

Page 1
Keeping it CLEAN
Grind Chute Cleaning Methods:
For best results, clean the grind chute every 7 to 10 uses
depending on the type of beans you are using.
Push the channel cover away
1.
2.
from you and lift up to access
the coffee chute.
To Clear Chute: With Coffee
Scoop/Cleaning Brush, brush
ground coffee toward front of
unit.
3.
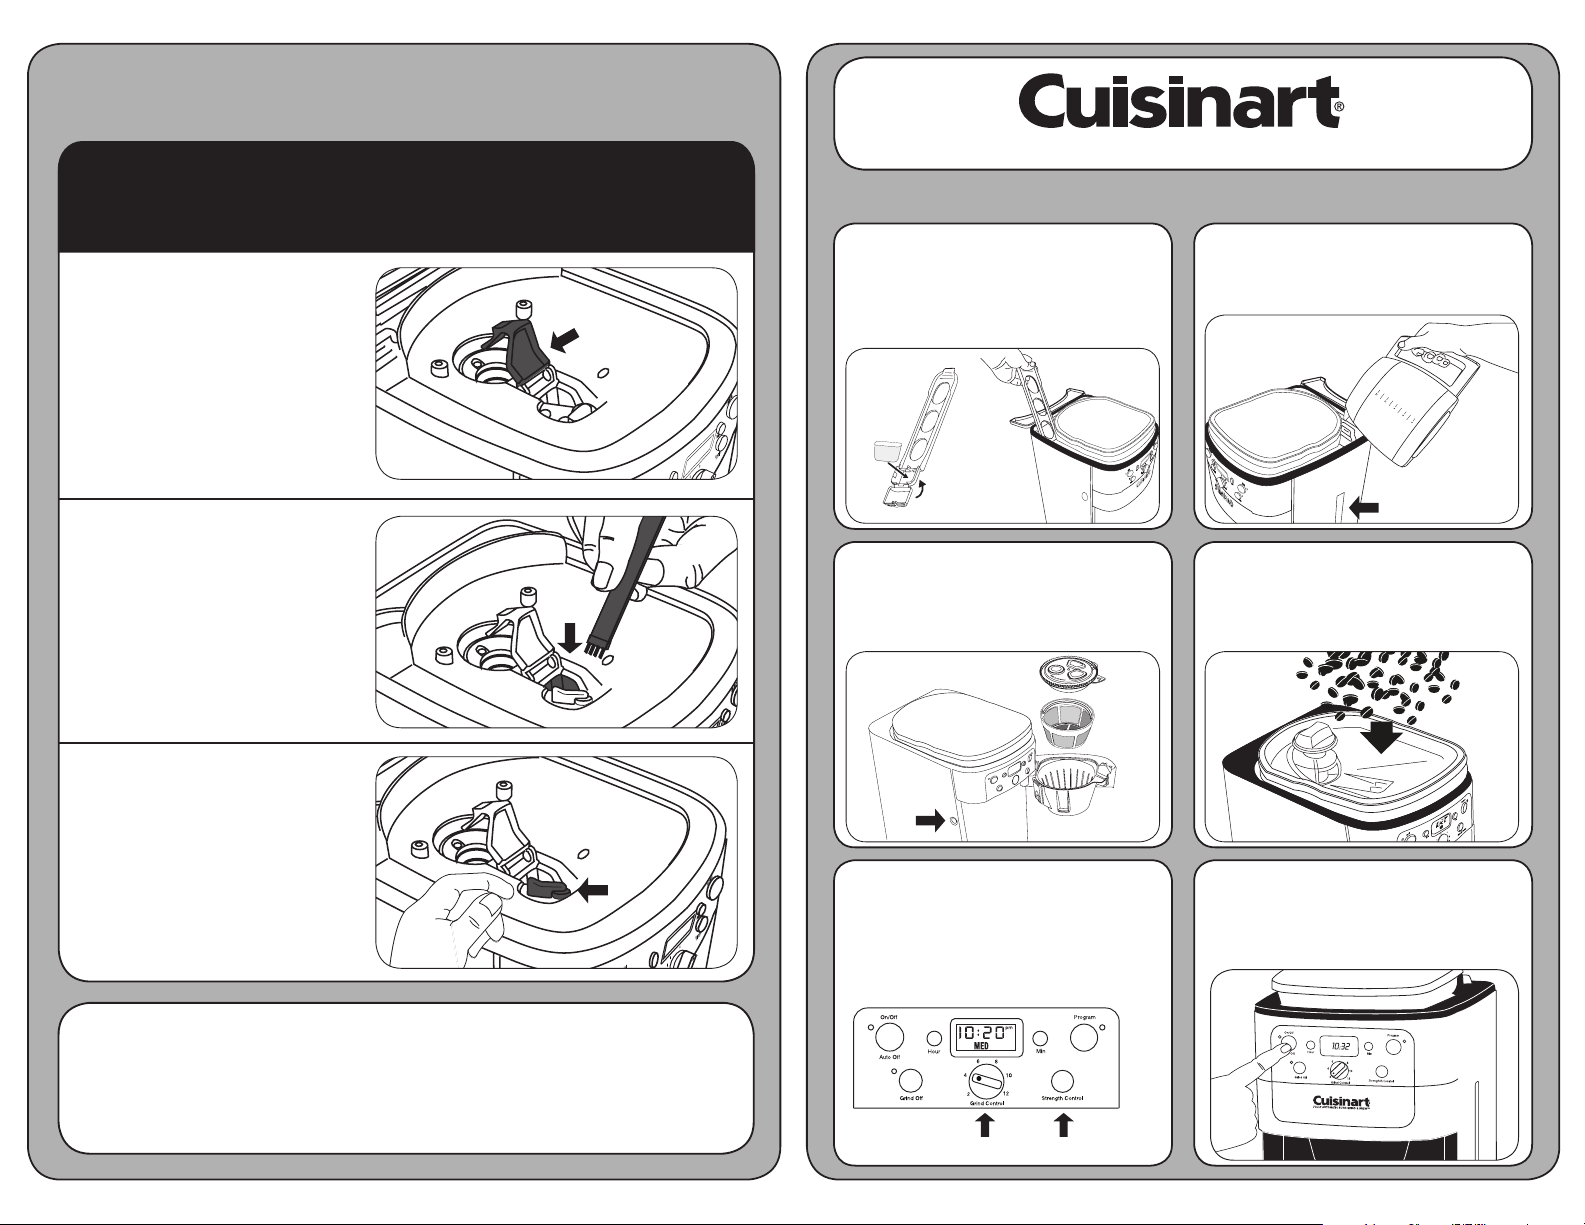
Fully Automatic Burr Grind & Brew™ Coffeemaker
Quick Reference SETUP Guide
Fully immerse the filter in cold tap water
and soak for 15 minutes (see complete
instructions in your Instruction Booklet).
Insert the charcoal water filter into
the water filter holder. Open the water
reservoir and insert it into the unit.
Open the filter basket door by pressing
the Release button and insert a paper filter
or permanent filter into the filter basket
holder. Replace the cover, line up arrows,
and close door.
2.1.
4.
Pour your desired amount of water into the
water reservoir. A water level indicator is
located on the side of the unit.
Remove hopper lid, fill with beans,
and replace the lid.
3.
PG-25261A
Open grind chute lever to allow
grounds into filter basket.
Be sure the filter basket is in
place to catch the grounds.
IMPORTANT
Do not throw away. Read before operating your new
Brewing System. Keep for future reference.
These helpful hints are intended to be a supplement to the Instruction Booklet. In order to ensure
safe operation and optimum performance, please read the entire Instruction Booklet.
5.
Select the amount of beans you wish to grind
with the Grind Control knob. Select your
desired coffee strength with the Strength
Control button. Your selected coffee strength
will be indicated on the LCD display.
6.
To start grinding & brewing, press the On/Off
button. Once the coffee has finished brewing,
the unit will alert you with a beep.
Page 2

Quick Reference PROGRAMMING Guide
Keeping it CLEAN
To set the Time: Press and hold the Hour or Minute button until the clock begins flashing. Hold down the Hour
or Minute button to quickly scroll through the numbers. When desired time approaches, release the button and
1.
2.
complete, press the Program button again. The green
indicator light will come on to remind you that the
programming function is in use.
press repeatedly to advance one digit at a time. To finish, wait for the numbers to stop flashing.
To program the Auto-On: Press and hold the
Program button until the clock begins flashing.
Set the time you want coffee to begin brewing
(follow “set the time” instructions). Once
3.
Permanent filter, filter basket, filter basket cover,
carafe and lid.
Wash in warm soapy water and rinse thoroughly
or clean in the upper rack of the dishwasher.
Dry all parts after every use.
Hopper Cleaning Methods:
Remove hopper lid, turn hopper release knob to unlocked position
to remove hopper. Set aside unused coffee beans.
At the programmed time, the red On/Off
indicator light will come on, indicating that
the brew cycle is starting.
Wash hopper and lid with warm, soapy water,
rinse thoroughly. Or place hopper and lid on
upper rack of dishwasher.
NOTE: DRY ALL PARTS THOROUGHLY.
DO NOT ADD WATER TO UNIT ONCE
THE HOPPER IS REMOVED AS WATER
CAN DAMAGE THE GRINDER MOTOR.
4.
To start the brew cycle at the same time on
another day, simply press the Program
button and release. The green Auto-On will
illuminate.
To program the Auto-Off: Press and hold
5.
from 0 to 4 hours. To exit, do nothing for 5 seconds.
Note: Auto-Off is preset for 2 hours.
the On/Off button until the red light and
clock begin flashing. Set the desired shutoff
time by pressing the Hour button to scroll
Remove any excess ground coffee
from the grinder area before placing
hopper and lid back on.
 Loading...