

Page 1
INSTRUCTION BOOKLET
®
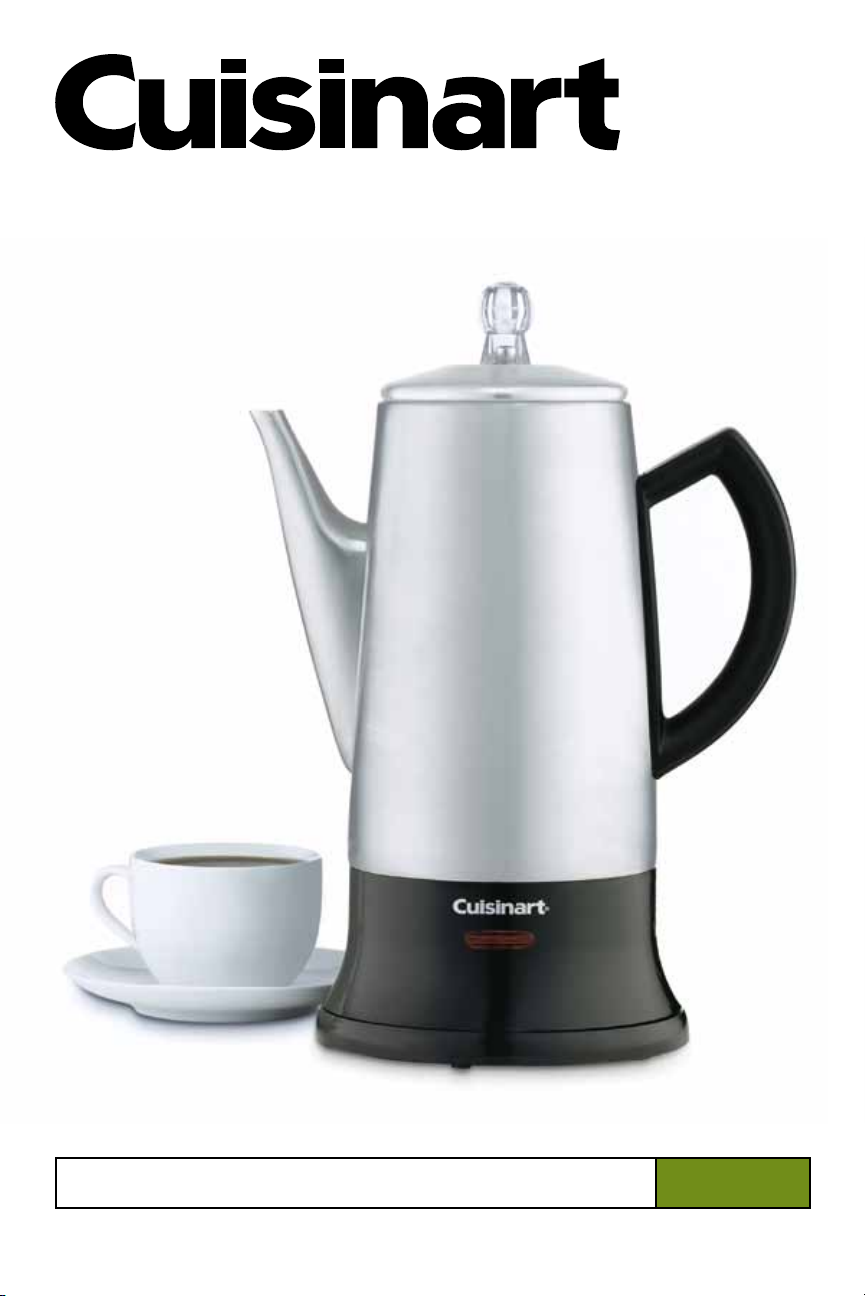
Classic Cordless Percolator
For your safety and continued enjoyment of this product, always read the instruction book carefully before using.
PER-12BCC
Page 2

CONTENTS
Important Safeguards....................2
Unpacking Instructions ..................3
Introduction ...........................3
Features and Benefits ...................4
Using the Percolator.....................5
Cleaning and Maintenance ...............6
Warranty..............................7
Important
SafeguardS
When using electrical appliances, basic safety
precautions should always be followed to
reduce the risk of fire, electric shock and/or
injury to persons, including the following:
1. READ ALL INSTRUCTIONS.
2. Always unplug from outlet when not
in use and before cleaning. Allow to
cool before putting on or taking off
parts and before cleaning the
appliance.
3. Do not touch hot surfaces. Use handles
and knobs.
4. To protect against electric shock, do not
place cord, plug, or base unit in water or
other liquids.
5. This appliance should not be used by
or near children or individuals with
certain disabilities.
6. Do not operate any appliance with a
damaged cord or plug, or after the
appliance malfunctions or has been
dropped or damaged in any manner.
Return appliance to the nearest
Cuisinart Repair Centre for examination,
repair, and electrical or mechanical
adjustment.
7. The use of accessory attachments
not recommended by Cuisinart may
cause injuries.
8. Do not use outdoors.
9. Do not let cord hang over edge of table
or counter, or touch hot surfaces.
10. Do not place on or near a hot gas or
electric burner, or in a heated oven.
11. Always fill the percolator first, then set
the appliance onto the power base, and
finally plug cord into wall outlet. To
disconnect, remove percolator body
from power base, then remove plug from
wall outlet.
12. Do not use appliance for other than
intended use.
13. Do not operate without adding the
minimum amount (16 oz.) of water first.
14. Be sure to unplug the appliance once
the percolator has been emptied and
has been removed from the power base.
15. Scalding may occur if the cover is
removed during the brewing cycle.
16. Be sure cover is secure before serving
any beverages.
17. WARNING: TO REDUCE THE
RISK OF FIRE OR ELECTRIC SHOCK,
DO NOT REMOVE THE BASE PANEL.
NO USER-SERVICEABLE PARTS ARE
INSIDE. REPAIR SHOULD BE DONE
ONLY BY AUTHORIZED PERSONNEL.
18. Do not operate your appliance in an
appliance garage or under a wall
cabinet. When storing in an appliance
garage, always unplug the unit from
the electrical outlet. Not doing so
could create a risk of fire, especially if
the appliance touches the walls of the
garage or the door touches the unit as it
closes.
SaVe tHeSe
InStruCtIonS
for HouSeHoLd
uSe onLY
SPECIAL CORD SET
INSTRUCTIONS
A short power-supply cord on the power base
is provided to reduce the risks resulting from
becoming entangled in or tripping over a longer
cord.
Longer extension cords are available and may
be used if care is exercised in their use.
If a long extension cord is used, the marked
electrical rating of the extension cord should be
at least as great as the electrical rating of the
appliance, and the longer cord should be
arranged so that it will not drape over the
countertop or tabletop where it can be pulled
on by children or animals or tripped over.
NOTICE
This appliance is of the grounded type; the
extension cord should be a grounded type
3-wire cord. If the plug does not fit contact a
qualified electrician. Do not modify the plug in
any way.
UNPACKING
INSTRUCTIONS
Place your Cuisinart® Classic Cordless
Percolator in its gift box on top of a sturdy
surface to unpack. Open the gift box, take
the power base out, and open the top flap.
Remove the cover and the pump tube, then
remove the top insert, take the percolator
body out of the gift box and remove the
bottom insert on the percolator body. Check
that all printed materials are removed from
the gift box.
Dispose of all packaging material, including
bags, properly.
KEEP ALL PLASTIC BAGS AWAY FROM
CHILDREN.
Before using for the first time: Wash all parts
according to the Cleaning and Maintenance
section of this booklet to remove any dust or
residue.
INTRODUCTION
Congratulations! You’ve just purchased a
little piece of nostalgia that makes a great
cup of coffee.
Cuisinart’s percolator lets you make 4 to 12
cups (1 to 3 L) of rich, flavourful brewed
coffee in just minutes. And we made it
cordless so you can take the pot right to the
table with you. The classic stainless steel
design helps keep coffee warm, and the
stay-cool bottom means you can set it down
almost anywhere without a worry.
So, prepare a pot, listen to the friendly
“perk”, and watch it brew right through the
transparent knob on the cover. When the
ready light comes on, sit down, relax, and
enjoy a cup of coffee.
Like all Cuisinart
was designed to give you years of
satisfaction and is backed by a three-year
limited warranty.
®
appliances, this product
2
3
Page 3

FEATURES AND BENEFITS
1
2
3
4
5
9
7
10
13
16
15
14
12
11
8
6
OF YOUR CORDLESS
PERCOLATOR
The Cuisinart® Classic Cordless Percolator has
been designed to increase the pleasure of
enjoying a perfectly percolated cup of coffee.
FEATURES AND BENEFITS
1.
Transparent Percolator Knob
Allows you to see the percolating
process
2. Stainless Steel Cover
Lock-down cover ensures safe pouring.
3. Coffee Basket Lid
4. Coffee Basket
Holds ground coffee for up to 12 cups
of coffee. Convenient measurement
markings take away the guess work.
5. Spring
6. Pump Tube
Delivers water automatically from the
carafe to the basket.
7. Stainless Steel Body
Holds from 4 to 12 cups (1 to 3 L) of
coffee.
8. Tapered Spout
For no-mess, dripless pouring
9. Comfort Grip Handle
Ergonomically designed for easy pouring.
10. Stay-Cool Base
Prevents heat damage on tables and
counters. Eliminates the need for a trivet
or other surface protector.
11. Indicator Light
Illuminates to indicate that the brewing
cycle is complete.
12. Power Base
For convenient cordless pouring and
serving, the percolator can be removed
from the power base to serve coffee at
the table.
13. Cord Wrap
Located under base, keeps counters
clutterfree and is ideal for storage.
14. Water Level Markings
15. 4-Cup (1 L) Water Level Mark
16. Well
.
.
USING THE PERCOLATOR
1. Before using for the rst time, thoroughly
wash all parts of the percolator. (See
The following chart serves as a guide for
preparing various brew strengths. Amounts
can be varied to suit personal taste and particular coffees.
Cleaning and Maintenance Instructions
section of this booklet.)
2. Remove cover, basket, lid and pump
tube with spring. Using the measurement
markings (located inside the body) ll the
percolator with the desired amount of
water. For best results be sure to use
cold water when lling the percolator.
When preparing 4 cups (1 L), use the
small circular marking as the 4-cup (1 L)
level mark.
Brew Strength of Coffee /
Number of Coffee Measures*
# Cups Mild Medium Strong
12 12 16 20
10 10 14 18
8 8 12 16
6 6 8 12
4 4 6 8
*1 coffee measure = 1 level tablespoon
(15 ml)
5. Place percolator on power base and
plug base into standard household
120 volt AC wall outlet. Brewing begins
within seconds, and continues at a rate
of approximately one cup per minute.
6. Once brewing cycle is complete, indicator light will illuminate to signal your
coffee is ready.
Warning: Be certain the percolating
3. Run cold water over the coffee basket.
Place basket on top of pump tube. Add
desired amount of coffee according to
level markings on basket. To help keep
small coffee grounds from sifting
through the holes in the basket, be
certain to use a grind designed for
percolator coffee, or use a coarse
grind. Finer grinds may sift through the
holes.
4. Place basket and pump tube assembly
process has stopped completely before
removing cover.
7. Once brewing has been completed,
remove the cover, carefully and using a
mitt or potholder, remove the basket
and pump tube. Caution: do not
touch the stainless steel parts of the
percolator, as they will be hot.
Replace cover so it snaps into place.
You are now ready to enjoy a flavorful cup of coffee.
into percolator so bottom of tube ts
into well. Place basket cover on top of
basket and push cover onto top of
percolator.
4
5
Page 4

CLEANING AND
MAINTENANCE
Always remove the percolator from the
power base and then remove the plug from
the electrical outlet before attempting to
clean the percolator.
The percolator cover, basket, lid, and pump
tube (with spring) can all be placed in the
upper rack of a dishwasher or washed in
warm soapy water and rinsed thoroughly.
NEVER WASH PERCOLATOR BODY OR
POWER BASE IN DISHWASHER.
Never immerse the detachable power base
or percolator body in water or other liquid.
To clean, simply wipe with a clean, damp
cloth and dry before storing. Do not use
scouring agents or harsh cleaners on any
part of the percolator. Note: washer at
bottom of pump tube must move freely.
Should coffee grounds become trapped near
the washer, loosen with a toothpick, then run
under tap water to clean.
Storage: Store percolator with cover off. The
power-supply cord is attached to the power
base. For a clutter-free counter, unwrap only
as much of the cord as needed to safely
reach the outlet.
Remaining cord can stay wrapped during
use. Before storing, wrap cord around “feet”
under base.
Any other servicing should be performed by
an authorized service representative.
DECALCIFICATION
Decalcification refers to removing the
calcium deposits which form on the metal
parts of the percolator over time.
For best performance from your percolator,
decalcify the unit from time to time. The
frequency depends upon the hardness of
your tap water and how often you use the
percolator. Decalcification will clean the
interior of the unit.
To decalcify, use cream of tartar, found in the
spice section of your grocery store, and
water. Put 2 tablespoons (30 ml) of cream of
tartar into the coffee basket, and fill the
percolator with 6 cups (1.5 L) of water. Be
sure that all parts are in place, and make
sure that the lid is securely on. Place the
percolator on the power base and plug the
unit into an electrical outlet. Let the unit run
through its normal cycle. Once complete,
discard the cream of tartar and water
solution.
Run one cycle of fresh, cold water (without
cream of tartar) through the unit at the
completion of decalcification before using
the unit to brew coffee.
WARRANTY
Limited Three-Year Warranty
We warrant that this Cuisinart product will be free
of defects in materials or workmanship under
normal home use for 3 years from the date of
original purchase. This warranty covers
manufacturer’s defects including mechanical and
electrical defects. It does not cover damage from
consumer abuse, unauthorized repairs or
modications, theft, misuse, or damage due to
transportation or environmental conditions.
Products with removed or altered identication
numbers will not be covered.
This warranty is not available to retailers or other
commercial purchasers or owners. If your Cuisinart
product should prove to be defective within the
warranty period, we will repair it or replace it if
necessary. For warranty purposes, please register
your product online at www.cuisinart.ca to
facilitate verication of the date of original
purchase and keep your original receipt for the
duration of the limited warranty.
This warranty excludes damage caused by
accident, misuse or abuse, including damage
caused by overheating, and it does not apply to
scratches, stains, discolouration or other damage
to external or internal surfaces that does not
impair the functional utility of the product. This
warranty also expressly excludes all incidental or
consequential damages.
Your Cuisinart product has been manufactured to
the strictest specications and has been designed
for use only in 120 volt outlets and only with
authorized accessories and replacement parts.
This warranty expressly excludes any defects or
damages caused by attempted use of this unit
with a converter, as well as use with accessories,
replacement parts or repair service other than
those authorized by Cuisinart.
If the appliance should become defective within
the warranty period, do not return the appliance to
the store. Please contact our Customer Service
Centre:
Toll-free phone number:
1-800-472-7606
Address:
Cuisinart Canada
100 Conair Parkway
Woodbridge, Ont. L4H 0L2
Email:
consumer_Canada@conair.com
Model:
PER-12BCC
To facilitate the speed and accuracy of your return,
please enclose:
• $10.00forshippingandhandlingoftheproduct
(cheque or money order)
• Returnaddressandphonenumber
• Descriptionoftheproductdefect
• Productdatecode*/copyoforiginalproofof
purchase
• Anyotherinformationpertinenttotheproduct’s
return
* Product date code can be found on the
underside of the base of the product. The
product date code is a 4 or 5 digit number.
Example, 90630 would designate year, month &
day (2009, June 30th).
Note: We recommend you use a traceable,
insured delivery service for added protection.
Cuisinart will not be held responsible for in-transit
damage or for packages that are not delivered to
us.
To order replacement parts or accessories, call our
Customer Service Centre at 1-800- 472-7606.
For more information, please visit our website at
www.cuisinart.ca
.
6
7
Page 5

®
Food
Processors
Blenders Griddler
TM
Cookware Tools and
Gadgets
Cuisinart offers an extensive assortment of top quality products to make life in the kitchen
easier than ever. Try some of our other countertop appliances, cookware, tools and gadgets.
www.cuisinart.ca
©2012 Cuisinart Canada
Woodbridge, Ontario L4H 0L2
Consumer_Canada@Conair.com
100 Conair Parkway,
Consumer Call Centre Email:
Printed in China
Trademarks or service marks of third
parties used herein are the trademarks
or service marks of their respective owners.
12CC133549
IB-2925-CAN-C
 Loading...