

Page 1
MULTICUISEUR ÉLECTRIQUE
ELECTRICAL MULTICOOKER
Instructions - Hinweise - Instructies - Istruzioni - Instrucciones MSC600E
Page 2

Page 3

SOMMAIRE
Consignes de sécurité . . . . . . . . . . . . . . . . . . . . . . . . . . . . . . . . . . . . . . . . . . . . . . . . . . . . . . . . . . . . . . . . . . . . . . . . . . . . . . . . . . . . . . . . . . . . . . . . . . . 6
1. Introduction . . . . . . . . . . . . . . . . . . . . . . . . . . . . . . . . . . . . . . . . . . . . . . . . . . . . . . . . . . . . . . . . . . . . . . . . . . . . . . . . . . . . . . . . . . . . . . . . . . . . . . . . . . . 8
2. Caractéristiques . . . . . . . . . . . . . . . . . . . . . . . . . . . . . . . . . . . . . . . . . . . . . . . . . . . . . . . . . . . . . . . . . . . . . . . . . . . . . . . . . . . . . . . . . . . . . . . . . . . . . . . 8
3. Utilisation . . . . . . . . . . . . . . . . . . . . . . . . . . . . . . . . . . . . . . . . . . . . . . . . . . . . . . . . . . . . . . . . . . . . . . . . . . . . . . . . . . . . . . . . . . . . . . . . . . . . . . . . . . . . . 8
A. Panneau de commande . . . . . . . . . . . . . . . . . . . . . . . . . . . . . . . . . . . . . . . . . . . . . . . . . . . . . . . . . . . . . . . . . . . . . . . . . . . . . . . . . . . . . . . . . . . . . . 8
B. Cuisson . . . . . . . . . . . . . . . . . . . . . . . . . . . . . . . . . . . . . . . . . . . . . . . . . . . . . . . . . . . . . . . . . . . . . . . . . . . . . . . . . . . . . . . . . . . . . . . . . . . . . . . . . . . . . . 9
C. Cuissons combinées . . . . . . . . . . . . . . . . . . . . . . . . . . . . . . . . . . . . . . . . . . . . . . . . . . . . . . . . . . . . . . . . . . . . . . . . . . . . . . . . . . . . . . . . . . . . . . . . . .9
D. Changer les réglages . . . . . . . . . . . . . . . . . . . . . . . . . . . . . . . . . . . . . . . . . . . . . . . . . . . . . . . . . . . . . . . . . . . . . . . . . . . . . . . . . . . . . . . . . . . . . . . . . 9
E. Cuisson sans minuterie . . . . . . . . . . . . . . . . . . . . . . . . . . . . . . . . . . . . . . . . . . . . . . . . . . . . . . . . . . . . . . . . . . . . . . . . . . . . . . . . . . . . . . . . . . . . . . . 9
F. Mode veille . . . . . . . . . . . . . . . . . . . . . . . . . . . . . . . . . . . . . . . . . . . . . . . . . . . . . . . . . . . . . . . . . . . . . . . . . . . . . . . . . . . . . . . . . . . . . . . . . . . . . . . . . . 9
4. Conseils d’utilisation . . . . . . . . . . . . . . . . . . . . . . . . . . . . . . . . . . . . . . . . . . . . . . . . . . . . . . . . . . . . . . . . . . . . . . . . . . . . . . . . . . . . . . . . . . . . . . . . . . 9
A. Dorer/Sauter . . . . . . . . . . . . . . . . . . . . . . . . . . . . . . . . . . . . . . . . . . . . . . . . . . . . . . . . . . . . . . . . . . . . . . . . . . . . . . . . . . . . . . . . . . . . . . . . . . . . . . . . 9
B. Mijoter . . . . . . . . . . . . . . . . . . . . . . . . . . . . . . . . . . . . . . . . . . . . . . . . . . . . . . . . . . . . . . . . . . . . . . . . . . . . . . . . . . . . . . . . . . . . . . . . . . . . . . . . . . . . . . 9
C. Cuisson vapeur . . . . . . . . . . . . . . . . . . . . . . . . . . . . . . . . . . . . . . . . . . . . . . . . . . . . . . . . . . . . . . . . . . . . . . . . . . . . . . . . . . . . . . . . . . . . . . . . . . . . . 10
D. Guide de cuisson . . . . . . . . . . . . . . . . . . . . . . . . . . . . . . . . . . . . . . . . . . . . . . . . . . . . . . . . . . . . . . . . . . . . . . . . . . . . . . . . . . . . . . . . . . . . . . . . . . . 11
5. L’ avis des chefs . . . . . . . . . . . . . . . . . . . . . . . . . . . . . . . . . . . . . . . . . . . . . . . . . . . . . . . . . . . . . . . . . . . . . . . . . . . . . . . . . . . . . . . . . . . . . . . . . . . . . . . 13
6. Nettoyage et entretien . . . . . . . . . . . . . . . . . . . . . . . . . . . . . . . . . . . . . . . . . . . . . . . . . . . . . . . . . . . . . . . . . . . . . . . . . . . . . . . . . . . . . . . . . . . . . . . 13
CONTENTS
Safety cautions . . . . . . . . . . . . . . . . . . . . . . . . . . . . . . . . . . . . . . . . . . . . . . . . . . . . . . . . . . . . . . . . . . . . . . . . . . . . . . . . . . . . . . . . . . . . . . . . . . . . . . . . . 14
1. Introduction . . . . . . . . . . . . . . . . . . . . . . . . . . . . . . . . . . . . . . . . . . . . . . . . . . . . . . . . . . . . . . . . . . . . . . . . . . . . . . . . . . . . . . . . . . . . . . . . . . . . . . . . . . 16
2. Product features . . . . . . . . . . . . . . . . . . . . . . . . . . . . . . . . . . . . . . . . . . . . . . . . . . . . . . . . . . . . . . . . . . . . . . . . . . . . . . . . . . . . . . . . . . . . . . . . . . . . . 16
3. Use . . . . . . . . . . . . . . . . . . . . . . . . . . . . . . . . . . . . . . . . . . . . . . . . . . . . . . . . . . . . . . . . . . . . . . . . . . . . . . . . . . . . . . . . . . . . . . . . . . . . . . . . . . . . . . . . . . . 16
A. Control panel . . . . . . . . . . . . . . . . . . . . . . . . . . . . . . . . . . . . . . . . . . . . . . . . . . . . . . . . . . . . . . . . . . . . . . . . . . . . . . . . . . . . . . . . . . . . . . . . . . . . . . . 16
B. Cooking . . . . . . . . . . . . . . . . . . . . . . . . . . . . . . . . . . . . . . . . . . . . . . . . . . . . . . . . . . . . . . . . . . . . . . . . . . . . . . . . . . . . . . . . . . . . . . . . . . . . . . . . . . . . 17
C. Combined cooking . . . . . . . . . . . . . . . . . . . . . . . . . . . . . . . . . . . . . . . . . . . . . . . . . . . . . . . . . . . . . . . . . . . . . . . . . . . . . . . . . . . . . . . . . . . . . . . . . 17
D. Changing settings . . . . . . . . . . . . . . . . . . . . . . . . . . . . . . . . . . . . . . . . . . . . . . . . . . . . . . . . . . . . . . . . . . . . . . . . . . . . . . . . . . . . . . . . . . . . . . . . . . 17
E. Cooking without a timer . . . . . . . . . . . . . . . . . . . . . . . . . . . . . . . . . . . . . . . . . . . . . . . . . . . . . . . . . . . . . . . . . . . . . . . . . . . . . . . . . . . . . . . . . . . . 17
F. Sleep mode . . . . . . . . . . . . . . . . . . . . . . . . . . . . . . . . . . . . . . . . . . . . . . . . . . . . . . . . . . . . . . . . . . . . . . . . . . . . . . . . . . . . . . . . . . . . . . . . . . . . . . . . . 17
4. Advices for use . . . . . . . . . . . . . . . . . . . . . . . . . . . . . . . . . . . . . . . . . . . . . . . . . . . . . . . . . . . . . . . . . . . . . . . . . . . . . . . . . . . . . . . . . . . . . . . . . . . . . . . 17
A. Brown/Sauté . . . . . . . . . . . . . . . . . . . . . . . . . . . . . . . . . . . . . . . . . . . . . . . . . . . . . . . . . . . . . . . . . . . . . . . . . . . . . . . . . . . . . . . . . . . . . . . . . . . . . . . 17
B. Slow cook . . . . . . . . . . . . . . . . . . . . . . . . . . . . . . . . . . . . . . . . . . . . . . . . . . . . . . . . . . . . . . . . . . . . . . . . . . . . . . . . . . . . . . . . . . . . . . . . . . . . . . . . . . 17
C. Steam . . . . . . . . . . . . . . . . . . . . . . . . . . . . . . . . . . . . . . . . . . . . . . . . . . . . . . . . . . . . . . . . . . . . . . . . . . . . . . . . . . . . . . . . . . . . . . . . . . . . . . . . . . . . . . 18
D. Cooking guidelines . . . . . . . . . . . . . . . . . . . . . . . . . . . . . . . . . . . . . . . . . . . . . . . . . . . . . . . . . . . . . . . . . . . . . . . . . . . . . . . . . . . . . . . . . . . . . . . . . 19
5. Advice from the chefs . . . . . . . . . . . . . . . . . . . . . . . . . . . . . . . . . . . . . . . . . . . . . . . . . . . . . . . . . . . . . . . . . . . . . . . . . . . . . . . . . . . . . . . . . . . . . . . . 21
6. Cleaning and storage . . . . . . . . . . . . . . . . . . . . . . . . . . . . . . . . . . . . . . . . . . . . . . . . . . . . . . . . . . . . . . . . . . . . . . . . . . . . . . . . . . . . . . . . . . . . . . . . . 21
3
Page 4

INHALTSVERZEICHNIS
Sicherheitshiweise . . . . . . . . . . . . . . . . . . . . . . . . . . . . . . . . . . . . . . . . . . . . . . . . . . . . . . . . . . . . . . . . . . . . . . . . . . . . . . . . . . . . . . . . . . . . . . . . . . . . . . 22
1. Einleitung . . . . . . . . . . . . . . . . . . . . . . . . . . . . . . . . . . . . . . . . . . . . . . . . . . . . . . . . . . . . . . . . . . . . . . . . . . . . . . . . . . . . . . . . . . . . . . . . . . . . . . . . . . . . 24
2. Merkmale . . . . . . . . . . . . . . . . . . . . . . . . . . . . . . . . . . . . . . . . . . . . . . . . . . . . . . . . . . . . . . . . . . . . . . . . . . . . . . . . . . . . . . . . . . . . . . . . . . . . . . . . . . . . 24
3. Gebrauch . . . . . . . . . . . . . . . . . . . . . . . . . . . . . . . . . . . . . . . . . . . . . . . . . . . . . . . . . . . . . . . . . . . . . . . . . . . . . . . . . . . . . . . . . . . . . . . . . . . . . . . . . . . . . 24
A. Funktionstastenfeld . . . . . . . . . . . . . . . . . . . . . . . . . . . . . . . . . . . . . . . . . . . . . . . . . . . . . . . . . . . . . . . . . . . . . . . . . . . . . . . . . . . . . . . . . . . . . . . 24
B. Garen . . . . . . . . . . . . . . . . . . . . . . . . . . . . . . . . . . . . . . . . . . . . . . . . . . . . . . . . . . . . . . . . . . . . . . . . . . . . . . . . . . . . . . . . . . . . . . . . . . . . . . . . . . . . . 25
C. Kombi-Garen . . . . . . . . . . . . . . . . . . . . . . . . . . . . . . . . . . . . . . . . . . . . . . . . . . . . . . . . . . . . . . . . . . . . . . . . . . . . . . . . . . . . . . . . . . . . . . . . . . . . . . 25
D. Ändern der Einstellungen . . . . . . . . . . . . . . . . . . . . . . . . . . . . . . . . . . . . . . . . . . . . . . . . . . . . . . . . . . . . . . . . . . . . . . . . . . . . . . . . . . . . . . . . . . 25
E. Garen ohne Zeitangabe . . . . . . . . . . . . . . . . . . . . . . . . . . . . . . . . . . . . . . . . . . . . . . . . . . . . . . . . . . . . . . . . . . . . . . . . . . . . . . . . . . . . . . . . . . . . 25
F. Standby-Modus . . . . . . . . . . . . . . . . . . . . . . . . . . . . . . . . . . . . . . . . . . . . . . . . . . . . . . . . . . . . . . . . . . . . . . . . . . . . . . . . . . . . . . . . . . . . . . . . . . . . 25
4. Gebrauchshinweise . . . . . . . . . . . . . . . . . . . . . . . . . . . . . . . . . . . . . . . . . . . . . . . . . . . . . . . . . . . . . . . . . . . . . . . . . . . . . . . . . . . . . . . . . . . . . . . . . . 25
A. Bräunen/Braten . . . . . . . . . . . . . . . . . . . . . . . . . . . . . . . . . . . . . . . . . . . . . . . . . . . . . . . . . . . . . . . . . . . . . . . . . . . . . . . . . . . . . . . . . . . . . . . . . . 25
B. Behutsames Köcheln . . . . . . . . . . . . . . . . . . . . . . . . . . . . . . . . . . . . . . . . . . . . . . . . . . . . . . . . . . . . . . . . . . . . . . . . . . . . . . . . . . . . . . . . . . . . . 25
C. Dampfgaren . . . . . . . . . . . . . . . . . . . . . . . . . . . . . . . . . . . . . . . . . . . . . . . . . . . . . . . . . . . . . . . . . . . . . . . . . . . . . . . . . . . . . . . . . . . . . . . . . . . . . . 26
D. Garanleitung . . . . . . . . . . . . . . . . . . . . . . . . . . . . . . . . . . . . . . . . . . . . . . . . . . . . . . . . . . . . . . . . . . . . . . . . . . . . . . . . . . . . . . . . . . . . . . . . . . . . . 27
5. Ratschläge Der Chefs . . . . . . . . . . . . . . . . . . . . . . . . . . . . . . . . . . . . . . . . . . . . . . . . . . . . . . . . . . . . . . . . . . . . . . . . . . . . . . . . . . . . . . . . . . . . . . . . . 29
6. Reinigen Und P ege . . . . . . . . . . . . . . . . . . . . . . . . . . . . . . . . . . . . . . . . . . . . . . . . . . . . . . . . . . . . . . . . . . . . . . . . . . . . . . . . . . . . . . . . . . . . . . . . . . 29
INHOUD
Veiligheisdvoorschriften . . . . . . . . . . . . . . . . . . . . . . . . . . . . . . . . . . . . . . . . . . . . . . . . . . . . . . . . . . . . . . . . . . . . . . . . . . . . . . . . . . . . . . . . . . . . . . . 30
1. Inleiding . . . . . . . . . . . . . . . . . . . . . . . . . . . . . . . . . . . . . . . . . . . . . . . . . . . . . . . . . . . . . . . . . . . . . . . . . . . . . . . . . . . . . . . . . . . . . . . . . . . . . . . . . . . . . . 32
2. Productkenmerken . . . . . . . . . . . . . . . . . . . . . . . . . . . . . . . . . . . . . . . . . . . . . . . . . . . . . . . . . . . . . . . . . . . . . . . . . . . . . . . . . . . . . . . . . . . . . . . . . . . 32
3. Het product gebruiken . . . . . . . . . . . . . . . . . . . . . . . . . . . . . . . . . . . . . . . . . . . . . . . . . . . . . . . . . . . . . . . . . . . . . . . . . . . . . . . . . . . . . . . . . . . . . . . 32
A. Bedieningspaneel . . . . . . . . . . . . . . . . . . . . . . . . . . . . . . . . . . . . . . . . . . . . . . . . . . . . . . . . . . . . . . . . . . . . . . . . . . . . . . . . . . . . . . . . . . . . . . . . . 32
B. Bereiding . . . . . . . . . . . . . . . . . . . . . . . . . . . . . . . . . . . . . . . . . . . . . . . . . . . . . . . . . . . . . . . . . . . . . . . . . . . . . . . . . . . . . . . . . . . . . . . . . . . . . . . . . . 33
C. Combinatiebereiding . . . . . . . . . . . . . . . . . . . . . . . . . . . . . . . . . . . . . . . . . . . . . . . . . . . . . . . . . . . . . . . . . . . . . . . . . . . . . . . . . . . . . . . . . . . . . . 33
D. De instellingen veranderen . . . . . . . . . . . . . . . . . . . . . . . . . . . . . . . . . . . . . . . . . . . . . . . . . . . . . . . . . . . . . . . . . . . . . . . . . . . . . . . . . . . . . . . . 33
E. Bereiding zonder kookwekker . . . . . . . . . . . . . . . . . . . . . . . . . . . . . . . . . . . . . . . . . . . . . . . . . . . . . . . . . . . . . . . . . . . . . . . . . . . . . . . . . . . . . . 33
F. Stand-by stand . . . . . . . . . . . . . . . . . . . . . . . . . . . . . . . . . . . . . . . . . . . . . . . . . . . . . . . . . . . . . . . . . . . . . . . . . . . . . . . . . . . . . . . . . . . . . . . . . . . . 33
4. Gebruiksaanwijzingen . . . . . . . . . . . . . . . . . . . . . . . . . . . . . . . . . . . . . . . . . . . . . . . . . . . . . . . . . . . . . . . . . . . . . . . . . . . . . . . . . . . . . . . . . . . . . . . 33
A. Bakken/Braden . . . . . . . . . . . . . . . . . . . . . . . . . . . . . . . . . . . . . . . . . . . . . . . . . . . . . . . . . . . . . . . . . . . . . . . . . . . . . . . . . . . . . . . . . . . . . . . . . . . . 33
B. Stoven . . . . . . . . . . . . . . . . . . . . . . . . . . . . . . . . . . . . . . . . . . . . . . . . . . . . . . . . . . . . . . . . . . . . . . . . . . . . . . . . . . . . . . . . . . . . . . . . . . . . . . . . . . . . 33
C. Stomen . . . . . . . . . . . . . . . . . . . . . . . . . . . . . . . . . . . . . . . . . . . . . . . . . . . . . . . . . . . . . . . . . . . . . . . . . . . . . . . . . . . . . . . . . . . . . . . . . . . . . . . . . . . 34
D. Bakhandleiding . . . . . . . . . . . . . . . . . . . . . . . . . . . . . . . . . . . . . . . . . . . . . . . . . . . . . . . . . . . . . . . . . . . . . . . . . . . . . . . . . . . . . . . . . . . . . . . . . . . 35
5. Het advies van de chefs . . . . . . . . . . . . . . . . . . . . . . . . . . . . . . . . . . . . . . . . . . . . . . . . . . . . . . . . . . . . . . . . . . . . . . . . . . . . . . . . . . . . . . . . . . . . . . 37
6. Reinigen en onderhoud . . . . . . . . . . . . . . . . . . . . . . . . . . . . . . . . . . . . . . . . . . . . . . . . . . . . . . . . . . . . . . . . . . . . . . . . . . . . . . . . . . . . . . . . . . . . . . 37
4
Page 5

INDICE
Istruzioni di sicurezza . . . . . . . . . . . . . . . . . . . . . . . . . . . . . . . . . . . . . . . . . . . . . . . . . . . . . . . . . . . . . . . . . . . . . . . . . . . . . . . . . . . . . . . . . . . . . . . . . . . 38
1. Introduzione . . . . . . . . . . . . . . . . . . . . . . . . . . . . . . . . . . . . . . . . . . . . . . . . . . . . . . . . . . . . . . . . . . . . . . . . . . . . . . . . . . . . . . . . . . . . . . . . . . . . . . . . . 40
2. Caratteristiche prodotto . . . . . . . . . . . . . . . . . . . . . . . . . . . . . . . . . . . . . . . . . . . . . . . . . . . . . . . . . . . . . . . . . . . . . . . . . . . . . . . . . . . . . . . . . . . . . 40
3. Utilizzo . . . . . . . . . . . . . . . . . . . . . . . . . . . . . . . . . . . . . . . . . . . . . . . . . . . . . . . . . . . . . . . . . . . . . . . . . . . . . . . . . . . . . . . . . . . . . . . . . . . . . . . . . . . . . . . 40
A. Pannello di comando . . . . . . . . . . . . . . . . . . . . . . . . . . . . . . . . . . . . . . . . . . . . . . . . . . . . . . . . . . . . . . . . . . . . . . . . . . . . . . . . . . . . . . . . . . . . . . 40
B. Cottura . . . . . . . . . . . . . . . . . . . . . . . . . . . . . . . . . . . . . . . . . . . . . . . . . . . . . . . . . . . . . . . . . . . . . . . . . . . . . . . . . . . . . . . . . . . . . . . . . . . . . . . . . . . . 41
C. Cotture combinate . . . . . . . . . . . . . . . . . . . . . . . . . . . . . . . . . . . . . . . . . . . . . . . . . . . . . . . . . . . . . . . . . . . . . . . . . . . . . . . . . . . . . . . . . . . . . . . . 41
D. Cambiare le regolazioni . . . . . . . . . . . . . . . . . . . . . . . . . . . . . . . . . . . . . . . . . . . . . . . . . . . . . . . . . . . . . . . . . . . . . . . . . . . . . . . . . . . . . . . . . . . . 41
E. Cottura senza contaminuti . . . . . . . . . . . . . . . . . . . . . . . . . . . . . . . . . . . . . . . . . . . . . . . . . . . . . . . . . . . . . . . . . . . . . . . . . . . . . . . . . . . . . . . . . 41
4. Istruzioni per l’uso . . . . . . . . . . . . . . . . . . . . . . . . . . . . . . . . . . . . . . . . . . . . . . . . . . . . . . . . . . . . . . . . . . . . . . . . . . . . . . . . . . . . . . . . . . . . . . . . . . . 41
A. Dorare/Saltare . . . . . . . . . . . . . . . . . . . . . . . . . . . . . . . . . . . . . . . . . . . . . . . . . . . . . . . . . . . . . . . . . . . . . . . . . . . . . . . . . . . . . . . . . . . . . . . . . . . . 41
B. Cuocere a fuoco lento . . . . . . . . . . . . . . . . . . . . . . . . . . . . . . . . . . . . . . . . . . . . . . . . . . . . . . . . . . . . . . . . . . . . . . . . . . . . . . . . . . . . . . . . . . . . . 41
C. Cottura al vapore . . . . . . . . . . . . . . . . . . . . . . . . . . . . . . . . . . . . . . . . . . . . . . . . . . . . . . . . . . . . . . . . . . . . . . . . . . . . . . . . . . . . . . . . . . . . . . . . . 42
D. Guida di cottura . . . . . . . . . . . . . . . . . . . . . . . . . . . . . . . . . . . . . . . . . . . . . . . . . . . . . . . . . . . . . . . . . . . . . . . . . . . . . . . . . . . . . . . . . . . . . . . . . . 43
5. Il parere degli chef . . . . . . . . . . . . . . . . . . . . . . . . . . . . . . . . . . . . . . . . . . . . . . . . . . . . . . . . . . . . . . . . . . . . . . . . . . . . . . . . . . . . . . . . . . . . . . . . . . . 45
6. Pulizia e manutenzione . . . . . . . . . . . . . . . . . . . . . . . . . . . . . . . . . . . . . . . . . . . . . . . . . . . . . . . . . . . . . . . . . . . . . . . . . . . . . . . . . . . . . . . . . . . . . . 45
ÍNDICE
Consignas de seguridad . . . . . . . . . . . . . . . . . . . . . . . . . . . . . . . . . . . . . . . . . . . . . . . . . . . . . . . . . . . . . . . . . . . . . . . . . . . . . . . . . . . . . . . . . . . . . . . . 46
1. Introducción. . . . . . . . . . . . . . . . . . . . . . . . . . . . . . . . . . . . . . . . . . . . . . . . . . . . . . . . . . . . . . . . . . . . . . . . . . . . . . . . . . . . . . . . . . . . . . . . . . . . . . . . . . 48
2. Características del producto . . . . . . . . . . . . . . . . . . . . . . . . . . . . . . . . . . . . . . . . . . . . . . . . . . . . . . . . . . . . . . . . . . . . . . . . . . . . . . . . . . . . . . . . . 48
3. Utilización . . . . . . . . . . . . . . . . . . . . . . . . . . . . . . . . . . . . . . . . . . . . . . . . . . . . . . . . . . . . . . . . . . . . . . . . . . . . . . . . . . . . . . . . . . . . . . . . . . . . . . . . . . . . 48
A. Panel de control . . . . . . . . . . . . . . . . . . . . . . . . . . . . . . . . . . . . . . . . . . . . . . . . . . . . . . . . . . . . . . . . . . . . . . . . . . . . . . . . . . . . . . . . . . . . . . . . . . 48
B. Cocción . . . . . . . . . . . . . . . . . . . . . . . . . . . . . . . . . . . . . . . . . . . . . . . . . . . . . . . . . . . . . . . . . . . . . . . . . . . . . . . . . . . . . . . . . . . . . . . . . . . . . . . . . . . 49
C. Cocción combinada . . . . . . . . . . . . . . . . . . . . . . . . . . . . . . . . . . . . . . . . . . . . . . . . . . . . . . . . . . . . . . . . . . . . . . . . . . . . . . . . . . . . . . . . . . . . . . . 49
D. Cambio de los ajustes . . . . . . . . . . . . . . . . . . . . . . . . . . . . . . . . . . . . . . . . . . . . . . . . . . . . . . . . . . . . . . . . . . . . . . . . . . . . . . . . . . . . . . . . . . . . . 49
E. Cocción sin temporizador . . . . . . . . . . . . . . . . . . . . . . . . . . . . . . . . . . . . . . . . . . . . . . . . . . . . . . . . . . . . . . . . . . . . . . . . . . . . . . . . . . . . . . . . . . 49
F. Ahorro de energía . . . . . . . . . . . . . . . . . . . . . . . . . . . . . . . . . . . . . . . . . . . . . . . . . . . . . . . . . . . . . . . . . . . . . . . . . . . . . . . . . . . . . . . . . . . . . . . . . . 49
4. Consejos de utilización . . . . . . . . . . . . . . . . . . . . . . . . . . . . . . . . . . . . . . . . . . . . . . . . . . . . . . . . . . . . . . . . . . . . . . . . . . . . . . . . . . . . . . . . . . . . . . . 49
A. Dorar/Saltear . . . . . . . . . . . . . . . . . . . . . . . . . . . . . . . . . . . . . . . . . . . . . . . . . . . . . . . . . . . . . . . . . . . . . . . . . . . . . . . . . . . . . . . . . . . . . . . . . . . . . 49
B. Estofar . . . . . . . . . . . . . . . . . . . . . . . . . . . . . . . . . . . . . . . . . . . . . . . . . . . . . . . . . . . . . . . . . . . . . . . . . . . . . . . . . . . . . . . . . . . . . . . . . . . . . . . . . . . . 49
C. Cocción al vapor . . . . . . . . . . . . . . . . . . . . . . . . . . . . . . . . . . . . . . . . . . . . . . . . . . . . . . . . . . . . . . . . . . . . . . . . . . . . . . . . . . . . . . . . . . . . . . . . . . 50
D. Guía de cocción . . . . . . . . . . . . . . . . . . . . . . . . . . . . . . . . . . . . . . . . . . . . . . . . . . . . . . . . . . . . . . . . . . . . . . . . . . . . . . . . . . . . . . . . . . . . . . . . . . . 51
5. Sugerencias de los chefs . . . . . . . . . . . . . . . . . . . . . . . . . . . . . . . . . . . . . . . . . . . . . . . . . . . . . . . . . . . . . . . . . . . . . . . . . . . . . . . . . . . . . . . . . . . . . 53
6. Limpiar y guardar . . . . . . . . . . . . . . . . . . . . . . . . . . . . . . . . . . . . . . . . . . . . . . . . . . . . . . . . . . . . . . . . . . . . . . . . . . . . . . . . . . . . . . . . . . . . . . . . . . . . 53
5
Page 6

CONSIGNES DE SÉCURITÉ
LIRE ATTENTIVEMENT CES CONSIGNES DE SECURITE AVANT D’UTILISER L’APPAREIL !
• ATTENTION : Les sachets en polyéthylène qui entourent l’appareil ou l’emballage peuvent
être dangereux. Pour éviter tout danger de su ocation, conservez ces sachets hors de la
portée de bébés et des enfants. Ces sachets ne sont pas des jouets.
• Utiliser cet appareil exclusivement en suivant les instructions de ce manuel.
• Toujours placer l’appareil sur une surface plane, stable, propre et sèche.
• Mettre l’appareil à l’arrêt et le déconnecter de l’alimentation avant de changer les accessoires ou
d’approcher les parties qui sont mobiles lors du fonctionnement.
• Ne pas placer l’appareil sur ou à proximité d’un appareil chau ant. Ne pas l’utiliser sur des surfaces
sensibles à la chaleur ou a proximité de matériaux in ammables.
• Ne pas laisser le cordon dépasser du bord du plan de travail, et ne pas le mettre en contact avec des
surfaces chaudes.
• Ne pas immerger dans l’eau ou tout autre liquide.
• Toujours débrancher l’appareil après utilisation et avant de le nettoyer. Ne jamais laisser l’appareil
branché sans surveillance. Pour débrancher, tirer sur la che et jamais sur le cordon.
• Ne pas utiliser l’appareil s’il est tombé ou s’il présente des traces apparentes de dommage.
• Cesser immédiatement d’utiliser l’appareil si le cordon est endommagé.
• Si le cable d’alimentation est endommagé, il doit être remplacé par le fabricant, son service après
vente ou des personnes de quali cation similaire a n d’éviter un danger.
• Aucune réparation ne peut être e ectuée par l’utilisateur.
• Toute utilisation d’accessoires non recommandés ou non vendus par Cuisinart® peut provoquer
incendie, électrocution et risque de blessure.
• Cet appareil peut être utilisé par des enfants âgés de 8 ans et plus et des personnes aux capacités
physiques, sensorielles ou mentales réduites, ou des personnes dénuées d’expérience et de
connaissance, si elles ont pu béné cier d’une surveillance ou d’instructions préalables concernant
l’utilisation de l’appareil en toute sécurité et si elles comprennent les risques impliqués. Les enfants
ne doivent pas jouer avec l’appareil. Le nettoyage et l’entretien de l’appareil ne peuvent être
e ectués par des enfants sans surveillance.
• Gardez l’appareil et son cordon électrique hors de la portée des enfants âgés de moins de 8 ans.
• Ne pas utiliser à l’extérieur.
• A usage domestique uniquement.
6
Page 7

Déchets des équipements électriques et électroniques en n de vie
Dans l’intérêt de tous et pour participer activement à l’e ort collectif de protection de
l’environnement :
• Ne jetez pas vos produits avec les déchets ménagers.
• Utilisez les systèmes de reprise et de collecte qui sont mis à votre disposition.
Certains matériaux pourront ainsi être recyclés ou valorisés.
7
Page 8
1. INTRODUCTION
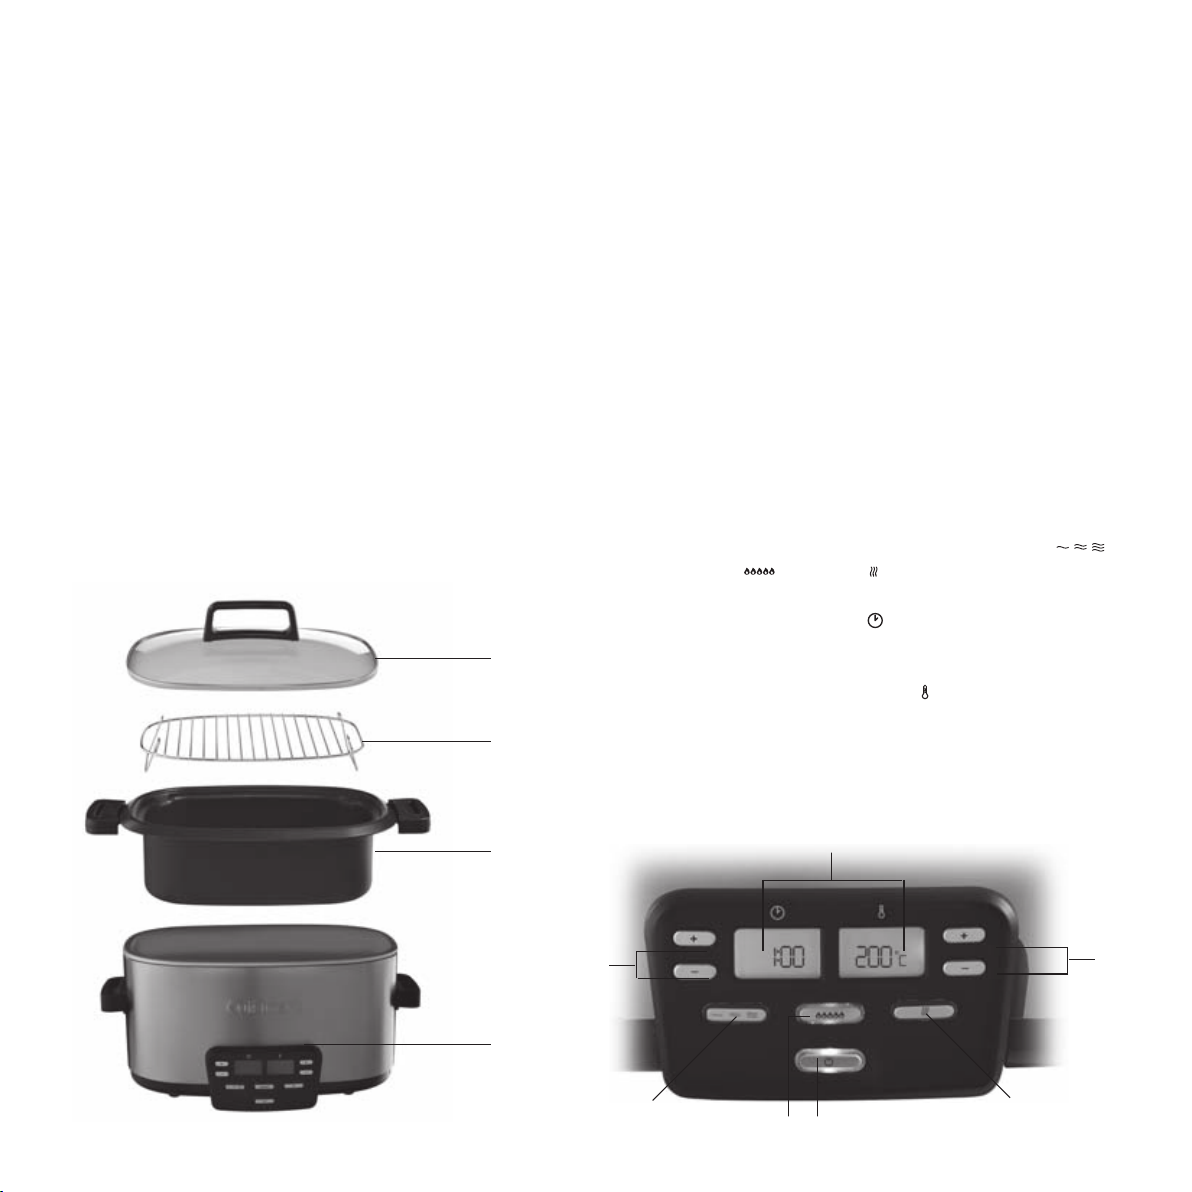
1. Couvercle en verre avec poignée : permet de surveiller la cuisson
sans libérer de la chaleur.
Félicitations pour votre achat!
Depuis plus de 30 ans, Cuisinart® développe une gamme complète
d’appareils culinaires qui permettent aux passionnés de cuisine et
aux grands chefs d’exprimer pleinement leur créativité.
Tous les appareils Cuisinart® sont le résultat d’une étroite collaboration
entre des ingénieurs et des grands noms de la Cuisine, tels que Paul
Bocuse, ambassadeur charismatique de la marque. Chaque produit
allie robustesse, innovation, performance et ergonomie.
Réalisés dans des matériaux d’origine professionnels tels que l’acier
brossé inoxydable, nos produits s’intègrent facilement dans chaque
cuisine, grâce à un design sobre et élégant.
2. CARACTÉRISTIQUES
1
2
2
2. Grille de cuisson vapeur : permet de mettre les aliments en hau-
teur pour une cuisson vapeur.
3. Cuve anti-adhésive en aluminium : permet une répartition ho-
mogène de la chaleur dans tous les types de cuisson. Capacité de
5,7 L.
4. Panneau de commande.
3. UTILISATION
A. Panneau de commande
1. Interrupteur On/O .
2. Sélecteur de cuisson : permet de sélectionner MIJOTER
DORER/SAUTER
3. Boutons de sélection du temps : permet de régler le temps de
cuisson.
4. Boutons de sélection de la température : permet de régler la température de cuisson.
5. Écrans LCD rétro-éclairés bleu : a chage du temps et de la température de cuisson.
ou VAPEUR
,
3
3
4
2
8
5
4
2
1
2
Page 9

B. Cuisson
Cuisiner est extrêmement simple avec le multi-cuiseur électrique :
• Sélectionner le type de cuisson.
• Régler le temps de cuisson et la température.
• Appuyer sur l’interrupteur On/O pour démarrer la cuisson.
• Pour arrêter l’appareil à tout moment, appuyer sur l’interrupteur On/
O .
Remarque : L’appareil est chaud. Utiliser des maniques pendant et
après la cuisson et tenir l’appareil à distance.
C. Cuissons combinées
Changer de fonction pendant la cuisson est très simple, par exemple
pour passer de « Sauter » à « Mijoter » ou d’un mode de mijotage à
un autre. Appuyer sur la cuisson désirée et l’appareil reprendra les
paramètres par défaut de votre sélection.
4. CONSEILS D’UTILISATION
A. Dorer/Sauter
• Appuyer sur .
• Sélectionner la température à l’aide des touches + et - (jusqu’à
200°C).
• Appuyer sur l’interrupteur O n/O p ou r co mm e nc er l e p ré c ha u age.
La température sélectionnée clignote pendant le préchau age.
• Lorsque la température sélectionnée est atteinte, deux signaux
sonores retentissent. Placer les ingrédients dans la cuve.
Note : Pour de meilleurs résultats, ne pas surcharger la cuve.
• Une fois la cuisson réalisée, appuyer sur l’interrupteur On/O
pour arrêter l’appareil. Si vous désirez passer en mode mijotage,
sélectionner directement cette fonction.
D. Changer les réglages
Vous pouvez également ajuster le temps et la température à tout
moment grâce aux boutons de sélection du temps
température
Ne pas appuyer sur l’interrupteur On/O pour changer de réglage.
L’appareil est déjà allumé et en cuisson.
de cuisson.
et de la
E. Cuisson sans minuterie
Si vous ne souhaitez pas programmer de temps, l’appareil cuira à la
température choisie jusqu’à l’arrêt manuel de l’appareil.
L’appareil s’éteindra automatiquement après que le temps maximum
pour la fonction sélectionnée soit atteint.
F. Mode veille
Le multi-cuiseur est équipé d’un mode automatique de mise en veille
qui éteindra les lumières lorsque l’appareil n’est pas utilisé. L’appareil
passe en veille si vous appuyez sur l’interrupteur On/O .
Appuyer sur n’importe quel bouton (sauf sur l’interrupteur On/O )
pour réactiver l’appareil.
Remarque : Vous pouvez sélectionner une durée de cuisson
di érente grâce aux boutons de sélection du temps
commence lorsque la température sélectionnée est atteinte.
L’appareil s’éteint automatiquement en n de cuisson.
. Le décompte
B. Mijoter
• Placer les ingrédients dans la cuve et mettre le couvercle.
• Appuyer sur
• Sélectionner HIGH, LOW, SIMMER ou WARM (voir le guide de
cuissons pour plus d’informations). La température par défaut est
LOW.
• Sélectionner la durée à l’aide des touches + et -.
• Appuyer sur l’interrupteur On/O pour démarrer la cuisson. Le
temps et la température de cuisson sélectionnés (HIGH, LOW,
SIMMER ou WARM) s’a chent.
Note : Si vous avez fait dorer des ingrédients avant de passer en
mode mijoteuse, cette étape n’est pas nécessaire.
• Pour les réglages HIGH, LOW et SIMMER, 5 signaux sonores
retentissent à la n du temps de cuisson. L’appareil passe en mode
maintien au chaud (WARM) pour 8 heures.
• A la n des 8 heures de maintien au chaud, un signal sonore retentit
et l’appareil s’éteint.
pour choisir le type de mijotage.
9
Page 10

• Pour arrêter l’appareil à tout moment, appuyer sur l’interrupteur On/
O .
C. Cuisson vapeur
• Ne pas mettre plus de 0,5 litre d’eau dans la cuve.
• Placer la grille de cuisson vapeur et mettre le couvercle.
• Appuyer sur
Remarque : La température en cuisson vapeur ne peut pas être
changée.
• Sélectionner la durée (jusqu’à 1h30) à l’aide des touches + et -.
• Appuyer sur l’interrupteur On/O pou r comm enc er le p réc hau age
La durée sélectionnée clignotera pendant le temps de chau age.
• Lorsque la température de cuisson vapeur est atteinte, deux
signaux sonores retentissent et le décompte commence.
• Enlever le couvercle avec précaution et placer les ingrédients sur la
grille, en commencant par le milieu. Remettre le couvercle.
• Lorsque la cuisson est terminée, 5 signaux sonores retentissent et
l’appareil s’éteint automatiquement.
• Retirer soigneusement les ingrédients.
• Pour arrêter l’appareil à tout moment, appuyer sur l’interrupteur On/
O .
.
Remarque : Lorsque toute l’eau s’est évaporée, l’appareil s’éteint.
Ajouter assez d’eau pour la cuisson vapeur désirée.
10
Page 11

D. Guide de cuisson
• SLOW COOK / MIJOTER
La fonction SLOW COOK est idéale pour réaliser des plats qui nécessitent un temps de cuisson important : ragoûts et plats en sauce, soupes,
bouillons, ... Elle est également idéale pour braiser longuement des pièces de viande entières : gigots, épaules, rôtis ...
Les réglages SIMMER et LOW sont utilisés pour les recettes mitonnées (sans ébullition). Le réglage HIGH est utilisé pour les recettes mijotées
(avec ébullition).
La fonction BROWN/SAUTE peut-être utilisée pour saisir et colorer les ingrédients avant de les faire mijoter.
La fonction WARM est sélectionnée automatiquement en n de cuisson pour le maintien au chaud.
Réglage Objectif Recette Température Temps de cuisson
Raccourcir le temps de
HIGH
LOW
SIMMER
WARM
cuisson, notamment pour
les grosses pièces
Mitonner lentement,
sans ébullition
Mitonner des aliments
fragiles
Maintenir au chaud les
préparations
TYPE DE VIANDE SUGGÉRÉ POUR LE MULTICOOKER
Bœuf/Veau Porc Agneau Volaille Gibiers
Rôti, poitrine, tranche de palette,
jarrets de veau, joue, tendron,
plats de côtes, paleron, macreuse,
gîte, blanquette, queue de bœuf
Rôti, côtes de porc, épaule,
palette, rouelle de jambon,
sauté
Gigot de 7 heures, Côte de
veau braisée, Légumes rôtis ou
braisés, Rôti de porc
Joue de bœuf, Pot-au-feu,
Blanquette, Viandes blanches,
Poulet à l’estragon
Soupe de poisson, Minestrone,
Fruits en compote
- 74°C
Gigot, épaule, collier, jarret,
poitrine, selle, navarin,
souris.
100°C
93°C
85°C
Volaille entière,
cuisse, pilon,
suprême
Programmable jusqu’à 24
heures, plus 8 heures (WARM)
Programmable jusqu’à 24
heures, plus 8 heures (WARM)
Programmable jusqu’à 24
heures, plus 8 heures (WARM)
Par défaut jusqu’à 8 heures,
ou programmable jusqu’à 24
heures
Selle, épaule, poitrine,
anchet, collier, carré.
11
Page 12

• CUISSON VAPEUR
La cuisson vapeur est l’un des moyens de cuisson les plus sains, sans matière grasse.
TABLEAU DE CUISSON VAPEUR
Aliment Quantité Préparation Temps de cuisson
Artichaut 4 Entier 50 - 60 mn
Asperge 1 kg Entière 10 - 12 mn
Brocoli Branche Petits bouquets de 5 cm 7 - 10 mn
Carotte 1 kg Entière 10 - 12 mn
Chou- eur Tête Petits bouquets de 5 cm 7 - 9 mn
Maïs 4 épis Épluché 10 - 12 min
Haricots verts 1 kg Equeutés 8 - 10 min
Pommes de terre grenailles 1 kg Entières, non épluchées 15 - 20 min
Pommes de terre 1 kg Entières, épluchées 30 min
Courgette 1 kg Tranches de 1 cm 5 - 8 min
Poulet 4 suprêmes Entiers 15 - 18 min
Crevettes 500 g Décortiquées et nettoyées 4 - 5 min
Poisson 6 Portions 8 - 12 min
Les temps de cuisson sont indiqués pour des ingrédients de taille moyenne, et devront donc être ajustés.
• BROWN/SAUTE
Utiliser la fonction BROWN/SAUTE pour faire revenir les ingrédients, les saisir, les faire sauter ou les colorer, éventuellement avant de les soumettre à une cuisson lente et longue (mijotage ou mitonnage).
Elle peut également être utilisée comme une sauteuse, pour faire rissoler des ingrédients, sans les faire mijoter par la suite.
12
Page 13

5. L’AVIS DES CHEFS
• Couper les aliments avant la cuisson pour avoir une cuisson
homogène.
• Eviter de soulever le couvercle pendant la cuisson a n de ne pas
faire sortir la chaleur et rallonger la durée de cuisson.
• Pour contrôler la bonne cuisson d’un ingrédient, utiliser la pointe
d’un couteau.
• La cuisson dans la mijoteuse doit toujours se faire dans la cocotte
prévue à cet e et.
• La cuisson dans la mijoteuse électrique entraîne très peu
d’évaporation de liquide. Adapter la quantité de liquide de vos
recettes à l’appareil.
• Décongeler un produit surgelé avant de l’utiliser pour une recette.
• Lorsqu’ il faut ajouter un bouillon à la recette, utiliser de préférence
un bouillon chaud pour accélérer la cuisson.
• Pour lier les sauces, ajouter un beurre manié (mélange de beurre et
de farine) ou bien un peu de crème en n de cuisson.
• Pour obtenir une sauce épaisse et onctueuse, Il est recommandé
d’ajouter de la farine juste après avoir fait revenir les morceaux
de viande et la garniture aromatique puis de verser le liquide de
cuisson dans la cocotte.
• En utilisant la grille fournie et en versant de l’eau dans la cocotte, il
est possible de cuire des préparations délicates au bain-marie telles
que des crèmes brûlées, des crèmes caramel, une terrine de foie
gras et un pain de poisson)
• Toutes les recettes à base de marinade de vin ont un goût plus
prononcé dû à l’évaporation peu importante d’alcool au cours de
la cuisson.
• Lorsque l’on met en fonction la mijoteuse tôt le matin pour le
repas du soir, préparer tous les ingrédients avant de commencer la
cuisson.
6. NETTOYAGE ET ENTRETIEN
• Tous les composants de l’appareil peuvent être mis au lave-vaisselle.
• Toujours laisser l’appareil refroidir complètement avant de le
nettoyer.
• Nettoyer le panneau de commande à l’aide d’un chi on doux.
• Utiliser une éponge imprégnée d’eau savonneuse pour nettoyer la
casserole, le couvercle et le support de cuisson vapeur et rincer soigneusement. Il est aussi possible de les mettre au lave-vaisselle (bac
supérieur uniquement).
• Sécher toutes les parties après chaque utilisation.
Remarque : Si des résidus d’aliments se trouvent sur la surface de
la casserole, la remplir d’eau savonneuse et laisser tremper avant de
nettoyer. S’il est nécessaire de récurer, utiliser un nettoyant non abrasif ou un détergent liquide avec une brosse.
13
Page 14

SAFETY CAUTIONS
READ THESE SAFETY PRECAUTIONS CAREFULLY BEFORE USING THE UNIT!
• CAUTION: The plastic bags used to cover the unit or packaging may be dangerous. To avoid
all risk of su ocation, keep these bags out of the reach of babies and children. These bags are
not toys.
• Always follow the instructions in this manual when using this appliance.
• Always place the motor housing on a level, stable, clean and dry surface.
• Turn the appliance o and unplug before changing the accessories or touching the parts that
move when the appliance is running.
• Do not place the appliance on or near a hot appliance. Do not use on heat sensitive surfaces or near
in ammable materials.
• Never let the cord hang over the edge of the work surface and never let it come in contact with
hot surfaces.
• Never immerse the appliance base in water or any other liquid.
• Unplug the appliance after use, before assembling or taking apart, before removing the food
and before cleaning. Never leave the appliance unsupervised when plugged in. To unplug the
appliance, pull on the plug never the cord.
• Do not use the appliance if the cord is damaged or if the appliance has fallen or appears damaged.
• Stop using the machine immediately if the cord is damaged.
• If the power cord is damaged, it should be replaced by the manufacturer, its after-sales service or
a similarly quali ed professional to avoid danger.
• Do not attempt to repair the appliance yourself.
• Using any accessories not recommended or sold by Cuisinart® may cause a re, electrocution and
risk of injury.
• This appliance can be used by children aged from 8 years and above and persons with reduced
physical, sensory or mental capabilities or lack of experience and knowledge if they have been
given supervision or instruction concerning use of the appliance in a safe way and understand the
hazards involved. Children shall not play with the appliance. Cleaning and user maintenance shall
not be made by children without supervision.
• Keep the appliance and its cord out of reach of children aged less than 8 years.
• Do not use this appliance outdoors.
• This appliance is intended for household use only.
14
Page 15

Electrical and electronic equipment at the end of life.
In everybody’s interest and to participate actively in protecting the environment:
• Do not discard these products with your household waste.
• Use return and collection systems available in your country.
Some materials can in this way be recycled or recovered.
15
Page 16

1. INTRODUCTION
1. Glass lid with handle: check the progress of cooking without
releasing heat.
Congratulations on your purchase!
For over 30 years, Cuisinart® has been developing a full range of
kitchen appliances that lets both passionate amateurs and great
chefs express their creativity to the fullest.
All Cuisinart® appliances result from close collaboration between
engineers and great names in Cookery like Paul Bocuse, the brand’s
charismatic ambassador. Every product combines sturdiness,
innovation, performance and ergonomics.
Made with professional materials like brushed stainless steel, our
products will easily t into any kitchen thanks to their simple and
elegant design.
2. PRODUCT FEATURES
1
2. Steaming cooking grid: elevates ingredients for steaming.
3. Nonstick aluminum cooking pot: spreads heat evenly in all
cooking types. Capacity: 5,7L.
4. Control panel.
3. USE
A. Control panel
1. On/O button.
2. Cooking function button: use to select SLOW COOK
BROWN/SAUTÉ
3. Time directionals
4. Temperature directionals
5. Blue backlit LCD displays: show cooking time and temperature.
or STEAM .
: use to set cooking time.
: use to set cooking temperatures.
,
16
2
3
3
4
2
5
4
2
1
2
Page 17

B. Cooking
4. ADVICES FOR USE
Cooking is simple with the electrical multi-cooker.
• Select cooking function.
• Set desired cooking time and temperature.
• Press On/O to begin cooking.
• To turn o the unit at any time during cooking, press On/O .
Note: The unit is hot. Always use pot holders during and after
cooking, and always lift the lid away from you.
C. Combined cooking
Switching functions during cooking is easy, for example for switching
from « Sauté » to « Slow cooking » or from one simmer mode to another. Press the desired new cooking function button and the unit will
adjust to the default settings for your selection.
D. Changing settings
You can also adjust cooking time or temperature at any point with
the time
Do not press On/O button to select new settings. The unit is already
on and cooking.
/temperature directionals.
E. Cooking without a timer
If you do not wish to program a time, the unit will cook at the selected
temperature until you manually turn the heater o .
The heater will also turn o automatically after the maximum
allowable time for the selected function has been reached.
F. Sleep mode
The multi-cooker is equipped with a powersaving sleep mode that
will turn o the lights if the multi-cooker is not being used. The unit
will also enter sleep mode if you manually stop cooking.
A. Brown/Sauté
• Press .
• Use the temperature directionals to select a temperature (up to
200°C).
• Press the On/O button to begin preheating. Selected temperature
will ash during heatup.
• When selected temperature is reached, two beeps will sound. Add
ingredients to cooking pot.
Note: for best results, do not crowd pot.
• Once cooking is complete, press On/O to st op co okin g. If you want
to switch to simmering, select the
Note: You can set a cooking time with the time directionals
. Countdown will start when selected temperature is reached. Unit
will automatically shut o after cooking.
function.
B. Slow cook
• Fill cooking pot with ingredients and cover with lid.
• Press
• Select HIGH, LOW, SIMMER or WARM (refer to chart for more infor-
mation). The preset temperature is LOW.
• Set desired cooking time with time directionals.
• Press the On/O button to begin cooking. Selected time and tempe-
ratur setting (HIGH, LOW, SIMMER or WARM) will be displayed.
Note: If you browned ingredients before switching to slow cooking,
this step is not necessary.
• For HIGH, LOW and SIMMER settings, the unit will beep ve times
at the end of the cooking time and will automatically switch to the
WARM setting for 8 hours.
• After 8 hours of keep warm, one beep will sound and heater will
turn o .
• To turn the heater o manually at any time, press the On/O button.
to select simmering type.
Press any button, except On/O , to “wake up” the unit and operate
as normal.
17
Page 18

C. Steam
• Place no more than 0,5l of water in cooking pot.
• Insert steaming cooking grid and cover with lid.
• Press
Note: Steaming temperature cannot be changed.
• Set desired cooking time (up to 1h30) by pressing time directionals.
• Press the On/O button to start preheating. Selected time and
• When steaming temperature is reached, the unit will beep two
• Carefully lift lid away from you and place food on grid, starting in the
• When cooking time is completed, the unit will beep ve times and
• Carefully remove food from pot.
• To turn the heater o manually at any time, press the On/O button.
Note: If all water has boiled away, the unit will shut o , so be sure to
add enough for the desired steaming task.
.
temperature will ash as unit heats up.
times and the timer will begin counting down cooking time.
middle. Be sure to cover pot with lid again.
the heater will turn o automatically.
18
Page 19

D. Cooking guidelines
• SLOW COOKING
Slow cooking is perfect for foods that require long, slow simmering, such as soups, stocks, stews, ... Slow cooking is also ideal for tougher and
cuts of meat like shoulder, pot roast ...
The SIMMER and LOW settings are usually used for recipes that cook longer (without boiling). The HIGH setting is used for simmered recipes
(with boiling).
The Brown/Sauté setting can be used to sear and mark food before simmer.
The WARM setting is selected automatically at the end of cooking to keep food warm.
Setting Guidelines Recipes Temperature Timer
HIGH
LOW Simmer slowly without boiling
SIMMER Simmer fragile food
WARM Keep food warm. - 74°C
Shorten the preparation time,
especially for large pieces
7-hour leg, braised veal chop,
roasted or braised vegetables,
roasted pork
Beef cheek, stew, Blanquette,
white meat, chicken with
tarragon
Fish soups, minestrone, fruits
in compote
SUGGESTED CUTS OF MEAT FOR SLOW COOKING
Beef/Veal Pork Lamb Poultry Game
Roast, shoulder, slices of
shoulder, veal shanks,
cheek, sinew, ribs, chuck,
shoulder of beef, shin,
Blanquette, tail
Roast, pork ribs,
shoulder, round steak, sauté
Leg, shoulder, collet, shank,
chest, saddle, navarin,
knuckle-end
100°C
93°C
85°C
Whole poultry, leg,
drumstick, supreme
Programmable up to 24 hours,
then 8 hours (Warm)
Programmable up to 24 hours,
then 8 hours (Warm)
Programmable up to 24 hours,
then 8 hours (Warm)
Defaults up to 8 hours. Or pro-
grammable up to 24 hours
Saddle, shoulder, chest, ank,
collet, rack.
19
Page 20

• STEAM
Steaming is one of the healthiest methods of cooking, without fat.
STEAMING CHART
Food Amount Preparation Cooking time
Artichokes 4 Whole 50 - 60 mn
Asparagus 1 kg Whole 10 - 12 mn
Broccoli Bunch 5 cm orets 7 - 10 mn
Carrots 1 kg Whole 10 - 12 mn
Cauli ower Bunch 5 cm orets 7 - 9 mn
Corn 4 ears Husked 10 - 12 min
Green Beans 1 kg Tailed 8 - 10 min
Potatoes 1 kg Whole, unpeeled 15 - 20 min
Potatoes 1 kg Whole, peeled 30 min
Courgette
Chicken 4 supreme Whole 15 - 18 min
Shrimps 500 g Cleaned and husked 4 - 5 min
Fish 6 Portions 8 - 12 min
1 kg 1 cm slices 5 - 8 min
Cooking times are given for ingredients of medium size and therefore need to be adjusted.
• BROWN/SAUTÉ
Use Brown/Sauté setting to brow, sear, sauté or color food, possibly before slow and long cooking (simmering or mitonnage).
This setting can also be used as a sauté pan to brown food, without slow-cooking after.
20
Page 21

5. ADVICE FROM THE CHEFS
• For even cooking, cut the food before cooking.
• Avoid lifting the lid to prevent heat from escaping.
• To test whether food is cooked, use the tip of a knife.
• Cooking in a slow cooker should always be done in the pot provided
for this.
• Very little liquid is lost through evaporation when cooking in the
electric slow cooker. Adjust the amount of liquid in your recipes to
the appliance.
• Allow frozen products to thaw before cooking.
• When a recipe calls for a bouillon, it is best to use a hot bouillon to
speed cooking.
• To thicken sauces, add beurre manié (mixture of butter and our) or
a little cream at the end of cooking.
• For a thick, creamy sauce, it is recommended you add our just after
having returned the meat pieces and the garniture aromatique then
pour the cooking liquid in the pot.
• Using the rack provided and pouring water into the pot, you can cook
delicate preparations in a bain-marie like crèmes brûlées, crèmes
caramels, pâté foie gras and sh loaves.
• All recipes with a wine marinade base have a very pronounced avour because very little alcohol evaporates during cooking.
• When you turn on the slow cooker early in the morning for the evening meal, prepare all the ingredients before starting to cook.
6. CLEANING AND STORAGE
• All removable parts are dishwasher safe.
• Unplug unit and allow it to cool completely before cleaning.
• To clean the housing and control panel, simply wipe with a clean
damp cloth.
• Wash cooking pot, lid and rack with warm soapy water and rinse
thoroughly. Or, clean in top rack of dishwasher (upper tray only).
• Dry all parts after every use.
Note: If food residue sticks or burns onto cooking pot surface, ll pot
with warm soapy water and allow to soak before cleaning. If scouring
is necessary, use a nonabrasive cleanser or liquid detergent with a
nylon pad or brush.
21
Page 22

SICHERHEITSHINWEISE
LESEN SIE VOR DER VERWENDUNG DES GERÄTS AUFMERKSAM DIESE SICHERHEITSHINWEISE!
• VORSICHT: Die Polyethylenbeutel, die das Produkt oder seine Verpackung enthalten, können
gefährlich sein. Um jede Erstickungsgefahr zu vermeiden sollten diese Beutel außerhalb der
Reichweite von Babys oder Kleinkindern aufbewahrt werden. Diese Beutel sind kein Spielzeug.
• Benutzen Sie dieses Gerät ausschließlich zum Garen und befolgen Sie die Hinweise in dieser
Anleitung.
• Den Motorsockel immer auf eine gerade, stabile, saubere und trockene Ober äche stellen.
• Immer die Klinge einsetzen, bevor die Zutaten hinein gegeben werden.
• Überprüfen Sie vor dem Einschalten des Geräts, dass die Klinge oder Scheibe so weit wie möglich
auf die Motorachse geschoben und dass der Deckel korrekt angebracht wurde.
• Äußerst vorsichtig mit den Klingen und Scheiben umgehen. Vermeiden Sie es, die scharfen Teile
zu berühren. Nie die Klingen berühren, wenn das Gerät an den Netzstrom angeschlossen ist.
• Nie eine Klinge oder Scheibe auf der Motorachse befestigen, bevor das Gefäß verriegelt wurde.
• Das Gerät ausschalten und den Netzstecker ziehen, bevor Sie Teile wechseln oder sich Teilen
nähern, die sich während des Betriebs bewegen. Vor dem Entfernen des Deckels oder der Schieber
immer warten, bis sich die Klinge oder Scheibe nicht mehr dreht.
• Zum Raspeln oder Reiben von Nahrungsmitteln immer den Schieber verwenden. Nie mit den
Fingern oder anderen Gegenständen schieben.
• Das Gefäß von dem Sockel entfernen, bevor Sie die Klinge herausnehmen. Die Klinge nie im Gerät
lassen, wenn es nicht benutzt wird. Die Klingen und Scheiben außerhalb der Reichweite von
Kindern aufbewahren.
• Das Gerät nicht überladen. Wenn der Motor klemmt, das Gerät ausschalten und den Netzstecker
ziehen. Einen Teil der Nahrungsmittel entfernen, 15 Minuten warten und dann wieder einschalten.
• Das Gerät nicht auf oder in die Nähe eines Geräts stellen, das heiß werden kann. Nicht auf
hitzeemp ndlichen Ober ächen oder in der Nähe von entzündlichem Material verwenden.
• Lassen Sie das Netzkabel nicht über den Rand der Arbeitsplatte hängen und bringen Sie es nie in
Berührung mit heißen Ober ächen.
• Den Sockel des Geräts nicht in Wasser oder andere Flüssigkeiten tauchen.
• Nach dem Gebrauch, vor dem Zusammensetzen und Auseinandernehmen, vor dem Entnehmen
der Nahrungsmittel und vor dem Reinigen immer den Netzstecker ziehen. Das Gerät nie
unbeaufsichtigt lassen, wenn es an den Netzstrom angeschlossen ist. Um den Netzstecker zu
22
Page 23

entfernen, immer am Stecker ziehen und nicht am Kabel.
• Das Gerät nicht benutzen, wenn es gefallen ist oder o ensichtliche Spuren einer Beschädigung
aufweist.
• Den Betrieb des Geräts unverzüglich einstellen, wenn das Kabel beschädigt ist.
• Wenn das Kabel beschädigt ist, muss es durch den Hersteller, seinen Kundendienst oder eine
ähnlich quali zierte Person ersetzt werden, um jede Gefahr zu vermeiden.
• Der Benutzer darf keinerlei Reparaturen selbst durchführen.
• Jeder Gebrauch von Zubehör, das nicht durch Cuisinart® empfohlen oder vertrieben wird, kann zu
Feuer, Stromschlag und Verletzungsrisiko führen.
• Das Gerät darf nicht von Kindern verwendet werden. Halten Sie das Gerät und das Netzkabel
außerhalb der Reichweite von Kindern.
• Das Gerät kann von von Personen mit eingeschränkten physischen, sensoriellen oder mentalen
Fähigkeiten oder von Personen mit fehlender Erfahrungsoder Kenntnisgrundlage verwendet
werden, wenn dies unter Aufsicht geschieht oder wenn sie vorher über den sicheren Gebrauch des
Geräts unterrichtet wurden und die mit der Verwendung im Zusammenhang stehenden Risiken
begreifen.
• Lassen Sie Kinder nicht mit dem Gerät spielen.
• Nicht im Freien verwenden.
• Ausschliesslich für den Hausgebrauch bestimmt.
Elektronische Altgeräte
Im allgemeinen Interesse und als aktive Teilnahme an den gemeinsamen Anstrengungen
zum Umweltschutz:
• Werfen Sie Ihre Geräte nicht in den Hausmüll.
• Nutzen Sie die Rücknahme- und Sammelsysteme, die Ihnen zur Verfügung stehen.
Gewisse Werksto e können so wieder verwertet oder aufbereitet werden.
23
Page 24

1. EINLEITUNG
1. Glasdeckel mit Gri : um den Garvorgang zu beobachten, ohne
dass Hitze entweicht.
Herzlichen Glückwunsch zu Ihrem Kauf!
Seit über 30 Jahren entwickelt Cuisinart® ein komplettes Sortiment
von Küchengeräten, die es sowohl passionierten Liebhabern einer
guten Küche als auch großen Küchenchefs ermöglichen, ihrer
Kreativität freien Lauf zu lassen.
Alle Geräte von Cuisinart® sind aus einer engen Zusammenarbeit
zwischen Ingenieuren und namhaften Vertretern der Kochkunst
wie Paul Bocuse, dem charismatischen Botschafter der Marke,
entstanden. Jedes Produkt vereint in sich Robustheit, Innovation,
Leistung und Ergonomie.
Unsere Produkte werden aus Materialien wie gebürstetem rostfreiem
Edelstahl gefertigt, die aus dem Pro bereich stammen und lassen
sich dank des nüchtern-eleganten Designs leicht in jede Küche
integrieren.
2. MERKMALE
1
2. Dampfgar-Gitter: um Nahrungsmittel höher zu legen und im
Dampf zu garen.
3. Antihaftbeschichteter Gartopf: um bei allen Gararten die Hitze
gleichmäßig zu verteilen. Fassungsvermögen 5,7 L.
4. Funktionstastenfeld.
3. GEBRAUCH
A. Funktionstastenfeld
1. On/O -Taste.
2. Wahltaste für die Garfunktion: mit den Wahlmöglichkeiten
BEHUTSAMES KÖCHELN , BRÄUNEN/BRATEN oder
DAMPF
3. Zeitwahltasten
4. Temperaturwahltasten
: zum Einstellen der Garzeit.
: zum Einstellen der Gartemperatur.
24
5. LCD-Anzeigen mit blauer Hintergrundbeleuchtung: zeigen Garzeit
2
und Gartemperatur.
5
3
3
4
2
1
2
2
4
Page 25

B. Garen
Das Zubereiten von Speisen mit dem elektrischen Multi-Garer ist extrem
einfach:
• Die Zubereitungsart auswählen.
• Garzeit und Temperatur einstellen.
• Die On/O -Taste betätigen, um mit der Zubereitung zu beginnen.
• Erneut die On/O -Taste betätigen, um das Gerät zu jedem gewünschten
Zeitpunkt wieder auszuschalten.
• Anmerkung: Das Gerät wird heiß. Verwenden Sie während und nach
der Zubereitung Kochlappen und halten Sie einen sicheren Abstand
vom Gerät.
C. Kombi-Garen
wieder zu aktivieren.
4. GEBRAUCHSHINWEISE
A. Bräunen/Braten
• Auf drücken.
• Die Temperatur mit den Tasten + und - einstellen (bis zu 200°C).
• Den Schalter On/O betätigen, um mit dem Vorheizen zu beginnen.
Während des Vorheizens blinkt die gewählte Temperatur.
• Wenn die gewählte Temperatur erreicht ist, werden zwei Pieptöne
abgegeben. Die Zutaten in den Topf geben.
Hinweis: Für die besten Resultate sollte der Topf nicht zu sehr gefüllt
werden.
Die Garfunktion kann während der Zubereitung ganz einfach geändert
werden - zum Beispiel von « Braten » auf « Behutsames Köcheln »
oder von einem Köchelmodus in einen anderen. Stellen Sie den
gewünschten Garmodus ein, und das Gerät übernimmt automatisch die
Voreinstellungen für Ihre Wahl.
D. Ändern der Einstellungen
Sie können ebenfalls beliebig die Einstellungen für Zeit und Temperatur
ändern, indem Sie die Tasten zur Zeitwahl bzw. Temperaturwahl
betätigen.
Nicht die On/O -Taste drücken, um die Einstellungen zu ändern. Das
Gerät ist bereits eingeschaltet und gart.
E. Garen ohne Zeitangabe
Wenn keine Garzeit eingestellt ist, gart das Gerät die Speisen auf der
gewählten Temperatur weiter, bis das Gerät von Hand ausgeschaltet wird.
Das Gerät schaltet sich automatisch aus, sobald die Höchstzeit für die
jeweilige Garfunktion erreicht ist.
F. Standby-Modus
• Sobald der Garvorgang abgeschlossen ist, die On/O -Taste drücken,
um das Gerät auszuschalten. Wenn Sie auf den Köchelmodus
umstellen möchten, sollten Sie diese Funktion direkt anwählen.
Anmerkung: Mit den Zeitwahltasten
geändert werden. Die Zeitzählung beginnt, sobald die gewählte
Temperatur erreicht ist. Am Ende der Zubereitungszeit schaltet sich
das Gerät automatisch aus.
kann die Garzeit jederzeit
B. Behutsames Köcheln
• Die Zutaten in den Topf geben und diesen mit dem Decken
verschließen.
• Auf
• Wählen Sie HIGH, LOW, SIMMER oder WARM (in der Garanleitung
nden Sie weitere Informationen). Die Standardtemperatur ist LOW.
• Die Garzeit mit den Tasten + und - einstellen.
• Die On/O -Taste betätigen, um mit der Zubereitung zu beginnen.
Die eingestellte Garzeit und Gartemperatur (HIGH, LOW, SIMMER
oder WARM) werden angezeigt.
Hinweis: Wenn Sie die Zutaten gebräunt haben und dann auf den
Köchelmodus umschalten, ist dieser Schritt nicht notwendig.
drücken, um die Köchelstärke einzustellen.
Der Multi-Garer ist mit einer Standby-Automatik ausgestattet, um die
Beleuchtung auszuschalten, wenn das Gerät nicht benutzt wird. Das
Gerät geht in Standby, wenn Sie die On/O -Taste drücken.
Drücken Sie eine beliebige Taste (außer die On/O -Taste), um das Gerät
• Für die Einstellungen HIGH, LOW und SIMMER ertönen am Ende
der Garzeit 5 Lautsignale. Das Gerät geht für 8 Stunden in den
Warmhaltemodus (WARM).
• Nach Ablauf der 8 Stunden Warmhaltezeit ertönt ein Lautsignal und
25
Page 26

das Gerät schaltet sich aus.
• Das Gerät kann jederzeit durch Betätigen der On/O -Taste
ausgeschaltet werden.
C. Dampfgaren
• Nicht mehr als 0,5 Liter Wasser in den Topf geben.
• Das Dampfgar-Gitter in den Topf stellen und diesen mit dem Deckel
schließen.
• Auf
drücken.
Anmerkung: Die Temperatur kann beim Dampfgaren nicht
geändert werden.
• Die Garzeit (bis zu 1h30) mit den Tasten + und - einstellen.
• Die On/O -Taste betätigen, um mit dem Vorheizen zu beginnen.
Die gewählte Garzeit blinkt während des Aufheizens.
• Sobald die Dampfgartemperatur erreicht ist, ertönen zwei
Lautsignale und die Zeitzählung beginnt.
• Ö nen Sie vorsichtig den Deckel und legen Sie die Zutaten von
Innen nach Außen auf das Gitter. Den Deckel wieder schließen.
• Nach Ablauf der Garzeit ertönen 5 Lautzeichen und das Gerät
schaltet sich automatisch aus.
• Entnehmen Sie vorsichtig die Nahrungsmittel.
• Das Gerät kann jederzeit durch Betätigen der On/O -Taste
ausgeschaltet werden.
Anmerkung: Wenn das Wasser vollständig verdampft ist, schaltet
sich das Gerät aus. Füllen Sie genug Wasser ein, um den gewünschten
Dampfgarvorgang abschließen zu können.
26
Page 27

D. Garanleitung
• SLOW COOK / BEHUTSAMES KÖCHELN
Die Funktion SLOW COOK ist ideal für Gerichte, die eine lange Garzeit erfordern: Eintöpfe und Saucengerichte, Suppen, Brühen, ... Sie ist
ebenfalls ideal, um größere Fleischteile langsam zart zu garen: Bratenstück, Schulter, Lammkeule ...
Die Einstellungen SIMMER und LOW werden für Gesottenes verwendet (ohne Aufwallen). Die Einstellung HIGH wird zum Köcheln verwendet
(mit Aufwallen).
Die Funktion BROWN/BRÄUNEN kann verwendet werden, um die Zutaten anzubraten oder zu bräunen, bevor sie weiter gesotten oder
geköchelt werden.
Die Funktion WARM wird automatisch am Ende des Garvorgangs eingeschaltet, um das Gericht warm zu halten.
Einstellung Verwendungszweck Rezept Temperatur Garzeit
Geschmorte Lammkeule,
HIGH
LOW
SIMMER
WARM Die Gerichte warm halten - 74°C
Verkürzen der Garzeit, beson-
ders für große Teile
Langsam sieden,
ohne Aufwallen
Zarte, leicht zerfallende
Nahrungsmittel sieden
Schmorbraten vom Rind,
gebratenes oder geschmortes
Gemüse, Schweinebraten
Rindswange, Pot-au-feu,
Kalbsragout, weißes Fleisch,
Estragonhuhn
Fischsuppe, Minestrone,
Kompottobst
100°C
93°C
85°C
24 Stunden, plus 8 Stunden
24 Stunden, plus 8 Stunden
24 Stunden, plus 8 Stunden
Standardeinstellung bis zu 8
Stunden, oder vorprogram-
EMPFOHLENE FLEISCHSORTEN FÜR DEN MULTICOOKER
Rind/Kalb Schwein Lamm Ge ügel Wild
Braten, Brust, Schulterstück, Kalbshaxe,
Wange, Kalbsbrust,
Querrippe, Bug,
Oberschale, Gulasch,
Ochsenschwanz
Braten, Karee, Schulter, Bug,
Beinscheibe, Schweinsgulasch
Keule, Schulter, Nacken, Haxe,
Brust, Hüfte, Ragout, Maus.
Ganzes Huhn, Schen-
kel, Unterschenkel,
Brust let
Hüfte, Brust, Bauchlappen,
Vorprogrammierbar bis zu
(WARM)
Vorprogrammierbar bis zu
(WARM)
Vorprogrammierbar bis zu
(WARM)
mierbar bis zu 24 Stunden
Nacken, Rippenstück
27
Page 28

• DAMPFGAREN
Dampfgaren ist eine der gesündesten Zubereitungsarten, ohne Fettzusatz.
DAMPFGARTABELLE
Nahrungsmittel Menge Vorbereitung Garzeit
Artischocke 4 Ganz 50 - 60 min
Spargel 1 kg Ganz 10 - 12 min
Brokkoli Staude Röschen von 5 cm 7 - 10 min
Mohrrüben 1 kg Ganz 10 - 12 min
Blumenkohl Kopf Röschen von 5 cm 7 - 9 min
Mais 4 Kolben Gepellt 10 - 12 min
Grüne Bohnen 1 kg Entstielt 8 - 10 min
Pellkarto eln 1 kg Ganz, ungeschält 15 - 20 min
Karto eln 1 kg Ganz, geschält 30 min
Zucchini 1 kg Scheiben von 1 cm 5 - 8 min
Huhn 4 Brust lets Ganz 15 - 18 min
Garnelen 500 g Geschält und geputzt 4 - 5 min
Fisch 6 Portionen 8 - 12 min
Die Garzeiten gelten für Zutaten durchschnittlicher Größe und müssen gegebenenfalls angepasst werden.
• BROWN/BRÄUNEN
Verwenden Sie die Funktion BROWN/BRÄUNEN, um Zutaten anzubraten, bevor sie langsam fertig gegart werden (sieden oder köcheln).
Sie kann auch wie ein Schmortopf verwendet werden, um die Zutaten goldbraun zu braten oder zu schmoren, ohne sie danach zu sieden
oder zu köcheln.
28
Page 29

5. DIE MEINUNG DER CHEFKÖCHE
• Die Lebensmittel vor dem Kochen zurecht schneiden, damit alles gleich
gar wird.
• Vermeiden Sie es, den Deckel während des Garens anzuheben, damit die
Hitze nicht ausweichen kann und die Kochzeit verlängert wird.
• Um das richtige Garen einer Zutat zu prüfen, nehmen Sie eine Messers-
pitze.
• Das Dampfgaren muss immer in dem vorgesehen Topf erfolgen.
• Beim Kochen im elektrischen Dampfgarer verdampft nur sehr wenig Flüs-
sigkeit. Passen Sie die Menge der Flüssigkeit Ihrer Rezepte dem Gerät an.
• Bevor Sie ein tiefgefrorenes Produkt für ein Rezept brauchen, muss es
enttaut werden.
• Wenn zum Rezept Brühe hinzugegeben werden muss, bevorzugen Sie
warme Brühe, um das Garen zu beschleunigen.
• Um Soßen zu binden, geben Sie etwas Butter und Mehl oder etwas
Sahne am Ende des Garens hinzu.
• Für eine dicke und cremige Soße wird empfohlen, etwas Mehl hinzuzuge-
ben, nachdem die Fleischstücke und die aromatische Garnitur angebraten wurden, und dann die Flüssigkeit in den Schmortopf zu geben.
• Wenn Sie das mitgelieferte Rost benutzen und wenn Sie Wasser in den
Topf geben, ist es möglich, sehr delikate Rezepte im Wasserbad zuzubereiten, wie Crème brûlée, Crème Caramel, eine Gänseleberterrine oder ein
Fischbrot)
• Alle Rezepte mit Weinmarinade haben einen stärkeren Geschmack, da
während des Kochens wenig Alkohol verdampft.
• Wenn Sie den Dampfgarer früh morgens für das Abendessen einschalten,
bereiten Sie alle Zutaten im Voraus vor.
6. REINIGUNG UND PFLEGE
• Alle Bestandteile des Geräts sind für die Spülmaschine geeignet.
• Das Gerät vor dem Reinigen immer vollständig abkühlen lassen.
• Das Tastenfeld mit einem weichen Tuch abwischen.
• Verwenden Sie einen Schwamm und Seifenlauge, um den Topf, den
Deckel und das Dampfgargitter zu reinigen; danach sorgfältig abspülen. Diese Teile können auch im Geschirrspüler gereinigt werden
(nur obere Schiene).
• Alle Teile nach jedem Gebrauch gut trocknen.
Anmerkung: Wenn Rückstände von Nahrungsmitteln auf der Ober äche des Topfs haften, diesen mit Seifenwasser füllen und vor dem
Reinigen einweichen lassen. Falls er doch gescheuert werden muss,
verwenden Sie bitte ein nicht scheuerndes Reinigungsmittel oder ein
Geschirrspülmittel und eine Bürste.
29
Page 30

VEILIGHEIDSINSTRUCTIES
DEZE VEILIGHEIDSRICHTLIJNEN AANDACHTIG LEZEN VOORALEER HET APPARAAT TE GEBRUIKEN !
• LET OP: De polyethyleenzakjes waar het apparaat in verpakt zit en het verpakkingsmateriaal
kunnen gevaar opleveren. Om verstikkingsgevaar te vermijden, deze zakjes buiten het bereik
van baby’s en kinderen bewaren. Deze zakjes zijn geen speelgoed.
• Gebruik dit apparaat uitsluitend in de keuken en volg altijd de instructies van deze handleiding
op.
• Plaats de motorbasis op een vlakke, stabiele, schone en droge ondergrond.
• Plaats het mes altijd voordat u de ingrediënten toevoegt.
• Controleer voordat u het apparaat aanzet of het mes of de schijf helemaal verzonken is op de
motoras en of het deksel goed geplaatst is.
• Ga heel voorzichtig om met de messen en de schijven. Raak de scherpe metalen snijdelen niet
aan. Raak nooit de messen aan terwijl de stekker van het apparaat in het stopcontact zit.
• Plaats het mes of de schijf nooit op de as van de motor voordat u de kom heeft vergrendeld.
• Zet het apparaat uit en haal de stekker uit het stopcontact alvorens de accessoires om te wisselen
of in de buurt te komen van onderdelen die bewegen wanneer het apparaat in werking is. Wacht
altijd totdat het mes of de schijf gestopt is met draaien voordat u de aanduwer of het deksel
verwijdert.
• Gebruik altijd de aanduwer bij het raspen of snijden van voedingsmiddelen. Druk ze nooit met de
vingers of een ander voorwerp aan.
• Haal eerst de kom van de basis voordat u het mes verwijdert. Laat het mes niet op de motoras
zitten wanneer het apparaat niet in gebruik is. Berg de messen en de schijven op buiten het bereik
van kinderen.
• Het apparaat niet overbelasten. Wanneer de motor afslaat, het apparaat uitschakelen en de stekker
uit het stopcontact halen. Een deel van de voedingsmiddelen verwijderen, 15 minuten wachten
en vervolgens het apparaat opnieuw aanzetten.
• Het apparaat niet op of bij een hittebron plaatsen. Niet gebruiken op oppervlakken die niet tegen
warmte kunnen of in de buurt van brandbare materialen.
• Het snoer niet over de rand van het werkblad laten hangen en niet in contact laten komen met
warme oppervlakken.
• Het apparaat niet onderdompelen in water of een andere vloeistof.
• Na gebruik en voor het schoonmaken altijd de stekker uit het stopcontact halen. Laat het apparaat
30
Page 31

nooit zonder toezicht achter met de stekker nog in het stopcontact. Om de stekker uit het
stopcontact te halen, altijd aan de stekker zelf trekken en nooit aan het snoer.
• Het apparaat niet gebruiken als het gevallen is of als er zichtbare beschadigingen zijn.
• Gebruik het apparaat niet meer zodra het snoer is beschadigd.
• Wanneer het snoer beschadigd is, dient dit, voor ieders veiligheid, te worden vervangen door de
fabrikant, diens reparatiedienst of door iemand met de juiste kwali caties.
• Reparaties mogen niet worden uitgevoerd door de gebruiker zelf.
• Het gebruik van accessoires die niet door Cuisinart® worden aangeboden of verkocht, kan brand,
elektrocutie of verwondingen veroorzaken.
• Het apparaat dient niet door kinderen te worden gebruikt. Houd het apparaat en het snoer buiten
bereik van kinderen.
• Het apparaat kan worden gebruikt door personen met lichamelijke, zintuigelijke of motorische
beperkingen of door personen zonder ervaring of kennis, mits onder toezicht of wanneer zij de
benodigde instructies hebben gekregen om het apparaat veilig te kunnen gebruiken en zij zich
bewust zijn van de gevaren die het gebruik van het apparaat met zich meebrengt.
• Laat kinderen niet met het apparaat spelen.
• Het apparaat niet buiten gebruiken.
• Alleen voor huishoudelijk gebruik.
Elektrische en elektronische apparaten aan het eind van hun levensduur
In ieders belang en om actief bij te dragen aan de gezamenlijke bescherming van het
milieu:
• Gooi oude apparaten niet bij het gewone huishoudelijke afval.
• Maak gebruik van de afvalstations en inzamelpunten van uw gemeente.
Sommige materialen kunnen dan namelijk weer hergebruikt worden.
31
Page 32

1. INLEIDING
Gefeliciteerd met uw aankoop!
Al meer dan 30 jaar maakt Cuisinart® keukenapparatuur waarmee
zowel hobbykoks als topkoks al hun creativiteit kunnen laten zien.
1. Glazen deksel met handvat: om het bakproces te volgen zonder
dat er warmte verloren gaat.
2. Stoomrooster: om de etenswaren hoger te plaatsen om ze te
kunnen stomen.
Alle Cuisinart® apparaten zijn het resultaat van een nauwe
samenwerking tussen technici en grote culinaire namen zoals Paul
Bocuse, onze charismatische ambassadeur. Elk product combineert
kracht, innovatie, prestatie en ergonomie.
Onze producten, die worden gemaakt van professionele materialen
zoals geborsteld RVS, passen in iedere keuken, dankzij hun strakke en
stijlvolle ontwerp.
2. PRODUCTKENMERKEN
1
2
3. Aluminium braadbak met anti-aanbaklaag: voor een
gelijkmatige verdeling van de warmte bij elke bereidingswijze.
Inhoud 5,7 L.
4. Bedieningspaneel.
3. GEBRUIK
A. Bedieningspaneel
1. Aan/uit-schakelaar.
2. Keuzeknop voor de bereidingswijze: om te kiezen tussen STOVEN
, BAKKEN/BRADEN of STOMEN
3. Tijdkeuzeknoppen : om de bereidingstijd in te stellen.
4. Temperatuurkeuzeknoppen
stellen.
5. Blauw oplichtende LCD-schermen: weergave van de
bereidingstijd en -temperatuur.
: om de baktemperatuur in te
5
32
3
3
4
2
1
2
2
4
Page 33

B. Bereiding
4. GEBRUIKSAANWIJZING
Eten bereiden wordt heel eenvoudig met de elektrische multi-cooker:
• Kies de bereidingswijze.
• Stel de bereidingstijd en de -temperatuur in.
• Druk op de On/O schakelaar om de bereiding te starten.
• Druk op de On/O -schakelaar om het apparaat op elk moment te
stoppen,
• Opmerking: Het apparaat is heet. Gebruik tijdens en na het koken
pannenlappen en kom niet te dicht bij het apparaat.
C. Combinatiebereiding
Het veranderen van de functie tijdens de bereiding is heel
eenvoudig, bijvoorbeeld om van « Bakken » naar « Stoven » over
te schakelen of van de ene stoofstand in een andere over te gaan.
Druk op de gewenste bereidingswijze en het apparaat zal naar de
standaardinstelling van uw keuze overschakelen.
D. De instellingen veranderen
U kunt ook op elk moment de tijd en de temperatuur aanpassen
dankzij de keuzeknoppen voor bereidingstijd
Druk niet op de On/O -schakelaar om van instelling te veranderen.
Het apparaat staat al aan en is al aan het bakken.
en -temperatuur .
E. Bereiding zonder kookwekker
Wanneer u geen tijd instelt, werkt het apparaat op de gekozen
temperatuur totdat hij handmatig wordt uitgezet.
Het apparaat zal pas automatisch uitschakelen wanneer de maximale
tijd voor de gekozen functie is bereikt.
F. Stand-by stand
De multi-cooker gaat automatisch in de stand-by stand en schakelt
de lampjes uit wanneer het apparaat niet wordt gebruikt. Het
apparaat gaat ook in de stand-by stand wanneer u op de On/O schakelaar drukt.
Druk op een willekeurige knop (behalve de On/O -schakelaar) om
het apparaat weer te activeren.
A. Bakken/Braden
• Druk op .
• Stel de temperatuur in met behulp van de + en - toetsen (tot 200°C).
• Druk op de On/O -schakelaar om het voorverwarmen te starten.
Tijdens het voorverwarmen knippert de gekozen temperatuur.
• Wanneer de gekozen temperatuur bereikt is, klinken twee
geluidssignalen. Plaats de ingrediënten in de braadbak.
Opmerking: Voor het beste resultaat niet te veel ingrediënten in de
bak plaatsen.
• Na het bakken op de On/O -schakelaar drukken om het apparaat
uit te zetten. Wanneer u over wilt schakelen naar de stoofstand, kunt
u direct deze functie selecteren.
Opmerking: U kunt een andere bereidingsduur kiezen met
behulp van de tijdkeuzeknoppen
de geselecteerde temperatuur is bereikt. Het apparaat schakelt
automatisch uit aan het einde van de bereidingstijd.
. Het aftellen begint wanneer
B. Stoven
• Plaats de ingrediënten in de braadbak en doe het deksel erop.
• Druk op
• Kies HIGH, LOW, SIMMER of WARM (zie bakhandleiding voor meer
informatie). De temperatuur staat standaard ingesteld op LOW.
• Kies de tijdsduur met behulp van de + en - toetsen.
• Druk op de On/O schakelaar om de bereiding te starten. De
gekozen bereidingstijd en -temperatuur (HIGH, LOW, SIMMER of
WARM) worden weergegeven.
Opmerking : Wanneer u de ingrediënten heeft aangebakken voordat
u naar de stoofstand gaat, kunt u deze stap overslaan.
• Bij de instellingen HIGH, LOW en SIMMER klinken 5 geluidssignalen
aan het eind van de bereidingstijd. Het apparaat schakelt over in de
warmhoudstand (WARM) voor maximaal 8 uur.
• Na 8 uur warmhouden klinkt een geluidssignaal en schakelt het
apparaat uit.
• Om het apparaat op elk moment te stoppen, drukt u op de On/
O -schakelaar.
om het soort stoven te kiezen.
33
Page 34

C. Stomen
• Doe niet meer dan 0,5 liter water in de bak.
• Plaats het stoomrooster en sluit het deksel.
• Druk op
Opmerking: Bij het stomen kan de temperatuur niet aangepast
worden.
• Selecteer de tijdsduur (maximaal anderhalf uur) met behulp van de
+ en - toetsen.
• Druk op de On/O -schakelaar om het voorverwarmen te beginnen
De geselecteerde duur knippert tijdens het opwarmen.
• Wanneer de stoomtemper atuur bereikt is, klinken 2 geluidssignalen
en begint het aftellen.
• Til het deksel voorzichtig op en plaats de ingrediënten op het
rooster, vanuit het midden. Plaats het deksel terug.
• Als de bereiding voltooid is, klinken 5 geluidssignalen en schakelt
het apparaat automatisch uit.
• Haal de etenswaren voorzichtig uit de braadbak.
• Om het apparaat op elk moment te stoppen, drukt u op de On/
O -schakelaar.
Opmerking: Wanneer al het water verdampt is, schakelt het
apparaat vanzelf uit. Zorg dat er voldoende water is om te kunnen
stomen.
.
34
Page 35

D. Bakhandleiding
• SLOW COOKING (STOVEN en SUDDEREN)
De SLOW COOK functie is ideaal voor gerechten die een aanzienlijke bereidingstijd vergen zoals ragouts, suddergerechten, soepen, bouillons
etc. Deze functie is ook ideaal om grote stukken vlees lang te stoven zoals bouten, schouderstukken, braadstuk etc.
De instellingen SIMMER en LOW worden gebruikt voor suddergerechten (zonder koken). De instelling HIGH wordt gebruikt voor stoofgerechten
(met koken).
De functie BROWN/SAUTE kan worden gebruikt om de ingrediënten dicht te schroeien en aan te bakken vóór het stoven.
De functie WARM wordt automatisch ingeschakeld aan het einde van de bereidingstijd, om het gerecht warm te houden.
Instelling Doel Gerecht Temperatuur Bereidingstijd
Schapenbout, gestoofd
HIGH
De bereidingstijd verkorten,
met name voor grote stukken
kalfsvlees, geroosterde of
gestoofde groente, varkens-
braakstuk
100°C
Instelbaar tot 24 uur, plus 8 uur
(WARM)
LOW
SIMMER Kwetsbare groente smoren
WARM Warmhouden van gerechten - 74°C
Langzaam sudderen,
zonder te koken
Kalfswang, stoofvlees, ragout,
Witvlees (gevogelte), kip met
dragon
Vissoep, Minestrone, Fruit-
compote
93°C
85°C
Instelbaar tot 24 uur, plus 8 uur
Instelbaar tot 24 uur, plus 8 uur
Standaard tot 8 uur of pro-
GEADVISEERDE VLEESSOORTVOOR DE MULTICOOKER
Rund/Kalf Varken Lam Gevogelte Wild
Braadstuk, borst,
kalfsschenkel,
wang, suddervlees,
speklappen, klaps-
tuk, sukadelappen,
runderlap, ragout,
ossenstaart
Rollade, karbonade, sudder-
vlees, krabbetjes, hamschijf
Lamsbout, schouder, halsstuk,
schenkel, borst, rug, lamsra-
gout, lamsrack.
Gevogelte (heel), dij,
drumstick, borst let
(WARM)
(WARM)
grammeerbaar tot 24 uur
Rug, schouder, borst, van-
gvlees, halsstuk, ribstuk.
35
Page 36

• STOMEN
Stomen is een van de meest gezonde bereidingswijzen omdat er geen vet aan toegevoegd wordt.
STOOMSCHEMA
Voedingsmiddel Hoeveelheid Voorbereiding Bereidingstijd
Artisjok 4 Heel 50 - 60 min
Asperge 1 kg Heel 10 - 12 min
Broccoli Hele stronk Stronkjes van 5 cm 7 - 10 min
Wortel 1 kg Heel 10 - 12 min
Bloemkool Heel Roosjes van 5 cm 7 - 9 min
Maïs 4 kolven Gepeld 10 - 12 min
Haricots verts/ sperziebonen 1 kg Gedopt 8 - 10 min
Krieltjes 1 kg Heel, ongeschild 15 - 20 min
Aardappelen 1 kg Heel, geschild 30 min
Courgette 1 kg In stukken van 1 cm 5 - 8 min
Kip 4 kip lets Heel 15 - 18 min
Garnalen 500 g Gepeld en schoongemaakt 4 - 5 min
Vis 6 Porties 8 - 12 min
De bereidingstijden die zijn aangegeven zijn voor ingrediënten van een gemiddeld formaat, en dienen dus eventueel te worden aangepast.
• BROWN/SAUTE
Gebruik de functie BROWN/SAUTE om ingrediënten op te bakken, dicht te schroeien, te braden of te kleuren, om ze daarna eventueel nog
langzaam en langdurig verder te bereiden (sudderen of stoven).
Deze functie kan ook worden gebruikt voor het roerbakken of fruiten van de ingrediënten zonder ze daarna verder te garen.
36
Page 37

5. DE MENING VAN DE CHEFS
• De voedingsmiddelen snijden voor de bereiding om een homogene berei-
ding te bekomen.
• Vermijden van het deksel op te lichten tijdens de bereiding om de warmte
niet te laten ontsnappen en aldus de bereidingstijd te verlengen.
• Om de goede bereiding van een ingrediënt te controleren de punt van een
mes gebruiken.
• De bereiding in de sudderpan moet steeds gebeuren in de speciaal voor-
ziene stoofpan..
• De bereiding in de elektrische sudderpan veroorzaakt heel weinig vloeis-
tofverdamping. De hoeveelheid vloeistof van uw recepten aan het apparaat
aanpassen.
• Een bevroren product ontvriezen vooraleer het te gebruiken voor een re-
cept.
• Als u een bouillon aan het recept moet toevoegen, gebruik dan bij voorkeur
een warme bouillon om de bereiding te bespoedigen.
• Om de sauzen te binden een bindmengsel van boter en bloem toevoegen
ofwel een beetje room op het einde van de bereiding.
• Om een dikke en smeuïge saus te bekomen is het aan te raden bloem toe
te voegen net na de stukken vlees en de aromatische garnituur te hebben
aangebraden en dan de kookvloeistof in de stoofpan te gieten.
• Door het meegeleverde rooster te gebruiken en water in de stoofpan te
gieten is het mogelijk delicate gerechten au bain-marie te bereiden, zoals
crème brûlée, crèmes caramel, een foie-gras terrine en een vispastei)
• Alle recepten op basis van wijnmarinade hebben een meer uitges-
proken smaak door de vrij kleine verdaming van alcohol tijdens de
bereiding.
• Als men de sudderpan ‘s morgens vroeg in werking stelt voor het avond-
maal, alle ingrediënten voorbereiden vooraleer de bereiding aan te vatten.
6. REINIGING EN ONDERHOUD
• Alle onderdelen van het apparaat kunnen in de vaatwasser.
• Laat het apparaat altijd helemaal afkoelen alvorens het schoon te
maken.
• Reinig het bedieningspaneel met een zacht doekje.
• Gebruik een spons met zeepsop om de bak, het deksel en het
stoomrooster te reinigen en spoel ze daarna goed af. Deze onderdelen kunnen ook in de vaatwasser (alleen bovenin).
• Droog alle onderdelen goed na elk gebruik.
Opmerking: Als er etensresten vastgekoekt zitten aan de braadbak,
de bak vullen met zeepsop en laten inweken alvorens de bak te reinigen. Indien nodig een niet schurend reinigingsmiddel of een vloeibaar afwasmiddel en borstel gebruiken.
37
Page 38

ISTRUZIONI DI SICUREZZA
LEGGERE ATTENTAMENTE LE PRESENTI ISTRUZIONI DI SICUREZZA PRIMA DI UTILIZZARE
L’A P P A R E C C H I O !
• AT TE NZ IO NE : I sacchetti in polietilene che avvolgono l’apparecchio o l’imballaggio possono
essere pericolosi. Per evitare rischi di so ocamento, conservare i sacchetti lontano dalla
portata dei bambini. Questi sacchetti non sono dei giocattoli.
• Utilizzare l’apparecchio unicamente secondo le istruzioni riportate nel presente manuale.
• Posizionare sempre il blocco motore su una super cie piatta, stabile, pulita e asciutta.
• Posizionare la lama sempre prima di aggiungere gli ingredienti.
• Prima di accendere l’apparecchio, veri care che lame o dischi siano bloccati al massimo in fondo
sull’asse del motore, e che il coperchio sia posizionato correttamente.
• Maneggiare lame e dischi con la massima attenzione. Evitare di toccare le parti metalliche a late.
Non toccare mai le lame quando l’apparecchio è attaccato alla corrente.
• Non mettere mai lame o dischi sull’asse del blocco motore prima di aver bloccato il recipiente in
posizione.
• Spegnere l’apparecchio e staccarlo dalla corrente prima di cambiare gli accessori o di avvicinare
le parti che sono mobili durante il funzionamento. Aspettare sempre che la lama o il disco abbia
terminato di girare prima di togliere gli spingi-alimenti o il coperchio.
• Per grattugiare o a ettare, utilizzare sempre lo spingi-alimenti.Non spingere mai con le dita né con
qualsiasi tipo di utensile.
• Togliere il recipiente dalla base prima di estrarre la lama. Non lasciare la lama inserita sull’asse del
motore quando l’apparecchio non viene utilizzato. Riporre lame e dischi fuori della portata dei
bambini.
• Non sovraccaricare l’apparecchio. Se il motore «rallenta», spegnere e staccare l’apparecchio dalla
corrente. Togliere una parte degli alimenti, aspettare 15 minuti, quindi riaccendere.
• Non posizionare l’apparecchio vicino o sopra un altro apparecchio che scotta. Non utilizzare
l’apparecchio su super ci sensibili al calore o in prossimità di materiali in ammabili.
• Non lasciare che il cavo di alimentazione superi il bordo del piano di lavoro, né metterlo a contatto
con super ci calde.
• Non immergere in acqua o altro liquido.
• Staccare sempre l’apparecchio dalla corrente dopo averlo utilizzato e prima di pulirlo. Non lasciare
mai l’apparecchio attaccato alla corrente e incustodito. Per staccare dalla corrente, tirare sempre la
38
Page 39

spina. Non tirare mai il cavo.
• Non usare l’apparecchio se è caduto o se si presenta danneggiato.
• Interrompere immediatamente l’utilizzo dell’apparecchio se il cavo risulta danneggiato.
• Se danneggiato, il cavo di alimentazione deve essere sostituito dal fabbricante, dal suo servizio
assistenza o da analogo personale quali cato, onde evitare qualsiasi pericolo.
• Nessuna riparazione può essere eseguita dall’utente.
• L’uso di accessori non raccomandati o venduti da Cuisinart® può provocare incendi, folgorazione e
rischio di infortuni.
• L’apparecchio non deve essere utilizzato dai bambini. Tenere l’apparecchio e il suo cavo elettrico
fuori della portata dei bambini.
• L’apparecchio può essere utilizzato da persone con capacità siche, sensoriali o motorie alterate,
o da soggetti privi delle necessarie conoscenze o esperienze, purché possano bene ciare di una
sorveglianza o abbiano ricevuto le istruzioni necessarie per utilizzare l’apparecchio in condizioni di
massima sicurezza, comprendendo i pericoli derivanti dall’utilizzo dell’apparecchio in questione.
• Non lasciare che i bambini giochino con l’apparecchio.
• Non utilizzare all’esterno.
• Esclusivamente per uso domestico.
Ri uti delle apparecchiature elettriche ed elettroniche a ne vita
Nell’interesse generale e al ne di partecipare attivamente allo sforzo collettivo di
proteggere l’ambiente:
• Non mischiare questi prodotti con i ri uti domestici.
• Utilizzare i sistemi di recupero e raccolta messi a vostra disposizione.
Parte del materiale può essere riciclato o recuperato.
39
Page 40

1. INTRODUZIONE
Complimenti per l’acquisto!
Da oltre 30 anni, Cuisinart® sviluppa una gamma completa di
apparecchi che consentono agli appassionati di cucina e ai grandi
chef di esprimere al meglio la loro creatività.
Tutti gli apparecchi Cuisinart® sono il frutto di una stretta
collaborazione fra ingegneri e grandi nomi della Cucina, fra cui Paul
Bocuse, ambasciatore carismatico della marca. Ogni prodotto unisce
in sé robustezza, innovazione, prestazioni e ergonomia.
1. Coperchio in vetro con manico: permette di controllare la cottura
senza far uscire il calore.
2. Griglia di cottura al vapore: permette di posizionare gli alimenti
in alto, per una cottura al vapore.
3. Recipiente antiaderente in alluminio: permette una ripartizione
omogenea del calore in tutti i tipi di cottura. Capacità: 5,7 l.
4. Pannello di comando.
Realizzati con materie prime professionali, come l’acciaio spazzolato
inossidabile, i nostri prodotti si integrano facilmente in qualsiasi tipo
di cucina, grazie a un design sobrio e elegante.
2. CARATTERISTICHE PRODOTTO
1
2
3
3. UTILIZZO
A. Pannello di comando
1. Interruttore On/O .
2. Selettore di cottura: permette di selezionare CUOCERE A FUOCO
LENTO , DORARE/SALTARE o VAPORE
3. Pulsante di selezione del tempo
di cottura.
4. Pulsante di selezione della temperatura : permette di regolare la
temperatura di cottura.
5. Schermi LCD retroilluminati blu: visualizzazione del tempo e della
temperatura di cottura.
3
: permette di regolare il tempo
5
4
40
4
2
1
2
2
Page 41

B. Cottura
4. ISTRUZIONI PER L’USO
Cucinare è facilissimo con il multicooker elettrico.
• Selezionare il tempo di cottura.
• Regolare il tempo di cottura e la temperatura.
• Premere l’interruttore On/O per avviare la cottura.
• Per spegnere l’apparecchio in qualsiasi momento, premere
l’interruttore On/O .
• Osservazione: l’apparecchio è caldo. Usare delle presine durante e
dopo la cottura; tenere l’apparecchio a distanza.
C. Cotture combinate
Cambiare funzione durante la cottura è molto semplice. Ad esempio,
per passare da «Saltare» a «Cuocere a fuoco lento», o da un tipo di
cottura all’altro. Premere la cottura desiderata e l’apparecchio si
regola in base ai parametri prestabiliti della vostra selezione.
D. Cambiare le regolazioni
È anche possibile regolare il tempo e la temperatura in qualsiasi
momento, grazie ai pulsanti di selezione del tempo
temperatura
Non premere l’interruttore On/O per cambiare le regolazioni.
L’apparecchio è già acceso e in cottura.
di cottura.
e della
E. Cottura senza contaminuti
Se non si vuole programmare il tempo, l’apparecchio cuoce alla
temperatura scelta no allo spegnimento manuale dell’apparecchio.
A. Dorare/Saltare
• Premere .
• Selezionare la temperatura utilizzando i tasti + e - ( no a 200°C).
• Premere l’interruttore On/O per avviare il preriscaldamento. La
temperatura selezionata lampeggia durante il preriscaldamento.
• Quando viene raggiunta la temperatura selezionata, si attivano due
segnali acustici. Mettere gli ingredienti nel recipiente.
Nota: per ottenere risultati migliori, non sovraccaricare il recipiente.
• Una volta ultimata la cottura, premere l’interruttore On/O per
spegnere l’apparecchio. Se si vuole passare alla modalità di cottura
a fuoco lento, selezionare direttamente questa funzione.
Osservazione: è possibile selezionare una durata di cottura diversa
grazie al pulsante di selezione del tempo
quando viene raggiunta la temperatura selezionata. L’apparecchio si
spegne automaticamente a ne cottura.
. Il calcolo del tempo inizia
B. Cuocere a fuoco lento
• Posizionare gli ingredienti nel recipiente quindi mettere il coperchio.
• Premere
• Selezionare HIGH, LOW, SIMMER o WARM (vedere la guida di cottura
per maggiori informazioni). La temperatura prede nita è LOW.
• Selezionare la durata utilizzando i tasti + e -.
• Premere l’interruttore On/O per avviare la cottura. Vengono
visualizzati tempo e temperatura di cottura selezionati (HIGH, LOW,
SIMMER o WARM).
per scegliere il tipo di cottura a fuoco lento.
L’apparecchio si spegne automaticamente al raggiungimento del
tempo massimo previsto per la funzione selezionata.
F. Modalità stand-by
Il multicooker è dotato della modalità automatica di stand-by che
spegne le luci quando non viene utilizzato. L’apparecchio passa in
modalità stand-by se viene premuto l’interruttore On/O .
Premere qualsiasi pulsante (tranne l’interruttore On/O ) per riattivare
l’apparecchio.
Nota: se avete fatto dorare ingredienti prima di passare alla modalità
di cottura a fuoco lento, questo passaggio non è necessario.
• Per le regolazioni HIGH, LOW e SIMMER, 5 segnali acustici indicano
la ne del tempo di cottura. L’apparecchio passa in modalità
mantenimento del calore (WARM) per 8 ore.
• Alla ne delle 8 ore di mantenimento del calore, un segnale
acustico indica lo spegnimento dell’apparecchio. • Per spegnere
l’apparecchio in qualsiasi momento, premere l’interruttore On/O .
41
Page 42

C. Cottura al vapore
• Non mettere più di 0,5 litri d’acqua nel recipiente.
• Inserire la griglia di cottura al vapore, quindi posizionare il coperchio.
• Premere
Osservazione: la temperatura di cottura al vapore non può essere
cambiata.
• Selezionare la durata ( no a un’ora e mezza) utilizzando i tasti + e -.
• Premere l’interruttore On/O per avviare il preriscaldamento. La
durata selezionata lampeggia durante il tempo di riscaldamento.
• Quando viene raggiunta la temperatura di cottura al vapore, due
segnali acustici indicano l’inizio di calcolo del tempo.
• Togliere il coperchio con precauzione e posizionare gli ingredienti
sulla griglia, cominciando dal centro. Rimettere il coperchio
• Quando la cottura è ultimata, 5 segnali acustici indicano lo
spegnimento automatico dell’apparecchio.
• Togliere con cura gli ingredienti.
• Per spegnere l’apparecchio in qualsiasi momento, premere
l’interruttore On/O .
Nota: una volta evaporata tutta l’acqua, l’apparecchio si spegne.
Aggiungere una quantità d’acqua su ciente per la cottura al vapore
desiderata.
.
42
Page 43

D. Guida di cottura
• SLOW COOK / CUOCERE A FUOCO LENTO
La funzione SLOW COOK è ideale per realizzare piatti che necessitano di tempi lunghi di cottura: spezzatini e piatti con salse, minestre, brodo…
Ideale per rosolare a lungo pezzi di carne interi : cosciotti, spalle, arrosti…
Le regolazioni SIMMER e LOW servono per le ricette da sobbollire a lungo (senza giungere alla piena ebollizione) La regolazione HIGH serve
per le ricette con cottura a fuoco lento (ma con ebollizione).
La funzione BROWN/SALTATO serve per saltare e colorire gli ingredienti prima di farli cuocere a fuoco lento.
La funzione WARM viene selezionata automaticamente a ne cottura per il mantenimento del calore.
Regolazione Obiettivo Ricetta Temperatura Tempo di cottura
Ridurre il tempo di cot-
HIGH
LOW
SIMMER
WARM Tenere al caldo le preparazioni - 74°C
tura, soprattutto per i pezzi di
grosse dimensioni
Cuocere a fuoco lento,
senza ebollizione
Cuocere a fuoco lento alimenti
fragili
Cosciotto da 7 ore, costata
di vitello rosolata, verdure
arrostite o rosolate, arrosto di
maiale
Guancia di manzo, lesso, blan-
quette, carni bianche, pollo al
dragoncello
Zuppa di pesce, minestrone,
composta di frutta
100°C
93°C
85°C
Programmabile no a 24 ore,
più 8 ore (WARM)
Programmabile no a 24 ore,
più 8 ore (WARM)
Programmabile no a 24 ore,
più 8 ore (WARM)
Fino a 8 ore prede nito, o pro-
grammabile no a 24 ore
TIPO DI CARNE SUGGERITA PER L’APPARECCHIO MULTIFUNZIONE
Manzo/Vitello Maiale Agnello Pollame Selvaggina
Arrosto, petto, tran-
cio di spalla, garretti
di vitello, guancia,
punta di petto,
costine, spalla, fesa
di spalla,
geretto, blanquette,
coda di manzo
Arrosto, braciole di maiale,
spalla, ossobuco di prosciutto,
sauté
Cosciotto, spalla sottospalla,
garretto, petto, sella, spez-
zatino, muscolo.
Pollame intero, coscia,
sottocoscia, suprême
Sella, spalla, petto, muscolo,
sottospalla, carré.
43
Page 44

• COTTURA AL VAPORE
La cottura al vapore è uno dei mezzi di cottura più sani, senza grassi.
TABELLA DI COTTURA AL VAPORE
Alimento Quantità Preparazione Tempo di cottura
Carcio 4 Interi 50 - 60 min
Asparagi 1 kg Interi 10 - 12 min
Broccoli In orescenze Mazzetti da 5 cm 7 - 10 min
Carote 1 kg Intere 10 - 12 min
Cavol ore Testa Mazzetti da 5 cm 7 - 9 min
Mais 4 pannocchie Sbucciate 10 - 12 min
Fagiolini 1 kg Mondati 8 - 10 min
Patatine novelle 1 kg Intere non sbucciate 15 - 20 min
Patate 1 kg Intere, sbucciate 30 min
Zucchine 1 kg Fette da 1 cm 5 - 8 min
Pollo 4 suprême Intere 15 - 18 min
Gamberetti 500 g Sgusciati e puliti 4 - 5 min
Pesce 6 Porzioni 8 - 12 min
I tempi di cottura sono indicati per ingredienti di medie dimensioni; dovranno, pertanto, essere regolati.
• BROWN/SALTATO
Utilizzare la funzione BROWN/SALTATO per so riggere, rosolare, saltare o colorire gli ingredienti, eventualmente prima di procedere con una
cottura lenta e lunga (cottura a fuoco lento, con o senza ebollizione).
L’apparecchio può essere anche utilizzato come casseruola, per rosolare gli ingredienti senza poi procedere a una cottura lunga a fuoco lento.
44
Page 45

5. IL PARERE DEGLI CHEF
• Tagliate gli alimenti prima di cucinarli per ottenere una cottura omogenea.
• Evitate di sollevare il coperchio durante la cottura per non far uscire il calore
e allungare così i tempi di cottura.
• Per veri care la giusta cottura di un ingrediente, utilizzate la punta di un
coltello.
• Quando cucinate con lo Slow Cooker, utilizzate sempre e solo l’apposita
pentola.
• La cottura nello Slow Cooker elettrico comporta poca evaporazione
di liquidi. Adattate la quantità di liquido necessaria per le vostre
ricette in funzione dell’apparecchio.
• Se utilizzate un ingrediente surgelato, scongelatelo prima di procedere alla
cottura.
• Se è necessario aggiungere brodo alla ricetta, aggiungete brodo caldo per
accelerare la cottura.
• Per legare le salse, aggiungete un po’ di burro impastato con della farina o
un po’ di panna da cucina a ne cottura.
• Per ottenere una salsa spessa e vellutata, aggiungete un po’ di farina subito
dopo aver scottato i pezzi di carne e gli aromi, e di versare in seguito il liquido della cottura nella pentola.
• Utilizzando la griglia fornita in dotazione e dopo aver versato acqua nella
pentola, è possibile cuocere gli alimenti in modo ancora più delicato a bagnomaria (ad esempio crème brûlée, crème caramel, sformati, ecc).
• Tutte le ricette che prevedono una marinatura al vino hanno un gusto più
accentuato dovuto alla leggera evaporazione di alcool durante la cottura.
• Se decidete di accendere lo Slow Cooker il mattino presto per preparare la
cena della sera, preparate tutti gli ingredienti prima di avviare la cottura.
6. PULIZIA E MANUTENZIONE
• Tutti i componenti dell’apparecchio sono lavabili in lavastoviglie.
• Lasciar sempre ra reddare completamente l’apparecchio prima di
pulirlo.
• Pulire il pannello di comando con un panno delicato.
• Utilizzare una spugna con acqua e sapone per pulire casseruola,
coperchio e supporto di cottura al vapore, quindi sciacquare
con cura. È possibile anche lavarli in lavastoviglie (solo cestello
superiore).
• Asciugare tutte le parti prima di ogni utilizzo.
Osservazione: se sulla super cie della casseruola vi sono residui di
alimenti, riempire d’acqua e lasciare a mollo prima di pulire. Se è poi
necessario lucidare la casseruola, utilizzare un agente non abrasivo o
un detersivo liquido con una spugnetta.
45
Page 46

CONSIGNAS DE SEGURIDAD
¡LEA ATENTAMENTE ESTAS CONSIGNAS DE SEGURIDAD ANTES DE UTILIZAR EL APARATO!
• ATENCIÓN : Las bolsas de polietileno que rodean el aparato o su embalaje pueden ser
peligrosas. Para evitar riesgo de as xia, mantenga estas bolsas fuera del alcance de los bebés
y de los niños. Estas bolsas no son juguetes.
• Utilice este aparato exclusivamente de acuerdo con las instrucciones de este manual.
• Coloque siempre la base sobre una super cie plana, estable, limpia y seca.
• Coloque siempre la cuchilla en su sitio antes de añadir los ingredientes.
• Antes de encender el robot veri que que la cuchilla o el disco están insertados hasta el fondo en
el eje del motor y que la tapadera está correctamente colocada.
• Manipule las cuchillas y los discos con suma precaución. Evite tocar las partes metálicas cortantes.
No toque las cuchillas con el aparato enchufado.
• No coloque nunca la cuchilla o el disco sobre el eje del motor antes de haber bloqueado la cubeta.
• Detenga y desenchufe el aparato antes de cambiar los accesorios o de acercarse a las partes que se
mueven cuando el aparato esté encendido. Espere siempre a que la cuchilla o el disco se detengan
completamente antes de retirar los embutidores o la tapadera.
• Utilice siempre el embutidor para rallar o rebanar los alimentos. No empuje nunca con los dedos
ni con cualquier otro utensilio.
• Retire la cubeta de la base antes de retirar la cuchilla. No deje nunca la cuchilla sobre el eje del
motor cuando no esté utilizando el robot. Guarde las cuchillas y los discos fuera del alcance de los
niños.
• No sobrecargue el aparato. Si el motor se cala, apague y desenchufe el robot. Retire una parte de
los alimentos, espere 15 min y vuélvalo a encender.
• No coloque el aparato sobre una fuente de calor o cerca de esta. No lo utilice sobre super cies
sensibles al calor o cerca de materiales in amables.
• No deje que el cable cuelgue del mostrador y no lo ponga en contacto con super cies calientes.
• No lo sumerja en agua o en cualquier otro líquido.
• Desenchufe el aparato después de usarlo, antes de montarlo o desmontarlo, antes de retirar
los alimentos y antes de limpiarlo. No deje nunca el aparato encendido sin vigilancia. Para
desenchufarlo, tire de la clavija, no del cable.
• No utilice el electrodoméstico si ha recibido un golpe o presenta señales aparentes de deterioro.
• Deje inmediatamente de utilizarlo si advierte que el cable está deteriorado.
46
Page 47

• Si el cable de alimentación está dañado, debe ser sustituido por el fabricante, su servicio técnico o
personas de cuali cación similar, con el n de evitar peligros.
• El usuario no puede realizar reparación alguna en el electrodoméstico.
• La utilización de accesorios no recomendados o vendidos por Cuisinart® puede provocar incendio,
electrocución y lesiones.
• El aparato no debe ser utilizado por niños. Guarde el aparato y el cable eléctrico fuera del alcance
de los niños.
• El aparato puede ser utilizado por personas con facultades físicas, sensoriales o motrices alteradas,
o bien por personas que no tengan experiencia o conocimientos su cientes, siempre que estén
bajo supervisión o que hayan recibido las instrucciones necesarias para utilizar el aparato con total
seguridad y que comprendan claramente los peligros inherentes a la utilización del aparato.
• Los niños no deben jugar con este aparato.
• No lo utilice en exteriores.
• Únicamente para uso doméstico.
Residuos de equipos eléctricos y electrónicos al nal de su vida
En interés de todos y para participar activamente en los esfuerzos colectivos de protección
del medio ambiente:
• No se deshaga de estos productos junto con la basura doméstica.
• Utilice los sistemas de recogida que estén a su disposición.
De esta forma, algunos materiales podrán recuperarse o reciclarse.
47
Page 48

1. INTRODUCCIÓN
¡Felicidades por su compra!
Desde hace más de 30 años, Cuisinart® desarrolla una gama completa
de electrodomésticos culinarios que permiten a los amantes de la
cocina y a los grandes chefs expresar plenamente su creatividad.
Todos los electrodomésticos Cuisinart® son el resultado de una
estrecha colaboración entre ingenieros y grandes nombres de la
cocina, como Paul Bocuse, embajador carismático de la marca. Cada
producto combina solidez, innovación, prestaciones y ergonomía.
Realizados en materiales de origen profesional, como el acero pulido
inoxidable, nuestros productos se integran fácilmente en todas las
cocinas, gracias a un diseño sobrio y elegante.
1. Tapadera de vidrio con asa: permite vigilar la cocción sin liberar
calor.
2. Rejilla para la cocción al vapor: permite colocar los alimentos en
altura para la cocción al vapor.
3. Cubeta antiadherente de aluminio: permite una distribución
homogénea del calor en todos los tipos de cocción. Capacidad de
5,7 L.
4. Panel de control.
3. UTILIZACIÓN
A. Panel de control
2. CARACTERÍSTICAS DEL PRODUCTO
1. Interruptor encendido/apagado.
2. Selector del modo de cocción: permite seleccionar ESTOFAR
, DORAR/SALTEAR o VAPOR
1
2
3
4
3. Botones de selección del tiempo : permite ajustar el tiempo de
cocción.
4. Botones de selección de la temperatura : permite regular la
temperatura de cocción.
5. Pantallas LCD retroiluminadas en azul: presentan el tiempo y la
temperatura de cocción.
5
3
4
48
2
1
2
2
Page 49

B. Cocción
4. CONSEJOS DE UTILIZACIÓN
Cocinar con esta olla eléctrica multifunción es extremadamente fácil:
• Seleccione el tipo de cocción.
• Ajuste el tiempo y la temperatura de cocción.
• Pulse el interruptor encendido/apagado para comenzar la cocción.
• Para detener el aparato, puede pulsar en cualquier momento el interruptor
encendido/apagado.
• Observación: Este aparato alcanza altas temperaturas. Utilice guantes
de cocina o agarradores durante y después de la cocción y manténgase a
distancia.
C. Cocción combinada
Es muy sencillo cambiar la forma de cocción durante la misma, por ejemplo,
pasar de «Saltear» a «Estofar» o de una modalidad de estofado a otra. Pulse el
modo de cocción deseado y el aparato pasará a los parámetros por defecto
de su selección.
D. Cambio de los ajustes
También puede ajustar el tiempo y la temperatura en cualquier momento
gracias a los botones de selección del tiempo
cocción.
No pulse el interruptor encendido/apagado para cambiar los ajustes. El
aparato ya está encendido y funcionando.
y de la temperatura de
E. Cocción sin temporizador
Si no desea programar el tiempo de cocción, el aparato cocinará a la
temperatura elegida hasta que lo detenga manualmente.
El aparato se apagará automáticamente cuando se alcance el tiempo máximo
para la función seleccionada.
F. Ahorro de energía
A. Dorar/Saltear
• Pulse .
• Seleccione la temperatura con ayuda de las teclas + y - (hasta 200 °C).
• Pulse el interruptor encendido/apagado para empezar el
precalentamiento. La temperatura seleccionada parpadeará
durante el precalentamiento.
• Cuando se alcance la temperatura seleccionada, escuchará dos
señales sonoras. Coloque los ingredientes en la cubeta.
Nota: Para obtener mejores resultados, no sobrecargue la cubeta.
• Una vez terminada la cocción, pulse el interruptor encendido/
apagado para detener el aparato. Si desea pasar al modo estofado,
seleccione directamente esta función.
Observación: Puede seleccionar un tiempo de cocción diferente
gracias a los botones de selección del tiempo
a contar cuando se ha alcanzado la temperatura seleccionada. El
aparato se apaga automáticamente al nal de la cocción.
. El tiempo empieza
B. Estofar
• Coloque los ingredientes en la cubeta y tápela.
• Pulse
• Seleccióne HIGH, LOW, SIMMER o WARM (vea la guía de cocción
para más información). La temperatura por defecto es LOW.
• Seleccione el tiempo de cocción con ayuda de las teclas + y -.
• Pulse el interruptor encendido/apagado para comenzar la cocción.
Aparecerán el tiempo y la temperatura de cocción seleccionados
(HIGH, LOW, SIMMER o WARM).
Nota: Si va a dorar los ingredientes antes de pasar al modo estofado,
esta etapa no es necesaria.
para elegir el tipo de estofado.
Esta olla multifunción está equipada con un modo automático de ahorro de
energía que apagará los indicadores luminosos cuando no esté utilizando el
aparato. El aparato pasará al modo ahorro de energía al pulsar el interruptor
encendido/apagado.
Pulse cualquier botón (salvo el interruptor encendido/apagado) para
reactivar el aparato.
• Para los ajustes HIGH, LOW y SIMMER, sonarán cinco pitidos
al nalizar el tiempo de cocción. El aparato pasará al modo
mantenimiento (WARM) durante 8 horas.
• Al nalizar las 8 horas de mantenimiento, sonará una señal sonora
y el aparato se apagará.
• Para detener el aparato, puede pulsar en cualquier momento el
49
Page 50

interruptor encendido/apagado.
C. Cocción al vapor
• No ponga más de 0,5 litros de agua en la cubeta.
• Coloque la rejilla de cocción al vapor y tape la cubeta.
• Pulse
Observación: La temperatura de cocción al vapor no se puede
modi car.
• Seleccione el tiempo de cocción (hasta 1.30 horas) con ayuda de las
• Pulse el interruptor encendido/apagado para empezar el
• Cuando se alcance la temperatura de cocción al vapor, sonarán dos
• Retire la tapadera con precaución y coloque los ingredientes en la
• Cuando haya terminado la cocción, sonarán cinco pitidos y el
• Retire cuidadosamente los ingredientes.
• Para detener el aparato, puede pulsar en cualquier momento el
.
teclas + y -.
precalentamiento. El tiempo seleccionado parpadeará mientras
dure el calentamiento.
pitidos y empezará a contar el tiempo.
rejilla, empezando por el centro. Vuelva a poner la tapa.
aparato se apagará automáticamente.
interruptor encendido/apagado.
Observación: Cuando se haya evaporado toda el agua, el aparato
se apagará. Añada su ciente agua para la cocción al vapor deseada.
50
Page 51

D. Guía de cocción
• SLOW COOK / ESTOFADO
La función SLOW COOK es ideal para realizar platos que requieren un tiempo de cocción importante: guisos y platos en salsa, sopas, caldos…
También es ideal para brasear despacio piezas de carne enteras: piernas, paletillas, redondos…
Los ajustes SIMMER y LOW se utilizan cuando la receta exige un estofado por debajo del punto de ebullición. El ajuste HIGH se utiliza cuando
la receta exige alcanzar el punto de ebullición.
La función BROWN/SALTEADO se puede utilizar para dorar y colorear los ingredientes antes de ponerlos a estofar.
La función WARM se selecciona automáticamente al nalizar la cocción para mantener la comida caliente.
Ajuste Objetivo Receta Temperatura Tiempo de cocción
Acortar el tiempo de cocción,
HIGH
LOW
SIMMER Estofar alimentos frágiles
WARM Mantener caliente la comida - 74°C
especialmente para piezas
grandes
Estofar lentamente,
sin ebullición
Pierna de 7 horas, Costillar de
ternera braseado, Verduras
asadas o braseadas, Asado de
cerdo
Carrillada, Puchero, Blan-
queta, Carnes blancas, Pollo al
estragón.
Sopa de pescado,
Minestrone, Compota de
frutas
100°C
93°C
85°C
Programable hasta 24 horas,
más 8 horas (WARM)
Programable hasta 24 horas,
más 8 horas (WARM)
Programable hasta 24 horas,
más 8 horas (WARM)
Por defecto, hasta 8 horas o
programable hasta 24 horas
TIPO DE CARNE SUGERIDA PARA LA OLLA ELÉCTRICA MULTIFUNCIÓN
Buey/Ternera Cerdo Cordero Aves Caza
Lomo, costillar,
aguja, espaldilla,
brazuelo, solomillo,
falda, cadera, mor-
cillo,
redondo, rabo de
buey
Lomo, aguja, costillar, paletilla,
solomillo, pierna deshuesada,
magro
Pierna, paletilla, pescuezo,
costillar, falda, silla.
Aves enteras, contra-
muslos, muslos,
pechuga
Silla, costillar, espaldilla, falda,
cuello, brazuelo.
51
Page 52

• COCCIÓN AL VAPOR
La cocción al vapor es una de las formas de cocción más sanas, sin materia grasa.
TABLA PARA LA COCCIÓN AL VAPOR
Alimentos Cantidad Preparación Tiempo de cocción
Alcachofas 4 Entera 50 - 60 min
Espárragos 1 kg Enteros 10 - 12 min
Brécol Pieza Ramilletes de 5 cm 7 - 10 min
Zanahorias 1 kg Enteras 10 - 12 min
Coli or Pieza Ramilletes de 5 cm 7 - 9 min
Maíz 4 mazorcas Peladas 10 - 12 min
Judías verdes 1 kg Limpias 8 - 10 min
Patatas pequeñas 1 kg Enteras, sin pelar 15 - 20 min
Patatas 1 kg Enteras, peladas 30 mm
Calabacín 1 kg Rodajas de 1 cm 5 - 8 min
Pollo 4 pechugas Enteras 15 - 18 min
Gambas 500 g Peladas y limpias 4 - 5 min
Pescado 6 Raciones 8 - 12 min
Los tiempos de cocción se indican para ingredientes de tamaño medio, por lo que habrá que adaptarlos si fuera necesario.
• BROWN/SALTEADO
Utilice la función BROWN/SALTEADO cuando sea necesario dorar los ingredientes, saltearlos o tostarlos antes de someterlos a una cocción
lenta y larga (salteado)
También se puede utilizar para brasear los ingredientes sin estofarlos después.
52
Page 53

5. SUGERENCIAS DE LOS CHEFS
• Corte los alimentos antes de prepararlos para obtener una cocción
homogénea.
• Procure no levantar la tapadera durante la cocción con el n de que no
se escape el calor, lo que prolongaría el tiempo de cocción.
• Para controlar si un ingrediente está bien cocinado, utilice la punta del
cuchillo.
• Este aparato siempre debe utilizarse con el recipiente incluido.
• La cocción en esta olla eléctrica no produce casi evaporación de líquido.
Adapte la cantidad de líquido de sus recetas a las necesidades de la olla.
• Descongele los productos congelados antes de utilizarlos para una
receta.
• Cuando tenga que añadir caldo a una receta, es preferible utilizar caldo
caliente para acelerar la cocción.
• Para ligar la salsa, añada mantequilla espesada con un poco de harina, o
bien un poco de nata al nalizar la cocción.
• Para obtener una salsa densa y cremosa, le recomendamos añadir la
harina inmediatamente después de haber rehogado los trozos de
carne y la guarnición y de introducir el líquido de cocción en la olla.
• Utilizando la rejilla incluida y llenando el recipiente de agua, es posible
cocinar platos delicados al baño maría, como natillas, crema catalana,
foie-gras en tarrina o pastel de pescado.
• Todas las recetas con salsas de vino tienen un gusto más fuerte de lo
normal, ya que se evapora menos alcohol durante la cocción.
• Cuando ponga en funcionamiento la olla muy temprano por la mañana
para la cena, prepare todos los ingredientes antes de comenzar la cocción.
6. LIMPIEZA Y GUARDAR
• Todos los componentes del aparato se pueden lavar en el lavavajillas.
• Desenchufe el aparato y déjelo enfriar completamente antes de
limpiarlo.
• Limpie el panel de control con ayuda de un trapo suave.
• Utilice una esponja impregnada con agua jabonosa para limpiar
la cacerola, la tapa y el soporte de cocción al vapor y aclare todo
cuidadosamente. También se pueden lavar en el lavavajillas
(únicamente en la bandeja superior).
• Seque todas las partes después de cada uso.
Observación: Si hay residuos en la super cie de la cacerola, déjela en
remojo con agua jabonosa antes de limpiarla. Si quedan restos, utilice
un limpiador no abrasivo o un detergente líquido con un cepillo.
53
Page 54

54
Page 55

55
Page 56

BABYLISS SARL
99 Avenue Aristide Briand
92120 Montrouge – France
F IB-14/183
Page 57

Version no.: MSC600E IB-14/183
210mm(W) x 210mm(H)
IB Size:
Die Cut:
DBM8E IB-4/248B
Material: COVER:157gsm matt art paper
INSIDE:120gsm gloss art paper
Coating: gloss varnishing in cover
Colors(Cover): 1C+1C(BLACK)
(Inside): 1C+1C(BLACK)
Date: MAY/31/2014
F
MSC600E IB-14/183
Tel: 0769-87720314 87886328 Fax: 0769-87720324
E-MAIL: pofatprepress@pofat.com
Astor You / Linda Ouyang
Co-ordinator:
(0.0)
BLACK
Operator: Revise Ver:
liao
100 95 90 85 80 75 70 65 60 55 50 45 40 35 30 25 20 15 10 5
 Loading...