

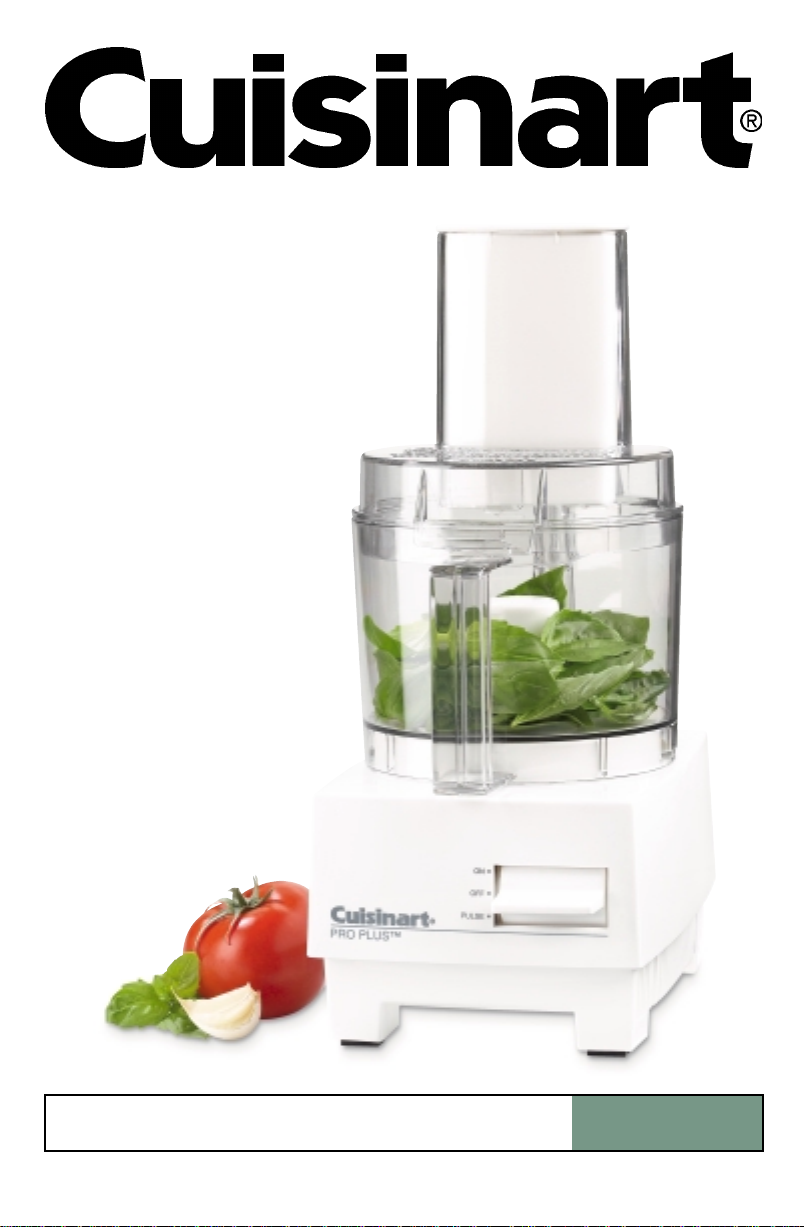
Page 1
For your safety and continued enjoyment of this product, always read the instruction book carefully before using.
INSTRUCTION AND RECIPE BOOKLET
Pro Plus™3-Cup Food Processor/Juicer
LPP
Page 2

LPP Capacities:
The following can be prepared in a single batch using the 3-cup work bowl. Using the
chute attachment for slicing and shredding will allow you to do unlimited amounts.
Food Amount
Sliced or shredded Cheeses, Fruits or Vegetables 3 cups using work bowl,
unlimited using chute attachment
Chopped Fruits and Vegetables For best chopping results,
chop 1 cup at a time
Puréed Fruits and Vegetables, Cooked Legumes 3 cups thick purée
Chopped Raw or Cooked Meats, Poultry up to 1/2 pound at a time
or Seafood
Thin Liquid 1-1/2 cups
Thick Liquid 2 cups
Bread/Pizza Dough (may use up to 1-1/2 cups flour in recipe yielding
3/4 cup whole grain flour in recipe) a scant 1 pound of dough
Cake batter 3/4 pound to yield one 8-inch layer
or 6 cupcakes
Cookie dough about 1 pound (12 – 24 cookies)
Cream for Whipping 1 cup to yield 1-1/4 cups
whipped cream
Nuts for Nut Butters 1-1/2 cups to yield
approximately 3/4 cups
IMPORTANT
UNP ACKING
INSTRUCTIONS
This package contains a
Cuisinart
Processor and the standard
parts for it:
Metal chopping blade,
slicing disc, shredding disc,
ejector disc, adapter stem,
chute attachment, juicer
attachment, 3 juicing
cones, spatula, and recipe
and instruction book.
CAUTION: THE CUTTING
TOOLS HAVE VERY
SHARP EDGES. To avoid
injury when unpacking the
parts, please follow these
instructions.
Place the box on a low
table or on the floor next to
the kitchen counter or table
where you intend to keep
the food processor. Be
sure the box is right side
up.
®
Pro Plus™Food
1. Remove the instruction
book and other printed
material.
2. You will see a corrugated insert containing the
cover with feed tube
and pusher, chute
attachment, juicer
attachment, juicing
cones and spatula.
Remove the cardboard
box using the finger
holes provided for easy
removal and place on
a table or other workspace. Carefully open
and remove contents.
3. You will now see another
corrugated insert, which
contains the slicing and
shredding discs.
HANDLE DISCS WITH
GREAT CAUTION.
THEIR CUTTING
BLADES ARE RAZOR
SHARP. Carefully open
and remove contents.
Grasp discs by the RIM
ONLY and carefully
place on work surface.
4. The motor base, work
bowl, blade assembly,
adapter stem and ejector
disc remain in the box.
Remove white ejector
disc, then remove
adapter stem from top of
work bowl.
5. The motor base and
work bowl with metal
blade are packed in a
foam block. The base,
work bowl and metal
blade are covered with a
polybag. Please note the
metal blade is loose in
the work bowl beneath
the polybag. Do not turn
over work bowl without
removing the polybag
and the metal blade.
6. Remove the base and
work bowl together by
grasping the plastic bowl
at the top with both
hands and lifting the
bowl straight up. Do not
rotate the bowl clockwise
on the base. This will
cause the bowl to
separate from the base.
7. Place the food processor
on a counter or table.
Remove the polybag.
Read the instructions
thoroughly before
assembling and using
the processor.
8. Save the shipping carton
and the foam and cardboard inserts. You may
want to use them at a
later date.
NOTE: Remember to
return your completed
warranty card with all
information carefully
filled out.
WHEN
REMOVING BLADE:
CAREFULLY REMOVE
THE METAL BLADE BY
GRASPING THE CENTER
HUB AND LIFTING IT
STRAIGHT UP. NEVER
TOUCH THE BLADES, AS
THEY ARE RAZOR
SHARP.
NOTICE
This appliance has a
polarized plug (one blade
is wider than the other).
As a safety feature, this
plug will fit only one way
in a polarized outlet. If the
plug does not fit fully in the
outlet, reverse the plug. If it
still does not fit, contact a
qualified electrician. Do
not attempt to defeat this
safety feature.
1
2
Page 3

Carefully read all
instructions before
using this appliance.
IMPORTANT
SAFEGUARDS
To reduce risk of injury,
always follow these safety
precautions when using
this appliance.
Getting Ready
1. Read all instructions.
2. Blades are sharp.
Handle them carefully.
3. Always unplug from
outlet when not in use,
before putting on or
taking off parts, and
before cleaning. To
unplug, grasp plug and
pull from electrical outlet. Never pull cord.
4. Do not use outdoors.
5. Do not let cord hang
over edge of table or
counter, or touch hot
surfaces.
6. Do not operate any
appliance with damaged cord or plug, or
after appliance has
been dropped or
damaged in any way.
Return appliance to
nearest authorized
facility for examination
repair for electrical
or mechanical
adjustment.
SAVE THESE
INSTRUCTIONS
FOR
HOUSEHOLD
USE ONLY
Operation
1. Keep hands as well
as spatulas and other
utensils away from
moving blades or discs
while processing food,
to prevent possibility of
severe personal injury
or damage to food
processor. Aplastic
spatula may be used,
but only when motor is
stopped.
2. Avoid contact with
moving parts. Never
push food down by
hand when slicing or
shredding. Always use
pusher, or injury may
occur.
3. Make sure motor has
completely stopped
before removing
cover. (If machine
does not stop within
2 seconds, when you
turn cover, call 1-800726-0190 for assistance). Do not use
machine.
4. Never store any blade
or disc on motor shaft.
To reduce the risk of
injury, no blade or disc
should be placed on
motor shaft except
when the bowl is properly locked in place
and the food processor
is in use. Store blades
and discs as you would
sharp knives, out of
reach of children.
5. Be sure cover is
securely locked in
place before operating
food processor.
6. Do not try to override
or tamper with cover
interlock mechanism.
Injury may result.
Cleaning
To protect against
electrical shock, do not
put base in water or other
liquid. If base falls in
water, unplug immediately. DO NOT REACH INTO
WATER.
General
1. Close supervision is
necessary when any
appliance is used by or
near children. Do not
allow children to use
this appliance.
2. Do not operate this, or
any other, motor-driven
appliance while under
the influence of alcohol
or other substances
that affect your reaction
time or perception.
3. This food processor is
UL listed for household
use. Use it only for
food preparation as
described in this book.
4. The use of attachments not recommended or sold by Cuisinart
may cause fire, electrical shock or personal
injury, or damage to
your food processor.
5. Maximum rating of 5
Amperes is based on
attachment that draws
greatest current. Other
recommended attachments may draw significantly less current.
TABLE OF CONTENTS
Important Safeguards. . . . . . . . . . . . . . . . . . . . . . . . . . . . . . . . . . . . . . . . . . . . Page 3
Introduction . . . . . . . . . . . . . . . . . . . . . . . . . . . . . . . . . . . . . . . . . . . . . . . . . . . Page 4
The Machine Includes . . . . . . . . . . . . . . . . . . . . . . . . . . . . . . . . . . . . . . . . . . . Page 5
Assembly Instructions . . . . . . . . . . . . . . . . . . . . . . . . . . . . . . . . . . . . . . . . . . . Page 6
The Machine Functions . . . . . . . . . . . . . . . . . . . . . . . . . . . . . . . . . . . . . . . . . . Page 6
Operating Instructions . . . . . . . . . . . . . . . . . . . . . . . . . . . . . . . . . . . . . . . . . . . Page 6
Chopping, Pureeing, Mixing . . . . . . . . . . . . . . . . . . . . . . . . . . . . . . . . . . . . . . . Page 6
Adding Food While Processing . . . . . . . . . . . . . . . . . . . . . . . . . . . . . . . . . . . . . Page 7
Removing Processed Food . . . . . . . . . . . . . . . . . . . . . . . . . . . . . . . . . . . . . . . Page 7
Slicing and Shredding Less Than 3 Cups of Food. . . . . . . . . . . . . . . . . . . . . . . Page 8
Slicing and Shredding More Than 3 Cups of Food . . . . . . . . . . . . . . . . . . . . . . Page 8
Food Prep Guide . . . . . . . . . . . . . . . . . . . . . . . . . . . . . . . . . . . . . . . . . . . . . . . Page 9
Guidelines for Perfect Slices and Uniform Shreds. . . . . . . . . . . . . . . . . . . . . . Page 11
Using the Juicer Attachment. . . . . . . . . . . . . . . . . . . . . . . . . . . . . . . . . . . . . . Page 12
Troubleshooting . . . . . . . . . . . . . . . . . . . . . . . . . . . . . . . . . . . . . . . . . . . . . . . Page 12
Cleaning And Storage . . . . . . . . . . . . . . . . . . . . . . . . . . . . . . . . . . . . . . . . . . Page 13
For Your Safety . . . . . . . . . . . . . . . . . . . . . . . . . . . . . . . . . . . . . . . . . . . . . . . Page 13
Technical Data . . . . . . . . . . . . . . . . . . . . . . . . . . . . . . . . . . . . . . . . . . . . . . . . Page 14
Warranty . . . . . . . . . . . . . . . . . . . . . . . . . . . . . . . . . . . . . . . . . . . . . . . . . . . . Page 14
Recipes . . . . . . . . . . . . . . . . . . . . . . . . . . . . . . . . . . . . . . . . . . . . . . . . . . . . . Page 15
INTRODUCTION
Congratulations on your purchase of the Cuisinart®Pro Plus™Food Processor/Juicer.
This product is the ultimate food preparation tool, and it comes from the originator of
the American food processor, Cuisinart.
The Pro Plus
shredding and kneading. With the Continuous Feed Chute you can slice or shred unlimited amounts of ingredients. It also features a Citrus Juicer Attachment with three sizes
of juicing cones so you can begin each day with freshly squeezed juice.
™
handles a variety of food prep tasks including chopping, mixing, slicing,
3
4
Page 4
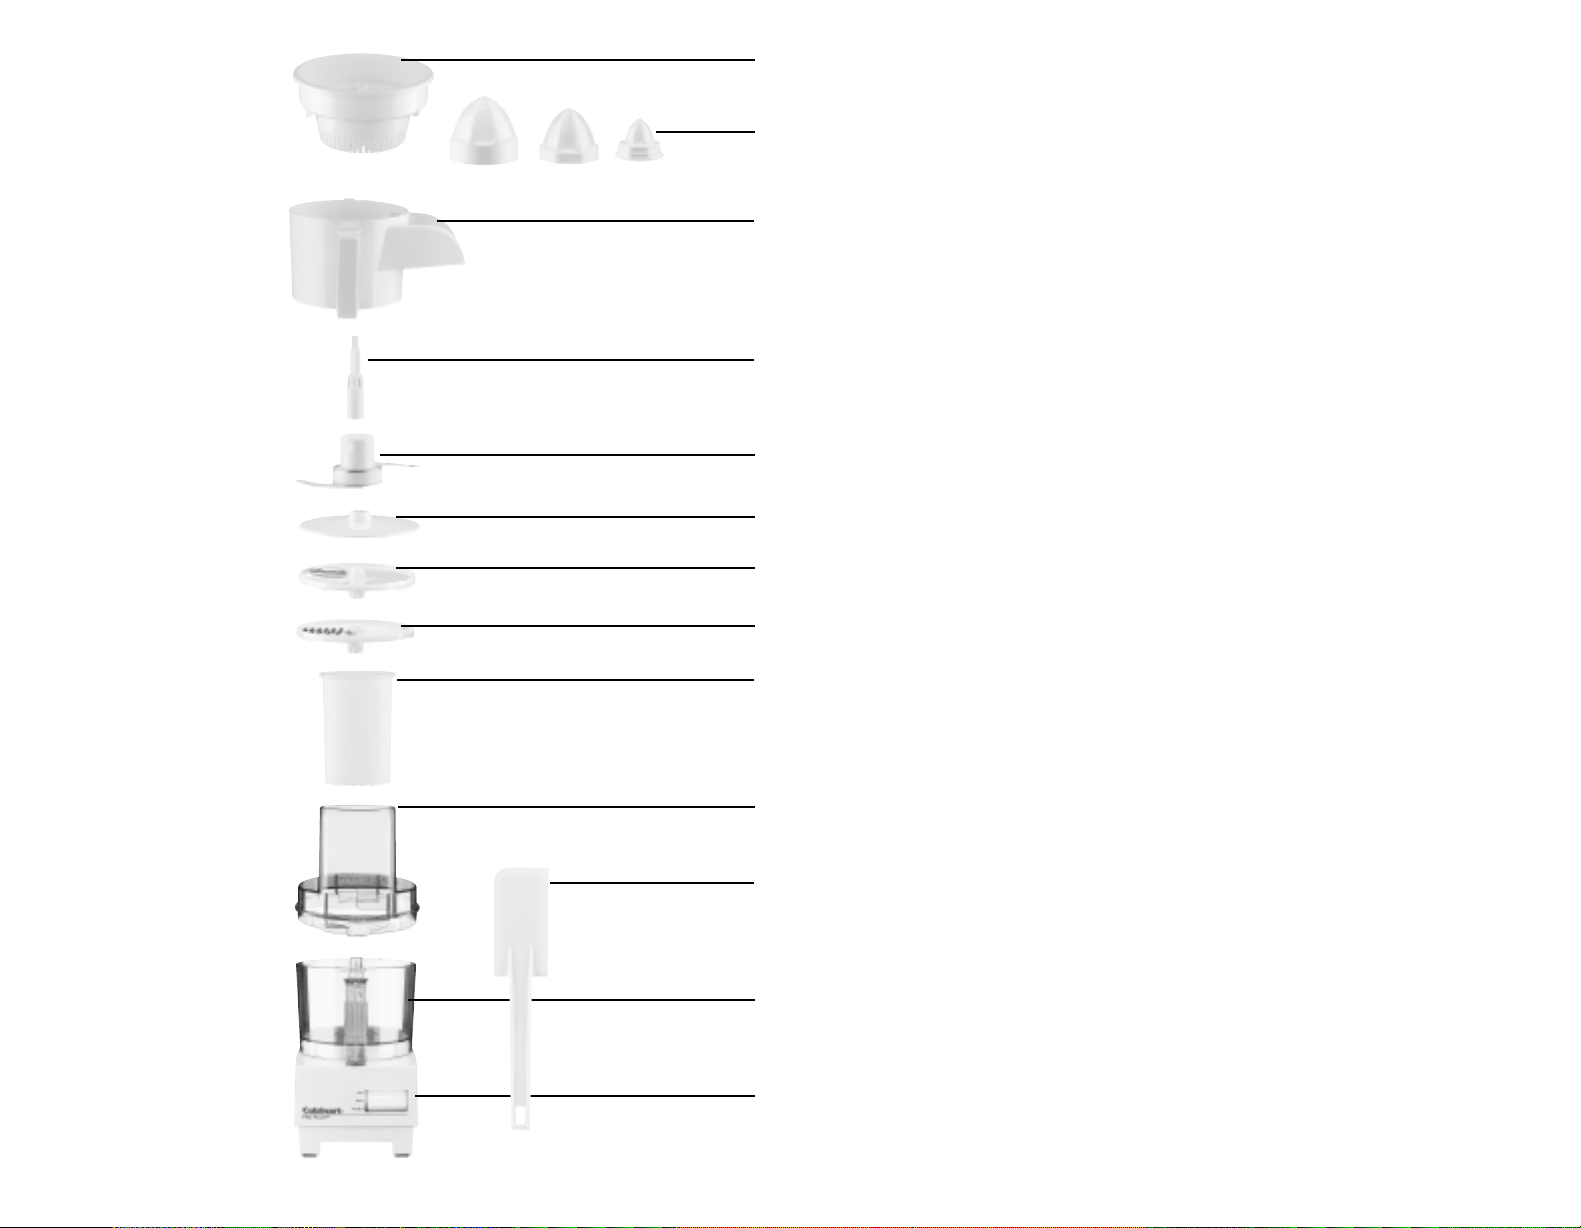
THE MACHINE
INCLUDES
1. Motor Base with
motor shaft and
3-position control
switch
2. 3-cup Work Bowl
made of durable
shatter-resistant
®
Lexan
3. Work Bowl Cover
with feed tube.
4. Pusher that slides
inside the feed tube.
5. Continuous Feed
Chute for slicing and
shredding unlimited
amounts of ingredients.
6. Juicer Attachment
with 3 sizes of juicing
cones.
7. Stainless Steel
Chopping/Mixing
Blade
8. Medium Shredding
Disc
9. 2mm Slicing Disc
10. Ejector Disc directs
sliced or shredded
ingredients through
feed chute attachment.
11. Adapter Stem
12. Spatula
plastic.
Citrus Attachment
3 Juicing
Cones
Continuous Feed Chute
Adapter Stem
Chopping/Mixing Blade
Ejector Disc
2mm Slicing Disc
Medium Shredding Disc
Pusher
Cover with Feed Tube
Spatula
3-Cup Work Bowl
Housing Base
ASSEMBLY
INSTRUCTIONS
Read all instructions on
these two pages before
you start. Check that your
household voltage matches
that shown on label on
bottom of food processor
base.
Note: Before using the Pro
™
for the first time,
Plus
wash all parts except base
in hot, soapy water. Rinse
and dry thoroughly. Handle
metal blade and slicing disc
or shredding disc with great
care. Their blades are
razor-sharp. Do not leave
them in soapy water, where
they may disappear from
sight. Never immerse base
in water or any liquid.
1. Put base on counter or
table near electrical
outlet. Do not plug in
until food processor is
totally assembled.
2. Pick up empty clear
work bowl, holding it
in both hands, with
handle toward you.
Put bowl on base,
fitting center tube over
shaft on base and
placing handle slightly
to left of front
center (7 o’clock.)
Hold bowl by handle
and turn bowl counterclockwise as far as it
will go. It will click into
locked position.
3. Pick up metal blade by
center plastic part.
Never touch metal
cutting blades, which
are razor sharp.
Place blade over motor
shaft, twisting it gently
clockwise until it drops
into place over shaft.
Push top of center
plastic part to push
blade down as far as it
will go. Lower blade
should almost touch
bottom of bowl.
4. Put cover on bowl, with
feed tube at back,
slightly to right of
center.
5. With hand on feed
tube, turn cover counterclockwise to lock it
into place. It will click
into position easily. Do
not force it.
Motor will not start
unless work bowl is
securely locked in
position and cover is
securely locked on
work bowl.
6. Hold pusher with more
rounded side toward
you and insert it in feed
tube. Always use
pusher to guide food
through feed tube.
Never use your fingers or spatula.
Plug your Cuisinart
Pro Plus™into a household electrical outlet.
To remove cover,
unlock it by turning it
clockwise, then lift it
straight up.
®
THE MACHINE
FUNCTIONS
Control switch on base of
machine has 3 positions,
giving you fingertip control
of operation.
ON (Continuous)
For continuous operation,
move control switch up to
ON position. Motor will
start, if you have followed
assembly instructions.
OFF
To turn motor off, move
control switch down to OFF
position in center.
PULSE
For on-off operation, called
pulse-chopping or pulsing,
press control switch down
to PULSE position, then
release it.
Motor runs as long as you
hold control switch down.
Motor stops when you
release control switch. Try
it a few times.
You control duration and
frequency of pulses by
length of time you hold
control switch down and
rate at which you press it.
Allow enough time between
pulses to let food in work
bowl fall to bottom.
Always use switch for
pulse/chopping. Never turn
cover back and forth to
start and stop processor.
OPERATING
INSTRUCTIONS
You may want to practice
before actually using the
Pro Plus™ to prepare food
for a meal. Try soft fruit or
vegetables like an apple or
zucchini.
Chopping,
Pureeing, Mixing
1. Remove cover and put
some food into work
bowl. First, cut food into
3/4-inch (2cm) pieces.
You will get a more even
chop if you start with
pieces that are all the
same size.
5
6
Page 5

Put pieces into work
bowl with metal blade in
place. You can put in up
to 1 cup of food at a
time. If you want to
process more, do it in
batches.
2. Put on cover and lock it.
Insert pusher. Press control switch down to
PULSE position, then
release it. Repeat two or
three times. Each time
blade stops, let food
pieces drop to bottom of
bowl before pulsing
again. This ensures that
the blade will chop them
at every pulse.
Watch what happens to
food. With pulse/chopping technique, you can
get an even chop without
danger of overprocessing. Check texture by
looking through work
bowl. Be careful not to
overprocess.
For a coarse chop, pulse
only a few times.
3. If you want a finer chop
or purée, move control
switch up to ON and let
machine run continuously until food is chopped
as fine as you want it.
Check frequently through
clear cover or bowl to
avoid chopping too fine.
Use spatula to scrape
down any pieces that
stick to inside of bowl.
Onions and other food
with a high water content
turn into a smooth purée
very quickly. Do not overchop — look at food
frequently through
work bowl.
To purée, follow same
procedure as for chopping, but let machine run
7
until food is a smooth
purée.
New users are often
surprised at how fast the
processor works. You will
quickly get used to its
great speed.
These are some conditions
that affect your results:
• size of pieces you put
in bowl – all should be
about the same
• amount of food you
process – don’t add too
much at a time
• type of processing
you choose – continuous
or pulse/chopping
Adding Food While
Processing
When you want to add liquid while machine is running, pour it through open
feed tube. This is especially useful when making
mayonnaise, bread dough,
cakes and many other
recipes. Asmall hole in the
pusher allows you to add
liquids in a very slow,
steady stream—useful
when making sauces like
mayonnaise.
When you want to add
small pieces of food like
cheese, meat or garlic
cloves while machine is
running, drop them through
open feed tube.
To prevent spills when
adding flour, sugar and
other dry ingredients, use
a funnel.
Removing
Processed Food
Before removing processed
food, move control switch
to OFF and wait for blade
to stop spinning. Then
remove cover by turning it
clockwise. Never try to
remove cover and work
bowl together; this can
damage work bowl.
If blade continues to turn
when control switch is OFF,
unplug machine before
removing cover. Do not use
machine any further. Call
1-800-726-0190 immediately for assistance.
After processing liquids,
remove work bowl from
base of processor before
removing metal blade. Turn
handle of bowl clockwise to
unlock bowl from base and
lift bowl straight up.
A locking device on metal
blade prevents it from moving up on motor shaft while
machine is in use. If blade
holds bowl locked, jiggle
white center section of
blade lightly. It should
release.
It is important not to let
metal blade fall out of work
bowl as you empty it. Here
are three ways to prevent it
from falling out:
1. Before tilting bowl, use
spatula to remove food
from around blade.
Carefully remove blade
by finger grip on top of
center plastic part.
2. Hold top of blade in
place with finger or spatula while pouring out
processed food.
3. Make sure your hands
are dry. Insert finger
through hole in underside of bowl and place
thumb on rim of bowl.
Grip inside of blade shaft
firmly to hold blade in
place.
Slicing And
Shredding Less
Than 3 Cups
Of Food
1. Assemble clear work
bowl on base in usual
way.
2. Pick up adapter stem.
Note that round base
is notched at one end.
Center section is hexagonal (six-sided) and top
section is flat on both
sides.
Hold stem firmly by flat
top and push it down as
far as it will go on motor
shaft.
3. Hold slicing or shredding
disc with its longer collar
down (the side that
reads “THIS SIDE
DOWN”). Always han-
dle slicing or shredding
discs by rims. Never
touch sharp cutting
blades.
Slide disc over stem and
push it down until its
center collar is flush with
hexagonal section of
stem.
4. Put cover on work bowl,
lock it into place and
insert food in feed tube.
(If you are slicing, first
cut one end of food flat.
Place in feed tube flat
side down.) See page 11
for guidelines on how to
get consistent slices and
shreds.
5. Insert pusher. Use moderate pressure to push
down on pusher with one
hand while holding control switch in PULSE
position with other hand
until food is sliced or
shredded. This will only
take a few seconds.
Wait until disc stops
spinning before removing cover. When it
stops, remove cover
before removing work
bowl. Never try to
remove cover and work
bowl together; this
could damage work
bowl.
6. Remove slicing or shredding disc before removing work bowl. To
remove it, grasp flat top
section of adapter stem
and lift it straight up.
Then turn bowl clockwise
to remove it from base
and lift it straight up.
Slicing And
Shredding More
Than 3 Cups
Of Food
1. Substitute chute attachment for clear work bowl.
Pick up empty work
bowl, holding it in both
hands with handle
toward you and chute
toward right. Put bowl on
base, fitting center tube
over motor shaft and
placing handle slightly to
left of front center (7
o’clock).
Hold bowl by handle and
turn bowl counterclockwise as far as it will go. It
will click into locked position.
2. Pick up adapter stem.
Note that round base is
notched at one end; center section is hexagonal
(six-sided) and top section is flat on both sides.
Hold stem firmly by flat
top and push it down as
far as it will go on motor
shaft.
3. Hold ejector disc with
side that reads “THIS
SIDE DOWN” down.
Slide ejector disc over
adapter stem, pushing it
down so it fits over
notched top of round
section of stem.
4. Hold slicing or shredding
disc with its longer collar
down (the side that
reads “THIS SIDE
DOWN.”) Always han-
dle slicing or shredding
discs by rims. Never
touch sharp cutting
blades.
Slide disc over stem and
push it down until its
center collar is flush with
hexagonal section of
stem.
5. Put cover on work bowl
and turn it counterclockwise to lock it into place.
Place receptacle for
processed food on
counter under chute.
You can use bowls or
saucepans. Those with
high (up to 6 inches,
21cm) straight sides
work best.
6. Put food in feed tube.
Remember to cut one
end of food flat if you are
slicing, and to insert in
feed tube flat side down.
Insert pusher and push
down on it with one hand
while holding control
switch in PULSE position
with other hand. Ejector
disc will direct food
through chute into receptacle. Total amount of
8
Page 6

food you can slice or
shred with Pro Plus™ is
limited only by size of
receptacle under chute.
You can replace full
receptacle with empty
one and continue slicing
or shredding.
Wait until slicing or shredding disc stops spinning
before you remove cover.
When it stops, remove
cover before trying to
remove work bowl. Never
try to remove cover and
work bowl together; this
To remove slicing or
shredding disc, grasp flat
top of adapter stem and
pull straight up. You must
remove discs before
removing work bowl.
could damage work bowl.
Food Prep Guide
Your Cuisinart®Pro Plus™makes many everyday food preparation tasks much easier and faster.
Use these guidelines to get the best food results. For larger amounts (more than 3 cups
processed) when slicing and shredding, use the chute attachment.
Food Blade Preparation/Method Results/Notes
Bread Metal blade Break or cut into 1-inch or Crumbs for fillings/ toppings/crusts. For
Butter or Metal blade Chop garlic, herbs or zest Smooth creamy flavored butter or
Cream first. Cut butter/cheese into cheese spreads.
Cheese, tablespoon size pieces.
Flavored Process until smooth,
Cheese Dips add liquids last if using.
& Spreads
Cheeses, Metal Blade Remove hard rind, cut into “Grated” hard cheese, texture from
Hard – 3/4-inch or smaller cubes. With coarse to fine. Process longer for
Asiago, machine running drop through finer texture.
Locatelli, feed tube and process “grated”
Parmesan, to desired texture. Hard cheese should not be
Romano shredded – use chopping
Slicing Disc Have cheese at room temperature technique for results similar to
Cheeses, Shredding Disc Chill cheeses. Cut to fit feed Shredded or sliced cheeses suitable for
Medium-Hard Slicing Disc tube. Stand cheese in feed salads, pizzas, tacos, casseroles, etc.
Such as tube, use light pressure to slice
Cheddar, or shred.
Swiss, etc.
Cheeses, Soft Shredding Disc Chill (best results, freeze 20 – Do not slice soft cheeses. Shredded
Such as 30 minutes) cheese; cut to fit cheeses suitable for salads, pizzas,
Mozzarella Shredding Disc feed tube. Stand cheese in tacos, casseroles, etc.
Citrus Peel Metal Blade Remove zest from fresh, washed Chopped citrus zest. For best chop, add
smaller pieces. Pulse to buttered bread crumbs, butter bread first
chop, then process until or add melted or softened butter through
crumbs are desired texture feed tube while processing. For Herbed
bread crumbs, chop herbs first.
Remove hard rind. Stand pieces grated/shredded cheeses.
in feed tube – use light pressure
to slice.
feed tube, use light pressure
to shred.
& dried citrus using vegetable sugar or salt from recipe when processing.
peeler leaving bitter white pith
on fruit. Cut in 1-inch pieces.
Pulse to chop then process until
zest is desired texture.
Food Blade Preparation/Method Results/Notes
Cooked Fruits Metal Blade Steam, poach or boil fruits or Smooth purées suitable for side dishes or
& Vegetables vegetables cut in 1-inch or baby food. Always consult with your
for Purées or smaller pieces until tender. pediatrician/family physician concerning
Baby Foods Process up to 1-1/2 cups at a the best foods for your baby and when to
time, adding cooking liquid introduce new foods to his/her diet. Prepare
(water, stock, broth or milk) as in single serving amounts or in amounts up
needed for desired texture. to 1-1/2 cups, which may be refrigerated or
Season as needed. frozen for later use. Cooked potatoes
should not be processed using metal blade
– the result will be a “gluey” texture.
Cooked potatoes may be shredded using
the shredding disc (see Potatoes).
Cookies Metal Blade Cut or break into 1-inch or May be used as crumb toppings or for
(Hard/Crisp) smaller pieces. Pulse to chop crumb crusts. Add softened or melted
or Crackers then process until crumbs butter, sugar, spices as needed.
reach desired texture.
Cream – Metal Blade Process up to 1 cup chilled Excellent, quick topping for desserts or hot
Heavy, cream until it reached desired beverages. For sweetened cream, add
Whipping thickness. sugar after about 30 seconds. Volume will
not be as great as with a mixer/whisk.
Fruits, Raw Metal Blade Peel, core, remove pits and Use fresh fruit purées as an addition to
seeds. Cut into 3/4-inch pieces. savory sauces or as dessert sauces.
Pulse to chop, then process to Strain seeds from sauce if needed.
desired texture. For fruit or
berry purées, process until
smooth, adding sugar as needed.
Shredding Disc Cut washed and dried fruits to For larger amounts, use chute
Slicing Disc fit feed tube. Arrange in feed tube attachment.
cut side down, solidly to prevent
tilting/slipping. Use moderate
pressure to shred or slice.
Herbs Metal Blade Pulse to chop, then process Use clean, dry herbs. Remove leaves from
continuously to reach desired stems before chopping.
texture. Work bowl and blade
must be clean and dry.
Mayonnaise Metal Blade Follow favorite 1-egg recipe, Raw egg mayonnaise not recommended.
adding oil through drip hole Use pasteurized liquid egg products or
in pusher. substitutes. Follow proper food safety
procedures.
Meat, Poultry – Metal Blade Cut into 3/4-inch cubes, chill. Do not overprocess unless purée is
Uncooked Process up to 8 ounces at one desired. Can be used for burgers, chilies,
time. Use pulse to chop to meatloaf, patés, terrines, etc.
desired texture.
Slicing Disc Trim visible fat from meat. Remove Processor sliced meats are perfect for stir-fry
and discard skin from poultry. dishes.
Cut meat to fit feed tube. Wrap in
plastic wrap and freeze on a
baking sheet until firm but not
frozen solid. Use firm pressure
to slice.
9
10
Page 7

Food Blade Preparation/Method Results/Notes
Meats, Metal Blade Cut meat into 3/4-inch or smaller Chopped meats can be used for salads or
Poultry – cubes/pieces. Pulse to chop to spreads. For Baby/Junior Foods, add broth
Cooked desired texture. Process up to or other liquid as needed. Always consult
Muffins, Metal Blade Use metal blade to “sift” dry Batters for small recipes of muffins and
Quick Breads ingredients; remove. Process wet quick breads can be prepared quickly and
Pastry/ Metal Blade Use recipe, pg 30 or other favorite Can prepare pastry for single crust pie.
Pie Crust recipe using recipe method. Repeat for a 2-crust pie, do not double.
Peanut Butter Metal Blade Process up to 1-1/2 cups peanuts Fresh nut butters contain no additional oils,
or Nut Butters or other nuts. Pulse to chop sugar or salt unless you choose to add
Potatoes, Shredding Disc Trim to fit feed tube as needed. Use chute attachment for larger
Cooked Slicing Disc Shred or slice using light pressure. amounts.
Potatoes, Raw Shredding Disc Trim as needed to fit feed tube. Use chute attachment for larger amounts.
Slicing Disc Shred or slice using medium
Vegetables, Metal Blade Peel vegetable & cut into pieces
Raw 3/4-inch or smaller. Keep pieces
Shredding Disc Peel and cut to fit feed tube. Cut For soft vegetables, use light to moderate
Slicing Disc one end flat, place in feed tube flat pressure. For firmer vegetables, use mod-
Yeast Doughs Metal Blade Process dry ingredients to blend, Makes a scant 1 pound of dough, enough
Guidelines for
Perfect Slices and
Consistently
Uniform Shreds
1. Choose food with care.
Fruits and vegetables
should be fresh, firm and
not overripe.
11
8 ounces at a time. with your pediatrician/family physician con-
ingredients, return dry ingredients with little fuss.
to work bowl and pulse to blend.
See Cuisinart recipes.
first, then process continuously them. Nut butters can be kept for several
until ground nuts form a ball. months tightly covered and refrigerated.
pressure.
similar size for most even chop.
Pulse to chop, or process to
“grind” or “purée. For small items
such as garlic or shallots, drop
through feed tube while machine
is running to chop.
end down. For cabbage remove erate to medium pressure.
and discard core. Do not use shredding disc for cabbage.
then add yeast mixture/liquid for a single small (8 x 4 x 2-1/2 – inch loaf
through feed tube in a steady pan) or free form bread. See recipes for
stream as fast as the flour will more ideas.
absorb it. After mixture forms
ball, process for 46 – 60 seconds
to knead.
2. Prepare food first.
Always remove large
hard pits and seeds.
When slicing, cut one
end flat and place in
feed tube cut side down.
3. Pack feed tube carefully.
Food should fit snugly
but not so tight that it
cerning the best foods for your baby and
when to introduce new foods to his/her diet.
For chunky-style, add a handful of nuts
before processing is completed.
prevents pusher from
moving. (Bottom of feed
tube is slightly larger
than top. If food is too
big for top, try inserting
from bottom.)
4. Pack feed tube for
desired results.
For small, round slices
or short shreds from carrots, zucchini and other
long vegetables, cut
them in 4-inch (10cm)
lengths, pack them
tightly upright. For long
slices or shreds, cut
them in 2-inch (5cm)
lengths.
5. Adjust pusher pressure
to food texture.
Never push down hard
on pusher.
Use light pressure for
soft fruits and vegetables
and pack them horizontally; like bananas,
mushrooms, strawberries
and tomatoes and for all
cheeses.
Use medium pressure for
most food — apples, celery, citrus fruit, potatoes,
zucchini. Use firm pressure for really hard vegetables like carrots and
yams.
Using The Juicer
Attachment
The Citrus Juicer
Attachment includes:
Strainer Basket, which
locks into processor work
bowl. It has grooved cam
on one side and smooth
locking device on opposite
side. In its center is the:
Juicer Stem Adapter,
which fits over motor shaft
of Pro Plus
Small cone, for lemons
and limes. It must always
be attached to Adapter
when Attachment is in use.
Slot in center of underside
fits rib on Adapter.
Medium cone, for oranges
and large cone, for grape-
fruits. Both fit over small
cone.
™
.
1. Place work bowl on Pro
™
base in usual way.
Plus
Hold Strainer Basket
open side up, with
locking device facing
you. Align locking device
slightly to left of locking
tab on front rim of work
bowl.
Place strainer basket on
work bowl, fitting Juicer
Stem Adapter loosely
over motor shaft. Turn
basket counterclockwise
as far as it will go, until it
clicks into position.
Turn Juicer Stem
Adapter clockwise until it
drops into position.
Check that it is down as
far as it will go on the
motor shaft.
2. Hold small cone by top
and place it over Juicer
Stem Adapter, fitting slot
over rib on adapter.
Cut citrus fruit in half and
hold cut side down over
cone. With other hand,
hold control lever in
PULSE position and
press down fruit to
extract juice. For continuous operation, move
control lever to ON. Twist
fruit to extract most juice.
Do not allow juice to
overflow center tube of
work bowl.
To remove attachment,
remove cone from Juicer
Stem Adapter. Loosen
adapter from motor shaft
by lifting it slightly, straight
up. Hold Strainer Basket
on both sides and turn
clockwise to unlock it from
work bowl. Lift straight up.
Remove work bowl from
base and pour out juice.
TROUBLESHOOTING
These are some problems
that beginners with a food
processor sometimes experience, along with their
solutions.
Food is unevenly
chopped
Try to process less food
at one time. Pulse/chop
until pieces of food are
no larger than 1/2 inch
(1.25cm). Then run
machine continuously,
checking consistency
often.
Liquid leaks from bottom
of work bowl onto
motor base
Remove work bowl from
base as soon as you finish processing. Do not
remove metal blade first.
When work bowl and
blade are removed
together, blade drops
down and forms almost
perfect seal against bowl.
Liquid leaks out between
work bowl and cover
when machine is running
Never use more than
1-1/2 cups (360ml) of a
very thin liquid. The
thicker the liquid, the
more you can use. With
thick mixtures like pancake or cake batter, for
example, you can
process as much as 2
cups (480ml).
Slices are uneven or
slanted
Pack feed tube carefully.
Maintain even pressure
on pusher.
Carrots or similar food
falls over in feed tube
Cut food into equally
sized pieces, not over 4
inches (10cm) long. Use
enough pieces to fit feed
tube snugly.
12
Page 8

Cut carrots in half and
insert one piece point-side
down and the other stemside down.
A few pieces of food
remain on top of slicing
or shredding disc
You can improve this by
raising and lowering
(bouncing) pusher when
food is almost all sliced
or shredded.
Cheese spreads out and
collects on top of shredding disc
Cheese was not cold
enough, or pressure on
pusher was too great.
Always use light pressure
when processing cheese.
CLEANING AND
STORING
Keep your food processor
ready for use on a kitchen
counter. When it’s not
being used, leave it
unplugged. Don’t leave it
with cover in locked position; this could damage the
off-on mechanism.
Store blades and discs in
safe, convenient place, as
you would sharp knives —
out of the reach of children.
All parts except motor base
are dishwasher safe and
we recommend washing
them in the dishwasher ON
THE TOP RACK. Due to
intense water heat, washing the work bowl, work
bowl cover and accessories
on the bottom rack may
cause damage over time.
Insert work bowl upside
down. Remember where
you place sharp blades and
discs, and unload them
carefully.
To simplify cleaning, rinse
work bowl, cover, pusher
13
and blade or disc immediately after use so food
won’t dry on them.
If you wash blades and
discs by hand, do it carefully. Avoid leaving them in
soapy water, where they
may disappear from sight.
To clean metal blade, fill
work bowl with soapy
water, hold blade by its
center plastic part and
move it up and down on
center shaft. Use of a spray
attachment is also effective. If necessary, use a
brush.
Work bowl is made of
®
Lexan
polycarbonate plastic, which is shatter resistant and heat resistant.
Chopping certain foods
may scratch or cloud work
bowl. Among them are rice,
whole spices and oils like
wintergreen. If you like to
prepare your own spice
blends, you may want to
keep a second bowl just for
that purpose.
Base housing is made of
touch plastic with high
impact resistance. Its
smooth surface will look
new for years. Keep a
sponge handy as you work
and wipe spills from base.
Wipe in direction away
from motor shaft. Do not
use abrasive spray cleaners on base or pusher.
Four rubber feet on underside of base keep it from
moving on most work surfaces when machine is processing heavy loads. Clean
feet from time to time; if
rubber surface is not clean,
machine may move on
counter. If feet leave spots
on counter, spray with spot
remover and wipe with
damp sponge. If any trace
of spot remains, repeat
procedure and wipe area
with damp sponge and
non-abrasive cleaner.
IMPORTANT: Never store
any blade or disc on motor
shaft. No blade or disc
should be placed on shaft
except when work bowl is
in place and processor is
about to be used.
FOR YOUR SAFETY
Like all powerful electrical
appliances, your food
processor should be handled with care.
Follow these guidelines to
protect yourself and your
family from misuse that
could cause injury.
Handle and store metal
blade and discs carefully.
Their cutting edges are
very sharp.
Never put adapter stem on
motor shaft until work bowl
is securely locked in place.
Always make certain that
adapter stem is down on
motor shaft as far as it will
go.
Always insert metal blade
in work bowl before putting
ingredients in work bowl.
When slicing or shredding food, always use
pusher. Never put your
fingers or a spatula into
feed tube.
Always wait for blade or
disc to stop spinning before
you remove cover from
work bowl.
Be careful not to let metal
blade fall out of work bowl
when you empty bowl.
Remove it before tilting
bowl or hold it in place.
TECHNICAL DATA
The line voltage and frequency approximate for
your machine are shown
on label on underside of
base.
An automatic temperaturecontrolled circuit breaker in
motor ensures protection
against motor burnout. If
processor runs for exceptionally long time when
chopping, mixing or kneading thick or heavy mixtures
in successive batches,
motor may overheat. If this
happens, processor will
stop. Turn it off and wait for
motor to cool off before
proceeding. It will usually
cool off within 10 minutes.
In extreme cases, it could
take an hour.
Safety switches prevent
machine from operating
when work bowl or cover is
not locked into position.
Motor stops within seconds
when control switch is
turned off or cover is
unlocked. If motor should
ever continue to run, do not
attempt to remove cover.
Remove plug from outlet
and immediately notify the
Cuisinart Consumer
Service Center.
WARRANTY
CUISINART®PRO PLUS
FOOD PROCESSOR /
JUICER LIMITED
THREE-YEAR
WARRANTY
This warranty supersedes all
previous warranties on
Cuisinart®Pro Plus™Food
Processors.
This warranty is available to
consumers only. You are a
consumer if you own a
Cuisinart
Processor that was purchased
at retail for personal, family or
®
Pro Plus™Food
™
household use. Except as otherwise required under applicable state law, this warranty is
not available to retailers
or other commercial
purchasers or owners.
We warrant that your
Cuisinart
Processor will be free of
defects in material and workmanship under normal home
use for three years from the
date of original purchase.
However, return of the
warranty registration card
is not a condition of this warranty and does not eliminate
the need for the consumer to
maintain the original proof of
purchase. In the event that you
do not have proof of purchase
date, the purchase date for
purposes of this warranty will
be the date of manufacture.
We suggest that you complete
and return the enclosed
warranty registration card
promptly to facilitate verification of the date of original
purchase.
If your food processor should
prove to be defective within
the warranty period, we will
repair it (or, if we think
necessary, replace it) without
charge to you. To obtain
warranty service, please call
our Consumer Service Center
toll-free at 800-726-0190 or
write to:
Cuisinart
150 Milford Road
East Windsor, NJ 08520
To facilitate the speed and
accuracy of your return, please
also enclose $7.00 for shipping
and handling of the product;
under California law, only proof
of purchase is required. Please
also be sure to include a return
address, description of the
product defect, product serial
number, and any other information pertinent to the products return. Please pay by
check or money order.
®
Pro Plus™Food
Your Cuisinart®Pro Plus™Food
Processor has been manufactured to strict specifications
and has been designed for use
with the Cuisinart®Food
Processor authorized accessories and replacement parts
for your model. This warranty
expressly excludes any
defects or damages caused by
accessories, replacement parts
or repair service other than
those that have been authorized by Cuisinart.
This warranty does not cover
any damage caused by
accident, misuse, shipment
or other than ordinary
household use.
This warranty excludes all incidental or consequential damages. Some states do not
allow the exclusion of or limitation of incidental or consequential damages, so the foregoing may not apply to you.
This warranty gives you specific legal rights, and you may
have other rights that vary
from state to state.
WARNING
Our food processors and
accessories are carefully
designed and manufactured
with high-quality materials to
assure your satisfaction and
safety when you use them.
Although accessories sold by
companies other than
Cuisinart may be compatible
with your Cuisinart®Food
Processor, they may also be
extremely dangerous and
expose the user to serious
injury.
We specifically caution you not
to use other brand accessories, such as juicers, which
permit your processor to operate with exposed cutting or
shredding discs.
If you have any questions
about the safety features of
your Cuisinart®Food
Processor, please call us at
the toll-free number that
appears on the above
warranty.
14
Page 9

Recipe Notes:
Nutritional analyses are based on number of servings indicated. If a recipe produces a range
of servings, they are based on the highest serving yield for that particular recipe.
Guacamole
Serve guacamole with crispy tortilla chips, or use as a sauce or side dish.
Makes about 2 cups
1 ripe plum tomato (3-4 ounces), cored,
seeded, cut into eighths
1 garlic clove, peeled
1 jalapeño pepper, seeded and halved,
cut in 3/4-inch pieces
1/2 ounce red onion (about 1-inch piece),
trimmed, cut into 1/2-inch pieces
2 ripe avocados (20-24 ounces total),
peeled, pitted, cut into 3/4-inch chunks
Insert metal blade. Place tomato pieces in work bowl; pulse to chop, 10 to 15 times; remove and
reserve. With machine running, drop garlic through feed tube and process until minced, about 10
seconds. Scrape work bowl. Add jalapeño and onion to work bowl, pulse to chop, 5 times. Add half
the avocado pieces, cilantro leaves, lime juice, chili powder, cumin and salt. Pulse 5 times to chop
avocado, then process until smooth, about 45 seconds. Add remaining avocado. Pulse until mixture is blended, and reaches desired texture for a chunky guacamole, or process until smooth and
creamy, about 1-1/2 minutes. Cover and refrigerate for at least 30 minutes before serving to allow
flavors to blend. Serve with tortilla corn chips.
Nutritional information per serving (2 tablespoons):
Calories 56 (73% from fat) • carb. 4g • pro. 0g • fat 5g • sat. fat 1g • chol. 0mg
• sod. 23mg • calc. 2mg • fiber 3g
2 tablespoons packed cilantro leaves,
washed & dried
2 tablespoons fresh lime or lemon juice
1/2 teaspoon chili powder
1/4 teaspoon ground cumin
1/4 teaspoon kosher salt
Fresh Tomato & Roasted Pepper Salsa Cruda
Roasted Red Peppers add a little something extra to a traditional favorite.
Makes 1-1/2 cups
1 garlic clove, peeled
4 plum tomatoes (12 ounces), cored,
seeded, quartered
1/2 roasted red pepper, cut in 1-inch
pieces
1/3 cup lightly packed fresh cilantro
leaves, washed and dried
Insert metal blade. With machine running, drop garlic through feed tube; process 5 seconds to
chop. Add half the tomatoes to work bowl. Pulse 5 times to chop, then process to chop finely,
about 15 to 20 seconds. Add remaining tomatoes to work bowl along with roasted red pepper,
cilantro, green onions, jalapeño pepper, lime juice, cumin and salt. Pulse 10 to 15 times (one
second pulses), or process until desired texture is reached. Let stand 30 minutes before serving
to allow flavors to blend.
15
1 green onion, trimmed, cut 1-inch
pieces
1-2 jalapeño peppers, stemmed, halved,
seeded, cut in 1/2-inch pieces
2 tablespoons fresh lime juice
1/2 teaspoon ground cumin
1/4 teaspoon kosher salt
Nutritional information per serving (1/4 cup):
Calories 8 (7% from fat) • carb 2g • pro. 0g • fat 0g • sat. fat • chol. 0mg
• sod. 58mg • calc. 7mg • fiber 0g
Hummus
Add a roasted red pepper and 1 teaspoon herbs de Provence for a variation.
Makes about 2 cups
1/4 cup loosely packed flat parsley leaves
1 clove garlic, peeled
1 can (19 ounces, 540g) chickpeas,
rinsed and drained
2 tablespoons tahini (see Note)
2 tablespoons fresh lemon juice
Insert metal blade. Add parsley to work bowl. Process to chop, 5 seconds; remove and reserve.
With machine running, drop garlic through feed tube. Process until finely chopped, about 5 seconds. Add chick peas, tahini, lemon juice, water and cumin to work bowl; process until smooth,
1-1/2 to 2 minutes, stopping to scrape work bowl as needed one or two times. With the machine
running, add the olive oil in a steady stream and process until the mixture is smooth and creamy.
Taste and season with kosher salt and freshly ground pepper. Transfer to a bowl, cover and let
stand for 30 minutes or longer to allow flavors to blend. Refrigerate if not serving in 30 minutes.
Note: Tahini is a sesame seed paste available most grocery stores.
Nutritional information per serving (2 tablespoons):
Calories 30 (38% from fat) • carb. 4g • pro. 2g • fat 1g • sat. fat 0g • chol. 0mg
• sod. 29mg • calc. 16mg • fiber 1g
1/4 cup water
1/2 teaspoon ground cumin
1/4 cup extra virgin olive oil
kosher salt and freshly ground black pepper
to taste
Herbed Chevre & Sun-dried Tomato Torta
Makes about 1-1/2 cups
4 sun-dried tomatoes, oil packed, with 1
tablespoon oil
1/2 teaspoon herbs de Provence (or basil
or thyme)
1 tablespoon toasted pine nuts
3-4 imported black olives, pitted
1 clove garlic, peeled
1/4 cup mixed fresh herbs, loosely
packed (such as parsley, thyme, basil,
oregano, marjoram, sage, etc.)
Insert metal blade. Place sun-dried tomatoes, herbs de Provence, pine nuts and olives in work
bowl. Pulse to chop, 5 times. Line a 2-cup bowl or mold with plastic wrap. Spoon the sun-dried
tomato mixture into the bottom of the prepared mold; reserve. Wipe the work bowl and metal blade
clean with a paper towel.
Insert the metal blade. With the machine running, drop the garlic through the feed tube and
process 10 seconds to chop. Scrape the work bowl. Add the herbs, process to chop finely,
15 seconds. Add cheese, salt, pepper and 2 - 3 drops hot sauce, process 20 to 30 seconds
to combine.
6 ounces cream cheese (may use
reduced fat), cut in 1-inch pieces
6 ounces Chevre or other goat cheese,
chilled, cut in 1-inch pieces
1/8 teaspoon kosher salt
1/8 teaspoon freshly ground pepper
2 - 3 drops hot sauce such as Tabasco
to taste
®
16
Page 10

Gently spoon some of the cheese mixture over the bottom of the bowl, pressing down gently.
Spoon in the remaining cheese mixture and smooth over the top. Cover with plastic wrap and
refrigerate until ready to use.
To unmold: remove plastic wrap. Arrange fresh herbs or other greens over the exposed “top” of the
molded cheese, so that some will come out from the edges. Place a flat plate or server over the
bowl and invert so that the “top” becomes the “bottom”. Carefully lift up the bowl and gently remove
the plastic wrap. Serve with crackers, pita wedges, bagel chips or baguette slices.
Nutritional information per serving (2 tablespoons):
Calories 104 (73% from fat) • carb. 2g • pro. 5g • fat 9g • sat. fat 5g • chol. 16mg
• sod. 165mg • calc. 87mg • fiber 0g
Transfer to a resealable container, cover and let stand for at least 30 minutes before using to allow
flavors to blend and develop. Refrigerate unused portions. Will keep about 5 days refrigerated.
Nutritional information per serving (2 tablespoons):
Calories 33 (33% from fat) • carb. 3g • pro. 3g • fat 1g • sat. fat 1g • chol. 86mg
• sod. 86mg • calc. 71mg • fiber 0g
Coleslaw
Shred cabbage in just seconds using your Pro Plus™.
Makes about 6 cups
Vinaigrette
Makes 1-1/2 cups
This basic vinaigrette can be easily changed by using a flavored vinegar or oil, or by
adding fresh or dried herbs. Add a touch of sugar for a little sweetness.
1 small garlic clove, peeled
1/3 cup wine vinegar
1 tablespoon fresh lemon juice
1 tablespoon Dijon mustard
Insert metal blade and turn on machine. Drop garlic through feed tube and process until minced
about 5 seconds. Add vinegar, mustard, salt and pepper to work bowl. While machine is running,
pour oil through feed tube in thin stream and process until completely mixed and emulsified, about
5 to 10 seconds.
Nutritional information per serving (1 tablespoon):
Calories 81 (98% from fat) • carb. 0g • pro. 0g • fat 9g • sat. fat 1g • chol. 0mg
• sod. 43mg • calc. 1mg • fiber 0g
1/2 teaspoon kosher salt
1/8 teaspoon freshly ground black pepper
1 cup vegetable oil
(may use half olive oil)
Creamy Ricotta Herb Dressing/Dip
This is a good light dressing for potato salad or other fresh vegetable salads. It also
2 shallots, peeled and halved
1 clove garlic, peeled (optional)
1/4 cup fresh flat-leaf parsley
1 tablespoon fresh tarragon leaves
1 teaspoon fresh thyme leaves
2-3 fresh basil leaves
Insert metal blade. With machine running, drop shallots and garlic (if using) through feed tube and
process to chop, 5 seconds. Scrape work bowl. Add fresh herbs; pulse to chop, 5 times. Add
ricotta, yogurt, dry mustard, salt, pepper. Process until creamy and smooth, about 20 seconds.
17
makes a nice dip for fresh crudités.
Makes about 1-1/2 cups
3/4 cup part skim ricotta cheese
3/4 cup buttermilk or fat free plain yogurt
1/2 teaspoon dry mustard
1/2 teaspoon each kosher salt and freshly
ground pepper
1 small head green cabbage (1-1/2
pounds), cut to fit feed tube
1 medium carrot (3 ounces), trimmed,
peeled, and cut to fit feed tube
Assemble processor with chute attachment, ejector disc and slicing disc. Slice cabbage through
chute into large bowl. Insert shredding disc, and shred carrots through chute into bowl. Toss cabbage and carrots with remaining ingredients.
Nutritional information per serving (3/4 cup):
Calories 73 (55% from fat) • carb. 7g • pro. 1g • fat 4g • sat. fat 1g • chol. 1mg
• sod. 109mg • calc. 45mg • fiber 2g
1/2 cup reduced fat mayonnaise
2 tablespoons vinegar
kosher salt and freshly ground black
pepper to taste
Asian Carrot Salad
This salad goes nicely with grilled seafood or chicken.
Makes 4 – 6 servings
1 pound carrots, trimmed & peeled, cut
to fit feed tube horizontally
1 small red onion (2-3 ounces), peeled,
halved vertically
1 small red bell pepper, stemmed,
cored, seeded, cut to fit feed tube
1/4 cup roasted unsalted peanuts
1 small clove garlic, peeled
Assemble processor with chute attachment, ejector disc and slicing shredding disc. Shred carrots.
Insert slicing disc, slice onion and red pepper. Toss vegetables to combine; reserve.
Switch to clear work bowl. Insert metal blade. Place peanuts in work bowl. Pulse to chop, 5 times;
remove and reserve. With machine running, drop garlic and ginger through feed tube, process 5
seconds to chop. Add cilantro and pepper flakes to work bowl, pulse to chop, 5 times; scrape
work bowl. Add vinegar and soy sauce to work bowl. Process to blend, 5 seconds. With machine
running, add oils in a steady stream; process until dressing is emulsified, 5 to 10 seconds. Add
dressing to carrot mixture and toss to combine. Let salad stand 15 to 20 minutes before serving to
allow flavors to blend.
2 slices fresh ginger root, each about
the size of a quarter
1 tablespoon fresh cilantro leaves
1/4 teaspoon pepper flakes
2 tablespoons rice vinegar
1 teaspoon low-sodium soy sauce
2 tablespoons vegetable oil
1 tablespoon Asian (toasted) sesame oil
18
Page 11

Nutritional information per serving:
Calories 126 (57% from fat) • carb. 12g • pro. 3g • fat 9g • sat. fat 1g • chol. 0mg
• sod. 342mg • calc. 30mg • fiber 3g
Marinated Cucumber Salad
Makes about 3 cups
3 medium cucumbers (1-1/2 pounds
total), peeled, halved lengthwise,
seeded, ends cut flat, cut to fit feed
tube
1/2 medium red onion, peeled
1/4 cup white wine vinegar *
Assemble processor with chute attachment, ejector disc and slicing disc. Slice cucumbers into
bowl. Slice onion into bowl. Toss cucumbers and onion with remaining ingredients and let sit for
30 minutes to allow flavors to combine.
Drain before serving.
*You may vary the salad by using flavored vinegar such as raspberry, or changing the herb.
Nutritional information per serving (1/2 cup):
Calories 38 (0% from fat) • carb. 9g • pro. 2g • fat 0g • sat. fat 0g • chol. 0mg
• sod. 667mg • calc. 35mg • fiber 2g
1 tablespoon kosher salt
1 tablespoon granulated sugar
1 teaspoon dried dill*
freshly ground black pepper to taste
Potatoes au Gratin
To make Potatoes au Gratin for a larger group, double or triple the recipe using
4 ounces Swiss, Gruyère or cheddar
cheese
1 small garlic clove, peeled
1 cup evaporated fat free milk
1/2 cup heavy cream
Preheat oven to 375°F. Generously butter 9-inch square or other 10-cup baking dish.
Insert shredding disc and shred cheese using medium pressure; remove and reserve. Insert metal
blade and turn on machine. Drop garlic through feed tube, and process until minced about
5 seconds.
Bring evaporated milk, cream and garlic to simmer in small pot.
Assemble processor with chute attachment, ejector disc and slicing disc. Slice potatoes. Make
an even layer of half the potato slices in bottom of baking dish. Sprinkle with salt, pepper and
half the cheese. Add remaining potatoes in layer over cheese season and pour hot cream mixture
over top. Bake until potatoes are tender, liquid is absorbed, and top is browned – about 1 hour.
Sprinkle remaining cheese on top, 5 minutes before end of cooking.
Calories 279 (44% from fat) • carb. 28mg • pro. 11g • fat 14g • sat. fat 8g • chol. 48mg
19
the chute attachment and ejector disc.
Makes 6 servings.
1-1/2 pounds russet potatoes (medium
sized), peeled, halved lengthwise,
ends cut flat
kosher salt and freshly ground black
pepper to taste
Nutritional information per serving:
• sod. 126mg • calc. 337mg • fiber 2g
Savory Sweet Potato & Carrot Bake
Full of beta carotenes, this pleasant alternative to traditional sweet potato dishes is
Preheat oven to 325° F. Brush a 6-cup shallow oval or other similar sized baking dish with 1 tablespoon melted butter.
1 tablespoon unsalted butter, melted
3/4 pound sweet potatoes or yams,
peeled, cut to fit feed tube
3/4 pound carrots, peeled, cut to fit feed
tube
2 ounces sharp white cheddar cheese,
cut to fit feed tube
2 slices good quality white bread (2
ounces), torn into pieces
2 tablespoons walnuts
Assemble processor with chute attachment, ejector disc and shredding disc. Place medium bowl
under chute opening. Use firm pressure to shred sweet potatoes, carrots and cheese. Reserve.
Place clear work bowl on food processor base. Insert metal blade. Place bread, walnuts and butter
in work bowl. Process until mixture is coarse crumbs, about 30 seconds; reserve. Place egg, egg
white, flour, milk, sugar, thyme, sage, salt, hot sauce, and remaining butter in work bowl. Process
until smooth and blended, 20 seconds. Pour over sweet potato/carrot mixture in bowl and stir to
combine. Arrange in prepared baking dish and pat to even thickness. Top evenly with buttered
crumb mixture. Bake in preheated 325° F oven for 1-1/2 hours, until vegetables are tender and
crumb topping is golden brown and crispy. Serve hot.
Calories 214 (42% from fat) • carb 25g • pro. 7g • fat 10g • sat. fat 5g • chol. 49mg
particularly good with turkey, pork or game dishes.
3 tablespoons unsalted butter, cut into
1/2-inch pieces, divided
1 large egg
1 large egg white
1/3 cup all-purpose flour
1/2 cup evaporated fat free milk
1/2 teaspoon thyme
1/2 teaspoon rubbed sage
1/2 teaspoon kosher salt
1/4 hot sauce such as Tabasco
Nutritional information per serving:
• sod. 228mg • calc. 131mg • fiber 3g
®
Meatloaf with Mushrooms & Herbs
For a change, use a combination of turkey breast and lean pork loin.
Makes 4 servings
cooking spray
1/4 cup flat parsley leaves, loosely
packed
2 slices good quality bread, broken into
pieces
1 small onion (3 ounces), peeled and
quartered
3 - 4 mushrooms (2 ounces), cleaned and
quartered
1 teaspoon Italian herb blend or herbs
de Provence
1 teaspoon kosher salt
1/2 teaspoon freshly ground pepper
1 large egg
1/4 cup reduced fat milk
2 tablespoons sodium free tomato paste
1/2 pound cold boneless beef chuck or
round, cut into 3/4-inch cubes
1/4 pound cold boneless pork, cut into
3/4-inch cubes
1/4 pound cold boneless veal, cut into
3/4-inch cubes
20
Page 12

Preheat oven to 400° F. Lightly coat a 7-1/2 x 3-3/4 x 2-1/4 -inch loaf pan with cooking spray.
Insert metal blade. Place parsley and bread in work bowl; pulse 5 times, then process until bread
is medium coarse crumbs, about 20 seconds. Add onion, mushrooms, herbs, salt, and pepper to
work bowl. Pulse to chop finely, 10 to 15 times. Remove and transfer to a medium bowl. Place
egg, milk and tomato paste in work bowl. Process to blend, 5 seconds; add to onion mixture and
stir. Place beef cubes in work bowl. Pulse to chop finely, 15 to 20 long pulses. Add to mixture in
bowl. Place pork and veal cubes in work bowl. Pulse to chop finely, 15 to 20 long pulses. Add to
bowl. Stir meats into vegetable/crumb mixture until completely combined. Spoon into prepared
loaf pan and press to compact. Bake in preheated 400° F oven for 40 to 45 minutes, until top is
browned and internal temperature measures 160° - 170° F when tested with an instant read thermometer. Let meatloaf stand in pan for 10 minutes. Drain if necessary, remove, slice and serve.
Alternatively, meat can be shaped into meatballs of desired size and baked until browned and
internal temperature measures 160°-170° F. Use with your favorite tomato sauce or brown gravy.
Nutritional information per serving:
Calories 196 (26% from fat) • carb. 12g • pro. 24g • fat 6g • sat. fat 2g • chol. 57mg
• sod. 465mg • calc. 59mg • fiber 1g
* Substitute 1/2 pound of well-trimmed pork loin or beef flank steak for the chicken. Trim, freeze
and slice as described for chicken.
Nutritional information per serving (3 servings):
Calories 342 (58% from fat) • carb. 12g • pro. 24g • fat 22g • sat. fat 2g • chol. 58mg
• sod. 455mg • calc. 33mg • fiber 3g
Pizza
You can prepare a pizza easily from start to finish without cleaning with work bowl between steps.
First, grate and shred cheeses and reserve. Second, prepare the dough, residual cheese in the
work bowl will just add flavor. Then slice or shred any toppings such as vegetables and cooked
meats. (If you use raw meats, you will have to wash and dry the work bowl and blades used.)
Finally prepare your sauce. Remember – go from dry to wet. Pizza toppings can be as creative as
your individual taste. But remember, too much of any topping will make your pizza wet and soggy,
no matter how long it is baked.
Ginger Chicken & Vegetable Stir-Fry
The hard part of stir-fries is the preparation – with the LPP it is simple and quick.
Makes 2 - 3 servings
1/2 pound trimmed boneless, skinless
chicken breast, cut to fit feed tube*
1 medium garlic clove, peeled
1 1/2-inch piece fresh ginger, peeled
2 carrots (about 4 ounces) peeled, cut
to fit feed tube horizontally
4 ounces mushrooms, stems trimmed
4 medium scallions, trimmed and cut
into 2-inch lengths
1 small zucchini (about 4 ounces, cut to
fit feed tube vertically)
Freeze chicken until hard to the touch but still easily pierced with tip of sharp knife, about 20 to 30
minutes. Meanwhile, prepare vegetables. Insert metal blade and turn on machine. Drop garlic and
ginger through feed tube and process until minced, about 10 seconds. Remove and reserve.
Insert shredding disc. Pack carrots in feed tube and shred. Remove and reserve. Insert slicing disc
and slice remaining vegetables separately. Remove and reserve. Slice semi-frozen chicken. Toss
chicken with 1-1/2 teaspoons cornstarch. Stir together remaining cornstarch and water; reserve.
Combine broth, soy sauce, and sesame oil; reserve.
Heat work or large stick free skillet over high heat. Add 1-2 tablespoons of vegetable oil. Stir-fry
chicken, in batches if necessary, until firm. Remove and reserve as done. Add more oil between
batches as necessary. Add remaining vegetable oil to wok or skillet, reduce heat to medium-high
and cook ginger and garlic, stirring, until fragrant, about 15 seconds. Add carrots and stir-fry for
15 seconds. Add remaining vegetables and stir-fry until just tender, about 1 minute. Return chicken
to skillet along with broth mixture. Raise heat and cook until bubbling. Lower heat and stir in
cornstarch mixture, cook just until thickened. Season to taste and serve immediately.
21
1 medium red pepper (about 5 ounces),
cored, seeded, cut to fit feed tube
3 teaspoons cornstarch, divided
1-1/2 teaspoons water
1/3 cup chicken broth
1-1/2 tablespoons less sodium soy sauce
1 teaspoon sesame oil
4 tablespoons vegetable oil
Pizza Dough
Makes 14 ounces dough to make:
One 15-inch pizza -or-
3/4 teaspoon active dry yeast
1/4 teaspoon granulated sugar
1/4 cup warm water (105°-110°F, test
using instant read thermometer)
1-1/2 cups all-purpose flour
Two 8 -10-inch pizzas -or-
Four 5 - 6-inch pizzas
Combine yeast, sugar and warm water in a 1-cup liquid measure with pour spout. Stir to combine
and let stand until the mixture is foamy, about 5 minutes. (Note: If the mixture does not become
foamy, the yeast is not active, discard and begin again with fresh yeast.)
Insert metal blade. Place flour, salt and oil in work bowl. Process 5 seconds to combine. Scrape
work bowl. Add cold water to yeast mixture; stir. With the machine running, add the yeast mixture
in a steady stream, as fast as the flour will absorb it. When the mixture forms a ball, process for
one minute to knead. Remove dough, dust lightly with flour and place in a 1-quart resealable food
storage bag. Press out air and seal. Let dough rise in a warm, draft-free place until doubled in size,
about 1 hour.
Nutritional information per serving:
Calories 203 (17% from fat) • carb. 36g • pro. 5g • fat 4g • sat. fat 1g • chol. 0mg
• sod. 295mg • calc. 8mg • fiber 1g
1 clove garlic, peeled
1 can (14 – 15 ounces) tomatoes in
thick juice/sauce
3 tablespoons sodium-free tomato
paste
1/2 teaspoon salt
1 tablespoon olive oil
1/4 cup cold water
1/2 teaspoon basil
1/2 teaspoon oregano
1/4 teaspoon thyme
1/4 teaspoon red pepper flakes
(optional, for a spicier sauce)
22
Page 13

Quick & Simple Pizza Sauce
Makes 2 cups sauce (use 1/2 cup for each 15-inch pizza), sauce may be frozen
Insert metal blade. With machine running, drop garlic through feed tube and process 5 seconds.
Scrape work bowl. Add tomatoes with juice, tomato paste, basil, oregano, thyme, and red pepper
flakes if using. Pulse 10 to 15 times to chop and blend sauce. If sauce is too chunky for your taste,
process until desired consistency is reached.
Cook’s Tip: Freeze remaining sauce in ?-cup portions to have ready to make pizzas.
Nutritional information per serving:
Calories 8 (3% from fat) • carb. 2g • pro. 0g • fat 0g • sat. fat 0g • chol. 0mg
• sod. 35mg • calc. 8mg • fiber 1g
White Wheat Baguette
This bread has a crunchy, crispy crust with a dense chewy interior.
Makes one baguette, about 12 ounces.
2-1/4 teaspoons active dry yeast (1 packet)
1/4 teaspoon granulated sugar
3 tablespoons warm (110° F) water
1 cup bread or all-purpose flour
Stir yeast and sugar into warm water in a 1-cup liquid measuring cup with pour spout.Let stand
until foamy, 3 to 5 minutes.
Place both flours and salt in work bowl fitted with metal blade, process 10 seconds to combine.
Add cold milk to foamy yeast mixture and stir to blend with a fork. With the machine running, add
the liquid in a steady stream, as fast as he flour absorbs it. Process until dough forms a ball, then
process 45 seconds longer to knead dough. (If too dry, add cold water, one teaspoon at a time,
processing 10 seconds after each addition. If too wet/sticky, add bread/all-purpose flour one tablespoon at a time, processing 10 seconds after each addition.) Remove dough, shape into a ball,
and dust lightly with 1 teaspoon of flour. Place in a resealable 1-quart food storage bag, press out
air, and seal tightly. Let dough rise in a warm, draft-free spot, until doubled in volume, about 1 hour.
Punch dough down to deflate; let rest 10 minutes. Roll dough into a rectangle, the roll up from the
long side jelly-roll style. Pinch seam and ends to seal. Roll to length of about 12 to 14 inches.
Place on a parchment lined baking sheet and dust loaf lightly with remaining flour. Cover loosely
with a sheet of plastic wrap that has been coated lightly with cooking spray. Let rise in a warm,
draft-free spot, until doubled in volume, about 1 hour.
1/2 cup whole wheat flour
3/4 teaspoon salt
1/2 cup cold lowfat milk
3 teaspoons flour for dusting, divided
Cherry Walnut Cinnamon Buns
You may substitute chopped dried apricots for the cherries and almonds for the walnuts.
3/4 teaspoon active dry yeast
2 tablespoons warm (110° F) water
4 teaspoons granulated sugar, divided
3 tablespoons packed brown sugar
1 teaspoon ground cinnamon
1/4 cup walnut halves
1-1/2 cups all-purpose flour
1 tablespoon lowfat cream cheese
Stir yeast and 1 teaspoon of the granulated sugar into warm water in a 1-cup liquid measure with
pour spout. Let stand until foamy, 5 to 10 minutes. Insert metal blade. Place the brown sugar and
cinnamon in work bowl and process 10 seconds. Add walnuts and pulse to chop, 5 times; remove
and reserve. Add 1/2 cup cold milk to yeast mixture and stir to blend.
Place flour, remaining granulated sugar, cream cheese and salt in work bowl; process 10 seconds.
With machine running, add yeast mixture in a steady stream, as fast as the flour will absorb it.
Process until dough forms a ball, then process 45 seconds to knead dough. Remove dough and
gather into a ball – dough will be slightly sticky. Dust lightly with flour and place in a 1-quart resealable food storage bag; press out air and seal tightly. Let dough rise in a warm, draft-free place,
until doubled in volume, about 1 hour. Place cherries in a small, heatproof bowl and cover with 1/2
cup boiling water. Let stand 15 minutes. Drain and pat dry. Lightly coat an 8-inch square baking
pan with cooking spray.
Punch dough down to deflate; let rest 10 minutes. On a lightly floured surface, roll the dough into a
rectangle 14 x 7-inches. Brush dough with melted butter all the way to the short sides, but leaving
a 1/2-inch border on each of the long sides. Sprinkle the buttered area evenly with the brown
sugar/walnut mixture; distribute the drained and dried cherries evenly over the sugared area.
Brush unbuttered edges with water. Roll from one long side jelly-roll style. Pinch seam to seal.
Use a serrated knife to cut the roll into 9 pieces, each about 1-1/2 inches in length. Place the rolls
in the prepared pan, cut side up. Cover with plastic wrap and place in a warm, draft-free place, until
nearly doubled in volume, about 1 hour. Fifteen minutes before baking, preheat oven to 350°F.
When ready, brush tops with remaining tablespoon milk. Bake in preheated 350°F oven for 25 to
30 minutes until golden brown and puffed. Let cool on a rack for 15 minutes. Drizzle with
Powdered Sugar Glaze. Serve warm. (May be made ahead – do not glaze. Reheat, covered with
foil in a 225°F oven for 20 to 30 minutes, then glaze and serve.)
Makes 9 buns, about 2-1/2 inches each.
1/8 teaspoon salt
1/2 cup + 1 tablespoon lowfat milk
1/4 cup dried tart cherries (may substitute
raisins)
1/2 cup boiling water
1-1/2 tablespoons unsalted butter, melted
cooking spray
Powdered sugar glaze (recipe follows)
About 15 minutes before baking, preheat oven to 425° F. Use a serrated knife to make 4 diagonal
slits about 1/4-inch deep across the loaf. Place in oven and bake until browned and crusty, about
20 to 25 minutes. Bread will sound hollow when tapped. Transfer to a rack to cool. For best results,
allow to cool for 20 to 30 minutes before slicing.
Nutritional information per 2-ounce serving:
Calories 122 (8% from fat) • carb. 23g • pro. 5g • fat 1g • sat. fat 0g • chol. 2mg
• sod. 308mg • calc. 37mg • fiber 2g
23
Powdered Sugar Glaze
1/3 cup powdered sugar
1/2 teaspoon vanilla extract
Insert metal blade in work bowl. Place powdered sugar, vanilla and 2 teaspoons of the milk in
work bowl. Process until smooth, about 15 to 20 seconds. If too thick to drizzle, add remaining
teaspoon milk.
Nutritional information per bun:
Calories 172 (22% from fat) • carb. 30g • pro. 4g • fat 4g • sat. fat 2g • chol. 7mg
• sod. 47mg • calc. 39mg • fiber 1g
2-3 teaspoons lowfat milk
24
Page 14

Lemon Macadamia Nut Bread
Makes 10 slices (about 3/4-inch thick)
Our quick and easy version of a classic favorite. For a change,
Glaze:
3 tablespoons fresh lemon juice
1/4 cup granulated sugar
Bread:
cooking spray
3/4 cup all-purpose flour
1/2 teaspoon baking powder
1/4 teaspoon salt
2 strips lemon zest/peel, 2 x 1/2-inch,
bitter white pith removed
Preheat oven to 350° F. Lightly coat a 7-1/2 x 3-3/4 x 2-1/4 -inch loaf pan with cooking spray.
Insert the metal blade. Place the flour, baking powder and salt in the work bowl and process 5 sec-
onds; remove and reserve. Cut the lemon peel into 1-inch pieces and place in work bowl with 1/4
cup of the sugar. Process until zest is finely chopped about 1 minute. Add remaining 1/4 cup sugar
and butter; process until creamy, 20 to 30 seconds. Add egg, process 10 seconds; scrape work
bowl. Add yogurt; process 10 seconds – mixture will look slightly curdled. Spoon flour mixture then
macadamia nuts over creamed mixture. Pulse until flour just disappears, 5 to 6 pulses. Do not
over process. Spoon into prepared pan and level top. Bake in preheated 350° F oven for 35 to
40 minutes, until bread is light golden brown and a tester comes out clean when inserted in the
center. While bread is baking, stir lemon juice and sugar for glaze together until sugar is dissolved.
Spoon the glaze over the hot bread a little at a time, allowing the glaze to absorb before adding
more. Let stand until glaze is completely absorbed, then remove from pan and let cool completely
on a wire rack. This bread is actually better the second day. Wrap tightly in plastic wrap to store.
try the Orange Ginger version.
1/2 cup granulated sugar
3 tablespoons unsalted butter, cut in
1/2-inch pieces
1 large egg
2 tablespoons fat free plain yogurt
1/3 cup unsalted, lightly toasted
macadamia nuts
Orange Ginger Variation:
Use orange zest and orange juice in place of lemon. Substitute crystallized ginger that
has been cut in 1/2-inch pieces for the nuts. For more orange flavor, add 1/3 teaspoon
orange flower water (available in specialty food shops) to batter when adding yogurt.
Nutritional information per serving:
Calories 164 (39% from fat) • carb. 23g • pro. 2g • fat 7g • sat. fat 3g • chol. 31mg
• sod. 79mg • calc. 13mg • fiber 1g
25
Cranberry Pistachio Scones
Cranberry Pistachio Scones are very good served with clotted cream or butter and mar-
malade. You may substitute walnuts, pecans, almonds, or hazelnuts for the pistachios.
Makes 8 scones
1/3 cup dried cranberries
1/2 cup boiling water
2 tablespoons packed brown sugar
1-1/3 cups all-purpose flour
2 teaspoons baking powder
1/8 teaspoon salt
Pour the boiling water over the cranberries in a small heatproof bowl. Let stand 10 minutes to
plump. Preheat oven to 375° F. Line a baking sheet with parchment paper. Drain cranberries and
pat dry, reserve.
Insert the metal blade. Place the brown sugar in the work bowl. Pulse to break up, 10 times. Add
flour, baking powder and salt. Process to blend, 10 seconds. Add cold butter pieces, process until
mixture resembles a coarse meal, 30 seconds. Add yogurt, cranberries and pistachios to work
bowl. Pulse until just incorporated, about 5 to 10 pulses. Turn dough out onto a lightly floured work
surface. With lightly floured hands, turn dough to knead, 4 times. (Press dough flat, fold, press flat
again, repeat for a total of 4 times.) Roll dough into a circle, 7 inches in diameter, 3/4-inch high.
Use a serrated knife or pizza cutter to cut dough into 8 wedges. Place the wedges on the prepared
baking sheet in a circle with the wedges about 1/2-inch apart. Brush lightly with milk and sprinkle
lightly with granulated sugar. Bake in preheated oven for 25 to 30 minutes, until golden and firm,
but not dry. Let cool on a rack for 10 minutes before serving.
Nutritional information per serving:
Calories 192 (38% from fat) • carb. 26g • pro. 4g • fat 8g • sat. fat 4g • chol. 16mg
• sod. 108mg • calc. 43mg • fiber 1g
4 tablespoons cold unsalted butter, cut
into 1/2-inch pieces
2/3 cup fat free vanilla yogurt
1/4 cup shelled pistachios
milk for brushing
granulated sugar for sprinkling
Fluffy Buttermilk Biscuits
Hot fluffy biscuits for breakfast or dinner are easy with the Little Pro.
Makes eight 2-inch biscuits
1-1/8 cups all-purpose flour
1-1/4 teaspoons baking powder
1/4 teaspoon baking soda
1/4 teaspoon salt
Preheat oven to 425°F. Line a baking sheet with parchment paper.
Insert metal blade. Place flour, baking powder, baking soda, and salt in work bowl. Process
5 seconds. Add butter and shortening to work bowl. Pulse 10 times, the process until the mixture
resemble coarse corn meal, about 30 seconds. Scrape work bowl. Drizzle buttermilk over flour
mixture. Process until the mixture just forms clumps, about 5 seconds, do not let form a ball.
Turn out onto a lightly floured surface. With floured hands gather and press into a ball. Flatten,
fold and turn 4 times to knead. Roll out into an 8 x 4-inch rectangle. Use a floured 2-inch round
biscuit/cookie cutter to cut into 8 biscuits. Place on parchment lined baking sheet and brush with
milk. Bake until puffed and lightly browned, 10 to 12 minutes. Fluffy biscuits are best served hot
or warm.
4 tablespoons cold unsalted butter, cut
in 1/2-inch pieces
5 tablespoons buttermilk
2 teaspoons milk
26
Page 15

Calories 120 (46% from fat) • carb. 14g • pro. 2g • fat 6g • sat. fat 4g • chol. 16mg
Nutritional information per serving (1 biscuit):
• sod. 155mg • calc. 17mg • fiber 0g
Double Chocolate Brownies with Walnuts
Rich, fudgy and very satisfying, these yummy brownies take just minutes to prepare in
your Cuisinart
Makes 25 brownies, each about 1-1/2 inches square.
8 tablespoons unsalted butter, melted
and hot
3 ounces unsweetened chocolate, cut
into 1/2 -inch pieces
1 teaspoon instant espresso powder
1/2 cup granulated sugar
1/2 cup packed dark or light brown sugar
®
Food Processor.
2 large eggs
1 teaspoon pure vanilla extract
1/3 cup all-purpose flour
1/3 cup walnut halves and pieces
1/3 cup milk chocolate morsels
Preheat oven to 350° F. Lightly coat six 1/2-cup muffin/cupcake tins with cooking spray.
Insert metal blade. Place flour, salt and baking powder in work bowl; process 5 seconds.
Remove and reserve.
Pulse/chop chocolate and 1/4 cup sugar 8 times, then process until chopped finely, about 45 sec-
onds. Bring water and butter to boil in small saucepan or in the microwave. With machine running,
pour liquid through feed tube and process 15 seconds, until smooth. Stir together buttermilk, egg
and vanilla extract. With machine running, add to chocolate mixture, 5 seconds. Scrape work bowl.
Add reserved dry ingredients; process until just blended, about 10 seconds. Do not over process.
Divide batter among tins and bake until toothpick inserted in center comes out clean, 20 to 25 minutes. Cool in tins for 10 minutes. Gently loosen cupcakes and remove from tin. Transfer to wire
racks to cool completely before frosting. Frost with chocolate frosting if desired.
Nutritional information per cupcake (unfrosted):
Calories 177 (37% from fat) • carb. 26g • pro. 3g • fat 8g • sat. fat 4g • chol. 46mg
• sod. 123mg • calc. 19mg • fiber 1g
Preheat oven to 350° F. Brush an 8-inch square baking pan with some of the melted butter. Fold a
sheet of aluminum foil so that it is 8 inches wide by 15 inches long. Place it in the baking pan so
that the long ends extend over two opposite sides of the pan and fold the excess down the outside
edge. Brush the foil bottom and sides.
Place the unsweetened chocolate and espresso powder in the work bowl of the processor. Using
long pulses, pulse to chop the chocolate, 10 times. With the machine running, add the hot butter
through the feed tube in a steady stream and process until chocolate is melted. Scrape work bowl
and lid. Add sugars to work bowl. Process until smooth, about 10 seconds. Place eggs and vanilla
in a liquid measuring cup with pour spout, stir with a fork to blend. With the machine running, add
the egg mixture in a steady stream, process 10 seconds. Scrape the work bowl. Place the flour,
nuts and chocolate morsels on top of the chocolate mixture. Pulse until just combined, 4 to 6
times. Do not over process. Transfer the mixture to the prepared baking pan. Use a spatula to
smooth the top. Bake in the preheated 350° F oven for about 35 to 40 minutes, until top is somewhat shiny and just beginning to crack. Cool on a rack for 10 minutes, then loosen the foil sides
and use them to lift the brownies out of the pan. Cool completely on a rack before cutting.
Cut into 25 squares.
Nutritional information per serving (1 brownie):
Calories 120 (55% from fat) • carb. 13g • pro. 1g • fat 8g • sat. fat 4g • chol. 28mg
• sod. 7mg • calc. 11mg • fiber 1g
Chocolate Cupcakes
Quick comfort food.
Makes 6 cupcakes.
cooking spray
1/2 cup all-purpose flour
1/4 teaspoon salt
1/8 teaspoon baking powder
1 ounce unsweetened chocolate, cut in
1/2-inch pieces
1/2 cup sugar
27
3 tablespoons water
2 tablespoons unsalted butter
3 tablespoons buttermilk
1/2 teaspoon pure vanilla extract
1 large egg
Chocolate Frosting
Makes about 3/4 cup
1-1/2 cups powdered sugar
1/4 cup unsweetened cocoa powder
3 tablespoons unsalted butter, cut in
1/2-inch pieces, at room temperature
Insert metal blade. Place powdered sugar and cocoa in work bowl. Pulse to sift, 10 times. Add
butter. Process 10 seconds. Combine 2-1/2 tablespoons of the milk with vanilla. With machine
running, add milk mixture in a steady stream. Process until smooth and creamy, adding additional
milk 1 teaspoon at a time until frosting is of spreading consistency.
Nutritional information per serving:
Calories 160 (34% from fat) • carb. 27g • pro. 1g • fat 7g • sat. fat 4g • chol. 17mg
• sod. 6mg • calc. 15mg • fiber 1g
2-3 tablespoons milk
1/2 teaspoon pure vanilla extract
pinch salt
Apple Streusel Pie
For the pastry:
1-1/4 cups all-purpose flour
1 tablespoon granulated sugar
1/4 teaspoon salt
1/2 cup (1 stick / 4 ounces) cold unsalted
butter, cut in 1/2-inch pieces
2 tablespoons cold vegetable shorten-
ing, cut in 1/2-inch pieces
3-4 tablespoons ice cold water
28
Page 16

For the streusel topping:
1/2 cup packed brown sugar
1/2 cup all-purpose flour
1/2 cup rolled oats (old-fashioned, not
quick cooking)
5 tablespoons cold unsalted butter, cut
in 1/2-inch pieces
1/2 cup walnut halves/pieces
Nutritional information per serving (one slice):
Calories 387 (41% from fat) • carb. 42g • pro. 4g • fat 18g • sat. fat 9g • chol. 34mg
• sod. 55mg • calc. 26mg • fiber 3g
Creamy Cheesecake with Walnut Crumb Crust
For the apple filling:
1-1/2 tablespoons fresh lemon juice
2 pounds apples (see note), peeled,
cored and quartered
2/3 cup granulated sugar
1/4 cup all-purpose flour
1 teaspoon cinnamon
1/2 teaspoon ginger
1/4 teaspoon freshly ground nutmeg
1/2 cup raisins or dried cranberries
(optional)
For the pastry:
Insert the metal blade. Place the flour, sugar and salt in the work bowl. Pulse to combine, 3 times.
Add cold butter and shortening. Pulse until the mixture resembles coarse crumbs, but still has
small pieces of butter visible, 15 one-second pulses. Sprinkle the mixture with 3 tablespoons of the
ice water and process just until it begins to clump together. If the mixture seems too dry, add just
enough of the remaining water to form the clumps. Turn the dough out onto work surface and form
a ball. Flatten into a disc, 6 inches in diameter. Cover and refrigerate at least 30 minutes before
rolling out.
For the Streusel Topping:
Insert the metal blade. Pulse to break up the brown sugar, 4 to 5 times. Add flour, oatmeal and
sugar to work; pulse 5 times. Add cold butter pieces and nuts, pulse 15 one-second pulses.
Transfer to a small bowl and work the mixture with fingers until it is large crumbs. Reserve.
For the Apple Filling:
Assemble the white chute bowl fitted with the slicing disc. Arrange a bowl under the chute. Add the
lemon juice to the bowl. Place the apple quarters in the feed tube. Use medium pressure to slice.
Toss the apples in the juice to coat. Add sugar, flour, spices, and raisins or cranberries if using.
Toss apples gently but thoroughly to combine.
Makes one 8-inch cheesecake, 6 to 8 servings
15 2-1/2 -inch low fat graham cracker
squares, broken in quarters
1/8 cup walnuts
1/2 teaspoon ground cinnamon
1-1/2 tablespoons unsalted butter, cut into 6
pieces
2/3 cup sugar
2 large eggs
1-1/2 teaspoons pure vanilla extract
1/2 teaspoon almond extract
2/3 cup fat free sour cream
12 ounces lowfat cream cheese, cut in
1-inch pieces
Preheat oven to 375° F.
Insert the metal blade. Place the broken graham crackers in the work bowl and pulse to break up,
10 times. Add walnuts and cinnamon to work bowl, pulse 12 to 15 times. With machine running,
drop butter through the feed tube and process until the mixture is coarse buttered crumbs.
Reserve 1/4 cup of the crumb mixture and press the remaining crumbs into the bottom of an 8-inch
springform or cheesecake pan. Bake for 7 minutes. Remove and let cool completely (may place in
freezer to speed cooling process). When cool, wrap pan with heavy duty aluminum foil so that it
comes up the sides of the pan.
Wipe work bowl and blade clean with a paper towel. Place cream cheese and sugar in work bowl.
Process until smooth, 15 to 20 seconds. Scrape work bowl. Add eggs, vanilla and almond extracts
to work bowl. Process until smooth, 20 seconds. Scrape work bowl. Add sour cream to work bowl.
Process until blended, 20 seconds. Pour the cheesecake batter into the cooled, wrapped pan.
Sprinkle the reserved crumb mixture evenly over the top. Place in an aluminum baking pan that is
at least 10 inches in diameter. Add hot water to the pan to a depth of 1/2 inch. Bake in the preheated oven for 1 hour and 30 minutes. Cheesecake will be lightly colored, sides will be firm, but
center will be jiggly. Remove from the pan of hot water and remove foil. Place on a wire rack to
cool completely, then wrap in plastic wrap and refrigerate at least 8 hours or overnight before
unmolding. Serve in wedges.
To assemble and bake the pie:
Arrange rack in lower third of oven. Preheat oven to 400°F. Dust the chilled dough lightly with flour
and place on a lightly floured surface. Roll the dough into a 15-inch round, rolling from one edge to
the opposite edge, rotating the dough as you go, and adding just enough flour to keep it from sticking to the counter or pin. Do not roll back and forth. When it has been rolled to size, gently fold it in
half, then in half again. Lift carefully and center in a 9-inch pie plate. Unfold, and let the pastry settle into the pan. Trim edges to an even ?-inch overhang. Brush rim of pastry with water and fold in;
press and seal. Use fingers or fork to crimp decoratively. Fill evenly with apple mixture, pressing
apple mixture lightly to remove air pockets. Top evenly with streusel topping. Place pie on rack in
preheated oven (may place foil or baking sheet on rack underneath to catch drips). Bake in preheated 400° F oven until browned and bubbly, about 55 to 60 minutes. If crust or topping appears
to brown to quickly, cover loosely with a sheet of foil. Let cool for at least 1 hour on a rack before
serving.
29
Nutritional information per serving (based on 8 servings):
Calories 283 (40% from fat) • carb. 34g • pro. 8g • fat 13g • sat. fat 6g • chol. 76mg
• sod. 372mg • calc. 157mg • fiber 1g
30
Page 17

Cuisinart offers an extensive assortment of top quality products to make life in
the kitchen easier than ever. Try some of our other countertop appliances and
cookware, and Savor the Good Life
®
.
www.cuisinart.com
Coffeemakers
Food
Processors
Toaster Ovens Blenders
Cookware
Ice Cream
Makers
© 2003 Cuisinart
Cuisinart® is a registered trademark of
Cuisinart
150 Milford Road
East Windsor, NJ 08520
Printed in China
02CU13467
IB-4528
 Loading...