

Page 1
TM
INSTRUCTION
AND RECIPE
BOOKLET
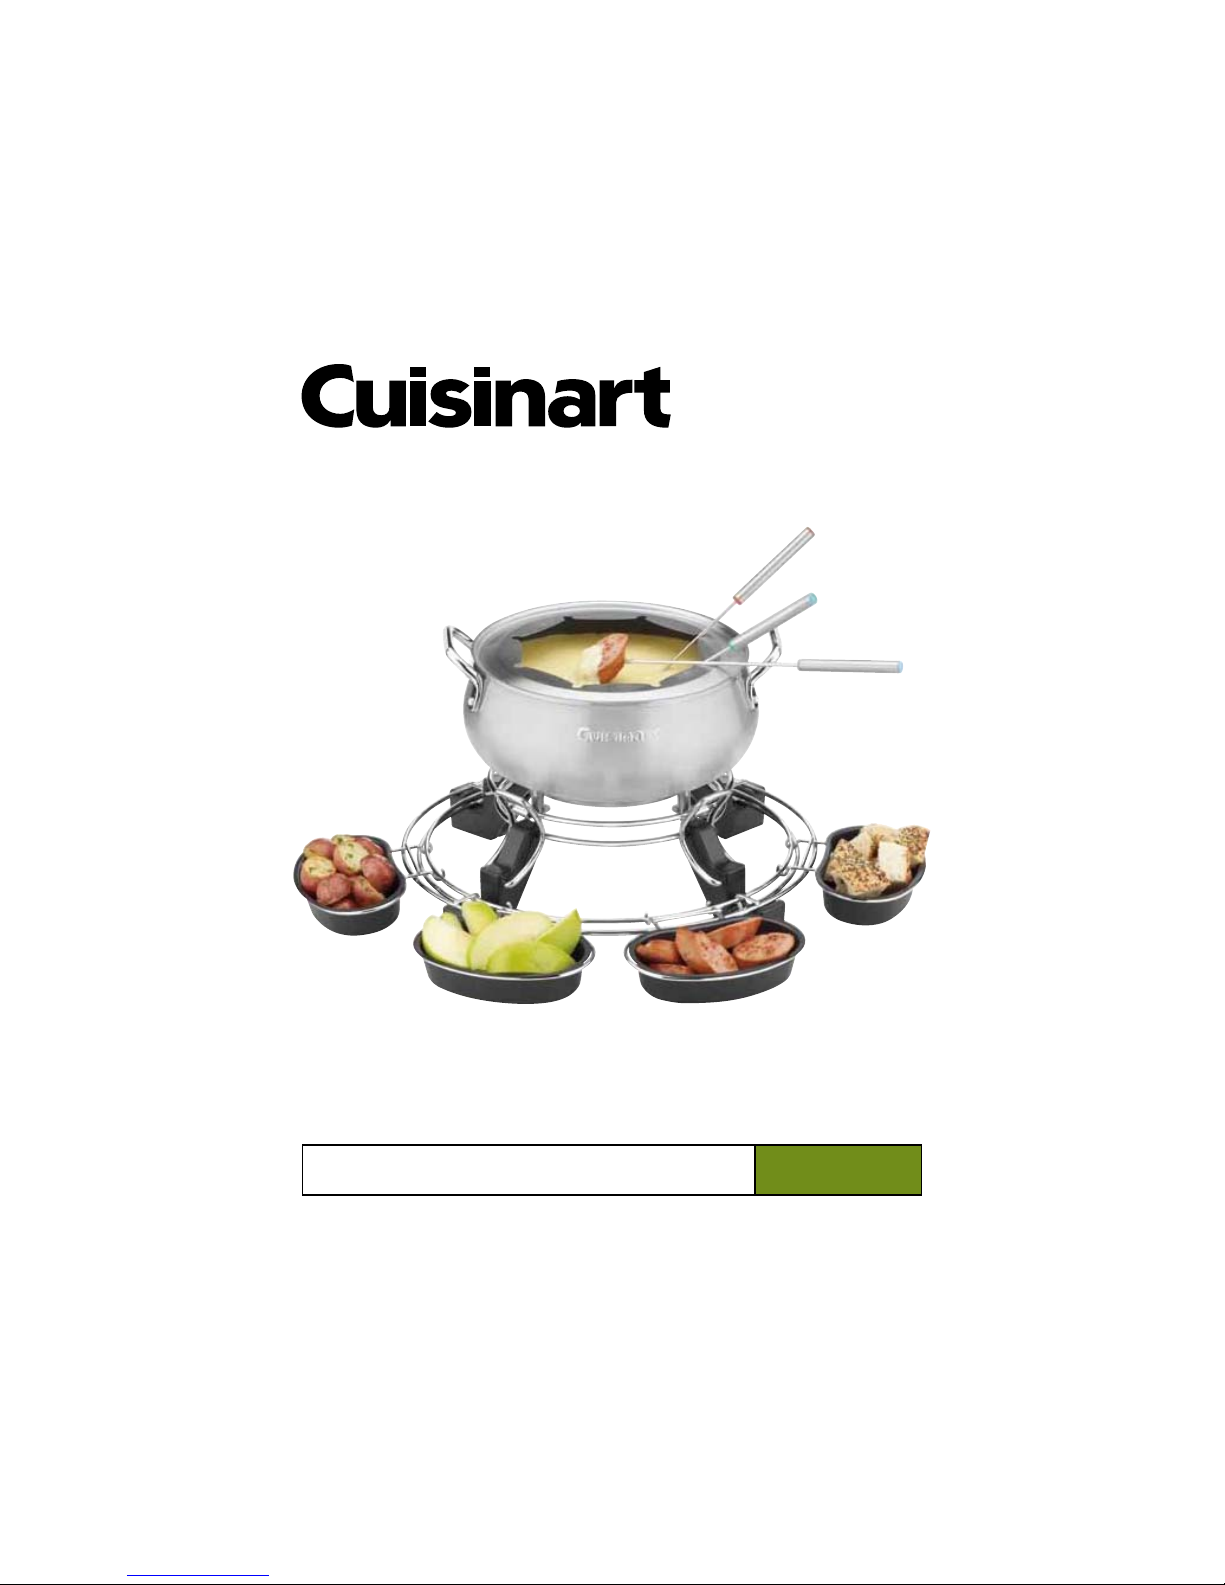
Lazy Susan Electric Fondue
CFO-1000C
For your safety and continued enjoyment of this product,
always read the instruction book carefully before using.
Page 2

2 3
IMPORTANT
SAFEGUARDS
When using an electrical appliance, basic safety
precautions should always be followed, including
the following:
1. READ ALL INSTRUCTIONS BEFORE
USING.
2. Unplug from outlet when not in use and
before cleaning. Allow to cool before
putting on or taking off parts, and before
cleaning the appliance.
3. Do not touch hot surfaces. Use handles.
4. Always use hot pads when handling a hot
fondue pot.
5. Do not immerse temperature control probe
or magnetic cord in water or other liquids.
6. Close supervision is necessary when any
appliance is used near children.
7. If the fondue maker has a damaged cord or
plug or malfunctions, DO NOT OPERATE.
Return appliance to the nearest authorized
service facility for examination repair, or
electrical or mechanical adjustment.
8. Using accessory attachments not sold or
recommended by Cuisinart can cause fire,
electric shock or injury.
9. Do not use outdoors.
10. Do not let cord hang over the edge of
counter, or touch hot surfaces.
11. Do not place on or near a hot gas or
electric burner, or in a heated oven.
12. Extreme caution must be used when
moving fondue containing hot oil or other
hot liquids.
13. Always attach temperature control probe
and magnetic cord to appliance first, then
plug cord in the wall outlet. To disconnect,
turn control to OFF, then remove plug from
wall outlet.
14. Do not use appliance for other than
intended use.
15. When making oil fondue, only the handle of
the fondue fork remains cool to the touch.
Take care not to eat directly off the fork
after removing it from hot oil.
16. Be sure handles are secure and
properly attached to bowl.
17. For oil fondues, do not fill fondue with more
than 3½ cups (875 ml) oil.
18. Use only on heat-resistant surfaces.
19. Do not use more than eight fondue forks at
once when cooking in hot oil.
20. A fondue containing hot oil should not be
left unattended.
21. Do not operate your appliance in an
appliance garage or under a wall cabinet.
When storing in an appliance garage
always unplug the unit from the electrical
outlet. Not doing so could create a risk of
fire, especially if the appliance touches the
walls of the garage or the door touches the
unit as it closes.
SAVE THESE
INSTRUCTIONS
FOR HOUSEHOLD
USE ONLY
SPECIAL CORD SET
INSTRUCTIONS
Do not immerse temperature control probe in
water or any liquid.
This product contains no user-serviceable
parts. Temperature control probe does not
need lubrication. Do not attempt to service this
product. A short power supply cord is provided
to reduce the risk resulting from becoming
entangled in or tripping over a longer cord.
An extension cord may be used with care.
However, the marked electrical rating of the
extension cord should be at least as great as
the electrical rating of the fondue pot. The
extension cord should not be allowed to drape
over the counter or tabletop where it can be
pulled on by children or animals, or tripped
over unintentionally.
NOTICE
This appliance has a polarized plug (one blade
is wider than the other). To reduce the risk of
electric shock, this plug will fit in a polarized
outlet only one way. If the plug does not fit fully
in the outlet, reverse the plug. If it still does not
fit, contact a qualified electrician. Do not modify
the plug in any way.
UNPACKING INSTRUCTIONS
1. Place the box on a large, sturdy, flat
surface.
2. Open the box and remove the instruction
book and any other literature.
3. Slide the packing materials, fondue pot and
accessories out of the box.
4. Remove all other parts packed in pulp mold
and remove packing materials surrounding
those parts. Be sure to check all packing
materials for all parts listed in the Parts
and Features section on page 4 before
discarding.
5. Remove any protective or promotional labels
from your fondue pot and other parts.
TABLE OF CONTENTS
Important Safeguards ...................................... 2
Unpacking Instructions .....................................3
Preparing Your Fondue Pot for Use ................ 3
Parts and Features ........................................... 4
Assembly Instructions ....................................... 5
Operating Instructions ...................................... 5
Suggested Temperatures for Fondues ............ 6
Using Your Fondue Pot with Cheese ................ 6
Using Your Fondue Pot with Oil ........................ 7
Using Your Fondue Pot with Broth ...................7
Using Your Fondue Pot with Chocolate ............7
Cleaning and Maintenance .............................. 8
Recipes ............................................................. 9
Warranty ......................................................... 20
PREPARING YOUR
FONDUE POT FOR USE
Wash fondue pot, removable Lazy Susan ring,
glass lid, serving cups, brackets, forks, and fork
ring in hot, soapy water, or in the dishwasher.
Rinse thoroughly and dry.
CAUTION: Do not wash or immerse the
temperature control probe.
INSTRUCTIONS FOR USE
Set FONDUE POT on a flat, dry, heatresistant
surface. Set TEMPERATURE CONTROL PROBE
to OFF and plug probe into TEMPERATURE
PROBE RECEPTACLE on FONDUE POT.
Be sure the cord is installed in the socket.
Plug cord into 120 Volt AC outlet.
Preheat if necessary. Turn TEMPERATURE
CONTROL DIAL to desired temperature.
INDICATOR LIGHT will turn on and then go off
when selected temperature is reached. During
cooking, the light will cycle ON and OFF to indicate that the temperature is being regulated.
Use the FONDUE FORKS to spear foods for
cooking or dipping. Be careful not to scratch
the nonstick surface when placing FORKS in
FONDUE POT.
NOTE: When ingredients are stirred in the
FONDUE POT, use plastic, nylon or wooden
utensils to prevent damage to nonstick
surface.
After cooking or serving, turn TEMPERATURE
CONTROL DIAL to OFF. Unplug cord from wall
outlet. After FONDUE POT has cooled, remove
TEMPERATURE CONTROL PROBE.
Page 3
4 5
ASSEMBLY INSTRUCTIONS
1. Place fondue pot and all removable parts
on a clean, dry, flat surface. Make sure all
parts have been cleaned and dried
thoroughly before assembling.
2. Using two hands, firmly hold the Lazy Susan
ring with hands on opposite sides.
Note: The ring must be positioned with the
upper tier (2 rings) on top, and the lower tier
(1 ring) on the bottom.
3. Lower the Lazy Susan ring over the pot
and onto the feet. The outer ring of the top
tier should rest on the upper grooves of the
feet. The single ring of the lower tier ts into
the lower grooves on the feet. Press down
on the ring with both hands to snap the
lower tier ring into place under the ring
support tabs.
4. Attach the serving cup brackets to the Lazy
Susan ring by taking each bracket and
holding it face up and flat.
Note: The bracket is positioned correctly if
the hooks on the end are in a “U” shaped
position.
5. Tilt the serving cup bracket on an angle
so that the “U” shaped hook fits between
the upper tier of the Lazy Susan ring.
6. Set the serving bracket in place by
notching the “U” shaped hooks onto the
most interior position of the upper tier.
7. Place your serving cup in the bracket so
that it fits easily.
Note: To add more serving cups with
brackets, repeat steps 4 to 6.
8. Position the fork ring on top of the unit so
that the rim of the ring sits firmly in place on
the edge of the fondue pot.
9. Assemble the power cord by inserting the
temperature control probe into the
temperature probe receptacle at the rear of
the fondue pot.
Note: Be sure to turn the temperature
control probe dial to the OFF position.
The fondue maker is now assembled for use.
OPERATING INSTRUCTIONS
1. Place fondue pot and all removable parts
on a clean, dry, at surface. Make sure
all parts have been cleaned and dried
thoroughly before assembling.
2. Plug the fondue maker into a 120 Volt AC
outlet.
3. Turn the temperature control dial to desired
setting. The indicator light will turn on,
staying on until selected temperature is
reached. During cooking, the light will
cycle ON and OFF to indicate that the
temperature is being regulated.
4. Once the temperature is reached, put
contents in fondue pot and cook for
designated amount of time.
5. Use the fondue forks to spear foods for
cooking or dipping when appropriate
temperature has been reached. Be careful
not to scratch the nonstick surface when
placing forks in fondue pot.
Note: When ingredients are being stirred in
the fondue pot, use plastic, silicone, nylon
or wooden utensils to prevent damage to
nonstick surface.
6. After cooking or serving is complete, turn
temperature control dial to OFF and unplug
cord from wall outlet. The glass lid may be
used to keep contents warm. NOTE: Lid
should never be on fondue pot during the
cooking process and NEVER used with oil
fondues.
7. After fondue pot has cooled, remove
temperature control probe.
Warning: Always disconnect plug from wall
outlet to disconnect unit.
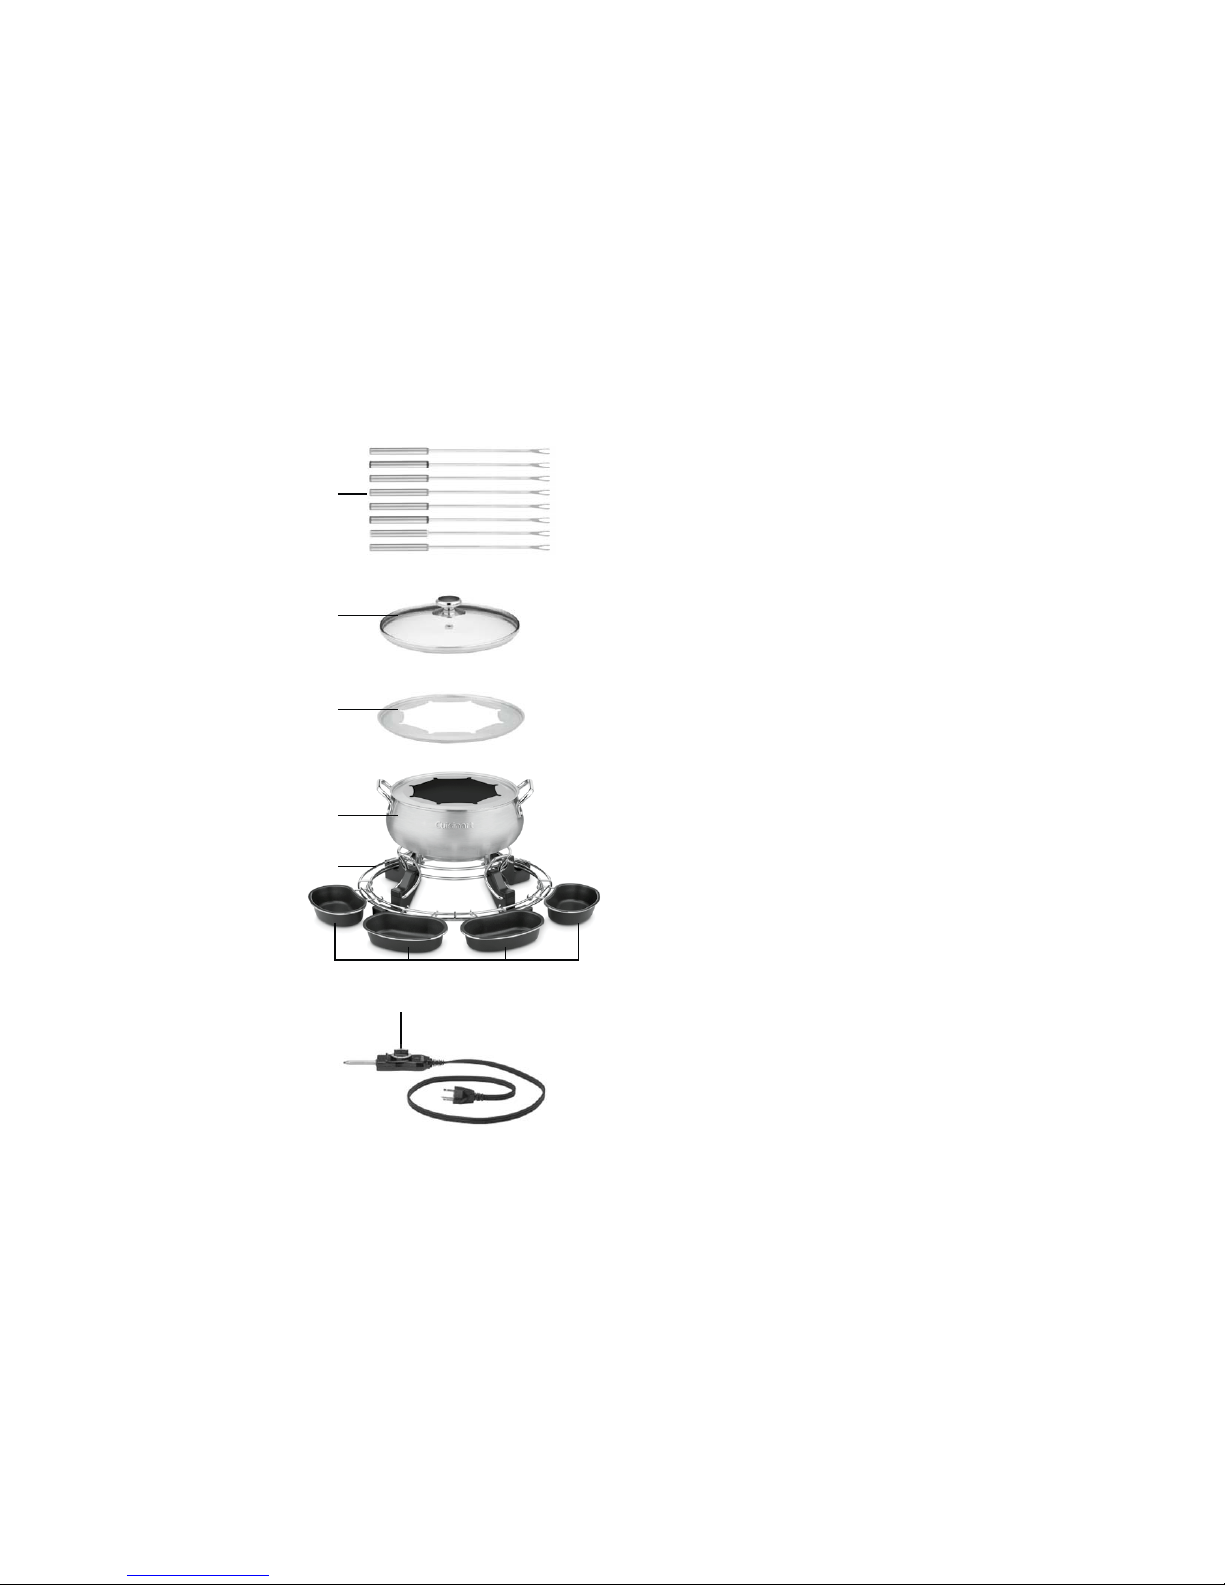
PARTS AND FEATURES
1. Stainless Steel Fondue Forks
Eight individually coloured forks to pierce
food for dipping.
2. Glass Lid Cover
Keeps contents in pot warm.
3. Fork Ring
Sits on top of the fondue pot and is
notched to hold fondue forks.
4. Brushed Stainless Steel Fondue Pot
Three-quart stainless steel pot with
nonstick interior holds fondue.
5. Temperature Probe Receptacle
(not shown)
6. Adjustable Temperature Control Probe
For selecting appropriate heat settings.
7. Removable Lazy Susan Ring
Easily rotates serving cups around
fondue pot.
8. Serving Cups with Brackets
Four serving cups rest inside brackets
that hook onto the Lazy Susan ring. Cups
are designed to hold food for dipping.
9. BPA-free (not shown)
All materials that come in contact with food
are BPA free.
6
8
1
2
3
4
7
Page 4

6 7
SUGGESTED
TEMPERATURES FOR
FONDUES
The temperature settings below are suggestions,
and may need to be adjusted up or down
according to initial temperature of ingredients
being cooked, and amount and temperature of
food being dipped or cooked at any given time.
USING YOUR FONDUE POT
WITH CHEESE
Begin by tossing finely shredded cheese with at
least 1 tablespoon (15 ml) of cornstarch. Pour
1 cup (250 ml) of liquid into the fondue pot and
turn to setting 4.5 to bring liquid to a simmer,
but not a boil. Once the liquid is just simmering, reduce temperature to 3.5 and add a small
amount of the cornstarch-coated cheese. Whisk
until it melts into the liquid. Continue, alternating
between shredded cheese and liquid, until all
cheese has been added and the desired
consistency has been achieved. In some cases,
you may not need all of the liquid in a recipe’s
list of ingredients.
If cheese ever seems like it is becoming clumpy
or stringy, put in a tablespoon (15 ml) of lemon
juice or cider vinegar. Once the preferred
consistency has been reached, stir together a
couple of tablespoons of liquid (either alcohol,
broth or lemon juice) and a tablespoon (15 ml)
of cornstarch (this is called a slurry). Whisk the
slurry into the fondue and allow to cook for a
minute or two. Reduce temperature to setting
3 for serving. The entire cooking process will
take 20 to 30 minutes, depending on the
ingredients being used.
Alcohol is used in cheese fondues for its flavour,
as well as the way it reacts with the proteins in
the cheese. It keeps cheese from separating or
clumping to create a very smooth fondue. That
being said, it is possible to make alcohol-free
versions without compromising flavour or
consistency. For alcohol-free options, substitute
the following for full amount of wine or beer:
Chicken stock or apple cider (depending on the
recipe), 2 to 4 tablespoons (30 to 60 ml)
of lemon juice or apple cider, and 2 to
4 tablespoons (30 to 60 ml) of apple cider
vinegar. Preparing fondue without alcohol takes
patience. You must add the shredded cheese
to hot liquid very slowly because cheese melts
more slowly in broth than in alcohol. Sprinkle in
no more than ¼ cup (60 ml) at a time. If it seems
like the mixture is breaking apart, add another
tablespoon of lemon juice or vinegar. If the recipe calls for adding more alcohol after
cooking, substitute 1 to 2 tablespoons (15 to 30
ml) of lemon juice or vinegar.
TIPS AND HINTS
r 'PSUIFCFTUDPOTJTUFODZVTFHPPENFMUJOH
cheeses: Gruyère, Emmenthaler, Fontina,
Cheddar, Monterey Jack, Swiss, Comté,
Raclette, Gouda, Edam.
r 8IFONBLJOHGPOEVFVTFBXJOFPSCFFS
that you would enjoy drinking because
taste and flavour are important. Sauvignon
Blanc or Pinot Grigio/Pinot Gris is a good
choice for making cheese fondue, as well as
Champagne or Prosecco.
r $IBSEPOOBZBOESFEXJOFTBSFOPU
recommended for fondue cooking because
the taste of chardonnay can be overwhelming,
and red wine lacks colour appeal.
r "MDPIPMJOUIFXJOFBOECFFSQSFWFOUTUIF
cheese in the fondue from breaking down
or becoming clumpy.
r 'POEVFTIPVMECFTFSWFEJNNFEJBUFMZBGUFS
being prepared. While it can be cooled down
and reheated, the consistency will be
compromised. If reheating, first bring to
room temperature; then turn to setting 4. Stir
continuously, allowing to warm until desired
consistency is reached, whisking in additional
liquid (alcohol or broth) as needed.
r %JQQJOHTVHHFTUJPOTJODMVEFDSVTUZCSFBE
cubes, grissini (breadsticks), bell peppers,
grape or cherry tomatoes, blanched broccoli or
cauliflower, steamed baby potatoes,
cornichons, pickled vegetables, carrots and
celery, and pretzels.
USING YOUR FONDUE POT
WITH OIL
Be sure fondue pot is completely dry before
filling with oil.
Fill fondue pot with 3½ cups (875 ml) of vegetable
or other comparable oil.
Note: Do not use more than 3½ cups (875 ml)
oil. Do not use butter, margarine, lard, olive oil or
shortening in place of vegetable oil. Never add
water or any other liquid to oil.
Place fork ring on top edge of fondue pot.
The fork ring holds fondue forks in place when
cooking foods in the hot oil. It also may prevent
some of the spattering during cooking.
Note: Do not place the glass cover over the
fondue pot when heating oil or cooking in oil.
Remove ice crystals or excess water on food
before cooking in oil by blotting with a paper
towel. Do not cook frozen vegetables in oil
fondue.
Heat oil at setting 7.5 for 10 to 15 minutes until
barely bubbling and oil reaches 375°F (190°C)
when tested with a candy thermometer or deep
fry thermometer, or a 1-inch (2.5 cm) cube of
bread can be cooked to a golden, toasty brown.
Note: If large quantities of cold food are added at
the same time, it may be necessary to increase
temperature from setting 7.5 to 8.
After cooking with oil, turn the temperature
control dial to Off. Allow fondue pot and fondue
ring to cool completely before handling and
cleaning.
TIPS AND HINTS
r Caution: Extreme caution must be used when
moving fondue pot containing hot oil or other
hot liquids. Cooking with hot oil is not
recommended when children are present.
Some spattering of oil can occur.
r %POPUQMBDFUIFHMBTTDPWFSPWFSUIFGPOEVF
pot when heating oil or coking in oil.
r /FWFSBEEXBUFSPSBOZPUIFSMJRVJEUPPJM
r 8IFOSFNPWFEGSPNUIFIPUPJMGPOEVFGPSLT
are extremely hot. Take care not to eat directly
from one of the fondue forks.
r "EKVTUUFNQFSBUVSFTFUUJOHBTOFFEFEUP
maintain oil temperature.
r %JQQJOHTVHHFTUJPOTJODMVEFTDBMMPQTTISJNQ
green beans, tofu, peppers, cauliflower,
carrots, and steamed potatoes.
r %JQQJOHTBVDFTBSFBHSFBUBDDPNQBOJNFOU
See page 17 for recipes.
USING YOUR FONDUE POT
WITH BROTH
r 8IFONBLJOHBCSPUIGPOEVFVTFBIPNFNBEF
stock that has been strained, or a flavourful
store-bought broth or stock.
r #FTVSFUIBUUIFCSPUIJTMPXJOTPEJVNm B
high-sodium stock will become more
concentrated as the stock or broth cooks.
r 4FBTPOCSPUITXJUITQJDFTPSGSFTIIFSCTGPS
flavourful dipping.
r ,FFQBEEJUJPOBMIPUTUPDLPSCSPUIBWBJMBCMFUP
add to the fondue pot as necessary.
r %JQQJOHTVHHFTUJPOTJODMVEFUIJOMZTMJDFENFBUT
(chicken, pork and/or beef); scallops; shrimp;
zucchini or summer squash; mushrooms; and
tofu.
r %JQQJOHTBVDFTBSFBHSFBUBDDPNQBOJNFOU
See page 17 for recipes.
USING YOUR FONDUE POT
WITH CHOCOLATE
To prepare chocolate fondue, first add your liquid,
a mixture of heavy cream and milk. Turn dial to
setting 4.5 and bring liquid to a simmer. Be sure
that it does not boil or it will be too hot for the
chocolate.
Once liquid is simmering, reduce temperature
to setting 3.5. Gradually whisk in the chocolate
until melted. Reduce to setting 3 and stir in any
additional flavourings, such as alcohol,
extracts, etc.
Page 5

8 9
TIPS AND HINTS
r *UJTQPTTJCMFUPVTFBMUFSOBUJWFNJMLTTVDI
as almond, coconut, and soy, but the
consistency will be much thinner. You may
need to add more chocolate to compensate.
r 6TFDIPDPMBUFDIJQTUPQSPEVDFBTNPPUI
chocolate fondue. They have the necessary
cocoa butter. If you use chocolate blocks
instead, it is likely that the chocolate will
separate and cause the fondue to be
somewhat oily.
r 8IJUFDIPDPMBUFCMPDLTOBUVSBMMZIBWFNPSF
cocoa butter than milk, semi-sweet or
bittersweet chocolate blocks. Because of
that, they work just as well as white
chocolate chips.
r %JQQJOHTVHHFTUJPOTJODMVEFBQQMFXFEHFT
berries, mango, pineapple, bananas, candied
and dried fruit, pretzels, marshmallows,
graham crackers, butter or shortbread
cookies, pound cake, and angel food cake.
CLEANING AND
MAINTENANCE
WARNING: ALWAYS TURN TEMPERATURE
CONTROL PROBE TO OFF; THEN
DISCONNECT PLUG FROM WALL OUTLET
BEFORE DISCONNECTING THE CORD.
CAUTION:
Do not immerse temperature control probe in
water or any liquid.
Turn temperature control probe dial to OFF.
After fondue pot and oil have cooled, unplug
cord from wall outlet. Remove the temperature
control probe from the unit before cleaning.
Do not add cold water or immerse pot in water
when hot.
CAUTION: Do not immerse temperature
control probe or cord set in water or other
liquids. Wipe with a damp cloth and dry.
Thoroughly wash fondue pot, Lazy Susan ring,
glass lid, serving cups, brackets, forks, and
fondue fork ring in hot, soapy water or an
automatic dishwasher. Rinse thoroughly and
dry. To remove stubborn stains, use a
nonabrasive cleaner or a nonmetal
cleaning pad.
CAUTION: Do not use metal scouring pads or
harsh scouring powders.
In time, the nonstick surface may discolour.
This is normal and will not seriously alter
the release properties; to remove any
discolouration, use a cleaner for nonstick
finishes such as a nonstick appliance cleaner.
Pour cleaner into pot. Allow to boil for
1 minute. Cool. Rinse with clean water.
Any other servicing should be performed by
an authorized service representative.
RECIPES
Cheese Fondues
Classic Cheese Fondue ................................................................................................................... 10
Brie & Mushroom Fondue ................................................................................................................ 12
Southwest Salsa Fondue ................................................................................................................. 12
Broth/Oil Fondues
Seafood Bouillabaisse Fondue ........................................................................................................ 14
Chicken Stock with Star Anise Fondue ........................................................................................... 15
Scallion & Ginger Scented Beef Broth............................................................................................. 15
Dessert Fondues
Chocolate Fondue .......................................................................................................................... 16
Chocolate Raspberry Fondue .......................................................................................................... 16
Butter Caramel Fondue .................................................................................................................... 17
Sauces for Fondues
Asian Peanut Sauce ......................................................................................................................... 17
Sundried Tomato & Roasted Red Pepper Dip ................................................................................ 19
Olive Tapenade Aioli ........................................................................................................................ 19
Tzatziki Sauce .................................................................................................................................. 20
Page 6

10 11
CLASSIC CHEESE FONDUE
The traditional fondue, this is the style that you
will nd on most classic menus. While the
wine gives it a distinct avour, see our note
below on making it alcohol-free.
Makes 6 to 8 servings
1 pound (500 g) Gruyère, nely shredded
¾ pound (375 g) Emmenthal, nely shredded
2 tablespoons (30 ml) cornstarch, divided
1½ teaspoons (7 ml) dry mustard
1 garlic clove, peeled and halved
2¼ cups (550 ml) dry white wine*, room
temperature, divided (note: you may
not need all of the wine)
2½ tablespoons (40 ml) Kirschwasser**
1. Put the shredded cheeses in a large bowl
and toss with 1 tablespoon (15 ml) of the
cornstarch and all the dry mustard to fully
coat. Reserve.
2. Rub the bottom and lower half of the sides
of the fondue pot with the cut sides of the
garlic clove. Add 1 cup (250 ml) of the wine
and set the temperature to Setting 4.5 to bring
the wine to a simmer (but not boiling).
3. Once the wine begins to simmer, reduce the
temperature to Setting 3.5. Slowly add the
cheese, about ¼ to
1
⁄3
of a cup (60 to 75 ml)
at a time. Use a nonstick whisk (such as a
silicone-coated one) to work the cheese into
the liquid. Once the cheese is fully melted into
the wine, gradually add more cheese, little
by little, alternating with the wine as you go,
about
1
⁄3
to ½ cup (75 to 125 ml) at a time.
This ensures that the consistency of the
fondue will be nice and creamy. (The wine
keeps the cheese from separating and from
becoming stringy).
4. Once all the cheese has been added ([most of
the wine will be incorporated as well, but you
may have up to ¾ cup (175 ml) remaining]
make a slurry of the remaining cornstarch and
Kirshwasser by stirring the two together until
homogenous. Add the slurry to the fondue
and whisk to fully combine. Stir in more wine if
the fondue is too thick.
5. Reduce the temperature to Setting 3 for
serving. The fondue should just simmer, but
never come close to boiling. Traditionally this
fondue is served with cubes of crusty bread,
but crisp, blanched vegetables and cornichons
are also perfect accompaniments.
* For an alcohol-free version, substitute chicken
stock plus 2 tablespoons (15 ml) of lemon
juice for the full amount of wine. Substitute
an additional 2 tablespoons (15 ml) of lemon
juice for the Kirschwasser. For more notes on
alcohol free fondues, see page 6.
** Kirschwasser is the classic component to
this recipe, but some nd that its avour too
strong. If this is the case, you can either substitute additional white wine or lemon juice in
its place.
BRIE & MUSHROOM FONDUE
Chilling the Brie beforehand is key to
cutting off the rind. Some can be removed
more easily than other rinds, so be patient.
Makes 6 to 8 servings
1½ pounds (750 g) Brie
3 tablespoons (45 ml) cornstarch, divided
1 small shallot, peeled and halved
6 ounces (170 g) mushrooms, cleaned and
chopped [quartered if they are on the
larger size–they should be no larger than
1 inch (2.5 cm)]
1 tablespoon (15 ml) unsalted butter
2½ cups (625 ml) dry white wine,* room
temperature, divided (note: you may not
need all of the cider)
1 tablespoon (15 ml) fresh lemon juice
1. Use a sharp knife to remove the rind from the
Brie. Cut or tear the Brie into ½-inch (1.25 cm)
cubes. Put into a large bowl and toss with
2 tablespoons (30 ml) of the cornstarch to fully
coat. Reserve.
2. In a food processor tted with the metal
chopping blade, chop the shallot. Scrape
down the sides of the work bowl and add the
mushrooms. Pulse until nely chopped, about
10 to 20 pulses.
3. Put the butter in the fondue pot and set to
Setting 4. Once butter is melted, add the
chopped shallot and mushrooms. Stir and
cook until the mushrooms are fully softened,
about 3 to 5 minutes.
4. Add 1 cup of the wine and 1 tablespoon
(15 ml) of the lemon juice and bring to a
simmer (but not boiling).
5. Once the wine begins to simmer, reduce the
temperature to Setting 3–3½. Slowly add the
cheese, about ¼ to
1
⁄3
of a cup (60 to 75 ml)
at a time. Use a nonstick whisk (such as a
silicone-coated one) to work the cheese into
the liquid. Once the cheese is fully melted into
the wine, gradually add more cheese, little
by little, alternating with the wine as you go,
about
1
⁄3
to ½ cup (75 to 125 ml) at a time.
This ensures that the consistency of the fondue will be nice and creamy. (The wine keeps
the cheese from separating and from becoming stringy).
6. Once all the cheese has been added (most
of the wine will be incorporated as well, but
you may have up to ½ cup remaining) make a
slurry of the remaining cornstarch and
2 tablespoons (30 ml) of the wine by stirring
the two together until homogenous. Add the
slurry to the fondue and whisk to fully
combine. If the fondue is too thick, whisk in
additional wine.
7. Reduce the temperature to Setting 3 for
serving. The fondue should just simmer, but
never come close to boiling. Serve with cubes
of crusty bread and blanched vegetables.
* For an alcohol-free version, substitute chicken
stock plus 2 tablespoons (30 ml) of lemon
juice for the wine.
SOUTHWEST SALSA FONDUE
This fondue is for those queso dip lovers. It is
perfect with a big bowl of hearty tortilla chips.
Makes 6 to 8 servings
¾ cup (175 ml) prepared salsa
1 pound (500 g) Monterey Jack, nely
shredded
½ pound (500 g) sharp Cheddar, nely
shredded
3 tablespoons (45 ml) cornstarch, divided
½ teaspoon (2 ml) ground cumin
1 garlic clove, peeled and halved
2 bottles [12 ounces (340 g)] Mexican beer*,
such as Corona, room temperature,
divided (note: you may not need all of the
beer)
2 tablespoons (15 ml) fresh lime juice
1. Put the salsa in a ne mesh strainer set over
a small mixing bowl. Allow to drain until
thickened, about 30 minutes, depending on
the type of salsa being used. Reserve.
2. Put the shredded cheeses in a large bowl and
toss with 2 tablespoons (30 ml) of the
cornstarch and the cumin to fully coat.
Reserve.
3. Rub the bottom and lower half of the sides
of the fondue pot with the cut sides of the
garlic clove. Add 1 cup (250 ml) of the beer
and the lime juice and set the temperature
to Setting 4½ to bring the beer to a simmer
(but not boiling).
4. Once the beer begins to simmer, reduce the
temperature to Setting 3½. Slowly add the
cheese, about ¼ to
1
⁄3
of a cup (60 to 75 ml)
at a time. Use a nonstick whisk (such as a
silicone-coated one) to work the cheese into
the liquid. Once the cheese is fully melted into
the beer, gradually add more cheese, little
by little, alternating with the beer as you go,
about
1
⁄3
to ½ cup (75 to 125 ml) at a time,
while adding the cheese. This ensures that
the consistency of the fondue will be nice and
creamy. (The beer keeps the cheese from
separating and from becoming stringy).
Page 7

12 13
5. Once all the cheese has been added [most
of the beer will be incorporated as well, but
you may have up to ¾ cup (175 ml)
remaining] make a slurry of the remaining
cornstarch and 2 tablespoons (30 ml) of the
beer by stirring the two together until
homogenous. Add the slurry to the fondue
and whisk to fully combine. Stir in the strained
salsa. Stir in more beer if the, fondue is too
thick.
6. Reduce the temperature to Setting 3 for
serving. The fondue should just simmer, but
never come close to boiling. Tortilla chips pair
perfectly with this fondue, but pieces of grilled
chicken work well, and crusty bread cubes
and blanched vegetables also pair nicely.
* For an alcohol-free version, substitute chicken
stock or apple cider plus 1 tablespoon (15 ml)
of lemon juice for the beer.
SEAFOOD BOUILLABAISSE FONDUE
Pour yourself a glass of crisp, white wine and
enjoy this delicious “fondue” during the
summer months. Not a drop will be left by
the end of the night!
Makes 6 to 8 servings
1 tablespoon (15 ml) olive oil
3 garlic cloves, peeled and thinly sliced
½ fennel bulb, thinly sliced
1 leek (white and light green part only),
halved, cleaned and thinly sliced
1 pound (500 g) fresh mussels, cleaned and
bearded*
3 1-inch (2.5 cm) strips orange peel, bitter
white pith removed
1 to 2 pinches saffron threads
1½ cups (375 ml) dry white wine
½ cup (125 ml) Pernod
1 teaspoon (5 ml) kosher salt
1 large tomato, chopped
1 tablespoon (15 ml) tomato paste
3 to 4 sprigs fresh basil
1 cup (250 ml) water
1 pound (500 g) large shrimp (16 to 20),
peeled and deveined
1 pound (500 g) sea scallops, dried, tough
muscle removed (most can be purchased
this way)
1. Put the oil in the fondue pot and set to Setting
4½. Once oil is hot, add the garlic, fennel and
leek. Cook until softened, about 1 to
2 minutes. Add the mussels, orange peel,
saffron, wine and Pernod to the pot. Cook,
stirring occasionally, until mussels have fully
opened, about 4 to 8 minutes.
2. Remove mussels and reserve, removing an
mussels that did not open. Add the salt,
tomato, tomato paste, basil and water.
Increase the temperature to Setting 6 to bring
to a boil. Once boiling, decrease to Setting
3½ to maintain a simmer. Allow to simmer for
about 10 minutes to allow avours to meld.
3. While broth is cooking, remove the mussels
from their shells; discard shells.
4. After broth has simmered, remove basil. To
serve, skewer shrimp, scallops or mussels
onto fondue forks and dip into simmering
broth. Cook shrimp and scallops until they are
rm, but not tough (about 3 to 5 minutes)
Cook mussels just to heat through. This broth
is also delicious with crusty French bread.
Suggested Dipping Sauce:
Olive Tapenade Aïoli (page 19)
* Fresh mussels should have tightly closed
shells when purchased, or those that are
slightly opened should close shut when
tapped. Discard any mussels that do not
close. Store in refrigerator until ready to use.
To clean mussels, place in a bowl of cold
water with about ¼ cup (60 ml) of cornmeal,
swirl gently, and let stand for 20 minutes –
this will help the mussels to expel any sandy
grit. Remove the “beard” by pulling on the
threads that are coming out of the shell. Lift
out of the water, leaving the cornmeal and grit
in the bottom of the bowl, and dry on several
layers of paper towels before cooking.
CHICKEN STOCK WITH
STAR ANISE FONDUE
With only a couple of ingredients,
the star anise really stands out.
Makes 6 to 8 servings
4½ cups (1.125 L) good quality chicken stock
or broth [you may need 1 to 2 additional
cups (250 to 500 ml) of stock/broth to add
during serving]
4 to 6 star anise pods [about ¾ to 1 ounce
(20 to 30 g)]
8 ounces (230g) small white mushrooms,
cleaned
1 small zucchini, cut into ½-inch (1.25 cm)
rounds or half-moons
½ pound (250 g) edible pod or snow peas,
trimmed
1½ pounds(43 g) boneless, skinless chicken
breasts, cut into 1-inch (2.5 cm) strips
steamed white or brown rice
1. Put the chicken stock/broth and star anise in
the fondue pot. Set to Setting 6 to bring to a
boil. Once boiling, reduce to Setting 3.5 to
reduce to a simmer. Allow to simmer for about
10 to 15 minutes.
2. To serve, skewer pieces of chicken onto forks
and cook until rm and cooked through in the
simmering broth, about 4 to 5 minutes.
Skewer vegetables and cook to taste.
The vegetables and broth pair very well with a
bowl of rice, or with the suggested dipping
sauces below. If liquid cooks off too much,
add additional stock/broth and allow to
simmer for a few minutes before cooking
foods.
Suggested Dipping Sauces:
Asian Peanut Sauce (page 17); Wasabi
Ginger Sauce (page 18)
SCALLION & GINGER SCENTED
BEEF BROTH
The Asian avours of the broth transfer perfectly
to the meats and vegetables. Pair with sauces
below for a complete meal.
Makes 6 to 8 servings
6 cups (1.5 L) good quality beef stock or
broth [you may need 1 to 2 additional cups
(250 yo 500 ml) of stock/broth to add
during serving]
8 to 10 slices peeled, fresh ginger, each about the
size of a quarter
6 whole peppercorns
4 garlic cloves, peeled and halved
3 scallions, trimmed and cut into 1-inch
(2.5 cm) pieces
2 tablespoons (30 ml) soy sauce, reduced
sodium
2 tablespoons (30 ml) mirin (Japanese rice
wine)
1 pound (500 g) beef or pork tenderloin,
thinly sliced
8 ounces (230 g) small white mushrooms,
cleaned
8 ounces (230 g) extra-rm tofu, cut into
1-inch (2.5 cm) cubes
1 small zucchini, cut into ½-inch (1.25 cm)
rounds or half-moons
½ pound (250 g) edible pod or snow peas,
trimmed
steamed white or brown rice
1. Put the beef stock/broth, ginger, peppercorns,
garlic, scallions, soy sauce and mirin in the
fondue pot. Set to Setting 6 to bring to a boil.
Once boiling, reduce to Setting 3.5 to bring
to a simmer. Allow to simmer for about 25 to
30 minutes.
Page 8

14 15
2. To serve, skewer pieces of beef or pork onto
forks and cook until rm and cooked through
in the simmering broth, about 3 to 5 minutes
Skewer vegetables and tofu and cook to taste.
The vegetables and broth pair very well with
a bowl of rice, or with the suggested dipping
sauces below. If liquid cooks off too much,
add additional stock/broth and allow to simmer
for a few minutes before cooking foods.
Suggested Dipping Sauces:
Asian Peanut Sauce (page 17); Wasabi
Ginger Sauce (page 18)
CHOCOLATE FONDUE
Everything goes well when dipped in chocolate –
pretzels, cake, brownies or fruit. You can even
drizzle over ice cream if there is any left over.
Makes 6 to 8 servings
¾ cup (175 ml) whole or reduced fat milk
1¾ cup (425 ml) heavy cream
1½ pounds (750 g) bittersweet or semisweet
chocolate chips (do not use blocks of
chocolate–the extra cocoa butter in the
chips produces a smoother fondue. Some
varieties of the blocks of chocolate are too
delicate)
½ teaspoon (2 ml) pure vanilla extract
pinch sea salt
1. Put the milk and heavy cream in the fondue
pot. Set to Setting 4.5 to bring the mixture to
a simmer, but not boiling. Reduce the heat
to Setting 3.5 and gradually, using a nonstick
whisk, add the chocolate chips. When the
chocolate is completely blended, stir in the
vanilla and salt.
2. Reduce heat to Setting 3. Serve with biscotti,
fresh or dried fruit, marshmallows, graham
crackers, pretzels, angel food cake, brownies,
etc.
CHOCOLATE RASPBERRY FONDUE
A twist on the standard chocolate – you can
use any fruit purée in place of the raspberry.
Makes 6 to 8 servings
1 cup (250 ml) frozen raspberries
[about 4 ounces (115 g)], thawed
1½ cups (375 ml) heavy cream
1½ pounds (750 g) bittersweet or semisweet
chocolate chips (do not use blocks of
chocolate –the extra cocoa butter in the
chips produces a smoother fondue. Some
varieties of the blocks of chocolate are too
delicate)
pinch sea salt
2 to 3 tablespoons (30 to 45 ml) Chambord
(optional)
1. Put the thawed raspberries in the work bowl
of a food processor tted with the metal
chopping blade. Process until puréed and
smooth, about 30 seconds. Place the purée
in a ne mesh strainer and press the liquid through into a bowl. Discard the seeds,
reserving the purée.
2. Put the cream in the fondue pot. Set to Setting
4.5 to bring the mixture to a simmer, but not
boiling. Reduce the heat to Setting 3.5 and
gradually, using a nonstick whisk, add the
chocolate chips.
3. When the chocolate is completely blended
stir in the raspberry purée, salt and the liqueur
(if using).
4. Reduce heat to Setting 3. Serve with biscotti,
fresh or dried fruit, marshmallows, graham
crackers, pretzels, angel food cake, brownies,
etc.
BUTTER CARAMEL FONDUE
Like the chocolate fondue, any leftover can
either be reheated the following day, or
drizzled over a bowl of ice cream.
Makes 6 to 8 servings
3 cups (750 ml) granulated sugar
1½ teaspoons (7 ml) sea salt
¾ cup (175 ml) water
3 tablespoons (45 ml) light corn syrup
1 cup (250 ml) heavy cream
1 stick [4 ounces (115 g)] unsalted butter,
cut into ½-inch (1.25 cm) cubes
1. Put the sugar, salt, water and corn syrup in
the fondue pot. Set to Setting 7.5 and cook
until the sugar mixture turns a very light
amber colour (about 15 minutes). Keep a
close eye on the caramel sauce as it can
burn easily.
2. Once the sugar mixture has a light amber
colour, reduce to Setting 5 and slowly and
carefully stir in the cream, no more than ¼
cup at a time (if you add the cream too quickly, it will foam and bubble too much). After the
cream has been incorporated, slowly whisk in
the butter (using a nonstick whisk), one piece
at a time, continually whisking to emulsify until
all the butter has been added.
3. Reduce heat to Setting 3. This is best served
with tart fruit, such as green apple wedges,
pretzels, angel food cake, brownies, etc.
SAUCES FOR FONDUES
ASIAN PEANUT SAUCE
Any type of peanut butter will work for this recipe
– natural, or processed; creamy or chunky.
Use your favourite!
Makes about 1¾ cups (425 ml)
1 1½-inch x 1-inch piece fresh ginger,
peeled and sliced
3 garlic cloves, peeled
½ cup chicken stock/broth, reduced sodium
1
⁄3
cup soy sauce, reduced sodium
¼ cup sesame oil
2 tablespoons rice vinegar
½ teaspoon fresh lime juice
1 to 2 tablespoons fresh cilantro
1½ tablespoons granulated sugar
½ cup peanut butter, creamy or chunky
2 to 4 drops Asian chili oil (add to taste)
1. Put the ginger and garlic in the work bowl of a
food processor tted with the metal chopping
blade. Process to chop, stopping to scrape
down the sides of the bowl as needed.
Add the remaining ingredients, except for the
chili oil. Process for 20 to 30 seconds to
combine, again stopping as needed to scrape
down the sides of the bowl.
2. Add the chili oil to taste, and process for an
additional 5 seconds to combine.
3. This may be used immediately, or stored in
the refrigerator for up to 5 days. Bring to room
temperature and stir well before using.
SUNDRIED TOMATO &
ROASTED RED PEPPER DIP
Very rich and packed with avour, this dip
is also great with crudités.
Makes about 1 cup (250 ml)
1 garlic clove, peeled
½ teaspoon dried basil
4 sundried tomatoes (oil-packed), drained
and cut into 1-inch (2.5 cm) pieces
1 large roasted red pepper, drained and cut
into 1-inch (2.5 cm) pieces
1 teaspoon (5 ml) balsamic vinegar
2 ounces (60 g) cream cheese, cut into
1-inch (2.5 cm) pieces
2 tablespoons (15 ml) sour cream
pinch kosher salt, or to taste
1. Put the garlic and basil into the work bowl of
a chopper or food processor tted with the
metal chopping blade. Pulse a few times to
break up, and then process until nely
chopped. Scrape down the sides of the bowl
and then add the sundried tomatoes, roasted
Page 9

16 17
red pepper and vinegar. Process to chop,
about 10 to 20 seconds, stopping to scrape
down the sides of the work bowl as needed.
Add the cream cheese and sour cream.
Pulse to combine, and then process until
homogenous. Scrape down the sides of the
work bowl, and then process an additional
5 seconds. Add salt to taste.
2. Transfer to a separate container and allow
to sit for at least 30 minutes to allow avors
to develop.
3. This may be used immediately after resting,
or stored in the refrigerator for up to a week.
Bring to room temperature and stir well
before using.
OLIVE TAPENADE AÏOLI
In addition to being used as a side sauce for the
fondue, this can also be spread on crostini,
or used to jazz up a simple grilled cheese
and tomato sandwich.
Makes about
2
⁄3
cup (150 ml)
1 garlic clove, peeled
12 pitted kalamata olives, drained
1 teaspoon (5 ml) fresh lemon juice
1 teaspoon (5 ml) drained capers
½ teaspoon (2 ml) Dijon mustard
½ teaspoon (2 ml) herbes de Provence
1
⁄3
cup (75 ml) mayonnaise
1. Put the garlic in the work bowl of a chopper
or food processor tted with the metal
chopping blade. Pulse a few times to break
up, and then process until nely chopped.
Scrape down the sides of the bowl and then
add the olives, lemon juice, capers, mustard
and herbes de Provence. Pulse to chop, and
then process until a paste is formed, about
30 seconds, scraping the sides of the work
bowl as necessary. Add the mayonnaise and
pulse to incorporate.
2. This may be used immediately, or stored in
the refrigerator for up to a week. Bring to room
temperature and stir well before using.
TZATZIKI SAUCE
Everyone has their own version of this sauce.
Ours is very simple, but is the perfect
accompaniment to the seafood fondue
on page 15.
Makes about
2
⁄3
cup (150 ml)
1 small cucumber, trimmed but not peeled,
and cut to t the feed tube
1 garlic clove, peeled
1½ tablespoons (25 ml) fresh dill
1½ tablespoons (25 ml) fresh mint leaves
½ tablespoon (7 ml) fresh oregano
[or ½ teaspoon (2 ml) dried]
2 cups (500 ml) plain Greek yogurt
1 tablespoon (15 ml) fresh lemon juice
¼ to ½ teaspoon (1 to 2 ml) kosher salt (to taste)
1 to 2 pinches freshly ground black pepper
(to taste)
1. Fit a food processor with the medium
shredding disc. Shred the cucumber using
medium pressure. Remove and reserve.
2. Replace the shredding disc with the metal
chopping blade. Put the garlic, dill, mint and
oregano in the work bowl and process to
chop, about 5 seconds. Scrape down the
sides of the bowl and add the yogurt. Process
to combine, about 10 seconds. Scrape down
the sides of the bowl and add the shredded
cucumber and lemon juice; pulse to combine.
Add salt and pepper to taste.
3. Transfer to a separate container and allow to
chill for at least 30 minutes to allow avours to
develop.
4. This may be used immediately after resting, or
stored in the refrigerator for up to 5 days. Stir
well before using.
WARRANTY
Limited Three Year Warranty
We warrant that this Cuisinart product will be
free of defects in materials or workmanship
under normal home use for 3 years from the
date of original purchase. This warranty
covers manufacturer’s defects including
mechanical and electrical defects. It does
not cover damage from consumer abuse,
unauthorized repairs or modications, theft,
misuse, or damage due to transportation or
environmental conditions. Products with
removed or altered identication numbers
will not be covered.
This warranty is not available to retailers or
other commercial purchasers or owners. If
your Cuisinart product should prove to be
defective within the warranty period, we will
repair it or replace it if necessary. For
warranty purposes, please register your
product online at www.cuisinart.ca to
facilitate verication of the date of original
purchase and keep your original receipt for
the duration of the limited warranty.
This warranty excludes damage caused by
accident, misuse or abuse, including
damage caused by overheating, and it does
not apply to scratches, stains, discolouration
or other damage to external or internal
surfaces that does not impair the functional
utility of the product. This warranty also
expressly excludes all incidental or
consequential damages.
Your Cuisinart product has been
manufactured to the strictest specications
and has been designed for use only in
120 volt outlets and only with authorized
accessories and replacement parts. This
warranty expressly excludes any defects or
damages caused by attempted use of this
unit with a converter, as well as use with
accessories, replacement parts or repair
service other than those authorized by
Cuisinart.
If the appliance should become defective
within the warranty period, do not return the
appliance to the store. Please contact our
Customer Service Centre:
Toll-free phone number:
1-800-472-7606
Address:
Cuisinart Canada
100 Conair Parkway
Woodbridge, Ont. L4H 0L2
Email:
consumer_Canada@conair.com
Model:
CF0-1000C
To facilitate the speed and accuracy of your
return, please enclose:
rGPSTIJQQJOHBOEIBOEMJOHPG
the product (cheque or money order)
r3FUVSOBEESFTTBOEQIPOFOVNCFS
r%FTDSJQUJPOPGUIFQSPEVDUEFGFDU
r1SPEVDUEBUFDPEFDPQZPGPSJHJOBMQSPPG
of purchase
r"OZPUIFSJOGPSNBUJPOQFSUJOFOUUPUIF
product’s return
1SPEVDUEBUFDPEFDBOCFGPVOEPOUIF
underside of the base of the product. The
product date code is a 4 or 5 digit number.
Example, 120630 would designate year,
month & day (2012, June 30th). Note: We
recommend you use a traceable, insured
delivery service for added protection.
Cuisinart will not be held responsible for
in-transit damage or for packages that are
not delivered to us.
To order replacement parts or accessories,
call our Customer Service Centre at
1-800-472-7606. For more information,
please visit our website at www.cuisinart.ca
Page 10

TM
MC
Any other trademarks or service marks referred to herein are
the trademarks or service marks of their respective owners.
Toutes les autres marques de commerce ou de service qui
sont mentionnées dans le présent livret sont des marques
de leur propriétaire respectif.
Juicers
Centrifugeuses
Coffeemakers
Cafetières
Cookware
Batteries
de cuisine
Tools and
Gadgets
Outils et
gadgets
Food
Processors
Robots
culinaires
CuisinartTM offers an extensive assortment of top quality products to make life
in the kitchen easier than ever. Try some of our other countertop appliances,
cookware, tools and gadgets.
Cuisinart
MC
offre une vaste gamme de produits de grande qualité qui facilitent la vie
dans la cuisine comme jamais auparavant. Essayez nos autres appareils de comptoir,
et nos ustensiles de cuisson et savourez la bonne vie.
www.cuisinart.ca
IB-11440-CAN
©2013 Cuisinart Canada
100 Conair Parkway,
Woodbridge, Ont L4H 0L2
Consumer Call Centre E-mail:/
Courriel centre au consommateur :
Consumer_Canada@Conair.com
Printed in China/Imprimé en Chine
13CC140734
 Loading...