

Page 1
Ice Cream Maker
ICE30BCU
Page 2

Congratulations on your purchase of the Cuisinart Ice Cream Maker.
For over 30 years Cuisinart’s aim has been to produce the very finest kitchen
equipment. All Cuisinart products are engineered for exceptionally long
life, and designed to be easy to use as well as to give excellent performance
day after day.
To learn more about our products and for recipe ideas visit our website
www.cuisinart.co.uk
2
Page 3

ontents
C
Product Control Guide ...................................................................................................... 4
Important Safety Cautions ................................................................................................ 5
Instructions for Use ........................................................................................................... 8
A Preparing the Freezer Bowl ............................................................................................................ 8
B Assembling the Ice Cream Maker ................................................................................................. 8
C Making Frozen Desserts ................................................................................................................... 9
D Dismantling the Ice Cream Maker ................................................................................................ 9
E Hints & Tips .......................................................................................................................................10
Cleaning & Maintenance ..................................................................................................11
UK Guarantee & After Sales Service ............................................................................... 12
Recipes .............................................................................................................................. 13
UK Wiring Instructions .................................................................................................... 27
3
Page 4
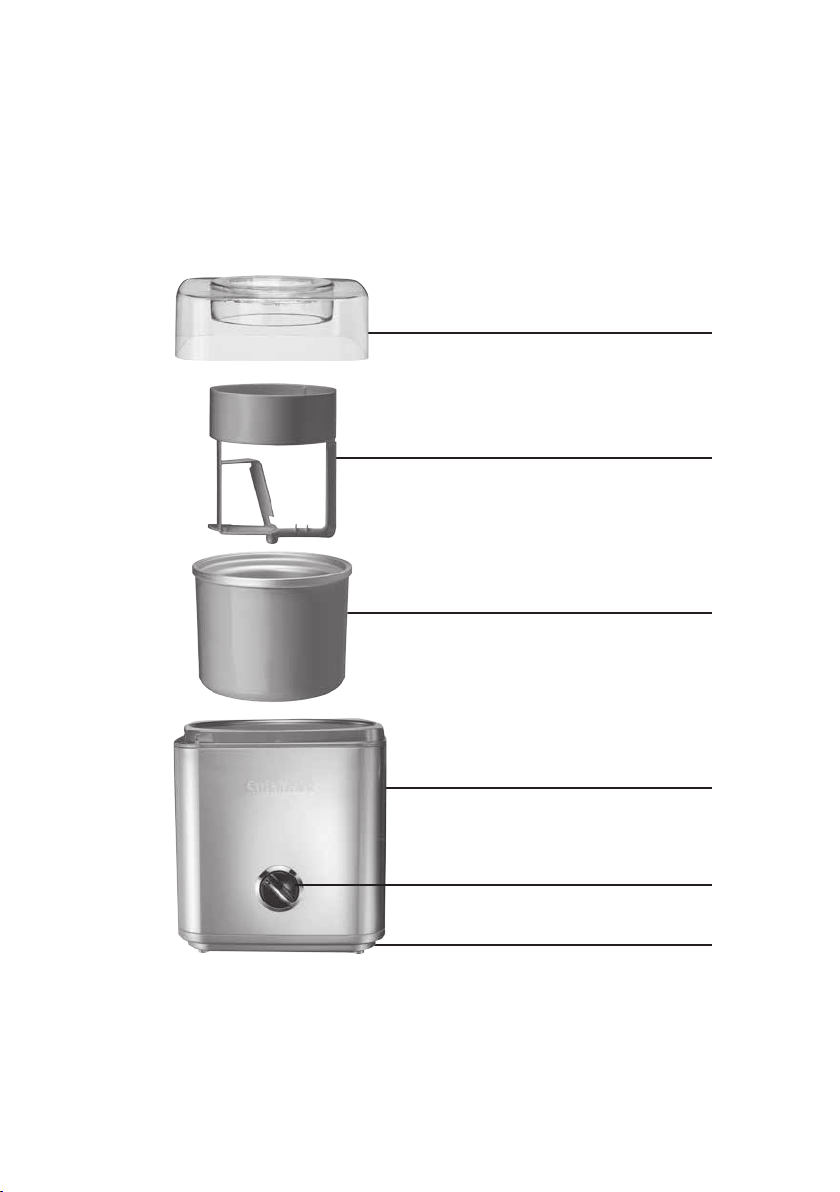
Product Control Guide
Easy-Lock Lid
Mixing Arm
2L Freezer Bowl
Housing Base
On/Off Switch
Rubber Feet
4
Page 5

IMPORTANT SAFETY CAUTIONS
Carefully read all the instructions before using the appliance and keep
in a safe place for future reference.
Always follow these safety cautions when using this appliance to avoid
personal injury or damage to the appliance. This appliance should be used
only as described within this instruction book.
1. The appliance is not intended to be operated by means of external timer
or separate remote control system.
2. This appliance is not intended for use by persons with reduced physical,
sensory or mental capabilities, or lack of experience and knowledge,
unless they have been given supervision or instruction concerning use of
the appliance by a person responsible for their safety.
3. Children should always be supervised to ensure that they do not play
with this product.
4. Not for use by children. Keep out of reach of children during and after
use.
5. Always inspect the appliance before use for noticeable signs of damage.
Do not use if damaged, or if the appliance has been dropped. In the event
of damage, or if the appliance develops a fault, contact the Cuisinart
Customer Care Line (refer to “UK After Sales Service section“ for further
information).
6. Do not use the appliance if the lead is damaged. In the event of lead
damage, discontinue use immediately. If the lead is damaged it must be
replaced by the manufacturer. Return the appliance to the Customer Care
Centre (refer to ‘UK After Sales Service’ section for further information).
No repair must be attempted by the consumer.
7. Never pull the plug out of the mains socket by the lead.
8. Do not wrap the lead around the main body of the appliance during or
after use.
9. Always ensure the voltage to be used corresponds with the voltage on
the appliance; this is indicated on the bottom of the housing.
5
Page 6

10. For indoor, domestic use only.
11. This product complies fully with all appropriate EU and UK legislation
and the standards relevant to this type and class of appliance. We are
an ISO9001:2015 accredited company that continually evaluates our
Quality Management System performance. If you have any queries
regarding product safety and compliance, please contact our Customer
Services Department (see “U.K. After Sales Service” section).
WARNING: Polythene bags over the product or packaging may
be dangerous. To avoid danger of suffocation, keep away from
babies and children. These bags are not toys.
6
Page 7

Safety During Use
Before first use, remove all packaging materials and any promotional
labels or stickers from the Ice Cream Maker.
n Do not use the appliance for anything other than its intended use.
n Position the Ice Cream Maker on a stable, level surface, near a power
socket.
n Do not place on or near hot gas or electric burners or in a heated
oven.
n Do not leave the lead hanging over the edge of a kitchen table or
worktop. Avoid contact between the lead and hot surfaces.
n Do not use accessories or attachments with this appliance other
than those recommended by Cuisinart.
n Avoid contact with moving parts. Keep hands, hair, clothing and
spatulas and other utensils away during operation to reduce the risk
of injury and/or damage to the appliance.
n Always ensure that your hands are dry before removing the plug
from the mains outlet.
n Always unplug from the mains outlet when not in use, before putting
on or taking off parts and before cleaning.
n Do not immerse the housing base in water or any other liquid or put
it in a dishwasher.
n Do not use the freezer bowl on flames, hot plates or ovens. Do not
expose to heat source. Do not wash in dishwasher; doing so may
cause risk of fire, electric shock or injury.
7
Page 8
Instructions for Use
Before first use, clean the lid, freezer bowl and mixing paddle in warm soapy water.
N.B. Do not clean any of the parts with abrasive cleaners or hard implements.
A Preparing the Freezer Bowl
n The freezer bowl must be completely frozen before you begin. Before freezing, wash
and dry the bowl. Wrap it in a plastic bag to prevent freezer burn. The length of time
required to freeze in the freezer, depends on the temperature of your freezer.
n In general, freezing time should be a minimum of 12 hours, with a freezer temperature
of -17°C or cooler. To determine whether the bowl is completely frozen, shake it. If you do
not hear liquid moving, the cooling liquid is frozen.
n We recommend that you place the freezer bowl in the back of your freezer where it is
coldest. Place the freezer bowl on a flat surface in its upright position for even freezing.
For convenience, leave your freezer bowl in the freezer at all times. You can take it out
any time for immediate use.
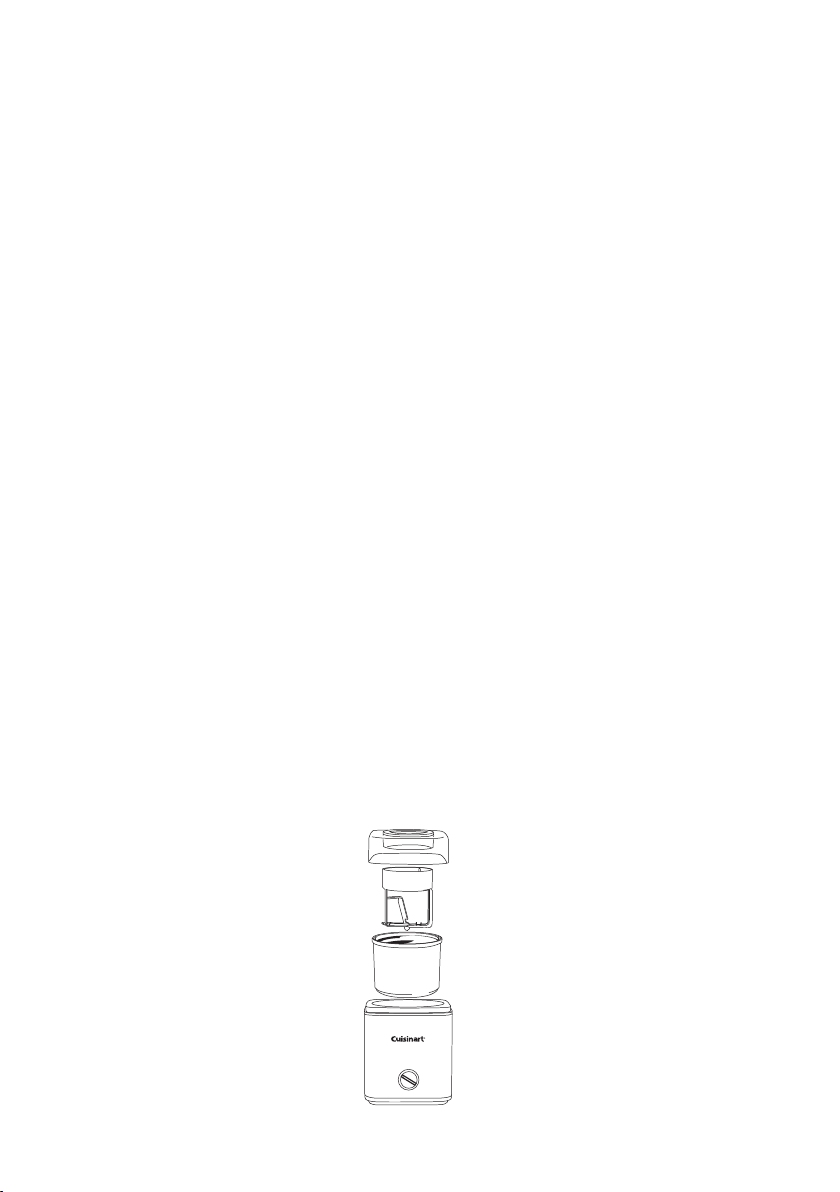
B Assembling the Ice Cream Maker
N.B. The bowl will begin to defrost rapidly after being removed from the freezer. Have your
recipe prepared before assembling the ice cream maker to ensure perfect results.
n Remove the freezer bowl from the freezer and remove the plastic bag. Place the freezer
bowl into the centre of the base.
n Place the mixing arm in the freezer bowl.
NOTE: The arm does not fit tightly, it just rests in the centre of the bowl, with the circle
facing up.
n Place the lid onto the housing base, and twist to lock into place. The easy lock lid
mechanism allows the lid to rest on the base in multiple positions.
8
Page 9

C Making Frozen Desserts
You can make lots of different frozen desserts using your Ice Cream Maker. There are a
selection of recipe ideas for Ice Cream, Gelato, Frozen Yoghurt and Sorbet at the back of
this booklet.
n For best results, prepare the ingredients in a container from which it is easy to pour.
n Switch to the ON position, the freezer bowl will begin to turn.
n Immediately pour ingredients through the lid. Always leave at least 2cm of space at the
top of the bowl as the ingredients will increase in volume during the freezing process.
n You can add extra ingredients during the mixing process such as nuts and chocolate
chips. These should be added about 5 minutes before the end of the mixing process.
N.B. Nuts and other ingredients should be no larger than a chocolate chip.
n Frozen desserts will be ready in 20-30 minutes. Processing time depends on the recipe,
the amount of dessert being made and the temperature of the ingredients being used.
n If the frozen dessert is stuck on top of the mixing arm, stop the machine briefly and use
a spatula to scoop the mixture off the arm back into the freezer bowl.
n Do not store the frozen desserts in the freezer bowl. Desserts will stick to the side of the
freezer bowl and may damage the bowl, always transfer to a plastic airtight container.
D Dismantling the Ice Cream Maker
n Remove the lid from the housing by twisting slightly out of its locked position and lifting
up.
n Carefully lift out the mixing arm, followed by the freezer bowl. Serve the ice cream, or,
for a firmer texture, scoop into an airtight container and place in the freezer.
9
Page 10

E Hints & Tips
n Your recipe should be no more than 1.5 litres of liquid, as it will expand in volume.
n Some recipes use pre-cooked ingredients. For best results, the mixture should be chilled
overnight before using. Well chilled ingredients will require a shorter mixing time.
n Prior to freezing, most mixed recipes may be stored in the refrigerator for up to 3 days
(depending on the use by date of the ingredients being used)
n Homemade Ice Cream uses fresh ingredients, i.e. without the preservatives etc as found in
commercial ice creams. Therefore it will not have the same hard consistency, for a firmer
consistency, transfer the dessert to an airtight container and store it in the freezer for at
least 2 hours before serving.
n You may substitute double cream for lower fat creams and whole milk for lower fat
milk. However, the higher the fat content the richer and creamier the result. Using lower
fat substitutes may change the taste, consistency and texture of the dessert. When
substituting ingredients you will need to experiment with quantities and timing in order
to achieve the same consistency as achieved in the recipe ideas within this book.
n You may also substitute artificial sweeteners for sugar. If the recipe is to be
pre-cooked, add the sweetener after the heating process is complete (the ingredients
have been cooked). Stir the mixture thoroughly to dissolve the sweetener.
N.B. If you are making a sorbet, the sugar should not be substituted. This is because
the sugar is required to stop the recipe from immediately freezing solid, and is an
important ingredient which helps to form the body and texture of the sorbet.
n When making sorbet, test the ripeness and sweetness of the fruit before you begin. The
freezing process reduces the sweetness of the fruit so that it will not taste as sweet as
the recipe mixture. If the fruit tastes tart, add sugar to the recipe. If the fruit is very ripe
or sweet, reduce the amount of sugar in the recipe.
n Mixing time suggestions can vary due to ingredients and type of recipe.
10
Page 11

Cleaning & Maintenance
n Always unplug the appliance before cleaning.
n To clean the base, wipe with a damp cloth and dry. Never use abrasive cleaners or
immerse in water.
n To clean the freezer bowl, lid and mixing arm, wash by hand in warm soapy water and
dry thoroughly before storing. Do not put in the dishwasher. Never use abrasive cleaners
or utensils such as scouring pads as this will damage the bowl.
n Do not put the freezer bowl in the freezer if it is wet. Do not store the lid, mixing arm or
base in the freezer. You may store the mixing bowl in the freezer, in its upright position
for convenient, immediate use. Before freezing, wrap the bowl in a plastic bag to prevent
freezer burn.
11
Page 12

UK Guarantee
This Cuisinart appliance is guaranteed for consumer use for 5 years. This guarantee
covers defects under normal use from date of purchase and ceases to be valid in the
event of alteration or repairs by unauthorised persons. If the appliance does not perform
satisfactorily due to defects in materials or manufacture, it will be repaired or replaced
through Conair UK After Sales Service. No responsibility will be accepted for any
damage caused in transit. The Conair Group Ltd reserves the right to amend terms and
specifications without prior notice.
This guarantee in no way affects your statutory rights.
UK After Sales Service
For further advice on using the appliance or should you need to return your product,
please contact the Conair Customer Care Line on 03702 406902 (09:00 to 17:00 Monday
to Friday) or email your enquiry to support@cuisinart.co.uk
The return address is:
Customer Care Centre
Conair Logistics
Unit 4 Revolution Park
Buckshaw Avenue
Buckshaw Village
Chorley
PR7 7DW
Please enclose your returns number, name and address details, together with a copy of
proof of purchase and details of the fault.
12
Page 13

Recipes
To help you get started with your new Ice Cream Maker, we have included a few recipe
ideas in this instruction manual. For further recipe ideas and inspiration please visit our
website www.cuisinart.co.uk. You can also share some of your own recipe ideas on our
Facebook page Cuisinart UK.
Ice Cream
Vanilla Ice Cream ...................................................................................................................................14
Fresh Strawberry Ice Cream ................................................................................................................15
Simple Chocolate Ice Cream ...............................................................................................................16
Pistachio Ice Cream ...............................................................................................................................17
Coffee Butter Almond Ice Cream ......................................................................................................19
Italian Gelato
Red Raspberry Gelato............................................................................................................................20
Blueberry Cassis Gelato ........................................................................................................................ 21
Frozen Yoghurt
Vanilla Frozen Yoghurt .........................................................................................................................22
Very Berry Frozen Yoghurt ...................................................................................................................23
Sorbet
Fresh Lemon Sorbet ...............................................................................................................................24
Dark Chocolate Sorbet ..........................................................................................................................25
Hedgerow Berry Eton Mess .................................................................................................................26
13
Page 14

Vanilla Ice Cream
Serves 6-8
300ml full fat milk
230g granulated sugar
600ml double cream
2 tsp vanilla extract
1 vanilla pod (optional)
n Ensure the freezer bowl is completely frozen (see page 8).
n Pour the milk and sugar into a medium bowl and whisk until the sugar has dissolved. Stir in
the cream and vanilla extract. If using a vanilla pod, split in two and scrape the seeds out
from the inside then add this to the liquid mixture. Cover and refrigerate for at least 2 hours.
n Once chilled, briefly whisk the mixture again. Turn the appliance on, pour the mixture into
the freezer bowl and leave the ice cream to churn for 20-25 minutes.
n This will produce a soft ice cream. For a firm ice cream, transfer to an air tight container and
place in the freezer for 2 hours.
Variations:
n Mint Chocolate: omit vanilla and replace with 1 tsp peppermint extract. Chop 180g milk
chocolate into very small pieces and add during the last 5 minutes of mixing.
n Cookies and Cream: add 160g coarsely chopped cookies of your liking and add during the
last 5 minutes of mixing.
n Pistachio: add 1 tsp almond extract to the base mixture. Coarsely chop 180g shelled pistachios
and add during the last 5 minutes of mixing.
14
Page 15

Fresh Strawberry Ice Cream
Serves 6-8
400g fresh strawberries, stemmed & sliced
2 tbsp lemon juice
220g granulated sugar
220ml full fat milk
400ml double cream
1 tsp vanilla extract
n Ensure the freezer bowl is completely frozen (see page 8).
n Combine the strawberries, lemon juice and 70g of the sugar into a small bowl. Stir gently
and leave to stand in the fridge for 2 hours. Strain the strawberries, reserving the liquid.
Mash half the strawberries and add these to the reserved liquid, keeping the remaining
sliced strawberries aside.
n Pour the milk and the remaining sugar into a medium bowl and whisk until the sugar
has dissolved. Stir in the cream, mashed strawberries and vanilla extract. Cover and
refrigerate for at least 2 hours.
n Turn the appliance on, pour the mixture into the freezer bowl and leave the ice cream
to churn for 30-35 minutes.
n 5 minutes before the end of churning add the remaining sliced strawberries and allow
them to mix in thoroughly.
n This will produce a soft ice cream. For a firmer ice cream, transfer to an air tight container
and place in the freezer for 2 hours.
15
Page 16

Simple Chocolate Ice Cream
Serves 6-8
300ml full fat milk
130g granulated sugar
260g milk chocolate, broken into 1cm pieces
600ml double cream
1 tsp vanilla extract
n Ensure the freezer bowl is completely frozen (see page 8).
n Place the sugar and chocolate into a food processor and pulse with the chopping blade
until finely chopped.
n Heat the milk over a medium heat until just bubbling around the edges. Add the hot
milk to the chocolate mixture and process until smooth. Transfer to a medium bowl and
allow to cool completely.
n Whisk the double cream and vanilla extract into the chocolate mixture. Cover and
refrigerate for 2 hours or overnight.
n Once chilled, briefly whisk the mixture again. Turn the appliance on, pour the mixture
into the freezer bowl and leave the ice cream to churn for 25-30 minutes.
n This will produce a soft ice cream. For a firm ice cream, transfer to an air tight container
and place in the freezer for 2 hours.
16
Page 17

Pistachio Ice Cream with Shortbread
Serves 6-8
Ice Cream
150g unsalted, shelled pistachios
175g caster sugar
8 medium egg yolks
400ml full fat milk
400ml double cream
Pistachio Shortbread
100g butter, diced
12g ground rice flour
120g plain flour
18g icing sugar
50g unsalted, shelled pistachios
1tbsp vanilla sugar
egg, lightly beaten
To Serve
Handful pistachio pieces
n Ensure the freezer bowl is completely frozen (see page 8).
n Finely grind the pistachios with 60g of the sugar in a food processor.
n Bring the milk to the boil in a heavy based saucepan with the ground pistachio mixture,
stirring occasionally. Once the milk has come to the boil remove from the heat.
n Whisk the remaining 115g sugar with the egg yolks together in a bowl.
n Gradually whisk the heated milk into the egg yolks.
n Pour back into the pan and cook on a low heat, stirring constantly, until the custard
coats the spatula. Do not boil.
n Strain the mixture through a sieve.
n Add the cream, stir well and leave in the fridge for at least 2 hours or overnight until
completely cold.
n When you are ready to churn the ice cream, place the ice cream bowl and the paddle
into the ice cream maker.
n Whisk the mixture again before pouring into the ice cream maker.
n Churn for approximately 30 minutes, until the ice cream is firm.
n Place into an air tight container and leave to set in the freezer for at least an hour.
17
Page 18

Shortbread
n Put the diced butter, rice flour, plain flour and icing sugar into the food processor and
process until the mixture becomes a paste.
n Turn out the dough and roll into a log shape of the diameter you want the shortbreads
to be. Wrap the dough in cling film and leave in the fridge for at least an hour.
n Place the pistachios in the food processor and process briefly until ground. Place the
ground pistachios on a flat tray.
n Remove the shortbread log from the fridge and brush the log with the beaten egg and
then evenly roll in the pistachios.
n Wrap the dough back up and chill for at least 30 minutes.
n Preheat the oven to 150ºC/Gas mark 2.
n Remove the cling film from the dough and cut the log into slices of about 1cm.
n Lay biscuits on a baking tray lined with parchment paper at least 2cm apart.
n Dust them with the vanilla sugar.
n Bake for between 13-15 minutes depending on the size. They should be a golden colour,
not too brown.
To Serve
n Place 2 scoops of pistachio ice cream into a bowl and scatter with some chopped
pistachio pieces.
n Serve with several pieces of shortbread.
18
Page 19

Coffee Butter Almond Ice Cream
Serves 6-8
50g unsalted butter
100g almonds, roughly chopped
1 tsp salt
300ml whole milk, chilled
220g granulated sugar
3-4 tbsp espresso coffee, to taste
600ml double cream
1 tsp almond extract
1 tsp vanilla extract
n Ensure the freezer bowl is completely frozen (see page 8).
n Melt the butter in a medium saucepan, add the almonds and salt and cook over a
medium-low heat until the almonds are toasted and golden. Stir frequently (for approx
1-2 minutes). Remove from the heat and strain, chill the almonds.
n In a medium mixing bowl, whisk the milk, granulated sugar and coffee until the sugar is
dissolved (for approx 1-2 minutes). Stir in the double cream, vanilla and almond extract.
Cover and refrigerate for at least 2 hours.
n Once chilled, briefly whisk the mixture again. Turn the appliance on, pour the mixture
into the freezer bowl and leave the ice cream to churn for 25-30 minutes.
n 5 minutes before mixing is completed, add the chopped almonds and allow them to mix
in completely.
n This will produce a soft ice cream. For a firm ice cream, transfer to an air tight container
and place in the freezer for 2 hours.
Variations:
n Coffee Ice Cream: Instead of adding toasted buttered almonds, if desired add 1 tbsp
coffee liqueur to the mixture.
19
Page 20

Red Raspberry Gelato
Serves 6-8
650g raspberries (pureed and strained to remove seeds)
180g granulated sugar
200ml semi-skimmed milk
200ml double cream
5 large egg yolks
40g skimmed milk powdered
2 tsp vanilla extract
n Ensure the freezer bowl is completely frozen (see page 8).
n Place the sugar, cream and semi-skimmed milk into a medium saucepan, bring to a
simmer over a medium heat and stir to dissolve the sugar. Keep warm over a low heat.
n Place the egg yolks in a medium bowl and whisk until thickened, for approximately 2
minutes. Whilst whisking the eggs, add half the hot sugar, milk and cream mixture and
whisk until blended. Then stir back into the saucepan with the rest of the sugar, cream
and milk and increase heat to medium. Stir the mixture constantly with a wooden spoon,
until the mixture is thickened like a custard sauce.
n Stir in the milk powder then strain the mixture through a fine mesh strainer, stir in
reserved raspberry purée and vanilla extract.
n Cover and chill for at least 6 hours before continuing.
n Once chilled, briefly whisk the mixture again. Turn the appliance on and pour the chilled
mixture into the freezer bowl, leave the gelato to churn for 20-25 minutes.
n The gelato will produce a soft, creamy texture. For a firm gelato, transfer to an air tight
container and place in the freezer for 2 hours
20
Page 21

Blueberry Cassis Gelato
Serves 6-8
600g blueberries (pureed and strained)
40ml crème de cassis
180g granulated sugar
5 large egg yolks
60g fat free powdered milk
180ml double cream
180ml semi-skimmed milk
2 tsp vanilla extract
n Ensure the freezer bowl is completely frozen (see page 8).
n Combine the blueberry purée with 30ml of the crème de cassis in a medium saucepan
and place over medium-low heat. Cook until the mixture is reduced by half. Remove
from pan and chill.
n Place the sugar, cream and semi-skimmed milk into a medium saucepan, bring to a
simmer over a medium heat and stir to dissolve the sugar. Keep warm over a low heat.
n Place the egg yolks in a medium bowl and whisk until thickened. Whilst whisking,
slowly add half of the hot cream, milk and sugar mixture and whisk until blended. Stir
the mixture back into the saucepan and increase heat to medium. Stir the mixture
constantly with a wooden spoon, until the mixture is thickened like a custard sauce.
n Stir in the powdered milk then strain the mixture through a fine mesh strainer. Stir in
reserved chilled blueberry purée, remaining crème de cassis and vanilla extract.
n Cover and chill for at least 6 hours before continuing.
n Once chilled, briefly whisk the mixture again. Turn the appliance on and pour the chilled
mixture into the freezer bowl, leave the gelato to churn for 20-25 minutes.
n The gelato will produce a soft, creamy texture. For a firm gelato, transfer to an air tight
container and place in the freezer for 2 hours.
21
Page 22

Vanilla Frozen Yoghurt
Serves 6-8
375ml whole milk
175g granulated sugar
875g low fat vanilla yoghurt
60ml double cream
2 leaves gelatine (1/2 sachet)
n Ensure the freezer bowl is completely frozen (see page 8).
n Place the gelatine in a medium saucepan and pour over the whole milk. Leave to stand
for one minute then gently heat the milk and gelatine and stir until smooth.
n Stir in the sugar and continue to gently heat until the sugar is dissolved. Transfer to a
medium bowl and cool to room temperature (Do not place in the refrigerator as this will
set the gelatine).
n Stir in the yoghurt and cream. Cover and chill for 2-3 hours.
n Once chilled, briefly whisk the mixture again.
n Turn the appliance on, pour the chilled mixture into the freezer bowl and leave the frozen
yoghurt to churn for 20-25 minutes. This will produce a soft frozen yoghurt. For a firm
frozen yoghurt, transfer to an air tight container and place in the freezer for 2 hours.
22
Page 23

Very Berry Frozen Yoghurt
Serves 6-8
60ml whole milk
150g granulated sugar
880ml low fat vanilla yoghurt
450g frozen mixed berries (thawed, puréed and strained to remove seeds)
1 tsp vanilla, almond, or lemon extract
n Ensure the freezer bowl is completely frozen (see page 8).
n Place the milk and sugar in a medium bowl, whisk together until the sugar is dissolved.
Stir in the yoghurt, berry purée and extract. Cover and chill for 2-3 hours.
n Turn the appliance on, pour the chilled mixture into the freezer bowl and leave the
frozen yoghurt to churn for 20-25 minutes.
n This will produce a soft frozen yoghurt. For a firm frozen yoghurt, transfer to an air tight
container and place in the freezer for 2 hours.
23
Page 24

Fresh Lemon Sorbet
Serves 6-8
500g granulated sugar
530ml water
400ml freshly squeezed lemon juice, strained (approx 12 lemons)
1 tbsp lemon zest
n Ensure the freezer bowl is completely frozen (see page 8).
n Place the sugar and water in a medium saucepan and bring to the boil. Reduce the
heat and simmer for 3-5 minutes stirring occasionally until the sugar dissolves. Cool
completely.
n When cool add the lemon juice and zest then stir well. Cover and chill for 2-3 hours.
n Once chilled, briefly stir the mixture again. Turn the appliance on, pour the chilled
mixture into the freezer bowl and leave the sorbet to churn for 20-25 minutes.
n This will produce a soft sorbet. For a firm frozen sorbet, transfer to an air tight container
and place in the freezer for 2 hours.
Variations:
n Fresh Lime Sorbet: Substitute 400ml freshly squeezed lemon juice for lime juice and 1
tbsp finely chopped lemon zest for lime zest.
n Fresh Lemon-Lime Sorbet: Use half lemon juice and half lime juice and 1/2 tbsp each
of lemon and lime zest.
24
Page 25

Dark Chocolate Sorbet
Serves 6-8
900ml water
375g granulated sugar
75g soft brown sugar
250g unsweetened cocoa powder
1 tbsp vanilla extract
n Ensure the freezer bowl is completely frozen (see page 8).
n Combine the water and sugars in a large saucepan and place over a medium heat. Stir until
the sugar dissolves.
n Whisk in the cocoa and bring the mixture to a simmer. Simmer for 2 minutes, stirring
constantly. Remove from the heat and transfer to a medium bowl. Stir in the vanilla
extract. Chill in the refrigerator for 2 hours.
n Once mixture is chilled turn the appliance on. Pour the chilled mixture into the freezer
bowl and leave the sorbet to churn for 20-25 minutes.
n This will produce a soft sorbet. For a firm frozen sorbet, transfer to an air tight container
and place in the freezer for 2 hours.
25
Page 26

Hedgerow Berry Eton Mess
Serves 6-8
Blackcurrant Sorbet
250g caster sugar (for the sugar syrup)
300ml water (for sugar syrup)
500g blackcurrant (for the blackcurrant puree)
4 tbsp icing sugar (for the blackcurrant puree)
Pulp of 3 passion fruits
Eton mess
300ml double cream
80g small meringues
60g raspberries
60g blackberry
20g redcurrant
20g white currant
Raspberry coulis
250g raspberries
2 tbsp icing sugar
n Ensure the freezer bowl is completely frozen (see page 8).
n Make a sugar syrup by boiling the water with the caster sugar until the sugar has fully
dissolved. Once the sugar has dissolved allow to cool.
n Make a blackcurrant puree by blending the blackcurrants and icing sugar at high speed
in a food processor . Once processed pass it through a fine sieve.
n Take the pulp out of the passion fruit and pass through a sieve, reserving the juice.
n Combine the sugar syrup, blackcurrant puree and passionfruit juice together and
refrigerate for at least 2 hours.
n When you are ready to churn the sorbet, place the freezer bowl and paddle into the Ice
Cream Maker.
n Whisk the mixture again before pouring into the freezer bowl.
n Churn for approximately 30 to 40 minutes, until the sorbet is firm.
n Place into an air tight container and leave to set in the freezer for at least an hour.
Raspberry Coulis
n Place the ingredients in a food processor and process (use a “grind” button if available).
n Pass through a sieve
Eton Mess
n Whip the double cream to soft peaks.
n Crush half of the meringues, cut half of the blackberries and raspberries in half.
n Fold them gently into the whipped cream
n Drizzle some coulis into the cream and fold lightly to create swirls.
n Divide between 4 glass bowls.
n Arrange the remaining fruits, meringues and coulis on the top.
n Place a scoop of sorbet on the top.
26
Page 27

UK Wiring Instructions
n The wires in the mains lead are coloured in accordance with the following code:
BLUE = NEUTRAL
BROWN = LIVE
As the colours of the wire in the mains lead of this appliance may not correspond with the
colour marking identifying the terminals on your plug, proceed as follows:
n The wire which is coloured BLUE must be connected to the terminal which is marked
with the letter N
n The wire which is coloured BROWN must be connected to the terminal which is marked
with the letter L
Neither the BLUE or BROWN wires should be connected to the terminal which is marked
with the letter E or the symbol
This appliance is supplied fitted with a BS1363 mains plug and a BS1362 3A fuse. If this
plug is removed from the appliance please ensure it is disposed of safely as a disconnected
plug is dangerous if reconnected to the mains. If any other type of plug is used, a 3A fuse
must be fitted.
The symbol
on the product or on its packaging indicates that this product may
not be treated as household waste. Instead it should be handed over to the applicable
collection point for the recycling of electrical and electronic equipment. By ensuring this
product is disposed of correctly, you will help prevent potential negative consequences
for the environment and human health, which could otherwise be caused by inappropriate
waste handling of this product. For more detailed information about the recycling of this
product, please contact your local council office or your household waste disposal service.
27
Page 28

www.cuisinart.co.uk
IB-8/099D
 Loading...