

Page 1
Automatic Frozen Yogurt-Ice Cream & Sorbet Maker
INSTRUCTION AND
RECIPE BOOKLET
For your safety and continued enjoyment of this product, always read the instruction book carefully before using.
ICE-21
Page 2

2
IMPORTANT
SAFEGUARDS
When using an electrical appliance, basic safety
precautions should always be followed to reduce the risk of
fire, electric shock, and/or injury, including the following:
1. READ ALL INSTRUCTIONS BEFORE USING.
2.
To protect against risk of electric shock, do not place
cord, plug, or base of appliance in water or any other
liquid.
3.
Close supervision is necessary when any appliance is
used by or near children.
4.
Always unplug from outlet when not in use, before
putting on or taking off parts, and before cleaning.
5.
Avoid contact with moving parts. Keep hands, hair and
clothing, as well as spatulas and other utensils, away
during operation to reduce the risk of injury and/or
damage to the appliance.
6.
Do not operate any appliance with a damaged cord or
plug, or after the appliance malfunctions or is dropped
or damaged in any manner. Return the appliance to the
nearest Cuisinart Repair Center for examination, repair,
electrical or mechanical adjustment.
7.
The use of attachments not recommended by Cuisinart
may cause fire, electric shock or risk of injury.
8.
Do not use outdoors.
9.
Do not let cord hang over edge of table or counter,
or touch hot surfaces.
10.
Keep hands and utensils out of freezer bowl while in
use to reduce the risk of injury to persons or to the
appliance itself. DO NOT USE SHARP OB JECTS OR
UTENSILS INSIDE THE FREEZER BOWL! Sharp
objects will scratch and damage the inside of the
freezer bowl. A rubber spatula or wooden spoon may
be used when the appliance is in the OFF position.
11.
This appliance is for household use. Any servicing
other than cleaning and user maintenance should be
done only by authorized Cuisinart Repair Personnel.
12.
Do not use the freezer bowl on flames, hot plates or
stoves. Do not expose to heat source. Do not wash in
dishwasher; doing so may cause risk of fire, electric
shock or injury.
13.
Do not operate your appliance in an appliance
garage or under a wall cabinet. When storing in
an appliance garage always unplug the unit
from the electrical outlet. Not doing so could
create a risk of fire, especially if the appliance
touches the walls of the garage or the door
touches the unit as it closes.
SAVE THESE
INSTRUCTIONS
FOR HOUSEHOLD
USE ONLY
NOTICE
This appliance has a polarized plug (one blade is wider than
the other). To reduce the risk of electric shock, this plug will
fit in a polarized outlet only one way. If the plug does not fit
fully in the outlet, reverse the plug. If it still does not fit,
contact a qualified electrician. Do not attempt to defeat this
safety feature.
SPECIAL CORD SET
INSTRUCTIONS
A short power-supply cord is provided to reduce the risks
resulting from becoming entangled in or tripping over a
longer cord. Longer extension cords may be used if care is
exercised in their use.
If a long, polarized extension cord is used, the marked
electrical rating of the extension cord should be at least as
great as the electrical rating of the appliance, and the
longer cord should be arranged so that it will not drape
over the countertop or tabletop, where it can be pulled on
by children or animals, or tripped over.
CAUTION
• Do not immerse base in water.
• To reduce the risk of fire or electric shock, do not
disassemble the base. Note: The base does not
contain any user-serviceable parts.
• Repairs should be made only by authorized personnel.
• Check voltage to be sure that the voltage indicated on
the name plate agrees with your voltage.
• Never clean with scouring powders or hard
implements.
Page 3
3
TABLE OF CONTENTS
Important Safeguards............................ 2
Features and Benefits ........................... 3
Before Using for the First Time . . . . . . .. . . . . . .. . . . . . 3
Freezing Time and Bowl Pr
eparation................ 4
Making Frozen Desserts.......................... 4
Adding Ingredients .............................. 4
Safety Feature .. . . . .. . . .. . .. . .. . . .. . .. . . .. . .. . . 4
Cleaning,Storage and Maintenance
................. 4
Warranty...................................... 5
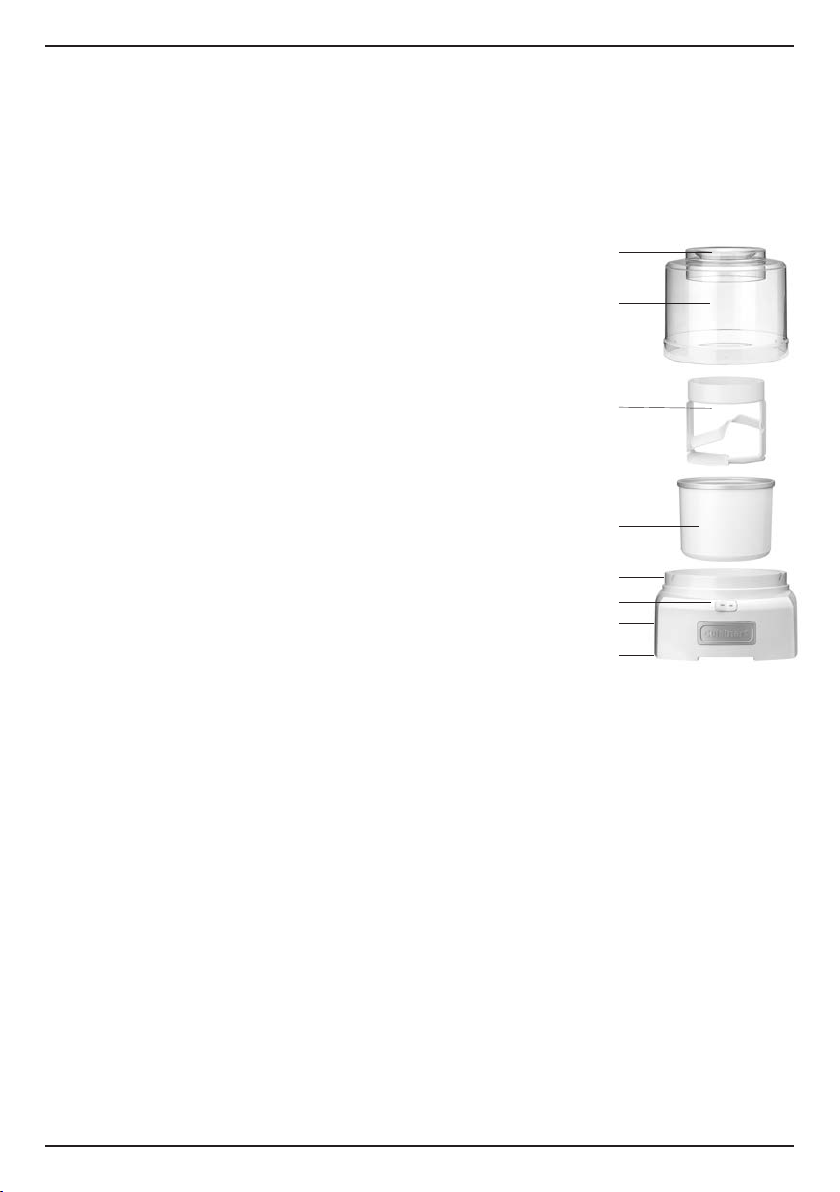
FEATURES AND BENEFITS
1. Ingredient Spout
Pour recipe ingredients through the spout. Also use to
add ingredients like chips or nuts, without interrupting
the fr
eezing cycle.
2. Easy-Lock Lid
Transparent to let you watch the freezing process as it
progr
esses. Lid is designed to easily lock to the base.
3. NEW
Mixing Paddle
Mixes and aerates
ingredients in fr
eezer
bowl to create frozen
desserts or drinks.
4. Freezer Bowl
Contains cooling
liquid between a
double-insulated wall
to cr
eate fast and
even fr
eezing. Double
wall keeps the bowl
cool and at an even
temperature.
5. Base
Contains heavy-duty
motor strong enough
to handle ice cr
eam,
frozen yogurt, sherbet,
sorbet, and frozen
drinks.
6. On/Off Switch
7. Rubber Feet
(not shown)
Non-slip feet keep
base stationary
during use.
8.
Cord Storage (not shown)
Unused cord is easily pushed into the base to keep
counters neat and safe.
9.
BPA-Free (not shown)
All materials that come in contact with food are
BPA-free.
BEFORE USING FOR
THE FIRST TIME
DO NOT immerse the motor base in water. Wipe it with a
moist cloth. Wash the lid, freezer bowl and mixing arm in
warm soapy water to remove any dust or residue from the
manufacturing and shipping process. DO NOT clean any of
the parts with abrasive cleaners or hard implements.
1
2
3
4
5
6
7
8
Page 4

4
FREEZING TIME AND BOWL
PREPARATION
The freezer bowl must be completely frozen before you
begin your recipe. Before freezing, wash and dry the bowl.
The length of time needed to reach the frozen state
depends on how cold your freezer is. It is recommended
that you place the freezer bowl in the back of your freezer
where it is coldest. Be sure to place the freezer bowl on a
flat surface in its upright position for even freezing.
Generally, freezing time is between 16 and 24 hours. Shake
the bowl to determine whether it is completely frozen. If you
do not hear the liquid within the bowl moving, the cooling
liquid is therefore frozen. For the most convenient frozen
desserts and drinks, leave your freezer bowl in the freezer
at all times. Use the bowl immediately after removing from
the freezer. It will begin to quickly defrost once it has been
removed from the freezer.
Reminder: Your freezer should be set to 0°F to ensure
proper freezing of all foods.
MAKING FROZEN DESSERTS
1. Prepare recipe ingredients from pages that follow or
from your own recipe. Flip booklet over for Cuisinart
recipes. If you use your own recipe, be sure it yields
1½ quarts or less.
2.
Remove the freezer bowl from the freezer. Place freezer
bowl on the center of the base.
NOTE: Bowl will begin to defrost quickly once it has
been removed from freezer. Use it immediately after
removing from freezer.
3. Place mixing paddle in freezer bowl. It just rests in the
center of the bowl, with the circle side facing up.
4. Place lid on base and rotate clockwise until tabs on lid
lock in place on base.
5. Press On/Off switch to ON position. Freezer bowl will
begin to turn.
6. Immediately pour ingredients through ingredient spout.
NOTE: Ingredients must be added to the freezer
bowl after unit is t urned on.
7. Frozen desserts will be done in less than 20 minutes.
The time will depend on the recipe and volume of the
dessert you are making. When the mixture has
thickened to your liking, it is done. If you desire a firmer
consistency, transfer the dessert to an airtight container
and store in the freezer for two or more hours.
NOTE: Do not store frozen desserts in the freezer
bowl. Desserts will stick to the sides of the freezer bowl
and may damage the bowl. Store only in a freezer-safe
airtight container.
ADDING INGREDIENTS
Ingredients such as chips and nuts should be added about
5 minutes before the recipe is complete. Once the dessert
has begun to thicken, add the ingredients thr
ough the
ingredient spout. Nuts and other ingredients should be no
larger than a chocolate chip.
SAFETY FEATURE
The Cuisinart® Automatic Frozen Yogurt–Ice Cream &
Sorbet Maker is equipped with a safety feature that
automatically stops the unit if the motor overheats. This
may occur if the dessert is extremely thick, if the unit has
been running for an excessively long period of time, or if
added ingredients (nuts, etc.) are in extremely large pieces.
To reset the unit, put the On/Off switch in the OFF position
and unplug the unit. Let the unit cool off. After a few
minutes, you may turn the unit on again and continue
making the dessert.
CLEANING, STORAGE AND
MAINTENANCE
Cleaning
Clean the freezer bowl, mixing paddle and lid in warm
soapy water. DO NOT PUT FREEZER BOWL IN THE
DISHW
ASHER. DO NOT CLEAN WITH ABRASIVE
CLEANSERS OR IMPLEMENTS. Wipe motor base clean
with damp cloth. Dry all parts thoroughly.
Storage
DO NOT put freezer bowl in freezer if bowl is wet. DO NOT
store lid, mixing paddle, or base in fr
eezer. You may store
the freezer bowl in the freezer for convenient, immediate
use. Do not store frozen desserts in the freezer bowl in the
freezer for more than 30 minutes at a time. Transfer frozen
desserts to a freezer-safe, airtight container for longer
storage in the freezer.
Maintenance
Any other servicing should be performed by an authorized
service representative.
Page 5

5
LIMITED THREE-YEAR
WARRANTY
(U.S. and C
ANADA only)
This warranty is available to consumers only. You are a
consumer if you own a Cuisinart
®
Automatic Frozen Yogurt–
Ice Cream & Sorbet Maker that was purchased at retail for
personal, family or household use. Except as otherwise
required under applicable law, this warranty is not available
to retailers or other commercial purchasers or owners.
We warrant that your Cuisinart
®
Automatic Frozen Yogurt–
Ice Cream & Sorbet Maker will be free of defects in
materials and workmanship under normal home use for 3
years from the date of original purchase.
We recommend that you visit our website, www.cuisinart.
com for a fast, efficient way to complete your product
registration. However, product registration does not
eliminate the need for the consumer to maintain the original
proof of purchase in order to obtain the warranty benefits.
In the event that you do not have proof of purchase date,
the purchase date for purposes of this warranty will be the
date of manufacture.
If your Cuisinart
®
Automatic Frozen Yogurt–Ice Cream &
Sorbet Maker should prove to be defective within the
warranty period, we will repair it, or if we think necessary,
replace it. To obtain warranty service, simply call our tollfree number, 1-800-726-0190, for additional information
from our Customer Service Representatives or send the
defective product to Customer Service at Cuisinart, 7475
North Glen Harbor Blvd., Glendale, AZ 85307.
To facilitate the speed and accuracy of your return, please
enclose $10.00 for shipping and handling of the product.
Please pay by check or money order (California residents
need only supply proof of purchase and should call 1-800726-0190 for shipping instructions).
NOTE: For added protection and secure handling of any
Cuisinart product that is being returned, we recommend
you use a traceable, insured delivery service. Cuisinart
cannot be held responsible for in-transit damage or for
packages that are not delivered to us. Lost and/or damaged
products are not covered under warranty.
Please be sure to include your return address, daytime
phone number, description of the product defect, product
model number (located on bottom of product), original date
of purchase, and any other information pertinent to the
product’s return.
CALIFORNIA RESIDENTS ONLY
California law provides that for In-Warranty Service,
California residents have the option of returning a
nonconforming product (A) to the store where it was
purchased or (B) to another retail store that sells Cuisinart
products of the same type.
The retail store shall then, at its discretion, either repair the
product, refer the consumer to an independent repair
facility, replace the product, or refund the purchase price
less the amount directly attributable to the consumer’s prior
usage of the product. If the above two options do not result
in the appropriate relief to the consumer, the consumer may
then take the product to an independent repair facility if
service or repair can be economically accomplished.
Cuisinart and not the consumer will be responsible for the
reasonable cost of such service, repair, replacement, or
refund for nonconforming products under warranty.
California residents may also, according to their preference,
return nonconforming products directly to Cuisinart for
repair, or if necessary, replacement, by calling our
Consumer Service Center toll-free at 1-800-726-0190.
Cuisinart will be responsible for the cost of the repair,
replacement, and shipping and handling for such products
under warranty.
BEFORE RETURNING YOUR
CUISINART PRODUCT
If you are experiencing problems with your Cuisinart
product, we suggest that you call our Consumer Service
Center at 1-800-726-0190 befor
e returning the product to
be serviced. If servicing is needed, a Representative can
confirm whether the product is under warranty and direct
you to the nearest service location.
Your Cuisinart
®
Automatic Frozen Yogurt–Ice Cream &
Sorbet Maker has been manufactured to the strictest
specifications and has been designed for use only in 120
volt outlets and only with authorized accessories and
replacement parts. This warranty expressly excludes any
defects or damages caused by attempted use of this unit
with a converter, as well as use with accessories,
replacement parts or repair service other than those
authorized by Cuisinart. This warranty does not cover any
damage caused by accident, misuse, shipment or other
than ordinary household use. This warranty excludes all
incidental or consequential damages. Some states do not
allow the exclusion or limitation of these damages, so these
exclusions may not apply to you. You may also have other
rights, which vary from state to state.
Important: If the nonconforming product is to be serviced
by someone other than Cuisinart’s Authorized Service
Center, please remind the servicer to call our Consumer
Service Center at 1-800-726-0190 to ensure that the
problem is properly diagnosed, the product is serviced with
the correct parts, and the product is still under warranty.
Trademarks or service marks of third parties referred to herein are
the trademarks or service marks of their respective owners.
©2015 Cuisinart
150 Milford Road
East Windsor, NJ 08520
Printed in China
15CE017661
G IB-9582-ESP
Page 6

6
RECIPE TIPS
The recipes that follow offer you a variety of options for
delicious frozen desserts. You may create or use recipes of
your own, as long as they yield no more than 1½ quarts.
• Frozen desserts from the Cuisinart
®
Automatic Frozen
Yogurt–Ice Cream & Sorbet Maker use pure, fresh
ingredients. Because of this, the desserts and drinks do
not have the same characteristics as commercially
prepared frozen desserts and drinks. Most store-bought
versions use gums and preservatives to make them firmer.
If you desire a firmer consistency, transfer the
dessert to an airtight container and store in the
freezer until desired consistency is reached, usually
two or more hours.
• Some recipes use precooked ingredients. For best results,
the mixture should be chilled overnight before using. Or,
chill the recipe over an ice bath, until it is completely
cooled, before using.
• To make an ice bath, fill a large container with ice and
water. Place saucepan or other container into the ice
bath. Cool precooked ingredients completely.
• Prior to freezing, most recipes may be stored in the
refrigerator for up to 3 days.
• You may substitute lower fat creams (e.g., half and half),
milk (reduced fat or lowfat) as well as non-dairy milks
(soy, rice) for heavy cream and whole milk used in many
recipes. However, keep in mind that the higher the fat
content, the richer and creamier the result. Using lower fat
substitutes may change the taste, consistency and
texture of the dessert. When substituting, be sure to use
the same volume of the substitute as you would have
used of the original item. For example, if the recipe calls
for two cups of cream, use a total of two cups of the
substitute (such as 1 cup cream, 1 cup whole milk).
• You may substitute artificial sweeteners for sugar. If the
recipe is to be precooked, add the sweetener after the
heating process is complete and ingredients have cooked.
Stir the mixture thoroughly to dissolve the sweetener.
• In recipes that use alcohol, add the alcohol during the last
two minutes of the freezing process. Otherwise, the
alcohol may impede the freezing process.
• When making sorbet, be sure to test the ripeness and
sweetness of the fruit before you use it. The freezing
process reduces the sweetness of the fruit so that it will
taste less sweet than the recipe mixture. If the fruit tastes
tart, add sugar to the recipe. If the fruit is very ripe or
sweet, reduce the amount of sugar in the recipe.
• The Cuisinart recipes listed below will yield up to 1½
quarts of dessert. When pouring ingr
edients in through
the ingredient spout, DO NOT fill the freezer bowl higher
than ¼-inch from the top of the freezer bowl. The
ingredients will increase in volume during the freezing
process.
•
When making more than one r
ecipe at a time, be sure the
freezer bowl is completely frozen before each use.
Additional freezer bowls may be purchased on the
Cuisinart web site (www.cuisinart.com).
•
Make sure mixing paddle and lid ar
e in place before
turning on machine.
Simple Ice Creams
Simple Vanilla Ice Cream
This ice cream can easily be dressed up by
adding your favorite chopped candies or sprinkles
at the end of churning.
Makes about 5 cups (ten ½-cup servings)
1 cup whole milk
¾ cup granulated sugar
pinch salt
2 cups heavy cream
1 tablespoon pure vanilla extract
1. In a medium bowl, use a hand mixer on low speed
or whisk to combine the milk, sugar and salt until
the sugar is dissolved. Stir in the heavy cream and
vanilla. Cover and refrigerate 1 to 2 hours, or
overnight.
2. Tu rn on the Cuisinart
®
ice cream maker; pour the
mixture into the frozen freezer bowl and let mix until
thickened, about 15 to 20 minutes. The ice cream
will have a soft, creamy texture. If a firmer
consistency is desired, transfer the ice cream to an
airtight container and place in freezer for about 2
hours. Remove from freezer about 15 minutes
before serving.
Nutritiona l information per ser ving (based on ½ cup):
Calories 222 (73% fr om fat) • carb. 13g • pro. 2g
• fat 18g • sat. fat 11g • chol. 69mg • sod. 45mg
• calc. 61mg • fiber 0g
Simple Chocolate Ice Cream
For a real treat, serve this with our
Chocolate Sauce on page 12.
Makes about 5 cups (ten ½-cup servings)
¾ cup cocoa powder, sifted
½ cup granulated sugar
¹∕³ cup packed dark brown sugar
pinch salt
1 cup whole milk
2 cups heavy cream
½ tablespoon pure vanilla extract
1. In a medium bowl, whisk together the cocoa, sugars
and salt. Add the milk and, using a hand mixer on
low speed or a whisk, beat to combine until the
cocoa, sugars and salt are dissolved. Stir in the
heavy cream and vanilla. Cover and refrigerate 1 to
2 hours, or overnight.
2. Tu rn the Cuisinart
®
ice cream maker on; pour the
mixture into the frozen freezer bowl and let mix until
Page 7

7
thickened, about 15 to 20 minutes. The ice cream
will have a soft, creamy texture. If a firmer
consistency is desired, transfer the ice cream to an
airtight container and place in freezer for about 2
hours. Remove from freezer about 15 minutes
before serving.
Nutritional information per s erving (based on ½
cup):Calories 268 (62% from fat) • carb. 23g • pro. 3g
• fat 19g • sat. fat 11g • chol. 69mg • sod. 44mg
• calc. 61mg • fiber 1g
Butter Pecan Ice Cream
The butter used to toast the pecans can be saved and
used over pancakes or waffles.
Makes about 5 cups (ten ½-cup servings)
4 tablespoons unsalted butter
1 cup pecans
1 teaspoon salt
1 cup whole milk
¾ cup granulated sugar
pinch salt
2 cups heavy cream
1 tablespoon pure vanilla extract
1. Melt the butter in a medium skillet. Add the pecans
and 1 teaspoon of salt. Cook over medium-low heat
until pecans are toasted and golden, stirring
frequently, about 6 to 8 minutes. Remove from the
heat, strain and reserve the pecans, allowing them
to chill. The butter can be used for another use –
delicious over pancakes or waffles.
2. In a medium bowl, use a hand mixer on low speed
or whisk to combine the milk, sugar and salt until
the sugar is dissolved. Stir in the heavy cream and
vanilla. Cover and refrigerate 1 to 2 hours, or
overnight.
3. Turn the Cuisinart
®
ice cream maker on; pour the
mixture into the frozen freezer bowl and let mix until
thickened, about 15 to 20 minutes. Five minutes
before mixing is completed, add the reserved
pecans and let mix in completely. The ice cream will
have a soft, creamy texture. If a firmer consistency
is desired, transfer the ice cream to an airtight
container and place in freezer for about 2 hours.
Remove from freezer about 15 minutes before
serving.
Nutritional information per s erving (based on ½ cup):
Calories 330 (79% from fat) • carb. 14g • pro. 3g
• fat 30g • sat. fat 15g • chol. 81mg • sod. 58mg
• calc. 68mg • fiber 1g
S’mores Ice Cream
All of the flavors of a s’more in one bite of ice cream.
Makes about 6 cups (twelve ½-cup servings)
½ cup cocoa powder, sifted
1
⁄3
cup granulated sugar
¼ cup packed dark brown sugar
pinch salt
2
⁄3
cup whole milk
1½ cups heavy cream
1 teaspoon pure vanilla extract
¾ cup marshmallow cream (e.g. Fluff
®
)
2 full graham cracker sheets, crushed
2 ounces milk chocolate (¹∕³ cup chips), melted
and reserved at room temperature
1. In a medium bowl, whisk together the cocoa, sugars
and salt. Add the milk and, using a hand mixer on
low speed or a whisk, beat to combine until the
cocoa and sugars are dissolved. Stir in the heavy
cream and vanilla. Cover and refrigerate 1 to 2
hours, or overnight.
2. Tu rn on the Cuisinart
®
ice cream maker; pour the
mixture into the frozen freezer bowl and let mix until
thickened, about 15 to 20 minutes. Five minutes
before mixing is completed, gradually add the
marshmallow cream, one spoonful at a time. Once
mixed, add the crushed graham crackers and
melted chocolate, one at a time, through the top and
let mix in completely. The ice cream will have a soft,
creamy texture. If a firmer consistency is desired,
transfer the ice cream to an airtight container and
place in freezer for about 2 hours. Remove from
freezer about 15 minutes before serving.
Tip:
If marshmallow cream is too stiff, warm slightly
in microwave before adding to freezer bowl.
Nutritional information per s erving (based on ½ cup):
Calories 292 (52% from fat) • carb. 33g • pro. 2g
• fat 17g • sat. fat 10g • chol. 57mg • sod. 48mg
• calc. 43mg • fiber 1g
Fresh Strawberry Ice Cream
Best made when strawberries are at their peak of
freshness, this ice cream is light, sweet and fruity.
Makes about 5 cups (ten ½-cup servings)
1½ cups fresh strawberries, hulled*
¾ cup whole milk
2
⁄3
cup granulated sugar
pinch salt
1½ cups heavy cream
1½ teaspoons pure vanilla extract
Page 8

8
1. Put the strawberries into the bowl of a food
processor fitted with the chopping blade. Pulse
strawberries until rough/finely chopped (depending
on preference). Reserve in bowl.
2. In a medium bowl, use a hand mixer on low speed
or whisk to combine the milk, sugar and salt until
the sugar is dissolved. Stir in the heavy cream and
vanilla. Stir in reserved strawberries with all juices.
Cover and refrigerate 1 to 2 hours, or overnight.
3. Turn on the Cuisinart
®
ice cream maker; pour the
mixture into the frozen freezer bowl and let mix until
thickened, about 15 to 20 minutes. The ice cream
will have a soft, creamy texture. If a firmer
consistency is desired, transfer the ice cream to an
airtight container and place in freezer for about 2
hours. Remove from freezer about 15 minutes
before serving.
* Frozen strawberries may be substituted if fresh
strawberries are not available.
Nutritional information per s erving (based on ½ cup):
Calories 192 (62% from fat) • carb. 16g • pro. 1g
• fat 13g • sat. fat 9g • chol. 51mg • sod. 23mg
• calc. 26mg • fiber 0g
Peanut Butter Cup Ice Cream
One of the easiest ice creams to make, the rich
peanut but ter flavors in this ice cream will have
your friends and family in awe.
Makes about 6 cups (twelve ½-cup servings)
1 cup good quality peanut butter (not natural)
2
⁄3
cup granulated sugar
1 cup whole milk
2 cups heavy cream
1 teaspoon pure vanilla extract
1 cup chopped chocolate peanut butter cup
candies (about 15 miniature peanut butter
cups)
1. In a medium mixing bowl, use a hand mixer on low
speed to combine the peanut butter and sugar until
smooth. Add the milk and mix on low speed until the
sugar is dissolved, about 1 to 2 minutes. Stir in the
heavy cream and vanilla. Cover and refrigerate 1 to
2 hours, or overnight.
2. Tu rn on the Cuisinart
®
ice cream maker; pour the
mixture into freezer bowl and let mix until thickened,
about 15 to 20 minutes. Five minutes before mixing
is completed, add the chopped candy through the
top and let mix in completely. The ice cream will
have a soft, creamy texture. If a firmer consistency
is desired, transfer the ice cream to an airtight
container and place in freezer for about 2 hours.
Remove from freezer about 15 minutes before
serving.
Nutritional information per s erving (based on ½ cup):
Calories 365 (68% from fat) • carb. 23g • pro. 8g
• fat 29g • sat. fat 12g • chol. 58mg • sod. 153mg
• calc. 58mg • fiber 2g
Peppermint Ice Cream
Not your ordinary mint ice cream, our Peppermint calls
for a lot of bright green fresh mint for a real natural flavor.
Makes about 6 cups (twelve ½-cup servings)
1 cup whole milk
2½ cups packed fresh mint leaves
¾ cup granulated sugar
pinch salt
2 cups heavy cream
1 tablespoon pure vanilla extract
1½ cup chopped peppermint patties
(about 10 to 12 bite-size patties)
1. In a medium saucepan set over medium-low heat,
bring the milk just to a boil. Remove from heat and
add the mint leaves; let steep for 20 to 30 minutes. If
you desire a milder mint flavor, strain and discard
the mint leaves after steeping, but for a more
intense ice cream, blend the milk/mint mixture using
an immersion blender.
2. Add the sugar and salt to the steeped milk/mint
mixture. Use a hand mixer on low speed or whisk to
combine, until the sugar is dissolved. Stir in the
heavy cream and vanilla. Cover and refrigerate, 1 to
2 hours, or overnight.
3. Turn on the Cuisinart
®
ice cream maker; pour the
mixture into the frozen freezer bowl and let mix until
thickened, about 15 to 20 minutes. Five minutes
before mixing is completed, add the chopped candy
through the top and let mix in completely. The ice
cream will have a soft, creamy texture. If a firmer
consistency is desired, transfer the ice cream to an
airtight container and place in freezer for about 2
hours. Remove from freezer about 15 minutes
before serving.
Nutritional information per s erving (based on ½ cup):
Calories 356 (45% from fat) • carb. 48g • pro. 3g
• fat 18g • sat. fat 11g • chol. 58mg • sod. 50mg
• calc. 68mg • fiber 1g
Cheesecake Ice Cream
This ice cream is excellent all alone in a cup, or go to
page 13 and make our Raspberry Sauce to top it off.
Makes about 5 cups (ten ½-cup servings)
12 ounces cream cheese, room temperature,
cut into 2-inch pieces
Page 9

9
1 cup granulated sugar
½ teaspoon salt
¼ cup mascarpone, room temperature
1 cup whole milk, room temperatu re
2 teaspoons pure vanilla extract
¼ cup sour cream, room temperature
1. Put the cream cheese into the bowl of a stand mixer.
Fitted with the mixing paddle. Mix the cream on
medium speed until very smooth. With the mixer
running, gradually add the sugar and salt; mix until
homogenous. Add the mascarpone and mix until
well combined. Slowly add the milk and vanilla; mix
until smooth. Use the fold function to mix in the sour
cream. Cover and refrigerate 1 to 2 hours, or
overnight.
2. Tu rn on the Cuisinart
®
ice cream maker; pour the
mixture into the frozen freezer bowl and let mix until
thickened, about 15 to 20 minutes. The ice cream
will have a soft, creamy texture. If a firmer
consistency is desired, transfer the ice cream to an
airtight container and place in freezer for about 2
hours. Remove from freezer about 15 minutes
before serving.
Nutritional information per s erving (based on ½ cup):
Calories 240 (56% from fat) • carb. 23g • pro. 4g
• fat 15g • sat. fat 10g • chol. 49mg • sod. 234mg
• calc. 65mg • fiber 0g
Banana Walnut Chip
Do not be intimidated by the multiple steps in this ice
cream. The end result of frozen banana, toasted walnuts
and flecks of chocolate makes it worth every minute.
Makes about 6 cups (twelve ½-cup servings)
½ cup whole milk
2 cups heavy cream
1 whole vanilla bean, halved and seeds scraped
½ teaspoon pure vanilla extract
¼ teaspoon salt
1
⁄3
cup packed dark brown sugar
1 tablespoon water
2 tablespoons unsalted butter
2 large bananas, cut into 1-inch pieces
1½ tablespoons dark rum
¼ teaspoon fresh lemon juice
2 ounces bittersweet chocolate (
1
⁄3
cup chips),
roughly chopped
½ cup toasted walnu ts, roughly chopped
1. In a medium saucepan set over medium-low heat,
bring the milk, cream, vanilla bean (including the
pod), vanilla extract and the salt just to a boil.
Remove from heat; let mixture steep for 30 minutes.
2. While the milk/cream mixture is steeping, heat the
sugar with water in a large skillet until it begins to
sizzle. Stir in the butter and heat until melted. Add
the bananas; cook for about 2 minutes, or until
fragrant and softened. Carefully stir in the rum and
cook for an additional 2 minutes, or until slightly
thickened. Remove from heat. Using a slotted
spoon, strain the banana/sugar mixture, reserving
the sugar syrup and bananas in separate bowls.
3. Remove the vanilla pod from the steeped milk/
cream mixture; discard pod. Stir the lemon juice into
the bananas and then mix the bananas into the
steeped milk/cream. Cover and refrigerate mixture 1
to 2 hours, or overnight.
4. Turn on the Cuisinart
®
ice cream maker; pour the
banana mixture into the frozen freezer bowl and let
mix until thickened, about 15 to 20 minutes.
5. While ice cream is churning, melt the bittersweet
chocolate in a bowl set over a pot of simmering
water; reserve.
6. When the ice cream is almost fully churned,
gradually add the sugar syrup; let mix until fully
combined. Once the sugar syrup has been mixed,
add the walnuts through the top of the ice cream
maker; let mix until combined. Right before the ice
cream is done, drizzle the melted chocolate into the
churning ice cream. The ice cream will have a soft,
creamy texture. If a firmer consistency is desired,
transfer the ice cream to an airtight container and
place in freezer for about 2 hours. Remove from
freezer about 15 minutes before serving.
Nutritional information per s erving (based on ½ cup):
Calories 194 (64% from fat) • carb. 15g • pro. 2g
• fat 15g • sat. fat 7g • chol. 34mg • sod. 58mg
• calc. 32mg • fiber 1g
Custard-Style Ice Creams
Vanilla Bean Ice Cream
For the true vanilla lover. Be sure to use fresh
vanilla beans to capture the intense flavor.
Makes about 6 cups (twelve ½-cup servings)
2 cups whole milk
2 cups heavy cream
1 cup granulated sugar, divided
pinch salt
1 whole vanilla bean, halved and seeds scraped
5 large egg yolks
1½ teaspoons pure vanilla extract
Page 10

10
1. In a medium saucepan set over medium-low heat,
whisk together the milk, cream, half of the sugar,
salt and the scraped vanilla bean (including the
pod). Bring the mixture just to a boil.
2. While the milk/cream mixture is heating, combine
the yolks and remaining sugar in a medium bowl.
Using a hand mixer on low speed or whisk, beat
until mixture is pale and thick.
3. Once the milk/cream mixture has come to a slight
boil, whisk about 1∕ 3 of the hot mixture into the yolk /
sugar mixture. Add another 1∕ 3 of the mixture, then
return the combined mixture to the saucepan. Using
a wooden spoon, stir the mixture constantly over
low heat until it thickens slightly and coats the back
of the spoon. This mixture must NOT boil or the
yolks will overcook – the process should only take a
few minutes.
4. Pour the mixture through a fine mesh strainer
(discard the vanilla pod) and bring to room
temperature. Stir in the vanilla extract. Cover and
refrigerate 1 to 2 hours, or overnight.
5. Turn on the Cuisinart
®
ice cream maker; pour the
mixture into the frozen freezer bowl and let mix until
thickened, about 20 minutes. The ice cream will
have a soft, creamy texture. If a firmer consistency
is desired, transfer the ice cream to an airtight
container and place in freezer for about 2 hours.
Remove from freezer about 15 minutes before
serving.
Nutritional information per s erving (based on ½ cup):
Calories 254 (62% from fat) • carb. 20g • pro. 3g
• fat 18g • sat. fat 11g • chol. 148mg • sod. 51mg
• calc. 85mg • fiber 0g
Fresh Mint with Chocolate Cookies
Always a winning combination, fresh mint and chocolate
take the forefront in this rich and creamy ice cream.
Makes about 6 cups (twelve ½-cup servings)
2 cups whole milk
2 cups heavy cream
1 cup granulated sugar, divided
pinch salt
1½ teaspoons pure vanilla extract
2 cups packed fresh mint leaves
5 large egg yolks
1 cup crushed chocolate sandwich cookies
(about 8 cookies)
1. In a medium saucepan set over medium-low heat,
whisk together the milk, cream, half of the
granulated sugar, salt, and vanilla. Bring the mixture
just to a boil. Remove from heat and add the mint
leaves; let steep for 20 to 30 minutes. If you desire a
milder mint flavor, remove and discard the mint
leaves after steeping, but for a more intense ice
cream we recommend blending the milk/mint
mixture using an immersion blender. After steeping,
return the mixture just to a boil over medium-low
heat.
2. While the milk/cream mixture is reheating, combine
the yolks and remaining sugar in a medium bowl.
Using a hand mixer on low speed or a whisk, beat
until mixture is pale and thick.
3. Once the milk/cream mixture has come to a slight
boil, whisk about 1∕ 3 of the hot mixture into the yolk /
sugar mixture. Add another 1∕ 3 of the mixture, then
return the combined mixture to the saucepan. Using
a wooden spoon, stir the mixture constantly over
low heat until it thickens slightly and coats the back
of the spoon. This mixture must NOT boil or the
yolks will overcook – the process should only take a
few minutes.
4. Pour the mixture through a fine mesh strainer. Bring
the ice cream base to room temperature. Cover and
refrigerate 1 to 2 hours, or overnight.
5. Turn on the Cuisinart
®
ice cream maker; pour the
mixture into the frozen freezer bowl and let mix until
thickened, about 20 minutes. When the ice cream is
almost fully churned, gradually add the crushed
cookies through the top of the ice cream maker; let
mix until fully combined.
6. The ice cream will have a soft, creamy texture. If a
firmer consistency is desired, transfer the ice cream
to an airtight container and place in freezer for
about 2 hours. Remove from freezer about 15
minutes before serving.
Nutritional information per s erving (based on ½ cup):
Calories 293 (58% from fat) • carb. 27g • pro. 4g
• fat 20g • sat. fat 11g • chol. 148mg • sod. 98mg
• calc. 115mg • fiber 1g
Mexican Style Chocolate Ice Cream
This ice cream can be spicy for some, so adjust the
cayenne to your personal taste.
Makes about 5 cups (about ten ½-cup servings)
2 cups whole milk
1½ cups heavy cream
1½ teaspoons pure vanilla extract
1 teaspoon ground cinnamon
1 to 2 pinches cayenne
pinch salt
2
⁄3
cup granulated sugar, divided
5 large egg yolks
6 ounces bit tersweet chocolate, roughly
chopped
Page 11

11
1. In a medium saucepan set over medium-low heat,
whisk together the milk, cream, vanilla, spices, salt
and half of the sugar. Bring the mixture just to a boil.
2. While the milk/cream mixture is heating, combine
the yolks and remaining sugar in a medium bowl.
Using a hand mixer on low speed or a whisk, beat
until mixture is pale and thick.
3. Place the chopped chocolate in a separate mixing
bowl; reserve.
4. Once the milk/cream mixture has come to a slight
boil, whisk about 1∕ 3 of the hot mixture into the yolk /
sugar mixture. Add another 1∕ 3 of the mixture, then
return the combined mixture to the saucepan. Using
a wooden spoon, stir the mixture constantly over the
low heat until it thickens slightly and coats the back
of the spoon. This mixture must NOT boil or the
yolks will overcook – the process should only take a
few minutes.
5. Pour the mixture through a fine mesh strainer into
the bowl of the reserved chocolate; whisk to
combine and then bring to room temperature. Cover
and refrigerate 1 to 2 hours, or overnight.
6. Turn on the Cuisinart
®
ice cream maker; pour the
mixture into the frozen freezer bowl and let mix until
thickened, about 20 minutes. The ice cream will
have a soft, creamy texture. If a firmer consistency
is desired, transfer the ice cream to an airtight
container and place in freezer for about 2 hours.
Remove from freezer about 15 minutes before
serving.
Nutritional information per s erving (based on ½ cup):
Calories 320 (64% from fat) • carb. 26g • pro. 5g
• fat 24g • sat. fat 14g • chol. 161mg • sod. 157mg
• calc. 97mg • fiber 1g
Pistachio Ice Cream
We love this flavor in our Ice Cream Birthday Cake on
page 12, or just scoop into your favorite cone.
Makes about 5 cups (about ten ½-cup servings)
2½ cups whole milk
1 whole vanilla bean, halved and seeds scraped
²∕³ cup granulated sugar, divided
2¼ cups chopped roasted, unsa lted pistachios;
shelled, divided
2
cups heavy cream
pinch salt
6 large egg yolks
¼ teaspoon pure almond extract
1. In a medium saucepan set over medium-low heat,
stir together the milk, vanilla bean (including the
pod), half of the sugar and 1½ cups pistachios.
Bring the mixture just to a boil. Remove from heat;
let mixture steep for 1 to 2 hours. After steeping,
add the cream and salt and gradually return the
mixture just to a boil over medium-low heat.
2. When the milk/pistachio/cream mixture is reheating,
combine the yolks and remaining sugar in a medium
bowl. Using a hand mixer
on low speed or a whisk,
beat until mixture is pale and thick.
3. Once the milk/pistachio/cream mixture has come to a
slight boil, whisk about 1∕3 of the hot mixture into the
yolk/sugar mixture. Add another 1∕3 of the mixture, then
return the combined mixture to the saucepan. Using a
wooden spoon, stir the mixture constantly over the low
heat until it thickens slightly and coats the back of the
spoon.
This mixture must NOT boil or the yolks will overcook –
th
e process should only take a few minutes.
4. Stir in the almond extract and pour the mixture through
a fine mesh strainer (discard the vanilla pods and
pistachios); bring to room temperature. Cover and
refrigerate 1 to 2 hours, or overnight.
5. Turn on the Cuisinart
®
ice cream maker; pour the
mixture into the frozen freezer bowl and let mix until
thickened, about 20 minutes. When the ice cream is
almost done churning, add the remaining toasted
pistachios through the opening at the top of the ice
cream maker. The ice cream will have a soft, creamy
texture. If a firmer consistency is desired, transfer the
ice cream to an airtight container and place in freezer
for about 2 hours. Remove from freezer about 15
minutes before serving.
Nutritional information per s erving (based on ½ cup):
Calories 341 (68% from fat) • carb. 21g • pro. 7g
• fat 27g • sat. fat 14g • chol. 200mg • sod. 71mg
• calc. 129mg • fiber 1g
Frozen Yogurts
Rich Vanilla Frozen Yogurt
While part-skim or fat-free yogurt can be substituted, to
get the real flavor and richness of this frozen yogurt it is
best to use the whole milk variety.
Makes about 5 cups (ten ½-cup servings)
1½ tablespoons light corn syrup
1½ tablespoons honey
3 tablespoons water
2 vanilla beans, split and seeds scraped
5 cups whole milk plain yogurt, strained
through a cheesecloth* for 2 to 4 hours
1 teaspoon pure vanilla extract
¾ cup granulated sugar
pinch salt
1. Put the corn syrup, honey, water and vanilla beans
into a medium saucepan. Over medium-low heat,
bring mixture to a boil, then simmer until reduced by
about half. Strain (discarding vanilla pods); reserve.
2. In a large mixing bowl, whisk the strained yogurt,
reserved honey/water/vanilla reduction, vanilla
extract, sugar and salt together. Whisk until the
Page 12

12
sugar has dissolved. Cover and refrigerate 2 to 3
hours, or overnight.
3. Turn on the Cuisinart
®
ice cream maker; pour the
mixture into the frozen freezer bowl and let mix until
thickened, about 15 to 20 minutes. The frozen yogurt
will have a soft, creamy texture. If a firmer
consistency is desired, transfer the frozen yogurt to
an airtight container and place in freezer for about 2
hours. Remove from freezer about 15 minutes before
serving.
* If you do not have a cheesecloth, you can use a
couple of layered paper towels.
Nutritional information per s erving (based on ½ cup):
Calories 161 (22% from fat) • carb. 25g • pro. 7g
• fat 4g • sat. fat 3g • chol. 15mg • sod. 67mg
• calc. 176mg • fiber 0g
Mango Frozen Yogurt
Be sure to use fresh, ripe mangoes.
The better the mango, the better the frozen yogurt.
Makes about 5 cups (ten ½-cup servings)
5 cups low-fat plain yogurt, strained through a
cheesecloth* for 2 to 4 hours
½ cup granulated sugar
2 mangoes, peeled, pitted and roughly chopped
(about ½ to 1-inch pieces)
1
teaspoon fresh lime juice, about ½ lime
1. In a large mixing bowl, whisk the strained yogurt and
sugar together; reser ve.
2. Using a blender, purée the mangoes with the lime
juice and 1 cup of the yogurt mixture. Combine with
the remaining yogurt/sugar mixture. Cover and
refrigerate 1 to 2 hours, or overnight.
3. Turn on the Cuisinart
®
ice cream maker; pour the
mixture into the frozen freezer bowl and let mix until
thickened, about 15 to 20 minutes. The frozen yogurt
will have a soft, creamy texture. If a firmer
consistency is desired, transfer the frozen yogurt to
an airtight container and place in freezer for about 2
hours. Remove from freezer about 15 minutes before
serving.
* If you do not have a cheesecloth, you can use a
couple of layered paper towels.
Nutritional information per s erving (based on ½ cup):
Calories 126 (8% from fat) • carb. 26g • pro. 5g
• fat 1g • sat. fat 1g • chol. 3mg • sod. 74mg
• calc. 204mg • fiber 2g
Chocolate Pretzel Frozen Yogurt
The combination of the chocolate and the salt from the
pretzel is a standout in this tangy and sweet dessert.
Makes about 5 cups (ten ½-cup servings)
4 cups whole milk plain yogurt, strained through
a cheesecloth* for 2 to 4 hours
¾
cup granulated sugar
1
⁄3
cup cocoa powder, sifted
pinch salt
1 cup lowfat milk
½ teaspoon pure vanilla extract
1 cup chopped chocolate or yogurt covered
pretzels
1. In a large mixing bowl, whisk the strained yogurt,
sugar, cocoa powder, salt, milk and vanilla together.
Whisk until the sugar has dissolved. Cover and
refrigerate 2 to 3 hours, or overnight.
2. Tu rn on the Cuisinart
®
ice cream maker; pour the
mixture into the frozen freezer bowl and let mix until
thickened, about 15 to 20 minutes. When the ice
cream is almost done churning, add the chopped
pretzels through the opening at the top of the ice
cream maker. The frozen yogurt will have a soft,
creamy texture. If a firmer consistency is desired,
transfer the ice cream to an airtight container and
place in freezer for about 2 hours. Remove from
freezer about 15 minutes before serving.
* If you do not have a cheesecloth, you can use a
couple of layered paper towels.
Nutritional information per s erving (based on ½ cup):
Calories 281 (22% from fat) • carb. 48g • pro. 8g
• fat 7g • sat. fat 3g • chol. 5mg • sod. 259mg
• calc. 215mg • fiber 2g
Lowfat Strawberry Frozen Yogurt
The tanginess of the yogurt comes through in
this frozen treat.
Makes about 5 cups (ten ½-cup servings)
4 cups low fat plain yogurt, strained through
a cheesecloth* for 2 to 4 hours
½
cup granulated sugar
pinch salt
1 teaspoon pure vanilla extract
2 tablespoons light corn syrup
1 pound frozen mixed berries
1½ tablespoons honey
1½ tablespoons fresh lemon juice
1. In a large bowl, whisk the strained yogurt with the
sugar, salt, vanilla and corn syrup; reserve.
2. In a medium saucepan, heat the berries, honey and
lemon juice on low for about 10 minutes, or until just
softened. Strain, discarding liquid, and cool. Once
the berries are cooled, stir into the yogurt/sugar
mixture. Cover and refrigerate 2 to 3 hours, or
overnight.
Page 13

13
3. Turn on the Cuisinart® ice cream maker; pour the
mixture into the frozen freezer bowl and let mix until
thickened, about 15 to 20 minutes. The frozen
yogurt will have a soft, creamy texture. If a firmer
consistency is desired, transfer the frozen yogurt to
an airtight container and place in freezer for about 2
hours. Remove from freezer about 15 minutes
before serving.
* If you do not have a cheesecloth, you can use a
couple of layered paper towels.
Nutritional information per s erving (based on ½ cup):
Calories 123 (8% from fat) • carb. 27g • pro. 4g
• fat 1g • sat. fat 1g • chol. 3mg • sod. 73mg
• calc. 167mg • fiber 2g
Sorbets
Coconut Sorbet
Delicious when topped with toasted coconut
or our Chocolate Sauce (page 12).
Makes about 6 cups (twelve ½-cup servings)
1½ cups water
1
1
⁄3
cups granulated sugar
1 whole vanilla bean, halved and seeds scraped
pinch salt
2 cans (13.5 ounces each) unsweetened coco
-
nut milk
1. Combine the water, sugar, vanilla bean (including
the pod) and salt in a medium saucepan set over
medium-low heat. Bring mixture just to a boil and
then remove from heat. Let mixture steep for 1 hour;
strain (discarding pod).
2. Add the coconut milk to the strained mixture. Cover
and refrigerate overnight.
3. Turn on the Cuisinart
®
ice cream maker; pour the
mixture into the frozen freezer bowl and let mix until
thickened, about 15 to 20 minutes. The sorbet will
have a soft, creamy texture. If a firmer consistency
is desired, transfer the sorbet to an airtight
container and place in freezer for about 2 hours.
Remove from freezer about 15 minutes before
serving.
Nutritional information per s erving (based on ½ cup):
Calories 199 (51% from fat) • carb. 25g • pro. 1g
• fat 12g • sat. fat 11g • chol. 0mg • sod. 28mg
• calc. 1mg • fiber 0g
Dark Chocolate Sorbet
A step away from the ordinar y sorbets,
our Dark Chocolate Sorbet is a real treat.
Makes about 5 cups (ten ½-cup servings)
3 cups water
1
2
⁄3
cups granulated sugar
pinch salt
1
2
⁄3
cups cocoa powder, sif ted
1 teaspoon pure vanilla extract
1. Prepare a simple syrup with the water, sugar and
salt by combining all three in a medium saucepan
set over medium-low heat. Cook mixture until the
sugar is fully dissolved.
2. Gradually add the cocoa powder to the simple syrup by
whisking constantly until smooth. Add the vanilla and
stir to combine. Cover and refrigerate 2 to 3 hours, or
overnight.
3. Turn on the Cuisinart
®
ice cream maker; pour the
mixture into the frozen freezer bowl and let mix until
thickened, about 15 to 20 minutes. The sorbet will have
a soft, creamy texture. If a firmer consistency is
desired, transfer the sorbet to an airtight container and
place in freezer for about 2 hours. Remove from freezer
about 15 minutes before serving.
Nutritional information per s erving (based on ½ cup):
Calories 183 (6% from fat) • carb. 41g • pro. 3g
• fat 1g • sat. fat 0g • chol. 0mg • sod. 15mg
• calc. 2mg • fiber 3g
Lemon Basil Sorbet
The basil adds a nice undertone to the sorbet,
but any one of your favorite herbs could be substituted.
Makes about 5 cups (ten ½-cup servings)
3 cups water
2 cups granu late d sugar
2 tablespoons lemon zest, divided
1½ cups packed fresh basil (if a stronger basil
flavor is wanted, use 2 cups)
pinch salt
3 cups fresh lemon juice
1. Prepare a lemon simple syrup with the water, sugar
and 1½ tablespoons of the lemon zest by combining
all three in a medium saucepan set over mediumlow heat. Cook mixture until the sugar is fully
dissolved. Remove from heat.
2. Once the simple syrup is ready, add the basil and
salt. Let the mixture steep for 30 minutes. Stir in the
lemon juice. Cover and refrigerate 2 to 3 hours, or
overnight.
3. Strain the chilled mixture through a fine mesh
strainer. Turn on the Cuisinart
®
ice cream maker;
pour the mixture into the frozen freezer bowl and let
mix until thickened, about 15 to 20 minutes. When
the sorbet is almost done, add the reserved zest
through the opening on top of the ice cream maker
and let churn until combined. The sorbet will have a
soft, creamy texture. If a firmer consistency is
desired, transfer the sorbet to an airtight container
Page 14

14
and place in freezer for about 2 hours. Remove from
freezer about 15 minutes before serving.
Nutritional information per s erving (based on ½ cup):
Calories 175 (0% from fat) • carb. 47g • pro. 0g
• fat 0g • sat. fat 0g • chol. 0mg • sod. 16mg
• calc. 15mg • fiber 1g
Raspberry Sorbet
Not only is this sorbet sweet and refreshing, but the color
makes a beautiful presentation on any menu.
Makes about 5 cups (ten ½-cup servings)
2 cups water
1½ cups gra nula ted s ugar
pinch table salt
4 cups frozen raspberries, thawed
1. Prepare a simple syrup with the water and sugar by
combining both in a medium saucepan set over
medium-low heat. Cook mixture until the sugar is
fully dissolved.
2. Once the simple syrup is ready, add the salt and the
raspberries. Using an immersion blender, blend the
mixture until smooth. Strain half of the mixture
through a fine mesh strainer to remove the seeds.
Use a spatula to aid in passing the purée through
the strainer. Remove seeds and repeat with the
second half. Cover and refrigerate 2 to 3 hours, or
overnight.
3. Turn on the Cuisinart
®
ice cream maker; pour the
mixture into the frozen freezer bowl and let mix until
thickened, about 15 to 20 minutes. The sorbet will
have a soft, creamy texture. If a firmer consistency
is desired, transfer the sorbet to an airtight
container and place in freezer for about 2 hours.
Remove from freezer about 15 minutes before
serving.
Nutritional information per s erving (based on ½ cup):
Calories 140 (0% from fat) • carb. 37g • pro. 0g
• fat 0g • sat. fat 0g • chol. 0mg • sod. 14mg
• calc. 9mg • fibe r 2g
Frozen Desserts
Ice Cream Sandwich Cookies
A step above the traditional ice cream sandwich cookies.
A per fect match for your favorite flavor.
If you cannot find cocoa nibs, miniature chocolate chips
can be substituted, or you can double the amount of
pecans.
Makes 24 cookies (for 12 ice cream sandwiches)
¹∕³ cup cocoa powder, sifted
1¹∕³ cups bread flour
¾ teaspoon baking powder
¼ teaspoon salt
1 tablespoon instant espresso powder
½ cup unsalted butter, room temperature and
cubed
1 cup granulated sugar
1 large egg
1 teaspoon pure vanilla extract
3 tablespoons cocoa nibs (These can be found
in most gourmet or cooking stores. If you
cannot find them, subst itute with coarsely
chopped, toasted pecans or miniature choco
-
late chips.)
¼
cup cho pped pecans, toasted
1. Preheat oven to 350°F.
2. Combine the cocoa powder, flour, baking powder,
salt and espresso powder in a small bowl. Whisk to
blend; reserve.
3. Put the butter into the bowl of a stand mixer, fitted
with the mixing paddle (or use a hand mixer fitted
with the mixing beaters). Using medium speed,
cream until smooth. Gradually add the sugar and
mix until creamy. Add the egg and vanilla and mix
until combined. Add the dry ingredients and, using a
low speed, mix until fully incorporated. Add the
cocoa nibs and pecans and mix on low until just
combined.
4.
Using a small ice cream scoop (about 1½ inches in
diameter) scoop the dough onto a parchment-lined
cookie sheet (each round should be about 2
tablespoons). Use a cup to flatten each cookie
mound down.
5. Bake in the preheated oven for about 15 to 20
minutes, or until the cookie looks dry, but not firm.
Let cookies fully cool before assembling.
To assemble:
Using a small ice cream scoop,
scoop about 3 tablespoons of your favorite ice
cream onto the flat part of one cookie. Place
another cookie on top of the ice cream and press
down until the ice cream just reaches the edge of
the cookies. Continue with each set of cookies.
Wrap each ice cream sandwich in plastic wrap and
chill in a freezer until firm (about 20 minutes).
Nutritional information per s erving
(2 cookies, not including ice cream):
Calories 225 (42% from fat) • carb. 31g • pro. 3g
• fat 11g • sat. fat 6g • chol. 39mg • sod. 89mg
• calc. 18mg • fiber 1g
Strawberry Chocolate Bonbons
This decadent dessert is reminiscent of
frozen chocolate-covered strawberries.
Makes 35 bonbons
Page 15

15
1 recipe Chocolate Brownies (recipe follows)
1
recipe (about 5½ cups) strawberry ice cream
(page 4)
12 ounces bittersweet or semisweet chocolate
(about 2 cups of chips), roughly chopped
¼ cup unsalted but ter, cubed
1 tablespoon light corn syrup
1. Using a 2¼-inch round pastry cutter, cut 35 rounds
out of the pan of brownies; reserve remaining
brownie bits for another use (great crumbled into
freshly churned ice cream). Reserve cut brownies on
a wax/parchment paper-lined pan that will be able
to fit in your freezer.
2. Using a 2-inch ice cream scoop, place one scoop of
the ice cream on each brownie round. Cover with
wax paper and freeze for about 15 minutes, or until
fully hardened.
3. While the ice cream/brownies are chilling, make the
chocolate glaze. In a heatproof bowl set over a pot
of simmering water, melt the chocolate, butter and
corn syrup together. Stir to combine and cool to
room temperature.
4. Remove the ice cream/brownies from the freezer.
Place
a cooling rack on top of a wax/parchment lined pan.
Place the ice cream/brownie pieces on top of the
cooling rack, leaving about ½-inch space in between
each one. Using a ladle, slowly pour the melted
chocolate/butter mixture over each ice cream/
brownie. Be sure that the chocolate fully covers the
gelato. Let the chocolate harden and then freeze for
15 minutes, or overnight (covered with wax paper).
Nutritional information per bonbon:
Calories 282 (54% from fat) • carb. 32g • pro. 3g
• fat 18g • sat. fat 11g • chol. 62mg • sod. 77mg
• calc. 17mg • fiber 2g
Chocolate Brownies
These brownies are for our bonbons, but they can also
be made in a 9-inch square pan as regular brownies.
Makes 35 brownies
nonstick cooking spray
1 cup uns alted but ter, cubed
6 ounces unsweetened chocolate,
finely chopped
2
ounces bittersweet chocolate, finely chopped
4 large eggs
1 large egg yolk
2 cups gra nula ted s ugar
1 cup packed light brown sugar
2 teaspoons instant espresso powder
2 teaspoons pure vanilla extract
1 cup unbleached, all-purpose flour
1 teaspoon table salt
1. Preheat oven to 375°F. Coat a jelly roll pan
(approximately 12" x 18") with cooking spray and
then line with parchment; reserve.
2. Put the butter and chocolates into a heatproof bowl
and place over a pot of simmering water. Once both
are completely melted, set aside to cool to room
temperature. Reserve.
3. In the bowl of a stand mixer fitted with the mixing
paddle, or using a hand mixer fitted with the mixing
beaters, mix the eggs and egg yolk on speed 3 until
lightened, about 30 seconds. Add the granulated
and brown sugars and beat on speed 4 until light
and thickened, another 30 seconds to 1 minute. Add
instant espresso and vanilla; beat until well
combined. Stir the flour and salt into the chocolate
mixture. Add the chocolate/flour mixture to the egg/
sugars mixture and mix on speed 1 until just
incorporated.
4. Pour into prepared pan. Bake for about 25 to 30
minutes, or until edges are dry.
5. When fully cooled, cut into rounds using a 2¼-inch
round pastry cutter.
Nutritional information per brownie:
Calories 166 (46% from fat) • carb. 22g • pro. 2g
• fat 9g • sat. fat 5g • chol. 44mg • sod. 70mg
• calc. 10mg • fiber 1g
Pistachio Birthday Cake
We love this recipe with our pistachio ice cream,
but any of your favorite flavors would work.
Makes 12 servings
6 tablespoons unsalted butter, cubed
3 ounces semisweet chocolate, chopped
40 chocolate wafer cookies (Nabisco® brand
works well), or 8 ounces of plain chocolate
cookies
1 recipe Pistachio Ice Cream (page 7), softened,
or 5 to 6 cups of your favorite flavor
½ cup chopped pistac hios, toasted
1. In a heat-proof bowl set over a pot of simmering
water, combine the butter and chocolate. Stirring
occasionally, let heat until just melted. Reserve.
2. Put the chocolate water cookies into the bowl of a
food processor fitted with the chopping blade. Pulse
until finely chopped. Add the melted butter/
chocolate mixture through the feed tube of the
processor and pulse until completely combined.
Press 2∕3 of the chocolate crumb mixture into the
bottom and half-way up the sides of an 8-inch
spring-form pan. Place in freezer; chill 10 to 15
minutes to let crust harden.
3. Remove from freezer and spread half of the ice
cream over the chilled chocolate crust. Cover
Page 16

16
directly with plastic and return to freezer for about
30 minutes, or until just firm. Sprinkle the reserved
chocolate crumb mixture over the chilled iced
cream, press down gently, and return to freezer
again to chill for about 30 minutes. Spread the
remaining ice cream evenly over the top and smooth
completely with an offset spatula. Cover and chill in
the freezer for a minimum of 4 hours, or overnight to
completely firm the cake.
4. Before serving, remove the ice cream cake from the
pan and sprinkle the chopped pistachios on top of
the cake. Serve on chilled plates.
Nutritional information per s erving:
Calories 483 (63% from fat) • carb. 38g • pro. 8g
• fat 35g • sat. fat 17g • chol. 182mg • sod. 176mg
• calc. 122mg • fiber 2g
Sauces
Caramel Sauce
While we love this sauce on our ice creams, it can also
be used as a dipping sauce for fruit and cake.
Makes about ¾ cup
¾ cup granulated sugar
½ teaspoon sea salt
¼
cup water (enough so that the consistency
when mixed with the sugar and salt is similar
to wet sand)
1 tablespoon light corn syrup
¹∕³ cup heavy cream
3 tablespoons unsalted butter, cut into ½-inch
cubes
1. In a medium, heavy-bottomed saucepan, stir
together the sugar, salt, water and corn syrup. Be
sure to clean the inside walls of the pan if there is
any sugar on the sides (a clean, wet pastry brush
works best). Set over medium-low heat and cook
until the sugar mixture turns a very light amber color
(about 10 to 15 minutes). Keep a close eye on the
caramel sauce as it can burn easily.
2. Once the sugar mixture has a light amber color, take
it off the stove and slowly and carefully stir in the
cream. After the cream has been incorporated,
slowly whisk in the butter, one piece at a time,
continually whisking to emulsify until all the butter
has been added. Use immediately, or keep warm
over a pot of warm water.
Nutritional information per s erving (2 tablespoons):
Calories 198 (46% from fat) • carb. 27g • pro. 0g
• fat 10g • sat. fat 7g • chol. 33mg • sod. 184mg
• calc. 9mg • fibe r 0g
Chocolate Sauce
So much better homemade – you will be
amazed by how easy it is to make.
Makes about 1 cup
1 cup semisweet chocolate (about 6 ounces),
chopped
¾ cup heavy cream
1½ tablespoons light corn syrup
½ teaspoon pure vanilla extract
pinch sea salt
pinch ground cinnamon
1. Put the chocolate into a mixing bowl; reserve.
2. In a small, heavy-bottomed saucepan, combine the
cream, corn syrup, vanilla, salt and cinnamon. Set
over low heat and bring to a strong simmer.
Immediately pour over the reserved chocolate and
let sit for five minutes before whisking to combine.
Use immediately, or keep warm over a pot of warm
water.
Nutritional information per s erving (2 tablespoons):
Calories 229 (61% from fat) • carb. 21g • pro. 2g
• fat 16g • sat. fat 10g • chol. 31mg • sod. 27mg
• calc. 25mg • fiber 2g
Raspberry Sauce
This works well with more than just frozen desserts.
Serve over pancakes or crêpes for your loved ones.
Makes about 1 cup
1 12-ounce bag frozen raspberries, thawed
(about 2½ cups)
2 t
o 3 tablespoons granulated sugar (depending on
sweetness preference)
pinch sea salt
pinch orange zest
1. Put the raspberries into the bowl of a food
processor fitted with the metal chopping blade;
process for 15 seconds. Add remaining ingredients
and process for an additional 45 seconds.
2. Strain through a fine mesh strainer and discard the
seeds. Taste and adjust sugar amount to personal
preference.
Nutritional information per s erving (2 tablespoons):
Calories 36 (0% from fat) • carb. 9g • pro. 0g
• fat 0g • sat. fat 0g • chol. 0mg • sod. 17mg
• calc. 7mg • fiber 2g
Page 17

Máquina para hacer helados, helados de yogur y sorbetes
INSTRUCCIONES Y
LIBRO DE RECETAS
Para su seguridad y para disfrutar plenamente de este producto, siempre lea cuidadosamente las instrucciones antes de usarlo.
ICE-21
Page 18

2
MEDIDAS DE
SEGURIDAD
IMPORTANTES
Al usar aparatos eléctricos, siempre debe tomar
precauciones básicas de seguridad para reducir el riesgo
de incendio, electrocución o heridas, incluso las siguientes:
1. LEA TODAS LAS INSTRUCCIONES ANTES DE
USARLOS.
2.
Para reducir el riesgo de electrocución, no sumerja el
cable, la clavija o el cuerpo del aparato en agua u otro
líquido.
3.
Supervise el uso de este aparato cuidadosamente
cuando sea usado por o cerca de niños.
4.
Desconecte el aparato cuando no está en uso,
antes de instalar/sacar piezas y antes de limpiarlo.
5.
Evite el contacto con las piezas móviles. Para evitar el
riesgo de heridas y/o daños a la máquina, mantenga
los dedos, cabello, ropa, espátulas y otros utensilios
fuera del aparato durante el funcionamiento.
6.
No utilice este aparato si el cable o la clavija estuviesen
dañados, después de que hubiese funcionado mal o
que se hubiese caído o si estuviese dañado; regréselo
a un centro de servicio autorizado para su revisión,
reparación o ajuste.
7.
El uso de accesorios no recomendados o vendidos por
Cuisinart presenta un riesgo de incendio, electrocución
o heridas.
8.
No lo utilice en exteriores.
9.
No permita que el cable cuelgue del borde de la
encimera o de la mesa, ni que haga contacto con
superficies calientes.
10.
Para reducir el riesgo de heridas o daños a la máquina,
mantenga las manos y utensilios fuera del tazón
congelador durante el funcionamiento. NUNCA
INTRODUZCA OBJETOS O UTENSILIOS PUNZANTES
EN EL TAZÓN CONGELADOR; esto podría rayar y
dañarlo Puede utilizar una espátula de goma o una
cuchara de madera, siempre que la máquina esté
apagada.
11.
Para uso doméstico solamente. Toda reparación,
excepto la limpieza y el mantenimiento por parte del
usuario, debe ser llevada a cabo por personal de
servicio autorizado.
12.
No coloque el tazón congelador sobre un quemador a
gas o eléctrico caliente, ni en un horno caliente. No lo
exponga a ninguna fuente de calor. No lo lave en el
lavavajillas; esto podría provocar un incendio, una
descarga eléctrica o heridas.
13.
No haga funcionar el aparato debajo o dentro de
un armario/gabinete. Siempre desconecte el
aparato antes de guardarlo en un armario/
gabinete. Dejar el aparato conectado presenta
un riesgo de incendio, especialmente si este toca
las paredes o la puerta del armario/gabinete
cuando cierra.
GUARDE ESTAS
INSTRUCCIONES
PARA USO
DOMÉSTICO
SOLAMENTE
AVISO
El cable de este aparato está dotado de una clavija
polarizada (una pata es más ancha que la otra). Como
medida de seguridad, se podrá enchufar de una sola
manera en la toma de corriente polarizada. Si no entrara en
la toma de corriente, inviértala. Si aún no entrara
completamente, comuníquese con un electricista. No
intente ir en contra de esta función de seguridad.
USO DE EXTENSIONES
El cable provisto con este aparato es corto, para reducir el
peligro de que alguien se enganche o tropiece con un cable
más largo. Se podrá usar una extensión eléctrica, siempre
que respete las precauciones siguientes.
La clasificación nominal de la extensión debe ser por lo
menos igual a la del aparato. Es importante acomodar el
cable más largo de manera que no cuelgue de la encimera/
mesa donde puede ser jalado por niños o puede causar
tropiezos.
PRECAUCIÓN
• No sumerja la base en agua.
• Para reducir el riesgo de incendio o descarga eléctrica,
no desarme la base. Nota: la base no contiene piezas
que puedan ser reparadas/cambiadas por el usuario.
•
Las reparaciones deben ser realizadas únicamente por
personal autorizado.
•
Asegúrese de que el voltaje indicado en la placa de
especificaciones técnicas del aparato coincida con el
voltaje de su casa.
•
Nunca limpie el aparato con productos o materiales
abrasivos.
Page 19

3
ÍNDICE
Medidas de seguridad importantes ................. 2
Piezas y características . . . . . . . . . . . . . . . . . . . . . . . . . . 3
Antes del primer uso
. . .. . .. . .. . .. . .. . .. . .. . .. . .. 3
Preparación del tazón . . . . . . . . . . .. . . . . . . . . . . . . . . . 4
Preparación de postres helados . .. . .. . .. . .. .. . .. . . 4
Ingredientes secos .............................. 4
Mecanismo de seguridad......................... 4
Limpieza, mantenimiento y almacenaje
.............. 4
Garantía . . . .. .. .. . . . . . . . . . . . .. .. . . . . . . . . . . . .. . 5
PIEZAS Y CARACTERÍSTICAS
1. Boca de llenado
Para agregar los ingredientes de la receta o agregar
ingredientes secos, como chispas de chocolate o
frutas secas, sin interrumpir el ciclo de preparación.
2.
Tapa fácil de cerrar
Transparente, para poder vigilar el proceso de
preparación. Especialmente diseñada para fijarse
fácilmente a la base.
3.
NUEVA paleta
mezcladora
Mezcla los
ingredientes e
incorpora aire para
preparar bebidas o
postres helados.
4.
Tazón congelador
Contiene un líquido
congelante en una
pared con doble
aislamiento para
mantener el tazón a
temperatura constante
y lograr un
congelamiento rápido
y uniforme.
5.
Base
Equipada con un
resistente motor, lo
suficientemente fuerte
como para preparar
helados, helados de
yogur, sorbetes y
bebidas heladas.
6. Botón de encendido/apagado
7.
Pies de goma
(no ilustrados)
Pies antideslizantes, para mantener el aparato estable.
8.
Espacio para guardar el cable
(no ilustrado)
El cable se hunde en la base para guardarlo y así
mantener la encimera limpia y segura.
9.
Sin BPA (no ilustrado)
Ninguna de las piezas en contacto con los alimentos
contiene bisfenol A (BPA).
ANTES DEL PRIMER USO
NO sumerja la base del motor en agua. Límpiela con un
paño ligeramente humedecido. Lave la tapa, el tazón
congelador y la paleta mezcladora en agua jabonosa tibia
para quitar el polvo o cualquier residuo que se haya
acumulado durante el proceso de fabricación y envío. NO
limpie ninguna de las piezas de la máquina con limpiadores
o materiales abrasivos.
1
2
3
4
5
6
7
8
Page 20

4
PREPARACIÓN/CONGELAMIENTO
DEL TAZÓN
El tazón debe estar completamente congelado antes de
preparar una receta. Lave y seque el tazón antes de
congelarlo. El tiempo necesario para congelar el tazón
depende de que tan frío esté su congelador. Le
recomendamos que coloque el tazón en el fondo del
congelador, donde es más frío. Coloque el tazón sobre una
superficie plana, en posición vertical.
Generalmente, el tiempo de congelación es entre 16 y 24
horas. Para saber si un tazón está completamente
congelado, agítelo. Si no escucha ningún movimiento de
líquido, entonces el tazón está listo. Para mayor
conveniencia, deje siempre el tazón en el congelador; Use
el tazón inmediatamente después de sacarlo del
congelador; comenzará a descongelarse rápidamente
después de haberlo sacado del congelador.
Nota: su congelador debe estar a una temperatura de 0 °F
(-18 °C) para asegurar el congelamiento adecuado de toda
comida.
PREPARACIÓN DE POSTRES
HELADOS
1. Prepare los ingredientes de la receta que desea
preparar (ver nuestras recetas al dorso). Si usa sus
propias recetas, asegúrese de que no rindan más de
1½ cuarto de galón (1.4L).
2. Saque el tazón congelador del congelador. Coloque el
tazón sobre la base de la máquina.
NOTA: el tazón comenzará a descongelarse
rápidamente después de haberlo sacado del
congelador; úselo inmediatamente.
3. Coloque la paleta mezcladora en el tazón. La paleta
debe descansar sobre el centro del tazón, con la parte
circular hacia arriba.
4. Coloque la tapa sobre la base y gírela en sentido
horario para sujetarla.
5. Ponga el botón de encendido/apagado en la posición
"ON"; el tazón empezará a girar.
6. Eche los ingredientes inmediatamente por la boca de
llenado.
IMPORTANTE: siempre encienda el aparato antes
de agregar los ingredientes.
7. Sus postres helados estarán listos en tan sólo 20
minutos. El tiempo de preparación dependerá de la
receta y de la cantidad que esté preparando. Apague
el aparato cuando la mezcla se haya espesado a su
gusto. Si desea una consistencia más firme, ponga la
preparación en un recipiente hermético y congélela por
dos o más horas.
NOTA: no guarde los postres helados en el tazón
congelador. Los ingredientes pegarán a las paredes del
tazón, lo que puede dañarlo. Guarde las preparaciones
únicamente en recipientes herméticos.
INGREDIENTES SECOS
Los ingredientes secos tales como las chispas o frutas
secas deben ser agregados en los últimos 5 minutos del
mezclado. Una vez que la bebida o el postre helado hayan
empezado a espesarse, eche los ingredientes por la boca
de llenado. El tamaño de los ingredientes secos no debe
ser mayor al de chispas de chocolate.
MECANISMO DE SEGURIDAD
La máquina para hacer helados, helados de yogur y
sorbetes Cuisinart
®
está equipada con un sistema de
seguridad que apaga automáticamente el aparato en caso
de recalentamiento del motor. Esto puede ocurrir si la
preparación es demasiado espesa, si la máquina ha estado
funcionando por un tiempo excesivo o si el tamaño de los
ingredientes que se agregan (frutas secas, etc.) es
demasiado grande. Para reiniciar el aparato, apague (OFF)
y desconéctelo. Permita que se enfríe. Después de unos
minutos, puede encender la máquina nuevamente y
continuar con su preparación.
LIMPIEZA, MANTENIMIENTO Y
ALMACENAJE
Limpieza
Limpie el tazón congelador, la paleta mezcladora y la tapa
en agua jabonosa tibia. NUNCA LAVE EL TAZÓN
CONGELADOR EN EL LAVAVAJILLAS. NO UTILICE
LIMPIADORES O MATERIALES ABRASIVOS. Limpie la
base con un paño ligeramente humedecido. Seque bien
todas las piezas.
Almacenaje
NO guarde el tazón congelador en el congelador si está
mojado. NO guarde la tapa, la paleta mezcladora ni la base
en el congelador. Guarde siempre el tazón en el congelador
para conveniencia y uso inmediato. No deje sus postres
helados dentro del tazón por más de 30 minutos.
Guárdelos en un recipiente hermético para optimizar su
tiempo de conservación.
Mantenimiento
Cualquier otro servicio debe ser realizado por un técnico
autorizado.
Page 21

5
GARANTÍA LIMITADA DE
TRES AÑOS
(VÁLIDA EN LOS EE.UU. Y EN
CANADÁ SOLAMENTE)
Esta garantía es para los consumidores solamente. Usted
es un consumidor si ha comprado su aparato Cuisinart
®
en
una tienda, para uso personal o casero. A excepción de los
estados donde la ley lo permita, esta garantía no es para
los detallistas u otros comerciantes.
Cuisinart garantiza leste aparato contra todo defecto de
materiales o fabricación durante 3 años después de la
fecha de compra original, siempre que el aparato haya sido
utilizado para uso doméstico y según las instrucciones.
Le aconsejamos que llene el formulario de registro
disponible en www.cuisinart.com a fin de facilitar la
verificación de la fecha de compra original. Sin embargo,
no es necesario registrar el producto para recibir servicio
bajo esta garantía. En ausencia del recibo de compra, el
período de garantía será calculado a partir de la fecha de
fabricación.
Si este aparato presentara algún defecto de materiales o
fabricación durante el período de garantía, la reparemos o
reemplazaremos (a nuestra opción). Para obtener servicio
bajo esta garantía, llame a nuestra línea directa gratuita al
1-800-726-0190 o regrese el aparato defectuoso a:
Cuisinart, Service Department, 7475 North Glen Harbor
Blvd.
Regrese el aparato defectuoso, junto con su recibo de
compra y un cheque o giro postal de US$10.00 por gastos
de manejo y envío.
Los residentes de California sólo necesitan dar una prueba
de compra y deben llamar al 1-800-726-0190 para recibir
instrucciones de envío.
NOTA: para más seguridad, le aconsejamos que mande su
paquete por un método de entrega con seguro y
seguimiento. Cuisinart no será responsable por los daños
ocurridos durante el transporte o por los paquetes
mandados a una dirección equivocada. Los productos
perdidos y/o lastimados durante el envío no serán cubiertos
bajo esta garantía.
Recuerde incluir su nombre, dirección y teléfono, la
descripción del problema, así como cualquier información
pertinente.
RESIDENTES DE CALIFORNIA SOLAMENTE
La ley del estado de California ofrece dos opciones bajo el
período de garantía. Los residentes del estado de California
pueden (A) regresar el producto defectuoso a la tienda
donde lo compraron o (B) a otra tienda que venda
productos Cuisinart
®
de este tipo.
La tienda, a su opción, reparará el producto, referirá al
consumidor a un centro de servicio independiente,
cambiará el producto o reembolsará al consumidor por el
precio original del producto, menos la cantidad imputable
al uso del producto por el consumidor hasta que este se
dañe. Si estas dos opciones no satisfacen al consumidor,
podrá llevar el producto a un centro de servicio
independiente, siempre que se pueda ajustar o reparar el
producto de manera económica. Cuisinart será responsable
por los gastos de servicio, reparación, reemplazo o
reembolso de los productos defectuosos durante el período
de garantía.
Los residentes de California también pueden, si lo desean,
mandar el aparato defectuoso directamente a Cuisinart
para que lo reparen o lo cambien. Para esto, se debe llamar
a nuestro servicio posventa al 1-800-800-726-0190.
Cuisinart será responsable por los gastos de reparación,
reemplazo, manejo y envío de los productos defectuosos
durante el período de garantía.
ANTES DE HACER REPARAR SU APARATO
Si su aparato tiene algún problema, le recomendamos que
llame a nuestro servicio posventa al 1-800-726-0190 antes
de regresar el aparato a Cuisinart. Un representante le
confirmará si su aparato sigue bajo garantía y le indicará la
dirección del centro de servicio más cercano.
Este aparato satisface las más altas exigencias de
fabricación y ha sido diseñado para uso sobre corriente de
120V, usando accesorios y piezas de repuesto autorizados
solamente. Esta garantía excluye expresamente los daños
causados por accesorios, piezas o reparaciones no
autorizados por Cuisinart, así como los daños causados
por el uso de un convertidor de voltaje. Esta garantía no
cubre el uso institucional o comercial del producto, y no es
válida en caso de daños causados por mal uso, negligencia
o accidente. Esta garantía excluye expresamente todos los
daños incidentales o consecuentes. Algunos Estados no
permiten la exclusión o limitación de daños incidentales o
consecuentes, de modo que las limitaciones mencionadas
pueden no regir para usted. Usted puede tener otros
derechos que varían de un Estado a otro.
Importante: si debe llevar el aparato defectuoso a un
centro de servicio no autorizado, por favor informe al
personal del centro de servicio que deberían llamar al
servicio posventa de Cuisinart al 1-800-726-0190 a fin de
diagnosticar el problema correctamente, usar las piezas
correctas para repararlo y asegurarse de que el producto
esté bajo garantía.
Page 22

6
CONSEJOS DE PREPARACIÓN
Las recetas ofrecidas más adelante le brindan una variedad
de opciones para preparar deliciosos postres helados.
Usted puede crear o usar sus propias recetas, siempre y
cuando no rindan más de 1½ cuarto de galón (1.4 L).
• Los postres helados preparados con la máquina para
hacer helados, helados de yogur y sorbetes Cuisinart
®
emplean ingredientes frescos y puros; por lo tanto no
tienen las mismas características que los preparados de
forma comercial. La mayoría de los postres helados que
se compran en las tiendas contienen gomas y
conservantes para darles firmeza. Si usted desea una
consistencia más firme, coloque la preparación en un
recipiente hermético y congélela hasta que adquiera
la consistencia deseada, por lo general dos o más
horas.
• Algunas recetas usan ingredientes precocidos. Para
lograr resultados óptimos, refrigere los ingredientes
calientes durante 12 horas o más, o enfríelos bien en un
baño de hielo antes de empezar la preparación.
•
Para hacer el baño de hielo, llene un recipiente grande
con hielo y agua. Coloque una olla u otro recipiente en el
baño de hielo. Enfríe completamente los ingredientes
precocidos.
• La mayoría de las mezclas pueden conservarse en el
refrigerador durante hasta 3 días.
• Puede sustituir cremas bajas en grasa (por ej. crema
líquida "half-and-half") y leche (semidescremada o
descremada) por la crema líquida para batir y la leche
entera usadas en muchas recetas. Sin embargo, tenga
presente que mientras más alto sea el contenido de
grasa, más rico y cremoso será el resultado. Usar
sustitutos bajos en grasa puede alterar el sabor, la
consistencia y textura de la preparación final. Cuando
haga la sustitución, asegúrese de usar el mismo volumen
de producto sustituto que hubiera usado para el producto
original. Por ejemplo, si la receta incluye 2 tazas (475 ml)
de crema, use un total de 2 tazas (475 ml) de producto
sustituto (por ej. 1 taza/235 ml de crema y 1 taza/235 ml
de leche entera).
• Puede sustituir edulcorantes artificiales por azúcar. Si es
necesario que la receta se precocine, añada el
edulcorante después de la cocción. Revuelva bien la
mezcla para que el edulcorante se disuelva.
• Si la lista de ingredientes incluye alcohol, agregue el
alcohol en los últimos dos minutos del mezclado, porque
el alcohol puede impedir el proceso de congelamiento.
• Cuando prepare sorbetes, cerciórese del grado de
maduración y dulzura de las frutas antes de usarlas. El
proceso de congelación reduce la dulzura de las frutas;
por eso el helado sabrá menos dulce que la mezcla
inicial. Si la fruta sabe ácida, agregue azúcar; si la fruta
está muy madura o dulce, utilice menos azúcar de lo
indicado en la receta.
•
Nuestras recetas permiten preparar hasta 1½ cuarto de
galón (1.4L) de postre helado. No llene el tazón
congelador hasta más de ¼ pulgada (0.5 cm) de la orilla,
ya que los ingredientes se expanden durante el
congelamiento.
•
Cuando prepare más de una receta, asegúrese de que el
tazón esté completamente congelado antes de preparar
la receta siguiente. Para comprar tazones congeladores
adicionales, visítenos en www.cuisinart.com.
•
Asegúrese de que la paleta mezcladora y la tapa estén
debidamente puestas antes de encender el aparato.
Page 23

7
Helados básicos
Helado de vainilla simple
Para "personalizar" este helado clásico, añada dulces
picados o chispas en los últimos minutos del mezclado.
Rinde aproximadamente 10 porciones de ½ taza (120 ml)
1 taza (235 ml) de leche entera
¾ taza (150 g) de azúcar granulada
1 pizca de sal
2 tazas (475 ml) de crema líquida para batir
("heavy cream")
1 cucharada de extracto natural de vainilla
1. Poner la leche, el azúcar y la sal en un tazón
mediano; batir a velocidad baja, usando una batidora
de mano, hasta que el azúcar esté disuelto. Agregar
la crema líquida y la vainilla. Cubrir y refrigerar por
1–2 horas, o más.
2. Encender la máquina y echar la mezcla en el tazón
congelador. Dejar que se mezcle durante 15–20
minutos, hasta que se espese. Nota: el helado tendrá
una consistencia cremosa. Si desea que sea más
firme, ponerlo en un recipiente hermético y congelarlo
durante aproximadamente 2 horas. Sacar del
congelador 15 minutos antes de servir.
Información nutricional por porción de ½ taza (120 ml):
Calorías 222 (73% de grasa) • Carbohidratos 13g
• Proteínas 2g • Grasa 18g • Grasa saturada 11 g
• Colesterol 69mg • Sodio 45mg • Calcio 61mg
• Fibra 0g
Helado de chocolate simple
Sirva este sabroso helado con nuestra salsa de chocolate
(página 17).
Rinde aproximadamente 10 porciones de ½ taza (120 ml)
¾ taza (90 g) de cacao en polvo, tamizado
½ taza (100 g) de azúcar granulada
¹∕³ taza llena (65 g) de azúcar moreno
1 pizca de sal
1 taza (235 ml) de leche entera
2 tazas (475 ml) de crema líquida para batir
("heavy cream")
½ cucharada de extracto natural de vainilla
1. Colocar el cacao en polvo, el azúcar y la sal en un
tazón mediano; revolver. Agregar la leche y mezclar,
usando una batidora de mano a velocidad baja, hasta
que el cacao, el azúcar y la sal estén disueltos.
Agregar la crema líquida y la vainilla. Cubrir y
refrigerar por 1–2 horas, o más.
2. Encender la máquina y echar la mezcla en el tazón
congelador. Dejar que se mezcle durante 15–20
minutos, hasta que se espese. Nota: el helado tendrá
una consistencia cremosa. Si desea que sea más
firme, ponerlo en un recipiente hermético y congelarlo
durante aproximadamente 2 horas. Sacar del
congelador 15 minutos antes de servir.
Información nutricional por porción:
Calorías 268 (62% de grasa) • Carbohidratos 23g
• Proteínas 3g • Grasa 19g • Grasa saturada 11 g
• Colesterol 69mg • Sodio 44mg • Calcio 61mg
• Fibra 1g
Helado de pacana
La mantequilla usada para tostar las pacanas es perfecta
para acompañar panqueques o wafles/gofres.
Rinde aproximadamente 10 porciones de ½ taza (120 ml)
4 cucharadas (55 g) de mantequilla sin sal
1 taza (100 g) de pacanas
1 cucharadita de sal
1 taza (235 ml) de leche entera
¾ taza (150 g) de azúcar granulada
1 pizca de sal
2 tazas (475 ml) de crema líquida para batir
("heavy cream")
1 cucharada de extracto natural de vainilla
1. Derretir la mantequilla en un sartén mediano. Agregar
las pacanas y una cucharadita de sal. Cocer a fuego
medio-lento durante 6–8 minutos, hasta que las
pacanas estén doradas y tostadas. Retirar del fuego,
escurrir y dejar enfriar. La mantequilla puede
guardarse para otro uso, por ej. para acompañar
panqueques o wafles/gofres.
2. Poner la leche, el azúcar y la sal en un tazón
mediano; batir a velocidad baja, usando una batidora
de mano, hasta que el azúcar esté disuelto. Agregar
la crema líquida y la vainilla. Cubrir y refrigerar por
1–2 horas, o más.
3. Encender la máquina y echar la mezcla en el tazón
congelador. Dejar que se mezcle durante 15–20
minutos, hasta que se espese. Añadir las pacanas en
los últimos 5 minutos del mezclado. Nota: el helado
tendrá una consistencia cremosa. Si desea que sea
más firme, ponerlo en un recipiente hermético y
congelarlo durante aproximadamente 2 horas. Sacar
del congelador 15 minutos antes de servir.
Información nutricional por porción de ½ taza (120 ml):
Calorías 330 (79% de grasa) • Carbohidratos 14g
• Proteínas 3g • Grasa 30g • Grasa saturada 15 g
• Colesterol 81mg • Sodio 58mg • Calcio 68mg
• Fibra 1g
Page 24

8
Helado "S'mores"
Sabroso helado con sabor a "s'mores" (galletas con
malvavisco y chocolate)
Rinde aproximadamente 12 porciones de ½ taza (120 ml)
½ taza (60 g) de cacao en polvo, tamizado
1
⁄3
taza (65 g) de azúcar granulada
¼ taza llena (50 g) de azúcar moreno
1 pizca de sal
2
⁄3
taza (160 ml) de leche entera
1½ taza (355 ml) de crema líquida para batir
("heavy cream")
1 cucharadita de extracto natural de vainilla
¾ taza (375 ml) de crema de malvavisco
(por ej. Fluff
®
)
2 galletas "Graham", picadas
2 onzas (55 g) de chocolate con leche o chispas
de chocolate, derretido y a temperatura
ambiente
1. Colocar el cacao en polvo, el azúcar y la sal en un
tazón mediano; revolver. Agregar la leche y mezclar,
usando una batidora de mano a velocidad baja, hasta
que el cacao y el azúcar estén disueltos. Agregar la
crema líquida y la vainilla. Cubrir y refrigerar por 1–2
horas, o más.
2. Encender la máquina y echar la mezcla en el tazón
congelador. Dejar que se mezcle durante 15–20
minutos, hasta que se espese. Añadir la crema de
malvavisco, una cucharada a la vez, en los últimos 5
minutos del mezclado. Después, añadir las galletas
picadas, y luego el chocolate derretido; dejar que se
combine todo. Nota: el helado tendrá una
consistencia cremosa. Si desea que sea más firme,
ponerlo en un recipiente hermético y congelarlo
durante aproximadamente 2 horas. Sacar del
congelador 15 minutos antes de servir.
Consejo:
si la crema de malvavisco está demasiado
espesa, calentarla durante varios segundos en el
microondas antes de agregarla a la preparación.
Información nutricional por porción de ½ taza (120 ml):
Calorías 292 (52% de grasa) • Carbohidratos 33g
• Proteínas 2g • Grasa 17g • Grasa saturada 10 g
• Colesterol 57mg • Sodio 48mg • Calcio 43mg
• Fibra 1g
Helado de fresas frescas
Helado ligero y dulce con delicioso sabor a fresas.
Rinde aproximadamente 10 porciones de ½ taza (120 ml)
1½ taza (300 g) de fresas frescas*
¾ taza (175 ml) de leche entera
2
⁄3
taza (135 g) de azúcar granulada
1 pizca de sal
1½ taza (355 ml) de crema líquida para batir
("heavy cream")
1½ cucharadita de extracto natural de vainilla
1. Poner las fresas en el bol de una procesadora de
alimentos equipada con cuchilla de metal. Pulsar
hasta que las fresas estén picadas al gusto. Reservar.
2. Poner la leche, el azúcar y la sal en un tazón
mediano; batir a velocidad baja, usando una batidora
de mano, hasta que el azúcar esté disuelto. Agregar
la crema líquida y la vainilla. Añadir las fresas con su
jugo. Cubrir y refrigerar por 1–2 horas, o más.
3. Encender la máquina y echar la mezcla en el tazón
congelador. Dejar que se mezcle durante 15–20
minutos, hasta que se espese. Nota: el helado tendrá
una consistencia cremosa. Si desea que sea más
firme, ponerlo en un recipiente hermético y congelarlo
durante aproximadamente 2 horas. Sacar del
congelador 15 minutos antes de servir.
* También puede usar fresas congeladas.
Información nutricional por porción de ½ taza (120 ml):
Calorías 192 (62% de grasa) • Carbohidratos 16g
• Proteínas 1g • Grasa 13g • Grasa saturada 9 g
• Colesterol 51mg • Sodio 23mg • Calcio 26mg
• Fibra 0g
Helado de mantequilla de maní
Muy fácil de preparar, este helado dejará a todo el mundo
con la boca abierta.
Rinde aproximadamente 12 porciones de ½ taza (120 ml)
1 taza (230 g) de mantequilla de maní de buena
calidad (no utilice mantequilla natural)
2
⁄3
taza (135 g) de azúcar granulada
1 taza (235 ml) de leche entera
2 tazas (475 ml) de crema líquida para batir
("heavy cream")
1 cucharadita de extracto natural de vainilla
1 taza (105 g) de bombones de chocolate y
mantequilla de maní picados
(aproximadamente 15 bombones)
1. Colocar la mantequilla de maní y el azúcar un tazón
mediano. Batir a velocidad baja, usando una batidora
de mano, hasta obtener una mezcla homogénea.
Añadir la leche y mezclar a velocidad baja durante
1–2 minutos, hasta que la mezcla esté suave y el
azúcar se haya disuelto. Agregar la crema líquida y la
vainilla. Cubrir y refrigerar por 1–2 horas, o más.
2. Encender la máquina y echar la mezcla en el tazón
congelador. Dejar que se mezcle durante 15–20
minutos, hasta que se espese. Añadir los dulces en
los últimos 5 minutos del mezclado. Nota: el helado
tendrá una consistencia cremosa. Si desea que sea
Page 25

9
más firme, ponerlo en un recipiente hermético y
congelarlo durante aproximadamente 2 horas. Sacar
del congelador 15 minutos antes de servir.
Información nutricional por porción de ½ taza (120 ml):
Calorías 365 (68% de grasa) • Carbohidratos 23g
• Proteínas 8g • Grasa 29g • Grasa saturada 12 g
• Colesterol 58mg • Sodio 153mg • Calcio 58mg
• Fibra 2g
Helado de menta
Preparado con menta fresca, este helado tiene un sabor
muy natural.
Rinde aproximadamente 12 porciones de ½ taza (120 ml)
1 taza (235 ml) de leche entera
2½ tazas llenas (150 g) de menta fresca
¾ taza (150 g) de azúcar granulada
1 pizca de sal
2 tazas (475 ml) de crema líquida para batir
("heavy cream")
1 cucharada de extracto natural de vainilla
1½ taza (165 g) de dulces de chocolate y menta
(10–12 mini "peppermint patties")
1. Calentar la leche a fuego medio-lento en una
cacerola mediana, justo hasta que empiece a hervir.
Retirar del fuego, agregar las hojas de menta y
remojar durante 20–30 minutos. Colar y reservar la
leche, o, si desea que el helado tenga un sabor a
menta más intenso, licuar la mezcla con una
licuadora de mano.
2. Agregar el azúcar y la sal a la leche. Mezclar, usando
una batidora de mano a velocidad baja, hasta que el
azúcar esté disuelto. Agregar la crema líquida y la
vainilla. Cubrir y refrigerar por 1–2 horas, o más.
3. Encender la máquina y echar la mezcla en el tazón
congelador. Dejar que se mezcle durante 15–20
minutos, hasta que se espese. Añadir los dulces en
los últimos 5 minutos del mezclado. Nota: el helado
tendrá una consistencia cremosa. Si desea que sea
más firme, ponerlo en un recipiente hermético y
congelarlo durante aproximadamente 2 horas. Sacar
del congelador 15 minutos antes de servir.
Información nutricional por porción de ½ taza (120 ml):
Calorías 356 (45% de grasa) • Carbohidratos 48g
• Proteínas 3g • Grasa 18g • Grasa saturada 11 g
• Colesterol 58mg • Sodio 50mg • Calcio 68mg
• Fibra 1g
Helado “torta de queso”
Este helado es excelente, ya sea sólo o con nuestra
exquisita salsa de frambuesa (página 13).
Rinde aproximadamente 10 porciones de ½ taza (120 ml)
12 onzas (340 g) de queso crema, a temperatura
ambiente, en pedazos
1 taza (200 g) de azúcar granulada
½ cucharadita de sal
¼ taza (55 g) de queso Mascarpone, a
temperatura ambiente
1 taza (235 ml) de leche entera, a temperatura
ambiente
2 cucharaditas de extracto natural de vainilla
¼ taza (60 ml) de crema agria, a temperatura
ambiente
1. Poner el queso crema en el bol de una batidora de
pie equipada con aspa plana. Batir el queso crema a
velocidad media hasta que esté muy suave. Sin dejar
de mezclar, agregar el azúcar y la sal; seguir
mezclando hasta obtener una mezcla homogénea.
Agregar el queso Mascarpone y mezclar. Agregar
lentamente la leche y la vainilla; mezclar hasta
obtener una mezcla suave. Incorporar la crema agria,
usando la función "mezcla delicada" (FOLD). Cubrir y
refrigerar por 1–2 horas, o más.
2. Encender la máquina y echar la mezcla en el tazón
congelador. Dejar que se mezcle durante 15–20
minutos, hasta que se espese. Nota: el helado tendrá
una consistencia cremosa. Si desea que sea más
firme, ponerlo en un recipiente hermético y congelarlo
durante aproximadamente 2 horas. Sacar del
congelador 15 minutos antes de servir.
Información nutricional por porción de ½ taza (120 ml):
Calorías 240 (56% de grasa) • Carbohidratos 23g
• Proteínas 4g • Grasa 15g • Grasa saturada 10 g
• Colesterol 49mg • Sodio 234mg • Calcio 65mg
• Fibra 0g
Helado de banana, nueces y chispas
de chocolate
La preparación de este helado es larga, pero el resultado
vale la pena.
Rinde aproximadamente 12 porciones de ½ taza (120 ml)
½ taza (120 ml) de leche entera
2 tazas (475 ml) de crema líquida para batir
("heavy cream")
1 vaina de vainilla, abierta
½ cucharadita de extracto natural de vainilla
¼ cucharadita de sal
1
⁄3
taza llena (65 g) de azúcar morena
1 cucharada de agua
2 cucharadas (30 g) de mantequilla sin sal
2 bananas grandes, en trozos
1½ cucharada de ron oscuro
¼ cucharadita de jugo de limón fresco
Page 26

10
2 onzas (55 g) de chocolate semiamargo, picado
grueso, o de chispas de chocolate
½ taza (60 g) de nueces tostadas, picadas
gruesas
1. Calentar la leche, la crema, la vaina de vainilla, el
extracto de vainilla y la sal a fuego medio-lento, justo
hasta que la mezcla empiece a hervir. Retirar del
fuego y dejar enfriar por 30 minutos.
2. Mientras tanto, poner a calentar el azúcar y el agua
en un sartén grande. Agregar la mantequilla y seguir
calentando hasta que esté derretida. Agregar las
bananas y cocer durante 2 minutos, hasta que estén
suaves y fragantes. Echar lentamente el ron y cocer
durante 2 minutos adicionales, o hasta que la mezcla
se espese. Retirar del fuego. Retirar las bananas de
la mezcla con una espumadera y reservar el jarabe.
3. Sacar la vaina de la mezcla de leche/crema. Agregar
el jugo de limón y las bananas; mezclar. Cubrir y
refrigerar por 1–2 horas, o más.
4. Encender la máquina y echar la mezcla en el tazón
congelador. Dejar que se mezcle durante 15–20
minutos, hasta que se espese.
5. Mientras el helado se está congelando, derretir el
chocolate semiamargo a baño María; reservar.
6. Unos minutos antes del final del mezclado, agregar el
jarabe de azúcar. Una vez combinado el jarabe,
agregar las nueces y seguir mezclando. Justo antes
del final del mezclado, agregar el chocolate derretido.
Nota: el helado tendrá una consistencia cremosa. Si
desea que sea más firme, ponerlo en un recipiente
hermético y congelarlo durante aproximadamente 2
horas. Sacar del congelador 15 minutos antes de
servir.
Información nutricional por porción de ½ taza (120 ml):
Calorías 194 (64% de grasa) • Carbohidratos 15g
• Proteínas 2g • Grasa 15g • Grasa saturada 7 g
• Colesterol 34mg • Sodio 58mg • Calcio 32mg
• Fibra 1g
Helados "gourmet"
Helado de vainilla tradicional
Helado con intenso sabor a vainilla, para los amantes de
la vainilla.
Rinde aproximadamente 12 porciones de ½ taza (120 ml)
2 tazas (475 ml) de leche entera
2 tazas (475 ml) de crema líquida para batir
("heavy cream")
1 taza (200 g) de azúcar granulada
1 pizca de sal
1 vaina de vainilla, abierta
5 yemas de huevo grande
1½ cucharadita de extracto natural de vainilla
1. Poner a calentar la leche, la crema, la mitad del
azúcar, la sal y la vaina de vainilla a fuego mediolento. Calentar justo hasta que empiece a hervir.
2. Colocar las yemas y el resto del azúcar en un tazón
mediano y mezclar. Batir a velocidad baja, usando
una batidora de mano, hasta obtener una mezcla
espesa y clara.
3. Agregar aproximadamente un tercio de la leche
caliente a la mezcla de azúcar/yema, batiendo.
Agregar otro tercio de la leche, y luego regresar toda
la mezcla en la cacerola. Cocer a fuego lento,
revolviendo continuamente con un cucharón de
madera, hasta que la mezcla se espese. NO permitir
que la mezcla hierva; esto cocinaría demasiado las
yemas (el proceso debería tomar solamente unos
minutos).
4. Colar la mezcla con un colador de malla fina y dejar
enfriar a temperatura ambiente. Agregar el extracto
de vainilla. Cubrir y refrigerar por 1–2 horas, o más.
5. Encender la máquina y echar la mezcla en el tazón
congelador. Dejar que se mezcle durante 15–20
minutos, hasta que se espese. Nota: el helado tendrá
una consistencia cremosa. Si desea que sea más
firme, ponerlo en un recipiente hermético y congelarlo
durante aproximadamente 2 horas. Sacar del
congelador 15 minutos antes de servir.
Información nutricional por porción de ½ taza (120 ml):
Calorías 254 (62% de grasa) • Carbohidratos 20g
• Proteínas 3g • Grasa 18g • Grasa saturada 11 g
• Colesterol 148mg • Sodio 51mg • Calcio 85mg
• Fibra 0g
Helado de menta fresca y galletas de
chocolate
La mezcla de la menta fresca con chocolate siempre es
una combinación ganadera.
Rinde aproximadamente 12 porciones de ½ taza (120 ml)
2 tazas (475 ml) de leche entera
2 tazas (475 ml) de crema líquida para batir
("heavy cream")
1 taza (200 g) de azúcar granulada
1 pizca de sal
1½ cucharadita de extracto natural de vainilla
2 tazas llenas (100 g) de menta fresca
5 yemas de huevo grande
1 taza (100 g) de "sándwiches de chocolate"
picados (aproximadamente 8 galletas)
Page 27

11
1. Poner a calentar la leche, la crema, la mitad del
azúcar, la sal y la vainilla a fuego medio-lento.
Calentar justo hasta que empiece a hervir. Retirar del
fuego, agregar las hojas de menta y remojar durante
20–30 minutos. Colar y reservar la leche, o, si desea
que el helado tenga un sabor a menta más intenso,
licuar la mezcla con una licuadora de mano. Volver a
calentar la mezcla a fuego medio-lento, justo hasta
que empiece a hervir.
2. Mientras tanto, colocar las yemas y el resto del
azúcar en un tazón mediano y revolver. Batir a
velocidad baja, usando una batidora de mano, hasta
obtener una mezcla espesa y clara.
3. Agregar aproximadamente un tercio de la leche
caliente a la mezcla de azúcar/yema, batiendo.
Agregar otro tercio de la leche, y luego regresar toda
la mezcla en la cacerola. Cocer a fuego lento,
revolviendo continuamente con un cucharón de
madera, hasta que la mezcla se espese. NO permitir
que la mezcla hierva; esto cocinaría demasiado las
yemas. El proceso debería tomar solamente unos
minutos.
4. Colar la mezcla con un colador de malla fina. Dejar
enfriar a temperatura ambiente. Cubrir y refrigerar por
1–2 horas, o más.
5. Encender la máquina y echar la mezcla en el tazón
congelador. Dejar que se mezcle durante 15–20
minutos, hasta que se espese. Unos minutos antes
del final del mezclado, agregar las galletas picadas.
6. Nota: el helado tendrá una consistencia cremosa. Si
desea que sea más firme, ponerlo en un recipiente
hermético y congelarlo durante aproximadamente 2
horas. Sacar del congelador 15 minutos antes de
servir.
Información nutricional por porción de ½ taza (120 ml):
Calorías 293 (58% de grasa) • Carbohidratos 27g
• Proteínas 4g • Grasa 20g • Grasa saturada 11 g
• Colesterol 148mg • Sodio 98mg • Calcio 115mg
• Fibra 1g
Helado de chocolate estilo mexicano
Este helado es un poco picante; ajuste la sazón al gusto.
Rinde aproximadamente 10 porciones de ½ taza (120 ml)
2 tazas (475 ml) de leche entera
1½ taza (355 ml) de crema líquida para batir
("heavy cream")
1½ cucharadita de extracto natural de vainilla
1 cucharadita de canela en polvo
1–2 pizcas de pimienta de Cayena
1 pizca de sal
2
⁄3
taza (135 g) de azúcar granulada
5 yemas de huevo grande
6 onzas (170 g) de chocolate semiamargo,
picado grueso
1. Poner a calentar la leche, la crema, la vainilla, las
especias, la sal y la mitad del azúcar a fuego mediolento. Calentar justo hasta que empiece a hervir.
2. Colocar las yemas y el resto del azúcar en un tazón
mediano y mezclar. Batir a velocidad baja, usando
una batidora de mano, hasta obtener una mezcla
espesa y clara.
3. Poner el chocolate picado en un tazón; reservar.
4. Agregar aproximadamente un tercio de la leche
caliente a la mezcla de azúcar/yema, batiendo.
Agregar otro tercio de la leche, y luego regresar toda
la mezcla en la cacerola. Cocer a fuego lento,
revolviendo continuamente con un cucharón de
madera, hasta que la mezcla se espese. NO permitir
que la mezcla hierva; esto cocinaría demasiado las
yemas (el proceso debería tomar solamente unos
minutos).
5. Colar la mezcla con un colador de malla fina y echar
sobre el chocolate. Batir para mezclar y dejar enfriar
a temperatura ambiente. Cubrir y refrigerar por 1–2
horas, o más.
6. Encender la máquina y echar la mezcla en el tazón
congelador. Dejar que se mezcle durante 15–20
minutos, hasta que se espese. Nota: el helado tendrá
una consistencia cremosa. Si desea que sea más
firme, ponerlo en un recipiente hermético y congelarlo
durante aproximadamente 2 horas. Sacar del
congelador 15 minutos antes de servir.
Información nutricional por porción de ½ taza (120 ml):
Calorías 320 (64% de grasa) • Carbohidratos 26g
• Proteínas 5g • Grasa 24g • Grasa saturada 14 g
• Colesterol 161mg • Sodio 157mg • Calcio 97mg
• Fibra 1g
Helado de pistacho
Es perfecto para servir en barquillos o preparar nuestro
pastel de cumpleaños helado (página 16).
Rinde aproximadamente 10 porciones de ½ taza (120 ml)
2½ tazas (590 ml) de leche entera
1 vaina de vainilla, abierta
²∕³ taza (135 g) de azúcar granulada
2¼ tazas (255 g) de pistachos (sin sal) asados,
picados
2 tazas (475 ml) de crema líquida para batir
("heavy cream")
1 pizca de sal
6 yemas de huevo grande
¼ cucharadita de extracto natural de almendra
1. Poner a calentar la leche, la crema, la vaina de
vainilla, el extracto de vainilla y la sal a fuego mediolento. Calentar justo hasta que empiece a hervir.
Retirar del fuego y dejar enfriar durante 1–2 horas.
Agregar entonces la crema y la sal, y volver a calentar
Page 28

12
la mezcla a fuego medio-lento, justo hasta que
empiece a hervir.
2. En un tazón mediano, revolver las yemas con el resto
del azúcar. Batir a velocidad baja,
usando una batidora
de mano, hasta obtener una mezcla espesa y clara.
3. Agregar aproximadamente 1∕3 de la leche caliente a la
mezcla de azúcar/yema, batiendo. Agregar otro tercio de
la leche, y luego regresar toda la mezcla en la cacerola.
Cocer a fuego lento, revolviendo continuamente con un
cucharón de madera, hasta que la mezcla se espese.
NO permitir que la mezcla hierva; esto cocinaría
demasiado las yemas (el proceso debería tomar
solamente unos minutos).
4.
Agregar el extracto de almendra. Colar con un colador
de malla fina y dejar enfriar a temperatura ambiente.
Cubrir y refrigerar por 1–2 horas, o más.
5.
Encender la máquina y echar la mezcla en el tazón
congelador. Dejar que se mezcle durante 15–20 minutos,
hasta que se espese. Unos minutos antes del final del
mezclado, agregar los pistachos tostados. Nota: el
helado tendrá una consistencia cremosa. Si desea que
sea más firme, ponerlo en un recipiente hermético y
congelarlo durante aproximadamente 2 horas. Sacar del
congelador 15 minutos antes de servir.
Información nutricional por porción de ½ taza (120 ml):
Calorías 341 (68% de grasa) • Carbohidratos 21g
• Proteínas 7g • Grasa 27g • Grasa saturada 14 g
• Colesterol 200mg • Sodio 71mg • Calcio 129mg
• Fibra 1g
Helados de yogur
Helado de yogur de vainilla
Este helado de yogur es más rico cuando se prepara con
yogur entero, pero puede usar yogur bajo en grasa si
desea.
Rinde aproximadamente 10 porciones de ½ taza (120 ml)
1½ cucharada de jarabe de maíz claro
1½ cucharada de miel
3 cucharadas de agua
2 vainas de vainilla, abiertas
5 tazas (1.2 L) de yogur entero, colado con
estopilla/colador de tela* durante 2–4 horas
1 cucharadita de extracto natural de vainilla
¾ taza (150 g) de azúcar granulada
1 pizca de sal
1. Colocar el jarabe de maíz, la miel, el agua y la vaina
de vainilla en una cacerola mediana; revolver. Cocer
a fuego medio-lento hasta reducir la mezcla a la
mitad. Colar (desechar la vaina) y reservar.
2. Colocar el yogur colado, la mezcla de miel/agua, el
extracto de vainilla, el azúcar y la sal en un tazón
grande; mezclar. Revolver hasta que el azúcar esté
disuelto. Cubrir y refrigerar por 2–3 horas, o más.
3. Encender la máquina y echar la mezcla en el tazón
congelador. Dejar que se mezcle durante 15–20
minutos, hasta que se espese. Nota: el helado de
yogur tendrá una consistencia cremosa. Si desea que
sea más firme, ponerlo en un recipiente hermético y
congelarlo durante aproximadamente 2 horas. Sacar
del congelador 15 minutos antes de servir.
* Si no tiene estopilla/colador de tela, puede usar un
colador regular forrado con un par de hojas de papel
absorbente.
Información nutricional por porción de ½ taza (120 ml):
Calorías 161 (22% de grasa) • Carbohidratos 25g
• Proteínas 7g • Grasa 4g • Grasa saturada 3 g
• Colesterol 15mg • Sodio 67mg • Calcio 176mg
• Fibra 0g
Helado de yogur de mango
Mangos maduros son esenciales al éxito de la receta.
Cuantos mejores los mangos, más rico el helado.
Rinde aproximadamente 10 porciones de ½ taza (120 ml)
5 tazas (1.2 L) de yogur bajo en grasa, colado
con estopilla/colador de tela durante
2–4 horas
½
taza (100 g) de azúcar granulada
2 mangos, en pedazos
1 cucharadita de jugo de lima/limón verde
fresco
1. Colocar el yogur y el azúcar en un tazón grande;
revolver y reservar.
2. Poner el mango picado, el jugo de limón y 1 taza
(235 ml) de la mezcla de yogur en la jarra de una
licuadora. Licuar. Revolver con el resto de la mezcla
de yogur/azúcar. Cubrir y refrigerar por 1–2 horas, o
más.
3. Encender la máquina y echar la mezcla en el tazón
congelador. Dejar que se mezcle durante 15–20
minutos, hasta que se espese. Nota: el helado de
yogur tendrá una consistencia cremosa. Si desea que
sea más firme, ponerlo en un recipiente hermético y
congelarlo durante aproximadamente 2 horas. Sacar
del congelador 15 minutos antes de servir.
* Si no tiene estopilla/colador de tela, puede usar un
colador regular forrado con un par de hojas de papel
absorbente.
Información nutricional por porción de ½ taza (120 ml):
Calorías 126 (8% de grasa) • Carbohidratos 26g
• Proteínas 5g • Grasa 1g • Grasa saturada 1 g
• Colesterol 3mg • Sodio 74mg • Calcio 204mg
• Fibra 2g
Page 29

13
Helado de yogur de chocolate con
"pretzels"
La combinación del chocolate y de los "pretzels"
es perfecta.
Rinde aproximadamente 10 porciones de ½ taza (120 ml)
4 tazas (945 ml) de yogur entero, colado con
estopilla/colador de tela* durante 2–4 horas
¾ taza (150 g) de azúcar granulada
1
⁄3
taza (50 g) de cacao en polvo, tamizado
1 pizca de sal
1 taza (235 ml) de leche baja en
grasa/semi-descremada
½
cucharadita de extracto natural de vainilla
1 taza (70 g) de "pretzels" cubiertos con
chocolate o yogur picados
1. Colocar el yogur, el azúcar, el cacao, la sal, la leche y
la vainilla en un tazón grande; revolver. Revolver
hasta que el azúcar esté disuelto. Cubrir y refrigerar
por 2–3 horas, o más.
2. Encender la máquina y echar la mezcla en el tazón
congelador. Dejar que se mezcle durante 15–20
minutos, hasta que se espese. Unos minutos antes
del final del mezclado, agregar los "pretzels" picados.
Nota: el helado de yogur tendrá una consistencia
cremosa. Si desea que sea más firme, ponerlo en un
recipiente hermético y congelarlo durante
aproximadamente 2 horas. Sacar del congelador 15
minutos antes de servir.
* Si no tiene estopilla/colador de tela, puede usar un
colador regular forrado con un par de hojas de papel
absorbente.
Información nutricional por porción de ½ taza (120 ml):
Calorías 281 (22% de grasa) • Carbohidratos 48g
• Proteínas 8g • Grasa 7g • Grasa saturada 3 g
• Colesterol 5mg • Sodio 259mg • Calcio 215mg
• Fibra 2g
Helado de yogur de fresa bajo
en grasa
El sabor agridulce del yogur es perfecto para esta receta.
Rinde aproximadamente 10 porciones de ½ taza (120 ml)
4 tazas (945 ml) de yogur bajo en grasa, colado
con estopilla/colador de tela* durante 2–4
horas
½ taza (100 g) de azúcar granulada
1 pizca de sal
1 cucharadita de extracto natural de vainilla
2 cucharadas de jarabe de maíz claro
1 libra (455 g) de frutas del bosque congeladas
1½ cucharada de miel
1½ cucharada de jugo de limón fresco
1. Colocar el yogur, el azúcar, la sal, la vainilla y el
jarabe de maíz en un tazón grande; revolver y
reservar.
2. Cocer las frutas del bosque, la miel y el jugo de limón
durante aproximadamente 10 minutos, hasta que las
frutas estén tiernas. Colar, reservando solamente las
frutas, y dejar enfriar. Una vez frías, agregar las frutas
a la mezcla de yogur/azúcar. Cubrir y refrigerar por
2–3 horas, o más.
3. Encender la máquina y echar la mezcla en el tazón
congelador. Dejar que se mezcle durante 15–20
minutos, hasta que se espese. Nota: el helado de
yogur tendrá una consistencia cremosa. Si desea que
sea más firme, ponerlo en un recipiente hermético y
congelarlo durante aproximadamente 2 horas. Sacar
del congelador 15 minutos antes de servir.
* Si no tiene estopilla/colador de tela, puede usar un
colador regular forrado con un par de hojas de papel
absorbente.
Información nutricional por porción de ½ taza (120 ml):
Calorías 123 (8% de grasa) • Carbohidratos 27g
• Proteínas 4g • Grasa 1g • Grasa saturada 1 g
• Colesterol 3mg • Sodio 73mg • Calcio 167mg
• Fibra 2g
Sorbetes
Sorbete de coco
Sabroso helado, especialmente acompañado con coco
tostado o nuestra salsa de chocolate (página 17).
Rinde aproximadamente 12 porciones de ½ taza (120 ml)
1½ taza (355 ml) de agua
1
1
⁄3
taza (265 g) de azúcar granulada
1 vaina de vainilla, abierta
1 pizca de sal
2 latas de 13.5 onzas (400 ml) de leche de coco
sin azúcar
1. Poner a calentar a fuego medio-lento el agua, el
azúcar, la vaina de vainilla y la sal. Cuando la mezcla
empiece a hervir, retirarla del fuego. Dejar enfriar
durante 1 hora, y luego colar.
2. Agregar la leche de coco. Cubrir y refrigerar por 12
horas.
3. Encender la máquina y echar la mezcla en el tazón
congelador. Dejar que se mezcle durante 15–20
minutos, hasta que se espese. Nota: el sorbete
tendrá una consistencia cremosa. Si desea que sea
más firme, ponerlo en un recipiente hermético y
congelarlo durante aproximadamente 2 horas. Sacar
del congelador 15 minutos antes de servir.
Page 30

14
Información nutricional por porción de ½ taza (120 ml):
Calorías 199 (51% de grasa) • Carbohidratos 25g
• Proteínas 1g • Grasa 12g • Grasa saturada 11 g
• Colesterol 0mg • Sodio 28mg • Calcio 1mg • Fibra 0g
Sorbete de chocolate oscuro
Nuestro sorbete de chocolate oscuro es
una delicia única.
Rinde aproximadamente 10 porciones de ½ taza (120 ml)
3 tazas (710 ml) de agua
1
2
⁄3
taza (335 g) de azúcar granulada
1 pizca de sal
1
2
⁄3
taza (200 g) de cacao en polvo, tamizado
1 cucharadita de extracto natural de vainilla
1. Poner a calentar el agua, el azúcar y la sal a fuego
medio-lento para preparar un jarabe simple. Cocer
hasta que el azúcar esté disuelto.
2. Agregar el cacao poco a poco, batiendo
constantemente, hasta obtener una mezcla suave.
Agregar la vainilla y revolver para mezclar. Cubrir y
refrigerar por 2–3 horas, o más.
3. Encender la máquina y echar la mezcla en el tazón
congelador. Dejar que se mezcle durante 15–20 minutos,
hasta que se espese. Nota: el sorbete tendrá una
consistencia cremosa. Si desea que sea más firme,
ponerlo en un recipiente hermético y congelarlo durante
aproximadamente 2 horas. Sacar del congelador 15
minutos antes de servir.
Información nutricional por porción de ½ taza (120 ml):
Calorías 183 (6% de grasa) • Carbohidratos 41g
• Proteínas 3g • Grasa 1g • Grasa saturada 0 g
• Colesterol 0mg • Sodio 15mg • Calcio 2mg • Fibra 3g
Helado de limón y albahaca
La albahaca da a este helado un sabor muy especial,
pero puede usar su hierba favorita para preparar
esta receta.
Rinde aproximadamente 10 porciones de ½ taza (120 ml)
3 tazas (710 ml) de agua
2 tazas (400 g) de azúcar granulada
2 cucharadas de ralladura de limón
1½ taza llena (90 g) de hojas de albahaca fresca
(utilice 2 tazas/120 g para un sabor más
intenso)
1 pizca de sal
3 tazas (710 ml) de jugo de limón fresco
1. Poner a calentar a fuego medio-lento el agua, el
azúcar y 1½ cucharada de la ralladura para preparar
un jarabe simple de limón. Cocer hasta que el azúcar
esté disuelto. Retirar del fuego.
2. Agregar la albahaca y la sal al jarabe simple. Dejar
enfriar por 30 minutos. Agregar el jugo de limón.
Cubrir y refrigerar por 2–3 horas, o más.
3. Colar con un colador de malla fina. Encender la
máquina y echar la mezcla en el tazón congelador.
Dejar que se mezcle durante 15–20 minutos, hasta
que se espese. Unos minutos antes del final del
mezclado, agregar la ralladura restante. Nota: el
sorbete tendrá una consistencia cremosa. Si desea
que sea más firme, ponerlo en un recipiente
hermético y congelarlo durante aproximadamente 2
horas. Sacar del congelador 15 minutos antes de
servir.
Información nutricional por porción de ½ taza (120 ml):
Calorías 175 (0% de grasa) • Carbohidratos 47g
• Proteínas 0g • Grasa 0g • Grasa saturada 0 g
• Colesterol 0mg • Sodio 16mg • Calcio 15mg
• Fibra 1g
Sorbete de frambuesa
Dulce, refrescante y hermoso sorbete.
Rinde aproximadamente 10 porciones de ½ taza (120 ml)
2 tazas (475 ml) de agua
1½ taza (300 g) de azúcar granulada
1 pizca de sal
4 tazas (500 g) de frambuesas congeladas,
descongeladas
1. Poner a calentar a fuego medio-lento el agua y el
azúcar para preparar un jarabe simple. Cocer hasta
que el azúcar esté disuelto.
2. Agregar la sal y las frambuesas al jarabe simple.
Licuar con una licuadora de mano hasta conseguir
una mezcla suave. Colar la mitad de la mezcla con un
colador de malla fina para eliminar las semillas.
Comprimir la mezcla en el fondo del colador para
ayudar a colar el puré. Tirar las semillas y repetir con
el resto de la mezcla. Cubrir y refrigerar por 2–3
horas, o más.
3. Encender la máquina y echar la mezcla en el tazón
congelador. Dejar que se mezcle durante 15–20
minutos, hasta que se espese. Nota: el sorbete
tendrá una consistencia cremosa. Si desea que sea
más firme, ponerlo en un recipiente hermético y
congelarlo durante aproximadamente 2 horas. Sacar
del congelador 15 minutos antes de servir.
Información nutricional por porción de ½ taza (120 ml):
Calorías 140 (0% de grasa) • Carbohidratos 37g
• Proteínas 0g • Grasa 0g • Grasa saturada 0 g
• Colesterol 0mg • Sodio 14mg • Calcio 9mg • Fibra 2g
Page 31

15
Postres helados
Galletas de chocolate para preparar
sándwiches de helado
Más allá delas galletas tradicionales.
Ideales para servir con su helado favorito.
Si no encuentra granos de cacao asados y picados
("nibs"), puede utilizar mini chispas de chocolate o doble
cantidad de pacanas.
Rinde 24 galletas (12 sándwiches de helado)
¹∕³ taza (40 g) de cacao en polvo, tamizado
1¹∕³ taza (165 g) de harina para hacer pan
¾ cucharadita de polvo de hornear
¼ cucharadita de sal
1 cucharada de café expreso instantáneo
½ taza (115 g) de mantequilla sin sal a
temperatura ambiente, en pedacitos
1 taza (200 g) de azúcar granulada
1 huevo grande
1 cucharadita de extracto natural de vainilla
3 cucharadas de granos de cacao asados y
picados ("nibs")
(disponibles en la mayoría de las tiendas
gourmet. Si no los encuentra, puede usar
pacanas tostadas picadas gruesas o mini
chispas de chocolate)
¼
taza (30 g) de pacanas picadas, tostadas
1. Precalentar el horno a 350°F (220°C).
2. Colocar el cacao en polvo, la harina, el polvo de
hornear, la sal y el café expreso en un tazón
pequeño; revolver. Reservar la mezcla.
3. Poner la mantequilla en el tazón de una batidora de
pie equipada con aspa plana (también puede usar
una batidora regular). Batir a velocidad media hasta
conseguir una mezcla suave. Agregar el azúcar poco
a poco y seguir mezclando hasta que la mezcla
adquiera una consistencia cremosa. Agregar el huevo
y la vainilla; revolver. Agregar los ingredientes secos;
mezclar. Agregar los granos de cacao y las pacanas;
seguir mezclando justo hasta incorporar los
ingredientes.
4.
Formar bolas de masa de aproximadamente 2
cucharadas, usando una cuchara para servir helado
de 1½ pulgada (4 cm) de diámetro. Colocarlas sobre
una bandeja para hornear forrada con papel
sulfurizado. Aplastar ligeramente cada galleta con el
fondo de un vaso.
5. Meter al horno durante 15–20 minutos, hasta que las
galletas parezcan secas, pero no firmes. Dejar enfriar.
Para armar:
colocar aproximadamente 3
cucharadas de su helado favorito sobre el lado plano
de una galleta. Colocar otra galleta encima y oprimir
hasta que el helado llegue hasta la orilla de las
galletas. Preparar los demás sándwiches, usando la
misma técnica. Envolver cada sándwich en una
película de plástico y congelar por aproximadamente
20 minutos, hasta que estén firmen.
Información nutricional por porción
(2 galletas, sin el helado):
Calorías 225 (42% de grasa) • Carbohidratos 31g
• Proteínas 3g • Grasa 11g • Grasa saturada 6 g
• Colesterol 39mg • Sodio 89mg • Calcio 18mg
• Fibra 1g
Bombones de helado de fresa y
chocolate
Este exquisito postre recuerda las fresas cubiertas
de chocolate.
Rinde 35 bombones
1 receta de "brownies" de chocolate (receta a
continuación)
5½ tazas (1.3 L) de helado de fresa
(receta en la página 8)
12
onzas (340 g) de chocolate semiamargo o
semidulce, picado grueso, o de chispas de
chocolate
¼ taza (55 g) de mantequilla sin sal, en pedacitos
1 cucharada de jarabe de maíz claro
1. Formar 35 "brownies" redondos, usando un
cortamasa de 2¼ pulgadas (6 cm) de diámetro.
Reservar el resto de los "brownies" para otro uso,
como por ejemplo para agregar a helado fresco.
Disponer los "brownies" sobre una bandeja para
hornear forrada con papel encerado/sulfurizado que
quepa en su congelador.
2. Usando una cuchara para servir helado de 2
pulgadas (5 cm) de diámetro, colocar helado encima
de cada "brownie". Cubrir con papel encerado y
congelar por aproximadamente 15 minutos, o hasta
que estén firmes.
3. Mientras tanto, preparar la cobertura de chocolate.
Derretir el chocolate, la mantequilla y el jarabe de
maíz a baño María. Mezclar y dejar enfriar a
temperatura ambiente.
4. Sacar los "bombones" del congelador. Forrar una
rejilla con papel sulfurizado o encerado. Colocar los
"bombones", cubiertos con helado, sobre la rejilla,
dejando un espacio de aproximadamente ½ pulgada
(1.5 cm) entre ellos. Verter lentamente el chocolate
derretido encima de cada "bombón", usando un
cucharón. Asegurarse de que el chocolate cubra
completamente el helado. Esperar hasta que el
chocolate se haya solidificado, y luego cubrir con
papel encerado y congelar por 15 minutos o más.
Información nutricional por bombón:
Calorías 282 (54% de grasa) • Carbohidratos 32g
• Proteínas 3g • Grasa 18g • Grasa saturada 11 g
• Colesterol 62mg • Sodio 77mg • Calcio 17mg
• Fibra 2g
Page 32

16
"Brownies" de chocolates
Estos "brownies" son perfectos para preparar nuestros
bombones de helado de fresa.
Rinde 35 "brownies"
Spray vegetal
1 taza (225 g) de mantequilla sin sal, en
pedacitos
6 onzas (170 g) de chocolate amargo,
finamente picado
2 onzas (55 g) de chocolate semiamargo,
finamente picado
4 huevos grandes
1 yema de huevo grande
2 tazas (400 g) de azúcar granulada
1 taza (200 g) de azúcar rubia
2 cucharaditas de café expreso instantáneo
2 cucharaditas de extracto natural de vainilla
1 taza (125 g) de harina común
1 cucharadita de sal
1. Precalentar el horno a 375°F (190°C). Engrasar una
charola para hornear de 12 x 18 pulgadas (30 cm x
45 cm) con spray vegetal y forrar con papel
sulfurizado; reservar.
2. Derretir la mantequilla y el chocolate picado a baño
María. Cuando el chocolate esté completamente
derretido, dejar enfriar a temperatura ambiente.
Reservar.
3. Poner los huevos y la yema en el tazón de una
batidora de pie equipada con aspa plana (también
puede usar una batidora regular); batir a velocidad
media durante aproximadamente 30 segundos.
Agregar el azúcar granulada y el azúcar rubia y batir a
velocidad 4 durante 30–60 segundos adicionales.
Agregar el café y la vainilla; batir para mezclar.
Revolver la harina y la sal con el chocolate derretido.
Agregar la mezcla de harina/chocolate a la mezcla de
huevo/azúcar y mezclar a velocidad 1 justo hasta
incorporar los ingredientes.
4. Echar la mezcla en el molde. Meter al horno por
25–30 minutos, hasta que las orillas estén secas.
5. Dejar enfriar antes de cortar.
Información nutricional por "brownie":
Calorías 166 (46% de grasa) • Carbohidratos 22g
• Proteínas 2g • Grasa 9g • Grasa saturada 5 g
• Colesterol 44mg • Sodio 70mg • Calcio 10mg
• Fibra 1g
Pastel de cumpleaños helado de
pistacho
Esta receta nos encanta con helado de pistacho, pero
puede usar su helado favorito.
Rinde 12 porciones
6 cucharadas (85 g) de mantequilla sin sal, en
pedacitos
3 onzas (85 g) de chocolate semidulce, picado
40 barquillos de chocolate (por ej. Nabisco
®
),
u 8 onzas (225 g) de galletas de chocolate
regulares
5–6
tazas (1.2–1.4 L) de helado de pistacho (receta
en la página 11)
½ taza (100 g) de pistachos picados, tostados
1. Derretir la mantequilla y el chocolate a baño María,
revolviendo de vez en cuando. Retirar del fuego
cuando esté justo derretido. Reservar.
2. Poner los barquillos de chocolate en el bol de una
procesadora de alimentos equipada con cuchilla de
metal. Pulsar para picar finamente. Agregar el
chocolate derretido por la boca de llenado y pulsar
varias veces para mezclar. Comprimir 2∕3 de la mezcla
en el fondo y los costados (hasta la mitad) de un
molde desmontable de 8 pulgadas (20 cm). Congelar
por 10–15 minutos, hasta que se endurezca.
3. Sacar del congelador y esparcir la mitad del helado
sobre el fondo de torta. Cubrir con una película de
plástico y congelar por aproximadamente 30 minutos,
o hasta que esté justo firme. Esparcir el resto de la
mezcla de galletas picadas sobre el helado,
aplastando suavemente, y congelar de nuevo durante
aproximadamente 30 minutos. Esparcir el resto del
helado sobre la torta, usando una espátula larga.
Cubrir y congelar por 4 horas o más. Si desea que el
pastel sea muy firme, congelar por 8–12 horas.
4. Antes de servir, retirar el pastel del molde y esparcir
los pistachos picados encima. Servir sobre platos
refrigerados.
Información nutricional por porción:
Calorías 483 (63% de grasa) • Carbohidratos 38g
• Proteínas 8g • Grasa 35g • Grasa saturada 17 g
• Colesterol 182mg • Sodio 176mg • Calcio 122mg
• Fibra 2g
Page 33

17
Salsas
Salsa de caramelo
Esta salsa es perfecta para servir con helado, frutas o
pastel.
Rinde aproximadamente ¾ taza (175 ml)
¾ taza (150 g) de azúcar granulada
½ cucharadita de sal marina
¼
taza (60 ml) de agua
1 cucharada de jarabe de maíz claro
¹∕³ taza (80 ml) de crema líquida para batir
("heavy cream")
3 cucharadas (45 g) de mantequilla sin sal, en
cubitos
1. Colocar el azúcar, la sal, el agua y el jarabe de maíz
en una cacerola mediana de fondo pesado; revolver.
Limpiar los costados con una brocha húmeda para
que el azúcar no adhiera a ellos. Cocer a fuego
medio-lento durante 10–15 minutos, hasta que la
mezcla adquiera un color ambarino muy claro. Vigilar
la cocción para que el caramelo no se queme.
2. Después de que la mezcla haya adquirido un color
ambarina claro, retirar del fuego y añadir lentamente
la crema. Después de haber incorporado la crema,
agregar la mantequilla, pedazo por pedazo, batiendo
constantemente. Usar inmediatamente o mantener
caliente a baño María.
Información nutricional por porción de 2 cucharadas:
Calorías 198 (46% de grasa) • Carbohidratos 27g
• Proteínas 0g • Grasa 10g • Grasa saturada 7 g
• Colesterol 33mg • Sodio 184mg • Calcio 9mg
• Fibra 0g
Salsa de chocolate
Esta deliciosa salsa es muy fácil de preparar y mucho
mejor que las salsas compradas.
Rinde aproximadamente 1 taza (235 ml)
6 onzas (170 g) de chocolate semidulce picado
¾ taza (175 ml) de crema líquida para batir
("heavy cream")
1½ cucharada de jarabe de maíz claro
½ cucharadita de extracto natural de vainilla
1 pizca de sal marina
1 pizca de canela en polvo
1. Poner el chocolate en un tazón; reservar.
2. Colocar la crema, el jarabe de maíz, la vainilla, la sal
y la canela en una cacerola pequeña de fondo
pesado; revolver., Calentar a fuego bajo, justo hasta
que empiece a hervir. Echar inmediatamente sobre el
chocolate, esperar por 5 minutos y batir. Usar
inmediatamente o mantener caliente a baño María.
Información nutricional por porción de 2 cucharadas:
Calorías 229 (61% de grasa) • Carbohidratos 21g
• Proteínas 2g • Grasa 16g • Grasa saturada 10 g
• Colesterol 31mg • Sodio 27mg • Calcio 25mg
• Fibra 2g
Salsa de frambuesa
Esta sabrosa salsa es ideal para acompañar no sólo
postres helados sino también panqueques o "crêpes".
Rinde aproximadamente 1 taza (235 ml)
12 onzas (340 g) de frambuesas congeladas,
descongeladas
2–3 cucharadas de azúcar granulada, al gusto
1 pizca de sal marina
1 pizca de ralladura de naranja
1. Poner las frambuesas en el bol de una procesadora
de alimentos equipada con cuchilla de metal;
procesar por 15 segundos. Agregar el resto de los
ingredientes y procesar por aproximadamente 45
segundos.
2. Colar con un colador de malla fina y tirar las semillas.
Probar y agregar más azúcar si desea.
Información nutricional por porción de 2 cucharadas:
Calorías 36 (0% de grasa) • Carbohidratos 9g • Proteínas
0g • Grasa 0g • Grasa saturada 0g • Colesterol 0mg
• Sodio 17mg • Calcio 7mg • Fibra 2g
Page 34

18
NOTAS:
Page 35

19
NOTAS:
Page 36

Todas marcas registradas o marcas de comercio mencionadas en
esta pertenecen a sus titulares respectivos.
©2015 Cuisinart
150 Milford Road
East Windsor, NJ 08520
Impreso en China
15CE017661
G IB-9582-ESP
 Loading...