

INSTRUCTION
BOOKLET
Cuisinart®
Countertop Filtration System
For your safety and continued enjoyment of this product, always read the instruction book carefully before using.
®
WCH-1500
IMPORTANT
SAFEGUARDS
When using an electrical appliance, basic
safety precautions should always be followed
to reduce the risk of fire, electric shock, and
personal injury, including the following:
1. Use this appliance only as described in this
manual. Other uses not recommended may
cause fire, electric shock or personal injury.
2. This product is intended for household use
only.
3. To protect against electric shock, do not
immerse unit, plug or cord in water or spray
with liquids.
4. Close supervision is necessary when any
appliance is used by or near children.
5. Unplug from the outlet when not in use or
when moving from one location to another,
and before cleaning.
6. To disconnect the appliance, grip the plug
and pull it from the wall outlet. Never pull
by the cord.
7. Do not operate the appliance in the
presence of explosive and/or flammable
fumes.
8. Do not place the appliance or any of its
parts near an open flame, cooking or other
heating appliance.
9. Do not operate the appliance with a
damaged cord or plug, if the product
malfunctions, or if it is dropped or damaged
in any manner.
10. The use of attachments not recommended
by the manufacturer may be hazardous.
11. Place the unit on a dry level surface.
12. Do not operate if the housing is removed
or damaged.
13. A loose fit between the AC outlet
(receptacle) and plug may cause
overheating and a distortion of the plug.
Contact a qualified electrician to replace
loose or worn outlet.
14. This appliance is designed to be
freestanding only, and should not be
recessed or built in (fully recessed).
15. Locate the unit away from direct sunlight
and sources of heat (stove, heater, radiator,
etc.). Direct sunlight will affect/alter the
outside color of the appliance.
16. Do not use with water that is
microbiologically unsafe or of unknown
quality without adequate disinfection before
or after the system. Individuals requiring
water of specific microbiological purity
should consult their physician.
NOTE: The system and installation of this
product need to comply with state and local
laws and regulations.
WARNING: To reduce the risk of fire,
electric shock or personal injury, unplug or
disconnect the appliance from the power
supply before servicing.
SAVE THESE
INSTRUCTIONS
FOR HOUSEHOLD
USE ONLY
SPECIAL CORD SET
INSTRUCTIONS
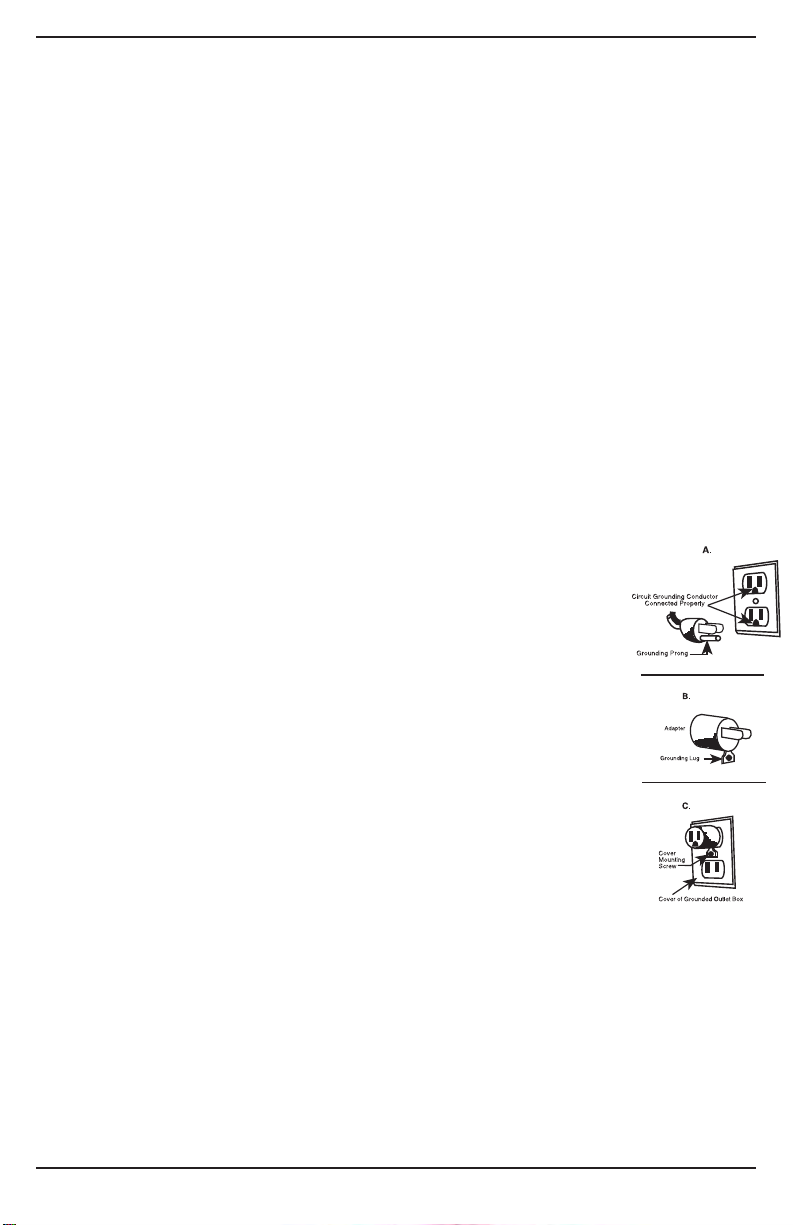
For your protection, this unit
is equipped with a
3-conductor cord set that
has a molded 3-prong
grounding-type plug,
and should be used in
combination with a properly
connected grounding-type
outlet as shown in figure A. If
a grounding-type outlet is
not available, an adapter,
shown in Figure B, may be
obtained so that a
2-slot wall outlet can be used
with a 3-prong plug. As
shown in Figure C, the
adapter must be grounded
by attaching its grounding
lug under the screw of the
outlet cover plate.
NOTE: Do not remove the
grounding prong.
CAUTION: Before using an adapter, it must be
determined that the outlet cover plate screw is
properly grounded. If in doubt, consult a
licensed electrician. Never use an adapter
unless you are sure it is properly grounded.
NOTE: Use of an adapter is not permitted
in Canada.
2
CONTENTS
Important Safeguards. . . . . . . . . . . . . . 2
Special Cord Set Instructions . . . . . . . 2
Introduction . . . . . . . . . . . . . . . . . . . . . 3
Parts and Features . . . . . . . . . . . . . . . . 3
Unpacking & Placement. . . . . . . . . . . . 4
Water Filter Setup . . . . . . . . . . . . . . . . 4
Water Dispenser Setup . . . . . . . . . . .4-5
Operating Instructions . . . . . . . . . . . . . 5
Replacing Water Filter . . . . . . . . . . . . . 5
Tips and Hints . . . . . . . . . . . . . . . . . .5-6
Cleaning and Care . . . . . . . . . . . . . . . . 6
Troubleshooting . . . . . . . . . . . . . . . . . . 7
Storing the Unit . . . . . . . . . . . . . . . . . . 8
Technical Specifications . . . . . . . . . . . 8
Performance Data Sheet . . . . . . . . . . . 9
California Certification . . . . . . . . . . . . 10
For Purchases Made in Iowa . . . . . . 10
Warranty . . . . . . . . . . . . . . . . . . . . . . . 11
INTRODUCTION
Pour yourself a glass of fresher, cleaner,
filtered water for a refreshing drink without
opening the refrigerator or a bottle.
Your
System is Cuisinart at its most convenient.
Drink healthy!
®
Countertop Filtration
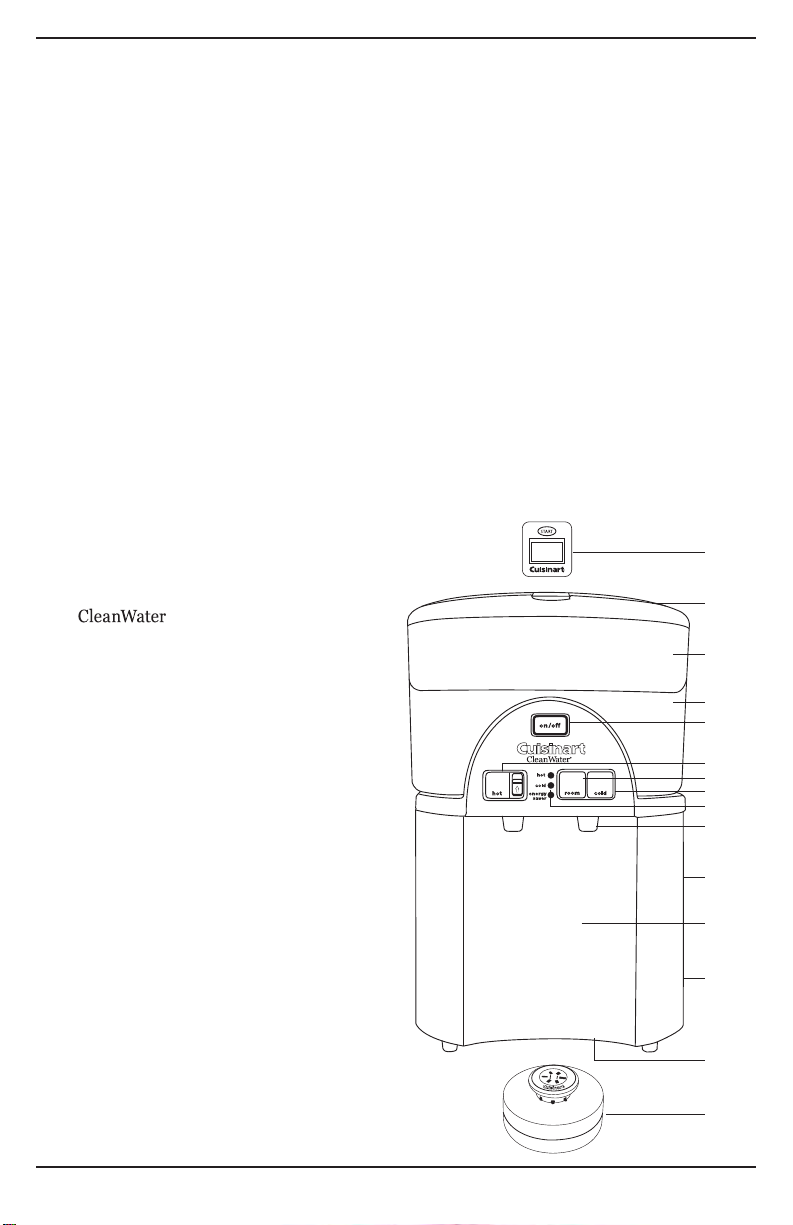
9. Indicator Lights
Red/blue LEDs light up when water has
reached hot/cold temperatures. Green LED
lights up when unit is in Energy Saver mode
(hot water is off).
10. Spigots
11. Brushed Stainless Steel Base
12. Internal Water Tanks (not shown)
Hot and cold tanks – approx. ½ gallon total
capacity.
13. Energy Saver Switch (not shown)
Turn off your heater when hot water is not
needed to reduce the system's energy
usage by more than 50%.
14. Drainage Plugs (not shown)
Two removable plastic plugs are located on
bottom of unit.
15. Replacement Water Filter
(Model GF-80)
The Cuisinart
®
water filter has an optimum
filter life of 3 months.
1
2
3
PARTS AND FEATURES
1. 12-Week Filter Timer
Lets you know when to change your
water filter.
2. Cover
Flip-top lid for easy filling.
3. Upper Water Tank
Holds approx. ½ gallon of unfiltered water.
4. Lower Water Tank
Holds approx. 1 gallon of filtered water.
5. On/Off Power Button
Press to power On. This will activate the
chilling and heating functions.
6. Hot Water Button with Child Lock
Push safety lock up, then press to dispense
hot water.
7. Room Water Button
Press to dispense room temperature water.
8. Cold Water Button
Press to dispense chilled water.
4
5
6
7
8
9
10
11
12
13
14
15
3
UNPACKING & PLACEMENT
1. Remove your Cuisinart®
Countertop Filtration System carefully from
the box.
2. Position the unit on a stable flat surface, close
to a main power outlet. Avoid direct sunlight
and keep out of the reach of children.
3. Allow at least 3 inches of space around
the sides and rear of the unit for proper air
circulation.
4. Remove filter from upper tank and carefully
follow the SETUP instructions below. You will
need a large bowl, a pitcher (or another type
of container), and a glass.
NOTE: Do not plug in unit until ALL steps of
SETUP are complete.
WATER FILTER SETUP
NOTE: For optimum filtering and flow rates,
the water filter must be prepared and installed
exactly as follows:
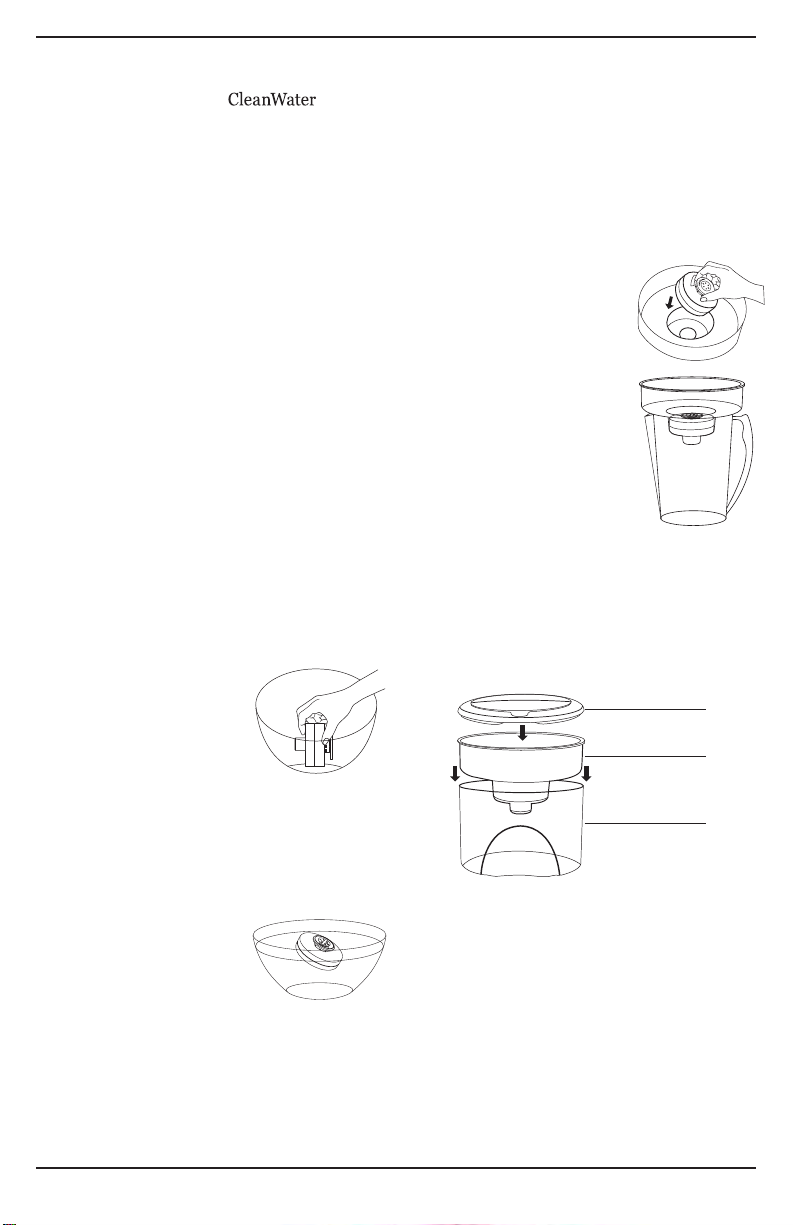
Preparing the Water Filter
1. Remove the filter from its packaging.
NOTE: The filter may contain a small amount
of loose carbon dust. It may also appear moist,
have a faint smell of plastic or a slight yellowish
tint – these are all normal. DO
NOT wash filter with soap or
water.
2. Place water filter in
empty bowl sideways
(see image). Pressing it
firmly to the bottom of the bowl, and being
careful not to pour water directly onto the
filter, slowly add enough cold water to fully
submerge and cover the filter by at least 1
inch. (You should see bubbles escaping the
filter.)
3. Continue to hold filter
under water for at least 30
seconds.
4. Release the filter and
let it soak at least 15 minutes. NOTE:
While soaking, the filter should be partially
submerged and may tilt to one side.
Installing the Prepared Water Filter
1. While the filter is soaking, remove the lid,
upper water tank and lower water tank.
®
2. Remove the filter timer from the lid by flipping
the lid over and pressing on the plastic tab.
3. Wash both tanks and plastic lid in mild, soapy
water, and rinse. Replace the filter timer.
4. Lift the filter from the bowl and allow water to
drain.
NOTE: The filter's loose carbon dust may
slightly darken water while soaking.
5. With the Cuisinart
®
logo
facing up, insert the water
filter into the upper water
tank and push firmly into
place.
6. Place the upper tank on a
pitcher (or another type of
container) and fill with cold
tap water. Allow to drain for
5 minutes to flush out any
remaining carbon dust, then
pour out remaining water.
WATER DISPENSER
SETUP
NOTE: Use only cold tap water to fill the unit.
Filling the Upper and Lower Tanks
1. Place the upper tank onto the lower tank and
cover with the lid.
Lid
Upper
water tank
Lower
water tank
2. Place assembled tanks on base. NOTE: The
vertical groove on the upper tank must face
the back of the unit.
3. Carefully lift the flip top lid and add cold
water to the FILL line. NOTE: This is a gravity
fill system. To increase the filtering flow rate,
continue adding water to the FILL line of the
upper tank until tanks are completely full.
4. During the initial setup, allow 30–40 minutes
for water to filter into and completely fill upper
and lower tanks.
4

Filling the Internal Tanks
NOTE: Upper and lower
Upper
Tank
tanks must be completely
full before proceeding.
1. Place a glass under the
Lower
Tank
right spigot and press
and continue to hold
the COLD button until
water flow becomes
steady (may take up
to 3 minutes).
2. Repeat process with ROOM button, and then
with the HOT button until all flow steadily.
NOTE: When filling hot and cold internal tanks,
the water level in the lower tank will drop and
you will hear the filling process taking place.
Setting the Filter Timer
The filter timer, located on the lid of the unit, lets
you know when to change your water filter. Each
filter will last for 3 months.
1. Once unit is set up and all water tanks are full,
peel off the “Filtering” sticker from the filter
timer screen.
2. Press and hold the Start button until
FILTERING is displayed (approx. 5 seconds).
3. In 12 weeks, the word REPLACE will appear.
For best results, we recommend inserting a
new Cuisinart
®
Water Filter immediately.
4. You may turn off the timer and display by
pressing the Start button for 5 seconds.
Once you replace the filter, reset the timer by
pressing the Start button for 3 seconds.
NOTE: You may reset the timer at any time by
pressing and holding the Start button for
3 seconds.
OPERATING INSTRUCTIONS
Once setup is completed, tanks are filled and
water is flowing steadily, your unit is ready to use!
1. Close the lid and plug unit into outlet.
2. Press the On/Off power switch on the control
panel to turn on. The BLUE light around the
power switch indicates the unit is on and
cooling and heating functions are activated.
3. After about 15 minutes, the RED hot water
indicator will light up, signaling hot water is
ready to dispense.
NOTE: Energy Saver switch must be in the
Off position for water to heat.
4. After about 1 hour and 20 minutes, the BLUE
cold water indicator will light up, signaling
water is chilled.
NOTE: On subsequent fill-ups, unit should take
less than 10 minutes to heat and 30 minutes
to chill.
5. Press and hold each button to ensure all air
has been purged from the unit so water flow
is steady.
Initiating Energy Saver Mode
You can turn off the heater used to heat the
water in the hot tank to reduce the system's
energy usage by more than 50%. While in
Energy Saver mode, you can still dispense water
from your hot tank; however, it will not
be heated.
NOTE: We recommend you power your unit off
when only room temperature filtered water
is needed.
1. Put the Energy Saver switch in its On position.
2. The green LED will light up, indicating your
unit is in Energy Saver mode.
3. Because your unit is in Energy Saver mode
and your hot water heater is disabled, the red
LED hot water indicator light will turn off when
the temperature of the hot water decreases
(this can take up to 2 hours).
4. To resume your hot water, simply put the
Energy Saver switch in its Off position. After
about 15 minutes, the red LED hot water
indicator will light up, signaling hot water is
ready to dispense.
NOTE: If your unit has been in Energy Saver
mode for longer than a week, we recommend
you flush out your hot water tank by dispensing
and disposing of a full glass of water from the
left spigot before enjoying your first glass of hot
water.
REPLACING WATER FILTER
Replacement filters may be purchased at most
retail outlets or www.cuisinart.com. To replace
your filter, follow “Water Filter Setup” on page 4.
TIPS AND HINTS
• Drinking 4 to 8 glasses of water each day is
healthy! Your countertop chiller makes it easy.
5

• Regular use of cleaner, filtered water in your
automatic coffeemaker means less frequent
decalcification treatments.
• Use filtered water in your iron to reduce
mineral build-up.
• Treat your pets to cleaner, filtered water.
• Cleaner, filtered water makes tea and instant
soup or coffee taste better.
• Keeping the upper tank full helps increase
the filtering process as well as the flow rate
of water from spigots.
• Proper setup of the filter (as instructed
on page 4) will maximize the reduction of
contaminants and optimize taste of water.
• You may notice some condensation and water
droplets on the lid and tanks of your unit. This is
normal due to the heating and cooling system.
CLEANING AND CARE
CAUTION: To prevent personal injury
or electric shock, always unplug your
Cuisinart
System from outlet before draining and
cleaning. NEVER immerse base in water
or other liquid.
STANDARD CLEANING:
1. Turn the unit off and unplug it from outlet.
2. Remove the filter and place it in a bowl.
3. Lift upper water tank, let it drain into lower
4. Clean the water tanks and the cover with
5. The base is not immersible. Simply wipe
6. Dry thoroughly when clean.
SEMI-ANNUAL CLEANING:
We recommend you clean your unit twice a
year to boost its operation and performance
and to remove any calcium scale residue from
the heating and cooling elements.
This cleaning process takes about 45 minutes.
If you are going to replace or recondition the
filter, we suggest you set it up while cleaning
the unit to save time (see #3 below).
®
®
Countertop Filtration
tank, and set it aside. Then lift lower tank off
base and empty. Careful, a full tank can be
very heavy!
warm soapy water. NOTE: Remove filter
timer before washing lid. Filter timer is not
immersible.
it clean with a damp cloth.
1. Turn the unit off and unplug it from outlet.
2. Remove and empty upper tank.
3. Remove the filter and place it in a bowl.
NOTE: To install a new filter or recondition
the existing one, follow WATER FILTER
SETUP instructions on page 4.
4. Remove and empty lower tank.
5. In the lower tank mix ½ gallon of distilled
(white) vinegar and ½ gallon of tap water.
6. Place lower tank back on base.
7. Draw the following amount of water from
each spigot: 2
cups of hot, 1¼ cups of
8
room temp, 3½ cups of cold. This allows
the inner tanks to fill with cleaning solution.
8. Plug in and turn power on for 20 minutes
– do not dispense water during this time.
9. Turn power off and draw the following
amount of water from each spigot: 2
8
cups of hot, 1¼ cups of room temp, 3½
cups of cold. This will help clear out scale
and residue.
10. Remove the lower tank and discard the
remaining solution. Place lower tank back
on base.
11. Allow hot water to cool, then drain the
internal reservoir over a sink by tilting unit
slightly and removing the 2 plastic drainage
plugs from bottom of unit. Plugs are tightly
inserted and must be gently, but firmly,
worked to remove.
12. When water has completely drained,
replace plugs and lower tank.
13. Re-fill lower tank with water only and drain
the internal reservoir again to flush
thoroughly (see #11 above).
14. When water has completely drained,
replace plugs, tanks, filter and cover.
15. Follow the WATER DISPENSER SETUP
instructions on page 4, and the STANDARD
CLEANING instructions on page 6.
16. To ensure the cleaning solution is
thoroughly removed and only clean water
flows, draw the following amount of water
from the spigots once more: 2
cups of
8
hot, 1¼ cups of room temp, 3½ cups of
cold. NOTE: If water has a vinegar taste or
smell, continue to draw water until taste or
smell is gone.
6

TROUBLESHOOTING
Symptom Possible Cause Solution
On/Off Power button does
not light up.
It takes longer than 45
minutes for the water to
pass through the lter.
Unit does not dispense
water when buttons are
pushed.
Water continues
owing from spigot
after push button is
released.
HOT water LED does not
light up.
COLD water LED does not
light up.
COLD water LED light
turns off even though cold
water is not dispensed.
Energy Saver mode LED
does not light up.
Heater is still working and
hot water is still available
in Energy Saver mode.
Filter timer does not show
“Filtering” or “Replace.”
Leakage on the
countertop.
Water leaks from the top
cover.
ROOM temperature water
is warm.
HOT temperature water is
not hot.
Unit might not be plugged into
outlet.
Some air is still in the lter.
Internal water tanks are not completely lled with water.
Push button is stuck.
1. Power is not on.
2. There is no water in tanks.
1. Power is not on.
2. There is no water in tanks.
Large amount of room temperature
water was dispensed.
1. Power is not on.
2. Energy Saver is in Off position
Battery is dead. Contact Customer Service for replacement lter timer.
1. Water tanks are not
properly seated on base.
2. Drainage plugs are not fully
engaged.
Water tanks are over lled. Drain excess water from tanks by pressing push buttons.
Energy Saver is in On position. Make sure Energy Saver is in its Off position.
Check the wall outlet for power. Make sure the outlet is not
controlled by a wall switch.
Place lter in an empty bowl, then ll with water, making
sure it is fully submerged. Resoak it for 10–15 minutes,
or until no more bubbles are observed.
Review “Filling the Internal Tanks” on page 5 to be sure it
was done correctly. Make sure the lower water tank is full.
Continue to press and hold push buttons until water flow
is steady. If unit still won’t dispense water or flow does not
become steady, contact Customer Service.
Remove water tanks from the base. Continue
pressing button until it no longer sticks.
1. Make sure unit is plugged into outlet.
2. Make sure air has been purged from internal tanks,
as stated on page 5.
3. If there is water in the tanks, it will take about 10 minutes
for the water to heat.
1. Make sure unit is plugged into outlet.
2. Make sure air has been purged from internal tanks, as
stated on page 5.
3. If there is water in the tanks, it will take about 80 minutes
for the water to chill the rst time. It takes only about 30
minutes for subsequent ll-ups.
Allow up to 30 minutes for water to chill and LED light will
turn on.
1. Make sure unit is plugged into outlet.
2. Make sure Energy Saver switch is in its On position.
Contact Customer Service.
1. Make sure water tanks are seated properly on the base.
2. Ensure that drainage plugs are correctly installed on the
bottom of the base.
Allow up to 30 minutes for cold water to chill and blue LED
light to turn on.
7

STORING THE UNIT
1. Turn the unit off and unplug it from outlet.
Bottom of unit
Drainage
2. Remove empty water tanks, filter and cover.
3. Allow hot water to cool, then bring base to sink.
4. Drain internal reservoir by tilting unit slightly and removing the
2 plastic drainage plugs from bottom of unit. Plugs are tightly
inserted and must be gently, but firmly, worked to remove.
5. When water has completely drained, replace plugs, tanks,
filter and cover.
6. Your Cuisinar t
®
®
Countertop Filtration System is ready to store.
TECHNICAL SPECIFICATIONS
Unit: WCH-1500 1 Cuisinart®
1 Cuisinart
Countertop Filtration System
®
Water Filter
System Capacity up to 3 months/ 48 gallons/ 181 liters
Maximum Input Temperature 104°F (40°C)
Minimum Input Temperature 34°F (1°C)
Maximum Output Temperature 194°F (90°C)
Minimum Output Temperature 44°F (7°C)
Rated Service Flow 6 gallons / 22.7 liters per day
(may vary according to water conditions)
Electrical Requirements AC~120V 60Hz 3.7A 450W
®
Plugs
System Tested and Certified by WQA against NSF/ANSI Standard 53
for the reduction of Lead, Benzene, Cadmium, Copper, Mercury,
Tetrachloroethylene, Toluene, and Standard 42 for the reduction of
Chlorine Taste and Odor.
See Performance Data Sheet for specific test conditions and results.
Claims are calculated based on WQA accepted practice of average percent reduction. The
contaminants or other substances removed or reduced by this water treatment device are not
necessarily in all users’ water. Do not use with water that is microbiologically unsafe or of
unknown quality without adequate disinfection before or after the system. Individuals requiring
water of specific microbiological purity should consult their physician.
The Cuisinart
®
181 liters. When the Cuisinart
®
Countertop Filtration System processes approximately 48 gallons/
®
Water Filter (GF-80) exceeds filtering capacity, replacement is
essential for the product to perform as represented. In the United States, replacement filters cost
generally $19.99 per filter. Replacement filters may be purchased at most retail outlets. The
performance of the filter may vary based on local water conditions.
Hot water should not be used with the Cuisinart
®
Water Filter (GF-80) as it will affect the filter’s
performance.
Refer to the Operating Instructions and Cleaning and Care for general unit operation and
maintenance requirements. Testing was performed under standard laboratory conditions;
actual performance may vary.
8

PERFORMANCE DATA SHEET
PERFORMANCE DATA SHEET FOR MODELS WCH-1000 AND WCH-1500
CONTAMINANT REMOVAL DATA IMPORTANT NOTICE:
Read this Performance Data Sheet and compare the capabilities of this unit with your actual
water treatment needs. It is recommended that, before purchasing a water treatment unit, you
have your water supply tested to determine your actual water treatment needs.
Performance testing conducted by WQA. These systems have been tested according to NSF/
ANSI Standard 53 and 42 for reduction of the substances listed below. The concentration of the
indicated substances in water entering the system was reduced to a concentration less than or
equal to the permissible limit for the water leaving the system, as specified in NSF/ANSI Standard
53 and Standard 42.
Testing was performed under standard laboratory conditions; actual performance may vary.
Removal Removal Action Level Hardness Temp Inlet
Max.
Permissible
Produc t Water
Concentration
(mg/L)
CaCO3
(mg/L)
Tes tin g
Compart.
(°C)
PH
Reduction
Requirement
Substance
Influent
Water Avg.
(mg/L)
Influent
Challenge
Concentration
(mg/L)
Filter
Effluent
Max.
(mg/L)
Percent
Reduction
(%)
NSF/ANSI Standard 42-Aesthetic Effects
Chlorine Taste and
Odor Reduction
2.0 2.0+/-10% N/A 97.5% N.A. N.A. 20 7.53
NSF/ANSI Standard 53-Health Effects
Copp er pH 6.5 3.15 3.0+/-10% .87 85.0% 1.3 16 20 6.42 N/A
Copp er pH 8.5 3.10 3.0+/-10% 1.0 85.4% 1.3 120 19 8.42 N/A
Merc ury pH 6.5 .006 0.006+/-10% .0009 92.8% 0.002 22 19 6.45 N/A
Merc ury pH 8.5 .006 0.006+/-10% .001 89.9% 0.002 140 20 8.55 N/A
Cadmium pH 6.5 .029 0.03+/-10% .002 96.6% 0.005 18 20 6.59 N/A
Cadmium pH 8.5 .03 0.03+/-10% .004 92.5% 0.005 120 20 8.44 N/A
Benzene .015 0.015+/-10% .003 84.1% 0.005 130 20 7.58 N/A
Toluene 2.9 3.0+/-10% .770 89.8% 1 320 20 7.54 N/A
Tetrachloroethylene .014 0.015+/-10% .003 92.5% 0.005 340 21 7.56 N/A
>50
Lead pH 8.5 .149 .15+/-10% .007 95.4% .010 98 21 8.5 N/A
Lead pH 6.5 .154 .15+/-10% .004 98.7% .010 18 19 6.5 N/A
9

PURCHASES MADE IN IOWA
For purchases made in Iowa:
This form must be signed and dated by the buyer and seller prior to consummation of this sale.
This form should be retained on file by the seller for a minimum of two years.
BUYER: SELLER:
Name Name
Address Address
City State Zip City State Zip
Signature Date Signature Date
10

WARRANTY
LIMITED THREE-YEAR WARRANTY
This warranty is available to consumers only.
You are a consumer if you own a Cuisinart
Countertop Filtration System that was
purchased at retail for personal, family or household
use. Except as otherwise required under applicable
law, this warranty is not available to retailers or other
commercial purchasers or owners.
®
We warrant that your Cuisinart
Countertop Filtration System will be free of defects
in materials and workmanship under normal home
use for 3 years from the date of original purchase.
We suggest you complete and return the enclosed
product registration card promptly to facilitate
verification of the date of original purchase.
However, return of the product registration card
does not eliminate the need for the consumer to
maintain the original proof of purchase in order to
obtain the warranty benefits. In the event that you
do not have proof of purchase date, the purchase
date for purposes of this warranty will be the date of
manufacture.
If your Cuisinart
®
Countertop Filtration
System should prove to be defective within the
warranty period, we will repair it, or if we think
necessary, replace it.
To obtain warranty service, simply call our toll-free
number 1-800-726-0190 for additional information
from our Customer Service Representatives, or send
the defective product to Customer Service at:
Cuisinart
150 Milford Road
East Windsor, NJ 08520.
To facilitate the speed and accuracy of your return,
please enclose $10.00 for shipping and handling of
the product.
Please pay by check or money order (California
residents need only supply proof of purchase
and should call 1-800-726-0190 for shipping
instructions).
NOTE: For added protection and secure handling
of any Cuisinart product that is being returned, we
recommend you use a traceable, insured delivery
service. Cuisinart cannot be held responsible for
in-transit damage or for packages that are not
delivered to us. Lost and/or damaged products
are not covered under warranty. Please be sure to
include your return address, daytime phone number,
description of the product defect, product model
number (located on bottom of product), original date
of purchase, and any other information pertinent to
the product’s return.
Your Cuisinart
®
Countertop Filtration
System has been manufactured to the strictest
specifications and has been designed for use with
the authorized accessories and replacement parts.
®
This warranty expressly excludes any defects or
damages caused by accessories, replacement
parts, or repair service other than those that have
been authorized by Cuisinart.
This warranty does not cover any damage caused
by accident, misuse, shipment or other ordinary
household use.
This warranty excludes all incidental or
consequential damages. Some states do not allow
the exclusion or limitation of these damages, so
these exclusions may not apply to you.
CALIFORNIA RESIDENTS ONLY
California law provides that for In-Warranty Service,
California residents have the option of returning a
nonconforming product (A) to the store where it was
purchased or (B) to another retail store that sells
Cuisinart products of the same type.
The retail store shall then, at its discretion, either
repair the product, refer the consumer to an
independent repair facility, replace the product, or
refund the purchase price less the amount directly
attributable to the consumer’s prior usage of the
product. If the above two options do not result in
the appropriate relief to the consumer, the consumer
may then take the product to an independent repair
facility if service or repair can be economically
accomplished. Cuisinart and not the consumer
will be responsible for the reasonable cost of
such service, repair, replacement, or refund for
nonconforming products under warranty.
California residents may also, according to their
preference, return nonconforming products directly
to Cuisinart for repair, or if necessary, replacement,
by calling our Consumer Service Center toll-free at
1-800-726-0190.
Cuisinart will be responsible for the cost of the
repair, replacement, and shipping and handling for
such products under warranty.
BEFORE RETURNING YOUR CUISINART
PRODUCT
If you are experiencing problems with your
Cuisinart product, we suggest that you call our
Cuisinart Service Center at 1-800-726-0190
before returning the product to be serviced. If
servicing is needed, a Representative can confirm
whether the product is under warranty and direct
you to the nearest service location.
Important: If the nonconforming product is to be
serviced by someone other than Cuisinart’s
Authorized Service Center, please remind the
servicer to call our Consumer Service Center at
1-800-726-0190 to ensure that the problem is
properly diagnosed, the product is serviced with
the correct par ts, and the product is still under
warranty.
11

Coffeemakers
Food
Processors
Toasters Rice Cookers
Cookware
Cuisinart offers an extensive assortment of top quality products to make life in the
kitchen easier than ever. Try some of our other countertop appliances and
cookware, and Savor the Good Life
®
.
www.cuisinart.com
©2010 Conair Corporation
Cuisinart® is a registered
trademark of the
Conair Corporation
Cuisinart
150 Milford Road
East Windsor, NJ 08520
1-800-726-0190
Printed in China
Grills
Any trademarks or service marks of third parties
referred to herein are the trademarks or service
marks of their respective owners.
09CE16603
G IB-8896B

Version no :
IB-8896B
Fold Size:
Material:
Coating:
Color:
Date: Nov-24-2009
PDF version :
Hugo Code :
Color Series:
Remark :
216X140MM Saddle Stitiched 12PP
COVER:
INSIDE: 80gsm woodfree artpaper
Gloss Varnishing in cover
COVER: 4C(CMYK)+1C(BK)
INSIDE: 1C(BK)+1C(BK)
157gsm matt artpaper
Co-ordinator : Scias Liu
Hugo Description
WCH1500 IB-8896B (0,0) BOOK
KWE0003IB-1B1
NON
Quality request(1)
Operator : HAI
 Loading...