

Page 1
INSTRUCTION AND RECIPE BOOKLET
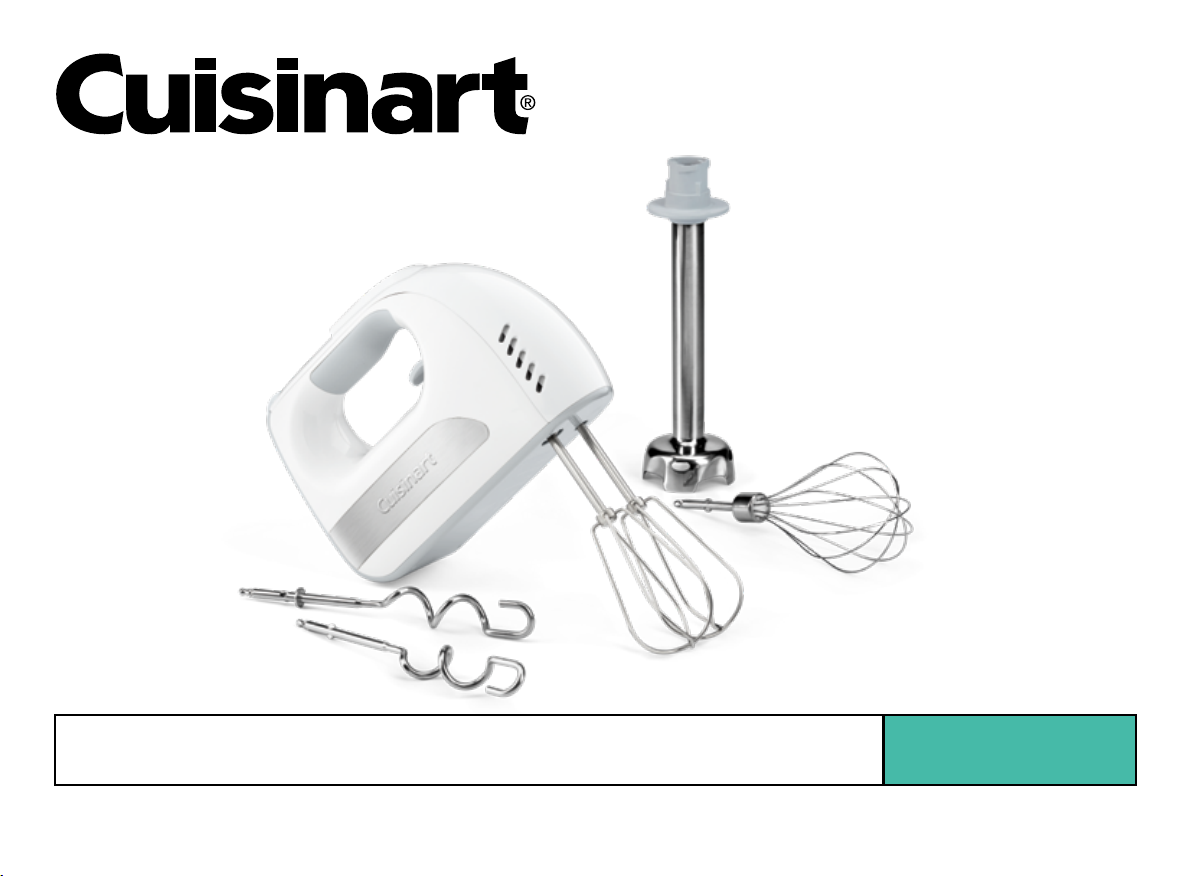
HM-8 SeriesPower Advantage® Deluxe 8-Speed Hand Mixer
For your safety and continued enjoyment of this product, always read the instruction book carefully before using.
hm8_20ce074058_eng_ib_final.indd 1hm8_20ce074058_eng_ib_final.indd 1 6/16/20 11:34 AM6/16/20 11:34 AM
Page 2

CONTENTS
Important Safeguards..................... 2
Features and Benefits .................... 3
Use, Care and Maintenance. . . . . . . . . . . . . . . . 4
Quick Reference Guide ................... 5
Warranty ............................... 7
Recipes................................ 8
IMPORTANT
SAFEGUARDS
When using an electrical appliance, basic
safety precautions should always be taken,
including the following:
1. Read all instructions.
2. Turn the appliance OFF, then unplug from
the outlet when not in use, before
assembling or disassembling parts and
before cleaning. To unplug, grasp the
plug and pull from the outlet. Never pull
from the power cord.
3. To protect against risk of electric shock, do
not put the hand mixer motor housing or
cord in water or other liquids. If hand mixer
motor housing or cord falls into liquid,
unplug the cord from outlet immediately.
Do not reach into the liquid.
4. This appliance is not intended for use by
children or by persons with reduced
physical, sensory, or mental capabilities, or
lack of experience and knowledge. Close
supervision is necessary when any
appliance is used near children. Children
should be supervised to ensure that they do
not play with the appliance.
5. Avoid contact with moving parts. Keep
hands, hair, clothing, as well as spatulas
and other utensils away from beaters and
other accessories/attachments during
operation to reduce risk of injury to persons,
and/or damage to the mixer.
6. Remove all accessories/attachments from the
mixer before washing.
7. Do not operate any appliance with a
damaged cord or plug or after the appliance
malfunctions, or is dropped or damaged in
any manner. Contact the manufacturer at
their customer service telephone number for
information on examination, repair, or
adjustment.
8. The use of attachments not recommended
by Cuisinart may cause fire, electric shock,
or risk of injury.
9. Do not use outdoors or anywhere the cord
or mixer might come into contact with water
while in use.
10. To avoid possibility of mixer being
accidentally pulled off work area, which
could result in damage to the mixer or in
personal injury, do not let cord hang over
edge of table or counter.
11. To avoid damage to cord and possible fire
or electrocution hazard, do not let cord con
tact hot surfaces, including the stove.
12. Blades are SHARP. Handle carefully when
removing, inserting or cleaning. ALWAYS
USE BLADE STORAGE COVER WHEN
NOT IN USE.
13. When mixing liquids, especially hot liquids,
use a tall container or mix small quantities
in separate batches to reduce spillage,
splattering and possibility of injury from
burning.
14. Use storage pouch to specifically store
hand blender unit and attachments.
Be sure blade storage cover is in place on
detachable blending shaft before putting
in storage pouch.
SAVE THESE
INSTRUCTIONS
FOR HOUSEHOLD
USE ONLY
NOTICE
To reduce the risk of electric shock, this
appliance has a polarized plug (one prong is
wider than the other). As a safety feature, this
plug will fit into a polarized outlet only one
way. If the plug does not fit fully into the
outlet, reverse the plug. If it still does not fit,
contact a qualified electrician. Do not modify
the plug in any way. The maximum rating
is based on the HM-C Chopper/Grinder
attachment (available separately), which
draws the greatest load (power); other
recommended attachments may draw
significantly less power.
2
hm8_20ce074058_eng_ib_final.indd 2hm8_20ce074058_eng_ib_final.indd 2 6/16/20 11:34 AM6/16/20 11:34 AM
Page 3
FEATURES AND
BENEFITS
250 Watt DC Motor
Powerful enough to easily cut through a
double batch of cookie dough or butter right
out of the refrigerator.
Maximum Comfort
Balanced to do more work for you. The shape
of the mixer allows for maximum possible
power and balance. Stress-free grip provides
unparalleled comfort and control, even during
extended mixing.
Automatic Feedback
No need for a power boost. An electronic
feedback mechanism automatically feeds in extra
power when needed. It assures that the mixer will
not bog down, even when mixing heavy loads.
SmoothStart
When the mixer is turned on, the beaters start
spinning very slowly to prevent ingredients
from splattering.
Easy to Clean
The Power Advantage® Deluxe Hand Mixer has
a smooth, sealed base; wipes clean instantly.
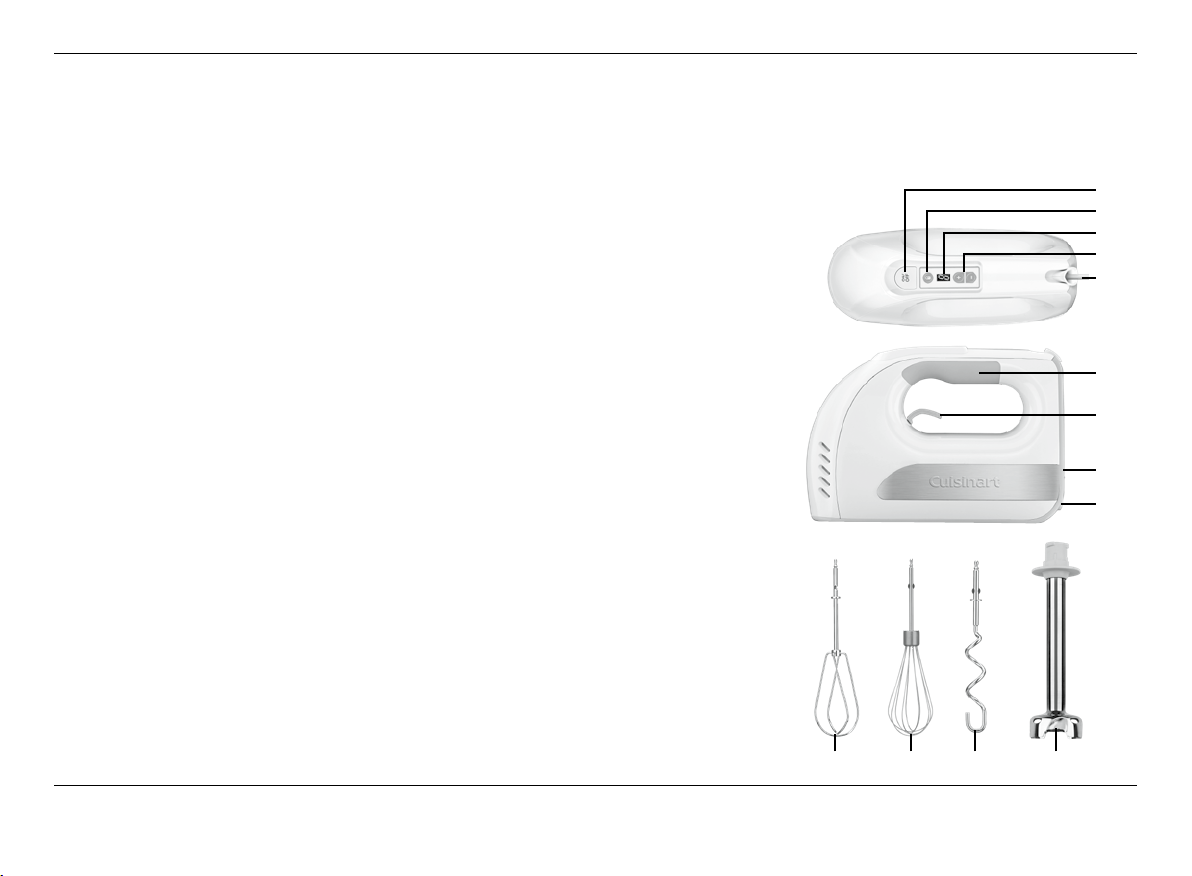
1. One-Step ON/OFF Button
One-step power button allows you to turn
mixer on and off in a single operation.
2. Blending Mode
Activates hand blending mode.
3. LED Speed Display
Digital speed settings are easy to read.
4. One-Touch Speed Control
Allows you to change speeds quickly while
you are mixing.
®
5. Rotating Cord
Unique center cord will freely rotate with
comfort for right or left-handed use.
6. Soft-Grip Handle
For maximum comfort.
7. Beater Release Lever
Conveniently located for easy ejection of
beaters, whisk, or dough hooks. Also activates
hand blending mode.
8. Attachment Port
Compatible with included blending shaft
attachment and optional Chopper/Grinder
attachment, available for purchase (HM-C).
9. Heel Rest
Allows mixer to rest upright on countertop.
10. Easy Clean Beaters
Two extra-wide beaters for easy aerating,
mixing, and creaming. Designed with no center
post to prevent ingredients from clogging up
beaters. Beaters are easy to clean and
dishwasher safe.
11. Balloon Whisk
Great for whipping heavy cream or egg
whites. May also be used for anything that
you would normally whisk by hand, like
crêpe batters or eggs for omelets.
12. Dough Hooks
For preparing and kneading yeast doughs
such as pizza and bread doughs. Easy to
clean and dishwasher safe.
13. Blending Shaft Attachment with
Stainless Steel Blade
Attaches to hand mixer, allowing you to
blend, mix, and purée all kinds of foods.
14. Blade Storage Cover (not shown)
Ensures safety and extends life of blade.
3
15. Canvas Storage Pouch (not shown)
Safely store hand mixer, blending shaft,
and accessories.
16. BPA Free (not shown)
All materials that come in contact with food
are BPA free.
1
2
3
4
5
6
7
8
9
10 11 12 13
hm8_20ce074058_eng_ib_final.indd 3hm8_20ce074058_eng_ib_final.indd 3 6/16/20 11:34 AM6/16/20 11:34 AM
Page 4
USE, CARE AND
MAINTENANCE
USING THE MIXER
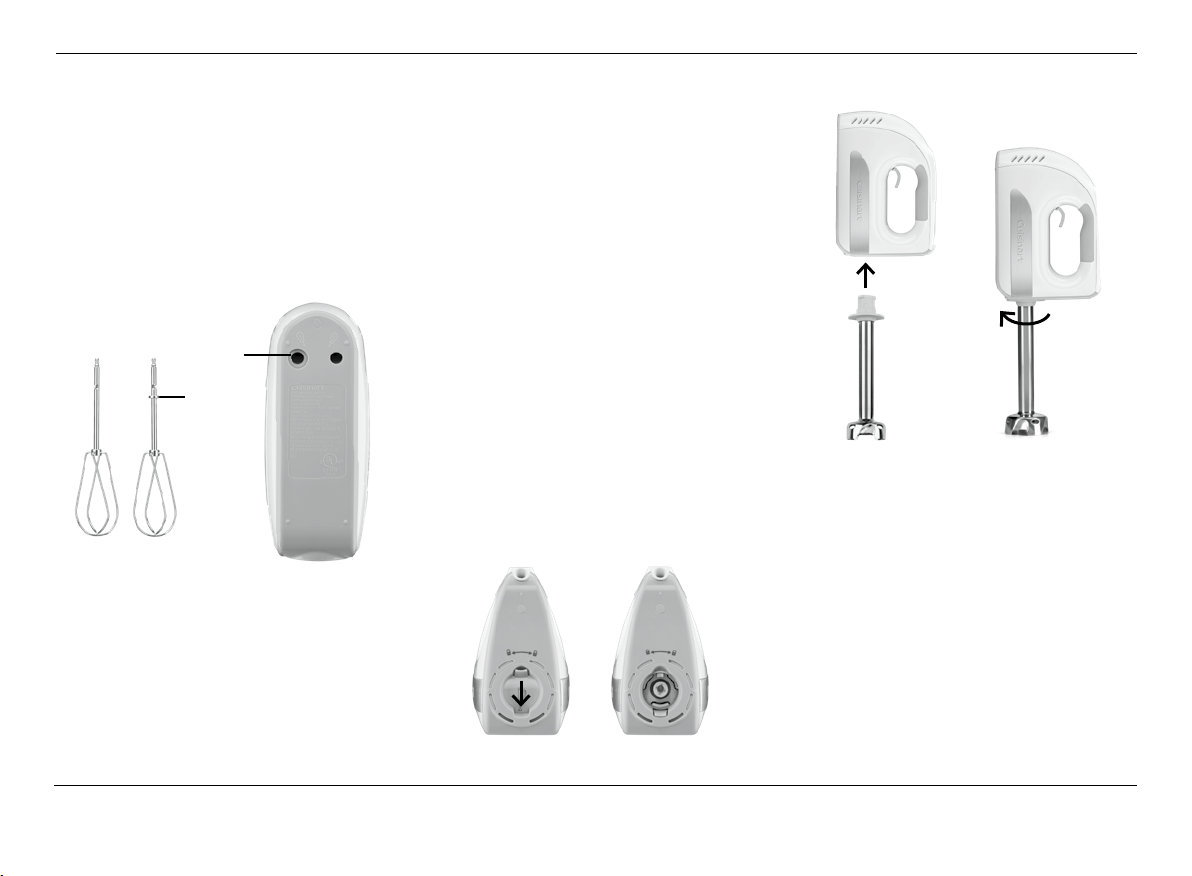
Inserting Beaters and Dough Hooks
With the mixer off and unplugged, insert
beater with collar into the larger hole. Push
beater or dough hook in until it clicks into
place. Insert the beater or dough hook without
collar into the smaller hole. Push beater or
dough hook in until it clicks into place.
Larger
Hole
Collar
Inserting Balloon Whisk
With the mixer off and unplugged, hold
balloon whisk at stem end, and insert into
either hole. Push whisk in until it clicks
into place. DO NOT PUSH WHISK IN FROM
WIRE END, AS YOU MAY DAMAGE WIRES.
Turning Mixer ON/OFF
Plug mixer into outlet. Press ON/OFF button
to turn mixer on. Mixer will immediately begin
to mix on Speed 1. To turn mixer off, press
ON/OFF button again.
Changing Speeds
Press the + button on the digital touchpad
to increase the speed. Press the – button to
decrease the speed.
Removing All Accessories
Press the OFF button and unplug from wall
outlet. Lift the beater release lever and remove
the accessories from the mixer.
HAND BLENDING MODE
The specially designed blade blends, mixes,
and purées all kinds of foods, including salad
dressings, smoothies, and protein shakes,
soups and sauces.
This blade is designed to add only minimal
air to your mixture. A gentle up-and-down
motion lets you achieve the most flavorful,
full-bodied results. Be careful never to remove
the blending shaft from the liquid while in
operation.
Attaching Blending Shaft
NOTE: The blending shaft port will not open if
beaters are inserted.
Slide open the door cover of blending shaft port.
Port: Closed Port: Open
Insert blending shaft attachment and turn
clockwise to secure into locked position.
To remove, turn attachment counterclockwise
and remove from port. Door cover will
automatically spring back into closed position.
Operation
1. With the unit off and unplugged, connect
the blending shaft to the blending shaft port.
2.
Plug electric cord into a wall outlet.
3.
Immerse the blade end of the blending
shaft into mixture to be blended. You can
blend in a tall cup, bowl, pot, saucepan
or pitcher.
4.
To turn on the blending shaft, press ON/
OFF button. LED will show Speed 1.
5.
To activate the hand blender, press the
Unlock button. LED will show “U.”
4
hm8_20ce074058_eng_ib_final.indd 4hm8_20ce074058_eng_ib_final.indd 4 6/16/20 11:34 AM6/16/20 11:34 AM
Page 5

6.
Lift and hold the beater release lever for
blending action to begin. To change the
speed setting, press the “+/-“ button.
LED will show Speed 1, 2 or 3. The motor
will adjust speeds accordingly.
7.
To pulse, release the blender release
lever, which will stop the blender action.
Pull on the blender release lever to
reactivate blender function.
8.
Press the ON/OFF button to turn off the
unit. Unplug immediately after use.
CLEANING
1. Wash beaters, dough hooks and whisk
after each use in hot, soapy water or in a
dishwasher.
2.
NEVER PUT THE MOTOR HOUSING
IN WATER OR OTHER LIQUIDS TO
CLEAN. Wipe it with a damp cloth or
sponge. Do not use abrasive cleansers,
which could scratch the surface.
3.
To clean blending shaft, wash by hand
in hot water using mild detergent.
The blending shaft is NOT dishwasher
safe. Be mindful of the fixed-mount, razorsharp blade edges.
4.
When not in use, your hand mixer should
be disconnected, wiped down and stored
in a safe, dry location out of reach of
children.
Use the storage pouch provided with
hand mixer.
MAINTENANCE
Any other servicing should be performed by
an authorized service representative.
®
NOTE: DO NOT USE THE CUISINART
POWER ADVANTAGE® DELUXE HAND
MIXER WITH NONSTICK COOKWARE.
QUICK REFERENCE
GUIDE
MIXING TECHNIQUES
For mixing attachments only.
NOTE: The balloon whisk attachment is used
only for light whipping. For all other mixing
tasks, use the beaters or dough hooks.
Speed 1
• Start mixing most ingredients together
• Start whipping cream
• Start whipping egg whites
• Fold delicate creams and egg whites into
batters
• Mix muffin and pancake batters
Speed 2
• Add nuts, chips, and dried fruit to doughs
and batters
• Sift and aerate dry ingredients
• Add dry ingredients to batters/doughs
• Mix heavy cookie doughs
• Start kneading yeast doughs
Speed 3
• Cut cold butter into dry ingredients
(for pie doughs, biscuits, and pastries)
• Mix cake batters
• Whip potatoes/squash
• Finish kneading yeast doughs
Speed 4
• Mix cookie dough
• Cream butter and sugar until light and fluffy
• Add eggs to batters/doughs
Speed 5
• Finish mixing frostings
• Beat whole eggs/yolks
Speed 6
• Whip egg whites
Speed 7
• Finish whipping cream
Speed 8
• Finish whipping meringues and egg whites
BLENDING TIPS & HINTS
1. Liquid should not come closer than 1
inch from where the shaft attaches to the
blending shaft port.
2.
Always start blending on Speed 1.
Gradually increase to Speeds 2 and 3 as
mixture gets smoother.
3.
Do not immerse motor body housing in
water or any other liquids.
4.
Cut solid foods into ½-inch pieces for
easier blending.
5.
To avoid splatter, be sure the protective
blade guard on the blending shaft
remains submerged in the liquid while
blending. Never remove it from the liquid
while the motor is running.
6.
Do not let hand blender stand in a hot pot
on stove while not in use.
7.
Do not put fruit pits, bones, or other hard
material into the blending mixture, as
these are liable to damage the blades.
5
hm8_20ce074058_eng_ib_final.indd 5hm8_20ce074058_eng_ib_final.indd 5 6/16/20 11:34 AM6/16/20 11:34 AM
Page 6

8.
Do not fill mixing containers too full.
The level of mixture will rise when
blending, and can overflow.
9.
With the hand blender, using a gentle
up-and-down motion is the best way
to blend and incorporate ingredients
uniformly.
10.
To whip air into a mixture, always
hold the blending blade just under
the surface.
6
hm8_20ce074058_eng_ib_final.indd 6hm8_20ce074058_eng_ib_final.indd 6 6/16/20 11:34 AM6/16/20 11:34 AM
Page 7

WARRANTY
Limited Three-Year Warranty
This warranty is available to U.S. consumers
only. You are a consumer if you own a
Cuisinart
Hand Mixer with Storage Case that was
purchased at retail for personal, family or
household use. Except as otherwise required
under applicable law, this warranty is not
available to retailers or other commercial
purchasers or owners. We warrant that your
Cuisinart
Hand Mixer with Storage Case will be free of
defects in materials and workmanship under
normal home use for 3 years from the date of
original purchase.
We recommend that you visit our website,
www.cuisinart.com for a fast, efficient way
to complete your product registration.
However, product registration does not
eliminate the need for the consumer to
maintain the original proof of purchase in
order to obtain the warranty benefits. In the
event that you do not have proof of purchase
date, the purchase date for purposes of this
warranty will be the date of manufacture.
CALIFORNIA RESIDENTS ONLY
California law provides that for In-Warranty
Service, California residents have the option
of returning a nonconforming product (A) to
the store where it was purchased or (B) to
another retail store that sells Cuisinart
products of the same type. The retail store
shall then, according to its preference, either
®
Power Advantage® Deluxe 8-Speed
®
Power Advantage® Deluxe 8-Speed
repair the product, refer the consumer to an
independent repair facility, replace the
product, or refund the purchase price less
the amount directly attributable to the
consumer’s prior usage of the product. If
neither of the above two options results in the
appropriate relief to the consumer, the
consumer may then take the product to an
independent repair facility, if service or repair
can be economically accomplished. Cuisinart
and not the consumer will be responsible for
the reasonable cost of such service, repair,
replacement, or refund for nonconforming
products under warranty. California residents
may also, according to their preference,
return nonconforming products directly to
Cuisinart for repair or, if necessary,
replacement by calling our Consumer Ser vice
Center toll-free at 800-726-0190. Cuisinart
will be responsible for the cost of the repair,
replacement, and shipping and handling for
such nonconforming products under warranty.
HASSLE-FREE REPLACEMENT
WARRANTY
Your ultimate satisfaction in Cuisinart
products is our goal, so if your Cuisinart
Power Advantage
®
Deluxe 8-Speed Hand
®
Mixer with Storage Case should fail within the
generous warranty period, we will repair it or,
if necessary, replace it at no cost to you.
To obtain a return shipping label, email us at
https://www.cuisinart.com/customer-care/
product-return. Or call our toll-free
customer service department at 1-800-7260190 to speak with a representative.
Your Cuisinart
®
Power Advantage® Deluxe
8-Speed Hand Mixer with Storage Case
has been manufactured to the strictest
specifications and has been designed for
use only in 120-volt outlets and only with
authorized accessories and replacement
parts. This warranty expressly excludes any
defects or damages caused by attempted
use of this unit with a converter, as well as
use with accessories, replacement parts or
repair service other than those authorized by
Cuisinart. This warranty does not cover any
damage caused by accident, misuse,
shipment or other than ordinary household
use. This warranty excludes all incidental or
consequential damages. Some states do not
allow the exclusion or limitation of these
damages, so these exclusions may not apply
to you. You may also have other rights, which
vary from state to state.
Important: If the nonconforming product is
to be serviced by someone other than
Cuisinart’s Authorized Service Center, please
remind the servicer to call our Consumer
Service Center at 1-800-726-0190 to ensure
that the problem is properly diagnosed, the
product is serviced with the correct parts,
and to ensure that the product is still under
warrant y.
7
hm8_20ce074058_eng_ib_final.indd 7hm8_20ce074058_eng_ib_final.indd 7 6/16/20 11:34 AM6/16/20 11:34 AM
Page 8

RECIPES
Breakfast
Crêpes with Lemon Cream
and Fresh Fruit ................................................ 9
Lemon Ginger Scones..................................... 9
Blueberry Muffins .......................................... 10
Pumpkin Spice Muffins ................................. 10
Gluten-Free Banana Muffins ......................... 11
Apple Cider Doughnuts ................................. 11
Cinnamon Swirl Coffee Cake ........................ 12
Lemon Pound Cake ...................................... 13
Quick Berry Jam ............................................ 13
Maple Butter .................................................. 14
Simple Fruit Smoothie ................................... 14
Berries and Greens Smoothie ....................... 14
Mango-Lime Smoothie .................................. 15
Sweet Protein Smoothie................................ 15
Matcha Latte ................................................. 15
Cold Brew Latte ............................................ 15
Savories
Deviled Eggs ................................................. 16
Bacon and Swiss Quiche .............................. 16
Ricotta-Thyme Tart ........................................ 17
Spinach Artichoke Dip................................... 17
Buffalo Chicken Dip ...................................... 18
Pimento Cheese Spread ............................... 18
Guacamole .................................................... 18
Hummus ........................................................ 19
Creamy Mashed Potatoes ............................. 19
Mashed Maple Sweet Potatoes .................... 19
Cauliflower Mash ........................................... 20
Spinach and Feta Soufflé .............................. 20
Sweet Potato Biscuits ................................... 21
Popovers ....................................................... 21
Three Cheese Calzones ................................ 22
Basic Tomato Sauce ..................................... 22
Bright Greens Soup ....................................... 23
Winter White Bean Soup ............................... 23
Sweets
Lemon-Thyme Shortbread ............................ 24
Strawberry Sandwich Cookies ...................... 25
Buckwheat Chocolate
Chunk Cookies .............................................. 25
Crunchy Peanut Butter Chip Cookies ........... 26
Ginger Cookies .............................................. 27
No-Bake Keto Bites ...................................... 27
Edible Cookie Dough
(with variations) ............................................. 28
Bittersweet Espresso Brownies ....................28
Blonde Brownies (Blondies) .......................... 29
Blueberry Crumble Bars ................................ 29
Golden Layer Cake........................................ 30
Berries and Cream Frosting .......................... 31
Deep Chocolate Layer Cake ......................... 31
Cream Cheese Frosting ................................32
Gluten-Free (and Vegan!)
Golden Cupcakes with Dairy-Free
Vanilla Frosting ..............................................32
Angel Food Cake ........................................... 33
Pavlova with Blood Orange
and Pomegranate .......................................... 33
Sour Cream Cheesecake .............................. 34
Chocolate Cream Pie .................................... 35
Pumpkin Pie .................................................. 36
Classic Whipped Cream ................................ 36
Royal Icing ..................................................... 36
Chocolate Peanut Butter
Ice Cream Shake ........................................... 37
Breads/Doughs
Pizza/Focaccia Dough .................................. 37
Pâte Brisée .................................................... 38
Cuisinart Classic White Bread ....................... 38
Honey Whole-Wheat Bread........................... 39
Rosemary Olive Oil Rolls ............................... 39
8
hm8_20ce074058_eng_ib_final.indd 8hm8_20ce074058_eng_ib_final.indd 8 6/16/20 11:34 AM6/16/20 11:34 AM
Page 9

Crêpes with Lemon Cream
and Fresh Fruit
The lemon cream is delicious for either
breakfast or dessert, but the crêpes can
also be filled with savory items, such as
scrambled eggs and vegetables.
Makes about 18 filled crêpes
Crêpe Batter:
¼ cup unsalted butter, cut into
tablespoons
1 cup reduced-fat milk,
room temperature
¾ cup unbleached, all-purpose flour
½ teaspoon kosher salt
1 tablespoon granulated sugar
3 large eggs, room temperature
1 teaspoon pure vanilla extract
1 teaspoon unsalted butter,
room temperature
Lemon Cream Filling:
½ cup heavy cream, cold
1½ teaspoons pure vanilla extract
¼ cup real maple syrup
Pinch fine sea salt
½ cup plain, whole milk yogurt
1 teaspoon grated lemon zest
1 teaspoon fresh lemon juice
2 medium bananas, thinly sliced
1 pound fresh strawberries,
hulled and thinly sliced
Confectioners’ sugar, for serving
(optional)
1. Prepare the crêpes: Put the butter with
the milk in a small saucepan over low
heat. When the butter is melted, remove
from heat and cool slightly.
2.
While butter/milk is heating, put the
flour, salt, and sugar in a medium bowl.
Using the beaters, mix on Speeds 1 to
2 to combine, about 30 seconds. Add
the eggs and vanilla extract and beat
until mixture resembles a thick and sticky
batter. While mixing on Speed 2, mix in the
milk and butter mixture until the batter is
smooth. Rest the batter in the refrigerator
for a minimum of 30 minutes, or up to
overnight.
3.
While batter is resting, just before cooking
crêpes, prepare the filling. Put the heavy
cream into a medium mixing bowl.
Starting on Speed 1 and very gradually
increasing to Speed 8, whip cream
to medium-stiff peaks, about 1 minute.
Add the vanilla extract, maple syrup, and
salt and mix on Speeds 1 to 3 until fully
combined. Add the remaining ingredients,
except for the fruit, and mix on Speed 1
until combined. Reserve.
4.
Cook the crêpes. Mix the crêpe batter
briefly using the beaters on Speed 2 to
remove any lumps that may have formed.
If lumps remain, pour through a fine
strainer. Set an 8- to 10-inch crêpe pan
or nonstick skillet over medium/mediumhigh heat. Once pan is hot, add the 1
teaspoon of butter. Tilt pan to evenly
distribute the butter; let pan rest on heat
for an additional 30 seconds. Add a small
amount of batter, a scant ¼ cup, and
with the pan in hand, quickly and evenly
rotate it so the crêpe batter thinly coats
the entire bottom surface. Allow to cook
until set, about 2 minutes (traditionally
the crêpe should not brown). Flip and
cook on the second side for no more than
30 seconds. Remove and repeat with
remaining batter.
5.
To serve, put 2 tablespoons of the lemon
cream in the center of each crêpe and
then top with a portion of the bananas
and strawberries. Fold sides of crêpes
over. Dust with powdered sugar, if using,
and serve.
Nutritional information per filled crêpe:
Calories 156 (46% from fat) • carb. 17g • pro. 4g
fat 8g • sat. fat 5g • chol. 68mg • sod. 131mg
calc. 52mg • fiber 1g
Lemon Ginger Scones
Not too sweet, these scones are a perfect
match for a steamy cup of tea in the morning.
Makes 8 scones
2½ cups cake flour, plus more for
2 tablespoons granulated sugar
1½ teaspoons baking powder
¼ teaspoon baking soda
1 teaspoon kosher salt
Grated zest of 1 lemon
6 tablespoons unsalted butter, cut into
shaping
(about 1 tablespoon)
½-inch cubes, room temperature
9
hm8_20ce074058_eng_ib_final.indd 9hm8_20ce074058_eng_ib_final.indd 9 6/16/20 11:34 AM6/16/20 11:34 AM
Page 10

(for about 5 to 10 minutes, be sure
the butter is not soft)
1 cup buttermilk
1 large egg
¼ cup chopped candied ginger
Egg wash (1 large egg plus
1 teaspoon water, whisked well)
Turbinado sugar, for sprinkling
1. Put the flour, sugar, baking powder,
baking soda, salt, and zest in a large
mixing bowl. Using the beaters, mix
the dry ingredients on Speed 1 to fully
combine. Reserve.
2.
Put the buttermilk and egg in a small
bowl. Mix on Speed 1 to combine. Add
the butter to the dry ingredients and
mix on Speed 3 until mixture is shaggy.
Reduce the speed to 1. With the mixer
running, slowly add the liquid ingredients,
and then the ginger, until just combined;
do not over-mix.
3.
Pour the mixture onto a clean counter/
large cutting board. Form the dough
into a 10-inch cylinder. Using a sharp
knife, cut into 8 even rounds. Place on
a parchment-lined baking sheet. Cover
lightly and transfer to a refrigerator to
chill for a minimum of 1 hour, or up to
overnight.
4.
Once chilled, preheat oven to 400°F with
the rack in the middle position. Brush
each scone with egg wash and sprinkle
with the turbinado sugar.
5.
Bake in preheated oven for about 25 to
30 minutes, or until golden brown. Allow
to cool before serving.
Nutritional information per scone:
Calories 264 (35% from fat) • carb. 40g • pro. 5g
fat 9g • sat. fat 6g • chol. 47g • sod. 440g
calc. 99 mg • fiber 1g
Blueberry Muffins
Everyone has a favorite muffin,
and this is quickly becoming ours.
The orange zest should not be overlooked – it
pairs so perfectly with the bright blueberr y
flavor.
Makes 12 muffins
Nonstick cooking spray
2 cups unbleached, all-purpose flour
¹⁄³ cup granulated sugar
¹⁄³ cup packed light brown sugar
1 teaspoon baking powder
¼ teaspoon baking soda
½ teaspoon kosher salt
½ teaspoon ground cinnamon
½ teaspoon grated orange zest
¾ cup buttermilk, room temperature
½ cup vegetable oil
1 large egg, room temperature
1 teaspoon pure vanilla extract
1 cup fresh or frozen, thawed,
blueberries
½ teaspoon turbinado sugar
1. Preheat oven to 400°F with the rack in
the middle position. Lightly coat a regular
12-cup muffin pan with nonstick cooking
spray; reserve.
10
2.
Put the flour, sugars, baking powder and
soda, salt, cinnamon, and zest in a large
mixing bowl. Using the beaters, mix on
Speed 1 until well combined, about 40
seconds. Reserve.
3.
In a small bowl, mix the buttermilk, oil,
egg, and vanilla extract on Speed 1.
Using Speed 1, gradually add the liquid
ingredients to the bowl of dry ingredients.
Once almost fully mixed in, add the
blueberries and gently mix until just
combined. Spoon evenly into prepared
muffin cups. Sprinkle the turbinado sugar
on the top of each muffin.
4.
Bake in the preheated oven for about
18 to 20 minutes, or until a cake tester
comes out clean.
Nutritional information per muffin:
Calories 209 (41% from fat) • carb. 28g • pro. 3g
fat 10g • sat. fat 1g • chol. 16g • sod. 178g
calc. 45mg • fiber 1g
Pumpkin Spice Muffins
An obvious choice for the fall months, the
warm spices and toasted nuts complement
the pumpkin in these moist and tasty muffins.
Makes 12 muffins
Nonstick cooking spray
2 cups unbleached, all-purpose flour
½ teaspoon kosher salt
1 teaspoon baking powder
¼ teaspoon baking soda
½ teaspoon ground cinnamon
¼ teaspoon ground nutmeg
hm8_20ce074058_eng_ib_final.indd 10hm8_20ce074058_eng_ib_final.indd 10 6/16/20 11:34 AM6/16/20 11:34 AM
Page 11

¼ teaspoon ground allspice
½ cup vegetable oil
1¾ cups granulated sugar
¼ cup packed light brown sugar
1 cup pumpkin purée
1 teaspoon pure vanilla extract
2 large eggs, room temperature
½ cup toasted, chopped walnuts
1. Preheat oven to 375°F with the rack in
the middle position. Lightly coat a regular
12-cup muffin pan with nonstick cooking
spray; reserve.
2.
Put the flour, salt, baking powder and
soda, cinnamon, nutmeg, and allspice in
a medium mixing bowl. Using the beaters,
mix on Speed 1 until well combined,
about 40 seconds. Reserve.
3.
In a large bowl, mix the oil, sugars,
pumpkin, and vanilla extract using
Speeds 1 to 3. Gradually add the eggs,
using Speed 2, until well incorporated.
4.
While mixing on Speed 1, gradually add
the dry ingredients to the sugar/oil/
pumpkin mixture. Once almost fully mixed
in, add the walnuts and gently mix until
just combined. Spoon evenly into
prepared muffin cups.
5.
Bake in the preheated oven for about
18 to 20 minutes, or until a cake tester
comes out clean.
Nutritional information per muffin:
Calories 342 (34% from fat) • carb. 54g • pro. 5g
fat 13g • sat. fat 2g • chol. 31g • sod. 197g
calc. 13mg • fiber 2g
Gluten-Free Banana Muffins
The all-purpose gluten-free flour mixes make
gluten-free baking easy and convenient.
There are a number of different brands on the
market to choose from, so taste a few and
Makes 12 muffins
Nonstick cooking spray
2 cups gluten-free, all-purpose flour
½ cup rolled oats, not quick cooking
¹⁄³ cup granulated sugar
¹⁄³ cup packed light brown sugar
1½ teaspoons baking powder
¼ teaspoon baking soda
½ teaspoon kosher salt
½ teaspoon xanthan gum
½ teaspoon ground cinnamon
½ cup vegetable oil
2 large eggs, room temperature
½ teaspoon pure vanilla extract
1½ cups mashed, very ripe bananas
1. Preheat oven to 375°F with the rack in
the middle position. Lightly coat a regular
12-cup muffin pan with nonstick cooking
spray; reserve.
2.
Put the flour, oats, sugars, baking powder
and soda, salt, xanthan gum (if using),
and cinnamon into a mixing bowl. Using
find your favorite.
(optional – only if flour blend does
not have it in list of ingredients)
(about 3 medium bananas)
the beaters, mix on Speeds 1 to 2 until
fully combined, about 30 seconds.
3.
In a separate, large mixing bowl, mix
the remaining ingredients on Speed 3
until smooth and creamy, about 1 to 2
minutes. Add the dry ingredients and mix
on Speed 2 until fully combined.
4.
Spoon evenly into prepared muffin cups.
Bake in the preheated oven for about
16 to 18 minutes, or until a cake tester
comes out clean.
Nutritional information per muffin:
Calories 248 (38% from fat) • carb. 37g • pro. 3g
fat 11g • sat. fat 1g • chol. 31g • sod. 223g
calc. 92mg • fiber 3g
Apple Cider Doughnuts
Be sure to use the best quality cider that you
can find, not juice, for a true apple flavor.
Makes 12 doughnuts
Nonstick cooking spray,
2 cups unbleached, all-purpose flour
1 teaspoon ground cinnamon
¼ teaspoon ground nutmeg
1½ teaspoons baking powder
½ teaspoon kosher salt
6 tablespoons unsalted butter,
²
¼ cup granulated sugar
2 tablespoons maple syrup
or softened butter
cut into four pieces, room
temperature
⁄³ cup packed light brown sugar
11
hm8_20ce074058_eng_ib_final.indd 11hm8_20ce074058_eng_ib_final.indd 11 6/16/20 11:34 AM6/16/20 11:34 AM
Page 12

2 large eggs, room temperature
1 teaspoon pure vanilla extract
¾ cup apple cider
¼ cup buttermilk, room temperature
6 tablespoons unsalted butter,
melted and warm
²
⁄³ cup granulated sugar
1 teaspoon ground cinnamon
Pinch kosher salt
1. Coat a standard doughnut pan with
nonstick cooking spray or softened
butter; reserve. Preheat oven to 350°F
with the rack in the middle position.
2.
Put the flour, 1 teaspoon of cinnamon,
nutmeg, baking powder, and ½ teaspoon
of salt into a medium mixing bowl.
Using the beaters, mix on Speed 2 to
thoroughly combine, a minimum of 30
seconds; reserve.
3.
Put the room temperature butter, brown
sugar, ¼ cup of granulated sugar, and
maple syrup in a large mixing bowl.
Starting on Speed 2, increase to Speed
4 until light and creamy, about 1 minute.
Gradually add the eggs, one at a time,
using Speed 2, and then the vanilla
extract.
4.
Combine the apple cider and buttermilk
in a liquid measuring cup. Add the
dry ingredients to the batter, in three
additions, alternating with the cider/
buttermilk. Be sure to mix gently, but
thoroughly, using Speed 2.
5.
Transfer batter to the prepared doughnut
molds.
6.
Put in the preheated oven and bake until
browned and set, about 15 to 20 minutes
(this will depend on the oven and pan
being used).
7.
While doughnuts are baking, keep the 6
tablespoons of melted butter warm and
then combine with the ²⁄³ cup granulated
sugar, 1 teaspoon of cinnamon, and
salt together in a shallow bowl. Using
the hand mixer on Speed 1, whisk until
combined; reserve.
8.
Remove pan from the oven and allow
doughnuts to rest in the pan for 5 to 6
minutes. Once they have rested, carefully
remove, brush with melted butter, then
gently toss in the cinnamon sugar.
These are best served and consumed
immediately!
Nutritional information per doughnut:
Calories 299 (35% from fat) • carb. 45g • pro. 3g
fat 12g • sat. fat 7g • chol. 61mg • sod. 146mg
calc. 18mg • fiber 1g
Cinnamon Swirl Coffee Cake
This coffee cake is rich, butter y, and
chock-full of cinnamon. It is best made and
Makes one 9-inch round cake; 12 servings
Filling/Topping:
unsalted butter, softened
½ cup toasted walnuts, chopped
¼ cup granulated sugar
1 tablespoon ground cinnamon
Pinch kosher salt
served the same day.
Cake:
1¾ cups unbleached, all-purpose flour
½ teaspoon kosher salt
½ teaspoon baking powder
¼ teaspoon baking soda
8 tablespoons (1 stick) unsalted
butter, cut into 4 pieces, room
temperature, plus more for pan
½ cup granulated sugar
¼ cup packed light brown sugar
2 large eggs, room temperature
1 teaspoon pure vanilla extract
1 cup plain Greek yogurt, preferably
full fat
1. Coat 9-inch round pan with softened
butter; reserve. Preheat oven to 350°F
with the rack in the middle position.
2.
Put the filling/topping ingredients into a
small mixing bowl. Using the beaters, mix
on Speed 1 until combined. Reserve.
3.
Put the flour, salt, baking powder and
soda into a medium mixing bowl. Mix
on Speed 2 to thoroughly combine, a
minimum of 30 seconds; reserve.
4.
Put the butter and sugars into a large
mixing bowl. Mix, starting on Speed 2
and increasing to Speed 4, until light and
creamy, about 2 minutes. Gradually add
the eggs, one at a time, using Speed
3, and then the vanilla extract and the
yogurt. Add the dry ingredients in two
additions and be sure to mix gently, but
thoroughly, using Speed 2.
12
hm8_20ce074058_eng_ib_final.indd 12hm8_20ce074058_eng_ib_final.indd 12 6/16/20 11:34 AM6/16/20 11:34 AM
Page 13

5.
Transfer half of the batter to the prepared
cake pan. Top with half of the nut filling/
topping, and then add the remaining
batter. Smooth to the edges of the pan,
and then top with the remaining nut
mixture.
6.
Put in the preheated oven and bake until
browned and set, about 45 minutes.
Nutritional information per serving:
Calories 245 (41% from fat) • carb. 31g
pro. 5g • fat 11g • sat. fat 5g • chol. 51mg
sod. 161mg • calc. 50mg • fiber 1g
Lemon Pound Cake
A traditional, moist pound cake with
Makes one 9-inch loaf cake; 16 servings
Cake:
Unsalted butter, softened,
2 cups unbleached, all-purpose flour
1 teaspoon baking powder
1 teaspoon kosher salt
14 tablespoons unsalted butter,
1¹⁄³ cups granulated sugar
3 tablespoons grated lemon zest
4 tablespoons vegetable oil
4 teaspoons fresh lemon juice
2 large eggs, room temperature
1 large egg yolk, room temperature
a lemon twist.
or nonstick cooking spray
cut into 1-inch pieces, room
temperature
²
⁄³ cup sour cream, room temperature
Icing:
1 cup confectioners’ sugar, sifted
3 tablespoons heavy cream
2 tablespoons fresh lemon juice
Pinch fine sea salt
1. Preheat oven to 350°F with the rack in
the lower third position. Lightly coat a 9
x 5 x 3-inch loaf pan with softened butter
or nonstick cooking spray; reserve.
2.
Put the flour, baking powder, and salt
together in a small mixing bowl. Using the
beaters, mix on Speed 1 until well sifted,
about 30 seconds. Reserve.
3.
Put the butter into a large mixing bowl
and using Speeds 2 to 4, cream butter
until softened. Add the sugar and lemon
zest. Mix well, using Speeds 2 to 5, until
very light in color, about 2 minutes.
4.
Combine the oil, lemon juice, eggs, egg
yolk, and sour cream in a small bowl. Mix
on Speed 1 to combine.
5.
While mixing on Speeds 1 to 2, gradually
add one-third of the dry ingredients to the
butter/sugar mixture, and then half of the
wet ingredients, alternating until all of the
ingredients are added and well mixed.
6.
Transfer the batter to the prepared cake
pan and then place in the preheated
oven. Bake until cake is set in the middle
and a cake tester comes out clean, about
1 hour and 10 minutes.
7.
Allow cake to cool in pan on a cooling
rack for about 10 to 15 minutes, and then
remove from the pan and immediately
wrap in plastic wrap to cool a bit further.
8.
While the cake is cooling, prepare
the lemon icing. Put all of the icing
ingredients into a small to medium mixing
bowl and using the whisk, mix on Speeds
1 to 3 until completely smooth, adding
more sifted sugar or cream to achieve
desired consistency.
9.
Once the cake is mostly cool, place on
the cooling rack atop a baking pan (or foil
or parchment, something that will catch
excess icing). Drizzle or spread over cake
as desired. Allow icing to set and cake
to cool completely before cutting and
serving.
Nutritional information per serving:
Calories 275 (44% from fat) • carb. 36g • pro. 3g
fat 14g • sat. fat 8g • chol. 71mg • sod. 164mg
calc. 13mg • fiber 2g
Quick Berry Jam
For those who have a fear of pressure
canning, or those who are trying to get
through a small batch of seasonal berries,
this is the recipe for you. It takes less than
40 minutes from start to finish, and can be
spread warm on some toast, or refrigerated
Makes 1 cup
1½ pounds mixed berries
²
⁄³ to ¾ cup granulated sugar, depending
for up to 3 weeks.
on ripeness and sweetness of fruit
and preference
13
hm8_20ce074058_eng_ib_final.indd 13hm8_20ce074058_eng_ib_final.indd 13 6/16/20 11:34 AM6/16/20 11:34 AM
Page 14

1 teaspoon fresh lemon juice
Pinch kosher salt
1. Prepare berries. If using strawberries, hull
and cut into pieces no larger than 1 inch
in size. Put all ingredients into a small to
medium saucepan and set over medium
heat. Stirring occasionally, bring the
mixture to a boil. Reduce to a simmer
and cook until mixture is thickened.
The jam should fully coat the back of a
spoon without dripping off to determine if
it is thick enough. Depending on the pot
being used, and the stove, this could take
anywhere from 30 to 40 minutes.
2.
Remove from heat and allow to cool for
about 10 minutes. Using the hand blender
attachment, blend on Speed 1 until
smooth. Transfer to a jar for storage and
cool to room temperature. Cover and
refrigerate until ready to use. Refrigerator
jam is good up to 3 weeks (it must stay
chilled).
Nutritional information per tablespoon:
Calories 59 (3% from fat) • carb. 14g • pro. 1g
fat 0g • sat. fat 0g • chol. 0mg • sod. 11mg
calc. 12mg • fiber 2g
Maple Butter
Serve on top of waffles and pancakes, or
even on top of toast, this delicious butter
should be served at room temperature.
Makes ½ cup
½ cup unsalted butter, room
2½ tablespoons pure maple syrup
temperature and cut into 4 pieces
Pinch fine sea salt
Put the butter in a medium mixing bowl.
Using the beaters, mix on Speeds 2 to
3 until creamy, about 30 to 40 seconds.
Add remaining ingredients and mix until
completely combined, another 40 to 50
seconds.
Nutritional information per teaspoon:
Calories 39 (86% from fat) • carb. 1g • pro. 0g
fat 4g • sat. fat 2g • chol. 10mg • sod. 6mg
calc. 2mg • fiber 0g
Simple Fruit Smoothie
This recipe works great with any type
Makes 1 serving (about 12 ounces)
1 cup mixed fruit, fresh or frozen
½ cup juice (use your favorite)
1. Put ingredients into a tall cup.
2.
Using the hand blender attachment, start
blending on Speed 1, gradually increasing
to Speed 3 until smooth, about 30 to 45
seconds.
3.
Serve immediately.
Nutritional information per serving:
Calories 144 (4% from fat) • carb. 48g • pro. 3g
fat 1g • sat. fat 0g • chol. 0mg • sod. 3mg
of fruit or juice.
calc. 27mg • fiber 5g
14
Berries and Greens Smoothie
The fat from both the avocado and coconut
oil will be sure to keep you from reaching for
Makes 2 servings (about 16 ounces)
1 cup mixed frozen berries
½ avocado, cut into 4 pieces
½ cup baby spinach or kale
1 tablespoon coconut oil
1 cup water
those mid-morning snacks.
1. Put all ingredients, in the order listed, into
a tall cup.
2.
Using the hand blender attachment, start
blending on Speed 1, gradually increasing
to Speed 3 until smooth, about 1 minute.
3.
Serve immediately.
Nutritional information per serving (8 ounces):
Calories 149 (4% from fat) • carb. 11g • pro. 1g
fat 12g • sat. fat 7g • chol. 0mg • sod. 5mg
calc. 16mg • fiber 5g
hm8_20ce074058_eng_ib_final.indd 14hm8_20ce074058_eng_ib_final.indd 14 6/16/20 11:34 AM6/16/20 11:34 AM
Page 15

Mango-Lime Smoothie
For a creamier smoothie, increase the
amount of yogurt to ½ cup.
Makes 1 serving (about 8 ounces)
1 cup mango, fresh or frozen, cut
into 1-inch chunks
¹⁄³ cup plain yogurt
1½ teaspoons fresh lime juice
½ teaspoon grated lime zest
¼ cup cold water (or coconut water)
1. Put all ingredients, in the order listed,
into a tall cup.
2.
Using the hand blender attachment, start
blending on Speed 1, gradually increasing
to Speed 3 until smooth, about 30 to 45
seconds.
3.
Serve immediately.
Nutritional information per serving
(when made with full-fat yogurt and water):
Calories 195 (15% from fat) • carb. 39g
pro. 5g • fat 3g • sat. fat 2g • chol. 10mg
sod. 53mg • calc. 156mg • fiber 3g
Sweet Protein Smoothie
Nut butter, banana and sweet dates — what’s
not to like? Plus, the combo is packed with
protein that is sure to fill you up.
Makes 1 serving (about 12 ounces)
1 banana, cut into 1-inch pieces
1 to 2 fresh dates, pitted
1 tablespoon nut butter
1 scoop (¼ cup) protein powder
1 teaspoon unsweetened cocoa
powder
¾ cup unsweetened almond milk
1. Put all ingredients, in the order listed,
into a tall cup.
2.
Using the hand blender attachment, start
blending on Speed 1, gradually increasing
to Speed 3 until smooth, about 30 to 45
seconds.
3.
Serve immediately.
Nutritional information per serving:
Calories 240 (52% from fat) • carb. 27g
pro. 23g • fat 6g • sat. fat 1g • chol. 0mg
sod. 232mg • calc. 95mg • fiber 5g
Matcha Latte
No need to bother your barista when
you can prepare this coffee shop favorite
Makes 2 servings
2 cups milk (any type, or alternative
milk)
2 teaspoons matcha powder
1 teaspoon honey or agave, optional
1. Put the milk into a small saucepan. Set
over medium heat and bring to a simmer.
2.
Once simmering, remove from heat and
add the matcha and sweetener, if using.
Using the hand blender attachment, blend
on Speed 1, keeping the blade end of the
blending blade just under the surface of
the mixture to produce the best froth.
at home.
3.
Divide between 2 glasses and serve
immediately.
Nutritional information per serving
Calories 90 (0% from fat) • carb. 13g • pro. 0g
fat 0g • sat. fat 0g • chol. 5mg • sod. 135mg
(using nonfat milk):
calc. 300mg • fiber 0g
Cold Brew Latte
Lattes need not be hot. Cool down
with this popular cold brew version.
If cold brew is not available, strong black
coffee, chilled, can be used.
Makes 1 serving
½ cup milk
1 cup cold brew
Ice, optional
1. Put ingredients into a tall cup.
2.
Using the hand blender attachment,
blend on Speed 1, keeping the blade of
the blending shaft just under the surface
of the mixture to produce the best froth.
3.
Add ice, if desired, and enjoy
immediately.
Nutritional information per serving:
Calories 59 (35% from fat) • carb. 5g
pro. 4g • fat 2g • sat. fat 1g • chol. 9mg
sod. 58mg • calc. 141mg • fiber 0g
15
hm8_20ce074058_eng_ib_final.indd 15hm8_20ce074058_eng_ib_final.indd 15 6/16/20 11:34 AM6/16/20 11:34 AM
Page 16

Deviled Eggs
This timeless hors d’oeuvre is welcome at any
Makes 24 servings
12 large, hard-boiled eggs
½ cup mayonnaise
1½ teaspoons Dijon-style mustard
1½ teaspoons fresh lemon juice
1 teaspoon Worcestershire sauce
1 tablespoon capers, drained
½ teaspoon kosher salt
¼ teaspoon freshly ground black
Paprika for garnish
1. Peel the cooked eggs and carefully slice
2.
Calories 54 (70% from fat) • carb. 1g • pro. 3g
fat 4g • sat. fat 1g • chol. 108mg • sod. 144mg
party or brunch table.
pepper
in half. Place the egg white halves on a
clean work surface. Remove yolks and
put them into a medium mixing bowl.
Using the hand blender attachment,
blend on Speed 1 until yolks are broken
up into small pieces, about 45 seconds.
Add the remaining ingredients and blend,
on Speed 1, until completely smooth.
Taste and adjust seasoning as desired.
Using either a small spoon, or a piping
bag fitted with a star tip, scoop or pipe
the yolk mixture into the center of each
white. Sprinkle with paprika before serving.
Nutritional information per serving:
calc. 15mg • fiber 0g
Bacon and Swiss Quiche
An American take on the classic French
Quiche Lorraine, we substitute bacon for the
Makes 12 servings
½ recipe Pâte Brisée (page 38)
8 ounces thick-cut bacon, diced
1 small shallot, finely chopped
1 cup half & half
4 large eggs
Pinch kosher salt
Pinch freshly ground black pepper
1 cup finely shredded Gruyère cheese
1 tablespoon thinly sliced chives
1. Preheat oven to 350°F with one rack in
the lower position and one rack in the
middle position.
2.
Roll out the rested pâte brisée dough and
fit into a 9-inch tart pan with removable
bottom. Prick the bottom and sides of the
dough with the tines of a fork, being sure
to not pierce all the way through. Chill
until firm, 15 minutes in the freezer, or 30
minutes in the refrigerator. Once chilled,
line the dough with foil, and then weigh it
down with pie weights (dried beans or rice
work just as well). Place the tart pan in the
lower position of the preheated oven and
bake for 25 minutes, or until the dough
no longer looks wet. Carefully remove
the foil with weights and then move the
shell to the middle rack for an additional 5
minutes, or until lightly browned.
traditional lardons.
(or another similar Swiss cheese)
3.
Remove and allow to cool completely
before filling.
4.
In a medium to large skillet, cook the
diced bacon until browned and crispy.
Remove and transfer to a paper towel-lined
plate to drain excess oil. Remove all but
about 1 tablespoon of the bacon grease
and then return the skillet to the stove.
Set over medium-low heat and then add
the shallot. Sauté until softened. Remove
and allow to cool slightly.
5.
Put the half & half, eggs, salt, and pepper
into a medium mixing bowl. Using the
beaters, mix on Speeds 2 to 3 until
completely combined, about 1 minute;
you want to be sure there are no flecks
of egg yolk.
6.
Place the cooled tart pan onto a rimmed
baking sheet (this will make it easier to
transfer to the oven). Sprinkle the bacon
and shallot evenly on the bottom of the
blind-baked tart shell. Pour the half & half/
egg batter over the bacon and shallot,
and then top with the shredded cheese.
Sprinkle the chives on top of the cheese.
7.
Carefully place the filled shell on the pan
onto the middle rack of the preheated
oven. Bake until it is just set around the
edges, but still a little jiggly in the center,
about 20 to 22 minutes.
8.
Remove and allow to cool slightly before
slicing and serving.
Nutritional information per serving:
Calories 283 (72% from fat) • carb. 8g • pro. 11g
fat 23g • sat. fat 12g • chol. 120mg • sod. 571mg
calc. 76mg • fiber 0g
16
hm8_20ce074058_eng_ib_final.indd 16hm8_20ce074058_eng_ib_final.indd 16 6/16/20 11:34 AM6/16/20 11:34 AM
Page 17

Ricotta-Thyme Tart
A very simple tart with only a handful
(or two) of ingredients. We keep it simple with
just ricotta, herbs and spices, but you can
top it with other items, such as microgreens,
grilled or sautéed vegetables, etc. If you need
a quick appetizer, skip the pastry dough and
just make the filling to serve as a dip
for veggies or as a spread on toasted
Makes 12 servings
½ recipe Pâte Brisée (page 38)
15 to 16 ounces ricotta, strained
¾ ounce grated Pecorino Romano
1 teaspoon olive oil
1 teaspoon fresh thyme leaves
½ teaspoon fresh lemon juice
Pinch kosher salt
Pinch freshly ground black pepper
1. Preheat oven to 350°F with one rack in
the lower position and one rack in the
middle position.
2.
Roll out the rested pâte brisée dough and
fit it into a 9-inch tart pan with removable
bottom. Prick the bottom and sides of the
dough with the tines of a fork, being sure
to not pierce all the way through. Chill
until firm, 15 minutes in the freezer, or 30
minutes in the refrigerator. Once chilled,
line the dough with foil, and then weigh
it down with pie weights (dried beans or
rice work just as well). Place the tart pan
in the lower position of the preheated
oven and bake for 25 minutes, or until
baguette slices.
the dough no longer looks wet. Carefully
remove the foil with weights and then
move the shell to the middle rack for an
additional 10 to 15 minutes, or until nicely
browned.
3.
Remove and allow to cool completely
before filling.
4.
Put the filling ingredients into a medium
mixing bowl. Using the beaters, mix on
Speeds 2 to 3 until completely combined,
about 40 seconds.
5.
Once the tart shell is completely cool,
fill with the ricotta filling. Serve at room
temperature.
Nutritional information per serving:
Calories 173 (67% from fat) • carb. 8g • pro. 6g
fat 13g • sat. fat 8g • chol. 36mg • sod. 170mg
calc. 112mg • fiber 0g
Spinach Artichoke Dip
A bit of a twist on the standard spinach
artichoke dip, for the more grown-up palate.
The combination of Gruyère and Parmesan
gives the dip a pleasant nuttiness. No special
pan required – we found that using a pie
plate was the best and quickest way to warm
Makes 2 cups
Olive oil or nonstick cooking spray
12 ounces cream cheese, cut into
1-inch pieces, room temperature
2 ounces Gruyère cheese, finely grated
1 ounce Parmesan cheese,
finely grated
this dish.
1 garlic clove, finely chopped
½ small shallot, finely chopped
8 ounces frozen chopped spinach,
thawed and drained well
1 can (15 ounces) quartered
artichoke hearts, drained
2 tablespoons heavy cream
½ teaspoon crushed red pepper
1. Preheat oven to 350°F with the rack in
the middle position. Lightly coat a 9-inch
pie or cake pan with olive oil or nonstick
cooking spray; reserve.
2.
Put the cream cheese in a large mixing
bowl. Using the beaters, mix on Speed
3 until softened, about 30 seconds. Add
remaining ingredients and mix on Speed
1 to fully combine, about 20 seconds.
3.
Transfer mixture to the prepared pie/cake
pan and transfer to the oven. Bake 20
minutes, and then broil for an additional
6 to 8 minutes, or until top is nicely
browned.
4.
Serve immediately with pita chips, crusty
bread, and crisp vegetables.
Nutritional information per serving
Calories 115 (76% from fat) • carb. 3g • pro. 4g
fat 10g • sat. fat 6g • chol. 30mg • sod. 218mg
(2 tablespoons):
calc. 71mg • fiber 1g
17
hm8_20ce074058_eng_ib_final.indd 17hm8_20ce074058_eng_ib_final.indd 17 6/16/20 11:34 AM6/16/20 11:34 AM
Page 18

Buffalo Chicken Dip
For the big game or the next holiday
gathering, this dip is sure to please a hungry
crowd. The hand mixer makes quick work of
shredding cooked chicken. Use this trick for
weekly meal prep; shredded chicken can be
the foundation for countless meals.
Makes about 6 cups
Olive oil or nonstick cooking spray
1 whole roasted chicken, warm,
1 celery stalk, cut into small dice
16 ounces (2 standard packages)
1 teaspoon kosher salt
½ teaspoon freshly ground black
6 to 8 tablespoons hot sauce*
1 cup crumbled blue cheese
about 3½ pounds
cream cheese, each package cut
into 4 pieces, room temperature
pepper
1. Preheat oven to 375°F with the rack in the
middle position. Lightly coat the inside
of a 1½-quart baking dish with cooking
spray. Reserve.
2.
Remove all meat from the roasted
chicken (discard skin and bones) and put
into a large mixing bowl. Using the
beaters, mix on Speed 2 to shred the
chicken, about 30 seconds. Once
shredded, add the celery, cream cheese,
salt, pepper, and hot sauce. Continue to
mix on Speed 2 until ingredients are well
combined, about 1 minute.
3.
Transfer the dip to the prepared baking
dish and top with the crumbled blue
cheese. Bake for about 40 minutes, until
hot and bubbling.
4.
Serve with cut veggies, bread pieces,
or tortilla chips.
* We developed this recipe to be on the
milder side, so either adjust the hot sauce
accordingly or serve with some hot sauce on
the side, for those who like it extra spicy.
Nutritional information per serving (½ cup):
Calories 213 (75% from fat) • carb. 2g • pro. 12g
fat 18g • sat. fat 10g • chol. 69mg • sod. 704mg
calc. 64mg • fiber 0g
Pimento Cheese Spread
This recipe stays pretty close to the beloved
Southern dish. It can be spread on crackers
or toasted bread, or made as a twist on a
grilled cheese sandwich.
Makes about 2 cups
4 ounces cream cheese, cut into
1-inch pieces, room temperature
¼ cup mayonnaise
8 ounces sharp Cheddar, shredded
1 jar (7 ounces) pimentos, drained
½ teaspoon onion powder
¼ teaspoon kosher salt
Pinch freshly ground black pepper
2 dashes hot sauce
1. Put the cream cheese in a medium mixing
bowl. Using the beaters, mix on Speed 3
until softened, about 30 seconds.
18
Add remaining ingredients and mix on
Speed 2 to fully combine, about 20 seconds.
2.
Use immediately.
Nutritional information per serving
Calories 113 (83% from fat) • carb. 1g • pro. 4g
fat 10g • sat. fat 6g • chol. 25mg • sod. 174mg
(2 tablespoons):
calc. 101mg • fiber 0g
Guacamole
Our fresh guacamole is perfect for the
Sunday game or served alongside quesadillas
Makes about 2 cups
1 garlic clove, peeled
½ jalapeño, seeded and cut into
½ small onion, cut into 1-inch pieces
1 tablespoon fresh cilantro leaves
3 ripe avocados, halved, pitted,
1 tablespoon fresh lime juice
½ to 1 teaspoon kosher salt
1. Put all the ingredients, in the order listed,
into a medium mixing bowl or a large,
wide, measuring cup. Using the hand
blender, press the blade of the blending
shaft into the avocado pieces and blend
on Speed 1 until mixture begins to
soften, about 15 to 20 seconds. Continue
blending with a gentle up-and-down
motion until desired texture is reached,
about 20 to 30 seconds longer.
for a festive dinner.
1-inch pieces
flesh scooped from skin and
roughly chopped
hm8_20ce074058_eng_ib_final.indd 18hm8_20ce074058_eng_ib_final.indd 18 6/16/20 11:34 AM6/16/20 11:34 AM
Page 19

2.
Taste and adjust seasoning as desired.
Serve immediately.
Nutritional information per serving
Calories 88 (74% from fat) • carb. 5g • pro. 1g
fat 8g • sat. fat 1g • chol. 0mg • sod. 147mg
(2 tablespoons):
calc. 9mg • fiber 4g
Hummus
This hummus is heavy on the sesame flavor,
so if you prefer a milder hummus, star t
with 2 tablespoons of tahini and increase
Makes about 2 cups
1 can (15.5 ounces) chickpeas,
rinsed and drained
¹⁄³ cup tahini
½ cup cold water, plus more
as needed
2 tablespoons fresh lemon juice
2 garlic cloves, peeled
¾ teaspoon kosher salt
½ teaspoon ground cumin
Extra virgin olive oil, for finishing
Pinch za´atar (optional),
for finishing
1. Put all of the ingredients, in the order
listed, into a small mixing bowl, or a large,
wide, measuring cup. Using the hand
blender attachment, press the blade of
the blending shaft into chickpeas while
blending on Speed 1. As the mixture
starts to blend, increase to Speed 3 and
as desired.
blend until fully smooth, about 40 to
60 seconds. If a thinner consistency is
desired, add water as needed.
2.
Taste and adjust seasoning as desired.
To serve, drizzle with olive oil and sprinkle
with za’atar (if using).
Nutritional information per serving
Calories 56 (47% from fat) • carb. 6g • pro. 2g
fat 3g • sat. fat 0g • chol. 0mg • sod. 80mg
(2 tablespoons):
calc. 32mg • fiber 2g
Creamy Mashed Potatoes
This recipe is a bit of a blank canvas. We
keep it simple, but it can easily be changed
by adding mix-ins or toppings, such as
chopped chives or scallions, crispy bacon
Makes about 6 cups
2½ pounds Yukon Gold potatoes,
½ cup whole milk, room temperature
3 tablespoons unsalted butter, cut into
¾ teaspoon kosher salt
½ teaspoon freshly ground black
½ cup mascarpone cheese or crème
1. Put the potatoes into a medium to
bits, or grated Cheddar.
peeled and cut into 1-inch pieces
1-inch pieces, room temperature
pepper
fraiche, room temperature
large stockpot; add cold water to cover
potatoes by 2 inches. Set over mediumhigh heat to bring to a boil, and then
reduce to simmer until the potatoes are
very soft.
2.
Drain the potatoes and return to the
pot. Using the beaters, mix on Speeds
1 to 2 to mash to desired consistency,
about 30 seconds. Add the remaining
ingredients and mix on Speed 2 until fully
incorporated.
3.
Taste and adjust seasoning according to
preference.
Nutritional information per serving (½ cup):
Calories 117 (38% from fat) • carb. 16g • pro. 2g
fat 5g • sat. fat 3g • chol. 16mg • sod. 159mg
calc. 35mg • fiber 2g
Mashed Maple Sweet Potatoes
The per fect mix of fall flavors makes this dish
a must-have for the holiday table.
Makes about 6 cups
3 pounds sweet potatoes or yams,
2 teaspoons kosher salt, divided
4 tablespoons unsalted butter,
¼ cup orange juice
¼ cup maple syrup
½ teaspoon ground cinnamon
¹⁄
peeled and cut into 1-inch pieces
cut into 1-inch pieces, room
temperature
8 teaspoon freshly ground nutmeg
1. Put potatoes into a medium to large
stockpot and cover with water by 2
inches.
19
hm8_20ce074058_eng_ib_final.indd 19hm8_20ce074058_eng_ib_final.indd 19 6/16/20 11:34 AM6/16/20 11:34 AM
Page 20

2.
Add 1 teaspoon of the salt to the pot and
place over medium-high heat. Bring water
to a boil and allow potatoes to simmer
until very tender. Drain water well and put
potatoes back in stockpot.
3.
Using the hand blender attachment on
Speed 2, mash the potatoes directly in
the pot to desired consistency.
4.
Add the remaining ingredients and mix on
Speed 2 until completely incorporated.
5.
Taste and adjust seasoning as desired.
Serve immediately.
Nutritional information serving (½ cup):
Calories 192 (18% from fat) • carb. 38g • pro. 2g
fat 4g • sat. fat 2g • chol. 10mg • sod. 189mg
calc. 26mg • fiber 5g
Cauliflower Mash
A great alternative to traditional mashed
potatoes, plus this recipe is dair y free.
Makes about 4 cups
1½ pounds cauliflower, cut into florets,
½ pound Yukon Gold potatoes,
3 tablespoons extra virgin olive oil
1¼ teaspoons kosher salt
½ teaspoon freshly ground
about 6 cups
peeled and cut into 2-inch pieces
black pepper
1. Put the cauliflower and potatoes into
a medium to large stockpot. Add cold
water to cover cauliflower and potatoes
by 2 inches. Set over medium-high heat
to bring to a boil, and then reduce to
simmer until the vegetables are very soft,
about 25 minutes, depending on the
stovetop and cookware being used.
2.
Once tender, drain the water, return to
the pot and set over medium-low heat.
Continue to cook until all water has
evaporated. Using the hand blender
attachment, mix on Speeds 1 to 2 to
mash to desired consistency, about 30
seconds. Add the remaining ingredients
and blend on Speed 2 until fully
incorporated.
3.
Taste and adjust seasoning according to
preference.
Nutritional information per serving (½ cup):
Calories 170 (28% from fat) • carb. 28g • pro. 5g
fat 6g • sat. fat 1g • chol. 0mg • sod. 375mg
calc. 41mg • fiber 6g
Spinach and Feta Soufflé
Soufflés are quite impressive. They grow to
a lofty, light, and airy dish that is surprisingly
filling. Be sure to ser ve it right out of the oven
for maximum height, and praise!
Makes 8 servings
6 tablespoons unsalted butter,
½ cup Parmesan, grated, divided
5 large eggs
½ cup unbleached, all-purpose flour
1½ cups whole milk
3 ounces feta, broken into pieces
divided
or crumbled
¼ teaspoon plus one pinch sea salt
¼ teaspoon freshly ground black
pepper
¹⁄
8 teaspoon freshly ground nutmeg
¼ teaspoon grated lemon zest
4 cups well-packed, fresh spinach
¼ teaspoon cream of tartar
1. Preheat oven to 325°F.
2.
Generously butter a 2-quart soufflé dish
thoroughly with 1 tablespoon of butter.
Sprinkle ¼ cup of Parmesan in the dish
so that the bottom and sides are coated.
Shake out any excess. Wipe the rim of
the dish with a paper towel to ensure that
no butter or cheese is on it; reserve.
3.
Separate eggs, placing each in separate
large mixing bowls. Break up yolks with a
fork. Reserve both.
4.
Place remaining butter in a saucepan over
medium-low heat. Once butter is melted,
stir flour into pan for 2 to 3 minutes in
order to cook off any raw flour taste.
Using the beaters, mix the butter/flour
mixture directly in the pan on Speeds 2
to 3, while slowly adding the milk. Once
all the milk is added, continue mixing,
increasing to Speed 6 until a smooth and
homogenous consistency is achieved.
Remove from heat and beat in remaining
Parmesan and feta, ¼ teaspoon salt,
pepper, nutmeg and lemon zest.
5.
Spoon a small amount of the milk mixture
into the yolks while simultaneously mixing
on Speed 1. Continue mixing in the
remaining mixture, one-third at a time.
Stir in the spinach; reserve.
20
hm8_20ce074058_eng_ib_final.indd 20hm8_20ce074058_eng_ib_final.indd 20 6/16/20 11:34 AM6/16/20 11:34 AM
Page 21

6.
Replace the beaters in the hand mixer
with the whisk. Starting on Speed 1,
begin to whip the egg whites. After 1
to 2 minutes, once the whites begin to
show some bubbles around the edges,
gradually raise speed to 3. Once the
whites begin to foam, add the remaining
salt and the cream of tartar. Gradually
increase to Speed 7, until medium-stiff
peaks are achieved.
7.
Mix ½ cup of the egg whites into the
spinach mixture until evenly combined.
Continue by carefully folding in egg
whites with a large rubber spatula. Don’t
over-fold.
8.
Pour mixture into prepared dish and
gently smooth the top to ensure an even
rise. Bake in the middle of preheated
oven until golden and just set, about 45
to 50 minutes.
9.
Serve immediately.
Nutritional information per serving:
Calories 208 (64% from fat) • carb. 9g • pro. 9g
fat 15g • sat. fat 8g • chol. 167mg • sod. 416mg
calc. 175mg • fiber 1g
Sweet Potato Biscuits
Sweet potato lends moisture for supremely
We love these warm with butter and a simple
Makes 12 biscuits
2 cups unbleached, all-purpose flour
2½ teaspoons baking powder
½ teaspoon baking soda
light and tender biscuits.
drizzle of honey or maple syrup.
2 teaspoons granulated sugar
1 teaspoon kosher salt
6 tablespoons cold, unsalted butter,
cut into ½-inch cubes
²
⁄³ cup cooked mashed or puréed
sweet potato (about 1 small
sweet potato)
½ cup buttermilk, cold
Nonstick cooking spray
Heavy cream, for brushing biscuits
1. Preheat oven to 400°F with the rack in
the middle position.
2.
Sift the flour, baking powder, baking soda,
sugar, and salt into a large mixing bowl.
Add the cold butter. Using the beaters,
begin to mix on Speed 1, pressing the
beaters into the cubes of butter to cut
them into the flour. Gradually increase to
Speed 3. Mix until only pea-sized pieces
of butter remain.
3.
Add the sweet potato and buttermilk.
Continue to mix until just combined, 15 to
30 seconds. The dough will be shaggy.
4.
Turn out the dough onto a lightly floured
surface. Roll out the dough, or press
with floured hands, into a rectangle.
Fold the dough in half and roll/press out
again, repeating this process 3 or 4 times
(folding creates layers in the dough). At
last, roll the dough into a rectangle of
¾-inch thickness. Use a 2½-inch round
cutter to cut out 12 biscuits, pressing
together scraps if necessary.
5.
Arrange the biscuits tightly in 3 rows
of 4 on a parchment-lined sheet pan.
Brush the tops with heavy cream. Bake
21
biscuits until puffed and golden, 20 to 22
minutes.
6.
Allow biscuits to rest for 5 minutes. Pull
apart and serve warm.
Nutritional information per biscuit:
Calories 145 (36% from fat) • carb. 19g • pro. 3g
fat 6g • sat. fat 4g • chol. 15mg • sod. 197mg
calc. 470mg • fiber 1g
Popovers
Light and airy, these are best served hot
Makes 6 popovers
Softened butter for greasing the pan
3 tablespoons unsalted butter
1 cup whole milk
3 large eggs, room temperature
1 cup unbleached, all-purpose flour,
½ teaspoon kosher salt
1. Preheat oven to 450°F with the rack in
the lower third position. Heavily butter
a popover pan with softened butter.
Reserve.
2.
Put the 3 tablespoons of butter and milk
in a small saucepan set over mediumlow heat. Warm until butter has melted;
remove and cool to room temperature.
3.
Put the eggs into a large mixing bowl.
Add the cooled butter/milk mixture. Using
the beaters, begin to mix on Speed 1,
gradually increasing to Speed 3, until well
combined. Add the flour and salt and mix,
out of the oven.
sifted
hm8_20ce074058_eng_ib_final.indd 21hm8_20ce074058_eng_ib_final.indd 21 6/16/20 11:34 AM6/16/20 11:34 AM
Page 22

gradually increasing to Speed 5. Mix for
about a minute longer, or until the batter
is completely smooth, with no visible
lumps.
4.
Evenly divide the batter among the 6
cups of the buttered popover pan (it will
fill each to about ½ to ²⁄³ full). Put pan
directly on the oven rack and bake for
35 minutes, or until very deeply browned
and puffed. Do not open oven door while
popovers are baking or they may deflate.
5.
Remove from oven and carefully unmold
from pan. Serve immediately.
NOTE: Popovers are easily adaptable. You can
make them cheesy (stir ¼ cup finely shredded
cheese into the batter), herby (1½ teaspoons
of herbes de Provence or 2 tablespoons of
fresh chives), or sweet (once out of oven,
brush with melted butter and sprinkle with
cinnamon sugar).
Nutritional information per popover:
Calories 183 (46% from fat) • carb. 17g • pro. 7g
fat 9g • sat. fat 5g • chol. 128mg • sod. 146mg
calc. 60mg • fiber 1g
Cheese Calzones
We use our own pizza dough recipe,
but if you want to save time, store-bought
Makes 6 individual calzones
15–16 ounces whole-milk ricotta,
2 garlic cloves, finely chopped
2 ounces (½ cup) grated Parmesan
dough works just as well.
drained well
¼ teaspoon kosher salt
Pinch freshly ground black pepper
Pinch crushed red pepper flakes
3 tablespoons fresh basil, thinly
sliced or torn into small pieces
2 ounces shredded mozzarella
1 recipe (1½ pounds) Pizza/Focaccia
Dough (page 37)
Unbleached, all-purpose flour
(for dusting)
Cornmeal (for dusting)
Water, for sealing the dough
Olive oil, for brushing calzones
1. Preheat oven to 500°F. If you have a
pizza stone, place the stone on the oven
rack and preheat. Once the oven comes
to temperature, let stone heat for an
additional 30 minutes. This will add an
extra crispiness to your calzones.
2.
In a large bowl, combine the ricotta,
garlic, Parmesan, salt, pepper, and
crushed red pepper. Using the beaters,
mix on Speeds 2 to 3 to fully combine.
3.
Lightly dust work surface with flour.
Divide the dough into six equal pieces.
Lightly cover with plastic wrap until using.
4.
Roll one piece into a circle about 6 inches
in diameter. Spread a generous ½ cup of
filling onto the bottom half of the dough
circle, leaving a 1-inch border. Top with
a sprinkle of the basil and 2 tablespoons
of the mozzarella. Using your fingers,
or a small pastry brush, wet the outer
edge of the dough with water. Fold top
half over the filling and press the edges
of the dough together. Crimp the edges
all around to fully seal. Using a sharp
knife, cut 2 small slits into the top of the
calzone to allow steam to escape while
baking. Reserve on a cornmeal-dusted
baking sheet and repeat with remaining
rounds.
5.
Using a pizza peel or a large turner,
transfer prepared calzones to the
preheated pizza stone (if you are not
using a pizza stone, just keep the
calzones on the cornmeal-dusted baking
sheet). Bake in preheated oven for about
18 to 20 minutes, or until fully browned.
Let cool slightly before serving.
Nutritional information per calzone:
Calories 473 (36% from fat) • carb. 56g • pro. 21g
fat 10g • sat. fat 10g • chol. 44mg • sod. 1091mg
calc. 278mg • fiber 2g
Basic Tomato Sauce
A simple and delicious sauce.
Makes about 7 cups
2 tablespoons extra virgin olive oil
2 large garlic cloves, peeled
2 cans (28 ounces each) whole,
10–15 fresh basil leaves
1 teaspoon kosher salt
peeled tomatoes
1. Put olive oil into a medium saucepan over
medium heat. When oil is hot, add garlic
and cook until lightly golden and fragrant,
2 to 3 minutes. Add tomatoes, cover and
reduce heat to simmer, stirring frequently,
22
hm8_20ce074058_eng_ib_final.indd 22hm8_20ce074058_eng_ib_final.indd 22 6/16/20 11:34 AM6/16/20 11:34 AM
Page 23

until sauce is reduced slightly and
thickened, about 20 to 25 minutes.
2.
Remove sauce from heat. Discard garlic
cloves if desired. Using the hand blender
attachment, blend on Speed 1, using a
gentle up-and-down motion. Increase to
Speed 2 until smooth, about 1½ minutes,
or until desired consistency is achieved.
3.
Tear up basil and add to sauce. Add salt,
taste and adjust seasoning as needed.
Nutritional information per serving (½ cup sauce):
Calories 58 (43% from fat) • carb. 7g • pro. 1g
fat 3g • sat. fat 0g • chol. 0mg • sod. 557mg
calc. 28 mg • fiber 1g
Bright Greens Soup
The potatoes add a false creaminess to
this yummy, blended soup that is a perfect
Makes about 5 cups
3 tablespoons olive oil, divided
1 medium onion, chopped
1 clove garlic, chopped
¾ teaspoon kosher salt, divided
Pinch freshly ground black pepper
3 cups chicken or vegetable broth,
8 ounces Yukon Gold potatoes,
10 ounces baby spinach
springtime lunch.
low sodium (be sure it is light in
color. Some vegetable broths can
be dark brown, and this will make
the finished soup dark)
peeled and cut into 1-inch pieces
2 ounces watercress (optional. If you
cannot find watercress, or wish
not to use it, you can substitute
additional spinach in its place)
Pinch ground nutmeg
2 tablespoons fresh lemon juice
1. Put the oil into a medium stockpot or
large saucepan set over medium-low
heat. Once hot, add the onion and garlic
with a pinch of the salt and pepper.
Cook until softened and fragrant, about
4 minutes.
2.
Add the broth and the potatoes.
Increase heat to high to bring to a boil.
Once boiling, reduce to a simmer and
cook, partially covered, until potatoes
are soft, about 12 to 15 minutes.
3.
Remove the pot from the heat and stir
in the spinach and watercress. Stir until
wilted and then add the nutmeg and
lemon juice.
4.
Using the hand blender attachment,
blend on Speed 1, gradually increasing
to Speed 3, until smooth. If using a larger
saucepan, tilt the pan to one side, away
from you, to ensure that the protective
guard of the blade is fully submerged to
prevent splatter.
5.
Taste and adjust seasoning as desired.
Nutritional information per serving (1 cup):
Calories 135 (54% from fat) • carb. 12g • pro. 4g
fat 9g • sat. fat 1g • chol. 0mg • sod. 760mg
calc. 79mg • fiber 3g
23
Winter White Bean Soup
A rich and creamy soup, serve with a nice,
Makes about 6 cups
4 slices bacon, finely chopped
1½ teaspoons olive oil, divided
1 garlic clove, chopped
1 medium onion, chopped
1 celery stalk, chopped
½ teaspoon kosher salt, divided
1 tablespoon dry white wine,
2 cans (15.5 ounces each) cannellini
1 rosemary sprig
1 bay leaf
Pinch freshly ground black pepper
4 cups chicken or vegetable broth,
Grated Parmesan for garnish
1. Put the bacon into a medium stockpot
or large saucepan set over medium heat.
Cook until crispy. Remove and reserve.
2.
When bacon is done cooking and has
been reserved, reduce the heat to
medium low. Add the olive oil. Once
hot, add the chopped vegetables with a
pinch of the salt to the pot. Sauté until
softened, about 4 to 6 minutes. Add the
crusty loaf of bread.
or vermouth
beans, drained, or 1 pound dried,
soaked overnight*
low sodium (be sure it is light in
color. Some vegetable broths can
be dark brown, and this will make
the finished soup dark)
hm8_20ce074058_eng_ib_final.indd 23hm8_20ce074058_eng_ib_final.indd 23 6/16/20 11:34 AM6/16/20 11:34 AM
Page 24

wine/vermouth, stirring to deglaze the
pan (picking up the brown bits from the
bottom of the pan and working them
into the mixture); let cook until fully
evaporated. Add the beans, rosemary,
bay leaf, remaining salt and pepper and
stir to mix. Heat until beans are warmed
through, about 4 to 5 minutes. Add the
broth and increase the heat to bring to
a boil. Once boiling, reduce heat and
simmer, partially covered, for about 60 to
75 minutes. Remove the rosemary sprig
and bay leaf.
3.
Using the hand blender attachment,
blend on Speed 1, gradually increasing
to Speed 3, until smooth. If using a larger
saucepan, tilt the pan to one side, away
from you, to ensure that the protective
guard of the blade is fully submerged to
prevent splatter.
4.
Taste and adjust seasoning as desired.
Garnish with a sprinkling of the cooked
bacon and grated Parmesan.
* When using soaked, dried beans, you may
need to add more broth and a bit more salt
as well.
Nutritional information per serving (1 cup):
Calories 245 (9% from fat) • carb. 36g • pro. 18g
fat 2g • sat. fat 0g • chol. 0mg • sod. 500mg
calc. 119mg • fiber 13g
Lemon Thyme Shortbread
While thyme may seem like an unlikely
ingredient for a sweet cookie, you will quickly
learn why these are so popular.
Makes about 3 dozen cookies
Cookie Dough:
1¾ cups unbleached, all-purpose flour
½ teaspoon kosher salt
16 tablespoons (2 sticks; ½ pound)
European style, unsalted butter,
cut into 8 pieces, room temperature
¹⁄³ cup granulated sugar
¹⁄³ cup confectioners’ sugar, sifted
2 large egg yolks, room temperature
1 to 2 tablespoons fresh thyme leaves
2 tablespoons grated lemon zest
Lemon Icing:
½ cup confectioners’ sugar, sifted
2 tablespoons heavy cream
2 teaspoons fresh lemon juice
Pinch fine sea salt
1. Put the flour and salt into a medium
mixing bowl. Using the beaters, mix
on Speed 1 to fully combine, about 30
seconds. Reserve.
2.
Put the butter into a large mixing bowl.
Mix on Speeds 2 to 3 until creamy, then
add the sugars. Mix on Speeds 2 to 3
until light, then add the egg yolks and mix
until combined. Add the dry ingredients
and mix on Speed 2 until evenly mixed.
Add the thyme and lemon zest and gently
mix into dough.
24
3.
Divide dough into two discs. Wrap in
wax paper/parchment, then wrap well in
plastic wrap, and refrigerate overnight.
4.
Take dough out of fridge to soften slightly.
Preheat oven to 350°F with two racks in
the lower and upper middle thirds of the
oven. Line two rimmed baking sheets
with parchment paper.
5.
Roll dough out to ¼-inch thickness and
use a 1½-inch round cutter to form small
discs. Put onto baking sheets and chill for
about 10 minutes.
6.
Bake chilled cookies for about 12
minutes, until just browned around the
edges, rotating pans if necessary. Cool
cookies completely.
7.
While cookies are cooling, prepare the
icing. Put all of the ingredients into a
medium mixing bowl and mix on Speed 1
until very smooth. If the icing appears to
be too thick, add more cream, 1 teaspoon
at a time. If it appears to be too thin, add
more confectioners’ sugar, 1 teaspoon at
a time. Spread on top of cooled cookies
as desired.
Nutritional information per cookie
Calories 89 (56% from fat) • carb. 9g • pro. 1g
fat 5g • sat. fat 3g • chol. 25mg • sod. 32mg
(with ½ teaspoon icing):
calc. 2mg • fiber 0g
hm8_20ce074058_eng_ib_final.indd 24hm8_20ce074058_eng_ib_final.indd 24 6/16/20 11:34 AM6/16/20 11:34 AM
Page 25

Strawberry Sandwich Cookies
The great part about these cookies is that you
can enjoy the taste of summer fruit any time
of year, thanks to the intense flavor in freeze-
dried strawberries. Adjust the amount in the
filling if a richer strawberry flavor is desired.
Makes about 2 dozen sandwich cookies
Cookie Dough:
1¾ cups unbleached, all-purpose flour
½ teaspoon kosher salt
16 tablespoons (2 sticks; ½ pound)
European style, unsalted butter,
cut into 8 pieces, room temperature
¹⁄³ cup granulated sugar
¼ cup confectioners’ sugar, sifted
½ teaspoon pure vanilla extract
1 cup freeze-dried strawberries,
finely ground and sifted*
2 large egg yolks, room temperature
Strawberry Filling:
4 tablespoons unsalted butter,
room temperature
2 ounces cream cheese,
room temperature
2 cups confectioners’ sugar, sifted
Pinch kosher salt
2 tablespoons whole milk, room
temperature
¼ teaspoon pure vanilla extract
½ cup freeze-dried strawberries,
finely ground and sifted*
1. Prepare the cookie dough. Put the flour
and salt into a medium mixing bowl.
Using the beaters, mix on Speed 1 to fully
combine, about 30 seconds. Reserve.
2.
Put the butter into a large mixing bowl.
Mix on Speeds 2 to 3 until creamy, then
add the sugars and vanilla extract. Mix
on Speeds 2 to 3 until light, then add the
egg yolks and mix until combined. Add
the dry ingredients and mix on Speed
2 until evenly mixed. Add the ground
strawberries and mix until fully combined.
3.
Divide dough into two discs. Wrap in
wax paper/parchment, then wrap well in
plastic wrap. Refrigerate overnight.
4.
Take dough out of fridge to soften slightly.
Preheat oven to 350°F with two racks in
the lower and upper thirds of the oven.
Line two rimmed baking sheets with
parchment paper.
5.
Roll dough out to ¼-inch thickness and
use a 1½-inch round cutter to form small
discs. Put onto baking sheets and chill for
about 10 minutes.
6.
Bake chilled cookies for about 12
minutes, until just set, rotating pans if
necessary – you want to avoid browning
of any kind. Cool cookies completely.
7.
While cookies are cooling, prepare the
filling. Put the butter and cream cheese
into a large mixing bowl. Again, using the
beaters, mix on Speeds 2 to 3 to soften
and fully combine, about 1 minute. Add
the sugar, salt, milk, and vanilla extract
and mix on Speeds 1 to 3 until light and
fluffy. Add the ground strawberries and
mix on Speed 1 until fully incorporated.
8.
Once cookies are fully cooled, scoop
filling onto the bottom of one cookie,
about 1 tablespoon, and then top with
another cookie to make a sandwich.
Repeat with remaining cookies.
* A spice or coffee grinder is the best way to
achieve the finest grind.
Nutritional information per cookie sandwich:
Calories 201 (47% from fat) • carb. 25g • pro. 1g
fat 10g • sat. fat 7g • chol. 43mg • sod. 57mg
calc. 8mg • fiber 1g
Buckwheat Chocolate
Chunk Cookies
The nuttiness of the buckwheat is a perfect
match for chunks of bittersweet chocolate.
Makes about 4 dozen cookies
1½ cups unbleached, all-purpose flour
¾ cup buckwheat flour (or may
1 teaspoon baking soda
1 teaspoon kosher salt
½ teaspoon espresso powder
16 tablespoons (2 sticks) unsalted
1 cup packed light brown sugar
½ cup granulated sugar
2 large eggs, room temperature
1½ teaspoons pure vanilla extract
2 cups chopped bittersweet chocolate
Flaked sea salt, for sprinkling
substitute whole-wheat flour)
butter, cut into 1-inch pieces,
room temperature
25
hm8_20ce074058_eng_ib_final.indd 25hm8_20ce074058_eng_ib_final.indd 25 6/16/20 11:34 AM6/16/20 11:34 AM
Page 26

1. Put the flours, baking soda, salt, and
espresso powder into a medium mixing
bowl. Using the beaters, mix on Speed
1 to fully combine, at least 30 seconds.
Reserve.
2.
Put the butter into a large mixing bowl.
Mix, starting at Speed 1 and increasing
to Speed 3, until light and creamy. Add
the sugars and mix on Speeds 2 to 4
until very light, scraping down the sides
of the bowl as necessary, where it seems
that much of the sugar has dissolved
into the butter, about 2 minutes. Add the
eggs, one at a time, mixing on Speed 2,
and then the vanilla extract. Add the dry
ingredients and mix on Speed 2 until just
combined, and then add the chopped
chocolate and mix on Speed 2 until
evenly incorporated.
3.
Scoop the dough into even, golf ballsized rounds and place on a parchmentlined tray or baking sheet. Wrap well and
allow to chill for a minimum of 1 hour, or
up to overnight.
4.
Preheat oven to 350°F with racks in the
lower and upper thirds of the oven. Line
two baking sheets with parchment paper.
5.
Once the oven has preheated, place the
chilled dough onto the baking sheets and
bake until just browned and set at the
edges, about 15 minutes. Remove and
immediately sprinkle baked cookies with
a pinch of flaked sea salt. Allow pans to
cool prior to baking remaining dough.
Nutritional information per cookie:
Calories 137 (48% from fat) • carb. 17g • pro. 2g
fat 8g • sat. fat 4g • chol. 18mg • sod. 78mg
calc. 3mg • fiber 1g
Crunchy Peanut Butter
Chip Cookies
Using a mixture of creamy peanut butter
and shelled, roasted peanuts makes each
bite of these tender cookies packed full of
Makes about 5 dozen cookies
2 cups unbleached, all-purpose flour
¾ teaspoon kosher salt
½ teaspoon baking powder
¼ teaspoon baking soda
16 tablespoons (2 sticks) unsalted
1½ cups creamy peanut butter,
1 cup packed light brown sugar
½ cup granulated sugar
2 large eggs, room temperature
1 teaspoon pure vanilla extract
1 cup roasted, unsalted peanuts
½ cup miniature chocolate chips
Turbinado sugar mixed with flaked
1. Preheat oven to 350°F with racks in the
lower and upper thirds of the oven. Line
two baking sheets with parchment paper.
2.
Put the flour, salt, baking powder, and
soda into a medium mixing bowl. Using
peanut flavor.
butter, cut into 1-inch pieces,
room temperature
preferably unsweetened (both
traditional and natural styles work
well, just be sure to fully stir the
natural to prevent separation)
sea salt, for sprinkling
the beaters, mix on Speed 1 to fully
combine, at least 30 seconds. Reserve.
3.
Put the butter and peanut butter into
a large mixing bowl. Mix, starting at
Speed 2 and increasing to Speed 5, until
homogenous, about 2 minutes. Scrape
down the sides of the bowl and then add
the sugars. Mix on Speeds 2 to 4 until
very light, where it seems that much of
the sugar has dissolved into the butter/
peanut butter, about 2 minutes. Add the
eggs, one at a time, mixing on Speeds 2
to 3, and then the vanilla extract. Add the
dry ingredients and mix on Speed 2 until
just combined, and then add the peanuts
and chocolate chips. Mix on Speed 2
until evenly combined.
4.
Scoop the dough into evenly sized, golfball rounds and place on a parchmentlined tray or baking sheet. Press each
round down with a fork and then sprinkle
with the sugar and flaked sea salt.
5.
Bake in the preheated oven until just set
at the edges, about 12 to 15 minutes.
Allow pans to cool before baking
remaining dough.
Nutritional information per cookie:
Calories 124 (57% from fat) • carb. 11g • pro. 3g
fat 8g • sat. fat 3g • chol. 15mg • sod. 70mg
calc. 7mg • fiber 1g
26
hm8_20ce074058_eng_ib_final.indd 26hm8_20ce074058_eng_ib_final.indd 26 6/16/20 11:34 AM6/16/20 11:34 AM
Page 27

Ginger Cookies
Not your ordinary ginger cookie. We up the
zing with chopped, crystalized ginger in these
Makes about 2½ dozen cookies
2¼ cups unbleached, all-purpose flour
1 teaspoon baking soda
1 tablespoon ground ginger
1 teaspoon ground cinnamon
½ teaspoon ground allspice
¾ teaspoon kosher salt
¼ cup finely chopped crystalized
12 tablespoons (1½ sticks) unsalted
¼ cup molasses
¾ cup packed light brown sugar
¼ cup granulated sugar
1 large egg, room temperature
1 teaspoon pure vanilla extract
¹⁄³ cup turbinado sugar, for rolling
1. Preheat oven to 350°F with racks in the
2.
chewy and spicy treats.
ginger
butter, cut into 1-inch pieces,
room temperature
lower and upper thirds of the oven. Line
two baking sheets with parchment paper.
Put the flour, baking soda, spices, and
salt into a medium mixing bowl. Using
the beaters, mix on Speed 1 to fully
combine, at least 30 seconds. Add the
chopped ginger and mix on Speed 1 to
coat; reserve.
3.
Put the butter and molasses into a large
mixing bowl. Mix, starting at Speed 2 and
increasing to Speed 5, until homogenous,
about 2 minutes. Scrape down the sides
of the bowl and then add the sugars.
Mix on Speeds 2 to 4 until very light,
where it seems that much of the sugar
has dissolved into the butter/molasses,
about 2 minutes. Add the egg, mixing
on Speeds 2 to 3, and then the vanilla
extract. Add the dry ingredients and mix
on Speed 2 until just combined.
4.
Put the turbinado sugar into a shallow
bowl or baking pan.
5.
Scoop the dough into evenly sized,
golf-ball rounds. Roll in the turbinado
sugar and then place the sugared dough
on a parchment-lined tray or baking
sheet. Gently press each round down
with the bottom of a clean glass.
6.
Bake in the preheated oven until just set
at the edges, about 12 to 15 minutes.
Allow pans to cool before baking
remaining dough.
Nutritional information per cookie:
Calories 96 (23% from fat) • carb. 18g • pro. 1g
fat 2g • sat. fat 2g • chol. 12mg • sod. 99mg
calc. 10mg • fiber 0g
No-Bake Keto Bites
Packed full of good-for-you fat and protein,
just one of these bites will fill you up and
Makes 16 bites
½ cup almond butter
2 tablespoons coconut oil
2 tablespoons chia seeds
1 cup shredded, unsweetened
1 tablespoon cocoa powder
1 teaspoon pure vanilla extract
2 teaspoons granulated monk
¼ teaspoon kosher salt
½ teaspoon ground cinnamon
1. Put all of the ingredients into a large
mixing bowl. Using the beaters, mix
on Speeds 1 to 3 until completely
incorporated, about 1 minute.
2.
Scoop the dough into desired-size
pieces and form into balls (gloves are
recommended). Chill in the refrigerator
for a minimum of 30 minutes, or in the
freezer for 10 minutes before enjoying.
Calories 148 (58% from fat) • carb. 6g • pro. 3g
fat 10g • sat. fat 5g • chol. 0mg • sod. 39mg
keep you energized.
coconut
fruit sweetener or ½ teaspoon
granulated stevia
Nutritional information per bite:
calc. 47mg • fiber 2g
27
hm8_20ce074058_eng_ib_final.indd 27hm8_20ce074058_eng_ib_final.indd 27 6/16/20 11:34 AM6/16/20 11:34 AM
Page 28

Edible Cookie Dough
(with variations)
Eat that dough guilt free (well, egg free!)
with one of our edible cookie dough recipes.
There are gluten-free options, as well as a
kid-favorite snickerdoodle. Eat by the scoop,
or even crumble into vanilla ice cream; there
Makes 3½ cups
8 tablespoons (1 stick) unsalted
²⁄³ cup packed light brown sugar
¹⁄³ cup granulated sugar
2 tablespoons milk (any fat variety or
1 tablespoon pure vanilla extract
1¹⁄³ cups unbleached, all-purpose flour
½ teaspoon kosher salt
1 cup semisweet chocolate chips
1. Put the butter and sugars into a large
2.
are so many possibilities.
butter, cut into 4 pieces, room
temperature
nondairy alternative)
(you can substitute a gluten-free,
all-purpose flour blend)
mixing bowl. Using the beaters, mix on
Speeds 2 to 4 until very light and creamy,
about 2 minutes. Stop to scrape down
sides of bowl as needed.
While mixing on Speed 2, add the milk
and vanilla extract. Add the flour and
salt and mix on Speed 2 until completely
combined. Add the chips and mix on
Speed 2.
3.
Scoop the dough into desired-size
pieces. While the dough can be eaten
right away, it is best eaten chilled.
Variations:
Snickerdoodle:
Add ½ teaspoon ground cinnamon and
do not add the chocolate chips. Scoop into
tablespoon-size balls and roll in cinnamon
sugar.
Oatmeal Cranberry:
Add ½ cup rolled oats and ¼ teaspoon
ground cinnamon with the flour. Substitute
dried cranberries for the chocolate chips.
Nutritional information per serving
(1 tablespoon, Chocolate Chip):
Calories 55 (41% from fat) • carb. 8g • pro. 0g
fat 3g • sat. fat 2g • chol. 4mg • sod. 22mg
Calories 42 (35% from fat) • carb. 6g • pro. 0g
fat 2g • sat. fat 1g • chol. 4mg • sod. 21mg
Calories 49 (32% from fat) • carb. 8g • pro. 0g
fat 2g • sat. fat 1g • chol. 4mg • sod. 22mg
calc. 2mg • fiber 0g
Nutritional information per serving
(1 tablespoon, Snickerdoodle):
calc. 1mg • fiber 0g
Nutritional information per serving
(1 tablespoon, Oatmeal Cranberry):
calc. 1mg • fiber 0g
Bittersweet Espresso Brownies
Rich and fudgy, these brownies are for the
Makes 16 brownies
Nonstick cooking spray
¾ cup (1½ sticks) unsalted butter,
4 ounces unsweetened chocolate,
4 ounces bittersweet chocolate,
2 tablespoons cocoa powder
2 teaspoons espresso powder
½ cup unbleached, all-purpose flour
¾ teaspoon kosher salt
3 large eggs, room temperature
1½ cups granulated sugar
2 teaspoons pure vanilla extract
1. Preheat oven to 350°F with the rack in
the middle position. Lightly coat a 9-inch
square baking pan with nonstick cooking
spray and line with parchment paper;
reserve.
2.
Put the butter and both chocolates into
a heatproof bowl and place over a pot
of simmering water. Once the butter/
chocolate mixture is almost completely
melted, stir in cocoa powder and
espresso powder. When chocolate is
completely melted, stir in flour and salt;
set aside to cool to room temperature.
3.
Put the eggs into a large mixing bowl.
Using the beaters, beat the eggs, on
true chocolate lover.
cubed
chopped
chopped
28
hm8_20ce074058_eng_ib_final.indd 28hm8_20ce074058_eng_ib_final.indd 28 6/16/20 11:34 AM6/16/20 11:34 AM
Page 29

Speed 2, to break them up slightly,
then gradually add the sugar. Increase
to Speed 4 and mix until light and
thickened, about 2 to 3 minutes. Add
the vanilla extract and mix until well
combined. Add the cooled chocolate
mixture into the egg mixture and gently
mix on Speed 1, until the batter is no
longer streaky, but be sure not to add too
much air. Pour the batter into prepared
pan. Tap pan on the counter a few times
to remove any air bubbles.
4.
Bake in the preheated oven for 25 to 30
minutes, or until edges are just dry. Cool
completely before cutting and serving.
Nutritional information per brownie:
Calories 249 (54% from fat) • carb. 28g • pro. 3g
fat 16g • sat. fat 10g • chol. 57mg • sod. 120mg
calc. 12mg • fiber 2g
Blonde Brownies (Blondies)
Often the sweeter, and obviously lighter,
cousin of the brownie, this recipe is rather
traditional, but it can easily be altered by
changing the type of chips or nuts to make it
Makes 24 blonde brownies
Unsalted butter, softened,
or nonstick cooking spray
2 cups unbleached, all-purpose flour
1½ teaspoons kosher salt
½ teaspoon ground cinnamon
16 tablespoons (2 sticks) unsalted
butter, cubed, room temperature
your own.
½ cup granulated sugar
1 cup packed light brown sugar
3 large eggs, room temperature
1 tablespoon pure vanilla extract
1½ cups bittersweet chocolate, chopped
1 cup white chocolate chips
1 cup walnuts
1. Preheat oven to 350°F with the rack in
the middle position. Lightly coat a 13 x
9-inch baking pan with softened butter
or nonstick cooking spray; line with
parchment paper. Reserve.
2.
Put the flour, salt, and cinnamon into a
medium bowl. Using the beaters, mix on
Speed 1 for about 20 seconds, or until
fully combined, reserve.
3.
Put the butter into a large mixing bowl.
Using Speed 3, beat until lightened, about
30 seconds. Gradually add both sugars
and beat on Speed 4 until lightened,
another 30 seconds to 1 minute. Reduce
to Speed 3 and add the eggs, one at a
time, and the vanilla extract; mix until well
combined. Reduce to Speed 1 and slowly
add the dry ingredients. Once almost
fully mixed, add the chopped chocolate,
chips, and nuts.
4.
Transfer mixture to the prepared pan.
Bake in the preheated oven until edges
are set and lightly browned, about 30
to 35 minutes. The brownies should be
fully cooled before cutting.
Nutritional information per blonde brownie:
Calories 320 (48% from fat) • carb. 39g • pro. 3g
fat 18g • sat. fat 10g • chol. 45mg • sod. 150mg
calc. 10mg • fiber 1g
29
Blueberry Crumble Bars
When you cannot decide between a cookie and
a crumble, this dessert satisfies both cravings.
Makes 12 servings
Nonstick cooking spray
Crust:
8 tablespoons (1 stick) unsalted
butter, cut into 4 pieces, room
temperature
¼ cup packed light brown sugar
2 tablespoons granulated sugar
1¼ cups unbleached, all-purpose flour
¼ teaspoon kosher salt
Pinch ground cinnamon
Filling:
¼ cup granulated sugar
¼ cup packed light brown sugar
2 tablespoons tapioca starch
¼ teaspoon kosher salt
Pinch ground cinnamon
Pinch ground ginger
¼ teaspoon pure vanilla extract
4 cups fresh blueberries
Topping:
¾ cup unbleached, all-purpose flour
½ cup rolled oats (not quick cooking)
½ cup packed light brown sugar
¼ teaspoon ground cinnamon
¼ teaspoon kosher salt
6 tablespoons unsalted butter,
cubed, cold
hm8_20ce074058_eng_ib_final.indd 29hm8_20ce074058_eng_ib_final.indd 29 6/16/20 11:34 AM6/16/20 11:34 AM
Page 30

1. Lightly coat a 9-inch square baking pan
with nonstick cooking spray and line with
parchment paper; reserve.
2.
Prepare the crust. Put the butter and
sugars into a medium mixing bowl.
Using the beaters, mix on Speeds 2 to
3 until creamy. Add the remaining crust
ingredients and mix on Speed 2 until
combined. Transfer the crust mixture into
the prepared pan and press down firmly
to pack into the bottom of the pan. Chill
in refrigerator until firm.
3.
While the crust is chilling, prepare the
filling. Put the sugars, starch, salt, and
spices into a large mixing bowl; using
the beaters, mix on Speed 1 to combine.
Add the vanilla extract and blueberries
and stir until blueberries are well coated.
Then mix on Speed 1 until about half of
the blueberries have burst open, about 2
minutes. Reserve.
4.
Put all of the topping ingredients, except
for the butter, into a medium mixing bowl.
Mix on Speed 1 to combine. Add the
butter and mix on Speed 2 until large
crumbs form.
5.
Once the crust has sufficiently chilled,
preheat oven to 350°F with the rack in
the middle position. When the oven
is preheated, bake until crust is firm and
golden at the edges, about 20 minutes.
Remove and spread filling on top of the
hot, baked crust and return to the oven
for an additional 15 minutes, or until
it’s bubbling at the edges. Cover evenly
with the crumb topping and return to the
oven for a final 15 minutes. The bars
are done when the topping is evenly
browned.
6.
Cool completely prior to cutting and
serving.
Nutritional information per bar:
Calories 282 (41% from fat) • carb. 39g • pro. 3g
fat 13g • sat. fat 8g • chol. 35g • sod. 143mg
calc. 4mg • fiber 2g
Golden Layer Cake
The go-to cake recipe for all of the “yellow
cake” lovers out there. This goes well with
just about any filling and frosting, but we
especially love it with our summer-inspired
Berries and Cream Frosting (recipe follows).
Makes two 9-inch layers (16 servings)
Nonstick cooking spray
3 cups cake flour, not self-rising
1¾ cups granulated sugar
1 tablespoon baking powder
¾ teaspoon kosher salt
2 large eggs, room temperature
2 large egg yolks, room temperature
1½ cups buttermilk, room temperature
2 teaspoons pure vanilla extract
1 cup vegetable oil
1. Preheat oven to 350°F with the rack in
the middle position. Spray two 9-inch
cake pans with nonstick cooking spray
and line the bottoms with parchment
paper. Reserve.
2.
Put the flour, sugar, baking powder, and
salt together into a large mixing bowl.
Using the beaters, mix on Speed 1 to
fully combine, a minimum of 30 seconds.
Reserve.
3.
Put the eggs, yolks, buttermilk, and
vanilla extract together into a medium
bowl. Mix on Speed 3.
4.
Reduce to Speed 2, gradually add the
oil to the dry ingredients and mix until
combined, then increase to Speeds 4 to
5 and mix until completely homogenous,
about 1½ minutes.
5.
Gradually add the egg/buttermilk mixture
and mix on Speed 2 until completely
combined.
6.
Divide batter between the two prepared
cake pans. Tap gently on the countertop
to remove bubbles and place in
preheated oven. Bake until the center
springs back
to the touch and a cake tester comes
out clean when inserted in the center,
about 25 minutes.
7.
Remove from oven, cool in pans on a
wire rack until cool to the touch, then
transfer cakes to a wire cooling rack to
cool completely before frosting.
Nutritional information per serving (unfrosted):
Calories 324 (42% from fat) • carb. 43g • pro. 4g
fat 16g • sat. fat 2g • chol. 47mg • sod. 225mg
calc. 52mg • fiber 0g
30
hm8_20ce074058_eng_ib_final.indd 30hm8_20ce074058_eng_ib_final.indd 30 6/16/20 11:34 AM6/16/20 11:34 AM
Page 31

Berries and Cream Frosting
The flavor, and color, can be adjusted by the
number of freeze-dried berries that are used
in the recipe. Start with ½ cup and then add
Makes about 3 cups, enough to frost one
9-inch layer cake (16 servings)
8 tablespoons (1 stick) unsalted
4 ounces cream cheese, cut into
4 cups (1 pound) confectioners’
¼ teaspoon kosher salt
¼ cup whole milk or heavy cream
2 tablespoons light corn syrup
½ cup freeze-dried berries, preferably
1. Put the butter and cream cheese into a
large mixing bowl. Using the beaters, mix
on Speeds 2 to 4 to lighten and combine,
about 2 minutes. Add the confectioners’
sugar and salt and mix until fully
combined, about 1 minute.
2.
While mixing on Speed 1, gradually add
the milk (or cream) and continue to mix
until lightened. If using light corn syrup,
mix in at this time as well, using Speed 1.
more as desired.
butter, cut into 8 pieces, room
temperature
4 pieces, room temperature
sugar, sifted
(optional, if a shiny finish is desired)
raspberries or strawberries, or a
mix of the two, finely ground (using
a spice grinder works best for this
task) and sifted
3.
Add the finely ground, sifted berries and mix
to desired consistency. Use immediately.
NOTE: If not using immediately, cover with
a damp towel and plastic wrap and keep at
room temperature until ready to use.
Nutritional information per serving (3 tablespoons):
Calories 214 (34% from fat) • carb. 35g • pro. 1g
fat 8g • sat. fat 5g • chol. 23mg • sod. 62mg
calc. 6mg • fiber 0g
Deep Chocolate Layer Cake
Frost this moist chocolate cake with our
Cream Cheese Frosting on page 32.
Makes two 9-inch cakes (16 servings)
Unsalted butter, softened,
or nonstick cooking spray
6 ounces bittersweet chocolate,
chopped
¾ cup cocoa powder, Dutch process,
sifted
2 teaspoons espresso powder
½ teaspoon baking soda
1 cup boiling water
2½ cups unbleached, all-purpose flour
1 cup granulated sugar
½ cup packed light brown sugar
1 teaspoon baking powder
¾ teaspoon kosher salt
1 cup vegetable oil
1 cup buttermilk, room temperature
4 large eggs, lightly beaten,
room temperature
31
2 teaspoons pure vanilla extract
1. Preheat oven to 350°F with the rack in
the middle position. Grease two 9-inch
round cake pans with cooking spray or
softened butter and line the bottoms with
parchment paper. Reserve.
2.
Put the bittersweet chocolate, cocoa
powder, espresso powder, and baking
soda into a medium bowl and pour the
boiling water over the ingredients. Stir
until chocolate has melted. Cool to room
temperature and reserve.
3.
Put the flour, sugars, baking powder, and
salt into a large mixing bowl. Using the
beaters, mix on Speed 2 until fully
combined, a minimum of 30 seconds.
Reserve.
4.
Using Speed 2, mix the oil, buttermilk,
eggs, and vanilla extract into the cooled
chocolate mixture.
5.
While mixing on Speed 2, slowly add the
liquid mixture to the dry ingredients. Mix
until smooth, about 1 minute, stopping as
necessary to scrape entire bowl.
6.
Divide the batter evenly between the
prepared pans. Bake in preheated oven
until a cake tester comes out clean when
inserted into the center, about 30 to 35
minutes.
7.
Remove from oven and cool in pans on a
wire rack until cool to the touch. Cool
cakes completely before frosting.
Nutritional information per serving (unfrosted):
Calories 345 (50% from fat) carb. 41g • pro. 6g
fat 21g • sat. fat 5g • chol. 47mg • sod. 195mg
calc. 31mg • fiber 3g
hm8_20ce074058_eng_ib_final.indd 31hm8_20ce074058_eng_ib_final.indd 31 6/16/20 11:34 AM6/16/20 11:34 AM
Page 32

Cream Cheese Frosting
A classic cream cheese frosting,
perfect for a variety of cakes, especially
Makes about 5 cups
5½ cups confectioners’ sugar, sifted
¼ teaspoon kosher salt
1 pound (two standard 8-ounce
8 tablespoons (1 stick) unsalted
1 teaspoon pure vanilla extract
1. Put the sugar and salt into a large mixing
2.
Nutritional information per serving (¼ cup):
Calories 250 (44% from fat) carb. 34g • pro. 1g
fat 12g • sat. fat 8g • chol. 47mg • sod. 101mg
carrot and chocolate.
packages) cream cheese,
room temperature
butter, cut into 1-inch pieces,
room temperature
bowl. Using the beaters, mix on Speed
1 to completely mix, a minimum of 30
seconds.
Put cream cheese into a separate, large
mixing bowl. Mix on Speeds 2 to 4 until
smooth, about 1½ to 2 minutes. Add
butter and beat until fully incorporated
and smooth. Reduce to Speed 1 and,
with the hand mixer running, slowly add
the sifted confectioners’ sugar/salt to the
bowl and mix until incorporated, about
2 minutes. Scrape the entire bowl well.
Add vanilla extract. Mix on Speed 2 until
combined. Use immediately.
calc. 22mg • fiber 0g
Gluten-Free (and Vegan!) Golden
Cupcakes with Vanilla Frosting
Unlike our muffin recipe that uses a gluten-
free flour blend, here we call for individual
ingredients that are now easily found in most
Makes 12 standard cupcakes
Nonstick cooking spray
2 cups sorghum flour
1 cup potato starch
½ cup arrowroot starch
1 tablespoon baking powder
½ teaspoon baking soda
1 teaspoon xanthan gum
1 teaspoon kosher salt
1½ cups agave nectar
½ cup olive oil
¾ cup butternut squash purée,
2 tablespoons pure vanilla extract
1 teaspoon white vinegar
1. Preheat oven to 350°F. Lightly coat a
standard cupcake pan with cooking
spray. Cupcake liners may be used (these
may also be sprayed, so that the liners
cleanly come off the cupcakes).
2.
Put the flour, starches, baking powder,
soda, xanthan gum, and salt into a large
mixing bowl. Using the beaters, mix on
Speed 1 to sift the ingredients together,
about 30 seconds.
grocery stores.
room temperature
3.
With the mixer running on Speed 2, add
the remaining ingredients, in the order
listed, and mix until all ingredients are
incorporated. Scrape the entire bowl to
ensure all of the ingredients are evenly
combined and mix an additional 20
seconds if necessary.
4.
Scoop batter into the prepared cupcake
pan. Bake until golden and a cake tester
comes out clean, about 20 to 22 minutes.
Remove from oven, cool in pans on a
wire rack until cool to the touch, and then
transfer cupcakes to a wire cooling rack
to cool completely before frosting.
Nutritional information per cupcake (unfrosted):
Calories 396 (22% from fat) carb. 77g • pro. 4g
fat 10g • sat. fat 1g • chol. 0mg • sod. 359mg
calc. 50mg • fiber 2g
Dairy-Free Vanilla Frosting
This frosting pairs very well with the
Gluten-Free Golden Cupcakes, but is also a
great alternative to any vanilla frosting.
Makes about 2 cups
1 cup non-hydrogenated vegetable
2 cups confectioners’ sugar, sifted
1 tablespoon pure vanilla extract
¼ teaspoon kosher salt
1 to 2 teaspoons water, optional
shortening
1. Put the shortening into a medium mixing
bowl. Using the beaters, mix on Speeds 2
to 4 to make creamy, about 30 seconds.
Add the sugar and mix on Speeds 2 to 5,
32
hm8_20ce074058_eng_ib_final.indd 32hm8_20ce074058_eng_ib_final.indd 32 6/16/20 11:34 AM6/16/20 11:34 AM
Page 33

then add the vanilla extract and salt.
Mix again, on the same speeds, until
smooth and fluffy, about 30 seconds.
2.
If the frosting is too thick, add enough
water to mix to desired consistency.
Nutritional information per serving
Calories 182 (61% from fat) • carb. 19g • pro. 0g
fat 13g • sat. fat 6g • chol. 0mg • sod. 33mg
(2 tablespoons):
calc. 36mg • fiber 0g
Angel Food Cake
Serve with whipped cream and fresh berries
for a light and delicious summer dessert.
Makes one 9-inch cake (12 servings)
1½ cups granulated sugar, divided
1¼ cups cake flour, not self-rising
12 large egg whites
1¼ teaspoons cream of tartar
¼ teaspoon kosher salt
1 teaspoon pure vanilla extract
1. Preheat oven to 325°F.
2.
Put ¾ cup of the sugar into a large mixing
bowl with the cake flour. Using the whisk,
mix on Speeds 1 to 2 to fully sift, a
minimum of 30 seconds; reserve.
3.
Put the egg whites into a large mixing
bowl. Using the whisk, begin mixing on
Speed 1. When the egg whites appear
foamy, add cream of tartar and salt.
Gradually increase to Speed 6.
4.
Add the remaining ¾ cup of granulated
sugar and vanilla extract and continue to
mix, on Speeds 6 to 8, until firm, glossy
peaks form. Stop mixing.
5.
Sift about ½ cup of the reserved flour and
sugar over the whites and carefully fold
in with a rubber spatula. Continue with
the remaining flour and sugar. Gently fold
until no pockets of dry ingredients remain.
6.
Spoon batter into an ungreased 9-inch
tube pan. Even out the top with the
spatula. Bake for 45 minutes, until a
toothpick that has been inserted comes
out clean. Invert pan onto the neck
of a bottle and allow the cake to cool
completely.
7.
Use a knife to free the cake from the pan.
Nutritional analysis per serving:
Calories 167 (1% from fat) • carb. 37g • pro. 5g
fat 0g • sat. fat 0g • chol. 0mg • sod. 278mg
calc. 5mg • fiber 0g
Pavlova with Blood Orange
and Pomegranate
A show-stopping dessert. This gorgeous
creation needs to be eaten the day it is made
(and best if that day is not humid!).
Makes 12 servings
Meringue:
4 large egg whites
Pinch cream of tartar
Pinch kosher salt
1 cup granulated sugar
2 teaspoons cornstarch, sifted
1 teaspoon white vinegar
¼ teaspoon pure vanilla extract
½ teaspoon grated citrus zest
Topping:
2 blood oranges, peeled and
segmented
3 tablespoons pomegranate berries
½ cup granulated sugar
½ cup water
1 cup blood orange juice (You can
substitute with pomegranate juice
if a more red/pink syrup is desired.
Blood orange makes a dark,
orange-colored syrup.)
¾ cup heavy cream
1 teaspoon pure vanilla extract
¼ cup confectioners’ sugar
1. Preheat oven, with the rack in the middle
position, to 350°F. Line a baking pan with
parchment paper (if your baking pan is
rimmed, invert it so you are using the
bottom. This will make transferring the
meringue easier once it has baked).
2.
Prepare the meringue. Put the egg whites,
cream of tartar, and salt into a large
mixing bowl (make sure it is spotlessly
clean). Using the whisk, start mixing on
Speed 1 and very gradually increase to
Speed 6. Whip until whites have formed
soft peaks. While still whipping, gradually
add the granulated sugar. Increase
to Speed 8 and whip until stiff peaks
have formed, about 8 minutes. Add the
remaining meringue ingredients and
gently mix on Speed 2 to combine.
33
hm8_20ce074058_eng_ib_final.indd 33hm8_20ce074058_eng_ib_final.indd 33 6/16/20 11:34 AM6/16/20 11:34 AM
Page 34

3.
Transfer meringue to the parchment-lined
baking pan. Shape into an 8-inch circle
and, using a spatula or knife, scrape the
sides upward (from the bottom of the
meringue to the top) to create smooth
edges along the sides of the meringue
and little peaks at the top.
4.
Transfer to the oven and immediately
reduce temperature to 200°F.
5.
Bake meringue for 1½ hours, until the
edges and top are dry – the color should
still be very pale. After the time has
elapsed, turn off the oven, but leave the
meringue in until it has cooled completely,
about 1 hour.
6.
While the meringue is cooling, prepare
the topping. Be sure that the oranges are
fully segmented (no visible white pith on
the segments). Reserve on a plate with
the pomegranate berries.
7.
Prepare the orange syrup. Put the
sugar and water into a heavy-bottomed
saucepan. Cook over medium heat until
the sugar has dissolved, then add the
juice. Cook until the mixture is thickened/
coats the bottom of the pan, about 20 to
25 minutes. Reserve and cool. NOTE: If
the syrup seems too thick to use, you can
thin it with hot water, adding a teaspoon
at a time.
8.
Once the pavlova is fully cooled, prepare
the whipped cream. Put the cream into a
large mixing bowl. Using the whisk, start
whipping cream on Speed 1, gradually
increasing to Speed 3, for about one
minute, so that the cream has some
body. Add the sugar and vanilla extract
and continue to whip to Speed 4 until
cream forms soft peaks.
9.
Assemble the pavlova. Put the baked
meringue on desired serving dish/plate.
Top with the whipped cream and then,
using a slotted spoon, top with the fruit.
Drizzle the syrup around the plate if
desired. You may garnish with grated
zest as well.
10.
Serve immediately.
Nutritional information per serving:
Calories 169 (27% from fat) • carb. 27g • pro. 1g
fat 5g • sat. fat 4g • chol. 20mg • sod. 37mg
calc. 3mg • fiber 0g
Sour Cream Cheesecake
This recipe is rather straightforward. While it
is simple, it can be elevated by topping with
fresh or cooked fruit, chocolate shavings, or
Makes one 8-inch cheesecake (12 servings)
1 tablespoon unsalted butter,
Graham Cracker Crust:
1 cup graham cracker crumbs
2 tablespoons granulated sugar
¼ teaspoon ground cinnamon
4 tablespoons (½ stick) unsalted
Filling:
24 ounces (3 standard packages)
chopped cookies.
room temperature
butter, melted and cooled slightly
cream cheese, each cut into 4
pieces, room temperature
1½ cups granulated sugar
¼ teaspoon kosher salt
5 large eggs, room temperature
1 cup sour cream, room temperature
1½ teaspoons pure vanilla extract
1. Preheat oven to 325°F with the rack in
the lower third of the oven. Coat the
inside of an 8-inch springform pan with
the tablespoon of butter. Reserve.
2.
Prepare the crust. Put cookie crumbs, 2
tablespoons sugar, cinnamon, and melted
butter into a small mixing bowl. Using
the beaters, mix on Speed 2 until the
mixture comes together. Pat crumb crust
evenly into the bottom of the prepared
springform pan, using the bottom of a
glass if necessary, to make it even. Put in
the preheated oven and bake for about
8 to
10 minutes, until the crust is just set.
Allow to cool while preparing the filling.
3.
Wipe the beaters of crumbs. Put the
cream cheese into a large mixing bowl.
Starting on Speed 1 and increasing to
Speed 4, mix until very smooth – you
want to be sure there are no lumps.
Scrape the mixing bowl and beaters.
While mixing on Speed 2, gradually add
the sugar, about ¼ cup at a time, and the
salt, mixing until very smooth. Add the
eggs, one at a time, mixing on Speeds 2
to 3, being sure each is fully incorporated
into batter before adding the next. Scrape
down the bowl and beaters and then add
the sour cream and vanilla extract. Mix on
Speed 1 until creamy, about 1 minute.
34
hm8_20ce074058_eng_ib_final.indd 34hm8_20ce074058_eng_ib_final.indd 34 6/16/20 11:34 AM6/16/20 11:34 AM
Page 35

4.
Wrap the cooled springform pan well with
both plastic and foil wraps – to come up
about two-thirds up the sides of the pan.
5.
Pour into cooled, prepared crust – do not
scrape any thick bits from the sides of the
bowl, as they are not thoroughly mixed
in and will change the texture of your
finished cheesecake.
6.
Put the filled pan into a roasting pan, or
something similar in size and oven safe,
and then add hot water so it comes about
halfway up the sides of the cake pan.
7.
Transfer the filled pan to the preheated
oven and bake for 45 minutes. The
cheesecake will still be jiggly at this point,
but that is OK. After the 45 minutes have
expired, turn the oven off and allow it to
rest in the warm oven for an additional 45
minutes.
8.
Remove and bring to room temperature.
Cover well and refrigerate to fully chill
prior to serving.
Nutritional information per serving:
Calories 449 (61% from fat) • carb. 36g • pro. 8g
fat 31g • sat. fat 18g • chol. 163mg • sod. 330mg
calc. 39mg • fiber 0g
Chocolate Cream Pie
Crowd-pleasing pie for any holiday or
Makes about 12 servings
Crust:
2½ cups chocolate cookie crumbs
special occasion!
(from about 24 chocolate sandwich
cookies)
5 tablespoons unsalted butter, melted
Filling:
¼ cup packed light brown sugar
¼ cup granulated sugar
3 tablespoons unsweetened
cocoa powder
2½ tablespoons cornstarch
¼ teaspoon kosher salt
3 cups half & half
3 large eggs, lightly beaten
4 ounces semisweet chocolate,
chopped
3 tablespoons unsalted butter,
cut into small dice
Topping:
2 cups heavy cream, well chilled
¼ cup plus 2 tablespoons granulated
sugar
Chocolate curls for garnish
1. Make the crust. Preheat oven to 350°F
with the rack in the middle position.
2.
Put the cookie crumbs and melted butter
into a medium mixing bowl. Using the
beaters, mix on Speeds 1 to 2 to fully
combine. Transfer crumb mixture to
a 9-inch pie plate. Press evenly into the
bottom and sides.
3.
Bake in preheated oven for 10 to 15
minutes, until crumb crust is fully set.
Cool completely while preparing the filling.
4.
Put the sugars, cocoa powder,
cornstarch, and salt into a large, wide
saucepan. Using the beaters once again,
mix on Speed 1 to combine. While still
mixing on Speed 1, gradually add the half
& half, and then the eggs, and continue to
mix until completely smooth.
5.
Set the pan over medium-low heat and
mix on Speeds 1 to 2, occasionally, to
prevent the mixture from overcooking –
do not leave the pot unattended.
6.
Allow the mixture to heat gradually,
until just about boiling. At this point, the
mixture will get quite thick. Continue to
mix on Speed 1 and when thickened,
remove from heat. Mix in the chopped
chocolate and butter until completely
incorporated. Strain the filling through
a fine mesh strainer and then transfer
the strained filling into the cooled crust.
Cover the filling directly with wax paper
or plastic wrap so that the filling does not
form a skin. Chill in the refrigerator until
set.
7.
After the filling is well chilled and ready
to serve, prepare the whipped cream. Put
the cream into a large mixing bowl. Using
the whisk, start whipping cream on Speed
1, gradually increasing to Speed 3, for
about one minute, so that the cream has
some body. Add the sugar and continue
to whip to Speed 4 until cream holds
medium-stiff peaks that have formed.
8.
Top the pie evenly with the whipped
cream and garnish with chocolate curls
prior to serving.
Nutritional information per serving:
Calories 515 (63% from fat) • carb. 43g • pro. 5g
fat 36g • sat. fat 23g • chol. 142mg • sod. 231mg
calc. 74mg • fiber 1g
35
hm8_20ce074058_eng_ib_final.indd 35hm8_20ce074058_eng_ib_final.indd 35 6/16/20 11:34 AM6/16/20 11:34 AM
Page 36

Pumpkin Pie
While most popularly a staple on
Thanksgiving, this pie really shouldn’t
be forgotten during the rest of the autumn
Makes about 12 servings
½ recipe Pâte Brisée (page 38)
1 can (15 ounces) pumpkin purée,
about 2 cups
½ cup granulated sugar
¼ cup packed light brown sugar
1 teaspoon ground cinnamon
¼ teaspoon ground cloves
¼ teaspoon ground ginger
¹⁄
8 teaspoon ground nutmeg
¾ teaspoon kosher salt
3 large eggs, room temperature
½ cup heavy cream or evaporated milk
1 teaspoon pure vanilla extract
Whipped cream, for topping
(next recipe)
1. Put a rimmed baking sheet on the middle
rack in the oven (this will aid in making a
nice crust for the pie). Preheat to 325°F.
2.
While the oven is preheating, roll the pâte
brisée out to a large round and fit it into
a pie plate, about 1½ inches in depth.
Gently prick all over with the tines of
a fork, being sure not to fully puncture
through the dough. Chill in the refrigerator
while preparing the pumpkin filling.
season.
3.
Put the pumpkin, sugars, spices, and salt
into a large mixing bowl. Using the hand
blender attachment, blend on Speed 1
until fully mixed, about 1 minute. Add the
eggs and cream/evaporated milk, and
vanilla extract and blend on Speed 1 until
combined.
4.
Pour the custard into the chilled pie crust.
Transfer the filled pie plate onto the hot
baking sheet and bake in preheated oven
until the edges are set and the middle is
still jiggly, about 35 minutes.
5.
Cool completely before serving. Serve with
freshly whipped cream.
Nutritional information per serving:
Calories 212 (51% from fat) • carb. 23g • pro. 3g
fat 12g • sat. fat 7g • chol. 80mg • sod. 257mg
calc. 15mg • fiber 2g
Classic Whipped Cream
Whether for topping ice cream and pie, or
as a dip for fruit, everyone should have a
foolproof formula for a basic, sweetened
whipped cream.
Makes about 2¼ cups
1 cup heavy cream, well chilled
¼ cup confectioners’ sugar, sifted
1 teaspoon pure vanilla extract
Pinch fine sea salt
1. Put heavy cream into a large mixing bowl.
2.
Using the whisk, start whipping cream on
Speed 1, gradually increasing to Speed
3, for about one minute so that the cream
has some body. Add the sifted sugar
36
and vanilla extract and continue to whip
to Speed 7 until cream holds stiff peaks,
about 1½ minutes.
Nutritional information per serving (2 tablespoons):
Calories 52 (84% from fat) • carb. 2g • pro. 0g
fat 4g • sat. fat 3g • chol. 18mg • sod. 8mg
calc. 0mg • fiber 0g
Royal Icing
This icing is great for decorating sugar
cookies or cakes. You can add food coloring
to color it or extracts to flavor it.
Makes 1½ cups
4 cups (1 pound) confectioners’
2 large egg whites, slightly beaten
1 tablespoon whole milk
1 teaspoon fresh lemon juice
Calories 133 (0% from fat) • carb. 33g • pro. 1g • fat 0g
sat. fat 0g • chol. 0mg • sod. 10mg • calc. 2mg • fiber 0g
sugar, sifted
1. Put the sugar into a large mixing bowl.
Using the whisk, start mixing on Speed 1,
and then slowly add in the egg whites
until fully incorporated, about 1 minute.
While continuing with the whisk, add the
milk and lemon juice and mix until fully
incorporated. Scrape the entire bowl as
necessary. Continue on Speeds 1 to 5
until soft peaks form, about 2 minutes.
2.
Use immediately or cover the bowl with a
damp cloth so the icing does not harden.
If using coloring or a flavoring extract for the
icing, add it with the milk and lemon juice.
Nutritional analysis per serving (2 tablespoons):
hm8_20ce074058_eng_ib_final.indd 36hm8_20ce074058_eng_ib_final.indd 36 6/16/20 11:34 AM6/16/20 11:34 AM
Page 37

Chocolate Peanut Butter
Ice Cream Shake
This will satisfy your sweet tooth.
Makes 2 cups (4 servings)
¾ cup chocolate ice cream
1 teaspoon creamy peanut butter
1 teaspoon chocolate syrup
¹⁄³ cup whole milk
1. Put all ingredients, in the order listed, into
a tall cup or a large, wide measuring cup.
2.
Using the hand blender, blend on Speed
1, using a gentle up-and-down motion,
until smooth and homogenous, about 30
to 40 seconds.
3.
Serve immediately.
Nutritional information per serving (½ cup):
Calories 156 (46% from fat) • carb. 18g • pro. 4g
fat 8g • sat. fat 5g • chol. 23mg • sod. 69mg
calc. 112mg • fiber 1g
Pizza/Focaccia Dough
One of the simplest doughs to prepare at
home to take your pizza night to the next
level. And if shaping piz za is not your thing,
we give instructions on how to turn this into a
Makes about 1½ pounds; 12 servings (enough
for two 10-inch pizzas)
1¹⁄³ cups warm (100°F to 110°F) water
2¼ teaspoons active dry yeast
1 teaspoon granulated sugar
3½ cups unbleached bread or
2 teaspoons kosher salt
2 tablespoons extra virgin olive oil
For Focaccia:
1 tablespoon extra virgin olive oil
2 tablespoons chopped fresh rosemary
½ teaspoon kosher salt
1. Put the warm water, yeast, and sugar into
2.
3.
delicious, herby focaccia.
all-purpose flour
a large mixing bowl. Stir to dissolve the
yeast and let stand for 5 to 10 minutes.
Mixture will foam and bubble – this
means the yeast is active and alive.
In a separate bowl, combine flour and
salt. Using the dough hooks, mix on
Speed 1 for 5 to 10 seconds; reserve.
Add the 2 tablespoons of olive oil and ½
cup flour to the yeast mixture. Using the
dough hooks, mix on Speed 1 until smooth,
about 30 to 40 seconds. Running on
Speed 2, continue to add the remaining
flour mixture, ½ cup at a time, mixing
completely, about 30 to 40 seconds,
until no flour is visible after each addition.
The dough at first will be a batter, and
slowly, as the flour is added, it will become
a dough ball. After all the flour mixture
has been incorporated, and the dough
has formed a dough ball that cleans
the sides of the mixing bowl, knead at
Speed 3 for an additional minute.
4.
Lightly dust the dough with flour and place
it in a large mixing bowl covered with either
a damp towel or plastic wrap. Allow to rise
in a warm place for about 45 minutes, or
until the dough has doubled in size.
5.
Put the dough on a lightly floured
surface and gently punch down. Shape
into desired size(s) for pizza, or use for
preparing calzones (see page 22).
6.
For focaccia, press dough into an oiled
13 x 9-inch baking pan, or a rimmed
baking pan. Lightly cover with plastic
wrap and allow to rise for an additional 45
minutes – dough will be nice and puffy.
Preheat oven to 425°F with the rack in
the middle position. Brush the remaining
1 tablespoon of olive oil on top of the
dough and, using your fingers, make
indentations all over the dough. Sprinkle
with the rosemary and salt. Bake for about
18 to 20 minutes, or until nicely golden.
Nutritional information per serving (Pizza Dough):
Calories 140 (15% from fat) • carb. 26g • pro. 4g
fat 2g • sat. fat 0g • chol. 0mg • sod. 356mg
Nutritional information per serving (Focaccia):
Calories 151 (21% from fat) • carb. 26g • pro. 4g
fat 4g • sat. fat 1g • chol. 0mg • sod. 445mg
calc. 1mg • fiber 1g
calc. 2mg • fiber 1g
37
hm8_20ce074058_eng_ib_final.indd 37hm8_20ce074058_eng_ib_final.indd 37 6/16/20 11:34 AM6/16/20 11:34 AM
Page 38

Pâte Brisée
This versatile dough can be used for sweet
Makes two 9-inch crusts (24 servings)
2 cups unbleached, all-purpose flour
1 teaspoon kosher salt
16 tablespoons (2 sticks) unsalted
¼ cup ice water
1. Put the flour and salt into a large mixing
bowl. Using the beaters, mix on Speed 1
to fully combine, about 5 to 10 seconds.
Add the butter and mix on Speed 1 until
the butter has been worked into the flour
and is about the size of peas.
2.
Slowly add the water, about 1 teaspoon
at a time, and mix until the flour is
hydrated, but not wet. The dough will not
be fully together, just shaggy.
3.
Turn the dough out onto a clean, lightly
floured surface and knead by hand a few
times to bring it together. Divide into two
pieces and form each into a flat disc.
Wrap in plastic wrap and chill until ready
to use, a minimum of 2 hours, or up to
2 days.*
* As long as it is wrapped, this pastry freezes
well for up to 6 months.
Calories 100 (66% from fat) • carb. 7g • pro. 1g
fat 7g • sat. fat 5g • chol. 20mg • sod. 95mg
or savory treats.
butter, cut into ½-inch cubes,
and sitting at room temperature
for 15 minutes
Nutritional information per serving:
calc. 0mg • fiber 0g
Cuisinart Classic White Bread
Spoil your family with homemade bread.
Makes 1 loaf (10 servings)
1 cup warm water (105°F to 110°F)
2¼ teaspoons active dry yeast
1½ teaspoons granulated sugar
2 cups unbleached, all-purpose flour
1 teaspoon kosher salt
2 tablespoons unsalted butter, cut into
Nonstick cooking spray or unsalted
1-inch pieces, room temperature
butter, softened, for greasing the
loaf pan
1. Put the warm water, yeast and sugar into
a large mixing bowl. Stir to dissolve the
yeast and let stand for 5 to 10 minutes.
Mixture will foam and bubble – this
means the yeast is active and alive.
2.
Put the flour and salt into a separate
mixing bowl. Using the dough hooks, mix
on Speed 1 for 5 to 10 seconds; reserve.
3.
Using the dough hooks, mix the yeast
mixture on Speeds 1 to 2 while adding
the flour/salt, ½ cup at a time. Mix in
each addition of flour well, before adding
the next, so that no flour is visible in
between. The dough at first will be a
batter, and slowly, as the flour is added,
the batter will form a dough ball and
clean the sides of the mixing bowl.
4.
Once all of the flour has been
incorporated, add the butter and knead
on Speed 3 for about 2 minutes. Dust the
dough ball lightly with flour and place it in
a resealable food storage bag, pressing
out any air before sealing. Let rise in a
warm, draft-free place until doubled in
size, about 1 hour.
5.
Lightly coat one standard loaf pan with
cooking spray or unsalted butter. Punch
dough to deflate. Shape into loaf and
place in prepared pan. Cover and let rise
until nearly doubled, about 1 hour.
6.
About 15 minutes before baking, preheat
oven to 400°F. Place loaf in preheated
oven and bake for 30 to 35 minutes, until
bread is browned and sounds hollow
when tapped. Remove from loaf pan and
cool on a wire rack. Bread slices best
when allowed to cool completely before
cutting. If top of bread is too crispy for
your taste, brush with butter for a softer
crust.
Nutritional information per serving (1 slice):
Calories 157 (14% from fat) • carb. 27g • pro. 5g
fat 2g • sat. fat 1g • chol. 6mg • sod. 113mg
calc. 0mg • fiber 1g
38
hm8_20ce074058_eng_ib_final.indd 38hm8_20ce074058_eng_ib_final.indd 38 6/16/20 11:34 AM6/16/20 11:34 AM
Page 39

Honey Whole-Wheat Bread
A hearty wheat bread flavored with honey.
Makes 1 loaf (10 servings)
1 cup warm water (105°F to 110°F)
1 tablespoon honey
2 teaspoons active dry yeast
1½ cups whole-wheat flour
¾ cup bread flour
¾ teaspoon salt
1½ tablespoons unsalted butter, cut into
Nonstick cooking spray or unsalted
½-inch pieces, room temperature
butter, softened, for greasing the
loaf pan
1. Put the warm water, honey and yeast into
a large mixing bowl. Stir to dissolve the
yeast and let stand for 5 to 10 minutes.
Mixture will foam and bubble – this
means the yeast is active and alive.
2.
Put the flours and salt in a separate
mixing bowl. Using the dough hooks, mix
on Speed 1 for 5 to 10 seconds; reserve.
Using the dough hooks, mix the yeast
mixture on Speeds 1 to 2 while adding
the flour/salt, ½ cup at a time. Mix in
each addition of flour, before adding the
next, so that no flour is visible in between.
The dough at first will be a batter, and
slowly, as the flour is added, the batter
will form a rough dough ball. (If a good
amount of dough is clinging to the
walls of the bowl, add an additional 1
to 3 tablespoons of bread flour; avoid
adding more).
3.
Once all of the flour has been
incorporated, add the butter and knead
on Speed 3 for about 2 minutes. The
dough will feel sticky. Dust the dough
ball lightly with flour and place it in a
resealable food storage bag, pressing out
any air before sealing. Let rise in a warm,
draft-free place until doubled in size,
about 1 hour.
4.
Lightly coat one standard loaf pan with
cooking spray or unsalted butter. Punch
dough to deflate. Shape into loaf and
place in prepared pan. Cover and let rise
until nearly doubled, about 1 hour.
5.
About 15 minutes before baking, preheat
oven to 400°F. Place loaf in preheated
oven and bake for 30 to 35 minutes, until
bread is browned and sounds hollow
when tapped. Remove from loaf pan and
cool on a wire rack. Bread slices best
when allowed to cool completely before
cutting. Crust will soften as it cools.
Nutritional information per serving (1 slice):
Calories 123 (15% from fat) • carb. 21g • pro. 4g
fat 2g • sat. fat 1g • chol. 5mg • sod. 1mg
calc. 14mg • fiber 3g
39
Rosemary Olive Oil Rolls
These rolls go well with dinner, but could also
be used as small sandwich rolls.
Makes 12 rolls
¼ cup flavorful, extra virgin olive oil
1½ tablespoons chopped,
2¼ teaspoons active dry yeast
1 cup warm water (105°F to 110°F)
3¼ cups unbleached bread or
1¾ teaspoons kosher salt
Cornmeal for the baking sheet
fresh rosemary
all-purpose flour
1. Combine the olive oil and rosemary, let
stand 10 minutes or longer. Put the yeast
and warm water into a large mixing bowl
with a pinch of the flour. Stir to dissolve
yeast and let stand for 5 to 10 minutes.
Mixture will foam and bubble – this
means the yeast is alive and active.
2.
Put the flour and salt into a separate,
small mixing bowl. Using the dough
hooks, mix on Speed 1 for 5 to 10
seconds; reserve. Using the dough
hooks, mix the yeast mixture on Speed
1 while adding the olive oil/rosemary,
following with ½ cup of the flour/salt. Mix
on Speeds 1 to 2 until smooth, about 30
to 40 seconds. Continue adding the flour,
½ cup at a time, mixing completely, about
30 to 40 seconds, until no flour is visible
after each addition. The dough at first
will be a batter, and slowly, as the flour is
added, the batter will form a dough ball
that cleans the sides of the mixing bowl.
hm8_20ce074058_eng_ib_final.indd 39hm8_20ce074058_eng_ib_final.indd 39 6/16/20 11:34 AM6/16/20 11:34 AM
Page 40

After all the flour has been incorporated,
knead on Speed 3 for about 2 minutes.
3.
Dust dough ball lightly with flour and
place it in a resealable food storage bag,
press out air and seal. Let rise in a warm,
draft-free place until doubled in size,
about 1 hour. Punch down and let rise
again for 1 hour (this second rise can be
skipped if pressed for time – but it adds
to the flavor and texture).
4.
After second rise, punch dough to deflate
and let rest 10 minutes. Lightly dust a
baking sheet with cornmeal. Divide dough
into 12 equal-size pieces. Roll each piece
of dough on a work surface and shape
into a ball. Flatten slightly. Transfer to
prepared baking sheet and cover with
plastic wrap. Let rise at room temperature
until almost doubled, about 45 to 60
minutes.
5.
Fifteen minutes before baking, preheat
the oven to 450°F. Uncover rolls and bake
at 450°F for 10 minutes. Reduce the heat
to 375°F and bake for an additional 10
to 15 minutes, until browned and hollow
sounding when tapped. Place on a wire
rack to cool.
Nutritional information per roll:
Calories 151 (28% from fat) • carb. 24g • pro. 4g
fat 5g • sat. fat 1g • chol. 0mg • sod. 312mg
calc. 2mg • fiber 1g
©2020 Cuisinart
East Windsor, NJ 08520
Printed in China
20CE074058
IB-16615-ESP-A
40
hm8_20ce074058_eng_ib_final.indd 40hm8_20ce074058_eng_ib_final.indd 40 6/16/20 11:34 AM6/16/20 11:34 AM
 Loading...