

Page 1
INSTRUCTION AND
RECIPE BOOKLET
HM-70C Series
Power Advantage
™
7-Speed Hand Mixer
For your safety and continued enjoyment of this product, always read the instruction book carefully before using.
Page 2

CONTENTS
Important Safeguards. . . . . . . . . . . . . . . 2
Introduction . . . . . . . . . . . . . . . . . . . . . . 2
Features and Benefits . . . . . . . . . . . . . . 3
Use and Care . . . . . . . . . . . . . . . . . . . . . 4
Quick Reference Guide . . . . . . . . . . . . . 4
Recipes. . . . . . . . . . . . . . . . . . . . . . . . . . 5
Warranty. . . . . . . . . . . . . . . . . . . . . . . . 16
IMPORTANT
SAFEGUARDS
When using an electrical appliance,
basic safety precautions should always
be followed, including the following:
1. Read all instructions.
2. To protect against risk of electrical
shock, do not put the hand mixer motor
housing or cord in water or other liquid.
If hand mixer motor housing or cord falls
into liquid, unplug the cord from outlet
immediately. Do not reach into the liquid.
3. To avoid possible accidental injury,
close supervision is necessary when any
appliance is used by or near children.
4. Unplug from outlet when not in use,
before putting on or taking off parts,
and before cleaning.
5. Avoid contact with moving parts. Keep
hands, hair, clothing, as well as spatulas
and other utensils away from beaters
during operation to reduce risk of injury
to persons, and/or damage to the mixer.
6. Remove beaters from the mixer before
washing.
7. Do not operate any appliance with a
damaged cord or plug or after the
appliance malfunctions, or is dropped
or damaged in any manner. Return
appliance to the nearest authorized
Cuisinart service facility for examination,
repair, mechanical or electrical adjustment.
8. The use of attachments not recom
mended by Cuisinart may cause fire,
electrical shock, or risk of injury.
9. Do not use outdoors or anywhere the
cord or mixer might come into contact
with water while in use.
10. To avoid possibility of mixer being
accidentally pulled off work area, which
could result in damage to the mixer or
in personal injury, do not let cord hang
over edge of table or counter.
11. To avoid damage to cord and possible
fire or electrocution hazard, do not let
cord contact hot surfaces, including
the stove.
12. The chef’s whisk should be used
without any other attachment.
SAVE THESE
INSTRUCTIONS
FOR HOUSEHOLD
USE ONLY
NOTICE
This appliance has a polarized plug (one
prong is wider than the other). As a safety
feature, this plug will fit into a polarized
outlet only one way. If the plug does not fit
fully into the outlet, reverse the plug. If it still
does not fit, contact a qualified electrician.
Do not modify the plug in any way.
INTRODUCTION
Get ready to enjoy more mixing opportunities with the extremely versatile Cuisinart®
Power Advantage™ 7-Speed Hand Mixer.
A 220-watt motor breezes through big
mixing jobs, and Automatic Feedback
kicks in more power whenever it’s needed.
Don’t worry about messy splatters...our
SmoothStart® feature, with its 3 extra-low
speeds, keeps all the ingredients right in the
bowl where they belong!
2
Page 3
2
3
4
5
1
6
7
8
9
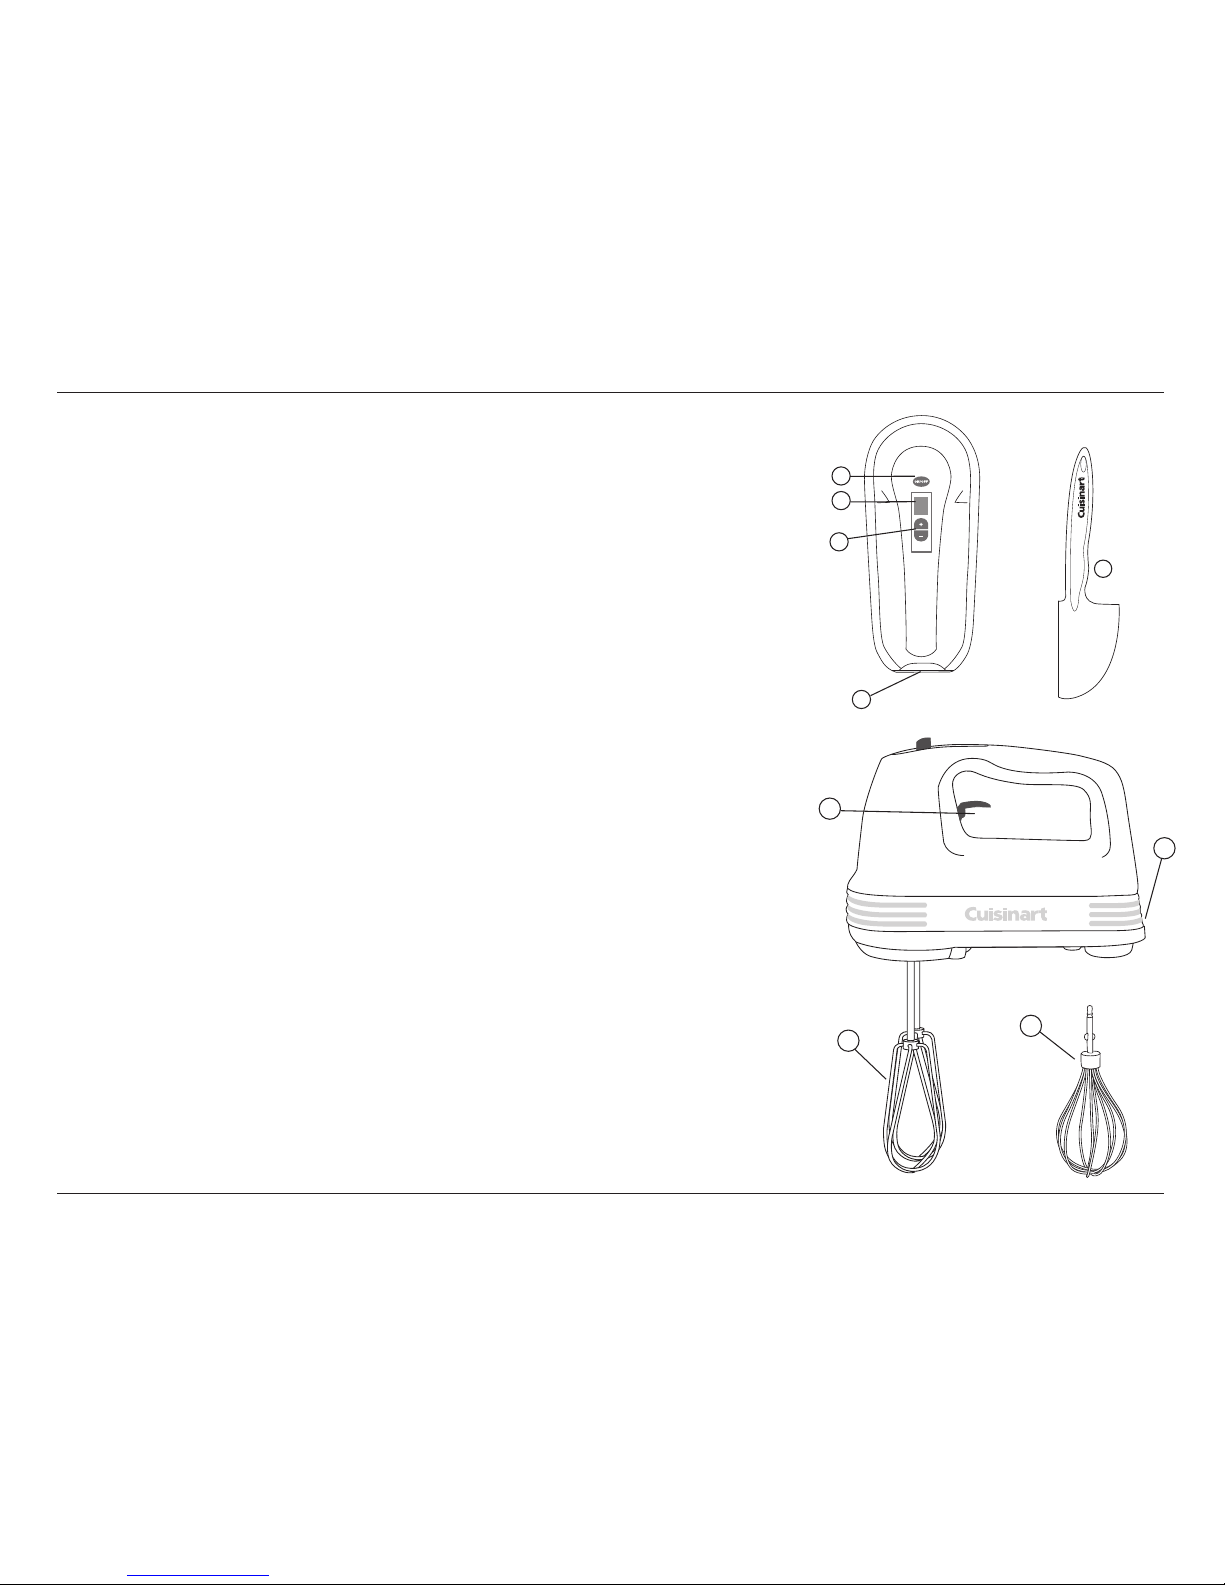
FEATURES
AND BENEFITS
220 Watts of Power
Powerful enough to easily cut through a
double batch of cookie dough or butter
right out of the refrigerator.
Maximum Comfort
Balanced to do more work for you. The
shape of the mixer allows maximum possible power and balance. Stress-free grip
provides unparalleled comfort and control,
even during extended mixing.
Automatic Feedback
No need for a power boost. An electronic
feedback mechanism automatically feeds in
extra power when needed. It assures that
the mixer will not bog down, even when
mixing heavy loads.
SmoothStart
®
When the mixer is turned on, the beaters
start spinning very slowly to prevent
ingredients from splattering.
3 Low Mixing Speeds
Lower mixing speeds provide greater control when folding or mixing dry ingredients.
Easy To Clean
The Power Advantage™ Hand Mixer has a
smooth, sealed base; wipes clean instantly.
1. One-Step On/Off Switch
One-step power switch allows you
to turn mixer on and off in a single
operation.
2. LED Speed Display
Digital speed settings are easy to read.
3. One-Touch Speed Control
Allows you to change speeds quickly
while you are mixing.
4. Exclusive Rotating Swivel Cord
Unique swivel cord can be positioned
for comfortable right- or left-handed use.
5. Spatula
6. Beater Release Lever
Conveniently located for easy
ejection of beaters or whisk.
7. Extra-Long Beaters
Extra-long, extra-wide beaters for
superior, faster aerating, mixing, and
whipping. Designed without center post
to prevent ingredients from clogging up
beaters. Beaters are easy to clean and
dishwasher safe.
8. Chef’s Whisk
Professional 3'' (6 cm) -diameter whisk
adds volume to whipped cream and
creates stiff, fine-textured egg whites.
Provides superior whipping and aerating.
9. Heel Rest
Allows mixer to rest squarely on
countertop.
3
Page 4

Larger
Hole
Collar
USE AND CARE
Inserting Beaters
1. Unplug mixer and set the power switch
to the OFF position.
2. Insert beater with collar into the larger
hole. Push beater in until it clicks into
place. Insert the beater without collar
into the smaller hole. Push beater in until
it clicks into place.
Inserting Chef's Whisk
1. Turn off and unplug mixer.
2. Hold chef’s whisk at stem end, and
insert into either hole. Push whisk in
until it clicks. DO NOT PUSH WHISK IN
FROM WIRE END, AS YOU MAY
DAMAGE WIRES.
Turning Mixer On/Off
Plug mixer into outlet. Press On/Off switch
to turn mixer On. Mixer will immediately
begin to mix on Speed 1. To turn mixer off,
press On/Off switch again.
Changing Speeds
Press the + button on the digital touchpad
to increase the speed. Press the - button to
decrease the speed.
Cleaning and Removing Beaters
1. Before cleaning the Power Advantage
TM
Hand Mixer, press the OFF switch and
unplug from wall outlet. Lift the beater
release lever and remove the beaters
from the mixer. Wash the beaters after
each use in hot, soapy water or in a
dishwasher.
2. NEVER PUT THE MOTOR HOUSING
IN WATER OR OTHER LIQUID TO
CLEAN. Wipe it with a damp cloth or
sponge. Do not use abrasive cleansers,
which could scratch the surface.
NOTE: DO NOT USE NONSTICK
COOKWARE WITH THE CUISINART
HAND MIXER.
QUICK REFERENCE GUIDE
Mixing Techniques
The Power AdvantageTM Hand Mixer should
always be set on the lowest speed when
you start mixing.
NOTE: The chef’s whisk attachment
is used only for light whipping. See Speeds
4, 6, and 7 below. For all other mixing tasks,
use the beaters.
With the Beaters
Speed 1
• Ultra-slow mixing to combine and
aerate dry ingredients without splatter
• Add nuts, chips, dried fruit to cookie
doughs/cake batters
• Fold delicate creams and egg whites
into batters
• Start mixing frostings
• Stir sauces/gravies
• Mix muffins/pancakes
Speed 2
• Cream cold (not frozen) butter and sugar
• Mash potatoes/squash
• Add dry ingredients to batters/doughs
Speed 3
• Start mixing cake mixes
• Add eggs to batters/doughs
• Add dry ingredients alternately with
liquid ingredients
• Cream softened butter and sugar
• Whip potatoes/squash
Speed 4
• Whip cream
(with chef’s whisk)
• Complete beating butter cream frostings
• Complete beating cake mixes
Speed 5
• Beat whole eggs/yolks
• Mix thin batters
With Chef’s Whisk Attachment
Speed 6
• Add sugar to whipped egg whites
for meringues
4
Page 5

• Beat egg yolks until thick and light
Speed 7
• Whip egg whites
RECIPES
Mixing Tips
• Always read entire recipe and measure all
ingredients before beginning the mixing
process.
• For best results, do not measure flour
directly from the bag. Pour into a con
tainer or bowl, scoop out the flour and
level with the back of a knife or spatula.
For flour stored in a container, stir before
measuring.
• Eggs, butter and cream cheese combine
more thoroughly at room temperature.
• Remove butter for recipe first and cut into
1
⁄
2
-inch (1.25 cm) pieces, then measure out
remaining ingredients for recipe. This will
hasten the warming process. Do not warm
butter for baking in a microwave unless
instructed to do so. Microwaving can melt
butter; melted butter will change the final
product.
• The best cheesecakes are made when
the eggs and cream cheese are at a
similar room temperature. While the
Cuisinart® Power Advantage™ Hand Mixer
can easily mix cold cream cheese, the
trick is not to add too much air, which can
cause cracking.
• For best results, use heavy cream, cold
from the refrigerator, for whipped cream.
• For best results, whip egg whites in
a spotlessly clean stainless steel or
glass mixing bowl. If available, use a
copper mixing bowl.
• Chocolate chips, nuts, raisins, etc. can
be added using speeds 1 or 2 of your
hand mixer.
• To separate eggs for any recipe, break
one at a time into a small bowl, gently
remove yolk, then transfer egg white to
spotlessly clean mixing bowl. If a yolk
breaks into the egg white, reserve that
egg for another use. Just a drop of egg
yolk will prevent the whites from whipping
properly.
• To achieve the highest volume of egg
whites, the mixing bowl and chef’s whisk
attachment or beaters must be spotlessly
clean and free of any fat, oil, etc. (Plastic
bowls are not recommended for whipping
egg whites.) The presence of any trace
of fat or oil will prevent the egg whites
from increasing in volume. Wash bowl
and attachments thoroughly before
beginning again.
• Occasionally ingredients may stick to
the sides of the mixing bowl. When this
occurs, turn mixer off and scrape the
sides of the bowl with a rubber spatula.
Note: All recipes are mixed with beaters
unless recipe specifies using chef’s whisk.
5
Page 6

CINNAMON MUFFINS
These tasty muffins are great for breakfast.
You may add blueberries or chopped apple
for a fruit muffin.
Makes 12 regular or 24 mini muffins.
cooking spray
3 tablespoons (45 ml) brown sugar,
packed
2 cups (500 ml) unbleached, all-purpose
flour
1 tablespoon (15 ml) baking powder
1 teaspoon (5 ml) cinnamon
¼ teaspoon (1 ml) salt
2 large eggs
1 cup (250 ml) evaporated skim milk
(not reconstituted), or whole milk
¼ cup (50 ml) unsalted butter, melted and
cooled
Preheat the oven to 375˚F (190°C). Lightly
coat 12 regular or 24 mini muffin cups
with cooking spray (even if using nonstick
bakeware).
Crumble the brown sugar to remove lumps.
Place the brown sugar, flour, baking powder,
cinnamon, and salt in a medium bowl. Mix
on Speed 1 for 30 seconds to combine;
reserve.
Place the eggs in a second bowl. Beat
on Speed 3 until slightly foamy, about
30 seconds. While mixing on Speed 3,
add the milk and melted butter; mix for
15 seconds. Pour over the dry ingredients,
and use Speed 1 to fold in until the
ingredients are just moistened. Scoop
into the prepared muffin cups. Bake in
the preheated oven: 18 to 20 minutes for
regular muffins, 14 to 16 minutes for mini
muffins, until lightly browned and springy
to touch in the centre. Serve warm with
Maple Orange Butter. Muffins may be
made ahead and frozen; thaw and warm
before serving.
Nutritional information per serving
(1 regular or 2 mini muffins):
Calories 155 (29% from fat) • carb. 22g • pro. 5g
• fat 5g • sat. fat 3g • chol. 46mg • sod. 208mg
• calc. 141mg • fiber 1g
DOUBLE CHOCOLATE GRAHAM
OAT COOKIES
Makes about 45 three-inch (6 cm) cookies.
1 cup (250 ml) graham cracker crumbs
1 cup (250 ml) rolled oats (regular, not
quick-cooking)
11⁄2 cups (375 ml) unbleached, all-purpose
flour
1 teaspoon (5 ml) baking soda
1
⁄2 teaspoon (2 ml) salt
1 cup (250 ml) unsalted butter, cut into
16 pieces, at room temperature
3
⁄4 cup (175 ml) granulated sugar
3
⁄4 cup (175 ml) brown sugar, packed
2 large eggs
2 teaspoons (10 ml) vanilla extract
12⁄3 cups [400 ml (11-ounce package)]
semi-sweet or milk chocolate morsels
Preheat oven to 350°F (180°C). Line baking
sheets with parchment paper or a nonstick
baking sheet liner.
In a small bowl, combine graham cracker
crumbs, oats, flour, baking soda, and salt.
Mix on Speed 1 for 15 seconds; reserve.
Place the butter and both sugars in a large
bowl. Mix on Speed 1 until creamy, about
45 to 60 seconds. Mix on Speed 3 until
creamed and smooth, about 1 minute. Mix
in eggs and vanilla, 30 seconds on Speed
2. Add the flour mixture in 2 additions,
mixing on Speed 2. Add chocolate morsels, mix on Speed 2 until combined, about
20 seconds.
Drop by rounded spoonfuls [2 tablespoons
(30 ml)]; for ease you may use a #40
ice cream scoop) onto prepared baking
sheets. Bake for 9 to 11 minutes, or until
set. Cool for 2 minutes on baking sheets,
then remove to wire racks to cool
completely.
Note: For a cookie with nuts, substitute
half or all of the chocolate morsels with
chopped nuts.
Nutritional information per cookie:
Calories 154 (42% from fat) • carb. 21g • pro. 2g
• fat 7g • sat. fat 4g • chol. 20mg • sod. 134mg
• calc. 37mg • fiber 1g
6
Page 7

CHOCOLATE CHIP
SHORTBREAD COOKIES
Makes about 4 dozen cookies.
1 cup (250 ml) unsalted butter,
room temperature
3
⁄4 cup (175 ml) brown sugar, packed
11⁄2 teaspoons (7 ml) pure vanilla extract
2 cups (500 ml) unbleached, all-purpose
flour
1 cup (250 ml) miniature semisweet
chocolate chips granulated sugar for
garnish
Preheat oven to 350ºF (175°C).
Starting on Speed 1, cream butter and
brown sugar for about 30 seconds.
Increase to Speed 3 and mix for 3 minutes
or until light and fluffy. Scrape bowl and
beat in vanilla, about 30 seconds. Sprinkle
1
⁄2 of the flour over the top and beat on 1
until mixed in, about 20 seconds. Sprinkle
the remaining flour and beat until a dough
begins to form, about 45 seconds. Using
Speed 1, stir in chocolate chips.
Roll dough into 11⁄4-inch (3 cm) balls and
place about 3 inches (7.5 cm) apart on
ungreased cookie sheets. Using the bottom of a drinking glass which has been
smeared with a little bit of butter, dip it in
sugar, and flatten each cookie to about
3
⁄8 inch (1 cm) . Bake in preheated 350°F
(175°C) oven for about 12 minutes until
cookies are just beginning brown on
edges.
Cool on baking sheets for 2 minutes, then
transfer to a wire rack to cool completely.
Store in an airtight container.
Nutritional information per cookie:
Calories 79 (57% from fat) • carb. 8g • pro. 1g
• fat 5g • sat. fat 3g • chol. 10mg • sod. 1mg
• calc. 4mg • fiber 0g
CHOCOLATE ALMOND
BISCOTTI
Makes about 4 dozen.
21⁄2 cups (625 ml) unbleached, all-purpose
flour
2
⁄3 cup (150 ml) unsweetened cocoa
powder (Dutch process preferred)
2 teaspoons (10 ml) baking powder
1
⁄2 teaspoon (2 ml) salt
1
⁄2 cup (125 ml) unsalted butter, at room
temperature
1
⁄2 cup (125 ml) granulated sugar
1
⁄2 cup (125 ml) packed brown sugar
3 large eggs, 1 of them separated
4 ounces (115 g) bittersweet chocolate,
melted and cooled slightly
1
⁄4 cup (50 ml) coffee liqueur (Kahlua®,
Tia Maria
®
, Kamora®)
1 teaspoon (5 ml) pure vanilla extract
1
⁄4 teaspoon (1 ml) almond extract
1 cup (250 ml) slivered almonds, lightly
toasted
Combine the flour, cocoa, baking powder,
and salt in a medium bowl. Mix on Speed
1 for 15 seconds. In a large bowl, cream
the butter and sugars using Speed 1, just
until incorporated, 5 to 10 seconds. Add
the 2 eggs and egg yolk, one at a time,
beating for 10 seconds after each addition.
Combine the chocolate, liqueur, vanilla and
almond extracts; combine with the butter
mixture, 15 seconds. Do not overbeat.
Using Speed 1, gradually beat in the flour
mixture, 1 cup (125 ml) at a time, for
15 seconds after each addition, to form a
soft dough. Stir in the nuts. Form dough
into a rough 9-inch (23 cm) square, cover
with plastic and refrigerate the dough for
1 hour or until it is easy to handle.
Preheat oven to 350ºF (175°C). Line a
baking sheet with parchment paper or a
nonstick baking liner. Divide the dough in
3 pieces, and with floured hands, shape
each into a 10-inch (25 cm) log. Place on
the prepared baking sheet and flatten to
2 inches (5 cm) across. Place the reserved
egg white in a small bowl and beat until
frothy using Speed 2. Brush the logs with
the beaten egg white. Bake 30 to
35 minutes until firm.
Remove from oven and cool on a rack for
10 minutes. Lower oven temperature to
250ºF. Slice each log into 1⁄2-inch (1.25 cm)
pieces using a serrated knife, place the
biscotti back on the baking sheet and bake
for 15 to 20 minutes, until dry. Let cool
completely on a wire rack. Store in an
airtight container.
Nutritional information per biscotti:
Calories 106 (47% from fat) • carb. 12g • pro. 2g
• fat 6g • sat. fat 2g • chol. 18mg • sod. 40mg
• calc. 19mg • fiber 1g
7
Page 8

CAPPUCCINO CHEESECAKE
Makes 12-16 servings.
2 tablespoons (30 ml) instant espresso
powder
1
⁄2 cup (125 ml) half-and-half
cooking spray
3 tablespoons (45 ml) unsalted butter, cut
into 1⁄2-inch (1.25 cm) pieces
21⁄2 cups (625 ml) granulated sugar, divided
3
⁄4 cup (175 ml) unbleached, all-purpose
flour
1
⁄4 cup (50 ml) unsweetened cocoa
1
⁄2 teaspoon (2 ml) cinnamon
1
⁄4 teaspoon (1 ml) baking powder
1
⁄8 teaspoon (0.8 ml) salt
1 large egg yolk
16 ounces (453 g) cream cheese (regular),
at room temperature
16 ounces (453 g) lowfat cream cheese,
at room temperature
4 large eggs*
2 tablespoons (30 ml) cornstarch
2 teaspoons (8 ml) vanilla extract choco
-
late curls for garnish, optional
In a small bowl dissolve the espresso
powder in the half-and-half; reserve.
Preheat oven to 350°F (180°C). Lightly
coat a 9 x 3 inch (23 x 6 cm) springform or
cheesecake pan with cooking spray.
Place the butter and 1⁄4 cup (50 ml) of the
sugar in a medium bowl. Mix on Speed 3
to cream, 11⁄2 minutes. Add flour, cocoa,
cinnamon, baking powder, and salt; mix on
Speed 1 until combined, 30 seconds. Add
egg yolk and mix on Speed 1 until crumbly,
15 seconds. Press into bottom of prepared
pan. Bake in preheated 350°F (180°C)
oven for 10 minutes, until slightly puffed
(crust may have cracked appearance; that
is normal). Place on a rack to cool. When
the pan is cool to touch, wrap a sheet of
aluminum foil around the bottom and sides
of the pan so that it comes up at least 2
inches (5 cm).
Place cream cheeses and remaining sugar
in a large mixing bowl. Beat on Speed 2
until combined and smooth, 2 minutes.
Using Speed 1, add eggs, one at a time,
mixing for 15 seconds after each addition.
Scrape the bowl. Add cornstarch, mix on
Speed 1, 20 seconds. Scrape the bowl.
Add half-and-half mixture and vanilla
extract; mix on Speed 2 until smooth and
completely combined. Pour the mixture
over the cooled crust. Place the pan in a
larger aluminum pan and place in the oven;
add enough hot water to the outer pan so
that it is 1⁄2-inch (1.25 cm) deep. Bake in
the preheated 350°F (180°C) oven for 60 to
70 minutes, until the cheesecake is pulling
away from the sides of the pan; the center
will be jiggly. Remove from the oven, remove
the foil and let cool completely on a rack.
Refrigerate at least 4 hours before serving.
Garnish with chocolate curls if desired.
Nutritional information per serving (16 servings):
Calories 368 (48% from fat) • carb. 41g • pro. 8g
• fat 20g • sat. fat 12g • chol. 116mg • sod. 290mg
• calc. 89mg • fiber 1g
Variation:
After the cheesecake is mixed, add
3 ounces (85 g) each chopped white and
bittersweet chocolate using Speed 1;
mix for 15 seconds to combine.
*Warm cold eggs safely before using by
placing in a bowl of hot (not boiling) water
for 10 minutes. They will incorporate more
easily into your mixture.
LEMON TEA LOAF
Yield: 1 loaf, sixteen 1⁄2-inch (1.25 cm) slices.
3 cups (750 ml) unbleached, all-purpose
flour
2 teaspoons (10 ml) baking powder
1
⁄2 teaspoon (2 ml) salt
2
⁄3 cup (150 ml) melted butter
2 cups (500 ml) sugar
3
⁄4 cup (175 ml) fresh lemon juice, divided
1
⁄4 cup (50 ml) finely chopped lemon zest
(about 4 lemons)
4 large eggs
1 teaspoon (5 ml) pure vanilla extract
1 cup (250 ml) whole milk yogurt
1
⁄2 cup (125 ml) confectioners’ sugar, sifted
Preheat oven to 350°F (180°C). Butter and
flour a 9 x 5 x 3 inch (23 x 13 x 6 cm)
[8-cup (2 L)] loaf pan.
Sift flour, baking powder, and salt together
into a medium mixing bowl.
Place the melted butter and sugar in a
large mixing bowl and combine using
Speed 3 for one minute. The mixture will
still seem slightly granular. Continue mixing
and add 1⁄2 cup (125 ml) of the lemon juice
and zest.
Add eggs one at a time and then the
vanilla.
Add the dry ingredients and yogurt to the
batter alternately in three additions, using
Speed 2, ending with the yogurt.
8
Page 9

Pour batter into prepared loaf pan. Bake
on the middle rack for approximately
1 hour 35 minutes, rotating the pan half
way through baking time. Check cake
for doneness after 1 hour 20 minutes.
Cake is finished when cake tester comes
out clean.
While cake is baking, mix remaining 1⁄4 cup
(50 ml)
of the lemon juice with sifted
confectioners’
sugar until white and glossy;
reserve.
Allow cake to rest about ten minutes, until
cool to the touch. Remove from pan and
place on a dish with a lip. Prick the cake
with a toothpick all over the top, particularly
along the cracks. Pour glaze over top of
cake, spreading it with a spatula or pastry
brush to make sure it covers the top and
side surfaces of the loaf. Transfer to a wire
rack and allow cake to cool completely
before slicing.
Nutritional information per serving:
Calories 294 (29% from fat) • carb. 49g • pro. 5g
• fat 10g • sat. fat 6g • chol. 75mg • sod. 131mg
• calc. 32mg • fiber 1g
ORANGE APRICOT GLAZE
Makes 1⁄2 cup (125 ml) glaze.
1
⁄2 cup (125 ml) apricot preserves
2 tablespoons (30 ml) Grand Marnier
®
liqueur
1 teaspoon (5 ml) fresh lemon juice
Place preserves, liqueur and lemon juice
in a small bowl. Insert the mixing beaters.
Mix on Speed 7 for 1 minute. May use as
is, or for a smoother glaze, press through
a strainer.
Nutritional information per serving
[about 11⁄3 teaspoon (6.6 ml)]:
Calories 28 (1% from fat) • carb. 7g • pro. 0g
• fat 0g • sat. fat 0g • chol. 0mg • sod. 4mg
• calc. 2mg • fiber 0g
MOCHA CAKE
These moist layers can be made ahead
and frozen. Frost several hours before
serving with Deep Mocha Frosting.
Makes two 9-inch (22 cm) layers,
12 servings.
13⁄4 cups (425 ml) unbleached, all-purpose
flour, plus
2 tablespoons for pan
2 cups (500 ml) granulated sugar
3
⁄4 cup (175 ml) unsweetened cocoa
powder
2 teaspoons (10 ml) baking soda
1 teaspoon (5 ml) baking powder
1 teaspoon (5 ml) salt
2 large eggs
1 cup (250 ml) strong brewed coffee
1 cup (250 ml) buttermilk
1
⁄2 cup (125 ml) unsalted butter, melted
and cooled, plus 1 tablespoon (15 ml)
for pan
1 teaspoon (5 ml) vanilla extract
Position rack in centre of the oven, and
preheat oven to 350ºF (180°C). Butter two
9-inch (22 cm) round, 2-inch (5 cm) deep
cake pans and line each with round of
parchment paper or waxed paper. Butter
the parchment and dust the pans with
flour, taking care to shake out all excess
flour.
Place flour, sugar, cocoa, baking soda,
baking powder and salt in a large bowl;
mix on Speed 1 for 20 seconds. Make a
well in the center and add eggs, coffee,
buttermilk, butter and vanilla. Beat for
2 minutes on speed 3; batter will be thin.
Pour into prepared pans.
9
Page 10

Bake for 30 to 40 minutes, until a toothpick
inserted into the centre comes out clean.
Cool for 10 minutes, remove from pans;
remove and discard parchment. Place on
wire racks to cool completely. Frost with
Deep Mocha Frosting.
DEEP MOCHA FROSTING
Makes about 21⁄2 cups (625 ml), enough for
two 9-inch (22 cm) round layers.
3
⁄4 cup (175 ml) heavy cream
1
⁄2 cup (125 ml) unsalted butter
1
⁄2 cup (125 ml) sugar
12 ounces (340 g) semisweet chocolate
1
⁄2 tablespoon (340 g) espresso powder
1 teaspoon (5 ml) vanilla
Combine all ingredients in saucepan and
place over medium heat. Heat mixture until
it is almost simmering. Reduce heat to
medium low and mix on Speed 2, mix until
all the chocolate is melted and mixture
is well combined, smooth, creamy and
homogenous with no visible bits of
chocolate remaining. This process takes
approximately 8 minutes.
Before using, transfer to a bowl and
refrigerate mixture for about an hour until it
sets up. Deep Mocha Frosting can be
made in advance and refrigerated. Remove
from refrigerator about an hour before
using to allow frosting to come to a
spreadable consistency.
Nutritional information per serving [about
31⁄3 tablespoons (50 ml) – frosting on 1⁄12 of a
2-layer cake):
Calories 151 (76% from fat) • carb. 9g • pro. 0g
• fat 13g • sat. fat 8g • chol. 41mg • sod. 7g
• calc. 12mg • fiber 0g
CHOCOLATE SOUFFLÉ CAKE
Makes one 10-inch (25 cm) round cake;
sixteen slices.
2 tablespoons (30 ml) unsalted butter
plus additional for pan
6 ounces (170 g) bittersweet chocolate
2 ounces (60 g) semisweet chocolate
9 large eggs
2 large egg whites
11⁄4 cups (300 ml) granulated sugar, divided
1
⁄3 cup (75 ml) unbleached, all-purpose
flour
Preheat oven to 365°F (185°C). Cut a circle
of parchment paper to line a 10" (25 cm)
round cake pan. Butter the bottom and
sides of cake pan well. Add enough flour
to coat the buttered interior, being sure to
tap the pan and remove any excess flour.
Place the parchment circle at the bottom of
the pan and butter and flour it as well.
Melt the butter and chocolates in a
stainless bowl over a double boiler, and
set aside.
Separate eggs into two mixing bowls,
adding the extra whites to the bowl of egg
whites. Add 3⁄4 cup (175 ml) of the sugar to
the bowl of yolks. Mix the yolks and sugar
on Speed 4 for 11⁄2 minutes until very pale
and thick; reserve. Using the chef’s whisk,
beat the egg whites on Speed 5 for 1 minute; add the remaining 1⁄2 cup (125 ml) of
sugar and continue beating whites for an
additional 2 minutes until it reaches soft
peaks. Remove the chef’s whisk and insert
the beaters. Using Speed 1, and
reserving about one quarter of the whites,
fold whites into the yolk mixture in three
additions. Scrape the bottom and sides of
bowl to make certain the mixture is evenly
blended. Sift in the flour into mixture and
fold gently. Finally add the last of the egg
whites again using the same folding
technique. To ensure complete incorporation, use a rubber spatula to scrape the
bottom and sides of the bowl.
Transfer the batter to the prepared pan
and bake in the preheated 365°F (185°C)
oven for about 40 minutes, until cake has
puffed and cracked but is still soft to the
touch on top.
Turn cake out onto serving plate and
remove pan. Sprinkle the top with sifted
confectioners’ sugar. Serve immediately
or at room temperature.
Nutritional information per serving:
Calories 195 (42% from fat) • carb. 25g • pro. 5g
• fat 10g • sat. fat 5g • chol. 123mg • sod. 43mg
• calc. 22mg • fiber 1g
10
Page 11

TIRAMISÙ
Makes one 9-inch (23 cm) square pan,
12 servings.
For champagne sabayon:
3 egg yolks
1
⁄2 cup (125 ml) granulated sugar
1
⁄2 cup (125 ml) champagne
8 ounces (225 g) mascarpone
3
⁄4 cup (175 ml) heavy cream
1
⁄4 cup (50 ml) plus 31⁄2 tablespoons
(52.5 ml) Kahlua® or coffee liqueur
1
⁄4 teaspoon (1 ml) pure vanilla extract
3 cup (85 g) espresso or strongly brewed
coffee
1 recipe g
énoise (recipe follows)*
3 ounces (85 g) semi-sweet chocolate,
made into chocolate curls (with
vegetable peeler)
To make sabayon:
Place egg yolks and sugar in mixing bowl.
Using beater attachment mix yolks and
sugar until pale and thick on Speed 4. Place
bowl over warm water bath to resemble
double boiler. Using the chef’s whisk attachment, beat the yolk mixture on Speed 2 or 3.
Add champagne after 11⁄2 minutes. Continue
beating for as long as 8 minutes, until the
mixture has tripled in volume and it is too
warm to submerge your finger. Remove bowl
from heat and continue beating an additional
30 seconds to cool slightly; set aside.
In two separate mixing bowls, place the
mascarpone and heavy cream. With the
beaters, mix the mascarpone until smooth.
Fold the mascarpone into the yolk mixture
using the lowest speed. Using the whisk
attachment, beat the heavy cream on Speed
5. After 1 minute add 1
1
⁄2 tablespoons (25 ml)
of Kahlua® and vanilla. Continue beating until
soft peaks form, about 2 minutes total.
Fold the whipped cream into the yolk and
mascarpone mixture. You should have about
31⁄2 cups (875 ml) of filling. Fill a shallow dish
with remaining Kahlua
®
and the coffee.
Slice the génoise into 1⁄2-inch (1.25 ml) strips.
Soak the cake pieces in coffee until
saturated. Use soaked cake to line the bottom of a 9-inch (23 cm) square pan. Cover
with half of the filling and then chocolate
curls. Continue with another layer of soaked
cake, the remaining filling and then finally
cover with the remaining chocolate curls.
Cover with plastic wrap and refrigerate for at
least 6 hours before serving.
After removing sabayon from heat, transfer
to a bowl and allow to cool. Cover and
place in the refrigerator until completely
chilled. Fold in 1⁄2 to 3⁄4 cups (125 - 175 ml)
whipped cream and serve.
Note: The sabayon is wonderful on its own
with berries for a simple dessert.
Nutritional information per serving:
Calories 382 (53% from fat) • carb. 33g • pro. 5g
• fat 23g • sat. fat 12g • chol. 184mg • sod. 68mg
• calc. 56mg • fiber 1g
*May substitute 18 to 20 savoiardi (crisp
lady fingers), purchased or homemade.
GRAND MARNIER®
WHIPPED CREAM
Makes about 2 cups (500 ml).
1 cup (250 ml) heavy cream
1
⁄4 cup (50 ml) confectioners’ sugar, sifted
1
⁄2 teaspoon (2 ml) pure vanilla extract
3 tablespoons (45 ml) Grand Marnier
®
liqueur
Place heavy cream in mixing bowl. Using
the chef’s whisk attachment, whip the
cream on Speed 5 for about 1 minute.
Add the sifted sugar, vanilla, and Grand
Marnier®. Whip for an additional minute
until soft peaks form.
Nutritional information per serving (2 tablespoons):
Calories 64 (76% from fat) • carb. 3g • pro. 0g
• fat 6g • sat. fat 3g • chol. 20mg • sod. 6mg
• calc. 13mg • fiber 0g
11
Page 12

COFFEE WHIPPED CREAM
Makes about 2 cups (500 mL).
1 cup (250 ml) heavy cream
1
⁄4 cup (50 ml) confectioners’ sugar, sifted
1
⁄4 teaspoon (1 ml) pure vanilla extract
1
⁄4 cup (50 ml) strong brewed coffee,
chilled
Place heavy cream in a cold mixing bowl.
Using the chef’s whisk, whip the cream for
1 minute on Speed 5. At this point add the
sifted confectioners’ sugar and vanilla and
1 teaspoon (5 ml) of coffee. Continue
beating, adding one teaspoon of coffee
at a time to taste until cream reaches soft
peak stage, about 2 to 3 minutes.
Nutritional information per serving:
Calories 59 (83% from fat) • carb. 23g • pro. 0g
• fat 6g • sat. fat 35g • chol. 20mg • sod. 6mg
• calc. 10mg • fiber 0g
HERBED CHEESE
Instead of purchasing expensive
herb-flavoured cheeses, you can easily
prepare your own.
Makes about 2 cups (500 ml).
Preparation: 10 minutes or less.
8 ounces (225 g) cream cheese (may use
regular or lowfat)
5 ounces (145 g) chèvre or other goat
cheese (soft type, not aged)
1 clove garlic, peeled and minced
1 tablespoon (15 ml) finely minced shallot
or green onion
1 tablespoon (15 ml) finely chopped fresh
parsley
1 teaspoon (5 ml) herbes de Provence
1
⁄2 teaspoon (2 ml) kosher salt
1
⁄4 teaspoon (1 ml) white pepper dash hot
sauce such as Tabasco®, to taste
Place the cream cheese, chèvre, garlic,
shallot, parsley, herbes de Provence, and
salt in a medium bowl. Mix for 1 minute,
on Speed 3, then increase speed to Speed
5 to whip for an additional 2 minutes until
light and fluffy. Add white pepper and hot
sauce to taste, whip on Speed 5 for 30
seconds longer. Allow cheese spread to
stand at least 30 minutes before serving,
to allow flavours to blend. Transfer to
a resealable container and refrigerate.
Remove from refrigerator 15 minutes
before
serving to soften. Serve with crackers,
pita
or bagel chips. It also makes a good topping for a baked potato.
Nutritional information per serving [2 tablespoons
(30 ml), made with lowfat cream cheese]:
Calories 58 (69% from fat) • carb. 1g • pro. 3g
• fat 4g • sat. fat 3g • chol. 9mg • sod. 156mg
• calc. 35mg • fiber 0g
ROASTED RED PEPPER AND
SUN-DRIED TOMATO DIP
Serve this dip with crackers, bagel
chips or pita chips. Or, try it as a spread
on sandwiches, or as a topping
for baked potatoes.
Makes 2 cups (500 ml).
8 ounces (225 g) cream cheese
(lowfat or regular), cut into 8 pieces
1
⁄2 cup (125 mL) sour cream
(lowfat or regular)
1 roasted red pepper,
cut into 1-inch (2.5 cm) pieces
1
⁄3 cup (75 ml) chopped sun-dried
tomatoes (not oil-packed)
1 tablespoon (15 ml) chopped
fresh parsley
1 clove garlic, chopped
1
⁄2 teaspoon (2 ml) basil
1
⁄8 teaspoon (0.5 ml) freshly ground black
pepper
Combine all ingredients in a medium bowl.
Mix on Speed 3 until well blended and
smooth, 2 minutes. Mix on Speed 5 to
lighten, 1 minute. Transfer to a resealable
container and refrigerate for 30 minutes
or longer to allow flavours to blend before
serving.
Nutritional information per serving [2 tablespoons
(30 ml)], made with lowfat products:
Calories 54 (52% from fat) • carb. 4g • pro. 2g
• fat 3g • sat. fat 2g • chol. 7mg • sod. 111mg
• calc. 43mg • fiber 0g
12
Page 13

GORGONZOLA BUTTER
Serve a slice of this savory compound
butter on top of your favourite steak – it
will melt and impart an incredible flavour.
Makes 1 roll compound butter, 16 slices.
1
⁄2 cup (125 ml) unsalted butter, softened
1
⁄4 cup (50 ml) Gorgonzola, crumbled
pinch freshly ground pepper
Place butter in mixing bowl, mix on Speed
1 until smooth and slightly fluffy, about
30 seconds. Add Gorgonzola and mix
until well blended, about 30 to 40 seconds
longer.
Using a sheet of plastic wrap or waxed
paper as an aid, shape butter into a log,
about 1 inch (2.5 cm) in diameter. Wrap
butter in plastic wrap twisting the ends to
form a log. Chill until firm enough to slice.
Place slices of Gorgonzola butter on top
of grilled or broiled steak, a fluffed baked
potato, or steamed vegetables.
Note: Butter can be wrapped in a whole
log or wrapped in smaller sizes and kept in
freezer. Double wrap using an outer wrap
of aluminum foil to prevent absorption of
freezer odors.
Nutritional information per slice:
Calories 52 (96% from fat) • carb. 0g • pro. 0g
• fat 6g • sat. fat 4g • chol.16 mg • sod. 5mg
• calc. 2mg • fiber 0g
BALSAMIC VINAIGRETTE
Makes 11⁄2 cups (375 ml).
1 shallot, peeled and finely chopped
[approximately 1 tablespoon (15 ml)]
1
⁄4 cup (50 ml) balsamic vinegar
1
⁄2 teaspoon (2 ml) salt
1
⁄2 teaspoon (2 ml) freshly ground pepper
1
⁄2 teaspoon (2 ml) sugar
3 teaspoons (15 ml) Dijon mustard
3
⁄4 cup (175 ml) extra virgin olive oil
1
⁄4 cup (50 ml) vegetable oil
Place shallot, vinegar, salt, pepper, sugar,
and Dijon in a mixing bowl. Mix ingredients
until well incorporated.
Add olive oil and then vegetable oil in
a slow stream to the bowl with the mixer
running to ensure emulsification.
Adjust seasoning to taste.
Nutritional information per serving
[2 tablespoons (30ml)]:
Calories 166 (96% from fat) • carb. 2g • pro. 0g
• fat 22 g • sat. fat • chol. 0g • sod. 153mg
• calc. 1mg • fiber 0g
PARMESAN PEPPERCORN
DRESSING
This dressing is not only good on salads,
but is a perfect spread for sandwiches,
from smoked turkey to roast beef. It can
be used as a dip for vegetables or even
served alongside roasted meats.
Makes 11⁄2 cups (375 ml).
1
⁄2 cup (125 ml) reduced fat mayonnaise
1
⁄2 cup (125 ml) reduced fat sour cream
1
⁄2 cup (125 ml) Parmigiano Reggiano,
finely grated
1 teaspoon (5 ml) crushed black
peppercorns
2 tablespoons (30 ml) fresh basil,
chopped
1 tablespoon (15 ml) red wine vinegar
1 teaspoon (5 ml) Dijon mustard
1 tablespoon (15 ml) fresh parsley, finely
chopped
1
⁄2 tablespoon (7 ml) finely chopped shallot
1
⁄2 teaspoon (2 ml) lemon juice
Place all ingredients in a medium mixing bowl
and mix on Speed 2 until thoroughly combined,
about 1 minute.
Nutritional information per serving
[2 tablespoons (30 ml)]:
Calories 61 (65% from fat) • carb. 3g • pro. 2g
• fat 4g • sat. fat 1g • chol. 8mg • sod. 169mg
• calc. 66mg • fiber 0g
13
Page 14

MISO GINGER DRESSING
This dressing is wonderful to use to
make an Asian Slaw using shredded
cabbage, bok choy, carrots, daikon,
cucumbers and green onions, as well
as to dress a traditional salad.
Makes about 2 cups (500 ml).
11⁄2 tablespoons (25 ml) miso*
1
⁄3 cup (75 ml) rice vinegar
1
⁄2 teaspoon (2 ml) mirin**
1 teaspoon (5 ml) soy sauce
3 teaspoons (15 ml) peeled and finely
chopped fresh ginger
1
⁄2 teaspoon (2 ml) finely chopped fresh
garlic
1 teaspoon (2 ml) brown sugar
11⁄4 cup (300 ml) vegetable oil
1 teaspoon (5 ml) sesame oil
In a medium mixing bowl, mix miso and
vinegar until well blended, smooth and
homogenous using Speed 2, about 1 to 2
minutes. Add mirin and soy sauce and mix
to combine, about 20 seconds. Add ginger,
garlic, and brown sugar and mix well about
30 seconds.
With mixer on Speed 1, add the vegetable oil and then the sesame oil in a
slow, steady stream into the bowl and mix
until totally emulsified and homogenous.
Let stand 30 minutes or longer to allow
flavours to blend before using. Store in
an airtight container in the refrigerator. If
dressing separates, mix on Speed 2 until
emulsified.
Nutritional information per serving
[2 tablespoons (30 ml)]:
Calories 158 (97% from fat) • carb. 1g • pro. 0g
• fat 17g • sat. fat 1g • chol. 0mg • sod. 80mg
• calc. 2mg • fiber 0g
*Miso (Japanese fermented soybean paste)
can be purchased in most Asian/Japanese
markets, natural food stores and in many
well-stocked grocery stores. It is kept
refrigerated in an airtight container.
**Mirin is a low-alcohol sweet wine
made from glutinous rice, also
known as “rice wine.” It is available in
Asian/Japanese markets, and in the
gourmet section of well-stocked
grocery stores.
CAPONATA
Serve Caponata as an appetizer spread
with pita chips or thinly sliced French
bread. It is also a good dressing to
use on a wrap-type sandwich.
Makes 11⁄4 cups (300 ml).
1 medium size eggplant, about
11⁄2 pounds (750 g)
2 tablespoons (30 ml) capers, drained
1 tablespoon (15 ml) celery, finely diced
1
⁄2 teaspoon (2 ml) finely diced sweet red
pepper
1 tablespoon (15 ml) finely chopped green
onion
1 teaspoon (5 ml) chopped fresh basil
1 teaspoon (5 ml) chopped fresh mint
1
⁄2 teaspoon (2 ml) finely chopped fresh
parsley
2 tablespoons (30 ml) extra virgin olive oil
1 teaspoon (5 ml) lemon juice dash red
pepper flakes
1 teaspoon (5 ml) honey
(if eggplant seems bitter)
Preheat oven to 400°F (200°C).
Pierce eggplant with fork all around the
eggplant (about 8 times) and wrap in
aluminum foil. Roast eggplant for
approximately 45 minutes to 1 hour,
until the eggplant is very soft and has
collapsed. Unwrap and let cool.
When eggplant is cool to the touch (about
15 minutes) cut in half and spoon the soft
eggplant flesh into a mixing bowl; there
will be approximately 11⁄2 cups (375 ml) of
eggplant.
With mixer on Speed 3, mix for about
2 minutes until the eggplant turns into an
almost smooth consistency.
Add remaining ingredients and mix on
Speed 1 until just blended. Let stand
30 minutes before serving to allow
flavours to blend. May be made ahead and
refrigerated in an resealable container.
Nutritional information per serving [¼ cup (50 ml)]:
Calories 72 (55% from fat) • carb. 7g • pro. 1g
• fat 5g • sat. fat 1g • chol. 0g • sod. 112mg
• calc. 15mg • fiber 3g
14
Page 15

BOURSIN®
SMASHED POTATOES
Makes 4 cups (1 L) / eight 1⁄2-cup (125 ml)
servings.
2 pounds (1 kg) red potatoes, scrubbed
1
⁄2 package Boursin® cheese* [about
21⁄2 ounces (70 g)], cut into 8 pieces
2 tablespoons (30 ml) unsalted butter
1
⁄4 cup (50 ml) whole milk
1
⁄2 teaspoon (2 ml) kosher salt
1
⁄4 teaspoon (1 ml) freshly ground pepper
Cut unpeeled potatoes into 1-inch (2.5 cm)
pieces as uniform as possible. Place in a
large saucepan. Add cold water to cover
and a large pinch of salt. Over high heat,
bring to a boil. When boiling, reduce heat
to medium low and simmer until potatoes
are very soft, about 25 minutes.
Drain potatoes and return to saucepan,
mix on Speed 3 until completely mashed,
about 2 minutes. Add Boursin®, butter,
milk, salt, and pepper and mix on Speed 4
until fully incorporated and fluffy, about
1 minute.
Transfer to a warm bowl and serve
immediately.
Nutritional information per serving:
Calories 167 (36% from fat) • carb. 24g • pro. 4g
• fat 7g • sat. fat 5g • chol. 19mg • sod. 258mg
• calc. 27mg • fiber 2g
*Boursin® cheese is a triple-cream cheese
that is white and smooth, with a creamy,
buttery texture. It is most often flavoured
with herbs, garlic or pepper. It can be
found in the specialty cheese section of
most well-stocked grocery stores or in
gourmet food markets.
GORGONZOLA SOUFFLÉ
Makes one 8-cup (2 L) soufflé.
2
⁄3 cup (150 ml) walnuts, toasted and
ground
5 eggs, whites and yolks separated into
two mixing bowls
5 tablespoons (75 ml) unsalted butter
1
⁄2 cup (125 ml) unbleached, all-purpose
flour
11⁄2 cups (375 ml) milk
1 cup (250 ml) Gorgonzola cheese,
crumbled
1
⁄2 teaspoon (2 ml) salt
1
⁄4 teaspoon (1 ml) fresh ground pepper
1
⁄2 cup (125 ml) shredded mozzerella
Preheat oven to 350°F (180°C). Butter an
eight-cup (2 L) soufflé dish well and coat
with toasted ground walnuts; set aside.
Beat egg yolks using Speed 1 for
30 seconds; reserve.
Melt butter in a saucepan. Add flour and
stir with a wooden spoon until smooth and
cook over medium heat for 2 minutes, stirring occasionally. Mix on Speed 1 while
adding the milk, about 11⁄2 minutes, beating until smooth. Cook slowly allowing the
mixture to thicken, while mixing on Speed
2 until the mixture becomes smooth and
thick, approximately 5 minutes total. Add
Gorgonzola and mozzarella and stir until
melted and smooth. Remove from heat.
While mixing egg yolks on Speed 1, spoon
a small amount of hot cheese mixture into
the yolks and mix until smooth. Continue
adding the warm cheese mixture slowly to
the yolks, while mixing (the mozzarella will
be stringy).
Using chef’s whisk, beat the egg whites
until soft peaks form, about 11⁄2 minutes on
Speed 5.
Fold the whites into the yolk/cheese
mixture in three additions with the beater
attachment set to the lowest speed.
Pour into prepared soufflé dish and bake in
the middle of oven until puffed over the rim
of soufflé dish and golden, approximately
40 to 45 minutes. Serve immediately.
Nutritional information per serving:
Calories 207 (70% from fat) • carb. 7g • pro. 8g
• fat 16g • sat. fat 7g • chol. 118mg • sod. 315mg
• calc. 139mg • fiber 0g
15
Page 16

WARRANTY
LIMITED THREE-YEAR
WARRANTY
This warranty supersedes all previous
warranties on this Cuisinart® product.
This warranty is available to consumers
only. You are a consumer if you own a
Cuisinart® product that was purchased
at retail for personal, family or
household use. This warranty is not
available to retailers or other
commercial purchasers or owners.
We warrant that this Cuisinart
®
product
will be free of defects in material or
workmanship under normal home use
for three years from the date of original
purchase.
For warranty purposes, we would like to
suggest that you register your product
on-line at www.cuisinart.ca to facilitate
verification of the date of original
purchase. However, should you not
wish to register on-line we recommend
the consumer to maintain original
receipt indicating proof of purchase. In
the event that you do not have proof of
purchase date, the purchase date for
purposes of this warranty will be the
date of manufacture.
When calling our Authorized Service
Centre for in warranty service please
make reference to your model number
and the manufacturing date code. This
information can be found in the rating
area on the body or underneath the
base of your unit. The model number
will follow the word Model: HM-70BKC.
The manufacturing date code is a 4 or 5
digit number. Example, 80630 would
designate year, month & day (2008,
June 30th).
If your Cuisinart® product should prove
to be defective within the warranty
period, we will repair it or, if we think it
necessary, replace it. To obtain warranty
service, please call our Consumer
Service Centre toll-free at
1-800-472-7606 or write to:
Cuisinart Canada
100 Conair Parkway
Woodbridge, Ontario
L4H 0L2
To facilitate the speed and accuracy of
your return, please also enclose $10.00
for shipping and handling of the
product. Please also be sure to include
a return address, description of the
product defect, product serial number,
and any other information pertinent to
the product’s return. Please pay by
cheque or money order.
NOTE: For added protection and secure
handling of any Cuisinart® product that
is being returned, we recommend you
use a traceable, insured delivery
service.
Cuisinart cannot be held responsible for
in transit damage or for packages that
are not delivered to us. Lost and/or
damaged products are not covered
under warranty.
Your Cuisinart
®
product has been
manufactured to strict specifications
and has been designed for use with
Cuisinart® authorized accessories and
replacement parts for your model.
These warranties expressly exclude any
defects or damages caused by
accessories, replacement parts or
repair service other than those that have
been authorized by Cuisinart. These
warranties exclude all incidental or
consequential damages.
BEFORE RETURNING YOUR
CUISINART PRODUCT
Important: If the nonconforming
product is to be serviced by someone
other than Cuisinart’s Authorized
Service Centre, please remind the
servicer to call our Consumer Service
Centre to ensure that the problem is
properly diagnosed, the product
serviced with the correct parts, and to
ensure that the product is still under
warranty.
16
Page 17

Cuisinart offers an extensive assortment of top quality products to make life in the
kitchen easier than ever. Try some of our other countertop appliances and
cookware, and Savor the Good Life®.
www.cuisinart.ca
Coffeemakers
Food
Processors
Toaster Ovens
Blenders
Stand Mixers
©2008 Cuisinart
Cuisinart® is a registered trademark of Cuisinart
100 Conair Parkway
Woodbridge, Ontario L4H 0L2
Consumer Call Centre E-mail:
Consumer_Canada@Conair.com
Printed in China
08CC25116
IB-7731-CAN
Any trademarks or service marks of third parties referred to herein
are the trademarks or service marks of their respective owners.
 Loading...