

Page 1
Recipe
Booklet
Included
For your safety and continued enjoyment of this product, always read the instruction book carefully before using.
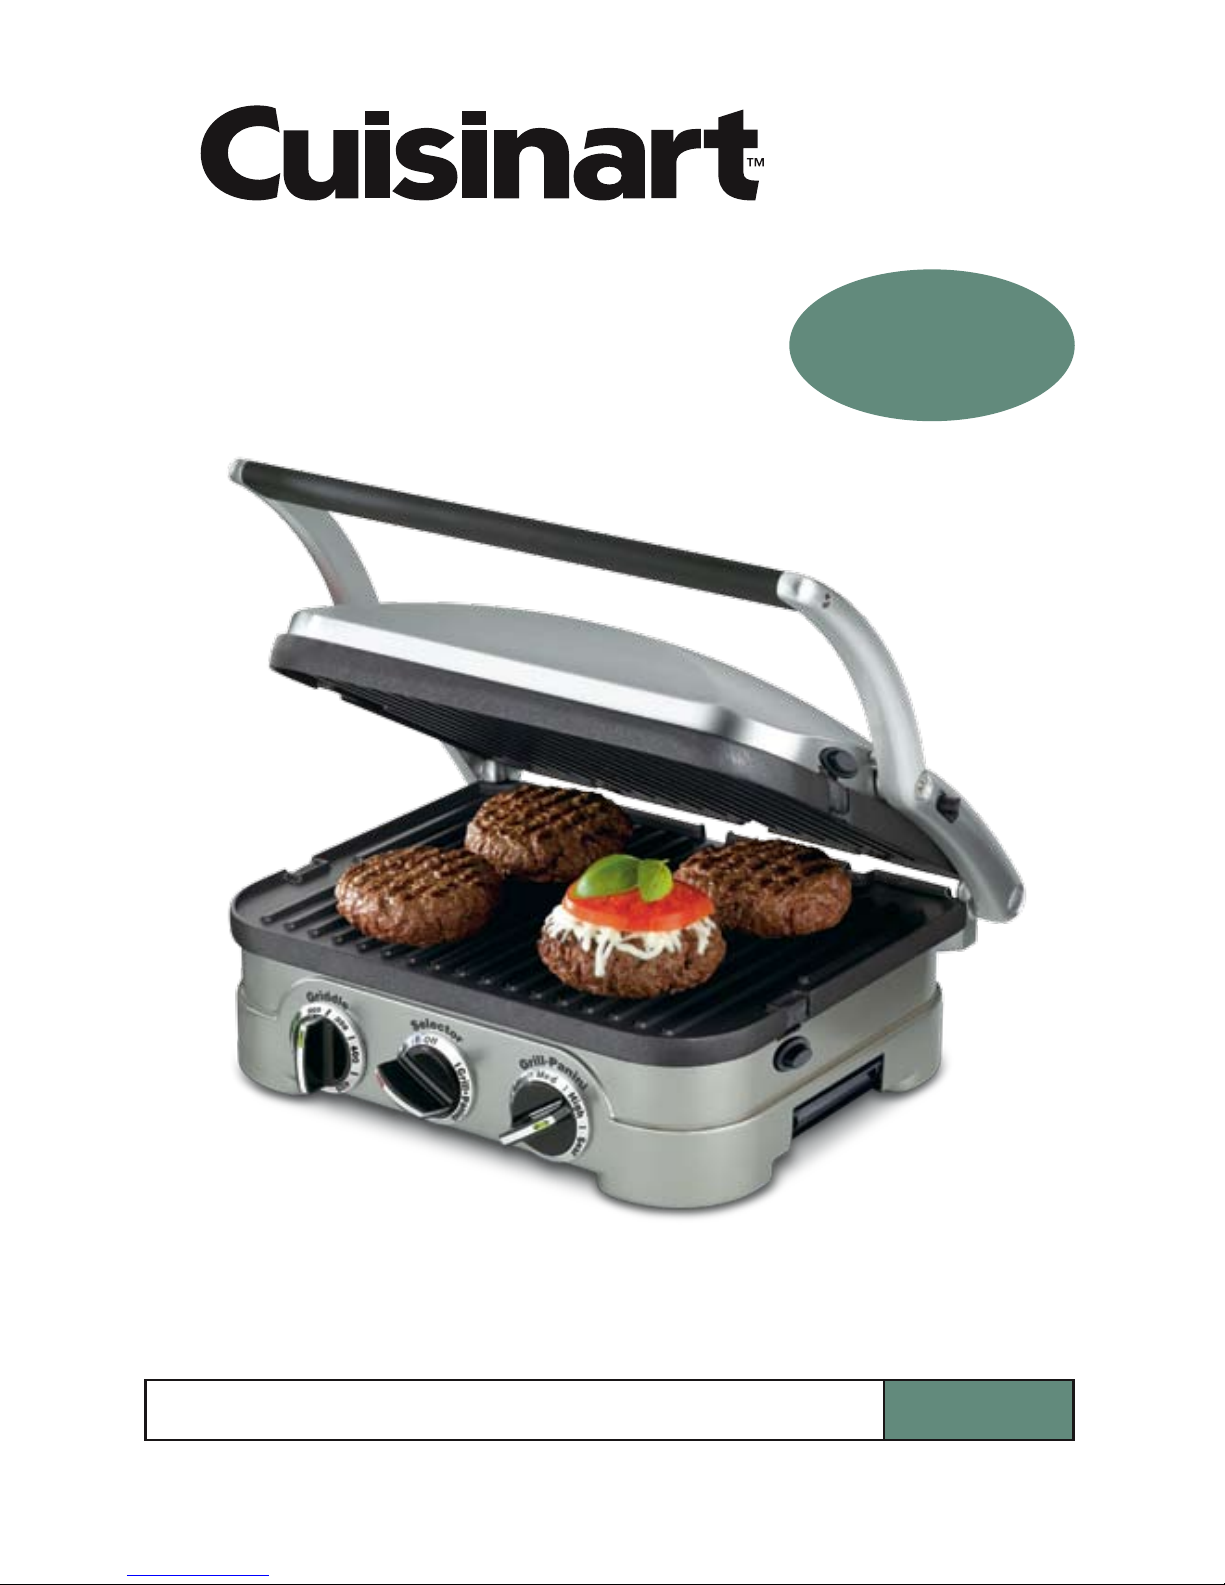
CuisinartTM Griddler
TM
CGR-4NC
INSTRUCTION
BOOKLET
Page 2
2
1
5
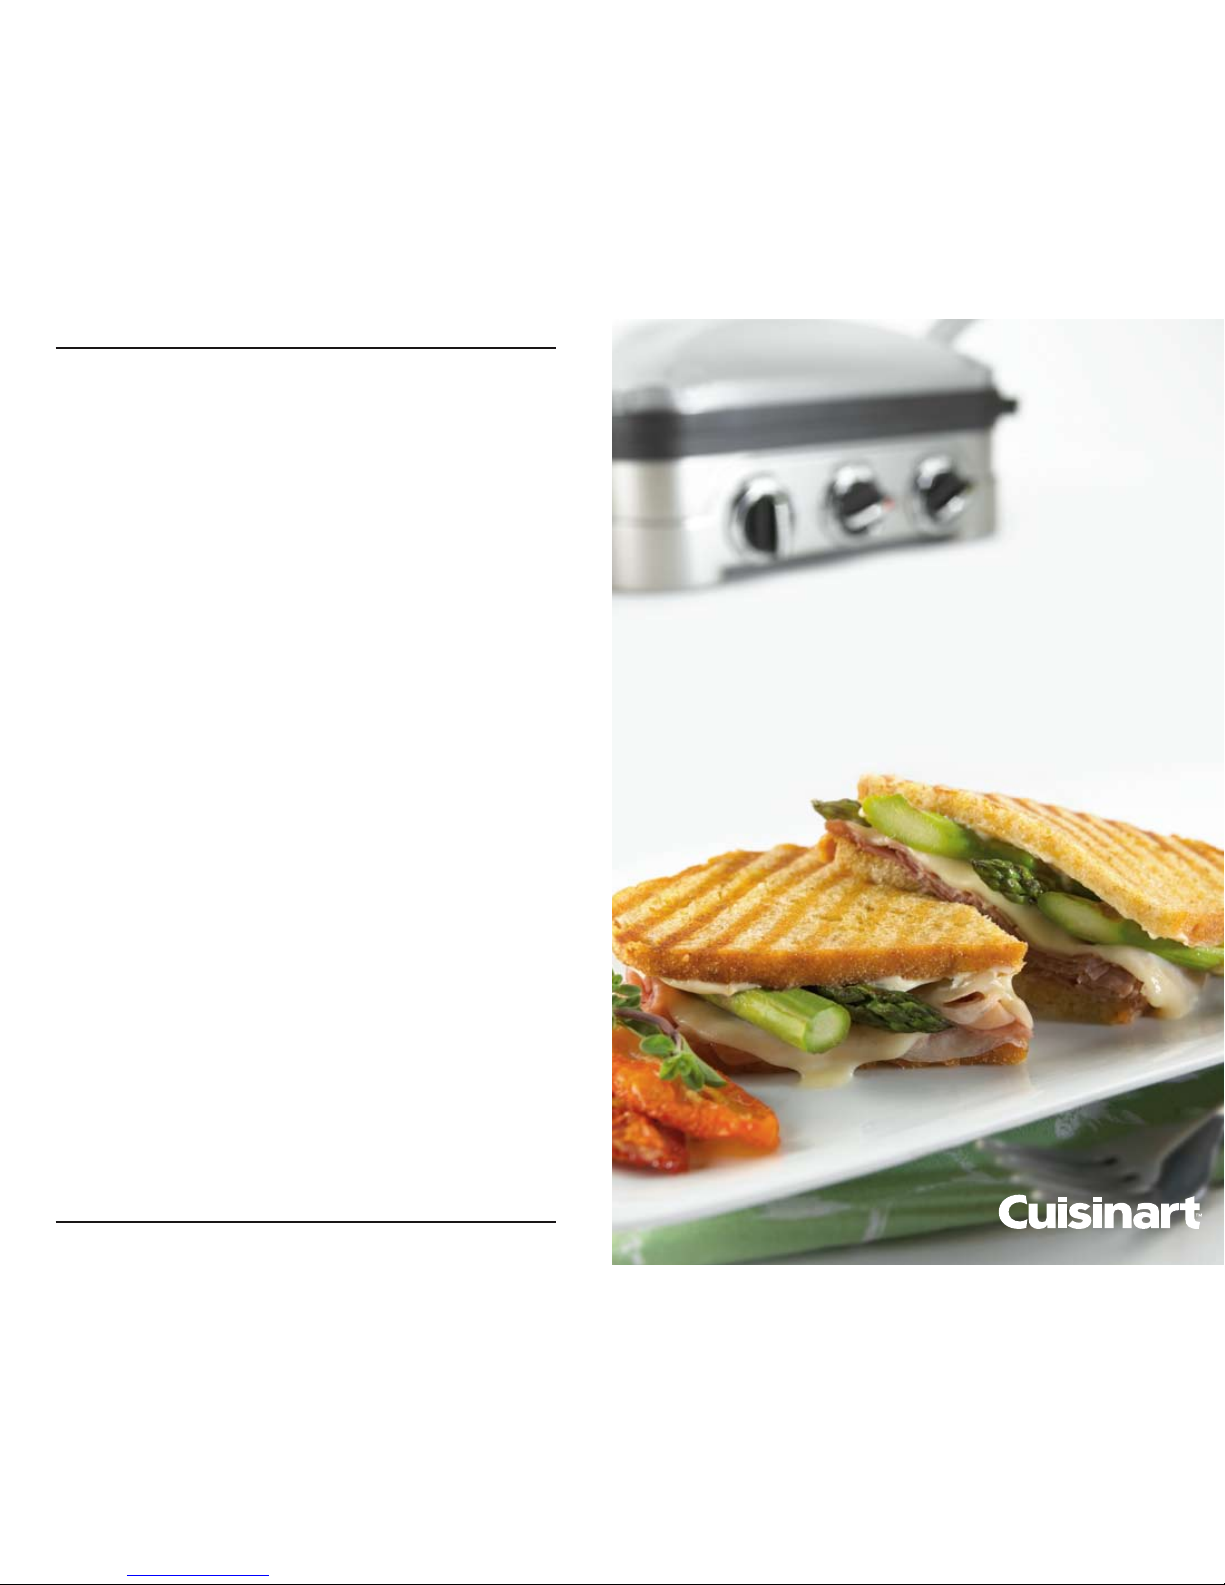
5
4a
4b
4c
6
7
8
7
3a
3b
1
2
3
INTRODUCTION
Congratulations on your purchase of the
CuisinartTM GriddlerTM. This product is
actually five appliances in one. A hinged,
floating cover and one set of removable
and reversible cooking plates turn the
GriddlerTM into a contact grill, panini
press, full grill, full griddle, or half grill/half
griddle. Dual temperature controls and
indicator lights make this product easy to
use. Dishwasher-safe plates, integrated
drip tray and a cleaning/scraping tool
make cleanup fast and easy.
PARTS AND FEATURES
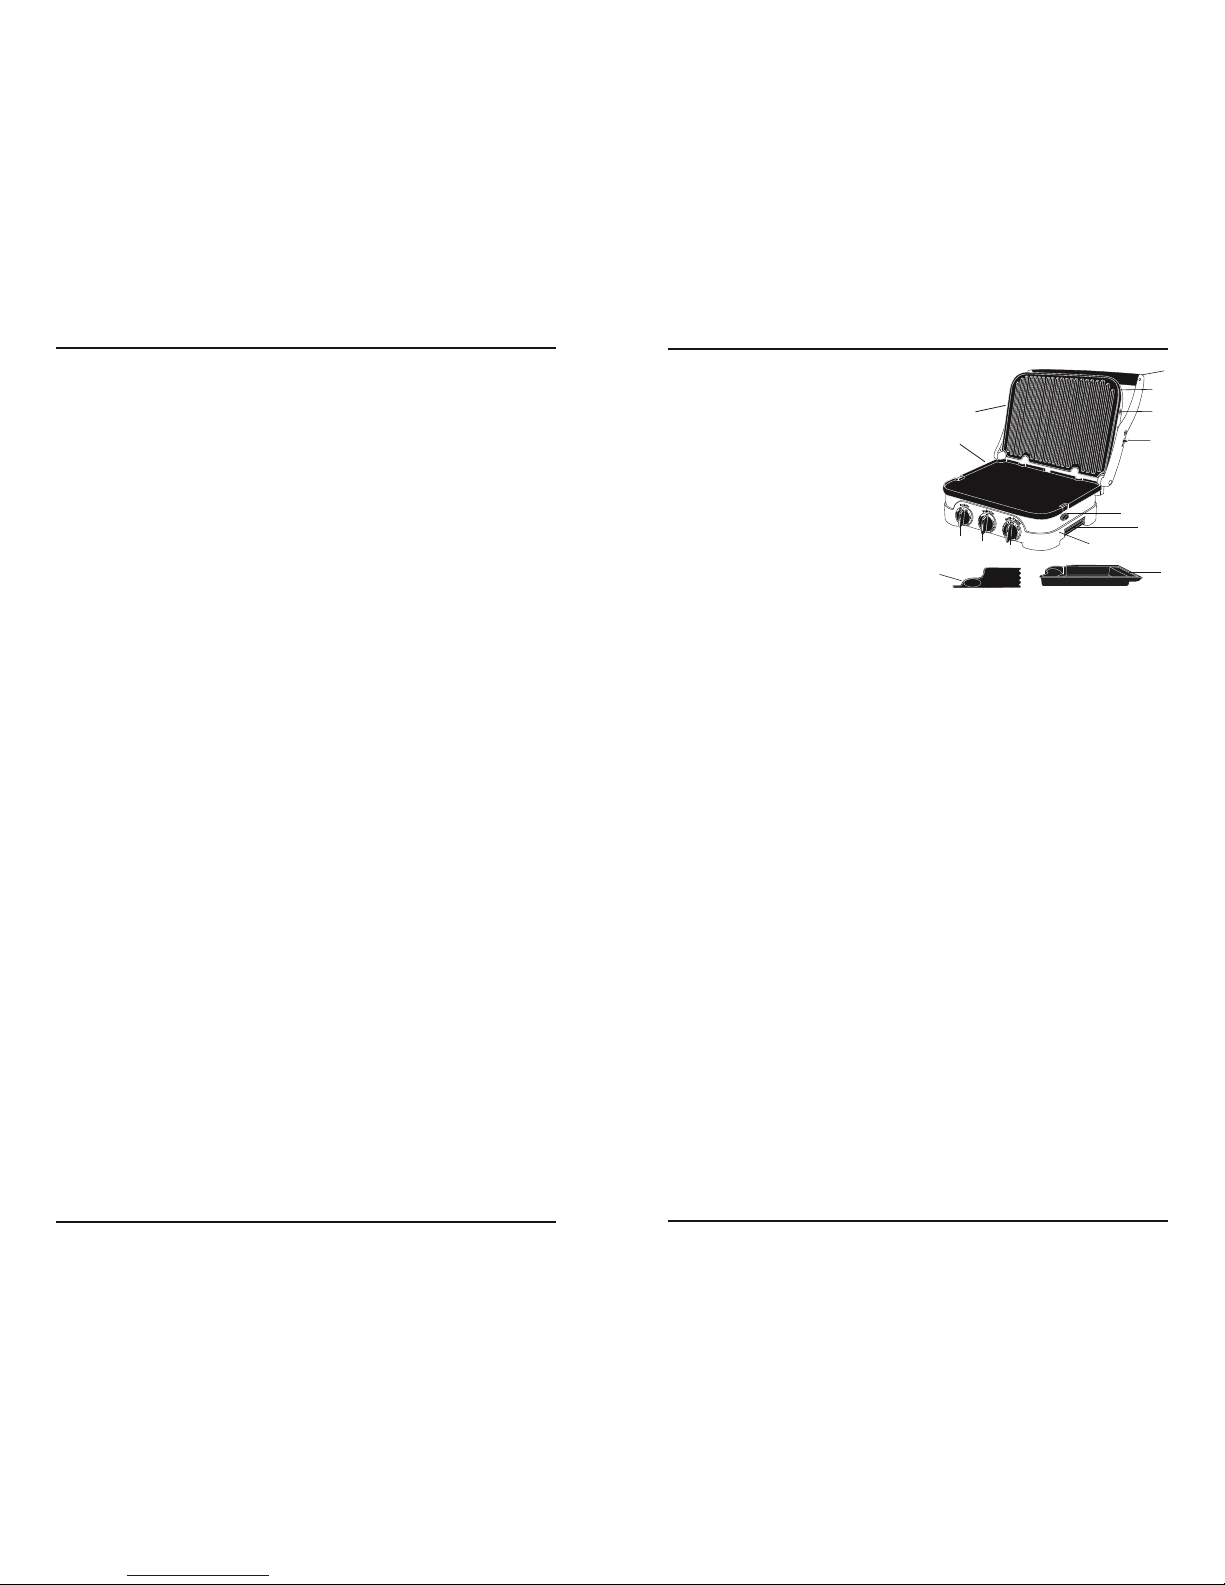
1. Base and Cover
Solid construction with stainless steel
self-adjusting cover
2.
Panini-Style Handle
Sturdy cast-metal handle adjusts cover
to accommodate thickness of food
3.
Removable and Reversible
Cooking Plates
Nonstick and dishwasher safe for easy
cleanup
a.
Grill Side: Perfect for grilling
steak,
burgers, chicken and vegetables
b. Griddle Side: Prepare flawless
pancakes, eggs, bacon and seared
scallops
4.
Controls
Indicator lights signal Power On
and Ready to Cook
a.
Selector
Choose the Grill/Panini or Griddle
function
b.
Grill/Panini
Adjust temperature from “warm” to
“sear”
c.
Griddle
Adjust temperature from 200ºF to 425ºF
(95°C to 220°C).
5.
Drip Tray
Collects grease and removes from base
for easy cleanup (dishwasher safe)
6.
Cleaning/Scraping Tool
Helps clean grill and griddle plates
after cooking
7.
Plate Release Buttons
Push in to release and remove
cooking plates
8.
Hinge Release Lever
Allows the cover to extend back for
cooking in the flat position
BEFORE THE
FIRST USE
Remove all packaging materials and any
promotional labels or stickers from your
grill. Be sure all parts (listed under Parts
and Features) of your new appliance
have been included before discarding any
packaging materials. You may want to
keep the box and packing materials for
use at a later date.
Before using your CuisinartTM GriddlerTM
for the first time, remove any dust from
shipping by wiping the base, cover and
controls with a damp cloth. Thoroughly
clean cooking plates, drip tray and
scraping tool. The plates, drip tray and
cleaning tool are dishwasher safe. Refer
to Assembly Instructions for plate
removal.
THE GRIDDLERTM
DOES IT ALL
The GriddlerTM is the ultimate kitchen
appliance, offering you five separate
cooking options. Simply flip the reversible
cooking plates and adjust the hinge to
use as a contact grill, panini press, full
grill, full griddle, or half grill/half griddle.
See Assembly Instructions and
Operating Instructions.
IMPORTANT
SAFEGUARDS
1. READ ALL INSTRUCTIONS.
2. Do not touch hot surfaces; use
handles or knobs.
3. To protect against fire, electric shock,
and injury to persons, DO NOT
IMMERSE CORD OR PLUG in water
or other liquids.
4.
Close supervision is necessary when
any appliance is used by or near
children.
5. Unplug from outlet when not in use
and before cleaning. Allow to cool
before putting on or taking off parts,
and before cleaning appliance.
6. Do not operate any appliance with a
damaged cord or plug, or after the
appliance has malfunctioned or has
been damaged in any manner.
7. The use of accessory attachments
not recommended by Cuisinart may
result in fire, electrical shock, or risk
of injury to persons.
8. Do not use outdoors.
9. Do not let power cord hang over
edge of table or counter, or touch hot
surfaces.
10. Do not place on or near hot gas or
electric burner, or in a heated oven.
11. Unplug the unit when finished using.
12. Do not use appliance for other
than intended use.
13. Extreme caution must be exercised
when moving an appliance containing
hot oil or other hot liquids.
14. To disconnect, turn Selector Dial to
OFF setting, then remove plug from
wall outlet.
15.
WARNING: TO REDUCE THE RISK
OF FIRE OR ELECTRIC SHOCK,
ONLY AUTHORIZED PERSONNEL
SHOULD DO REPAIRS.
SAVE THESE
INSTRUCTIONS
FOR HOUSEHOLD
USE ONLY
SPECIAL CORD SET
INSTRUCTIONS
A short power-supply cord is provided to
reduce the risks resulting from becoming
entangled in or tripping over a longer
cord. Longer extension cords are
available and may be used if care is
exercised in their use.
If a long extension cord is used, the
marked electrical rating of the extension
cord should be at least as great as the
electrical rating of the appliance, and the
longer cord should be arranged so that it
will not drape over the countertop or
tabletop where it can be pulled on by
children or animals, or tripped over.
NOTICE
This appliance has a polarized plug (one
blade is wider than the other) to reduce
the risk of electric shock. This plug will fit
in a polarized outlet only one way. If the
plug does not fit fully in the outlet, reverse
the plug. If it still does not fit, contact a
qualified electrician. Do not modify the
plug in any way.
CONTENTS
Important Safeguards ............................ 2
Introduction ............................................ 3
Parts and Features ................................ 3
Before the First Use ............................... 3
The Griddler
TM
Does it All....................... 3
Assembly Instructions ........................... 5
Operating Instructions ........................... 6
User Maintenance .................................. 7
Cleaning and Care ................................. 7
Storage ................................................... 8
Warranty ............................................... 28
Page 3
4
5
Contact Grill
Use the GriddlerTM as a Contact Grill to
cook burgers, boneless pieces of meat
and thin cuts of meat and vegetables.
The Contact Grill function works best
when you want to cook something in a
short amount of time or when you are
looking for a healthy method of grilling.
When cooked on the contact grill, food
will cook quickly because you are grilling
both sides of the food at the same time.
The ribs on the grill side of the plates,
combined with the grease spout at the
rear of the plate, allow the grease to drip
from the meat and drain off the plates.
When the GriddlerTM is used as a Contact
Grill, the grill side of the plates is
recommended. Rest the cover evenly on
top of the food until it has reached the
desired cooked temperature.
The GriddlerTM was designed with a
unique handle and hinge that allow the
cover to adjust to the thickness of the
food. You can easily grill anything from a
thinly sliced potato to a thick sirloin steak
with even results.
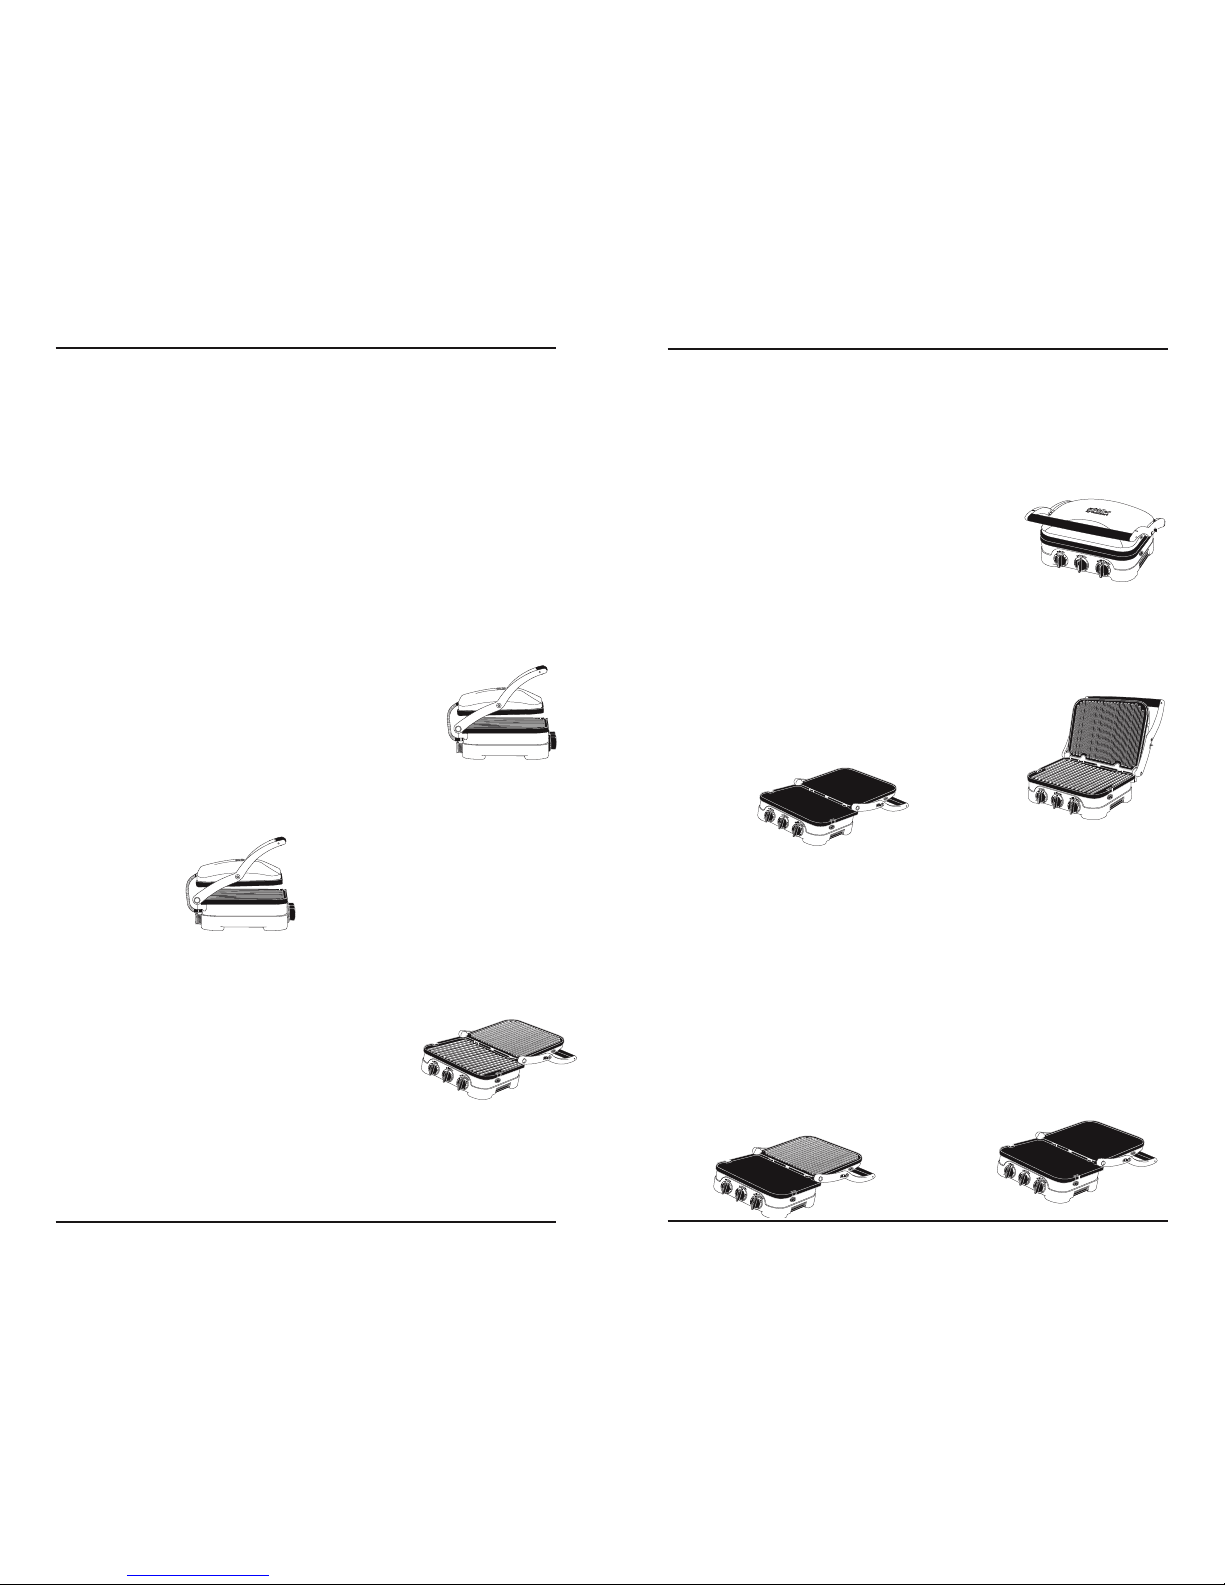
When cooking more than one food item in
the Contact Grill, it is
important that the
thickness of food
items is consistent so
the cover will close
evenly on the food.
Panini Press
Use the GriddlerTM as
a Panini Press to grill
sandwiches, breads and quesadillas.
The word “panini” is Italian for grilled
sandwiches. Panini can include any
combination of ingredients such as
vegetables, meat and cheese layered
between two pieces of fresh-baked
bread. The sandwich is then pressed
between two grill or griddle plates to toast
the bread and warm the sandwich.
Experiment to make a variety of savory or
sweet sandwiches for any meal. We
recommend using fresh-baked bread to
produce the best tasting panini. Popular
breads used for panini are focaccia (a flat
bread frequently baked with rosemary,
salt and onion on top), michetta (a small
round roll with a crisp crust), ciabatta (a
rectangular bread with a slightly domed
crust) and thick slices of classic Italian
bread.
When the GriddlerTM is used as a Panini
Press, the grill side of the plates is
recommended. We recommend the grill
side of the plates because traditionalstyle panini sandwiches have grill marks
on the bread. However, depending upon
the type of sandwich you are preparing,
you may wish to use the griddle side of
the plates or any combination of the two.
The GriddlerTM functions as a panini press
in the same manner that it functions as a
Contact Grill. The GriddlerTM was
designed with a unique handle and hinge
that allow the cover
to adjust to the
thickness of the
sandwich you are
preparing, and to
rest there evenly.
Light pressure can
be applied to the
handle to press and heat the sandwich to
your liking.
When cooking two or more panini, it is
important that the thickness of the
sandwiches is consistent so the cover will
close evenly on the panini.
Full Grill
Use the GriddlerTM as a Full Grill to
cook burgers, steak, poultry (we do not
recommend cooking bone-in chicken,
since it does not cook evenly on a Full
Grill), fish and vegetables.
Full Grill refers to using the GriddlerTM with
the cover lying
flat, creating a
double, flat
cooking surface.
In this position,
the foods you
are grilling will
have to be turned over for cooking. When
the GriddlerTM is used as a Full Grill, the
grill side of the plates should be used.
Cooking on the Full Grill is the most
versatile method of using the GriddlerTM.
With the Full Grill, you have double the
surface area (200 sq. inches or 500 cm2)
for grilling. You have the option of cooking
different types of foods on separate
plates without combining their flavours, or
cooking large amounts of the same type
of food.
The Full Grill also accommodates
different cuts of meat with varying
thicknesses, allowing you to cook each
piece to your liking.
Full Griddle
Use the GriddlerTM as a Full Griddle to
cook pancakes, eggs, French toast, hash
browns and breakfast meats.
When you use the GriddlerTM as a Full
Griddle, open the cover so it lies flat,
creating a double, flat cooking surface. In
this position, the foods you are preparing
will have to be turned over for cooking.
When using this cooking function, the
griddle side of the plates should be used.
Cooking on the Full Griddle is a wonderful
way to
prepare
breakfast for
two or for a
large family.
The large
surface area
allows you to cook a variety of different
foods at the same time, or large amounts
of your favourite food.
Half Grill/Half Griddle
Use the GriddlerTM as a Half Grill/Half
Griddle in order to create full meals like
bacon and eggs or steak and potatoes at
the same time.
When using the GriddlerTM as a Half Grill/
Half Griddle, simply place the unit in the
flat position and insert one plate with the
grill side facing up, and another plate with
the griddle side facing up. This cooking
option allows you to use either the grill/
panini temperature or the griddle
temperature selector.
ASSEMBLY
INSTRUCTIONS
Place GriddlerTM on a clean flat surface
where you intend to cook. The GriddlerTM
can be positioned in three ways:
Closed Position – Upper plate/cover
rests flat on
lower plate/
base. This is
your starting
and heating
position
when using the
Contact Grill or Panini Press functions.
Open Position – Upper plate/cover is
open and in the 100° position. Open the
cover to this position before using the
GriddlerTM as a Contact Grill or Panini
Press.
To adjust the
GriddlerTM to
this position,
simply lift the
handle until you
feel it come to a
locking position.
The unit will
stay in this
position until you close the cover or
continue to open it to the flat position.
The cover will stay in the upright position
until you lower the handle for cooking.
When this is done, the cover will release
itself so that it lies flat on the top of the
food you are preparing. This allows you to
cook your food evenly from both top and
bottom. When you lift the handle to open
the GriddlerTM after cooking, the cover will
remain in the flat position, parallel with
the lower plate. In order to lock the cover
back into the upright position, you must
close the GriddlerTM, without any food in
place, and open it again.
Flat Position – Upper plate/cover is level
with lower plate/base. The upper and
lower
plates line
up to
create one
large
cooking
Page 4
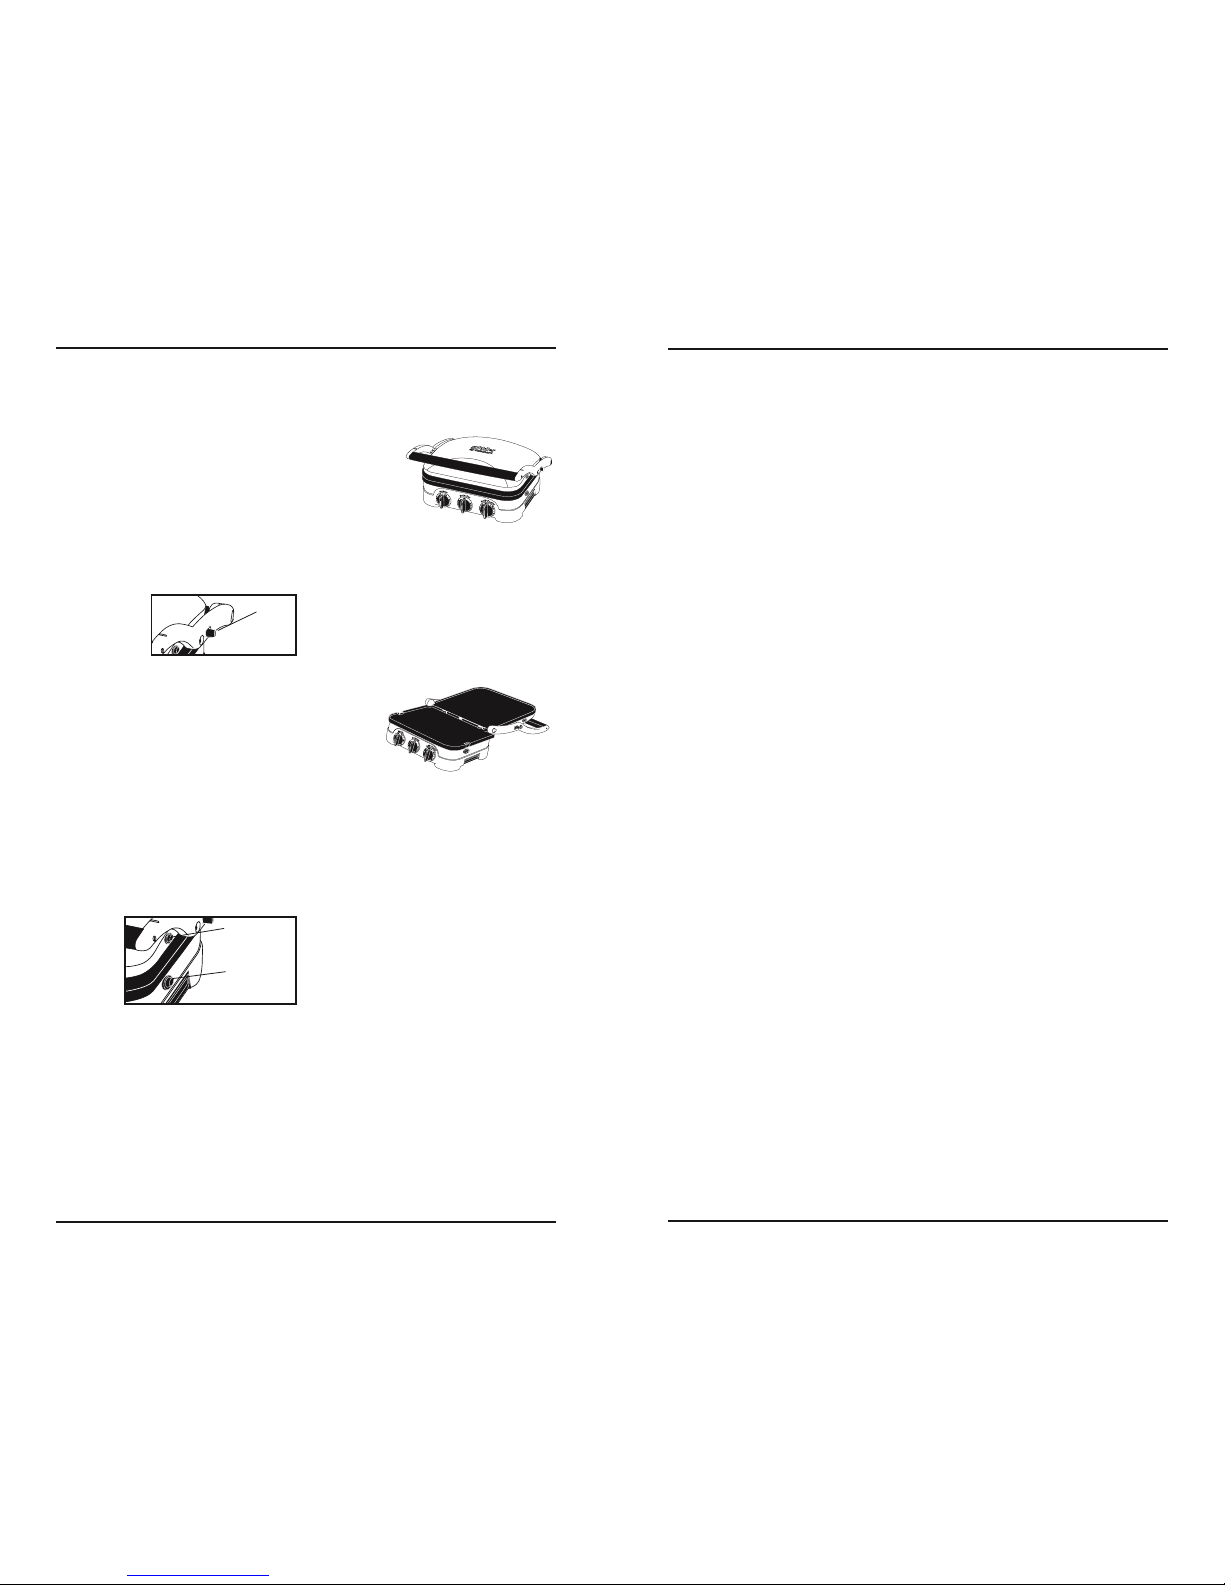
Hinge
release
lever
Lower plate
release button
Upper plate
release button
6
7
surface. The GriddlerTM is in this position
when it is used as a Full Grill, Full Griddle,
or Half Grill/Half Griddle.
To adjust the GriddlerTM to this position,
locate the hinge release lever on the
right arm.
With your left hand on the handle, use
your right hand to slide the lever toward
you. Push the handle back until the cover
rests flat on the counter. The unit will stay
in this position until you lift the handle
and cover to return it to the closed
position.
If the GriddlerTM
is already in the
open position
and you wish to
adjust it to the
flat position, pull the handle slightly
toward you and then lift the hinge release
lever. Push the handle back until the
cover rests in the flat position. Pulling the
handle forward slightly before lifting the
hinge release lever will take some of the
pressure off of the hinge and you will be
able to adjust the GriddlerTM more easily.
To insert cooking plates
Adjust the GriddlerTM to the flat position
(see page 5) with the controls directly in
front of you. Insert one plate at a time.
Each plate is designed to fit in either the
upper housing or the lower housing of the
GriddlerTM.
If you are
facing the
GriddlerTM,
the drip
spout
should be
at the
rear of the plate. Locate the metal
brackets at the center of the housing. Tilt
the back end of the plate and line up the
cutouts at the back of the plate with the
metal brackets. Slide the plate
underneath the brackets and push down
the front end of the plate. It will snap into
place. Turn the GriddlerTM around and
insert the second plate on either its grill
or griddle side into the upper housing as
you did with the first plate.
To remove cooking plates
Once the GriddlerTM is cooled, adjust to
flat position (see page 5). Locate the plate
release button
on one side of
the unit. Press
firmly on
button and the
plate will pop
up slightly
from the base.
Grasp the plate with two hands, slide it
out from under the metal brackets, and
lift it out of the base. Press on the other
plate release button to remove the other
cooking plate in the same manner.
To position drip tray
One side of the base has a slot provided
for the drip
tray. Slide
the drip
tray into
the base
according
to the
instruction
on the tray.
Grease from the food will run off the
plates through the grease spout and into
the drip tray. Grease should be safely
disposed of after the GriddlerTM has
cooled down completely. The drip tray
can be cleaned in the dishwasher.
OPERATING
INSTRUCTIONS
Once the GriddlerTM is assembled
properly and you are ready to begin
cooking, turn the Selector Dial to the left
to choose the Griddle function or to the
right to choose the Grill/Panini function,
depending on what you intend to cook.
When the knob is turned to either
function, a red indicator light will
illuminate to indicate that the power is on.
If you intend to use the GriddlerTM as a
Contact Grill, Panini Press or Full Grill,
turn the Grill/Panini control to the desired
temperature for cooking. Settings range
from Warm to Sear.
If you intend to use the GriddlerTM as a
Full Griddle, turn the Griddle control to
the desired temperature for cooking.
Settings range from 200°F to 425°F.
If you intend to use the GriddlerTM as a
Half Grill/Half Griddle, you may use either
the grill/panini temperature or the griddle
temperature.
If you intend to use the GriddlerTM as a
Half Grill/Half Griddle, but you do not
need the entire surface, use the bottom
plate.
It may take up to 10 minutes to reach
operating temperature, depending on the
temperature level that was set. When the
thermostat has reached operating
temperature, a green indicator light inside
the chosen control will indicate that the
GriddlerTM is ready for cooking. During
operation, the light will continue to turn on
and off as the thermostat regulates the
temperature. This is normal.
The temperature controls are used to set
and maintain the temperature of the
cooking surface. You may vary the setting
of the control knob at any time during
cooking, and may wish to do so
depending on the types of foods on the
cooking plate. Refer to the Cooked Food
Temperature Chart on pages 16–17 of the
Recipe Book for recommendations.
Always exercise caution when handling
the GriddlerTM during cooking, as the
GriddlerTM housing will become hot during
use. To open the GriddlerTM, grasp the
black plastic area of the handle. This part
of the handle stays cool to the touch
while cooking. The arms are made of
die-cast aluminum and will become hot
during use. Do not touch them during or
immediately following cooking.
The cover is made of stainless steel and
will become very hot and should not be
touched during or immediately following
cooking. If you need to adjust the cover,
be sure to use an oven mitt to prevent
burns.
The lower housing is made of plastic and
can become very warm. If you need to
move the GriddlerTM during cooking, be
sure to handle it from the base only while
wearing an oven mitt. Do not touch the
cover.
Allow the GriddlerTM to cool down before
handling (at least 30 minutes).
NOTE: The first time you use the
GriddlerTM, it may have a slight odor and
may smoke a bit. This is normal and
common to appliances with nonstick
surfaces.
The GriddlerTM comes with a black
cleaning/scraping tool. This can be used
for cleaning both the grill and griddle
sides of the plates after you have finished
cooking and the unit has cooled down
completely (at least 30 minutes). Using
the cleaning tool on a hot surface for too
long will cause the plastic to melt.
USER MAINTENANCE
• Never use metal utensils, as they will
scratch the nonstick plates. Instead, use
only wooden or heat-proof plastic
utensils.
• Never leave plastic utensils in contact
with the hot grill plates. This includes
the provided cleaning tool.
• In between recipes, use a wooden or
heat-proof plastic utensil to scrape
excess food buildup through grease
channels and into drip tray, then wipe
off any residue with a paper towel
before proceeding with next recipe.
• Allow the Griddler
TM
to cool down
completely (at least 30 minutes) before
cleaning.
CLEANING AND CARE
CAUTION: BEFORE CLEANING
APPLIANCE, MAKE SURE IT HAS
COOLED DOWN COMPLETELY.
Once you have finished cooking, turn the
Selector Dial control to the Off position
and unplug the power cord from the wall
outlet. Allow the unit to cool down for at
least 30 minutes before handling.
Use the cleaning/scraping tool to remove
any leftover food from the cooking plate.
The scraping tool can be washed by hand
or in the dishwasher.
Dispose of grease from the drip tray once
cooled. The drip tray can be cleaned by
Page 5
the
GRIDDLER
TM
a guide to perfect meals
8
hand or in the dishwasher.
Press the plate release buttons to remove
plates from the housing. Be sure that the
plates have cooled completely before
handling (at least 30 minutes). The
cooking plates can be washed in the
dishwasher. Do not use metallic objects
such as knives or forks for cleaning. Do
not use a scouring pad for cleaning; the
nonstick coating can be damaged.
If you have been cooking seafood, wipe
the cooking plate with lemon juice to
prevent seafood flavour transferring to the
next recipe.
The housing base, cover and control
knobs can be wiped clean with a soft, dry
cloth. For tough stains, dampen cloth.
Never use an abrasive cleaner or harsh
pad.
STORAGE
Always make sure the GriddlerTM is cool
and dry before storing.
The power cord can be wrapped around
the back of the base for storing.
The cooking plates and drip tray should
be stored in the GriddlerTM when not in
use. The scraping tool can be stored in a
drawer or cabinet.
Page 6

RECIPES
BRE A KFAST
Cinnamon Sugar Fren ch Toast ................................................ ........................ .......... 1 1
Blueberry Oat Butt ermilk Pancakes .................................................. ........................ 11
Breakfast Sausage ......................... ........................ ........................ ........................ ... 12
Weekend Breakf ast for Two .................... ........................ ........................ ................. 13
PANI NI
Asparagus, Prosciutto, Roasted Pepper & Font ina Panini ...... ............... .................... 14
Sopressata, Provolon e, Roasted Pepper & Pest o Panini .............. ............... ............. 1 4
Zucchini ai Quattro Formagg i Pa nini ............. ........................ ........................ ............. 15
Pizza Panini ...................... ........................ ........................ ........................ .................... 16
Chicken Quesadilla Wraps ............... ........................ ........................ ........................ . 16
THE M AIN COURS E
Not Fried Fi sh & Chips ................................... ........................ ........................ .......... 17
The Best Hamburger ............. ........................ ........................ ........................ ............ 18
Shrim p Fa jitas ......................................................... ........................ ........................ ... 19
Saga Blue Stuffed Beef Fillets wi th Herb C rust ........... ........................ ............. 20
Southweste rn Spiced Grilled Rib Ey e Steak s ................................... ....................21
Herb Grilled Boneless Pork Chops ........... ............... ........................ ....................... 21
Teriyaki Grilled Chi cken ........... ........................ ........................ ........................ ........ 2 2
SIDE DISHE S
Potato & Gorganzola C akes .............................. ........................ ........................ ....... 23
Grilled G reen Beans with Feta ..................... ........................ ........................ ........... 23
DE SSE RTS
Cheese & Raisin Danish on Swirl Bread Panini ..................................................... 24
Grilled Pound Cake wit h Cinnamon Glazed Pears ........................... ........................ 25
COO KIN G GUIDE AND FOOD TEMPE R ATURE CHA RT ............. 26-27
BREAKFAST
Cinnamon Sugar French Toast
GriddlerTM Position: Flat
Selector: Griddle
Plate Side: Griddle
Makes 4 servings (2 slices per ser ving)
8 slices (preferabl y thick slice d) cin namon swirl or cinnamon rai sin br ead
5 large eggs
1 cup (2 50 ml) evaporated fat-free mi lk (not recons titute d)
¼ cup (50 m l) hal f-and-h alf (may use fa t free)
¼ teaspoon (1 ml) sa lt
1 teaspoon (5 ml) grou nd cin namon
1 table spoon (15 ml) pur e vanil la ext ract
1 pinch nutmeg (fres hly gr ated)
Arrange the bread in two 8 x 8 x 2-inch (20 x 20 x 5 cm) glas s baking dishes. Whisk
eggs, evaporated milk, half-and-half, salt, spices, and vanilla until smooth but not
foamy. Pour the batter over bread. Turn the bread over, let sit 5 minutes, then turn the
bread over again.
Preheat the CuisinartTM GriddlerTM to 325°F (160°C) with unit close d. When G riddler
TM
is
ready, open unit to extend flat and arrange the soaked bread on the hot griddle. Cook
until deep golden brown on each side, about 4 to 5 minutes per side. French toast can
be kept warm on a rack on a baking sheet in a low (200°F [95°C]) oven.
Nutriti onal inf ormation per se rving:
Calori es 308 ( 31% from fat) • c arb. 36 mg • pro. 17 • fat 10g • sa t. fat 4g
• chol. 271mg • sod. 947mg • c alc. 274mg • fi ber 3g
Blueberry Oat Buttermilk Pancakes
GriddlerTM Position: Flat
Selector: Griddle
Plate Side: Griddle
Makes 16 pancakes
1 cup (2 50 ml) blueb erries (fres h or frozen)
1 cup (2 50 ml) all-p urpose flour, di vided
11⁄3 cups ( 325 ml ) rolle d oats (regul ar, not quick oats)
¼ cup (5 0 ml) w hole wheat flour
¼ cup (50 m l) brow n sugar
1 teaspoon (5 ml) baki ng soda
½ teaspoon (2 ml) s alt
2 cups ( 500 m l) but termil k
2 large eggs, lightl y beate n
3 table spoons (45 ml) vegeta ble oil
10
11
Page 7

12
13
To cook the sausage patties on the full griddle, preheat the CuisinartTM GriddlerTM to
375°F with the unit closed. In the flat position, cook the sausage for 14 to 16 minutes
total, turning once after 8 minutes. Cooking on the full griddle allows you to cook eggs
or pancakes to accompany the sausage, either on one side of the GriddlerTM or when
finished cooking the sausage.
Recipe note :
If you have a CuisinartTM Food Processor, you may use it to chop your own freshly
ground turkey and pork. Follow the instructions that accompany your processor. Af ter
chopping the meat, you may add the chopped apples, onions and seasonings using the
pulse until completely combined.
Nutriti onal inf ormation per sa usage p atty:
Calori es 75 (11% from fat) • carb. 1g • p ro. 11g • fat 3g • s at. fat 1g
• chol. 27mg • sod. 166m g • calc. 13mg • fib er 0g
Weekend Breakfast for 2
Griddle Position: Flat
Selector: Griddle
Plate Side: Half Grill/Half Griddle
4 slices bacon – stri ps or Ca nadian bacon – or sau sage pattie s
2 slices good q ualit y bread
2 teaspoons (10 ml ) unsalted bu tter, mel ted, divided
1 teaspoon (5 ml) unsa lted butter, di vided
2 large eggs
kosher salt and fres hly gr ound black pepper to taste
Insert one plate on its grill side and another on its griddle side on the Cuisina rtTM
GriddlerTM. Select Griddle and preheat to 350°F (180°C) with the unit closed. Open to
extend flat. A rrange bacon, Canadian bacon, or sausage on grill plate and begin
cooking.
While meat is cooking, brush both sides of each slice of bread with 2 teaspoons (10 ml)
of the melted butter. Use a 3-inch (7.5 cm) round or square cookie cutter to cut a cente r
out of each slice of bread. After meat has been cooking for 7 to 8 minutes, turn.
Arrange buttered bread and cut-out centers on hot griddle plate. Let cook for 4 to 5
minutes until lightly golden brown and toasted. Turn. Add ½ teaspoon (2 ml) unsalte d
butter to the griddle plate in the open center of each slice of bread. Break an egg into
the center of each slice of bread. Let cook until whites are firm, about 4 to 5 minutes. If
desired, carefully turn using a nonstick heat resistant spatula . Cook for 1 to 2 minute s,
to desired preference. Transfe r to warmed plates. Season to taste with kosher salt and
freshly ground pepper. Drain bacon or sausage on double layer of paper towels. Slice
griddle toasted cut-out “center” of bread in half and use for dipping.
Nutriti onal inf ormation per se rving:
Calori es 479 (72% f rom fat)• carb. 20 g • pro. 13g • fat 38g • sat. f at 15g
• chol. 259mg • so d. 577mg • ca lc. 44mg • fiber 1g
Put the blueberries into a small bowl. Sprinkle with 1 tablespoon of the flour and toss to
coat; reserve. Preheat Cuisinar tTM GriddlerTM to 375°F (190°C) with unit closed.
Put the remaining flour, oats, wheat flour, brown sugar (break up any lumps), baking
soda, and salt into a medium bowl; stir with a whisk. Put the buttermilk, eggs and oil
into a small bowl; stir. Add the liquid mixture to the dry ingredients and stir with a whisk
until blended. Gently fold in the blueber ries.
When GriddlerTM has preheated, open unit to extend flat. Drop the batter onto the grill
plates, using a scant quarter-cup measure. Cook the pancakes for 3½ to 4 minutes.
When pancakes are bubbling on the top, turn and cook for an additional 2 to 3 minutes.
Blueberr y Oat Pancakes are best served hot. Pancakes can be kept warm by placing
them on a rack on a baking sheet in a low (175º–200°F [80°C - 95°C]) oven while
cooking the remainder.
Serve with warm syrup and butter as desired.
Nutriti onal inf ormatio n per pa ncake:
Calori es 121 (29% fro m fat) • c arb. 18g • p ro. 4g • f at 4g • s at. fat 1g
• chol. 28mg • so d. 184 mg • c alc. 47mg • fi ber 1g
Breakfast Sausage
GriddlerTM Position: Closed or Flat
Selector: Griddle
Plate Side: Griddle
Makes 10 sausage pat ties (about 1¾ ounces [50 g] each)
12 oun ces (3 40 g) ground t urkey (ca n use ve ry le an)
4 ounces (115 g) lean gr ound p ork
1
⁄3 cup ( 75 ml) ve ry fi nely chopped tart apple
1 table spoon (15 ml) ver y fine ly minced oni on
2 table spoons (30 ml ) chop ped fresh par sley (1 t ables poon [15 ml]
dried parsl ey)
1 teaspoon (5 ml) rubbed sag e
½ teaspoon (2 ml) t hyme
1 teaspoon (5 ml) koshe r salt
¼ teaspoon (1 ml) fresh ly ground bla ck pepper
¼ teaspoon (1 ml) pa prika
Put all ingredients into a medium bowl and mix as for meatloaf – combining thoroughly
to distribute the seasonings evenly. Unlike ground meat for burgers, which should not
be overmixed, it is important to completely mix the meat and seasonings. Shape into
ten patties of equal size (about 1¾ ounces [50 g] each, 1½ to 2 inches [3.75 to 5 cm] in
diameter). This may be done the night before, or sausage may be made ahead and
frozen.
The sausage may be cooked using either the flat or closed griddle position. For closed
griddle cooking, preheat the CuisinartTM GriddlerTM to 425°F (220°C) with the unit closed.
Arrange the sausage patties evenly spaced on the hot griddle plate. Cook the patties
for 5 to 6 minutes, until they have reac hed an internal temperature of 170°F [76°C]. This
is a great, quick way to cook sausage for sausage biscuits or other break fast
sandwiche s.
Page 8

14
15
PANINI
Asparagus, Prosciutto,
Roasted Pepper & Fontina Panini
GriddlerTM Position: Closed
Selector: Grill/Panini
Plate Side: Grill
Makes 4 servings
20 spears a spara gus
2 table spoons (30 ml ) extr a virgin olive oil, d ivided
4 ounces (115 g) shredded fontina cheese
1 teaspoon (5 ml) herb es de Provence
2 roaste d red p epper s (abou t one 12-ounce [345 g] jar, drai ned)
8 slices crusty cou ntry bread (each ab out 8 x 4 x ½ inches
[20 x 10 x 1.25 cm])
2 ounces (60 g) thinl y slic ed pros ciutt o (8 ver y thi n slices)
Preheat CuisinartTM GriddlerTM to High with the unit close d.
Trim asparagus and peel. Toss asparagus with 2 teaspoons (10 ml) of the olive oil. Lay
the oiled asparagus on the bottom plate of the preheated grill. Cover and cook until
crisp and bright, about 4 to 5 minutes. Reser ve. Put shredded cheese and herbes de
Provence into a small bowl and toss to combine; reser ve. Drain roasted peppers well
and pat dry.
Preheat conventional oven to 175ºF (80°C). Lightly brush one side of each slice of bread
with the remaining olive oil. Place 4 slice s of bread on the work surface, oile d side
down. Build the sandwiches in this order – shredded cheese, asparagus, roasted
peppers, and prosciut to – using equal amounts of each item on each sandwich. Top
with the remaining sliced bread, oiled side up.
Place two sandwiches on the bottom grill plate, evenly spaced. Lower cover and apply
light pressure to handle for about 30 seconds. Grill panini for 3½ to 4 minutes. Remove
to a rack and keep warm in preheated oven. Grill remaining 2 sandwiches in the same
way. Cut in half on the diagonal to ser ve.
Nutriti onal inf ormatio n per se rving:
Calori es 366 (41% from fat) • ca rb. 34g • pro. 20g • fat 16g • sat. fat 7g
• chol. 46mg • so d. 1088mg • calc. 201mg • fiber 3g
Sopressata, Provolone,
Roasted Pepper & Pesto Panini
GriddlerTM Position: Closed
Selector: Grill/Panini
Plate Side: Grill
Makes 4 servings
1 long French baguette (about 22 inc hes [56 cm] long)
1 table spoon (15 ml) ext ra vir gin oli ve oil
4 teaspoons (2 0 ml) pesto
4 ounces (115 g) thinl y slice d sopr essata
2 roaste d red p epper s, dra ined
4 ounces (115 g) sliced provolo ne
Cut off the two heels of the baguette and cut the baguette into two 10-inch (25 cm)
lengths. Cut each in half horizontally. Lightly brush the outside of each piece of bread
with olive oil.
Spread each half with 1 teaspoon (5 ml) pesto. Evenly layer the sopressata on each
bottom. Cut the roa sted peppers to lie flat. A rrange the roasted peppers over the
sopressata. Top with a layer of the provolone. Place top on sandwich. Cut in half
crosswise to make 4 sandwiches total.
Preheat CuisinartTM GriddlerTM to High with the unit close d. When G riddler
TM
is ready,
place the sandwiches on the bottom grill plate. Lower cover and press lightly on the
handle for 30 seconds. Grill for 5 minutes, until the bread is golden, toasty and well
marked, the filling is warm and cheese is melted. Serve warm.
Nutriti onal inf ormation per se rving:
Calori es 565 ( 31% from fat) • c arb. 69 g • pro. 27g • fa t 19g • sat. fat 8g
• chol. 39mg • so d. 1601mg • calc . 271mg • fiber 1g
Zucchini ai Quattro Formaggi Panini
GriddlerTM Position: Closed
Selector: Grill/Panini
Plate Side: Grill
Makes 4 servings
10 oun ces (2 90 g) s hredded zucc hini
½ teaspoon (2 ml) ko sher s alt
4 ounces (115 g) shredded fresh mozzarell a
2 ounces (60 g) shred ded fontina
2 ounces (60 g) shred ded sh arp pr ovolone
2 table spoons (30 ml ) fres hly gr ated Parmiagiano-Re ggiano or Asiago
1 teaspoon (5 ml) drie d basi l
8 slices crusty cou ntry bread (about 8 x 4 x ½ inches) (20 x 10 x 1.25 c m)
4 teaspoons (2 0 ml) ex tra virgin o live oil
Put the shredded zucchini into a colander and toss with salt. Let stand for 20 minutes.
After 20 minutes, rinse and press out as much liquid as possible. Place in a clean tea
towel and squeeze until no more liquid is released. Put into a medium bowl with the four
cheeses and the basil. Toss gently to combine. You should have about 3 cups (750 ml).
Preheat CuisinartTM GriddlerTM to High with the unit close d. Preheat conventional oven to
175ºF (80°C). Lightly brush one side of each slice of bread with olive oil. Place 4 slices
of bread on the wor k surface, oiled side down. Divide the shredded zucchini and
cheese mixture evenly among the 4 slices of bread – making as even a layer as
possible. Top with the remaining sliced bread, oiled side up.
Page 9

16
17
When GriddlerTM has preheated, place two sandwiches on the bottom grill plate, evenly
spaced. Lower cover and apply light pressure to handle for about 30 seconds. G rill
panini for 3½ to 4 minute s. Remove to a rack and keep warm in preheated oven. Grill
remaining 2 sandwiches in the same way. Cut in half on the diagonal to serve.
Nutriti onal inf ormatio n per se rving:
Calori es 380 (49% from fa t) • carb . 28g • pr o. 20g • f at 21g • sat. fa t 10g
• chol. 52mg • sod. 665mg • calc. 39 0mg • fi ber 1g
Pizza Panini
GriddlerTM Position: Closed
Selector: Grill/Panini
Plate Side: Grill
Makes one 8-inch (20 cm) double- crusted panini, 2 to 4 servings
2 8-inch (20 cm) thi n-cru st pre -baked pizza crusts , such as Bobo li
®
½ table spoon (7 ml) extra v irgin olive oil or may use ol ive oil spray
¼ cup (5 0 ml) t hick marinar a sauc e*
4 ounc es (115 g) sliced par t-skim m ozzarella (ca n be in crease d to 6 ounces
[170 g] if a “chees ier” s andwich is preferred) or p rovolon e
crumb led coo ked sausage or julien ned
thinl y slic ed pepperoni , or coo ked thinly
slice d vegetables s uch as mushro oms or zucchin i (opti onal)
Insert the plates on their grill side. Preheat CuisinartTM GriddlerTM to Medium-High with
the unit closed.
Brush “bottom” sides of each crust with olive oil or lightly spray with cooking spray.
Place one crust on work sur face, oiled side down. Top with sauce spread to within ½
inch (1.25 cm) of all edges. Arrange cheese slices over sauce, add sausage, pepperoni
or sliced vegetables if using. Top with second crust, oiled side up. Place on preheated
GriddlerTM. Grill for 8 to 9 minutes, until crust is crispy and well marked with grill lines,
and filling is hot. Remove pizza panini and let rest for 5 minutes on a wire rack. Use a
pizza wheel to cut into 4 or more wedges. Ser ve while warm.
* If sauce seems thin or watery, thicken it by placing it in a strainer lined with a coffee
filter for about 20 to 30 minutes.
Nutriti onal inf ormatio n per se rving ( based o n 4 ser vings):
Calori es 260 ( 37% from fat ) • carb. 27g • pro. 15g • fa t 11g • sat. fat 1g
• chol. 20mg • so d. 574mg • calc . 276mg • fi ber 1g
Chicken Quesadilla Wraps
GriddlerTM Position: Closed
Selector: Grill/Panini
Plate Side: Grill
Makes 2 quesadilla wraps, 2 ser vings
1½ cups ( 375 ml) s hredd ed/chopp ed cooke d chicken*
½ cup (125 ml) cho pped cooked onion (sau téed until te nder)
2 table spoons (30 ml ) chop ped jal apeño pepper s
6 table spoons (90 ml) shredded l owfat Chedda r or Monterey J ack che ese
2 9-inch [23 cm] flour tort illas or wrap s (can u se pla in, herb, spi nach)
1 table spoon (15 ml) oli ve oil
Inser t the plates on the ir gril l side.
Preheat CuisinartTM GriddlerTM to High with the unit close d. In a small bowl, combine the
chicken, onion, and jalapeño peppers. Sp rinkle half the cheese in the center of each
tortilla. Top with the chicken mixture, keeping the chicken mix ture in a “log” about 1½
inches (9 cm) wide and 4 to 5 inches (10 to 12 cm) long in the center of the tortilla. Fold
one side over the filling lengthwise to cover, fold top and bottom over short sides to
cover, then fold last side over to close. Turn over so that flap is on bottom. Lightly brush
the tops and bottoms of the wraps with the olive oil. Place quesadilla wraps on
preheated GriddlerTM. Close, using medium-light pressure. Grill/bake for 3½ to 4
minutes, until tortilla is warm with grill markings, filling is warm and cheese is melted.
Serve with salsa if de sired.
*This can be from a purchased roast or rotisserie chicken.
Nutriti onal inf ormation per se rving (o ne ques adilla):
Calori es 366 ( 24% from fat) • carb. 25g • pro. 43g • fat 10g • sat. fat 4g
• chol. 100mg • so d. 564mg • calc. 28 9mg • fib er 1g
THE MAIN COURSE
Not Fried Fish and Chips
GriddlerTM Position: Flat
Selector: Griddle
Plate Side: Half Grill/Half Griddle
Makes 2 servings
2 table spoons (30 ml ) extr a virgin olive oil, d ivided
½ tablesp oon (7 ml) fre sh lemo n juice
½ teaspoon (2 ml) g arlic powder
½ teaspoon (2 ml) d ried t hyme
¼ teaspoon (1 ml) kos her salt
¹⁄8 t easpoon (0.5 ml) pap rika
¹⁄8 teaspoon (0. 5 ml) cayenne
1 pound (500 g) floun der fi lets (or other bonele ss fish filet s such as hadd ock,
hake, co d)
8 ounces (230 g) new red pota toes (ab out 2 to 3 inch es [5 to 8 cm] in
diameter), scrubbed
tart ar sau ce (rec ipe fol lows)
slice d lemon wedges
Put 1 tablespoon (15 ml) of the olive oil into a medium bowl with the lemon juice, garlic
powder, thyme, salt, paprika, and cayenne; stir to blend. Pat fish dr y and cut each filet
into 2 pie ces lengthwise along the bone line. Add fish to bowl and toss gently to coat
with seasoned oil mixture.
Page 10

18
19
Slice the potatoes into thin slices (approximately 4 mm or ¹/16 inch – this can be done
easily in a CuisinartTM Food Processor). Place in a bowl and toss with the remaining
olive oil.
Insert one plate on its grill side and another plate on its griddle side on the CuisinartTM
GriddlerTM. Select Griddle and preheat to 425°F (220°C) with the unit closed. Preheat
oven to 200°F (95°C).
Open preheated unit to extend flat. In 2 or 3 batches, arrange slice d potatoes on hot
grill plate. Grill for 6 to 8 minutes on each side. As they are cooked, transfer to a platter
and keep warm in the oven. When the last batch of potatoes is ready to turn, arrange
the fish filets on the hot griddle. Cook for 4 to 5 minutes on each side.
Serve hot with grilled potatoes, tar tar sauce, and fresh lemon wedges.
Nutriti onal inf ormatio n per se rving:
Calori es 420 (3 6% from f at)• carb . 22g • pro. 45g • fat 16g • sat. fat 3g
• chol. 109mg • sod . 358mg • calc. 57mg • fiber 2g
The Best Hamburger
GriddlerTM Position: Closed
Selector: Grill/Panini
Plate Side: Grill
Makes 4 servings
1½ pounds (750 g) fres hly gr ound beef rou nd or c huck (15% lean)
¼ teaspoon (1 ml) kos her salt
¼ teaspoon (1 ml) fr eshly ground black pepper
Preheat CuisinartTM GriddlerTM to Sear with the unit closed.
Working the ground chuck as little as possible, shape into four 6-ounce (170 g) burger
patties, about 4 inche s (10 cm) in diameter. The best way to do this is to use a 4-inch
(10 cm) round cookie cutter: Put 6 ounces (170 g) of meat in the cookie cutter and
gently press to fill the cookie cutter evenly. It is important that all the burgers be of the
same height for optimal grilling results.
When GriddlerTM has preheated, place the burgers on the bottom grill plate, evenly
spaced. Close the GriddlerTM and grill for 5 to 8 minutes (until the internal temperature
reaches from 140°F to 165°F [60°C to 74°C]) depending on per sonal preference.
Remove burgers and sprinkle with salt and pepper. Serve hot with your favourite
condiments.
Nutriti onal inf ormatio n per se rving:
Calori es 254 (18% fro m fat) • c arb. 1g • pr o. 30g • fat 20g • sat. fat 8g
• chol. 87mg • sod. 324mg • calc. 7mg • fibe r 0g
Variations
Burgers may be seasoned for variety before they are grilled. Ge ntly stir one or a
combination of these suggested seasonings or your own favourites into the meat,
working the meat as lit tle as possible for best texture.
1 to 2 cloves finely mi nced garlic
2 to 3 finely choppe d green onion s
1 teaspoon (5 ml) minc ed fresh ging er
1 to 2 tablespoons (15 - 30 ml) soy sau ce
1 to 2 tablespoons (15 - 30 ml) Worcest ershi re sauce
1 table spoon (15 ml) minced capers
1 to 2 tablespoons (15 - 30 ml) minced impor ted ol ives
1 to 2 tablespoons (15 - 30 ml) barbecue sau ce
hot sauce to t aste
minced jalap eño pepper to taste
Shrimp Fajitas
GriddlerTM Position: Flat
Selector: Griddle
Plate Side: Half Grill/Half Griddle
Makes about 12 fajitas
Marin ade:
8 sprig s fresh cilan tro
1 table spoon (15 ml) fre sh lime juice
1 table spoon (15 ml) chi li powde r
¼ teaspoon (1 ml) cayenne
2 smash ed clove s of gar lic
1 jalap eño pep per, seed ed and sliced
1 table spoon (15 ml) ext ra vir gin oli ve oil
1 pound (500 g) large shrimp, peeled and deveine d
Vegetab les:
½ re d bell pepper, t hinly sliced
½ yel low bel l pepper, thinl y sliced
1 jalap eño pep per, seed ed and thinl y sliced
1 small onion, thinl y sliced
1 table spoon (15 ml) ext ra vir gin oli ve oil + extra for bru shing torti llas
¼ teaspoon (1 ml) ch ili powd er
¼ teaspoon (1 ml) kos her salt
pinch cayenne peppe r
12 small (6 -inch [15 cm]) co rn tor tillas
Combine the marinade ingredients (cilantro, lime juice, chili powder, cayenne, garlic,
jalapeño, and olive oil) in a medium stainless or glass mixing bowl and stir. Add the
shrimp to marinade and refrigerate for an hour.
Insert one plate on its grill side and another on its griddle side on the Cuisina rtTM
GriddlerTM. Select Griddle and preheat to 425°F with the unit closed.
In a mixing bowl toss sliced peppers and onion with the tablespoon of olive oil, ¼
teaspoon (1 ml) of chili powder, ¼ teaspoon (1 ml) of salt, and cayenne. When green
indicator light illuminates, open the unit to ex tend flat and place vegetables on the grill
side in a single layer, cooking them in two batches. Stir the vegetables occasionally
during cooking and remove when tender and browned, about 8 minute s per batch;
reserve.
While second batch of vegetables is cooking, brush tor tillas with oil, and be gin to warm
1 to 2 minutes per side on the griddle. Re serve.
Sprinkle shrimp with ¼ teaspoon (1 ml) of salt and grill for about 2 to 3 minutes per
side. Ser ve all fajita ingredients with salsa, sour cream, and sliced avocado so each
individual can prepare his/her own.
Page 11

Southwestern Spiced Grilled Rib Eye Steaks
GriddlerTM Position: Closed
Selector: Grill/Panini
Plate Side: Grill
Makes 2 to 4 servings
1 teaspoon (5 ml) grou nd cumin
1 teaspoon (5 ml) chil i powder
½ teaspoon (2 ml) basi l
½ teaspoon (2 ml) grou nd coriander
½ teaspoon (2 ml) oreg ano
½ teaspoon (2 ml) papr ika
½ teaspoon (2 ml) koshe r salt
½ teaspoon (2 ml) fres hly gr ound black pe pper
2 bone less rib eye or strip steaks, ¾-inch (2 cm) thick e ach (12 oun ces [3 40
g] each)
Put the cumin, chili powder, basil, coriander, oregano, paprika, salt, and pepper into a
small bowl and stir to combine – there will be about 2 table spoons (30 ml). Reserve. Dry
steaks and rub evenly with prepared spice rub. Let stand 20 to 30 minutes – or rub,
cover and refrigerate for up to 12 hours.
Insert plates on their grill side. Preheat the CuisinartTM GriddlerTM to Sear with the unit
closed. When hot, arrange steaks evenly spaced on lower grill. Cover, using light
pressure. Grill until steaks have reached desired level of doneness when tested with an
instant-read thermometer. Grilling will take approximately 3 to 10 minutes. Grill until
about 5° under temperature desired – meat will continue to cook while resting. Remove
immediately. Let steaks stand for 5 to 10 minutes before ser ving to a llow temperature to
even out, and fibers to relax and reabsorb the juices, making the steak more tender and
juicy.
Nutriti onal inf ormation per se rving:
Calori es 386 (48% from fat ) • carb. 1g • pro. 48 g • fat 20 g • sat. fat 8g
• chol. 140mg • sod. 294mg • c alc. 19mg • fiber 0 g
Herb Grilled Boneless Pork Chops
GriddlerTM Position: Closed
Selector: Grill/Panini
Plate Side: Grill
Makes 4 servings
1 teaspoon (5 ml) herb es de Provence o r Ital ian herb blen d
½ teaspoon (2 ml) koshe r salt
½ teaspoon (2 ml) papr ika (swe et or hot, to t aste)
¼ teaspoon (1 ml) dry mustar d
¼ teaspoon (1 ml) fresh ly ground bla ck pepper
4 bone less po rk loin chops , all t he same thick ness (½ to ¾ in ch [1.2 to
2 cm]), each abo ut 5 ounces (145 g)
20
21
Nutriti onal inf ormatio n per fa jita:
Calori es 106 (29% from fat)• carb. 10g • pro. 9g • fat 3g • sat. fa t 0g
• chol. 57mg • sod. 146mg • calc. 5 5mg • fib er 1g
Saga Blue Stuffed Beef Filets
with Herb Crust
GriddlerTM Position: Closed
Selector: Grill/Panini
Plate Side: Grill
Makes 4 servings
2 table spoons (30 ml ) herb es de Pr ovence
1 teaspoon (5 ml) koshe r salt
½ teaspoon (2 ml) f reshl y ground black peppe r
4 beef tenderl oin filets, e ach abo ut 6 ou nces (170 g) – 1-inch ( 2.5 c m) thick
4 tablespoons (60 ml) col d Saga Blue cheese (may also use Br ie, mus hroom
Brie o r Camba zola ch eese)
1 table spoon (15 ml) good quali ty oli ve oil
Put the herbes de Provence, salt and pepper into a small bowl. Stir to blend; reserve.
Using a sharp knife, cut a horizontal slit in the side of a filet, then carefully cut into the
cente r of the filet to create a pocket – do not cut all the way through to the sides.
Repeat for each filet. Place one tablespoon (15 ml) of the cheese in each pocket –
press the open sides together tightly. Drizzle the filets with the olive oil and rub in to
coat completely and evenly. Sprinkle the filets on both sides with the herb mixture and
press into the meat. Refrigerate for 20 to 30 minutes before grilling. (Filets may be
prepared up to 8 hours ahead and refrigerated.)
Insert plates on their grill side. Preheat CuisinartTM GriddlerTM to Sear with the unit
closed. When GriddlerTM is hot, arrange the f ilets evenly spaced on the grill. Cover,
using light pressure.
Grill until steaks have reached desired level of doneness when tested with an instantread ther mometer. Grilling will take approximately 6 to 10 minutes. Grill until about 5°
under temperature desired – meat will continue to cook while resting. Remove
immediately.
(Note: this type of beef has more flavour and better texture when cooked rare to
medium.)
Let meat rest for 5 to 10 minutes before serving.
Nutriti onal inf ormatio n per se rving:
Calori es 464 ( 55% from fa t) • carb . 1g • pro. 50 g • fat 27g • s at. fat 11g
• chol. 148mg • sod. 456mg • c alc. 57mg • fi ber 0g
Page 12

Combine herbs, salt, paprika, dry mustard, and pepper. Blend well. Rub evenly on pork
chops. Let stand for 15 to 20 minutes. (Or may be done early in day, covered and
refrigerated.)
Insert plates on their grill side. Preheat CuisinartTM GriddlerTM to High with the unit
closed. When hot, arrange the seasoned pork chops evenly spaced on the lower grill
plate.
Close and grill for 4½ to 9 minutes – grilling time will depend on thickness and
temperature of meat. Internal temperature of pork should register about 150°–160°F
(70°C - 71°C) when teste d with an instant-read thermometer.
Nutriti onal inf ormatio n per se rving:
Calori es 289 (37% from fat) • carb. 0g • pro. 43g • fa t 12g • sat. f at 4g
• chol. 116mg • s od. 543m g • calc . 52mg • fi ber 0g
Teriyaki Grilled Chicken
GriddlerTM Position: Flat
Selector: Grill/Panini
Plate Side: Grill
Makes 4 servings
1
⁄3 cup ( 75 ml) low-sodiu m soy sa uce
3 table spoons (45 ml) rice v inegar
2 table spoons (30 ml ) dry or med ium dr y sherry (or may us e mirin)
2 table spoons (30 ml ) brown sugar, pa cked
2 teaspoons (10 ml ) powder ed ging er
1½ pounds (750 g) bone less, s kinle ss chic ken thi ghs
Put soy sauce, vinegar, sherr y, brown sugar, and ginger into a medium bowl and stir with
a whisk to blend. Makes 2⁄3 cup (150 ml) marinade.
Trim all visible fat from chicken a nd add chicken to marinade in bowl; stir to coat. Allow
to marinate for 20 to 30 minutes (may ma rinate longer – cover and refrigerate).
Preheat CuisinartTM GriddlerTM to High with the unit close d.
Drain the chicken, put the marinade into a small saucepan and bring to a boil. Reduce
heat to low and simmer until chicken is ready (do not save and use marinade as a sauce
unless you perform this step). Open preheated unit to extend flat. Arrange the chicken,
“skin” side down, evenly spaced on the grill. Grill for 6 to 7 minutes per side – chicken
juices should run clear and test 170°F (77°C) when checked with an instant-read
thermometer. Transfer to warm plate and pour the simmered reser ved sauce over the
chicken. Serve with steamed brown or white rice.
Nutriti onal inf ormatio n per se rving:
Calori es 486 ( 36% from fat) • ca rb. 30g • pro. 47g • fat 19g • sat. f at 5g
• chol. 162mg • sod. 1012mg • calc. 44 mg • fibe r 2g
22
23
SIDE DISHES
Potato & Gorgonzola Cakes
GriddlerTM Position: Flat
Selector: Griddle
Plate Side: Griddle
Makes 8 cakes
2 large (10 ounces [285 g] each) russe t potatoes, pe eled, thickl y slic ed
1 teaspoon (5 ml) koshe r salt , divi ded
1
⁄3 cup ( 75 ml) finely c rumbl ed Gorgonzola cheese*
1 large egg, li ghtly beaten
1 table spoon (15 ml) fin ely minced sh allot
1 table spoon (15 ml) cho pped fresh pa rsley
1 teaspoon (5 ml) extr a virg in olive oil
1
⁄8 teasp oon (0. 5 ml) f reshl y ground black pepper
Put potatoes into a medium saucepan and cover with 1 inch (2.5 cm) of water. Stir in ½
teaspoon (2 ml) salt. Bring to a boil over high heat. Reduce heat to medium and simmer
for 15 to 18 minute s, or until potatoe s are fork tender. D rain, reserving ¼ cup (1 ml )
cooking liquid. Put potatoes into a bowl with the reserved liquid. Mash potatoes using a
potato masher or ricer.
Measure out 2 cups (500 ml) of mashed potatoes and put into a medium bowl. (Discard
extra potatoes or reserve for anothe r use.) Add cheese, beaten egg, shallot, parsley,
olive oil, remaining salt, and pepper. Stir to blend.
Preheat CuisinartTM GriddlerTM to 375°F (190°C) with the unit closed, then open
preheated unit to extend flat. Scoop out potato mixture using a ¼-cup (50 ml) measure.
Arrange 4 scoops on each side of the griddle. Cook for 6 to 7 minutes per side, until
golden and crispy on the outside and hot on the inside. Serve hot.
*Cheese may be varied according to pe rsonal preference. Try crumbled chèvre or feta ,
or grated Cheddar, G ouda, Parmesan, etc.
Nutriti onal inf ormation per ca ke:
Calori es 69 (37% from fat) • carb. 8g • pro. 3g • fat 3g • sat. fat 1g
• chol. 31mg • sod. 255m g • calc. 37mg • fiber 1g
Grilled Green Beans with Feta
GriddlerTM Position: Closed
Selector: Grill/Panini
Plate Side: Grill
Makes 4 servings
1 pound (500 g) gree n beans , rins ed
1½ teaspoons (7 ml) ext ra virgin ol ive oil
¼ teaspoon (1 ml) kosher salt
1 table spoon (15 ml) fre sh lemo n juice
½ teaspoon (2 ml) basi l
¹⁄8 teaspoon ( 0.5 ml ) freshly ground bl ack pep per
Page 13

Grilled Pound Cake
with Cinnamon Glazed Pears
Griddler
TM
Position: Flat
Selector: Griddle
Plate Side: Half Grill/Half Griddle
Makes 8 servings
2 large pears , firm but rip e, peeled, ha lved an d cored
2 teaspoons (10 ml ) fresh lemon juice
1 table spoon (15 ml) uns alted butter, m elted
1 table spoon (15 ml) lig ht brown sugar
1 teaspoon (5 ml) grou nd cin namon
8 teaspoons (40 ml) un salted butte r, at room temper ature
8 slices pound cake, each abou t ½ to ¾- inch [1. 25 to 2 cm] thic k
Cut each pear half into eight slices. Put into a bowl with lemon juice and toss gently.
Add melted butter, brown sugar, and cinnamon. Stir gently to coat. Let stand for 15
minutes.
Spread ½ teaspoon (2 ml) of the softened butter on each side of each slice of pound
cake.
Insert one plate on its grill side and another on its griddle side on the Cuisina rtTM
GriddlerTM. Select Griddle and preheat to 40 0°F (200°C) with the unit closed.
Arrange the pears in a single layer on the griddle, and cook for 4 to 5 minutes. Turn and
cook for 3 to 4 minutes longer until tender and caramelized. While the pears a re
cooking, arrange the pound cake on the grill and grill for 4 to 5 minutes on each side,
until browned and warm.
Serve warm pears on warm grilled pound cake.
Nutriti onal Inf ormation per se rving:
Calori es 382 (5 6% from f at)• carb . 39g • pr o. 4g • f at 24g • sa t. fat 8g
• chol. 109mg • sod . 72mg • ca lc. 25mg • fiber 2g
24
25
¼ cup (5 0 ml) c rumbl ed feta cheese
Insert the plates on their grill side.
Preheat the CuisinartTM GriddlerTM to High with the unit close d. Remove tips and tops
from green beans. Put into a bowl and drizzle with olive oil. Toss to coat. When
GriddlerTM is hot, arrange half the green beans on the bottom grill plate. Close and grill
for 5 to 6 minutes. Using a pair of heatproof tongs for nonstick cookware, remove the
green beans and transfer to a bowl. Sprinkle with half the salt. Grill remaining green
beans and add to the bowl. Sprinkle with the remaining salt, lemon juice, basil and
pepper; toss to coat. Arrange green beans in a shallow serving bowl and sprinkle with
crumbled feta cheese.
Nutriti onal inf ormatio n per se rving:
Calori es 61 (34% f rom fat) • carb. 9 g • pro. 3 g • fat 3 g • sat. f at 1g
• chol. 3mg • sod . 130mg • c alc. 64mg • fiber 4g
DESSERTS
Cheese & Raisin Danish
on Swirl Bread Panini
GriddlerTM Position: Closed
Selector: Grill/Panini
Plate Side: Grill or Griddle
Makes 2 panini
3 ounces (85 g) lowfa t cream chees e
1½ teaspoons (7 ml) granulat ed suga r
¼ teaspoon (1 ml) pure vanilla extra ct
2 table spoons (30 ml ) rais ins or dried tart cherri es
4 teaspoons (2 0 ml) softene d unsa lted bu tter
4 slices cinna mon swi rl toas ting b read
powdered suga r for sp rinkl ing (opt ional)
Insert plates on grill or griddle side.
Preheat the CuisinartTM GriddlerTM to High with the unit close d while assembling panini.
Put cream cheese, sugar, and vanilla into a small bowl and stir to combine. Add raisins
and blend well.
Butter the bread slices on one side with butter and place them buttered sided down.
Spread two slices with sweetened cream cheese/raisin mixture. Top with remaining
bread, buttered side up, and press together lightly.
Place each panini on preheated G riddlerTM and close. Grill for about 2½ to 3 minute s,
until bread is crisp and toasty with grill markings and filling is warm. Let stand 3 to 5
minutes on a rack before cutting (do not serve too soon). Cut and sprinkle with
powdered sugar if desired before serving.
Nutriti onal inf ormatio n per se rving (o ne sand wich):
Calori es 449 (40 % from fa t) • carb . 56g • pr o. 11g • fat 20g • s at. fat 11g
• chol. 36mg • s od. 656mg • calc. 148mg • fibe r 1g
Page 14
Meat Preparation
Suggested Grilling
Temperatures and Times
Bacon
Not recommended for
grilling on GriddlerTM in
closed position. Cook on
grill or griddle side of plates
in flat position only.
High, until desired donenes s.
Beef, bone less
steak, ¾ to
1-inch (1.8 -
2.5 cm) thick
Season to taste. Drain off
marinade well if marinated
before grilling.
Sear, in the closed position, 3 to 10
minutes. Sear, in the flat position, for
3 to 5 minutes per side.
Beef, filets,
1-inch (2.5 cm)
thick
Season to taste Sear, 4 to 5 minutes.
Beef,
hamburgers
Shape meat into burgers of
even weight and thickness.
Sear, 5 to 8 minutes to degree of
desired doneness. USDA recommends
cooking ground meat to an internal
temperature of 160°F (71°C) (nearly
well done).
135° to 140°F (57°-60°C) – medium
rare
145° to 150°F (62°-70°C) – me dium
150° to 155°F (70°-77°C) – medium
well
165° to 170°F (74°-77°C) – well done
Ham steak
Dry thoroughly with paper
towels; remove bone if the re
is one.
High-Sear
About 4 to 5 minute s.
Hot dogs,
cooke d
sausages
Splitting your hot dogs or
sausages gives them a
deeper grilled flavour.
High, in the closed position, 3 to 4
minutes if grilling split hot dogs or
sausages.
Whole sausages take 6 to 10 minutes
in the closed position.
If grilling in the flat position, always
split the hot dogs or sausages. Flip
after 3 to 4 minutes.
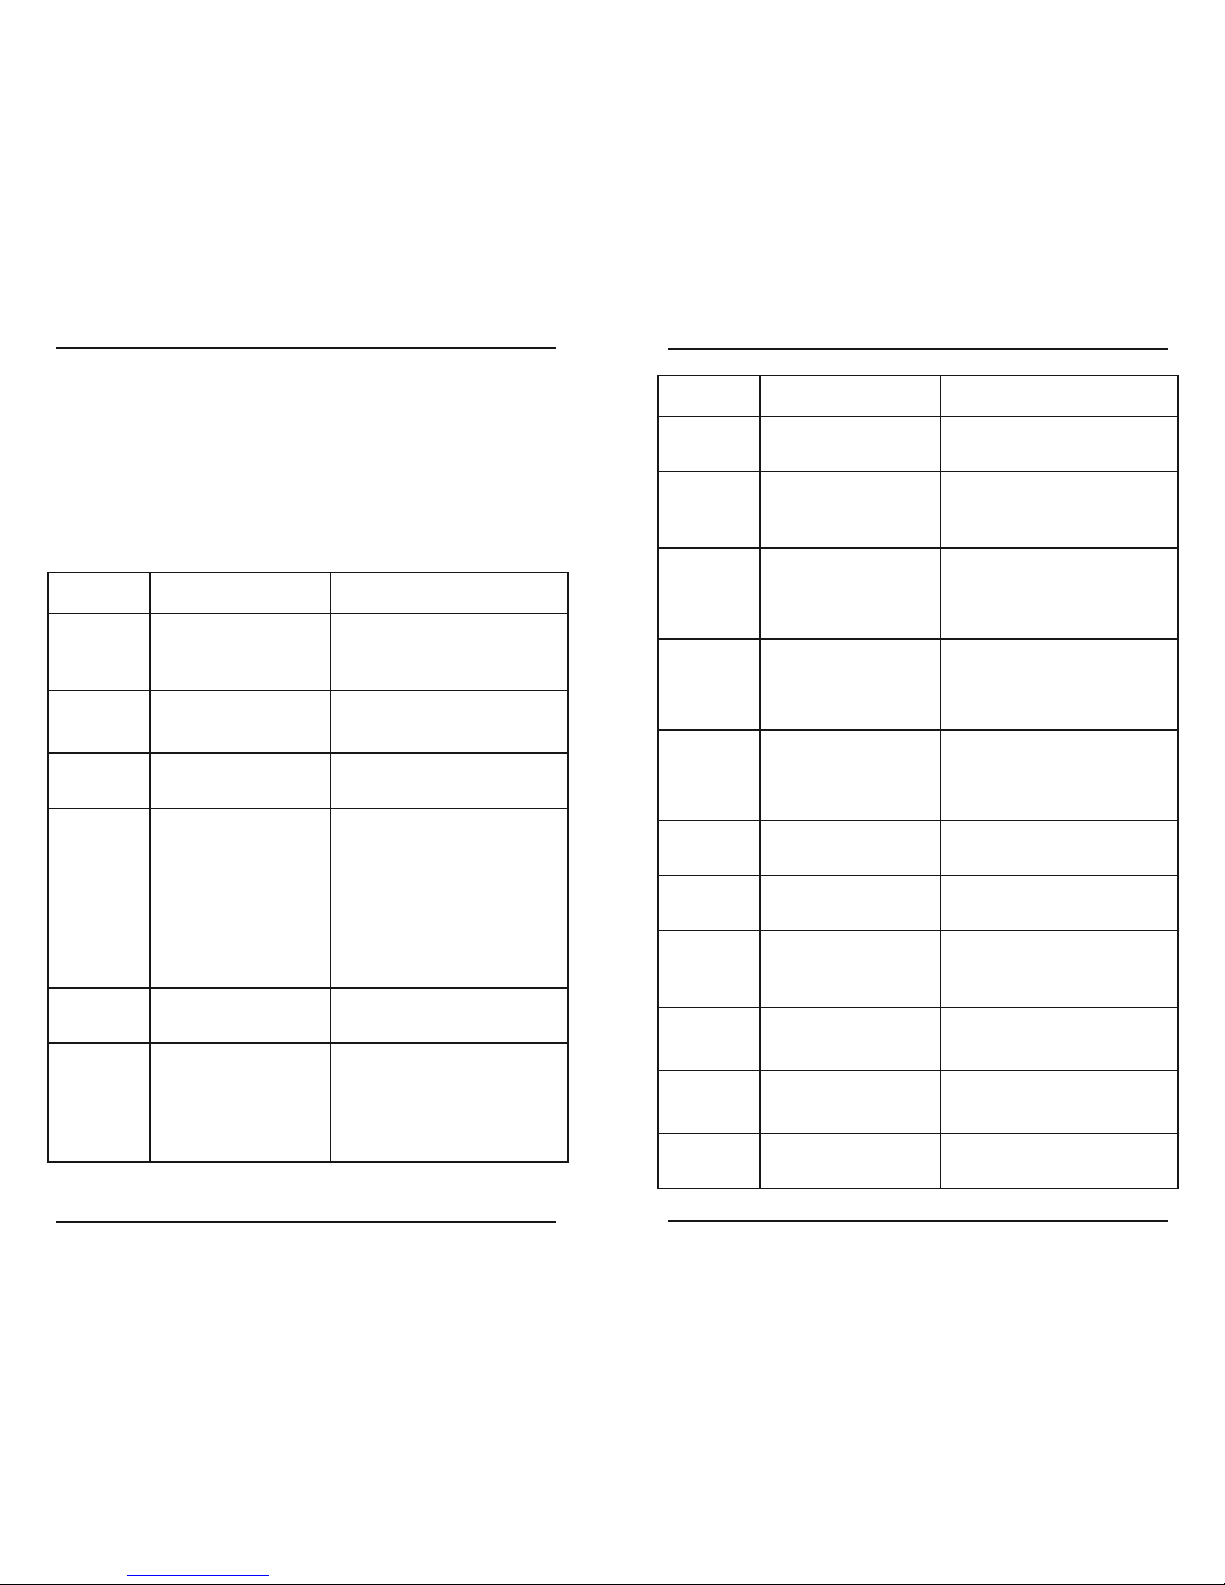
Cooking Guide and Food Temperature Chart
Following are suggested grilling times for the GriddlerTM, using the grill side of the plates
in the closed position. Times are approximate and will vary with temperature of items
being grilled. Only boneless poultr y, meat and seafood should be grilled – plates will
maintain contact with bones, but will lose contact with meat as it cooks and it will
appear “steamed.” Preheat GriddlerTM with the unit closed according to instructions
before grilling.
Marinades can be used, but draining is sugge sted before placing on the hot Griddler.
An instant-read thermometer or a probe-type thermometer is a handy tool for checking
the internal temperature of foods grilled.
Meat Preparation
Suggested Grilling
Temperatures and Times
Sausages,
uncooked
Prick links with tines of fork
or tip of paring knife.
High. Grill for 14 to 18 minutes in
the closed position, depending on
thickness of sausage.
Lamb
medallions,
boneless, ¾inch (1.8 cm)
thick
Season to taste or marinate. Sear, 3 to 5 minutes
Boneless pork
loin chops
½ to 1-inch (1.25 to 2.5 cm)
thick. All chops grilled at
one time should be same
thickness. Pale pink interior.
Grilling too long will result in
dried meat.
High, Grill for 4 to 9 minute s,
depending on the thickness of the
chops. Internal temperature of 160°F
(71°C).
Chicken,
boneless,
skinless breast
halves
Pound to an even thickness
of ½ to ¾ inches (1.25 to 1.8
cm) (all to be grilled should
be the same).
High, in the closed position, for 7 to 9
minutes. If grilling in the flat position,
cook on high for 8 to 10 minutes per
side. (internal temperature of 170°F
[77°C] – juices will run clear with no
signs of pink).
Chicken,
boneless,
skinless thighs
Spread to even thickness,
remove all visible fat.
High, in the closed position, for 8 to 10
minutes. If grilling in the flat position,
cook on high for 8 to 10 minutes per
side. (internal temperature of 180°F
[83°C] – juices will run clear with no
signs of pink).
Pork
tenderloin
Cut into ¾-inch (1.8 cm)
thick medallions. may be
pounded. Season to taste.
Sear, about 4 minutes, should be
slightly pink in appearance or meat
will be dry.
Turkey cutlets,
½-inch (1.25
cm) thick
Season to taste or marinate.
Drain well if marinated.
High, 3½ to 4 minutes.
Scallops, sea
Remove tough “foot”
(muscle) and discard. Dry
well. Season to taste and/or
rub with extra virgin olive oil.
Sear, in the closed position, 2 to 2½
minutes.
If grilling in the flat position, sea r for
2 to 3 minutes per side. Do not
overcook.
Shrimp
Shell and devein. D ry well.
Season to taste and/or rub
with extra virgin olive oil.
Sear, in the closed position, 2 to 2½
minutes.
If grilling in the flat position, sea r for
1 to 2 minutes per side.
Fish steaks
(sword, tuna,
salmon/boned)
About ¾-inch (2.5 cm) thick
to 1-inch thick.
High, 6 to 7½ minutes when grilling in
the closed position.
If using the flat position, cook on High
for 7 to 8 minutes per side.
Portobello
mushrooms
Cut into ½ -inch (1.25 cm)
thick slices.
High, 6 to 8 minutes, until nicely
brown and tender.
26
27
continues next page
Page 15

28
WARRANTY
LIMITED THREE-YEAR
WARRANTY
We warrant that this Cuisinart product will be
free of defects in material or workmanship under
normal home use for 3 years from the date of
original purchase.
This warranty covers manufacturer’s defects
including mechanical and electrical defects.
It does not cover damage from consumer
abuse, unauthorized repairs or modifications,
theft, misuse, or damage due to transportation
or environmental conditions. Products with
removed or altered identification numbers will
not be covered.
This warranty is not available to retailers or other
commercial purchasers or owners.
If your Cuisinart product should prove to be
defective within the warranty period, we will
repair it or replace it if necessary.
For warranty purposes, please register your
product online at www.cuisinart.ca to facilitate
verification of the date of original purchase or
keep your original receipt for the duration of the
limited warranty.
If the appliance should become defective within
the warranty period, do not return the appliance
to the store. Please contact our Customer
Service Centre:
Toll-free phone number: 1-800-472-7606
Address:
Cuisinart Canada
100 Conair Parkway
Woodbridge, Ont. L4H 0L2
Email:
Model:
CGR-4NC
To facilitate the speed and accuracy of your
return, please enclose:
• $10.00 for shipping and handling of the
product (cheque or money order)
• Return address and phone number
• Description of the product defect
• Product date code*/copy of original proof of
purchase
• Any other information pertinent to the product’s
return
* Product date code can be found on the
underside of the base of the product.
The product date code is a 4 or 5 digit number.
Example, 90630 would designate year, month
& day (2009, June 30th).
Note: We recommend you use a traceable,
insured delivery service for added protection.
Cuisinart will not be held responsible for intransit damage or for packages that are not
delivered to us.
To order replacement parts or accessories, call
our Customer Service Centre at 1-800-472-7606.
For more information, please visit our website at
www.cuisinart.ca
©2009 Cuisinart
Cuisinart® is a registered
trademark of Cuisinart
100 Conair Parkway
Woodbridge, Ont. L4H 0L2
Consumer Call Centre E-mail:/
1-800-472-7606
Printed in China
09CC14887
Any other trademarks or service marks referred to herein are
the trademarks or service marks of their respective owners.
IB-8999-CAN
 Loading...