

Page 1
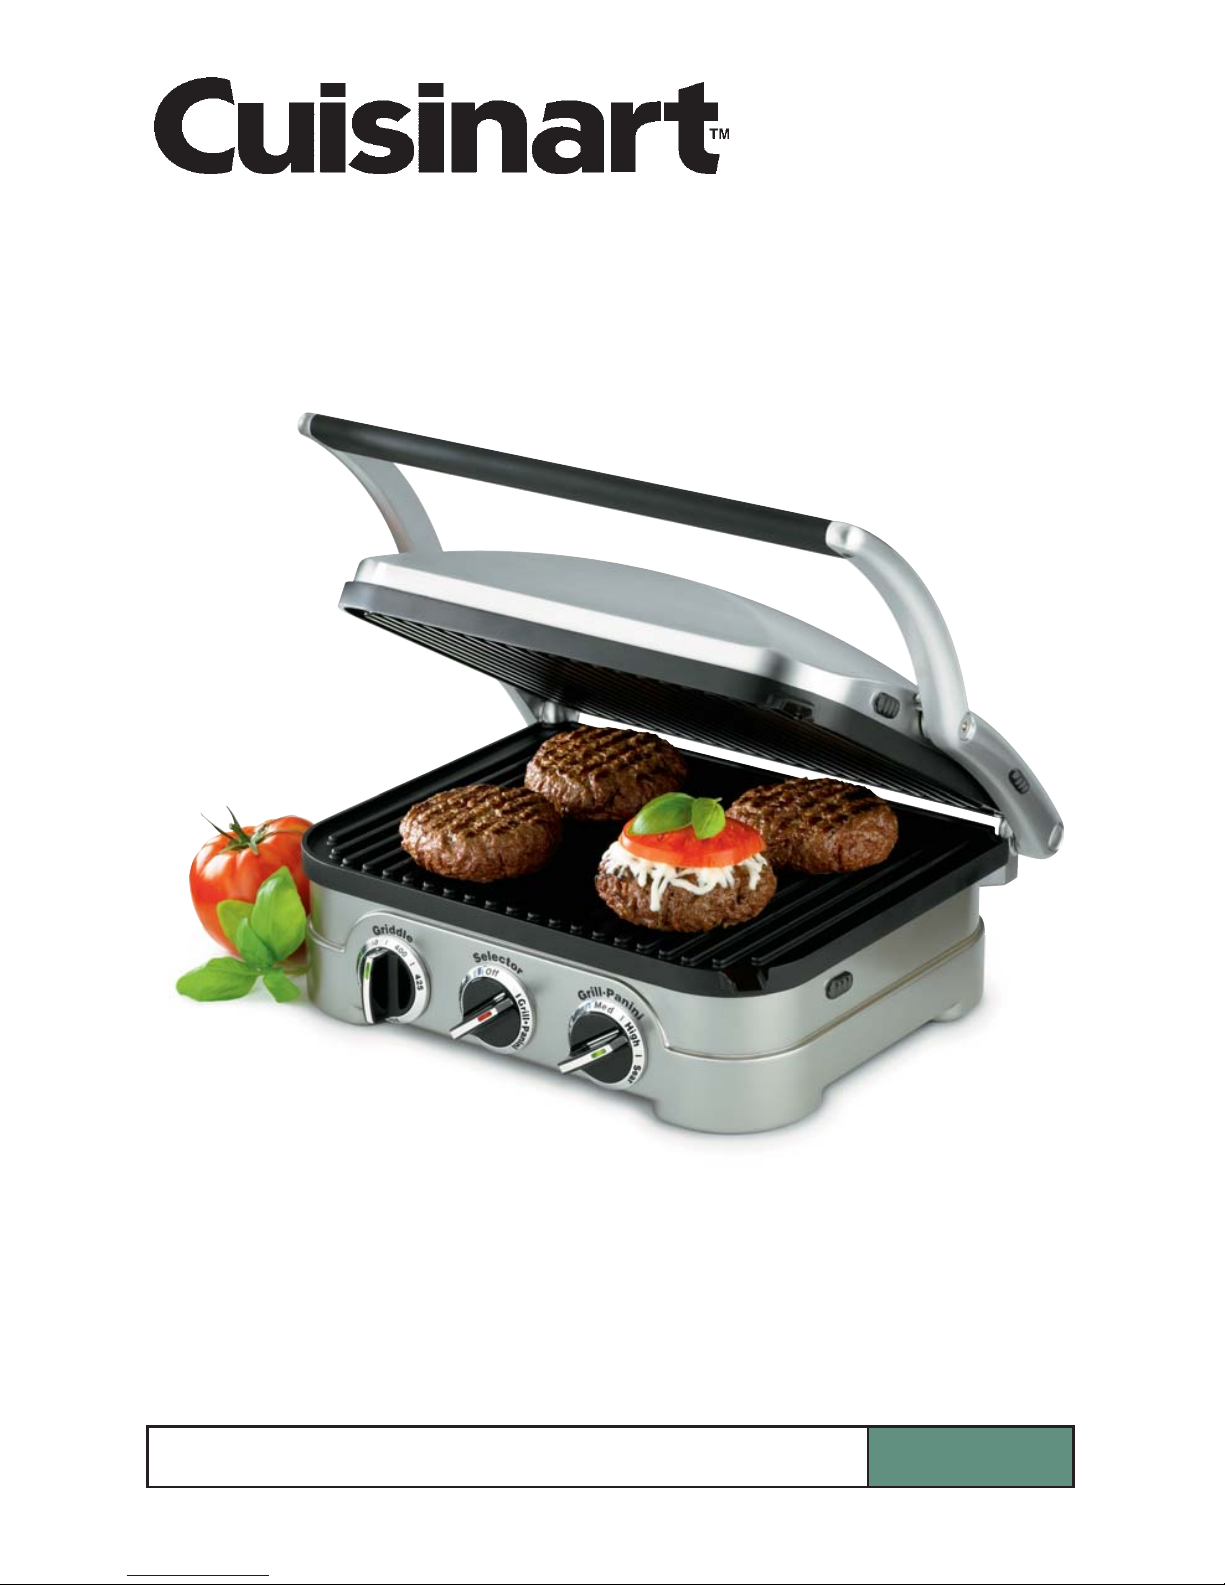
Cuisinart™Griddler
™
For your safety and continued enjoyment of this product, always read the instruction book carefully before using.
CGR-4C
INSTRUCTION
BOOKLET AND
RECIPES
Page 2

1
IMPORTANT
SAFEGUARDS
1. READ ALL INSTRUCTIONS.
2. Do not touch hot surfaces; use handles or
knobs.
3. To protect against fire, electric shock, and
injury to persons, DO NOT IMMERSE
CORD OR PLUG in water or other liquids.
4. Close supervision is necessary when any
appliance is used by or near children.
5. Unplug from outlet when not in use and
before cleaning. Allow to cool before putting
on or taking off parts, and before cleaning
appliance.
6. Do not operate any appliance with a
damaged cord or plug, or after the appliance
has malfunctioned or has been damaged in
any manner. Return the appliance to the
nearest Cuisinart Repair centre for
examination, repair or adjustment.
7. The use of accessory attachments not recommended by Cuisinart may result in fire,
electrical shock, or risk of injury to persons.
8. Do not use outdoors.
9. Do not let power cord hang over edge of
table or counter, or touch hot surfaces.
10. Do not place on or near hot gas or electric
burner, or in a heated oven.
11. Unplug the unit when finished using.
12. Do not use appliance for other than
intended use.
13. Extreme caution must be exercised when
moving an appliance containing hot oil or
other hot liquids.
14. To disconnect, turn control to OFF setting,
then remove plug from wall outlet.
15. WARNING: TO REDUCE THE RISK OF
FIRE OR ELECTRIC SHOCK, ONLY
AUTHORIZED PERSONNEL SHOULD
DO REPAIRS.
SAVE THESE
INSTRUCTIONS
FOR HOUSEHOLD
USE ONLY
SPECIAL CORD SET
INSTRUCTIONS:
A short power-supply cord is provided to reduce
the risks resulting from becoming entangled in
or tripping over a longer cord.
Longer extension cords are available and may
be used if care is exercised in their use.
If a long extension cord is used, the marked
electrical rating of the extension cord should be
at least as great as the electrical rating of the
appliance, and the longer cord should be
arranged so that it will not drape over the
countertop or tabletop where it can be pulled
on by children or animals, or tripped over.
NOTICE:
This appliance has a polarized plug (one blade
is wider than the other). To reduce the risk of
electric shock, this plug will fit in a polarized
outlet only one way. If the plug does not fit fully
in the outlet, reverse the plug. If it still does not
fit, contact a qualified electrician. Do not modify
the plug in any way.
TABLE OF CONTENTS:
Introduction . . . . . . . . . . . . . . . . . . . . . . . . . . . 1
Parts and Features . . . . . . . . . . . . . . . . . . . . . 2
Before the First Use . . . . . . . . . . . . . . . . . . . . 2
The Griddler™Does it All . . . . . . . . . . . . . . . . 2
Assembly Instructions . . . . . . . . . . . . . . . . . . 4
Operating Instructions . . . . . . . . . . . . . . . . . . 5
Cleaning and Care . . . . . . . . . . . . . . . . . . . . . 6
Storage . . . . . . . . . . . . . . . . . . . . . . . . . . . . . . 6
Warranty . . . . . . . . . . . . . . . . . . . . . . . . . . . . . 6
Recipes . . . . . . . . . . . . . . . . . . . . . . . . . . .7-24
INTRODUCTION
Congratulations on your purchase of the
Cuisinart
™
Griddler™. This multifunctional product
is actually four appliances in one. A floating
hinge, two sets of removable cooking plates and
a convertible design turn the Griddler™into a
Contact Grill, a Panini Press, or your choice
of a large double Open Grill or Griddle.
Dual temperature controls and indicator lights
make this product easy to use. Dishwasher-safe
grill plates, griddle plates, drip pans and a
cleaning/scraping tool clean up in seconds.
Page 3
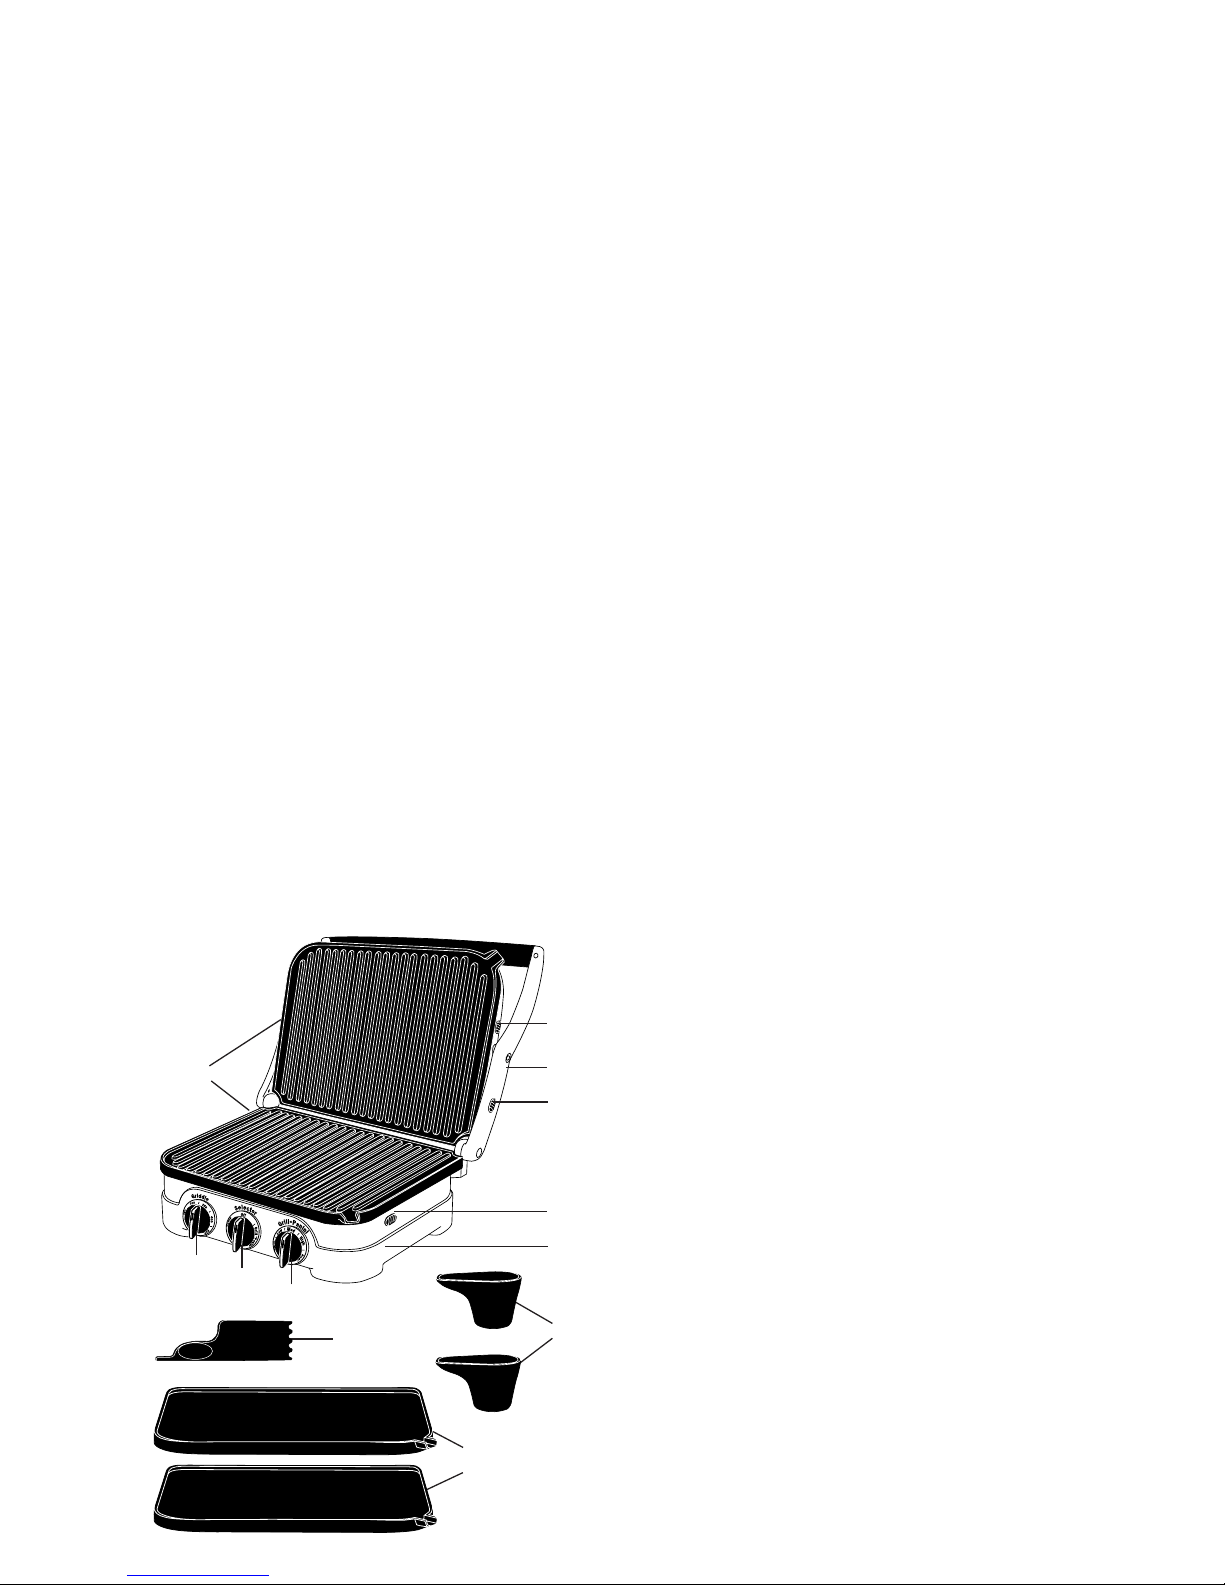
PARTS AND FEATURES
1. Base and Cover: Solid construction with
stainless steel self-adjusting cover
2. Panini-Style Handle: Sturdy cast metal
handle adjusts cover to accommodate
thickness of food
3. Removable Cooking Plates: Nonstick and
dishwasher safe for easy cleanup
a. Grill Plates:
Perfect for grilling steak,
burgers, chicken and vegetables
b. Griddle Plates:
Prepare flawless pan-
cakes, eggs, bacon and seared scallops
4. Controls: Indicator lights signal “power on”
and “ready to cook”
a. Selector:
Choose the Grill/Panini or
Griddle function
b. Grill/Panini:
Adjust temperature from
“warm” to “sear”
c. Griddle:
Adjust temperature from 200
to 425˚F
5. Drip Cups: Collect grease and are
dishwasher safe
6. Cleaning/Scraping Tool: Helps clean grill
or griddle plates after cooking
7. Plate Release Buttons: Push in to release
and remove cooking plates
8. Hinge Release Lever: Allows the cover to
lay back for cooking in the flat position
9. Recipe Book (not shown): With 26 recipes
BEFORE THE FIRST USE:
Remove all packaging materials and any
promotional labels or stickers from your grill.
Be sure all parts (listed under Parts and
Features) of your new appliance have been
included before discarding any packaging
materials. You may want to keep the box and
packing materials for use at a later date.
Note: Drip cups are located on outside or left
polyfoam insert.
Before using your Cuisinart
™
Griddler™for the
first time, remove any dust from shipping by
wiping the base, cover and controls with a
damp cloth. Thoroughly clean cooking plates,
drip trays and scraping tool. The grill and
griddle plates, drip trays and scraping tool
are dishwasher safe. Refer to Assembly
Instructions for plate removal.
THE GRIDDLER
™
DOES IT ALL:
The Griddler™is the ultimate kitchen appliance,
offering you four separate cooking options.
Simply change the cooking plates and adjust the
hinge to use as a
Contact Grill, Panini Press,
Open Grill or Griddle
. See Assembly
Instructions and Operating Instructions.
Contact Grill:
Use the Griddler™as a
Contact Grill
to cook
burgers, boneless pieces of meat and thin cuts
of meat and vegetables.
The
Contact Grill
function works best when you
want to cook something in a short amount of
time or when you are looking for a healthy
method of grilling. When cooked on the
Contact
Grill,
food will cook quickly because you are
grilling both sides of the food item at the same
time. The ribs on the grill plates combined with
the grease spout at the corner of the plate allow
the grease to drip from the meat and drain off
the plates.
When the Griddler
™
is used as a
Contact Grill
the grill plates are recommended. Rest the
cover evenly on top of the food until it has
reached the desired cooked temperature.
The Griddler
™
was designed with a unique
handle and hinge that allows the cover to adjust
to the thickness of the food. You can easily grill
anything from a thinly-sliced potato to a thick
sirloin steak with even results.
2
1
2
3a
4a
5
4c
4b
7
8
3b
6
7
Page 4
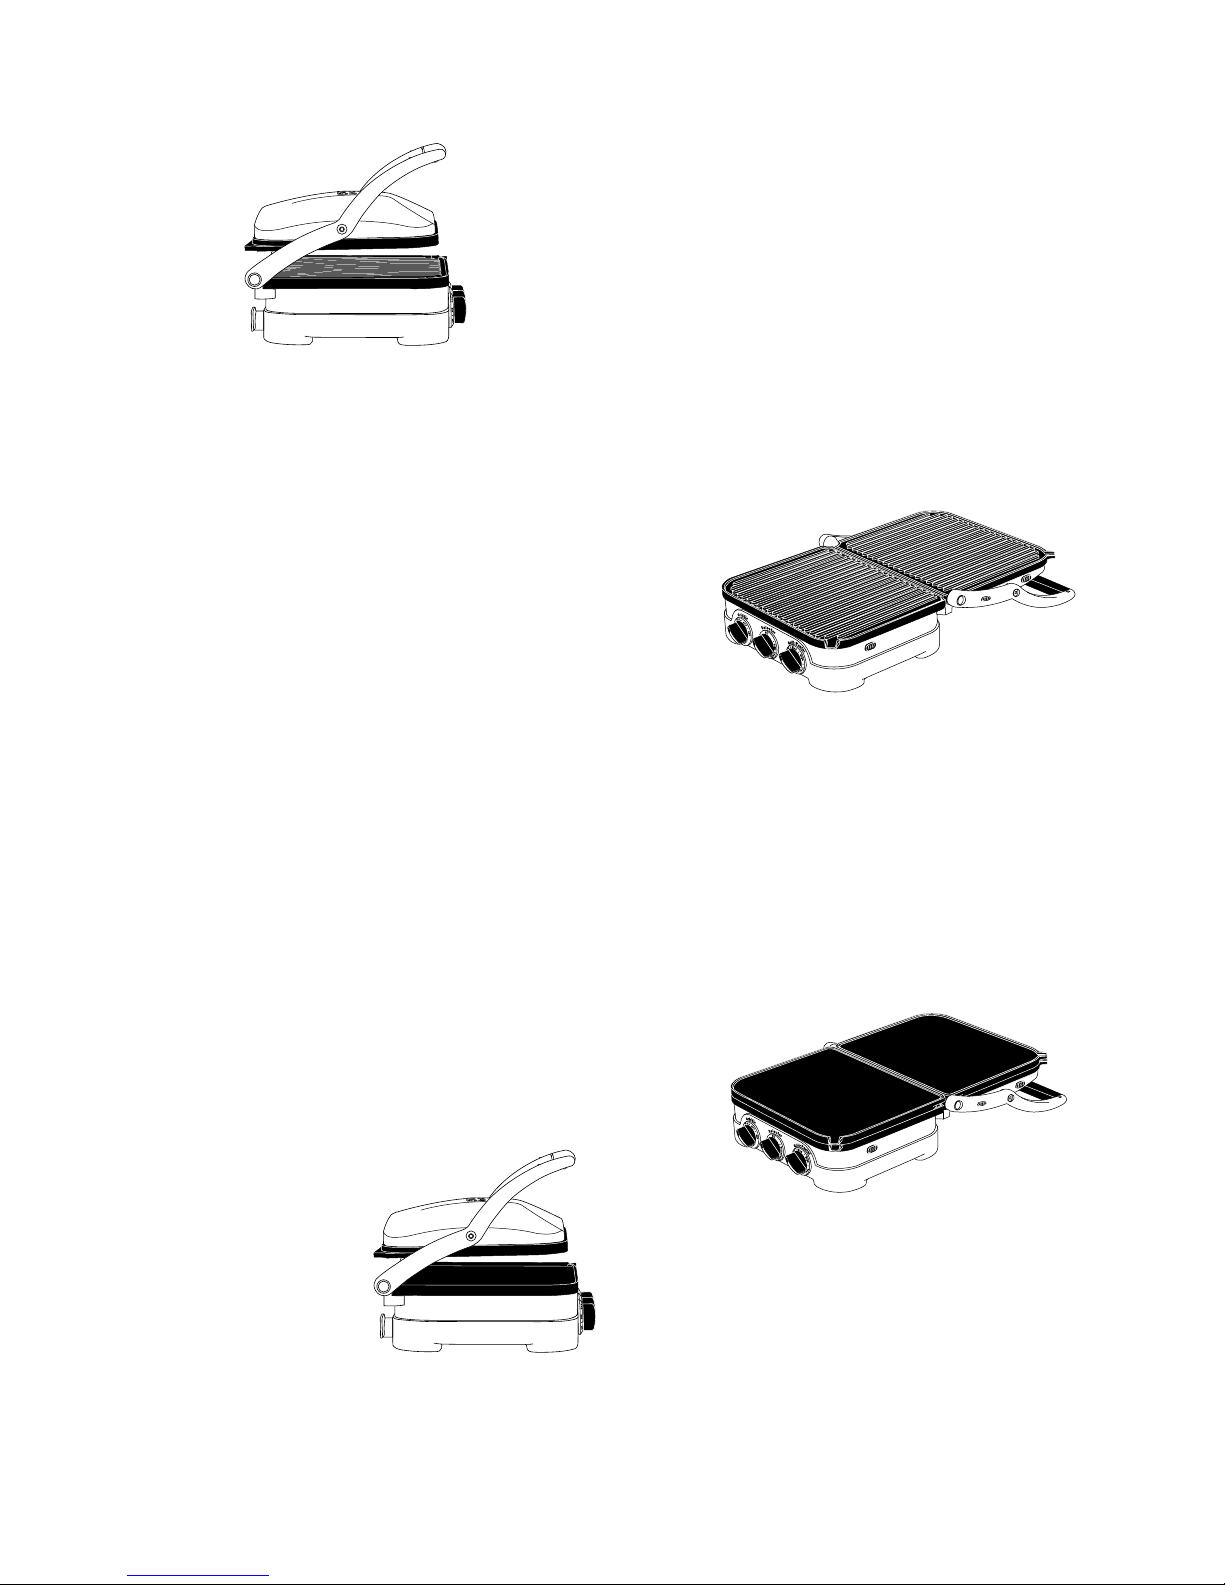
When cooking more than one food item in the
contact grill, it is important that the thickness of
food items is consistent so the cover will close
evenly on the food.
Panini Press:
Use the Griddler™as a
Panini Press
to grill
sandwiches, breads and quesadillas.
The word “Panini” is an Italian term for grilled
sandwich. Panini can include any combination
of ingredients such as vegetables, meat and
cheese layered between two pieces of fresh
baked bread. The sandwich is then pressed
between two grill or griddle plates to toast the
bread and warm the sandwich. Experiment to
make a variety of savoury or sweet sandwiches
for any meal. We recommend using fresh
baked bread to produce the best tasting Panini.
Popular breads used for Panini are focaccia
(a flat bread frequently baked with rosemary,
salt and onion on top), michetta (a small round
roll with a crisp crust), ciabatta (a rectangular
bread with a slightly domed crust) and thick
slices of classic Italian bread.
When the Griddler
™
is used as a
Panini Press,
the grill plates are recommended. We recommend the grill plates because a traditional-style
Panini sandwich will have grill marks on the
bread. However, depending upon the type of
sandwich you are preparing, you may wish to
use the griddle plates. The Griddler
™
functions
as a
Panini Press
in the same manner that it
functions as a
Contact Grill
. The Griddler™was
designed with a unique handle and hinge that
allows the cover to
adjust to the thickness
of the sandwich you
are preparing, and
to rest there evenly.
Light pressure can be
applied to the handle
to press and heat the
sandwich to your liking.
When cooking more
than one Panini, it is
important that the thickness of each sandwich is
consistent so the cover will close evenly on the
Panini.
Open Grill:
Use the Griddler™as an
Open Grill
to cook
burgers, steak, poultry (we do not recommend
cooking bone-in chicken, since it does not cook
evenly on an open grill), fish and vegetables.
Cooking on the
Open Grill
is the most versatile
method of using the Griddler™. In the open
position, you have double the surface area
(200 sq. inches) for grilling. You have the option
of cooking different types of foods on separate
plates without combining their flavours, or cooking large amounts of the same type of food. The
open position also accommodates different cuts
of meat with varying thicknesses, allowing you
to cook each piece to your liking.
“Open Grill” refers to using the Griddler
™
with the
cover laying flat, creating a double, flat cooking
surface.
In this
position,
the foods
you are
grilling
will have
to be
turned over for cooking. When the Griddler
™
is used as an
Open Grill,
the grill plates should
be used.
Griddle:
Use the Griddler™as a
Griddle
to cook
pancakes, eggs, French toast, hash browns
and breakfast meats.
Using the
Griddle
function is a wonderful way to
prepare breakfast for two or for a large family.
The large
surface
area
allows
you to
cook a
variety of
different
foods at
the same time, or large amounts of your
favourite food.
When you use the Griddler
™
as a
Griddle
, open
the cover so it lays flat, creating a double, flat
cooking surface. In this position, the foods you
are preparing will have to be turned over for
cooking. When using this cooking function, the
griddle plates should be used.
3
Page 5
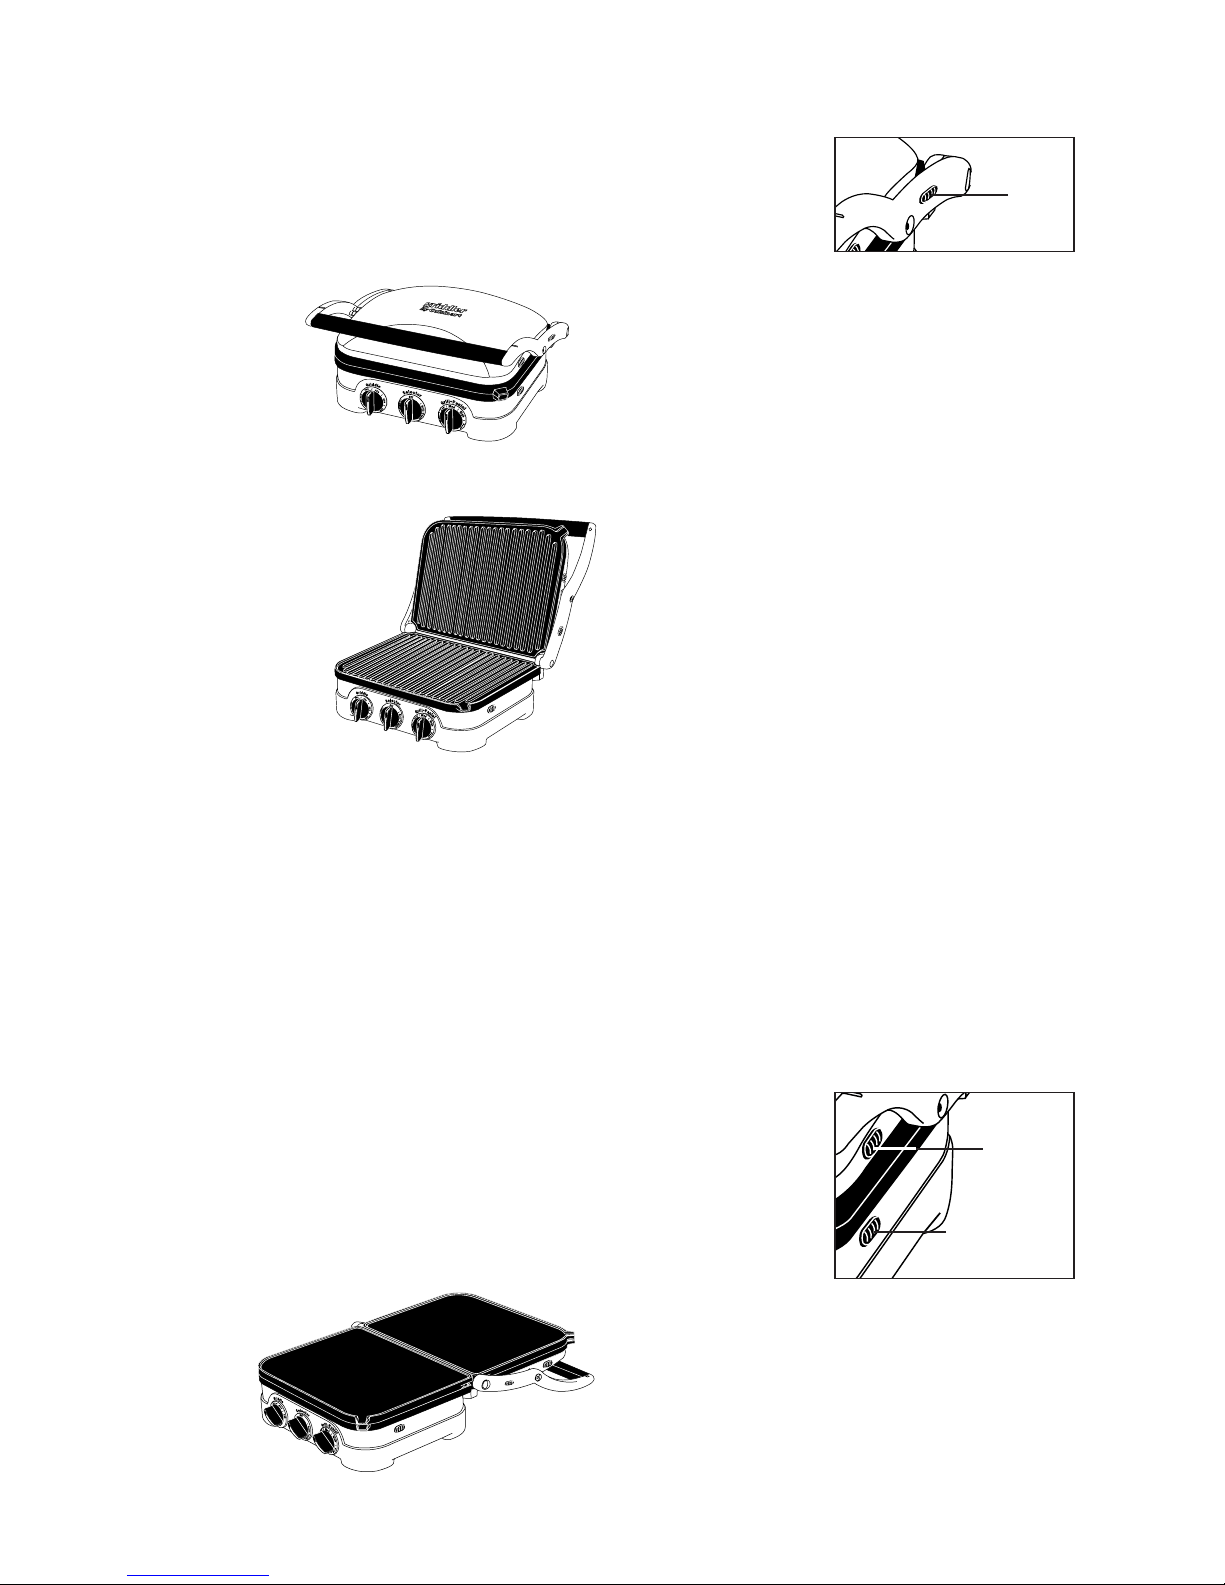
4
ASSEMBLY
INSTRUCTIONS:
Place Griddler™on a clean flat surface where
you intend to cook.
The Griddler™can be positioned in three ways:
Closed Position – Upper plate/cover rests flat
on lower plate/base.
This is your
starting and
heating position
when using the
Contact Grill or
Panini Press
functions.
Open Position – Upper plate/cover is open and
in the 100° position. Open the cover to this
position to add or
remove food from
the Griddler
™
when
using the Contact
Grill or Panini
Press functions.
To adjust the
Griddler
™
to this
position, simply lift
the handle until
you feel it come to a locking position. The unit
will stay in this position until you close the cover
or continue to open it to the Flat Position.
The cover will stay in the upright position until
you lower the handle for cooking. When this is
done, the cover will release itself so that it lies
flat on the top of the food you are preparing.
This allows you to cook your food evenly from
both top and bottom. When you lift the handle to
open the Griddler™ after cooking the cover will
remain in the flat position, parallel with the lower
plate. In order to lock the cover back into the
upright position, you must close the Griddler™,
without any food in place, and open it again.
Flat Position – Upper plate/cover is level with
lower plate/base. The upper and lower plates
line up to create one large cooking surface. The
Griddler
™
is in this position when it is used as an
Open Grill or Griddle.
To adjust the Griddler
™
to this position, locate
the hinge
release
lever on
the right
arm. With
your left
hand on
the handle,
use your right hand to slide the lever towards
you. Push the handle back until the cover rests
flat on the counter. The unit will stay in this position until you lift the cover off the table and
return it to the closed position.
If the Griddler™ is
already in the open
position and you wish
to adjust it to the flat
position, pull the handle towards you and then lift the hinge release
lever. Push the handle back until the cover rest
in the flat position. Pulling the handle forward
slightly before lifting the hinge release switch will
take some of the pressure off of the hinge and
you will be able to adjust the Griddler™ more
easily.
To insert cooking plates:
Adjust Griddler™to Flat Position (see above)
with the Controls directly in front of you. Insert
one plate at a time. Each plate is designed to fit
in either the upper housing or the lower housing
of the Griddler™. The word “lower” or “upper” is
embossed into each grill or griddle plate to let
you know where to attach the plate. Pick up the
lower grill/griddle plate with the cutouts for the
heating element facing down. If you are facing
the Griddler™ the drip spout should be at the
forward right-hand corner of the plate. Locate
the metal brakets at the center of the housing.
Tilt the back end of the plate and line up the
cutouts at the back of the plate with the metal
brakets. Slide the plate underneath the brakets
and push down the front end of the plate. It will
snap into place. Turn the Griddler™ around and
insert the matching grill or griddle plate into the
upper housing as you did with the first plate.
To remove cooking plates:
Adjust Griddler™to Flat Position (see above).
Locate the plate release buttons on one side of
the unit. Press firmly on buttons and the plate at
that end of the unit
will pop up slightly
from the base. Grasp
the plate with two
hands, slide it out
from under the metal
brackets, and lift it out
of the base. Press on
the other plate release button to remove the
other cooking plate in the same manner.
Upper Plate
Release
Button
Lower Plate
Release Button
Hinge
Release
Lever
Flat Position
Page 6
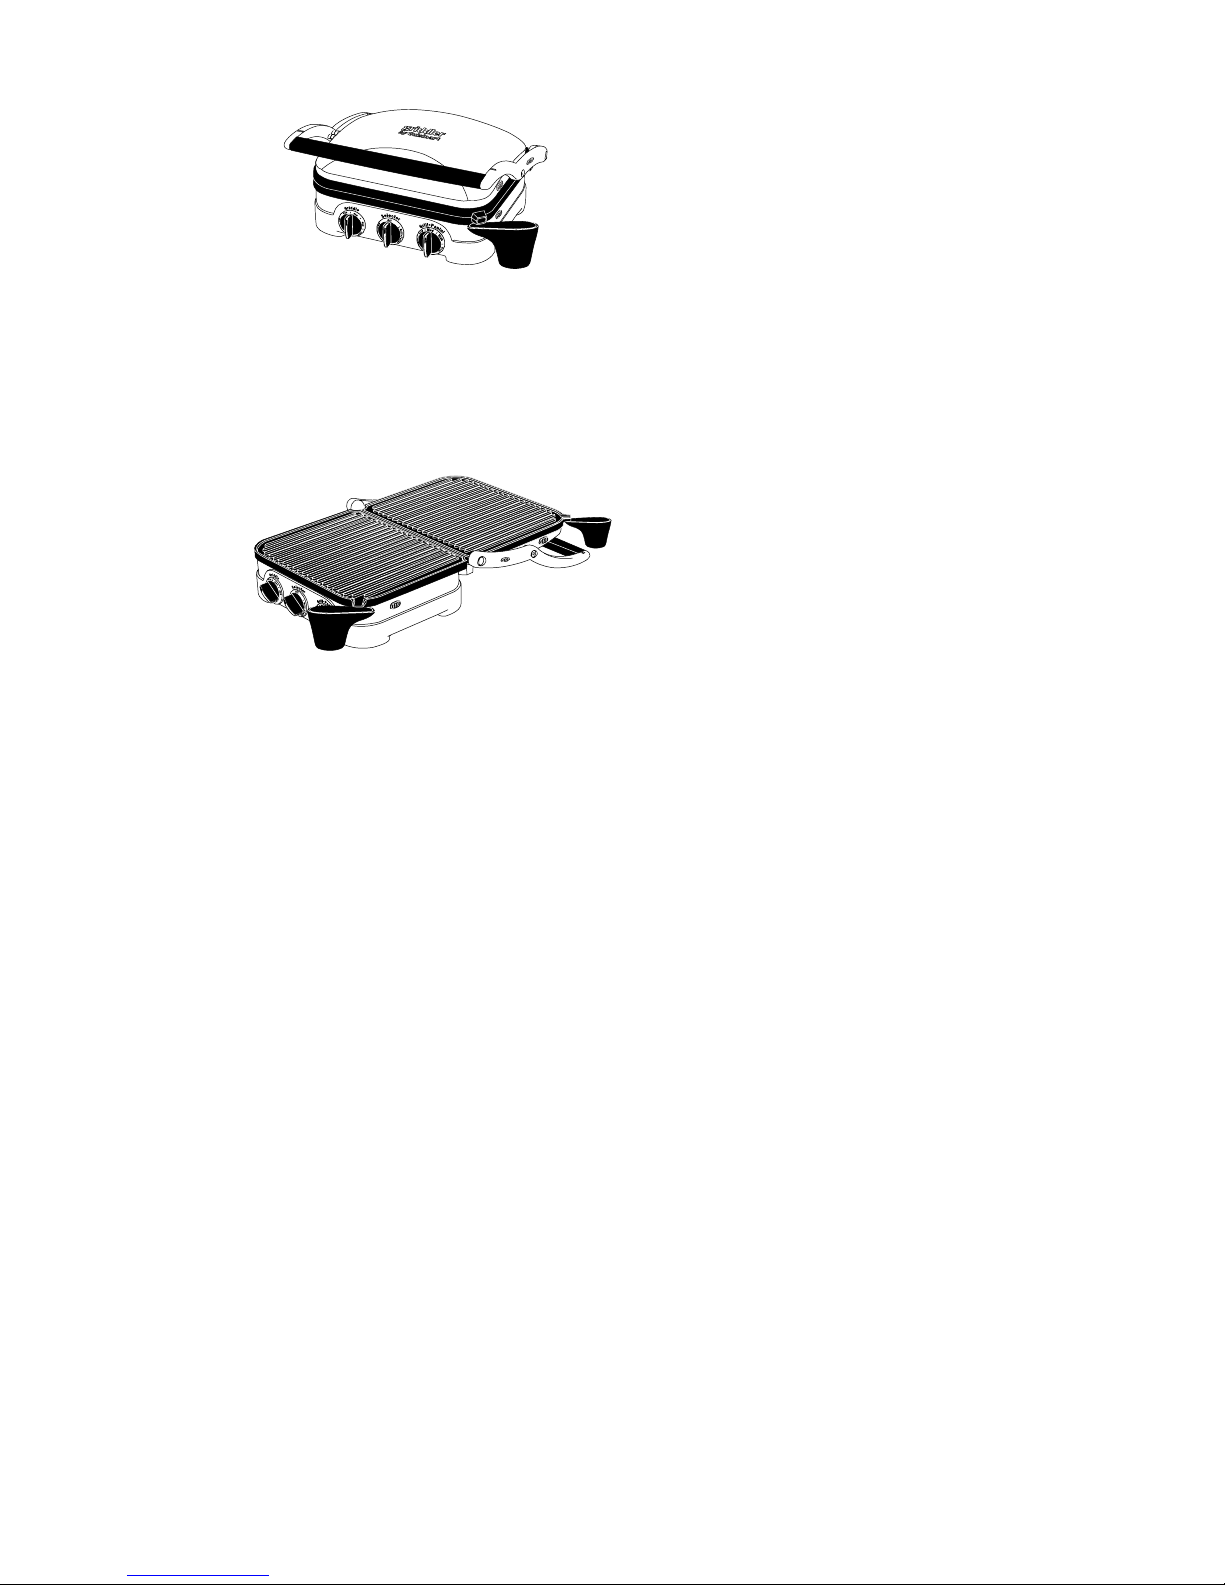
Position drip cups:
When using
the Griddler
™
as a Contact
Grill or Panini
Press, only
one drip cup
is needed.
Place the cup
directly below the grease spout while cooking.
Grease from the food will run off the plates
through the grease spout and into the drip cups.
Grease should be safely disposed of after
cooking. The drip cups can be cleaned in the
dishwasher.
When using the Griddler
™
as an Open Grill or
Griddle,
both drip
cups
should be
used.
Place the
cups at
either end
of the unit directly below the grease spouts.
Once the Griddler
™
is assembled properly, plug
the cord into a standard electrical outlet. You are
now ready to begin cooking.
OPERATING
INSTRUCTIONS:
Once the Griddler™is assembled properly and
you are ready to begin cooking, turn the
Selector to the left to choose the Griddle
function or to the right to choose the Grill/Panini
function, depending on what you intend to cook.
When the knob is turned to either function,
a red indicator light will illuminate to indicate
that the power is on.
If you intend to use the Griddler
™
as a Contact
Grill, Panini Press or Open Grill, turn the
Grill/Panini Control to the desired temperature
for cooking. Settings range from Warm (150°F)
to Sear (450°F).
If you intend to use the Griddler
™
as a Griddle,
turn the Griddle Control to the desired
temperature for cooking. Temperature settings
range from 200°F to 425°F.
If you intend to use the Griddler™as a Flat Grill
or Griddle, but you do not need the entire surface, use the bottom plate.
It may take up to 10 minutes to reach
operating temperature, depending on the
temperature level that was set. When the
thermostat has reached operating temperature,
a green indicator light inside the chosen control
will indicate that the Griddler
™
is ready for cooking. During operation, the light will continue to
turn on and off as the thermostat regulates the
temperature. This is normal.
The temperature controls are used to set and
maintain the temperature of the cooking surface.
You may vary the setting of the control knob at
any time during cooking, and may wish to do so
depending on the types of foods on the cooking
plate. Refer to the Cooked Food Temperature
Chart of the Recipe Book for recommendations.
Always exercise caution when handling the
Griddler™ during cooking. To open the
Griddler™ grasp the black plastic area of the
handle. This part of the handle stays cool to the
touch while cooking. The arms are made of diecast aluminum and will become hot during use.
Do not touch them during or immediately following cooking.
The Griddler™ housing will become hot during
use. The cover is made of stainless steel and
will become very hot and should not be touched
during or immediately following cooking. If you
need to adjust the cover be sure to use an oven
mitt to prevent burns.
The lower housing is made of plastic, and while
it will become very warm it will not burn you. If
you need to move the Griddler™ during cooking
be sure to handle it from the base only. Do not
touch the cover. Allow the Griddler™ to cool
down before handling (at least 30 minutes).
NOTE: The first time you use the Griddler
™
, it
may have a slight odour and may smoke a bit.
This is normal and common to appliances with
nonstick surfaces.
The Griddler™ comes with a black
cleaning/scraping tool. This can be used for
cleaning the grill and griddle plates after you
have finished cooking and the unit has cooled
down completely (at least 30 minutes). Using
the cleaning tool on a hot surface for too long
will cause the plastic to melt.
User Maintenance:
* Never use metal utensils, as they will scratch
the nonstick grill plate. Instead, use only
wooden or heat-proof plastic utensils.
* Never leave plastic utensils in contact with the
hot grill plate. This includes the provided
cleaning tool.
* In between recipes, scrape excess food
buildup through grease channel and into drip
cups, then wipe off any residue with a paper
towel before proceeding with next recipe.
* Allow the Griddler™ to cool down completely
(at least 30 minutes) before cleaning.
5
Page 7

CLEANING AND CARE:
CAUTION: BEFORE CLEANING APPLIANCE,
MAKE SURE IT HAS COOLED DOWN
COMPLETELY.
Once you have finished cooking, turn the
Selector Control to the OFF position and unplug
the power cord from the wall outlet. Allow the
unit to cool down for at least 30 minutes before
handling.
Use the cleaning/scraping tool to remove any
leftover food from the cooking plate. The scraping tool can be washed by hand or in the dishwasher.
Dispose of grease from drip cups. The drip cups
can be cleaned by hand or in the dishwasher.
Press the Plate Release Buttons to remove
plates from the housing. Be sure that the plates
have cooled completely before handling
(at least 30 minutes). The cooking plates can be
washed in the dishwasher. Do not use metallic
objects such as knives or forks for cleaning. Do
not use a scouring pad for cleaning. The nonstick coating can be damaged.
If you have been cooking seafood, wipe the
cooking plate with lemon juice to prevent
seafood flavour transferring to the next recipe.
The housing base, cover and control knobs can
be wiped clean with a soft, dry cloth. For tough
stains, dampen cloth. Never use an abrasive
cleaner or harsh pad.
STORAGE:
Always make sure the Griddler™is cool and dry
before storing.
The power cord can be wrapped around the
back of the base for storing.
One set of cooking plates should be stored in
the Griddler
™
when not in use. The other set can
be stored in a drawer or cabinet, along with the
drip cups and scraping tool.
WARRANTY
Limited Three-Year Warranty
This warranty is available to consumers only.
You are a consumer if you own a Cuisinart
™
Griddler™that was purchased at retail for
personal, family or household use. This warranty
is not available to retailers or other commercial
purchaser or owners.
We warrant that your Cuisinart™Griddler™will
be free of defects in materials and workmanship
under normal home use for 3 years from the
date of original purchase.
We suggest you complete and return the
enclosed product registration card promptly
to facilitate verification of the date of original
purchase. However, return of the product
registration card does not eliminate the need
for the consumer to maintain the original proof
of purchase in order to obtain the warranty
benefits. In the event that you do not have
proof of purchase date, the purchase date for
purposes of this warranty will be the date of
manufacture.
For added convenience, you may also visit
our website at www.cuisinart.ca to register
your product online.
If your Cuisinart
™
Griddler™should prove to be
defective within the warranty period, we will
repair it, or if we think necessary, replace it.
To obtain warranty service, simply call our
toll-free number 1-800-472-7606 for additional
information from our Customer Service
Representatives or send the defective product to
Customer Service at Cuisinart, 156 Parkshore
Drive, Brampton, Ont. L6T 5M1.
To facilitate the speed and accuracy of your
return, please enclose $10.00 for shipping and
handling of the product.
Please pay by cheque or money order.
NOTE: For added protection and secure
handling of any Cuisinart
®
product that is being
returned, we recommend you use a traceable,
insured delivery service. Cuisinart cannot be
held responsible for in-transit damage or for
packages that are not delivered to us. Lost
and/or damaged products are not covered
under warranty.
Please be sure to include your return address,
daytime phone number, description of the
product defect, product model # (located on
bottom of product), original date of purchase,
and any other information pertinent to the
product’s return.
Your Cuisinart
™
Griddler™has been
manufactured to the strictest specifications and
has been designed for use with the authorized
accessories and replacement parts.
This warranty expressly excludes any defects or
damages caused by accessories, replacement
parts, or repair service other than those that
have been authorized by Cuisinart.
This warranty does not cover any damage
caused by accident, misuse, shipment or other
ordinary household use.
This warranty excludes all incidental or
consequential damages.
6
Page 8
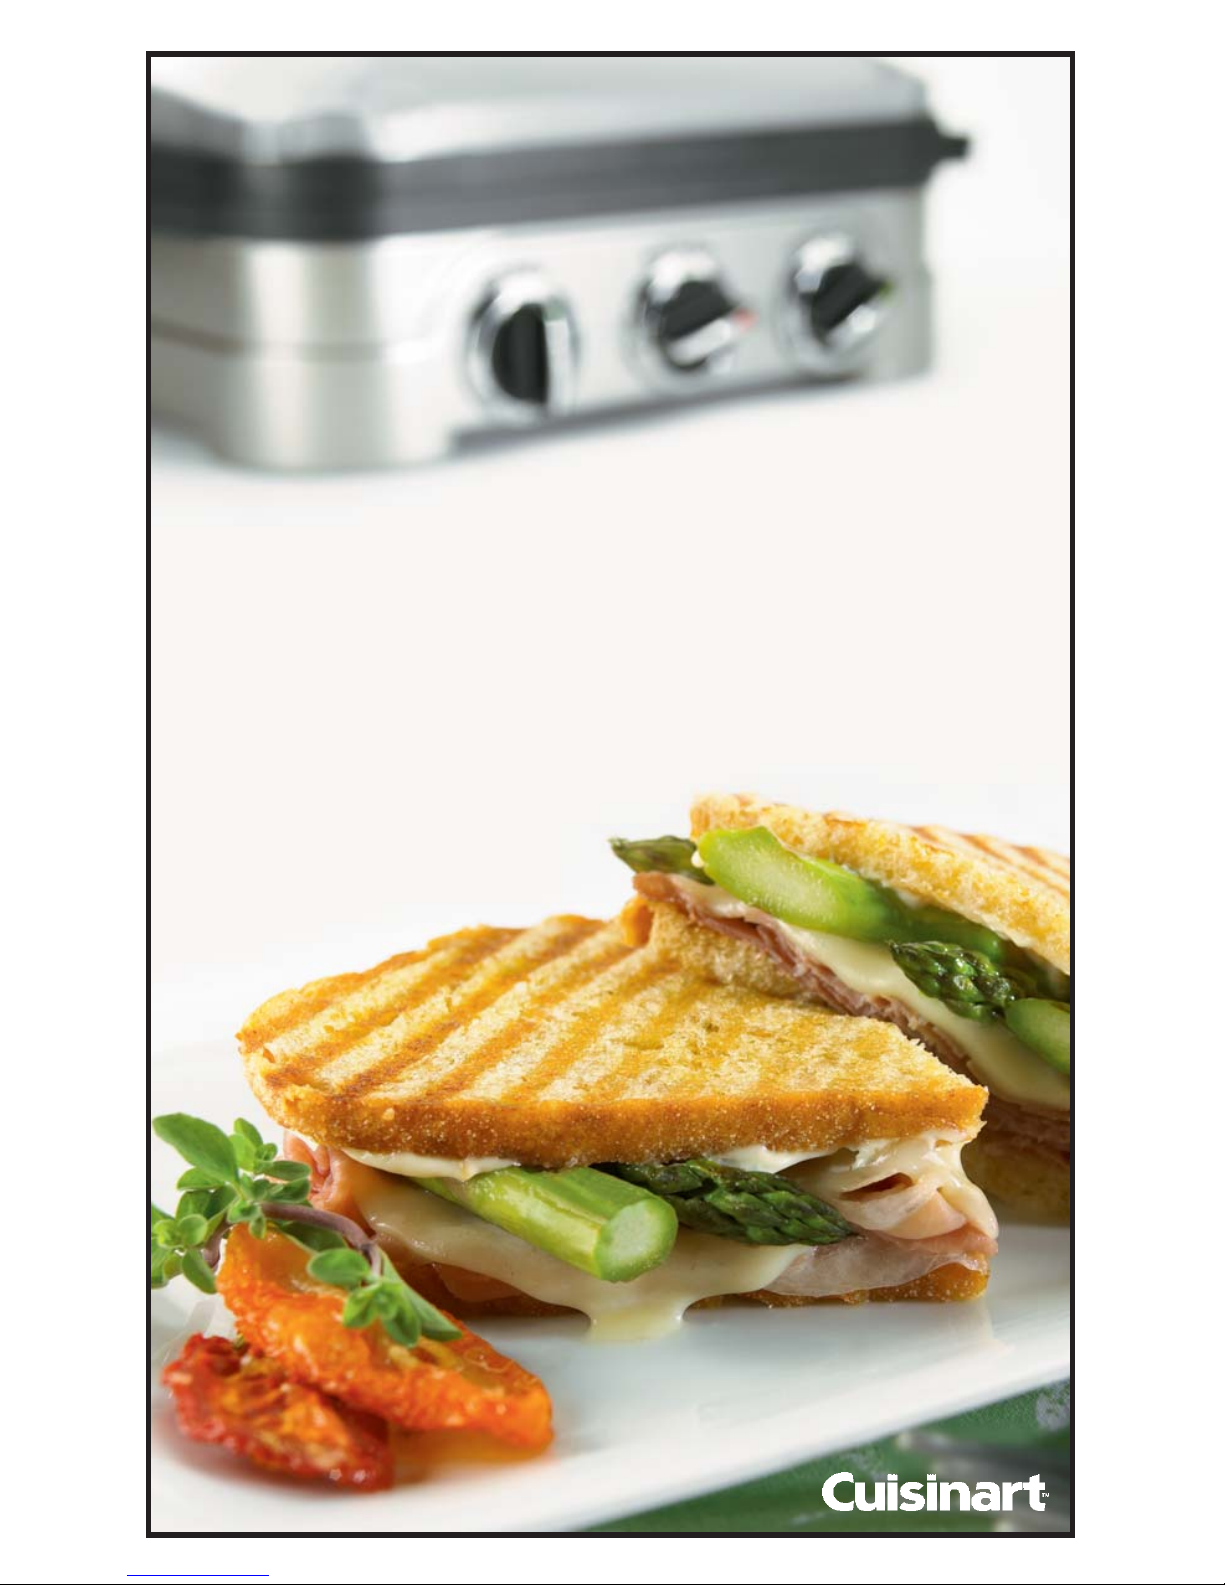
the
GRIDDLER
a guide to perfect meals
™
7
Page 9
SAVOURY RECIPES
ON THE CLOSED GRILL
Grilled Portobello Salad 9
Honey Dijon Grilled Turkey Cutlets 10
Mustard & Herb Grilled Pork Chops 10
The Best Hamburgers 11
THE PANINI PRESS
Grill Plates:
Grilled Fresh Mozzarella & Tomato Panini 12
Sopressata, Provolone, Roasted Pepper & Pesto Panini 13
Smoked Turkey, Tomato & Gouda Panini 14
Griddle Plates:
Chicken Quesadillas 14
Croque Monsieurs 15
Grilled Reubens 16
ON THE FLAT GRILL
Marinated Grilled Chicken 17
Teriyaki Grilled Chicken & Pineapple 18
Grilled Lime Sage Swordfish 19
Spicy Grilled Flank Steak 19
ON THE GRIDDLE
Blueberry Oat Buttermilk Pancakes 20
Cinnamon Sugar French Toast 21
Breakfast Sausages 22
Southwestern Spiced Shrimp & Scallops 23
COOKED FOOD TEMPERATURE CHART 24
8
Page 10

9
Grilled Portobello Salad
Griddler™Function: Closed
Selector: Grill/Panini
Plates: Grill
Makes 6 servings
4 tablespoons (60 ml) extra virgin olive oil
2 tablespoons (25 ml) balsamic vinegar
1 tablespoon (15 ml) water
1 clove garlic, peeled and minced
1 tablespoon (15 ml) minced onion or shallot
1 teaspoon (5 ml) thyme
1/2 teaspoon (2 ml) kosher salt
1/4 teaspoon (1 ml) freshly ground pepper
18 ounces (540 g) thickly sliced Portobello mushrooms*
1/3 cup (75 ml) finely chopped red bell pepper
1/3 cup (75 ml) finely chopped yellow bell pepper
Place the olive oil, vinegar, water, garlic, onion, thyme, salt, and pepper in a food
processor fitted with the metal blade, or in a blender. Process or blend until
emulsified. Pour over the sliced Portobellos and toss gently to coat. Let stand for
10 to 15 minutes.
Preheat the Griddler
™
on High. When ready, arrange one third of the sliced
Portobellos on the bottom grill, cut side down. Close and grill for 3 minutes.
Remove and place on a platter. Repeat with the remaining sliced Portobellos.
Sprinkle with the chopped red and yellow peppers and serve. May be served
warm or chilled.
Grilled portobellos also make a very good filling for grilled panini sandwiches
use in place of, or in addition to meat.
* Sliced Portobello mushrooms are available in the produce sections of most
well-stocked grocery stores. The pre-sliced Portobellos are evenly sliced, resulting
in a very good grilled mushroom.
Nutritional information per ser ving:
Calories 111 (71% from fat) • carb. 7g • pro. 2g • fat 9g • sat. fat 1g •
chol. 0mg • sod. 60mg • calc. 13mg • fiber 1g
Page 11
10
Honey Dijon Grilled Turkey Cutlets
Griddler™Function: Closed
Selector: Grill/Panini
Plates: Grill
Makes 4 servings
2 tablespoons (25 ml) dry sherry
2 tablespoons (25 ml) Dijon-style mustard
2 tablespoons (25 ml) honey
1/2 tablespoon (7 ml) light soy sauce
1/4 teaspoon (1 ml) powdered ginger
4 turkey breast cutlets, each about 5-6 ounces (150-175 g) and 1/2-inch
(1.25 cm) thick
Place sherry, mustard, honey, soy, and ginger in a bowl; whisk to blend. Place
turkey in marinade and let stand 15 minutes (it may be marinated longer if
placed in refrigerator).
Preheat Griddler™on High. When the green indicator light is on, the unit is ready.
Drain the turkey cutlets and arrange on the bottom grill plate – discard remaining
marinade. Close and grill for 5 minutes (add 30 to 60 seconds if meat has been
marinated in the refrigerator for 1 hour or longer). Serve.
Nutritional information per ser ving:
Calories 227 (7% from fat) • carb. 11g • pro. 42g • fat 2g • sat. fat 1g •
chol. 79mg • sod. 393mg • calc. 27mg • fiber 0g
Mustard & Herb Grilled Pork Chops
Griddler™Function: Closed
Selector: Grill/Panini
Plates: Grill
Makes 4 servings
2 tablespoons (25 ml) Dijon-style mustard
2 tablespoons (25 ml) extra virgin olive oil
1 tablespoon (15 ml) raspberry (or other fruit flavour) vinegar
1 tablespoon (15 ml) herbes de Provence
1 tablespoon (15 ml) water
4 boneless pork loin chops, each about 3/4-inch (1.87 cm) thick, about 5
ounces (150 g)*
Place the mustard, olive oil, vinegar, herbes de Provence, and water in a small
bowl. Whisk until emulsified (this may also be done in a blender or mini food
processor). Reserve.
Page 12

11
Trim any excess fat from the pork chops. Place in a shallow bowl or pie plate
and add marinade. Coat thoroughly. Let marinate for 15 to 20 minutes at room
temperature (for marinating longer, cover and refrigerate – remove from
refrigerator 20 minutes before grilling).
Preheat Griddler™on High. When green indicator light comes on, allow the
excess marinade to drip off the chops and arrange the chops evenly spaced on
the bottom grill plate. Close grill. Grill for 6 to 8 minutes, until the pork chops
have reached an internal temperature of 160°F (71°C); do not overcook or the
pork may become dry. Remove to a warm platter and allow to rest for
5 minutes before serving.
*When grilling in the closed position, it is important that the pork chops all be
the same thickness for best results.
Nutritional information per ser ving:
Calories 334 (44% from fat) • carb. 2g • pro. 43g • fat 16g • sat. fat 4g •
chol. 133mg • sod. 272mg • calc. 14mg • fiber 0g
The Best Hamburgers
Griddler™Function: Closed
Selector: Grill/Panini
Plates: Grill
Makes 4 servings
1-1/2 pounds (750 g) freshly ground beef round or chuck (15% lean)
1/4 teaspoon (1 ml) kosher salt
1/4 teaspoon (1 ml) freshly ground black pepper
Preheat the Cuisinart™Griddler™fitted with the grill plates in the closed grill
position on High.
Working the ground chuck as little as possible, shape into four 6-ounce (175 g)
burger patties, about 4 inches (10 cm) in diameter. (The best way to do this is to
use a 4-inch (10 cm) round cookie cutter). Place 6 ounces (175 g) of meat in
the cookie cutter and gently press to fill the cookie cutter evenly. It is important
that all the burgers be of the same height for optimal grilling results.)
Place the burgers on the bottom grill plate of the Griddler
™
, evenly spaced.
Close the Griddler
™
and grill for 4 to 6 minutes [until the internal temperature
reaches from 140°F to 165°F (60-74°C)] depending on personal preference.
Remove burgers from Griddler™and sprinkle with salt and pepper. Serve hot
with your favourite condiments.
Nutritional information per ser ving [1/4 cup (50ml)]:
Calories 254 (181% from fat) • carb 1g • pro. 30g • fat 20g • sat. fat 8g •
chol. 87mg • sod. 324mg • calc. 7mg • fiber 0g
Page 13
12
Variations:
Burgers may be seasoned for variety before they are grilled. Gently stir
suggested seasonings or your own favourites into the meat, working the meat as
little as possible for best texture.
1-2 cloves finely minced garlic
2-3 finely chopped green onions
1 teaspoon (5 ml) minced fresh ginger
1-2 tablespoons (15-25 ml) soy sauce
1-2 tablespoons (15-25 ml) Worcestershire sauce
1 tablespoon (15 ml) minced capers
1-2 tablespoons (15-25 ml) minced imported olives
1-2 tablespoons (15-25 ml) barbecue sauce
hot sauce to taste
minced jalapeno pepper to taste
THE PANINI PRESS
Grilled Fresh Mozzarella, Tomato &
Basil Panini Sandwiches
Griddler™Function: Closed
Selector: Grill/Panini
Plates: Grill
Makes 2 servings
4 slices [1/2-inch (1.25 cm) thick] crusty artisan bread* or individual
focaccia sliced horizontally
1 tablespoon (15 ml) extra virgin olive oil
4 ounces (125 g) sliced fresh mozzarella (or fresh smoked mozzarella)
4-6 thin tomato slices (to fit across bread)
kosher or sea salt and freshly ground pepper
8 large basil leaves
Preheat Griddler
™
on High.
Lightly brush one side of each slice of bread with olive oil. Place two slices on
work surface oiled side down. Layer with cheese and tomato. Season lightly with
salt and pepper if desired. Stack basil leaves and roll into a cylinder. Slice the
cylinder, using a sharp knife to get shreds of basil. Sprinkle the tomato with the
basil shreds. Top with the other slices of bread, oiled side up.
Page 14
13
Place the sandwiches on the preheated grill plates. Close the Griddler™. Press
lightly for 30 seconds and bake for 3 to 4 minutes until bread is grill marked and
crispy, and cheese is melted. Serve hot.
*Can use plain artisan country bread or a flavoured bread such as roasted garlic
or rosemary bread. Slices should be about 7x3-1/2x1/2 inches (17.5x8.75x1.25
cm) each.
Nutritional information per sandwich:
Calories 365 (49% from fat) • carb. 29g • pro. 17g • fat 20g • sat. fat 9g •
chol. 44mg • sod. 579mg • calc. 309mg • fiber 1g
Sopressata, Provolone,
Roasted Pepper & Pesto Panini
Griddler™Function: Closed
Selector: Grill/Panini
Plates: Grill
Makes 4 servings
1 long French baguette [about 22 inches (55 cm) long, 8 ounces (250 g)]
4 ounces (125 g) thinly sliced Sopressata
2 roasted red peppers, drained
4 ounces (125 g) sliced provolone
4 teaspoons (20 ml) pesto
1 teaspoon (5 ml) extra virgin olive oil
Cut off the two heels of the baguette and cut the baguette into two 10-inch
(25 cm) lengths. Cut each in half horizontally.
Spread each half with 1 teaspoon (5 ml) pesto. Evenly layer the Sopressata on
each bottom. Cut the roasted peppers to lay flat. Arrange the roasted peppers
over the sopressata. Top with a layer of the provolone. Place top on sandwich.
Cut in half crosswise to make 4 sandwiches total.
Preheat Griddler™on High. When ready, open and place the sandwiches on the
bottom grill plate. Lower cover and press lightly on the handle for 30 seconds.
Grill for 5 minutes, until the bread is golden, toasty and well marked, the filling is
warm and cheese is melted. Serve warm.
Nutritional information per ser ving:
Calories 565 (31% from fat) • carb. 69g • pro. 27g • fat 19g • sat. fat 8g •
chol. 39mg • sod. 1601mg • calc. 271mg • fiber 1g
Page 15

14
Smoked Turkey, Tomato & Gouda Panini
Griddler™Function: Closed
Selector: Grill/Panini
Plates: Grill
Makes 4 servings
8 slices crusty country bread [about 7x3-1/2x1/2 (17.5x8.75x1.25 cm)]
4 teaspoons (20 ml) extra virgin olive oil
2 teaspoons (10 ml) Dijon-style mustard
4 ounces (125 g) Gouda cheese, shredded or very thinly sliced
8 ounces (250 g) thinly sliced smoked turkey breast
12 thin slices tomato (beefsteak) or 16 thin slices Roma tomato
2 ounces (56 g) very thinly sliced red onion
Preheat Griddler
™
on High. Lightly brush one side of each slice of bread with
the olive oil. Place 4 slices of bread on the work surface, oiled side down. Spread
lightly with mustard. Build the sandwiches in this order –cheese, smoked turkey,
tomato – using equal amounts of each item on each sandwich. Top with the
remaining sliced bread, oiled side up.
Place two sandwiches on the bottom grill plate, evenly spaced. Lower cover and
apply light pressure to handle for about 30 seconds. Grill panini for 3 to 3-1/2
minutes. Remove to a rack and keep warm in an oven preheated to 175°F
(80°C). Grill remaining 2 sandwiches in the same way. Cut in half on the diagonal to serve.
Nutritional information per ser ving:
Calories 348 (36% from fat) • carb. 31g • pro. 25g • fat 14g • sat. fat 6g •
chol. 57mg • sod. 1174mg • calc. 215mg • fiber 1g
THE PANINI PRESS
Chicken Quesadillas
Griddler™Function: Closed
Selector: Grill/Panini
Plates: Griddle
Makes 4 quesadillas
4 8-inch (20 cm) flour tortillas
2 teaspoons (10 ml) unsalted butter, melted
1 cup (250 ml) shredded cooked chicken [about 5-6 ounces (150-175 g)]
2 ounces (56 g) reduced fat shredded sharp cheddar cheese
1/3 cup (75 ml) sliced black olives [one 2.25oz. (64 g) can, drained]
1/4 cup (50 ml) finely sliced green onion (about 3 green onions)
1 tablespoon (15 ml) finely chopped jalapeño pepper salsa
Lightly brush one side of each tortilla with 1/2 teaspoon (2 ml) melted butter.
Page 16

15
Place on the work surface, buttered side down. Preheat Griddler™on
Low-Medium.
Place chicken, olives, green onion, and jalapeño pepper in a medium bowl and stir
to blend. Divide mixture equally among the 4 tortillas, placing to one side of the
tortilla. Fold each tortilla in half. Place 2 tortillas on the bottom griddle and
close. Bake quesadillas for 5 to 6 minutes – until chicken is hot, cheese is melted,
and tortillas are lightly golden brown and crispy. Place on a rack in a low
[175-200°F (80-93°C)] oven to keep warm. Repeat cooking for remaining 2
quesadillas.
Cut quesadillas into wedges and serve with salsa.
Nutritional information per ser ving (1 quesadilla):
Calories 255 (27% from fat) • carb. 27g • pro. 20g. • fat 8g • sat. fat 2g •
chol. 42mg • sod. 556mg • calc. 169mg • fiber 2g
Croque Monsieurs
Griddler™Function: Closed
Selector: Grill/Panini
Plates: Griddle
Makes 2 servings
4 slices firm white or wheat bread
2 teaspoons (10 ml) Dijon-style mustard
2 thin slices smoked deli ham
2 thin slices deli turkey
2 slices Swiss, Cheddar or Gouda cheese (may use reduced fat)
1 large egg, lightly beaten
1/4 cup (50 ml) milk (whole, reduced fat, lowfat or fat free)
1 tablespoon (15 ml) melted unsalted butter
kosher salt and freshly ground pepper to taste
Preheat Cuisinart™Griddler™fitted with the griddle plates in the panini position
on Medium.
Divide and layer the ham, turkey, and cheese to make two sandwiches. Place the
egg, milk, salt, and pepper to taste in a small bowl and whisk until smooth. Dip
the sandwiches into the egg and milk mixture and soak briefly to coat. Brush
both sides evenly with melted butter. Place sandwiches on bottom plate. Close
Griddler™and apply medium pressure for 10 seconds. Cook for 3 to 4 minutes,
until bread is browned and crispy, and filling is warmed. Remove sandwiches
using a heatproof plastic spatula and allow to rest for 3 to 5 minutes before
cutting and serving.
Nutritional analysis per serving:
Calories 402 (41% from fat) • carb. 29g • pro. 32g • fat 17g • sat. fat 8g •
chol. 170mg • sod. 1291mg • calc. 431mg • fiber 1g
Page 17

16
Grilled Reubens
Griddler™Function: Closed
Selector: Grill/Panini
Plates: Griddle
Makes 4 servings
3/4 cup (175 ml) sauerkraut
8 teaspoons (40 ml) unsalted butter, softened
8 slices rye or pumpernickel bread
4 tablespoons (60 ml) prepared fat free or regular Thousand Island
or Russian dressing, divided
4 ounces (125 g) reduced fat sliced Swiss or Jarlsberg cheese
8 ounces (250 g) thinly sliced corned beef
Rinse the sauerkraut and drain. Press out all water and place on a triple
thickness of paper towels.
Brush one side of each slice of bread with softened butter. Place 4 slices bread
on work surface, buttered side down. Spread each of those slices with dressing.
Layer each with 1/2 ounce (14 g) sliced cheese, 2 ounces (56 g) corned beef, 3
tablespoons (45 ml) sauerkraut, and the remaining cheese. Top with the remaining bread, buttered side up.
Preheat the Cuisinart
™
Griddler™fitted with the griddle plates in the panini position on Medium. Arrange the sandwiches (depending on the shape of the bread,
you will be able to cook 2 or 4 sandwiches) evenly spaced on the bottom griddle
plate. Close Griddler™and apply medium pressure for 10 seconds. Cook until
bread is toasty, filling is warm and cheese is melted, about 4 to 5 minutes. Serve
warm with mustard.
Nutritional information per ser ving [1/4 cup (50ml)]:
Calories 490 (233% from fat) • carb 40g • pro. 27g • fat 26g • sat. fat 12g •
chol. 94mg • sod. 1489mg • calc. 409mg • fiber 5g
Page 18
17
ON THE FLAT GRILL
Marinated Grilled Chicken
Griddler™Function: Flat
Selector: Grill/Panini
Plates: Grill
Makes 6 servings
1/4 cup (50 ml) extra virgin olive oil
1/4 cup (50 ml) balsamic vinegar
1/4 cup (50 ml) red currant jelly
1 tablespoon (15 ml) Dijon-style mustard
1 tablespoon (15 ml) fresh lemon juice
1/2 tablespoon (7 ml) finely minced garlic
2 teaspoons (10 ml) light soy sauce
1/4 teaspoon (1 ml) ground coriander
1/4 teaspoon (1 ml) ground cumin
1/4 teaspoon (1 ml) ground ginger
2-3 dashes hot sauce, such as Tabasco
®
6 boneless, skinless chicken breast halves
Place the oil, vinegar, jelly, mustard, lemon juice, garlic, soy, coriander, cumin, ginger,
and hot sauce in a medium bowl. Stir with a whisk until smooth.
(This may also be done in a food processor, blender or chopper/grinder.)
Remove the tenders from the chicken and reserve for another use. Place a
chicken breast between 2 sheets of plastic wrap. Flatten to an even thickness of
1/2 inch (1.25 cm) using a flat pounder; repeat with remaining chicken. Place
chicken in marinade and stir to coat. Cover and refrigerate for 1 to 2 hours
(do not marinate longer than this; the acid will begin to toughen and dry out the
chicken).
Preheat the Griddler™on High-Sear. Drain the chicken and discard the marinade
(do not reuse). Arrange 3 drained chicken breast halves evenly spaced on each
side of the grill. Grill for 5 to 6 minutes on each side, until the chicken reaches
an internal temperature of 170°F (77°C). Serve hot or warm.
Nutritional information per ser ving:
Calories 277 (30% from fat) • carb. 6g • pro. 41g • fat 9g • sat. fat 2g •
chol. 109mg • sod. 200mg • calc. 23mg • fiber 0g
Page 19

18
Teriyaki Grilled Chicken & Pineapple
Griddler™Function: Flat
Selector: Grill/Panini
Plates: Grill
Makes 4 servings
1/3 cup (75 ml) low-sodium soy sauce
3 tablespoons (45 ml) rice vinegar
2 tablespoons (25 ml) dry or medium dry sherry (or may use mirin)
2 tablespoons (25 ml) brown sugar, packed
2 teaspoons (10 ml) powdered ginger
1-1/2 pounds (750 g) boneless, skinless chicken thighs
8 slices fresh pineapple, 1/2-inch (1.25 cm) thick
Place soy, sherry, vinegar, brown sugar, and ginger in a medium bowl and stir with
a whisk to blend. Makes 2/3 cup (150 ml) marinade – measure out and reserve
1/3 cup (75 ml).
Trim all visible fat from chicken and add chicken to marinade in bowl; stir to coat.
Allow to marinate for 20 to 30 minutes (may marinate longer – cover and refrigerate). Pour remaining 1/3 cup (75 ml) marinade over pineapple slices and
marinate for 20 to 30 minutes.
Preheat Griddler
™
on High. Drain the pineapple; reserve marinade in a small
sauce pan. When hot, grill the pineapple slices for 2-1/2 to 3 minutes per side.
Remove to a warm plate and cover loosely. Drain the chicken – add the marinade to the saucepan and bring to a boil. Reduce heat to low and simmer until
chicken is ready (do not save and use marinade as a sauce unless you do this
step). Arrange the chicken,“skin” side down, evenly spaced on the grill. Grill for
5 to 6 minutes per side – chicken juices should run clear and test 170°F (77°C)
when checked with an instant read thermometer. Transfer to warm plate and
pour the simmered reserved sauce over the chicken. Serve with steamed brown
or white rice.
Nutritional information per ser ving:
Calories 486 (36% from fat) • carb. 30g • pro. 47g • fat 19g • sat. fat 5g •
chol. 162mg • sod. 1012mg • calc. 44mg • fiber 2g
Page 20

19
Grilled Lime Sage Swordfish
Griddler™Function: Flat
Selector: Grill/Panini
Plates: Grill
Makes 8 servings
zest of 2 limes, finely chopped
2 cloves garlic, peeled, finely chopped
1/4 cup (50 ml) fresh sage leaves, finely chopped
1 tablespoon (15 ml) fresh rosemary leaves, finely chopped
1/3 cup (75 ml) fresh lime juice
1/2 cup (125 ml) extra virgin olive oil
1 teaspoon (5 ml) kosher salt
1/2 teaspoon (2 ml) freshly ground pepper
8 portions swordfish steak, 5-6 ounces (150-175 g) each
2 avocados, peeled and sliced lengthwise
Place lime zest, garlic, sage, rosemary, lime juice, olive oil, salt, and pepper in a
medium bowl and whisk until emulsified. Place swordfish in a 13x9x2-1/2 - inch
(32.5x22.5x6.25 cm) dish and add marinade. Turn fish to coat completely. Allow
to marinate for 30 minutes. (Do not marinate longer – the acid will begin to
“cook” the fish and give it a dry texture.)
Preheat Griddler
™
on High-Sear. When grill is hot, arrange the swordfish steaks
on both sides, evenly spaced. Grill for 3 to 4 minutes on each side. Internal
temperature of fish should be 145°F (63°C).
Serve garnished with avocado slices.
Nutritional information per ser ving:
Calories 312 (49% from fat) • carb. 4g • pro. 35g • fat 17g • sat. fat 3g •
chol. 67mg • sod. 327mg • calc. 28mg • fiber 3g
Spicy Grilled Flank Steak
Griddler™Function: Flat
Selector: Grill/Panini
Plates: Grill
Makes 8 servings
1 tablespoon (15 ml) kosher salt
1 tablespoon (15 ml) sweet paprika
2 teaspoons (10 ml) thyme
2 teaspoons (10 ml) marjoram
1-1/2 teaspoons (7 ml) granulated garlic
1-1/2 teaspoons (7 ml) dried minced onion
Page 21

20
1 teaspoon (5 ml) freshly ground (coarse) black pepper
3/4 teaspoon (4 ml) cayenne pepper
1/2 teaspoon (2 ml) white pepper
1 beef flank steak, about 2 pounds (1 kg)
Place the salt, paprika, thyme, granulated garlic, minced onion, black pepper,
cayenne, and white pepper in a blender or food processor and process for 20 to
30 seconds. Makes about 1/4 cup (50 ml) Spicy Rub.
Trim any visible fat from the flank steak, using a sharp knife. Score the meat in a
cross-hatch pattern on both sides – do not cut through more than 1/16 inch
(0.16 cm). Rub with 1 tablespoon (15 ml) of the Spicy Rub on each side
(reserve the remainder for another time). Let stand 15 minutes or longer.
Preheat Cuisinart™Griddler™in the flat grill position on High-Sear. When hot,
arrange the flank steak on the grill. Grill for 6 to 10 minutes per side, moving the
steak only to turn, until steak is done to personal preference. Let stand 10
minutes before slicing. Slice on the diagonal, across the grain into thin slices.
(A Cuisinart®Electric Knife makes this task easy.)
Nutritional information per ser ving [1/4 cup (50ml)]:
Calories 311 (60% from fat) • carb 1g • pro. 30g • fat 20g • sat. fat 8g •
chol. 87mg • sod. 324mg • calc. 7mg • fiber 0g
ON THE GRIDDLE
Blueberry Oat Buttermilk Pancakes
Griddler™Function: Flat
Selector: Griddle
Plates: Griddle
Makes 16 pancakes
1 cup (250 ml) blueberries (fresh or frozen)
1 cup (250 ml) all-purpose flour, divided
1-1/3 cups (325 ml) rolled oats (regular, not quick oats)
1/4 cup (50 ml) whole wheat flour
1/4 cup (50 ml) brown sugar
1 teaspoon (5 ml) baking soda
1/2 teaspoon (2 ml) salt
2 cups (500 ml) buttermilk
2 large eggs, lightly beaten
3 tablespoons (45 ml) vegetable oil
Place the blueberries in a small bowl. Sprinkle with 1 tablespoon (15 ml) of the
flour and toss to coat; reserve. Preheat Griddler™to 350°F (177°C).
Page 22

21
Place the remaining flour, oats, wheat flour, brown sugar (break up any lumps),
baking soda, and salt in a medium bowl; stir with a whisk. Place the buttermilk,
eggs and oil in a small bowl; stir. Add the liquid mixture to the dry ingredients
and stir with a whisk until blended. Gently fold in the blueberries.
When ready, drop the batter onto the grill plates, using a scant quarter cup
(50 ml) measure. Bake the pancakes for 2 to 3 minutes. When pancakes are
bubbling on the top, turn and bake for an additional 2 to 3 minutes. Blueberry
Oat Pancakes are best served hot. Pancakes can be kept warm by placing them
on a rack on a baking sheet in a low [175-200°F (79-93°C)] oven while baking
the remainder.
Serve with warm syrup and butter as desired.
Nutritional information per pancake:
Calories 121 (29% from fat) • carb. 18g • pro. 4g • fat 4g • sat. fat 1g •
chol. 28mg • sod. 184 mg • calc. 47mg • fiber 1g
Cinnamon Sugar French Toast
Griddler™Function: Flat
Selector: Griddle
Plates: Griddle
Makes 4 servings (2 slices per serving)
8 slices (preferably thick sliced) cinnamon swirl or cinnamon raisin bread
5 large eggs
1 cup (250 ml) evaporated fat free milk (not reconstituted)
1/4 cup (50 ml) half & half (may use fat free)
1/4 teaspoon (1 ml) salt
1 teaspoon (5 ml) cinnamon
1 tablespoon (15 ml) vanilla extract
pinch nutmeg (freshly grated)
Arrange the bread in two 8x8x2-inch (20x20x5 cm) glass baking dishes. Whisk
eggs, half-&-half, salt, spices, and vanilla until smooth but not foamy. Pour the
batter over bread. Turn the bread over, let sit 5 minutes, then turn the bread
over again.
Preheat the Cuisinart
™
Griddler™in the flat griddle position on 325°F (163°C).
When the Griddler
™
is hot (green indicator light will turn on), arrange the soaked
bread on the hot griddle. Cook until deep golden brown on each side, about 3
to 4 minutes per side. French toast can be kept warm by placing them on a rack
on a baking sheet in a low [200°F (93°C )] oven. Serve with warm Maple Syrup.
Nutritional information per ser ving:
Calories 308 (31% from fat) • carb. 36mg • pro. 17 • fat 10g • sat. fat 4g •
chol. 271mg • sod. 947mg • calc. 274mg • fiber 3g
Page 23

22
Breakfast Sausages
Griddler™Function: Closed or Flat
Selelctor: Griddle
Plates: Griddle
Makes 10 sausage patties [about 1-3/4 ounces (50 g) each]
12 ounces (375 g) ground turkey (can use very lean)
4 ounces (125 g)lean ground pork
1/3 cup (75 ml) very finely chopped tart apple
1 tablespoon (15 ml) very finely minced onion
2 tablespoons (25 ml) chopped fresh parsley [1 tablespoon (15 ml) dried
parsley]
1 teaspoon (5 ml) rubbed sage
1/2 teaspoon (2 ml) thyme
1 teaspoon (5 ml) kosher salt
1/4 teaspoon (1 ml) freshly ground black pepper
1/4 teaspoon (1 ml) paprika
Place all ingredients in a medium bowl and mix as for meatloaf – mixing thoroughly to distribute the seasonings evenly. Unlike ground meat for burgers, which
should not be overmixed, it is important to completely mix the meat and seasonings. Shape into ten patties of equal size [about 1-3/4 ounces (50 g) each, 1-1/2
to 2 inches (3.75x5 cm) in diameter]. This may be done the night before, or
sausage may be made ahead and frozen.
The sausage may be cooked using either the flat or closed griddle position. For
closed griddle cooking, preheat the Griddler™to 425°F (218°C). Arrange the
sausages evenly spaced on the hot griddle plate. Using the closed griddle, cook
the sausages for 4 to 5 minutes, until they have reached an internal temperature
of 170°F (77°C). This is a great, quick way to cook sausages for sausage biscuits
or other breakfast sandwiches.
To cook the sausages on the flat griddle, preheat the Griddler™to 375°F (190°C).
In the flat griddle position, cook the sausages for 12 to 15 minutes total, turning
once after 6 minutes. Cooking in the flat griddle position allows you to cook
eggs or pancakes to accompany the sausages, either on one side of the Griddler
™
or when finished cooking the sausages.
Nutritional information per ser ving [1/4 cup (50 ml)]:
Calories 75 (11% from fat) • carb 1g • pro. 11g • fat 3g • sat. fat 1g •
chol. 27mg • sod. 166mg • calc. 13mg • fiber 0g
Recipe note:
It you have a Cuisinart®Food Processor, you may use it to chop your own freshly
ground turkey and pork. Follow the instructions that accompany your processor.
After chopping the meat, you may add the chopped apples, onions and seasonings using the pulse until completely combined.
Page 24

23
Southwestern Spiced Shrimp & Scallops
Griddler™Function: Flat
Selector: Griddle
Plates: Griddle
Makes 4 entrée servings or 16 appetizer servings
1 teaspoon (5 ml) ground cumin
1 teaspoon (5 ml) chili powder
1/2 teaspoon (2 ml) basil
1/2 teaspoon (2 ml) ground coriander
1/2 teaspoon (2 ml) oregano
1/2 teaspoon (2 ml) paprika
1/2 teaspoon (2 ml) kosher salt
1/2 teaspoon (2 ml) freshly ground black pepper
16 extra large (16-20 count) shrimp (peeled, leaving on tail shell, deveined)
16 large sea scallops
2 tablespoons (25 ml) extra virgin olive oil
fresh lemon or lime wedges
Place the cumin, chili, basil, coriander, oregano, paprika, salt, and pepper in a small
bowl and stir to combine – there will be about 2 tablespoons (25 ml). Soak four
10-inch (25 cm) wooden skewers in water for 10 minutes.
Rinse the shrimp; drain. Place on a triple thickness of paper towels and pat dry.
Remove tough muscle (also called “foot” – this attaches the scallop to its shell)
from the side of each scallop. Rinse the scallops; drain. Place on a triple thickness
of paper towels and pat dry. Transfer shrimp and scallops to a bowl. Drizzle with
olive oil and stir/toss gently to coat completely. Sprinkle with spice rub; stir/toss
gently to coat. Thread shrimp onto wooden skewers, putting the skewer through
the tail end to the “head”, 4 shrimp per skewer (this keeps them from curling
when heated).
Preheat the Cuisinart™Griddler™in the flat griddle position on 450°F (232°C).
When hot, arrange the skewered shrimp evenly on one side of the griddle.
Arrange the scallops evenly spaced on the other side. Grill the shrimp until firm
and pink, about 2 to 3 minutes per side. Grill the scallops until firm and
browned, about 2 minutes per side. Remove immediately. Garnish with fresh
lemon or lime wedges to serve.
Nutritional information per ser ving [1/4 cup (50 ml)]:
Calories 267 (87% from fat) • carb 4g • pro. 38g • fat 10g • sat. fat 1g •
chol. 209mg • sod. 516mg • calc. 89mg • fiber 0g
Page 25

Cooked Food Temperature Chart
Check internal temperature, using an instant read thermometer.
Beef
The USDA recommends cooking all ground beef to at least Medium
[160°F (71°C)] doneness, or until centre is no longer pink.
Pork
Always grill using an instant read thermometer until the internal
temperature reaches 160°F (71°C) when tested.
Poultry
Boneless poultry breast should be cooked to an internal temperature of 170°F
(77°C).
Ground poultry should be cooked to an internal temperature of 165-170°F
(74-77°C).
(The Cuisinart™Griddler™is not recommended for cooking bone-in poultry.)
Seafood
Fin Fish – Cook until opaque and easily flaked with a fork.
Scallops – Cook until opaque and firm.
Shrimp – Cook until shrimp turn orange/red and flesh is
pearly opaque.
Bacon
Cook bacon until crispy to taste.
Hot Dogs/Smoked Sausages
Although they are “precooked”, we recommend cooking hot dogs and smoked
sausages until the internal temperature is 165°F (74°C) when tested with an
instant read thermometer.
24
Rare Bright red centre, lighter pink to outside 140°F (60°C)
Medium Light pink centre, brown to outside 160°F (71°C)
Well-done Brown consistently throughout 170°F+(77°C)+
Page 26

Cuisinart offers an extensive assortment of top quality products to make life in the
kitchen easier than ever. Try some of our other countertop appliances and
cookware, and Savor the Good Life
™
.
Cuisinart offre un vaste choix de produits haut de gamme pour vous
faciliter la tâche dans la cuisine. Essayez nos autres appareils de comptoir ainsi que
notre batterie de cuisine et... savourez la bonne vie.
www.cuisinart.ca
Coffeemakers
Cafetières
Toasters
Fours grilloirs
Food Processors
Robots de cuisine
Grill &Griddle
Gril & Crêpière
Juicers
Presse-fruits
© 2004 Cuisinart
Cuisinart®is a registered
trademark of Cuisinart
Cuisinart®est une marque de
commerce déposée de Cuisinart
Cuisinart Canada
156 Parkshore Drive
156 chemin Parkshore
Brampton, Ont. L6T 5M1
Consumer Call Centre Email:
Courriel centre au consommateur :
Printed in China
Imprimé en Chine
04CC18029
IB-5280-CAN-A
 Loading...