

Page 1
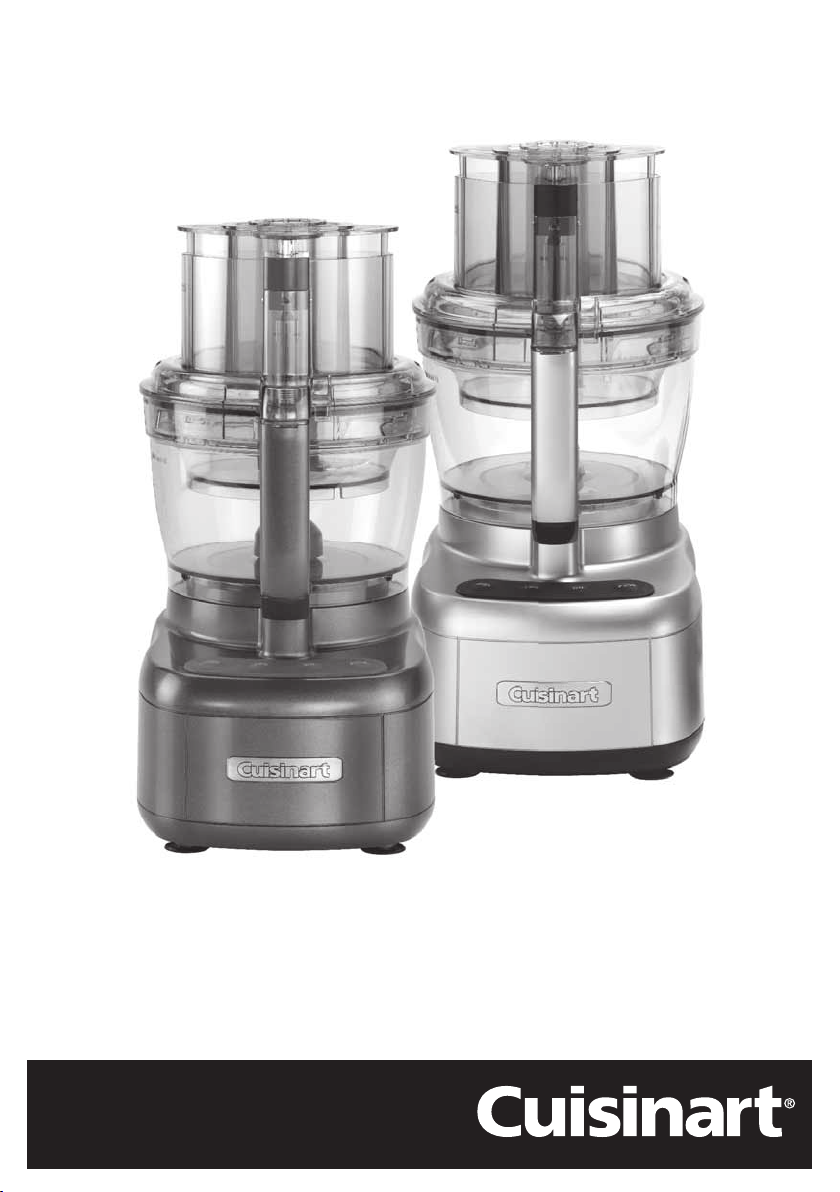
Expert Prep Pro
FP1300U/SU
Page 2

At Cuisinart, we appreciate that throwing a dinner party, cooking for a special
occasion or even having friends over for an impromptu get-together can be a
daunting task.
But when you have the right tools at hand, it’s easy to rustle up something
delicious. Which is why we’ve developed a range of high quality appliances
that can take the strain in the kitchen and give you the confi dence to try new
things. We’re not looking for perfection on a plate – instead, we want real,
honest and mouth-watering treats without the fuss.
To learn more about our products and for recipe ideas please visit our website
at cuisinart.co.uk or follow us on Facebook and Instagram.
Page 3

Contents
IMPORTANT SAFETY CAUTIONS
Important Safety Cautions ..............................................................................................5
Product Control Guide .....................................................................................................8
Accessory Storage Case .................................................................................................10
Dicing Kit Storage Case ................................................................................................. 10
General Assembly Instructions ....................................................................................... 11
Machine Controls .......................................................................................................... 12
Chopping/Mixing Blades ............................................................................................... 13
Dough Blade ....................................................................................................................14
Slicing/Shredding Discs ................................................................................................. 14
Dicing ............................................................................................................................... 16
Spiralising ........................................................................................................................18
&
Cleaning, Storage
Technical Data ................................................................................................................20
Troubleshooting ..............................................................................................................21
Repacking Guide .............................................................................................................23
UK Guarantee ...................................................................................................................24
UK After Sales Service ...................................................................................................25
Maintenance .................................................................................20
Carefully read all the instructions before using the appliance and keep in
a safe place for future reference.
Always follow these safety cautions when using this appliance to avoid
personal injury or damage to the appliance. This appliance should be used
only as described within this instruction book.
1. For indoor, domestic use only. This appliance is intended to be used in
household and similar applications such as:
- staff kitchen areas in shops, offi ces and other working environments;
- farm houses;
- by clients in hotels, motels and other residential type environments;
- bed and breakfast type environments.
2. This appliance is not intended for use by persons with reduced physical,
sensory or mental capabilities, or lack of experience and knowledge, unless
they have been given supervision or instruction concerning use of the
appliance by a person responsible for their safety.
3. Children should always be supervised to ensure that they do not play with
this product.
4. This appliance shall not be used by children. Keep the appliance and its
supply cord out of reach of children during and after use.
5. There is a risk of injury if the product is misused.
6. Do not use the appliance if the supply cord is damaged. In the event of
supply cord damage, discontinue use immediately. If the supply cord is
damaged it must be replaced by the manufacturer in order to avoid a
hazard. Return the appliance to the Customer Care Centre (refer to ‘UK
After Sales Service’ section for further information). No repair must be
attempted by the consumer.
7. Always disconnect the appliance from the supply if it is left unattended
and before assembling, disassembling or cleaning
8. CAUTION: TAKE CARE WHEN HANDLING THE SHARP CUTTING BLADES,
EMPTYING THE BOWLS AND DURING CLEANING. DO NOT TOUCH
METAL BLADES OR CUTTING EDGES OF DISCS. ALL ARE EXTREMELY
SHARP AND CONTACT COULD CAUSE INJURY.
9. WARNING: Use extra care when working with hot liquids to avoid injury
from overflowing, sudden steaming and splattering. In order to avoid
5
Page 4

scalds from steam it may be advisable to process smaller quantities on
a low speed.
10. Always inspect the appliance and appliance accessories before use for
noticeable signs of damage. Do not use if damaged, or if the appliance
has been dropped. In the event of damage, or if the appliance develops a
fault, contact the Cuisinart Customer Care Line (refer to “UK After Sales
Service section” for further information).
11. Never pull the plug out of the mains socket by the supply cord.
12. Do not wrap the supply cord around the main body of the appliance
during or after use.
13. Always ensure the voltage to be used corresponds with the voltage on the
appliance; this is indicated on the bottom of the housing.
14. Do not leave the supply cord hanging over the edge of a kitchen table or
worktop.
15. Avoid contact between the supply cord and hot surfaces.
16. Always ensure that your hands are dry before removing the plug from the
mains outlet.
17. Never place the blade or disc directly on the motor of the housing base.
Always ensure the correctly associated work bowl is in place.
18. Before switching on the processor, ensure that the blade is locked into
place on the motor spindle (taking care to avoid the sharp edges), and that
the lid is correctly fi tted. Do not force or block the lid mechanism.
19. Always carefully insert the blade before adding the ingredients.
20. Keep hands, spatulas and other utensils away from moving blades or
discs whilst the appliance is in operation. A plastic spatula may be
used, but only when the food processor motor is stopped.
21. Never push food down by hand when slicing or shredding. Always use a
pusher.
22. Make sure the motor has completely stopped before removing the lid.
23. Always remove the bowl from the motor base very carefully before
removing the blade.
24. Never leave the appliance unattended when switched on or plugged in.
25. Always ensure the blades and bowl have been thoroughly cleaned after
each use and have dried completely before storing.
26. Never store any blade or disc on motor shaft. To reduce the risk of injury,
no blade or disc should be placed on the shaft except when the bowl is
properly locked in place and the processor is in use. Store blades and discs
out of reach of children.
27. All parts except the housing base are dishwasher safe, and we recommend
washing them in the dishwasher on the top rack only. If you wash the
blades, discs, dicing and spiral accessories by hand, do it carefully. When
handling, use the plastic hubs. Avoid leaving them in soapy water where
they may disappear from sight. To clean the blades, hold the blade by its
plastic center and use the cleaning brush provided to clean the inside of
the hub.
28. Do not immerse the housing base in water or any other liquid or put it in
a dishwasher.
29. This product complies fully with all appropriate EU and UK legislation
and the standards relevant to this type and class of appliance. We are an
ISO9001:2015 certifi ed company that continually evaluates our Quality
Management System performance. If you have any queries regarding
product safety and compliance, please contact our Customer Services
Department (see “U.K. After Sales Service” section).
WARNING: Polythene bags over the product or packaging may be
dangerous. To avoid danger of suffocation, keep away from babies
and children. These bags are not toys.
The symbol on the product or on its packaging indicates that this product may not be
treated as household waste. Instead it should be handed over to the applicable collection point
for the recycling of electrical and electronic equipment.
By ensuring this product is disposed of correctly, you will help prevent potential negative
consequences for the environment and human health, which could otherwise be caused by
inappropriate waste handling of this product. For more detailed information about the recycling
of this product, please contact your local council offi ce or your household waste disposal service.
6 7
Page 5
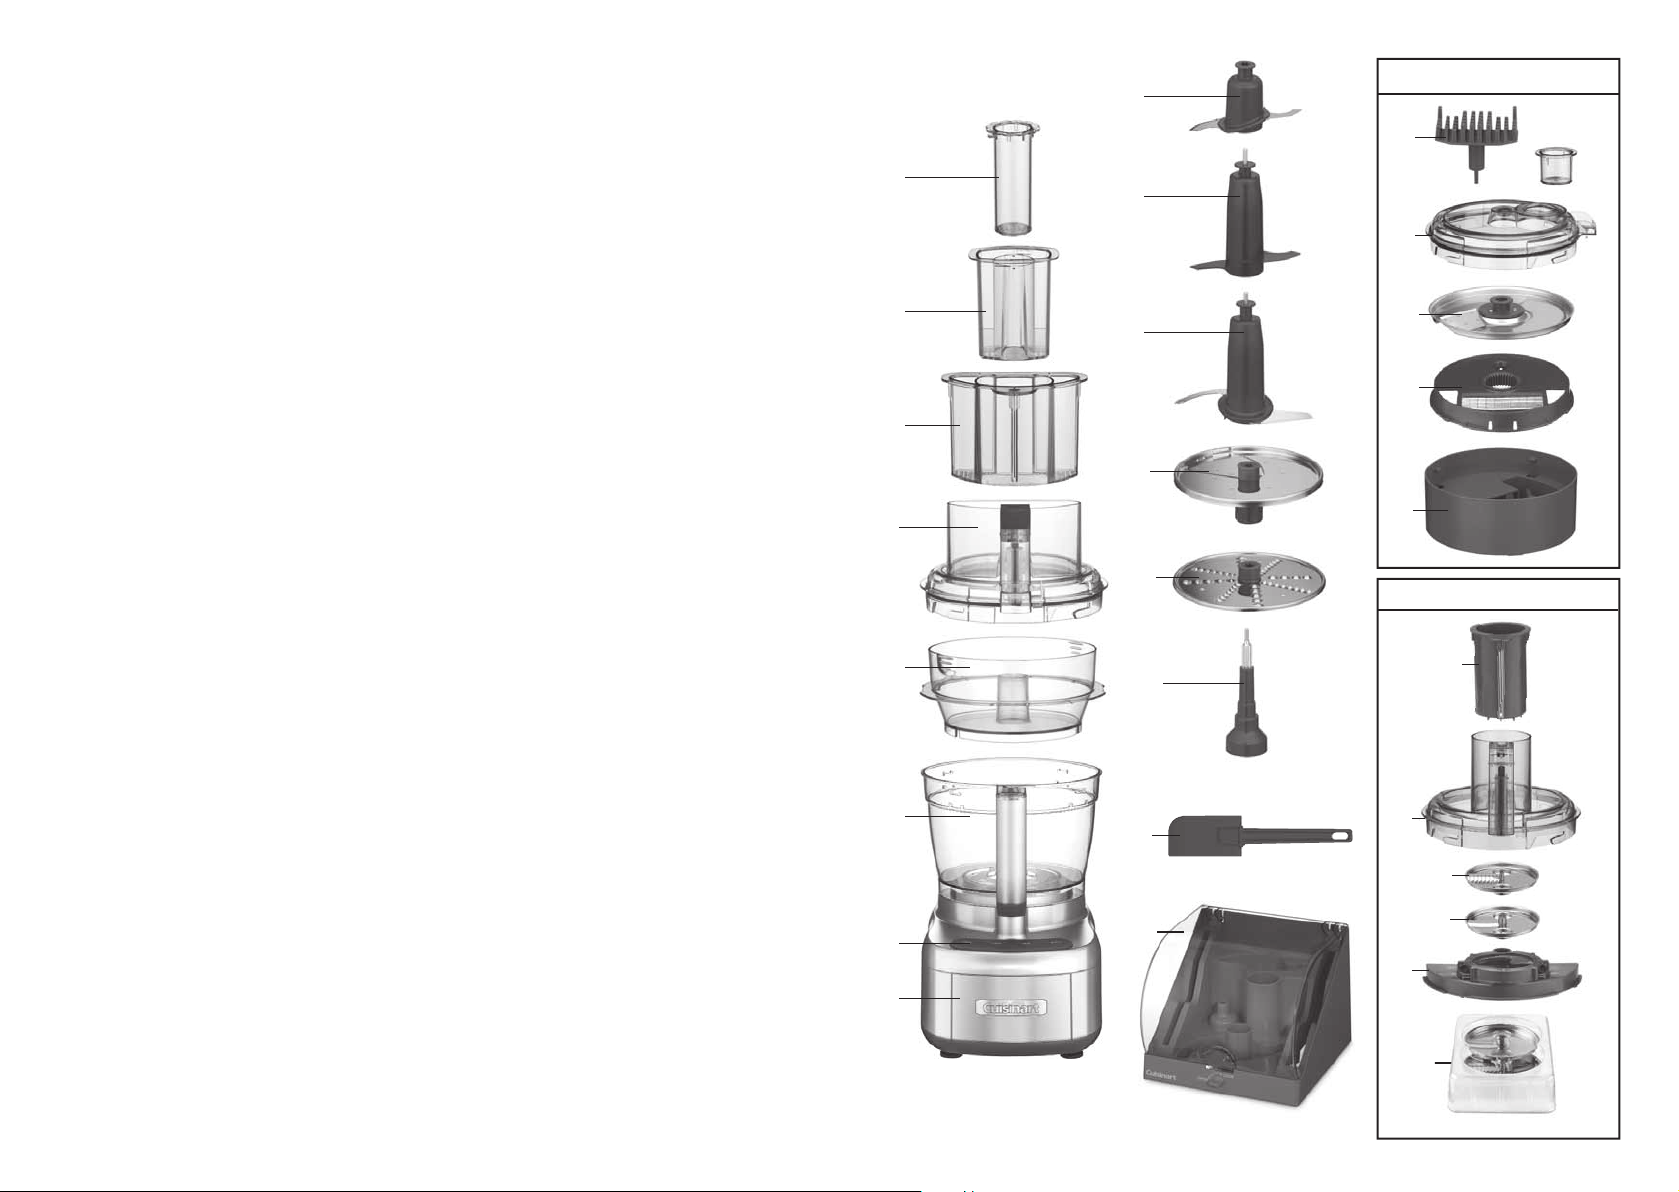
Product Control Guide
1
. 3-Part Pusher Assembly: Small pusher (1a), Medium pusher (1b) & Large pusher (1c)
2. Work Bowl Cover
3. Small 0.95L (3a) and Large 3L (3b) Work Bowls
4. Touchpad Control Panel (High, Low, Off and Pulse)
6.
1a.
7.
Dicing Kit and Storage Case
14a .
14b .
5. Housing Base
6. Small Chopping/Mixing Blade
7. Dough Blade
8. Large Chopping/Mixing Blade
9. Adjustable Slicing Disc
10. Reversible Shredding/Grating Disc
11. Stem Adapter
12. Spatula
13. Accessory Storage Case
14. Dicing Kit
a. Dicing Grid Cleaning Tool
b. Flat Work Bowl Cover with Small Pusher (&
c. Dicing Disc
d. Dicing Grid
e. Dicing Storage Case
15. Spiralising Accessories
a. Spiraliser Pusher
b. Spiraliser Cover
c. Spaghetti Cut Disc
d. Ribbon Cut Disc
e. Spiraliser Disc Holder
f. Spiral Disc Storage
Dicing Storage Case Cover)
1b.
1c.
2.
3a.
3b.
4.
5.
8.
9.
10.
14c .
14d .
14e .
Spiral Accessories
11.
12.
13.
15a
15b
15c
15d
15e
Includes cleaning brush (not shown)
15f
8 9
Page 6
Accessory Storage Case
General Assembly Instructions
Accessories
The Accessory Storage Case contains the following accessories:
•
Small Chopping/Mixing Blade
•
Large Chopping/Mixing Blade
•
Dough Blade
•
Stem Adapter
•
Adjustable Slicing Disc (in the right slot)
•
Reversible Shredding/Grating Disc
(in the left slot)
Operating the Lock
To unlock, turn the dial at the front of the case anticlockwise to the 'Open' position. Gently lift up
the transparent cover. Do not force the cover open when the dial is in the locked position. To lock,
gently close the cover and turn the dial clockwise to the 'Lock' position.
NOTE: Carefully hold the blades & discs by their center hubs when inserting and removing
from the storage case.
CAUTION: DO NOT TOUCH METAL BLADES OR CUTTING EDGES OF DISCS. ALL ARE
EXTREMELY SHARP AND CONTACT COULD CAUSE INJURY.
1
Dicing Kit Storage Case
Unpacking & Repacking
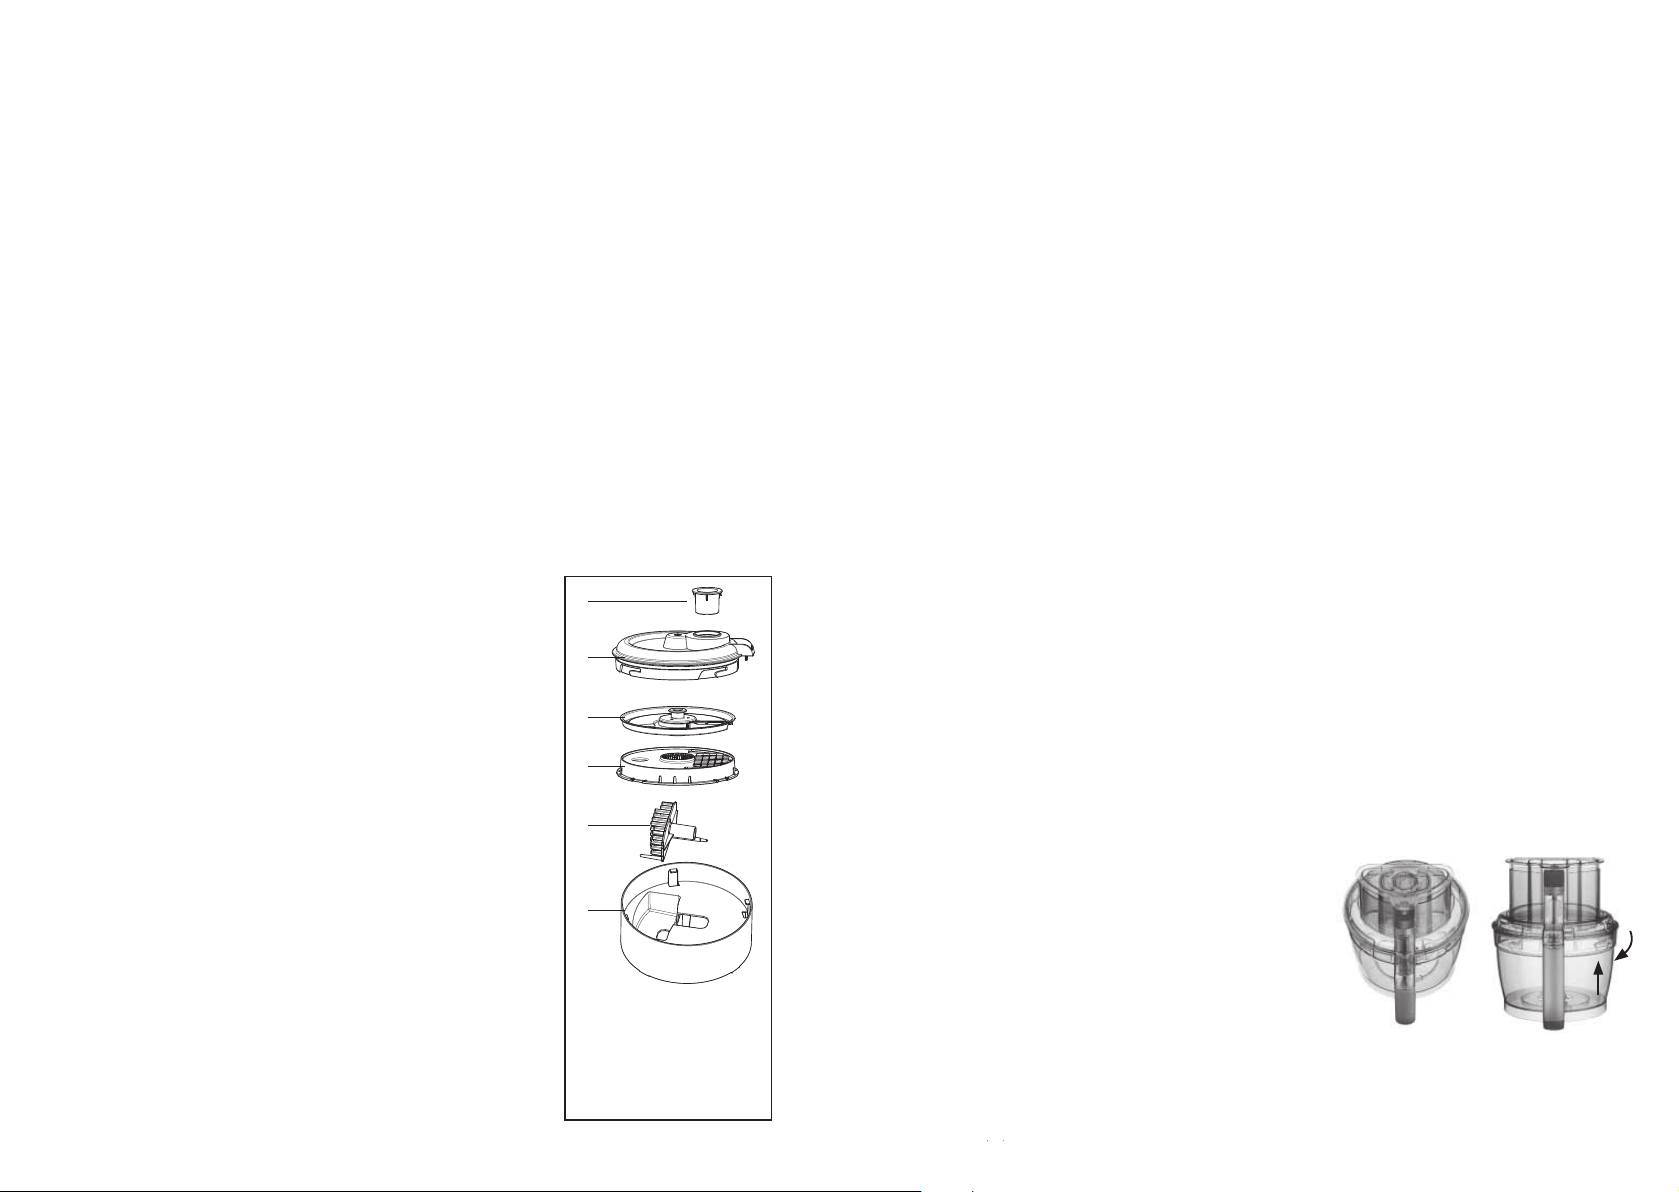
1. To open the kit, turn the flat work bowl cover
anticlockwise and lift to remove.
2. Grasp the center hub on the dicing blade and carefully
lift out of the storage case. Set aside on a flat surface.
3. Using the opening in the top of the dicing grid, grip and
lift out to remove.
4. The cleaning tool sits in a dedicated space in the base
of the storage case.
5. When repacking the dicing kit, ensure all the parts are
clean and dry. Repack by inserting parts into the case in
reverse order to the above, beginning with the cleaning
tool and so on.
2
3
4
5
6
Before First Use
Before using your Expert Prep Pro for the first time, wash and dry all the parts thoroughly (see
Cleaning, Storage and Maintenance section).
Work Bowls
• The Food Processor is supplied with two work bowls.
• The large work bowl has a maximum capacity of 3L and can be used with the Large Chopping/
Mixing Blade, Dough Blade, Adjustable Slicing Disc, Reversible Shredding/Grating Disc, Dicing Kit
& Spiralising Kit.
•
The small work bowl has a maximum capacity of 0.95L and can be used with the Small Chopping/
Mixing Blade only. When the Work Bowl Cover is fitted, it prevents any leakage into the large work
bowl, allowing you to use the small bowl without the need to wash up the large bowl after use.
N.B. The large work bowl must always be fitted before the small work bowl can be set up inside.
It will not always be possible to use the work bowls to their maximum capacity. The amount of food/
liquid you can process in the bowls will depend on the density of the ingredients in the work bowl
and the consistency of the desired end result. If you find that the motor is struggling or that the
processing results are uneven, then we would recommend that you reduce the amount of ingredients
in the work bowl and instead process in batches.
For liquid, we recommend that you do not fill the bowls above the Maximum Liquid Fill markings on
each bowl (1800ml on the large work bowl and 400ml on the small work bowl.) This is to avoid liquid
spilling into the central spindle which may cause leakage.
Chopping certain foods may scratch or cloud the work bowl; this will not affect the functionality of
the bowls.
Main Work Bowl & Cover Operation
1. Place the food processor base on a dry, level worktop with the controls facing toward you. Do not
plug the unit in until it is fully assembled.
2. Place the Large Work Bowl on the base and use the handle to turn the bowl anticlockwise to lock
it into place.
3. To use the Small Work Bowl, first attach the Large Work Bowl to the base. Place the Stem Adapter
onto the shaft, then lower the Small Work Bowl over the adapter and into the Large Work Bowl.
Place your fingers in the recesses of the Small Work Bowl and turn slightly to secure, until the
bowl drops into place (it will still be possible to move the bowl slightly from side to side).
4. Place the workbowl cover over the large work bowl with the feedtube assembly shifted slightly to
the right of the handle.
5. Once the cover is fully seated, rotate it to the left
(clockwise) to engage the lid-locking mechanism and
interlock. It should click into place.
6. To remove the cover, turn anticlockwise until it will
not turn any further, then lift to release.
NOTE:
1 = Small pusher
2 = Flat work bowl cover lid
3 = Dicing disc
4 = Dicing grid
5 = Cleaning tool
6 = Storage case
10 11
You cannot remove the work bowl before removing
the work bowl cover.
Page 7
Flat Work Bowl Cover Operation
The Flat Cover provides added convenience for recipes that do not require the 3 feed tubes, as it is
lightweight and there are fewer pieces to wash afterwards. You may find it useful when you are
preparing baked goods such as cakes, cookies, pies and breads. The Flat Work Bowl Cover also doubles
as the Dicing Kit storage lid.
Note: Do not use the Flat Cover with the Small Work Bowl & Small Chopping/Mixing Blade,
Slicing Disc, Shredding/Grating Disc, Dicing or Spiraliser attachments.
To Assemble the Flat Cover
Place the Flat Cover on the work bowl so that the Cuisinart logo written on the cover is face up
and readable. Then turn the cover clockwise to lock into place. Make sure the small cap is in place
before using.
To Disassemble the Flat Cover
Place one hand near the Cuisinart logo and one hand on the opposite end of the cover. Turn
anticlockwise to release.
Machine Controls
High and Low Control Buttons
The High and Low controls are buttons that allow the machine to run until Off is selected.
1. Properly assemble the machine.
2. Add ingredients to the work bowl, either through the feed tube or directly into the bowl. Lock
cover into place.
3. Press the High or Low button. The blue LED light will illuminate and the motor will start.
4. Press the Off button when finished.
Chopping/Mixing Blades
Bladelock Feature
The BladeLock feature is designed to keep the blade in place during processing, pouring, lifting, and
handling tasks — but is not permanently attached. Handle with care. Always check to be sure the
blade is securely locked before turning the bowl upside down.
Large Chopping/Mixing Blade Operation
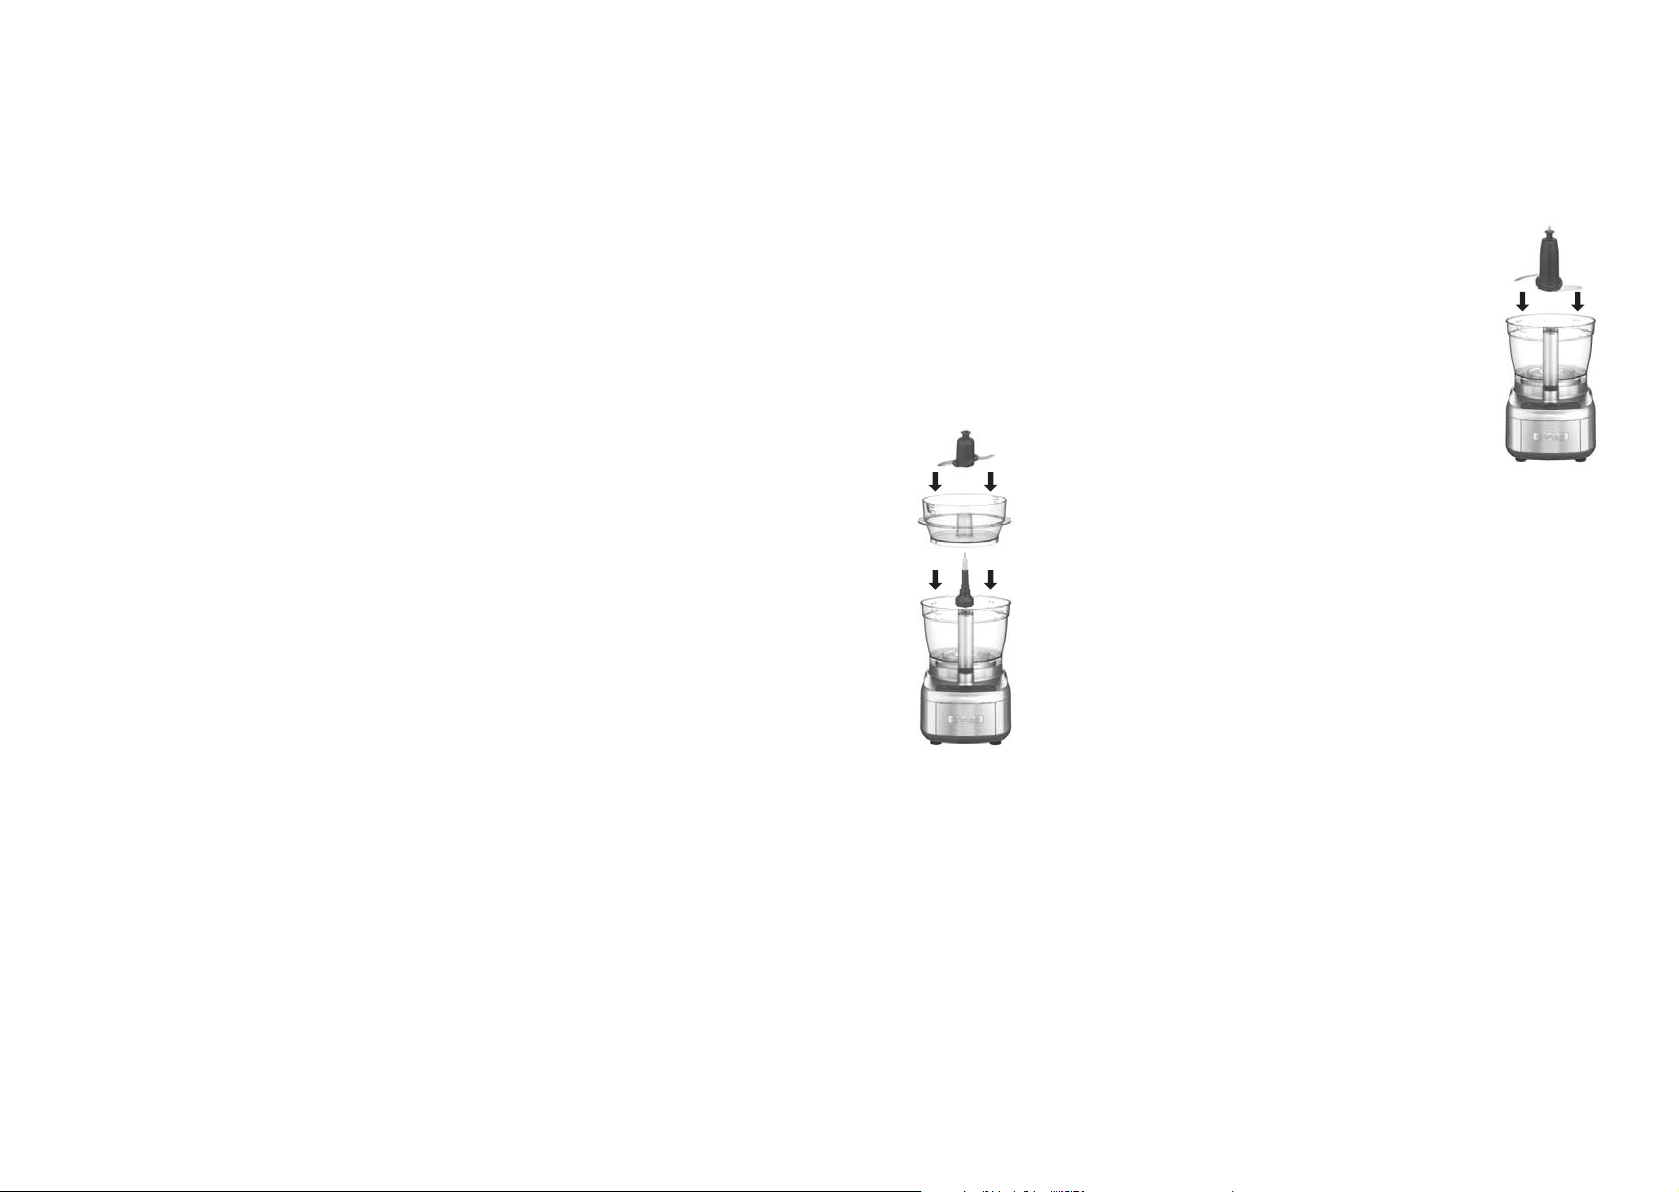
Fit the Large Work Bowl to the base. Grasp the Large Chopping/Mixing
Blade by its hub and align it over the center of the bowl. Place it onto the
shaft and push down until it locks into place. Fit the Work Bowl Cover or
Flat Cover. After processing, check to be sure the blade is securely locked
before pouring from the bowl. To remove the blade, firstly detach the
cover, then remove the bowl from the base and put it on a flat surface.
Rest the heel of your hand on the rim of the bowl and pull the blade up
gently and carefully.
Small Chopping/Mixing Blade Operation
Fit the Large Work Bowl to the base. Place the Stem Adapter onto the hub
in the center of the bowl. Next, put the Small Work Bowl into the Large
Work Bowl, positioning it over the Stem Adapter. Grasp the Small
Chopping/Mixing Blade by its hub, placing it on the Stem Adapter. Push
down firmly to lock. Fit the Work Bowl Cover. To remove the blade, firstly
detach the cover, then remove the Small Work Bowl from inside the Large
Work Bowl and put it on a flat surface. Rest the heel of your hand on the
rim of the bowl and pull the blade up gently and carefully.
Pulse Button
The Pulse control is a button that allows the machine to run only while it is being pressed. This
capability provides more accurate control of the duration and frequency of processing. Unless
otherwise specified, a pulse should be about two seconds.
With the machine properly assembled and engaged, and ingredients in the work bowl, press the Pulse
button repeatedly as needed. As you get used to using the processor you will get to know which
setting works best for the food you are using.
12 13
Hints & Tips
Chopping
• For raw ingredients: Peel, core and/or remove seeds and pits. Food should be cut into even, 1.5-
2.5cm pieces. Foods cut into same size pieces produce the most even results.
• Pulse food in 1-2 second increments to chop. For the finest chop, either hold the Pulse button down
or press High or Low to run the machine continuously. Watch ingredients closely to achieve desired
consistency and scrape the sides of the work bowl as necessary. High speed is recommended for
most chopping and processing tasks.
Puréeing
• To purée fresh fruits or cooked fruits/vegetables: Ingredients should be cut into 2.5cm pieces; a
smooth purée is best achieved when all the pieces are equal in size. Pulse to initially chop and then
process on High or Low until food is puréed; scrape the sides of the work bowl as necessary. Do not
use this method to purée cooked white potatoes.
• To purée solids for a soup or sauce: Strain the solids from the liquid and process the solids alone.
Add cooking liquid through the feed tube and process as required. NOTE: Maximum puréeing
capacity is 1150ml.
Page 8
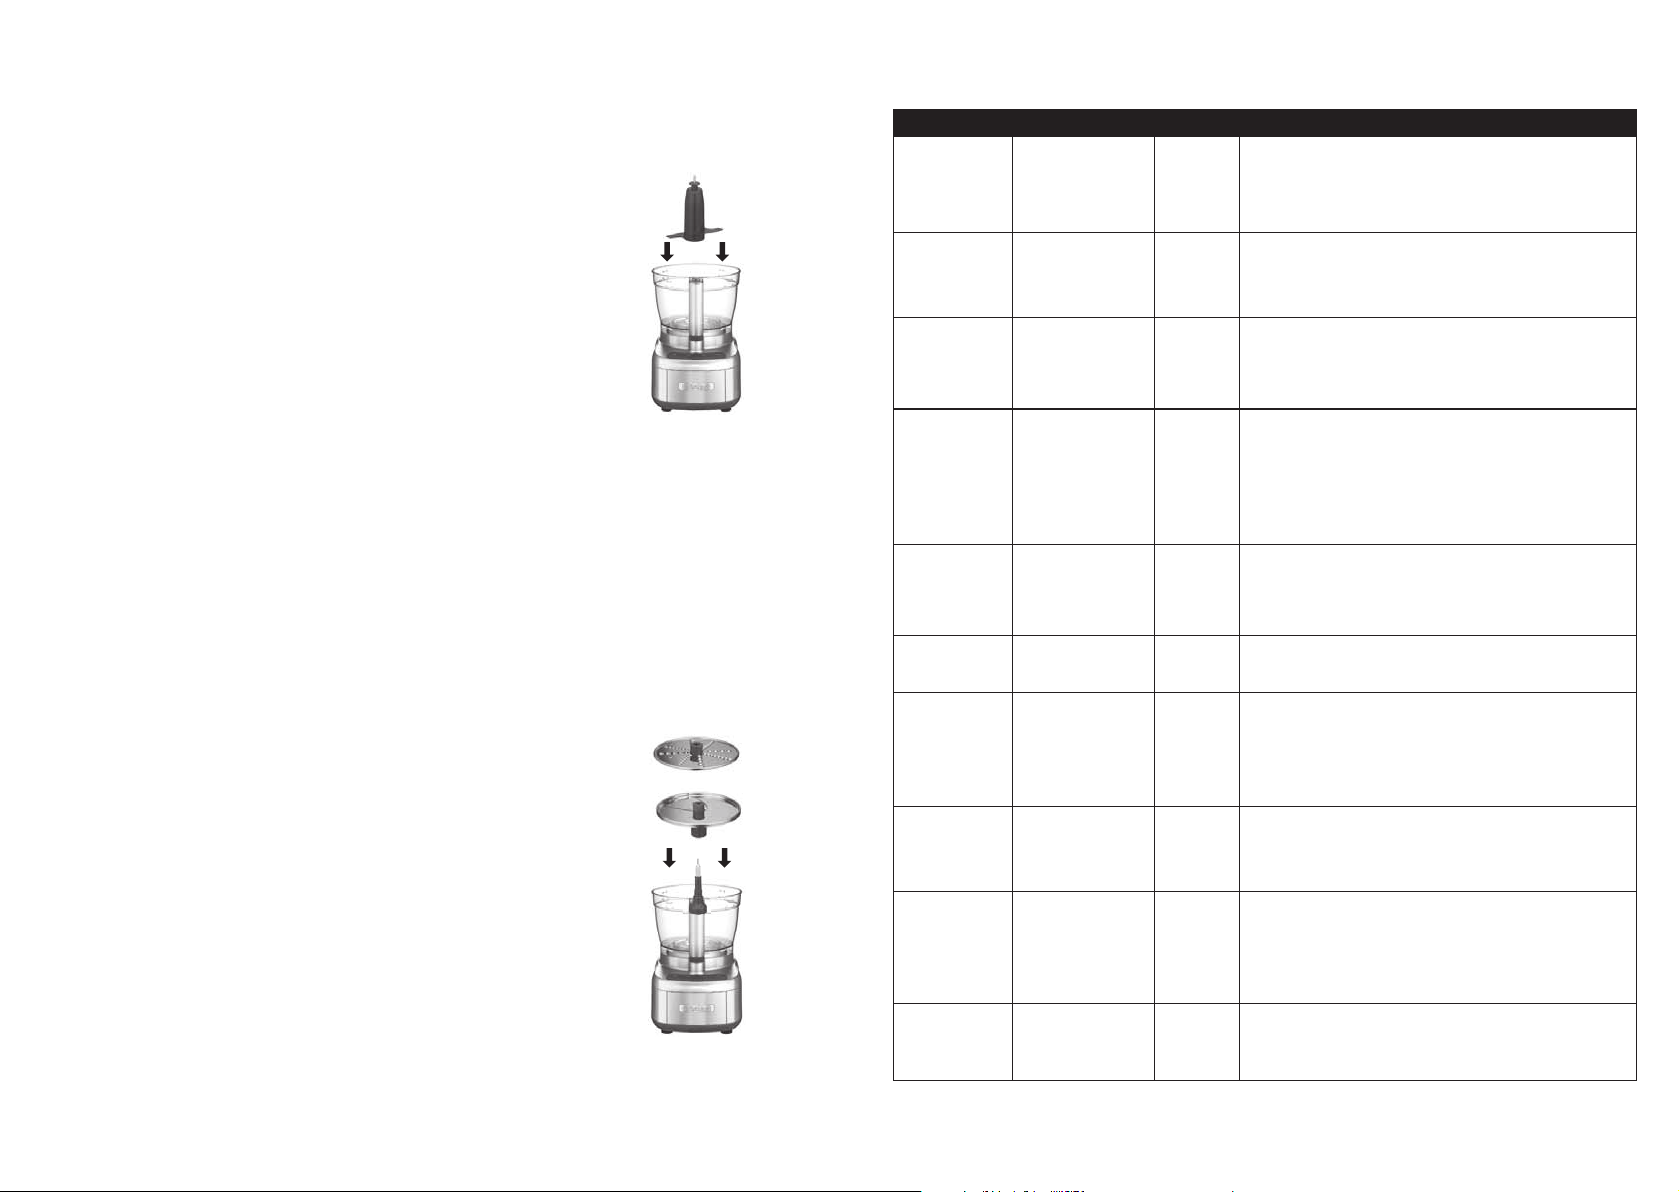
Dough Blade
User Guide
Dough Blade Operation
For use with the Large Work Bowl only. To fit the Dough Blade,
carefully lower it onto the shaft and push into place.
Kneading (using Dough Blade or Large Chopping/Mixing Blade)
• The Chopping/Mixing Blade is ideal for pastry doughs, while the
Dough Blade is specifically designed for kneading yeast doughs.
• The Large Pusher Lock (located on the Work Bowl Cover and marked
each side with 'Lock' and an arrow) is recommended to be in the
locked position when kneading dough to avoid it from moving around
— some vibration is still normal. To lock, simply pull the Pusher Lock
towards you, which will prevent the removal of the large feed tube.
Slicing/Shredding Discs
Assembly
NOTE: The Slicing and Shredding/Grating Discs can only be used in the Large Work Bowl.
Fit the large work bowl to the base, then lower the Stem Adapter onto the shaft. If using the
Adjustable Slicing Disc, use the rotating hub and indicator markings to select slicing thickness from
1 to 7 (1, thin slice; 7, thick slice). Using the plastic hub, align and insert the disc over the Stem
Adapter. Ensure the disc is the correct side up with the text visible. The plastic hub may be used for
removal of the disc.
If using the Reversible Shredding Disc, determine whether the fine or coarse side will be used, and
use the plastic hub to twist into position on the Stem Adapter. Ensure the chosen side is facing
upwards with the text visible. The plastic hub may be used for removal of this disc.
Operation
• The Slicing Disc makes whole slices. It slices fruits, vegetables and
cooked meat.
• The Shredding/Grating Disc shreds most firm and hard cheeses. It
also shreds vegetables like potatoes, carrots and courgettes.
• Always pack food in the feed tube evenly for slicing and shredding.
The food will dictate the amount of pressure: Use light pressure for
soft foods, medium pressure for medium foods and firm pressure for
harder foods. Always process with even pressure.
• For round fruits or vegetables, slice a thick piece off the base so it
sits upright in the feed tube. Slice to fit tube if necessary.
• For small ingredients like mushrooms, radishes or strawberries: Trim
the ends so the food sits upright in the feed tube.
• When slicing or shredding cheese, be sure that it is well chilled.
• To shred leafy vegetables like lettuce or spinach: Roll leaves
together and stand them up in the feed tube. Process with even
pressure.
NOTE: Always use the pusher when slicing or shredding. Never
put your fi ngers in the feed tube while unit is running.
or
FOOD ACCESSORY CONTROL DIRECTIONS
Soft Cheeses
(ricotta, cream
cheese, cottage
cheese, etc.)
Firm Cheeses
(Cheddar, Swiss,
Edam, Gouda,
etc.)
Hard Cheeses
(Parmesan,
Romano, etc.)
Baby Food Chopping/Mixing
Crumbs (Bread,
Cookie, Cracker)
Fresh Herbs Chopping/Mixing
Ground Meat Chopping/Mixing
“Ice Cream” Chopping/Mixing
Milk Shakes/
Smoothies
Nuts Chopping/Mixing
Chopping/Mixing
Blade
Slicing or Shredding
Disc
Chopping/Mixing
Blade
Slicing or Shredding
Disc
Blade
Chopping/Mixing
Blade
Blade
Blade
Blade
Chopping/Mixing
Blade
Blade
Low to
gently mix
or High to
whip
High Cheese should be well chilled before slicing/shredding.
Pulse
and High
Pulse
and High
Pulse
and High
Pulse Wash and dry herbs thoroughly. Pulse to roughly chop.
Pulse Cut meat into 2.5cm pieces. Pulse to chop, about 25 pulses,
Pulse
and High
Low For milk shakes, first add ice cream. While the unit is
Pulse and
High
Have cheese at room temperature. If required, cut into 2.5cm
pieces. Process until smooth, stopping to scrape down the
sides of the bowl as needed. Perfect for making cheesecakes,
dips, pasta fillings and more.
Cut to fit feed tube. Use light to medium pressure when
slicing/shredding.
If using the Chopping/Mixing Blade, cut into 1.5cm pieces.
Pulse to break up and then process until you achieve a fine
consistency. If slicing or shredding, cut to fit the feed tube
and use light to medium pressure.
As for all fruit and vegetable purées, cut ingredients into
1.5-2.5cm pieces. Cook ingredients until completely soft.
Pulse to chop, then process until completely smooth
(add steaming liquid through the feed tube when processing
if necessary). Keep frozen in ice cube trays for individual
portions.
Break into pieces. Pulse to break up, and then process until
you achieve the desired consistency. This will make perfect
crumbs for coating meats and fish. Processed cookies make
delicious pie and cake crusts.
Continue pulsing until desired consistency is achieved.
or until desired consistency is achieved.
If a purée is desired, continue to process. Never chop/purée
more than 2 pounds at one time. Make sure to never process
meat containing bones.
Cut frozen fruit into 2.5cm pieces and add to the work bowl
with liquid (juice or milk), any desired sweeteners, such as
sugar, honey, and other flavours. Pulse to break up, then
process on High until smooth.
running, add milk through the feed tube until desired
consistency is achieved. For smoothies, add fruit first, then
add the liquid through the feed tube while the unit is
running.
Pulse to chop to desired consistency. To make a nut butter,
pulse to break up, and then process until smooth, stopping to
scrape down as necessary.
14 15
Page 9
FOOD ACCESSORY CONTROL DIRECTIONS
Superfine Sugar Chopping/Mixing
Butter & Honey
mixture
Whipped Cream Chopping/Mixing
Blade
Small chopping/
mixing blade
Blade
High Process granulated sugar for about 1 minute until finely
ground. Excellent for using in meringues and other baked
goods.
High Butter (300gr) taken from the refrigerator and cut in pieces
of size approx. 15x40mm. Honey (400gr) taken from the
refrigerator should be kept min. 1 day.
Process for 20 seconds.
Low Process well-chilled cream until it begins to thicken.
Add sugar as desired; process continuously until cream
reaches desired consistency. The dense cream is perfect as a
whipped topping for cake or ice cream.
Operation
• The Dicing Disc and Dicing Grid make cubed pieces of fruit and vegetables. The recommended speed
for dicing most fruits and vegetables is High. Use Low speed when dealing with very soft items
such as kiwi.
• When dicing, only use the medium or small feed tube. Be sure to pack single items tightly, to the
left of the feed tube using consistent downward pressure.
• Use the Dicing Grid Cleaning Tool to clear the Dicing Grid. First dislodge jammed particles using the
long single tooth on the handle. Then align the two long pins along the right and left of the Grid.
Guide the cleaner into the correct position and press down to clear the Grid of food residue.
• When processing items like squash and potatoes, clean the Dicing Grid every 3 to 4 times to prevent
buildup.
• When large pieces of food remnants are lying between the Dicing Grid and Dicing Disc, use caution
when
cleaning off the remains by using the gaps featured
to the right and left of the Dicing Grid.
Dough bread Dough Blade High/ Pulse
(as required)
Max time of
use at max
speed is
2min
Yeast doughs (bread, brioche, sweet rolls)
Maximum dough capacity is 700 flour + 425 water = 1125g
Dicing
Assembly
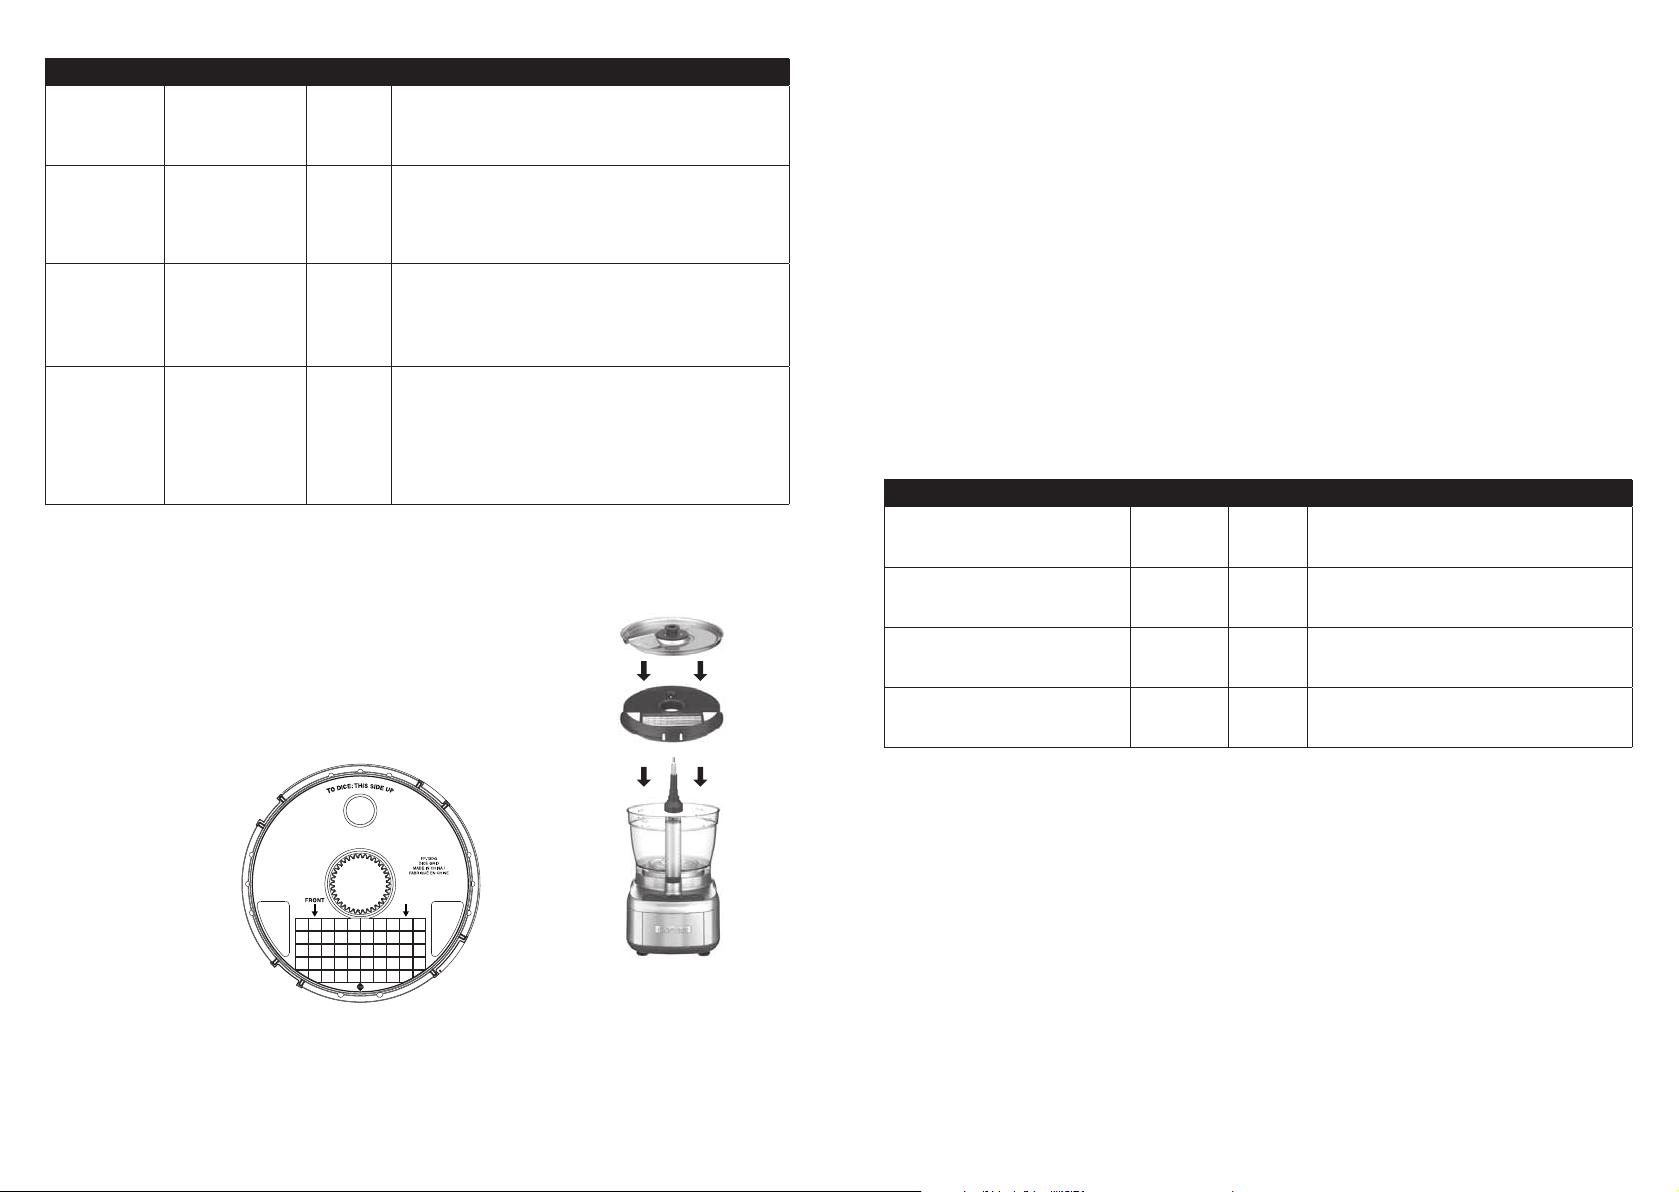
1.
Fit the Large Work Bowl to the base and insert the Stem Adapter.
2. Carefully place the Dicing Grid onto the Stem Adapter with the
Dicing Grid positioned closest to the front of the food processor.
Be sure “This Side Up” shows on top. The two arrows on the grid
should be pointing towards the handle. The Dicer will not work if
inserted incorrectly.
NOTE: We do not recommend dicing frozen foods and meats.
Dicing Guide
FOOD ACCESSORY CONTROL DIRECTIONS
Most Vegetables (e.g., Potato,
Courgette)
Soft/Very Ripe Vegetables
(e.g., Ripe Tomatoes and Avocados)
Most Fruits
(e.g., Apples, Bananas, Strawberries)
Soft/Very Ripe Fruits (e.g., Kiwi, Ripe
Pineapple, Very Ripe Bananas)
Dicing Kit High Peel vegetables if necessary, and trim to fit small
or medium feed tube before dicing.
Dicing Kit Low Peel vegetables if necessary, and trim to fit small
or medium feed tube before dicing.
Dicing Kit High Peel fruit if necessary, and trim to fit small or
medium feed tube before dicing.
Dicing Kit Low Peel fruit if necessary, and trim to fit small or
medium feed tube before dicing.
3. Carefully place the Dicing Disc on top of the Dicing Grid. Push down slightly to lock into place.
It should not move if positioned accurately. NOTE: Always use caution when handling the
Dicing Disc; the blade is very sharp.
4. Fit the Work Bowl Cover.
16 17
Page 10
Spiralising
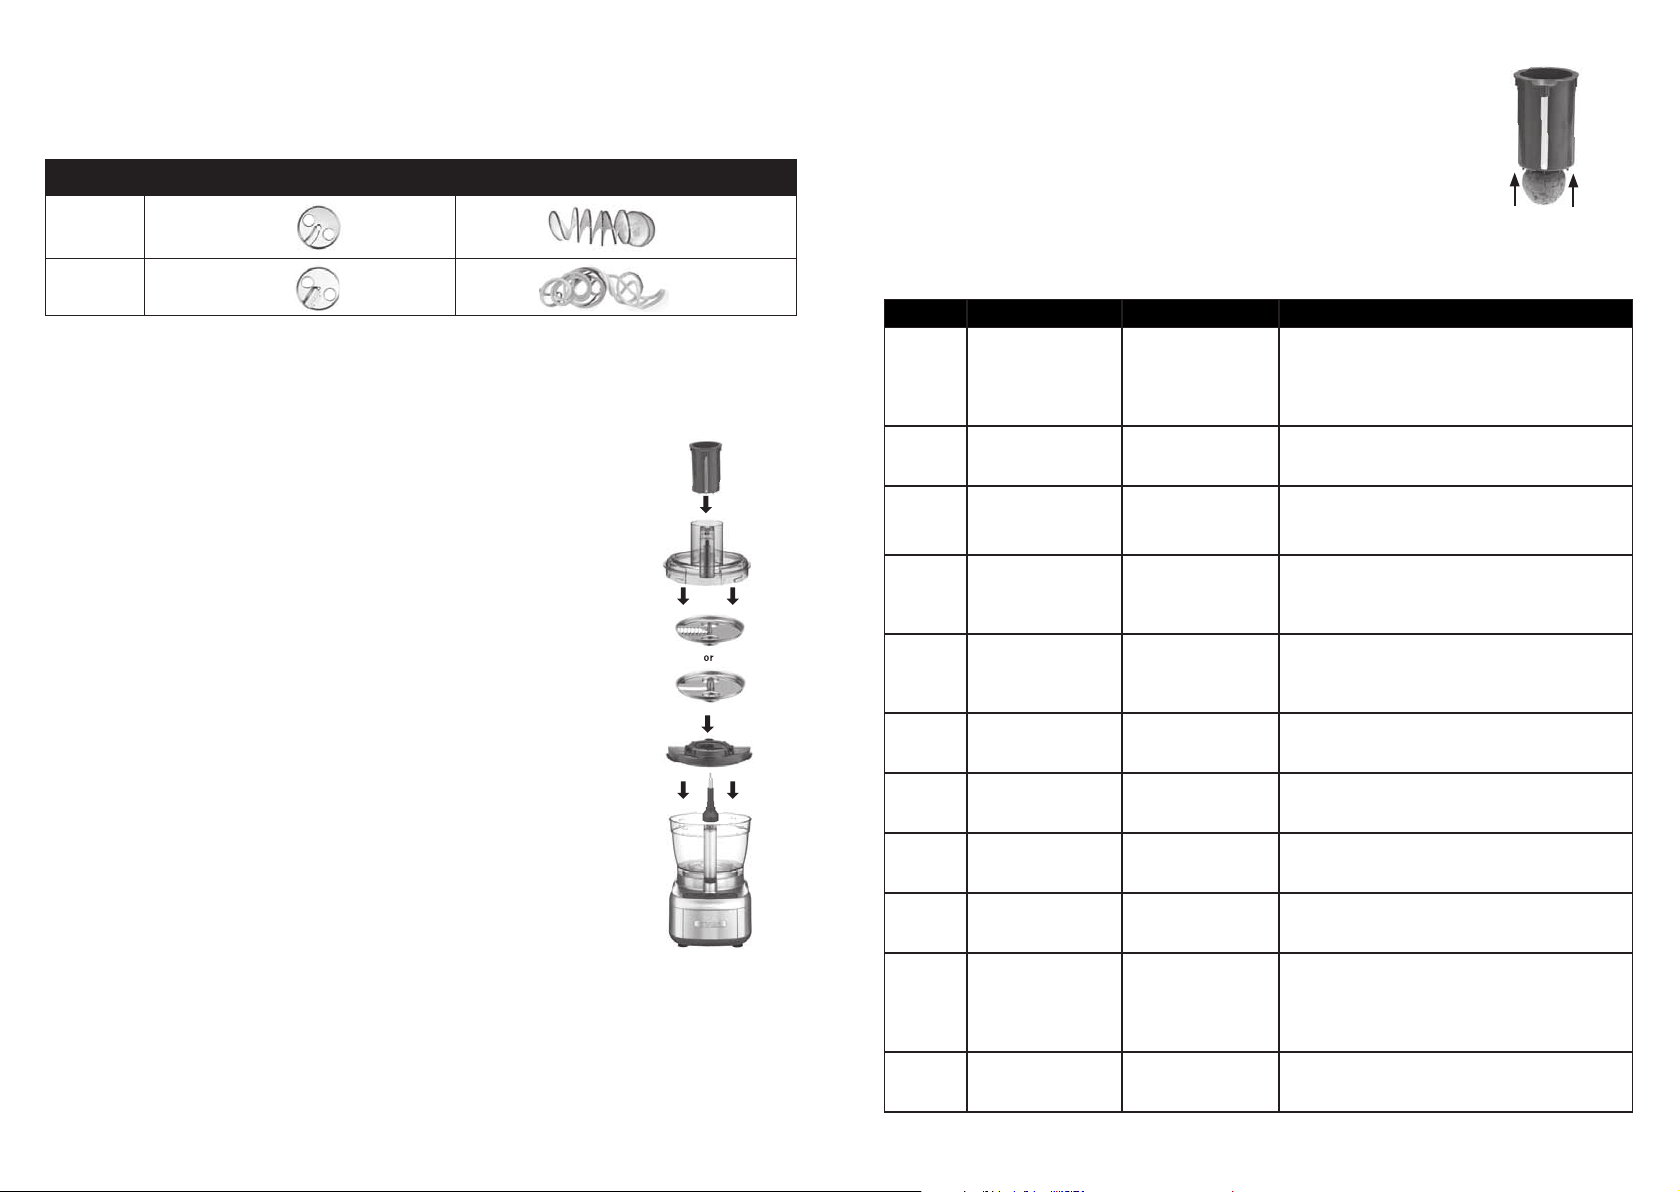
The Spiraliser attachment uses two discs – a Spaghetti Cut Disc and a Ribbon Cut Disc—to create
garnishes or cut slices of vegetables and fruits in wide or narrow spirals.
FUNCTIONS
Ribbon Cut
Disc
Spaghetti Cut
Disc
ACCESSORY
RESULTS
7. Attach shorter foods such as radishes by pressing the Spiraliser
Pusher's teeth onto the food, then place into Feed Tube for a more
secure hold.
NOTE: You may need to experiment by processing certain foods
horizontally or vertically to produce the best results.
Spiraliser Guide
FOOD ACCESSORY PREPARATION RECIPE TIPS
Assembly
1. With the Large Work Bowl on the base, insert the Stem Adapter.
2. Place the spiraliser disc holder (with the circular space closest to the
handle) over the stem adapter and secure into place.
3. Fit the desired disc onto the Spiraliser Disc Holder. Insert your fingers
into the finger holes and turn the disc clockwise to lock into place.
4. Lock the Spiraliser cover into place.
Operation
1. Trim the fruit or vegetable to fit the Feed Tube. Trim the top and
bottom to form a flat surface on both sides. Put the item into the Feed
Tube, centering it onto the corer (middle pin).
2. Using the Spiraliser Pusher, push down item to secure firmly onto the
pusher’s teeth.
3. Select High or Low to spiralise item. Select Off to stop spiralising and
remove Spiraliser Cover. Remove scraps remaining on cutting disc.
Remove scraps on Spiraliser Pusher. Replace Spiraliser Cover and
repeat with next item.
4. Once the desired amount of spiralised fruit or vegetable accumulates
in the work bowl, turn the food processor off, remove the spiraliser
cover, and remove the food.
5. For best results, use firm fruits and vegetables and process on High
speed (see chart for suggestions).
6. Be sure to clean the entire unit after each usage. All pieces are
dishwasher safe
Apple Spaghetti or Ribbon
Pear Ribbon Cut Core; trim to fi t if
Potato Spaghetti or Ribbon
Sweet
Potato
Beetroot Spaghetti or Ribbon
Cucumber Spaghetti or Ribbon
Radish Spaghetti or Ribbon
Carrot Spaghetti or Ribbon
Courgette Spaghetti or Ribbon
Cut
Cut
Spaghetti or Ribbon
Cut
Cut
Cut
Cut
Cut
Cut
Core (no need to
peel)
pears are large
Trim to fi t feed tube Fry spaghetti cut in oil – toss with salt and
Trim to fi t feed tube Steam or quick boil spaghetti cut for a “pasta”;
Peel; trim to fi t feed
tube
Trim to fi t feed tube Serve raw with desired dressing. Ribbon cut and
Trim to fi t feed tube Ribbon cut to pickle, or to add a tangy bite to a
Peel Spaghetti or ribbon cut to use raw in salads.
Trim to fi t feed tube Spaghetti cut to use with your favorite pasta
Use spaghetti cut raw in salads (be sure to toss
with lemon juice to prevent oxidation). Bake
in the oven with cinnamon sugar for dessert
toppings, or bake into a tart or pie.
Cut into smaller pieces and bake into chips. Sauté
to caramelise.
pepper. Roast in the oven with olive oil.
roast.
Roast ribbon cut with olive oil and salt.
Use the spaghetti cut raw in a salad, or steam for
a light side dish. Roast the ribbon cut beets and
serve with a good olive oil.
make into quick pickles.
fresh spring salad.
sauce. Ribbon cut can be sautéed in olive oil.
Butternut
Squash
Parsnip Spaghetti or Ribbon
18 19
Ribbon Cut Peel; trim to fi t feed
Cut
tube. Use only the
neck (save bottom
for another use)
Peel; trim to fi t feed
tube
Roast or steam to add to soups, salads or as a light
side dish.
These are great when added to broth-based soups.
Page 11

Cleaning, Storage & Maintenance
• All parts except the housing base are dishwasher safe, and we recommend washing them in the
dishwasher on the top rack only. Due to intense water heat, washing the work bowls, cover and
accessories on the bottom rack may cause damage over time. Insert the cover with the feed tube
facing up to ensure proper cleaning. Insert the work bowls and pusher upside down for drainage.
Remember to unload the dishwasher carefully wherever you have placed sharp blades and discs.
• To simplify cleaning, rinse the work bowls, covers, pushers and blades or discs immediately after
use so food won’t dry on them. Be sure to position the pushers upside down for drainage. If food
lodges in the pusher, remove it by running water through it, or use the cleaning brush provided.
• If you wash the blades, discs, dicing and spiralising accessories by hand, do it carefully. When
handling, use the plastic hubs. Avoid leaving them in soapy water where they may disappear from
sight. To clean the blades, hold the blade by its plastic center and use the cleaning brush provided
to clean the inside of the hub.
• The work bowls are made of plastic with metal components. They should not be placed in a microwave
oven.
• The housing base may be wiped clean with a soapy, nonabrasive material. Be sure to dry it thoroughly.
• If the feet leave spots on the counter, spray them with a spot remover and wipe with a damp sponge.
• If any trace of the spot remains, repeat the procedure and wipe the area with a damp sponge and
nonabrasive cleaning powder.
IMPORTANT: Never store any blade or disc on the motor shaft. No blade or disc should be placed on
the shaft except when the processor is about to be used.
MAINTENANCE: Any other servicing should be performed by an authorized service representative.
Technical Safety Information
If the processor runs for an exceptionally long time when chopping, mixing or kneading a thick or
heavy mixture in successive batches, the motor may overheat. If this happens, the processor will stop.
Turn it off and wait for the motor to cool before proceeding. It will usually cool within 10 minutes.
In extreme cases, it could take an hour.
Safety switches prevent the machine from operating when the work bowl or the cover is not locked
into position. The motor stops within seconds when the machine is turned off; and when the pusher
assembly is removed, a fast-stop circuit also enables the motor to stop within seconds.
Troubleshooting
Food Processing
1. Problem: The food is unevenly processed when chopping.
Solution:
• The ingredients should be cut evenly into 1.5-2.5cm pieces before processing.
• Process in batches to avoid overloading.
2. Problem: Slices are uneven or slanted.
Solution:
• Place evenly cut food, cut side down, into the feed tube. Always use the smallest feed tube
possible.
• Apply even pressure on the pusher.
3. Problem: Food falls over in feed tube.
Solution:
• Feed tube should be packed full for best results.
4. Problem: Some food remains on top of the disc.
Solution:
• It is normal for small pieces to remain; cut remaining bits by hand and add to processed
ingredients.
Spiralising
1. Problem: No room for ribbon stacks to fall.
Solution:
• Turn the food processor off, remove the Spiraliser Cover, and transfer the food to a separate
bowl before continuing.
2. Problem: Spaghetti cuts wrap around stem.
Solution:
• Turn the food processor off, remove the Spiraliser Cover, and transfer the food to a separate
bowl before continuing.
3. Problem: Food is not spiralising.
Solution:
• Remove food from Feed Tube, remove scraps from Spiral Disc and Spiraliser Pusher and
retrim edges of food to form a new, flat surface.
4. Problem: Spaghetti cuts are not clean cut.
Solution:
• Rinse Spiral Disc and make sure it is free of any scraps.
Dicing
1. Problem: Food is stuck in the Dicing Grid.
Solution:
• First, unplug unit. Carefully remove Dicing Disc.
• Use the long, single tooth on the Dicing Grid Cleaning Tool handle to push
stubborn food through Dicing Grid and large openings.
• Then, carefully reach into the large openings on either side of Dicing Grid to remove large
food pieces.
• Do not use your fingers to clean the Dicing Grid. ONLY USE THE DICING GRID CLEANING
20 21
TOOL.
Page 12
2. Problem: Pieces of food are not evenly cut.
Solution:
• Pack items closest to the left in medium or small feed tube.
• Use the small feed tube for smaller items.
• Apply even pressure when using feed tube.
Dough Kneading
1. Problem: Motor slows down.
Solution:
• Amount of dough may exceed maximum capacity of your food processor. Remove half and
process in two batches.
• Dough may be too wet (see number 8). If motor speeds up, continue processing.
If not, add more flour, 1 tablespoon at a time, until the motor speeds up. Process until dough
cleans the sides of the work bowl.
2. Problem: Blade doesn’t incorporate ingredients.
Solution:
• Always start the food processor before adding liquid. Add liquid in a slow, steady stream, or
through the drizzle hole in the pusher, allowing the dry ingredients time to absorb it. If liquid
is added too quickly, wait until ingredients in the work bowl have mixed, then add remaining
liquid slowly (do not turn off the machine). Pour liquid onto dough as it passes under feed tube
opening; do not pour liquid directly onto bottom of the work bowl.
3. Problem: Blade rises in work bowl.
Solution:
• Excessively sticky dough can cause blade to rise. Carefully reinsert blade and immediately add
2 tablespoons of flour through the feed tube while the machine is running.
4. Problem: Dough doesn’t clean inside of the work bowl.
Solution:
• Amount of dough may exceed maximum capacity of your food processor. Remove half and
process in two batches.
• Dough may be too dry (see number 7).
• Dough may be too wet (see number 8).
5. Problem: Lump of dough forms on top of blade and does not become uniformly kneaded.
Solution:
• Stop machine, carefully remove dough, divide it into 3 pieces and redistribute them evenly in
the work bowl.
6. Problem: Dough feels tough after kneading.
Solution:
• If the dough is tough with a rubber feel, it may of been over kneaded. Stop kneading, allow to
rest and then continue with your recipe.
7. Problem: Dough is too dry.
Solution:
• While machine is running, add water, 1 tablespoon at a time, until dough cleans the inside of
the bowl.
8. Problem: Dough is too wet.
Solution:
• While machine is running, add flour, 1 tablespoon at a time, until dough cleans the inside of
the bowl.
22 23
Technical
1. Problem: The motor does not start.
Solution:
• There is a safety interlock to prevent the motor from starting if it is not properly assembled.
Make sure the work bowl and work bowl cover are securely locked into position.
• If the motor still will not start, check the power cord and outlet.
2. Problem: The food processor shuts off during operation.
Solution:
• The cover may have become unlocked; check to make sure it is securely in position.
• A safety protector in the motor prevents the motor from overheating, which is caused by
excessive strain. Press the Off control button and wait 10 minutes to allow the food processor
to cool off before resuming.
3. Problem: The motor slowed down during operation.
Solution:
• This is normal as some heavier loads (e.g., slicing/shredding cheese) may require the motor to
work harder. Simply reposition the food in the feed tube and try again.
• The maximum load capacity may have been exceeded. Remove some of the ingredients and
continue processing.
4. Problem: The food processor vibrated/moved around the countertop during processing.
Solution:
• Make sure the rubber feet at the bottom of the unit are clean and dry. Also make sure that the
maximum load capacity is not being exceeded.
• This is normal as some heavier loads (e.g., slicing/shredding cheese) may require the motor to
work harder.
Repacking Guide
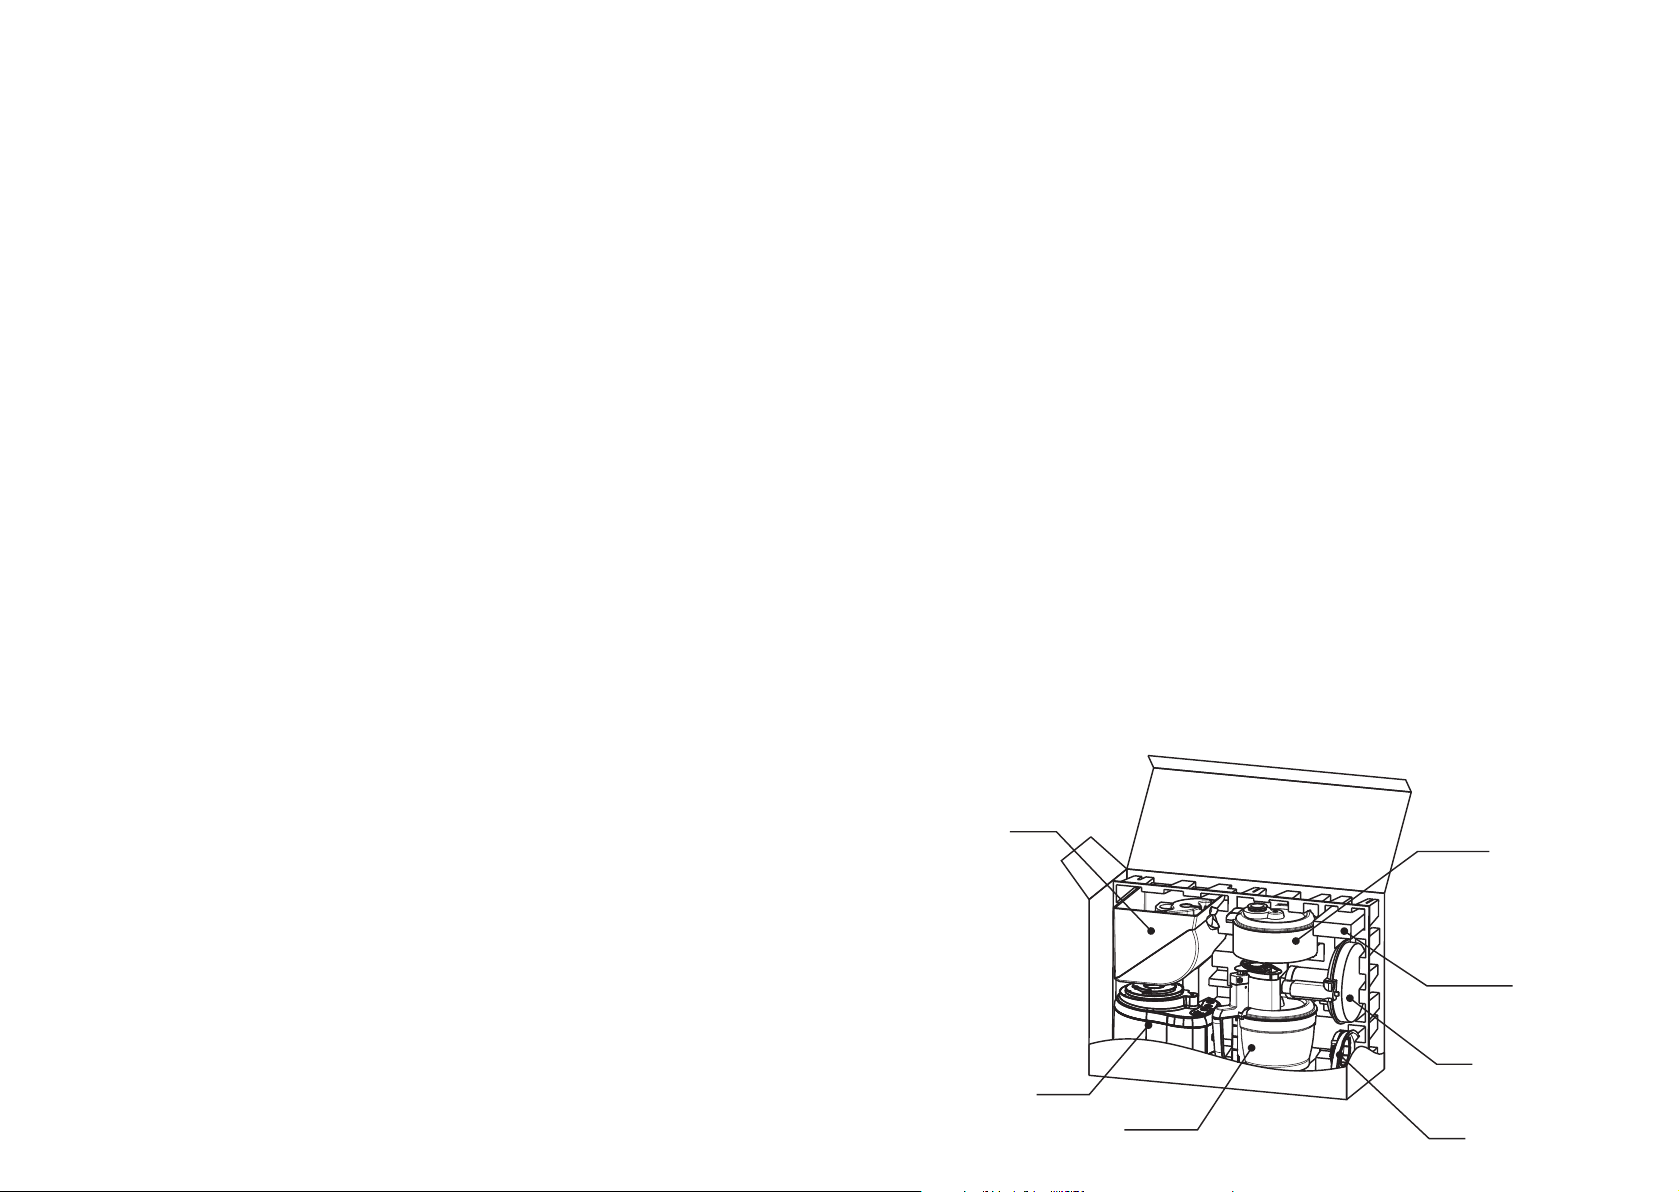
We recommend you retain the main box and inner cardboard pieces for easy repacking and safe
transport of your Expert Prep Pro.
Please refer to the diagram below which provides a guide for repacking all parts if required.
Storage
Box
Housing/
Base
Work Bowl/
Pushers
Dicing
Storage
Case
Spiral Cut &
Spaghetti Cut
Discs
Spiral
Lid
Spiraliser
Disc
Holder
Page 13

UK Guarantee
UK After Sales Service
The Conair Group Ltd, Unit 3 Waterfront Business Park, Fleet, GU51 3TW
This appliance is guaranteed for consumer use for 5 years and is only valid within the United
Kingdom.
This guarantee covers consumer use only i.e. defects occurring under normal use within the home
from date of purchase or date of delivery, whichever is later.
If the product develops a fault due to defects in materials or manufacture within 12 months
from the date of purchase, to avoid delays and unnecessary inconvenience, where possible please
return the product to the point of purchase for an exchange.
If the product develops a fault due to defects in materials or manufacture after 12 months from
the date of purchase, and within the guarantee period, Conair UK After Sales Service will repair
or replace the product.
Exclusions
This guarantee will no longer be valid meaning that The Conair Group Ltd will not be liable to
repair or replace your product where:
1. The appliance has been used on a voltage supply other than that which is marked on the
product, or advised within this instruction booklet
2. The appliance has been purchased from an unauthorised stockist*
3. The appliance is used for professional / non domestic usage
4. Repairs or alterations have been attempted by unauthorised persons
5. The failure of the appliance is a direct result of misuse
6. The failure is a result of not following the instructions for use
This guarantee does not cover any cosmetic damage due to misuse of the product nor any damage
to persons or property that occurs because of product misuse.
For further advice on using the appliance or should you need to return your product, please
contact the Conair Customer Care Line on 03702 406 902 (09:00 to 17:00 Monday to Friday) or
email your enquiry to [email protected]
Return address:
Customer Care Centre
Conair Logistics
Unit 4, Revolution Park
Buckshaw Avenue
Buckshaw Village
Chorley
PR7 7DW
Please enclose your returns number, name and address details, together with a copy of proof of
purchase and details of the fault.
Please note this Instruction Booklet is not the guarantee.
*unauthorised stockists include, but are not limited to online auction sites, private sellers and
those selling second hand goods, refurbished products etc
Please contact the Conair Customer Care Line on 03702 406902 (09:00 to 17:00 Monday to
Friday) or email [email protected] for further information on authorised stockists.
It is important to retain your proof of purchase. We recommend attaching your receipt to
this page.
Even where a refund may be applicable, no refund will be provided without a valid receipt
or proof of purchase, we will only be able to offer a repair or replacement service. Please
note this does not apply if the product was purchased directly from The Conair Group Ltd.
Guarantees on replacement products run from the original purchase date or date of delivery,
whichever is later, and not from the date of replacement.
This guarantee is an additional benefi t and does not affect your statutory rights as a
consumer.
If you have any queries regarding this guarantee please contact the Conair Customer Care Line on
03702 406 902 (09:00 to 17:00 Monday to Friday) or email your enquiry to support@cuisinart.
co.uk
24 25
Page 14

26 27
Page 15

www.cuisinart.co.uk
IB-18/438
 Loading...