

Page 1
INSTRUCTION
& RECIPE BOOKLET
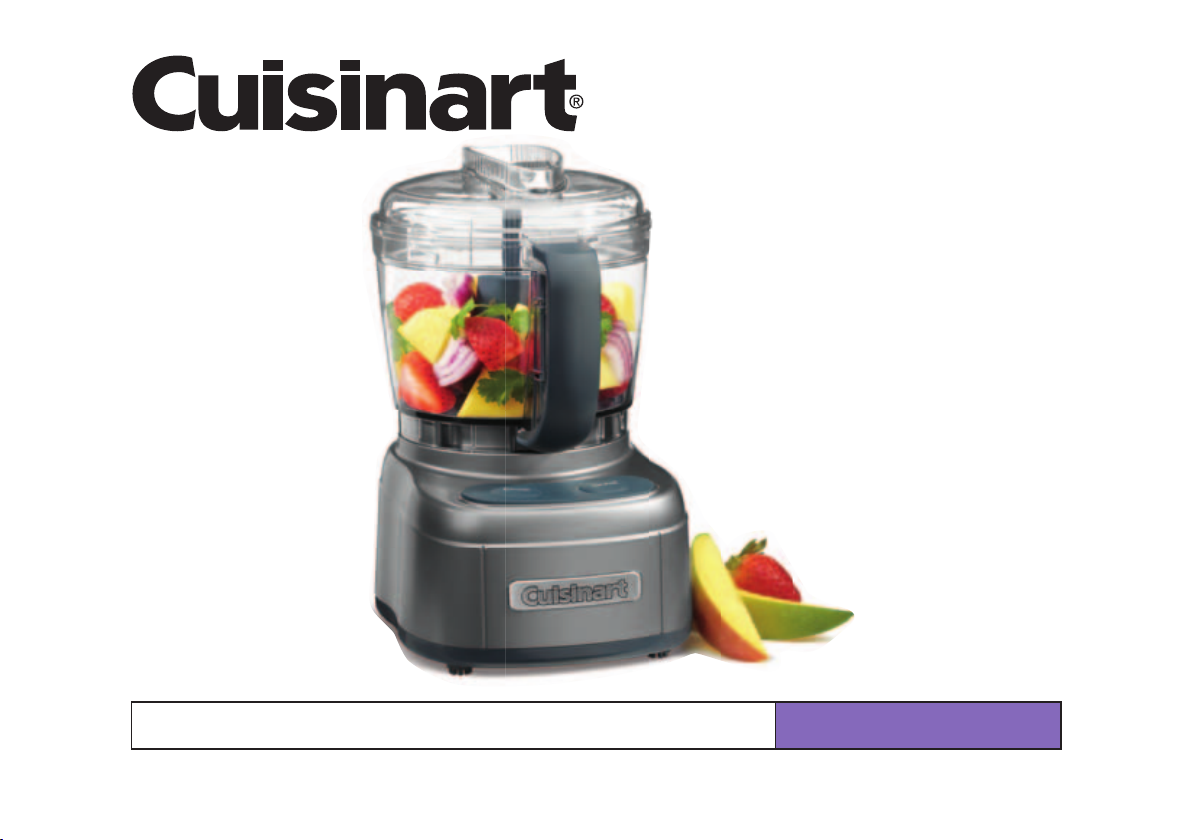
Cuisinart® Elemental™ Series 4-Cup Chopper/Grinder
For your safety and continued enjoyment of this product, always read the instruction book carefully before using.
ECH-4 Series
Page 2

IMPORTANT UNPACKING
INSTRUCTIONS
This package contains a Cuisinart® Elemental™
4-Cup Chopper/Grinder and the standard
Series
parts for it: SmartPower
blade with BladeLock System, spatula, and instruction/recipe booklet.
CAUTION: THE CUTTING BLADE HAS VERY SHARP
EDGES.
To avoid injury when unpacking, please follow these
instructions:
1. Place the box on a table or kitchen counter.
Be sure the box is right side up.
2. Lift and remove the cardboard lid from the work
bowl cover.
3. Grasping the work bowl handle, lift the unit up and out
of the box and place on the tabletop.
4. Turn the work bowl clockwise to unlock it from the unit
base. Lift up and remove.
5. CAREFULLY REMOVE THE METAL BLADE BY
GRASPING THE CENTER WHITE HUB AND
LIFTING IT STRAIGHT UP. NEVER TOUCH THE
BLADE, AS IT IS RAZOR SHARP.
6. Read the instructions thoroughly before using the
machine.
NOTE: We recommend that you visit our
website, www.cuisinart.com for a fast, efficient way to
complete your product registration.
®
metal chopping/grinding
CONTENTS
Important Safeguards ..........................................2
Introduction .........................................................3
Assembly Instructions .........................................3
Tips for Processing Food ....................................4
Processing Food .................................................4
Cleaning, Storage and Maintenance ...................5
Troubleshooting ................................................... 5
Operating Techniques Chart ................................6
Recipes ................................................................8
Warranty ............................................................10
IMPORTANT
SAFEGUARDS
When using an electrical appliance, basic safety
precautions should always be adhered to, including
the following:
1. Read all instructions.
2. To protect against risk of electric shock, do not put
3. Close supervision is necessary when any appliance
4. Always unplug unit from outlet when not in use,
5. Avoid contact with moving parts.
6. Do not operate any appliance with a damaged cord
motor base in water or other liquids.
is used by or near children or individuals with certain
disabilities.
before putting on or taking off parts, before
cleaning, and before removing food from bowl.
To unplug, grasp plug and pull from electrical
outlet. Never pull cord.
or plug or after the appliance malfunctions, or if
appliance has been dropped or damaged in any
manner, or dropped into water. Return the appliance
to the nearest authorized Consumer Service Center
(see Warranty for details) for examination, repair, and
electrical or mechanical adjustment.
2
7. The use of attachments not recommended or sold by
Cuisinart may cause fire, electric shock or injury.
8. Do not let cord hang over edge of table or counter,
or touch hot surfaces, including the stove.
9. Do not use outdoors.
10. Keep hands and utensils away from moving blade
while processing to prevent the risk of severe injury
to persons or damage to the chopper/grinder. A
scraper may be used, but must only be used when
the
chopper/grinder is not running.
11. Blade is extremely sharp. Handle carefully when
removing, inserting or cleaning. Always allow
blade to stop moving before removing cover.
12. To reduce the risk of injury, never place cutting blade
on base without first putting work bowl properly in
place.
13. Be certain cover is securely locked in place before
operating appliance. Do not attempt to remove cover
until blade has stopped rotating.
14. Do not attempt to defeat the cover interlock
mechanism, as serious injury may result.
15. Before using, check work bowl for presence of
foreign objects.
16. Do not operate your appliance in an appliance
garage or under a wall cabinet. When storing in an
appliance garage, always unplug the unit from the
electrical outlet. Not doing so could create a risk of
fire, especially if the appliance touches the walls of
the garage or the door touches the unit as it closes.
Page 3
SAVE THESE
S
)
Motor B
Work B
with Ha
INSTRUCTIONS
FOR HOUSEHOLD USE
ONLY
NOTICE
This appliance has a polarized plug (one blade is
wider than the other). As a safety feature, this plug
will fit only one way in a polarized outlet. If the plug
does not fit fully in the outlet, reverse the plug. If it
still does not fit, contact a qualified electrician. Do
not attempt to defeat this safety feature.
INTRODUCTION
Congratulations on your new Cuisinart® Elemental™
Series 4-Cup Chopper/Grinder! It handles a variety
of food preparation tasks, such as chopping,
grinding, puréeing, emulsifying, and blending.
The patented SmartPower
features an incredibly sharp edge for delicate
chopping and puréeing soft foods. The reverse
edge is blunt, to grind through spices and harder
foods. And the exclusive BladeLock System
enables the blade to lock into the bowl, so you can
now pour ingredients out of the bowl without first
having to remove the blade.
The powerful, high-speed motor works hard and
fast to accomplish small jobs with ease. Chop
herbs, onions, garlic; grind spices, hard cheese;
purée baby foods; blend homemade mayo and
flavored butter – all in this one, compact machine.
You have virtually unlimited options with the
®
Cuisinart
Grinder. Enjoy!
Elemental™ Series 4-Cup Chopper/
®
auto-reversing blade
ASSEMBLY INSTRUCTIONS
1. With the base unit on the tabletop, place
the work bowl firmly on the motor base. Back of bowl
must face column at back of chopper/grinder.
2. Turn the work bowl counterclockwise to
lock onto base.
3. CAREFULLY pick up the blade by its hub and place
on the center stem until it drops to the bottom of the
stem. Firmly push to ensure that the blade is locked
into position. IMPORTANT: HANDLE WITH CARE –
The blade is razor sharp.
4. Add food ingredients.
5. Place the cover on the work bowl with the small
tab to the left of the work bowl handle.
6. Turn cover counterclockwise (toward handle) to
securely lock.
7. Plug unit into wall socket.
8. You are ready to Chop/Grind.
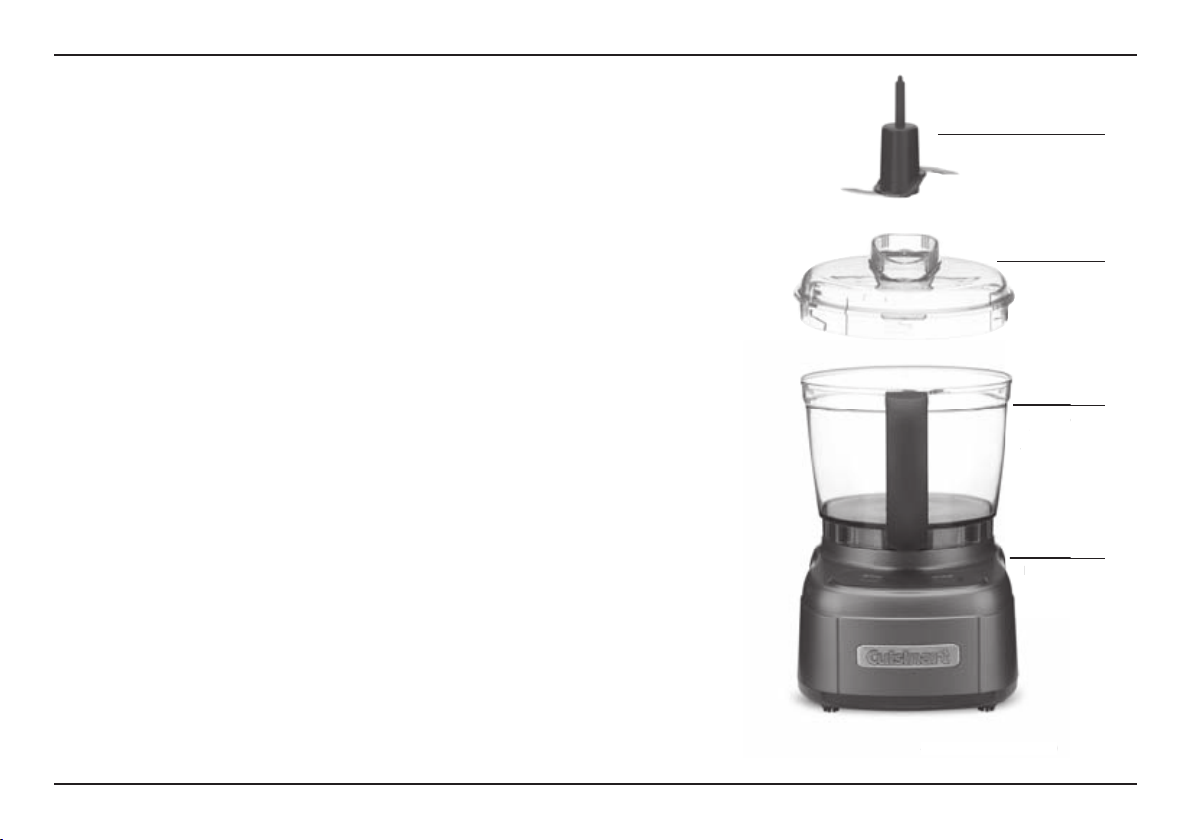
SmartPower
Spatula (not shown)
patula (not shown
Cuisinart®
with BladeLock
Work Bowl
with Handle
Motor Base
®
Blade
System
Cover
4-Cup
4
3
Page 4

TIPS FOR PROCESSING FOOD
Preparing the Food
Size
Always cut large pieces of food into smaller pieces of
even size – about ½ to ¾ inch (12mm) or as specified in
the Operating Techniques Chart on pages 6 and 7. If you
don’t start with pieces that are small and uniform, you
will not get an even chop.
Quantity
Do not overload the work bowl. Overloading causes
inconsistent results and it strains the motor. As a rule
of thumb, remember most foods should not reach more
2
than
⁄3 of the way up the work bowl. Use the quantities
given in the chart and recipe section as a guide.
NOTE: Due to the powerful motor provided with this
unit, it is recommended to use one hand to support the
®
Cuisinart
Elemental™ Series 4-Cup Chopper/Grinder
during operation.
Selecting the Right Operating Control
Use the Chop function for chopping, puréeing and
mixing. It is the right choice, for example, for chopping
soft, delicate foods such as herbs, celery, onions, garlic
and most cheeses. It is also the right choice for
puréeing cooked vegetables, making mayonnaise, and
mixing salad dressing.
Pulse action is best when you are using the Chop
function. Two or three pulses are often enough. Be sure
to check the food frequently to prevent overprocessing.
If you overprocess, you are likely to get a watery paste
instead of a fine chop.
Use the Grind function for grinding spices, and for
chopping hard foods such as peppercorns, seeds,
chocolate and nuts.
Continuous-hold action is best when you are using the
Grind function. You may have to operate the Cuisinart
™
Elemental
Series 4-Cup Chopper/Grinder for several
®
seconds with some foods to achieve the desired results
– or as long as 20 seconds for some seeds.
When you operate the unit for more than 10 seconds, use
a pulse action every 10 seconds or so to allow food to
drop to the bottom of the work bowl. This provides more
consistent results.
®
Never operate the Cuisinart
Elemental™ Series 4-Cup
Chopper/Grinder continuously for longer than 1 minute
at a time.
NOTE: The work bowl and cover may become scratched
when you use them for grinding grains and spices.
This does not affect the performance of the Cuisinart
™
Elemental
Series 4-Cup Chopper/Grinder. However, you
®
may want to reserve the original bowl for grinding, and
purchase an additional bowl and cover set for other uses.
These are available from the Cuisinart Consumer Service
Department, which you can reach by dialing our toll-free
number: 800-726-0190.
Adding Liquid
You can add liquids such as water, oil or flavoring while
the machine is running. For example, you might want to
add oil when making mayonnaise or salad dressing. Pour
the liquid through openings in the cover.
IMPORTANT: Add liquid through only one opening at a
time. The other opening must be left free to allow air to
escape. If both openings are blocked, liquid cannot flow
smoothly into the bowl.
Removing Food from the Sides of the Bowl
Occasionally, food will stick to the sides of the bowl
as you process. Stop the machine to clear food away.
AFTER THE BLADE HAS STOPPED MOVING, remove
the cover, and use the spatula to scrape the food from
the sides of the bowl back into the center. Do not put
hands into bowl unless unit is unplugged.
NOTE: HANDLE WITH CARE – the blade is razor sharp.
PROCESSING FOOD
1. Place the work bowl firmly on the motor base.
Opening at back of bowl must face column at back of
the
Cuisinart® Elemental™ Series 4-Cup Chopper/
Grinder. Turn bowl counterclockwise to lock in place.
2. Insert the SmartPower
blade by its hub and place on the center stem until it
drops to the bottom of the stem. Firmly push to lock
the blade into position. NEVER TOUCH THE BLADE
ITSELF AND NOTE THE BLADE IS RAZOR SHARP.
3. Place food in the assembled work bowl. Be sure
the food is cut into even, small pieces, and the bowl
is not overloaded.
4. Lock the cover into position.
5. Press the appropriate Chop or Grind control,
depending on the food you are processing.
6. When you have finished processing the food,
stop the machine by releasing the control
button.
7. WHEN THE BLADE STOPS MOVING,
unplug the unit.
8. Remove cover and work bowl.
a. Turn work bowl cover clockwise to remove.
b. Turn work bowl clockwise to unlock it and lift it
off base.
9. To remove liquids and sauces from bowl:
Simply pour ingredients out of work bowl. Our
convenient BladeLock System keeps blade safely in
place.
10. To remove thicker ingredients from bowl:
Carefully remove the SmartPower
the stem on the top and gently pulling up to
disengage blade lock. Remove food with spatula.
You can also remove ingredients while the bowl is
still on the base.
®
Blade. Carefully pick up the
®
Blade by holding
4
Page 5

NOTE: HANDLE WITH CARE – THE BLADE IS
RAZOR SHARP.
Tips: Always process foods in order, from dry to wet,
to avoid having to clean bowl and blade between each
task.
Never operate the
Chopper/Grinder without ingredients in the work bowl.
Cuisinart® Elemental
™
Series 4-Cup
CLEANING, STORAGE AND
MAINTENANCE
To simplify cleaning, rinse the work bowl, cover, and
blade immediately after each use, so that food won’t dry
on them. Wash blade, work bowl, cover, and spatula in
warm, soapy water. Rinse and dry. Wash the blade
carefully.
Avoid leaving blade in soapy water where it may
disappear from sight. The work bowl and cover can be
washed on the top rack of a dishwasher. Insert the work
bowl upside down and the cover right side up. Put the
blade and spatula in the cutlery basket. Unload the
dishwasher carefully to avoid contact with the sharp
blade. Wipe the motor base clean with a damp sponge
or cloth. Dry it immediately. Never submerge the motor
base or the plug in water or other liquids.
The Cuisinart
Grinder stores neatly on the countertop. When it is not in
use, be sure to leave it unplugged. The hidden cord
storage underneath the motor base will help to keep
excess cord off the countertop. Store the unit assembled
to prevent loss of parts. Store the blade as you would
sharp knives – out of the reach of children.
The
Grinder is intended for HOUSEHOLD USE ONLY.
Maintenance: Any service other than cleaning and
normal user maintenance should be performed by an
authorized Cuisinart Service Representative.
®
Elemental™ Series 4-Cup Chopper/
Cuisinart® Elemental™ Series 4-Cup Chopper/
TROUBLESHOOTING
Motor doesn’t start or blade doesn’t rotate.
• Check that plug is securely inserted into outlet.
• Check that work bowl and cover are securely locked
into place.
• Be sure to press only one operation control button at
a time.
• This appliance comes with a resettable protection
device to prevent damage to the motor in the case of
extreme overload. Should unit shut off unexpectedly,
unplug it and let it cool for at least 15 minutes before
continuing.
Food is unevenly chopped.
• Try cutting food into smaller, even-sized pieces.
• Try processing smaller amounts of food per batch.
Food is chopped too fine or is watery.
• The food has been overprocessed. Use brief pulses,
or process for a shorter time. Let blade stop completely between pulses.
Food collects on work bowl cover or sides of prep
bowl.
• This is normal; turn machine off. When blade stops
rotating, remove cover and clean bowl and cover
with spatula.
Food catches on blade.
• You may be processing too much food. Carefully
remove blade. Remove food from blade with spatula
and start over again.
5
Page 6

OPERATING TECHNIQUES CHART
With the Cuisinart® Elemental™ Series 4-Cup Chopper/Grinder you can chop, grind or purée a variety of foods. As a rule of thumb, most foods
should not reach more than 2⁄3 of the way up the work bowl.
Food Operation/Technique Comments/Notes
Anchovies Chop. Pulse to desired consistency. Drain first. Cut in half.
Bread for crumbs Chop. Pulse to break up, then process continuously
Butter Alternate pulsing between Chop and Grind and then
Celery Chop. Pulse to desired size. Cut into ½-inch-long pieces.
Cheese – hard (Parmesan,
Asiago, Romano, etc.)
Cheese – soft
(cream cheese, etc.)
Chocolate Chop. Pulse to break up, then process continuously
Cinnamon sticks, nutmeg,
other hard spices
Citrus zest Chop. Pulse to break up, then process continuously
Cookies, graham crackers
for crumbs, hard Amaretti or
macaroons
Fruits, cooked; fresh or
frozen (thawed) berries
Garlic Chop. Pulse to chop roughly, then process
*Surface scratches that may occur will not impair the function of the Cuisinart® Elemental™ Series 4-Cup Chopper/Grinder. You may want to consider purchasing a second work bowl specifically for these tasks.
until desired crumb size is reached.
run continuously on Chop.
Chop. Pulse 10 times, then process continuously
until desired consistency.
Chop. Pulse to break up, then process continuously
to “cream.”
until desired chop size is achieved.
Grind. Pulse to break up, about 5 times, then
process continuously until finely chopped.
until finely chopped.
Chop. Pulse 5 times to break up, then process
continuously until finely chopped.
Chop. Pulse to break up, then process continuously
until desired consistency.
continuously for fine chop.
Use day-old, hard bread for dry crumbs; fresh bread for moist crumbs. Cut or break into
pieces no larger than 1 inch. For buttered crumbs, add 1 teaspoon of melted butter per
slice after crumbs have started to form, and process to combine and coat.
Cut into ½-inch pieces. Best at room temperature. Process up to ¾ cup at a time. Add
freshly chopped citrus zest, garlic, herbs or shallots to create compound butters.
Remove and discard rind or reserve for another use. Cut into ½-inch pieces. If possible,
remove from refrigerator 20–30 minutes before processing. Process up to 4 ounces at
a time.
Best at room temperature. Cut into 2-inch pieces. Process up to 12 ounces at a time.
Process no more than 1½ ounces at a time. For best results, chill chocolate for 3–5
minutes in freezer before chopping. Cut baking chocolate squares into ½-inch pieces to
chop.
Break up to 2 cinnamon sticks into 1-inch pieces. Up to ¼ cup of all other spices can
be processed. Hard spices may cause scratches on the work bowl and cover.*
Use vegetable peeler to remove zest (color only) from citrus; scrape off any white with
sharp knife. Cut strips in half. Adding a small amount of sugar or salt will help achieve a
finer texture.
Hard cookies only. Break up into 1-inch or smaller pieces. For buttered crumbs, add 1
teaspoon of melted butter per graham cracker sheet or for every 3 cookies.
Cooked fruits may be processed to make baby foods or purées; liquid may be added
for consistency. To process fresh or frozen (thawed) berries for sauce, pulse to chop,
then process until puréed (sugar may be added to taste). Fill work bowl up to of the
way full.
Peel garlic cloves first. Scrape work bowl sides and bottom as needed.
6
Page 7

Food Operation/Technique Comments/Notes
Ginger root, fresh Chop. Pulse to break up, then process continuously
to reach desired consistency.
Green onions, scallions Chop. Pulse to chop to desired consistency. Trim and cut into ¾
Herbs, fresh Chop. Pulse to chop to desired consistency. Rinse and dry completely. Remove leaves from stems to chop.
Horseradish Chop. Pulse to chop to desired consistency. Peel first. Cut into ½-inch pieces. Process up to 4 ounces at a time.
Leeks Chop. Pulse to chop to desired consistency. Trim off root end and tough outer skin. Wash thoroughly to remove sand and grit; dry
Meats Chop. Pulse to chop, or process continuously
to desired consistency (add liquid as needed to
process to puréed consistency).
Mushrooms Chop. Pulse to chop to desired consistency. Choose firm, fresh mushrooms. Cut into quarters or even-size pieces, no larger than
Nuts Chop. Pulse to chop to desired consistency. Or
Grind. Pulse first then process continuously until
desired consistency.
Olives Chop. Pulse to chop to desired consistency. Use only pitted olives. Drain well for best results.
Onions Chop. Pulse 5–10 times to chop to desired size. Peel; cut into ¾-inch or smaller pieces of similar size.
Peppercorns Grind. Pulse first, then process continuously until
desired consistency.
Peppers, fresh Chop. Pulse to chop to desired consistency. Core, seed and cut into ½-inch pieces. Do not overprocess.
Seeds, dried berries Grind. Pulse to break up, then process continuously
Shallots Chop. Pulse 5–10 times to chop to desired
Vegetables, cooked Chop. Pulse 5–10 times to chop, then process
to desired consistency.
consistency.
continuously until desired consistency is reached.
Peel first; cut into ½-inch pieces or slices. Scrape work bowl sides and bottom as
needed. Process up to 4 ounces at a time.
-inch pieces.
completely. Cut into ½-inch pieces.
Uncooked meats should be cold, but not frozen; cut up to 8 ounces into ½-inch pieces,
trimmed of gristle and soft fat; some hard fat may remain. Cooked meats can be cold
or warm; cut up to 8 ounces into ½-inch pieces. Add liquid (water, broth or from cooking) as needed to process to puréed consistency.
¾ inch.
Toast nuts first for maximum flavor. Allow to cool completely before chopping. Process
up to 1 cup at a time.
Combine peppercorns with dried herbs or spices or coarse salt to create rubs and
seasonings. Hard peppercorns may scratch work bowl and cover.*
Coriander, cumin, dill, fennel, sesame, poppy, and juniper berries.
Peel first; cut into quarters, or pieces no larger than ¾ inch.
Cook vegetables until tender. Process to a smooth purée for baby food or sauces; may
need to add liquid for consistency. Fill work bowl up to of the way full.
*Surface scratches that may occur will not impair the function of the Cuisinart® Elemental™ Series 4-Cup Chopper/Grinder. You may want to consider purchasing a second work bowl specifically for these tasks.
7
Page 8

RECIPES
CHUNKY GUACAMOLE
Our fresh guacamole is perfect for the Sunday game or served
alongside quesadillas for a festive dinner.
Makes about 11/3 cups
1 small garlic clove, peeled
½ jalapeño, seeded, cut into 1-inch pieces
1 green onion, cut into 1-inch pieces
1 tablespoon fresh cilantro leaves, stems
discarded
2 ripe avocados, halved, pitted
2 tablespoons fresh lime juice
¾ teaspoon kosher salt
TAPENADE
This spread goes great with fresh, crusty bread. Spread on
sandwiches or even bake a thin layer onto salmon or chicken.
Makes about 11/3 cups
1 garlic clove, peeled
3 tablespoons packed fresh parsley leaves
1½ cups pitted black olives, such as Kalamata or
Niçoise
1½ cups pitted green olives
¼ cup capers, drained and rinsed
1½ teaspoons fresh lemon juice
1½ teaspoons Dijon mustard
½ teaspoon freshly ground black pepper
2 tablespoons extra virgin olive oil
HUMMUS
Serve this brightly flavored dip with warm pita
Makes about 12/3 cups
1 garlic clove
1 can (15.5 ounces ) chickpeas, rinsed and
drained
1
/3 cup tahini
1
/3 cup plus 2 tablespoons cold water
2 tablespoons fresh lemon juice
½ to ¾ teaspoon kosher salt (to taste)
¼ teaspoon ground cumin
Extra virgin olive oil, for finishing
Pinch za’atar (optional), for finishing
for a satisfying snack.
1. Put the garlic, jalapeño, green onion and cilantro in
the work bowl. Pulse on Chop to roughly but evenly chop,
about 8 to 10 pulses.
2. Scrape down the sides of the bowl. Scoop out the
flesh of the avocados, in pieces, and put directly into the
work bowl; add the lime juice and salt. Alternate pulsing
between Chop and Grind and then run on Chop
continuously to achieve desired consistency.
Nutritional information per serving (1/3 cup):
Calories 118 (74% from fat) • carb. 7g • pro. 1g • fat 10g
sat. fat 1g • chol. 0mg • sod. 434mg • calc. 13mg • fiber 5g
Put all ingredients in the work bowl. Pulse on Chop to
evenly chop the ingredients, and then run on Chop
continuously until desired consistency is achieved.
Nutritional information per serving (2 tablespoons):
Calories 51 (82% from fat) • carb. 2g • pro. 0g • fat 5g
sat. fat 1g • chol. 0mg • sod. 266mg • calc. 24mg • fiber 1g
8
1. Put the garIic in the work bowl. Run on Chop continuously to finely chop. Add remaining ingredients to the
work bowl. Pulse on Chop to start processing ingredients.
Continue pulsing to process until smooth and creamy.
2. Taste and adjust seasoning as desired. To serve, drizzle
with olive oil and sprinkle with za’atar (if using).
Nutritional information per serving (2 tablespoons):
Calories 78 (40% from fat) • carb. 9g • pro. 3g • fat 4g
• sat. fat 0g • chol. 0mg • sod. 154mg • calc. 39mg
• fiber 3g
Page 9

MAYONNAISE
Taste the difference in homemade mayonnaise.
Makes about 2/3 cup
2 large egg yolks
1 tablespoon water
1 teaspoon fresh lemon juice
½ teaspoon kosher salt
½ teaspoon Dijon mustard
2
/3 cup vegetable oil
1. Put the egg yolks, water, lemon juice, salt, and mustard
in the work bowl and press Chop to process until smooth,
about 15 seconds. While running on Chop continuously,
add the oil slowly through one of the drizzle holes on the
cover until all oil is incorporated and the mayonnaise is
emulsified and homogenous.
2. Taste and adjust seasoning accordingly.
Note: For fresh herb mayonnaise: Process
packed fresh herbs (e.g., parsley, dill, tarragon, basil, etc.),
stems removed, with the yolks before adding the oil.
For a bolder-flavored mayonnaise, increase the salt by
¼ teaspoon, the Dijon by ½ teaspoon and lemon juice
to 1 tablespoon.
Nutritional information per serving
(1 tablespoon, using egg yolks):
Calories 127 (98% from fat) • carb. 0g • pro. 0g
• fat 14g • sat. fat 1g • chol. 34mg • sod. 111mg
• calc. 4mg • fiber 0g
1
/3 cup firmly
APPLE CRISP
This is your no-frills autumn dessert that can be prepared
and baked in under an hour. Any type of apple will do,
but we like to use a mix of tart and sweet varieties.
Makes about 6 to 8 servings
Topping:
1 cup rolled oats (not quick cooking)
1
/3 cup unbleached, all-purpose flour
2
/3 cup packed light brown sugar
¼ teaspoon kosher salt
¼ teaspoon ground cinnamon
Pinch ground ginger
6 tablespoons unsalted butter, cold and cubed
Filling:
5 to 6 medium apples (about 2 pounds), peeled,
cored and cut into 1-inch pieces
1 tablespoon fresh lemon juice
1
/3 cup granulated sugar
1 teaspoon ground cinnamon
½ teaspoon pure vanilla extract
Pinch kosher salt
1. Preheat oven with rack in the middle position to 375°F.
2. Put all of the topping ingredients, except for the butter,
in the work bowl. Pulse on Chop to combine, about 4 to 6
pulses. Add the butter and pulse on Chop until butter is in
small pieces, about 5 to 6 pulses. Reserve.
3. Put the apples in a 9x9-inch square baking pan.
Sprinkle the lemon juice evenly over the apples and then
add the remaining ingredients. Gently toss to evenly coat
the apples.
4. Cover the apple mixture with the prepared topping.
Transfer pan to the preheated oven and cook until filling is
bubbling and the top is browned and crispy, about 40 to
45 minutes.
5. Allow to cool for 5 minutes prior to serving.
Nutritional information per serving (based on 8 servings):
Calories 375 (28% from fat) • carb. 66g • pro. 3g • fat 12g
sat. fat 7g • chol. 30mg • sod. 122mg • calc. 12mg • fiber 4g
9
APPLESAUCE
Homemade applesauce is a quick (and healthy!) comfort food
for the entire family. Our version does not call for any sugar, but
some varieties of apples may call for a teaspoon or two.
Makes about 11/3 cups
3 medium to large apples (about 1 pound),
peeled or not peeled, cored and cut into 1-inch
pieces (if you leave the peel on, the applesauce
will have a beautiful, rosy hue)
½ teaspoon ground cinnamon
Pinch ground nutmeg
Pinch kosher salt
½ cup water
½ teaspoon fresh lemon juice
1. Put all of the ingredients, except the lemon juice, into a
medium saucepan. Cover and set over medium-high heat
to bring to a boil. Once boiling, partially cover and reduce
heat to maintain a simmer. Allow to cook until apples are
very tender, about 20 to 25 minutes (keep an eye on the
water, you may need to add a tablespoon or so during
cooking – you do not want it to dry out).
2. Transfer apple mixture to the work bowl. Add the lemon
juice and then alternate pulsing between Chop and Grind,
until desired consistency is achieved.
3. Taste and adjust seasoning as desired. Serve warm or
chilled.
Nutritional information per serving (
Calories 60 (3% from fat) • carb. 16g • pro .01g • fat 0g
• sat. fat 0g • chol. 0mg • sod. 38mg • calc. 10mg
• fiber 3g
1
/
cup):
3
Page 10

CUISINART
®
ELEMENTAL™ SERIES 4-CUP
CHOPPER/GRINDER
LIMITED 18-MONTH
WARRANTY
(U.S. AND CANADA ONLY)
This warranty is available to consumers only. You are
a consumer if you own a Cuisinart
4-Cup Chopper/Grinder that was purchased at retail for
personal, family or household use. Except as otherwise
required under applicable law, this warranty is not
available to retailers or other commercial purchasers
or owners.
We warrant that your Cuisinart
4-Cup Chopper/Grinder will be free of defects in materials and workmanship under normal home use for 18
months from the date of original purchase.
We recommend that you visit our website, www.cui-
sinart.com for a fast, efficient way to complete your
product registration. However, product registration does
not eliminate the need for the consumer to maintain the
original proof of purchase in order to obtain the warranty benefits. In the event that you do not have proof of
purchase date, the purchase date for purposes of this
warranty will be the date of manufacture.
If your Cuisinart
Grinder should prove to be defective within the warranty
period, we will repair it, or if we think necessary, replace
it. To obtain warranty service, simply call our toll-free
number 1-800-726-0190 for additional information from
our Consumer Service Representatives, or send the
defective product to Consumer Service at Cuisinart,
7475 North Glen Harbor Blvd., Glendale, AZ 85307.
To facilitate the speed and accuracy of your return,
please enclose $10.00 for shipping and handling of the
product.
®
Elemental™ Series 4-Cup Chopper/
®
Elemental™ Series
®
Elemental™ Series
Please pay by check or money order made payable to
Cuisinart (California residents need only supply proof of
purchase and should call 1-800-726-0190 for shipping
instructions).
NOTE: For added protection and secure handling of any
Cuisinart product that is being returned, we recommend
you use a traceable, insured delivery service. Cuisinart
cannot be held responsible for in-transit damage or for
packages that are not delivered to us. Lost and/or
damaged products are not covered under warranty.
Please be sure to include your return address, daytime
phone number, description of the product defect,
product model number (located on bottom of product),
original date of purchase, and any other information
pertinent to the product’s return.
You r Cuisi n a r t
Grinder has been manufactured to the strictest specifications and has been designed for use only in 120volt outlets and only with authorized accessories and
replacement parts. This warranty expressly excludes
any defects or damages caused by attempted use of
this unit with a converter, as well as use with accessories, replacement parts or repair service other than
those authorized by Cuisinart. This warranty does not
cover any damage caused by accident, misuse, shipment or other than ordinary household use. This warranty excludes all
incidental or consequential damages. Some states do
not allow the exclusion or limitation of these damages,
so these exclusions may not apply to you. This warranty
gives you specific legal rights, and you may also have
other rights, which vary from state to state.
CALIFORNIA RESIDENTS ONLY:
California law provides that for In-Warranty Service,
California residents have the option of returning a
nonconforming product (A) to the store where it was
purchased or (B) to another retail store that sells
Cuisinart products of the same type.
®
Elemental™ Series 4-Cup Chopper/
10
The retail store shall then, at its discretion, either repair
the product, refer the consumer to an independent repair
facility, replace the product, or refund the purchase price
less the amount directly attributable to the consumer’s
prior usage of the product. If the above four options do
not result in the appropriate relief to the consumer, the
consumer may then take the product to an independent
repair facility if service or repair can be economically
accomplished. Cuisinart and not the consumer will be
responsible for the reasonable cost of such service,
repair, replacement, or refund for nonconforming
products under warranty.
California residents may also, according to their
preference, return nonconforming products directly to
Cuisinart for repair, or if necessary, replacement, by
calling our Consumer Service Center toll-free at
1-800-726-0190.
Cuisinart will be responsible for the cost of the repair,
replacement, and shipping and handling for such
products under warranty.
BEFORE RETURNING YOUR
CUISINART PRODUCT
If you are experiencing problems with your Cuisinart
product, we suggest that you call our Consumer Service
Center at 1-800-726-0190 before returning the product
to be repaired. If servicing is needed, a Representative
can confirm whether the product is under warranty and
direct you to the nearest service location.
Important: If the nonconforming product is to be serviced
by someone other than Cuisinart’s Authorized Service
Center, please remind the servicer to call our Consumer
Service Center at 1-800-726-0190 to ensure that the
problem is properly diagnosed, the product is serviced
with the correct parts, and the product is still under
warranty.
Page 11

11
Page 12

© 2017 Cuisinart
150 Milford Road
East Windsor, NJ 08520
Printed in China
17CE026093
F IB-14830-ESP
Page 13

F IB-14830-ESP
17CE026093
Impreso en China
East Windsor, NJ 08520
150 Milford Road
© 2017 Cuisinart
12
Page 14

11
producto esté bajo garantía.
piezas correctas para repararlo y asegurarse de que el
de diagnosticar el problema correctamente, usar las
servicio posventa de Cuisinart al 1-800-726-0190 a fin
personal del centro de servicio que deberían llamar al
centro de servicio no autorizado, por favor informe al
Importante: si debe llevar el producto defectuoso a un
más cercano.
garantía y le indicará la dirección del centro de servicio
representante le confirmará si su producto sigue bajo
0190 antes de regresar el aparato a Cuisinart. Un
que llame a nuestro servicio posventa al 1-800-726Si su aparato tiene algún problema, le recomendamos
ANTES DE HACER REPARAR SU APARATO
durante el período de garantía.
reemplazo, manejo y envío de los productos defectuosos
Cuisinart será responsable por los gastos de reparación,
0190.
debe llamar a nuestro servicio posventa al 1-800-726Cuisinart para que lo reparen o lo cambien. Para esto, se
desean, mandar el producto defectuoso directamente a
Los residentes de California también pueden, si lo
durante el período de garantía.
reemplazo o reembolso de los productos defectuosos
será responsable por los gastos de servicio, reparación,
o reparar el producto de manera económica. Cuisinart
servicio independiente, siempre que se pueda ajustar
al consumidor, podrá llevar el producto a un centro de
que este se dañe. Si estas dos opciones no satisfacen
imputable al uso del producto por el consumidor hasta
por el precio original del producto, menos la cantidad
cambiará el producto o reembolsará al consumidor
al consumidor a un centro de servicio independiente,
La tienda, a su opción, reparará el producto, referirá
Page 15

de este tipo.
®
10
cubrir los gastos de manejo y envío.
de compra y un cheque o giro postal de US$10.00 para
Regrese el producto defectuoso, junto con su recibo
Glen Harbor Blvd., Glendale, AZ 85307.
defectuoso a: Cuisinart, Service Department, 7475 North
venda productos Cuisinart
a la tienda donde lo compraron o (B) a otra tienda que
California pueden (A) regresar el producto defectuoso
el período de garantía. Los residentes del estado de
La ley del estado de California ofrece dos opciones bajo
RESIDENTES DE CALIFORNIA SOLAMENTE
tener otros derechos que varían de un Estado a otro.
le otorga derechos legales específicos y usted puede
mencionadas pueden no regir para usted. Esta garantía
o consecuentes, de modo que las limitaciones
permiten la exclusión o limitación de daños incidentales
incidentales o consecuentes. Algunos Estados no
Esta garantía excluye expresamente todos los daños
daños causados por mal uso, negligencia o accidente.
o comercial del producto, y no es válida en caso de
de voltaje. Esta garantía no cubre el uso institucional
como los daños causados por el uso de un convertidor
piezas o reparaciones no autorizados por Cuisinart, así
expresamente los daños causados por accesorios,
repuesto autorizados solamente. Esta garantía excluye
corriente de 120 V, usando accesorios y piezas de
de fabricación y ha sido diseñado para uso sobre
Este aparato satisface las más altas exigencias
problema, así como cualquier información pertinente.
su nombre, dirección y teléfono, la descripción del
no serán cubiertos bajo esta garantía. Recuerde incluir
Los productos perdidos y/o dañados durante el envío
los paquetes mandados a una dirección equivocada.
por los daños ocurridos durante el transporte o por
seguro y seguimiento. Cuisinart no será responsable
mande su paquete por un método de entrega con
NOTA: para mayor seguridad, le aconsejamos que
para recibir instrucciones de envío.
prueba de compra y deben llamar al 1-800-726-0190
Los residentes de California solo necesitan dar una
™
ELEMENTAL
®
directa gratuita al 1800-726-0190 o regrese el aparato
obtener servicio bajo esta garantía, llame a nuestra línea
para uso doméstico y según las instrucciones Para
garantía, siempre que el aparato haya sido utilizado
de materiales o fabricación durante el período de
Cuisinart garantiza este aparato contra todo defecto
de fabricación.
período de garantía será calculado a partir de la fecha
bajo esta garantía. En ausencia del recibo de compra, el
no es necesario registrar el producto para recibir servicio
verificación de la fecha de compra original. Sin embargo,
disponible en www.cuisinart.com a fin de facilitar la
Le aconsejamos que llene el formulario de registro
instrucciones. .
haya sido utilizado para uso doméstico y según las
de la fecha de compra original, siempre que el aparato
de materiales o fabricación durante 18 meses después
Cuisinart garantiza este aparato contra todo defecto
comerciantes ni los dueños.
esta garantía no es para los detallistas, los demás
A excepción de los estados donde la ley lo permita,
en una tienda, para uso personal o casero.
Cuisinart
®
Usted es un consumidor si ha comprado su aparato
Esta garantía es para los consumidores solamente.
EN CANADÁ SOLAMENTE)
(VÁLIDA EN LOS EE.UU. Y
18 MESES
GARANTÍA LIMITADA DE
CUISINART
DE 4 TAZAS (945 ML)
PICADORA/MOLEDORA
3
taza):
Calcio 10 mg • Fibra 3 g
/
1
Grasa 0 g • Grasa saturada 0g • Colesterol 0 mg • Sodio 38 mg
Calorías 60 (3 % de grasa) • Carbohidratos 16 g • Proteína 1 g
nformación nutricional por porción (
3. Probar y ajustar la sazón al gusto. Servir tibio o frío.
función GRIND, hasta obtener la consistencia deseada.
Pulsar repetidamente, alternando la función CHOP y la
2. Verter la mezcla en el bol. Agregar el jugo de limón.
Page 16

9
⁄3 taza
1
empieza a secarse.
una cucharada de agua durante la cocción si la mezcla
tiernas. Nota: vigilar la cocción y añadir aproximadamente
20–25 minutos, hasta que las manzanas estén muy
y seguir cocinando, parcialmente tapado. Cocinar por
reducir el fuego de manera que hierva a fuego lento
fuego medio-alto hasta que empiece a hervir. Entonces,
limón, en una cacerola mediana. Tapar y calentar a
1. Colocar todos los ingredientes, excepto el jugo de
½ cucharadita de jugo de limón fresco
½ taza (120 ml) de agua
1 pizca de sal kosher
1 pizca de nuez moscada rallada
½ cucharadita de canela en polvo
tinte rosado)
las manzanas, la compota tendrá un hermoso
descarozadas y cortadas en pedazos (si no pela
(aproximadamente 1 libra/455 g), peladas o no,
3 manzanas medianas a grandes
Rinde aproximadamente 1
pueden requerir 1–2 cucharaditas de azúcar.
versión no requiere azúcar, pero algunas variedades de manzana
comida reconfortante que le gusta a toda la familia! Nuestra
¡Rápida y saludable, la compota de manzana casera es una
COMPOTA DE MANZANA
122 mg • Calcio 12 mg • Fibra 4 g
g • Grasa 12 g • Grasa saturada 7 g • Colesterol 30 mg • Sodio
Calorías 375 (28 % de grasa) • Carbohidratos 66 g • Proteínas 3
Información nutricional por porción (basada en 8 porciones):
5. Dejar enfriar por 5 minutos antes de servir.
crujiente.
relleno esté hirviendo y que la cobertura esté dorada y
preparada. Hornear por 40–45 minutos, hasta que el
4. Cubrir la mezcla de manzana con la cobertura
cortadas en pedazos
pedacitos
instantánea)
combinar manzanas dulces con manzanas agrias.
Puede usar cualquier variedad de manzana, pero nos gusta
Este postre de otoño simple estará listo en menos de una hora.
MANZANA
TARTA CRUJIENTE DE
Revolver suavemente para cubrir las manzanas.
el jugo de limón y agregar los ingredientes restantes.
9 pulgadas (23 cm x 23 cm). Rociar uniformemente con
3. Colocar las manzanas en un molde cuadrado de 9 x
111 mg • Calcio 4 mg • Fibra 0 g
picada en pedazos pequeños. Reservar.
usando la función CHOP, hasta que la mantequilla esté
para mezclar. Agregar la mantequilla y pulsar 5–6 veces,
en el bol. Pulsar 4–6 veces, usando la función CHOP,
(1 cucharada, usando yemas):
Información nutricional por porción
2. Poner todos los ingredientes, excepto la mantequilla,
precalentar el horno a 375°F (190°C).
1. Poner la rejilla del horno en el centro del horno y
1 pizca de sal kosher
½ cucharadita de extracto natural de vainilla
1 cucharadita de canela en polvo
/3 taza (65 g) de azúcar granulada
1
1 cucharada de jugo de limón fresco
/3 taza llena
1
5–6 manzanas medianas a grandes, peladas y
Relleno:
6 cucharadas (85 g) de mantequilla sin sal, en
1 pizca de jengibre en polvo
¼ cucharadita de canela en polvo
¼ cucharadita de sal kosher
⁄3 taza llena (65 g) de azúcar rubio
2
⁄3 taza (85 g) de harina común
1
1 taza (80 g) de copos de avena (no utilice avena
Cobertura:
Rinde 6–8 porciones
⁄3 taza (160 ml)
2
MAYONESA
0 g • Grasa 14 g • Grasa saturada 1 g • Colesterol 34 mg • Sodio
Calorías 127 (98 % de grasa) • Carbohidratos 0 g • Proteínas
cucharada de jugo de limón.
de cucharadita de sal, ½ cucharadita de mostaza y 1
Para obtener una mayonesa más fuerte, agregar ¼
agregar el aceite.
albahaca, etc. (hojas solamente) a las yemas antes de
(10 g) de hierbas frescas como perejil, eneldo, estragón,
Nota: Mayonesa con hierbas frescas: añadir
2. Probar y ajustar la sazón al gusto.
homogénea.
procesando hasta que la mezcla esté emulsionada y
de oliva lentamente por el orificio en la tapa y seguir
mezcla suave. Sin apagar la máquina, agregar el aceite
por aproximadamente 15 segundos, hasta obtener una
la mostaza en el bol. Procesar, usando la función CHOP,
1. Colocar las yemas, el agua, el jugo de limón, la sal y
⁄3 taza (160 ml) de aceite vegetal
2
½ cucharadita de mostaza de Dijon
½ cucharadita de sal kosher
1 cucharadita de jugo de limón fresco
1 cucharada (15 ml) de agua
2 yemas de huevo grande
Rinde aproximadamente
La mayonesa casera es mucho más sabrosa que la comprada.
Page 17

8
⁄3 taza
2
Calcio 39 mg • Fibra 3 g
Información nutricional por porción (2 cucharadas):
escurridos y enjuagados
HUMUS
Grasa 4g • Grasa saturada 0g • Colesterol 0 mg • Sodio 154 mg
Calorías 78 (40 % de grasa) • Carbohidratos 9 g • Proteínas 3 g
Calcio 24 mg • Fibra 1 g
con aceite de oliva y salpicar con “za’atar” (opcional).
2. Probar y ajustar la sazón al gusto. Para servir, rociar
hasta obtener una consistencia suave y cremosa.
ingredientes restantes. Pulsar, usando la función CHOP,
CHOP, hasta que esté finamente picado. Agregar los
1. Colocar el ajo en el bol. Procesar, usando la función
1 pizca de “za’atar” (opcional)
Aceite de oliva virgen extra
¼ cucharadita de comino en polvo
½–1 cucharadita de sal kosher, a gusto
2 cucharadas (30 ml) de jugo de limón fresco
/3 taza + 2 cucharadas (110 ml) de agua fría
1
/3 taza (80 ml) de salsa Tahini
1
1 lata de 15.5 onzas (425 g) de garbanzos,
1 diente de ajo
Rinde aproximadamente 1
Esta sabrosa salsa para mojar es perfecta para servir con pan pita.
⁄3 taza
1
salmón o pollo.
“TAPENADE”
/3 taza):
1
Grasa 5 g • Grasa saturada 1 g • Colesterol 0 mg • Sodio 266 mg
Calorías 51 (82 % de grasa) • Carbohidratos 2g • Proteínas 0 g
Información nutricional por porción (2 cucharadas):
deseada.
usando la función CHOP, hasta obtener la consistencia
uniformemente picados, y luego procesar continuamente,
la función CHOP, hasta que los ingredientes estén
Poner todos los ingredientes en el bol. Pulsar, usando
2 cucharadas de aceite de oliva virgen extra
½ cucharadita de pimienta negra recién molida
1½ cucharadita de mostaza de Dijon
1½ cucharadita de jugo de limón fresco
¼ taza (35 g) de alcaparras, escurridas y lavadas
1½ taza (300 g) de aceitunas verdes deshuesadas
o Niçoises) deshuesadas
1½ taza (300 g) de aceitunas negras (p. ej. Kalamata
3 cucharadas de hojas de perejil fresco
1 diente de ajo
⁄3 taza
1
Rinde aproximadamente 1
También la puede usar para preparar sándwiches o aderezar
Esta crema para untar es deliciosa sobre pan crujiente fresco.
434 mg • Calcio 13 mg • Fibra 5 g
Grasa 10 g • Grasa saturada 1 g • Colesterol 0 mg • Sodio
Calorías 118 (74 % de grasa) • Carbohidratos 7 g • Proteínas 1 g
Información nutricional por porción (
deseada.
usando la función CHOP, hasta obtener la consistencia
y la función GRIND, y luego procesar continuamente,
la sal. Pulsar repetidamente, alternando la función CHOP
2. Raspar el bol. Agregar el aguacate, el jugo de limón y
picar grueso.
el bol. Pulsar, usando la función CHOP, 8 a 10 veces para
1. Poner el ajo, el jalapeño, la cebolleta y el cilantro en
¾ cucharadita de sal kosher
fresco
2 cucharadas (30 ml) de jugo de lima/limón verde
2 aguacates maduros, partidos a la mitad
1 cucharada de cilantro fresco (sin tallos)
1 cebolleta (“green onions”), en trozos
½ jalapeño, sin semillas, en trocitos
1 diente de ajo pequeño
Rinde aproximadamente 1
frente al televisor o servir con quesadillas.
Nuestro guacamole fresco es perfecto para comer con chips
GUACAMOLE CON TROZOS
RECETAS
Page 18

7
* Moler granos y especias puede rayar el bol y la tapa; esto no afectará el rendimiento del aparato. Sin embargo, es buena idea usar el bol original para moler y comprar otro bol para otros usos.
los
de su altura.
para preparar papillas o salsas (agregar líquido si desea). No llenar el bol hasta más de
Cocer los vegetales hasta que estén suaves. Procesar hasta obtener un puré suave
Semillas de cilantro, comino, eneldo, sésamo, amapola, bayas de enebro, etc.
a la vez.
pedacitos de ½ pulgada (1.5 cm).
procesar más de 1 taza (100 g) a la vez.
Tostar primero para maximizar el sabor. Dejar enfriar completamente antes de picar. No
continuamente hasta obtener la textura deseada.
continuamente hasta obtener la consistencia deseada.
GRIND. Pulsar para romper, y luego procesar
obtener a consistencia deseada.
GRIND. Pulsar, y luego procesar continuamente hasta
Vegetales cocidos CHOP. Pulsar 5–10 para picar, y luego procesar
secas
frutas del bosque
Semillas, granos,
Rábano picante CHOP. Pulsar hasta obtener la consistencia deseada. Pelar. Cortar en pedacitos de ½ pulgada (1.5 cm). No procesar más de 4 onzas (115 g)
Puerro CHOP. Pulsar hasta obtener la consistencia deseada. Cortar las raíces y quitar las hojas duras. Lavar bien para eliminar la arena. Cortar en
Pimientos frescos CHOP. Pulsar hasta obtener la consistencia deseada. Sacar el corazón y cortar en pedazos de ½ pulgada (1.5 cm). No procesar demasiado.
Nueces CHOP. Pulsar hasta obtener la consistencia deseada. o
procesar más de 4 onzas (115 g) a la vez.
Pelar y cortar en rodajas de ½ pulgada (1.5 cm). Raspar el bol si es necesario. No
de pimienta pueden rayar el bol y la tapa.*
Revolver con hierbas secas, especias o sal gruesa para preparar adobos. Los granos
Pelar y cortar en pedazos de ¾ pulgada (2 cm) o menos.
Pelar y cortar en pedazos de ¾ pulgada (2 cm) o menos
cocción) en caso de necesidad.
procesar más de 8 onzas (225 g) a la vez. Agregar líquido (agua, caldo o líquido de
Carne cocinada: Usar carne fría o tibia. Cortar en pedazos de ½ pulgada (1.5cm). No
y eliminar el cartílago y la grasa suave. No procesar más de 8 onzas (225 g) a la vez.
Carne cruda: Refrigerar antes de procesar. Cortar en pedazos de ½ pulgada (1.5cm)
continuamente hasta obtener la consistencia deseada.
obtener a consistencia deseada.
deseada.
deseada.
hacer puré (agregar líquido si es necesario).
Jengibre fresco CHOP. Pulsar para romper, y luego procesar
Hierbas frescas CHOP. Pulsar hasta obtener la consistencia deseada. Enjuagar y secar bien. Usar las hojas solamente.
Granos de pimienta GRIND. Pulsar, y luego procesar continuamente hasta
Champiñones/Hongos CHOP. Pulsar hasta obtener la consistencia deseada. Usar champiñones frescos y firmes. Cortar en pedazos de ¾ pulgada (2 cm) o menos.
Chalotes CHOP. Pulsar 5–10 veces, hasta obtener la consistencia
Cebollas CHOP. Pulsar 5–10 veces, hasta obtener la consistencia
Cebolletas/Cebollines CHOP. Pulsar hasta obtener la consistencia deseada. Cortar en pedazos de ¾ pulgada (2 cm).
Carne CHOP. Pulsar para picar o procesar continuamente para
Aceitunas CHOP. Pulsar hasta obtener la consistencia deseada. Usar aceitunas deshuesadas solamente. Escurrir bien.
Alimento Función/Técnica Comentarios
Page 19

de su altura.
6
* Moler granos y especias puede rayar el bol y la tapa; esto no afectará el rendimiento del aparato. Sin embargo, es buena idea usar el bol original para moler y comprar otro bol para otros usos.
azúcar o sal para picar más fino.
cuchillo afilado. Cortar las tiras a la mitad. Agregar una pequeña cantidad de
Quitar la cáscara con un pelador de vegetales. Raspar la parte blanca con un
No procesar más de 12 onzas (340 g) a la vez.
Usar queso a temperatura ambiente. Cortar en pedazos de 2 pulgada (2.5 cm).
procesar más de 4 onzas (115 g) a la vez.
tiempo lo permite, sacar del refrigerador unos 20–30 minutos antes de procesar. No
Quitar la corteza antes de picar. Cortar en pedacitos de ½ pulgada (1.5 cm). Si el
para mezclar.
agregar una cucharadita de mantequilla por rebanada después de rallar el pan; procesar
pedazos de 1 pulgada (2.5 cm) o menos. Para preparar pan rallado con mantequilla,
Utilice pan del día anterior o pan fresco si desea preparar pan rallado suave. Cortar en
taza (50 g) a la vez. Las especias duras pueden rayar el bol y la tapa.*
Romper los palitos de canela en trozos de 1 pulgada (2.5 cm). No procesar más de ¼
ajo, hierbas o chalotes para preparar mantequillas aromatizadas.
No procesar más de ¾ taza (175 g) a la vez. Revolver con ralladura de limón/naranja,
Cortar en pedacitos de ½ pulgada (1.5 cm). Usar queso a temperatura ambiente.
mantequilla derretida por galleta Graham o por 3 galletas regulares.
Para preparar galletas picadas con mantequilla, agregar 1 cucharadita (5 g) de
Usar galletas duras solamente. Cortar en pedazos de 1 pulgada (2.5 cm) o menos.
No llenar el bol hasta más de los
(descongeladas), pulsar y luego procesar continuamente (agregar azúcar si desea).
si desea). Para preparar salsas de frutas del bosque frescas o congeladas
Procesar frutas cocidas para preparar puré de frutas o papillas (agregar líquido
pulgada (1.5 cm).
chocolate durante 3–5 minutos antes de picarlo. Cortar el chocolate en pedazos de ½
No procesar más de 1½ onza (45 g) a la vez. Para resultados óptimos, congelar el
Pelar. Raspar el bol si es necesario.
permite picar, moler o procesar una variedad de alimentos. Véase
™
Elemental
®
continuamente hasta obtener la consistencia deseada.
continuamente.
CHOP. Pulsar para romper, y luego procesar
continuamente hasta obtener a consistencia deseada.
CHOP. Pulsar 10 veces, y luego procesar
continuamente hasta obtener la consistencia deseada.
continuamente hasta obtener la consistencia deseada.
GRIND. Pulsar 5 veces para romper, y luego procesar
usando la función CHOP.
la función GRIND, y luego procesar continuamente,
continuamente hasta obtener la consistencia deseada.
CHOP. Pulsar 5 veces para romper, y luego procesar
continuamente hasta obtener la consistencia deseada.
CHOP. Pulsar para romper, y luego procesar
continuamente hasta obtener la consistencia deseada.
continuamente hasta obtener la consistencia deseada.
Ralladura de limón/naranja CHOP. Pulsar para romper, y luego procesar
etc.)
Queso suave (queso crema,
Asiago, Romano, etc.)
Queso duro (Parmesano,
Pan rallado CHOP. Pulsar para romper, y luego procesar
duras
moscada y otras especias
Palitos de canela, nuez
Mantequilla Pulsar repetidamente, alternando la función CHOP y
macarrones)
Graham, galletas Amaretti o
Galletas picadas (galletas
bosque congeladas
Frutas frescas o frutas del
Chocolate CHOP. Pulsar para romper, y luego procesar
Apio CHOP. Pulsar hasta obtener la consistencia deseada. Cortar en pedacitos de ½ pulgada (1.5 cm).
Anchoa CHOP. Pulsar hasta obtener la consistencia deseada. Escurrir antes de picar. Cortar a la mitad.
Ajo CHOP. Pulsar para picar grueso, y luego procesar
Alimento Función/Técnica Comentarios
las pautas de preparación a continuación. No llene el bol hasta más de los 2/3 de su altura.
Su picadora/moledora de 4 tazas (945 ml) Cuisinart
PAUTAS DE PREPARACIÓN
Page 20

5
alimentos trabados con la espátula.
Retire cuidadosamente la cuchilla. Desaloje los
• Puede que esté procesando demasiados alimentos.
Los alimentos pegan a la cuchilla.
la tapa y desaloje los alimentos con la espátula.
la cuchilla esté completamente inmóvil, y luego abra
• Esto es normal. Apague el aparato. Espere hasta que
bol.
Los alimentos pegan a la tapa y/o a las paredes del
entre dos pulsaciones.
Permita que la cuchilla se detenga completamente
procese los alimentos durante menos tiempo.
demasiado tiempo. Utilice pulsaciones cortas o
pequeños.
más antes de continuar.
el aparato y permita que se enfríe por 15 minutos o
sobrecalentamiento. Si esto ocurriera, desenchufe
protección térmica que apaga el motor en caso de
cerrada.
sobre la base y de que la tapa esté debidamente
enchufado en una toma de corriente.
®
• Se han procesado los ingredientes durante
aguada
La textura de los alimentos está demasiado fina o
• Procese pequeñas cantidades a la vez.
• Corte los alimentos en pedazos uniformes más
Los resultados no son uniformes
• Este aparato está equipado con un dispositivo de
• Cerciórese de presionar solamente un botón a la vez.
• Asegúrese de que el bol esté debidamente instalado
• Cerciórese de que el cable está debidamente
El motor no prende o la cuchilla no gira.
Cuisinart
®
es PARA USO DOMÉSTICO SOLAMENTE.
™
es fácil de almacenar directamente sobre
RESOLUCIÓN DE PROBLEMAS
autorizado.
usuario, debe ser llevada a cabo por personal de servicio
excepto la limpieza y el mantenimiento por parte del
Mantenimiento: toda operación de mantenimiento,
Elemental
La picadora/moledora de 4 tazas (945 ml)
Guarde la cuchilla fuera del alcance de los niños.
Guarde el aparato ensamblado para evitar perder piezas.
debajo de la base para mantener la encimera ordenada.
cuando no la está usando. Guarde el cable en el espacio
la encimera. Cerciórese de mantenerla desconectada
Elemental
™
La picadora/moledora de 4 tazas (945 ml) Cuisinart
clavija en agua ni en ningún otro líquido.
inmediatamente. Nunca sumerja el bloque-motor o la
aparato con un paño ligeramente humedecido. Seque
al sacar la cuchilla del lavavajillas. Limpie el cuerpo del
la espátula en la cesta para cubiertos. Tenga cuidado
bandeja superior del lavavajillas. Coloque la cuchilla y
(boca abajo) y la tapa (lado hondo hacia abajo) en la
y la espátula son aptos para lavavajillas. Coloque el bol
pueda perder de vista. El bol, la tapa del bol, la cuchilla
Procure no dejar la cuchilla en agua jabonosa, donde la
la cuchilla cuidadosamente.
agua jabonosa tibia. Enjuague y seque las piezas. Lave
limpieza. Lave la cuchilla, el bol, la tapa y la espátula en
los residuos de alimentos se sequen, lo que dificulta la
tapa inmediatamente después del uso para evitar que
Le recomendamos que enjuague el bol, la cuchilla y la
ALMACENAJE
LIMPIEZA, MANTENIMIENTO Y
Page 21

4
, agarrándola
®
Nunca haga funcionar el aparato con el bol vacío.
®
bol entre los dos.
ingredientes frescos/líquidos para no tener que lavar el
Consejos: procese los alimentos secos antes de los
AFILADOS; MANIPULE ESTA CON CUIDADO.
NOTA: LOS FILOS DE LA CUCHILLA SON MUY
sigue puesto sobre la base.
con la espátula. También puede vaciar el bol mientras
suavemente hacia arriba. Saque los alimentos del bol
firmemente por la parte de plástico y jalando
retire la cuchilla SmartPower
10. Para vaciar ingredientes espesos:
vaciar el bol.
de bloqueo BladeLock permanecerá en su puesto al
incline el bol para vaciarlo; la cuchilla con sistema
9. Para vaciar los líquidos y las salsas: simplemente
b. Gire el bol en sentido horario y retírelo de la base.
a. Gire la tapa del bol en sentido horario y retírela.
8. Abra la tapa y retire el bol de la base.
de corriente.
INMÓVIL, y luego desconecte el cable de la toma
7. ESPERE HASTA QUE LA CUCHILLA ESTE
aparato.
6. Después de terminar, suelte el botón para apagar el
según su necesidad.
5. Presione el botón CHOP (picar) o GRIND (moler),
4. Cierre la tapa.
lleno.
. Sin
™
Elemental
®
pequeños y uniformes, y de que el bol no esté muy
de que los alimentos estén cortados en pedazos
3. Coloque los ingredientes en el bol. Asegúrese
FILOS DE LA CUCHILLA SON MUY AFILADOS.
DE LA CUCHILLA Y TENGA PRESENTE QUE LOS
que esté bloqueada. NUNCA TOQUE LOS FILOS
Presione firmemente la cuchilla para asegurarse de
sosteniéndola hasta que llegue al fondo del bol.
por el eje e introdúzcala sobre el árbol del motor,
2. Agarre cuidadosamente la cuchilla SmartPower
antihorario para sujetarlo. Instale la cuchilla.
la parte trasera del aparato. Gire el bol en sentido
trasera del bol debe coincidir con la columna en
1. Instale el bol sobre la base. La abertura en la parte
FUNCIONAMIENTO
AFILADOS; MANIPULE ESTA CON CUIDADO.
NOTA: LOS FILOS DE LA CUCHILLA SON MUY
en el bol a menos que el aparato esté desconectado.
desaloje los alimentos con la espátula. No meta la mano
COMPLETAMENTE INMÓVIL, retire la tapa del bol, y
desalojarlos. ESPERE HASTA QUE LA CUCHILLA ESTÉ
bol durante el procesado. Apague el aparato antes de
Puede que los alimentos peguen a las paredes del
Cómo desalojar alimentos pegados
usa ambas aberturas, el líquido no fluirá con facilidad.
vez, para permitir que el aire se escape por la otra. Si
IMPORTANTE: agregue líquido por una abertura a la
,
el líquido por una de las aberturas en la tapa.
™
para preparar mayonesa o aderezo; simplemente vierta
durante el procesado. Por ejemplo, puede agregar aceite
Puede agregar líquido como agua, aceite o saborizante
PARA AGREGAR LÍQUIDO
postventa al: 800-726-0190.
de repuesto, comuníquese con nuestro servicio
comprar otro bol para otros usos. Para pedir accesorios
embargo, es buena idea usar el bol original para moler y
moledora de 4 tazas (945 ml) Cuisinart
tapa. esto no afectará el rendimiento de su picadora/
NOTA: moler granos y especias puede rayar el bol y la
más de 1 minuto.
Nunca haga funcionar el aparato continuamente durante
uniformes.
regresen al fondo del bol; obtendrá resultados más
Elemental
®
/3 de su altura. Utilice las
2
cada 10 segundos para permitir que los alimentos
Si usa el aparato durante más de 10 segundos, pulse
resultados deseados después de varios a 20 segundos.
para moler. Según el tipo de alimentos, obtendrá los
Nota: es preferible mantener oprimido el botón GRIND
chocolate y nueces.
alimentos duros como granos de pimienta, semillas,
Utilice la función GRIND para moler especias y picar
licuarán.
Si pica los alimentos durante demasiado tiempo, se
Averigüe la consistencia de los alimentos a menudo.
suficientes para conseguir los resultados deseados.
CHOP para picar. Por lo general, 2–3 pulsaciones son
Nota: es preferible oprimir repetidamente el botón
puré de vegetales y emulsionar mayonesa y aderezos.
mayoría de los quesos. También es perfecta para hacer
suaves y delicados como hierbas, ajo, cebolla, ajo y la
mezclar. Esta función es ideal para picar alimentos
Utilice la función CHOP para picar, hacer puré y
SELECCIÓN DE LA FUNCIÓN
durante el funcionamiento.
le recomendamos que sostenga el bol con una mano
moledora de 4 tazas (945 ml) Cuisinart
NOTA: debido a la potencia del motor de la picadora/
cantidades indicadas en nuestras recetas como pauta.
llene el bol hasta más de los
inconsistentes y exige demasiado fuerza del motor. No
No sobrellene el bol; esto produce los resultados
CANTIDAD
homogéneos.
“Pautas de preparación”; esto logrará resultados más
¾ pulgada (2 cm), o según se especifica en la sección
uniformes de aproximadamente ½ pulgada (1.5 cm) a
Siempre corte los alimentos grandes en pedazos
TAMAÑO
Preparación
CONSEJOS
Page 22

(
a)
Bl
o
qu
Bol
de
(
a
con asa
(945 ml)
Tapa
con
®
BladeLock
no ilustrad
Bloque-motor
Bol de 4 tazas
sistema de bloqueo
SmartPower
Exclusiva cuchilla
Espátula (no ilustrada)
Espátula
ra
3
le ofrece opciones
™
®
!
™
8. El aparato está listo.
7. Conecte el cable a una toma de corriente.
cerrar.
6. Gire la tapa en sentido antihorario (hacia el asa) para
izquierdo del asa.
5. Coloque la tapa sobre el bol, la pata corta al lado
4. Coloque los ingredientes en el bol.
afilados; MANIPULE ESTA CON CUIDADO.
IMPORTANTE: los filos de la cuchilla son muy
la cuchilla para asegurarse de que esté bloqueada.
hasta que llegue al fondo del bol. Presione firmemente
introdúzcala sobre el árbol del motor, sosteniéndola
3. Agarre CUIDADOSAMENTE la cuchilla por el eje e
2. Gire el bol en sentido antihorario para sujetarlo.
aparato.
debe coincidir con la columna en la parte trasera del
1. Instale el bol sobre la base. La parte trasera del bol
Elemental
®
Elemental
®
ENSAMBLAJE
INSTRUCCIONES DE
prácticamente infinitas. ¡Buen provecho!
(945 ml) Cuisinart
compacta. Su picadora/moledora de 4 tazas
mantequillas aromatizadas – con la misma máquina
duros... Prepare papillas, mayonesa casera y
cebolla, ajo... Muela especias duras, quesos
preparación sin ningún esfuerzo. Pique hierbas,
rápidamente, para llevar a cabo sus tareas de
El potente motor de alta velocidad trabaja
permite vaciar el bol sin tener que retirar la cuchilla.
duros. El exclusivo sistema de bloqueo BladeLock
otro filo recto para moler especias y alimentos
alimentos delicados y licuar alimentos suaves, y
cuenta con un filo increíblemente filoso para picar
La cuchilla autoreversible patentada SmartPower
licuar.
desde picar y moler hasta hacer puré, emulsionar y
cabo una gran variedad de tareas de preparación,
Su nueva picadora/moledora es capaz de llevar a
moledora de 4 tazas (945 ml) Cuisinart
¡Le felicitamos por su compra de la picadora/
INTRODUCCIÓN
función de seguridad.
con un electricista. No intente ir en contra de esta
Si aún no entrara completamente, comuníquese
Si no entrara en la toma de corriente, inviértala.
una sola manera en la toma de corriente polarizada.
Como medida de seguridad, se podrá enchufar de
polarizada (una pata es más ancha que la otra).
El cable de este aparato está dotado de una clavija
AVISO
SOLAMENTE
PARA USO DOMÉSTICO
INSTRUCCIONES
GUARDE ESTAS
Page 23

2
del armario/gabinete cuando cierra.
especialmente si este toca las paredes o la puerta
el aparato conectado presenta un riesgo de incendio,
antes de guardarlo en un armario/gabinete. Dejar
armario/gabinete. Siempre desconecte el aparato
16. No haga funcionar el aparato debajo o dentro de un
del uso.
15. Averigüe que no hay objetos extraños en el bol antes
mecanismo de seguridad de la tapa.
14. Para evitar las heridas, no intente forzar el
completo.
tapa hasta que la cuchilla se haya detenido por
antes de encender el aparato. No intente quitar la
13. Asegúrese de que la tapa esté debidamente cerrada
instalar la cuchilla.
que el bol esté debidamente ensamblado antes de
12. Para reducir el riesgo de heridas, asegúrese de
inmóvil antes de abrir la tapa.
Espere hasta que la cuchilla esté completamente
con sumo cuidado al retirar, instalar o limpiarla.
11. La cuchilla es extremadamente filosa; manipúlela
una espátula, siempre que el aparato esté apagado.
la cuchilla durante el funcionamiento. Se podrá usar
aparato, mantenga las manos y los utensilios lejos de
10. Para reducir el riesgo de herida grave o de daño al
9. No lo utilice en exteriores.
superficies calientes, incluso la cocina/estufa.
encimera o de la mesa, ni que haga contacto con
8. No permita que el cable cuelgue del borde de la
incendio, descarga eléctrica o heridas.
o vendidos por Cuisinart presenta un riesgo de
7. El uso de accesorios/aditamentos no recomendados
su revisión, reparación o ajuste.
servicio autorizado (véase la sección “Garantía”) para
caído o caído al agua; regréselo a un centro de
de que hubiese funcionado mal o que se hubiese
estuviesen dañados, si estuviese dañado, después
6. No utilice este aparato si el cable o la clavija
5. Evite el contacto con las piezas móviles.
agárrelo por la clavija; nunca jale el cable.
Para desconectar el cable de la toma de corriente,
limpiarlo y antes de vaciar el bol.
en uso, antes de instalar/sacar piezas, antes de
4. Siempre desconecte el aparato cuando no está
con ciertas discapacidades.
cuando sea usado por o cerca de niños o personas
3. Supervise el uso de este aparato cuidadosamente
líquido.
coloque el bloque-motor en agua ni en ningún otro
2. Para reducir el riesgo de descarga eléctrica, no
1. Lea todas las instrucciones.
siguientes:
precauciones básicas de seguridad, incluso las
Al usar aparatos eléctricos, siempre debe tomar
a fin de
www.cuisinart.com
IMPORTANTES
MEDIDAS DE SEGURIDAD
Garantía .............................................................10
Recetas ...............................................................8
Pautas de preparación ........................................6
Resolución de problemas ....................................5
Limpieza, mantenimiento y almacenaje ............. 5
Funcionamiento ...................................................4
Consejos .............................................................4
Instrucciones de ensamblaje ...............................3
Introducción ........................................................3
Medidas de seguridad importantes ....................2
ÍNDICE
y sus accesorios
™
con sistema de bloqueo BladeLock,
®
Elemental
®
facilitar la verificación de la fecha de compra original.
registro disponible en
NOTA: Le aconsejamos que llene el formulario de
usar el aparato.
6. Lea cuidadosamente todas las instrucciones antes de
MUY AFILADOS.
NUNCA TOQUE LOS FILOS DE LA CUCHILLA; SON
SOSTENIÉNDOLA POR EL EJE DE PLÁSTICO.
5. ALCE LA CUCHILLA CUIDADOSAMENTE,
Retire la tapa.
4. Gire la tapa del bol en sentido antihorario para abrir.
3. Agarre el aparato por la tapa y retírelo de la caja.
2. Retire el cartón que cubre la tapa del bol.
de cabeza.
Asegúrese de que la caja esté del lado correcto, no
como una mesa o una encimera.
1. Ponga la caja sobre una superficie llana y amplia,
continuación:
cuidadosamente, siguiendo las instrucciones a
Para evitar las heridas, desembale el aparato
PRECAUCIÓN: LA CUCHILLA ES MUY FILOSA.
recetas.
una espátula y un manual de instrucciones/libro de
SmartPower
estándares: la cuchilla picadora/moledora
(945 ml) Cuisinart
Esta caja incluye una picadora/moledora de 4 tazas
DESEMBALAJE
INSTRUCCIONES DE
IMPORTANTES
Page 24

Serie ECH-4
™
Elemental
®
Para su seguridad y para disfrutar plenamente de este producto, siempre lea cuidadosamente las instrucciones antes de usarlo.
Picadora/Moledora de 4 tazas (945 ml) Cuisinart
LIBRO DE RECETAS
MANUAL DE INSTRUCCIONES &
Page 25

Version no.: ECH4 Series IB-14830-ESP
210mm(W) x 148mm(H)
IB Size:
Die Cut:
new
Material: 105gsm gloss art paper for whole book
Coating: gloss varnishing in cover
Colors(Cover): 4C+1C
(Inside): 1C+1C
Date: MAR/09/2017
Tel: 0769-87720314 87886328 Fax: 0769-87720324
E-MAIL: pofatprepress@pofat.com
B C M Y
Co-ordinator:
F
ECH4 Series IB-14830-ESP
Astor You/Annie Liu
(0.0)
Operator: Revise Ver:
100 95 90 85 80 75 70 65 60 55 50 45 40 35 30 25 20 15 10 5
100 95 90 85 80 75 70 65 60 55 50 45 40 35 30 25 20 15 10 5
100
liao
50 45 40 35 30 25 20 15 10 595 90 85 80 75 70 65 60 55
100 95 90 85 80 75 70 65 60 55 50 45 40 35 30 25 20 15 10 5
100 95 90 85 80 75 70 65 60 55 50 45 40 35 30 25 20 15 10 5
 Loading...