

Page 1
Instruction & Recipe Booklet
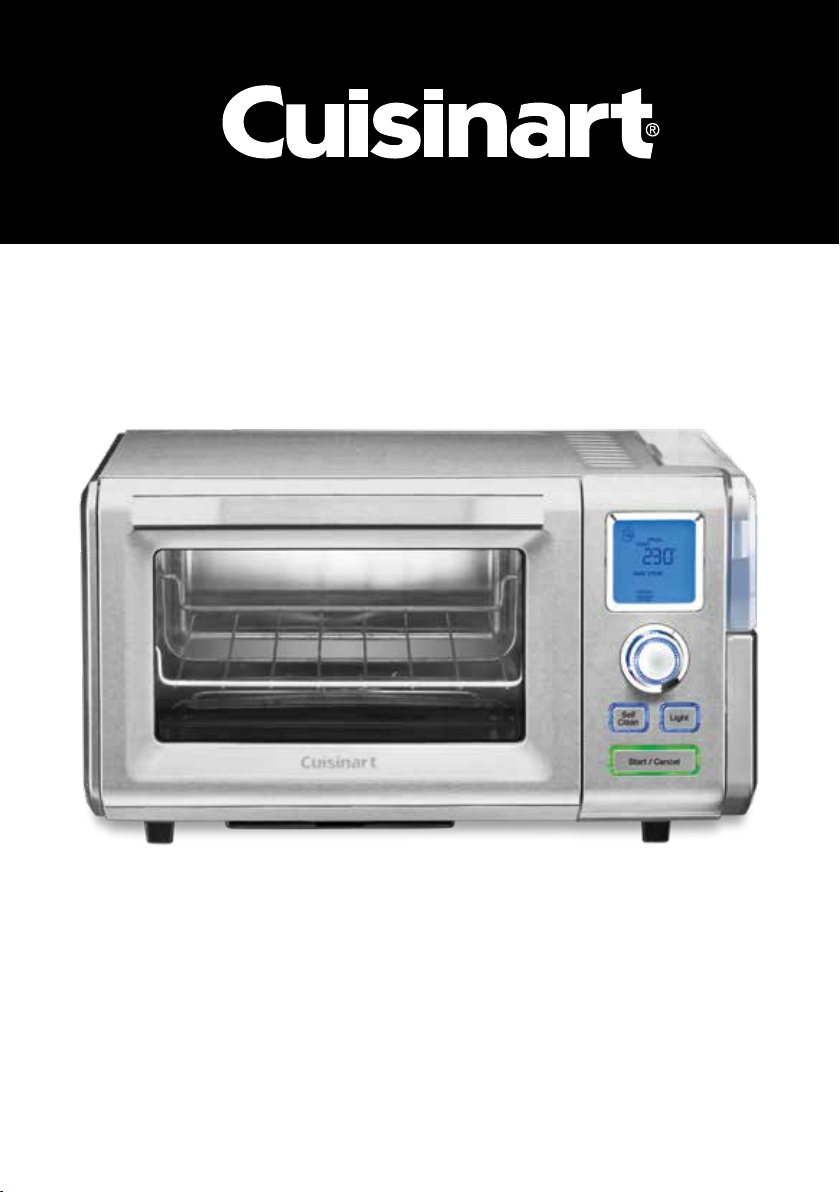
Combo Steam + Convection Oven
CSO-300NXA
For your safety and continued enjoyment of this product, always read the instruction book carefully before using.
Page 2

IMPORTANT
SAFEGUARDS
READ ALL INSTRUCTIONS
BEFORE USING
When using any electrical appliance, especially
when children are present, basic safety
precautions should always be taken to reduce
the risk of fire, electric shock and/or injury,
including the following:
• Never leave unattended while cooking to
avoid possibility of fire.
• This appliance is intended for HOUSEHOLD
USE ONLY and similar applications such as:
- staff kitchen areas in shops, offices & other
working environments;
- farmhouses;
- clients in hotels, motels and other
residential type environments;
- bed and breakfast settings
• This appliance is not intended for use by
persons (including children) with reduced
physical, sensory, or mental capabilities, or
lack experience and knowledge unless, they
have been given instruction concerning use
of the appliance by a person responsible for
their safety.
• To ensure no possible accidental injury
occurs, when infirmed persons (including
children) are near the appliance, they must
be closely supervised.
• Children should always be supervised to
ensure they do not play with the appliance.
• Use only on an appropriate benchtop &
indoors only, sitting away from flammable
materials such as curtains, draperies and
walls of similar nature as a fire may occur if
comes in contact or becomes covered during
operation.
• Do not place on or near a hot gas, electric
burner, or in a heated oven.
• Do not use appliance for other than its
intended use.
• This appliance is under 220V~240V use only.
Check voltage to be sure the voltage
indicated on the nameplate agrees with your
voltage.
• Always attach plug to unit first, then plug
cord to wall outlet. To safely disconnect,
press/turn dial “OFF” to stop cooking cycle
and remove plug from electrical outlet.
• To avoid the possibility of the unit being
accidentally pulled off the working area,
which could result in damage to the unit or
personal injury, do not let the cord hang over
the edge of a table or benchtop.
• To avoid damage to the cord and possible
fire or electrocution hazard, do not let cord
come into contact with any hot surfaces
including a stovetop.
• Do not operate this appliance if it has been
dropped or damaged (including the cord) in
any manner or is not operating correctly.
Return the appliance to the nearest Cuisinart
Repair Centre for examination, repair,
electrical or mechanical adjustment.
• Do not operate this appliance in an appliance
cabinet or under a wall cabinet. When
storing in an appliance cabinet, always
unplug the unit from the electrical outlet. Not
doing so could create a risk of fire, especially
if the unit is in contact with the walls of any
cabinetry or on closing the cabinet door and
touching the unit.
• When in use, avoid contact with any moving
parts.
• Keep hands hair and clothing, as well as
spatulas and other utensils away during
operation to reduce the risk of injury and/or
damage to the appliance.
• Always unplug from the electrical outlet when
not in use before putting on or taking off
parts and before cleaning.
• The use of attachments not recommended
by Cuisinart may be hazardous.
• This appliance is not intended to be operated
by means of an external timer or separate
remote-control system.
• At no time, before or during cooking and
cleaning immerse unit, plug or cord in water,
or any other liquids similarly under running
water too – this is to protect against the
starting of a fire and electric shock that could
induce injury to persons. If the unit, plug or
cord should fall into water or other liquids,
unplug the cord from the electrical output
immediately. DO NOT reach into the water.
• Do not cover crumb tray or any part of the
oven except the baking pan with metal foil –
this will cause overheating of the oven.
• The top of the oven, steam vents and any
other opening should always be clear 15cms
of any other object while in use.
2
Page 3

• The temperature of accessible
• Oversized foods, metal food packages and
• No object should ever be rested on the glass
• Do not place sealed or airtight containers in
• Do not place paper, cardboard, plastic or
• Extreme caution should be exercised when
• Use extreme caution when removing trays,
• Do not clean with metal scouring pads.
surfaces may be high when the
appliance is operating. Surfaces
marked with this symbol will be very hot to
touch during use – only use handles and/or
knobs. DO NOT TOUCH until the unit has
cooled down.
utensils must not be inserted in the oven as
this can create a risk of fire or electric shock.
door. This includes cooking utensils and
baking dishes.
the oven.
similar products in the oven
using containers constructed of materials
other than metal, glass or ceramic in the
oven.
pans, racks or disposing of grease and oils
or when moving the unit itself that may
contain hot oils or grease to avoid burns.
Pieces can break off the pad and touch
electrical parts, involving a risk of electric
shock.
SPECIAL CORDSET
INSTRUCTIONS
A short power supply cord is provided to reduce
the risks resulting from becoming entangled in or
tripping over a longer cord.
Extension cords may be used if care is exercised
in their use.
If an extension cord is used, the marked electrical
rating of the extension cord must be at least as
great as the electrical rating of the appliance, and
the longer cord should be arranged so that it will
not drape over the countertop or tabletop where
it can be tripped over unintentionally or pulled on
by children.
UNPACKING INSTRUCTIONS
1. Place the box on a large, sturdy, flat surface.
Open the box and remove the instruction booklet
2.
and any other literature.
3. Lift the packing materials, oven and
accessories out of the box.
4. Remove all other parts packed in pulp mold
and remove packing materials surrounding
those parts. Be sure to check all packing
materials for all parts listed in the Parts and
Features section on page 4 before discarding.
5. Remove any protective or promotional labels
from your steam oven and other parts.
SAVE THESE
INSTRUCTIONS
BEFORE THE FIRST USE
Before using your Cuisinart® Combo Steam +
Convection Oven for the first time, remove any
dust from shipping by wiping the base, cover and
controls with a damp cloth.
Be sure to thoroughly clean all accessories before
first use. The oven rack, baking pan, grilling rack
and crumb tray are dishwasher safe. Rinse water
reservoir in hot, sudsy water.
®
Before using your Cuisinart
Convection Oven, make sure it is 15cm away
from the wall or from any items on the
countertop. Do not use on heat-sensitive
surfaces.
DO NOT STORE ITEMS ON TOP OF THE OVEN.
IF YOU DO, REMOVE THEM BEFORE YOU
TURN YOUR OVEN ON. THE EXTERIOR WALLS
GET VERY HOT WHEN IN USE.
CONTENTS
Important Safeguards. . . . . . . . . . . . . . . . . . . . .2
Unpacking Instructions. . . . . . . . . . . . . . . . . . . .3
Before the First Use . . . . . . . . . . . . . . . . . . . . . .3
Parts & Features . . . . . . . . . . . . . . . . . . . . . . . .4
Getting to Know Your Control Panel . . . . . . . . .5
Other Control Functions. . . . . . . . . . . . . . . . . . . 5
Cooking Functions . . . . . . . . . . . . . . . . . . . . . . 6
Oven Rack Position Guide . . . . . . . . . . . . . . . . 6
Operating Instructions . . . . . . . . . . . . . . . . . . . 7
Quick Tips Guide . . . . . . . . . . . . . . . . . . . . . . . .8
How to Change Settings, During Cooking . . . . . 9
Cleaning & Maintenance . . . . . . . . . . . . . . . . .10
Decalcification . . . . . . . . . . . . . . . . . . . . . . . . 10
Combo Steam +
3
Page 4
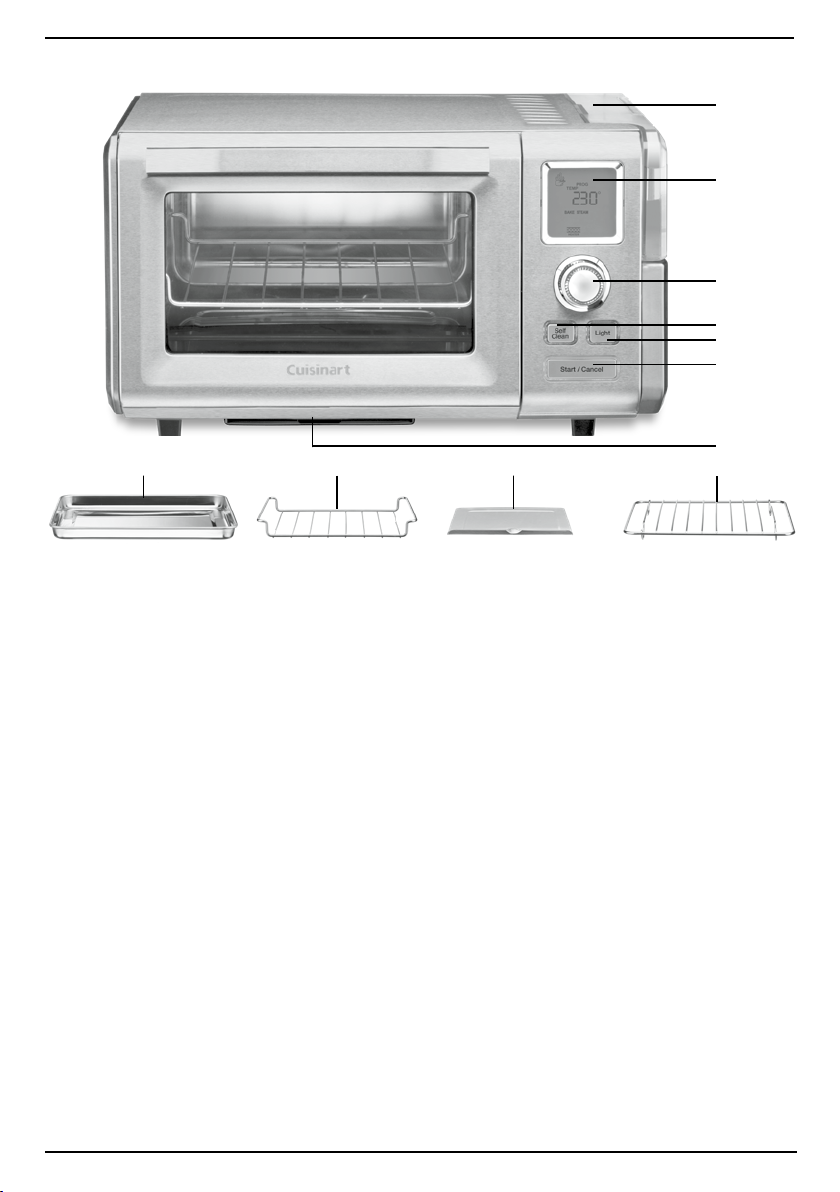
PARTS & FEATURES
F
A
B
D
C
E
G
H
KI
J
A. Blue Backlit LCD Digital Display
Shows cooking function with icon,
temperature and cooking time. Also
displays clock, heater elements in use,
toast shade and fill water indicator.
B. Blue Backlit Program Dial/Button
Select from 9 cooking functions, set the
temperature, cooking time, and the LCD
display clock.
C. Light Button
Illuminates interior to monitor cooking
progress for 2 minutes.
D. Self-Clean Button
For an effortless cleanup.
E. Start/Cancel Button
Starts and stops the function, cooking
time, and temperature selected. Green LED
surrounds the button to indicate the
cooking cycle has begun.
F. Water Reservoir
1.4–litre removable reservoir for all
functions requiring steam, and for oven
steam-cleaning.
G. Drip Tray
The drip tray comes already positioned in
your steam oven and is designed to collect
excess liquid. The drip tray slides out from
the bottom front of the oven.
H. Oven Rack
Four-position rack for multiple cooking
functions: See page 6.
I. Baking Pan
A baking pan is included for use with the
grilling/steaming rack; use alone when
baking or roasting.
J. Grilling/Steaming Rack
A grilling/steaming rack fits into the baking
pan for use when grilling or steaming
foods such as fish and vegetables.
K. Crumb Tray
Sits underneath the heating elements to
catch crumbs. For convenience, we
recommend removing the crumb tray when
using steam functions.
L. Cord Storage (not shown)
Wraps around rear of unit for a clutter-free
countertop.
M. Water Drain (not shown. at the rear of
oven)
Collects excess water from steaming
foods. Always empty the water tank after
use. Before use, ensure cap is tightly
closed before refilling reservoir.
4
Page 5

GETTING TO KNOW YOUR CONTROL PANEL
View functions, time, temperature, toast shade, active
heating elements, “Add Water” alert
.
When plugged in, but not operating, the clock will be
displayed.
PROGRAM BUTTON/DIAL:
LCD DISPLAY:
Dial to select cook function, change preset
time or temperature & choose toast shade.
Push to conrm selection.
SELF-CLEAN BUTTON:
Select for a steam clean with default of 30 minutes at 100°C.
OVEN-LIGHT BUTTON
Select to view while cooking.
START/CANCEL BUTTON
OTHER CONTROL FUNCTIONS
ADD
WATER
TOAST
SHADE
HEATER
CLOCK
When reservor needs to be filled, this symbol will illuminate & continuously beep until you refill the
reservoir or when water has run dry & oven will switch oven off.
After TOAST is selected, scroll from 1 to 7 for light to dark shade.
NB: Always use crumb tray when toasting.
Upper &/or lower elments will illuminate which heating elements are on for individual cooking
functions.
When plugged in, the LCD display will illuminate blue with 12:00 showing. To set clock, press the
Program Dial/Button until time starts flashing. Scroll dial to select AM or PM & press dial to
confirm. Scroll dial to set hour then press to confirm. Proceed to scroll for minutes then press to
set.
5
Page 6

COOKING FUNCTIONS
The large blue-backlit LCD screen is easy to view while clearly displaying the function, time, temperature
and toast shade you have selected. Indicators also let you know if top, bottom or both elements are
heating and when to “Add Water” to the reservoir.
FUNCTION
TOAST
CONVECTION
BAKE
BAKE
STEAM
GRILL 10mins 250°C 150°C - 250°C • Lower • Upper
GRILL
STEAM
STEAM 30mins 100°C 40°C - 100°C • Middle
SUPER
STEAM
BREAD 10mins 180°C 50°C - 230°C • Lower • Middle
WARM 30mins 70°C 50°C - 150°C • Lower • Middle
DEFAULT
TIME
Selection of
Shade
30mins 180°C 50°C - 230°C • Lower • Middle
30mins 180°C 110°C - 230°C • Lower • Middle
10mins 250°C 150°C - 250°C • Lower • Upper
20mins 120°C 50°C - 200°C • Lower • Middle
DEFAULT
TEMP.
Fixed Temp. Fixed Temp. • Middle
TEMP.
RANGE
RACK
POSITION
OVEN RACK POSTION GUIDE
All our recipes give you step-by-step directions and indicate oven rack position for best results.
WARNING: While toasting, DO NOT USE the lower or upper grill rack positions as this may result in a
fire.
Lower Rack Middle Rack
Lower Grill Upper Grill
6
Page 7

OPERATING INSTRUCTIONS
1. Place oven and appropriate accessories on a
1
2. Open the unit using the handle on
2
3. Before cooking, position the oven
3
page 6 for proper positioning. Never operate
the oven without the drip tray in place.
4. WHEN COOKING WITH STEAM
Fill the water reservoir with tap water if using
a function requiring steam. Remove reservoir
by lifting vertically, using the integrated
handle. Invert and remove reservoir cap and
fill. Replace cap and return reservoir so that
it is properly seated in its original position.
NOTE: If oven is not in use for more than 1
month, fill the water reservoir and run oven
on the Steam function at 100°C for 60
minutes before using.
5. Place food in oven and close door.
6. Turn the Program dial to engage the
functions menu.
NOTE: The Program dial/button will be
surrounded by a blue LED light to indicate
the functions menu is engaged.
7. Scroll until the proper cooking function
appears on the screen. Refer to the Cooking
Functions chart on page 6 for function
information.
8. Press the Program button in the center of the
dial to set the function. A beep will sound
and the temperature setting will start
flashing.
9. Use the Program dial to select the desired
temperature. Refer to the Cooking Functions
chart on page 5 for temperature ranges.
10. Press the Program button again to set
temperature. A beep will sound and the
default time will begin flashing.
11. To increase or decrease cooking time, use
the Program dial to scroll to appropriate time
then press the Program button again to set
clean, dry, flat surface. Make sure
oven interior and accessories have
been cleaned and dried thoroughly
before use.
the door, pulling it downward until
it rests comfortably in place.
rack for the cooking function being
used. Refer to the Cooking
Functions Chart on page 6 and
Oven Rack Position Guide on
the time.
12. Press the Start/Cancel button to begin
cooking cycle.
NOTE: A beep will sound and the Start/Cancel
button will be surrounded by a green LED
light to indicate the cooking cycle has begun.
The countdown timer will begin counting
down until cooking cycle is complete.
NOTE: When you choose any of the
functions with the Program button/dial
(including the clean function button) if you do
not then push the Start/Cancel button within
30 seconds the oven will not commence it's
operation. It will return automatically to
displaying the clock time.
NOTE: No preheating needed - food should
be placed in oven before selecting cooking
function and pressing start, as preheat time
is minimal and incorporated into overall
cooking time.
TOAST Function:
1. Slide the crumb tray into position
1
by tilting the crumb tray under
the bottom heating elements
inside the unit, and pushing it to
the rear wall.
NOTE: The crumb tray is properly positioned
if it rests flat on the interior base of the unit.
2. All toasting is done with the oven rack in the
middle rack position. Refer to the Oven Rack
Position Guide on page 6.
3. Turn the Program dial to engage the
functions menu.
4. Scroll until the TOAST function appears on
screen, then press the Program button to set
TOAST. A beep will sound and the toast
shade selector will start flashing.
5. Using the Program dial, select a toast shade
setting between 1 and 7 (1 being lightest, 7
being darkest).
6. Press the Program button to set shade,
which will appear in the display; a beep will
sound and the toast shade selector will no
longer flash.
7. Press the Start/Cancel button to begin
toasting cycle.
NOTE: Default countdown timer for the
shade selected will now appear and begin
counting down.
7
Page 8

QUICK TIPS GUIDE
FUNCTIONS NOTES, TIPS
TOAST
CONVECTION
BAKE
BAKE
STEAM
GRILL &
GRILL STEAM
STEAM
Toast up to 4 average-sized
slices of bread to your
preferred shade.
Convection Bake is best
used for most baked goods
such as cakes, cookies &
pastries.
The combination of baking
& steaming means crispy &
juicy results every time, in
less time, using little to no
oil when roasting with
steam alone.
Even moist heat benefits
many types of foods, from
silky custards to effortless
browned braised & tender
dishes.
For your convenience the
oven has two different rack
positions for Grill & Grill
Steam.
The lower grill position is
best suited for thicker cut
foods like steaks, chops &
larger fish fillets, as well as
top-browning of dishes
such as cheese-style lid
bakes & nachos.
The upper grill position is
ideal for smaller seafood &
thinner fillets like prawns &
schnitzel.
Traditional steaming of
vegetables, seafood & other
protein at 100°C.
Proofing dough at 40°C.
NB: Use provided crumb
tray when making toast.
TIP: For even results,
place bread in centre of
rack.
TIP: Rotating baking pan halfway through cooking time
is recommended for even baking.
TIP: Place less tender cuts of meat like short ribs,
shanks, cubes of shoulder or leg, with minimal or no
liquid directly on the baking tray. Start cooking on Bake
Steam at a medium temperature. After one hour, reduce
the temperature & set cooking time for 2 hours (see rib
recipe on page 13. as a guide). Minimal to no liquid is
used in steam-baked, braised dishes as natural juices
are drawn out from the meat, providing the perfect
braising liquid.
NB: When arranging foods to grill, ensure the food does
not touch the heating elements as they may burn easily.
We recommend leaving the oven door slightly ajar when
grilling.
NB: For all vegetables & protein steaming place food
on the grilling/steaming rack fitted into the baking pan.
TIP: With seafood place a small amount of wine or
other aromatic liquid on the bottom of the baking pan
to infuse flavour.
TIP: Allow dough to complete at least one rise at room
temperature. Shape dough & place on the baking pan
lined with baking paper. Place directly in the oven on
the lower rack position. Set in oven for a minimum of
20 minutes & up to ½ hour on 40°C to proof. Once time
elapses, switch oven to the Bread function then set
temperature & time, indicated by recipe.
8
Page 9

SUPER
STEAM
BREAD
WARM
Super steam uses
additional heating of the
bottom element - the ideal
setting for perfect rice &
vegetables.
The Bread function
simulates a professional
bread oven with an initial
burst of steam followed by
convection baking yields
professional results every
time - crispy crusts &
perfectly softly risen
interiors.
Use the Bread function for
other recipes that use yeast
as the leavening agent.
Keep dishes warm that
have already been cooked
to completion. Food should
be placed in oven before
selecting Warm.
NB: The ratio for white rice is 2 cups to 2¼ cups water.
TIP: Combine rice & water in an ovenproof dish with
cover. Place on rack in the lower position & set to
Super Steam at 150°C. White rice takes about 25 to 30
minutes from start to finish while brown rice takes
about 40 minutes using the same ratio. All rice should
rest about 10 to 15 minutes covered before fluffing &
serving.
TIP: Super steam vegetables on the lower or middle
rack positions at 100°C for at least 20 minutes.
NB: Baking times may be shortened for certain recipes
– keep an eye on the bread in the oven during the last
10 minutes of recipe-specified baking time.
TIP: Prior to baking, use the Steam function set at 40°C
for the final proofing step (see section on Steam for
tips). Set oven temperature for recipe recommended on
the Bread function.
NB: No preheating is needed before selecting this
function. Preheat time is minimal & incorporated into
overall cooking time
TIP: Make delicious & light doughnuts using the Steam
function then bake with the Bread function. Keep in a
airtight container & use the Warm function before
eating.
NB: No preheating is needed before selecting this
function. Preheat time is minimal & incorporated into
overall cooking time.
HOW TO CHANGE SETTINGS DURING COOKING
SETTING TO CHANGE HOW TO CHANGE DURING COOKING
Press and hold the program button until set temperature starts flashing. Press
TIME
(COUNTDOWN)
FUNCTION
TEMPERATURE
Program button again. The countdown timer will begin flashing and the current
remaining time will be displayed. Turn the Program dial to select new time and
press Program button to set that time. The new countdown time will be displayed,
and cooking process will continue.
Press and hold the Program button until set temperature starts flashing. Press
Program button in again. Time will start flashing. Press Program button again.
Current function icon will start flashing. Use Program dial to scroll to desired
function, and press Program button to set.
During the cooking process, the LCD screen will display the countdown timer.
Press and hold the Program button until a beep sounds and the LCD screen
displays the previously selected temperature flashing. Turn the Program dial to
desired temperature. Press Program button to set new temperature. A beep
will sound.
9
Page 10

CLEANING & MAINTENANCE
Always allow the oven to cool completely before
cleaning and always be unplugged from the
power outlet.
• When cleaning the exterior, wipe the exterior
with a clean damp cloth and dry thoroughly.
• To clean the interior walls, you can first loosen
food debris by running the Self-Clean function,
as per the operating instructions for the SelfClean function below.
• To remove excess liquid, slide out the drip tray
and discard contents.
• The oven rack, baking pan, grilling rack, crumb
and drip tray are dishwasher safe. If heavily
soiled, soak in hot sudsy water and use a
sponge to clean it.
• Rinse water reservoir in hot, sudsy water. Dry
well.
• Never wrap the cord around the outside of the
oven. Use the cord storage tabs on the back
of the oven.
• Any other servicing should be performed by an
authorised service representative.
How to Drain your Water Tank
It is recommend to drain the water tank when you
do not plan to use your oven for an extended
period of time, and at the end of each
decalcification process.
1. Remove the external water reservoir from the
oven by lifting it vertically using the handle.
2. Position a tray, short bowl or other container
under the rear drain to catch the water.
3. Turn the cap slowly counterclockwise to ensure
the water drains in your container.
4. Tilt the oven back slightly as necessary to
empty all of the water from the tank.
5. When finished, replace the cap by rotating it
clockwise until secure. Do not overtighten.
Self-Clean Function
When roasting and baking sometimes there can
be splatters and spills within the oven. The
Self-Clean function is encouraged to be used
shortly after cooking so that any food debris does
not dry-out.
As steam is used, the water reservoir needs to be
full before operating. Ensure the power is on
before selecting this function. A default time of 30
minutes will appear in the LCD screen which can
be adjusted between 5 and 120 minutes
depending on the oven’s cleaning needs. Once
selecting the timing, push the Start/Cancel button
to begin the cleaning cycle. If you delay longer
than 30 seconds the clock time will automatically
be displayed. When time that was selected is up,
the cleaning has finished and the oven will turn
off. Proceed to wipe the oven dry with paper
towels. Do not use harsh abrasives or corrosive
products, as this could damage the oven.
DECALCIFICATION
Decalcification refers to the removal of calcium
deposits that form over time. These deposits can
cause damage to the oven. To maintain the
performance of your oven, decalcify every 6
months.
1. Remove the reservoir from the unit to empty it
completely. Set oven to the Steam function at
100°C for 30 minutes. Press the Start/Cancel
button.
2. While the unit is running, add 1 cup of water
and 1 cup of distilled white vinegar to the
reservoir. When the “Add water” alert sounds,
return reservoir to the unit. Wait 30 seconds
and press the Program button to reset the
Steam function at 100°C for 75 minutes. Press
the Start/Cancel button and let the oven run
until the "Add water" alert sounds.
3. Remove the reservoir and rinse out with fresh
clean water. Fill the reservoir halfway with
clean water. Return the reservoir to the unit.
Wait 30 seconds and press the Program
button. Oven will resume from the point at
which the cycle was interrupted. Let the oven
run until the "Add water" alert sounds or the
timer runs out.
©2020 Cuisinart
Suite 101 Ground Floor
18 Rodborough Rd
Frenchs Forest NSW, 2086
Australia
Visit our Website:
www.cuisinart.com.au
Printed in China
IB-13/330C
10
Page 11

NOTES
11
 Loading...