

Page 1

Professional Hand Blender
CSB800U
Page 2
Page 3

Congratulations on your purchase of your new Professional Hand Blender.
For over 30 years Cuisinart’s aim has been to produce the very nest kitchen equipment
so that cooks at home as well as professional chefs have the tools to express their
creativity.
All Cuisinart products are engineered for exceptionally long life, and designed to be
easy to use as well as to give excellent performance day after day. That is why they have
come to be regarded as the dening machines in their eld by chefs across the world.
Whatever you cook, cook it better with Cuisinart.
Page 4

Contents
Product Description . . . . . . . . . . . . . . . . . . . . . . . . . . . . . . . . . . . . . . . . . . . . . . . . . . . . 5
Safety Cautions. . . . . . . . . . . . . . . . . . . . . . . . . . . . . . . . . . . . . . . . . . . . . . . . . . . . . . . . 6
Instructions for Use . . . . . . . . . . . . . . . . . . . . . . . . . . . . . . . . . . . . . . . . . . . . . . . . . . . . 8
A Using the Blender Attachment . . . . . . . . . . . . . . . . . . . . . . . . . . . . . . . . . . . . . . . . . . . . . . 8
B Using the Balloon Whisk Attachment . . . . . . . . . . . . . . . . . . . . . . . . . . . . . . . . . . . . . . . . . 9
C Using the Beaters . . . . . . . . . . . . . . . . . . . . . . . . . . . . . . . . . . . . . . . . . . . . . . . . . . . . . . . . 10
D Using the Chopper Attachment . . . . . . . . . . . . . . . . . . . . . . . . . . . . . . . . . . . . . . . . . . . . . 11
E Setting the Speed . . . . . . . . . . . . . . . . . . . . . . . . . . . . . . . . . . . . . . . . . . . . . . . . . . . . . . . . 13
F Hints and Tips. . . . . . . . . . . . . . . . . . . . . . . . . . . . . . . . . . . . . . . . . . . . . . . . . . . . . . . . . . . 14
Cleaning & Maintenance . . . . . . . . . . . . . . . . . . . . . . . . . . . . . . . . . . . . . . . . . . . . . . . . 15
UK Guarantee . . . . . . . . . . . . . . . . . . . . . . . . . . . . . . . . . . . . . . . . . . . . . . . . . . . . . . . . 16
UK After Sales Service . . . . . . . . . . . . . . . . . . . . . . . . . . . . . . . . . . . . . . . . . . . . . . . . . 17
Recipes . . . . . . . . . . . . . . . . . . . . . . . . . . . . . . . . . . . . . . . . . . . . . . . . . . . . . . . . . . . . . . 18
Page 5
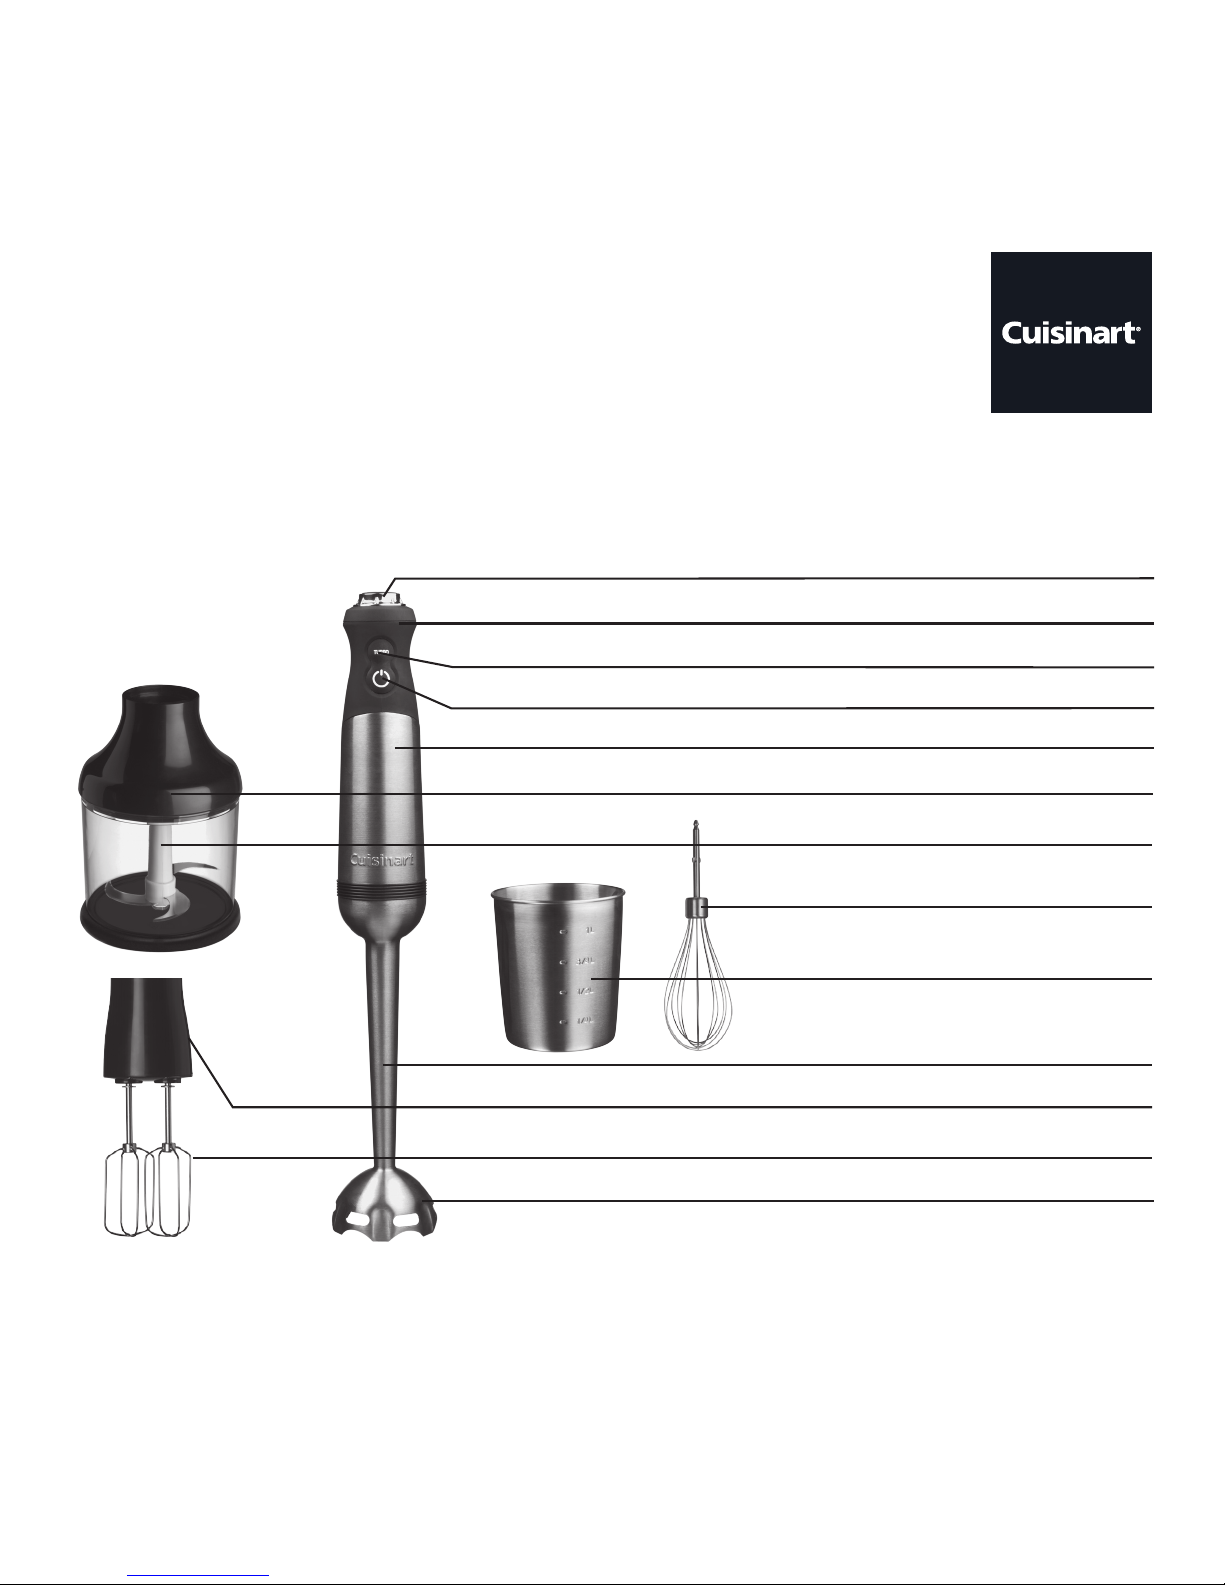
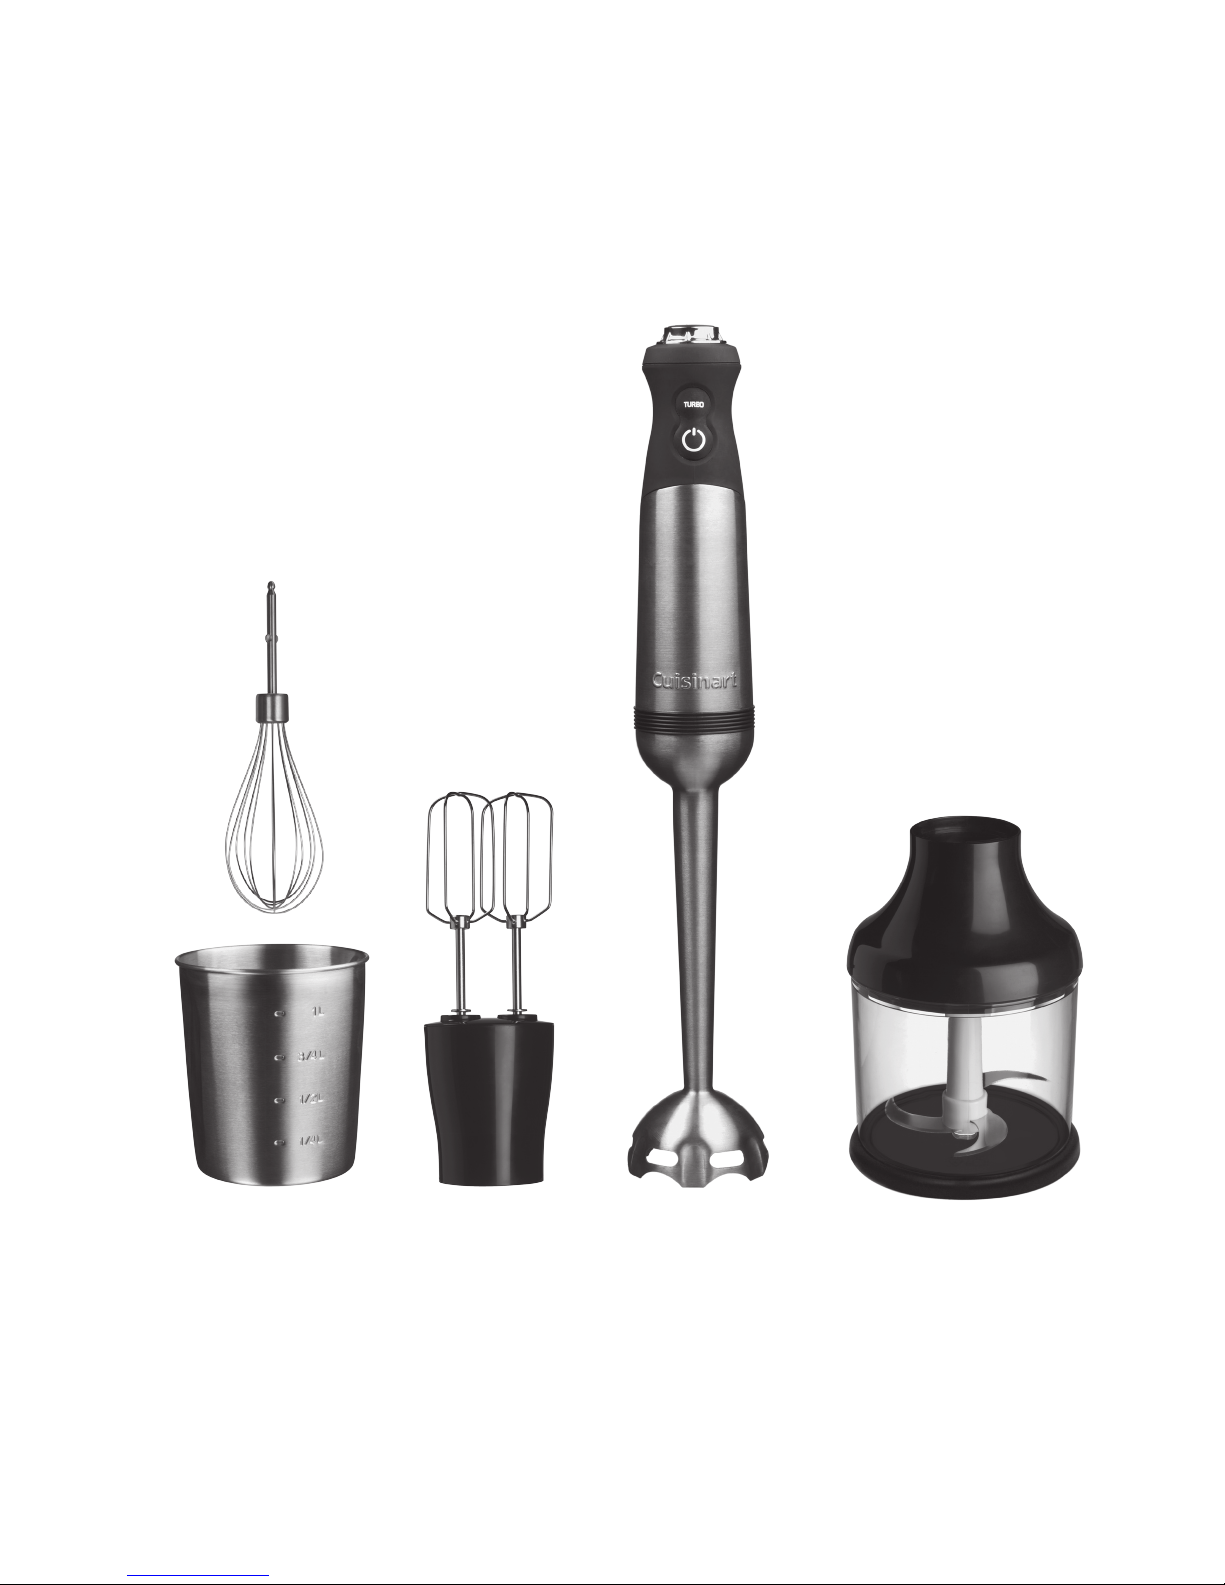
Product Description
Blending Shaft
Motor Housing
Chopping Bowl
Chopping Attachment
Stainless Steel
Whisk Attachment
Adaptor
Beater Attachments
Variable Speed Control Dial
Comfort Grip Handle
Turbo Button
On/Off Button
Protective Anti-splash Guard
Stainless Steel
Measuring Jug
Page 6

Safety Cautions
Carefully read all the instructions before using the appliance and keep in a safe place for future
reference.
Always follow these safety cautions when using this appliance to avoid personal injury or damage to the
appliance. This appliance should be used only as described within this instruction book.
ß To protect against electrical shock, do not put the motor body, cord or electrical plug of this hand blender
in water or other liquid. The detachable blending shaft of this appliance has been designed for immersion
into water or other liquids. Never submerge any other portion of this unit. If hand blender falls into liquid,
unplug the appliance before removing it. Do not reach into the liquid without unplugging the unit rst.
ß This appliance should not be used by adults or children whose lack of experience, product knowledge or
disability might cause a hazard, unless they have been correctly instructed and are adequately supervised.
ß Children should always be supervised to ensure that they do not play with this product.
ß Do not use any accessories or attachments with this appliance other than those recommended by
Cuisinart.
ß Unplug from the mains when not in use and before cleaning or changing parts. Allow to cool before putting
on or taking off parts, and before cleaning appliance.
ß Do not place on or near a hot gas or electric burner, or in a heated oven.
ß Do not let power cord hang over edge of table or counter, or touch hot surfaces.
ß Avoid contact with moving parts.
ß Remove detachable shaft from the blender before washing the blades or shaft.
ß Blades are SHARP. Handle carefully when removing, inserting or cleaning.
ß When mixing liquids, especially hot liquids, use a tall container or make small quantities at a time to reduce
spillage, splashing and possibility of injury from burning.
ß To avoid splashing, do not turn the hand blender on until the blade is beneath the surface of the mixture
and do not pull the hand blender out of the mixture while blender is running. Always start hand blender
on low setting and increase speed until desired power is reached.
ß For indoor use only.
Page 7

ß Do not use outdoors.
ß Make sure the appliance is off, the motor has stopped completely and the appliance is unplugged from the
mains outlet before putting on or taking off attachments and before cleaning.
ß Always inspect the appliance before use for noticeable signs of damage. Do not use if damaged, or if the
appliance has been dropped. In the event of damage, remove the plug from the mains outlet then contact
the Cuisinart Helpline (see “UK After Sales Service” section). No repair should be carried out by the user.
ß Unplug from the mains outlet when not in use and before cleaning. To disconnect, remove the plug from
the mains outlet. Never pull the plug out of the mains outlet by its lead.
ß Always ensure that your hands are dry before removing the plug from the mains outlet.
ß The maximum operating time is 2 minutes.
ß This appliance complies with the basic requirements of Directives 04/108/EEC (Electromagnetic Compatibility)
and 06/95/EEC (Safety of domestic electrical appliances).
WARNING: A cut off plug inserted into a 13 amp outlet is a serious safety (shock) hazard. Ensure the cut
off plug is disposed of safely.
WARNING: Polythene bags over the product or packaging may be dangerous. To avoid danger of suffocation,
keep away from babies and children. These bags are not toys.
The temperature of all surfaces marked with this symbol will be very hot when the appliance is in use.
DO NOT TOUCH these surfaces as possible injury could occur. Allow to cool completely
before handling this appliance.
The symbol on the product or on its packaging indicates that this product may not be treated as
household waste. Instead it should be handed over to an appropriate collection point for the recycling of
electrical and electronic equipment.
By ensuring this product is disposed of correctly, you will help prevent potential negative consequences for
the environment and human health, which could otherwise be caused by inappropriate waste handling of this
product. For more detailed information about the recycling of this product, please contact your local council
ofce or your household waste disposal service.
Page 8
Instructions for Use
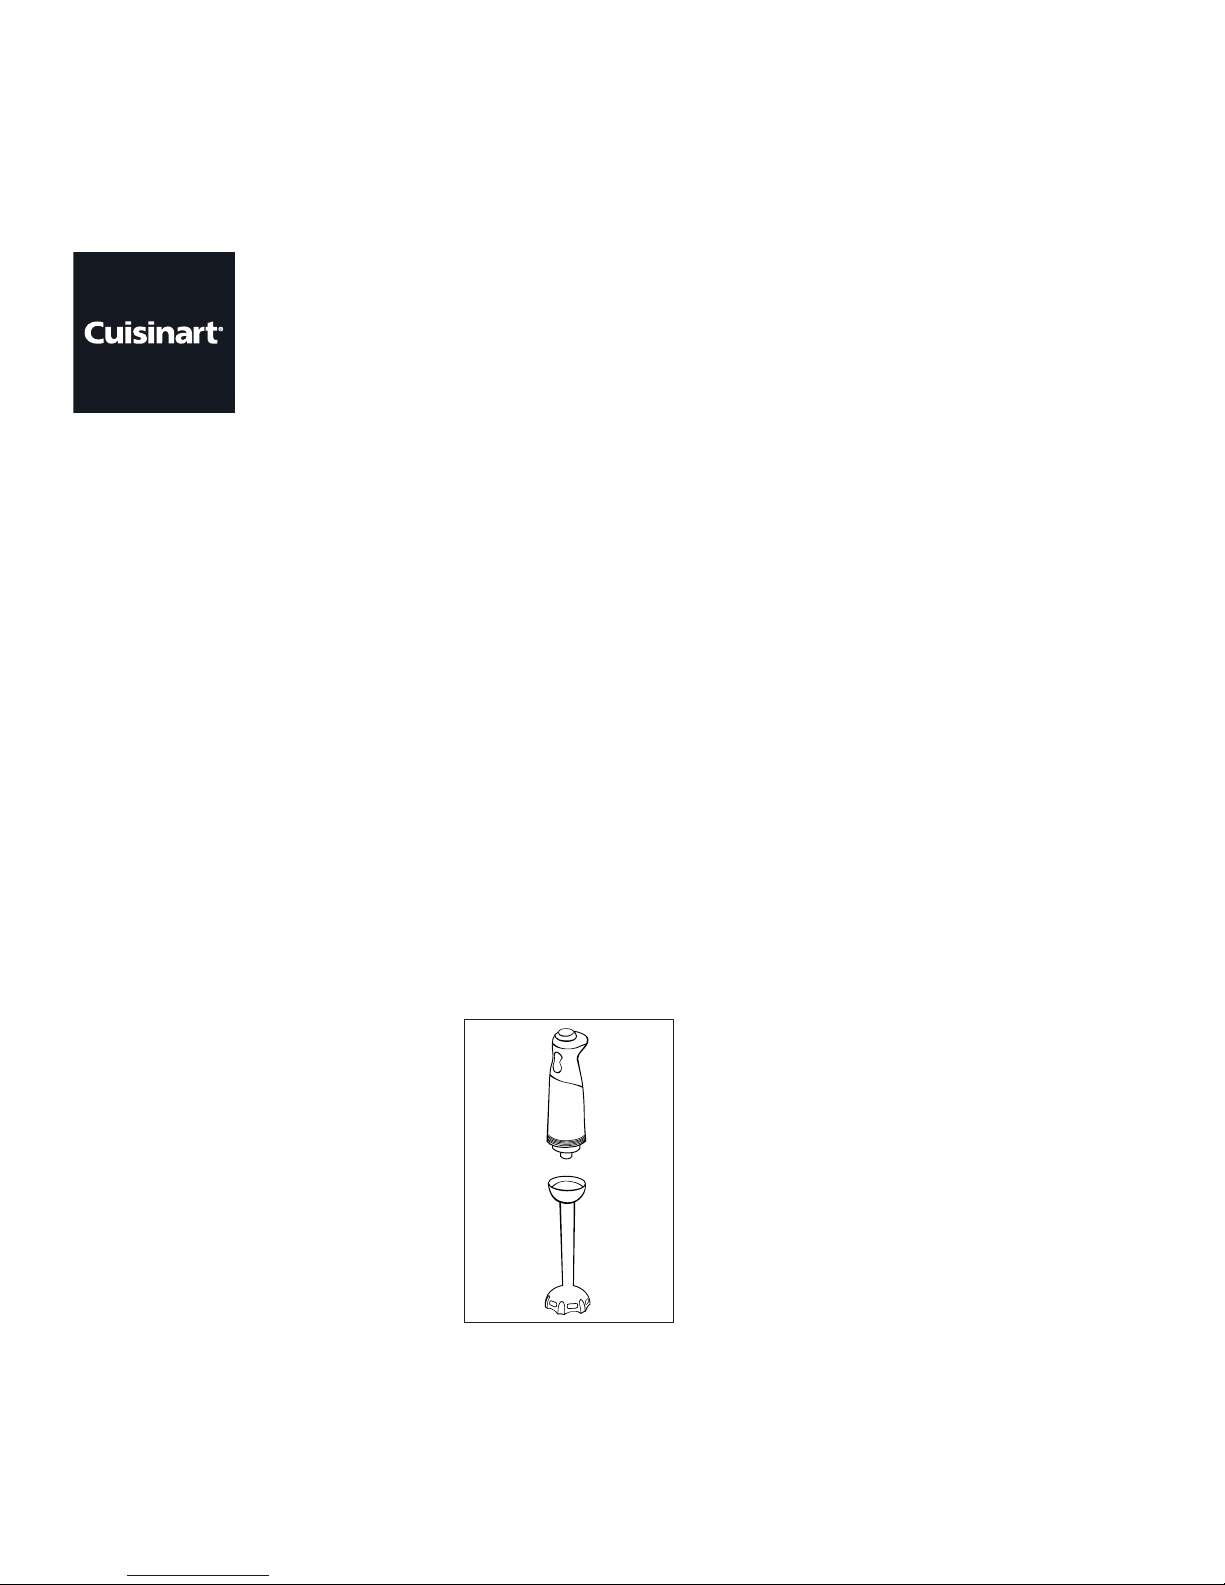
A Using the Blender Attachment
ß To attach the blending shaft, align the motor housing with the blending attachment and turn the blending
attachment anti-clockwise to secure into place.
ß Plug into the mains.
ß Place blending shaft into mixture to be blended, ensuring the anti-splash guard is submerged.
ß With the speed dial set to minimum, press and hold the ON/OFF button.
ß The hand blender will continue to run as long as the button is pressed in. Increase speed during blending
as required.
ß To turn hand blender off, release the ON/OFF button and the motor will stop.
ß Unplug immediately after use.
ß Use the variable speed control dial on top of the motor housing to increase the speed. For an extra
burst of power, press the “Turbo” button on the front of the housing above the ON/OFF button.
ß This blade mixes and stirs while adding only a minimum amount of air to your mixture. A gentle up-and-
down motion is all you need to make the most avourful, full-bodied liquid recipes. To avoid splashing
liquid, never remove the hand blender from the liquid while in operation.
Page 9

B Using the Balloon Whisk Attachment
ß To attach the balloon whisk, align the motor housing with the adaptor and turn the adaptor anti-clockwise
to secure into place.
ß Align the end of the stainless steel whisk attachment with either opening of the adapter.
ß Push end into opening until it locks into position.
ß Plug into the mains.
ß Place the appliance into mixture that will be whisked.
ß With the speed dial set to minimum, press and hold the ON/OFF button. The appliance will continue to
run as long as the switch is pressed in. To turn the appliance off, release the ON/OFF button and the motor
will stop.
ß Use the variable speed control dial on top of the motor housing to increase the speed. For an extra burst
of power, press the “Turbo” button on the front of the housing above the ON/OFF button.
ß Unplug immediately after use.
Page 10

10
C Using the Beaters
ß To attach the beaters, align the motor housing with the adaptor and turn anti-clockwise to secure into place.
ß Insert the beater into the two holes on the adaptor and push until they click into place.
ß Plug cord into the mains.
ß Place the appliance into mixture that will be beaten.
ß With the speed dial set to minimum, press and hold the ON/OFF button. The appliance will continue
to run as long as the switch is pressed in. To turn the appliance off, release the ON/OFF button and the
motor will stop.
ß Use the variable speed control dial on top of the motor housing to increase the speed. For an extra
burst of power, press the “Turbo” button on the front of the housing above the ON/OFF button.
ß Unplug immediately after use.
Page 11
11
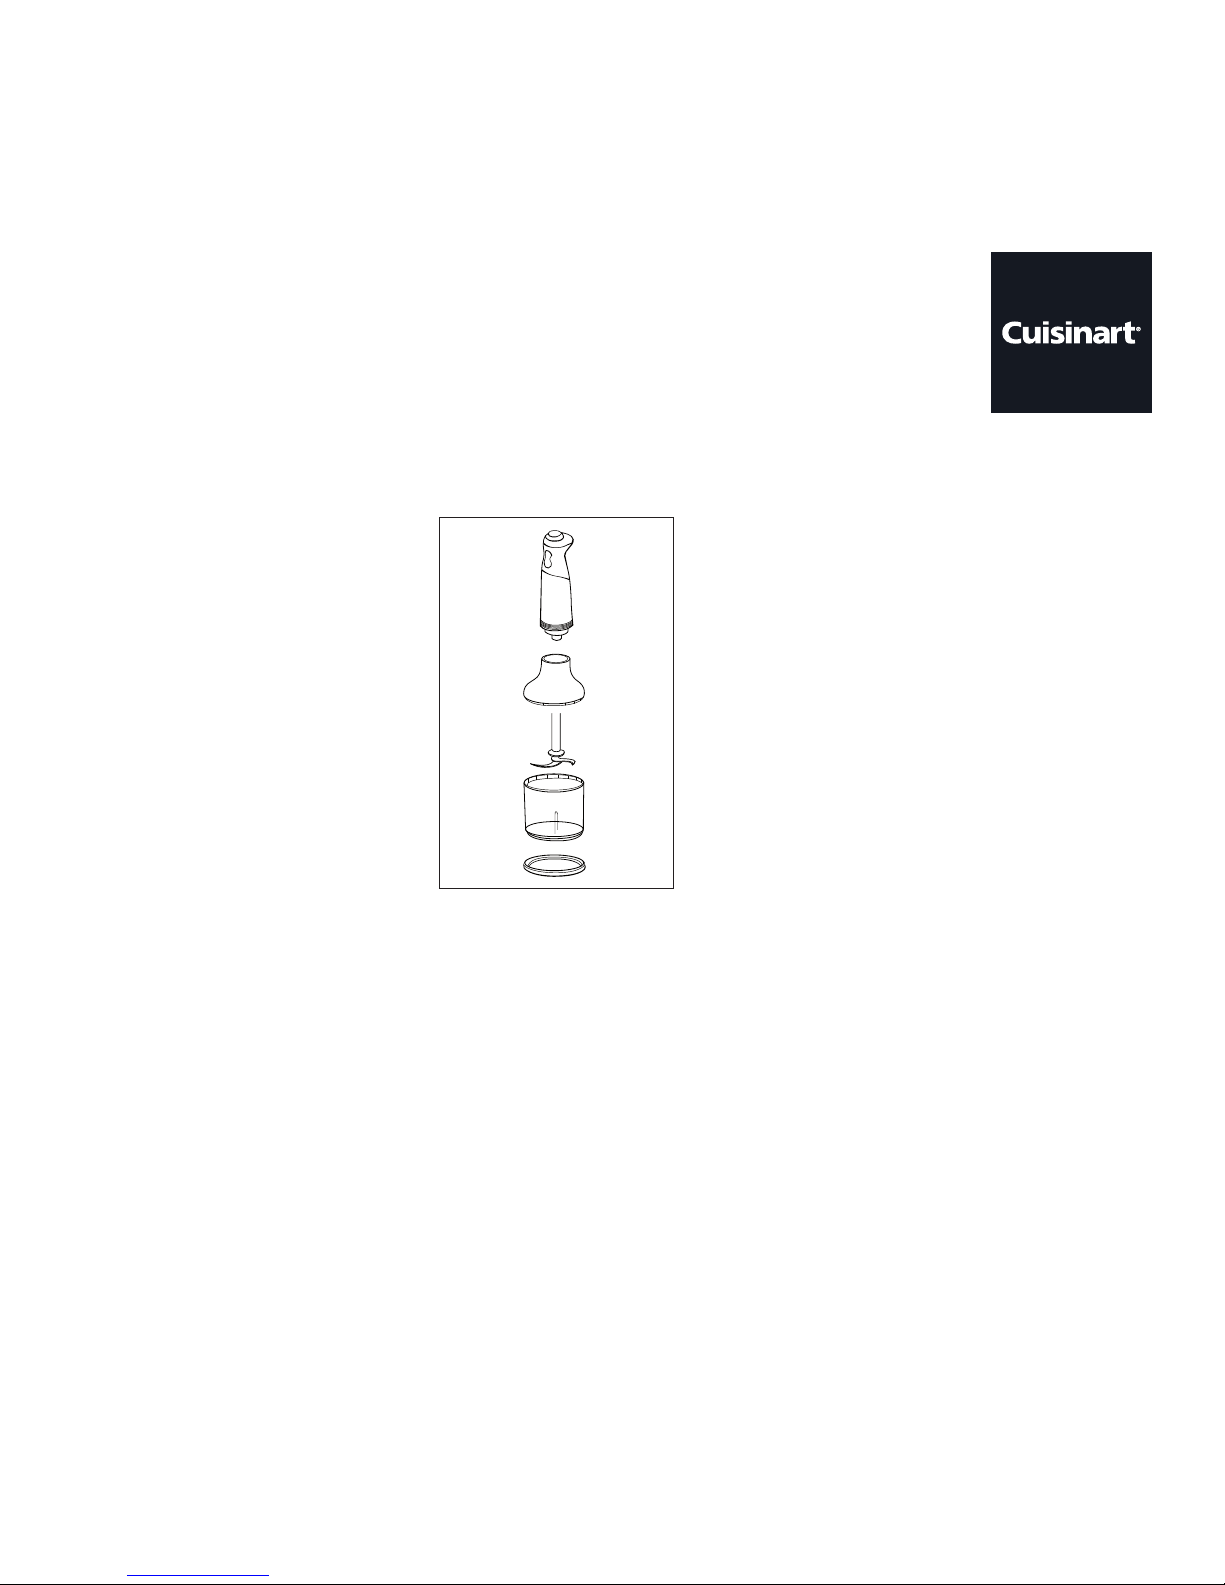
D Using the Chopper Attachment
ß Use the chopper attachment for chopping meat, vegetables and dried fruit.
ß Put the appliance on a stable, at surface. Take the chopper blade and place it into the centre of the
Chopper Bowl.
ß Add ingredients into the Chopper Bowl.
N.B.
Make sure that larger parts of food are cut into small pieces of even size.
ß Put the lid on the Chopper Bowl and push gently until it ts tightly.
ß Attach the Motor Housing to the lid and turn in a clockwise direction until it is securely in place.
ß Plug cord into the mains.
ß Switch on the appliance and hold rmly during the chopping process. When the chopping task is complete,
press the ON/OFF button then inplug from the outlet.
ß Remove the Motor Housing from the Chopper lid.
ß Remove Chopper lid from the Chopper Bowl; then remove Chopper Blade carefully. Refer to Table 1 on
next page for chopping guide.
Page 12

12
Table 1
Food Maximum Quantity Approx. Operation Time (sec) Preparation
Carrots 300g 15-20 Peeled, cut into 2cm pieces.
Apple 300g 15-20 Peeled and cored, cut into 2cm pieces.
Mild Cheddar Cheese 100g 15-20 Cut into 2cm pieces.
Eggs 6 5-10 Hard-boiled and peeled, cut into quarters.
Meats (raw or cooked) 300g 15-20
Cut into 2cm pieces. Raw meat will take slightly
longer to process than cooked meat.
Walnuts 150g 10-15
Use halved or broken. Scrape down sides of
bowl to ensure even processing.
Onions 300g 10-15 Peeled, cut into quarters.
Parsley
Few springs
400g
10
To ensure successful results, it is essential the bowl
and parsley are completely dry. Remove any stalks.
Dough
160g Flour +
160g Water
10
(High Speed)
Page 13

1
E Setting the Speed
ß The variable speed dial at the top of this stick blender can be used to select the desired speed. Always
start blending with a low speed and then turn the dial in a clockwise direction toward the “+” to increase
the speed during processing.
ß Maximum processing speed can be achieved by pressing the “Turbo” button. You may also use the “Turbo”
button for instant, powerful pulses without having to alter the variable speed control dial (see gure 1).
Depending on the attachment being used, we recommend the following speed setting:
Attachment Recommended speed
Blending shaft min - turbo
Chopping bowl min - turbo
whisk min - turbo
Beaters max - turbo
-
+
Maximum speed
Minimum speed
Figure 1
Page 14

1
F Hints & Tips
ß Liquid should come within 2.5cm of where the shaft attaches to the motor housing.
ß When using with a non-stick cooking surface, be careful not to scratch the non-stick coating with the
hand blender.
ß Do not immerse motor housing in water or any other liquid.
ß Cut most solid foods into 2.5cm (1inch) cubes for easy blending.
ß Pour liquid ingredients into the measuring jug rst, unless recipe instructs otherwise.
ß To avoid splashing, do not turn the hand blender on until the blade is beneath the surface of the mixture
and do not pull the hand blender out of the mixture while appliance is running.
ß Do not let hand blender stand in a hot pot on stove while not in use.
ß Do not put fruit stones, bones or other hard material into the blending mixture, as these will damage the blades.
ß Do not overll the measuring jug. The level of mixture will rise when blending and can overow.
ß Adding liquids that are warm, not cold, speeds up blending solids with liquids.
ß For recipes requesting ice, use crushed ice (not whole cubes) for best results.
ß Using a gentle up-and-down motion is the best way to blend and incorporate ingredients uniformly.
ß To whip air into a mixture, always hold the whisk just under the surface.
ß To make a soup creamy in texture, use the hand blender to purée the soup solids to the desired
consistency using a gentle up-and-down motion in the saucepan. You can quickly change your soup into a
thick and creamy blend.
ß The hand blender is also suitable for frothing milk for a cappuccino or latte.
ß Use the hand blender to smooth gravies and sauces.
ß For best results when adding celery to a recipe, use a vegetable peeler to remove tough outer strings
from the celery before blending.
ß Use the whisk attachment for beating heavy cream or egg whites. It may also be used for whisking eggs
for scambled eggs or uffy omelettes.
ß When beating egg whites use a very clean metal or glass bowl, never plastic.
ß When beating heavy cream, if possible and time allows, use a chilled bowl and chill the whisk
attachment. The most suitable bowl for whipping cream is one that is deep with a rounded bottom.
The cream should come out of the refrigerator just before whipping.
ß Use the beaters for mixes such as cakes, biscuit mix, custard and mayonnaise.
ß The hand blender should not be used to prepare dough.
Page 15

1
Cleaning & Maintenance
Always clean the hand blender motor housing and blender shaft thoroughly after each use.
ß Unplug the appliance.
ß Remove the blending attachment from the motor housing. Clean the motor housing with a sponge or
damp cloth. Do not use abrasive cleaners which could scratch the surface. Never immerse the motor
housing in water or any other liquid.
ß To clean the blending attachment and measuring jug, wash by hand in hot water using mild detergent.
Handle blending attachment with care. Sharp blades may cause injury.
ß To clean your whisk and beater attachments simply remove the adaptor from the motor housing, detach
the whisk or beater (which ever you have used) from the adaptor by pulling in a downward motion.
To clean the attachments, wash with warm, soapy water or place in the dishwasher.
ß To clean lid, wipe with clean damp cloth. Do not immerse in liquid.
ß To clean adapter, wipe with clean damp cloth. Do not immerse in liquid.
ß To clean your Chopper Bowl, Chopper Blade, Sieve Cover and Chopper Bowl Base, wash in warm soapy
water or place in the dishwasher.
Page 16

1
UK Guarantee
ß This Cuisinart appliance is guaranteed for domestic consumer use for 5 years.
ß The guarantee covers defects under normal use from date of purchase and ceases to be valid in the event
of alteration or repair by unauthorised persons.
ß If the appliance does not perform satisfactorily due to defects of material or manufacture, it will be
repaired or replaced by the manufacturer (see “UK After Sales Service” section).
ß This guarantee is only valid in the United Kingdom and Eire (includes Channel Islands and The Isle of Man).
ß No responsibility will be accepted for any damage caused in transit.
ß A charge may be made if goods are returned outside the relevant guarantee period or if the product is
returned unnecessarily.
ß The manufacturer reserves the right to amend terms and specications without prior notice.
ß This guarantee in no way affects your statutory rights.
Page 17

1
UK After Sales Service
For further advice on using your Cuisinart Professional Hand Blender and other products in the Cuisinart
range, contact the Cuisinart Customer Care Line on 0870 240 6902 (09:00 to 17:00 hrs Monday to Friday)
or alternatively, email your enquiry to support@cuisinart.co.uk.
In Guarantee
Firstly, please call the Cuisinart Helpline 0870 240 6902.
Return the product to the Cuisinart Service Centre at the following address:
Cuisinart Service Centre
P.O. Box 506
WIGAN
WN1 9AA
Enclose your name and address, together with proof of purchase and details of the fault. Cuisinart will
either repair or replace the product, as appropriate.
Out of Guarantee
Contact the Cuisinart Customer Care Line on 0870 240 6902 (09:00 to 17:00 hrs Monday to Friday) or,
alternatively, email your enquiry to support@cuisinart.co.uk for details of the standard repair or
replacement charge. If you wish to proceed with the repair or replacement, return the product to the
Cuisinart Service Centre at the following address:
Cuisinart Service Centre
P.O. Box 506
WIGAN
WN1 9AA
Enclose your name, address and contact number along with details of the fault.
Page 18

1
Recipes
Smoothies & Drinks
Blueberry Banana Antioxidant Smoothie . . . . . . . . . . . . . . . . . . . . . . . . . . . . . . . . . . . . . . . . . . . . . 19
Strawberry Kiwi Smoothie . . . . . . . . . . . . . . . . . . . . . . . . . . . . . . . . . . . . . . . . . . . . . . . . . . . . . . . . 20
Frozen Coffee Frappé . . . . . . . . . . . . . . . . . . . . . . . . . . . . . . . . . . . . . . . . . . . . . . . . . . . . . . . . . . . 21
Peach Margarita. . . . . . . . . . . . . . . . . . . . . . . . . . . . . . . . . . . . . . . . . . . . . . . . . . . . . . . . . . . . . . . . . 22
Red Raspberry Lemonade . . . . . . . . . . . . . . . . . . . . . . . . . . . . . . . . . . . . . . . . . . . . . . . . . . . 23
Soups
Asparagus Soup . . . . . . . . . . . . . . . . . . . . . . . . . . . . . . . . . . . . . . . . . . . . . . . . . . . . . . . . . . . . . . . . 24
Potato and Roasted Garlic Soup . . . . . . . . . . . . . . . . . . . . . . . . . . . . . . . . . . . . . . . . . . . . . . . . . . . . 25
Sauces & Dressing
Sweet Red Pepper Coulis . . . . . . . . . . . . . . . . . . . . . . . . . . . . . . . . . . . . . . . . . . . . . . . . . . . . . . . . . 26
Rustic Tomato & Roasted Red Pepper Sauce . . . . . . . . . . . . . . . . . . . . . . . . . . . . . . . . . . . . . . . . . . 27
Parsnip & Sweet Potato Purée. . . . . . . . . . . . . . . . . . . . . . . . . . . . . . . . . . . . . . . . . . . . . . . . . . . . . . 28
Mushroom Gravy . . . . . . . . . . . . . . . . . . . . . . . . . . . . . . . . . . . . . . . . . . . . . . . . . . . . . . . . . . . . . . . 29
Easy Creamy Guacamole . . . . . . . . . . . . . . . . . . . . . . . . . . . . . . . . . . . . . . . . . . . . . . . . . . . . . . . . . 30
Basic Vinaigrette . . . . . . . . . . . . . . . . . . . . . . . . . . . . . . . . . . . . . . . . . . . . . . . . . . . . . . . . . . . . . . . . 31
Creamy Parmesan & Roasted Garlic Dressing . . . . . . . . . . . . . . . . . . . . . . . . . . . . . . . . . . . . . . . . . 32
Mayonnaise . . . . . . . . . . . . . . . . . . . . . . . . . . . . . . . . . . . . . . . . . . . . . . . . . . . . . . . . . . . . . . . . . . . . 33
Desserts
Sweet Whipped Cream . . . . . . . . . . . . . . . . . . . . . . . . . . . . . . . . . . . . . . . . . . . . . . . . . . . . . . . . . . . 34
Peanut Cookies . . . . . . . . . . . . . . . . . . . . . . . . . . . . . . . . . . . . . . . . . . . . . . . . . . . . . . . . . . . . . . . . 35
Berry Coulis . . . . . . . . . . . . . . . . . . . . . . . . . . . . . . . . . . . . . . . . . . . . . . . . . . . . . . . . . . . . . . . . . . . 36
Peaches & Cream . . . . . . . . . . . . . . . . . . . . . . . . . . . . . . . . . . . . . . . . . . . . . . . . . . . . . . . . . . . . . . . 37
Page 19

1
Blueberry Banana Antioxidant Smoothie
Serves 2
150g frozen blueberries
1 small banana, sliced
165ml soy milk or fat free milk
14g soy protein powder
1 tsp oil or ax seed oil (if using)
1-2 tsp honey (optional)
ß Place blueberries, banana, soy milk, protein powder, ax seed oil and honey, if using, into the measuring jug.
ß Insert the hand blender, ensuring the protective anti-splash guard is submerged.
ß Blend, using a gentle up-and-down motion until ingredients are combined for approximately 30 seconds.
Page 20

20
Strawberry Kiwi Smoothie
Serves 1
150g frozen strawberries, partly thawed
1 kiwi, peeled, cut into eighths
220ml cup fat free vanilla yogurt
220ml cup fat free milk
1 tbsp honey
ß Place all ingredients into the measuring jug. Insert the hand blender, ensuring the protective anti-splash
guard is submerged.
ß Blend, using a gentle up-and-down motion until ingredients are well combined, approximately 30 seconds.
Page 21

21
Frozen Coffee Frappé
Serves 1
165ml coffee ice cream or ice milk
75ml strongly brewed coffee (may use espresso), chilled
2 tbsp fat free milk
ß Place all ingredients into the measuring jug.
ß Insert the hand blender, ensuring the protective anti-splash guard is submerged.
ß Blend, using an up-and-down motion until ingredients are well combined, approximately 20 to 30 seconds.
ß Tip: For a thicker milkshake, ll measuring jug with coffee ice cream up to the 360ml mark. Add 30ml of
brewed coffee and 2 tbsps of fat free milk. Blend using the same technique as above.
For a Mudslide variation add 1 tbsp each of Irish cream liqueur and Kahlúa®.
Page 22

22
Peach Margarita
Serves 2
150g frozen peaches
220ml citrus juice (orange, lime, lemon in any combination)
75ml tequila
½ tbsp Triple Sec or Grand Marnier®
1-2 tsp granulated sugar
ß Place all ingredients in measuring jug. Insert the hand blender, ensuring the protective anti-splash guard is
submerged.
ß Blend, using an up-and-down motion until ingredients are combined, approximately 30 seconds.
Page 23

2
Red Raspberry Lemonade
Serves 10
300g frozen raspberries (no sugar added), thawed
350g icing sugar
330ml fresh lemon juice (or lime juice for Red Raspberry Limeade)
1½ litres cold water or sparkling water or soda
ß Place the raspberries in the measuring jug. Place the hand blender in the measuring jug, ensuring the
protective anti-splash guard is submerged in the raspberries.
ß Blend, using a gentle up-and-down motion, moving the blender from the bottom to just under the top of
the raspberries, until the raspberries are blended and completely puréed.
ß Press raspberry purée through a ne mesh strainer (chinois) using a wooden spoon or spatula. There will
be approximately 220ml of purée.
ß Place raspberry purée in a large pitcher with the sugar. Insert the hand blender into the mixture, ensuring
the protective anti-splash guard is submerged in the mixture. Blend using a gentle up-and-down motion,
until the sugar is completely dissolved, for approximately 60 seconds.
ß Add the lemon juice and blend again until completely mixed, about 15 seconds.
ß To serve, add chilled water to raspberry-lemon mixture. Serve over ice and garnish with a sprig of fresh
mint, a thin slice of lemon, and some fresh raspberries.
Page 24

2
Asparagus Soup
Serves 5
1 tbsp unsalted butter
110g shallots, peeled and quartered
1-2 cloves garlic, peeled and crushed
1.35kg fresh asparagus, tough ends removed
175g red potato, peeled, cut into 2 ½ cm cubes
110ml dry white wine or vermouth
650ml fat free chicken stock
Pinch salt
Ground pepper
Dried basil
110ml heavy cream (optional)
ß Melt butter in a saucepan over medium low heat. Add shallots and crushed garlic and sauté over medium
low heat for approximately 5 minutes. Do not allow the shallots and garlic to brown.
ß While shallots are cooking, cut the asparagus into ½ cm pieces. When shallots are soft, add asparagus
(reserving the tips for garnish), and potato to saucepan and cook for approximately 6 minutes longer, until
asparagus is bright in colour, then add wine.
ß Raise the heat to bring the wine to the boil. Reduce the wine until a tablespoon remains. Add chicken stock.
ß Bring to the boil and then reduce heat to low. Simmer for approximately 20 minutes until the vegetables
are soft. Insert the hand blender into the saucepan, making sure the protective anti-splash guard is submerged.
ß Blend, using a gentle up-and-down motion until ingredients are well combined, about 30 to 45 seconds.
ß Add salt, pepper and basil. Stir in cream if using.
ß While soup is cooking, bring 2 cups of water to the boil. Add the asparagus tips and cook until just
tender and bright green. Drain and immediately plunge into an ice water bath to stop cooking. Drain and dry
completely.
ß Serve soup hot, garnished with reserved asparagus tips.
Page 25

2
Potato and Roasted Garlic Soup
Serves 8
8-12 cloves garlic cloves, peeled
2 tsp extra virgin olive oil
½ tbsp unsalted butter
1 medium onion (150g), peeled and cut into 2½cm pieces
1 carrot (50g), peeled, cut into 2½cm pieces
1 stick celery (50g), peeled, cut into 2½cm pieces
750ml fat free, chicken or vegetable stock
650ml water
900g potatoes, peeled, cut into 2½cm slices
1 tsp ‘herbes de Provence’
220ml evaporated fat free milk
1 tsp salt
Ground white pepper
ß Preheat oven to 190°C. Place cloves of garlic in the centre of a 27cm square of foil, drizzle with 1 tsp of
the olive oil and toss to coat. Wrap the foil around the garlic and fold or crimp to seal. Roast until garlic
is tender, about 1 hour. Cool slightly before using. (Garlic may be roasted ahead, and will keep in a
re-sealable container for 5 days in the refrigerator).
ß While the garlic is roasting, heat remaining olive oil with butter in a large saucepan over medium heat.
Add the onion, carrot, and celery. Reduce heat to low, cover loosely and cook until vegetables are tender
but not browned, 8 to 10 minutes. Stir in the stock, water, potatoes, ‘herbes de Provence’, and roasted
garlic. Raise heat and bring to the boil. Reduce heat to medium low and simmer, loosely covered, until
potatoes are tender, for approximately 20 minutes. Turn off heat and let stand for 2 to 3 minutes.
ß Insert the hand blender into the saucepan, ensuring the protective guard is submerged. Blend, using an
up-and-down motion, moving the blender slowly throughout the saucepan, until well combined, smooth,
and no visible pieces of vegetables remain, about 1 to 2 minutes.
ß Add light cream, salt and pepper. Insert the hand blender and blend for an additional 15 to 20 seconds.
Serve hot. Garnish with chopped fresh parsley if desired.
Page 26

2
Sweet Red Pepper Coulis
1 tbsp olive oil
1 medium onion, peeled, roughly chopped
6 cloves garlic, peeled and smashed
3 medium peppers (approx 175g each), roughly chopped
Pinch salt
Ground pepper
1 sprig of fresh thyme
55ml dry white wine
55ml chicken stock
ß Heat the olive oil in a medium saucepan over medium-low heat. Add the onion, garlic, red pepper, salt,
pepper and thyme, and stir to coat. Reduce heat to low, cover loosely and cook until vegetables are
softened, but not browned, about 15 to 20 minutes.
ß When vegetables are soft, add wine. Raise the temperature so that the wine comes to the boil. Reduce
the wine, leaving approximately 1 tbsp. Add stock and bring to the boil.
ß Reduce heat to medium-low and simmer for about 10 minutes. Insert the hand blender into the
saucepan, ensuring the protective anti-splash guard is submerged. Blend, using an up-and-down motion
until ingredients are smooth and well combined, approximately 30 to 45 seconds.
Page 27

2
Rustic Tomato & Roasted Red Pepper Sauce
2 tsp extra virgin olive oil
1 onion (160g), peeled and cut into 2cm pieces
1 carrot (25g), peeled and cut into 2cm pieces
1 stick celery, trimmed and cut into 2cm pieces
2 cloves garlic, peeled
1 tsp dried basil
1 roasted pepper, cut into 2½cm pieces
75ml dry white wine (such as vermouth)
2 tbsp tomato paste
2 tins (425g) chopped tomatoes with juices
Pinch salt
Ground black pepper
ß In a small saucepan, heat the olive oil over medium heat. Add the onion, carrot, celery, garlic, and basil.
Cover loosely and cook until the vegetables are softened but not browned, 6 to 8 minutes.
ß Stir in the roasted red pepper, wine, tomato paste, tomatoes, salt and pepper. Bring to the boil, then
reduce heat and simmer for 35 to 40 minutes, loosely covered. Uncover and simmer for 15 to 20
minutes longer to thicken. Turn off heat and let stand 5 minutes.
ß Insert the hand blender into the saucepan, ensuring the protective guard is submerged. Blend, using an
up-and-down motion until ingredients are well combined, about 30 to 60 seconds, until the sauce reaches
desired consistency.
Page 28

2
Parsnip & Sweet Potato Purée
Serves 6
675g parsnips, peeled and cut into 2½cm pieces
225g sweet potato, peeled and cut into 2½cm pieces
1 small onion (75g), peeled and cut into 2½cm pieces
Pinch salt
110ml cream
2 tbsp unsalted butter, cut into 2½cm pieces, room temperature
Ground white pepper
ß Place parsnips, sweet potato, and onion pieces in a small saucepan and cover with approximately 2.5cm high
of water. Add ¼ tsp salt to the water.
ß Bring to the boil over high heat, then reduce heat to medium-high and simmer until vegetables are tender,
about 10 to 15 minutes.
ß When vegetables are tender, remove from heat. Drain and return to saucepan. Add light cream and
butter. Insert the hand blender into the cooked vegetables, making certain the protective anti-splash guard is
submerged in the vegetables.
ß Blend using a gentle up-and-down motion, moving the hand blender through the pan, until ingredients are
well blended, smooth and creamy, approximately 50 to 60 seconds.
ß Season with the remaining salt and the white pepper. Serve hot. If not serving immediately, transfer purée
to a double boiler and keep warm over simmering water.
ß Tips: Change the avour by adding a few cloves of peeled fresh garlic or slices of fresh peeled ginger to the
water when cooking. Make a healthy version by substituting chicken or vegetable stock for the light cream,
and extra virgin olive oil for the butter (do not add fresh ginger to this version).
Page 29

2
Mushroom Gravy
Serves 5
50g dried porcini mushrooms
3 tbsp unsalted butter
1 medium onion, (approx. 130g), sliced
1 clove garlic, peeled and crushed
225g white mushrooms, cleaned and sliced
2½ tbsp plain our
90ml sherry
225g cremini (baby portobello) mushrooms, cleaned, stems removed, and sliced
880ml chicken or vegetable stock
Pinch salt
Pinch dried thyme
ß Place dried porcini mushrooms in a heatproof bowl. Cover with boiling water and let stand for 30
minutes. After 30 minutes, drain mushrooms, strain (through a sieve lined with a coffee lter) and reserve
cooking liquid. Chop the mushrooms and reserve.
ß Place 2 tbsp of the butter in a small sauté pan over medium heat. When butter has melted, add onions
and garlic. Sauté lightly until onions have softened, approximately 8 minutes.
ß Add fresh white mushrooms in 2 batches. Stir mushrooms over medium-high heat until lightly browned,
approximately 6 to 7 minutes. Reduce heat to medium-low and stir in 2 tbsp of the our. Continuously
stir mixture for approximately a minute. Add 60ml sherry and scrape the bottom of the pan clean.
If needed, add 110ml of the stock to scrape anything that remains.
ß Pour mixture out into a bowl to reserve. Wipe out pan and add the remaining tbsp of butter. Sauté the
cremini mushrooms until lightly browned. Stir in chopped porcini. Add remaining ½ tbsp of our and stir for
approximately a minute. Stir in 2 tbsp of sherry, dislodging any avourful brown bits that remain on bottom of pan.
ß Add 110ml of the stock if necessary. Add the reserved cooked mushrooms, salt, thyme, 110ml mushroom
soaking liquid, and remaining stock to the sauté pan. Bring mixture to the boil and then reduce to a
simmer. Simmer for about 20 to 30 minutes.
ß Insert the hand blender into the mixture ensuring the protective anti-splash guard is submerged.
Carefully blend using a circular motion, moving the blender over the surface of the pan and through the
gravy. Serve immediately or store sealed in the fridge for up to 5 days.
Page 30

0
Easy Creamy Guacamole
1 avocado, ripe, peeled, seeded, cut into 3½ cm pieces
2 tbsp fresh lemon or lime juice
½ clove garlic, peeled and crushed
Pinch salt
ß Add all ingredients into the chopper work bowl.
ß With the speed dial set to minimum, use a pulse action for approximately 60 seconds or untill ingredients
are well combined and then hold ON/OFF button continuously for another 60 sections until as smooth as
desired.
ß Serve chilled as a dip with nachos or crudités.
Page 31

1
Basic Vinaigrette
55ml wine vinegar
1 tbsp Dijon mustard
165ml olive oil
Salt and freshly ground pepper to taste
ß Place the mustard, vinegar, seasoning and oil into the work bowl. Lock the lid into place.
ß With the speed dial set to minimum, press and hold the ON/OFF button.
Tip: If the vinegratte is too stick, add 1-2tsp cold water.
Page 32

2
Creamy Parmesan & Roasted Garlic Dressing
35g grated Parmesan cheese
4 cloves roasted garlic
2 tbsp fresh lemon juice
2 tbsp red wine vinegar
1 egg white
1 tbsp Dijon mustard
3 anchovies
1 tsp Worcestershire sauce
Pinch freshly ground pepper
110ml extra virgin olive oil
Dash Tabasco® or other hot sauce (to taste)
ß Place all the ingredients in the measuring jug in the order listed. Insert the hand blender and process for
approximately 40 seconds, until creamy and totally emulsied.
ß Tip: To roast garlic place 12 or more peeled cloves in a double thickness of aluminium foil, toss with a
tbsp of olive oil and fold the foil to seal. Place in a 190°C oven for 30 to 40 minutes, until tender and
browned. If you do not wish to roast the garlic, you may blanch it until tender in water to cover (this may
be done in the microwave if desired).
Page 33

Mayonnaise
2 egg whites
1 tbsp fresh lemon juice
½ tbsp Dijon mustard
220ml vegetable oil
Pinch salt
Pinch ground white pepper
ß Place all ingredients into the measuring jug in the order listed. Insert the hand blender holding blade
against bottom of beaker and process until mixture begins to thicken, approximately 15 to 20 seconds.
ß Continue processing with a gentle up-an-down motion until thick, approximately 20 to 30 seconds longer.
Page 34

Sweet Whipped Cream
300ml thick cream, chilled
2 tbsp granulated sugar
1½ tsp vanilla extract
ß Place the cream, sugar and vanilla into the blending jug.
ß Insert the blender tted with the whisk attachment.
ß Start the blender ensuring the whisk skims the surface of the cream. Whisk until the cream gains some
body. Whipped cream will reach soft peaks between 50-60 seconds.
ß Tip: for cocoa whipped cream, place 300ml thick cream, 3 tbsp granulated sugar, 1 tbsp un-sweetened
cocoa, and 1 tbsp of vanilla into the blending jug and whip as directed above.
Page 35

Peanut Cookies
Makes approximately 50
100g margarine, divided into 2½ cm pieces
100g crunchy peanut butter
100g soft brown sugar
100g caster sugar
2 eggs
275g plain our
½ tsp baking powder
½ tsp bicarbonate of soda
Pinch of salt
Granulated sugar
ß Preheat the oven to 190°C/375°F, Gas Mark 5.
ß Using the beater attachments add the margarine, peanut butter, brown and caster sugar and eggs and mix
together until thoroughly combined.
ß Add the our, baking powder, bicarbonate of soda and salt and mix until a soft dough is formed.
ß Remove the dough from the work bowl and roll small balls, approximately the size of walnuts. Place well
apart on a greased baking tray.
ß Using a fork, press down to form each cookie. Sprinkle the tops with granulated sugar and bake for
approximately 15 minutes or until risen and lightly browned. Cool on a wire rack.
Page 36

Berry Coulis
40g bag of frozen mixed berries, thawed
55g granulated sugar
½ tsp fresh lemon juice
ß Place all ingredients in a medium saucepan. Over medium heat bring mixture to a simmer and cook for
approximately 5 minutes to melt the sugar.
ß Insert the hand blender into the saucepan, ensuring the protective anti-splash guard is submerged. Blend,
using an up-and-down motion until ingredients are well combined, about 30 seconds. Strain the sauce
through a ne mesh strainer and serve.
Page 37

Peaches & Cream
Serves 8
2 tbsp unsalted butter
4 tbsp sugar, divided
450g fresh peaches, peeled, pitted and sliced
1 strip lemon zest (2 x 1cm)
225g mascarpone
1 tbsp vanilla extract
ß In a medium sized saucepan, melt butter and 2 tbsp of the sugar over medium-low heat, stirring until
golden and caramel in colour, approximately 5 to 8 minutes. Add peaches and zest, cover loosely and
cook over low heat until peaches are tender, approximately 15 minutes. Remove and discard zest strip.
ß Insert hand blender, ensuring the protective anti-splash guard is submerged and process using a gentle
up-and-down motion, moving the blender through the pan until smooth, about 1 minute. Transfer to a
bowl, let cool, then cover and chill.
ß Place the mascarpone, remaining sugar and vanilla in a medium bowl. Insert hand blender making sure the
protective anti-splash guard is submerged and process, about 20 seconds. Scrape bowl and process about
1 minute longer. Chill until ready to use.
ß Spoon peach mixture and whipped mascarpone mixture into goblets in alternate layers. Keep chilled until
ready to serve. May be garnished with fresh raspberries, toasted sliced almonds or a mint leaf.
Page 38

Page 39

Page 40

www.cuisinart.co.uk
IB-9/005
 Loading...