

Page 1
INSTRUCTION AND RECIPE
BOOKLET
Smart Stick PLUS® Cordless Rechargeable Hand Blender CSB-78
For your safety and continued enjoyment of this product, always read the instruction book carefully before using.
Page 2

CONTENTS
Important Safeguards......................................................................................2
Features and Benefits .....................................................................................4
Before You Begin ............................................................................................5
Assembly ......................................................................................................... 5
Operation .........................................................................................................8
Tips and Hints .................................................................................................9
Frequent Uses ............................................................................................... 10
Charging & Battery Life ................................................................................. 10
Storage Stand / Wall Brackets ......................................................................11
Cleaning and Maintenance ...........................................................................13
Disposal / Recycling of Batteries .................................................................. 13
Warranty ........................................................................................................ 14
Template for Wall Mount Storage..................................................................14
IMPORTANT SAFEGUARDS
When using an electrical appliance, basic safety precautions
should always be followed, including the following:
1. READ ALL INSTRUCTIONS.
2. To protect against electrical shock, do not put the charger handle or motor
body of this hand blender in water or other liquids. The drive shaft of this
appliance, where blades are interchanged, has been designed for
submersion in water or other liquids. Never submerge any other portion of
this unit. If hand blender falls into liquid, remove immediately. Carefully
remove, clean and dry unit thoroughly before continuing.
3. This appliance should not be used by children. To avoid possible accidental
injury, close supervision is necessary when any appliance is used by or
near children.
4. Do not operate in the presence of explosive and/or flammable fumes.
5. To avoid possibility of personal injury, always detach the charger handle
from the motor body before attaching or removing blades and/or
attachments.
6. Unplug charger handle from outlet when not in use, before putting on
or taking off parts and before cleaning.
7. Avoid contact with moving parts. Keep hands, hair, clothing, as well as
spatulas and other utensils away from attachments and mixing container
during operation to reduce risk of injury to persons, and/or damage to the
appliance. A spatula may be used, but must be used only when the unit is
not operating.
8. Remove detachable shaft from the blender before washing the blades or
shaft.
9. Blades and accessory attachments are SHARP. Handle carefully.
10. When mixing liquids, use a tall container or make small quantities at a time
to reduce spillage and possibility of injury.
2
Page 3

11. Charger handle should be plugged into an electrical outlet away from sink
or hot surfaces.
12. Do not use an extension cord. Plug charger handle directly into an
electrical outlet.
13. Do not attempt to use this charger handle with any other product. Also, do
not attempt to charge the batteries with any other charger.
14. Do not use appliance for other than intended use.
15. Do not charge batteries with handle charger plugged into an outdoor outlet.
16. Do not operate any appliance with a damaged cord or plug, or after the
appliance has malfunctioned or has been dropped or damaged in any way,
or is not operating properly. Return the appliance to the nearest Cuisinart
Repair Center for examination, repair, or mechanical or electrical
adjustment.
17. The use of attachments or accessories not recommended by Cuisinart may
cause fire, electrical shock or risk of injury.
18. Make sure the appliance is off and the motor has stopped completely
before putting on or taking off attachments, and before cleaning.
19. This appliance is intended for household use only and not for commercial
or industrial use.
20. Do not use this hand blender for other than intended use of preparing
foods and beverages.
21. To avoid splattering, use care when stirring hot liquids.
22. To reduce the risk of fire or electric shock, do not operate any heating
appliance beneath the mounted charging handle unit.
23. Do not mount the storage bracket/unit over or near any portion of a heating
or cooking appliance, or a sink or wash basin.
24. Unplug the charger handle from the outlet before attempting any routine
cleaning of the charger handle.
25. Do not operate a damaged charger. Have damaged charger replaced
immediately.
26. Do not incinerate the hand blender, even if it is severely damaged.
The batteries can explode in a fire.
27. This product contains nickel cadmium batteries which
must be recycled at the end of the life of the hand blender and disposed of
properly. (See Disposal/Recycling of Batteries, page 12.) Do not incinerate
or compost batteries, as they will explode at high temperatures.
28. Leaks from battery cells can occur under extreme conditions. If the liquid,
which is a 20-35% solution of potassium hydroxide, gets on the skin, (1)
wash quickly with soap and water or (2) neutralize with a mild acid such as
lemon juice or vinegar. If the liquid gets into eyes, flush them immediately
with clean water for a minimum of 10 minutes. Seek medical attention.
29. To reduce the risk of injury, never place chopper/grinder attachment cutting
blade on base without first putting prep bowl properly in place.
30. Be certain the chopper/grinder attachment cover is securely locked in
place before operating appliance. Do not attempt to remove cover until
blade has stopped rotating.
31. Check prep bowl for presence of foreign objects before using.
32. Do not operate your appliance in an appliance garage or under a wall
cabinet. When storing in an appliance garage always unplug the unit
from the electrical outlet. Not doing so could create a risk of fire,
especially if the appliance touches the walls of the garage or the door
touches the unit as it closes.
SAVE THESE INSTRUCTIONS
FOR HOUSEHOLD USE ONLY
3
Page 4
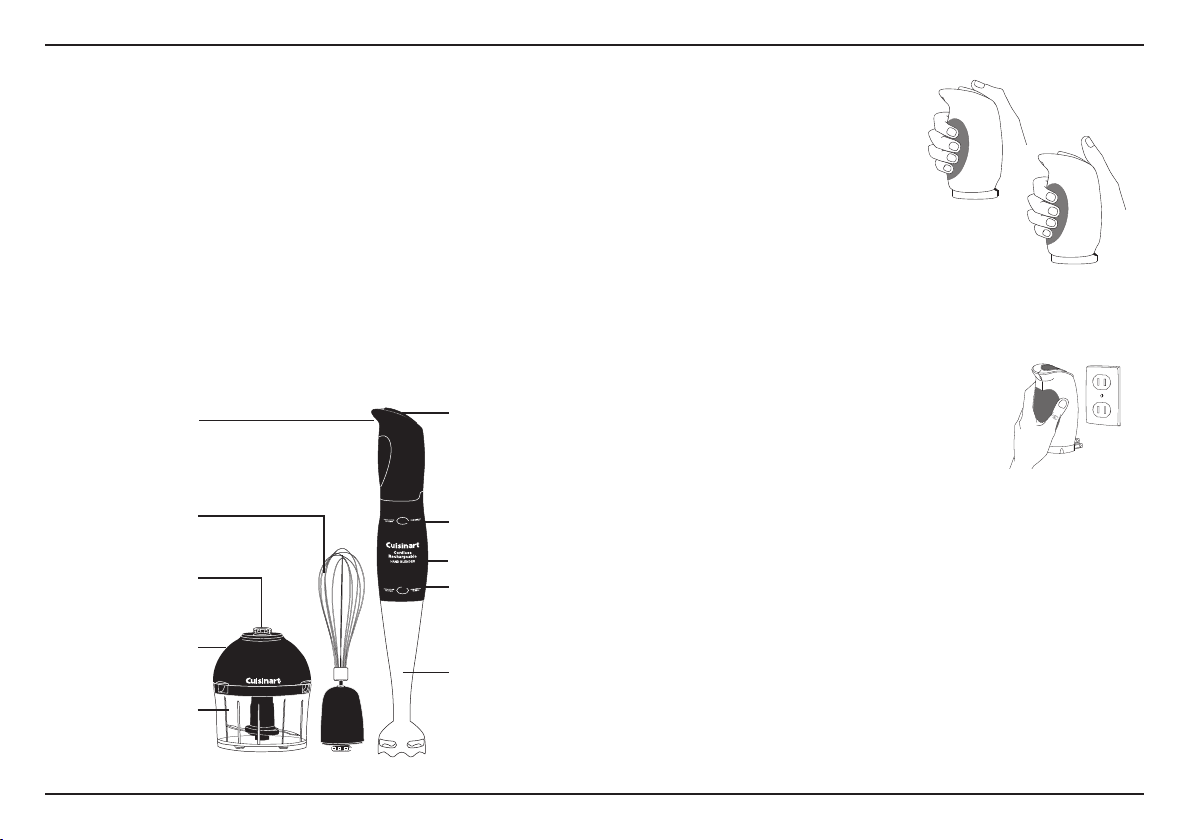
FEATURES AND BENEFITS
1. Cordless Operation
No cord! Operates on battery power.
2. Three Stages Snap Together Easily
Disassemble for compact storage, either separately
or together in storage stand.
a. Charger Handle
b. Motor Body
c. Detachable Shaft
Batteries are in the handle. Release button allows this combination handle and charger to detach from main motor body. Plug
extends from handle to plug charger into wall socket.
Contains powerful DC motor.
Release button allows shaft to detach from motor body for easy
cleaning in dishwasher or under
running water from faucet.
Charging Light
Whisk
Attachment
Chopper/
Grinder
Attachment
21 oz.
Work Bowl
Stainless Steel
Chopping
Blade
On/Off (Power)
Button
Handle Release
Button
Motor Body
Shaft Release
Button
Detachable
Shaft
3. Easy-to-Recharge Batteries
Runs up to 20 minutes under normal
use (depending on specific uses) and
regains over half of full power within 3
hours. Full charge in 12 to 24 hours.
Normal time required for a blending
task is 10 seconds to 2 minutes.
4. Maximum Comfort Handle
The hand blender handle and power
button are designed around the way
you actually hold a stirring utensil. The
shape of this handle gives you comfortable control and easy access to
the power button. Rubberized handle gives better grip, especially when
your hands are wet.
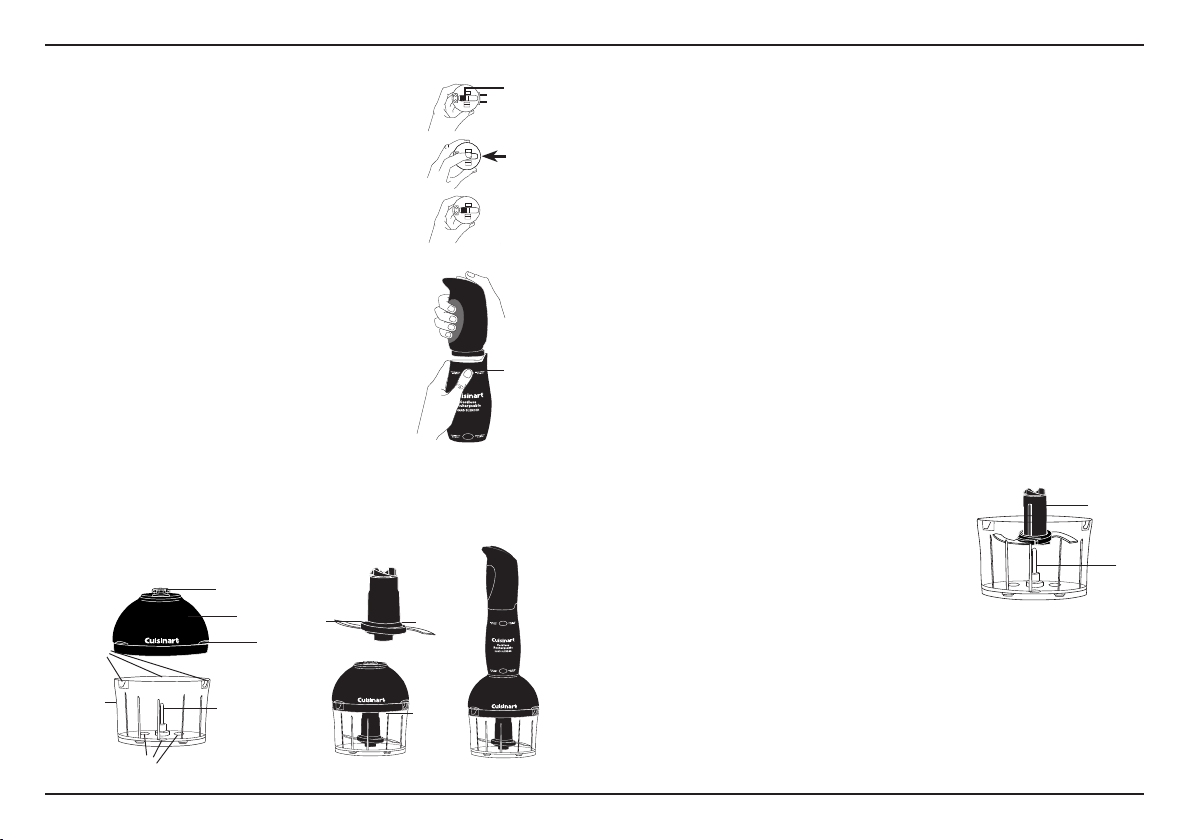
5. One-Step ON/OFF (Power) Button
Press and hold the rubberized power button to
operate blender. Release button to stop motor.
6. Plug-In Charger with Charging Light
Plugs into wall outlet to recharge the batteries.
Charging light is on to let you know the outlet is
in operation and batteries are recharging. Light
remains on when charging is completed.
Detach charger handle from motor body with release button,
slide wall plug out of housing, and plug directly into wall outlet.
No cords necessary.
7. Detachable Shaft
Easy to use, easy to clean and easy to store. Detach from motor body
by pressing release button.
8. Blending Attachment with Stainless Steel Blade and Blade Guard
This attachment easily snaps into the motor body housing. The stainless blade is partially covered by a stainless housing that keeps
splashing to a minimum.
4
Page 5
9. Whisk Attachment
Whisk attachment snaps into the motor
body housing. This attachment is great
for whipping cream, egg whites and
other delectable treats.
10. Chopper/Grinder Attachment
Chop, mince and grind with the
®
Cuisinart
Chopper/grinder attaches to the blender motor body in place of the blender
shaft or whisk attachment.
11. Long Running Time
The Cordless Rechargeable Hand Blender runs for 10 to 20
minutes during normal use with a full charge. Maximum
usage time for most applications is only 1 to 2 minutes!
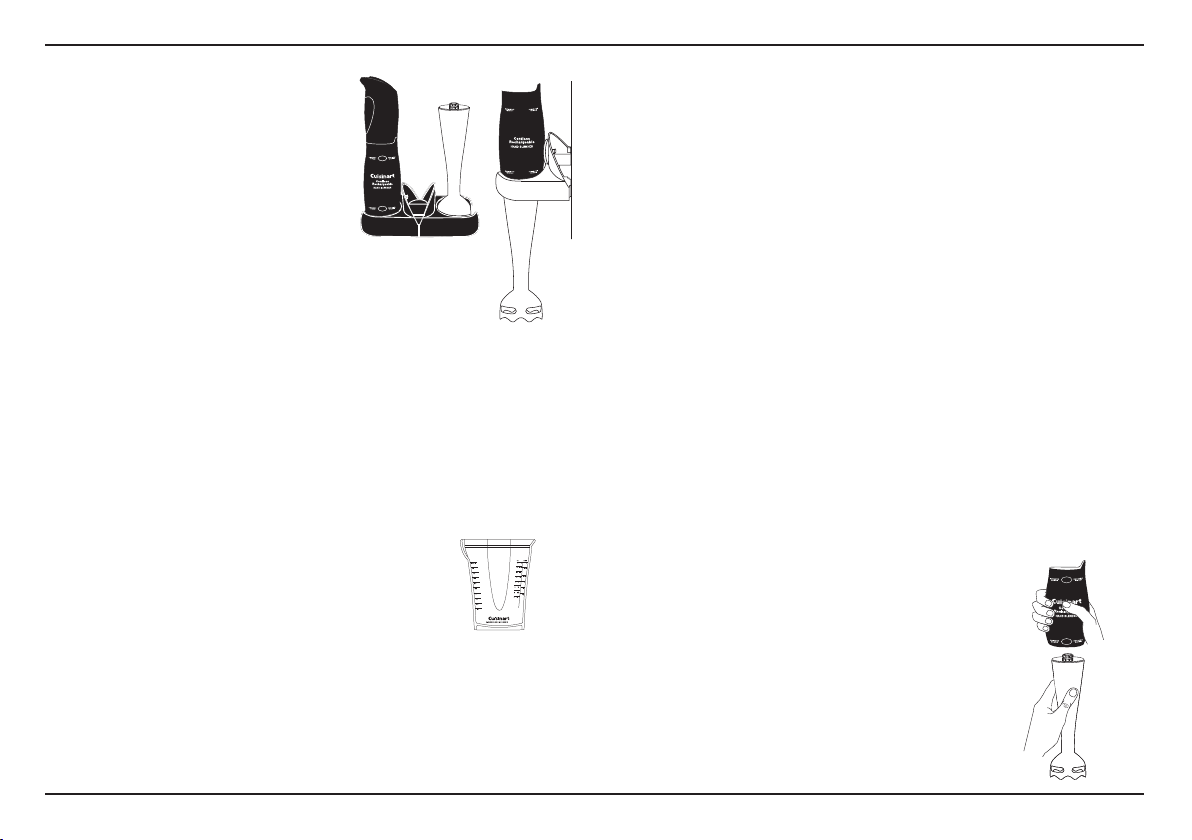
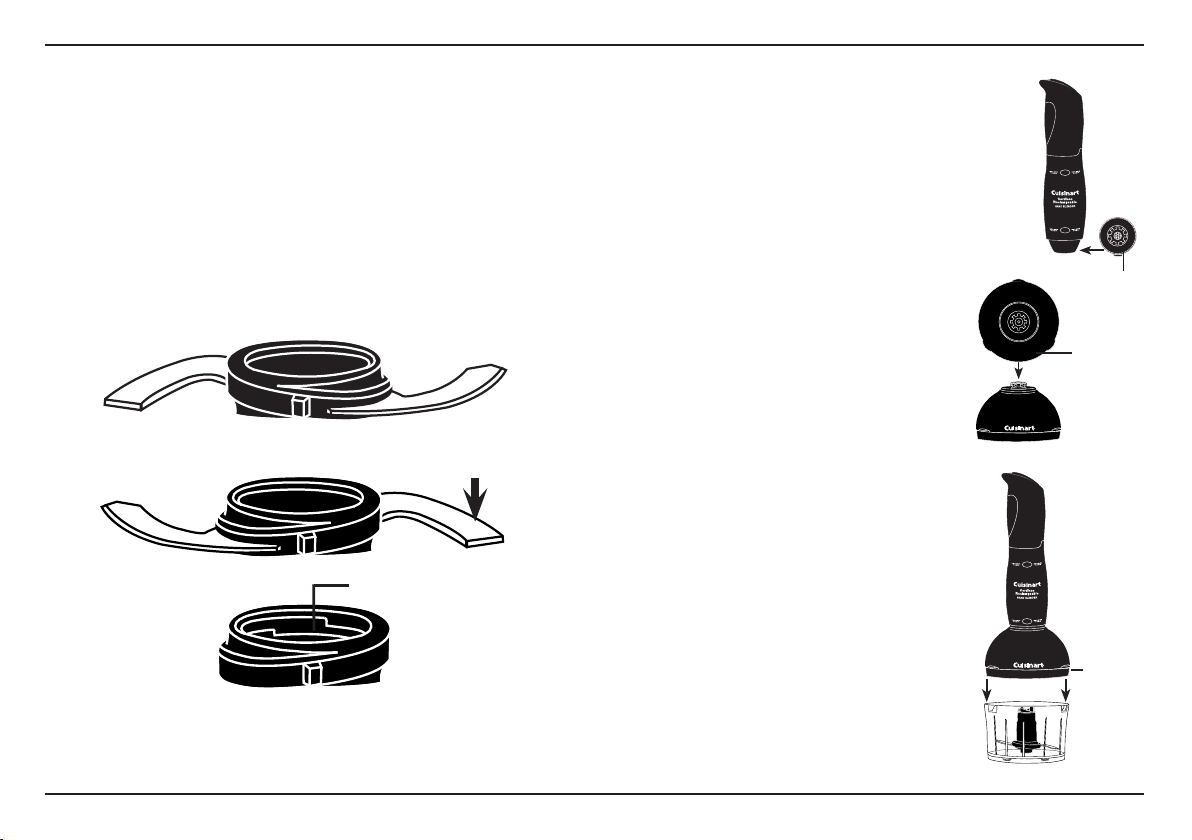
12. Convenient Storage
Storage stand is made of two pieces. One side holds the detachable shaft.
The other holds the motor body, either with or without the charger handle
attached. The 2 storage pieces snap together for compact countertop storage of the motor body and shaft. Detach and mount one section to the wall
and hang the entire appliance from the wall as shown. The appliance can
also be hung from the wall with charger handle detached. Use anchor and
screws included with this appliance.
13. Easy to Clean
The Cuisinart
Rechargeable Hand Blender has a smooth
surface that wipes clean instantly and easily.
14. Mixing/Measuring Beaker
See-through mixing beaker is marked in liters
and cups for convenient measuring. Use for
drinks, shakes, salad dressings, etc. Designed
for easy gripping and drip-free pouring.
15. Detachable Blending Blade
Blade can be detached from shaft for cleaning.
Blade can also be cleaned without detaching.
16.
BPA-Free (not shown)
All materials that come in contact with food are BPA-free.
chopper/grinder attachment.
®
Smart Stick PLUS® Cordless
BEFORE YOU BEGIN
Place the package containing the Cuisinart® Smart Stick PLUS® Cordless
Rechargeable Hand Blender on a sturdy surface. Unpack the hand blender from
its box by removing the upper protective insert. Carefully remove each piece
from the box.
Note: The blending blade is extremely sharp. Use caution when removing
and unpacking the storage stand. The blending blade is stored in the
storage stand.
Remove all support materials from the box and replace the upper insert. Save
packaging for possible repacking of the unit.
Before using the Cuisinart® Smart Stick PLUS® Cordless Rechargeable Hand
Blender for the first time, we recommend that you wipe the unit with a clean,
damp cloth to remove any dirt or dust. Dry it thoroughly with a soft, absorbent
cloth. Handle carefully. Wash the blending blade, whipping attachment, mixing
beaker and detachable shaft by hand or in the dishwasher (upper rack only). Dry
thoroughly before use. Read all instructions completely for detailed operating
procedures.
The batteries in your Cuisinart® Smart Stick PLUS® Cordless Rechargeable
Hand Blender have not been charged. Before the first use of this appliance,
the batteries must be charged for 24 hours. See Charging and Battery Life
on page 10.
ASSEMBLY
Note: To avoid possibility of personal injury, always detach the charger
handle from the motor body before attaching or removing attachments.
1. Attach/detach blender shaft to motor body.
a. Align blender shaft with motor body as shown in
illustration. Push together until you feel and hear
a click.
b. To detach: Press the release button and pull the
shaft away from the body. Do not grasp shaft
around the blade or whipping attachment.
1.
5
Page 6
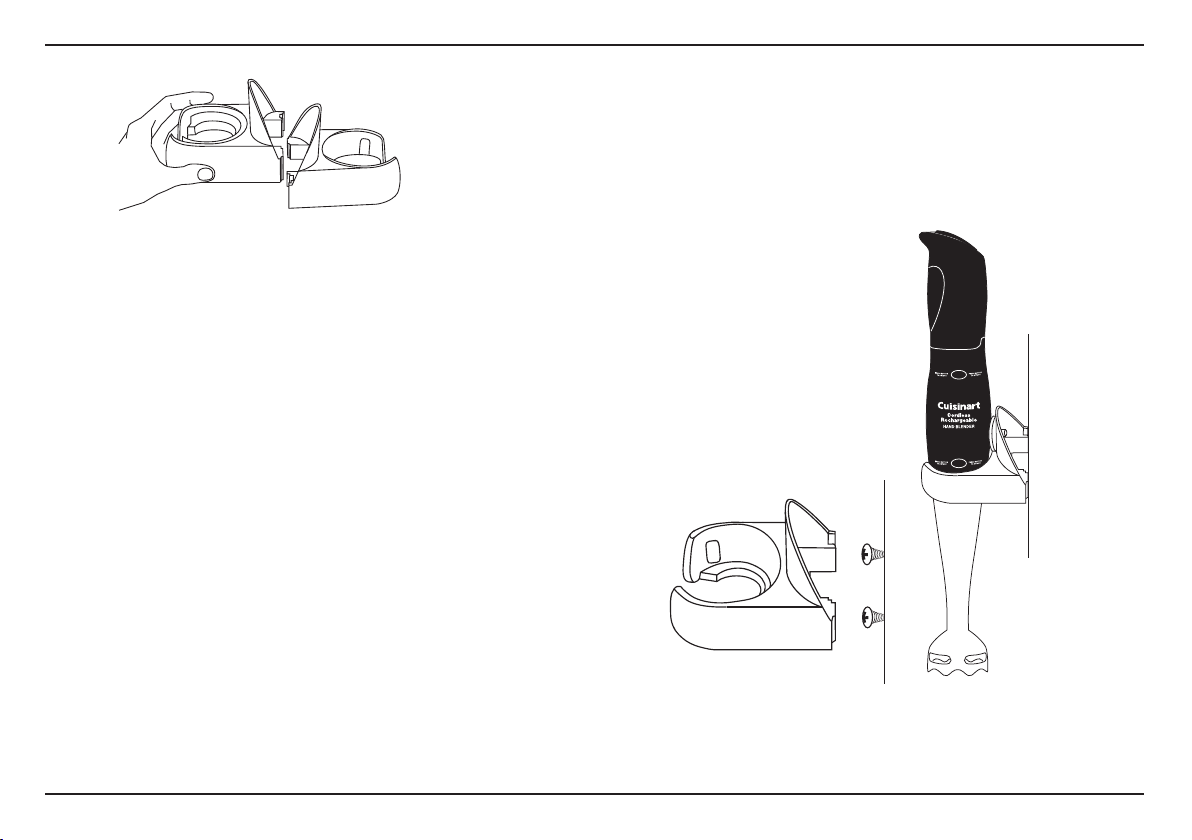
2. Attach/detach charger handle to motor body.
a. After batteries are fully charged,
remove charger handle from wall socket. Push down on thumb grip and slide
the plug to the retracted position
inside the housing.
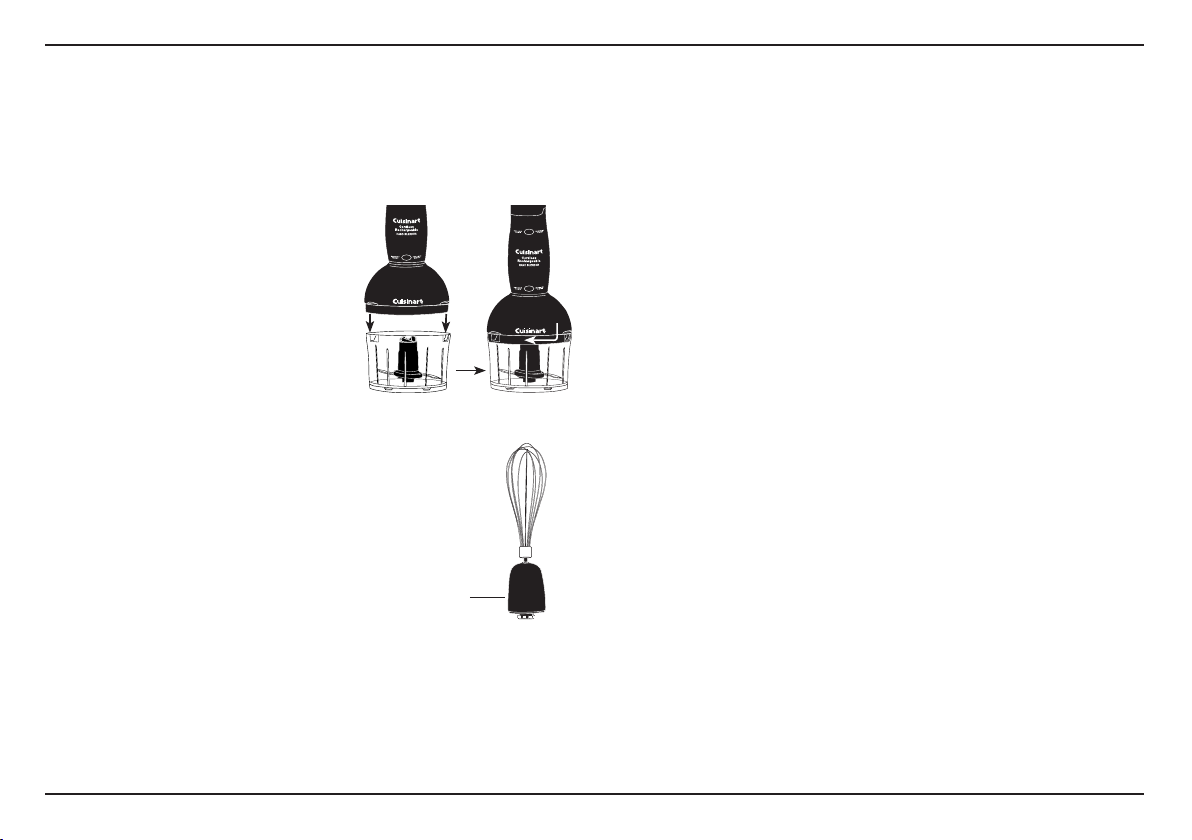
b. Press the release button. Align two
slots on bottom of charger with two
tabs on top of motor body. Press
together until you hear a
click and the two sections fit together
without gaps.
c. To detach: Hold motor body firmly in
one hand. Detach charger handle by
pressing release button located at top
of motor body, then pull charger handle away from motor body by lifting up
with other hand.
Note: Detach the changer handle from the
motor body after each use.
CHOPPER/GRINDER ATTACHMENT
J
H
B
A
C
E
I
2a.
2b.
Thumb
grip
Push
thumb
grip In
Press
release
button to
separate
or attach
G
F
A. Chopper/Grinder Prep Bowl
B. Cover Slots (3) for Attaching Cover
C. Metal Blade Assembly Shaft
D. Rubber Feet
E. Blade Assembly
F. Blade Ring
G. Plastic Blade Sheath
H. Chopper/Grinder Cover
I. Lift Tabs
J. Chopper/Grinder Spline
REVERSIBLE BLADE
The Cuisinart® Smart Stick PLUS® Cordless Rechargeable Hand Blender
chopper/grinder attachment is equipped with a reversible blade. This blade
is sharp on one side and blunt on the other. The blade is attached to a
plastic ring which slides over the plastic blade sheath, so it can be easily
turned over to select the appropriate blade. To reverse the blade; see
detailed instructions below. Frequent Uses for Chopper/Grinder (page 9.)
Before you process any food, assemble the parts.
1. Place the prep bowl on a flat, dry, stable surface.
2. The metal blade assembly shaft (C) is
attached to the bottom of the prep
bowl. If not already in place, slide
the fully assembled blade assembly
blade assembly shaft.
2a. Putting together the blade assembly:
plastic blade sheath (G). Line up the blade ring opening with the plastic
sheath.
b.
Let the blade ring slide to the bottom of the plastic sheath.
(E)
over the top of the metal
Connect the blade ring (F) to the
2
E
C
D
6
Page 7
HOLD THE BLADE RING BY THE CENTRAL HUB HOLDING RIBS (grips) (K)
ONLY. DO NOT TOUCH THE RAZOR-SHARP BLADES.
Note these important features of the blade ring. The blade ring can be
placed over the plastic blade sheath in two different ways:
If you hold it as in figure A, you will see the word “Sharp” on the blade.
Assemble the blade this side up to use the sharp edge. (See the section on
processing food, page 9, for information about when to use the sharp
edge.)
If you hold it as in figure B, you will see no writing on the blade. Assemble
the blade this side up to use the blunt edge.
See the section on processing food, page 9, for information about when to use
the blunt edge.
There are notches (K) on opposite sides of the interior of the hub. These fit over
ridges on the sides of the plastic blade sheath.
A
BLUNT SIDE UP
SHARP SIDE
K-NOTCH
Pick up the blade ring by its hub holding ribs (grips) and turn it very slightly
clockwise. This locks it in place on the plastic blade sheath and prevents it
from sliding up during processing.
3. Connect the hand blender motor body to the top of the
chopper/grinder attachment cover. Align the spline, in
the chopper/grinder cover’s drive shaft with the ribbed
opening on the underside of the motor body. When
aligned properly, slide the two pieces together until they
mate. You will feel and hear a slight click. It may be
helpful to press the rubber release button when sliding
these pieces together.
4. With the hand blender in place, locate the chopper/
grinder cover and place it on top of the prep bowl.
a.
Be sure that the 3 ridges (cover slots) at the top of the
prep bowl line up with the 3 notches in the underside
of the chopper/grinder cover, and that the cover
is seated all around the top of the prep bowl.
b. To rotate cover clockwise to secure it to the
prep bowl.
5. Place one hand on the cover of the chopper/grinder
attachment, while gripping the hand blender
motor body handle with the other. Press the High
or Low button with your fingers to start the motor
and run the chopper/grinder.
To turn the unit off, remove your fingers from the
selected button.
6. WHEN THE BLADE STOPS MOVING, remove the
motor body from the chopper/grinder cover, and
remove the cover from the prep bowl.
Whisk attachment
1. Align the end of the whisk (A) with the small opening
of the whisk gearbox (B).
2. Push end into opening until it locks into position (C).
3. Align the motor body with the assembled whisk
attachment and slide the pieces together until you
hear and feel the pieces click together. It may be
helpful to press the release button
when assembling.
4a.
3.
Motor
body
bottom –
top view
Chopper/
grinder
cover –
top view
Chopper/
grinder
cover
assembly
7
Page 8
OPERATION
TURNING CORDLESS RECHARGEABLE
HAND BLENDER
Keep hands, hair, clothing and other utensils away from blending blade.
Press and hold rubberized
top of handle
button is marked PRESS. The hand blender
will continue to run as long as the switch is
pressed in. To turn hand blender
On/Off button and the motor will stop.
to turn motor On. The On/Off
ON/OFF
On/Off button on
off, release
BLENDING AND MIXING
The specially designed blade is for mixing
and stirring all kinds of foods, including
dressings, powdered drink products,
salad
and sauces.
ingredients, and can be used to emulsify
mayonnaise, too.
This blade mixes and stirs while adding only a minimum of air
to your mixture. A gentle up-and-down motion is all you need
to make the most flavorful, full-bodied liquid recipes. Be careful
never to remove the hand blender from the liquid while in
operation.
1. Insert the blending attachment into the motor body.
2. Plug electrical cord into an electrical wall socket.
3. Insert blending shaft into mixture to be blended.
4. Press and hold the ON/OFF button. The hand blender
5. Do not hold the button ON for longer than 50 seconds at
6. Unplug immediately after use.
It is ideal for combining dry
(See Assembly for Blending Attachment, page 5.)
will continue to run as long as the switch is pressed in.
To turn hand blender OFF, release the ON/OFF button and the
motor will stop.
a time.
4a.
b
WHISKING
1. Insert the whisk attachment into the motor body.
(See, page 7.)
2. Insert the whisk into mixture to be blended.
3. Press and hold the On/Off button. The hand blender will continue to run as
long as the switch is pressed in. To turn hand blender off, release the On/
Off button and the motor will stop.
CHOPPING AND GRINDING
Processing Food
1. Put the prep bowl firmly on a flat sturdy surface like a countertop. Be sure
the blade is assembled to use the blade edge that is appropriate for the
food to be processed.
2. Put food into the prep bowl. Be sure the food is cut into small pieces, and
the bowl is not overloaded.
3. Put the chopper/grinder cover on top of the prep bowl. Be sure the cover is
properly seated.
4. Put the On/Off button on the hand blender.
5. Do not operate the chopper/grinder attachment for longer than 15 seconds
at a time.
Note: Due to the powerful motor provided with this unit, Cuisinart
recommends using one hand to support the chopper/grinder during
operation.
6. When you have finished processing the food, stop the machine by taking
your fingers off the On/Off button.
7. WHEN THE BLADE STOPS MOVING, remove the hand blender motor body
from the chopper/grinder cover, and remove the cover from the
chopper/grinder.
8. Carefully remove the blade assembly, holding it by the gripping ridges on
the plastic sheath. NEVER TOUCH THE BLADE ITSELF.
9. Remove food with a spatula.
Note: Do not operate the chopper/grinder attachment without food
contents in the prep bowl.
8
Page 9

TIPS AND HINTS
1. Liquid should not come closer than 1 inch of where the shaft attaches to
the motor housing.
2. Some spices may scratch the chopper/grinder attachment.
3. When using with a nonstick cooking surface, be careful not to scratch the
coating with the hand blender.
4. Do not immerse motor body housing, chopper/grinder cover, or whisk gearbox in water or any other liquid.
5. Cut most solid foods into ½-inch cubes for easy blending. Suggestion: Use
chopper/grinder for chopping and grinding solid foods.
6. Do not overload work bowl. For best results most foods should not reach
more than
7. Liquids in work bowl should not exceed 1 ½ cups. Use quantities given in
the recipe section as a guide.
8. Pour liquid ingredients into the mixing beaker first, unless recipe instructs
otherwise.
9. Never operate the hand blender longer than 1 minute at a time. For best
results, allow for 20-30 seconds rest time in between cycles.
10. To avoid splashing, don’t turn the hand blender on until the blade is
beneath the surface of the mixture and do not pull the hand blender out of
the mixture while blender is running.
11. Do not let hand blender stand in a hot pot on stove while not in use.
12. Do not put fruit pits, bones, or other hard material into the blending mixture, as these are liable to damage the blades.
13. Do not fill mixing containers too full. The level of mixture will rise when
blending, and can overflow.
14. Adding liquids that are warm, not cold, facilitates blending solids with liquids.
15. Using a gentle up-and-down motion is the best way to blend and incorporate ingredients uniformly.
16. To whip air into a mixture, always hold the blade just under
the surface.
2
/3
of the way up the work bowl.
17. To purée a soup, use the hand blender to blend the soup solids to the
desired consistency using a gentle up-and-down motion right in the saucepan or pot. You can quickly change your soup into a thick and creamy
blend.
18. When making compound butters, remove the butter from the refrigerator
and let it come to room temperature before blending the ingredients.
19. The hand blender is perfect for frothing milk for cappuccino or lattes.
20. Use the hand blender to make smooth gravies and pan sauces.
9
Page 10
FREQUENT USES FOR CHOPPER/GRINDER
Ingredient Comments
Baby foods (always consult a pediatri-
cian or family physician for appropriate
food recommendations)
Bread Crumbs - fresh or dry (day old) Pulse to chop, then process until desired consistency is reached.
Hard Cheese (Asiago, Locatelli,
Parmesan, Romano, etc.) (Not recommended for softer cheeses unless
making a dip or dressing)
Chocolate
Place small amounts of cooked foods into chopper/grinder bowl. Add small amount of
appropriate liquid. Pulse to chop, then hold to blend.
Cut into 1/4-inch pieces. Pulse to chop, then process until desired consistency is reached.
Cut into 1/2 inch pieces; may chill in freezer for 3 minutes before chopping. Pulse to
chop, then process, no more than 1 ounce at a time, until desired texture is reached.
CHARGING & BATTERY LIFE
Your Cuisinart® Smart Stick PLUS® Cordless Rechargeable Hand Blender is
d with nickel cadmium batteries.
equippe
We have selected these batteries to give you maximum life
and long running times, as well as rapid recharging times.
If you run your batteries down completely, it will take between 12 and 24 hours
to completely recharge them. They will be over 50% charged after only 3 hours.
Normally, you will not run them down completely. The normal running time with
a full charge varies depending on what you are blending, but you can expect up
to 20 minutes. The maximum time for most mixing tasks is up to 2 minutes.
Creamy Dressing and Dips
Garlic Peel up to 6 cloves. Pulse to chop.
Gingerroot (fresh) Peel, cut into-1/2 inch pieces. Pulse to chop 1/2 ounce at a time.
Hard Spices
(coriander, dill, poppy, star, anise, etc.)
Herbs (fresh) 1/2 cup; must be clean/dry. Pulse to chop
Nuts
Onion
Vegetables (cooked)
Vegetables (uncooked)
Meat (Beef, Pork) 2.5 oz. or 75g, cut into 1/2 inch pieces. Pulse until desired consistency.
Simple Blending For light mixing and incorporating.
Cream (for whipping) 1/4 cup. Whisk until desired consistency.
Egg whites (for whipping)
Place ingredients in chopper/grinder bowl; do not cover or spill on stem. Use pulse action
to chop, then continuous-hold action to blend to desired consistency.
Pulse to chop until desired consistency. Pulse with sharp blade to get fine results.
Shelled; toast first for best flavor. Pulse to chop, process up to a 1/3 cup at a time, until
desired consistency is reached. May be processed to nut-butter stage.
Peel, cut into 1/2-inch pieces. Pulse to chop, up to 1/2 cup at a time, until desired chop
is reached.
Cut into inch pieces; pulse to chop, up to 1/2 cups at a time. Add cooking liquid, stock or
milk to process to a puree. It is not recommended for making mashed potatoes
Peel as needed; cut into 1/2-inch pieces. Peel celery with peeler to remove tough strings.
Chop/process up to 1/2 cup at a time.
2 to 3 egg whites. Process until desired consistency.
10
Thumb Grip
Push thumb
grip out
Page 11
CHARGING PROCEDURES
When brand new, the Cuisinart® Smart Stick PLUS® Cordless Rechargeable
Hand Blender is not fully charged. Plug the charger handle into the electrical
socket and leave it plugged in for 24 hours to ensure maximum operating
capability. For best performance, fully discharge and recharge the battery 3
times before first use.
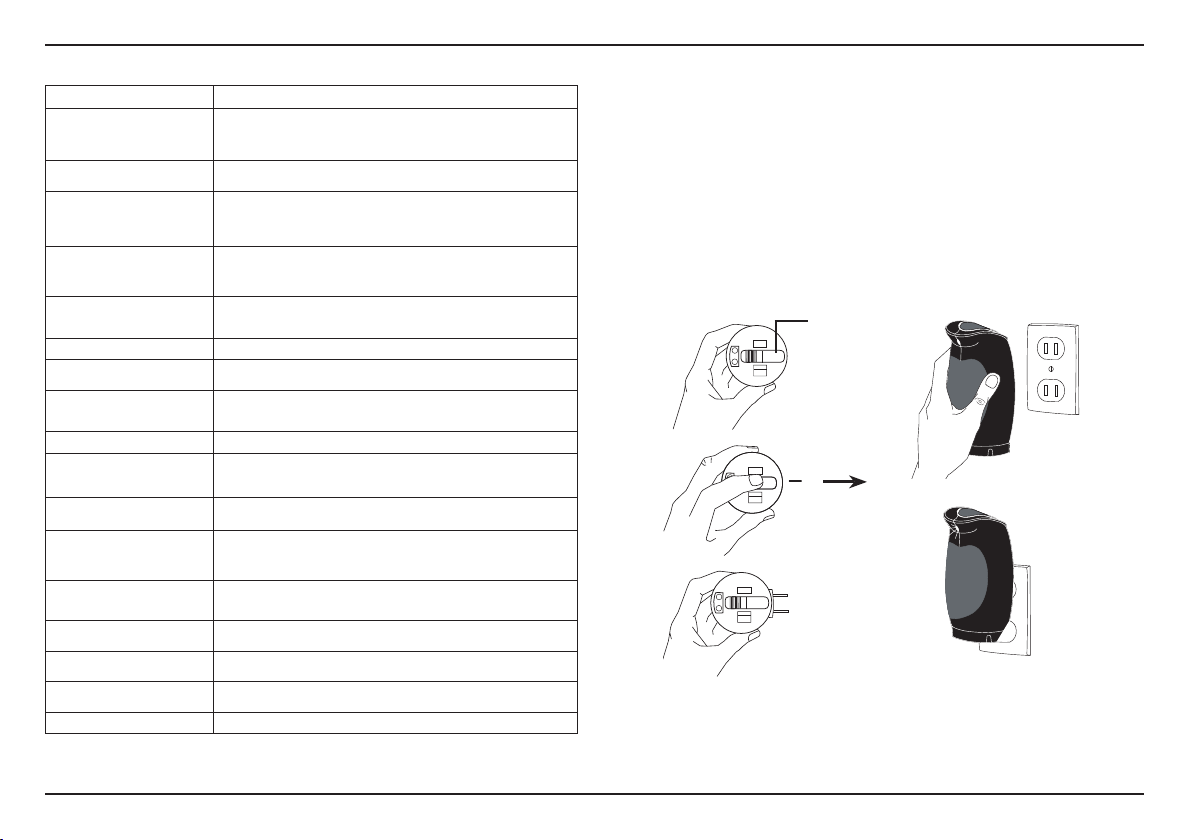
TO CHARGE
Detach charger handle from motor body. Turn charger handle upside down.
Using the thumb grip on the underside of the charger handle, push down
slightly and slide the plug as far as it will go until it is fully exposed and
extending from the handle housing (see illustration). Plug the prongs into a wall
outlet. The batteries will begin charging. The charging light will be illuminated.
CONTINUOUS CHARGING
The unit is designed so that the batteries may remain on continuous charge. It
is recommended that the Cuisinart
Hand Blender charger be kept plugged into a wall socket to charge, so that it
will always be ready to use. Leaving the unit on continuous charge is very
inexpensive in terms of the amount of electricity being used.
HOLDING THE CHARGE
The batteries will keep most of their charge even when not plugged in. The
batteries will lose approximately 20% of their total charge per month if they are
not plugged in and charging.
SHORT RUN TIMES
If after repeated use the run time seems to get shorter and the hand blender
has less power, it may not be the result of a faulty unit. This condition can be
remedied by allowing the Cuisinart
Hand Blender to run until it stops. Then recharge the unit for 24 hours for a new
charge. This procedure improves the batteries’ capacity. You may need to
repeat this a few times for the best results.
CHARGING LIGHT
The charging light on the tip of the handle glows when the unit is charging. This
light will be illuminated even when the batteries are fully charged. If the unit
does not function, make sure that the charger handle is securely plugged into
the outlet, and check to see if the outlet is controlled by a wall switch. Also,
check for a blown house fuse. Note that if this light is on, the charger is
operating.
®
Smart Stick PLUS® Cordless Rechargeable
®
Smart Stick PLUS® Cordless Rechargeable
STORAGE STAND / WALL BRACKETS
The Cuisinart® Smart Stick PLUS® Cordless Rechargeable Hand
Blender includes a two-part storage stand that can be assembled
into a single piece for countertop use. You can also separate the
stand into two pieces, and mount one of the pieces to your wall to
use as a wall storage bracket.
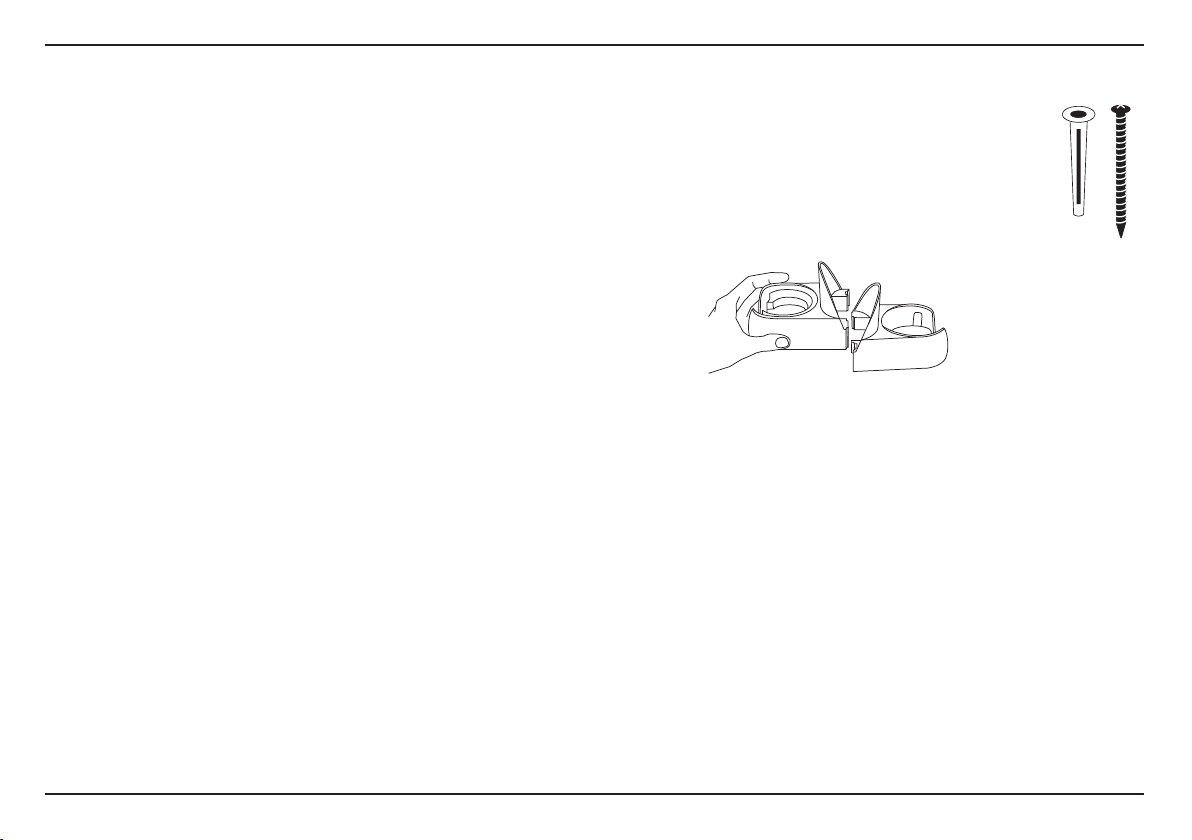
Storage stand kit consists of six (6) pieces: two anchor bolts, two
plastic wall anchors, and two storage pieces that can fit together
for countertop, or be separated for wall mount.
COUNTERTOP OPTION
The two storage pieces fit together. (See diagram above)
Align the two pieces back to back on a flat surface, with the ring-shaped
reservoirs facing right and left. The raised walls should be in the middle. Lift up
the right piece; align the two tabs in the back with the two slots of the left
piece. Gently slide the tabs into the slots until both pieces are resting flat on the
countertop.
To store the hand blender, detach the shaft and place the bottom part (blade
guard) into one of the reservoirs. Place the motor body (right side up) into the
other reservoir. You should be able to read the Cuisinart logo when the motor
body is in the stand.
The charger handle can be attached to the motor body when you store the unit.
This is especially helpful when you want the hand blender close at hand during
a period of heavy use. Plug the charger handle into the electrical socket to keep
the battery charged during other times. The counter storage unit can also be
placed in a cupboard or on a shelf.
11
Page 12
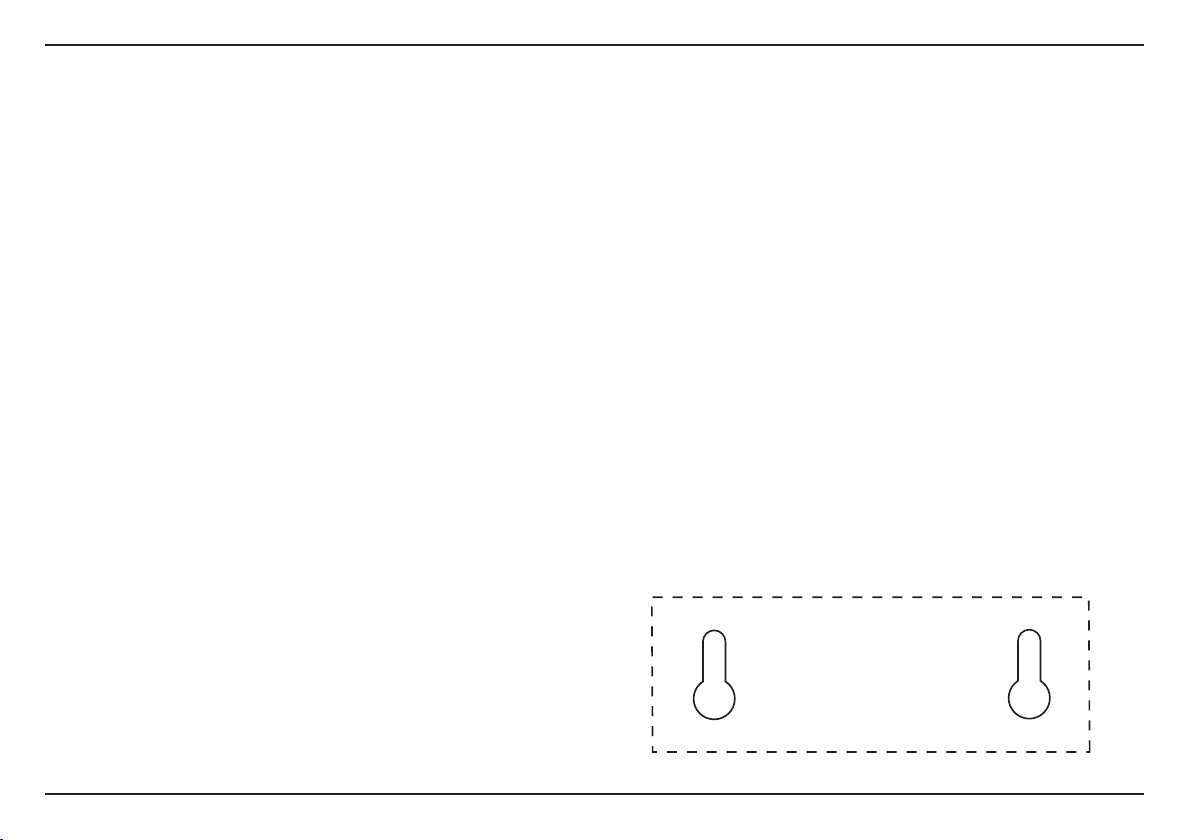
WALL-MOUNT OPTION
Separate the two plastic storage stand pieces. You will need only one for
wall mount. (See diagram above)
When selecting a mounting location, be sure to leave enough room above
the storage stand for your hand to remove the Cuisinart® Smart Stick
®
Cordless Rechargeable Hand Blender. Also be sure to leave enough
PLUS
room below the stand to allow the appliance to hang freely.
You will need to drill two holes 2
the center of each hole. To assist in proper location of holes for the
mounting screws, remove the wall mount template from this instruction
book (page 13). Place the template over the back of the wall unit, aligning
the outline of the template with the wall bracket. When you have done this,
place the template and wall bracket against the wall in the desired location.
Remove the wall bracket, leaving the template in place. Mark the wall with a
pencil in the locations
indicated for screw holes by the template. Remove
the template.
With a drill, make a 3/16" starter hole for each screw. Place the plastic anchor
in each hole. Push completely into the hole with fingers, or tap in gently
with a hammer. Screw a mounting screw into each hole, leaving
the head and screw exposed.
Position the two mounting holes of the wall bracket over the screw heads,
and slide wall bracket down the wall until the bracket is resting against the
screw head, and will not slide any further. If the wall bracket feels too loose
against the wall, remove bracket, put screws further into wall, and replace
bracket.
2
/3" apart from each other, measured from
1
/8" to ¼" of
Place the assembled hand blender into the wall bracket. The unit will hang
from the bracket, held in place by the motor body width.
The charger handle can be attached to the motor body when you store the
unit. This is especially helpful when you want the hand blender close at
hand during a period of heavy use. At other times, keep the charger handle
plugged into the electrical socket to assure the battery is always 100%
charged.
12
Page 13

CLEANING AND MAINTENANCE
Always clean the hand blender thoroughly after using.
Any other servicing should be performed by an authorized service
representative.
HAND BLENDER
Detach the charger handle from the motor body before cleaning. Remove the
shaft with the blade from the motor body. The shaft with the blade can be
cleaned by hand in hot water with a mild detergent. It is not necessary to
remove the blade from the shaft. Do not use abrasive cleansers that could
scratch the surface.
Clean the motor body and the charger handle with a sponge or damp cloth
only. Do not use abrasive cleansers that could scratch the surface.
The mixing/measuring beaker can be cleaned in the dishwasher (upper rack) or
by hand in hot water with a mild detergent.
Never immerse the motor body or charger handle in water.
CHOPPER/GRINDER ATTACHMENT
To simplify cleaning, rinse the prep bowl, cover and blade immediately after
use, so that food won’t dry onto them. Wash blade ring, plastic sheath, and
prep bowl in warm soapy water. Rinse and dry. Wipe the underside of the
chopper/grinder cover with a sponge or damp cloth to remove any food. Do
not submerge the cover in water or place in the dishwasher. Wash the
blade carefully. Avoid leaving it in soapy water where it may disappear from
sight.
If you have a dishwasher, you can wash the prep bowl and blade assembly on
the upper shelf. Insert the prep bowl upside down. Put the blade in the cutlery
basket. Unload the dishwasher carefully to avoid contact with the sharp blade.
Wipe the top cover with a damp sponge or cloth. Dry it immediately.
The chopper/grinder attachment is intended for HOUSEHOLD USE ONLY. Any
service, other than cleaning and normal user maintenance, should be performed
by an authorized Cuisinart Service Representative.
WHISK ATTACHMENT
To clean your whisk attachment, simply release the attachment
from the motor body housing. Once the whisk is removed, detach the metal
whisk from the gearbox by pulling pieces apart. To clean the gearbox, simply
wipe with a damp cloth. To clean the metal whisk, wash with warm, soapy
water or place in the dishwasher. Do not submerge the gearbox in water or
any other liquid. Any other servicing should be performed by an authorized
service representative.
DISPOSAL/RECYCLING
OF BATTERIES
This product uses four nickel-cadmium rechargeable and recyclable batteries.
At the end of the batteries’ useful life, they should be recycled. These batteries
must not be incinerated or composted.
Nickel-cadmium batteries should not be put in municipal waste systems.
Contact your local waste collection agency for proper recycling and disposal
information for your area.
Please do not attempt to dismantle the charger handle to replace these
batteries on your own. Damage could result to the unit.
When it is time to replace and/or recycle the batteries, or to receive additional
instructions for disposing of old batteries, call toll-free 1-800-726-0190 to order
a new charger handle which will include the four new batteries. Or send the
charger handle to Cuisinart, 150 Milford Road, E. Windsor, NJ 08520.
13
Page 14
LIMITED 3-YEAR WARRANTY
This warranty is available to consumers only. You are a consumer if you
own a Cuisinart
purchased at retail for personal, family or household use. Except as otherwise required under
applicable law, this warranty is not available to retailers or other commercial purchasers or
owners.
We warrant that your Cuisinart
be free of defects in materials and workmanship under normal home use for 3 years from the
date of original purchase.
We recommend that you visit our website, www.cuisinart.com for a fast, efficient way to
complete your product registration. However, product registration does not eliminate the need
for the consumer to maintain the original proof of purchase in order to obtain the warranty
®
Smart Stick PLUS® Cordless Rechargeable Hand Blender that was
®
Smart Stick PLUS® Cordless Rechargeable Hand Blender will
Cuisinart and not the consumer will be responsible for the reasonable cost of such service,
repair, replacement, or refund for nonconforming products under warranty.
California residents may also, according to their preference, return nonconforming products
directly to Cuisinart for repair, or if necessary, replacement, by calling our Consumer Service
Center toll-free at 1-800-726-0190.
Cuisinart will be responsible for the cost of the repair, replacement, and shipping and
handling for such products under warranty.
BEFORE RETURNING YOUR CUISINART PRODUCT
If you are experiencing problems with your Cuisinart product, we suggest that you call our
Consumer Service Center at 1-800-726-0190 before returning the product to be serviced. If
servicing is needed, a Representative can confi rm whether the product is under warranty and
direct you to the nearest service location.
benefits. In the event that you do not have proof of purchase date, the purchase date for
purposes of this warranty will be the date of manufacture.
If your Cuisinart Smart Stick PLUS
®
Cordless Rechargeable Hand Blender should prove to be
defective within the warranty period, we will repair it, or if we think necessary, replace it. To
obtain warranty service, simply call our toll-free number 1-800-726-0190 for additional
information from our Customer Service Representatives, or send the defective product to
Customer Service at Cuisinart, 7475 North Glen Harbor Blvd., Glendale, AZ 85307.
To facilitate the speed and accuracy of your return, please enclose $10.00 for shipping and
handling of the product.
Please pay by check or money order (California residents need only supply proof of purchase
and should call 1-800-726-0190 for shipping instructions).
NOTE: For added protection and secure handling of any Cuisinart
®
product that is being
returned, we recommend you use a traceable, insured delivery service. Cuisinart cannot be
held responsible for in-transit damage or for packages that are not delivered to us. Lost and/
or damaged products are not covered under warranty. Please be sure to include your return
Your Cuisinart® Smart Stick PLUS® Cordless Rechargeable Hand Blender has been
manufactured to the strictest specifi cations and has been designed for use only in 120 volt
outlets and only with authorized accessories and replacement parts. This warranty expressly
excludes any defects or damages caused by attempted use of this unit with a converter, as
well as use with accessories, replacement parts or repair service other than those authorized
by Cuisinart. This warranty does not cover any damage caused by accident, misuse, shipment
or other than ordinary household use. This warranty excludes all incidental or consequential
damages. Some states do not allow the exclusion or limitation of these damages, so these
exclusions may not apply to you. You may also have other rights, which vary from state to state.
Important: If the nonconforming product is to be serviced by someone other than Cuisinart’s
Authorized Service Center, please remind the servicer to call our Consumer Service Center at
1-800-726-0190 to ensure that the problem is properly diagnosed, the product is serviced with
the correct parts, and the product is still under warranty.
address, daytime phone number, description of the product defect, product model number
(located on bottom of product), original date of purchase, and any other information pertinent
to the product’s return.
CALIFORNIA RESIDENTS ONLY:
California law provides that for In-Warranty Service, California residents have the option of
returning a nonconforming product (A) to the store where it was purchased or (B) to another
retail store that sells Cuisinart products of the same type.
The retail store shall then, at its discretion, either repair the product, refer the consumer to an
independent repair facility, replace the product, or refund the purchase price less the amount
directly attributable to the consumer’s prior usage of the product. If the above two options do
not result in the appropriate relief to the consumer, the consumer may then take the product
to an independent repair facility if service or repair can be economically accomplished.
TEMPLATE FOR WALL MOUNTING
14
Page 15

RECIPES
Smoothies, Shakes, and Drinks
Breakfast Shake for the Road ........................................................................ 15
Power Blast Protein Shake ............................................................................ 15
Super “C” Smoothie ....................................................................................... 16
Go Green Smoothie ....................................................................................... 16
Triple Chocolate Shake .................................................................................. 16
Sunshine Colada ............................................................................................ 16
Soups, Sauces, Dips and Spreads
Green Pea Soup ............................................................................................. 17
Roasted Parsnip and Apple Soup .................................................................. 17
Lightened Broccoli and Potato Soup ............................................................. 18
Carrot Ginger Soup ........................................................................................ 18
Mayonnaise .................................................................................................... 18
Ketchup .......................................................................................................... 19
Marinara Sauce .............................................................................................. 19
Ancho Chile Sauce ......................................................................................... 19
Basic Vinaigrette ............................................................................................ 20
Fresh Herb and Yogurt Dressing .................................................................... 20
Hummus ......................................................................................................... 20
Black Bean Spread ........................................................................................ 21
Fresh Tomato and Corn Salsa........................................................................ 21
Citrus and Avocado Salsa .............................................................................. 21
Roasted Garlic and Onion Spread ................................................................. 22
Tapenade ........................................................................................................ 22
Roasted Pepper Tapenade ............................................................................. 22
Desserts
Chocolate Chip French Macaroons ............................................................... 23
Mexican Chocolate Pudding .......................................................................... 23
Strawberry Shortcake .................................................................................... 24
Breakfast Shake for the Road
Makes 2 cups
¾ cup orange peach mango juice
6 ounces lowfat vanilla yogurt
½ banana, broken into 3 pieces
½ cup frozen blueberries
3 to 4 frozen strawberries
1 tablespoon ground flax seed
Put all ingredients in order listed into the Cuisinart blending cup. Using the Cuisinart®
Smart Stick PLUS
®
Cordless Hand Blender, blend by using a gentle up-and-down motion
until ingredients are homogenous, about 30 seconds. Be sure to keep the metal blade
completely submerged while blending.
Nutritional information per serving (1 cup):
Calories 320 (7% from fat) • carb. 69g • pro. 6g • fat 3g • sat. fat 1g • chol. 0mg
sod. 65mg • calc. 185mg • fiber 4g
Power Blast Protein Shake
Makes 2 cups
1 cup lowfat or skim milk (may use soy or rice milk)
1 banana, broken into 2-inch pieces
½ cup mango, cut into 1-inch pieces
½ cup frozen blueberries
2 tablespoons protein powder
1 to 2 tablespoons honey (optional)
Put all ingredients in order listed into the Cuisinart blending cup. Using the Cuisinart®
Smart Stick PLUS
®
Cordless Hand Blender, blend using a gentle up-and-down motion
until ingredients are homogenous, about 30 seconds. Be sure to keep the metal blade
completely submerged while blending.
Nutritional information per serving (1 cup):
Calories 190 (9% from fat) • carb. 33g • pro. 13g • fat 2g • sat. fat 1g
chol. 0mg • sod. 170mg • calc. 232mg • fiber 3g
15
Page 16

Super “C” Smoothie
This delicious smoothie is packed with vitamin C.
Makes 2 cups
½ cup orange juice
½ cup navel orange sections, all pith and membrane removed
½ cup grapefruit sections, all pith and membrane removed
½ cup fresh mango, cut into ½-inch cubes
½ cup frozen strawberries
Put all ingredients in order listed into the Cuisinart blending cup. Using the Cuisinart®
Smart Stick PLUS
®
Cordless Hand Blender, blend using a gentle up-and-down motion
until ingredients are homogenous, about 30 seconds. Be sure to keep the metal blade
completely submerged while blending.
Nutritional information per serving (1 cup):
Calories 116 (4% from fat) • carb. 29g. • pro. 2g • fat 1g • sat. fat 0g
chol. 0mg • sod. 11mg • calc. 56mg • fiber 3g
Go Green Smoothie
Makes 2 cups
½ cup orange or apple juice
2 kiwis, cut into ½-inch cubes (about ¾ cup cubed)
1 cup honeydew, cut into 1-inch cubes
½ cup fresh pineapple, cut into-1 inch cubes
Put all ingredients in order listed into the Cuisinart blending cup. Using the Cuisinart®
Smart Stick PLUS® Cordless Hand Blender, blend using a gentle up-and-down motion
until ingredients are homogenous, about 30 seconds. Be sure to keep the metal blade
completely submerged while blending.
Nutritional information per serving (1 cup):
Calories 120 (4% from fat) • carb. 30g • pro. 2g • fat 1g • sat. fat 0g
chol. 0mg • sod. 25mg • calc. 46mg • fiber 4g
Triple Chocolate Shake
The ultimate chocolate lover’s milkshake.
Makes 2 cups
¾ cup chocolate milk
1 cup premium chocolate ice cream
2 tablespoons chocolate syrup
Put all ingredients in order listed into the Cuisinart blending cup. Using the Cuisinart®
Smart Stick PLUS® Cordless Hand Blender, blend using a gentle up-and-down motion
until ingredients are homogenous, about 40 seconds. Be sure to keep the metal blade
completely submerged while blending.
Calories 400 (43% from fat) • carb. 47g • pro. 9g • fat 19g • sat. fat 12g
Nutritional information per serving (1 cup):
chol. 120mg • sod. 140mg • calc. 294mg • fiber 2g
Sunshine Colada
Heat up your next party with a pitcher of these tasty coladas.
Makes eight 8-ounce servings
2 cups orange peach mango juice
8 ounces light rum
8 ounces cream of coconut
2 bananas, each broken into about 4 pieces
3 cups fresh pineapple, cut into ½-inch cubes
2½ cups frozen peaches
Put all ingredients in order listed into a large pitcher. Using the Cuisinart® Smart Stick
PLUS® Cordless Hand Blender, blend using a gentle up-and-down motion until ingredients
are homogenous, about 50 seconds. Be sure to keep the metal blade completely
submerged while blending.
Serve on its own or over ice.
Nutritional information per serving (1 cup):
Calories 240 (24% from fat) • carb. 29g • pro. 2g • fat 7g • sat. fat 6g
chol. 0mg • sod. 20mg • calc. 14mg • fiber 3g
16
Page 17

Green Pea Soup
This soup is bright, light and fresh.
It is wonderful served hot or cold.
Makes about 8 cups
3 tablespoons extra virgin olive oil
3 garlic cloves, crushed
1 medium leek, trimmed, halved and chopped
1 teaspoon sea or kosher salt, divided
¾ teaspoon freshly ground black pepper, divided
1
⁄
3
cup white wine
3 to 4 cups vegetable stock, hot
2 pounds (about 5 cups) frozen peas, divided
1
⁄
3
cup chopped fresh parsley
1 cup half-and-half
3 tablespoons fresh lemon juice
Heat olive oil in a large saucepan over low heat. Add the garlic and leek and a pinch each
of the salt and pepper; sauté for about 10 minutes, or until vegetables are softened and
fragrant. Add the wine and raise the heat to medium. Reduce the wine until it is almost
completely evaporated. Add the vegetable stock, half the peas, and the reserved salt and
pepper. Bring mixture to a boil. Reduce heat and simmer, covered, until peas are tender,
about 5 minutes. Add remaining peas and simmer for an additional 2 to 3 minutes. Stir in
parsley, half-and-half and lemon juice.
®
Using the Cuisinart
Smart Stick PLUS® Cordless Hand Blender, blend using an up-anddown motion, until ingredients are smooth and completely combined. Be sure to keep the
metal blade completely submerged while blending.
Taste and adjust seasoning accordingly.
Makes about 10 cups
3½ tablespoons extra virgin olive oil, divided
2½ pounds parsnips, cut into 1-inch rounds
¼ teaspoon sea or kosher salt
2 small shallots, minced (about 1 cup)
2 medium apples, peeled and cut into 1-inch pieces
¼ cup white wine
5 cups vegetable stock, hot
1 cup reduced-fat milk
Preheat oven to 400°F.
In a mixing bowl, toss together 1½ tablespoons olive oil, parsnips, and salt. Place on a foillined baking tray; roast for 30 to 35 minutes, or until parsnips are tender and golden, being
sure not to brown them too much.
While the parsnips are roasting, heat the remaining olive oil in a large saucepan over
medium-low heat. Add the shallots and cook for about 3 minutes, or until softened and
translucent. Add the apples; cover and cook until apples are softened, about 8 minutes.
Stir in roasted parsnips and add wine. Raise heat to medium and reduce wine until it is
almost completely evaporated. Add the stock and bring to a boil. Reduce heat and let
simmer for about 5 to 8 minutes, or until all vegetables are tender.
Stir in the milk. Using the Cuisinart
Using an up-and-down motion, until ingredients are smooth and completely combined. Be
sure to keep the metal blade completely submerged while blending.
Taste and adjust seasoning accordingly.
Note: This soup is very thick, so add more stock if a thinner consistency is desired.
Nutritional information per serving (1 cup):
Calories 180 (43% from fat) • carb. 18g • pro. 7g • fat 9g • sat. fat 3g
chol. 10mg • sod. 660mg • calc. 75mg • fiber 4g
Roasted Parsnip and Apple Soup
®
Smart Stick PLUS® Cordless Hand Blender, blend.
Nutritional information per serving (1 cup):
Calories 120 (40% from fat) • carb. 16g • pro. 2g • fat 6g • sat. fat 1g
• chol. 5mg • sod. 360mg • calc. 59mg • fiber 2g
17
Page 18

Lightened Broccoli and Potato Soup
This soup is a delicious and healthy substitute for other cream soups.
Makes about 10 cups
2½ tablespoons extra virgin olive oil
2 garlic cloves, chopped
½ medium onion, chopped
1¾ teaspoons sea or kosher salt, divided
1 teaspoon freshly ground black pepper, divided
2 pounds broccoli, stems cut into ½-inch pieces, florets separated
1 pound potatoes, peeled and cut into ½-inch pieces
3 tablespoons sherry
4 cups vegetable stock, hot
¾ teaspoon lemon zest
3 tablespoons grated Parmesan
5 cups vegetable stock
1
Heat the olive oil in a large saucepan over low heat. Add the shallots, 2 tablespoons of
the ginger, and a pinch each of the salt and pepper. Sauté until vegetables are softened,
about 5 minutes. Add the carrots, and raise the heat to a medium/medium-high. Sauté for
2 to 3 minutes, or until carrots are tender. Add the vinegar and cook until almost entirely
evaporated. Add the stock, the reserved ginger, salt and pepper. Bring mixture to a boil.
Reduce heat and let simmer for about 8 to 10 minutes.
Stir in the half-and-half. Using the Cuisinart
blend, using an up-and-down motion until ingredients are smooth and completely
combined. Be sure to keep the metal blade completely submerged while blending.
Taste and adjust seasoning accordingly.
Note: This soup is very thick, so add more stock if a thinner consistency is desired.
Heat the olive oil in a large saucepan over low heat. Add the garlic and onion, with a pinch
each of salt and pepper. Sauté until softened, about 8 to 10 minutes. Raise the heat to
medium and add the broccoli stems, potatoes and a pinch each of the salt and pepper;
sauté 2 to 3 minutes, and then add the sherry. Let the sherry cook down until almost
evaporated. Add the stock and bring to a boil. Reduce heat to medium-low, and stir in the
florets, lemon zest, Parmesan and remaining salt and pepper. Simmer until vegetables are
tender.
®
Using the Cuisinart
Smart Stick PLUS® Cordless Hand Blender, blend using an up-anddown motion, until ingredients are smooth and completely combined. Be sure to keep the
metal blade completely submerged while blending. Taste and adjust seasoning accordingly.
Note: This soup is very thick, so add more stock if a thinner consistency is desired.
Nutritional information per serving (1 cup):
Calories 140 (39% from fat) • carb. 17g • pro. 5g • fat 7g • sat. fat 2g
chol. 5mg • sod. 680mg • calc. 71mg • fiber 4g
Carrot Ginger Soup
Makes about 8 cups
3 tablespoons extra virgin olive oil
2 shallots, chopped
Makes about 1 cup
¼ cup pasteurized liquid egg product (such as EggBeaters
1 tablespoon fresh lemon juice
½ tablespoon white vinegar
½ tablespoon Dijon mustard
½ teaspoon granulated sugar
pinch sea or kosher salt
pinch ground white pepper
2
Put all ingredients, except for the oil, into the Cuisinart blending cup in order listed. Using
the Cuisinart® Smart Stick PLUS® Cordless Hand Blender, process until mixture begins to
thicken. Be sure to keep the metal blade completely submerged while blending. Gradually
add the oil, two tablespoons at a time. Continue processing with a gentle up-and-down
motion until thick, about 30 seconds longer.
3 tablespoons finely chopped fresh ginger, divided
1 teaspoon sea or kosher salt, divided
¾ teaspoon freshly ground black pepper, divided
2 pounds carrots, cut into 1-inch pieces
2 tablespoons rice vinegar
EggBeaters
⁄
3
cup half-and-half
®
Smart Stick PLUS® Cordless Hand Blender,
Nutritional information per serving (1 cup):
Calories 150 (39% from fat) • carb. 20g • pro. 3g • fat 7g • sat. fat 2g
• chol. 5mg • sod. 490mg • calc. 72mg • fiber 3g
Mayonnaise
⁄
3
cup vegetable oil
Nutritional information per serving (1 tablespoon):
Calories 30 (96% from fat) • carb. 4g • pro. 1g • fat 2g • sat. fat 0g
• chol. 0mg • sod. 100mg • calc. 1mg • fiber 1g
®
is a registered trademark of Nabisco.
®
)
18
Page 19

Ketchup
Makes about 2 cups
½ tablespoon extra virgin olive oil
1 garlic clove, chopped
½ medium onion, chopped
1 can (14.5 ounces) diced tomatoes, juices drained
1 can (6 ounces) tomato paste
½ cup packed dark brown sugar
1
⁄
3
cup cider vinegar
¾ teaspoon sea or kosher salt
Heat oil in a large saucepan over low heat. Add garlic and sauté until softened and fragrant
but not browned, about 5 minutes. Add the tomatoes with their juices; crush slightly with
the back of a wooden spoon. Bring to a strong simmer. Add basil, spices and salt; let
simmer 20 to 30 minutes until thickened. Stir in sugar; taste and adjust seasoning. Let
simmer an additional 10 minutes.
Using a Cuisinart
homogenous and smooth. Be sure to keep the metal blade completely submerged while
blending.
Adjust seasoning to taste.
½ teaspoon dry mustard
¼ teaspoon ground cinnamon
pinch freshly ground black pepper
¼ teaspoon ground allspice
Heat the oil in a medium skillet set over medium-low heat. Add the garlic and onion. Sauté
until softened, about 5 minutes.
Put sautéed vegetables into the Cuisinart blending cup. Add the remaining ingredients.
Using the Cuisinart
®
Smart Stick PLUS® Cordless Hand Blender, process until mixture
begins to thicken and is completely smooth. Be sure to keep the metal blade completely
submerged while blending.
Adjust seasoning to taste.
Nutritional information per serving (1 tablespoon):
Calories 20 (10% from fat) • carb. 5g • pro. 0g • fat 0g • sat. fat 0g
• chol. 0mg • sod. 85mg • calc. 5mg • fiber 0g
Marinara Sauce
Makes about 6 cups
3 tablespoons extra virgin olive oil
10 garlic cloves, finely chopped
2 cans (28 ounces each) whole plum tomatoes in purée
10 leaves fresh basil, thinly sliced (chiffonade) (about ¼ cup packed)
½ tablespoon freshly ground black pepper
1 teaspoon dried oregano
¼ teaspoon fennel seed
pinch sea or kosher salt
¼ cup granulated sugar
Makes 1½ cups
6 dried ancho chiles
1 large shallot, cut into 1-inch pieces
1 garlic clove
1 jalapeño, seeds removed and cut into ½-inch pieces
1 tablespoon extra virgin olive oil
¼ cup white wine
1 cup chicken stock, hot
1 teaspoon sea or kosher salt, divided
2 tablespoons honey
1 tablespoon fresh lime or lemon juice
Reconstitute chiles: place them in a bowl and pour boiling water over them so that they are
completely covered. Cover bowl with foil or an inverted plate. Allow the chiles to sit until
they soften, about 30 to 45 minutes. Once soft, remove all seeds and stems and reserve.
While chiles are soaking, insert the blade assembly in the prep bowl. Add the shallot, garlic
and jalapeño and process until roughly chopped, about 6 to 8 seconds. Reserve.
In a 3½-quart sauté pan, heat the olive oil over medium heat. Add shallot, garlic, jalapeño
and a pinch of the salt. Stir and sauté until softened and slightly browned, about 5 minutes.
Stir in reserved chiles and heat through for about a minute. Stir in white wine. Scrape any
bits that are clinging to the bottom of the pan. Allow wine to reduce until almost completely
®
Smart Stick PLUS® Cordless Hand Blender, blend the sauce until
Nutritional information per serving (¼ cup):
Calories 42 (37% from fat) • carb. 6g • pro. 1g • fat 2g • sat. fat 0g
• chol. 0mg • sod. 149mg • calc. 14mg • fiber 1g
Ancho Chile Sauce
A perfect all-purpose sauce for Mexican dishes.
19
Page 20

evaporated. Add the chicken stock, bring to a boil and then reduce heat to allow mixture to
simmer for about 10 to 15 minutes. Add the remaining salt, honey and lime/lemon juice.
Using the Cuisinart
®
Smart Stick PLUS® Cordless Stick Blender, blend until mixture
begins to thicken and is completely smooth. Be sure to keep the metal blade completely
submerged while blending.
Adjust seasoning to taste.
Nutritional information per serving (¼ cup):
Calories 100 (21% from fat) • carb. 17g • pro. 3g • fat 3g
sat. fat 0g • chol. 0mg • sod. 460mg • calc. 27mg • fiber 2g
Basic Vinaigrette
This recipe may be easily modified by changing
the oils and vinegars used.
Makes 1½ cups
1 garlic clove
2 teaspoons Dijon mustard
½ cup red wine vinegar
1 teaspoon fresh lemon juice
¾ teaspoon sea or kosher salt
½ teaspoon freshly ground black pepper
1¼ cups extra virgin olive oil
Insert the blade assembly in the prep bowl. Put the garlic into the prep bowl and process
for 10 to 15 seconds; scrape bowl. Add the mustard, vinegar, lemon juice, salt and pepper;
pulse 4 to 5 times, until combined. Add the oil and process until completely combined.
Adjust seasoning to taste.
This dressing is best made at least ½ hour ahead of serving. Vinaigrette will keep well if
covered in refrigerator for one week. Remove from refrigerator about 30 minutes before
serving; it may need to be reprocessed if separation has occurred.
Nutritional information per serving (1 tablespoon):
Calories 8 (82% from fat) • carb. 0g • pro. 0g • fat 1g
sat. fat 0g • chol. 0mg • sod. 98mg • calc. 0mg • fiber 0g
Fresh Herb and Yogurt Dressing
This tangy dressing is a lowfat version to other creamy dressings.
It also pairs well with crudités.
2
⁄
3
Makes
cup
1 garlic clove
1 tablespoon fresh dill
½ tablespoon fresh tarragon
½ tablespoon Dijon mustard
1 tablespoon white vinegar
¼ teaspoon sea or kosher salt
¼ teaspoon freshly ground black pepper
¾ teaspoon granulated sugar
1 tablespoon fresh lemon juice
½ cup nonfat Greek yogurt (or another strained yogurt)
Insert the blade assembly in the prep bowl. Put the garlic into the prep bowl and process
for 10 to 15 seconds; scrape bowl. Add the dill and tarragon; pulse 4 to 5 times until
roughly chopped. Add the remaining ingredients and process until completely combined.
Adjust seasoning to taste.
Nutritional information per serving (1 tablespoon):
Calories 15 (1% from fat) • carb. 3g • pro. 1g • fat 0g
• sat. fat 0g • chol. 0mg • sod. 130mg • calc. 32mg • fiber 0g
Hummus
Makes 1 cup
1 garlic clove
1 cup chickpeas
3½ tablespoons tahini
2 tablespoons fresh lemon juice
½ teaspoon sea or kosher salt
¼ teaspoon freshly ground black pepper
3 tablespoons extra virgin olive oil
1
⁄
3
cup water (plus more if needed)
Insert the blade assembly in the prep bowl. Add garlic to bowl and process for 10 to 15
seconds; scrape bowl. Add chickpeas, tahini, lemon juice, salt and pepper; pulse 6 to
8 times. Add the oil and process until almost completely combined. Add the water and
process until very smooth. If a thinner consistency is desired, add more water.
Adjust seasoning to taste.
Nutritional information per serving (2 tablespoons):
Calories 120 (63% from fat) • carb. 9g • pro. 3g • fat 9g
sat. fat 1g • chol. 0mg • sod. 230mg • calc. 39mg • fiber 2g
20
Page 21

Black Bean Spread
Makes 1 cup
1 garlic clove
½ jalapeño, seeded and cut into ½-inch pieces
2 tablespoons fresh cilantro
1 cup black beans, plus 1 tablespoon reserved for the end
3 tablespoons fresh lime juice
½ teaspoon ground cumin
¼ teaspoon sea or kosher salt
¾ teaspoon freshly ground black pepper
1 tablespoon extra virgin olive oil
1 tablespoon water
Insert the blade assembly in the prep bowl. Add the garlic, jalapeño and cilantro. Process
for 5 seconds; scrape the work bowl. Add the remaining ingredients, reserving the extra
tablespoon of the black beans. Pulse 2 to 3 times, and then process for about 5 seconds,
until combined. Add the reserved tablespoon of beans and pulse 2 to 3 times.
Adjust seasoning to taste.
Nutritional information per serving (2 tablespoons):
Calories 48 (38% from fat) • carb. 6g • pro. 1g • fat 2g
sat. fat 0g • chol. 0mg • sod. 71mg • calc. 20mg • fiber 2g
Fresh Tomato and Corn Salsa
Homemade salsa in just a few minutes – and it is fat-free, too.
Makes 1¼ cups
1 garlic clove
¼ medium onion, cut into 1-inch pieces
½ jalapeño, seeded and cut into ½-inch pieces
1 green onion, cut into 1-inch pieces
¼ cup fresh cilantro
1½ teaspoons fresh lime juice
¼ teaspoon sea or kosher salt
pinch freshly ground black pepper
pinch chili powder
1 medium tomato, cut into 1-inch pieces
1
⁄
3
cup frozen corn kernels, not defrosted
Insert the blade assembly in the prep bowl. Add the garlic, onion, jalapeño, green onion
and cilantro to the bowl and pulse about 5 times, or until roughly chopped; scrape bowl.
Add the lime juice, salt, pepper, chili powder and tomato; pulse an additional 3 to 4 times.
Add the corn and pulse 2 to 3 times to combine.
Adjust seasoning to taste. Serve with warm tortilla chips.
Nutritional information per serving (2 tablespoons):
Calories 10 (6% from fat) • carb. 2g • pro. 0g • fat 0g
sat. fat 0g • chol. 0mg • sod. 100mg • calc. 4mg • fiber 1g
Citrus and Avocado Salsa
This salsa is great served on top of grilled chicken or fish.
Makes 1½ cups
1 garlic clove
¼ medium red onion, cut into 1-inch pieces
½ jalapeño, seeded and cut into ½-inch pieces
¼ cup fresh cilantro
½ tablespoon honey
¼ teaspoon sea or kosher salt
pinch freshly ground black pepper
¼ teaspoon ground cumin
1 grapefruit, white pith removed
and cut into 1-inch pieces
1 avocado, cut into ½-inch pieces
Insert the blade assembly in the prep bowl. Add the garlic, red onion, jalapeño, and
cilantro to the bowl and pulse about 5 times, or until roughly chopped; scrape bowl. Add
the honey, salt, pepper, cumin and grapefruit; pulse an additional 3 to 4 times. Add the
avocado and pulse 2 to 3 times to combine.
Adjust seasoning to taste. Pour off excess liquid before serving.
Nutritional information per serving (2 tablespoons):
Calories 30 (54% from fat) • carb. 4g • pro. 1g • fat 2g
sat. fat 0g • chol. 0mg • sod. 100mg • calc. 6mg • fiber 1g
21
Page 22

Roasted Garlic and Onion Spread
So simple to make, this sweet spread goes well with crostini.
Makes 1½ cups
6 garlic cloves, peeled
2 Vidalia (or Spanish) onions, quartered
2 tablespoons extra virgin olive oil
¾ teaspoon sea or kosher salt, divided
1 tablespoon honey
3 tablespoons fresh parsley
¾ teaspoon freshly ground black pepper
3 tablespoons grated Parmesan
Preheat oven to 450°F.
Toss garlic and onions in a large bowl with the oil, ¼ teaspoon of salt and the honey.
Spread on a foil-lined baking sheet and roast for about 25 minutes, or until vegetables are
medium browned, but not burnt.
Insert the blade assembly in the prep bowl. Add the parsley and pulse about 5 to 6 times
until chopped. Add the roasted vegetables and remaining ingredients. Pulse 2 to 3 times
and then process until completely homogenous.
Adjust seasoning to taste.
Nutritional information per serving (2 tablespoons):
Calories 45 (54% from fat) • carb. 4g • pro. 1g • fat 3g
sat. fat 1g • chol. 0mg • sod. 200mg • calc. 22mg • fiber 0g
Tapenade
A traditional French condiment. Serve alongside crackers
or a nice crusty bread.
Makes 1 cup
1 garlic clove
2½ tablespoons fresh parsley
1 cup pitted black olives (niçoise work very well)
1
⁄
3
cup pitted green olives
1½ tablespoons capers, drained and rinsed
½ teaspoon freshly ground black pepper
2 tablespoons extra virgin olive oil
Insert the blade assembly in the prep bowl. Add the garlic and parsley. Process for 5
seconds; scrape the work bowl. Add the olives and capers; pulse 10 times to chop. Add
the pepper and oil; process for 10 to 15 seconds, or until a thick paste forms.
Nutritional information per serving (1 tablespoon):
Calories 30 (87% from fat) • carb. 1g • pro. 0g • fat 3g
sat. fat 0g • chol. 0mg • sod. 120mg • calc. 12mg • fiber 0g
Roasted Pepper Tapenade
Makes 1 cup
½ red bell pepper
½ yellow pepper
½ orange pepper
2 garlic cloves
½ shallot, cut into 1-inch pieces
2 tablespoons fresh parsley
1 green onion, cut into 1-inch pieces
1
⁄
3
cup pitted black olives
1 tablespoon capers, drained and rinsed
1 teaspoon fresh lemon juice
1 tablespoon toasted pine nuts
pinch sea or kosher salt
¼ teaspoon freshly ground black pepper
Preheat oven to 450°F.
Line a baking sheet with foil and lay peppers flat, skin side up. Roast on the upper rack
until skins are just starting to brown, about 25 minutes – be sure not to roast too much so
the colors of the peppers stay vibrant and they do not get too soft. Once taken out of the
oven, cover the peppers with another sheet of foil and let sit about 10 minutes. After the 10
minutes, peel off the skins and discard. Cut peppers into 1-inch pieces; reserve.
While the peppers are roasting, start to prepare the tapenade.
Insert the blade assembly in the prep bowl. Put the garlic and shallot into the prep bowl
and process for 10 to 15 seconds; scrape bowl. Add parsley and green onion; pulse 4 to
5 times until roughly chopped. Add the olives and pulse an additional 4 to 5 times, or until
chopped. Add the reserved peppers and capers; pulse until chopped, about 4 times. Add
the remaining ingredients and pulse 2 to 3 times to combine.
Adjust seasoning to taste. Serve with crackers or crostini.
22
Page 23

Nutritional information per serving (2 tablespoons):
Calories 30 (42% from fat) • carb. 4g • pro. 1g • fat 2g
sat. fat 0g • chol. 0mg • sod. 100mg • calc. 14mg • fiber 1g
Allow the piped macaroons to sit for 40 to 60 minutes before baking (this ensures a smooth
top to the baked cookies and a better-tasting final product).
Bake the rested macaroons for 12 to 14 minutes, or until the edges just begin to brown.
Let the macaroons cool completely before removing from the parchment.
Chocolate Chip French Macaroons
These delicate meringue cookies are not the macaroons
that you’re used to. They make a beautiful presentation
on any cookie platter.
Makes 40 filled cookies or 80 plain
Macaroons
2
⁄
3
cup almond meal
1 cup confectioners’ sugar
4 large egg whites
pinch sea or kosher salt
¼ cup granulated sugar
¼ teaspoon pure vanilla extract
If using, make the ganache filling while macaroons are cooling.
In a small mixing bowl, combine the chocolate, butter and salt. In a heavy bottomed small
saucepan, bring the cream to just a boil. Pour the hot cream over the chocolate mixture.
Let sit for about 5 minutes, and then, using the Cuisinart
Hand Blender fitted with the Chef’s Whisk, gently whisk together to fully combine. Let
ganache come to room temperature, and then refrigerate for about 20 to 30 minutes until
just thickened.
Once the ganache has thickened, either pipe or spoon the filling onto the flat side of half of
the macaroons (about ½ teaspoon per macaroon). Top with a plain macaroon.
*If you do not have a piping bag, you can spoon the batter onto the pans instead.
1 ounce bittersweet or semisweet chocolate, very finely chopped (about
¼ cup chopped)
Chocolate Ganache Filling (optional):
2
⁄
3
cup bittersweet or semisweet chocolate, chopped
3 tablespoons unsalted butter, cut into ½-inch cubes
pinch sea or kosher salt
½ cup heavy cream
Preheat oven to 325°F. Line two baking sheets with parchment paper.
Insert the blade assembly into the prep bowl. Add the almond meal and confectioners’
sugar. Process until ingredients are combined, about 10 seconds. Reserve.
Put the egg whites and salt in a large mixing bowl. Using the Cuisinart
®
Smart Stick PLUS®
Cordless Hand Blender fitted with the Chef’s Whisk, whip whites for about 1 to 2 minutes,
or until the whites are beginning to thicken and froth. Gradually add the granulated sugar
and vanilla and continue to whip whites until they reach medium-firm peaks, about 3 to 4
minutes.
Very gently fold the almond/sugar mixture and the chopped chocolate into the egg whites,
taking care not to deflate the meringue.
Pour the batter into a piping bag fitted with a small to medium plain tip*. Pipe nickel-size
mounds onto the prepared pans.
Makes six ½-cup servings
½ cup granulated sugar
2 tablespoons cornstarch
¾ teaspoon sea or kosher salt, divided
1½ teaspoons ground cinnamon
¼ teaspoon cayenne
1
⁄
3
6 ounces bittersweet chocolate, chopped
2 cups whole milk
1½ teaspoons pure vanilla extract
3 large egg yolks
1 tablespoon unsalted butter
In a heavy-bottomed medium saucepan, whisk together the sugar, cornstarch, ¼ teaspoon
of salt, cinnamon, cayenne and cocoa powder. Stir in the chopped chocolate.
Nutritional information per serving (1 filled cookie):
Calories 50 (49% from fat) • carb. 6g • pro. 1g • fat 3g
sat. fat 2g • chol. 5mg • sod. 15mg • calc. 4mg • fiber 0g
Mexican Chocolate Pudding
The hint of spice in this pudding adds a wonderful twist
on the traditional chocolate pudding.
cup unsweetened cocoa powder
®
Smart Stick PLUS® Cordless
23
Page 24

In a mixing bowl, combine the milk, vanilla and egg yolks. Using the Cuisinart
®
Cordless Hand Blender fitted with the Chef’s Whisk, gently whisk together to fully
PLUS
®
Smart Stick
combine. Add to the chocolate mixture and set over medium heat. Bring the mixture to
a boil, whisking often to maintain a smooth mixture. Once the mixture comes to a boil,
continue to whisk with the hand blender for an additional 1 to 2 minutes. Whisk in the
butter.
Strain the pudding and then divide among six ramekins or custard dishes. Chill for at least
2 hours, or overnight. Note: to prevent a skin from forming on top of the pudding, cover
with plastic wrap directly on surface of pudding.
Best served chilled.
Nutritional information per serving:
Calories 330 (48% from fat) • carb. 41g • pro. 7g • fat 20g
sat. fat 10g • chol. 120mg • sod. 320mg • calc. 124mg • fiber 4g
Strawberry Shortcake
Makes about 10 to 11 individual shortcakes.
Sponge cake:
½ cup whole milk
1¼ cups cake flour
¼ teaspoon salt
1 teaspoon baking powder
6 large eggs
¾ cup granulated sugar, divided
Using the Cuisinart
attachment, beat whites until soft peaks form, about 2 minutes; add ¼ cup of sugar and
continue beating for about 3½ to 4 minutes, until whites are stiff and glossy.
Beat yolks with remaining sugar and vanilla. Beat until the mixture is pale and thick
and lemony in color, about 2 minutes. Carefully add the dry ingredients and warm milk
alternately, beginning and ending with the dry ingredients. When adding ingredients to
yolk mixture, use short pulses with the whisk attachment until incorporated, scraping bowl
with large rubber spatula between additions. Pulse in the lemon zest. Carefully fold in egg
whites in three additions: use the whisk to incorporate the first addition and then a large
spatula for the subsequent additions. Incorporate gently but thoroughly so not to deflate
the egg whites.
Pour batter into prepared pan. Bake until lightly golden and cake springs back when
touched, about 20 minutes. Allow cake to cool for about 10 minutes and then invert pan
onto a large sheet of parchment paper. Cool completely.
While cake is baking, prepare the topping.
Toss the strawberries and sugar together in a small bowl. Reserve.
Put the cream, sugar, and vanilla in a large mixing bowl. Using the Chef’s Whisk, whisk the
cream until firm peaks are achieved, about 2 to 3 minutes.
Once cake is completely cool, cut individual circles out of the sheet cake with a round
4-inch cutter.
To prepare individual cakes: top each cake with a heaping ¼ cup of whipped cream and
then top each with ¼ cup of the macerated strawberries.
1 teaspoon pure vanilla extract
1 teaspoon lemon zest
Topping:
1 pound strawberries, hulled and sliced
2 tablespoons granulated sugar
1½ cups heavy cream
¼ cup plus 2 tablespoons confectioners’ sugar
1 teaspoon pure vanilla extract
Preheat oven to 350°F. Butter a jelly-roll pan (17 x 11 x 1 inch) well and line the bottom with
a piece of parchment paper to fit the pan.
Put the milk in a small saucepan over medium-low heat. Sift dry ingredients together in a
small bowl.
Separate eggs into separate large mixing bowls.
Trademarks or service marks referred to herein are the
trademarks or service marks of their respective owners.
®
Smart Stick PLUS® Cordless Hand Blender with Chef’s Whisk
Nutritional information per serving (based on 11 shortcakes):
Calories 300 (39% from fat) • carb. 41g • pro. 5g • fat 13g
sat. fat 7g • chol. 135mg • sod. 130mg • calc. 56mg • fiber 1g
©2013 Cuisinart
150 Milford Road
East Windsor, NJ 08520
Printed in China
13CE144362
G IB-8270-ESP
24
Page 25

24
G IB-8270-ESP
13CE144362
Impreso en la China
150 Milford Road
©2013 Cuisinart
East Windsor, NJ 08520
en ésta pertenecen a sus titulares respectivos.
Todas marcas registradas o marcas de comercio mencionadas
• Grasa saturada 7g • Colesterol 135mg • Sodio 130mg • Calcio 56mg • Fibra 1g
Calorías 300 (39% de grasa) • Carbohidratos 41g • Proteínas 5g • Grasa 13g
Información nutricional por porción (basada en 11 bizcochos):
fresas encima de cada círculo.
Para armar: colocar 4 cucharadas llena de crema batida, y luego 4 cucharadas llenas de
cortador de galletas.
Una vez frío el bizcocho, cortar círculos de 4 pulgadas (10 cm) de diámetro con un
usando el accesorio batidor, hasta que se formen picos firmes.
Colocar la crema, el azúcar y la vainilla en un tazón grande. Batir durante 2–3 minutos,
Combinar las fresas y el azúcar en un tazón pequeño. Reservar.
Mientras el bizcocho está cociendo, preparar la cobertura.
enfriar completamente.
y luego desmoldar, invirtiendo la bandeja, sobre una hoja de papel sulfurizado. Dejar
minutos, hasta que las orillas estén ligeramente doradas. Dejar enfriar durante 10 minutos,
Esparcir la mezcla en la bandeja preparada. Meter al horno durante aproximadamente 20
desinflarlas.
para incorporar el resto. Incorporar las claras delicadamente, pero completamente, sin
veces: utilizar el accesorio batidor para incorporar la primera parte, y una espátula grande
de caucho. Agregar la ralladura y combinar. Incorporar delicadamente las claras, en tres
usando pulsaciones cortas. Raspar el tazón después de cada adición con una espátula
secos y la leche caliente, empezando y terminado con los ingredientes secos. Batir,
minutos, hasta obtener una mezcla pálida y espesa. Agregar, alternando, los ingredientes
Agregar el resto del azúcar y la vainilla a las yemas. Batir durante aproximadamente 2
3½–4 minutos, hasta que se formen picos firmes.
que se formen picos suaves. Agregar ¼ taza (50 g) del azúcar y seguir batiendo durante
Batir las claras, usando el accesorio batidor, durante aproximadamente 2 minutos, hasta
Separar los huevos en dos tazones diferentes.
secos, juntos. Reservar.
Calentar la leche a fuego medio-lento, en una cacerola pequeña. Tamizar los ingredientes
pulgadas (42x 30 cm) y forrar con papel sulfurizado.
Precalentar el horno a 350°F (180°C). Enmantequillar una bandeja baja de 17x11
1 cucharadita de extracto natural de vainilla
¼ taza + 2 cucharadas (35 g) de azúcar glasé
1½ taza (355 ml) de crema líquida para batir ("heavy cream")
2 cucharadas de azúcar granulado
1 libra (455 g) de fresas, partidas en dos
Cobertura:
1 cucharadita de ralladura de limón
1 cucharadita de extracto natural de vainilla
¾ taza (150 g) de azúcar granulado
6 huevos grandes
1 cucharadita de polvo de hornear
¼ cucharadita de sal
1½ taza (155 g) de harina de repostería
½ taza (120 ml) de leche entera
Bizcocho:
Cantidad: 10–11 "shortcakes" individuales
"Shortcakes" de fresa
• Calcio 124mg • Fibra 4g
• Grasa saturada 10g • Colesterol 120mg • Sodio 320mg
Calorías 330 (48% de grasa) • Carbohidratos 41g • Proteínas 7g • Grasa 20g
Información nutricional por porción:
plástico. Servir frío.
evitar que una piel se forme encima del budín, cubrir la superficie con una película de
Colar el budín y dividir entre seis ramequines. Refrigerar durante 2–12 horas. Nota: para
mantequilla.
menudo con el batidor. Cuando la mezcla hierva, licuar durante 1–2 minutos. Agregar la
Page 26

23
y poner a calentar a fuego medio. Calentar hasta que la mezcla hierva, revolviendo a
accesorio batidor, hasta obtener una mezcla suave. Agregar la mezcla de chocolate
En un tazón, combinar la leche, la vainilla y las yemas. Batir suavemente, usando el
cacao en polvo en una cacerola de fondo pesado. Revolver. Agregar el chocolate picado.
Colocar el azúcar, la maicena, ¼ cucharadita de la sal, la canela, la pimienta de canela y el
1 cucharada (15 g) de mantequilla sin sal
3 yemas de huevo grande
1½ cucharadita de extracto natural de vainilla
2 tazas (475 ml) de leche entera
6 onzas (180 g) de chocolate semi-amargo ("bittersweet"), picado
taza (40 g) de cacao amargo en polvo
3
⁄
1
¼ cucharadita de pimienta de Cayena
1½ cucharadita de canela en polvo
¾ cucharada de sal kosher o marina
2 cucharadas de maicena
½ taza (100 g) de azúcar granulado
Cantidad: 6 porciones de ½ taza (120 ml)
Las especias dan a este budín de chocolate un toque maravilloso e inesperado.
Budín de chocolate mexicano
• Grasa saturada 2g • Colesterol 5mg • Sodio 15mg • Calcio 4mg • Fibra 0g
Calorías 50 (49% de grasa) • Carbohidratos 6g • Proteínas 1g • Grasa 3g
Información nutricional por porción (1 galleta):
*Si no tienen manga pastelera, utilizar una cuchara.
la mitad de las galletas. Colocar otra galleta encima.
Una vez fría, colocar aproximadamente ½ cucharadita de "ganache" sobre el lado plano de
temperatura ambiente, y luego refrigerar durante 20–30 minutos, hasta espesarse.
el accesorio batidor, hasta obtener una mezcla suave. Dejar la "ganache" enfriar a
caliente sobre el chocolate. Dejar reposar durante 5 minutos, y luego batir, usando
en una cacerola de fondo pesado y calentar hasta que empiece a hervir. Echar la crema
Combinar el chocolate, la mantequilla y la sal en un tazón pequeño. Colocar la crema
Si usa "ganache", rellenar los macarrones aún tibios.
enfriar completamente, sobre la placa.
Meter al horno durante 12–14 minutos, hasta que las orillas empiecen a dorarse. Dejar
Dejar reposar durante 40–60 minutos antes de meter al horno.
Formar pequeños merengues sobre las placas.
Colocar la mezcla en una manga pastelera con una boquilla simple pequeña a mediana.
teniendo cuidado de no desinflar el merengue.
Incorporar muy delicadamente la mezcla de almendras/azúcar y el chocolate picado,
picos medio-firmes.
azúcar granulado y la vainilla y seguir batiendo durante 3–4 minutos, hasta que se formen
batidor, durante 1–2 minutos, hasta que empiecen a espesarse. Agregar poco a poco el
Colocar las claras de los huevos y la sal en un tazón grande. Batir, usando el accesorio
Procesar durante 10 segundos para combinar. Reservar.
Instalar el accesorio picador/moledor. Agregar las almendras en polvo y el azúcar glasé.
Precalentar el horno a 325°F (160°C). Forrar dos placas para horno con papel sulfurizado.
½ taza (120 ml) de crema líquida para batir ("heavy cream")
1 pizca de sal marina o kosher
3 cucharadas (45 g) de mantequilla sin sal, en pedacitos
("semisweet"), picado
taza (120 g) de chocolate semi-amargo ("bittersweet") o semi-dulce
3
⁄
2
"Ganache" de chocolate (opcional)
("semisweet"), finamente picado
1 onza (30 g) de chocolate semi-amargo ("bittersweet") o semi-dulce
¼ cucharadita de extracto natural de vainilla
¼ taza (50 g) de azúcar granulado
1 pizca de sal marina o kosher
4 claras de huevo grande
1 taza (120 g) de azúcar glasé
taza (75 g) de almendras en polvo
3
⁄
2
Macarrones
Cantidad: 40 galletas rellenas o 80 galletas simples
hermosos, sobre cualquier plato.
Estas deliciosas galletas de merengue no son macarrones comunes. Lucen
Macarrones franceses con chispas de chocolate
• Grasa saturada 0g • Colesterol 0mg • Sodio 100mg • Calcio 14mg • Fibra 1g
Calorías 30 (42% de grasa) • Carbohidratos 4g • Proteínas 1g • Grasa 2g
Información nutricional por porción (2 cucharadas):
Page 27

22
Ajustar la sazón al gusto. Servir con vegetales crudos o "crostini".
2 ó 3 veces para combinar.
y pulsar aproximadamente 4 veces para picar. Agregar el resto de los ingredientes y pulsar
Agregar las aceitunas y pulsar 4 ó 5 veces. Agregar los pimientos asados y las alcaparras
veces. Raspar el bol. Agregar el perejil y la cebolleta y pulsar 4 ó 5 veces para picar.
Instalar el accesorio picador/moledor. Colocar el ajo y el chalote en el bol y pulsar 10–15
Empezar a preparar el "tapenade".
pedazos y reservar.
aluminio y dejar reposar durante 10 minutos. Después de 10 minutos, pelar. Cortar en
hasta que estén bien dorados, pero no quemados. Retirar del horno, cubrir con papel de
lado con piel apuntando hacia arriba. Asar sobre la rejilla superior durante 25 minutos,
Disponer los pimientos sobre una placa para horno forrada con papel de aluminio, el
Precalentar el horno a 450°F (230°C).
¼ cucharadita de pimienta negra recién molida
1 pizca de sal marina o kosher
1 cucharada de piñones tostados
1 cucharadita de jugo de limón fresco
1 cucharada de alcaparras, lavadas y escurridas
taza (65 g) de aceitunas negras
3
⁄
1
1 cebolleta ("green onions"), en trozos
2 cucharadas de perejil fresco
½ chalote, en trozos
2 dientes de ajo
½ pimiento dulce anaranjado
½ pimiento dulce amarillo
½ pimiento dulce rojo
Cantidad: 1 taza (235 ml)
"Tapenade" de pimiento rojo asado
• Grasa saturada 0g • Colesterol 0mg • Sodio 120mg • Calcio 12 mg • Fibra 0g
Calorías 30 (87% de grasa) • Carbohidratos 1g • Proteínas 0g • Grasa 3g
Información nutricional por porción (1 cucharada):
la pimienta y el aceite. Procesar durante 10–15 segundos, hasta obtener una pasta espesa.
segundos. Raspar el bol. Agregar las aceitunas y las alcaparras y pulsar 10 veces.. Agregar
Instalar el accesorio picador/moledor. Agregar el ajo y el perejil. Procesar durante 5
crujiente.
"Tapenade"
2 cucharadas de aceite de oliva virgen extra
½ cucharadita de pimienta negra recién molida
1½ cucharada de alcaparras, lavadas y escurridas
taza (65 g) de aceitunas verdes
3
⁄
1
1 taza (200 g) de aceitunas negras deshuesadas
2½ cucharadas de perejil fresco
1 diente de ajo
Cantidad: 1 taza (235 ml)
Condimento francés tradicional. Ideal para servir con galletas saladas o pan
• Grasa saturada 1g • Colesterol 0mg • Sodio 200mg • Calcio 22mg • Fibra 0g
Calorías 45 (54% de grasa) • Carbohidratos 4g • Proteínas 1g • Grasa 3g
Información nutricional por porción (2 cucharadas):
Ajustar la sazón al gusto.
obtener una mezcla homogénea.
vegetales asados y los ingredientes remanentes. Pulsar 2–3 veces, y luego procesar hasta
Instalar el accesorio picador/moledor. Agregar el perejil y pulsar 5 ó 6 veces. Agregar los
durante 25 minutos, hasta que los vegetales estén bien dorados, pero no quemados.
Esparcir la mezcla sobre una placa para horno forrada con papel de aluminio y asar
Combinar el ajo, la cebolla, el aceite ¼ cucharadita de la sal y la miel en un tazón grande.
Precalentar el horno a 450°F (230°C).
3 cucharadas de queso Parmesano rallado
¾ cucharadita de pimienta negra recién molida
3 cucharadas de perejil fresco
1 cucharada de miel
¾ cucharada de sal kosher o marina
2 cucharadas de aceite de oliva virgen extra
2 cebollas Vidalia, en cuartos
6 dientes de ajo
Cantidad: 1½ taza (355 ml)
Esta crema muy fácil de preparar es ideal para servir con "crostini".
Crema para untar de ajo y cebolla asados
Page 28

21
• Grasa saturada 0g • Colesterol 0mg • Sodio 100mg • Calcio 6mg • Fibra 1g
Calorías 30 (54% de grasa) • Carbohidratos 4g • Proteínas 1g • Grasa 2g
Información nutricional por porción (2 cucharadas):
Ajustar la sazón al gusto. Eliminar el exceso de líquido antes de servir.
veces para combinar.
pimienta, el comino y la toronja. Pulsar 3–4 veces más. Agregar el aguacate. Pulsar 2 ó 3
en el bol y pulsar 5 veces, hasta picar grueso. Raspar el bol. Agregar la miel, la sal, la
Instalar el accesorio picador/moledor. Colocar el ajo, la cebolla, el jalapeño y el cilantro
1 aguacate, en pedazos
1 toronja, pelada y cortada en pedazos (quitar la piel amarga)
¼ cucharadita de comino en polvo
1 pizca de pimienta negra recién molida
¼ cucharadita de sal marina o kosher
½ cucharada de miel
¼ taza (15 g) de cilantro fresco
½ jalapeño mediano, sin semillas, en trocitos
1 cebolla roja mediana, en pedazos
1 diente de ajo
Cantidad: 1½ taza (355 ml)
Esta salsa es perfecta para servir con pollo asado o pescado.
Salsa de aguacate y cítricos
• Grasa saturada 0g • Colesterol 0mg • Sodio 100mg • Calcio 4mg • Fibra 1g
Calorías 10 (6% de grasa) • Carbohidratos 2g • Proteínas 0g • Grasa 0g
Información nutricional por porción (2 cucharadas):
Ajustar la sazón al gusto. Servir con chips de maíz calientes.
maíz. Pulsar 2 ó 3 veces para combinar.
de lima, la sal, la pimienta, el chile en polvo y el tomate. Pulsar 3–4 veces más. Agregar el
y el cilantro en el bol y pulsar 5 veces, hasta picar grueso. Raspar el bol. Agregar el jugo
Instalar el accesorio picador/moledor. Colocar el ajo, la cebolla, el jalapeño, la cebolleta
taza (65 g) de maíz en grano congelado
3
⁄
1
1 tomate mediano, en trozos
1 pizca de chile en polvo
1 pizca de pimienta negra recién molida
¼ cucharadita de sal marina o kosher
1½ cucharadita de jugo de lima fresco
¼ taza (15 g) de cilantro fresco
1 cebolleta ("green onions"), en trozos
½ jalapeño mediano, sin semillas, en trocitos
¼ cebolla mediana, en pedazos
1 diente de ajo
Cantidad: 1¼ taza (295 ml)
Salsa casera sin grasa, lista en minutos.
Salsa de tomates y maíz
• Grasa saturada 0g • Colesterol 0mg • Sodio 71mg • Calcio 20mg • Fibra 2 g
Calorías 48 (38% de grasa) • Carbohidratos 6g • Proteínas 1g • Grasa 2g
Información nutricional por porción (2 cucharadas):
Ajustar la sazón al gusto.
combinar los ingredientes. Agregar el queso y pulsar 2–3 veces.
1 cucharada de frijoles. Pulsar 2–3 veces, luego procesar durante 5 segundos, hasta
durante 5 segundos. Raspar el bol. Agregar los ingredientes remanentes, reservando
Instalar el accesorio picador/moledor. Agregar el ajo, el jalapeño y el cilantro. Procesar
1 cucharada de agua
1 cucharada de aceite de oliva virgen extra
¾ cucharadita de pimienta negra recién molida
¼ cucharadita de sal marina o kosher
½ cucharadita de comino en polvo
3 cucharadas de jugo de lima fresco
1 taza (200 g) de frijoles negros cocinados
2 cucharadas de cilantro fresco
½ jalapeño mediano, sin semillas, en trocitos
1 diente de ajo
Cantidad: 1 taza (235 ml)
Crema para untar de frijoles negros
Page 29

20
Humus
saturada 1g • Colesterol 0mg • Sodio 230mg • Calcio 39mg • Fibra 2 g
Calorías 120 (63% de grasa) • Carbohidratos 9g • Proteínas 3g • Grasa 9g • Grasa
Información nutricional por porción (2 cucharadas):
Ajustar la sazón al gusto.
agregue más agua.
obtener una mezcla muy suave. Si desea una consistencia menos espesa, simplemente
ó 8 veces. Agregar el aceite y procesar hasta emulsionar. Agregar el agua y procesar hasta
el bol. Agregar los garbanzos, la salsa Tahini, el jugo de limón, la sal y la pimienta. Pulsar 6
Instalar el accesorio picador/moledor. Poner el ajo en el bol y pulsar 10–15 veces. Raspar
taza (80 ml) de agua (usar más si es necesario)
3
⁄
1
3 cucharadas de aceite de oliva virgen extra
¼ cucharadita de pimienta negra recién molida
½ cucharadita de sal marina o kosher
2 cucharadas de jugo de limón fresco
3½ cucharadas de salsa Tahini
1 taza (200 g) de garbanzos
1 diente de ajo
Cantidad: 1 taza (235 ml)
• Grasa saturada 0g • Colesterol 0mg • Sodio 130mg • Calcio 32mg • Fibra 0g
Calorías 15 (1% de grasa) • Carbohidratos 3g • Proteínas 1g • Grasa 0g
Información nutricional por porción (1 cucharada):
Ajustar la sazón al gusto.
ingredientes remanentes y procesar para combinar.
el bol. Agregar el eneldo y el estragón y pulsar 4 ó 5 veces para picar. Agregar los
Instalar el accesorio picador/moledor. Poner el ajo en el bol y pulsar 10–15 veces. Raspar
½ taza (120 ml) de yogur griego (u otro yogur escurrido)
1 cucharada de jugo de limón fresco
¾ cucharadita de azúcar granulado
¼ cucharadita de pimienta negra recién molida
¼ cucharadita de sal marina o kosher
1 cucharadas de vinagre blanco
½ cucharada de mostaza de Dijon
½ cucharada de estragón fresco
1 cucharada de eneldo fresco
1 diente de ajo
taza (160 ml)
3
∕
2
Cantidad:
Es perfecto para servir con vegetales crudos.
aderezos cremoso tradicionales.
Aderezo de yogur y hierbas frescas
Información nutricional por porción (1 cucharada):
el vinagre de su elección.
Vinagreta básica
Información nutricional por porción (¼ taza/60 ml):
Este aderezo picante es cremoso, sin embargo, tiene menos grasa que los
• Grasa saturada 0g • Colesterol 0mg • Sodio 98mg • Calcio 0mg • Fibra 0g
Calorías 8 (82% de grasa) • Carbohidratos 0g • Proteínas 0g • Grasa 1g
refrigerador 30 minutos antes de usar. Procesar durante unos segundos si es necesario.
en el refrigerador, durante hasta una semana, en un recipiente hermético. Sacar del
Si el tiempo lo permite, dejar reposar durante 30 minutos o más antes de usar. Conservar
Ajustar la sazón al gusto.
veces. Agregar el aceite y procesar hasta emulsionar.
el bol. Agregar la mostaza, el vinagre, el jugo de limón, la sal y la pimienta. Pulsar 4 ó 5
Instalar el accesorio picador/moledor. Poner el ajo en el bol y pulsar 10–15 veces. Raspar
1¼ taza (295 ml) de aceite de oliva virgen extra
½ cucharadita de pimienta negra recién molida
¾ cucharadita de sal marina o kosher
1 cucharadita de jugo de limón fresco
1 cucharada de vinagre de vino tinto
2 cucharaditas de mostaza de Dijon
1 diente de ajo
Cantidad: 1½ taza (355 ml)
Esta receta básica puede modificarse fácilmente, usando el aceite y
• Grasa saturada 0g • Colesterol 0mg • Sodio 460mg • Calcio 27mg • Fibra 2 g
Calorías 100 (21% de grasa) • Carbohidratos 17g • Proteínas 3g • Grasa 3g
Ajustar la sazón al gusto.
varilla sumergida al licuar.
Licuar hasta que la mezcla esté suave y empiece a espesarse. Cerciorarse de mantener la
miel y el jugo de limón/lima.
reducir el fuego y cocer a fuego lento durante 10–15 minutos. Agregar la sal remanente, la
Page 30

Salsa multiuso perfecta para servir con platos mexicanos.
Salsa de chile ancho
Información nutricional por porción (¼ taza/60 ml):
19
evaporarse casi por completo. Agregar el caldo de pollo, esperar hasta que hierva y luego
un minuto adicional. Agregar el vino. Raspar el fondo del sartén. Reducir el vino hasta
minutos, hasta que estén suaves y ligeramente dorados. Agregar los chiles y cocer durante
mezcla de chalote/ajo/jalapeño y una pizca de la sal. Saltear durante aproximadamente 5
Calentar el aceite de oliva a fuego medio en una salteadora o un sartén. Agregar la
procesar durante 6–8 segundos para picar grueso. Reservar.
Instalar el accesorio picador/moledor. Colocar el chalote, el ajo y el jalapeño en el bol y
suaves. Cuando estén suaves, retirar las semillas y los tallos y reservar.
aluminio o con un plato. Dejar reposar durante 30–45 minutos, hasta que los chiles estén
Poner los chiles en un tazón y cubrir con agua hirviente. Cubrir el tazón con papel de
1 cucharada de jugo de limón/lima fresco
2 cucharadas de miel
1 cucharadita de sal kosher o marina
1 taza (235 ml) de caldo de pollo caliente
¼ taza (60 ml) de vino blanco
1 cucharada de aceite de oliva virgen extra
1 jalapeño, sin semillas, en trocitos
1 diente de ajo
1 chalote grande, en trozos
6 chiles anchos, secos
Cantidad: 1½ taza (355 ml)
• Grasa saturada 0g • Colesterol 0mg • Sodio 149mg • Calcio 14mg • Fibra 1g
Calorías 42 (37% de grasa) • Carbohidratos 6g • Proteínas 1g • Grasa 2g
Ajustar la sazón al gusto.
sumergida al licuar.
Licuar hasta que la mezcla esté suave y homogénea. Cerciorarse de mantener la varilla
lento durante 10 segundos adicionales.
minutos, hasta que espese. Agregar el azúcar, probar y ajustar la sazón. Cocer a fuego
hierva bien. Agregar la albahaca, las especias y la sal. Cocer a fuego lento durante 20–30
jugo, aplastándolas suavemente con un cucharón de madera. Cocer hasta que la mezcla
y saltear durante 5 minutos, hasta que esté suave y fragante. Agregar los tomates y su
Poner el aceite de oliva a calentar a fuego lento, en una cacerola grande. Agregar el ajo
Salsa Marinara
Información nutricional por porción (1 cucharada):
Ketchup
¼ taza (50 g) de azúcar granulado
1 pizca de sal marina o kosher
¼ cucharadita de semillas de hinojo
1 cucharadita de orégano seco
½ cucharadita de pimienta negra recién molida
10 hojas de albahaca fresca, picadas
2 latas de 28 onzas (810 g) de puré de tomate
10 dientes de ajo, finamente picados
3 cucharadas de aceite de oliva virgen extra
Cantidad: 6 tazas (1.4 L)
• Grasa saturada 0g • Colesterol 0mg • Sodio 85mg • Calcio 5mg • Fibra 0g
Calorías 20 (10% de grasa) • Carbohidratos 5g • Proteínas 0g • Grasa 0g
Ajustar la sazón al gusto.
varilla sumergida al licuar.
Licuar hasta que la mezcla esté suave y empiece a espesarse. Cerciorarse de mantener la
Colocar los vegetales salteados en el vaso medidor. Agregar el resto de los ingredientes.
cebolla. Saltear durante aproximadamente 5 minutos, hasta que estén suaves.
Calentar el aceite de oliva a fuego medio-lento, en un sartén mediano. Agregar el ajo y la
¼ cucharadita de pimienta de Jamaica en polvo
1 pizca de pimienta negra recién molida
¼ cucharadita de canela en polvo
½ cucharadita de mostaza de Dijon
¾ cucharadita de sal marina o kosher
taza (60 ml) de vinagre de sidra de manzana
3
⁄
1
½ taza (100 g) de azúcar moreno
1 lata de 6 onzas (170 g) de concentrado de tomate
1 lata de 14.5 onzas (420 g) de tomates picados, escurridos
½ cebolla roja mediana, picada
1 diente de ajo, picado
½ cucharada de aceite de oliva virgen extra
Cantidad: 2 tazas (475 ml)
Page 31

18
es una marca registrada de Nabisco.
®
Información nutricional por porción (1 cucharada):
)
®
Mayonesa
Información nutricional por porción (1 taza/235 ml):
EggBeaters
• Grasa saturada 0g • Colesterol 0mg • Sodio 100mg • Calcio 1mg • Fibra 1g
Calorías 30 (96% de grasa) • Carbohidratos 4g • Proteínas 1g • Grasa 2g
que la mezcla esté espesa.
aproximadamente 30 segundos más, con un movimiento suave hacia arriba y abajo, hasta
Agregar el aceite 2 cucharadas a la vez, sin dejar de licuar. Seguir licuando durante
la mezcla empiece a espesarse. Cerciorarse de mantener la varilla sumergida al licuar.
Crema de zanahoria y jengibre
Colocar todos los ingredientes, excepto el aceite, en el vaso medidor. Licuar hasta que
tazas (160 ml) de aceite vegetal
3
⁄
2
1 pizca de pimienta blanca recién molida
1 pizca de sal marina o kosher
Información nutricional por porción (1 taza/235 ml):
½ cucharadita de azúcar granulado
½ cucharada de mostaza de Dijon
½ cucharada de vinagre de vino blanco
1 cucharada de jugo de limón fresco
¼ taza (60 ml) de sustituto de huevo pasteurizado (como EggBeaters
Cantidad: 1 taza (235 ml)
• Grasa saturada 2g • Colesterol 5mg • Sodio 490mg • Calcio 72mg • Fibra 3g
Calorías 150 (39% de grasa) • Carbohidratos 20g • Proteínas 3g • Grasa 7g
Nota: Esta crema es muy espesa. Si desea que sea más líquida, agregar más caldo.
Probar y ajustar la sazón al gusto.
mezcla suave y homogénea. Cerciorarse de mantener la varilla sumergida al licuar.
Agregar la crema. Licuar, con un movimiento suave hacia arriba y abajo, hasta obtener una
hasta que hierva. Reducir el fuego y seguir cociendo a fuego lento durante 8–10 minutos.
Agregar el caldo de vegetales, y el resto del jengibre, de la sal y de la pimienta. Calentar
suaves. Agregar el vinagre y reducir hasta que se haya evaporado casi por completo.
ajustar el fuego a medio-alto, Saltear por 2–3 minutos, hasta que las zanahorias estén
durante aproximadamente 5 minutos, hasta que estén suaves. Agregar las zanahorias y
chalotes, 2 cucharadas del jengibre y una pizca de sal y pimienta. Saltear los vegetales
Poner el aceite de oliva a calentar a fuego lento, en una cacerola grande. Agregar los
taza (80 ml) de crema líquida "half-and-half" (mitad leche/mitad crema)
3
⁄
1
5 tazas (710 ml) de caldo de vegetales
2 cucharadas de vinagre de arroz
Esta deliciosa crema es muy ligera y saludable.
Crema ligera de brécol y papas
2 libras (910 g) de zanahorias, en trozos
¾ cucharadita de pimienta negra recién molida
1 cucharadita de sal kosher o marina
3 cucharadas de jengibre fresco finamente rallado
2 chalotes, picados
3 cucharadas de aceite de oliva virgen extra
Cantidad: 8 tazas (1.9 L)
• Grasa saturada 2g • Colesterol 5mg • Sodio 680mg • Calcio 71mg • Fibra 4g
Calorías 140 (39% de grasa) • Carbohidratos 17g • Proteínas 5g • Grasa 7g
Nota: Esta crema es muy espesa. Si desea que sea más líquida, agregar más caldo.
sazón al gusto.
y homogénea. Cerciorarse de mantener la varilla sumergida al licuar. Probar y ajustar la
Licuar, con un movimiento suave hacia arriba y abajo, hasta obtener una mezcla suave
tiernas.
el resto de la sal y pimienta. Seguir cociendo a fuego lento hasta que las verduras estén
Reducir el fuego y agregar los cogollitos de brécol, la ralladura, el queso Parmesano y
el jerez hasta que se haya evaporado casi por completo. Agregar el caldo y dejar hervir.
y pimienta. Saltear a fuego medio durante 2–3 minutos, luego agregar el jerez. Reducir
suave. Subir el fuego y agregar las papas y los tallos de brécol a la olla. Sazonar con sal
la cebolla, y una pizca de sal y pimienta. Saltear durante 8–10 minutos, hasta que esté
Poner el aceite de oliva a calentar a fuego lento, en una cacerola grande. Agregar el ajo,
3 cucharadas de queso Parmesano rallado
¾ cucharadita de ralladura de limón
4 tazas (945 ml) de caldo de vegetales caliente
3 cucharadas de jerez
1 libra (455 g) de patatas, peladas en cortadas en cubos
2 libras (910 g) de brécol (tallos pelados y cogollitos separados)
1 cucharadita de pimienta negra recién molida
1¾ cucharadita de sal marina o kosher
½ cebolla roja mediana, picada
2 dientes de ajo, picados
2½ cucharadas de aceite de oliva virgen extra
Cantidad: 10 tazas (2.3 L)
Page 32

17
• Grasa saturada 1g • Colesterol 5mg • Sodio 360mg • Calcio 59mg • Fibra 2 g
Calorías 120 (40% de grasa) • Carbohidratos 16g • Proteínas 2g • Grasa 6g
Información nutricional por porción (1 taza/235 ml):
Nota: Esta crema es muy espesa. Si desea que sea más líquida, agregar más caldo.
Probar y ajustar la sazón al gusto.
mezcla suave y homogénea. Cerciorarse de mantener la varilla sumergida al licuar.
Agregar la leche. Licuar, con un movimiento suave hacia arriba y abajo, hasta obtener una
estén tiernos.
Reducir el fuego y cocinar a fuego lento durante 5–8 minutos, hasta que los vegetales
y reducir hasta que se haya evaporado casi por completo. Agregar el caldo y dejar hervir.
hasta que estés suaves. Agregar las chirivías asadas y el vino. Subir el fuego ligeramente
y translúcidos. Agregar las manzanas, tapar y cocer durante aproximadamente 8 minutos,
cacerola grande. Agregar los chalotes y cocer durante 3 minutos, hasta que estén suaves
Durante este tiempo, calentar el resto del aceite de oliva a fuego medio-lento en una
quemarlas.
durante 30–35 minutos, hasta que las chirivías estén suaves y doradas. Cerciorarse de no
Colocar la mezcla sobre una placa para horno forrada con papel de aluminio y asar
Combinar 1½ cucharada del aceite de oliva, las chirivías, la sal y la pimienta en un tazón.
Precalentar el horno a 400°F (200°C).
1 taza (235 ml) de leche baja en grasa
5 tazas (1.2 L) de caldo de vegetales caliente
¼ taza (60 ml) de vino blanco
2 manzanas medianas, peladas y cortadas en pedazos
2 chalotes pequeños, finamente picados
¼ cucharadita de sal marina o kosher
2½ libras (1.1 kg) de chirivías ("parsnips"), peladas y cortadas en rodajas
3½ cucharadas de aceite de oliva virgen extra
Cantidad: 10 tazas (2.3 L)
Crema de chirivía asada y manzana
Información nutricional por porción (1 taza/235 ml):
Puede servirse caliente o fría.
Esta sopa es hermosa, ligera y fresca.
Crema de arvejas
• Grasa saturada 3g • Colesterol 10mg • Sodio 660mg • Calcio 75mg • Fibra 4g
Calorías 180 (43% de grasa) • Carbohidratos 18g • Proteínas 7g • Grasa 9g
Probar y ajustar la sazón al gusto.
homogénea. Cerciorarse de mantener la varilla sumergida al licuar.
Licuar, con un movimiento suave hacia arriba y abajo, hasta obtener una mezcla suave y
adicionales. Agregar el perejil, la crema y el jugo de limón.
que las arvejas estén suaves. Agregar el resto de las arvejas y cocer durante 2–3 minutos
hasta que hierva. Reducir el fuego, tapar y hervir a fuego lento durante 5 minutos, hasta
caldo de vegetales, la mitad de las arvejas y el resto de la sal y de la pimienta. Calentar
a medio-alto. Reducir el vino hasta que se haya evaporado casi por completo. Agregar el
minutos, hasta que los vegetales estén suaves y fragantes. Agregar el vino y cocer fuego
ajo, el puerro y una pizca de sal y de pimienta, y saltear durante aproximadamente 10
Poner el aceite de oliva a calentar a fuego lento, en una cacerola grande. Agregar el
3 cucharadas de jugo de limón fresco
(mitad leche/mitad crema)
1 taza (235 ml) de crema líquida "half-and-half"
taza (20 g) de perejil picado
3
⁄
1
2 libras (910 g) de arvejas congeladas
3–4 tazas (710–945 ml) de caldo de vegetales
taza (80 ml) de vino blanco
3
⁄
1
¾ cucharadita de pimienta negra recién molida
1 cucharadita de sal kosher o marina
1 puerro mediano, cortado longitudinalmente por la mitad y picado
3 dientes de ajo, machacados
3 cucharadas de aceite de oliva virgen extra
Cantidad: 8 tazas (1.9 L)
Page 33

Información nutricional por porción (1 taza/235 ml):
Esta sabrosa colada será el éxito de su próxima fiesta.
Colada de frutas mixtas
• Calcio 294mg • Fibra 2 g
Información nutricional por porción (1 taza/235 ml):
El último batido para los amantes del chocolate.
Batido con triple chocolate
Calorías 240 (24% de grasa) • Carbohidratos 29g • Proteínas 2g • Grasa 7g
• Grasa saturada 12g • Colesterol 120mg • Sodio 140mg
16
• Grasa saturada 6g • Colesterol 0mg • Sodio 20mg • Calcio 14mg • Fibra 3g
Servir con o sin hielo.
y homogénea. Cerciorarse de mantener la varilla sumergida al licuar.
segundos, con un movimiento suave hacia arriba y abajo, hasta obtener una mezcla suave
Colocar todos los ingredientes en en una jarra grande. Licuar durante aproximadamente 50
2½ tazas (300 g) de durazno congelado
3 tazas (495 g) de cubos de piña fresca
2 bananos, en trozos
8 onzas (235 ml) de crema de coco
8 onzas (235 ml) de ron claro
2 tazas (475 ml) de jugo de naranja, pera, mango
Cantidad: 8 porciones de 8 onzas (235 ml)
Batido verde
Calorías 400 (43% de grasa) • Carbohidratos 47g • Proteínas 9g • Grasa 19g
licuar.
obtener una mezcla suave y homogénea. Cerciorarse de mantener la varilla sumergida al
aproximadamente 40 segundos, con un movimiento suave hacia arriba y abajo, hasta
Colocar todos los ingredientes en el vaso medidor, en el orden indicado. Licuar durante
2 cucharadas de jarabe de chocolate
1 taza (235 ml) de helado de chocolate
¾ taza (175 ml) de leche con chocolate
Cantidad: 2 tazas (475 ml)
Batido súper antioxidante
Información nutricional por porción (1 taza/235 ml):
Información nutricional por porción (1 taza/235 ml):
Este sabroso batido está lleno de vitamina C.
Calorías 120 (4% de grasa) • Carbohidratos 30g • Proteínas 2g • Grasa 1g
Calorías 116 (4% de grasa) • Carbohidratos 29g • Proteínas 2g • Grasa 1g
• Grasa saturada 0g • Colesterol 0mg • Sodio 25mg • Calcio 46mg • Fibra 4g
licuar.
obtener una mezcla suave y homogénea. Cerciorarse de mantener la varilla sumergida al
aproximadamente 30 segundos, con un movimiento suave hacia arriba y abajo, hasta
Colocar todos los ingredientes en el vaso medidor, en el orden indicado. Licuar durante
½ taza (100 g) de cubos de piña
1 taza (200 g) de cubos de melón
2 kiwis, en cubos
½ taza (120 ml) de jugo de naranja o de manzana
Cantidad: 2 tazas (475 ml)
• Grasa saturada 0g • Colesterol 0mg • Sodio 11mg • Calcio 56mg • Fibra 3g
licuar.
obtener una mezcla suave y homogénea. Cerciorarse de mantener la varilla sumergida al
aproximadamente 30 segundos, con un movimiento suave hacia arriba y abajo, hasta
Colocar todos los ingredientes en el vaso medidor, en el orden indicado. Licuar durante
½ taza (100 g) de fresas congeladas
½ taza (100 g) de cubos de mango
½ taza (100 g) de pedazos de toronja, sin membrana
½ taza (100 g) de pedazos de naranja, sin membrana
½ taza (120 ml) de jugo de naranja
Cantidad: 2 tazas (475 ml)
Page 34

15
Batido proteico
Batido de desayuno para el camino
• Grasa saturada 1g • Colesterol 0mg • Sodio 170mg • Calcio 232mg • Fibra 3g
Calorías 190 (9% de grasa) • Carbohidratos 33g • Proteínas 13g • Grasa 2g
Información nutricional por porción (1 taza/235 ml):
licuar.
obtener una mezcla suave y homogénea. Cerciorarse de mantener la varilla sumergida al
aproximadamente 30 segundos, con un movimiento suave hacia arriba y abajo, hasta
Colocar todos los ingredientes en el vaso medidor, en el orden indicado. Licuar durante
1–2 cucharadas de miel (opcional)
2 cucharadas de proteínas en polvo
½ taza (70 g) de arándanos azules congelados
½ taza (75 g) de cubos de mango
1 banano, en trozos
puede usar leche de soya o de arroz)
1 taza (235 ml) de leche descremada o semi-descremada (también
Cantidad: 2 tazas (475 ml)
• Grasa saturada 1g • Colesterol 0mg • Sodio 65mg • Calcio 185mg • Fibra 4g
Calorías 320 (7% de grasa) • Carbohidratos 69g • Proteínas 6g • Grasa 3g
Información nutricional por porción (1 taza/235 ml):
licuar.
obtener una mezcla suave y homogénea. Cerciorarse de mantener la varilla sumergida al
aproximadamente 30 segundos, con un movimiento suave hacia arriba y abajo, hasta
Colocar todos los ingredientes en el vaso medidor, en el orden indicado. Licuar durante
1 cucharada de semillas de linaza en polvo
3–4 fresas congeladas
½ taza (70 g) de arándanos azules congelados
½ banano, en trozos
6 tazas (175 ml) de yogur de vainilla bajo en grasa
¾ taza (175 ml) de jugo de naranja, durazno y mango
Cantidad: 2 tazas (475 ml)
"Shortcakes" de fresa .................................................................................... 24
Budín de chocolate mexicano ....................................................................... 23
Macarrones franceses con chispas de chocolate ......................................... 23
Postres
"Tapenade" de pimiento rojo asado .............................................................. 22
"Tapenade" .................................................................................................... 22
Crema para untar de ajo y cebolla asados .................................................... 22
Salsa de aguacate y cítricos .......................................................................... 21
Salsa de tomates frescos y maíz ................................................................... 21
Crema para untar de frijoles negros .............................................................. 21
Humus ............................................................................................................ 20
Aderezo de yogur y hierbas frescas .............................................................. 20
Vinagreta básica ............................................................................................. 20
Salsa de chile ancho ...................................................................................... 19
Salsa marinara ................................................................................................ 19
Ketchup .......................................................................................................... 19
Mayonesa ....................................................................................................... 18
Crema de zanahoria y jengibre ...................................................................... 18
Crema ligera de brécol y papas ..................................................................... 18
Crema de chirivía asada y manzana .............................................................. 17
Crema de arvejas ........................................................................................... 17
Cremas, salsas, salsas para mojar y cremas para untar
Colada de frutas mixtas ................................................................................. 16
Batido con triple chocolate ............................................................................ 16
Batido verde ................................................................................................... 16
Batido súper antioxidante .............................................................................. 16
Batido proteico ............................................................................................... 15
Batido de desayuno para el camino .............................................................. 15
Batidos y otras bebidas
RECETAS
Page 35

14
reemplazo o reembolso de los productos defectuosos durante el período de garantía.
manera económica. Cuisinart será responsable por los gastos de servicio, reparación,
un centro de servicio independiente, siempre que se pueda ajustar o reparar el producto de
éste se dañe. Si estas dos opciones no satisfacen al consumidor, podrá llevar el producto a
producto, menos la cantidad imputable al uso del producto por el consumidor hasta que
independiente, cambiará el producto o reembolsará el consumidor por el precio original del
La tienda, a su opción, reparará el producto, referirá el consumidor a un centro de servicio
de este tipo.
®
MURAL A LA PARED
PATRÓN PARA MONTAR EL SOPORTE
correctas para repararlo y asegurarse de que el producto esté bajo garantía.
Cuisinart al 1-800-726-0190 a fin de diagnosticar el problema correctamente, usar las piezas
favor informe al personal del centro de servicio que deberían llamar al servicio posventa de
Importante: Si debe llevar el aparato defectuoso a un centro de servicio no autorizado, por
varían de un Estado a otro.
limitaciones mencionadas pueden no regir para usted. Usted puede tener otros derechos que
permiten la exclusión o limitación de daños incidentales o consecuentes, de modo que las
excluye expresamente todos los daños incidentales o consecuentes. Algunos Estados no
no es válida en caso de daños causados por mal uso, negligencia o accidente. Esta garantía
convertidor de voltaje. Esta garantía no cubre el uso institucional o comercial del producto, y
reparaciones no autorizados por Cuisinart, así como los daños causados por el uso de un
Esta garantía excluye expresamente los daños causados por accesorios, piezas o
sobre corriente de 120V, usando accesorios y piezas de repuesto autorizados solamente.
Este aparato satisface las más altas exigencias de fabricación y ha sido diseñado para uso
cercano.
si su aparato sigue bajo garantía y le indicará la dirección del centro de servicio más
al 1-800-726-0190 antes de regresar el aparato a Cuisinart. Un representante le confirmará
Si su aparato tiene algún problema, le recomendamos que llame a nuestro servicio posventa
ANTES DE HACER REPARAR SU APARATO
productos defectuosos durante el período de garantía.
Cuisinart será responsable por los gastos de reparación, reemplazo, manejo y envío de los
nuestro servicio posventa al 1-800-726-0190.
directamente a Cuisinart para que lo reparen o lo cambien. Para esto, se debe llamar a
Los residentes de California también pueden, si lo desean, mandar el aparato defectuoso
en una tienda, para uso personal o casero. A excepción de
®
donde lo compraron o (B) a otra tienda que venda productos Cuisinart
residentes del estado de California pueden (A) regresar el producto defectuoso a la tienda
La ley del estado de California ofrece dos opciones bajo el período de garantía. Los
RESIDENTES DE CALIFORNIA SOLAMENTE
cualquier información pertinente.
Recuerde incluir su nombre, dirección y teléfono, la descripción del problema, así como
productos perdidos y/o lastimados durante el envío no serán cubiertos bajo esta garantía.
durante el transporte o por los paquetes mandados a una dirección equivocada. Los
entrega con seguro y seguimiento. Cuisinart no será responsable por los daños ocurridos
NOTA: Para mayor seguridad, le aconsejamos que mande su paquete por un método de
1-800-726-0190 para recibir instrucciones de envío.
Los residentes de California sólo necesitan dar una prueba de compra y deben llamar al
de US$10.00 por gastos de manejo y envío.
Regrese el aparato defectuoso, junto con su recibo de compra y un cheque o giro postal
85307.
defectuoso a: Cuisinart, Service Department, 7475 North Glen Harbor Blvd., Glendale, AZ
esta garantía, llame a nuestra línea directa gratuita al 1-800-726-0190 o regrese el aparato
garantía, la reparemos o reemplazaremos (a nuestra opción). Para obtener servicio bajo
Si este aparato presentara algún defecto de materiales o fabricación durante el período de
el período de garantía será calculado a partir de la fecha de fabricación.
no es necesario para recibir servicio bajo esta garantía. En ausencia del recibo de compra,
de facilitar la verificación de la fecha de compra original. Sin embargo, registrar el producto
Le aconsejamos que llene el formulario de registro disponible en www.cuisinart.com a fin
para uso doméstico y según las instrucciones.
años después de la fecha de compra original, siempre que el aparato haya sido utilizado
Cuisinart garantiza este aparato contra todo defecto de materiales o fabricación durante 3
comerciantes.
los estados donde la ley lo permita, esta garantía no es para los detallistas u otros
comprado su aparato Cuisinart
Esta garantía es para los consumidores solamente. Usted es un consumidor si ha
GARANTÍA LIMITADA DE 3 AÑOS
Page 36

13
Windsor, NJ 08520.
de atención al cliente a: Service Center, Cuisinart, 150 Milford Road, East
un nuevo mango, el cual contiene nuevas baterías. O escriba a nuestro centro
Cuando es tiempo de cambiar las baterías, llame al 1-800-726-0190 para pedir
dañar el aparato.
No intente desarmar el mango cargador para cambiar las baterías. Esto podría
autoridades locales en materia de reciclaje y eliminación de desechos.
información acerca del reciclaje de las baterías, comuníquese con las
Tampoco se deben tirar las baterías con el resto de la basura. Para más
las baterías, ni las coloque en un compostador.
reciclables. Las baterías deben ser recicladas al final de su vida útil. No queme
Este producto utiliza cuatro baterías de níquel-cadmio recargables y
RECICLAJE DE LAS BATERÍAS
Cualquier otro servicio debe ser realizado por un técnico autorizado.
lavavajillas. No sumerja la caja de engranajes en agua u otro líquido.
un paño humedecido. Lave el batidor en agua jabonosa tibia, o en el
engranajes, jalándolos en dirección opuesta. Límpiela la caja de engranajes con
Separe el accesorio batidor del bloque-motor. Separe el batidor de la caja de
ACCESORIO BATIDOR
ser llevada a cabo por personal de servicio autorizado.
reparación, excepto la limpieza y el mantenimiento por parte del usuario, debe
El accesorio picador/moledor es para USO DOMÉSTICO SOLAMENTE. Toda
Séquelo inmediatamente.
cuchilla del lavavajillas. Limpie la tapa con un paño ligeramente humedecido.
Coloque la cuchilla en la cesta para cubiertos. Tenga cuidado al sacar la
póngalo al revés para evitar que se llene de agua durante el ciclo de lavado.
El bol y la cuchilla son aptos para lavavajillas. Si lava el bol en el lavavajillas,
cuidadosamente. No la deje en agua jabonosa, donde la pueda perder de vista.
sumerja la tapa del bol en agua y no la meta al lavavajillas. Lave la cuchilla
paño ligeramente humedecido para eliminar los residuos de alimentos. No
y seque las piezas. Limpie la parte inferior de la tapa con una esponja o un
aro de la cuchilla, el poste de plástico y el bol en agua jabonosa tibia. Enjuague
después del uso, ya que alimentos secos podrían dificultar la limpieza. Lave el
Le recomendamos que enjuague el bol, la cuchilla y la tapa inmediatamente
ACCESORIO PICADOR/MOLEDOR
Nunca sumerja el bloque-motor o el mango cargador en agua.
lavavajillas (bandeja superior solamente).
El vaso medidor puede lavarse a mano, con un detergente suave, o en el
No utilice limpiadores abrasivos, los cuales podrían dañar el acabado.
Limpie el bloque-motor con una esponja o un paño ligeramente humedecido.
podrían dañar el acabado.
cuchilla para limpiar la varilla. No utilice limpiadores abrasivos, los cuales
Lave la vajilla a mano, en agua jabonosa tibia. No es necesario desmontar la
Separe el mango cargador del bloque-motor antes de limpiarlo. Retire la varilla.
LICUADORA DE MANO
Cualquier otro servicio debe ser realizado por un técnico autorizado.
Siempre limpie el aparato cuidadosamente después de cada uso.
LIMPIEZA Y MANTENIMIENTO
Page 37

12
, indicados
/3 pulgadas
2
útil para mantener el aparato listo durante períodos de uso intensivo. El
Puede dejar el mango cargador conectado al bloque-motor. Esto es muy
soporte, mantenida por el bloque-motor.
Coloque la licuadora (ensamblada) sobre el soporte. La unidad colgará del
pared.
retírelo, apriete un poco más los tornillos y vuelva a montar el soporte a la
hasta que repose seguramente contra el muro. Si el soporte se mueve,
Instale el soporte mural sobre los tornillos y deslice el soporte hacia abajo
/8–¼ pulgada (3–6 mm) del tornillo expuesto.
1
Atornille los tornillos adentro de las clavijas, dejando aproximadamente
con un martillo, suavemente, hasta que esté completamente adentro.
Introduzca una clavija de plástico en cada hueco. Empuje con el dedo o
/16 pulgada (5 mm) de diámetro para cada tornillo.
3
Haga un hueco de
sobre el patrón, con un lápiz. Retire el patrón.
el patrón contra la pared. Marque la ubicación de los orificios
pared, en la ubicación deseada. Retire el soporte mural, dejando solamente
soporte mural. Coloque el patrón y el soporte, aún alineados, contra la
del soporte mural, alineando el contorno del patrón con el contorno del
ubicación exacta de los huecos. Coloque el patrón sobre la parte trasera
(7cm) uno de otro. Utilice el patrón en la página 13 para determinar la
Necesitará hacer dos huecos, a una distancia aproximada de 2
y abajo del soporte para la licuadora.
Elija la ubicación del soporte mural, dejando suficientemente espacio arriba
para montar a la pared. (véase la ilustración arriba).
Separe las dos piezas de la base de almacenaje. Sólo necesitará una pieza
MONTAJE A LA PARED
corriente para que las baterías siempre estén 100% cargadas.
resto del tiempo, mantenga el mango cargador conectado a la toma de
Page 38

de
®
11
estante.
base de carga también puede ubicarse adentro de un armario o sobre un
tiempo, mantenga el mango cargador conectado a la toma de corriente. La
para mantener el aparato listo durante períodos de uso intensivo. El resto del
Puede dejar el mango cargador conectado al bloque-motor. Esto es muy útil
visible.
motor en el otro depósito, de manera que el logotipo Cuisinart permanezca
la varilla en uno de los depósitos, las cuchillas hacia abajo. Coloque el bloquePara guardar la licuadora de mano, separe la varilla del bloque-motor y coloque
planas sobre la encimera.
Deslice suavemente los resaltos en las muescas, hasta que ambas piezas estén
resaltos en la parte de atrás con las dos muescas de la pieza a la izquierda.
elevadas deberían estar en el centro. Alce la pieza derecha; alinee los dos
en forma de círculo apuntando hacia la derecha y la izquierda. Las paredes
Alinee las dos piezas de espaldas sobre una superficie plana, con los depósitos
Las dos piezas de la base de almacenaje encajan. (véase la ilustración arriba).
INSTALACIÓN SOBRE LA ENCIMERA
dos tornillos proveídos.
Para montar a la pared, utilice las dos clavijas de plástico y los
mantenerse separadas para montar a la pared.
pueden conectarse para guardar el aparato sobre la encimera o
incluye una base de almacenaje de dos piezas que
Cuisinart
®
La licuadora de mano inalámbrica Smart Stick PLUS
de
®
ALMACENAJE/MONTAJE A LA PARED
funcionando.
no está quemado. Si la luz de carga está encendida, el cargador está
interruptor. También cerciórese que el fusible conectado a la toma de corriente
de corriente y averigüe que la toma de corriente no está controlada por un
asegúrese de que el mango cargador esté debidamente conectado a la toma
Permanecerá encendida una vez cargadas las baterías. Si la luz no se enciende,
La luz de carga arriba del mango cargador se enciende durante la carga.
LUZ DE CARGA
Para mejores resultados, repita este proceso varias veces.
póngalo a cargar durante 24 horas. Esto mejorará la capacidad de las baterías.
aparato hasta que las baterías estén completamente descargadas, y luego
parece ser más corto y el aparato tiene menos potencia, haga funcionar el
Si, después de usar el aparato repetidamente, el tiempo de funcionamiento
TIEMPO DE FUNCIONAMIENTO REDUCIDO
aproximadamente el 20% de la carga total por mes.
Las baterías mantienen la carga aunque el aparato no cargando, perdiendo
MANTENIMIENTO DE LA CARGA
consume mucha electricidad y no notará una diferencia en su factura eléctrica.
corriente. De esta manera, el aparato siempre estará listo. El cargador no
aconsejamos que siempre deje el mango cargador conectado a la toma de
Este aparato ha sido diseñado para poder mantenerse cargando. Le
CARGA CONTINUA
de carga se encenderá.
la clavija en una toma de corriente. Las baterías empezarán a cargarse. La luz
deslice la clavija hacia fuera hasta que esté completamente expuesta. Enchufe
Presione ligeramente el apoyapulgar ubicado debajo del mango cargador y
Retire el mango cargador del bloque-motor. Voltee el mango cargador.
INSTRUCCIONES DE CARGA
el aparato 3 veces antes del primer uso.
óptimo, permita que las baterías se descarguen completamente, y luego cargue
asegurar la capacidad máxima de operación. Para asegurar un rendimiento
cargador a una toma de corriente y déjelo conectado durante 24 horas para
no han sido pre-cargadas. Para cargarlas, conecte el mango
Cuisinart
®
Las baterías de su licuadora de mano inalámbrica Smart Stick PLUS
INSTRUCCIONES DE CARGA
Page 39

10
está equipada
®
de Cuisinart
®
apoyapulgar
Presionar el
Apoyapulgar
deseada.
No procesar más de 2–3 claras de huevo. Procesar continuamente hasta obtener la consistencia
consistencia deseada.
No procesar más de ¼ taza (60 ml) a la vez. Procesar continuamente hasta obtener la
Pulsar hasta obtener la consistencia deseada.
Cortar en pedazos de ½ pulgada (1.5 cm). No procesar más de 2.5 onzas (75g) a la vez.
Pulsar para picar. No procesar más de ½ taza (100 g) a la vez.
eliminar los hilos duros.
Pelar y cortar en pedazos de ½ pulgada (1.5 cm). Pelar el apio con un pelador para
No se aconseja preparar puré de papas.
(100 g) a la vez. Agregar un poco de líquido de cocción, caldo o leche para preparar puré.
Cortar en pedazos de 1 pulgada (2.5 cm). Pulsar para picar. No procesar más de ½ taza
continuamente hasta obtener la textura deseada.
Pelar y cortar en pedazos de ½ pulgada (1.5 cm). Pulsar para picar, y luego procesar
1/3 taza a la vez. Procesar por más tiempo para obtener mantequilla de nuez.
y luego procesar continuamente hasta obtener la textura deseada. No procesar más de
Utilizar nueces sin cáscara. Tostar las nueces para maximizar el sabor. Pulsar para picar,
más finos.
Pulsar hasta obtener la consistencia deseada. Usar el lado afilado para obtener resultados
½ onza (15 g) a la vez.
Pelar y cortar en rodajas de ½ pulgada (1.5 cm). Pulsar para picar. No procesar más de
luego procesar continuamente hasta obtener la textura deseada.
Colocar los ingredientes en el bol, sin cubrir el eje de la cuchilla. Pulsar para picar, y
licuado demoran solamente 1–2 minutos.
se puede esperar hasta 20 minutos de autonomía. La mayoría de las tareas de
una carga completa varía dependiendo de lo que usted está mezclando, pero
las baterías se descarguen completamente. El tiempo de funcionamiento con
recargará las baterías al 50%. Bajo condiciones de uso normales, es raro que
durante 12–24 horas para recargarse completamente. Una carga de 3 horas
Si las baterías se descargan completamente, se deberán poner a cargar
su carga rápida.
Hemos seleccionado estas baterías por su larga vida útil y autonomía, así como
con baterías recargables de níquel-cadmio.
Su licuadora de mano inalámbrica Smart Stick PLUS
CARGA Y VIDA ÚTIL DE LAS BATERÍAS
textura deseada. No procesar más de una onza a la vez.
antes de picarlo. Pulsar para picar, y luego procesar continuamente hasta obtener la
Cortar el chocolate en pedazos de ½ pulgada (1.5 cm) y congelarlo durante 3 minutos
continuamente hasta obtener la textura deseada.
Cortar el queso en pedazos de ¼ pulgada (0.5 cm). Pulsar para picar, y luego procesar
Pulsar para picar, y luego procesar continuamente hasta obtener la textura deseada.
cantidad de líquido. Pulsar para picar, y luego procesar continuamente para licuar.
Colocar una pequeña cantidad de alimentos cocinados en el bol. Agregar une pequeña
Ingrediente Comentarios
Claras (montadas)
Crema/nata (batida)
Licuado simple Usar para mezclar e incorporar.
Carne (res, cerdo)
Vegetales (crudos)
Vegetales (cocidos)
Cebolla
Nueces
Hierbas (frescas) Colocar ½ taza (30 g) de hierbas limpias y secas en el bol. Pulsar para picar.
de amapola, anís estrellado, etc.)
(semillas de cilantro, eneldo, semillas
Especias duras
Jengibre (fresco)
Ajo Pelar 6 dientes de ajo. Pulsar para picar.
Aderezos y cremas para mojar
Chocolate
aderezo o una salsa para mojar)
a menos que sea para preparar un
recomienda procesar queso suave
Parmesano, Romano, etc.) (no se
Queso rallado (Asiago, Locatelli,
anterior)
Pan rallado (pan fresco o pan del día
médico)
Papillas (pida consejo a su pediatra/
PAUTAS DE USO DEL ACCESORIO PICADOR/MOLEDOR
Page 40

9
∕
3 del bol.
2
20. Utilice la licuadora de mano para preparar salsas suaves y homogéneas.
capuchino o café con leche.
19. La licuadora de mano es perfecta para espumar la leche, para servir con
ambiente.
18. Para preparar mantequilla aromatizada, utilice mantequilla a temperatura
Obtendrá cremas espesas y homogéneas muy rápidamente.
suave hacia arriba y abajo, hasta obtener la consistencia deseada.
17. Licue las sopas directamente en la cacerola/olla, usando un movimiento
superficie.
16. Para incorporar aire a una mezcla, mantenga la cuchilla justo debajo de la
resultados uniformes y homogéneos.
15. Un movimiento suave hacia arriba y abajo es la mejor manera de conseguir
14. Utilice líquido tibio (no frío) para licuar sólidos más fácilmente.
durante el licuado y puede desbordarse.
13. No sobrellene los recipientes en los cuales licua. La mezcla se expande
podría dañar las cuchillas.
12. No licue/pique/muela alimentos que contengan huesos, pepas, etc. Esto
11. No deje el aparato adentro de una cacerola/olla caliente.
funcionamiento.
esté sumergida y no retire la licuadora de la mezcla durante el
10. Para evitar las salpicaduras, no encienda el aparato hasta que la cuchilla
20–30 segundos después de cada ciclo.
a la vez. Para lograr resultados óptimos, deje descansar el aparato durante
9. Nunca haga funcionar el aparato continuamente durante más de 1 minuto
ingredientes líquidos primero, salvo indicación contraria en la receta.
8. Cuando licua directamente en el vaso medidor, siempre agregue los
cantidades indicadas en las recetas como referencia.
7. No procese más de 1½ taza (355 ml) de líquido a la vez. Utilice las
deberían pasarse de los
6. No sobrellene el bol. Para lograr resultados óptimos, los ingredientes no
accesorio picador/moledor para procesar los alimentos sólidos.
5. Corte los alimentos en cubos para facilitar el licuado. Consejo: Utilice el
caja de engranajes del accesorio batidor en agua u otro líquido.
4. No sumerja el bloque-motor, la tapa del accesorio picador/moledor o la
con el revestimiento antiadherente.
3. Si usa cacerolas antiadherentes, no permita que la licuadora haga contacto
2. Algunas especias pueden rayar el bol del accesorio picador/moledor.
1. No sumerja la varilla hasta menos de 1 pulgada (2.5 cm) del bloque-motor.
CONSEJOS
Page 41

8
vacío.
Nota: Nunca haga funcionar el accesorio picador/moledor con el bol
9. Retire los alimentos del bol con una espátula.
NUNCA TOQUE LOS FILOS DE LA CUCHILLA.
8. Retire la cuchilla, agarrándola cuidadosamente por la parte de plástico.
bloque-motor de la tapa y retire la tapa del bol.
7. TRAS INMOVILIZARSE LA CUCHILLA, desenchufe el aparato, separe el
6. Suelte el botón de velocidad para apagar el motor.
el bol con una mano durante el funcionamiento.
Nota: Debido a la potencia del motor, le recomendamos que sostenga
durante más de 15 segundos seguidos.
5. No haga funcionar el aparato con el accesorio picador/moledor puesto
4. Presione el botón de encendido/apagado.
3. Cierre la tapa del bol. Asegúrese de que la tapa esté debidamente puesta.
cortados en pedazos pequeños y de que el bol no esté muy lleno.
2. Coloque los ingredientes en el bol. Asegúrese de que los alimentos estén
debidamente instalada.
segura, como una encimera. Asegúrese de que la cuchilla esté
1. Coloque el bol del accesorio picador/moledor sobre una superficie plana y
FUNCIONAMIENTO
b
CÓMO PICAR/MOLER
botón.
3. Oprima el botón de encendido/apagado. El aparato se apagará al soltar el
2. Sumerja el batidor en la mezcla.
Véase la sección "Instrucciones de ensamblado".
1. Conecte el accesorio batidor al bloque-motor.
4a.
CÓMO BATIR
6. Desconecte el aparato inmediatamente después del uso.
seguidos.
5. No haga funcionar el aparato durante más de 50 segundos
apagará al aflojar el botón.
4. Oprima el botón de encendido/apagado. El aparato se
3. Sumerja la varilla en la mezcla.
2. Enchufe el cable en una toma de corriente
(véase las instrucciones de ensamblado en la página 5).
1. Conecte el accesorio licuador al bloque-motor.
no sacar la cuchilla del líquido durante el uso.
las más sabrosas recetas. Para evitar las salpicaduras, procure
movimiento suave hacia arriba y abajo es todo lo que necesita para preparar
incorporar mucho aire a la mezcla. Un
La cuchilla mezcla los alimentos sin
puede usarse para emulsionar mayonesa.
para combinar ingredientes secos, y también
aderezos, bebidas en polvo y salsas. Es ideal
una gran variedad de alimentos, incluso
La cuchilla ha sido diseñada para procesar
CÓMO LICUAR/MEZCLAR
al soltar el botón.
escrita sobre el botón. El aparato se apagará
encender el motor. La palabra "PRESS" está
Mantenga oprimido el botón de encendido ubicado arriba del mango para
cuchilla durante el funcionamiento.
Mantenga los dedos, cabello, ropa, espátulas y otros utensilios lejos de la
CÓMO ENCENDER/APAGAR EL APARATO
FUNCIONAMIENTO
Page 42

moledor
picador/
accesorio
Tapa del
moledor
picador/
accesorio
del
superior
Parte
motor
bloque
del
inferior
Parte
7
con el árbol del motor. Una vez alineadas, conecte ambas piezas hasta
moledor. Haga coincidir el eje de la tapa del accesorio picador/moledor
3. Conecte el bloque-motor de la licuadora de mano al accesorio picador/
bloquea la cuchilla sobre el poste.
Agarre la cuchilla por el centro y gírela ligeramente en sentido horario. Esto
Muescas (K)
oprimiendo el botón de liberación de la varilla.
4a.
3.
bloqueen. Puede que se le haga más fácil
motor y conecte ambas piezas hasta que se
3. Haga coincidir el accesorio batidor con el bloque
para sujetarlo (C).
2. Introduzca la extremidad en el orificio y empuje
pequeño en la caja de engranajes (B).
1. Alinee la extremidad del batidor (A) con el orificio
Accesorio batidor
tapa del bol.
aparato, separe el bloque-motor de la tapa y retire la
6. TRAS INMOVILIZARSE LA CUCHILLA, desenchufe el
Para apagar el aparato, suelte el botón.
encendido/apagado para encender el aparato.
otra mano sobre la tapa del bol. Oprima el botón de
5. Sostenga el bloque-motor con una mano y coloque la
b. Gire la tapa en sentido horario para sujetarla.
tapa está debidamente asentada sobre el bol.
coinciden con las 3 muescas debajo de la tapa y que la
Cerciórese que los 3 resaltos en la parte superior del bol
a.
4. Coloque la tapa del bol sobre éste.
resultar útil oprimir el botón de liberación de la varilla.
que se bloqueen. Debería escuchar un "clic". Puede
LADO AFILADO
LADO RECTO
A
muescas con los resaltos en los costados del poste.
Note las muescas (C) en la parte central de la cuchilla. Haga coincidir estas
más información).
(Véase las pautas de uso del accesorio picador/moledor en la página 9 para
cuchilla. Para usar el filo recto, este lado debe apuntar hacia arriba.
Si la sostiene de esta manera (B), no notará ninguna palabra sobre la
para más información).
(Véase las pautas de uso del accesorio picador/moledor en la página 9
la cuchilla. Para usar el filo afilado, este lado debe apuntar hacia arriba.
Si la sostiene de esta manera (A), notará la palabra “SHARP” escrita sobre
diferentes.
IMPORTANTE: La cuchilla encaja sobre el poste de dos maneras
Page 43

6
D
SOLAMENTE. NO TOQUE LOS FILOS DE LA CUCHILLA.
SOSTENGA LA CUCHILLA POR EL CENTRO DEL ARO (K)
b.
Deje que la cuchilla se deslice a lo largo del poste.
Conecte el aro de la cuchilla (F) al poste de
(E)
sobre el eje.
C
E
2
está equipado con una cuchilla reversible. La
®
plástico (G), haciendo coincidir el orificio en el aro con el poste.
2a. Para ensamblar la cuchilla:
cuchilla completamente ensamblada
2. Note el eje (C) en el fondo del bol. Deslice la
seca y segura,
1. Coloque el bol sobre una superficie plana,
"Ensamblado".
aparato según se describe en la sección
Antes de procesar cualquier alimento, ensamble el
retirar
instalar/
para
liberación
de
el botón
Presionar
de Cuisinart
®
Véase las pautas de uso del accesorio picador/moledor en la página 9.
fácilmente. Para invertir la cuchilla, véase las instrucciones a continuación.
La cuchilla cuenta con un aro de plástico que permite darle vuelta
cuchilla reversible tiene un filo afilado para moler, y otro recto para picar.
Stick PLUS
El accesorio picador/moledor de la licuadora de mano inalámbrica Smart
CUCHILLA REVERSIBLE
J. Conector del accesorio picador/moledor
I. Lengüetas para alzar
H. Tapa del bol
G. Poste de plástico
F. Aro de la cuchilla
E. Cuchilla reversible
D. Pies antideslizantes
apoyapulgar
Presionar el
C. Cuchilla de metal ensamblada
B. Resaltos (3) para conectar la tapa
A. Bol
F
G
2b.
Apoyapulgar
2a.
C
I
E
H
A
B
J
ACCESORIO PICADOR/MOLEDOR
bloque-motor después de cada uso.
Nota: Separe el mango cargador del
otra mano.
el mango cargador hacia abajo con la
ubicado arriba del bloque-motor, y jale
Presione el botón de liberación
motor firmemente en una mano.
c. Para separar: Sostenga el bloque-
encajen. Debería escuchar un "clic".
Presione hasta que las dos piezas
resaltos sobre el bloque-motor.
del mango cargador con los dos
las dos muescas en la parte inferior
b. Presione el botón de liberación. Alinee
adentro del mango.
apoyapulgar y deslice la clavija
toma de corriente. Presione el
desconecte el mango cargador de la
a. Después de cargar las baterías,
2. Instalación/Remoción del mango cargador.
Page 44

de
®
5
bisfenol A (BPA).
Ninguna de las piezas en contacto con los alimentos contiene
Sin BPA (no ilustrado)
nivel de las cuchillas o del accesorio batidor.
jale la varilla hacia abajo. No agarre la varilla al
b. Para separar: Presione el botón de liberación y
"clic".
según se indica. Presione hasta que escuche un
1.
a. Haga coincidir la varilla con el bloque-motor,
1. Instalación/Remoción de la varilla.
bloque-motor antes de instalar/retirar los accesorios.
Nota: Para evitar las heridas, siempre separe el mango cargador del
ENSAMBLADO
cuenta
®
de Cuisinart
®
página 10.
cargar durante 24 horas. Véase la sección "Instrucciones de carga" en la
no han sido pre-cargadas. ¡Antes del primer uso, las deberá
®
Cuisinart
Las baterías de su licuadora de mano inalámbrica Smart Stick PLUS
Lea cuidadosamente las instrucciones antes de usar el aparato.
(bandeja superior solamente). Seque todas las piezas antes de usar el aparato.
accesorio batidor, el vaso medidor y la varilla a mano o en el lavavajillas
absorbente. Manipular con sumo cuidado. Lave la cuchilla licuadora, el
humedecido antes del primer uso. Seque todas las piezas con un paño suave y
Le aconsejamos que limpie el aparato con un paño limpio y ligeramente
adentro de la caja. Le aconsejamos que guarde el material de embalaje.
Retire el manual de instrucciones y otros folletos de la caja y regrese el inserto
almacenaje.
de almacenaje de la caja. La cuchilla licuadora está en la base de
Nota: La cuchilla licuadora es muy filosa. Tenga cuidado al retirar la base
pieza de la caja.
inserto de cartón ubicado encima del aparato. Retire cuidadosamente cada
Coloque la caja sobre una superficie llana y segura. Abra la caja y retire el
ANTES DE EMPEZAR
16.
También puede dejarse sobre la varilla para la limpieza.
Puede retirarse de la varilla para limpiarse.
15. Cuchilla licuadora removible
fácilmente y servir sin gotear.
aderezos para ensalada, etc. Diseñado para agarrarse
medir fácilmente. Ideal para preparar bebidas, batidos,
Vaso transparente con medidas en ml y tazas, para
14. Vaso medidor/para mezclar
con una superficie suave fácil de limpiar en segundos.
La licuadora de mano inalámbrica Smart Stick PLUS
13. Limpieza fácil
para instalar el soporte mural).
con o sin el mango cargador (utilice las clavijas y los tornillos proveídos
de la base a la pared para usarla como soporte mural y colgar el aparato,
bloque-motor y la varilla. También tiene la opción de montar una sección
dos piezas se conectan para proporcionar un almacenaje compacto para el
El otro lado sostiene el bloque-motor, con o sin el mango cargador. Las
Base de almacenaje de dos piezas. Un lado sostiene la varilla desmontable.
12. Almacenaje práctico
solamente 1–2 minutos!
minutos. ¡La mayoría de las aplicaciones demoran
Una carga completa da al aparato una autonomía de 10–20
11. Larga autonomía
licuador.
que el accesorio batidor o el accesorio
al bloque-motor de la misma manera
accesorio picador/moledor se conecta
Permite picar y moler fácilmente. El
10. Accesorio picador/moledor
delicias.
claras y preparar crema batida y otras
Este accesorio es ideal para montar
Fácil de instalar sobre el bloque-motor.
9. Accesorio batidor
Page 45

4
acero inoxidable evita las salpicaduras.
Fácil de instalar sobre el bloque-motor. El protector de cuchillas de
de cuchillas
8. Accesorio licuador con cuchillas de acero inoxidable y protector
liberación para separar la varilla del bloque-motor.
Fácil de usar, fácil de limpiar y fácil de guardar. Presione el botón de
7. Varilla desmontable
desmontable
Varilla
acero
No requiere cable.
cargador a la toma de corriente.
bloque-motor, deslice la clavija hacia fuera y conecte el mango
Presione el botón de liberación para separar el mango cargador del
están cargando. La luz permanece encendida después de la carga.
para cargar las baterías. La luz de carga indica cuando las baterías se
Simplemente conecte el mango cargador a una toma de corriente
la varilla
liberación de
Botón de
Bloque-motor
mango
liberación del
Botón de
batidor
6. Cargador de uso fácil, con luz de carga
apagar el motor.
para encender el aparato. Suelte el botón para
Mantenga oprimido el botón cubierto de caucho
5. Botón de encendido/apagado
apagado
encendido/
Botón de
especialmente cuando tiene las manos mojadas.
caucho proporcione un mejor agarre,
cómodo y un alcance fácil al botón de encendido. El revestimiento de
utensilio para revolver. La forma del mango proporciona un control
comodidad. El mango se agarra de la misma manera que se agarra un
El mango y el botón de encendido han sido diseñados para su
4. Cómodo mango
segundos y 2 minutos.
Licuar alimentos requiere entre 10
completa demora entre 12 y 24 horas.
una carga de 3 horas. Una carga
recobran el 50% de su potencia con
condiciones de uso normales y
autonomía de 20 minutos bajo
Las baterías dan el aparato una
cargar
3. Baterías recargables fáciles de
inoxidable
picadora de
Cuchilla
Bol de 620 ml
Accesorio picador/moledor
Accesorio
Luz de carga
motor. Apta para lavavajillas.
Presione el botón de liberación para separar la varilla del bloque-
c. Varilla desmontable
Potente motor de corriente directa.
b. Bloque-motor
cargar las baterías.
motor. Conecte el mango cargador a la toma de corriente para
botón de liberación para retirar el mango cargador del bloqueLas baterías recargables están adentro del mango. Presione el
a. Mango cargador
base de almacenaje.
Fácil de ensamblar/desensamblar para guardar por separado o en la
2. Tres piezas fáciles de ensamblar
¡Sin cable! Funciona con baterías recargables.
1. Inalámbrico
PIEZAS Y CARACTERÍSTICAS
Page 46

3
PARA USO DOMÉSTICO SOLAMENTE
GUARDE ESTAS INSTRUCCIONES
toca las paredes o la puerta del armario cuando cierra.
aparato conectado presenta un riesgo de incendio, especialmente si éste
desconecte el aparato antes de guardarlo en un armario. Dejar el
32. No haga funcionar el aparato bajo o adentro de un armario. Siempre
31. Averigüe que no hay objetos extraños en el bol antes de usarlo.
cuchilla esté completamente inmóvil.
cerrada antes de encender el aparato. No intente abrir la tapa hasta que la
30. Asegúrese de que la tapa del accesorio picador/moledor esté debidamente
moledor esté debidamente ensamblado antes de instalar la cuchilla.
29. Para reducir el riesgo de heridas, asegúrese de que el accesorio picador/
atención médica.
inmediatamente con abundante agua durante 10 minutos o más. Busque
vinagre. Si el líquido entrara en contacto con los ojos, enjuáguelos
agua y jabón y (2) neutralice la acidez de la piel con jugo de limón o
potasio) entrara en contacto con la piel, (1) lave la piel rápidamente con
adentro de las baterías (el cual es una solución de 20–35% de hidróxido de
28. Las baterías pueden tener fugas bajo condiciones extremas. Si el líquido
por el calor.
queme ni coloque las baterías en un compostador, ya que pueden explotar
aparato. Véase la sección "Reciclaje de las baterías" en la página 12. No
cuales deben reciclarse según las leyes vigentes al final de la vida útil del
27. Este aparato está equipado con baterías recargables de níquel-cadmio, las
Las baterías pueden explotar al calentarse.
26. No queme el aparato, aunque esté gravemente dañado.
inmediatamente.
25. No utilice el cargador si está dañado. Reemplace el cargador
24. Siempre desconecte el cargador antes de limpiarlo.
fuente de calor o de un fregadero.
23. No instale la base de almacenaje/el soporte mural a proximidad de una
pared.
ningún aparato caliente debajo del cargador cuando está montado a la
22. Para reducir el riesgo de incendio o electrocución, no haga funcionar
21. Para evitar salpicaduras, tenga cuidado al mezclar líquidos calientes.
20. Solamente utilice este aparato para preparar comida y bebidas.
industrial.
19. Para uso doméstico solamente. No aprobado para uso comercial o
aparato.
detenido completamente, antes de instalar/retirar accesorios o limpiar el
18. Asegúrese de que el aparato esté apagado, y de que el motor se haya
de incendio, electrocución o herida.
17. El uso de accesorios no recomendados por Cuisinart presenta un riesgo
revisión, reparación o ajuste.
dañado. Regrese el aparato a un centro de servicio autorizado para su
de que hubiese funcionado mal o que se hubiese caído o si estuviese
16. No utilice este aparato si el cable o la clavija estuviesen dañados, después
libre.
15. No conecte el mango cargador a una toma de corriente que esté al aire
14. No utilice el aparato para ningún otro fin que no sea el indicado.
cargar este producto con otro cargador.
13. No intente utilizar el mango cargador con otro producto. Tampoco intente
toma de corriente.
12. No utilice una extensión. Enchufe el mango cargador directamente en una
o de superficies calientes.
11. Conecte el mango cargador a una toma de corriente alejada del fregadero
Page 47

2
pequeñas cantidades a la vez.
especialmente líquidos calientes, utilice un recipiente alto o procese
10. Para reducir el riesgo de salpicadura o quemadura al mezclar líquidos,
cuidado.
9. Las cuchillas y los accesorios son MUY FILOSOS. Manipular con sumo
varilla.
8. Retire la varilla desmontable del aparato antes de lavar las cuchillas o la
una espátula de goma, siempre que el aparato esté apagado.
utensilios lejos de los accesorios durante el funcionamiento. Se podrá usar
y/o daños al aparato, mantenga los dedos, cabello, ropa, espátulas y otros
7. Evite el contacto con las piezas móviles. Para evitar el riesgo de heridas
instalar o remover piezas y antes de limpiarlo.
6. Desconecte el mango cargador cuando no esté en uso, antes de
motor antes de instalar/remover las cuchillas y/o los accesorios.
5. Para evitar las heridas, siempre separe el mango cargador del bloque-
inflamables.
4. No haga funcionar el aparato en la presencia de vapores explosivos o
aparato cuidadosamente cuando esté usado por o cerca de niños.
3. Este aparato no debería ser usado por niños. Supervise el uso de este
cuidadosamente la unidad antes de continuar.
cayera en líquido, desconéctelo y luego retírelo del líquido. Limpie y seque
sumerja ninguna otra parte del aparato en agua u otro líquido. Si el aparato
motor en agua u otro líquido. Sólo la varilla desmontable es sumergible. No
2. Para reducir el riesgo de electrocución, no ponga el cargador o el bloque-
1. LEA TODAS LAS INSTRUCCIONES.
seguridad, incluidas las siguientes:
Siempre que use aparatos eléctricos, debe tomar precauciones básicas de
MEDIDAS DE SEGURIDAD IMPORTANTES
Patrón para montar el soporte mural a la pared ..........................................14
Garantía ......................................................................................................... 14
Reciclaje de las baterías ............................................................................... 13
Limpieza y mantenimiento ........................................................................... 13
Almacenaje/Montaje a la pared ....................................................................11
Instrucciones de carga ..................................................................................10
Pautas de uso ............................................................................................... 10
Consejos útiles ................................................................................................ 9
Funcionamiento ............................................................................................... 8
Ensamblado ....................................................................................................5
Antes de empezar ...........................................................................................5
Piezas y características .................................................................................. 4
Medidas de seguridad importantes ................................................................2
ÍNDICE
Page 48

1
Para su seguridad y para disfrutar plenamente de este producto, siempre lea las instrucciones cuidadosamente antes de usarlo.
CSB-78
®
Licuadora de mano inalámbrica Smart Stick PLUS
RECETAS
INSTRUCCIONES Y LIBRO DE
Page 49

Version no :
IB-8270-ESP
Fold Size :
Material :
Coating :
Color(Cover) :
(Inside) :
Date :
PDF version :
Hugo Code :
Color Series :
Hugo Diecut :
Remark :
210x148MM
(Cover):
105gsm artpaper for whole book
Saddle Stitched 48 pp
(Inside):
Gloss Varnishing in cover
4C(CMYK)+1C(BK)
1C(BK)+1C(BK)
NOV-05-2013
Co-ordinator :
Hugo Description
IB-8270-ESP(0.2) BOOK
CEM0497IB-1-1
Operator :
Quality Request(1)
Andy Ws.Chan
WANG
IRP :
BBJ
Cyan Magenta Yellow Black
 Loading...