

Page 1
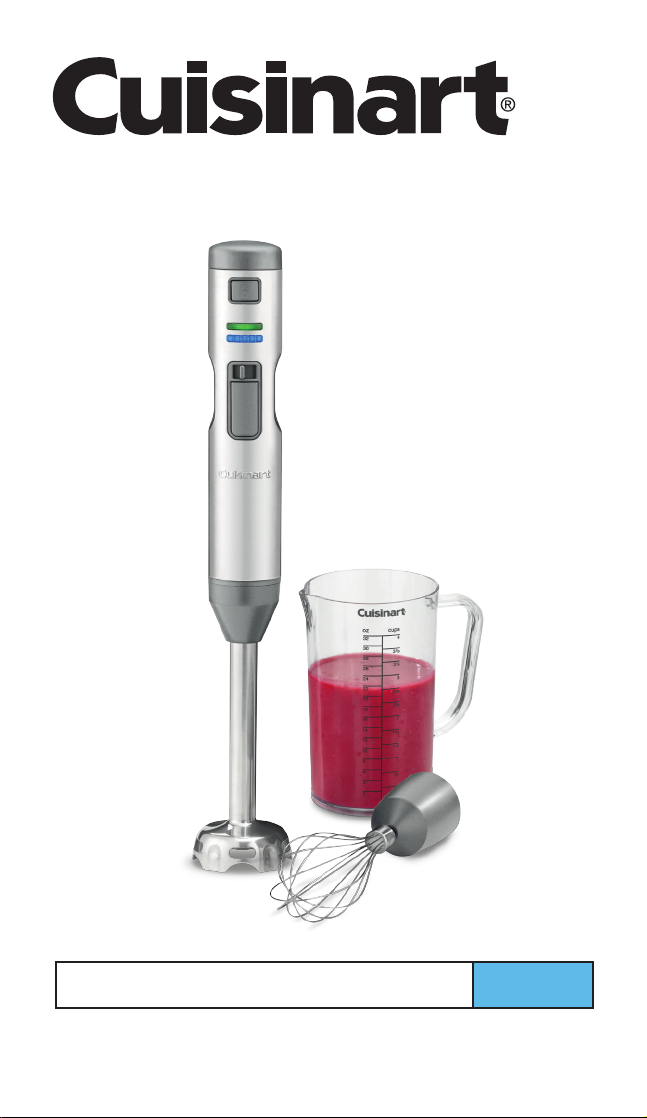
INSTRUCTION AND
RECIPE BOOKLET
Smart Stick® Cordless Hand Blender
For your safety and continued enjoyment of this product,
always read the instruction book carefully before using.
CSB-400CD
Page 2

IMPORTANT SAFEGUARDS
When using an electrical appliance, especially when children are
present, basic safety precautions should always be taken, including
the following:
WARING: Read all safety warnings and instructions. Failure to
follow the warnings and instructions may result in electric shock,
fire and/or serious injury.
1. READ ALL INSTRUCTIONS.
2. To protect against electric shock, do not put the charger handle
or motor body of this Smart Stick
blender in water or other liquids. The blending shaft of this
appliance, where blades are interchanged, has been designed for
submersion in water or other liquids. Never submerge any other
portion of this unit. If stick blender falls into liquid, remove
immediately. Carefully remove, clean and dry unit thoroughly
before continuing.
3. This appliance should not be used by children. To avoid possible
accidental injury, close supervision is necessary when any
appliance is used by or near children or individuals with certain
disabilities.
4. Do not operate in the presence of explosive and/or flammable
fumes.
5. To avoid the possibility of personal injury, always unplug the unit
from the charger before attaching or removing blades and/or
attachments for cleaning or any other purpose.
6. Illuminated lights indicate unit is ready to operate. Avoid any
contact with blades or movable parts.
7. Once blender is unlocked and/or powered on, avoid any contact
with blades or moveable parts.
8. Avoid contact with moving parts. Keep hands, hair, clothing, as
well as spatulas and other utensils away from attachments and
mixing container during operation to reduce risk of injury to
persons, and/or damage to the appliance. A spatula may be used,
but must be used only when the unit is not operating.
9. Remove detachable blending shaft from the power handle before
washing the blades or shaft.
10. Blades are SHARP. Handle carefully. Always handle blades with
your hand away from cutting edge. Always store blades with
cutting edge away from you.
11. When mixing liquids, use a tall container or mix small quantities at
a time to reduce spillage and possibility of injury.
12. Charger should be plugged into an electrical outlet away from sink
or hot surface.
®
Cordless Hand Blender hand
2
Page 3

13. Do not use an extension cord. Plug charger directly into an
electrical outlet.
14. Do not attempt to use this charger with any other product. Also,
do not attempt to charge the batteries with any other charger.
15. Do not charge batteries with charger plugged into an outdoor
outlet.
16. Do not operate any appliance with a damaged cord or plug, or
after the appliance has malfunctioned or has been dropped or
damaged in any way, or is not operating properly. Return the
appliance to the nearest Cuisinart Repair Center for examination,
repair, or mechanical or electrical adjustment.
17. The use of attachments or accessories not recommended by
Cuisinart may cause fire, electric shock or risk of injury.
18. Make sure the appliance is off and the motor/blade/attachment
has stopped completely before putting on or taking off attachments, and before cleaning.
19. This appliance is intended for household use only and is not for
commercial or outdoor use.
20. Do not use this hand blender for other than its intended use of
preparing foods and beverages.
21. Use extra care when working with hot liquids to avoid
splattering.
22.
To reduce the risk of fire or electric shock, do not operate any
heating appliance beneath or near the mounted charging handle
unit.
23. Do not mount or store unit over or near a portion of a heating or
cooking appliance, or a sink or washbasin.
24. Unplug the charger from the outlet before attempting any routine
cleaning of the charger.
25. Do not operate a damaged charger. Have damaged charger
replaced immediately.
26. Do not incinerate the hand blender, even if it is severely
damaged. The batteries can explode in a fire.
27.
This product contains lithium batteries which must be recycled at
the end of the life of the hand blender and disposed of properly.
(See Disposal/Recycling of Batteries, page 29.) Do not incinerate
or compost batteries, as they will explode at high temperature.
28. Leaks from battery cells can occur under extreme conditions. If
the liquid gets on the skin, (1) wash quickly with soap and water
or (2) neutralize with mild acid such as lemon juice or vinegar. If
the liquid gets into eyes, flush them immediately with clean
water for a minimum of 10 minutes. Seek medical attention.
29. Prevent unintentional starting. Never press the Auto Lock/Unlock
switch on the power handle while pressing the Power On switch
unless you are ready to use your blender or whisk.
3
Page 4

30. Recharge only with the charger specified by the manufacturer. A
charger that is suitable for one type of battery pack may create a
risk of fire when used with another battery pack.
31.
Use appliances only with specifically designated battery packs.
Use of any other battery packs may create a risk of injury and fire.
32. Under abusive conditions, liquid may be ejected from the battery.
Avoid contact with such liquid. If contact accidentally occurs,
flush with water. If liquid contacts eyes, seek medical help.
Liquid ejected from the battery may cause irritation or burns.
33. Do not use a battery pack or appliance that is damaged or modified. Damaged or modified batteries may exhibit unpredictable
behavior resulting in fire, explosion or risk of injury.
34. Do not expose a battery pack or appliance to fire or excessive
heat. Exposure to fire or temperatures above 265°F/130°C/ may
cause an explosion.
35. Have servicing performed by a qualified repair person using only
identical replacement parts. This will ensure that the safety of the
product is maintained.
36. Recommended ambient charging temperature 50°F−104°F
(10°C− 40°C).
37. Recommended storage temperature (10°C− 40°C) (50°F−104°F).
38. Use only the power adapter (10.0VDC/1000mA output) supplied
with this product.
39. Any other servicing should be performed by an authorized
service representative.
40. Do not operate your appliance in an appliance garage or under a
wall cabinet. When storing in an appliance garage, always
unplug the unit from the electrical outlet. Not doing so could
create a risk of fire, especially if the appliance touches the walls
of the garage or the door touches the unit as it closes.
SAVE THESE INSTRUCTIONS
FOR HOUSEHOLD USE ONLY
CONTENTS
Important Safeguards ....................................2
Unpacking Instructions ...................................5
Features and Components ................................5
Assembly ..............................................7
Blending Attachment ................................7
Whisk Attachment ..................................7
Operation ..............................................8
Blending and Mixing ................................8
4
Page 5
Whisking .........................................8
Cleaning and Maintenance ................................8
Tips and Hints ..........................................9
Recipes ..............................................11
Warranty .............................................29
Disposal/Recycling of Batteries ...........................30
UNPACKING INSTRUCTIONS
Place the package containing the Smart Stick® Cordless Hand Blender
on a sturdy surface. Unpack the Hand Blender from its box by removing
the power handle, blending shaft, whisk, and beaker. Remove all support
materials from the box. Save packaging for possible repacking of the
unit.
NOTE: All blades are extremely sharp. Be careful when removing
and/or handling.
Before using the Cuisinart® Cordless Rechargeable Hand Blender for
the first time, we recommend that you wipe the unit with a clean,
damp cloth to remove any dirt or dust. Dry it thoroughly with a soft
absorbent cloth. To clean all parts see instructions on page 8. Read all
instructions completely for detailed operating procedures.
FEATURES AND COMPONENTS
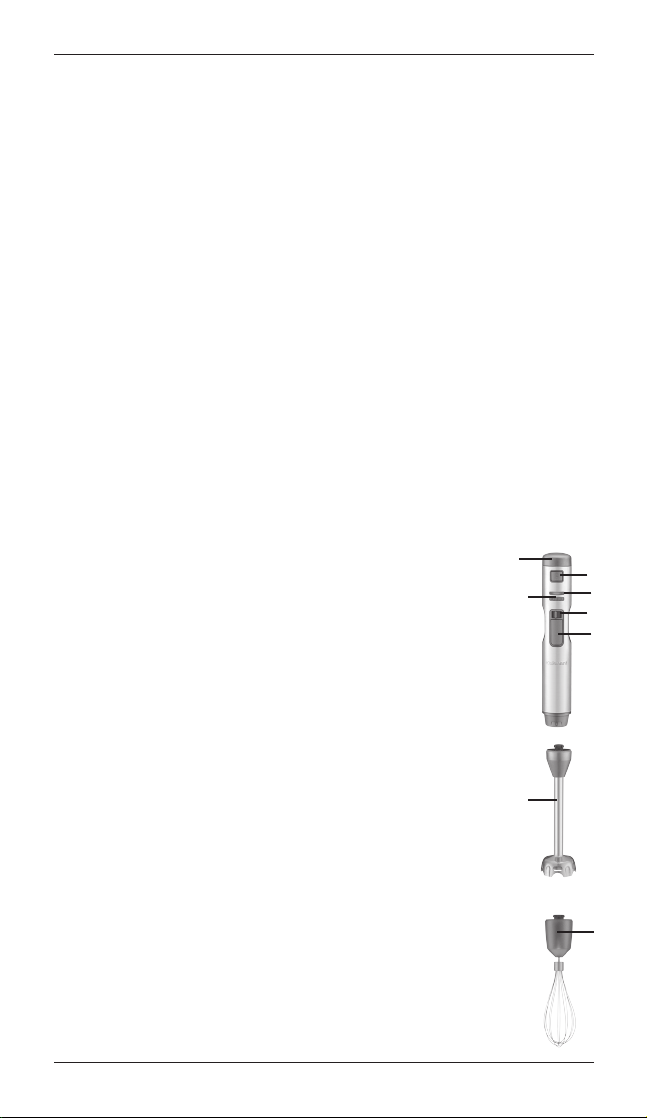
1. Power Handle
No cord! Operates on two rechargeable 4.0 volt
lithium-ion batteries, with power button within
easy reach. Shaped like a stirring utensil for
comfortable control.
a. Auto Lock/Unlock Button Must be pressed to
unlock before power handle will operate.
b. Battery Indicator Lights. Red/Low: Less
than 25%. Orange/Normal Use Range: 25–75%.
Green/High: 75–100%.
c. Blue Speed Indicators. Five bars light up to
indicate low to high speed selection.
d. Speed Control. Push button to left or right
to select speed.
e. Power On Button. Press and hold before
or right after pushing Auto Lock/Unlock switch.
NOTE: Operation stops instantly and locks
when Power button is released.
2. Blending Shaft
Detachable 8¾" shaft with stainless steel
blade and blade guard snaps on and off power
handle for easy operation and cleanup.
3. Whisk Assembly
Whisk attachment snaps into the power handle housing.
This attachment is great for whipping cream, egg whites
1.
c.
2.
a.
b.
d.
e.
3.
5
Page 6
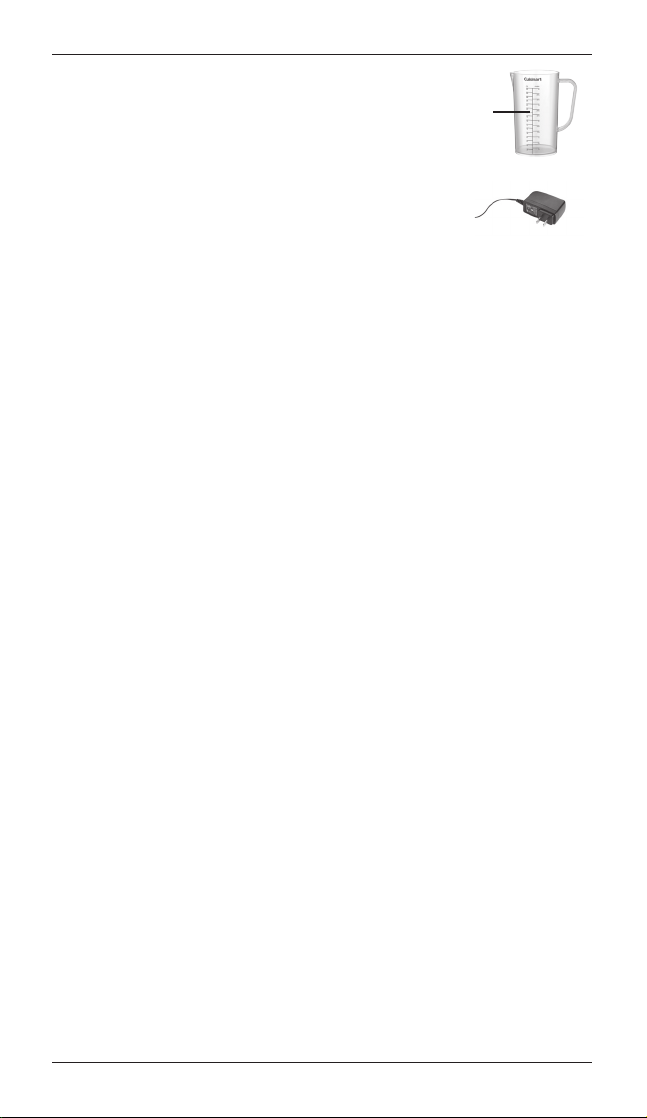
and other delectable treats.
4. Mixing/Measuring Beaker
Beaker is marked for liters and cups for
convenient measuring. Use for drinks, shakes,
salad dressings, etc. Designed for easy gripping
and drip-free pouring.
5. Charger Port
Located on back of the power handle at
the top.
BEFORE YOU BEGIN
Before using the Smart Stick® Cordless Hand
Blender for the first time, we recommend that you
wipe the unit with a clean, damp cloth to remove
any dirt or dust. Dry it thoroughly with a soft,
absorbent cloth. Handle carefully.
NOTE: Blending shaft, whisk attachment, and
mixing beaker are NOT dishwasher safe,
refer to cleaning instructions on page 8.
Read all instructions completely for detailed
operating procedures. The batteries in your Smart
Stick® Cordless Hand Blender have not been fully
charged. Before the first use of this appliance, the
batteries must be charged until the green light
goes on. See Charging and Battery Life below.
CHARGING YOUR
BLENDER/BATTERY LIFE
The batteries in your Smart Stick® Cordless Hand
Blender have not been fully charged. Before the
first use of this appliance, the batteries must be
charged until the GREEN battery indicator light
illuminates. With a full charge, your stick blender
will run for approximately 20 minutes, depending
on load. Your stick blender will be fully charged in
approximately 2½ hours. Battery Life Indicator
Lights: Green: When the unit displays a green
power light, you are between 100% and 75% of
battery power. Orange: When illuminated in
Orange, you are between 75% and 25% of
battery power. When Red, you are at less than
25% and will need to charge soon.
4.
NOTE: Do not leave your stick blender uncharged
for an extended period of time, as it will affect the
life of the rechargeable battery.
6
Page 7
ASSEMBLY
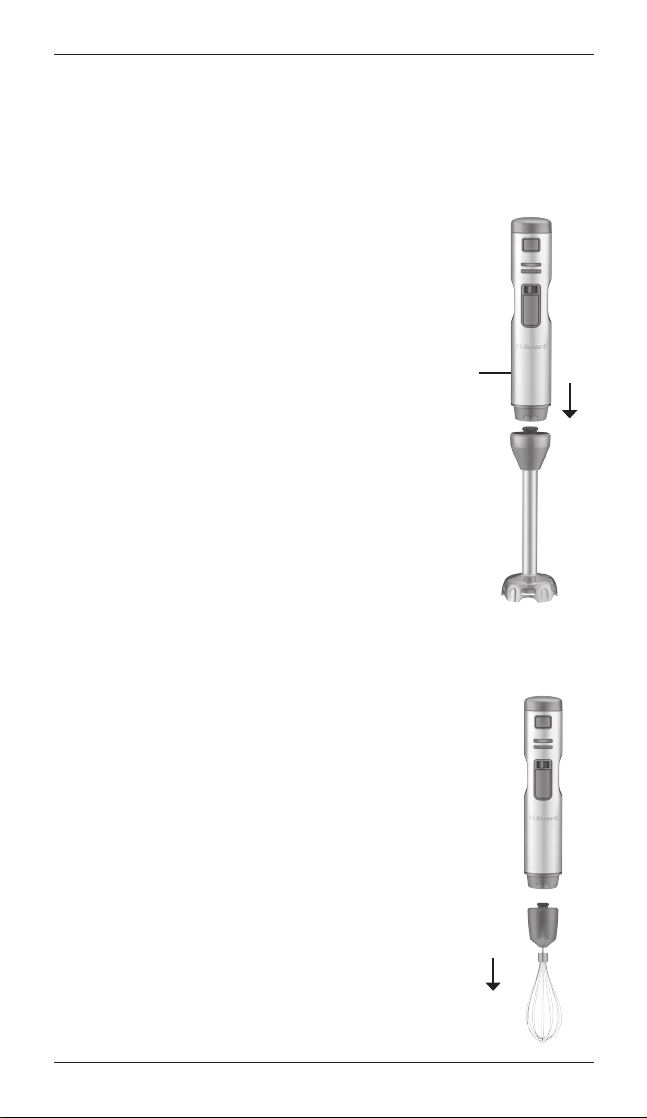
BLENDING ATTACHMENT
Align the motor body housing with the
blending shaft and push the pieces together
until you hear and feel them click together.
It may be helpful to press the release button
when assembling.
Release
button
WHISK ATTACHMENT ASSEMBLY
Align the motor power handle with the assembled
whisk attachment and push the pieces together
until you hear and feel them click together. It may
be helpful to press the release button when
assembling. NOTE: Whisk and gearbox are detachable from one
another.
7
Page 8

OPERATION
TURNING CORDLESS HAND BLENDER
ON/OFF
The power handle lets you operate the blender and whisk. Keep
hands, hair, clothing and other utensils away from all blades.
BLENDING AND MIXING
The blending shaft is specially designed for mixing and stirring
all kinds of foods, including salad dressings, smoothies, shakes,
powdered drink products, soups and sauces. It is ideal for combining
dry ingredients, and can also be used to make mayonnaise. The
blade mixes and stirs while adding only a minimum of air to your
mixture. A gentle up-and-down motion is all you need to thoroughly
blend the most flavorful, full-bodied liquid recipes. To avoid splatter, be sure the protective blade guard on the blending shaft remains
submerged in the liquid while blending. Never remove it from liquid
while the motor is running.
Insert the blending attachment into the power handle. (See Assembly
for Blending Attachment, page 7.) Insert blending shaft into mixture to
be blended. Press and hold the Auto Lock/Unlock button and press
and Power On button to turn motor on. Once motor is on, you can
release the Auto Lock/Unlock button. You can also press the Power
On button first, holding it down as you press the Auto Lock/Unlock
button to turn motor on. Do not hold Power On button down for more
than 2 minutes at a time. To turn the blender motor off, release the
Power On button.
WHISKING
1. Make sure the whisk is attached to the gearbox before attaching it
to the power handle (see page 7). Insert the whisk into the mixture
to be whipped and turn unit on.
2. Begin whisking at Speed 1, gradually increasing speed to avoid
splatters.
CLEANING AND MAINTENANCE
HAND BLENDER
Always clean the power handle and blending shaft thoroughly after
using. Remove the blending shaft from the power handle. Clean the
power handle only with a sponge or damp cloth. Do not use abrasive
cleaners that could scratch the surface. To clean the blending shaft,
wash by hand in hot water using a mild detergent. Be mindful of the
fixed razor-sharp edges. The blending shaft is NOT dishwasher safe.
8
Page 9

WHISK
To clean the whisk attachment, simply release the attachment
from the power handle. Once the whisk is removed, detach
the metal whisk from the gearbox by pulling the pieces apart. To clean
the gearbox, simply wipe with a damp cloth. To clean the metal
whisk, wash with warm, soapy water or put in the dishwasher.
Do not submerge the gearbox in water or any other liquids.
TIPS AND HINTS
FOR HAND BLENDER
• Be sure the protective blade guard on the blending shaft is fully
submerged before blending ingredients.
• To purée a soup, use the hand blender to blend the soup ingredients
to the desired consistency, using a gentle up-and-down motion
directly in the saucepan or pot.
• When blending ingredients in a pot or pan, tilt the pan away from
you to create a deeper area for blending and to prevent splatter.
• If blending a small volume of liquid, tilt the container slightly for
better results.
• When using a nonstick cooking surface, be careful not to scratch
the coating with the hand blender.
• When blending in the beaker – for example, if making a fruit
smoothie – cut firmer fruit into ½-inch pieces for easy blending.
• When blending in the beaker, put harder ingredients in first, then soft
ingredients. Finish with any liquid you want to add, unless recipe
instructs otherwise.
• Liquid should not come closer than 1 inch of where the shaft
attaches to the power handle.
• The hand blender is perfect for frothing milk for cappuccino or
lattes. Just warm milk in a small saucepan, and then pulse the hand
blender gently, being sure to keep the blending blade guard fully
submerged.
• Do not let hand blender stand in a hot pot on stove while not in use.
• Do not attempt to blend fruit pits, bones or other hard materials, as
these are likely to damage the blades.
• Do not fill mixing containers too full. The level of mixture will rise
when blending and can overflow.
• To whip air into a mixture, always hold the blade just under the
surface.
• Using a gentle up-and-down motion is the best way to blend and
incorporate ingredients uniformly.
• Use the hand blender to make smooth gravies and pan sauces.
• Do not immerse power handle in water or any other liquids.
9
Page 10

FOR WHISK ATTACHMENT
• Do not immerse whisk attachment gearbox in water or any other liquids.
• Use the whisk attachment for whipping heavy cream or egg whites.
• When whipping egg whites, use a very clean metal or glass bowl,
never plastic. Plastic can contain hidden oils and fats that can ruin the
delicate egg white foam. To help stabilize the egg whites, add 1/8
teaspoon of cream of tartar per egg white prior to whipping them.
(If using a copper bowl, omit the cream of tartar.) Whip the egg whites
until desired peaks form.
• Whipping the egg whites too long causes them to dry out and become
less stable.
• When adding sugar to whipping egg whites to make a meringue, add it
slowly, when soft peaks just begin to form, and then continue whipping
to form desired peaks.
• When whipping heavy cream, if possible and time allows, use a chilled
bowl and chill the whisk attachment. The best-shaped bowl for
whipping cream is one that is deep with a rounded bottom to minimize
any splatter.
• The cream should come out of the refrigerator just before whipping.
Whipped cream may be used at either soft or firm peaks, depending
on preference. It may be flavored as desired. For best results, whip
cream just before using.
• It may also be used for any task that you would normally whisk by
hand, like crêpe batters or eggs for omelets.
10
Page 11

RECIPES
Berry On-the-Go Smoothie ........ 12
Mango-Lime Smoothie ............... 12
Protein Shake ............................. 13
Simple Fruit Smoothie ................ 13
Cherry-Ginger Smoothie ............ 14
Triple Chocolate Shake .............. 14
Baba Ghanoush ......................... 15
Hummus ..................................... 16
Aioli/Mayonnaise ....................... 16
Cranberry Sauce ........................ 17
Garden Vegetable Sauce............ 17
Horseradish Sauce ..................... 18
Basic Vinaigrette ........................ 19
Caesar Dressing ......................... 19
Sesame Ginger Dressing ............ 20
Spring Asparagus Leek Soup .... 20
Cauliflower Soup ........................ 21
Zucchini Herb Soup ................... 22
Roasted Tomato and
Red Pepper Soup ....................... 23
Winter White Bean Soup ............ 24
Chocolate Mousse ..................... 25
Whipped Cream ......................... 26
Belgian Waffles ........................... 26
11
Page 12

Berry On-the-Go Smoothie
The mint in this recipe pleasantly offsets the sweetness of the berries
and the tartness of the cranberry juice. Try it in any of your favorite
fruit smoothies.
Makes 2 cups
½ cup frozen blueberries
1 cup strawberries, hulled and halved
¼ cup packed fresh mint leaves
1 banana, cut into 1-inch pieces
1
/3 cup cranberry juice
1
/3 cup water
1. Put all ingredients, in the order listed, into the mixing beaker. Using
the blending shaft, select Speed 5 and blend, using an up-and-down
motion, for 1 minute 30 seconds.
2. Serve immediately.
Calories 117 (3% from fat) • carb. 29g • sugars 16g • pro. 1g • fat 0g • sat. fat 0g
Nutritional information per serving (1 cup):
• chol. 0mg • sod. 7mg • calc. 38mg • fiber 5g
Mango-Lime Smoothie
For a creamier smoothie, increase the amount of yogurt to ½ cup.
Makes 1 scant cup
1 cup mango, cut into 1-inch chunks
1
/3 cup plain, full-fat yogurt
1½ teaspoons fresh lime juice
½ teaspoon grated lime zest
2 tablespoons cold water
1. Put all ingredients, in the order listed, into the mixing beaker. Using
the blending shaft, select Speed 5 and blend, using an up-and-down
motion, for 30 seconds.
2. Serve immediately or refrigerate until ready to enjoy.
Calories 195 (15% from fat) • carb. 39g • sugars 35g • pro. 5g • fat 3g • sat. fat 2g
Nutritional information per serving (1 cup):
• chol. 10mg • sod. 53mg • calc. 156mg • fiber 3g
12
Page 13

Protein Shake
Peanut butter, banana and cocoa powder—what’s not to like? Plus, the
combo is packed with protein that is sure to fill you up.
Makes 1¼ cups
2 tablespoons creamy-style peanut butter
1 banana, cut into 1-inch pieces
1 tablespoon protein powder
1 teaspoon unsweetened cocoa powder
1 teaspoon flaxseed
¾ cup unsweetened almond milk
1. Put all ingredients, in the order listed, into the mixing beaker. Using
the blending shaft, select Speed 5 and blend, using an up-and-down
motion, for 1 minute 30 seconds.
2. Serve over ice or refrigerate until ready to enjoy.
Calories 192 (52% from fat) • carb. 18g • sugars 8g • pro. 6g • fat 12g • sat. fat 2g
Nutritional information per serving (about ½ cup):
• chol. 4mg • sod. 111mg • calc. 95mg • fiber 3g
Simple Fruit Smoothie
Less is more, especially when it comes to making a quick and nutritious
Makes a scant 2 cups
1 cup fresh strawberries, hulled and halved
1 cup frozen pineapple chunks
¾ cup orange juice
1. Put all ingredients, in the order listed, into the mixing beaker. Using
the blending shaft, select Speed 5 and blend, using an up-and-down
motion, for about 1 minute.
2. Serve immediately or refrigerate until ready to enjoy.
Calories 129 (2% from fat) • carb. 30g • sugar 25g • pro. 1g • fat 0g • sat. fat 0g
snack with your hand blender.
Nutritional information per serving (1 cup):
• chol. 0mg • sod. 5mg • calc. 20mg • fiber 4g
13
Page 14

Cherry-Ginger Smoothie
Coconut milk beverage, normally found in a carton, is much lighter than
traditional, canned coconut milk. Substitute 2/3 cup of the canned
Makes about 1 cup
1 cup dark, sweet frozen cherries
¾ cup coconut milk beverage
1 piece (¾ inch) fresh ginger, peeled and halved
1. Put all ingredients, in the order listed, into the mixing beaker. Using
the blending shaft, select Speed 5 and blend, using an up-and-down
motion, for about 30 seconds.
2. Serve immediately or refrigerate until ready to enjoy.
version for a creamier, richer smoothie.
Calories 242 (57% from fat) • carb. 25g • sugars 18g • pro. 3g • fat 16g • sat. fat 14g
Nutritional information per serving (1 cup):
• chol. 0mg • sod. 10mg • calc. 14mg • fiber 3g
Triple Chocolate Shake
For the chocolate lover.
Makes about 2 cups
¾ cup milk (any fat variety)
1½ tablespoons chocolate syrup
½ teaspoon cocoa powder
1½ cups premium chocolate ice cream
1. Put all ingredients, in the order listed, into the mixing beaker. Using
the blending shaft, select Speed 3 and blend, using an up-and-down
motion, for 45 seconds.
2. Serve immediately.
Calories 154 (39% from fat) • carb. 21g • sugars 19g • pro. 3g • fat 7g • sat. fat 4g
Nutritional information per serving (½ cup):
• chol. 23mg • sod. 65mg • calc. 110mg • fiber 1g
14
Page 15

Baba Ghanoush
This popular, roasted eggplant dish is great as a dip for vegetables or
pita, but is also nice as a sandwich spread. To achieve the signature
charred flavor, cooking the eggplant over an open flame is the way to
go, but you can also just broil or roast it in your oven until the eggplant
Makes about 1¼ cups
1 medium eggplant (about 1 pound), not peeled
1 garlic clove, chopped
1
/3 cup fresh parsley leaves
2 tablespoons tahini
2 teaspoons fresh lemon juice
2 teaspoons extra virgin olive oil
½ teaspoon kosher salt
1. Prick the eggplant evenly on all sides with the tines of a fork. Char
the eggplant. This can be done in one of two ways: If you have a gas
stove, you can char over the stove (the faster method). Holding the
eggplant with heatproof tongs, place over the flame of the stove and
carefully turn the eggplant until all sides are blackened. Set aside to
cool slightly. The second method is to char in an oven under the broiler.
Set on a rack fit into a foil-lined baking pan. Place as close as possible
to the broiler/top element and turn every 5 to 10 minutes, until all sides
are charred (this may not get as blackened as it would over an open
flame). It is important for the flesh to be very soft, to the point where
the eggplant is falling apart. This can take anywhere between 15 and 30
minutes, depending on your oven. NOTE: This is a great task for your
toaster oven! Once the eggplant is charred, set aside to cool slightly.
2. Put the remaining ingredients into a small bowl. Scrape the flesh off the
eggplant (discard the skin and the seeds) and add it to the bowl. Using
the blending shaft, pulse a few times to break up, and then process,
using an up-and-down motion, until desired consistency.
3. Taste and adjust seasoning as desired.
is cooked to a soft consistency.
Calories 37 (54% from fat) • carb. 4g • sugars 1g • pro. 1g • fat 2g • sat. fat 0g
Nutritional information per serving (2 tablespoons):
• chol. 0mg • sod. 153mg • calc. 33mg • fiber 2g
15
Page 16

Hummus
This is your basic hummus. To change it up a bit, add a cooked
red pepper, or roasted beets or fresh herbs. This hummus is delicious
on its own, but also makes a great foundation for new flavor variations.
Makes about 2 cups
1 garlic clove, chopped
1 can (15.5 ounces) chickpeas, drained and rinsed
½ cup tahini
2 tablespoons fresh lemon juice
¾ teaspoon kosher salt, or to taste
Pinch ground cumin
½ cup water (plus more if needed)
1. Put all ingredients, in the order listed, into the mixing beaker. Process on
Speed 5 until fully smooth, about 40 to 60 seconds.
2. Taste and adjust seasoning as desired. If a thinner consistency is
desired, add additional water, or olive oil for a richer tasting hummus.
Calories 71 (47% from fat) • carb. 7g • sugars 0g • pro. 3g • fat 4g • sat. fat 1g
Nutritional information per serving (2 tablespoons):
• chol. 0mg • sod. 119mg • calc. 45mg • fiber 2g
Aioli/Mayonnaise
Aioli, like mayonnaise, has its roots in France, but it has been adopted
by many cuisines, most notably the Catalans of Spain. This version
makes it simple by using the same base for mayonnaise, but adding a
hefty amount of garlic to the mix. Traditionally, aioli is used as a dip for
crudités, but it can also top burgers, fish and crab cakes.
Makes about 1 cup
2 garlic cloves, peeled (if making aioli)
2 large egg yolks
2 tablespoons fresh lemon juice
1 tablespoon Dijon-style mustard
1 to 2 pinches kosher salt
11/3 cups vegetable oil
Put all ingredients (excluding the garlic, if making mayonnaise), in the
order listed, into the mixing beaker. Allow to sit for about 30 seconds to
1 minute. Insert the blending shaft so that it is sitting level on the bottom
of the cup. Select Speed 3 and blend, being sure to keep the metal
blade completely submerged. Process until the mixture begins to thicken.
Continue processing, with a gentle up-and-down motion until thick, and
oil is fully incorporated.
16
Page 17

Calories 169 (98% from fat) • carb. 0g • sugars 0g • pro. 0g • fat 19g • sat. fat 2g
• chol. 23mg • sod. 32mg • calc. 3mg • fiber 0g
Cranberry Sauce
Freshly made cranberry sauce beats out the canned variety any day.
Makes about 3 cups
4 cups whole cranberries (fresh, or frozen and thawed)
2 cups water
2
/3 cup granulated sugar
¼ teaspoon kosher salt
3 inch piece orange peel, bitter white pith removed
1. Put all ingredients into a medium saucepan. Bring to a boil, then lower
heat to achieve a simmer. Continue to simmer until the cranberries
are very plump, about 20 minutes (in addition to the cranberries being
plump, you want to reduce the liquid by about one-third or one-half).
Remove from heat and let come to room temperature.
2. Remove orange peel and then insert the blending shaft. Select Speed 3
and blend for 10 to 15 seconds, depending on desired consistency.
3. Transfer to a storage container, cover and chill in the refrigerator.
4. Cranberry sauce can be stored in the refrigerator for up to 1 week.
Nutritional information per serving (1 tablespoon):
Calories 57 (1% from fat) • carb.14g • sugars 11g • pro. 0g • fat 0g • sat. fat 0g
Nutritional information per serving (¼ cup):
• chol. 0mg • sod. 55mg • calc. 7mg • fiber 2g
Garden Vegetable Sauce
This all-purpose pasta sauce is a great way to get
Makes about 4 cups
1 tablespoon extra virgin olive oil
1 small onion, cut into ½-inch pieces
1 carrot, cut into ½-inch pieces
½ cup ½-inch cubed eggplant (not peeled)
1 celery stalk, cut into ½-inch pieces
2 garlic cloves, smashed
½ teaspoon kosher salt, divided
½ teaspoon dried oregano
½ teaspoon dried basil
your daily dose of vegetables.
17
Page 18

1 roasted red pepper, cut into 1-inch pieces
¼ cup dry white wine
1 tablespoon tomato paste
1 can (28 ounces) diced tomatoes with their juices
Pinch freshly ground black pepper
1 tablespoon granulated sugar
1. Put the oil into a large saucepan set over medium heat. Once oil is hot,
add the onion, carrot, eggplant, celery, garlic and ¼ teaspoon of the
salt. Gently sauté ingredients together until they turn slightly golden.
2. Add the oregano, basil, red pepper and wine. Cook until reduced by at
least half. Add the tomato paste, tomatoes and remaining salt. Bring to
a boil, then reduce heat and simmer for 35 minutes, loosely covered.
Uncover and then simmer for an additional 10 to 15 minutes to thicken.
Turn off heat and let sit 5 minutes.
3. Select Speed 3 and blend sauce directly in the pot using the blending
shaft. Process until desired consistency is achieved, being sure to keep
the metal blade completely submerged in the sauce (depending on the
size of the pot being used, you may need to tilt the pot to one side – be
sure to tilt the pot away from you to prevent any possible splatter).
4. Taste and adjust seasoning as desired.
5. Serve immediately or cool completely and then transfer to storage
containers to store in the refrigerator. Sauce will keep in the refrigerator
for up to one week. It can also be frozen for up to one month.
Calories 41 (25% from fat) • carb. 7g • sugars 4g • pro. 1g • fat 1g • sat. fat 0g
Nutritional information per serving (¼ cup):
• chol. 0mg • sod. 245mg • calc. 18mg • fiber 2g
Horseradish Sauce
Perfect accompaniment for any roast beef dish.
Makes about 1 cup
2
/3 cup sour cream
1
/3 cup mayonnaise
1
/3 cup prepared horseradish
2 teaspoons Dijon-style mustard
¾ teaspoon kosher salt
Pinch freshly ground black pepper
Put all ingredients, in the order listed, into the mixing beaker. Using the
blending shaft, select Speed 3 and blend. While blending, gradually
increase to Speed 5, using a gentle up-and-down motion until
completely combined, about 20 to 30 seconds.
Nutritional information per serving (1 tablespoon):
18
Page 19

Calories 56 (89% from fat) • carb. 7g • sugars 1g • pro. 1g • fat 5g • sat. fat 2g
• chol. 10mg • sod. 163mg • calc. 10mg • fiber 0g
Basic Vinaigrette
Use this basic vinaigrette as a guide and change your vinegar/oil fla-
vors to come up with varying combinations to create exciting salad
dressings. You can add other flavors such as crushed or roasted garlic,
chopped shallots, fresh or dried herbs, sun-dried tomatoes, honey or
Makes about 1 cup
¼ cup red wine vinegar
1 teaspoon Dijon-style mustard
¼ teaspoon kosher salt
¼ teaspoon freshly ground black pepper
¾ cup extra virgin olive oil
1. Put all ingredients, in the order listed, into the mixing beaker.
2. Insert the blending shaft so that it is sitting level on the bottom of the
beaker. Select Speed 3 and blend, being sure to keep the metal blade
completely submerged. Process until the mixture begins to thicken.
Continue processing with a gentle up-and-down motion until dressing
is homogenous, about 30 seconds.
3. Taste and adjust seasoning as desired.
lemon juice.
Calories 181 (100% from fat) • carb. 0g • sugars 0g • pro. 0g • fat 21g • sat. fat 3g
Nutritional information per serving (2 tablespoons):
• chol. 0mg • sod. 91mg • calc. 0mg • fiber 0g
Caesar Dressing
An old favorite made fresh at home.
Makes about 1 cup
2 small garlic cloves, peeled
6 anchovy fillets
¼ cup egg substitute (may substitute 2 fresh, raw egg yolks; be
sure you use the freshest eggs possible and from a trusted
source – or use ¼ cup mayonnaise)
4 teaspoons fresh lemon juice
4 teaspoons red wine vinegar
2 teaspoons Dijon-style mustard
2 teaspoons Worcestershire sauce
½ teaspoon freshly ground black pepper
2
/3 cup extra virgin olive oil, divided
19
Page 20

1. Put all ingredients, except for the olive oil, into the mixing beaker. Using
the blending shaft, select Speed 5 and blend until fully combined.
2. Add half of the olive oil and blend on Speed 5 until well combined. Add
the remaining olive oil and blend until homogenous, about 1 minute.
3. Taste and adjust seasoning as desired.
4. Serve immediately. Transfer to an airtight container and store in the
refrigerator for up to 5 days.
Calories 90 (96% from fat) • carb. 0g • sugars 0g • pro. 1g • fat 10g • sat. fat 2g
Nutritional information per serving (1 tablespoon):
• chol. 24mg • sod. 68mg • calc. 3mg • fiber 0g
Sesame Ginger Dressing
This Asian-style dressing goes great over cold, crisp vegetables.
Makes about 1 cup
1 green onion, trimmed and cut into 1-inch pieces
1 small garlic clove, peeled
1 piece (¾ inch) fresh ginger, peeled and halved
1 tablespoon toasted sesame seeds
3 tablespoons rice wine vinegar
1 tablespoon soy sauce
2 tablespoons toasted sesame oil
¾ cup vegetable oil
1. Put all ingredients, except for the vegetable oil, into the blending beaker.
Using the blending shaft, select Speed 5 and blend, about 15 seconds.
2. Add oil. Select Speed 3 and blend until homogeneous, about 30
seconds.
Calories 217 (98% from fat) • carb. 1g • sugars 0g • pro. 0g • fat 25g • sat. fat 4g
Nutritional information per serving (2 tablespoons):
• chol. 0mg • sod. 85mg • calc. 3mg • fiber 0g
Spring Asparagus Leek Soup
Spring ingredients shine in this simple yet tasty soup.
Makes about 8 cups
2 tablespoons unsalted butter
2 garlic cloves, chopped
2 medium leeks, white and light green parts only, sliced
1 to 1½ teaspoons kosher salt, to taste, divided
2 large bunches asparagus (about 2 to 2½ pounds), rough ends
trimmed and cut into 2-inch pieces, tips removed and
reserved for garnish, optional (see note in step 3)
1 large red potato (about 8 ounces), peeled and cut into ½-inch
20
Page 21

pieces, held in water to prevent oxidation
¼ cup dry white wine or Cognac
¼ teaspoon freshly ground black pepper
5 cups vegetable or chicken broth low sodium (the clearer the
broth, the greener the soup will be)
1 teaspoon fresh lemon juice
Crème fraîche for garnish
Chopped chives for garnish
1. Put the butter in a medium stockpot set over medium heat. Once
melted, add the garlic and leeks with a half teaspoon of salt; stir until
you hear a slight sizzle and then cover pan to sweat the leeks for about
5 to 10 minutes, until they are very soft.
2. Add the asparagus stalks and potato to the pan. Stir to coat all
vegetables and sauté until soft, about 10 minutes. Pour in white wine or
Cognac and stir until evaporated. Add remaining salt and pepper and
stir in the broth. Bring mixture to a boil and then reduce to a simmer.
Simmer until all vegetables are very tender, about 20 to 25 minutes.
3. While soup is simmering, steam the asparagus tips separately, about
5 to 8 minutes, until crisp tender. Shock tips in ice water to maintain
a bright green color. Once cool, thinly slice tips lengthwise to be
used for garnish. (NOTE: This step is optional, but makes for a great
presentation.)
4. Once soup vegetables are tender, select Speed 3 and start blending,
using the blending shaft. Gradually increase to Speed 5, until puréed,
about 1½ minutes. If using a larger pot, tilt the pan away from you
to ensure that the protective guard of the blending blade is fully
submerged to prevent splatter.
5. Stir in lemon juice. Taste and adjust seasoning as desired.
6. Serve immediately, garnished with a dollop of crème fraîche, some
chopped chives and asparagus tips.
Calories 97 (26% from fat) • carb. 13g • sugars 4g • pro. 5g • fat 35g • sat. fat 2g
Nutritional information per serving (based on 6 servings):
• chol. 8mg • sod. 650mg • calc. 45mg • fiber 3g
Cauliflower Soup
Let this soup warm you up on a cold, winter afternoon. It is so easy to
prepare with the Smart Stick® Cordless Hand Blender.
Makes 6 cups
1 tablespoon olive oil
1 medium leek, cleaned well, white and light green parts only,
sliced
1 medium head cauliflower, about 2½ pounds, cut into florets
2 teaspoons kosher salt, divided
¼ teaspoon freshly ground black pepper
¼ teaspoon caraway seeds
21
Page 22

4 cups vegetable broth, low sodium
Dill, for garnish (optional)
1. Put the olive oil in a medium stockpot over medium heat. Once warm,
add the leek and gently sauté until soft and fragrant, about 5 minutes.
Be careful not to let the leek pick up any color.
2. Add the cauliflower florets and 1 teaspoon of the salt, all the pepper
and caraway seeds. Stir together until coated and gently sauté for
an additional couple of minutes. Add the broth and an additional ½
teaspoon of the salt and increase heat. Allow liquid to come to a boil
and then reduce heat so that the liquid is just simmering.
3. Simmer for about 20 minutes, until the cauliflower is tender. Once
tender, select Speed 5 and blend, using the blending attachment, in an
up-and-down motion until smooth, about 1 to 2 minutes. If the soup
seems too thick, add additional broth or water until desired consistency
is achieved.
4. Taste and adjust seasoning as desired. Garnish with a sprig of fresh dill
when serving.
Calories 76 (30% from fat) • carb. 10g • sugars 4g • pro. 4g • fat 3g • sat. fat 0g
Nutritional information per serving (about 1 cup):
• chol. 0mg • sod. 991mg • calc. 53mg • fiber 4g
Zucchini Herb Soup
A great way to use up that surplus of summer garden zucchini –
Makes about 7 cups
1 tablespoon unsalted butter or olive oil
2 medium leeks, white and light green parts, sliced
1 medium celery stalk, finely chopped
4 medium zucchini (about 2 pounds), sliced
8 ounces white (waxy) potato, peeled and cut into 2-inch pieces
1½ teaspoons kosher salt, divided
½ teaspoon freshly ground black pepper
½ cup dry white wine
2¾ cups chicken broth, low sodium
2 tablespoons fresh mint leaves (about 10 to 12 medium leaves)
2 tablespoons fresh basil leaves (about 14 to 15 large leaves)
¼ cup heavy cream (optional)
serve cold or warm!
1. Put the butter or oil in a medium stockpot over medium heat. Once the
butter is melted, add the leeks and celery. Stir over medium heat until
vegetables are soft, about 8 to 10 minutes.
2. When vegetables are soft, add the zucchini and potato and 1 teaspoon
of the salt and the pepper, and stir ingredients together until well
coated. Once coated, add the white wine. Simmer until wine is just
about evaporated. Add the broth and increase the heat to bring mixture
to a boil. Once the soup comes to a boil, reduce the heat in order to
22
Page 23

maintain a simmer. Simmer until all vegetables are tender, about 15
minutes.
3. When all vegetables are tender, add the fresh herbs. Blend soup on
Speed 5 with the blending shaft, using an up-and-down motion until
smooth, about 1 to 2 minutes. To help facilitate blending, tilt pot to one
side, away from you, so the protective guard of the blade is completely
submerged. Blend until mixture is completely puréed.
4. If using cream, add at the very end of blending: Stir in cream and
simmer soup for an additional 5 to 10 minutes before seasoning. If
not adding cream, taste and adjust seasoning with remaining salt as
desired.
Calories 93 (19% from fat) • carb. 14g • sugars 5g • pro. 3g • fat 2g • sat. fat 1g
Nutritional information per serving (about 1 cup):
• chol. 4mg • sod. 718mg • calc. 44mg • fiber 3g
Roasted Tomato and Red Pepper Soup
Simple to prepare – this soup can be enjoyed hot or cold.
Makes about 5 cups
4 large red peppers, about 2½ pounds
5 large plum tomatoes, about 1½ pounds
1 large shallot, peeled
4 large garlic cloves, crushed
1 cup chicken broth, low sodium
¾ teaspoon kosher salt
¼ teaspoon freshly ground black pepper
1. Preheat oven to 425°F.
2. Put the peppers, tomatoes, shallot and garlic on a foil or parchmentlined baking sheet and place in the oven. Roast for about 45 minutes,
until all vegetables are slightly charred.
3. Transfer peppers to a stainless bowl and cover with plastic wrap, allow
to sit for about 30 minutes to steam and loosen the skins. Remove and
discard the pepper skins and seeds. Remove the skins and core of the
tomatoes.
4. Put the roasted vegetables in a saucepan. Using the blending shaft,
select Speed 5 and blend to purée. Stir in the chicken broth, salt and
pepper and put over medium heat until soup begins to simmer.
5. Remove from heat and blend again on Speed 5 for about 1 minute
until completely smooth.
6. Taste and adjust seasoning and texture as desired.
Calories 68 (11% from fat) • carb. 13g • sugars 8g • pro. 3g • fat 1g • sat. fat 0g
Nutritional information per serving (about 1 cup):
• chol. 5mg • sod. 389mg • calc. 20mg • fiber 4g
23
Page 24

Winter White Bean Soup
A rich and creamy soup, serve with a nice crusty loaf of bread.
Makes about 6 cups
1½ teaspoons olive oil, divided
4 slices bacon, finely chopped
1 garlic clove, chopped
1 medium onion, chopped
1 celery stalk, chopped
½ teaspoon kosher salt, divided
1 tablespoon dry white wine, or vermouth
2 cans (15.5 ounces. cannellini beans, drained
(or 1 pound dried, soaked overnight)*
1 rosemary sprig
1 bay leaf
Pinch freshly ground black pepper
4 cups chicken or vegetable broth, low sodium
Grated Parmesan for garnish
1. Put the bacon in a medium stockpot or large saucepan set over
medium heat. Cook until crispy. Remove and reserve.
2. Once bacon is done cooking and has been reserved, reduce the heat to
medium low. Add the olive oil. Once hot, add the chopped vegetables
with a pinch of the salt to the pot. Sauté until softened, about 4 to 6
minutes. Add the wine/vermouth, stirring to deglaze the pan (picking
up the brown bits from the bottom of the pan and working into the
mixture); let cook until fully evaporated. Add the beans, rosemary, bay
leaf, remaining salt and pepper and stir to mix. Heat until beans are
warmed through, about 4 to 5 minutes. Add the broth and increase the
heat to bring to a boil. Once boiling, reduce heat and simmer, partially
covered, for about 60 to 75 minutes. Remove the rosemary sprig and
bay leaf.
3. Using the blending shaft, select Speed 3 and blend, until smooth. If
using a larger saucepan, tilt the pan to one side, away from you, to
ensure that the protective guard of the blade is fully submerged to
prevent splatter.
4. Taste and adjust seasoning as desired. Garnish with a sprinkling of the
cooked bacon and grated Parmesan.
* When using soaked dried beans, you may have to add more broth and a
bit more salt as well.
Calories 245 (9% from fat) • carb. 36g • sugars 4g • pro. 18g • fat 2g • sat. fat 0g
Nutritional information per serving (based on 6 servings):
• chol. 0mg • sod. 500mg • calc. 119mg • fiber 13g
24
Page 25

Chocolate Mousse
While chocolate mousse is light and airy, do not be fooled – this is
incredibly rich! If you want smaller portions, use smaller cups, like
espresso cups. This can also be piped with a pastry bag to make the
Makes about 2½ cups (five individual servings)
6 ounces (about 1 cup) semisweet chocolate, chopped or chips
4 large egg yolks
4 tablespoons granulated sugar, divided
Pinch kosher salt
½ teaspoon espresso powder
2 tablespoons unsalted butter, cubed and room temperature
1 cup heavy cream
1 teaspoon pure vanilla extract
1. Melt the chocolate in a double boiler.
2. While chocolate is heating, put the yolks, 2 tablespoons of the sugar
and the salt into a medium mixing bowl. Using the whisk attachment,
select Speed 2 and whisk, gradually increasing to Speed 4, until
lightened, about 1½ minutes. Add the espresso powder and whisk on
Speed 4 until combined. Reserve.
3. Once the chocolate has just melted, add the butter and, still using
the whisk attachment, whisk on Speed 2 until butter is completely
incorporated. Add the egg yolk/sugar mixture and whisk on Speeds 3
and 4 until completely combined. Once combined, continue to whisk
over the double boiler for 1 minute to ensure the eggs have reached a
safe, cooked temperature (if you have a thermometer, you want to have
the mixture be 160°F). Remove bowl from the heat and reserve until
cool to the touch.
4. While the chocolate is cooling, put the heavy cream, vanilla and
remaining sugar into a medium to large mixing bowl. Using the whisk
attachment (no need to clean it from the previous task – a quick rinse is
fine, if desired), whisk, starting on Speed 1 and gradually increasing to
Speed 5 to reach medium-stiff peaks. This will take about 2½ minutes.
Take about one-third of the whipped cream and stir into the chocolate
mixture to lighten, and then with a large spatula, fold the remaining
whipped cream into the mixture until there are no streaks visible.
5. Divide among five custard cups (about 4 ounces each). Cover and chill
until fully set, minimum 2 hours. These will keep for up to 3 days in the
refrigerator.
perfect presentation.
Calories 447 (58% from fat) • carb. 32g • sugars 28g • pro. 4g • fat 34g • sat. fat 21g
Nutritional information per serving (4 ounces):
• chol. 224mg • sod. 39mg • calc. 29mg • fiber 2g
25
Page 26

Whipped Cream
The whisk attachment on the Smart Stick® Hand Blender makes
whipping cream much easier than whipping it by hand.
Makes 2 cups
1¼ cups chilled heavy cream
2 tablespoons confectioners’ sugar
1½ teaspoons pure vanilla extract
1. Put all ingredients into a large mixing bowl. Using the whisk attachment,
select Speed 1 and whisk, being sure the whisk just skims the surface
of the whipped cream.
2. Continue whisking until cream begins to thicken. Then gradually
increase speed to Speed 5 and move whisk in an up-and-down motion
until desired stiffness is achieved. You will reach soft peaks in about 1½
minutes.
Calories 67 (92% from fat) • carb. 1g • sugar 1g • pro. 0g • fat 6g • sat. fat 4g
Nutritional information per serving (2 tablespoons):
• chol. 25mg • sod. 0mg • calc. 0mg • fiber 0g
Belgian Waffles
Whipped egg whites make these waffles light, fluffy and irresistible.
Makes 4 cups batter, about 4 large Belgian waffles
2 cups unbleached, all-purpose flour
2 tablespoons yellow cornmeal
¾ teaspoon kosher salt
½ teaspoon baking soda
2 large eggs, separated
Pinch cream of tartar
¼ cup vegetable oil
1¾ cups buttermilk
½ teaspoon pure vanilla extract
1. Put dry ingredients into a large mixing bowl. Using the whisk
attachment, select Speed 1 and whisk to combine ingredients, about 10
seconds. Reserve.
2. Put the egg whites and cream of tartar into a separate, clean, large
bowl. Again, using the whisk attachment, select Speed 1 and whisk. As
the egg whites start to thicken, slowly increase the speed to Speed 5 to
achieve medium peaks, which takes about 2 minutes total. Reserve.
3. Put the yolks, oil, buttermilk and vanilla extract into a small bowl. select
Speed 1 and whisk until combined, about 10 seconds. Reserve.
4. Make a well in the dry ingredients and, using Speed 1, whisk in the yolk
mixture until just combined. Then, with a spatula, carefully fold in the
egg whites.
26
Page 27

5. Use the recommended amount of batter in your waffle maker’s recipe
booklet to cook waffles.
Calories 411 (38% from fat) • carb. 52g • sugars 6g • pro. 1g • fat 17g • sat. fat 3g
Nutritional information per serving (1 cup batter):
• chol. 97mg • sod. 705mg • calc. 138mg • fiber 1g
27
Page 28

WARRANTY
LIMITED THREE-YEAR WARRANTY (U.S. ONLY)
This warranty is available to consumers only. You are a consumer if you
own a Smart Stick® Cordless Hand Blender that was purchased at retail
for personal, family or household use. Except as otherwise required
under applicable law, this warranty is not available to retailers or other
commercial purchaser or owners.
We warrant that your Smar t Stick® Cordless Hand Blender will be free of
defects in materials and workmanship under normal home use for 3 years
from the date of original purchase.
We recommend that you visit our website, www.cuisinart.com for a
fast, efficient way to complete your product registration. However,
product registration does not eliminate the need for the consumer to
maintain the original proof of purchase in order to obtain the warranty
benefits. In the event that you do not have proof of purchase date, the
purchase date for purposes of this warranty will be the date of
manufacture.
If your Smar t Stick® Cordless Hand Blender should prove to be defective
within the warranty period, we will repair it, or if we think necessary,
replace it. To obtain warranty service, simply call our toll-free number
1-800-726-0190 for additional information from our Consumer Service
Representatives or send the defective product to Consumer Service at
Cuisinart
7475 North Glen Harbor Blvd.
Glendale, AZ 85307
To facilitate the speed and accuracy of your return, please enclose
$10.00 for shipping and handling of the product.
Please pay by check or money order made payable to Cuisinart
(California residents need only supply proof of purchase and should call
1-800-726-0190 for shipping instructions).
NOTE: For added protection and secure handling of any Cuisinart
product that is being returned, we recommend you use a traceable,
insured delivery service. Cuisinart cannot be held responsible for
in-transit damage or for packages that are not delivered to us. Lost and/
or damaged products are not covered under warranty.
Please be sure to include your return address, daytime phone number,
description of the product defect, product model # (located on bottom of
product), original date of purchase, and any other information pertinent to
the product’s return.
CALIFORNIA RESIDENTS ONLY
California law provides that for In-Warranty Service, California residents
have the option of returning a nonconforming product
(A) to the store where it was purchased or
(B) to another retail store that sells Cuisinart products of the same type.
The retail store shall then, at its discretion, either repair the product, refer
the consumer to an independent repair facility, replace the product, or
refund the purchase price less the amount directly attributable to the
consumer’s prior usage of the product. If either of the above two options
does not result in the appropriate relief to the consumer, the consumer
may then take the product to an independent repair facility if service or
repair can be economically accomplished. Cuisinart and not the
28
Page 29

consumer will be responsible for the reasonable cost of such service,
repair, replacement, or refund for nonconforming products under
warr ant y.
California residents may also, according to their preference, return
nonconforming products directly to Cuisinart for repair, or if necessary,
replacement, by calling our Consumer Service Center toll-free at
1-800-726-0190.
Cuisinart will be responsible for the cost of the repair, replacement, and
shipping and handling for such products under warranty.
BEFORE RETURNING YOUR CUISINART PRODUCT
If you are experiencing problems with your Cuisinart product, we
suggest that you call our Cuisinart Service Center at 1-800-726-0190
before returning the product to be serviced. If servicing is needed, a
Representative can confirm whether the product is under warranty and
direct you to the nearest service location.
You r
Smart Stick® Cordless Hand Blender
strictest specifications and has been designed for use only in 120 volt outlets
and only with authorized accessories and replacement parts. This warranty
expressly excludes any defects or damages caused by attempted use of this
unit with a converter, as well as use with accessories, replacement parts or
repair service other than those authorized by Cuisinart. This warranty does
not cover any damage caused by accident, misuse, shipment or other than
ordinary household use. This warranty excludes all incidental or consequential
damages. Some states do not allow the exclusion or limitation of these
damages, so these exclusions may not apply to you. You may also have other
rights, which vary from state to state.
Important: If the nonconforming product is to be serviced by someone
other than Cuisinart’s Authorized Service Center, please remind the
servicer to call our Consumer Service Center at 1-800-726-0190 to ensure
that the problem is properly diagnosed, the product is serviced with the
correct parts, and the product is still under warranty.
has been manufactured to the
DISPOSAL/RECYCLING OF BATTERIES
This product uses two Li-ion rechargeable and recyclable batteries. At the
end of the batteries’ useful life, they should be recycled. These batteries must
not be incinerated or composted. Li-ion batteries should not be put in
municipal waste systems. Contact your local waste collection agency for
proper recycling and disposal information for your area. Please do not attempt
to dismantle the power handle to replace these batteries on your own.
Damage could result to the unit.
29
Page 30

30
Page 31

Trademarks or service marks of third
parties referred to herein are the
trademarks or service marks of their
respective owners.
31
©2018 Cuisinart
150 Milford Road
East Windsor, NJ 08520
Printed in China
18CE0054392
IB-15737-ESP
 Loading...