

Page 1
INSTRUCTION AND
RECIPE BOOKLET
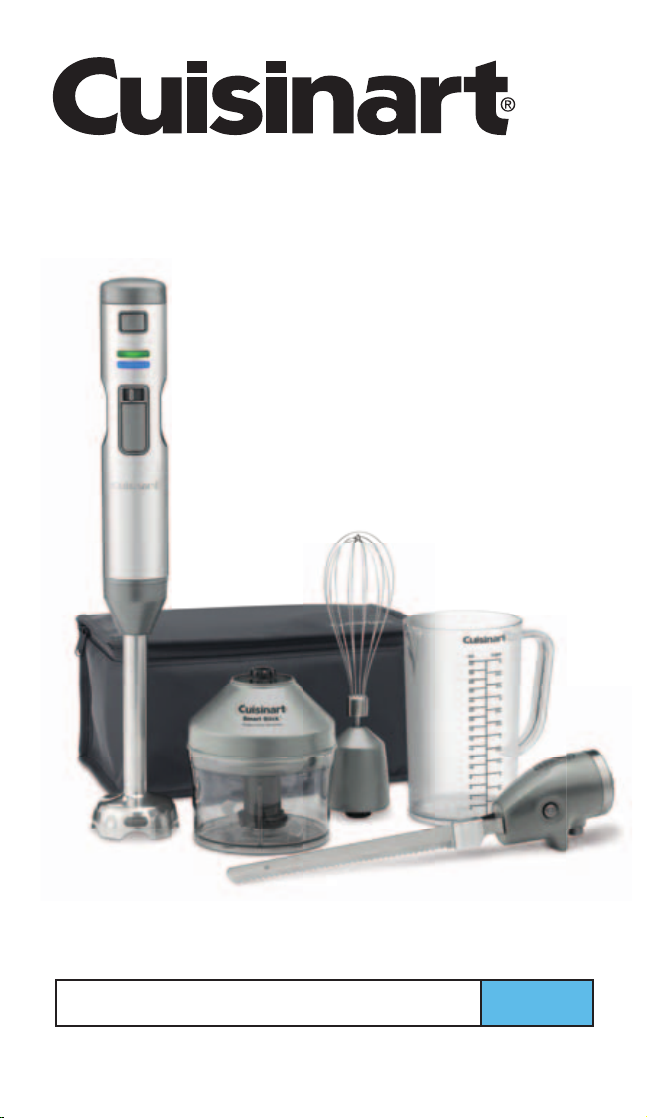
Cordless SmartStick® Hand Blender and Knife
For your safety and continued enjoyment of this product,
always read the instruction book carefully before using.
CSB-300
Page 2

Page 3

IMPORTANT SAFEGUARDS
When using an electrical appliance, basic safety precautions should
always be taken, including the following:
WARING: Read all safety warnings and instructions. Failure to
follow the warnings and instructions may result in electric shock,
fire and/or serious injury.
1. READ ALL INSTRUCTIONS.
2. To protect against electrical shock, do not put the charger handle
or motor body of this hand blender in water or other liquids. The
drive shaft of this appliance, where blades are interchanged, has
been designed for submersion in water or other liquids. Never
submerge any other portion of this unit. If hand blender falls into
liquid, remove immediately. Carefully remove, clean and dry unit
thoroughly before continuing.
3. This appliance should not be used by children. To avoid possible
accidental injury, close supervision is necessary when any
appliance is used by or near children or individuals with certain
disabilities.
4. Do not operate in the presence of explosive and/or flammable
fumes.
5. To avoid the possibility of personal injury, always unplug the unit
from the charger before attaching or removing blades and/or
attachments for cleaning or any other purpose.
6. Illuminated lights indicate unit is ready to operate. Avoid any
contact with blades or movable parts.
7. Once blender is unlocked and/or powered on, avoid any contact
with blades or moveable parts.
8. Avoid contact with moving parts. Keep hands, hair, clothing, as
well as spatulas and other utensils away from attachments and
mixing container during operation to reduce risk of injury to
persons, and/or damage to the appliance. A spatula may be used,
but must be used only when the unit is not operating.
9. Remove detachable shaft from the power handle before washing
the blades or shaft.
10. Blades and accessory attachments are SHARP. Handle carefully.
Always handle blades with hand away from cutting edge. Always
store blades with cutting edge away from you.
11. When mixing liquids, use a tall container or make small quantities
at a time to reduce spillage and possibility of injury.
12. Charger should be plugged into an electrical outlet away from sink
or hot surface.
13. Do not use an extension cord. Plug charger directly into an
electrical outlet.
14. Do not attempt to use this charger with any other product. Also,
do not attempt to charge the batteries with any other charger.
3
Page 4

15. Do not charge batteries with charger plugged into an outdoor
outlet.
16. Do not use appliance for other than intended use.
17. Do not operate any appliance with a damaged cord or plug, or
after the appliance has malfunctioned or has been dropped or
damaged in any way, or is not operating properly. Return the
appliance to the nearest Cuisinart Repair Center for examination,
repair, or mechanical or electrical adjustment.
18. The use of attachments or accessories not recommended by
Cuisinart may cause fire, electrical shock or risk of injury.
19. Make sure the appliance is off and the motor/blade/attachment
has stopped completely before putting on or taking off attachments, and before cleaning.
20. This appliance is intended for household use only and is not for
commercial or outdoor use.
21. Do not use this hand blender for other than its intended use of
preparing foods and beverages.
22. Use extra care when working with hot liquids to avoid
splattering.
23.
To reduce the risk of fire or electric shock, do not operate any
heating appliance beneath or near the mounted charging handle
unit.
24. Do not mount or store/unit over or near a portion of a heating or
cooking appliance, or a sink or washbasin.
25. Unplug the charger from the outlet before attempting any routine
cleaning of the charger.
26. Do not operate a damaged charger. Have damaged charger
replaced immediately.
27. Do not incinerate the hand blender, even if it is severely dam-
aged. The batteries can explode in a fire.
28.
This product contains lithium batteries which must be recycled at
the end of the life of the hand blender and disposed of properly.
(See Disposal/Recycling of Batteries, page 44.) Do not incinerate
or compost batteries, as they will explode at high temperature.
29. Leaks from battery cells can occur under extreme conditions. If
the liquid gets on the skin, (1) wash quickly with soap and water
or (2) neutralize with mild acid such as lemon juice or vinegar. If
the liquid gets into eyes, flush them immediately with clean
water for a minimum of 10 minutes. Seek medical attention.
30. Prevent unintentional starting. Never press the Auto Lock/Unlock
switch on the power handle or electric knife attachment while
pressing the Power On switch or trigger unless you are ready to
use your blender or knife.
31. Recharge only with the charger specified by the manufacturer. A
charger that is suitable for one type of battery pack may create a
risk of fire when used with another battery pack.
4
Page 5

32.
Use appliances only with specifically designated battery packs.
Use of any other battery packs may create a risk of injury and fire.
33. Under abusive conditions, liquid may be ejected from the battery.
Avoid contact with such liquid. If contact accidentally occurs,
flush with water. If liquid contacts eyes, seek medical help.
Liquid ejected from the battery may cause irritation or burns.
34. Do not use a battery pack or appliance that is damaged or modified. Damaged or modified batteries may exhibit unpredictable
behavior resulting in fire, explosion or risk of injury.
35. Do not expose a battery pack or appliance to fire or excessive
heat. Exposure to fire or temperatures above 265°F/130°C/ may
cause an explosion.
36. Have servicing performed by a qualified repair person using only
identical replacement parts. This will ensure that the safety of the
product is maintained.
37. Recommended ambient charging temperature 50°F−104°F
(10°C− 40°C).
38. Recommended storage temperature (10°C− 40°C) (50°F− 104°F).
39. Use only the power adapter (10.0VDC/1000mA output) supplied
with this product.
40. Any other servicing should be performed by an authorized
service representative.
41. To reduce the risk of injury, never place chopper/grinder attachment cutting blade assembly on cup shaft without first putting
chopper cup properly in place.
42. Be certain the chopper/grinder attachment cover is securely
locked in place before operating appliance. Do not attempt to
remove cover until blade has stopped rotating.
43. Check chopping cup for presence of foreign objects before
using.
44. Do not operate your appliance in an appliance garage or under a
wall cabinet. When storing in an appliance garage, always
unplug the unit from the electrical outlet. Not doing so could
create a risk of fire, especially if the appliance touches the walls
of the garage or the door touches the unit as it closes.
SAVE THESE INSTRUCTIONS
FOR HOUSEHOLD USE ONLY
Note: The unit comes with overload protection feature if unit stops are
unexpectedly, it must be reset by recharging for a few seconds.
5
Page 6

CONTENTS
Important Safeguards . . . . . . . . . . . . . . . . . . . . . . . . . . . . . . . . . . . . 3
Unpacking Instructions . . . . . . . . . . . . . . . . . . . . . . . . . . . . . . . . . . . 6
Introduction . . . . . . . . . . . . . . . . . . . . . . . . . . . . . . . . . . . . . . . . . . . . 6
Features and Components . . . . . . . . . . . . . . . . . . . . . . . . . . . . . . . . 7
Assembly . . . . . . . . . . . . . . . . . . . . . . . . . . . . . . . . . . . . . . . . . . . . . . 8
Blending Attachment . . . . . . . . . . . . . . . . . . . . . . . . . . . . . . . . 8
Chopper/Grinder Attachment . . . . . . . . . . . . . . . . . . . . . . . . . 9
Reversible Blade . . . . . . . . . . . . . . . . . . . . . . . . . . . . . . . . . . . 9
Whisk Attachment . . . . . . . . . . . . . . . . . . . . . . . . . . . . . . . . . 10
Knife Attachment . . . . . . . . . . . . . . . . . . . . . . . . . . . . . . . . . . 10
Operation . . . . . . . . . . . . . . . . . . . . . . . . . . . . . . . . . . . . . . . . . . . . . 11
Blending and Mixing . . . . . . . . . . . . . . . . . . . . . . . . . . . . . . . 11
Chopping/Grinding . . . . . . . . . . . . . . . . . . . . . . . . . . . . . . . . 11
Whisking . . . . . . . . . . . . . . . . . . . . . . . . . . . . . . . . . . . . . . . . 12
Carving and Slicing . . . . . . . . . . . . . . . . . . . . . . . . . . . . . . . . 12
Cleaning and Maintenance . . . . . . . . . . . . . . . . . . . . . . . . . . . . . . . 12
Tips and Hints . . . . . . . . . . . . . . . . . . . . . . . . . . . . . . . . . . . . . . . . . 13
Frequent Uses for Chopper/Grinder Attachment . . . . . . . . . . . . . . 16
Recipes . . . . . . . . . . . . . . . . . . . . . . . . . . . . . . . . . . . . . . . . . . . . . . 17
Warranty . . . . . . . . . . . . . . . . . . . . . . . . . . . . . . . . . . . . . . . . . . . . . 43
Disposal/Recycling of Batteries . . . . . . . . . . . . . . . . . . . . . . . . . . . 44
UNPACKING INSTRUCTIONS
Place the package containing the Cuisinart® Cordless Rechargeable
Hand Blender on a sturdy surface. Unpack the Hand Blender from its box
by removing the storage pouch containing the power handle, blending
shaft, knife attachment and whisk. Remove all support materials from the
box. Save packaging for possible repacking of the unit.
NOTE: All blades are extremely sharp. Be careful when removing
and/or handling.
Before using the Cuisinart
the first time, we recommend that you wipe the unit with a clean,
damp cloth to remove any dirt or dust. Dry it thoroughly with a soft
absorbent cloth. To clean all parts see instructions on page 12. Read
all instructions completely for detailed operating procedures.
®
Cordless Rechargeable Hand Blender for
INTRODUCTION
Introducing another first from Cuisinart. Your new Cordless
SmartStick
Electric Knife. Slip our exclusive new attachment onto the power
handle to carve meat or slice bread. With no cord to get in the way,
you can slice a smoked turkey, or blend and whisk right in a bowl on
the counter or pot at the stove. Want to do even more? Attach the
handle onto the chopper/grinder and find out what we mean when we
say we’ve just taken multifunctionality over the top!
®
Hand Blender and Knife is also a full size, full-power
6
Page 7
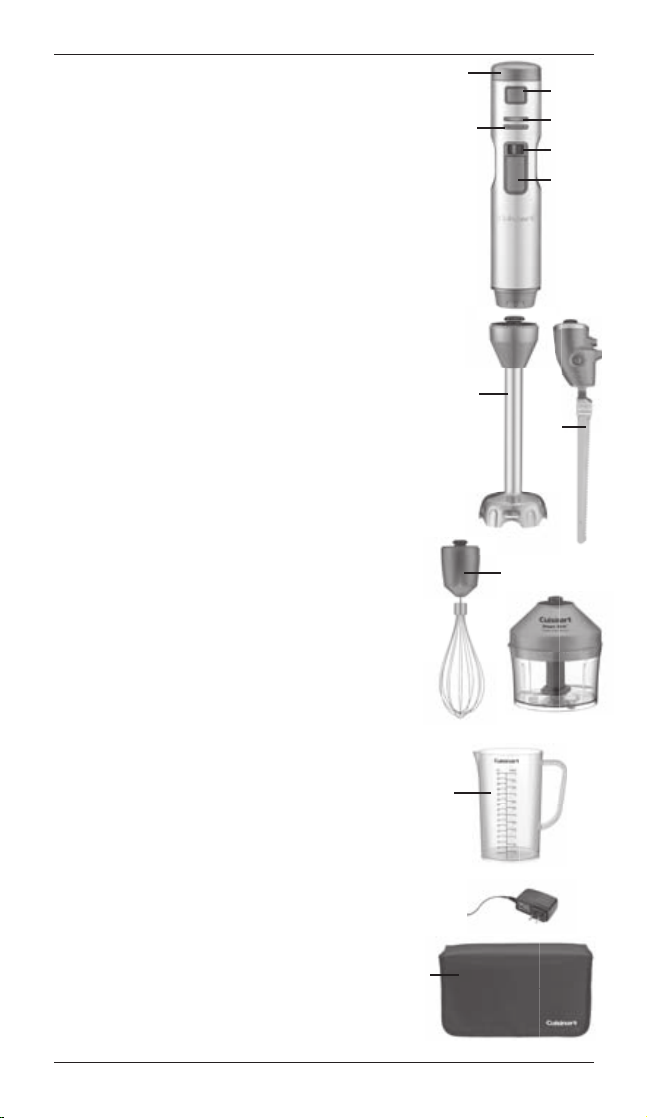
FEATURES AND
COMPONENTS
1. Power Handle
No cord! Operates on two rechargeable 4.0 volt
lithium-ion batteries, with power button within
easy reach. Shaped like a stirring utensil for
comfortable control.
a. Auto Lock/Unlock Button for safe operation.
b. Battery Indicator Lights. Red/Low: Less than
25%. Orange/Normal Use Range: 25–75%.
Green/High: 75–100%.
c. Blue Speed Indicators. Five bars light up to
indicate low to high speed selection.
d. Speed Control. Push button to left or right to
select speed.
e. Power On Button. Press and hold before
or right after pushing Auto Lock/Unlock
switch. NOTE: Operation stops instantly
and locks when Power button is released.
2. Blending Shaft
Detachable 8¾" shaft with stainless steel
blade and blade guard snaps on and off power
handle for easy operation and cleanup.
3. Electric Knife Assembly
Snaps onto the power handle creating a
full-size, electric carving knife.
4. Chopper/Grinder Attachment
Chop, mince and grind with the Cuisinart®
chopper/grinder attachment. Chopper/grinder
attaches to the power handle in place of the
blender shaft or whisk attachment.
5. Whisk Assembly
Whisk attachment snaps into the power handle
housing. This attachment is great for whipping
cream, egg whites and other delectable treats.
6. Mixing/Measuring Beaker
Beaker is marked for liters and cups for
convenient measuring. Use for drinks, shakes,
salad dressings, etc. Designed for easy gripping
and drip-free pouring.
7. Charger Port
Located on back of the power handle at
the top.
8. Storage Pouch
Interior dividers safely store power handle,
blending, shaft, knife and whisk.
8.
6.
1.
c.
a.
b.
d.
e.
2.
3.
5.
4.
7
Page 8

BEFORE YOU BEGIN
Before using the Cuisinart® Cordless SmartStick® Hand Blender and
Knife for the first time, we recommend that you wipe the unit with a
clean,damp cloth to remove any dirt or dust. Dry it thoroughly with a
soft, absorbent cloth. Handle carefully. Wash the blending blade,
whipping attachment, chopper cup and blade, mixing beaker, knife
blades and detachable shaft by hand or in the dishwasher (upper rack
only). Dry thoroughly before use.
Read all instructions completely for detailed operating procedures.
The batteries in your Cuisinart
and Knife have not been fully charged. Before the first use of this
appliance, the batteries must be charged until the green light goes on.
See Charging and Battery Life below.
®
Cordless SmartStick® Hand Blender
CHARGING YOUR BLENDER/BATTERY
LIFE
The batteries in your Cuisinart® Cordless SmartStick® Hand Blender
and Knife have not been fully charged. Before the first use of this
appliance, the batteries must be charged until the GREEN battery
indicator light illuminates. With a full charge, your stick blender will run
for approximately 20 minutes, depending on load. Your stick blender
will be fully charged in approximately 2-2.5 hours. You can “quick
charge” your stick blender for 5 minutes of run time in 30 minutes.
Battery Life Indicator Lights: Green: When the unit displays a green
power light, you are between 100% and 75% of battery power
Orange: When illuminated in Orange, you are between 75% and 25%
of battery power. When Red, you are at less than 25%
and will need to charge soon.
Note: do not leave your stick blender uncharged for an
extended period of time, as it will affect the life of the
rechargeable battery.
ASSEMBLY
BLENDING ATTACHMENT
Align the motor body housing with the
blending shaft and push the pieces together
until you hear and feel them click together.
It may be helpful to press the release button
when assembling.
Release
button
8
Page 9
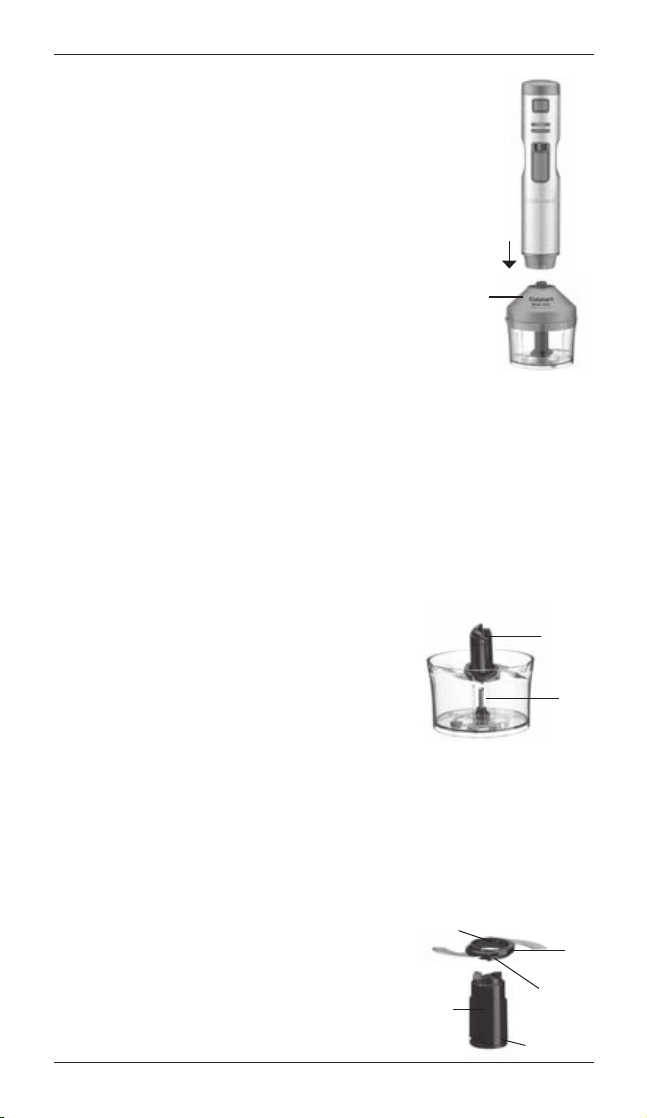
CHOPPER/GRINDER
1. Place the chopping/grinding blade
assembly into center of the chopping
cup over metal blade shaft.
2. Place your ingredients into the chopper
cup. Close cover, rotating clockwise to
lock in place.
3. Connect the power handle to the top of
the chopping cup cover until you hear a
slight click.
REVERSIBLE BLADE
The chopper/grinder attachment is equipped
with a reversible blade – sharp on one side
and blunt on the other. The blade is attached
to a plastic ring that slides over the plastic blade shaft, so it can be
easily turned over to select the appropriate blade. To reverse the
blade, see detailed instructions below. Also see Frequent Uses for
Chopper/Grinder (page 16).
Assemble the parts.
1. Place the chopping cup on a flat, dry, stable surface.
2. The metal blade assembly shaft (A) is attached to the bottom of the
chopping cup. If not already in place, slide the fully assembled
blade assembly (B) over the top of the metal blade assembly shaft.
2a. Put together the blade assembly if not
assembled: Very carefully connect the
blade ring (C) to the plastic blade shaft
(D). Line up the blade ring opening with
the plastic sheath. There are notches (E)
on opposite sides of the
interior of the ring. These fit over ridges on
the sides of the plastic blade sheath (G).
Let the blade ring slide to the bottom of
the plastic shaft. HOLD THE BLADE RING BY THE CENTRAL
HUB HOLDING RIBS (grips) (F) ONLY. DO NOT TOUCH THE
RAZOR-SHARP BLADES. Pick up the blade ring by its hub
holding ribs (grips) and turn it very slightly clockwise. This locks it
in place on the plastic blade sheath and prevents it from sliding
up during processing. Note these important features of the blade
ring. The blade ring can be placed over the plastic blade shaft in
two different ways: If you hold it this
way (A), you will see the word “Sharp”
on the blade. Assemble the blade this
side up to use the sharp edge. If you
hold it this way (B), you will see no
writing on the blade. Assemble the
blade this side up to use the blunt
edge. (See the section on processing
chopping
cup cover
E
G
B
A
C
F
D
9
Page 10
food, page 16, for information about when to use the
B
blunt edge.)
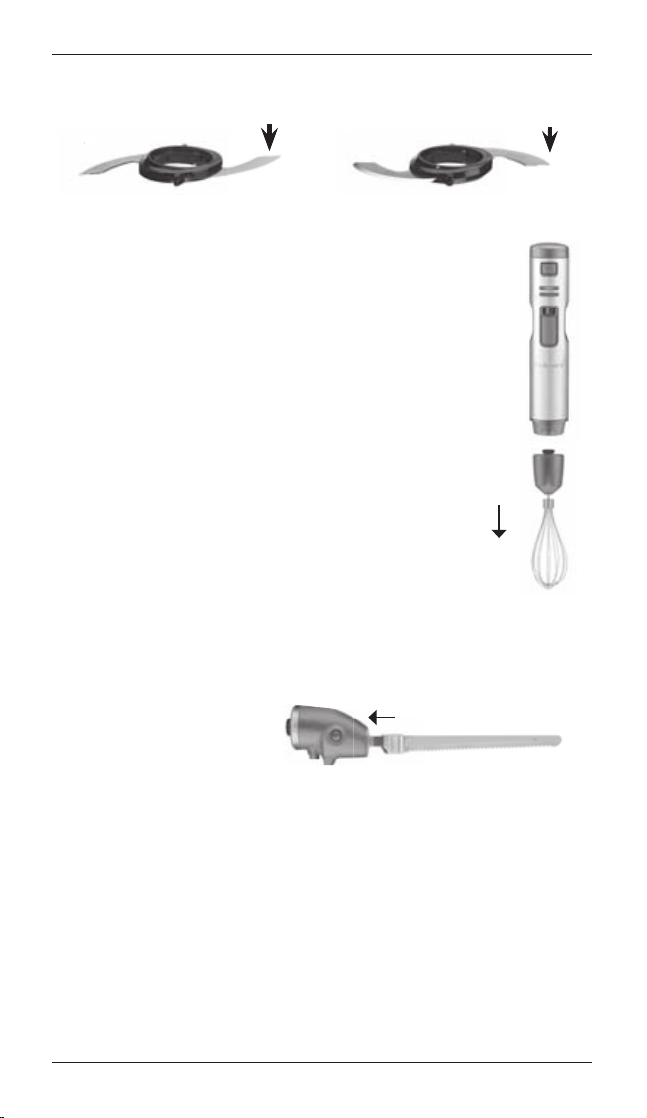
SHARP SIDE
A.
B.
.
BLUNT SIDE UP
REMOVING CHOPPER/BLADE ASSEMBLY
To remove rotate assembly right or left to release from the
cup shaft.
WHISK ATTACHMENT ASSEMBLY
Align the motor power handle with the assembled whisk
attachment and push the pieces together
until you hear and feel them click together. It may
be helpful to press the release button when assembling.
Note: Whisk and gearbox are
detachable from one another.
KNIFE ATTACHMENT
1. Before first use, separate the blades and wash them in hot, soapy
water or in the dishwasher. CAUTION: BLADES ARE SHARP.
HANDLE WITH CARE. Dry
thoroughly.
2. The two blades must be
attached before inserting
into the gearbox. Lock the blades together by inserting the rivet on
one blade into the keyhole of the other blade.
3. Holding the blades with the serrated edge facing down, insert
blades into the gearbox until you hear a click. The blades may not
line up evenly when properly inserted. CAUTION: THE BLADES
ARE VERY SHARP. BE CAREFUL WHEN HANDLING THEM.
A BLADE SHEATH IS INCLUDED TO PROTECT YOU AND YOUR
KNIFE BLADE.
10
Page 11

OPERATION
TURNING CORDLESS RECHARGEABLE HAND BLENDER
ON/OFF
The power handle lets you operate the blender, chopper whisk and
knife. Keep hands, hair, clothing and other utensils away from all
blades.
BLENDING AND MIXING
The blending shaft is specially designed for mixing and stirring
all kinds of foods, including salad dressings, smoothies, shakes,
powdered drink products and sauces. It is ideal for combining dry
ingredients, and can also be used to make mayonnaise, too. The
blade mixes and stirs while adding only a minimum of air to your
mixture. A gentle up-and down motion is all you need to thoroughly
blend the most flavorful, full-bodied liquid recipes. To avoid splatter, be sure the protective blade guard on the blending shaft remains
submerged in the liquid while blending. Never remove it from liquid
while the motor is running.
Insert the blending attachment into the power handle. (See Assembly
for Blending Attachment, page 8.) Insert blending shaft into mixture to
be blended. Press and hold the Auto Lock/Unlock button and press
and Power On button to turn motor on. Once motor is on, you can
release the Auto Lock/Unlock button. You can also press the Power
button first, holding it down as you press the Auto Lock/Unlock button to turn motor on. Do not hold Power button down for more than
2 minutes at a time. To turn the blender motor off, release the Power
On button.
CHOPPING AND GRINDING
Put the chopping cup firmly on a flat sturdy surface like a countertop.
Be sure the blade is assembled to use the blade edge that is appropriate for the food to be processed.
Put food unto the chopping cup. Be sure the food is cut into small
uniform pieces and the cup is not overloaded.
Put the chopper/grinder cover on top of the chopping cup. Be sure
the cover is properly seated. Then attach power handle to the cup
cover.
NOTE: To pulse – hold the Auto Lock/Unlock button down while
pressing and releasing the Power On button. Due to the powerful
motor provided with this unit, Cuisinart recommends using one hand
to support the chopper/grinder during operation. When you have
finished processing, release Power On button to turn motor off.
WHEN THE BLADE STOPS MOVING, remove the power handle from
the chopper/grinder cover, and remove the cover from the
chopping cup.
NOTE: Do not operate the chopper/grinder attachment without food
in the chopping cup.
11
Page 12

WHISKING
1. Make sure the whisk is attached to it’s the gearbox before attaching
it to the power handles. (See page 10 Insert the whisk into mixture to
be blended, and turn unit on.
2. Begin whisking at Speed 1, gradually increasing speed to avoid
splatters.
CARVING AND SLICING
The knife blades should be assembled and inserted into gearbox
before attaching gearbox to the power handle.
1. Press gearbox onto power handle until you hear a click.
2. The knife has its own Lock/Unlock switch on top of the gearbox.
Slide the switch and immediately press and hold the power button
on the gearbox.
3. Continue pressing the power button as you cut, keeping the blade
straight so thickness of slices is consistent. CAUTION: NEVER
place your hand on top of the blade to support it while operating
the knife, as the blades are designed to move only back and forth.
4. Blades will automatically stop when power trigger is released.
Press the two blade release buttons on either side of gearbox to
release the blades.
CLEANING AND MAINTENANCE
HAND BLENDER
Always clean the motor body and blending shaft thoroughly after
using.
Remove the blending shaft from the motor body. Clean the
motor body only with a sponge or damp cloth. Do not use abrasive
cleaners that could scratch the surface. To clean the blending shaft,
wash by hand in hot water using mild detergent. Be mindful of the
fixed razor-sharp edges.
CHOPPER
To simplify cleaning, rinse the chopping cup, blade and cover
immediately after use so that food won’t dry on them. Do not
submerge the chopping cup cover in water or put in the dishwasher.
Wash chopping blade and chopping cup in warm, soapy water. Rinse
and dry. Wipe the underside of the chopper/grinder cover with a
sponge or damp cloth to remove any food. Wash the blade carefully.
Avoid leaving it in soapy water where it may disappear from sight.
You can wash the chopping cup and chopping blade on the upper
shelf of your dishwasher. Unload the dishwasher carefully to avoid
contact with the sharp blade. Wipe the motor body and top of the
cover with a damp sponge or cloth. Dry it immediately.
12
Page 13

WHISK
To clean your whisk attachment, simply release the attachment
from the power handle. Once the whisk is removed, detach
the metal whisk from the gearbox by pulling the pieces apart. To clean
the gearbox, simply wipe with a damp cloth. To clean the metal
whisk, wash with warm, soapy water or put in the dishwasher.
Do not submerge the gearbox in water or any other liquids.
ELECTRIC KNIFE
1. Remove the gearbox from the power handle.
2. To remove the blades, press the blade release buttons on both
sides of the gearbox and grasp the blades with the cutting edge
away from you. Slowly pull blades out from knife handle. To wash,
separate the blades by sliding the rivet out of the keyhole. Wash
them in hot, soapy water or the dishwasher and dry thoroughly.
3. Do not put gearbox into dishwasher or into water. Wipe it with a
damp cloth to clean.
Caution: Do not clean handle with blades in place. Do not immerse
the appliance in water or other liquids or place it under running water.
Any service, other than cleaning and normal user maintenance, should
be performed by an authorized Cuisinart Service Representative.
TIPS AND HINTS
FOR HAND BLENDER
• Be sure the protective blade guard on the blending shaft is fully
submerged before blending ingredients.
• To purée a soup, use the hand blender to blend the soup ingredients
to the desired consistency, using a gentle up-and-down motion
directly in the saucepan or pot.
• When blending ingredients in a pot or pan, tilt the pan away from
you to create a deeper area for blending and to prevent splatter.
• If blending a small volume of liquid, tilt the container slightly for
better results.
• When using a nonstick cooking surface, be careful not to scratch
the coating with the hand blender.
• When blending in the beaker – for example, if making a fruit
smoothie – cut firmer fruit into ½-inch pieces for easy blending.
• When blending in the beaker, put harder ingredients in first, then soft
ingredients. Finish with any liquid you want to add, unless recipe
instructs otherwise.
• Liquid should not come closer than 1 inch of where the shaft
attaches to the motor housing.
• The hand blender is perfect for frothing milk for cappuccino or
lattés. Just warm milk in a small saucepan, and then pulse the hand
blender gently, being sure to keep the blending blade guard fully
submerged.
13
Page 14

• Do not let hand blender stand in a hot pot on stove while not in use.
• Do not attempt to blend fruit pits, bones or other hard materials, as
these are likely to damage the blades.
• Do not fill mixing containers too full. The level of mixture will rise
when blending and can overflow.
• To whip air into a mixture, always hold the blade just under the
surface.
• Using a gentle up-and-down motion is the best way to blend and
incorporate ingredients uniformly.
• Use the hand blender to make smooth gravies and pan sauces.
• Do not immerse motor body housing in water or any other liquids.
FOR FOOD CHOPPER/GRINDER ATTACHMENT
1. Do not overload work bowl. For best results, most foods should not
reach more than
2
∕3 of the way up the work bowl.
2. Do not attempt to chop fruit pits, bones or other hard materials, as
these are likely to damage the blades.
3. Pulse food in 1-second increments to chop. For the finest chop,
process continuously. Watch ingredients closely to achieve desired
consistency and scrape the work bowl as necessary
4. For raw ingredients: Peel, core and/or remove seeds and pits. Food
should be between ½ and 1 inch, depending on hardness of the food.
5. The size of pieces you put in bowl should be about the same size to
achieve even results.
6. Do not operate chopper/grinder attachment for more than
30 seconds continuously.
7. Liquids in work bowl should not exceed 1½ cups. Use quantities
given in the recipe section as a guide.
8. Some spices may scratch the work bowl.
9. When making compound butters, remove the butter from the
refrigerator and let it come to room temperature before blending the
ingredients.
10. Do not immerse chopper/grinder cover in water or any other liquids.
FOR WHISK ATTACHMENT
• Do not immerse whisk attachment gearbox in water or any other liquid.
• Use the whisk attachment for beating heavy cream or egg whites.
• When beating egg whites use a very clean metal or glass bowl, never
plastic. Plastic can contain hidden oils and fats that can ruin the
delicate egg white foam. To help stabilize the egg whites, add
1
/8
teaspoon of cream of tartar per egg white prior to beating them.
(If using a copper bowl omit the cream of tartar.) Beat the egg whites
until desired peaks form.
14
Page 15

• It may also be used for any task that you would normally whisk by
hand, like crêpe batters or eggs for omelets.
• Beating the egg whites too long causes them to dry out and become
less stable.
• When adding sugar to beaten egg whites, add it slowly when soft
peaks just begin to form, and then continue beating to form desired
peaks.
• When beating heavy cream, if possible and time allows, use a chilled
bowl and chill the whisk attachment. The best-shaped bowl for
whipping cream is one that is deep with a rounded bottom to minimize
any splatter.
• The cream should come out of the refrigerator just before whipping.
Whipped cream may be used at either soft or firm peaks depending
on preference. It may be flavored as desired. For best results, whip
cream just before using.
FOR KNIFE ATTACHMENT
• Do not press down when carving or slicing; let the motion of the
blades control the cutting.
• When slicing bread, keep the blades at a right angle to the cutting
board for consistent thickness.
• Be careful to avoid bones when carving meat or poultry; they could
damage the cutting edges of blades.
• When carving or slicing with one hand, be sure to keep the other hand
(which is often holding the item being cut) away from the blades.
15
Page 16

FREQUENT USES FOR CHOPPER/GRINDER
Ingredient Suggested Blade* Speed Comments
Baby Foods (always
consult a pediatrician
or family physician for
appropriate food recommendations)
BreadCrumbs – fresh
or dry (day old)
Hard Cheese (Asiago,
Locatelli, Parmesan,
Romano, etc.) (Not
recommended for softer
cheeses unless making
a dip or dressing)
Chocolate Sharp Blade High
Creamy Dressings
and Dips
Garlic Sharp Blade High Peeled to 6 cloves. Pulse to chop.
Gingerroot (fresh) Sharp Blade High
Hard Spices
(coriander, dill, poppy,
star, anise, etc.)
Herbs (fresh) Sharp Blade High 1/2 cup; must be clean/dry. Pulse to chop.
Nuts Dull Blade High
Onion Sharp Blade High
Vegetables (cooked) Sharp Blade
Vegetables (uncooked) Sharp Blade High
Raw Meat (beef, pork) Sharp Blade High
Simple Blending Dull Blade
* See page 9-10 for instructions on how to safely change the blade from the sharp side to
the blunt side.
Sharp Blade
Sharp Blade High
Sharp Blade High
Sharp Blade Low
Sharp Blade High
Place small amounts of cooked food into chop-
Low–
per/grinder bowl. Add small amount of appro-
High
priate liquid. Pulse to chop, then hold to blend.
Pulse to chop, then process until desired
consistency is reached.
Cut into 1/4-inch pieces. Pulse to chop, then
process until desired consistency is reached.
Cut into 1/2- inch pieces; may chill in freezer
for 3 minutes before chopping. Pulse to chop,
then process, no more than 1 ounce at a time,
until desired texture is reached.
Place ingredients in chopper/grinder bowl; do
not cover or spill on stem. Use pulse action to
chop, then continuous-hold action to blend to
desired consistency.
Peel, cut into-1/2-inch pieces. Pulse to chop
1/2 ounce at a time.
Pulse to chop until desired consistency is
reached. Pulse with sharp blade to get fine
results.
Shelled; toast first for best flavor. Pulse to
chop, process up to a 1/3 cup at a time, until
desired consistency is reached. May be processed to nut-butter stage.
Peel, cut into 1/2-inch pieces. Pulse to chop,
up to 1/2 cup at a time, until desired chop is
reached.
Cut into inch pieces; pulse to chop, up to 1/2
Low–
cup at a time. Add cooking liquid, stock or
High
milk to process to a purée. It is not recommended for making mashed potatoes.
Peel as needed; cut into 1/2-inch pieces. Peel
celery with peeler to remove tough strings.
Chop/process up to 1/2 cup at a time.
6 oz. or 175g, cut into 1/2-inch pieces. Pulse
until desired consistency.
Low–
For light mixing and incorporating.
High
16
Page 17

RECIPES
Berry On-the-Go Smoothie ........ 18
Mango-Lime Smoothie ............... 18
Protein Shake ............................. 19
Simple Fruit Smoothie ................ 19
Cherry-Ginger Smoothie ............ 20
Triple Chocolate Shake .............. 20
Baba Ghanoush ......................... 21
Guacamole ................................. 22
Hummus ..................................... 22
Mango Salsa .............................. 23
Spinach, Gruyère and
Artichoke Dip .............................. 23
Tapenade .................................... 24
Tzatziki ....................................... 25
Aioli/Mayonnaise ........................ 25
Cranberry Sauce ........................ 26
Garden Vegetable Sauce............ 26
Horseradish Sauce ..................... 28
Pesto .......................................... 28
Salsa Verde.................................29
Basic Vinaigrette ........................30
Caesar Dressing ......................... 30
Citrus Vinaigrette ........................ 31
Sesame Ginger Dressing ............ 31
Spring Asparagus Leek Soup .... 32
Butternut Squash Bisque
with Bacon Sage Butter ............. 33
Cauliflower Soup ........................ 34
Zucchini Herb Soup ................... 35
Roasted Tomato and
Red Pepper Soup ....................... 36
Winter White Bean Soup ............ 36
Chocolate Mousse ..................... 37
Whipped Cream ......................... 38
Belgian Waffles ........................... 39
Fresh Herb-Crusted Pork Loin ... 39
Thanksgiving Turkey ................... 40
Middle Eastern Leg of Lamb ...... 41
Easy Weeknight Tenderloin ........ 42
Yogurt Tahini Sauce .................... 29
17
Page 18

SMOOTHIES AND DRINKS
Berry On-the-Go Smoothie
The mint in this recipe pleasantly offsets the sweetness of the berries
and the tartness of the cranberry juice. Try it in any of your favorite
Makes 2 cups
½ cup frozen blueberries
1 cup strawberries, hulled and halved
¼ cup packed fresh mint leaves
1 banana, cut into 1-inch pieces
1
/3 cup cranberry juice
1
/3 cup water
1. Put all ingredients, in the order listed, into the mixing beaker. Using
the blending shaft, select Speed 5 and blend, using an up-and-down
motion, for 1 minute 30 seconds.
2. Serve immediately.
Calories 117 (3% from fat) • carb. 29g • sugars 16g • pro. 1g • fat 0g • sat. fat 0g
Nutritional information per serving (1 cup):
• chol. 0mg • sod. 7mg • calc. 38mg • fiber 5g
Mango-Lime Smoothie
For a creamier smoothie, increase the amount of yogurt to ½ cup.
fruit smoothies.
Makes a scant cup
1 cup mango, cut into 1-inch chunks
1
/3 cup plain full fat yogurt
1½ teaspoons fresh lime juice
½ teaspoon grated lime zest
2 tablespoons cold water
1. Put all ingredients, in the order listed, into the mixing beaker. Using
the blending shaft, select Speed 5 and blend, using an up-and-down
motion, for 30 seconds.
2. Serve immediately or refrigerate until ready to enjoy.
Calories 195 (15% from fat) • carb. 39g • sugars 35g • pro. 5g • fat 3g • sat. fat 2g
Nutritional information per serving (1 cup):
• chol. 10mg • sod. 53mg • calc. 156mg • fiber 3g
18
Page 19

Protein Shake
Peanut butter, banana and cocoa powder—what’s not to like? Plus, the
combo is packed with protein that is sure to fill you up.
Makes 1¼ cups
2 tablespoons creamy-style peanut butter
1 banana, cut into 1-inch pieces
1 tablespoon protein powder
1 teaspoon unsweetened cocoa powder
1 teaspoon flaxseed*
¾ cup unsweetened almond milk
1. Put all ingredients, in the order listed, into the mixing beaker. Using the
blending shaft, select Speed 5 and blend, using up-and-down motions,
for 1 minute 30 seconds.
2. Serve over ice or refrigerate until ready to enjoy.
Calories 192 (52% from fat) • carb. 18g • sugars 8g • pro. 6g • fat 12g • sat. fat 2g
Nutritional information per serving (about ½ cup):
• chol. 4mg • sod. 111mg • calc. 95mg • fiber 3g
Simple Fruit Smoothie
Less is more, especially when it comes to making a quick and nutritious
Makes a scant 2 cups
1 cup fresh strawberries, hulled and halved
1 cup frozen pineapple chunks
¾ cup orange juice
1. Put all ingredients, in the order listed, into the mixing beaker. Using the
blending shaft, select Speed 5 and blend, using up-and-down motions,
for about 1 minute.
2. Serve immediately or refrigerate until ready to enjoy.
Calories 129 (2% from fat) • carb. 30g • sugar 25g • pro. 1g • fat 0g • sat. fat 0g
snack with your hand blender.
Nutritional information per serving (1 cup):
• chol. 0mg • sod. 5mg • calc. 20mg • fiber 4g
19
Page 20

Cherry-Ginger Smoothie
Coconut milk beverage, normally found in a carton, is much lighter than
traditional canned coconut milk. Substitute 2/3 cup of the canned
Makes about 1 cup
1 cup dark, sweet frozen cherries
¾ cup coconut milk beverage
1 piece (¾-inch) fresh ginger, peeled and halved
1. Put all ingredients, in the order listed, into the mixing beaker. Using
the blending shaft, select Speed 5 and blend, using an up-and-down
motion, for about 30 seconds.
2. Serve immediately or refrigerate until ready to enjoy.
version for a creamier, richer smoothie.
Calories 242 (57% from fat) • carb. 25g • sugars 18g • pro. 3g • fat 16g • sat. fat 14g
Nutritional information per serving (1 cup):
• chol. 0mg • sod. 10mg • calc. 14mg • fiber 3g
Triple Chocolate Shake
For the chocolate lover.
Makes about 2 cups
¾ cup milk (any fat variety)
1½ tablespoons chocolate syrup
½ teaspoons cocoa powder
1½ cups premium chocolate ice cream
1. Put all ingredients, in the order listed, into the mixing beaker. Using
the blending shaft, select Speed 3 and blend, using an up-and-down
motion, for 45 seconds.
2. Serve immediately.
Calories 154 (39% from fat) • carb. 21g • sugars 19g • pro. 3g • fat 7g • sat. fat 4g
Nutritional information per serving (½ cup):
• chol. 23mg • sod. 65mg • calc. 110mg • fiber 1g
20
Page 21

Baba Ghanoush
This popular roasted eggplant dip dish is great as a dip for vegetables
or pita, but is also nice as a sandwich spread. To achieve the signature
charred flavor, cooking the eggplant over an open flame is the way to
go, but you can also just broil or roast it in your oven so until the egg-
Makes about 1¼ cups
1 medium eggplant (about 1 pound), not peeled
1 garlic clove, peeled
1
/3 cup fresh parsley leaves
2 tablespoons tahini
2 teaspoons fresh lemon juice
2 teaspoons extra virgin olive oil
½ teaspoon kosher salt
1. Prick the eggplant evenly on all sides with the tines of a fork. Char
the eggplant. This can be done in one of two ways: If you have a gas
stove, you can char over the stove (the faster method). Holding the
eggplant with heatproof tongs, place over the flame of the stove and
carefully turn the eggplant until all sides are blackened. Set aside to
cool slightly. The second method is to char in an oven under the broiler.
Set on a rack fit into a foil-lined baking pan. Place as close as possible
to the broiler/top element and turn every 5 to 10 minutes, until all sides
are charred (this may not get as blackened as it would over an open
flame). It is important for the flesh to be very soft, to the point where
the eggplant is falling apart. This can take anywhere between 15 and
30 minutes, depending on your oven. Note: This is a great task for your
toaster oven! Once the eggplant is charred, set aside to cool slightly.
2. Put the garlic into the chopping cup. Process on Speed 5 to chop. Add
the remaining ingredients, and then scrape in the flesh (not the skin)
of the eggplant into the bowl (discard any seeds). Process on Speed 5
until completely combined.
3. Taste and adjust seasoning as desired.
plant is cooked to a soft consistency.
Calories 37 (54% from fat) • carb. 4g • sugars 1g • pro. 1g • fat 2g • sat. fat 0g
Nutritional information per serving (2 tablespoons):
• chol. 0mg • sod. 153mg • calc. 33mg • fiber 2g
21
Page 22

Guacamole
This popular Mexican specialty is delicious with chips and vegetable
Makes about 1 cup
1 small garlic clove, peeled
½ small jalapeño, seeded and quartered
¼ cup grape tomatoes
1 ripe avocado, halved and pitted
1 teaspoon fresh lime juice
½ teaspoon kosher salt
1. Put the garlic and jalapeño into the chopping cup. Process on Speed
5 for 5 seconds to chop. Add the tomatoes and pulse 2 to 3 times to
chop. Add the remaining ingredients and pulse on Speed 5 until desired
consistency is achieved.
2. Taste and adjust seasoning as desired.
crudités, or as a topping for grilled chicken or fish.
Nutritional information per serving (2 tablespoons):
Calories 30 (72% from fat) • carb. 2g • sugars 0g • pro. 0g • fat 3g • sat. fat 0g
• chol. 0mg • sod. 144mg • calc. 4mg • fiber 1g
Hummus
This is your basic hummus. To change it up a bit, add a cooked
red pepper, or roasted beets or fresh herbs. This hummus is delicious
on its own, but also makes a great foundation for new flavor variations
like roasted pepper or fresh herb.
Makes about 2 cups
1 garlic clove, peeled
1 can (15.5 ounces) chickpeas, drained and rinsed
½ cup tahini
2 tablespoons fresh lemon juice
¾ teaspoon kosher salt, or to taste
Pinch ground cumin
½ cup water (plus more if needed)
1. Put the garlic clove into the chopping cup and process on Speed 5
for 10 to 15 seconds; scrape bowl. Add the remaining ingredients and
process until fully smooth, about 40 to 60 seconds.
2. Taste and adjust seasoning as desired. If a thinner consistency is
desired, add additional water, or olive oil for a richer tasting hummus.
Calories 71 (47% from fat) • carb. 7g • sugars 0g • pro. 3g • fat 4g • sat. fat 1g
Nutritional information per serving (2 tablespoons):
• chol. 0mg • sod. 119mg • calc. 45mg • fiber 2g
22
Page 23

Mango Salsa
Serve alongside warm tortilla chips or over grilled chicken, fish or pork.
Makes about 1 cup
1 small garlic clove, peeled
¼ jalapeño, seeded and quartered
1 scallion, cut into ½-inch pieces
1 tablespoon packed cilantro leaves
1 cup grape tomatoes, halved
½ cup mango, cut into ½-inch pieces
¼ teaspoon kosher salt
Pinch freshly ground black pepper
1 teaspoon fresh lime juice
1. Put garlic, jalapeño, scallion and cilantro into the chopping cup. Select
Speed 5 and pulse to finely chop, about 6 to 8 times. Transfer to a
medium bowl.
2. Add grape tomatoes and mango to chopping cup. Select Speed 5
and pulse to roughly chop, about 5 to 6 times. Transfer to bowl with
chopped garlic, jalapeño and cilantro. Add salt, pepper and lime juice;
stir to combine. Drain excess liquid if necessary.
3. Taste and adjust seasoning as desired.
The fresh flavors will brighten any simple meal.
Nutritional information per serving (¼ cup):
Calories 23 (6% from fat) • carb. 6g • sugars 4g • pro. 1g • fat 0g • sat. fat 0g
• chol. 0mg • sod. 137mg • calc. 15mg • fiber 1g
Spinach, Gruyère and Artichoke Dip
A bit of a twist on the standard spinach artichoke dip, for the more
grown-up palate. The combination of Gruyère and Parmesan gives the
dip a pleasant nuttiness. No special pan required – we found that using
a pie plate was the best and quickest way to warm this dish.
Makes about 2 cups
Olive oil or nonstick cooking spray
2 ounces Gruyère, cut into ½-inch cubes
1 ounce Parmesan, cut into ½-inch cubes
1 garlic clove, peeled
½ small shallot, cut into 1-inch pieces
8 ounces frozen spinach, thawed and drained well
1 can (15 ounces) quartered artichoke hearts, drained
12 ounces cream cheese, room temperature and cut into 1-inch
pieces (regular or reduced-fat style, such as Neufchâtel,
works)
2 tablespoons heavy cream
½ teaspoon crushed red pepper
23
Page 24

1. Lightly coat a 9-inch pie or cake pan with olive oil or nonstick cooking
spray. Reserve. Preheat oven, with the rack in the middle position, to
375°F.
2. Put both cheeses into the chopping cup. Process on Speed 5 until
chopped, about 20 to 30 seconds. Add the garlic and shallot and
process on Speed 5 until chopped, another 20 seconds.
3. Put the remaining ingredients into a medium mixing bowl, along with the
chopped mixture. Using the blending shaft, process on Speed 5 until
combined. Use an up-and-down motion, about 1 to 1½ minutes, to be
sure to cut through all ingredients.
4. Transfer mixture to the prepared pie/cake pan and put into the
preheated oven. Bake until the top is nicely browned, about 20 to 25
minutes.
5. Serve immediately with pita chips, crusty bread and crisp vegetables.
Calories 99 (61% from fat) • carb. 5g • sugars 1g • pro. 5g • fat 7g • sat. fat 4g
Nutritional information per serving (2 tablespoons):
• chol. 23mg • sod. 169mg • calc. 93mg • fiber 3g
Tapenade
A traditional French condiment. Serve alongside crackers
Makes about 1½ cups
1 garlic clove, peeled
3 tablespoons packed fresh parsley
1½ cups pitted black olives (Kalamata or Niçoise work very well)
¼ cup capers, drained and rinsed
2 tablespoons extra virgin olive oil
1½ teaspoons fresh lemon juice
1½ teaspoons Dijon-style mustard
½ teaspoon freshly ground black pepper
1. Put the garlic and parsley into the chopping cup. Select speed 5 and
process roughly chop, about 20 seconds. Scrape down the sides of the
bowl. Add the olives and capers and continue processing on Speed 5
for to chop another 20 seconds. Add the remaining ingredients. Process
until combined and desired consistency has been achieved. Tapenade is
equally delicious whether puréed or more roughly chopped.
2. Taste and adjust seasoning as desired.
Nutritional information per serving (2 tablespoons):
Calories 42 (84% from fat) • carb. 2g • sugars 0g • pro. 0g • fat 4g • sat. fat 1g
• chol. 0mg • sod. 224mg • calc. 33mg • fiber 2g
or a nice crusty bread.
24
Page 25

Tzatziki
The Greek cousin of raita, this sauce benefits from time
in the refrigerator so the flavors can develop.
Makes about 1¾ cups
2 garlic cloves, peeled
1 tablespoon fresh dill
1 piece (½ inch) lemon peel, bitter white pith removed
4 ounces cucumber, seeded (if necessary) and cut into 1-inch
pieces – do not peel
1 cup plain Greek yogurt (any fat variety works)
1 tablespoon fresh lemon juice
2 pinches kosher salt
1. Put the garlic, dill and lemon peel into the chopping cup. Select
Speed 5 and process on Speed 5 to roughly chop, about 20 seconds.
Scrape down the sides of the bowl and add the cucumber. Process
again on Speed 5 until finely chopped, about 10 seconds.
2. Add the remaining ingredients and process until combined.
3. Transfer to a storage container, cover and refrigerate for a minimum of
2 hours, preferably overnight.
4. Taste and adjust seasoning as desired.
Calories 7 (1% from fat) • carb. 1g • sugars 1g • pro. 2g • fat 3g • sat. fat 0g
Nutritional information per serving (2 tablespoons):
• chol. 0mg • sod. 153mg • calc. 33mg • fiber 2g
Aioli/Mayonnaise
Aioli, like mayonnaise, has its roots in France, but it has been adopted
by many cuisines, most notably the Catalans of Spain. This version
makes it simple by using the same base for mayonnaise, but adding a
hefty amount of garlic to the mix. Traditionally, aioli is used as a dip for
crudités, but it can also top burgers, fish and crab cakes.
Makes about 1 cup
2 garlic cloves, peeled (if making aioli)
2 large egg yolks
2 tablespoons fresh lemon juice
1 tablespoon Dijon-style mustard
1 to 2 pinches kosher salt
11/3 cups vegetable oil
25
Page 26

Put all ingredients (excluding the garlic if making mayonnaise), in the
order listed, in the mixing beaker. Allow to sit for about 30 seconds to 1
minute. Insert the blending shaft so that it is sitting level on the bottom
of the cup select Speed 3 and blend, being sure to keep the metal blade
completely submerged. Process until the mixture begins to thicken.
Continue processing with a gentle up-and-down motion until thick and
oil is fully incorporated.
Calories 169 (98% from fat) • carb. 0g • sugars 0g • pro. 0g • fat 19g • sat. fat 2g
Nutritional information per serving (1 tablespoon):
• chol. 23mg • sod. 32mg • calc. 3mg • fiber 0g
Cranberry Sauce
Freshly made cranberry sauce beats out the canned variety any day.
Makes about 3 cups
4 cups whole cranberries (fresh, or frozen and thawed)
2 cups water
2
/3 cup granulated sugar
¼ teaspoon kosher salt
3-inch piece orange peel, bitter white pith removed
1. Put all ingredients into a medium saucepan. Bring to a boil, then lower
heat to achieve a simmer. Continue to simmer until the cranberries
are very plump, about 20 minutes (in addition to the cranberries being
plump, you want to reduce the liquid by about one-third or one-half).
Remove from heat and let come to room temperature.
2. Remove orange peel and then insert the blending shaft. Select Speed 3
and blend for 10 to 15 seconds, depending on desired consistency.
3. Transfer to a storage container, cover and chill in the refrigerator.
4. Cranberry sauce can be stored in the refrigerator for up to 1 week.
Calories 57 (1% from fat) • carb.14g • sugars 11g • pro. 0g • fat 0g • sat. fat 0g
Nutritional information per serving (¼ cup):
• chol. 0mg • sod. 55mg • calc. 7mg • fiber 2g
26
Page 27

Garden Vegetable Sauce
This all-purpose pasta sauce is a great way to get
Makes about 4 cups
1 tablespoon extra virgin olive oil
1 small onion, cut into ½-inch pieces
1 carrot, cut into ½-inch pieces
½ cup ½-inch cubed eggplant (not peeled)
1 celery stalk, cut into ½-inch pieces
2 garlic cloves, smashed
½ teaspoon kosher salt, divided
½ teaspoon dried oregano
½ teaspoon dried basil
1 roasted red pepper, cut into 1-inch pieces
¼ cup dry white wine
1 tablespoon tomato paste
1 can (28 ounces) diced tomatoes with their juices
Pinch freshly ground black pepper
1 tablespoon granulated sugar
1. Put the oil into a large saucepan set over medium heat. Once oil is hot,
add the onion, carrot, eggplant, celery, garlic and ¼ teaspoon of the
salt. Gently sauté ingredients together until they turn slightly golden.
2. Add the oregano, basil, red pepper and wine. Cook until reduced by at
least half. Add the tomato paste, tomatoes and remaining salt. Bring to
a boil, then reduce heat and simmer for 35 minutes, loosely covered.
Uncover and then simmer for an additional 10 to 15 minutes longer to
thicken. Turn off heat and let sit 5 minutes.
3. Select Speed 3 and blend sauce directly in the pot on using the
blending shaft. Process until desired consistency is achieved, being
sure to keep the metal blade completely submerged in the sauce
(depending on the size of the pot being used, you may need to tilt the
pot to one side – be sure to tilt the pot away from you to prevent any
possible splatter).
4. Taste and adjust seasoning as desired.
5. Serve immediately or cool completely and then transfer to storage
containers to store in the refrigerator. Sauce will keep in the refrigerator
for up to one week. It can also be frozen for up to one month.
your daily dose of vegetables.
Calories 41 (25% from fat) • carb. 7g • sugars 4g • pro. 1g • fat 1g • sat. fat 0g
Nutritional information per serving (¼ cup):
• chol. 0mg • sod. 245mg • calc. 18mg • fiber 2g
27
Page 28

Horseradish Sauce
Perfect accompaniment for any roast beef dish.
Makes about 1 cup
2
/3 cup sour cream
1
/3 cup mayonnaise
1
/3 cup prepared horseradish
2 teaspoons Dijon-style mustard
¾ teaspoon kosher salt
Pinch freshly ground black pepper
Put all ingredients, in the order listed, into the mixing beaker. Using the
blending shaft, select Speed 3 and blend. While blending, gradually
increase to Speed 5, using a gentle up-and-down motion until
completely combined, about 20 to 30 seconds.
Calories 56 (89% from fat) • carb. 7g • sugars 1g • pro. 1g • fat 5g • sat. fat 2g
Nutritional information per serving (1 tablespoon):
• chol. 10mg • sod. 163mg • calc. 10mg • fiber 0g
Pesto
Make this traditional pesto when basil is abundant in the garden.
Makes about ¾ cup
1½ ounces Parmigiano Reggiano, cut into ½-inch cubes
1
/3 cup toasted pine nuts (may substitute another nut,
like walnuts, if not available)
2 garlic cloves, peeled
½ to ¾ teaspoon kosher salt
1½ cups packed fresh basil leaves
1
/3 cup extra virgin olive oil, divided
1. Put the cheese into the chopping cup. Select Speed 5 and pulse to
process until finely ground, about 5 pulses.
2. Add the nuts, garlic and salt. Process on Speed 5 until chopped, about
30 seconds.
3. Add half of the basil and process until chopped. Add the remaining
basil and process until chopped. Add half of the oil and process
until combined. Add the remaining oil and process until mixture is
homogenous and finely chopped, about 1 minute.
4. Taste and adjust seasoning as desired. Transfer pesto to an airtight
container – either drizzle additional olive oil on top of the pesto or press
a piece of plastic wrap directly on top prior to covering the container.
Pesto will keep in the refrigerator for up to a week, or frozen for up to 1
month.
Calories 94 (89% from fat) • carb. 1g • sugars 0g • pro. 1g • fat 10g • sat. fat 2g
Nutritional information per serving (1 tablespoon):
• chol. 2mg • sod. 152mg • calc. 49mg • fiber 0g
28
Page 29

Salsa Verde
Spoon this green, herby sauce over grilled meat – it will become
Makes ¾ cup
1 small garlic clove, peeled
¼ small jalapeño or serrano chile
1 small scallion, trimmed and cut into ½-inch pieces
1 cup fresh parsley leaves
½ teaspoon red wine vinegar
¼ teaspoon kosher salt
Pinch freshly ground black pepper
¾ cup extra virgin olive oil
1. Put the garlic, jalapeño and scallion into the chopping cup. Process on
Speed 5 to finely chop, 5 to 8 seconds. Add parsley. Pulse to medium
chop, about 16 times. Transfer to a small mixing bowl.
2. Add vinegar, salt, pepper and oil to chopped parsley mixture. Stir
together with a spoon.
3. Taste and adjust seasoning as desired.
an instant favorite.
Calories 246 (12% from fat) • carb. 1g • sugars 0g • pro. 0g • fat 28g • sat. fat 4g
Nutritional information per serving (2 tablespoons):
• chol. 0mg • sod. 105mg • calc. 18mg • fiber 0g
Yogurt Tahini Sauce
From falafel to our Middle Eastern Leg of Lamb (page 41), this tangy
Makes about 1 cup
1 cup plain yogurt, whole or reduced fat
1 tablespoon tahini
½ teaspoon fresh lemon juice
½ teaspoon kosher salt
¼ teaspoon ground cumin
1. Select Speed 1 and blend, using the blending shafts, until homogenous.
2. Taste and adjust seasoning as desired.
3. Serve immediately or reserve in the refrigerator. This can be made in
advance and stored in an airtight container in the refrigerator for up to 1
week.
Calories 53 (50% from fat) • carb. 4g • sugars 25g • pro. 2g • fat 3g • sat. fat 1g
sauce is a fitting accompaniment.
Nutritional information per serving (2 tablespoons):
• chol. 4mg • sod. 180mg • calc. 83mg • fiber 1g
29
Page 30

Basic Vinaigrette
Use this basic vinaigrette as a guide and change your vinegar/oil flavors
to come up with varying combinations to create exciting salad dressings.
You can add other flavors such as crushed or roasted garlic, chopped
shallots, fresh or dried herbs, sun-dried tomatoes, honey or lemon juice.
Makes about 1 cup
¼ cup red wine vinegar
1 teaspoon Dijon-style mustard
¼ teaspoon kosher salt
1
/3 teaspoon freshly ground black pepper
¾ cup extra virgin olive oil
1. Put all ingredients, in the order listed, into the mixing beaker.
2. Insert the blending shaft so that it is sitting level on the bottom of the
beaker and select Speed 3 and blend, being sure to keep the metal
blade completely submerged. Process until the mixture begins to
thicken. Continue processing with a gentle up-and-down motion until
dressing is homogenous, about 30 seconds.
3. Taste and adjust seasoning as desired.
Calories 181 (100% from fat) • carb. 0g • sugars 0g • pro. 0g • fat 21g • sat. fat 3g
Nutritional information per serving (2 tablespoons):
• chol. 0mg • sod. 91mg • calc. 0mg • fiber 0g
Caesar Dressing
An old favorite made fresh at home.
Makes about 1 cup
2 small garlic cloves, peeled
6 anchovy fillets
¼ cup egg substitute (may substitute 2 fresh, raw egg yolks; be
sure you use the freshest eggs possible and from a trusted
source – or use ¼ cup mayonnaise)
4 teaspoons fresh lemon juice
4 teaspoons red wine vinegar
2 teaspoons Dijon-style mustard
2 teaspoons Worcestershire sauce
½ teaspoon freshly ground black pepper
2
/3 cup extra virgin olive oil, divided
1. Put all ingredients except for the olive oil into the mixing beaker. Using
the blending shaft, select Speed 5 and blend, until fully combined.
2. Add half of the olive oil and blend on Speed 5 until well combined. Add
the remaining olive oil and blend until homogenous, about 1 minute.
3. Taste and adjust seasoning as desired.
30
Page 31

4. Serve immediately. Transfer to an airtight container and store in the
refrigerator for up to 5 days.
Calories 90 (96% from fat) • carb. 0g • sugars 0g • pro. 1g • fat 10g • sat. fat 2g
Nutritional information per serving (1 tablespoon):
• chol. 24mg • sod. 68mg • calc. 3mg • fiber 0g
Citrus Vinaigrette
Use any variety of citrus in this recipe to dress up your typical green
salad. This dressing also makes a great marinade for chicken.
Makes about 1 cup
¼ small shallot, cut into ½-inch pieces
1 teaspoon Dijon-style mustard
2 – 3 teaspoons grated orange zest (zest of 1 orange)
1
/3 cup freshly squeezed orange juice
½ teaspoon kosher salt
Pinch freshly ground black pepper
2
/3 cup extra virgin olive oil
1. Put shallot into the chopping cup. Select Speed 5 and process to chop,
about 10 seconds. Add the remaining ingredients and blend about 30
seconds until homogenous.
2. Taste and adjust seasoning as desired.
Calories 167 (96% from fat) • carb. 2g • sugars 1g • pro. 0g • fat 19g • sat. fat 3g
Nutritional information per serving (2 tablespoons):
• chol. 0mg • sod. 163mg • calc. 3mg • fiber 0g
Sesame Ginger Dressing
This Asian-style dressing goes great over cold, crisp vegetables.
Makes about 1 cup
1 scallion, trimmed and cut into 1-inch pieces
1 small garlic clove, peeled
1 piece (¾ inch) fresh ginger, peeled and halved
1 tablespoon toasted sesame seeds
3 tablespoons rice wine vinegar
tablespoon soy sauce
2 tablespoons toasted sesame oil
¾ cup vegetable oil
1. Put all ingredients, except for the oil, into the blending beaker. Using the
blending shafts, select Speed 5 and to chop, about 15 seconds.
31
Page 32

2. Add oil. Select Speed 3 and blend until homogeneous about 30
seconds.
Calories 217 (98% from fat) • carb. 1g • sugars 0g • pro. 0g • fat 25g • sat. fat 4g
Nutritional information per serving (2 tablespoons):
• chol. 0mg • sod. 85mg • calc. 3mg • fiber 0g
Spring Asparagus Leek Soup
Spring ingredients shine in this simple yet tasty soup.
Makes about 8 cups
2 garlic cloves, peeled
2 medium leeks, white and light green parts only, cut into
1-inch pieces
2 tablespoons unsalted butter
1 – 1½ teaspoons kosher salt, to taste, divided
2 large bunches asparagus (about 2 to 2½ pounds), rough ends
trimmed and cut into 2-inch pieces, tips removed and
reserved for garnish, optional (see note in step 3)
1 large red potato (about 8 ounces), peeled and cut into ½-inch
pieces, held in water to prevent oxidation
¼ cup dry white wine or cognac
¼ teaspoon freshly ground black pepper
5 cups vegetable or chicken broth (the clearer the broth, the
greener the soup will be)
1 teaspoon fresh lemon juice
Crème fraîche for garnish
Chopped chives for garnish
1. Put the garlic and leeks into the chopping cup. Select Speed 5 and
process to chop, about 8 seconds. Remove and reserve.
2. Put the butter in a medium stockpot set over medium heat. Once
melted, add the garlic and leeks with a half teaspoon of salt; stir until
you hear a slight sizzle and then cover pan to sweat the leeks for about
5 to 10 minutes, until they are very soft.
3. Add the asparagus stalks and potato to the pan. Stir to coat all
vegetables and sauté until soft, about 10 minutes. Pour in white wine
or cognac and stir until completely reduced. Add remaining salt and
pepper and stir in the broth. Bring mixture to a boil and then reduce to
a simmer. Simmer until all vegetables are very tender, about 20 to 25
minutes.
4. While soup is simmering, steam the asparagus tips separately, about
5 to 8 minutes, until crisp tender. Shock tips in ice water to maintain a
bright green color. Once cool, thinly slice tips lengthwise to be used for
garnish. (Note: This step is optional, but makes for a great presentation.)
5. Once soup vegetables are tender, select Speed 3 and start blending,
using the blending shafts. Gradually increase to Speed 5, until puréed,
about 1½ minutes. If using a larger pot, tilt the pan away from you
to ensure that the protective guard of the blending blade is fully
submerged to prevent splatter.
32
Page 33

6. Stir in lemon juice. Taste and adjust seasoning as desired.
7. Serve immediately, garnished with a dollop of crème fraîche, some
chopped chives and asparagus tips.
Calories 97 (26% from fat) • carb. 13g • sugars 4g • pro. 5g • fat 35g • sat. fat 2g
Nutritional information per serving (based on 6 servings):
• chol. 8mg • sod. 650mg • calc. 45mg • fiber 3g
Butternut Squash Bisque with Bacon Sage Butter
The bacon sage butter partners perfectly with this soup. Rave reviews
Makes about 7 cups
Butter:
2 slices bacon, diced and cooked through,
about ¼ cup bacon crumbles
3 to 4 sage leaves
4 ounces unsalted, good quality butter, room temperature,
cut into tablespoons
1 teaspoon kosher salt
¼ teaspoon freshly ground pepper
Soup:
1 tablespoon unsalted butter
1 medium leek, cleaned well, white and light green parts only
(about 6 ounces trimmed), sliced, about 1 cup
1 medium butternut squash, peeled, seeded and cut into 2-inch
cubes, about 8 cups
1 garlic clove, smashed
1 sprig thyme
1½ teaspoons kosher salt, divided
¼ teaspoon freshly ground black pepper
2 tablespoons sherry
4 cups chicken broth, low sodium
are almost guaranteed.
Make the butter:
1. Put the bacon and sage leaves into the chopping cup. Select Speed
5 and pulse until evenly and finely chopped. Add the butter, salt and
pepper and process until combined.
2. Wrap butter in plastic wrap (twist both ends of the plastic wrap so that
butter will form a log shape). Refrigerate until serving. Butter should be
really cold and hard for serving.
Make the soup:
1. Put the butter into a medium stockpot and place over medium/medium
low heat. Once butter melts, add the leeks. Cook until soft and fragrant,
about 5 minutes. Stir in the butternut squash, garlic, thyme, ½ teaspoon
salt and all of the pepper.
33
Page 34

2. Stir ingredients together well and cook for an additional 5 minutes. Stir
in the sherry. Once the sherry has just about evaporated, add the broth
so that the squash is completely submerged. Increase the heat. When
the liquid comes to a boil, reduce the heat to a simmer, until squash is
very soft and tender, about 20 minutes.
3. Once tender, select Speed 5 and blend, using the blending shafts and
an up-and-down motion until smooth, about 1 to 1½ minutes.
4. Taste and adjust seasoning as desired. Add the remaining salt ½
teaspoon at a time, tasting with each addition until desired seasoning is
achieved.
5. To serve: Ladle soup into individual serving bowls and place a pat of
Bacon Sage Butter in each bowl.
Calories 268 (59% from fat) • carb. 22g • sugars 4g • pro. 5g • fat 18g • sat. fat 11g
Nutritional information per serving (about 1 cup):
• chol. 70mg • sod. 741mg • calc. 92mg • fiber 4g
Cauliflower Soup
Let this soup warm you up on a cold, winter afternoon. It is so easy to
Makes 6 cups
1 medium leek, cleaned well, white and light green parts only,
1 tablespoon olive oil
1 medium head cauliflower, about 2½ pounds, cut into florets
2 teaspoons kosher salt, divided
¼ teaspoon freshly ground black pepper
¼ teaspoon caraway seeds
4 cups vegetable broth
Dill, for garnish (optional)
1. Put the leek into the chopping cup. Select Speed 5 and process for
about 8 seconds to chop.
2. Put the olive oil in a medium stockpot over medium heat. Once warm,
add the leeks and gently sauté until soft and fragrant, about 5 minutes.
Be careful not to let the leeks pick up any color.
3. Add the cauliflower florets and 1 teaspoon of the salt, all the pepper
and caraway seeds. Stir together until coated and gently sauté for
an additional couple of minutes. Add the broth and an additional ½
teaspoon of the salt and increase heat. Allow liquid to come to a boil
and then reduce heat so that the liquid is just simmering.
4. Simmer for about 20 minutes, until the cauliflower is tender. Once
tender, select Speed 5 and blend, using the blending attachment, in an
up-and-down motion until smooth, about 1 to 2 minutes. If the soup
seems too thick, add additional broth or water until desired consistency
is achieved.
5. Taste and adjust seasoning as desired. Garnish with a sprig of fresh dill
when serving.
prepare with the Cuisinart® Cordless Hand Blender.
cut into 1-inch pieces
34
Page 35

Calories 76 (30% from fat) • carb. 10g • sugars 4g • pro. 4g • fat 3g • sat. fat 0g
Nutritional information per serving (about 1 cup):
• chol. 0mg • sod. 991mg • calc. 53mg • fiber 4g
Zucchini Herb Soup
A great way to use up that surplus of summer garden zucchini –
Makes about 7 cups
2 medium leeks, white and light green parts, cut into 1-inch
pieces
1 medium celery stalk, cut into 1-inch pieces
1 tablespoon unsalted butter or olive oil
4 medium zucchini (about 2 pounds), sliced
8 ounces white (waxy) potato, peeled and cut into 2-inch pieces
1½ teaspoons kosher salt, divided
½ teaspoon freshly ground black pepper
½ cup dry white wine
2¾ cups chicken broth low sodium
2 tablespoons fresh mint leaves (about 10 to 12 medium leaves)
2 tablespoons fresh basil leaves (about 14 to 15 large leaves)
¼ cup heavy cream (optional)
1. Put the leeks and celery into the chopping cup. Select Speed 5 and
process to chop, about 8 seconds.
2. Put the butter in a medium stockpot over medium heat. Once the butter
melts, add the leeks and celery. Stir over medium heat until vegetables
soften, about 8 to 10 minutes.
3. When vegetables are soft, add the zucchini and potato and 1 teaspoon
of the salt and the pepper, and stir ingredients together until well
coated. Once coated, add the white wine. Simmer until wine is just
about evaporated. Add the broth and increase the heat to bring mixture
to a boil. Once the soup comes to a boil, reduce the heat in order to
maintain a simmer. Simmer until all vegetables are tender, about 15
minutes.
4. When all vegetables are tender, add the fresh herbs. Blend soup on
Speed 5 with the blending shaft, using an up-and-down motion until
smooth, about 1 to 2 minutes. To help facilitate blending, tilt pot to one
side, away from you, so the protective guard of the blade is completely
submerged. Blend until mixture is completely puréed.
5. If using cream, add at the very end of blending: Stir in cream and
simmer soup for an additional 5 to 10 minutes before seasoning. If
not adding cream, taste and adjust seasoning with remaining salt as
desired.
serve cold or warm!
Calories 93 (19% from fat) • carb. 14g • sugars 5g • pro. 3g • fat 2g • sat. fat 1g
Nutritional information per serving (about 1 cup):
• chol. 4mg • sod. 718mg • calc. 44mg • fiber 3g
35
Page 36

Roasted Tomato and Red Pepper Soup
Simple to prepare – this soup can be enjoyed hot or cold.
Makes about 5 cups
4 large red peppers, about 2½ pounds
5 large plum tomatoes, about 1½ pounds
1 large shallot, peeled
4 large garlic cloves, crushed
1 cup chicken broth low sodium
¾ teaspoon kosher salt
¼ teaspoon freshly ground black pepper
1. Preheat oven to 425°F.
2. Put the peppers, tomatoes, shallot and garlic on a lined baking sheet
and place in the oven. Roast for about 45 minutes, until all vegetables
are slightly charred.
3. Transfer peppers to a stainless bowl and cover with plastic wrap, allow
to sit for about 30 minutes to steam and loosen the skins. Remove and
discard the pepper skins and seeds. Remove the skins and core of the
tomatoes.
4. Put the roasted vegetables in a saucepan. Using the blending shafts,
select Speed 5 and blend to purée. Stir in the chicken broth, salt and
pepper and turn heat onto medium. Heat soup until hot.
5. Remove from heat and blend again on Speed 5 for about 1 minute until
completely smooth.
6. Taste and adjust seasoning and texture as desired.
Calories 68 (11% from fat) • carb. 13g s• sugars 8g • pro. 3g • fat 1g • sat. fat 0g
Nutritional information per serving (about 1 cup):
• chol. 5mg • sod. 389mg • calc. 20mg • fiber 4g
Winter White Bean Soup
A rich and creamy soup, serve with a nice crusty loaf of breads.
Makes about 6 cups
4 slices bacon, finely chopped
1 garlic clove, peeled
1 medium onion, cut into 1-inch pieces
1 celery stalk, cut into 1-inch pieces
1½ teaspoons olive oil, divided
½ teaspoon kosher salt, divided
1 tablespoon dry white wine, or vermouth
2 cans (15.5 oz cannellini beans drained
(or 1 pound dried, soaked overnight)*
1 rosemary sprig
1 bay leaf
36
Page 37

Pinch freshly ground black pepper
4 cups chicken or vegetable broth, low sodium
Grated Parmesan for garnish
1. Put the bacon in a medium stockpot or large saucepan set over medium
heat. Cook until crispy. Remove and reserve.
2. While the bacon is cooking, prep the vegetables. Put the garlic, onion
and celery into the chopping cup. Select Speed 5 and process until
chopped, about 5 seconds.
3. Once bacon is done cooking and has been reserved, reduce the heat
to medium low. Add the oil. Once hot, transfer the chopped vegetables
with a pinch of the salt to the pot. Sauté until softened, about 4 to 6
minutes. Add the wine/vermouth, stirring to deglaze the pan (picking up
the brown bits from the bottom of the pan and working into the mixture);
let cook until fully evaporated. Add the beans, rosemary, bay leaf,
remaining salt and pepper and stir to mix. Heat until beans are warmed
through, about 4 to 5 minutes. Add the broth and increase the heat to
bring to a boil. Once boiling, reduce heat and simmer, partially covered,
for about 60 to 75 minutes. Remove the rosemary sprig and bay leaf.
4. Using the blending shaft, select Speed 3 and blend, until smooth. If
using a larger saucepan, tilt the pan to one side, away from you, to
ensure that the protective guard of the blade is fully submerged to
prevent splatter.
5. Taste and adjust seasoning as desired. Garnish with a sprinkling of the
cooked bacon/prosciutto and grated Parmesan.
* When using soaked dried beans, you may have to add more broth and a
bit more salt as well.
Calories 245 (9% from fat) • carb. 36g • sugars 4g • pro. 18g • fat 2g • sat. fat 0g
Nutritional information per serving (based on 6 servings):
• chol. 0mg • sod. 500mg • calc. 119mg • fiber 13g
Chocolate Mousse
While chocolate mousse is light and airy, do not be fooled – this is
incredibly rich! If you want smaller portions, use smaller cups, like
espresso cups. This can also be piped with a pastry bag to make the
Makes about 2½ cups (five individual servings)
6 ounces (about 1 cup) semisweet chocolate, chopped or chips
4 large egg yolks
4 tablespoons granulated sugar, divided
Pinch kosher salt
½ teaspoon espresso powder
2 tablespoons unsalted butter, cubed and room temperature
1 cup heavy cream
1 teaspoon pure vanilla extract
perfect presentation.
37
Page 38

1. Melt the chocolate in a double boiler.
2. While chocolate is heating, put the yolks, 2 tablespoons of the sugar
and the salt into a medium mixing bowl. Using the whisk attachment,
select Speed 2 and whisk, gradually increasing to Speed 4, until
lightened, about 1½ minutes. Add the espresso powder and whisk on
Speed 4 until combined. Reserve.
3. Once the chocolate has just melted, add the butter and, still using
the whisk attachment, whisk on Speed 2 until butter is completely
incorporated. Add the egg yolk/sugar mixture and whisk on Speeds 3
and 4 until completely combined. Once combined, continue to whisk
over the double boiler for 1 minute to ensure the eggs have reached a
safe, cooked temperature (if you have a thermometer, you want to have
the mixture be 160°F). Remove bowl from the heat and reserve until
cool to the touch.
4. While the chocolate is cooling, put the heavy cream, vanilla and
remaining sugar into a medium to large mixing bowl. Using the whisk
attachment (no need to clean it from the previous task – a quick rinse is
fine if desired), whisk, starting on Speed 1 and gradually increasing to
Speed 5 to reach medium-stiff peaks. This will take about 2½ minutes.
Take about one-third of the whipped cream and stir into the chocolate
mixture to lighten, and then with a large spatula, fold the remaining
whipped cream into the mixture until there are no streaks visible.
5. Divide among five custard cups (about 4 ounces each). Cover and chill
until fully set, minimum 2 hours. These will keep for up to 3 days in the
refrigerator.
Calories 447 (58% from fat) • carb. 32g • sugars 28g • pro. 4g • fat 34g • sat. fat 21g
Nutritional information per serving (4 ounces):
• chol. 224mg • sod. 39mg • calc. 29mg • fiber 2g
Whipped Cream
The whisk attachment on the Cuisinart® hand blender makes whipping
Makes 2 cups
1¼ cups chilled heavy cream
2 tablespoons confectioners’ sugar
1½ teaspoons pure vanilla extract
1. Put all ingredients into a large mixing bowl. Using the whisk attachment,
select Speed 1 and whisk, being sure the whisk just skims the surface
of the whipped cream.
2. Continue blending with the whisking until cream begins to thicken. Then
gradually increase speed to Speed 5 and move whisk in an up-anddown motion until desired stiffness is achieved. You will reach soft
peaks in about 1½ minutes.
Calories 67 (92% from fat) • carb. 1g • sugar 1g • pro. 0g • fat 6g • sat. fat 4g
cream much easier than whipping it by hand.
Nutritional information per serving (2 tablespoons):
• chol. 25mg • sod. 0mg • calc. 0mg • fiber 0g
38
Page 39

Belgian Waffles
Whipped egg whites make these waffles light, fluffy and irresistible.
Makes 4 cups batter, about 4 large Belgian waffles
2 cups unbleached, all-purpose flour
2 tablespoons yellow cornmeal
¾ teaspoon kosher salt
½ teaspoon baking soda
2 large eggs, separated
Pinch cream of tartar
4 tablespoons vegetable oil
1¾ cups buttermilk
½ teaspoon pure vanilla extract
1. Put dry ingredients into a large mixing bowl. Using the whisk attachment
, select Speed 1 and whisk to combine ingredients, about 10 seconds.
Reserve.
2. Put the egg whites and cream of tartar into a separate clean, large bowl.
Again, using the whisk attachment, select Speed 1 and whisk. As the
egg whites start to thicken, slowly increase the speed to Speed 5 to
achieve medium peaks, which takes about 2 minutes total. Reserve.
3. Put the yolks, oil, buttermilk and vanilla in a small bowl. select Speed 1
and whisk until combined, about 10 seconds. Reserve.
4. Make a well in the dry ingredients and, using Speed 1, whisk in the yolk
mixture until just combined. Then, with a spatula, carefully fold in the
egg whites.
5. Use the recommended amount of batter in your waffle maker’s recipe
booklet to cook waffles.
Calories 411 (38% from fat) • carb. 52g • sugars 6g • pro. 1g • fat 17g • sat. fat 3g
Nutritional information per serving (1 cup batter):
• chol. 97mg • sod. 705mg • calc. 138mg • fiber 1g
Fresh Herb-Crusted Pork Roast
You will love how easy it is to chop fresh herbs in the hand blender’s
3 garlic cloves, peeled
2 tablespoons fresh oregano leaves
2 tablespoons fresh rosemary leaves
2 tablespoons fresh thyme leaves
1 tablespoon Dijon-style mustard
1 teaspoon fresh lemon juice
1¼ teaspoons kosher salt
¼ teaspoon freshly ground black pepper
1 3-pound pork loin, (previously brined if desired)
chopping cup.
39
Page 40

1. Put the garlic, oregano, rosemary and thyme into the chopping cup.
Select Speed 5 and pulse to roughly chop, about 8 to 10 times. Add
mustard, lemon juice, salt and pepper. Process to fully combine
ingredients, about 20 seconds.
2. Rub pork loin with herb paste. Preheat oven to 425° F. (Allow pork to sit
at room temperature while the oven heats up.)
3. Roast pork until the internal temperature reaches 145°F, about 40
minutes. If you prefer well done, roast until the internal temperature
reaches 155°F.
4. Allow pork to rest for at least 10 minutes before slicing.
5. Using the knife attachment on speed, slice the pork into even slices by
keeping your hand steady and applying medium pressure to the meat in
a downward motion.
Calories 229 (58% from fat) • carb. 1g • sugars 5g • pro. 22g • fat 14g • sat. fat 5g
Nutritional information per serving (4 oz):
• chol. 71mg • sod. 309mg • calc. 31mg • fiber 0g
Thanksgiving Turkey
Makes about 16 servings
4 medium carrots, cut into 2-inch pieces
4 medium celery stalks, cut into 2-inch pieces
2 large onions, cut into 8 pieces
2 fresh thyme sprigs
2 fresh sage sprigs
1 teaspoon black peppercorns
1 teaspoon juniper berries
2 cups water
1 16-pound turkey
1 teaspoon kosher salt
½ teaspoon freshly ground black pepper
2 teaspoons olive oil
1. Preheat oven to 450°F.
2. Put the carrots, celery, onions, thyme, sage, peppercorns and juniper
berries with the water in the bottom of a large roasting pan.
3. Fit the rack in the pan on top of the vegetables. Pat the turkey with
paper towels to completely dry the entire bird, both outside and inside
the cavity. Sprinkle the salt and pepper all over the turkey, including the
cavity. Rub the outside of the turkey with the olive oil and then place on
the rack fitted in the roasting pan.
4. Put turkey into the preheated oven and immediately reduce the
temperature to 350°F. Rotate roasting pan every hour while cooking.
5. Roast until the thickest part of the thigh registers 170°F with an instantread thermometer. Begin checking the temperature at 4 hours.
6. Allow turkey to rest at least 30 minutes before carving. while it's resting,
pour off any drippings and place in freezer to separate out the fat,
leaving the rest to add to the gravy.
40
Page 41

To carve:
Transfer turkey on a stable cutting board. Using the knife attachment on
speed 5, carve turkey by starting with the legs. Cut each drumstick off and
then each thigh. Slice the meat off each as you go. Remove each breast,
using the breastbone as a guide. Slice each breast thinly against the grain.
Calories 141 (17% from fat) • carb. 0g • sugars. 0g• pro. 28g • fat 3g • sat. fat 1g
Nutritional information per serving (meat only):
• chol. 90mg • sod. 223mg • calc. 15mg • fiber 0g
Middle Eastern Leg of Lamb
It seems as though Middle Eastern spices were created to go with lamb;
this recipe will definitely show you why! The potatoes and onions roast
right alongside the meat, making this an impressive and easy main dish
for your next dinner party night. Leftover lamb is great sliced for sand-
wiches, spread with our Yogurt Tahini Sauce (page 29).
Makes 8 to 10 servings
1 teaspoon cumin seeds
1 teaspoon coriander seeds
1½ teaspoons kosher salt, plus more for sprinkling
½ teaspoon freshly ground black pepper, plus more for sprinkling
4 garlic cloves
4 fresh oregano sprigs, leaves only
½ teaspoon cayenne
1
/3 cup olive oil, divided
½ teaspoon ground cinnamon
1 boneless leg of lamb, 2½ to 3 pounds
1 pound red potatoes, scrubbed, halved and cut into ¼-inch half
moons
12 pearl onions, peeled and halved (alternatively, 2 shallots,
sliced, can be used in place of the pearl onions)
Pita bread, toasted and kept warm for serving
1. Prepare the marinade for the lamb: Put the cumin and coriander seeds
in a small, dry skillet set over medium heat. Cook until seeds are just
toasted and fragrant. Remove. Put the toasted seeds into the chopping
cup with the grinding blade along with the salt, pepper, garlic, oregano
and cayenne. Pulse a few times to break up, scraping down as needed.
Then add ¼ cup of the olive oil and process until a paste has formed.
2. Rub the paste all over the lamb (if it was tied or netted, be sure to
remove string or netting so the lamb can be evenly coated). Transfer to
a large mixing bowl, cover with plastic wrap, or place lamb in a 2-gallon
re-sealable bag. Marinate in the refrigerator overnight.
3. Preheat oven to 400°F, with rack in the middle of the oven. Remove
lamb from bowl/bag and tie well with butcher’s twine. Cover a baking
sheet with foil. Add the potatoes and onions, and toss with the
remaining olive oil and a couple pinches of salt and a pinch of pepper.
41
Page 42

Place the tied, marinated lamb on top of potatoes and onions, centered
in the pan.
4. Put the lamb in the oven. Roast for about 50 minutes, until the internal
temperature reaches 130°F, for medium rare. Allow it to rest for
10 minutes.
5. Transfer lamb to a stable cutting board. Using the knife attachment
on Speed 5, slice the lamb thinly and serve with the roasted potatoes,
onions, Yogurt Tahini Sauce and toasted pita bread.
Calories 270 (46% from fat) • carb. 11g • sugars. 1g • pro. 25g • fat 14g • sat. fat 3g
Nutritional information per serving (lamb; based on 10 servings):
∙ chol. 37mg • sod. 441mg • calc. 30mg • fiber 1g
Easy Weeknight Tenderloin
For a last-minute special occasion, this delicious cut of meat
can easily be prepared in only 30 minutes. Perfect with the
Makes about 6 servings
1½ pounds beef tenderloin
1 teaspoon kosher salt
½ teaspoon freshly ground black pepper
2 teaspoons olive oil, divided
1. Sprinkle the tenderloin with the salt and the pepper, rub all over with 1
teaspoon of the olive oil and let sit at room temperature for about 20
minutes.
2. Preheat oven or toaster oven to 400°F.
3. While oven is preheating, put the remaining teaspoon of oil into a
large skillet and place over medium heat. Once the oil is hot, place the
tenderloin in the pan and sear until brown on all four sides, about 3 to
4 minutes per side. When browned, put tenderloin into the preheated
toaster oven and roast for about 20 to 25 minutes, until an instant-read
thermometer reads 125°F, for medium rare.
4. Allow tenderloin to rest for at least 10 minutes. Using the knife
attachment, slice on Speed 5.
Horseradish Sauce (page 28).
Calories 193 (46% from fat) • carb. 0g • sugars. 0g • pro. 25g • fat 10g • sat. fat 3g
Nutritional information per serving:
• chol. 75mg • sod. 445mg • calc. 32mg • fiber 0g
42
Page 43

WARRANTY
LIMITED THREE-YEAR WARRANTY (U.S. ONLY)
This warranty is available to consumers only. You are a consumer if you
own a Cuisinart® Cordless Rechargeable Hand Blender that was
purchased at retail for personal, family or household use. Except as
otherwise required under applicable law, this warranty is not available to
retailers or other commercial purchaser or owners.
We warrant that your Cuisinart® Cordless Rechargeable Hand Blender
will be free of defects in materials and workmanship under normal home
use for 3 years from the date of original purchase.
We recommend that you visit our website, www.cuisinart.com, for a
fast, efficient way to complete your product registration. However,
product registration does not eliminate the need for the consumer to
maintain the original proof of purchase in order to obtain the warranty
benefits. In the event that you do not have proof of purchase date, the
purchase date for purposes of this warranty will be the date of
manufacture.
If your Cuisinart® Cordless Rechargeable Hand Blender should prove to
be defective within the warranty period, we will repair it, or if we think
necessary, replace it. To obtain warranty service, simply call our toll-free
number 1-800-726-0190 for additional information from our Customer
Service Representatives or send the defective product to Customer
Service at
Cuisinart
7475 North Glen Harbor Blvd.
Glendale, AZ 85307.
To facilitate the speed and accuracy of your return, please enclose
$10.00 for shipping and handling of the product.
Please pay by check or money order (California residents need only
supply proof of purchase and should call 1-800-726-0190 for shipping
instructions).
NOTE: For added protection and secure handling of any Cuisinart
product that is being returned, we recommend you use a traceable,
insured delivery service. Cuisinart cannot be held responsible for
in-transit damage or for packages that are not delivered to us. Lost and/
or damaged products are not covered under warranty.
Please be sure to include your return address, daytime phone number,
description of the product defect, product model # (located on bottom of
product), original date of purchase, and any other information pertinent to
the product’s return.
CALIFORNIA RESIDENTS ONLY
California law provides that for In-Warranty Service, California residents
have the option of returning a nonconforming product
(A) to the store where it was purchased or
(B) to another retail store that sells Cuisinart products of the same type.
The retail store shall then, at its discretion, either repair the product, refer
the consumer to an independent repair facility, replace the product, or
refund the purchase price less the amount directly attributable to the
consumer’s prior usage of the product. If either of the above two options
does not result in the appropriate relief to the consumer, the consumer
43
Page 44

may then take the product to an independent repair facility if service or
repair can be economically accomplished. Cuisinart and not the
consumer will be responsible for the reasonable cost of such service,
repair, replacement, or refund for nonconforming products under
warranty.
California residents may also, according to their preference, return
nonconforming products directly to Cuisinart for repair, or if necessary,
replacement, by calling our Consumer Service Center toll-free at
1-800-726-019 0.
Cuisinart will be responsible for the cost of the repair, replacement, and
shipping and handling for such products under warranty.
BEFORE RETURNING YOUR CUISINART PRODUCT
If you are experiencing problems with your Cuisinar t product, we
suggest that you call our Cuisinart Service Center at 1-800-726-0190
before returning the product to be serviced. If servicing is needed, a
Representative can confirm whether the product is under warranty and
direct you to the nearest service location.
You r
Cuisinart® Cordless Rechargeable Hand Blender
manufactured to the strictest specifications and has been designed for use
only in 120 volt outlets and only with authorized accessories and replacement
parts. This warranty expressly excludes any defects or damages caused by
attempted use of this unit with a converter, as well as use with accessories,
replacement parts or repair service other than those authorized by Cuisinart.
This warranty does not cover any damage caused by accident, misuse,
shipment or other than ordinary household use. This warranty excludes all
incidental or consequential damages. Some states do not allow the exclusion
or limitation of these damages, so these exclusions may not apply to you. You
may also have other rights, which vary from state to state.
Important: If the nonconforming product is to be serviced by someone
other than Cuisinart’s Authorized Ser vice Center, please remind the
servicer to call our Consumer Service Center at 1-800-726-0190 to ensure
that the problem is properly diagnosed, the product is serviced with the
correct parts, and the product is still under warranty.
has been
DISPOSAL/RECYCLING OF BATTERIES
This product uses two Li-ion rechargeable and recyclable batteries. At the
end of the batteries’ useful life, they should be recycled. These batteries must
not be incinerated or composted. Li-ion batteries should not be put in
municipal waste systems. Contact your local waste collection agency for
proper recycling and disposal information for your area. Please do not
attempt to dismantle the power handle to replace these batteries on your
own. Damage could result to the unit.
©2015 Cuisinart
150 Milford Road
East Windsor, NJ 08520
Trademarks or service marks of third
parties referred to herein are the
trademarks or service marks of their
respective owners.
Printed in China
15CE012813
F IB-13523-ESP
44
Page 45

F IB-13523-ESP
15CE012813
Impreso en China
150 Milford Road
©2015 Cuisinart
East Windsor, NJ 08520
respectivos.
documento pertenecen a sus titulares
de comercio mencionadas en este
Todas las marcas registradas o marcas
Page 46

NOTAS:47NOTAS:
Page 47

46
Page 48

45
.
Esta garantía excluye expresamente los
dañar el aparato.
desarmar Bloque-motor/Empuñadura para cambiar las baterías. Esto podría
locales en materia de reciclaje y eliminación de desechos. No intente
acerca del reciclaje de las baterías, comuníquese con las autoridades
baterías de iones de litio con el resto de la basura. Para más información
baterías, ni las coloque en un compostador. Tampoco se deben tirar las
litio. Las baterías deben ser recicladas al final de su vida útil. No queme las
Este producto cuenta con dos baterías recargables y reciclables de iones de
RECICLAJE DE LAS BATERÍAS
repararlo y asegurarse de que el producto esté bajo garantía.
diagnosticar el problema correctamente, usar las piezas correctas para
llamar al servicio posventa de Cuisinart al 1-800-726-0190 a fin de
autorizado, por favor informe al personal del centro de servicio que deberían
Importante: si debe llevar el aparato defectuoso a un centro de servicio no
que varían de un Estado a otro.
mencionadas pueden no regir para usted. Usted puede tener otros derechos
daños incidentales o consecuentes, de modo que las limitaciones
o consecuentes. Algunos Estados no permiten la exclusión o limitación de
accidente. Esta garantía excluye expresamente todos los daños incidentales
y no es válida en caso de daños causados por mal uso, negligencia o
voltaje. Esta garantía no cubre el uso institucional o comercial del producto,
Cuisinart, así como los daños causados por el uso de un convertidor de
daños causados por accesorios, piezas o reparaciones no autorizados por
repuesto autorizados solamente
diseñado para uso sobre corriente de 120V, usando accesorios y piezas de
Este aparato satisface las más altas exigencias de fabricación y ha sido
le indicará la dirección del centro de servicio más cercano.
Cuisinart. Un representante le confirmará si su aparato sigue bajo garantía y
servicio posventa al 1-800-726-0190 antes de regresar el aparato a
Si su aparato tiene algún problema, le recomendamos que llame a nuestro
ANTES DE HACER REPARAR SU APARATO
garantía.
manejo y envío de los productos defectuosos durante el período de
Cuisinart será responsable por los gastos de reparación, reemplazo,
1-800-726-0190.
cambien. Para esto, se debe llamar a nuestro servicio posventa al
Page 49

44
de este tipo.
®
en una tienda, para uso
®
aparato defectuoso directamente a Cuisinart para que lo reparen o lo
Los residentes de California también pueden, si lo desean, mandar el
productos defectuosos durante el período de garantía.
los gastos de servicio, reparación, reemplazo o reembolso de los
reparar el aparato de manera económica. Cuisinart será responsable por
a un centro de servicio independiente, siempre que se pueda ajustar o
Si estas dos opciones no satisfacen al consumidor, podrá llevar el aparato
imputable al uso del producto por el consumidor hasta que éste se dañe.
consumidor por el precio original del producto, menos la cantidad
centro de servicio independiente, cambiará el producto o reembolsará al
La tienda, a su opción, reparará el producto, referirá al consumidor a un
(B) a otra tienda que venda productos Cuisinart
(A) regresar el producto defectuoso a la tienda donde lo compraron o
garantía. Los residentes del estado de California pueden
La ley del estado de California ofrece dos opciones bajo el período de
RESIDENTES DE CALIFORNIA SOLAMENTE
problema, así como cualquier información pertinente.
Recuerde incluir su nombre, dirección y teléfono, la descripción del
y/o lastimados durante el envío no serán cubiertos bajo esta garantía.
paquetes mandados a una dirección equivocada. Los productos perdidos
responsable por los daños ocurridos durante el transporte o por los
un método de entrega con seguro y seguimiento. Cuisinart no será
NOTA: para más seguridad, le aconsejamos que mande su paquete por
deben llamar al 1-800-726-0190 para recibir instrucciones de envío.
Los residentes de California sólo necesitan dar una prueba de compra y
cheque o giro postal de US$10.00 por gastos de manejo y envío.
Regrese el aparato defectuoso, junto con su recibo de compra y un
Cuisinart, 7475 North Glen Harbor Blvd. Glendale, AZ 85307.
directa gratuita al 1-800-726-0190 o regrese el aparato defectuoso a:
opción). Para obtener servicio bajo esta garantía, llame a nuestra línea
durante el período de garantía, la reparemos o reemplazaremos (a nuestra
Si este aparato presentara algún defecto de materiales o fabricación
de garantía será calculado a partir de la fecha de fabricación.
servicio bajo esta garantía. En ausencia del recibo de compra, el período
original. Sin embargo, no es necesario registrar el producto para recibir
cuisinart.com a fin de facilitar la verificación de la fecha de compra
Le aconsejamos que llene el formulario de registro disponible en www.
instrucciones.
siempre que el aparato haya sido utilizado para uso doméstico y según las
fabricación durante 3 años después de la fecha de compra original,
Cuisinart garantiza este aparato contra todo defecto de materiales o
esta garantía no es para los detallistas u otros comerciantes.
personal o casero. A excepción de los estados donde la ley lo permita,
consumidor si ha comprado su aparato Cuisinart
Esta garantía es para los consumidores solamente. Usted es un
SOLAMENTE)
(VÁLIDA EN LOS EE.UU. Y EN CANADÁ
GARANTÍA LIMITADA DE TRES AÑOS
GARANTÍA
Page 50

43
• Calcio 32mg • Fibra 0g
• Grasa 10g • Grasa saturada 3g • Colesterol 75mg • Sodio 445mg
Calorías 193 (46 % de grasa) • Carbohidratos 0g • Azúcar 0g • Proteínas 25g
Información nutricional por porción:
Rebanar a velocidad 5, usando el cuchillo eléctrico.
4. Retirar del horno y dejar descansar durante por lo menos 10 minutos.
interna de la carne alcance 125°F (52°C).
esto, meter al horno por 20–25 minutos, hasta que la temperatura
agregar los filetes y dorar durante 3–4 minutos por lado. Después de
a fuego medio, en un sartén grande. Cuando el aceite esté caliente,
3. Mientras el horno está calentando, poner el aceite restante a calentar
2. Precalentar el horno (o el horno tostador) a 400°F (200°C).
aceite de oliva. Dejar reposar a temperatura ambiente por 20 minutos.
1. Rociar la carne con sal y pimienta y restregar con 1 cucharadita del
2 cucharaditas de aceite de oliva
½ cucharadita de pimienta negra recién molida
1 cucharadita de sal kosher
1½ libra (680 g) de filete de res
Rinde aproximadamente 6 porciones
rábano picante (página 28).
ocasiones especiales de último minuto. Sírvalo con nuestra salsa de
Esta deliciosa receta lista en menos de una hora es perfecta para las
Filete de res fácil para noche de semana
• Calcio 30mg • Fibra 1g
• Grasa 14g • Grasa saturada 3g • Colesterol 37mg • Sodio 441mg
Calorías 270 (46% de grasa) • Carbohidratos 11g • Azúcar 1 g • Proteínas 25g
Información nutricional por porción (basada en 10 porciones):
Page 51

42
pan pita.
finas y servir con las papas y las cebollas asadas, con salsa de yogur y
velocidad 5, usando el cuchillo eléctrico. Cortar el cordero en tajadas
5. Colocar el cordero sobre una tabla de picar estable. Trinchar a
reposar por 10 minutos.
hecha, la temperatura interna debe alcanzar 130 °F (54 °C). Dejar
4. Meter al horno por aproximadamente 50 minutos. Para carne poco
el centro de la bandeja.
de pimienta y revolver. Colocar el cordero encima de los vegetales, en
las cebollas, el aceite de oliva restante y dos pizcas de sal y una pizca
de cocina. Forrar la bandeja con papel de aluminio. Agregar las papas,
400°F (200°C). Retirar el cordero del tazón o de la bolsa y atar con hilo
3. Poner la rejilla del horno en el centro del horno y precalentar el horno a
el refrigerador durante 8–12 horas.
de plástico, o colocar en una bolsa hermética grande. Dejar marinar en
uniformemente). Colocar en un tazón grande y cubrir con una película
2. Restregar el cordero con la pasta (quitar el hilo de cocina para restregar
una pasta.
necesario. Agregar ¼ taza (60 ml) del aceite y procesar hasta obtener
moledor. Pulsar varias veces para romper, raspando el bol si es
el orégano y la pimienta de Cayena en el bol del accesorio picador/
del fuego. Colocar las semillas tostadas, la sal, la pimienta, el ajo,
hasta que las semillas estén ligeramente tostadas y fragantes. Retirar
semillas de comino y de cilantro, en un sartén seco pequeño. Cocer
1. Preparar la marinada para el cordero: calentar a fuego medio las
Pan pita, tostado y mantenido caliente para servir
mitad (o 2 chalotes, en rodajas)
12 cebollas cambray ("pearl onions"), peladas y cortadas a la
media-rodajas gruesas
1 libra (455 g) de papas rojas, restregadas y cortadas en
1 pierna de cordero de 2½–3 libras (1.1–1.4 kg), deshuesada
½ cucharadita de canela en polvo
/3 taza (80 ml) de aceite de oliva
1
½ cucharadita de pimienta de Cayena
4 ramitas de tomillo fresco (hojas solamente)
4 dientes de ajo
para rociar
½ cucharadita de pimienta negra recién molida + un poco más
1½ cucharadita de sal kosher + un poco más para rociar
1 cucharadita de semillas de cilantro
1 cucharadita de semillas de comino
Rinde 8–10 porciones
sándwiches, junto con salsa de yogur-Tahini (página 29).
para su próxima fiesta. Las sobras de cordero son perfectas para preparar
costado de la carne, haciendo de este plato un plato fácil e impresionante
¡Esta receta le mostrará por qué! Las papas y las cebollas se asan justo al
Pareciera que las especias orientales fueron hechas para el cordero.
Pierna de cordero al estilo oriental
Page 52

41
• Calcio 15mg • Fibra 0g
• Grasa 3g • Grasa saturada 1g• Colesterol 90mg • Sodio 223mg
Calorías 141 (17% de grasa) • Carbohidratos 0 g • Azúcar 0g • Proteínas 28g
Información nutricional por porción (carne solamente):
grano.
guiar por la espoleta. Cortar las pechugas en tajadas finas, en contra del
tajadas a medida que separa las presas. Cortar las pechugas, dejándose
extremidades de los muslos, y luego los muslos. Cortar la carne en
piernas, trinchar a velocidad 5, usando el cuchillo eléctrico. Cortar las
colocar el pavo sobre una tabla de picar estable. Empezando con las
Para trinchar:
meterlo al congelador para que la grasa se solidifique.
de trinchar. Mientras tanto, verter el jugo de cocción en un recipiente y
6. Retirar del horno y dejar reposar durante por lo menos 30 minutos antes
después de 4 horas.
muslo alcance 170°F (77°C). Nota: empezar a averiguar la temperatura
5. Hornear hasta que la temperatura interna en la parte más gruesa del
(180°C). Hornear, girando la bandeja cada 30 minutos.
4. Meter al horno y ajustar inmediatamente la temperatura a 350°F
rejilla/bandeja.
Restregar el exterior del pavo con aceite de oliva y colocarlo sobre la
Espolvorear la sal y la pimienta sobre todo el pavo, incluso la cavidad.
y fuera con papel absorbente hasta que esté completamente seco.
3. Colocar una rejilla encima de los vegetales. Secar el pavo por dentro
con el agua.
2. Colocar los vegetales y las especias en una bandeja de horno; cubrir
1. Precalentar el horno a 450°F (220°C).
2 cucharadas de aceite de oliva
½ cucharadita de pimienta negra recién molida
1 cucharadita de sal kosher
1 pavo de 16 libras (aproximadamente 7.5 kg)
2 tazas (475 ml) de agua
1 cucharadita de granos de enebro
1 cucharada de granos de pimienta
2 ramitas de salvia fresca
2 ramitas de tomillo fresco
2 cebollas grandes, en 8 pedazos
4 ramas de apio medianas, en trozos
4 zanahorias medianas, en trozos
Rinde aproximadamente 16 porciones
Pavo del Día de Acción de Gracia
Page 53

40
• Calcio 31mg • Fibra 0g
• Grasa 14g • Grasa saturada 5g • Colesterol 71mg • Sodio 309mg
Calorías 229 (58% de grasa) • Carbohidratos 1g • Azúcar 5g • Proteínas 22g
Información nutricional por porción de 4 onzas (115 g):
mantener su mano firme y de usar presión moderada.
antes de trinchar.
hecha, asar hasta que la temperatura interna alcance 155°F (68°C).
temperatura interna alcance 145°F (63°C). Si el gusta la carne muy
calentando.
Nota: dejar la carne a temperatura ambiente mientras el horno está
20 segundos para mezclar.
jugo de limón, la sal y la pimienta. Procesar durante aproximadamente
veces, usando la velocidad 5, para picar grueso. Agregar la mostaza, el
moledor de su licuadora de mano.
Le encantará lo fácil que es picar hierbas frescas con el accesorio picador/
hierbas frescas
Lomo de cerdo asado con corteza de
5. Rebanar a velocidad 5, usando el cuchillo eléctrico y cerciorándose de
4. Retirar del horno y dejar descansar durante por lo menos 10 minutos
3. Meter al horno por aproximadamente 40 minutos, hasta que la
2. Restregar la carne con la pasta. Precalentar el horno a 425°F (220°C).
1. Colocar el ajo, el orégano, el romero y el tomillo en el bol. Pulsar 8–10
1 lomo de cerdo de 3 libras (1.3 kg) (en salmuera si desea)
¼ cucharadita de pimienta negra recién molida
1¼ cucharadita de sal kosher
1 cucharadita de jugo de limón fresco
1 cucharadita de mostaza de Dijon
2 cucharadas de tomillo fresco (hojas solamente)
2 cucharadas de romero fresco (hojas solamente)
2 cucharadas de orégano fresco (hojas solamente)
3 dientes de ajo
• Calcio 138mg • Fibra 1g
• Grasa 17g • Grasa saturada 3g • Colesterol 97mg • Sodio 705mg
Calorías 411 (38% de grasa) • Carbohidratos 52g • Azúcar 6g • Proteínas 1g
Información nutricional por porción de 1 taza (235 ml):
el manual de uso de su gofrera/waflera.
5. Cocer los gofres/wafles, usando la cantidad de mezcla recomendada en
Luego, incorporar delicadamente las claras con una espátula.
mezcla de yema, batiendo a velocidad 1 para incorporar ligeramente.
4. Hacer un pozo en el centro de los ingredientes secos y agregar la
Page 54

39
pequeño. Batir hasta obtener una mezcla homogénea. Reservar.
3. Colocar las yemas, el aceite, el suero de leche y la vainilla en un tazón
debería demorar aproximadamente 2 minutos). Reservar.
espesan, y seguir batiendo hasta obtener picos medio-firmes (esto
progresivamente la velocidad al nivel 5 a medida que las claras se
Empezar a batir a velocidad 1, usando el accesorio batidor. Aumentar
2. Colocar las claras y el crémor tártaro en un tazón grande limpio.
segundos para mezclar. Reservar.
el accesorio batidor) a velocidad 1 durante aproximadamente 10
1. Colocar los ingredientes secos en un tazón grande. Batir (usando
½ cucharadita de extracto natural de vainilla
1¾ taza (430 g) de suero de leche ("buttermilk")
4 cucharadas de aceite vegetal
1 pizca de crémor tártaro
2 huevos grandes
½ cucharadita de bicarbonato de sodio
¾ cucharadita de sal kosher
2 cucharadas de harina de maíz amarilla
2 tazas (250 g) de harina común
belgas grandes)
Rinde 4 tazas (945 ml) de mezcla (aproximadamente 4 gofres/wafles
esponjosos e irresistibles.
Las claras batidas hacen que estos gofres/wafles sean ligeros,
Gofres/Wafles belgas
• Calcio 0mg • Fibra 0g
• Grasa 6g • Grasa saturada 4g • Colesterol 25mg • Sodio 0mg
Calorías 67 (92% de grasa) • Carbohidratos 1g • Azúcar 1g • Proteínas 0g
Información nutricional por porción de 2 cucharadas:
es mucho más fácil y rápido que hacerlo a mano.
Crema batida
Obtendrá picos suaves en aproximadamente 1½ minutos.
y abajo y alrededor del tazón, hasta conseguir la consistencia deseada.
velocidad al nivel 5 y seguir batiendo, moviendo el batidor hacia arriba
2. Batir hasta que la crema empiece a espesarse. Luego, ajustar la
manteniendo el batidor justo debajo de la superficie de la crema.
1. Colocar todos los ingredientes en un tazón grande. Batir a velocidad 1,
1½ cucharadita de extracto natural de vainilla
2 cucharadas de azúcar glasé
1¼ taza (295 ml) de crema líquida para batir ("heavy cream")
Rinde 2 tazas (475 ml)
Preparar crema batida con el accesorio batidor de su licuadora de mano
Page 55

38
• Calcio 29mg • Fibra 2g
• Grasa 34g • Grasa saturada 21g • Colesterol 224mg • Sodio 39mg
Calorías 447 (58% de grasa) • Carbohidratos 32g • Azúcar 28g • Proteínas 4g
Información nutricional por porción de 4 onzas (120 ml):
refrigerador durante 3 días.
y refrigerar durante un mínimo de 2 horas. Podrán conservarse en el
5. Dividir la mezcla entre cinco ramequines de 4 onzas (150 ml). Cubrir
manera.
espátula. Luego, agregar el resto de la crema batida de la misma
a la mezcla de chocolate, incorporando ésta delicadamente con una
aproximadamente 2½ minutos. Agregar un tercio de la crema batida
al nivel 5, hasta obtener picos medio-firmes. Esto debería tomar
con la velocidad 1 e incrementando progresivamente la velocidad
Enjuagar el accesorio batidor si desea (opcional). Batir, empezando
líquida, la vainilla y el azúcar restante en un tazón mediano a grande.
4. Mientras la mezcla de chocolate está enfriándose, colocar la crema
160°F (71°C). Retirar el tazón del agua y dejar que se enfríe.
cocidas; para esto, la temperatura interna de la mezcla debe alcanzar
incorporado, seguir batiendo al baño María hasta que las yemas estén
mezcla de yema/azúcar y batir a velocidad 3–4 para incorporar. Una vez
velocidad 2 hasta que la mantequilla esté incorporada. Agregar la
3. Una vez derretido el chocolate, agregar la mantequilla y batir a
batir a velocidad 4 para incorporar. Reservar.
nivel 4, hasta obtener una mezcla ligera. Agregar el expreso en polvo y
con la velocidad 2 e incrementando progresivamente la velocidad al
accesorio batidor, durante aproximadamente 1½ minuto, empezando
cucharadas del azúcar y la sal en un tazón mediano. Usando el
2. Mientras el chocolate se está derritiendo, colocar las yemas, 2
1. Derretir el chocolate a baño María.
1 cucharadita de extracto natural de vainilla
1 taza (235 ml) de crema líquida para batir ("heavy cream")
ambiente, en pedacitos
2 cucharadas (85 g) de mantequilla sin sal a temperatura
½ cucharadita de café expreso instantáneo
1 pizca de sal kosher
4 cucharadas de azúcar granulada
4 yemas de huevo grande
(también puede usar chispas de chocolate)
6 onzas (170 g) de chocolate semiamargo o semidulce, picado
Rinde aproximadamente 5 porciones de 4 onzas (120 ml)
hermosamente pasteles y otros postres, usando una manga pastelera.
como tazas para café expreso. También puede usarlo para decorar
suave. Si desea porciones más pequeñas, utilice tazas pequeñas
Nuestro mousse de chocolate es ligero y esponjoso, pero increíblemente
Mousse de chocolate
Page 56

37
• Calcio 119mg • Fibra 13g
• Grasa 2g • Grasa saturada 0g • Colesterol 0mg • Sodio 500mg
Calorías 245 (9% de grasa) • Carbohidratos 36g • Azúcar 4g • Proteínas 18g
Información nutricional por porción (basada en 6 porciones):
*Si remoja frijoles secos, puede que tenga que usar más caldo y sal.
Parmesano rallado antes de servir.
5. Probar y ajustar la sazón al gusto. Rociar tocino picado y queso
sumergido.
la cacerola para que el protector de cuchillas esté completamente
una mezcla suave. Si usa una cacerola grande, inclinar ligeramente
4. Licuar a velocidad 3, usando el accesorio licuador, hasta obtener
minutos. Quitar el romero y la hoja de laurel.
el fuego y hervir a fuego lento, parcialmente tapado, durante 60–75
caldo y subir el fuego hasta que hierva. Dejar hervir, y luego reducir
durante 4–5 minutos, hasta que los frijoles estén calientes. Agregar el
el romero, la hoja de laurel, la sal restante y la pimienta; revolver. Cocer
que el vino se haya evaporado casi por completo. Agregar los frijoles,
la cacerola con un cucharón para despegar los pedazos. Reducir hasta
minutos, hasta que estén suaves. Agregar el vino y raspar el fondo de
agregar los vegetales picados y una pizca de sal. Saltear durante 4–6
y ajustar el fuego a medio-lento. Agregar el aceite. Una vez caliente,
3. Regresar la olla/cacerola en la que coció el tocino sobre la hornilla
aproximadamente 5 segundos para picar.
el ajo, la cebolla y el apio en el bol. Procesar a velocidad 5 durante
2. Mientras el tocino está cociendo, preparar los vegetales. Colocar
a fuego medio. Cocer hasta que esté crujiente. Reservar.
1. Colocar el tocino en una olla mediana o una cacerola grande y calentar
Queso Parmesano rallado para decorar
4 tazas (945 ml) de caldo de pollo o de vegetales bajo en sodio
1 pizca de pimienta negra recién molida
1 hoja de laurel
1 ramita de romero
durante 8–12 horas)*
escurridos (o 1 libra/455 g de frijoles secos, remojados
2 latas de 15 onzas (435 g) de frijoles blancos cocidos,
1 cucharada de vino blanco seco o vermú
½ cucharadita de sal kosher
1½ cucharadita de aceite de oliva
1 rama de apio, en trozos
1 cebolla mediana, en cubos
1 diente de ajo
4 lonjas de tocino, finamente picadas
Rinde aproximadamente 6 tazas (1.2 L)
Sirva esta sopa rica y cremosa con pan crujiente.
Sopa invernal de frijoles blancos
• Calcio 20mg • Fibra 4g
• Grasa 1g • Grasa saturada 0g• Colesterol 5mg • Sodio 389mg
Calorías 68 (11% de grasa) • Carbohidratos 13g • Azúcar 8g • Proteínas 3g
Información nutricional por porción de 1 taza (235 ml):
Page 57

36
6. Probar y ajustar la sazón al gusto. Licuar más si es necesario.
minuto, hasta obtener una mezcla muy suave.
5. Retirar del calor y licuar a velocidad 5 durante aproximadamente 1
la sopa esté caliente.
pollo, la sal y la pimienta; ajustar el fuego a medio. Calentar hasta que
usando el accesorio licuador, hasta conseguir puré. Agregar el caldo de
4. Colocar los vegetales asados en una cacerola. Licuar a velocidad 5,
corazón de los tomates.
piel se despegue. Quitar y tirar la piel y las semillas. Quite la piel y el
plástico y dejar enfriar por aproximadamente 30 minutos, hasta que la
3. Colocar los pimientos en un recipiente de acero inoxidable, cubrir con
45 minutos, hasta que todos los vegetales estén ligeramente quemados.
para horno forrada con papel sulfurizado. Meter al horno y asar durante
2. Disponer los pimientos, los tomates, el chalote y el ajo sobre una placa
1. Precalentar el horno a 425°F (220°C).
¼ cucharadita de pimienta negra recién molida
¾ cucharadita de sal kosher
1 taza (235 ml) de caldo de pollo bajo en sodio
4 dientes de ajo grandes, machacados
1 chalote grande
5 tomates italianos grandes
4 pimientos rojos grandes
Rinde aproximadamente 5 tazas (1.2 L)
Esta sopa fácil de hacer puede disfrutarse caliente o fría.
Sopa de tomates y pimientos rojos asados
• Grasa 2g • Grasa saturada 1g
• Colesterol 4mg • Sodio 718mg • Calcio 44mg • Fibra 3g
Calorías 93 (19% de grasa) • Carbohidratos 14g • Azúcar 5g • Proteínas 3g
Información nutricional por porción de 1 taza (235 ml):
necesario.
la sazón. Probar y ajustar la sazón al gusto, agregando más sal si es
calentar la sopa a fuego bajo durante 5–10 minutos antes de ajustar
5. Si desea usar crema, agregarla después de licuar. Agregar la crema y
Seguir licuando hasta obtener una mezcla suave.
para que el protector de cuchillas esté completamente sumergido.
suave hacia arriba y abajo. Si es necesario, inclinar ligeramente la olla
la sopa a velocidad 5 durante 1–2 minutos, usando un movimiento
4. Cuando los vegetales estén tiernos, agregar las hierbas frescas. Licuar
minutos, hasta que los vegetales estén tiernos.
reducir el fuego. Cocer a fuego lento durante aproximadamente 15
caldo y subir el fuego hasta que hierva. Cuando empiece a hervir,
hasta que el vino se haya evaporado casi por completo. Agregar el
y de la pimienta; revolver bien. Agregar el vino blanco. Seguir cociendo
3. Agregar los calabacines y las papas, junto con 1 cucharadita de la sal
Page 58

35
8–10 minutos, revolviendo, hasta que las verduras estén tiernas.
derretido, agregar el puerro y el apio. Cocer a fuego medio durante
2. Derretir la mantequilla a fuego medio, en una olla mediana. Una vez
aproximadamente 8 segundos para picar.
1. Colocar el puerro y el apio en el bol. Procesar a velocidad 5 durante
(opcional)
¼ taza (60 ml) de crema líquida para batir ("heavy cream")
2 cucharadas de albahaca fresca (14–15 hojas grandes)
2 cucharadas de menta fresca (10–12 hojas medianas)
2¾ tazas (650 ml) de caldo de pollo bajo en sodio
½ taza (120 ml) de vino blanco seco
½ cucharadita de pimienta negra recién molida
1½ cucharadita de sal kosher
8 onzas (225 g) de papas blancas, peladas y cortadas en cubos
4 calabacines ("zucchini") medianos, en rodajas
1 cucharada (15 g) de mantequilla sin sal o de aceite de oliva
1 rama de apio mediana, en trozos
rodajas gruesas
2 puerros medianos (parte blanca y verde claro solamente), en
Rinde aproximadamente 7 tazas (1.6 L)
manera de usar los calabacines del huerto.
Esta sabrosa sopa, que puede servirse caliente o fría, es una excelente
Sopa de calabacines con hierbas
• Calcio 53mg • Fibra 4g
• Grasa 3g • Grasa saturada 0g • Colesterol 0mg • Sodio 991mg
Calorías 76 (30% de grasa) • Carbohidratos 10g • Azúcar 4g • Proteínas 4g
Información nutricional por porción de 1 taza (235 ml):
fresco y servir.
5. Probar y ajustar la sazón al gusto. Aderezar con un ramito de eneldo
la consistencia deseada.
parece muy espesa, agregar caldo o agua hasta que la mezcla adquiera
minutos, usando un movimiento suave hacia arriba y abajo. Si la sopa
coliflor esté tierna. Licuar a velocidad 5 durante aproximadamente 1–2
4. Cocer a fuego lento durante aproximadamente 20 minutos, hasta que la
hervir, luego reducir el fuego para que la mezcla hierva a fuego lento.
caldo y ½ cucharadita más de sal y pimienta; subir el fuego. Dejar
Revolver y saltear suavemente por 2 minutos adicionales. Agregar el
3. Agregar los cogollos de coliflor y 1 cucharadita de sal/pimienta/comino.
permitir que se dore.
aproximadamente 5 minutos, hasta que esté suave y fragante pero sin
Una vez caliente, agregar el puerro y saltear suavemente durante
2. Calentar el aceite de oliva a fuego medio, en una olla mediana.
aproximadamente segundos para picar.
1. Colocar el puerro en el bol. Procesar a velocidad 5 por
Page 59

34
Eneldo, para aderezar (opcional)
4 tazas (945 ml) de caldo de vegetales
1 cucharadita de semillas de alcaravea/comino
¼ cucharadita de pimienta negra recién molida
2 cucharaditas de sal kosher
1 coliflor pequeño, en cogollos
1 cucharada de aceite de oliva
rodajas gruesas
1 puerro mediano (parte blanca y verde claro solamente), en
Rinde 6 tazas (1.4 L)
.
®
Cuisinart
Es muy fácil de preparar gracias a su licuadora de mano inalámbrica
Esta sopa rica y cremosa le calentará durante los días fríos del invierno.
Sopa de coliflor
• Calcio 92mg • Fibra 4g
• Grasa 18g • Grasa saturada 11g• Colesterol 70mg • Sodio 741mg
Calorías 268 (59% de grasa) • Carbohidratos 22g • Azúcar 4g • Proteínas 5g
Información nutricional por porción de 1 taza (235 ml):
mantequilla de salvia/tocino.
5. Para servir: servir la sopa en cuencos individuales, con una porción de
cucharadita a la vez, probando después de cada adición.
4. Probar y ajustar la sazón al gusto. Si necesita más sal, agregar sal ½
un movimiento suave hacia arriba y abajo.
3. Licuar a velocidad 5 durante aproximadamente 1–1½ minuto, usando
que la calabaza esté muy suave.
cociendo a fuego lento durante aproximadamente 20 minutos, hasta
Después de que el líquido empiece a hervir, reducir el fuego y seguir
caldo como para sumergir completamente la calabaza. Subir el fuego.
Después de que el jerez se haya evaporado, agregar suficientemente
2. Revolver y cocer durante 5 minutos adicionales. Agregar el jerez.
pimienta.
la calabaza moscada, el ajo, el tomillo, ½ cucharadita de sal y toda la
5 minutos, hasta que los vegetales estén tiernos y fragantes. Agregar
Una vez derretida, agregar el puerro. Cocer durante aproximadamente
1. Poner la mantequilla a derretir a fuego medio/medio-lento, en una olla.
Preparar la sopa:
momento de servir. La mantequilla debería estar muy fría y firme.
película de plástico, torciendo las extremidades. Refrigerar hasta el
2. Formar una barra de mantequilla y envolverla de manera segura en una
homogénea.
mantequilla, la sal y la pimienta; procesar hasta conseguir una mezcla
5, hasta que estén finamente y uniformemente picados. Agregar la
1. Colocar el tocino y la salvia en el bol. Pulsar, usando la velocidad
Preparar la mantequilla:
Page 60

33
4 tazas (945 ml) de caldo de pollo bajo en sodio
2 cucharadas de jerez
¼ cucharadita de pimienta negra recién molida
1½ cucharadita de sal kosher
1 ramita de tomillo
1 diente de ajo, machacado
semillas, y cortada en cubos grandes
1 calabaza moscada ("butternut squash") mediana, pelada, sin
y cortado en rodajas
1 puerro mediano (parte blanca y verde claro solamente) limpio
1 cucharada (15 g) de mantequilla sin sal
Sopa:
¼ cucharadita de pimienta recién molida
1 cucharadita de sal kosher
en pedacitos
4 onzas (115 g) de mantequilla sin sal a temperatura ambiente,
3–4 hojas de salvia fresca
2 lonjas de tocino, picado y cocinado
Mantequilla:
Rinde aproximadamente 7 tazas (1.6 L)
¡A nadie le dejará frío!
con mantequilla de tocino y salvia
"Bisque" de calabaza moscada
• Calcio 45mg • Fibra 3g
• Grasa 35g • Grasa saturada 2g • Colesterol 8mg • Sodio 650mg
Información nutricional por porción (basada en 6 porciones):
La mantequilla de salvia/tocino combina perfectamente con esta sopa.
Calorías 97 (26% de grasa) • Carbohidratos 13g • Azúcar 4g • Proteínas 5g
espárragos y servir inmediatamente.
7. Decorar con "crème fraîche", cebollinos picados y las puntas de los
6. Agregar el jugo de limón. Probar y ajustar la sazón al gusto.
esté completamente sumergido para evitar las salpicaduras.
grande, inclinar ligeramente la olla para que el protector de cuchillas
velocidad al nivel 5, hasta obtener una mezcla suave. Si usa una olla
aproximadamente 1½ minuto, aumentando progresivamente la
abajo, hasta conseguir una mezcla homogénea. Licuar durante
frescas y licuar, usando un movimiento suave hacia arriba y
5. Cuando los vegetales de la sopa estén tiernos, agregar las hierbas
hermosa decoración.
la mitad y reservarlas. Nota: este paso es opcional, pero provee una
verde vivo. Una vez enfriadas, cortar las puntas longitudinalmente a
las puntas en un baño de agua helada para que mantengan su color
vapor durante 5–8 minutos, hasta que estén tiernas-crujientes. Enfriar
4. Mientras la sopa está cociendo, cocer las puntas de los espárragos al
estén muy suaves.
Cocer a fuego lento durante 20–25 minutos, hasta que los vegetales
Page 61

32
pimienta y el caldo de vegetales. Dejar hervir, luego reducir el fuego.
hasta que el vino se haya evaporado. Agregar la sal restante, la
estén suaves. Agregar el vino blanco o el coñac y cocer, revolviendo,
saltear durante aproximadamente 10 minutos, hasta que los vegetales
3. Agregar los espárragos (no las puntas) y la papa. Revolver para cubrir y
durante 5–10 minutos, hasta que estén muy suaves.
hasta que empiece a crepitar, y luego tapar la cacerola y rehogar
derretida, agregar el ajo, el puerro y ½ cucharadita de la sal; revolver
2. Derretir la mantequilla a fuego medio, en una olla mediana. Una vez
aproximadamente 8 segundos para picar. Reservar.
1. Colocar el ajo y el puerro en el bol. Procesar a velocidad 5 durante
Cebollinos ("chives") picados para decorar
"Crème fraîche" para decorar
1 cucharadita de jugo de limón fresco
caldo, más verde la sopa)
5 tazas (1.2 L) de caldo de vegetales (cuanto más claro el
¼ cucharadita de pimienta negra recién molida
¼ taza (60 ml) de vino blanco seco o coñac
agua fría hasta el momento de usar)
1 papa roja grande, pelada y cortada en cubitos (mantener en
2 pulgadas (5cm)
y las puntas reservadas (opcional), cortados en trozos de
2–2½ libras (910 g–1.1 kg) de espárragos, sin la parte dura del tallo
1–1½ cucharadita de sal kosher, a gusto
2 cucharadas (180 g) de mantequilla sin sal
en rodajas
2 puerros medianos (parte blanca y verde claro solamente),
2 dientes de ajo
Rinde aproximadamente 8 tazas (1.9 L)
Sopa de vegetales de primavera simple, sin embargo sabrosa.
Sopa primaveral de espárragos y puerro
• Calcio 3mg • Fibra 0g
• Grasa 25g • Grasa saturada 4g • Colesterol 0mg • Sodio 85mg
Calorías 217 (98% de grasa) • Carbohidratos 1g • Azúcar 0g • Proteínas 0g
Información nutricional por porción de 2 cucharadas:
segundos, hasta conseguir una mezcla homogénea.
2. Agregar el aceite. Licuar a velocidad 3 durante aproximadamente 30
segundos para picar.
el accesorio licuador, licuar a velocidad 5 durante aproximadamente 15
1. Colocar todos los ingredientes, excepto el aceite, en el vaso. Usando
¾ taza (175 ml) de aceite vegetal
2 cucharadas de aceite de sésamo tostado
1 cucharada de salsa de soya
Page 62

31
3 cucharadas de vinagre de vino de arroz
1 cucharada de semillas de sésamo tostadas
a la mitad
1 trozo de ¾ pulgada (2 cm) de jengibre, pelado y cortado
1 diente de ajo pequeño
1 cebolleta ("scallion"), en trocitos
Rinde aproximadamente 1 taza (235 ml)
los vegetales crujientes fríos.
Aderezo de jengibre y sésamo
• Calcio 3mg • Fibra 0g
Información nutricional por porción de 2 cucharadas:
marinar pollo.
Vinagreta de cítricos
Este aderezo con sabor oriental acompaña deliciosamente
• Grasa 19g • Grasa saturada 3g • Colesterol 0mg • Sodio 163mg
Calorías 167 (96% de grasa) • Carbohidratos 2g • Azúcar 1g • Proteínas 0g
2. Probar y ajustar la sazón al gusto.
obtener una mezcla homogénea.
ingredientes y procesar durante aproximadamente 30 segundos, hasta
aproximadamente 10 segundos para picar. Agregar el resto de los
1. Colocar el chalote en el bol. Procesar a velocidad 5 durante
/3 taza (80 ml) de aceite de oliva virgen extra
2
1 pizca de pimienta negra recién molida
½ cucharadita de sal kosher
/3 taza (80 ml) de jugo de limón fresco
1
2–3 cucharadita de ralladura de naranja
1 cucharadita de mostaza de Dijon
¼ chalote pequeño, en pedazos
Rinde aproximadamente 1 taza (235 ml)
ensaladas de verduras. Esta receta también es excelente para hacer
Use cualquier tipo de cítrico. Todos son perfectos para aderezar las
• Calcio 3mg • Fibra 0g
• Grasa 10g • Grasa saturada 2g • Colesterol 24mg • Sodio 68mg
Calorías 90 (96% de grasa) • Carbohidratos 0g • Azúcar 0g • Proteínas 1g
Información nutricional por porción (1 cucharada):
durante hasta 5 días.
4. Servir inmediatamente. O poner en un recipiente hermético y refrigerar
3. Probar y ajustar la sazón al gusto.
Page 63

30
1 minuto adicional, hasta obtener una mezcla homogénea.
incorporar. Agregar el resto del aceite y licuar durante aproximadamente
2. Agregar la mitad del aceite de oliva y licuar a velocidad 5 para
velocidad 5, usando el accesorio licuador.
1. Colocar todos los ingredientes, excepto el aceite, en el vaso. Licuar a
/3 taza (80 ml) de aceite de oliva virgen extra
2
½ cucharadita de pimienta negra recién molida
2 cucharaditas de salsa Worcestershire
2 cucharaditas de mostaza de Dijon
4 cucharaditas de vinagre de vino tinto
4 cucharaditas de jugo de limón fresco
que se cerciore que estén muy frescos) o mayonesa
); también puede usar yemas de huevo (siempre
®
EggBeaters
¼ taza (60 ml) de sustituto de huevo pasteurizado (por ej.
6 filetes de anchoa
2 dientes de ajo pequeños
Rinde aproximadamente 1 taza (235 ml)
Un favorito de restaurante de siempre, hecho fresco en casa.
Aderezo César
• Calcio 0mg • Fibra 0g
• Grasa 21g • Grasa saturada 3g • Colesterol 0mg • Sodio 91mg
Información nutricional por porción de 2 cucharadas:
Vinagreta básica
Calorías 181 (100% de grasa) • Carbohidratos 0g • Azúcar 0g • Proteínas 0g
3. Probar y ajustar la sazón al gusto.
hacia arriba y abajo, hasta obtener una mezcla homogénea.
durante aproximadamente 30 segundos, usando un movimiento suave
Procesar hasta que la mezcla empiece a espesarse. Seguir licuando
2. Licuar a velocidad 3, cerciorándose de mantener la varilla sumergida.
1. Colocar todos los ingredientes en el vaso, en el orden indicado.
¾ taza (175 ml) de aceite de oliva virgen extra
/3 cucharadita de pimienta negra recién molida
1
¼ cucharadita de sal kosher
1 cucharadita de mostaza de Dijon
¼ taza (60 ml) de vinagre de vino tinto
Rinde aproximadamente 1 taza (235 ml)
frescas o secas, tomates secados al sol, miel o jugo de limón.
También puede añadir otros sabores como ajo, ajo asado, chalote, hierbas
sustituyendo el vinagre/aceite al gusto para crear aliños interesantes.
Utilice esta vinagreta como base para preparar muchas variaciones,
Page 64

29
• Calcio 83mg • Fibra 1g
• Grasa 3g • Grasa saturada 1g • Colesterol 4mg • Sodio 180mg
Calorías 53 (50% de grasa) • Carbohidratos 4g • Azúcar 25g • Proteínas 2g
Información nutricional por porción de 2 cucharadas:
durante hasta 1 semana, en un recipiente hermético.
salsa puede prepararse por adelantado y conservarse en el refrigerador
"falafel" hasta nuestra pierna de cordero al estilo oriental (página 42).
Esta salsa es perfecta para acompañar una variedad de platos, desde
Salsa de yogur-Tahini
• Calcio 18mg • Fibra 0g
• Grasa 28g • Grasa saturada 4g • Colesterol 0mg • Sodio 105mg
Calorías 246 (12% de grasa) • Carbohidratos 1g • Azúcar 0g • Proteínas 0g
Información nutricional por porción de 2 cucharadas:
cuchara.
para picar. Reservar, en un tazón pequeño.
5 durante 5–8 segundos para picar. Agregar el perejil. Pulsar 16 veces
3. Servir inmediatamente o refrigerar hasta el momento de usar. Nota: la
2. Probar y ajustar la sazón al gusto.
1. Licuar a velocidad 1 hasta conseguir una mezcla homogénea.
¼ cucharadita de comino en polvo
½ cucharadita de sal kosher
½ cucharadita de jugo de limón fresco
1 cucharada de salsa Tahini
1 taza (235 ml) de yogur natural entero o bajo en grasa
Rinde aproximadamente 1 taza (235 ml)
3. Probar y ajustar la sazón al gusto.
2. Agregar el vinagre, la sal, la pimienta y el aceite. Revolver con una
1. Colocar el ajo, el jalapeño y la cebolleta en el bol. Procesar a velocidad
volverá su favorita al instante.
Salsa verde
¾ taza (175 ml) de aceite de oliva virgen extra
1 pizca de pimienta negra recién molida
¼ cucharadita de sal kosher
½ cucharada de vinagre de vino tinto
1 taza llena (120 g) de hojas de perejil
1 cebolleta ("scallion") pequeña, en trocitos
¼ jalapeño o chile serrano
1 diente de ajo pequeño
Rinde ¾ taza (175 ml)
Esta salsa con hierbas es perfecta para acompañar carne asada. Se
Page 65

28
Pesto
• Grasa saturada 2g • Colesterol 2mg • Sodio 152mg • Calcio 49mg • Fibra 0g
Información nutricional por porción (1 cucharada):
Calorías 94 (89% de grasa) • Carbohidratos 1g • Azúcar 0g • Proteínas 1g • Grasa 10g
durante hasta 1 mes en el congelador.
El pesto se conservará durante hasta una semana en el refrigerador; o
de plástico puesta directamente sobre él) antes de cerrar el recipiente.
hermético y cubrir con una capa de aceite de oliva (o con una película
4. Probar y ajustar la sazón al gusto. Colocar el pesto en un recipiente
obtener una mezcla homogénea.
resto del aceite y procesar durante aproximadamente 1 minuto, hasta
picada. Agregar la mita del aceite y procesar para mezclar. Agregar el
Agregar la albahaca restante y seguir procesando hasta que esté
3. Agregar la mita de la albahaca y procesar hasta que esté picada.
aproximadamente 30 segundos para picar.
2. Agregar las nueces, el ajo y la sal. Procesar a velocidad 5 por
que esté finamente picado.
1. Colocar el queso en el bol. Pulsar 5 veces, usando la velocidad 5, hasta
/3 taza (80 ml) de aceite de oliva virgen extra
1
1½ taza llena (90 g) de hojas de hojas de albahaca fresca
½–¾ cucharadita de sal kosher
2 dientes de ajo
/3 taza (40 g) de piñones tostados (también puede usar nueces)
1
1½ onza (40 g) de queso Parmigiano-Reggiano, en cubitos
Rinde aproximadamente ¾ taza (175 ml)
Prepare este pesto tradicional cuando la albahaca esté de temporada.
• Grasa saturada 2g • Colesterol 10mg • Sodio 163mg • Calcio 10mg • Fibra 0g
Información nutricional por porción (1 cucharada):
Calorías 56 (89% de grasa) • Carbohidratos 7g • Azúcar 1g • Proteínas 1g • Grasa 5g
segundos, usando un movimiento suave hacia arriba y abajo.
progresivamente la velocidad al nivel 5 y seguir licuando por 20–30
Empezar a licuar a velocidad 3, usando el accesorio licuador. Aumentar
Colocar todos los ingredientes en el vaso, en el orden indicado.
1 pizca de pimienta negra recién molida
¾ cucharadita de sal kosher
2 cucharaditas de mostaza de Dijon
/3 taza (60 g) de salsa de rábano picante preparada
1
⁄3 taza (80 ml) de mayonesa
1
/3 taza (160 ml) de crema agria
2
Rinde aproximadamente 1 taza (235 ml)
Son perfectos para servir con rosbif.
Salsa de rábano picante
Page 66

27
• Calcio 18mg • Fibra 2g
• Grasa 1g • Grasa saturada 0g • Colesterol 0mg • Sodio 245mg
Calorías 41 (25% de grasa) • Carbohidratos 7g • Azúcar 4g • Proteínas 1g
Información nutricional por porción (¼ taza/60 ml):
hasta una semana. También puede congelarse durante hasta un mes.
hermético y refrigerar. La podrá conservarse en el refrigerador durante
5. Servir inmediatamente, o dejar enfriar, colocar en un recipiente
4. Probar y ajustar la sazón al gusto.
cacerola hacia un lado para evitar las salpicaduras).
(dependiendo del tamaño de la cacerola, puede resultar útil inclinar la
deseada, cerciorándose de mantener la cuchilla sumergida en la salsa
directamente en la cacerola. Procesar hasta obtener la consistencia
3. Usando el accesorio licuador, licuar la salsa a velocidad 3,
el fuego y dejar reposar durante 5 minutos.
tapa y hervir a fuego lento durante 10–15 minutos adicionales. Apagar
cocer a fuego lento durante 35 minutos, parcialmente tapado. Quitar la
los tomates y la sal restante. Dejar hervir, y luego reducir el fuego y
reducir el vino a la mitad o menos. Agregar el concentrado de tomate,
2. Agregar el orégano, la albahaca, el pimiento rojo y el vino. Cocer hasta
estén ligeramente dorados.
¼ cucharadita de la sal. Saltear suavemente los ingredientes hasta que
caliente, agregar la cebolla, la zanahoria, la berenjena, el apio, el ajo y
1. Calentar el aceite a fuego medio, en una cacerola grande. Una vez
1 cucharada de azúcar granulada
1 pizca de pimienta negra recién molida
1 lata de 28 onzas (795 g) de tomates cocidos, con jugo
1 cucharadita de concentrado de tomate
¼ taza (60 ml) de vino blanco seco
1 pimiento dulce rojo asado, en pedazos
½ cucharadita de albahaca seca
½ cucharadita de orégano seco
½ cucharadita de sal kosher
2 dientes de ajo, machacados
1 rama de apio, en trozos
½ taza (40 g) de cubitos de berenjena (con piel)
1 zanahoria, en trozos
1 cebolla pequeña, en pedazos
1 cucharada de aceite de oliva virgen extra
Rinde aproximadamente 4 tazas (945 ml)
diaria de vegetales.
Salsa de vegetales del huerto
Esta salsa para pasta multiuso es una buena manera de comer su dosis
Page 67

26
• Grasa saturada 0g • Colesterol 0mg • Sodio 55mg • Calcio 7mg • Fibra 2g
Información nutricional por porción (¼ taza/60 ml):
Calorías 57 (1 % de grasa) • Carbohidratos 11g • Proteínas 0g • Grasa 0g
4. Guardar en el refrigerador durante hasta 1 semana.
3. Poner la mezcla en un recipiente, cubrir y refrigerar.
consistencia deseada.
Licuar a velocidad 3 por 10–15 segundos, dependiendo de la
2. Quitar la tira de cáscara de naranja y licuar con el accesorio licuador.
temperatura ambiente.
los arándanos estén muy gordos. Retirar del horno y dejar enfriar a
minutos, hasta reducir el líquido a la mitad o a un tercio, y hasta que
y luego reducir el fuego. Cocer a fuego lento por aproximadamente 20
1. Colocar todos los ingredientes en una cacerola mediana. Dejar hervir,
(sin la piel blanca)
1 tira de 3 pulgadas (7.5 cm) de cáscara de naranja
¼ cucharadita de sal kosher
/3 taza (65 g) de azúcar granulada
2
2 tazas (475 ml) de agua
(frescos o descongelados)
4 tazas (600 g) de arándanos agrios enteros
Rinde aproximadamente 3 tazas (710 ml)
variedad en lata.
Salsa de arándanos agrios
• Grasa 19g • Grasa saturada 2g
Información nutricional por porción (1 cucharada):
La salsa de arándanos agrios fresca es muchísimo mejor que cualquier
• Colesterol 23mg • Sodio 32mg • Calcio 3mg • Fibra 0g
Calorías 169 (98% de grasa) • Carbohidratos 0g • Azúcar 0g • Proteínas 0g
mezcla esté espesa.
licuando, usando un movimiento suave hacia arriba y abajo, hasta que la
al licuar. Procesar hasta que la mezcla empiece a espesarse. Seguir
Licuar a velocidad 3, cerciorándose de mantener la varilla sumergida
el ajo para hacer mayonesa). Dejar descansar durante 30–60 segundos.
Colocar todos los ingredientes en el vaso, en el orden indicado (omitir
Page 68

25
11/3 taza (315 ml) de aceite vegetal
1–2 pizcas de sal kosher
1 cucharadita de mostaza de Dijon
2 cucharadas de jugo de limón fresco
2 yemas de huevo grande
2 dientes de ajo, pelados (si hace alioli)
Rinde aproximadamente 1 taza (235 ml)
croquetas de cangrejo.
Alioli/Mayonesa
• Colesterol 0mg • Sodio 153mg • Calcio 33mg • Fibra 2g
• Grasa 3g • Grasa saturada 0g
Calorías 7 (1% de grasa) • Carbohidratos 1g • Azúcar 1g • Proteínas 2g
Información nutricional por porción de 2 cucharadas:
(sin la piel blanca)
crudos, pero también puede servirla con hamburguesas, pescado o
cantidad de ajo. Tradicionalmente, el alioli sirve para mojar vegetales
sencilla usa los mismos ingredientes que la mayonesa, con una buena
por muchas cocinas, principalmente la cocina catalana. Esta versión
El alioli, como la mayonesa, tiene raíces franceses, pero ha sido adoptado
4. Probar y ajustar la sazón al gusto.
3. Poner la mezcla en un recipiente, cubrir y refrigerar durante 2–12 horas.
2. Agregar los ingredientes restantes y procesar para mezclar.
segundos adicionales para picar finamente.
Raspar el bol y agregar el pepino. Procesar por aproximadamente 10
velocidad 5 durante aproximadamente 20 segundos para picar grueso.
1. Colocar el ajo, el eneldo y la cáscara de limón en el bol. Procesar a
2 pizcas de sal kosher
1 cucharada de jugo de limón fresco
1 taza (235 ml) de yogur griego natural (cualquier variedad)
4 onzas (115 g) de pepino (sin semillas), en pedazos (no lo pele)
1 tira de ½ pulgada (1.5 cm) de cáscara de limón
1 cucharada de eneldo fresco
2 dientes de ajo
Rinde aproximadamente 1¾ taza (415 ml)
Salsa Tzatziki
algunas horas en el refrigerador para combinar y realzar los sabores.
El equivalente griego de la salsa "Raita", esta salsa se beneficia de pasar
Page 69

24
• Grasa 4g • Grasa saturada 1g
o pan crujiente.
"Tapenade"
• Colesterol 0mg • Sodio 224mg • Calcio 33mg • Fibra 2g
Calorías 42 (84% de grasa) • Carbohidratos 2g • Azúcar 0g • Proteínas 0g
Información nutricional por porción de 2 cucharadas:
2. Probar y ajustar la sazón al gusto.
suave o con pedazos.
hasta obtener la consistencia deseada. La "tapenade" es tan deliciosa
segundos adicionales. Agregar el resto de los ingredientes; Procesar
Agregar las aceitunas y las alcaparras; procesar a velocidad 5 por 20
aproximadamente 20 segundos para picar grueso. Raspar el bol.
1. Colocar el ajo y el perejil en el bol. Procesar a velocidad 5 durante
½ cucharadita de pimienta negra recién molida
1½ cucharadita de mostaza de Dijon
1½ cucharadita de jugo de limón fresco
2 cucharadas de aceite de oliva virgen extra
¼ taza (35 g) de alcaparras, escurridas y lavadas
deshuesadas
1½ taza (300 g) de aceitunas negras (por ej. Kalamata o Niçoises)
3 cucharadas de perejil fresco picado
1 diente de ajo
Rinde aproximadamente 1½ taza (355 ml)
Condimento francés tradicional, Ideal para servir con galletas saladas
• Calcio 93mg • Fibra 3g
• Grasa 7g • Grasa saturada 4g • Colesterol 23mg • Sodio 169mg
Calorías 99 (61% de grasa) • Carbohidratos 5g • Azúcar 1g • Proteínas 5g
Información nutricional por porción de 2 cucharadas:
5. Servir con chips de pan pita, cubos de pan crujiente y vegetales crudos.
20–25 minutos, hasta dorarse.
4. Colocar la mezcla en el molde preparado y meter al horno. Hornear por
cerciorándose de cortar todos los ingredientes.
1–1½ minuto, usando un movimiento suave hacia arriba y abajo,
Licuar a velocidad 5, usando el accesorio licuador. Licuar por
3. Colocar la mezcla y el resto de los ingredientes en un tazón mediano.
20 segundos para picar.
para picar. Agregar el ajo y el chalote; procesar a velocidad 5 durante
2. Colocar el queso en el bol. Procesar a velocidad 5 por 20–30 segundos
precalentar el horno a 375°F (190°C).
vegetal. Reservar. Poner la rejilla del horno en el centro del horno y
1. Engrasar levemente un molde redondo de 9 pulgadas (22 cm) con spray
Page 70

23
½ cucharadita de hojuelas de pimiento rojo
2 cucharadas de crema líquida para batir ("heavy cream")
temperatura ambiente, en pedazos
12 onzas (340 g) de queso crema regular o bajo en grasa, a
1 lata de 15 onzas (425 g) de corazones de alcachofa, escurridos
y exprimida
8 onzas (225 g) de espinaca congelada, descongelada, escurrida
½ chalote pequeño, en pedazos
1 diente de ajo
1 onza (30 g) de queso Parmesano, en cubitos
2 onzas (55 g) de queso Gruyère, en cubitos
Aceite de oliva o spray vegetal
Rinde aproximadamente 2 tazas (475 ml)
molde de tarta es el método más rápido para calentarlo.
agradable sabor a nuez. No requiere ningún tipo de fuente especial; un
los adultos. La combinación de quesos Gruyère y Parmesano le da un
Crema para mojar tradicional, con un giro especial para el paladar de
queso Gruyère y alcachofa
Crema para mojar de espinaca,
• Calcio 15mg • Fibra 1g
• Grasa 0g • Grasa saturada 0g • Colesterol 0mg • Sodio 137mg
Calorías 23 (6% de grasa) • Carbohidratos 6g • Azúcar 4g • Proteínas 1g
Información nutricional por porción (¼ taza/60 ml):
sabor fresco realzará cualquier comida.
Salsa de mango
3. Probar y ajustar la sazón al gusto.
limón; revolver. Escurrir el exceso de líquido si es necesario.
el resto de los vegetales. Agregar la sal, la pimienta y el jugo de lima/
la velocidad 5, para picar grueso. Colocar la mezcla en el tazón, con
2. Colocar los tomates y el mango en el bol. Pulsar 5–6 veces, usando
finamente. Reservar, en un tazón mediano.
picador/moledor. Pulsar 6–8 veces, usando la velocidad 5, para picar
1. Poner el ajo, el jalapeño, la cebolleta y el cilantro en el bol del accesorio
1 cucharadita de jugo de lima/limón verde fresco
1 pizca de pimienta negra recién molida
¼ cucharadita de sal kosher
½ taza (75 g) de cubos de mango
1 taza (150 g) de tomates de pera, partidas a la mitad
1 cucharada de hojas de cilantro fresco
1 cebolleta ("scallion"), en trocitos
¼ jalapeño pequeño, sin semillas, en cuartos
1 diente de ajo pequeño
Rinde aproximadamente 1 taza (235 ml)
Sírvala con chips de maíz o sobre pollo, pescado o cerdo asados. Su
Page 71

22
• Calcio 45mg • Fibra 2g
Humus
• Grasa 4g • Grasa saturada 1g • Colesterol 0mg • Sodio 119mg
Calorías 71 (47% de grasa) • Carbohidratos 7g • Azúcar 0g • Proteínas 3g
Información nutricional por porción de 2 cucharadas:
más rico.
espeso, agregar un poco más de agua o aceite de oliva para un sabor
2. Probar y ajustar la sazón al gusto. Si desea que el humus sea menos
obtener una mezcla suave.
ingredientes restantes y procesar durante 40–60 segundos, hasta
a velocidad 5 durante 10–15 segundos; raspar el bol. Agregar los
1. Poner el ajo en el bol del accesorio picador/moledor y procesar
½ taza (120 ml) de agua (usar más si es necesario)
1 pizca de comino en polvo
¾ cucharadita de sal kosher, o a gusto
2 cucharadas de jugo de limón fresco
½ taza (120 ml) de salsa Tahini
1 lata de 15.5 onzas (425 g) de garbanzos, escurridos y lavados
1 diente de ajo
Rinde aproximadamente 2 tazas (475 ml)
humus de pimiento asado o humus con hierbas frescas.
también puede servir de base para preparar muchas variaciones incluso
remolacha asada o hierbas frescas. Este humus es delicioso así, pero
Puede cambiar esta receta básica, añadiéndole pimiento rojo cocido,
• Grasa saturada 0g • Colesterol 0mg • Sodio 144mg • Calcio 4mg • Fibra 1g
Calorías 30 (72% de grasa) • Carbohidratos 2g • Azúcar 0g • Proteínas 0g • Grasa 3g
Información nutricional por porción de 2 cucharadas:
2. Probar y ajustar la sazón al gusto.
conseguirla consistencia deseada.
picar. Agregar los ingredientes y pulsar, usando la velocidad 5, hasta
5 segundos para picar. Agregar los tomates; pulsar 2–3 veces para
1. Colocar el ajo y el jalapeño en el bol. Procesar a velocidad 5 durante
Guacamole
½ cucharadita de sal kosher
1 cucharada de jugo de lima/limón verde fresco
1 aguacate maduro, partido a la mitad
¼ taza (40 g) de tomates de pera
½ jalapeño pequeño, en cuartos
1 diente de ajo pequeño
Rinde aproximadamente 1 taza (235 ml)
vegetales crudos. También puede acompañar pollo o pescado asado.
Esta especialidad mejicana es ideal para servir con chips de maíz o
Page 72

21
• Grasa 2g • Grasa saturada 0g
• Colesterol 0mg • Sodio 153mg • Calcio 33mg • Fibra 2g
Calorías 37 (54% de grasa) • Carbohidratos 4g • Azúcar 1g • Proteínas 1g
Información nutricional por porción de 2 cucharadas:
3. Probar y ajustar la sazón al gusto.
mezclar.
cuidado de no incluir la piel ni las semillas. Procesar a velocidad 5 para
los ingredientes restantes, incluso la pulpa de la berenjena, teniendo
2. Colocar el ajo en el bol. Procesar a velocidad 5, para picar. Agregar
tostador! Una vez rostizada, reservar y dejar enfriar ligeramente.
potencia de su horno. Nota: ¡este es un excelente trabajo para su horno
Este proceso puede demorar entre 15 y 30 minutos, dependiendo de la
berenjena esté muy suave, al punto que la berenjena se desbarate.
que esté rostizada uniformemente. Es importante que la carne de la
de la parrilla, y asar, volteando la berenjena cada 5–10 minutos, hasta
forrada con papel de aluminio. Meter al horno, lo más cerca posible
Colocar la berenjena sobre una rejilla puesta adentro de una bandeja
enfriar ligeramente. Segunda opción: asándola a la parrilla del horno.
rostizada uniformemente (debe estar negro por todos lados). Dejar
pinzas y colocarla justo encima de la llama. Voltearla hasta que esté
a gas, ésta es la manera más rápida). Sostener la berenjena con
la manera deseada: Primera opción: a fuego abierto (si tiene cocina
1. Pinchar la berenjena por todos lados con un tenedor. Rostizar, de
½ cucharadita de sal kosher
2 cucharaditas de aceite de oliva virgen extra
2 cucharaditas de jugo de limón fresco
2 cucharadas de salsa Tahini
/3 taza llena (40 g) de hojas de perejil
1
1 diente de ajo
1 berenjena mediana, no pelada
Rinde aproximadamente 1¼ taza (295 ml)
puede rostizar al horno hasta que esté suave.
sabor rostizado típico, lo mejor es cocerla a fuego abierto, pero también la
o pan pita, o para untar en sándwiches. Para que la berenjena tenga este
Esta popular crema de berenjena asada es perfecta para mojar vegetales
"Baba Ghanoush"
Page 73

20
• Grasa 7g • Grasa saturada 4g
• Colesterol 23mg • Sodio 65mg • Calcio 110mg • Fibra 1g
Calorías 154 (39% de grasa) • Carbohidratos 21g • Azúcar 19g • Proteínas 3g
Información nutricional por porción de ½ taza (120 ml):
2. Servir inmediatamente.
arriba y abajo.
a velocidad 3 durante 45 segundos, usando un movimiento suave hacia
1. Colocar todos los ingredientes en el vaso, en el orden indicado. Licuar
1½ taza (355 ml) de helado de chocolate fino
½ cucharada de cacao en polvo
1½ cucharada de jarabe de chocolate
¾ taza (175 ml) de leche (cualquier tipo)
Rinde aproximadamente 2 tazas (475 ml)
Para los amantes del chocolate.
Batido de triple chocolate
• Grasa 16g • Grasa saturada 14g
• Colesterol 0mg • Sodio 10mg • Calcio 14mg • Fibra 3g
Calorías 242 (57% de grasa) • Carbohidratos 25g • Azúcar 18g • Proteínas 3g
Información nutricional por porción de 1 taza (235 ml):
2. Servir inmediatamente o refrigerar hasta el momento de tomar.
movimiento suave hacia arriba y abajo.
a velocidad 5 durante aproximadamente 30 segundos, usando un
1. Colocar todos los ingredientes en el vaso, en el orden indicado. Licuar
mitad
1 trozo de ¾ pulgada (2 cm) de jengibre, pelado y cortado a la
¾ taza (175 ml) de bebida de leche de coco
1 taza (150 g) de cerezas congeladas
Rinde aproximadamente 1 taza (235 ml)
/3 taza (160 ml) de
2
leche de coco en lata.
y cremoso, sustituya la bebida de leche de coco por
que la leche de coco en lata. Sin embargo, si desea un batido más espeso
Las bebidas hechas con leche de coco contienen menos calorías y grasa
"Smoothie" de jengibre-cereza
Page 74

19
• Colesterol 0mg • Sodio 5mg • Calcio 20mg • Fibra 4g
• Grasa 0g • Grasa saturada 0g
Calorías 129 (2% de grasa) • Carbohidratos 30g • Azúcar 25g • Proteínas 1g
Información nutricional por porción de 1 taza (235 ml):
2. Servir inmediatamente o refrigerar hasta el momento de tomar.
suave hacia arriba y abajo.
velocidad 5 durante aproximadamente 1 minuto, usando un movimiento
1. Colocar todos los ingredientes en el vaso, en el orden indicado. Licuar a
¾ taza (175 ml) de jugo de naranja
1 taza (200 g) de trocitos de piña congelada
1 taza (200 g) de fresas, partidas en dos
Rinde 2 taza (475 ml)
rápido y nutritivo con su licuadora de mano.
Menos es más, especialmente cuando se trata de preparar este batido
Batido de frutas simple
• Colesterol 4mg • Sodio 111mg • Calcio 95mg • Fibra 3g
• Grasa 12g • Grasa saturada 2g
Calorías 192 (52% de grasa) • Carbohidratos 18g • Azúcar 8g • Proteínas 6g
Información nutricional por porción de ½ taza (120 ml):
suave hacia arriba y abajo.
a velocidad 5 durante 1 minuto y 30 segundos, usando un movimiento
este combo está repleto de sustanciosas proteínas.
Mantequilla de maní, banano y cacao – ¿Cómo no va a gustar? Además,
Batido proteico
2. Servir inmediatamente o refrigerar hasta el momento de tomar.
1. Colocar todos los ingredientes en el vaso, en el orden indicado. Licuar
¾ taza (175 ml) de leche de almendra sin grasa
1 cucharadita de aceite de linaza/semilla de lino
1 cucharadita de cacao amargo en polvo
1 cucharada de proteínas en polvo
1 banano, en trozos
2 cucharadas (30 g) de mantequilla de maní cremosa
Rinde 1¼ taza (295 ml)
Page 75

18
• Grasa 3g • Grasa saturada 2g
• Colesterol 10mg • Sodio 53mg • Calcio 156mg • Fibra 3g
Calorías 195 (15% de grasa) • Carbohidratos 39g • Azúcar 35g • Proteínas 5g
Información nutricional por porción de 1 taza (235 ml):
2. Servir inmediatamente o refrigerar hasta el momento de tomar.
arriba y abajo.
a velocidad 5 durante 30 segundos, usando un movimiento suave hacia
1. Colocar todos los ingredientes en el vaso, en el orden indicado. Licuar
2 cucharadas de agua fría
½ cucharadita de ralladura de lima/limón verde
1½ cucharadita de jugo de lima/limón verde fresco
⁄3 taza (80 ml) de yogur natural sin grasa
1
1 taza (140 g) de cubitos de mango
Rinde 1 taza (235 ml)
utilice ½ taza (120 ml) de yogur.
Para conseguir un "smoothie" aún más cremoso,
"Smoothie" de mango y limón
• Grasa 0g • Grasa saturada 0g
• Colesterol 0mg • Sodio 7mg • Calcio 38mg • Fibra 5g
Información nutricional por porción de 1 taza (235 ml):
Calorías 117 (3% de grasa) • Carbohidratos 29g • Azúcar 16g • Proteínas 1g
2. Servir inmediatamente.
suave hacia arriba y abajo.
a velocidad 5 durante 1 minuto y 30 segundos, usando un movimiento
1. Colocar todos los ingredientes en el vaso, en el orden indicado. Licuar
⁄3 taza (80 ml) de agua
1
/3 taza (80 ml) de jugo de arándano agrio
1
1 banano, en trozos
¼ taza (15 g) de menta fresca
1 taza (200 g) de fresas, partidas en dos
½ taza (70 g) de arándanos azules congelados
Rinde 2 tazas (475 ml)
su batido de fruta favorito!
frutas del bosque y la acidez del jugo de arándanos agrios. ¡Pruébela en
La menta en esta receta compensa agradablemente la dulzura de las
"Smoothie" de frutas del bosque para llevar
BATIDOS Y BEBIDAS
Page 76

17
Salsa de yogur-Tahini ................29
semana ....................................... 42
Filete de res fácil para noche de
estilo oriental .............................. 41
Pierna de cordero al
Gracia ......................................... 40
Pavo del Día de Acción de
de hierbas frescas ...................... 39
Lomo de cerdo asado con corteza
Gofres/Wafles belgas ................. 39
Crema batida .............................. 38
Mousse de chocolate ................. 37
Sopa invernal de frijoles blancos 36
asados ........................................ 36
Sopa de tomates y pimientos rojos
Sopa de calabacines con hierbas 35
Sopa de coliflor .......................... 34
mantequilla de tocino y salvia .... 33
"Bisque" de calabaza moscada con
Salsa verde ................................. 29
Pesto .......................................... 28
Salsa de rábano picante ............ 28
Salsa de vegetales del huerto .... 26
Salsa de arándanos agrios......... 26
Alioli/Mayonesa .......................... 25
Salsa Tzatziki .............................. 25
"Tapenade" ................................ 24
queso Gruyère y alcachofa ........ 23
Crema para mojar de espinaca,
Salsa de mango .........................23
Humus ........................................ 22
Guacamole ................................. 22
"Baba Ghanoush" ......................21
Batido de triple chocolate .......... 20
puerro ......................................... 32
Sopa primaveral de espárragos y
Aderezo de jengibre y sésamo... 31
Vinagreta de cítricos ..................31
Aderezo César ............................ 30
Vinagreta básica ......................... 30
RECETAS
"Smoothie" de jengibre-cereza .. 20
Batido de frutas simple .............. 19
Batido proteico ........................... 19
"Smoothie" de mango y limón ... 18
para llevar ................................... 18
"Smoothie" de frutas del bosque
Page 77

16
consistencia deseada.
más de 6 onzas (170 g) a la vez. Pulsar hasta obtener la
Cortar en pedazos de ½ pulgada (1.5 cm). No procesar
a la vez.
Pulsar para picar. No procesar más de ½ taza (100 g)
el apio con un pelador para eliminar los hilos duros.
Pelar y cortar en pedazos de ½ pulgada (1.5 cm). Pelar
papas.
para preparar puré. No se aconseja preparar puré de
Agregar un poco de líquido de cocción, caldo o leche
picar. No procesar más de ½ taza (100 g) a la vez.
Cortar en pedazos de 1 pulgada (2.5 cm). Pulsar para
(100 g) a la vez.
obtener la textura deseada. No procesar más de ½ taza
para picar, y luego procesar continuamente hasta
Pelar y cortar en pedazos de ½ pulgada (1.5 cm). Pulsar
nuez, procesar por más tiempo.
1/3 taza (75 g) a la vez. Para conseguir mantequilla de
hasta obtener la textura deseada. No procesar más de
sabor. Pulsar para picar, y luego procesar continuamente
Quitar las cáscaras; tostar primero para maximizar el
bol. Pulsar para picar.
Colocar ½ taza (30 g) de hierbas limpias y secas en el
lado afilado para obtener resultados más finos.
Pulsar hasta obtener la consistencia deseada. Usar el
para picar. No procesar más de ½ onza (15 g) a la vez.
Pelar y cortar en pedazos de ½ pulgada (1.5 cm). Pulsar
continuamente hasta obtener la textura deseada.
de la cuchilla. Pulsar para picar, y luego procesar
Colocar los ingredientes en el bol, sin cubrir el eje
(30 g) a la vez.
obtener la textura deseada. No procesar más de 1 onza
para picar, y luego procesar continuamente hasta
y congelarlo durante 3 minutos antes de picarlo. Pulsar
Cortar el chocolate en pedazos de ½ pulgada (1.5 cm)
obtener la textura deseada.
Pulsar para picar, y luego procesar continuamente hasta
Cortar el queso en pedazos de ¼ pulgada (0.5 cm).
obtener la textura deseada.
Pulsar para picar, y luego procesar continuamente hasta
Afilado Alta
Afilado Alta
Afilado Baja a alta
Afilado Alta
Afilado Alta
Afilado Alta
Afilado Baja
Afilado Alta
(crudos)
(cocidos)
(frescas)
(fresco)
(Asiago,
Afilado Alta
* Véase las instrucciones de instalación de la cuchilla en las páginas 9–10.
Licuado simple Recto Baja a alta Usar para mezclar e incorporar.
cerdo)
Carne cruda (res,
Vegetales
Vegetales
Cebolla Afilado Alta
Nueces Recto Alta
Hierbas
estrellado, etc.)
de amapola, anís
eneldo, semillas
(semillas de cilantro,
Especias duras
Jengibre
Ajo Afilado Alta Hasta 6 dientes, pelados. Pulsar para picar.
para mojar
Aderezos y cremas
Chocolate Afilado Alta
para mojar)
un aderezo o una salsa
que sea para preparar
queso suave a menos
recomienda procesar
Romano, etc.) (no se
Locatelli, Parmesano,
Queso rallado
o pan del día anterior)
Pan rallado (pan fresco
para picar, y luego procesar continuamente para licuar.
el bol. Agregar una pequeña cantidad de líquido. Pulsar
Colocar una pequeña cantidad de alimentos cocidos en
Afilado Baja a alta
recomendado*
la cuchilla
Velocidad Comentarios
a su pediatra/médico)
Papillas (pida consejo
Ingrediente Lado de
PAUTAS DE USO DEL ACCESORIO PICADOR/MOLEDOR
Page 78

15
lejos de las hojas.
• Cerciórese de mantener la mano con la cual no sostiene el cuchillo
podría dañar las hojas.
• Cuando rebane carne o aves, tenga cuidado de evitar los huesos o
con la tabla de picar; esto logrará un groso uniforme.
• Cuando rebane pan, mantenga las hojas a un ángulo recto en relación
hojas controlen la velocidad a la que corta el cuchillo.
• No haga presión sobre el cuchillo; deje que el movimiento de las
CUCHILLO ELÉCTRICO
prepare la crema batida justo antes de usarla.
extracto de vainilla) si desea. Para conseguir resultados óptimos,
conseguir picos suaves o firmes, al gusto. Añada saborizante (por ej.
• Refrigere la crema/nata antes de batirla. Bata la crema hasta
tazón profundo con un fondo redondo que minimiza las salpicaduras.
antes de batir crema. El mejor tazón para preparar crema batida es un
• Si el tiempo lo permite, es aconsejable refrigerar el tazón y el batidor
empiecen a formarse picos suaves, y luego siga batiendo.
• Cuando añada azúcar a las claras, haga esto despacio, justo cuando
sean menos estables.
• Batir las claras durante un tiempo excesivo hace que se sequen y
"crêpes" (crepas) o tortillas de huevos.
• El accesorio batidor también puede usarse para preparar mezcla para
claras a punto de nieve.
Nota: no use crémor tártaro si usa un recipiente de cobre. Bata las
añada
/8 cucharadita de crémor tártaro por clara antes de montarlas.
1
pueden impedir montar las claras). Para ayudar a estabilizar las claras,
utilice tazones de plástico (el plástico suele contener aceites que
• Monte las claras en un tazón de metal o de vidrio muy limpio; nunca
• Utilice el accesorio batidor para montar claras o batir crema.
• No sumerja la caja de engranaje en agua u otro líquido.
ACCESORIO BATIDOR
Page 79

14
∕3 del bol.
2
líquido.
10. No sumerja la tapa del accesorio picador/moledor en agua u otro
temperatura ambiente.
9. Para preparar mantequilla aromatizada, utilice mantequilla a
del aparato.
8. Algunas especias pueden rayar el bol; esto no afectará en rendimiento
cantidades indicadas en nuestras recetas como pauta.
7. No procese más de 1½ taza (355 ml) de líquido a la vez. Utilice las
segundos seguidos.
6. No haga funcionar el accesorio picador/moledor durante más de 30
tamaño.
5. Obtendrá resultados más homogéneos si los pedazos son del mismo
pedazos de ½–1 pulgada (1.5–2.5 cm), según su textura.
duras (corazón, pepas, semillas, huesos, etc.). Corte los alimentos en
4. Alimentos crudos: pele las frutas y los vegetales y quite las partes
alimentos a menudo y raspar el bol con una espátula si es necesario.
los alimentos de manera continua. Averiguar la consistencia de los
consistencia deseada. Para conseguir resultados más finos, procesa
3. Pulse, usando pulsaciones de 1 segundo, hasta obtener la
pepas, etc.; esto podría dañar las cuchillas.
2. No pique alimentos que contengan materias duras como hueso,
no deben pasar los
1. No sobrellene el bol. Para lograr resultados óptimos, los ingredientes
ACCESORIO PICADOR/MOLEDOR
• No sumerja el bloque-motor en agua u otro líquido.
homogéneas.
• Utilice la licuadora de mano para preparar salsas suaves y
conseguir resultados uniformes y homogéneos.
• Un movimiento suave hacia arriba y abajo es la mejor manera para
debajo de la superficie.
• Para incorporar aire a una mezcla, mantenga la cuchilla justo
expande durante el licuado y puede desbordarse.
• No sobrellene los recipientes en los cuales licua; la mezcla se
pepas, etc.; esto podría dañar las cuchillas.
• No licue alimentos que contengan materias duras como hueso,
• No deje la licuadora en una cacerola/olla caliente.
pulsando mientras mantiene la cuchilla sumergida.
caliente la leche en una cacerola, y luego lícuela suavemente,
servir con capuchino o "latté" (café con leche). Simplemente
• La licuadora de mano es perfecta para espumar la leche, para
bloque-motor.
• No sumerja la varilla hasta menos de 1 pulgada (2.5 cm) del
Page 80

13
receta).
Finalmente, agregue el líquido (salvo indicación contraria en la
ingredientes duros primero, y luego los ingredientes suaves.
• Cuando licue directamente en el vaso, siempre agregue los
cm).
batidos de frutas, corte los alimentos en cubitos de ½ pulgada (1.5
• Cuando licue directamente en el vaso, por ejemplo para preparar
haga contacto con el revestimiento antiadherente.
• Si usa cacerolas/ollas antiadherentes, no permita que la licuadora
para obtener mejores resultados.
• Cuando licue pequeños volúmenes de líquido, incline el recipiente
la cacerola/olla para evitar las salpicaduras.
• Cuando licue directamente en la cacerola/olla, incline ligeramente
consistencia deseada.
movimiento suave hacia arriba y abajo hasta obtener la
• Licue las sopas directamente en la cacerola/olla, usando un
sumergido antes de empezar a licuar.
• Asegúrese de que el protector de cuchillas esté completamente
ACCESORIO LICUADOR
CONSEJOS Y SUGERENCIAS
usuario, debe ser llevada a cabo por personal de servicio autorizado.
Toda reparación, excepto la limpieza y el mantenimiento por parte del
enjuague bajo agua corriente.
puestas. No sumerja el aparato en agua u otro líquido y no lo
Precaución: no limpie la empuñadura mientras las hojas siguen
lavavajillas. Límpiela con un paño ligeramente húmedo.
3. No sumerja la caja de engranaje en ningún líquido, ni la meta al
agua jabonosa caliente o en el lavavajillas; seque bien.
lavarlas, deslizando el remache fuera del ojo. Lave las hojas en
y jale suavemente las hojas del mango. Separe las hojas para
engranaje, agarre cuidadosamente las hojas por el filo que no corta
liberación de las hojas ubicados en ambos lados de la caja de
2. Separe las hojas de la caja de engranaje: presione los botones de
1. Separe la caja de engranaje del bloque-motor.
CUCHILLO ELÉCTRICO
No sumerja la caja de engranaje en agua u otro líquido.
en agua jabonosa tibia, o en el lavavajillas.
caja de engranaje con un paño ligeramente húmedo. Lave el batidor
caja de engranaje, jalando cada pieza en dirección opuesta. Limpie la
Separe el accesorio batidor del bloque-motor. Separe el batidor de la
ACCESORIO BATIDOR
ligeramente húmedos. Seque inmediatamente.
motor y la parte superior de la tapa con una esponja o un paño
Page 81

12
Tenga cuidado al sacar la cuchilla del lavavajillas. Limpie el bloquetambién pueden lavarse en el lavavajillas (nivel superior solamente).
en agua jabonosa, donde la pueda perder de vista. El bol y la cuchilla
residuos de alimentos. Lave la cuchilla cuidadosamente. No la deje
una esponja o un paño ligeramente humedecido para eliminar los
Enjuague y seque las piezas. Limpie la parte inferior de la tapa con
meta al lavavajillas. Lave la cuchilla y el bol en agua jabonosa tibia.
dificultar la limpieza. No sumerja la tapa del bol en agua y no la
inmediatamente después del uso, ya que alimentos secos podrían
Le recomendamos que enjuague el bol, la cuchilla y la tapa
ACCESORIO PICADOR/MOLEDOR
cuidado al manipular la varilla, ya que la cuchilla es muy filosa.
mano o en el lavavajillas, con un detergente suave. Tenga mucho
limpiadores abrasivos, los cuales podrían dañarlo. Lave la varilla a
motor con una esponja o un paño ligeramente húmedos. No utilice
uso.
Retire el accesorio licuador del bloque-motor. Limpie el bloque-
Limpie el bloque-motor y la varilla cuidadosamente después de cada
ACCESORIO LICUADOR
LIMPIEZA Y MANTENIMIENTO
ubicados en ambos lados de la caja de engranaje.
encendido. Para quitar las hojas, presione los botones de liberación
4. Las hojas se detendrán automáticamente al soltar el botón de
adelante y atrás para cortar.
hojas durante el funcionamiento, ya que éstas se mueven hacia
uniformes. PRECAUCIÓN: NUNCA coloque su mano encima las
mantiene la hoja bien recta para obtener rebanadas/lonjas/lonchas
3. Mantenga oprimido el botón de encendido para cortar, mientras
botón de encendido ubicado sobre la caja de engranaje.
caja de engranaje. Deslice el botón y presione inmediatamente el
2. El cuchillo tiene su propio botón de desbloqueo, ubicado sobre la
que encajen.
1. Conecte la caja de engranaje al bloque-motor, presionando hasta
conectar el accesorio al bloque-motor
Ensamble las cuchillas y conéctelas a la caja de engranaje antes de
CÓMO TRINCHAR/REBANAR
aumente progresivamente la velocidad.
2. Para evitar las salpicaduras, empiece a batir a velocidad baja y
página 10). Sumerja el batidor en la mezcla y encienda la unidad.
la caja de engranaje antes de conectarlo al bloque-motor (véase la
1. Cerciórese que el accesorio batidor está debidamente conectado a
CÓMO BATIR
Page 82

11
vacío.
NOTA: no haga funcionar el accesorio picador/moledor con el bol
de la tapa y quite la tapa del bol.
TRAS INMOVILIZARSE LA CUCHILLA, separe el bloque-motor
botón de encendido; el motor se apagará
una mano durante el funcionamiento. Después de terminar, suelte el
la potencia del motor, le recomendamos que sostenga el bol con
mientras presiona repetidamente el botón de encendido. Debido a
NOTA: para pulsar, mantenga oprimido el botón de desbloqueo
puesta. Conecte el bloque-motor (la empuñadura) a la tapa del bol.
Cierre la tapa del bol, asegurándose de que esté debidamente
está muy lleno.
están cortados en pedazos pequeños y uniformes, y que el bol no
Coloque los ingredientes en el bol, cerciorándose que los alimentos
esté debidamente instalada.
plana y segura, como una encimera. Asegúrese de que la cuchilla
Coloque el bol del accesorio picador/moledor sobre una superficie
CÓMO PICAR/MOLER
apagar, suelte el botón de encendido.
el botón de encendido durante más de 2 minutos seguidos. Para
encendido primero, y luego el botón de desbloqueo. No presione
botón de desbloqueo. Nota: también puede oprimir el botón de
botón de encendido. Una vez encendido el motor, puede soltar el
motor, mantenga oprimido el botón de desbloqueo y presione el
en la página 8). Sumerja la varilla en la mezcla. Para encender el
instrucciones de ensamblaje
Conecte el accesorio licuador al bloque-motor (véase las
líquido durante el uso.
permanezca en la mezcla durante el licuado. Nunca lo saque del
completamente sumergido antes de empezar a licuar, y que
las salpicaduras, asegúrese de que el protector de cuchilla esté
que necesita para preparar las más sabrosas recetas. Para evitar
mezcla. Un movimiento suave hacia arriba y abajo es todo lo
alimentos sin incorporar mucho aire a la
y también puede usarse para hacer mayonesa. La cuchilla licua los
bebidas en polvo y salsas. Es ideal para mezclar ingredientes secos,
variedad de alimentos, incluso aderezos, "smoothies", batidos,
El accesorio licuador ha sido diseñado para procesar una gran
CÓMO LICUAR/MEZCLAR
cuchillas durante el funcionamiento.
los dedos, cabello, ropa, espátulas y otros utensilios lejos de las
de desbloqueo, ubicado sobre la caja de engranaje). Mantenga
apagan de la misma manera (nota: el cuchillo tiene su propio botón
Todos los accesorios se conectan al bloque-motor y se encienden/
CÓMO ENCENDER/APAGAR EL APARATO
FUNCIONAMIENTO
Page 83

10
B.
A.
GUARDE LAS HOJAS EN LA FUNDA PROVEÍDA.
MANIPÚLELAS CON CUIDADO. CUANDO NO LAS USA,
esto es normal. PRECAUCIÓN: LAS HOJAS SON MUY FILOSAS.
encajen. Puede que las hojas no queden perfectamente alineadas;
introdúzcalas en la caja de engranaje, presionando hasta que
3. Sostenga las hojas con el filo apuntando hacia abajo e
pequeña.
grande en el ojo de la hoja
el remache de la hoja
Junte las hojas, insertando
2. Ensamble las hojas antes de instalarlas sobre la caja de engranaje.
bien.
SON MUY FILOSAS. MANIPÚLELAS CON CUIDADO. Seque
jabonosa caliente o en el lavavajillas. PRECAUCIÓN: LAS HOJAS
1. Antes del primer uso, separe y lave las hojas en agua
ACCESORIO "CUCHILLO ELÉCTRICO"
desmontable.
liberación de la varilla. Nota: la caja de engranaje es
que encajen. Nota: puede resultar útil oprimir el botón de
empuñadura) y conecte ambas piezas, presionando hasta
Haga coincidir la varilla con el bloque-motor (la
ACCESORIO BATIDOR
para soltarla del árbol motor.
Para sacar la cuchilla del bol, gírela hacia la izquierda o la derecha
REMOCIÓN DE LA CUCHILLA REVERSIBLE
LADO RECTO
B.
(marcado SHARP)
LADO AFILADO
A.
Page 84

9
D
F
G
C
E
A
B
picador/moledor
del accesorio
Tapa
en la página 16 para más información.
de uso del accesorio picador/moledor
para usar el filo recto. Véase las pautas
Ensamble la cuchilla de esta manera
ninguna palabra sobre la cuchilla.
ilustrada sobre la Fig. B, no notará
hacia arriba) para usar el filo afilado. Si la sostiene de la manera
cuchilla de esta manera (con la palabra "SHARP" apuntando
notará la palabra “SHARP” escrita sobre la cuchilla. Ensamble la
diferentes. Si la sostiene de la manera ilustrada sobre la Fig. A,
IMPORTANTE: la cuchilla encaja sobre el poste de dos maneras
en sentido horario; esto la bloqueará sobre el poste.
AFILADOS. Agarre la cuchilla por el centro y gírela ligeramente
LOS FILOS DE LA CUCHILLA; SON MUY
CENTRO (F) SOLAMENTE. NO TOQUE
poste. SOSTENGA LA CUCHILLA POR EL
que la cuchilla se deslice a lo largo del
resaltos en los costados del poste. Deje
Haga coincidir estas muescas con los
Note las muescas (E) en el interior del aro.
coincidir el orificio del aro con el poste.
(C) al poste de plástico (D), haciendo
2a. Para ensamblar la cuchilla: conecte muy cuidadosamente el aro
ensamblada (B) sobre el eje.
2. Note el eje de metal (A) en el fondo del bol. Deslice la cuchilla
1. Coloque el bol sobre una superficie plana, seca y segura,
Ensamblaje.
picador/moledor en la página 16.
continuación). También véase las pautas de uso del accesorio
fácilmente para elegir el lado deseado. (véase las instrucciones a
está conectada a un aro de plástico que permite darle vuelta
moler, y otro recto para picar. La cuchilla
cuchilla reversible con un filo afilado para
El accesorio picador/moledor cuenta con una
CUCHILLA REVERSIBLE
presionando hasta que encaje.
empuñadura) a la tapa del bol,
3. Conecte el bloque-motor (la
sujetar.
la tapa, girando en sentido horario para
2. Ponga los ingredientes en el bol y cierre
sobre el eje en el centro del bol.
1. Instale la cuchilla picadora/moledora
MOLEDOR
ACCESORIO PICADOR/
Page 85

no han
®
liberación
Botón de
8
de liberación de la varilla.
Nota: puede resultar útil oprimir el botón
presionando hasta que encajen.
(la empuñadura) y conecte ambas piezas,
Haga coincidir la varilla con el bloque-motor
ACCESORIO LICUADOR
ENSAMBLAJE
recargables.
que esto puede afectar la vida de las baterías
Nota: no deje el aparato descargado por un tiempo prolongado, ya
carga inferior al 25 %; póngalo a cargar pronto.
Anaranjado: nivel de carga entre el 75% y el 25%. Rojo: nivel de
Verde: nivel de carga entre el 100 % y el 75 %.
ofrecerá una autonomía de 5 minutos. Indicadores del nivel de carga:
aproximadamente 2–2.5 horas Una "carga rápida" de 30 minutos
minutos, dependiendo de la tarea. Cargar el aparato debería tomar
Una carga completa ofrecerá una autonomía de aproximadamente 20
cargar hasta que el indicador del nivel de carga VERDE se encienda.
sido precargadas en la fábrica. Antes del primer uso, las deberá
Las baterías de su licuadora de mano inalámbrica SmartStick
CARGA Y VIDA ÚTIL DE LAS BATERÍAS
no han
®
Véase la sección "Instrucciones de carga" a continuación.
cargar hasta que el indicador del nivel de carga verde se encienda.
sido precargadas en la fábrica. Antes del primer uso, las deberá
Las baterías de su licuadora de mano inalámbrica SmartStick
Lea cuidadosamente las instrucciones antes de usar el aparato.
aparato.
(bandeja superior solamente). Seque todas las piezas antes de usar el
cuchillo eléctrico y la varilla removible a mano o en el lavavajillas
cuchilla del accesorio picador/moledor, el vaso medidor, las hojas del
la cuchilla del accesorio licuador, el accesorio batidor, el bol y la
con un paño suave y absorbente, manipulándolas con cuidado. Lave
ligeramente humedecido antes del primer uso. Seque todas las piezas
Le aconsejamos que limpie el aparato con un paño limpio y
ANTES DE EMPEZAR
Page 86

7
s.
o
8.
6.
4.
5.
3.
2.
e.
d.
b.
a.
c.
1.
eléctrico" y el accesorio batidor de manera segura.
motor, el accesorio licuador, el accesorio "cuchillo
Paneles divisorios permiten guardar el bloque-
8. Bolsa de almacenaje
Ubicado en la parte trasera del bloque-motor.
7. Puerto de conexión del cargador
para agarrarse fácilmente y servir sin gotear.
batidos, aderezos para ensalada, etc. Diseñado
para medir fácilmente. Ideal para preparar bebidas,
Vaso transparente con medidas en ml y tazas,
6. Vaso medidor/para mezclar
otras delicias.
para montar claras y preparar crema batida y
Fácil de instalar sobre el bloque-motor. Ideal
5. Accesorio batidor
accesorio batidor y el accesorio licuador.
bloque-motor de la misma manera que el
accesorio picador/moledor se conecta al
Permite picar y moler fácilmente. La tapa del
4. Accesorio picador/moledor
cuchillo eléctrico de tamaño estándar.
Conéctelo al bloque-motor para conseguir un
3. Accesorio "cuchillo eléctrico"
motor, para una operación y una limpieza simples.
inoxidable. Fácil de instalar/quitar del bloquecuchilla y protector de cuchilla de acero
Varilla removible de 8¾ pulgadas (22 cm) con
2. Varilla
de encendido.
bloquea automáticamente al soltar el botón
desbloqueo. NOTA: el aparato se apaga y se
antes o justo después de presionar el botón de
e. Botón de encendido. Manténgalo oprimido
velocidad.
izquierda o la derecha para elegir/ajustar la
d. Control de velocidad. Deslice el botón hacia la
iluminan para indicar el nivel de velocidad.
c. Indicador de velocidad. Cinco barras se
medio): 25–75 %. Verde (nivel alto): 75–100%.
bajo): menos del 25 %. Anaranjado (nivel
b. Indicadores del nivel de carga. Rojo (nivel
a. Botón de desbloqueo para mayor seguridad.
comodidad y control.
forma de utensilio para mezclar, para máxima
encendido al alcance de los dedos. Diseñado en
de iones de litio de 4.0V y cuenta un botón de
¡Inalámbrico! Contiene dos baterías recargables
1. Bloque-motor (empuñadura)
PIEZAS Y CARACTERÍSTICAS
Page 87

6
aparato multifunción!
moledor para descubrir todo lo que tiene que ofrecer este increíble
esto no es todo... ¡Conecte el bloque-motor al accesorio picador/
para hacerle estorbo, puede trinchar, licuar o batir donde quiera. Y
bloque-motor para trinchar carne o cortar pan fácilmente. Sin cable
se transforma en un potente cuchillo eléctrico de tamaño
®
estándar! Simplemente conecte el accesorio "cuchillo eléctrico" al
SmartStick
Cuisinart. ¡Su nueva licuadora de mano multifunción inalámbrica
Estamos orgullosos de presentar aún otro aparato revolucionario de
INTRODUCCIÓN
cuidadosamente las instrucciones antes de usar el aparato.
mantenimiento" para más información acerca de la limpieza. Lea
con un paño suave y absorbente. Véase la sección "Limpieza y
ligeramente humedecido antes del primer uso. Seque todas las piezas
Le aconsejamos que limpie el aparato con un paño limpio y
al retirarlas de la caja o al manipularlas.
NOTA: todas las cuchillas/hojas son muy filosas. Tenga cuidado
técnica de la caja. Le aconsejamos que guarde el material de embalaje.
"cuchillo eléctrico" y el accesorio batidor. Retire la documentación
bolsa que contiene el bloque-motor, el accesorio licuador, el accesorio
Coloque la caja sobre una superficie llana y segura. Retire de la caja la
INSTRUCCIONES DE DESEMBALAJE
Reciclaje de las baterías . . . . . . . . . . . . . . . . . . . . . . . . . . . . . . . . . 44
Garantía . . . . . . . . . . . . . . . . . . . . . . . . . . . . . . . . . . . . . . . . . . . . . . 43
Recetas . . . . . . . . . . . . . . . . . . . . . . . . . . . . . . . . . . . . . . . . . . . . . . 17
Pautas de uso del accesorio picador/moledor . . . . . . . . . . . . . . . . 16
Consejos útiles . . . . . . . . . . . . . . . . . . . . . . . . . . . . . . . . . . . . . . . . 13
Limpieza y mantenimiento . . . . . . . . . . . . . . . . . . . . . . . . . . . . . . . 12
Cómo trinchar/rebanar . . . . . . . . . . . . . . . . . . . . . . . . . . . . . 12
Cómo batir . . . . . . . . . . . . . . . . . . . . . . . . . . . . . . . . . . . . . . . 12
Cómo picar/moler . . . . . . . . . . . . . . . . . . . . . . . . . . . . . . . . . 11
Cómo licuar/mezclar . . . . . . . . . . . . . . . . . . . . . . . . . . . . . . . 11
Funcionamiento . . . . . . . . . . . . . . . . . . . . . . . . . . . . . . . . . . . . . . . . 11
Cuchillo eléctrico . . . . . . . . . . . . . . . . . . . . . . . . . . . . . . . . . . 10
Accesorio batidor . . . . . . . . . . . . . . . . . . . . . . . . . . . . . . . . . 10
Cuchilla reversible . . . . . . . . . . . . . . . . . . . . . . . . . . . . . . . . . . 9
Accesorio picador/moledor . . . . . . . . . . . . . . . . . . . . . . . . . . . 9
Accesorio licuador . . . . . . . . . . . . . . . . . . . . . . . . . . . . . . . . . . 8
Ensamblaje . . . . . . . . . . . . . . . . . . . . . . . . . . . . . . . . . . . . . . . . . . . . 8
Piezas y características . . . . . . . . . . . . . . . . . . . . . . . . . . . . . . . . . . . 7
Introducción . . . . . . . . . . . . . . . . . . . . . . . . . . . . . . . . . . . . . . . . . . . 6
Instrucciones de desembalaje . . . . . . . . . . . . . . . . . . . . . . . . . . . . . 6
Medidas de seguridad importantes . . . . . . . . . . . . . . . . . . . . . . . . . 3
ÍNDICE
Page 88

5
apaga de repente, cárguela durante unos segundos para reiniciarla.
que apaga el motor en caso de sobrecalentamiento. Si la unidad se
Nota: este aparato está equipado con un dispositivo de protección
PARA USO DOMÉSTICO SOLAMENTE
GUARDE ESTAS INSTRUCCIONES
armario/gabinete cuando cierra.
incendio, especialmente si éste toca las paredes o la puerta del
armario/gabinete. Dejar el aparato conectado presenta un riesgo de
gabinete. Siempre desconecte el aparato antes de guardarlo en un
44. No haga funcionar el aparato debajo o dentro de un armario/
43. Averigüe que no hay objetos extraños en el bol antes de usarlo.
la tapa hasta que la cuchilla se haya detenido por completo.
debidamente cerrada antes de encender el aparato. No intente abrir
42. Asegúrese de que la tapa del accesorio picador/moledor esté
instalar la cuchilla.
accesorio picador/moledor esté debidamente ensamblado antes de
41. Para reducir el riesgo de heridas, asegúrese de que el bol del
40. Cualquier otro servicio debe ser realizado por un técnico autorizado.
aparato.
39. Solamente use el adaptador de 10.0V DC/1000mA proveído con el
(50°F–104°F/10°C–40°C).
38. Le recomendamos que guarde el aparato a temperatura ambiente
(50°F−104°F/10°C–40°C).
37. Le recomendamos que cargue el aparato a temperatura ambiente
presentar un riesgo para el usuario.
usando repuestos idénticos. No seguir estas instrucciones puede
36. Cualquier reparación debe ser realizada por un técnico calificado,
265°F/130°C puede provocar una explosión.
excesivo. Exponerlos al fuego o a temperaturas superiores a
35. No exponga la batería recargable ni el aparato al fuego o a un calor
herida.
están dañados; esto presenta un riesgo de incendio, explosión o
34. No intente modificar la batería recargable o el aparato, ni los use si
de la batería puede causar irritaciones o quemaduras.
contacto con los ojos, busque atención médica. El líquido eyectado
accidental, enjuague la piel con abundante agua. En caso de
esto ocurriera, evite el contacto con el líquido. En caso de contacto
33. En condiciones abusivas, líquido puede ser eyectado de la batería. Si
y/o incendio.
diseñada específicamente para él; esto presenta un riesgo de herida
32.
No utilice el aparato con una batería recargable que no haya sido
Page 89

4
causar un incendio.
cargadores diseñados para otro tipo de batería recargable puede
31. Utilice solamente el cargador proveído para cargar el aparato. Usar
o el cuchillo.
botón de encendido a menos que esté listo/a para usar la licuadora
Nunca presione el botón de desbloqueo al mismo tiempo que el
30. Procure no encender el aparato a menos que esté listo/a para usarlo.
agua durante 10 minutos o más. Busque atención médica.
contacto con los ojos, enjuáguelos inmediatamente con abundante
de la piel con jugo de limón o vinagre. Si el líquido entrara en
lave la piel rápidamente con agua y jabón y (2) neutralice la acidez
líquido adentro de las baterías entrara en contacto con la piel, (1)
29. Las baterías pueden tener fugas bajo condiciones extremas. Si el
pueden explotar por el calor.
44. No queme ni coloque las baterías en un compostador, ya que
del aparato. Véase la sección "Reciclaje de las baterías" en la página
cuales deben reciclarse según las leyes vigentes al final de la vida útil
Este aparato está equipado con baterías recargables de litio, las
28.
pueden explotar si se calientan.
27. No incinere el aparato, aunque esté gravemente dañado; las baterías
26. No utilice el cargador si está dañado; reemplácelo inmediatamente.
25. Siempre desconecte el cargador antes de limpiarlo.
un aparato de cocción o de un fregadero.
24. No instale/guarde la unidad a proximidad de una fuente de calor, de
cuando está montado a la pared).
ningún aparato que produzca calor debajo del bloque-motor (por ej.
Para reducir el riesgo de incendio o electrocución, no haga funcionar
23.
calientes.
22. Tenga cuidado de evitar las salpicaduras al mezclar líquidos
21. Solamente utilice este aparato para preparar comida y bebidas.
para uso en exteriores.
20. Para uso doméstico solamente; no aprobado para uso comercial, ni
limpiar el aparato.
haya detenido completamente, antes de instalar/retirar accesorios o
19. Asegúrese de que el aparato esté apagado, y de que el motor se
presenta un riesgo de incendio, electrocución o herida.
18. El uso de accesorios/aditamentos no recomendados por Cuisinart
su revisión, reparación o ajuste.
estuviese dañado; regréselo a un centro de servicio autorizado para
después de que hubiese funcionado mal o que se hubiese caído o si
17. No utilice este aparato si el cable o la clavija estuviesen dañados,
16. No utilice el aparato para ningún otro fin que no sea el indicado.
15. No conecte el cargador en exteriores.
cargar este aparato con otro cargador.
14. No intente utilizar el cargador con otro aparato. Tampoco intente
Page 90

3
toma de corriente.
13. No utilice una extensión. Conecte el cargador directamente a una
las superficies calientes.
12. Conecte el cargador una toma de corriente alejada del fregadero y de
pequeñas cantidades a la vez.
especialmente líquidos calientes, utilice un recipiente alto o procese
11. Para reducir el riesgo de salpicadura o quemadura al mezclar líquidos,
que su filo apunte hacia el lado opuesto a su cuerpo.
sosteniéndolas por el lado opuesto al filo. Guarde las hojas de manera
sumo cuidado. Manipule las hojas con mucho cuidado,
10. Las cuchillas y otros accesorios son MUY FILOSOS; manipúlelos con
de lavar las cuchillas o la varilla.
9. Separe la varilla desmontable del bloque-motor (la empuñadura) antes
aparato esté apagado.
funcionamiento. Se podrá usar una espátula de goma, siempre que el
espátulas y otros utensilios lejos de los accesorios durante el
heridas y/o daños al aparato, mantenga los dedos, cabello, ropa,
8. Evite el contacto con las piezas móviles. Para evitar el riesgo de
haber quitado el seguro o encendido el aparato.
7. Evite el contacto con las cuchillas o las piezas móviles después de
contacto con las cuchillas o las piezas móviles.
6. Luces encendidas significan que el aparato está listo. Evite el
instalar/sacar las cuchillas y/o los accesorios.
5. Para evitar las heridas, siempre desconecte el cargador antes de
inflamables.
4. No haga funcionar el aparato en la presencia de vapores explosivos o
personas con alguna discapacidad.
aparato cuidadosamente cuando sea usado por o cerca de niños o
3. Este aparato no debe ser usado por niños. Supervise el uso de este
continuar.
del líquido. Limpie y seque cuidadosamente la unidad antes de
líquido. Si el aparato cayera en líquido, desconéctelo y luego retírelo
sumergible. No sumerja ninguna otra parte del aparato en agua u otro
empuñadura) en agua u otro líquido. Sólo la varilla desmontable es
2. Para reducir el riesgo de electrocución, no ponga el bloque-motor (la
1. LEA TODAS LAS INSTRUCCIONES.
un incendio y/o heridas graves.
advertencias e instrucciones puede provocar una electrocución,
seguridad antes de utilizar este aparato. El incumplimiento de las
ADVERTENCIA: lea todas las instrucciones y medidas de
básicas de seguridad, incluso las siguientes:
Al usar aparatos eléctricos, siempre debe tomar precauciones
IMPORTANTES
MEDIDAS DE SEGURIDAD
Page 91

Page 92

CSB-300
lea las instrucciones cuidadosamente antes de usarlo.
con cuchillo eléctrico
®
Para su seguridad y para disfrutar plenamente de este producto, siempre
SmartStick
Licuadora de mano multifunción recargable
LIBRO DE RECETAS
INSTRUCCIONES Y
Page 93

Version no.: CSB300 IB-13523-ESP
114 mm(W) x 197 mm(H)
IB Size:
Die Cut: new
Material: 105gsm gloss art paper for whole book
Coating: gloss varnishing in cover
Colors(Cover): 4C+1C(BLACK)
(Inside): 1C+1C(BLACK)
Date:
SEP/08/2015
F CSB300 IB-13523-ESP (0.0)
Tel: 0769-87720314 87886328 Fax: 0769-87720324
E-MAIL: pofatprepress@pofat.com
B C M Y
Astor You / Andy WS Chan
Co-ordinator:
Operator: Revise Ver:
100 95 90 85 80 75 70 65 60 55 50 45 40 35
100 95 90 85 80 75 70 65 60 55 50 45 40 35
100
LIAO
100 95 90 85 80 75 70 65 60 55 50 45 40 35
100 95 90 85 80 75 70 65 60 55 50 45 40 35
50 45 40 3595 90 85 80 75 70 65 60 55
 Loading...