

Page 1
INSTRUCTION BOOKLET
Classic 2-Slice Toaster
For your safety and continued enjoyment of this product,
always read the instruction book carefully before using.
CPT-320C Series
Page 2

IMPORTANT
SAFEGUARDS
When using an electrical appliance, basic
safety precautions should always be followed, including the following:
1. Read all instructions.
2. Always unplug from outlet when not
in use and before cleaning. Allow to
cool before cleaning or handling.
3. Do not touch hot surfaces. Use
handles or knobs.
4. To protect against electrical shock,
do not place any part of the toaster
in water or other liquid. See instructions for cleaning.
5. Close supervision is necessary
when any appliance is used by or
near children.
6. Do not operate any appliance with a
damaged cord or plug, or after the
appliance has malfunctioned or has
been dropped or damaged in any way,
or if it is not operating properly. Return
the toaster to the nearest Cuisinart
Repair Center for examination, repair
or mechanical or electrical adjustment.
7. The use of accessory attachments
not recommended by Cuisinart may
cause injury.
8. Do not use outdoors.
9. Do not let cord hang over the edge of
the table or countertop or touch hot
surfaces.
10. Do not place toaster on or near a hot
gas or electric burner or in a heated
oven.
11. Do not use this toaster for other than
intended use.
12. Oversize foods, metal foil packages
or utensils must not be inserted in
the toaster, as they may involve a
risk of fire or electric shock.
13. A fire may occur if the toaster is
covered or touching flammable
materials, such as curtains, draperies or walls when in operation. Do
not operate under wall cabinets.
14. Do not attempt to dislodge food when
the toaster is plugged into electrical
outlet.
15. To avoid possibility of fire, do not
leave toaster unattended during use.
16. To disconnect, push the cancel
button, then remove plug from wall.
17.
WARNING: TO REDUCE THE RISK
OF FIRE OR ELECTRIC SHOCK,
REPAIR SHOULD BE DONE ONLY BY
AUTHORIZED PERSONNEL. NO USER
SERVICEABLE PARTS ARE INSIDE.
18. Do not operate your appliance in an
appliance garage or under a wall cabinet. When storing in an appliance
garage always unplug the unit from
the electrical outlet. Not doing so
could create a risk of fire, especially if
the appliance touches the walls of the
garage or the door touches the unit as
it closes.
1
Page 3

SAVE THESE
INSTRUCTIONS
FOR HOUSEHOLD USE
ONLY
SPECIAL CORD SET
INSTRUCTIONS
A short power-supply cord is provided to
reduce the risks resulting from becoming
entangled in or tripping over a longer cord.
Longer extension cords are available and
may be used if care is exercised in their
use.
If a long extension cord is used, the
marked electrical rating of the extension
cord should be at least as great as the
electrical rating of the appliance, and the
longer cord should be arranged so that it
will not drape over the countertop or tabletop where it can be pulled on by children or
tripped over unintentionally.
NOTICE: This appliance has a polarized
plug (one blade is wider than the other).
As a safety feature to reduce the risk of
electric shock, this plug will fit in a polarized outlet only one way. If the plug does
not fit fully in the outlet, reverse the plug. If
it still does not fit, contact a qualified electrician. Do not attempt to defeat this safety
feature.
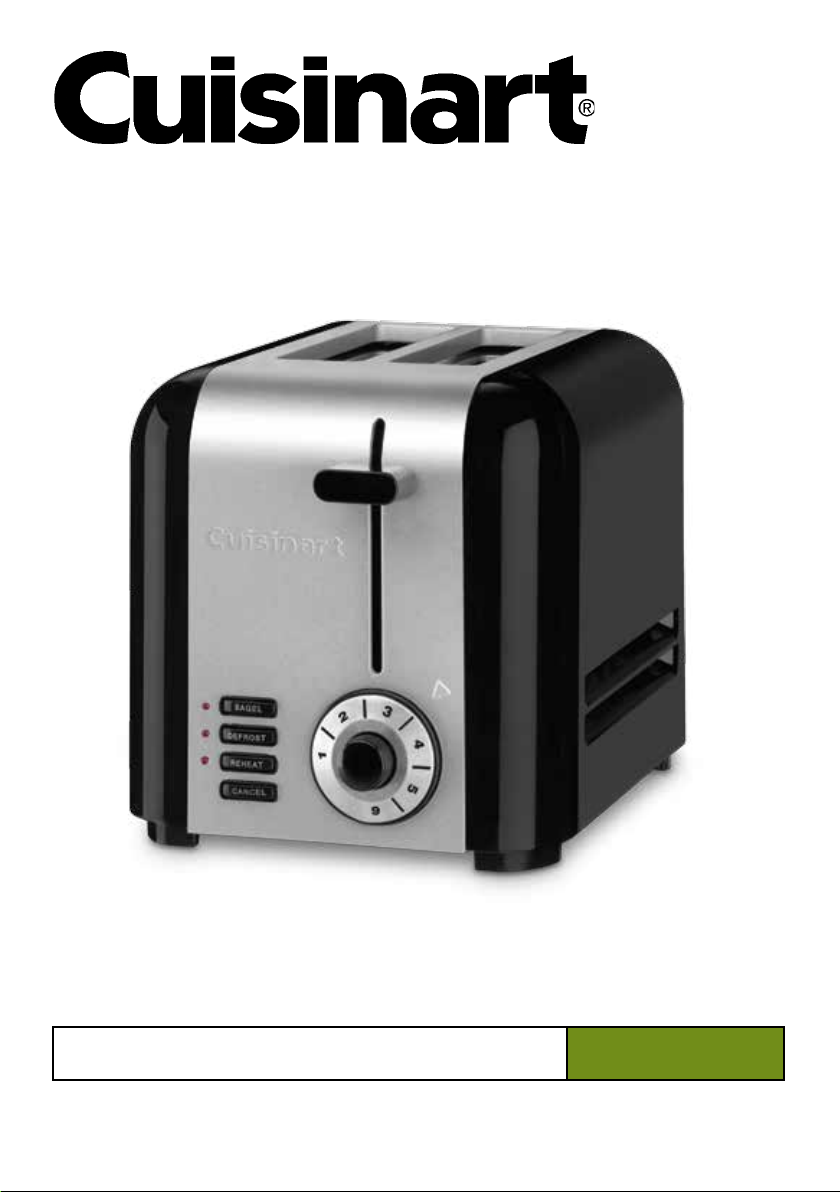
FEATURES AND
BENEFITS
1. Dual Toasting Slots
1½-inch slot toasts a wide variety of
breads.
2. Extra-Lift Carriage Control Lever
Brings the toast close to the top of the
toaster, making it easy to remove the
smallest items.
3. Browning Control
Sets desired toast color from light to
dark, with six browning levels.
4. Bagel Button
Add extra time to toasting cycle. LED
lights when selected.
5. Defrost Button
Defrosts and toasts frozen bread.
LED lights when selected.
6. Reheat Button
Reheats without browning or toasting.
LED lights when selected.
7. Cancel Button
Interrupts toasting process.
8. Slide-out Crumb Tray (not shown)
Pulls out to clean crumbs that collect
in bottom of toaster.
9. Cord Storage (not shown)
Takes up excess cord and keeps
countertop neat.
10. BPA Free (not shown)
All parts that come in contact with
food are BPA free.
1
TABLE OF CONTENTS
Important Safeguards ........................ 1
Features and Benefits......................... 2
Use and Care...................................... 3
Cleaning and Maintenance................. 5
Warranty ............................................. 6
2
3
4 5 6 7
2
Page 4

USE AND CARE
Unwind the power cord. Check that the
crumb tray is in place and that there is
nothing in the toaster slot. Plug power cord
into the wall outlet.
1. Insert Slice(s) of Bread
Be sure that multiple slices do not overlap and that the carriage is in the up
position.
2. Set the Browning Control
Turn rotary dial to the desired position:
Dial Setting Color
1-2 light
3-4 medium
5-6 dark
Some notes on browning
Toasting is a combination of cooking and
drying of the bread. Therefore, differences
in moisture level from one bread to another
can result in varying toasting times.
• For slightly dry bread, use a lower set-
ting than you normally would.
• For very fresh bread or whole wheat
bread, use a higher setting than normal.
• Breads with very uneven surfaces (such
as English muffins) will require a higher
toast setting.
• Thickly cut pieces of bread (including
bagels) will take longer to toast, sometimes significantly longer, since more
moisture must be evaporated from the
bread before toasting can occur. Very
thick pieces may require two cycles.
• When toasting raisin or other fruit
breads, remove any loose raisins, etc.
from the surface of the bread before
placing into the toaster. This will help
prevent fruit pieces from falling into the
toaster or sticking on the guide wires in
the slot.
Single Slice Toasting
If you are toasting a single slice of bread,
set the heat selector to a lighter setting
than you normally would. The toaster is
designed to heat the whole toasting chamber for two slices. By lowering the heat for
a single slice, you won’t over-toast.
These breads and pastries should be
warmed using the Defrost button
Frozen Waffles, Pancakes, French Toast
and Frozen Bagels
Toaster pastries
Exercise caution with toaster pastries;
the filling can become quite hot, long
before the surface of the pastry becomes
browned. Never leave toaster pastries
unattended while toasting or warming.
3. To Begin Toasting
Press the carriage lever until it locks
into the down position.
4. To Stop Toasting
When the toasting cycle is finished, the
toast will be raised. If you wish to stop
the cycle before it is finished, simply
press the Cancel button.
Tips
• Never force foods into the toasting slot.
Foods should fit freely between the
guide wires.
• Do not place buttered breads or pastries with fillings or frostings in the
toaster, as this could create a fire hazard.
• Uneven toasting is usually due to bread
slices of uneven thickness.
• After use, unplug your toaster from the
electrical outlet.
• Before toasting bagels, slice each bagel
into two equal halves.
3
Page 5

DEFROST BUTTON
The defrost feature is designed to first
defrost and then toast the bread, which
extends the toasting cycle slightly.
1. Insert slice(s) of bread
Be sure that multiple slices do not
overlap and the carriage is in
the up position.
2. Set the Browning Control.
Setting 1-2
For refrigerated breads and thinner
frozen items such as frozen pancakes.
Setting 3-4
For toaster pastries, frozen waffles
and (thin) French toast, and
refrigerated bagels.
Setting 5-6
For thicker frozen items such as
bagels, hand-cut bread and thick
French toast.
3. Press the carriage control lever until
it locks into position.
4. Press the Defrost button. Red LED
indicates feature is activated.
To stop cycle
When the defrost cycle is complete, the
toaster will raise the bread. If you wish to
stop the cycle before it is finished, simply
press the “Cancel” button to interrupt.
2. Press the carriage control lever until
it locks into position.
3. Press the Reheat button. Red LED
indicates feature is activated.
To stop cycle
When the reheat cycle is complete, the
toaster will raise the bread. If you wish to
stop the cycle before it is finished, simply
press the Cancel button to interrupt.
BAGEL BUTTON
The bagel feature adds extra time to the
toasting cycle.
1. Insert slice(s) of bread or halved
bagels.
Be sure that multiple slices do not
overlap and the carriage is in the up
position.
2. Press the carriage control lever until
it locks into position.
3. Press the Bagel button. Red LED
indicates feature is activated.
To stop cycle
When the bagel cycle is complete, the
toaster will raise the bread. If you wish
to stop the cycle before it is finished,
simply press the cancel button to
interrupt.
After use, unplug the toaster from the electrical outlet.
REHEAT BUTTON
The reheat feature allows you to reheat
bread without browning or toasting.
1. Insert slice(s) of bread.
Be sure that multiple slices do not
overlap and the carriage is in the up
position.
4
Page 6

CLEANING AND MAINTENANCE
Always allow the toaster to cool completely
before cleaning.
1. Always unplug the toaster from the
electrical outlet.
2. Do not use abrasive cleansers. Simply
wipe the exterior with a clean damp
cloth and dry thoroughly. Apply any
cleansing agent to a cloth, not to the
toaster, before cleaning.
3. To remove crumbs, slide out the
crumb tray and discard crumbs. Wipe
clean and replace. Never operate the
toaster without the crumb tray in
place.
4. To remove any pieces of bread
remaining in the toaster, turn the
toaster upside down and gently shake.
Never insert any hard or sharp
instruments into the slot, as this could
damage the toaster and cause a
safety hazard.
5. Never wrap the cord around the
outside of the toaster. Use the cord
storage cleats on the underside of the
toaster.
6 Any other servicing should be
performed by an authorized service
representative.
5
Page 7

WARRANTY
LIMITED THREE-YEAR
WARRANTY
We warrant that this Cuisinart® product will be free
of defects in materials or workmanship under normal home use for 3 years from the date of original
purchase. This warranty covers manufacturer’s
defects including mechanical and electrical defects.
It does not cover damage from consumer abuse,
unauthorized repairs or modifications, theft, misuse,
or damage due to transportation or environmental
conditions. Products with removed or altered identification numbers will not be covered.
This warranty is not available to retailers or
other commercial purchasers or owners. If your
Cuisinart® product should prove to be defective within the warranty period, we will repair it
or replace it if necessary. For warranty purposes,
please register your product online at www.cuisinart.ca to facilitate verification of the date of
original purchase and keep your original receipt for
the duration of the limited warranty. This warranty
excludes damage caused by accident, misuse or
abuse, including damage caused by overheating,
and it does not apply to scratches, stains, discolouration or other damage to external or internal
surfaces that does not impair the functional utility of
the product. This warranty also expressly excludes
all incidental or consequential damages.
Your Cuisinart product has been manufactured to the
strictest specifications and has been designed for
use only in 120 volt outlets and only with authorized
accessories and replacement parts. This warranty
expressly excludes any defects or damages caused
by attempted use of this unit with a converter, as
well as use with accessories, replacement parts
or repair service other than those authorized by
Cuisinart.
If the appliance should become defective within the
warranty period, do not return the appliance to the
store. Please contact our Customer Service Centre:
Toll-free phone number:
1-800-472-7606
Address:
Cuisinart Canada
100 Conair Parkway
Woodbridge, Ont. L4H 0L2
Email:
consumer_Canada@conair.com
Model:
CPT-320C
To facilitate the speed and accuracy of your return,
please enclose:
• $10.00 for shipping and handling of the product
(cheque or money order)
• Return address and phone number
• Description of the product defect
• Product date code*/copy of original proof of purchase
• Any other information pertinent to the product’s
return
* Product date code can be found on the underside
of the base of the product. The product date code
is a 4 or 5 digit number. Example, 90630 would
designate year, month & day (2009, June 30th).
Note: We recommend you use a traceable, insured
delivery service for added protection. Cuisinart will
not be held responsible for in-transit damage or for
packages that are not delivered to us.
To order replacement parts or accessories, call our
Customer Service Centre at 1-800-472-7606. For
more information, please visit our website at
www.cuisinart.ca.
6
Page 8

TM
Coffeemakers
Blenders
Juicers
Cookware
Tools and
Cuisinart offers an extensive assortment of top quality products to make life in the kitchen
easier than ever.
Try some of our other countertop appliances and cookware, and Savor the Good Life®.
www.cuisinart.ca
©2014 Cuisinart Canada
Woodbridge, Ontario L4H 0L2
Consumer_Canada@Conair.com
Trademarks or service marks of third parties
referred to herein are the trademarks or service
marks of their respective owners.
100 Conair Parkway,
Consumer Call Centre E-mail:
Printed in China
14CC146899
IB-11728-CAN
 Loading...