

Page 1
INSTRUCTION AND RECIPE BOOKLET
International Chef™ Crêpe/Pizzelle/Pancake Plus
For your safety and continued enjoyment of this product, always read the instruction book carefully before using.
CPP-200 Series
Page 2

IMPORTANT
SAFEGUARDS
When using an electrical appliance, basic safety
precautions should always be followed, including
the following:
1. READ ALL INSTRUCTIONS.
2. Do not touch hot surfaces. Use handles
and dials.
3. To protect against fire, electrical shock,
and injury to persons, DO NOT IMMERSE
CORD, PLUG, OR UNIT in water or other
liquids.
4. Close supervision is necessary when any
appliance is used by or near children.
5. Unplug from outlet when not in use and
before cleaning. Allow to cool before
putting on or taking off parts, and before
cleaning appliance.
6. Do not operate any appliance with a
damaged cord or plug or after the appliance malfunctions or has been damaged in
any manner. Return appliance to the nearest Cuisinart Authorized Service Facility for
examination, repair, or adjustment.
7. The use of accessory attachments not
recommended by Cuisinart may result in
fire, electric shock, or injury to persons.
8. Do not use outdoors.
9. Do not let power cord hang over edge of
table or counter, or touch hot surfaces.
10. Do not place on or near a hot gas or electric burner, or in a heated oven.
11. Do not use appliance for other than
intended use.
12. Always unplug the unit when finished
cooking.
13. To safely disconnect power at any time,
remove the plug from the outlet.
14. Extreme caution must be used when
moving an appliance containing hot oil or
other hot liquids.
15. WARNING: TO REDUCE THE RISK
OF FIRE OR ELECTRIC SHOCK,
REPAIR SHOULD BE DONE ONLY BY
AUTHORIZED PERSONNEL. NO USERSERVICEABLE PARTS ARE INSIDE.
16. Do not operate your appliance in an appliance garage or under a wall cabinet. When
storing in an appliance garage always
unplug the unit from the electrical outlet.
Not doing so could create a risk of fire,
especially if the appliance touches the walls
of the garage or the door touches the unit
as it closes.
SAVE THESE
INSTRUCTIONS
FOR HOUSEHOLD
USE ONLY
SPECIAL CORD SET
INSTRUCTIONS
A short power-supply cord is provided to
reduce the risks resulting from becoming
entangled in or tripping over a longer cord.
Extension cords may be used if care is exercised in their use.
If an extension cord is used, the marked
electrical rating of the extension cord should
be at least as great as the electrical rating of
the appliance, and the longer cord should be
arranged so that it will not drape over the
countertop or tabletop where it can be pulled
on by children or animals, or tripped over.
NOTICE
This appliance has a polarized plug (one blade
is wider than the other). To reduce the risk of
electric shock, this plug will fit in a polarized
outlet only one way. If the plug does not fit
fully in the outlet, reverse the plug. If it still
does not fit, contact a qualified electrician. Do
not modify the plug in any way.
2
Page 3
CONTENTS
Important Safeguards. . . . . . . . . . . . . . . . . 2
Parts and Features . . . . . . . . . . . . . . . . . . . 3
Before the First Use . . . . . . . . . . . . . . . . . . 4
Assembly Instructions . . . . . . . . . . . . . . . . . 4
Operating Instructions . . . . . . . . . . . . . . . . 4
Tips and Hints . . . . . . . . . . . . . . . . . . . . . . .5
Cleaning, Care and Maintenance. . . . . . . . 5
Storage/Locking Lid . . . . . . . . . . . . . . . . . . 6
Warranty . . . . . . . . . . . . . . . . . . . . . . . . . . . 6
Recipe Chart and Recipes . . . . . . . . . . . . . . 8
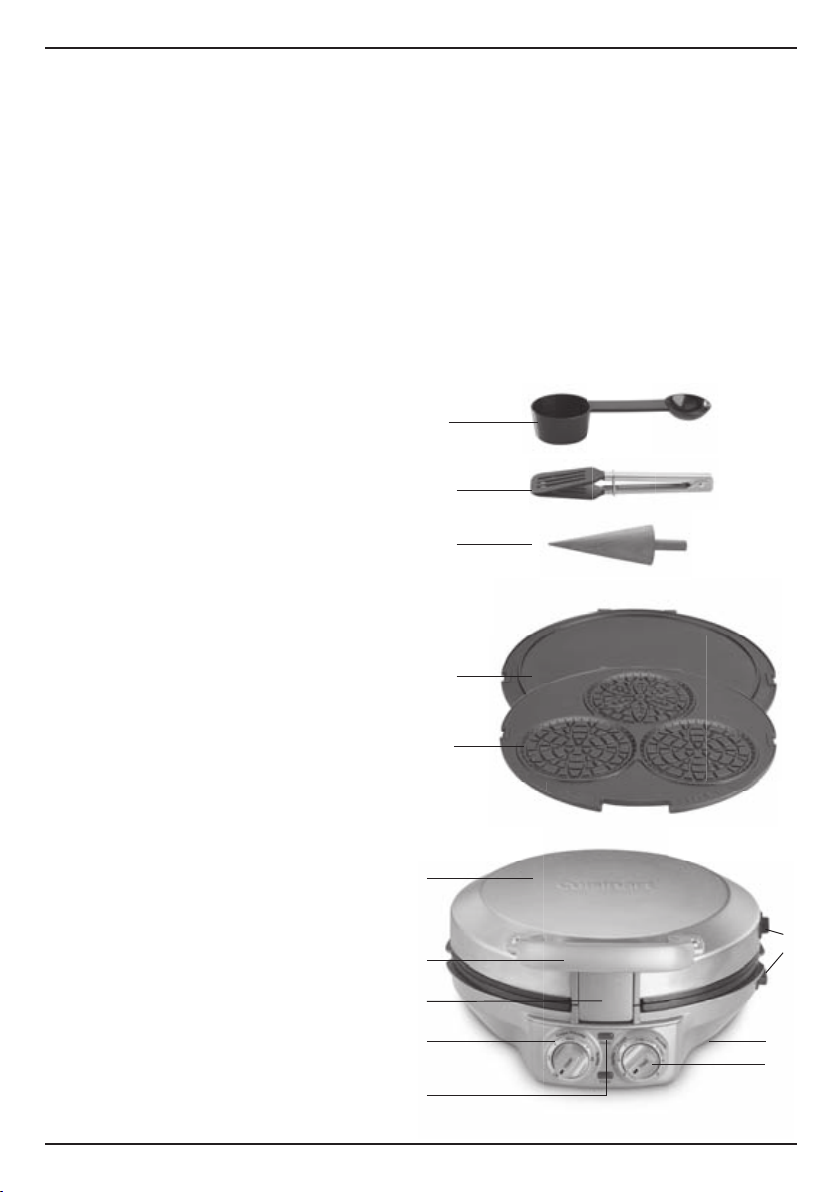
PARTS AND FEATURES
1. Housing – Elegant brushed stainless
steel with embossed Cuisinart logo.
2. Lid Handle – Durable, easy-lift and easy-
press handle that stays cool to the touch.
3. Removable and Reversible
Baking Plates – Nonstick and dishwasher
safe for easy cleanup.
a. Flat Side: Perfect for pancakes, crêpes,
tortillas and any other flatbreads.
b. Pizzelle Side: Prepare pizzelles
and mini ice-cream cones.
4. Temperature Knob – Settings for Low,
Medium and High; Preset Temperatures
for Crêpe, Pizzelle, Tortilla.
5. Timer Knob – Manual settings for 0 to 3 min-
utes. Preset Times for Crêpe, Pizzelle, Tortilla.
6. Indicator Lights – Red indicator light
signals power ON; green indicator light
signals Ready-to-Cook and Ready-to-Eat.
7. Cord Storage (not shown) – Cord wraps
around the back of the unit.
8. Rubber Feet – Keep unit steady and will
not mark countertop.
9. Plate Release Buttons – Release plates to
remove for easy cleaning.
10. Storage/Locking Lid – Locks plates
together to prevent lifting during cooking.
Also for upright storage.
11. Measuring Scoop – Dual sided with
1
⁄3
cup and 1 tablespoon capacities.
12. Tongs – For easy removal of food.
13. Mini Ice-Cream Cone Roller
14. BPA Free – (not shown) All material that
comes in contact with food is BPA free.
1
2
10
4
6
15. Quick Peek Feature – (not shown) Open up
the lid for up to 5 seconds without the timer
shutting off.
11
12
13
3a
3b
9
8
5
3
Page 4
BEFORE THE FIRST USE
Remove all packaging and any promotional
labels or stickers from your unit. Be sure that
all parts (listed on Page 3, Parts and Features)
have been included before discarding any packaging materials. You may want to keep the box
and packing materials for use at a later date.
Before using your International Chef
Pizzelle/Pancake Plus for the first time, wipe
housing with a damp cloth and wash plates and
accessories well to remove any dust from the
warehouse or shipping.
Note: The International Chef
Pancake Plus has been treated with a special
nonstick coating. Before the first use, we suggest you season the plates with flavorless vegetable oil. Apply oil with a paper towel or pastry
brush. You may find it helpful to repeat this process before each use.
™
Crêpe/
™
Crêpe/Pizzelle/
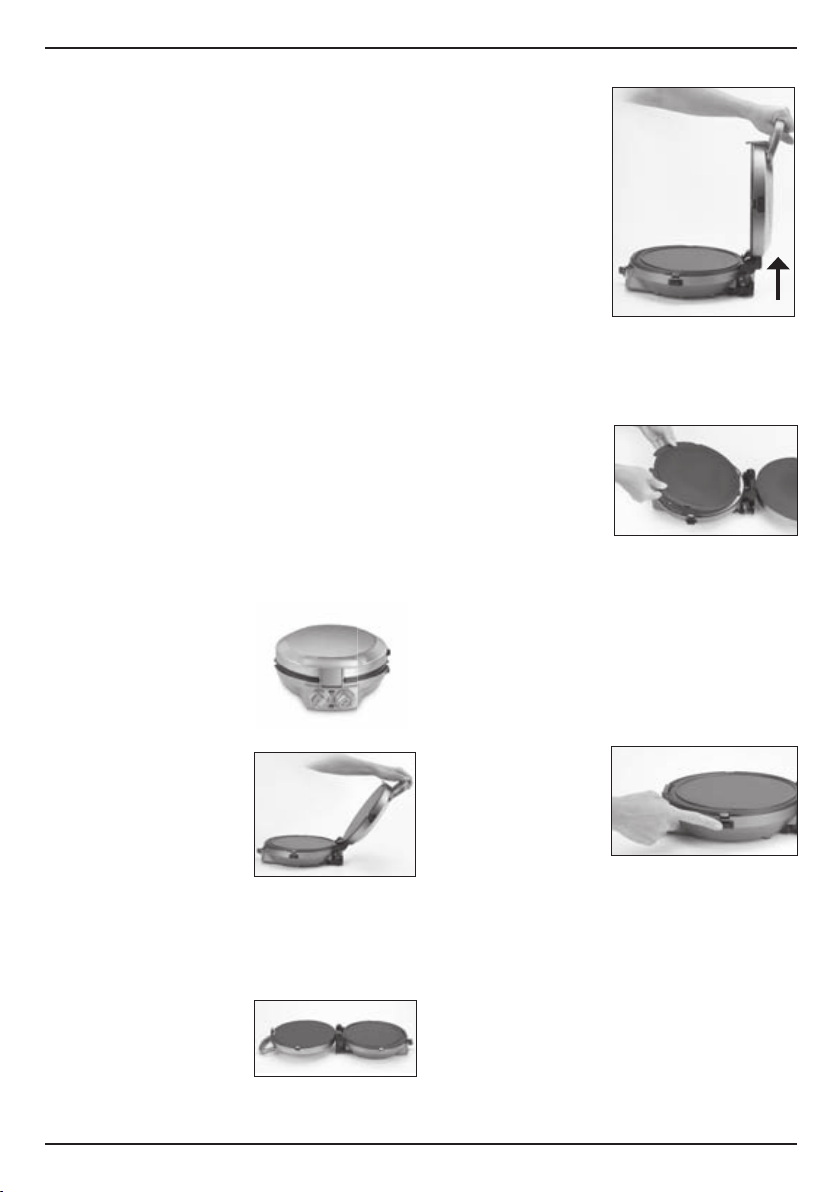
ASSEMBLY INSTRUCTIONS
Place the International Chef™ Crêpe/Pizzelle/
Pancake Plus on a clean flat surface where you
intend to cook. It can be
positioned in three ways:
Closed Position – Upper
plate/cover rests flat on
lower plate/base. This is
your starting and heating position. Always use
caution when changing
positions once the unit is
preheated.
Open Position – Upper
plate/cover is open and in
the 105° position. Open
the cover to this position
before using the unit as
a press or in the flat position.
To adjust to this position, press the top of the
locking latch and lift the handle until you feel it
come to a locking position. The unit will stay in
this position until you close the cover or continue to open it to the flat
position.
Flat Position – Upper
plate/cover is level with
lower plate/base. The
upper and lower plates lie flat to double the
cooking surface.
4
Start with the unit
in the open position. Then, lift the
handle vertically at a
90˚ angle. Push the
handle back until
the cover rests flat
on the counter.
The unit will stay in
this position until
you lift the handle
and cover to return
it to the closed position.
To insert plates
1. Adjust the unit to the flat position.
2. Insert one plate at a time. The plate marked
LOWER is designed
for the lower housing. The plate marked
UPPER is designed
for the upper housing.
3. Locate the two holes
in the hinge at the
back of the housing. Tilt the back end of the
plate and line up the pegs at the back of the
plate with the holes in the hinge. Slide the
plate into the holes and push down the front
end of the plate. It will snap into place.
4. Repeat with second plate.
To remove plates
1. Locate the plate release buttons on the right
side of the unit. Press firmly on button and
the plate will pop
up slightly from the
base.
2. Grasp the plate with
two hands, slide it
out from the holes,
and lift it out of the
base.
3. Press on the other plate release button to
remove the other plate in the same manner.
OPERATING INSTRUCTIONS
1. Plug the power cord into a standard electrical
outlet.
2. Adjust the Temperature Knob to the desired
setting or to one of the preset temperatures if
cooking crêpes, pizzelle, or tortillas. Be sure
to close lid. Red Power-on light will illuminate.
Page 5

3. If working in the closed position, adjust the
Timer Knob to the desired time, or to one of
the preset times if cooking crêpes, pizzelle,
or tortillas.
4. When green light illuminates, plates have
reached the selected temperature and you’re
ready to cook. NOTE: Depending on temperature selected, heat-up times will vary.
5. Pour batter or place ingredients on plates.
Green light will go off.
6. Close lid if not cooking on open griddle.
When lid is closed and locked, timer will
begin counting down. NOTE: If lid is opened
for more than 5 seconds during cooking,
timer will shut off.
7. When items are cooked and ready to eat,
green light will illuminate and you will hear a
beep tone.
8. Refer to the chart on page 8 for cooking tips
and recommendations.
Caution: Always exercise caution when handling the unit during cooking as the housing
will become very hot. Be sure to use an oven
mitt to prevent burns. The handle stays cool for
opening and closing during cooking.
Note: The first time you use your International
™
Chef
Crêpe/Pizzelle/Pancake Plus it may have
a slight odor and may smoke a bit. This is normal, and common to appliances with a nonstick
surface.
TIPS AND HINTS
1. The temperature control is used to set and
maintain the temperature of the cooking
surface. You may vary the setting of the
temperature control knob at any time during
cooking, depending on the types of foods
being prepared. Use our preset temperatures
for crêpes, pizzelle, and tortillas.
2. Cooking is based on time. All recipes are
given a recommended time for cooking
and our preset times make cooking perfect
crêpes, pizzelle, and tortillas easy. Times
are approximate. Please refer to the Recipe
Chart and Recipes for guidelines. Timer
works only in the locked closed position.
3. For fastest preheat we recommend preheat-
ing in the closed position. Be sure to use
caution when adjusting to a different cooking
position.
Helpful tips for crêpe making:
1. Always allow the crêpe batter to rest in refrig-
2. The best temperature setting for crêpes is
3. Generally, crêpes take about 1½ minutes to
CLEANING, CARE AND
MAINTENANCE
•
• Never leave plastic utensils in contact with the
• Allow the unit to cool down completely (at
Once you have finished cooking, remove plug
from electrical outlet. Leave lid open so plates
begin to cool. Allow the unit to cool down completely before handling.
Press the plate release buttons to remove
plates from the housing. Be sure that the plates
have cooled completely before handling (at
least 30 minutes). The plates, measuring scoop
and tongs can be washed in the dishwasher,
the wooden mini ice cream cone roller should
be handwashed. Do not use metal objects such
as knives or forks for cleaning. Do not use a
scouring pad for cleaning. The nonstick coating
can be damaged.
To clean exterior, wipe with a soft damp cloth.
Never use an abrasive cleanser or harsh pad.
NEVER IMMERSE CORD, PLUG OR UNIT IN
WATER OR OTHER LIQUIDS.
Any other servicing should be performed by an
authorized service representative.
5
erator before cooking. It is recommended
to rest for at least 30 minutes (preferably
overnight if time allows). Resting the batter
gives time for the gluten in the flour to relax
and the starch molecules to fully absorb
the liquid. This creates a thicker batter and
ultimately more even and delicate crêpes. A
cooler, rested batter may also prevent any
unnecessary overflow.
the preset (medium). Should crêpes seem
thick, or if you like them darker or lighter, the
temperature may need to be adjusted.
cook, which is the preset time. Certain crêpe
recipes, like the Crespelle, require less time.
Also if lighter or darker crêpes are desired,
adjust cooking time accordingly.
Never use metal utensils, as they will scratch
the nonstick plates. Instead, use the provided
tongs, or wooden or heat-proof plastic utensils.
hot plates. This includes the provided tongs.
least 30 minutes) before cleaning.
Page 6
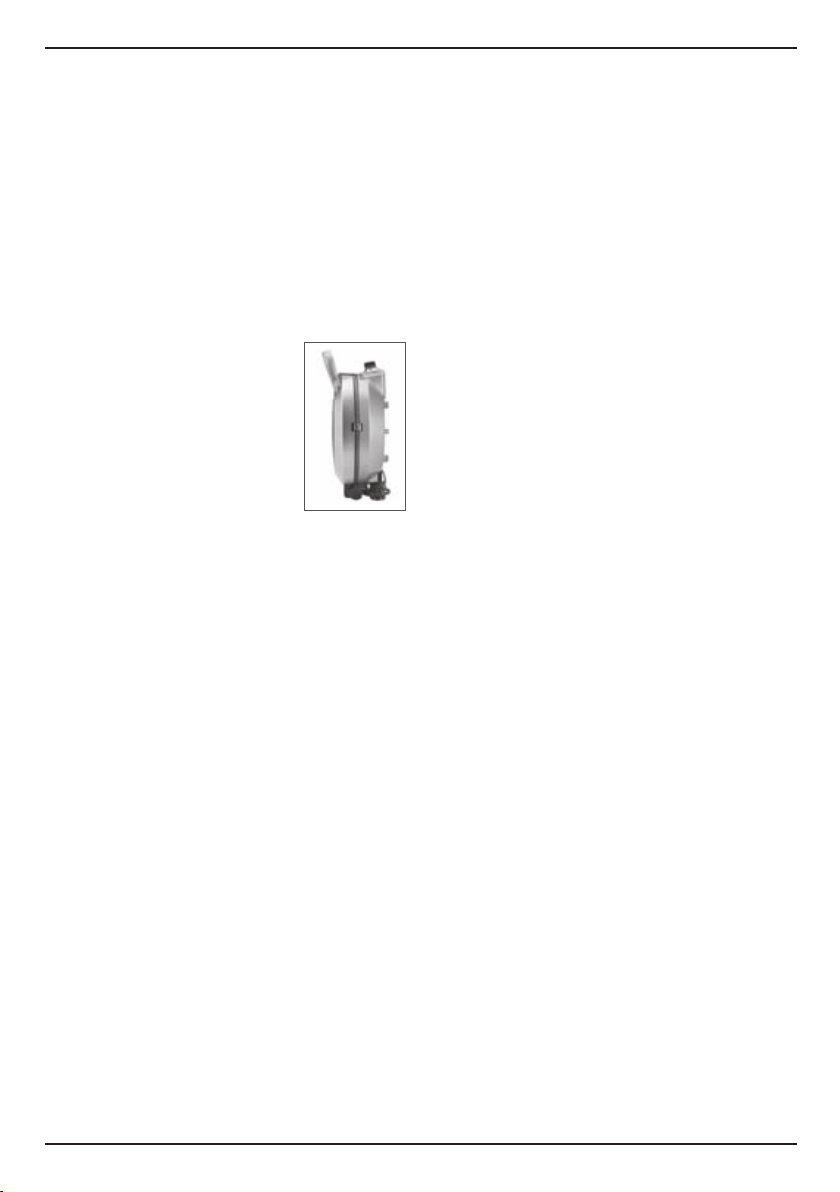
STORAGE/LOCKING LID
Store with plates inserted and cord wrapped
securely around the back of the unit. For compact storage, stand the unit on its back end
with control panel facing up. The unit has been
designed with a special latching feature so the
lid stays closed during storage.
WARRANTY
Limited Three-Year Warranty
This warranty is available to
consumers only. You are a
consumer if you own an
International Chef™ Crêpe/
Pizzelle/Pancake Plus
purchased at retail for personal,
family or household use. Except
as otherwise required under
applicable law, this warranty is
not available to retailers or other
commercial purchasers or owners.
We warrant that your
Pizzelle/Pancake Plus
materials and workmanship under normal
home use for 3 years from the date of original
purchase.
We recommend that you visit our website,
www.cuisinart.com for a fast, efficient way to
complete your product registration. However,
product registration does not eliminate the
need for the consumer to maintain the original
proof of purchase in order to obtain the
warranty benefits. In the event that you do not
have proof of purchase date, the purchase
date for purposes of this warranty will be the
date of manufacture.
If your
International Chef™ Crêpe/Pizzelle/
Pancake Plus
within the warranty period, we will repair it, or
if we think necessary, replace it. To obtain
warranty service, simply call our toll-free
number, 1-800-726-0190, for additional
information from our Customer Service
Representatives, or send the defective product
to Customer Service at Cuisinart, 7475 North
Glen Harbor Blvd., Glendale, AZ 85307.
To facilitate the speed and accuracy of your
return, please enclose $10.00 for shipping and
handling of the product. Please pay by check
that was
International Chef™ Crêpe/
will be free of defects in
should prove to be defective
or money order (California residents need only
supply proof of purchase and should call
1-800-726-0190 for shipping instructions).
NOTE: For added protection and secure
handling of any Cuisinart product that is being
returned, we recommend you use a traceable,
insured delivery service. Cuisinart cannot be
held responsible for in-transit damage or for
packages that are not delivered to us. Lost
and/or damaged products are not covered
under warranty. Please be sure to include your
return address, daytime phone number,
description of the product defect, product
model number (located on bottom of product),
original date of purchase, and any other
information pertinent to the product’s return.
Your
International Chef™ Crêpe/Pizzelle/
Pancake Plus
strictest specifications and has been designed
for use only in 120-volt outlets with the
authorized accessories and replacement parts.
This warranty expressly excludes any defects
or damages caused by accessories,
replacement parts, or repair service other than
those that have been authorized by Cuisinart.
This warranty does not cover any damage
caused by accident, misuse, shipment or other
than ordinary household use.
This warranty excludes all incidental or
consequential damages. Some states do not
allow the exclusion or limitation of these
damages, so these exclusions may not apply
to you.
CALIFORNIA RESIDENTS ONLY:
California law provides that for In-Warranty
Service, California residents have the option of
returning a nonconforming product (A) to the
store where it was purchased or (B) to another
retail store that sells Cuisinart products of the
same type.
The retail store shall then, at its discretion,
either repair the product, refer the consumer to
an independent repair facility, replace the
product, or refund the purchase price less the
amount directly attributable to the consumer’s
prior usage of the product. If the above two
options do not result in the appropriate relief to
the consumer, the consumer may then take the
product to an independent repair facility if
service or repair can be economically
has been manufactured to the
6
Page 7

accomplished. Cuisinart and not the consumer
will be responsible for the reasonable cost of
such service, repair, replacement, or refund for
nonconforming products under warranty.
California residents may also, according to their
preference, return nonconforming products
directly to Cuisinart for repair, or if necessary,
replacement, by calling our Consumer Service
Center toll-free at 1-800-726-0190.
Cuisinart will be responsible for the cost of the
repair, replacement, and shipping and handling
for such products under warranty.
BEFORE RETURNING YOUR
CUISINART PRODUCT
If you are experiencing problems with your
Cuisinart product, we suggest that you call our
Consumer Service Center at 1-800-726-0190
before returning the product to be serviced. If
servicing is needed, a representative can
confirm whether the product is under warranty
and direct you to the nearest service location.
Important: If the nonconforming product is to
be serviced by someone other than Cuisinart’s
Authorized Service Center, please remind the
servicer to call our Consumer Service Center at
1-800-726-0190 to ensure that the problem is
properly diagnosed, the product serviced with
the correct parts, and the product is still under
warranty.
7
Page 8

RECIPE CHART
Item Plate Position Temperature Batter/Dough Amount
Pizzelle Pizzelle
Closed +
Locked
Pizzelle/
Medium
Small scoop 2 mins.
General
Cooking Time
Sugar
Cone
Pancake Flat Flat Medium-High
Crêpe Flat
Tortilla Flat
Crackers Flat Closed High
Large Scoop =
Small Scoop = 1 tablespoon
Pizzelle
1
3
/
cup
Closed +
Locked
Closed +
Locked
Closed +
Locked
Medium Small scoop 2½ mins.
Crêpe/
Medium
Tortilla/High
RECIPES
Silver Dollar Pancakes ............................9
Sugar Cones............................................9
Chocolate Waffle Cones ........................10
Blini ........................................................10
Classic Pizzelle ......................................11
Sweet Chocolate Pizzelle ......................12
Basic Crêpes, with variations ................12
Buckwheat Crêpes ................................13
Crespelle ...............................................14
Blintzes ..................................................14
Socca ....................................................15
Potato Pancakes (Latkes) .....................15
Wine Crackers .......................................16
Flour Tortillas .........................................17
Arepas ...................................................17
Silver dollar = small scoop
Standard pancake = large
scoop
Large scoop 1½ mins.
Dough stretched/rolled to
thin 6- to 8-inch disc
Dough stretched/rolled to
very thin 8-inch disc
2 to 3 mins.
per side
a. 30 secs
b. 4 to 6 mins.
3 to 4 mins.
Carne Mechada .....................................18
Pita Bread ..............................................19
Mandarin Pancakes with Mu Shu Pork
....20
Spring Rolls ...........................................21
Okonomiyaki (Japanese Pancakes) ......22
Naan ......................................................22
Chapati ..................................................23
Fresh Green Chutney ............................24
Dosa ......................................................24
Sambhar (South Indian Lentil Stew) ......25
Roti ........................................................26
Curried Chickpeas with
Potatoes and Spinach ...........................26
Injera ......................................................27
Doro Wat (Ethiopian Chicken Stew) ......27
Niter Kibbeh ..........................................28
8
Page 9

Silver Dollar Pancakes
This is a great all-purpose pancake recipe to
have up your sleeve for breakfast. It can be
dressed up by mixing in fresh or frozen fruit,
or nuts and chocolate chips.
Makes about 24, two and a half-inch pancakes
2 large eggs
1½ cups buttermilk
½ teaspoon pure vanilla extract
1 tablespoon vegetable oil, or
melted and cooled butter
1½ cups unbleached, all-purpose flour
1½ teaspoons baking powder
½ teaspoon baking soda
1 teaspoon granulated sugar
½ teaspoon ground cinnamon
¼ teaspoon kosher salt
1. Put the eggs, buttermilk and vanilla in
a small bowl and whisk to blend until
smooth. Whisk in oil; reserve.
2. Combine the dry ingredients in a medi-
um bowl. Whisk to blend. Add to the
liquid mixture and stir until just combined. Do not over-mix, or pancakes will
be thin and tough – batter should be a
bit lumpy.
3. Preheat the International Chef™ Crêpe/
Pizzelle/Pancake Plus with the flat
plates. Adjust temperature to Med-High.
Once preheated, carefully open to the
flat position.
4. Using the small scoop, drop batter onto
preheated griddle, about 4 per plate
(if you like extra-buttery pancakes, put
about 1 teaspoon of butter on each
plate and immediately drop batter on
plates). Cook pancakes until bubbles
form, about 2 to 3 minutes; flip and
cook until done, another 2 minutes.
5. Transfer to warm plates to serve. As you
finish each batch of pancakes, you can
keep them warm on a wire rack placed
on a baking sheet in a 200°F oven.
Repeat until all the batter is used.
Nutritional information per serving (4 pancakes):
Calories 150 (35% from fat) • carb. 20g • pro. 4g
• fat 6g • sat. fat 3g • chol. 74mg • sod. 453mg
• calc. 83mg • fiber 0g
Sugar Cones
You may find that these cones disappear
before you even add the ice cream.
Makes 15 cones
½ cup unbleached, all-purpose
flour
¼ teaspoon kosher salt
2 large egg whites
½ cup granulated sugar
6 tablespoons unsalted butter,
melted and slightly cooled
½ teaspoon pure vanilla extract
1. Stir together the flour and salt in a
small bowl. In a medium bowl whisk
together the egg whites with the sugar
until incorporated. Whisk in the butter
and vanilla extract and then finally the
dry ingredients.
™
2. Preheat the International Chef
Pizzelle/Pancake Plus fitted with the pizzelle plates by adjusting the temperature to Medium. Set the timer to 2½
minutes.
3. Using the small scoop, put the batter in
the middle of each pizzelle/cone mold
on the hot plate. Close cover and lock
to activate timer and begin cooking.
Tone will sound when time has expired.
4. Using tongs very carefully (cones will
be hot ) remove one cone at a time
and place on a flat work surface.
Place the cone mold in the center of
the circle and wrap one side on top of
the mold and then roll it on the work
surface to meet the other side. Press
the mold down on the counter using
the tongs with the seam side down to
seal. Carefully remove and repeat with
remaining cones.
4. Repeat with remaining batter.
Crêpe/
9
Page 10

Nutritional information per cone:
Calories 82 (48% from fat) carb. 9g • pro. 1g
•
fat 4g • sat. fat 3g • chol 12mg • sod. 47mg
•
calc. 0mg • fiber 0g
Chocolate Waffle Cones
Thick and chocolate, what could go better
with your favorite ice cream?
Makes 12 cones
½ cup confectioners’ sugar
2 tablespoons Dutch processed
cocoa
2 large egg whites
6 tablespoons unsalted butter,
melted and slightly cooled
2
⁄3 cup unbleached, all-purpose
flour
¼ teaspoon kosher salt
1. In a small bowl, sift together the sugar
and cocoa. In a medium bowl, whisk
together the egg whites with the
sugar/cocoa until incorporated. Whisk
in the butter and then finally whisk in
the flour and salt.
2. Preheat the International Chef™ Crêpe/
Pizzelle/Pancake Plus fitted with the
pizzelle plates by adjusting the temperature to Medium. Set the timer to
2 minutes.
3. Using the small scoop, put the batter
in the middle of each pizzelle/cone
mold on the hot plate. Close cover
and lock to activate timer and begin
cooking. Tone will sound when time
has expired.
4. Using tongs, (cones will be hot ) very
carefully remove one cone at a time
and place on a flat work surface.
Place the cone mold in the center of
the circle and wrap one side on top of
the mold and then roll it on the work
surface to meet the other side. Press
the mold down on the counter using
the tongs with the seam side down to
seal. Carefully remove and repeat with
remaining cones.
5. Repeat with remaining batter.
Nutritional information per cone:
Calories 98 (51% from fat)
•
fat 6g • sat. fat 4g • chol. 15 mg • sod. 54mg
•
calc. 0mg • fiber 0g
•
carb. 10g • pro. 1g
Blini
The perfect cocktail party hors d’oeuvre,
these are traditionally topped with smoked
Makes about 32 two-inch blini
1 pound Yukon Gold potatoes
½ teaspoon active dry yeast
¾ cup unbleached, all-purpose
1 teaspoon baking powder
3 tablespoons sour cream
2 large eggs
1 large egg yolk
2 tablespoons whole milk
1¾ teaspoons kosher salt
ground white pepper to taste
2 large egg whites
vegetable oil or clarified butter,
1. Put the potatoes into a large stockpot.
Add cold water until potatoes are submerged. Bring to a boil and cook until
potatoes are fully tender. Once cool
enough to touch, press through a ricer
or food mill. Transfer potatoes to a large
mixing bowl (discard peels).
2. Add the yeast, flour and baking powder
to the potatoes and stir to combine. Add
the sour cream, eggs, egg yolk, milk,
salt and pepper. Using a hand mixer, or
the mixing paddle of a stand mixer, beat
until mixture is very creamy and thoroughly combined, about 3 to 5 minutes.
salmon and caviar.
flour
pinch cream of tartar
for brushing plates
10
Page 11

3. In a large, clean bowl, whip the 2 egg
whites with the cream of tartar to soft
peaks (egg whites should droop a bit
when lifted with the whisk. You do not
want them to be too stiff). Lighten the
potato mixture by gently stirring about
of the whipped egg whites into it. Fold
the remaining whites into the lightened
potato mixture.
4. Preheat the International Chef™ Crêpe/
Pizzelle/Pancake Plus fitted with the flat
plates by adjusting the temperature to
High. Once preheated, carefully open to
the flat position. Brush liberally with oil
or clarified butter. Once oil/butter is hot,
use the small scoop to drop 6 rounds
of batter per plate. Cook about 6 minutes per side or until golden brown and
cooked through. Keep warm on serving
plate.
5. Repeat with remaining batter.
6. To serve: Top with smoked salmon, caviar, horseradish sauce, smoked trout and/
or crème fraîche and chopped chives.
Nutritional information per blini:
Calories 36 (30% from fat) • carb. 5g • pro. 1g
• fat 1g • sat. fat 0g • chol. 18mg • sod. 150mg
• calc. 7mg • fiber 0g
Classic Pizzelle
Our basic pizzelle recipe is flavored with
the universally popular vanilla. You may
vary the flavor by using other extracts such
as anise, almond or lemon.
Makes about 28 pizzelle
1¾ cups unbleached, all-purpose
flour
2 teaspoons baking powder
3 large eggs
¾ cup granulated sugar
½ cup (1 stick) unsalted butter,
melted and cooled
1 teaspoon pure vanilla extract
vegetable oil, for brushing
plates
1. Put flour and baking powder in a small
bowl and stir to combine. Put eggs and
sugar in a medium bowl. Using a hand
mixer, beat until thickened. While mix-
1
ing on low, gradually add the melted
butter and vanilla and mix until com-
⁄3
bined, about 15 seconds. Add the dry
ingredients and mix until just combined,
about 10 to 15 seconds; do not overmix. (Alternately, this can be done by
hand with a whisk – be sure there are no
lumps in the batter.)
2. Preheat the International Chef
Pizzelle/Pancake Plus fitted with the pizzelle plates in the closed position with
the temperature set to Pizzelle (Medium).
Adjust the timer to Pizzelle (2 minutes).
3. Once preheated, use the small scoop
and dollop batter onto the center of
each pizzelle circle. Close cover and
lock to activate timer and begin cooking. A tone will sound when time has
expired. Pizzelle should be lightly golden, but still pliable. If pizzelle seem too
light, add a minute or two extra to the
cooking time.
4. Carefully remove and transfer to a flat
cooling rack. Repeat with remaining
batter.
5. Serve pizzelle by breaking any excess
cookie away from the classic pizzelle
design, making 3 per round.
Note: This recipe is perfect for making
cannoli shells! They have to be formed
immediately after removing from the
plates, so be quick. Form into a cylindrical shape, like a tunnel. Allow to rest
until set and crispy.
Nutritional information per pizzelle:
Calories 104 (50% from fat) • carb. 11g • pro. 1g
• fat 6g • sat. fat 3g • chol. 30mg • sod. 44mg
• calc. 9mg • fiber 0g
™
Crêpe/
11
Page 12

Sweet Chocolate Pizzelle
A more decadent take on the classic,
these are great when served with fresh
Makes about 28 pizzelle
2
1
⁄3 cups unbleached, all-purpose
¼ cup unsweetened cocoa
powder
2 teaspoons baking powder
¼ teaspoon kosher salt
3 large eggs
1 cup granulated sugar
½ cup (1 stick) unsalted butter,
1 teaspoon pure vanilla extract
vegetable oil, for brushing
plates
1. Put the flour, cocoa, baking powder and
salt into a small bowl; stir to combine
and reserve. Put eggs and sugar into
a medium bowl. Using a hand mixer,
mix until thickened. While mixing on
low, gradually add the melted butter
and vanilla and mix until combined,
about 15 seconds. Add the flour mixture
and blend until just combined, about
10 to 15 seconds; do not over-mix.
(Alternately, this can be done by hand
with a whisk – be sure there are no
lumps in the batter.)
2. Preheat the International Chef
Pizzelle/Pancake Plus fitted with the pizzelle plates in the closed position. Set
the temperature to Pizzelle (medium).
Set timer to Pizzelle (2 minutes).
3. Once preheated, use the small scoop
and dollop batter onto the center of
each pizzelle circle. Close cover and
lock to activate timer and begin cooking. A tone will sound when time has
expired.
4. Carefully remove and transfer to a flat
cooling rack. Repeat with remaining
batter.
fruit or ice cream.
flour
melted and cooled
™
Crêpe/
Nutritional information per pizzelle:
Calories 108 (47% from fat) • carb. 13g • pro. 2g
• fat 6g • sat. fat 3g • chol. 29mg • sod. 62mg
• calc. 9mg • fiber 0g
Basic Crêpes
Every corner of the world has their own
variation of the crêpe. Here we give you the
classic followed by a couple of our sweeter
favorites. Experiment with filling options to
create your own – from simple and sweet
to savory, they are all delicious.
Makes about 8 crêpes
1 cup whole milk
4 tablespoons (½ stick) unsalted
butter, plus more for brushing
plates
¾ cup unbleached, all-purpose
flour
½ teaspoon kosher salt
3 large eggs
1. Put the milk and butter into a small
saucepan over low heat until butter has
just melted. Remove and allow to cool
to room temperature.
2. Put the flour and salt into a mixing bowl
and whisk to combine. Add the eggs
and whisk until batter is smooth – it will
be very thick and sticky. Gradually whisk
in the milk and butter until the batter is
smooth. Cover the bowl with plastic and
let batter rest in the refrigerator for at
least 30 minutes, preferably overnight if
time allows. Batter is best used within 3
days.
™
3. Preheat the International Chef
Pizzelle/Pancake Plus fitted with the flat
plates in the closed position by adjusting
the temperature to Crêpe (Medium). Set
ê
the timer to Cr
pe (1½ min).
4. Once preheated, use the large scoop
and pour batter onto the
cover and lock to activate timer and
begin cooking. Tone will sound
Crêpe/
hot plate. Close
12
Page 13

when time has expired. Crêpe should be
light with minimal golden color, if at all.
Remove crêpe and repeat with remaining
batter.
5. Serve immediately with your favorite
fillings.
Note: For sweet crêpes, add a teaspoon
of granulated sugar to the batter.
Nutritional information per crêpe:
Calories 106 (56% from fat) • carb. 8g • pro. 4g
• fat 7g • sat. fat 4g • chol. 71mg • sod. 148mg
• calc. 38mg • fiber 0g
Variations:
Pannkakor (Sweden)
Serve with butter, granulated sugar,
powdered sugar, berries, and jam.
Palacsinta (Hungary)
These crêpe-like pancakes from Hungary
are traditionally served rolled. Here is just
one example of a sweet filling.
Filling:
1½ cups toasted walnuts
¼ cup granulated sugar
1 teaspoon ground cinnamon
½ teaspoon grated orange zest
1 tablespoon rum
1. Put all of the filling ingredients in a mini
chopper or a food processor fitted with
the metal chopping blade. Process until
finely ground.
2.
With a crêpe laid flat, sprinkle a small
amount of the filling, about 1 to 2 tablespoons, over the crêpe. Tightly, but gently, roll the crêpe. Sprinkle with confectioners’ sugar and serve immediately.
Buckwheat Crêpes
A delicious alternative to traditional French
crêpes. A Test Kitchen favorite is filling
them with sautéed spinach and garlic, goat
cheese and topped with an egg. Delicious!
Makes about 10 crêpes
1¼ cups whole milk
3 tablespoons unsalted butter,
plus more for brushing plates
¾ cup buckwheat flour
¼ cup unbleached, all-purpose
flour
½ teaspoon kosher salt
3 large eggs
1. Put the milk and butter into a small
saucepan over low heat until butter has
just melted. Remove and allow to cool
to room temperature.
2. Put the flours and salt into a mixing bowl
and whisk to combine. Add the eggs
and whisk until batter is incorporated – it
will be very sticky and thick. Gradually
whisk in the milk and melted butter until
the batter is smooth. If time allows, let
the batter rest in the refrigerator for at
least 30 minutes. Batter is best used
within 3 days.
3. Preheat the International Chef
™
Crêpe/
Pizzelle/Pancake Plus fitted with the flat
plates in the closed position by adjusting the temperature to Crêpe (Medium).
Adjust the timer to Crêpe (1½ minutes).
4.
Once preheated, use the large scoop,
and pour batter onto the hot, greased
plate. Close cover and lock to activate
timer and begin cooking. Tone will sound
when time has expired. Crêpe should
be just golden at the edges. If desired,
increase cooking time. Remove and
repeat with remaining batter.
5. Serve warm.
Nutritional information per crêpe:
Calories 116 (45% from fat) • carb. 11g • pro. 5g
• fat 6g • sat. fat 3g • chol. 69mg • sod. 154mg
• calc. 50mg • fiber 1g
13
Page 14

Crespelle
The Italian version of crêpes, these are used
in many dishes and can be filled with
savory fillings, such as ricotta in manicotti,
or sweet fillings. These are slightly different
from the French version because this recipe
does not call for butter in the batter.
Makes about 8 crespelle
1 cup unbleached, all-purpose
flour
pinch kosher salt
1 cup whole milk
2 large eggs, beaten
1. Put the flour and salt into a medium
2. Add the milk and eggs to the dry ingre-
3.
4. Once preheated, brush the plates with
5. Fill as desired and serve immediately.
Note: This recipe is easy to double if you
are cooking for a crowd.
Calories 87 (23% from fat) • carb. 13g • pro. 4g
• fat 2g • sat. fat 1g • chol. 51mg • sod. 71mg
vegetable oil, for brushing
bowl; whisk to combine.
dients and beat until completely smooth.
Preheat the International Chef™ Crêpe/
Pizzelle/Pancake Plus fitted with the flat
plates in the closed position by adjusting
the temperature to Crêpe (Medium). Set
timer to 1 minute. (This recipe requires
less time than the average crêpe).
a bit of oil (blot any excess off carefully with a paper towel). Using the large
scoop, pour the batter onto the hot
greased plate. Close cover and lock to
activate timer and begin cooking. Tone
will sound when timer has expired. These
should have NO browning to them.
Remove and repeat with remaining batter.
Nutritional information per crespelle:
• calc. 45mg • fiber 0g
plates
Blintzes
There are countless fillings for blintzes, so
be creative. Here we have a classic filling
of farmer’s cheese, but you can stir in jam
or preserves for a sweet twist.
Makes 8 blintzes
Blintzes:
3 large eggs
1¼ cups reduced-fat or whole milk
2 tablespoons vegetable oil
1 cup unbleached, all-purpose
flour
1 teaspoon granulated sugar
¼ teaspoon kosher salt
softened, unsalted butter or
vegetable oil, for brushing
plates
Filling:
1 pound farmer’s cheese
(or ricotta)
¼ cup whole milk
2 tablespoons granulated sugar
¼ teaspoon grated lemon zest
1 to 2 pinches kosher salt
1. Make batter: In a blender, add the eggs,
milk, oil, flour, sugar and salt and blend
on low until smooth, scraping down as
needed. Transfer batter to a bowl, cover
with plastic wrap and allow to rest for a
minimum of 30 minutes, or overnight.
2.
Make filling: Using a hand mixer or a
whisk, combine the filling ingredients until
smooth. Set aside while the blintzes are
being made
3. Preheat the International Chef™ Crêpe/
Pizzelle/Pancake Plus fitted with the flat
plates in the closed position
the temperature to Crêpe (Medium)
timer to 1 minute.
4. Once preheated, lightly grease plates
with butter or oil. Using the large scoop,
pour batter onto the hot greased plate.
Close cover and lock to activate timer
and begin cooking
.
by adjusting
. Set
. Tone will sound when
14
Page 15

timer has expired. Blintzes should have
very little color. Transfer cooked blintzes
to a serving plate, allowing them to overlap slightly so they do not stick together.
Line with wax paper or parchment every
fifth blintz, if need be. Cover with plastic
wrap or foil until ready to fill. Repeat with
remaining batter, lightly greasing plates
as needed to promote spreading of batter.
5. To fill, spoon about 3 to 4 tablespoons
of filling on each blintz toward the bottom. Fold the top over the bottom then
the two ends to close.
6. Increase heat to High and open to the
flat position. Brush plates well with butter, and place up to 3 filled blintzes on
each plate. Cook about 3 to 4 minutes
per side, or until nicely browned.
Nutritional information per filled blintz:
Calories 302 (60% from fat) • carb. 19g
• pro. 12g • fat 20g • sat. fat 7g • chol. 96mg
• sod. 213mg • calc. 243mg • fiber 0g
Socca
Popular in the South of France, this flavorful snack crepe is crispy around the edges
and best served hot off the griddle. While
they can be filled with roasted or grilled
vegetables, they are traditionally served on
their own as an appetizer alongside cold
drinks.
Makes about 5 socca
1¼ cups chickpea or garbanzo
bean flour, sifted
1 teaspoon kosher salt
½ teaspoon freshly ground black
pepper
¼ teaspoon ground cumin
1 cup warm water
2 tablespoons olive oil, plus more
for brushing plates
1. Put the flour, salt and spices into a mix-
ing bowl; whisk to fully combine. Slowly
whisk in the water until homogenous,
and then whisk in the olive oil. Batter
should be the consistency of heavy
cream. If it is too thick, slowly whisk in
additional warm water.
2. Preheat the International Chef
™
Crêpe/
Pizzelle/Pancake Plus fitted with the flat
plates in the closed position
ing the temperature to High.
by adjust-
Adjust timer
to Crêpe (1½ minutes). Increase time if
darker crêpe is preferred.
3. Once preheated, lightly brush the plates
with olive oil. Using the large scoop,
pour batter onto the hot greased plate.
Close cover and lock to activate timer
and begin cooking
. Tone will sound when
timer has expired. Remove and repeat
with remaining batter.
Nutritional information per socca:
Calories 159 (41% from fat) • carb. 18g • pro. 6g
• fat 8g • sat. fat 1g • chol. 0mg • sod. 463mg
• calc. 3mg • fiber 5g
Potato Pancakes (Latkes)
This no-fail recipe is great for the holidays
Makes 12 three-inch latkes
1 pound russet potatoes (about 1
medium-large potato), peeled
and shredded
½ medium onion, shredded
2 tablespoons unbleached,
all-purpose flour (you may use
matzo meal)
1 tablespoon chopped parsley
1 teaspoon kosher salt
¼ teaspoon freshly ground black
pepper
1 large egg, lightly beaten
vegetable oil, for brushing
plates
1. Squeeze all excess liquid out of the
potato and onion by wrapping them in a
clean towel and gently wringing. Transfer
potato and onion to a bowl; add the
flour, parsley, salt and pepper; toss to
mix thoroughly. Stir in the egg.
or any time of the year.
15
Page 16

2. Preheat the International Chef™ Crêpe/
Pizzelle/Pancake Plus fitted with the flat
plates by adjusting the temperature to
High. Once preheated, carefully open
to the flat position and brush the plates
with the oil.
3. Using the large scoop, portion amounts
of the potato mixture, continuing to
squeeze out any excess liquid. Place
three pancakes on each plate and cook
for about 6 minutes on each side, until
crispy and lightly browned.
4. Repeat with remaining pancake mixture,
liberally brushing oil on the plates in
between each round.
5.
Transfer finished latkes to a paper-towellined tray or plate. You may keep latkes
warm in a 200ºF oven until ready to serve.
Nutritional information per latke:
Calories 62 (39% from fat) • carb. 8g • pro. 2g
• fat 3g • sat. fat 0g • chol. 16mg • sod. 198mg
• calc. 9mg • fiber 1g
Wine Crackers
Delectable with soft goat cheese and
flaked sea salt, these are the perfect
accompaniment to a glass of wine. Top
dough with any number of seeds or
spices, such as poppy, sesame or anise,
before cooking.
Makes 8 eight-inch crackers
½ cup whole milk
2 tablespoons unsalted butter
1 teaspoon active dry yeast
pinch granulated sugar
2 tablespoons warm water
(105˚F–110˚F)
1½
cups unbleached, all-purpose
½ cup rye flour
¾ teaspoon kosher salt
vegetable oil, for brushing plates
flaked sea salt, for sprinkling
assorted seeds for sprinkling
1. Put the milk and butter in a small
saucepan over low heat until butter has
flour
just melted; remove and reserve to cool
slightly. In a small bowl dissolve yeast
and sugar in warm water and set aside
until foamy, about 5 minutes.
2. In the work bowl of a food processor fitted with the dough or chopping
blade, process the flours and salt to
sift, about 10 seconds.
3. Combine the cooled butter/milk mixture with the proofed yeast. With the
unit running, gradually pour the butter/
milk through the feed tube, adding just
enough liquid to form a dough that isn't
sticking to the sides of the bowl. You
may not need all the liquid. Once dough
forms, knead in processor for an additional minute.
4. Transfer dough to a clean bowl. Cover
with plastic wrap and allow to rise until
doubled in size, about 2 hours. Gently
punch down and fold dough over. Let
rise an additional hour, until doubled in
size again.
5. Divide dough into 8 pieces and cover
with plastic.
6. Preheat the
Pizzelle/Pancake Plus
plates in the closed position
ing the temperature to High
International Chef™ Crêpe/
fitted with the flat
by adjust-
. Set timer to
3 minutes.
7. Roll each piece of dough into a very
thin, 8-inch round. Once preheated,
brush the bottom plate with oil and
carefully place dough on the bottom
plate. Brush the top of the dough with
oil and sprinkle with salt and desired
seeds or seasonings. Close cover and
to activate timer and begin cooking
lock
Tone will sound when timer has expired.
Remove and reserve; repeat with
remaining dough.
Nutritional information per cracker:
Calories 158 (33% from fat) • carb. 24g
• pro. 4g • fat 6g • sat. fat 3g • chol. 10mg
• sod. 294mg • calc. 19mg • fiber 2g
.
16
Page 17

Flour Tortillas
If you have never tasted fresh, homemade
flour tortillas then we strongly suggest you
give these a try. Simple and quick to pre-
pare, they will make store-bought tortillas a
Makes 10 six-inch tortillas
2½ cups unbleached, all-purpose
1 teaspoon kosher salt
6 tablespoons vegetable
shortening, room temperature
¾ cup warm water
vegetable oil, for brushing
plates
1. Put the flour and salt in a medium bowl
and stir to combine.
2. Using your fingertips, work the shortening into the flour until well blended. Add
the water and use your hands to work
the dough into a ball. Transfer the dough
to a lightly floured surface and knead
until it becomes smooth.
3. Divide the dough into 10 equal pieces
and shape into rounds. Loosely cover
the rounds with plastic wrap and let
them sit at room temperature for 30
minutes to 1 hour.*
4. Working with one dough ball at a time
and keeping the rest covered, roll the
dough into a 6-inch circle, about
thick.
5. Preheat the International Chef™ Crêpe/
Pizzelle/Pancake Plus fitted with the flat
plates in the closed position by adjusting the temperature to Tortilla (High). Set
the timer to Tortilla (30 seconds). Once
preheated, open the lid and lightly brush
both plates with vegetable oil. Place the
dough on the bottom plate, close cover,
lock
Tone will sound when timer has expired.
Tortillas should be cooked through but
pliable and light in color.
thing of the past.
flour
1
/8-inch
to activate timer and begin cooking
6. Remove the tortilla to a plate and cover
with a damp paper towel or clean towel
to keep warm. Continue cooking the
remaining tortillas in the same manner.
Serve with desired accompaniments.
* Tortilla dough rounds can be stored in the
refrigerator for up to 5 days in a zip-top
plastic bag. Let the dough come to room
temperature before rolling out.
Note: The above method for making tortillas yields a tortilla that is more store
bought in appearance. For a more traditional, homemade-looking version cook the
tortilla on High with the crepe maker open
to the flat position. Cook the tortillas for
about 4 to 6 minutes, flipping them every
1½ to 2 minutes.
Nutritional information per tortilla:
Calories 190 (47% from fat) • carb. 22g • pro. 3g
• fat 10g • sat. fat 2g • chol. 0mg • sod. 229mg
• calc. 1mg • fiber 1g
Arepas
A traditional Latin American cornmeal
flatbread most commonly found in
Venezuela and Colombia, arepas can be
filled or served with a variety of differ-
ent foods. We love them filled with Carne
Makes 6 arepas
2 cups masarepa*
1 teaspoon kosher salt
2 tablespoons olive oil, plus
additional for brushing plates
2 cups warm water
1 recipe Carne Mechada, recipe
follows
1. In a bowl stir together the masarepa and
.
Mechada (recipe follows).
salt. Combine the olive oil and water and
slowly add to the dry ingredients with a
spoon. Mixture should come together in
a solid, somewhat wet mass. Continue
to mix as the masarepa continues to
absorb the liquid. The final arepa dough
should feel damp to the touch.
17
Page 18

2. Gather dough with your hands and
divide into 6 equal pieces and form each
by hand into a flat disc, about 3 inches
in diameter.
™
3. Preheat the International Chef
Crêpe/
Pizzelle/Pancake Plus fitted with the flat
plates by adjusting the temperature to
High. Once preheated, carefully open
to the flat position and brush the plates
well with olive oil. Add three arepas per
plate and cook for about 5 to 6 minutes
per side, so that they develop a crispy
exterior and are cooked inside.
4. To serve, slice the arepas horizontally
and fill with about ½ cup of the Carne
Mechada. Serve as is or with desired
toppings (e.g. crumbled cotija cheese,
chopped cilantro, pickled red onion,
avocado, etc.).
* Masarepa is a precooked ground corn flour. It
can be found in most grocery stores in the Latin
foods section.
Nutritional information per arepa:
Calories 185 (32% from fat) • carb. 29g • pro. 4g
• fat 7g • sat. fat 1g • chol. 0mg • sod. 385mg
• calc. 54mg • fiber 2g
Carne Mechada
Makes about 3 cups
Carne:
1½ pounds flank steak
½ teaspoon kosher salt
½ teaspoon freshly ground black
pepper
1 teaspoon vegetable oil
1 small onion, sliced
4 garlic cloves, peeled and
crushed
1 large bay leaf
¼ cup Worcestershire sauce
1 cup beef broth
Sofrito:
1 teaspoon vegetable oil
1 small onion, finely chopped
1 small to medium red bell pep-
per, cut into thin 1½-inch-long
julienne strips
1 chipotle pepper, puréed
4 garlic cloves, finely chopped
2
tablespoons Worcestershire
sauce
¼ cup tomato sauce
¾ cup reserved beef cooking
liquid
1. Preheat oven to 275°F.
2. Season the beef on both sides with the
salt and pepper. Cut the meat in half if
necessary to fit into the sauté pan. Put
the oil in a large sauté pan and place
over medium heat. Once the pan is hot
and the oil is shimmering, add the meat
to brown, about 3 to 5 minutes per side
(if necessary brown the meat in two
batches).
3. Once meat is browned, remove and
reserve. Add the onion and garlic to the
pan, scraping up with a wooden spoon
any browned bits that may remain on
the bottom. Cook until soft and fragrant.
Stir in the bay leaf, Worcestershire and
beef broth. Bring mixture to a simmer
and put meat back into the pan. Put pan
into oven and cook uncovered for
2 hours.
4. Remove from oven. Allow to cool. For
maximum flavor allow meat to chill in
refrigerator in the cooking liquid overnight. Before using, shred meat into 1½
to 2-inch-long shreds with fork or your
hands.
5. For the sofrito, put the oil into a separate
sauté pan and place over medium heat.
Once the oil shimmers in the pan, briefly
brown the shredded beef in batches,
about 3 minutes per batch. Remove and
reserve the meat and add the onion, red
pepper and garlic to the pan, scraping
up any brown bits that may remain on
the bottom. Stir in the chipotle then the
Worcestershire, tomato sauce and cooking liquid.
6.
Bring to a simmer and return the shredded
beef to the pan. Simmer on low for about
18
Page 19

10 minutes. Stir and cover; continue to
simmer on low for an additional 10 to
15 minutes.
Nutritional information per ½-cup serving:
Calories 215 (38% from fat) • carb. 7g • pro. 26g
• fat 9g • sat. fat 3g • chol. 78mg • sod. 626mg
• calc. 47mg • fiber 1g
Pita Bread
Do not be discouraged if your pitas do not
puff during cooking, as the dough can be a
bit temperamental. They may not have their
signature “pocket” interior, but they will still
Makes 8 six-inch pita breads
1¾ teaspoons active dry yeast
pinch granulated sugar
1 cup warm water (105˚F–110˚F)
2 cups unbleached, all-purpose
flour
1 cup whole wheat flour
1½ teaspoons kosher salt
1 tablespoon olive oil
vegetable oil, for brushing plates
1.
In the bowl of a stand mixer fitted with the
dough hook, combine the yeast, sugar and
water and let stand for 5 to 10 minutes
until foamy.
2. In a medium bowl, combine the flours.
When the yeast is proofed, add all but
½ cup of the combined flour, salt and oil
to the yeast mixture. Turn the mixer on
the lowest speed and mix for 1 minute to
combine. Gradually increase the speed
to 4, adding the remaining flour until the
dough forms a ball and begins to pull
away from the sides of the bowl. You may
not need all of the remaining flour. Once
the dough forms a ball, reduce the speed
to 3 and knead the dough for 5 to 6 minutes until it is soft, smooth, and slightly
tacky.
be delicious.
3. Lightly coat a medium bowl with oil and
put the dough in the bowl, turning it to
coat with the oil. Tightly cover the bowl
with plastic wrap and let the dough sit at
room temperature for about 1 hour, or until
the dough has doubled in size.
4.
Remove the plastic wrap and gently punch
down the dough to deflate it. Divide the
dough into 8 equal pieces and shape into
rounds. Loosely cover the rounds with
plastic wrap and let sit at room temperature for 20 to 30 minutes.
5. Working with one round at a time, roll out
each pita into a 6-inch circle, between
1
⁄8-
inch and ¼-inch thick. Keep all the dough
under plastic wrap to keep from drying
out.
6. Once about half the dough balls have
been rolled out, preheat the International
™
Chef
Crêpe/Pizzelle/Pancake Plus fitted
with the flat plates in the closed position
by adjusting the temperature to High.
Once preheated, carefully open to the
flat position. Lightly brush the plates with
a bit of oil. Place one of the rolled-out
pita rounds onto each plate and cook for
about 5 to 6 minutes, flipping every 1½ to
2 minutes, until pita is cooked through and
browned in spots. The pitas should puff
up while cooking.
7. Once cooked, remove the pita to a plate
and cover with a clean towel to keep
warm. Repeat with the rest of the dough,
rolling out the remaining rounds while
pitas cook.
Calories 199 (25% from fat) • carb. 33g • pro. 5g
Nutritional information per pita:
• fat 6g • sat. fat 1g • chol. 0mg • sod. 429mg
• calc. 6mg • fiber 2g
19
Page 20

Mandarin Pancakes with
Mu Shu Pork
The key to perfect pancakes is to roll them
really thin before cooking. Our Mu Shu Pork
is a fresher version of the take-out classic
and the ideal companion to the pancakes.
Makes 8 pancakes and 4 cups Mu Shu Pork
Pancakes:
2 cups unbleached, all-purpose
flour
1 cup boiling water
1 tablespoon sesame oil
Pork:
1 pound boneless pork chops
2 tablespoons plus ½ cup soy
sauce, divided
1 teaspoon plus 2 tablespoons
cornstarch, divided
1 teaspoon plus
divided
½ cup water
¼ cup hoisin sauce
2 teaspoons vegetable oil, divided
2 large eggs, lightly beaten
4 ounces shiitake mushrooms,
cut into thin julienne strips
½ ounce fresh ginger, peeled and
finely chopped
1 garlic clove, finely chopped
1 medium carrot, cut into thin
julienne strips
3 cups shredded napa cabbage
(about 6-ounce piece)
2 scallions, sliced
1. Prepare the pancake dough. Sift the flour
into a medium mixing bowl. Pour the boiling water into the bowl while stirring with
a spoon so that it forms a ball. Knead the
ball on a well-floured surface for about 5
minutes until smooth. Put in a bowl, cover
with plastic wrap, and let rest for at least
one hour.
2. Roll the dough ball into a cylinder, about
12 inches long, and cut into 16 equal
1
⁄3 cup rice wine,
pieces. Flatten each piece and on a wellfloured surface, roll each using a rolling
pin, into a flat, very thin circle (about 7
inches in diameter). When one pancake
is rolled, brush the top with sesame oil.
Place it, oiled side down, on a piece of
waxed paper. Brush the top with sesame
oil. Continue with remaining pieces of
dough so that all sides of each pancake
have been oiled.
3. Pre
heat the
Pizzelle/Pancake Plus
in the closed position by adjusting the
temperature
carefully open to the flat position and lightly oil both plates. Cook pancakes about 2
minutes per side so that pancakes remain
pliable. Pancakes should bubble slightly
before being flipped and pick up some
brown speckles when cooked.
4. While dough for Mandarin Pancakes is
resting, begin preparing the pork. Slice the
pork into very thin matchstick-like strips.
Toss with the 2 tablespoons of soy sauce,
1 teaspoon cornstarch and 1 teaspoon
rice wine. Cover and place in the refrigerator for 30 minutes.
5. Stir together the ½ cup soy sauce,
2 tablespoons cornstarch,
wine, water, and hoisin; reserve.
6. Once the pork has rested, put 1 teaspoon
of the oil into a large skillet and place
over medium heat. Once oil is shimmering
across the pan, add the eggs and stir until
just cooked through. Remove and reserve.
Add the pork in two batches and cook
until lightly browned. Remove and reserve.
7. Wipe pan clean, add remaining teaspoon
of oil and place over medium high heat.
Once oil shimmers across the pan add the
shiitake, ginger and garlic. Cook for about
2 minutes until fragrant. Stir in the carrots and cabbage and cook for a minute
or two before adding the scallions. Stir
all ingredients together and cook for an
additional 5 minutes. Add the soy sauce
International Chef™ Crêpe/
with the flat plates
to Medium. Once preheated,
1
⁄3 cup rice
20
Page 21

mixture to the pan and bring to a simmer.
Return the pork to the pan and stir in the
eggs before serving. Serve each pancake
with about ¼ cup of Mu Shu Pork filling.
Nutritional information per pancake:
Calories 58 (14% from fat) • carb. 11g • pro. 2g
• fat 1g • sat. fat 0g • chol. 0mg • sod. 1mg
Nutritional information per ¼ cup pork:
Calories 91 (22% from fat) • carb. 10g • pro. 8g
• fat 2g • sat. fat 1g • chol. 42mg • sod. 584mg
• calc. 0mg • fiber 0g
• calc. 14mg • fiber 1g
Spring Rolls
Make your favorite take-out dish at home –
these appetizers are packed with fresh
ingredients and great flavor.
Makes 28 spring rolls
Wrappers:
1 large egg
1 cup unbleached, all-purpose flour
1 cup water
¼ teaspoon kosher salt
Filling:
6 green cabbage leaves, shredded
or finely sliced
4 medium carrots, julienned
1 1-inch piece fresh ginger, peeled
and julienned
3 scallions, thinly sliced
½ cup fresh cilantro, chopped
1
/3 cup fresh basil leaves, thinly
sliced
½ small green chile, like jalapeño or
serrano, finely chopped
1½ tablespoons fish sauce
juice of ½ lime
½ block extra-firm tofu, cut into 28
thick julienne strips
vegetable oil, for brushing plates
and frying
sweet chili sauce, for serving
1. Put all wrapper ingredients into a mixing
bowl and whisk until completely smooth
(if batter seems lumpy, pour through a fine
mesh strainer – alternately, this can be
processed in a blender). Reserve.
2. Mix all of the filling ingredients, except the
tofu, in a bowl until thoroughly combined.
Reserve.
3. Preheat the International Chef
™
Crêpe/
Pizzelle/Pancake Plus fitted with the flat
plates in the closed position by adjusting
temperature to High. Set timer to 1 minute. Once preheated, brush bottom plate
with oil. Using the small scoop, pour one
scoop of the batter onto the hot greased
plate. Using a pastry brush, quickly and
gently spread batter to thin it, being sure
to keep a circular shape. Close and lock
activate timer and begin cooking
. Tone will
to
sound when timer has expired. Carefully
remove and repeat with remaining batter.
4.
Once all wrappers have been cooked, place
1 piece of tofu toward the bottom of each,
and top with about 1 tablespoon of the
filling. Fold the other long-sided flap over,
then the two ends to close. Roll the spring
roll tight to secure. Reserve and repeat with
remaining wrappers.
5. Fill a large sauté pan or a small stockpot
with about 2 inches of oil. Heat until a
deep-fat thermometer registers 350°F.
Once hot, carefully add spring rolls, a few
at a time, depending on the size of the pot
being used. Do not overcrowd the pan or
the temperature will go down. Fry until all
spring rolls are golden brown and crispy.
6. Serve immediately with a sweet chili
sauce.
Nutritional information per spring roll:
Calories 45 (43% from fat) • carb. 5g • pro. 2g
• fat 2g • sat. fat 0g • chol. 7mg • sod. 95mg
• calc. 15mg • fiber 1g
21
Page 22

Okonomiyaki
(Japanese Pancakes)
More akin to pizza than pancake, this popular
Japanese snack can be made with any type
of vegetable, meat or seafood that you desire
– the dish’s name is derived from the word
Makes 4 eight-inch pancakes
Sauce:
2 tablespoons ketchup
1 tablespoon Worcestershire sauce
1½ teaspoons honey
¾ teaspoon mirin
½ teaspoon soy sauce
Pancakes:
2½
1 cup carrot ribbons, about
2 inches x ¾-inch, made using a
vegetable peeler
½ cup plus 2 tablespoons thinly
sliced scallions, divided
½ cup cooked shrimp, cut into
½-inch pieces
¾ cup unbleached, all-purpose flour
½ teaspoon kosher salt
3 large eggs
1 tablespoon water
1 tablespoon mirin
2 teaspoons soy sauce
1 teaspoon toasted sesame oil
vegetable oil, for brushing plates
Kewpie mayonnaise*, for serving
gomasio* or sesame seeds, for
serving
bonito flakes*, for serving
1. In a small bowl, whisk together all sauce
2. In a large bowl, toss together the cab-
okonomi, or “as you like.”
cups finely shredded green cabbage
ingredients. Set aside.
bage, carrots, ½ cup scallions and shrimp.
Add the flour and salt and toss to coat.
Add the eggs, water, mirin, soy sauce and
sesame oil and gently stir together until
flour has dissolved and all ingredients are
evenly coated in batter.
™
3. Preheat the International Chef
Crêpe/
Pizzelle/Pancake Plus fitted with the flat
plates in the closed position by adjusting
the temperature to High. Once preheated,
brush both plates with oil. Pour a heaping
½ cup of batter onto the bottom plate and
spread into a 6-inch circle. Gently close
cover without locking. Cook for about 3½
minutes, until crisp and golden brown.
4. Open the unit and flip the pancake. Brush
the top of the pancake all over with about
1 tablespoon of the prepared okonomiyaki
sauce. Drizzle the mayonnaise on top in
a cross-hatch pattern and sprinkle with
the gomasio, bonito flakes, and reserved
scallions. Transfer the pancake to a plate.
Continue with remaining batter in the
same manner. Cut finished pancakes into
4 wedges and serve.
* These Japanese condiments and ingredients can be found in the ethnic food aisle of
most grocery stores or in Asian markets.
Nutritional information per wedge
(4 per pancake) with accompaniments:
Calories 78 (40% from fat) • carb. 8g • pro. 4g
• fat 4g • sat. fat 0g • chol. 50mg • sod. 270mg
• calc. 24mg • fiber 1g
Naan
A standard Indian bread served with just
about any main dish. The cumin is optional,
Makes 8 breads
3½ cups unbleached, all-purpose flour
4 teaspoons granulated sugar
1 teaspoon baking powder
½ teaspoon kosher salt
pinch ground cumin (optional)
1 cup reduced-fat or whole milk
¼ cup vegetable oil, plus more for
clarified butter or ghee, for
1. In the work bowl of a food processor fit-
but adds a nice spice to it.
bowl
brushing plates
ted with the dough or chopping blade,
process the dry ingredients to sift, about
22
Page 23

10 seconds. With the unit running, gradually add the milk and oil through the feed
tube until a dough forms. Let unit run for
an additional minute to knead dough.
Remove and on a lightly floured surface,
knead a few times by hand.
2. Transfer the dough to a lightly oiled bowl
and cover with plastic wrap. Allow to rest
at room temperature for 15 minutes.
3. Divide the dough into 8 pieces. Keeping
dough covered with plastic wrap while
working, roll one piece into a 4-inch round
then stretch to make a 6- to 8-inch circle.
Repeat with remaining dough (this can
be done while cooking initial rounds of
dough).
4. Preheat the International Chef
™
Crêpe/
Pizzelle/Pancake Plus fitted with the flat
plates by adjusting the temperature to
High. Once preheated, carefully open to
the flat position. Brush plates with clarified
butter or ghee. Place a dough circle on
each plate and brush surface with additional butter. Cook for about 2 minutes
per side, or until nicely browned in spots.
Remove and reserve; repeat with remaining dough.
Calories 279 (31% from fat) • carb. 42g • pro. 6g
Nutritional information per naan:
• fat 10g • sat. fat 3g • chol. 9mg • sod. 195mg
• calc. 38mg • fiber 1g
Chapati
Enjoy these thin Indian breads with our
delicious vegetable curry (page 26),
or Fresh Green Chutney (recipe follows).
Makes 8 chapati
2 cups whole wheat pastry flour
1 teaspoon kosher salt
1 cup warm water
clarified butter or ghee for
brushing plates
process the flour and salt to sift, about
10 seconds. With the unit running, gradually add the water through the feed tube.
Once dough comes together into a ball,
knead in processor for 1 minute. Place on
a lightly floured work surface and knead
dough by hand a few times. Transfer
dough to a bowl and cover with plastic
wrap. Let dough rest at room temperature
for a minimum of 30 minutes and up to 2
hours.
2. Divide dough into eight equal-size pieces.
Flatten and roll each into thin 6- to 8-inch
discs. Keep covered with plastic wrap
while rolling out remaining dough.
3. Preheat the International Chef™ Crêpe/
Pizzelle/Pancake Plus fitted with the flat
plates in the closed position by adjusting
the temperature to High. Once preheated,
brush plates with clarified butter or ghee.
Working with one disc at a time, put rolled
dough on the bottom plate. Gently close,
but do not lock. Allow to cook for about
30 to 40 seconds; open and brush the
edges with butter. Use pressure while
brushing to create steam pockets in the
bread. Gently close and cook 10 seconds more until edges are just brown, but
chapati is still pliable.
4. Remove and cover with a clean towel to
keep warm and soft. Repeat with remaining dough.
5. Serve warm.
Nutritional information per chapati:
Calories 130 (20% from fat) • carb. 23g • pro. 3g
• fat 3g • sat. fat 0g • chol. 0mg
• sod. 286mg • calc. 1mg • fiber 4g
1. In the work bowl of a food processor fitted with the dough or chopping blade,
23
Page 24

Fresh Green Chutney
This chutney of southern Indian influence
is perfect when paired with our naan or
chapati, as well as a topping for any curry.
Makes about ¾ cup
4 teaspoons fresh lime or lemon
juice
1 small tomato, chopped
1 ½-inch piece fresh ginger, peeled
and halved
1 serrano or jalapeño seeded and
cut into ½-inch pieces
½ teaspoon kosher salt
¼ teaspoon ground cumin
½ cup chopped cilantro
¼ cup fresh mint
½ cup unsweetened, shredded
coconut
1. Put the first six ingredients into the jar of
a blender. Run on High until well blended,
about 1 minute. Scrape down and blend
for an additional 20 seconds, if necessary.
Add the cilantro, mint and coconut. Blend
on High until smooth, about 1 minute.
Stop to scrape down as needed.
2. If not using immediately, store in an
airtight jar in the refrigerator for up to
2 weeks.
Nutritional information per serving (1 tablespoon):
Calories 27 (69% from fat) • carb. 2g • pro. 0g
• fat 2g • sat. fat 2g • chol. 0mg • sod. 98mg
• calc. 7mg • fiber 1g
Dosa
Allowing the batter to ferment overnight
develops the tangy flavor of this thin,
crisp South Indian crêpe. Serve with our
Fresh Green Chutney (preceding recipe) or
Sambhar (page 25) as is customary.
Makes 12 dosas
½ cup urad dal*, picked over,
rinsed, and soaked overnight
with the fenugreek seeds in water
to cover
¼ teaspoon fenugreek seeds,
(soaked overnight with the urad
dal)
2 cups cold water, divided
1 cup white rice flour
½ teaspoon kosher salt
¼ yellow onion, for cooking
¼ cup vegetable oil, for brushing
plates
1. Drain the dal and fenugreek and put into
a food processor fitted with the chopping
blade. Pulse 10 to 15 times, until evenly
ground, scraping down the sides of the
bowl as necessary with a spatula. Process
the lentils, while slowly adding 1½ cups
of the water through the feed tube. Blend
until smooth, about 3 minutes, scraping
the sides as necessary.
2. Pour the lentil mixture into a large bowl
and add the rice flour and salt. Whisk well
to form a smooth batter. Cover the bowl
loosely with plastic wrap and let stand
overnight at room temperature. The batter
should double in volume overnight.
™
3. Preheat the International Chef
Crêpe/
Pizzelle/Pancake Plus fitted with the flat
plates in the closed position by adjusting
the temperature to High. While the unit is
heating, gently re-whisk the batter, and
add the remaining half-cup of water to
achieve a thin, crêpe-batter-like consistency.
4. Once preheated, carefully stick a fork into
the curved side of the onion. Dip the cut
side of the onion in the oil and when the
unit has preheated, use the onion to lightly
grease both plates.
5. Fill the large scoop with batter and ladle
it into the center of the bottom cooking
plate. Using the bottom of the scoop, gently spread out the batter from the center
toward the edges into a circle as large
and thin as possible. Cook the dosa in the
open position for 25 to 30 seconds to set
the batter, then close the lid gently without
locking and cook for another 2½ to 3 min-
24
Page 25

utes until the dosa is browned and crisp.
Open the lid, flip and cook another 30
seconds. Remove the dosa to a plate and
cover with a clean towel to keep warm.
6. Repeat with remaining batter, stacking
the dosas as they finish cooking to keep
warm.
*Note: Also known as split black lentils, urad
dal can be found in most specialty grocery
stores prepackaged or in bulk containers.
Nutritional information per dosa:
Calories 99 (45% from fat) • carb. 12g • pro. 1g
• fat 5g • sat. fat 0g • chol. 0mg • sod. 109mg
• calc. 3mg • fiber 1g
Sambhar
(South Indian Lentil Stew)
An essential component of any South Indian
meal, versions of this hearty dish abound,
depending on the cook. This variation has
mild heat and is rich with vegetables. Serve
over rice or as an accompaniment to breads.
Makes 4 cups
½ cup yellow split peas, picked
over, rinsed and drained
4 cups water, divided
1 tablespoon plus 1½ teaspoons
vegetable oil
½ large jalapeño
1 teaspoon ground coriander
1 teaspoon chili powder
¼ teaspoon ground turmeric
¼ teaspoon ground cumin
pinch asafetida
½ medium russet potato, peeled
and cut into ½-inch dice (about
½ cup)
½ medium sweet potato, peeled
and cut into ½-inch dice (about
½ cup)
1 medium onion cut into ½-inch
dice
1 medium plum tomato, chopped
1 medium carrot, cut into ½-inch
dice (about ½ cup)
½ cup cauliflower florets
1¼ teaspoons kosher salt
½ cup frozen green peas
½ teaspoon whole mustard seeds
1 bay leaf
2 tablespoons fresh lemon juice
1. In a small saucepan combine the split
peas with 1½ cups of the water. Bring to a
boil, cover and reduce to a simmer. Cook
until the split peas are very soft and water
has been absorbed, about 40 to 45 minutes. Set aside.
2. In a medium-large saucepan set over
medium heat, add 1 tablespoon of the
oil. When hot, add the jalapeño and
ground spices. Cook for about 1 minute
until fragrant. Add the potatoes, onion,
tomato, carrot, cauliflower and salt. Stir to
combine and add the remaining 2½ cups
water. Bring to a boil and reduce to a simmer. Cook until the vegetables are tender,
about 20 minutes.
3. When the split peas are cooked, remove
from the heat and mash them with a
wooden spoon, leaving some split peas
whole. Stir the split peas into the vegetable pot until evenly distributed. Simmer
for another 10 to 12 minutes. Stir in the
green peas during the last 1 to 2 minutes
of cooking.
4. In a small skillet, heat the remaining 1½
tablespoons of oil. Once hot, carefully add
the mustard seeds and bay leaf. Cook
for about 5 seconds, until the mustard
seeds pop. Add the seeds, bay leaf and
oil directly to the stew and stir to combine.
Stir in the lemon juice, remove from the
heat and serve.
Nutritional information per ½-cup serving:
Calories 106 (27% from fat) • carb. 15g • pro. 5g
• fat 3g • sat. fat 0g • chol. 0mg • sod. 393mg
• calc. 27mg • fiber 3g
25
Page 26

Roti
Roti is a flatbread that can be found in
many regions of the globe. This recipe, along
with the Curried Chickpeas (following recipe),
is a street food commonly found in Trinidad.
Makes 8 shells
2 cups unbleached, all-purpose
flour
½ teaspoon kosher salt
¼ teaspoon baking soda
1 tablespoon extra virgin olive oil
2
⁄3 cup water
vegetable oil, for brushing plates
1. Sift the flour, salt and baking soda togeth-
er in a mixing bowl. With a fork stir in
the oil, then the water until a dough ball
forms. The dough will appear quite shaggy
at first. Continue to mix, then knead with
hands to fully form the dough ball. Should
the dough still be dry, add water 1 teaspoon at a time until dough completely
comes together. Knead the dough on a
floured surface by hand for about 5 minutes until smooth. Cover with plastic wrap
and let dough rest for at least an hour.
2. Roll the dough into a cylinder about 12
inches long. Cut the dough into eight
equal portions. Roll each portion into a
ball, then roll each into a thin round, about
8 inches in diameter. Be sure to keep each
rolled roti separate so that the dough does
not stick together.
3. Preheat the International Chef
Pizzelle/Pancake Plus fitted with the flat
plates in the closed position by adjusting the temperature to High. Fold a damp
paper towel into a small square for pressing the roti. Once preheated, brush the
bottom plate lightly with oil. Place a roti on
the heated plate and with the paper towel
square, press the roti all over its surface.
Pressing will create steam pockets that
are traditionally seen in roti. Cook roti
about 2 minutes per side.
4. Continue with remaining roti and serve
™
Crêpe/
with Curried Chickpeas with Potatoes and
Spinach (recipe follows).
Nutritional information per roti:
Calories 135 (27% from fat) • carb. 22g • pro. 3g
• fat 4g • sat. fat 1g • chol. 0mg • sod. 181mg
• calc. 1mg • fiber 1g
Curried Chickpeas with
Potatoes and Spinach
This simple curry can be enjoyed with
any Indian flatbread.
Makes about 4 cups
2 teaspoons vegetable oil
½ red onion, finely chopped
1 Scotch bonnet chile
(or habanero), seeded and
finely chopped
2 garlic cloves, finely chopped
1 tablespoon mild curry powder
½ teaspoon ground cumin
½ teaspoon kosher salt
1 can (15 ounces) chickpeas,
drained
2 cups chicken stock
12 ounces white potatoes, cut into
½-inch dice
1 cup packed fresh baby spinach
1. Put the oil into a medium sauté pan over
medium heat. Once the oil shimmers
across the pan, add the onion, chile and
garlic. Cook until softened and fragrant,
about 5 minutes. Add the curry powder,
cumin and salt and stir well. Continue to
cook for a few minutes.
2. Stir in the chickpeas and chicken stock
and bring to a simmer. Maintain a slight
simmer and cook for about 10 minutes.
Add the potatoes and cover. Cook until
potatoes are cooked through, about an
additional 15 minutes.
3. Once the potatoes are cooked through,
stir in the spinach and cook until wilted.
26
Page 27

Taste and adjust seasoning accordingly.
Serve with the roti.
Nutritional information per ½-cup serving:
Calories 152 (20% from fat) • carb. 24g • pro. 7g
• fat 3g • sat. fat 0g • chol. 0mg • sod. 443mg
• calc. 47mg • fiber 16g
Injera
This traditional Ethiopian flatbread acts as
both plate and utensil. Stews and salads
are served on top of the injera and eaten as
small pieces of injera are torn off and used
to scoop up and eat the meal.
Makes about 8 to 9 injera
2 cups teff flour, divided
3 cups water
½ cup unbleached, all-purpose flour
½ teaspoon kosher salt
1. In a bowl, stir 1 cup of the teff flour
together with the water. Cover and leave
at room temperature for about 24 hours.
The surface of the mixture should be covered with small bubbles.
2. Whisk in the remaining cup of teff flour,
all-purpose flour and salt.
3. Heat the International Chef
Pizzelle/Pancake Plus fitted with the flat
plates in the closed position by adjusting
the temperature to High. Once preheated,
pour ½ cup of the injera batter over the
center of the bottom plate and gently
spread to the edges of the plate, creating
an even, large circle. Cook in the open
position for about one minute so that
the bottom is set and tiny bubbles have
formed over the surface of the injera.
To finish cooking, hold the unit’s handle in
position so that the top plate is just hovering over the bread, for about 30 seconds.
4. Serve on a plate with Doro Wat (recipe follows) and/or a variety of Ethiopian dishes
on top. Eat by tearing pieces of the injera
off and using as a utensil to scoop up the
food to eat.
™
Crêpe/
Nutritional information per injera:
Calories 123 (7% from fat) • carb. 24g • pro. 4g
• fat 1g • sat. fat 0g • chol. 0mg • sod. 134mg
• calc. 2mg • fiber 4g
Doro Wat
(Ethiopian Chicken Stew)
This stew uses the spice berbere* and niter
kibbeh (recipe follows), a spiced clarified
butter, to give it a unique and utterly
delicious flavor.
Makes about 8 servings
2 medium red onions, cut into
1-inch pieces
5 to 6 garlic cloves, peeled
1 1-inch piece of fresh ginger,
peeled
4 ounces Niter Kibbeh
(recipe follows)
½ cup berbere*
1 cup water
2½ pounds bone-in, skin-on chicken
thighs
1. Put onions into a food processor fitted
with the chopping blade. Pulse about 10
times to finely chop, scrape bowl and
repeat 2 times so that onions are completely chopped to the point of purée.
2. Place a large sauté pan or casserole over
medium heat and add the onions. Cook,
monitoring heat to maintain a slow, but
steady heat to sweat the onions for about
15 to 20 minutes so they are completely
soft and fragrant, but have not picked up
any color.
3. While the onions are cooking, finely chop
the garlic and ginger in the food processor. Once the onions are cooked, add the
garlic and ginger to the pan and continue
to cook for an additional 25 minutes.
4. Add the niter kibbeh and berbere and
simmer for an additional 10 minutes.
5. Stir in the water and add the chicken
thighs. Be sure the thighs are almost
27
Page 28

completely submerged. Cover and cook
for about 40 minutes so that chicken is
cooked through.
6. Serve on top of the injera.
* Berbere is a traditional Ethiopian spice blend
that can be found in specialty stores or can be
purchased online.
Nutritional information per serving:
Calories 290 (48% from fat) • carb. 8g • pro. 29g
• fat 16g • sat. fat 8g • chol. 142mg • sod. 248mg
• calc. 53mg • fiber 3g
Niter Kibbeh
This spice-infused clarified butter is worth
the extra step. It adds layers of flavor, plus it
keeps for months in the refrigerator.
Makes 8 ounces
1 pound unsalted butter
1 small onion, finely chopped
4 garlic cloves, chopped
1 1-inch piece fresh ginger, peeled
and chopped
1 cinnamon stick
1 teaspoon toasted cardamom
seeds
2 whole cloves
1 teaspoon fenugreek seeds
1 bay leaf
1. Put all ingredients in a small saucepan
and place over medium heat. When butter
begins to bubble, reduce heat to maintain
a very slight simmer. Skim any foam from
the surface and discard.
2. Continue to cook over low heat for at
least 30 minutes and up until 1 hour.
Continue skimming so that ultimately the
surface is clear and all milk solids have
sunk to the bottom.
3. Remove from heat and line a fine mesh
strainer with cheesecloth or a coffee filter.
Slowly pour the butter through the strainer
and discard all solids. Allow butter to
cool; store in the refrigerator for up to two
months.
Nutritional information per tablespoon:
Calories 209 (97% from fat) • carb. 1g • pro. 0g
• fat 22g • sat. fat 16g • chol. 61mg • sod. 1mg
• calc. 6mg • fiber 0g
©2014 Cuisinart
150 Milford Road
East Windsor, NJ 08520
Printed in China
14CE005623
F IB-12950-ESP
Any other trademarks or service marks referred to herein are the
trademarks or service marks of their respective owners.
28
Page 29

F IB-12950-ESP
14CE005623
Impreso en China
East Windsor, NJ 08520
150 Milford Road
©2014 Cuisinart
ésta pertenecen a sus titulares respectivos.
Todas marcas registradas o marcas de comercio mencionadas en
Page 30

31
NOTES:
Page 31

30
NOTES:
Page 32

29
1 hoja de laurel
fenogreco
1 cucharadita de semillas de
2 clavos de olor enteros
cardamomo tostadas
1 cucharadita de semillas de
1 palito de canela
jengibre fresco, pelado y picado
1 trozo de 1 pulgada (2.5 cm) de
4 dientes de ajo, picados
picada
1 cebolla mediana, finamente
sal
1 libra (455 g) de mantequilla sin
Rinde 8 onzas (230 g)
refrigerador durante meses.
a los platos y se puede conservar en el
vale la pena. Añade un sabor muy especial
Esta mantequilla clarificada con especias
"Niter Kibbeh"
• Calcio 6mg • Fibra 0g
16g • Colesterol 61mg • Sodio 1mg
• Proteínas 0g • Grasa 22g • Grasa saturada
Calorías 209 (97% de grasa) • Carbohidratos 1g
Información nutricional por cucharada:
hasta 2 meses.
Conservar en el refrigerador durante
tirando los sólidos. Dejar enfriar.
café. Colar lentamente la mantequilla,
malla fina con una estopilla o un filtro de
3. Retirar del fuego. Forrar un colador de
cacerola.
que los sólidos estén en el fondo de la
hasta que la superficie esté clara y
30–60 minutos, eliminando la espuma
2. Seguir cociendo a fuego lento durante
tirarla.
encima de la mezcla con una cuchara y
lento. Retirar la espuma que se forma
reducir el fuego para hervir a fuego muy
la mantequilla empiece a hacer burbujas,
medio, en una cacerola pequeña. Cuando
1. Calentar todos los ingredientes a fuego
53mg • Fibra 3g
8g • Colesterol 142mg • Sodio 248mg • Calcio
• Proteínas 29g • Grasa 16g • Grasa saturada
Calorías 290 (48% de grasa) • Carbohidratos 8g
Información nutricional por porción:
especializadas.
etíope, disponible en línea y en las tiendas
* El "berbere" es una mezcla de especias
6. Servir sobre las "injeras".
minutos, hasta que el pollo esté cocido.
sumergido. Tapar y cocer durante 40
que el pollo está casi completamente
5. Agregar el agua y el pollo. Cerciorarse
cocer durante 10 minutos adicionales.
4. Agregar el "Niter Kibbeh" y el "berbere" y
cocer durante 25 minutos adicionales.
cocida, agregar el ajo y el jengibre y
procesadora. Cuando la cebolla esté
finamente el ajo y el jengibre con la
3. Mientras la cebolla está cociendo, picar
fragante, pero sin permitir que se dore.
hasta que la cebolla esté muy suave y
cebolla. Rehogar durante 15–20 minutos,
grande a fuego medio y agregar la
Page 33

28
con hueso y piel
único y totalmente delicioso.
(guiso de pollo etíope)
"Doro Wat"
• Fibra 4g
Información nutricional por "injera":
2. Calentar un sartén o una salteadora
finamente picadas.
veces hasta que las cebollas estén muy
picar finamente, raspar el bol y repetir 2
cuchilla de metal. Pulsar 10 veces para
procesadora de alimentos equipada con
1. Poner las cebollas en el bol de una
2½ libras (1.1 kg) de muslo de pollo,
1 taza (235 ml) de agua
½ taza (60 g) de "berbere"*
(receta a continuación)
4 onzas (115 g) de "Nitter Kibbeh"
jengibre, pelado
1 trozo de 1 pulgada (2.5 cm) de
5–6 dientes de ajo
pedazos
2 cebollas rojas medianas, en
Rinde aproximadamente 8 porciones
mantequilla clarificada, para darle un sabor
kibbeh" (receta a continuación), un tipo de
Este guiso emplea "berbere"* y "nitter
• Colesterol 0mg • Sodio 134mg • Calcio 2mg
• Proteínas 4g • Grasa 1g • Grasa saturada 0g
Calorías 123 (7% de grasa) • Carbohidratos 24g
"Injera"
• Fibra 16g
"injera" y usarlos como cubierto.
etíope. Para comer, cortar pedacitos de la
(receta a continuación) u otro plato
4. Servir sobre un plato con "Doro Wat"
segundos adicionales.
justo encima del pan y cocer durante 30
superior ligeramente, manteniéndola
Para terminar de cocer, cerrar la placa
aparezcan a la superficie de la "injera".
un minuto, hasta que pequeñas burbujas
grande. Cocer durante aproximadamente
hacia las orillas, formando un círculo
el centro de la placa inferior y esparcirla
echar ½ taza (120 ml) de la mezcla en
en la posición cerrada. Una vez caliente,
precalentar el aparato a TORTILLA/HI,
3. Instalar las placas del lado plano y
común y la sal y batir para combinar.
2. Agregar la harina remanente, la harina
cubierta de burbujas pequeñas.
La superficie de la mezcla debería estar
a temperatura ambiente durante 14 horas.
agua en un tazón. Cubrir y dejar reposar
1. Combinar 1 taza (125 g) de la harina y el
½ cucharadita de sal kosher
½ taza (60 g) de harina común
3 tazas (475 ml) de agua
2 tazas (250 g) de harina de "tef"
Rinde 8–9 "injeras"
"injera", el cual se usa para comerlos.
guisos y las ensaladas se sirven sobre el
tradicionalmente como plato y cubierto. Los
Este pan sin levadura etíope se usa
• Colesterol 0mg • Sodio 443mg • Calcio 47mg
• Proteínas 7g • Grasa 3g • Grasa saturada 0g
Calorías 152 (20% de grasa) • Carbohidratos 24g
Información nutricional por porción (½ taza):
gusto. Servir con el "roti".
se marchite. Probar y ajustar la sazón al
agregar la espinaca y cocer hasta que
3. Cuando las patatas estén cocidas,
suaves.
minutos, hasta que las patatas estén
las patatas y tapar. Cocer durante 15
aproximadamente 10 minutos. Agregar
hervir. Hervir a fuego lento durante
2. Agregar los garbanzos y el caldo y dejar
cociendo durante unos minutos.
comino y la sal, y revolver bien. Seguir
fragantes. Agregar el curry en polvo, el
5 minutos, hasta que estén suaves y
ajo. Saltear durante aproximadamente
caliente, agregar la cebolla, el chile y el
Page 34

27
sartén mediano. Cuando el aceite esté
1. Calentar el aceite a fuego medio, en un
(espinaca "baby") fresca
1 taza (30 g) de espinaca tierna
en cubitos
12 onzas (350 g) de patatas blancas,
2 tazas (475 ml) de caldo de pollo
garbanzos, escurridos
1 lata de 15 onzas (435 g) de
½ cucharadita de sal kosher
½ cucharadita de comino en polvo
1 cucharada de curry en polvo
2 dientes de ajo, finamente picados
picado
habanero, sn semillas, finamente
1 chile "Scotch Bonnet" o
picada
½ cebolla roja pequeña, finamente
2 cucharaditas de aceite vegetal
Rinde aproximadamente 4 tazas (120 ml)
cualquier pan sin levadura indio.
Este curry sencillo puede servirse con
patatas y espinaca
Curry de garbanzos con
3. Instalar las placas del lado plano y
para que no peguen uno a otro.
diámetro. Mantener los "rotis" separados
delgado de 8 pulgadas (20 cm) de
luego estirarla para formar un disco
Formar una bola con cada porción, y
Dividir la masa en ocho porciones iguales.
12 pulgadas (30 cm) de largo con la masa.
2. Formar un cilindro de aproximadamente
reposar por una hora o más.
esté suave. Cubrir con plástico y deje
aproximadamente 5 minutos, hasta que
sobre una superficie enharinada durante
vez y seguir amasando. Amasar la bola
seca, agregar 1 cucharada de agua a la
una bola de masa. Si la masa parece
mezclando, y luego amasar, para formar
La masa se desmigaja al principio. Seguir
tenedor hasta formar una bola de masa.
y luego el agua, revolviendo con un
hornear en un tazón. Agregar el aceite,
1. Tamizar la harina, la sal y el polvo de
placas
aceite vegetal para engrasar las
⁄3 taza (160 ml) de agua
2
virgen extra
• Fibra 1g
• Colesterol 0mg • Sodio 181mg • Calcio 1mg
• Proteínas 3g • Grasa 4g • Grasa saturada 1g
Calorías 135 (27% de grasa) • Carbohidratos 22g
Información nutricional por "roti":
espinaca (receta a continuación).
con curry de garbanzos con patatas y
4. Repetir con el resto de los "rotis" y servir
lado.
durante aproximadamente 2 minutos por
ven tradicionalmente en el "roti". Cocer
Esto creará las bolsas de vapor que se
"Roti"
1 cucharada de aceite de oliva
sodio
¼ cucharadita de bicarbonato de
½ cucharadita de sal kosher
2 tazas (250 g) de harina común
Rinde 8 panes
a continuación), es originaria de Trinidad.
acompañada por curry de garbanzos (receta
regiones del mundo. Esta receta,
Este pan plano se encuentra en muchas
superficie con el cuadro de papel toalla.
el "roti" sobre la placa y presionar la
la placa inferior con aceite. Colocar
Una vez caliente, engrasar levemente
cuadro pequeño para presionar el "roti".
de papel humedecida para formar un
en la posición cerrada. Doblar una tolla
precalentar el aparato a TORTILLA/HI,
• Fibra 3g
• Colesterol 0mg • Sodio 393mg • Calcio 27mg
• Proteínas 5g • Grasa 3g • Grasa saturada 0g
Calorías 106 (27% de grasa) • Carbohidratos 15g
Información nutricional por porción (½ taza):
jugo de limón, retirar el fuego y servir.
Page 35

26
guiso y revolver para combinar. Agregar el
semillas, la hoja de laurel y el aceite al
de mostaza se revienten. Agregar las
5 segundos, hasta que las semillas
laurel. Cocer durante aproximadamente
las semillas de mostaza y la hoja de
pequeño. Cuando esté caliente, agregar
4. Calentar el aceite remanente en un sartén
antes del final de la cocción.
las arvejas aproximadamente 1–2 minuto
lento durante 10–12 minutos. Agregar
arvejas con los vegetales. Cocer a fuego
algunas arvejas enteras. Combinar las
con un cucharón de madera, dejando
cocidas, retirarlas del fuego y majarlas
3. Cuando las arvejas partidas estén
los vegetales estén suaves.
aproximadamente 20 minutos, hasta que
luego reducir el fuego. Cocer durante
el agua remanente. Dejar hervir, y
la coliflor y la sal. Revolver y agregar
batata, la cebolla, el tomate, la zanahoria,
estén fragantes. Agregar la patata, la
aproximadamente 1 minuto, hasta que
y las especias en polvo. Cocer durante
Cuando esté caliente, agregar el jalapeño
medio, en un sartén medio-grande.
2. Calentar 1 cuchara del aceite a fuego
toda el agua; reservar.
estén muy suaves y que hayan absorbido
minutos, hasta que las arvejas partidas
el fuego y tapar. Cocer durante 40–45
pequeña. Dejar hervir, luego reducir
(355 ml) del agua en una cacerola
1. Colocar las arvejas partidas y 1½ taza
fresco
2 cucharadas de jugo de limón
1 hoja de laurel
cucharadita de granos de pimienta
taza (75 g) de cogollitos de coliflor
½
½ taza (75 g) de arvejas congeladas
1¼ cucharadita de sal kosher
½
1 zanahoria mediana, en cubitos
1 tomate italiano mediano, picados
1 cebolla mediana, en cubitos
cortada en cubitos
½ batata/camote mediana, pelada u
cortada en cubitos
½ patata Russet mediana, pelada u
1 pizca de "asafétida"
¼ cucharadita de comino en polvo
¼ cucharadita de cúrcuma en polvo
1 cucharadita de chile en polvo
cilantro en polvo
1 cucharadita de semillas de
½ jalapeño grande
aceite vegetal
1 cucharada + ½ cucharadita de
4 tazas (945 ml) de agua
amarillas, lavadas y escurridas
½ taza (75 g) de arvejas partidas
Rinde 4 tazas (710 ml)
arroz o pan.
picante y repleta con vegetales. Sírvalo con
la India. Nuestra versión es moderadamente
componente esencial de la cocina del sur de
Existen muchas variaciones de este
India)
(guiso de lentejas del sur de la
"Sambhar"
Fibra 1g
Colesterol 0mg • Sodio 109mg • Calcio 3mg •
Proteínas 1g • Grasa 5g • Grasa saturada 0g •
Calorías 99 (45% de grasa) • Carbohidratos 12g •
Información nutricional por "dosa":
donde lo venden envasado o por peso.
la mayoría de las tiendas especializadas,
lentejas partidas negras, está disponible en
*Nota: el "ural dal", también conocido como
tibios.
los "dosas" cocidos para mantenerlos
6. Repetir con el resto de la mezcla, apilando
mantenerlo tibio.
un plato y cubrir con una toalla limpia para
Una vez cocido, colocar el "dosa" sobre
y cocer durante 30 segundos adicionales.
dorado y crujiente. Abrir las placas, voltear
minutos más, hasta que el "dosa" esté
Page 36

25
(sin ponerle seguro) y cocer durante 2½–3
y luego cerrar cuidadosamente las placas
Cocer el "dosa" durante 25–30 segundos,
círculo grande y lo más delgado posible.
la mezcla hacia las orillas, formando un
la parte inferior de la cuchara, esparcir
en el centro de la placa inferior. Usando
5. Echar una cucharada grande la mezcla
engrasar levemente las placas.
aceite, y usar la cebolla aceitada para
hundir el lado cortado de la cebolla en
el lado curvo de la cebolla con un tenedor,
4. Cuando el aparato esté caliente, pinchar
las "crêpes".
mezcla líquida, semejante a la mezcla de
½ taza (120 ml) de agua para obtener una
está calentando, batir la mezcla y agregar
la posición cerrada. Mientras el aparato
precalentar el aparato a TORTILLA/HI, en
3. Instalar las placas del lado plano y
debería doblar de volumen.
ambiente durante 8–12 horas. La masa
plástico y dejar reposar a temperatura
Cubrir sin apretar con una película de
sal. Batir hasta formar una mezcla suave.
grande y agregar la harina de arroz y la
2. Colocar la mezcla de lenteja en un tazón
mezcla suave.
aproximadamente, hasta obtener una
por la boca de llenado. Procesar durante
lentamente 1½ taza (355 ml) de agua,
Seguir procesando mientras agrega
con una espátula si es necesario.
moler, raspando los lados del tazón
de metal. Pulsar 10–15 veces para
de alimentos equipada con cuchilla
colocarlos en el tazón de una procesadora
1. Escurrir las lentejas y el fenogreco y
para engrasar las placas
¼ taza (60 ml) de aceite vegetal,
¼ cebolla amarilla
½ cucharadita de sal kosher
1 taza (125 g) de harina de arroz
2 tazas (475 ml) de agua fría
con las lentejas
fenogreco para remojar
¼ cucharadita de semillas de
semillas de fenogreco
durante una noche en agua y
enjuagadas y remojadas
(lentejas partidas negras)*,
½ taza (75 g) de "urad dal"
Rinde 12 "dosas"
"sambhar" (página 25).
nuestro chatni verde fresca (receta anterior) o
crujientes del sur de la India. Sírvalas con
maximiza el sabor agrio de estas "crêpes"
Dejar fermentar la mezcla durante la noche
"Dosas"
• Fibra 1g
• Colesterol 0mg • Sodio 98mg • Calcio 7mg
• Proteínas 0g • Grasa 2g • Grasa saturada 2g
Calorías 27 (69% de grasa) • Carbohidratos 2g
Información nutricional por porción (1 cucharada):
un recipiente hermético.
refrigerador durante hasta 2 semanas, en
2. Usar inmediatamente o conservar en el
necesario.
la licuadora para raspar la jarra si es
hasta obtener una mezcla suave. Apagar
alta durante aproximadamente 1 minuto,
la menta y el coco. Licuar a velocidad
segundos adicionales. Agregar el cilantro,
minuto. Raspar la jarra y licuar durante 20
velocidad alta durante aproximadamente 1
en la jarra de una licuadora. Licuar a
1. Colocar los primeros seis ingredientes
azúcar
½ taza (40 g) de coco rallado sin
¼ taza (15 g) de menta fresca
½ taza (30 g) de cilantro fresco
¼ cucharadita de comino en polvo
½ cucharadita de sal kosher
semillas, en trocitos
1 jalapeño o chile serrano, sin
mitad
jengibre, pelado y cortado a la
1 trozo de ½ pulgada (1.5 cm) de
1 tomate pequeño, picado
Page 37

24
fresco
4 cucharadas de jugo de limón/lima
Rinde aproximadamente ¾ taza (175 ml)
minuto adicional. Colocar la masa sobre
a formar una bola, amasar durante 1
llenado. Después de que la masa llegue
echar lentamente el agua por la boca de
o amasadora. Encender la máquina y
o para acompañar cualquier curry.
perfecto para servir con "naan" o "chapati",
Este chatni originario del sur de la India es
Chatni ("chutney") verde fresca
alimentos equipada con cuchilla picadora
segundos con una procesadora de
1. Procesar la harina y la sal durante 10
engrasar las placas
mantequilla clarificada o ghi para
1 taza (235 ml) de agua tibia
• Fibra 4g
• Colesterol 0 mg • Sodio 286mg • Calcio 1mg
• Proteínas 3g • Grasa 3g • Grasa saturada 0g
Calorías 130 (20% de grasa) • Carbohidratos 23g
Información nutricional por "chapati":
5. Servir tibio.
verde (receta a continuación).
Repetir con el resto de la masa.
limpia para mantenerlo tibio y suave.
4. Reservar, cubriendo el pan con una toalla
"Chapati"
1 cucharadita de sal kosher
de trigo integral
2 tazas (250 g) de harina pastelera
Rinde 8 "chapati"
con curry de vegetales (página 26) o chatni
Estos panes indios delgados son deliciosos
"chapati" siga flexible.
que las orillas estén doradas, pero que el
durante 10 minutos adicionales, hasta
el pan. Cerrar cuidadosamente y cocer
cepilla para crear bolsas de vapor en
mantequilla. Usar presión mientras
segundos, abrir y cepillar la orilla con
ponerle seguro. Cocer durante 30–40
Cerrar cuidadosamente la tapa, sin
disco de masa sobre la placa inferior.
mantequilla clarificada o ghi. Colocar un
engrasar levemente las placas con
en la posición cerrada. Una vez caliente,
precalentar el aparato a TORTILLA/HI,
3. Instalar las placas del lado plano y
masa.
plástico a medida que estira el resto de la
cm) de diámetro. Cubrir los discos con
discos delgados de 6–8 pulgadas (15–20
Aplastar y estirar la masa para formar
2. Dividir la masa en 8 porciones iguales.
temperatura ambiente durante ½–2 horas.
una película de plástico. Dejar reposar a
la masa en un tazón limpio y cubrir con
y amasar a mano varias veces. Colocar
una superficie ligeramente enharinada
• Fibra 1g
• Colesterol 9mg • Sodio 195mg • Calcio 38mg
• Proteínas 6g • Grasa 10g • Grasa saturada 3g
Calorías 279 (31% de grasa) • Carbohidratos 42g
Información nutricional por "naan":
con el resto de la masa.
hasta dorarse. Retirar y reservar; repetir
aproximadamente 2 minutos por lado,
masa con más mantequilla. Cocer durante
placa y cepillar la parte superior de la
Colocar un disco de masa sobre cada
placas con mantequilla clarificada o ghi.
(posición abierta). Engrasar levemente las
caliente, abrir cuidadosamente las placas
el aparato a TORTILLA/HI. Una vez
4. Instalar las placas planas y precalentar
los discos a medida que cuece el pan.
pulgadas (15–20 cm) de diámetro. Formar
cada bola para formar un disco de 6–8
manteniendo el resto cubierto, estirar
con solamente una bola a la vez y
3. Dividir la masa en 8 porciones. Trabajando
minutos, a temperatura ambiente.
plástico. Dejar reposar durante 15
aceitado y cubrir con una película de
Page 38

23
engrasar las placas
tazón
un poco más para engrasar el
"Naan"
• Calcio 24mg • Fibra 1g
panqueque):
2. Colocar en un tazón limpio levemente
enharinada.
sobre una superficie ligeramente
adicional. Retirar y amasar manualmente
de masa. Amasar durante un minuto
y procesar hasta que se forme una bola
leche y el aceite por la boca de llenado
funcionando, agregar lentamente la
picadora o amasadora. Con la máquina
de alimentos equipada con cuchilla
10 segundos con una procesadora
1. Procesar los ingredientes secos durante
mantequilla clarificada o ghi para
¼ taza (60 ml) de aceite vegetal +
baja en grasa
1 taza (235 ml) de leche entera o
(opcional)
1 pizca de comino en polvo
½ cucharadita de sal kosher
1 cucharadita de polvo de hornear
4 cucharaditas de azúcar granulada
3½ tazas (435 g) de harina común
Rinde 8 panes
opcional, pero le da un sabor interesante.
casi cualquier plato indio. El comino es
Pan indio tradicional, ideal para acompañar
• Colesterol 50mg • Sodio 270mg
• Proteínas 4g • Grasa 4g • Grasa saturada 0g
Calorías 78 (40% de grasa) • Carbohidratos 8g
Información nutricional por pedazo (4 por
las tiendas asiáticas.
mayoría de los supermercados grandes o en
disponibles en la sección étnica de la
* Estos condimentos japoneses están
panqueque en cuatro pedazos y servir.
con el resto de la mezcla. Cortar cada
el panqueque sobre un plato. Repetir
y las cebolletas reservadas. Colocar
rociar con "gomasio", "katsuobushi"
formando líneas perpendiculares, y
preparada. Rociar la mayonesa encima,
con 1 cucharada de la salsa okonomiyaki
Cepillar la parte superior del panqueque
4. Abrir las placas y voltear el panqueque.
que esté crujiente y dorado.
seguro. Cocer durante 3½ minutos, hasta
cuidadosamente la tapa, sin ponerle
6 pulgadas (15 cm) de diámetro. Cerrar
la placa inferior y formar un círculo de
taza (60 ml) de la mezcla en el centro de
engrasar las placas con aceite. Echar ½
en la posición cerrada. Una vez caliente,
precalentar el aparato a TORTILLA/HI,
3. Instalar las placas del lado plano y
ingredientes estén cubiertos con mezcla.
la harina esté disuelta y que todos los
sésamo y revolver suavemente hasta que
el mirín, la salsa de soya y el aceite de
sal; revolver. Agregar los huevos, el agua,
un tazón grande. Agregar la harina y la
(75 g) de cebolletas y los camarones en
2. Combinar la col, las zanahorias, ½ taza
una mezcla homogénea; reservar.
en un tazón pequeño y batir hasta obtener
1. Colocar todos los ingredientes de la salsa
katsuobushi*, para servir
para servir
gomasio* o semillas de sésamo,
mayonesa Kewpie*, para servir
placas
aceite vegetal para engrasar las
1 cucharadita de aceite de sésamo
2 cucharaditas de salsa de soya
arroz japonés)
1 cucharadas de mirín (vino de
1 cucharada de agua
3 huevos grandes
½ cucharadita de sal kosher
¾ taza (95 g) de harina común
pedacitos
½ taza (75 g) de camarones, en
en rodajas
cebolletas ("scallions"),
½ taza (75 g) + 2 cucharadas de
Page 39

22
rallada
tazas (250 g) de col verde finamente
le gusta".
(panqueques japoneses)
Okonomiyaki
de vegetales
zanahoria hecha con un pelador
1 taza (100 g) de "cinta" de
2½
Panqueques:
½ cucharadita de salsa de soya
Al final del
arroz japonés)
¾ cucharadita de mirín (vino de
1½ cucharada de miel
Worcestershire
1 cucharada de salsa
2 cucharadas de ketchup
Salsa:
Rinde 4 panqueques de 8 pulgadas (20 cm)
de la palabra "okonomi" que significa "como
vegetal, carne o marisco. Su nombre viene
puede prepararse con cualquier tipo de
parecido a la pizza que a los panqueques,
Este tentempié japonés popular, más
una cucharada del relleno encima. Doblar la
la mitad inferior de cada disco y esparcir
cocidas, disponer un pedazo de tofu sobre
4.
Cuando todas las hojas wan-tan están
la mezcla.
cuidadosamente y repetir con el resto de
tiempo, la unidad emitirá un pitido. Retirar
activar el temporizador.
Cerrar la tapa y ponerle seguro para
brocha, para formar un círculo delgado.
rápidamente la mezcla, usando una
la placa engrasada caliente. Esparcir
cucharada pequeña de la mezcla sobre
la placa inferior con aceite. Echar una
a 1 minuto. Una vez caliente, engrasar
la posición cerrada. Fijar el temporizador
precalentar el aparato a TORTILLA/HI, en
3. Instalar las placas del lado plano y
para combinar; reservar.
excepto el tofu, en un tazón, y revolver
2. Colocar todos los ingredientes del relleno,
reservar.
colador de malla fina si es necesario);
obtener una mezcla muy suave (colar con
hojas de wan-tan en un tazón y batir hasta
1. Colocar todos los ingredientes de las
• Fibra 1g
• Colesterol 7mg • Sodio 95mg • Calcio 15mg
• Proteínas 2g • Grasa 2g • Grasa saturada 0g
Calorías 45 (43% de grasa) • Carbohidratos 5g
Información nutricional por rollito:
dulce.
6. Servir inmediatamente, con salsa de chile
que estén dorados y crujientes.
la temperatura del aceite bajará. Freír hasta
cuidando de no sobrellenar la salteadora, o
caliente, agregar unos rollitos, teniendo
que alcance 180°C (350 °F). Cuando esté
(5 cm) de aceite. Calentar el aceite hasta
pequeña con aproximadamente 2 pulgadas
5.
Llenar una salteadora grande o una olla
repetir con el resto de los discos.
Enrollar el rollito de primavera. Reservar y
luego doblar las extremidades para cerrar.
mitad inferior encima de la mitad superior, y
salsa de chile dulce para servir
placas y freír
aceite vegetal para engrasar las
cortado en 28 tiritas
½ bloque de tofu extrafirme,
jugo de ½ limón
1½ cucharada de salsa de pescado
picado
jalapeño o serrano, finamente
½ chile verde pequeño, por ej.
finamente rebanadas
/3 taza (20 g) de hojas de albahaca,
1
picado
½ taza (30 g) de cilantro fresco,
picadas
3 cebolletas ("scallions"), finamente
en juliana
jengibre fresco, pelado y cortado
1 trozo de 1 pulgada (2.5 cm) de
4 zanahorias, en juliana
Page 40

21
rebanadas
6 hojas de col verde, finamente
Relleno:
⁄3 taza (235 ml)
1
¼ cucharadita de sal kosher
1 taza (235 ml) de agua
1 taza (125 g) de harina común
1 huevo grande
Hojas de wan-tan:
Rinde 28 rollitos de primavera
ingredientes frescos y sabor.
Estos deliciosos aperitivos están repletos con
Rollitos de primavera
reservar.
de vino de arroz, el agua y la salsa Hoisin;
2 cucharadas de maicena,
soya,
5. Combinar ½ taza (125 ml) de salsa de
durante 30 minutos.
de vino de arroz. Cubrir y refrigerar
cucharadita de maicena y 1 cucharadita
con 2 cucharadas de salsa de soya, 1
cerdo en tiritas muy finas. Combinar
4. Preparar el relleno de cerdo. Cortar el
dorados.
darles la vuelta y cocerlos hasta que estén
la superficie de los panqueques antes de
• Fibra 1g
• Colesterol 42mg • Sodio 584mg • Calcio 14mg
• Proteínas 8g • Grasa 2g • Grasa saturada 1g
Calorías 91 (22% de grasa) • Carbohidratos 10g
Información nutricional por ¼ taza (50 g) de cerdo:
Esperar hasta que aparezcan burbujas a
hasta que estén cocidos pero flexibles.
aproximadamente 2 minutos por lado,
con aceite. Cocer los panqueques durante
abierta) y engrasar levemente las placas
• Fibra 0g
• Colesterol 0mg • Sodio 1mg • Calcio 0mg
• Proteínas 2g • Grasa 1g • Grasa saturada 0g
Calorías 58 (14% de grasa) • Carbohidratos 11g
Información nutricional por panqueque:
de cerdo "Mu Shu"
aproximadamente ¼ taza (50g) de relleno
de servir. Servir cada panqueque con
el cerdo al sartén y agregar el huevo antes
hasta que esté a punto de hervir. Regresar
mezcla de salsa de soya y seguir cociendo
durante 5 minutos adicionales. Agregar la
de añadir las cebolletas. Revolver y cocer
la col, y cocer durante 1–2 minutos antes
estén fragantes. Agregar las zanahorias y
aproximadamente 2 minutos, hasta que
setas, el jengibre y el ajo. Cocer durante
Cuando el aceite esté caliente, agregar las
aceite y calentarla a fuego medio-alto.
agregar la cucharada remanente de
7. Limpiar el sartén con una toalla de papel,
ligeramente; reservar.
el cerdo, en dos veces, hasta dorarse
hasta que estén cocidos; reservar. Cocer
los huevos y cocer, revolviendo, justo
Cuando el aceite esté caliente, agregar
cucharada de aceite, en un sartén grande.
6. Poner a calentar a fuego medio 1
Una vez caliente, abrir las placas (posición
PIZZELLE/MED, en la posición cerrada.
y precalentar el aparato a CREPE/
3. Instalar las placas del lado plano
los lados estén aceitados.
con el resto de la masa hasta que todos
superior con aceite de sésamo. Repetir
apuntando hacia abajo. Cepillar la parte
de papel encerado, el lado aceitado
de sésamo. Colocarlo sobre un pedazo
la parte superior de cada disco con aceite
pulgadas (17.5 cm) de diámetro. Cepillar
muy delgados de aproximadamente 7
superficie enharinada para formar discos
iguales. Estirar cada porción sobre una
de largo y cortarlo en 16 porciones
aproximadamente 12 pulgadas (30 cm)
2. Formar un cilindro de masa de
más.
de plástico y dejar leudar durante 1 hora o
masa en un tazón, cubrir con una película
minutos, hasta que esté suave. Colocar la
enharinada durante aproximadamente 5
bola. Amasar la bola sobre una superficie
revolver con una cuchara hasta formar una
tazón mediano. Agregar el agua caliente y
1. Preparar la masa. Tamizar la harina en un
Page 41

20
finamente picadas
2 cebolletas ("scallions"),
3 tazas (180 g) de col china rallada
fina
1 zanahoria mediana, en juliana
1 diente de ajo, finamente picado
finamente picado
½ onza (15 g) de jengibre, pelado y
en juliana fina
4 onzas (115 g) de setas Shiitake,
batidos
2 huevos grandes, ligeramente
2 cucharadas de aceite vegetal
¼ taza (60 ml) de salsa Hoisin
½ taza (120 ml) de agua
vino de arroz
⁄3 taza (80 ml) de
1
1 cucharadita +
maicena
1 cucharadita + 2 cucharadas de
salsa de soya
2 cucharadas + ½ taza (60 ml) de
deshuesadas
1 libra (455 g) de chuletas de cerdo
Cerdo:
1 cucharada de aceite de sésamo
1 taza (235 ml) de agua hirviente
2 tazas (250 g) de harina común
Panqueques:
"Mu Shu"
Rinde 8 panqueques y 4 tazas (800 g) de cerdo
perfecta para acompañar los panqueques.
más fresca que la versión comprada, y es
Nuestro cerdo "Mu Shu" es una versión
perfectos es formar discos muy delgados.
El secreto para preparar panqueques
con cerdo "Mu Shu"
Panqueques mandarines
mientras los panes están cociendo.
resto de la mezcla, estirando cada bola
para mantenerlo tibio. Repetir con el
un plato y cubrir con una toalla limpia
7. Una vez cocido, colocar el pan pita sobre
cocción.
Los panes deberían inflarse durante la
1½–2 minutos, hasta que esté cocido.
5–6 minutos, dándoles la vuelta cada
masa sobre cada placa y cocer durante
placas con aceite. Colocar un disco de
(posición abierta). Engrasar levemente las
caliente, abrir cuidadosamente las placas
HI, en la posición cerrada. Una vez
precalentar el aparato a TORTILLA/
6. Instalar las placas del lado plano y
cubierta para evitar que se seque.
(15 cm) de diámetro. Mantener la masa
disco delgado a espeso de 6 pulgadas
la vez, estirar cada bola para formar un
5. Trabajando con solamente una bola a
ambiente durante 20–30 minutos
de plástico y dejar reposar a temperatura
bolas. Cubrir sin apretar con una película
la masa en 8 porciones iguales y formar
4.
Aplastar la masa para desinflarla. Dividir
volumen.
aproximadamente 1 hora, al doble de su
reposar a temperatura ambiente durante
Cubrir con una película de plástico y dejar
volteándola para cubrirla con aceite.
con aceite y colocar la masa en el tazón,
3. Engrasar levemente el interior de un tazón
esté suave, lisa y ligeramente pegajosa.
la masa durante 5–6 minutos, hasta que
reducir la velocidad al nivel 3 y amasar
harina. Cuando la masa forme una bola,
pegajosa. Puede que no necesite toda la
hasta que la masa forme una bola
• Fibra 2g
• Colesterol 0mg • Sodio 429mg • Calcio 6mg
• Proteínas 5g • Grasa 6g • Grasa saturada 1g
Calorías 199 (25% de grasa) • Carbohidratos 33g
Información nutricional por pan pita:
al nivel 4, agregando la harina remanente,
Incrementar progresivamente la velocidad
1 minuto, usando la velocidad más baja.
harina, la sal y el aceite. Mezclar durante
fermentada, agregar 2 tazas (250 g) de la
Page 42

19
sabroso.
Pan pita
mediano. Cuando la levadura esté
2. Combinar las harinas en un tazón
durante 5–10 minutos.
con gancho amasador y dejar fermentar
en el bol de una batidora de pie equipada
1.
Colocar la levadura, el azúcar y el agua
placas
aceite vegetal para engrasar las
1 cucharada de aceite de oliva
1½ cucharaditas de sal kosher
integral
1 taza (125 g) de harina de trigo
2 tazas (250 g) de harina común
1 taza (235 ml) de agua tibia
1 pizca de azúcar granulada
activa
1¾ cucharadita de levadura seca
Rinde 8 panes pita de 6 pulgadas (15 cm)
hueco en el centro, pero estará igual de
algo caprichosa. Puede que el pan no esté
durante la cocción; la masa del pan pita es
No se desanime si su pan pita no se infla
• Sodio 626mg • Calcio 47mg • Fibra 1g
• Grasa saturada 3g • Colesterol 78mg
• Proteínas 26g • Grasa 9g
Calorías 215 (38% de grasa) • Carbohidratos 7g
Información nutricional por porción (½ taza):
a fuego lento durante 10–15 minutos.
minutos. Revolver, tapar y seguir cociendo
salteadora. Cocer a fuego lento durante 10
regresar la carne desmenuzada a la
6.
Cuando la mezcla empiece a hervir,
líquido de cocción.
Worcestershire, la salsa de tomate y el
Agregar el chipotle, y luego la salsa
para despegar los pedacitos de carne.
ajo en la salteadora, raspando el fondo
carne. Colocar la cebolla, el pimiento y el
veces. Retirar del fuego y reservar la
aproximadamente 3 minutos, en varias
la carne desmenuzada y cocer durante
grande. Cuando esté caliente, agregar
calentar a fuego medio, en una salteadora
5. Para preparar el sofrito, poner el aceite a
carne con un tenedor.
8–12 horas. Antes de usar, desmenuzar la
en su jugo, en el refrigerador, durante
maximizar el sabor, dejar reposar la carne
4. Retirar del horno. Dejar enfriar. Para
al horno, sin tapar, durante 2 horas.
carne a la salteadora. Meter la salteadora
la mezcla empiece a hervir, regresar la
Worcestershire y el caldo de res. Cuando
Agregar la hoja de laurel, la salsa
Cocer hasta que estén suaves y fragantes.
para despegar los pedacitos de carne.
el ajo en la saltadora y raspar el fondo
3. Retirar y reservar. Colocar la cebolla y
veces si es necesario).
3–5 minutos por lado (hacer esto en varias
caliente, agregar la carne y cocer durante
en una salteadora grande. Cuando esté
Poner el aceite a calentar a fuego medio,
y pimienta. Cortar la carne si es necesario.
2. Sazonar la carne por ambos lados con sal
1. Precalentar el horno a 275°F (160°C).
cocción de la res
¾ taza (175 ml) del líquido de
¼ taza (60 ml) de salsa de tomate
Worcestershire
cucharadas de salsa
2
4 dientes de ajo, finamente picados
1 chipotle, en puré
mediano, en juliana
1 pimiento dulce rojo pequeño a
ebolla mediana, finamente picada
1 c
1 cucharadita de aceite vegetal
Sofrito:
1 taza (235 ml) de caldo de res
Worcestershire
¼ taza (60 ml) de salsa de
1 hoja de laurel
4 dientes de ajo machacados
1 cebolla pequeña, en rodajas
1 cucharadita de aceite vegetal
Page 43

18
recién molida
½ cucharadita de pimienta negra
½ cucharadita de sal kosher
arrachera/entraña ("flank steak")
1½ libra (680 g) de bistec de falda/
Carne:
Rinde aproximadamente 3 tazas
Carne mechada
• Calcio 54mg • Fibra 2g
• Colesterol 0mg • Sodio 385mg
• Grasa 7g • Grasa saturada 1g
• Carbohidratos 29g • Proteínas 4g
Calorías 185 (32% de grasa)
Información nutricional por arepa:
supermercados.
cocida. La encontrará en la mayoría de los
* La Masarepa es una harina de maíz pre-
aguacate, etc.).
desmenuzado, cebolla roja curtida,
cobertura deseada (por ej. queso Cotija
de carne mechada. Servir así o con la
con aproximadamente ½ taza (100 g)
longitudinalmente por la mitad y rellenar
4. Para servir, cortar las arepas
estén doradas y crujientes.
durante 5–6 minutos por lado, hasta que
tres arepas sobre cada placa y cocer
placas con aceite de oliva. Disponer
caliente, engrasar generosamente las
el aparato a TORTILLA/HI. Una vez
3. Instalar las placas planas y precalentar
de diámetro.
formar 6 discos de 3 pulgadas (7.5 cm)
2. Dividir la masa en 6 porciones iguales y
ligeramente húmeda al toque.
líquido. La masa final debería sentirse
la Masarepa haya absorbido todo el
sólida. Seguir mezclando hasta que
mezcla debería estar entre líquida y
revolviendo con una cuchara. La
la mezcla a los ingredientes secos,
oliva y el agua y echar lentamente
tazón grande. Combinar el aceite de
1. Combinar la Masarepa y la sal en un
continuación)
1 receta de carne mechada (a
2 tazas (475 ml) de agua tibia
placas
poco más para engrasar las
2 cucharadas aceite de oliva + un
1 cucharadita de sal kosher
2 tazas (300 g) de Masarepa*
Rinde 6 arepas
continuación).
rellenas con carne mechada (receta a
una variedad de alimentos. Nos encantan
tradicional puede rellenarse o servirse con
Este plato colombiano/venezolano
Arepas
• Calcio 1mg • Fibra 1g
• Colesterol 0mg • Sodio 229mg
• Grasa 10g • Grasa saturada 2g
• Carbohidratos 22g • Proteínas 3g
Calorías 190 (47% de grasa)
Información nutricional por tortilla:
cada 1½–2 minutos.
durante 4–6 minutos, dándole la vuelta
en la posición abierta. Cocer las tortillas
tortillas en TORTILLA/HI con el aparato
tortillas más tradicionales, cocer las
compradas en las tiendas. Si desea
tortillas muy parecidas a las tortillas
Nota: el método descrito arriba rinde
ambiente antes de estirar.
bolsa hermética. Llevar a temperatura
refrigerador durante hasta 5 días, en una
* La masa se podrá conservar en el
acompañamientos deseados.
de la misma manera. Servir con los
tibia. Cocer el resto de las tortillas
o una toalla limpia para mantenerla
con una toalla de papel humedecida
6. Colocar la tortilla sobre un plato y cubrir
claras y flexibles.
tortillas deberían estar cocidas, pero
tiempo, la unidad emitirá un pitido. Las
activar el temporizador. Al final del
Cerrar la tapa y ponerle seguro para
Colocar la masa sobre la placa inferior.
ambas placas con aceite vegetal.
segundos). Una vez caliente, engrasar
el temporizador a TORTILLA (30
HI, en la posición cerrada. Fijar
Page 44

17
precalentar el aparato a TORTILLA/
5. Instalar las placas del lado plano y
diámetro.
delgado de 6 pulgadas (15 cm) de
estirar cada bola para formar un disco
la vez y manteniendo el resto cubierto,
4. Trabajando con solamente una bola a
minutos.*
a temperatura ambiente durante 30–60
una película de plástico y dejar reposar
y formar bolas. Cubrir sin apretar con
3. Dividir la masa en 10 porciones iguales
amasarla hasta que esté suave.
una superficie ligeramente enharinada y
una bola de masa. Poner la masa sobre
mezclando con los dedos, hasta formar
los dedos. Agregar el agua y seguir
2. Combinar la manteca a la harina, con
mediano y revolver para combinar.
1. Poner la harina y la sal en un tazón
Fijar el
la placa. Cepillar la placa superior con
colocar cuidadosamente la masa sobre
engrasar la placa inferior con aceite y
cm) de diámetro. Una vez caliente,
disco muy delgado de 8 pulgadas (20
7. Estirar cada porción para formar un
temporizador a 3 minutos.
HI, en la posición cerrada.
precalentar el aparato a TORTILLA/
6.
Instalar las placas del lado plano y
con plástico.
5. Dividir la masa en 8 porciones y cubrir
doble de su volumen.
Dejar leudar durante una hora más, al
suavemente para desinflar y doblar.
aproximadamente 2 horas. Aplastar
de plástico y dejar leudar durante
Cubrir sin apretar con una película
4. Colocar la masa en un tazón limpio.
amasar durante un minuto adicional.
placas
aceite vegetal para engrasar las
taza (175 ml) de agua tibia
¾
vegetal, a temperatura ambiente
6 cucharadas (85 g) de manteca
1 cucharadita de sal kosher
2½ tazas (310 g) de harina común
Rinde 10 tortillas de 6 pulgadas (15 cm)
compradas una cosa del pasado.
rápidas de preparar, harán de las tortillas
sugerimos que pruebe estas. Simples y
Si nunca ha probado tortillas frescas, le
Tortillas de harina
líquido. Después de obtener una masa,
tazón. Puede que no necesite todo el
masa que no pegue a los lados del
líquido necesaria para obtener una
llenado, agregando la cantidad de
mantequilla/leche por la boca de
echar lentamente la mezcla de
levadura. Con la máquina encendida,
mantequilla/leche a la mezcla de
3. Agregar la mezcla enfriada de
picadora o amasadora.
de alimentos equipada con cuchilla
10 segundos con una procesadora
2. Procesar la harina y la sal durante
294mg • Calcio 19mg • Fibra 2g
saturada 3g • Colesterol 10mg • Sodio
24g • Proteínas 4g • Grasa 6g • Grasa
Calorías 158 (33% de grasa) • Carbohidratos
Información nutricional por galleta:
resto de la masa.
Retirar y reservar. Repetir con el
pitido.
final del tiempo, la unidad emitirá un
Al
Cerrar la tapa y ponerle
seguro para activar el temporizador.
masa si desea.
aceite y esparcir sal y semillas sobre la
durante aproximadamente 5 minutos.
azúcar en agua tibia y dejar fermentar
tazón pequeño, disolver la levadura y el
del fuego y enfriar ligeramente. En un
la mantequilla esté derretida; retirar
hasta que la leche esté tibia y que
fuego lento, en una cacerola pequeña,
1. Calentar la leche y la mantequilla a
semillas variadas
copos de sal marina
Page 45

16
las placas
aceite vegetal para engrasar
¾ cucharadita de sal kosher
taza (60 g) de harina de centeno
taza (185 g) de harina común
½
1½
2 tazas (475 ml) de agua tibia
1 pizca de azúcar granulada
activa
1 cucharadita de levadura seca
mantequilla sin sal
2 cucharadas (55 g) de
½ taza (120 ml) de leche entera
Rinde 8 galletas de 8 pulgadas (20 cm)
sésamo o anís) antes de cocer.
semillas o especias (por ej. amapola,
de vino. Puede salpicar la mezcla con
son perfectas para acompañar un vaso
y copos de sal marina, estas galletas
Deliciosas con queso de cabra suave
con vino
Galletas saladas para comer
• Sodio 198mg • Calcio 9mg • Fibra 1g
• Grasa saturada 0g • Colesterol 16mg
• Proteínas 2g • Grasa 3g
Calorías 62 (39% de grasa) • Carbohidratos 8g
Información nutricional por "latke":
hasta el momento de servir.
el horno (precalentado a 100°C/200°F)
puede mantener los "latkes" calientes en
forrado con papel absorbente. También
Colocar los "latkes" sobre un plato
5.
entre cada turno.
engrasando generosamente las placas
4. Repetir con el resto de la mezcla,
estén crujientes y ligeramente dorados.
durante 6 minutos por lado, hasta que
tres panqueques por placa y cocer
exprimir el exceso de líquido. Formar
sobre las placas, continuando de
3. Echar cucharadas grandes de la mezcla
con aceite.
caliente, abrir las placas y engrasarlas
el aparato a TORTILLA/HI. Una vez
2. Instalar las placas planas y precalentar
Al final del
Agregar el huevo; revolver.
sal y la pimienta; mezclar para combinar.
un tazón y agregar la harina, el perejil, la
eliminar el exceso de agua. Colocar en
suavemente en una toalla limpia para
1. Exprimir la patata y la cebolla
placas
aceite vegetal para engrasar las
huevo grande, ligeramente batido
del año.
1
recién molida
¼ cucharadita de pimienta negra
1 cucharada de sal kosher
1 cucharada de perejil picado
harina de pan ácimo
2 cucharadas de harina común o
½ cebolla mediana, rallada
peladas y ralladas
1 libra (455 g) de patatas Russet,
Rinde 12 "latkes" de 3 pulgadas (4.5 cm)
para las fiestas, o en cualquier momento
Esta receta fácil de preparar es perfecta
(panqueques de patata)
"Latkes"
• Sodio 463mg • Calcio 3mg • Fibra 5g
• Grasa saturada 1g • Colesterol 0mg
Calorías 159 (41% de grasa)
Cerrar la tapa y ponerle seguro
• Carbohidratos 18g • Proteínas 6g • Grasa 8g
Información nutricional por "socca":
Retirar y repetir con el resto de la mezcla.
tiempo, la unidad emitirá un pitido.
para activar el temporizador.
inferior.
grandes de la mezcla sobre la placa
con aceite de oliva. Echar cucharadas
3. Una vez caliente, engrasar las placas
más oscuras.
Aumentar el tiempo si desea "crêpes"
temporizador a CREPE (1½ minutos).
HI, en la posición cerrada. Fijar el
precalentar el aparato a TORTILLA/
2. Instalar las placas del lado plano y
caliente.
demasiado espesa, agregar más agua
de la crema líquida para batir. Si está
Page 46

15
mezcla debería tener la consistencia
Agregar el aceite de oliva, batiendo. La
conseguir una mezcla homogénea.
lentamente el agua, batiendo, hasta
un tazón y batir para combinar. Agregar
1. Poner la harina, la sal y las especias en
placas
un poco más para engrasar las
2 cucharadas aceite de oliva +
1 taza (235 ml) de agua tibia
¼ cucharadita de comino en polvo
recién molida
½ cucharadita de pimienta negra
1 cucharadita de sal kosher
garbanzo, tamizada
1¼ taza (155 g) de harina de
Rinde aproximadamente 5 "socca"
rellenar con vegetales asados.
relleno. Sin embargo, también se pueden
tradicionalmente como aperitivos, sin
se sirven muy calientes. Se comen
"crêpes" crujientes llenas de sabor
Popular en el sur de Francia, estas
"Socca"
• Calcio 243mg • Fibra 0g
• Colesterol 96mg • Sodio 213mg
• Grasa 20g • Grasa saturada 7g
• Carbohidratos 19g • Proteínas 12g
Calorías 302 (60% de grasa)
Información nutricional por "blintz":
estén bien dorados.
durante 3–4 minutos por lado, hasta que
rellenos sobre cada placa. Cocer
mantequilla y colocar 3 "blintzes"
generosamente las placas con
HI y abrir las placas. Engrasar
6. Ajustar la temperatura a TORTILLA/
extremidades para cerrar.
de la mitad superior, y luego doblar las
"blintz". Doblar la mitad inferior encima
relleno sobre la mitad inferior de cada
5. Para rellenar, echar 3–4 cucharadas del
placas cuando es necesario.
mezcla, engrasando ligeramente las
de rellenar. Repetir con el resto de la
Al final del
Cerrar la tapa
papel de aluminio hasta el momento
Cubrir con una película de plástico o
de cada quinto "blintz" si es necesario.
sulfurizado o de papel encerado encima
no peguen. Colocar una hoja de papel
superponiéndolos ligeramente para que
Colocar los "blintzes" sobre un plato,
"blintzes" deberían estar muy claros.
tiempo, la unidad emitirá un pitido. Los
para activar el temporizador.
sobre la placa inferior.
cucharadas grandes de la mezcla
con mantequilla o aceite. Echar
4. Una vez caliente, engrasar las placas
Fijar el temporizador a 1 minuto.
PIZZELLE/MED, en la posición cerrada.
y precalentar el aparato a CREPE/
3. Instalar las placas del lado plano
Reservar hasta el momento de usar.
mano, hasta obtener una mezcla suave.
ingredientes, usando una batidora de
2.
Preparar el relleno: combinar los
horas).
minutos o más (preferiblemente 8–12
de plástico y dejar reposar durante 30
en un tazón, cubrir con una película
durante el licuado. Colocar la mezcla
raspando la jarra si es necesario
hasta obtener una mezcla homogénea,
la sal en la jarra de una licuadora y licuar
la leche, el aceite, la harina, el azúcar y
1. Preparar la mezcla: colocar los huevos,
1–2 pizcas de sal kosher
limón
¼ cucharadita de ralladura de
granulada
2 cucharadas de azúcar
¼ taza (60ml) de leche entera
queso Ricotta
1 libra (455 g) de queso fresco o
Relleno:
placas
vegetal, para engrasar las
temperatura ambiente o aceite
mantequilla sin sal a
¼ cucharadita de sal kosher
Page 47

14
granulada
1 cucharadita de azúcar
1 taza (125 g) de harina común
2 cucharadas de aceite vegetal
baja en grasa
1¼ taza (295 ml) de leche entera o
3 huevos grandes
Mezcla:
Rinde aproximadamente 8 "blintzes"
puede usar mermelada.
clásico de queso fresco, pero también se
sea creativo. Aquí usamos un relleno
gran variedad de ingredientes. Entonces,
Los "blintzes" pueden rellenarse con una
"Blintzes"
• Calcio 45mg • Fibra 0g
• Colesterol 51mg • Sodio 71mg
• Grasa 2g • Grasa saturada 1g
• Carbohidratos 13g • Proteínas 4g
Calorías 87 (23% de grasa)
Información nutricional por "crespelle":
preparar esta receta para más personas.
Nota: duplicar los ingredientes para
5. Rellenar y servir inmediatamente.
Retirar y repetir con el resto de la mezcla.
permitir que las "crespelle" se doren.
tiempo, la unidad emitirá un pitido. NO
para activar el temporizador. Al final del
inferior. Cerrar la tapa y ponerle seguro
grandes de la mezcla sobre la placa
con papel absorbente. Echar cucharadas
un poco de aceite y eliminar el exceso
4. Una vez caliente, cepillar las placas con
crêpes tradicionales).
receta requiere menos tiempo que las
Fijar el temporizador a 1 minuto. (esta
PIZZELLE/MED, en la posición cerrada.
y precalentar el aparato a CREPE/
3.
Instalar las placas del lado plano
una mezcla homogénea.
ingredientes secos y batir hasta obtener
2. Agregar la leche y los huevos a los
batir para combinar.
1. Poner la harina y la sal en un tazón y
placas
aceite vegetal, para engrasar las
batidos
2 huevos grandes, ligeramente
1 taza (235 ml) de leche entera
1 pizca de sal kosher
flour
1 taza (125 g) de harina común
Rinde aproximadamente 8 "crespelle"
"crêpes" francesas, no incluyen mantequilla.
Ricotta) o dulces. A diferencia de las
salados (por ej. "manicotti" de queso
recetas y pueden rellenarse con rellenos
Estas "crêpes" italianas se usan en muchas
"Crespelle"
• Calcio 50mg • Fibra 1g
• Colesterol 69mg • Sodio 154mg
• Grasa 6g • Grasa saturada 3g
• Carbohidratos 11g • Proteínas 5g
Calorías 116 (45% de grasa)
Información nutricional por "crêpe":
5. Servir tibio.
½
repetir con el resto de la mezcla.
desea, cocer por más tiempo. Retirar y
deberían estar ligeramente doradas. Si
la unidad emitirá un pitido. Las orillas
el temporizador. Al final del tiempo,
la tapa y ponerle seguro para activar
sobre la placa inferior engrasada. Cerrar
4.
Echar cucharadas grandes de la mezcla
minutos).
Fijar el temporizador a CREPE (1
PIZZELLE/MED, en la posición cerrada.
y precalentar el aparato a CREPE/
3. Instalar las placas del lado plano
conservar durante hasta 3 días.
el refrigerador. La mezcla se podrá
la mezcla durante ½ hora o más, en
mezcla homogénea. Dejar reposar
y seguir batiendo hasta conseguir una
poco la mezcla de leche/mantequilla
espesa y pegajosa). Agregar poco a
mezcla homogénea (la mezcla estará
huevos y batir hasta conseguir una
y batir para combinar. Agregar los
Page 48

13
2. Poner la harina y la sal en un tazón
ambiente.
fuego y dejar enfriar a temperatura
mantequilla esté derretida. Retirar del
hasta que la leche esté tibia y que la
fuego lento, en una cacerola pequeña,
1. Calentar la leche y la mantequilla a
3 huevos grandes
½ cucharadita de sal kosher
¼ taza (30 g) de harina común
sarraceno
¾ taza (95 g) de harina de trigo
más para engrasar las placas
mantequilla sin sal + un poco
3 cucharadas (45 g) de
1¼ taza (295 ml) de leche entera
Rinde aproximadamente 10 "crêpes"
un huevo. ¡Delicioso!
relleno de espinaca y ajo, y cubiertas con
francesas tradicionales. Nos encantan con
Una deliciosa alternativa a las "crêpes"
"Crêpes" de trigo sarraceno
y servir inmediatamente.
delicadamente. Decorar con azúcar glasé
encima de la "crêpe". Enrollar firme pero
Esparcir 1–2 cucharada del relleno
2.
estén finamente picados.
cuchilla picadora. Procesar hasta que
procesadora de alimentos, equipada con
1. Poner los ingredientes en el bol de una
1 cucharada de ron
naranja
½ cucharadita de ralladura de
1 cucharadita de canela en polvo
¼ taza (50 g) de azúcar granulada
1½ taza (200 g) de nueces tostadas
Relleno:
relleno dulce:
tradicionalmente enrollados. Ejemplo de
Estos panqueques finos húngaros se sirven
Palacsinta (Hungría)
½
Cerrar
bosque y mermelada.
azúcar granulada, azúcar glasé, frutas del
Servir estas "crêpes" con mantequilla,
Pannkakor (Suecia)
Variaciones:
• Sodio 148mg • Calcio 38mg • Fibra 0g
• Grasa saturada 4g • Colesterol 71mg
• Proteínas 4g • Grasa 7g
Calorías 106 (56% de grasa) • Carbohidratos 8g
Información nutricional por "crêpe":
granulada.
añadir una cucharadita de azúcar
Nota: para preparar "crêpes" dulces,
favoritos.
5. Servir inmediatamente, con sus rellenos
Retirar y repetir con el resto de la mezcla.
deberían ser muy ligeramente doradas.
la unidad emitirá un pitido. Las "crêpes"
temporizador. Al final del tiempo,
la tapa y ponerle seguro para activar el
mezcla sobre la placa inferior.
4. Echar cucharadas grandes de la
minuto).
Fijar el temporizador a CREPE (1
PIZZELLE/MED, en la posición cerrada.
y precalentar el aparato a CREPE/
3. Instalar las placas del lado plano
hasta 3 días.
La mezcla se podrá conservar durante
(preferiblemente durante 8–12 horas).
el refrigerador durante ½ hora o más
película de plástico y dejar reposar en
mezcla homogénea. Cubrir con una
y seguir batiendo hasta conseguir una
poco la mezcla de leche/mantequilla
espesa y pegajosa). Agregar poco a
mezcla homogénea (la mezcla estará
huevos y batir hasta conseguir una
y batir para combinar. Agregar los
2. Poner la harina y la sal en un tazón
ambiente.
fuego y dejar enfriar a temperatura
mantequilla esté derretida. Retirar del
Page 49

12
hasta que la leche esté tibia y que la
fuego lento, en una cacerola pequeña,
1. Calentar la leche y la mantequilla a
3 huevos grandes
½ cucharadita de sal kosher
¾ taza (95 g) de harina común
más para engrasar las placas
mantequilla sin sal + un poco
4 cucharadas (55 g) de
1 taza (235 ml) de leche entera
Rinde aproximadamente 8 "crêpes"
o salada. ¡Todas son deliciosas!
rellenos para crear su propia versión, dulce
variaciones dulces. Experimente con varios
la versión clásica, así como un par de
de las "crêpes". Aquí le proponemos
Cada rincón del mundo tiene su versión
"Crêpes" clásicas
• Sodio 62mg • Calcio 9mg • Fibra 0g
• Grasa saturada 3g • Colesterol 29mg
• Carbohidratos 13g • Proteínas 2g • Grasa 6g
Calorías 108 (47% de grasa)
Información nutricional por pizzella:
resto de la mezcla.
una rejilla para enfriar. Repetir con el
4. Retirar cuidadosamente y colocar sobre
pitido.
final del tiempo, la unidad emitirá un
seguro para activar el temporizador. Al
de cada molde. Cerrar la tapa y ponerle
una cucharada de la mezcla en el centro
3. Cuando las placas están calientes, echar
PIZZELLE (2 minutos).
PIZZELLE/MED. Fijar el temporizador a
Ajustar la temperatura al nivel CREPE/
2. Instalar las placas para pizzellas.
mezcla).
cerciorándose que no hay grumos en la
puede usar un batidor de mano,
no mezclar demasiado (nota: también
10–15 segundos, justo hasta combinar;
los ingredientes secos y batir durante
aproximadamente 15 segundos. Agregar
la vainilla y seguir batiendo durante
baja, agregar la mantequilla derretida y
mezcla espesa. Batiendo a velocidad
batidora de mano, hasta conseguir una
en un tazón mediano. Batir, usando una
reservar. Colocar los huevos y el azúcar
de hornear y la sal en un tazón pequeño;
1. Combinar la harina, el cacao, el polvo
engrasar las placas
de vainilla aceite vegetal para
1 cucharada de extracto natural
sal, derretida y enfriada
½ taza (115 g) de mantequilla sin
taza (200 g) de azúcar granulada
1
3 huevos grandes
¼ cucharadita de sal kosher
hornear
2 cucharaditas de polvo de
polvo
¼ taza (30 g) de cacao amargo en
12⁄3 taza (210 g) de harina común
Rinde aproximadamente 28 pizzellas
frutas frescas o helado.
clásicas, estas galletas son deliciosas con
Aún más exquisitas de las pizzellas
Pizzellas de chocolate
• Calcio 9mg • Fibra 0g
• Colesterol 30mg • Sodio 44mg
• Grasa 6g • Grasa saturada 3g
• Carbohidratos 11g • Proteínas 1g
Calorías 104 (50% de grasa)
Información nutricional por pizzella:
crujientes.
reposar hasta que estén firmes y
pizzellas para formar cilindros. Dejar
pizzellas de las placas. Enrollar las
y rápidamente después de retirar las
formar los "cannoli" inmediatamente
preparar "cannoli". Cerciorarse de
Nota: esta receta es perfecta para
redondas.
galleta para formar tres pizzellas
5. Antes de servir, cortar el exceso de
resto de la mezcla.
una rejilla para enfriar. Repetir con el
4. Retirar cuidadosamente y colocar sobre
Page 50

11
1–2 minutos adicionales.
Si parecen muy claras, cocer durante
ligeramente doradas, pero aún flexibles.
un pitido. Las pizzellas deberían estar
Al final del tiempo, la unidad emitirá
seguro para activar el temporizador.
de cada molde. Cerrar la tapa y ponerle
una cucharada de la mezcla en el centro
3. Cuando las placas están calientes, echar
minutos).
Ajustar el temporizador a PIZZELLE (2
PIZZELLE/MED, en la posición cerrada.
precalentar el aparato a CREPE/
2. Instalar las placas para pizzellas y
mezcla).
cerciorándose que no hay grumos en la
también puede usar un batidor de mano,
combinar; no mezclar demasiado (nota:
durante 10–15 segundos, justo hasta
Agregar los ingredientes secos y batir
durante aproximadamente 15 segundos.
derretida y la vainilla y seguir batiendo
a velocidad baja, agregar la mantequilla
conseguir una mezcla espesa. Batiendo
usando una batidora de mano, hasta
azúcar en un tazón mediano. Batir,
combinar. Colocar los huevos y el
en un tazón pequeño, y revolver para
1. Colocar la harina y el polvo de hornear
placas
aceite vegetal para engrasar las
de vainilla
⁄3 de
1
1 cucharadita de extracto natural
sal, derretida y enfriada
½ taza (115 g) de mantequilla sin
taza (150 g) de azúcar granulada
¾
3 huevos grandes
hornear
2 cucharaditas de polvo de
1 taza (220 g) de harina común
Rinde 28 pizzellas
de anís, de almendra o de limón, si desea.
Sustituya otro saborizante, como extracto
perfumadas con extracto de vainilla.
Nuestras pizzellas clásicas están
Pizzellas clásicas
• Calcio 7mg • Fibra 0g
• Colesterol 18mg • Sodio 150mg
• Proteínas 1g • Grasa 1g • Grasa saturada 0g
Calorías 36 (30% de grasa) • Carbohidratos 5g
Información nutricional por blini:
picados.
y/o "crême fraîche" y cebollinos
caviar, salsa de rábano, trucha ahumada
6. Para servir: servir con salmón ahumado,
5. Repetir con el resto de la mezcla.
servir.
Mantener caliente hasta el momento de
6 minutos por lado, hasta dorarse.
placa. Cocer durante aproximadamente
cucharadas de la mezcla sobre cada
mantequilla esté caliente, echar 6
clarificada. Cuando el aceite/la
las placas con aceite o mantequilla
placas. Engrasar generosamente
caliente, abrir cuidadosamente las
el aparato a TORTILLA/HI. Una vez
4. Instalar las placas planas y precalentar
claras.
Incorporar delicadamente el resto de las
las claras batidas al puré de patatas.
firmes. Agregar aproximadamente
claras batidas no deberían estar muy
que se formen picos suaves. Nota: las
en un tazón grande y limpio y batir hasta
3. Colocar las claras y el crémor tartárico
esté cremosa y homogénea.
la batidora de pie, hasta que la mezcla
batidora de mano o el batidor plano de
Batir durante 3–5 minutos, usando una
la yema, la leche, la sal y la pimienta.
Agregar la crema agria, los huevos,
de hornear; revolver para combinar.
2. Agregar la levadura, la harina y el polvo
grande (tirar las peladuras).
pasapuré. Colocar en un recipiente
enfriar ligeramente y hacer puré con un
Page 51

placas
clarificada para engrasar las
Gold
caviar.
•
•
Fibra 0 g
•
Sodio 54mg
•
Grasa saturada 4 g
•
Carbohidratos 10g ∙
Calcio 0 mg
•
Grasa 6 g
10
patatas estén muy suaves. Dejar
Poner a hervir y cocer hasta que las
Cubrirlas completamente con agua fría.
1. Poner las patatas en una olla grande.
aceite vegetal o mantequilla
1 pizca de crémor tártaro
2 claras de huevo grande
(al gusto)
pimienta negra recién molida
1¾ cucharadita de sal kosher
2 cucharadas de leche entera
1 yema de huevo grande
2 huevos grandes
3 cucharadas de crema agria
hornear
1 cucharadita de polvo de
¾ taza (95 g) de harina común
activa
½ cucharadita de levadura seca
1 libra (455 g) de patatas Yukon
Rinde aproximadamente 32 blinis
tradicionalmente con salmón ahumado y
Este aperitivo de fiesta se come
"Blinis" (panqueques rusos)
•
Colesterol 15mg
Proteínas 1 g
Calorías 98 (51% de grasa)
Información nutricional por barquillo:
5. Repetir con el resto de la mezcla.
de los barquillos.
cuidadosamente y repetir con el resto
∙
encimera para sellar la juntura. Retirar
Presionar el cono formador sobre la
la encimera para cerrar el barquillo.
cono, y hacer rodar el cono sobre
del círculo, enrollar un lado sobre el
Colocar el cono formador en el centro
la vez, y colocarlos sobre la encimera.
cuidadosamente los barquillos, uno a
4. Usando las pinzas, retirar muy
•
Fibra 0 g
•
Sodio 47 mg
•
Grasa saturada 3 g
•
Calcio 0 mg
•
Colesterol 12 mg
•
Grasa 4 g
unidad emitirá un pitido.
temporizador. Al final del tiempo, la
y ponerle seguro para activar el
para pizzella caliente. Cerrar la tapa
la mezcla en el medio de cada molde
3. Usando la cuchara medidora, verter
en 2 minutos.
PIZZELLE/MED. Fijar el temporizador
precalentar el aparato a CREPE/
2. Instalar las placas para pizzellas y
harina y la sal.
batiendo, la mantequilla, y luego la
mezcla de azúcar/cacao. Agregar,
mediano, combinar las claras con la
azúcar glasé y el cacao. En un tazón
1. En un tazón pequeño, tamizar juntos el
¼ cucharadita de sal kosher
⁄3 taza (85 g) de harina común
2
ligeramente enfriada
mantequilla sin sal, derretida y
6 cucharadas (85 g) de
2 claras de huevo grande
(Dutch process)
2 cucharadas de cacao en polvo
½ taza (60 g) de azúcar glasé
Rinde 12 barquillos
para acompañar su helado favorito.
Barquillos gruesos de chocolate, perfectos
Barquillos de chocolate
Proteínas 1 g
Calorías 82 (48% de grasa) • Carbohidratos 9g
Información nutricional por barquillo:
4. Repetir con el resto de la mezcla.
de los barquillos.
cuidadosamente y repetir con el resto
encimera para sellar la juntura. Retirar
Presionar el cono formador sobre la
la encimera para cerrar el barquillo.
cono, y hacer rodar el cono sobre
Page 52

9
del círculo, enrollar un lado sobre el
Colocar el cono formador en el centro
la vez, y colocarlos sobre la encimera.
cuidadosamente los barquillos, uno a
4. Usando las pinzas, retirar muy
pitido.
final del tiempo, la unidad emitirá un
seguro para activar el temporizador. Al
pizzella caliente. Cerrar la tapa y ponerle
mezcla en el medio de cada molde para
3. Usando la cuchara medidora, verter la
2½ minutos.
PIZZELLE/MED. Fijar el temporizador en
precalentar el aparato a CREPE/
2. Instalar las placas para pizzellas y
vainilla, y luego los ingredientes secos.
Agregar, batiendo, la mantequilla, la
revolver las claras con el azúcar.
un tazón pequeño. En un tazón mediano,
1. Combinar la harina y la sal y la canela en
de vainilla
½ cucharadita de extracto natural
enfriada
sin sal, derretida y ligeramente
6 cucharadas (85 g) de mantequilla
½ taza (100 g) de azúcar granulada
2 claras de huevo grande
¼ cucharadita de sal kosher
½ taza (60 g) de harina común
Rinde 15 barquillos
tiempo de llenarlos con helado.
pueden "desaparecer" antes de que tenga
Estos barquillos son tan sabrosos que
Barquillos de azúcar
• Calcio 83mg • Fibra 0g
• Colesterol 74mg • Sodio 453mg
• Proteínas 4g • Grasa 6g • Grasa saturada 3g
Calorías 150 (35% de grasa) • Carbohidratos 20g
Información nutricional por porción (4 panqueques):
Repetir con el resto de la mezcla.
y meterlos al horno (200 °F/100°C).
ponerlos sobre una placa para horno
mantener los panqueques calientes,
5. Servir sobre platos calientes. Para
durante 3 minutos adicionales.
aparezcan burbujas; voltear y cocer
durante 2½–3 minutos, hasta que
antes de formar los panqueques. Cocer
mantequilla encima de cada placa
muy mantecosos, echar un poco de
las placas. Si le gustan los panqueques
4. Echar cucharadas de la mezcla sobre
placas.
vez caliente, abrir cuidadosamente las
Precalentar el aparato a MED-HI. Una
3. Instalar las placas del lado plano.
tener grumos.
delgados y duros – la mezcla debería
demasiado, o los panqueques estarán
justo hasta combinar. No mezclar
Agregar a la mezcla líquida y mezclar
tazón mediano. Batir para combinar.
2. Colocar los ingredientes secos en un
reservar.
homogénea. Agregar el aceite, batiendo;
pequeño. Batir hasta obtener una mezcla
mantequilla y la vainilla en un tazón
1. Combinar los huevos, el suero de
¼ cucharadita de sal kosher
½ cucharadita de canela en polvo
1 cucharadita de azúcar granulada
soda
½ cucharadita de bicarbonato de
1½ cucharadita de polvo de hornear
1½ taza (185 g) de harina común
enfriada
15 g de mantequilla, derretida y
1 cucharada de aceite vegetal o
vainilla
½ cucharadita de extracto natural de
mantequilla
1½ taza (365 g) de suero de
2 huevos grandes
Rinde aproximadamente 24 mini panqueques
congeladas, nueces o chispas de chocolate.
desayuno. Puede añadirle frutas frescas o
Esta receta versátil es perfecta para el
Mini panqueques
Page 53

8
3–4 minutos
"Niter Kibbeh" .......................................29
"Doro Wat" (guiso de pollo etíope) .......28
"Injera" ...................................................28
espinaca ................................................27
Curry de garbanzos con patatas y
"Roti" .....................................................27
India) ......................................................26
"Sambhar" (guiso de lentejas del sur de la
"Dosas" .................................................25
Chatni ("chutney") verde fresca ............24
"Chapati" ...............................................24
"Naan" ...................................................23
Okonomiyaki (panqueques japoneses) .22
Rollitos de primavera ............................21
................................................20
"Mu Shu"
Panqueques mandarines con cerdo
Pan pita .................................................19
pulgadas (20 cm)
en forma de disco de 8
Masa estirada, bien delgada,
/
de taza (80 ml)
3
1
Plana Cerrado Tortilla/Hi
Carne mechada .....................................18
Arepas ...................................................18
Tortillas de harina ..................................17
Galletas saladas para comer con vino ..16
"Latkes" (panqueques de patata) .........16
"Socca" .................................................15
"Blintzes" ...............................................14
"Crespelle" ............................................14
"Crêpes" de trigo sarraceno .................13
"Crêpes" básicas y variaciones ............12
Pizzellas de chocolate ...........................12
Pizzellas clásicas ...................................11
Blinis ......................................................10
Barquillos de chocolate.........................10
Barquillos de azúcar ................................9
Mini panqueques .....................................9
RECETAS
Cuchara pequeña = 1 cucharada regular
Cuchara grande =
saladas
Galletas
b. 4 to 6 minutos
a. 30 segundos
por lado
2–3 minutos
aproximado
cocción
Tiempo de
pulgadas (15–20 cm)
en forma de disco de 6–8
Masa estirada, bien delgada,
Cuchara grande 1½ minuto
Regular = cuchara grande
Mini = cuchara pequeña
Cuchara pequeña 2½ minutos
Cuchara pequeña 2 minutos
Tortilla/Hi
Pizzelle/Med
Crêpe/
Pizzelle/Med
Crêpe/
Pizzelle/Med
Crêpe/
con seguro
Cerrada,
con seguro
Cerrada +
con seguro
Cerrada +
con seguro
Cerrada,
Pizzelle
Tortilla Plana
Crêpes Plana
Panqueque Plana Plana Med-Hi
de azúcar
Barquillos
Pizzelle Pizzelle
Producto Placa Posición Temperatura Cantidad de mezcla/masa
PAUTAS DE COCCIÓN
Page 54

7
de este tipo.
®
esté bajo garantía.
repararlo y asegurarse de que el producto
correctamente, usar las piezas correctas para
0190 a fin de diagnosticar el problema
servicio posventa de Cuisinart al 1-800-726-
centro de servicio que deberían llamar al
autorizado, por favor informe al personal del
defectuoso a un centro de servicio no
Importante: Si debe llevar el aparato
más cercano.
le indicará la dirección del centro de servicio
confirmará si su aparato sigue bajo garantía y
el aparato a Cuisinart. Un representante le
posventa al 1-800-726-0190 antes de regresar
recomendamos que llame a nuestro servicio
Si su aparato tiene algún problema, le
ANTES DE HACER REPARAR SU APARATO
garantía.
productos defectuosos durante el período de
reparación, reemplazo, manejo y envío de los
Cuisinart será responsable por los gastos de
nuestro servicio posventa al 1-800-726-0190.
lo cambien. Para esto, se debe llamar a
directamente a Cuisinart para que lo reparen o
si lo desean, mandar el aparato defectuoso
Los residentes de California también pueden,
durante el período de garantía.
reembolso de los productos defectuosos
gastos de servicio, reparación, reemplazo o
económica. Cuisinart será responsable por los
ajustar o reparar el producto de manera
servicio independiente, siempre que se pueda
podrá llevar el producto a un centro de
dos opciones no satisfacen al consumidor,
consumidor hasta que éste se dañe. Si estas
imputable al uso del producto por el
original del producto, menos la cantidad
reembolsará el consumidor por el precio
independiente, cambiará el producto o
referirá el consumidor a un centro de servicio
La tienda, a su opción, reparará el producto,
venda productos Cuisinart
donde lo compraron o (B) a otra tienda que
regresar el producto defectuoso a la tienda
residentes del estado de California pueden (A)
opciones bajo el período de garantía. Los
La ley del estado de California ofrece dos
RESIDENTES DE CALIFORNIA SOLAMENTE
pueden no regir para usted.
modo que las limitaciones mencionadas
de daños incidentales o consecuentes, de
Estados no permiten la exclusión o limitación
Page 55
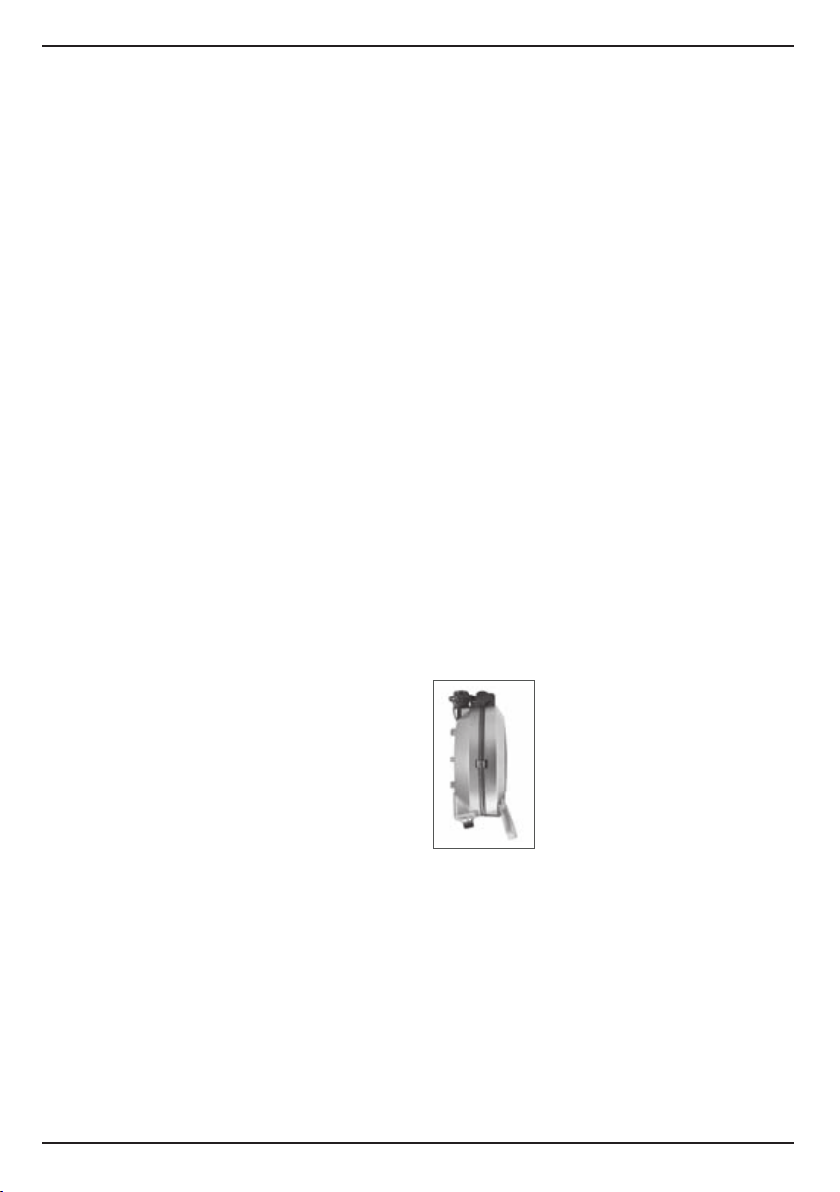
6
daños incidentales o consecuentes. Algunos
Esta garantía excluye expresamente todos los
negligencia o accidente.
caso de daños causados por mal uso,
comercial del producto, y no es válida en
Esta garantía no cubre el uso institucional o
reparaciones no autorizados por Cuisinart.
daños causados por accesorios, piezas o
Esta garantía excluye expresamente los
solamente.
accesorios y piezas de repuesto autorizados
para uso sobre corriente de 120V, usando
exigencias de fabricación y ha sido diseñado
Este aparato satisface las más altas
como cualquier información pertinente.
teléfono, la descripción del problema, así
Recuerde incluir su nombre, dirección y
envío no serán cubiertos bajo esta garantía.
productos perdidos y/o lastimados durante el
mandados a una dirección equivocada. Los
durante el transporte o por los paquetes
no será responsable por los daños ocurridos
entrega con seguro y seguimiento. Cuisinart
que mande su paquete por un método de
NOTA: para más seguridad, le aconsejamos
envío.
1-800-726-0190 para recibir instrucciones de
dar una prueba de compra y deben llamar al
Los residentes de California sólo necesitan
de US$10.00 por gastos de manejo y envío.
recibo de compra y un cheque o giro postal
Regrese el aparato defectuoso, junto con su
Glendale, AZ 85307.
Department, 7475 North Glen Harbor Blvd.,
aparato defectuoso a: Cuisinart, Service
gratuita al 1-800-726-0190 o regrese el
esta garantía, llame a nuestra línea directa
nuestra opción). Para obtener servicio bajo
garantía, la reparemos o reemplazaremos (a
materiales o fabricación durante el período de
Si este aparato presentara algún defecto de
a partir de la fecha de fabricación.
compra, el período de garantía será calculado
bajo esta garantía. En ausencia del recibo de
producto no es necesario para recibir servicio
compra original. Sin embargo, registrar el
a
www.cuisinart.com
fin de facilitar la verificación de la fecha de
registro disponible en
Le aconsejamos que llene el formulario de
para uso doméstico y según las instrucciones.
en una tienda,
®
Usted es un consumidor si ha
siempre que el aparato haya sido utilizado
años después de la fecha de compra original,
defecto de materiales o fabricación durante 3
Cuisinart garantiza este aparato contra todo
comerciantes.
garantía no es para los detallistas u otros
los estados donde la ley lo permita, esta
para uso personal o casero. A excepción de
comprado su aparato Cuisinart
solamente.
Esta garantía es para los consumidores
años
Garantía limitada de tres
GARANTÍA
placas bien cerradas.
ahorrar espacio. El seguro mantendrá las
vertical, con el panel de control arriba, para
de guardarlo. Guarde el aparato en posición
de manera segura atrás del aparato antes
Coloque las placas en su sitio y enrolle el cable
ALMACENAJE
un técnico autorizado.
Cualquier otro servicio debe ser realizado por
EL APARATO EN AGUA U OTRO LÍQUIDO.
NUNCA SUMERJA EL CABLE, LA CLAVIJA O
estropajos duros.
utilice limpiadores abrasivos ni
con un paño suave seco. Nunca
Limpie el cuerpo del aparato
revestimiento antiadherente.
metálicos; esto podría dañar el
Tampoco utilice estropajos
metal para limpiar las placas.
a mano. No utilice utensilios de
lavavajillas. El mini cono formador debe lavarse
cuchara medidora y las pinzas son aptas para
antes de retirarlas o limpiarlas. Las placas, la
placas enfríen durante 30 minutos o más
de liberación. Importante: permita que las
Retire las placas, presionando los botones
se enfríe completamente antes de manipularlo.
permitir que se enfríe. Permita que el aparato
después del uso. Deje la tapa abierta para
Desconecte el cable de la toma de corriente
lo menos 30 minutos antes de limpiarlo.
• Permita que el aparato se enfríe durante por
Page 56

5
"crêpes", pizzellas y tortillas.
placas calientes.
las pinzas proveídas, hagan contacto con las
• No permita que utensilios de plástico, incluso
del calor.
utensilios de madera o de plástico a prueba
placas. Solamente use las pinzas provistas o
dañar el revestimiento antiadherente de las
•
Nunca utilice utensilios de metal; esto podría
MANTENIMIENTO
LIMPIEZA Y
temperatura a gusto.
"crêpes" sean más/menos cocidas, ajuste la
requieren menos tiempo. Si desea que sus
tipos de "crêpes", como las "crespelle",
programado para cocer "crêpes". Algunos
aproximadamente 1½ minuto, el tiempo pre-
3. Por lo general, cada "crêpes" está lista en
de temperatura.
que sean más/menos cocidas, ajuste el nivel
Si las "crêpes" parecen espesas, o si desea
programada para cocer "crêpes" y pizzellas.
MED – la cual también es la temperatura pre-
2. La mejor temperatura para cocer "crêpes" es
los derrames.
mezcla más fría y descansada también evita
en "crêpes" más uniformes y delicadas. Una
lo que resulta en una mezcla más espesa, y
almidón absorben completamente el líquido,
la harina) se relaje y que las moléculas de
Esto permite que el gluten (presente en
más (preferiblemente durante 8–12 horas).
descansar la mezcla durante 30 minutos o
antes de usarla. Se recomienda dejar
1. Deje descansar la mezcla en el refrigerador
Consejos útiles para preparar "crêpes":
calientes.
posición, ya que las placas estarán muy
cerrada. Tenga cuidado al cambiar la
que el aparato caliente en la posición
3. Para un calentamiento más rápido, permita
bloqueada.
marcha una vez que la tapa está cerrada y
temporizador solamente se pondrá en
la tabla incluida antes de las recetas. El
es aproximado. Consulte las pautas en
fácilmente. Nota: el tiempo de cocción
permiten cocer "crêpes", pizzellas y tortillas
receta. Nuestros tiempos pre-programados
2. El tiempo de cocción depende de la
temperaturas pre-programadas para preparar
tipo de alimentos cocinados. Utilice nuestras
durante el funcionamiento, dependiendo del
de cocción. Puede ajustar la temperatura
mantener la temperatura de la superficie
1. El control de temperatura sirve para fijar y
CONSEJOS ÚTILES
use; esto es normal.
un ligero olor a quemado la primera vez que lo
Nota: puede que el aparato produzca humo y
placas.
fría durante la cocción, para abrir y cerrar las
quemaduras. Utilice el asa, la cual permanece
para el horno/manoplas para evitar las
muy caliente durante el uso. Utilice guantes
Precaución: el cuerpo del aparato se vuelve
la página 8.
8. Véase los consejos de cocción en la tabla en
unidad emitirá un pitido.
indicador luminoso verde se encenderá y la
7. Cuando los alimentos estén listos, el
temporizador se apagará.
abierta durante más de 5 segundos, el
y bloqueada. NOTA: si mantiene la tapa
marcha una vez que la tapa está cerrada
El temporizador solamente se pondrá en
6. Cierre la tapa (si usa la posición cerrada).
sobre las placas. La luz verde se apagará.
5. Vierta la mezcla o coloque los ingredientes
elegida.
calentamiento dependerá de la temperatura
se encenderá. NOTA: el tiempo de
deseada, el indicador luminoso verde
4. Cuando las placas alcancen la temperatura
pizzellas o tortillas.
tiempos pre-programados para crêpes,
coloque el temporizador sobre uno de los
3. En la posición cerrada, fije el tiempo o
encenderá.
Cierre la tapa. El indicador luminoso rojo se
para cocer crêpes, pizzellas, o tortillas.
una de las temperaturas pre-programadas
2. Ajuste la temperatura al nivel deseado o a
1. Enchufe el cable en una toma de corriente.
OPERACIÓN
INSTRUCCIONES DE
Page 57

4
presionando el otro botón de liberación.
3. Retire la segunda placa de la misma manera,
deslícela fuera de los orificios y álcela.
2. Sostenga la placa con ambas manos,
la placa.
el botón para liberar
Presione firmemente
derecho del aparato.
placas en el costado
de liberación de las
1. Localice los botones
Remoción de las placas:
placa.
4. Repita este procedimiento con la segunda
hacia abajo. La placa se bloqueará.
en los orificios y presione la parte delantera
orificios en la bisagra. Introduzca las espigas
espigas en la parte trasera de ésta con los
aparato. Incline la placa y haga coincidir las
3. Ubique los dos orificios en la bisagra del
para la tapa del aparato.
inscripción "UPPER" (superior) está diseñada
para la base del aparato. La placa con la
inscripción "LOWER" (inferior) está diseñada
vez. La placa con la
2. Instale una placa a la
en la posición abierta.
1. Coloque el aparato
placas:
Instalación de las
que lo vuelva a cerrar.
El aparato permanecerá en esta posición hasta
que las dos placas estén al mismo nivel.
ángulo de 90˚. Empuje el asa hacia atrás hasta
verticalmente en un
levante el asa
abierta. Luego,
en la posición semiColoque el aparato
cocción.
la superficie de
para duplicar
permanecen planas
están paralelas y
y la placa inferior
– La placa superior
Posición abierta
están
™
Esta
– La
completamente.
esta posición hasta que cierre la tapa o la abra
tapa se bloquee. El aparato permanecerá en
superior del seguro y alce el asa hasta que la
posición, presione la parte
Para ajustar la tapa a esta
abierta.
prensa o en la posición
de usar el aparato como
a la base. Abra la tapa en esta posición antes
está abierta en un ángulo de 105° con respeto
Posición semi-abierta – La placa superior
calientes.
ya que éstas estarán muy
posición de las placas,
cuidado al cambiar la
y calentamiento. Tenga
es la posición de inicio
sobre la placa inferior.
placa superior descansa
Posición cerrada
tiene tres posiciones:
plana y segura. El aparato
una superficie limpia,
Coloque el aparato sobre
ENSAMBLAJE
INSTRUCCIONES DE
cada uso.
papel o una brocha. Haga lo mismo antes de
primer uso. Aplique el aceite con una toallita de
placas con aceite vegetal sin sabor antes del
Sin embargo, le aconsejamos que engrase las
cubiertas con un revestimiento antiadherente.
prensa-pizzellas International Chef
Nota: las placas de su crepera/panquequera/
durante el proceso de fabricación y envío.
o cualquier residuo que se haya acumulado
las placas y los accesorios para quitar el polvo
bien el cuerpo con un paño húmedo y lave bien
Antes de usar el aparato por primera vez, limpie
embalaje.
Le aconsejamos que guarde el material de
Piezas y características estén incluidas.
todas las piezas descritas en la sección
en el cuerpo del aparato. Asegúrese de que
quite las etiquetas promocionales pegadas
Retire el aparato del material de embalaje y
ANTES DEL PRIMER USO
Page 58

3
5
8
9
6
4
10
2
fácil.
Permiten retirar las placas, para una limpieza
9. Botones de liberación de las placas –
y no dejan marcas en la encimera.
8. Pies de goma – Mantienen el aparato estable
aparato.
1
ilustrado) – El cable se enrolla atrás del
7. Espacio para guardar el cable (no
para cocinar y listo para comer.
calentando; la luz verde indica que está listo
3b
indica que el aparato está encendido y
6. Indicadores luminosos – La luz roja
3a
para cocer "crêpe", pizzellas y tortillas.
hasta 3 minutos. Tiempos pre-programados
5. Temporizador – Ajustes manuales desde 0
13
12
11
cocer "crêpe", pizzellas y tortillas.
y temperaturas pre-programadas para
temperatura: Lo (bajo), Med (medio) y Hi (alto)
4. Control de temperatura – Tres ajustes de
pizzellas y mini barquillos.
b. Lado estampado: Ideal para preparar
"crêpes", tortillas y otros panes sin levadura.
a. Lado plano: perfecto para panqueques,
segundos sin que se apague el temporizador.
Permite abrir las placas durante hasta 5
15. Modo "vistazo rápido" – (no ilustrado)
contiene bisfenol A (BPA).
piezas en contacto con los alimentos
14. Sin BPA – (no ilustrado) Ninguna de las
13. Mini cono formador
12. Pinzas – Para retirar fácilmente los alimentos.
⁄3
taza (80 ml) y 1 cucharada (15 ml).
para
1
11. Cuchara medidora – Cuchara de doble cara
lavavajillas, para una limpieza fácil.
y removibles – Antiadherentes y aptas para
3. Placas reversibles
fría al tacto
de alzar y de fácil manejo, que permanece
2. Asa para abrir la tapa – Asa duradera, fácil
Cuisinart.
inoxidable cepillado con logotipo estampado
1. Cuerpo – Elegante cuerpo de acero
PIEZAS Y CARACTERÍSTICAS
guarda verticalmente.
Mantiene el aparato cerrado cuando se
para evitar que se abran durante la cocción.
10. Tapa con seguro – Bloquea las placas
No intente modificarla.
completamente, comuníquese con un electricista.
toma de corriente, inviértela. Si aún no entrara
Pautas de cocción y recetas . . . . . . . . . . . .8
Garantía . . . . . . . . . . . . . . . . . . . . . . . . . . . 6
Almacenaje. . . . . . . . . . . . . . . . . . . . . . . . . .6
Limpieza y mantenimiento . . . . . . . . . . . . . 5
Consejos útiles . . . . . . . . . . . . . . . . . . . . . . . 5
Instrucciones de operación . . . . . . . . . . . . 5
Instrucciones de ensamblaje . . . . . . . . . . . .4
Antes del primer uso . . . . . . . . . . . . . . . . . .4
Piezas y características . . . . . . . . . . . . . . . 3
Medidas de seguridad importantes . . . . . . . 2
ÍNDICE
Page 59

2
de corriente polarizada. Si no entrara en la
enchufar de una sola manera en la toma
otra). Como medida de seguridad, se podrá
clavija polarizada (una pata es más ancha que
El cable de este aparato está dotado de una
AVISO
con ella.
o los animales no puedan jalarla o tropezar
encimera o la mesa de tal forma que los niños
importante colocar la extensión sobre la
ser por lo menos igual a la del aparato. Es
La clasificación nominal de la extensión debe
cuidado.
Puede usarse una extensión eléctrica con
enganche o tropiece con un cable más largo.
para reducir el peligro de que alguien se
El cable provisto con este aparato es corto
USO DE EXTENSIONES
SOLAMENTE
DOMÉSTICO
PARA USO
INSTRUCCIONES
GUARDE ESTAS
la puerta del armario cuando cierra.
especialmente si éste toca las paredes o
conectado presenta un riesgo de incendio,
guardarlo en un armario. Dejar el aparato
desconecte el aparato antes de
o adentro de un armario. Siempre
16. No haga funcionar el aparato debajo
SER REPARADAS POR EL USUARIO.
NO CONTIENE PIEZAS QUE PUEDAN
TÉCNICO CALIFICADO. ESTE APARATO
DEBEN SER REALIZADAS POR UN
ELECTROCUCIÓN, LAS REPARACIONES
EL RIESGO DE INCENDIO O
15. ADVERTENCIA: PARA REDUCIR
calientes.
que contenga aceite u otros líquidos
14. Tenga sumo cuidado al mover un aparato
el cable.
segura en cualquier momento, desenchufe
13. Para desconectar el aparato de manera
de usarlo.
12. Siempre desconecte el aparato después
que no sea el indicado.
11. No utilice el aparato para ningún otro fin
caliente, ni en un horno caliente.
un quemador a gas o una hornilla eléctrica
10. No coloque el aparato sobre o cerca de
contacto con superficies calientes.
de la encimera o de la mesa, ni que haga
9. No permita que el cable cuelgue del borde
8. No lo utilice en exteriores.
de incendio, electrocución o herida.
vendidos por Cuisinart presenta un riesgo
7. El uso de accesorios no recomendados ni
para su revisión, reparación o ajuste.
aparato a un centro de servicio autorizado
caído o si estuviese dañado. Regrese el
que hubiese funcionado mal o se hubiese
clavija estuviesen dañados, después de
6. No utilice este aparato si el cable o la
antes de limpiarlo.
enfríe antes de instalar o remover piezas y
uso y antes de limpiarlo. Permita que se
5. Desconecte el aparato cuando no esté en
cerca de ellos.
cuando esté siendo usado por niños o
4. Supervise de cerca el uso de este aparato
agua u otro líquido.
CABLE, LA CLAVIJA O EL APARATO en
electrocución o herida, NO SUMERJA EL
3. Para reducir el riesgo de incendio,
mango y los botones o perillas.
2. No toque las superficies calientes; utilice el
1. LEA TODAS LAS INSTRUCCIONES.
siguientes:
precauciones básicas de seguridad, incluso las
Siempre que use aparatos eléctricos, debe tomar
IMPORTANTES
SEGURIDAD
MEDIDAS DE
Page 60

cuidadosamente antes de usarlo.
Para su seguridad y para disfrutar plenamente de este producto, siempre lea las instrucciones
Serie CPP-200
™
Crepera/Panquequera/Prensa-pizzellas International Chef
INSTRUCCIONES Y LIBRO DE RECETAS
 Loading...