

Page 1
INSTRUCTION
& RECIPES
BOOKLET
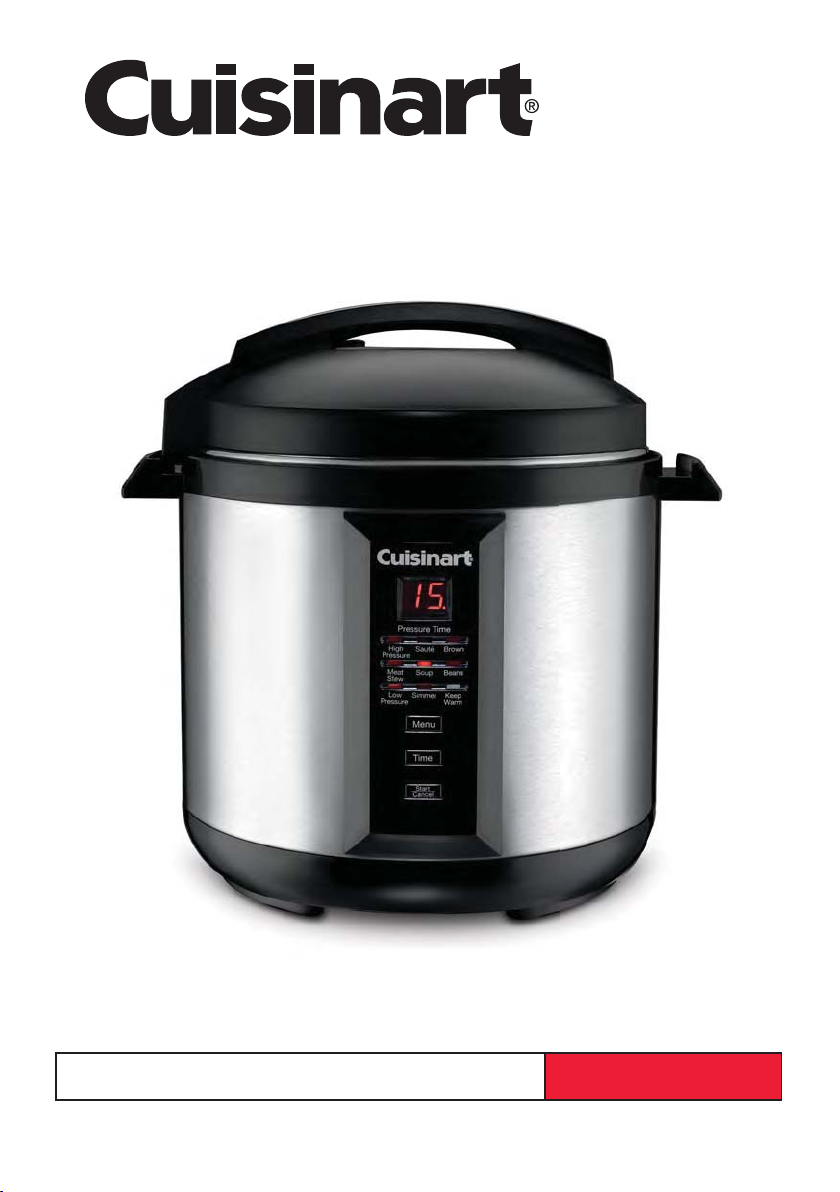
Cuisinart® Electric Pressure Cooker
For your safety and continued enjoyment of this product, always read the instruction book carefully before using.
CPC-800 Series
Page 2

IMPORTANT
SAFEGUARDS
When using electrical appliances, especially when
children are present, basic safety precautions
should always be taken, including the following:
1. Read all instructions.
2. Always attach plug to appliance first, before
plugging into wall outlet. To disconnect,
turn control to OFF, then remove plug from
outlet.
3. Do not place the pressure cooker in a
heated oven or on any stovetop.
4. Do not touch hot surfaces of pressure cooker.
Use handles only.
5. This appliance should not be used
by or near children or individuals with certain
disabilities.
6. NEVER ATTEMPT TO OPEN LID WHILE
THE UNIT IS OPERATING.
Do not open the pressure cooker until the unit
has cooled and all internal pressure has been
released. If lid is difficult to rotate, this
indicates that the cooker is still pressurized.
Do not force it to open. Any pressure in the
cooker can be hazardous. See Operating
Instructions, page 5.
7. Extreme caution must be used when moving
a pressure cooker containing hot liquids or
foods.
8. Do not use the pressure cooker for other than
its intended use.
9. This appliance cooks under pressure.
Improper use may result in scalding injury.
Make certain unit is properly closed before
operating. See Instructions For Use, page 4.
10. Do not fill unit over two-thirds full. When
cooking foods that expand during cooking,
such as dried vegetables. NOTE: This
includes legumes, beans, and grains. Do not
fill the unit over half full. Overfilling may cause
a risk of clogging the pressure limit valve and
developing excess pressure.
11. To protect against electric shock, do not
immerse cord, plugs, or outer vessel in water
or other liquids.
12. Unplug from outlet when not in use and
before cleaning. Allow to cool before putting
on or removing parts.
13. Do not operate any appliance with a damaged
cord or plug or after the appliance
malfunctions or has been damaged in any
manner. Return appliance to the nearest
authorized service facility for examination,
repair, or electrical or mechanical adjustment.
14. Do not let cord hang over edge of table or
counter, or touch hot surfaces.
15. Use of accessories not specifically
recommended by Cuisinart may cause
damage to unit.
16. Do not use outdoors.
17. Do not use under hanging cabinets; steam
from pressure release may cause damage.
18.
Be aware that certain foods, such as applesauce,
cranberries, pearl barley, oatmeal and other
cereals, split peas, noodles, macaroni, rhubarb, or
spaghetti can foam, froth and sputter,
the pressure release devices. These foods should
not be cooked in a pressure cooker.
NOTE: Your instruction booklet may contain
recipes which use above ingredients. You must
follow recipe exactly as written.
19. Always check the pressure release devices for
clogging before use.
20. Do not use this pressure cooker for pressure
frying oil.
21. Do not operate your appliance in an
appliance garage or under a wall cabinet.
When storing in an appliance garage,
always unplug the unit from the electrical
outlet. Not doing so could create a risk of
fire, especially if the appliance touches the
walls of the garage or the door touches the
unit as it closes.
22. To prevent risk of explosion and injury,
replace only dynamic seal ring as
recommended by the manufacturer. See
Operating Instructions.
23. Intended for countertop use only.
WARNING:
Spilled food can cause serious burns.
Keep appliance and cord away from children.
Never drape cord over edge of counter, never
use outlet below counter, and never use with
an extension cord.
and clog
2
Page 3
SAVE THESE
INSTRUCTIONS
FOR HOUSEHOLD USE
ONLY
SPECIAL CORD SET
INSTRUCTIONS
A short power-supply cord is used to reduce
the risk resulting from it being grabbed by
children, becoming entangled in, or tripping
over a longer cord.
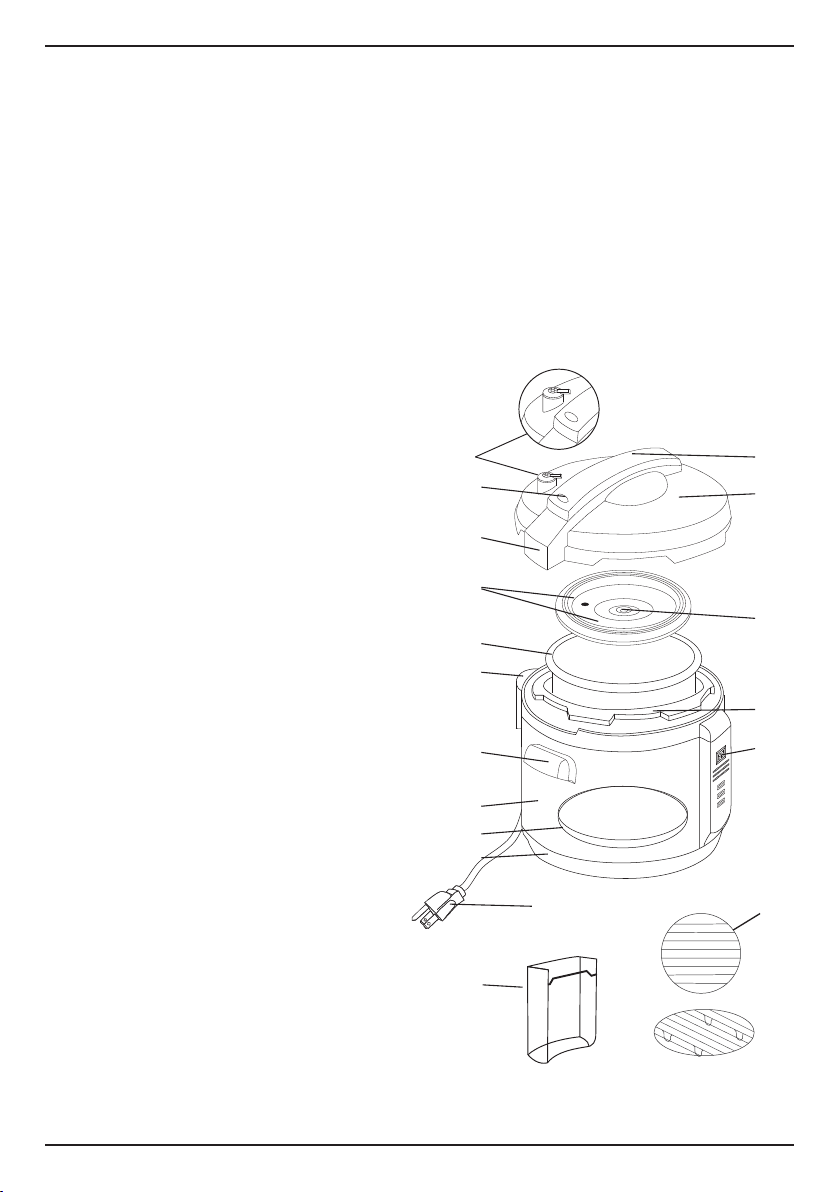
12. Lid Handle
13. Lid
14. Rubber Grommet
15. Upper Ring
16. Control Panel
17. Trivet – Used for some recipes such
as desserts. See Recipe Booklet.
NOTE: Trivet is specially designed for
this pot and will not damage coating if
used as directed.
18. BPA Free (not shown) – All materials that
come in contact with food are BPA free.
CONTENTS
Important Safeguards........................... 2
Special Cord Set Instructions .............. 2
Parts and Features ............................... 3
Before First Use ................................... 4
Instructions for Use .............................. 4
Pressure Cooker Settings .................... 5
Operating Instructions .......................... 5
Safety Features .................................... 6
Cleaning and Maintenance .................. 7
Troubleshooting .................................... 8
Warranty ............................................... 9
Tips and Hints .................................... 11
Cooking Time Charts ......................... 11
Recipes ............................................... 16
PARTS AND FEATURES*
1. Pressure Limit Valve
2. Red Float Valve (Pressure Indicator)
3. Push Rod
4. Sealing Ring Assembly
5. Cooking Pot
6. Condensation Collector
7. Handle
8. Outer Body
9. Heating Plate
10. Base
11. Power Cord
1
2
3
4
5
6
7
8
9
10
11
6
* Illustrations may not represent actual product.
12
13
14
15
16
17
3
Page 4
BEFORE FIRST USE
Remove any packaging materials and promotional
labels from your electric pressure cooker.
Be sure all parts have been included before
discarding any packaging materials. You may
want to keep the box and packing materials for
use at a later date.
Before using your Cuisinart
Cooker for the first time, remove any dust from
shipping by wiping clean with a damp cloth.
Thoroughly clean the cooking pot in the
dishwasher or with warm, soapy water.
Rinse, towel-, or air-dry, and place in the
pressure cooker.
1. Place the pressure cooker on a clean,
flat surface.
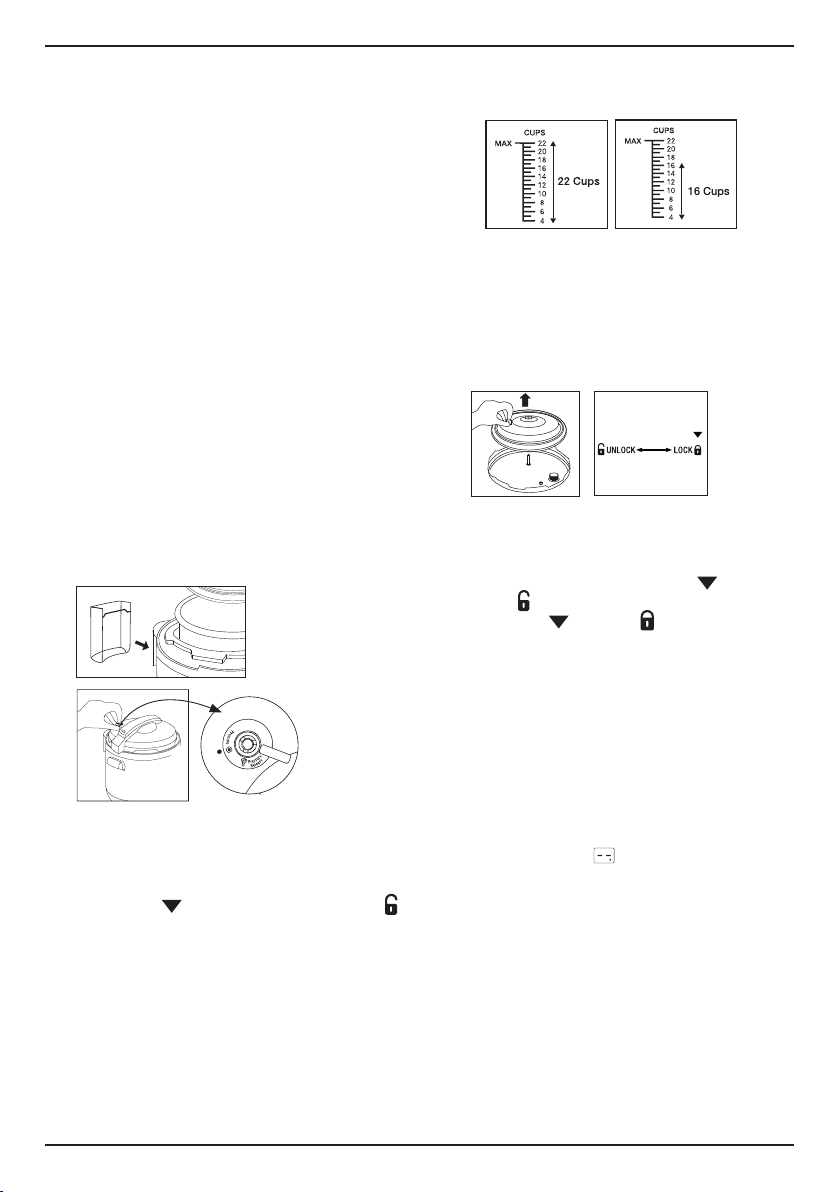
2.
Place the condensation collector in rear
of the unit until it clicks into place (as shown
below in figure 1; and #6 on diagram, page 3).
3. Place the pressure limit valve on the lid,
as shown in figure 2.
NOTE: The pressure limit valve does not click
or lock into place. Even though it will have a
loose fit, it is safely secured.
1.
1.
2.
®
Electric Pressure
INSTRUCTIONS
FOR USE
1. To remove lid, grasp handle, turn clockwise
until arrow
icon. Lift to remove.
2. Remove cooking pot from pressure cooker
and add food and liquids as the recipe
directs. NOTE: The total volume of food and
liquid must not exceed two-thirds (22 cups)
of the capacity of the cooking pot (figure 3).
For foods such as dried vegetables and
beans, or rice and grains, the total volume
must not exceed half (~16 cups) the capacity
(figure 4). NOTE: Overfilling may clog the
pressure limit valve, which can cause
is directly above the unlock
excess pressure to develop. Always use at
least ½ cup liquid when pressure cooking.
3. 4.
3. If sealing ring assembly has been removed
from lid, check to ensure flexible ring is
securely in place on the metal plate. Then,
holding the knob on the metal plate, place
the assembly over the center post of inner lid
and press down firmly to secure (figure 5). BE
SURE KNOB FACES OUT.
5.
4.
To lock the lid in place, remove any food
residue from upper rim of cooking pot to
ensure a proper seal. Place lid firmly onto
pressure cooker and align arrow
unlock
align arrow
Plug the unit into the outlet.
NOTE: When placing lid on pressure cooker,
the float valve should be facing left.
5. Position the pressure limit valve (located on
lid) as directed in figure 2, ensuring it is set to
the
fully down to properly seal the pot before
cooking.
6. Plug the power cord into the pressure
cooker and then into the wall outlet. The LED
display will show
icon, then turn counterclockwise to
•
position. The float in handle must be
6.
with lock
.
icon (figure 6).
with
4
Page 5

PRESSURE COOKER
SETTINGS
1. High Pressure
2. Sauté – The preset temperature, done prior to
pressure cooking with lid removed, allows you
to quickly soften vegetables in a small
amount of fat or liquid without browning, and
to cook items such as rice (Arborio, brown,
Carnaroli, white, etc.)
for pilafs and risottos. Sautéing reduces the
time it takes full pressure to build and
pressure cooking to begin.
3. Brown – This preset
temperature allows
cooking over high heat,
without the lid, before
pressure cooking.
Browning foods in a
small amount of fat in
this way seals the outer
surfaces of meats and
vegetables, producing a
visually appealing,
flavorful exterior with a
moist, tender interior.
Browning reduces the
time it takes full
pressure to build and
pressure cooking to
begin.
NOTE: Use wooden spoon to scrape up
brown bits. DO NOT use metal utensils.
4. Meat/Stew – This preset will precisely
measure and moderate the perfect amount of
pressure required to cook various types of
meat, including beef, chicken, pork, and
lamb. Meat/Stew function will take the
guesswork out of cooking your stew. With the
press of one button, your stew will cook
perfectly every time. Meat/Stew will be a full
pressure setting and should be used with the
lid on.
5. Soup – This preset can be used to prepare
very flavorful soup with a simple touch of a
button. Place the meat (if using), vegetables
and other add-ins to inner pot, add enough
liquid to cover, season, and close lid to have
unit specifically apply the proper amount of
pressure. The Sauté or Browning feature can
be used before to cook ingredients, then
switched to Soup preset to finish your meal.
6. Beans – This preset can be used to prepare
dried beans quicker and tastier than on the
stovetop or in the oven. Add beans and other
ingredients to inner pot. Add enough liquid to
cover beans by one inch. Close the lid and
start the preset. Unit will automatically apply
pressure to ensure properly cooked beans.
The Beans preset will end using tricky, finicky,
or complicated recipes.
7. Low Pressure
8. Simmer – This preset temperature allows you
to cook liquids at a lower temperature. It is
primarily used to finish cooking some items,
e.g., to add ingredients to a risotto, sauce,
stew, or to continue the cooking process
to achieve a preferred texture. Simmering
reduces the time it takes full pressure to build
and pressure cooking to begin.
9. Keep Warm – Holds and keeps cooked food
warm for up to 12 hours.
OPERATING INSTRUCTIONS
With the unit on and the LED displayed, press the
MENU button to select the desired cooking
function. The function light will flash. Press the
flashing function to Select.
If Selecting Brown, Sauté, Simmer,
Meat/Stew, Soup or Beans
Press START, and unit will begin to heat up.
When browning, sautéing or simmering is
complete, press START/CANCEL to cancel
program cover the cooker as directed. Press
MENU again and select Low or High Pressure
function.
If Selecting Low or High Pressure
Press TIME to select number of minutes needed
for pressure cooking. Time increases in 1-minute
increments up to 40 minutes. Time increases in
5-minute increments from 40 to 99 minutes.
Once cooking time is programmed, press START/
CANCEL to start the cooking process. As the unit
heats up and pressure builds, the red float will
rise. The amount of liquid and other ingredients in
the pressure cooker determines the length of time
needed for full pressure to build – generally 5 to
40 minutes, depending on the recipe. (A red
blinking dot on lower right-hand corner of LED
indicates the unit is on and heating up.)
NOTE: When full pressure is reached,
red light in the lower right-hand corner of
the LED will stop flashing and remain lit.
5
Page 6

Pressure cooking will begin and the timer
will start to count down.
The raised red float indicates you are cooking
under pressure. The lid is double-locked and
cannot be opened. YOU SHOULD NEVER
ATTEMPT TO OPEN THE LID WHILE
PRESSURE COOKING.
Automatic Keep Warm Feature
When LED display reaches
cooker automatically shifts to Keep Warm
temperature. The Keep Warm light will turn on and
unit will beep to indicate cooking is complete.
NOTE: The Keep Warm setting should not be
used for more than 12 hours. The quality or
texture of the food will begin to change after 1
hour on Keep Warm. In the Keep Warm setting, a
little condensation in the upper ring is normal.
To R eset or Cancel
Users can reset the function or cancel the timing
setup anytime by pressing the START/CANCEL
button.
To Remove Lid
When pressure cooking cycle is finished, the unit
will automatically switch to the Keep Warm
position. At this point, you may choose to release
pressure in one of three ways – Natural Pressure
Release, Quick Pressure Release, or a
combination of both. The choice will be dictated
by the particular food being cooked and
indications in the recipe. If adapting your own
recipe for pressure cooking, find a similar recipe
in our recipe booklet and use that as a guide.
1. Natural Pressure Release – Allow the unit to
remain on Keep Warm. The pressure will
begin to drop – time for pressure to drop will
depend on the amount of liquid in the
pressure cooker and the length of time that
pressure was maintained. Natural Pressure
Release will take from 12 to 30 minutes.
During this time cooking continues, so it is
not recommended for certain cuts of meats
and some desserts. When pressure is fully
released, the float (pressure indicator) will
drop and the lid will unlock to open.
2. Quick Pressure Release – Following pressure
cooking you will hear a series of beeps
indicating the process is finished. Turn off and
pull the handle of the pressure limit valve
forward (see figure 7). Do not touch with your
hand. Use tongs or another tool.
the pressure
, \
7.
Steam will immediately begin to release
through the valve. Keep face and hands away
from steam as it is released, and do not
release pressure under hanging cabinets,
which can be damaged by steam. When
pressure is fully released, the pressure
indicator will drop and the lid will unlock to
open. Using Quick Pressure Release stops
the pressure cooking immediately. If further
cooking is necessary, the unit may be
returned to Pressure, or the food may be
further cooked on the Simmer setting.
3.
Combination Natural Pressure Release
and Quick Pressure Release – Some
recipes use a combination of Natural
Pressure Release and Quick Pressure
Release. Allow Natural Pressure Release
for the time indicated in the recipe (food
will continue to cook slightly), followed by
Quick Pressure Release.
WARNING
WHEN RELEASING PRESSURE. USE TONGS
OR SIMILAR UTENSIL TO PULL HANDLE OF
PRESSURE LIMIT VALVE FORWARD.
When the red float is completely down, turn the lid
clockwise and lift to remove.
: USE EXTREME CAUTION
SAFETY FEATURES
There are seven safety devices installed in the
pressure cooker to assure its reliability.
1. Open-and-Close Lid Safety Device
The appliance will not start pressurizing until
the lid is closed and locked properly. The lid
cannot be opened if the appliance is filled
with pressure.
2. Pressure Control Device
The correct pressure level is automatically
maintained during the cooking cycle.
3. Pressure Limit Valve
The pressure limit valve will release air
automatically when the pressure inside
exceeds the preset temperature.
6
Page 7

NOTE: Overfilling the pressure cooker (see
Instructions for Use) may clog the
pressure limit valve, which can cause
excess pressure to develop.
4. Anti-Block Cover
Prevents any food material from blocking the
pressure limit valve.
5. Pressure Relief Device
When the pressure cooker reaches the
maximum allowable pressure and
temperature, the cooking pot will move down
until lid separates from the sealing ring,
releasing air pressure.
6. Thermal Control
The power will automatically shut off when
the cooking pot temperature reaches the
preset value, or the pressure cooker is
heating without any food inside.
7. Thermal Fuse
The circuit will be opened when the pressure
cooker reaches the maximum temperature.
8. Replace sealing ring
9. Cooking pot is
10. To clean the
CLEANING AND
MAINTENANCE
1. Unplug the power
cord before cleaning.
2. Clean the outer body with a soft cloth such
as a paper towel or microfiber cloth. Do not
immerse the outer body in water or pour
water into it.
3. Remove the sealing ring assembly from the
inside of the lid by grasping the knob and
pulling. Set aside.
4. Remove the pressure limit valve (figure 8)
from the lid by gripping and pulling firmly
upward. Rinse with warm water, and dry.
5. Rinse the upper and underside of the lid with
warm water, including the air escape on the
underside and the float valve on top. Dry
completely, and replace pressure limit valve.
6. To clean sealing ring assembly, carefully
remove flexible sealing ring and clean with a
dampened cloth or microfiber cloth. Do not
use chemical cleaners. Wash metal plate
with warm water, dry thoroughly and replace
sealing ring.
7. To clean the rubber grommet in center of
sealing ring assembly, carefully remove it,
clean it, and replace it.
11. Any other servicing should be performed by
NOTE: If scouring is necessary, use a
assembly in lid. BE
SURE KNOB FACES
OUT (figure 9).
dishwasher safe. To
hand-clean the pot,
use a soft cloth or
sponge and wipe. Be
careful not to damage
the inside coating.
Never use harsh
chemicals or scouring
pads.
condensation collector, remove and clean it
with warm, soapy water, then reinstall it
(figure 10).
10.
an authorized service representative.
nonabrasive cleaner or liquid detergent with
nylon pad or brush.
8.
9.
7
Page 8

TROUBLESHOOTING
Symptom Possible Reasons Solutions
The sealing ring assembly is not
properly installed in lid.
Lid does not lock.
The float is seized by the push rod. Push the rod with
Cannot open the lid after releasing
the pressure.
Air escapes from the rim of the lid.
Air escapes from the float valve.
The float will not rise.
Unit shuts off when START is
pressed to begin Pressure Cooking.
The float is still up. Press the float down.
No sealing ring was installed. Install the sealing ring.
Food residue on sealing ring. Clean sealing ring.
Sealing ring worn out. Replace the sealing
Lid not locked properly. Be sure lid is firmly on
Food stuck on the sealing ring of
the float valve.
The sealing ring on the float
wore out.
The pressure limit valve is not
placed properly.
Not enough food and water. Check recipe for
Air escaping from the rim of the lid
and the pressure limit valve.
Browning function was just
used and temperature in unit is
higher than Pressure Cooking
temperature, so safety shutoff
occurs.
Re-install the sealing
ring assembly
as instructed in
INSTRUCTIONS FOR
USE, page 4.
hands.
ring.
unit and arrow
directly above the lock
icon.
Clean the sealing ring.
Replace the sealing
ring.
See Before First Use,
# 3, page 4.
proper quantities.
Call our Consumer
Service Center toll free
at 1-800-726-0190.
After browning, let
unit cool down for 2
or 3 minutes before
you start Pressure
Cooking.
is
8
Page 9

LIMITED THREE-YEAR
WARRANTY
(U.S. & CANADA ONLY)
This warranty is available to consumers only. You are a
consumer if you own a Cuisinart
that was purchased at retail for personal, family or household use. Except as otherwise required under applicable
law, this warranty is not available to retailers or other commercial purchasers or owners.
We warrant that your Cuisinart
will be free of defects in materials and workmanship under
normal home use for 3 years from the date of original purchase. We recommend that you visit our website, www.
cuisinart.com for a fast, efficient way to complete your
product registration. However, product registration does
not eliminate the need for the consumer to maintain the
original proof of purchase in order to obtain the warranty
benefits. In the event that you do not have proof of purchase date, the purchase date for purposes of this warranty will be the date of manufacture.
®
If your Cuisinart
to be defective within the warranty period, we will repair
it, or if we think necessary, replace it. To obtain warranty
service, simply call our toll-free number 1-800-726-0190
for additional information from our Consumer Service
Representatives, or send the defective product to
Customer Service at Cuisinart, 7475 North Glen Harbor
Blvd., Glendale, AZ 85307.
To facilitate the speed and accuracy of your return, please
enclose $10.00 for shipping and handling of the product.
Please pay by check or money order made payable to
Cuisinart (California residents need only supply proof of
purchase and should call 1-800-726-0190 for shipping
instructions).
NOTE: For added protection and secure handling of any
Cuisinart product that is being returned, we recommend
you use a traceable, insured delivery service. Cuisinart
cannot be held responsible for in-transit damage or for
packages that are not delivered to us. Lost and/or damaged products are not covered under warranty.
Please be sure to include your return address, daytime
phone number, description of the product defect, product
model number (located on bottom of product), original
date of purchase, and any other information pertinent to
the product’s return.
Your Cuisinart
factured to the strictest specifications and has been
designed for use only in 120 volt outlets and only with
authorized accessories and replacement parts. This warranty expressly excludes any defects or damages caused
by attempted use of this unit with a converter, as well as
Electric Pressure Cooker should prove
®
Electric Pressure Cooker has been manu-
®
Electric Pressure Cooker
®
Electric Pressure Cooker
use with accessories, replacement parts or repair service
other than those authorized by Cuisinart. This warranty
does not cover any damage caused by accident, misuse,
shipment or other than ordinary household use. This warranty excludes all incidental or consequential damages.
Some states do not allow the exclusion or limitation of
these damages, so these exclusions may not apply to you.
This warranty gives you specific rights and you may also
have other rights, which vary from state to state.
Important: If the nonconforming product is to be serviced
by someone other than Cuisinart’s Authorized Service
Center, please remind the servicer to call our Consumer
Service Center at 1-800-726-0190 to ensure that the problem is properly diagnosed, the product is serviced with
the correct parts, and to ensure that the product is still
under warranty.
CALIFORNIA RESIDENTS ONLY
California law provides that for In-Warranty Service,
California residents have the option of returning a nonconforming product (A) to the store where it was purchased or
(B) to another retail store that sells Cuisinart products of
the same type.
The retail store shall then, at its discretion, either repair
the product, refer the consumer to an independent repair
facility, replace the product, or refund the purchase price
less the amount directly attributable to the consumer’s
prior usage of the product. If the above two options do
not result in the appropriate relief to the consumer, the
consumer may then take the product to an independent
repair facility if service or repair can be economically
accomplished. Cuisinart and not the consumer will be
responsible for the reasonable cost of such service, repair,
replacement, or refund for nonconforming products under
warranty.
California residents may also, according to their preference, return nonconforming products directly to Cuisinart
for repair, or if necessary, replacement, by calling our
Consumer Service Center toll-free at 1-800-726-0190.
Cuisinart will be responsible for the cost of the repair,
replacement, and shipping and handling for such products
under warranty.
BEFORE RETURNING YOUR
CUISINART PRODUCT
If you are experiencing problems with your Cuisinart product, we suggest that you call our Cuisinart Service Center
at 1-800-726-0190 before returning your product to be
serviced. If servicing is needed, a representative can confirm whether the product is under warranty and direct you
to the nearest service location.
9
Page 10

©2018 Cuisinart
150 Milford Road
East Windsor, NJ 08520
Printed in China
18CE055761
U IB-15888-ESP
Page 11

TIPS AND HINTS
• Many family favorites can be easily
adapted for preparation in your Cuisinart
Electric Pressure Cooker – soups, stews,
side dishes and more.
• The amount of liquid needed is much less
than for traditional cooking methods.
• Never exceed the Maximum Fill amount of
the pressure cooker.
• Make sure the lid is on firmly and tightly,
and moved as far counterclockwise as
it will go to allow proper locking.
• Hot foods/liquids will come to pressure
more quickly than cold foods/liquids.
• When pressure cooking is completed,
follow recipe instructions for releasing
pressure. For Quick Pressure Release, it is
important to begin immediately upon
completion of pressure cooking; otherwise
foods will continue to cook, and may
overcook.
• Do not store pressure cooker with
lid on tightly. This saves on gasket wear
and tear.
• More nutrients are preserved during
pressure cooking than with traditional
cooking methods, as less liquid is used
and thus fewer nutrients are lost to
evaporation.
• To adapt your own recipes, find a similar
one in our recipe booklet and use it as a
guide. In general, cooking time will be
at least one-third to one-half of the
traditional cooking time. Reduce your
cooking liquid by at least half – you may
need to “play” with your recipe to get it
right. You may wish to add vegetables at
the end of cooking to avoid overcooking.
You can also use the cooking charts
provided as a guide.
• If something is almost cooked, use
Simmer to complete cooking.
®
COOKING TIME
CHARTS:
Poultry and Meats ......................................12
Vegetables ..................................................13
Rice and Grains ..........................................14
Dried Beans ................................................15
Recipes .......................................................16
Pressure Heat-Up Times
When pressure cooking, remember that
it will take approximately 5 to 40 minutes
(depending on the recipe) for pressure to
build and pressure cooking to begin.
Suggested Cooking Times for Poultry
and Meats
Be sure to add at least 1 cup of liquid when
pressure cooking meats for 45 minutes or
less, and 1½ cups if cooking for longer
amounts of time. Be sure to add vegetables
such as chopped onions, carrots, and
celery, and aromatic herbs such as garlic,
parsley, thyme, etc., for added flavor. Most
items are cooked on High Pressure unless
otherwise indicated. For best results and
flavor, most poultry and meats benefit from
browning first. Cooking times will vary
slightly due to individual size of pieces and
starting temperatures.
11
Page 12

POULTRY & MEATS
Food Cooking Time Pressure Release Method
Chicken
Whole – up to 4 pounds
Chicken Breast,
bone in, 3 pounds
Boneless Chicken Breast,
2 pounds
Thighs/Legs, bone in 9 to 12 minutes
Thighs/Legs, boneless 8 to 10 minutes
25 to 30 minutes
8 to 10 minutes
5 to 6 minutes
Beef
Pot Roast, Bottom
Round, 3 to 3½ pounds
Brisket, 2½ to 3 pounds 55 minutes
Corned Beef Brisket
Short Ribs, 2 to 3 inches
thick
Stew – 1½- to 2-inch cubes
60 to 90 minutes
60 to 90 minutes
50 minutes
20 to 30 minutes
Lamb
Shanks, four, 12 ounces
each
Shoulder cubes for stew,
about 1½ inches
25 to 30 minutes
20 to 25 minutes
Pork
Chops, Loin, bone in,
¾ to 1 inch thick
Boneless Shoulder Roast,
about 3 pounds
Spareribs, cut into 2 to 3
rib pieces
4 to 5 minutes,
brown first
50 to 55 minutes
20 to 30 minutes
Veal
10 minutes per
Boneless Shoulder Roast
Cubes for stew,
1½ to 2 inches
pound (weight is
important to avoid
overcooking)
15 to 20 minutes
Quick Pressure Release
Quick Pressure Release
Quick Pressure Release
Quick Pressure Release
Quick Pressure Release
Natural Pressure Release
Natural Pressure Release
Natural Pressure Release
Natural Pressure Release
Natural Pressure Release (see recipe for
Beef Stew for times with vegetables)
Natural Pressure Release
Natural Pressure Release
Quick Pressure Release
Natural Pressure Release
Quick Pressure Release
Natural Pressure Release
Natural Pressure Release
12
Page 13

Vegetables
Vegetables should be well washed and peeled if necessary. Vegetables cook very
quickly – be sure to use Quick Pressure Release immediately after audible beep
sounds. If vegetables require more cooking, turn pressure cooker off, and cover to
steam the vegetables until preferred texture is reached. Add ½ cup water or liquid for
cooking. If pressure cooking frozen vegetables, 1 to 2 minutes additional cooking time
and longer steaming time may be needed. When cooking vegetables, it is always best
to undercook, then allow additional time to steam – to avoid overcooking. All cooking
is on High Pressure unless otherwise indicated.
Food Cooking Time Pressure Release Method
Artichokes
4 medium/large, 8 to 10 ounces
each
Beans, Green or Yellow Waxy
1½ pounds, cut into 2-inch
lengths
Beets,
Broccoli,
Cauliflower,
Carrots,
or “baby cut”
Carrots,
Corn,
(use trivet/rack)
Greens,
1-inch strips
Onions,
Parsnips,
2-inch pieces
Parsnips,
Potatoes
White,
Red,
Sweet, 2-inch cubes
Squash – Winter
Acorn,
Butternut,
Spaghetti,
Squash, Yellow Crookneck or
Zucchini,
medium-large
cut into large florets
cut into large florets
cut into 2-inch lengths –
½-inch slices
4 to 6 ears
collards, kale, cut into
baby, peeled
peeled, cut into
½-inch slices
medium, quartered
new (2 to 3 oz. each)
halved & seeded
peeled & sliced
halved
cut into ½-inch slices
7 to 9 minutes
1 to 2 minutes
15 to 20 minutes
2 to 3 minutes
2 to 3 minutes
5 minutes
2 to 3 minutes
2 to 3 minutes
5 to 7 minutes
2 to 4 minutes
3 to 4 minutes
1 to 2 minutes
5 to 7 minutes
5 to 8 minutes
4 to 5 minutes
6 to 8 minutes
3 to 4 minutes
10 to 12 minutes
1 to 2 minutes
Quick Pressure Release
Quick Pressure Release
Quick Pressure Release
Quick Pressure Release
Quick Pressure Release
Quick Pressure Release
Quick Pressure Release
Quick Pressure Release
Quick Pressure Release
Quick Pressure Release
Quick Pressure Release
Quick Pressure Release
Quick Pressure Release
Quick Pressure Release
Quick Pressure Release
Quick Pressure Release
Quick Pressure Release
Quick Pressure Release
Quick Pressure Release
13
Page 14

Rice and Grains
Grains (1 cup)
Barley (pearl)
Brown Rice
Bulgur
Farro (whole grain)
Quinoa
Steel-Cut Oats
White Rice (long grain)
Wild Rice
Cooking time -
minutes
Liquid Needed Release Method
(High Pressure)
20 to 25 3 cups Quick
20 2 cups Natural
6 2 cups Quick
18 3 cups Quick
5 1½ cups Quick
5 3 cups Natural
4 to 6 1½ cups Quick
22 3 to 4 cups Quick
14
Page 15

Dried Beans
• Before cooking dried beans, pick over and discard any broken or shriveled beans or bits
of dirt and debris. Rinse beans and drain.
• Beans may be soaked overnight, but the pressure cooker allows you to cook beans
without presoaking.
• Onions, garlic, celery, sprigs of fresh herbs or a bay leaf may be added for additional
flavor. Do not salt before cooking as salt inhibits cooking.
• Cook beans in large batches (1 pound beans + 8 cups water + seasonings + onion, garlic,
herbs to taste + 4 teaspoons oil) and freeze in 1-cup amounts to add to other dishes.
• Never fill pressure cooker more than one-third full when cooking beans.
• Add 2 teaspoons oil per cup of beans to prevent foaming.
• After cooking beans, clean lid, gasket, steam release valve, and float valve carefully.
• When cooking beans, use High Pressure and Natural Pressure Release.
• If beans are not completely cooked (this is partially dependent on the age of the dried
beans, something you will have no control over), select Simmer and allow the beans to
simmer until cooked tender. As with vegetables, it is better to undercook and allow to
simmer to complete cooking.
Beans
(1 cup)
Black Beans
Cannellini
Chickpeas
(Garbanzo Beans)
Great Northern
Lentils
Pinto
Navy Beans
Red Beans
Split Peas
Cooking Time
(soaked overnight)
7 minutes 28 to 32 minutes
7 minutes 33 to 38 minutes
15 minutes 50 to 60 minutes
8 to 10 minutes 30 to 35 minutes
N.A. 8 to 10 minutes
8 to 10 minutes 30 to 35 minutes
8 to 10 minutes 30 to 35 minutes
8 to 10 minutes 30 to 35 minutes
N.A. 8 to 10 minutes
Cooking Time
(unsoaked)
Yield
2 cups
2 cups
2½ cups
2¼ cups
2 cups
2¼ cups
2 cups
2 cups
2 cups
15
Page 16

RECIPES
Steel-Cut Oats .................. 17
Chicken Stock .................. 17
Vegetable Stock ................. 17
Brown Beef Stock ............... 18
Quick Chicken Soup ............. 18
Cuban Black Bean Soup .......... 19
Borscht ....................... 20
Escarole and White Bean Stew ..... 20
Pho........................... 21
Pasta e Fagioli .................. 22
Lentil Soup ..................... 22
Vegetarian Bean Chili ............. 23
Artichokes with Three Sauces ...... 23
Mushroom Risotto ............... 25
Black Beans and Rice ............ 25
Curried Chickpeas with Potatoes
and Spinach .................... 26
Sautéed Kale ................... 26
Green Beans with Shallots
and Pine Nuts ................... 26
Acorn Squash with Melted
Red Onion and Sage . . . . . . . . . . . . . 27
Garlic and Herb Smashed Potatoes . . 27
Honey-Glazed Salmon ............ 28
Arroz con Pollo .................. 28
Chicken and Vegetable Curry ....... 29
Simple Chicken.................. 29
Classic Beef Stew ............... 30
Carne Mechada ................. 30
Corned Beef and Cabbage ......... 31
Asian-Style Pork Ribs ............. 32
Pineapple Chipotle Pulled Pork Tacos 32
Pork Chops with Apricot Sauce ..... 33
Creamy Rice Pudding ............. 34
“Baked” Apples.................. 34
Key Lime Cheesecake ............ 35
Cherry Chocolate Chip Bread Pudding 35
16
Page 17

Steel-Cut Oats
Traditionally, steel-cut oats take care, time and
a watchful eye, but in the pressure cooker it’s a
hands-off quick task for perfectly cooked,
2
5
∕3 cups water
2 cups steel-cut oats (not quick cooking)
1 tablespoon coconut oil
1½ cinnamon sticks
¼ cup, plus 2 tablespoons unsweetened
coconut flakes
2 tablespoons real maple syrup
¾ cup dried fruit
2 pinches ground nutmeg
Pinch kosher salt
1. Put all of the ingredients into the cooking
pot of the Cuisinart
Secure the lid and select High Pressure. Set
the time for 5 minutes. When the audible
beep sounds, allow pressure to release
naturally.
2. Once pressure has released completely, red
indicator will drop. Remove lid and remove
the cinnamon sticks.
3. Stir to combine and serve immediately.
Nutritional information per serving (½ cup):
Calories 131 (26% from fat) • carb. 22g • pro. 3g
fat 4g • sat. fat 2g • chol. 0mg • sod. 20mg
creamy oats.
Makes about 7 cups
®
Pressure Cooker.
calc. 8mg • fiber 3g
Chicken Stock
This nourishing stock has many uses. Sip it
plain, use it as a base for soups and stews,
or store it in 1-cup containers to cook with
4 pounds chicken parts with bones
3 carrots, cut into 2-inch pieces
2 celery stalks, cut into 2-inch pieces
1 medium onion, cut into about 2-inch
1 garlic clove
15 parsley stems
3 thyme sprigs
or to warm up meals.
Makes about 12 cups
chunks
2 teaspoons black peppercorns
2 bay leaves
12 cups water
1. Put all of the ingredients into the cooking
pot of the Cuisinart
Secure the lid and select Soup. Set the
time for 80 minutes. When the audible beep
sounds, allow pressure to release naturally.
2. Once pressure has released completely,
the red indicator will drop. Remove lid and
strain stock through a fine mesh strainer.
3. Cool strained stock to room temperature
before transferring to the refrigerator to
complete the cooling process. When ready
to serve, use a spoon to discard the solid
fat that sits on top of the stock before
using. Stock may be stored for 7 days in
the refrigerator and up to 6 months in the
freezer.
NOTE: If time is short, stock can be prepared
in 30 minutes – the flavor deepens the longer
it cooks.
Nutritional information per serving (one cup):
Calories 86 (7% from fat) • carb. 1g • pro. 6g
fat 3g • sat. fat 1g • chol. 0mg • sod. 343mg
®
Pressure Cooker.
calc. 0mg • fiber 0g
Vegetable Stock
While this recipe uses whole vegetables, scraps
can also be added. Store carrot peels, celery
leaves and ends, onion skins, mushroom stems
and herbs in an airtight container in the freezer.
Add to the veggie stock ingredients to enhance
4 large carrots, cut into 2-inch pieces
3 celery stalks, cut into 2-inch pieces
2 onions, cut into about 8 chunks
1 leek, cleaned well and cut into
12 black peppercorns
10 parsley stems
3 thyme sprigs
2 bay leaves
2 garlic cloves
10 cups water
a flavorful, vegetarian stock.
Makes 10 cups
2-inch pieces
17
Page 18

1. Put all of the ingredients into the cooking pot
of the Cuisinart
®
Pressure Cooker. Secure
the lid and select Soup. Set the time for 30
minutes. When the audible beep sounds,
allow pressure to release naturally.
2. Once pressure has released completely,
the red indicator will drop. Remove lid and
strain through a fine mesh strainer. Discard
vegetables.
3. Vegetable stock may be used immediately
or allow to cool to room temperature and
refrigerate; it may be stored for 7 days in the
refrigerator and up to 6 months in the freezer.
Nutritional information per serving (one cup):
Calories 39 (3% from fat) • carb. 9g • pro. 1g
fat 0g • sat. fat 8g • chol. 0mg • sod. 56mg
calc. 39mg • fiber 2g
Brown Beef Stock
For a deeper-flavored beef stock, roast the
bones at 425°F for 40 to 45 minutes before
adding to the pressure cooker.
Makes about 8 cups
2 pounds beef chuck, short ribs
or shank
2 pounds beef bones
2 large carrots, peeled and (?) cut into
2-inch pieces
2 celery stalks, cut into 2-inch pieces
1 large onion, quartered
1 tablespoon olive oil
2 garlic cloves
1 teaspoons black peppercorns
10 parsley stems
4 thyme sprigs
1 bay leaf
8 cups water
1. Preheat oven to 425°F. Arrange beef,
bones, carrots, celery and onion in a shallow
roasting pan. Drizzle with oil and toss to
coat. Roast in oven for about 40 minutes,
turning ingredients halfway through roasting
time. Ingredients on tray should be nicely
browned.
2. Put contents of roasting pan minus any
excess oil into the cooking pot of the
Cuisinart
peppercorns, herbs and bay leaf to the pot.
®
Pressure Cooker. Add the garlic,
Cover ingredients with 8 cups of water.
Secure the lid and select Soup. Set the
time for 75 minutes. When the audible beep
sounds, allow pressure to release naturally.
3. Once pressure has released completely,
the red indicator will drop. Remove lid and
strain stock through a fine mesh strainer.
Reserve any meat, discard bones and
vegetables.
4. Cool strained stock to room temperature
before transferring to the refrigerator to
complete the cooling process. When ready
to serve, use a spoon to discard the solid
fat that sits on top of the stock before
using. Stock may be stored for 7 days in
the refrigerator and up to 6 months in the
freezer.
Nutritional information per serving (1 cup):
Calories 17 (2% from fat) • carb. 1g • pro. 3g
fat 0g • sat. fat 0g • chol. 0mg • sod. 893mg
calc. 12mg • fiber 0g
Quick Chicken Soup
The Cuisinart® Pressure Cooker makes it
possible to achieve a flavorful base for chicken
soup in 25 minutes with no flavor enhancers
4 pounds skinless, boneless
2 carrots, cut into 2-inch pieces
2 celery stalks, cut into 2-inch pieces
1 onion, cut into 2-inch chunks
10 parsley stems
2 thyme stems
1 bay leaf
1 garlic clove, crushed
10 cups chicken broth
1½ teaspoons kosher salt
¼ teaspoon freshly ground black pepper
6 carrots, halved and thinly sliced
3 celery stalks, halved and thinly sliced
Chopped parsley, for garnish
1. Put the chicken, chunks of carrots, celery
and onion, parsley and thyme stems, bay
leaf, garlic and broth into the cooking pot
of the Cuisinart
the lid and select Soup. Set the time for 25
like salty bouillon cubes.
Makes about 12 cups
chicken thighs
®
Pressure Cooker. Secure
18
Page 19

minutes. When the audible beep sounds,
allow pressure to release naturally.
2. Once pressure has released completely, the
red indicator will drop. Remove lid and allow
to cool slightly before removing chicken
and vegetables with a sturdy, slotted spoon
or skimmer. Reserve chicken and discard
vegetables.
3. Add sliced carrot and celery to the cooking
pot. Secure the lid and select High Pressure.
Set time for 3 minutes. While vegetables
cook, shred the chicken.
4. When time expires, use Quick Pressure
Release. Remove lid and stir in shredded
chicken with the salt and pepper to taste.
Once chicken is warmed through, taste and
adjust seasoning as desired. Garnish with
chopped parsley before serving
* For chicken noodle soup, add 1 cup of egg
noodles with the sliced veggies and increase
cooking time to 5 minutes.
**Make Greek Avgolemono Soup by adding
8 ounces of orzo with the sliced vegetables.
Cook for 5 minutes with High Pressure. Then,
after stirring in the shredded chicken, combine
4 eggs, the juice of 2 lemons and 1 teaspoon
kosher salt in the mixing cup of a hand blender
or a small bowl. Use a hand blender to beat the
egg mixture until light and frothy. (A fork may
also be used.) While continuously beating the
egg mixture, slowly add in about 1 cup of hot
broth; this will gently cook the eggs so they do
not scramble when you add them to the soup.
Slowly add more broth to the mixture until the
outside of the mixing cup or bowl is warm.
Then, while stirring the soup, slowly add in the
tempered egg mixture. Sprinkle with freshly
ground black pepper and garnish with a pinch
of chopped parsley or dill before serving.
Nutritional information per serving
(1 cup, for Quick Chicken Soup):
Calories 379 (56% from fat) • carb. 11g • pro. 30g
fat 23g • sat. fat 7g • chol. 0mg • sod. 135mg
calc. 36mg • fiber 1g
Cuban Black Bean Soup
Rich black bean soup that is both smoky
1 tablespoon olive oil
12 ounces chicken or pork andouille
sausage, cut into small dice
1 medium onion, chopped
1 red pepper, cut into small dice
3 garlic cloves, finely chopped
1 tablespoon dried oregano
1 teaspoon ground cumin
½ teaspoon coriander
6 cups water
1 pounds dried black beans,
rinsed and drained
1 bay leaf
¼ teaspoon cayenne
1 tablespoon red wine vinegar
1 teaspoon kosher salt
1. Put oil into the cooking pot of the
Cuisinart
Brown. When the oil is hot, cook the
sausage until slightly brown, about 5
minutes. Add the onion, pepper, garlic,
oregano, cumin and coriander. Sauté until
onion is are translucent and soft, about
3 to 5 minutes. Add the water, black beans
and bay leaf.
2. Secure the lid and select Beans. Set the
time for 30 minutes. When the audible beep
sounds, allow pressure to release naturally.
3. Once pressure has released completely, the
red indicator will drop. Remove lid and stir
in the cayenne, vinegar and salt.
4. Taste and adjust the seasoning as desired.
* Serving ideas: Serve with diced avocado, sour
cream, cilantro and cooked rice.
and satisfying.
Makes about 9 cups
®
Pressure Cooker and select
Nutritional information per cup:
Calories 140 (20% from fat) • carb. 16g • pro. 10g
fat 3g • sat. fat 1g • chol. 22 mg • sod. 447mg
calc. 35mg • fiber 5g
19
Page 20

Borscht
This soup tastes even better the next day
when all the flavors have had a chance to
meld overnight.
Makes about 8 cups
Beef Stock:
2 to 3 beef shanks, about 3 pounds total
1 teaspoon kosher salt
½ teaspoon freshly ground black pepper
1 tablespoon olive oil
2 medium carrots, cut into 3-inch pieces
2 celery stalks, cut into 3-inch pieces
2 plum tomatoes, halved
1 onion, halved
1 tablespoon tomato paste
8 cups water
12 black peppercorns
10 parsley stems
2 thyme sprigs
1 bay leaf
Soup:
1 teaspoon olive oil
2 medium carrots, shredded
3 medium beets, shredded
¼ teaspoon kosher salt
1 teaspoon granulated sugar
1 tablespoon red wine vinegar
2 medium potatoes (about 1 pound),
peeled and cut into 1-inch pieces
½ small green cabbage, thinly sliced
½ cup fresh dill, chopped, plus more for
serving
Sour cream, for serving
select Soup. Set the time for 80 minutes.
When audible tone sounds, allow pressure
to release naturally.
3. When the red indicator drops, remove lid,
cool stock and strain through a cheesecloth
or fine mesh strainer. Shred meat from
shanks and reserve. Discard vegetables.
4. Cool strained stock to room temperature,
then transfer to the refrigerator until the fat
rises to the top and solidifies.
Make the soup:
1. Once the stock has completely cooled
and has fat solidified, remove and discard
fat. Put the oil into the cooking pot of the
pressure cooker and select Sauté. Once
the oil is hot, add the shredded carrots and
beets with the salt and sugar. Sauté until
slightly soft. Add the vinegar, scraping up
any brown bits that may have accumulated
on the bottom of the pot. Add the stock
back to the cooking pot with the potatoes.
Secure the lid and select High Pressure. Set
the time for 3 minutes. When time expires,
use Quick Pressure Release.
2. Once pressure has released completely,
remove the lid. Stir in the reserved shredded
beef and the cabbage. When beef is hot
and the cabbage has wilted, after about 5
minutes, stir in the dill.
3. Taste and adjust seasoning as desired.
Serve with a small dollop of sour cream and
more chopped dill.
Nutritional information per serving (2 cups):
Calories 309 (22% from fat) • carb. 38g • pro. 38g
fat 10g • sat. fat 3g • chol. 62mg • sod. 688mg
calc. 138mg • fiber 8g
Make the stock:
1. Season the beef with the salt and pepper;
reserve. Put the olive oil into the Cuisinart
Pressure Cooker and select Brown. When
hot, add one seasoned beef shank and
brown on all sides. Reserve and repeat with
remaining shank.
2. Once browned, return reserved shanks to
the pot with the beef bones, carrots, celery,
tomatoes, onion and tomato paste. Stir, and
then add the water, peppercorns, parsley,
thyme and bay leaf. Secure the lid and
Escarole and
White Bean Stew
®
Simple ingredients transform into a hearty yet
healthy and delicious dish. Serve with extra
1 tablespoon olive oil
3 garlic cloves, smashed
1 pound dried white beans, rinsed
8 cups chicken broth
20
olive oil and crusty bread.
Makes 12 cups
Page 21

1 large head escarole, roughly chopped
½ teaspoon kosher salt
1. Put the olive oil into the cooking pot of
the Cuisinart
®
Pressure Cooker and select
Sauté. Once the oil is hot, add the garlic
cloves. Sauté until garlic is fragrant, about
3 to 5 minutes. Add the white beans and
broth. Secure the lid and select Beans. Set
the time for 30 minutes. When time expires,
allow pressure to release naturally.
2. Once pressure has released completely,
remove the lid. Stir in the escarole and salt.
Select Simmer. Cook until escarole has
completely wilted.
3. Taste and adjust seasoning as desired.
Nutritional information per serving (one cup):
Calories 157 (8% from fat) • carb. 26g • pro. 11g
fat 1g • sat. fat 0g • chol. 0mg • sod. 286mg
calc. 128mg • fiber 7g
Pho
Traditional Vietnamese Pho simmers for
hours and is constantly skimmed to create
a deep-flavored, clear broth. Our version is
lighter, but takes a fraction of the time and is
Broth:
2 pounds beef bones
2 pounds mix of beef shank, oxtail or
1 onion, halved
2 carrots, cut into 2-inch pieces
1 2-inch piece ginger, unpeeled
2 cinnamon sticks
4 star anise pods
3 cloves
½ bunch cilantro
12 cups water
just as comforting
Makes about 12 cups
short rib
Fresh cilantro
Fresh mint
Mung beans
Green onions, thinly sliced
Fresh lime juice
Fish sauce, optional
Chili sauce, optional
Hoisin sauce, optional
1. Add the broth ingredients into the cooking
pot of the Cuisinart
®
Pressure Cooker.
Secure the lid and select Soup. Set the time
for 90 minutes. When time expires, allow
pressure to release naturally.
2. Once pressure is released completely, the
red indicator will drop. Remove the lid. Cool
stock and then strain through a cheesecloth
or fine mesh strainer. Beef may be shredded
and used in the soup, or reserved for
another use. Discard bones, vegetables and
aromatics.
3. When strained stock reaches room
temperature, transfer it to the refrigerator
until the fat rises to the top and solidifies.
Make the soup:
4. When ready to serve, discard the solidified
fat with a spoon and add remaining stock
to the cooking pot and select Sauté. Bring
stock to simmer while preparing the bowls
for serving: Put 1 cup cooked rice noodles,
5 hand-torn basil leaves, 1 tablespoon
hand-torn cilantro leaves, 5 hand-torn mint
leaves, 1 tablespoon mung beans and 1
teaspoon green onions in each bowl.
5. Just before serving, add the fish sauce
and the sliced flank steak to the simmering
stock and switch to Keep Warm. Remove
pot from heat to just cook through the meat.
Add about 2 cups of the hot stock, with
the cooked steak, to each prepared bowl
with a squeeze of lime juice. If desired, stir
in a dash of fish sauce, chili sauce and/or
hoisin sauce. Taste and adjust seasoning as
desired. Serve immediately.
Soup:
4 tablespoons fish sauce
1 pound flank steak, very thinly sliced
Ingredients for serving:
8 ounces rice noodles, cooked
Fresh basil
Nutritional information per serving (1 cup):
Calories 777 (36% from fat) • carb. 50g • pro. 68g
fat 29g • sat. fat 14g • chol. 98mg • sod. 536mg
calc. 60mg • fiber 3g
21
Page 22

Pasta e Fagioli
Try our hearty and healthy vegetarian version of
1 tablespoon olive oil
1 onion, chopped
1 carrot, cut into ½-inch dice
1 celery stalk, cut into ½-inch dice
3 garlic cloves, chopped
1 teaspoon dried oregano
1 teaspoon dried basil
1 pound dried cannellini or white beans,
1 bay leaf
6 cups water
4 cups vegetable broth
2 cans (14 ounces each) diced tomatoes
1½ teaspoons kosher salt
1½ cups tubetti, small macaroni or small
Chopped fresh parsley
Freshly grated Parmesan
1. Put the olive oil into the cooking pot of
the Cuisinart
Sauté. Add the onion, carrot, celery and
garlic and sauté until fragrant and soft,
about 5 minutes. Add the oregano, basil,
beans, bay leaf and water. Secure the
lid and select Beans. Set the time for 30
minutes. When the audible beep sounds,
allow pressure to release naturally.
2. Once pressure is released completely,
the red indicator will drop. Remove the lid.
Add the broth, diced tomatoes, salt and
pasta. Secure the lid and select High
Pressure. Set the time for 5 minutes.
Once time expires, use Quick Pressure
Release.
3. Taste and adjust seasoning as desired.
Serve with chopped fresh parsley and
grated Parmesan on the side.
this classic Italian soup.
Makes about 12 cups
rinsed
with juice
shell pasta
®
Pressure Cooker and select
Lentil Soup
Simple, yet satisfying. This cool
weather favorite is ready in no time with
1 tablespoon olive oil
1 medium onion, finely chopped
1 carrot, peeled and cut into
2 garlic cloves, thinly sliced
1 small bay leaf
1 pound dried brown lentils
5 cups vegetable or chicken broth
1 teaspoon kosher salt
¼ teaspoon freshly ground black pepper
½ teaspoon fresh lemon juice
1. Put the oil into the cooking pot of the
Cuisinart
Once oil is hot, add the onion, carrot and
garlic. Stir vegetables and cook until soft
and fragrant, about 5 minutes.
2. Add the bay leaf, lentils and broth to the
cooking pot. Secure lid and select Soup.
Set time for 8 minutes. When the audible
beep sounds, allow pressure to release
naturally.
3. Once pressure has released completely,
the red indicator will drop. Remove lid
and add the salt, pepper and lemon juice.
Discard the bay leaf. Taste and adjust
seasoning as desired.
For variation, stir in chopped fresh spinach and
freshly grated Parmesan when serving.
Calories 110 (16% from fat) • carb. 16g • pro. 7g
fat 2g • sat. fat 0mg • chol. 0mg • sod. 515mg
the pressure cooker!
Makes 8 cups
¼-inch dice
®
Pressure Cooker. Select Sauté.
Nutritional info per cup:
calc. 21mg • fiber 5g
Nutritional information per serving (1 cup):
Calories 246 (11% from fat) • carb. 46g • pro. 11g
fat 3g • sat. fat 0g • chol. 0mg • sod. 228mg
calc. 111mg • fiber 12g
22
Page 23

Vegetarian Bean Chili
The smokiness of the chipotle not only
adds a lot of flavor (and some heat), but an
unexpected meatiness to the dish, making this
2 cups dried beans, soaked overnight,
1 tablespoon olive oil
1 ½-inch piece fresh ginger, peeled and
2 garlic cloves, finely chopped
1 small onion, finely chopped
1 teaspoon kosher salt, divided
¼ teaspoon freshly ground black pepper,
1 medium bell pepper (yellow or green
2 teaspoons chili powder
¼ teaspoon ground cumin
¼ teaspoon ground cinnamon
1 can (28 ounces) diced tomatoes,
2 tablespoons tomato paste
1 chipotle in adobo sauce, puréed with
2 cups vegetable broth
Shredded Cheddar or Monterey Jack,
Fresh cilantro, for garnish
1. Put the olive oil into the cooking pot of the
Cuisinart
Once the oil is hot, add the ginger, garlic
and onion with a pinch each of the salt and
pepper. Cook until softened and the onion
is translucent, about 2 to 3 minutes. Add
the bell pepper and the spices and cook to
meld the flavors and cook the pepper, about
3 to 4 minutes. Add the drained beans,
tomatoes, tomato paste, chipotle and sauce,
broth and remaining salt and pepper.
a filling, but healthy, chili.
Makes about 7 cups
then drained (a mixture of beans works
well for this dish – black, kidney, navy,
adzuki, garbanzo, etc.)
finely chopped
divided
preferably, for color), cored, seeded
and diced
drained
additional 1 teaspoon adobo sauce
for garnish
®
Pressure Cooker. Select Sauté.
2. Secure the lid and select Soup. Set the
time for 20 minutes. When the audible beep
sounds, allow pressure to release naturally.
3. Once the pressure is released completely,
the red indicator will drop. Remove lid.
4. Taste and adjust seasoning as desired.
Nutritional information per serving (1 cup):
Calories 247 (10% from fat) • carb. 44g • pro. 14g
fat 3g • sat. fat 0g • chol. 0mg • sod. 728mg
calc. 117mg • fiber 14g
Artichokes with
Three Sauces
Perfect artichokes, ready in just 7 minutes! The
best part is that these can be made in advance
and served at room temperature with any one
½ cup water
4 medium artichokes
1 lemon, halved
1. Put water and the juice of one lemon into
the cooking pot of the Cuisinart
Cooker.
2. Prepare artichokes by cutting the stem off
at the base to make an even, flat surface.
Cut one-third off the top, and trim the outer
layers of tough leaves.
3. Rub the cut parts of the artichoke with the
remaining lemon halves. Place artichokes
into the pot. Secure the lid and select High
Pressure. Set timer for 7 minutes. When the
audible beep sounds, use Quick Pressure
Release.
4. Once pressure has released completely, the
red indicator will drop. Remove lid.
5. Serve immediately with melted butter or one
of our suggested dipping sauces.
Nutritional information per serving (one artichoke):
of our suggested sauces
Makes 4 artichokes
®
Pressure
Calories 76 (2% from fat) • carb. 17g • pro. 5g
fat 0g • sat. fat 0g • chol. 0mg • sod. 152mg
calc. 71mg • fiber 9g
23
Page 24

Garlic-Chile Oil
A simple oil for the artichokes, any leftovers can
be used for dipping bread
Makes ½ cup
½ cup olive oil
4 garlic cloves, thinly sliced
Pinch kosher salt
Freshly ground black pepper
Pinch red pepper flakes
Put the oil and garlic in a small saucepan set
over medium heat. Cook until garlic is fragrant,
but not colored, 3 to 5 minutes. Remove from
the heat, add the remaining ingredients and
allow to cool. Cover and steep for 1 hour.
Strain into a jar or small serving/dipping bowl
(discard the garlic). The oil can be stored
at room temperature for 24 hours, or in the
refrigerator for up to 1 week (bring to room
temperature before serving).
Nutritional information per serving (2 teaspoons):
Calories 82 (98% from fat) • carb. 0g • pro. 0g
fat 9g • sat. fat 1g • chol. 0mg • sod. 12mg
calc. 2mg • fiber 0g
Lemon-Thyme Butter
The melted butter coats the artichoke leaves
perfectly, and the hint of lemon brightens up this
delicious dipping sauce.
Makes about ½ cup
8 tablespoons (1 stick) unsalted butter
2 tablespoons fresh lemon juice
2 teaspoons fresh thyme leaves
½ teaspoon grated lemon zest
Pinch kosher salt
Hollandaise
This classic sauce can be made in a blender,
food processor or by hand, but we have found
in our testing that the hand blender is the
quickest and most foolproof way to prepare it.
Makes 1½ cups
4 large egg yolks
1 tablespoon fresh lemon juice
¾ teaspoon kosher salt
½ pound (2 sticks) unsalted butter, melted
and kept slightly warm (not hot)
Warm water, as needed
1. Put the egg yolks, lemon juice and salt into
the blending cup of a hand blender (or a tall,
shatterproof cup would work well). Slowly
pour the warm butter into the cup, carefully
leaving any white milk solids on the bottom
of the pot behind. Allow to rest for about 1
minute.
2. Insert the blending shaft into the blending
cup so that the blade guard touches the
bottom of the cup. Blend, using Low speed
if available, keeping the blade on the bottom.
Once the ingredients thicken and start to
emulsify, continue processing, using a gentle
up-and-down motion, until thick and all the
ingredients are incorporated.
3. If sauce is too thick, blend in warm water, 1
teaspoon at a time, until desired consistency
is achieved (approximately 2 tablespoons
water total).
4. Taste and adjust seasoning as desired. Serve
immediately or transfer to a double boiler to
keep warm.
Nutritional information per serving (1 tablespoon):
Calories 115 (97% from fat) • carb. 0g • pro. 1g
fat 12g • sat. fat 7g • chol. 76mg • sod. 109mg
calc. 6mg • fiber 0g
Put the butter in a small saucepan to melt.
Remove from heat and cool slightly. Add the
remaining ingredients and stir to combine.
Serve warm.
Nutritional information per serving (1 teaspoon):
Calories 67 (99% from fat) • carb. 0g • pro. 0g
fat 7g • sat. fat 5g • chol. 20mg • sod. 24mg
calc. 1mg • fiber 0g
24
Page 25

Mushroom Risotto
Fresh mushrooms star in this simple
1 tablespoon olive oil
1 tablespoon unsalted butter
1 medium leek, thoroughly cleaned and
1 teaspoon kosher salt, divided
¼ teaspoon freshly ground black pepper
16 ounces sliced cremini mushrooms
8 ounces sliced shiitake mushrooms
3 sprigs fresh thyme
3 cups Arborio rice
½ cup dry white wine
6 cups low-sodium chicken or vegetable
1 cup green peas
½ cup shredded fontina
1. Put the oil and butter into the cooking pot
of the Cuisinart
select Brown. Once oil is hot and butter
melted, add the leek with ½ teaspoon
of the salt and pepper. Stir and cook
until soft and fragrant. Add the sliced
mushrooms and thyme, and cook until soft
and browned at the edges.
2. Add the rice and stir to evenly coat with
the other ingredients. Cook until the outer
edges are translucent, but the middle is
still opaque. Add the wine and stir until the
wine evaporates and the pot is just about
dry. Add broth and remaining salt.
3. Secure the lid and select High Pressure.
Set the time for 3 minutes. When the
audible beep sounds, use quick pressure
release.
4. Once pressure has released completely,
the red indicator will drop. Remove lid and
stir in the peas and cheese.
5. Remove thyme stems, taste and adjust
seasoning as desired. Serve immediately.
yet flavorful risotto
Makes about 12 cups
finely chopped
broth/stock
(about 1¼ ounces)
®
Pressure Cooker and
Black Beans and Rice
A quick version of the classic
Cuban side dish.
Makes 8 cups
1 cup dried black beans, soaked
overnight
1 tablespoon olive oil
1 jalapeño, seeded and chopped
2 garlic cloves, finely chopped
½ teaspoon ground cumin
4 cups low-sodium chicken broth,
divided
1 bay leaf
2 cups long-grain white rice
1 teaspoon kosher salt
1. Drain and rinse soaked beans; reserve.
2. Put the olive oil into the cooking pot of the
Cuisinart
When the oil is hot, add the jalapeño and
garlic and cook until soft and fragrant,
about 3 minutes. Stir in the cumin and
rinsed beans with 2 cups of broth and the
bay leaf.
4. Secure the lid and select Beans. Set time
for 15 minutes. When the audible beep
sounds, use Quick Pressure Release.
5. Once the pressure has released
completely, the red indicator will drop.
Remove lid and add the remaining chicken
broth, rice and salt. Stir well and select
High Pressure for 3 minutes, allowing the
pressure to release naturally.
6. Remove lid and stir together, adjust
seasoning as desired and serve.
Calories 265 (7% from fat) • carb. 52g • pro. 9g
®
Pressure Cooker. Select Sauté.
Nutritional information per serving (1 cup):
fat 2g • sat. fat 0g • chol. 0mg • sod. 553mg
calc. 73mg • fiber 4g
Nutritional information per first-course serving (½ cup):
Calories 170 (19% from fat) • carb. 27g • pro. 5g
fat 4g • sat. fat 2g • chol. 8mg • sod. 388mg
calc. 34mg • fiber 1g
25
Page 26

Curried Chickpeas with
Potatoes and Spinach
Vegetarian comfort food!
Makes about 4 cups
2 teaspoons vegetable oil
½ red onion, finely chopped
1 habanero pepper, deseeded and
finely chopped
2 garlic cloves, finely chopped
1 tablespoon mild curry powder
½ teaspoon ground cumin
1 cup dried chickpeas, rinsed
and drained
2 cups vegetable or chicken stock
12 ounces white potatoes, cut into
½-inch dice
½ teaspoon kosher salt
1 cup fresh baby spinach, packed
1. Put the oil into the cooking pot of the
Cuisinart
Once the oil is hot, add the onion, pepper
and garlic. Cook until softened and
fragrant, about 5 minutes. Add the curry
powder and cumin and stir well over the
heat; continue to cook for a few minutes.
Add the dried chickpeas and stock.
Secure the lid and select Beans. Set time
for 30 minutes. When audible tone sounds,
allow pressure to release naturally.
2. Once pressure has released completely,
the red indicator will drop. Remove the lid.
Add the potatoes and salt and secure the
lid. Select High Pressure for 3 minutes.
When time expires, use Quick Pressure
Release.
3. Remove the lid and stir in the spinach.
Taste and adjust seasoning as desired.
Calories 152 (20% from fat) • carb. 24g • pro. 7g
®
Pressure Cooker. Select Sauté.
Nutritional information per cup:
fat 3g • sat. fat 0mg • chol. 0mg • sod. 443mg
calc. 47mg • fiber 16g
Sautéed Kale
This simple side dish is a tasty way to get
greens on your plate any night of the week.
Makes about 3 cups
1 tablespoon olive oil
1 garlic clove, crushed
¼ teaspoon kosher salt
Pinch crushed red pepper
8 ounces (10 packed cups) kale, hard
stems removed and discarded, leaves
and tender stems roughly chopped
½ cup low-sodium chicken broth
1. Put the olive oil in the cooking pot of the
Cuisinart
Add the garlic clove and simmer slightly until
barely golden. Stir in the salt and crushed
red pepper.
2. Once the garlic is golden, stir in the kale
to evenly coat with oil and add the broth.
Secure the lid and select High Pressure.
Set the time for 2 minutes. When the audible
beep sounds, use Quick Pressure Release.
3. Once the pressure is completely released,
the red indicator will drop.
4. Remove lid. Taste and adjust seasoning
as desired.
®
Pressure Cooker. Select Sauté.
Nutritional information per serving
(based on ½ cup serving):
Calories 98 (53% from fat) • carb. 9g • pro. 4g
fat 6g • sat. fat 1g • chol. 3mg • sod. 291mg
calc. 124mg • fiber 2g
Green Beans with
Shallots and Pine Nuts
This side dish is elegant enough for a dinner
party, yet simple enough to make every day.
Makes about 8 cups
½ cup pine nuts
2 tablespoons unsalted butter
1 large shallot (about 3 ounces), peeled
and thinly sliced
¾ teaspoon kosher salt
24 ounces green beans, trimmed
2 tablespoons fresh lemon juice
1 cup water
26
Page 27

1. Put the pine nuts into the cooking pot of
the Cuisinart® Pressure Cooker and select
Brown. Stir over the heat for about 5
minutes, until the nuts are slightly toasted.
2. Add the butter to the pot with the shallots to
slightly sauté and soften.
3. Sprinkle with salt before adding the green
beans, lemon juice and water. Secure the
lid and select High Pressure. Set the time
for 1 minute. When the audible beep sounds,
use Quick Pressure Release. Once pressure
is completely released, the red indicator
will drop.
4. Remove lid and stir together, taste and adjust
seasoning as desired
Nutritional information per serving (½ cup):
Calories 64 (73% from fat) • carb. 4g • pro. 2g
fat 5g • sat. fat 1g • chol. 4mg • sod. 151 mg
calc. 17mg • fiber 1g
.
Acorn Squash with
Melted Red Onion
and Sage
A hearty winter side dish.
Makes about 4 cups
2 teaspoons olive oil
1 medium acorn squash, seeded
and cut into wedges
1 medium red onion (about 8 to 9
ounces), cut into wedges
2 teaspoons pure maple syrup
½ teaspoon kosher salt
½ cup chicken stock
1 teaspoon fresh sage leaves,
thinly sliced
1. Put the olive oil into the cooking pot of
the Cuisinart
Brown. Once the oil is hot and shimmers
across the pan, add the squash wedges
in a single layer (this will take 2 batches).
Cook until golden, about 2 minutes per
side. Repeat with second batch and then
remove and reserve.
2. Add the onion wedges to the pot and cook
until golden, again about 2 minutes per
side. Once golden, stir in the maple syrup,
salt, and chicken stock. Add the squash
®
Pressure Cooker. Select
back to the pot, secure the lid and select
High Pressure. Set the time to 3 minutes.
When the audible beep sounds, use Quick
Pressure Release.
3. Once all the pressure has completely
released, the red indicator will drop.
Remove lid and add the sage.
4. Taste and adjust seasoning as desired.
Nutritional information per serving (½ cup):
Calories 56 (21% from fat) • carb. 11g • pro. 1g
fat 1g • sat. fat 0g • chol. 0mg • sod. 213mg
calc. 34mg • fiber 2g
Garlic and Herb
Smashed Potatoes
The potato side dish to fit every plate.
Makes 4 to 6 servings
2 tablespoons unsalted butter, divided
2 pounds small red potatoes, halved
lengthwise
2 garlic cloves, sliced
½ teaspoon kosher salt
½ cup chicken broth
¼ cup chopped fresh herbs (any favorite
or combination – parsley, mint,
rosemary, thyme and/or dill)
1. Put 1 tablespoon of the butter into the
cooking pot of the Cuisinart
Cooker. Select Sauté. Once butter melts,
stir in the potatoes, garlic and salt. Sauté
so that the butter coats all the potatoes
and the garlic softens and becomes
aromatic, about 4 to 5 minutes. Add the
broth and secure the lid. Select High
Pressure. Set the time for 5 minutes.
When the audible beep sounds, use Quick
Pressure Release.
2. Once pressure is released completely,
the red indicator will drop. Remove lid and
strain potatoes. Toss with remaining butter
and chopped herbs. Serve immediately.
Nutritional information per serving
(based on 6 servings)
Calories 175 (30% from fat) • carb. 28g • pro. 4g
fat 6g • sat. fat 4g • chol. 16mg • sod. 226mg
calc. 21mg • fiber 3g
®
Pressure
27
Page 28

Honey-Glazed Salmon
While the Cuisinart® Pressure Cooker may cook
food very quickly, its Low Pressure setting is
gentle enough for delicate items such as fish. In
this recipe, salmon cooks perfectly in just a few
minutes. Plus, a touch of sweetness and Asian
flavors will appeal to even the pickiest eaters.
Makes 2 to 3 servings
¼ teaspoon kosher salt
1 pound salmon fillet, about 1½
inches thick, skin removed, cut into
2 to 3 pieces
Freshly ground black pepper
½ cup water
2 tablespoons honey
1½ tablespoons reduced-sodium soy sauce
1 garlic clove, smashed
1 1-inch piece ginger, peeled and
thinly sliced
1 green onion, thinly sliced for serving
1. Season salmon with the salt and pepper.
In a small bowl, whisk together the water,
honey, soy sauce, garlic and ginger and
put into the cooking pot of the Cuisinart
Pressure Cooker with the salmon fillets.
Select Low Pressure. Set time to 4
minutes. When the audible beep sounds,
use Quick Pressure Release.
2. Once pressure is released completely, the
red indicator will drop. Remove lid and
transfer salmon to a serving plate, flesh
side up. Select Brown to reduce cooking
liquid until it thickens. Spoon over salmon
and sprinkle with sliced green onions.
Nutritional information per serving
(based on 3 servings)
Calories 278 (30% from fat) • carb. 15g • pro. 33g
fat 9g • sat. fat 2g • chol. 68mg • sod. 414mg
calc. 64mg • fiber 0g
®
Arroz con Pollo
A perfect one-pot meal, in only
30 minutes, total.
Makes about 6 servings
4 pounds boneless, skinless
chicken thighs
1½ teaspoons kosher salt, divided
½ teaspoon freshly ground black pepper
1 teaspoon extra virgin olive oil
1 onion, chopped
1 red pepper, chopped
4 garlic cloves, chopped
2 plum tomatoes, cut into ½-inch dice
¼ teaspoon smoked paprika
2 cups long-grain white rice
3 cups low-sodium chicken broth
1
∕8 teaspoon saffron threads
1 bay leaf
1. Season the chicken on both sides with 1
teaspoon of the salt and the pepper.
2. Put the oil into the cooking pot of the
Cuisinart
Once the oil is hot, brown the chicken
in 2 batches, about 5 minutes per side.
Remove and reserve. Add the chopped
onion, red pepper and garlic. Stir well,
scraping any brown bits from the bottom
of the pot. Sauté vegetables until fragrant,
about 5 minutes. Add the tomatoes with
remaining salt and smoked paprika and
cook for a couple of minutes before
stirring in the rice.
3. Add the chicken back to the pot with the
broth, saffron and bay leaf. Stir together.
Secure the lid and select High Pressure.
Set the time for 18 minutes. When the
audible beep sounds, use Quick Pressure
Release.
4. Once all the pressure is released
completely, the red indicator will drop.
5. Remove lid, stir ingredients together and
serve immediately.
®
Pressure Cooker. Select Brown.
Nutritional information per serving:
Calories 397 (13% from fat) • carb. 52g • pro. 32g
fat 6g • sat. fat 1g • chol. 108mg • sod. 935mg
calc. 71mg • fiber 2g
28
Page 29

Chicken and
Vegetable Curry
Thanks to the pressure cooker, it tastes like this
quick curry spent all day cooking on the stove.
(Spoiler alert: It takes under an hour!)
Makes about 10 cups
1 tablespoon ghee (clarified butter), or
vegetable oil, divided
2 pounds boneless, skinless chicken
thighs (about 4 thighs)
1 teaspoon kosher salt, divided
¼ teaspoon freshly ground black
pepper, divided
1 small onion, finely chopped
2 garlic cloves, finely chopped
1 1-inch piece fresh ginger, peeled
and finely chopped
1 jalapeño, seeded and finely chopped
¼ cup curry powder (mild heat, not hot)
1 can (13.5 ounces) coconut milk
(not “lite”)
1 can (14 ounces) diced tomatoes,
drained
½ pound Yukon gold or red potatoes, cut
into 1-inch pieces
½ pound sweet potatoes, peeled and cut
into 1-inch pieces
1 large carrot, peeled and cut into
½-inch pieces
½ cup green peas, fresh or frozen
Fresh cilantro, chopped, for garnish
Basmati rice, for serving
1. Put ½ tablespoon of the ghee or oil into
the cooking pot of the Cuisinart
Cooker. Select Brown. While oil is heating,
season chicken on both sides with a pinch
each of the salt and pepper. Brown the
chicken, in batches, about 5 minutes per
side. Remove and reserve.
2. Add remaining ghee/oil and add the onion,
garlic, ginger and jalapeño, along with a
pinch each of the salt and pepper and the
curry powder. Sauté until softened. Add
the chicken back to the pot and stir so the
thighs are evenly coated with the sautéed
vegetables and spices.
3. Add the coconut milk and drained
tomatoes, along with the remaining salt
and pepper. Secure the lid and select High
®
Pressure
Pressure. Set the time for 10 minutes.
When the audible beep sounds, use Quick
Pressure Release.
4. Once the pressure is released completely,
the red indicator will drop. Remove lid and
add the potatoes, sweet potatoes and
carrot. Stir well and set for High Pressure
again for 7 minutes. When time expires,
allow pressure to release naturally.
5. Remove lid and stir in the peas. Taste and
adjust seasoning as desired. Garnish with
the cilantro and serve over rice.
Nutritional information per serving (1 cup):
Calories 261 (56% from fat) • carb. 20g • pro. 10g
fat 17g • sat. fat 9g • chol. 32mg • sod. 374mg
calc. 41mg • fiber 3g
Simple Chicken
An easy way to make a tasty and moist whole
chicken for the family any night of the week.
Makes 4 to 6 servings
1 4-pound chicken
1 teaspoon kosher salt
½ teaspoon freshly ground pepper
2 teaspoons olive oil
2 rosemary sprigs
2 thyme sprigs
2 garlic cloves, smashed
1 bay leaf
½ lemon
1 cup chicken broth
1. Season chicken on both sides with salt
and pepper.
2. Put 2 teaspoons olive oil into the cooking
pot of the Cuisinart
Select Brown. Once oil shimmers, add
the chicken, breast down. Brown on both
sides well, about 5 minutes per side. Add
the herbs, garlic and bay leaf to the pot.
Squeeze the lemon into the pot and add
the lemon with the broth.
3. Secure the lid and select High Pressure.
Set the time to 30 minutes. Once audible
beep sounds, use Quick Pressure Release.
®
Pressure Cooker.
29
Page 30

4. When pressure is released completely, the
red indicator will drop. Remove lid and
place chicken on a cutting board.
5. Carve chicken and serve.
Nutritional information per serving
(based on 6 servings):
Calories 150 (31% from fat) • carb. 1g • pro. 24g
fat 5g • sat. fat 1g • chol. 77mg • sod. 573mg
calc. 26mg • fiber 0g
Classic Beef Stew
A hearty dish, perfect for a cold, winter day.
Makes 6 servings
3 pounds beef chuck roast, cut into 1½-
to 2-inch pieces
1½ teaspoons kosher salt, divided
½ teaspoon freshly ground pepper
1 tablespoon olive oil
2 medium carrots, finely chopped
2 celery stalks, finely chopped
1 onion, finely chopped
2 garlic cloves, finely chopped
¼ cup tomato paste
½ cup dry red wine
3 cups beef broth
1 bay leaf
1 pound baby carrots
1½ pounds baby potatoes
1 cup frozen peas
Chopped parsley, for garnish
1. Season the beef with 1 teaspoon of the
salt and the pepper. Reserve.
2. Put the oil into the cooking pot of the
Cuisinart
Brown. When the oil is hot, add the
meat and brown in batches, about 3
to 5 minutes per side. Once browned,
remove the meat and reserve, repeat with
remaining meat. Add the chopped carrots,
celery, onion, garlic and remaining salt.
Stir and cook to soften until vegetables
become fragrant, about 5 minutes. Add the
tomato paste and stir; cook for 2 minutes.
Add the wine and cook until it is reduced
by about half. Add the reserved beef with
®
Pressure Cooker and select
the beef broth and bay leaf. Stir to fully
mix.
3. Secure the lid and select Meat/Stew. Set
the time for 30 minutes. When the audible
beep sounds, use Quick Pressure Release.
4. Once the pressure is released completely,
the red indicator will drop. Remove lid and
add the baby carrots and potatoes. Secure
the lid and select High Pressure for 5
minutes.
5. When time expires, allow pressure to
release naturally. Once the red indicator
drops, remove lid.
6. Taste and adjust seasoning as desired.
Before serving,* stir in peas and garnish
with parsley.
*If a thicker sauce is desired, strain the
solids from the stew liquid, reserving both
separately. Remove and discard bay leaf.
Blend 1½ tablespoons softened butter and
1½ tablespoons flour to make a paste (beurre
manié). Return liquid to pot and bring to a
boil. Once liquid comes to a boil, whisk in
the butter and flour mixture and simmer until
liquid thickens. Pour over reserved meat and
vegetables.
Nutritional information per serving (1 cup):
Calories 379 (21% from fat) • carb. 28g • pro. 41g
fat 9g • sat. fat 3g • chol. 114mg • sod. 583mg
calc. 63mg • fiber 6g
Carne Mechada
A Venezuelan shredded beef dish that is
traditionally served alongside rice, beans and
plantains. It is also quite tasty in a taco!
Makes about 3 cups
Carne:
3 pounds flank or hanger steak
1 teaspoon kosher salt
½ teaspoon freshly ground black pepper
1 teaspoon vegetable oil
1 onion, sliced
6 garlic cloves, crushed
1 large bay leaf
½ cup Worcestershire sauce
2 cups beef broth
30
Page 31

Sofrito:
1 teaspoon vegetable oil
1 onion, finely chopped
6 garlic cloves, finely chopped
2 small to medium red peppers, cut into
thin, 1½-inch long julienne strips
2 chipotle peppers, puréed
¼ cup Worcestershire sauce
½ cup tomato sauce
1½ cups reserved beef cooking liquid
1. Season the beef on both sides with the
salt and pepper, cut in half if necessary for
browning. Put oil into the cooking pot of
the Cuisinart
®
Pressure Cooker and select
Brown. When the oil is hot, add the meat
to brown, about 3 to 5 minutes per side.
2. Once meat is browned, remove and
reserve. Add the onion and garlic to the
pan, scraping up any browned bits that
may remain on the bottom with a wooden
spoon. Cook until soft and fragrant. Stir
in the bay leaf, Worcestershire and beef
broth. Secure lid and select High Pressure.
Set the time for 75 minutes. When the
audible beep sounds, let pressure release
naturally.
3. Once pressure is released completely,
red indicator will drop. Remove lid. Allow
to cool before shredding. For maximum
flavor, allow meat to chill in refrigerator in
the cooking liquid overnight. Before using,
shred meat into 1½- to 2-inch long shreds
with fork or hands.
4. Once the meat has rested and is
shredded, make the sofrito. Put oil into
the cooking pot and select Brown. When
the oil is hot, briefly brown the beef in
batches, about 3 minutes per batch.
Reserve the meat and add the onion,
garlic and peppers to the pan, scraping
up any brown bits that may remain on the
bottom. Stir in the chipotle and then the
Worcestershire, tomato sauce and cooking
liquid. Add reserved meat back to pot.
Secure lid and select High Pressure. Set
time for 3 minutes.
5. When time expires, use Quick Pressure
Release. Once pressure is completely
released, remove lid. Taste and adjust
seasoning as desired.
Nutritional information (based on 6 servings):
Calories 215 (38% from fat) • carb. 7g • pro. 26g
fat 9g • sat. fat 3g • chol. 78mg • sod. 626mg
calc. 47mg • fiber 1g
Corned Beef
and Cabbage
The Cuisinart® Pressure Cooker takes all the
guesswork – and long cooking time – out of this
perfectly prepared St. Patrick’s Day favorite.
Makes 12 servings
4 pounds corned beef, rinsed
½ teaspoon coarsely ground black pepper
5 whole allspice berries, coarsely ground
(or crushed)
1 teaspoon yellow mustard seeds
¼ teaspoon ground ginger
1 bay leaf
2 celery stalks, cut into 2-inch pieces
1 carrot, peeled and halved
1 small onion, halved
Water
2 cups baby carrots
2 pounds baby potatoes
1 small head cabbage, cored and
quartered
Horseradish, for serving, optional
Whole-grain mustard, for serving,
optional
Chopped parsley, for garnish
1. Put the first 9 ingredients (through
the onion), into the cooking pot of the
Cuisinart
until it covers roughly two-thirds of the
corned beef. Secure the lid and select
Meat/Stew. Set the time for 90 minutes.
When the audible beep sounds, allow
pressure to release naturally.
2. Once pressure has released completely,
the red indicator will drop. Remove lid and
remove corned beef and reserve. Strain
the liquid and add back to cooking pot.
Discard the solids. Return the meat to the
pot with the baby carrots, potatoes and
cabbage. Secure the lid and select High
Pressure for 5 minutes. When time expires,
use Quick Pressure Release.
®
Pressure Cooker. Add water
31
Page 32

3. When ready to serve, transfer the
vegetables to a serving plate and the
corned beef to a cutting board. Thinly
slice the corned beef, against the grain.
If desired, serve with horseradish or
whole-grain mustard. Garnish with
chopped parsley.
Nutritional information per serving
(based on 12 servings):
Calories 323 (30% from fat) • carb. 23g • pro. 36g
fat 11g • sat. fat 4g • chol. 100mg • sod. 1278mg
calc. 53mg • fiber 4g
Asian-Style Pork Ribs
Instead of a slow braise in the oven, using the
pressure cooker makes these sweet and savory
ribs fall-off-the-bone tender in no time.
Makes 1 rack or 3½ to 4 cups shredded meat
1 cup hoisin sauce
½ cup soy sauce, low-sodium
1 tablespoon yuzu juice* or fresh lime
juice
1 tablespoon mirin
1 tablespoon fish sauce
1 1- to 2-inch piece of ginger, peeled and
roughly chopped
2 garlic cloves, peeled
½ cup packed light brown sugar
¼ cup plus one teaspoon grapeseed or
canola oil, divided
1 rack bone-in pork ribs (about 2 to 3
pounds), cut into individual ribs
1 cup water
4. Add the remaining teaspoon of oil to the
cooking pot of the Cuisinart
®
Pressure
Cooker. Select Brown. When oil is hot,
add the ribs, about 4 to 5 at a time,
until browned on all sides, about 1 to 2
minutes per side. Remove and repeat with
remaining ribs.
5. Once all meat is browned, scrape up any
burnt or dark bits from the bottom of the
pot and remove. Return all the ribs to the
cooking pot and add the marinade/water
mixture. Cover and lock lid in place. Select
Meat/Stew and set time for 30 minutes.
When audible beep sounds, allow pressure
to release naturally. When pressure is
released completely, the red indicator
will drop.
6. Remove lid. Remove the ribs from the
oven and serve with juices.
*Yuzu is a Japanese citrus fruit that is quite
sour. Yuzu juice can be found at Japanese
grocery stores or gourmet shops.
Nutritional information per serving
(based on 4 servings):
Calories 353 (57% from fat) • carb. 14g • pro. 24g
fat 22g • sat. fat 7g • chol. 78mg • sod. 145mg
calc. 40mg • fiber 0g
Pineapple Chipotle
Pulled Pork Tacos
Cutting the pork into smaller pieces before
cooking speeds up the cooking time and
guarantees each bite will melt in your mouth.
1. Put the hoisin, soy sauce, yuzu juice, mirin,
fish sauce, ginger, garlic, brown sugar
and ¼ cup oil in the jar of a blender in the
order listed. Blend on high until completely
homogenous.
2. Put ribs in a stainless steel bowl and coat
completely with the marinade. Cover the
bowl tightly with plastic wrap and chill in
the refrigerator overnight.
3. Take the meat from the refrigerator and
remove as much marinade from each
individual rib as possible. Combine 1 cup
of the leftover marinade with 1 cup of
water and set aside.
Makes about 4 cups
2 pounds pork butt, cut into
2-inch chunks
1 teaspoon kosher salt
1 teaspoon chili powder
½ teaspoon ground cumin
3 garlic cloves, smashed
1 cinnamon stick
¾ cup pineapple juice
¼ cup water
1
∕3 cup ketchup
1 chipotle, finely chopped
32
Page 33

For serving:
Taco shells
Red cabbage, thinly sliced
Diced pineapple (fresh, not canned)
Radish, cut into thin matchsticks
Cilantro, roughly chopped
Lime
Season the pork with the salt, chili
1.
powder and cumin. Add the pork and
garlic to the cooking pot of the Cuisinart
Pressure Cooker and stir together with the
cinnamon stick. Stir together the pineapple
juice, water, ketchup and chipotle; add
to the cooking pot with the pork. Mix all
ingredients together well.
2. Secure the lid and select Meat/Stew. Set
time for 75 minutes. When the audible
beep sounds, let pressure release
naturally.
3. Once the pressure is released completely,
the red indicator will drop. Remove lid and
transfer the pork to a large mixing bowl;
shred with 2 forks or your hands (gloves
are recommended). Taste and adjust
seasoning as desired.*
4. Serve approximately 1 tablespoon pulled
pork with taco shells, thinly sliced red
cabbage, diced fresh pineapple, radish
matchsticks, chopped cilantro and lime.
*For added flavor, the strained cooking liquid
may be cooked more to reduce into a sauce
and added to the shredded pork, tablespoon
by tablespoon.
Nutritional information per serving (one taco):
Calories 76 (58% from fat) • carb. 4g • pro. 5g
fat 5g • sat. fat 2g • chol. 16mg • sod. 159mg
calc. 6mg • fiber 0g
Pork Chops with
Apricot Sauce
Say good-bye to dry pork chops with the
Cuisinart
4 boneless pork chops, about
1 teaspoon kosher salt
®
¼ teaspoon freshly ground black pepper
1 tablespoon olive oil
½ cup apricot jam
1
∕3 cup chicken broth
2 garlic cloves, smashed
2 thyme sprigs
1. Season the pork chops with the salt and
pepper. Put the olive oil into the cooking
pot of the Cuisinart
Select Brown. Once hot, add 2 of the pork
chops and brown on both sides. Remove
and reserve. Repeat with remaining pork
chops.
2. Return the reserved pork chops to the
pot and add the apricot jam, broth, garlic
and thyme sprigs. Secure the lid and
select High Pressure. Set the time for 8
minutes. When the audible beep sounds,
use Quick Pressure Release. Once
pressure is completely released, the red
indicator will drop.
3. Remove lid and transfer the pork chops
to a serving plate. Remove and discard
the garlic cloves and thyme sprigs.
Select Brown to simmer cooking liquid to
thicken. Spoon over pork chops and serve
immediately.
Nutritional information per serving (1 pork chop):
Calories 430 (46% from fat) • carb. 26g • pro. 32g
®
Pressure Cooker, which cooks
them up in minutes.
Makes 4 servings
2 inches thick
®
Pressure Cooker.
fat 22g • sat. fat 7g • chol. 92mg • sod. 499mg
calc. 76mg • fiber 0g
33
Page 34

Creamy Rice Pudding
Not rich enough for you? Top with sweetened
whipped cream and some chopped nuts
3 cups Arborio or Carnaroli rice
4 cups whole milk
2 cup heavy cream
2 cup water
1 cup granulated sugar
1 tablespoon plus 1 teaspoon
ground cinnamon
1 tablespoon pure vanilla extract
½ teaspoon kosher salt
3 pinches ground nutmeg
before serving.
Makes 4½ cups
1. Put rice, milk, cream, water, sugar,
cinnamon, vanilla extract, salt and nutmeg
into the cooking pot of the Cuisinart
®
Pressure Cooker.
2. Secure the lid and select Low Pressure.
Set the time for 15 minutes. When the
audible beep sounds, use Quick Pressure
Release.
3. Once the pressure releases completely, the
red indicator will drop.
4. Remove lid and stir. Serve warm.
Nutritional information per serving (½ cup):
Calories 304 (35% from fat) • carb. 43g • pro. 6g
fat 12g • sat. fat 7g • chol. 42mg • sod. 98mg
calc. 83mg • fiber 1g
“Baked” Apples
These are perfect when served on their own, but
even more decadent with a dollop of whipped
cream or a scoop of vanilla ice cream.
Makes 4 servings
2 tablespoons old-fashioned, rolled oats
2 tablespoons pecans
2 tablespoons unbleached,
all-purpose flour
¼ cup packed light brown sugar
½ teaspoon pure vanilla extract
1 teaspoon ground cinnamon
¼ teaspoon ground nutmeg
Pinch ground cardamom
Pinch kosher salt
4 tablespoons unsalted butter,
cold and cubed
4 medium to large apples, a sweet-tart
variety
½ cup water
½ cup packed light brown sugar
1. Put the first 9 ingredients (through the
salt) into the bowl of a Cuisinart
®
Food
Processor or chopper fitted with the
chopping blade. Process until combined.
Add the cold butter and pulse until
combined – the mixture should resemble
an uneven crumb. Reserve in the
refrigerator until ready to stuff the apples.
2. Prepare the apples by coring each, but
being careful to keep the bottom intact.
The easiest way to do this is to first
use a paring knife to cut about a ½- to
1-inch circle out of the top of the apple.
Then, using a melon baller, scoop out the
remainder of the core as best you can,
down to just the bottom of the apple (you
will want to be sure to remove all of the
seeds). Repeat with each apple.
3. Fill each apple cavity with the crumb
topping, packing it in as firmly as possible.
4. Put the ½ cup of water and ½ cup of
brown sugar into the cooking pot of
the Cuisinart
®
Pressure Cooker. Stir to
combine. Place the apples into the pot so
that they are standing straight up.
5. Secure the lid and select Low Pressure.
Set the time for 5 minutes. When the
audible beep sounds, let pressure release
naturally.
6. Once pressure is released completely, the
red indicator will drop.
7. Remove lid. Serve warm.
Nutritional information per apple:
Calories 285 (28% from fat) • carb. 53g • pro. 2g
fat 9g • sat. fat 5g • chol. 20mg • sod. 26mg
calc. 16mg • fiber 5g
34
Page 35

Key Lime Cheesecake
Yes, your pressure cooker can also perform
finicky oven duties as well. This may just be the
easiest cheesecake yet!
Makes one 7-inch cheesecake,
6 to 8 servings
Melted, butter or nonstick cooking
spray
¾ cup graham cracker (or other cookie)
crumbs
1 tablespoon unsalted butter, melted
1 pound regular cream cheese (2
standard packages), cut into 1-inch
pieces, room temperature
½ cup granulated sugar
¼ teaspoon kosher salt
Grated zest of 1 key lime or lime
2 large eggs
1 tablespoon fresh key lime juice
1½ teaspoons pure vanilla extract
1. Lightly coat a 7-inch round, by 3-inch
high springform pan with melted butter or
nonstick cooking spray. Place a sheet of
plastic wrap (about 16 x 16 inches) on top
of a sheet of aluminum foil the same size.
Place the springform pan in the center and
wrap the exterior tightly.
2. Combine the cookie crumbs and 1
tablespoon melted butter in a small bowl.
Transfer to the prepared pan and turn
to dust the sides of the pan. Press the
remainder onto the bottom of the pan.
Reserve.
3. Put cream cheese, sugar, salt and key
lime zest in the work bowl of a food
processor fitted with the chopping blade
(this can also be done with an electric
hand or stand mixer fitted with the paddle
attachment. Mix on a low speed, being
careful not to incorporate too much air
into the batter). Process until smooth,
about 15 to 20 seconds. Add the eggs,
key lime juice, and vanilla extract. Process
until combined, about 10 seconds. Scrape
down the bowl and process for another 5
seconds. Pour the batter into the prepared
pan. Cover cheesecake with a piece of
aluminum foil that has been brushed with
butter or sprayed with nonstick cooking
spray. Make the sides tight, but allow room
for the cheesecake to expand.
4. Put the rack into the cooking pot of the
Cuisinart
®
Pressure Cooker with 2 cups
of water. Cut a piece of aluminum foil
that is about 24 inches long. Fold in half
lengthwise, then fold in half again two
more times to create a strip about 24
inches in length and 2 inches wide to
make a “cradle.” Put the filled springform
pan in the center of the foil strip and then
carefully lift and transfer to the pot.
5. Put the filled springform pan onto the rack.
Secure the lid and select Low Pressure.
Set the time for 15 minutes. When the
audible beep sounds, allow pressure to
release naturally.
6. When the pressure is released completely,
the red indicator will drop. Remove lid.
Carefully lift the springform pan out of
the pressure cooker foil cradle. Remove
foil and plastic wrap. If moisture has
accumulated on the top, dab gently with
a paper towel to remove. Let cool to room
temperature, then cover and refrigerate
to fully chill. Before serving, remove from
springform pan.
Nutritional information per serving (based on 8 servings):
Calories 318 (66% from fat) • carb. 21g • pro. 6g
fat 24g • sat. fat 14g • chol. 111mg • sod. 309mg
calc. 10mg • fiber 0g
Cherry Chocolate Chip
Bread Pudding
This can be prepared a day in advance and
then cooked while you and your family are
eating dinner, making it a quick way to have
a fresh dessert on a weeknight.
Makes 12 servings
1 pound challah bread, cut into
1-inch pieces
¾ cup chocolate chips
¾ cup dried cherries
4 large eggs
¼ cup granulated sugar
¼ teaspoon kosher salt
2 cups whole milk*
1 cup heavy cream*
1 teaspoon pure vanilla extract
Melted butter or nonstick
cooking spray
35
Page 36

1. Put the bread pieces, chocolate chips
and dried cherries into a large mixing
bowl. Reserve.
2. Put the remaining ingredients into a
separate mixing bowl. Whisk until well
combined (to the point where the sugar
has dissolved; this can be done by hand,
with a hand mixer or even in a blender).
Pour liquid mixture over the bread mixture.
Stir to fully coat. Cover with plastic wrap
and allow to rest in the refrigerator for a
minimum of 3 hours or up to overnight.
Bring to room temperature before cooking.
3. Lightly coat a 2-quart ceramic baking dish
with melted butter or nonstick cooking
spray. Transfer the soaked bread mixture
to the baking dish. Cover with aluminum
foil that has also been coated with melted
butter or nonstick cooking spray.
4. Put the rack into the cooking pot of the
Cuisinart
®
Pressure Cooker with 3 cups
of water. Cut a piece of aluminum foil
that is about 24 inches long. Fold in half
lengthwise, then fold in half again two
more times to create a strip about 24
inches in length and 2 inches wide to
make a “cradle.” Put the filled baking
dish in the center of the foil strip and then
carefully lift and transfer to the rack in the
cooking pot.
5. Secure the lid and select Low Pressure.
Set the time for 45 minutes. When the
audible beep sounds, allow pressure to
release naturally.
6. When the pressure is released completely,
the red indicator will drop. Remove lid.
Use the foil cradle to carefully lift baking
dish out of the pressure cooker. Transfer
to a cooling rack and remove foil.
Serve warm.
*In place of the milk and cream, you may
substitute non-dairy milk, such as almond or
rice, for the full amount of the milk and cream
Nutritional information per serving:
Calories 339 (43% from fat) • carb. 40g • pro. 8g
fat 16g • sat. fat 9g • chol. 112mg • sod. 246mg
calc. 95mg • fiber 2g
36
Page 37

NOTES:
37
Page 38

39
Calcio 95mg • Fibra 2g
Colesterol 112mg • Sodio 246mg
Proteínas 8g • Grasa 16g • Grasa saturada 9g
Calorías 339 (43% de grasa) • Carbohidratos 40g
Información nutricional por porción:
cantidad.
ej., de almendra o de arroz) y usar las mismas
líquida batir, puede utilizar leche vegetal (p.
*En lugar de la leche entera y la crema para
retirar el papel de aluminio. Servir tibio.
de aluminio. Dejar enfriar sobre una rejilla y
cuidadosamente usando la tira de papel
rojo bajará. Sacar la tapa. Retirar la fuente
6. Después de la descompresión, el indicador
natural para liberar el vapor.
emplear el método de descompresión
pitido que indica el final de la cocción,
temporizador en 45 minutos. Después del
PRESSURE (presión baja). Fijar el
5. Cerrar la tapa y elegir el modo LOW
Page 39

spray vegetal para engrasar el molde
de vainilla
batir (“heavy cream”)
Rinde 12 porciones
momento.
38
encima de la rejilla en la olla.
y levantarla con cuidado para ponerla
en el centro de la tira de papel de aluminio
x 2 pulgadas (60 x 5 cm). Colocar la fuente
cuatro veces, hasta conseguir una tira de 24
de largo. Doblar por la mitad, a lo largo,
de aproximadamente 24 pulgadas (60 cm)
agua. Cortar una hoja de papel de aluminio
olla a presión y agregar 3 tazas (710 ml) de
4. Colocar la rejilla de cocción en la olla de la
engrasado con spray vegetal.
en la fuente. Cubrir con papel de aluminio
el spray vegetal. Verter la mezcla de pan
de cerámica de 2 L con la mantequilla o
3. Engrasar ligeramente una fuente de horno
de cocer.
Dejar entibiar a temperatura ambiente antes
film/plástico y refrigerar por 3 a 12 horas
Revolver para cubrir bien. Cubrir con papel
mano). Verter la mezcla por encima del pan.
batidora de mano, una licuadora o batir a
el azúcar se haya disuelto). Puede usar una
separado. Batir y mezclar bien (hasta que
2. Colocar los ingredientes restantes en tazón
Reservar.
las cerezas en un tazón grande; revolver.
1. Colocar el pan, las chispas de chocolate y
Mantequilla a temperatura ambiente o
1 cucharadita de extracto natural
1 taza (235 ml) de crema líquida para
2 tazas (475 ml) de leche entera
¼ cucharadita de sal kosher
¼ taza (50 g) de azúcar granulada
4 huevos grandes
¾ taza (90 g) de cerezas secas
¾ taza (130 g) de chispas de chocolate
1 libra (455 g) de pan Jalá, en pedazos
y así tener de forma rápida un postre fresco al
tú y tu familia estén cenando, o en otra ocasión,
anticipación, y luego se puede cocer mientras
Esta receta se puede preparar con un día de
chocolate y cerezas
Budín de chispas de
Colesterol 111mg • Sodio 309mg • Calcio 10mg • Fibra 0g
Proteínas 6g • Grasa 24g • Grasa saturada 14g
Calorías 318 (66% de grasa) • Carbohidratos 21g
(basada en 8 porciones):
Información nutricional por porción
molde.
refrigerar. Antes de servir, sacar la tarta del
a temperatura ambiente, luego cubrir y
acumulada durante la cocción. Dejar enfriar
de la tarta para quitar la condensación
suavemente una toallita de papel encima
papel film/plástico. De ser necesario, pasar
aluminio. Quitar el papel de aluminio y el
cuidadosamente usando la tira de papel de
rojo bajará. Sacar la tapa. Retirar el molde
6. Después de la descompresión, el indicador
descompresión natural para liberar el vapor.
final de la cocción, emplear el método de
minutos. Después del pitido que indica el
(presión baja). Fijar el temporizador en 15
la tapa y elegir el modo LOW PRESSURE
5. Colocar el molde encima de la rejilla. Cerrar
olla.
y levantarlo con cuidado para ponerlo en la
en el centro de la tira de papel de aluminio
x 2 pulgadas (60 x 5 cm). Colocar el molde
cuatro veces, hasta conseguir una tira de 24
de largo. Doblar por la mitad, a lo largo,
de aproximadamente 24 pulgadas (60 cm)
agua. Cortar una hoja de papel de aluminio
olla a presión y agregar 2 tazas (475 ml) de
4. Colocar la rejilla de cocción en la olla de la
suba.
dejando espacio arriba para que la tarta
y cubrir la tarta, apretando los lados pero
hoja de papel aluminio con spray vegetal
Echar la mezcla en el molde. Engrasar una
procesar durante 5 segundos adicionales.
Procesar por 10 segundos. Raspar el bol y
jugo de lima/limón y el extracto de vainilla.
mezcla esté suave. Agregar los huevos, el
durante 15 a 20 segundos, hasta que la
no incorporar demasiado aire). Procesar
a velocidad baja, teniendo cuidado de
equipada con un batidor plano. Mezclar
una batidora eléctrica de pie o de mano
una cuchilla picadora (también puede usar
procesadora de alimentos equipada con
la ralladura de lima/limón en el bol de una
3. Colocar el queso crema, el azúcar, la sal y
Reservar.
resto de la mezcla en el fondo del molde.
mezcla hasta cubrir los lados. Comprimir el
Page 40

37
Espolvorear el interior del molde con la
derretida, en un tazón pequeño.
2. Revolver las galletas y la mantequilla
cuidadosamente el exterior del mismo.
Colocar el molde en el centro y envolver
de papel de aluminio del mismo tamaño.
pulgadas (40 x 40 cm) encima de una hoja
hoja de papel film/plástico de 16 x 16
(18 x 8 cm) con spray vegetal. Poner una
desmontable redondo de 7 x 3 pulgadas
1. Engrasar ligeramente un molde
de vainilla
1½ cucharaditas de extracto natural
1 cucharada de jugo de lima/limón fresco
2 huevos grandes
Ralladura de 1 lima/limón
¼ cucharadita de sal kosher
½ taza (100 g) de azúcar granulada
pedazos, a temperatura ambiente
1 libra (455 g) de queso crema, en
derretida
1 cucharada (15 g) de mantequilla sin sal,
(u otro tipo de galletas)
¾ taza de galletas Graham molidas
spray vegetal para engrasar el molde
Mantequilla a temperatura ambiente o
Rinde 6 a 8 porciones (una tarta mediana)
ser la tarta de queso más fácil que prepares.
recetas de horno especiales. Y esta puede bien
¡Sí! la olla a presión también puede preparar
de lima/limón
Tarta de queso
Calcio 16mg • Fibra 5g
Colesterol 20mg • Sodio 26mg
Proteínas 2g • Grasa 9g • Grasa saturada 5g
Calorías 285 (28% de grasa) • Carbohidratos 53g
Información nutricional por manzana:
7. Sacar la tapa. Servir tibio.
rojo bajará.
6. Después de la descompresión, el indicador
natural para liberar el vapor.
emplear el método de descompresión
pitido que indica el final de la cocción,
temporizador en 5 minutos. Después del
PRESSURE (presión baja). Fijar el
5. Cerrar la tapa y elegir el modo LOW
. Procesar
®
paradas.
manzanas en la olla de manera que queden
presión. Revolver para mezclar. Colocar las
(100 g) de azúcar rubia en la olla de la olla a
4. Poner la ½ taza (120 ml) de agua y ½ taza
preparada.
3. Rellenar bien cada manzana con la mezcla
mismo con las demás manzanas.
(parte de abajo) de la manzana. Hacer lo
y las semillas sin llegar a cortar la base
sacabolas, retirar lo que quede del corazón
manzana y cortar una parte. Luego, con un
(1.5 a 2.5 cm) en la parte superior de la
pelador y hacer un círculo de ½ a 1 pulgada
hacer esto es usar un cuchillo mondador/
la base intacta. La manera más fácil de
2. Quitar el corazón de las manzanas, dejando
rellenar las manzanas.
mezclar. Refrigerar hasta el momento de
Agregar la mantequilla y pulsar para
hasta obtener una mezcla homogénea.
o de una picadora Cuisinart
alimentos (equipada con cuchilla picadora)
la sal) en el bol de una procesadora de
1. Colocar los primeros 9 ingredientes (hasta
(azúcar de caña integral)
½ taza llena (100 g) de azúcar rubia
½ taza (120 ml) de agua
de sabor dulce-agrio
4 manzanas medianas a grandes,
sal, en pedacitos
4 cucharadas (55 g) de mantequilla sin
1 pizca de sal kosher
1 pizca de cardamomo rallado
¼ cucharadita de nuez moscada rallada
1 cucharadita de canela en polvo
de vainilla
½ cucharadita de extracto natural
de caña integral)
¼ taza llena (50 g) de azúcar rubia (azúcar
2 cucharadas (15 g) de harina común
2 cucharadas de pacanas
tradicionales
2 cucharadas de copos de avena
Rinde 4 porciones
vainilla.
exquisitas servidas con crema batida o helado de
Perfectas para servirlas solas, pero son aún más
Manzanas al horno
Page 41

36
Calcio 83mg • Fibra 1g
Colesterol 42mg • Sodio 98mg
Proteínas 6g • Grasa 12g • Grasa saturada 7g
Calorías 304 (35% de grasa) • Carbohidratos 43g
Información nutricional por porción de ½ taza:
4. Retirar la tapa y revolver. Servir tibio.
rojo bajará.
3. Después de la descompresión, el indicador
rápido para liberar el vapor.
emplear el método de descompresión
pitido que indica el final de la cocción,
temporizador en 15 minutos. Después del
PRESSURE (presión baja). Fijar el
2. Cerrar la tapa y elegir el modo LOW
nuez moscada en la olla de la olla a presión.
batir, el agua, la canela, la vainilla, la sal y la
1. Colocar el arroz, la leche, la crema para
Calcio 76mg • Fibra 0 g
Colesterol 92mg • Sodio 499mg
Proteínas 32g • Grasa 22g • Grasa saturada 7g
Calorías 430 (46% de grasa) • Carbohidratos 26g
Información nutricional por porción (1 chuleta):
sobre las chuletas y servir inmediatamente.
que espese, luego echarlo con una cuchara
BROWN (dorar) para reducir el líquido hasta
desechar el ajo y el tomillo. Elegir el modo
colocarlas en un plato para servir. Retirar y
3. Sacar la tapa, retirar las chuletas y
descompresión, el indicador rojo bajará.
rápido para liberar el vapor. Después de la
emplear el método de descompresión
pitido que indica el final de la cocción,
temporizador en 8 minutos. Después del
HIGH PRESSURE (presión alta). Fijar el
el tomillo. Cerrar la tapa y elegir el modo
agregar la mermelada, el caldo, el ajo y
2. Colocar todas las chuletas en la olla y
chuletas.
y reservar. Hacer lo mismo con las otras 2
chuletas y dorarlas por ambos lados. Retirar
(dorar). Cuando esté caliente, agregar 2
de la olla a presión. Elegir el modo BROWN
pimienta. Poner el aceite de oliva en la olla
1. Sazonar las chuletas con la sal y la
3 pizcas de nuez moscada rallada
½ cucharadita de sal kosher
de vainilla
1 cucharada de extracto natural
en polvo
1 cucharada + 1 cucharadita de canela
1 taza (200 g) de azúcar granulada
2 tazas (475 ml) de agua
batir (“heavy cream”)
2 tazas (475 ml) de crema líquida para
4 tazas (945 ml) de leche entera
Carnaroli
3 tazas (555 g) de arroz Arborio o
Rinde 4½ tazas
dulce y algo de nueces picadas antes de servir.
¿Cree que le falta algo? Agréguele crema batida
Budín de arroz
unos minutos.
, dile adiós a las
®
∕3 taza (80 ml) de caldo de pollo
albaricoque/chabacano/damasco
recién molida
deshuesadas
Rinde 4 porciones
chuletas de cerdo secas. Además, las cocina en
Con la olla a presión Cuisinart
salsa de albaricoque
Chuletas de cerdo con
2 ramitas de tomillo
2 dientes de ajo, machacados
1
½ taza (115 g) de mermelada de
1 cucharada de aceite de oliva
¼ cucharadita de pimienta negra
1 cucharadita de sal kosher
4 chuletas gruesas de cerdo,
Page 42

35
Calcio 6mg • Fibra 0g
Colesterol 16mg • Sodio 159mg
Proteínas 5g • Grasa 5g • Grasa saturada 2g
Calorías 76 (58% de grasa) • Carbohidratos 4g
Información nutricional por porción (1 taco):
gusto.
se puede agregar a la carne desmenuzada al
se puede reducir hasta obtener una salsa que
*Para agregar más sabor, el líquido de cocción
palitos de rábano, cilantro y lima.
taco y agregar col roja, piña en cubitos,
cerdo desmenuzada en una tortilla para
4. Servir aprox. 1 cucharada de carne de
la sazón al gusto.*
recomienda usar guantes). Probar y ajustar
usando dos tenedores o con las manos (se
colocarla en un tazón grande; desmenuzarla
rojo bajará. Retirar la carne de cerdo y
3. Después de la descompresión, el indicador
descompresión natural para liberar el vapor.
final de la cocción, emplear el método de
minutos. Después del pitido que indica el
(carne/guiso). Fijar el temporizador en 75
2. Cerrar la tapa y elegir el modo MEAT/STEW
cerdo. Revolver bien todos los ingredientes.
agregar esta mezcla en la olla junto con el
el agua, la salsa de tomate y el chipotle y
presión; revolver. Mezclar el jugo de piña,
y el palito de canela en la olla de la olla a
polvo y el comino. Agregar el cerdo, el ajo
1.
Sazonar el cerdo con la sal, el chile en
Lima
Cilantro fresco, picado grueso
Rábanos, cortados en palitos finos
no de lata)
Piña cortada en cubitos (fresca,
Col roja, finamente cortada
Tortillas para taco
Para servir:
1 chipotle, finamente picado
∕3 taza (80 ml) de salsa de tomate
1
¼ taza (60 ml) de agua
¾ taza (175 ml) de jugo de piña
1 palito de canela
3 dientes de ajo, machacados
½ cucharadita de comino en polvo
1 cucharadita de chile en polvo
1 cucharadita de sal kosher
en pedazos
2 libras (910 g) de pierna de cerdo,
Rinde aproximadamente 4 tazas
se derretirá en su boca.
cocción sino que también es seguro que la carne
antes de cocinarlo no solo reduce el tiempo de
Cortar la carne de cerdo en pedazos pequeños
y chipotle
desmenuzado con piña
Tacos de cerdo
Calcio 40mg • Fibra 0g
Colesterol 78mg • Sodio 145mg
Proteínas 24g • Grasa 22g • Grasa saturada 7g
Calorías 353 (57% de grasa) • Carbohidratos 14g
(basada en 4 porciones):
Información nutricional por porción
japonesas o en las tiendas especializadas.
El jugo de Yuzu está disponible en las tiendas
*El Yuzu es un cítrico japonés bastante agrio.
con su jugo.
6. Sacar la tapa. Retirar las costillas y servir
descompresión, el indicador rojo bajará.
natural para liberar el vapor. Después de la
emplear el método de descompresión
del pitido que indica el final de la cocción,
el temporizados en 30 minutos. Después
el modo MEAT/STEW (carne/guiso); fijar
marinada con agua. Cerrar la tapa. Elegir
costillas en la olla y agregar la mezcla de la
retirar los residuos. Colocar de nuevo las
de madera para despegar los residuos;
raspar el fondo de la olla con un cucharón
5. Cuando todas las costillas estén doradas,
repetir con el resto de las costillas.
lados (1 a 2 minutos por lado). Retirar y
a 5 pedazos a la vez) y dorarlas por todos
caliente, agregar las costillas de a pocos (4
BROWN (dorar). Cuando el aceite esté
la olla de la olla a presión. Elegir el modo
4. Poner la cucharadita de aceite restante en
taza (235 ml) de agua y reservar.
Mezclar 1 taza (235 ml) de la marinada con 1
una por una para eliminar la marinada.
3. Sacar del refrigerador y escurrir las costillas
Page 43

34
en el refrigerador por una noche.
tazón con papel film/plástico y dejar reposar
inoxidable y cubrir con la mezcla. Cubrir el
2. Colocar las costillas en un tazón de acero
mezcla homogénea.
Licuar a velocidad alta hasta obtener una
licuadora en el mismo orden mencionado.
taza (60 ml) del aceite en la jarra de una
el jengibre, el ajo, el azúcar rubia y ¼ de
jugo de Yuzu, el Mirín, la salsa de pescado,
1. Colocar la salsa Hoisin, la salsa de soya, el
1 taza (235 ml) de agua
individuales
cerdo con hueso, cortadas en costillas
2 a 3 libras (910g a 1.4 kg) de costillas de
colza/canola
aceite de semilla de uva o aceite de
¼ taza (60 ml) + 1 cucharadita (5 ml) de
(azúcar de caña integral)
½ taza llena (100 g) de azúcar rubia
2 dientes de ajo
de jengibre, pelado y picado grueso
1 trozo de 1 a 2 pulgadas (1.5 a 2.5 cm)
1 cucharada de salsa de pescado
japonés)
1 cucharada de Mirín (vino de arroz
de lima/limón verde fresco
1 cucharada de jugo de Yuzu* o de jugo
en sodio
½ taza (120 ml) de salsa de soya baja
1 taza (235 ml) de salsa Hoisin
desmenuzada
Rinde 1 costilla o 3½ a 4 tazas de carne
hueso con una preparación rápida.
dulces y saladas se desprenden fácilmente del
a presión y verá como estas deliciosas costillas
No guise a fuego lento en una estufa, use la olla
estilo asiático
Costillas de cerdo al
Calcio 53mg • Fibra 4 g
Colesterol 100mg • Sodio 1278mg
Proteínas 36g • Grasa 11g • Grasa saturada 4g
Calorías 323 (30% de grasa) • Carbohidratos 23g
(basada en 12 porciones):
Información nutricional por porción
picado.
mostaza con semillas. Decorar con perejil
Si desea, servir con rábano picante o
contra la dirección de las fibras.
picar. Cortar la cecina en tajadas delgadas,
plato para servir y la cecina en una tabla de
3. Para servir, colocar los vegetales en un
liberar el vapor.
método de descompresión rápido para
Cuando el tiempo termine, emplear el
PRESSURE (presión alta) por 5 minutos.
verde. Cerrar la tapa y elegir el modo HIGH
zanahoria “baby”, la papa Cambray y la col
Colocar la cecina en la olla y agregar la
nuevo en la olla. Desechar los sólidos.
reservar. Colar el líquido y colocarlo de
rojo bajará. Sacar la tapa y retirar la cecina;
2. Después de la descompresión, el indicador
natural para liberar el vapor.
emplear el método de descompresión
pitido que indica el final de la cocción,
temporizador en 90 minutos. Después del
modo MEAT/STEW (carne/guiso). Fijar el
cecina de res. Cerrar la tapa y elegir el
aproximadamente dos tercios de la
a presión. Agregar agua hasta cubrir
(hasta la cebolla) en la olla de la olla
1. Poner los primeros 9 ingredientes
Perejil picado, para decorar
(opcional)
Mostaza con semillas, para servir
(opcional)
Salsa de rábano picante, para servir
y descarozada
1 col verde pequeña, cortada en cuartos
pequeñas)
2 libras (910 g) de papas Cambray (papas
2 tazas (500 g) de zanahorias “baby”
Agua
1 cebolla pequeña, partida a la mitad
longitudinalmente a la mitad
1 zanahoria, pelada y cortada
2 ramas de apio, en trozos
1 hoja de laurel
¼ cucharadita de jengibre en polvo
amarilla
1 cucharadita de semillas de mostaza
tabasca), molida gruesa o triturada
pimienta de chapa, pimienta chapa y
dulce, pimienta inglesa, malagueta,
Gorda, pimienta guayabita, pimienta
(también conocida como pimienta
5 granos de pimienta de Jamaica
gruesa
Page 44

33
Rinde 12 porciones
despeja toda duda y
®
Calcio 47mg • Fibra 1 g
Colesterol 78mg • Sodio 626mg
(basada en 6 porciones):
Información nutricional por porción
½ cucharadita de pimienta negra molida
4 libras (1.8 kg) de cecina de res, lavada
Día de San Patricio preparado a la perfección.
del largo tiempo de cocción– de este favorito del
elimina toda dificultad e incertidumbre –además
La olla a presión Cuisinart
Cecina de res con col
Proteínas 26g • Grasa 9g • Grasa saturada 3g
Calorías 215 (38% de grasa) • Carbohidratos 7g
ajustar la sazón al gusto.
descompresión, retirar la tapa. Probar y
para liberar el vapor. Después de la
el método de descompresión rápido
5. Cuando el tiempo termine, emplear
el temporizador en 3 minutos.
modo HIGH PRESSURE (presión alta). Fijar
Agregar la carne. Cerrar la tapa y elegir el
la salsa de tomate y el líquido de cocción.
el chipotle, y luego la salsa Worcestershire,
despegar los pedacitos de carne. Agregar
pimiento en la olla, raspando el fondo para
reservarla. Agregar la cebolla, el ajo y el
3 minutos por tanda. Retirar la carne y
dorarla ligeramente por aproximadamente
agregar la carne desmenuzada en tandas y
BROWN (dorar). Cuando esté caliente,
olla de la olla a presión y elegir el modo
preparar el sofrito. Poner el aceite en la
4. Cuando la carne esté desmenuzada,
tenedor o con las manos.
Antes de usar, desmenuzar la carne con un
su jugo, en el refrigerador, por una noche.
maximizar el sabor, dejar reposar la carne en
carne se enfríe antes de desmenuzarla. Para
rojo bajará. Sacar la tapa. Dejar que la
3. Después de la descompresión, el indicador
descompresión natural para liberar el vapor.
final de la cocción, emplear el método de
minutos. Después del pitido que indica el
(presión alta). Fijar el temporizador en 75
la tapa y elegir el modo HIGH PRESSURE
Worcestershire y el caldo de res. Cerrar
fragantes. Agregar la hoja de laurel, la salsa
carne. Cocinar hasta que estén suaves y
de madera para despegar los pedacitos de
y raspar el fondo de la olla con un cucharón
2. Retirar y reservar. Agregar la cebolla y el ajo
aprox. 3 a 5 minutos por lado.
caliente, agregar la carne y dorarla por
BROWN (dorar). Cuando el aceite esté
la olla de la olla a presión y elegir el modo
necesario para dorarla. Poner el aceite en
la sal y la pimienta, y cortarla si fuera
1. Sazonar la carne por ambos lados con
de la res
1½ tazas (355 ml) del líquido de cocción
½ taza (120 ml) de salsa de tomate
¼ taza (60 ml) de salsa de Worcestershire
2 chipotles, en puré
en juliana (tiras largas)
2 pimientos rojos pequeños a medianos,
6 dientes de ajo, finamente picados
1 cebolla, finamente picada
1 cucharadita de aceite vegetal
Sofrito:
2 tazas (475 ml) de caldo de res
½ taza (120 ml) de salsa Worcestershire
1 hoja grande de laurel
6 dientes de ajo, machacados
1 cebolla, en rodajas
1 cucharadita de aceite vegetal
molida
½ cucharadita de pimienta negra recién
1 cucharadita de sal kosher
arrachera/entraña (“flank steak”)
3 libras (1.4 kg) de bistec de falda/
Carne:
Rinde aproximadamente 3 tazas
plátano frito. ¡También es delicioso en un taco!
tradicionalmente se sirve con arroz, frijoles y
Un plato venezolano con carne mechada, que
Carne mechada
Calcio 63mg • Fibra 6 g
Colesterol 114mg • Sodio 583mg
Proteínas 41g • Grasa 9g • Grasa saturada 3g
Calorías 379 (21% de grasa) • Carbohidratos 28g
Información nutricional por porción de 1 taza:
y los vegetales.
líquido haya espesado. Echarlo sobre la carne
Page 45

32
de mantequilla y harina y cocinar hasta que el
esté hirviendo, agregar, removiendo, la mezcla
líquido en la olla y hervir. Cuando el líquido
cucharada de harina. Volver a colocar el
mantequilla a temperatura ambiente y 1½
la hoja de laurel. Mezclar 1½ cucharada de
el líquido por separado. Retirar y desechar
*Para espesar el estofado, colarlo y reservar
perejil.
servir*, agregar las arvejas y decorar con el
6. Probar y ajustar la sazón al gusto. Antes de
haya bajado, retire la tapa.
liberar el vapor. Cuando el indicador rojo
método de descompresión natural para
5. Cuando el tiempo termine, emplear el
alta) por 5 minutos.
y elegir el modo HIGH PRESSURE (presión
zanahorias “baby” y la papa. Cerrar la tapa
rojo bajará. Sacar la tapa y agregar las
4. Después de la descompresión, el indicador
descompresión rápido para liberar el vapor.
final de la cocción, emplear el método de
minutos. Después del pitido que indica el
(carne/guiso). Fijar el temporizador en 30
3. Cerrar la tapa y elegir el modo MEAT/STEW
de laurel. Revolver y mezclar bien.
que se había reservado, el caldo y la hoja
hasta reducirlo a la mitad. Agregar la carne
por 2minutos. Agregar el vino y cocinar
concentrado de tomate, revolver y cocinar
a suavizarse y estén fragantes. Agregar el
minutos, hasta que los vegetales empiecen
de la sal. Revolver y cocinar por aprox. 5
picada, el apio, la cebolla, el ajo y el resto
reservar. Agregar la zanahoria finamente
Cuando termine de dorar toda la carne,
dorarla por aprox. 3 a 5 minutos por lado.
el aceite esté caliente, agregar la carne y
y elegir el modo BROWN (dorar). Cuando
2. Poner el aceite en la olla de la olla a presión
y la pimienta. Reservar.
1. Sazonar la carne con 1 cucharadita de la sal
Perejil picado, para decorar
1 taza (145 g) de arvejas congeladas
(papas pequeñas)
1½ libra (680 g) de papas Cambray
1 libra (455 g) de zanahorias “baby”
1 hoja de laurel
3 tazas (710 ml) de caldo de res
½ taza (120 ml) de vino rojo seco
¼ taza (60 ml) de concentrado de tomate
2 dientes de ajo, finamente picados
1 cebolla, finamente picada
2 ramas de apio, finamente picadas
picadas
2 zanahorias medianas, finamente
1 cucharada de aceite de oliva
recién molida
½ cucharadita de pimienta negra
1½ cucharaditas de sal kosher
en pedazos
3 libras (1.35 kg) de aguja/paleta de res,
Rinde 6 porciones
invierno.
Un plato sustancioso, ideal para un día de
Estofado de res clásico
Calcio 26mg • Fibra 0 g
Colesterol 77mg • Sodio 573mg
Proteínas 24g • Grasa 5g • Grasa saturada 1g
Calorías 150 (31% de grasa) • Carbohidratos 1g
(basada en 6 porciones):
Información nutricional por porción
4. Cortar el pollo y servir.
colocarlo en una tabla de picar.
rojo bajará. Sacar la tapa, retirar el pollo y
4 Después de la descompresión, el indicador
rápido para liberar el vapor.
emplear el método de descompresión
pitido que indica el final de la cocción,
temporizador en 30 minutos. Después del
PRESSURE (presión alta). Fijar el
3. Cerrar la tapa y elegir el modo HIGH
agregarlo junto con el caldo.
de laurel. Exprimir el limón en la olla y
lado. Agregar las hierbas, el ajo y la hoja
bien durante aprox. 5 minutos por cada
el pollo con la pechuga hacia abajo. Dorar
Cuando el aceite haya calentado, agregar
a presión. Elegir el modo BROWN (dorar).
2. Poner el aceite de oliva en la olla de la olla
pimienta.
1. Sazonar el pollo por ambos lados con sal y
1 taza (235 ml) de caldo de pollo
½ limón
Page 46

31
1 hoja de laurel
2 dientes de ajo, machacados
2 ramitas de tomillo
2 ramitas de romero
2 cucharaditas (10 ml) de aceite de oliva
recién molida
½ cucharadita de pimienta negra
1 cucharadita de sal kosher
1 pollo de 4 libras (1.8 kg)
Rinde 4 a 6 porciones
cualquier momento de la semana.
jugoso pollo entero para toda la familia en
Una manera fácil de preparar un delicioso y
Pollo simple
Calcio 41mg • Fibra 3g
Colesterol 32mg • Sodio 374mg
Proteínas 10g • Grasa 17g • Grasa saturada 9g
Calorías 261 (56% de grasa) • Carbohidratos 20g
Información nutricional por porción de 1 taza:
con el cilantro y servir sobre el arroz.
Probar y ajustar la sazón al gusto. Decorar
5. Sacar la tapa y agregar las arvejas; revolver.
liberar el vapor.
el método de descompresión natural para
minutos. Cuando el tiempo termine, emplear
HIGH PRESSURE (presión alta) por 7
Revolver bien y elegir de nuevo el modo
papas, el camote/batata y la zanahoria.
rojo bajará. Sacar la tapa y agregar las
4. Después de la descompresión, el indicador
rápido para liberar el vapor.
emplear el método de descompresión
pitido que indica el final de la cocción,
temporizador en 10 minutos. Después del
HIGH PRESSURE (presión alta). Fijar el
pimienta. Cerrar la tapa y elegir el modo
escurridos y el resto de la sal y la
3. Agregar la leche de coco, los tomates
con los vegetales.
nuevo el pollo en la olla y revolverlo bien
los ingredientes estén suaves. Colocar de
y del curry en polvo. Saltear hasta que
también una pizca de la sal, de la pimienta
el ajo, el jengibre y el jalapeño; agregar
2. Agregar el ghi/aceite restante, la cebolla,
lado. Retirar y reservar.
Dorar el pollo durante aprox. 5 minutos por
con una pizca de la sal y de la pimienta.
aceite, sazonar el pollo por ambos lados
BROWN (dorar). Mientras se calienta el
la olla de la olla a presión. Elegir el modo
1. Poner ½ cucharada de ghi o del aceite en
Arroz basmati cocido, para servir
Cilantro fresco, picado, para decorar
congeladas
½ taza (70 g) de arvejas frescas o
trozos
1 zanahoria grande, pelada y cortada en
cortado en pedazos
½ libra (225 g) de camote/batata, pelado y
papas rojas, cortadas en pedazos
½ libra (225 g) de papas Yukon Gold o
picados, sin jugo
1 lata de 14 onzas (400 g) de tomates
coco regular
1 lata de 13.5 onzas (400 ml) de leche de
muy picante)
¼ taza (30 g) de curry en polvo (suave, no
1 jalapeño, sin semillas, finamente picado
pelado y finamente picado
1 trozo de 1 pulgada (2.5 cm) de jengibre,
2 dientes de ajo, finamente picados
1 cebolla pequeña, finamente picada
molida
¼ cucharadita de pimienta negra recién
1 cucharadita de sal kosher
muslos)
deshuesados y sin piel (aprox. 4
2 libras (910 g) de muslos de pollo,
clarificada o aceite vegetal
1 cucharada de ghi, mantequilla
Rinde aproximadamente 10 tazas
(Alerta: se prepara en ¡menos de 1 hora!)
bien como si se hubiera cocinado todo el día.
Gracias a la olla a presión, este curry sabe tan
Curry de pollo y vegetales
Calcio 71mg • Fibra 2g
Colesterol 108mg • Sodio 935mg
Proteínas 32g • Grasa 6g • Grasa saturada 1g
Calorías 397 (13% de grasa) • Carbohidratos 52g
Información nutricional por porción:
servir inmediatamente.
5. Sacar la tapa, revolver los ingredientes y
Page 47

30
rojo bajará.
4. Después de la descompresión, el indicador
rápido para liberar el vapor.
emplear el método de descompresión
pitido que indica el final de la cocción,
temporizador en 18 minutos. Después del
HIGH PRESSURE (presión alta). Fijar el
revolver. Cerrar la tapa y elegir el modo
el caldo, el azafrán y la hoja de laurel,
3. Colocar de nuevo en la olla el pollo con
agregar el arroz.
y cocinar por un par de minutos antes de
los tomates, el resto de la sal y la páprika,
que los vegetales estén fragantes. Agregar
pollo. Saltear por aprox. 5 minutos hasta
madera para despegar los residuos de
el fondo de la olla con un cucharón de
pimiento y el ajo. Revolver bien y raspar
Retirar y reservar. Agregar la cebolla, el
pollo durante aprox. 5 minutos por lado.
Cuando el aceite esté caliente, dorar el
presión. Elegir el modo BROWN (dorar).
2. Poner el aceite en la olla de la olla a
cucharadita de la sal y con la pimienta.
1. Sazonar el pollo por ambos lados con 1
1 hoja de laurel
∕8 cucharadita de hebras de azafrán
1
en sodio
3 tazas (710 ml) de caldo de pollo bajo
largo
2 tazas (370 g) de arroz blanco de grano
¼ cucharadita de páprika ahumada
2 tomates italianos, en cubitos
4 dientes de ajo, picados
1 pimiento rojo, picado
1 cebolla, picada
extra
1 cucharadita de aceite de oliva virgen
molida
½ cucharadita de pimienta negra recién
1½ cucharaditas de sal kosher
deshuesados y sin piel
4 libras (1.8 kg) de muslos de pollo,
Rinde aproximadamente 6 porciones
solo 30 minutos.
Una comida completa perfecta en tan
Arroz con pollo
puede
®
Calcio 64mg • Fibra 0 g
Colesterol 68mg • Sodio 414mg
Proteínas 33g • Grasa 9g • Grasa saturada 2g
Calorías 278 (30% de grasa) • Carbohidratos 15g
porciones):
Información nutricional por porción (basada en 3
decorar, y servir.
sobre el salmón; rociar cebolleta, para
hasta que espese, y con una cuchara echar
modo BROWN (dorar) para reducir el líquido
y colocarlo en un plato para servir. Elegir el
rojo bajará. Sacar la tapa, retirar el salmón
2. Después de la descompresión, el indicador
rápido para liberar el vapor.
emplear el método de descompresión
del pitido que indica el final de la cocción,
Fijar el temporizador en 4 minutos. Después
el modo LOW PRESSURE (presión baja).
salmón en la olla de la olla a presión. Elegir
y luego colocar esta mezcla y los filetes de
miel, la salsa de soya, el ajo y el jengibre,
En un tazón pequeño, revolver el agua, la
1. Sazonar el salmón con la sal y la pimienta.
finas, para decorar al servir
1 cebolleta (“green onion”), en rodajas
en rodajas finas
jengibre fresco, pelado y cortado
1 trozo de 1 pulgada (2.5 cm) de
1 diente de ajo, machacado
en sodio
1½ cucharadas de salsa de soya baja
2 cucharadas de miel
½ taza (120 ml) de agua
Pimienta negra recién molida
en 2 a 3 piezas
(4 cm) de grosor, sin piel, cortado
aproximadamente 1½ pulgadas
1 libra (455 g) de filete de salmón de
¼ cucharadita de sal kosher
Rinde 2 a 3 porciones
encantará, incluso al paladar más exigente.
Y el toque dulce de los sabores asiáticos
salmón se cocina a la perfección en solo minutos.
delicados, como el pescado. En esta receta, el
PRESSURE (presión baja) es ideal para alimentos
cocinar rápidamente las comidas, el modo LOW
Si bien la olla a presión Cuisinart
con miel
Salmón glaseado
Page 48

29
Calcio 21mg • Fibra 3g
Colesterol 16mg • Sodio 226mg
Proteínas 4g • Grasa 6g • Grasa saturada 4g
Calorías 175 (30% de grasa) • Carbohidratos 28g
(basada en 6 porciones):
Información nutricional por porción
una cuchara. Servir inmediatamente.
picadas; revolver y machacar las papas con
el resto de la mantequilla y las hierbas
líquido de cocción de las papas. Agregar
rojo bajará. Sacar la tapa y escurrir el
2. Después de la descompresión, el indicador
descompresión rápido para liberar el vapor.
final de la cocción, emplear el método de
minutos. Después del pitido que indica el
(alta presión). Fijar el temporizador en 5
la tapa. Elegir el modo HIGH PRESSURE
ajo esté fragante. Agregar el caldo y cerrar
sal. Saltear por 4 a 5 minutos, hasta que el
esté derretida, agregar las papas, el ajo y la
SAUTÉ (saltear). Cuando la mantequilla
en la olla de la olla a presión. Elegir el modo
1. Poner 1 cucharada (15 g) de la mantequilla
menta, romero, tomillo o eneldo)
(su favorita o puede combinar perejil,
¼ taza (15 g) de hierbas frescas picadas
½ taza (120 ml) de caldo de pollo
½ cucharadita de sal kosher
2 dientes de ajo, rebanados
cortadas a la mitad
2 libras (910 g) de papas rojas pequeñas,
sin sal
2 cucharadas (30 g) de mantequilla
Rinde 4 a 6 porciones
cualquier comida.
Es el plato de acompañamiento que va con
con ajo y hierbas
Papas machacadas
Calcio 34mg • Fibra 2g
Colesterol 0mg • Sodio 213mg
Proteínas 1g • Grasa 1g • Grasa saturada 0g
Calorías 56 (21% de grasa) • Carbohidratos 11g
Información nutricional por porción de ½ taza:
4. Probar y ajustar la sazón al gusto.
rojo bajará. Sacar la tapa y agregar la salvia.
3. Después de la descompresión, el indicador
descompresión rápido para liberar el vapor.
final de la cocción, emplear el método de
minutos. Después del pitido que indica el
(presión alta). Fijar el temporizador en 3
la tapa y elegir el modo HIGH PRESSURE
caldo. Agregar de nuevo la calabaza, cerrar
Agregar el jarabe de arce/maple, la sal y el
que se dore, aprox. 2 minutos por lado.
2. Agregar la cebolla a la olla y cocinar hasta
luego reservar.
Repetir con otra tanda hasta terminar;
que se doren, aprox. 2 minutos por lado.
simple (agregar en tandas). Cocinar hasta
pedazos de la calabaza formando una capa
Cuando el aceite esté caliente, agregar
a presión. Elegir el modo BROWN (dorar).
1. Poner el aceite de oliva en la olla de la olla
finamente rebanadas
1 cucharadita de hojas de salvia fresca,
½ taza (120 ml) de caldo de pollo
½ cucharadita de sal kosher
puro
2 cucharaditas de jarabe de arce/maple
1 cebolla roja mediana, en pedazos
semillas, en pedazos
1 calabaza de bellota mediana, sin
2 cucharaditas de aceite de oliva
Rinde aproximadamente 4 tazas
perfecto para el invierno.
Un plato de acompañamiento sustancioso,
y salvia
en salsa de cebolla roja
Calabaza de bellota
Page 49

Calcio 17mg • Fibra 1g
días.
y piñones
28
Colesterol 4mg • Sodio 151mg
Proteínas 2g • Grasa 5g • Grasa saturada 1g
Calorías 64 (73% de grasa) • Carbohidratos 4g
Información nutricional por porción de ½ taza:
sazón al gusto.
4. Sacar la tapa y revolver, probar y ajustar la
rojo bajará.
Después de la descompresión, el indicador
descompresión rápido para liberar el vapor.
el final de la cocción, emplear el método de
en 1 minuto. Después del pitido que indica
PRESSURE (presión alta). Fijar el temporizador
agua. Cerrar la tapa y elegir el modo HIGH
habichuelas/judías, el jugo de limón y el
3. Rociar con sal y luego agregar las
ligeramente hasta que empiecen a suavizarse.
2. Agregar la mantequilla y los chalotes, y saltear
ligeramente dorados.
Revolver por aprox. 5 minutos hasta que estén
presión y elegir el modo BROWN (dorar).
1. Poner los piñones en la olla de la olla a
1 taza (235 ml) de agua
2 cucharadas de jugo de limón fresco
verdes, limpias
24 onzas (680 g) de habichuelas/judías
¾ cucharadita de sal kosher
en rodajas
1 chalote grande, pelado y cortado
sin sal
2 cucharadas (30 g) de mantequilla
½ taza (70 g) de piñones
Rinde aproximadamente 8 tazas
pero tan simple que puede prepararlo todos los
suficientemente elegante como para una fiesta,
Este plato de acompañamiento es lo
Habichuelas con chalotes
Calcio 124mg • Fibra 2g
Colesterol 3mg • Sodio 291mg
Proteínas 4g • Grasa 6g • Grasa saturada 1g
Calorías 98 (53% de grasa) • Carbohidratos 9g
Información nutricional por porción de ½ taza:
gusto.
4. Sacar la tapa. Probar y ajustar la sazón al
rojo bajará.
3. Después de la descompresión, el indicador
para liberar el vapor.
emplear el método de descompresión rápido
del pitido que indica el final de la cocción,
Fijar el temporizador en 2 minutos. Después
modo HIGH PRESSURE (presión alta).
agregar el caldo. Cerrar la tapa y elegir el
rizada y revolver bien con el aceite, luego
2. Cuando el ajo esté dorado, agregar la col
hojuelas de pimiento rojo.
ligeramente dorado. Agregar la sal y las
Agregar el ajo y esperar hasta que esté
a presión. Elegir el modo SAUTÉ (saltear).
1. Poner el aceite de oliva en la olla de la olla
en sodio
½ taza (120 ml) de caldo de pollo bajo
los tallos tiernos y las hojas)
desechar los tallos duros; picar grueso
8 onzas (225 g) de col rizada (quitar y
1 pizca de hojuelas de pimiento rojo
j29
¼ cucharadita de sal kosher
1 diente de ajo, machacado
1 cucharada de aceite de oliva
Rinde aproximadamente 3 tazas
comidas cualquier día de la semana.
deliciosa forma de agregar verduras a sus
Este plato de acompañamiento simple es una
Col rizada salteada
Calcio 47mg • Fibra 16 g
Colesterol 0mg • Sodio 443mg
Proteínas 7g • Grasa 3g • Grasa saturada 0mg
Calorías 152 (20% de grasa) • Carbohidratos 24g
Información nutricional por porción de 1 taza:
revolver. Probar y ajustar la sazón al gusto.
3. Sacar la tapa y agregar las espinaca;
rápido para liberar el vapor.
emplear el método de descompresión
por 3 minutos. Cuando el tiempo termine,
Page 50

27
HIGH PRESSURE (presión alta) y cocinar
papas, la sal y volver a tapar. Elegir el modo
rojo bajará. Sacar la tapa. Agregar las
2. Después de la descompresión, el indicador
natural para liberar el vapor.
emplear el método de descompresión
pitido que indica el final de la cocción,
temporizador en 30 minutos. Después del
y elegir el modo BEANS (frijoles). Fijar el
los garbanzos y el caldo. Cerrar la tapa
cociendo durante unos minutos. Agregar
curry y el comino y revolver bien; seguir
que estén suaves y fragantes. Agregar el
por aproximadamente 5 minutos, hasta
la cebolla, el pimiento y el ajo. Saltear
Cuando el aceite esté caliente, agregar
presión. Elegir el modo SAUTÉ (saltear).
1. Poner el aceite en la olla de la olla a
(espinaca “baby”) fresca
1 taza llena (30 g) de espinaca tierna
½ cucharadita de sal kosher
en cubitos
12 onzas (340 g) de papas blancas,
o de pollo
2 tazas (475 ml) de caldo de vegetales
escurridos y enjuagados
1 taza (120 g) de garbanzos,
½ cucharadita de comino en polvo
picante) en polvo
1 cucharada de curry suave (no muy
2 dientes de ajo, finamente picados
finamente picado
1 pimiento habanero, sin semillas,
½ cebolla roja, finamente picada
aceite vegetal
2 cucharaditas (20 ml) de
Rinde aproximadamente 4 tazas
Comida vegetariana reconfortante.
papas y espinaca
Curry de garbanzos con
Calcio 73mg • Fibra 4g
Colesterol 0mg • Sodio 553mg
Proteínas 9g • Grasa 2g • Grasa saturada 0g
Calorías 265 (7% de grasa) • Carbohidratos 52g
Información nutricional por porción de 1 taza:
gusto y servir.
6. Sacar la tapa, revolver, ajustar la sazón al
natural para liberar el vapor.
empleando el método de descompresión
PRESSURE (presión alta) por 3 minutos,
bien, cerrar la tapa y elegir el modo HIGH
resto del caldo, el arroz y la sal. Revolver
rojo bajará. Sacar la tapa y agregar el
5. Después de la descompresión, el indicador
descompresión rápido para liberar el vapor.
final de la cocción, emplear el método de
minutos. Después del pitido que indica el
(frijoles). Fijar el temporizador en 15
4. Cerrar la tapa y elegir el modo BEANS
tazas (475 ml) de caldo y la hoja de laurel.
fragantes. Agregar el comino, los frijoles, 2
3 minutos, hasta que estén suaves y
el jalapeño y el ajo y saltear por aprox.
Cuando el aceite esté caliente, agregar
a presión. Elegir el modo SAUTÉ (saltear).
2. Poner el aceite de oliva en la olla de la olla
1. Escurrir y enjuagar los frijoles; reservar.
1 cucharadita de sal kosher
de grano largo
2 tazas (370 g) de arroz blanco
1 hoja de laurel
en sodio
4 tazas (945 ml) de caldo de pollo bajo
½ cucharadita de comino en polvo
2 dientes de ajo, finamente picados
1 jalapeño, sin semillas, picado
1 cucharada de aceite de oliva
remojados por una noche
1 taza (150 g) de frijoles negros secos,
Rinde 8 tazas
acompañamiento.
Una versión rápida del clásico plato cubano de
negros
Arroz con frijoles
Calcio 34mg • Fibra 1g
Colesterol 8mg • Sodio 388mg
Proteínas 5g • Grasa 4g • Grasa saturada 2g
Calorías 170 (19% de grasa) • Carbohidratos 27g
de ½ taza:
Información nutricional por porción como entremés
inmediatamente.
y ajustar la sazón al gusto. Servir
5. Retirar las ramitas de tomillo, probar
Page 51

26
arvejas y el queso.
rojo bajará. Sacar la tapa y agregar las
4. Después de la descompresión, el indicador
rápido para liberar el vapor.
emplear el método de descompresión
pitido que indica el final de la cocción,
temporizador en 3 minutos. Después del
PRESSURE (presión alta). Fijar el
3. Cerrar la tapa y elegir el modo HIGH
sal restante.
por completo. Agregar el caldo y la
el líquido se haya evaporado de la olla casi
opaco. Agregar el vino y revolver hasta que
se vean transparentes, pero el centro siga
ingredientes. Cocinar hasta que las orillas
2. Agregar el arroz y revolver con los otros
los bordes estén dorados.
tomillo, y cocinar hasta que estén suaves y
esté suave y fragante. Agregar las setas y el
y la pimienta. Revolver y cocinar hasta que
agregar el puerro y ½ cucharadita de la sal
caliente y la mantequilla se haya derretido,
BROWN (dorar). Cuando el aceite esté
la olla de la olla a presión y elegir el modo
1. Poner el aceite de oliva y la mantequilla en
½ taza (35 g) de queso Fontina rallado
1 taza (145 g) de arvejas congeladas
de vegetales bajo en sodio
6 tazas (1.4 L) de caldo de pollo o
½ taza (120 ml) de vino blanco seco
3 tazas (555 g) de arroz Arborio
3 ramitas de tomillo fresco
en rodajas
8 onzas (225 g) de setas Shiitake,
de Paris), en rodajas
champiñones cremini o champiñones
o comunes (también conocidos como
16 onzas (450 g) de champiñones blancos
recién molida
¼ cucharadita de pimienta negra
1 cucharadita de sal kosher
finamente picado
1 puerro mediano, bien lavado y
1 cucharada (15 g) de mantequilla sin sal
1 cucharada de aceite de oliva
Rinde aproximadamente 12 tazas
simple, pero sabroso
Las setas frescas son la estrella de este risotto
Risotto de setas
Calcio 6mg • Fibra 0 g
Colesterol 76mg • Sodio 109mg
Proteínas 1g • Grasa 12g • Grasa saturada 7g
Calorías 115 (97% de grasa) • Carbohidratos 0g
Información nutricional por porción de 1 cucharada:
baño María hasta el momento de servir.
inmediatamente, o bien mantener caliente a
4. Probar y ajustar la sazón al gusto. Servir
cucharadas de agua en total).
conseguir la consistencia deseada (aprox. 2
agua tibia, 1 cucharadita a la vez, hasta
3. Si la salsa está demasiado espesa, agregar
espesa y homogénea.
hacia arriba y abajo, hasta obtener una mezcla
normalmente, usando un movimiento suave
ingredientes empiecen a espesarse, licuar
la cuchilla en el fondo del vaso. Cuando los
vaso. Licuar a velocidad baja, manteniendo
el protector de cuchillas toque el fondo del
2. Introducir la varilla en el vaso de manera que
leche). Dejar reposar por aprox. 1 minuto.
incluir la espuma blanca (los sólidos de la
la mantequilla tibia, teniendo cuidado de no
un vaso inastillable alto). Agregar lentamente
el vaso de mezcla de una batidora de mano (o
1. Colocar las yemas, el jugo de limón y la sal en
Agua tibia, a gusto
derretida y a temperatura ambiente
½ libra (225 g) de mantequilla sin sal,
¾ cucharadita de sal kosher
1 cucharada de jugo de limón fresco
4 yemas de huevo grande
Rinde 1½ tazas (355 ml)
rápida e infalible de prepararla.
pero con una licuadora de mano es la forma más
licuadora, procesadora de alimentos o a mano,
Esta salsa clásica se puede hacer en una
Salsa holandesa
Page 52

25
Calcio 1mg • Fibra 0 g
Colesterol 20mg • Sodio 24mg
Proteínas 0g • Grasa 7g • Grasa saturada 5g
Calorías 67 (99% de grasa) • Carbohidratos 0g
Información nutricional por porción (1 cucharadita):
y revolver para mezclar. Servir tibio.
ligeramente. Agregar los ingredientes restante
pequeña. Retirar del fuego y dejar enfriar
Derretir la mantequilla en una cacerola
1 pizca de sal kosher
½ cucharadita de ralladura de limón
2 cucharaditas de tomillo fresco
2 cucharadas de jugo de limón fresco
sin sal
8 cucharadas (115 g) de mantequilla
Rinde aprox. ½ taza (120 ml)
sabor de esta deliciosa salsa.
hojas de alcachofa , y el toque de limón realza el
La mantequilla derretida cubre a la perfección las
Rinde ½ taza (120 ml)
puede usar para mojar el pan
Calcio 71mg • Fibra 9g
Colesterol 0mg • Sodio 152mg
de limón-tomillo
Mantequilla
Calcio 2mg • Fibra 0g
Colesterol 0mg • Sodio 12mg
Proteínas 0g • Grasa 9g • Grasa saturada 1g
Calorías 82 (98% de grasa) • Carbohidratos 0g
Información nutricional por porción (2 cucharaditas):
temperatura ambiente antes de servir).
en el refrigerador por hasta 1 semana (llevar a
a temperatura ambiente durante 24 horas, o
(desechar el ajo). El aceite puede guardarse
o en un tazón pequeño para servir o remojar
y dejar reposar por 1 hora. Colar en un frasco
resto de los ingredientes y dejar enfriar. Cubrir
pero no dorado. Retirar del fuego, agregar el
3 a 5 minutos, hasta que el ajo esté fragante,
medio, en una cacerola mediana. Cocinar por
Poner el aceite y el ajo a calentar a fuego
1 pizca de hojuelas de pimiento rojo
Rinde 4 porciones
de nuestras salsas sugeridas.
con tres salsas
Alcachofas
Pimienta negra recién molida
1 pizca de sal kosher
4 dientes de ajo, finamente rebanados
½ taza (120 ml) de aceite de oliva
Un aceite simple para las alcachofas; si sobra, se
Aceite con ajo-chile
Proteínas 5g • Grasa 0g • Grasa saturada 0g
Calorías 76 (2% de grasa) • Carbohidratos 17g
Información nutricional por porción (1 alcachofa):
mojar (recetas a continuación).
derretida o con una de nuestras salsas para
5. Servir inmediatamente con mantequilla
rojo bajará. Sacar la tapa.
4. Después de la descompresión, el indicador
descompresión rápido para liberar el vapor.
el final de la cocción, emplear el método de
en 7 minutos. Después del pitido que indica
PRESSURE (presión alta). Fijar el temporizador
la olla. Cerrar la tapa y elegir el modo HIGH
el limón restante. Colocar las alcachofas en
3. Frotar la parte cortada de las alcachofas con
externas de hojas duras.
Cortar el tercio superior y recortar las capas
para obtener una superficie plana y uniforme.
2. Preparar las alcachofas, cortando el tallo
de la olla a presión.
1. Poner el agua y el jugo de un limón en la olla
1 limón, cortado a la mitad
4 alcachofas medianas
½ taza (120 ml) de agua
y servirse a temperatura ambiente con cualquiera
mejor es que se pueden preparar con anticipación
¡Alcachofas perfectas, en tan solo 7 minutos! Lo
Page 53

24
Calcio 117mg • Fibra 14 g
Colesterol 0mg • Sodio 728mg
Proteínas 14g • Grasa 3g • Grasa saturada 0g
Calorías 247 (10% de grasa) • Carbohidratos 44g
Información nutricional por porción de 1 taza:
4. Probar y ajustar la sazón al gusto.
rojo bajará. Sacar la tapa.
3. Después de la descompresión, el indicador
para liberar el vapor.
emplear el método de descompresión natural
del pitido que indica el final de la cocción,
Fijar el temporizador en 20 minutos. Después
2. Cerrar la tapa y elegir el modo SOUP (sopa).
adobo, el caldo, y la sal/pimienta restantes.
el concentrado de tomate, el chipotle y el
Agregar los frijoles escurridos, los tomates,
3 a 4 minutos para combinar los sabores.
dulce y las especias y cocinar por aprox.
suave y translúcida. Agregar el pimiento
2 a 3 minutos, hasta que la cebolla esté
la sal y de la pimienta. Cocinar por aprox.
jengibre, el ajo, la cebolla, y una pizca de
Cuando el aceite esté caliente, agregar el
a presión. Elegir el modo SAUTÉ (saltear).
1. Poner el aceite de oliva en la olla de la olla
Cilantro fresco, para decorar
rallado, para decorar
Queso Cheddar o Monterey Jack
2 tazas (475 ml) de caldo de vegetales
cucharadita de adobo
1 chipotle en adobo, licuado, más 1
2 cucharadas de concentrado de tomate
picados, sin jugo
1 lata de 28 onzas (795 g) de tomates
¼ cucharadita de canela en polvo
¼ cucharadita de comino en polvo
2 cucharaditas de chile en polvo
semillas y picado
preferencia amarillo o verde), sin
1 pimiento dulce mediano (de
molida
¼ cucharadita de pimienta negra recién
1 cucharadita de sal kosher
1 cebolla pequeña, finamente picada
2 dientes de ajo, finamente picados
jengibre, pelado y finamente picado
1 trozo de ½ pulgada (1.5 cm) de
1 cucharada de aceite de oliva
escurridos
etc.) remojados por una noche y
blancos, porotos adzuki, garbanzos,
una mezcla de frijoles negros, rojos,
2 tazas (200 g) de frijoles secos (usar
Rinde aproximadamente 7 tazas
saludable.
que lo convierte en un plato sustancioso pero
sino también un toque “carnoso” inesperado,
a este chile mucho sabor (y algo de calor),
El sabor ahumado del chipotle no solo le da
vegetariano
Chile de frijoles
Calcio 21mg • Fibra 5g
Colesterol 0mg • Sodio 515mg
Proteínas 7g • Grasa 2g • Grasa saturada 0mg
Calorías 110 (16% de grasa) • Carbohidratos 16g
Información nutricional por porción de 1 taza:
queso Parmesano recién rallado antes de servir.
Variación: agregar espinaca fresca picada y
de laurel. Probar y ajustar la sazón al gusto.
pimienta y el jugo de limón. Desechar la hoja
rojo bajará. Sacar la tapa y agregar la sal, la
3. Después de la descompresión, el indicador
para liberar el vapor.
emplear el método de descompresión natural
del pitido que indica el final de la cocción,
Fijar el temporizador en 8 minutos. Después
(sopa).
caldo. Cerrar la tapa y elegir el modo SOUP
2. Agregar la hoja de laurel, las lentejas y el
estén tiernos y fragantes.
aprox. 5 minutos, hasta que los vegetales
zanahoria y el ajo. Revolver y cocinar por
aceite esté caliente, agregar la cebolla, la
Elegir el modo SAUTÉ (saltear). Cuando el
1. Poner el aceite en la olla de la olla a presión.
½ cucharadita de jugo de limón fresco
recién molida
¼ cucharadita de pimienta negra
1 cucharadita de sal kosher
o de pollo
5 tazas (1.2 L) de caldo de vegetales
secas
Page 54

23
1 libra (455 g) de lentejas marrones
1 hoja pequeña de laurel
2 dientes de ajo, finamente rebanados
1 zanahoria, pelada y picada en cubitos
1 cebolla mediana, finamente picada
1 cucharada de aceite de oliva
Rinde 8 tazas
olla a presión!
frío estará listo en un abrir y cerrar de ojos con la
Simple, pero sustanciosa. ¡Este favorito de clima
Sopa de lentejas
Calcio 11mg • Fibra 12g
Colesterol 0mg • Sodio 228mg
Proteínas 11g • Grasa 3g • Grasa saturada 0g
Calorías 246 (11 % de grasa) • Carbohidratos 46g
Información nutricional por porción de 1 taza:
al lado.
perejil fresco picado y con queso Parmesano
3. Probar y ajustar la sazón al gusto. Servir con
vapor.
de descompresión rápido para liberar el
Cuando el tiempo termine, emplear el método
temporizador en 5 minutos.
HIGH PRESSURE (presión alta). Fijar el
y la pasta. Cerrar la tapa y elegir el modo
Agregar el caldo, el tomate picado, la sal
rojo bajará. Sacar la tapa.
2. Después de la descompresión, el indicador
descompresión natural para liberar el vapor.
final de la cocción, emplear el método de
minutos. Después del pitido que indica el
BEANS (frijoles). Fijar el temporizador en 30
y el agua. Cerrar la tapa y elegir el modo
el orégano, la albahaca, los frijoles, el laurel
hasta que estén suaves y fragantes. Agregar
ajo y saltear por aproximadamente 5 minutos,
Agregar la cebolla, la zanahoria, el apio y el
a presión y elegir el modo SAUTÉ (saltear).
1. Poner el aceite de oliva en la olla de la olla
Queso Parmesano recién rallado
Perejil fresco picado
otra pasta pequeña
1½ tazas (150 g) de Tubetti, macarrones u
1½ cucharaditas de sal kosher
cocidos picados, con jugo
2 latas de 14 onzas (400 g) de tomates
4 tazas (945 ml) de caldo de vegetales
6 tazas (1.4 L) de agua
1 hoja de laurel
frijoles blancos, lavados
1 libra (455 g) de frijoles Cannellini o
1 cucharadita de albahaca seca
1 cucharadita de orégano seco
3 dientes de ajo, picados
1 rama de apio, en cubitos
1 zanahoria, en cubitos
1 cebolla, picada
1 cucharada de aceite de oliva
Rinde aproximadamente 12 tazas
vegetariana de la famosa sopa italiana.
Pruebe esta sustanciosa y saludable versión
“Pasta e Fagioli”
Calcio 60mg • Fibra 3g
Colesterol 98mg • Sodio 536mg
Proteínas 68g • Grasa 29g • Grasa saturada 14g
Calorías 777 (36% de grasa) • Carbohidratos 50g
Información nutricional por porción de 1 taza (235 ml):
gusto. Servir inmediatamente.
o salsa Hoisin. Probar y ajustar la sazón al
pizca de salsa de pescado, salsa de chile
limón verde. Si desear puede agregar una
bistec en cada tazón y exprimir jugo de lima/
carne. Verter 2 tazas (475 ml) de caldo con
la olla a presión para terminar de cocinar la
WARM (mantener caliente). Retirar la olla de
entraña en el caldo y elegir el modo KEEP
pescado y el bistec de falda/arrachera/
5. Justo antes de servir, agregar la salsa de
cucharada de cebolletas.
la mano, 1 cucharada de porote chino y 1
con la mano, 5 hojas de menta cortadas con
la mano, 1 cucharada de cilantro cortado
cocidos, 5 hojas de albahaca cortadas con
cada tazón colocar 1 taza de fideos de arroz
mientras prepara los tazones para servir: en
SAUTÉ (saltear). Cocinar a fuego lento
el caldo restante a la olla y elegir el modo
la grasa formada encima del caldo, agregar
4. Antes de usar el caldo, retirar con un cuchara
Preparar la sopa:
refrigerador hasta que la grasa se solidifique.
temperatura ambiente, colocarlo en el
3. Cuando el caldo ya colado alcance
y las hierbas.
otro uso. Desechar los huesos, los vegetales
carne y usarla en la sopa o reservarla para
colador de malla fina. Puede desmenuzar la
caldo y colarlo con un colador de tela o un
Page 55

22
rojo bajará. Sacar la tapa. Dejar enfriar el
2. Después de la descompresión, el indicador
para liberar el vapor.
emplear el método de descompresión natural
en 90 minutos. Cuando el tiempo termine,
el modo SOUP (sopa). Fijar el temporizador
olla de la olla a presión. Cerrar la tapa y elegir
1. Agregar los ingredientes para el caldo en la
Salsa Hoisin (opcional)
Salsa de chile (opcional)
Salsa de pescado (opcional)
Jugo de lima/limón verde fresco
en rodajas finas
Cebolletas (“green onions”),
Porote chino
Menta fresca
Cilantro fresco
Albahaca fresca
8 onzas de fideos de arroz, cocidos
Ingredientes para servir:
finamente cortado
arrachera/entraña (“flank steak”),
1 libra (455 g) de bistec de falda/
4 cucharadas de salsa de pescado
Sopa:
12 tazas (2.8 L) de agua
½ manojo de cilantro fresco
3 clavos de olor
4 estrellas de anís estrellado
2 palitos de canela
sin pelar
1 trozo de 2 pulgadas (5 cm) de jengibre,
2 zanahorias, en trozos
1 cebolla, partida a la mitad
de res
brazuelo de res, rabo de toro o costilla
2 libras (910 g) de combinación de
2 libras (910 g) de huesos de res
Caldo:
Rinde aproximadamente 12 tazas
Calcio 128mg • Fibra 7g
Colesterol 0mg • Sodio 286mg
Proteínas 11g • Grasa 1g • Grasa saturada 0g
Calorías 157 (8% de grasa) • Carbohidratos 42g
Información nutricional por porción de 1 taza:
3. Probar y ajustar la sazón al gusto.
completo.
hasta que la escarola se haya marchitado por
SIMMER (cocinar a fuego lento). Cocinar
Agregar la escarola y la sal. Elegir el modo
2. Después de la descompresión, sacar la tapa.
liberar el vapor.
el método de descompresión natural para
minutos. Cuando el tiempo termine, emplear
BEANS (frijoles). Fijar el temporizador en 30
el caldo. Cerrar la tapa y elegir el modo
esté fragante. Agregar los frijoles blancos y
Saltear por 3 a 5 minutos, hasta que el ajo
Cuando el aceite esté caliente, agregar el ajo.
a presión y elegir el modo SAUTÉ (saltear).
1. Poner el aceite de oliva en la olla de la olla
½ cucharadita de sal kosher
picada gruesa
1 cabeza grande de escarola,
8 tazas (1.9 L) de caldo de pollo
lavadas
1 libra (455 g) de frijoles blancos secos,
3 dientes de ajo, machacados
1 cucharada de aceite de oliva
Rinde 12 tazas
y pan crujiente.
delicioso. Perfecto para servir con aceite de oliva
un plato sustancioso y a la vez saludable y
Ingredientes simples se transforman en
frijoles blancos
Estofado de escarola y
“Pho”
prepararlo, pero es igual de reconfortante.
es más ligera, toma una fracción del tiempo en
sabor intenso característico. Nuestra versión
da como resultado un caldo claro con una
cocina a fuego lento por horas y su preparación
Este plato tradicional de la cocina vietnamita se
Calcio 138mg • Fibra 8 g
Colesterol 62mg • Sodio 688mg
Proteínas 38g • Grasa 10g • Grasa saturada 3g
Calorías 309 (22% de grasa) • Carbohidratos 38g
Información nutricional por porción (2 tazas/475 ml):
crema agria y más eneldo picado.
3. Probar y ajustar la sazón al gusto. Servir con
Page 56

21
agregar el eneldo.
haya marchitado, después de aprox. 5 min,
col. Cuando la res esté caliente y la col se
tapa. Agregar la res desmenuzada y la
2. Después de la descompresión, sacar la
descompresión rápido para liberar el vapor.
el tiempo termine, emplear el método de
Fijar el temporizador en 3 minutos. Cuando
el modo HIGH PRESSURE (presión alta).
el caldo y las papas. Cerrar la tapa y elegir
para despegar los residuos. Agregar de nuevo
fondo de la olla con un cucharón de madera
ligeramente. Agregar el vinagre y raspar el
Saltear has que los ingredientes se suavicen
rallada, la remolacha, la sal y el azúcar.
Cuando esté caliente, agregar la zanahoria
a presión y elegir el modo SAUTÉ (saltear).
completo. Poner el aceite en la olla de la olla
caldo después de que se haya enfriado por
1. Retirar y desechar la grasa solidificada del
Preparar la sopa:
refrigerador hasta que la grasa se solidifique.
temperatura ambiente, luego colocarlo en el
4. Después de colar el caldo, dejar enfriar a
reservar. Desechar los vegetales.
Desmenuzar la carne de los brazuelos y
colador de tela o un colador de malla fina.
la tapa. Dejar enfriar el caldo y colar con un
3. Cuando el indicador rojo haya bajado, retirar
descompresión natural para liberar el vapor.
el final de la cocción, emplear el método de
80 minutos. Después del pitido que indica
modo SOUP (sopa). Fijar el temporizador en
y la hoja de laurel. Cerrar la tapa y elegir el
granos de pimienta negra, el perejil, el tomillo
de tomate. Revolver y agregar el agua, los
el apio, el tomate, la cebolla y el concentrado
olla junto con los huesos de res, la zanahoria,
2. Colocar todos los brazuelos dorados en la
Repetir con el resto de los brazuelos.
brazuelo de res y dorarlo por todos lados.
(dorar). Cuando esté caliente, agregar un
de la olla a presión y elegir el modo BROWN
reservar. Poner el aceite de oliva en la olla
1. Sazonar la res con la sal y la pimienta;
Preparación del caldo:
Crema agria para servir
un poco más para decorar
½ taza (30 g) de eneldo fresco picado +
rebanada
emanar.
½ col verde pequeña, finamente
en pedazos
2 papas medianas, peladas y cortadas
1 cucharada de vinagre de vino tinto
1 cucharadita de azúcar granulada
¼ cucharadita de sal kosher
3 remolachas medianas, ralladas
2 zanahorias medianas, ralladas
1 cucharadita de aceite de oliva
Sopa:
1 hoja de laurel
2 ramitas de tomillo
10 ramitas de perejil
12 granos de pimienta negra
8 tazas (1.9 L) de agua
1 cucharada de concentrado de tomate
1 cebolla, partida a la mitad
2 tomates italianos, partidos a la mitad
2 ramas de apio, en trozos
2 zanahorias medianas, en trozos
1 cucharada de aceite de oliva
recién molida
½ cucharadita de pimienta negra
1 cucharadita de sal kosher
2 a 3 brazuelos de res
Caldo de res:
Rinde aproximadamente 8 tazas (1.9 L)
cuando todos los sabores han tenido tiempo de
Esta sopa sabe aún mejor al día siguiente,
“Borscht”
Calcio 35mg • Fibra 5 g
Colesterol 22mg • Sodio 447mg
Proteínas 10g • Grasa 3g • Grasa saturada 1g
Calorías 140 (20% de grasa) • Carbohidratos 16g
Información nutricional por taza:
aguacate, crema agria, cilantro y arroz.
* Ideas a la hora de servir: Servir con pedazos de
4. Probar y ajustar la sazón al gusto.
pimienta de Cayena, el vinagre y la sal.
rojo bajará. Sacar la tapa y agregar la
3. Después de la descompresión, el indicador
descompresión natural para liberar el vapor.
final de la cocción, emplear el método de
minutos. Después del pitido que indica el
Page 57

20
(frijoles). Fijar el temporizador en 30
agua, los frijoles y la hoja de laurel.
cebolla esté suave y transparente. Agregar el
polvo. Saltear por 3 a 5 minutos, hasta que la
ajo, el orégano, el comino y el cilantro en
dorada. Agregar la cebolla, el pimiento, el
aprox. 5 minutos, hasta que esté ligeramente
caliente, agregar la salchicha y saltear por
y elegir el modo BROWN (dorar). Una vez
lavados y escurridos
polvo ("ground coriander")
de pollo o de cerco, en cubitos
Rinde aproximadamente 9 tazas (2 L)
rico sabor ahumado.
negros
Proteínas 30g • Grasa 23g • Grasa saturada 7g
Calorías 379 (56% de grasa) • Carbohidratos 11g
(sopa de pollo rápida):
2. Cerrar la tapa y elegir el modo BEANS
1. Poner el aceite en la olla de la olla a presión
1 cucharadita de sal kosher
1 cucharada de vinagre de vino tinto
¼ cucharadita de pimienta de Cayena
1 hoja de laurel
1 libra (455 g) de frijoles negros secos,
6 tazas (1.4 L) de agua
½ cucharadita de semillas de cilantro en
1 cucharadita de comino en polvo
1 cucharada de orégano seco
3 dientes de ajo, finamente picados
1 pimiento rojo, en cubitos
1 cebolla mediana, picada
12 onzas (340 g) de salchicha “andouille”
1 cucharada de aceite de oliva
Esta sopa es sustanciosa, deliciosa y tiene un
Sopa cubana de frijoles
Colesterol 0mg • Sodio 135mg • Calcio 36mg • Fibra 1g
Información nutricional por porción de 1 taza (235 ml)
picado o de eneldo antes de servir.
recién molida y decorar con una pizca de perejil
constantemente. Sazonar con pimienta negra
la mezcla de huevo a la sopa, revolviendo
haya calentado. Luego, agregar lentamente
caldo a la mezcla, hasta que el exterior del tazón
al agregarlos a la olla. Agregar lentamente más
huevos y evitará que formen pedazos grandes
caldo caliente; esto cocinará suavemente los
de huevos, agregar aprox. 1 taza (235 ml) de
usar un tenedor). Sin dejar de batir la mezcla
una mezcla ligera y espumosa (también puede
con una licuadora de mano hasta conseguir
limones y 1 cucharadita de sal kosher. Batir
colocar en un tazón 4 huevos, el jugo de 2
después de agregar el pollo desmenuzado,
PRESSURE (presión alta) por 5 minutos. Luego,
vegetales rebanados. Cocinar en modo HIGH
griega), agregar 8 onzas (225 g) de orzo con los
** Para preparar “Abgolemono” (sopa de pollo
cocción en 5 minutos.
vegetales rebanados e incrementar el tiempo de
1 taza (150 g) de fideos de huevo junto con los
* Para preparar sopa de pollo con fideos, agregar
servir.
al gusto. Decorar con perejil picado antes de
pollo esté caliente, probar y ajustar la sazón
desmenuzado, la sal y la pimienta. Cuando el
vapor. Quitar la tapa y agregar el pollo
de descompresión rápido para liberar el
4. Cuando el tiempo termine, emplear el método
pollo.
vegetales se están cocinando, desmenuzar el
temporizador en 3 minutos. Mientras los
HIGH PRESSURE (presión alta). Fijar el
a la olla. Cerrar la tapa y elegir el modo
3. Agregar las rodajas de zanahoria y de apio
los vegetales.
cuchara calada. Reservar el pollo y desechar
antes de sacarlos con una espumadera o una
pollo y los vegetales se enfríen ligeramente
rojo bajará. Retirar la tapa y permitir que el
2. Después de la descompresión, el indicador
descompresión natural para liberar el vapor.
el final de la cocción, emplear el método de
25 minutos. Después del pitido que indica
modo SOUP (sopa). Fijar el temporizador en
la olla a presión. Cerrar la tapa y elegir el
hoja de laurel; el ajo y el caldo en la olla de
y cebolla; las ramitas de perejil y tomillo; la
1. Colocar el pollo; los trozos de zanahoria, apio
Perejil picado, para decorar
luego en rodajas finas
3 ramas de apio, cortadas a la mitad y
luego en rodajas finas
6 zanahorias, cortadas a la mitad y
recién molida
¼ cucharadita de pimienta negra
1½ cucharaditas de sal kosher
10 tazas (2.35 L) de caldo de pollo
Page 58

deshuesados y sin piel
Rinde aproximadamente 12 tazas
cubos de caldo salados.
permite preparar una
®
19
1 diente de ajo, machacado
1 hoja de laurel
2 ramitas de tomillo
10 ramitas de perejil
1 cebolla, en pedazos grandes
2 ramas de apio, en trozos
2 zanahorias, en trozos
4 libras (1.8 kg) de muslos de pollo,
sin usar potenciadores de sabor, tales como
base sabrosa para sopa de pollo en 25 minutos
La olla a presión Cuisinart
Sopa de pollo rápida
8 tazas (1.9 L) de agua
1 hoja de laurel
4 ramitas de tomillo
10 ramitas de perejil
1 cucharadita de granos de pimienta
2 dientes de ajo
1 cucharada de aceite de oliva
1 cebolla grande, en cuartos
2 ramas de apio, en trozos
cortadas en trozos
2 zanahorias grandes, peladas y
2 libras (910 g) de huesos de res
o brazuelos
2 libras (910 g) de carne de res, costillas
Calcio 12mg • Fibra 0g
Colesterol 0mg • Sodio 893mg
Proteínas 3g • Grasa 0g • Grasa saturada 0g
Calorías 17 (2% de grasa) • Carbohidratos 1g
Información nutricional por porción de 1 taza (235 ml):
congelador.
en el refrigerador y hasta 6 meses en el
del caldo. Se puede guardar hasta 7 días
con un cuchara la grasa formada encima
enfriamiento. Antes de usar el caldo, retire
el refrigerador para completar el proceso en
temperatura ambiente antes de colocarlo en
4. Después de colar el caldo, dejar enfriar a
desechar los huesos y los vegetales.
un colador de malla fina. Reservar la carne;
rojo bajará. Quitar la tapa y colar el caldo con
3. Después de la descompresión, el indicador
para liberar el vapor.
emplear el método de descompresión natural
del pitido que indica el final de la cocción,
el temporizador en 75 minutos. Después
la tapa y elegir el modo SOUP (sopa). Fijar
Cubrir con 8 tazas (1.9 L) de agua. Cerrar
las hierbas y la hoja de laurel en la olla.
Agregar el ajo, los granos de pimienta,
de la grasa) en la olla de la olla a presión.
2. Colocar los ingredientes asados (sin el aceite
quedar bien dorados.
mitad del tiempo. Los ingredientes deben
40 minutos, volteando los ingredientes a la
para cubrir. Asar durante aproximadamente
poco profunda. Rociar con aceite y revolver
apio y la cebolla en una bandeja para asar
Colocar la carne, los huesos, la zanahoria, el
1. Precalentar el horno a 425°F (220°C).
Rinde aproximadamente 8 tazas (235 ml)
antes de agregarlos a la olla.
huesos a 425 °F (220 °C) de 40 a 45 minutos
Para un caldo con sabor más intenso, asar los
Caldo de res asado
Calcio 39mg • Fibra 2g
Colesterol 0mg • Sodio 56mg •
Proteínas 1g • Grasa 0g • Grasa saturada 8g
Calorías 39 (3% de grasa) • Carbohidratos 9g
Información nutricional por porción de 1 taza (235 ml):
meses.
hasta 7 días, o en el congelador por hasta 6
refrigerar; conservar en el refrigerador por
o dejar enfriar a temperatura ambiente y
3. Usar el caldo de vegetales inmediatamente,
colador de malla fina. Desechar los vegetales.
rojo bajará. Quitar la tapa y colar con un
2. Después de la descompresión, el indicador
descompresión natural para liberar el vapor.
el final de la cocción, emplear el método de
30 minutos. Después del pitido que indica
modo SOUP (sopa). Fijar el temporizador en
la olla a presión. Cerrar la tapa y elegir el
1. Poner todos los ingredientes en la olla de
10 tazas (2.4 L) de agua
2 dientes de ajo
2 hojas de laurel
3 ramitas de tomillo
10 ramitas de perejil
Page 59

18
12 granos de pimienta negra
1 puerro, limpio, en trozos
2 cebollas, en pedazos
3 ramas de apio, en trozos
4 zanahorias grandes, en trozos
Rinde 10 tazas (2.35 L)
el sabor de este caldo de vegetales.
champiñones y hierbas. Agréguelos para realzar
restos de apio, piel de cebolla, tallos de
recipiente hermético las cáscaras de zanahoria,
que tenga. Almacene en el congelador en un
puede agregar pedazos de partes de vegetales
En esta receta se usan vegetales enteros, pero
Caldo de vegetales
Calcio 0mg • Fibra 0g
Colesterol 0mg • Sodio 343mg
Proteínas 6g • Grasa 3g • Grasa saturada 1g
Calorías 86 (7% de grasa) • Carbohidratos 1g
Información nutricional por porción de 1 taza (235 ml):
mejor mientras sea más larga la cocción.
puede preparar en 30 minutos, pero el sabor es
NOTA: si no tiene mucho tiempo, el caldo se
congelador.
en el refrigerador y hasta 6 meses en el
del caldo. Se puede guardar hasta 7 días
con un cuchara la grasa formada encima
enfriamiento. Antes de usar el caldo, retire
el refrigerador para completar el proceso en
temperatura ambiente antes de colocarlo en
3. Después de colar el caldo, dejar enfriar a
colador de malla fina.
rojo bajará. Quitar la tapa y colar con un
2. Después de la descompresión, el indicador
descompresión natural para liberar el vapor.
el final de la cocción, emplear el método de
80 minutos. Después del pitido que indica
modo SOUP (sopa). Fijar el temporizador en
la olla a presión. Cerrar la tapa y elegir el
1. Poner todos los ingredientes en la olla de
12 tazas (2.8 L) de agua
2 hojas de laurel
2 cucharaditas de granos de pimienta
3 ramitas de tomillo
15 ramitas de perejil
1 diente de ajo
1 cebolla mediana, en pedazos
2 ramas de apio, en trozos
3 zanahorias, en trozos
con hueso
Rinde aproximadamente 12 tazas
cocinar o para calentar comidas.
y guisos o estofados, o puede guardarlo en
tomarlo solo, usarlo como base para sopas
Caldo de pollo
Calcio 8mg • Fibra 3g
Colesterol 0mg • Sodio 20mg
Proteínas 3g • Grasa 4g • Grasa saturada 2g
Calorías 131 (26% de grasa) • Carbohidratos 22g
Información nutricional por porción de ½ taza:
de canela.
rojo bajará. Sacar la tapa y retirar los palitos
para liberar el vapor.
emplear el método de descompresión natural
del pitido que indica el final de la cocción,
el temporizador en 5 minutos. Después
modo HIGH PRESSURE (presión alta). Fijar
la olla a presión. Cerrar la tapa y elegir el
puro
sin azúcar (45 g)
instantánea)
escocesa (no utilice avena
Rinde aproximadamente 7 tazas
avena cremosa y deliciosa.
, la preparación es fácil,
®
Avena escocesa
4 libras (1.8 kg) de presas de pollo,
recipientes pequeños para luego usarlo para
Este caldo nutritivo tiene muchos usos. Puede
3. Revolver y servir inmediatamente.
2. Después de la descompresión, el indicador
1. Poner todos los ingredientes en la olla de
1 pizca de sal kosher
2 pizcas de nuez moscada rallada
¾ taza (90 g) de frutas secas
2 cucharadas de jarabe de arce/maple
¼ taza + 2 cucharadas de coco rallado
1½ palitos de canela
1 cucharada de aceite de coco
2 tazas (160 g) de copos de avena
∕3 tazas (3.9 L) de agua
5
2
rápida y a la perfección para que disfrute de una
olla a presión Cuisinart
escocesa toma tiempo y dedicación, pero con la
Tradicionalmente, la preparación de la avena
Page 60

17
chispas de chocolate ...............38
Budín de pan de cereza con
Tarta de queso de lima/limón ........37
Manzanas “al horno” ...............37
Budín de arroz ....................36
albaricoque.......................36
Chuletas de cerdo con salsa de
con piña y chipotle.................35
Tacos de cerdo desmenuzado
Costillas de cerdo al estilo asiático ....34
Cecina de res con col ..............33
Carne mechada ...................33
Estofado de res clásico .............32
Pollo simple ......................31
Curry de pollo y vegetales ...........31
Arroz con pollo....................30
Salmón glaseado con miel...........30
Papas machacadas con ajo y hierbas. . 29
en salsa de cebolla roja y salvia ......29
Calabaza de bellota
y piñones ........................28
Habichuelas con chalotes
Col rizada salteada.................28
y espinaca .......................27
Curry de garbanzos con papas
Arroz con frijoles negros ............27
Risotto de setas ...................26
Alcachofas con tres salsas ..........25
Chile de frijoles vegetariano..........24
Sopa de lentejas ..................23
“Pasta e Fagioli”” ..................23
“Pho” ...........................22
Estofado de escarola y frijoles blancos . 22
“Borscht” ........................21
Sopa de frijoles negros .............20
Sopa de pollo rápida ...............19
Caldo de res asado ................19
Caldo de vegetales ................18
Caldo de pollo ....................18
Avena escocesa...................18
RECETAS
Page 61

16
2 tazas
2 tazas
2 tazas
2¼ taza
2 tazas
2¼ tazas
cocido
arroz
(475 g) de
2½ tazas
2 tazas
2 tazas
No aplicable 8 a 10 minutos
8 a 10 minutos 30 a 35 minutos
8 a 10 minutos 30 a 35 minutos
8 a 10 minutos 30 a 35 minutos
No aplicable 8 a 10 minutos
8 a 10 minutos 30 a 35 minutos
15 minutos 50 a 60 minutos
7 minutos 33 a 38 minutos
7 minutos 28 a 32 minutos
noche)
Tiempo de cocción (secos) Rinde
(remojados por una
Tiempo de cocción
Arvejas partidas
Frijoles rojos
Frijoles blancos
Frijoles pintos
Lentejas
Northern”
Frijoles “Great
Garbanzos
Frijoles Cannellini
Frijoles negros
(1 taza/200 g)
ysemejantes
Frijoles
cocinarlos a fuego lento.
lento, usando el modo SIMMER. Es preferible cocinar de menos los frijoles y terminar de
edad de los frijoles, algo que usted no puede controlar), termine de cocinarlos a fuego
• Si los frijoles no están completamente cocinados (lo que depende parcialmente de la
liberar el vapor.
• Cocine los frijoles a presión alta y emplee el método de descompresión natural para
presión y la válvula indicadora de presión.
• Después de la cocción, limpie cuidadosamente la tapa, el sello, la válvula reguladora de
hagan espuma.
• Añada 2 cucharaditas de aceite por cada taza (150 g) de frijoles para evitar que
• Nunca llene la olla más de un tercio de su capacidad.
en porciones de 1 taza (175 g) para utilizar en otras recetas.
sazón + cebolla, ajo, hierbas + 4 cucharaditas de aceite) y congele los frijoles cocinados
• Cocine altas cantidades de frijoles (1 libra/455 g de frijoles + 8 tazas/1.9 L de agua +
añada sal, la cual inhibe la cocción de los frijoles.
• Agregue cebollas, ajo, apio, hierbas frescas o laurel para dar más sabor al plato. No
cocinar los frijoles secos, sin necesidad de remojarlos.
• Los frijoles pueden ser remojados durante una noche, pero la olla a presión permite
otras suciedades. Enjuague y escurra los frijoles.
• Antes de cocinar frijoles secos, descarte los frijoles rotos o arrugados y las piedritas y
Frijoles secos
Page 62

15
Rápido
descompresión
Método de
Líquido
945 ml)
22 3 a 4 tazas (710 a
4 a 6 1½ tazas (355ml) Rápido
5 3 tazas (710 ml) Natural
5 1½ tazas (355 ml) Rápido
18 3 tazas (710 ml) Rápido
6 2 tazas (475 ml) Rápido
20 2 tazas (475 ml) Natural
20 a 25 3 tazas (710 ml) Rápido
(presión alta)
(minutos)
Tiempo de cocción
Arroz salvaje
largo)
Arroz blanco (grano
Avena escocesa
Quinua
Farro (grano entero)
Bulgur
Arroz integral
Cebada (perlada)
(1 taza/aprox, 200 g)
Granos
Arroz y cereales
Page 63

14
Rápido
Rápido
Rápido
Rápido
Rápido
Rápido
Rápido
Rápido
Rápido
Rápido
Rápido
Rápido
Rápido
Rápido
Rápido
Rápido
Rápido
Rápido
Rápido
1 a 2 minutos
3 a 4 minutos
6 a 8 minutos
4 a 5 minutos
5 a 8 minutos
5 a 7 minutos
1 a 2 minutos
3 a 4 minutos
5 a 7 minutos
2 a 3 minutos
2 a 3 minutos
1 a 2 minutos
7 a 9 minutos
en rodajas
de 2 a 3 onzas
medianas, cortadas
peladas 2 a 4 minutos
repollo, col rizada,
en rodajas gruesas 2 a 3 minutos
en trozos 5 minutos
medianas o grandes 15 a 20 minutos
Alimento Tiempo de cocción Método de descompresión
calabacita (“zucchini”),
Calabaza, zapallo, calabacín/
Espaguetis 10 a 12 minutos
pelada y cortada en rodajas
peladas y cortadas en
separada en cogollos
squash”),
Calabaza moscada (“butternut
partidas en dos y sin semillas
Calabacitas (“acorn squash”),
Calabazas y vegetales similares
Batata/Camote, en cubos
(60 a 90 g) cada una
Papas rojas,
en cuartos
Papas blancas,
Papas
Chirivías, en rodajas gruesas
trozos
Chirivías,
Cebollas “baby”,
en tiras de 1 pulgada (2.5 cm)
Verduras de hoja,
(utilizar la rejilla de cocción al vapor)
Maíz,
4–6 mazorcas
Zanahorias,
Zanahorias,
grandes
Coliflor,
Brécol,
separado en cogollos grandes 2 a 3 minutos
Remolachas,
pulgadas (5cm)
1½ libras (680 g), en pedazos de 2
Habichuelas/Judías verdes o amarillas
cada una
4, de 8 a 10 onzas (240 a 300 g)
Alcachofas
Salvo indicación contraria, la mayoría de los vegetales se cocinan a presión alta.
necesario, y que termine de cocinarlos al vapor; esto evitará que se cocinen en exceso.
tiempo de cocción a vapor. Le recomendamos que cocine los vegetales menos de lo
Si usa vegetales congelados, deberá añadir 1 a 2 minutos de cocción y posiblemente más
cocinándose al vapor. Siempre agregue ½ taza (120 ml) de líquido para cocinar vegetales.
la cocción. Si los vegetales requieren cocinarse más, apague la olla y cierre la tapa; seguirán
descompresión rápido, inmediatamente después de escuchar el pitido que indica el final de
se cocinan muy rápidamente; recuerda liberar el vapor, empleando el método de
Siempre lave y pele (de ser necesario) los vegetales antes de cocinarlos. Los vegetales
Vegetales
Page 64

13
Natural
Natural
Rápido
Natural
Rápido
Natural
Natural
verduras)
carne para el tiempo de cocción con
Natural (ver la receta de estofado de
Natural
Natural
Natural
Natural
Rápido
Rápido
Rápido
Rápido
Rápido
15 a 20 minutos
carne demasiado)
importante, para no cocinar la
10 minutos por libra (el peso es
20 a 30 minutos
50 a 55 minutos
4 a 5 minutos, después de dorar
20 a 25 minutos
25 a 30 minutos
20 a 30 minutos
50 minutos
60 a 90 minutos
55 minutos
60 a 90 minutos
5 a 6 minutos
8 a 10 minutos
25 a 30 minutos
1½ a 2 pulgadas (4 a 5 cm)
Carne para guisar – cubos de
Paleta, deshuesada
Ternera
piezas
Costillas, cortadas en 2 o 3
(1.35 kg)
Paleta asada – 3 libras
espesor
1 pulgada (2 a 2.5 cm) de
Chuletas, con hueso, de ¾ a
Cerdo
pulgadas (4 cm)
Paleta – cubos de 1½
de 12 onzas (340 g) cada uno
Brazuelos/Piernas – cuatro,
Cordero
1½ a 2 pulgadas (4 a 5 cm)
Carne para guisar – cubos de
7.5 cm) de espesor
ribs”) de 2 a 3 pulgadas (5 a
Costillas cargadas (“short
Cecina de res
libras (1.1 a 1.35 kg)
Falda (“brisket”) – 2½ a 3
1.6 kg)
round”) – 3 a 3½ libras (1.35 a
Paleta/Pulpa contra (“bottom
Res
Mulsos/Piernas, deshuesados 8 a 10 minutos
Muslos/Piernas, con hueso 9 a 12 minutos
libras (910 g)
Pechuga deshuesada – 2
(1.35 kg)
Pechuga con hueso – 3 libras
(1.8 kg)
Entero – hasta 4 libras
Pollo
Alimento Tiempo de cocción Método de descompresión
POLLO/AVES Y CARNES
Page 65

12
de los alimentos.
según el tamaño y la temperatura inicial
su sabor. El tiempo de cocción variará
cocción para conservar su textura y realzar
Se recomienda dorar las carnes antes de la
de los alimentos se cocinan a presión alta.
indicación contraria en la receta, la mayoría
dar más sabor a sus platos. Salvo
aromáticas (ajo, perejil, tomillo, etc.) para
zanahorias y apio), así como hierbas
de líquido. Añada vegetales (p. ej., cebollas,
es más largo, agregue 1½ tazas (355 ml)
(235 ml) de líquido. Si el tiempo de cocción
minutos, agregue por lo menos 1 taza
Si el tiempo de cocción es inferior a 45
y carnes
Tiempos de cocción sugeridos para aves
minutos, dependiendo de la receta.
máximo, lo que puede demorar de 5 a 40
hasta que la olla alcance el nivel de presión
Recuerde que la cocción no empezará
adecuado
Tiempo para alcanzar el nivel de presión
.
Recetas ..................................................... 17
Frijoles secos .............................................16
Arroz y cereales ..........................................15
Vegetales .................................................... 14
Pollo/Aves y carnes .................................... 13
®
GUÍAS DE COCCIÓN
cocinar los alimentos.
(cocinar a fuego lento) para terminar de
• De ser necesario, use el modo SIMMER
referencia a continuación.
cocinen en exceso. Consulte las tablas de
final de la cocción, para evitar que se
aconsejamos que añada los vegetales al
las proporciones perfectas). Le
más (la experiencia le ayudará a encontrar
Reduzca el líquido de cocción a la mitad o
un método de cocción tradicional.
más rápido que el tiempo de cocción con
de cocción es generalmente 30 a 50%
de recetas y úsela como guía. El tiempo
busque una receta similar en nuestro libro
• Para adaptar sus recetas favoritas,
agua de cocción.
evaporación de los nutrientes junto con el
tradicionales, ya que reduce la
nutrientes que los métodos de cocción
• La cocción a presión conserva más
esto evitará que el sello se desgaste.
• No guarde el aparato con la tapa cerrada;
los alimentos sigan cocinándose.
después de la cocción, a fin de evitar que
rápido debe emplearse inmediatamente
receta. El método de descompresión
método de descompresión indicado en la
• Después de la cocción, siempre emplee el
alimentos/líquidos fríos.
de presión adecuado más rápido que los
• Los alimentos/líquidos alcanzarán el nivel
sentido antihorario lo más que pueda.
debidamente cerrada, girándola en
• Asegúrese de que la tapa está
• Nunca pase la línea “MAX”.
que los métodos de cocción tradicionales.
cocción requiere mucho menos líquido
• Tenga presente que este método de
Cuisinart
más, para cocinarlas en su olla a presión
favoritas, p. ej., sopas, estofados y mucho
• Puede adaptar muchas de sus recetas
SUGERENCIAS
CONSEJOS Y
Page 66

U IB-15888-ESP
18CE055761
Impreso en China
East Windsor, NJ 08520
150 Milford Road
©2018 Cuisinart
11
Page 67

de este tipo.
®
10
más cercano.
garantía y le indicará la dirección del centro de servicio
representante le confirmará si su aparato sigue bajo
0190 antes de regresar el aparato a Cuisinart. Un
que llame a nuestro servicio posventa al 1-800-726Si su aparato tiene algún problema, le recomendamos
ANTES DE HACER REPARAR SU APARATO
productos defectuosos durante el período de garantía.
reemplazo, manejo y envío de los
Cuisinart será responsable por los gastos de reparación,
726-0190.
se debe llamar a nuestro servicio posventa al 1-800Cuisinart para que lo reparen o lo cambien. Para esto,
desean, mandar el producto defectuoso directamente a
Los residentes de California también pueden, si lo
durante el período de garantía.
reemplazo o reembolso de los productos defectuosos
será responsable por los gastos de servicio, reparación,
o reparar el producto de manera económica. Cuisinart
servicio independiente, siempre que se pueda ajustar
al consumidor, podrá llevar el producto a un centro de
que este se dañó. Si estas dos opciones no satisfacen
imputable al uso del producto por el consumidor hasta
el precio original del producto, menos la cantidad
cambiará el producto o reembolsará al consumidor
al consumidor a un centro de servicio independiente,
La tienda, a su opción, reparará el producto, referirá
venda productos Cuisinart
a la tienda donde lo compraron o (B) a otra tienda que
California pueden regresar el producto defectuoso (A)
el período de garantía. Los residentes del estado de
La ley del estado de California ofrece dos opciones bajo
RESIDENTES DE CALIFORNIA
producto aún está bajo garantía.
piezas correctas para repararlo y asegurarse de que el
de diagnosticar el problema correctamente, usar las
servicio posventa de Cuisinart al 1-800-726-0190 a fin
personal del centro de servicio que deben llamar al
centro de servicio no autorizado, por favor informe al
Importante: si debe llevar el aparato defectuoso a un
derechos que varían de un Estado a otro.
le otorga derechos específicos y usted puede tener otros
mencionadas pueden no regir para usted. Esta garantía
o consecuentes, de modo que las limitaciones
permiten la exclusión o limitación de daños incidentales
incidentales o consecuentes. Algunos Estados no
Esta garantía excluye expresamente todos los daños
daños causados por mal uso, negligencia o accidente.
o comercial del producto, y no es válida en caso de
de voltaje. Esta garantía no cubre el uso institucional
como los daños causados por el uso de un convertidor
piezas o reparaciones no autorizados por Cuisinart, así
expresamente los daños causados por accesorios,
repuesto autorizados solamente. Esta garantía excluye
corriente de 120 V, usando accesorios y piezas de
de fabricación y ha sido diseñado para uso sobre
Este aparato satisface las más altas exigencias
información pertinente.
la descripción del problema, así como cualquier
Recuerde incluir su nombre, dirección y teléfono,
cubiertos bajo esta garantía.
productos perdidos o dañados durante el envío no serán
paquetes enviados a una dirección equivocada. Los
por los daños ocurridos durante el transporte o por los
seguro y seguimiento. Cuisinart no será responsable
mande su paquete por un método de entrega con
NOTA: para mayor seguridad, le aconsejamos que
para recibir instrucciones de envío.
prueba de compra y deben llamar al 1-800-726-0190
Los residentes de California solo necesitan dar una
cubrir los gastos de manejo y envío.
de compra y un cheque o giro postal de US$10.00 para
Regrese el producto defectuoso, junto con su recibo
Glen Harbor Blvd., Glendale, AZ 85307.
defectuoso a: Cuisinart, Service Department, 7475 North
directa gratuita al 1-800-726-0190 o regrese el producto
obtener servicio bajo esta garantía, llame a nuestra línea
repararemos o reemplazaremos (a nuestra opción). Para
o fabricación durante el período de garantía, lo
Si este aparato presenta algún defecto de materiales
de la fecha de fabricación.
de compra, el período de garantía será calculado a partir
recibir servicio bajo esta garantía. En ausencia del recibo
Sin embargo, no es necesario registrar el producto para
facilitar la verificación de la fecha de compra original.
de registro disponible en www.cuisinart.com a fin de
instrucciones. Le aconsejamos que llene el formulario
haya sido utilizado para uso doméstico y según las
de la fecha de compra original, siempre que el aparato
de materiales o fabricación durante 3 años después
Cuisinart garantiza este aparato contra todo defecto
los demás comerciantes ni los dueños.
ley lo permita, esta garantía no es para los detallistas,
familiar o casero. A excepción de los estados donde la
que fue comprado en una tienda para uso personal,
Usted es un consumidor si posee un aparato Cuisinart
Esta garantía es para los consumidores solamente.
EN CANADÁ SOLAMENTE)
(VÁLIDA EN LOS EE.UU. Y
TRES AÑOS
GARANTÍA LIMITADA DE
Page 68

9
y el
cocción.
antes de empezar la
por 2 a 3 minutos
deje enfriar la olla
Después de dorar,
1-800-726-0190.
servicio posventa al
Llame a nuestro
en la receta.
cantidades indicadas
Chequee las
DEL PRIMER USO”.
de la sección “ANTES
Véase el punto n.° 3
Cambie el sello.
Limpie el sello.
firmemente la tapa.
alineados y presione
candado están
la flecha
Asegúrese de que
sellador.
Limpie el anillo
sellador.
indicadora de presión.
Presione la válvula
de cierre.
Empuje el mecanismo
DE USO”.
“INSTRUCCIONES
4 de la sección
en el punto n.°
según se describe
el anillo sellador,
Vuelva a instalar
a fuego lento.
está demasiado alta para cocinar
(dorar) y la temperatura de la olla
Ha usado el modo BROWNING
y la válvula reguladora de presión.
Aire se está escapando por la tapa
alimentos en la olla.
No hay suficientemente líquido o
no está bien puesta.
La válvula reguladora de presión
presión está desgastado.
El sello de la válvula indicadora de
presión.
el sello de la válvula indicadora de
Hay residuos de alimentos sobre
correctamente.
La tapa no se cierra
El anillo sellador está desgastado. Cambie el sello.
el anillo sellador.
Hay residuos de alimentos sobre
El anillo sellador no está puesto. Instale el anillo
bajado.
El indicador de presión no ha
de presión.
bloqueando la válvula indicadora
El mecanismo de cierre está
debidamente instalado.
El anillo sellador no está
Problema Posibles causas Soluciones
cocción
el botón START para empezar la
La unidad se apaga al presionar
El indicador de presión no sube
indicadora de presión.
Aire se escapa de la válvula
orilla de la tapa
Aire se está escapando por la
después de la descompresión.
La tapa no se puede abrir aún
La tapa no se cierra
RESOLUCIÓN DE PROBLEMAS
Page 69

8
detergente no abrasivo.
utilice un cepillo o un estropajo de nailon y
NOTA: si es necesario restregar la olla,
por un técnico autorizado.
11. Cualquier otro servicio debe ser realizado
Después, vuelva a instalarlo (Fig. 10).
retírelo y lávelo en agua jabonosa tibia.
10. Para limpiar el depósito de condensación,
productos químicos fuertes o estropajos.
revestimiento antiadherente. Nunca utilice
paño suave. Tenga cuidado de no dañar el
a mano, restriéguela con una esponja o un
9. La olla es apta para lavavajillas. Para lavarla
Page 70

7
10.
alcance el nivel máximo de temperatura.
Corta la corriente en caso de que la olla
7. Dispositivo de protección térmica
de la olla.
ARRIBA (Fig. 9).
APUNTA HACIA
QUE LA PERILLA
tapa. ASEGÚRESE DE
anillo sellador en la
8. Vuelva a colocar el
9.
8.
puesto.
colocarlo en su
lávelo y vuelva a
cuidadosamente,
retírelo
del anillo sellador,
caucho en el centro
7. Para limpiar el ojal de
sellador.
seque bien y vuelva a instalar el anillo
Limpie la placa de metal con agua tibia,
microfibra. No utilice limpiadores químicos.
un paño humedecido o un paño de
cuidadosamente el aro flexible y límpielo con
6. Para lavar el anillo sellador, quite
reguladora de presión en su puesto.
(arriba). Seque bien y regrese la válvula
(abajo) y la válvula indicadora de presión
tibia, incluso el orificio de salida del aire
5. Enjuague ambos lados de la tapa en agua
y seque.
fuerza hacia arriba. Enjuague con agua tibia
tapa (Fig. 8), agarrándola y jalando con
4. Retire la válvula reguladora de presión de la
la perilla y jalando. Déjelo a un lado.
3. Retire el anillo sellador de la tapa, agarrando
en ella.
carcasa del aparato en agua, ni vierta agua
toallita de papel humedecida. No sumerja la
suave, tal como un paño de microfibra o una
2. Limpie la carcasa del aparato con un paño
1. Desenchufe el aparato antes de limpiarlo.
MANTENIMIENTO
LIMPIEZA Y
de temperatura, o si no hay alimentos dentro
caso de que la olla alcance el nivel máximo
El aparato se apagará automáticamente en
6. Monitoreo térmico
anillo sellador, liberando así aire.
bajará ligeramente para romper el sello del
presión o la temperatura máxima, la olla
En caso de que la unidad llegue a exceder la
5. Mecanismo de descompresión automática
válvula de seguridad.
Evita que residuos de alimentos atasquen la
4. Tapa antiatascamiento
INSTRUCCIONES DE USO).
dentro de la olla (véase la sección
una peligrosa acumulación de presión
válvula reguladora de presión y provocar
NOTA: sobrellenar la olla puede atascar la
temperatura programada.
presión dentro de la olla excede la
Libera aire automáticamente cuando la
3. Válvula reguladora de presión
adecuado durante toda la cocción.
Mantiene automáticamente la presión al nivel
2. Dispositivo de control de la presión
descompresión.
La tapa no podrá abrirse hasta el final de la
tapa esté debidamente cerrada y bloqueada.
La presurización no empezará hasta que la
1. Tapa con bloqueo de seguridad
seguridad.
presión cuenta con siete mecanismos de
Para su seguridad y mayor fiabilidad, su olla a
SEGURIDAD
MECANISMOS DE
sentido horario para abrirla.
vuelto a su posición original, gire la tapa en
Después de que el indicador de presión haya
JALAR EL PULSADOR DE LA VÁLVULA.
UTILICE PINZAS U OTRO UTENSILIO PARA
LLEVARSE A CABO CON SUMO CUIDADO.
ADVERTENCIA: LA DESCOMPRESIÓN DEBE
Page 71

6
de aquella receta.
luego abra la válvula.
naturalmente durante el tiempo indicado, y
combinado, permita que el vapor salga
tiempito más. Para usar el método
los alimentos sigan cocinándose por un
(natural/rápido) de descompresión, para que
recetas, usamos un método combinado
– En algunas de nuestras
Método combinado
3.
SIMMER.
alimentos a fuego lento, usando el modo
vez. También puede terminar de cocinar los
que la presión alcance el nivel adecuado otra
volver a encender el aparato y esperar hasta
necesitan cocinarse más, será necesario
terminará al instante. Si los alimentos
original y se podrá abrir la tapa. La cocción
indicador de presión volverá a su posición
cocina. Después de la descompresión, el
dañarse con el calor, tal como gabinetes de
dirigido hacia ningún objeto que pueda
vapor y asegúrese de que este no está
Mantenga las manos y el rostro alejados del
El vapor saldrá inmediatamente por la válvula.
aparecerá en
busque una receta similar y siga las instrucciones
cuál método usar. Si su receta no lo indica,
alimentos cocinados. Nuestras recetas indican
método de descompresión dependerá del tipo de
de descompresión indicados a continuación. El
acumulada en la olla, usando uno de los métodos
Al final de la cocción, deberá eliminar la presión
Para abrir la tapa:
momento, oprima el botón START/CANCEL.
presión, o para cancelar la cocción en cualquier
Para elegir otro modo de cocción u otro ajuste de
Para reiniciar o cancelar:
aparezca en el aro superior; esto es normal.
después de 1 hora. Puede que condensación
el sabor de los alimentos empezarán a cambiar
no debe usarse por más de 12 horas. La textura y
NOTA: la función KEEP WARM (mantener caliente)
emitirá un pitido.
al lado de KEEP WARM se encenderá y la unidad
calientes automáticamente. El indicador luminoso
la pantalla y la olla mantendrá los alimentos
Al final del tiempo de cocción,
Función “mantener caliente” automática
LA TAPA DURANTE LA COCCIÓN.
y de la descompresión. NUNCA INTENTE ABRIR
tapa no se podrá abrir hasta el final de la cocción
durante toda la cocción. Para mayor seguridad, la
El indicador de presión rojo permanecerá alzado
7.
temporizador se pondrá en marcha.
Entonces, la cocción a presión comenzará y el
cocina.
mano; utilice pinzas u otro utensilio de
no toque la válvula ni el pulsador con la
presión hacia delante (Fig. 7). IMPORTANTE:
y jale el pulsador de la válvula reguladora de
(indicado por unos pitidos), apague el aparato
2. Descompresión rápida – Al final de la cocción
podrá abrir la tapa.
de presión volverá a su posición original y se
Después de la descompresión, el indicador
cocinar ciertos cortes de carne y postres.
desaconseja usar este método después de
tiempo, la cocción continúa; por eso, se
de 12 a 30 minutos. Nota: durante este
líquido dentro de la olla, esto puede demorar
Dependiendo de la cantidad de alimentos y
disminuirá naturalmente poco a poco.
caliente) después de la cocción. La presión
se quede en el modo KEEP WARM (mantener
1. Descompresión natural – Deje que la unidad
encendida.
de presión adecuado, la luz roja permanecerá
NOTA: después de que la olla alcance el nivel
parte inferior derecha de la pantalla parpadeará.
en la olla. Durante este tiempo, una luz roja en la
dependiendo de la cantidad de líquido y alimentos
puede demorar desde 5 hasta 40 minutos,
alcance el nivel de presión adecuado, lo que
olla. La cocción no empezará hasta que la olla
medida que la presión se acumula dentro de la
de cocción. El indicador de presión subirá a
botón START/CANCEL para empezar el proceso
Después de programar el temporizador, oprima el
de 5 minutos entre 40 y 99 minutos.
1 minuto entre 1 y 40 minutos, y en incrementos
temporizador. el tiempo subirá en incrementos de
Oprima el botón TIME para programar el
(presión alta):
PRESSURE (presión baja) o HIGH PRESSURE
Después de elegir el ajuste de presión LOW
Page 72

5
PRESSURE).
deseado, bajo (LOW PRESSURE) o alto (HIGH
oprimir el botón MENU y elija el ajuste de presión
cancelar el programa y cierre la olla. Vuelva a
fuego lento, oprima el botón START/CANCEL para
calentarse. Después de dorar, saltear o cocinar a
Oprima el botón START; el aparato empezará a
(sopa) o BEANS (frijoles):
fuego lento), MEAT/STEW (carne/guiso), SOUP
(dorar), SAUTÉ (saltear), SIMMER (cocinar a
Después de elegir el modo de cocción BROWN
modo de cocción.
el modo parpadeante deseado para elegir este
Todos los modos de cocción parpadean. Oprima
MENU para elegir el modo de cocción deseado.
Después de encender el aparato, oprima el botón
OPERACIÓN
INSTRUCCIONES DE
cocción.
durante hasta 12 horas después de la
modo mantiene los alimentos calientes
9. KEEP WARM (mantener caliente) – Este
rápidamente.
olla alcance el nivel de presión adecuado más
la textura deseada. También permite que la
de cocinar los alimentos hasta que consigan
risottos, salsas o estofados, o para terminar
últimos ingredientes a platos tales como
principalmente después de agregar los
modo permite cocinar a fuego lento. Se usa
8. SIMMER (cocinar a fuego lento) – Este
complicadas para cocinar frijoles!
frijoles. ¡No más recetas difíciles o
nivel de presión adecuado para cocinar los
cocción. La unidad elegirá automáticamente el
líquido. Cierre la tapa y fije el modo de
cubrir los frijoles con 1 pulgada (2.5 cm) de
la olla. Agregue suficiente líquido como para
y horno). Simplemente coloque los frijoles en
sabrosos que los métodos tradicionales (estufa
secos más rápidamente y con resultados más
perfecto para preparar platos que lleven frijoles
BEANS (frijoles) – Este modo de cocción es
7.
terminar de cocinar la sopa.
simplemente elija el modo SOUP (sopa) para
ingredientes antes de cocinarlos; luego,
pueden usarse para saltear y dorar los
modos SAUTÉ (saltear) y BROWN (dorar)
presión adecuado para hacer sopa. Los
la unidad elija automáticamente el nivel de
ingredientes, sazone y cierre la tapa para que
agregue suficiente líquido para cubrir los
vegetales y otros ingredientes en la olla,
tocar un botón. Coloque la carne (si usa), los
permitirá preparar sopas sabrosas con solo
6. SOUP (sopa) – Este modo de cocción le
usarse con la tapa cerrada.
modo MEAT/STEW es el más alto, y debe
cada vez. El nivel de presión usado por el
guiso/estofado se cocinará perfectamente
estofados. Con solo oprimir un botón, su
conjeturas a la hora de cocinar los guisos/
cordero. El modo MEAT/STEW le quitará las
incluyendo carne de res, pollo, cerdo y
para cocinar varios tipos de carnes,
precisión, usando el nivel de presión perfecto
cocción mide y modera la presión con
5. MEAT/STEW (carne/guiso) – Este modo de
residuos. NO utilice utensilios metálicos.
raspar el fondo de la olla y despegar los
NOTA: use un cucharón de madera para
rápidamente.
el nivel de presión adecuado más
ternura. También permite que la olla alcance
sabor, y preservando su jugosidad y su
grasa los “sella”, realzando su aspecto y su
Dorar los vegetales o la carne en un poco de
alimentos a fuego alto antes de cocinarlos.
permite dorar (con la tapa abierta) los
4. BROWN (dorar) – Este modo de precocción
más rápidamente.
depresión adecuado
olla alcance el nivel
También permite que la
pilaf o “risotto”.
para preparar arroz
blanco, integral, etc.)
(Arborio, Carnaroli,
alimentos como arroz
doren, así como cocinar
rápidamente sin que se
para suavizarlos
de grasa o de líquido
alimentos en un poco
tapa abierta) los
permite saltear (con la
modo de precocción
3. SAUTÉ (saltear) – Este
(presión baja)
2. LOW PRESSURE
1. HIGH PRESSURE (presión alta)
MODOS DE COCCIÓN
AJUSTES DE PRESIÓN Y
Page 73

4
aparecerá
(Fig. 2).
. Alce para
en la pantalla digital.
toma de corriente. El símbolo
6. Conecte el cable al aparato, y luego a una
que la olla está debidamente sellada.
•
con el candado abierto , y luego
6.
Oprima el asa de la tapa para asegurarse de
encontrarse frente al símbolo
5. La válvula reguladora de presión debe
encontrarse a mano izquierda.
NOTA: la válvula indicadora de presión debe
corriente.
6.). Enchufe el cable en una toma de
coincida con el candado cerrado (Fig.
gire en sentido antihorario hasta que la flecha
la flecha
olla. Coloque la tapa sobre la olla, alineando
Antes de cerrar la tapa, limpie la orilla de la
4.
5.
APUNTA HACIA ARRIBA.
(Fig. 5). ASEGÚRESE DE QUE LA PERILLA
tapa, presionando firmemente para sujetar
y colóquela sobre el eje central adentro de la
Luego, agarre la placa de metal por la perilla
debidamente puesto en la placa de metal.
tapa, cerciórese de que el aro flexible está
3. Si el anillo sellador ha sido quitado de la
3. 4.
más de líquido junto con los ingredientes.
de la olla. Siempre agregue ½ taza (120 ml) o
peligrosa acumulación de presión dentro
válvula reguladora de presión y causar una
NOTA: sobrellenar la olla puede atascar la
quede
1.
capacidad de la olla (Fig. 4).
exceder el 50% (~16 tazas/3.75 L) de la
cereales, el volumen de ingredientes no debe
deshidratados, frijoles, arroz, granos y
(Fig. 3). En el caso de vegetales/legumbres
(22 tazas/5.2 L) de la capacidad de la olla
total de ingredientes no debe exceder los 2/3
ingredientes deseados. NOTA: el volumen
2. Saque la olla del aparato y agregue los
abrir.
alineada con el candado abierto
sentido horario hasta que la flecha
1. Para sacar la tapa, agarre el asa y gire en
DE USO
INSTRUCCIONES
2.
1.
reposa sobre el poste.
NOTA: la válvula no se bloquea; simplemente
continuación.
la tapa, según se indica en la figura 2 a
3. Ponga la válvula reguladora de presión sobre
continuación.
trasera del aparato, según se indica a
(pieza n.° 6 en la página anterior) en la parte
Instale el depósito de condensación
2.
limpia y seca.
1. Coloque el aparato sobre una superficie
Enjuague y seque la olla antes de usarla.
agua jabonosa tibia, o en el lavavajillas.
acumulado durante el transporte. Lave la olla en
con un paño humedecido para quitar el polvo
Antes de usar el aparato por primera vez, límpielo
de embalaje para uso futuro.
incluidas. Le aconsejamos que guarde el material
Asegúrese de que todas las piezas están
promocionales pegadas al aparato.
Quite el material de embalaje y las etiquetas
ANTES DEL PRIMER USO
Page 74

3
El producto ilustrado puede diferir del producto real.
6
17
16
15
14
13
12
11
10
9
8
7
6
5
4
3
2
1
alimentos contiene bisfenol A (BPA).
Ninguna de las piezas en contacto con los
18. Sin BPA (no ilustrado)
instrucciones.
siempre que siga cuidadosamente las
dañará el revestimiento antiadherente,
diseñada especialmente para esta olla y no
NOTA: la rejilla de cocción al vapor ha sido
postres. Véase el libro de recetas.
cocinar ciertas recetas, tales como los
17. Rejilla de cocción al vapor – Usada para
16. Panel de control
15. Aro superior
14. Ojal de caucho
13. Tapa
12. Asa de la tapa
11. Cable
10. Base
9. Placa calentadora
8. Carcasa
7. Asa
6. Depósito de condensación
5. Olla
4. Anillo sellador
3. Mecanismo de cierre de la tapa
(indicador rojo)
2. Válvula indicadora de presión
1. Válvula reguladora de presión
CARACTERÍSTICAS*
PIEZAS Y
Recetas ............................................. 17
Guías de cocción ............................... 13
Consejos y sugerencias ..................... 12
Garantía .............................................. 10
Resolución de problemas .................... 9
Limpieza y mantenimiento .................. 7
Mecanismos de seguridad ................... 7
Instrucciones de operación .................. 5
de cocción ............................................ 5
Ajustes de presión y modos
Instrucciones de uso ............................ 4
Antes del primer uso ............................ 4
Piezas y características ........................ 3
Uso de extensiones .............................. 2
Medidas de seguridad importantes ..... 2
ÍNDICE
tropiece con un cable más largo.
reducir el peligro de que alguien se enganche o
El cable provisto con este aparato es corto, para
USO DE EXTENSIONES
SOLAMENTE
DOMÉSTICO
PARA USO
INSTRUCCIONES
GUARDE ESTAS
este aparato con una extensión.
corriente por debajo la encimera y nunca utilice
nunca enchufe el aparato en una toma de
que el cable cuelgue del borde de la encimera,
y el cable alejados de los niños. Nunca permita
quemaduras graves. Mantenga el aparato
los alimentos derramados pueden causar
ADVERTENCIA:
Page 75

2
11. Para reducir el riesgo de descarga eléctrica,
solamente.
23. Diseñado para la cocción en la encimera
(véase las instrucciones de operación).
según las recomendaciones del fabricante.
sustituya solo el anillo de sellado dinámico
22. Para evitar el riesgo de explosión y lesiones,
puerta del armario/gabinete cuando cierra.
especialmente si este toca las paredes o la
enchufado representa un riesgo de incendio,
en un armario/gabinete. Dejar el aparato
desenchufe el aparato antes de guardarlo
de un armario/gabinete. Siempre
21. No haga funcionar el aparato debajo o dentro
20. No utilice esta olla para freír.
cada uso.
presión está libre de obstrucciones antes de
19. Compruebe que la válvula reguladora de
las recetas al pie de la letra.
recetas con los ingredientes anteriores; siga
NOTA: el libro de recetas puede incluir
no deben cocinarse en una olla a presión.
válvula reguladora de presión. Estos alimentos
barbotean durante la cocción, obstruyendo la
ruibarbo o espaguetis, echan espuma y
los guisantes partidos, fideos, macarrones,
la cebada perlada, la avena y otros cereales,
como la compota de manzana, los arándanos,
Tenga presente que algunos alimentos, tales
18.
armario/gabinete; el vapor puede dañarlo.
17. No haga funcionar el aparato debajo de un
16. No lo utilice en exteriores.
Cuisinart puede dañar el aparato.
15. El uso de accesorios no recomendados por
contacto con superficies calientes.
la encimera o de la mesa, ni que tenga
14. No permita que el cable cuelgue del borde de
reparación o ajuste.
centro de servicio autorizado para su revisión,
caído, incluso en el agua; regréselo a un
si está dañado, o después de que se haya
están dañados, si no funciona correctamente,
13. No utilice este aparato si el cable o el enchufe
antes de instalar/sacar piezas.
y antes de limpiarlo. Permita que se enfríe
12. Desenchufe el aparato cuando no está en uso
otro líquido.
otra parte del aparato en agua ni en ningún
no sumerja el cable, el enchufe ni ninguna
de la olla..
una peligrosa acumulación de presión dentro
la válvula reguladora de presión y provocar
capacidad; Sobrellenar la olla puede atascar
no llene la olla a más de la mitad de su
legumbres, frijoles, granos y cereales),
tales como vegetales secos (incluyendo
pueden expandirse durante su cocción,
capacidad. Cuando cocina alimentos que
10. No lo llene la unidad a más de 2/3 de su
las instrucciones de uso en la página 4.
debidamente cerrada antes del uso. Véase
graves. Asegúrese de que la tapa está
inadecuado puede causar quemaduras
9. Este aparato cocina bajo presión. Su uso
indicado.
8. No lo use para ningún fin que no sea el
contenga líquidos o alimentos calientes.
7. Tenga sumo cuidado al mover un aparato que
operación en la página 5.
ser peligrosa. Véase las instrucciones de
la apertura. Cualquier presión en la olla puede
la olla aún está bajo presión. No intente forzar
resulta difícil abrir la tapa, esto significa que
vapor se escape antes de abrir la tapa. Si
Permita que la olla se enfríe y que todo el
LA COCCIÓN.
6. NO INTENTE ABRIR LA TAPA DURANTE
discapacidades.
de niños o personas con ciertas
5. Este aparato no debe ser usado por o cerca
aparato; emplee las asas solamente.
4. No toque las superficies calientes de este
horno caliente o sobre la estufa.
3. No ponga la olla a presión dentro de un
de desenchufarlo.
Siempre apague (“OFF”) el aparato antes
de enchufarlo en la toma de corriente.
2. Siempre conecte el cable al aparato antes
1. Lea todas las instrucciones.
ellas las siguientes:
precauciones básicas de seguridad, entre
en presencia de niños, siempre debe tomar
Al usar aparatos eléctricos, especialmente
IMPORTANTES
SEGURIDAD
MEDIDAS DE
Page 76

Serie CPC-800
®
antes de usarlo.
Para su seguridad y para disfrutar plenamente de este producto, siempre lea cuidadosamente las instrucciones
Olla a presión eléctrica Cuisinart
LIBRO DE RECETAS
INSTRUCCIONES Y
MANUAL DE
Page 77

Version no: CPC800 IB-15888-ESP
Size:
148 mm (W) x 210 mm (H)
Total Pages:76pp
Material:
105gsm gloss artpaper
Cover:
Inside:
Coating:
GLOSS VARNISHING IN COVER
Color: 4C+1C(BLACK)
Cover:
Inside:1C+1C(BLACK)
Die cut:
New
Bar Code:
Date: 17/08/18 (00)
Coordinator: Astor You / Scias Liu
C
M
Y
 Loading...