

Page 1
INSTRUCTION
BOOKLET
Recipe
Booklet
Reverse Side
Cuisinart® Compact Microwave
For your safety and continued enjoyment of this product, always read the instruction book carefully before using.
CMW-55 Series
IB-8083
Page 2

IMPORTANT SAFETY
INSTRUCTIONS
WARNING: To reduce the risk of burns,
electric shock, fire, injury to persons, or
exposure to excessive microwave energy, and when using electrical appliances, basic safety precautions should be
followed including the following:
1. Read all instructions before using
the appliance.
2. Read and follow the specific warn
ing: PRECAUTIONS TO AVOID
POSSIBLE EXPOSURE TO
EXCESSIVE MICROWAVE
ENERGY, page 3.
3. This appliance must be grounded.
Connect only to properly grounded
outlet. See GROUNDING
INSTRUCTIONS, page 4.
4. Install or locate this appliance only
in accordance with the provided
installation instructions, pages 7-8.
5. Some products such as whole
eggs and sealed containers – for
example, closed glass jars – can
explode and should not be heated
in this oven.
6. Use this appliance only for its
intended use as described in this
manual. Do not use corrosive
chemicals or vapors in this appliance. This oven is specifically
designed to heat or cook food. It is
not designed for industrial or laboratory use.
7. As with any appliance, close super
vision is necessary when it is used
by children.
8. Do not operate this appliance if
it has a damaged cord or plug,
if it is not working properly or if it
has been damaged or dropped.
9. This appliance should be serviced
only by qualified service technicians. Contact 1-800-726-0190.
10. Do not cover or block any openings
on the appliance.
-
-
11. Do not store or use this appliance
outdoors.
12. Do not use this product near water,
for example, near a kitchen sink, in
a wet basement, near a swimming
pool, or similar locations.
13. Do not immerse cord or plug in
water.
14. Keep cord away from heated sur
faces.
15. Do not let cord hang over edge of
table or counter.
16. When cleaning surfaces of door
and oven that come together on
closing the door, use only mild,
nonabrasive soaps or detergents
applied with a sponge or soft cloth.
17. To reduce the risk of fire in the oven
interior:
a) Do not overcook food. Carefully
attend appliance when paper,
plastic, or other combustible
materials are placed inside the
oven to facilitate cooking.
b) Remove wire twist-ties from
paper or plastic bags before
placing bag in oven.
c) If materials inside the oven ignite,
keep oven door closed, turn
oven off, and disconnect the
power cord, or shut off power at
the fuse or circuit breaker panel.
d) Do not use the interior for stor
age purposes. Do not leave
paper products, cooking utensils
or food in the oven when not in
use.
18. Liquids such as water, coffee, or
tea can be overheated beyond
the boiling point without
appearing to be boiling. This is
called delayed eruptive boiling.
Visible bubbling or boiling when
the container is removed from
the microwave oven is not
always present. THIS COULD
RESULT IN VERY HOT LIQUIDS
SUDDENLY BOILING OVER
WHEN THE CONTAINER IS
-
-
2
Page 3

DISTURBED OR A UTENSIL IS
INSERTED INTO THE LIQUID.
19. To reduce the risk of injury to
persons:
a. Do not use straight-sided
containers with narrow necks.
Use a wide-mouth container.
b. Stir liquid both before and
halfway through heating it.
c. Do not overheat liquid.
d. Use extreme care when inserting
a spoon or other utensil into the
container. This may also cause
delayed eruptive boiling.
e. After heating, allow the container
to stand in the microwave oven
for at least 20 seconds before
removing the container.
SAVE THESE
INSTRUCTIONS
break or tamper with the safety
interlocks.
2. Do not place any object between
the front of the oven interior and
the door or allow soil or cleaner
residue to accumulate on sealing
surfaces.
3. Do not operate the oven if it is
damaged. It is particularly important that the oven door closes
properly and that there is no damage to the door (for example, make
sure that it is not bent); hinges and
latches (for example, make sure
that they are not broken or loosened); door seals and sealing surface.
4. The oven should not be adjusted or
repaired by anyone except properly
qualified service personnel.
If the microwave unit is not kept clean,
its surface could be degraded and lead
to a hazardous situation.
FOR HOUSEHOLD
USE ONLY
PRECAUTIONS TO AVOID
POSSIBLE EXPOSURE
TO EXCESSIVE
MICROWAVE ENERGY
1. Do not attempt to operate this oven
with the door open as this can
result in harmful exposure to microwave energy. It is important not to
WARNING
RISK OF FIRE OR ELECTRIC SHOCK
DO NOT OPEN
WARNING: TO REDUCE THE RISK OF FIRE OR ELECTRIC SHOCK,
DO NOT REMOVE COVER (OR BACK)
NO USER-SERVICEABLE PARTS INSIDE
REPAIR SHOULD BE DONE BY AUTHORIZED SERVICE PERSONNEL ONLY
SPECIAL CORD SET
INSTRUCTIONS
DANGER - Electric Shock Hazard
Touching some of the internal components can cause serious personal injury or
death. Do not disassemble this appliance.
WARNING - Electric Shock Hazard
Improper use of the grounding can
result in electric shock. Do not plug into
an outlet until appliance is properly
installed and grounded.
3
Page 4

GROUNDING
INSTRUCTIONS
This appliance must be grounded.
In the event of an electrical short circuit,
grounding reduces the risk of electric
shock by providing an escape wire for
the electric current. This appliance is
equipped with a cord with a grounding
wire and grounding plug. The plug must
be plugged into an outlet that is properly installed and grounded.
Consult a qualified electrician or serviceman if the grounding instructions are not
completely understood or if doubt exists
as to whether the appliance is properly
grounded. If it is necessary to use an
extension cord, use only a 3-wire extension cord that has a 3-pronged grounding plug, and a 3-slot receptacle that
will accept the plug on the appliance.
1. A short power-supply cord is pro
vided to reduce the risks resulting
from becoming entangled in or tripping over a longer cord.
2. Longer cord sets or an extension
cord should not be used unless the
following precautions are followed
(see 3, below).
3. If a long cord or extension cord is
used:
• The marked electrical rating of
the cord set or extension cord
should be at least as great as the
electrical rating of the appliance.
• The extension cord must be a
grounding-type 3-wire cord.
• The longer cord should be
arranged so that it will not drape
over the countertop or tabletop
where it can be pulled on by children or tripped over.
-
CONTENTS
Important Safety Instructions ....... 2
Precautions to Avoid Possible Exposure
to Excessive Microwave Energy.... 3
Special Cord Set Instructions ....... 3
Grounding Instructions ............ 4
Introduction . . . . . . . . . . . . . . . . . . . . . 4
Important Safeguards . . . . . . . . . . . . . 5
Specifications ................... 5
Containers ...................... 5
Materials You Can Use in
Microwave ..................... 6
Materials to be Avoided in
Microwave ..................... 7
Installation ...................... 7
Control Panel.................... 8
Operation....................... 8
Pre-Set Express Cooking Chart .... 13
Troubleshooting................. 14
Warranty ...................... 15
INTRODUCTION
Congratulations on choosing a very
smart microwave oven! Your Cuisinart
Compact Microwave requires very little
counter space to perform a huge variety
of functions! You’ll find the interior big
enough for most of the items you’d like
to defrost, reheat or microwave. Take a
few minutes to read how to use the presets and you’ll be amazed at how easily
you can prepare a meal, snack
or beverage. And be sure to enjoy this
oven’s unique two-stage feature, which
lets you set it to automatically shift from
one function to another. There’s so
much to look forward to. Bon appetit!
®
4
Page 5

IMPORTANT
SAFEGUARDS
1. The oven must be placed on a level
surface.
2. The glass turntable and turntable
assembly must be in the oven during cooking. Handle the glass turntable carefully and place cookware
on it gently to avoid possible breakage.
3. Incorrect use of a browning dish
may cause the turntable to break,
see page 6.
4. Use only the specified bag size
when using the preset popcorn
program.
5. The oven has several built-in safety
switches to ensure that the power
remains off when the door is open.
Do not tamper with these switches.
6. Do not operate the microwave oven
empty. Operating the oven with no
food or food that is extremely low
in moisture can cause fire, charring
or sparking.
7. Do not cook bacon directly on the
turntable. Excessive local heating
of the turntable may cause the
turntable to break.
8. Do not heat baby bottles or baby
food in the microwave oven.
Uneven heating/hotspots may
occur and could cause injury.
9. Do not heat narrow-necked con
tainers, such as syrup bottles.
10. Do not attempt to deep-fry in your
microwave oven.
11. Do not attempt home canning in
this microwave oven, as it is impossible to be sure all contents of the
jar have reached boiling temperature.
12. Do not use this microwave oven for
commercial purposes. This microwave oven is made for household
use only.
-
13. Failure to maintain the oven in a
clean condition could lead to deterioration that could adversely affect
the life of the appliance and possibly result in a hazardous situation.
SPECIFICATIONS
Model: CMW-55
Rated Voltage: 120V~ 60Hz
Rated Input Power: 1050W
Rated Output Power: 700W
Oven Capacity: 0.6 Cu Ft
Turntable Diameter: 9.6 inches
External Dimensions (WxHxD):
Approximate Net Weight: 22 lbs.
17.3 x 13.0 x 10.2 inches
CONTAINERS
CAUTION: Personal Injury Hazard
Tightly closed containers could explode.
Closed containers should be opened
and plastic pouches should be pierced
before cooking.
See the charts on pages 6 and 7 of
materials you can use in microwave
oven or to avoid using in your microwave oven. There may be certain nonmetallic materials that are not safe to
use for microwaving. If in doubt, you
can test the material/container in question following the procedure below.
Material/Container Test
1. Fill a microwave-safe container with
1 cup of cold water (250ml) along
with the material or container in
question.
2. Cook on maximum power for 1
minute.
3. Carefully feel the material or con
tainer. If it is warm, do not use it for
microwave cooking.
4. Do not exceed 1 minute cooking
time.
-
5
Page 6

MATERIALS YOU CAN USE IN MICROWAVE
Arcing is sparks or electric flashes that crackle or pop. Arcing can produce heat
that is quite intense and can damage the interior of the microwave or containers
being used in the microwave. It can also cause fire.
Arcing occurs when metal containers are used in the microwave and can also occur
with the use of metal skewers, metal clamps, or twist ties for plastic bags. To prevent arcing, use these charts (below and following page) to determine which materials are microwave safe, or follow instructions from container/wrap manufacturer.
Shielding only. Small smooth pieces may be used to cover
Aluminum foil
Browning dish
Dinnerware
Glass jars
Glassware
Oven cooking bags
Paper plates &
cups
Paper towels
Parchment paper
Plastic
Plastic wrap
Thermometers Microwave safe only (meat and candy thermometers).
Wax paper
thin parts of poultry to prevent overcooking. Arcing can
occur if foil is too close to oven walls. The foil should be at
least 1 inch (2.5cm) away from the oven walls.
Use a browning dish in this microwave oven only if your
browning dish is supplied with a microwave trivet that will
lift the browning dish
Incorrect usage may cause the turntable to break.
Microwave safe only. Follow manufacturer’s instructions.
Do not use cracked or chipped dishes.
Always remove lid. Use only to heat food until just warm.
Most glass jars are not heat resistant and may break. Use
tempered glass only. Jars for canning are tempered and
microwave safe.
Heat-resistant oven glassware only. Make sure there is no
metallic trim. Do not use cracked or chipped glassware.
Follow manufacturer’s instructions. Do not close with metal
tie. Make slits to allow steam to escape.
Use for short-term cooking/warming only. Do not leave
oven unattended while cooking. They should be labeled
for use in microwave – with no color/dye.
Use to cover food for reheating and for absorbing fat. Use
with supervision for short-term cooking only.
Use as a cover to prevent splattering or as a wrap for
steaming.
Microwave safe only. Follow the manufacturer’s instructions. Should be labeled microwave safe. Some plastic
containers soften as the food inside gets hot. “Boiling
bags” and tightly closed plastic bags should be split,
pierced or vented as directed by package instructions. Do
not reuse plastic containers from carry-out foods or frozen
foods.
Microwave safe only. Use to cover food during cooking to
retain moisture. Do not allow plastic wrap to touch food.
Vent or pierce before cooling.
Use as a cover to prevent splattering and retain moisture
inside.
3
⁄16 inch (5mm) above the turntable.
6
Page 7
MATERIALS TO BE AVOIDED IN MICROWAVE
Aluminum tray May cause arcing. Transfer food to microwave-safe dish.
Food carton with
metal handle
Metal or metal-
trimmed utensils
Metal twist ties May cause arcing and could cause a fire in the oven.
Paper bags May cause a fire in the oven.
Plastic foam
Wood
May cause arcing. Transfer food to microwave-safe dish.
Metal shields the food from microwave energy. Metal trim
may cause arcing.
Plastic foam may melt or contaminate the liquid inside
when exposed to high temperature.
Wood will dry out when used in the microwave oven and
may split or crack.
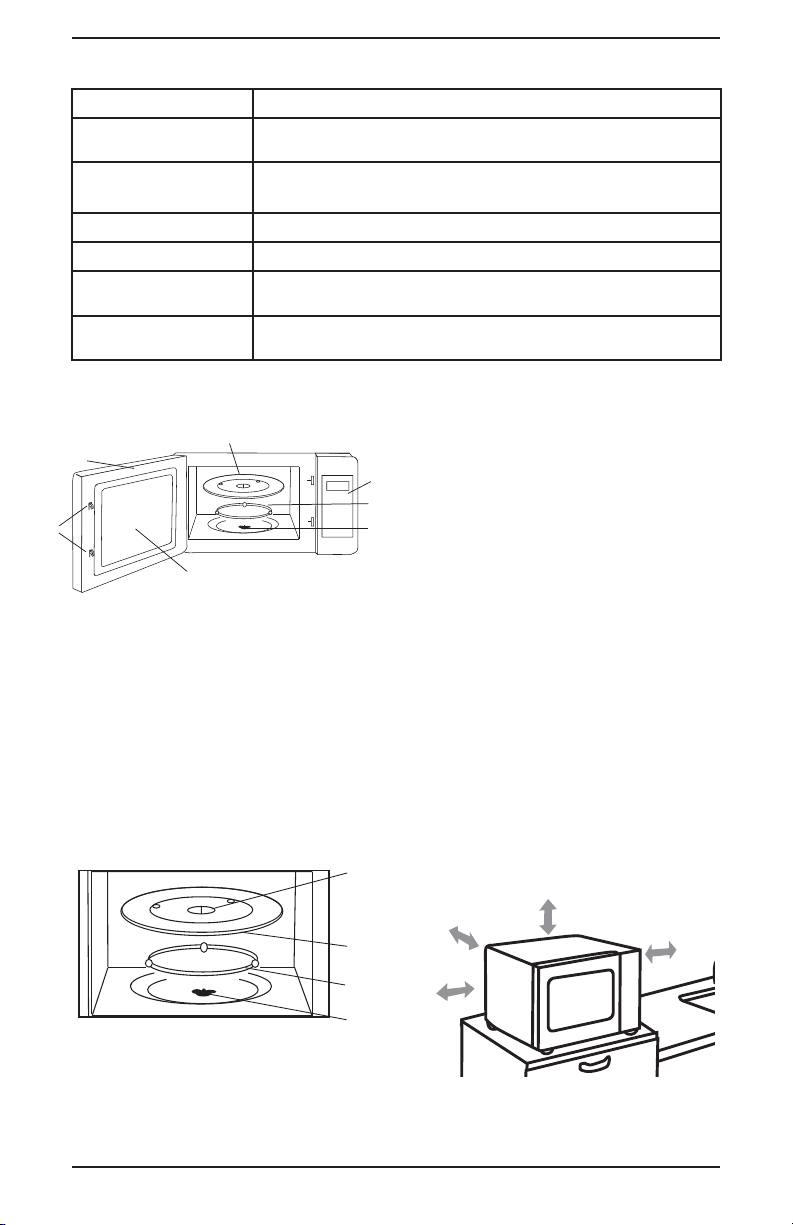
PARTS AND
ACCESSORIES
6
7
5
1. Control Panel
2. Turntable Shaft
3. Turntable Assembly
4. Glass Turntable
5. Observation Window
6. Door Assembly
7. Safety Interlock System
TURNTABLE
INSTALLATION
Never place the glass turntable upside
down. Free movement of the glass turn
4
table should never be restricted.
Both glass turntable and turntable
1
assembly must always be used during
cooking.
3
2
All food and containers of food are
always placed on the glass turntable for
cooking.
Do not use another type of round tray to
replace original part. If glass turntable or
turntable assembly cracks or breaks, a
replacement can be ordered from
Customer Services as a replacement
part. See page 14 for details.
COUNTERTOP
INSTALLATION
Remove all packing material and accessories. Examine the oven for any damage such as dents or broken door. Do
not install if oven is damaged.
1
3.0 inch
(8 cm)
2
3.0 inch
3
(8 cm)
12.0 inch
(30 cm)
Open
1. Hub (on bottom of glass
turntable)
2. Glass Turntable
3. Turntable Assembly
4. Turntable Shaft
4
1. Select a level surface that provides
enough open space for the intake
an/or outlet vents.
7
Page 8
2. Do not remove the legs from the
bottom of the oven.
3. Leave a minimum clearance of 12
inches (30cm) above the oven. A
minimum clearance of 3.0 (8cm)
inches is required between the
oven and any adjacent walls. One
side must be open.
4. Remove any protective film found
on the microwave oven cabinet surface.
5. Do not remove the light brown mica
cover “wave guard” that is attached
to the oven cavity to protect the
magnetron.
6. Blocking the intake and/or outlet
openings can damage the oven.
7. Operation of microwave oven may
cause interference to other electronic equipment in the vicinity.
8. Plug your oven into a standard
household outlet. Be sure the voltage and the frequency are the
same as the voltage and the frequency on the rating label.
WARNING: Do not install oven over a
range cooktop or other heat-producing
appliance. If improperly installed near or
over a heat source, the oven could be
damaged and the warranty would be
void.
The accessible surfaces may be hot
during operation.
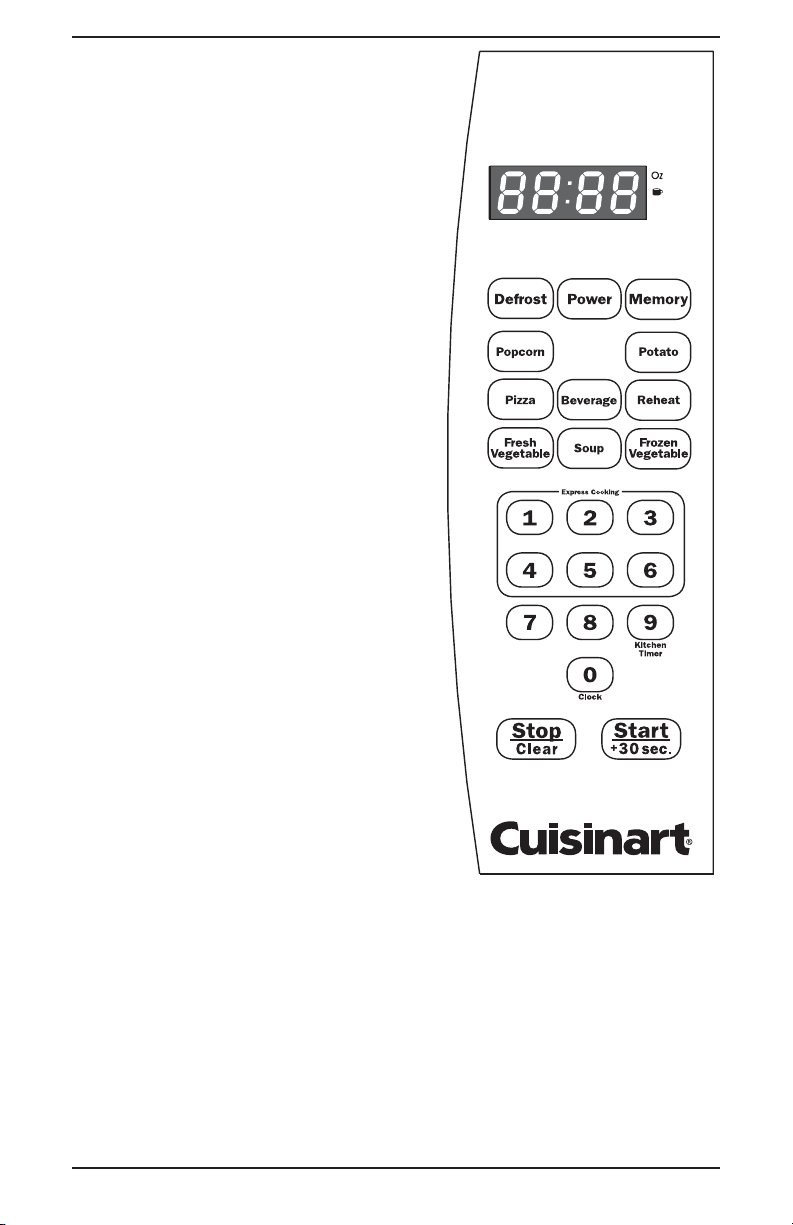
CONTROL PANEL
OPERATION
1. SETTING THE CLOCK
When the microwave oven is
plugged into an outlet, the LED will
display 0:00.
1. Press 0/CLOCK. LED will display
00:00.
2. Press the number keys to enter
the correct time as corresponding 00 is flashing. Time entered
can be 1:00–12:59.
8
For example, for 10:12, press 1, 0,
1, 2 in turn.
3. Press START/+30SEC. to confirm.
Time will appear in LED.
Note:
To see the time of day while the
timer is showing cooking time,
press 0/CLOCK. To see the power
level currently in use, press
POWER. The LED will resume previous display after three seconds.
Page 9

2. KITCHEN TIMER
1. Press touchpad 9/KITCHEN
TIMER. LED will display 00:00.
2. Press the number keys to enter
the desired cooking time. Enter
hours and/or minutes as corresponding 00 is flashing on display. The maximum cooking time
is 99 minutes and 99 seconds.
3. Press START/+30SEC. to confirm
setting.
4. When the cooking time has
elapsed, the buzzer will sound 5
times and the LED will display
the current time.
3. MICROWAVE COOKING
Ten power levels are available.
Level Power Display
10 100% PL10
990% PL9
880% PL8
770% PL7
660% PL6
550% PL5
440% PL4
330% PL3
220% PL2
110% PL1
1. Press POWER repeatedly to
choose the microwave power you
need. PL10, PL9, PL8...PL1 will
be displayed in sequence.
2. Press number keys to enter the
cooking time; the maximum
cooking time is 99 minutes and
99 seconds.
3. Press START/+30SEC. to start
cooking; the LED will count down
the remaining cooking time.
Note: If the STOP/CLEAR button is
pressed during cooking, or if there
no operation is selected within 1
minute of entering the cooking time,
the oven will automatically go back
to its former setting.
For example: to cook with 50%
microwave power for 15 minutes:
1. Press POWER repeatedly until
PL5 displays.
2. Enter the cooking time: press
1,5,0,0.
3. Press START/+30SEC. to start
cooking.
Notes
a. LED will display the remaining
cooking time while the oven is
operating or paused.
b. If cooking is interrupted, START/
+30SEC. must be pressed to
resume cooking.
4. TO START COOKING
1. The microwave is automatically
set at level 10 (PL10/100%.)
Press START/+30SEC. to
increase the cooking time; the
maximum cooking time is 99
minutes and 99 seconds.
2. At 100% power level, with cook
ing time measured in 30-second
increments, press START/
+30SEC. Each press of the button will increase cooking time by
30 seconds. The maximum cooking time is 99 minutes and 99
seconds.
Note: Press START/+30SEC. to
increase selected cooking time by
30-second increments. This applies
to microwave and Express cooking.
However, the operation will not
work when defrosting by weight.
5. DEFROSTING BY WEIGHT
1. Press DEFROST once to choose
the defrost by weight function;
screen will display dEF1.
2. Press number keys to enter
weight to be defrosted. Weight
must be between 4 and 100
ounces.
3. Press START/+30SEC. to start
defrosting; the LED will show the
remaining defrosting time.
6. DEFROSTING BY TIME
1. Press DEFROST twice to choose
-
9
Page 10

the defrost by time function;
screen will display dEF2.
2. Press number keys to enter
defrosting time. The time range is
00:01–99:99.
3. Press START/+30SEC. to start
defrosting. The LED will show the
remaining defrosting time.
Notes
a. If the time entered is not within
00:01–99:99, the setting will not
work.
b. The default microwave power is
power level 3. It cannot be
changed.
7. EXPRESS COOKING
Popcorn
1. Press POPCORN repeatedly until
a preset number of ounces you
wish appears in the display. 1.75,
3.0 and 3.5 will be displayed in
sequence. For example, press
POPCORN once; 1.75 is displayed.
2. Press START/+30 SEC. to cook;
time counts down.
3. When cooking is finished, buzzer
sounds five times. 0:00 displays.
If the clock has been set, current
time will be displayed.
Times
(Press Popcorn)
Once 1.75 oz. 1.75
Twice 3.0 oz. 3.0
Three times 3.5 oz. 3.5
Weight Display
Potato
1. Press POTATO repeatedly until
a preset number of ounces you
wish appears in the display; 1, 2,
3 will be displayed in sequence.
Press 1 for 1 potato
(approximately 8oz/230g)
Press 2 for 2 potatoes
(approximately 1lb/460g)
Press 3 for 3 potatoes
(approximately 1½ lb/690g)
For example, press POTATO
once; 1 is displayed.
2. Press START/+30 SEC. to cook;
time counts down.
3. When cooking is finished, buzzer
sounds five times. 0:00 displays.
If the clock has been set, current
time will be displayed.
Times
(Press Potato)
Once 8 oz. 1
Twice 1 lb. 2
Three times 1½ lb. 3
Weight Display
Pizza
1. Press PIZZA repeatedly until a
preset number of ounces you
wish appears in the display; 1, 2,
3 will be displayed in sequence.
2. Press START/+30 SEC. to cook,
time counts down.
For example, press PIZZA twice;
2 appears in the LED.
3. Buzzer sounds five times when
cooking is finished.
Times
(Press Pizza)
Once 1 slice 1
Twice 2 slices 2
Three times 3 slices 3
Weight Display
Beverages
1. Press BEVERAGE repeatedly
until a preset number of ounces
you wish appears in the display;
1, 2, 3 will be displayed in
sequence.
You can reheat 1 to 3 cups of
beverage each time (each
approximately 8oz/250ml). For
example, press BEVERAGE
twice; 2 appears in the display.
2. Press START/+30 SEC. to cook.
3. Buzzer sounds five times when
cooking is finished. 0:00 displays. If the clock has been set,
current time will be displayed.
10
Page 11

Soup
1. Press SOUP repeatedly until the
number you wish appears in the
display. 4.0, 8.0,12.0,16.0 will be
displayed in sequence.
For example, press SOUP twice;
8.0 appears in the display.
2. Press START/+30 SEC. to cook.
3. Buzzer sounds five times when
cooking is finished. 0:00 displays.
If the clock has been set, current
time will be displayed.
Reheat
1. Press REHEAT repeatedly until a
preset number of ounces you
wish appears in the display; 9.0,
12.0 and 18.0 will be displayed in
sequence. For example, press
REHEAT twice; 12.0 appears in
the display.
2. Press START/+30 SEC. to cook.
Time counts down.
3. Buzzer sounds five times when
cooking is finished. 0:00 displays.
If the clock has been set, current
time will be displayed.
Times (Press Reheat) Weight Display
Once 9.0 oz 9.0
Twice 12.0 oz 12.0
Three times 18.0 oz 18.0
Fresh Vegetables
1. Press FRESH VEGETABLE
repeatedly until a preset number
of ounces you wish appears in
the display; 4.0, 8.0 and 16.0 will
be displayed in sequence. For
example, press FRESH
VEGETABLE twice; 8.0 appears
in the display.
2. Press START/+30 SEC. to cook.
Time counts down.
3. Buzzer sounds five times when
cooking is finished. 0:00 displays. If the clock has been set,
current time will be displayed.
Frozen Vegetables
1. Press FROZEN VEGETABLE
repeatedly until a preset number
of ounces you wish appears in
the display; 4.0, 8.0 and 16.0 will
be displayed in sequence. For
example, press FROZEN
VEGETABLE twice; 8.0 appears
in the display.
2. Press START/+30 SEC. to cook.
Time counts down.
3. Buzzer sounds five times when
cooking is finished. 0:00 displays.
If the clock has been set, current
time will be displayed.
Times
(Press FROZEN
VEGETABLE)
Once 4.0 oz 4.0
Twice 8.0 oz 8.0
Thrice 16.0 oz 16.0
Weight Display
8. Memory
You can enter up to three cooking
procedures, each with one or two
stages of cooking, into the oven’s
memory. They will be numbered
1, 2 and 3, and will be saved for
selection at any time, as long as
power to the oven is uninterrupted.
To save a procedure in memory:
For example: Set the following pro
cedure as memory 2: Cook at 80%
power for 3 minutes 20 seconds.
1. Press MEMORY twice; the
screen displays 2.
2. Press POWER until PL8 displays.
3. Press number keys 3, 2, 0 in turn
to enter the cooking time.
4. Press MEMORY to save the
setting. Buzzer sounds once.
5. To save a second stage in this
procedure, follow instructions
1–4 above, entering instructions
for power and timing for the
second stage of cooking.
11
Page 12

6. To operate microwave on a
Memory immediately after saving
it, press START/+30SEC.
To run a procedure that has been
saved previously:
1. Press MEMORY until the proce
dure’s number displays (1, 2 or
3). The LED will display the
selected number.
2. Press START/ +30 SEC. to start
cooking.
3. Buzzer sounds five times when
cooking is finished. 0:00 displays. If the clock has been set,
current time will be displayed.
Notes
a. Express cooking cannot be
saved as memory.
b. If oven is unplugged or power is
cut off, memory will not be saved
and will have to be reset.
9. TO USE THE CHILD LOCK/
UNLOCK FUNCTION
To lock: Press STOP/CLEAR for 3
seconds. There will be a long beep;
LED will display __. The control
panel will be deactivated. The door
will still open and close.
To unlock: Press STOP/CLEAR for
3 seconds. There will be a long
beep indicating that the lock is
released and the control panel is
activated.
10. MULTI-STAGE COOKING
This microwave oven can be set for
2 stages of cooking. If one stage is
to defrost, either by weight or time,
it will placed at the first stage auto-
-
matically.
Example: To defrost 20 oz of beef
first and then cook it at 80%
microwave power for 7 minutes.
1. Press DEFROST once to choose
defrost by weight function. dEF1
is displayed.
2. Press 2, 0 in sequence to set
weight.
3. Press POWER until PL8 displays.
4. Press 7, 0, 0 in sequence to set
cooking time.
5. Press START/ +30 SEC. to start
cooking.
When defrosting is finished, the
buzzer sounds once, and the second stage begins.
Notes
a. Express cooking cannot be set
as one of the 2 stages.
b. You can choose defrosting either
by time or weight as the first
stage.
12
Page 13

PRESET EXPRESS COOKING CHART
Item Weight/Amount Display Notes
Popcorn
(Use only
prepackaged
bagged popcorn.
Do not pop loose
popcorn)
Pizza
(Use only
microwave-safe
dishes or
containers)
Beverage
Reheat
Baked potato
Fresh
vegetables
Soup
1.75 ounces 1.75
3.00 ounces
3.5 ounces 3.5
1 slice 1
2 slices 2
3 slices 3
8 ounces 1
16 ounces 2
24 ounces 3
9.00 oz. 9.0
12.00 oz. 12 .0
18.00 oz. 18 .0
8 ounces 1
16 ounces 2
24 ounces 3
½ cup 4.0
1 cup 8.0
2 cups 16.0
½ cup 4.0
1 cup 8.0
1½ cu ps 12. 0
3.0
Place prepackaged bagged popcorn in
microwave according to package
directions, making sure proper side of
bag is up. Pop only one bag at a time.
Use care when removing from
microwave and opening hot bag.
Remove from package or wrapping.
Place on microwave safe dish or rack.
Place rack or microwave-safe dish on
turntable tray.
Please note the number on the display
equals the number of slices.
Reheat beverage in microwave-safe
mugs/cups. Do not cover. Place cups in
microwave. After heating stir well.
Place food on microwave-safe plate or
in microwave safe bowl. Cover loosely
with wax paper or plastic wrap, or a
purchased microwave dish cover.
Scrub potatoes well. Prick each potato
several times with a fork or tip of a
sharp knife. After cooking, let stand 3
minutes before serving.
Can be used to precook potatoes before
placing in traditional oven to crisp skins.
Wash well. Place in a microwave-safe
casserole or bowl with lid. Add a small
amount of water. Cover. After cooking,
let stand for 2 minutes before serving.
This is a general cooking time, and may
not be suitable for cooking all
vegetables.
Use this setting to reheat refrigerated
liquids such as soups and sauces. Cover
with microwave safe-lid. After cooking
let stand for 2-3 minutes.
Frozen
vegetables
2 cups 16.0
½ cup 4.0
1 cup 8.0
2 cups 16.0
Remove from packaging and place in
microwave-safe casserole or bowl. Add
a small amount of liquid (2 to 4
tablespoons). Cover and cook. Stir and
let stand. Add more cooking times as
needed.
13
Page 14

TROUBLESHOOTING
TROUBLE POSSIBLE CAUSE POSSIBLE REMEDY
Oven will not start
Arcing or sparking
Unevenly cooked
foods
Overcooked food
a. Electrical cord for oven is not
plugged in.
b. Door is open.
c. Wrong operation is set.
a. Materials to be avoided in
microwave oven were used.
b. The oven was operated when
empty.
c. Spilled food remained in the
interior.
a. Materials to be avoided in
microwave oven were used.
b. Food was not defrosted
completely.
c. Cooking time and/or power
level were not suitable.
d. Food was not turned or stirred.
Cooking time and/or power level
were not suitable.
a. Plug into the outlet.
b. Close the door and try again.
c. Check instructions.
a. Use microwave-safe cookware
only.
b. Do not operate with oven empty.
c. Clean interior with wet towel or
microfiber cloth specifically for
stainless steel.
a. Use microwave-safe cookware
only.
b. Completely defrost food.
c. Use correct cooking time and/or
power level.
d. Turn or stir food.
Use correct cooking time and/or
power level.
Undercooked foods
Improper defrosting
14
a. Materials to be avoided in
microwave oven were used.
b. Food was not defrosted
completely.
c. Oven ventilation ports were
blocked.
d. Cooking time and/or power
level were not suitable.
a. Materials to be avoided in
microwave were used.
b. Cooking time and/or power
level were not suitable.
c. Food was not turned or stirred.
a. Use microwave safe cookware
only.
b. Completely defrost food.
c. Check to see that oven ventilation
ports are not blocked.
d. Use correct cooking time and/or
power level.
a. Use microwave-safe cookware
only.
b. Use correct cooking time and/or
power level.
c. Turn or stir food.
Page 15

WARRANTY
LIMITED THREE-YEAR
WARRANTY
This warranty is available to consumers only.
You are a consumer if you own a Cuisinart
Compact Microwave that was purchased at
retail for personal, family or household use.
Except as otherwise required under applicable law, this warranty is not available to retailers or other commercial purchasers
or owners.
We warrant that your Cuisinart® Compact
Microwave will be free of defects in materials
and workmanship under normal home use
for 3 years from the date of original purchase.
We suggest you complete and return the
enclosed product registration card promptly
to facilitate verification of the date of original
purchase. However, return of the product
registration card does not eliminate the need
for the consumer to maintain the original
proof of purchase in order to obtain the warranty benefits. In the event that you
do not have proof of purchase date, the purchase date for purposes of this warranty will
be the date of manufacture.
If your Cuisinart® Compact Microwave
should prove to be defective within the warranty period, we will repair it, or if we think
necessary, replace it. To obtain warranty service, simply call our toll-free number
1-800-726-0190 for additional information
from our Customer Service Representatives,
or send the defective product to Customer
Service at Cuisinart, 150 Milford Road, East
Windsor, NJ 08520.
To facilitate the speed and accuracy of your
return, please enclose $15.00 for shipping
and handling of the product.
Please pay by check or money order
(California residents need only supply proof
of purchase and should call 1-800-726-0190
for shipping instructions).
NOTE: For added protection and secure handling of any Cuisinart® product that is being
returned, we recommend you use a traceable, insured delivery service. Cuisinart cannot be held responsible for in-transit damage
or for packages that are not delivered to us.
Lost and/or damaged products are not covered under warranty. Please be sure to
include your return address, daytime phone
number, description of the product defect,
product model # (located on bottom of product), original date of purchase, and any other
information pertinent to the product’s return.
Your Cuisinart
been manufactured to the strictest specifications and has been designed for
®
Compact Microwave has
®
use with the authorized accessories and
replacement parts.
This warranty expressly excludes any
defects or damages caused by accessories,
replacement parts, or repair service other
than those that have been authorized by
Cuisinart.
This warranty does not cover any damage
caused by accident, misuse, shipment or
other ordinary household use.
This warranty excludes all incidental or consequential damages. Some states do
not allow the exclusion or limitation of these
damages, so they may not apply to you.
CALIFORNIA RESIDENTS ONLY:
California law provides that for In-Warranty
Service, California residents have the option
of returning a nonconforming product (A) to
the store where it was purchased or (B) to
another retail store which sells Cuisinart
products of the same type.
The retail store shall then, at its discretion,
either repair the product, refer the consumer
to an independent repair facility, replace the
product, or refund the purchase price less
the amount directly attributable to the consumer’s prior usage of the product.
If the above two options do not result in
the appropriate relief to the consumer, the
consumer may then take the product to an
independent repair facility if service or repair
can be economically accomplished. Cuisinart
and not the consumer will be responsible for
the reasonable cost of such service, repair,
replacement, or refund for nonconforming
products under warranty.
California residents may also, according
to their preference, return nonconforming
products directly to Cuisinart for repair,
or if necessary, replacement, by calling
our Consumer Service Center toll-free at
1-800-726-0190.
Cuisinart will be responsible for the cost of
the repair, replacement, and shipping and
handling for such products under warranty.
©2008 Cuisinart
Cuisinart® is a registered
trademark of Cuisinart
150 Milford Road
East Windsor, NJ 08520
Printed in China
www.cuisinart.com
08CU038
Any other trademarks or service marks
referred to herein are the trademarks or
service marks of their respective owners.
15
Page 16

25
NOTES
Page 17

24
NOTES
Page 18

23
23
Compact
®
• calc. 127mg • fiber 2g
use whole milk)
(for creamier, richer pudding,
teaspoon salt
cup granulated sugar
cup regular or golden raisins
instead of hours.
Raisins
• fat 4g • sat. fat 2g • chol. 86mg • sod. 104mg
Calories 224 (16% from fat) • carb. 40g • pro. 7g
Nutritional information per serving (one-half cup):
pudding.
• calc. 17mg • fiber 3g
*Short grain rice will yield a creamier rice
to serve.
let cool, cover and refrigerate until ready
pudding to prevent a skin from forming,
plastic wrap placed directly on the
cover with a sheet of waxed paper or
Let stand 5 minutes before serving, or
minutes longer, until thick and creamy.
then on medium-high (PL 7) for 2 to 3
and microwave on high for 3 minutes,
Cover the casserole with waxed paper
well.
Stir in vanilla. Add to rice mixture and stir
similar to a custard sauce in appearance.
minute, until mixture is thick, bubbly and
10) for 7 to 8 minutes, stirring once every
Microwave and microwave on high (PL
place in the Cuisinart
mixture into a microwave safe bowl and
dry mixture, whisk well until smooth. Pour
whisking, gradually add milk mixture to
Whisk milk and egg together. While
and salt in a mixing bowl; stir to blend.
Combine sugar, cornstarch, cinnamon,
Compact Microwave and
®
and reserve.
microwave-safe casserole or bowl. Stir
Place rice and raisins in a 1½-quart
1 tablespoon pure vanilla extract
3 large eggs, beaten
2¾ cups reduced fat milk
⁄
8
1
½ teaspoon ground cinnamon
1 tablespoon cornstarch
⁄
3
1
⁄
3
2
3 cups cooked short grain rice*
Makes 4 cups
• calc. 62mg • fiber 5g
Old-fashioned rice pudding in minutes
Creamy Rice Pudding with
• fat 1g • sat. fat 0g • chol. 0mg • sod. 1mg
Calories 129 (3% from fat) • carb. 33g • pro. 0g
Nutritional information per serving:
cream or vanilla yogurt.
Top with syrup if made and freshly whipped
spoon cranberries into the hollow of the pear.
chilled. Arrange pear halves on dessert plates,
Pears can be served at room temperature or
spoons.
to 5 minutes until reduced to about 2 tablesyrup by microwaving uncovered on high for 4
desired, poaching liquid can be reduced to a
lemon zest. When cool, remove pears. If
basting now and then. Remove and discard
pears cool in the poaching liquid, turning and
and microwave on high for 1½ minutes. Let
on high for 3 minutes. Turn cut side up, cover
Cover with waxed paper or lid and microwave
side down. Spoon some of the liquid over each.
stem ends to the center in the hot liquid, cut
lemon juice. Arrange the pears with the narrow
Peel the pears, cut in half and core. Brush with
microwave on high (PL 10) for 3 minutes.
Place in the Cuisinart
with a sheet of waxed paper or casserole lid.
microwave-safe 1½-quart casserole and cover
Combine juice, dried cranberries and zest in a
1 tablespoon fresh lemon juice
but still firm
2 pears (about 8 ounces each), ripe
bitter white pith removed
(each about 2-x-½ inches),
4 strips lemon zest
¼ cup dried cranberries
juice
1 cup cranraspberry or cranberry
Makes 4 servings
Cranberry Poached Pears
• fat 22g • sat. fat 12g • chol. 43mg • sod. 200mg
Calories 331 (58% from fat) • carb. 33g • pro. 2g
Nutritional information per serving (one-half cup):
crust, chill and serve as a pie.
Spoon into a prepared 9-inch cookie crumb
Page 19

Compact Microwave and micro-
®
powder
cut into ½-inch pieces
chocolate
morsels or chopped semisweet
chocolate.
Chocolate Mousse
• calc. 8mg • fiber 0g
whipped cream or chocolate shavings.
If desired, may be garnished with freshly
Serving suggestions:
15 minutes before serving for best flavor.
for at least 6 hours. Remove from refrigerator
ramekins or stemmed glasses. Cover and chill
into the chocolate mixture. Spoon into 5-ounce
lighten it. Then, gently fold the remaining cream
whipped cream into the chocolate mixture to
holds stiff peaks. Stir about one fourth of the
to room temperature, whip cream until it just
Compact Microwave and
®
When chocolate mixture has cooled completely
ature before continuing.
the chocolate mixture to come to room temperwhisking to blend. Stirring now and then, allow
homogenous. Add espresso powder and vanilla,
pletely melted and the mixture is smooth and
until the chocolate and marshmallows are com-
cup fresh lemon juice
zest of 4 lemons
cut into 16 pieces
30-second intervals, stirring well after each,
with a whisk. Continue to microwave on high for
wave on high (PL 10) for 2 minutes. Stir well
in Cuisinart
lates in a 1½-quart microwave-safe bowl. Place
Combine milk, marshmallows, and both choco-
1 cup heavy cream, chilled
1 teaspoon pure vanilla extract
1 teaspoon instant espresso
Lemon Curd
• calc. 9mg • fiber 5g
1 ounce unsweetened chocolate,
8 ounces semisweet chocolate
2½ cups miniature marshmallows
1 cup reduced fat milk
Makes 4 cups
Microwaving is a simple way to melt
Compact
®
pinch of nutmeg
• fat 9g • sat. fat 5g • chol. 56mg • sod. 12mg
Calories 146 (51% from fat) • carb. 17g • pro. 1g
Nutritional information per serving (2 tablespoons):
pinch of allspice
(only if using water)
perature. Cover and refrigerate.
into sterilized jars and let come to room tem-
apple juice or cranberry juice
When thick, whisk again until smooth. Ladle
naise. Do not boil or the mixture will curdle.
minutes, until thick and smooth like mayonRepeat – stir and microwave for an additional 2
wave on medium-high again for 2 minutes.
high (PL 7) for 7 to 8 minutes. Stir and micro-
Applesauce
2222
with waxed paper and microwave on mediummixture to the eggs, whisking constantly. Cover
whisking the eggs, slowly add the hot butter
bowl with handle, beat eggs until frothy. While
In a 1½-quart microwave-safe measuring cup or
pletely dissolved.
3 and 4 minutes of cooking, until sugar is commicrowave for 4 to 4½ minutes, stirring after 2,
lemon juice. Cover with waxed paper and
minutes. Stir in the sugar, lemon zest, and
microwave on high (PL 10) to melt, about 1½
Place in the Cuisinart
suring cup or bowl and cover with waxed paper.
Place butter in a 4-cup microwave-safe mea-
4 large eggs
⁄
3
2
2 cups granulated sugar
1 cup unsalted butter,
Makes about 3 cups
be used to fill tartlets or meringues.
gingerbread, or pound cake. It can also
Lemon curd is very good with scones,
• fat 1g • sat. fat 0g • chol. 0mg • sod. 2mg
Calories 102 (6% from fat) • carb. 26g • pro. 1g
Nutritional information per serving:
tor.
refrigerate. Keeps about 1 week in the refrigeraAdd spices. Serve warm or let cool, cover and
texture using a potato masher or hand blender.
mashed with a fork. Mash or purée to desired
cooking, until apples are tender and can be
18 minutes, stirring apples after 10 minutes of
Microwave. Microwave on high (PL 10) for 15 to
lid or plate and place in the Cuisinart
Toss with liquid in recipe. Cover with casserole
a 1½-quart microwave-safe casserole or bowl.
Peel, core, and cut apples into eighths. Place in
¼ teaspoon ground cinnamon
½ tablespoon fresh lemon juice
2½ tablespoons water, apple cider,
4 apples (about 8 ounces each)*
Makes about 2½ cups
Page 20

21
21
• calc. 5mg • fiber 1g
Compact Microwave
®
Jam
• fat 0g • sat. fat 0g • chol. 0mg • sod. 4mg
Calories 65 (0% from fat) • carb. 17g • pro. 0g
Nutritional information per serving (2 tablespoons):
refrigerator.
and refrigerate. Keeps about 10 days in the
Transfer to containers with non-metallic covers
before using – jam will thicken as it cools.
Stir and allow to cool for at least 20 minutes
card any foam that has accumulated on the top.
from Microwave and carefully skim off and dismore minutes – jam will be boiling. Remove
for 2 minutes. Stir well. Microwave on high for 2
utes. Stir well. Microwave, uncovered, on high
bowl. Microwave uncovered on high for 5 minspoon; be sure to scrape the bottom of the
Stir using a heatproof spatula or wooden
and microwave on high (PL 10) for 5 minutes.
Place in the Cuisinart
than the bowl/casserole.
sheet of waxed paper cut just slightly larger
deep. Stir to combine. Cover loosely with a
safe bowl or casserole that is at least 4 inches
Place all ingredients in a 1½-quart microwave-
2 tablespoons pomegranate juice
low sugar recipes
¾ ounce powdered fruit pectin for
sugar
or other hot
®
¾ cup plus 1 tablespoon granulated
and quartered
1 pound strawberries, stemmed
Makes about 1¾ cups
this delightful ruby red jam.
be simpler, and the result here is
Making jam in the microwave couldn’t
Strawberry Pomegranate
• calc. 114mg • fiber 0g
• fat 7g • sat. fat 4g • chol. 21mg • sod. 126mg
Calories 90 (69% from fat) • carb. 3g • pro. 4g
Nutritional information per serving (2 tablespoons):
Asiago in place of Cheddar.
*May use grated Reggiano Parmigiano or
seconds.
medium (PL 5) for 1½ minutes, stirring after 45
short time (10 to 15 minutes), microwave on
skin from forming. To reheat after standing for a
waxed paper directly on the sauce to prevent a
If not using immediately, cover with a round of
and again when done. Serve hot.
utes, whisking after 1 minute, after 2 minutes,
uncovered, on medium-high (PL 7) for 3 minAdd cheese and stir until smooth. Microwave,
white sauce.
and thickens. At this point, you have a medium
then every 45 seconds, until the sauce boils
ered for 3 minutes, stirring after 1 minute, and
smooth. Microwave on medium-high, uncovsalt, mustard, and hot sauce; whisk until
after 1½ minutes of cooking. Add warm milk,
stirring with a whisk after 45 seconds and again
Microwave on high for 2 minutes until foamy,
Add flour and stir with a whisk until smooth.
microwave for 1 minute on high or until melted.
handle. Cover with a sheet of waxed paper and
other deep 4-cup microwave-safe bowl with a
Place butter in a 4 -cup glass measuring cup or
1½ minutes on high (PL 10); reserve.
Compact Microwave. Microwave for
Cuisinart
®
other microwave-safe cup and place in the
Place milk in a 1-cup glass measuring cup or
Cheddar*
¾ cup (3 ounces) shredded sharp
sauce to taste
dash Tabasco
¼ teaspoon dry mustard
¼ teaspoon kosher salt
pose flour
2 tablespoons unbleached all-pur-
2 tablespoons unsalted butter
1 cup reduced fat milk
Makes 1 cup
broccoli and cauliflower.
Delicious served over microwaved
Cheddar Cheese Sauce
Page 21

2020
• calc. 12mg • fiber 0g
• fat 13g • sat. fat 8g • chol. 111mg • sod. 88mg
Calories 125 (95% from fat) • carb. 0g • pro. 1g
Nutritional information per serving (2 tablespoons):
completed.
ute of cooking, and again when cooking is
for 2 minutes, stirring with a whisk after 1 minwaxed paper. Microwave on medium-low (PL 3)
prevent a skin from forming. To reheat, remove
waxed paper placed directly on the sauce to
If not serving immediately, cover with a round of
bles, or eggs.
of a spoon. Serve warm with seafood, vegetauntil mixture thickens enough to coat the back
the edges and resemble a soft custard. Cook
20 seconds. The mixture will begin to thicken at
um-high (PL 7), stopping to whisk briskly every
Cook sauce uncovered for 2 minutes on medi-
until completely emulsified.
smooth. Whisk in melted, cooled butter; whisk
bowl with handle. Whisk until emulsified and
mustard in a microwave-safe 4-cup measure or
Place egg yolks, lemon juice, water, salt and dry
cool slightly, about 4 to 5 minutes.
on high (PL 10) to melt, about 1 minute. Let
Compact Microwave and microwave
Cuisinart
®
sure. Cover with waxed paper and place in the
Place butter in a microwave-safe 1-cup mea-
¼ teaspoon dry mustard
½ teaspoon kosher salt
1 tablespoon water
2 tablespoons fresh lemon juice
3 large egg yolks
cut into ½-inch slices
½ cup unsalted butter,
Makes about 1 cup
vegetables or to make Eggs Benedict.
makes it quick and easy. Serve with fish,
ing – making this one in your microwave
Sauces with egg emulsions can be daunt-
Simple Hollandaise
food sections, or in specialty grocery stores.
well-stocked grocery stores with international
size of a peppercorn. It can be found in many
*Israeli couscous is a semolina pasta about the
• calc. 17mg • fiber 2g
Compact Microwave.
®
and Pine Nuts
• fat 8g • sat. fat 1g • chol. 0mg • sod. 251mg
Calories 191 (35% from fat) • carb. 28g • pro. 4g
Nutritional information per serving:
nish. Serve hot.
sprinkle with julienned fresh sage leaves to garcranberries, parsley and orange zest. If desired,
reserved toasted pine nuts, remaining dried
couscous is tender. Let stand 2 minutes. Stir in
minutes, until all the liquid is absorbed and
Microwave on medium-high (PL 7) for 8 to 9
ries, all the raisins, salt and pepper; cover.
high for 5 minutes. Stir in half the dried cranberstir. Cover with a lid or plate and microwave on
high for 1 minute. Add broth/stock and water;
Cover with waxed paper and microwave on
in couscous and spread into an even layer.
paper and microwave on high for 1 minute. Stir
(PL 10) for 2 minutes. Stir, re-cover with waxed
sheet of waxed paper and microwave on high
role or bowl. Stir to combine. Cover with a
Provence in a 1½-quart microwave-safe cassePlace olive oil, shallot, garlic, and herbes de
to taste. Reserve.
stirring every 30 seconds until they are toasted
Microwave for 1½ to 2 minutes on high (PL 10),
place in the Cuisinart
Spread pine nuts in a microwave-safe dish and
(optional garnish)
julienned fresh sage leaves
zest
1 teaspoon chopped fresh orange
parsley
2 tablespoon chopped fresh
¼ teaspoon freshly ground pepper
¾ teaspoon kosher salt
cup golden raisins
⁄
3
1
cup dried cranberries, divided
⁄
3
2
1 cup water
vegetable broth/stock
1 cup low sodium chicken or
1 cup Israeli couscous*
¾ teaspoon herbes de Provence
1 garlic clove, peeled and chopped
¼ cup chopped shallot
1½ tablespoons extra virgin olive oil
cup pine nuts
⁄
3
1
Makes about 3 cups (six ½-cup servings)
halves of acorn squash.
own, or can be used to stuff the steamed
This side dish is wonderful served on its
Cranberries, Golden Raisins
Israeli Couscous Pilaf with
Page 22

19
19
• calc. 71mg • fiber 1g
(based on 6 servings):
• fat 5g • sat. fat 3g • chol. 15mg • sod. 228mg
Calories 146 (33% from fat) • carb. 15g • pro. 7g
Nutritional information per serving
for 3 minutes. Stir again. Serve hot.
Microwave on high for 1 minute. Let stand
reserved peas and the grated cheese.
microwave on high for 5 minutes. Stir in
utes. Stir in remaining chicken stock and salt;
ed chicken stock. Microwave on high for 5 minminutes. Stir. Stir in 1 cup of the reserved heatsaffron-infused water; microwave on high for 5
wine; microwave on high for 1 minute. Stir in
layer; microwave on high for 2 minutes. Stir in
high for 2 minutes. Stir and arrange in an even
stir to coat with melted butter; microwave on
on high for 3 minutes. Stir. Add Arborio rice and
larger than the diameter of the dish. Microwave
with a round of waxed paper cut just slightly
least 4 inches high. Add chopped shallot, cover
1½-quart round microwave-safe casserole at
Heat the butter for 30 seconds on high in a
on high; reserve.
broth in a 2-cup glass measure for 5 minutes
saffron threads and stir; reserve. Heat chicken
boiling, about 3 minutes on high (PL 10). Add
Compact Microwave and heat to
®
the Cuisinart
Place water in a 2-cup measure and place in
Transfer to a strainer and let drain.
Defrost peas in microwave. Do not cook.
Parmigiano
cup freshly grated Reggiano
⁄
3
1
½ teaspoon kosher salt
dry white wine
cup dry white vermouth or other
⁄
3
1
1 cup Arborio rice
½ cup finely chopped shallot
into eight ½-inch pieces
2 tablespoons unsalted butter, cut
2 cups low sodium chicken broth
¼ teaspoon saffron threads
1 cup water
1 cup frozen peas
or 2 to 3 servings as an entrée
Makes 4 to 6 servings as a side dish,
in the serving dish.
no constant stirring, and it is prepared
has 2 distinct advantages –
Making risotto in the microwave
Risotto with Peas
pickles (dill or sweet, to taste).
been roughly chopped and/or ¼ to ½ cup chopped
Note: If desired, add 2 hard cooked eggs that have
Compact
®
• calc. 33mg • fiber 2g
• fat 5g • sat. fat 1g • chol. 10mg • sod. 257mg
Calories 163 (30% from fat) • carb. 26g • pro. 3g
Nutritional information per serving (one-half cup):
ly, or cover and refrigerate until ready to serve.
adjust seasoning accordingly. Serve immediategently to combine and coat potatoes. Taste and
tly. Add mayonnaise mixture to potatoes. Toss
are still warm. Add celery and onions; stir genbowl and sprinkle with vinegar while potatoes
potatoes into bite-sized pieces. Place in a large
Peel warm potatoes and discard skins. Cut the
whisk to blend.
salt, and pepper in a small bowl. Stir with a
onnaise, sour cream, mustard, dill/tarragon,
While potatoes are “baking”, combine the may-
for 5 to 10 minutes.
more cooking time if needed. Let potatoes cool
utes. Test for doneness; add 2 to 3 minutes
high (PL 10) for 12 minutes. Let stand 3 mintoward the edge of the turntable. Microwave on
Microwave and arrange the potatoes in a circle
on the turntable of the Cuisinart
or the tip of a paring knife. Place 2 paper towels
Prick each potato in several places with a fork
white, red or green)
¼ cup chopped onion (may use
½ cup thinly sliced celery
balsamic vinegar
1 tablespoon rice vinegar or white
pepper
¼ teaspoon freshly ground black
½ teaspoon kosher salt
(dry; double if using fresh)
1 teaspoon dill weed or tarragon
½ tablespoon Dijon-style mustard
¼ cup lowfat sour cream
½ cup lowfat mayonnaise
scrubbed well and dried
1 pound russet baking potatoes,
Makes 3 cups potato salad
kitchen cool – and no pot to wash!
for the summertime favorite keeps the
Cooking your potatoes in the microwave
Potato Salad
• calc. 223mg • fiber 6g
• fat 8g • sat. fat 2g • chol. 22mg • sod. 142mg
Calories 289 (23% from fat) • carb. 45g • pro. 13g
(prepared without optional bacon):
Nutritional information per serving
Page 23

Compact
®
kle with crumbled crispy bacon bits. Serve hot.
minutes on high to melt cheese. If desired, sprinor returned to the microwave for another 1½
cheese. Potatoes can be served at this point,
(PL 10) for 4 minutes. Sprinkle with remaining
towel or waxed paper. Microwave on high
safe plate. Cover with a microwave safe paper
Place the potatoes in a circle on a microwave
decoratively on each potato.
mixture into shells. Arrange about 4 flowerets
cheese, salt, and pepper. Spoon the potato
Stir in remaining cooked broccoli, ½ cup of the
pieces of the broccoli flowerets and reserve.
yogurt and milk. Mash well. Choose about 16
toes in bowl and mash well. Add sour cream/
Add butter and chopped green onions to potaing ¼-inch-thick potato shell; reserve shells.
cooked potato flesh into a medium bowl, leavSlice potatoes in half horizontally. Scoop the
drain.
setting. Remove from microwave, uncover and
and microwave for 1 serving on fresh vegetable
microwave-safe bowl. Cover with plate or lid
Place the broccoli and water in a shallow
in aluminum and let stand 10 minutes.
for 2 potatoes. Remove from microwave, wrap
Microwave and microwave on the potato setting
with a fork. Place in the Cuisinart
Scrub the potatoes well and dry them. Prick
crumbled (optional)
2 slices crispy microwaved bacon,
or black pepper
¼ teaspoon freshly ground white
½ teaspoon kosher salt
shredded sharp Cheddar, divided
¾ cup (about 3 ounces) light
3 tablespoons lowfat milk
or plain yogurt
3 tablespoons lowfat sour cream
onion (include some of the green)
2 tablespoons chopped green
2 teaspoons unsalted butter
2 tablespoons water
pieces)
flowerets cut to bite-sized
(stems cut to ½-inch pieces,
1½ cups chopped fresh broccoli
2 medium russet potatoes
Makes 4 servings as a side dish
Twice baked potatoes in minutes.
Stuffed Potatoes
Broccoli and Cheddar
1818
• calc. 38mg • fiber 2g
• fat 5g • sat. fat 3g • chol. 15mg • sod. 179mg
Calories 124 (39% from fat) • carb. 17g • pro. 3g
(one-half cup, made with milk):
Nutritional information per serving
desired, use a food mill. Serve hot.
to desired consistency. If a smoother texture is
hand mixer to “smash” potatoes and cauliflower
with salt and pepper. Use a potato masher or
Pour over potato/cauliflower mixture. Sprinkle
milk is hot and butter is completely melted.
or bowl. Microwave on high for 2 minutes, until
Place milk and butter in a 2-cup glass measure
to 3 minutes.
high for 8 minutes. Remove and let stand for 2
high (PL 10) for 10 minutes. Stir. Microwave on
Compact Microwave. Microwave on
Cuisinart
®
tightly with lid or a plate and place in the
serole/bowl that is at least 4 inches deep. Cover
broth/water in a 1½-quart microwave-safe casPlace the potatoes, cauliflower, garlic, and
pepper
pinch freshly ground white
¼ teaspoon kosher salt
cut into ½-inch pieces
2 tablespoons unsalted butter,
milk or half-and-half
cup plus 1 tablespoon whole
⁄
3
1
chicken broth or water
¼ cup low sodium vegetable broth,
sliced
2 garlic cloves, peeled and thinly
1-inch flowerets, then cut in half
½ pound cauliflower, separated into
peeled, cut into 1-inch cubes
¾ pounds Yukon Gold potatoes,
Makes about 2½ cups
even easier to prepare.
potatoes and cauliflower, making them
The best thing is no need to drain the
the potatoes to lighten up this side dish.
Cauliflower is substituted for some of
Cauliflower with Garlic
Smashed Potatoes and
Page 24

17
17
• calc. 70mg • fiber 5g
• fat. 6g • sat. fat 1g • chol. 4mg • sod. 88mg
Calories 101 (46% from fat) • carb. 12g • pro. 3g
Nutritional information per serving:
top with toasted almonds and serve hot.
Drain beans. Stir in the cooked mushrooms,
done to taste.
after 5 minutes of cooking, until beans are
Microwave for 8 to 10 minutes on high, stirring
microwaveable bowl or casserole with lid.
Place green beans and water in a 1½-quart
through cooking time, reserve.
uncovered for 5 minutes, stirring halfway
Sprinkle with herbes de Provence. Microwave
plate and toss to coat with butter and olive oil.
20 seconds on high. Add sliced mushrooms to
Using same pie plate, melt butter with olive oil,
transfer to a small bowl and reserve.
30 seconds of cooking, to toast. Remove,
high (PL 10) for 2 minutes, stirring after every
Compact Microwave. Microwave on
Cuisinart
®
or ceramic 9-inch pie plate and place in the
Place the almonds in a microwave safe glass
Freshly ground pepper to taste
¼ teaspoon kosher salt
½ cup water
slices
drained and cut into 1 to 1¼-inch
1 pound green beans, rinsed,
thyme
½ teaspoon herbes de Provence or
mushrooms, cleaned and sliced
4 ounces white button or cremini
½ tablespoon extra virgin olive oil
½ tablespoon unsalted butter
3 tablespoons slivered almonds
Makes 4 servings
Almonds
Mushrooms and Toasted
Green Beans with
• calc. 29mg • fiber 2g
®
• fat 3g • sat. fat 2g • chol. 8mg • sod. 313mg
Calories 67 (33% from fat) • carb. 12g • pro. 1g
Nutritional information per serving:
on high. Serve hot.
If desired, microwave for an additional minute
honey sauce over the carrots and stir to coat.
(PL 10) for 45 seconds. Drain carrots. Pour the
covered with a sheet of waxed paper, on high
cup microwaveable measuring cup. Microwave,
juice, ginger, mustard, salt, and pepper in a 1While carrots stand, place butter, honey, lemon
ered and let stand for 2 to 3 minutes.
stirring after 4 minutes of cooking. Leave cov(PL 10) for 6 to 8 minutes or until crisp tender,
Compact Microwave and microwave on high
wave-safe dish and cover. Place in Cuisinart
Place carrots and water in a 1½-quart micro-
freshly ground pepper to taste
½ teaspoon kosher salt
½ teaspoon Dijon-style mustard
1 teaspoon ground ginger
½ tablespoon fresh lemon juice
1 tablespoon honey
1 tablespoon unsalted butter
3 tablespoons water
1 pound baby cut carrots
Makes 4 servings
that is ready in just minutes.
this a quick and easy side dish
Using the prepared carrots makes
Baby Carrots
Honey Ginger Glazed
• calc. 121mg • fiber 0g
• fat 4g • sat. fat 1g • chol. 3mg • sod. 210mg
Calories 70 (53% from fat) • carb. 5g • pro. 3g
Nutritional information per serving (about ¼ cup):
until ready to serve.
serving following resting, cover and refrigerate
before serving to allow flavors to blend. If not
whisk until smooth. Let stand for 30 minutes
Place all ingredients in small bowl and stir with
¼ teaspoon kosher salt
1 teaspoon dill weed
½ tablespoon lemon juice
zest
½ teaspoon finely chopped lemon
Page 25

½ tablespoon extra virgin olive oil
chopped
½ garlic clove, peeled and finely
2 tablespoons chopped parsley
½ cup plain lowfat yogurt
Makes about ½ cup
your Cuisinart Microwave.
good sauce to serve with fish cooked in
Tangy Lemon Herb Sauce also makes a
Tangy Lemon Herb Sauce
• calc. 105mg • fiber 12g
Compact Microwave and
®
• fat 1g • sat. fat 0g • chol. 0mg • sod. 216mg
Calories 121 (6% from fat) • carb. 26g • pro. 8g
Nutritional information per serving (one artichoke):
Herb Sauce or other favorite dipping sauce.
Serve cooked artichokes with Tangy Lemon
5 minutes before serving.
upright in liquid and cover. Let stand for
high for 8 minutes longer. Stand artichokes
artichokes over, re-cover and microwave on
microwave on high (PL 10) for 8 minutes. Turn
in the Cuisinart
with a sheet of waxed paper, then the lid. Place
sides in seasoned water in casserole and cover
lemon half to prevent discoloration. Place on
all cut surfaces immediately after cutting with
snips/shears to trim sharp tips of leaves. Rub
Cut off top inch of artichoke and use kitchen
stem ends so that artichokes will sit upright.
off lower outer leaves/petals and discard. Trim
Wash the artichokes under cold water. Pull
with lid.
olive oil in a 1½ quart microwave-safe casserole
Place water, lemon slice, garlic, shallot, and
½ lemon
about 8 ounces each
2 globe artichokes,
½ tablespoon extra virgin olive oil
2 tablespoons chopped shallot
1 garlic clove, peeled and sliced
1 slice lemon
1 cup water
recipe follows
Tangy Lemon Herb Sauce,
Makes 2 servings
Herb Sauce
Artichokes with Tangy Lemon
Compact
®
1616
conventional oven.
ahead and reheated in your microwave or a
as stuffing for squash. Both can be prepared
Golden Raisins and Pine Nuts (p. 20) and use
Prepare Israeli Couscous Pilaf with Cranberries,
Tip: Prepare acorn squash, but do not glaze.
• calc. 164mg • fiber 10g
• fat 2g • sat. fat 1g • chol. 5mg • sod. 69mg
Calories 234 (8% from fat) • carb. 56g • pro. 4g
Nutritional information per serving:
high (PL 7). Serve hot.
wave and microwave for 1 minute on mediumto brush over the squash. Return to the microamong the squash halves. Use a pastry brush
squash half. Divide maple syrup mixture evenly
Place ½ teaspoon butter in the cavity of each
per to taste. When squash is tender, turn over.
soy sauce, cinnamon, and freshly ground pepWhile squash is cooking, combine maple syrup,
for 3 minutes.
der when tested with a sharp knife. Let stand
about 8 to 12 minutes, until the squash is tenMicrowave and microwave on high (PL 10) for
plastic wrap. Place in the Cuisinart
dish tightly with a lid, plate or microwave-safe
squash in a single layer. Add water and cover
pie plate, soufflé or other dish that will hold the
fibers. Place cut side down in a microwaveable
Cut squash in half and remove seeds and
freshly ground pepper to taste
¼ teaspoon ground cinnamon
½ teaspoon low sodium soy sauce
2 tablespoons maple syrup
1 teaspoon unsalted butter
¼ cup water
1½ pounds), washed
1 acorn squash (about 1¼ to
Makes 2 servings
into “fast food.”
a timesaver, and almost turns it
microwave cooked squash is quite
to prepare in a conventional oven,
Since acorn squash takes about an hour
Maple Glazed Acorn Squash
Page 26

15
15
fold the thin portion under to make them equal.
equal thickness – if they are not evenly thick,
*It is important that they be of a similar and
• calc. 50mg • fiber 0g
• fat 15g • sat. fat 3g • chol. 99mg • sod. 283mg
Calories 289 (46% from fat) • carb. 4g • pro. 34g
Nutritional information per serving:
also be used for sandwiches.
vegetables of choice. Pesto Chicken Salad may
and garnish with tomato, cucumber or other
Line individual plates with lettuce or spinach,
Serving suggestions:
and chill.
naise mixture and toss gently to blend. Cover
en has cooled completely, dice. Add to mayonmedium bowl and stir to combine. When chickPlace celery, onion, mayonnaise and pesto in a
longer. Let chicken cool in cooking liquid.
covered, on medium-high for 4 to 5 minutes
(PL 7) for 4 minutes. Turn chicken and cook,
chicken, cover and microwave on medium-high
Compact
®
(PL 10) for 3 to 4 minutes to bring to a boil. Add
Compact Microwave and microwave on high
®
with lid or waxed paper. Place in the Cuisinart
safe baking dish or glass casserole and cover
Place chicken broth and shallot in a microwave-
¼ cup prepared pesto
cup light mayonnaise
⁄
3
2
cup chopped onion
⁄
3
1
½ cup thinly sliced celery
about 6 ounces each
breast halves,
4 boneless, skinless chicken
1 shallot, peeled and chopped
2 cups low sodium chicken broth*
Makes 6 servings
chicken.
chicken for any recipe requiring cooked
sandwiches. Use this method to poach
Pesto Chicken Salad makes delicious
Pesto Chicken Salad
• calc. 106mg • fiber 4g
• fat 22g • sat. fat 3g • chol. 94mg • sod. 804mg
Calories 477 (40% from fat) • carb. 34g • pro. 38g
Nutritional information per serving:
of lemon and fronds from the fennel bulb.
ing. Serve hot. If desired, garnish with a wedge
ture. Let stand for 2 to 3 minutes before servdepend on thickness of fish, and its temperato 9 minutes – until salmon is flaky – timing will
round of waxed paper. Microwave on high for 7
with the remaining basil and salt. Cover with the
Drizzle with the remaining olive oil, and sprinkle
Arrange salmon fillets over the vegetables.
vegetables should be not quite cooked.
cover. Microwave on high for 3 minutes longer –
minutes. Add julienned squashes, stir and reMicrowave and microwave on high (PL 10) for 4
paper. Place in the Cuisinart
safe pie plate and cover with a round of waxed
Arrange in an even layer in a 9-inch microwavezest, and ¾ teaspoon of salt. Toss to combine.
the olive oil, 1 teaspoon of the basil, the lemon
tomato in a medium bowl with 1 tablespoon of
Place the carrots, fennel, potato, shallot, and
2 6-ounce pieces salmon fillet*
1 teaspoon kosher salt, divided
lemon zest
½ teaspoon finely chopped fresh
1½ teaspoons dry basil, divided
divided
1½ tablespoons extra virgin olive oil,
½ cup julienned plum tomato
cup julienned shallot
⁄
3
1
1 cup julienned red potato
1 cup julienned fennel bulb
½ cup julienned carrots
Makes 2 servings
Vegetables
Salmon with Julienned
Page 27

1414
• calc. 99mg • fiber 3g
(without optional olives):
• fat 15g • sat. fat 1g • chol. 149mg • sod. 1133mg
Calories 504 (27% from fat) • carb. 21g • pro. 62g
Nutritional information per serving
Serving suggestion: serve with rice or pasta.
resist the urge to microwave further.
• calc. 64mg • fiber 0g
• fat 26g • sat. fat 9g • chol. 252mg • sod. 505mg
Calories 346 (68% from fat) • carb. 2g • pro. 24g
Nutritional information per serving:
letting stand for 1 minute after each.
and cook on high for 30-second increments,
cooked at this point, return to the microwave
If there are any shrimp that appear understand for 2 minutes to complete cooking.
Microwave on high for 1 minute. Stir and let
Microwave on high for 3 minutes. Stir.
utes. Stir well. Add shrimp and stir to coat.
Microwave again on medium-high for 4 minmedium-high (PL 7) for 4 minutes. Stir.
(PL 10) for 2½ minutes. Stir. Microwave on
Compact Microwave and microwave on high
®
about 4 inches deep. Place in the Cuisinart
microwave-safe round casserole or bowl that is
Compact
®
Place the remaining ingredients in a 1½-quart
Rinse and drain shrimp, pat dry and reserve.
½ teaspoon kosher salt
½ teaspoon thyme
½ teaspoon rosemary
½ teaspoon oregano
½ teaspoon basil
taste
½-¾ teaspoon cayenne pepper, to
pepper
1 teaspoon freshly ground black
1 large bay leaf
2 cloves garlic, finely minced
1 tablespoon Worcestershire sauce
1 tablespoon soy sauce
¼ cup fresh lemon juice
cup beer, at room temperature
⁄
3
1
6 tablespoons extra virgin olive oil
into 6 pieces
6 tablespoons unsalted butter, cut
shrimp, in shells
1-½ pounds medium (28-35 count)
Makes 4 to 6 servings
Scallops will continue to cook while resting –
longer. Let stand 2 to 3 minutes before serving.
scallops and Microwave on high for 1 minute
mixture. Microwave on high for 4 minutes. Turn
remaining tomatoes. Top with reserved tomato
Arrange the scallops in a circle on top of the
mixture.
minutes. Remove about one third of the tomato
for 5 minutes. Stir. Microwave uncovered for 2
with the waxed paper and microwave on high
Stir in diced tomatoes and olives if using. Cover
on high for another 2 minutes.
2 minutes. Stir, replace cover and microwave
Microwave and microwave on high (PL 10) for
food. Place in the Cuisinart
rim of the dish so that it is not touching the
round of waxed paper cut to fit on top of the
mouth, olive oil, salt, and pepper. Cover with a
dish such as a deep dish pie plate. Stir in verbes de Provence in a microwave-safe round
Place chopped shallots/onion, garlic, and her-
discard. Reserve scallops.
tough muscle from side of scallop if still on, and
Rinse and pat scallops completely dry. Remove
pitted and halved, optional
10 niçoise or other black olives,
tomatoes, drained
1 can (14 to 15 ounces) diced
teaspoon freshly ground pepper
⁄
8
1
¼ teaspoon kosher salt
1 tablespoon extra virgin olive oil
or dry white wine
3 tablespoons dry white vermouth
½ teaspoon herbes de Provence
2 garlic cloves, finely chopped
or red onion
¼ cup finely chopped shallot
(about 8 to 10 scallops)
1 pound sea scallops
Makes 2 servings
and lots of napkins.
Serve with crusty French bread
Spicy Cajun BBQ Shrimp
seafood and shellfish.
The microwave shines when cooking
Scallops Provençal
Page 28

13
13
• calc. 52mg • fiber 4g
• fat 3g • sat. fat 0g • chol. 0mg • sod. 636mg
Calories 98 (27% from fat) • carb. 16g • pro. 3g
Nutritional information per serving:
smooth and homogenous. Serve hot.
blender, blend until completely emulsified,
more cooking time. Using a blender or hand
Check rice, if not tender add 2 to 3 minutes
utes, stirring after about 10 minutes of cooking.
and microwave on medium (PL 5) for 20 minliquid in the blender jar. Cover with lid or plate
ing liquid. Place solids and 1 cup of the cooking
Strain the solids from the cooking liquid, reserv-
(PL 5) for 1 minute.
and sauce. Microwave on medium
5 minutes of cooking. Stir in chipotle peppers
ered, on high for 10 minutes, stirring after about
stock, rice, and salt. Stir. Microwave, uncovAdd tomatoes with liquid, roasted pepper,
for 10 minutes.
Microwave and microwave uncovered on high
2 minutes. Stir. Place in the Cuisinart Compact
a lid or plate and microwave on high (PL 10) for
oil, then distribute in an even layer. Cover with
4 inches deep. Stir to coat all vegetables with
safe 1½ quart casserole or bowl that is at least
oregano, coriander, and cumin in a microwave
Place the olive oil, onions, carrots, celery, garlic,
peppers with adobo sauce*
½-1 tablespoon chipotle chile
¼ teaspoon kosher salt
1 tablespoon white rice
or vegetable stock
¾ cups low-sodium chicken
(drain and pat dry if using jarred)
seeded and cut into 1-inch pieces
1 large roasted red bell pepper,
tomatoes with juices
1 can (14-15 ounces) diced
pinch ground cumin
pinch ground coriander
½ teaspoon oregano
1 garlic clove, peeled and chopped
¼ cup sliced celery (½-inch)
¼ cup sliced carrots (½-inch)
½ cup chopped (½-inch) onion
divided
1 tablespoon extra virgin olive oil,
Makes about 5 cups
cheese sandwich.
soup would be perfect alongside a grilled
This slightly spicy, slightly smoky tomato
Chipotle Tomato Soup
Compact
®
desired.
to 3 tablespoons half-and-half to finish if
creamy, adding broth/stock as needed. Add 2
stock. Purée vegetables until smooth and
recipe but do not add all the remaining broth/
To make a purée to serve as a side dish, follow
Note:
• calc. 40mg • fiber 4g
• fat 0g • sat. fat 0g • chol. 0mg • sod. 494mg
Calories 131 (1% from fat) • carb. 30g • pro. 4g
Nutritional information per serving (¾ cup):
through. Serve hot.
on medium-high (PL 7) for 2 minutes to heat
thinner soup is desired. Cover and microwave
and smooth. Add remaining half-and-half if a
half-and-half or more stock. Blend until creamy
microwave on high for 1 minute. Add ½ cup
lemon juice. Return to microwave, cover and
nous. (May also be done in a blender.) Stir in
stock until completely smooth and homogegradually adding the remainder of the broth/
Use a hand blender to purée until smooth while
2 to 3 minutes.
20 minutes, stirring after 10 minutes. Let stand
Microwave and microwave on high (PL 10) for
lid or plate. Place in the Cuisinart
Cover with a sheet of waxed paper, then with a
of the broth/stock and stir; dot with butter.
microwave safe bowl or casserole. Add 1 cup
parsnips, onion, ginger, and salt in a 1½-quart
Place peeled and diced sweet potatoes and
free) or more stock
½-¾ cup half-and-half (may use fat1 tablespoon fresh lemon juice
cut into 4 pieces
1 teaspoon unsalted butter,
vegetable broth/stock, divided
2¼ cups low sodium chicken or
½ teaspoon kosher salt
½ tablespoon chopped fresh ginger
¼ cup chopped onion
cut into ½-inch dice
¼ pound parsnips, peeled,
peeled, cut into ½-inch dice
¾ pound sweet potatoes,
(total yield 3 cups)
Makes 2 entrée or 4 first course servings
simple enough to prepare on any night.
A soup fit for a special occasion, but
Parsnip Soup with Ginger
Creamy Sweet Potato and
Page 29

1212
• calc. 168mg • fiber 2g
• fat 28g • sat. fat 13g • chol. 474mg • sod. 369mg
Calories 349 (72% from fat) • carb. 7g • pro. 18g
Nutritional information per omelet:
serving plate. Serve hot.
the spatula, folding it over and turning onto
and partially melt cheese. Loosen omelet with
high (PL 7) for 20 seconds to reheat vegetables
and shredded cheese. Microwave on mediumand top is creamy. Top with cooked vegetables
onds – omelet will rise and puff, until just set
turn over. Microwave on high for 35 to 45 secpartially set edges of the eggs to the center and
Use a heatproof rubber spatula to move the
pared plate. Microwave on high for 45 seconds.
until frothy. Add salt and pepper. Pour into prebutter in bowl of dish. Beat eggs with a whisk
or 6-inch microwave-safe soup plate. Spread
Soften the remaining teaspoon of butter in a 5-
through cooking time. Remove and reserve.
for 5 minutes, stirring the vegetables halfway
and toss to coat with butter. Microwave on high
mushrooms, green onions, and basil to plate
10) for about 10 to 20 seconds. Add zucchini,
Compact Microwave. Microwave on high (PL
®
glass pie plate and place in the Cuisinart
Place 3 teaspoons of the butter in a 9-inch
Cheddar or Swiss cheese
2 tablespoons lowfat shredded
pinch freshly ground pepper
teaspoon kosher salt
⁄
8
1
2 large eggs
blend
teaspoon basil or Italian herb
⁄
8
1
into ¼-inch pieces
2 green onions, trimmed and cut
3 1-inch mushrooms, sliced
(¼-inch cut)
¼ cup julienned zucchini
divided
4 teaspoons unsalted butter,
Makes 1 omelet
on a busy night.
This omelet is an easy supper
Mushrooms
Omelet with Zucchini and
• calc. 49mg • fiber 0g
• fat 10g • sat. fat 3g • chol. 425mg • sod. 121mg
Calories 149 (62% from fat) • carb. 1g • pro. 12g
(made without butter):
Nutritional information per serving
serve hot.
to taste with salt and freshly ground pepper and
10 to 15 seconds after second stirring. Season
If dryer eggs are preferred, cook an additional
ger; they will be at a safe temperature at 165°F.
wave has stopped – resist the urge to cook loneggs will continue to cook even after the microreach preferred consistency, remembering that
until creamy and firm, but still moist. Stir to
Microwave, uncovered on high for 30 seconds,
vigorously to break up solids into curds.
Microwave, uncovered on high for 1 minute. Stir
and beat to blend with a fork or small whisk.
one minute. Break eggs into the cup, add water,
cup for 20 seconds on high (PL 10). Let cool
Melt butter (if using) in a 2-cup glass measuring
freshly ground pepper to taste
kosher salt, to taste
1 tablespoon water
4 large eggs
optional
1 tablespoon unsalted butter,
Makes 2 servings
Scrambled Eggs for Two
Page 30

11
11
Compact
®
• calc. 49mg • fiber 0g
• fat 10g • sat. fat 3g • chol. 425mg • sod. 121mg
Calories 149 (62% from fat) • carb. 1g • pro. 12g
(made without butter):
Nutritional information per serving
serve hot.
to taste with salt and freshly ground pepper and
10 to 15 seconds after second stirring. Season
If dryer eggs are preferred, cook an additional
ger; they will be at a safe temperature at 165°F.
wave has stopped – resist the urge to cook lon-
eggs will continue to cook even after the micro-
reach preferred consistency, remembering that
until creamy and firm, but still moist. Stir to
Microwave, uncovered on high for 30 seconds,
Stir vigorously to break up solids into curds.
Microwave, uncovered on high for 30 seconds.
beat to blend with a fork or small whisk.
minute. Break eggs into the cup, add water, and
high (PL 10) to melt the butter. Let cool one
Microwave and microwave for 20 seconds on
ing cup and place in the Cuisinart
Place butter (if using) in a 2-cup glass measur-
freshly ground pepper, to taste
kosher salt, to taste
1 tablespoon water
2 large eggs
optional
½ tablespoon unsalted butter,
nate the butter – though it is quite tasty.
waveable measuring cup, you can elimi-
Since the eggs will not stick to the micro-
Scrambled Eggs for One
RECIPES
Creamy Rice Pudding with Raisins .23
Cranberry Poached Pears ............... 23
Chocolate Mousse ..........................22
Desserts
Lemon Curd..................................... 22
Applesauce...................................... 22
Strawberry Pomegranate Jam......... 21
Misc.
Cheddar Cheese Sauce ..................21
Simple Hollandaise.......................... 20
Sauces
and Pine Nuts ................................ 20
Cranberries, Golden Raisins
Israeli Couscous Pilaf with
Risotto with Peas ............................19
Potato Salad ................................... 19
Stuffed Potatoes............................ 18
Broccoli and Cheddar
with Garlic...................................... 18
Smashed Potatoes and Cauliflower
Toasted Almonds ...........................17
Green Beans with Mushrooms and
Honey Ginger Glazed Baby Carrots 17
Sauce............................................. 16
Artichokes with Tangy Lemon Herb
Maple Glazed Acorn Squash .......... 16
Vegetables/Side Dishes
Pesto Chicken Salad ....................... 15
Salmon with Julienned Vegetables..15
Spicy Cajun BBQ Shrimp ................ 14
Scallops Provençal.......................... 14
Entrees
Chipotle Tomato Soup..................... 13
Soup with Ginger........................... 13
Creamy Sweet Potato and Parsnip
Soups
and Mushrooms............................. 12
Omelet with Zucchini
Scrambled Eggs for Two .................12
Scrambled Eggs for One................. 11
Breakfast
CONTENTS
Page 31

defrosted. Let stand for 10-20 minutes.
any pieces of food that are nearly
After each stage, rearrange or remove
30-60 minutes in the refrigerator.
aluminum foil. Let stand, covered, for
any warm portions with narrow strips of
foil. After the second stage, again shield
portions with narrow strips of aluminum
chicken over and shield any warm
down. After the first stage, turn the
Start defrosting with the breast side
Remove giblets before freezing poultry.
covered with foil, for 5-10 minutes.
food that are nearly defrosted. Let stand,
After each stage, remove any pieces of
Let stand, covered, for 5-10 minutes.
pieces of food that are nearly defrosted.
pieces of aluminum foil. Remove any
of food, shield them with narrow flat
there are any warm or thawed portions
After each stage, rearrange the food. If
narrow strips of aluminum foil.
over and shield any warm portions with
down. After each stage, turn the food
Start with the food placed fat side
DIRECTIONS
0.5-3.0 lbs.
AMOUNT
STANDARD
10
10
ately to prevent harmful bacteria from developing.
Meats that have been defrosted in the microwave should be cooked immedi-
and thinner sections of the food.
defrosted. Use narrow, flat, smooth strips of aluminum foil to cover the edges
pieces of foil prevents the edges from cooking before the center of the food has
be icy; let them stand to continue thawing. Shielding roast and steaks with small
Check foods when the oven signals. After the final stage, small sections may still
Chicken Pieces 0.5-3.0 lbs.
Whole Chicken 2.5-6.0 lbs.
Ground Meat 0.5-3.0 lbs.
Fish
Steaks, Chops,
Roast Beef, Pork 2.5-6.0 lbs.
FOOD
Follow the instructions below when defrosting different types of food.
AUTO DEFROSTING GUIDE
Page 32

9
9
stirring once during cooking.
High (PL-10) for 9 to 12 minutes, until tender,
tablespoons water. Cover. Microwave on
Place in casserole/baking dish with 2
before using.
minutes, until tender. Let rest 3 minutes
Microwave on High (PL-10) for 16-21
baking dish with ¼ cup water. Cover.
Place squash halves, cut side down in
during cooking.
High (PL-10) for 4 to 7 minutes, stirring once
tablespoons water. Cover. Microwave on
Place in casserole/baking dish with 2
5 to 9 minutes, until tender.
water. Cover. Microwave on High (PL-10) for
casserole/baking dish with 3 tablespoons
For cube/sliced butternut squash, place in
knife. Let stand 3 minutes before turning over.
14 minutes, until tender when tested with a
Cover. Microwave on High (PL-10) for 10 to
casserole/baking dish with ¼ cup water.
Place squash halves, cut side down in
over.
knife. Let stand 3 minutes before turning
12 minutes, until tender when tested with a
Cover. Microwave on High (PL-10) for 8 to
casserole/baking dish with ¼ cup water.
Place squash halves, cut side down in
during cooking.
(PL-10) for 3 to 6 minutes, stirring once
tablespoon water. Cover. Microwave on High
Place in casserole/baking dish with 1
or 3 times during cooking.
High (PL-10) for 10 to 14 minutes, stirring 2
tablespoons water. Cover. Microwave on
Place in casserole/baking dish with 3
done to taste.
(PL-10) for 5 to 8 minutes, until tender or
tablespoons water. Microwave on High
Place in casserole/baking dish with 2 to 3
tender, stirring once during cooking.
High (PL-10) for 3 to 5 minutes until crisp/
tablespoons water. Cover. Microwave on
Place in casserole/baking dish with 3
cubes.
into quarters or
Wash and peel, cut
and discard seeds.
lengthwise – remove
Wash, halve
into ¼-inch slices.
blossom ends. Cut
discard stem and
Wash, trim and
and cubed or sliced.
can also be peeled
Butternut squash
seeds and stem.
lengthwise, remove
Wash and halve
slices.
or cut into ½-inch
quarters lengthwise
Wash. Cut into
root end/base.
Cut thin slice from
remove stems.
Wash and drain,
into ½-inch cubes.
Wash and peel. Cut
Shell and rinse.
Wash.
trim tips and tops.
Remove strings,
1 pound
Sweet Potatoes
about 2½ to 3 pounds)
Spaghetti (one squash,
Squash
1 pound
yellow crookneck,
Zucchini, summer,
Squash
turban
butternut, hubbard,
Banana, buttercup,
Squash
1 to 1½ pound
sweet dumpling,
nugget, kabocha,
Acorn, delicate, golden
Squash
1 pound
Spinach
or Swedes), 1 pound
(Yellow, waxy turnips
Rutabagas
pods)
about 2 pounds in
3 cups fresh (from
Peas, green
12 ounces
peas or sugar snap,
edible pod – snow
Peas
VEGETABLE PREPARATION DIRECTIONS
Page 33

88
stirring once during cooking.
High (PL-10) for 4 to 7 minutes, until tender,
tablespoons water. Cover. Microwave on
Place in casserole/baking dish with 3
if adding to a dish that will be cooked further.
High (PL-10), for 3 to 5 minutes – undercook
tablespoons water. Cover. Microwave on
Place in casserole/baking dish with 3
minutes, stirring twice during cooking.
Microwave on High (PL-10) uncovered for 5
to plate and toss to coat. Season to taste.
10). Add up to 6 ounces sliced mushrooms
safe pie plate for 20 seconds on High (PLunsalted butter and olive oil in a microwaveTo sauté, melt ½ tablespoon each of
cooking.
for 4 to 6 minutes, stirring twice during
olive oil. Cover. Microwave on High (PL-10)
tablespoons melted butter or extra virgin
Place in casserole/baking dish with 2
(PL-10) for 6 to 9 minutes.
with ¼ cup water. Microwave on High
Place lima beans in a microwave-safe dish
cooking.
minutes, until tender, stirring once during
water. Cover. Microwave on High for 6 to 8
Place in casserole/baking dish with ¼ cup
minutes for 4 ears.
7 to 10 minutes for 3 ears, and 9 to 12
minutes for 1 ear, 4 to 6 minutes for 2 ears,
Microwave on High (PL-10) for 2 to 4
parchment. Place on glass turntable.
Wrap each ear in waxed paper or
High for 4 to 6 minutes, stirring once.
tablespoons water. Cover. Microwave on
Place in casserole/baking dish with 2
stirring once during cooking.
(PL-10) for 5 to 6 minutes, until crisp/tender,
tablespoons water. Microwave on High
Place in casserole/baking dish with 2
once during cooking).
head, 7 to 11 minutes for florets (stirring
High (PL-10), 9 to 12 minutes for a whole
tablespoons of water. Cover. Microwave on
Place in casserole/baking dish with 3
lengths.
and cut into 2-inch
quarter lengthwise
into ¼-inch slices or
Wash and peel. Cut
cooking.
pearl onions after
before cooking. Peel
Peel boiling onions
slice.
whole, quarter or
immediately. Leave
Wash and dry
and rinse.
Shell lima beans
into ½-inch slices.
lengthwise or cut
Cut into quarters
end/base. Wash.
thin slice from root
layer of stalks. Cut
tough/wilted outer
upper stalks and
Trim, discarding
silk.
Remove husks and
about 2 cups.
from ears to yield
silk; cut kernels
Remove husks and
½-inch slices.
wash. Cut into
Remove leaves,
break into florets.
Leave whole or cut/
discard leaves.
Wash; remove and
1 pound
Parsnips
8 ounces
Small boiling or pearl,
Onions
1 pound
Mushrooms
pounds in pods/shells)
3 cups (about 3
Lima Beans
2 bulbs
Fennel
4 ears
Corn on the Cob
4 ears
Corn
6 stalks
Celery
1 pound
Cauliflower
VEGETABLE PREPARATION DIRECTIONS
Page 34

7
7
during cooking.
(PL-10) for 7 to 9 minutes, stirring once
tablespoons water. Microwave on High
Place in casserole/baking dish with 3
cooking.
minutes for julienned, stirring once during
High (PL-10), 7 to 9 minutes for sliced, 5 to 7
tablespoons water. Cover. Microwave on
Place in casserole/baking dish with 3
minutes, stirring once during cooking.
water. Cover. Microwave on High for 7 to 9
Place in casserole/baking dish with ¼ cup
immediately in ice water.
choose shorter cooking times and refresh
using in a salad or to add to another dish,
or to taste, stirring once during cooking. If
(PL-10) for 4 to 9 minutes, until crisp-tender
tablespoons water. Microwave on High
Place in casserole/baking dish with 3
12 minutes, stirring after 5 minutes.
easily. Microwave sliced/diced beets for 9 to
until tender. Let cool and skins will slip off
beets for 9 to 12 minutes on High (PL-10)
tablespoons water. Cover. Microwave whole
Place in casserole/baking dish with 3
verts for 5 to 9 minutes.
(PL-10); Microwave French cut or haricots
whole beans for 8 to 12 minutes on High
tablespoons water. Cover. Microwave cut or
Place in casserole/baking dish with 3
done to taste.
or stirring halfway through cooking until
High (PL-10) for 3 to 6 minutes, rearranging
tablespoons water. Cover. Microwave on
Place in casserole/baking dish with 3
drain.
cooking, until a leaf pulls out easily. Invert to
3-6 minutes, turning halfway through
water. Cover. Microwave on High (PL-10) for
Place in casserole/baking dish with ¼ cup
rinse again).
prewashed, but
Rinse (they may be
julienne.
into ¼-inch slices or
Wash and peel. Cut
with sharp knife.
cut a cross in end
Trim stem ends and
loose outer leaves.
Trim off and discard
or spears.
into florets (1-inch)
outer leaves. Cut
discard stalks and
Wash, remove and
diced, peel and cut.
whole. For sliced or
not peel if cooking
well, but prick, do
inch. Scrub beets
Trim stems to 1-
whole.
haricots verts, leave
Trim ends from
cut or leave whole.
inch pieces, FrenchCut into 1 to 1½Wash. Trim ends.
to 2-inch lengths.
on diagonal into 1Leave whole or cut
Peel as desired.
woody part of spear.
Wash and break off
juice.
with fresh lemon
brush cut edges
from leaves. Rub/
snip off sharp tips
kitchen scissors to
from top. Use
cut about 1 inch
well; trim stems and
artichokes. Wash
Choose firm, closed
1 pound
Carrots, baby cut
1 pound
Carrots
1 pound
Brussels Sprouts
1 pound
Broccoli
medium)
1 pound (3 to 4
Red, yellow, or orange,
Beets
haricots verts
(green, yellow wax) or
Beans
thickness.
asparagus of similar
results choose
asparagus. For best
with thickness of
time will vary greatly
(1 pound) Cooking
Asparagus
ounces each)
globe (2-about 10
Artichokes
VEGETABLE PREPARATION DIRECTIONS
Page 35

66
eggplant, etc., in several spots be-
-
-
-
-
-
etables such as potatoes, squash,
• Prick skin of whole, unpeeled veg
edge.
reverse so that tips are on the outer
About two-thirds through cooking
in a spoke fashion, stem end out.
paragus, arrange trimmed asparagus
• For best results when cooking as
vented microwave plastic wrap.
ways cover the dish with a lid or
• When cooking cut vegetables, al
and the tips toward the center.
pointing toward the edge of the dish
gus and broccoli with the stem ends
• Always place vegetables like aspara
half the cooking time.
cook more evenly if turned over after
turntable before cooking. They will
should be arranged in a circle on the
acorn squash or corn on the cob
• Whole vegetables such as potatoes,
er than larger ones.
rots, peas, lima beans will cook fast-
• Small vegetables such as sliced car
add about ¼ cup of water.
and green beans are being cooked,
vegetables such as potatoes, carrots
no extra water is needed. If dense
may require several washings. Often,
Some vegetables such as spinach
cold clear water just before cooking.
• Vegetables should be washed in
YOUR MICROWAVE
VEGETABLES IN
ately.
dish of peas can be served immedifore cooking is completed, while a
on the counter for five minutes bethe oven). A baked potato can stand
finish cooking after they come out of
dense, large foods and vegetables to
time refers to the time necessary for
longer the standing time (standing
• Generally, the denser the food, the
through the cooking time.
-
range whole vegetables halfway
• For more even cooking, stir or rear
bursting.
fore cooking to prevent them from
FOR COOKING
SUGGESTIONS
they become tough if overcooked.
which time they will finish cooking;
allow for carryover cooking during
• Cook eggs just until barely set and
shell; they can explode.
never warm hard-cooked eggs in the
• Never cook eggs in the shell and
YOUR MICROWAVE
COOKING EGGS IN
SUGGESTIONS FOR
Page 36

5
5
to 3 minutes, covered.
juice. Cover with plate. Let stand 2
with melted butter and/or lemon
microwave-safe pie plate. Season
Arrange in single layer in
to 5 minutes covered.
outside, cover with plate. Let rest 3
plate, meaty (head) portion to
Arrange on flat microwave-safe
before serving.
about ¾ inch. Let stand 3 minutes
Fold over to create thickness of
stand 4-5 minutes before serving.
Cover loosely with wax paper. Let
Let stand 3 minutes before serving.
DIRECTIONS
High (PL-10)
Power Level: High (PL-10)
turn over/stir after 1-1½ minutes
Cooking Time: 2-4 minutes,
Power Level: High (PL-10)
Cooking Time: 1-3 minutes
Power Level: High (PL-10)
Cooking Time: 4-6 minutes
Power Level:
Cooking Time: 2½-3 minutes
Power Level: High (PL-10)
Cooking Time: 4-6 minutes
POWER LEVEL
COOK TIME/
foot before cooking.
large – remove muscle/
Scallops, 1 pound,
– peeled and deveined.
Shrimp, 1 pound, large
flat fillets, 1 pound
Flounder, sole, thin
1 pound
Salmon, fillets
filets of even thickness
haddock, 1 pound
Fillets – cod, halibut,
FOOD
prior to cooking. Let stand 5-10 minutes.
or similar product
®
or similar product prior to
®
brush with Gravy Master
be browned or crispy. To aid in browning,
near the bone is no longer pink. Skin will not
half up. Cook until juices run clear and meat
paper. Turn over when the cooking time is
the dish in a spoke pattern. Cover with wax
the thickest portions toward the outside of
Place chicken bone-side down on dish, with
cooking. Let stand 5-10 minutes.
with Gravy Master
browned or crispy. To aid in browning, brush
the bone is no longer pink. Skin will not be
up. Cook until juices run clear and meat near
paper. Turn over when the cooking time is half
microwave-safe roasting rack. Cover with wax
Place chicken breast-side down on
170°F - 180°F
DIRECTIONS
Medium High (70)
Power Level:
170°F light meat
180°F dark meat
6-9 mins/lb
Cooking Time:
Medium High (70)
Power Level:
6-9 mins/lb
Cooking Time:
POWER LEVEL
COOK TIME/
Up to 2 lbs.
Chicken Pieces
Up to 4 lbs.
Whole Chicken
FOOD
the recommended time.
places before letting the poultry stand
• Check the temperature in several
wax paper.
• Cover before cooking with a plate or
ness.
ate pieces of similar size and thick-
-
-
• When possible fold fish fillets to cre
to outside.
• Arrange pieces with thick sections
YOUR MICROWAVE
FISH/SHELLFISH IN
GUIDE FOR COOKING
areas that start to overcook.
shield bone tips, thin meat areas or
• Use small pieces of aluminum foil to
vent spattering.
• Cover poultry with wax paper to pre
dish.
roasting rack in a microwave-safe
• Place poultry on a microwave-safe
MICROWAVE
POULTRY IN YOUR
GUIDE FOR COOKING
Page 37

44
10 minutes.
time is half up. Let stand
Turn over when cooking
with vented plastic wrap.
on roasting rack. Cover
Place roast fat-side down
up. Let stand 10 minutes.
when cooking time is half
with wax paper. Turn over
on roasting rack. Cover
Place roast fat-side down
DIRECTIONS
standing time.
ture of the food will rise during the
moval temperatures. The tempera-
• The following temperatures are re-
visually appealing.
will aid in “browned” appear-
-
ance and make finished product more
Master
®
meats with a product such as Gravy
by traditional methods. Brushing
different in texture than meats cooked
Microwaved meats will be somewhat
•
the recommended time.
places before letting the meat stand
• Check the temperature in several
any bone tips or thin meat areas.
row strips of aluminum foil to shield
• Start meat fat side down. Use nar
–
dish.
roasting rack in a microwave-safe
• Place meat on a microwave-safe
POWER LEVEL
COOK TIME/
MICROWAVE
MEAT IN YOUR
GUIDE FOR COOKING
cooked.
temperature of the foods being
will vary depending on the starting
microwave cooking than others. Times
wave. Some foods are more suited for
cook a variety of foods in the microThe following guides will help you to
COOKING GUIDE
minutes, then Medium (50)
Power Level: High (Hi) for first 5
Well Done – 11-15 min/lb for 160°F
Cooking Time:
according to specific recipe.
minutes, then Medium (PL-5) or
Power Level: High (Hi) for first 5
Well Done – 9-14 min/lb for 145°F
Medium – 8-12 min/lb for 120°F
Rare – 7-11 min/lb for 115°F
Cooking Time:
Up to 4 lbs.
Bone-in
Boneless or
Pork
Up to 4 lbs.
roast beef
Boneless
FOOD
– 1-quart, 2-quart, 3-quart sizes
•
Glass/ceramic/porcelain soufflé dishes
Glass/ceramic 9- to 12-inch pie plates
•
• 12-ounce mugs for coffee
– 12-ounce, 24-ounce sizes.
• Glass/ceramic oval baker/gratin dish
– 1½-quart, 3-quart sizes
• Glass/ceramic bowl with lid
– 4 to 8 ounces in size.
• Glass, ceramic or porcelain ramekins
1-cup, 2-cup, 4-cup and 8-cup sizes.
• Glass measuring cups with handle
THE MICROWAVE
SUGGESTED DISHES FOR USE IN
using.
utes. Let stand for 2 minutes before
wave on High (PL-10) for 1½ minwith a plate or plastic wrap. Microwith 2-3 teaspoons water, and cover
dish/bowl. For 1 cup rice, sprinkle
• Reheat rice by placing in serving
onds.
on High (PL-10) for about 30 secCover with plastic wrap. Microwave
with a slice of fresh white bread.
plate. Cover with wax paper. Top
ar, place on a glass or ceramic pie
• To soften hard-as-rocks brown sug-
Page 38

3
3
containers that have changed shape.
30 to 60 seconds.
microwaving on Medium (PL-5) for
• Soften freezer-hard ice cream by
improved and less difficult.
and your juice yield will be greatly
High (PL-10) for 20 to 30 seconds
lemons and limes in microwave on
• Get more juice from citrus. Place
High (PL-7).
for 30 to 60 seconds on Medium
the jar and placing in the microwave
• Decrystallize honey by uncovering
tions.
ceed according to recipe instrucRemove from microwave and pro30 minutes until doubled in volume.
warm, steamy microwave for 20 to
wave. Close door and let rise in the
ered bowl of dough in the microcorner of microwave and place covboil. Move it immediately to back
in the microwave and bring to the
cup measure filled with 1 cup water
cover with plastic wrap. Place a 2pared dough in a large bowl and
• To proof yeast doughs, place pre-
YOUR MICROWAVE
OTHER USES FOR
30-seconds of cooking time.
level 10 as well as adding an extra
use, this will default set the power to
pressed while the microwave is in
• If the start/30-second button is
the product.
age have a microwave-safe claim for
towels it is suggested that the packof metal which can ignite). For paper
(these may contain chemicals or bits
undecorated materi-
als, not made of recycled papers
use only white,
If using paper goods in the microwave,
•
it is tempered glass or it will shatter.
• When microwaving in glass, be sure
-
-
not recommended to eat foods from
and will change form or warp – it is
withstand high heat or to be reused,
Some plastics are not designed to
chemicals into microwaved foods.
time and impart or leach harmful
cally when microwaved a second
they may change chemically/physiping containers in the microwave, as
as margarine tubs or whipped topother “single use containers” such
containers from frozen food items, or
Do not reuse deli containers, plastic
the pattern cannot be microwaved.
na or porcelain with gold or silver in
structions as to microwavability. Chicooking. Check manufacturer’s in-
• Use microwave-safe containers for
temperatures.
is only for checking finished cooking
stant-read thermometer in foods – it
seconds. Do not cook with the inand will give you a reading within
to check temperatures as needed
great tool to have – it will allow you
• An instant-read thermometer is a
vals until warm.
on High (PL-10) for 30-second interget extremely hot), and microwave
tainer with a handle (sugar syrups
fles, place in a microwave-safe con-
• To heat syrup for pancakes or waf
ed, then stir to complete melting.
increments until three-quarters meltwave on High (PL-10) in 30-second
paper to prevent spattering. Microsuring cup. Cover loosely with wax
blespoons and place in glass mea-
• To melt butter, unwrap, cut into ta
2 tablespoons.
PL-2) for 20 to 30 seconds for each
dish. Microwave on Low (PL-1 or
and place on small microwavable
• To soften butter for baking, unwrap
for about 40 to 60 seconds.
microwave on Medium-Low (PL-3)
Remove from original wrapper and
• Soften cream cheese in microwave.
Page 39

22
cook or these items will burn.
cooking, so take care not to overevery minute. There will be carryover
High for 1 to 3 minutes, stirring once
safe plate or pie plate. Microwave on
-
-
-
nut. Spread them on a microwave-
• Toast nuts, bread crumbs and coco
ily!
MICROWAVE – chocolate burns eascomplete melting. DO NOT OVER¾ of the chocolate is melted, stir to
while it is being stirred. When about
essary. Stir well, as chocolate melts
again at 30-second intervals as necStir well. If necessary, microwave
Medium High (PL-7) for 1 minute.
cup will be fine) and microwave on
container with handle (a measuring
chocolate morsels. Place in glass
cut it into 1-inch pieces, or use
allow for boil-ups.
Cook in a large enough container to
meal, follow package instructions.
that they do not burst.
prick yolks with tines of a fork so
they will burst! If poaching eggs,
cook evenly.
“wreath” pattern if possible to help
to similar sizes.
etables should be cut and trimmed
of similar size and thickness. Vegetables and seafood when they are
frequently to ensure even cooking.
erator.
as foods taken right from the refrigfoods will not take as long to cook
temperature. Room temperature
be greatly affected by their starting
protein/fat structure.
rubbery because of their complex
ditional methods may be tough and
that are tender when cooked by trareheated in the microwave. Meats
will become rubbery in texture when
-
-
• To melt chocolate in the microwave,
• For cooking hot cereals such as oat
• Do not cook eggs in their shells –
• Arrange foods in a “spoke” or
-
• You will get best results with veg
• Move foods around and stir them
• Foods cooked in the microwave will
water content. Breads and pastries
etables and foods that have a high
ticularly well suited to cooking veghow it cooks. Microwaving is parcharacteristics will be an indicator of
• The type of food and its individual
foods stand to prevent overcooking.
is better to undercook slightly and let
after the microwave has stopped. It
waving, foods will continue cooking
• Carryover cooking – When micro
package/recipe directions.
liquid and cooking according to
stovetop until tender, adding fresh
minutes longer. Drain and cook on
utes. Let stand in microwave for 15
safe container on high for 12 min
2 inches of water in a microwavein the microwave: cover beans with
can presoak them by “flash-soaking”
microwave is not recommended, you
• Although cooking dried beans in the
boiling on the stovetop.
surface bubbles actively, just like
• To boil liquids, microwave until the
COOKING
foods cooked.
aromas are not absorbed by the next
towel so that the chemicals and their
microwave clean with a dampened
cleaning, be sure to wipe interior of
• If using a chemical-based spray for
sive or harsh detergents.
• Do not use scouring pads or abra
move softened cooking residues.
a dampened microfiber cloth to repaper towels, a damp clean towel or
wipe walls of microwave with clean
wave for 5 minutes to steam. Then
microwave. Allow to stand in microjuice or baking soda to a boil in the
ter mixed with 2 tablespoons lemon
• In a 2-cup measure, bring 1 cup wait working efficiently and effectively.
Keeping your microwave clean will keep
CLEANING
TIP AND HINTS
Page 40

CMW-55 Series
Compact Microwave
®
Cuisinart
Reverse Side
Booklet
Instruction
Recipe Booklet
Page 41

8GTUKQP 0Q %/9+$
5K\G
//9://*
/CVGTKCN
%18'4)5//#66 #462#2'4
+05+&')5/).155#462#2'4
%QCVKPI ).1558#40+5*+0)+0%18'4
%QNQT (TQPV
%%/;-%$-
$CEM %$-%$-
&CVG
,70
%QQTFKPCVQT #5614 ;17
 Loading...