

Page 1

Mini Processor
CH4DCU
Page 2

Page 3

Congratulations on the purchase of your new Cuisinart Mini Processor.
For over 30 years Cuisinart’s aim has been to produce the very nest kitchen
equipment, so that cooks at home as well as professional chefs have the tools to
express their creativity.
All Cuisinart products are engineered for exceptionally long life, and
designed to be easy to use as well as to give excellent performance day after
day. That is why they have come to be regarded as the de ning machines in their eld
by chefs across the world.
To learn more about new products we are launching, register for our free Cuisinart
newsletter, simply visit our website www.cuisinart.co.uk and refer to the club
section.
Whatever you cook, cook it better with Cuisinart.
3
Page 4

Contents
Product Description . . . . . . . . . . . . . . . . . . . . . . . . . . . . . . . . . . . . . . . . . . . . . . . 5
Safety Cautions . . . . . . . . . . . . . . . . . . . . . . . . . . . . . . . . . . . . . . . . . . . . . . . . . . . 6
Instructions For Use . . . . . . . . . . . . . . . . . . . . . . . . . . . . . . . . . . . . . . . . . . . . . . . 9
A Fitting & removing the parts . . . . . . . . . . . . . . . . . . . . . . . . . . . . . . . . . . . 9
B The dual blade . . . . . . . . . . . . . . . . . . . . . . . . . . . . . . . . . . . . . . . . . . 11
C Control switches . . . . . . . . . . . . . . . . . . . . . . . . . . . . . . . . . . . . . . . . 12
D Processing . . . . . . . . . . . . . . . . . . . . . . . . . . . . . . . . . . . . . . . . . . . . 13
Processing Techniques . . . . . . . . . . . . . . . . . . . . . . . . . . . . . . . . . . . . . . . . . . . . . . 14
A Chopping fresh herbs . . . . . . . . . . . . . . . . . . . . . . . . . . . . . . . . . . . . . . 16
B Chopping meat, poultry, sh & shell sh . . . . . . . . . . . . . . . . . . . . . . . . . . . . . 16
C Chopping nuts . . . . . . . . . . . . . . . . . . . . . . . . . . . . . . . . . . . . . . . . . . 16
D Producing a purée . . . . . . . . . . . . . . . . . . . . . . . . . . . . . . . . . . . . . . . . 17
E Grinding coffee beans and hard foods . . . . . . . . . . . . . . . . . . . . . . . . . . . . . . 17
F Adding liquid . . . . . . . . . . . . . . . . . . . . . . . . . . . . . . . . . . . . . . . . . . 17
Trouble Shooting . . . . . . . . . . . . . . . . . . . . . . . . . . . . . . . . . . . . . . . . . . . . . . . . . . 18
Cleaning & Maintenance . . . . . . . . . . . . . . . . . . . . . . . . . . . . . . . . . . . . . . . . . . . . . 19
UK Guarantee . . . . . . . . . . . . . . . . . . . . . . . . . . . . . . . . . . . . . . . . . . . . . . . . . . . 20
UK After Sales Service . . . . . . . . . . . . . . . . . . . . . . . . . . . . . . . . . . . . . . . . . . . . . . 21
Recipes . . . . . . . . . . . . . . . . . . . . . . . . . . . . . . . . . . . . . . . . . . . . . . . . . . . . . . . . 22
4
Page 5
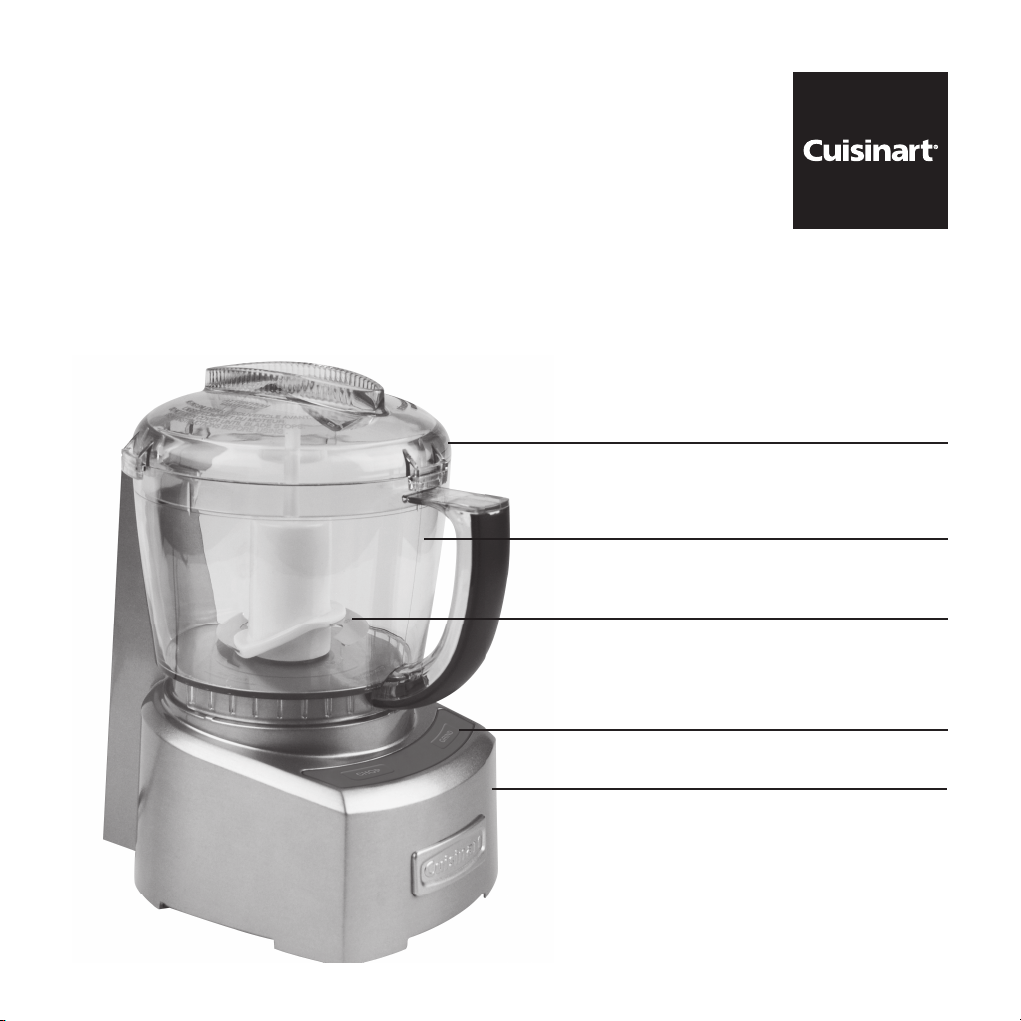
Product Description
Lid
Work bowl with handle
Blade (curved sharp
blade, at blunt blade)
with BladeLock system
Control switches
Housing base
Spatula (not shown)
5
Page 6

Carefully read all the instructions before using the appliance and keep in a safe place for future
reference.
Safety Cautions
Always follow these safety cautions when using this appliance to avoid personal injury or damage to the
appliance. This appliance should be used only as described within this instruction book.
Always disconnect the appliance from the mains supply after use, before assembly or dismantling and before
cleaning. Never leave the appliance unattended when plugged in. To disconnect, switch off and pull the plug
out. Never pull on the lead to remove the plug.
Do not immerse the housing base in water or in any other liquid or put into a dishwasher.
Do not allow the lead to overhang the kitchen table or worktop.
Do not allow the lead to come into contact with hot surfaces.
Always store the blade out of the reach of children where it cannot be accidentally touched.
Do not operate the appliance without food contents in the work bowl.
This appliance should not be used by adults or children whose lack of experience, product knowledge or
disability might cause a hazard, unless they have been correctly instructed and are adequately supervised.
Children should always be supervised to ensure that they do not play with this product.
Do not use this appliance if it has fallen or shows signs of damage. Discontinue use immediately and contact
the Cuisinart helpline (see “UK After Sales Service” section).
No repair should be carried out by the user. Return the appliance to the Cuisinart Service Centre for
inspection or repair/replacement (see “UK After Sales Service” section).
Do not use this appliance if the lead is damaged. In the event of lead damage discontinue use immediately.
If the lead is damaged it must be replaced by a special lead available from the manufacturer or its service
agent (see “UK After Sales Service” section).
This appliance should be used solely for food and drink preparation as described within the instructions for
use which accompany it. Please retain these instructions for future use.
6
Page 7

Do not use any accessories or attachments with this appliance other than those recommended by
Cuisinart.
To protect against fire, electric shock or personal injury, do not immerse cord, plug or unit in water or other
liquids.
For indoor use only.
For domestic use only.
Always ensure that your hands are dry before removing the plug from the mains outlet. Never pull the plug
out of the mains outlet by its lead.
Do not connect this appliance to an external timer or remote control system.
This appliance complies with the basic requirements of Directives 04/108/EEC (Electromagnetic Compatibility)
and 06/95/EEC (Safety of domestic electrical appliances).
WARNING: A cut off plug inserted into a 13 amp socket is a serious safety (shock) hazard. Ensure the
cut off plug is disposed of safely.
WARNING: Polythene bags over the product or packaging may be dangerous. To avoid danger of suffocation,
keep away from babies and children. These bags are not toys.
The symbol on the product or on its packaging indicates that this product may not be treated as
household waste. Instead it should be handed over to the applicable collection point for the recycling of
electrical and electronic equipment.
By ensuring this product is disposed of correctly, you will help prevent potential negative consequences for
the environment and human health, which could otherwise be caused by inappropriate waste handling of this
product. For more detailed information about the recycling of this product, please contact your local council
of ce or your household waste disposal service.
7
Page 8

For Your Safety
Handle the blade with extreme care, it is very sharp. Avoid touching the sharp edges.
Never place the blade directly on the motor of the housing base.
Before switching on the food processor, ensure that the blade is locked into place on the the motor spindle
(taking care to avoid the sharp edges), and that the lid is correctly inserted. Do not force or block the lid
mechanism.
Always carefully insert the blade before adding the ingredients.
Only use a spatula when the blade is stationary. Avoid all contact with moving parts.
Always wait for the blade to stop before removing lid.
Disconnect the appliance from the mains supply before cleaning or moving it or removing any of the
attachments.
Always remove the bowl from the motor base very carefully before removing the blade.
Never leave the appliance unattended when switched on or plugged in. Never pull the plug out with the
lead.
Keep hands, spatulas and other utensils away from moving blades whilst appliance is in operation. Only use
the spatula once the food processor motor has stopped.
8
Page 9

Instructions For Use
A Fitting & removing the parts
1. Place the housing base on a at, dry, stable surface.
2. Place the work bowl over the motor base with the handle facing forward.
N.B. Opening at back of bowl must face column at back of mini processor.
3. Turn the bowl in an anticlockwise direction until it locks into position on the housing base.
4. Carefully lift the blade assembly, holding the central plastic stem and place over the motor spindle. Push
the blade down until it clicks into place. The lower blade of the blade assembly should almost touch the
bottom of the work bowl.
5. To remove blade, pull up and away using gentle force.
N.B. Always hold the blade assembly from the plastic stem. Never touch the blade it is very sharp.
N.B. Never place the blade on the motor shaft until the work bowl is locked into place.
N.B. Always insert the blade in the work bowl before adding ingredients.
9
Page 10

6. Add the food you wish to process.
7. Place the lid on the work bowl with the long tab to the right of the rear column. While holding the
housing base with your left hand, securely grip the handle on the top of the lid and turn in an
anticlockwise direction until the descending tab locks into the locking post.
N.B. If the tab does not lock in the post, the motor will not start.
8. To remove the lid, hold the housing base with your left hand, securely grip the handle on the top of the
lid and rotate it in a clockwise direction.
N.B. Make sure the motor has completely stopped and the blade has stopped moving before removing the lid.
9. To remove liquids and sauces from the bowl, simply pour ingredients out of the work bowl. The
BladeLock System keeps blade safely in place.
10. To remove the blade, gently pull up to disengage blade lock away from the motor spindle holding the
plastic stem.
11. To remove the work bowl, hold the housing base with your left hand, hold the work bowl handle with
your right hand and turn in a clockwise direction to unlock and lift away from the housing base.
10
Page 11
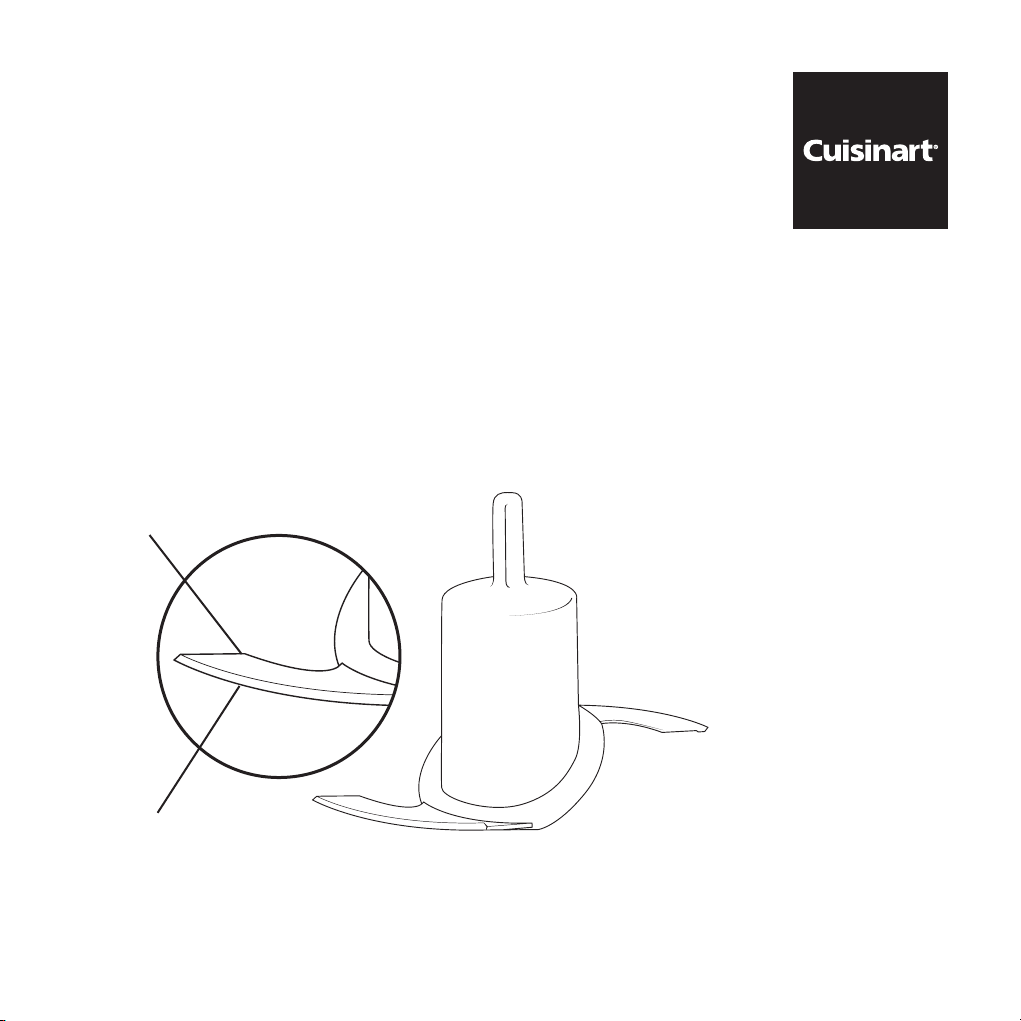
B. The Dual Blade
This appliance processes using a dual blade with a sharp, curved edge for chopping/mixing and a at, blunt
edge for grinding. It also features the exclusive BladeLock System, which enables the blade to lock into the
bowl, so you can pour ingredients out of the bowl without having to remove the blade.
Blunt edge
Sharp edge
11
Page 12

C. Control Switches
To start operation, simply press one of the two speed switches and hold down for the desired length of
time.
Use the ‘Chop’ speed switch for chopping, puréeing and mixing food with the sharp edge of the blade.
Use the ‘Grind’ speed switch for grinding and for chopping hard food with the blunt edge of the blade.
A ‘Pulse’ action is best when you are using the sharp edge of the blade. Two or three pulses are often enough.
Ensure you check the food frequently to prevent over processing. Over processing will result in a watery
paste instead of a ne chop.
N.B. Due to the powerful motor provided with this unit, we recommend using one hand to support the mini
processor during operation.
Continuous hold action is best when you are using the grind function. You may have to operate the mini
processor for several seconds to achieve the desired results with some food, as long as 20 seconds for some
seeds or 40 seconds for coffee beans. When you operate the unit for more than 10 seconds, use a pulse
action every 10 seconds or so to allow food to drop to the bottom of the work bowl. This provides more
consistent results.
IMPORTANT: Never operate the mini processor continuously for longer than 1 minute at a time.
12
Page 13

D. Processing
1. Fit the work bowl and blade (refer to section A).
2. Ensure you use the correct action (chop or grind) that is appropriate for the food to be processed (refer
to ‘Processing Techniques’ for further details).
3. Place food in the work bowl. Ensure food is cut into small evenly sized pieces and the work bowl is not
overloaded.
4. Lock the lid into position.
5. Press the appropriate control switch i.e. ‘Chop’ or ‘Grind’, depending on the food you are processing, for
the required amount of time (refer to ‘Processing Techniques for further details).
6. Wait for the blade to stop moving. Unplug the appliance and remove the lid & work bowl.
7. To remove liquids and sauces from bowl, simply pour ingredients out of work bowl. The BladeLock System
keeps blade safely in place.
8. To remove thicker ingredients from bowl, carefully remove the blade assembly, holding it by the top of the
plastic central stem. Gently pull up to disengage blade lock and remove blade from the work bowl. Remove
food with a spatula.
Occasionally food will stick to the sides of the work bowl as you process. If this happens, stop the appliance.
After the blade has stopped moving, remove the lid and use the spatula to scrape the food from the sides of
the work bowl back into the centre. Do not use your hand.
N.B. Do not operate without food contents in the work bowl.
13
Page 14

Processing Techniques
The following section includes useful hints and tips on how to use the Mini processor to achieve a number
of processing results. We recommend that you practice using these techniques before processing food to
eat. See ‘Operating Techniques’ table below for recommended food quantities for processing different types
of food.
Ingredients Operation Comments
Chop Grind
Anchovy
Bacon
Butter
Celery
Cheese – Soft Chilled
Cheese – Semi Soft
Cheese – Firm Chilled
Cheese – Hard
Chocolate
Cinnamon sticks
Coffee beans
Fresh herbs dry
Garlic
✓
✓
✓
Cut into 1.5cm pieces. Best at room temperature.
✓
✓
✓
✓
✓
Cut into 1.5cm pieces. Process 50g at a time.
✓
✓
✓
✓
✓
Drain rst. Cut in half.
Should be crispy.
Cut into 1.5cm long pieces.
Max 25g at a time, cut into 1.5cm pieces.
Break into 1.5cm pieces.
Max 50g at a time
14
Page 15

Meat, poultry, sh
Mushrooms
Nutmeg
Nuts
Olives
Onions, shallots
Peppers
Peppercorns
Seeds (e.g. cumin)
Vegetables, cooked
✓
✓
Choose rm, fresh mushrooms. Cut into even pieces no larger than 1.5cm.
✓
Pulse approximately 5 times to break apart, and then run continuously.
Should be very cold but not frozen.
✓
✓
Use pitted olives.
✓
✓
Cut into 1.5cm pieces.
✓
✓
✓
Should be cooked until soft.
15
Page 16

For best results:
Always cut large pieces of food into smaller pieces of even size of approximately 1.5cm to achieve even results.
Use the sharp edge for chopping, puréeing and mixing. It is ideal for chopping softer food such as herbs,
celery, onions, garlic and most cheese. It is also useful for puréeing cooked vegetables, making mayonnaise
and mixing salad dressing.
Use the blunt edge for grinding coffee beans and spices, and for chopping hard food such as peppercorns,
seeds, chocolate and nuts.
Do not overload the work bowl. Overloading causes inconsistent results and strains the motor. After
being processed, food should not reach more than 2/3 of the way up the central plastic stem of the blade
assembly.
A. Chopping fresh herbs:
The herbs, work bowl and blade must all be thoroughly cleaned and dried. Remove the stems from herbs.
Add the leaves to work bowl and process, using the ‘Chop’ switch and a ‘pulse’ action until they are
chopped to the desired consistency.
B. Chopping meat, poultry, sh and shell sh:
The food should be very cold but not frozen. Cut into 1.5cm pieces and place in work bowl. Use the
‘Chop’ switch and a ‘pulse’ action until the food is evenly chopped. Use a continuous processing action for
a few seconds for a ner chop if required. Use a spatula to scrape food down from the sides of the work
bowl as necessary.
C. Chopping nuts:
Add the nuts to the work bowl and process continuously using the ‘Chop’ switch until chopped to the desired consistency. Check frequently to avoid nuts clumping together. If necessary, use the spatula to re-distribute the nuts evenly in the work bowl.
16
Page 17

D. Producing a purée:
Cut the food into 1.5cm pieces, and place in work bowl. Use the ‘Chop’ switch and a ‘pulse’ action to chop
coarsely, then process continuously until food is puréed.
N.B. Cooked potatoes are an exception to this procedure. They develop a gluey texture when processed
with the metal blade.
E. Grinding coffee beans and hard foods:
Add coffee or hard food to the work bowl. Use the ‘Grind’ switch and process using a continuous action
until desired consistency is reached. Coffee beans may take slightly longer to process, so use a pulse action
every 10 seconds or so to allow food to drop to the bottom of the work bowl.
F. Adding liquid:
You can add liquids such as water, oil or avouring while the appliance is running. Pour the liquid through
one of the two openings in the lid.
N.B. Add liquid through only one opening at a time. The other opening must be left free for air to circulate.
17
Page 18

Trouble Shooting
Motor doesn’t start or blade doesn’t rotate.
Check that plug is securely inserted into the mains.
Check that work bowl and lid are securely locked into place.
Ensure only one control switch is being pressed at a time.
Food is unevenly chopped.
Either you are chopping too much food at one time, or the pieces are too large. Try cutting food into
smaller pieces of an even size and processing a smaller amount per batch.
Food is chopped too ne or is watery.
The food has been over-processed. Use brief pulses or process for a shorter period of time.
Food collects on lid or sides of work bowl.
You may be processing too much food. Turn the appliance off. When blade stops moving remove lid and
clean work bowl and lid with spatula.
Food gets stuck on blade.
You may be processing too much food. Turn the appliance off. When blade stops moving, carefully remove
blade. Remove food from blade and work bowl using a spatula and start again.
18
Page 19

Cleaning & Maintenance
When not in use, leave the appliance unplugged.
All parts except the housing base are dishwasher safe. We recommend washing them in the dishwasher
on the top rack. Due to intense water heat, washing the work bowl, lid and accessories on the bottom
rack may cause damage over time. Insert the work bowl upside down.
If you wash the blade by hand, wash with extreme care, the blade is very sharp. Do not leave it in soapy
water where it may disappear from sight.
Take extra care when loading and unloading blade in the dishwasher.
To simplify cleaning, rinse the work bowl, lid and blade immediately after use so food won’t dry on them.
Chopping certain foods may scratch, cloud or discolour the work bowl.
Do not use abrasive cleaners on the housing base. Simply wipe with a damp cloth and dry thoroughly.
Apply any cleaning agent to the cloth, not the housing base.
19
Page 20

UK Guarantee
This Cuisinart appliance is guaranteed for domestic consumer use for 5 years.
The guarantee covers defects under normal use from date of purchase and ceases to be valid in the event
of alteration or repair by unauthorised persons.
If the appliance does not perform satisfactorily due to defects of material or manufacture, it will be
repaired or replaced by the manufacturer (see “UK After Sales Service” for details).
This guarantee is only valid in the United Kingdom and Eire (includes Northern Ireland, Republic of Ireland,
the Channel Islands and the Isle of Man).
No responsibility will be accepted for any damage caused in transit.
A charge may be made if goods are returned outside the relevant guarantee period or if the product is
returned unnecessarily.
The manufacturer reserves the right to amend terms and speci cations without prior notice.
This guarantee in no way affects your statutory rights.
20
Page 21

UK After Sales Service
For further advice on using your Cuisinart Mini Processor and other products in the Cuisinart range,
contact the Cuisinart Customer Care Line on 0870 240 6902 (09:00 to 17:00 hrs Monday to Friday) or
alternatively, email your enquiry to support@cuisinart.co.uk.
In Guarantee
Firstly, please call the Cuisinart Helpline 0870 240 6902.
Return the product to the Cuisinart Service Centre at the following address:
Cuisinart Service Centre
P.O. Box 506
WIGAN
WN1 9AA
Enclose your name and address, together with proof of purchase and details of the fault. Cuisinart will
either repair or replace the product, as appropriate.
Out of Guarantee
Contact the Cuisinart Customer Care Line on 0870 240 6902 (09:00 to 17:00 hrs Monday to Friday) or,
alternatively, email your enquiry to support@cuisinart.co.uk for details of the standard repair or
replacement charge. If you wish to proceed with the repair or replacement, return the product to the
Cuisinart Service Centre at the following address:
Cuisinart Service Centre
P.O. Box 506
WIGAN
WN1 9AA
Enclose your name, address and contact number along with details of the fault.
21
Page 22

Recipes
Sauces and dressings
Classic mayonnaise . . . . . . . . . . . . . . . . . . . . . . . . . . . . . . . . . . . . . . . . . . . 23
Roasted red pepper sauce . . . . . . . . . . . . . . . . . . . . . . . . . . . . . . . . . . . . . . . 24
Creamy roasted garlic and herb dressing . . . . . . . . . . . . . . . . . . . . . . . . . . . . . . . . 25
Pesto . . . . . . . . . . . . . . . . . . . . . . . . . . . . . . . . . . . . . . . . . . . . . . . . . . 26
Vinaigrette . . . . . . . . . . . . . . . . . . . . . . . . . . . . . . . . . . . . . . . . . . . . . . . 27
Crème Chantilly . . . . . . . . . . . . . . . . . . . . . . . . . . . . . . . . . . . . . . . . . . . . 28
Dips
Hummus . . . . . . . . . . . . . . . . . . . . . . . . . . . . . . . . . . . . . . . . . . . . . . . . 29
Guacamole . . . . . . . . . . . . . . . . . . . . . . . . . . . . . . . . . . . . . . . . . . . . . . . 30
Fruits and drinks
Cinnamon and pear compote . . . . . . . . . . . . . . . . . . . . . . . . . . . . . . . . . . . . . . 31
Mojito . . . . . . . . . . . . . . . . . . . . . . . . . . . . . . . . . . . . . . . . . . . . . . . . . 32
22
Page 23

Classic Mayonnaise
Serves 4
1 medium egg yolk
1 tsp mustard
Salt and pepper to taste
300 ml sun ower oil
Place the egg yolk and mustard into the work bowl, season well with salt and pepper and process
continuously using the ‘Chop’ switch until combined.
While pulsing, gradually add the oil, through 1 hole of the lid, leaving the other hole free for air to circu-
late. Process until the sauce emulsi es. If the mayonnaise is too thick, add 1tsp vinegar to thin slightly.
Variations: for added avour try adding spices, e.g. paprika, cayenne, or herbs, e.g. parsley, basil.
23
Page 24

Roasted Red Pepper Sauce
3 garlic cloves, peeled
2 strips lemon zest
1 ½ teaspoons rock salt
1 ½ teaspoons herbs de provence
2 tablespoons fresh lemon juice
2 tablespoons regular or white balsamic vinegar
120ml extra virgin olive oil
3 jars roasted red peppers, drained but not rinsed
Add the garlic, zest, salt and herbs to the work bowl; chop for 5-10 seconds. Scrape the bottom and sides
of the work bowl. Add the lemon juice, vinegar, olive oil and peppers. Pulse on ‘Chop’ 10 times, then
process for 15-20 seconds until smooth.
Transfer to a resealable container and refrigerate for at least 30 minutes to allow the avours to blend.
The sauce will keep up to 1 week refrigerated.
24
Page 25

Creamy Roasted Garlic and Herb Dressing
9 garlic cloves, peeled
1 teaspoon extra virgin olive oil
170g loosely packed basil leaves
170g loosely packed parsley leaves
170g fat free plain yoghurt
120g light mayonnaise
1 ½ tablespoons balsamic vinegar
Preheat the oven to 190ºC (375ºF). Toss the garlic with the oil and wrap loosely in aluminum foil. Roast in
the preheated oven for about 45 minutes or until cloves have softened. Allow to cool for 5 to 10 minutes.
Place the cooled garlic in the work bowl with the basil and parsley. Pulse on ‘Grind’ 10 times; scrape the
work bowl. Add the yoghurt, mayonnaise and vinegar.
Process on ‘Grind’ until smooth for about 30 seconds. Scrape the work bowl; process for an additional 15
seconds.
Transfer to an airtight container. Dressing keeps for one week in refrigerator.
25
Page 26

Pesto
Serves 6
1 clove garlic, peeled
1 tbsp pinenuts
50g basil leaves
15g goat’s cheese
1 tsp nut oil
50g parmesan
60ml olive oil
Salt and pepper
Add the garlic, pinenuts and basil into the work bowl and process using the ‘Chop’ switch until nely chopped.
Add the goat’s cheese, half the nut oil and process until mixed. Add the parmesan and mix using a pulse
action until combined.
Add the olive oil, season to taste and process until mixed.
26
Page 27

Vinaigrette
Serves 6
1 tsp mustard
2 tsp white wine vinegar
300ml sun ower oil
10g parsley
Salt and pepper
Place the mustard, vinegar and seasoning into the work bowl. Lock lid into place.
Gradually add the oil through 1 hole of the lid, leaving the other hole free for air to circulate, whilst proces-
sing continuously with the ‘Chop’ switch.
Once combined add the parsley and process until mixed using a pulse action, until parsley is chopped as desired.
Tip: If the vinaigrette is too thick, add 1-2 tsp cold water through the lid.
27
Page 28

Crème Chantilly
Serves 4
300ml single cream
80g granulated sugar
1 tbsp vanilla extract
Place the cream in the work bowl and process using the ‘Chop’ switch for 1 minute.
Add the sugar and vanilla extract and process for a few seconds until mixed.
28
Page 29

Houmous
Serves 4
75g chick peas
5g at leaf parsley
½ tsp lemon zest
1 clove garlic, peeled
Juice of 1 lemon
½ tsp ground cumin
1 tbsp olive oil
Place the chick peas, parsley, lemon zest, garlic, lemon juice and the ground cumin into the work bowl and
process using the ‘Grind’ switch until combined.
Once combined, process the mixture using the ‘Chop’ switch, whilst adding the olive oil through the hole
in the lid until well mixed and thickened.
Serve with pitta bread or as a dip for crudités.
29
Page 30

Guacamole
Serves 4
1 avocado, peeled, stones removed, cut into 1.5cm pieces
Juice of lemon
25g fresh coriander
25g onion, peeled and cut to 1.5cm cubes
Green chilli, cored, deseeded and cut to 1.5cm pieces
1 tsp olive oil
Salt and freshly ground black pepper
Add all the ingredients to the work bowl and process using the ‘Chop’ switch and a pulse action until
combined and then a continuous action until as smooth as desired.
Serve chilled as a dip with Nachos or crudités.
30
Page 31

Cinnamon and pear compote
75g brown sugar
1 stick cinnamon, broken into 1.5cm pieces
25g butter
2 pears, peeled and cut into 1.5cm cubes
Place the sugar and cinnamon into the work bowl. Process using the ‘Grind’ switch and a pulse action
until broken, and then use a continuous action, until powdered. Remove the powder, sieve and keep to
one side.
Melt the butter in a saucepan, add the powdered cinnamon mix and pear and simmer for 10 minutes.
Return to the work bowl and process until puréed.
Variations: try replacing the pears with other fruits e.g. apples, peaches.
31
Page 32

Mojito
Serves 4
8 ice cubes
Juice 2 limes
8 leaves fresh mint
8 brown sugar cubes
80ml Rum
120ml Perrier water
Place the ice in the work bowl and process using the ‘Chop’ switch for a few seconds to break up the ice.
Add the lime juice and mint leaves and process until combined.
Add the sugar and rum, and mix for a few seconds.
Finally, add the Perrier water by gradually pouring through one hole of the lid. Pulse to combine and serve
immediately.
32
Page 33

33
Page 34

Page 35

Page 36

www.cuisinart.co.uk
IB-9/323
Page 37

Version no :
Color (Front):
(Back):
IB-9/323
Fold Size: 180mmX180mm 36pp Saddle Stitiched
Material:
157gsm Gloss artpaper
Coating:
Waterbase varnishing for whole book
1C(BK)
1C(BK)
Date: Aug-27-2009
Co-ordinator : /
Hugo Description
PDF version :
Hugo Code :
Color Series:
CH4DCU IB-9/323 (0,0) Book
SMT0012IB-1-1
Non
Remark :
Quality request(1)
Operator : HAI
 Loading...