

Page 1

INSTRUCTION AND
RECIPE BOOKLET
CookFresh™ Digital Glass Steamer
For your safety and continued enjoyment of this product, always read
the Instruction Book carefully before using.
STM-1000
Page 2

Carefully read all instructions before using this
appliance.
IMPORTANT
SAFEGUARDS
When using electrical appliances, basic safety
precautions should always be taken, including
the following:
1. READ ALL INSTRUCTIONS BEFORE
USING.
2. To protect against the risk of electrical
shock, do not immerse cord, plugs or base of
steamer in water or other liquids.
3. Close supervision is necessary when any
appliance is used by or near children.
Cuisinart does not recommend the use of this
appliance by children.
4. Always unplug from outlet when not in use
and before cleaning. Allow to cool before
putting on or taking off parts, and before
cleaning or removing contents from steamer.
5. Do not operate any appliance with a
damaged cord or plug, or after the appliance
malfunctions, or is dropped or damaged in
any manner. Return appliance to nearest
Cuisinart service facility for examination,
repair, and/or mechanical or electrical
adjustment.
6. The use of attachments, other than those
recommended by Cuisinart, may cause re,
electrical shock, or risk of injury to persons.
7. Do not use outdoors.
8. Avoid sudden temperature changes, such
as adding refrigerated foods into the glass
steaming pot.
9. Do not let cord hang over edge of counter
or table or touch hot surfaces, which could
damage the cord.
10. Be certain the steamer lid is securely in place
before operating appliance. Never operate
without the lid securely in place.
11. This appliance is intended for household use
only.
12. Wash all parts before rst use.
13. WARNING: TO REDUCE THE RISK OF
ELECTRICAL SHOCK OR FIRE, DO NOT
REMOVE THE BASE PANEL. NO USER
SERVICEABLE PARTS ARE INSIDE. REPAIR
SHOULD BE DONE ONLY BY AUTHORIZED
PERSONNEL.
14. Do not touch hot surfaces. Use handles or
knobs.
15. Extreme caution must be used when moving
an appliance containing hot oil or other hot
liquids.
16. To disconnect, press START/STOP to turn
unit off, then remove plug from wall outlet.
17. Do not use appliance for other than its
intended use.
18. Do not place on or near a hot gas or electric
burner, or in a heated oven.
19. Do not operate your appliance in an appliance
garage or under a wall cabinet. When storing
in an appliance garage, always unplug the
unit from the electrical outlet. Not doing
so could create a risk of re, especially if the
appliance touches the walls of the garage or
the door touches the unit as it closes.
SAVE THESE
INSTRUCTIONS
FOR HOUSEHOLD
USE ONLY
2
Page 3

SPECIAL CORD SET
INSTRUCTIONS
A short power-supply cord is provided to reduce
the risks of injury resulting from becoming entangled in or tripping over a longer cord. Longer,
extension cords are available and may be used if
care is exercised in their use. If a longer extension cord is used:
1. The marked electrical rating of the cord set or
extension cord should be at least as great as
the electrical rating of the appliance.
2. The cord should be arranged so that it will not
drape over the countertop or tabletop where
it can be pulled on by children or tripped over
unintentionally.
NOTICE: This appliance has a polarized plug
(one prong is wider than the other).To reduce the
risk of electric shock, this plug will t into a polarized outlet only one way. If the plug does not t
fully into the outlet, reverse the plug.
If it still does not t, contact a qualied electrician. Do not modify the plug in any way.
UNPACKING
INSTRUCTIONS
Place the box containing the Cuisinart®
CookFresh™ Digital Glass Steamer on a at,
sturdy surface before unpacking. Open box and
remove instruction book and any printed materials from top of box.
Remove packing materials and all components.
CAUTION: Remove glass bowl carefully.
Check the Features and Benets section to
ensure you’ve removed all parts. Place all packing materials back into the gift box andsave,in
the event that future shipping of the item is
needed.
BEFORE THE FIRST USE
Before using your Cuisinart® CookFresh™ Digital
Glass Steamer for the rst time, remove any
dust from shipping by wiping the housing, steam
tower, and control panel with a damp cloth.
The removable water reservoir, lid, steaming
pot and steaming tray should be hand-washed
in hot, sudsy water and thoroughly rinsed.
Before using your steamer, make sure it is 2 to
4 inches away from the wall or from any items
on the countertop. Do not use on heat-sensitive
surfaces. Do not use under cabinets.
TABLE OF CONTENTS
Important Safeguards ...................................... 2
Unpacking Instructions....................................3
Features and Benets ......................................4
Getting to Know Your Control Panel ............... 5
Operation ......................................................... 6
Cleaning and Storage ......................................7
Descaling the Steamer ....................................7
Helpful Hints ....................................................8
Steaming Guide ............................................... 8
Recipes .......................................................... 11
Warranty ......................................................... 23
3
Page 4
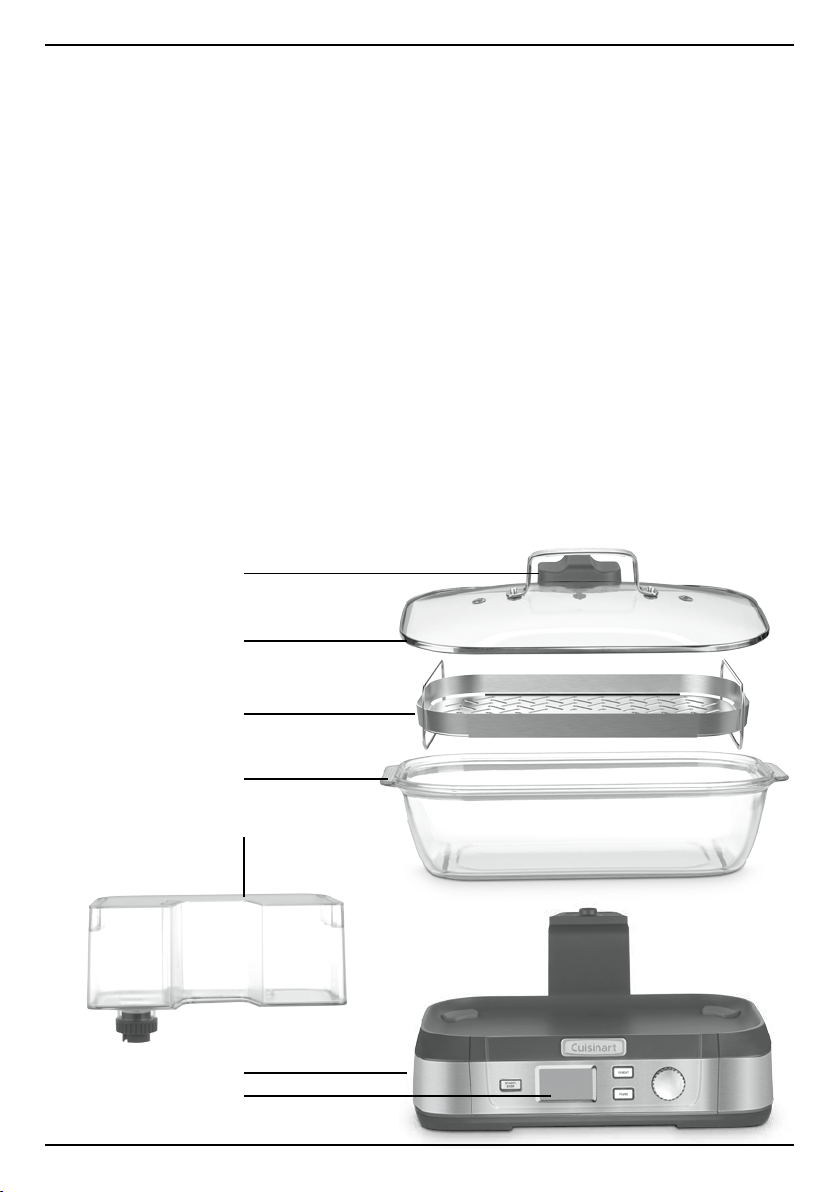
FEATURES AND BENEFITS
1. Large 5-Liter Glass Steaming Pot
Provides clear view of food as it steams.
Steaming in glass prevents food from
coming into contact with plastic. Dishwasher safe. Can also be used as a
serving dish.
2. Glass Lid with Stainless Steel Rim
Provides clear view of food as it steams;
features two release vents.
3. Reversible Stainless Steel
Steaming Tray
Flips to accommodate different foods,
and elevates food for even steaming;
side bars prevent small items from falling off. Dishwasher safe.
4. Removable 1-Liter Water Reservoir
Large capacity allows you to steam
complete meals without relling.
Lifts off for easy lling.
5
2
5. Steam Tower Cover
Attached to the lid, disburses steady
stream of steam from the top down,
circulating it around food for even
results.
6. Control Panel
See following page.
7. Base with Brushed Stainless
Steel Housing
Elegant and easy to clean with
a damp cloth.
8. Audible Alert (not shown)
Signals you when steam cycle ends and
water needs to be relled.
9. Water Release Drain (not shown)
3
1
4
7
6
4
Page 5

GETTING TO KNOW YOUR CONTROL PANEL
12 346 5
1. Large LCD
The blue-backlit LCD screen is easy to
read; displays function menu, illuminates
function selected, shows steaming time,
and displays “add water” icon when water
reservoir needs relling.
2. START/STOP Button
Press to start or manually stop the
steaming process.
3. Selector Dial
Use to select food category presets:
VEGETABLES, POULTRY, SEAFOOD,
and GRAINS, plus MANUAL and KEEP
WARM settings. Use to increase or
decrease steam time if desired.
4. REHEAT Button
Press to bring food up to serving
temperature.
5. PAUSE Button
Press to pause steam ow before
removing lid during the steaming
process. Timer will pause; press again to
resume steaming.
6. ADD WATER Indicator
Icon appears in LCD to let you know
when to rell water reservoir. An audible
alert will also sound.
5
Page 6
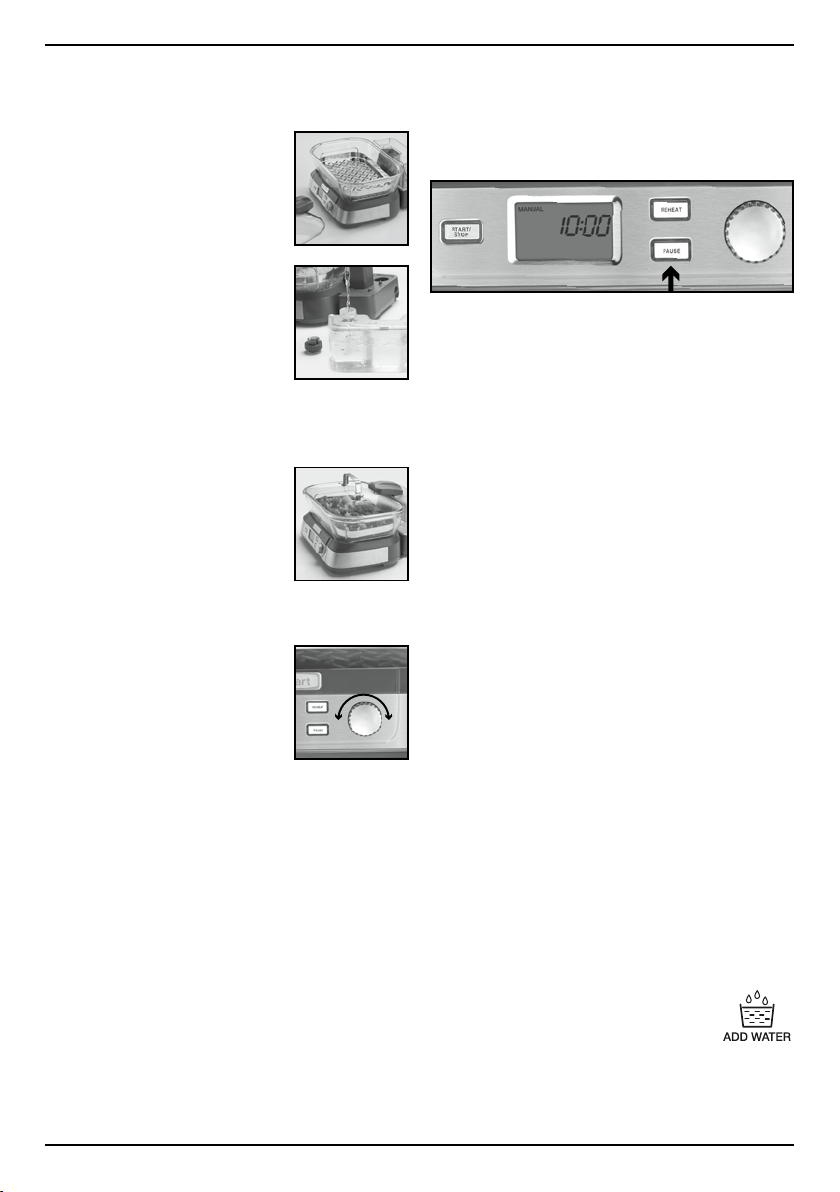
OPERATION
Plug steamer into an electrical outlet.
1. Prepare the Steamer
Position the steamer where
you want to do your cooking.
Choose a at, dry, sturdy
surface. Set the glass
steaming pot in place on the
base.
2. Fill Water Reservoir
Remove the water reservoir
and twist the black cap
counterclockwise to open.
Fill with cold or distilled water,
twist the cap clockwise to
close, and set reservoir back into the steamer.
3. Add Food
Place steaming tray in the desired position.
Place food onto the steaming
tray.
4. Cover Pot
Place lid on steaming pot,
positioning the steam tower
cover over the steam tower.
5. Select Steaming Time
Turn Selector Dial until the food type you
are steaming illuminates
in the LCD display, then
press the dial to select it.
Recommended steaming time
will appear in the LCD display.
Turn Selector Dial to increase
or decrease preset time for
personal preference. If you wish to return to
the food-type menu, press the Selector Dial.
NOTE: Cooking time will vary depending
on the quantity and density of food, size of
pieces, and other factors. As you get to know
your steamer and cook different foods, you’ll
learn how much time is needed to get the
exact results you want.
6. Press START/STOP Button
Steaming time will begin to count down and
the unit will start to emit steam in just 30
seconds. When steam time has elapsed,
steaming will stop and an alert will sound.
WARNING: During use, never touch the
base, steamer pot, or lid, since they get
very hot.
NOTE: Use the PAUSE function when checking
food doneness or removing/adding ingredients
during the steaming process. Press to pause
steam ow before removing lid. Timer will pause;
press again to resume steaming.
7. Manual Timer Option
The manual timer offers two options:
a. To set a preferred cooking time, turn
Selector Dial to illuminate MANUAL in LCD
and press the dial. Next, turn dial to the
desired cooking time and press START/
STOP to begin steaming. Timer will begin to
count down steaming time.
b. To steam without setting a time, turn
Selector Dial to illuminate MANUAL in LCD
and press START/STOP. Steaming will begin
and timer will start counting up. Press
START/STOP to stop steaming.
NOTE: Steamer shuts off automatically
when timer reaches 60 minutes.
8. Audible Alert Signals Steaming Is Complete
To stop steaming before time has elapsed,
simply press START/STOP button. To adjust
time during cooking, press pause button and
turn Selector Dial to increase or decrease
steaming time. If not serving right away, you
can use the KEEP WARM mode. Turn Selector
Dial to illuminate KEEP WARM. Press the dial,
00:00 will appear in the display. Press START/
STOP and the timer will begin to count up.
Press START/STOP again to turn KEEP WARM
off. To select a specic KEEP WARM time,
when 00:00 appears, use dial to select time,
then press START/STOP. Timer will begin
counting down.
NOTE: Residual heat may continue to cook
food; adjust time accordingly.
9. Adding Water During Cooking
When there is little or no water left
in the water reservoir, ADD WATER
icon will appear in the LCD. An
audible alert will sound continuously until
water reservoir is relled. Follow Step 2 above
for water reservoir lling instructions.
6
Page 7

10. Remove Food When Ready to Serve
Use oven mitts to remove lid, lifting the
side farthest from you, allowing any excess
moisture to drip back in the pot and allowing
steam to escape away from you.
11. After Cooking Is Complete
a. Remove plug from power outlet.
b. Allow water in steaming pot to cool
completely before emptying.
c. During cooking cycle, condensation causes
hot water to accumulate in the steamer
base. Empty carefully when cooled.
d. Follow cleaning instructions below.
CLEANING AND
STORAGE
Always unplug the steamer from electrical outlet
and allow to cool completely before cleaning.
Before rst use and after each use, clean each
part thoroughly.
Wash all parts except the steamer base in warm,
soapy water; rinse and dry thoroughly. The
steaming pot, tray and lid can also be cleaned on
the top rack of a dishwasher.
Do not use chlorine bleach or abrasive cleaners
on any part of the steamer.
Never put the steamer base in dishwasher or
immerse it in water. The base can be wiped with a
damp cloth to remove residue.
To clean the inner area of the steamer base where
the steaming pot sits, sprinkle a clean, damp
sponge with a teaspoon of baking soda, and wipe
carefully. Wipe again with a clean, damp sponge.
Empty Water Release Drain over a kitchen sink
before storing the unit. Water Release Drain is
located below the Water Reservoir on back of
unit.
Store your steamer in a dr y place, out of the reach
of children.
Maintenance: Any other servicing should
be performed by an authorized service
representative.
DESCALING THE
STEAMER
After several months of use, calcium deposits
may build up in the steam tube of your steamer.
This process is normal. You should descale
regularly to maintain maximum steam production
and extend the life of your steamer.
To descale: Fill the water reservoir to the
maximum level with equal parts of water and
white vinegar (not cider or wine vinegar).
Plug the unit into an electrical outlet. The
steaming pot and lid should be in place. Set
timer for 60 minutes and begin steaming.
When the timer sounds, unplug and allow to cool
completely before pouring out vinegar solution.
Rinse the water reservoir, steaming pot and lid
several times with fresh, cold water.
Fill the reservoir with cold water and place on
unit. Set timer for 30 minutes and begin steaming
to remove any residual vinegar from the steamer.
We also recommend using the descaling method
to clean the steamer after steaming seafood.
7
Page 8

HELPFUL HINTS
• Steaming times stated in the Steaming Guide and
Recipes are only to be used as a guide. Times may
vary depending on the quantity, size of pieces,
spacing and placement of food on the steaming
tray, and personal preference.
• For the most consistent results, food pieces should
be similar in size.
•
Steaming times will vary according to size,
temperature, freshness of foods and personal taste.
• Meat, poultry and seafood should be thawed
completely before steaming.
• Never add seasonings, broth or herbs to the water
re servo ir.
• No liquids other than water should be used in the
water reservoir.
• When using recipes, follow quantities as closely as
possible for best results.
• Some foods, such as grains and rice, can be
steamed in ovenproof dishes and covered with
aluminum foil. See the recipe section for examples.
• For high altitude cooking, steaming times may need
to be increased.
• For optimum results, do not overll steaming tray;
distribute evenly in a single layer.
• Ready-to-Eat Cues: Vegetables and fruits will be
easy to pierce with by the tip of a knife or tines of
a fork. Their colors will also brighten. For meats
and chicken, check the internal temperature. The
recommended temperature for chicken breast is
165°F. The recommended temperature for sh is
14 5° F.
STEAMING GUIDE
PROTEINS
Food Amount Preparation Function Time
Chicken breast 4 chicken breasts, about
Clams 1 dozen Scrubbed Seafood 6 to 8 minutes
Crab legs, fresh 1 pound Rinsed Seafood 8 minutes
Crab legs, frozen 1 pound Rinsed Seafood 10 minutes
Fish fillet, thick, e.g., salmon ¾ pound Rinsed Seafood 15 minutes
Fish fillet, thin, e.g.,
flounder/sole
Fish, whole 2 pounds Cleaned and rinsed Seafood 20 minutes
Fish, whole 1 to 1½ pounds Cleaned and rinsed Seafood 15 minutes
Lobster tail 4 lobster tails Rinsed Seafood 10 minutes
Mussels 2 pounds Scrubbed and debearded Seafood 6 to 8 minutes
Shrimp 1 pound Peeled and deveined Seafood 6 minutes
Shrimp, frozen 1 pound N/A Seafood 10 minutes
1½ pounds total; yields 4
cups cubed
½ pound Rinsed Seafood 6 to 8 minutes
• To check on food during the steam cycle, always
press the PAUSE button to stop ow of steam.
Wait a second before lifting the lid.
• Always lift the side of lid farthest away from you
rst, to allow steam to escape away from you.
• Times indicated are based upon use of fresh
vegetables, meats and seafood (frozen chicken or
meat are not recommended). Steaming times will
vary according to size, temperature, freshness of
foods and personal taste.
• Preset times are a good guide, but as you use your
steamer, you may want to adjust the time to get the
exact results you want. Less time will produce a
“crisp-tender” vegetable; more will give you a softer
texture.
• Be sure to cover foods placed into steamer in
dishes to avoid steam condensing in bottom of
dish. We suggest using aluminum foil.
• Always use tongs to remove food from the steamer.
Use mitts or potholders to lift tray out of steamer
before removing food.
• The steamer is a great way to cook dried beans.
You’ll nd they cook evenly and do not break up as
readily as those cooked on the stovetop.
• Use the REH E AT button for bringing food up to
serving temperature. The recommended serving
temperature for food is at least 165º F.
• Steaming is the best cooking method when it
comes to making baby food: Steam food until
very tender. Process in either a blender or food
processor, adding breast milk or ltered water,
1 tablespoon at a time, to desired consistency.
Trimmed of any excess fat Poultry 15 to 20 minutes
8
Page 9

VEGETABLES
Food Amount Preparation Function Time
Artichokes, globe, large 11 to 12 ounces each Trimmed (see page 13 for
Asparagus, medium stalk 1 pound Trimmed Vegetable 7 to 8 minutes
Green beans 1 pound Trimmed Vegetable 7 to 8 minutes
Green beans, frozen 1 pound N/A Vegetable 6 minutes
Wax beans 1 pound Trimmed Vegetable 10 to 12 minutes
Beets, medium 1 bunch, about 12 to 14
ounces total
Broccoli 1 pound Cut into 1–2-inch florets Vegetable 7 minutes
Broccoli, frozen 12 ounces N/A Vegetable 6 minutes
Broccolini 1 bunch, about 8 ounces Trimmed Vegetable 8 minutes
Broccoli rabe 1 bunch, about 10 ounces Trimmed Vegetable 8 minutes
Brussels sprouts 1 pound Trimmed Vegetable 14 minutes
Cabbage, individual leaves 1 small head, about 1
pound
Cabbage, small head, whole 1 pound Rinsed Vegetable 15 minutes
Carrots 1 pound Cut lengthwise into 3-inch
Carrots, baby 1 pound N/A Vegetable 9 to 10 minutes
Cauliflower 1½ pounds Cut into 2–inch florets Vegetable 10 minutes
Corn on the cob 4 ears Husked Vegetable 8 minutes
Escarole 1 head, about 8 ounces Trimmed Vegetable 7 to 8 minutes
Fennel 1 medium bulb, 12 ounces Cut into wedges Vegetable 10 minutes
Frozen mixed vegetables 1 pound N/A Vegetable 7 minutes
Kale 1 bunch, 6 to 8 ounces Trimmed Vegetable 6 to 8 minutes
Parsnips 1 bunch, about pound Cut lengthwise into 3-inch
Potatoes, red 1½ pounds Cut into 1–2-inch cubes Vegetable 20 minutes
Potatoes, red, medium 3 pounds Scrubbed and left whole Vegetable 40 minutes
Green peas, fresh 8 ounces Shelled Vegetable 5 minutes
Spinach, baby or whole leaf 5 ounces Rinsed Vegetable 3 to 4 minutes
Spinach, frozen 10 ounces N/A Vegetable 14 minutes
Squash, butternut 1½ pounds, about 4 cups Cut into large cubes Vegetable 15 to 20 minutes
Squash, yellow 12 ounces Cut into ½-inch rounds Vegetable 6 minutes
Sugar snap peas 12 ounces Trimmed Vegetable 6 to 8 minutes
Snow peas 12 ounces Trimmed Vegetable 6 minutes
Turnips 16 ounces Peeled and cut into wedges Vegetable 20 minutes
Zucchini 12 ounces Cut into ½-inch rounds Vegetable 5 minutes
preparation tips)
Trimmed and scrubbed Vegetable 25 to 30 minutes
Rinsed Vegetable 5 minutes
pieces and quartered
pieces and quartered
Vegetable 35 to 45 minutes
Vegetable 8 to 9 minutes
Vegetable 8 to 10 minutes
9
Page 10

GRAINS
Food Amount Preparation Function Time
Bulgar 2 cups bulgar: 3 cups water;
yields 6.5 cups cooked
Couscous 2 cups couscous: 2 cups
water; yields 6 cups cooked
Oats, rolled 1 cup oats: 1½ cups water Placed into ovenproof vessel,
Oats, steel cut 1 cup oats: 2 cups water Placed into ovenproof vessel,
1
Rice, brown 2 cups rice: 2
Rice, white 2 cups rice: 2
yields 6 cups cooked
yields 6 cups cooked
⁄3 cups water;
1
⁄3 cups water;
Quinoa 2 cups quinoa: 2 cups water;
yields 6 cups cooked
Placed into ovenproof vessel,
tightly covered with lid or foil
and placed on steaming tray
Placed into ovenproof vessel,
tightly covered with lid or foil
and placed on steaming tray
tightly covered with lid or foil
and placed on steaming tray
tightly covered with lid or foil
and placed on steaming tray
Placed into ovenproof vessel,
tightly covered with lid or foil
and placed on steaming tray
Placed into ovenproof vessel,
tightly covered with lid or foil
and placed on steaming tray
Placed into ovenproof vessel,
tightly covered with lid or foil
and placed on steaming tray
Grains 25 minutes with
5-minute rest
Grains 15 minutes with
5-minute rest
Grains 25 minutes with
5-minute rest
Grains 45 minutes with
5-minute rest
Grains 40 minutes with
5-minute rest outside of steamer
Grains 25 minutes with
5-minute rest outside of steamer
Grains 25 minutes with
5-minute rest
BEANS
Food Amount Preparation Function Time
Beans, black 1 cup dry and soaked: 2 cups
water; yields approximately 3
cups cooked
Beans, garbanzo 1 cup dry and soaked: 3 cups
water; yields approximately
3 cups
Beans, white 1 cup dry and soaked: 2 cups
water; yields approximately 3
cups cooked
Lentils, brown 1 cup lentils: 3 cups of water;
yields approximately 3 cups
cooked
Placed into ovenproof vessel,
tightly covered with lid or foil
and placed on steaming tray
Placed into ovenproof vessel,
tightly covered with lid or foil
and placed on steaming tray
Placed into ovenproof vessel,
tightly covered with lid or foil
and placed on steaming tray
Placed into ovenproof vessel,
tightly covered with lid or foil
and placed on steaming tray
Manual 50 to 55 minutes
Manual 55 to 60 minutes
Manual 45 to 50 minutes
Manual 45 minutes
EGGS AND CUSTARD
Food Amount Preparation Function Time
Eggs, soft to medium-soft
boiled
up to 1 dozen N/A Manual 8 minutes, plus
shocked in an ice
bath
Eggs, hard boiled up to 1 dozen N/A Manual 14 minutes, plus
shocked in an ice
bath
Custards, individual ramekins 4, 5-oz. ramekins Placed into ovenproof vessel,
tightly covered with lid or foil
Manual 25 minutes
and placed on steaming tray
10
Page 11

RECIPES
CONTENTS
Maple Cinnamon Oatmeal.................................................... 12
Deviled Eggs .............................................................. 12
Chicken and Ginger Dumplings ............................................... 13
Steamed Artichokes ........................................................ 13
Steamed Pork Buns......................................................... 14
Asian BBQ Ribs ............................................................ 14
Greek Stuffed Cabbage Leaves with Egg-Lemon Sauce............................ 15
Green Chile Tamales ........................................................ 16
Cantonese-Style Steamed Bass ............................................... 17
Asian Chicken Salad ........................................................ 17
Easy Mussels .............................................................. 18
Indoor Clambake ........................................................... 18
Dilly Potato Salad........................................................... 18
Quinoa Tabbouleh Salad ..................................................... 19
White Bean Salad .......................................................... 19
Mocha Pots de Crème....................................................... 20
Raspberry and Chocolate Chip Bread Pudding ................................... 20
Sauces:
Cocktail Sauce ............................................................ 21
Hollandaise ............................................................... 21
Remoulade................................................................ 21
Asian Dipping Sauce ........................................................ 22
Bagna Cauda .............................................................. 22
Creamy Herb Mayo ......................................................... 22
11
Page 12

Maple Cinnamon Oatmeal
Deviled Eggs
In less than an hour, you’ll have a healthy
breakfast prepared for the rest of the week.
Makes 4 cups
1 cup steel-cut oats
1
⁄3 cup raisins or any other dried fruit
(for larger dried fruit varieties,
chop into small, bite-size pieces)
1 cinnamon stick
1 tablespoon pure maple syrup
1 to 2 pinches kosher salt
Pinch ground nutmeg
2 cups water
1. Put all of the ingredients into a 9x3-inch loaf
pan. Cover with foil and place on tray inside
the steamer. Secure lid.
2. Select Manual, set timer for 45 minutes and
press Start. Once timer expires, allow oats to
rest in steamer for an additional 5 minutes.
3. Carefully remove steamer lid and foil from the
pan. Remove cinnamon stick, stir and serve
immediately.
Nutritional information per serving (1 cup):
Calories 201 (11% from fat) • carb. 40g • pro. 5g
• fat 3g • sat. fat 1g • chol. 0mg • sod. 42mg
• calc. 15mg • fiber 4g
The timer makes it easier than you’d ever imagine
to make perfect hard-boiled eggs.
Makes 24 servings
12 large eggs
½ cup mayonnaise
1½ teaspoons Dijon-style mustard
1½ teaspoons fresh lemon juice
1 teaspoon Worcestershire sauce
2 tablespoons capers, drained
¾ teaspoon kosher salt
¼ freshly ground pepper
Paprika for garnish
1. Put eggs onto the tray inside the steamer.
Secure lid.
2. Select Manual, set timer to 14 minutes and
press Start. Once timer expires, immediately
transfer eggs to a large bowl lled with ice
water to stop the cooking process.
3. Once eggs are cool, peel and carefully slice in
half lengthwise.
4. Remove yolks and put into the work bowl of a
Cuisinart
®
Food Processor tted with the metal
chopping blade. Process until smooth.
5. Pulse in the remaining ingredients and process
again until smooth. Taste and adjust seasoning
as desired.
6. Spoon or pipe the yolk lling into the center of
each egg white. Sprinkle with paprika before
serving.
12
Nutritional information per ½ egg:
Calories 54 (70% from fat) • carb. 1g • pro. 3g
• fat 4g • sat. fat 1g • chol. 108mg • sod. 144mg
• calc. 15mg • fiber 0g
Page 13

Chicken and Ginger
Dumplings
Ginger is the star in this lighter alternative to the
traditional pork dumpling.
Makes 48 dumplings
¾ pound ground chicken (dark meat)
or turkey
3 tablespoons fresh chopped ginger
(about a 2-inch piece)
2 tablespoons chopped green onion
1 tablespoon fresh chopped cilantro
1 tablespoon soy sauce (reduced sodium)
2 teaspoons sesame oil
½ teaspoon rice vinegar
Water and cornstarch for sealing
dumplings
48 wonton wrappers
Nonstick cooking spray
1. In a medium mixing bowl, combine the
chicken, ginger, onion, cilantro, soy sauce,
sesame oil and vinegar. Mix well with hands or
a spoon.
2. Prepare a large, clean and at work surface
equipped with two small bowls, one with water
and the other with cornstarch and a pastry
brush.
3. Sprinkle the work surface with cornstarch
and arrange wonton wrappers in rows on the
work surface (starting with 2 rows of 3). Put 1
teaspoon of lling in the center of each wrapper.
Brush the edges of each wrapper with water
and then fold the wrapper in half, sealing in the
lling and also sealing together the damp edges.
Pull the edges on the long side of the triangle
together and seal. Continue with remaining lling
and wrappers. Toss the dumplings very lightly
with cornstarch as they sit.
4. Lightly coat the tray with nonstick cooking
spray. Arrange half of the dumplings on the
tray inside the steamer. Secure lid.
5. Select Manual, set timer for 10 minutes and
press Start. Once timer expires, remove and
repeat with the second batch of dumplings.
6. Serve dumplings with a soy dipping sauce,
such as the Asian Dipping Sauce on page 21.
Nutritional information per serving (6 dumplings):
Calories 245 (25% from fat) • carb. 29g • pro. 17g • fat 7g
• sat. fat 2g • chol. 49mg • sod. 377mg
calc. 40mg • fiber 1g
Steamed Artichokes
Artichokes are a sure sign of spring.
Simply steamed, they are delicious with our
recipes for Bagna Cauda or a Creamy Herb Mayo
for dipping. Try one or both sauces for a
memorable rst course.
Makes 4 servings
4 large globe artichokes
1. Trim artichokes to t the steamer by rst
cutting off the stems so the artichokes can
sit upright on the tray. Then trim 1 or 2 inches
off the top of the artichoke so the lid can be
secured. Remove rough outer leaves and snip
any remaining sharp tips with scissors.
2. Once all the artichokes are trimmed, put them
on the tray inside the steamer. Secure lid.
Select Vegetable, adjust timer to 40 minutes
and press Start. Once time expires, test one
artichoke leaf to conrm it is tender. For extralarge artichokes, an extra 5 minutes might be
necessary.
3. Serve artichokes immediately with melted
butter or the following dips: Bagna Cauda and
Creamy Herb Mayo. Once all leaves have been
removed, scrape the fuzzy choke and discard
to eat the heart.
Nutritional information per artichoke:
Calories 76 (2% from fat) • carb. 17g • pro. 5g • fat 0g
• sat. fat 0g • chol. 0mg • sod. 152mg
calc. 71mg • fiber 9g
13
Page 14

Steamed Pork Buns
These delicate breads are a classic dim sum
component and have quickly become a favorite in
Makes 12 buns
1 recipe Asian BBQ Ribs,
recipe follows
1 teaspoon active dry yeast
¼ cup sugar
1
1
⁄3 cups water, 110°F, divided
4 cups all-purpose flour, plus more as
needed, divided
¼ teaspoon baking soda
1 tablespoon canola oil
Nonstick cooking spray
1. Remove meat from ribs and shred well. Place
in a bowl and keep in refrigerator until ready to
use. If desired, reserve any juices from the ribs
after baking to moisten meat before lling.
2. In a large measuring cup lled with
the warm water, dissolve the yeast with a pinch
of the sugar. Let stand until foamy, about 5 to
10 minutes.
3. In the bowl of a Cuisinart® Stand Mixer tted
with the dough hook attachment, combine 3
cups of the our, remaining sugar, baking soda
and oil. Add the remaining cup of water to the
yeast.
4. Turn the mixer on the lowest speed and slowly
add the yeast mixture. Alternating, add the
remaining liquid with the remaining cup of our
until both have been completely incorporated
and the dough begins to form a ball. If
necessary, add another 1 to 2 tablespoons
of our. Increase to speed 2 and continue to
knead dough until it is smooth and springy to
the touch, about 10 minutes.
5. Place the dough into an oiled bowl, ipping
to coat, and cover tightly with plastic wrap.
Let the dough rest at room temperature until
doubled in size, about 1 hour.
6. Once rested, lightly our the work surface and
roll the dough into a log, about 16 inches in
length. Cut the log into 16 equal pieces, about
2 ounces each.
7. Working with one piece of dough at a time and
our test kitchen.
1
⁄3 cup of
keeping the rest covered with a damp cloth,
roll each piece of dough into a very at round,
about 6 inches in diameter. Fill the center with
3 tablespoons of the shredded pork. It may
seem like a lot, but the dough will stretch as
you pull it around the lling. Gather the dough
up and around the lling by pleating along the
edges. Pinch the pleats together, making a little
neck on the bun, and twist rmly to seal. Place
the bun on wax paper and cover with a damp
cloth. Repeat with remaining dough and lling
until all buns have been made.
8. Lightly coat the steaming tray with nonstick
cooking spray and put six buns onto the tray
inside the timer. Secure lid. Select Manual, set
timer to 30 minutes and press Start. Once the
timer expires, remove buns and repeat with
remaining buns.
9. Serve immediately.
Nutritional information per bun:
Calories 589 (40% from fat) • carb. 62g • pro. 29g
• fat 26g • sat. fat 8g • chol. 85mg • sod. 1134mg
• calc. 40mg • fiber 1g
Asian BBQ Ribs
These delicious ribs are great as a lling for our
Steamed Pork Buns or try them on their own.
Makes about 4 to 6 as a main course and up to
12 appetizer servings
Marinade:
1 cup hoisin sauce
½ cup soy sauce
1 tablespoon yuzu* or fresh lime juice
1 tablespoon mirin
1 tablespoon fish sauce
1 1–to-2 inch piece of ginger, peeled
2 garlic cloves, peeled
½ cup brown sugar
¼ cup grapeseed oil
Rack baby back ribs, about 3 pounds,
cut into individual ribs
1. Put ingredients into a blender jar in the order
listed and blend on high until completely
homogenous.
2. Put prepped ribs in a stainless bowl and coat
completely with the marinade. Cover and
refrigerate overnight.
3. When ready to cook, place individual ribs on
14
Page 15

the baking tray of a Cuisinart® Toaster Oven.
Reserve remaining marinade. (Marinade must
be boiled for at least 5 minutes before using.)
4. Set oven to convection bake at 375°F for
45 minutes. Once time expires, reduce
temperature to 250°F for 1 additional hour.
5. Serve immediately, or, if using as lling for
Steamed Pork Buns, remove all meat from the
bones and shred well with a fork. If mixture
seems dry, boil reserved marinade and add
to shredded pork 1 tablespoon at a time until
coated, but not wet.
*Yuzu is a Japanese citrus fruit that is quite sour.
Yuzu juice can be found at Japanese grocery
stores or gourmet food shops.
Nutritional information per serving (based on 12 servings):
Calories 395 (51% from fat) • carb. 26g • pro. 23g
• chol. 78mg • fat 23g • sat. fat 7g • sod. 853mg
calc. 36mg • fiber 0g.
Greek Stuffed
Cabbage Leaves with
Egg-Lemon Sauce
These Greek-style cabbage leaves stay perfectly
intact when cooked in the steamer. Plus, no
need to fuss over how much liquid to add to the
cooking pot, like in the traditional method made
on the stove.
Makes about 18 stuffed cabbage leaves
Makes about 1 cup of sauce
Stuffed Cabbage:
1 small head cabbage, about 1 pound,
trimmed to fit inside the cooking pot
2 tablespoons olive oil, divided
1 small bunch scallions, trimmed and
thinly sliced (about 5 scallions)
1 cup rice, uncooked
½ cup water
1¼ teaspoon kosher salt, divided
¼ teaspoon pepper, divided
½ cup fresh dill, chopped, plus more
for garnish
½ pound ground lamb (or any other
ground meat of your choice)
2 tablespoons lemon juice
Egg-Lemon Sauce:
2 eggs
2 tablespoons freshly squeezed
lemon juice
¼ teaspoon salt
2 teaspoons cornstarch dissolved in
1 tablespoon of water
½ cup reserved cooking broth, divided
Fresh dill optional
1. Put cabbage head into the steamer. Secure
lid. Select Vegetable, set timer for 10 minutes
and press Start. Once timer expires, remove
cabbage from steamer and set aside to slightly
cool.
2. While cabbage is steaming, put 1 tablespoon
of the olive oil into a medium-sized skillet.
Heat over medium-high heat. Once the oil is
hot, add the scallions and cook until softened,
about 2 minutes. Add rice and cook until
transparent, about 2 to 3 minutes. Add ½ cup
water, ½ teaspoon of the salt and a pinch of
the pepper; stir until the rice has completely
absorbed the water, about 4 to 5 minutes.
Remove rice mixture from heat and transfer to
a medium-sized bowl.
3. Add dill, ground lamb, lemon juice, remaining
olive oil, salt and pepper to the bowl with the
rice mixture. Stir to evenly combine.
4. Stuff the cabbage leaves by rst removing
one cabbage leaf from the cabbage head. Put
it on a clean surface with the ribs facing up.
Use a paring knife to remove the leaf’s core by
cutting an upside down “V” into the bottom of
the leaf.
5. Put 2 tablespoons of the rice and meat mixture
into the center of the leaf. Gently fold up the
bottom of the leaf so that it covers half of the
mixture. Fold the right part of the leaf inward
and over the mixture; repeat with the left side
of the leaf. Using your thumb, roll the leaf with
the rice and meat mixture upward so that the
leaf seals and the seam faces down. Transfer
to the tray inside the steamer. Repeat with the
remaining leaves and mixture. Secure lid.
6. Select Manual, set timer for 1 hour and press
Start.
7. Once timer expires, remove the tray with the
stuffed cabbage leaves from the steamer
and set aside. Pour 1 cup of the hot cooking
15
Page 16

liquid from the bottom of the cooking pot into
a measuring cup. Discard the rest. Return the
steamer tray with the stuffed cabbage leaves to
the glass cooking pot. Select Keep Warm and
press Start.
8. While the stuffed cabbage leaves keep
warm, put the eggs, lemon juice and salt in a
double boiler. Whisk until very foamy, slightly
thickened and the temperature reaches 160 º F.
Slowly whisk in ¼ cup of the reserved cooking
liquid and cornstarch mixture; continue
whisking and cook until sauce is thickened,
about 1 minute. If sauce is too thick, add in
the remaining cooking liquid 1 tablespoon at a
time until desired consistency is achieved.
9. Serve sauce immediately spooned over the
stuffed cabbage leaves. If desired, garnish
with fresh dill.
Nutritional information per serving (1 stuffed cabbage):
Calories 82 (33% from fat) • carb. 10g • sugars 1g • pro. 3g
• fat 1g • sat. fat 1g • chol. 9mg • sod. 163mg
• calc. 23mg • fiber 8g
Nutritional information per serving
(1 tablespoon egg-lemon sauce):
Calories 11 (51% from fat) • carb. 0g • pro. 1g
• fat 1g • sat. fat 0g • chol. 23mg • sod. 42mg
• calc. 4mg • fiber 0g
Green Chile Tamales
Serve tamales as an appetizer or main course
with avocado and a side salad.
Makes about 24 tamales
24 corn husks
1 teaspoon vegetable oil
1 small onion, finely chopped
1 jalapeño pepper, seeded and finely
chopped
2 garlic cloves, finely chopped
½ teaspoon kosher salt, divided
¼ teaspoon freshly ground pepper
3 pounds chicken thighs, roasted, meat
removed and shredded
1½ tablespoons fresh lime juice
3 cans (4 ounces each) chopped green
chiles
4 cups masa
1 tablespoon baking powder
2 teaspoons kosher salt
3 cups water
1 cup vegetable oil
16
1. Put the corn husks into a large stainless
bowl and cover with boiling water; weight
with a heavy plate so they are all completely
submerged.
2. Put the oil into a medium sauté pan and place
over medium heat. Once the oil is hot, add
the chopped onion, jalapeño pepper, garlic, ¼
teaspoon of the salt and the pepper to the pan.
Sauté until soft, about 5 minutes.
3. Put the shredded chicken into a medium bowl
and stir together with the sautéed vegetables,
lime juice, green chiles and remaining salt. Set
aside.
4. Put the masa, baking powder, salt, water and
oil into a large mixing bowl. Use a hand mixer
to combine. Set aside.
5. To assemble tamales: Drain corn husks and
unroll. Hold one in your hand and spread ¼
cup of masa dough onto the husk, covering
2
of the husk toward the wider end of the husk.
Place 2 heaping tablespoons of lling on top of
the masa. Fold the narrow end of the husk up
into the tamale and then roll the sides together
to close. Repeat with remaining tamales.
6. Put 12 tamales onto the tray inside the
steamer. Secure lid.
7. Select Manual, set timer for 1 hour and press
Start. Once time expires, remove and repeat
with remaining tamales.
8. Serve immediately.
Nutritional information per tamale:
Calories 232 (54% from fat) • carb. 15g • pro. 12g
• chol. 36mg • fat 14g • sat. fat 3g • sod. 376mg
calc. 49mg • fiber 1g
⁄3
Page 17

Cantonese-Style
Steamed Bass
Nutritional information per serving:
Calories 395 (44% from fat) • carb. 23g • pro. 33g
• chol. 70mg • fat 19g • sat. fat 3g • sod. 559mg
calc. 60mg • fiber 1g
This sweet and spicy play on the traditional style
uses individual llets for easy preparation.
Makes 2 servings
2 teaspoons granulated sugar
¼ cup plus 2 teaspoons mirin, divided
1 large garlic clove, finely chopped
1 1-inch piece of fresh ginger, peeled and
finely chopped
1 green onion, thinly sliced
1 chili pepper, like serrano or Fresno,
thinly sliced
1 baby bok choy, rinsed, cleaned and
quartered
2 sea bass fillets, about ½ pound each
¼ cup grapeseed oil
2 teaspoons soy sauce, reduced sodium
1 teaspoon sesame oil
Lime wedges, cilantro (optional for
garnish)
1. In a small bowl, stir together sugar, ¼ cup of
mirin, garlic, ginger, onion and pepper. Set
aside.
2. Put the bok choy onto the tray inside the
steamer. Secure lid. Select Vegetable, set
timer to 8 minutes and press Start. When timer
expires, divide bok choy evenly between two
serving plates.
3. Rinse the sea bass llets and place onto
the tray inside the steamer. Drizzle each
with a teaspoon of the remaining mirin and
replace lid. Select Seafood, set timer to 10
to 12 minutes depending on the thickness of
the llets and press Start. While the sh is
cooking, put the grapeseed oil into a small
saucepan and place over medium-high heat.
Once oil is hot, add the reserved mirin mixture
and stir over heat until boiling.
4. When timer expires, remove bass and place
each llet over the bed of bok choy on
prepared serving plates. Drizzle each with
1 teaspoon of soy sauce and ½ teaspoon
sesame oil. Spoon the chili-ginger sauce
evenly over the sh on each plate.
5. Serve immediately. If desired, garnish with
cilantro and a squeeze of lime.
Asian Chicken Salad
Vietnamese avors are the inspiration for this
fresh and avorful chicken salad.
Makes 5 cups
2 tablespoons fresh lime juice
1 tablespoon sriracha sauce
½ teaspoon fish sauce
4 tablespoons grapeseed or vegetable oil
4 cups steamed chicken*, cut into small
cubes
½ cup julienne-cut carrot
(about 1 medium)
1 cup julienne-cut red cabbage (about 1
small wedge from a medium head)
½ cup fresh mint leaves, chopped
½ cup fresh cilantro leaves, chopped
*See steaming guide on page 8 for directions.
1. Put the lime juice, sriracha, sh sauce and oil
together into a large mixing bowl and stir.
2. Stir together the chicken, carrot, cabbage, mint
and cilantro. Toss to thoroughly combine.
3. Taste and adjust seasoning as desired.
Nutritional information per serving (based on 10 servings):
Calories 144 (46% from fat) • carb. 3g • pro. 17g
• chol. 43mg • fat 7g • sat. fat 1g • sod. 74mg
• calc. 40mg • fiber 1g
17
Page 18

Easy Mussels
In just minutes, you’ll have the taste of the sea
right on your countertop.
Makes 4 to 6 servings
1 garlic clove, thinly sliced
1 shallot, thinly sliced
¼ cup dry white wine
1 tablespoon unsalted butter
1 sprig fresh thyme
2 pounds fresh mussels, rinsed well and
debearded
1. Put the garlic, shallot, wine, butter, thyme and
mussels directly into the steamer without the
tray. Secure lid. Select Seafood, set timer to 9
minutes and press Start.
2. Once all the mussels have opened and the
timer expires, serve in shallow bowls with
plenty of crusty bread on the side. Discard any
mussles that have not opened.
Nutritional information per serving (based on 6 servings):
Calories 169 (29% from fat) • carb. 9g • pro. 19g
• chol. 47mg • fat 5g • sat. fat 2g • sod. 433mg
• calc. 42mg • fiber 0g
Indoor Clambake
Take the beach party inside with this easy,
but impressive dish.
Makes 4 servings
1 tablespoon olive oil
2 shallots, sliced
4 garlic cloves, crushed
4 sprigs thyme
½ teaspoon kosher salt
¼ teaspoon freshly ground black pepper
10 small red potatoes
2 lobster tails
12 littleneck clams, scrubbed
2 ears corn, cut into 2-inch pieces
½ small fennel bulb, sliced
½ cup white wine
1 pound mussels, scrubbed and
debearded
½ tablespoon finely chopped parsley
2. After 10 minutes, press Pause and add the
lobster, clams, corn, fennel and white wine.
Replace lid and then press Pause again to
resume cooking. After an additional 4 minutes,
press Pause and add the mussels. Press
Pause again to resume cooking.
3. Once all the clams and mussels have opened
and the timer expires, divide clambake into two
serving dishes and garnish with the chopped
parsley.
Nutritional information per serving:
Calories 587 (13% from fat) • carb. 74g • pro. 50g
• fat 8g • sat. fat 1g • chol. 156mg • sod. 1625mg
• calc. 191mg • fiber 8g
Dilly Potato Salad
Olive oil replaces mayonnaise to lighten up
Makes 5 cups
2 pounds small red potatoes, cut into
½ cup packed fresh dill, chopped
1 green onion, chopped (about ½ cup)
2 tablespoons white wine vinegar
1
⁄3 cup extra virgin olive oil
½ teaspoon Dijon-style mustard
2 teaspoons kosher salt
½ teaspoon freshly ground black pepper
1. Put potatoes onto the tray inside the steamer.
Secure lid. Select Vegetable, set the timer to 15
minutes and press Start.
2. Once timer expires, test potatoes to conrm
they are cooked through. Toss in a medium
stainless bowl with the remaining ingredients.
3. Taste and adjust seasoning as desired.
Nutritional information per serving (based on 10 servings):
this requisite picnic dish.
eighths
Calories 135 (49% from fat) • carb. 16g • pro. 2g
• chol. 0mg • fat 8g • sat. fat 1g • sod. 485mg
• calc. 13mg • fiber 2g
1. Put the oil, shallots, garlic, thyme, salt, pepper
and potatoes into the steamer without the tray.
Secure lid. Select Seafood, set timer to 20
minutes and press Start.
18
Page 19

Quinoa Tabbouleh Salad
White Bean Salad
The bright avors of lemon and herbs pair nicely
with the nuttiness of the quinoa.
Makes 6 cups
4 cups steamed quinoa*
½ cup packed fresh parsley leaves,
chopped
½ cup packed fresh mint leaves, chopped
2 cups cherry tomatoes, halved
1½ cups cucumber, cut into ½-inch dice
(about ½ English cucumber)
½ teaspoons kosher salt
1
½ teaspoon freshly ground pepper
3 tablespoons fresh lemon juice
4 tablespoons extra virgin olive oil
*See steaming guide on page 10 for directions.
1. Combine the quinoa, parsley, mint, cherry
tomatoes, cucumber, salt, pepper, lemon juice
and olive oil all together in a large bowl so
ingredients are thoroughly combined.
2. Taste and adjust seasoning as desired.
Nutritional information per serving (based on 12 servings):
Calories 132 (39% from fat) • carb. 18g • pro. 4g
chol. 0mg · fat 6g • sat. fat 1g • sod. 304mg
• calc. 24mg • fiber 2g
Makes about 3 cups
2 cups steamed white beans*
½ small red onion, finely chopped (about
1
⁄3 cup)
½ medium red bell pepper, finely chopped
2
(about
⁄3 cup)
½ cup fresh parsley leaves, chopped
1 tablespoon extra virgin olive oil
2 teaspoons fresh lemon juice
½ teaspoon kosher salt
Pinch freshly ground black pepper
1 to 2 pinches crushed red pepper (optional)
2 tablespoons goat cheese, crumbled
*See
steaming guide
1. Put all of the ingredients, except for the goat
cheese, into a medium mixing bowl. Toss to
fully combine. Sprinkle with the goat cheese
and gently stir to combine.
2. Taste and adjust seasoning as desired.
Nutritional information per serving (½ cup):
Calories 117 (11% from fat) • carb. 17g • sugars 1g
• pro. 7g • fat 3g • sat. fat 1g • chol. 1mg • sod. 206mg
on page 10 for directions.
• calc. 15mg • fiber 4g
19
Page 20

Mocha Pots de Crème
The gentle heat of the steamer makes
cooking custards foolproof!
Makes 4 servings
1 cup heavy cream
1 cup whole milk
4 ounces bittersweet chocolate, roughly
chopped
1 tablespoon instant espresso
4 large egg yolks
1
⁄3 cup sugar
1 tablespoon vanilla extract
1. Put the cream and milk in a small saucepan set
over medium heat until hot and bubbly around
the edges.
2. Put the chopped chocolate and espresso into
a medium stainless steel bowl. Pour the hot
cream mixture over the chocolate and let sit for
1 to 2 minutes. Stir together until chocolate is
completely melted. Set aside.
3. Put the yolks, sugar and vanilla extract into a
bowl and whisk together until yolks are pale
yellow and thick.
4. While whisking the egg mixture continuously,
slowly pour in the chocolate mixture until fully
incorporated.
5. Strain the custard base through a ne mesh
strainer. Scoop off any foam and discard.
Divide evenly among four, 5-ounce ramekins.
Cover each one with foil and arrange the
ramekins on the steaming tray in the steamer
and replace the lid. Select Manual, set timer for
25 minutes and press Start.
6. Once timer expires, allow the custards to
remain in the steamer for 1 additional minute.
Transfer the custards to a tray—they will be
jiggly in the center. Allow to cool to room
temperature. Refrigerate for at least 3 hours to
chill, or up to 2 days.
Nutritional information per serving:
Calories 338 (67% from fat) • carb. 35g • pro. 7g
chol. 273mg • fat 26g • sat. fat 23g • sod. 40mg
calc. 97mg • fiber 2g
Raspberry and Chocolate
Chip Bread Pudding
A great make-ahead dessert from fridge to table
in less than an hour.
Makes 8 servings
6 cups challah bread cubes, about half of
a pound loaf, Cut into 1" pieces
½ cup chocolate chips
1 cup fresh raspberries
2 large eggs
¼ cup granulated sugar
¾ cup whole milk
¾ cup heavy cream
1 teaspoon pure vanilla extract
Nonstick cooking spray
1. Put the bread cubes, chocolate chips and
raspberries into a large bowl.
2. Put the eggs and sugar into a mixing bowl and
whisk until light and frothy. Add the milk, heavy
cream and vanilla and continue to whisk until
well combined. Pour liquid mixture over the
bread, chocolate chips and raspberries. Gently
stir to fully coat. Cover with plastic and allow to
rest in the refrigerator for a minimum of 3 hours
and up to overnight.
3. Lightly coat a 9" x 5" loaf pan with nonstick
cooking spray. Transfer the soaked bread
mixture to the pan. Cover with aluminum foil
that has also been sprayed with nonstick
cooking spray. Put the pan onto the tray inside
the steamer. Secure lid.
4. Select Manual, set timer to 1 hour and press
Start. Bread pudding is done when it is nicely
puffed and the internal temperature registers
160°F. Serve immediately with freshly whipped
cream.
Nutritional information per serving:
Calories 397 (45% from fat) • carb. 45g • pro. 10g • fat 20g
• sat. fat 11g • chol. 142 mg • sod. 432mg
• calc. 117mg • fiber 1g
20
Page 21

Cocktail Sauce
Here is the foundation for the classic seafood
dipping sauce. Make it your own by adding hot
sauce, freshly ground pepper or even freshly
grated horseradish.
Makes about 1 cup
1 cup chili sauce
2 tablespoons prepared horseradish
1 tablespoon fresh lemon juice
1. Stir ingredients together in a small bowl. Serve
immediately or store covered in the refrigerator
until serving.
Nutritional information per serving (1 tablespoon):
Calories 17 (0% from fat) • carb. 4g • pro. 0g • fat 0g
• sat. fat 0g • chol. 0 mg • sod. 241mg
• calc. 0mg • fiber 0g
Hollandaise
This classic and decadent sauce pairs perfectly
with simple steamed vegetables and eggs. This
version, made in a blender, is also foolproof.
Makes 1 cup
½ cup (8 tablespoons) unsalted butter
4 large egg yolks
¼ teaspoon kosher salt
Pinch ground mustard
Pinch freshly ground black pepper
1½ tablespoons fresh lemon juice
skinny spatula to stir, as some yolk may have
accumulated in the well by the blade. If overall
consistency is too thick, blend in some hot
water, 1 tablespoon at a time, until desired
consistency is achieved.
5. Taste and adjust seasoning accordingly.
6. Serve immediately or transfer hollandaise to a
double boiler to keep warm for serving.
Nutritional information per serving (1 tablespoon):
Calories 114 (97% from fat) • carb. 0g • pro. 1g
• fat 12g • sat. fat 7g • chol. 82mg • sod. 35mg
• calc. 6mg. • fiber 0g
Remoulade
This sauce complements freshly steamed
seafood, as well as vegetables. For a richer,
thicker consistency, use Greek yogurt in place of
Makes 2
1
⁄3 cups
½ medium to large shallot, peeled and cut
into 1-inch pieces
¼ cup fresh Italian parsley, stems
discarded
1 tablespoon fresh dill
1 tablespoon Dijon mustard
3 tablespoons drained capers
½ cup nonfat plain yogurt
¼ cup sweet relish
1¼ cups mayonnaise
1
⁄8 teaspoon freshly ground black pepper
regular.
1. Put the butter into a saucepan set over low
heat until butter is melted and reaches a slight
simmer.
2. While the butter is melting, put the remaining
ingredients into the blender jar. About a minute
before adding the butter, run the unit on Low
for about 30 seconds to combine.
3. With the blender still running on Low, carefully
remove the pour lid from the cover. Very slowly
drizzle the hot butter through the opening while
using a measuring cup or dish towel to shield
the opening to prevent any splatter. When
adding the butter, be careful not to add the
white milk solids that will be left on the bottom
of the pan.
4. Once all the butter has been added, check
hollandaise for consistency. Use a long,
1. Insert the chopping blade into the work bowl
of a food processor. Add the shallot, parsley
and dill; pulse to chop, about 10 pulses.
Scrape down the sides of the bowl and add the
mustard and capers and pulse 5 to 10 times to
chop.
2. Add the yogurt, relish, mayonnaise and black
pepper; use 5 long pulses to combine. Do not
over-process. Refrigerate until ready to use.
Nutritional information per serving (1 tablespoon):
Calories 64 (89% from fat) • carb. 1g • pro. 1g
• fat 6g • sat. fat 1g • chol. 26mg • sod. 105mg
• calc. 8mg • fiber 0g
21
Page 22

Asian Dipping Sauce
Makes 1½ cups
¾ cup soy sauce
¾ cup water
¼ cup sugar
1 1-inch piece fresh ginger
1 tablespoon sesame oil
2 teaspoons cornstarch
¼ cup cold water
1. Put soy sauce, water, sugar, ginger and
sesame oil in a small saucepan. Bring to a boil
and then turn down heat to simmer for about
10 minutes.
2. Whisk together cornstarch and cold water, and
then whisk into simmering sauce to slightly
thicken.
Nutritional information per serving (2 tablespoons):
Calories 40 (27% from fat) • carb. 6g • sugars 5g
• pro. 1g • fat 1g • sat. fat 10g • chol. 0mg • sod. 671mg
• calc. 0mg • fiber 0g
Bagna Cauda
This delicious sauce that originates from
Piedmont, Italy, is perfect for dipping vegetables
and bread. Use as a centerpeice for your next
crudité platter.
Makes about 1½ cups
Serves 4 to 6
1 cup extra virgin olive oil, divided
¼ cup (4 tablespoons) unsalted butter*
2 large garlic cloves, finely chopped
(approximately 2 to 3 tablespoons
chopped)
4 anchovy fillets, chopped
¼ teaspoon crushed red pepper
*It is possible to use all olive oil instead of the oil/
butter combination.
Nutritional information per serving (1 tablespoon):
Calories 118 (99% from fat) • carb. 0g • pro. 0g
• chol. 7mg • fat 13g • sat. fat 3g • sod. 26mg
• calc. 1mg • fiber 0g
Creamy Herb Mayo
This mayonnaise dip can be whipped up in
minutes for an easy yet avorful dip.
Makes 1 cup
1 cup prepared mayonnaise
1 small green onion, finely chopped
¼ cup packed fresh mint leaves, chopped
¼ cup packed fresh parsley leaves,
chopped
1 teaspoon fresh lemon juice
¼ teaspoon fresh lemon zest
1. Stir ingredients together in a small bowl.
2. Taste and adjust seasoning as desired. Flavors
will continue to develop as the dip sits.
Nutritional information per serving (1 tablespoon):
Calories 103 (98% from fat) • carb. 1g • pro. 0g
• chol. 10mg • fat 11g • sat. fat 2g • sod. 67mg
• calc. 11mg • fiber 0g
1. Put ½ cup olive oil and chopped garlic into
a small saucepan over medium-low heat. Be
very careful to keep the heat low enough so the
garlic does not color. Warm the garlic for about
5 minutes until soft.
2. Stir in butter, remaining olive oil and anchovies.
Warm through over medium heat until
anchovies are melted. Stir in crushed red
pepper.
3. Serve immediately.
22
Page 23

Limited Three-Year Warranty
(U.S. and Canada ONLY)
This warranty is available to consumers only. You
are a consumer if you own a Cuisinart® CookFresh™
Digital Glass Steamer that was purchased at retail for
personal, family or household use. Except as otherwise
required under applicable law, this warranty is not
available to retailers or other commercial purchasers
or owners.
®
We warrant that your Cuisinart
Glass Steamer will be free of defects in materials and
workmanship under normal home use for 3 years from
the date of original purchase. We recommend that
you visit our website, www.cuisinart.com for a fast,
efcient way to complete your product registration.
However, product registration does not eliminate the
need for the consumer to maintain the original proof
of purchase in order to obtain the warranty benets. In
the event that you do not have proof of purchase date,
the purchase date for purposes of this warranty will be
the date of manufacture.
®
If your Cuisinart
Steamer should prove to be defective within the
warranty period, we will repair it, or if we think
necessary, replace it. To obtain warranty service,
simply call our toll-free number 1-800-726-0190 for
additional information from our Consumer Service
Representatives, or send the defective product to
Consumer Service at Cuisinart, 7475 North Glen
Harbor Blvd., Glendale, AZ 85307.
To facilitate the speed and accuracy of your return,
please enclose $10.00 for shipping and handling of the
product.
Please pay by check or money order made payable to
Cuisinart (California residents need only supply proof of
purchase and should call 1-800-726-0190 for shipping
instructions).
NOTE: For added protection and secure handling
of any Cuisinart product that is being returned, we
recommend you use a traceable, insured delivery
service. Cuisinart cannot be held responsible for intransit damage or for packages that are not delivered
to us. Lost and/or damaged products are not covered
under warranty. Please be sure to include your return
address, daytime phone number, description of the
product defect, product model number (located on
bottom of product), original date of purchase, and any
other information pertinent to the product’s return.
CALIFORNIA RESIDENTS ONLY:
California law provides that for In-Warranty Service,
California residents have the option of returning a
nonconforming product (A) to the store where it was
purchased or (B) to another retail store that sells
Cuisinart products of the same type.
CookFresh™ Digital Glass
CookFresh™ Digital
The retail store shall then, at its discretion, either repair
the product, refer the consumer to an independent
repair facility, replace the product, or refund the
purchase price less the amount directly attributable to
the consumer’s prior usage of the product. If the above
two options do not result in the appropriate relief to the
consumer, the consumer may then take the product
to an independent repair facility if service or repair
can be economically accomplished. Cuisinart and not
the consumer will be responsible for the reasonable
cost of such service, repair, replacement, or refund for
nonconforming products under warranty.
California residents may also, according to their
preference, return nonconforming products directly to
Cuisinart for repair, or if necessary, replacement, by
calling our Consumer Service Center toll-free at 1-800726-0190. Cuisinart will be responsible for the cost of
the repair, replacement, and shipping and handling for
such products under warranty.
BEFORE RETURNING YOUR CUISINART PRODUCT
If you are experiencing problems with your Cuisinart
product, we suggest that you call our Cuisinart Service
Center at 1-800-726-0190 before returning the product
for service. If servicing is needed, a Representative
can conrm whether the product is under warranty and
direct you to the nearest service location.
®
Your Cuisinart
has been manufactured to the strictest specications
and has been designed for use only in 120-volt outlets
and only with authorized accessories and replacement
parts. This warranty expressly excludes any defects
or damages caused by attempted use of this unit
with a converter, as well as by use with accessories,
replacement parts or repair service other than those
authorized by Cuisinart. This warranty does not cover
any damage caused by accident, misuse, shipment
or other than ordinary household use. This warranty
excludes all incidental or consequential damages. Some
states do not allow the exclusion or limitation of these
damages, so these exclusions may not apply to you.
You may also have other rights, which vary from state
to state.
Important: If the nonconforming product is to be
serviced by someone other than Cuisinart’s Authorized
Service Center, please remind the servicer to call our
Consumer Service Center at 1-800-726-0190 to ensure
that the problem is properly diagnosed, the product is
serviced with the correct parts, and the product is still
under warranty.
CookFresh™ Digital Glass Steamer
23
Page 24

©2016 Cuisinart
150 Milford Road
East Windsor, NJ 08520
Printed in China
Trademarks or service marks of third parties used herein are
the trademarks or service marks of their respective owners.
15CE015377
IB-13970-ESP
 Loading...