

Page 1
Precision Master™ Stand Mixer
INSTRUCTION AND
RECIPE BOOKLET
For your safety and continued enjoyment of this product, always read the Instruction Book carefully before using.
SM-50A Series
Page 2

2
IMPORTANT SAFEGUARDS
When using electrical appliances, basic safety precautions should always be taken, including
the following:
1. READ ALL INSTRUCTIONS.
2. Turn dial to the OFF position and unplug from outlet when not in use, before tting or
removing accessories or attachments, after use and before cleaning.
3. Close supervision is necessary when any appliance is used by or near children.
Cuisinart does not recommend the use of this appliance by children.
4. Avoid contact with moving parts and tted attachments. Keep hands, hair, clothing,
as well as spatulas and other utensils away from beaters during operation to reduce the
risk of injury to persons and/or damage to the mixer.
5. The use of accessories or attachments not recommended or sold by Cuisinart may cause
re, electric shock or injury.
6. Do not use more than one accessory or attachment at a time.
7. Do not exceed the maximum capacities listed in this Instruction Book.
8. Do not use the stand mixer if it is damaged or if the cord is damaged. After having been
damaged, have the stand mixer checked and serviced before resuming use.
9. When using an attachment, make sure that you have read the safety instructions that
come with the particular attachment.
10. Do not use outdoors.
11.
Keep stainless steel bowl away from heat sources such as stovetops, ovens or microwaves
.
12.
To protect against the risk of electric shock, do not put the base power unit in water or other
liquids
.
13. Remove all accessories and attachments from stand mixer before washing.
14. Do not let cord hang over edge of table or counter.
15. Do not operate any appliance with a damaged cord or plug or after the appliance
malfunctions, or is dropped or damaged in any manner. Return appliance to the nearest
authorised service facility for examination, repair or electrical or mechanical adjustment.
16. Do not operate your appliance in an appliance garage or under a wall cabinet. When
storing in an appliance garage always unplug the unit from the electrical outlet. Not
doing so could create a risk of re, especially if the appliance touches the walls of the
garage or the door touches the unit as it closes.
17. This appliance is not intended for use by persons (including children) with reduced
physical, sensory or mental capabilities, or lack of experience and knowledge, unless they
have been given supervision or instruction concerning use of the appliance by a person
responsible for their safety.
18. This appliance is intended to be used in household and similar applications such as:
- staff kitchen areas in shops, ofces and others working environments;
- farm houses;
- by clients in hotels, motels and other residential type environments;
- bed and breakfast type environments.
Page 3

3
SAVE THESE INSTRUCTIONS
FOR HOUSEHOLD USE ONLY
NOTE: The maximum rating is based on the attachment that draws the greatest power. Other
recommended attachments may draw signicantly less power.
WARNING: RISK OF FIRE OR ELECTRIC SHOCK
The lightning ash with arrowhead symbol within an equilateral triangle is intended to
alert the user to the presence of uninsulated, dangerous voltage within the product’s
enclosure that may be of sufcient magnitude to constitute a risk of re or electric
shock to persons.
The exclamation point within an equilateral triangle is intended to alert the user to the presence
of important operating and maintenance (servicing) instructions in the literature accompanying
the appliance.
SPECIAL CORD SET INSTRUCTIONS
A short power-supply cord is provided to reduce the risks resulting from becoming entangled
in or tripping over a longer cord. Longer extension cords are available and may be used if care
is exercised in their use. If a long extension cord is used, the marked electrical rating of the
extension cord must be at least as great as the electrical rating of the appliance, and the longer
cord should be arranged so that it will not drape over the countertop or tabletop where it can
be pulled on by children or tripped over.
IMPORTANT: Always unplug the Cuisinart® Precision Master™ Stand Mixer from outlet when assembling
and disassembling.
CONTENTS
Important Safeguards ..........................................................................................................................2
Features and Components ................................................................................................................. 4
Assembly Instructions .........................................................................................................................5
Operation ............................................................................................................................................ 5
Cleaning and Maintenance ................................................................................................................. 5
Suggested Speed Control Guide ....................................................................................................... 6
Maximum Capacities ...........................................................................................................................7
Troubleshooting .................................................................................................................................. 7
Tips and Hints .................................................................................................................................... 7
Cookie Baking ............................................................................................................................ 8
Bread Baking .............................................................................................................................. 8
Cake Baking ............................................................................................................................... 8
Egg Whites ...................................................................................................................................9
Whipping Cream ........................................................................................................................10
Warranty Information ........................................................................................................................ 11
Recipes ..............................................................................................................................................12
Page 4
4
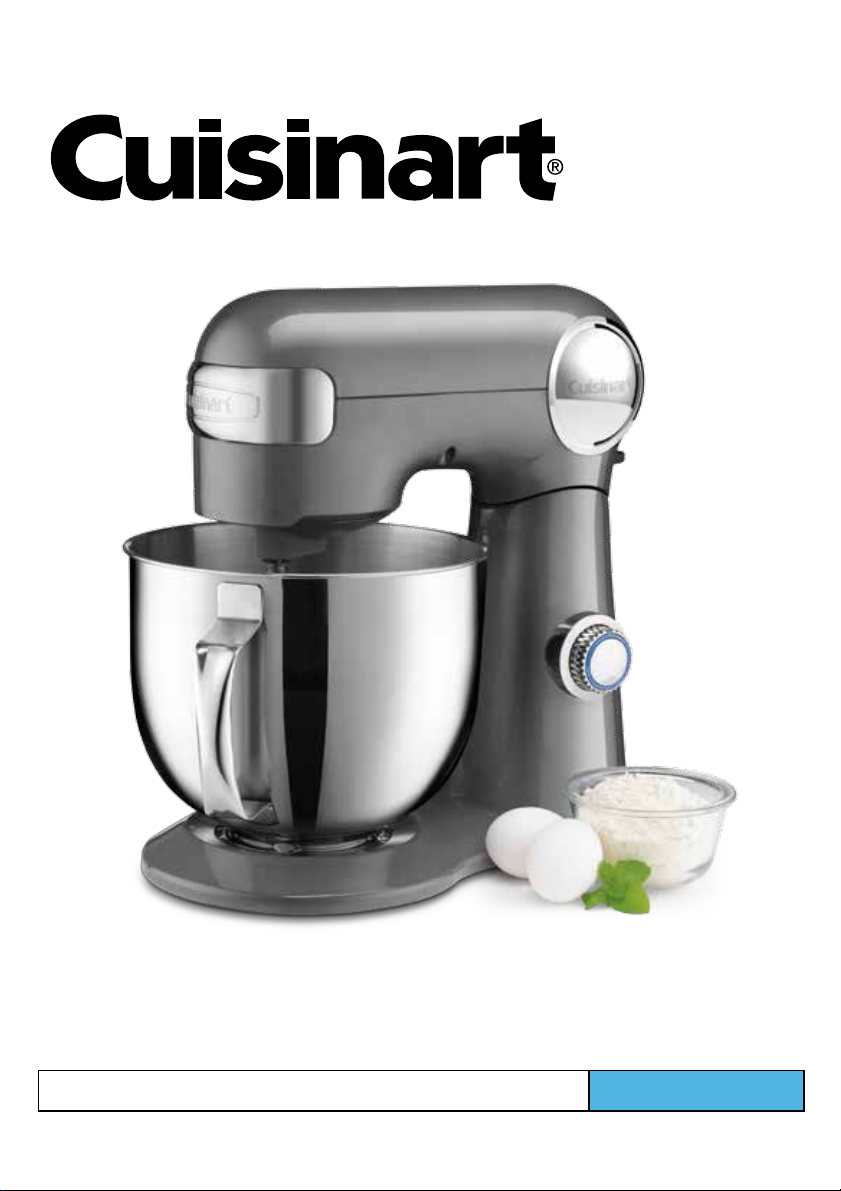
INTRODUCTION
Cuisinart just raised the bar on mixing! This Cuisinart® Precision Master™ Stand Mixer has the
capacity, power, and precision engineering to handle any job a recipe calls for. The three acces
-
sories allow you to mix, whip and knead dough, and with 12 speeds, you’ll always do it just right.
Cuisinart offers optional attachments that can be purchased separately. The selected attachment connects to the port on the front of the mixer, so you can make homemade pastas or
grind your own meats. You can even turn your mixer into an ice cream maker! The Cuisinart
®
Fruit Scoop™ Ice Cream and Fresh Fruit Frozen Dessert Maker attachment lets you make allfruit frozen desserts, ice cream or frozen yoghurt.
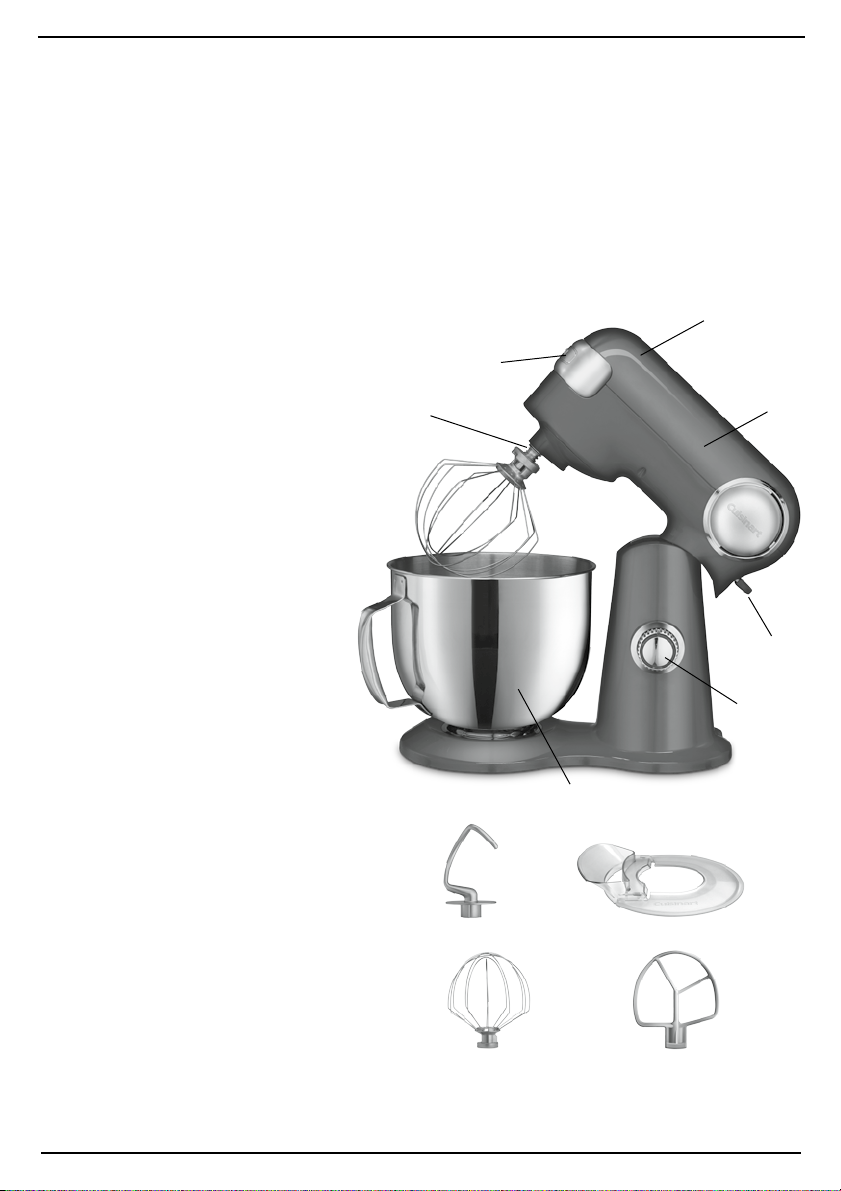
FEATURES AND
COMPONENTS
1. 500 Watt Motor
Plenty of power for double
recipes and heavy mixing tasks.
2. Tilt-Back Head
Makes it easy to attach accessories and scrape sides and bottom
of bowl.
3. Attachment Port
Large Meat Grinder and Pasta
Maker attachments (sold
separately) connect to the port
located behind the port cover
on the front of the stand mixer
head. A locking screw makes
attachments easy to put on,
secure and take off.
4. Accessory Port
Chef’s whisk, at mixing paddle
and dough hook connect to this
port.
5. 5.2L Stainless Steel Bowl with
Handle
Handle makes the bowl easy to
lift, hold, scrape and remove.
Large capacity bowl lets you mix
larger quantities.
6. Head-Lift Release Lever
Securely locks stand mixer head
into raised, tilt-back position.
Used to return mixer head to
mixing position.
7. On/Off and Speed Control Dial
12 speeds for precision mixing.
1.
6.
3.
4.
5.
2.
7, 8
11.
12.
10.
9.
Page 5

5
8. Blue Light Ring
Illuminates when mixer is operating. Turns
off in OFF position.
9. Chef’s Whisk
Incorporates air into ingredients/mixtures.
Ideal for whipping eggs, egg whites or
heavy cream. Used in recipes for angel
food cake, chiffon cake, meringue, some
types of candy, such as marshmallows,
and quickly whips potatoes.
10. Flat Mixing Paddle
Used for stirring, mixing and beating
ingredients/mixtures. Best accessory for
mixing cookies, cakes and batters, and for
frostings. Also use for making pie crusts,
biscuits and shortcakes, and combining
ingredients for meatloaf or meatballs.
11. Dough Hook
Used for the mixing and kneading of yeast
dough for breads, rolls, pizza/focaccia,
pasta dough and yeast-raised coffee cakes.
12. Splash Guard with Pour Spout
Prevents splattering when mixing and
adding ingredients. Guides ingredients
into the bowl.
ASSEMBLY INSTRUCTIONS
1. Raise Mixer Head – Push down the head-
lift release lever and raise the stand mixer
head until it locks into place.
2. Attach Accessory – Place at mixing
paddle, chef’s whisk or dough hook into
the accessory port. Push up and turn
counterclockwise until it locks. Turn clockwise to remove.
3. Place Bowl on Base – Turn clockwise to
secure.
4. Lower Mixer Head – Holding the stand
mixer head, push down the head-lift lever
again and fully lower the mixer head.
5. To Attach Splash Guard with Pour
Spout – After attaching the accessory
and lowering the stand mixer head, slide
the splash guard onto the bowl. Attach
the pour spout by placing it into the tabs
on the splash guard ring and slide it into
place. The splash guard ring can rotate
in any direction to more easily add
ingredients.
To remove: Remove the pour spout from
the splash guard and slide splash guard off
the bowl.
OPERATION
Position the Stand Mixer
The logo plate that covers the attachment port
should face you.
To Turn Stand Mixer On
Turn control dial to desired speed – 1 through
12 (see Speed Control Guide on page 6).
To Turn Stand Mixer Off
Turn the dial to “0” OFF position. Mixing
process stops and unit shuts off.
CLEANING AND
MAINTENANCE
Unplug your Cuisinart® Stand Mixer before
cleaning.
Power Unit
Wipe with a damp cloth and dry. Never use
abrasives or immerse in water.
Bowl
Wash by hand and dry thoroughly or put in
dishwasher. Never use a wire brush, steel
wool or bleach.
Accessories
Mixing paddle and dough hook are top rack
dishwasher safe; can also wash by hand and
dry thoroughly. Chef’s whisk must be washed
by hand.
Attachments
Clean as directed in instructions included with
each attachment you purchase.
Splash Guard with Pour Spout
Top rack dishwasher safe; can also wash by
hand and dry thoroughly.
Maintenance
Any other servicing should be performed by
an authorised service representative.
Page 6

6
1
• Sifting dry ingredients
• Folding in ingredients, such as mix-ins
• Whipping cream & egg whites (gradually
increasing speed)
7
• “Cutting in” butter to our (for pastry/
pie dough)
• Mashing potatoes/vegetables
• Whipping cream & egg whites (gradually
increasing speed)
2
• Sifting dry ingredients
• Folding in ingredients, such as mix-ins
• Mixing quick breads (mufns, etc.)
• Creaming butter and sugar
• Whipping cream & egg whites (gradually
increasing speed)
8
• “Cutting in” butter to our (for pastry/
pie dough)
• Mashing potatoes/vegetables
• Whipping cream & egg whites (gradually
increasing speed)
3
• Creaming butter and sugar
• Incorporating eggs
• Kneading bread dough
• Whipping cream & egg whites (gradually
increasing speed)
9
• Mashing potatoes/vegetables
• Whipping cream & egg whites (gradually
increasing speed)
4
• Creaming butter and sugar
• Kneading bread dough
• Kneading pasta dough
• “Cutting in” butter to our (for pastry/
pie dough)
• Whipping cream & egg whites (gradually
increasing speed)
10
• Whip potatoes/vegetables
• Whipping cream & egg whites (gradually
increasing speed)
5
• Creaming butter and sugar
• “Cutting in” butter to our (for pastry/
pie dough)
• Mashing potatoes/vegetables
• Whipping cream & egg whites (gradually
increasing speed)
11
• Whip potatoes/vegetables
• Whipping cream & egg whites (gradually
increasing speed)
6
• “Cutting in” butter to our (for pastry/
pie dough)
• Mashing potatoes/vegetables
• Whipping cream & egg whites (gradually
increasing speed)
12
• Whip potatoes/vegetables
• Whipping cream & egg whites (gradually
increasing speed)
SUGGESTED SPEED CONTROL GUIDE
Page 7

7
MAXIMUM CAPACITIES
• Yeast doughs (most breads, pizza) – 6 cups
white our
• Cookie dough – 5 dozen cookies
• Whipping cream – 6 cups liquid (12 cups
whipped)
• Egg whites – 12 large
TROUBLESHOOTING
If the stand mixer shuts off, the unit may have
overheated. Your stand mixer has an overload
protection device, it will shut down to protect
the motor.
Solution: In the unlikely event that this
happens:
• Turn off and unplug the unit.
• Reduce the load by removing some of
the ingredients, and allow the mixer to
stand for a few minutes.
• Plug in and reset the speed. If the stand
mixer does not start when you turn the
Speed Dial ON, allow the unit to stand
for additional time.
TIPS AND HINTS
• Before preheating your oven, adjust racks
to accommodate your baking task. Most
recipes use the middle rack; pies bake best
in the lower third of the oven.
• Carefully follow each mixing step in a recipe.
Take care not to over- or under-mix.
• Don’t crowd the oven, and avoid opening
the oven door during baking – use the oven
light to help you watch. With certain recipes,
particularly when baking more than one tray
of cookies at a time, rotate halfway through
baking.
• Proper measurements are very important
when baking. To measure our correctly, stir
the our rst, then spoon into the measuring cup. Level off the top with the blunt side
of a knife blade or the handle of a spoon.
Do not press or compact our. It is also
very important not to measure directly from
the bag – while the our is pre-sifted, it has
been pressed/compacted to t into the bag.
Baked goods made from unstirred our are
likely to be heavy and dry because too much
our is used.
• For most baking recipes, refrigerated items
like butter, milk and eggs incorporate better
when they are at room temperature.
• Remove butter from the refrigerator and cut
into 1cm pieces to help it come to room
temperature faster while you measure out
the remaining ingredients. Do not warm
butter in the microwave; this can change the
structure of the butter if it melts and give the
nished product a different texture.
• To separate eggs for use in any recipe, break
them one at a time into a small bowl. Gently
remove the yolks, then transfer the whites to
a spotlessly clean glass or stainless bowl. If
a yolk breaks into a white, use that egg for
another recipe. Just a drop of egg yolk in
the white prevents the white from whipping
properly.
• Scraping the entire bowl – sides, bottom and
paddle over the course of mixing and adding
new ingredients – ensures even incorporation of ingredients and overall best results.
The more you scrape the bowl, the better.
• For whipping egg whites, both the mixing
bowl and chef’s whisk must be spotlessly
clean and dry. Any trace of fat/oil will prevent
the egg whites from whipping properly.
• To check the freshness of eggs, place them
in a bowl of warm water – if they oat, they
are not fresh. This is most important when
using for whipping egg whites. The fresher
the eggs, the more stable the foam.
• To melt chocolate for a recipe, put chopped
chocolate in a double boiler insert or larger
bowl over a pan of barely simmering water.
The water should not boil, nor should it
touch the bottom of the double boiler insert
or bowl. If it does, this could cause the
chocolate to “seize” and you will not be able
to use it in your recipe.
• Always test yeast for freshness before using it in a recipe. Sprinkle a little over warm
(40–43°C) water and add a pinch of sugar or
Page 8

8
our from the recipe. If it does not become
foamy/bubbly in 5 to 10 minutes, the yeast
may be “dead.” Start over with fresh yeast
from a new package.
COOKIE BAKING
• Use an ice cream scoop to measure out
cookie dough – this keeps the cookies
evenly shaped and uniform in size. Ice cream
scoops are also good for lling mufn tins.
• To better maintain cookie shapes, put
scoops of cookie dough onto sheets of
waxed paper or plastic wrap on a tray and
chill before baking. Most cookie dough can
be refrigerated for 2 to 3 days prior to baking
– be sure to wrap well.
• Cookie dough may also be frozen. Shape
into individual cookies, double wrap and
freeze for up to 3 months. Thaw before
baking.
•
Line baking sheets with parchment paper for
easy release and easy cleanup.
• Let cookies rest on sheets for 2 to 3 minutes
before removing them to a wire rack to cool.
This keeps cookies from wrinkling, crumbling or breaking.
• Cookies must cool completely before being
put into storage containers to ensure they
don’t get soggy or misshapen.
BREAD BAKING
• One ¼-ounce packet of yeast equals 2¼
teaspoons yeast.
• Using milk in place of water will produce a
softer crust.
• After baking, you can soften the crust, if
desired, by rubbing it with unsalted butter
soon after removing it from the oven. This
prevents it from drying out quickly.
• If a recipe calls for a specic type of our,
use the our recommended. If you do not
have bread our, you can substitute unbleached, all-purpose our, but your bread
may not rise quite as much.
• Do not use “lite” or tub margarines for bread
baking – they have different structures and
they do not work as well in baking.
• Vital wheat gluten is the dried protein taken
from the our by eliminating the starch. It is
a good dough conditioner or enhancement
for yeast breads, especially for whole-grain
breads or when using all-purpose our. If a
recipe specically calls for vital wheat
gluten, we recommend that it be used for
best results.
• For 100% whole-wheat bread, use 1½
teaspoons vital wheat gluten per cup of our.
• Lite salt can be used if it has both potassium
chloride and sodium.
• Many bread recipes have a “range” amount
of our – start by using the lower end of the
range, then add more our as needed to
produce a smooth, not sticky dough.
• Using too much liquid, or baking on a humid
day, can cause your bread to fall or wrinkle
on top.
• An instant-read thermometer is helpful to
have on hand when making bread. It can
be used to measure the temperature of the
liquid for proong yeast, and for taking the
internal temperature of the baked bread.
• Liquid for proong yeast should be between
40-43°C.
• Finished bread should have an internal
temperature of 88°C (enriched breads, those
that normally include eggs, are done at a
higher temperature, closer to 97°C).
CAKE BAKING
• Have all ingredients and mixing bowls at
room temperature. Room temperature ingredients incorporate and blend more easily.
• Fill pans immediately after mixing.
• Bake immediately after lling pans.
• Check for doneness at the beginning of the
time range given.
• Cool cakes in pans until cool to touch, and
remove from pans to completely cool on a
wire rack after baking.
• An offset spatula will make spreading
frosting easier than a knife or regular spatula.
EGG WHITES
• Egg whites at room temperature are best for
whipping. Bring to room temperature safely
Page 9

9
by placing uncracked eggs in a bowl of
warm water for 10 to 15 minutes.
• Add a small amount of acid such as cream
of tartar, lemon juice or vinegar when whipping egg whites to stabilise them and allow
them to reach their optimum volume and
stiffness. Use
1
⁄
8
teaspoon cream of tartar per
large egg white – or 1 teaspoon cream of
tartar per cup of egg whites (8 to 10 large).
• The time required to whip egg whites will
vary with the temperature of the egg whites,
age of egg whites, and temperature/humidity of the kitchen. Keep a close watch while
whipping egg whites.
• In humid or damp weather, you may not get
the volume of whipped egg whites that you
do in drier, warmer weather.
• Place the room temperature egg whites in
the clean, dry mixing bowl. Attach the clean,
dry chef’s whisk. Start whipping the egg
whites on Speed 1 and gradually increase to
Speed 6 until foamy, and then gradually increase to Speed 12. If egg whites are beaten
too rapidly in the beginning, their structure
will not be as stable and strong, and they will
not reach the volume that they should when
completely beaten. Over-beaten egg whites
will also separate or deate in a meringue
topping.
• Timing when adding sugar to egg whites is
important. Add sugar slowly and gradually
to the whipped egg whites once they start
to foam. Always add sugar in a slow, steady
stream along side of bowl while egg whites
are being whipped – do not add sugar
directly to the centre of the bowl on top of
beaten egg whites; doing this may cause
them to deate.
• When whipping egg whites, they will at
rst appear foamy or frothy. Then they will
become stiffer and start to hold their shape.
Next, soft peaks will form – this is when
the tips of the peaks fall when the whisk is
lifted up – soft peaks are often required for
mousses or soufés. The next stage is medium to stiff peaks. This is used for recipes
such as meringues – the whites will appear
dry, the peaks will hold their shape and the
whites will be shiny. The nal stage is stiff
and dry. The whites will not be uniformly
white, but will appear speckled and they will
no longer be shiny in appearance.
• Beaten egg whites should be used immediately after beating them. If they wait for
longer than 5 minutes, they will begin to
deate and lose volume and structure. Egg
whites beaten with sugar or cream of tartar
are more stable and will last a little longer.
SANITISING EGG WHITES
Take care when adding raw egg whites to
recipes that are not cooked or baked as there
is a chance they may carry harmful bacteria.
If you have a recipe that calls for raw egg
whites, you may wish to use powdered egg
whites or “sanitise” the egg whites by doing
the following:
• Put the egg whites, 2 tablespoons of
the granulated sugar from your recipe, 2
tablespoons water, and a pinch of cream
of tartar into the Cuisinart
®
mixing bowl
and stir until smooth.
• Put over a pan of simmering water and
stir constantly with a spotlessly clean
rubber spatula until the mixture registers
70°C on an instant-read thermometer
– start checking the temperature after
about a minute of stirring.
• When the egg white mixture registers
70°C, dry off the bottom of the bowl and
place it on the Cuisinart
®
stand mixer.
Insert the chef’s whisk. Continue as
directed in your recipe.
WHIPPING CREAM
The difference between heavy cream and
whipping cream is the butterfat content. The
higher the butterfat content, the more stable
the whipped cream. Heavy cream has a higher
butterfat content than whipping cream does.
Light cream may also be whipped, but will
not last as long. Creams that are not ultrapasteurized are best for whipping.
The yield of cream generally doubles in vol-
Page 10

10
ume. To make 2 cups of softly whipped cream,
put 1 cup of heavy/whipping cream into the
well-chilled mixing bowl. Starting on Speed 2
and increasing to Speed 10 or 12, whip until
it just begins to hold its shape. Add about ½
teaspoon pure vanilla or other pure avoured
extract and 1 to 4 tablespoons granulated,
superne or confectioners’ sugar. Whip until
the cream holds soft, oppy peaks.
To make whipped cream:
• Start with well-chilled cream, mixing bowl
and chef’s whisk (place bowl and whisk in
freezer for at least 15 minutes before making
whipped cream). The room should not be
too hot.
• Whip cream on low speeds until small
bubbles form – this will take about 30 seconds. Gradually increase to Speed 12 and
continue beating until desired doneness,
being careful not to over-whip. It takes just
seconds for cream to go from smooth and
creamy whipped cream to whipped cream
with grainy bits of butter forming.
• If you are making a sweetened, avoured
whipped cream, begin to slowly add the
sugar and avourings as the cream becomes
soft and billowy in appearance.
• Sugars should be sifted before adding to
whipping cream.
• Stop whipping cream when it has doubled
in volume – it should be smooth, creamy
and thick, forming either soft (for garnishing
desserts, folding into desserts) or stiff (for
topping cakes, desserts, piping decoratively)
peaks.
• Unless stabilised, whipped cream should be
served immediately.
STABILISED WHIPPED CREAM
Stabilised whipped cream will hold longer in
the refrigerator before using, and it can also
be used for decorating, using a pastry bag
and tip. Using gelatin or a purchased stabiliser
will prevent whipped cream from weeping.
To make stabilised whipped cream, soften
powdered gelatin by sprinkling it over water
in a measuring cup. Let stand 5 minutes to
soften. Then place the measuring cup in a pan
of simmering water and stir over low heat until
gelatin is dissolved. Let cool slightly before
adding to cream – but do not allow to get cold
and harden.
• For 1 cup of cream, use ½ teaspoon gelatin
soaked in 1 tablespoon water.
• For 2 cups of cream, use 1 teaspoon gelatin
soaked in 2 tablespoons water.
• For 8 cups of cream, use 1 tablespoon + 1
teaspoon gelatin soaked in 8 tablespoons
water.
Follow basic whipping instructions, adding
cooled gelatin mixture to cream all at once
after it has whipped to a slightly thickened
stage.
Page 11

11
WARRANTY
THREE-YEAR LIMITED WARRANTY
This warranty supersedes all previous warranties
on Cuisinart
®
Precision Master Stand Mixer. This
warranty is available to consumers only. You are
a consumer if you own a Cuisinart
®
Precision
Master Stand Mixer that was purchased at retail
for personal, family, or household use. This
warranty is not available to retailers or other
commercial purchasers or owners.
We warrant that your Cuisinart® Precision Master
Stand Mixer will be free of defects in material or
workmanship under normal home use for three
years from the date of original purchase.
Please visit our website, www.cuisinart.com.au
for the fastest most efcient way to complete
your product registration.
or
Call toll-free 1800 808 971 (AUST),
0800 435 000 (NZ),
or
Write to
Cuisinart
®
Australia
24 Salisbury Road
Asquith NSW 2077
or
Cuisinart
®
New Zealand
44 Apollo Drive Mairangi Bay
Auckland New Zealand
However, the above registration methods do
not eliminate the need for the consumer to
maintain the original proof of purchase in order
to obtain the warranty benets. In the event that
you do not have proof of purchase date, the
purchase date for purposes of this warranty will
be the date of manufacture. If your Ice Cream
maker should prove to be defective within the
warranty period, we will repair it (or, if we think it
necessary, replace it)without charge to you.
This warranty expressly excludes any defects or
damages caused by accessories, replacement
parts, or repair service other than those that
have been authorised by Cuisinart
®
.
This warranty does not cover any damage
caused by accident, misuse, shipment or other
than ordinary household use.
Please also be sure to include a return address,
daytime phone number, description of the
product defect, product serial number (stamped
on bottom of product base), and any other
information pertinent to the product’s return.
Your Cuisinart
®
Precision Master Stand Mixer has
been manufactured to strict specications and
has been designed for use with the Cuisinart
®
Precision Master Stand Mixer accessories and
replacement parts. These warranties expressly
exclude any defects or damages caused by
accessories, replacement parts, or repair service
other than those that have been authorised by
Cuisinart
®
. These warranties do not cover any
damage caused by accident, misuse, shipment,
or other than ordinary household use. These
warranties exclude all incidental or consequential
damages.
Page 12

12
RECIPES
SAVOURIES
Gougères ................................................... 13
Spinach and Feta Soufé .......................... 13
Mashed Potatoes ...................................... 14
Cauliower Purée ...................................... 14
Pasta Dough .............................................. 15
YEAST BREADS AND ROLLS
Pizza Dough .............................................. 15
Gluten-Free Pizza Dough .......................... 16
Basic White Bread ..................................... 16
Molasses Wheat Bread ............................. 17
Multigrain Bread ........................................ 17
Buttery Dinner Rolls .................................. 18
Challah ...................................................... 18
Rustic Italian Bread ................................... 19
COFFEE CAKES, MUFFINS AND
QUICK BREADS
Blueberry Buttermilk Crumb Cake ............ 20
Banana Chocolate Chip Bread .................. 20
Pecan Sticky Buns .................................... 21
Apple Oat Bran Mufns ............................. 22
Triple Citrus Tea Loaf ................................. 22
COOKIES AND BARS
Chocolate Cherry Crackles ....................... 23
Pecan Linzer Cookies ................................ 23
Chocolate Chunk Cookies......................... 24
Cherry and Almond Biscotti ...................... 25
Mocha Sugar Cookies ............................... 25
Black & White Cookies .............................. 26
Power Cookies .......................................... 26
Fudge Brownies ........................................ 27
Blondies ..................................................... 28
PIES
Basic Flaky Pastry Dough for
Pies & Tarts ................................................ 28
Cookie Crumb Crust ................................. 29
Lemon Meringue Pie ................................. 29
Chocolate Cream Pie ................................ 30
CAKES AND CUPCAKES
Golden Yellow Cake .................................. 30
Deep Chocolate Layer Cake ..................... 31
Coconut Cake ........................................... 31
Chocolate Marble Cheesecake ................. 32
Gluten-Free Golden Cupcakes ................. 33
Angel Food Cake ....................................... 34
FROSTINGS, ICINGS AND FILLINGS
French Buttercream ................................... 34
Swiss Buttercream .................................... 35
Chocolate Frosting .................................... 35
Cream Cheese Frosting ............................. 35
Dairy-Free Vanilla Frosting......................... 36
Royal Icing ................................................. 36
Chocolate Glaze/Ganache ........................ 36
Simple Chocolate Mousse ........................ 37
Whipped Cream ........................................ 37
Page 13

13
Gougères
Gruyère is the classic cheese used in gougères,
but you may substitute your favourite.
Makes about 65, 2 cm gougères
½ cup water
4 tablespoons (½ stick) unsalted butter, cut
into 2 cm pieces
½ teaspoon kosher salt, divided
½ teaspoon granulated sugar
1 cup unbleached, all-purpose flour
2
large eggs, plus up to 2 more if necessary
1 cup shredded Gruyère cheese, divided
¼ teaspoon cayenne
¼ teaspoon paprika
Preheat oven to 260°C. Line two baking sheets
with parchment paper. Reserve.
Put the water, butter, ¼ teaspoon of the salt
and sugar into a medium saucepan set over
medium heat. Once the mixture comes to a
boil, remove from heat and stir in all of the flour.
Return to the burner and raise the heat to
medium-high. Using a wooden spoon,
continuously stir the mixture until it “dries out”
and a thick, hard film remains on the bottom of
the pot, about 1½ to 2 minutes.
Remove from heat and put flour mixture into
the Cuisinart
®
mixing bowl. Attach the flat
mixing paddle and mix on Speed 3 to release
steam and cool, about 2 to 3 minutes. Once
the dough has cooled (and the bowl is no
longer warm), increase the speed to 4 and add
the eggs, one at a time until each is fully
incorporated before adding the next. Scrape
down the entire bowl between each addition.
Dough is ready when it becomes a pale yellow
colour and drops from the beater in a slow,
steady stream. If the dough is too thick, beat
the remaining 2 eggs together and slowly begin
to add them, 1 teaspoon at a time, with the
mixer running. Do not make the dough too
runny or it will not hold its shape.
Add ½ cup of Gruyère, the remaining salt and
spices and mix on Speed 2 to incorporate.
Transfer the batter to a large pastry bag fitted
with a small to medium-sized round tip. Pipe
the gougère dough into 2 cm rounds, 1 cm
apart on the prepared baking trays. Top each
with a pinch of the reserved Gruyère.
Put in the oven, and immediately turn the heat
down to 150°C. Bake until gougères are nicely
browned, completely hollow and not wet inside,
about 20 minutes.
Serve immediately.
TIP: To ensure even colouring, rotate the
baking sheets halfway through baking.
Nutritional analysis per gougère:
Calories 29 (61% from fat) • carb. 1g • pro. 1g
• fat 2g • sat. fat 1g • chol. 11mg • sod. 39mg
• calc. 36mg • fibre 0g
Spinach and Feta Soufflé
Looking for a new idea for a fun and festive side
dish? The classic combination of spinach and feta
come together in this tasty soufflé.
Makes 12 servings
6 tablespoons (¾ stick) unsalted butter, cut
into 2 cm pieces, divided
½ cup grated Romano cheese, divided
5 large eggs
1 large egg white
½ cup unbleached, all-purpose flour
1½ cups whole milk
90g feta cheese
¼ teaspoon kosher salt
¼ teaspoon freshly ground black pepper
1
/8 teaspoon freshly ground nutmeg
1 300g package frozen, chopped
spinach, thawed with any moisture
squeezed out
¼ teaspoon lemon zest
Preheat oven to 200°C. Position racks so that
the soufflé can bake in the middle of the oven.
Generously butter a 2-litre (8-cup) soufflé dish
thoroughly with 1 tablespoon of the butter.
Sprinkle ¼ cup of the Romano in the dish so
that the bottom and sides are coated. Shake
out any excess. Wipe the rim of the dish with
a paper towel to remove any butter or cheese;
reserve.
Separate eggs, putting whites (including extra
white) into the Cuisinart
®
mixing bowl and the
yolks into a separate mixing bowl. Break yolks
up by stirring with a fork. Attach the chef’s
whisk and reserve both bowls containing eggs.
Page 14

14
Put the remaining butter in a saucepan over
medium-low heat. Once butter melts, add the
flour to the pan and stir to cook off any raw
flour taste, about 3 to 4 minutes. While
continuously whisking the butter/flour mixture,
slowly add the milk. Once all the milk is added,
whisk until a smooth and homogenous
consistency is achieved. Once mixture is
smooth, beat in remaining Romano and feta
salt, pepper and nutmeg. Stir in the spinach
and lemon zest.
While continuously mixing with a whisk, spoon
a small amount of the milk and spinach mixture
into the yolks. Continue mixing in the remaining
mixture, a third at a time.
Beat egg whites, starting on Speed 1 and
gradually increasing to Speed 12. Whip only
until firm peaks form, about 1½ minutes total.
Mix a third of the egg whites into the spinach
mixture until evenly combined. Continue by
carefully folding the remaining egg whites in
two additions with a large rubber spatula. Fold
just until combined.
Pour mixture into prepared dish and gently
smooth the top to ensure an even rise. Put
soufflé into preheated oven and reduce
temperature to 190°C. Bake until golden and
just set, about 45 to 50 minutes.
Serve immediately.
Nutritional analysis per serving (½ cup):
Calories 207 (64% from fat) • carb. 9g • pro. 9g
• fat 15g • sat. fat 8g • chol. 152mg • sod. 418mg
• calc. 175mg • fibre 1g
Mashed Potatoes
This basic recipe is perfect to serve as is,
or be creative and add different flavours like
fresh herbs or cheese.
Makes about 9 cups
2kg Yukon gold potatoes, peeled and cut into
2cm pieces
51/3 tablespoons unsalted butter, cut into
2cm pieces
1 cup crème fraîche
½ cup milk (any fat variety works)
1 teaspoon kosher salt
½ teaspoon freshly ground black pepper
Put potatoes into a stockpot and cover with
cold water. Bring to a boil and simmer until
potatoes are tender.
Once the potatoes are tender, drain the
potatoes completely and then transfer to the
Cuisinart
®
mixing bowl. Attach the chef’s whisk
and mix on Speed 5 until potatoes are
completely mixed with no lumps, scraping
down the entire bowl as necessary.
Once potatoes are smooth, add the butter,
crème fraîche, milk, salt and pepper. Mix again
on Speed 8, increasing to Speed 12 until
potatoes are light and fluffy. Scrape the bowl
once to make sure all ingredients are evenly
incorporated.
Taste and adjust seasoning as desired.
Nutritional analysis per serving (½ cup):
Calories 172 (42% from fat) • carb. 21g • pro. 3g
• fat 8g • sat. fat 5g • chol. 27mg • sod. 155mg
• calc. 55mg • fibre 3g
Cauliflower Purée
A great, healthy alternative to traditional mashed
potatoes, plus this recipe is dairy free!
Makes 6 cups
1
large head cauliflower, cored, about 1.5 kg
450g pound Yukon gold potatoes, peeled and
cut into 2 cm pieces
¼ cup extra virgin olive oil
2 teaspoons kosher salt
½ teaspoon freshly ground black pepper
Cut cauliflower into large chunks and put into a
large stockpot with the potatoes. Cover with
cold water and place over high heat until water
comes to a boil. Reduce heat to maintain a
healthy simmer and cook until vegetables are
tender, about 25 minutes.
Once tender, drain all water from the
vegetables and place into the Cuisinart
®
mixing
bowl. Attach the chef’s whisk and mix on
Speed 5 until vegetables are smooth. Scrape
the entire bowl as necessary during the
process. Increase the speed between 8 and 10
to completely smooth out the cauliflower.
Once smooth, decrease speed to 2 to add the
olive oil, salt and pepper, and then slowly
increase to Speeds 10 to 12 until light and
Page 15

15
fluffy. Scrape the bowl once to make sure all
ingredients are evenly incorporated. Taste and
adjust seasonings as desired.
Nutritional analysis per serving (½ cup):
Calories 142 (56% from fat) • carb. 13g • pro. 3g
• fat 10g • sat. fat 1g • chol. 0mg • sod. 394mg
• calc. 27mg • fibre 3g
Pasta Dough
The combination of “00” and semolina flour gives this
dough the perfect bite when cooked, compared to
traditional pasta dough made with just “00” flour.
Makes about 100g of dough, enough for 8 servings
5 large eggs
2½ cups “00” flour
2
/3 cup semolina flour
Put all of the ingredients, in the order listed,
into the Cuisinart
®
mixing bowl. Attach the
dough hook and mix on Speed 5 to combine,
about 1 minute.
Continue mixing until dough mostly comes
together, about 4 to 6 minutes. At about 5
minutes of mixing, check the texture. If it is too
dry, add water one tablespoon at a time;
alternatively, if it is too wet, add the “00” flour
one tablespoon at a time to desired
consistency. Keep in mind this dough won’t
resemble a smooth ball, it will only just come
together in large chunks with some possible
smaller bits to knead in by hand. Should any
flour or loose, dry bits be left behind at the
bottom of the bowl, leave them there and do
not incorporate into final dough.
Transfer dough to a lightly floured surface and
knead all dough together into a ball by hand
until smooth and it springs back to the touch,
about 2 minutes.
Wrap in plastic wrap and let rest at room
temperature before using, at least 20 minutes.
Pasta dough can be made and stored in the
refrigerator for up to 3 days.
For best results use the Cuisinart
®
Pasta Roller
and Cutter to make the perfect lasagna sheets,
pappardelle, linguine or spaghetti.
Nutritional analysis per serving (3 ounces):
Calories 218 (15% from fat) • carb. 35g • pro. 10g
• fat 4g • sat. fat 1g • chol. 11mg • sod. 41mg
• calc. 13mg • fibre 3g
Pizza Dough
This dough can be used for more than just the
obvious, although who doesn’t love homemade pizza?
Makes 700g of dough, two 30cm crusts
1 cup warm water (40-43°C)
1½ teaspoons granulated sugar
2¼ teaspoons active dry yeast
3 cups bread flour (unbleached, all-
purpose flour may be substituted),
plus additional for dusting and rolling
1½ teaspoons kosher salt
1 tablespoon extra virgin olive oil, plus
more for coating the dough
Stir together the warm water, sugar and yeast
in the Cuisinart
®
mixing bowl. Attach the dough
hook and let stand until the mixture is foamy
and bubbly, about 5 to 10 minutes.
While the yeast is proofing, combine the bread
flour and salt in a separate mixing bowl.
Once the yeast is foamy, add the flour mixture
and olive oil to the bowl and turn the mixer on
to Speed 3 until dough comes together as a
ball and cleans the side of the bowl.
Once dough ball forms, continue to knead on
Speed 3 for about 4 minutes. Dough should
be smooth and spring back to the touch. If
sticky, add 1 tablespoon of flour at a time until
smooth. Alternatively, if the dough seems too
dry, add 1 tablespoon of water at a time.
Cover bowl with plastic wrap and let rise in a
warm, draft-free place until doubled in volume,
about 1 hour.
Place dough on a lightly floured surface and
form into desired crust size(s) or as directed by
recipe.
Nutritional analysis per serving (60g, based on 12 servings for
two, 30cm crusts):
Calories 114 (9% from fat) • carb. 23g • pro. 3g
• fat 1g • sat. fat 0g • chol. 0mg • sod. 286mg
• calc. 1mg • fibre 1g
Page 16

16
Gluten-Free Pizza Dough
Finally! Pizza that folks with gluten allergies or
sensitivities can cheer about.
Makes about 450g of dough, about two 25cm pies
¾ cup tapioca flour
¾ cup white rice flour, plus additional for
dusting and rolling
1
/3 cup quinoa flour
1
/3 cup arrowroot flour
1 teaspoon xanthan gum
1 teaspoon kosher salt
2 teaspoons granulated sugar
½ cup rice milk
¼ cup water
2 tablespoons extra virgin olive oil
Put the flours, xanthan gum, salt and sugar into
the Cuisinart
®
mixing bowl. Attach the dough
hook and mix on Speed 4 to combine.
Combine the rice milk, water and olive oil
together in a liquid measuring cup.
With the stand mixer running on Speed 3,
slowly add the liquid ingredients. Once a dough
ball forms, knead the dough on Speed 4, for
about 3 to 4 minutes. Dough should be
smooth. If sticky, add 1 tablespoon of rice flour
at a time until smooth. Alternatively, if the
dough seems too dry, add 1 tablespoon of
water at a time.
When ready to roll, dust a large surface with
rice flour. Divide the dough into 2 equal pieces.
Roll dough out into about a 30cm circle.
Liberally dust a pizza peel or the bottom of a
sheet tray with rice flour. Transfer pizza dough
to the well-floured surface and decorate with
desired pizza toppings before baking.
Nutritional analysis per serving (11/3 ounces, based on 12
servings for two, 10-inch pies):
Calories 114 (22% from fat) • carb. 22g • pro. 9g
• fat 3g • sat. fat 0g • chol. 0mg • sod. 209mg
• calc. 23 mg • fibre 1g
Basic White Bread
A basic white bread, great for sandwiches.
Makes two loaves, 600g each
12/3 cups warm water (40-43°C)
1½ tablespoons honey
2¼ teaspoons active dry yeast
5½ cups unbleached, all-purpose or bread
flour, divided
½ cup nonfat dry powdered milk
2 teaspoons kosher salt
4 tablespoons (½ stick) unsalted butter,
cut into 1cm pieces and at room
temperature
Nonstick cooking spray
Stir together the warm water, honey and yeast
in the Cuisinart
®
mixing bowl. Attach the dough
hook and let stand until the mixture is foamy
and bubbly, about 5 to 10 minutes.
While the yeast is proofing, combine the flour,
powdered milk and salt in a separate mixing
bowl.
Once the yeast is foamy, add the flour mixture
and the butter and turn the mixer on to Speed
3 until dough comes together as a ball and
cleans the side of the bowl.
Once dough ball forms, continue to knead on
Speed 3 for about 4 to 5 minutes. Dough
should be smooth and spring back to the
touch. If sticky, add 1 tablespoon of flour at a
time until smooth. Alternatively, if the dough
seems too dry, add 1 tablespoon of water at a
time.
Cover bowl with plastic wrap and let rise in a
warm, draft-free place until doubled in volume,
about 1 hour.
Lightly coat two 23cm loaf pans with cooking
spray. Punch the dough down and divide
dough into 2 equal portions. Shape into loaves
and place in prepared pans. Cover with plastic
wrap and let rise until nearly doubled, about 30
to 45 minutes.
While loaves are rising, preheat oven to 190°C.
When loaves have doubled, bake until the
bread is browned and sounds hollow when
tapped, about 35 to 40 minutes. Remove from
oven and cool on wire rack until cool to touch;
Page 17

17
remove from pans and allow to cool completely
before slicing.
Nutritional analysis per serving (one 1-ounce slice):
Calories 64 (15% from fat) • carb. 12g • pro. 1g
• fat 1g • sat. fat 1g • chol. 3mg • sod. 116mg
• calc. 7mg • fibre 1g
Molasses Wheat Bread
A hearty wheat bread flavoured lightly with molasses.
Makes two loaves, about 700g each
12/3 cups warm water (40-43°C)
1½ tablespoons molasses
2¼ teaspoons active dry yeast
3½ cups whole-wheat flour, divided
2¼ cups unbleached, all-purpose or bread
flour, divided
½ cup nonfat dry powdered milk
2 teaspoons kosher salt
4 tablespoons (½ stick) unsalted butter, cut
into 1cm pieces, at room temperature
Nonstick cooking spray
Stir together the warm water, molasses and
yeast in the Cuisinart
®
mixing bowl. Attach
dough hook and let stand until mixture is foamy
and bubbly, about 5 to 10 minutes.
While yeast is proofing, combine 3 cups of the
whole-wheat flour and 1¾ cups of the bread
flour with powdered milk and salt. Once the
yeast mixture proofs, add the flour mixture to
the yeast mixture with the unsalted butter.
Mix on Speed 2 for 2 minutes. Combine
remaining flours and reserve. Continuing on
Speed 2, add the combined remaining flour one
tablespoon at a time until dough comes
together as a ball and cleans the side of the
bowl.
Knead on Speed 3 for 4 minutes. Dough should
be smooth and spring back to the touch. If
sticky, add 1 tablespoon of flour at a time until
smooth. Alternatively, if the dough seems too
dry, add 1 tablespoon of water at a time.
Cover bowl with plastic wrap and let rise in a
warm, draft-free place until doubled in volume,
about one hour.
Lightly coat two 23cm loaf pans with cooking
spray. Punch the dough down and divide into 2
equal portions. Shape into loaves and place in
prepared pans. Cover and let rise until nearly
doubled, about 30 to 45 minutes.
While bread is rising, preheat oven to 190°C.
Bake until bread is browned and sounds hollow
when tapped, about 35 to 40 minutes. Remove
from oven and cool on wire rack until cool to
touch; remove from pans and allow to cool
completely before slicing.
Nutritional analysis per serving (one 2-ounce slice):
Calories 154 (16% from fat) • carb. 28g • pro. 5g
• fat 3g • sat. fat 2g • chol. 11mg • sod. 224mg
• calc. 33mg • fibre 3g
Multigrain Bread
This nutrient-dense bread with subtle honey flavour
is great for sandwiches.
Makes two loaves, about 700g each
1 cup warm water (40-43°C)
1½ tablespoons honey
2¼ teaspoons active dry yeast
3 cups whole-wheat flour
1½ cups unbleached, all-purpose or bread
flour
2 tablespoons vital wheat gluten
2 teaspoons kosher salt
½ cup rolled oats
¼ cup hulled sunflower seeds
¼ cup flax seeds
2 tablespoons wheat germ
2 tablespoons flax oil or vegetable oil
Nonstick cooking spray
Stir together the warm water, honey and yeast
in the Cuisinart
®
mixing bowl. Attach dough
hook and let stand until mixture is foamy and
bubbly, about 5 to 10 minutes.
While yeast is proofing, combine flours, vital
wheat gluten, salt, oats, seeds and wheat germ
in a separate large bowl. Once the yeast
mixture proofs, add the flax oil and flour
mixture flour to the yeast mixture. Mix on
Speed 2 to just combine. Increase to Speed 4
and knead, about 4 minutes. Dough should be
smooth and spring back to the touch. If sticky,
add 1 tablespoon of the white flour at a time
until smooth. Alternatively, if the dough seems
too dry, add 1 tablespoon of water at a time.
Cover bowl with plastic wrap and let rise in a
warm, draft-free place until doubled in volume,
about 1 hour.
Page 18

18
Lightly coat two 23cm loaf pans with cooking
spray. Punch dough and divide into 2 equal
portions. Shape into loaves and place in
prepared pans. Cover and let rise until nearly
doubled, about 30 to 45 minutes.
While bread is rising, preheat oven to 190°C.
Bake loaves until bread is browned and sounds
hollow when tapped, about 35 to 40 minutes.
Remove from oven and cool on wire rack until
cool to touch; remove from pans and allow to
cool completely before slicing.
Nutritional analysis per serving (one 2-ounce slice):
Calories 137 (23% from fat) • carb. 24g • pro. 1g
• fat 4g • sat. fat 0g • chol. 0mg • sod. 215mg
• calc. 15mg • fibre 3g
Buttery Dinner Rolls
The classic dinner roll we all remember from Sunday
or holiday dinners.
Makes 16 dinner rolls
¾ cup whole milk
8 tablespoons (1 stick) unsalted butter, cut
into 2 cm pieces
1 teaspoon kosher salt
4 tablespoons granulated sugar, divided
¼ cup warm water (40-43°C)
2¼ teaspoons active dry yeast
1 large egg
4 cups bread flour, plus additional for
dusting and rolling
Unsalted butter for greasing pan
1 tablespoon whole milk
1 tablespoon unsalted butter
Scald milk (heat until just bubbling around
edges – may be done in microwave). Stir in
unsalted butter, salt and 3 tablespoons of
sugar. Let cool until just warm (40-43°C).
Stir together the warm water, remaining
tablespoon of sugar and yeast in the Cuisinart
®
mixing bowl. Attach the dough hook and let
stand until the mixture is foamy and bubbly,
about 5 to 10 minutes.
While the yeast is proofing, measure out the
bread flour in a separate mixing bowl.
Once the yeast is foamy and the milk mixture
is at the appropriate temperature, add the milk
mixture, egg and flour and turn the mixer on to
Speed 3 until dough comes together as a
ball and cleans the side of the bowl.
Once dough ball forms, continue to knead on
Speed 3 for about 4 to 5 minutes. Dough
should be smooth. If sticky, add 1 tablespoon
of flour at a time until smooth. Alternatively, if
the dough seems too dry, add 1 tablespoon of
water at a time.
Cover bowl and let rise in a warm, draft-free
place until doubled in volume, about 1 hour.
Preheat oven to 190°C. Lightly butter a 23cm
round baking pan. Divide the dough into 16
equal pieces. Roll into balls and arrange in the
prepared pan. Cover with plastic wrap and let
rise until about doubled, about 30 to 45
minutes.
Combine remaining tablespoon of milk and
butter and heat until butter is melted. Just
before baking, gently brush rolls with melted
butter and milk. Bake until golden brown, about
25 to 30 minutes (internal temperature of rolls
will be 95°C when tested with an instant-read
thermometer).
Remove from oven and cool on wire rack until
cool to touch; remove from pan and allow to
cool completely.
Nutritional analysis per roll:
Calories 183 (35% from fat) · carb. 26g • pro. 4g
• fat 7g • sat. fat 5g • chol. 34mg • sod. 153mg
• calc. 13mg • fibre 1g
Page 19

19
Challah
Our challah makes the best French toast — that’s if
you have any left over, of course!
Makes one loaf
¼ cup warm water (40-43°C)
2¼ teaspoons active dry yeast
4 tablespoons granulated sugar, divided
2
/3 cup cold water
8 tablespoons (1 stick) unsalted butter,
melted
41/3 cups unbleached, all-purpose flour
2 teaspoons kosher salt
Egg wash (1 large egg and 1 tablespoon
water whisked together)
Nonstick cooking spray
Stir together the warm water, yeast and 2
teaspoons of the sugar into the Cuisinart
®
mixing bowl. Attach the dough hook and let
stand until foamy, about 5 minutes.
Once the yeast has proofed, add the cold
water, melted butter, flour and salt to the mixing
bowl. Knead on Speed 2 to incorporate
ingredients. Increase to Speed 4 and knead
until smooth, about 5 minutes. Dough should
be soft and spring back to the touch.
Cover mixing bowl and let dough rise in a
warm, draft-free place until volume is doubled,
about 1 to 1½ hours. Line a sheet tray with
parchment paper.
Transfer dough to a lightly floured surface and
punch down. Divide dough into 3 equal pieces.
Use your hands to roll each piece into a
cylinder about 4 x 36cm. Place the cylinders
side by side on the prepared tray. Braid loosely
from one end. Gently pull and taper each end
to a point, then pinch and tuck under loaf.
Cover with plastic wrap coated with cooking
spray and let rise until doubled in size, about
45 minutes. Preheat oven to 190°C with the
rack positioned in the lower third of the oven.
Brush the loaf with the egg wash. Bake for 20
minutes. Lower temperature to 175°C and bake
until loaf is browned and sounds hollow when
tapped, about an additional 10 minutes.
Remove from oven and cool on wire rack.
Nutritional analysis per serving (one 2-ounce slice):
Calories 119 (61% from fat) • carb. 18g • pro. 3g
• fat 4g • sat. fat 2g • chol. 30mg • sod. 202mg
• calc. 4mg • fibre 0g
Rustic Italian Bread
This airy and crusty loaf proves that making artisan-
style bread at home can be so simple.
Makes 1 round loaf
1 cup warm water (40-43°C)
¾ teaspoon granulated sugar
1¾ teaspoons active dry yeast
3 cups bread flour
1
/3 cup wheat bran
1½ teaspoons kosher salt
2 tablespoons extra virgin olive oil
Egg wash (1 egg and 1 tablespoon water
whisked together)
Stir together the warm water, sugar and yeast
in the Cuisinart
®
mixing bowl. Attach the dough
hook and let stand until the mixture is foamy
and bubbly, about 5 to 10 minutes.
While the yeast is proofing, combine the bread
flour, wheat bran and salt in a separate mixing
bowl.
Once the yeast is foamy, add the flour mixture
and the olive oil and turn the mixer on to Speed
3 until dough comes together as a ball and
cleans the side of the bowl.
Once dough ball is formed, continue to knead
on Speed 3 for about 4 to 5 minutes. Dough
should be smooth and spring back to the
touch. If sticky, add 1 tablespoon of flour at a
time until smooth. Alternatively, if the dough
seems too dry, add 1 tablespoon of water at a
time.
Cover bowl with plastic wrap and let rise in a
warm, draft-free place until doubled in volume,
about one hour. Punch the dough down,
reshape again into a ball, cover with plastic
wrap to rise until doubled in size again.
Gently punch down the dough and shape into a
tight, large round. Put the round on a baking
sheet lined with parchment paper and loosely
cover with plastic wrap. Allow to rise one last
time, about 30 minutes.
While bread is rising, preheat oven to 200°C.
When ready to bake, cut an “X” into the top of
the loaf with a serrated knife, brush with egg
Page 20

20
wash and bake for about 30 minutes, until
bread is nicely browned and has an internal
temperature of 95°C. Remove from oven and
cool completely on a wire rack before slicing.
Nutritional analysis per serving (one 1.5-ounce slice):
Calories 95 (15% from fat) • carb. 17g • pro. 3g
• fat 2g • sat. fat 0g • chol. 12mg • sod. 219 mg
• calc. 2mg • fibre 1g
Blueberry Buttermilk
Crumb Cake
This coffee cake is guaranteed to receive
rave reviews.
Makes one cake, 16 servings
Nonstick cooking spray
Crumb Topping:
1¾ cups unbleached, all-purpose flour
¾ cup packed light brown sugar
12 tablespoons (1½ sticks) unsalted butter,
cut into 2 cm pieces and at room
temperature
2 teaspoons ground cinnamon
¾ teaspoon pure vanilla extract
¼ teaspoon kosher salt
Buttermilk Cake:
22/3 cups unbleached, all-purpose flour
¾ teaspoon baking soda
¾ teaspoon cream of tartar
½ teaspoon kosher salt
102/3 tablespoons (11/3 sticks) unsalted butter,
cut into 2 cm pieces and at room
temperature
11/3 cups granulated sugar
2 large eggs, at room temperature
¾ teaspoon pure vanilla extract
2
/3 cup buttermilk
3 cups blueberries
Preheat oven to 175°C. Lightly coat a 33 x
23cm baking pan with cooking spray; reserve.
To prepare the Crumb Topping: Put all of the
crumb topping ingredients in the Cuisinart
®
mixing bowl. Attach the flat mixing paddle and
mix on Speed 2 to break up, scrape if
necessary and then turn up the mixer to Speed
4 until the mixture resembles large crumbs,
stopping to scrape bowl as necessary. Remove
and reserve in refrigerator until ready to use.
To prepare the Buttermilk Cake: Put the flour,
baking soda, cream of tartar and salt in a
medium bowl and stir to combine; reserve.
Put the butter and granulated sugar in the
Cuisinart
®
mixing bowl. Attach the flat mixing
paddle and mix on Speed 3 until incorporated.
Scrape the entire bowl and increase to Speed
5. And mix until light and fluffy, about 1 minute.
Scrape the bowl well and reduce speed to 3.
Add the eggs, one at a time, and the vanilla
extract and mix until each is fully incorporated
and batter is smooth. Scrape the entire bowl
Add half the reserved dry mixture and half the
buttermilk. Mix on Speed 1 until just blended.
Scrape the entire bowl. Add remaining dry
ingredients and buttermilk. Continue mixing on
Speed 1 until smooth and blended.
Pour batter into prepared pan and smooth over
top. Sprinkle blueberries evenly over the top;
lightly press blueberries into batter (submerge
blueberries slightly). Crumble any large clumps
in the crumb mixture and sprinkle the crumb
mixture evenly over the blueberries.
Bake in preheated oven until crumbs are evenly
golden brown and tester is clean when
inserted in centre of pan, about 60 to 65
minutes. Remove from oven and cool on a
wire rack before cutting in pan.
Nutritional analysis per serving (based on 16 servings):
Calories 381 (38% from fat) • carb. 55g • pro. 5g
• fat 16g • sat. fat 12g • chol. 70mg • sod. 178mg
• calc. 16mg • fibre 1g
Page 21

21
Banana Chocolate
Chip Bread
The secret to soft banana bread is a light mixing
hand. Although the Cuisinart® Stand Mixer is tough
enough for your heaviest breads, Speed 1 ensures
delicate mixing and folding.
Makes one 23cm loaf
11/3 cups unbleached, all-purpose flour
1 teaspoon baking soda
¾ teaspoon baking powder
¼ teaspoon kosher salt
2
/3 cup granulated sugar
6 tablespoons (¾ stick) butter, cut into
2cm pieces, plus more for buttering pan
2 large eggs
½ teaspoon pure vanilla extract
1¼ cups peeled, ripe banana, cut into
2cm pieces
½ cup mini chocolate chips
Preheat oven to 175°C. Generously butter a
23cm loaf pan.
Combine flour, baking soda, baking powder
and salt in a medium bowl. Reserve.
Put sugar and butter into the Cuisinart
®
mixing
bowl. Attach the flat mixing paddle and mix on
Speed 2 until creamy, about 2 minutes. Scrape
the entire bowl.
Continuing on Speed 2, add eggs, one at a
time, and mix until each is incorporated.
Scrape the entire bowl. Add vanilla extract and
then the banana and continue to mix until
banana is well combined, about 1 minute.
Scrape the bowl.
Add flour mixture and mix until just combined.
Scrape the bowl well and add chocolate chips
and mix to fold. Transfer the batter to the
prepared loaf pan.
Bake until deep golden brown and a cake
tester comes out clean, about 40 to 50
minutes. Remove from oven and cool on wire
rack until cool to touch; remove from pan and
allow to cool completely.
Nutritional analysis per serving (based on 12 servings):
Calories 210 (38% from fat) • carb. 31g • pro. 3g
• fat 9g • sat. fat 6g • chol. 51mg • sod. 190mg
• calc. 9mg • fibre 1g
Pecan Sticky Buns
The Cuisinart® Stand Mixer makes it easier than you’d
ever imagine to make a large amount of light, silky
smooth dough needed for sticky buns.
Makes 18 sticky buns
Sweet Dough:
1
/3 cup warm water (40-43°C)
1
/3 cup granulated sugar, divided
2¼ teaspoons active dry yeast
½ cup fat-free milk
51/3 tablespoons unsalted butter, cut into
2cm pieces and at room temperature
1 large egg
3½ cups unbleached, all-purpose flour
¾ teaspoon kosher salt
Topping:
¾ cup pecans, chopped and divided
1
/3 cup granulated sugar
¾ teaspoon ground cinnamon
1½ tablespoons unsalted butter, at room
temperature
½ cup raisins
51/3 tablespoons (2/3 stick) unsalted butter,
melted
½ cup packed light brown sugar
Nonstick cooking spray
To make dough:
Stir together the warm water, 1 teaspoon of the
sugar and the yeast in the Cuisinart
®
mixing
bowl. Let stand until foamy, about 5 minutes.
Once the yeast has proofed, add the milk,
butter and egg. Attach the flat mixing paddle
and mix on Speed 2 to break up egg. Add the
flour and salt, and mix to just combine. Remove
flat mixing paddle and attach dough hook.
Knead on Speed 5 until dough comes together
as a ball and cleans the side of the bowl.
Dough should be smooth and spring back to
the touch. If sticky, add 1 tablespoon of flour at
a time until smooth. Alternatively, if the dough
seems too dry, add 1 tablespoon of water at a
time. Cover bowl with plastic wrap and let rise
in a warm, draft-free place until doubled in
volume, about 1½ hours.
To make topping / assemble buns:
In a small bowl, combine half of the pecans,
sugar and cinnamon. Reserve.
Page 22

22
Transfer dough to a lightly floured surface and
punch dough down. Roll into a 50 x 30cm
rectangle. Spread with the softened butter (1½
tablespoons), sprinkle with cinnamon/sugar
mixture and top with raisins. Beginning on long
side (this is easiest if it is the side closest to
you) roll dough up tightly and pinch seam to
seal. Using a sharp knife, cut into 18 slices
(about 2cm thick).
Pour melted butter evenly into a 33 x 23cm
baking pan. Sprinkle brown sugar and
remaining pecans over butter. Place buns, cut
side up, in pan. Cover with plastic wrap coated
with cooking spray and let rise in a warm place
for 40 minutes. While buns are rising, preheat
oven to 190°C.
Bake until tops are well browned, about 30
minutes. Remove from oven and invert pan
immediately onto serving plate, allowing sugar
mixture to drip onto buns. Scrape any
remaining sugar/nut mixture onto buns and
serve warm.
Nutritional analysis per sticky bun:
Calories 259 (38% from fat) • carb. 36g • pro. 4g
• fat 11g • sat. fat 5g • chol. 32mg • sod. 109mg • fibre 1g
Apple Oat Bran Muffins
The diced apples in these oat bran muffins offer a
pleasant, unexpected sweetness.
Makes 24 muffins
Nonstick cooking spray
1 cup oat bran
½ cup unbleached,
all-purpose flour
½ cup whole-wheat flour
1½ tablespoons baking powder
1½ teaspoons ground cinnamon
½ teaspoon kosher salt
6 tablespoons (¾ stick) unsalted butter,
cut into 2 cm pieces and at room
temperature
¼ cup, plus 2 tablespoons packed light
brown sugar
1 large egg
1 cup buttermilk
1 teaspoon pure vanilla extract
½ cup applesauce
1 Granny Smith apple, peeled, cored and
cut into 1cm cubes
½ cup roughly chopped walnuts
Preheat oven to 190°C. Line muffin/cupcake
pan with paper liners. Generously spray liners
with nonstick cooking spray. Set aside.
Stir together the oat bran, flours, baking
powder, cinnamon and salt in a small bowl.
Reserve.
Put butter and sugar into the Cuisinart
®
mixing
bowl. Insert the flat mixing paddle and mix on
Speed 2 to slightly break up, then increase to
Speed 5 to cream until light and fluffy, about
2½ to 3 minutes. Scrape down the entire bowl
if necessary.
Decrease speed to 3 and add the egg. Mix
until fully incorporated. Scrape down the entire
bowl.
Decrease speed to 2 and add the reserved
flour mixture. Mix until combined. Scrape the
bowl. Add buttermilk and vanilla extract. Mix
until combined, about 1 minute.
Decrease speed to 1 and fold in the
applesauce. Add the cubed apples and
walnuts and mix to fold in.
Scoop batter evenly into prepared muffin/
cupcake pan. Bake until deep golden in colour
and a cake tester comes out completely clean.
Remove from oven and cool on wire rack until
very cool, about 15 minutes; remove from pan
and allow to cool completely.
TIP: The liners will remove more easily the
longer the muffins cool.
Nutritional analysis per muffin:
Calories 81 (38% from fat) • carb. 11g • pro. 2g
• fat 4g • sat. fat 2g • chol. 16mg • sod. 143mg
• calc. 36mg • fibre 1g
Page 23

23
Triple Citrus Tea Loaf
This moist, quick bread has a bright citrus flavour that
is accentuated by a tangy sugar glaze.
Makes one loaf cake
Butter and flour for preparing pan
3 cups unbleached, all-purpose flour
1½ teaspoons baking powder
¼ teaspoon baking soda
½ teaspoon kosher salt
11/3 sticks (12 tablespoons) unsalted butter,
melted and cooled to room temperature
2 cups granulated sugar, plus ½ cup for
glaze
1 orange, zested and juiced
1 lemon, zested and juiced
1 lime, zested and juiced
4 large eggs, room temperature
1 teaspoon pure vanilla extract
½ cup whole milk, room temperature
2 tablespoons confectioners’ sugar, for
glaze
Preheat oven to 175°C with the rack in the
lower position. Butter and flour a 23cm loaf
pan. Reserve.
Sift together the flour, baking powder, baking
soda and salt in a small bowl. Reserve.
Put the melted butter and sugar into the
Cuisinart
®
mixing bowl. Attach the flat mixing
paddle and mix on Speed 2 to combine and
then increase to Speed 5 to cream, about 2½
to 3 minutes. Scrape the entire bowl.
Decrease to Speed 3. Combine the citrus
juices. Mix together the citrus zests. Add
1
/
3
cup of the mixed juices and 2 tablespoons of
mixed zests. Scrape the entire bowl. Add eggs,
one at a time, and vanilla extract, and mix until
fully incorporated. Scrape the entire bowl.
Decrease speed to 2, and add
1
/
3
of the flour
mixture, followed by ½ of the milk. Repeat,
ending with the flour. Scrape the bowl as
needed.
Pour the batter into the prepared pan. Bake
until golden brown and a cake tester comes
out clean, about 65 to 70 minutes.
Allow the cake to cool in pan on a wire rack.
While cake is cooling, put the remaining ½ cup
of sugar and mixed citrus juice into the
Cuisinart
®
mixing bowl. Insert the whisk and
mix on Speed 5 until sugar is dissolved, about
2 to 3 minutes. Decrease to Speed 2 and add
confectioners’ sugar to thicken.
When cake is just cool to touch, remove from
pan, brush glaze all over top and sides of cake
with a spatula or pastry brush. Allow cake to
cool completely before slicing.
Nutritional analysis per serving (based on 12 servings):
Calories 356 (29% from fat) • carb. 58g • pro. 5g
• fat 12g • sat. fat 8g • chol. 90mg • sod. 204mg
• calc. 34mg • fibre 1g
Chocolate Cherry Crackles
Chewy, chocolatey cookies with tart cherries
for contrast.
Makes about 30 cookies
½ cup unsweetened cocoa (preferably
Dutch process)
1½ cups unbleached, all-purpose flour
1½ teaspoons baking powder
¼ teaspoon baking soda
¼ teaspoon kosher salt
4 tablespoons (½ stick) unsalted butter,
melted
1½ cups granulated sugar
3 large eggs
2 teaspoons pure vanilla extract
½ cup mini chocolate chips
½ cup tart dried cherries
1 cup confectioners’ sugar, sifted
Preheat oven to 175°C. Line two baking sheets
with parchment paper.
Stir together cocoa, flour, baking powder,
baking soda and salt in a small bowl.
Put the melted butter and sugar in the
Cuisinart
®
mixing bowl. Attach the flat mixing
paddle and mix on Speed 4 until smooth.
Scrape the entire bowl. With the mixer running
again on Speed 4, add the eggs, one at a time,
and the vanilla extract, being sure each egg is
incorporated before adding the next. Scrape
the entire bowl as necessary.
With the mixer running on Speed 2, add the dry
ingredients, in two additions, until just
combined, scraping the bowl in between. Add
chocolate chips and cherries until just mixed.
Page 24

24
Refrigerate batter for at least 30 minutes before
scooping.
Shape dough into 3 cm balls, coat generously
in confectioners’ sugar and arrange on baking
sheets 1 inch apart. Bake for about 12 minutes
until tops appear crackled. Remove from oven
and cool in pan; transfer to a wire rack to cool
completely.
Nutritional analysis per cookie:
Calories 115 (26% from fat) • carb. 20g • pro. 12g
• fat 3g • sat. fat 2g • chol. 23mg • sod. 60mg
• calc. 8mg • fibre 1g
Pecan Linzer Cookies
This shortbread is perfect for linzer cookies.
Makes about 60 cookie sandwiches
3 cups unbleached, all-purpose flour, plus
additional for rolling
½ teaspoon kosher salt
2½ sticks unsalted butter, cut into 2cm
pieces and at room temperature
½ cup toasted pecan halves, finely ground
¼ cup granulated sugar
1 cup confectioners’ sugar, sifted, plus
extra for dusting
1 teaspoon pure vanilla extract
¾ cup seedless raspberry jam
Combine the flour and salt in a small bowl.
Reserve.
Put the butter, finely ground pecans and sugar
into the Cuisinart
®
mixing bowl. Insert the flat
mixing paddle and mix on Speed 2 to combine.
Increase to Speed 5 and cream the butter
mixture until light and creamy, about 2 to 3
minutes. Scrape down the bowl as necessary.
Decrease to Speed 2 and add the
confectioners’ sugar. Mix until combined.
Scrape down the bowl. Add the flour mixture,
in 3 batches, and the vanilla extract; mix until
fully combined and smooth, about 2 to 3
minutes. Scrape down the bowl as necessary.
Dough should be one large, smooth ball when
done.
Remove dough from bowl and divide into two
equal pieces. Form each into a disk and wrap
in plastic wrap and refrigerate for at least 2
hours.
Preheat oven to 175°C. Line two baking sheets
with parchment paper. Reserve.
Remove one dough disk from refrigerator. On
a floured surface, roll the dough into an even
3mm thickness. Using a 5cm round, fluted
cookie cutter, cut rounds and place on
parchment-lined baking sheet. Roll out and
cut any remaining dough scraps in the same
manner and transfer to the lined baking sheets.
Bake until cookies are very lightly browned on
the edges, about 16 to 20 minutes. Remove
from oven and cool completely in pan.
While the first batch of cookies is baking, roll
out and cut the second dough disk with the
same 5cm cookie cutter. Make a second cut
with a 2cm round cookie cutter in the centre of
each cookie. Roll and cut remaining scraps.
Transfer cookies to baking sheets and bake as
directed above.
Heat jam either in microwave or on stovetop
until just liquid – jam will be too runny if it is
too hot.
Once the cookies have cooled, spread about
¾ teaspoon of warm jam on the centre of the
solid cookie. Then place the cutout cookie on
top. Sprinkle with confectioners’ sugar. Store in
an airtight container with cookie layers
separated by wax paper.
Nutritional analysis per 1 cookie sandwich:
Calories 107 (47% from fat) • carb. 13g • pro. 1g
• fat 6g • sat. fat 4g • chol. 13mg • sod. 26mg
• calc. 1mg • fibre 0g
Chocolate Chunk Cookies
Chunks of three different types of chocolate make
these cookies quite decadent.
Makes about 48 cookies
3 cups unbleached, all-purpose flour
1 teaspoon baking soda
½ teaspoon kosher salt
16 tablespoons (2 sticks) unsalted butter,
cut into 2cm pieces and at room
temperature
1 cup packed light brown sugar
¾ cup granulated sugar
2 large eggs, room temperature
1½ teaspoons pure vanilla extract
4 ounces bittersweet chocolate, broken
Page 25

25
into 1cm pieces (may substitute with
¾ cup chocolate chips)
120g semisweet chocolate, broken into
1cm pieces or use chocolate chips
(about ¾ cup)
120g milk chocolate, broken into 1cm pieces
or use chocolate chips (about ¾ cup)
Line two baking sheets with parchment paper;
reserve.
Combine the flour, baking soda and salt in a
small bowl; reserve.
Put the butter into the Cuisinart
®
mixing bowl.
Attach the flat mixing paddle and mix on
Speed 3 to soften. With mixer running, add
both sugars and cream together on Speed 4
until light and fluffy. Scrape the entire bowl
well.
Reduce speed to 3 and add the eggs, one at a
time, and the vanilla extract, allowing each egg
to fully incorporate before adding the next.
Scrape the entire bowl.
With the mixer running on Speed 2, add the
dry ingredients and mix until just combined.
Scrape the entire bowl well and then add the
chocolate. Increase to Speed 3 and mix just
until fully incorporated.
Drop well-rounded scoops (about 1½
tablespoons,) onto the prepared pans. Cover
with plastic wrap and refrigerate for at least 2
hours.
When ready to bake, preheat oven to 175°C.
Bake until cookies are nicely browned, about
12 to 16 minutes. Remove from oven and
cool in pan; transfer to a wire rack to cool
completely.
TIP: For evenly baked cookies, be sure to
rotate baking trays halfway through baking
time.
Nutritional analysis per cookie:
Calories 170 (47% from fat) • carb. 22g • pro. 2g
• fat 9g • sat. fat 4g • chol. 22mg • sod. 151mg
• calc. 5mg • fibre 1g
Cherry and Almond Biscotti
These biscotti resemble the more traditional dunking
biscuit − they have an excellent crunch.
Makes 96 biscotti
2¾ cups unbleached, all-purpose flour, plus
additional for rolling
2 cups granulated sugar
1 teaspoon baking powder
1 pinch kosher salt
3 large eggs
2 large yolks
½ cup tart dried cherries
½ cup almonds, toasted and roughly
chopped
Preheat oven to 175°C. Line two baking sheets
with parchment paper. Reserve.
Put the flour, sugar, baking powder and salt in
the Cuisinart
®
mixing bowl. Attach the flat
mixing paddle and mix on Speed 2 to
combine. Increase to Speed 3, add eggs and
then yolks, one at a time, allowing each to fully
incorporate before adding the next. Scrape
down the entire bowl well. Add the cherries
and chopped almonds and mix until just
incorporated. Dough may be sticky – this is
OK. Turn dough out onto a floured surface and
divide into four equal pieces. Shape each
piece into a rectangular log that is
30 x 4 x 4 cm. Place 2 logs on each prepared
baking sheet. Bake in preheated oven until
golden, about 35 minutes.
Remove from oven and, when cool to touch,
slice each log into about 65cm slices. Put back
into oven and bake until golden, about 30
minutes.
Remove from oven and cool in pan; transfer to
a wire rack to cool completely. Once cool,
serve or store in an airtight container.
Nutritional analysis per biscotti:
Calories 82 calories (66% from fat) • carb. 3g • pro. 4g
• fat 6g • sat. fat 4g • chol. 19mg • sod. 97mg
• calc. 116mg • fibre 0g
Page 26

26
Mocha Sugar Cookies
These sugar cookies have a deep mocha flavour.
Makes about 45 cookies
3 cups unbleached, all-purpose flour
2 tablespoons unsweetened cocoa powder
1½ teaspoons baking powder
¾ teaspoon kosher salt
½ teaspoon baking soda
2 tablespoons milk (may use low-fat)
2 tablespoons instant espresso powder
2 tablespoons pure vanilla extract
24 tablespoons (3 sticks) unsalted butter,
cut into 1cm pieces and at room
temperature
1½ cups granulated sugar, divided
1 large egg
1 large egg yolk
½ cup coarse sugar for rolling (granulated
sugar may be substituted)
Preheat oven to 175°C. Line two baking sheets
with parchment paper; reserve.
Put the flour, cocoa, baking powder, salt and
baking soda into a small mixing bowl. Whisk to
combine; reserve. Put the milk, espresso
powder and vanilla extract into another small
bowl. Stir to combine; reserve.
Put the butter and sugar into the Cuisinart
®
mixing bowl. Attach the flat mixing paddle and
mix on Speed 2 to soften, then increase to
Speed 5 and cream until very light and fluffy,
about 3 to 5 minutes. Scrape down the entire
bowl as necessary.
Decrease speed to 3 and add the egg and
yolk, one at a time, allowing each to fully
incorporate before adding the next. Add the
milk mixture and mix until fully incorporated.
Scrape down the entire bowl as necessary.
Decrease speed to 2. Add the reserved dry
ingredients and mix until just combined.
Using a small cookie scoop (about 1½
tablespoons, scoop out the cookie dough and
roll each cookie in the coarse sugar. Place
rolled cookies on prepared baking sheets,
about 2cm apart.
Bake in the preheated oven until just set, about
12 minutes. Remove from oven and cool in
pan; transfer to a wire rack to cool completely.
Nutritional analysis per cookie:
Calories 119 (46% from fat) • carb. 15g • pro. 1g
• fat 6g • sat. fat 4g • chol. 25mg • sod. 67mg
• calc. 5mg • fibre 0g
Black & White Cookies
These irresistible cookies are sure to be your new
favourite, a step up from the standard diner version.
Makes about 45 cookies
Cookies:
1½ cups unbleached, all-purpose flour
1½ cups cake flour, not self-rising
1 teaspoon baking soda
1 teaspoon kosher salt
½ teaspoon lemon zest
1 cup buttermilk
1 teaspoon pure vanilla extract
12 tablespoons (1½ sticks) unsalted butter,
melted and cooled to room temperature
11/3 cups granulated sugar
2 large eggs
Icing:
3 cups confectioners’ sugar, sifted
3 tablespoons light corn syrup, divided
¾ teaspoon pure vanilla extract
¼ cup water, plus additional tablespoons if
necessary, divided
120g bittersweet chocolate, chopped, melted
and cooled to room temperature
In a small bowl, combine the flours, baking
soda, salt and zest; reserve. In a measuring
cup, combine the buttermilk and vanilla
extract; reserve.
Put the butter into the Cuisinart® mixing bowl.
Attach the flat mixing paddle and mix on
Speed 5 until creamy, about 1 minute. With
the mixer running on Speed 3, gradually add
the sugar. Increase to Speed 8 and mix until
light, about 2 minutes. Scrape the entire bowl
well. With the mixer running on Speed 3, add
the eggs, one at a time. Mix until fully
incorporated, about 2 minutes. Scrape the
bowl well.
Reduce to Speed 1 and add
1
/3 of the dry
ingredients. Once almost fully combined, add
half of the buttermilk mixture. Repeat with the
dry and wet ingredients, scraping the entire
Page 27

27
bowl as necessary. End with the final third of
the dry. Chill dough for at least one hour.
When ready to bake, preheat oven to 175°C.
Line two baking sheets with parchment paper;
reserve.
Using a small cookie scoop (1½ tablespoons,
measure the chilled dough and place on a
cookie sheet, leaving about 5cm between each
cookie. Bake until edges of the cookies are
lightly golden, about 10 to 15 minutes.
While cookies are baking, make the icings. Put
the sifted confectioners’ sugar, 2 tablespoons
of the corn syrup, vanilla extract and ¼ cup
water in the bowl of the Cuisinart
®
mixer.
Attach the chef’s whisk. Begin mixing by
slowly increasing to Speed 5 until ingredients
are smooth and incorporated. Using a small
offset spatula, ice half of each cooled cookie.
Add cooled chocolate, 1 tablespoon of corn
syrup and 1 tablespoon of water to remaining
icing. Mix at Speed 5. If necessary, add
additional water 1 tablespoon at a time until
smooth and glossy. Spread chocolate icing on
the other half of each cookie.
Allow cookies to set before serving.
Nutritional analysis per cookie:
Calories 157 (28% from fat) • carb. 27g • pro. 2g
• fat 5g • sat. fat 3g • chol. 20mg • sod. 105mg
• calc. 12mg • fibre 0g
Power Cookies
With no added sugar or salt, these gluten- and
dairy-free bites are practically guilt free.
Makes 28 cookies
1 medium banana, broken into 2cm pieces
2 tablespoons chia seeds
1
/3 cup almond butter
1 teaspoon pure vanilla extract
2 cups rolled oats
½ cup chopped almonds
½ cup tart dried cherries
½ cup carob chips
Preheat oven to 175°C. Line two baking trays
with parchment paper; reserve.
Put the banana pieces into the Cuisinart
®
mixing bowl. Attach the flat mixing paddle and
mix on Speed 2 to soften, about 20 seconds.
Increase speed to 6 and mix until completely
broken up, about 1 minute. Add chia seeds
and mix until incorporated, about 30 seconds.
Add the almond butter and vanilla extract and
mix until incorporated, about 30 seconds
Decrease speed to 2 and add oats in batches.
Mix until incorporated and add almonds, dried
cherries and carob chips in batches.
Using a small cookie scoop (4cm), drop batter
onto lined baking trays. Gently press down
with a fork to flatten, re-forming if they break
apart.
Bake until golden and slightly firm, 12 minutes.
Remove from oven and cool in pan; transfer to
a wire rack to cool completely.
Nutritional analysis per cookie:
Calories 93 (42% from fat) • carb. 12g • pro. 3g
• fat 5g • sat. fat 1g • chol. 0mg • sod. 4mg
• calc. 29mg • fibre 2g
Fudge Brownies
These rich, fudgy brownies are for
true chocolate lovers.
Makes 24 brownies
Nonstick cooking spray
16 tablespoons (2 sticks) unsalted butter,
cut into 2cm pieces
180g
unsweetened chocolate, chopped
60g bittersweet chocolate, chopped
1 tablespoon cocoa powder
4 large eggs
1 large egg yolk
2 cups granulated sugar
1 cup packed light brown sugar
2 teaspoons instant espresso powder
2 teaspoons pure vanilla extract
¾ cup unbleached, all-purpose flour
¼ cup cake flour, not self-rising
1 teaspoon kosher salt
¾ cup bittersweet chocolate chips
Preheat oven to 190°C. Coat a 33 x 23cm
baking pan with nonstick cooking spray; line
with parchment paper or aluminum foil leaving
a 2cm overhang on either side.
Put the butter and chocolates into a heatproof
bowl and place over a pot of simmering water.
Once both are completely melted, stir in the
cocoa powder and set aside to cool to room
temperature. Reserve.
Page 28

28
Put the eggs and egg yolk into the Cuisinart®
mixing bowl. Attach the flat mixing paddle and
mix on Speed 3 until broken up and lightened,
about 30 seconds. Add the granulated and
brown sugars and beat on Speed 4 until light
and thickened, about 1 more minute. Scrape
the entire bowl as necessary.
Add espresso powder and vanilla extract; mix
until well combined.
Combine the flours and salt and stir the
mixture into the melted chocolate and butter.
Decrease speed to 2 and add the chocolate/
flour mixture. Mix until just combined, about 45
seconds. Scrape the entire bowl well.
Decrease speed to 1 and add the chocolate
chips to fold in.
Pour into prepared pan. Bake until edges are
dry, about 45 to 50 minutes. The brownies will
still be “wet” inside.
Remove from oven and cool slightly in pan;
then, using the parchment paper/foil overhang,
lift brownies out of pan and transfer to a wire
rack to continue cooling. Cut and serve warm
if desired. Store remaining brownies in an
airtight container.
Nutritional analysis per brownie:
Calories 269 (48% from fat) • carb. 35g • pro. 3g
• fat 15g • sat. fat 9g • chol. 59mg • sod. 102mg
• calc. 15mg • fibre 2g
Blondies
These blondies are hard to resist − loaded with just
the right amount of sweetness and a combination of
chocolate and white chocolate chips.
Makes 24 blondies
Nonstick cooking spray
2 cups unbleached, all-purpose flour
1½ teaspoons kosher salt
½ teaspoon ground cinnamon
16 tablespoons (2 sticks) unsalted butter,
cut into 2cm pieces and at room
temperature
½ cup granulated sugar
1 cup packed light brown sugar
3 large eggs, at room temperature
1 tablespoon pure vanilla extract
1½ cups bittersweet chocolate, chopped
1 cup white chocolate chips
1 cup walnut halves
Preheat oven to 175°C. Coat a 33 x 23cm
baking pan with nonstick cooking spray; line
with parchment paper or aluminum foil with a 2
cm overhang on either side to aid in removing
from pan. Reserve.
Combine the flour, salt and cinnamon in a
small bowl. Reserve.
Put the butter into the Cuisinart
®
mixing bowl.
Attach the flat mixing paddle and mix on
Speed 2 to soften. Add the sugars and
increase to Speed 5 to cream until light and
fluffy, about 2½ to 3 minutes. Scrape down the
entire bowl as necessary.
Decrease to Speed 3 and add the eggs, one at
a time, and the vanilla extract, allowing each
egg to fully incorporate before adding the next.
Scrape the entire bowl as necessary.
Decrease speed to 1 and slowly add the dry
ingredients. Once almost fully mixed, add the
chopped chocolate, chocolate chips and nuts.
Mix until combined and then pour into the
prepared pan. Bake until top is just starting to
crack, about 30 to 35 minutes.
Remove from oven and cool slightly in pan;
then, using the parchment paper/foil overhang,
lift blondies out of pan and transfer to a wire
rack to continue cooling. Cut and serve warm
if desired. Store remaining blondies in an
airtight container.
Nutritional analysis per blondie:
Calories 317 (48% from fat) • carb. 39g • pro. 3g
fat 18g • sat. fat 10g • chol. 44mg • sod. 153mg
• calc. 317mg • fibre 1g
Page 29

29
Basic Flaky Pastry Dough
for Pies & Tarts
This recipe will make ample dough for
a 23 to 25cm regular or deep-dish pie, or
for a tart up to 28-30cm.
For a One-Crust Pie:
1½ cups unbleached, all-purpose flour
¼ teaspoon kosher salt
8 tablespoons (1 stick) unsalted butter, cut
into 1cm pieces, well chilled
2 tablespoons vegetable shortening
(preferably non-hydrogenated), cut into
1cm pieces, well chilled
2 to 4 tablespoons ice water
For a Double-Crust Pie (or two single crusts):
3 cups unbleached, all-purpose flour
½ teaspoon kosher salt
16 tablespoons (2 sticks) unsalted butter,
cut into 1cm pieces, well chilled
4 tablespoons vegetable shortening
(preferably non-hydrogenated), cut into
1cm pieces, well chilled
5 to 8 tablespoons ice water
Put flour and salt into the Cuisinart® mixing
bowl. Attach the flat mixing paddle and mix to
blend dry ingredients on Speed 2 for 30
seconds. Distribute butter and shortening bits
evenly over flour mixture. Start mixing on
Speed 4, gradually increasing to Speed 8 until
mixture resembles coarse crumbs with some
visible pieces of butter and shortening about
the size of small peas. Scrape the entire bowl
well.
Sprinkle with the minimal amount of ice water
and mix on Speed 1. Add just enough ice
water, 1 tablespoon at a time, so that the
dough just begins to come together and when
pressed will hold together. Do not over-mix.
Gather the dough into a ball (2 balls for larger
recipe), and flatten into a 15cm disk (2 disks
for larger recipe). Wrap tightly in plastic wrap
and refrigerate for one hour before continuing
to allow the gluten in the flour to rest. The
dough will keep refrigerated for up to 3 days,
or may be frozen (double wrapped) for up to a
month – thaw at room temperature for an hour
before using. Roll as directed by recipe to use.
To bake the pastry blind for a single-crust
filled pie or tart:
Roll out pastry 3mm thick to fit pan, crimp and
seal edges. Prick bottom all over with a fork.
Chill for at least 30 minutes. Preheat the oven
to 200°C. Line pastry with a sheet of
parchment paper and fill with pie weights, dry
rice or beans to the top of the crust. Bake for
20 minutes, until set. Carefully remove
parchment paper foil and weights, bake for
another 5 to 10 minutes, until lightly browned.
Remove from oven and cool completely in pan
on a wire rack.
Nutritional analysis per serving
(based on 8 servings for one crust pie):
Calories 203 (63% from fat) • carb. 17g • pro. 2g
• fat 14g • sat. fat 9g • chol. 30mg • sod. 67mg
• calc. 0mg • fibre 0g
Cookie Crumb Crust
This basic cookie crumb crust can be made with
crushed cookies or biscuits. It can then be used for
most pies that have a creamy or custard-based
filling.
Makes one pie crust
240g finely crushed cookie crumbs
(gingersnaps, chocolate cookies,
vanilla wafers)
2 to 3 tablespoons granulated sugar (to taste,
depending on cookies chosen)
1
/8 teaspoon kosher salt
6 tablespoons (¾ stick) unsalted butter,
melted
Preheat oven to 175°C.
Put the crumbs, sugar and salt in the
Cuisinart
®
mixing bowl. Attach the flat mixing
paddle. Mix on Speed 2 to combine, about 30
seconds. While mixing, slowly add melted
butter and mix until crumbs are totally coated,
about 2 minutes. Transfer to a pie plate and
press evenly into bottom and up the sides of
the plate. Use the bottom of a glass or custard
cup to firmly tamp down the bottom of the
crust. Bake until firm to the touch 8 to 10
minutes.
Remove from oven and cool completely in pan
on a wire rack.
Nutritional analysis per serving (based on 8 servings):
Calories 222 (57% from fat) • carb. 23g • pro. 1g
• fat 6g • sat. fat 7g • chol. 23mg • sod. 183mg
• calc. 7mg • fibre 1g
Page 30

30
Lemon Meringue Pie
Lemon Meringue Pie has been a favourite since
the early 19th century. Our version has a
marshmallow-like meringue topping.
Makes one deep-dish pie, 8 to 12 servings
1 Flaky Pie Crust (page 28), blind baked
and cooled
For the filling:
1½ cups granulated sugar
¼ cup, plus 3 tablespoons cornstarch
1½ cups water
¾ cup fresh lemon juice
7 large egg yolks (reserve whites for
meringue)
5 tablespoons (2/3 stick) unsalted butter,
cut into 2cm pieces
Zest of 3 lemons
Meringue topping:
7 large egg whites (reserved from eggs)
¾ cup, plus 2 tablespoons granulated
sugar, divided
2 tablespoons water
1 teaspoon cream of tartar
1
/8 teaspoon kosher salt
Position the oven rack in the upper third of the
oven. Set the oven to High broil. Have the
prebaked Flaky Pie Crust ready to fill.
To make the lemon filling, place the granulated
sugar and cornstarch in a 2,5 Litres saucepan
and stir together. Add the water and lemon
juice and stir until smooth. Place over medium
heat and cook until slightly thickened, about 3
to 4 minutes.
Whisk the egg yolks in a separate mixing bowl.
While whisking constantly, add about one half
of the hot liquid to the egg yolks. Stir the now
“tempered” egg yolks into the saucepan
together with the remaining liquid and place
over medium heat. Stirring or whisking
constantly, cook until quite thickened and just
beginning to bubble, about 5 to 6 minutes.
Add the butter and stir until blended. Stir in
the zest until completely blended. Cover until
ready to fill pie; keep warm.
To make the meringue: Put the egg whites, 2
tablespoons of the granulated sugar, the 2
tablespoons water and the cream of tartar into
the Cuisinart
®
mixing bowl and stir until
smooth. Attach the chef’s whisk and whisk on
Speed 3 for 30 seconds. Increase the speed to
Speed 12 and slowly add the remaining ¾ cup
of granulated sugar. Add the salt and whip
until the egg whites form stiff peaks, about 4
minutes.
Spread the hot lemon filling into the prepared
pie shell. Top the filling with the meringue,
taking care to spread the meringue to touch
the crust all the way around. Make decorative
swirls and peaks on the meringue as desired.
This makes a generous, meringue topping – if
you prefer, use less.
Broil until lightly browned, about 5 minutes.
Remove from oven and cool on a wire rack for
one hour, then refrigerate for several hours,
uncovered, until completely chilled.
TIPS: When making a Lemon Meringue Pie, it
is important that the filling is hot when topped
with the meringue before baking to prevent the
meringue from shrinking.
This pie is best served the day it is made.
Nutritional analysis per serving (based on 12 servings):
Calories 393 (38% from fat) • carb. 56g • pro. 5g
• fat 17g • sat. fat 10g • chol. 140mg • sod. 105mg
• calc. 15mg • fibre 0g
Chocolate Cream Pie
Three layers of chocolate topped with a pile of
whipped cream—what’s not to love?
Makes one, 23cm pie; 12 servings
1 recipe Cookie Crumb Crust (prepared
with chocolate cookie crumbs, page 29)
1 recipe Chocolate Glaze/Ganache,
(page 36)
1 recipe Simple Chocolate Mousse
(page 37)
1 recipe Whipped Cream (page 37)
Chocolate curls for garnish
Prepare and bake Cookie Crumb Crust. Let
cool while preparing Chocolate Glaze/
Ganache.
Pour chocolate glaze/ganache into the cookie
crumb crust and spread evenly; let set in the
Page 31

31
refrigerator for about 30 minutes while
preparing the Simple Chocolate Mousse.
Spoon chocolate mousse over set glaze/
ganache layer and refrigerate again, at least 30
minutes or overnight.
Before serving, make Whipped Cream and
spoon over the chocolate cream pie. Sprinkle
with chocolate curls and serve immediately.
Nutritional analysis per serving (based on 12 servings):
Calories 902 (78% from fat) • carb. 44g • pro. 4g • fat 2g
• sat. fat 49g • chol. 230mg • sod. 150mg
• calc. 60mg • fibre 3g
Golden Yellow Cake
This is the basic yellow cake everyone remembers
and loves, and its nearly as simple as making one
from a package. Pair with our Chocolate Frosting on
page 35 to make a great cake for any occasion.
Makes two, 23cm layers; 12 servings
Nonstick cooking spray
3 cups cake flour, not self-rising
1 tablespoon baking powder
2 teaspoons baking soda
½ teaspoon kosher salt
2 large eggs, plus 2 yolks
11/3 cups granulated sugar
2 teaspoons pure vanilla extract
150g bittersweet chocolate, chopped
¾ cup unsweetened cocoa powder
1½ teaspoons instant espresso powder
1 cup boiling water
1 cup vegetable oil
¾ cup granulated sugar
¾ cup brown sugar
3 large eggs
1½ teaspoons pure vanilla extract
¾ cup buttermilk
Preheat oven to 175°C. Grease two, 23cm
round pans with butter and line with parchment
paper. Reserve.
Sift the flour, baking soda, baking powder and
salt together in a medium mixing bowl.
Reserve. Put the bittersweet chocolate, cocoa
powder and espresso powder into a small
bowl and pour the boiling water over the
ingredients. Stir to combine until melted;
reserve.
Put the butter and sugars into the Cuisinart
®
mixing bowl. Attach the flat mixing paddle and
mix on Speed 5 to beat until light and creamy,
about 2½ to 3 minutes. Decrease speed to 3
and add eggs, one at a time, and the vanilla
extract, allowing each egg to fully incorporate
before adding the next. Scrape the entire bowl
as necessary.
Decrease speed to 2 and add
1
/
3
of the
reserved flour mixture to the bowl. Mix until
just combined. Add ½ of the buttermilk and
mix until fully incorporated. Scrape the entire
bowl. Repeat, ending with the flour.
Decrease speed to 1 and fold in the chocolate
mixture until just combined, scraping bowl one
last time.
Divide the batter evenly between the prepared
pans. Bake in preheated oven until a cake
tester comes out clean when inserted into the
centre, about 45 to 50 minutes.
Remove from oven, cool in pans on a wire rack
until cool to touch and then transfer cakes to a
wire cooling rack to cool completely before
frosting.
Nutritional analysis per serving (based on 12 servings):
Calories 789 (48% from fat) • carb. 98g • pro. 12g
• fat 45g • sat. fat 29g • chol. 175mg • sod. 427mg
• calc. 59mg • fibre 6g
Coconut Cake
This moist, delicious cake with delicate flavour is
perfect for any special occasion.
Makes one, 2-layer cake; 12 servings
Nonstick cooking spray
3 cups unbleached, all-purpose flour
1 teaspoon baking powder
½ teaspoon baking soda
½ teaspoon kosher salt
16
tablespoons (2 sticks) unsalted butter,
cut into 2cm pieces, at room temperature
2 cups granulated sugar
3 large eggs
2 large yolks
½ teaspoon pure vanilla extract
½ teaspoon coconut extract
½ cup crème fraîche or sour cream
½ cup cream of coconut
1½ cups dried shredded coconut or
unsweetened coconut flakes
Page 32

32
Preheat oven to 165°C. Coat two, 23cm round
pans with cooking spray and line with
parchment paper. Coat the parchment paper
with nonstick cooking spray; reserve.
Sift the flour, baking powder, baking soda and
salt together in a small bowl. Reserve.
Put the butter into the Cuisinart
®
mixing bowl.
Attach the flat mixing paddle and mix on
Speed 2 to soften. Add the sugar and increase
speed to 5 to cream until light and fluffy, about
2½ to 3 minutes. Scrape the entire bowl well.
Reduce speed to 3 and add the eggs and
yolks one at a time until each is fully
incorporated before adding the next. Scrape
the entire bowl after every other addition. Add
the extracts and mix until incorporated. Scrape
the entire bowl.
Reduce speed to 2 and add
1
/
3
of the reserved
flour mixture; mix until incorporated. Add the
crème fraîche and mix until incorporated.
Repeat, adding flour mixture and the cream of
coconut, ending with the flour mixture. Scrape
the entire bowl as necessary.
Reduce speed to 1 and fold in the shredded or
flaked coconut until fully incorporated. Spoon
the batter evenly between the two prepared
pans.
Bake until a cake tester comes out clean when
inserted into the centre, about 40 to 45
minutes.
Remove from oven, cool in pans on a wire rack
until cool to touch and then invert cakes onto a
wire rack to cool completely before frosting.
TIP: This is a very versatile cake. To make a
layer cake, cut each cake in half horizontally
and frost using your favourite frosting. One
frosting that works extremely well is the Swiss
Buttercream (page 35) for both between layers
and the outside of the cake. To be even more
extravagant, frost with the buttercream, but fill
two of the layers with Chocolate Glaze/
Ganache (page 36) made with semisweet
chocolate. To finish, sprinkle the top of the
cake with dried coconut.
Nutritional analysis per serving (based on 12 servings):
Calories 489 (41% from fat) • carb. 67g • pro. 5g • fat 22g
• sat. fat 16g • chol. 124mg • sod. 195mg
• calc. 18mg • fibre 1g
Chocolate Marble
Cheesecake
Ribbons of semisweet chocolate cheesecake are
swirled throughout a classic cheesecake on top of a
chocolate brownie cookie crust.
Makes one, 26cm cake; 12 servings
For the crust:
6 tablespoons (¾ stick) unsalted butter,
cut into 2cm pieces and at room
temperature
1 cup unbleached, all-purpose flour
¼ cup packed brown sugar
3 tablespoons unsweetened cocoa powder
1 large egg yolk
½ teaspoon pure vanilla extract
For the filling:
1kg low-fat cream cheese, at room
temperature
1¼ cups granulated sugar
5 large eggs, at room temperature
2 tablespoons pure vanilla extract
240g semisweet chocolate, melted and cooled
Preheat oven to 175°C. Lightly coat a
26 x 8 cm springform pan with cooking spray.
Line the outside of the pan with heavy-duty
aluminum foil; reserve.
Put all the crust ingredients into the Cuisinart
®
mixing bowl. Attach the flat mixing paddle and
mix on Speed 2 until fully combined, about
2 minutes.
Transfer to prepared pan and flatten to evenly
cover the bottom and about 1cm up the sides.
Use the bottom of a drinking glass or
measuring cup to tamp down firmly.
Bake on middle rack for 8 to 10 minutes.
Remove and allow to cool. When baked crust
is removed from oven, put a large roasting pan
on the lowest rack in the oven and fill with
5-8 cm of water; this aids in the gentle baking
of the cheesecake and prevents any cracking.
While the crust is cooling, prepare the filling.
Wipe out the Cuisinart
®
mixing bowl and add
the cream cheese. Leave the flat mixing paddle
in place and mix on Speed 2 until just smooth,
about 1 minute. Add sugar, ¼ cup at a time,
and mix until completely smooth. Scrape down
the entire bowl after every other addition.
Page 33

33
Once cream cheese and sugar are completely
smooth, add the eggs, one at a time, allowing
each to fully incorporate before adding the
next egg. Scrape the entire bowl after every
other addition. Add the vanilla extract and mix
to fully incorporate. Continue to mix on Speed
2 until fully smooth, about 1½ to 2 minutes.
Pour all except approximately 1½ cups of the
batter into the cooled, prepared crust.
Reattach the mixing bowl to the Cuisinart
®
Stand Mixer. On Speed 2, mix in the melted
and cooled chocolate mixture. Drop chocolate
mixture onto cream cheese mixture, ¼ cup at a
time. Draw swirls with a knife or spatula to
create a marbled effect.
Put cheesecake on the middle rack. Add more
water to the roasting pan if necessary.
Bake the cheesecake until the edges of the
cheesecake start to pull away from the sides
of the pan and the centre is slightly jiggly,
about 1 hour and 15 minutes. Remove from
oven and cool in pan on a wire rack until
completely cooled. Refrigerate for 6 hours or
longer before serving.
Nutritional analysis per serving (based on 12 servings):
Calories 507 (48% from fat) • carb. 53g • pro. 12g
• fat 28g • sat. fat 17g • chol. 159mg • sod. 475mg
• calc. 160mg • fibre 2g:
Gluten-Free Golden
Cupcakes
These cupcakes pair very nicely with our Dairy-Free
Vanilla Frosting (page 36)
Makes 12 standard cupcakes or 42 mini cupcakes
Nonstick cooking spray
2 cups sorghum flour
1 cup potato starch
½ cup arrowroot starch
1 tablespoon baking powder
½ teaspoon baking soda
1 teaspoon xanthan gum
1 teaspoon kosher salt
1½ cups agave nectar
½ cup olive oil
¾ cup butternut squash purée
2 tablespoons pure vanilla extract
1 teaspoon white vinegar
Preheat oven to 175°C. Lightly coat a full or
mini muffin pan with cooking spray. Cupcake
liners may be used (these may also be sprayed
so that the liners cleanly come off the
cupcakes).
Put the flour, starches, baking powder, soda,
xanthan gum and salt into the Cuisinart
®
mixing bowl. Attach the flat mixing paddle and
stir on Speed 2 to sift the ingredients together.
Scrape the entire bowl well.
With the mixer running on same speed, add
the remaining ingredients, in the order listed,
and mix until all ingredients are incorporated.
Scrape the entire bowl to ensure all of the
ingredients are evenly incorporated.
Scoop batter into prepared muffin pans. Bake
until golden and a cake tester comes out
clean, about 30 minutes for regular-sized
muffins, 15 minutes for minis. Remove from
oven, cool in pans on a wire rack until cool to
touch and then transfer cupcakes to a wire
cooling rack to cool completely before frosting.
Nutritional analysis per standard cupcake:
Calories 396 (22% from fat) • carb. 77g • pro. 4g
• fat 10g • sat. fat 1g • chol. 0mg • sod. 359mg
• calc. 50mg • fibre 2g
Page 34

34
Angel Food Cake
Serve with Whipped Cream (page 37) and fresh
berries for a light and delicious summer dessert.
Makes one, 23cm cake, 12 servings
1½ cups granulated sugar, divided
1¼ cups cake flour
12 large egg whites
1¼ teaspoons cream of tartar
¼ teaspoon kosher salt
1 teaspoon pure vanilla extract
Preheat oven to 165°C.
Sift ¾ cup of the sugar together with the cake
flour in a mixing bowl; reserve.
Put egg whites into the Cuisinart
®
mixing bowl.
Attach the chef’s whisk and begin mixing on
Speed 5. Once whites are foamy, add cream of
tartar and salt and gradually increase to Speed
12. While mixing on Speed 12, slowly add
remaining ¾ cup of granulated sugar and
vanilla extract and continue to mix until the
peaks are firm and glossy. Remove bowl from
mixer.
Gradually sift the reserved flour and sugar into
the whites and carefully fold in with a large
rubber spatula. Be gentle when folding, but at
the same time make sure all ingredients are
evenly incorporated.
Spoon batter into an ungreased, 23cm tube
pan. Smooth the top by evenly spreading with
a rubber spatula.
Bake for about 45 minutes, until a toothpick
that has been inserted comes out clean. Invert
pan onto the neck of an empty long-necked
bottle (such as a wine bottle) and allow to cool
completely.
To remove cake from pan, remove the pan from
the neck of the bottle and slide the tip of a
long, narrow knife between the cake and the
pan. Cover the pan with a plate and invert it,
sliding the knife along the bottom of the pan
until it is free.
Nutritional analysis per serving:
Calories 167 (1% from fat) • carb. 37g • pro. 5g
• fat 0g • sat. fat 0g • chol. 0mg • sod. 278mg
• calc. 5mg • fibre 0g
French Buttercream
The classic frosting. Temperature is key to achieving
a smooth and delicious result. Having a candy/deep
fat thermometer on hand takes out the guesswork.
Makes 4 cups
1¾ cups granulated sugar
5 tablespoons water
7 large egg yolks
3 sticks 350g unsalted butter, cold and cut
into 1cm cubes
¾ teaspoon pure vanilla extract
½ teaspoon kosher salt
Put sugar and water together into a small
saucepan and place over medium heat until
sugar is melted and the mixture reaches 115°C.
Put the yolks into the Cuisinart
®
mixing bowl.
Attach the chef’s whisk and mix on Speed 8,
gradually increasing speed from the start, until
thick and creamy, about 3 minutes. Scrape the
entire bowl and then slowly turn up to Speed
12 and continue to whip until pale yellow in
colour, 5 minutes.
Reduce speed to 6 and slowly pour in the
sugar mixture while the mixer is running. Once
all the sugar is added, scrape the entire bowl
and slowly turn up to Speed 12 until the bowl
is completely cool, about 10 minutes.
Once the bowl is cool, turn speed down to 7
and add the butter very slowly, a piece at a
time. Once half of the butter has been added,
increase speed to about 10 to incorporate
remaining. Once all of the butter has been
added, add the vanilla extract and salt, mixing
until all is incorporated.
TIP: If the buttercream appears curdled, beat
on Speed 12 until smooth—this occurs when
the butter is too soft or warm.
Nutritional analysis per serving (2 tablespoons):
Calories 130 (64% from fat) • carb. 11g • pro. 1g
• fat 9g • sat. fat 6g • chol. 63mg • sod. 35mg
• calc. 5mg • fibre 0g
Page 35

35
Swiss Buttercream
Swiss buttercream, a more forgiving and stable
version, will be ready to use immediately after making
and can be used for traditional frosting and piping.
Makes about 6 cups
8 large egg whites
1¾ cups granulated sugar
½ teaspoon kosher salt
5 sticks (600g) unsalted butter, cold and
cut into 1cm cubes and at room temper-
ature
1 tablespoon fresh lemon juice
1 teaspoon pure vanilla extract
Put egg whites, sugar and salt in the Cuisinart®
mixing bowl. Place bowl over a pan of
simmering water and whisk the whites
constantly until the temperature reaches 60°C.
Place bowl on mixer. Attach the chef’s whisk.
Once whites come to temperature, mix on
Speed 10, until cool, about 15 minutes. Once
cool, decrease speed to 3 and add the butter,
piece by piece, until each is fully incorporated
before adding the next. Scrape down the entire
bowl as necessary.
Once all the butter is added, add the lemon
juice and vanilla extract and mix until fully
incorporated, about 1 minute. Increase speed
to 8 and beat until smooth and silky, about 2 to
3 minutes.
Use immediately or store in an airtight
container for up to 10 days.
TIP: If the buttercream appears curdled, beat
on Speed 12 until smooth—this occurs when
the butter is too soft or warm.
Nutritional analysis per serving (2 tablespoons):
Calories 115 (72% from fat) • carb. 7g • pro. 1g
• fat 9g • sat. fat 7g • chol. 25mg • sod. 9mg
• calc. 0mg • fibre 0g
Chocolate Frosting
A light and fluffy classic.
Makes about 3 cups
4 cups confectioners’ sugar, sifted
120g unsweetened chocolate, melted and
cooled
60g semisweet chocolate, melted and
cooled
8 tablespoons (1 stick) unsalted butter,
cut into 1cm pieces and at room tem-
perature
2 teaspoons pure vanilla extract
¼ teaspoon kosher salt
10 to 12
tablespoons milk or cream
Put all ingredients except the milk or cream
into the Cuisinart
®
mixing bowl. Attach the
chef’s whisk and mix on Speed 2 for 2
minutes. Add 8 tablespoons of the milk.
Increase speed to 5 and beat until smooth and
fluffy, about 4 minutes. Scrape the entire bowl
as necessary. Add remaining milk, tablespoon
by tablespoon, as needed for spreadability.
Nutritional analysis per serving (2 tablespoons):
Calories 158 (39% from fat) • carb. 24g • pro. 1g
• fat 7g • sat. fat 5g • chol. 12mg • sod. 30mg
• calc. 21mg • fibre 1g
Cream Cheese Frosting
A classic cream cheese frosting, perfect for a variety
of cakes, especially carrot and chocolate.
Makes 4 cups
5½ cups confectioners’ sugar
¼ teaspoon kosher salt
450g cream cheese, at room temperature
8 tablespoons (1 stick) unsalted butter,
cut into 2cm pieces and at room
temperature
2 teaspoons pure vanilla extract
Sift the sugar into a small bowl and reserve.
Put cream cheese in the Cuisinart
®
mixing
bowl. Attach the flat mixing paddle and mix on
Speed 4 until smooth, about 1½ to 2 minutes.
Add butter and beat until fully incorporated
and smooth, stopping to scrape down as
necessary. Reduce speed to 2 and, with
Page 36

36
the mixer running, slowly add the sifted
confectioners’ sugar to the bowl and mix until
incorporated, about 2 minutes. Scrape the
entire bowl well. Add vanilla extract. Mix on
Speed 5 until incorporated.
Refrigerate to set, at least 30 minutes.
Nutritional analysis per serving (2 tablespoons):
Calories 157 (43% from fat) • carb. 21g • pro. 1g
• fat 8g • sat. fat 5g • chol. 23mg • sod. 46mg
• calc. 14mg • fibre 0g
Dairy-Free Vanilla Frosting
This frosting pairs very well with the Gluten-Free
Golden Cupcakes (page 33).
Makes about 2 cups
1 cup non-hydrogenated vegetable
shortening
2 cups confectioners’ sugar, sifted
1 tablespoon pure vanilla extract
¼ teaspoon kosher salt
Put the shortening into the Cuisinart® mixing
bowl. Attach the chef’s whisk and begin
whisking on Speed 2, increasing up to Speed 5
to cream and make smooth, about 30
seconds.
Scrape the entire bowl and then add the sugar.
Start the mixer on Speed 2 and then slowly
increase speed to 5 to incorporate the sugar.
Scrape the bowl again and then add the vanilla
extract and salt. Mix again, increasing up to
speed 10 until smooth and fluffy, about 30
seconds.
Nutritional analysis per serving (2 tablespoons):
Calories 182 (61% from fat) • carb. 19g • pro. 0g
• fat 13g • sat. fat 6g • chol. 0mg • sod. 33mg
• calc. 36mg • fibre 0g
Royal Icing
This icing is great for decorating sugar cookies or
cakes. You can add food colouring to colour it or
extracts to flavour it.
Makes 1½ cups
4 cups confectioners’ sugar, sifted
1 large egg white, slightly beaten
2 tablespoons whole milk
1 teaspoon fresh lemon juice
Put the sugar into the Cuisinart® mixing bowl.
Attach the chef’s whisk and mix on Speed 3
and, with the mixer running, slowly add in the
egg white until fully incorporated, about 1
minute.
While the mixer is still running, add the milk
and lemon juice and mix until fully
incorporated. Scrape the entire bowl as
necessary.
Continue mixing until soft peaks form, about
2 minutes. Use immediately or cover the bowl
with a damp cloth so the icing does not
harden. If using colouring or a flavouring
extract for the icing, add it with the milk and
lemon juice.
Nutritional analysis per serving (2 tablespoons):
Calories 163 (1% from fat) • carb. 40g • pro. 0g
• fat 0g • sat. fat 0g • chol. 0mg • sod. 6mg
• calc. 3mg • fibre 0g
Chocolate Glaze/Ganache
Use to frost or fill your favourite cakes.
Makes about 1 cup
180g chocolate (may use bittersweet or
semisweet), chopped
¾ cup thickened cream
3 tablespoons unsalted butter, cut into
2cm pieces
Put the chopped chocolate in the Cuisinart®
mixing bowl.
Put the heavy cream into a small saucepan
and bring to just a simmer. Pour hot cream
over chocolate. Allow to sit for 1 minute to
cool slightly.
Page 37

37
Attach the chef’s whisk and mix on Speed 4
until chocolate is melted and the mixture
comes together, about 2 minutes. Add butter,
one cube at a time, and whisk until fully
incorporated and shiny.
If using as a glaze, use immediately. If using as
a filling, allow to sit until slightly hardened. Any
leftovers can be refrigerated until solid, and
then scooped and shaped into truffles.
Nutritional analysis per serving (2 tablespoons):
Calories 221 (79% from fat) • carb. 11g • pro. 2g
• fat 21g • sat. fat 13g • chol. 42mg • sod. 8mg
• calc. 15mg • fibre 2g
Simple Chocolate Mousse
Whipping cream is effortless in the Cuisinart® Stand
Mixer. Plus, you can fold in the chocolate on Speed 1
without worrying about over-mixing.
Makes 5 cups
180g good quality, bittersweet
chocolate, coarsely chopped
1¾ cups thickened cream, divided
1 tablespoon pure vanilla extract
2 tablespoons brandy or liqueur (optional,
e.g., Frangelico®, Amaretto, Grand
Marnier®)
In a double boiler set over barely simmering
water, melt the chocolate with 2 tablespoons
of the thickened cream, stirring until smooth.
Remove from the heat and let cool until
lukewarm. Stir in the vanilla extract and brandy
or liqueur.
Add the remaining cream to the mixing bowl of
the Cuisinart
®
Stand Mixer. Attach the chef’s
whisk and begin whisking on low speed.
Gradually increase to Speed 12 until the cream
holds soft peaks, about 1½ minutes.
Stir about a quarter of the whipped cream into
the cooled, melted chocolate mixture. Then
fold in the remaining whipped cream.
Cover and refrigerate the mousse for 30
minutes.* Spoon or pipe into serving bowls or
goblets. If desired, garnish with shaved or
finely chopped chocolate and a dollop of
whipped cream.
*If using the mousse to fill a pie, pour mixture
directly into cooled pie crust like in our
Chocolate Cream Pie on page 30.
Nutritional analysis per serving (½ cup):
Calories 240 (78% from fat) • carb. 10g • pro. 1g
• fat 21g • sat. fat 13g • chol. 56mg • sod. 0mg
• calc. 0mg • fibre 1g
Whipped Cream
Whipped cream can over-whip very quickly. Once it
starts getting thick, check it often by lifting the head
of the mixer and looking for medium peaks.
Makes about 3½ cups
2 cups thickened cream
3 to 4 tablespoons confectioners’ sugar, sifted
1 teaspoon pure vanilla extract
Put thickened cream into the Cuisinart® mixing
bowl. Attach the chef’s whisk and begin mixing
on Speed 1, gradually increasing speed to 12
and mix until thick, 40 seconds. Add the
confectioners’ sugar and vanilla extract, being
careful not to over-whip. Stop mixer once
medium peaks form, about 1 minute total.
Nutritional analysis per serving (2 tablespoons):
Calories 122 (93% from fat) • carb. 2g • pro. 0g
• fat 11g • sat. fat 8g • chol. 46mg • sod. 0mg
• calc. 0mg • fibre 0g
Page 38

38
WEIGHTS, MEASURES AND CONVERSIONS
Temperature ºF / ºC
Metric cup & spoon sizes
cup metric
¼ cup 60ml
cup 80ml
½ cup 125ml
1 cup 250ml
spoonmetric
¼ teaspoo
n1
.25ml
½ teaspoo
n2
.5ml
1 teaspoon 5ml
2 teaspoon 10ml
1 tablespoon (equal to 4 teaspoons) 20ml
Liquids
Metric cupimperial
30 ml 1 fl oz
60 ml
¼ cup2 fl oz
80 ml
3 ½ fl oz
100ml
cup2 ¾ fl oz
125ml
½ cup4 fl oz
150ml 5 fl oz
180ml
¾ cup6 fl oz
200ml 7 fl oz
250ml 1 cup
8 ¾ fl oz
310ml
1 ¼ cups 10 ½ fl oz
375ml
1 ½ cups 13 fl oz
430ml
1 ¾ cups 15 fl oz
475ml 16 fl oz
500ml 2 cups 17 fl oz
625ml
2 ½ cups 21 ½ fl oz
750ml 3 cups 26 fl oz
1L 4 cups 35 fl oz
1.25L 5 cups 44 fl oz
1.5L 6 cups 52 fl oz
2L 8 cups 70 fl oz
2.5L 10 cups 88 fl oz
Fahrenheit
Celsius
120º
130º
140º
150º
160º
170º
180º
190º
310º
300º
290º
280º
270º
260º
250º
240º
390º
380º
370º
360º
350º
340º
330º
320º
70º
80º
90º
100º
110º230º
220º
210º
200º
190º
180º
170º
160º
150º
200º
210º
220º
230º
440º
430º
420º
410º
400º
240º
460º
450º
ºF=
9 X ºC
5
+ 32
ºC=
5(ºF - 32)
9
Page 39

39
NOTES:
Page 40

Cuisinart® offers an extensive assortment of top quality
products to make life in the kitchen easier than ever. Try some of our other
countertop appliances and cookware, and Savor the Good Life.
www.cuisinart.com.au
Grills &
Griddlers
Food
Processors
Toaster Ovens
Blenders
Hand
Blender
Any other trademarks or service marks referred to herein are
the trademarks or service marks of their respective owners.
IB-16/343
©2016 Cuisinart
Cuisinart
®
is a registered trademark of Cuisinart,
East Windsor, NJ 08520
1-800-726-0190
Cuisinart Australia
24 Salisbury Road
Asquith, NSW 2077
Cuisinart New Zealand
44 Apollo Drive
Mairangi Bay, Auckland, New Zealand
Printed in China
 Loading...