

Page 1

Some of Cuddeback pro staff with
their favorite “Cuddy Bucks”
“Cuddeback takes great
pictures, is extremely reliable
and the batteries last forever!”
Jay Gregory –
Host, The Wild Outdoors
“As a TV producer and bow
hunter for ESPN... I primarily
look for ‘Cuddy Bucks’ walking
during camera light hours.
Thanks Cuddeback!!”
Tom Miranda– Advantage Adventures
cuddebackdigital.com
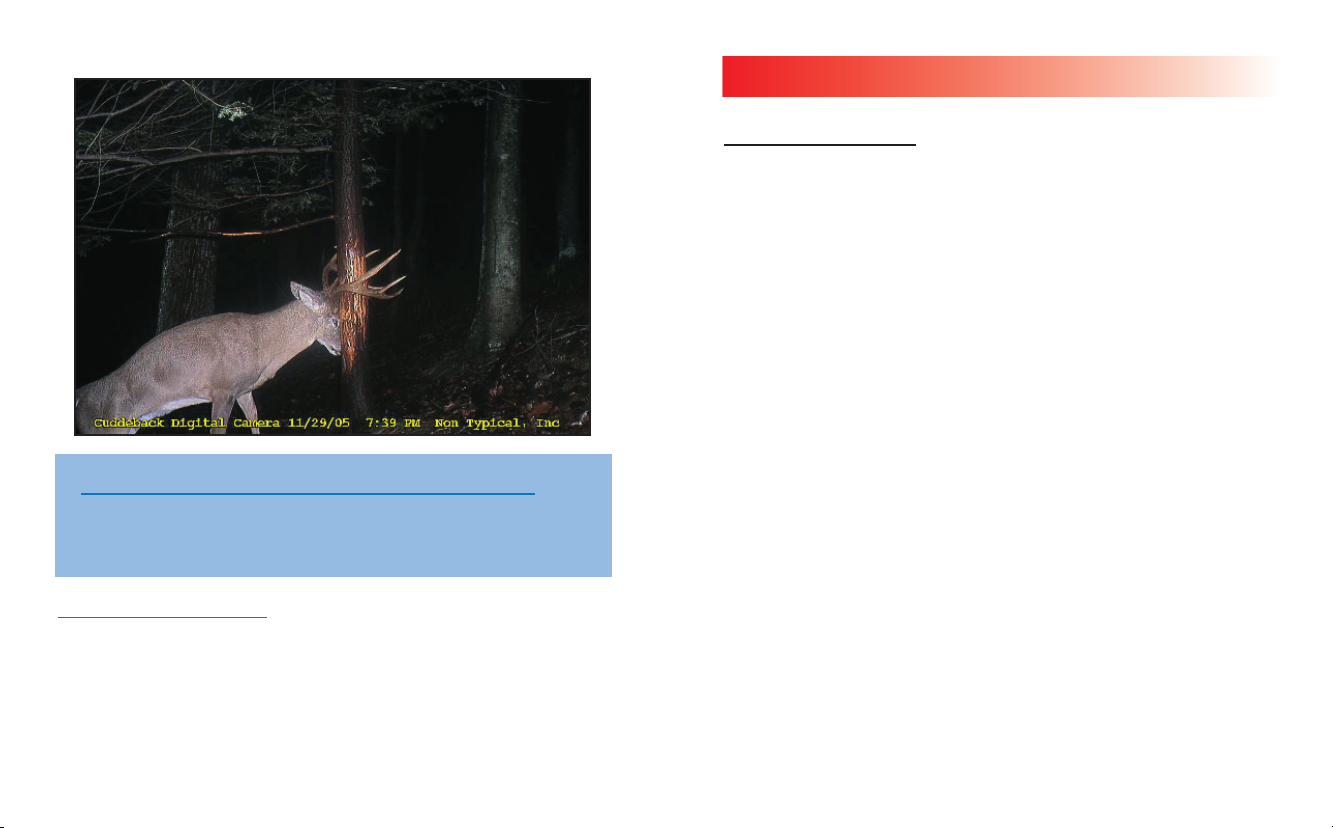
“When I’m in search of a big
buck, I use my Cuddeback.
This buck is one that I have
been after for the past couple of years.
Each year I get a photo of him, confirming
that he is still alive.”
Pat Reeve – Driven 24/7
“It’s photos like this that
make me proud of my
food plots and put in the
extra effort in the fall!”
Mike Wheeler – Wheeler’s Whitetails
Non Typical, Inc. 860 Park Lane,
Park Falls, WI 54552
1-715-762-2260
Owner’s Manual
The #1 digital scouting camera
Page 2

CuddeView is the ONLY device you
need to view, transfer and delete your
digital scouting camera images.
New from Cuddeback ... the
CuddeView 4-in-1 Field Viewer
1. View images in the field -
Use CuddeView to view your scouting camera images in the field.
4. Transfer images -
2. View images on your computer -
CuddeView serves as a PC or laptop card reader so you can download
images to your computer for viewing or storage (cable included;
requires USB port and Windows XP/Vista operating system).
Eliminate card swapping! Check each scouting camera and, using
CuddeView, transfer images from each camera’s CF/SD card to a
single, high-capacity (we recommend 2.0GB) SD/CF “archive” card.
Once the images are transferred, delete the images from the
camera card and re-insert the clean card into your camera.
The archive card now holds all your images.
3. View images on your TV -
CuddeView comes with a TV cable so you can see your scouting
camera images larger-than-life on your TV (TV requires RCA
video-in port).
To learn more, visit
Cuddebackdigital.com
•
Compatible with CompactFlash and SD cards
•
Built-in rechargeable lithium battery
•
Built-in LED light
•
View, transfer or delete images
•
Includes FREE CuddeVision Image
Management PC Software that will help
you organize your scouting camera images
2
3
Page 3
~ 2006 Contest Winner ~
Cuddeback Digital Photo and Video Submission
We want to see your images and videos in our online gallery. The top
photos/videos are selected each year by scouting camera expert Walt Larsen
and placed in categories for the Cuddeback Digital Scouting Camera contest.
You pick the winners!
Great Cuddeback prizes are awarded for best images and videos during our
Cuddeback Digital Scouting Camera Contest .
for details and to enter your images into our photo gallery.
By submitting images, you give Cuddeback permission to use the submitted images for any and all marketing purposes, no monetary compensation will be awarded. Images that are not Cuddeback or images that
have been altered in any way will not be considered for contests.
Visit www.cuddebackdigital.com
NoFlash
Table of contents
CuddeView . . . . . . . . . . . . . . . . . . . . . . . . . 2 - 3
Introduction . . . . . . . . . . . . . . . . . . . . . . . . . . . 6
Cuddeback Stores Images on
Compact Flash Cards . . . . . . . . . . . . . . . . . . . . . 7
Step 1
Familiarize yourself with Cuddeback . . . . . . . . . 8
Step 2
Turning Cuddeback ON/Installing batteries . 10 - 11
Step 3
Learn the Keypad & Display . . . . . . . . . . . . . . . 12
Step 4
(S KEY) is for setting up Cuddeback . . . . . 12 - 13
Step 5
(M KEY) is for controlling Cuddeback . . . . . . . 14
Step 6
Attaching Cuddeback to a Tree . . . . . . . . . . . . . 15
Step 7
Checking Cuddeback . . . . . . . . . . . . . . . . . . . . 16
Step 8
Viewing Images . . . . . . . . . . . . . . . . . . . . 16 - 19
Turning Cuddeback On and Off . . . . . . . . . . . . 20
Cuddeback Advanced Mode . . . . . . . . . . . 21 - 22
Taking Videos . . . . . . . . . . . . . . . . . . . . . . 22 - 23
Viewing the Videos . . . . . . . . . . . . . . . . . . . . . 23
Theftstop Plus . . . . . . . . . . . . . . . . . . . . . 23 - 25
Setting the Owner Password . . . . . . . . . . 25 - 26
Setting the Lock Password . . . . . . . . . . . . 27 - 28
Entering the Owner Name . . . . . . . . . . . . 28 - 30
Entering the Phone Number . . . . . . . . . . . 31 - 32
Turning the Flash On or Off . . . . . . . . . . . . . . . 33
Setting the Flash Power . . . . . . . . . . . . . . . . . 33
Controlling the Time the Camera Operates . . . 34
Surveillance Mode . . . . . . . . . . . . . . . . . . . . . 35
View Statistical Data . . . . . . . . . . . . . . . . 35 - 37
Events . . . . . . . . . . . . . . . . . . . . . . . . . . . 37 - 39
Viewing Images on a TV Faster . . . . . . . . 40 - 41
Time Lapse Photography . . . . . . . . . . . . . 41 - 42
Programming the Time Lapse Interval . . . . . . 43
Programming the Time Lapse Start Hour . . . . 43
Motion/Heat Detector Sensitivity Level . . . . . 44
Taking a Picture Manually . . . . . . . . . . . . 44 - 45
Formatting the Compact Flash Card . . . . 45 - 46
Diagnostics Display . . . . . . . . . . . . . . . . . 46 - 47
Displaying the Model of Cuddeback . . . . . . . . 47
Technical Information . . . . . . . . . . . . . . . 47 - 48
File System . . . . . . . . . . . . . . . . . . . . . . . . . . . 48
Image, Video & Event File Format . . . . . . . . . 49
Detection Zone & Sensitivity Adjustment . . . . 49
TV Requirements . . . . . . . . . . . . . . . . . . . . . . 50
Warranty Information . . . . . . . . . . . . . . . . 51 - 52
Service . . . . . . . . . . . . . . . . . . . . . . . . . . . . . . 53
BearSafe . . . . . . . . . . . . . . . . . . . . . . . . . 54 - 55
4
5
Page 4
Introduction
Cuddeback NoFlash takes 3 megapixel color images during daylight and 1.3 megapixel
black/white images during darkness. If there is not sufficient light to expose the image,
infrared light will be used to illuminate the image. Cuddeback NoFlash can also record
video clips during daylight and darkness.
We have tested various
brands of batteries and these
are our results.
A. Rayovac - 800 images at
25 degrees, 1600 images
at 70 degrees
B. Duracell - 600 images at
25 degrees, 1400 images
at 70 degrees
C. Energizer - 500 images at
25 degrees, 1200 images
at 70 degrees
D. Other brands - other battery
brands typically took less
images
E. Below 25 degrees battery
life will be less than shown
Test Method
set to take 4 images per hour,
with 50% of them being flash
images. Test results are for
comparison only, your actual
results may be different.
Temperature, flash operation,
video mode, battery age, and
other factors can affect battery life.
- Cameras were
What You Need...
Before you can use your Cuddeback, you
will need the following items:
1)
One or more Compact Flash Cards. We recommend a size of 256MB or bigger. The
higher the number on the card, the more
images that can be saved on the card.
2) Four D Cell Batteries (we recommend
Duracell or Rayovac).
comparison table on the left.
3) A #25 Torx screwdriver if you want to attach
the camera to a tree with the supplied screw.
4) A bungee, strap, or wire if you want to attach
Cuddeback to a tree without the Torx screw.
Refer to the battery
TIP - We do not recommend attaching Cuddeback to a tree with a strap or bungee.
Rodents may chew the strap causing the camera to fall from the tree. If you do not use
the security screw, we recommend that you use wire to secure Cuddeback to the tree.
The following items are optional:
A
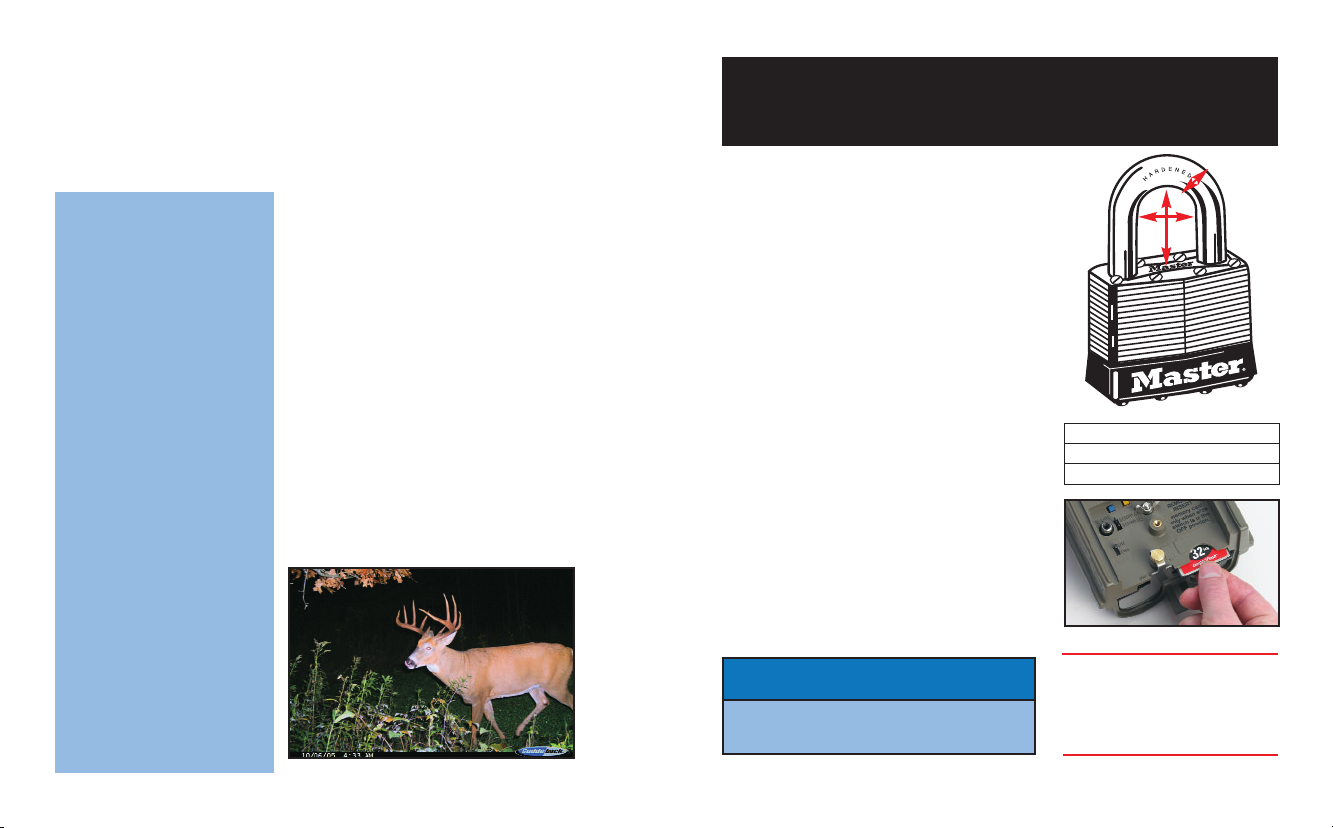
5) A small padlock if you want to prevent
tampering. Note: Only certain sized padlocks
will fit.
See diagram at right for measurements.
C
B
6) USB cable if you want to attach Cuddeback to
your computer's USB port.
7) Video cable & TV if you want to view images
with a TV.
CUDDEBACK STORES IMAGES ON
COMPACT FLASH CARDS
Images are stored on a Compact Flash card
(not included). The Compact Flash card slot
is located on the bottom of the camera.
• Install the card. There is a small lip on the
card. The lip needs to be pointed down
(towards the batteries). Slide the card in
firmly.
• Remove the card by pulling the card out.
• You can use any type of Compact
Flash Card.
WARNING
Remove or insert CF card ONLY when
slide switch is in the OFF position.
A Shackle Diameter 3/16"
B Vertical Clearance 9/16"
C Horizontal Clearance 5/8"
LEARN - We suggest you have your
Cuddeback and batteries with you as
you read this manual and perform the
steps described. In short time, you
will have mastered your Cuddeback.
Shown actual size
Figure 1
6
7
Page 5
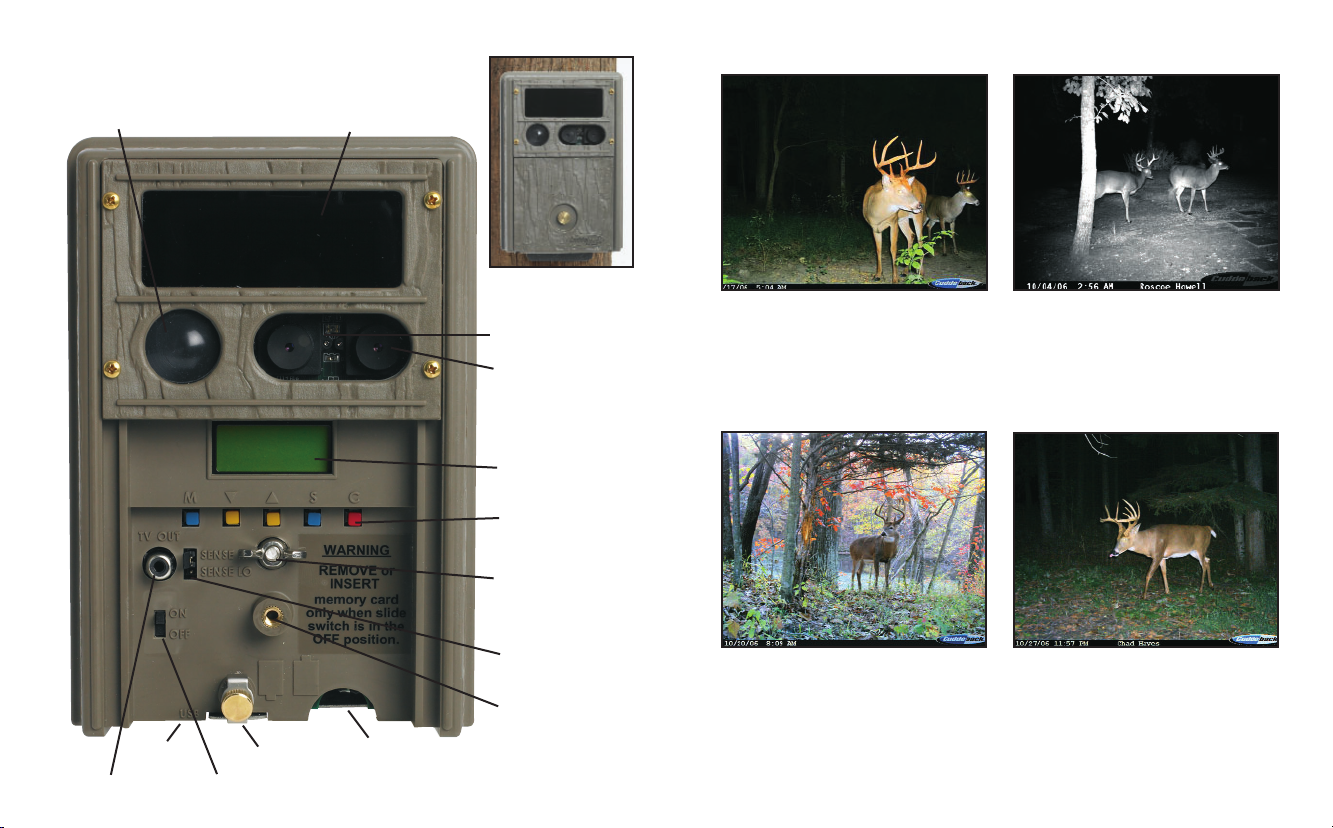
STEP 1 -
Take a moment to familiarize yourself with Cuddeback's parts.
FAMILIARIZE YOURSELF WITH CUDDEBACK
Fresnel Lens
Infrared Flash Lens
Figure 3
LED
Camera window
LCD screen
Operation keys
Mounting hole for
wood screw (wing
nut/bolt included for
alternative mounting)
“I placed a Cuddeback next to another
camera for a comparison. The first night
out, my old camera took 24 photos, the
Cuddeback took 118! Thank you for a
great product.”
John Parker, Clarksville, TN
“We never knew the quality of bucks we
had until we installed our NoFlash. Every
morning is like Christmas. Thanks for a
great product!”
Roscoe Howell, Wetumpka, AL
USB port
TV connection port
Battery plate screw
On/Off switch
Flash Card
port
8
Sensitivity adjustment
Cover screw
receptacle
Figure 2
“I thought color, balance and the woods
pond in the background make it an
exceptional photo. Thanks Cuddeback.”
Gene Wensel, Libertyville, IA
“I set up my camera over a scrape and
caught this bruiser licking his chops,
literally! Another great buck caught
by Cuddeback...”
Chad Hayes, Portage, WI
9
Page 6

Battery
100%
4/05/06
11:13 AM
Figure 4
Figure 5
Figure 7
Figure 8
STEP 2 - TURNING CUDDEBACK ON
1) Slide the On/off Switch to the OFF position
(figure 4).
Remove the Compact Flash card if it is
2)
installed (figure 5).
3) Install 4 brand new alkaline D cell batteries.
(figure 6).
Duracell brand batteries only!
4) Install the Compact Flash card.
5) Slide switch to ON. Do not press any key
at this time.
6) In a few seconds the battery level will be
displayed (figure 7). In a few seconds the
date & time will be displayed (figure 8).
TIP - Always remove the Compact Flash
Card when removing or installing batteries.
This will make it easier to remove the battery plate and prevent damage to the card.
TIP - Don't be afraid to press the keys to
learn Cuddeback operation. You can not
damage your Cuddeback by pressing keys.
If you need to start over slide the power
switch to OFF, and then back to ON to
restart Cuddeback.
We recommend Rayovac or
How to install batteries into your Cuddeback
1.
Unscrew
battery
thumb
screw.
3.
Insert
batteries.
Center
➤
Bottom Lip
➤
5.
Screw battery
thumb screw
back in.
Lip
To remove batteries
1. Unscrew battery thumb screw.
2. Pull metal plate up and out.
3. Remove batteries.
4. Replace metal plate.
5. Screw in thumb screw.
2.
Pull metal
plate and
thumb
screw up
and out.
Battery
orientation
4.
Replace metal plate.
Push down to secure
firmly behind center
and bottom lips.
10
Figure 6
11
Page 7
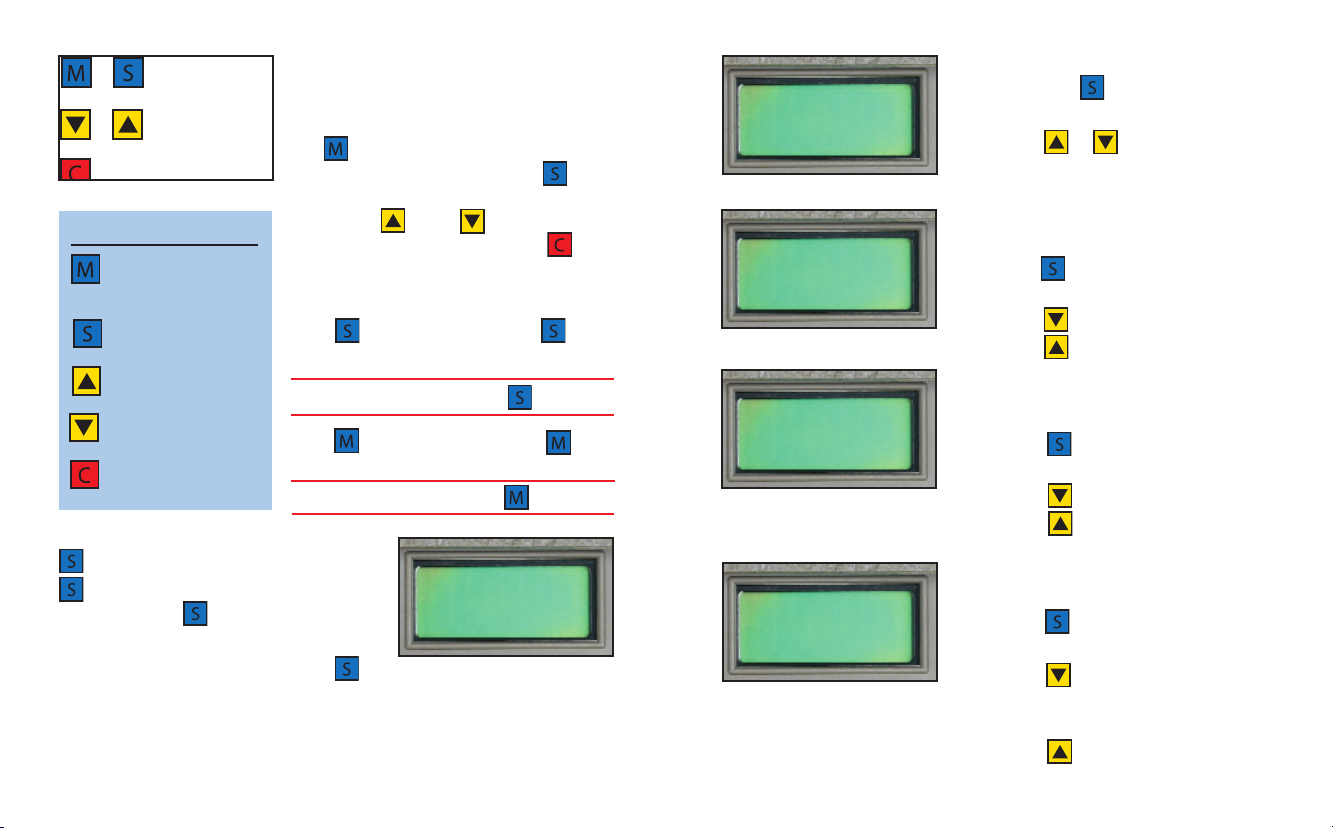
STEP 3 - LEARN THE KEYPAD & DISPLAY
Cuddeback is programmed by using a 2 line
LCD display and 5 keys. (Figure 9).
The KEY is used to enable or disable the
camera and to view information. The KEY
is used to set the date, time, delay and other
settings. The KEY & KEY are used to
change settings or view information. KEY
is a general purpose key used for various tasks.
Moving from One Menu to the Next
Press to change settings. Press again
to move to the next setting.
LEARN - To see how this works, press multiple times.
Press to view information. Press again
to move to the next display.
LEARN - To see how this works, press multiple times.
What each key does!
Enables/disables camera;
also used to view
information
Set key – sets date, time,
delays, etc.
Up key
Down key
General purpose key
used to change
settings, view
}
information
Figure 9
STEP 4 -
KEY IS FOR SETTING UP CUDDEBACK
is used to change Cuddeback's settings.
With each press of , a different setting will be
displayed (Figure 10).
After you view or change the setting, press to
view the next parameter.
1) Camera Delay. After taking a picture, the camera will wait this amount of time
before arming itself for the next picture.
Delay
01 min
Figure 10
12
Delay
01 min
Set Date
4/05
Set Year
2006
Set Time
11:16 AM
Figure 11
Figure 12
Figure 13
Figure 14
a) If [Camera Delay] is not displayed on the
LCD, press numerous times until
[Camera Delay] is displayed (figure 11).
b) Press or to change the setting.
c) The range is 1 minute to 60 minutes.
2) Set Date (figure 12)
a) If [Set Date] is not displayed on the LCD,
press numerous times until
[Set Date] is displayed.
b) Press to advance the month.
c) Press to advance the day.
3) Set Year (figure 13)
a) If [Set Year] is not displayed on the LCD,
press (S) numerous times until
[Set Year] is displayed.
b) Press to reduce the year.
c) Press to advance the year.
4) Set Time (figure 14)
a) If [Set Time] is not displayed on the LCD,
press numerous times until
[Set Time] is displayed.
b) Press to advance the hour.
The AM/PM indicator will change to
indicate an AM or PM hour.
c) Press to advance the minutes.
13
Page 8
STEP 5 - KEY IS FOR
CONTROLLING CUDDEBACK
Press to view information and to set the
operating mode.
1) View Date and Time (figure 15) - Press
until the date/time is displayed on the LCD
display.
2) View Images Saved - Press again.
The LCD will display the number of images
saved on the Compact Flash card.
(figure 16).
4/05/06
11:13 AM
Images
19
Figure 15
Figure 16
Figure 18
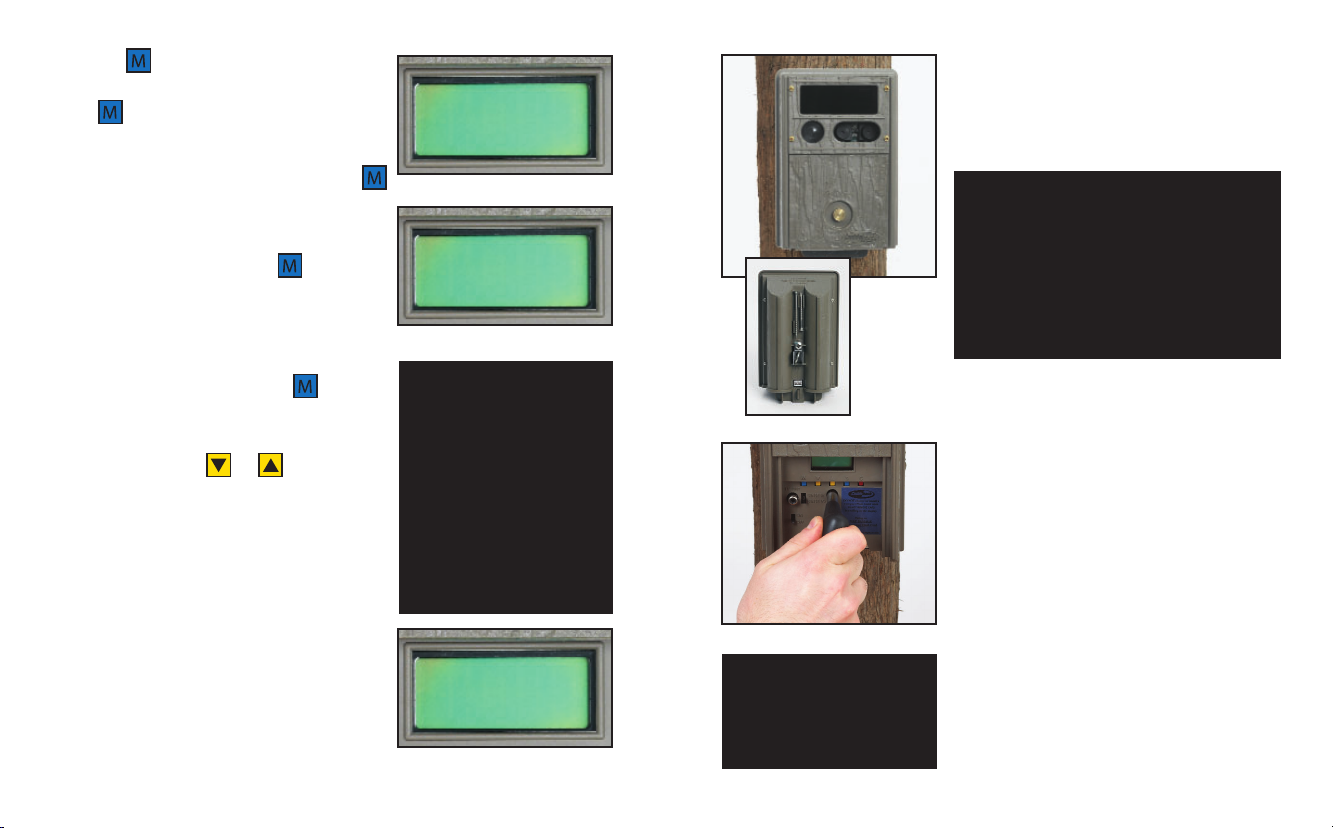
STEP 6 - ATTACHING CUDDEBACK TO A TREE
For best image quality, install Cuddeback about
10 feet from the place animals are expected.
Attach Cuddeback to a suitable tree 3 to 4 feet
above the ground (figure 18).
TIP - To determine the detection area, you can enable
TEST MODE. Then walk slowly back and forth in front
of the camera. The red LED will illuminate when the
camera senses you. The camera will NOT trigger
when in TEST MODE.
Cuddeback can sense and record images at distances
of 50 feet or more. However, you will get the best
image quality if Cuddeback is set closer to the animals.
3) Set the Camera Mode - Press again.
One of Cuddeback's 3 camera modes
(Standby, Test, and Live) will be displayed
(figure 17). Press or as needed to
change the camera mode.
a) Standby - Cuddeback will not trigger the
camera.
b) Test Mode - The red LED will illuminate
when activity is sensed but the camera will
not trigger.
c) Live Mode - Cuddeback will trigger the
camera when activity is sensed. The red
LED will NOT illuminate. About 45 seconds
after [Live Mode] is displayed, the
LCD will clear.
14
TIP - After Live Mode is displayed,
there is a 45 second delay before
the motion sensor starts. This
gives you time to install the cover
and move out of the area without
triggering the camera.
After setting up Cuddeback, install
the cover and leave the area. You
can leave the Camera Mode in
Standby or Test and Cuddeback
will automatically arm itself within
12 minutes.
TestMode
Figure 17
Figure 19
Figure 20
TIP - We recommend using a
padlock (not included) to secure
the battery cover. This will assure
that nobody tampers with your
Cuddeback Digital Camera.
There are four ways to attach Cuddeback to a tree.
1) Attach with the supplied Torx® screw
(stored on back of Cuddeback)(figure 19).
You will need a #25 Torx screwdriver (not
supplied) (figure 20).
2) Use a cord or bungee (not supplied) in con-
junction with the eyebolt (supplied) to
secure Cuddeback to a tree.
3) Use a tripod or other device (not supplied)
attached to the socket on the back of the
camera. The socket has standard 1/4-20
threads and is compatible with most
tripods.
4) Use Cuddeback BearSafe (see page 54
for details).
15
Page 9
STEP 7 - CHECKING CUDDEBACK
To field-check Cuddeback, remove the cover and
press . A series of messages will be displayed.
Press until [Images Saved] is displayed
(figure 21). This is how many images are saved on
the card (or internal memory if you do not have a
card installed).
Saved
26
Figure 21
TIP - When checking Cuddeback, the camera may activate and take a picture of you. You can cancel this
image by pressing (C) when the message [Picture!] is
on the display.
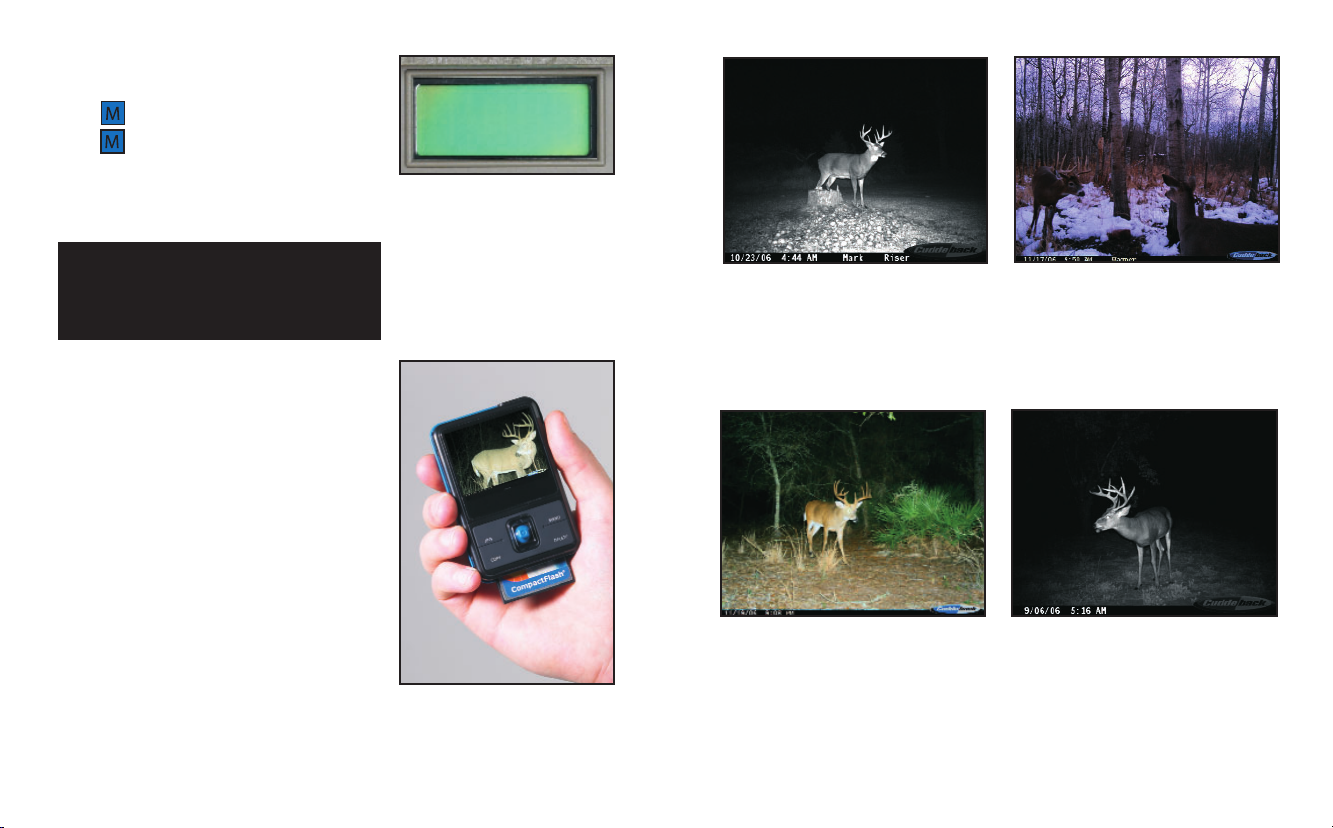
STEP 8 - Viewing Images
There are 4 ways to view the images that
Cuddeback has taken.
1) Replace the Compact Flash card with a
different card. Take the original card home
and view the images on your computer or
other device.
2) Attach a computer to Cuddeback's USB port
(described later in this section).
3) You can view images in the field or at home
with a TV attached to Cuddeback (described
later in this section).
4) You can view images in the field with a
portable field viewer or camera
(see page 2 for details).
Cuddeback videos can only be viewed with a
computer. You will need to copy the videos to
your computer to view them.
(figure 22)
16
Figure 22
“This buck is a legend around our
community. Now, thanks to my
Cuddeback NoFlash he is on my wall.
Thank you Cuddeback.”
George Riser, Saint Clairsville, OH
“I recently got this big Florida whitetail,
10-point with my Cuddeback Expert 3.0
megapixels...what an awesome camera!”
Sean Leavine, Wesley Chapel, FL
“This picture was taken on a NoFlash
the morning before deer season. I didn't
have any troubles waking up the next
morning!!”
John Wagner, Stoughton, WI
“I passed on this buck many times this
year. Thanks for an awesome camera,
the infrared works awesome!!”
Al Babnaeu, Firth, ID
17
Page 10

Figure 23
TO VIEW IMAGES WITH A PC ATTACHED TO
CUDDEBACK USB PORT
1) Press until [Images Saved] appears
(figure 24).
2) Press or .
the display (figure 25).
3)
Wait Approximately 10 seconds and then attach
your computer to Cuddeback with the appropriate USB cable (not supplied)(figure 23). Your
computer must be using Windows XP.
4) Your computer should recognize Cuddeback
and bring up a window to display or copy the
images. We recommend copying the images
to your computer hard disk. Use the software
on your computer to view and print the
images.
5) Press when you are finished.
[Viewing] will appear on
1) Attach a TV or camcorder to the TV
connector on Cuddeback.
2) Press until [Images Saved] appears
(figure 24).
3) Press or . [Viewing] will appear on
the display (figure 25). An image will appear
on the TV.
4)
View additional images by pressing or .
5)
Press when you are finished viewing images.
To Erase an Image that is being Viewed on the TV
1) View an image with the TV as described above.
2) Press . The LCD will prompt [Clear Image
C = Yes] (figure 26).
3) To clear the image, press .
4) To continue without clearing the image,
press
.
Saved
18
Figure 24
Viewing
Figure 25
Clear
C = Yes
Figure 26
TO VIEW IMAGES ON A TV/CAMCORDER
ATTACHED TO CUDDEBACK
TIP - To view images with this method, you need a
portable TV or camcorder. Your TV or camcorder
must have a VIDEO IN connector. Connect the TV or
camcorder to the Cuddeback with a video cable.
Cuddeback uses an RCA plug, your TV will have its
own style. Radio Shack can supply you with the correct cable for your TV or camcorder. We recommend
you bring your Cuddeback with you to Radio Shack if
you elect to purchase a cable.
18
To Erase All Images on the Card
1) Press until [Images Saved] appears.
2) Press . The LCD will prompt [Clear All
Images C = Yes] (figure 27).
3) To clear all images, press . The LCD will
prompt [Confirm? C = Yes] (figure 28).
4) To clear all images press . All images will
be cleared.
5) To continue without clearing the images,
press , , or .
19
All Ima
C = Yes
Figure 27
Confirm?
C = Yes
Figure 28
Page 11

Battery
100%
Figure 29
Figure 30
TURNING CUDDEBACK ON AND OFF
To disarm Cuddeback and prevent it from taking
pictures, slide the On/off switch to the OFF position. The date and time will be maintained.
To turn Cuddeback on, slide the On/off switch to
the ON position (figure 29). If messages do not
appear on the LCD, replace the D Cell batteries.
When you slide the On/off switch to OFF, there
may be a delay before Cuddeback turns off.
Viewing the Battery Level
When you start Cuddeback, the display shows
the battery level of the 4 D Cell batteries. Battery
level reading is 100%, 75%, 50%, 25%, or 10%
(figure 30). When the batteries fail, the message
"Battery Failed" will be displayed.
TIP - Batteries fail sooner in cold temperature.
When temperatures are below 30 degree Fahrenheit,
you may want to replace the batteries when the
battery level is 25%.
STORING CUDDEBACK
If you intend to store your Cuddeback for more
than a month or two, we recommend that you
remove the batteries to eliminate any chance of
battery leakage.
20
CUDDEBACK ADVANCED MODE
Advanced Mode enables the following additional features you may find beneficial:
• Ability to turn the flash on or off
• Set the flash power
• Program Cuddeback to take videos
• Program the time of day Cuddeback will
trigger an image
• View a wealth of statistical data
• Enable event recording
• Enable password protection
• Write your name and phone number into
Cuddeback's memory
• Enable time lapse photography
• Enable Surveillance Mode (endless loop
recording of images)
To enable Advanced Mode
1) Remove the batteries from Cuddeback.
2) Install the batteries. Slide On/off switch ON
3) When the display prompts [E-Z Mode
Change?] immediately press
(figure 31).
4) The display will prompt [ADV Mode]
(figure 32).
21
LEARN - You should now have a good
understanding of Cuddeback operation
and be able to use Cuddeback in the
field. The remainder of this manual
describes advanced features that you
do not need to learn to begin using
Cuddeback. We recommend learning
the Advanced Mode only if you wish.
EZ Mode
Change?
Figure 31
ADV Mode
Figure 32
Page 12

ADV Mode
Change?
Figure 33
EZ Mode
Figure 34
TIP - When videos are enabled
Cuddeback will still take a still image.
TIP - Videos are a great way to see
what happens after the image is
taken and allows you to see if
another animal is with the animal
that triggered the camera.
Video Mode
On
Figure 35
To re-enable E-Z Mode
1) Remove the batteries from Cuddeback.
2) Install the batteries. Slide On/off switch to ON.
3) When the display prompts [ADV Mode
Change?] immediately press (figure 33).
4) The display will prompt [E-Z Mode] (figure 34).
The next sections describe how to use the additional features that are available in Advanced
Mode. Advanced Mode must be enabled to view
and set these features.
TAKING VIDEOS
Cuddeback can be programmed to take videos
when an animal is detected.
Turning on the Video
1) Press numerous times until [Camera
Setup? C = Yes] is displayed.
2) Press .
3) Press numerous times until [Video
Mode] is displayed (figure 35).
4) Press or to change the setting.
5) Off - Video clips will not be recorded.
6) On - Video clips will be recorded during day
and night. When video is ON still images will
still be recorded.
Setting the Length of the Videos
1) If you select On to enable videos, press
again to set the length of the video. [Video
Time] will be displayed (figure 36). You can
set the video time from 10 seconds to 60
seconds.
2) Press or to change the length of
the video.
VIEWING THE VIDEOS
You CAN NOT view video clips in the field. Video
clips can only be viewed with a personal computer. You will need to copy the videos to your
personal computer. Almost all PCs include software that will view the videos. Simply double
click the video to have your PC automatically
play the video.
THEFTSTOP PLUS
TheftStop Plus is a simple to use security system for your Cuddeback camera. It features
Password Protection and writing your name and
phone number into Cuddeback's electronics. In
addition, the text you program into the Owner
Name is printed on the image.
Video Time
15 secs
Figure 36
TIP - 10 seconds of video will
use about the same amount of
space on the Compact Flash Card
as 1 image.
22
23
Page 13

Password Protection prevents an unauthorized
person from using your Cuddeback. Cuddeback
features two passwords, an
a
lock password
to let a friend use your Cuddeback camera, yet
you prevent them from altering your passwords
or changing the owner name and phone number.
This is accomplished by telling your friend the
Lock Password and not telling them the Owner
Password.
The Owner Password is like a master key that is
used to enable setting the Lock Password, Owner
Name, and Phone Number. When shipped from
the factory, the Owner Password is 00000 (five
zer
os). Even if you do not change the owner
password, you still need to enter the 5 zeros
when you want to change the Lock Password,
Owner Name, and Phone Number.
The Lock Password will prevent someone from
using your Cuddeback. This password is required
to unlock Cuddeback when it starts. When
shipped from the factory, this password is 00000
(five zeros). When the lock password is 00000,
the unlock feature is disabled (you will not be
prompted to enter a password to use your
Cuddeback). If the Lock Password is set to anything other than 00000, you will be required to
enter the Lock Password to use Cuddeback.
. Having 2 passwords allows you
owner password
and
24
Programming the Passwords
To prevent accidentally programming a password, Cuddeback requires three steps to be
completed before the password is programmed.
1) Enter the current owner password (the
default as shipped is 00000).
2) Enter a new password.
3) Repeat the new password.
When the 3 steps are successfully completed,
[Saved!] will be displayed and the new password will be programmed into Cuddeback.
SETTING THE OWNER PASSWORD
To change the owner password you must first
enter the current owner password of 00000.
Step 1 - Enter the owner password to enable
changing the owner password.
1) Press numerous times until [Theft Stop?
C = Yes] appears on the LCD.
2) Press . The display will prompt [Owner
PW Change?] (figure 37).
3) Press . The display will prompt [Owner
PW <0 >].
4) Follow these steps to enter the default
password of 00000.
a. Press . The 0 will change to a 1.
b. Press numerous times. The 1 will
continue to increment. When the
number gets to 0, stop pressing the key.
25
TIP - You can program the passwords, name, and phone numbers as many times as you wish.
If you make an error you can
reprogram them.
Owner PW
Change?
Figure 37
Page 14

LEARN - When setting a password,
(DOWN) changes the number and
(UP) advances to the next position.
New OPW
<0 >
Figure 38
LEARN - You have now successfully
entered the default Owner Password of
00000. You can cancel setting the
Owner Password at this time by pressing (M). If you want to continue and
set your Owner Password, continue as
described next.
Repeat PW
<0 >
Figure 39
TIP - You can cancel setting the
password at any point before
Saved! is displayed by pressing (S).
c. Press to advance to the next digit.
00 will be displayed.
d. Press three more times. A 0 will be
added to the display each time is
pressed.
e. When five 0s are displayed, press .
5) The display will prompt [New OPW <0 >]
(figure 38). (OPW is the abbreviation for
Owner Password).
Follow these steps to continue to program the
owner password.
Step 2 - Enter the 5 numbers you want for the
owner password
6) The display should be [New OPW <0 >]. If
not, repeat steps 1 through 5 above.
7) Enter the 5-digit number password you desire
using the method described in step 4 above.
8) After all 5 numbers are entered press .
The
display will prompt [RepeatPW <0 >]
(figure 39).
Step 3 - Repeat the 5 numbers for the owner
password
9) Enter the 5-digit number again, then press .
10) If both sequences of numbers are identical the
display will prompt [Saved!]. If the saved message does not appear, the password was not
programmed and you will have to repeat the
entire process.
11) Press to continue to set the Lock Password.
26
SETTING THE LOCK PASSWORD
The method to set the lock password is similar
to setting the owner password. To change the
lock password you must first enter the owner
password. The default owner password is
00000. If you changed the owner password,
you will need to enter that password instead.
Step 1 - Enter the owner password to enable
changing the lock password
1) If you have just programmed the Owner
Password, the Lock Password will be displayed. If not, follow steps 2 and 3.
2) Press numerous times until [Theft
Stop? C = Yes] appears on the LCD.
3) Press . The display will prompt [Owner
PW Change?].
4) Press again. The display will prompt [Lock
PW Change?] (figure 40).
5) Press . The display will prompt [Owner
PW <0 >].
6) Enter the owner password using the method
previously described. After all 5 numbers are
entered, press . If you did not program the
owner password, you need to enter the default
owner password 00000.
27
TIP - For the best security you
should use different numbers for
the owner and lock passwords.
Lock PW
Change?
Figure 40
Page 15

New LPW
<0 >
Figure 41
Repeat PW
<0 >
Figure 42
Saved!
Figure 43
TIP - You can cancel setting the
password at any point before
Saved! is displayed by pressing (S).
To disable password protection
program the Lock and Owner password with 00000 (five zeros).
Step 2 - Enter the 5 numbers you want for the
lock password
7) The display should be [New LPW <0 >]
(figure 41). (LPW is the abbreviation for Lock
Password).
8) Enter the 5-digit number password you desire
using the method previously described.
9) After all 5 numbers are entered, press .
The display will prompt [RepeatPW <0 >]
(figure 42).
Step 3 - Repeat the 5 numbers for the lock
password
10) Enter the 5-digit number again, then press .
11) If both sequences of numbers are identical, the
display will prompt [Saved!] (figure 43). If the
saved message does not appear, the password
was not programmed and you will have to
repeat the process.
12) Press to continue to set the Owner Name.
ENTERING THE OWNER NAME
You can program 16 characters that will be printed onto the image. This can be your name or the
location of where the camera is setup.
Step 1 - Enter the owner password to enable
changing the owner name
1) If you have just programmed the
Passwords, the Owner Name will be displayed. If not, perform steps 2 and 3.
2) Press numerous times until [Theft
Stop? C = Yes] appears on the LCD.
3) Press . The display will prompt [Owner
PW Change?].
4) Press numerous times until [Enter
Owner Name Change?] is displayed (figure
44). (If you previously programmed the
owner name, that text would be displayed on
line 1).
5) Press . The display will prompt
[Owner PW <0 >].
6) Enter the owner password using the method
previously described. After all 5 numbers are
entered, press .
Step 2 - Enter the characters you want for the
owner name
7) The display will change to [A ]
a. Press . The A will change to a B.
b. Press numerous times. The B will
continue to increment. Keep pressing
to see all the available characters.
(figure 45).
TIP - Instead of programming your
name into Cuddeback, you can program any text, such as location.
This will allow you to identify the
location of the images.
Enter Owner
Change?
Figure 44
A
Figure 45
LEARN - When entering the owner
name, (DOWN) changes the letter and
(UP) advances to the next position.
28
29
Page 16

TIP - You can program a space
between your first and last name.
Press (DOWN) until no character is
displayed. Then press (UP) to
advance to the next position.
You don't have to enter characters
in all 16 positions. At any time you
can finish by pressing (C).
You can cancel entering the Owner
Name at any point before Saved! is
displayed by pressing (S).
You can erase the Owner Name by
programming all spaces. To do this
program the Owner Name, change
the first position to a blank, all the
other positions will be blank already,
then press (C).
Saved!
Figure 46
c. Once the character you want is displayed,
press to advance to the second
position.
d.
Press to change the second character.
Continue to press until the character
you desire is displayed. Then press
to advance to the next position.
e. Continue repeating step D until you have
completed entering the text you desire.
f.
Enter up to 16 characters using this method.
g. After you have entered the text you
desire, press . [Saved!] will be
displayed and the text you entered will
be saved in Cuddeback's memory
(figure 46)
.
If you make an error while entering the owner name
and need to back up to the previous position to
correct the error you can follow these steps.
1) After you press the display will advance to
the next position and the character < will be
displayed.
2) If you made an error and want to return to the
prior position press when < is displayed.
3) If the < character is not displayed press
until < is displayed. Using this method you can
back up all the way to the start if required.
ENTERING THE PHONE NUMBER
You can program your phone number into
Cuddeback. In the event that your Cuddeback is
stolen and returned to the factory, we will be able
to retrieve this phone number and call you.
Step 1 - Enter the owner password to enable
changing the phone number
1) If you have just programmed the Owner Name,
the Phone Number will be displayed. If not,
perform steps 2 and 3.
2) Press numerous times until [Theft Stop?
C = Yes] appears on the LCD.
3) Press . The display will prompt [Owner
PW Change?].
4) Press numerous times until [715-762-
2260 Change?] is displayed (figure 47). This
default number is the phone number of the
Cuddeback factory.
5) Press . The display will prompt [Owner
PW <0 >].
6) Enter the owner password using the method
previously described. After all 5 numbers are
entered, press .
Step 2 - Enter the numbers and characters you
want for the phone number.
7) The display will change to [( ] (figure 48).
LEARN - When setting the phone number, (DOWN) changes
the number and (UP) advances to the next position.
(715)762
Change?
Figure 47
(
Figure 48
30
31
Page 17

TIP - You don't have to enter characters in all 16 positions. At any
time you can finish by pressing (C).
You can cancel entering the phone
number at any point before Saved!
is displayed by pressing (S)
Saved!
Figure 49
If you make an error while entering the phone number and need to back up to the previous position to correct the error, you can follow these steps.
1) After you press the display will advance to the next position and the character <
will be displayed.
2) If you made an error and want to return to the prior position, press when < is
displayed.
3) If the < character is not displayed, press until < is displayed. Using this
method, you can back up all the way to the start if required.
a. Press numerous times. The “(“ will
change and continue to change as is
pressed. Keep pressing to see all the
available characters.
b. Once the character you want is displayed,
press to advance to the second position. A 0 will be displayed.
c. Press to change the second character.
Continue to press until the character
you desire is displayed. Then press
to advance to the next position.
d. Continue repeating step c until you have
completed entering the text you desire.
e. Enter up to 16 characters that you desire
using this method.
f. After you have entered the text you desire,
press . [Saved!] will be displayed and
the text you entered will be saved in
Cuddeback's memory (figure 49).
TURNING THE FLASH ON OR OFF
Cuddeback allows you to turn off the built in flash.
You can select Auto or Off. When Auto is selected,
Cuddeback will use the flash if needed. This is the
recommended setting. When Off is selected,
Cuddeback will NOT use the flash, therefore
images that require the flash will NOT be taken.
Daylight images will always be taken.
1) Press numerous times until [Camera
Setup? C = Yes] is displayed (figure 50).
2) Press .
3) Press numerous times until [Flash
Mode] is displayed (figure 51).
4) Press or to change the setting.
SETTING THE FLASH POWER
Cuddeback's built-in flash has two flash settings: Image or distance.
1) Press numerous times until [Camera
Setup? C = Yes] is displayed.
2) Press .
3) Press numerous times until [Flash Best
For] is displayed (figure 52).
4) Press or to change the setting.
Camera Set
C = Yes
Figure 50
Flash Mode
Auto
Figure 51
Flash Best
For
Figure 52
Image - provides best image
quality and freezes motion.
Distance -
range but fast moving animals
may be blurred.
We recommend you experiment
with both settings and choose
the one you prefer
provides greater flash
32
33
Page 18

Camera Window
All Day
Figure 53
Camera Window
02A->12A
Figure 54
increment on hour
increment off hour
LEARN - Press (DOWN) numerous
times and watch the ON hour change.
Keep pressing (DOWN) until you see
all the different numbers and DAY
ONLY, DARK ONLY, & ALL DAY. Stop
pressing (DOWN) when you get to
12P. Now press (UP) until you get to
11P. Now press (UP) again and the
display will change to All Day.
CONTROLLING THE TIME THE
CAMERA OPERATES
Cuddeback allows you to set the time of day you
want the camera to operate. This is programmed
with a feature called “Camera Window.” You can
program the camera to trigger ALL DAY, DAY
ONLY, NIGHT ONLY, or for the SPECIFIC HOURS
you select.
1) Press numerous times until [Camera
Window] is displayed (figure 53). The bottom
line of the display will show the setting:
a) All Day the camera will trigger 24 hours a day.
b) Dark Only the camera will trigger only
in darkness.
c) Day Only the camera will trigger only
in daylight.
d) The selected hours will be displayed in the
form [on hour -> off hour]. In this setting, the
camera will trigger from the hour listed first
up to the hour listed second. Outside of those
hours, the camera will not trigger when activity is detected.
2) Press to increment the on hour (figure 54).
3) Press to increment the off hour (figure 54).
4) When the on hour is the same as off hour, the
camera is set to trigger 24 hours a day and the
display will show [All Day] (figure 53).
5) To enable Dark Only or Day Only press or
numerous times until the desired setting
is displayed.
34
SURVEILLANCE MODE
In normal operation, Cuddeback will stop taking
images when the Compact Flash card is full. In
some situations, you may want to keep recording images even if the card is full. We call this
Surveillance Mode. When surveillance mode is
ON, Cuddeback will always take images. When
the Compact Flash card is full, a few of the oldest images will be deleted to make room for
new images. This allows Cuddeback to always
save the most recent images.
1) Press numerous times until [Camera
Setup? C = Yes] is displayed.
2) Press .
3) Press numerous times until
[Surveillance] is displayed.
4) Press or to change the setting.
5) Off, surveillance mode is off and Cuddeback
will stop recording images when the
Compact Flash card is full. (figure 55)
6) On, surveillance mode is on and Cuddeback
will record all images by deleting old images.
VIEW STATISTICAL DATA
Cuddeback records a variety of statistical data
that you may find interesting, such as how
many images have been taken, how many days
you have used your Cuddeback, and other
information.
35
Surveillan
Off
Figure 55
TIP - If you elect to use Surveillance
Mode we recommend a Compact
Flash Card of 256 MB or bigger.
This will assure you have a good
history of activity.
Page 19

6/28/06
1:34 AM
Figure 56
New Images
13
Figure 57
Free Memor
.7MB
Figure 58
Master Cou
77
Figure 59
Run Days
14
Figure 60
1) Press until the date and time is displayed.
2) Press to view the first item, New Images.
3) Press again to view the next item, Free
Memory. Continue to press to view all
information listed here.
TIP - You can press (UP) to view this information as well.
4) Press at any time to return to the
date/time display. (figure 56)
A) New Images. This is the number of images
taken since you last checked your
Cuddeback camera. This counter is incremented every time Cuddeback triggers an
image. This count is automatically cleared
every time Live Camera Mode is activated.
(figure 57)
B) Free Memory. This display shows the avail-
able space in megabytes that is available on
the Compact Flash card. (figure 58)
C) Master Counter. This display is the number
of counts Cuddeback has detected.
Maximum number of counts is over 65,000.
Pressing will clear the Master Counter
to 0. (figure 59)
D) Run Days. This is the number of days the
Cuddeback has been operating since the
batteries were installed. (figure 60)
E) Run Images. This is the number of images
the Cuddeback has taken since the batteries
were installed.
36
F) Lifetime Run Days. This is the number of
days the Cuddeback has been operating since
the camera was manufactured. (figure 61)
G) Lifetime Images. This is the number of
images the Cuddeback has taken since the
camera was manufactured. (figure 62)
H) Battery Level. This display shows the bat-
tery level of the 4 D Cell batteries. (figure 63)
TIP - Batteries fail sooner in cold temperature.
When temperatures are below 30 degree Fahrenheit,
you may want to replace the batteries when the
battery level is 25%.
EVENTS
An event is the date/time activity was sensed
and is saved in Cuddeback's electronic memory.
(Events are not the same as images). You can
control the time between events from 5 seconds
to 60 minutes. You can clear an individual event,
clear all the saved events, or write the events to
the Compact Flash card. Cuddeback will store
475 events. When the memory is full, the oldest
25 events will be deleted to make room for the
new events.
TIP - Because Cuddeback prints the date and time onto
all images you may find you do not need events. This is
OK, just ignore them. You do not need to clear them or
set the Event Delay.
37
Run Days
20
Figure 61
Lifetime Im
11
Figure 62
Battery
100%
Figure 63
Page 20

Event Dela
30 sec
Figure 64
Event 11
1:04 AM
Figure 65
9/27
12:05P
Figure 66
Event Sav
11
Figure 67
Setting the Event Delay
Event Delay is the amount of time Cuddeback
will wait after recording an event before it will
record another event.
1) Press numerous times until [Event
Delay] is displayed.(figure 64)
2) Press or to change the setting.
3) The range is 5 seconds to 60 minutes. The
“sec” or “min” indicates if the delay is in minutes or seconds. However, the Event Delay
can not be set longer than the Camera Delay.
Viewing the Saved Events
1) Press numerous times until [Events
Saved] is displayed.
2) Press to view the first event.
3) An event will be displayed in this form:
a. Line 1 of display will show the [Event
number] (figure 65).
b. After a few seconds the date and time of
the event will be displayed. (figure 66)
4) To display the next event press .
5) To display the previous event press .
6) Pressing and holding or will
advance the displayed event by 10.
7) To return to the [Events Saved] display,
press . (figure 67)
38
Clear an Event
1) Display the event as described above.
2) Press to clear the event. While the event
is being cleared, a progress counter will be
displayed. You must wait until this is finished
before you can perform additional operations.
Depending upon the number of events saved,
it can take up to 45 seconds to clear an event.
Clear all Events
You can clear all the events in memory.
1) Press numerous times until [Events
Saved] is displayed.
2) Press , then press until [Clear All
Events?] is displayed.
3) Press and all events will be erased.
Save Events to Compact Flash Card
You can save all the events to the Compact Flash
card. The file name is EVENT.TXT.
1) Press until [Events Saved] is displayed.
2) Press , then press until [Save Events
to Card] is displayed.
3) Press and the events will be written to
the Compact Flash card.
39
TIP - All events are saved to a file
named EVENT.TXT. New events will
be continually added to the file.
Maximum file size is about 1 MB.
You can open this file with a text
editor (Notepad) or a spreadsheet
program (Excel). To erase this file
you must use your computer or the
Format Card command discussed
elsewhere in this manual. It is OK
to leave this file on the Compact
Flash Card.
Page 21

View Qual
High
Figure 68
View Qual
Standard
Figure 69
TIP - Why would you want to do all
this? If your Cuddeback has taken a
lot of images, you will find that it
takes a long time to view all the
images when High Quality viewing
is selected. If you select Standard,
you will be able to view the images
much faster. Then, when an image
of importance is displayed, you can
switch that image to High Quality to
see more details.
Viewing Quality does NOT effect
how the images are saved on the
Compact Flash card. Images are
always saved in high resolution.
This command only effects how the
images are displayed on a TV
attached to Cuddeback.
VIEWING IMAGES ON A TV FASTER
If you use a TV to view images in EZ Mode, you
will notice that it takes a few seconds to display
the image. In Advanced Mode, you can speed up
the TV viewing process by displaying the image
in lower quality.
You can set the default view quality to Standard
or High. When High is selected, images will be
displayed in high quality. It will take several seconds to display the image on the TV. When
Standard is selected, images will be displayed in
lower quality, but they will be displayed very
quickly. When images are viewed on the TV in
standard quality, you can switch to high quality
to see a more detailed image.
Setting the Default View Quality
1) Press numerous times until [Utilities?
C = Yes] is displayed.
2) Press . The display will prompt
Quality] (figure 68) or (figure 69)
3) Press or to change the setting.
Switching from Standard to High Quality when
Viewing an Image
If you are viewing an image on a TV attached to
Cuddeback in standard quality, you can switch
the viewing of that image to high quality.
1) Display the image on the TV as described on
page 19.
[View
2) Press to display options.
3) Press numerous times until [View in Hi
Res?] is displayed.
4) Press to view the image in high resolution.
TIME LAPSE PHOTOGRAPHY
Cuddeback can automatically take an image every day,
at the time you specify. This can be used to take periodic images of a construction project (building a
house), take images of a food plot growing, or any
other idea you may have.
To enable time lapse photography, you need to program 3 settings in Cuddeback.
First, you need to enable time lapse mode. This is
done in a menu called Capture Mode. If you only want
to take time lapse images, you can disable
Cuddeback's motion triggered images. Or you can
program Cuddeback to take time lapse and motion
triggered images.
Second, you need to program the time between
images. This is called the Time Lapse Interval. The
range is 1 hour to 96 hours (4 days) in increments of
1 hour.
Third, you need to program the time of day you want
the time lapse sequence to begin. This is called the
Time Lapse Start Hour. The range is any hour of the
day and Next Hour.
40
41
Page 22

Capture Mo
Motion
Figure 70
Capture Mo
TimeLpse
Figure 71
Capture Mo
Both
Figure 72
Capture Mode. This selects what type of action
will trigger an image. The options are Motion,
Time Lapse, Both.
➢ Motion - Cuddeback will activate the camera
when it senses an animal/person with its
motion/heat sensor. This is the setting you
use to photograph animals that travel past
Cuddeback
➢ Time Lapse - Cuddeback will activate the
camera on a time lapse interval. In this mode,
the motion/heat sensor is disabled. If an animal travels past Cuddeback, an image will
NOT be taken
➢ Both - Cuddeback will activate the camera
when it senses an animal and on the programmed time lapse interval
1) Press numerous times until [Camera
Setup? C = Yes] is displayed.
2) Press . [Capture Mode] will be displayed.
On the second line of the display the current
mode will displayed (Motion, TimeLpse, or Both).
3) Press or to change the setting.
LEARN - Press (UP) 3 times to see all the available settings
described above.
If you enable time lapse photography, you will
then need to program the Time Lapse Interval
and Time Lapse Start Time.
(Note - the next two settings will only appear if
Capture Mode is Time Lapse or Both).
(figure 70).
(figure 71).
(figure 72).
42
PROGRAMMING THE TIME
LAPSE INTERVAL
The interval between images can be programmed
from 1 hour to 96 hours.
1) After you select a Capture Mode of Time Lapse
or Both, press . [Time Lapse Interval] will
be displayed.
2) Press
between images.
3) When you have entered the correct time
interval, press to continue to the Time
Lapse Start Hour.
(figure 73)
or
to change the interval
PROGRAMMING THE TIME LAPSE
START HOUR
You need to program the time of day you want
the time lapse image sequence to start. If you
don't care when the sequence starts, you can
program the Start Time to be Next Hour, which
will begin the sequence at the start of the
next hour.
1) After you program the Time Lapse Interval,
press . [Time Lapse Start Hour] will be
displayed.
2) Press or to change the start hour.
The range is any hour of the day and Next Hour.
To begin the time lapse operation, you must
enter Live Mode as described on page 14.
43
Time Lapse
12 Hours
Figure 73
Page 23

TIP - Detection performance
varies with air temperatures and
animal size. If you photograph
more small animals than you
would like, or see more blank
images, lower the sensitivity.
Blank images are typically caused
by very fast moving animals and
birds. Setting a sensitivity level of
low or standard will reduce these
occurrences. However, because a
digital image does not cost anything, we recommend using the
high setting and allow for the few
blank images that may occur.
Sense Leve
High
Figure 74
Take Pictu
C = Yes
Figure 75
Take Pictu
Pending
Figure 76
MOTION / HEAT DETECTOR SENSITIVITY LEVEL
The sensitivity of Cuddeback's motion/heat sensor
can be changed.
1) Press numerous times until [Utilities? C =
Yes] is displayed.
2) Press [View Quality] is displayed.
3) Press [Sense Level] is displayed (figure 74).
4) Press or to change the setting. Select
one of the following settings.
a) Low
b) Standard
c) High. We recommend using this setting.
d) Auto will program Cuddeback to automatically
change the sensitivity level for day or night
activity. This limits Cuddeback's detection
range to the distance of the camera's flash.
TAKING A PICTURE MANUALLY
You can manually take a picture with Cuddeback.
1) Press until [Utilities? C = Yes] is displayed.
2) Press . The display will prompt [View Quality].
3) Press two times. [Take Picture? C = Yes] is
displayed. (figure 75)
4) Press to take a picture. Press to continue
without taking a picture.
5) If you press , the display will show [Pending]
and the red LED will flash. In about 20 seconds
the camera will record an image. (figure 76)
44
6) If you want to record an image without waiting 20 seconds, press again to record the
image immediately.
7) When the image is complete, you can press
to continue.
FORMATTING THE COMPACT FLASH CARD
Cuddeback will automatically format the
Compact Flash card if required. However, you
can also manually format the card.
1) Press until [Utilities? C = Yes] is
displayed.
2) Press . The display will prompt [View
Quality].
3) Press numerous times until [Format
Card? C = Yes] is displayed.
4) Press if you want to format the Compact
Flash card. Press to continue without
formatting the card.
5) The display will show [Confirm? C = Yes].
6) To confirm that you really want to format the
card, press again.
7) [Please wait] will be displayed. When for-
matting is complete [DONE] will be displayed.
45
TIP - Formatting will completely
erase all files from the Compact
Flash card and all IMAGES &
VIDEOS CAN NEVER BE
RECOVERED.
Page 24

When to Format a Compact Flash Card
1) Format your card when you want to erase all images, videos, events, and other
files on the card.
2) If you experience problems with a Compact Flash card formatting the card will
generally correct the problem.
3) If you are using a card that was previously used in some other product (camera,
computer, etc.), you should format the card before using it.
DIAGNOSTICS DISPLAY
Cuddeback can display diagnostic information
Utilities
C = Yes
Figure 77
that can assist when troubleshooting
Cuddeback. You will seldom, if ever, need this
information.
1) Press until [Utilities? C = Yes] is
displayed. (figure 77)
2) Press . The display will prompt
[View Quality].
3) Press numerous times until a series of
numbers and letters are displayed. Those
numbers are described below.
4) Press again to cancel this display and
advance to the model display
(described next).
The
M number
change as activity is sensed. A reading around
125 indicates no activity, readings above and
below 125 indicates activity.
is a 3 digit number that will
A number
The
indicates the amount of ambient light - 0
indicates dark and 255 indicates full light.
The
B number
indicates the condition of the batteries, the
larger the number the stronger the batteries.
Range is 90 to about 140.
The
T number
sents the internal temperature of the
electronics (figure 78).
is a 3 digit number that
is a 3 digit number that
is a 3 digit number that repre-
DISPLAYING THE MODEL OF CUDDEBACK
Cuddeback model and version is displayed.
The top line of the display shows the Cuddeback
model. The bottom line shows the
version (figure 79). Press to continue.
software
TECHNICAL INFORMATION
How Cuddeback Saves Images
Images taken with your Cuddeback camera
are stored in Cuddeback's internal memory or
on a Compact Flash card. Cuddeback does
not include a Compact Flash card. Cards are
readily available from most stores that sell
digital cameras.
M117A034
B141T013
Figure 78
M - motion sensor field
A - ambient sensor field
B - battery level field
T - temperature field
NoFlash
D71 A31
Figure 79
46
47
Page 25

Using Cuddeback without a Compact Flash card
When Cuddeback is used without a Compact Flash card, images are stored in
Cuddeback's internal image memory. Approximately 20 images can be saved. Image
resolution is reduced when Cuddeback is operated without a Compact Flash card.
Images can be transferred from internal memory to a Compact Flash card. Set the slide
switch to OFF. Insert a CF card, slide the switch to ON. Wait until the date & time are
displayed. The internal images have now been copied to the CF card.
File System - FAT (FAT16) and FAT32
Personal Computers (PCs) and digital cameras will either use a FAT (also referred to as
FAT16) or a FAT32 file system on the Compact Flash card. Cuddeback is compatible
with both file systems.
1) You should not have to worry about the file system unless you have problems
with a digital camera reading the card. If this happens, format your Compact
Flash card in the digital camera first and then install the card into your
Cuddeback.
2) The default file system for the Cuddeback is FAT32. Cuddeback will format 64 MB
cards and higher as FAT32. Most new digital cameras will use the FAT32 file system.
3) Some digital cameras use the FAT or FAT16 file system. If you want to read
Cuddeback images with these cameras, you should format the CF card in the digital
camera and not with the Cuddeback camera.
4) You can also format your CF cards with your PC. You can use either FAT or FAT32
formats. We recommend you use FAT32 unless you need to view your images on a
device that does not support FAT32.
48
IMAGE, VIDEO, & EVENT FILE FORMAT
The Cuddeback Compact Flash folder structure is as follows:
\DCIM\100CUDDY Directory where images are saved
\event.txt Event file is saved in the root folder
Images are named in the format CDY_0001.JPG. The number will increment with
each image.
Videos are named in the format CDY_0001.AVI. The number of the AVI file will
match the number of the JPG file it coincides with.
DETECTION ZONE & SENSITIVITY ADJUSTMENT
Cuddeback can detect an animal up to 100 feet. However, this detection range is
dependent upon ambient air temperatures. The cooler the temperatures the farther
Cuddeback can sense an animal. In very hot weather (above 80° F), the sensor may
only sense up to 20 feet. You can change the
motion/heat sensor using the method described on page 44.
However, you can also adjust the sensitivity by moving a small black removable
jumper located below the LCD display. When this jumper is in the lower position,
standard sensitivity
sensitivity
In hot weather (above 80° F) you may always want to use the jumper in the upper
position to increase the detection distances. You may need to use a small tweezers
to access the jumper. If you lose the jumper, your Cuddeback will still function properly with the sensitivity set to standard. If you are getting false detections, lower the
sensitivity using the jumper or software menu.
is selected. We recommend leaving the jumper in the upper position.
is selected. When this jumper is in the upper position,
sensitivity
of Cuddeback's
high
49
Page 26

TV REQUIREMENTS
You can use a portable TV or Camcorder to view images in the field. You will
need: 1) a portable TV with a built in video-in connector, 2) a patch cord to attach
the TV to the Cuddeback's TV connector (both are available at Radio Shack and
other electronic stores). The patch cord must have an RCA jack on one end to
attach to Cuddeback, and the opposite cable end must have a connector compatible with the portable TV you select. We recommend you bring your Cuddeback to
the TV retailer so he can assist in getting you the correct cable. Radio Shack has a
selection of TVs and cables that will work with your Cuddeback.
Images displayed on the TV/camcorder will be at a low resolution. Best image
resolution will be obtained on your computer display or on printed images.
© Non Typical, Inc. 2007
Cuddeback is protected by United States patent # 6,744,980.
Cuddeback and Cuddeback logo are registered trademarks of Non Typical, Inc.
TheftStop is a trademark of Non Typical, Inc.
Specifications and features subject to change without notice.
LIMITED WARRANTY
1. Limited W
2. Limitations. Limited Warranty service will not be provided unless the Product, returned in
This Limited Warranty does not cover the following:
a. Any defect in or damage to the Product that occurs due to mishandling of the Product;
b. Any defect in or damage to the Product that occurs due to repair, modification, or other
c. Any defect in or damage to the Product that occurs due to transport, dropping, shock, or
d. Any defect in or damage to the Product that occurs due to careless or improper storage, or
e. Any defect in or damage to the Product that occurs due to exhausted batteries;
f. Any defect in or damage to the Product that occurs due to sand, mud, or other foreign
objects entering the inside of the Product; or
g. Any defect in or damage to the Product related to accident, misuse, abuse, use with incompati-
3. ALL OTHER EXPRESS AND IMPLIED WARRANTIES FOR THE PRODUCT, INCLUDING THE
arranty. Non Typical, Inc. (“Non Typical”) warrants the Product to be free from
malfunctions and defects in both materials and workmanship for one (1) year from the date
of purchase (“Warranty Period”). Non Typical will repair or replace, at its option, the Product
if it fails to function properly during the Warranty Period, subject to the conditions and/or
limitations stated herein. Such repair or replacement is your sole remedies under this
Limited Warranty.
the manner set forth below, is accompanied by a copy of your original dated sales receipt.
Non Typical reserves the right to require you to provide your original dated sales receipt.
similar activity performed by anyone other than Non Typical;
other similar activity after your purchase of the Product;
improper use or maintenance of the Product;
ble accessories or attachments, your failure to follow proper operating instructions provided by
Non Typical, claims made after the duration of the Warranty Period, or your failure to follow the
instructions set forth below with respect to return of the Product to Non Typical.
IMPLIED WARRANTIES OF MERCHANTABILITY AND FITNESS FOR A PARTICULAR PURPOSE
ARE HEREBY DISCLAIMED. NON TYPICAL EXPRESSLY DISCLAIMS ALL WARRANTIES NOT
STATED IN THIS WARRANTY. ANY IMPLIED WARRANTIES THAT MAY BE IMPOSED BY LAW
ARE LIMITED IN DURATION TO THE TERMS OF THIS EXPRESS LIMITED WARRANTY.
50
51
Page 27

LIMITED WARRANTY
(continued)
OBTAINING SERVICE FOR YOUR PRODUCT
3. (CONTINUED)
SOME JURISDICTIONS DO NOT ALLOW THE EXCLUSION OF IMPLIED WARRANTIES OR LIMITATIONS ON HOW LONG AN IMPLIED WARRANTY LASTS, SO THE ABOVE EXCLUSIONS OR
LIMITATIONS MAY NOT APPLY TO YOU. IN NO EVENT WILL NON TYPICAL BE LIABLE TO YOU,
OR ANY THIRD PARTY, FOR ANY DAMAGES IN EXCESS OF THE PURCHASE PRICE OF THE
PRODUCT. IN ADDITION, NON TYPICAL SHALL IN NO EVENT BE LIABLE TO YOU, OR ANY
THIRD PARTY, FOR ANY DIRECT OR INDIRECT DAMAGES OR OTHER SPECIAL, INCIDENTAL,
EXEMPLARY OR CONSEQUENTIAL DAMAGES ARISING OUT OF THE USE OF OR INABILITY TO
USE THE PRODUCT. SOME JURISDICTIONS DO NOT ALLOW THE EXCLUSION OR LIMITATION
OF INCIDENTAL OR CONSEQUENTIAL DAMAGES FOR SOME PRODUCTS, SO THE EXCLUSIONS
OR LIMITATIONS MAY NOT APPLY TO YOU. THIS LIMITED WARRANTY GIVES YOU SPECIFIC
LEGAL RIGHTS, AND YOU MAY ALSO HAVE OTHER RIGHTS WHICH MAY VARY FROM JURISDICTION TO JURISDICTION.
4. Notwithstanding any terms of this Limited Warranty to the contrary, no warranty coverage
shall be provided for any Product purchased from, through or with the assistance or involvement of any Internet auction web site.
STEP 1: You can get answers to common questions, run a troubleshooting wizard, or authorize
a product return on our web site (www.cuddebackdigital.com). Click on product support.
STEP 2: Call Non Typical at (715) 762-2260.
As a condition of the warranty coverage for your Product, you are required to contact Non
Typical by telephone at (715) 762-2260 before returning your Product for service. Do not contact the dealer from whom you purchased the Product. Returning your Product without first
calling Non Typical will void this Limited Warranty and will significantly delay service.
Service calls should be made during Non Typical normal business hours of Monday through
Friday from 8:00 a.m. to 4:30 p.m., Central Standard Time.
STEP 3: Obtain a Return Material Authorization number from Non Typical.
If Non Typical's staff instructs you to return your Product, you will be given a RMA number.
Your RMA number must be written on the outside of the carton in which you ship the Product
to Non Typical. Packages without a RMA number will incur significant service delays.
STEP 4: Package your product for shipping and include a copy of your sales receipt.
Non Typical is not responsible for damage to your Product due to ineffective packaging or damage to the Product while in transit to Non Typical. You should ship your Product in a sturdy
carton with sufficient internal packaging materials to avoid damage. Do not include batteries
within your Product unless instructed to do so by a Non Typical technician.
In order to qualify for service under this Limited Warranty, any Product returned to Non Typical for service must be accompanied by a copy of or, if requested by Non Typical, the original dated sales receipt.
STEP 5: Return your product to the factory.
Ship your product to the factory: Non Typical, Inc.
STEP 6: Non Typical will send you a Post Card.
After we receive your Product, we will send you a post card with an estimated return date.
You do not need to call us for confirmation that your package has arrived at the factory. If your
Product is out of warranty, an estimate will be sent to you for approval before repairs are conducted.
Attn: RMA
860 Park Lane
Park Falls, WI 54552
<write your RMA number here>
52
53
 Loading...