

Page 1
Page 2

is device complies with Part 15 of the FCC Rules.
Operation is subject to the following two conditions:
(1) this device may not cause harmful interference, and
(2) this device must accept any interference received,
including interference that may cause undesired operation.
Please note that changes or modi cations not expressly
approved by the party responsible for compliance could
void the user’s authority to operate the equipment.
NOTE: is equipment has been tested and found to
comply with the limits for a Class B digital device, pursuant
to Part 15 of the FCC Rules. ese limits are designed
to provide reasonable protection against harmful
interference in a residential installation. is equipment
generates, uses and can radiate radio frequency energy
and, if not installed and used in accordance with the
instructions, may cause harmful interference to radio
communications. However, there is no guarantee that
interference will not occur in a particular installation. If
this equipment does cause harmful interference to radio
or television reception, which can be determined by
turning the equipment o and on, the user is encouraged
to try to correct the interference by one or more of the
following measures: --Reorient or relocate the receiving
antenna. --Increase the separation between the equipment
and receiver. --Connect the equipment into an outlet on a
circuit di erent from that to which the receiver is connected.
--Consult the dealer or an experienced radio/TV technician
for help.
Page 3

Send us your photos and you may win a
free Cuddeback®
Got a great picture? A big deer or a special
scene? A funny situation or beautiful
colors? We want to see them and give you
a chance to win a free Cuddeback. Visit
http://cuddeback.com/contest to enter
your best pictures into our photo contest.
Contest entry also allows you to become a
CuddeBacker and receive special promotions, rebates and other discount o ers.
Like Us
Let us know how you like our cameras,
and feel free to suggest improvements.
In this connected world, your reviews
do make a di erence. Please support us
online by writing a positive review on
any of the retail or forum websites. We
thank you for your support.
Please Update
We never stop improving our products.
Firmware updates allow your camera
to
be improved with enhanced performance
and new features. Refer to Appendix B:
Firmware, for instructions.
Page 4

Battery Notice
Remove batteries when the camera is not going to be
used for an extended period of time. Failure to follow
these
guidelines may result in battery leakage, which will
damage
your camera.
✓ Never mix old and new batteries.
✓
Never mix di erent types of batteries.
✓ Never mix lithium and alkaline batteries.
✓
Replace all batteries at the same time.
✓
Always remove batteries when the
camera won’t
be used for an extended period of time.
✓ Dispose of batteries properly as recommended
by the manufacturer.
SD Card Notice
is Cuddeback camera is compatible with secure digital
(SD) cards sizes 2GB to 32GB. Do not use SDXC cards.
Micro SD cards will
function with the proper adapter
(usually
included with the micro SD card).
Treat your SD cards well. ey are very sophisticated
electronic devices made with billions of static-sensitive
transistors. Keep them dry and do not bend them.
WARNING – Never insert a wet or damp
SD card into your camera or computer.
Page 5

Internal Memory
You can use this camera without an SD card. Up to
120MB of internal memory is available for image storage.
Note: Videos and time-lapse images cannot be stored to
internal memory. Images stored in internal memory must
be copied to an SD card for retrieval.
is feature is handy if you check a camera without a
spare SD card. You can remove the SD card and take it
home, yet still leave the camera a eld. When you return,
all you need to do is install the SD card and transfer
images from internal memory to the SD card.
Page 6
Cuddeback® IR Operating Instructions
What You Need
1. One or more secure digital (SD) cards.
Compatible with SD cards up to 32GB.
2. Eight AA batteries (we recommend
Rayovac
®
or Duracell® brand batteries).
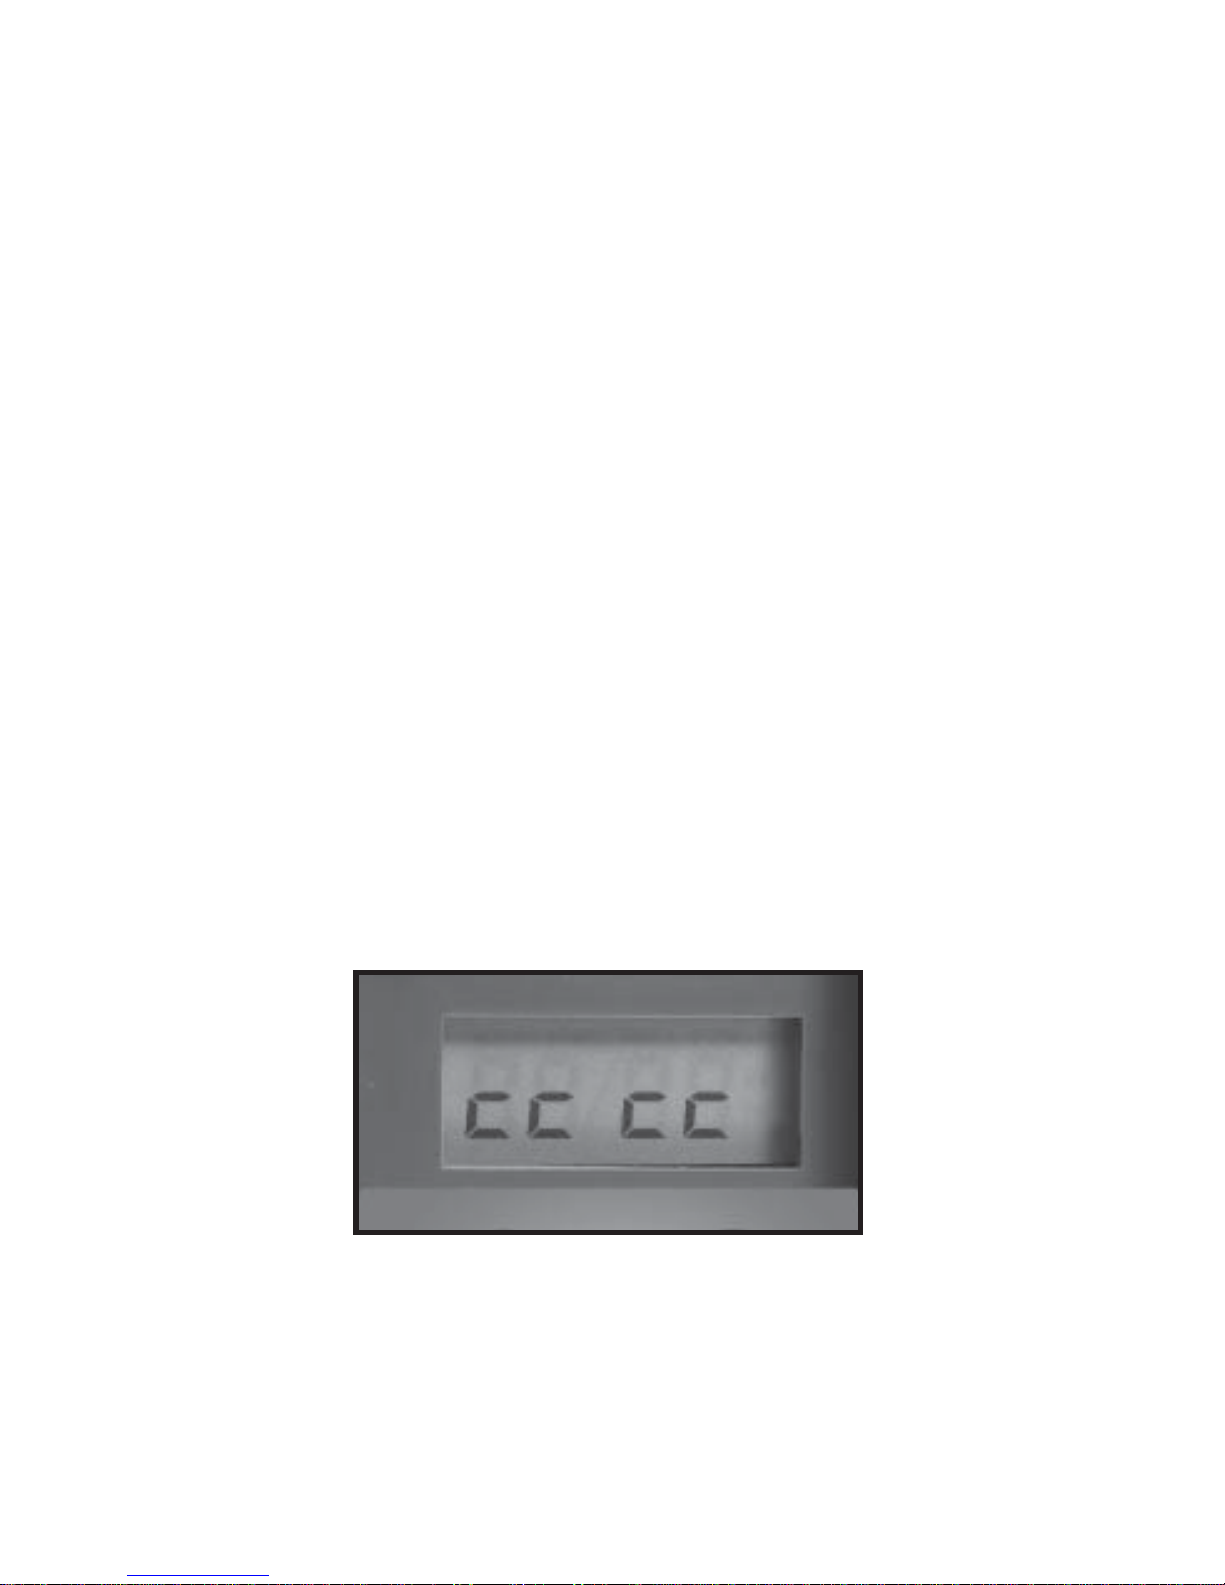
3.
When Cuddeback® IR is running it displays
an
electronic “worm” on the LCD. This worm scrolls
around the LCD to indicate that you must not remove
the SD card, must not turn the rotary knob, and must
not press any button. Please be patient and wait for
the worm to go away before removing the SD card.
“Worm”
1
Page 7
2
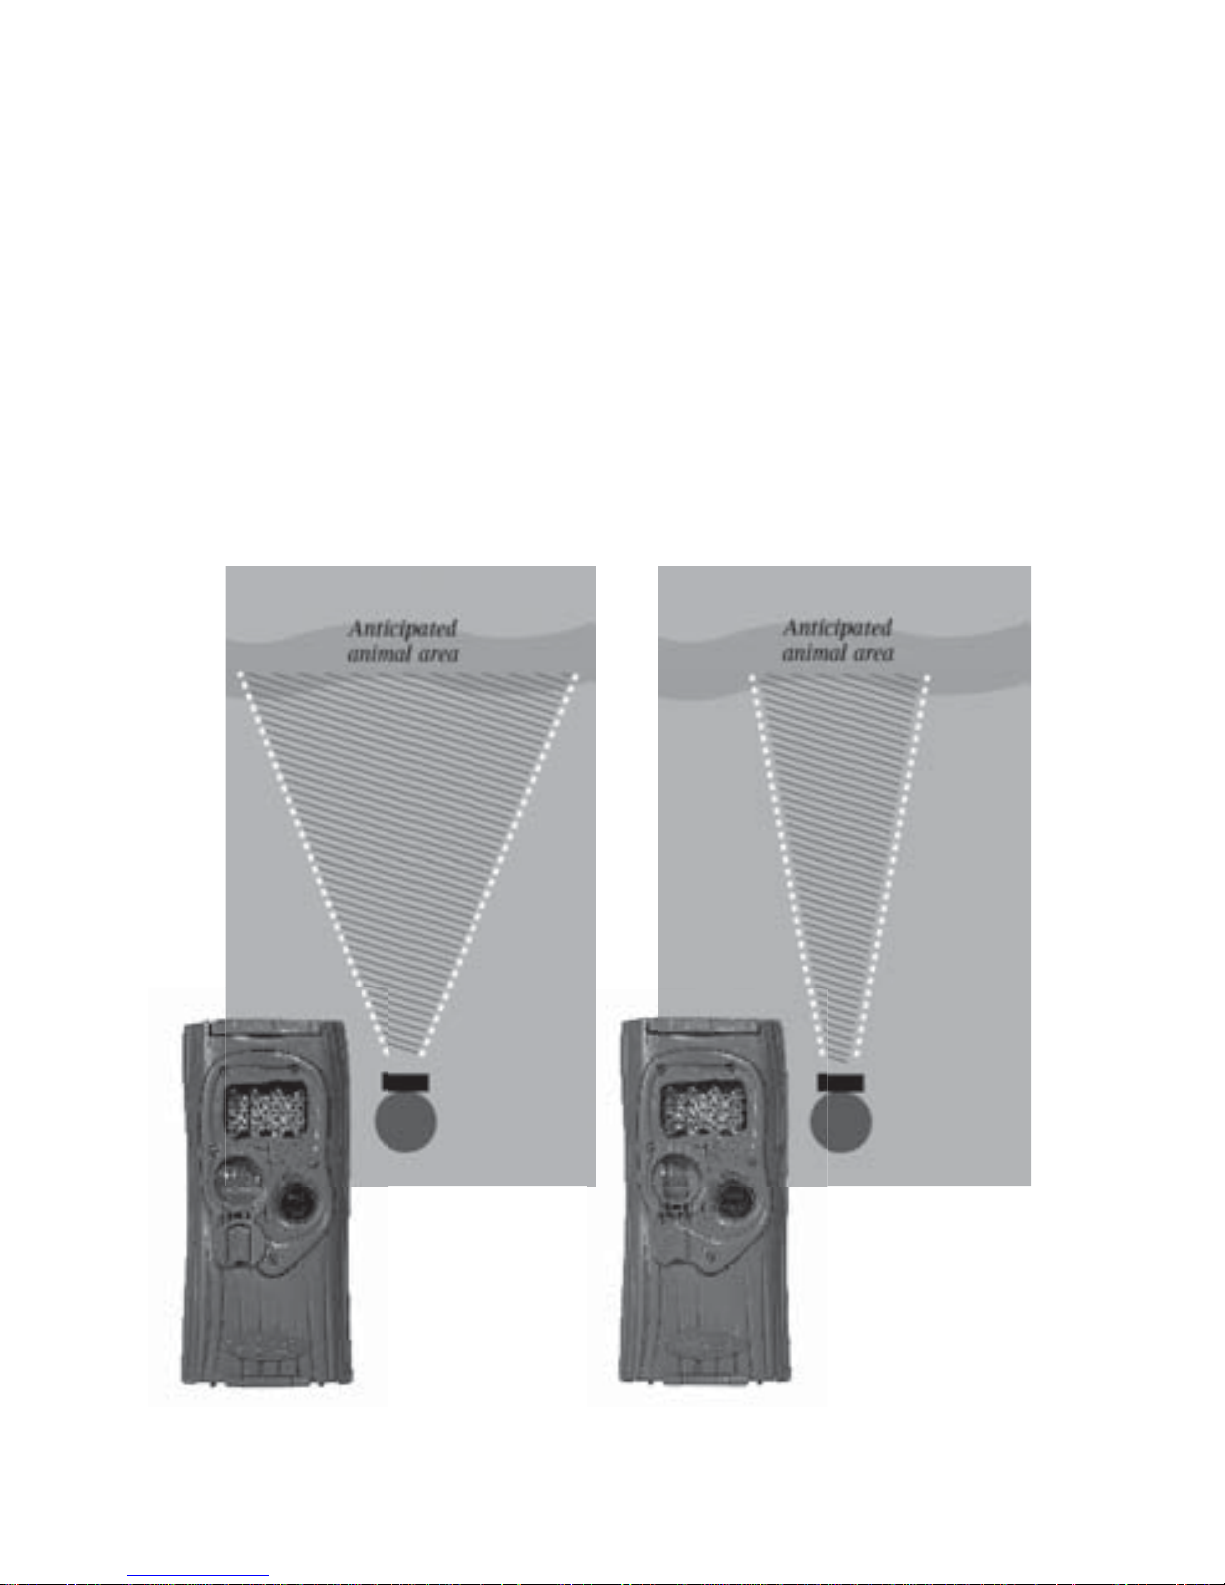
Zone Control
Cuddeback’s patent-pending Zone Control allows you to
select wide-angle view or centered-subject view. Position
the shutter as appropriate for your needs. Be aware that
wide-view mode can generate more blank images when
deer move to the edges of the view.
Zone Control
Centered-Subject Setting
Zone Control
Wide-Angle Setting
Page 8
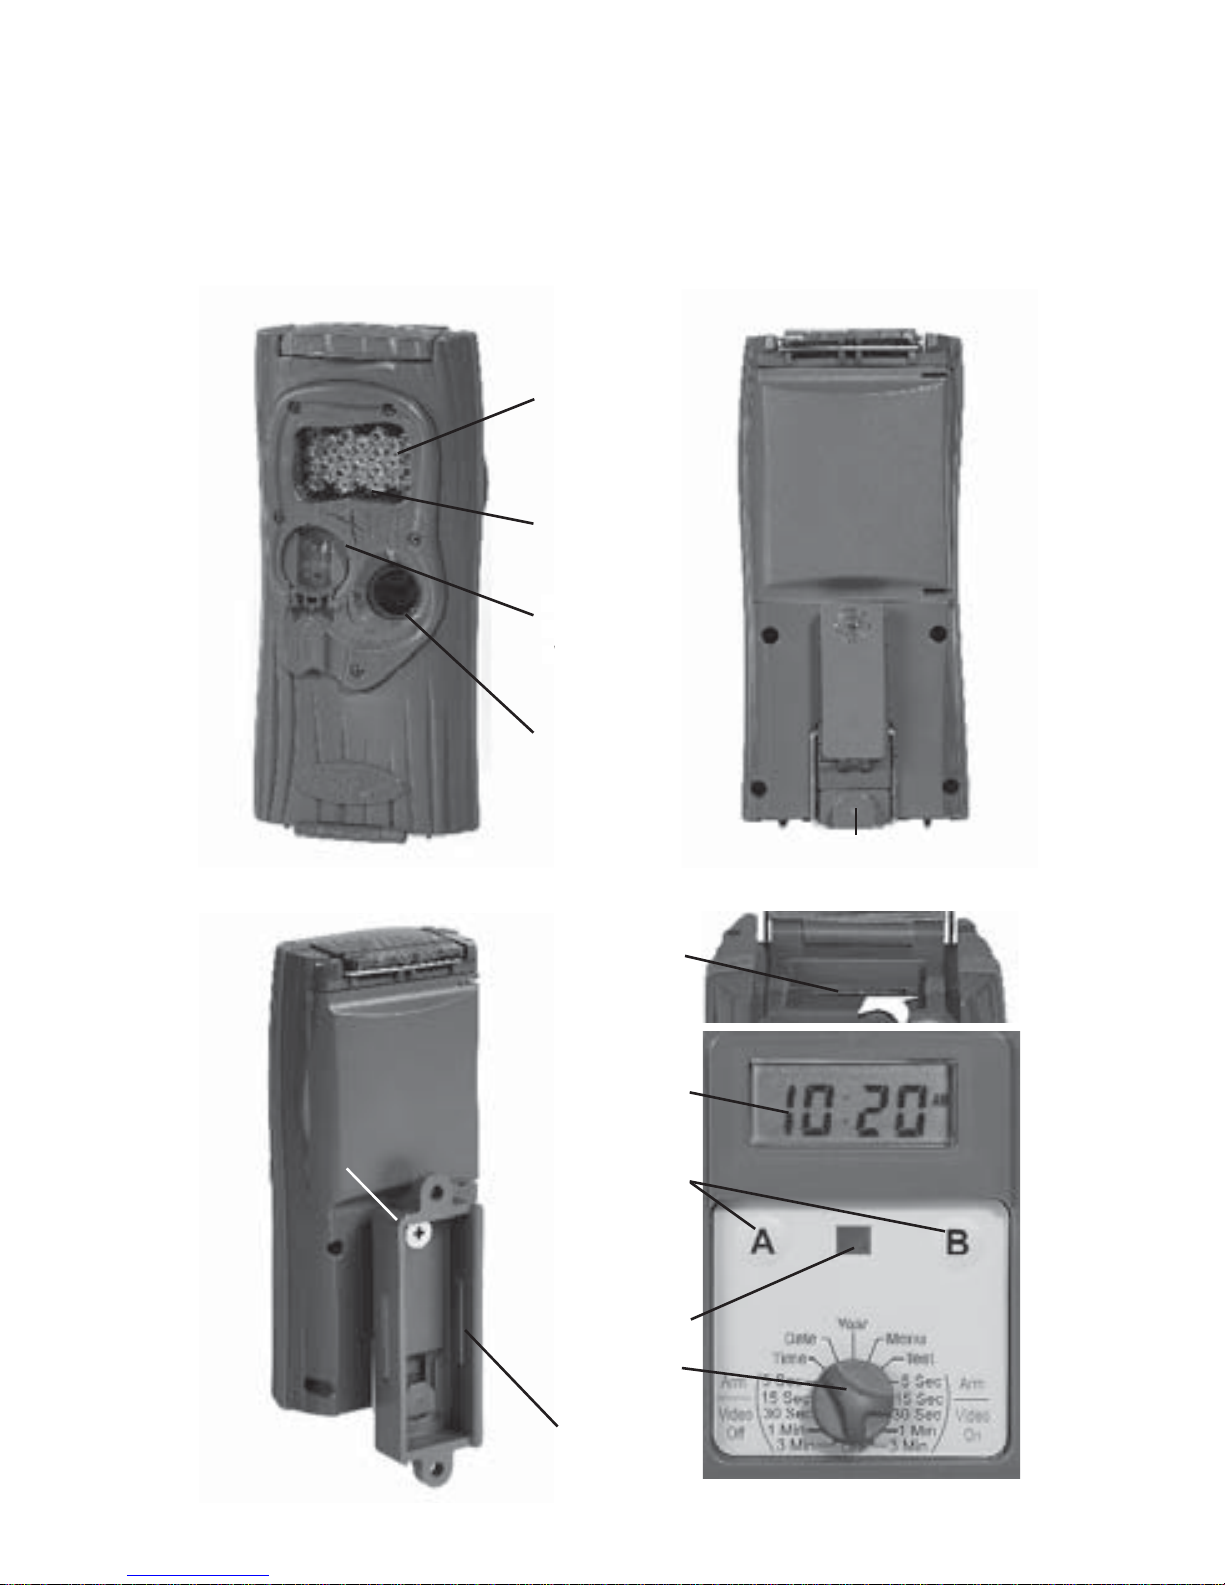
Step 1: Getting Familiar With the
Cuddeback® IR Camera
Take a moment to familiarize yourself with Cuddeback® IR
camera parts.
MotionHeat
Sensor
M
H
S
Front Back
Back
Test
LED
SD
Card
Socket
Mount
Bracket
Strap
Slots
LCD
Screen
Rotary
Knob
A/B
Buttons
User
Interface
LED
Camera
Lens
User Interface
Door
Battery Door
Infrared
LEDs
Back
Top
3
Page 9
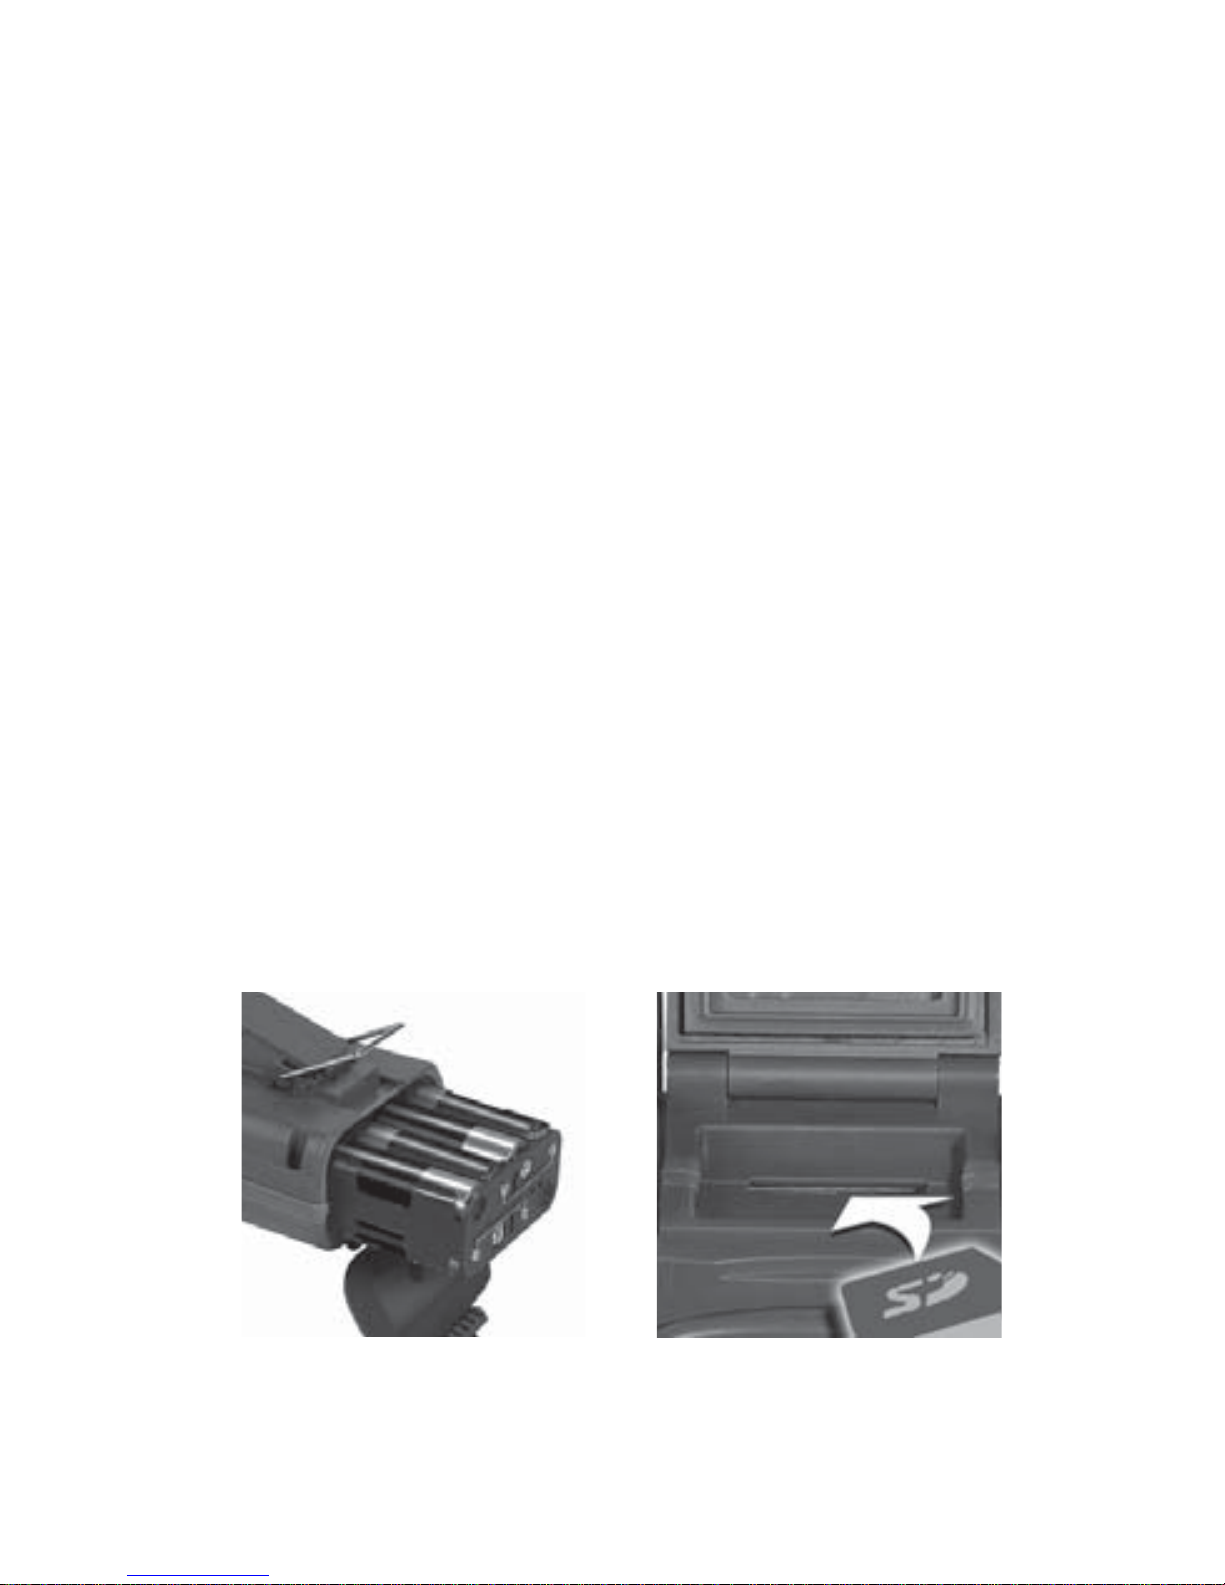
Step 2: Installing Batteries and SD Card
1. Turn the rotary knob to the OFF position.
2. Open latch to the battery compartment door.
Install 8 AA alkaline or 8 AA lithium batteries.
Lithium batteries will
provide longer battery life
and better night IR images.
Make sure to observe
correct polarity. Close the door and secure latch.
3.
A series of numbers display. These are the
Cuddeback® IR camera’s
hardware and software
version numbers.
4. Wait until the LCD display goes blank and the
green and red LEDs are off.
5. Install your SD card. Be sure to observe the correct
polarity, with clipped corner on the card to the right.
Bottom View Top View
Battery Install SD Card Install
4
Page 10

Step 3: Setting Up the Cuddeback® IR
1. Turn the rotary knob to Time position,
press A and B to set. Time is AM/PM format.
2. Turn the rotary knob to Date position,
press A and B to set.
3. Turn the rotary knob to Year position,
press A and B to set.
4.
Later you will read “Step 8 – Using More Features”
for information on the MENU positions.
Step 4: Attaching
Cuddeback® IR
to a Tree
1.
We recommend you fi rst try your Cuddeback® IR
camera at home.
2. For optimum detection of deer and similar-size
animals, we
recommend mounting
Cuddeback® IR
about
30 to 36 inches off the ground, roughly
waist high.
3. For best image quality, install
Cuddeback® IR
about 10 to 15 feet from where animals are expected
.
Note that detection distance varies greatly with
air
temperature, animal size and the speed the animal
is moving.
5
Page 11

4.
Cuddeback® IR
features our
Genius Mounting System.
This system allows you to
attach the bracket to a tree
or pole and then slide
Cuddeback
®
IR on and off
the bracket as needed.
5. Once the bracket is
attached to the tree,
slide
Cuddeback® IR
onto the bracket.
6.
It’s best to remove any vegetation or other obstructions
from
Cuddeback® IR’s
fi eld-of-view that may
interfere with the Cuddeback
®
IR sensor.
7. Aim/align
Cuddeback® IR
to make sure it’s
pointed where you expect the animals to be. Aim
Cuddeback® IR
level with the ground to maximize
detection range and performance. You can use the
Cuddeback® IR
test feature
(Step 5) to help
you determine the detection area.
8.
Cuddeback® has optional mounting methods available,
such as tilt-brackets, bear-resistant boxes and
mounting posts. See your retailer or visit
www.cuddeback.com for details.
6
Page 12

Step 5: Checking the Cuddeback® IR
Detection Zone
1. Turn the rotary knob to the Test position. Close the
cover and tighten the thumb screw. Put
Cuddeback®
IR
back onto the tree bracket. (Note: For a more
convenient method to enable test mode, see “Step 7 –
Checking Cuddeback
®
IR Display Information”).
2.
Walk back and forth in front of
Cuddeback® IR. The
red LED will illuminate when
Cuddeback® IR
’s
sensor has detected you. Using this method you can
accurately position your Cuddeback® as desired.
Step 6: Arming the
Cuddeback® IR
You can program the Cuddeback® IR to record still images,
or still images AND videos. Turn the rotary knob to either
the Video Off setting or the Video On setting as desired.
The settings represent the amount of time
Cuddeback®
IR
will wait before it is armed and ready to take another
image. This delay time prevents multiple images of the
same animal. Here is our recommendation for the various
Armed settings:
a. Under 30 seconds – game trails
b. 1 and 3 minutes – scrapes, food plots or feeders
When fi rst armed,
Cuddeback® IR
will display the
indicated delay for 5 seconds and then begin counting
down from 30 to 0. When the counter reaches 0,
Cuddeback® IR
will arm and be ready to record images.
When Cuddeback
®
IR detects a subject and takes a
7
Page 13

picture, a “worm” will be displayed and the LED will
fl ash red and green – do not remove the SD card until the
LED is OFF. After the image is saved to the SD card, the
LCD will display the delay setting and begin counting
down. Once the counter reaches 0,
Cuddeback® IR
is
armed and ready to record the next picture.
Step 7: Checking
Cuddeback® IR Display
Information
When you need to check for information such as battery
level or the number of images on the SD card,
it is not
necessary to turn the
rotary knob. Instead, press the A or
B button to temporarily
suspend Armed mode. Each time
you press the A or B button, new information will be
displayed in this sequence:
1. Images on SD card. Note the ARMED, DWELL,
and IMAGES icons are displayed.
2. Free Space on SD card in MB. Note that ARMED
and DWELL icons are displayed.
3. Battery Level as a percentage. For example,
bt:99 means there is 99% battery power left.
4. Time
5. Date
6. Year
7.
Test indicates Cuddeback® IR is in Test mode and will
illuminate the red Test LED when activity is sensed.
8. Pressing A or B again will arm the camera and
the current delay setting will be displayed.
8
Page 14

You can leave Cuddeback® IR in any of the states 1
through 7 and Cuddeback
®
IR will automatically re-arm
in about fi ve minutes. This allows you to close the cover
and leave the area without triggering an image.
Step 8: Using More Features
Menu Position
Turn the rotary knob to the MENU position to perform
various activities. Press A to advance to the next menu
item; press B to activate the displayed menu action.
1. Battery Level – The battery level is displayed in the
format bt:99, which is a percentage of remaining
battery power. Press the A button to advance to the
next menu item.
2. CLr (Clear SD card) – This menu allows you to
clear all images and content on the SD card. Press
and hold B to clear
the card. The worm will appear
and the LEDs will fl ash RED.
When fi nished, the
LCD will display the amount of space on the SD
card in MBs. Press A to advance to the next menu item.
3. Pic – Lets you take a test picture. Press B to take
a picture. Press A to advance to the next menu item.
4. LEd – This menu allows you to test Cuddeback® IR
LEDs and measure the battery strength. Press B to
test Cuddeback
®
IR infrared LEDs. The LEDs will
be driven from 33% minimum power to 99%
maximum power. The test will stop at 99% or when
the batteries do not have suffi cient power to drive
the LEDs. If the batteries are depleted, FAIL will be
9
Page 15

displayed. If the reading is below 99% you may
want to change the batteries to maximize the
illumination range.
5.
StAt (Statistical Data) – Press B to display Activation
Date, Armed Days and Image Counter. Activation
Date is the fi rst day you used the camera. Armed
Days is how many days the camera has been used.
Image Counter is the total number of images taken
with the camera.
6. LOAd – Lets you to install new fi rmware. We may
update the
Cuddeback® IR fi rmware to improve its
performance. If a fi rmware update is required you
will need to download a fi rmware fi le from our
website. Instructions will be provided with the fi rmware.
Please see www.cuddeback.com for details.
We
recommend you check our website for updates at
the beginning of your scouting season.
7. Firmware Version – A four-digit number will be
displayed, such as 0200. This is the fi rmware version.
Turn the rotary knob to a new setting or press A to
return to the battery level display.
10
Page 16

No Card Mode – Using Cuddeback® IR Without
an SD Card
When Cuddeback® IR is used without an SD card, images
are stored in Cuddeback
®
IR internal image memory.
Cuddeback
®
IR features an internal memory of about
120 MB. This will allow storage of up to 120 images.
Images can be transferred from internal memory to an
SD card.
Transfer to SD card: If you use Cuddeback
®
IR without
an SD card, follow these steps to transfer the images
from the internal memory to an SD card.
1. If Cuddeback
®
IR is not armed, turn the rotary knob
to any of the Armed positions.
2.
If
Cuddeback® IR
is armed, press A to display
the
number of
images in internal memory.
3. Insert your SD card into Cuddeback
®
IR.
4. Press A. The amount of free space on the SD card
will be displayed.
5. Press B to initiate the transfer. Images saved in
internal memory will be copied to the SD card.
The LCD will display the worm on the left and the
percentage of fi les copied on the right. Please wait
while images are being copied.
6. When the time is displayed, the transfer is complete
and all the images on the internal memory
have been
erased.
7.
To stop the transfer before it has fi nished, press and
hold B.
11
Page 17

Battery Life and Battery Low Warning
Battery life in Cuddeback® IR will vary depending upon
battery quality, ambient temperature, the number of images
taken, how long Cuddeback
®
IR has been operating and
other factors. The battery life you get may be more or
less than these numbers, depending on the circumstances.
Cuddeback® IR – 5,000 images or 6 months, depending
on usage.
Note that using video mode greatly reduces battery life.
Replace Cuddeback® IR batteries in the following
scenarios:
1. The BLOW icon appears on the LCD.
2. When batteries are below 10% the battery level will
fl ash until you press the A or B key to continue.
3.
When
Cuddeback® IR does not appear to operate
correctly.
In some cases the batteries may be too low
to turn on the LCD or BLOW icon.
Battery Squeeze
Cuddeback
®
IR
will attempt to use every amount of
power from the batteries.
Cuddeback® IR
will alter its
performance to prevent
erroneous operation when battery
voltage is very low. Battery Squeeze is enabled when
battery voltage is 25% or less. Battery Squeeze will disable
videos and extend the camera delay to 1 minute at night
and 15 seconds for day. This allows the batteries to
recover and will extend operating time.
12
Page 18

Viewing Images
You will need an external viewing device or computer to
view images. First, remove the SD card from the camera.
Make sure to remove the SD card only when the worm is
not visible. Here is a list of some viewing options.
1. You can view the images with an optional viewer
or a point-and-shoot camera that is able to read
Cuddeback
®
IR
’s images (Note: Not all SD-based
cameras
can view Cuddeback® IR’s
images.
Please test any camera before purchasing).
2. Replace the SD card with a fresh SD card and take
the
original SD card with you to view on your PC
or other device.
3. Cuddeback’s CuddeView® viewer will allow you to
view the images, copy the images to a second SD
card and erase the images from the SD card. You
can then put the original SD card back into any
Cuddeback
®
camera. CuddeView® allows you to
transfer images from multiple cameras to a single
SD card. Go to www.cuddeback.com for
more
information on CuddeView
®
. (Note: CuddeView®
may not be able to copy all the images taken in
Guard Duty mode. If you are using Guard Duty,
we recommend you view the images on a computer.)
13
Page 19

Additional Topics
Mounting
Genius mount is more versatile than the traditional
strapping of the camera to a tree. Using a strap or
screws, the Genius mount
easily and quickly attaches
to and removes from a tree without altering the
camera aim and alignment.
14
Page 20

Strap Use and Assembly
For secure strapping, follow the steps below:
15
Step 1 – Route strap through bracket.
Step 2 – Insert strap through buckle as shown. Note the hook is
facing out.
Step 3 – Loop strap
and insert through
buckle as shown.
Step 5 – Li tab
to loosen strap.
i ta
b
Step 4 – Pull tight.
Page 21

Setup
For best image quality, proper camera setup
is important.
16
Correct
Incorrect
Incorrect
Correct
Correct
On level ground, your
camera should be roughly
waist high and aimed
parallel to the ground.
In a
downhill
situation,
aim
the camera
downhill parallel
to the ground, to avoid
shooting over the deer.
In an uphill situation,
aim the camera uphill,
parallel to the ground, to
avoid shooting the hillside.
Position your camera about 3 feet off the ground
Open eld with no backdrop
Not
Recommended
Area with tree line or other obstruction
to reect light back to camera
Area with tree line or other obstruction
to reect light back to camera
Long Range IR
50 feet
Black Flash®
25 feet
Optimum setup for best image quality
Camera mounted on tree IR camera mounted on tree Black Flash® camera mounted on tree
Page 22

Detection Range
e motion sensor detects the temperature di erence
between the air and the animal. e range at which
an animal will be detected varies with animal size,
movement speed, air temperature and the heat of
the animal.
1. Detection range will be reduced in hot
temperatures (over 26˚C or 80˚F).
2. Animals walking directly toward the camera
may not be detected until they are very close
(within 10 feet) to the camera.
3. Animals with thick hair (such as deer in
winter) will be harder to detect than animals
with a thin summer coat. is can occasionally
result in reduced detection range in winter.
4. e larger the animal, the farther away it can
be detected. For example, a deer may be detected
beyond 50 feet, but a fox may be detected
only up
to 25 feet.
5. A moving animal is detected better than
stationary animals. A small ying bird can
be detected because of the wing movement
and speed.
6. Stationary animals might not be detected.
An animal standing in front of the camera
may stay undetected until it moves.
17
Page 23

Using the Camera in Cold Conditions
Be aware of these issues if you use your camera
in extreme cold (below 0˚C or 32˚F).
1. Battery life may be reduced by 50% or more.
2. Night illumination range may be reduced
because cold batteries typically cannot
deliver the same amount of power to the
LEDs as warm batteries.
3. e cold a ects LED cameras more than
ash cameras.
4. Lithium batteries operate much better in
cold conditions, so winter night illumination
will be nearly equal to warm-condition
illumination.
5. We recommend you use a longer delay,
around 30 seconds or more, to give the batteries
a rest period.
6.
In cold conditions, we recommend you do not
use videos or limit their length to 10 seconds.
If you want to record videos in the cold, we
recommend you use lithium batteries.
18
Page 24

Appendix A: Parameters
Setting Cuddeback® IR Parameters
Some Cuddeback® IR model’s features can be changed
by the user. Cuddeback
®
IR can also be programmed to
become a time-lapse camera. (Note: In the text that
follows, the underlined items are default settings. For
most users these settings are not required, and they can
leave PO set to 0.)
Step 1: Enable or disable parameters OR select
time-lapse operation
First you must enable parameters:
1. Rotate knob to MENU
2. Press A until P0:0 is displayed. P0 indicates
Parameter Zero, which is the parameter
ON/OFF control.
3. When P0:0 is displayed, press the B key to select
from these 3 options:
P0:0 = parameters are OFF and set to defaults
(recommended for most users)
P0:1 = parameters are ON and can be changed
as desired
P0:tL = time-lapse mode (explained on page 21)
Step 2:
Press the A key to display P1 (strobe power)
P1 controls the Cuddeback® strobe camera’s illumination.
This applies to strobe cameras only. Select available
settings by pressing the B key:
19
Page 25

P1:0 = INDOORS
P1:1 = CLOSE
P1:2 = MEDIUM
P1:3 = FAR
Step 3:
Press the A key to display P2 (video length)
P2 controls the Cuddeback® IR video length.
Select available settings by pressing the B key:
P2:1 = 10-second video
P2:2 = 20-second video
P2:3 = 30-second video
Step 4:
Press the A key to display P3 (video operating time)
P3 controls the
Cuddeback® IR
video operating time
Select available settings by pressing the B key:
P3:1 = record videos only at night
P3:2 = record videos only during the day
P3:3 = record videos during day & night
Step 5:
Press the A key to display P4 (operating time)
P4 controls the time Cuddeback® IR will take pictures.
Select available settings by pressing the B key:
P4:1 = operate only at night
P4:2 = operate only during the day
P4:3 = operate during day & night
Step 6:
Press the A key to display P5 (quality)
On certain Cuddeback cameras, P5 selects image size.
If P5 is not displayed, your camera does not require
this feature.
20
Page 26

Select available settings by pressing the B key:
P5:1 = standard resolution 5MP
P5:2 = high-quality 20MP
Step 7:
Press the A key to display P6 (FAP Mode)
P6 enables or disables a super-fast camera delay, called
Fast-as-Possible, or FAP. When P6 is on, the camera will
re-arm immediately after the image or video is saved to the
SD card. This can result in a camera delay of 1 to 2 seconds.
When P6 is on, the 5-second camera delay position becomes
FAP. The remaining dial positions are not affected.
Note: Using FAP mode can result in blank images.
Press B to enable or disable FAP:
P6:0 = FAP mode disabled
P6:1 = FAP mode enabled
Step 8:
Press the A key to display P7 (Zone Control)
P7 controls the Cuddeback® IR Zone Control setting.
Select available settings by pressing the B key:
P7:0 = when Zone Control shutter is up (centered)
P7:
1 = when Zone Control shutter is down (wide angle)
Step 9:
Press the A key to display P8 and then P9
(camera ID)
This camera has a 4 digit camera ID fi eld that is printed
on the image footer. Parameter P8 is used to set the low 2
digits, and P9 is used to set the high 2 digits. For example,
if you want CAM ID = 1234, set P8 to 34 & set P9 to 12.
For each Parameters use the B key to set a value from 0
thru 99. If 0 is selected, the ID number will not be printed.
21
Page 27

Step 10:
Press the A key to display PA (burst mode)
Set PA from 1 thru 5 to set the number of images taken
with each trigger.
Time-Lapse / Guard Duty Mode (P0= tL)
Time-Lapse / Guard Duty mode is enabled when Parameter
0 is set to tL. When P0 is set to tL, the rotary dial enables
Time-Lapse or Guard Duty.
Guard Duty
Guard Duty allows you to constantly monitor a fi eld or
other location by continually taking pictures at a selected
interval of 1 to 5 images per minute.
• To enable Guard Duty, set P0 to tL and set the
rotary dial to one of the left (video off) positions.
Settings are 1 to 5 images per minute (60, 30, 20,
15 and 12 seconds).
• Guard Duty takes images only during daylight.
•
At night, Cuddeback® will revert to motion sensing
mode and take pictures of animals as they are
detected. The camera delay will default to
15 seconds.
• Guard Duty images are 1.3 MP and are saved in
the folder
DCIM\200CUDDY.
• Guard Duty will record thousands of images per
day. We recommend 8GB SD cards or bigger.
22
Page 28

• Battery life using Guard Duty will be less than
in other modes, perhaps as low as 1 week if 5
images a minute is selected. Choosing fewer
images per minute will extend operating time.
•
We recommend you use our Trophy Room PC program
to view Guard Duty images. Available for free at
www.cuddeback.com.
Time-Lapse Mode
Time-Lapse mode records images 24 hours a day at a
preset interval from 1 hour to 24 hours.
• To enable Time-Lapse, set P0 to tL and set the
rotary dial to one of the right (video on) positions.
Settings are 1, 3, 6, 12 and 24 hours.
• Time-Lapse will record images 24 hours a day.
At night illumination (fl ash or LEDs) are used.
•
Motion sensing is disabled when Time-Lapse is enabled.
To disable Time-Lapse Mode, set P0 to P0:0 or P0:1.
Appendix B: Firmware
We never stop improving our products. Firmware updates
allow your camera to be improved with enhanced performance
and new features. We strongly recommend you visit our
website prior to camera deployment to check for rmware
updates.
Updating your Cuddeback camera rmware is a
2-step process: 1) retrieving rmware from the Cuddeback
website, and 2) loading the rmware onto your camera.
23
Page 29

1. How to retrieve rmware updates:
a. Occasionally visit our website and check
if new rmware is available. Visit
Cuddeback.com and click SUPPORT.
Select your product and click PRODUCT
UPDATES to see if there is new rmware available.
b. PC Windows users can install Cuddeback
Updater. is small PC program will check
for new rmware and inform you when
rmware is available. You can download
this program at cuddeback.com/updater.
c.
Use our Trophy Room Windows PC program,
which will automatically inform you when
new rmware is available. You can download
Trophy Room at http://cuddeback.com/
TrophyRoom.
d. Register your camera cuddeback.com and
opt-in to our emails. We will email you new
rmware when it is available.
2.
Loading rmware onto your Cuddeback camera:
a. Copy the rmware le to your SD card.
b.
Insert the SD card into your Cuddeback camera.
c.
Press A until LoAD is displayed.
d. Press B to load the rmware.
e. If EC:10 is displayed, then the correct rmware
is not on the SD card.
24
Page 30

f. e LCD will scroll while the rmware is
loading. DO NOT REMOVE THE SD CARD
while the LCD is scrolling.
g.
When the process is nished, the battery level
will be displayed. It is now ok to remove the
SD card.
h. You can use the same SD card to update all
your Cuddeback® cameras. e same rmware
le will update all recent Cuddeback® models
(Attack, Ambush and C & E models).
Appendix C: Battery Life
It is impossible to predict exactly how long batteries will
last in a camera. Battery life varies greatly and depends
upon battery quality, temperature, operating days,
number of images taken, video mode, etc. Depending on
usage and other factors, you may get as long as 12 months
on a set of batteries, or only weeks. Here are some facts
that will help you understand battery life.
1. Higher-quality batteries last longer. We
recommend only Rayovac, Energizer and
Duracell brands.
2. Older batteries will generally have less power
than newer batteries. Batteries purchased
many months ago may not last as long as
batteries purchased recently.
3. Temperatures below 32˚F (0˚C) may reduce
battery life 50% or more.
25
Page 31

4. e more images taken, the fewer days the
camera will operate.
5.
Video consumes more power than still images.
6.
Night images require considerably more power
than day images.
7.
Night video requires considerably more power
than day video.
8. Night illumination range will be reduced as
battery power weakens.
9. Lithium batteries will perform better in cold
temperatures, and may perform better overall.
You can maximize battery life by using the camera delay
and video settings wisely.
1. A short daytime delay (5 seconds) will deplete
batteries more quickly than a longer delay
(15 seconds to 1 minute).
2. Using shorter video length (10 seconds) will
extend battery life.
3. At night, a longer delay (15 second of more)
will extend battery life.
Recommendations to Maximize Battery Life
Trails and Scrapes. On a trail or scrape, a 5-second delay
works because trails typically do not have a lot of activity
(compared with feeders and food plots).
26
Page 32

Feeders. A short delay on a feeder will generate a lot of images
and can deplete batteries quickly. Do you
really need a
5-second delay to capture dozens of images
of the same ani-
mal? A delay of 15 seconds to 1 minute
will extend battery
life and still capture all the deer.
Food Plots.
A short delay is typically okay, since deer will
be moving around and you don’t want to miss any.
Appendix D: Trophy Room
Trophy Room
Cuddeback o ers a free Windows PC tool to manage your
trail camera images. Trophy Room is valued at over $100
but is free to all trail camera users.
• Works with all brands of trail cameras
• Copies images from SD card to PC with a simple
mouse click
•
Organizes images by year, property, and camera location
• Zooms and enhances images
• Automatically determines buck/doe/fawn ratios
• Prepares reports of animal activity during
moon phases
•
Predicts deer movement based upon moon phase
• Automatically keeps your Cuddeback cameras
updated with latest rmware
27
Page 33

Download a free copy of Trophy Room at
http://cuddeback.com/TrophyRoom
For additional Product support, visit http://support.
cuddeback.com. You can also email us your questions
by
visiting http://cuddeback.com/email.
Approvals: FCC, CE, ROHS.
is device complies with Part 15 of the FCC Rules.
Operation is subject to the following two conditions:
(1) this device may not cause harmful interference, and
(2) this device must accept any interference received,
including interference that may cause undesired operation.
LIMITED WARRANTY FOR THIS CUDDEBACK CAMERA
1.
Limited Warranty. Non Typical, Inc. (“Non Typical”)
warrants the Product to be free from malfunctions and
defects in both materials and workmanship for the period
of the warranty (“Warranty Period”). Non Typical will
repair or replace, at its option, the Product if it fails to
function properly during the Warranty Period, subject
to the conditions and/or limitations stated herein. Such
repair or replacement is your exclusive remedy under
this Limited Warranty.
2. Limitations. Limited Warranty service will not be
provided unless the Product is returned in the manner
set forth below.
28
Page 34

3. Warranty Period. e Warranty Period shall
commence on the date of the product’s registration and
shall expire on either: (a) the 1st annual anniversary of
the Product’s Activation Date; or (b) the 181st Run Day
of the Product, whichever comes rst.
Note: Registration must be within 2 weeks of the rst
installation of batteries.
is Limited Warranty does not cover the following:
a. Any defect in or damage to the Product that occurs
due to mishandling of the Product;
b. Any defect in or damage to the Product that occurs
due to repair, modi cation, or other similar activity
performed by anyone other than Non Typical;
c. Any defect in or damage to the Product that occurs
due to transport, dropping, shock, or other similar
activity a er your purchase of the Product;
d. Any defect in or damage to the Product that occurs
due to careless or improper storage, or improper
use or maintenance of the Product;
e. Any defect in or damage to the Product that occurs
due to exhausted batteries;
f. Any defect in or damage to the Product that occurs
due to sand, mud, or other foreign objects entering
the inside of the Product; or
g. Any defect in or damage to the Product related to
29
Page 35

accident, misuse, abuse, use with incompatible
accessories or attachments, your failure to follow
proper operating instructions provided by Non
Typical, claims made a er the duration of the Warranty
Period, or your failure to follow the instructions set
forth below with respect to return of the Product
to Non Typical.
4.
ALL OTHER EXPRESS AND IMPLIED WARRANTIES
FOR THE PRODUCT, INCLUDING THE IMPLIED
WARRANTIES OF MERCHANTABILITY AND FITNESS
FOR A PARTICULAR PURPOSE ARE HEREBY DISCLAIMED. NON TYPICAL EXPRESSLY DISCLAIMS
ALL WARRANTIES NOT STATED IN THIS WARRANTY.
ANY IMPLIED WARRANTIES THAT MAY BE IMPOSED
BY LAW ARE LIMITED IN DURATION TO THE
TERMS OF THIS EXPRESS LIMITED WARRANTY.
SOME JURISDICTIONS DO NOT ALLOW THE
EXCLUSION OF IMPLIED WARRANTIES OR LIMITATIONS ON HOW LONG AN IMPLIED WARRANTY
LASTS, SO THE ABOVE EXCLUSIONS OR LIMITATIONS MAY NOT APPLY TO YOU. IN NO EVENT
WILL NON TYPICAL BE LIABLE TO YOU, OR ANY
THIRD PARTY, FOR ANY DAMAGES IN EXCESS
OF THE PURCHASE PRICE OF THE PRODUCT. IN
ADDITION, NON TYPICAL SHALL IN NO EVENT
BE LIABLE TO YOU, OR ANY THIRD PARTY, FOR
ANY DIRECT OR INDIRECT DAMAGES OR OTHER
SPECIAL, INCIDENTAL, EXEMPLARY OR CONSEQUENTIAL DAMAGES ARISING OUT OF THE USE
30
Page 36

OF OR INABILITY TO USE THE PRODUCT. SOME
JURISDICTIONS DO NOT ALLOW THE EXCLUSION
OR LIMITATION OF INCIDENTAL OR CONSEQUENTIAL DAMAGES FOR SOME PRODUCTS, SO THE
EXCLUSIONS OR LIMITATIONS MAY NOT APPLY
TO YOU. THIS LIMITED WARRANTY GIVES YOU
SPECIFIC LEGAL RIGHTS, AND YOU MAY ALSO
HAVE OTHER RIGHTS WHICH MAY VARY FROM
JURISDICTION TO JURISDICTION.
5. Notwithstanding any terms of this Limited Warranty to
the contrary, no warranty coverage shall be provided for
any product purchased from, through or with the
assistance or involvement of any Internet auction web site.
OBTAINING SERVICE FOR YOUR PRODUCT
Visit www.cuddeback.com and click Product Support
or go to cuddeback.com/support for up-to-date service
options and get phone numbers. Here you will also nd
product manuals, answers to common questions, and
view service options.
31
Page 37

Put your Cuddeback
virtually anywhere!
No tree needed!
Patents Pending
Secure your
Cuddeback
with the included
lock clip
Pan
& Tilt
Post
Mount
Lock
Mount
Put a Genius Mount
bracket in all your
favorite hunting spots!
For use with all
Cuddeback
®
scouting cameras
32
Page 38

Page 39

Page 40

Non Typical, Inc., P.O. Box 10447, Green Bay, WI 54307-0447
920-347-3810
www.cuddeback.com
20160512
 Loading...