

Page 1
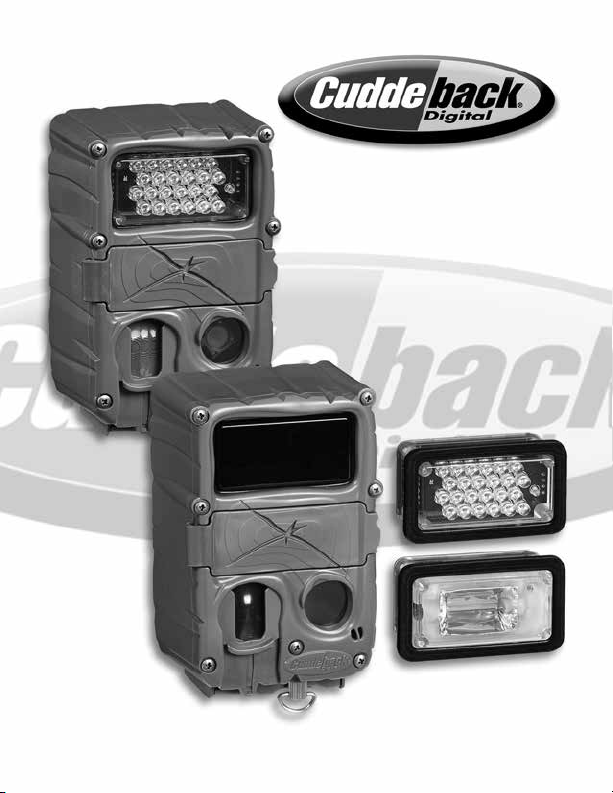
C (modular) &
E model
User Manual
Page 2

e new Cuddeback cameras are the best
cameras we have ever oered. e compact
design does not sacrice performance or image
quality. In fact, C & E cameras are the highest
performing Cuddeback cameras ever and feature
¼ second trigger speed, 20MP images, and
a
Zone Control.
Cuddeback Instruction Manual for
C & E Model Cameras
ank you for purchasing Cuddeback. You must read
this manual to completely learn camera operation.
Please update
We never stop improving our products. Firmware
updates
enhanced performance and new
Appendix A: Firmware for instructions on keeping
your camera up to date with rmware updates.
Like Us
Let us know how you like our cameras and feel free
to suggest improvements. In this connected world
your reviews do make a dierence. Please support
us online by writing a positive review on any of the
retail or forum websites. We thank you for your
support.
Battery Notice
Remove batteries when the camera is not going to
be used for an extended period of time. Failure to
follow these guidelines may results in battery leakage which will damage your camera.
allow your camera to be improved with
features. Refer to
1
Page 3

✓ Never mix old and new batteries.
✓ Never mix dierent types of batteries.
✓ Never mix lithium and alkaline batteries.
✓ Replace all batteries at the same time.
✓ Always remove batteries when the camera is
not going to be used for a period of time.
✓ Dispose of batteries properly as recommended
by the manufacturer.
SD Card Notice
is Cuddeback camera is compatible with SD cards
sizes 2GB to 64GB. Do not use SDXC cards. Micro
SD cards will function with the proper adapter
(usually included with the micro SD card).
storage.
Note – videos and time lapse images cannot
be stored to internal memory. Images stored in
internal memory must be copied to an SD card for
retrieval.
is feature is handy if you check a camera without
a spare SD card. You can remove the SD card and take
it home, yet still leave the camera a-eld. When you
return, all you need to do is install the SD card and
transfer images from internal memory to the SD card.
Treat your SD cards well. ey are very sophisticated
electronic devices made with billions of static sensitive
transistors. Keep them dry and do not bend them.
– Never insert a wet or damp SD card into your
camera or computer –
Internal Memory
You can use this camera without an SD card. Up
120MB of internal memory is available for image
to
2 3
Page 4
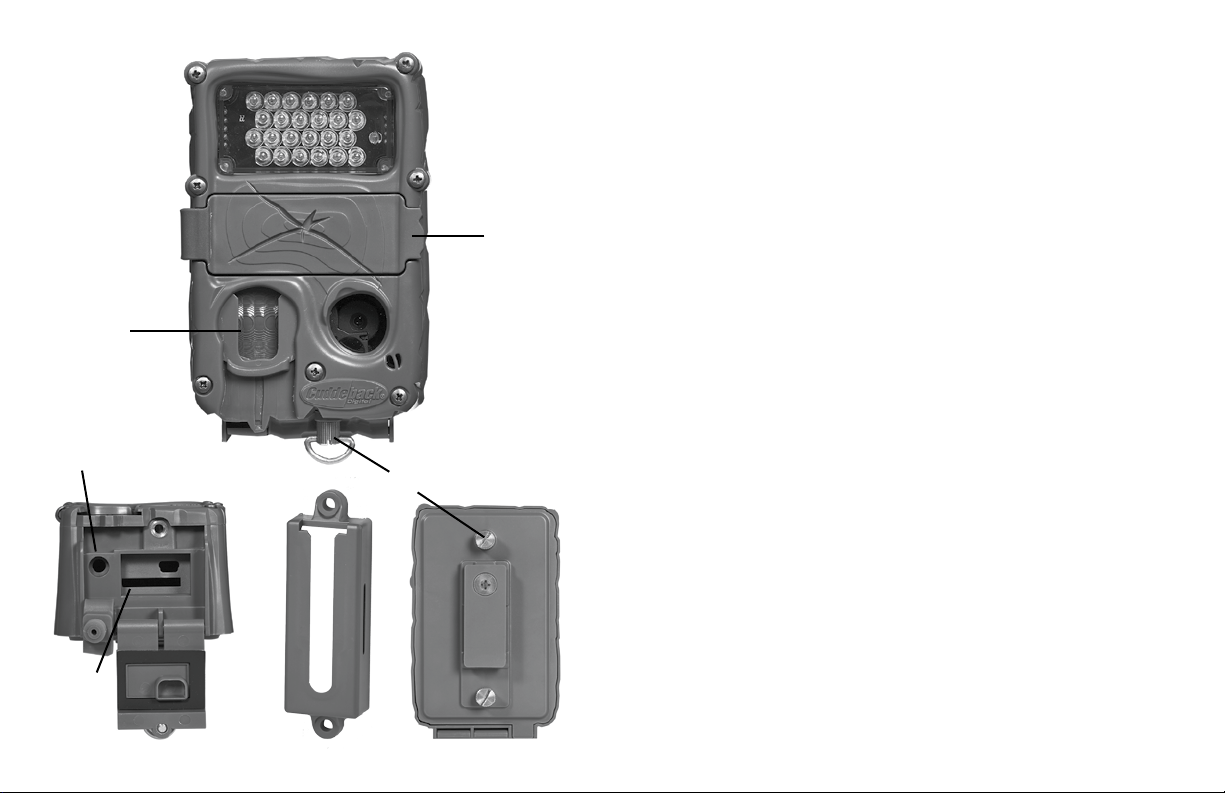
Design eory
Cuddeback C & E model cameras have been designed
to be as compact as possible, without compromising
the performance, features, reliability, and image
quality Cuddeback is known for.
1
1. User Interface is weather resistance and covered
with a sealing door. is resilient rubber/plastic
door is more robust than a conventional hinge
door.
4
2. e SD card ts into a socket in the bottom of
the
camera
6
3
5
2
4 5
e SD card socket is not spring loaded. We
have found pull-out style sockets to be more
reliable.
3. e battery door and SD card door are secured
4. e Fresnel lens is user replaceable.
5. e Genius mount is inexpensive and
replaceable. If abused by a person or animal,
the bracket will break before the camera.
camera. is prevents water from entering the
when you check your camera in the rain.
with brass thumb screws instead of breakable latches.
Page 5
6. DC INPUT – Only use Cuddeback CuddePower
battery pack or cables. Maximum input voltage
is 9 volts DC. DO NOT ATTACH CAMERA
TO A 12 VOLT BATTERY!
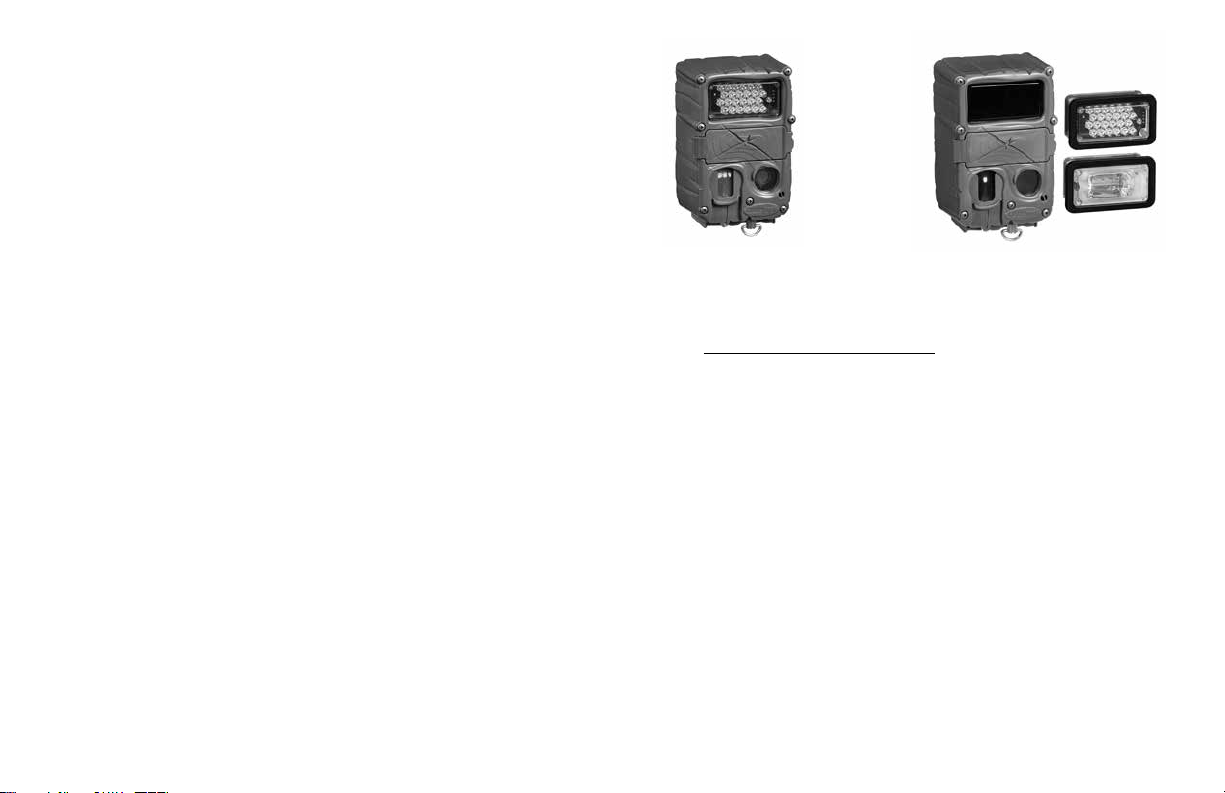
E Model
Long Range IR (shown)
C Model with Black Flash® module in camera and
interchangeable Long Range IR and White Flash
(color) modules along side.
See Appendix C: C Camera for instruction on re-
C and E Models
placing ash modules.
Cuddeback C & E models are very similar, but with
these notable dierences.
✓ C models feature exchangeable ash modules.
By removing the ash bezel the user can replace
the ash module as desired. is allows the user
to convert the camera to strobe (white ash),
IR, Black Flash®, or white LEDs (for night color
videos) by changing modules.
✓ e C model ash modules are also more
powerful than the built-in illuminators in the
E models.
slightly longer
6 7
erefore, the C models will have
ash illumination range.
Page 6
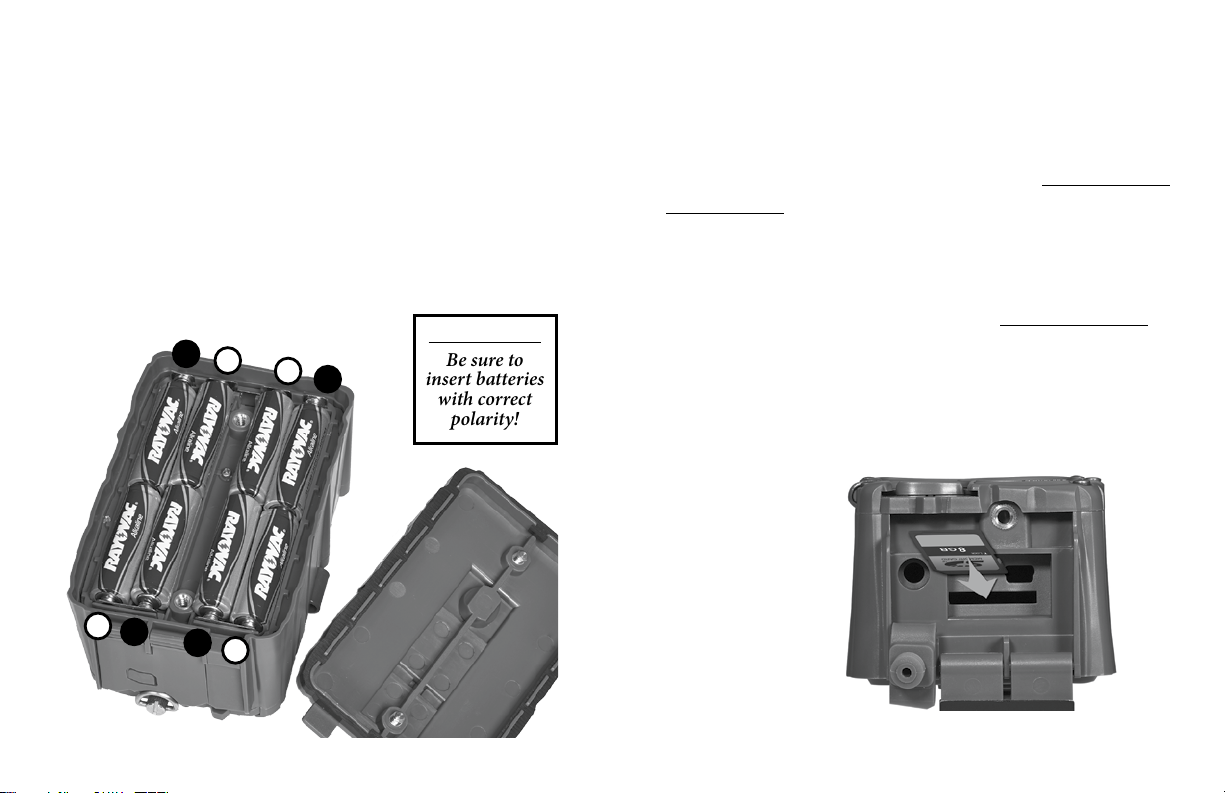
Install batteries
Install batteries by removing the 2 battery door
thumb
8 AA batteries
correct polarity. BATTERIES CAN EXPLODE,
LEAK ACID, OR IGNITE IF INSERTED
INCORRECTLY. Aer batteries are inserted correctly,
thumb screws.
screws and removing the battery door. Insert
as shown. Make sure to observe the
reinstall the battery door and fully tighten the 2
IMPORTANT
+
–
–
–
+
+
+
–
Be sure to
insert batteries
with correct
polarity!
We recommend Rayovac, Duracell, or Energizer
brand batteries only. (Choose batteries carefully
there is a dierence, especially in cold temperatures).
Lithium batteries provide better performance in
(below freezing) temperatures. Refer to Appendix B:
Battery Life for more information on maximizing
battery life.
Install SD Card
Insert the SD card into the camera label side down.
Do not force the card. If it does not go in easily,
check to make sure you are inserting it correctly.
You will break the card socket if you force the card.
Insert SD card
with label facing
down or towards
the back of the
camera
(SD/bottom panel
door open)
-
cold
8 9
Page 7

Zone Control
is camera is equipped with Cuddeback’s patent
pending Zone Control. e motion sensor can be set
to detect animals in a wide angle or a narrow view.
Wide view will capture more animals but is more
susceptible to triggering by non-target animals
(such as birds) which can lead to blank images.
Narrow view is very accurate and generates images
with the animals centered in the image. Slide the
Zone Control shutter to the appropriate position
by placing your thumb as shown in the diagram
(be careful not to damage the Fresnel lens).
Slide up for narrow view
Slide down for wide view
10 11
Page 8

Flash LED’s
(Long Range IR)
C & E camera front view
(control panel door open)
Test LED
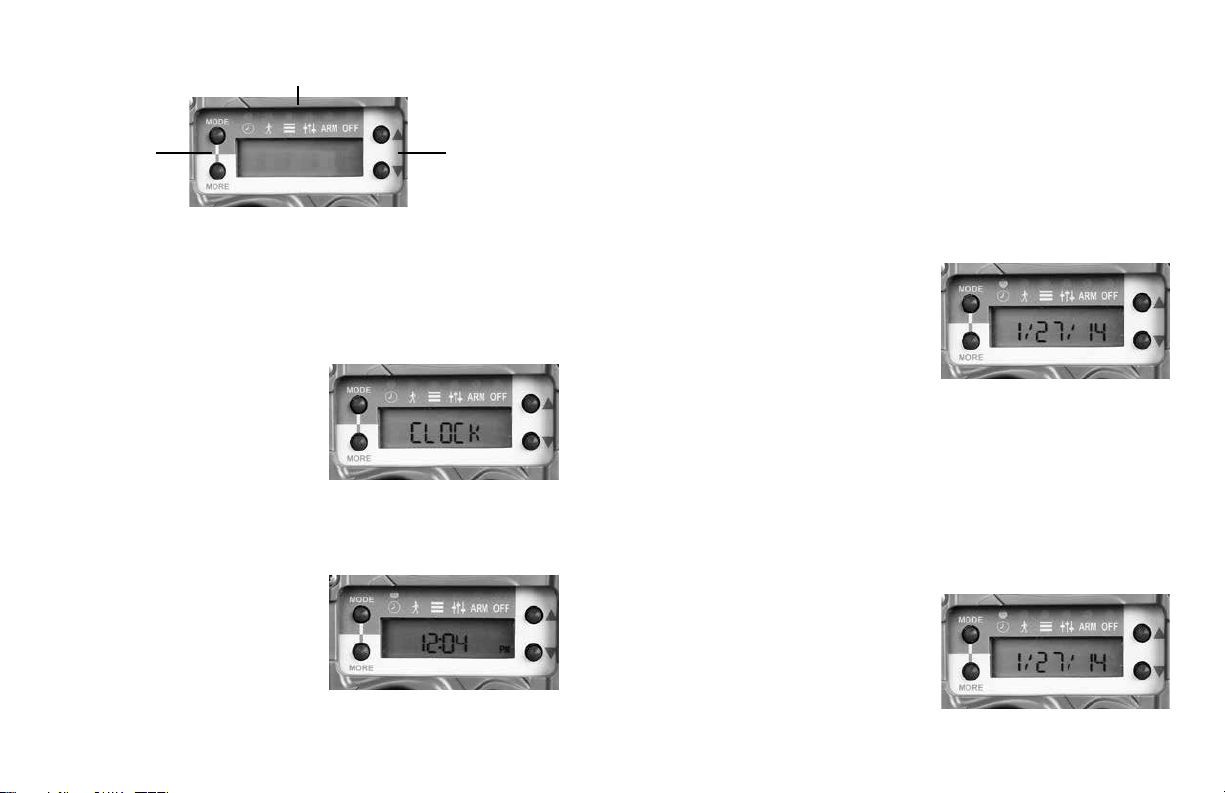
Quick Start Guide (EZ Mode)
C & E model cameras have 2 operating modes, EZ
and ADVANCED. e default mode is EZ and we
will explain that rst.
ere are 6 LEDs named CLOCK, TESTS, COMMANDS,
Mode &
More
Keys
Up & Down
Keys
SETTINGS, ARM, OFF that correspond to user
settings.
ere are 4 keys labeled MODE, MORE, UP,
Fresnel lens
Display
DOWN as well as an LCD display.
e MODE key changes the mode as indicated on
Zone Control
shutter
the LEDs and DISPLAY. Press MODE and TEST
illuminates, press MODE again and COMMANDS
illuminates, and so on. (Note – to conserve power
the LEDs will turn o aer 60 seconds).
C & E camera bottom view
CuddePower
battery
connection
SD card
slot
(SD card panel door open)
e MORE key displays additional actions for the
selected MODE.
e best way to think of this is MODE moves
across the LEDs, and MORE moves down to display
additional items.
e UP and DOWN keys perform an action or
12 13
command.
Page 9
CLOCK, TESTS, COMMANDS, SETTINGS, ARM, OFF
LEDs
indicating you can set the hour. Press UP and/or
DOWN as needed to set the HOUR. When correct,
Mode &
More
Keys
( )
Up & Down
Keys
press MORE to advance to minute. Minute will
begin ashing and use the UP and DOWN to set the
correct minute. Press MORE again to complete the
time setting.
Set the date
Setting the clock will demonstrate how the user
interface functions.
Clock Item
Press MODE until the
CLOCK LED is illuminated.
e current time will be
displayed. Press MORE and
the date will be displayed. Press MORE again
and the time will be redisplayed.
Set the clock
Press MODE until the
CLOCK LED is illuminated.
e time will be displayed.
With the time displayed
press UP or DOWN. e hour will start to ash
14 15
Press MODE until the
CLOCK LED is illuminated.
e time will be displayed.
Press MORE and the date
will be displayed. With the date displayed press UP
or DOWN. e month will start to ash indicating
you can set the month. Press UP and/or DOWN
as needed to set the month. When correct, press
MORE to advance to day. Day will begin ashing
and you use the UP and DOWN to set the correct
day. Press MORE to advance to the year. Press UP
or DOWN as needed to
set the correct year. Press
MORE again to complete
the date setting. Press MORE
to return to the time display.
Page 10
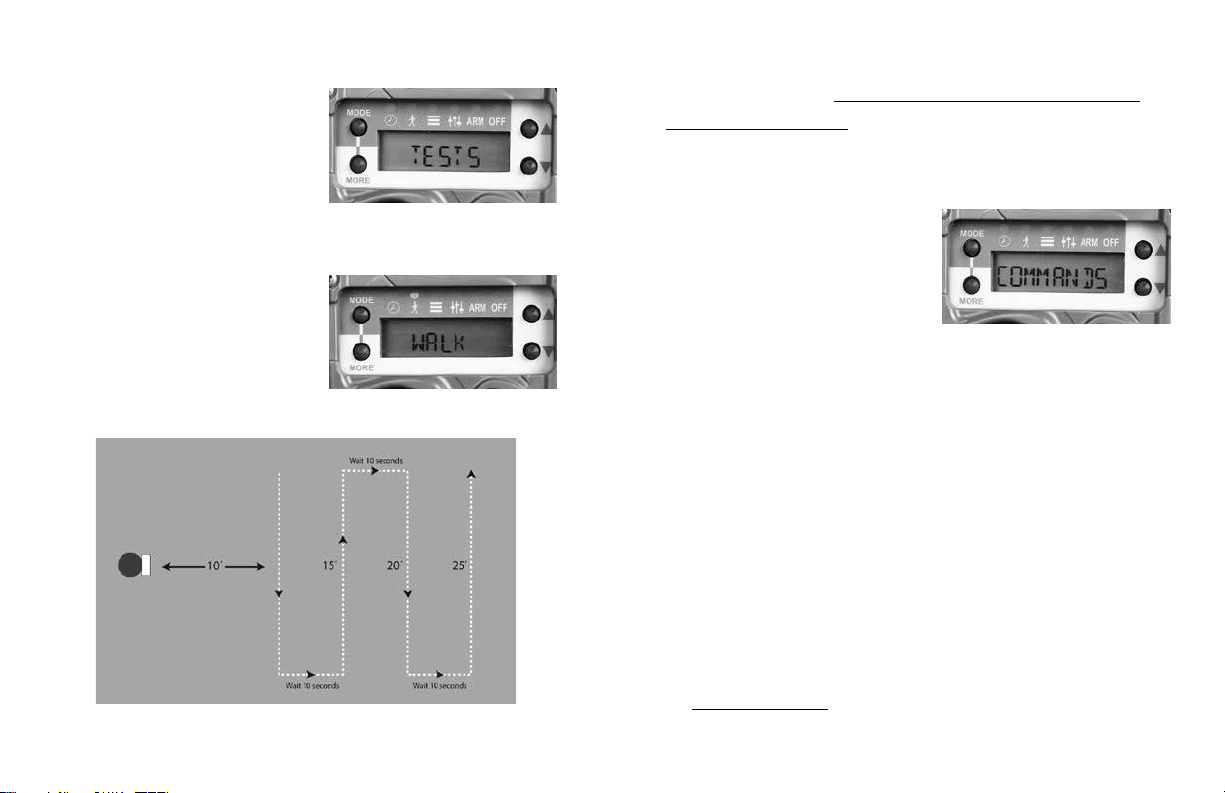
Test Item
Press MODE until the
TESTS LED is illuminated.
Aer a short delay WALK
will be displayed and walk-test is enabled. When
test mode is enabled the RED LED (inside the ash
module) will illuminate
when a subject is detected.
Walk back and forth (not
toward) the camera to
verify the detection zone.
Pressing MORE from the WALK test will display
TEST CAM. See Appendix E: Troubleshooting,
Service & Support for instructions on how to use
these commands to troubleshoot and test your camera.
Command Item
Press MODE until the
COMMANDS LED is
illuminated. e rst menu
item is BATTERY which
displays the battery level. Press MORE to display
additional Command items. When a Command
item is displayed press UP or DOWN to activate
the command (if required).
BATT –––. Battery level displayed as FULL, GOOD,
LOW or DEAD. Press UP or DOWN to display
more information on battery status:
BD – Battery Days shows how long the camera
has been operating on this set of batteries. is
count is reset to 0 when the batteries are removed.
BI – Battery Images is a count of how many
battery images have been taken on this set of
Diagram of “Walk” test
16 17
batteries. is value is calculated based upon
Page 11

how much battery power is used to take a picture
or video.
Day Images require the least amount of battery
power and are counted as 1Battery Image.
Video and Night Images require more power
than day images and will increase the BI count
by more than 1 depending upon how much
power they consume.
CLEAR. is command clears the SD card (WARNING:
ALL FILES ON THE SD CARD WILL BE ERASED).
Press UP or DOWN to activate this command. You
will be asked to CONFIRM the operation. Press
UP or DOWN again to conrm. If you do not want
to CLEAR wait a few seconds and the CONFIRM
prompt will vanish and the operation is canceled.
DST MODE. Daylight Savings Time. For USA
users you can have the camera automatically adjust
for spring and autumn daylight savings time
changes. Press UP or DOWN to select AUTO or
OFF. In AUTO mode DST clock adjustments are
done automatically.
F/W VER. Displays the camera’s rmware version.
LOAD F/W. is will load a new rmware le from
a SD card. See Appendix A: Firmware section latter
in this manual.
SETUP. You can change setup mode to ADVANCED
(ADV) or EZ. Default mode is EZ. Advanced Mode
enables numerous additional features. Press UP or
DOWN to change Setup Mode from EZ to Advance.
See Advanced Mode section latter in this manual.
IM COPY. is command copies images saved in
internal memory (IM) to the SD card. Press UP or
DOWN to initiate copying. You will be asked to
STATS. Displays operating history statistics. Press UP
or DOWN to display: Activation Date, Lifetime Days,
Run Days, Lifetime Images, Lifetime Flash images.
CONFIRM the operation. Press UP or DOWN to
✓
conrm and images will be copied to the SD card.
18 19
Activation Date is the day your warranty begins.
It is set automatically when batteries are installed.
Page 12

✓ Lifetime Days is how many days the camera has
been operating.
✓ Run Days is how many days the camera has
been armed.
✓
Lifetime Images is how many images the camera
has recorded.
Armed Item
Press MODE until the ARM
LED is displayed. e word
ARMING will ash on the
LCD and then a 30 second
count down will begin, aer which the camera will
arm and begin operation. Note – if the SD card is
not installed or not functioning correctly the message
✓ Lifetime Flash Image is how many ash images
CHECK SD will be displayed.
that camera has taken.
Armed Info. When the camera is armed you can
Settings Item
Press MODE until the
SETTINGS LED is displayed.
is is where camera delay
and video length is set. Press MORE to display these
settings. (In advanced mode additional settings are
enabled, see Advanced Mode section in this manual).
Delay – this is the delay between images. Settings
are FAP (Fast-as-Possible which is about 1 second)
to 1 hour. Press the UP or DOWN key to select.
suspend operation and view the status and images
count on the SD card or Internal Memory:
1. When the camera is armed press UP or DOWN.
e battery level will be displayed.
2. Consecutive pressing the UP or DOWN key will
display this data as appropriate. Note that SD data
will only be displayed if an SD card is installed; and
IM data will only be displayed if images are saved in
Internal Memory.
a. SD IMAGE is the number of images on the
Video – press UP or DOWN to select the length of
the video or OFF if you do not want to record videos.
20 21
SD card
Page 13

Auto Arm
b. SD VIDEO is the number of videos on the
SD card
In any mode other than OFF the camera will automatically arm within 5 minutes. is eliminates you
accidentally leaving the camera aeld not armed.
c. SD FREE is the amount of free space on the
SD card
O Item
Press MODE until the OFF
d. IM IMAGE is the number of images saved in
Internal Memory
LED is displayed. You will
be prompted to CONFIRM
you want to turn the camera
e. IM FREE is the amount of free space in
Internal Memory
o. Press UP or DOWN to conrm. When OFF the
camera is disabled and will not take images, nor will
the camera auto arm. Use this mode when you do
3. Press UP or DOWN again. e word WALK will
be displayed and the camera is put into WALK TEST
mode which causes the Test LED to illuminate when
activity is sensed.
not want the camera to record images, such as for
storage and transporting the camera. Press MODE
key as needed to rearm the camera. We recommend
removing batteries if the camera is not going to be
used for a month or more.
4. Press the UP or DOWN key again and the camera
will arm.
5. You can leave the camera in any of these states and
the camera will rearm in 5 minutes. We recommend
leaving the camera in WALK states, as this allows
you to verify the detection zone as you leave the area.
22 23
Page 14

Additional Topics
Mounting
Genius mount is more versatile than the traditional
strapping the camera to a tree. e Genius mount is
easy to attach to a tree and the camera can be quickly
attached and removed without altering the camera
aim and alignment. You can strap or screw the
Genius mount to a tree.
Tree or Pole
Setup
For best image quality, proper camera setup is im-
portant.
Optimum setup for best image quality
Open eld with no back drop
Not
Recommended
Camera mounted on tree IR camera mounted on tree Black Flash® camera mounted on tree
Area with tree line or other obstruction
to reect light back to camera
Long Range IR
50 feet
Area with tree line or other obstruction
to reect light back to camera
Black Flash®
25 feet
Tree or PoleTree or Pole
With C/E camera
Strapped on
Position your cameras about 3 feet off the ground
Incorrect
Correct
On level ground your camera
should be roughly waist high
and aimed parallel to the ground.
Correct Correct
In a downhill situation,
make sure your camera
aims downhill parallel to the
ground. If you simply attach it to
the tree you’ll shoot right over the deer.
Incorrect
In a uphill situation, aim
the camera uphill, parallel to
the ground. Failure to do so will
result in images of the hillside ground.
Genius Mount
Screwed in
24 25
Page 15

Image Footer Icons
e footer on Cuddeback images includes icons to
provide status about the image. Note, Advanced
mode is required to set burst mode and Camera ID.
(black bolt) – indicates
no-glow Black Flash
was used
Close-up of image footer’s
lower le corner showing
moon phase, ash and
burst mode icons
Moon Phase – the far le
icon will show the moon
phase at the time the image
was taken
Flash Mode – the second
icon indicates if the ash
was used or if it was a
daytime (non-ash) image
(sun/cloud) – indicates that
the ash was not used
Burst Mode – if the images
were taken in burst mode
this icon will appear. e
letter a, b, c, d, or e will
indicate image position
in the burst sequence.
is icon will not appear
if the image count was
set to 1 (see Advanced
(white bolt) – indicates
a strobe (white) ash
Mode section for more
on burst mode).
(red bolt) – indicates an
IR ash was used
Camera ID – if you set Camera ID to a non-zero
26 27
number it will be displayed here.
Page 16

SD Card Organization
Files are saved on the SD card in this format:
• Copies images from SD card to PC with
a simple mouse click
Images are saved in this folder
SD:\DCIM\100CUDDY
Time lapse images are saved in this folder
SD:\DCIM\200CUDDY
Videos are saved in this folder
SD:\DCIM\300CUDDY
If you elect to record an image and a video,
you can match up the video to the corresponding
image using the le time stamp. e video and
corresponding image will have identical time
stamps. NOTE – Our PC program, Trophy Room,
will match up the video to the image for you.
Trophy Room
Cuddeback oers a free Windows PC tool to
manage your trail camera images. Trophy Room
is valued at over $100, but is free to all trail
camera users.
• Organizes images by year, property,
and camera location
• Zoom and enhance images
• Automatically determines buck/
doe/fawn ratios
• Prepare reports of animal activity
versus moon phase
• Predict deer movement based
upon moon phase
• Automatically keeps your Cuddeback
cameras updated with latest rmware
Download a free copy of Trophy Room at
http://cuddeback.com/TrophyRoom
• Works with all brands of trail cameras
28 29
Page 17

Detection Range
e motion sensor detects the temperature dierence
between the air and the animal. e range at which
an animal will be detected varies with animal size,
movement speed, air temperature and the heat of
the animal.
detected because of the wing movement
and speed.
6. Stationary animals may not be detected.
An animal standing in front of the camera
may not be detected until it moves.
1. Detection range will be reduced in hot
(over 80˚ F) temperatures.
2. Animals walking directly towards the camera
may not be detected until they are very close
(10 feet) to the camera.
3. Animals with thick hair (deer in winter) will
be harder to detect than animals with a thin
summer coat. is can result in reduced
detection range in winter.
4. e larger the animal the further away it can
be detected. For example, a deer may be detected
beyond 50 feet, but a fox may only be detected
to 25 feet.
Using the camera in cold conditions
Be aware of these things if you use your camera
in extreme cold (below 0˚C or 32˚F).
1. Battery life may be reduced by as much
as 50% or more.
2. Night illumination range may be reduced
because cold batteries typically cannot
deliver the same amount of power to the
LEDs as warm batteries.
3. Flash cameras are not as aected by cold
as much LED based cameras are.
4. Lithium batteries operate much better in
cold conditions and will allow the night
5. A moving animal is detected better than
stationary animals. A small ying bird can be
30 31
illumination to be about as good as during
warm conditions.
Page 18

5. We recommend you use a longer delay,
around 30 seconds or more, to give the batteries
a rest period.
6. We recommend you do not use videos or
limit video length to 10 seconds. If you want
to record videos we recommend you use
lithium batteries in cold conditions.
is concludes the Quick Start Guide and the
explanation of EZ Mode.
See Appendixes for other important topics. If you elect
to use ADVANCE Mode please continue reading.
5. Image aspect ratio selection (wide or full)
4 x 3 (FULL)
16 x 9 (WIDE)
6. Image size selection (1MP, 5MP, or 20MP)
7. Camera ID setting
Advanced Mode
Advanced mode provides these additional features:
1. Separate delays for day and night operation
Enabling Advanced Mode
1. Press MODE until the COMMANDS LED
is illuminated.
2. Time Lapse mode
3. Burst mode
4. Enhanced video/image programming
32 33
Page 19

2. Press MORE until SETUP is displayed.
3. Press UP or DOWN to select ADV MODE.
2. Press MODE consecutive times to scroll
through the available test items.
a. CLEAR – press UP or DOWN to clear
the SD card. CONFIRM will be displayed.
Press UP or DOWN to conrm that you
want to clear the SD card.
b. ASPECT – this selects the format of the
image. Select WIDE view or FULL view.
WIDE is the modern 16 x 9 format, and
FULL is the traditional 4 x 3 format.
4. Press MORE to retain the viewed setting.
c. STILL SZ – select 5MP or 20MP.
d. LAPSE SZ – select 1MP, 5MP, or 20MP.
e following sections explain the dierences and
additions to topics covered previously.
Note, the bigger the image size the more
space on the SD card is required. We
recommend 1 MP when time lapse is
set to 1 minute or less.
Command Menu
Advanced mode enables additional COMMANDS
that allow you to change camera performance.
e.
saving time mode to AUTO for automatic
DST MODE – For USA users select daylight
time adjustment for daylight savings time.
1. Press MODE until COMMAND LED is
For other users select OFF.
illuminated
f. F/W VER – rmware version.
34 35
Page 20

g. LOAD F/W – Press UP or DOWN to
load a new rmware from a SD Card.
See Appendix A: Firmware section in
the manual.
1.
Press MODE until SETTINGS LED is illuminated
2. ADV MODE will be displayed. Press MORE
consecutive times to view the available settings.
h. SETUP – Press UP or DOWN to select
EZ MODE or ADV MODE.
a. DAY will be displayed to indicate that the
next settings only aect daytime camera
operation.
i. CAM ID – Select a number from 0 to 250
to have printed on to the image. is can
be used for easier image identication.
j. RESET – press UP or DOWN to reset
a.i. D/ DELAY
a.ii. D/ IMAGE
a.iii. D/ VIDEO
the camera to factory defaults.
a.iv. D/ LAPSE
k. STATS – Press UP or DOWN to view
statistics about your camera. Displayed are
Activation Date, Run Days, Lifetime Images
taken, & Lifetime Flash Images taken.
b. NIGHT will be displayed to indicate that
the next settings only aect nighttime
camera operation.
b.i. N/ DELAY
Settings Menu
Advanced mode enables additional SETTINGS
menu items that provide more versatile camera
b.ii. N/ IMAGE
b.iii. N/ VIDEO
deployment. (We recommend reading this entire
section rst and then read it again while working
b.iv. N/ LAPSE
with your camera.)
36 37
Page 21

3.
is system allows you to set daytime operation
dierently than nighttime operation. Here is a
description of these settings:
a.
DELAY – sets the delay between photographs.
Settings are OFF & FAP to 1 hour. OFF
means the camera will not record motion
triggered activity. Select OFF if you only
want time lapse photos. FAP indicates
Fast-as-Possible, which is about 1 second
but will vary depending upon image size,
video length, and SD card speed.
b. IMAGE – sets the number of images to
record with each detection. Settings are
OFF, 1, 2, 3, 4, 5. OFF indicates the camera
will not record an image. 1 thru 5 is the
burst count of images to record.
30 sec. OFF indicates the camera will not
record a video.
d. LAPSE – this is the time lapse setting for
time triggered images. Settings are OFF
and the range 10 sec to 24 hours.
By separating day and night operating parameters
the camera becomes very powerful. However, it is
important to pay attention to these settings as it is
possible to set the camera to not record activity the
way you intended. Here is just a sample of things
these settings allow you to do:
• Record time lapse images without motion
images
• Record time lapse images and motion images
• Record only video, only images, or video &
images
• Use time lapse during the day, and motion
sense at night
c. VIDEO – sets the length of the video to
record. Settings are OFF, 10 sec, 20 sec,
38 39
• Record videos during the day, and images at
night
Page 22

• Record burst images during day, and a single
image at night
Arm Menu
When the camera is arming an additional screen
will be displayed to remind you of the camera
settings. e screen will show the status of the still,
video and time lapse settings:
Appendix A: Firmware
We never stop improving our products Firmware
updates allow your camera to be improved with
enhanced performance and new features. We
strongly recommend you visit our website prior to
camera deployment to check for rmware updates.
Updating your Cuddeback camera rmware is a 2
step process: 1) retrieving rmware from the Cuddeback website, and 2) loading the rmware onto your
camera.
Day Time Mode Night Time Mode
I V L I V L
Where:
I indicates still image is enabled
V indicates video is enabled
L indicates Time Lapse is enabled
– indicates the feature is disabled
e status menu will be displayed
for 5 seconds and then a 30 second
count down will begin. When the
countdown reaches 0 the display
will clear and the camera is armed.
40 41
1. How to retrieve rmware updates:
a. Occasionally visit our website and check if
new rmware is available. Visit Cuddback.
com and click SUPPORT. Select your
product and click PRODUCT UPDATES
to see if there is new rmware available.
b. Windows PC users can install Cuddeback
Updater. is small PC program will check
for new rmware and inform you when
rmware is available. You can download
this program at cuddeback.com/updater.
Page 23

c.
Use our Trophy Room Windows PC program
which will automatically inform you when
new rmware is available. You can download
Trophy Room at http://cuddeback.com/
Trop hyR oo m
d. Register your camera cuddeback.com
and opt-in to our emails. We will email you
new rmware when it is available
2.
Loading rmware onto your Cuddeback camera:
g. e LCD display will display BUSY and the
LEDs will illuminate. When nished the
time will be displayed and you can remove
the SD card.
h. You can use the same SD card to update all
your Cuddeback cameras. e same rmware
le will update all recent Cuddeback
models (Attack, Ambush, and C & E models).
Appendix B: Battery Life
a. Copy the rmware le to your SD card.
b. Insert the SD card into your Cuddeback
camera.
It is impossible to predict exactly how long batteries
will last in a camera. Battery life varies greatly and
depends upon battery quality, temperature, operating
days, number of images taken, video mode, etc.
c.
d. Press MORE until LOAD F/W is displayed.
e. Press UP to begin. CONFIRM will be
displayed. Press UP to conrm.
f. DO NOT REMOVE THE SD CARD until
the time is displayed.
Press MODE until COMMANDS LED is on.
Depending on usage and other factors you may get as
long as 12 months on a set of batteries, or only weeks.
Here are some facts that will help you understand
battery life.
1. Higher quality batteries last longer. We
recommend only Rayovac, Energizer, and
Duracell brands.
42 43
Page 24

2. Older batteries will generally have less power
than newer batteries. Batteries purchased
many months ago may not last as long as
batteries purchased recently.
3. Temperatures below 32˚F (0˚C) may reduce
battery life 50% or more.
4. e more images taken the fewer days the
camera will operate.
5.
Video consumes more power than still images.
1. A short day delay (FAP to 5 seconds) will
deplete batteries more quickly than a longer
delay (15 seconds to 1 minute).
2. Using shorter video length (10 seconds) will
extend battery life.
3. At night a longer delay (15 second of more)
will extend battery life.
4. Minimizing burst mode will extend battery
life (select 1 or 2 images).
6.
of day images.
7.
of day video.
8. Night illumination range will be reduced as
Night images require considerably more power
Night video requires considerably more power
Recommendations to maximize battery life
Trails and Scrapes. On a trail or scrape a FAP or 5
second delay is okay to use because trails typically
do not have a lot of activity (compared to feeders
and food plots).
battery power weakens.
Feeders. A short delay on a feeder will generate a lot
9. Lithium batteries will perform better in cold
temperatures, and may perform better overall.
of images and can deplete batteries quickly. Do you
really need a 5 second delay to capture dozens of
images of the same animal? A delay of 15 seconds to
You can maximize battery life by using the camera
delay and video settings wisely.
44 45
1 minute will extend battery life and still capture all
the deer.
Page 25

Food Plots. A short delay is typically okay as deer
will be moving around and you don’t want to miss
any. However, FAP can deplete batteries quickly if
a deer remains feeding in front of the camera. A 5
or 15 second delay may be a better choice to extend
battery life.
Want even longer battery life?
e CuddePower Battery Booster allows C & E
model cameras to operate from 6 D batteries. 6 D
batteries have 4 times the power capacity of 8 AA
batteries. is extra power provides a higher quality
night image, better cold weather performance, and
much longer battery life. Using the CuddePower
Battery Booster will show many users how to run
their camera for over 12 months on 6 D batteries,
even in freezing conditions.
CuddePower
battery power pack
(shown with and
without camera)
Appendix C: C Model Camera
C model cameras have replaceable ash modules.
Never operate a camera without a ash module
installed. Make sure to install the rubber gasket
correctly.
1. Remove bezel 2. Remove module
3. Move rubber gasket from module and
attach to new module
46 47
Page 26

4. Insert into camera 5. Assure gasket and
(it only ts one way)
module are seated
correctly
Appendix D: CuddeBacker & Photo Contest
Got a great picture? A big deer or a special scene?
A funny situation or beautiful colors? We want to
see them and give you a chance to win a free
Cuddeback. Visit http://cuddeback.com/contest to
enter your best pictures into our photo contest.
Contest entry also allows you to become a CuddeBacker and receive special promotions, rebates,
and other discount oers.
Appendix E: Troubleshooting, Service & Support
If you suspect your Cuddeback is not functioning
correctly, follow these simple steps:
6. Replace bezel and secure with screws
(do not over tighten, but make sure
screws are snug)
Press MODE until the TESTS LED is illuminated.
Press MORE and TEST CAM will be displayed.
Diagnose allows you to test your camera for proper
operation. Follow these instructions to test your
camera:
1. Press UP to enable test commands. Press UP
again to CONFIRM. Aer each test press
MORE to continue to the next test.
48 49
Page 27

2. RESET is the rst command. Pressing UP
will reset the camera to factory settings. is
command is useful if you think the camera
settings are incorrect. We always recommend
resetting the camera before performing
additional diagnostic steps. Press UP and
conrm and reset the camera.
3. BATTERY level will be displayed next. If
Battery level is LOW or DEAD we recommend
you replace the batteries. Press UP to view the
Battery Image and Battery Day counters.
4. BATTERY LOAD test is next. Press UP to
begin the battery load test. is test will
display a value from 10 (low) to 99 (high).
If the number is below 50 we recommend
you replace the batteries.
5. FILTER veries the camera lter works
correctly. Press UP to test and you should
see the lter move inside the camera.
to see the LEDs turn on. Use a cell phone
camera to view the LEDs. (Note – some
cell phones, like the iPhone 5S, will not
display the IR LEDs.)
7.
SD CARD veries your SD card is functioning.
Press UP to test your SD card. is test will
write a le to the SD card and read it back to
verify the SD card is functional.
8. IMAGE - Press UP or DOWN to take a still
image. You can view this image on your PC
or other viewing device to assure it is OK.
9. VIDEO - Press UP or DOWN to record a
video. You can view this video on your PC
or other viewing device to assure it is OK.
For additional product support visit http://support.
cuddeback.com. You can also email us your questions by visiting http://cuddeback.com/email.
6. IR LED tests the camera’s illumination
LEDS Press UP to turn on the LEDs.
NOTE: for Black Flash you will not be able
50 51
Page 28

Appendix F: Warranty
Battery
Booster
FREE
Extended Warranty
with online registration!
Extend the warranty on your Cuddeback
camera to 24 months by registering your
purchase at
Click “Support” then “Product Registration”.
Activation required within 2 weeks
www.cuddeback.com.
of registration.
CuddePower® Battery Booster allows C & E
model cameras to operate on 6 D batteries.
Increasing power, image quality and extended
battery life.
•
Four times the power capacity of 8 AA batteries
• Provides a higher quality night image
• Better performance in cold/freezing conditions
•
Much longer battery life
52 53
Page 29

Put a Genius Mount
bracket in all your
Patents Pending
favorite hunting spots!
For use with all
Cuddeback
scouting cameras
®
Tilt
Mount
Lock
Mount
Pan
& Tilt
Secure your
Cuddeback
with the included
CuddeSafe® Protects your
Cuddeback
®
camera from bears,
thieves and the elements!
•
Fits Cuddeback C & E model scouting cameras
• Heavy-duty, bear-proof metal design
• E
asy to install (lag-bolts to tree); accepts a padlock
•
Makes for easier card checking/battery replacement
54 55
lock clip
Post
Mount
Put your Cuddeback
virtually anywhere!
No tree needed!
Page 30

Approvals: FCC, CE, ROHS.
is device complies with Part 15 of the FCC Rules.
Operation is subject to the following two conditions:
(1) this device may not cause harmful interference,
and (2) this device must accept any interference
received, including interference that may cause
undesired operation.
56
Page 31

Designed in USA with ¼ Second Trigger Speed
www.cuddeback.com
NON TYPICAL, INC., PO Box 10447
Green Bay, WI 54307-0447
 Loading...