

Page 1

Owner’s Manual
10225
Page 2

Table of contents
Get to know your CuddeView X2 ..................................................................................... 1
Install batteries .............................................................................................................. 2
Install SD card(s) ............................................................................................................. 3
Power on/off .................................................................................................................... 4
Card status screen .......................................................................................................... 5
Viewing images ............................................................................................................... 6
Zoom in/out ...................................................................................................................... 7
Panning ............................................................................................................................ 8
Copy images .................................................................................................................... 9
Delete images ................................................................................................................ 10
Rotation Method for checking cameras .................................................................. 11-12
PC card reader ............................................................................................................... 13
View images on TV ......................................................................................................... 14
Page 3
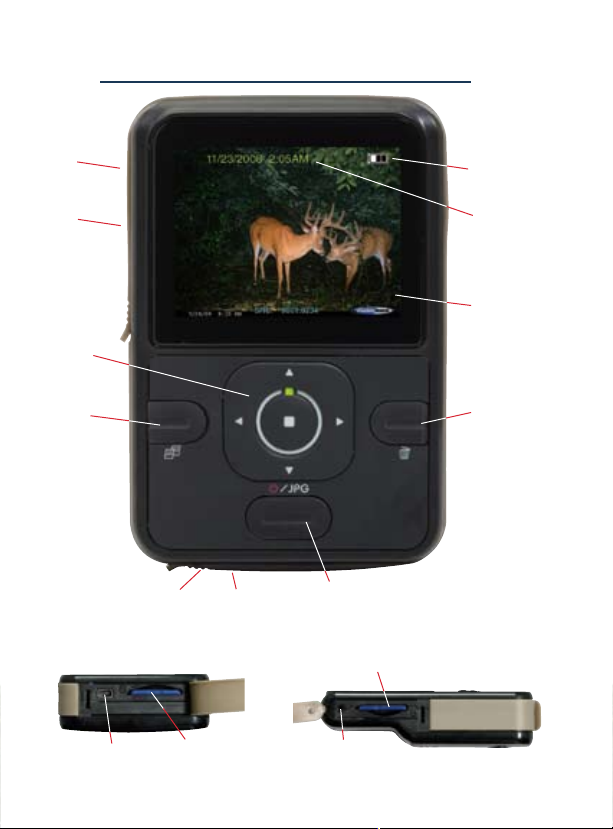
Get to know your CuddeView X2
TV out
(behind flap)
Source
(SD) card
(behind flap)
Operation
keys
Copy key
Bottom view
USB port
(behind flap)
Destination
(SD) card
(behind flap)
Power (on/off)/JPG key
Source (SD) Card
Battery life
indicator
Time/date
information
LCD screen
Delete key
Side view
USB port
Destination (SD) card
TV out
1
Page 4
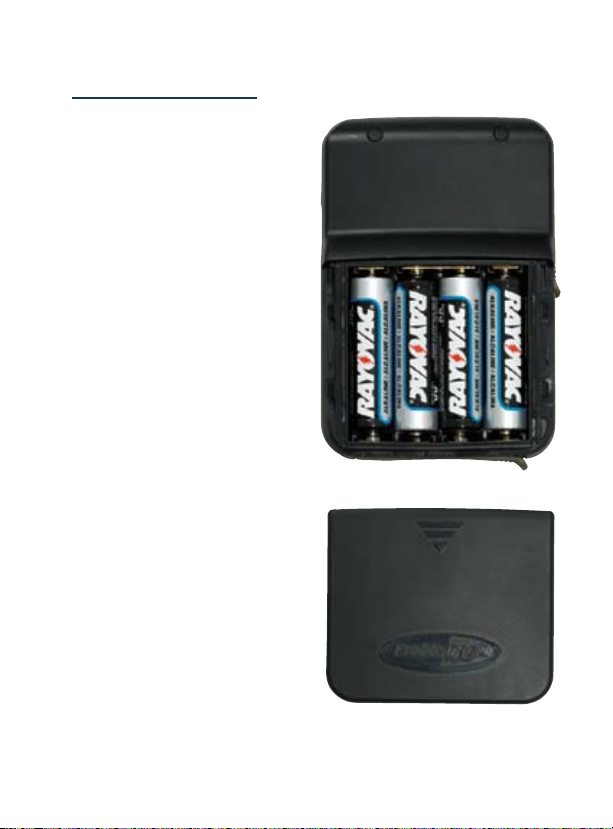
Install batteries
CuddeView X2 operates on
4 “AA” batteries.
Slide bottom cover (on
•
back of CuddeView X2)
down to expose battery
compartment.
Install batteries and
•
replace cover.
Battery life indicator
•
appears on LCD screen
when CuddeView X2 is
powered on.
Remove batteries when
•
CuddeView X2 will not be
used for one month or
more. Dead batteries can
leak acid and destroy
your product.
µ
µ
Page 5
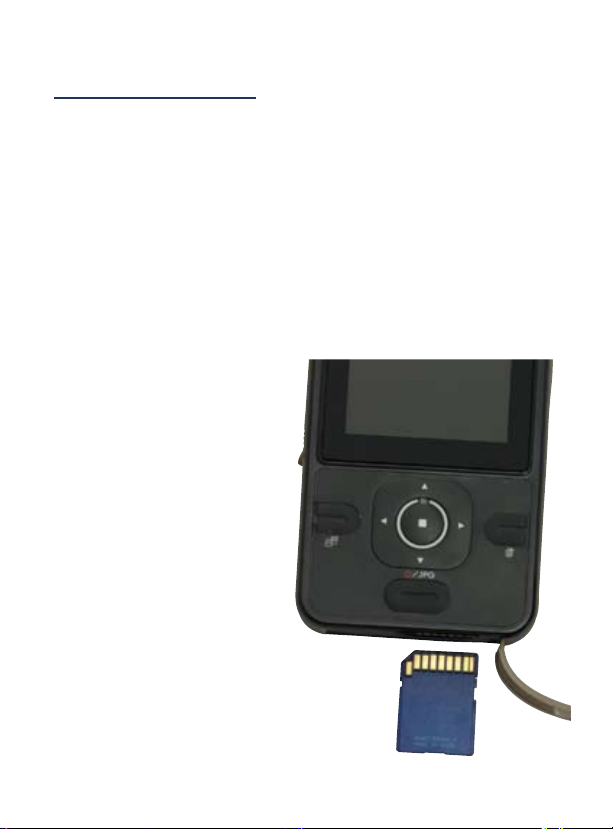
Install SD card(s)
CuddeView X2 takes SD cards. It will hold two SD cards
which allows you to copy images from one card to the other.
Only install or remove SD cards when CuddeView X2
•
is off!
Install SD cards with label facing down into either slot
•
(see below). Installing an SD card incorrectly will
damage your CuddeView X2.
Push card all the way in until it “clicks.”
•
To remove the SD card
•
push it in until it “clicks”
and pops part way out.
CuddeView X2 will allow
•
you to view images with
a single SD card in
either slot.
CuddeView X2 will allow
•
you to copy images from
Source card to Destination
card (see Copy images
section on page 9).
µ
µ
32
Page 6
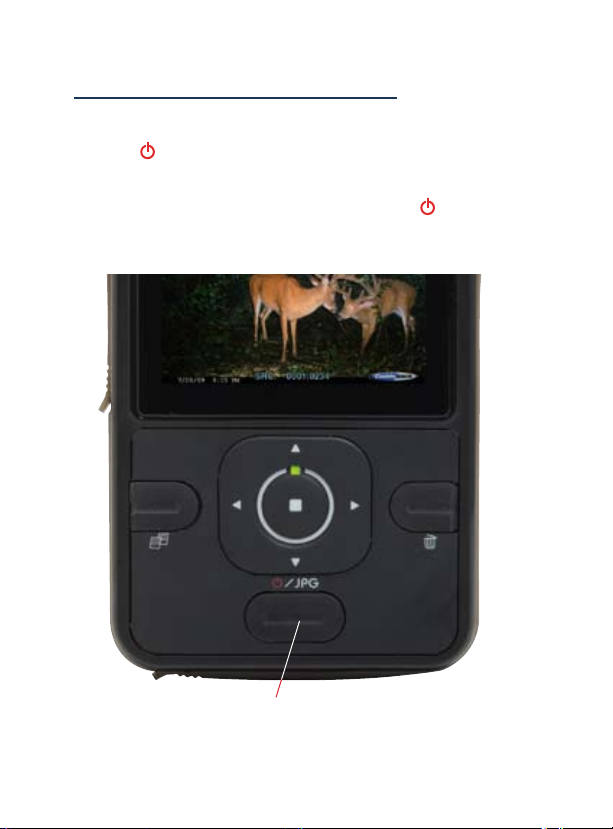
Power CuddeView X2 On/Off
To power your CuddeView “ON” push the key
labeled: /JPG.
To turn CuddeView X2 “OFF”, hold down /JPG button
•
for 3 seconds.
Power (on/off)/JPG key
Page 7

Card status screen
After CuddeView X2 powers ON, a Card Status screen
appears which allows you to select between the Source
and Destination cards.
Yellow box around card indicates active card.
•
Red X over card indicates empty card slot.
•
Push JPG key to switch between cards when two cards
•
are installed or to return to card status screen when
viewing images.
Number below card indicates number of images on
•
that card.
54
Page 8

Viewing images
To view images on the selected card, press either the
or keys.
t
u
To view next image, press key.
•
To view previous image, press key.
•
To return to card status screen (to select other card),
•
press JPG key.
u
t
Time/date information
Battery indicator
Image #:
total images
on card
Page 9

Zoom in/out
CuddeView X2 allows you to “zoom” in on an image to get a
closer look at details like antlers.
To zoom in, press the key.
•
To zoom in even further, continue to press to key.
•
To zoom out, press to key.
•
To switch from zoom to “pan” press the key.
•
To exit zoom mode, press the JPG key.
•
Blue box indicates
“zoom” mode.
u
u
u
76
Page 10

Panning
To pan up, down, left or right you must first zoom in on
displayed image (by pressing key). Next, press
key to switch to “pan” mode.
Press arrow keys to pan up, down, left, right.
•
To exit panning mode, press JPG key.
•
To revert to
•
zoom mode,
press key.
Yellow box indicates
“pan” mode.
u
Page 11

Copy images
To copy images from Source card to Destination card, press
JPG key to go to card status screen.
Press copy key.
•
Select Yes (use or
•
u
to toggle between
Yes, No).
Press to copy
•
images to
Destination card.
Note: Copy speed is dependent
upon image file size, number
of images and SD card.
u
u
Copy key
98
Page 12

Delete images
CuddeView X2 allows you to delete individual images or all
images from your SD card. You must be in “view images” mode.
Press Delete key.
•
once (to display single image delete).
twice (to display all-image delete).
three times (to exit delete mode).
Select Yes to confirm, No to cancel by using arrow keys.
•
Press to initiate delete operation.
•
Deleted images can NOT be recovered.
•
Delete key
Page 13

The “Rotation Method” for checking cameras
Here is a simple, yet clever system for using your CuddeView
X2 to make checking scouting cameras more efficient.
Each scouting camera has an SD card installed.
•
We recommend 1 GB cards for Cuddeback cameras.
Install 2 blank SD cards into the CuddeView X2, one in the
•
Source card slot, one in the Destination card slot.
Again, we recommend 1 GB cards.
When checking your scouting camera, follow these
next steps:
Remove the SD card from the scouting camera.
•
Remove the blank Source SD card from CuddeView X2
•
and install this card into your camera. Re-arm the
camera. You are now finished with that camera.
Install the camera’s SD card into CuddeView X2’s Source
•
card slot.
Copy the images from the Source card to the Destination
•
card. While images are being copied you can leave the
area and travel to your next camera.
Once the copy process is complete, delete the images
•
from the Source SD card (be careful, do NOT delete the
images from the Destination card). (continued)
1110
Page 14

View these new images by selecting the Destination card
•
and using the key to view the most recent images.
Continue viewing in reverse order to eliminate having to
view all the images on the Destination card.
Check additional cameras using this same “Rotation
•
Method.” By swapping the blank Source card with the
camera card you save the time of waiting for images to
copy. You also go home with all images saved to a single
Destination card.
u
Page 15

Using CuddeView X2 as a PC card reader
CuddeView X2, can be used as a computer card reader.
Turn CuddeView X2 “OFF”.
•
Plug USB cable (included) into CuddeView X2 USB port.
•
Bottom view
Plug USB cable into PC USB port.
•
Turn CuddeView X2 “ON”.
•
When “USB Mode?” is displayed, select YES to use
•
CuddeView X2 as a card reader, press NO to use
CuddeView X2 as a viewer.
The SD card(s) in your CuddeView X2 will be available on
•
your PC.
If you use Cuddeback’s Trophy Room Image Management
•
Software, all you need to do is press “G” on your
keyboard to copy images to your PC. Trophy Room is
available for FREE download at www.cuddeback.com.
USB port
1312
Page 16

Using CuddeView X2 to view images
on your TV
CuddeView X2 also allows you to view images on your
TV screen.
Turn CuddeView X2 “OFF”.
•
Plug video cable (included) into CuddeView X2’s TV out.
•
Side view
Plug video cable into TV’s video in.
•
Enable your TV to view the appropriate video source.
•
Turn CuddeView X2 on and view images using same
•
methods as previously explained.
CuddeView X2’s LCD screen will not operate when video
•
cable is attached.
TV out
Page 17

LIMITED WARRANTY
1. Limited Warranty. Non Typical, Inc. (“Non Typical”) warrants the Product
to be free from malfunctions and defects in both materials and
workmanship for 1 year from the date of purchase (“Warranty Period”).
Non Typical will repair or replace, at its option, the Product if it fails to
function properly during the Warranty Period, subject to the conditions
and/or limitations stated herein. Such repair or replacement is your sole
remedies under this Limited Warranty.
2. Limitations. Limited Warranty service will not be provided unless the
Product, returned in the manner set forth below, is accompanied by a
copy of your original dated sales receipt. Non Typical reserves the right
to require you to provide your original dated sales receipt.
This Limited Warranty does not cover the following:
a. Any defect in or damage to the Product that occurs due to mishandling
of the Product;
b. Any defect in or damage to the Product that occurs due to repair,
modification, or other similar activity performed by anyone other than
Non Typical;
c. Any defect in or damage to the Product that occurs due to transport,
dropping, shock, or other similar activity after your purchase of the
Product;
d. Any defect in or damage to the Product that occurs due to careless or
improper storage, or improper use or maintenance of the Product;
e. Any defect in or damage to the Product that occurs due to exhausted
batteries;
f. Any defect in or damage to the Product that occurs due to sand, mud, or
other foreign objects entering the inside of the Product; or
g. Any defect in or damage to the Product related to accident, misuse,
abuse, use with incompatible accessories or attachments, your failure
to follow proper operating instructions provided by Non Typical, claims
made after the duration of the Warranty Period, or your failure to follow
the instructions set forth below with respect to return of the Product to
Non Typical.
1514
Page 18

3. ALL OTHER EXPRESS AND IMPLIED WARRANTIES FOR THE PRODUCT,
INCLUDING THE IMPLIED WARRANTIES OF MERCHANTABILITY AND
FITNESS FOR A PARTICULAR PURPOSE ARE HEREBY DISCLAIMED.
NON TYPICAL EXPRESSLY DISCLAIMS ALL WARRANTIES NOT STATED
IN THIS WARRANTY. ANY IMPLIED WARRANTIES THAT MAY BE
IMPOSED BY LAW ARE LIMITED IN DURATION TO THE TERMS OF THIS
EXPRESS LIMITED WARRANTY. SOME JURISDICTIONS DO NOT
ALLOW THE EXCLUSION OF IMPLIED WARRANTIES OR LIMITATIONS ON
HOW LONG AN IMPLIED WARRANTY LASTS, SO THE ABOVE EXCLUSIONS
OR LIMITATIONS MAY NOT APPLY TO YOU. IN NO EVENT WILL NON
TYPICAL BE LIABLE TO YOU, OR ANY THIRD PARTY, FOR ANY DAMAGES
IN EXCESS OF THE PURCHASE PRICE OF THE PRODUCT. IN ADDITION,
NON TYPICAL SHALL IN NO EVENT BE LIABLE TO YOU, OR ANY THIRD
PARTY, FOR ANY DIRECT OR INDIRECT DAMAGES OR OTHER SPECIAL,
INCIDENTAL, EXEMPLARY OR CONSEQUENTIAL DAMAGES ARISING
OUT OF THE USE OF OR INABILITY TO USE THE PRODUCT. SOME
JURISDICTIONS DO NOT ALLOW THE EXCLUSION OR LIMITATION OF
INCIDENTAL OR CONSEQUENTIAL DAMAGES FOR SOME PRODUCTS,
SO THE EXCLUSIONS OR LIMITATIONS MAY NOT APPLY TO YOU. THIS
LIMITED WARRANTY GIVES YOU SPECIFIC LEGAL RIGHTS, AND YOU
MAY ALSO HAVE OTHER RIGHTS WHICH MAY VARY FROM
JURISDICTION TO JURISDICTION.
4. Notwithstanding any terms of this Limited Warranty to the contrary,
no warranty coverage shall be provided for any Product purchased from,
through or with the assistance or involvement of any Internet auction
web site.
OBTAINING SERVICE FOR YOUR PRODUCT
STEP 1: Visit www.cuddeback.com and click Product Support
You can get answers to common questions, run a troubleshooting wizard, or
authorize a product return on our web site (www.cuddeback.com). Note – if
you use our web site to authorize a return you DO NOT need to call us.
Page 19

STEP 2: Call Non Typical at (920) 347-3810
As a condition of the warranty coverage for your Product, you are required
to contact Non Typical by telephone at (920) 347-3810 or the web site listed
above before returning your Product for service. Do not contact the dealer
from whom you purchased the Product. Returning your Product without first
calling Non Typical will significantly delay service. Service calls should be
made during Non Typical normal business hours of Monday through Friday
from 8:00 a.m. to 4:30 p.m., Central Standard Time.
“Thanks for making a great camera, beats all
the others I’ve tried, hands down.”
– Ken Luko - Black Earth, WI
“Cuddeback is the best there is! I wouldn’t
use anything else!”
– Luke Mitchell - Perry, MO
“I have tried many other game cameras but
nothing compares or is anything close to a
Cuddeback.”
– Davis Wood - Lewisburg, WV
1716
Page 20

jfaksjfoijaofjofjajfaij
“The colors captured are second to none!
Thanks, Cuddeback, for an excellent product!”
– Cal Otten - Mehoopany, PA
“I would recommend these cameras to anyone
looking for a great trail camera! Lightning fast
trigger speed, longest lasting battery life!”
– Weston Lovelette - Elk River, MN
“I love my Cuddeback, it is the best on
the market.”
– Chris Ransom - Vandalia, OH
 Loading...