

Page 1
Page 2
Attack® Operating Instructions
The latest, full size version of this manual is available for download at www.cuddeback.com/support. We recommend that you
download the manual as we periodically make changes/updates
to the product or manual.
Introduction
Thank you for purchasing a Cuddeback Attack digital scouting
camera. Attack is so easy to use that you may feel you do not need
to read this manual. However, we recommend you read the manual
to familiarize yourself with the not-so-obvious features of Attack.
What You Need To Know
1) You should have one or more Secure Digital (SD) cards.
(See Appendix A for recommendations).
2) You will need four D cell batteries (we recommend
Rayovac
®
or Duracell® brand batteries).
3)
When Attack is working it displays an electronic “worm”
on the LCD. This worm scrolls around the LCD to indicate
that you must not remove the SD card, must not turn the
rotary knob, or must not press any button. Please be patient
and wait for the worm to go away before removing the
SD card.
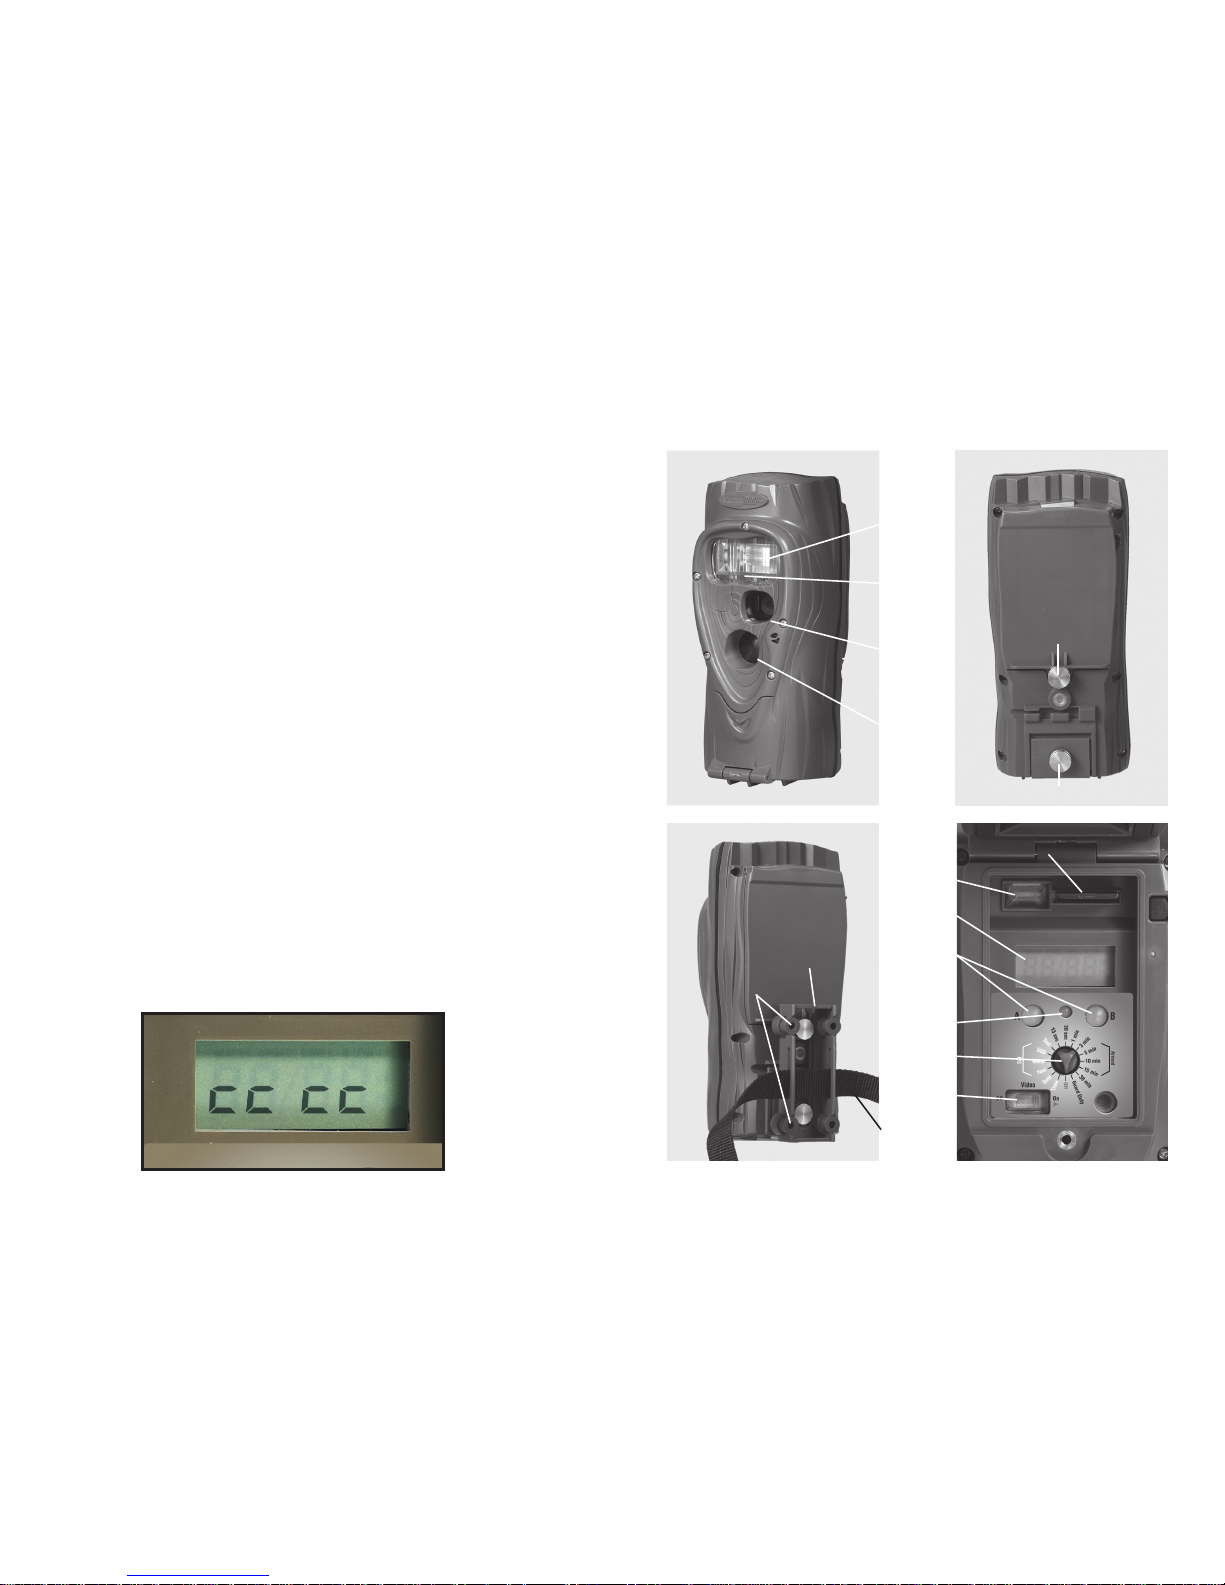
“worm”
1
Step 1 – Familiarize yourself with Attack
®
Take a moment to familiarize yourself with Attack’s parts.
Front
NOTE: After the bracket has been mounted to a tree, slide
Attack’s two thumb screws down into the bracket.
Back
Back Back
Test
LED
USB
Connector
SD Card Socket
Mount
Bracket
Screw
Holes
Strap &
Slots
LCD
Screen
Video
Switch
Rotary
Knob
A/B
Buttons
User
Interface
LED
Camera
Lens
MotionHeat
Sensor
User Interface
Door
Battery Door
Flash
2
Page 3

Step 2 – Installing Batteries and SD Card
1) Turn the rotary knob to the OFF position.
2) Loosen the battery thumb screw and open the battery
compartment door. Install four brand new alkaline D cell
batteries. Make sure to observe correct polarity. Close the
door and tighten the thumb screw completely.
3) You may notice a series of numbers displayed. These are
Attack’s hardware and software version numbers.
4) Wait until the LCD display goes blank and the green and red
LEDs are off.
5) Install your SD card. Be sure to observe the correct polarity
with clipped corner on the card to the right.
Step 3 – Setting up the Attack
®
1) Turn the rotary knob to Time position, press A and B to set.
Time is AM/PM format.
2) Turn the rotary knob to Date position, press A and B to set.
3) Turn the rotary knob to Year position, press A and B to set.
4) Later you will read Step 8 – More Features for information
on the USB and MENU positions.
Bottom View
Battery Install SD Card Install
3
Step 4 – Attaching Attack® to a Tree
1) We recommend you first try your Attack at home. In this
case, set Attack on a table instead of mounting it to a tree.
2) For optimum detection of deer-sized animals we recommend
mounting Attack about 30 to 36 inches off the ground
(this is about waist high to slightly higher).
3) For best image quality, install Attack about 10 to 15 feet
from where animals are expected. Attack will detect
animals at distances from directly in front of the camera to
about 50 feet. Note that detection distance varies greatly with
air temperature, animal size, and the speed the animal is moving.
4) Attack features our new Genius Mounting System. This
system allows you to attach the bracket to a tree and then
slide Attack on and off the bracket as needed. Use the
included strap to attach the tree bracket. You can also use
screws (not supplied) to attach the bracket to a tree.
5) Once the tree bracket is attached to the tree, make sure
both thumb screws on the back of Attack are tightened
completely. Then slide Attack onto the bracket.
6) It is best to remove any vegetation and obstructions from
Attack’s field-of-view that may interfere with Attack’s
sensor or camera.
7) Aim/align Attack to make sure it is pointed where you
expect the animals to be. Aim Attack level with the
ground to maximize detection range and performance.
You can use Attack’s test feature (explained next) to help
you determine the detection area.
8) Cuddeback has optional mounting methods available, such
as tilt-brackets, bear-resistant boxes, and mounting posts.
See your retailer or www.cuddeback.com for details.
4
Page 4

Step 5 – Checking Attack®’s Detection Zone
1) Turn the rotary knob to the Test position. Close the cover
and tighten the thumb screw. Put Attack back onto the tree
bracket. (Note: there is a more convenient method to enable
test mode, see Step 7 - Checking your Attack for details).
2) Walk back and forth in front of Attack. The red LED will
illuminate
when Attack’s sensor has detected you. Using
this method you can accurately position your Attack as
desired. For more details on how Attack’s motion/heat
sensor works see our website, www.cuddeback.com/support.
Step 6 – Arming the Attack
®
Turn the rotary knob to one of the Armed delay settings. These
settings represent the amount of time Attack will wait before it will
take
another image. This dwell time prevents multiple images of the
same animal. Here is our recommendation for the various Armed
settings:
a. 15 and 30 seconds – game trails
b. 1 and 3 minutes – scrapes
c. 5 to 30 minutes – food plots or feeders
When first armed, Attack will display the indicated delay for
5 seconds and then begin counting down from 45 to 0. When the
counter gets to 0, Attack will arm and be ready to record images.
When Attack detects a subject and takes a picture a “worm” will
be displayed and the LED will flash red and green – do not remove
the SD card until the LCD and LED are both OFF. After the image
is saved to the SD card the LCD will display the delay
setting and
begin counting down. Once the counter reaches 0,
Attack is ready to record the next image.
5
Step 7 – Checking Attack
®
When you check Attack it is not necessary to turn the rotary knob.
Instead, press the A or B button to temporarily suspend Armed
mode and view pertinent information, such as the number of images on the SD card and battery level. Each time you press the A or
B button new information will be displayed. Here is the sequence
of information that is displayed each time the A or B
button is pressed.
1) Images on SD card. Note the ARMED, DWELL, and
IMAGES icons are displayed.
2) Free Space on SD card in MB. Note that ARMED and
DWELL icons are displayed.
3) Battery Level as a percentage. For example, bt:99 means
there is 99% battery power left.
4) Time
5) Date
6) Year
7) Test indicates Attack is in Test mode and will
illuminate the red Test LED when activity is sensed.
8) Pressing A or B again will Arm the camera and
the current delay setting will be displayed.
You can leave Attack in any of the states 1 thru 7 and Attack will
automatically re-arm in about 5 minutes. This allows you to close
the cover and leave the area without triggering an image.
Step 8 – More Features
Video Mode - Daytime Only
Attack can be set to record a 30 second video (day only) when it
records an image. Video recording is enabled by moving the Video
Switch to ON. To disable video recording move the switch to OFF.
Attack
will take an image before it begins recording the video,
thus you
do not give up images to get video.
6
Page 5

Menu Position
Turn the rotary knob to the MENU position to perform various
housekeeping activities. Press A to advance to the next menu item,
or press B to activate the displayed menu action.
1) Battery Level – the battery level is displayed in the format
bt:99, which is a percentage of remaining battery power.
Press the A button to advance to the next menu item.
2) CLr (Clear SD card) – This menu allows you to clear all
images and content on the SD card. Press and hold B to clear
the card. The worm will appear and the LEDs will flash RED.
When finished, the LCD will display the amount of space on
the SD card in MBs. Press A to advance to the next menu item
.
3) FLSH (Flash) – This menu allows you to
test Attack’s flash.
Press B to charge the flash circuit. The LCD will begin
counting down from 30. After the 30 second count down the
LED will flash green to indicate that the flash is charged.
Press B again to fire the flash (CAUTION – light output from
the flash is very bright!).
4) Pic – This menu takes a test picture. Press B to take a picture.
Press A to advance to the next menu item.
5) LOAd – This menu allows you to install new firmware. We
may update the Attack firmware to improve its performance.
If a firmware update is required you will need to download a
firmware file from our website. Instructions will be provided
with the firmware. Please see
www.cuddeback.com\support
for details. We recommend you check our website for updates
at the beginning of your scouting season.
6) Turn the rotary knob to a new setting or press A to return to
the battery level display.
7
USB Position
Attack can copy images from the SD card to a USB flash
drive. This allows you to quickly retrieve your images and take
them home with you.
Follow these steps to copy images from SD card to USB device:
1) Turn the rotary knob to the USB position. USB will be
displayed on the LCD.
2) Install a compatible USB flash drive (see appendix A).
3) Press A to display COPY.
4) Press B to begin the transfer of images from the SD card to
the USB device. The percentage of files copied will be
displayed during the copy process. Please wait while the
images are copied.
4) Once the copy process is complete all images on the SD card
will automatically be erased, and done will be displayed.
5) If you need to interrupt and cancel this operation, press and
HOLD B for 3 seconds. The operation will be cancelled and
the images on the SD card and USB device will remain.
Follow these steps to erase all content on the USB device:
1) Turn the rotary knob to the USB position. USB will be
displayed on the LCD.
2) Install a compatible USB flash drive (see appendix A).
3) Press A twice to display CLr.
4) Press and hold B to clear the USB device.
CAUTION - Once the device is cleared it cannot be restored.
8
Page 6

Guard Duty
Attack features an innovative time lapse photography mode
we call Guard Duty. When Guard Duty is enabled Attack will
take a picture every 12 seconds and save the images onto the
SD card. Guard Duty allows you to continuously monitor a
field or hunting location and then view everything that happened.
In practice, Guard Duty can compress an entire day of activity
into a ten minute viewing experience.
• ToenableGuardDutyturntherotaryknobtotheGuard
Duty position. Guard Duty will automatically arm after a
45 second countdown.
• GuardDutywillonlytakeimagesduringdaylight;itwill
not record images at night.
•
When Attack is in Guard Duty mode it will not take
images when an animal is detected with the motion-heat sensor.
• GuardDutyimagesare1.3MPandaresavedinthefolder
DCIM\200CUDDY. Images from each day will be saved in
a separate folder.
• GuardDutywillrecord3600imagesevery10hours.Ina
week Guard Duty can record over 10,000 images. This
requires a large SD card. We recommend an 8GB card
or larger.
• TocheckAttackwheninGuardDutymodepressA.
The check process is similar to checking Attack
when in Armed mode, except the number of images on the
card is not displayed. Instead, the free space on the card is
displayed first. Additionally, the test mode is not enabled
either as it is not required in Guard Duty. See Step 7 for
additional information on checking Attack.
• Aday’sworthofGuardDutyimagescantypicallybe
viewed in less than 10 minutes on your PC.
•
Due to the high number of images saved we do not recommend
using
a field viewer to view Guard Duty images. You will
need to use a PC to view Guard Duty images.
9
• Cuddeback’sTrophyRoomsoftwarewillsoonbeable
to rapidly view Guard Duty images. Trophy Room is
available for free download at www.cuddeback.com.
• BatterylifewhileinGuardDutymodewillbelessthan
in other operating modes.
No Card Mode - Using Attack® Without an SD Card
When Attack is used without an SD card, images are stored in
Attack’s internal image memory. Attack features an internal memory of about 60 MB. This will allow storage of up to 60
images. Images can be transferred from internal memory to
an SD card or USB flash device.
Transfer to SD card: If you use Attack without an SD card, follow these steps to transfer the images from the internal memory to
an SD card.
1) If Attack is not armed, turn the rotary knob to any of the
Armed positions.
2) If Attack is armed, press A to display the number of
images in internal memory.
3) Insert your SD card into Attack.
4) Press A. The amount of free space on the SD card
will be displayed.
5) Press A to initiate the transfer. Images saved in
internal memory will be copied to the SD card. As they are
being copied the worm will appear and the number of images
remaining to be transferred will be displayed on the LCD.
6) When the count reaches 0 the transfer is complete and all
images on the internal memory are erased.
7) To stop the transfer before it has finished, press and hold B.
10
Page 7

Transfer to USB ash device: If you use Attack without an SD
card, follow these steps to transfer the images from the internal
memory to a USB flash device.
1) If Attack is armed, press A to display the number of
mages in internal memory.
2) Insert your USB device into the USB connector.
3)
Turn the rotary knob to the USB position. USB will be displayed
.
4)
Press B to initiate the transfer. Images saved in internal
memory will be copied to the USB device. As they are being
copied the worm will appear and the number of images
remaining will be displayed on the LCD.
5) When the count reaches 0 the transfer is complete and all
images on the internal memory are erased.
6) To stop the transfer before it has finished, press and hold B.
Battery Life and Battery Low Warning
Battery life in Attack will vary depending upon battery quality,
ambient temperature, the number of images taken, how long
Attack has been operating, and other factors. What you get may be
more or less than these numbers depending on the circumstances
.
Attack – 10,000 images or 12 months, whichever comes first.
Guard Duty Mode – 80,000 images or about 1 month of use.
(Note – these numbers are based upon limited testing.
See www.cuddeback.com for the most recent test results.)
Replace Attack batteries when:
1) The BLOW icon appears on the LCD.
2) When the displayed battery level is bt:10 or bt:00.
3) When Attack does not appear to operate correctly.
In some cases the batteries may be too low to turn
on the LCD or BLOW icon.
11
Viewing Images
You will need an external viewing device or computer to view
images. First, remove the SD card from the camera. Make sure to
only remove the SD card when the worm is not visible. Here is a
list of some viewing options.
1) You can view the images with an optional viewer or a point and-shoot camera that is able to read Attack images (Note:
not all SD based cameras can view Attack images,
please test any camera before purchasing).
2) Replace the SD card with a fresh SD card and take the
original SD card with you to view on your PC or other device.
3) Cuddeback’s CuddeView viewer will allow you to view the
images, copy the images to a second SD card and erase the
images from the SD card. You can then put the original SD
card back into Attack. CuddeView allows you to transfer
images from multiple cameras to a single SD card.
See www.cuddeback.com for more information
on CuddeView. (Note: CuddeView may not be able to copy
all the images taken in Guard Duty mode. If you are using
Guard Duty we recommend you view the images on a computer.)
Use Windows PC to Manage Cuddeback Images with Trophy Room
Trophy Room software makes it easy to manage your Cuddeback images
.
Trophy Room
1) Automatically copies images from your SD card to your PC
and organizes them by year and date.
2) Allows you to rename each folder to make it easy to find
your images.
12
Page 8

3) Displays sun and moon data for each image, including moon
phase, moon rise and set, sunrise and set, and moon and sun
position in the sky at the time the image was taken.
4) Categorizes images as buck, doe, fawn, bear, etc. There are
28 categories to select from. For whitetail deer you can enter
point count and give deer a name to allow easy monitoring
of trophy animals.
5) Automatically calculates the buck/doe/fawn ratios based
upon your images.
6)
Includes CuddeCharts with which you can analyze your images
to determine pea
k movement patterns based upon sun and moon
phase and position.
7)
Includes
Crystal Ball with which you can use the data you’ve
collected
and analyzed with CuddeCharts to predict future
activity. Think of this as the traditional moon tables, only
tailored to you.
8) Allow you to rapidly view Cuddeback images taken in Guard
Duty mode.
9)
Is FREE and works with all Cuddeback
cameras. You can
download it at www.cuddeback.com.
Trophy Room data screen example
13
Appendix A
SD Card Requirements
SDcardsaresizedinGB(Gigabytes);thebiggerthenumberthe
more images that can be saved on the card. Attack will work
with card sizes from 1 GB to 32 GB.
We have extensively tested Attack with most major brands
of SD cards, however, low quality cards are available that may
not operate in Attack. We recommend you use SanDisk
brand cards which are readily available at stores that sell
cameras. You can also order cards directly from Cuddeback.
See www.cuddeback.com/products for information.
USB Devices
Attack will only function with small form factor USB Flash
Devices. If you decide to use a larger form factor you will
need an optional extension cable. While we have made every
attempt to assure Attack works with most brands of USB
devices, it is possible some brands may not work. Compatible
USB
Flash Drives are available direct from Cuddeback at
www.
cuddeback.com/products.
14
Page 9

Non Typical, Inc., P.O. Box 10447, Green Bay, WI 54307-0447
920-347-3810
www.cuddeback.com
www.cuddeback.com
®
 Loading...