


CR-0821FI
CR-0621FI
Electric Rice cooker/warmer


1
2
3
4

1
2
3
5
4


12
4
3


1
3
2 2

4
2
1
3


1
2
3
4

1
2
3
4

1
2
3


The following must be observed to use the product safely and correctly to prevent accident and dangerous situations.
Warning and Caution are different as follows.
This means that the action it describes
may result in death or severe injury.
WARNING
This means that the action it describes
may result in injury or property damage.
CAUTION
This sign is for reminding something may cause problems
under the certain situation.
Please read and follow the instruction to avoid any harmful
situation.
Indicates a prohibition
Indicates an instruction
WARNING
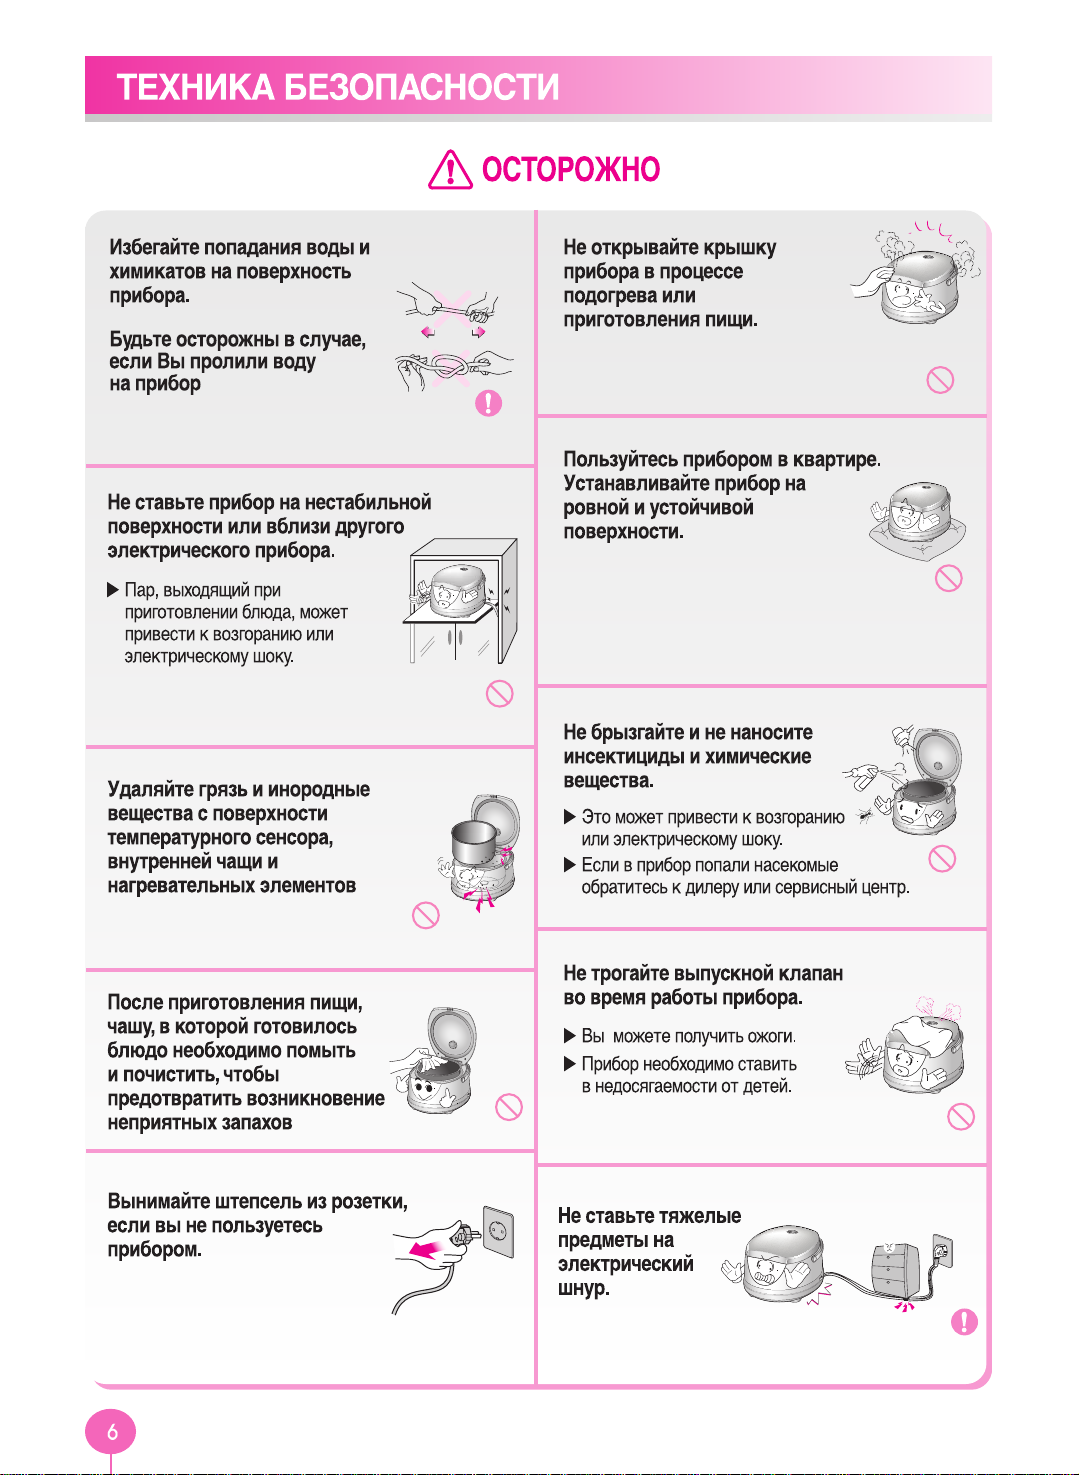
Keep the cooker out of
reach of children.
It can cause burns, electric
shock or injury.
Do not use damaged power cord,
plug or loose socket.
It can cause an electric shock,
short circuit or fire.
If the plug were damaged,
contact dealer or a service center.
Do not cover the automatic
steam outlet or pressure
weight with your hand or
face.
It can cause burns.
Especially be careful to
keep it out reach of children.
Do not plug or pull the power cord with
wet hands.
It can cause an electric shock.
When you pull out the
power plug, don’t pull
the power cord. Please, surely
pull out the power plug.
It can cause an electric shock.
Do not use the cooker near hot
things such as stove, gas stove
or direct ray of light.
It can cause an electric shock,
fire, transformation or
discoloration.
Use a single socket with the rated current
above 15A.
Using several lines in one socket
can cause overheating resulting
in fire.
Use the extension cord with
the rated current above 15A.
Please pay careful attention against
water and chemicals.
It can cause an electric
shock or fire.

WARNING
Do not press heavy
things on the
power cord.
It can cause an
electric shock or fire.
Do not cover the automatic steam outlet or
pressure weight with a duster,
a towel or apron, etc.
It can cause a transformation
or a breakdown.
It can cause an explosion by pressure.
Use product at the flat place. Do not
use on the cushion. Please avoid
using it on an unstable location
easy to be fallen down
It can cause a transformation or a fire.
It can cause burns or breakdowns.
Be careful to install the power cord
which does not disturb to pass.
Don’t spray or put any
insecticide and chemicals.
It can cause an electric shock or
fire.
In case cockroach or any insects get
inside of the cooker please call a
dealer or a service center.
Clean any dust or alien substance
off the temperature sensor,
heating plate and inner pot.
It can cause a system problem or fire.
Please clean the body and
other parts after cooking.
It can cause the transformation
or smell.
Please surely pull out the
plug when not in use.
It can cause electric shocks or fire.
Use AC 220V only.
Do not use on a rice chest or a shelf.
Do not press the power code
between furniture.
It can cause an electric shock
resulting in fire.
When use on furniture automatic
steam releasing can cause damage,
fire and an electric shock.

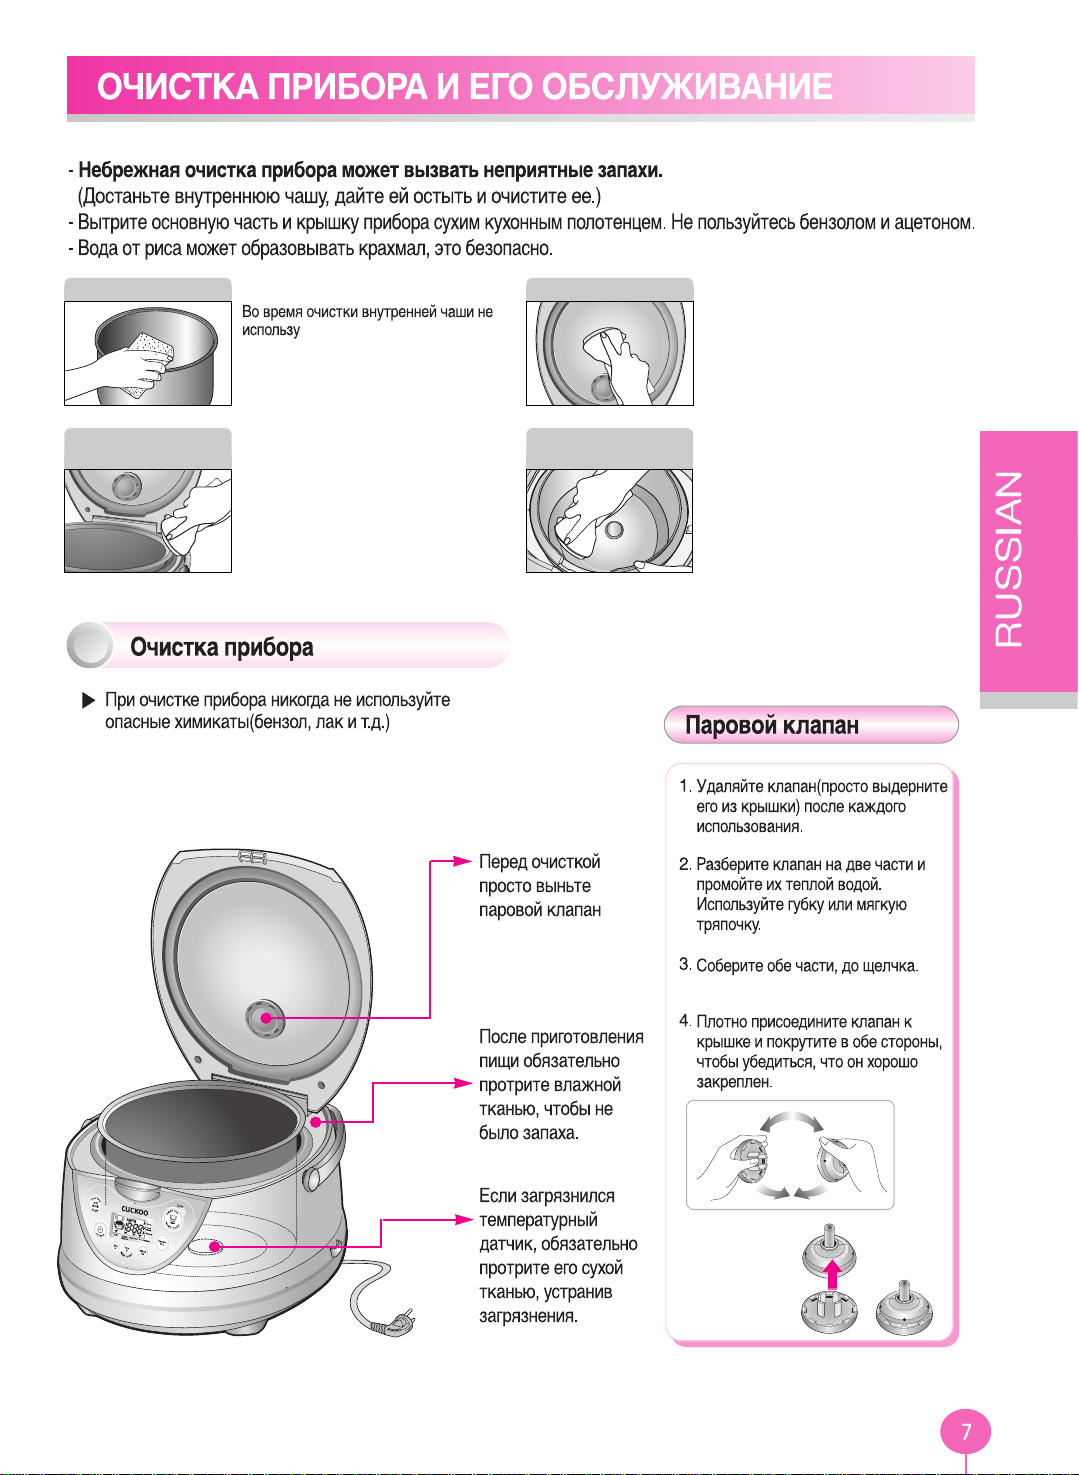
- Negligent cleaning may cause a bad smell while keeping the rice warm. Clean the lid frequently
(Clean the rice cooker after pulling out the plug and waiting until the main body cools.)
- Wipe the main body and the lid with a dry dishcloth. Do not use benzene or thinners.
- The rice water left on the inner lid or in the inner pot may form a starch film but it is harmless.
Wipe alien materials and moisture from the
outer and the bottom of the inner pot.
Using a rough sponge, brush or abrasive
may result in peeling of the coating.
Use dishwashing detergent and a soft cloth
or sponge.
If rice water remains on the inner lid,
wipe the lid with a dry dishcloth.
Since the edge of the lid is made of
metal, clean it with care.
Inner LidInner Pot
The rice water generated while
cooking is designed to be collected
in the dew dish.
After cooking, clean it with a dry
dishcloth.
If alien materials stick to the temperature
detector, remove them avoiding
damaging the metal plate.
Wipe alien materials or moisture from the
thermal plate.
Inside the main bodyPot Water Groove
After cooking,
wipe the water
with a wet cloth
because of the
smell.
Never use the hazardous chemical.
(ex : benzene, varnish and so on)
Before cleaning,
unplug the steam
cap.
If there is any alien
substance on the
temperature sensor
carefully wipe it out
without damping the
metal plate.
How to clean
1. Remove the steam cap by simply
pulling it off from the lid after every
use.
2. Separate the steam cap into 2
parts and soak them in lukewarm
water. Wash with a sponge or a
soft cloth.
3. Assemble the 2 parts by snapping
them together.
4. Attach the steam cap fimly to the
lid and rotate on both directions to
ensure that it is fixed properly.
The steam cap

How to assmble the steam cap
catalogue
Rice scoop
Rice measuring cup
Rice scoop holder
Steam plate

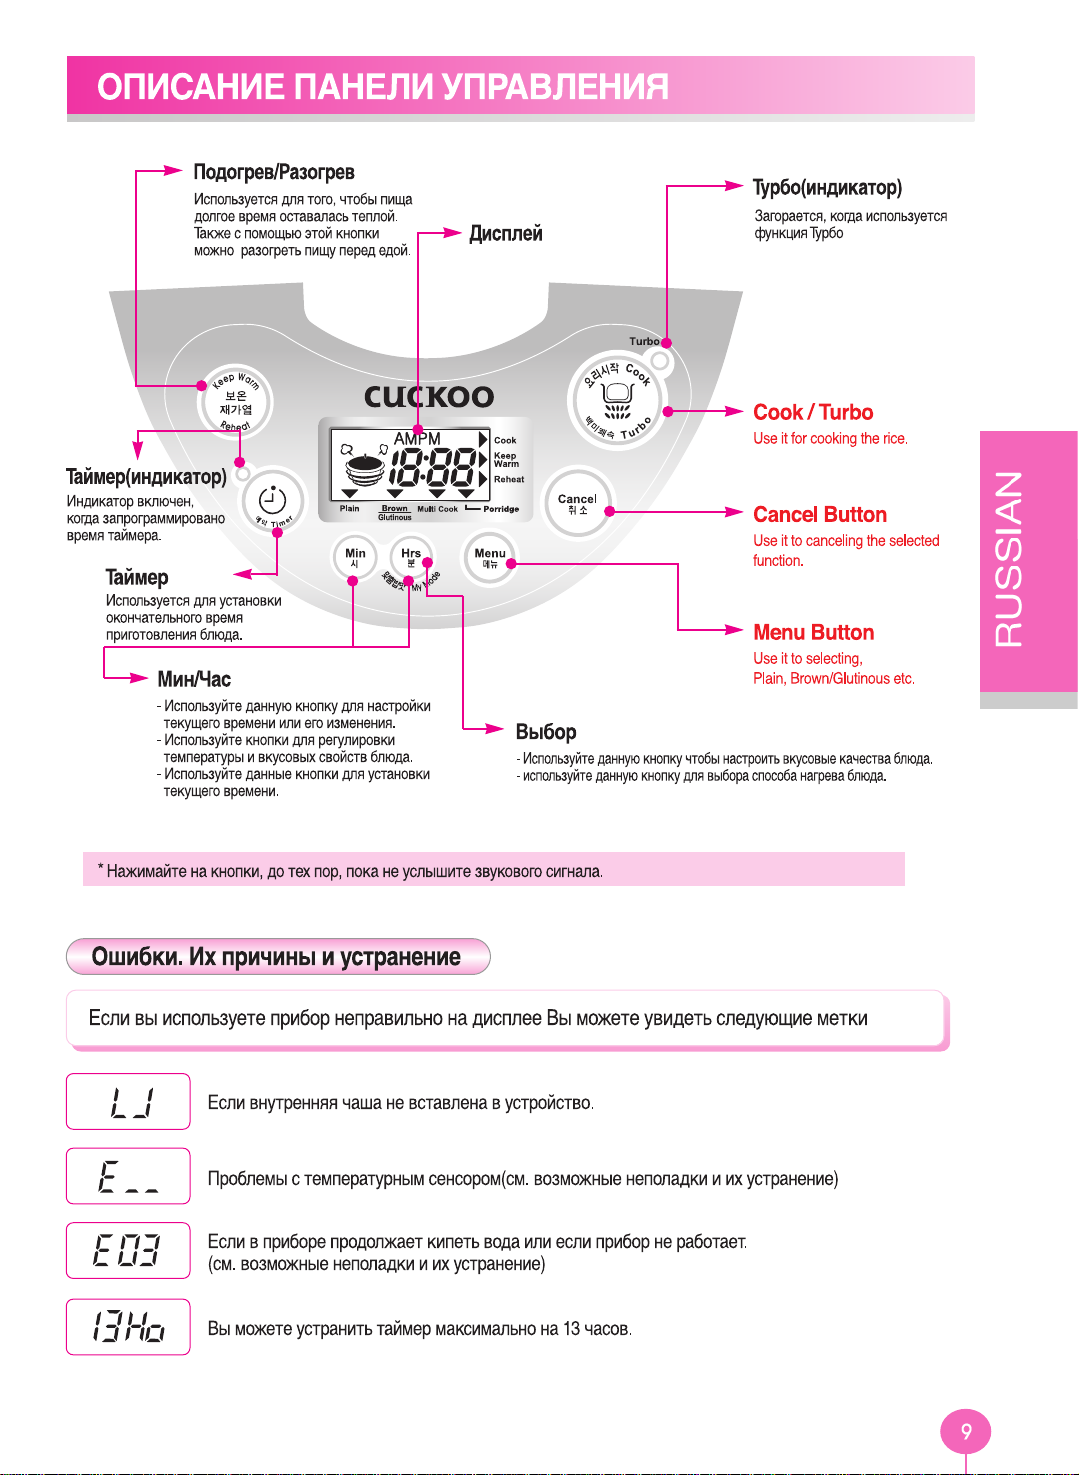
Error Codes and Possible Causes
*Press the buttons until you hear a buzzer sound. The design of this template may differ from the actual product.
When the product have any problem or use it inappropriately you can see the below mark.
Temperature sensor problem.
(Consult the service center and dealer)
When the inner pot is not placed into the unit.
When setting preset time longer than 13 hours.
Set the preset time within 13 hours.
When the operation don’t finish for a long time.
(Consult the service center and dealer)
Menu Button
Use it to selecting,
Plain, Brown/Glutinous etc.
T urbo Lamp
The light will be on when it’s
ready to operate turbo function.
Cancel Button
Use it to canceling the selected
function.
Min / Hrs Buttons
- Use the button to set up the preset time
or change the preset time.
- Use the buttons when selecting the step of the
custom-made rice taste, customized warming
mode and customized cooking function.
- Use the buttons to set up the current time.
Display
My mode Button
- Use the button to set up the custom-made rice taste function.
- Use the button when selecting the customized warming mode and
customized cooking function.
Keep Warm / Reheat
Use for warming or reheating
the cooked rice right before eating.
Cook / T urbo
Use it for cooking the rice.
Timer Button
Use it to preset the cooking time you
want..
Timer lamp
The lamp turns on when the
cooking time is programmed
with the timer.

Connect the power plug.
1
Press the “Hrs”, “Min” button more than
1 second.
2
Set the current time using the “Hrs”,
“Min” button. Press the button longer than 1 second.
Make sure not to change A.M. and P.M.
Each time you press Hrs button, the time increases after 1 hour.
Each time you press Min button, the time increases after 1 minute.
In case of 12:00 at noon, it will be displayed 12:00 P.M.
Once time is set, colon (:) does not blink and set time is displayed with
a buzzer.
Set time is stored pressing other buttons except for Hrs, Min, and Cancel
buttons.
3
It will automatically start in 7 second.
4

Clean the inner pot and remove any moisture.
Clean the inner pot with a dishcloth.
Using a rough sponge may cause peeling of the inner surface of the inner pot.
1
Measure the rice correctly with a measuring cup.
Rice level with the top of the measuring cup corresponds to person.
(Example: 3 persons for 3 cups, 3 persons for 6 cups)
2
Clean the rice in a separate container until the water becomes clear.
3
Put the inner pot into the main body and cover the inner lid.
Completely insert the inner pot with care.
If alien materials like rice are attached to the bottom of the inner pot, rice may not cook or the cooker may not work
correctly.
5
For the rice of 4 persons
(4 measuring cups): Pour water up to
water level 4.
When the rice is soaked sufficiently or to overcook
rice: Pour less water than the required water level
To cook sticky rice or for old rice:
Pour more water than the required water level
For the rice of 4 persons
(4 measuring cups):
Pour water up to water level 4.
When the rice is soaked sufficiently or to overcook
rice:
Pour less water than the required water level
To cook sticky rice or for old rice:
Pour more water than the required water level
Adjust the water amount in accordance with the menu.
Place the inner pot on a flat surface and adjust the water amount up to the water level line.
The water level line is marked on the inner pot.
Adjustment of water height
Plain rice : Adjust water based on ‘Plain rice’ water level line.
Brown/Glutinous : Adjust water based on ‘Brown/Glutinous’ water line.
For 8 persons product: Max. 8 persons for plain rice and max. 6 persons for brown/glutinous are available
For 6 persons product: Max. 6 persons for plain rice and max. 4 persons for brown/glutinous are available
Porridge: Adjust water based on ‘Porridge’ water level line.
For 8 persons product: Max. 2 persons for porridge are available
For 6 persons product: Max. 1.5 persons for porridge are available
4
For 8 persons (1.5L) product For 6 persons (1.0L) product
Plain rice for 4 persons (4 measuring cup) Plain rice for 4 persons (4 measuring cup)

How to Cook Tasty Rice
Store rice correctly.
Always clean the
cooker.
Always measure rice correctly with the measuring
cup. (The rice amount measured by a commercial
rice container may vary depending on products.)
Adjust water amount to the water level line after
placing the inner pot on a flat surface.
Purchase rice in as small quantity as possible and
avoid direct sunlight or hot and humid places to
prevent rice moisture from being vaporized.
For dried rice unpacked for a long time, it is better
to cook with more water (about a half water level
line).
Clean the cooker frequently.
In particular, wipe alien materials from the lid
frequently.
If rice was dried up, it may be hard
or undercooked.
Negligent cleaning may cause an
odor while keeping rice warm.
Observe the following instructions for tasty rice:
Measure rice with a
measuring cup.
Pour water up to the
water level line of the
inner pot.
Keeping rice warm for a long time
may cause it to be discolored or
develop an odor.
It is better to make the
warm time short.
If the amount of water is incorrect
for rice amount, the rice
may be undercooked
or scorched.
It is better to make the
timer cooking short.
For dried-up rice, avoid timer cooking if at all
possible and add water (about a half water level
line).
It is recommended to keep rice warm for less than
12 hours.
Timer cooking over 10 hours or
with dried rice may cause rice to
be undercooked, scorched or
cooked unevenly.

Press the Menu button and select
the desired menu.
Press the Cook/T urbo button to start
cooking.
Whenever pressing the Menu button, the menu is changed in
sequence of Plain rice, Brown/Glutinous rice, Multi-cook, Porridge.
Once plain rice and Brown/Glutinous rice are cooked, their menus are
memorized. So, you may not select the menus for the same menu.
12
Completion of cooking
When the cooking is completed and a beep sounds, the Keep Warm
function starts.
When rice is cooked, quickly stir the rice. If the rice is not stirred, the rice may
be discolored or develop an odor.
Do not press the Cancel button while cooking. The cooking will be canceled.
4
Steaming boiled rice (example: plain rice)
The remaining cook time is shown on the display from the
steaming boiled rice process.
The remaining time may vary depending on the menu.
3
Category
Menu
Cooking
Quantity
Cooking Time
If you cook rice after cooking steamed dish, an odor may permeate the rice.
(Clean the lid referring to Page 7.)
The cooking time by menu may vary depending on the operating environment.
Example) Selection of Brown / Glutinous rice
Example) Cooking plain rice

Choose cook menu
When you cook white rice
When you cook long rice or
brown rice
Cooks glutinous into porridge
The unit cooks all kind of stew by setting
cooking time
Press twice “Cook/Turbo” Button after choosing “Plain”and it will switch to quick cooking
It takes about 37~40 minutes for person.
Melanoizing effect
The cooked rice can be light yellow at the bottom of the oven, because this product is designed
to improve pleasant flavor and taste.
Especially, melanoizing is more serious at the “Preset cooking” than just “Cooking”. It does not
mean malfunction.

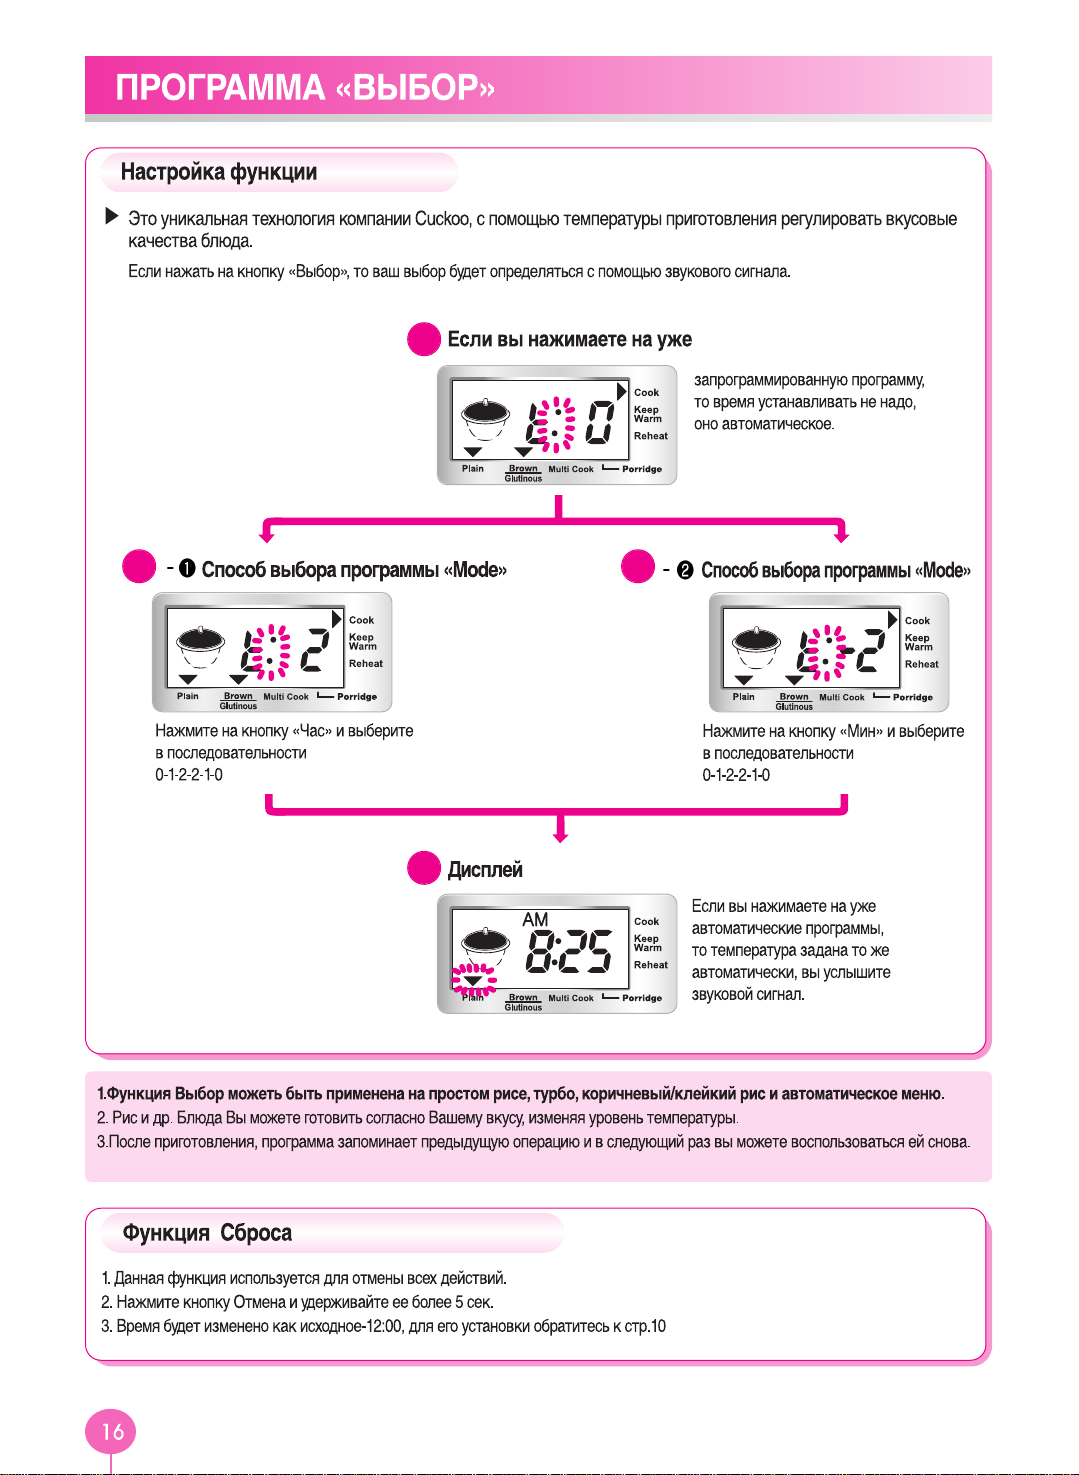
What is “MY MODE”?
Cuckoo s patented technology based on variable circuit design. User can select the degree of “softness”and
“glutinosity & tastiness” to meet a user’s specific taste.
MY MODE Function
Longer “SOAK” Time : rice becomes soft and sticky. (selectable in 4 steps)
Longer “HEAT” Time : rice becomes tasty (selectable in 4 steps) [melanizing will occur]
Above 2 functions can be selected both or individually.
How to use “MY MODE”
Setting screen
Press the menu button and select
“Cook” or “Glutinous”
This picture is example.
Setting “MY MODE” and
extended “SOAK”
Press “Min” button to set “MY MODE”
Press “Hrs” button to set “SOAK”
Setting “HEA T” and save
Press “Min” button to set “HEAT”
Press “Cook” button to save then
press “Cook” button again.

1. The My mode function is applied plain rice, Turbo and Brown / Glutinous Rice menus in a batch.
2. Based on ‘ ’, set the stages of the cooking temperature according to your taste. Rice may be scorched in the high
cooking stage.
3. After setting each stage, cooking status may vary according to rice status in cooking status and water content percentage.
Customized Cooking Function
It is Cuckoo’s unique technology to adjust the stages of the cooking temperature according to
customer’s taste.
If you press the My mode button, My mode appears along with a buzzer sound as shown in the figure
below:
If you press the Timer button
in the My mode, the mode
enters the Customized
Cooking mode.
Cuckoo Customized Cooking Window
1
If you press the Cook button,
the configured temperature is
automatically entered along
with a buzzer sound.
Cuckoo Customized Cooking Window
3
Press the Hr. button and the display
part is changed in sequence of
0
1 2 -2 -1 0.
Stage Setting Mode
2
Press the Min. button and the
display part is changed in sequence
of 0
-1 -2 2 1 0.
Stage Setting Mode
2
Reset Function (Customization/Function)
1. This function is used to reset all setting values such as customized rice taste, customized cooking, customized warming
and keep warm during sleep.
2. Press the Cancel button for 5 seconds in standby mode.
3. The current time is initialized at 12:00. For the setting of the current time, refer to Page 10.

How to preset the Steaming function
4
1. Check if the current time is
correct.
2. Press the Timer
button.
4. Press the Menu
button to select the
Multi-cook menu.
5. Press the Hr/Min.
buttons to set the
Steaming time.
6. Press the Timer
button or the
Cook/Turbo
button.
Press the Hr. and Min. buttons to set the desired time.
2
Press the Menu button and select
Multi-cook menu.
1
Press the “Cook/T urbo” button to start the
Multi-cook menu.
If the Multi-cook function starts, the cooking status is
marked and the remaining time is shown on the
display.
If the Multi-cook menu is selected, the display
shows 20 min .
3
1. If you press the Hr.
button, the Steaming
time increases by
5 minutes.
2. If you press the Min.
button, the Steaming
time reduces by
5 minutes.
3. The Steaming time can be
configured up to 10 ~ 60
minutes.
3. Set the Preset
time by pressing
the Hr/Min.
buttons.
How to use Multi-cook function and preset time

How to steam food
Pour 3 cups of water into the inner pot.
Insert the steam plate in the inner pot and place clean sweet potatoes on the plate.
Lock the inner lid and select [Steam] by pressing the menu button. Set the steam
time to 50 min. and press the Cook/Turbo button.
After steaming, be careful of hot sweet potatoes.
3 sweet potatoes
* Cut a big-sized sweet potato in half.
Pour 3 cups of water into the inner pot.
Insert the steam plate in the inner pot and place clean potatoes on the plate.
Lock the inner lid and select [Steam] by pressing the menu button. Set the steam
time to 50 min. and press the Cook/Turbo button.
After steaming, be careful of hot potatoes.
3 Potatoes (under 200g)
Pour 3 cups of water into the inner pot.
Insert the steam plate in the inner pot and place corns on the plate.
Lock the inner lid and select [Steam] by pressing the menu button. Set the steam
time to 50 min. and press the Cook/Turbo button.
After steaming, be careful of hot corns.
3 corns
Pour 3 cups of water into the inner pot.
Insert the steam plate in the inner pot and place dumplings on the plate.
Lock the inner lid and select [Steam] by pressing the menu button. Set the steam
time to 30 min. and press the Cook/Turbo button.
15 Dumplings

Check if the current time and the menu are correct.
Refer to page 11 for the time setting method.
If the current time is not set correctly, the presetting time also be
incorrect.(Make sure not to change A.M. and P.M.)
If the menu is incorrect, press the “Menu” button and select the
desired menu.
1
Press the “Timer” button.
2
Set the presetting time.
Set the presetting time with the “Hrs” and “Min” button.
If the preset time is already correct, you do not need to set time
again.
Example) When you want to eat the rice at 7:30A.M. Press the “Timer”
button and then press the “Min” button, set time at 7 hours.
And press the “Min” button, set time at 30 minutes.
(The unit for the “Hrs” button is 1 hour and the unit for the
“Min” button is 1 minute.)
3
Press the “Timer” button.
When finish presetting, the time lamp will be on.
The preset time will be stored.If you want to cook the rice to the
preset time already entered, press the “Timer” button
4
The default for set time is 6: 30 A.M. If you want to preset at this
time, you do not need to set the preset time.
If you press Timer button, previously inputted preset time is
displayed and the timer lamp will be on.
By using Hrs., Min buttons, set the finishing cooking time.
Set the preset time within 7 seconds after pressing Timer button.

Precautions for preset cooking
Preset time will be changed automatically and displays “ ” when setup time exceeds 13hours.
Ex) If you want to finish cooking at 7AM, 14 hours after from now, the finishing cooking time will be changed
at 6AM, 13 hours after from now. At this time, “ ” sign is displayed.
If you want to finish cooking at 12:00 at noon, set time 12:00 PM.
Use preset mode to finish cooking from 1 hour later to 13 hours later.
If you want to check current time, press Hrs or Min button. Current time will be displayed for 2 seconds.
If you want to use preset cooking
If rice was dried-up, it may be hard or undercooked.
There is a chance to cook hard or undercook depending on preset time and cooking
conditions.
1
If you want to change preset time
If you want to change preset time, press cancel button and start as new.
2
If setup time is shorter than preset time
If setup time is shorter than preset time, the cooking starts immediately.
3
If setup time exceeds 13 hours
4
Using range of Timer cook for each menu

For a Meal
‘ ’ on the display indicates that the cooked rice
is kept warm for 3 hours.
If you press the Hr. button while keeping rice
warm, the elapsed time is shown on the display.
If pressing the Min. button, the current time is
displayed.
The ‘ ’ mark turns round and round while
reheating.
After reheating, the Keep Warm function restarts
and the elapsed warm time is displayed.
If you want warm rice, press the Keep Warm/Reheat button to start the reheating. After 9 minutes, the
reheated rice tastes as it has been just cooked.
To change the current time while keeping warm, refer to Page 10.
The frequent use of the Reheat function may cause the cooked rice to be discolored or dried. Use it once or twice
per day.
If a separate heating appliance or gas burner is used to cook rice, put the cooked rice into the cooker and press
the Keep Warm/Reheat button to keep the rice warm.
At this time, ' ' is shown on the display. (Like this, transferring hot rice to a cold cooker may cause the rice to
be discolored or develop an odor.
24 hours after keeping the cooked rice warm, the passed time blinks on the display to give the long time warning.
Once the display status is set, the status is memorized until it is changed. Therefore, you may not set the status
at every warming.
After cooking, the temperature of the cooked rice may be higher than the configured warming temperature.
On Keeping
Warm
1
On
Reheating
2
Completion
of Reheating
3

Press the Min. button to change
the display in turn of
Press the Keep Warm button in Keep
Warm or Standby mode at length over
5 sec. The display is changed and a
buzzer sounds as shown in the above
figure. In the figure, means the
current warm temperature.
Press the Hr. button to change
the display part in turn of
If an odor develops, water drops are formed or the cooked rice is discolored despite frequent cleaning
and the use of sterilized water. The warm temperature may be incorrect. Adjust the temperature.
After setting the desired temperature,
press the Cook, Keep Warm and Timer
buttons to automatically enter the value.
At this time a buzzer sounds.
If you press the Cancel button or
7 seconds flow with no input, the function
is cancelled and the mode returns to
Standby mode.
To adjust the warm temperature while keeping rice warm, press the Keep Warm button for over 5 seconds and adjust the warm
temperature.
1. A stale smell develops and lots of water drops are formed: The warm temperature is low. Raise the temperature by 1 ~ 2
.
2. The cooked rice turns yellow, the rice gets dry and an odor develops: The warm temperature is high. Lower the temperature by 1 ~ 2
.
The factory setting temperature may be different from that of this manual.
How to Adjust the Warm Temperature
How to adjust the Customized Warm function
- Press the Min. button to change the
display part in turn of
Press the Keep Warm/Reheat
button in My mode.
The display part is changed and a
buzzer sounds as shown in the
above figure. In the figure, ‘ ’
means the default value.
After setting the desired value, press the
My mode button to automatically enter
the value. At this time a buzzer sounds.
If you press the Cancel button or 7
seconds pass with no input, the function
is cancelled and the mode returns to
Standby mode.
- Press the Hr. button to change
the display part in turn of
This function is used in case that water runs when you open the inner lid while keeping warm or the cooked rice is swelled up.
1. If plenty of water runs out when you open the lid: Press the Hr. button to raise the setting mode by 1 or 2 stages.
2. If the cooked rice is swollen around the edge of the rice: Press the Hr. button to lower the setting mode by 1 or 2 stages.

How to set Keep Warm during Sleep mode
Odor Develops While Keeping Warm
1. Press the Keep Warm button twice in My mode to enter 'Keep Warm during Sleep' mode.
2. Press the Hr. button in the 'Keep Warm during Sleep' mode and press the Cook button to set the function
when the ' ' letters are fixed on the display.
3. If you press the Cancel button or 7 seconds pass with no input in 'Keep Warm during Sleep' mode, the
function is cancelled and the mode returns to Standby mode.
4. This function is inactivated in factory setting. Activate this function to your need.
1. Press the Keep Warm button twice in Customized Rice Taste mode to enter 'Keep Warm during Sleep'
mode.
2. Press the Min. button in the 'Keep Warm during Sleep' mode and press the Cook button to cancel the
function when the ' ' letters blink on the display.
3. If you press the Cancel button or 7 seconds pass with no input in 'Keep Warm during Sleep' mode , the
function is cancelled and the mode returns to Standby mode.
When cooked rice is kept warm for a long time, the rice quality deteriorates (discoloration, drying and
odor). To prevent deterioration, set the warm temperature as low temperature during sleeping time
( 10:00pm ~ 04:00am) as needs arise.
Clean the cooker frequently. In particular, negligent cleaning of the lid part may develop an odor while keeping warm
because of the proliferation of bacteria.
Even though the product is apparently clean, bacteria can be present. If strong odors develop, boil water to sterilize.
Fill with the water up to the plain rice water level line for 4 persons and add a big spoonful of ginger. After that, close the
lid and press the Cook/Turbo button to boil the water.
Press the Cancel button 20 ~ 30 minutes after boiling. After boiling, always clean the inner pot.
If you keep the cooked rice warm without cleaning the inner pot after steaming food, an odor may penetrate the rice.
How to Set
How to Cancel

It is recommended to evenly stir the cooked
rice after cooking. The rice taste is improved.
(For a small quantity of rice, pile up the rice on
the center area of the inner pot to keep warm)
Do not keep the rice scoop in the inner pot while
keeping the cooked rice warm. In particular, a
wooden scoop may generate bacteria and result in
the development of an odor.
Keeping rice warm for a long time may cause
the rice to be discolored or develop an odor.
So, it is recommended to keep warm for less
than 12 hours.
24 hours after keeping the cooked rice warm,
the passed time blinks on the display.
The warming status of mixed/brown rice is
worse than plain rice. Do not keep it warm if at
all possible.
The rice on the edge of the inner pot or the
bottom of the steam outlet may turns plain and
swollen. In this case, stir and mix the rice.
Do not mix too small quantity of rice or leftovers
with the rice under keeping warm. Doing so may
develop an odor.
(Use a microwave oven for the cold rice.)
Cautions for Keeping Warm

If there is a problem with your cooker, check the following details before requesting service to your dealer. Sometimes
the cooker may not operate as desired if used incorrectly.
Case
When the rice is not well
cooked.
Been(other grains)is half
cooked.
Rice is too watery or stiff.
When the water overflow.
When you smell something
while warming.
sign is appeared.
Check points
Did you use the measuring cup to
measure your rice?
Did you measure proper water?
Did you clean the rice before cooking?
Did you put rice in water too long time?
Is the rice old or dry?
Is bean (other grains) is too dry?
Is it selected the menu correctly?
Did you measure proper water?
Did you open the top cover before
cooking was finished?
Did you use the measuring cup?
Did you measure proper water?
Did you open the top cover before
cooking was finished?
Did you close the top cover.
Please check the power cord input to
wall socket.
Did it warm over 12 hours?
Is there any other substance such as
rice scoop or cold rice.
There is some problem on the
temperature sensor.
During warm,
time display
shine
During warm, rice is cold or
wet
Did “Warm” time spend over 24hrs?
Did you set “sleep warm” mode?
Do the following
Cook/Turbo”button is pressed?
Is there power cut while in cooking?
When the rice is not cooked.
You change mode or set the warm
temperature.
The shining display announces that
“Warm”time is over 24hrs.
Please contact to dealer or service center.
Close the top cover perfectly.
Alway be keeping the power on while
warming.
As possible as warming time is within 12
hours.
Don’t warm rice with other substance.
Refer to page 11.
Selected the correct menu.
Measure the proper water.
Open the top cover after cooking finished.
Soaked or steam beans other grains before
cooking in the pressure cooker in order to avoid
partially cooked beans or grains. Beans should be
soaked for-to-minutes or steamed for-to-minutes
prior to cooking, depending on your taste.
Refer to page 11.
Insert some more water (about half of 1 level)
Press the Cook/Turbo”button once. And
check
sign on the display.
Re-press the Cook/Turbo”button

If there is a problem with your cooker, check the following details before requesting service to your dealer. Sometimes
the cooker may not operate as desired if used incorrectly.
Case
When the time cannot be
preset.
When you smell after and
before cooking?
Check points
Is the current time correct?
Is it right A.M. or P.M.?
Did you set the reservation time over
13 hours?
Did you clean it after cooking?
Do the following
Rice is too watery or
stiff.
Is it selected the menu correctly?
Did you measure proper water?
Select the correct menu.
Measure the proper water.
Set the current time.(refer to page 10)
Check the A.M., P.M.
Maximum reservation time is 13 hours.
Please clean it after cooking.
When the button cannot
operate with
Is there inner pot?
Do you use 120V?
Please insert inner pot.
This product only uses 220V.
When
tick, tick sounds
occurs while cooking and
warming.
Is it the sound of cooking relay?
Did you wipe the moisture of bottom of
inner pot?
Is your voltage 120V?
It is normal that the “tick, tick”sound of relay is
an on and off operation.
The moisture of the bottom of the inner pot
may cause “tick, tick” sound.
Please wipe the moisture.
This product have to use 220V.
Consult the service center and dealer.
When the operation don’t
finish for a long time and
display


100% Recycled paper 383-835D
 Loading...