

Page 1
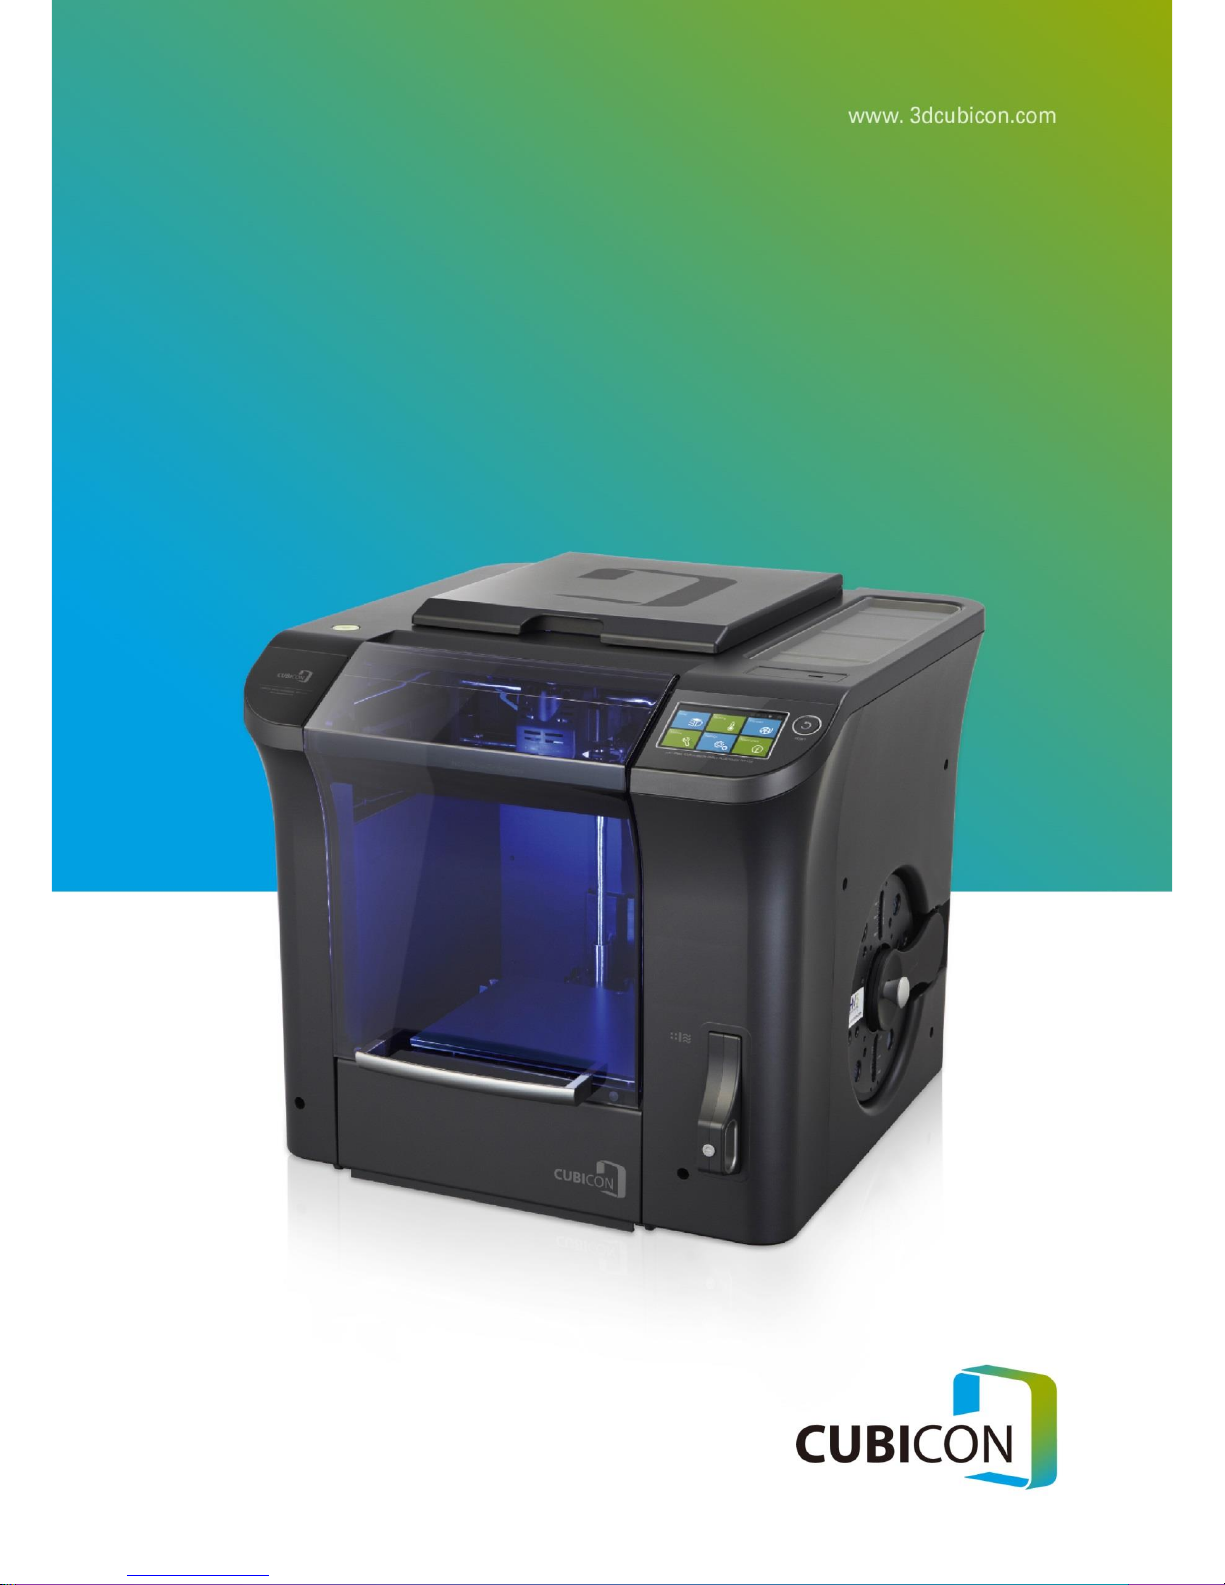
CUBICON Single Plus
User manual
Page 2

CUBICON Single Plus User Manual
2
INFORMATION TO THE USER
This equipment has been tested and found to comply with the limits for a Class A digital
device, pursuant to Part 15 of the FCC rules. These limits are designed to provide
reasonable protection against harmful interference when the equipment is operated in a
commercial environment. This equipment generates, uses, and can radiate radio
frequency energy and, if not installed and used in accordance with the instruction manual,
may cause harmful interference to radio communications. Operation of this equipment in
a residential area is likely to cause harmful interference, in which case you will be
required to correct the interference at your own expense.
WARNING
Any changes or modifications not expressly approved by the manufacture could void the
user’s authority to operate the equipment.
Page 3
CUBICON Single Plus User Manual
3
This is the user manual (170118,En) of CIBICON Single Plus (3DP-310F). The user
manual is subject to change without notice in purpose of the product function
improvement. HyVISION System is not responsible for the user manual contained error or
the user manual supply or use related loss. Images in the user manual are based on
English.
Contents
1. Product introduction ......................................................................................................................... 5
2. Safety Caution ................................................................................................................................. 6
3. Directions for use............................................................................................................................... 7
4. Product component and parts name ................................................................................................. 9
4-1. Product components ...................................................................................................................................... 9
4-2. Product parts name ...................................................................................................................................... 10
5. Installation and printing preparation ................................................................................................. 12
5-1. Unpacking .................................................................................................................................................. 12
5-2. Filter installation ......................................................................................................................................... 13
5-3. Filament installation .................................................................................................................................... 14
5-4. Printer power ON ........................................................................................................................................ 15
6. Printer use ....................................................................................................................................... 16
6-1. LCD control panel......................................................................................................................................... 16
6-2. LCD main screen ......................................................................................................................................... 17
7. Filament replacement (Loading / Unloading) .................................................................................. 18
7-1. Filament Loading ........................................................................................................................................ 17
7-2. Filament Unloading ..................................................................................................................................... 21
7-3. Filament replacement using ‘Pause’............................................................................................................. 22
8. Test model printing ........................................................................................................................ 23
8-1. First printing .................................................................................................................................................. 23
8-2. Printing with USB memory ............................................................................................................................ 23
9. Network ........................................................................................................................................... 24
9-1.USB cable connection between PC and printer ............................................................................................. 25
9-2.WIFI connection ........................................................................................................................................... 25
9-3. Cubicreator3 WIFI connection ....................................................................................................................... 29
Page 4

CUBICON Single Plus User Manual
4
10. User Interface ................................................................................................................................ 32
11. Printer maintenance and repair ........................................................................................................ 44
11-1. Extruder detaching ..................................................................................................................................... 44
11-2. Extruder maintenance ................................................................................................................................ 46
11-3. Auto leveling interface part maintenance ................................................................................................... 50
11-4. Heating bed maintenance ......................................................................................................................... 51
11-5. Filter replacement....................................................................................................................................... 52
11-6. Nozzle cleaning brush replacement period and method ............................................................................. 52
11-7. Firmware update ........................................................................................................................................ 53
11-8. Firmware recover ....................................................................................................................................... 55
12. Trouble shooting .............................................................................................................................. 56
13. Product specification ....................................................................................................................... 60
Page 5

CUBICON Single Plus User Manual
5
1. Product introduction
Thank you for purchasing CUBICON Single Plus.
CUBICON Single Plus is one of the 3D printers of FFF type and easy to use and made in consideration of
clients’ convenience comparing to other general FFF type.
CUBICON Single Plus features include below.
• The printer case is made with flame resisting material and is relatively safe from fire. Stylish design of
the printer came from exclusive painting.
• Detachable extruder replacement allows various material use. Therefore, filament of various material
can be used.
• Gas and micro-dust are effectively removed using triple filter the first time in Korea.
• More advanced Auto Level of the printer is unveiled by taking over Auto Level Plus of CUBICON
Single.
• Printout is possible and output takeout is easy without commonly used special adhesive taping work
by Specially laminated bed
• Touch color LCD use along with immediate printing stop and pause is possible by 32Bit application
• Inside memory application allows outside memory separation after printing start. Therefore, private
USB memory is not required anymore.
• One button is enough to check the printer problem by diagnosis function.
• 600 W high capacity power application allows safe printout and fast warm-up.
• The printer immediately enters into pause mode by filament detectable sensor application in the case
of unwanted Filament decrement.
This user manual explains all process, from the printer installation to sample model printing step by step. Those users,
who have already tried special technology of CUBICON 3D printer series, are also recommended to read this user
manual carefully.
Experience new 3D printing with CUBICON Single Plus
Page 6
CUBICON Single Plus User Manual
6
2. Safety caution
Please read and follow the guide of ‘Safety Cautions’ in prior to printer use.
Aim of the guide is to prevent printer user or third party injury and printer damage
Serious injury or printer damage may occur, unless you follow this safety guide.
Risk of explosion if battery is replaced by an incorrect type. Dispose of used batteries according to the
instructions.
Fire may occur due to part of human body or any object input into printer as high heat occur during printer
operation. Printer shall be stopped and cooled in the case of inputting human body part or any subject
inside printer during printer operation.
The printer operates movable parts such as motor, belt, gear etc. injury may occur due to getting jammed
in movable parts in the case of putting human body or any subject into printer.
User shall be cautious that fire or shock may occur in the case of putting water or other liquid or metal
pieces or any other conductive foreign substances into the printer. Besides, do not handle the printer with
wet hand as there is fire/electric shock danger.
User shall be cautios on installation place as children or pet may get injured by the printer. Children or pet
around the printer shall be under care and protection.
Printer or its subsidiary materials include sharp surfaced parts. The user shall be cautious of any possible
his/her body injury or printer damage.
Do not heat or transshape main material of the printer-Filament, as it may cause fire or injury. User shall
be cautious that suffocation may occur in the case of swallowing output or Filament leftover.
Do not use volatile objects for the printer as it may cause fire/explosion. Remove any ignition or
inflammable material from printer side, as negligance of such objects may cause fire.
User shall protect his/her eyes from looking at the printer LED directly, as the LED contains high-brightness.
Do not cause damage or transformation on the printer power and USB cable and do not supply power
more than designated voltage power.
In the case of moving printer, make sure to stop printer operation first and cool inside printer parts off, and
then separate printer power and USB cable after turning off main power of the printer.
Do not put Filament or other objects into empty space of the inside printer, as it may cause printer
damage and fire.
Do not turn off the printer power in heat condition of heating bed or extruder as it may cause printer
malfunction or fire due to extreme heat by cooling fan malfunction.
The printer uses materiall by melting them and may cause unique smell in the process of melting
materials. Therefore the printer shall be installed in well ventilated place.
Do not install the printer in places such as outdoor, direct sunlight reflective place, vibratory or humid place.
Do not install the printer in wobble or uneven place. Remove any objects from around the printer, which
may cause printer damage due to heat or vibration in the printer operation process.
The compnay do not guarantee the printer damage or quality in the case of not using the company
supplied Filament or components. All problems, which are caused by such cases are excluded from
complimentary A/S.
User shall not dismantle or remodel the printer arbitrarily apart from the printer instrucion manual allowed
parts. Problems, injury or printer damage, which are caused by such cases are excluded from
complimentary A/S.
Do not cause extreme impact or shock to the printer as it may cause damage or injury. Users are advised
to use the printer after reading precautions section of the instrution manual.
Page 7
CUBICON Single Plus User Manual
7
3. Directions for use
Please read and follow the guide of ‘Product use precautions’ in prior to printer use.
Filament
User shall use the manufacturer’s original filament.
* Printer malfunction caused by imitation filament use excluded from complimentary A/S.
Unpacked filament shall be used as soon as possible.
In the case of keeping, filament shall be kept in sealed condition after fastening it to a spool
to prevent filament unpacking.
Filament spool
Installation and
separation
Filament shall be installed considering rotation direction and a door handle locking condition
shall be inspected after installation.
Filament shall be prevented from coming loose from spool in the process of separating
filament spool from the printer.
Filament
replacement,
loading
unloading
User shall be cautious of extruder temperature setting.
* Extruder malfunction may occur in the case of wrong temperature setting due to nozzle
blockage, filament dividing etc.
User shall be cautious of temperature setting and shall remove filament of inside nozzle.in
the process of new filament replacement.
Temperature
condition of heating
bed and nozzle
Nozzle/heating bed shall be heated and used with appropriate temperature for the filament in
use.
* Printing quality faulty and equipment malfunction, such as filament carbonization, extruding
faulty, dividing, and floor bird-caging may occur in the case of out of scale of filament in use
temperature.
Once printing is finished, a model shall be separated after cooling heating bed off.
Detachable
extruder and nozzle
cleaning
Regular extruding condition inspection and cleaning control are required.
* Worn nozzle replacement caused by regular use is excluded from complimentary A/S.
Outside of nozzle shall be cleaned with pure cotton cloth after heating nozzle.
User shall be cautious of damage of inside extruder in the process of inside nozzle cleaning
with the nozzle control pin.
* User shall get proficient to prevent extruder malfunction due to wrong use.
The nozzle control pin shall be used after detachable extruder separation to prevent inside
extruder damage.
The nozzle cooling, heating repetition is prohibited in the condition of putting filament inside
nozzle.
Detachable
extruder
Separation/
combination
Make sure to turn off the printer power before separation/combination.
The printer power shall not be turned off in the heat condition of detachable extruder.
(The printer power can be turned off in the case of detachable extruder separation right after
turning off the power for repair/replacement etc.)
Fixed extruder
Regular cleaning control of fixed extruder is required.
Contaminants of visible gear of fixed extruder bottom side and contaminants of filament
channel shall be removed after detachable extruder separation.
Page 8

CUBICON Single Plus User Manual
8
Heating bed
cleaning
General cleaning is conducted by cleaning surface contaminants with scraper, dry cotton
cloth.
* Damaged lamination of heating bed, caused by regular use, is excluded from
complimentary A/S.
Cleaning shall be conducted with only high-purity acetone in the case of serious
contamination.
* Do not use general cleanser (wet tissue) for cleaning as it may contain substances, which
may cause bed lamination damage.
Auto tilt
Nozzle touch process in section of level contact point shall be inspected in the case of error
occurrence of auto tilt process. And heating bed contact point and cleaning the end of nozzle
(steel brush is recommended for cleaning). Inspection/repair by A/S center is required in the
case of continuous error.
Preparation of AS
requirement
In the case of any problem occurrence, user shall take a photo or video of problematic file
and problem situation, inside printer, LCD display etc. for inspection/repair.
Page 9
CUBICON Single Plus User Manual
9
4. Product component and parts name
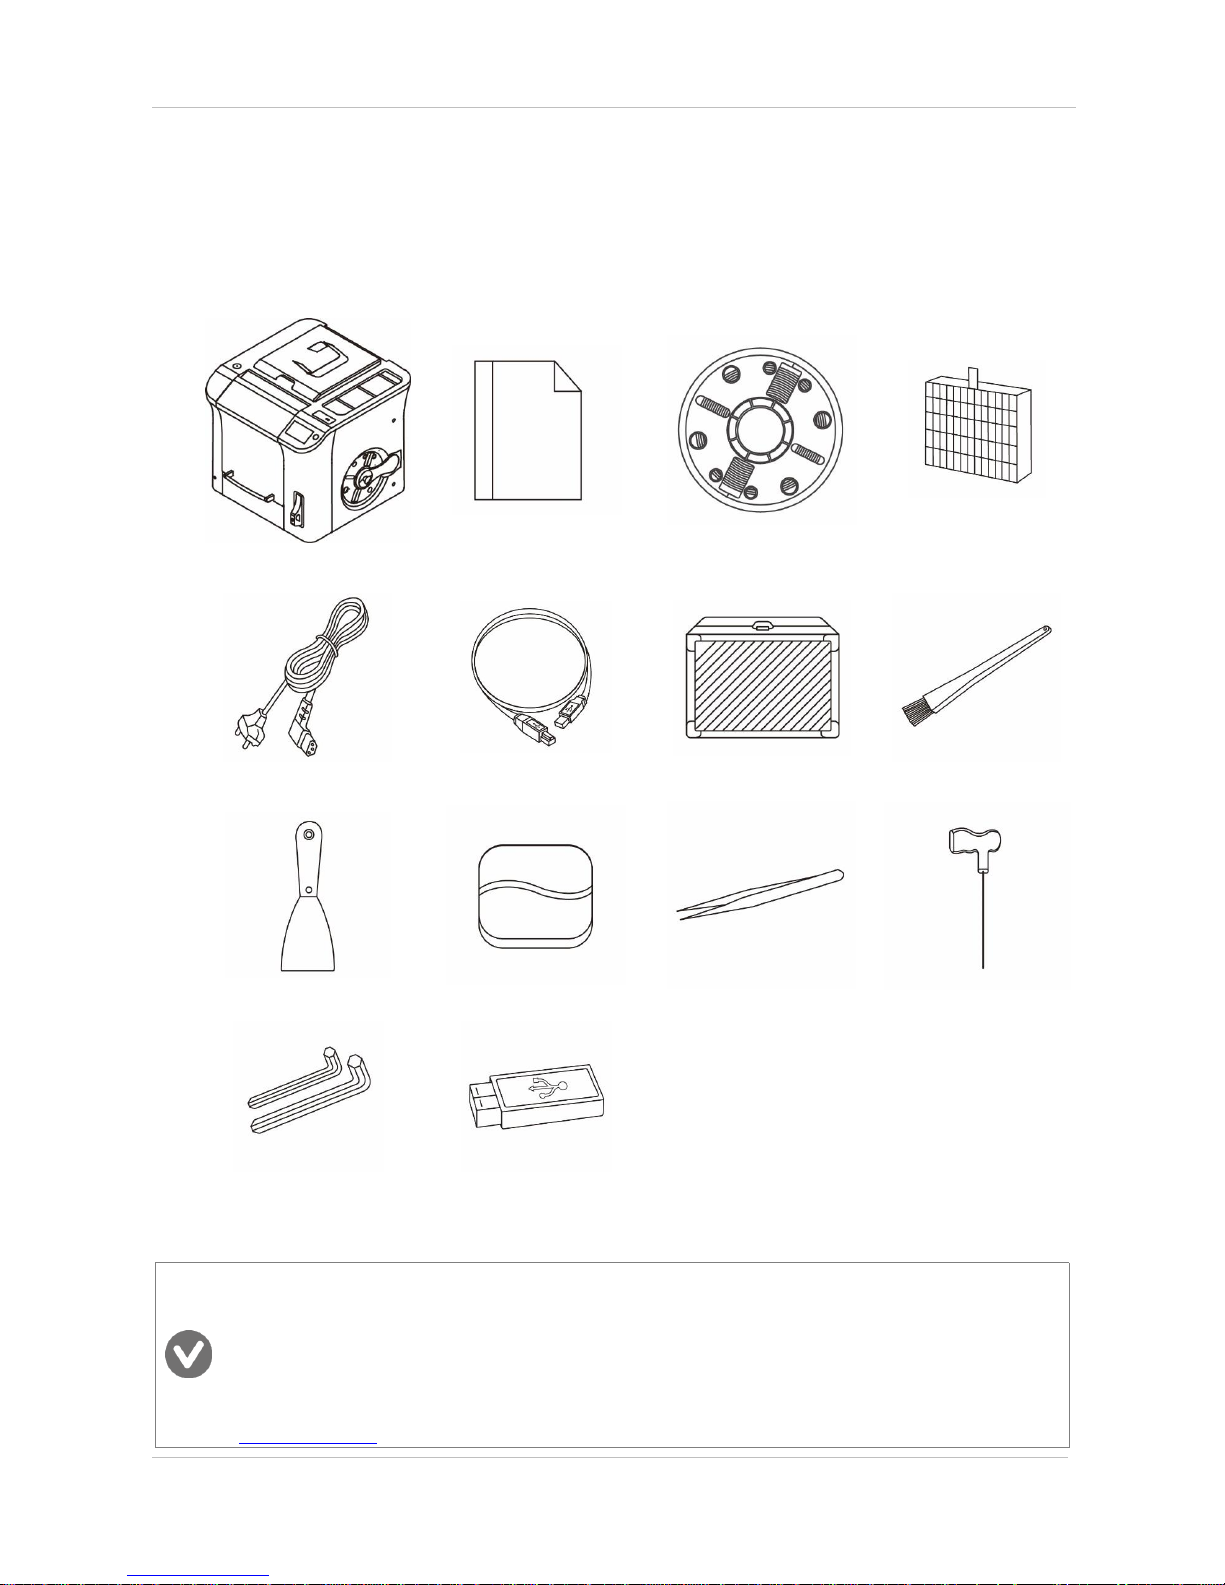
4-1. Product components name
Cubicon single plus
Quick Guide
Filament
Filter
Power cable
USB cable
Tool box
Antistatic brush
Scraper
Bed cleaning brush
Tweezers
Control pin
Wrench 2 type (2Ø, 2.5Ø)
USB memory
* The product included secondary accessory type and spec are subject to change without notification for the product
function improvement
* User can purchase additional subsidiary accessories through homepage or designated distributor.
* Subsidiary accessory is excluded from A/S as it is service product.
* Material and color of first filament supply are provided randomly.
* Manual, cubicreator are included in USB memory. Updated version can be downloaded at homepage
(www.3dcubicon.com)
Page 10
CUBICON Single Plus User Manual
10
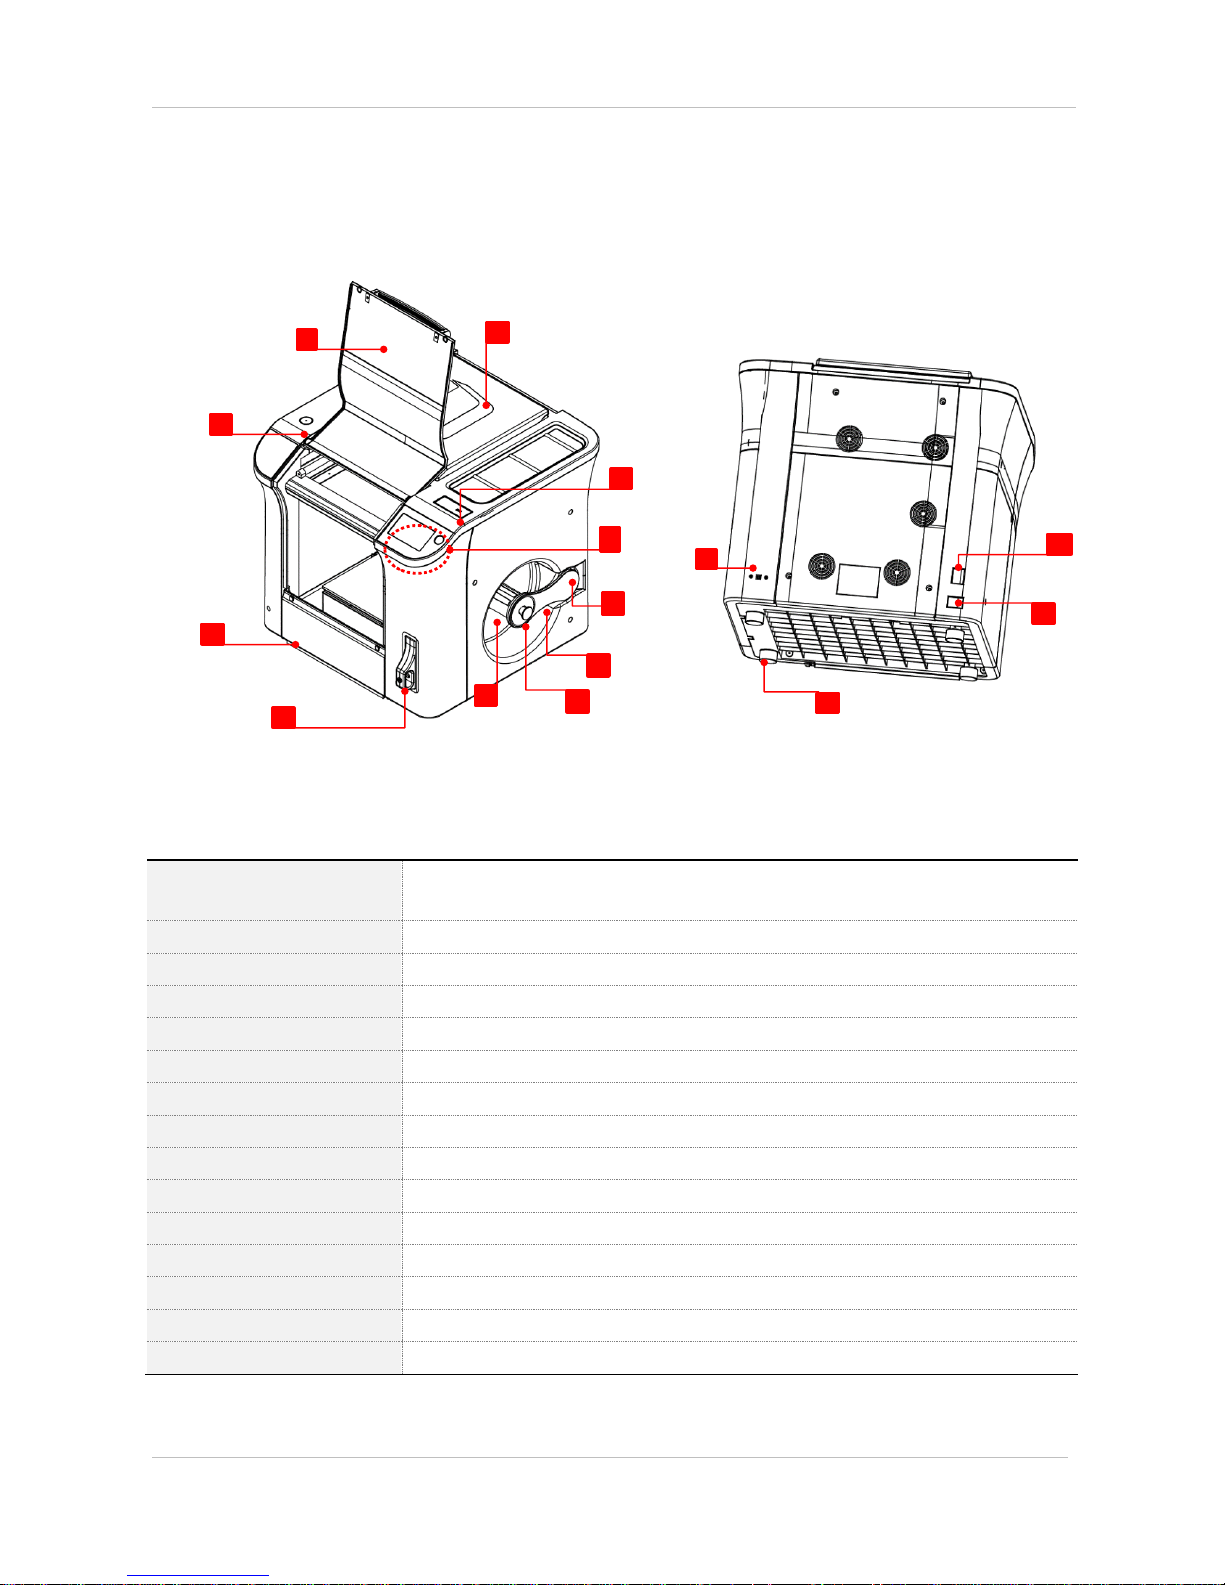
4-2. Product parts name
(1) Cubicon single plus body
[1] Top door
Is used for filament replacement, detachable extruder separation and
maintenance/repair.
[2] Front door
Is used to pull out the model part
[3] Level
Is used for horizontality inspection in the printer installation process
[4] Bottom door
Is used for floor cleaning
[5] Clean filter case
Is input to clean filter.
[6] USB memory insert hole
Is inserted to USB memory.
[7] Touch LCD and Reset
Is used for urgent stop of touch LCD and printer.
[8] Filament insert hole
Is used to supply filament.
[9] Spool door
Is used for filament spool fixation
[10] Spool door handle
Is used to lock the spool door (make sure to lock the door after spool installation)
[11] Spool carrier
Is filament spool installation place
[12] USB input
Is the input socket (Type-B) for PC and USB connective cable
[13] Power switch
Is the main power switch of the printer
[14] Power input
Is the connective socket of printer power.
[15] Rubber feet
Is used to prevent the printer sliding(four spot on a floor)
2
3
4
5 6 7
10
11
8
9
1
12
13
14
15
Page 11
CUBICON Single Plus User Manual
11
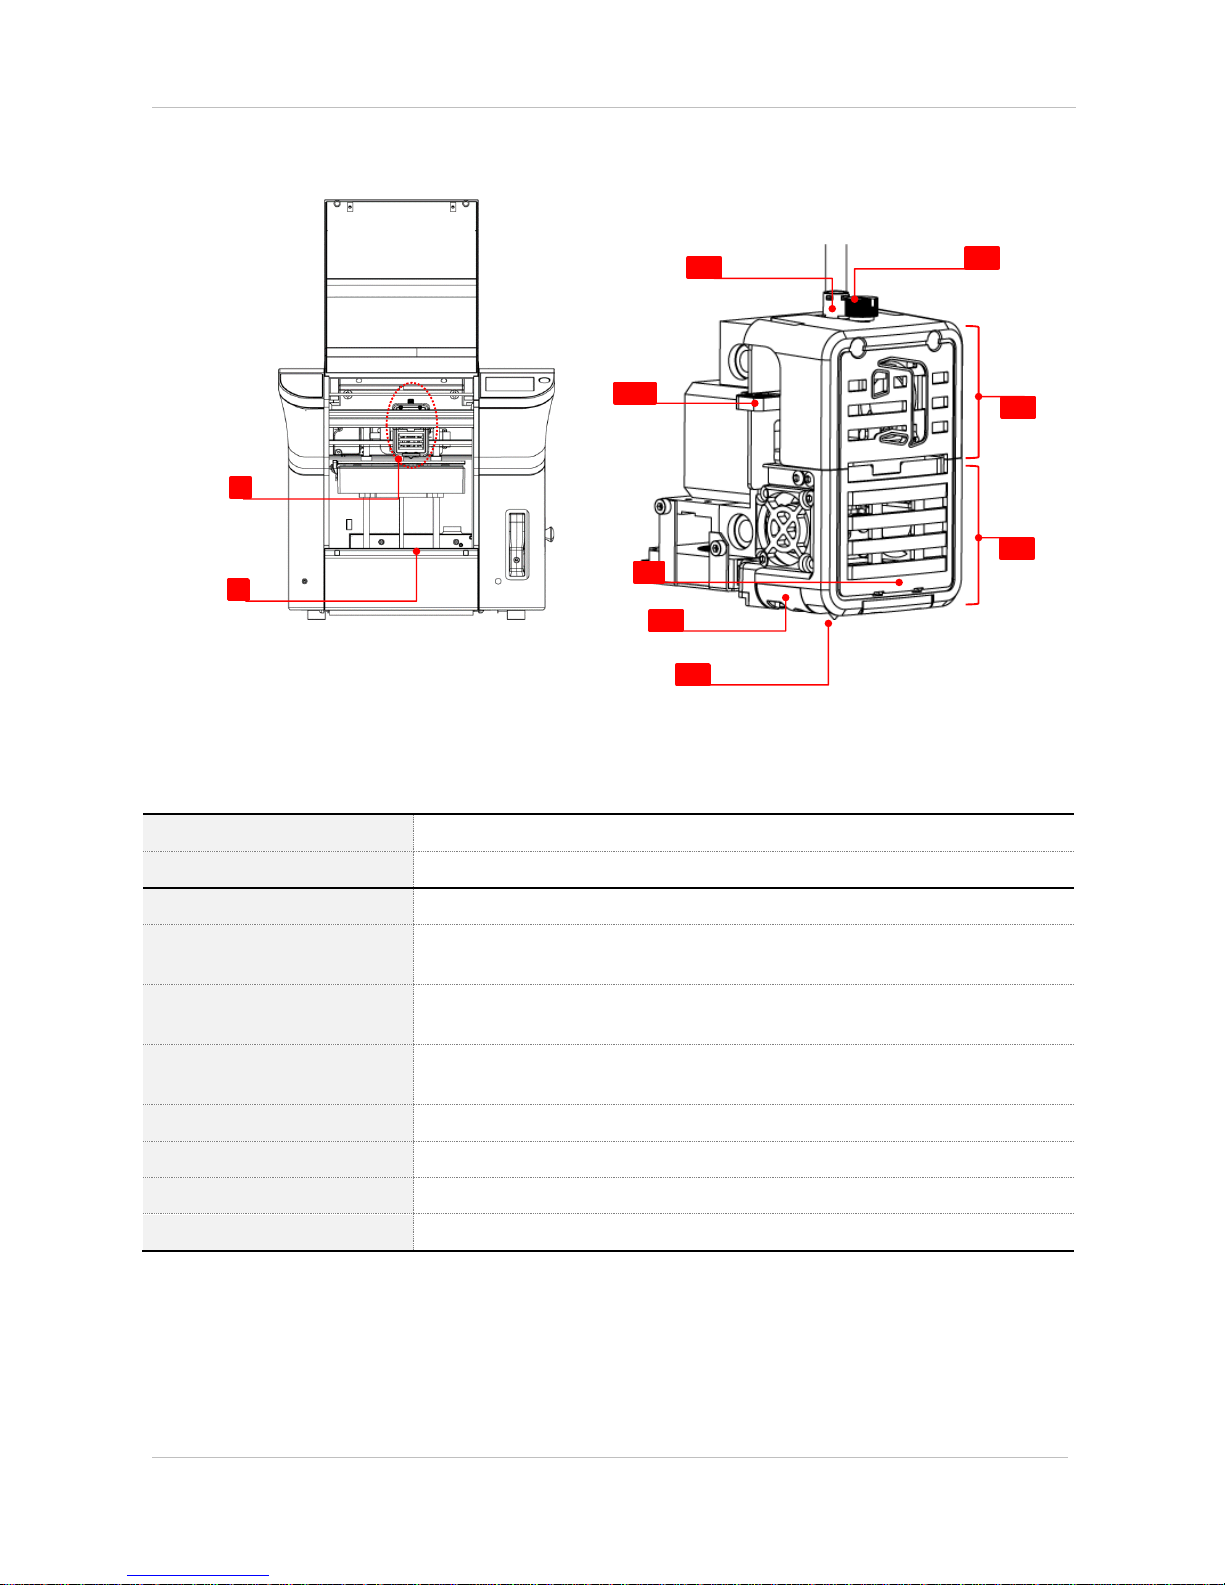
(2) Cubicon single plus extruder
[1] Extruder part
Spills filament and melts it and sends to nozzle
[2] Heating bed
Is printing platform of output in the printing process.
[E1] Filament insert hole
Is the hole which puts filament into extruder. A Teflon tube is placed inside it.
[E2] Filament press handle
Is the handle, which manually takes out filament from inside extruder and is pressed
in the inserting process
[E3] Formative LED
Is the white LED to check the model status, and is located in detachable extruder
part.
[E4] Wind guide
Is the tool, which blows modeling fan wind to a model side and is located in
detachable extruder part.
[E5] Nozzle
Melts and comes out from filament.
[E6] Removable setscrew
Is used for detachable extruder part separation.
[E7]Fixture extruder part
Is fixture part of extruder.
[E8] Detachable extruder part
Is removable part of extruder.
1
2
E4
E2
E6
E7
E8
E3
E1
E5
Page 12
CUBICON Single Plus User Manual
12
5. Installation and printing preparation
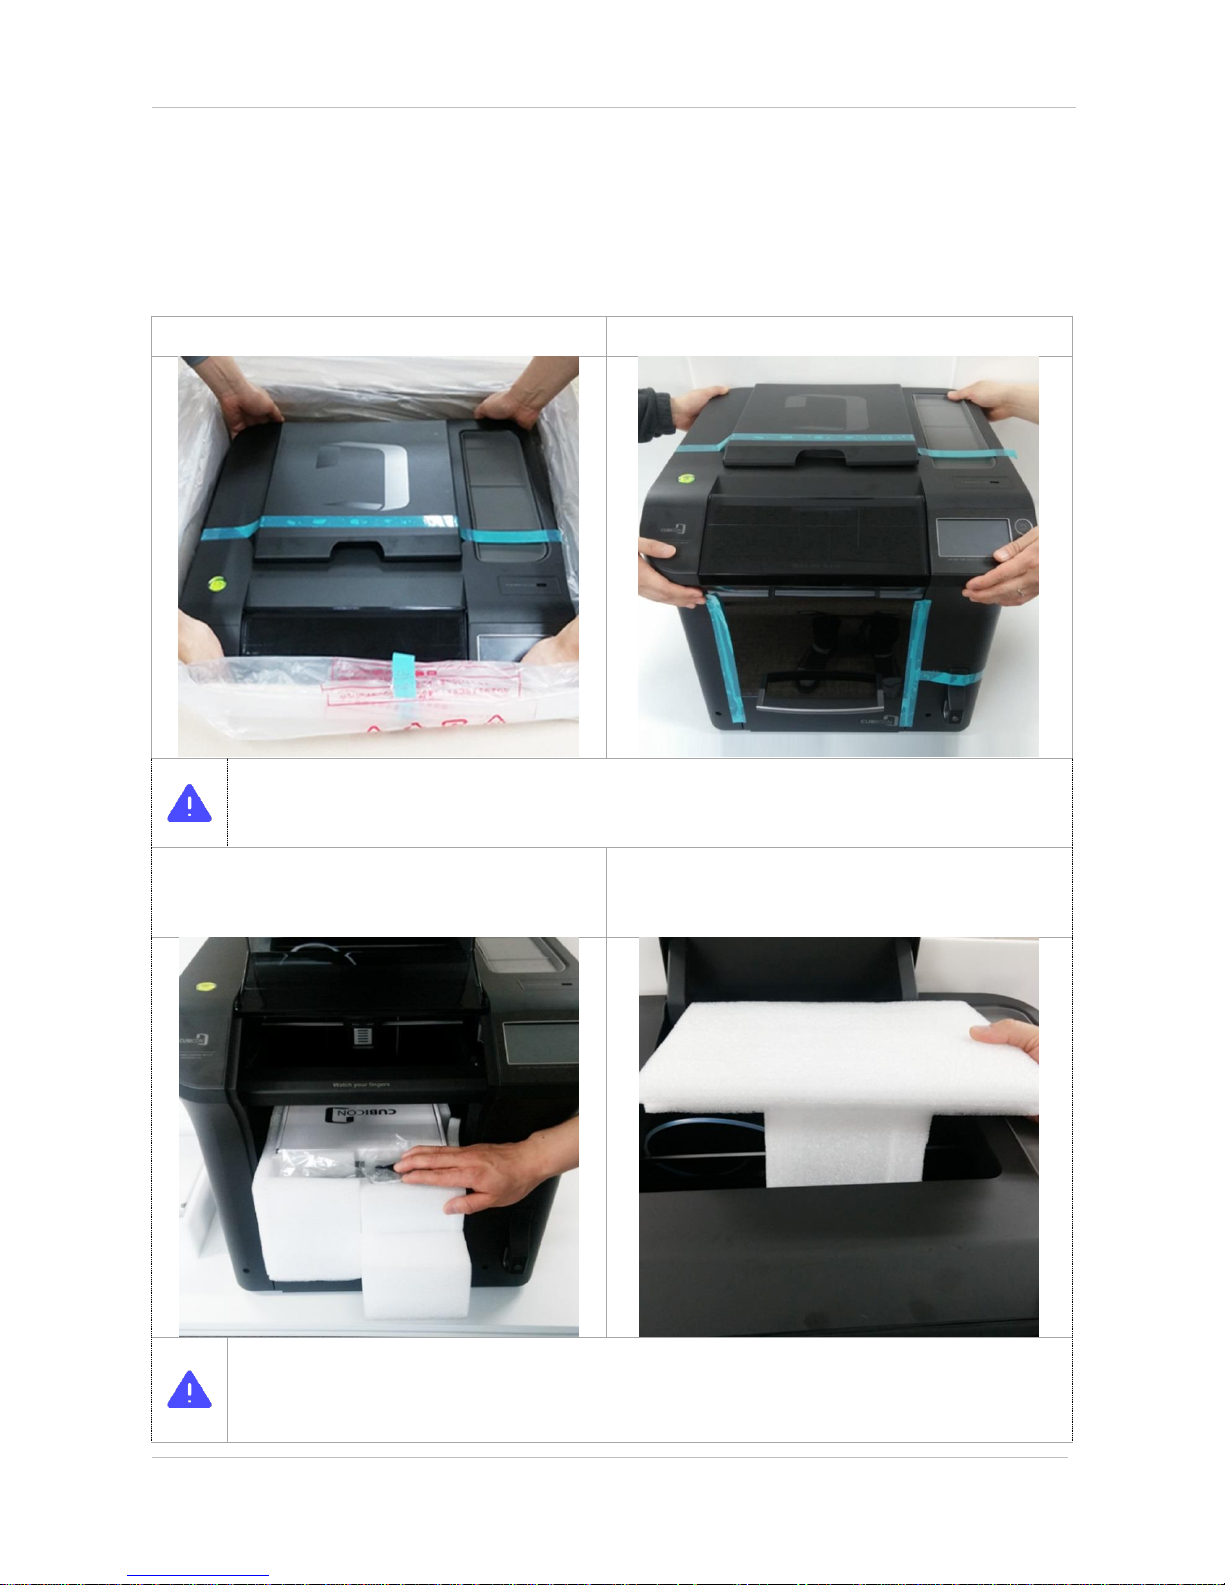
5-1. Unpacking
① Take out the product from plastic packing.
② Move the product to installation spot.
* Considering volume and weight of the printer, at least two persons shall handle the printer.
* Release the printer from plastic packing and then take out only the printer without plastic packing as plastic
material may slip in the process of taking out.
③ Open the front door and take out inside packing
material, accessories and check out if any material is
missing.
④ Open the top door and take out extruder fixture packing material. Make
sure not to break the extruder driving cable or a Teflon.
* The driving part is fixed only with packing material without using cable tie to prevent potential problems when
the printer is operating with it. Please, be cafeful not to damage the part when removing the internal packing
material.
Page 13
CUBICON Single Plus User Manual
13
* Driving cable of the extruder or a teflon tube is placed near extruder fixture packing material.
Make sure to prevent from pull, breaking, stabbing, press etc. as the extruder connective cable and the Teflon
tube are supply channel for the extruder operation and the filament.
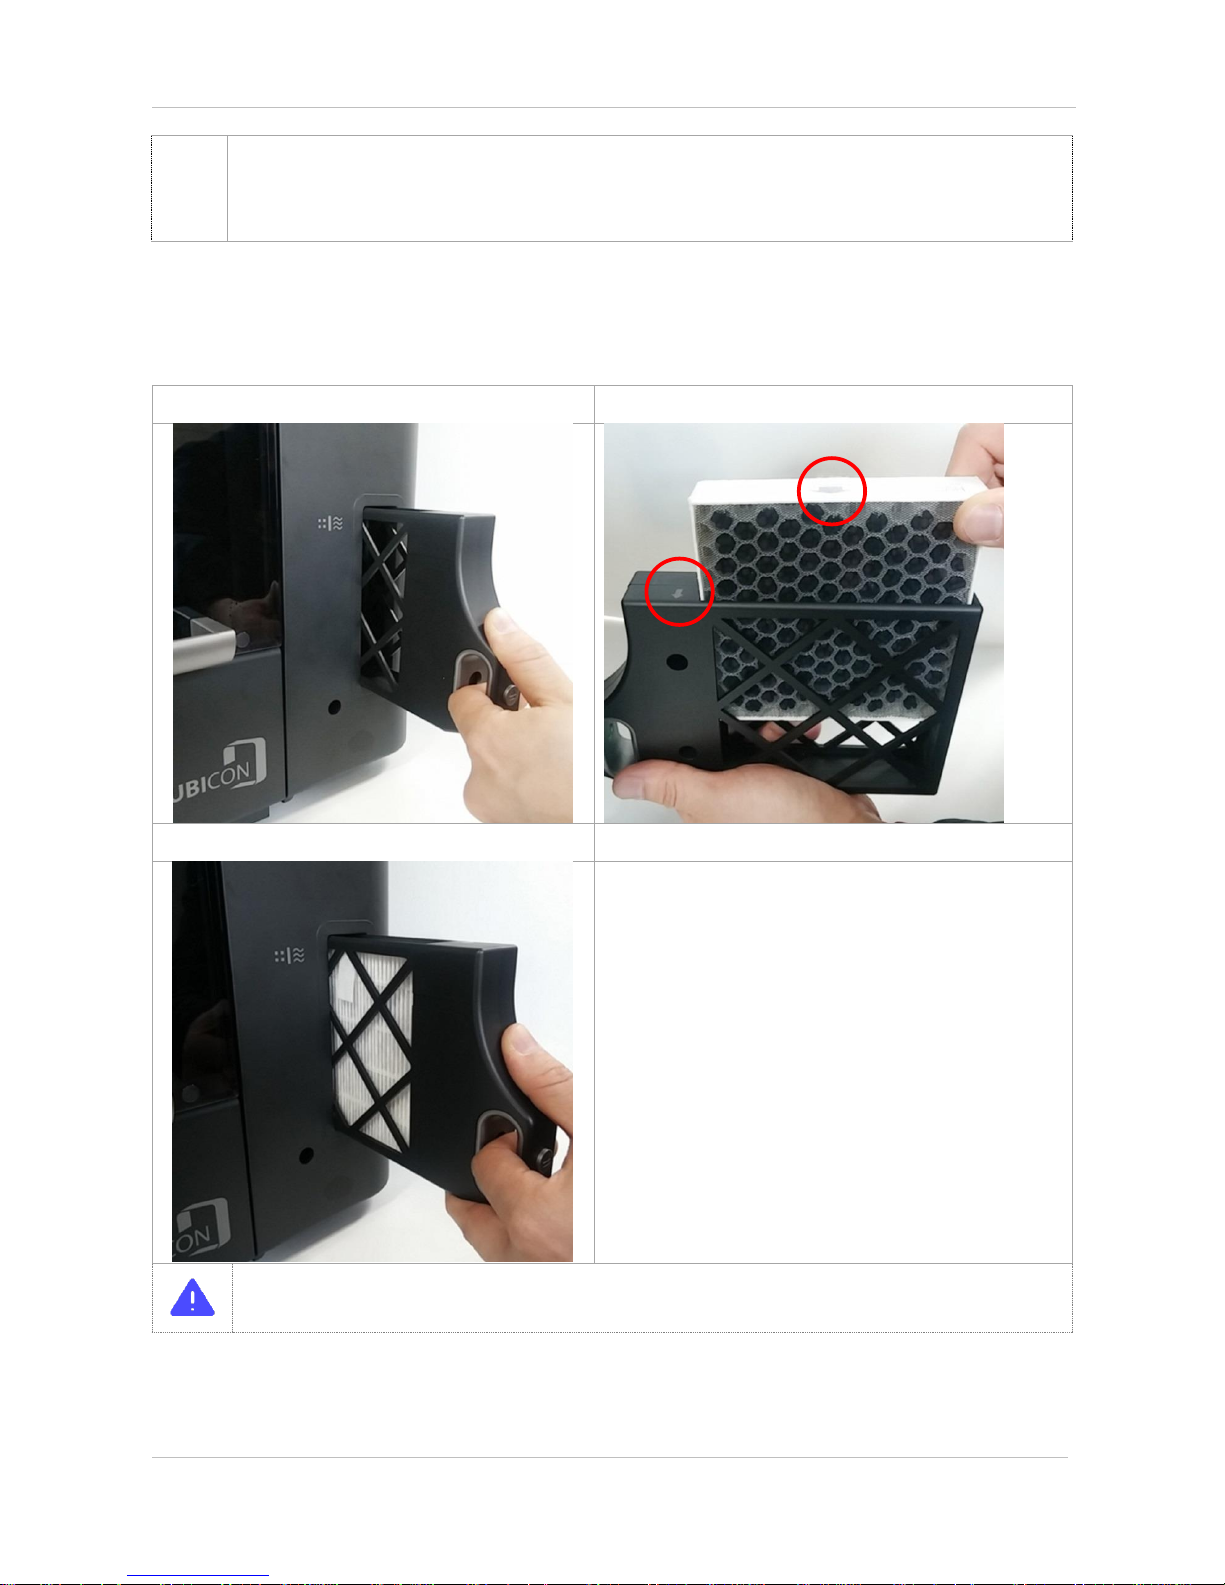
5-2. Filter installation
① Pull out a filter from the printer body.
② Put the filter into a case considering their direction.
③ Insert clean filter case into the printer body.
* Make sure to insert the clean filter into the printer body in normal direction.
* In the case of wrong inserting direction, the filter funtion decreases and it may cause a ventilation fan
malfunction.
Page 14
CUBICON Single Plus User Manual
14
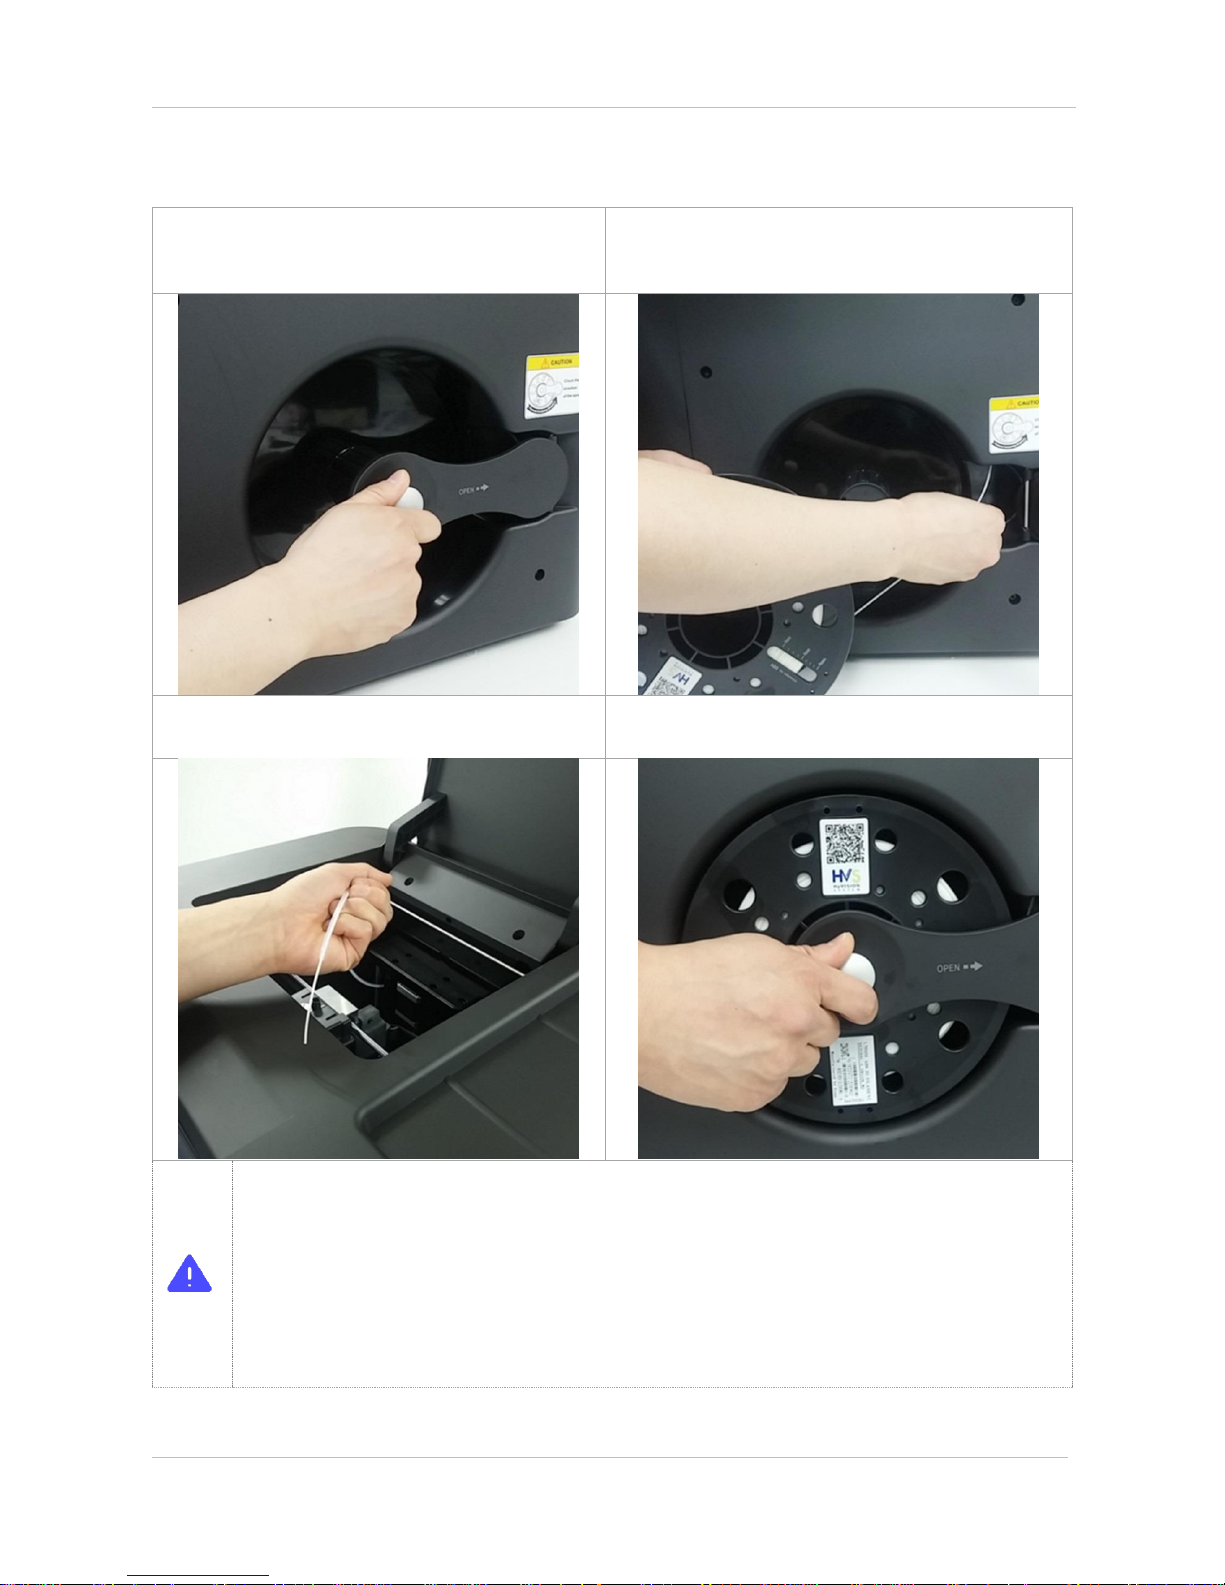
5-3. Filament installation
① You can open by pushing back a spool door handle of
the printer body.
② Slowly release the filament from filament spool and
push the filament into filament insert hole * be careful of the
rotation direction
③ Open the top door and push in the filament until it
comes out of Teflon tube entrance
④ Insert the filament spool into filament bar and fix spool by
closing the spool door pressing handle until you hear clicker.
* Filament spool has its own direction (Install the spool, make sure that company logo or the product sticker
side is visible from outside)
*Any interruption between filament bar and the spool, in the process of the filament spool installation, may
cause the printer malfunction as it raise the problem in a filament supply. Make sure to remove an obstacle,
which causes interruption to rotation in the spool insert process. Make sure to remove a spool package
included silica gel from inside spool.
* A teflon tube is the channel from the filament spool to the extruder. if the tube is pulled with exteme power,
tube breaking, or tube twisting may occur and it may cause abnormal filament operation and malfunction as
the teflon tube length is optimised to the printer. Do not break, cut or pull installed teflon tube with extreme
power.
Page 15
CUBICON Single Plus User Manual
15
* Make sure that the filament does not come loose in the process of taking out remaining filament spool. And
fix the remaining filament to the spool. Make sure that remaining filament does not come loose in storage
process.
* Keep remaining filament in use in a plastic bag to prevent it from outside exposure such as humidity and
dust. Make sure to use filament as soon as you open it. If the filament is exposed to external enviroment for
a while, the printing quality may get worse, it stops extruding from the extruder.
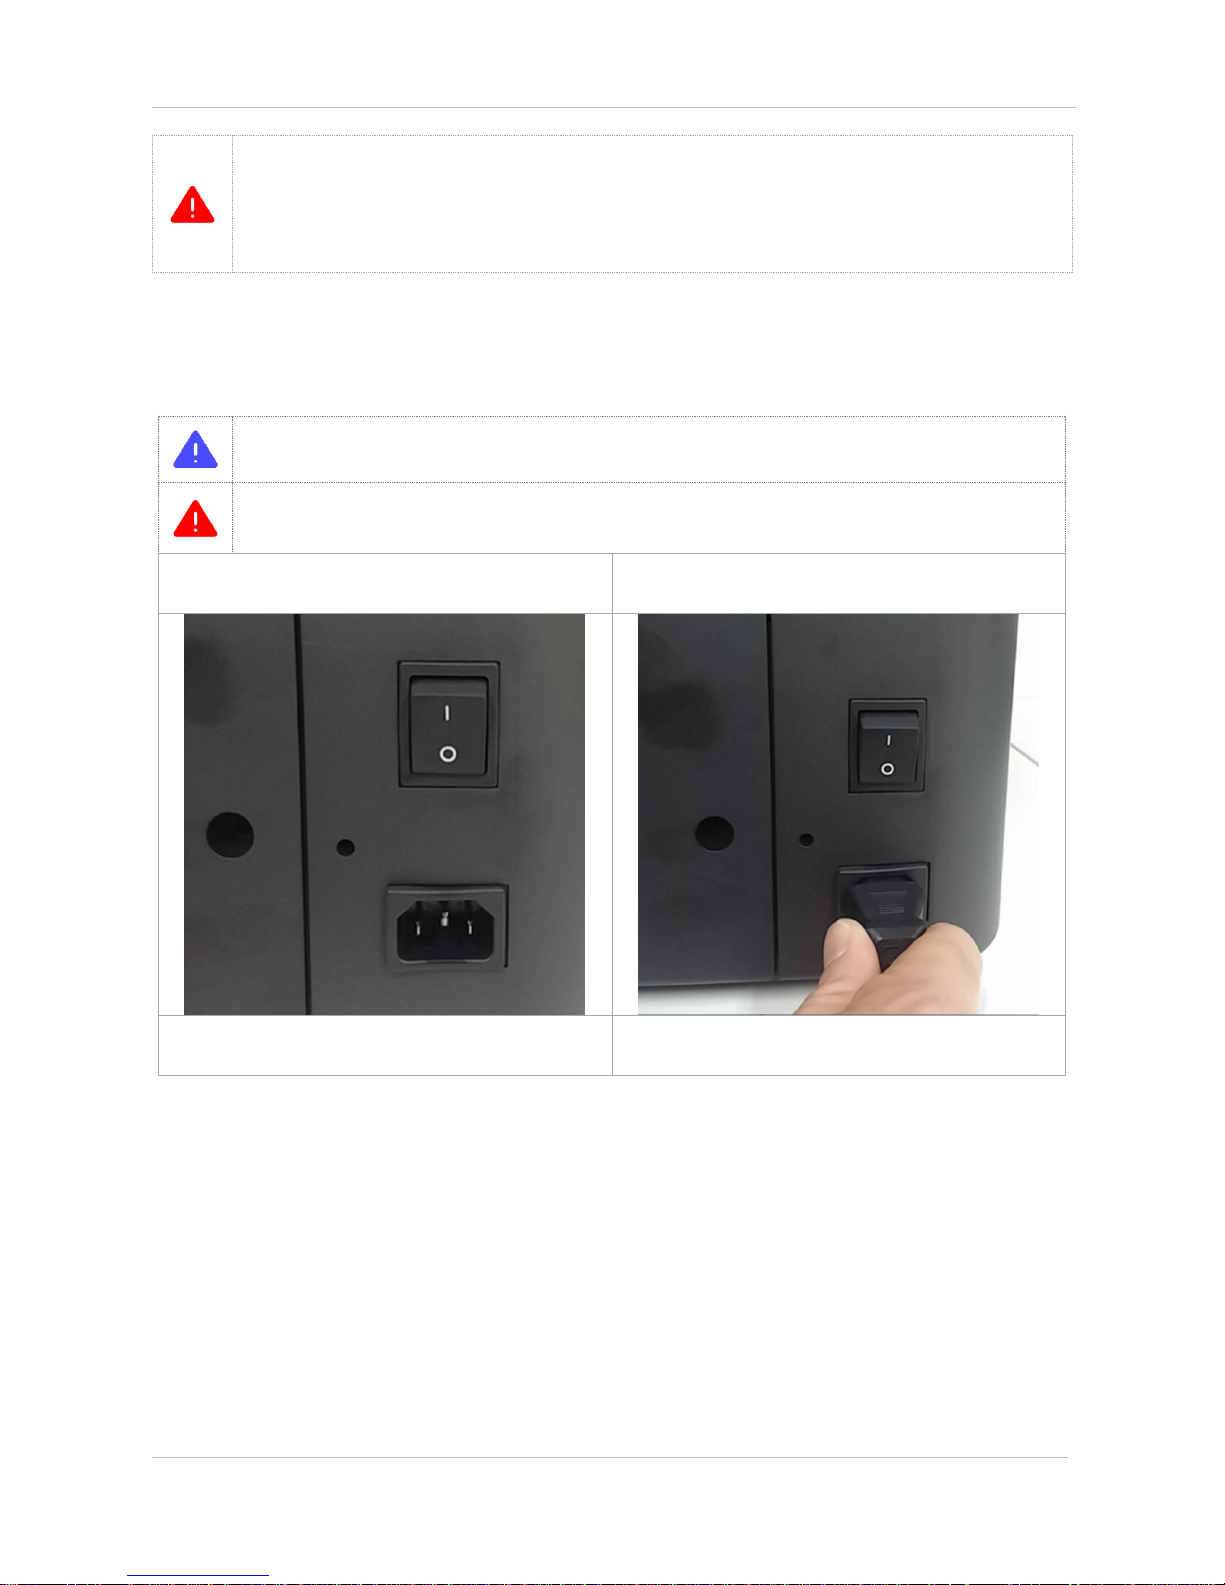
5-4. Printer power ON
Make sure to recheck inside packing material removal, any part damage, the spool installation
condition/rotation direction/rotation condition etc. in prior to turn on the printer power.
Do not neglect the printer by turning off the printer power in heat condition of the extruder. The printer
malfunction may be caused due to electronic part damage by abnormal cooling fan operation.
① Change power switch (O) of the printer body to
【OFF】
② Put a power cable to a socket.
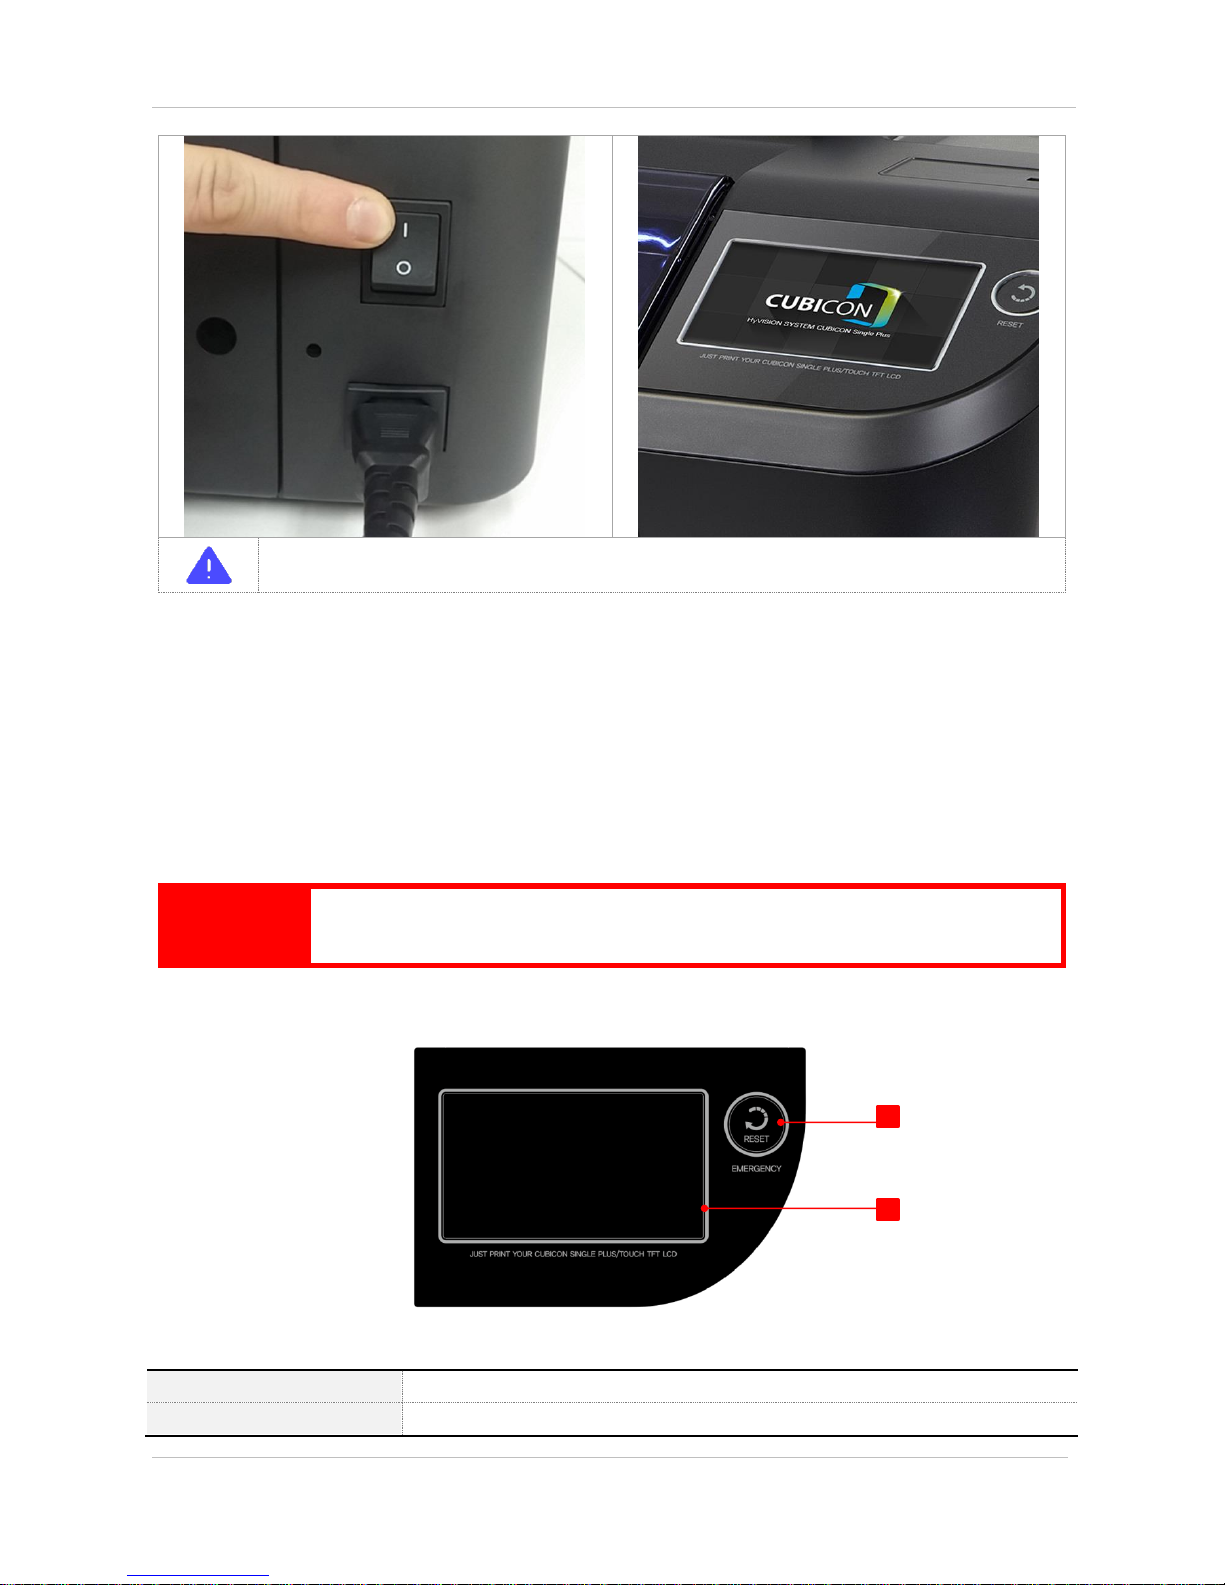
③ Change the power switch (|) of the printer body to
【ON】
④ Check the indication of LCD screen.
Page 16
CUBICON Single Plus User Manual
16
* In the case of power or USB cable separation, make sure to separate it by pulling connector and do not
hold the cable.
6. Printer use
6-1. LCD control panel
Urgent stop
Press Reset (Emergency) button so that the printer stops its operation immediately and proceed
rebooting (soft booting) in the case of problem occurrence in the printer operation.
[1] Reset
Press Reset (Emergency) button, then the printer will reset immediately.
[2] Touch LCD
‘Touch LCD’ shows current condition screen or menu on a touch screen.
2
Page 17
CUBICON Single Plus User Manual
17
Make sure not to press Reset button accidentally in printing process or do not put any object near
Reset button as it may cause the printer reset pressing Reset button.
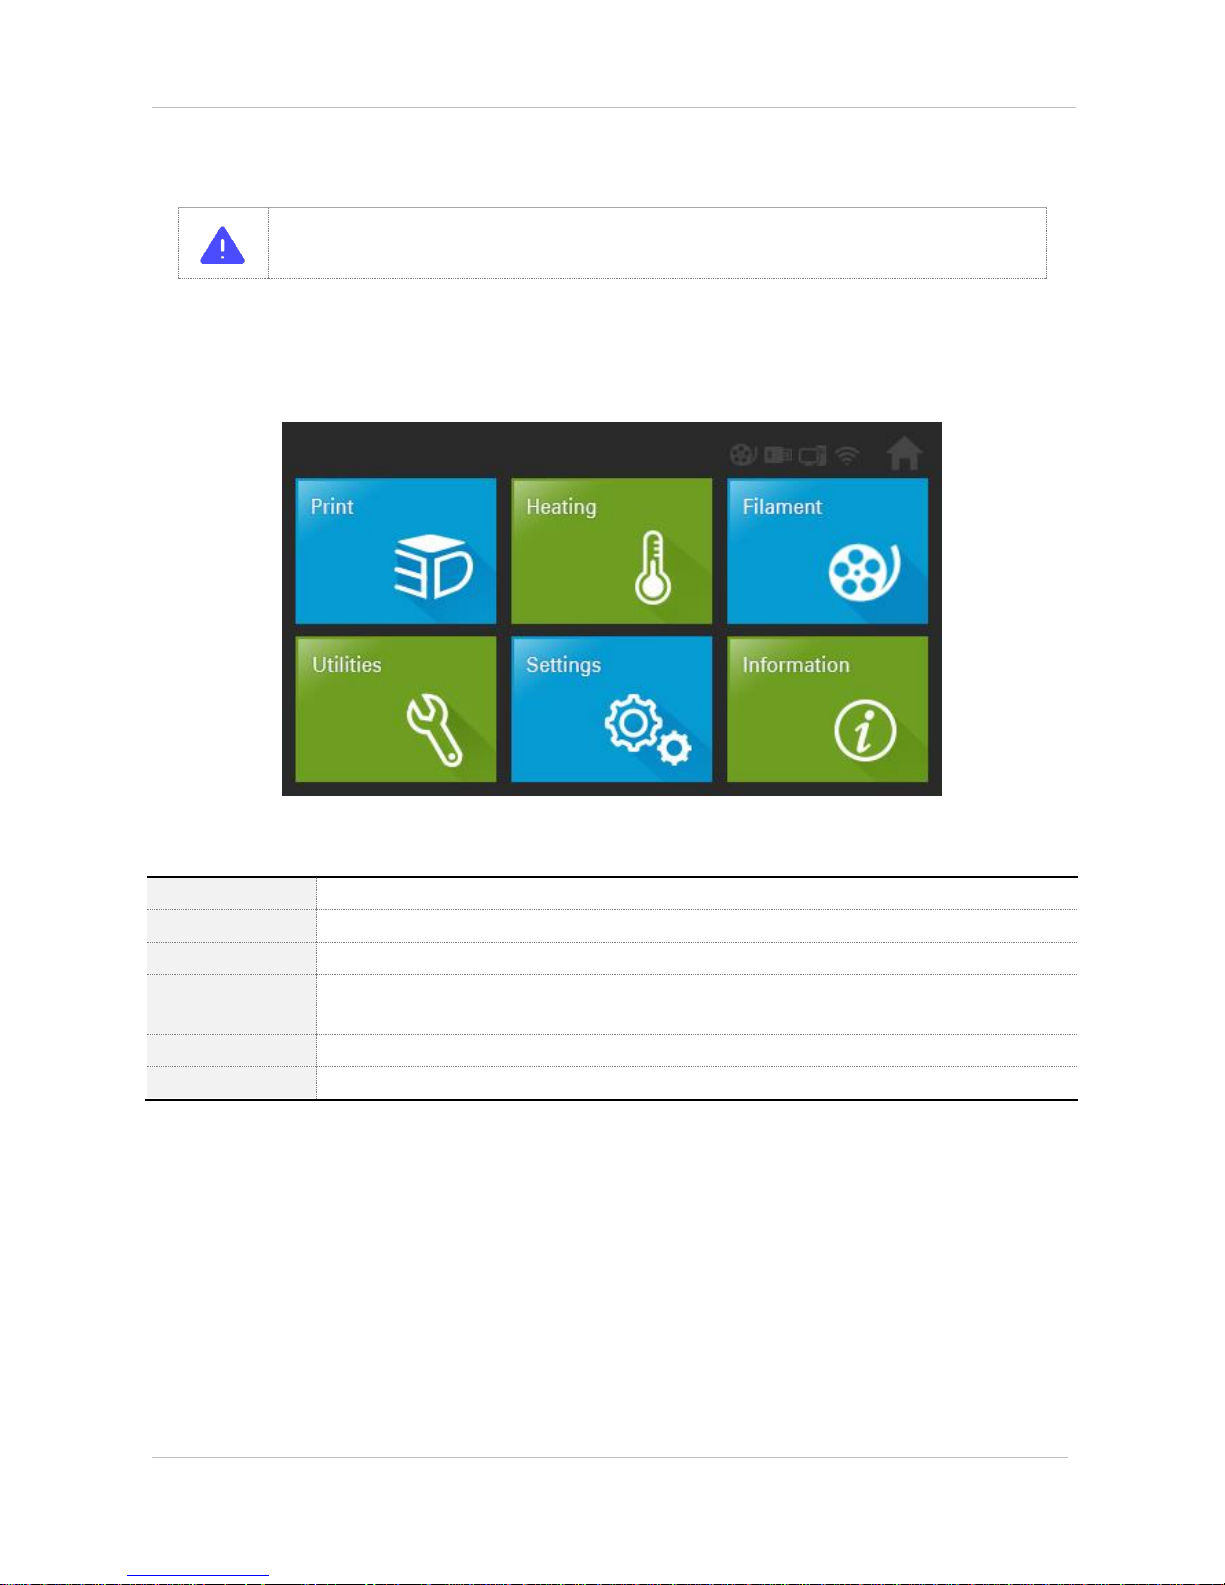
6-2. LCD main screen
[1] Print
‘Print’ menu is used for printing the saved file of inside the printer or the saved file of USB memory.
[2] Heating
‘Heating’ menu is used for warm-up by nozzle/bed material.
[3] Filament
‘Filament’ menu is used for the filament loading/unloading.
[4] Utilities
‘Utilities’ menu is used for G-code copy/delete and the extruder movement, self-diagnosis, auto
level etc.
[5] Setting
‘Setting’ menu is used for amendment and firmware update matching to CUBICON Single Plus
[6] Information
‘Information’ menu indicates the printer information and time, inside memory capacity.
Page 18
CUBICON Single Plus User Manual
18
7. Filament replacement (Loading/unloading)
Filament-printing material shall be inserted into the extruder for filament melting with a nozzle and for pushing
it. The extruder inserted filament shall be removed to replace another filament.
Loading means process of inserting filament into the extruder by melting with nozzle and pushing it, in an
empty extruder condition to print a material out. On the other hand, unloading means the process of taking out
filament from extruder.
7-1. Loading
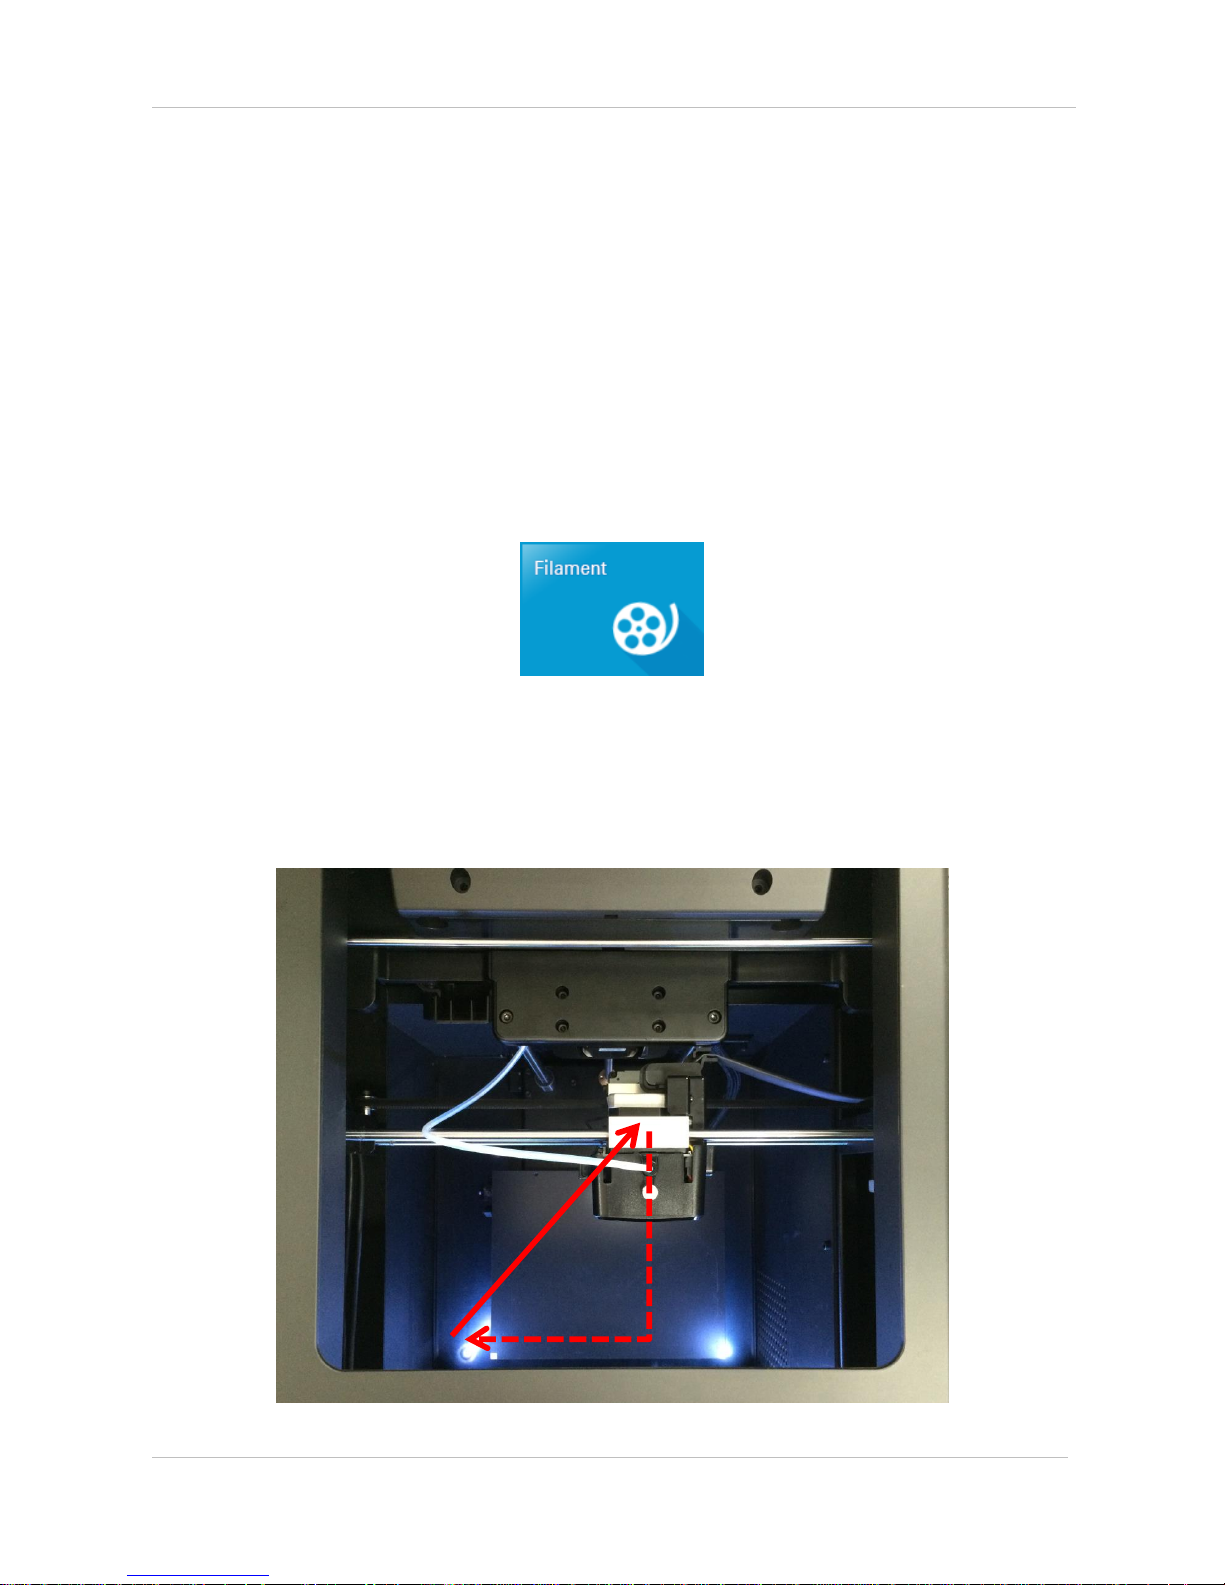
Select ‘filament’ from main menu.
Press ‘loading’ button, once you select the filament to load.
Select ‘start’ button, once temperature reach the target temperature.
Page 19
CUBICON Single Plus User Manual
19
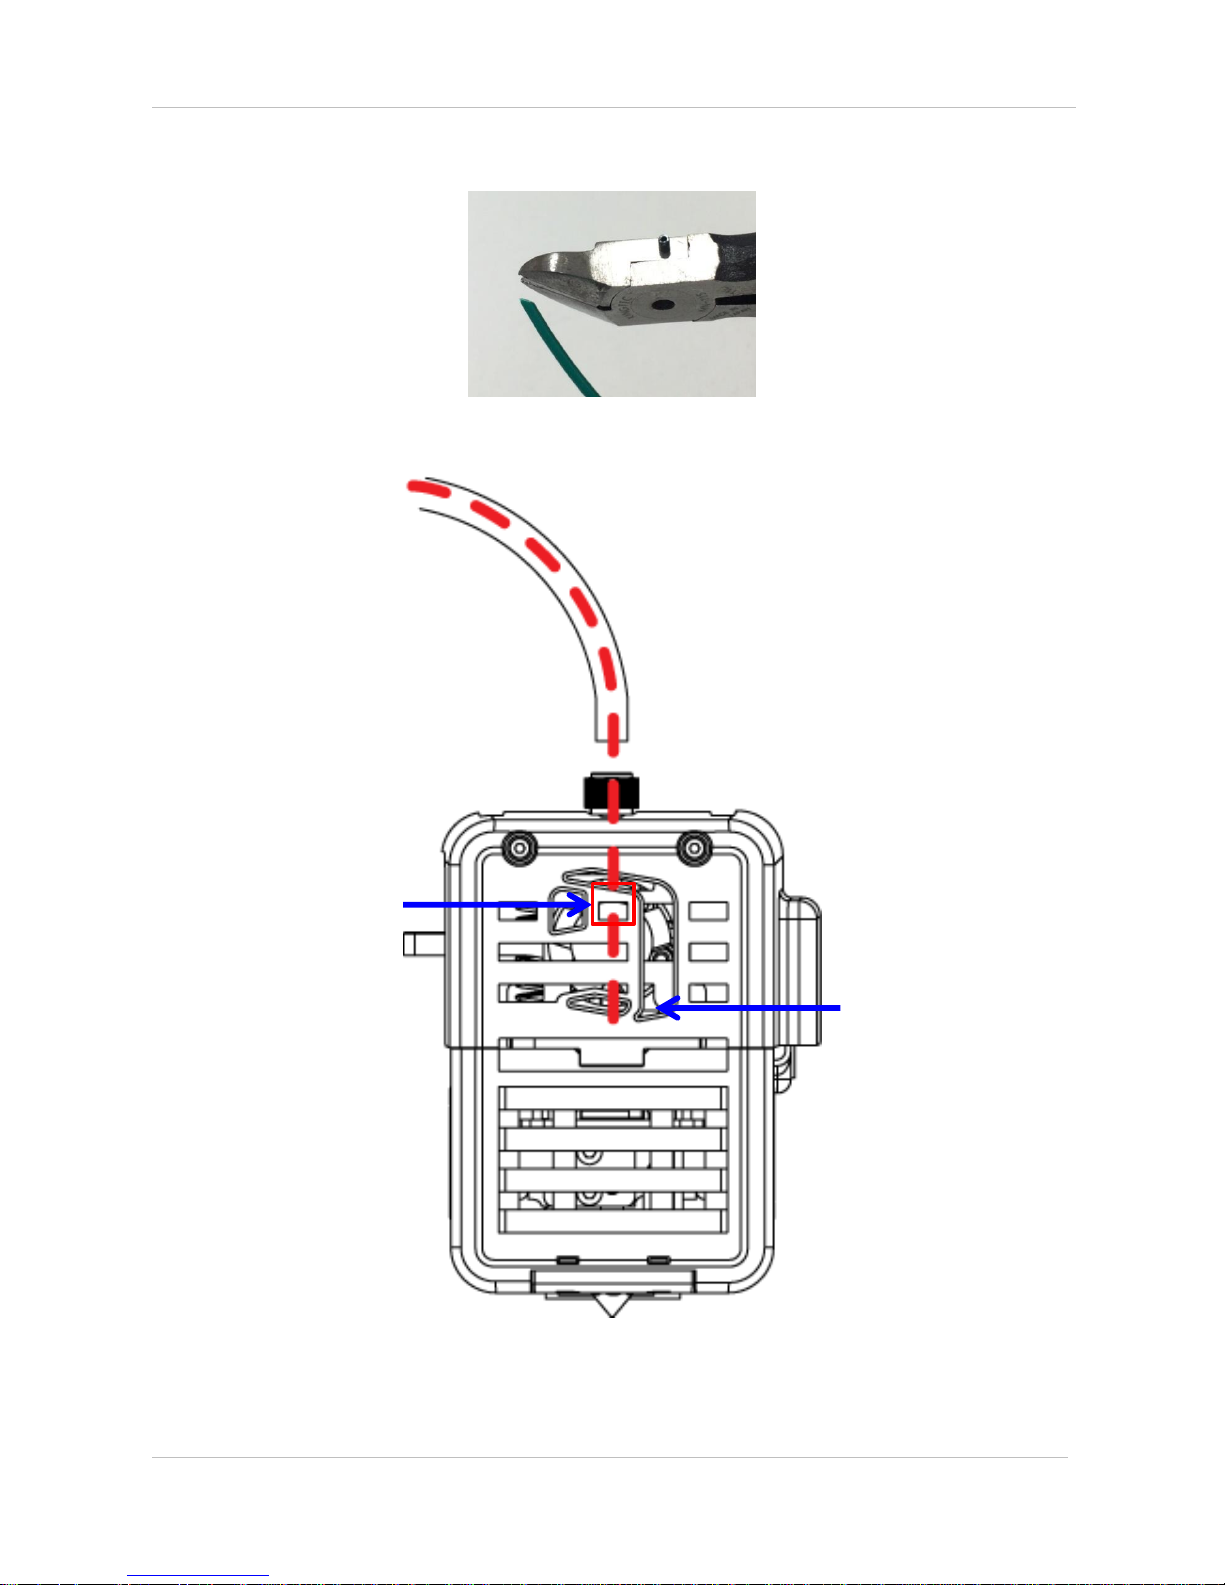
Be cautious of safety as the extruder moves toward parking location.
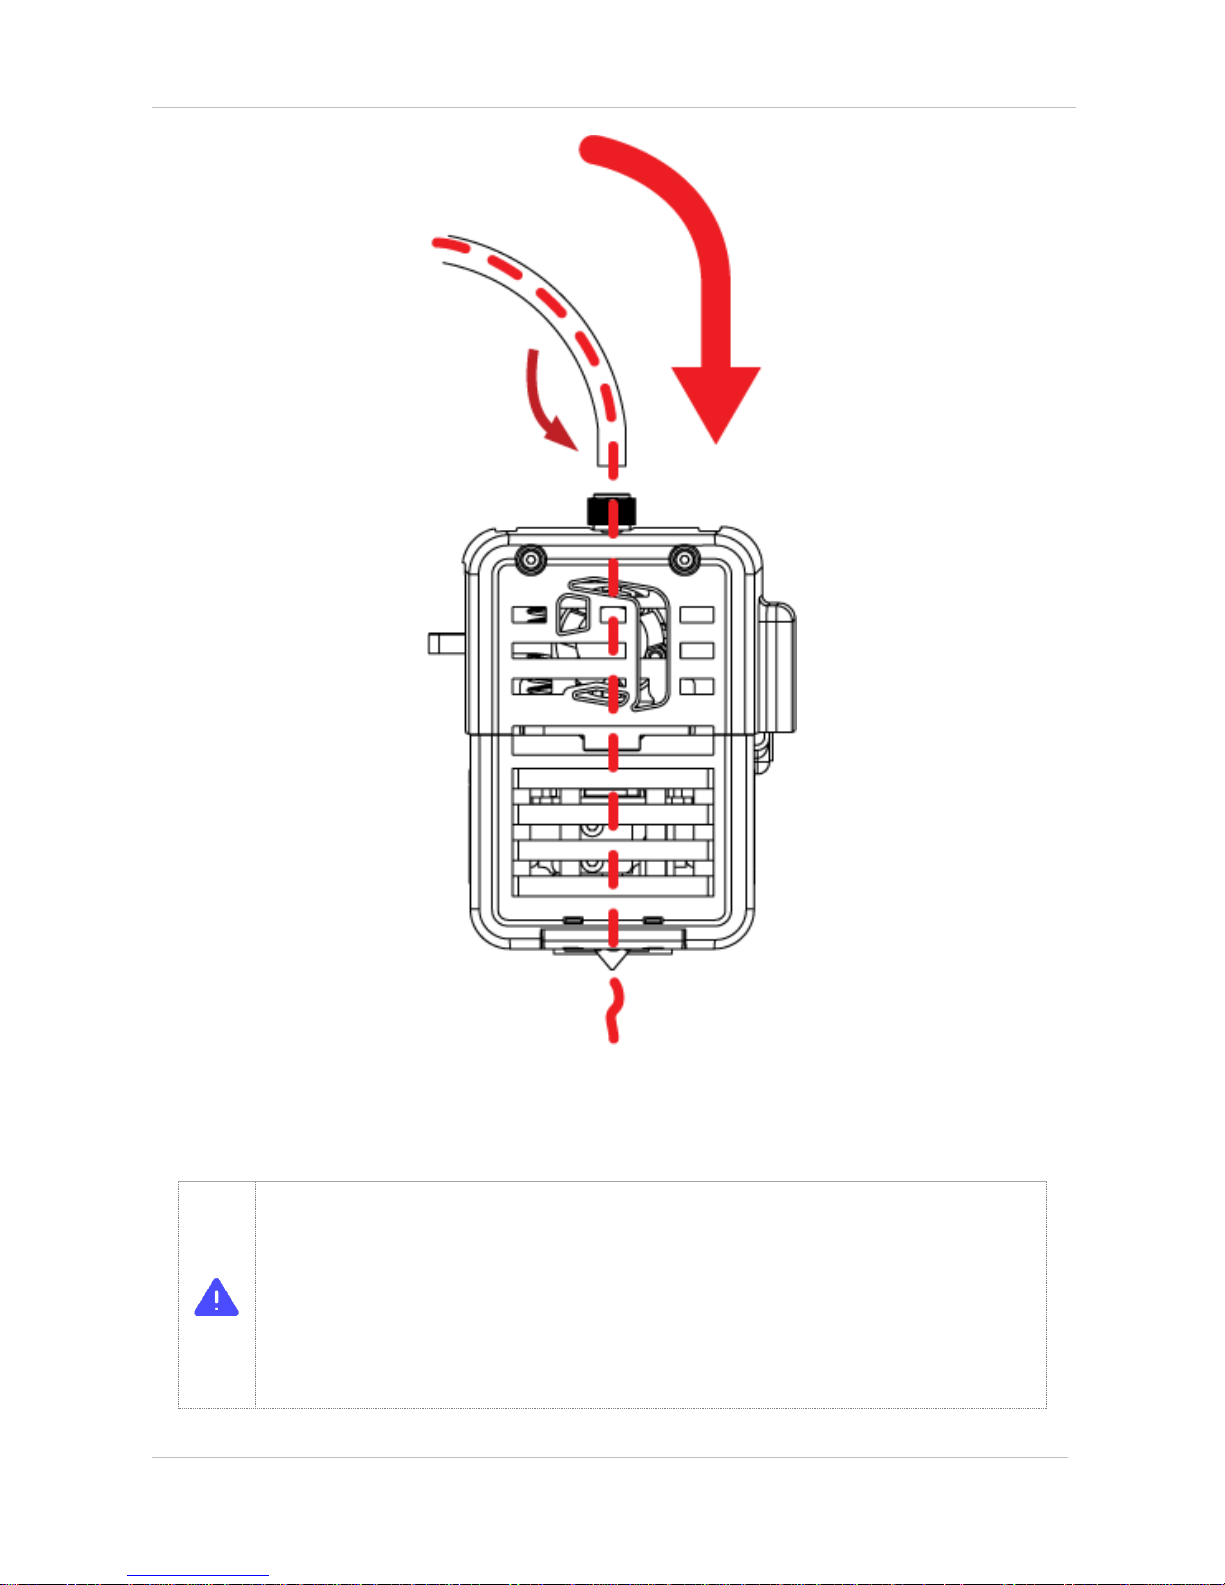
Cut the end part of filament carefully with a knife or scissors.
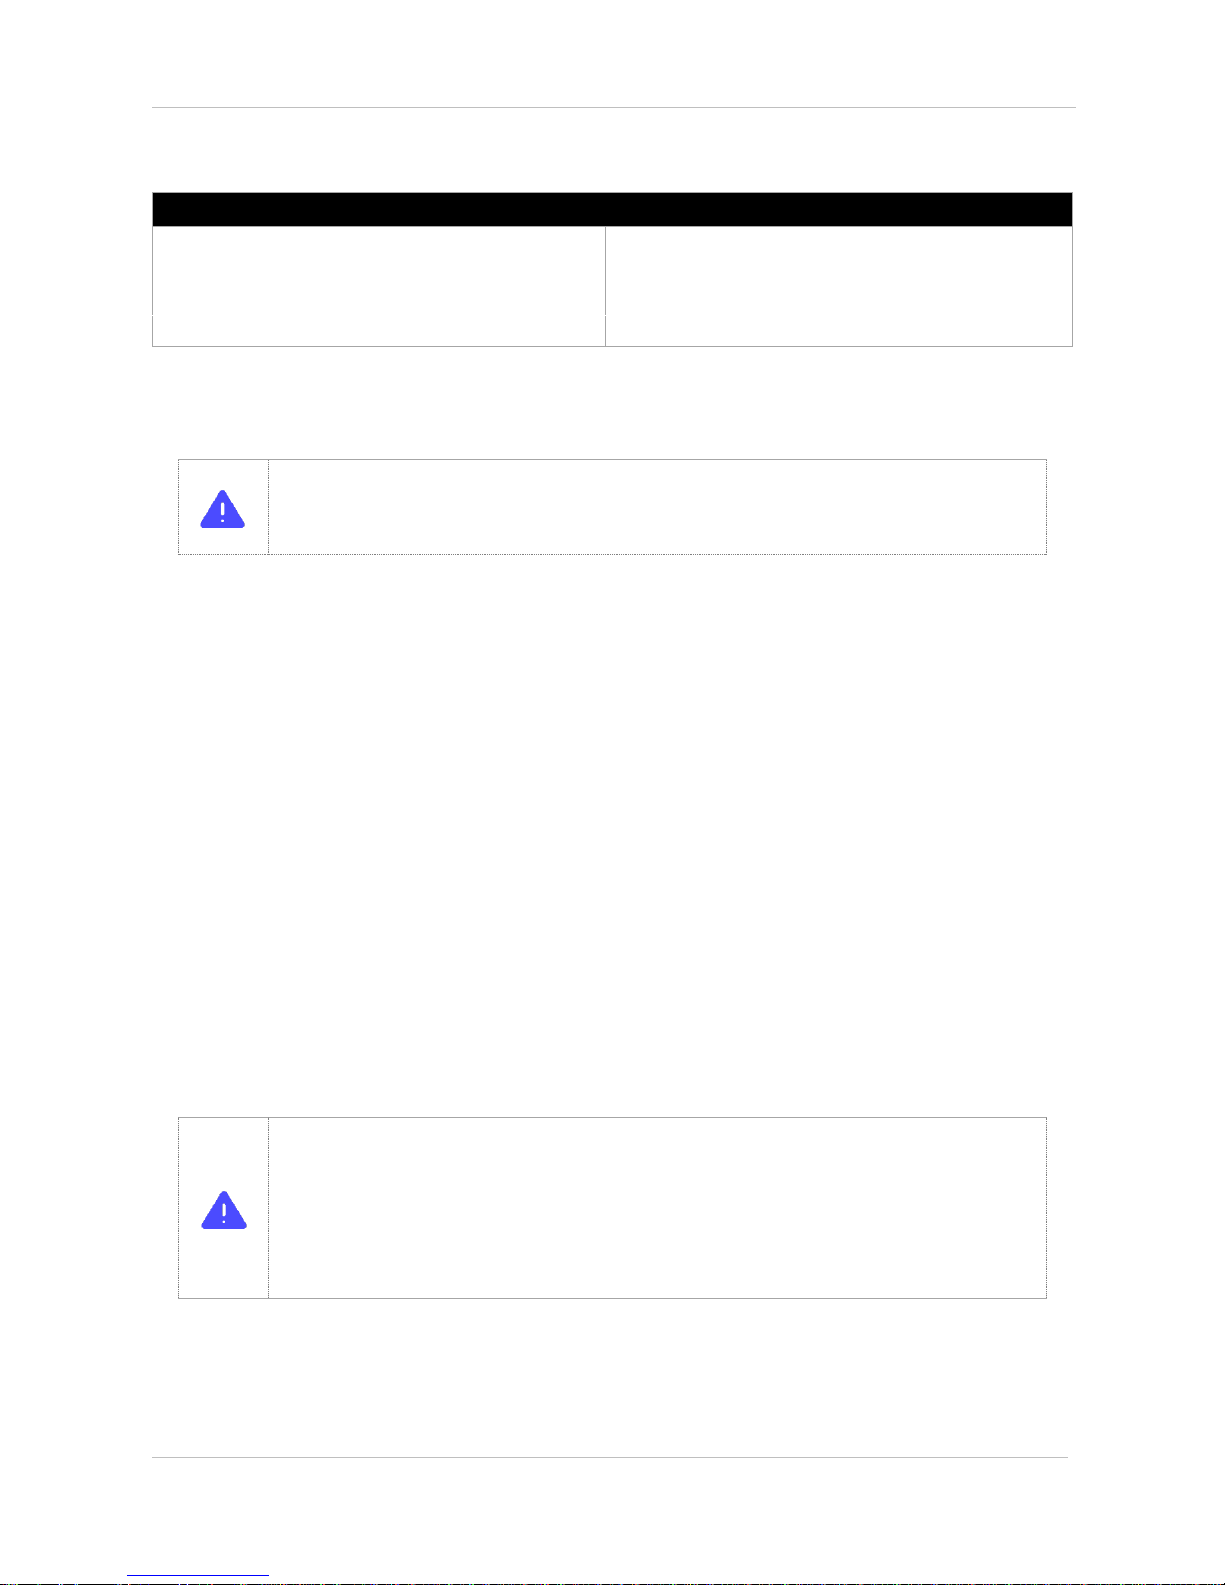
Push in the filament until gear entrance passing through the filament detection sensor.
Filament detection sensor
Gear
Page 20
CUBICON Single Plus User Manual
20
Make sure to check if the filament is extruding through a nozzle.
* Make sure to keep a nozzle part away from your body as nozzle gets hot once nozzle temperature of
the extruder gets high and melted filemant is also hot.
* The filament may get caught to a nozzle bar entrance in the process of the filemant goes into nozzle
bar of detachable extruder part. (you may hear crack sound) In that case, press the filament press
handle and pull filament up. Then cut the end part of filament with scisorrs and try loading again
putting the filament into insert hole.
* In the case of manual working by using the filament press handle, make sure not to pull the filament
up with extreme power as it may cause inside sensor or nozzle bar damage.
Page 21
CUBICON Single Plus User Manual
21
7-2. Unloading
Select ‘Filament’ from the main menu.
Press ‘Unloading’ button, once you select ‘Filament’ to unload.
Press ‘Start’ button, once temperature reach target temperature.
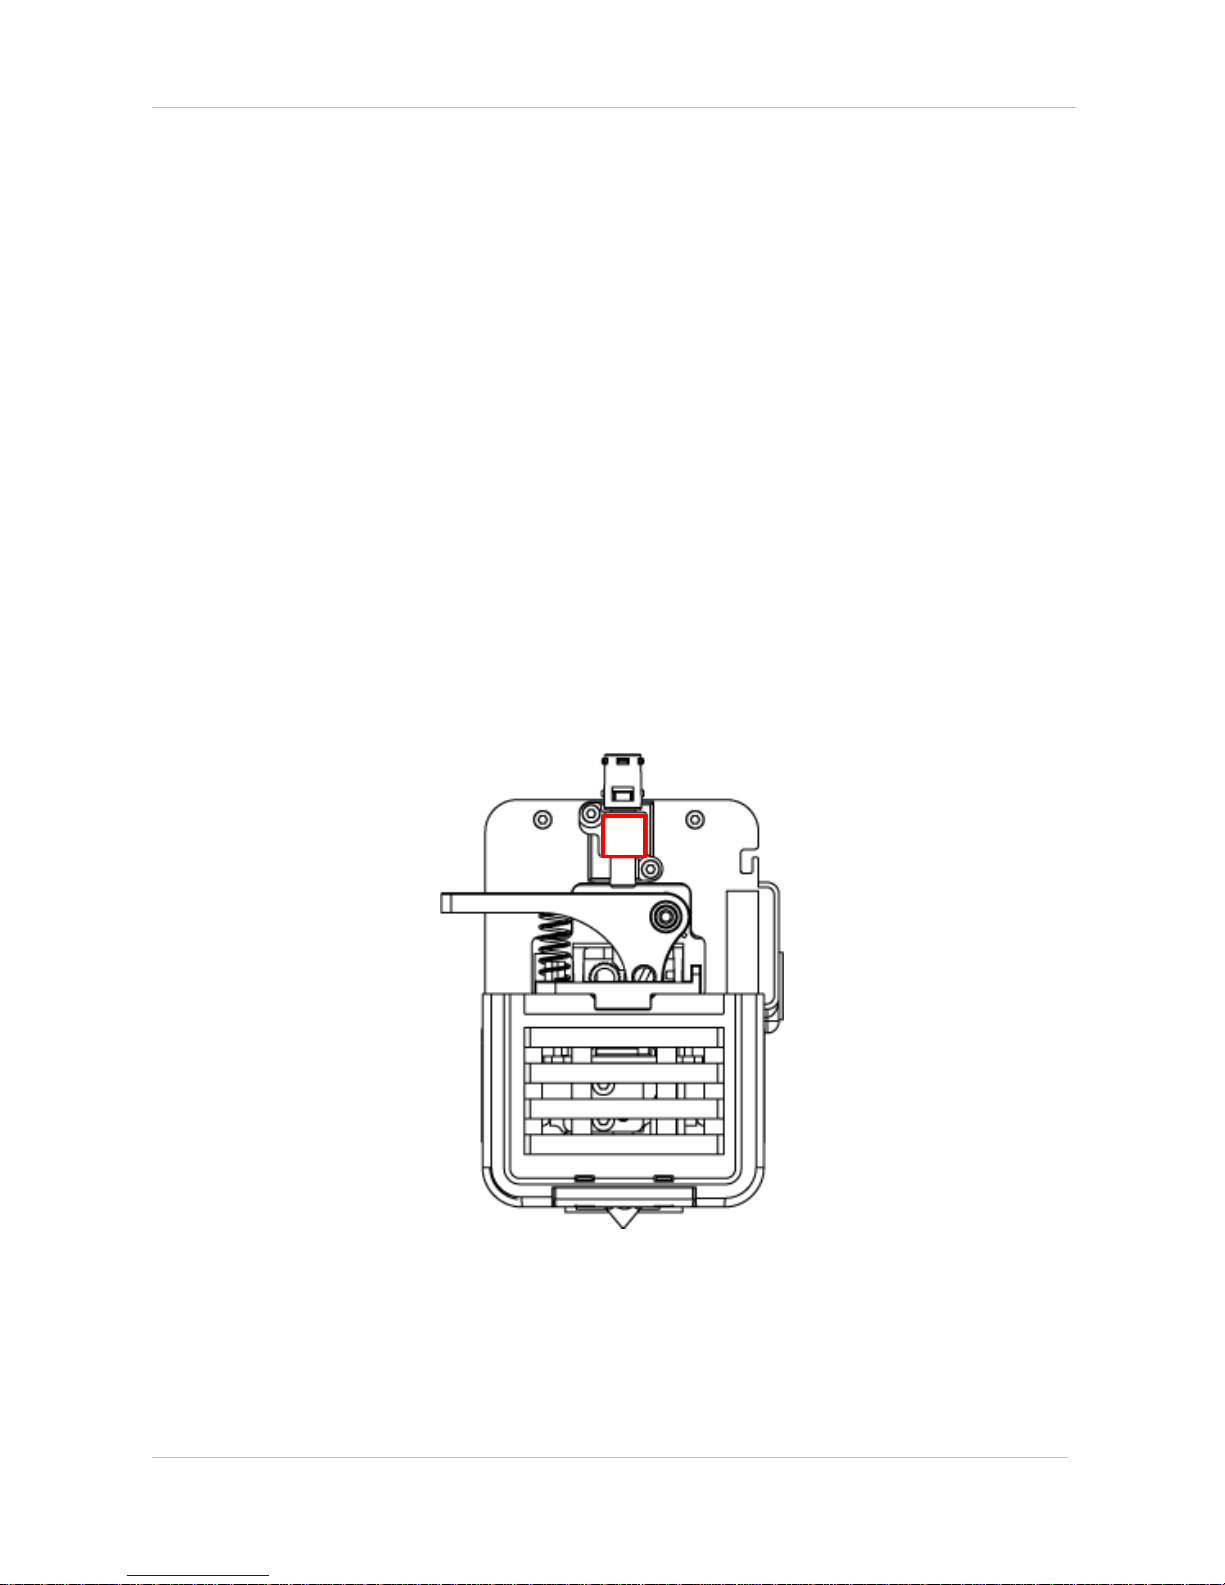
Press handle and take out the filament, once you see an icon on LCD screen, which indicates the filament
takeout pressing handle.
* Do not touch nozzle part as not only nozzle but melting filament, once the nozzle temperature of
the extruder goes up.
* Make sure to take out the filament by pressing handle.
* Make sure to prevent possible malfunction as melted filament end part may get caught inside
extruder.
*The filament might get caught inside the extruder in unloading process as filaments’ end part are
different from each other by their type.
Do not pull out the filament forcefully with your hand, in the case of possible caught inor difficulty of
the filament pull out.
1) unloading by pushing the filament into the nozzle and correcting it through melting the filament
end piece or
2) Separate detachable extruder and remove the filament after cutting out the filament of outside
extruder. Forcible filament pull out may cause the filament (leftover) caught in of inside the
extruder and it may lead to fixed extruder part repair.
Page 22
CUBICON Single Plus User Manual
22
7-3. Filament replacement using ‘Pause’.
The filament replacement can be conducted easily to use by ‘Pause’ function of Cubicon Single Plus. User
can replace the filament in advance, if the remaining filament is not enough. User can also change color by
replacing different colored filament.
(1) ‘Pause’ by user.
Printing is stopped and the extruder moves to parking point, once ‘Pause’ button is pressed. Then installed
filament can be replaced or other work can also be conducted.
Pressing ‘Continue’ button allows restarting printing, once required work is completed.
(2) Pausing due to filament run out.
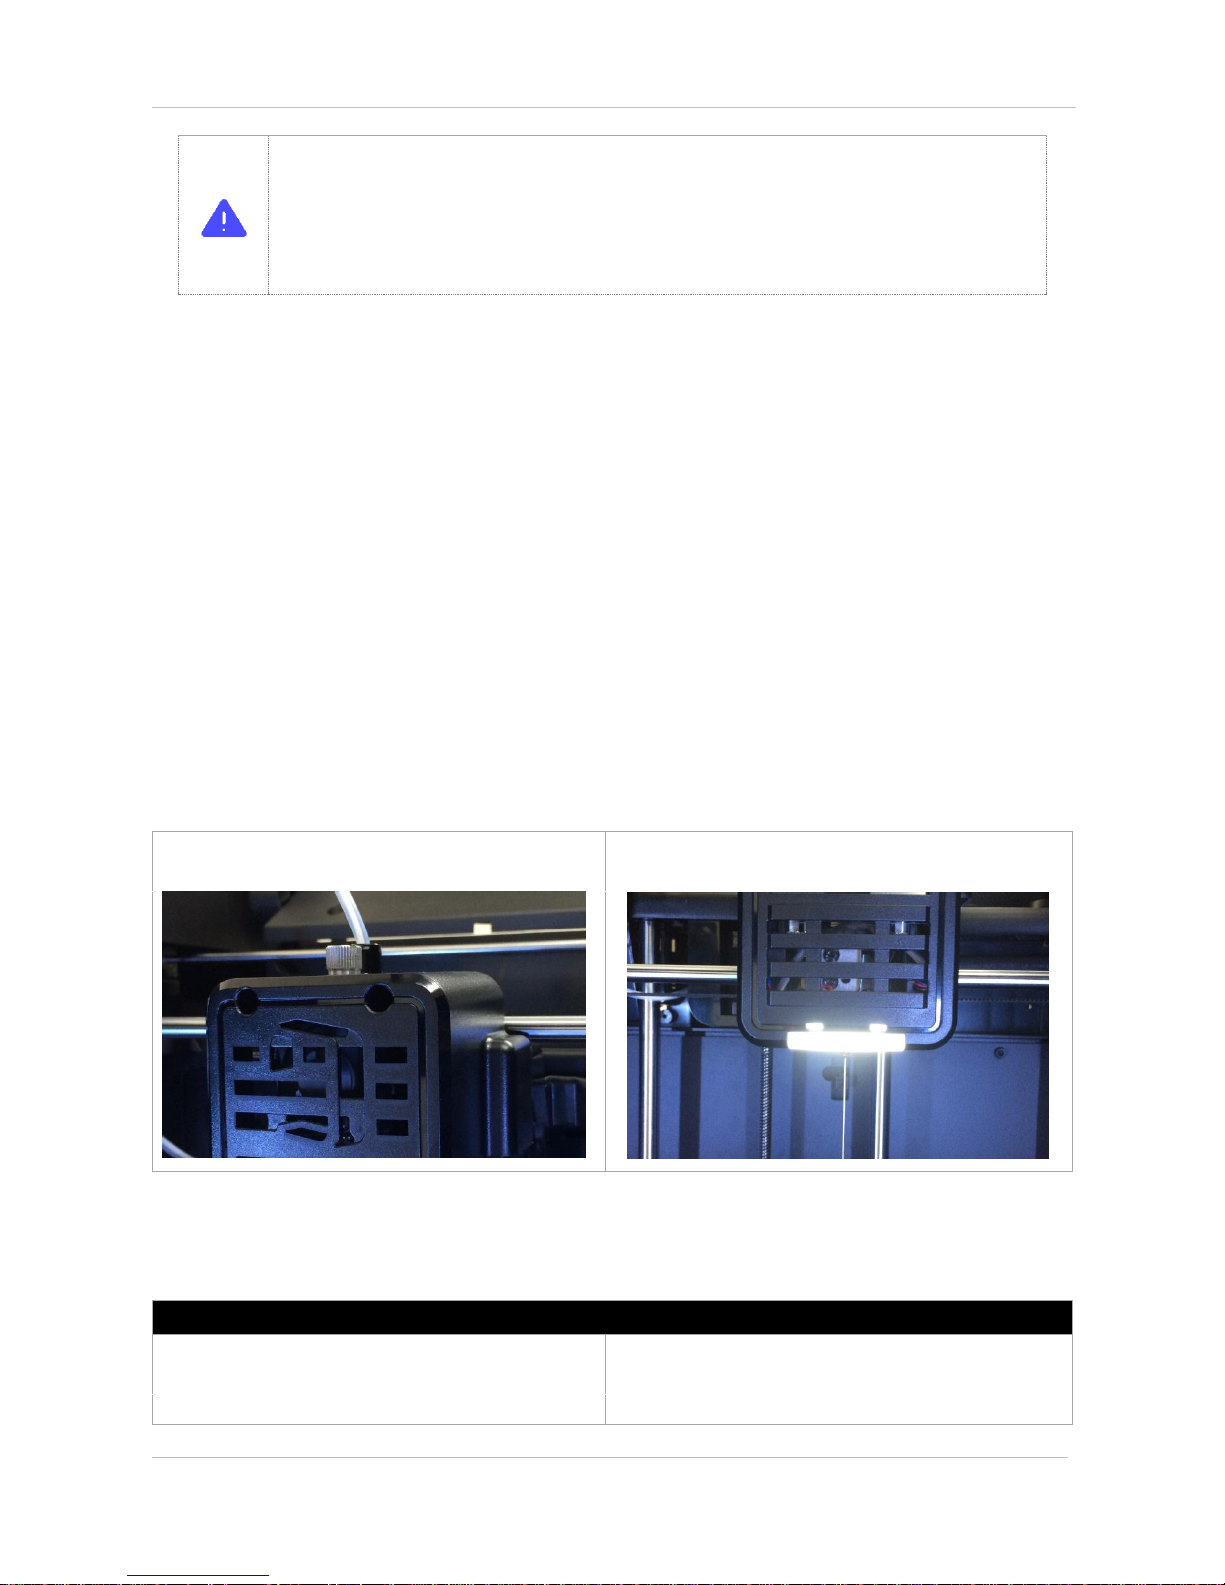
There is a filament detection sensor of Cubicon Single Plus.
The printer automatically goes in ‘Pause’ mode, once sensor, as shown above picture, indicates filament run
out.
Page 23
CUBICON Single Plus User Manual
23
* Sensor may not operate properly due to TPU ductility ,in the time of TPU printing. Make sure to
go to Setting > Function > Filament check OFF in prior to using ductile filament.
* Filament pieces, which come out by automatic unloading in the time of the filament passes through
the detection sensor, might be different depending on the printer model. The amount of filament
pieces might decrease as far as area gets wider and it makes pull out of filament pieces
impossible. Make sure to check remaining filament amount in prior to printing, as reprinting might
be needed.
8. Test model printing
This section explains from the installation to printing by using USB memory. Refer to Cubicreator Software
manual for method of printing through PC and USB cable connection.
8-1. First printing
① ‘7-1 Start loading after reading ‘Loading’ section.
② Loading completion means printing preparation
completion.
8-2. Sample file of USB memory printing
Direct printing
① There is a sample file for printing in provided USB
memory.
② Select a file icon by pressing a print icon. Select
installed filament suitable clip.hfb file and print it out.
Page 24
CUBICON Single Plus User Manual
24
Saving and printing
① Select ‘Utilities’ button and go to ‘File manager’. Select
USB memory and select clip.hfb file and copy it.
②Press the printer icon again and select file icon. Select
copied clip.hfb file, which is suitable to installed filament
and print it out.
* In the case of direct printing method, copy is made to inside memory but unlike saving and
printing method, once you print next file, previous file will be deleted automatically. Make sure to
save the file and print it out, if you want to save the file to inside memory.
9. Network
In order to print with Cubicon single Plus, make sure to save sliced file to USB memory and insert the printer
USB to slot and print the saved file or printing can conducted by connecting PC and USB cable or WIFI. This
section explains about USB cable connection and WIFI connection. (In order to print through a network, over
Cubicreator v3.1* version shall be used.) Once printing starts in Network connection printing process, (after
slicing date transmission to the printer is completed.) normal printing can be processed, even if Network
breaks.
* WPA2PSK security setting for a router is recommended. Other security level are not guaranteed.
* Connection error may occur in the case of SSID includes korean letter, special characters, chinese
characters etc.
* WIFI connection shall be directed to router installation spot antena. Connection property may be
different, depending on a router.
* Printing shall be proceeded after transmitting slcing date form PC in order to print through WIFI
connection. Transmission failure may occur in the case of unstable connection. USB memory use is
recommended if the slicing data is big.
Page 25
CUBICON Single Plus User Manual
25
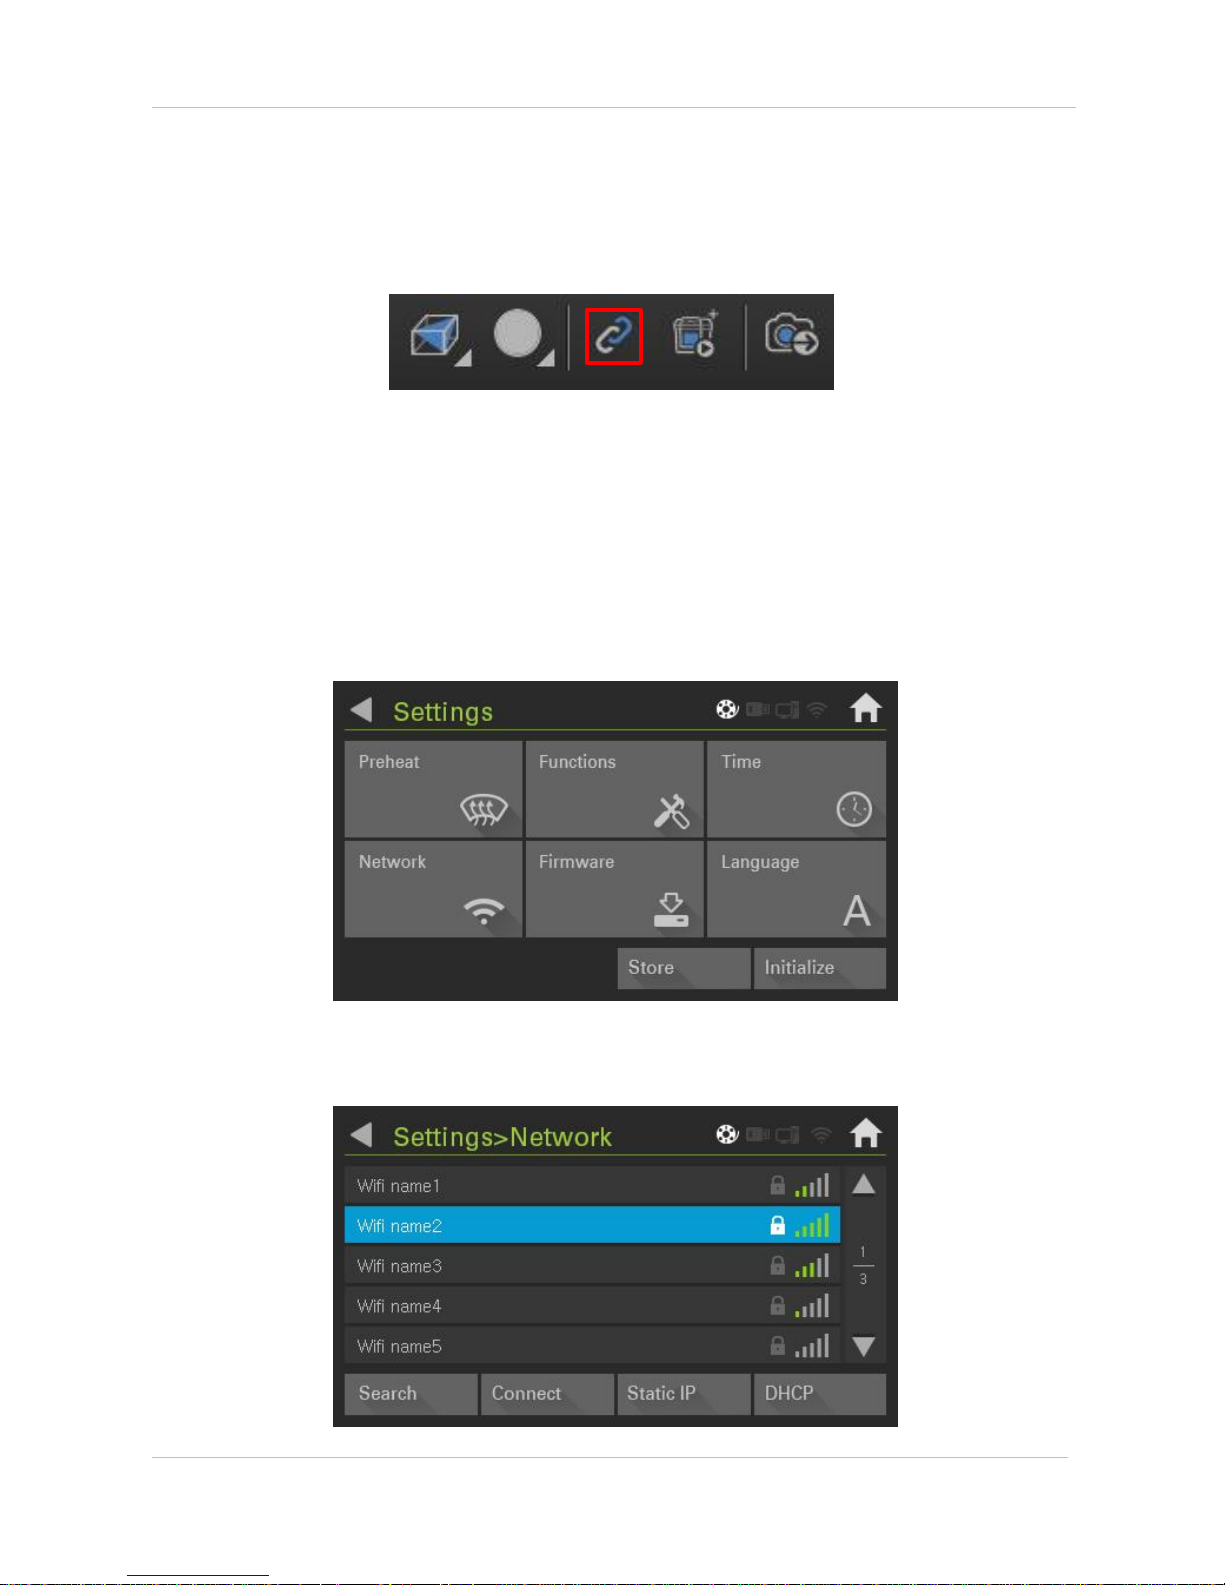
9-1. USB cable connection between PC and printer
PC and the printer are connected with USB cable. (Make sure to install a cubicreator related driver in the
cubicreator installation process.)
Indicated icon activation means completion of printing preparation. Refer to the cubicreator manual for
detailed printing method.
9-2. WIFI connection
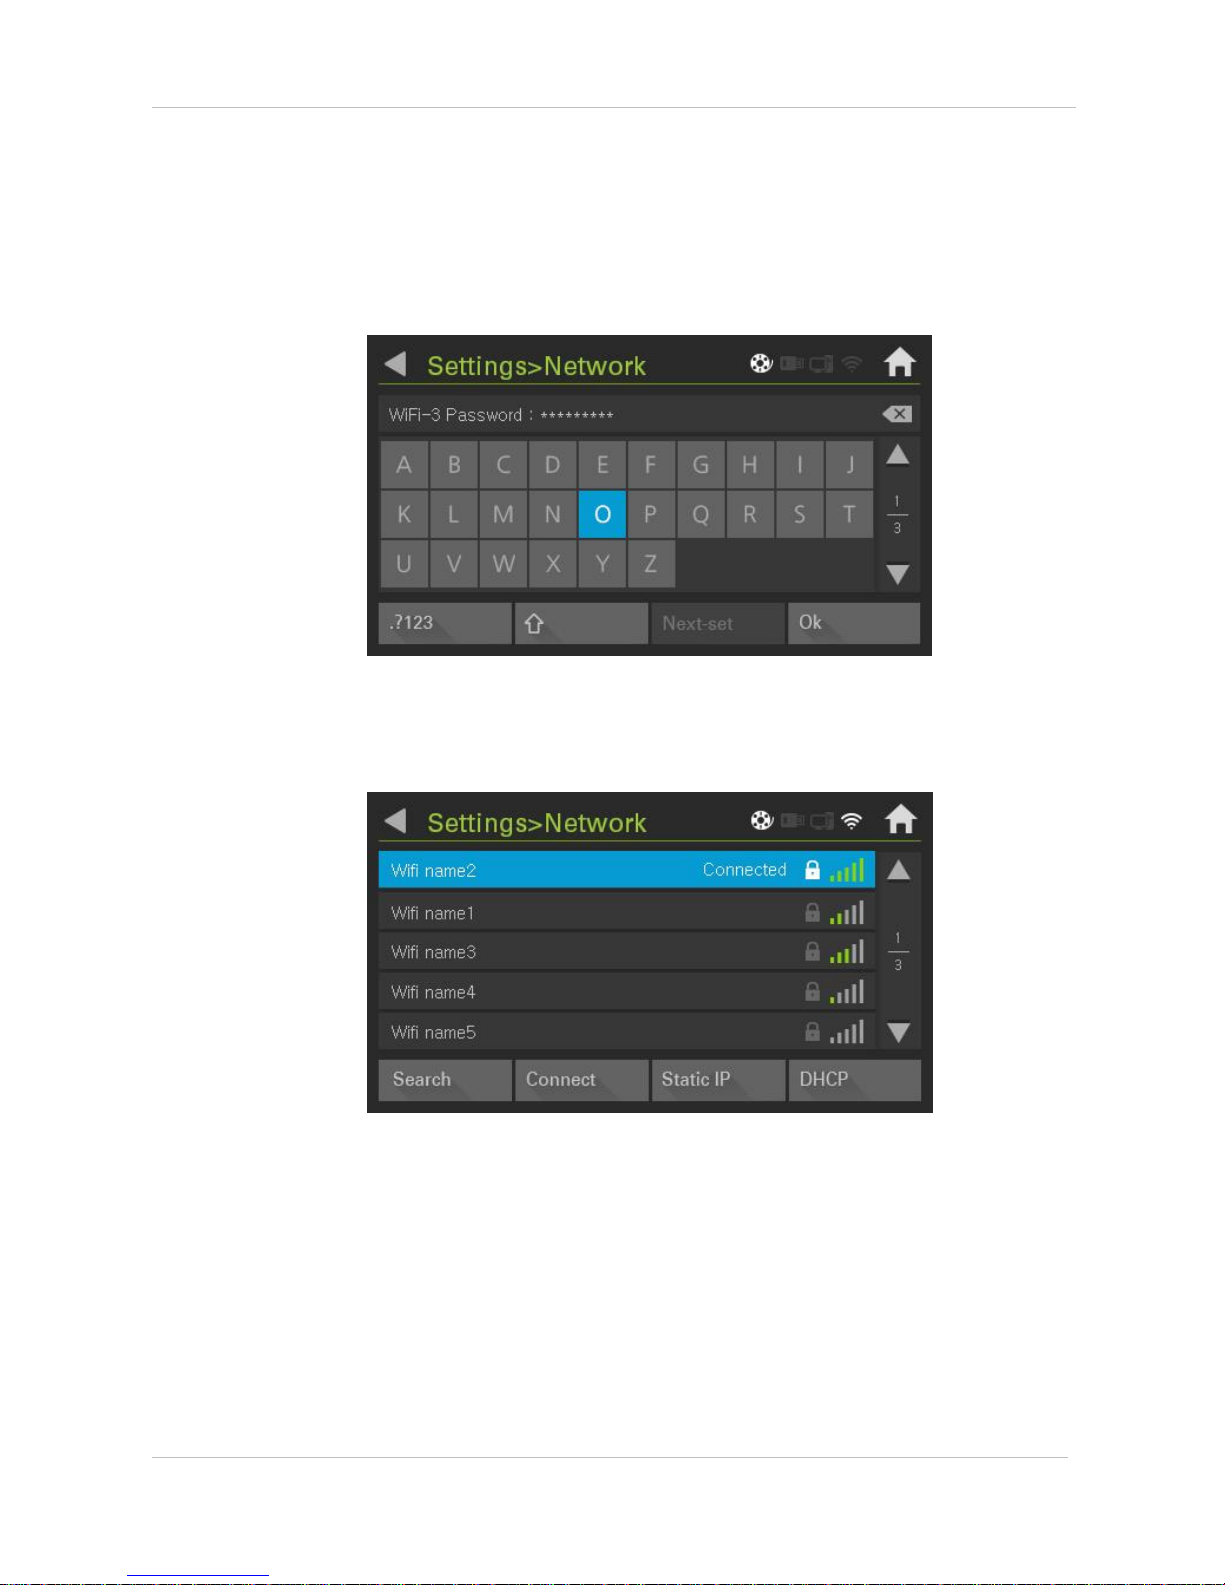
Go to ‘Settings’ and select ‘Network’.
Page 26
CUBICON Single Plus User Manual
26
Select one between Static IP and DHCP, press search, and search for available WIFI. Once you find
available WIFI, select it.
(1) DHCP connection
Press ‘OK’ and start connection, once you finish inputting password.
‘Connected’ indication will activate, once connection is completed and Network Setting of Cubicon
single plus is completed.
Page 27
CUBICON Single Plus User Manual
27
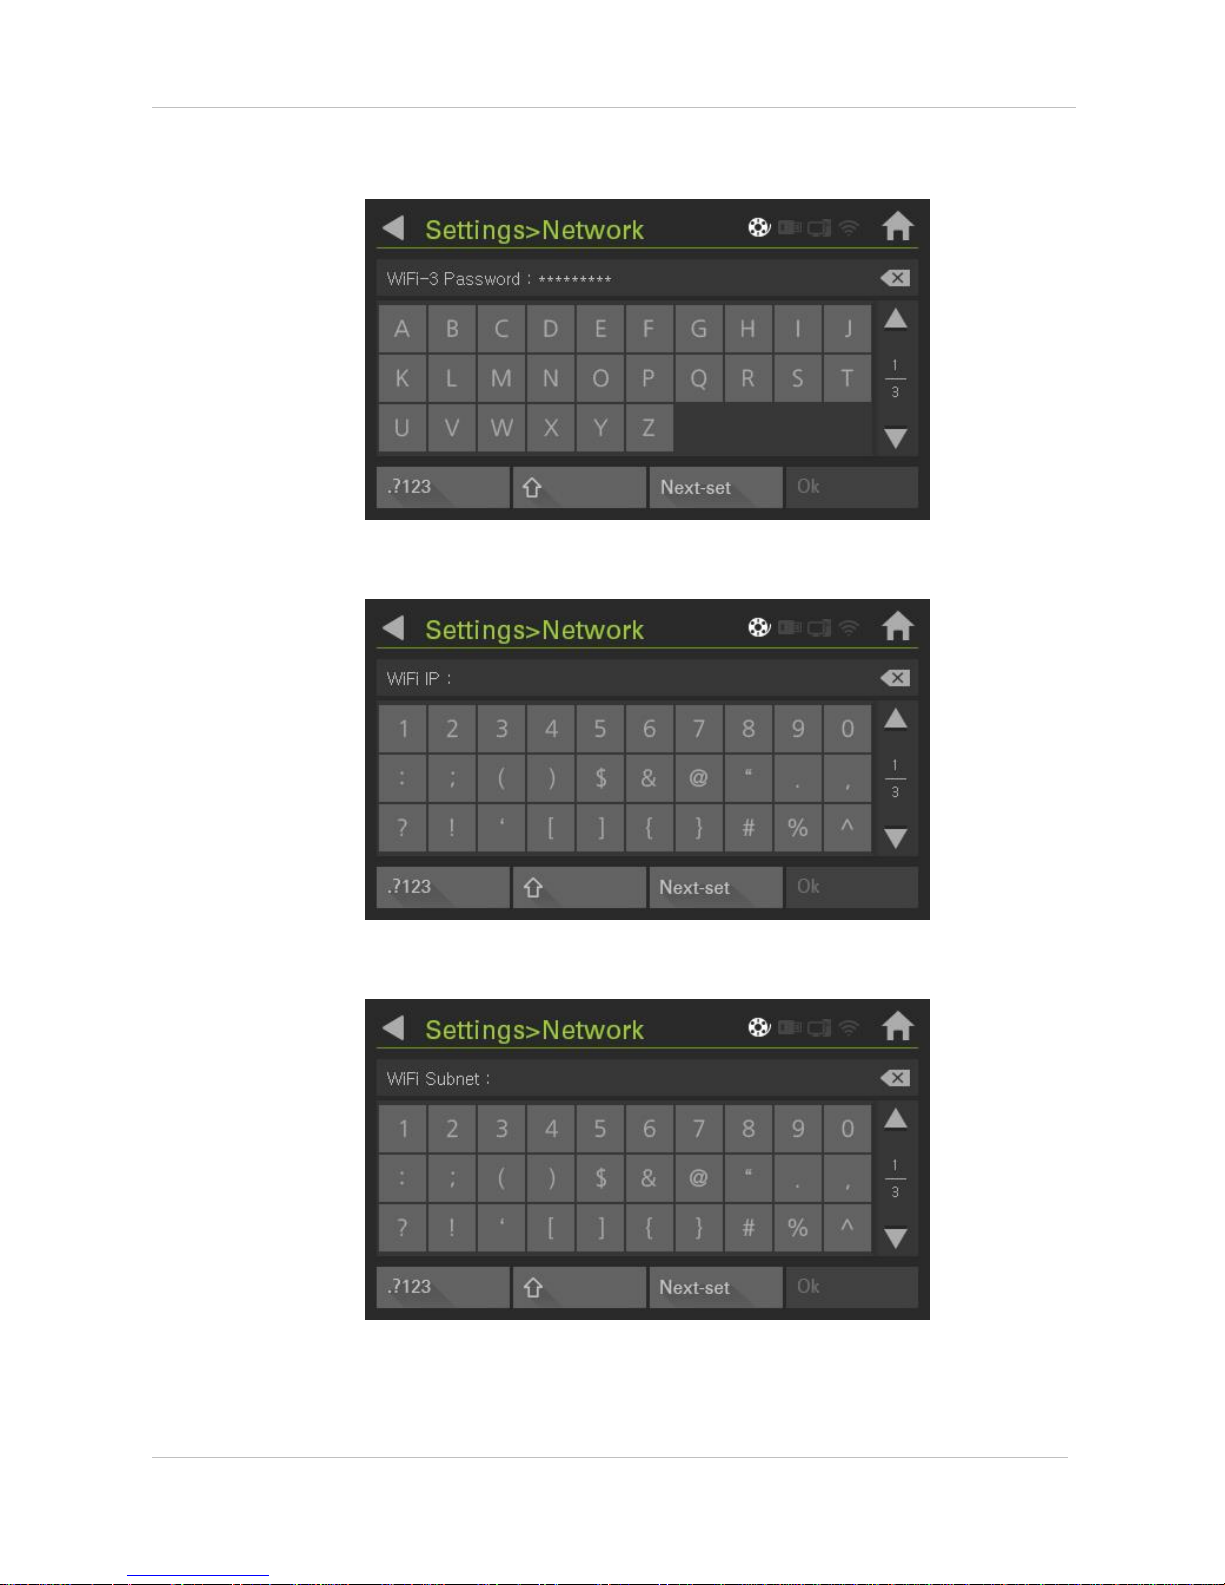
(2) Static IP connection
Input password and select ‘Next-set’.
Input WIFI IP.
Page 28
CUBICON Single Plus User Manual
28
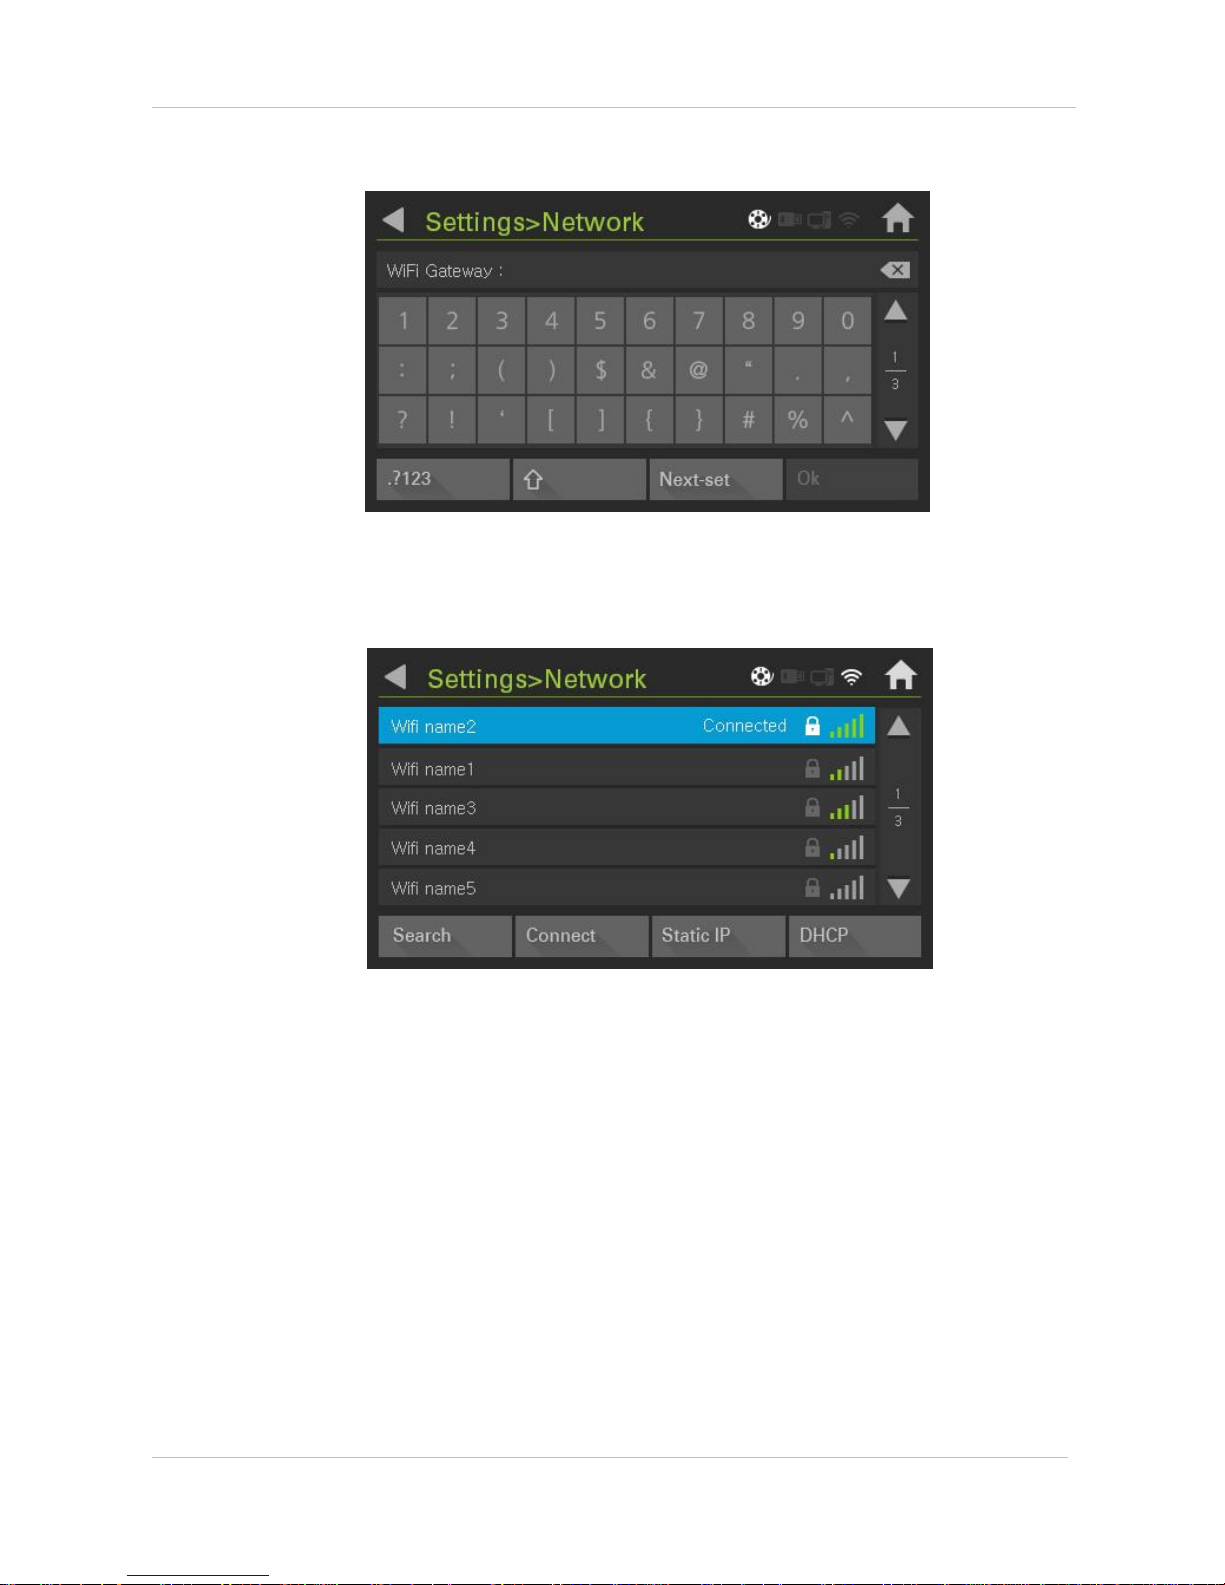
Input Subnet
Input Gateway, press ‘OK’ and start connection
‘Connected’ indication will activate, once connection is completed and Network Setting of Cubicon
single plus is completed.
Page 29
CUBICON Single Plus User Manual
29
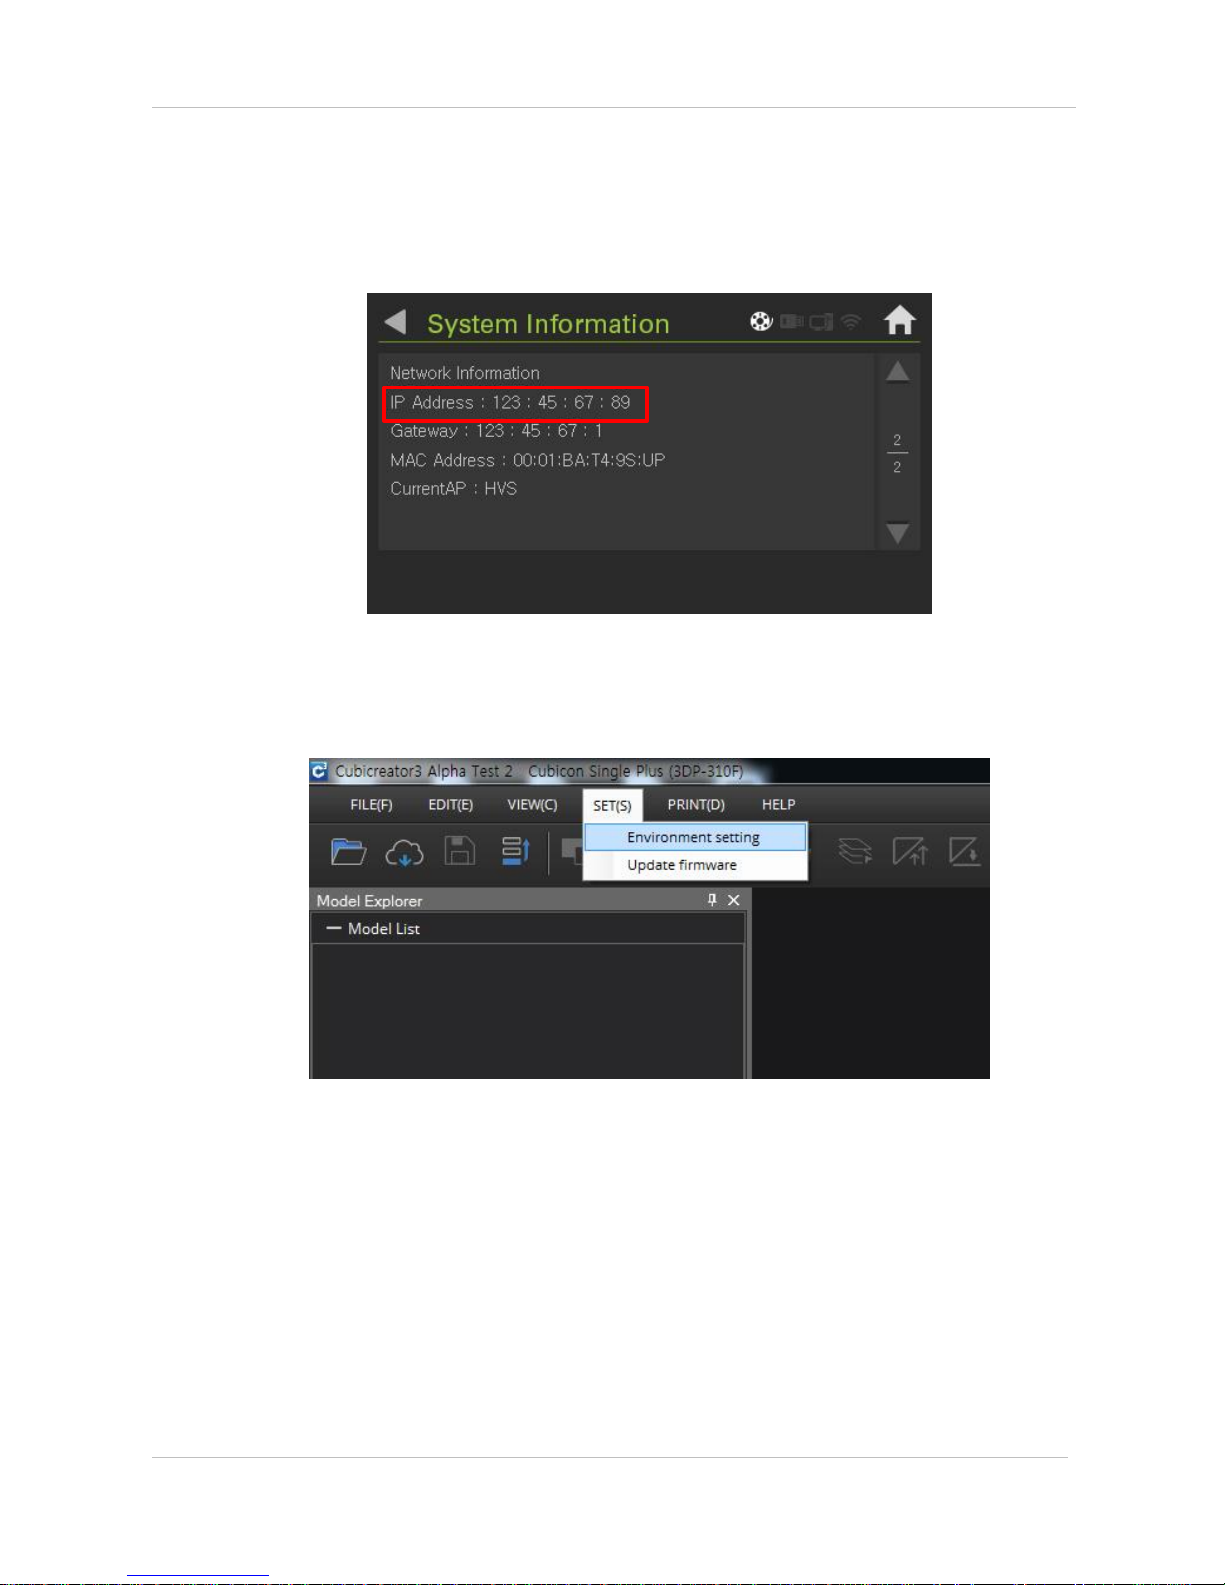
(3) Connected IP check
User can check current printer IP on 2/2 screen by pressing ‘System information’ on the main
menu after WIFI connection.
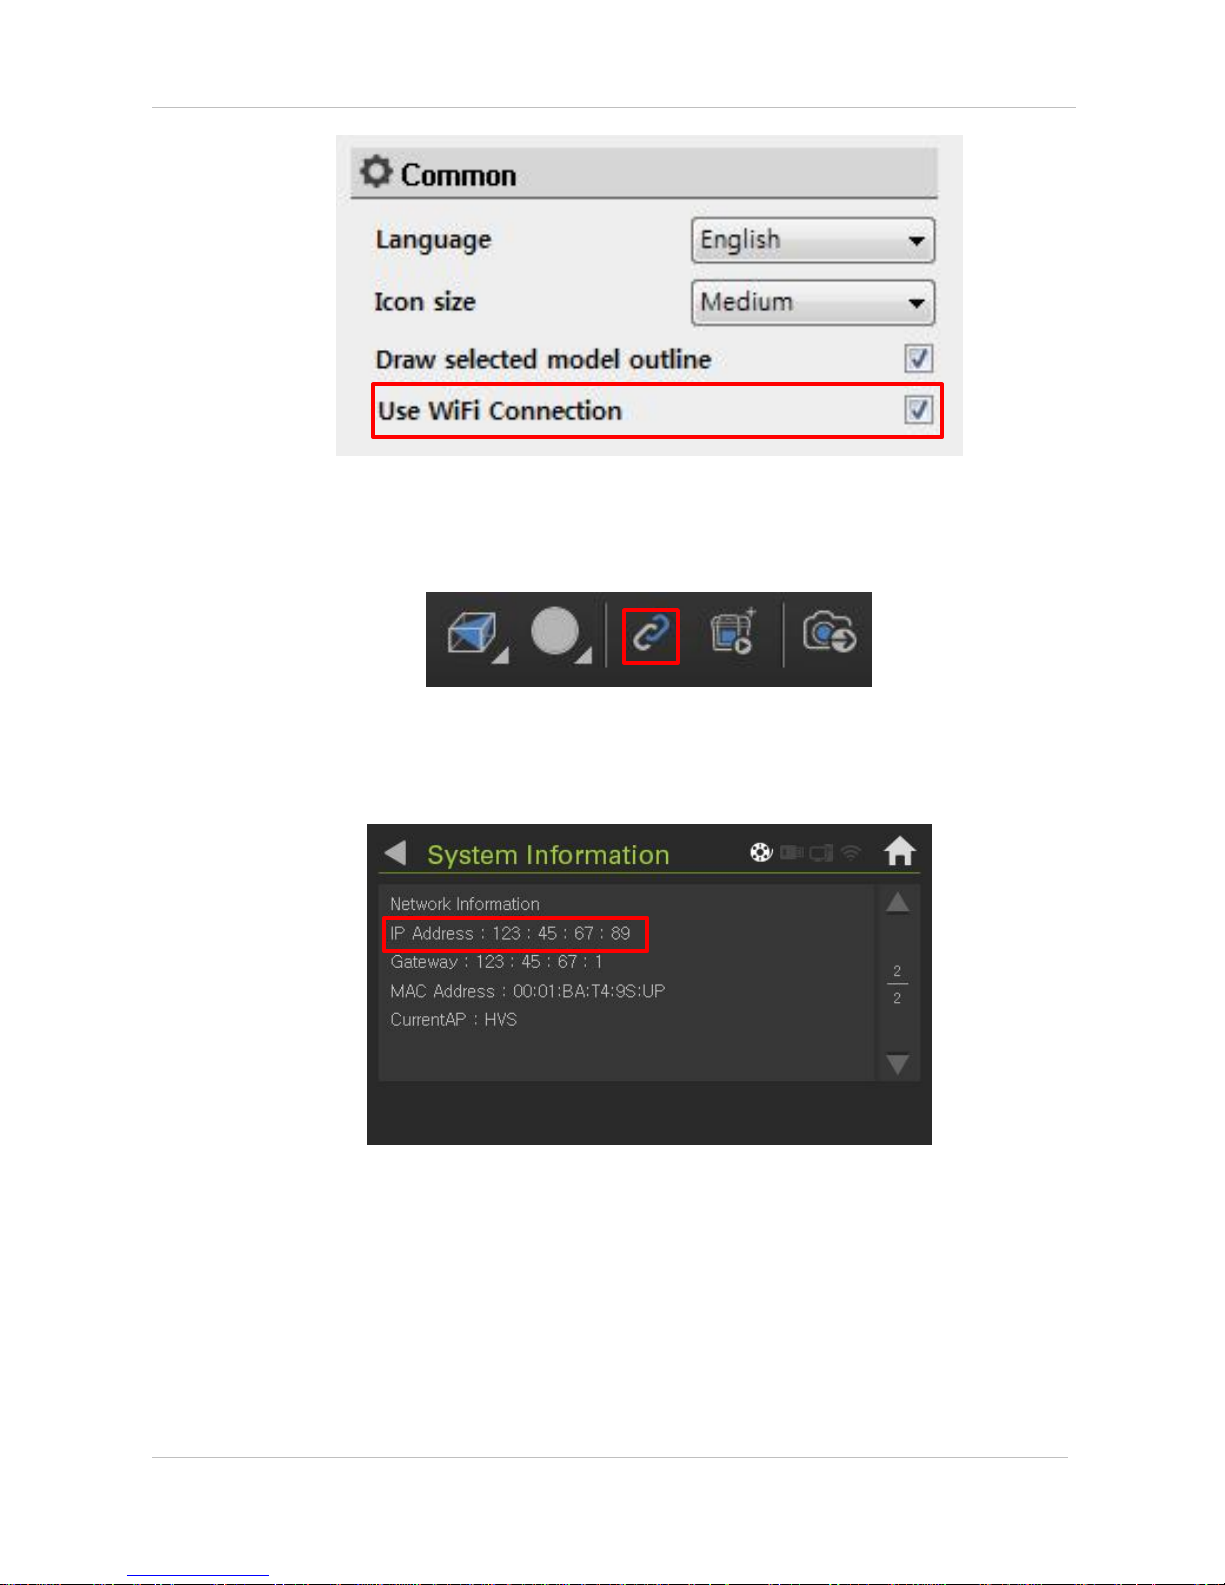
9-3. Cubicreator3 WIFI connection
Activate Cubicreator 3 and select ‘Environment setting’.
Page 30
CUBICON Single Plus User Manual
30
Select ‘Use WiFi Connection’ option.
Press connection icon. Connect with related printer IP. Refer to Cubicreator3 manual for details.
IP can be checked on 2/2 of ‘System Information’.
Page 31
CUBICON Single Plus User Manual
31
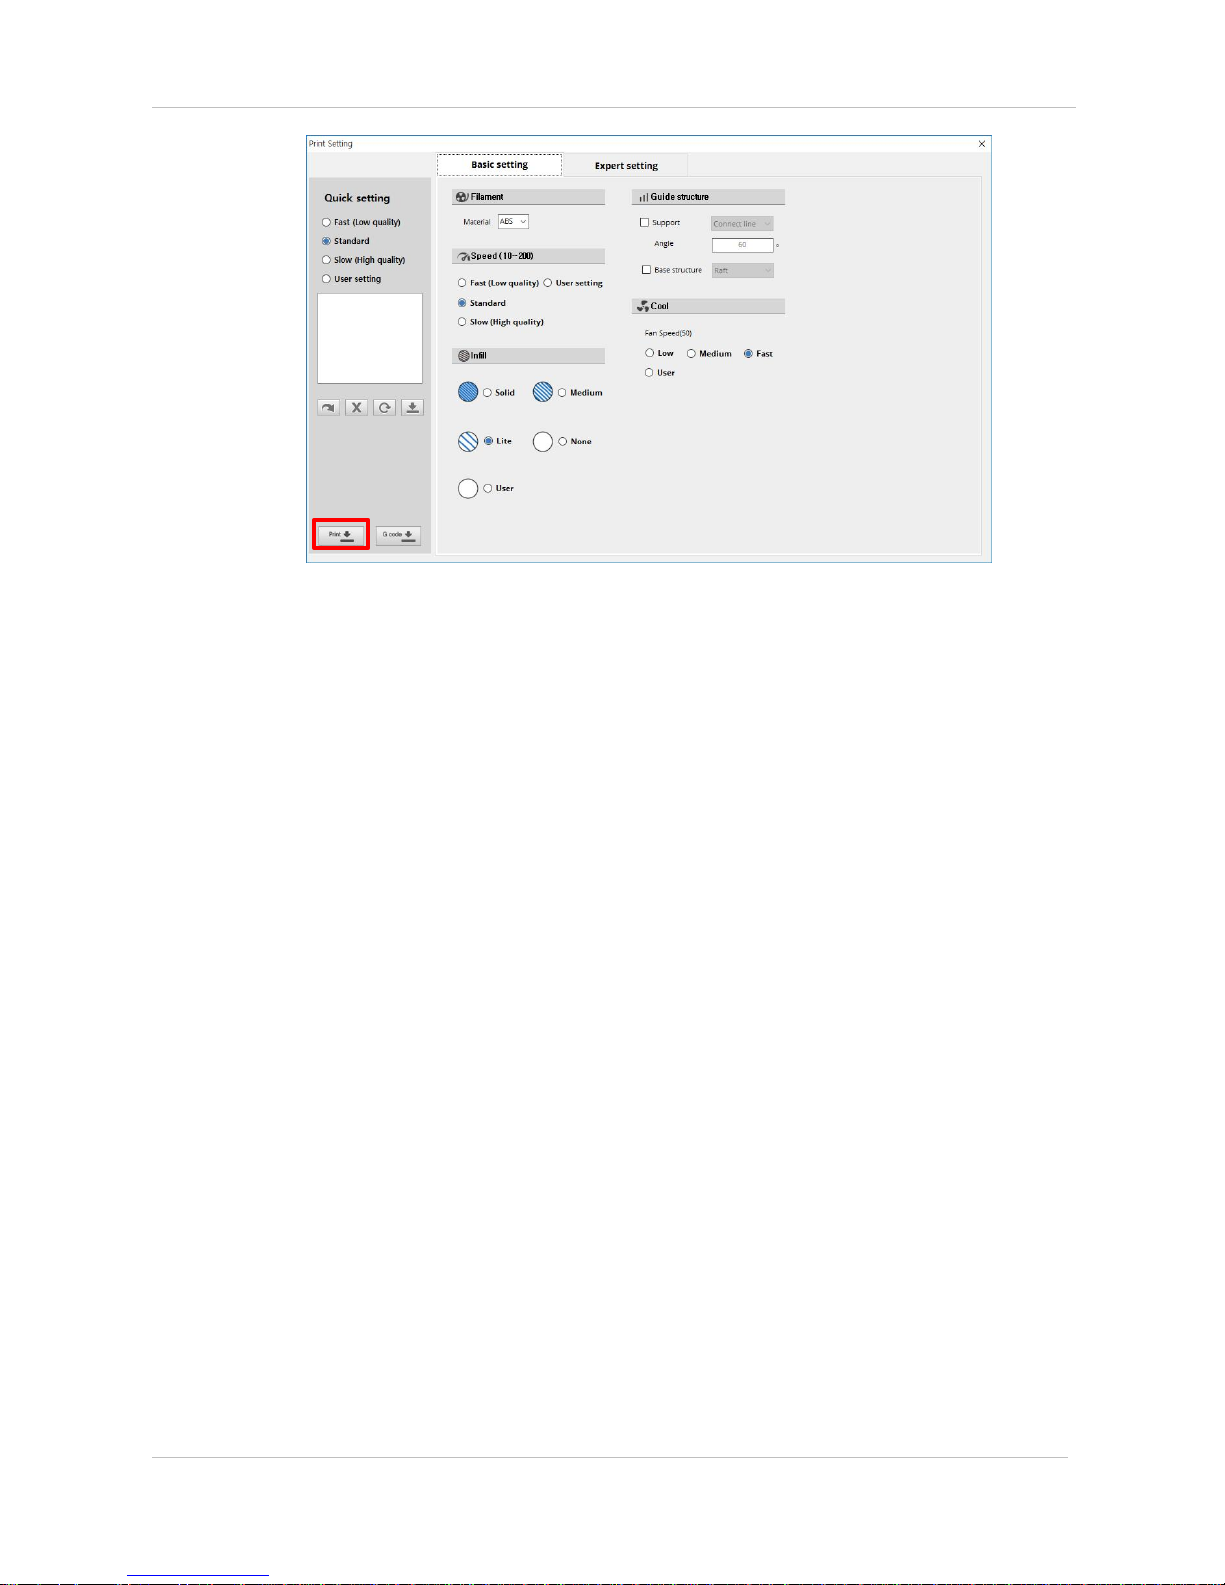
Once proper connection is finished, Print icon will activate in the same way with USB cable
connection.
Page 32
CUBICON Single Plus User Manual
32
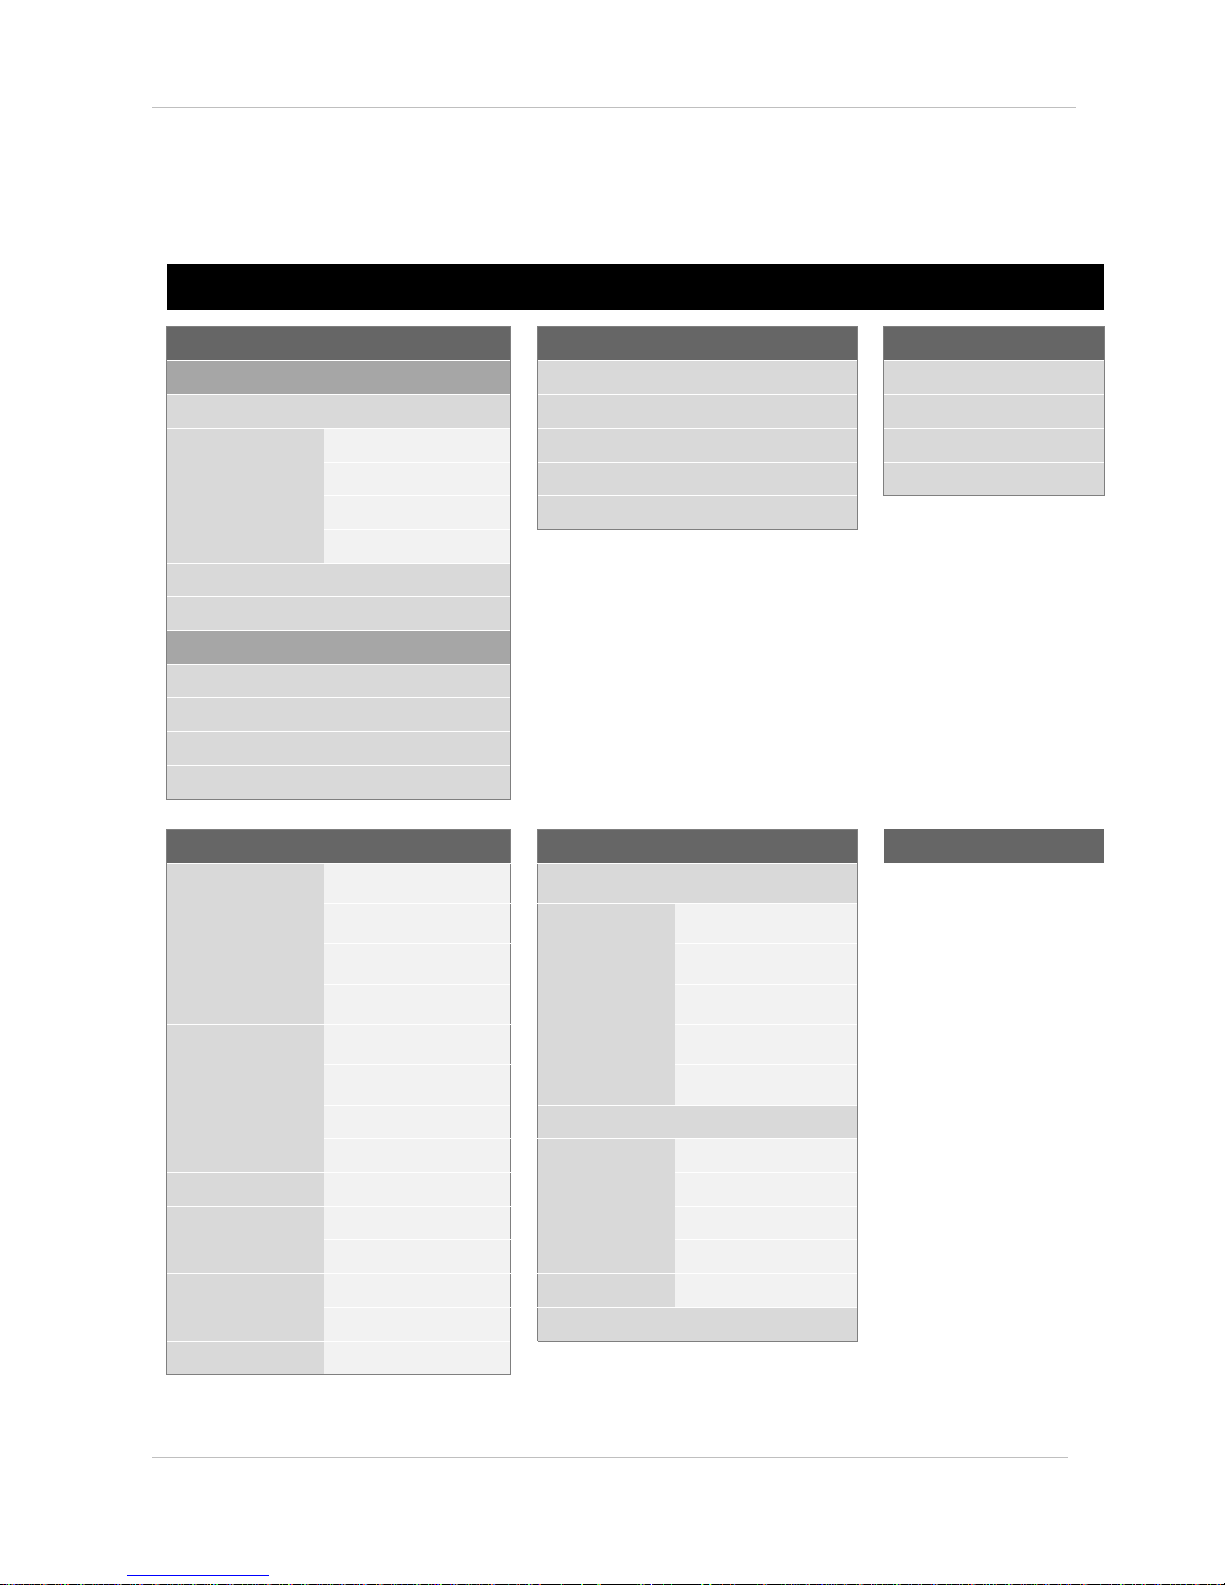
10. User Interface
Menu tree
Print
Heating
Filament
•Print standby status
Cool Down
Start
Start(Deactivated)
ABS Stop
File
- Start
PLA Unloading
- Up-Folder
TPU Loading
- Information
USER
- USB / I - Memory
Heating
Filament
• Printing under process
Pause
Stop
Heating
Filament
Utility
Setting
Information
File Manager
- Copy
Preheat
- Delete
Function
- Filament Check
- Up-Folder
- File Sorting
- USB / I - Memory
- Filter Fan
Motion
- Extruder
- Rear Fan
- Bed
- Tilt Offset
- Motor
Time
- D-Gear
Network
– Search
Diagnostics
- Start
- Connect
LED& Sound
- Store
- Static IP
- Initialize
- DHCP
Auto Level Test
– Filament
Firmware
– Download
- Start
Language
System Log
- Copy
Page 33
CUBICON Single Plus User Manual
33
* Menu composition of pre-print and printing under process are different.
*. Menu composition is subject to change in accordance with a firmware and cubicreator version.
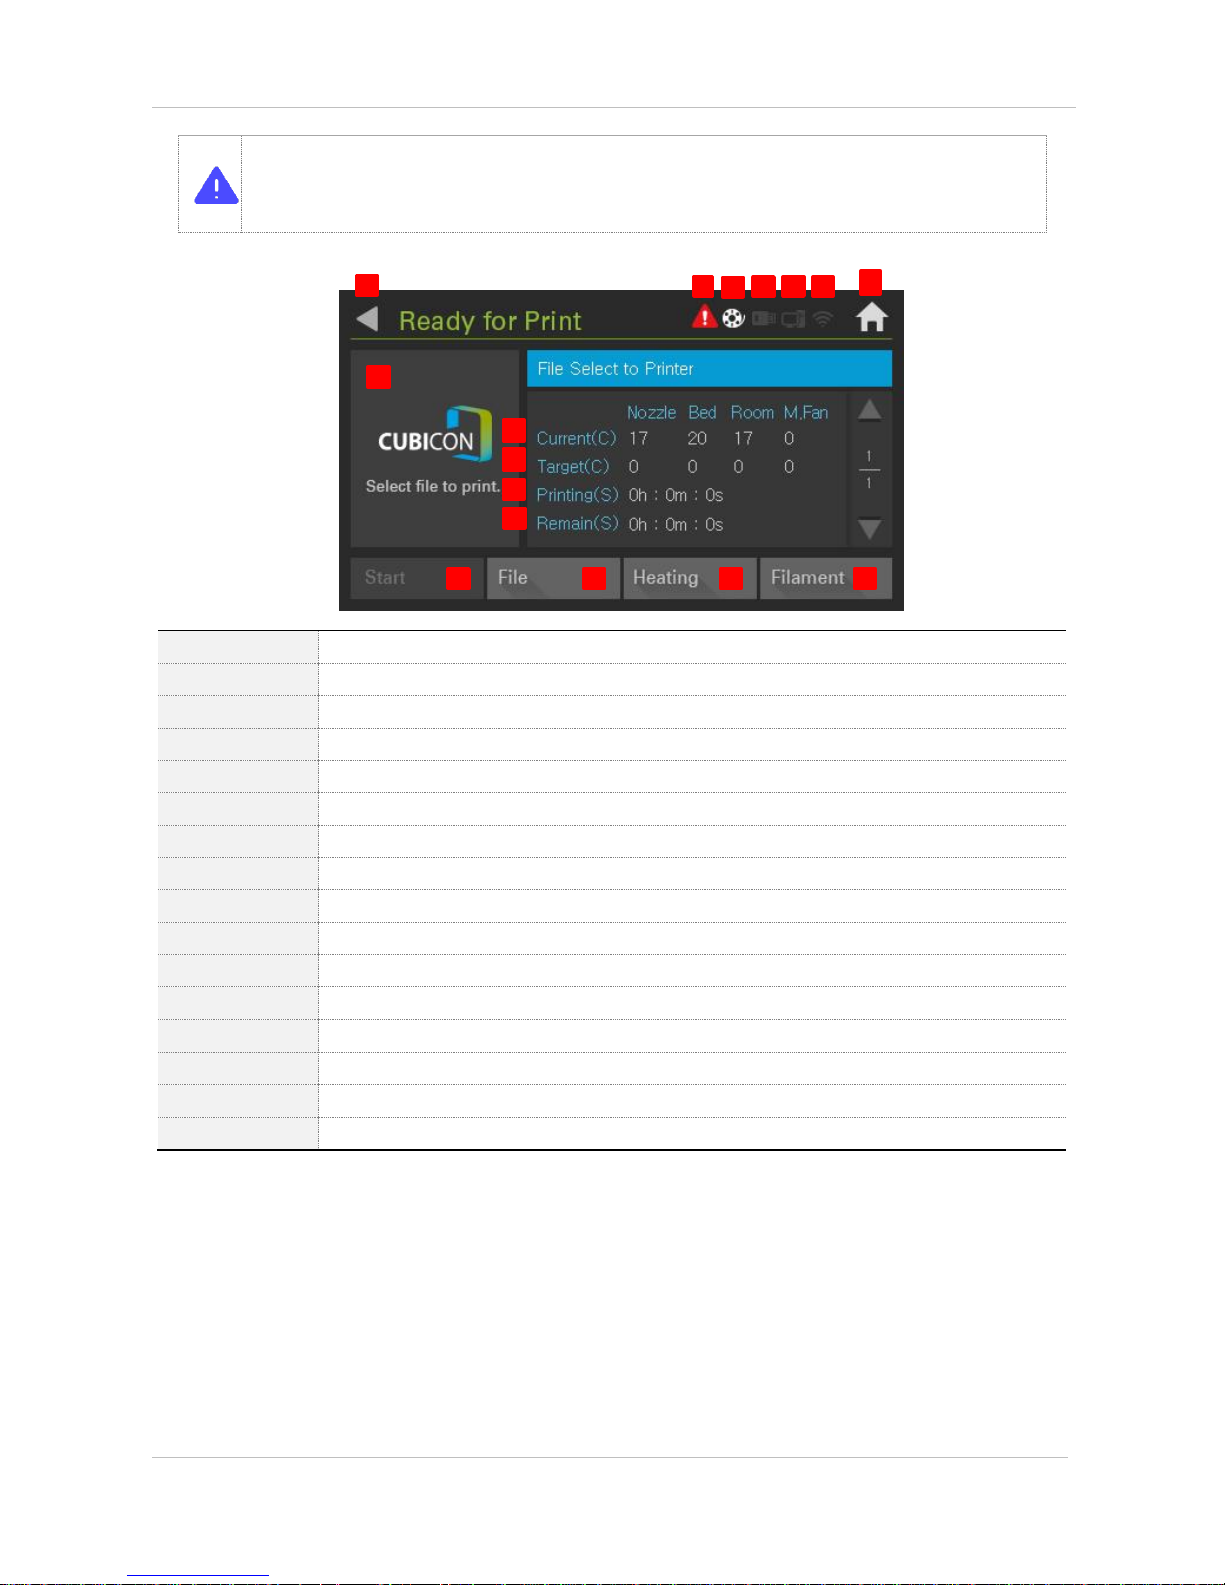
Main > Print > Ready for Print
[1] Back
Goes back to previous screen
[2] Error
Notifies the printer problem. (if ‘Error’ is pressed on main screen, it enters to ‘Diagnostic’)
[3] Filament
Is the icon indicating the filament presence
[4] USB Memory
Is the icon, which indicates USB memory activation
[5] PC
Is the icon, which activates in the time of connection with PC
[6] Wi-Fi
Is the icon, which activates in the time of WIFI connection
[7] Home
Goes back to the main screen
[8] Image
Indicates printing file image and is activated in the time of Gcode formation with Cubicreator 3
[9] Current
Indicates current temperature
[10] Target
Indicates fixed temperature of Gcode
[11] Printing
Indicates process time of printing model
[12] Remain
Indicates remaining time of printing model
[13] Start
Is in deactivation mode in the first start
[14] File
Selects file to print out
[15] Heating
Enters to Heating menu
[16] Filament
Enters to Filament menu
2
3 4 5 6 7
10
11
8
9
1
12
13
14
15
16
Page 34
CUBICON Single Plus User Manual
34
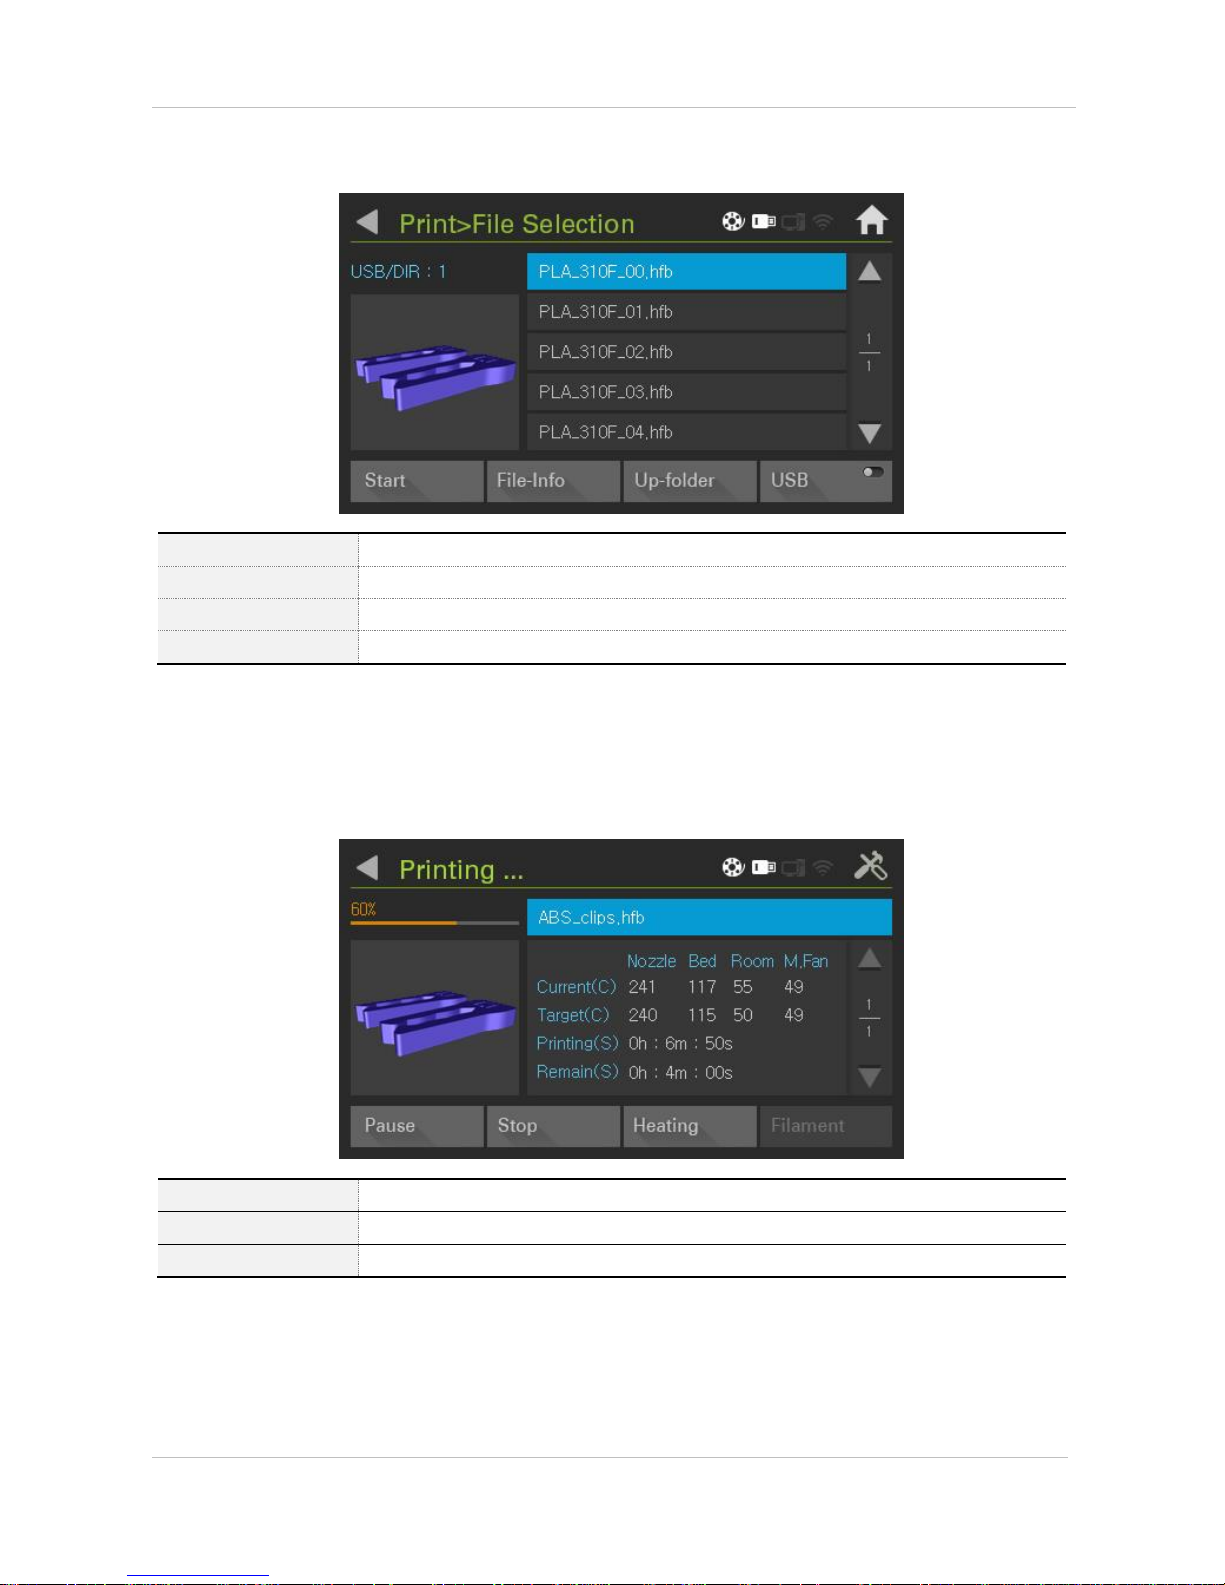
Main > Print > file Selection
[1] Start
Prints selected file
[2] File-Info
Shows information of selected file (over Cubicreator3.0 version)
[3] Heating
Enters to Heating menu
[4] Filament
Enters to Filament menu
Main > Printing...
[1] Pause
Pauses printing
[2] Stop
Stops printing
[3] Heating
Controls current temperature
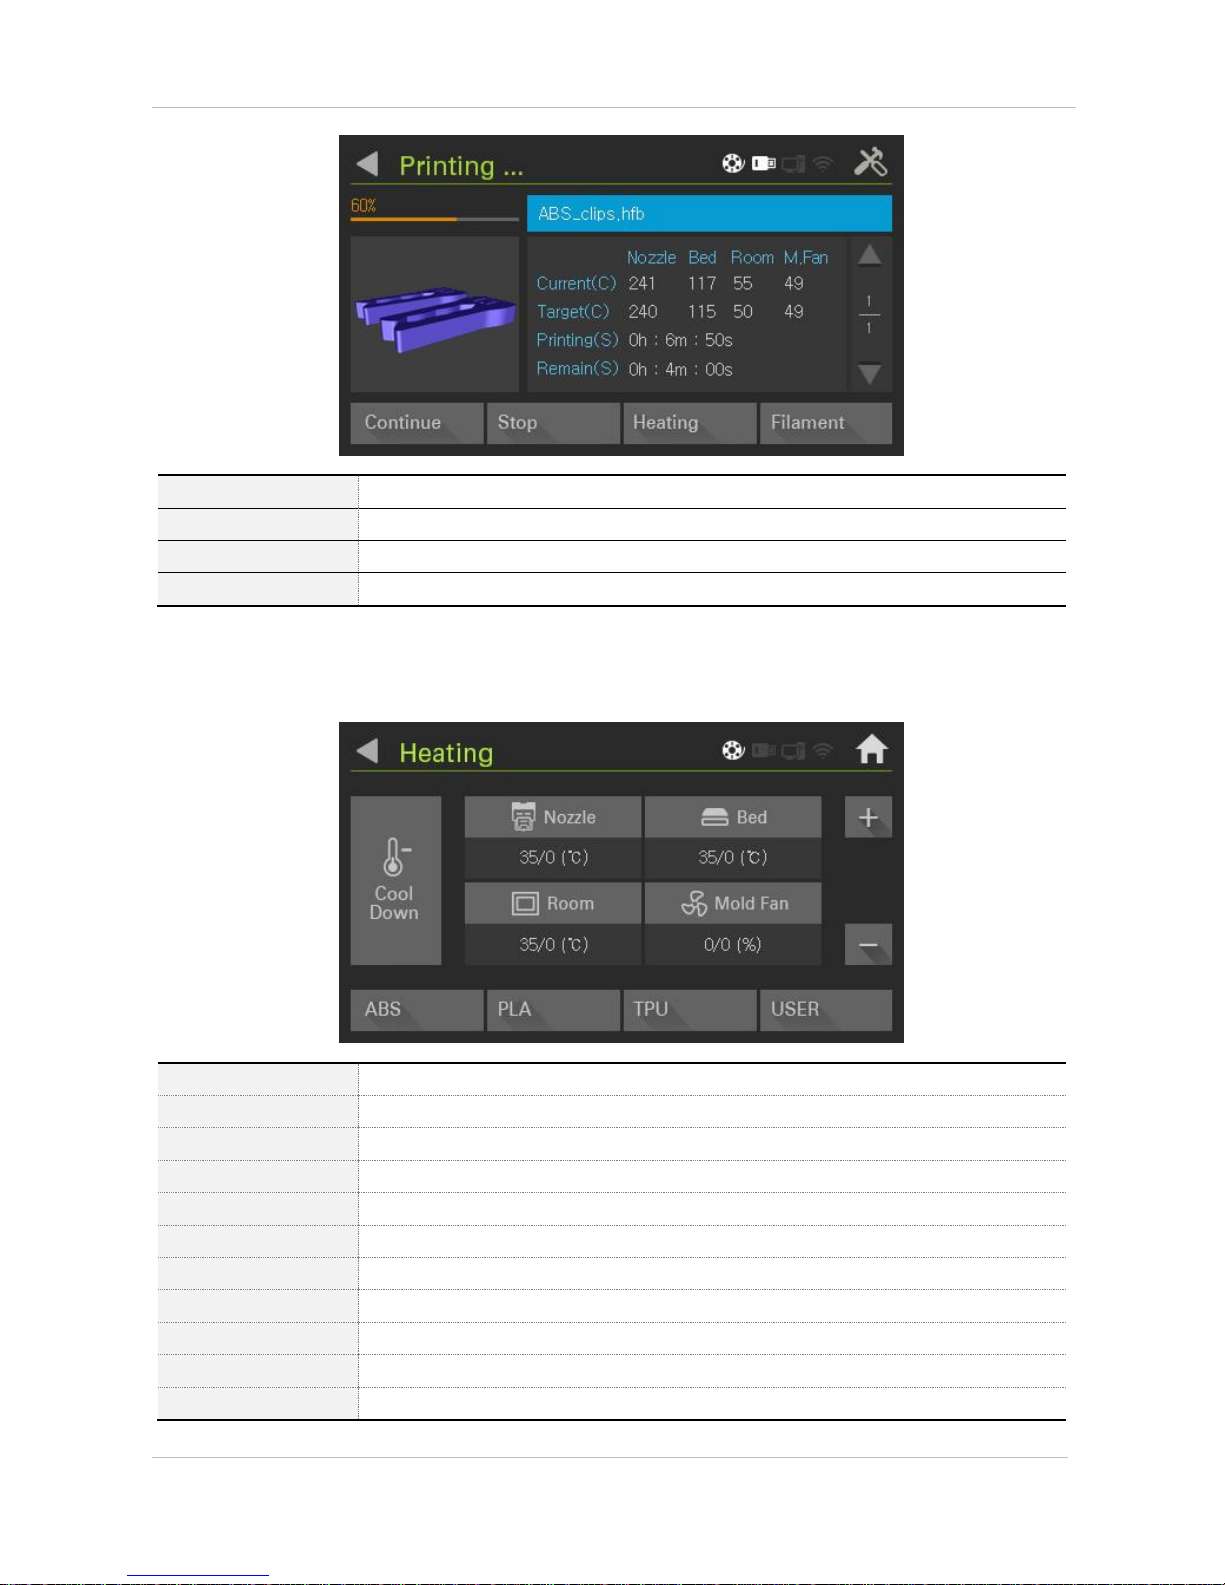
Main > Printing Pause
Page 35
CUBICON Single Plus User Manual
35
[1] Continue
Connects and prints paused files from paused point.
[2] Stop
Stops printing (Pup-up is activated after FW1.1)
[3] Heating
Controls current temperature
[4] Filament
Enters the filament loading / unloading
Main > Heating
[1] Nozzle
Nozzle temperature
[2] Bed
Bed temperature
[3] Room
Inside printer temperature
[4] Fan
Controls shaped fan wind power
[5] +
Increase selected number
[6] -
Decrease selected number
[7] Cool Down
Initializes all temperature setting value
[8] ABS
Warms up basic setting temperature of ABS
[9] PLA
Warms up basic setting temperature of PLA
[10] TPU
Warms up basic setting temperature of TPU
[11] USER
Warms up user setting temperature. Basic temperature is 0°C
Page 36
CUBICON Single Plus User Manual
36
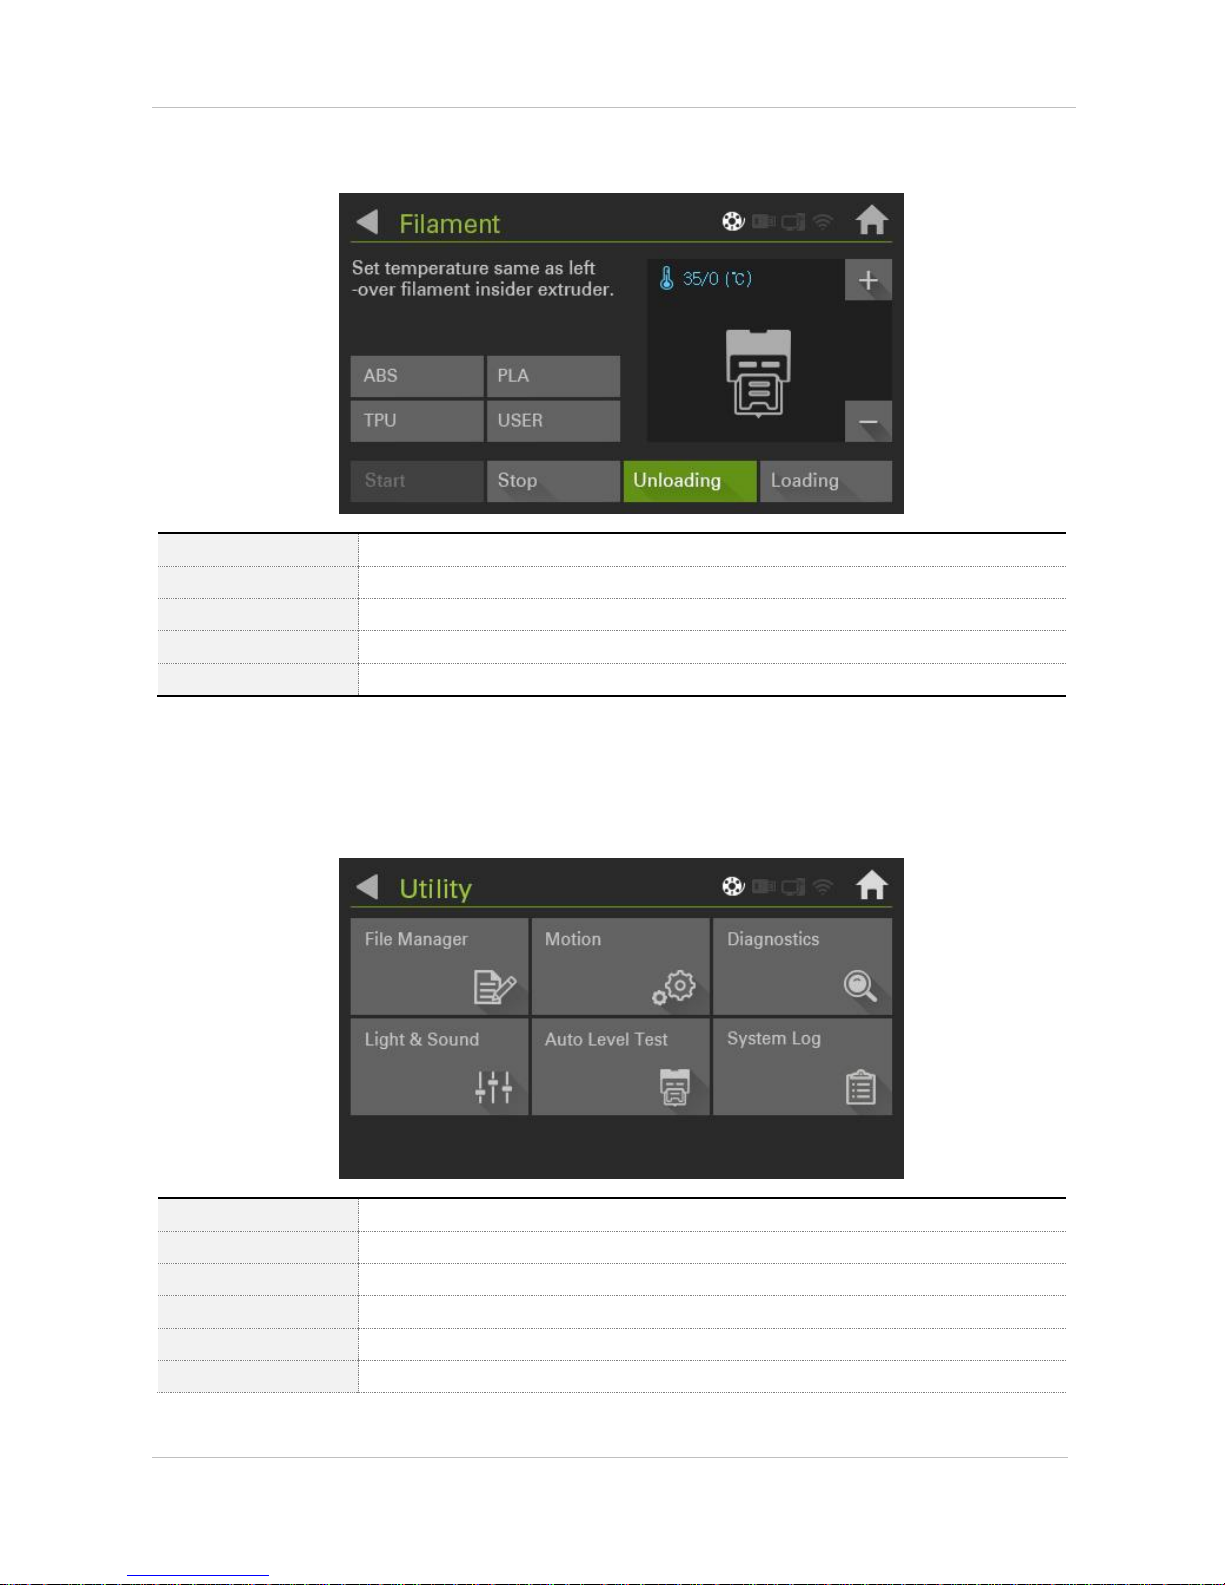
Main> Filament
[1] Filament type
Selects filament.( ABS, PLA, TPU, user description)
[2] Start
Starts selected operation
[2] Stop
Stops current operation
[3] Unloading
Pulls out filament
[4] Loading
Puts in Filament
Main > Utilities
[1] File Manager
Copies and deletes USB / inside memory file
[2] Motion
Starts selected operation
[3] Diagnostic
Decides malfunction presence with self-diagnosis
[4] LED & Sound
Adjusts LED color selection and volume
[5] Auto Level Test
Measures bed flatness
[6] System Log
Copies saved log
Page 37
CUBICON Single Plus User Manual
37
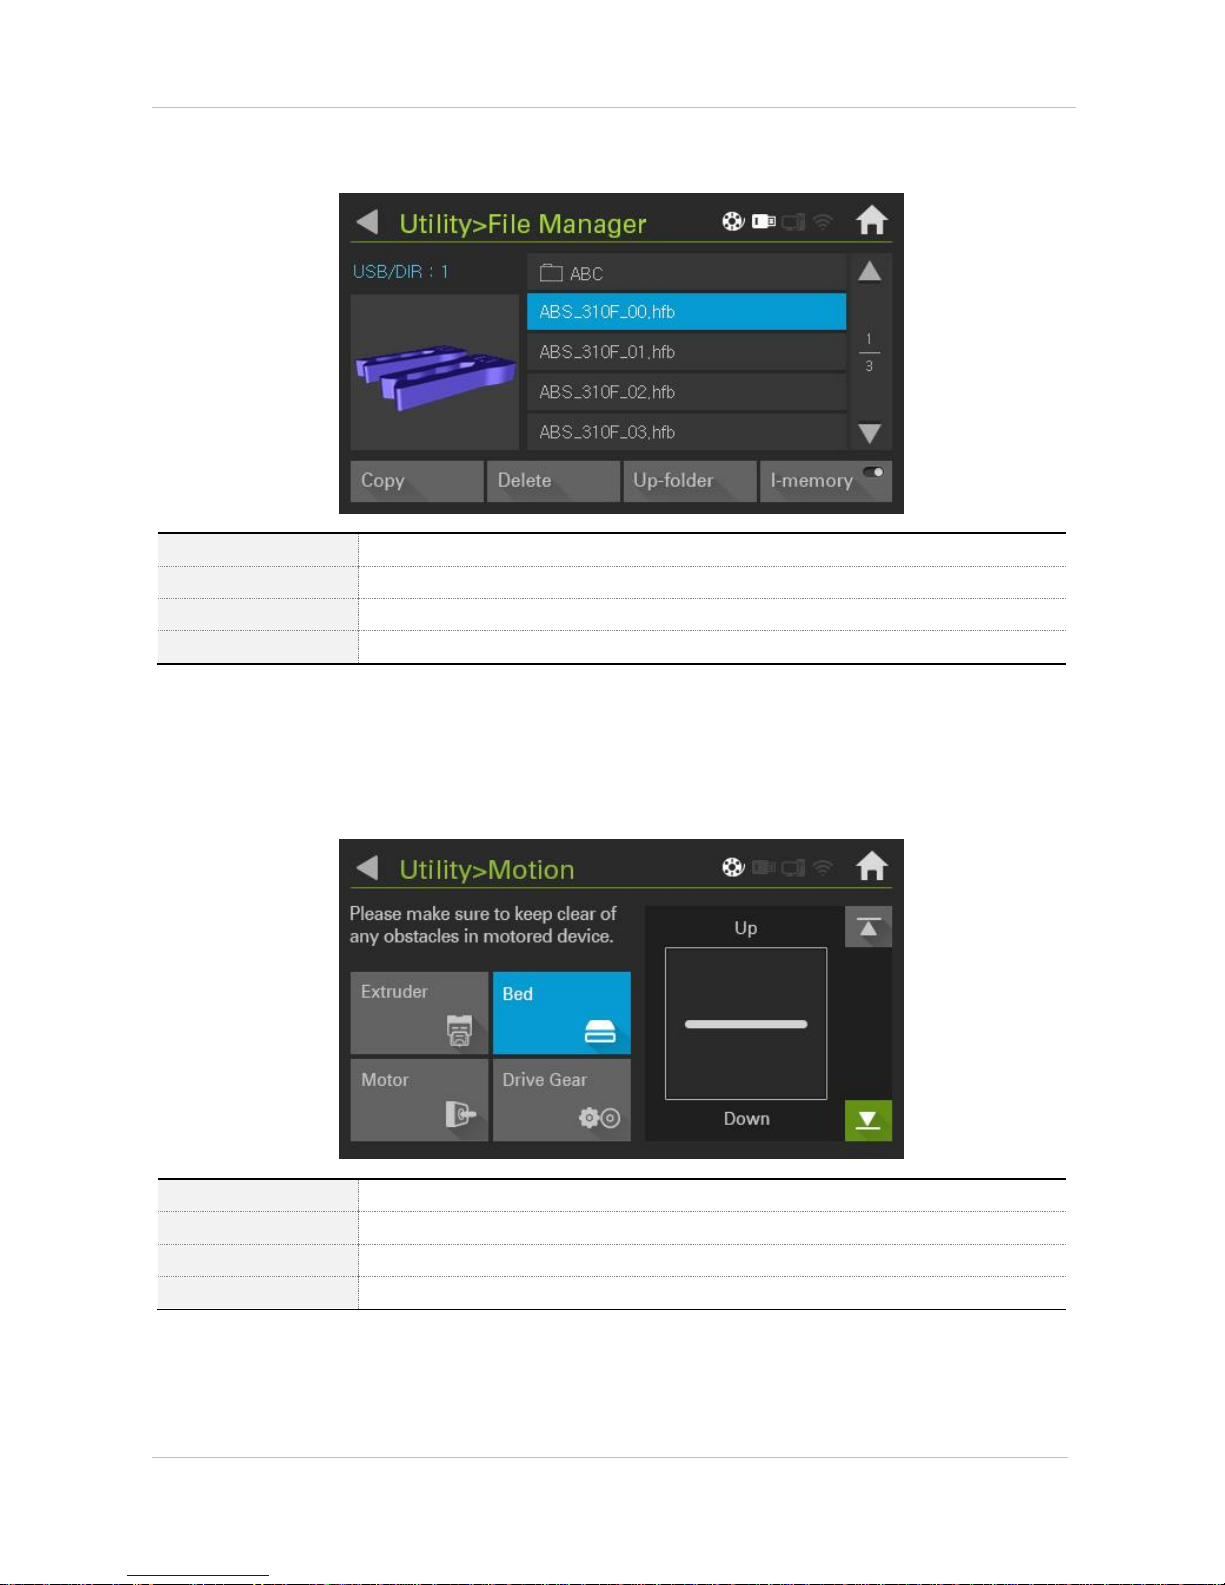
Main > Utilities > File Manager
[1] Copy
Copies selected file after moving with △▽
[2] Delete
Deletes selected file
[3] Up-Folder
Gets out from inside folder to top folder
[4] USB/inside memory
Enters to USB / inside memory
Main > Utilities > Motion
[1] Extruder
Moves the extruder to home and parking point
[2] Bed
Moves bed up and down
[3] Motor
Fixes or manually moves extruder
[4] D-Gear
Rotates extruder gear
Page 38
CUBICON Single Plus User Manual
38
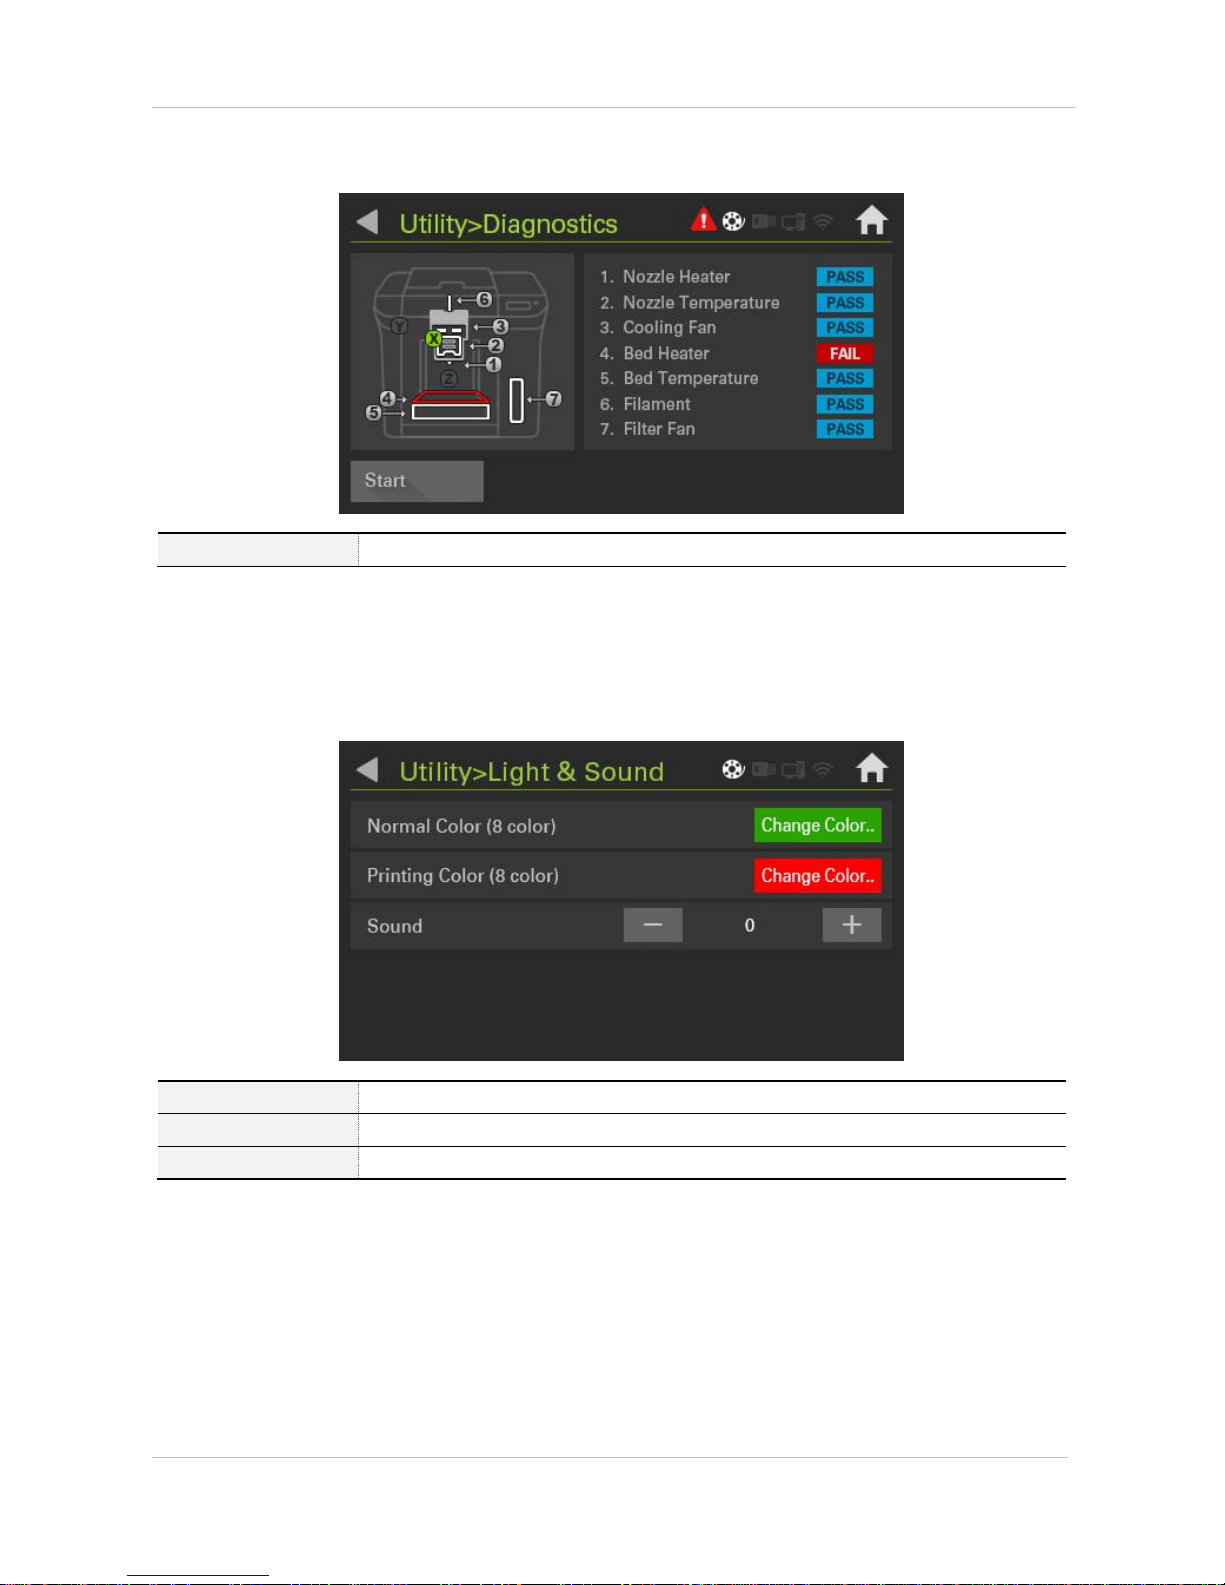
Main > Utilities > Diagnostic
[1] Start
Self-diagnoses main parts (enters to above screen, once ‘Warning’ icon is pressed)
Main > Utilities > LED & Sound
[1] Nomal Color
Selects inside light color in the time of not printing
[2] Printing Color
Selects inside light color in the time of printing
[3] Sound
Conducts setting up and down of button touch volume
Page 39
CUBICON Single Plus User Manual
39
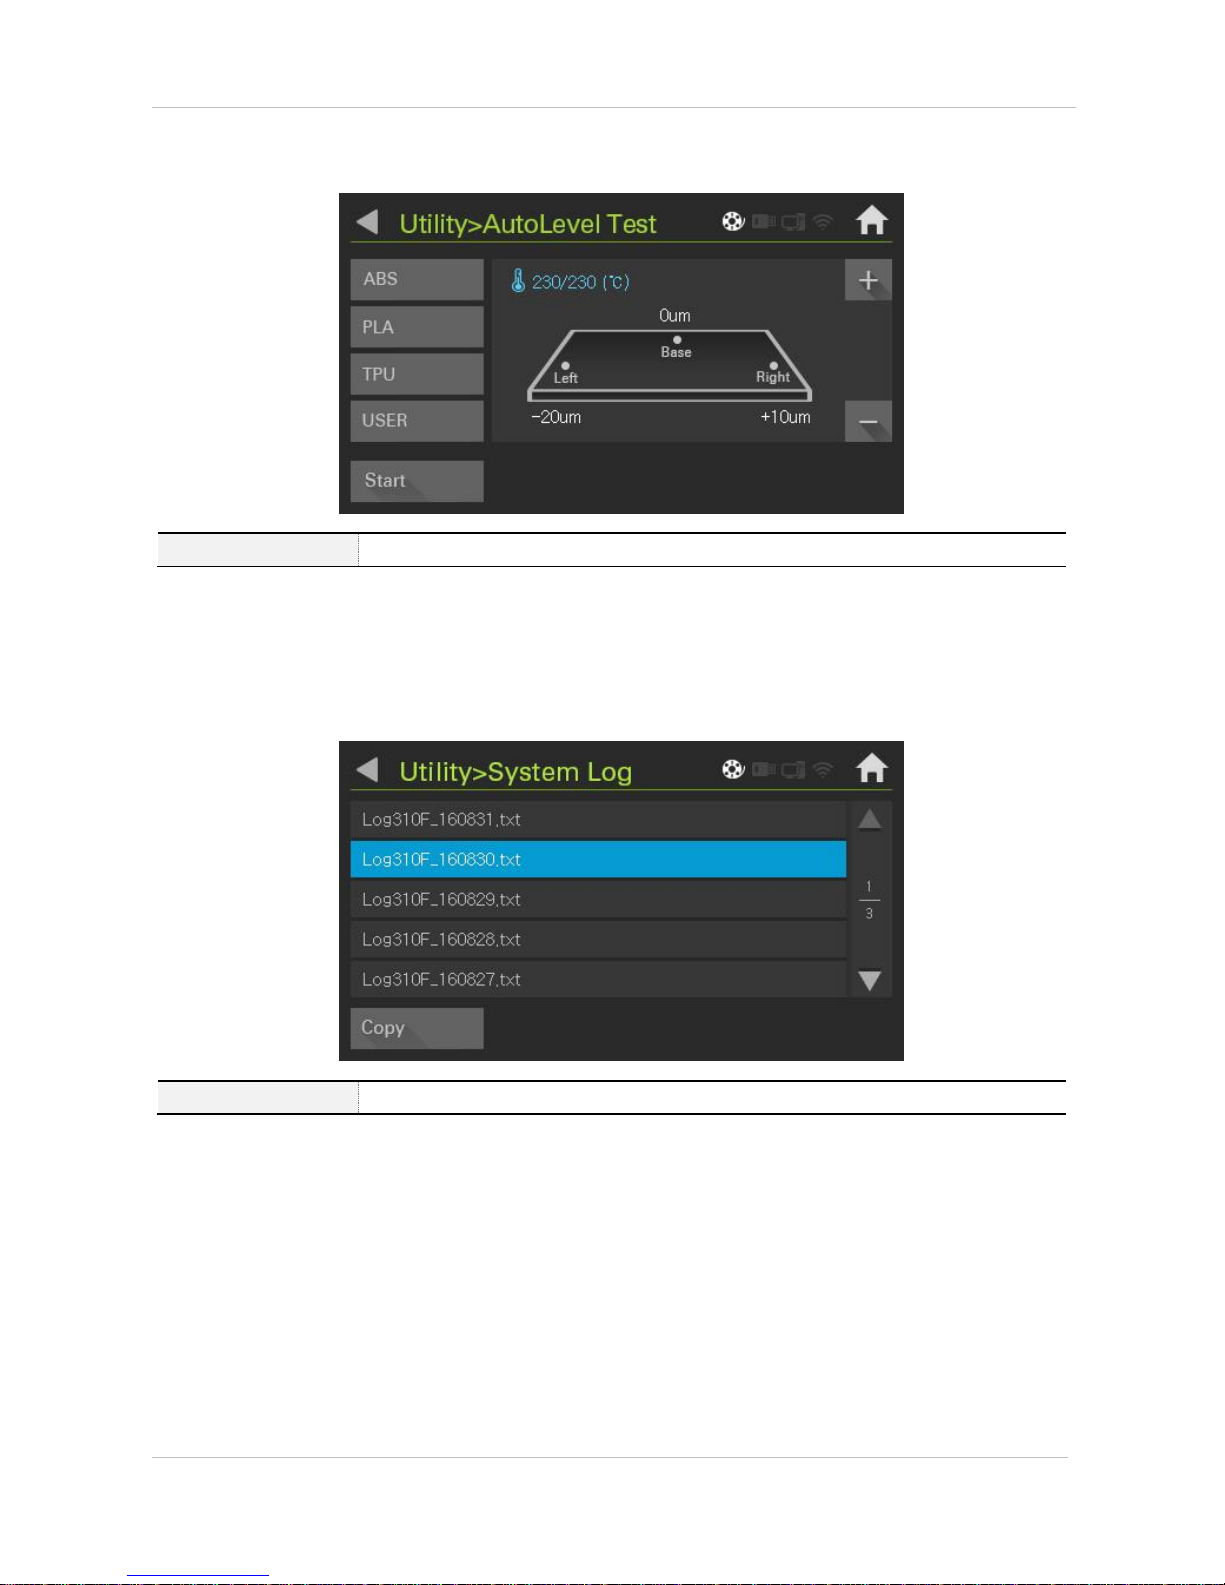
Main > Utilities > Auto Level Test
[1] Start
Selects filament suitable material and starts test
Main > Utilities > System Log
[1] Copy
Copies system log
Page 40
CUBICON Single Plus User Manual
40
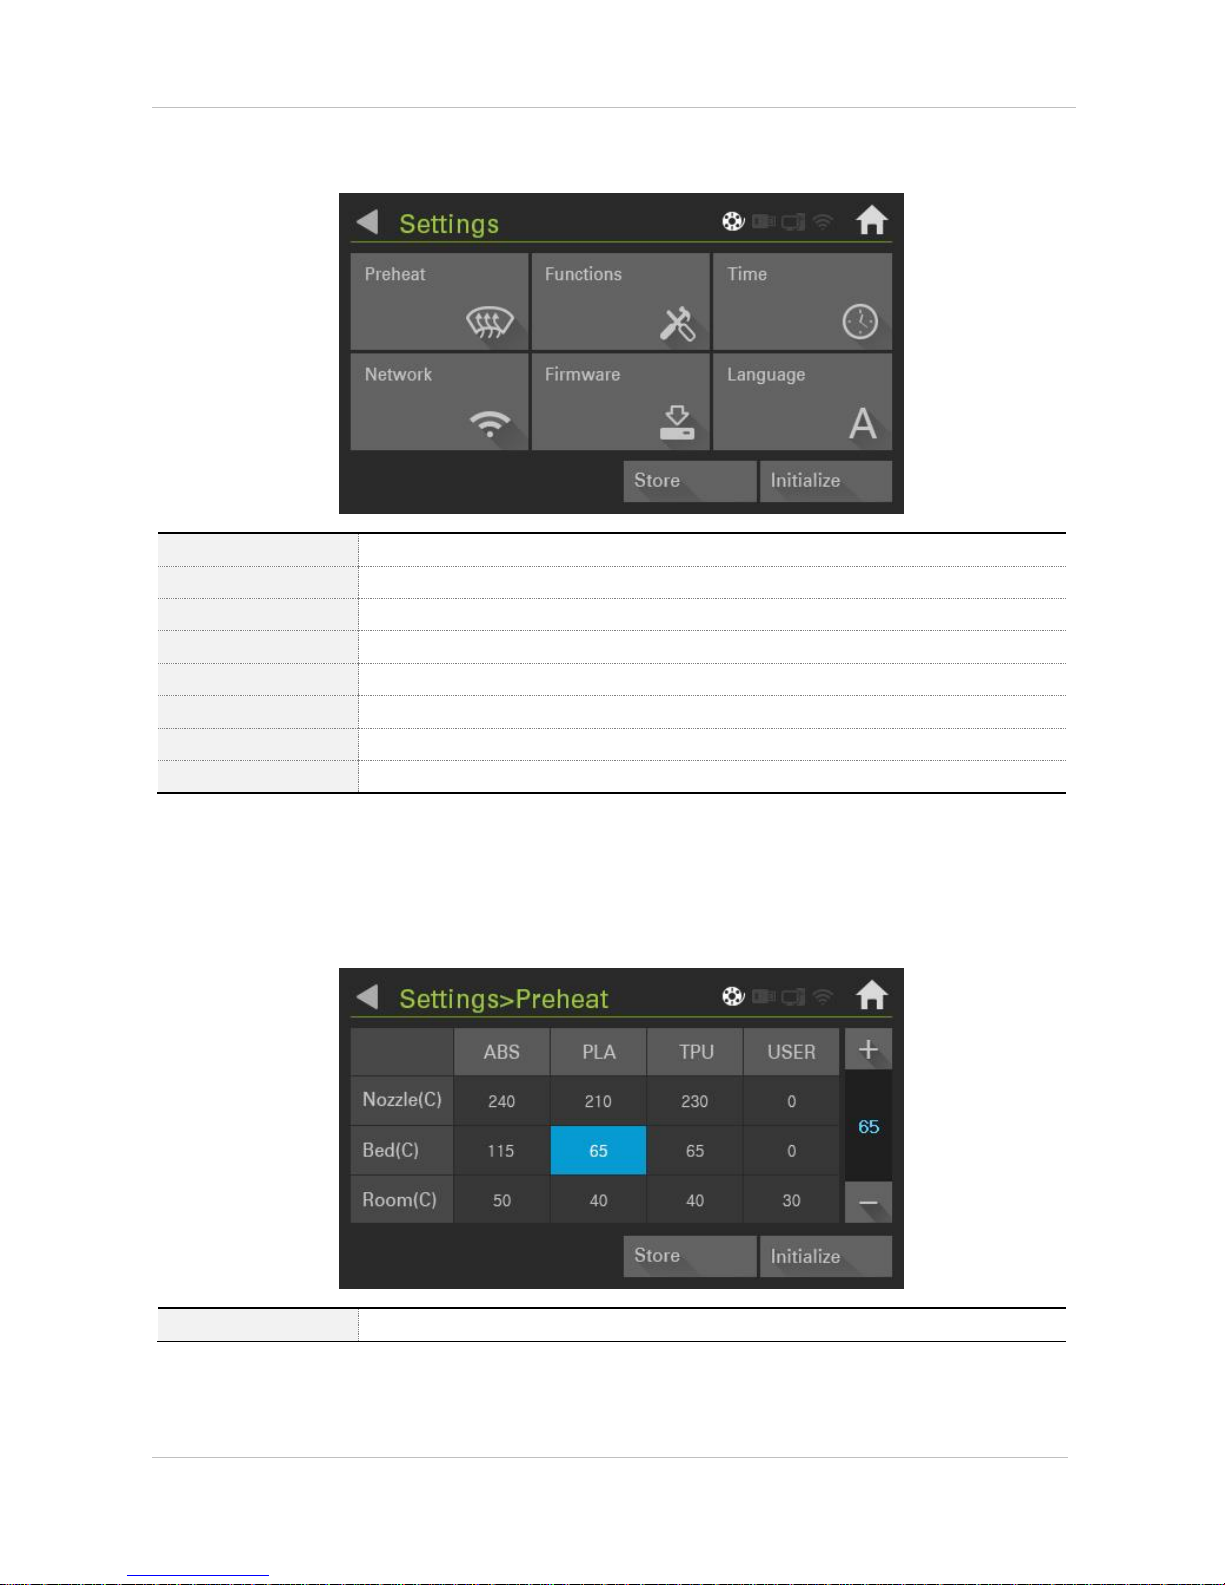
Main > Setting
[1] Preheat
Adjusts setting value of filament temperature
[2] Function
Configures filament detection sensor and filter ON/OFF
[3] Time
Configures current time
[4] Network
Transmits Gcode using inside WIFI
[5] Firmware
Updates firmware
[6] Language
Selects language
[7] Store
Saves current setting
[8] Initialize
Initializes current setting
Main > Setting > Preheat
User can configure selected temperature with + - button
Page 41
CUBICON Single Plus User Manual
41
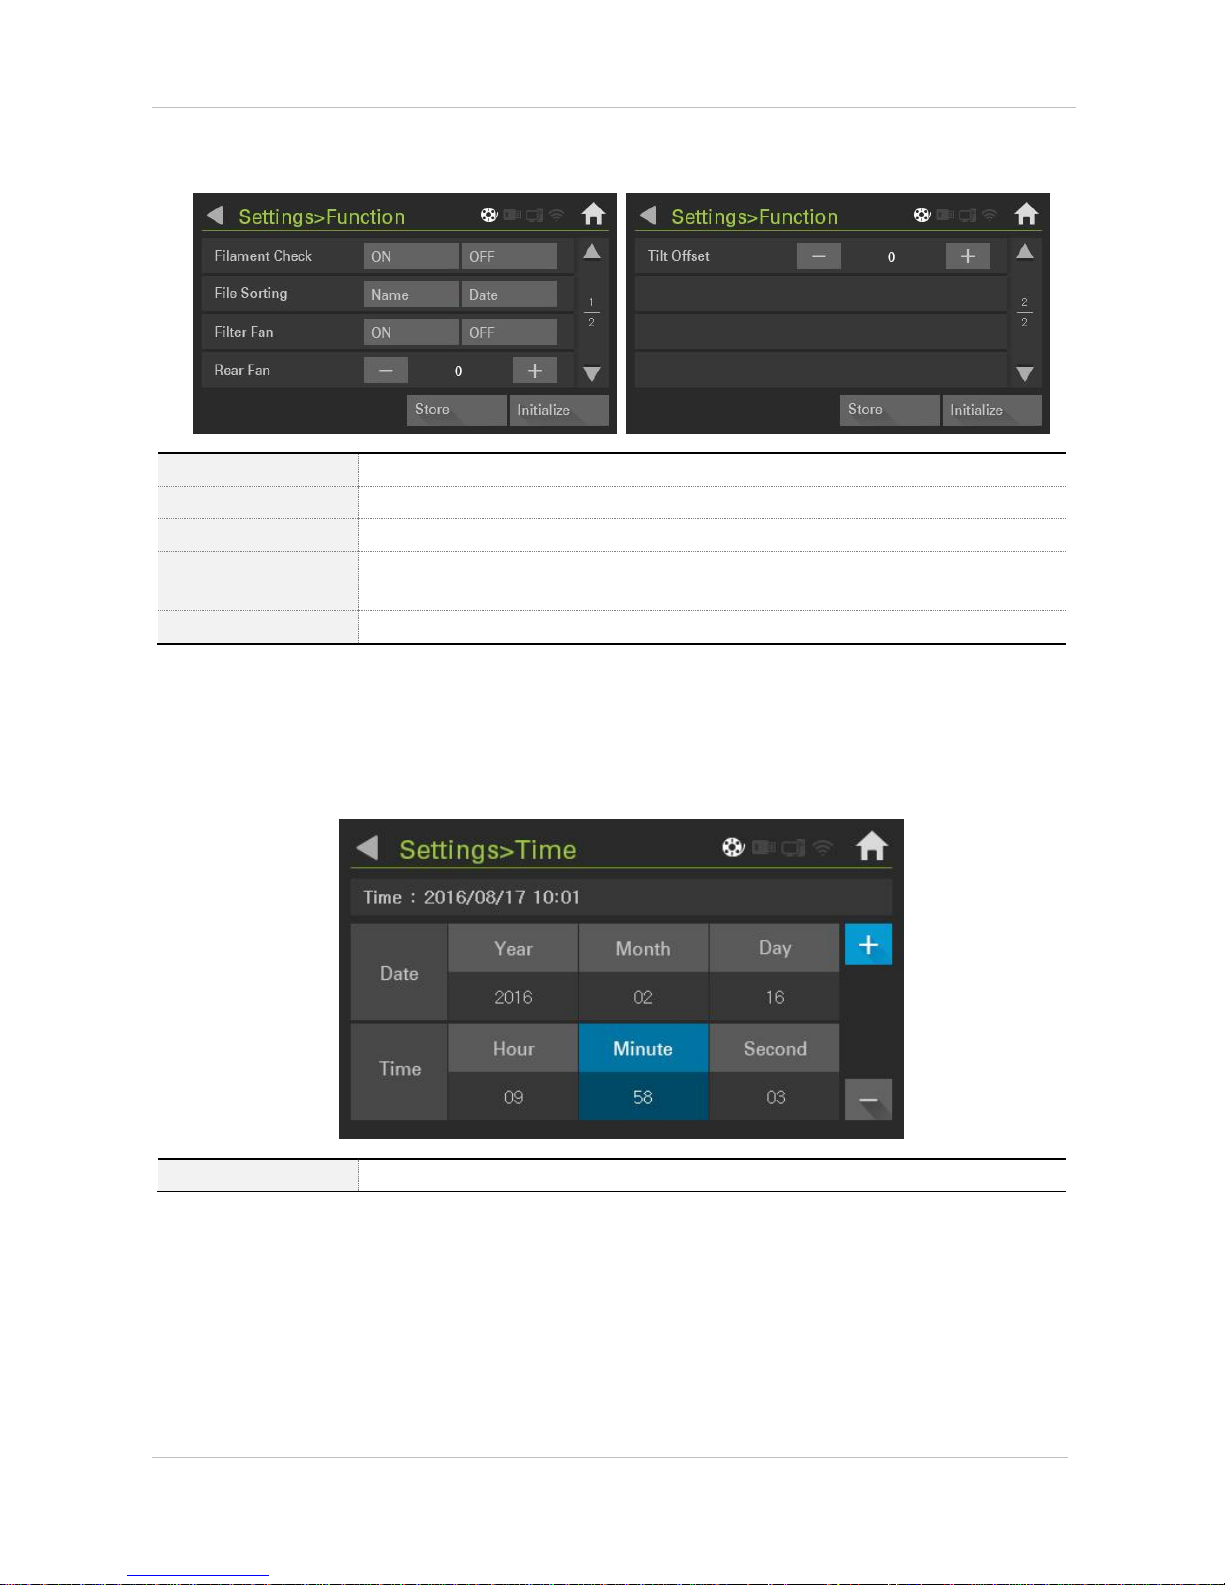
Main > Setting > Function
[1] Filament Check
Turns ON/OFF the filament detection sensor
[2] File Sorting
Sorts file order by name/date
[3] Filter Fan
Turns ON/OFF filter fan
[4] Rear Fan
Adjusts rear fan power with + - button. Flexible adjustment is required based on outside
environment temperature
[5] Tilt Offset
Configures nozzle and bed interval. Narrows nozzle and bed interval with ‘-‘ button
Main > Setting > Time
Configures time
Page 42
CUBICON Single Plus User Manual
42
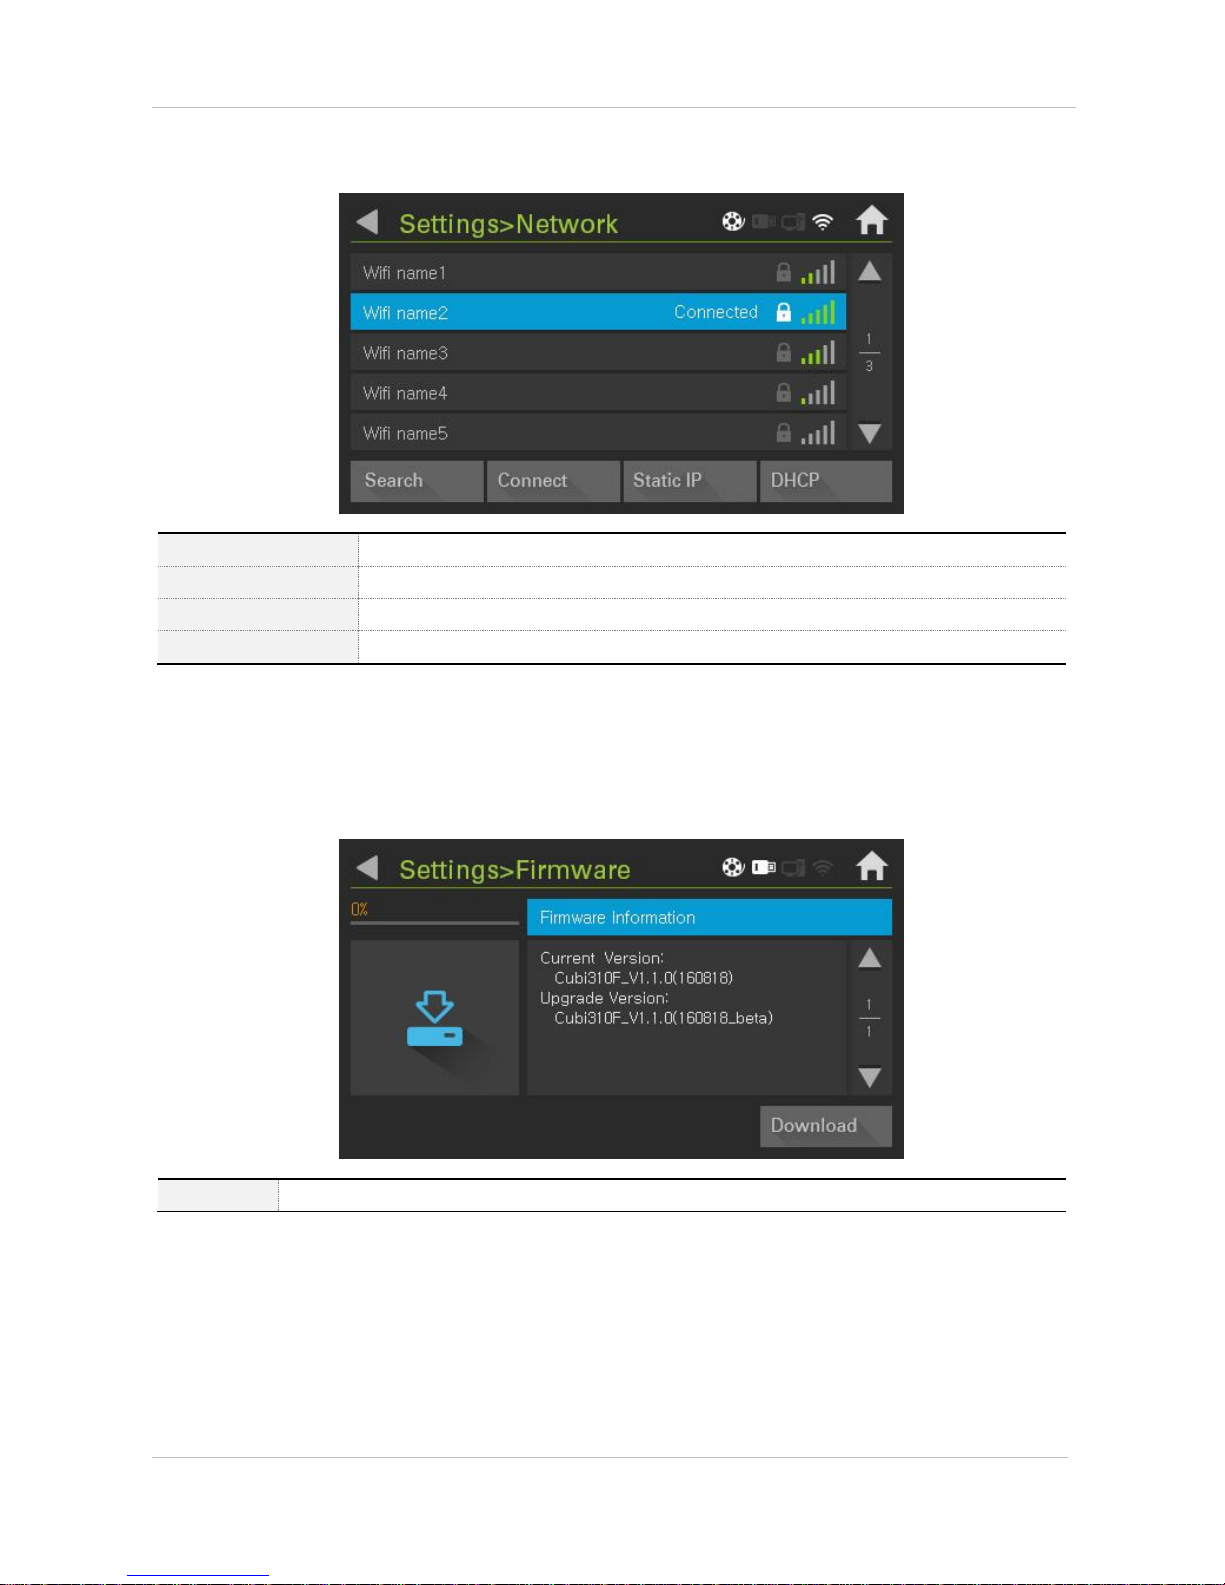
Main > Setting > Network
[1] Search
Searches Wi-Fi signal
[2] Connect
Connects to selected Wi-Fi
[3] Static IP
Selects fixed IP
[4] DHCP
Selects flexible IP
Main > Setting > Firmware
[1] Download
Installs new firmware version using USB memory. (Refer to 11-7. Firmware update section)
Page 43
CUBICON Single Plus User Manual
43
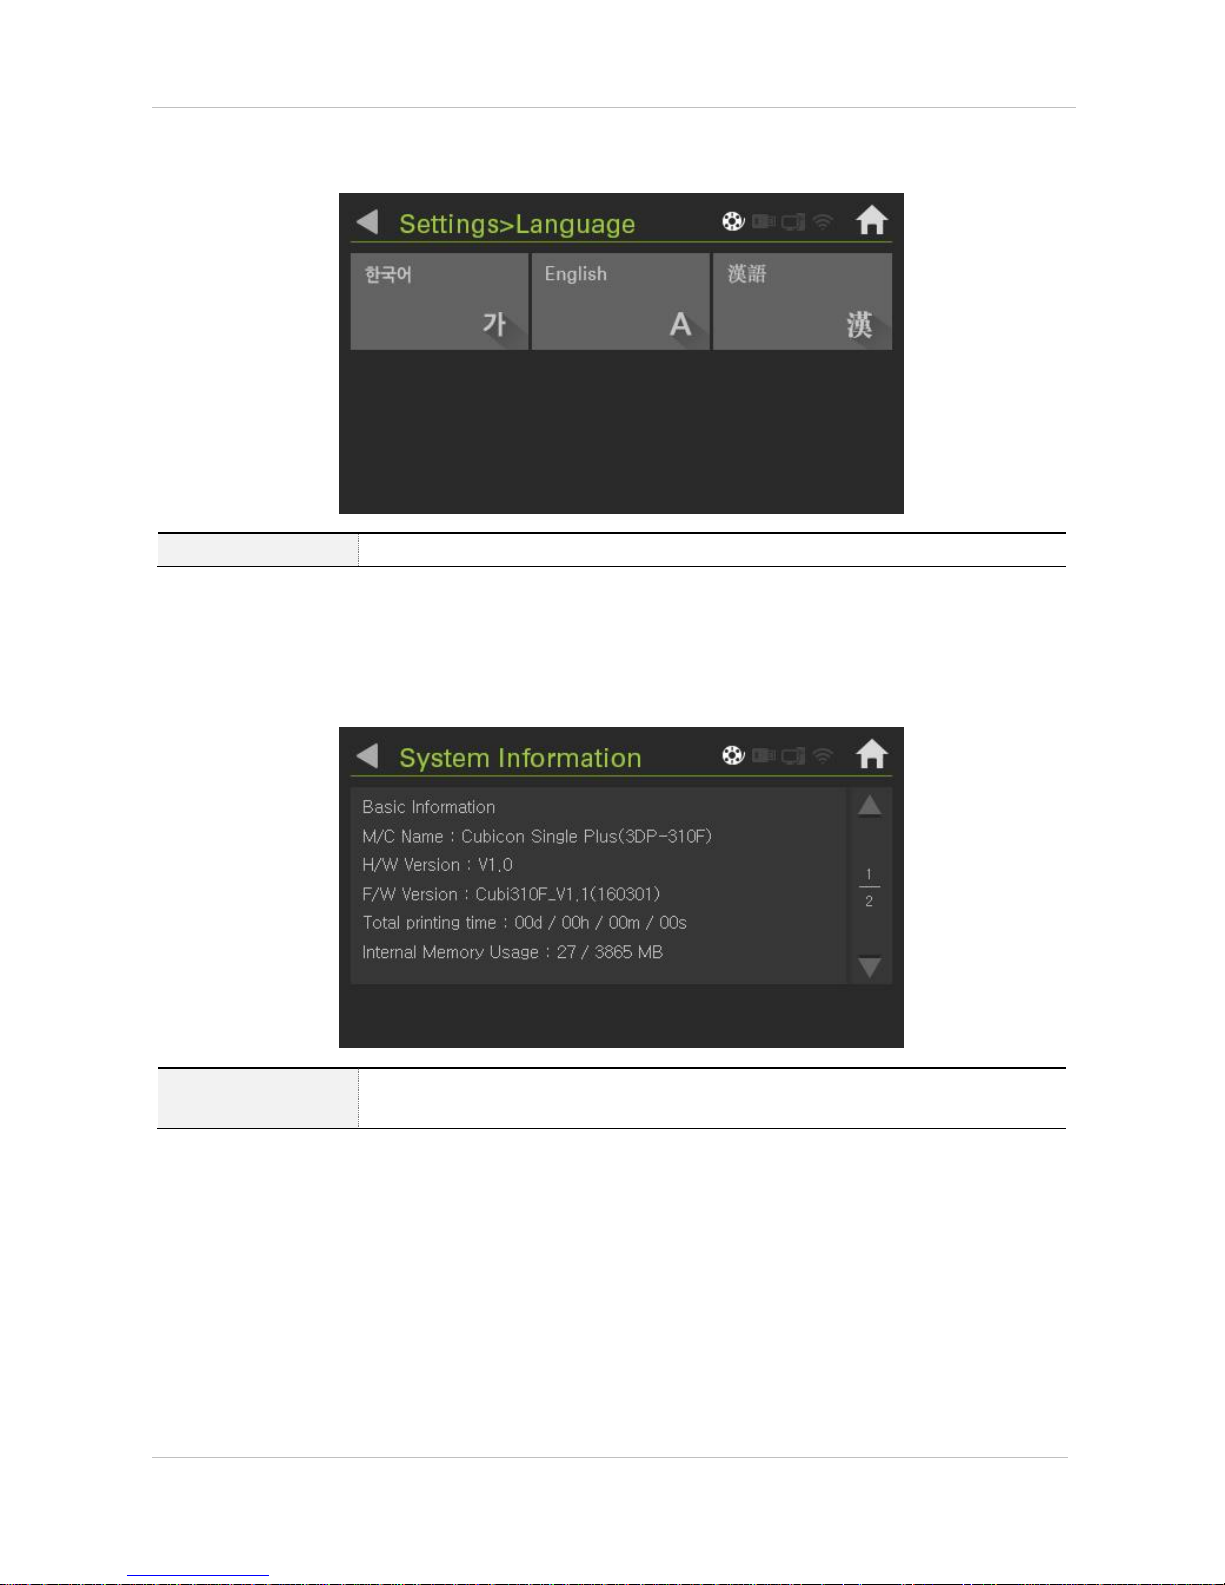
Main > Setting > Language
Basic language is English. Other languages can be selected
Information
Indicates the printer information and total printing time, inside memory capacity and
network information
Page 44
CUBICON Single Plus User Manual
44
11. Printer maintenance and repair
11-1. Extruder detaching
* Printer malfunction may occur, in the case of separating or installing removable etruder while power is ON.
Make sure to proceed the detachable extruder separation/installation when the printer power is OFF and
nozzle temperature is equal to indoor temperature.
* Make sure to wear gloves and mind possible scalding due to hot extruder in the time of separating the
detachable extruder in hot temperature.
* be careful of the sensor or other equipment malfuntion in the case of separating the detachable extruder
while the filament is put into extruder.
* In the case of abnormal unloading due to malfuntion, cut out the filament from filament entry of the extruder
and separate the extruder mindfully by pressing filament handle.
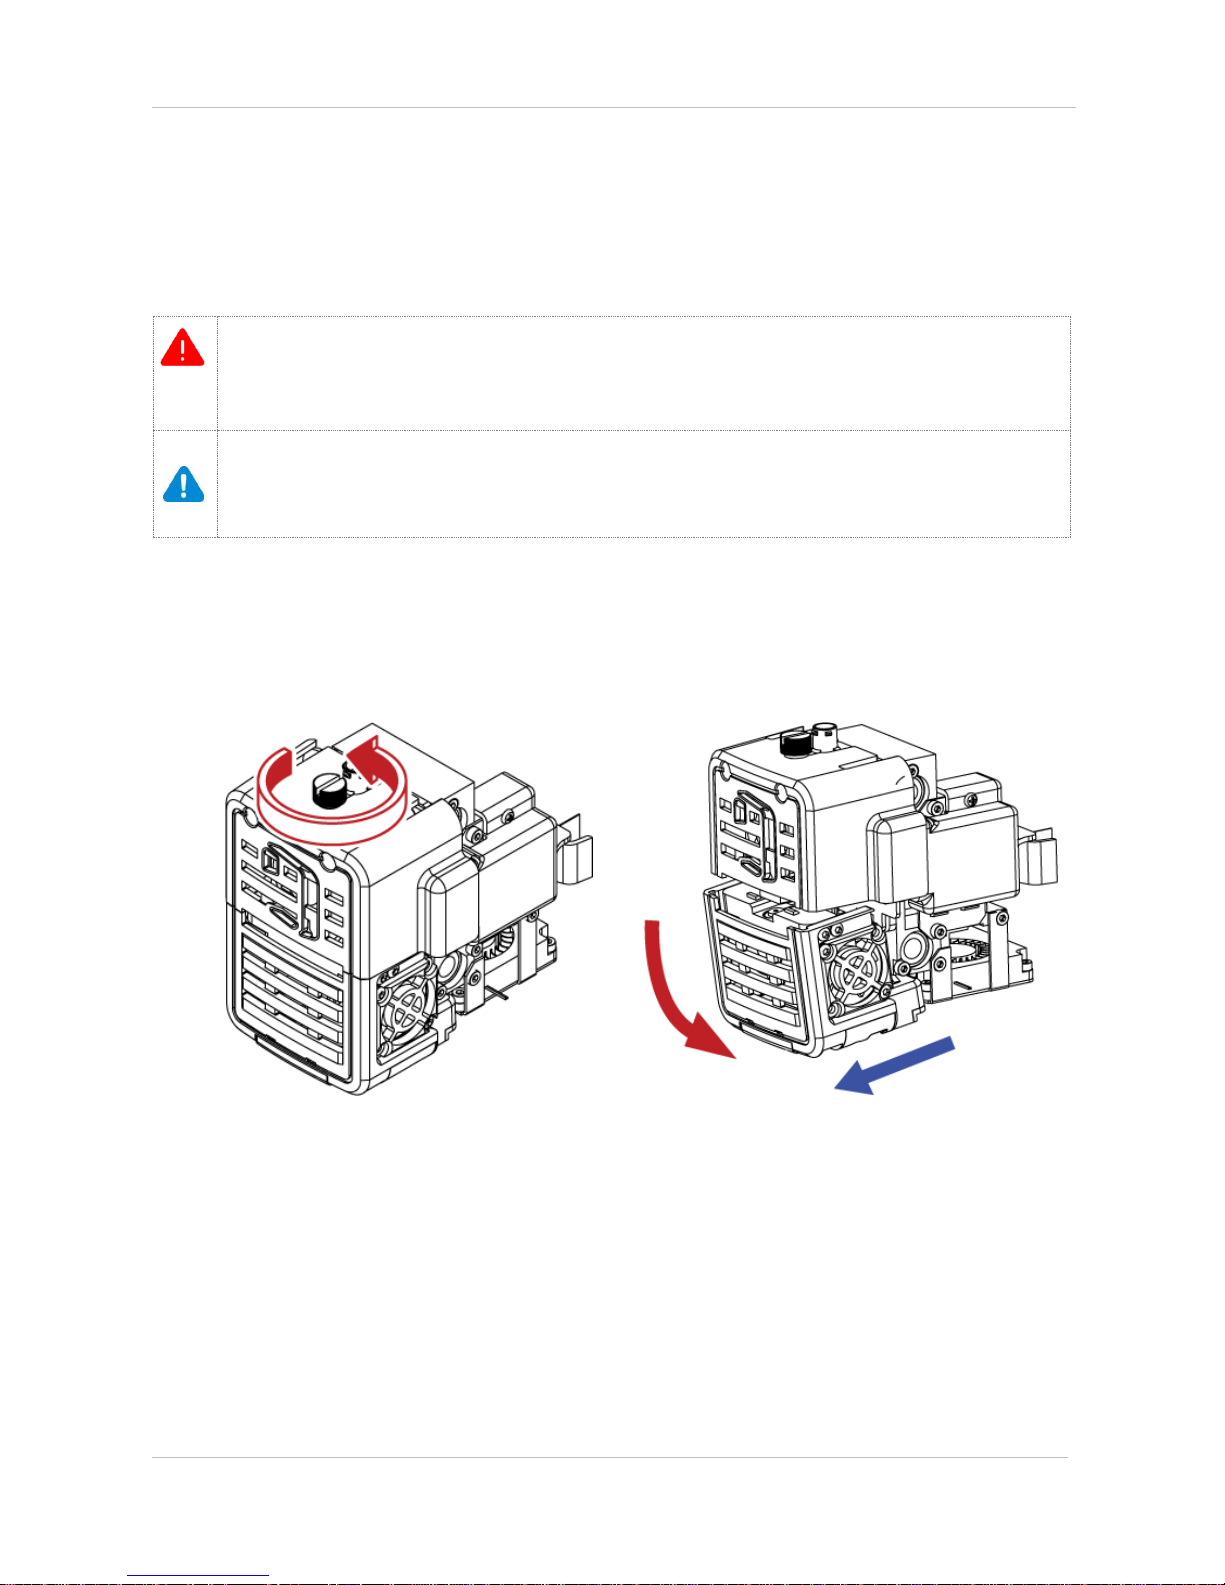
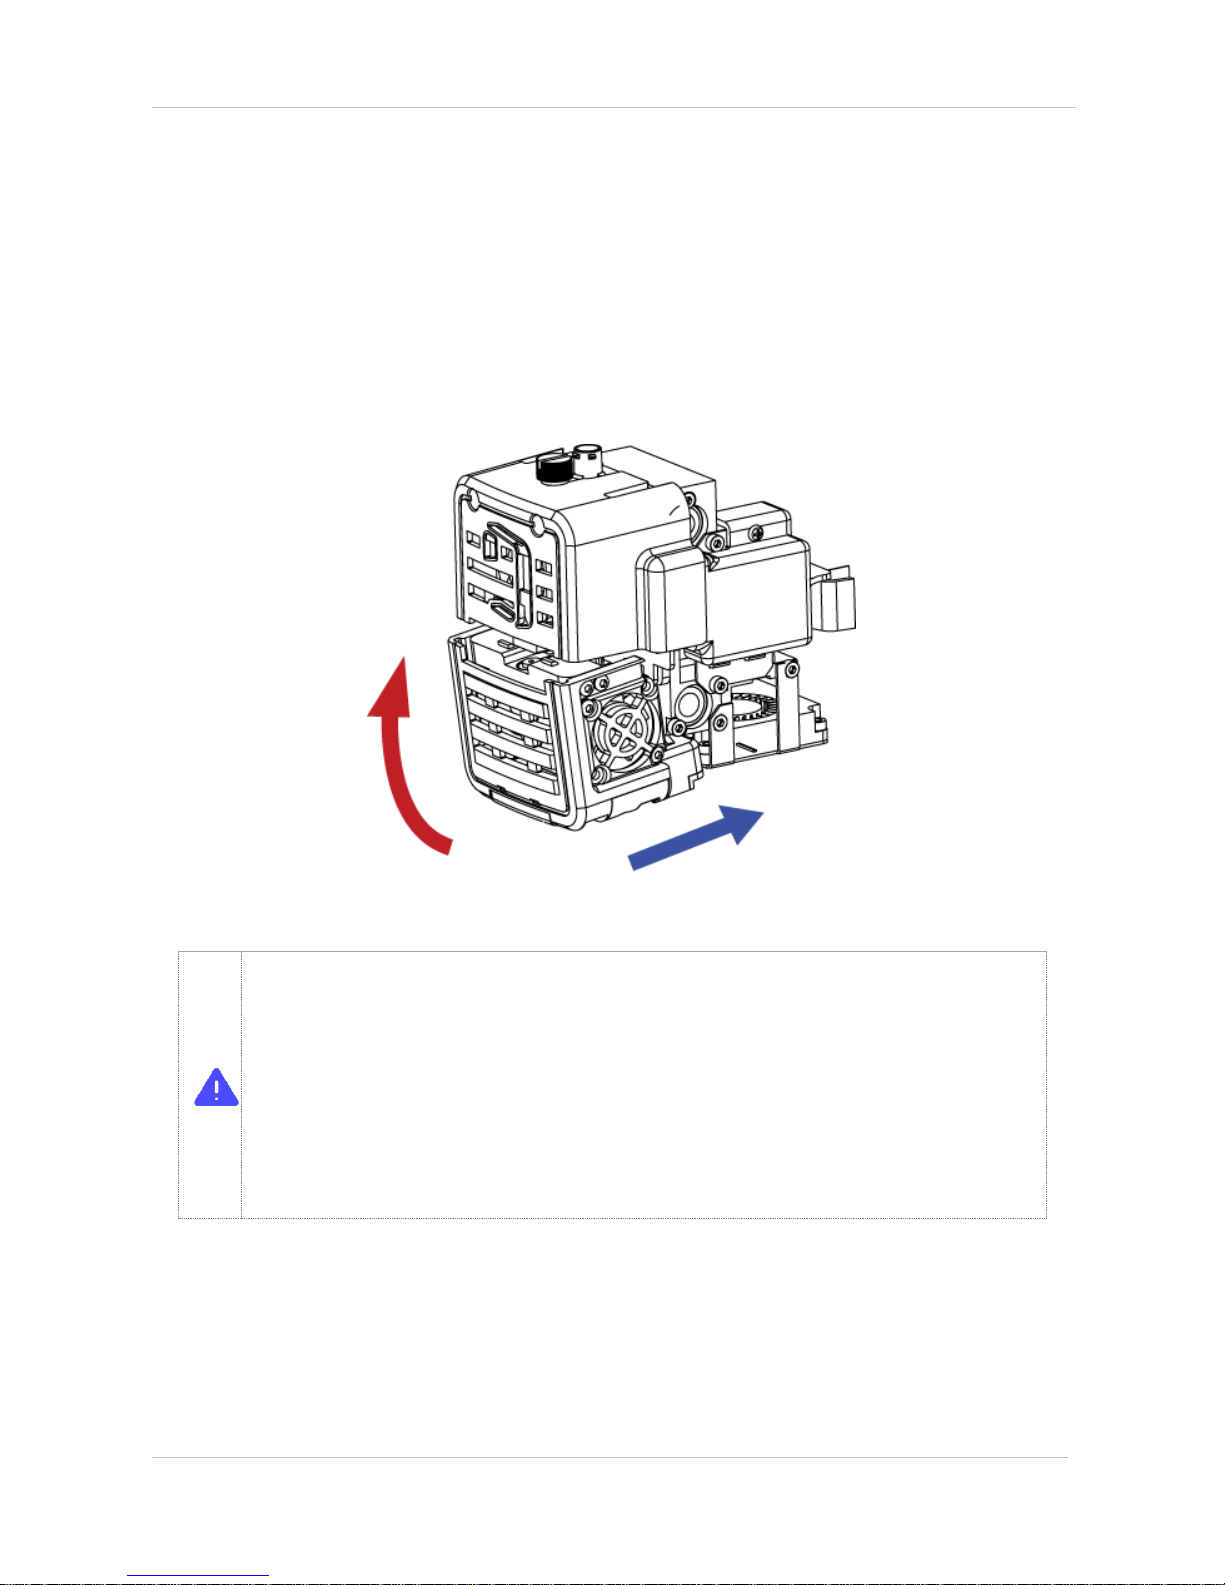
(1) Detaching
Turn off the printer power and untie knob of the extruder in counter clockwise direction.
Please hold the extruder with one hand while untying the knob, because the extruder may fall into bed in the
time of completely untying.
The extruder will be separated, once detachable extruder is pulled down.
Mind that extruder might be tight as it is basically inserted to fixed part fan.
①
②
Page 45
CUBICON Single Plus User Manual
45
(2) Attaching
Attaching is basically in reverse order of detaching.
Make sure to attach the extruder after inserting it to fixture part and tighten knob in clockwise direction, once
you can hear clicker after hole, which is put on shaped fan of rear extruder, is engaged. Do not put the knob
with force as accurate combination is required. Instead, proceed attaching process again.
* Make sure to turn off the printer power to separate/install the detachable extruder, proceed the work
after temperature of extruder nozzle is completely cooled off.
*. Mind possible scalding if the removable extuder separation/installation is unavoidable in high nozzle
temperature condition.
* Make sure not to install / separate detachable extruder with extreme force as it may cause the extruder
part damage.
* Printing in the case of detachable extruder is not properly installed to fixture part or removable
setscrew is not tightened condition, may cause problem of the extruder installation or malfunction
which make printing impossible. Make sure to install the extruder properly in prior to using the printer.
* Make sure not to touch the extruder part or cause shock with wet hand as the extruder includes electric
equipment.
①
②
Page 46
CUBICON Single Plus User Manual
46
11-2. Extruder maintenance
Nozzle of the extruder is located at the bottom of the extruder and it is the part, which makes model as
filament melts and comes out.
Nozzle is the consumable part of the printer and can be worn out or filament carbonization leftover, impurities
of filament might be piled up inside due to continuous nozzle use. Therefore regular nozzle replacement is
required. However, in the case of improper nozzle control, several problems related to the nozzle can occur
earlier than normal nozzle use period and it may cause poor printing quality. In the case of serious printing
quality problem occurrence, the nozzle cover might be blocked and it requires the nozzle replacement.
Regular nozzle cleaning is required for the nozzle continuous use with uniform printing quality.
(1) Cleaning gear contaminants
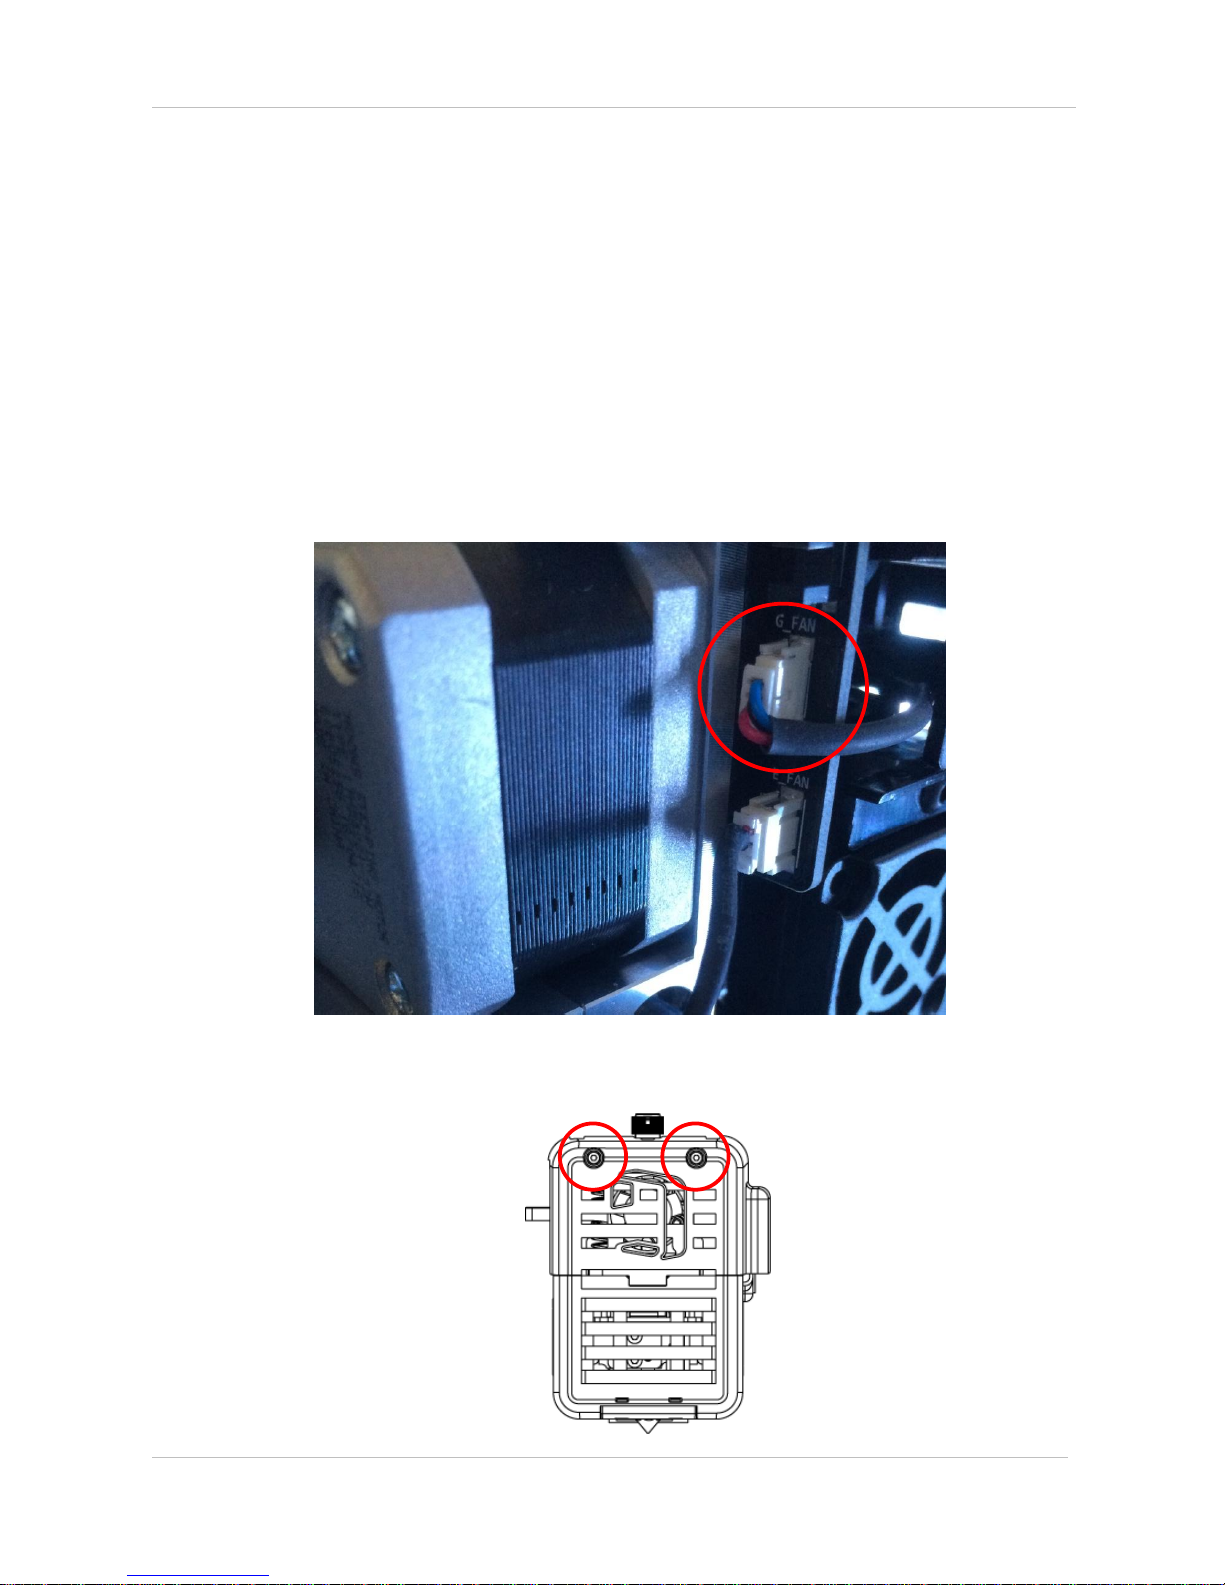
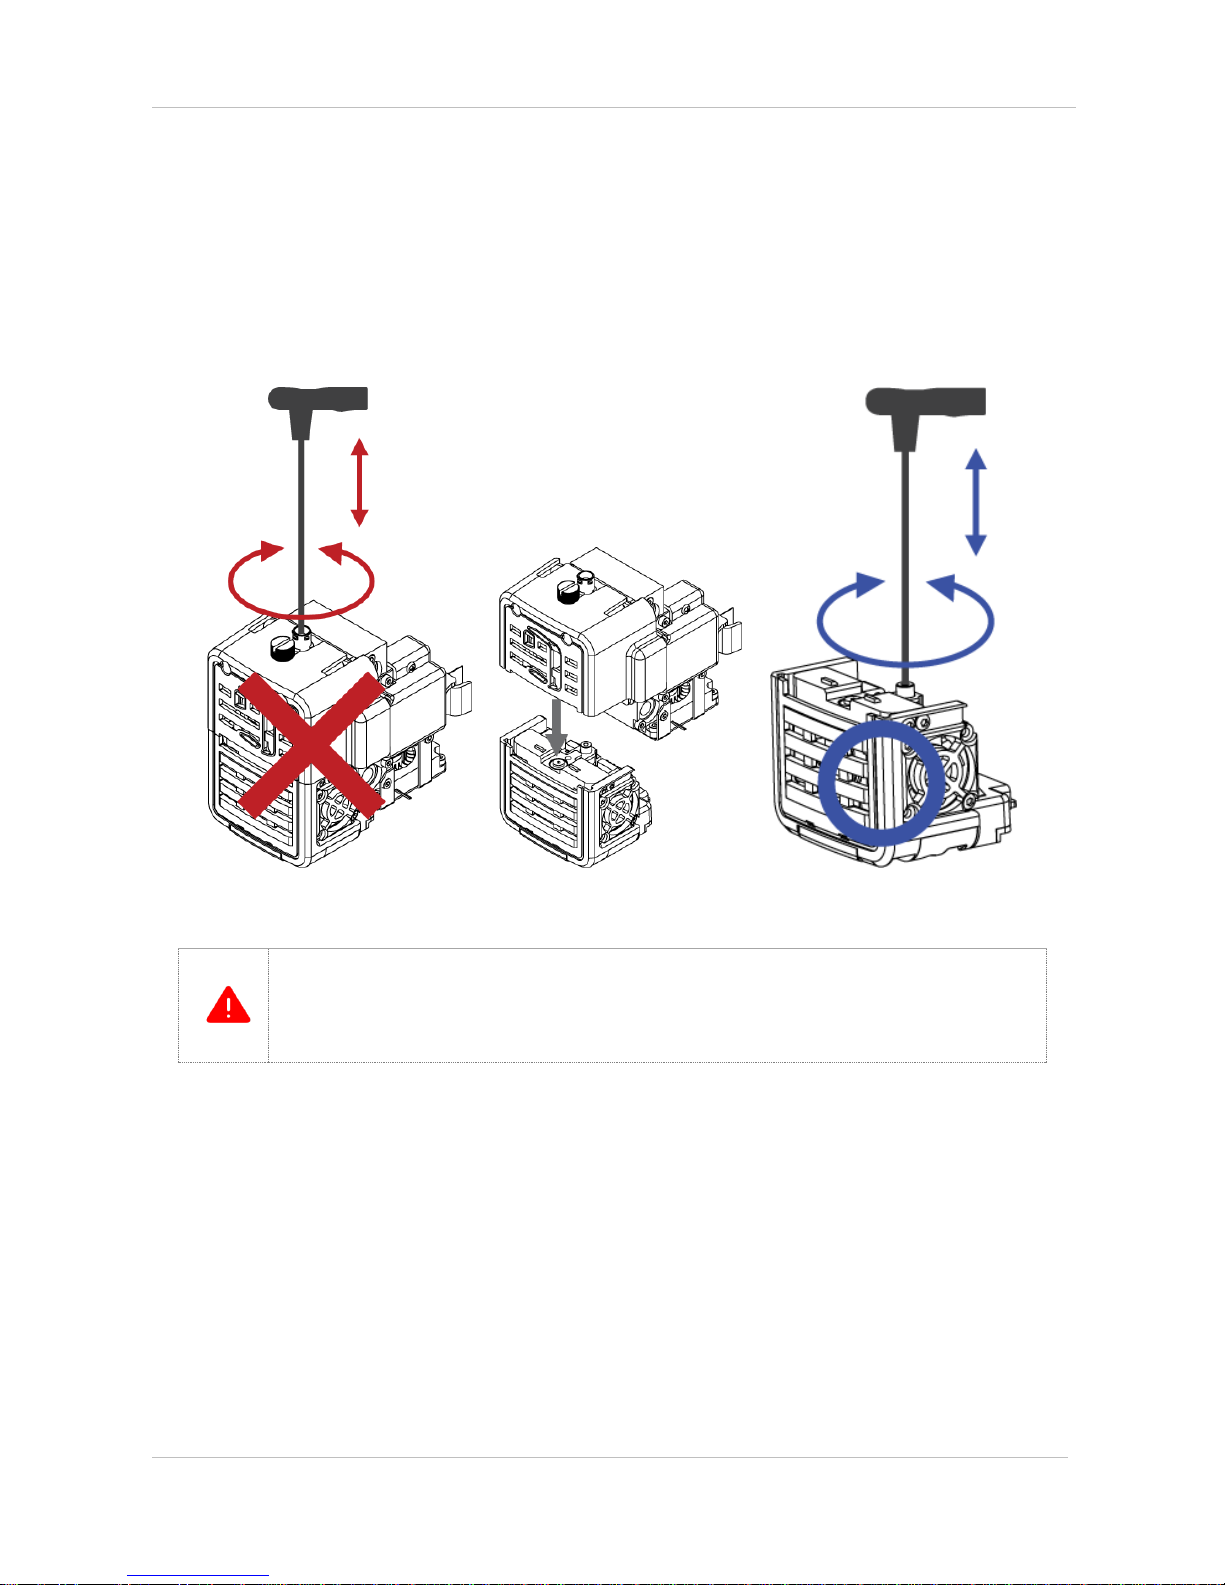
Turn off the printer power and pull out G_FAN from the extruder rear side. Be mindful that damage might
occur in the cable pull out process.
Page 47
CUBICON Single Plus User Manual
47
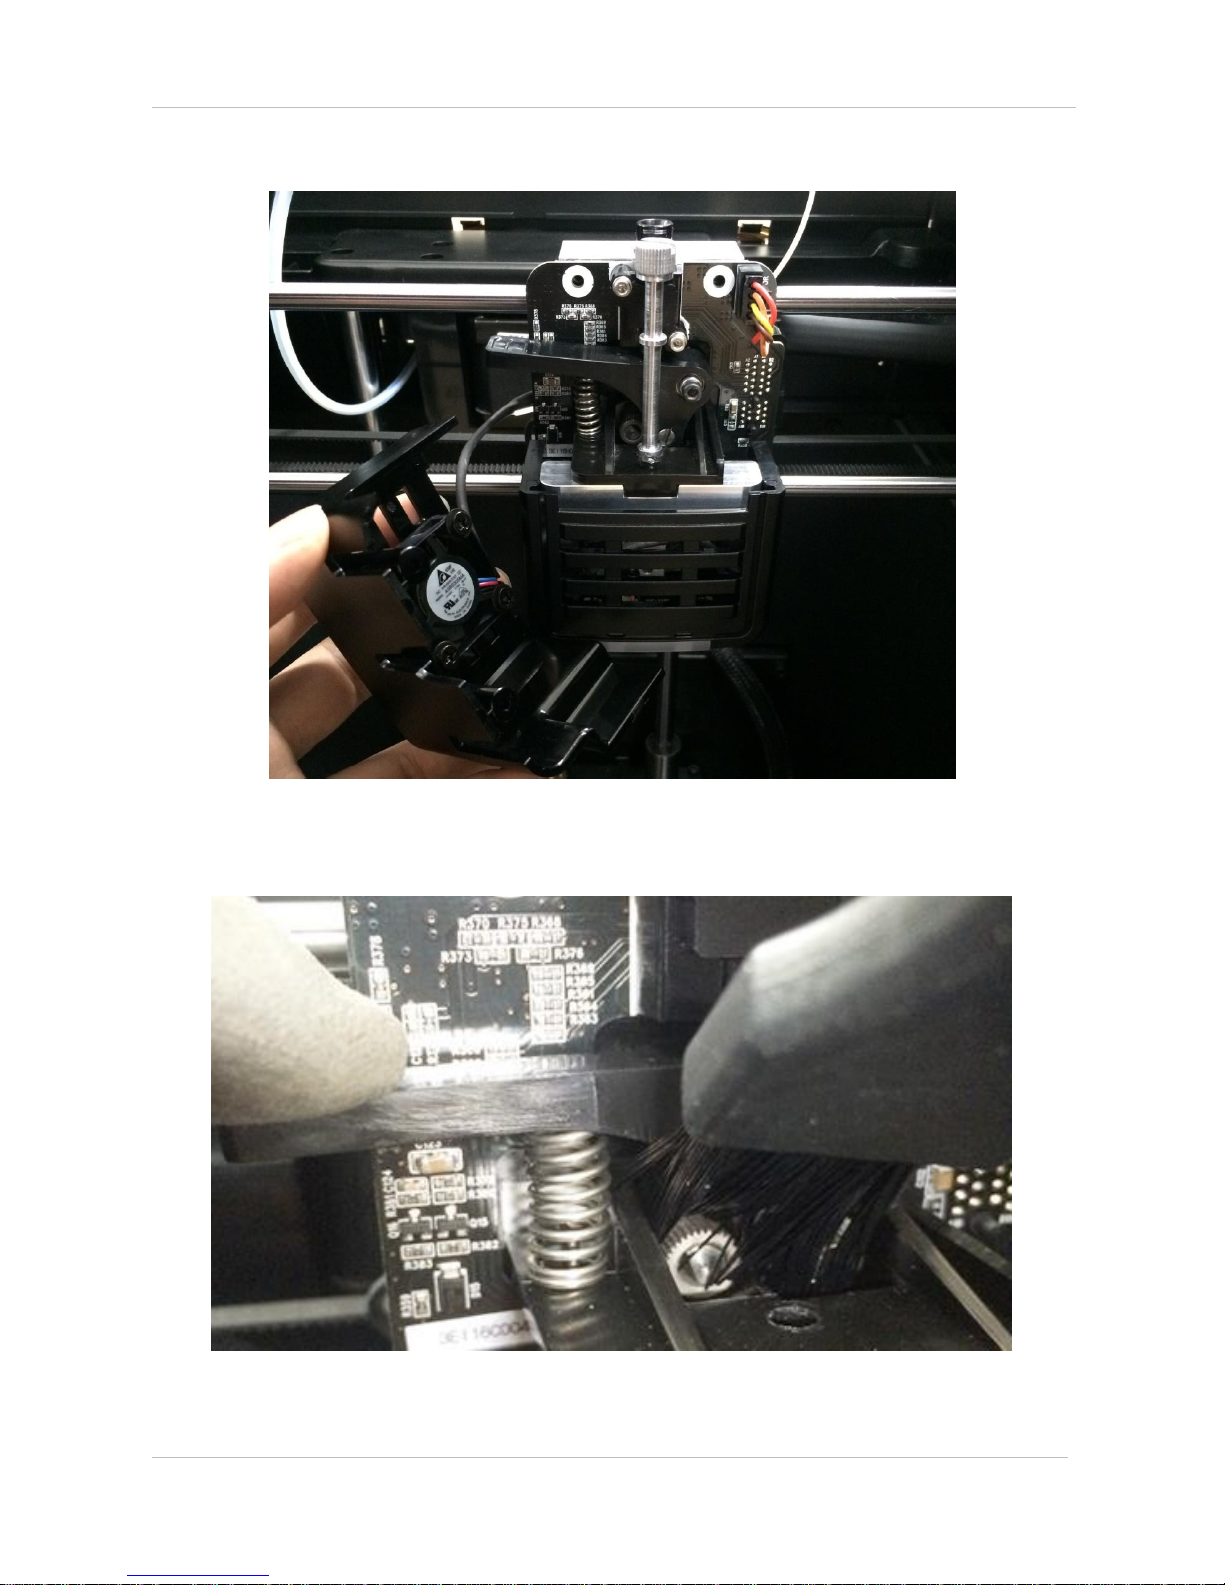
Turn and separate the bolt from cover front in counterclockwise direction with wrench of 2Ø diameter.
Be mindful of a gear fan, which is installed to the cover and separate the cover. Then remove all filament
leftover and filament powder from the gear with the antistatic brush.
Press the handle and clean dusts with antistatic brush.
Page 48
CUBICON Single Plus User Manual
48
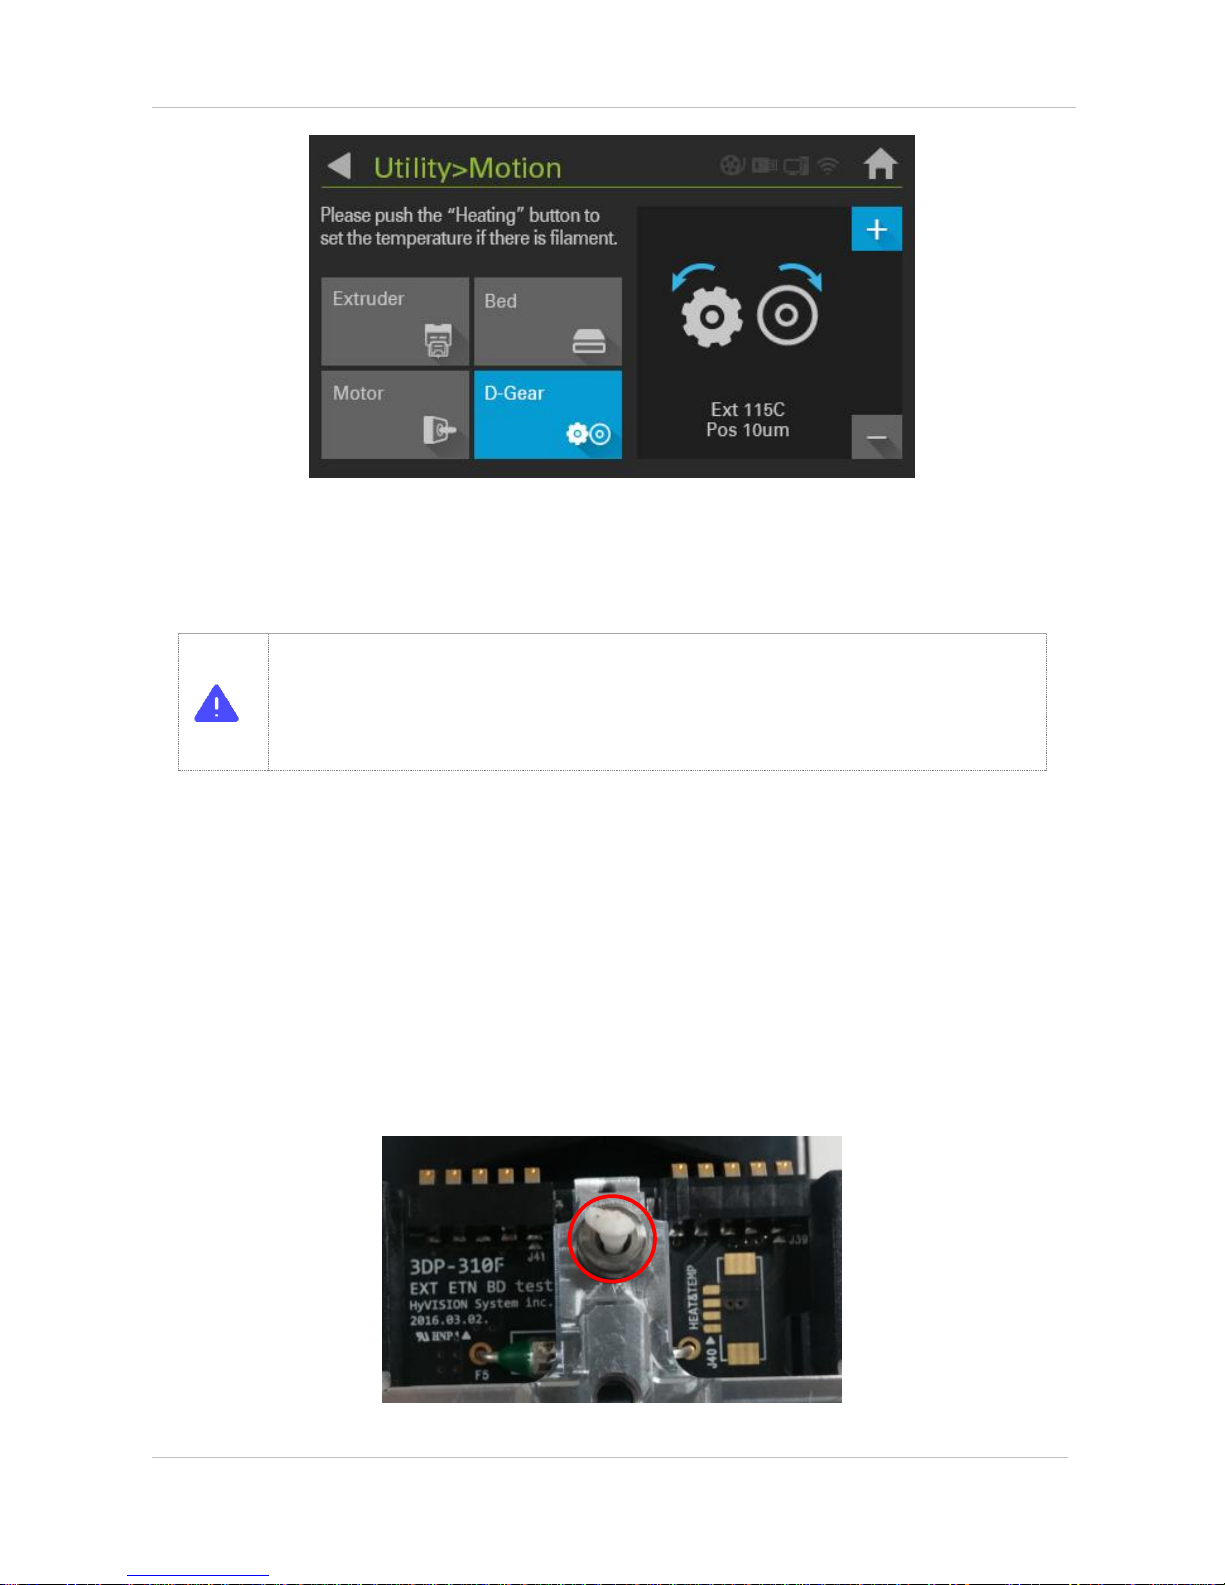
The extruder gear can be rotated with D-gear of motion by turning the power ON in the extruder pullout condition.
Make sure to rotate the gear pressing handle. In the case of cleaning with air compressor, quality decrease
and equipment malfunction may occur due to powder insert to shaft.
* Make sure to rotate the gear by pressing handle in the process of the gear cleaning. The gear
abrasion may occur in the case of moving the gear without pressing handle.
* Be mindful that equipment malfunction might be caused due to powder insert to the shaft in the air
cleaning process.
* Do not put conductive materials into cleaning part during the printer power is ON. It may cause
equipment shock.
(2) Cleaning of filament channel contaminants
Basically, the extruder, which uses all provided material or mixes all materials are not recommended.
Filaments have different property and temperature. Those differences may be accumulated slowly and they
may cause serious problems. Even though the inside filament can be deleted in the time of using ABS during
PLA use period, PLA ingredient may remain on a wall surface. Those filament leftovers are accumulated
continuously and sometime they cause printing failure due to nozzle blockage (Below picture shows the
phenomenon, which is caused by the filament mix.)
Page 49
CUBICON Single Plus User Manual
49
Make sure to remove the filament with tweezers, which is inserted to filament entrance of detachable extruder
(3) Inside nozzle cleaning
Cleaning inside nozzle is basically possible with filament loading. Clean the inside with nozzle control pin in
the case of loading is impossible due to change of inside filament property caused by materials mix. Make
sure not to push in forcefully as it may cause damage to inside.
* Make sure to wear gloves as inside nozzle cleaning is proceeded in hot condition and be mindful of
possible scalding
* Make sure to work holding only plastic part of detachable extruder in hot condition. Metal part and
rubber part are in hot condition.
* Nozzle control pin is not required to be used often if it does not mix material.
Page 50
CUBICON Single Plus User Manual
50
11-3. Auto leveling interface part maintenance
The extruder nozzle end part of Cubicon single plus touches interface part of heating bed and decides electric
current applying necessity. Also, it recognizes the interval between heating bed and nozzle and adjusts bed
height automatically. Therefore in the case of contaminants presence on heating bed interface part and nozzle
end part, auto leveling will be failed due to poor electric current application. Make sure to clean contaminants
for normal auto leveling operation.
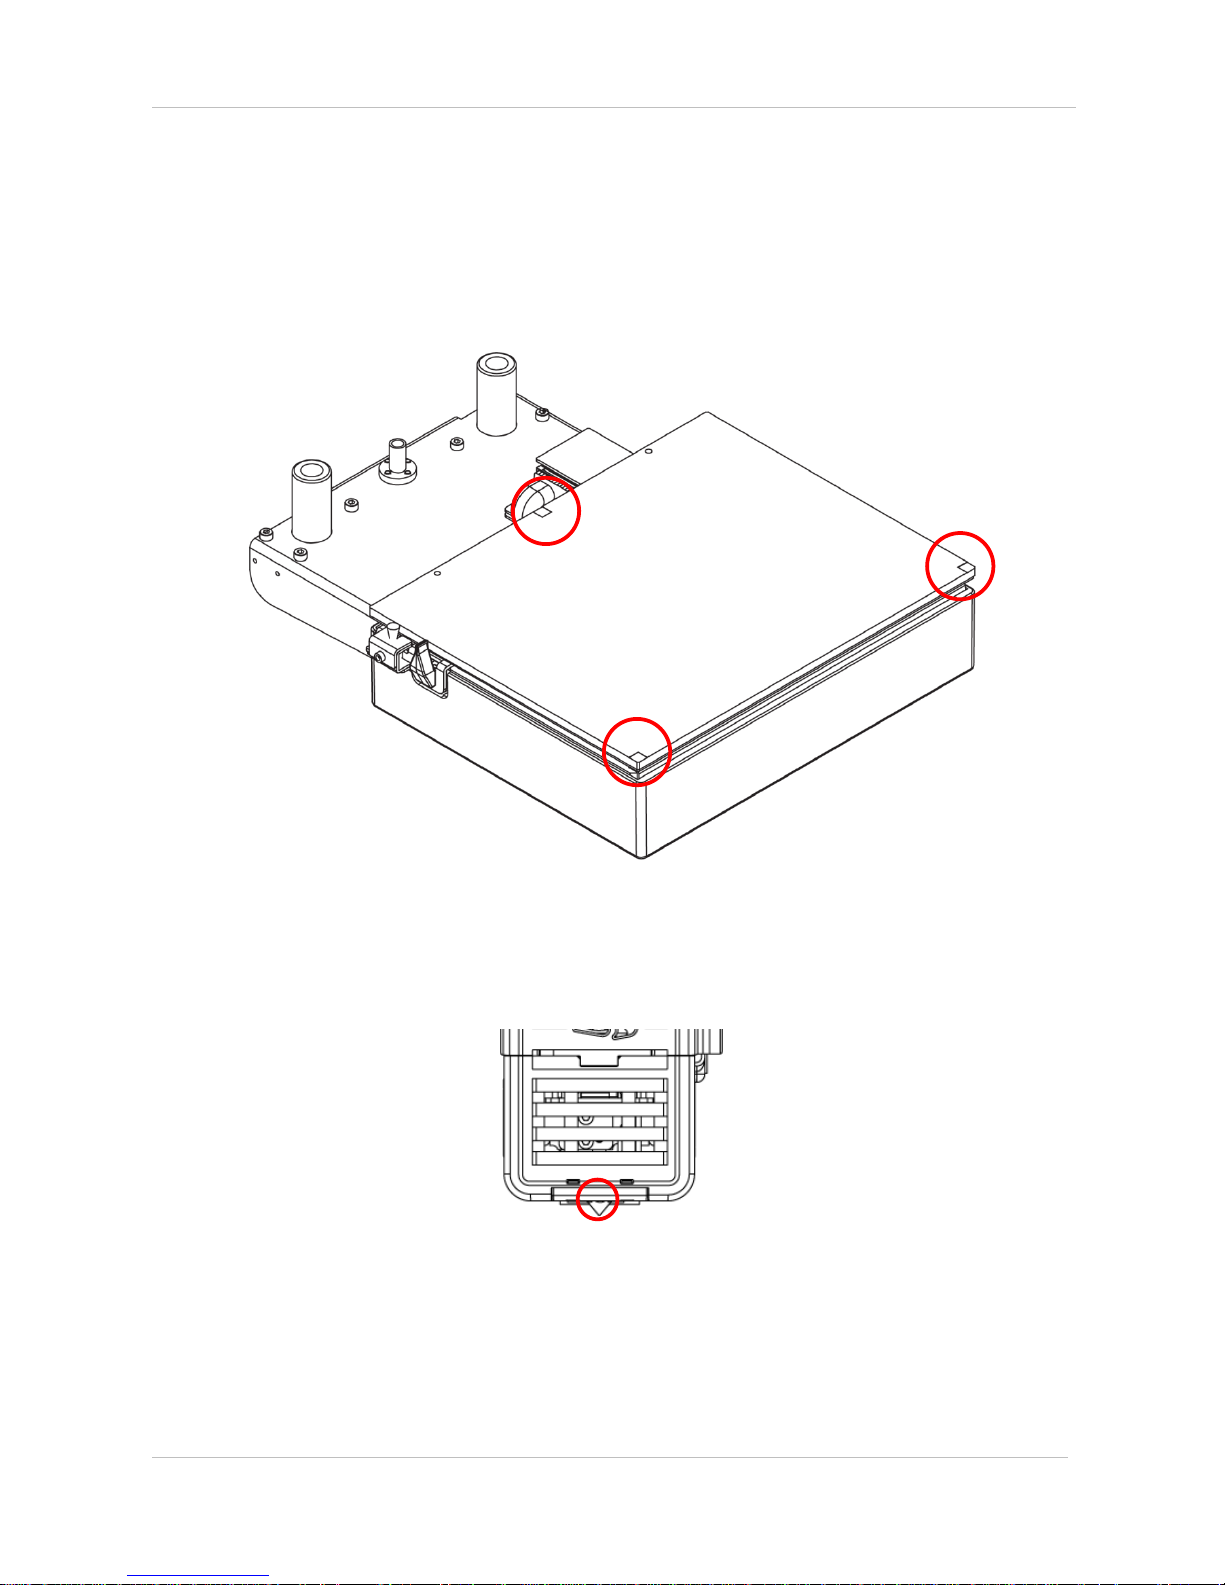
3 points, which are indicated in red, in above picture, are used for auto leveling interface. The filament melts
and puffs and it causes pollution in the process of auto leveling of heating bed auto leveling interface. Auto
leveling failure occurs due to melted filament fixation in the case of not removing and neglecting pollution.
Make sure to clean the interface part with tweezers or scraper in prior to printing.
Above nozzle in the extruder picture is directly contacted part in auto leveling process. It basically proceeds
cleaning it printing process, but it gets carbonized easily due to filament staining in printing process. Make
sure to clean with a wire brush, which is equipped to an antistatic brush.
Page 51

CUBICON Single Plus User Manual
51
11-4. Heating bed maintenance
The heating bed is a floor, on which printing material is formed by melting and extruding filament. The heating
bed gets polluted easily by filament or filament pieces, which is melted and attached in the formation process.
In the case of continuous printing in polluted condition, contaminants sticks at formation too, and it causes
pollution of formation or poor formation attachment to the heating bed in the printing process.
Make sure to maintain the heating bed in tidy place before and after printing to prevent poor printing quality
due to printing material pollution.
① Remove filament leftover of the heating bed, using tools such as tweezers, scraper or a brush. Be mindful of heating
bed surface damage in a tool use process. Lamination gets peeled off due to surface damage and it causes poor printing
material sticking.
② Filament leftover or filament sign on the surface of heating bed in formation process may not be removed easily. Make
sure to remove those serious pollutions wiping as if melting with right amount of high purity acetone.
* Make sure to use only high purity acetone for the heating bed cleaning
* Some stain may be seen on the heating bed surface. You do not need to concern on this matter as
those stains usually occur in lamination process and do not effect to the heating bed property.
* The heating bed lamination usage period depends on user’s printing habit.
* The heating bed of Cubicon single plus can process printing without using kapton tapes in appropriate
temperature in the case of printing our company’s ABS/PLA. However users can purchase and use
kapton tape depending on their printing habit or printing model.
In the case of melted filament printing method, contraction may occur if melted filament is hardened and
it may lead to printing floor bird-caging. Contradiction can be improved depending on printing
temperature condition or heating bed adhesive strength or slicing option change. Most of contradiction
phenomenon occurs often and contradiction difference occurs based on contradiction degree. Make
sure to consider a design method, which can disperse contradiction force in 3D model designing
process.
* Do not use solvents other than aceton for the heating bed as they lead to lamination damage.
* Make sure that aceton shall not stain onto other objects in the time of using aceton for heating bed
cleaning as it may lead to the product damage.
* Make sure to use aceton in well ventilated place and be midful of aceton maintenance.
(Make sure to follow safety regulations, which is written on aceton package)
* Do not use a wet tissue as abluent ingredient of some wet tissues may lead to heating bed lamination
pollution.
* Do not seprate or force the heating bed for formation pullout as it may lead to heating bed malfunction.
* Auto leveling is adjusted with unlaminated bed part. Make sure to remove foreign substances in prior to
printing.
Page 52
CUBICON Single Plus User Manual
52
11-5. Filter replacement
Purafil accelerator, HEPA filter, clear filter, which consist of triple structure of deodorizing filter is used for
filtering out contaminants, which occurs from a printer of FFF type in Cubicon single plus.
Contaminants of the clean filter may cause not only poor filter performance but also filter fan operation
interference and lead to the product malfunction.
Do not cleanse polluted clean filter. But replace it with new one.
Replacement period of the clean filter depends on the product use environment and user’s printing habit.
Generally, it is recommended to replace the clean filter every six months.
Make sure to install the clean filter to a case in appropriate direction. Inappropriate installation may
lead to poor filter performance and a fan malfunction.
11-6. Rubber brush & wire brush replacement period and method
Heat resisting rubber cleaning brush and wire brush are attached to the left side of heating bed for cleaning
the end part of nozzle. Make sure to remove filament leftover as it may cause secondary nozzle pollution.
Those two brushes are consumable products. Therefore, user can replace those products through designated
A/S center in the case of product damage.
Replacement period of nozzle cleaning brush is when the brush cannot function properly due to filament
leftover and the brush replacement is required in this case. Continuous brush use without replacement may
lead to auto leveling failure and nozzle shock.
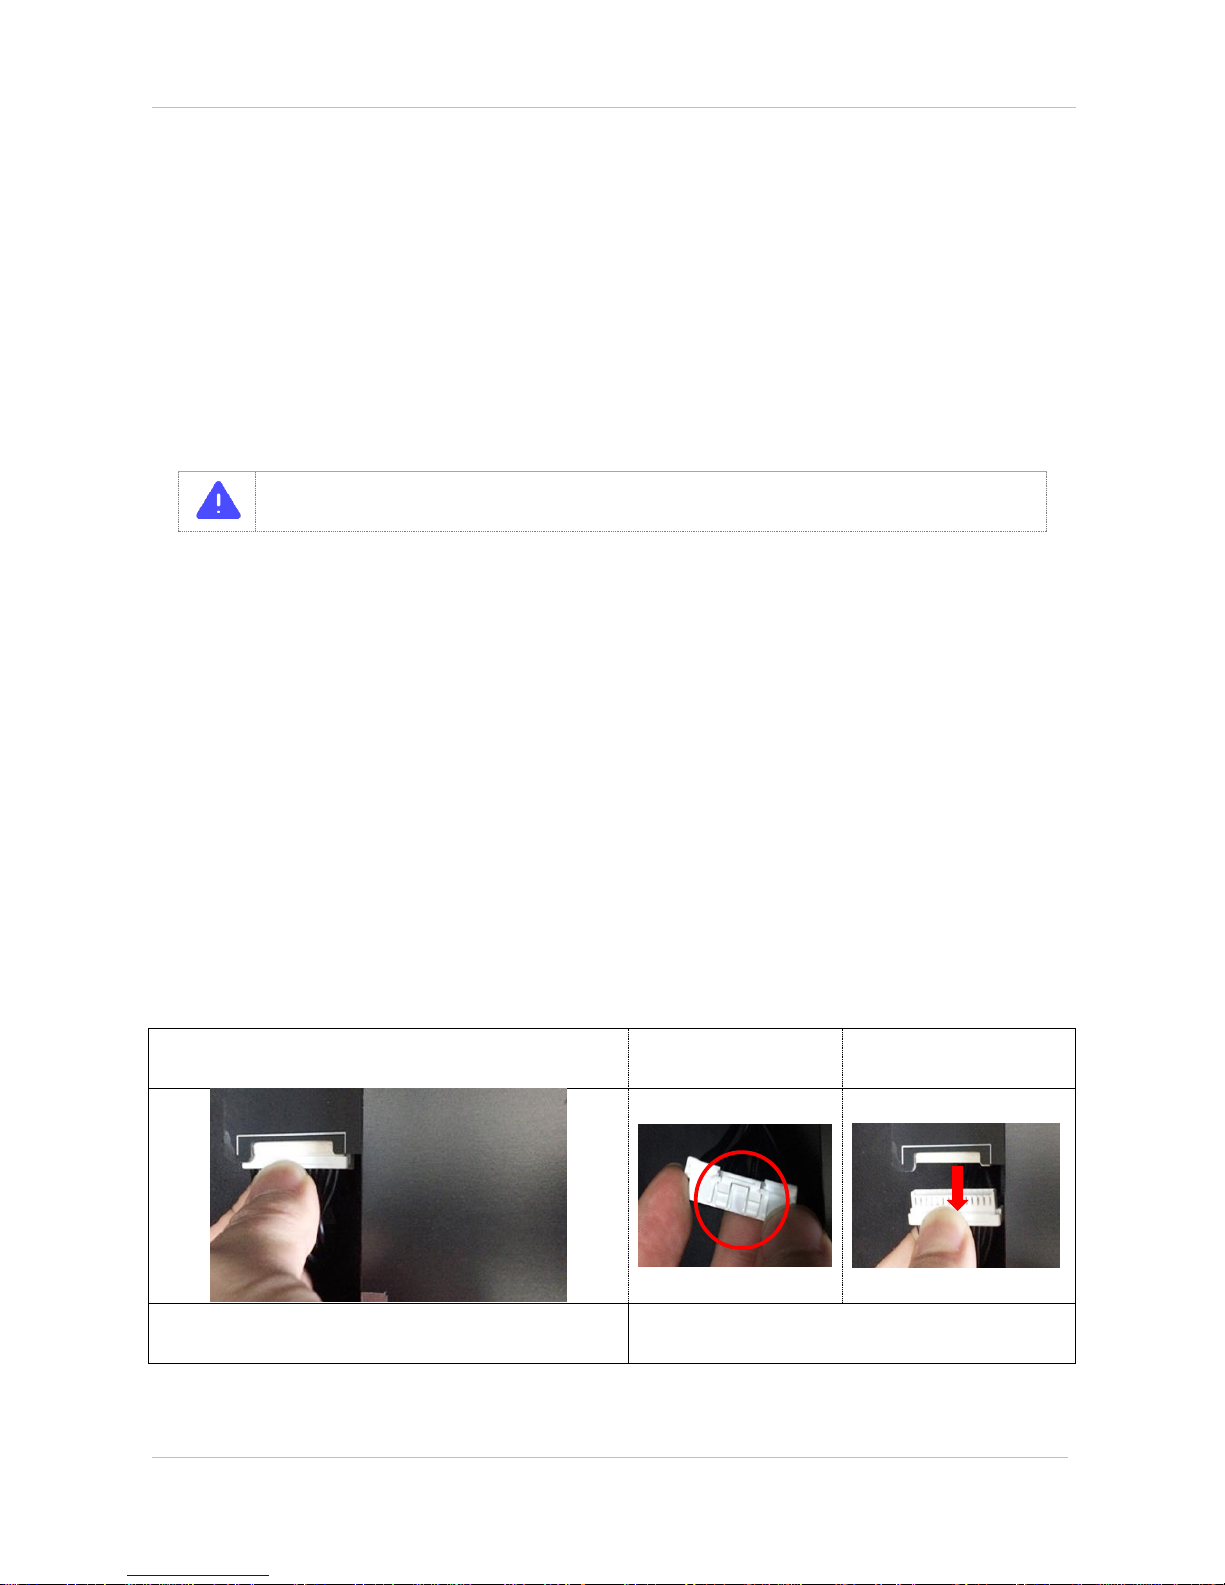
① Press fixture to the bottom part of rear socket and pull out
socket
Bottom part fixture
Pull out
② Take out the bed by pulling it up
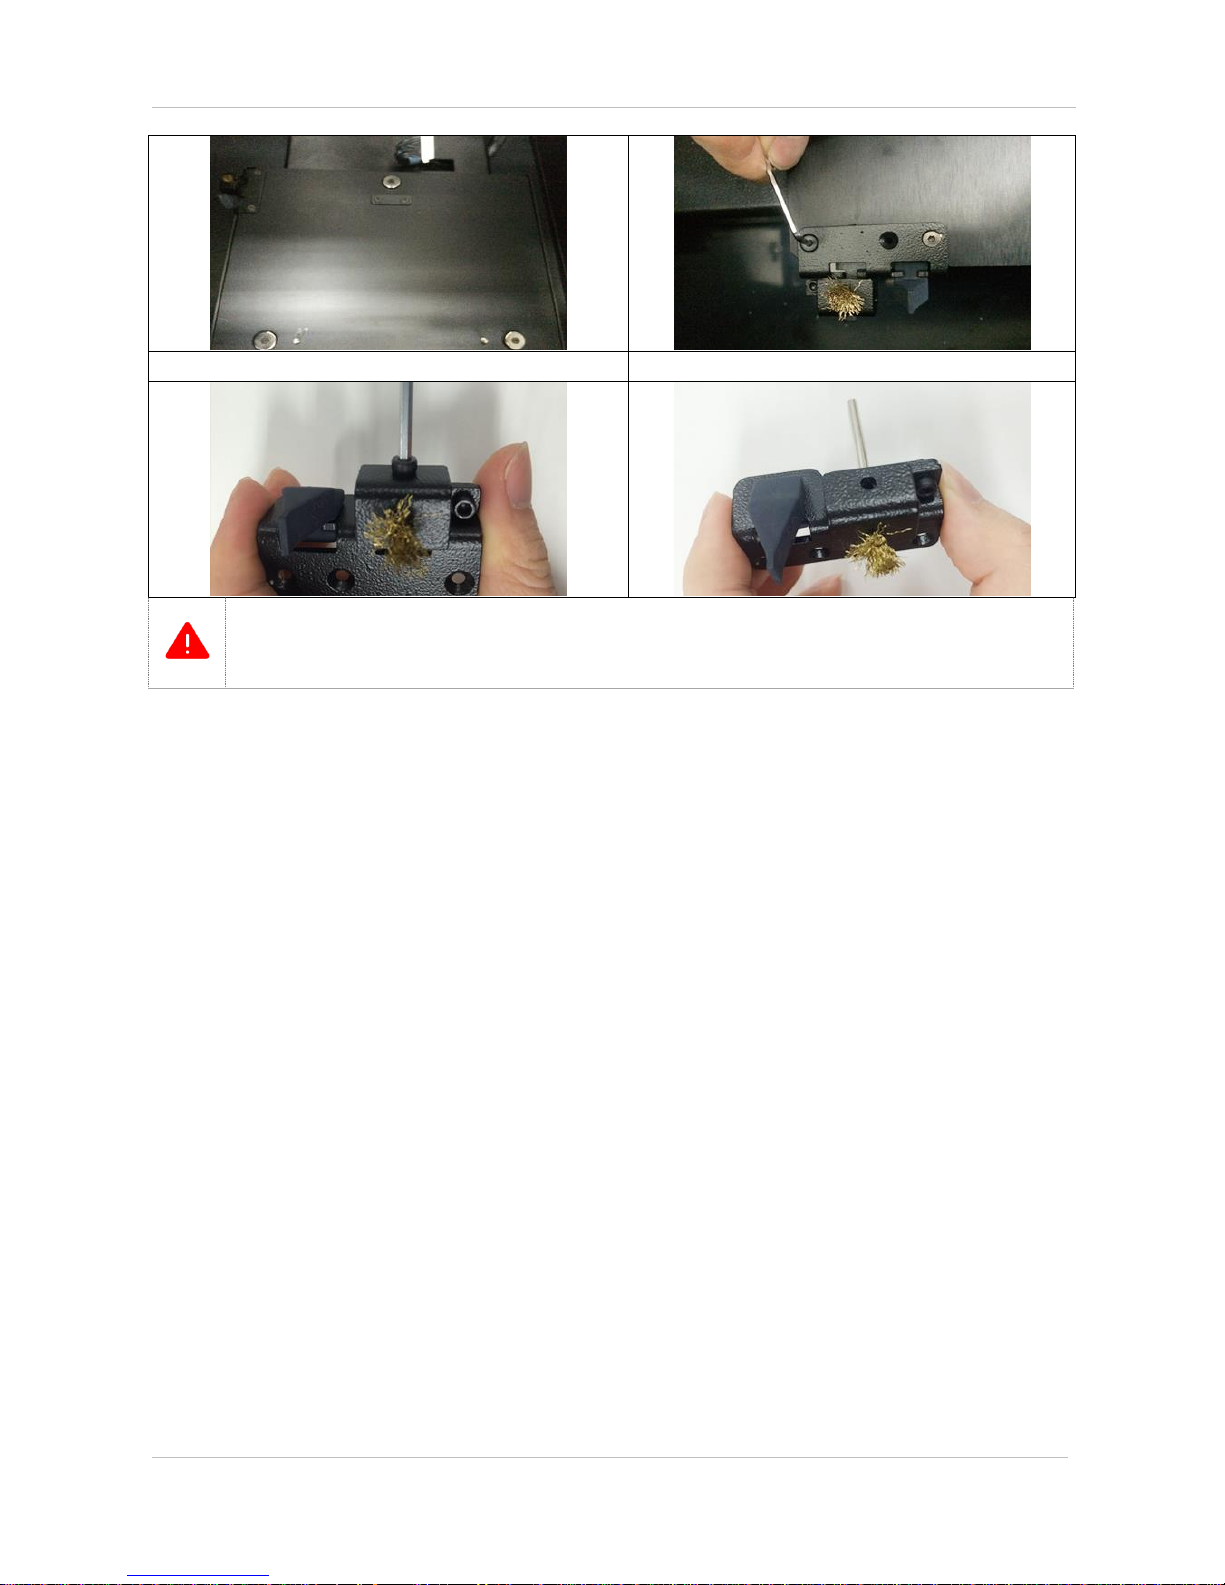
③ Rotate and untie the bed in 2Ø wrench
counterclockwise direction.
Page 53
CUBICON Single Plus User Manual
53
④ Untie in 2.5Ø wrench counterclockwise direction.
Replace a brush in complete separated condition.
* Make sure that bed temperature is cooled off and its power is OFF in prior to proceed work.
* Make sure to wear gloves in separation/installation process to prevent hand injury as the bed is fixed with
extreme magnet force.
* Assembly is the vice versa of separation.
11-7. Firmware update
User can download the firmware from Cubicon homepage and install new version of the firmware.
(1) Firmware installation by cubicreator
Setting –Install new version of the firmware after selecting updated firmware and a file to install. (Refer to
the cubicreator manual for detailed information.)
Page 54
CUBICON Single Plus User Manual
54
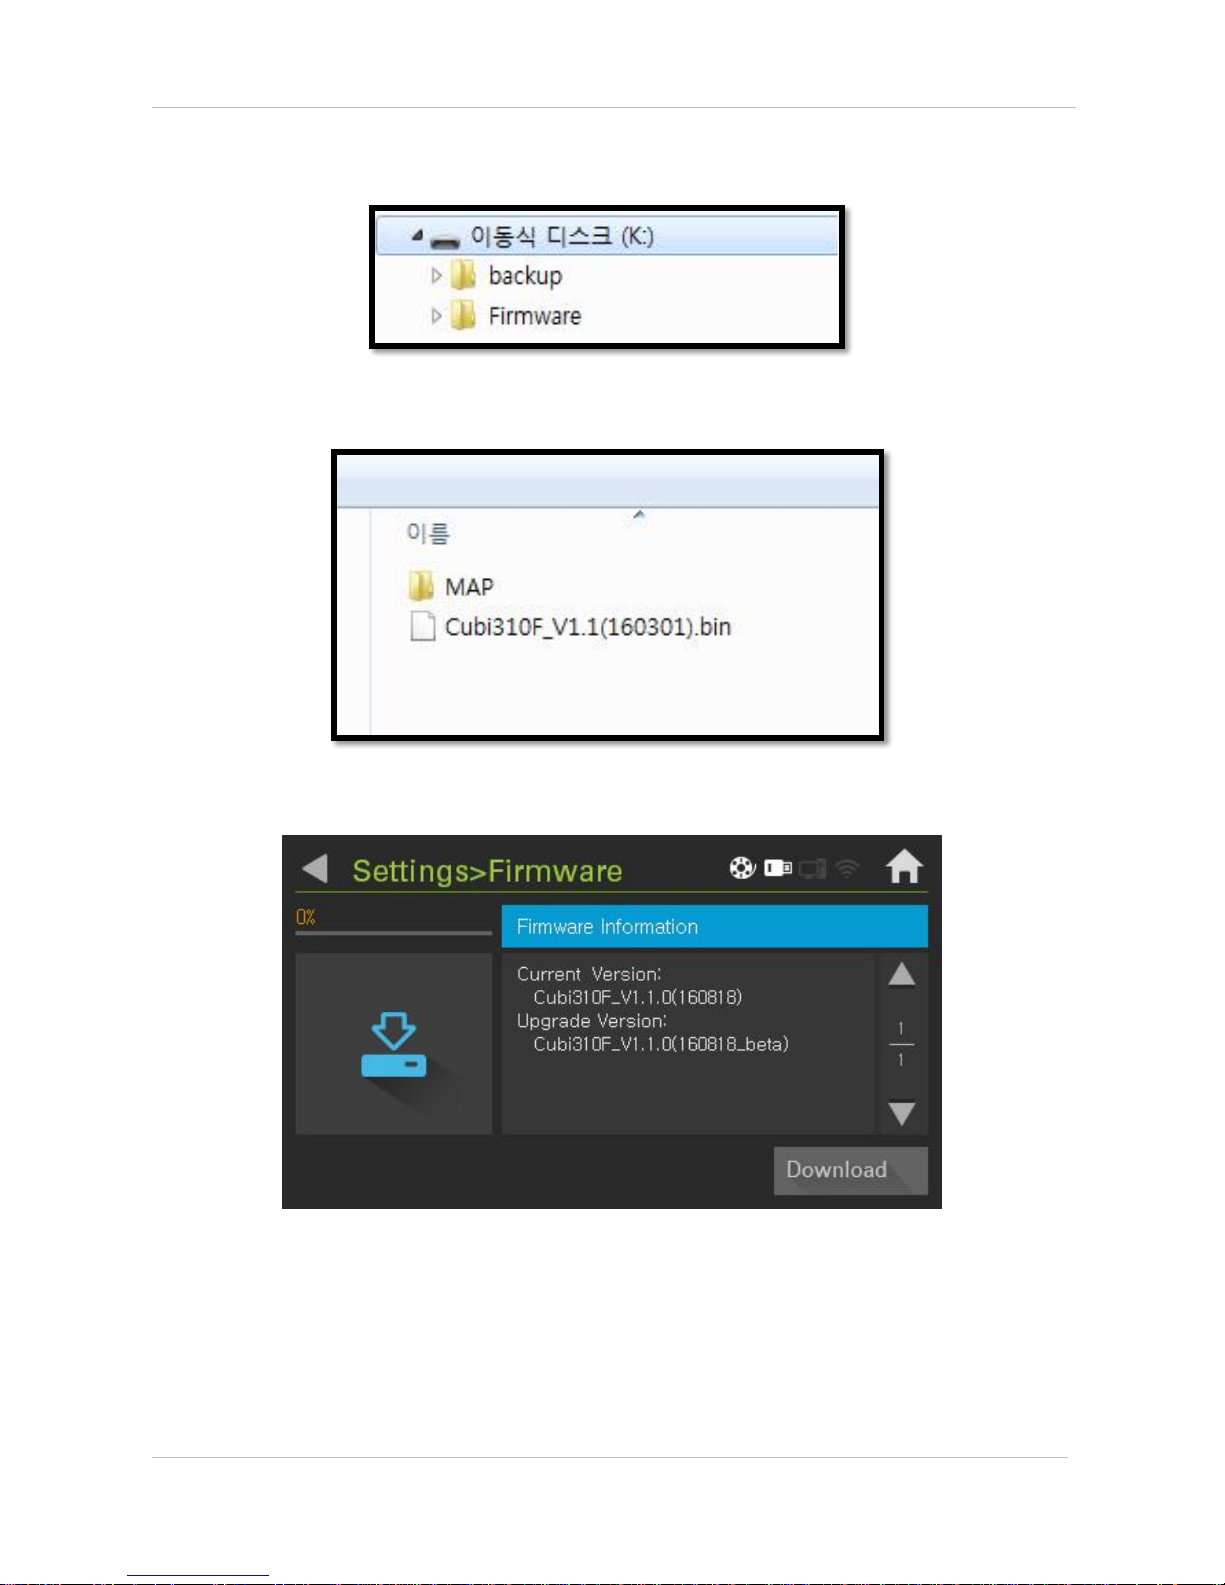
(2) Firmware installation through USB memory
Create ‘Firmware’ folder in ‘Root’ folder of USB memory.
Copy UI file and new version of firmware into ‘Firmware’ folder.
Select firmware icon of ‘Setting’ after inserting USB memory to Cubicon single plus. Firmware update starts,
once ‘Download’ button is selected. Make sure to initialize after firmware update completion-rebooting.
Initialize process takes no more than 1 minute.
Page 55
CUBICON Single Plus User Manual
55
11-8. Firmware recovery
Cubicon Single Plus has the function to recover previous firmware to prevent any possible problem in
firmware update process.
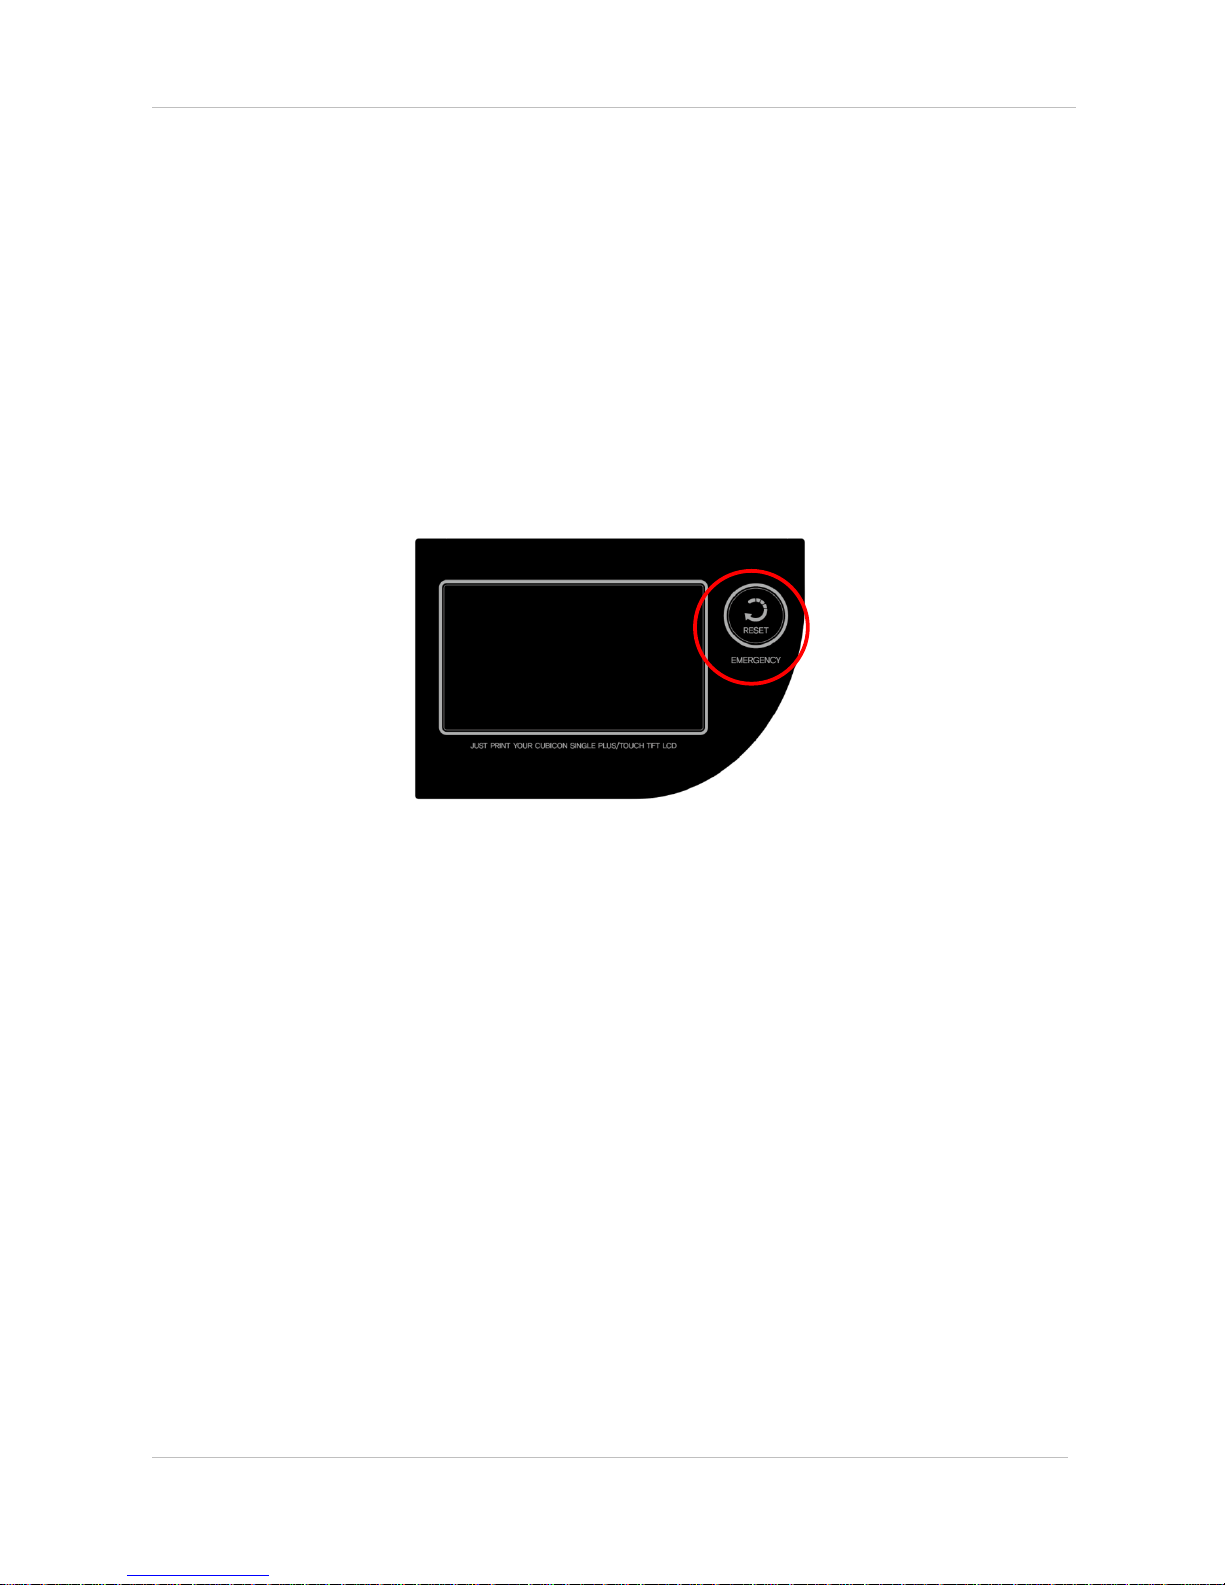
(1) Operation method
Keep pressing ‘Reset’ button after the printer power is OFF. Keep pressing ‘Reset’ button for 20 seconds after
the printer power is ON to recover previous firmware recovery.
Touch LCD reset and rebooting means successful recovery completion.
Page 56
CUBICON Single Plus User Manual
56
12. Trouble shooting
* The printer hardware problem can be solved by initializing through {Setting > Function > Initialize} or through
firmware update.
* Printing quality can be different depending on printing condition or cubicreator option setting in G-Code process.
Therefore make sure to check quality using different printing condition or option.
It is important to inspect problem source clearly in the case of equipment problem occurrence. Make sure to film
of modelling file (STL), hfb(hvs) file, related problem picture and video to provide for customer support.
1) USB memory data is invisible.
Cubicon Single Plus supports only formats in FAT32 form file system.
Cubicon Single Plus supports only English named files. In the case of file names in different languages,
letters may break or it may seem as empty blank. Therefore make sure to change file name from other
language to English for proper use.
Printing might be interrupted in the case of including characters such as “.“ in file name. (System
recognizes “.“ from back as filename extension)
Only *.hfb and .hvs files are visible on LCD screen of Cubicon Single Plus. Make sure to check if a file is
copied properly into USB memory.
Printer may recognize up to 255 USB memory files. Make sure to arrange files in proper quantity.
2) USB memory data cannot be printed.
Make sure to check if selected files are in G-Code of *.hfb , *.hvs filename extension.
Only sliced G-Code (*.hfb , *.hvs filename extension) files can be used by cubicreator in Cubicon
Single Plus. G-Codes, which use different slicing programs, cannot be printed and they may cause
equipment damage.
USB memory data might have been damaged. Try to remake and use remade G-code file.
Printing cannot be processed in the case of improper implementation in memory copy process after
slicing by using cubicreator. Make sure to use the cubicreator and check if related G-Code is proper to
use. G-code is improper to use in the case of abnormal printing channel, which is shown as G-Code.
Slicing might have been gone wrong through the cubicreator due to improper 3D model. Import original
3D model from the cubicreator and check if there is any problem in slicing or G-Code transmission
normality. Use special 3D model inspection program and check any possible problem of 3D model.
There might be a problem in USB memory data storage due to security program of PC or virus. Take
appropriate measures for soling problem after inspection and try again.
3) Printing cannot be proceeded due to PC and USB cable connection.
Check if there is any problem in PC and printer USB cable connection.
Check if Cubicon Single Plus driver is installed to PC properly.
. Check if PC problem is related to virus and reinstall driver after solving the problem.
Connection problem may occur due to communication problem of PC and printer. Try to reconnect USB
cable or rerun the cubicreator or turn OFF and ONN rear power button.
4) Printing cannot be proceeded due to PC and WIFI connection
Check if PC and the printer are connected to identical router.
Use the printer and PC in places, where WIFI is well connected.
Page 57

CUBICON Single Plus User Manual
57
Connection interruption may occur depending on a wireless router model.
Try to initialize the printer setting or turn OFF and ON the printer power.
Refer to 22P for detailed information.
5) Filament cannot be extruded with the nozzle.
Check if the filament is a genuine product. Some filaments have different temperature condition from
other genuine filaments and problem may occur in extruding process due to those filaments’ serious
temperature change. Serious temperature change may lead to the extruder malfunction. The printer
malfunction due to non-geniune filament use is excluded from complimentary A/S.
Check if the filament supply is normal. Untie and rearrange the filament in the case of problems such as
the filament twisting in a spool or untied filament. It is highly recommended to untie and rearrange
filament as twisted or untied filament may cause continuous problem.
The filament nature may change from its original nature due to pollution such as humidity or dust. Such
filament use may cause malfunction such as extruder blockage. Use opened filament as soon as
possible and keep the filament in fixed condition in the spool using plastic to prevent the filament from
humidity/dust. Make sure to keep the filament only for short period.
Check if supplied filament is not too thick or not too thin either. The filament in 1.6~1.9mm diameter
shall be used for accurate filament supply in Cubicon Single Plus. Using too thin or thick filament may
be inserted to equipment and it may lead to equipment malfunction.
In the case of inside extruder filament gets twisted or caught in equipment, extruding cannot be
processed due to extruding problem. Make sure to separate detachable extruder and remove
problematic filament. Inside extruder twisting problem may easily occur in the case of filament of low
printing temperature. Twisting problem can be solved by adjusting inside equipment temperature to low
degree.
Check if detachable extruder installation is proper. Error message may occur on LCD screen in the case
of problem occurrence.
Check if filament in use and the printer extruder temperature are proper.
Replace damaged nozzle. The nozzle is consumable product and can be replaced through A/S.
6) A model is not attached to a floor (heating bed) and is detaching.
Check if filament is genuine product. Some filaments are not glued to the manufacturer’s heating bed
and it may cause equipment malfunction in printing process.
The filament nature may change from its original nature due to pollution such as humidity or dust. Those
polluted filaments may be glued to the heating bed poorly. Use opened filament as soon as possible
and keep the filament in fixed condition in the spool using plastic to prevent the filament from
humidity/dust. Make sure to keep the filament only for short period.
Remove contaminants from heating bed. General wet tissues may cause damage to heating bed
lamination. Never use wet tissues for heating bed.
Check if filament in use and heating bed, extruder temperature condition are proper. The heating bed
use in Cubicon Single Plus can be glued well if only it can maintain proper temperature condition with
filament in use. And the temperature condition can be different depending on printing environment.
Check if the heating bed attachable area is not too small or formed floor is not irregular. Use a floor
supportive material option in the G-Code formation process or slow down the first layer printing speed
to solve the problem.
Use proper tape if required. Applying special heat resisting tape such as kapton tape to heating bed in
accordance with formed model or filament type, might be helpful for a model attachment. Corner
Page 58

CUBICON Single Plus User Manual
58
contact point which is auto level shall be attached with exposure. Make sure to calibrate tilt offset as
thick as tape thickness.
Check if the heating bed lamination has not been damaged or the heating bed bending is not serious.
Replace heating bed in the case of heating bed lamination damage or serious heating bed bending.
The heating bed is consumable material and can be replaced through A/S.
7) A part of the model, mostly floor border detach from the floor.
Refer to “6) A model is not attached to a floor (heating bed) and detaching” and take appropriate
measure.
The problem can be solved partially with option such as inside fill density in G-Code formation process.
Material contraction from heat melting printer is the main reason.
Adjust printing condition (extruder, heating bed, printer inside temperature) or use less contracted
materials. Contraction can be improved somewhat depending on material. However model modification
is the most effective method for contraction improvement, which appears by filament solidification as
natural phenomenon.
8) The middle of model is cracked.
This is caused by contraction of the material caused by printer using the thermal melting method.
Adjust printing condition (extruder, heating bed, printer inside temperature) or use less contracted
materials. Contraction can be improved somewhat depending on material. However model modification
is the most effective method for contraction improvement, which appears by filament solidification as
natural phenomenon.
The problem can be solved partially with option such as inside fill density in G-Code formation process
9) The model does not detach from a floor (heating bed)
Wait until heating bed cools off sufficiently. Forceful pull out may harm the heating bed. The model is
attached onto the floor in the heating bed printing process of Cubicon Single Plus. The model can be
detached easily, once the heating bed cools off after printing completion. Proper temperature for the
model detaching is different based on the filament and model model and environment.
In the case of heating bed cannot be detached after heating bed cooled off (cold temperature), try to pull
out the model by pushing its floor part with flat ended object.
In the case of continuous model leftover fixture to the heating bed, the model cannot be detached from
bed as it is attached to fixated leftover. Make sure maintain the heating bed surface tidy.
Replace the heating bed in the case of heating bed lamination damage through A/S.
10) The model is printed partially or it is not printed at all or it is printed abnormally.
Refer to “5) Filament cannot be extruded with nozzle.” and take appropriate measure.
Check printing model and G-Code. Problem may occur in G-Code formation process in the case of
abnormal model. Modify model and try again.
Problem may occur in printing due to printed model and stanchion interruption based on model or
stanchion in use. The problem can be solved in the case of slicing method change (slicing option
adjustment or direction change).
Remove contaminants from inside nozzle.
In the case of continuous problem occurrence although proper model, the nozzle shall be replaced by
A/S.
Page 59

CUBICON Single Plus User Manual
59
11) Printing cannot be processed due to auto leveling failure.
Check if environmental vibration affects equipment in auto level process. Auto level may fail in the case
of vibration transmission to equipment.
The printer proceeds auto level of bed in prior to print. The printer stops printing in the case of auto
leveling failure (automatically proceeding for several times) due to some reason.
Make sure to maintain auto level contact point continuously.
In the case of continuous problem occurrence, replace extruder cleaning brush or heating bed by A/S.
Auto leveling may fail depending on temperature and filament difference in non-genuine filament use.
12) The presence detection sensor of filament is not operated properly.
Make sure to check supplying filament’s diameter is 1.6~1.9mm in prior to use it.
Flexible filament such as TPU may malfunction due to filament pressure to supply detection sensor.
Make sure not to use filament supply detection function in this case.
(Setting > Function > Filament Check “Off”)
The filament detection sensor may get worn out due to continuous use as it is consumable material.
Replace the presence detection sensor through A/S.
13) Operation stops in printing process.
Check power supply.
In the case of continuous problem occurrence take a photo or video of problematic part and use A/S.
Page 60
CUBICON Single Plus User Manual
60
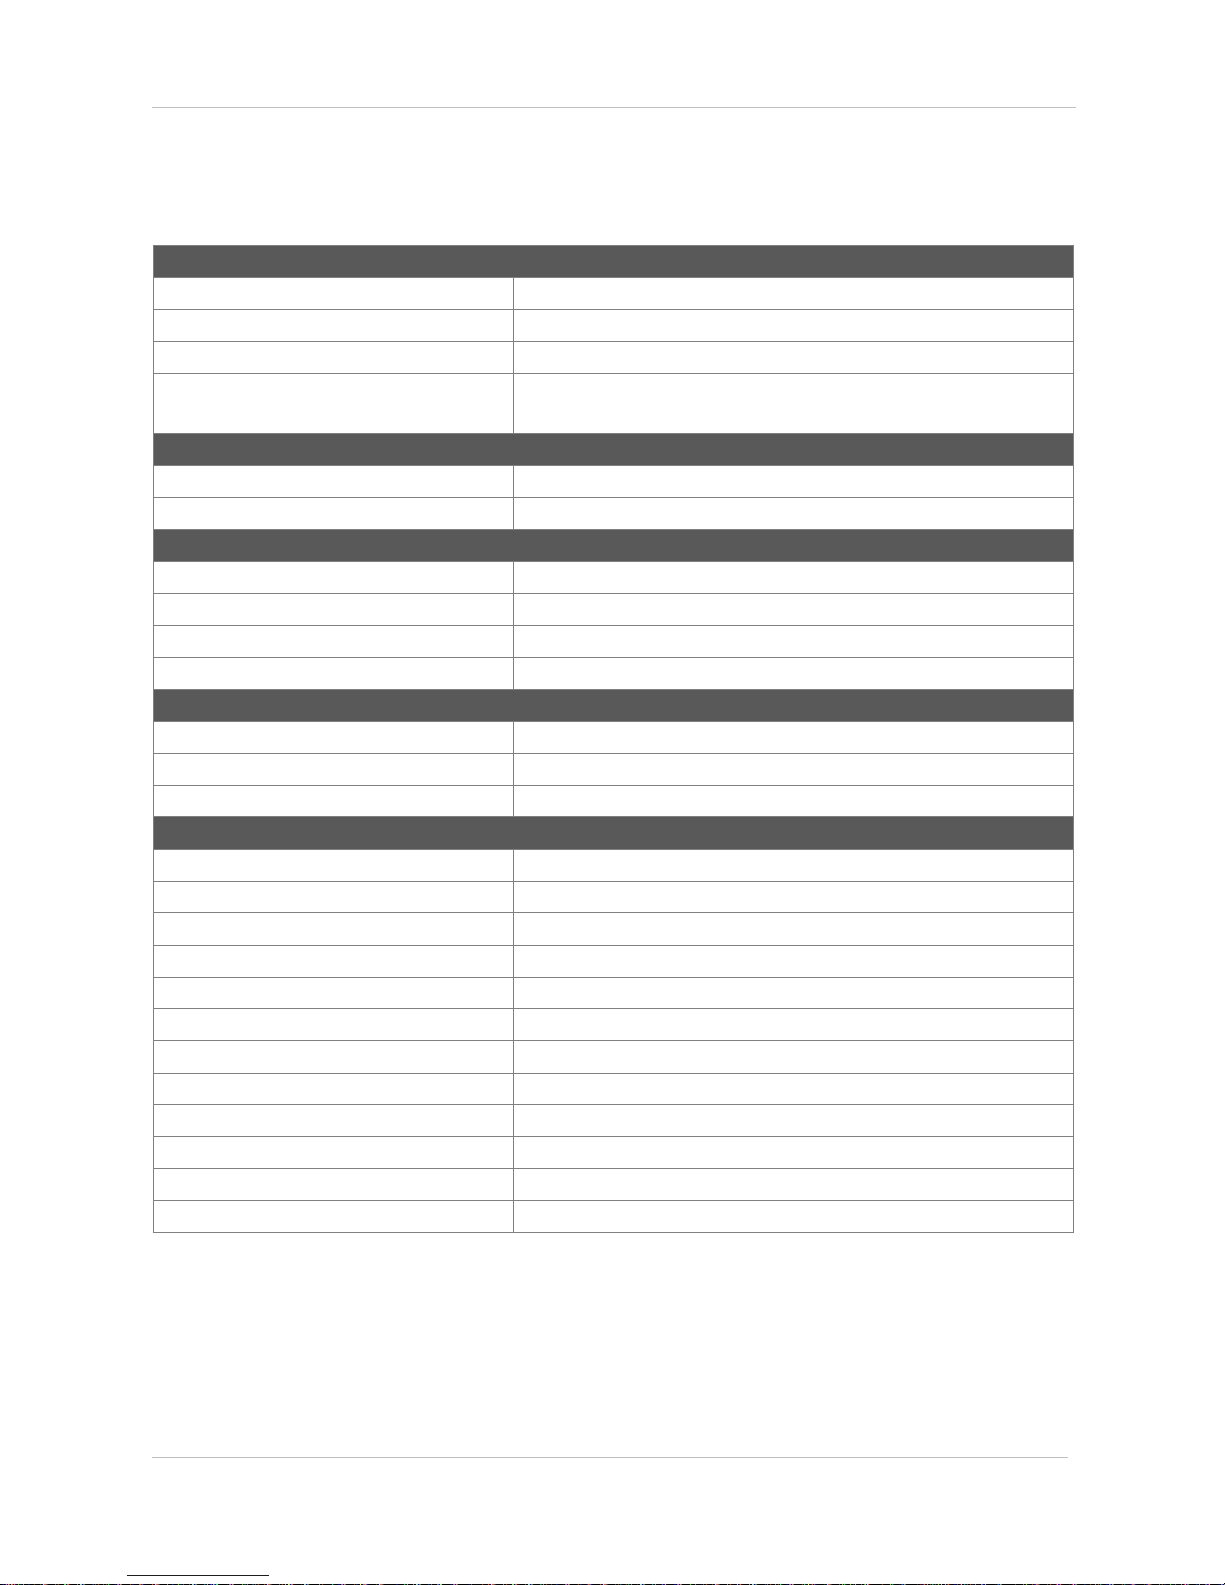
13. Product specification
Standard
Product size
554x579x524 mm
Product weight
~25kg (~55lbs)
Packing box
640x630x610 mm (25.1x24.8x24.0 in)
Packing weight (including the product body
and secondary accessories)
~32kg (70.1lbs)
Temperature
Operation temperature
15 - 35 °C
Storage temperature
0 - 35 °C
Electricity
AC input
Free Volt 100-240V~, 50/60Hz, 5A
Power Supply
24V DC @ 25A
Power consumption
~500W (MAX)
Memory and communication environment
USB Memory(FAT32), USB Cable, WIFI
Software
Slicing software
Cubicreator v3.0 (for Windows)
Inputted 3D design file type
.stl , .obj
Operation system
Over Windows 7
Printing
Printing technology
FFF (Fused Filament Fabrication)
Formation size
240x190x200mm (9.4x7.4x7.7 in)
Formation speed
Max 500mm/sec
Layer height setting
150~300um, Min 100um
Formation wall thickness
Optimal 400um+
Filament diameter
1.75mm
Filament type
ABS, PLA, Flexible Filament
Nozzle diameter
0.4mm
XY location precision degree
6.25um
Z location precision degree
1.25um
Nozzle maximum temperature
260°C
Heating bed maximum temperature
120°C
- The specifications can be changed, without advance notice, when needed to improve the product.
 Loading...