

Page 1
Professional Shop Manual
61/65/70/75 Series Horizontal Shaft Engines
NOTE: These materials are for use by trained technicians who are experienced in the service and repair of outdoor power
equipment of the kind described in this publication, and are not intended for use by untrained or inexperienced individuals.
These materials are intended to provide supplemental information to assist the trained technician. Untrained or inexperienced individuals should seek the assistance of an experienced and trained professional. Read, understand, and follow all
instructions and use common sense when working on power equipment. This includes the contents of the product’s Operators Manual, supplied with the equipment. No liability can be accepted for any inaccuracies or omission in this publication,
although care has been taken to make it as complete and accurate as possible at the time of publication. However, due to
the variety of outdoor power equipment and continuing product changes that occur over time, updates will be made to these
instructions from time to time. Therefore, it may be necessary to obtain the latest materials before servicing or repairing a
product. The company reserves the right to make changes at any time to this publication without prior notice and without
incurring an obligation to make such changes to previously published versions. Instructions, photographs and illustrations
used in this publication are for reference use only and may not depict actual model and component parts.
© Copyright 2013 MTD Products Inc. All Rights Reserved
MTD Products Inc. - Product Training and Education Department
Page 2

Page 3

Table of Contents
Chapter 1: Introduction
Professional Service Manual Intent .................................................................. 1
Safety................................................................................................................ 1
Fasteners .......................................................................................................... 3
Assembly instructions ....................................................................................... 3
Model and serial number .................................................................................. 5
Maintenance ..................................................................................................... 5
Spark plugs ....................................................................................................... 6
Air filter .............................................................................................................. 7
Oil type and capacity......................................................................................... 8
Changing the oil .............................................................................................. 10
Fuel system ..................................................................................................... 11
Servicing the fuel system ................................................................................ 11
Fuel filter ......................................................................................................... 11
Valve lash ....................................................................................................... 13
Exhaust system ............................................................................................... 16
Cleaning the engine ........................................................................................ 16
General torque specifications ......................................................................... 16
Chapter 2: Basic Troubleshooting
Definitions ....................................................................................................... 17
Introduction ..................................................................................................... 17
Steps to troubleshooting ................................................................................. 17
Define the problem .......................................................................................... 17
Identify factors that could cause the problem ................................................. 19
Repairing the problem ..................................................................................... 23
Prime test ........................................................................................................ 24
Leak-down test ................................................................................................ 24
Compression test ............................................................................................ 26
PCV testing ..................................................................................................... 27
Troubleshooting flow charts ............................................................................ 28
Chapter 3: Air Intake systems
Snow engines ................................................................................................. 33
Heat box .......................................................................................................... 33
Chore engines ................................................................................................. 36
Air filters .......................................................................................................... 36
Air filter base and intake elbow ....................................................................... 37
Carburetor Insulator ........................................................................................ 38
i
Page 4

Chapter 4: The Fuel System and Governor
Fuel Line ......................................................................................................... 41
Inspect the fuel lines ....................................................................................... 41
Inspecting the fuel........................................................................................... 42
Test fuel for alcohol ......................................................................................... 42
Fuel filter ......................................................................................................... 43
Fuel tank vent ................................................................................................. 44
To test the cap vent ........................................................................................ 44
The fuel tank ................................................................................................... 45
Choke .............................................................................................................. 47
Choke linkage ................................................................................................. 48
Primers............................................................................................................ 49
Evaporative (EVAP) emissions system ........................................................... 50
Troubleshooting the EVAP system ................................................................. 51
Roll over valve vent ......................................................................................... 52
Charcoal canister ............................................................................................ 53
Testing a charcoal canister ............................................................................. 54
Carburetors ..................................................................................................... 55
Inspecting the carburetor ................................................................................ 55
Disassembly and rebuilding the carburetor ..................................................... 55
Governor ......................................................................................................... 59
Governor arm .................................................................................................. 59
Governor shaft ................................................................................................ 60
Governor cup and the governor gear .............................................................. 61
Chapter 5: Lubrication
Oil type and quantity ....................................................................................... 63
Oil dip stick ...................................................................................................... 64
Dip stick tube removal ..................................................................................... 65
Lubrication system .......................................................................................... 66
Positive crankcase ventilation valve ................................................................ 67
Chapter 6: Starter and Charging Systems
Recoil Starter Removal ................................................................................... 69
Starter Cup ...................................................................................................... 69
Starter Rope .................................................................................................... 71
Starter pulley and recoil spring ....................................................................... 72
Electric starter ................................................................................................. 74
Electric starter switch ...................................................................................... 75
Charging system ............................................................................................. 79
Stator .............................................................................................................. 80
Rotor ............................................................................................................... 80
ii
Page 5

Chapter 7: Ignition System 81
Troubleshooting the ignition system ............................................................... 81
Stop switch ..................................................................................................... 82
Remote (ignition) stop switch ......................................................................... 83
The module .................................................................................................... 85
Module removal .............................................................................................. 86
Installing the module and setting the air gap .................................................. 86
Flywheel ......................................................................................................... 87
The spark plug ................................................................................................ 88
Cleaning the spark plug .................................................................................. 88
Inspection of the spark plug ............................................................................ 88
Spark plug removal ......................................................................................... 88
Chapter 8: Exhaust
Summer engines ............................................................................................. 89
Spark arrestor ................................................................................................. 89
To remove/replace the muffler ........................................................................ 90
Snow engines ................................................................................................. 91
Chapter 9: Cylinder Head
Valves ............................................................................................................. 97
Push rod bushings ........................................................................................ 100
Chapter 10: Crankshaft, piston and Connecting Rod
Crank shaft inspection .................................................................................. 106
Piston Inspection ........................................................................................... 107
Connecting rod inspection ............................................................................ 108
Cylinder inspection ........................................................................................ 109
Bearings ........................................................................................................ 110
Reassembly .................................................................................................. 111
Engine specifications chart ........................................................................... 114
Engine torque values chart ........................................................................... 118
Chapter 11: Failure Analysis
Abrasive Ingestion ........................................................................................ 119
Insufficient lubrication ................................................................................... 122
Engine Overspeed ........................................................................................ 123
Overheated ................................................................................................... 124
Mechanical Breakage/ Wear ......................................................................... 125
Detonation/preignition ................................................................................... 125
iii
Page 6

iv
Page 7

Introduction
Caution is used to point out potential danger to the technician, operator, bystanders, or surrounding property.
! CA UTION! CA UTION
Warning indicates a potentially hazardous situation that, if not avoided, could result in death
or serious injury.
! WA RNI NG! WA RNI NG
! DANGER! DANGER
Danger indicates an imminently hazardous situation that, if not avoided, will result in death or
serious injury. This signal word is to be limited to the most extreme situations
CHAPTER 1: INTRODUCTION
Professional Service Manual Intent
This manual is intended to provide service dealers with an introduction to proven diagnostic and repair proce-
dures for MTD 61, 65, 70 and 75 series horizontal shaft engines.
Disclaimer: The information contained in this manual is correct at the time of writing. Both the product and the infor-
mation about the product are subject to change without notice.
About the text format:
NOTE: Is used to point out information that is relevant to the procedure, but does not fit as a step in the proce-
dure.
• Bullet points: indicate sub-steps or points.
1. Numbered steps
1a. Substeps
the actions required to complete a step.
Disclaimer: This manual is intended for use by trained, professional technicians.
• Common sense in operation and safety is assumed.
• In no event shall MTD be liable for poor text interpretation or poor execution of the procedures described
in the text.
• If the person using this manual is uncomfortable with any procedures they encounter, they should seek
the help of a qualified technician or MTD Technical Support.
Safety
This Service Manual is meant to be used along with the Operator’s Manual. Read the Operator’s Manual and
familiarize yourself with the safety and operational instructions for the equipment being worked on. Keep a copy of
the Operator’s Manual for quick reference. Operator’s manuals may be viewed for free at the brand support website.
It will be necessary to have the complete model and serial number for the equipment.
indicate specific things that should be done, and the order in which they should be done.
will be lettered and nested within steps. Two or more substeps may be combined to describe
1
Page 8
61/ 65/70/75 Series Horizontal Shaft Engines
• Be prepared in case of emergency:
Keep a fire extinguisher nearby
Keep a first aid kit nearby
Keep emergency contact numbers handy
• Replace any missing or damaged safety labels on shop equipment.
• Replace any missing or damaged safety labels on equipment being serviced.
! CAUTION! CAUTION
• Grooming and attire:
Do not wear loose fitting clothing that may become entangled in equipment.
Long hair should be secured to prevent entanglement in equipment.
Jewelry is best removed.
• Protective gear: includes, but is not limited to
Clear eye protection ................................ while working around any machinery
Protective gloves ..................................... where necessary
Armored footwear .................................... when working around any machinery
Hearing protection ................................... in noisy environments
Chemically resistant gloves ..................... when working with chemicals or solvents
Respirator ................................................ when working with chemical or solvents
Appropriate tinted eye protection............. when cutting or welding
Flame resistant headgear, jacket, chaps . when cutting or welding
! WARNING! WARNING
! CAUTION! CAUTION
• Remember that some hazards have a cumulative effect. A single exposure may
cause little or no harm, but continual or repeated exposure may cause very serious
harm.
• Clean spills and fix obviously dangerous conditions as soon as they are noticed.
• Lift and support heavy objects safely and securely.
• Be aware of your surroundings and potential hazards that are inherent to all power
equipment. All the labels in the world cannot protect a technician from an instant of
carelessness.
• Exhaust fumes from running engines contain carbon monoxide (CO). Carbon
monoxide is a colorless odorless gas that is fatal if inhaled in sufficient quantity.
Only run engines in well ventilated areas. If running engines indoors, use an
exhaust evacuation system with adequate make-up air ventilated into the shop.
! DANGER! DANGER
2
Page 9

Introduction
Fasteners
• Most of the fasteners used on the MTD engine are metric. Some are fractional inches. For this reason,
wrench sizes are frequently identified in the text, and measurements are given in U.S. and metric scales.
• If a fastener has a locking feature that has worn, replace the fastener or apply a small amount of releasable thread locking compound such as Loctite® 242 (blue).
• Some fasteners, like cotter pins, are single-use items that are not to be reused. Other fasteners such as
lock washers, retaining rings, and internal cotter pins (hairpin clips) may be reused if they do not show
signs of wear or damage. This manual leaves that decision to the judgement of the technician.
Assembly instructions
• Torque specifications may be noted in the part of the text that covers assembly. They may be summa-
rized in tables along with special instructions regarding locking or lubrication. Whichever method is more
appropriate will be used. In many cases, both will be used so that the manual is handy as a quick-reference guide as well as a step-by-step procedure guide that does not require the user to hunt for information.
• Lubricant quantity and specification may be noted in the part of the text that covers maintenance, and
again in the section that covers assembly. They may also be summarized in tables along with special
instructions. Whichever method is more appropriate will be used. In many cases, the information will be
found in several places in the manual so that the manual is handy as a quick-reference guide as well as a
step-by-step procedure guide that does not require the user to hunt for information.
• The level of assembly instructions provided will be determined by the complexity of reassembly, and by
the potential for damage or unsafe conditions to arise from mistakes made in assembly.
• Some instructions may refer to other parts of the manual for subsidiary procedures. This avoids repeating
the same procedure two or three times in the manual.
3
Page 10
61/ 65/70/75 Series Horizontal Shaft Engines
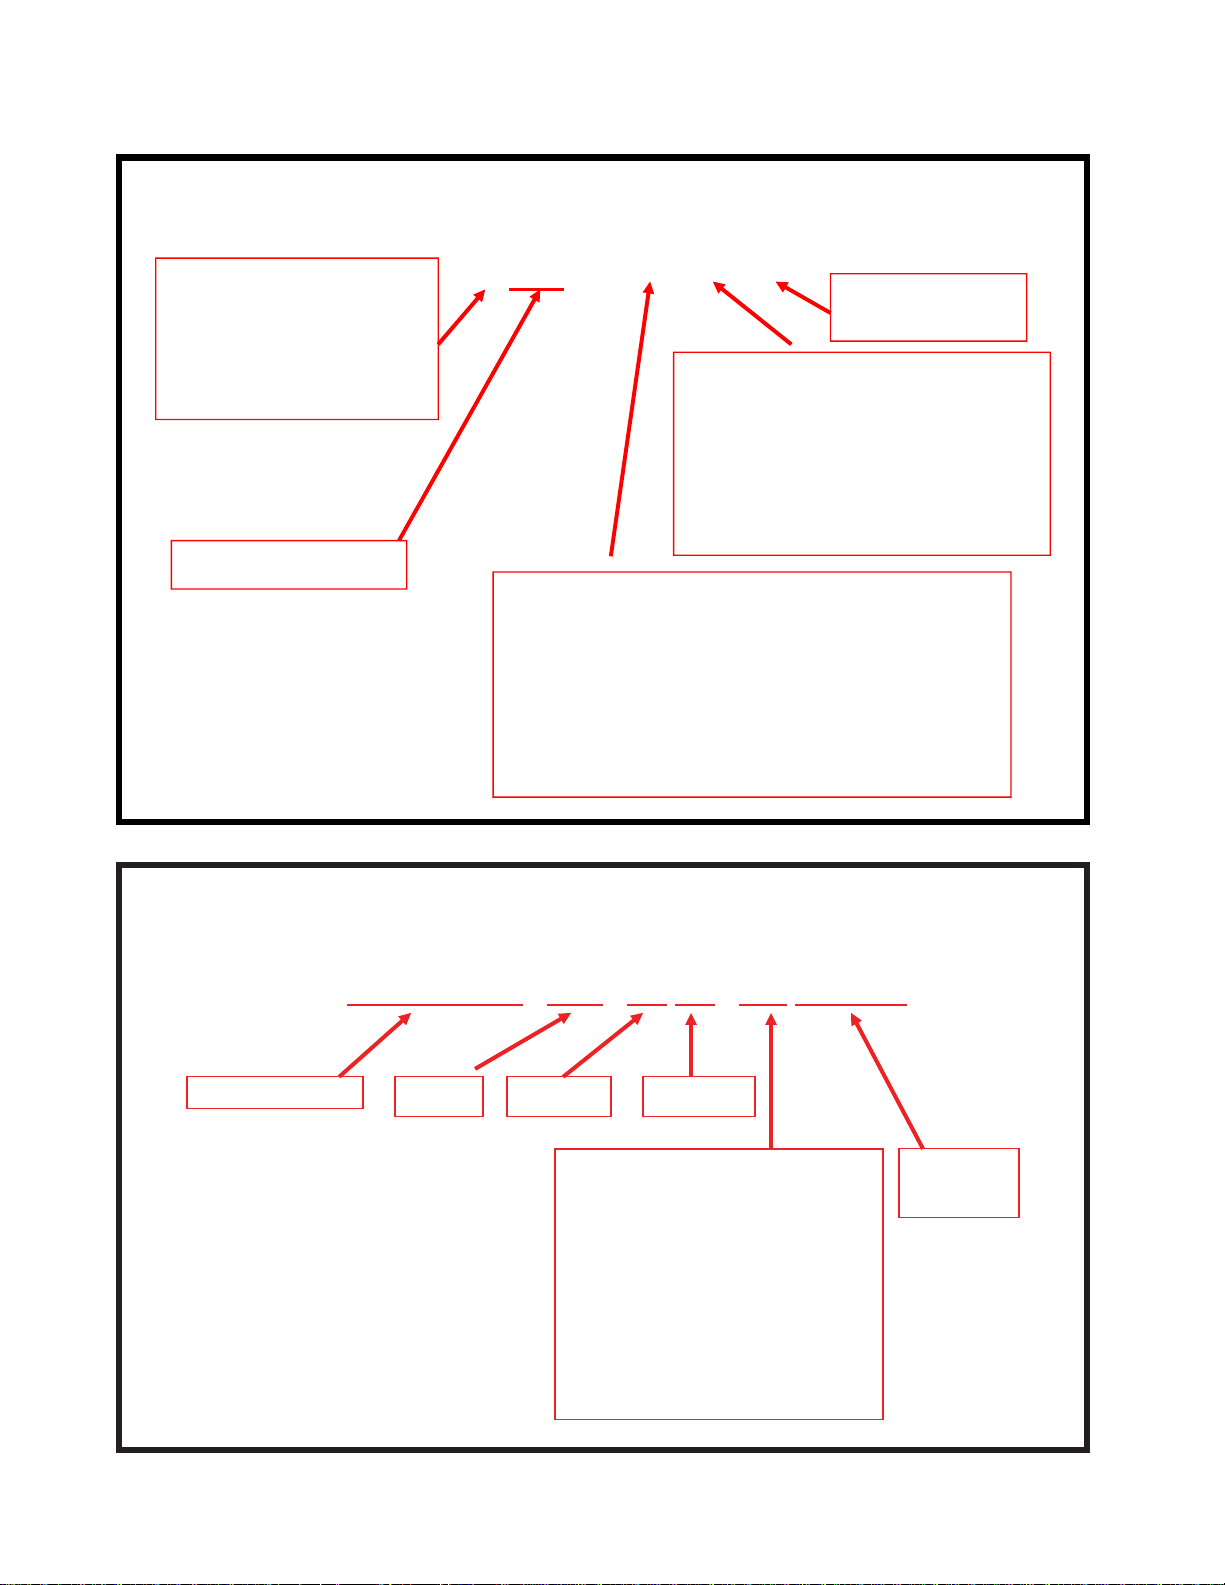
MTD Horizontal Engine Model Designators
1 6 1 - S H A
Bore Dia. (mm)
Starter/Alternators
1=Recoil start
2=Electric start
3=E. start/alt. 20W/20W
4=E. start/alt. 3A DC/5A
End Product
C Chipper/Shredder
J Snow/No tank
L Logsplitter
R Tiller (slow reverse)
S Snow
T Tiller
V Verticutter
Major Revision
Change
Compliance
U United States (50 State)
H Europe
C California
0 (Zero) 49 State
L 49 State - special
G U.S.(49) and Europe
T Australia (S.A.)
Y China
W U.S.(50) and Europe
MTD Engine Serial Numbers
Model number
1P65FH/0510271A0023
MonthYear
Producing Line# and Shift#:
1A=Line 1, 1
st
Shift
1B=Line 1, 2
nd
Shift
2A=Line 2, 1
st
Shift
2B=Line 2, 2
nd
Shift
3A=Line 3, 1
st
Shift
3B=Line 3, 2
nd
Shift
4A=Line 4, 1
st
Shift
4B=Line 4, 2nd Shift
Date
Engine
number
4
Page 11
Introduction
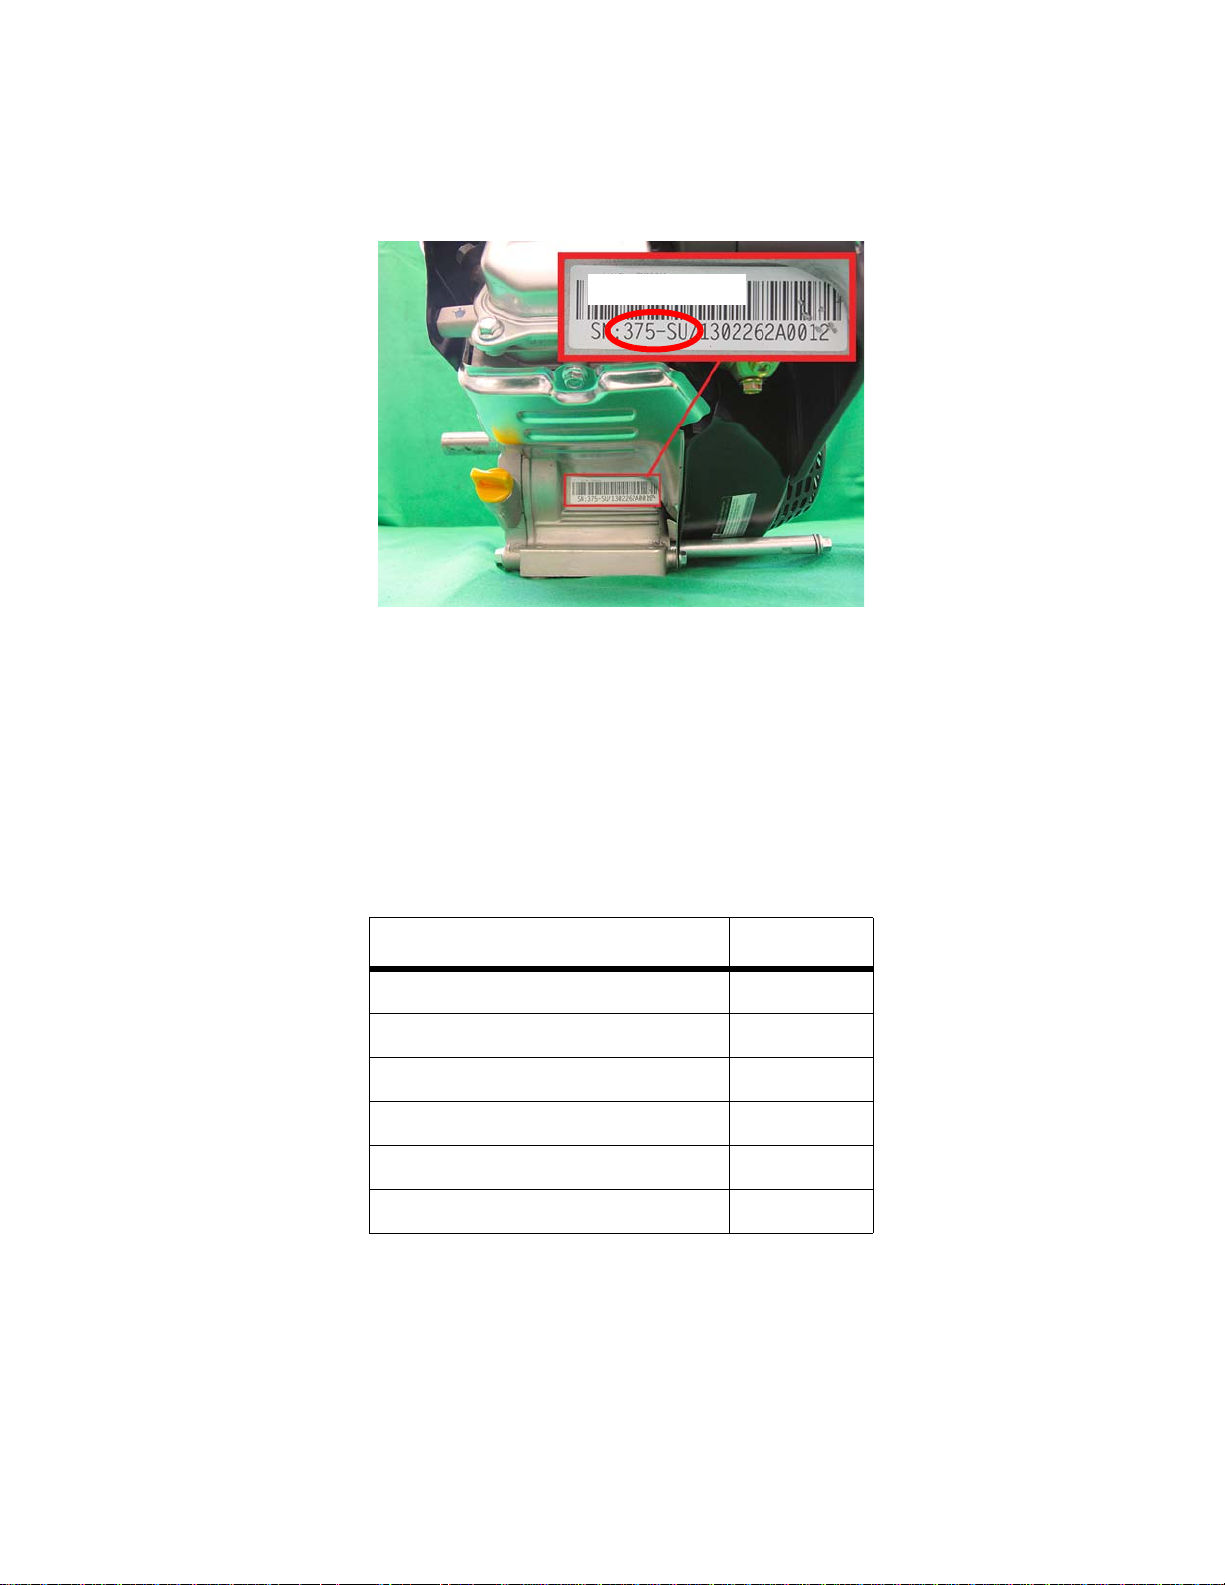
Figure 1.1
Model number
Model and serial number
The model and serial number can be found on a white sticker with a bar code. The sticker is usually located at the
base of the engine, under the valve cover. See Figure 1.1.
NOTE: The serial number will always start with the model number.
Maintenance
The recommended maintenance intervals listed in this manual are a guideline. They are adjustable for local con-
ditions.
Maintenance items Interval
Oil Change* 25 hrs
Clean/replace spark arrestor** 25 hrs
Replace the air filter** 25 hrs
Spark plugs 50 hrs
Fuel filter 50 hrs
Clean the engine 25 hours
* First oil change at 5 hours
**If equipped
5
Page 12
61/ 65/70/75 Series Horizontal Shaft Engines
Figure 1.2
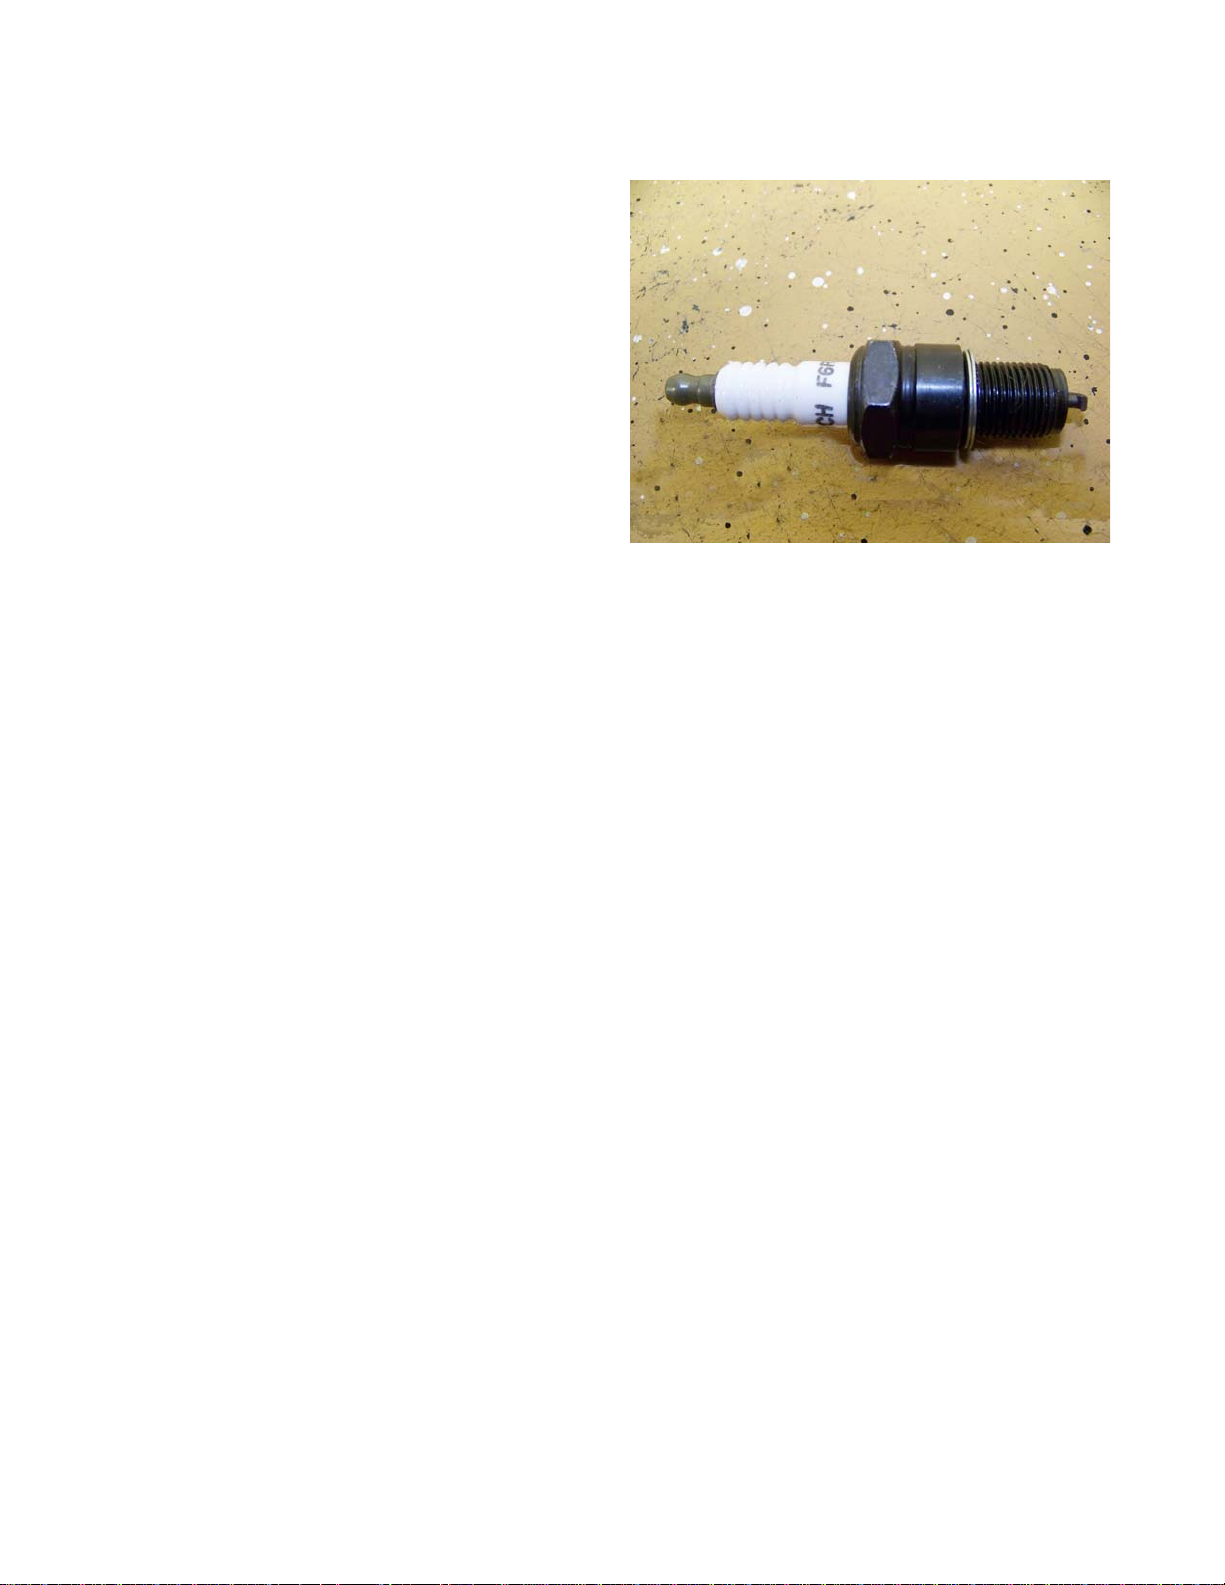
Spark plugs
The information in this manual applies to the MTD
engine. Some basic principles may apply to engines produced by other manufacturers.
As the saying goes “an ounce of prevention is worth a
pound of cure”. The same can be said about preventive
maintenance on outdoor power equipment. By changing
the spark plug and oil at recommended intervals many failures can be avoided.
NOTE: Please refer to Chapter 7: Ignition for the
complete service instructions on spark
plugs.
1. The spark plug used in most MTD engines is a
F6RTC (part # 951-10292) gapped to 0.024” -
0.031” (0.60 - 0.80 mm). See Figure 1.2.
2. Wear rate will vary somewhat with severity of use. If
the edges of the center electrode are rounded-off,
or any other apparent wear / damage occurs, replace the spark plug before operating failure (no start) occurs.
3. Cleaning the spark plug:
NOTE: MTD does not recommend cleaning spark plugs. Use of a wire brush may leave metal deposits on the
insulator that causes the spark plug to short out and fail to spark. Use of abrasive blast for cleaning
may cause damage to ceramic insulator or leave blast media in the recesses of the spark plug. When
the media comes loose during engine operation, severe and non-warrantable engine damage may
result.
4. Inspection of the spark plug can provide indications of the operating condition of the engine.
• Light tan colored deposits on insulator and electrodes is normal.
• Dry, black deposits on the insulator and electrodes indicate an over-rich fuel / air mixture (too much fuel or
not enough air)
• Wet, black deposits on the insulator and electrodes indicate the presence of oil in the combustion cham-
ber.
• Heat damaged (melted electrodes / cracked insulator / metal transfer deposits) may indicate detonation.
• A spark plug that is wet with fuel indicates that fuel is present in the combustion chamber, but it is not
being ignited.
6
Page 13
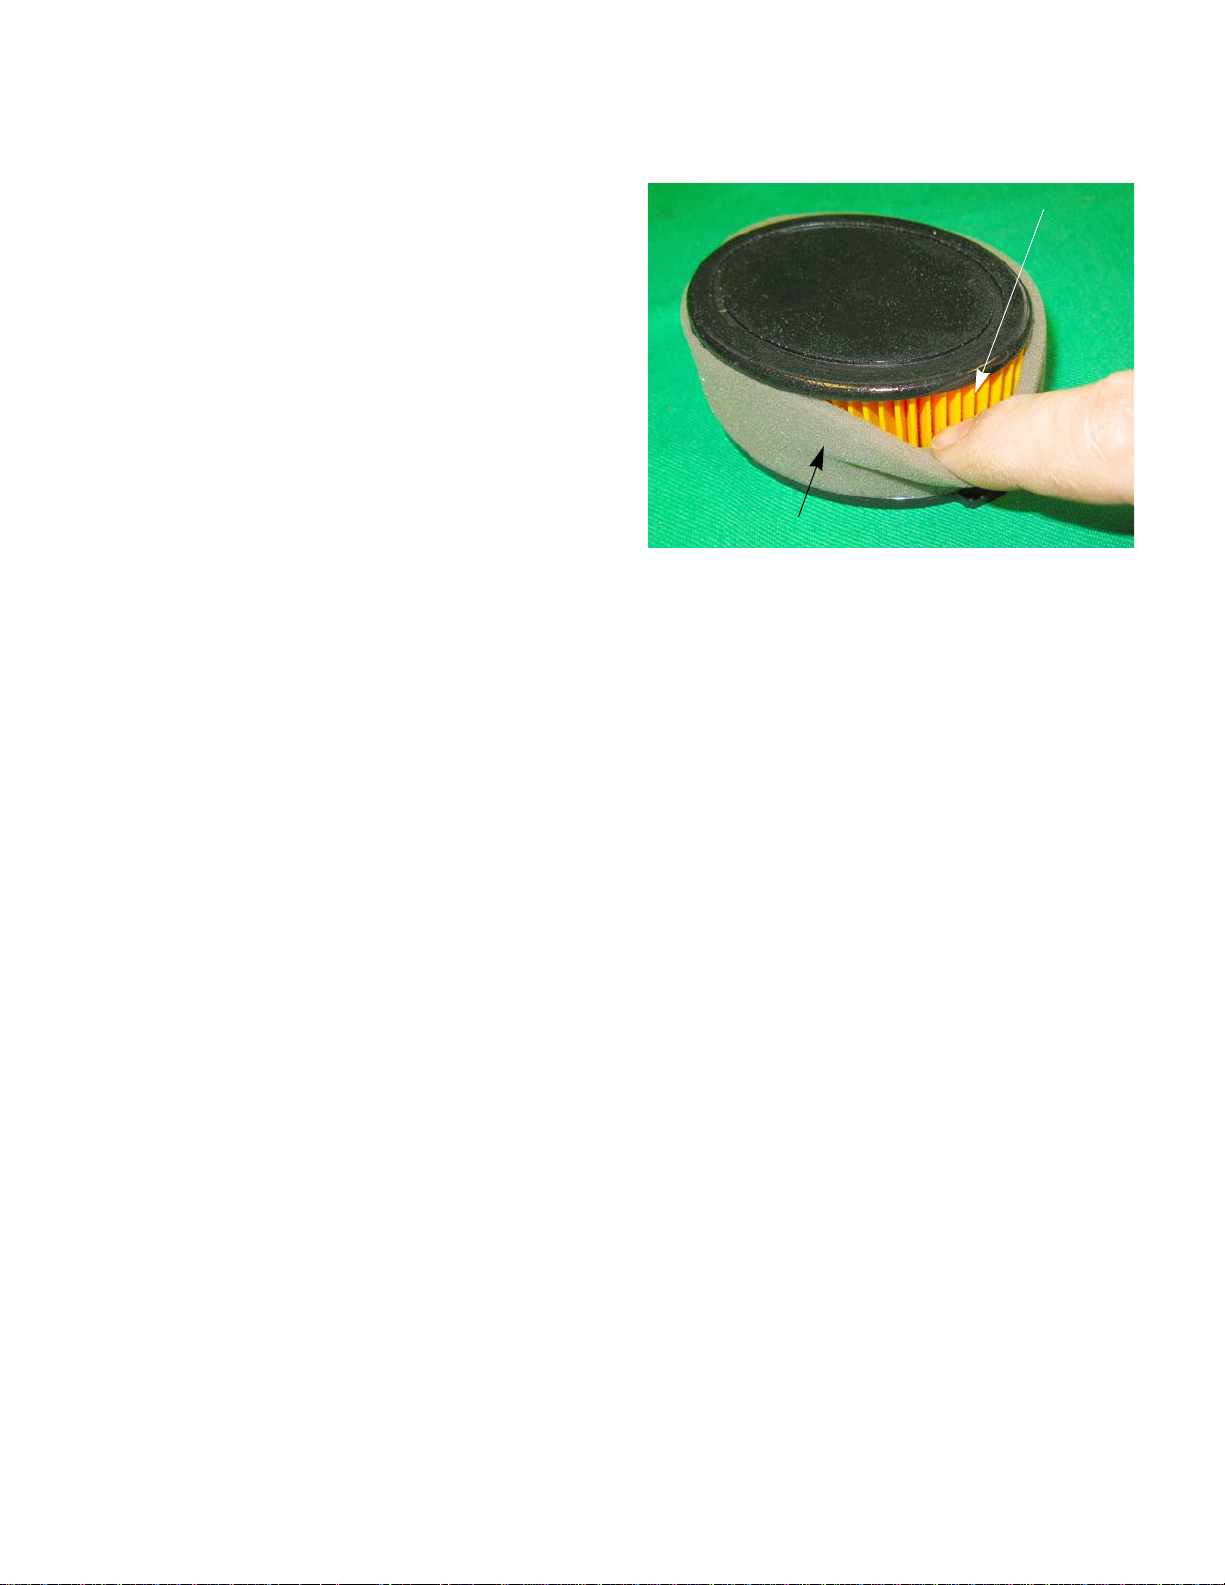
Air filter
Figure 1.3
Paper-pleated element
Foam pre-cleaner
The main function of the air filter is to trap air borne particles before they reach the carburetor that can cause catastrophic internal engine damage.
Generally air filters come in two different types, a
pleated-paper element, or a foam plastic, sometimes a
combination of the two will be used like the one on the
MTD engine. See Figure 1.3.
• Air filters used on the MTD engine are designed
to prevent particles larger than 3-5 micron from
passing through into the engine.
• The filter should be checked on a regular basis
possibly several times in a season.
• Typically an air filter should be changed before
every season.
• If a foam pre-cleaner is dirty, but not in bad of
condition, it can be cleaned and reused. The
paper pleated filters can be shaken or lightly
tapped to free the debris from the filter.
Introduction
NOTE: Never use compressed air on a paper air filter. Compressed air will remove the tiny fibers that are used
to catch the dirt in the air. Without these fibers the filter is useless.
• Foam pre-cleaners can be washed in warm soapy water.
NOTE: When drying a foam pre-cleaners either squeeze it inside of a paper towel or let it air dry. DO NOT
wring it. Wringing the foam pre-cleaners will cause damage to the foam.
NOTE: Always check with factory specification prior to servicing/replacing any engine components.
NOTE: Do not oil the foam pre-cleaner. The paper filer will absorb the oil and it will become plugged.
7
Page 14
61/ 65/70/75 Series Horizontal Shaft Engines
SAE 40
SAE 30
SAE 10W30/SAE 10W40
SAE 5W20
-4°F
14°F
32°F 50°F 68°F 86°F 104°F
-20°C
-10°C
0°C
10°C 20°C
30°C
40°C
Oil Chart
Oil type and capacity
The recommended oil for MTD engines is an SAE 10W-30 oil for summer engines and SAE 5W-30 for snow
engines. Both oils should have a SM API rating or better. The oil capacity is 17.0- 20.3 fl.oz (0.5-0.6 liters).
• Check the oil level daily and change the oil more frequently in severe operating conditions such as high
ambient temperature, dusty conditions, or high load use in exceptionally thick grass.
• Synthetic oil is a suitable alternative, but it does not extend service intervals.
NOTE: MTD recommends the use of petroleum oil during the break in period to ensure the piston rings cor-
rectly break in.
• Synthetic vs. Petroleum based oil: To simply look at synthetic oil and to compare it with Petroleum based
oil there is very little difference. However, when you look at the two through a microscope it is easy to see
the difference. Synthetic is made up of smaller molecules. This allows the oil to get into areas that petroleum based oil cannot.
• No oil additives or viscosity modifiers are recommended. The performance of a good oil meeting the API
specifications will not be improved by oil additives.
NOTE: Some oil additives may cause severe and non-warrantable engine damage, constituting a lubrication
failure.
NOTE: If the oil is noticeably thin, or smells of gasoline, a carburetor repair may be needed before the engine
can be run safely.
8
Page 15
Introduction
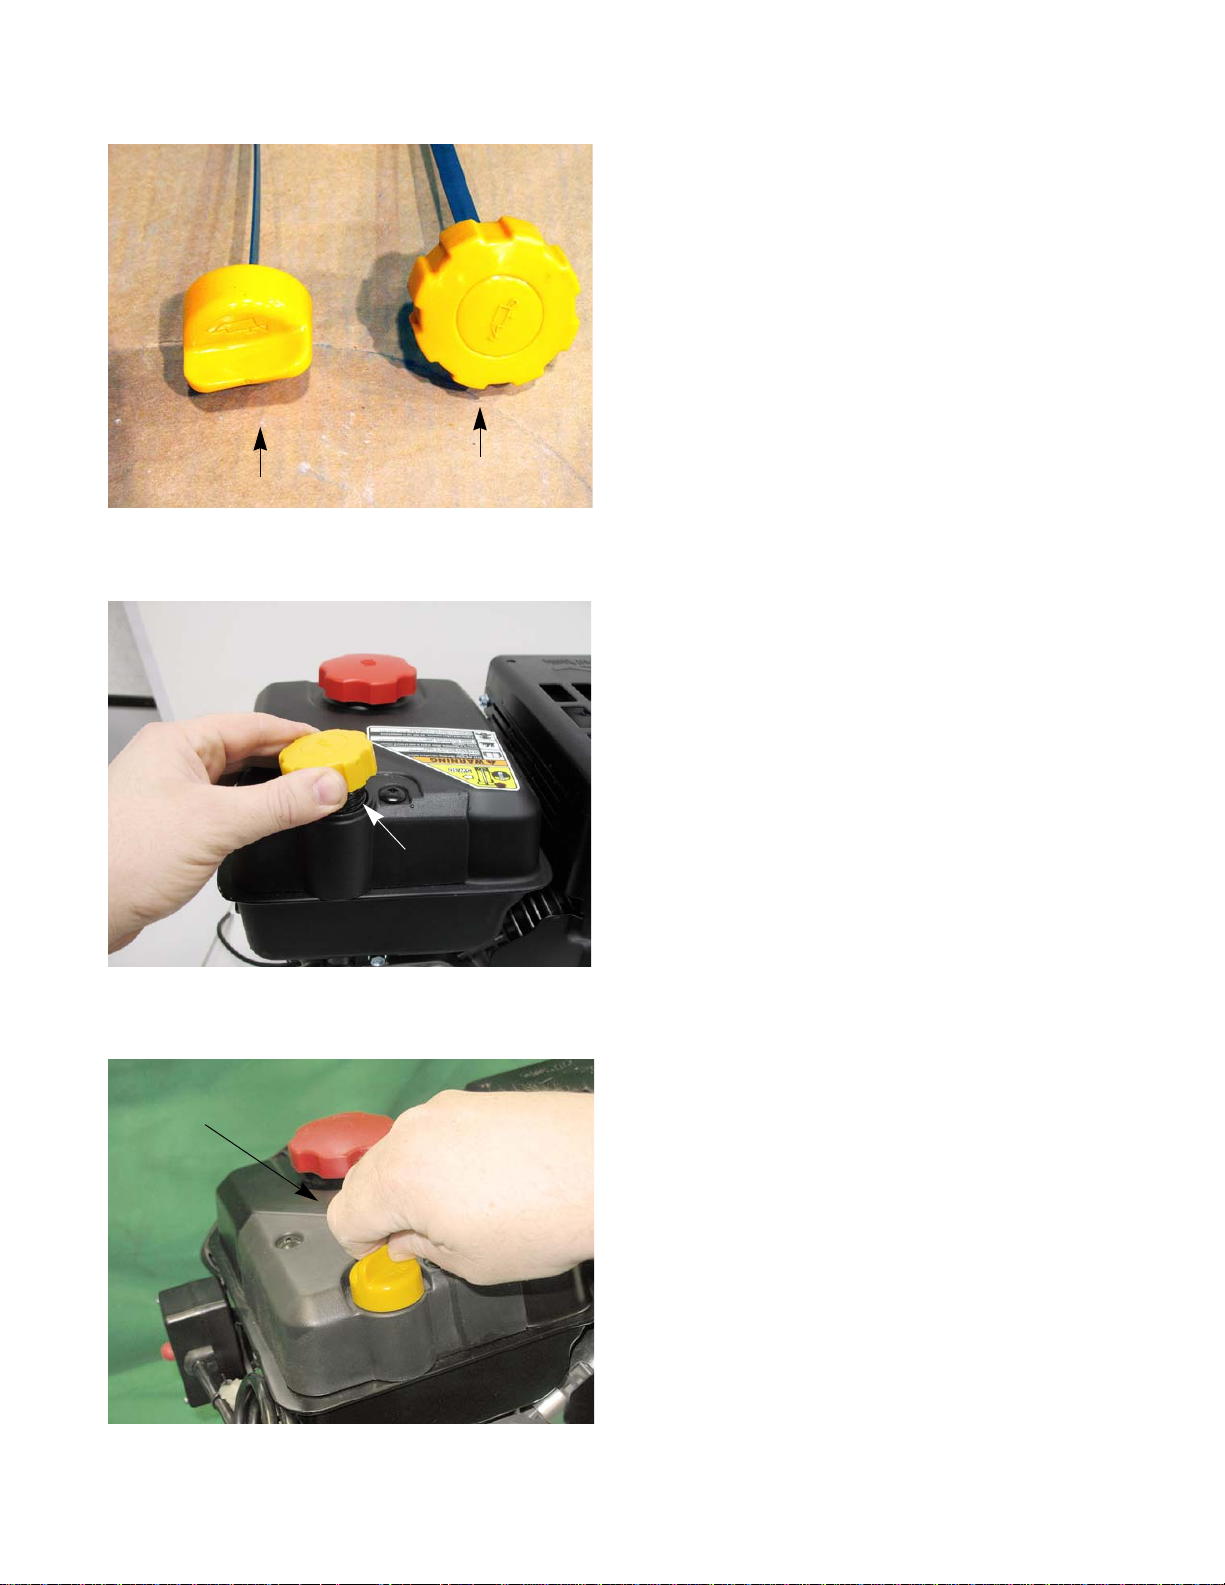
Figure 1.4
1/4 turn
Threaded
Figure 1.5
Dip stick
Figure 1.6
Fully seat the
dip stick before
reading it
NOTE: There are two types of dip sticks that can be found
on MTD engines; a threaded dip stick that was
used on older engines and a quarter turn dip stick
that is used on engines currently being produced.
See Figure 1.4.
To check the oil with a threaded dip stick:
1. Twist and remove the dip stick from the engine.
2. Clean the oil off of the tip of the dipstick.
3. Re-insert the dipstick without threading it in to get
the oil level reading. See Figure 1.5.
4. The oil level is determined by the lowest point on the
dipstick that is completely covered with oil.
To check the oil with a 1/4 turn dip stick:
1. Twist and remove the dip stick from the engine.
2. Clean the oil off of the tip of the dipstick.
3. Re-insert the dipstick and turn it until it is fully
seated to get the oil level reading. See Figure 1.6.
4. The oil level is determined by the lowest point on the
dipstick that is completely covered with oil.
9
Page 16
61/ 65/70/75 Series Horizontal Shaft Engines
Figure 1.7
Siphon
Figure 1.8
Drain plugs
Figure 1.9
7 mm square drive
Changing the oil
NOTE: If the engine has been running, allow the
engine to cool before doing any maintenance work.
NOTE: The oil should be changed after the first 5
hours of operation and every 25 hours there
after.
There are three methods of changing the oil. The
application the engine is mounted to will determine which
method to use:
Siphon the oil out through the dip stick tube
A. Insert the siphon hose into the dip stick tube. See
Figure 1.7.
B. Siphon the oil out of the engine by following the pro-
cedures provided by the siphon manufacturer.
Drain Plug in the bottom of the engine
A. Place an approved oil drain pan under the drain
plug.
B. Remove the drain plug using a 10 mm wrench. See
Figure 1.8.
NOTE: Some engines have a 7 mm square drain
plug. See Figure 1.9.
C. Allow all of the oil to drain into the oil pan.
D. Apply a small amount of releasable thread sealing
compound such as Loctite® 565 to the threads of
the drain plug.
E. Install the drain plug, tightening it to a torque of 124
- 150 in lbs (14 - 17 Nm).
10
Page 17
Introduction
! CAUTION! CAUTION
Gasoline and its vapors are extremely flammable. Use common sense when working around
the fuel system. Avoid sparks, open flames or heat sources that can ignite the fuel vapors.
Figure 1.10
Fuel Filter
To avoid personal injury or
property damage, use
extreme care in handling
gasoline. Gasoline is
extremely flammable and the vapors are
explosive. Serious personal injury can occur
when gasoline is spilled on yourself and/or
your clothes which can ignite. Wash your
skin and change clothes immediately.
! WARNING! WARNING
Fuel system
What you should know about fuel.
Most of the fuel presently available in North America is oxygenated to some extent. This is commonly done
through the addition of ethanol. Most engines offered for sale on outdoor power equipment in the North American
markets are designed to tolerate no more than 10% ethanol by volume
Ethanol is hygroscopic, meaning it absorbs water. If left exposed to air, it will draw water out of the air.
Ethanol is an oxygenator, which means that it will oxidize (corrode) metal that it comes into contact with. Exposure to air causes fuel to go bad quickly, leaving gum and varnish deposits.
Fuel used in Cub Cadet outdoor power equipment should be no more than 30 days old. Because it may already
have been stored at the refinery or gas station for a week or more, fuel should be purchased in small quantities and
stored in safety approved gas cans with the caps closed.
For storage, all fuel should be run out of the tank and engine. Anti-oxidation additives will help keep the fuel
fresher.
Servicing the fuel system
Inspect the fuel system every time the engine is operated. If dirty fuel is found in the fuel tank or fuel that does not
smell “right”, drain the fuel tank and replace the fuel filter. Dispose of bad fuel in a safe and legal manner.
Refer to the units service manual for the procedures to drain the fuel tank.
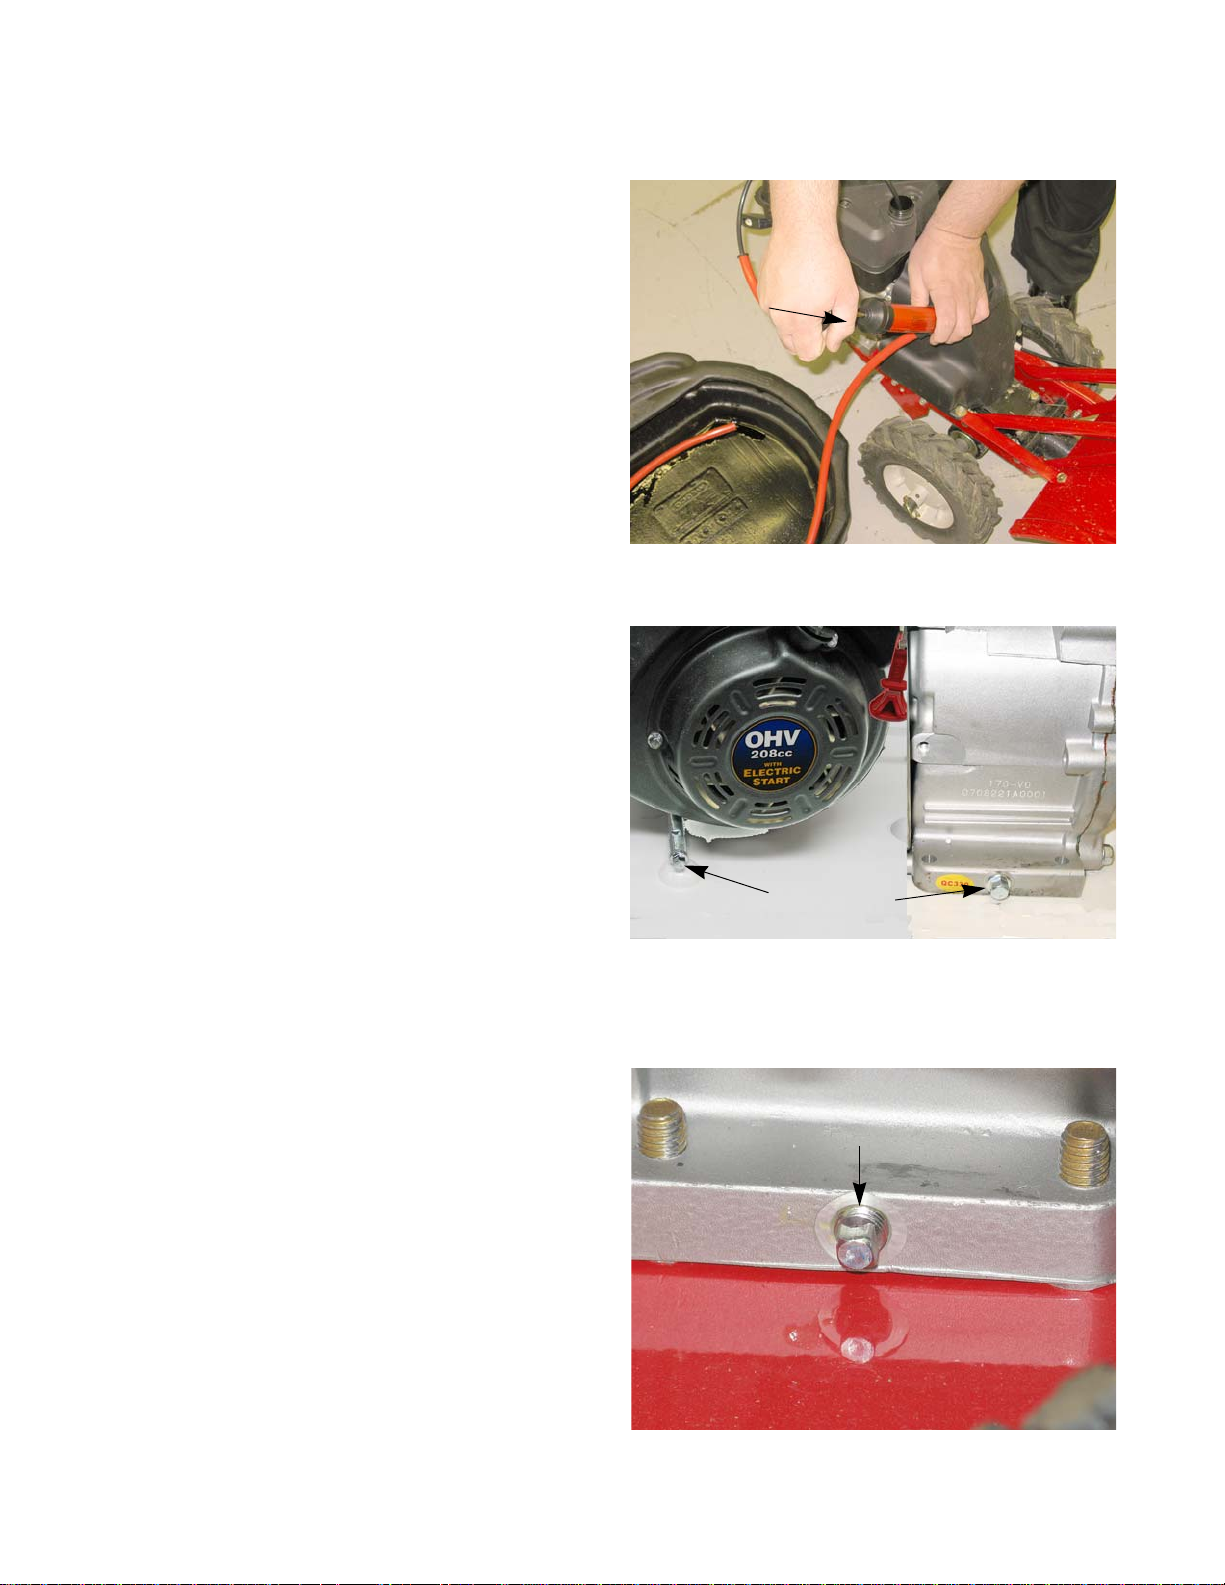
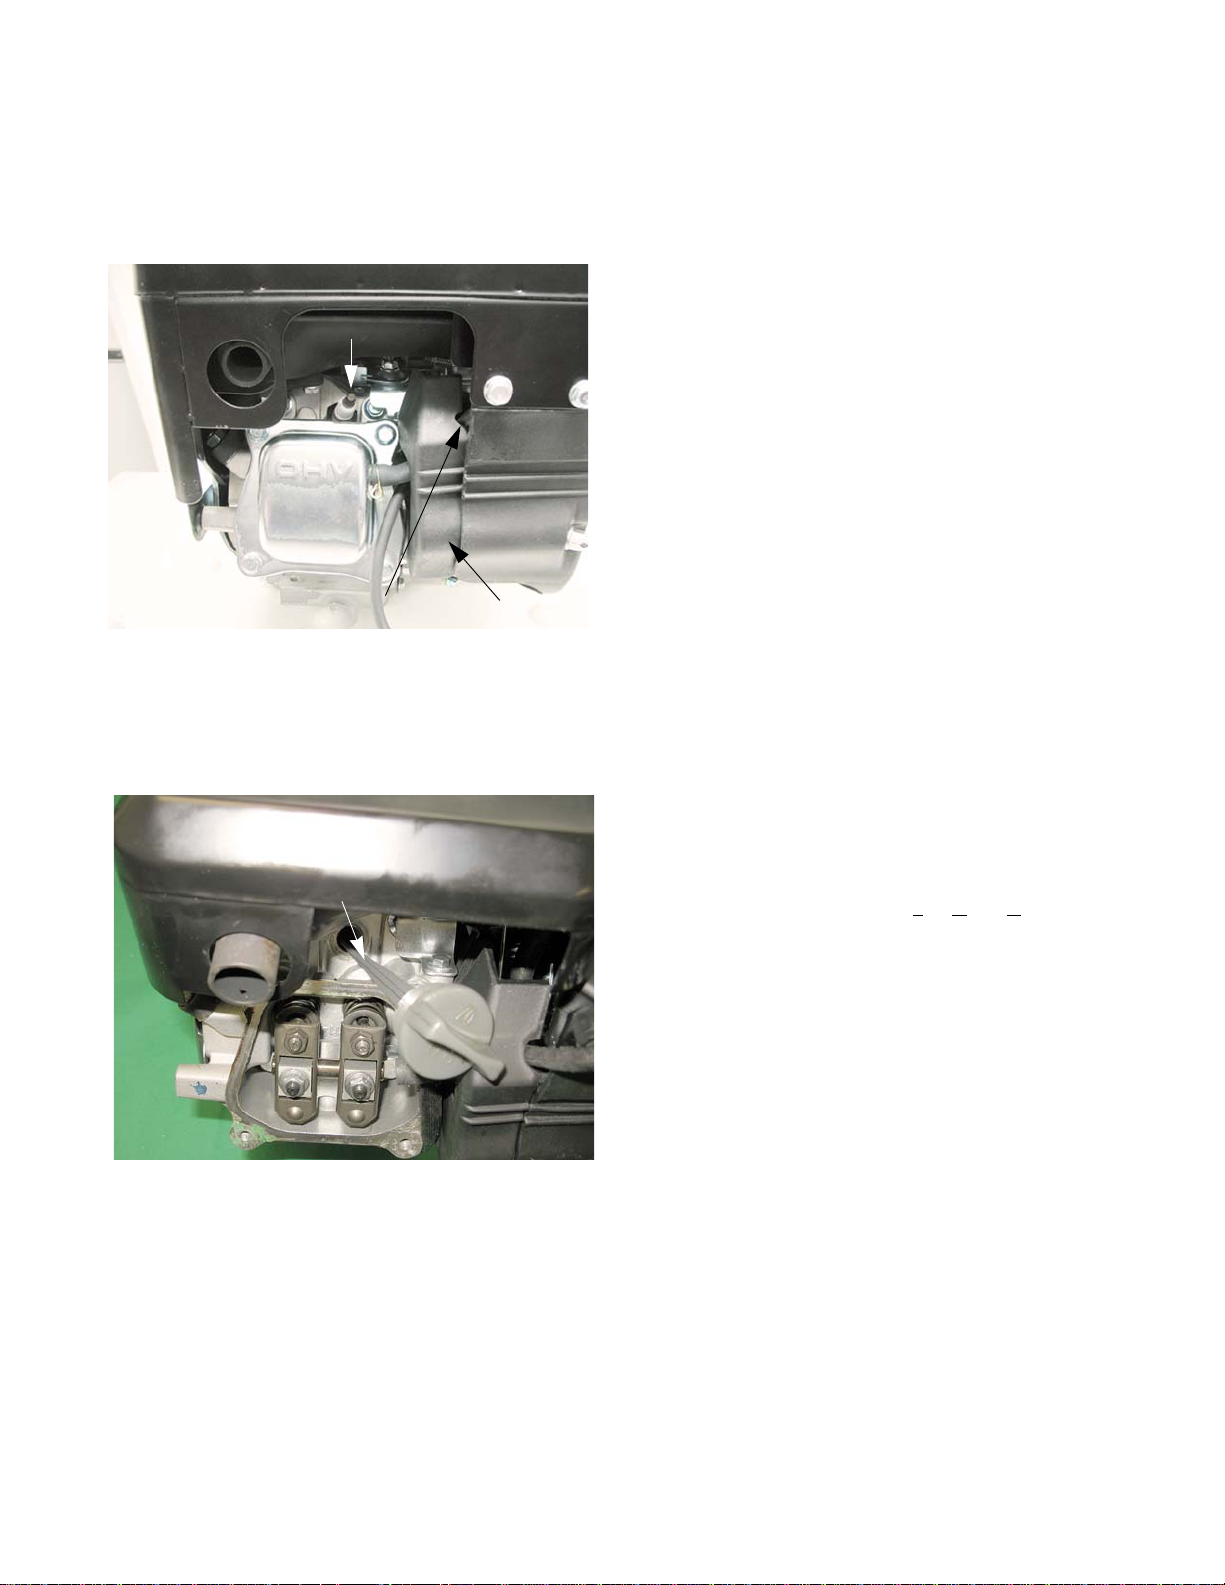
Fuel filter
To replace the fuel filter:
1. Drain the fuel.
2. Gently pry up on the tab that holds the fuel line in place.
3. Remove the fuel line.
4. Remove the fuel tank nipple using a 12 mm wrench. See Figure 1.10.
NOTE: On snow blower engines, the engine shroud
must be removed to reach the fuel line.
Refer to Chapter 3: Air intake systems for
directions on how to remove it.
11
Page 18
61/ 65/70/75 Series Horizontal Shaft Engines
Figure 1.11
5. Install a new filter by following the above steps in
reverse order.
NOTE: Apply a small amount of a thread sealing
compound such as Loctite® 564 and tighten
the filter by hand and the an additional 3/4 to
1 full turn. See Figure 1.11.
12
Page 19
Introduction
Figure 1.12
Spark plug
High tension lead
Muffler
Valve cover
Figure 1.13
Plastic dip stick
Valve lash
Valve lash is the clearance between the top of the valve stem and the rocker arm. The valve lash should be
checked after the first 25 hours of use and every 100 hours after that. Valve lash can be checked and adjusted using
the following steps:.
1. If the engine has been run, allow it to cool thoroughly.
Position the unit for easy access to the cylinder head.
2. Disconnect the high-tension lead from the spark plug
and ground it well away from the spark plug hole.
3. Remove the spark plug using a 13/16” or 21mm
wrench. A flexible coupling or “wobbly” extension
may help. See Figure 1.12.
4. Remove the four bolts that secure the valve cover
using a 10mm wrench, and remove the valve cover
from the engine.
NOTE: If care is used not to damage the valve cover gas-
ket, it can be re-used.
5. Confirm that the piston is at T
compression stroke.
NOTE: A plastic dip stick makes an excellent probe to find
TDC. See Figure 1.13.
• The compression stroke can be distinguished
from the overlap stroke by the presence of air
pressure at the spark plug hole and the fact that
neither of the valves should move significantly on
the compression stroke.
• There is an automatic compression release mech-
anism that “bumps” the exhaust valve as the piston
rises on the compression stroke. At TDC, the
exhaust valve should be fully closed.
op-Dead-Center on the
13
Page 20
61/ 65/70/75 Series Horizontal Shaft Engines
Figure 1.14
Setting intake valve lash
0.004” feeler
gauge
0.006” feeler
gauge
Figure 1.15
61/65/70 series engines
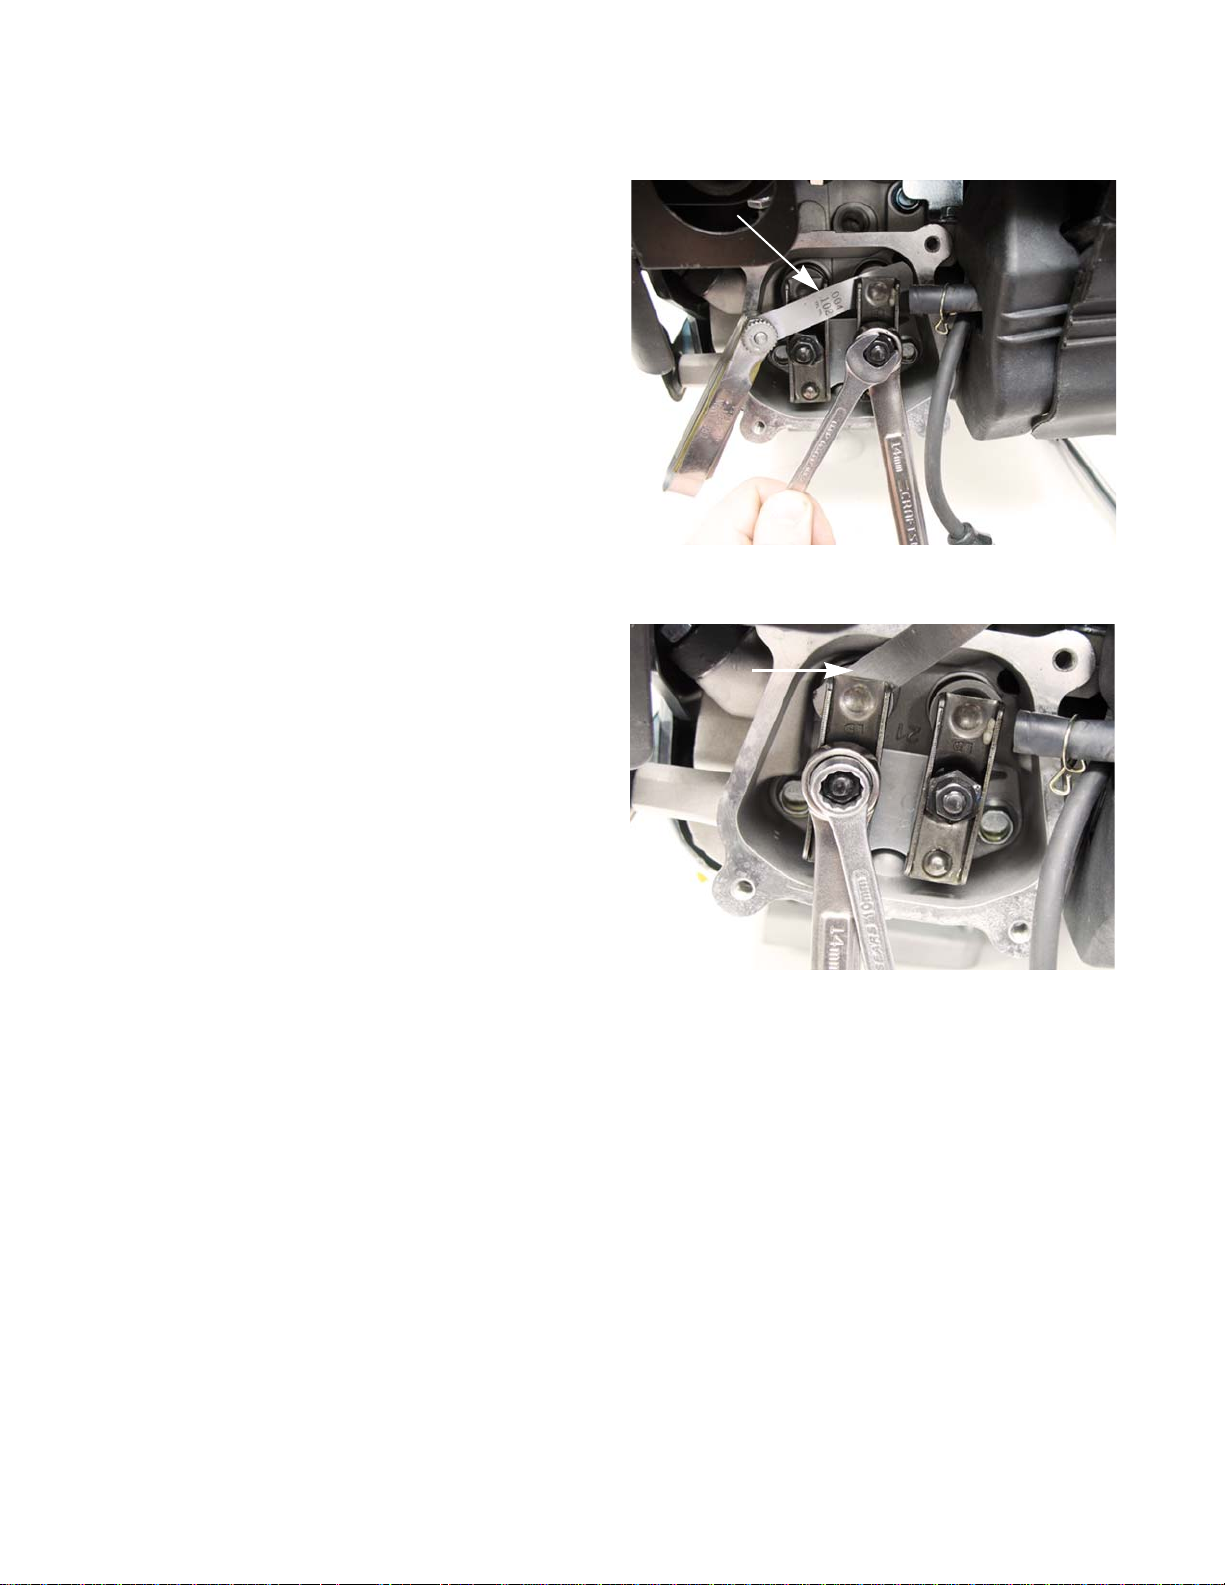
6. Check valve lash between each valve stem and
rocker arm using a feeler gauge.
6a. Intake valve lash should be 0.004” - 0.006”
(0.10 - 0.15 mm). See Figure 1.14.
6b. Exhaust valve lash should be 0.006” - 0.008”
(0.15 - 0.20 mm). See Figure 1.15.
6c. Use a 10mm wrench to loosen the jam nut,
and a 14mm wrench to adjust the rocker arm
fulcrum nut.
• Tighten the rocker arm fulcrum nut to close-up
the clearance between the end of the valve
stem and the contact point on the rocker arm.
• Loosen the rocker arm fulcrum nut to open-up
the clearance between the end of the valve
stem and the contact point on the rocker arm.
6d. Hold the fulcrum nut with a 14mm wrench,
tighten the jam nut to a torque of 80 - 106 inlb. (9 - 12 Nm) using a 10mm wrench.
6e. Double-check the clearance after tightening the jam nut, to confirm that it did not shift. Re-adjust if nec-
essary.
14
Page 21

75 series engines
Figure 1.16
Feeler gauge
Figure 1.17
Feeler gauge
Introduction
6. Check valve lash between each valve stem and
rocker arm using a feeler gauge.
6a. Intake valve lash should be 0.004” - 0.006”
(0.10 - 0.15 mm). See Figure 1.16.
6b. Exhaust valve lash should be 0.006” - 0.008”
(0.15 - 0.20 mm). See Figure 1.17.
6c. Use a 10mm wrench to loosen the jam nut.
Adjust the jack screw using a small flat headed
screw driver.
• Tighten the jack screw to close-up the clearance
between the end of the valve stem and the contact
point on the rocker arm.
• Loosen the jack screw to open-up the clearance
between the end of the valve stem and the contact
point on the rocker arm.
7. Rotate the engine through several compression cycles:
• Observe the movement of the valve gear.
• Return the piston to TDC compression stroke and re-check the valve lash to confirm consistent movement
of the valve gear, including the slight bump to the exhaust valve from the automatic compression release.
8. Clean-up any oil around the valve cover opening, clean the valve cover, replace the valve cover gasket if necessary.
9. Install the valve cover, tightening the valve cover screws to a torque of 62 - 80 in-lbs (7 - 9 Nm).
IMPORTANT: Over tightening the valve cover will cause it to leak.
10. Install the spark plug.
11. Test run the engine before returning it to service.
15
Page 22

61/ 65/70/75 Series Horizontal Shaft Engines
41M 21M 01Mezis 8M 6M 5M
4Mezis
347261sbl-tf398322
1
1sbl-ni8.4 edarG
856.637.12mN5.013.45.22.1mN
5553
02sbl-tf021058251sbl-ni8.5
675.741.72mN6.317.52
.3
7
.1
mN
791653sbl-tf612881562sbl-ni8.8
2317.285.74mN
4.4
29
.
98.5
9.2
mN
6316894sbl-tf0034212763sbl-ni
9.0
1
4816.6114.6
6
mN9.3
3
41
1.8
1.4
mN
261
30
1
0
6sbl-
tf063641
6
8
44sbl-ni
9.2
1
02
2
7.93
1
4.18
m
N
7.0
4
5.61
7.9
5
m
N
075452sbl-tf051065381sbl-ni
m
N
59169.33mN7
1
8.6
4
2
lacitircno
N
ni srenetsa
F
munimulA
Exhaust system
The exhaust system is a frequently overlooked component of an engine. It is important to make sure the muffler is in
good condition and free of blockage.
NOTE: A blocked muffler will result in poor performance. If a muffler is completely blocked, the engine may not
start.
Cleaning the engine
1. To maintain a proper operating temperature and to keep the equipment looking good, all debris should be
removed from the engine.
2. It is recommended to use compressed air to blow all of the debris off of the engine.
NOTE: A pressure washer may be used to clean outdoor power equipment but only after the unit has been
allowed to properly cool.
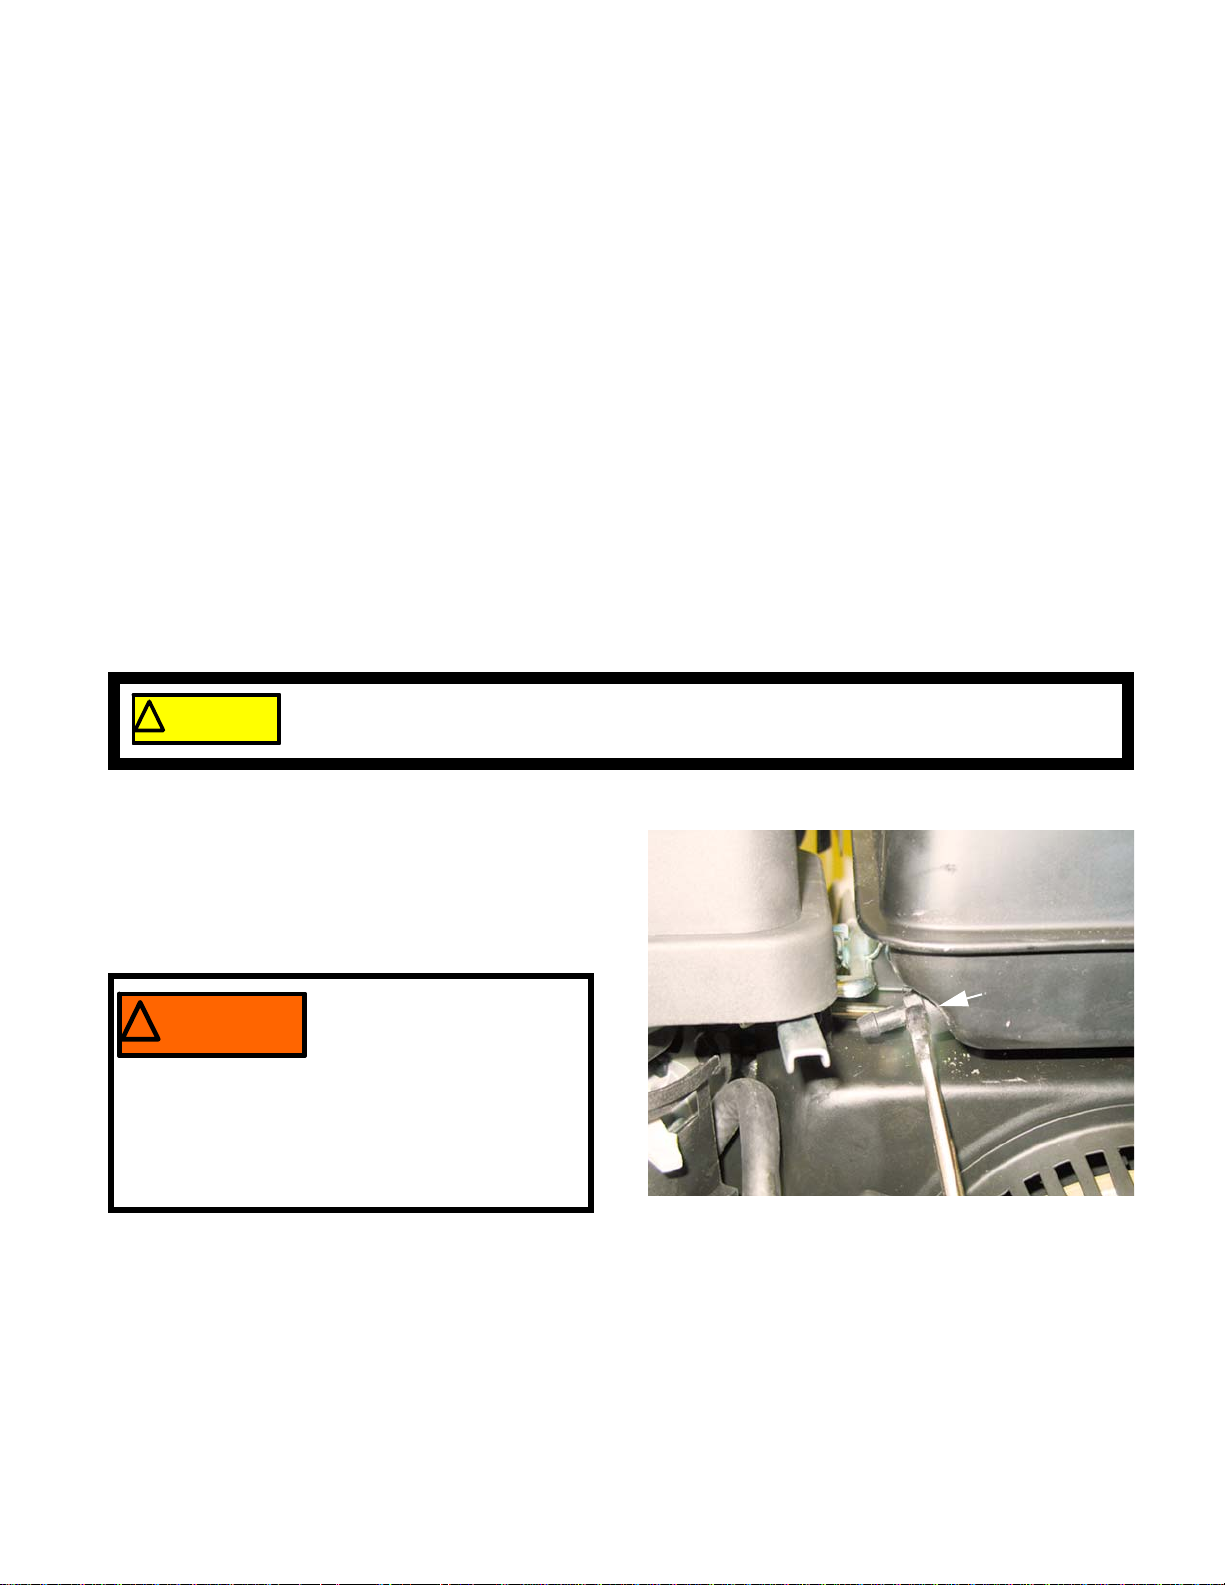
General torque specifications
16
Page 23

Definitions
! CA UTION! CA UTION
The first two rules in troubleshooting is to cause no further harm to the engine and prevent
injuries. Always make sure to check the oil for level and condition before starting an engine.
Also check attachments for damage and make sure they are firmly mounted.
BASIC TROUBLESHOOTING
CHAPTER 2: BASIC TROUBLESHOOTING
Troubleshooting
Diagnosis
shooting.
Introduction
Diagnosing an engine is an art form that is built upon several factors. First and most importantly is a good understanding of how the engine works. The second is skills that have been honed by experience. Finally the use of visual
observations and a structured, systematic approach to troubleshooting a problem.
The first part of this chapter will outline the steps of troubleshooting an engine so a technician can form a proper
diagnosis. The second half of this chapter will describe specific procedures and tests to perform while troubleshooting.
Steps to troubleshooting
NOTE: The steps and the order of the steps that follow are a suggested approach to troubleshooting an MTD
Define the problem
The first step in troubleshooting is to define the problem:
- The act of gathering information by performing tests and direct observations.
- Developing and testing theories of what the problem is, based on the information gathered in trouble-
engine. The technician does not necessarily have to follow them as described in this chapter.
• Crankshaft will not turn.
A. Starter not working
B. Engine in a bind (external - attachment jammed)
C. Engine in a bind (internal - engine seized)
• Crankshaft turns, no start
• Starts, runs poorly
A. Starts, then dies
B. Runs with low power output
C. Makes unusual smoke when running
I. Black smoke, usually heavy
II. White smoke, usually heavy
III. Blue smoke. usually light
D. Makes unusual sounds when running
I. Knock
II. Click
III. Chirp
17
Page 24

61/65/70/75 Series Horizontal Shaft Engines
IV. Unusual exhaust tone
There are tools that the technician can use in order to define the problem, such as:
1. Interview the customer.
1a. Get a good description of their complaint.
1b. If it is an intermittent problem, verify what conditions aggravate the problem as best as possible.
1c. Get an accurate service history of the equipment.
1d. Find out how the customer uses and stores the equipment.
2. Direct observation:
2a. Do not automatically accept that the customer is correct with their description of the problem. Try to
duplicate the problem.
2b. Check the general condition of the equipment (visually).
I. Cleanliness of the equipment will indicate the level of care the equipment has received.
II. Make sure the engine and attachments are securely fastened.
III. The tune-up factors.
NOTE: Most hard starting and poor running conditions can be solved by performing a tune-up.
a. Check the condition and amount of oil in the crankcase.
b. Check the level and condition of the fuel.
c. Check the ignition and “read” the spark plug.
d. Look for obvious signs of physical damage, exhaust system blockage or cooling system block-
age.
18
Page 25

Identify factors that could cause the problem
This is the second step in the troubleshooting process.
1. Crankshaft will not turn.
BASIC TROUBLESHOOTING
A. Starter not working
I. A dead battery.
II. A bad ground
III. A failure in the electrical circuit.
IV. A failure of the starter itself.
B. Engine in a bind (external - attachment jammed)
the engine either failed or has something jammed in it, locking up the system.
C. Engine in a bind (internal - engine seized)
likely suspects are:
I. Complete hydraulic lock (easy fix).
II. Bent crankshaft (unrepairable)
III. Internal binding, crankshaft, connecting rod or piston (unrepairable)
2. Crankshaft turns, no start.
2a. Most gasoline engine diagnosis involves isolating problems in the four critical factors an engine needs to
run properly:
I. Ignition
II. Compression
needs sufficient sealing to generate the vacuum needed to draw in and atomize the next intake
charge.
- sufficient spark to start combustion in the cylinder, occurring at the right time.
. This can be an electrical failure or a mechanical failure. The likely suspects are:
. This usually indicates that the unit being powered by
. This is usually either a quick fix or a catastrophic failure. The
- enough pressure in the cylinder to convert combustion into kinetic motion. It also
III. Fuel
IV. Flow
2a. Isolate the ignition system and compression from the fuel system by preforming a prime test.
I. Burns prime and dies. This would indicate a fuel system issue.
II. Does not burn prime. Not a fuel system issue. Check for an ignition, compression or flow problem.
2c. Compression or ignition problem
I. Check the engine stop and safety switch.
II. Test the ignition system using a proper tester.
III. Replace the spark plug with a new one or a known good one.
IV. Check compression or leak down.
V. Check valve lash.
VI. Check valve timing/actuation.
VII. Check exhaust.
3. Starts, runs poorly
3a. Starts, then dies
- correct type and grade of fresh gasoline; in sufficient quantity, atomized (tiny droplets) and in
correct fuel/air proportions.
- if all of the above conditions are met but the flow of air is constricted on the inlet or exhaust
side, it will cause the engine to run poorly or not at all. This also includes ensuring the valves are
timed to open at the proper time.
19
Page 26

61/65/70/75 Series Horizontal Shaft Engines
I. Run the engine with a spark tester in-line between the spark plug wire and the spark plug or use an
oscilloscope and see if the spark goes away at the same time the engine dies.
II. Check choke operation.
a. Black smoke?
b. Wet plug?
III. Prime test immediately after engine dies. If it restarts, this may indicate a problem with fuel flow to
the carburetor. Check the gas cap, fuel line, fuel filter, and the float in the carburetor.
3b. Runs with low power output.
I. Look for unusual exhaust color (smoke).
II. Unusually hot muffler (may glow red).
a. Retarded ignition
b. Exhaust valve opening early (lash too tight)
III. Mechanical bind
a. A slightly bent crankshaft. In some cases the drag may increase and decrease as the crankshaft
rotates. This produces a pulsing feeling that is different than a jerk back.
b. Parasitic external load. A bind in the equipment the engine is powering.
c. Internal drag from a scored piston or similar damage.
IV. Low governor setting or stuck governor.
a. Check RPMs using a tachometer.
b. RPMs should not droop under moderate to heavy loads.
V. Low compression
a. Check valve lash
b. Check compression
c. Check leak down to identify the source of the compression loss.
VI. Flow blockage
a. Exhaust blockage, usually accompanied by an unusual exhaust sound.
• Just as a throttle on the carburetor controls the engine RPMs by limiting the amount of air an
engine can breathe in, an exhaust blockage will limit engine performance by constricting the
other end of the system.
• The muffler itself my be blocked.
• The exhaust valve may not be opening fully, possibly because of extremely loose valve lash
settings.
• The exhaust valve seat may have come loose in the cylinder head. This may cause a loss of
compression, a flow blockage or it may randomly alternate between the two.
NOTE: The cause of an exhaust valve coming loose is usually over heating.
b. Intake blockage
• An intake blockage up-stream of the carburetor will cause a rich fuel/air mixture and constrict
the amount of air that the engine can draw in, limiting performance.
• The intake valve not fully opening. A possible cause of this is loose valve lash.
20
Page 27

V. Makes unusual smoke when running
BASIC TROUBLESHOOTING
a. Black smoke
• Not enough air: air flow blockage or a partially closed choke.
• Too much fuel: carburetor float or float valve stuck or metering / emulsion issues with the carburetor.
b. White smoke
• Oil in muffler, usually the result of improper tipping. The engine will “fog” for a minute or so,
then clear-up on its own.
• Massive oil dilution with gasoline. It may be caused by improper tipping. It can also be caused
by leaky carburetor float valve, if there is a down-hill path from the carburetor to the intake port.
Check oil for gasoline smell, repair carburetor.
c. Blue smoke,
PCV system
• May be blocked or unplugged.
• May be over-come by massive over-filling or oil dilution with gasoline.
• Will cause oil to exit the engine via any low-resistance paths.
Piston rings
• Confirm with leak-down test.
• Smoke will be more pronounced under load.
, usually heavy, usually indicates a rich air fuel mixture
, usually heavy
usually light.
• Repair may not make economic sense.
Valve guides (and intake valve stem seal).
• Smoke will be more pronounced on over-run.
VI. Makes unusual noise when running
a. Knock
• Check for loose mounting of engine or driven implement
• Rotate crankshaft back-and-forth to check for loose connecting rod.
b. Click
• Clicks and pops on engine shut-down: Compression release coming into play as the engine
RPMs cross the activation threshold. This will have no ill effects on engine performance.
• Half-engine speed clatter: loose valve lash.
• Half-engine speed clatter, slightly heavier: wrist-pin.
• Rhythmic heavy-light engine speed click: piston slap
c. Spark-knock
• Advanced ignition timing
• Low octane fuel
• Over-heating engine (check for blocked cooling air flow)
• Carbon build-up in cylinder: glowing carbon chunks pre-igniting air fuel mix.
d. Chirp
• Compression, blowing-by the fire-ring of a damaged head gasket will sometimes produce a
21
Page 28

61/65/70/75 Series Horizontal Shaft Engines
chirping noise.
• Confirm with a compression test and leak-down test.
e. Unusual exhaust tone
Splashy or blatty
• Splashy idle usually indicates a slight rich condition.
• May indicate an exhaust blockage, usually slightly muffled.
Backfire
• On over-run: unburned fuel igniting past exhaust valve. Mixture not burning completely in combustion chamber. It may be too rich or it may be spark-plug or ignition problem.
• Occasional, under load: engine momentarily runs lean, usually will cycle with float bowl level or
governor pull-in, sometimes sounds like a slight stumble. Ethanol content exceeding 10% will
make the engine run artificially lean.
Skip
• Usually ignition related.
• Run the engine with a spark tester in-line between the spark plug wire and the spark plug or
use an oscilloscope and see if the spark goes away at the same time the engine dies.
4. Engine over-speed
A. Continual over-speed
• Binding or damaged external governor linkage or carburetor throttle.
• Mis-adjusted governor arm.
• Internal governor failure.
B. Momentary over-speed
• Intermittent bind (very unusual).
• Interference: This is fairly common when debris can fall on the governor linkage during normal
operations.
5. Engine RPMs surge (hunting)
A. Over-governed condition- Return spring replaced with wrong part or hooked into wrong hole.
NOTE: This is an extremely rare condition, usually created by tampering.
B. Lean Air-fuel mixture condition- When AFR (Air Fuel Ratio) is significantly below stoichiometric ratio
(14.7:1) engine RPMs sink until they reach a point that can be supported by the available fuel. This
causes a momentary surge in power until the available fuel is consumed, then the RPMs fall again,
repeating the cycle.
• Too much air: look for an air leak in the intake tract
• Not enough fuel: look for fuel supply or carburetor problems
22
Page 29

BASIC TROUBLESHOOTING
Repairing the problem
The third step in the troubleshooting process is to repair the problem. This step consists of:
A. Form a diagnosis by using all of the information gathered from the troubleshooting that was performed.
B. Physically perform the repair.
The fourth, and hopefully final, step in the troubleshooting process is the follow through. This step consists of:
A. Thoroughly test the repaired equipment: confirming that the initial diagnosis was correct. If it was
wrong, start the troubleshooting process over again.
NOTE: Sometimes the engine will have multiple problems at the same time. By performing one repair, other
issues may show up that are unrelated to the first repair.
B. Delivery to customer: We are not just repairing equipment, we are repairing customers.
• Inoculate against recurring problem with education, e.g.: if the problem was caused by stale
fuel, make sure the customer is aware that fuel goes bad over time.
• Make sure the customer understands the repair, preventing “superstitious” come-backs.
23
Page 30
61/65/70/75 Series Horizontal Shaft Engines
! CA UTION! CAUTION
If the engine is not centered at top dead center, the engine will rotate when compressed air is
introduce to the combustion chamber.
Figure 2.1
Leak-down
tester adapter
Prime test
To perform a prime test:
1. Prime the engine through the carburetor throat using a squirt bottle, filled with clean fresh gasoline.
2. Make sure the throttle is in the run position.
3. Attempt to start the engine.
4. If the engine starts and runs long enough to burn the prime, the problem is effectively isolated to the fuel system. Proceed to Chapter 4: The Fuel System and Governor.
5. If the engine did not start, check ignition system as described in Chapter 7: Ignition System.
6. If the ignition system is working, check the compression or perform a leak down test.
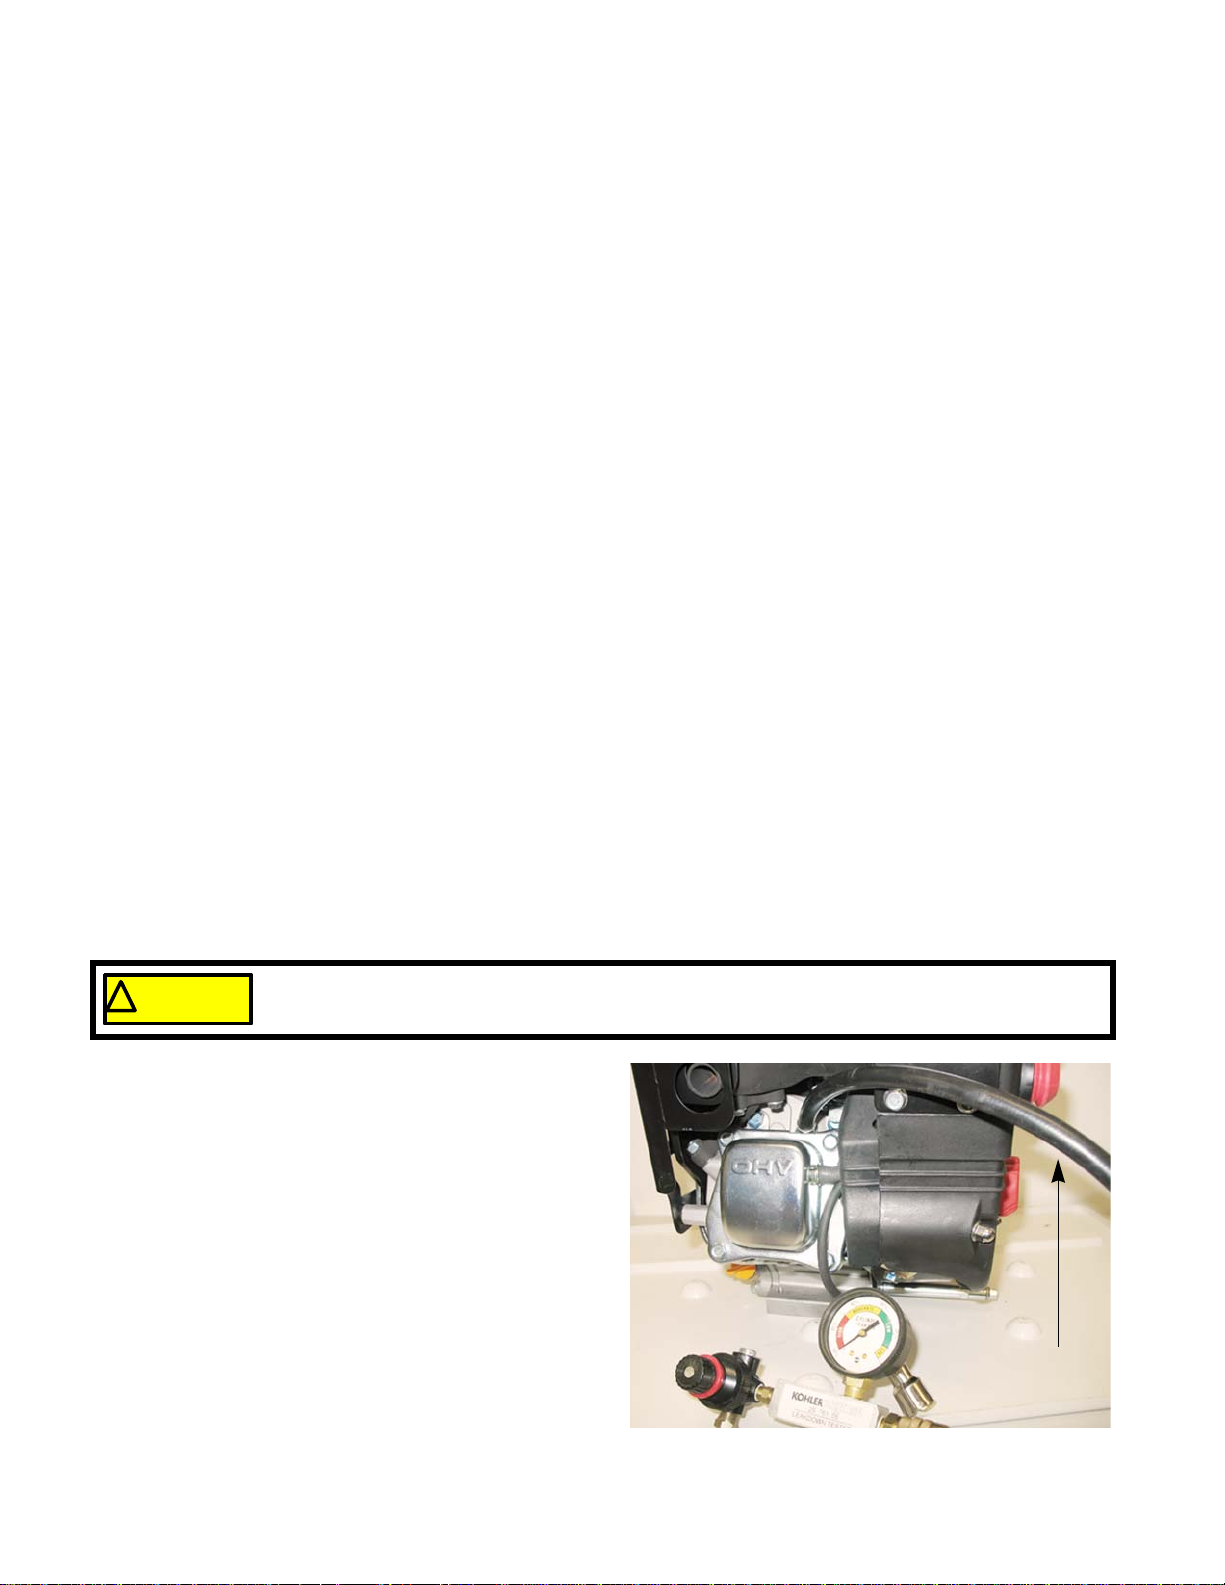
Leak-down test
A leak-down test is the preferred method to test the engine’s ability to compress the charge. It will also show
where pressure is leaking from.
To perform a leak-down test:
NOTE: A leak down test pressurizes the combustion chamber with an external air source and will allow the
technician to listen for air “leaking“ at the valves, piston rings and the head gasket.
NOTE: These are general instructions. Read and follow the instructions that came with the tester before
attempting to perform this test.
• If possible, run the engine for 3-5 minutes to warm up the engine.
• Remove the spark plug and air filter.
• Find top dead center of the compression stroke.
1. Remove the spark plug.
2. Remove the valve cover.
3. Rotate the engine to top dead center (compression
stroke)
NOTE: An old plastic dip stick makes a nice probe
that will not damage the piston crown.
4. Lock the engine to prevent it from rotating when
5. Thread the lead down tester adapter hose into the
6. Attach the leak down tester to an air supply of 90
24
pressurized.
engine. See Figure 2.1.
psi.
Page 31

BASIC TROUBLESHOOTING
7. Adjust the tester until the gauge’s needle is pointing to the set position.
8. Connect the tester to the adapter.
NOTE: If the engine rotates it was not at top dead center.
9. Check the reading on the gauge.
NOTE: If the reading is >15% pressure loss, investigate for the cause of the leak by:
• Listen for air escaping through the carburetor (intake valve leak)
• Listen for air escaping through the muffler (exhaust valve leak)
• Listen for air escaping through the dipstick tube (blow by, head gasket leak)
NOTE: it is normal for a little leakage to be heard from the dipstick tube.
10. Disconnect the tester.
11. Rotate the engine to BDC.
12. Loosen the rockers to prevent them from opening the valves.
13. Re-attach the tester.
14. Compare the results.
NOTE: If the cylinder passes at TDC but fails at BDC, the bottom of the cylinder is scored. If it passes at BDC,
but not at TDC, the top of the cylinder is scored.
25
Page 32

61/65/70/75 Series Horizontal Shaft Engines
Figure 2.2
Compression gauge
Compression test
To perform a compression test:
NOTE: Compression should be in the range of 55 - 80 PSI (3.8 - 5.5 Bar).
• Disconnect the high-tension lead from the spark plug and ground it well away from the spark plug hole.
• Remove the spark plug using a 13/16” or 21mm wrench. A flexible coupling or “wobbly” extension may
help.
• Pull the starter rope several times to purge any fuel or oil from the combustion chamber.
NOTE: Air compresses readily, liquid does not. Liquid in the combustion chamber will result in an artificially
high compression reading.
1. Install a compression gauge in the spark plug hole.
2. Confirm that the gauge is “zeroed”, then pull the
starter rope repeatedly, until the needle on the
gauge stops rising. See Figure 2.2.
3. Interpreting compression readings.
Readings in
psi
<20
(1.4 Bar)
20 - 55
(1.4-3.8 Bar)
55 - 80
(3.8-5.5 Bar)
>80
(>5.5 Bar)
Compression Readings
Possible causes
Most likely a stuck valve or
too tight of a valve lash,
provided the starter rope
pulls with normal effort.
Valve seat damage or piston ring and/or cylinder
wear.
Normal readings
Excessive valve lash, a
partial hydraulic lock, a bad
cam or a bad automatic
compression relief.
26
Page 33

BASIC TROUBLESHOOTING
Figure 2.3
crankcase air chamber
Figure 2.4
Bottom of heat box
crankcase air chamber
PCV testing
The PCV valve is located in the valve cover and allows the crankcase pressure to escape.
Leakage and blockage are the two failure modes for a PCV system. Either mode will cause crankcase pressure
to build-up, though the effects of a blocked PCV are generally more dramatic. Increased case pressure will result in
oil entering the combustion chamber.
1. The PCV chamber is vented to the air filter through
a molded rubber hose. The rubber hose directs
crankcase fumes to a chamber within the air filter
housing. See Figure 2.3.
NOTE: On snow blower engines the breather hose
2. When functioning properly, the PCV valve (Positive
Crankcase Ventilation) works with the inherent
pumping action of the piston in the bore to expel
pressure from the crankcase.
NOTE: Normally, small engines run with slightly
3. An engine that fails to purge extra case pressure in
a controlled manner will build case pressure. The
pressure will find it’s own way out of the engine in
undesirable ways.
• Oil will be forced by the rings and valve guides, being burnt in the combustion chamber.
• The cause of this oil burning can be mistaken for a worn-out engine, if proper diagnosis (compression,
connects to a chamber inside the lower half
of the heat box assembly. See Figure 2.4.
negative case pressure. This case pressure
can be measured using a slack-tube water
manometer, or an electronic version of the
same tool. Less than (between -3 and -4”) (
-7.6 - 10.2cm) of water is a typical reading at
idle.
leak-down, and case pressure) is not performed.
4. Experimentation by MTD’s Training and Education Department has revealed the following characteristics of
MTD engines:
• A leaky PCV system will not build-up substantial case pressure.
• A leaky PCV system will allow the engine to ingest contaminants through the system, accelerating engine
wear.
• A blocked PCV system will allow crankcase pressure to build very rapidly. Noticeable oil fumes will be evident in the exhaust within several minutes of normal operation.
27
Page 34

61/65/70/75 Series Horizontal Shaft Engines
Ignition Troubleshooting
Engine will
not start
Engine runs
erratically or shuts
off, restarts
Check for spark
Spark No Spark
Check for the correct spark
plug
Check flywheel and key for
damage or sheared key
Set proper air gap on
ignition module
Test ignition module
for intermittent or
weak spark
Check electric starter and
battery if applicable
Replace spark plug
Isolate engine from
equipment and repeat
test
Spark No Spark
Equipment problem,
check switches, wiring
and equipment controls
Engine problem, check
for shorts or grounds in
wiring
Disconnect ignition
ground-out wire at
the ignition module &
repeat test
Check for proper air gap
on ignition module
and repeat test
Check flywheel magnets
for strength
Test ignition module
Troubleshooting flow charts
28
Page 35

Engine Operation Problems
Excessive engine loading
OVERHEATS
Low oil level or wrong viscosity oil
Cooling air flow obstructed or
clogged cooling fins
Carburetor improperly adjusted or
improper RPM setting*
Ignition timing or
incorrect spark plug
Carbon in the combustion
chamber
ENGINE KNOCKS
Check for excessive carbon in
combustion chamber
Loose flywheel examine key, key way
and proper flywheel nut torque
Ignition timing or
incorrect spark plug
Loose or worn connecting rod
Worn cylinder
Associated equipment loose or
improperly adjusted
BASIC TROUBLESHOOTING
29
Page 36

61/65/70/75 Series Horizontal Shaft Engines
SURGES OR RUNS UNEVENLY
Fuel cap vent obstructed
Dirty carburetor or air filter
Carburetor improperly adjusted
Governor sticking, binding or
improper RPM setting
Carburetor linkage, shafts or
shutters sticking or binding
Intermittent spark, check ignition
or incorrect spark plug
Oil level above full
Wrong viscosity oil
Engine cooling fins dirty causing
overheating
Breather damaged, dirty or
improperly installed
Excessive engine speed
Damaged gaskets, seals or "O" rings
EXCESSIVE OIL CONSUMPTION
Valve guides worn excessively
Worn or glazed cylinder
Piston rings worn
Lean carb setting causing
overheating (adjustable carb)
Engine Operation Problems
30
Page 37

ENGINE MISFIRES
Improper Valve Lash
Weak valve spring
Excessive carbon build up
Carburetor improperly adjusted
Ignition timing or
incorrect spark plug
Valves sticking or not
seating properly
Wrong or fouled spark plug
Bent crankshaft
ENGINE VIBRATES
EXCESSIVELY
Attached equipment out
of balance
Loose mounting bolts
If applicable counter balance not
properly aligned
Engine Operation Problems
BASIC TROUBLESHOOTING
31
Page 38

61/65/70/75 Series Horizontal Shaft Engines
BREATHER PASSING OIL
Oil level too high
Breather damaged, dirty or
improperly installed
Damaged gaskets, seals
or "O" rings
Excessive RPM or improper
governor setting
Angle of operation too severe
Piston rings not properly seated
or ring end gaps are aligned
LACKS POWER
Air intake obstructed
Lack or lubrication or improper
lubrication
Carburetor improperly adjusted
Exhaust Obstructed
Improper valve lash
Loss of compression (worn rings,
blown head gasket)
Engine Operation Problems
32
Page 39

AIR INTAKE SYSTEMS
Remove these
screws
Figure 3.1
Figure 3.2
Pull off the throttle
and choke knobs
CHAPTER 3: AIR INTAKE SYSTEMS
MTD builds horizontal crank engines for snow blowers and chore performers. The differences between snow
engines and chore engines are the muffler and the air intake system. Therefore the air intake system for the snow
and chore engines will be discussed separately, as will the mufflers in a later chapter.
Snow engines
One of the big differences between the snow engine and the chore engine is that the air intake of the snow
engine does not have an air filter because air filters freeze and cut off air flow. The snow engine however does have
a heat box to preheat the intake air, which the chore engines do not have.
Heat box
To remove/replace the heat box:
1. Drain the fuel out of the fuel tank into an approved
safety fuel can.
2. Remove the muffler shroud by taking off the six
screws the hold the muffler shroud in place using a
10 mm wrench. See Figure 3.1.
3. Disconnect the breather hose from the valve cover.
4. Pull off the choke and throttle knobs. See Figure 3.2.
33
Page 40

61/65/70/75 Series Horizontal Shaft Engines
Figure 3.3
Remove these
screws
Figure 3.4
Remove this screw
Figure 3.5
carburetor nuts
5. Disconnect the wire from the ignition switch and the
primer line from the primer button.
6. Remove the two screws that fasten the upper heatbox housing to the lower housing and lift out the
upper housing. See Figure 3.3.
NOTE: Write down or take a picture of how the
prime line and ignition wires are routed
through the upper heat box housing.
7. Remove the screw that fastens the engine shroud
by the fuel tank using a #2 phillips screwdriver. See
Figure 3.4.
8. Remove the two carburetor nuts using a 10 mm
wrench. See Figure 3.5.
34
Page 41

AIR INTAKE SYSTEMS
Figure 3.6
Pop primer line out of
notch while working the
shroud off
Figure 3.7
fuel line
disconnected
Throttle linkage
Figure 3.8
Unhook the
spark plug wire
9. Work the engine shroud off of the carburetor studs.
NOTE: Be careful to pop the primer line out of the notch
that secures it while working the engine shroud off.
See Figure 3.6.
10. Disconnect the fuel line from the fuel tank.
NOTE: The barb on the carburetor fuel inlet nipple is very
sharp and will damage the inside of the fuel line if
the fuel line is removed. Therefore if the line is
removed from the carburetor, it must be replaced.
11. Disconnect the throttle linkage and return spring from
the carburetor. See Figure 3.7.
12. Slide the carburetor off of the carburetor studs.
NOTE: The choke linkage will come off with the carburetor.
13. Unhook the spark plug wire from the clip in the carburetor insulator. Slide the insulator off of the carburetor
studs. See Figure 3.8.
14. Remove the carburetor insulator gasket and clean
the cylinder head sealing surface.
15. Reassemble by following the previous steps in
reverse order.
NOTE: Tighten the carburetor nuts to a torque of 80 - 107
in lbs (9-12 Nm).
NOTE: Do not over tighten the carburetor nuts. Doing so
can cause the vent channel in the carburetor insulator to collapse which will plug the carburetor bowl
vent. This can result in the engine stalling or not
running.
35
Page 42

61/65/70/75 Series Horizontal Shaft Engines
Figure 3.9
Paper-pleated element
Foam pre-filter
Figure 3.10
Press here
Figure 3.11
Ta b
Pin
Chore engines
Air filters
Generally air filters come in two different types, a
pleated-paper element or foam. A combination of the two
are used on the MTD engine. See Figure 3.9.
• Air filters used on the MTD engine are designed
to prevent particles larger than 3-5 micron from
passing through into the engine.
• The filter should be checked on a regular basis
possibly several times in a season.
NOTE: Never use compressed air on a paper air fil-
ter. Compressed air will remove the tiny
fibers that are used to catch the dirt in the
air. Without these fibers the filter is useless.
NOTE: Refer to Chapter 1: Introduction for the
maintenance interval and cleaning instructions for the air filter.
To service the air filter:
1. Press in on the tab in the air filter cover. See Figure
3.10.
2. Swing open the cover and lift it off of the air filter
base.
3. Lift the air filter out of the base.
4. Replace the air filter or clean it, following the steps
described in Chapter 1: Introduction.
NOTE: When installing the air filter, make sure the
tabs on the filter fit in between the pins in the air filter base. See Figure 3.11.
5. Re-assemble by following the above steps in
reverse order.
36
Page 43

Air filter base and intake elbow
Figure 3.12
Mounting
screws
Intake elbow
Figure 3.13
Carburetor
nuts
Figure 3.14
Vulcanized metal
gasket
AIR INTAKE SYSTEMS
To remove the air filter base:
1. Remove the air filter following the steps described in
the previous section.
2. Remove the two screws that hold the air filter base to
the intake elbow. See Figure 3.12.
3. Lift the base off of the elbow.
NOTE: If the engine is equipped with a charcoal canister,
remove it by following the procedures described in
Chapter 4: Fuel System and Governor.
4. Remove the two carburetor nuts using a 10 mm
wrench. See Figure 3.13.
5. Slide the elbow off of the carburetor studs.
6. Inspect the air intake gasket.
NOTE: The air intake gasket is a Vulcanized metal gasket.
If the rubber is not ripped or deformed, it can be
reused. See Figure 3.14.
7. Re-install by following the previous steps in reverse
order.
NOTE: Tighten the carburetor nuts to a torque of 80 - 106
in lbs (9-12 Nm).
37
Page 44

61/65/70/75 Series Horizontal Shaft Engines
Figure 3.15
Remove the fuel line
from the fuel tank
When working around the fuel
system, do not bring any
sources of heat, spark, or open
flame near the work area.
! WA RNI NG! WA RNI NG
Figure 3.16
Throttle linkage
Return spring
Figure 3.17
Engine model number
Carburetor Insulator
1. Remove the intake elbow by following the previously described steps.
NOTE: Drain the fuel tank before starting work to
prevent spillage.
NOTE: Dispose of drained fuel in a safe and
responsible manner.
2. Remove the carburetor.
2a. Disconnect the fuel line from the fuel tank. See
Figure 3.15.
NOTE: The barb on the carburetor inlet is very
sharp. If The fuel line is pulled off of it, the
line will be damaged and must be replaced.
2b. Disconnect the throttle linkage and return
spring. See Figure 3.16.
NOTE: The carburetors are not inter-changeable
from one engine model to another. To help
prevent carburetor mix-ups, the engine
model number is stamped on the carburetor
by the fuel nipple. See Figure 3.17.
38
Page 45

AIR INTAKE SYSTEMS
Spark plug wire
Clip
Figure 3.18
Figure 3.19
Insulator plate
Gaskets
3. Unhook the spark plug wire from the clip molded into
the insulator plate. See Figure 3.18.
NOTE: An insulator block separates the carburetor from
the cylinder head. There is a gasket on each side
of the insulator. See Figure 3.19.
NOTE: The gaskets are different, and there is an orienta-
tion to the insulator.
• The gasket with the “D” shaped opening goes
between the insulator and the cylinder head,
matching the shape of the gasket to the shape of
the intake port.
• The bowl vent channel in the insulator faces the
carburetor, with the exit toward the bottom.
• There is a small hole in the insulator to carburetor
gasket. The hole should be aligned to allow passage of air through the bowl vent channel to the
throttle side bowl vent in the carburetor body.
4. Install the insulator by following the previous steps in
reverse order.
NOTE: Tighten the carburetor mounting nuts to a torque of
80 - 106 in lbs (9 - 12 Nm).
5. Test run the engine before returning to service.
39
Page 46

61/65/70/75 Series Horizontal Shaft Engines
40
Page 47

FUEL SYSTEM AND GOVERNOR
Figure 4.1
NBR inner liner
THV barrier layer
NBR intermediate layer
Reinforcement
CSM Cover
Picture courtesy of Avon Automotive
When working around the fuel system, do not bring any sources of heat, spark, or open flame
near the work area.
! WA RNI NG! WA RNI NG
CHAPTER 4: THE FUEL SYSTEM AND GOVERNOR
The function of the fuel system is to store fuel, mix the fuel with air in the correct ratio and deliver it to the intake
port. The fuel system consists of the following components:
• Fuel tank
• Fuel lines
• Fuel filter
• Carburetor and insulator block
NOTE: When working on the fuel systems, look at the whole system. A problem will rarely be isolated to one
component.
Fuel Line
The fuel line used by MTD is GREENbar
a multi-layer fuel line that meets the current EPA guidelines.
TM
. This is
NOTE: This fuel line has a thin inner liner. If a tear
forms in this inner liner, fuel can get between
the liner and the hose. This will cause the
liner to collapse, cutting off the fuel flow.
NOTE: The fuel line must be replaced every time it
is disconnected from the brass barb on the
carburetor.
NOTE: Replace the fuel line only with GREENbar
700 series fuel line.
Inspect the fuel lines
• Are they cracked?
• Are they clogged?
• Are they brittle?
NOTE: If the answer to any of the above is yes,
replace the fuel lines. When replacing fuel lines, low permeable fuel line must be used in order to meet
EPA and CARB standards.
TM
NOTE: The nipple has a sharp edge that will damage the inner lining of the fuel line. Replace the fuel line
every time it is removed from the carburetor fuel nipple.
• Drain the fuel tank or clamp the fuel line before starting work to prevent spillage.
• Dispose of drained fuel in a safe and responsible manner.
41
Page 48

61/65/70/75 Series Horizontal Shaft Engines
Figure 4.2
Figure 4.3
Inspecting the fuel
NOTE: Fuel is the maintenance item most often overlooked by consumers. A lot of fuel systems problems are
caused by gas that is out of date or fuel with too much alcohol in it. When inspecting the fuel:
• Look for water.
• Look for dirt.
• Look for discoloration.
• Sniff carefully to see if it smells like varnish or kerosene.
• Save the fuel to show to customer.
• Look for oil in the fuel.
• Test the fuel for alcohol content.
NOTE: Save a sample of the fuel collected to show the customer.
NOTE: Customers pouring engine oil into the fuel tank seems to be a growing problem.
Test fuel for alcohol
Fuels currently on the market contain a wide array of
additives. Some of these additives oxygenate the fuel.
Oxygenated fuel reduces emissions, and is required in
some parts of the United States. Fuel make-up varies seasonally and geographically. Ethanol is the primary additive
used to oxygenate fuel.
Ethanol in fuel creates a lot of problems for gasoline
engines. The biggest problem is that alcohol attracts and
holds water. This corrodes the metal components of the
fuel system, especially the carburetor. Alcohol also does
not produce as much heat as gasoline when burnt and it
burns at a different stoichiometric ratio. This results in less
power for the engine.
A 10% ethanol (E10) mix is acceptable for MTD
engines. Anything higher than that will result in performance issues.
NOTE: E15 and E85 fuels are not to be used in any
MTD engines.
There are several alcohol test kit available commercially. See Figure 4.2.
Generally these kits involve mixing a measured
amount of water and gas together and seeing were the
boundary layer is. See Figure 4.3.
The test kit should come with a chart to compare the
boundary layer height to alcohol percentage.
42
Page 49

Fuel filter
Figure 4.4
New style
To avoid personal injury or property damage, use extreme care in handling gasoline. Gasoline is extremely flammable and the vapors are explosive. Serious personal injury can
occur when gasoline is spilled on yourself and/or your clothes which can ignite. Wash your
skin and change clothes immediately.
! WARNING! WARNING
Figure 4.5
Fuel Filter
FUEL SYSTEM AND GOVERNOR
NOTE: The fuel filter is located in the fuel tank. It can be
removed and cleaned with a can of carb cleaner or
replaced
To replace the fuel filter:
NOTE: On snow blower engines, the engine shroud must
be removed to reach the fuel line. Refer to Chapter
3: Air intake systems for directions on how to
remove it.
1. Drain the fuel.
2. Gently pry up on the tab that holds the fuel line in
place.
3. Remove the fuel line.
4. Remove the fuel tank nipple using a 12 mm wrench.
See Figure 4.5.
5. Install a new filter by following the previous steps in
reverse order.
NOTE: Apply a small amount of a thread sealing com-
pound such as Loctite® 564 and tighten the filter
by hand and the an additional 3/4 to 1 full turn.
43
Page 50

61/65/70/75 Series Horizontal Shaft Engines
Figure 4.6
Roll over valve
Figure 4.7
Vent
Fuel tank vent
The fuel tank vent performs the important task of allowing air into the fuel tank. As fuel is being used by the
engine, the fuel level in the tank drops. The dropping fuel
level then creates a vacuum in the tank. If the fuel tank
could not suck air through the vent, the vacuum would prevent the fuel from getting to the carburetor.
NOTE: Fuel tanks with a roll over valve vent: See
Figure 4.6.
• Have unvented fuel caps
• The fuel caps are tethered to the tank.
• They vent through the charcoal canister.
NOTE: The fuel tanks that do no have a roll over
valve are vented through the cap. See Figure 4.7.
To test the cap vent
1. Clean off the vent.
2. Blow air into the vent hole. The air should blow
throw the vent with little back pressure.
3. Suck air through the vent hole. Air should freely
enter through the vent.
• Replace the cap if the vent builds pressure or
restricts air movement.
• A cap that maintains pressure will cause the
engine to run rich as the fuel in the tank heats
and expands, forcing it’s way past the float
valve in the carburetor.
• A cap that maintains vacuum will cause the engine to run lean as the fuel is depleted and no air comes in
to replace it.
• The two conditions may both be present, but the symptoms vary with fuel, fuel level, and operating condi-
tions.
• Usually presents as a “Runs and quits” scenario
44
Page 51

The fuel tank
Figure 4.8
Dip stick tube cover
Figure 4.9
Remove these nuts
Figure 4.10
Starter switch bracket
FUEL SYSTEM AND GOVERNOR
To remove the fuel tank:
1. Drain the tank.
2. Disconnect the fuel line from the tank by following the
steps described in the fuel filter section of Chapter 1:
Introduction.
3. Remove the dip stick
4. Remove the dip stick tube cover by removing the two
screws. See Figure 4.8.
5. Remove the two nuts from the fuel tank studs. See
Figure 4.9.
NOTE: On snow engines with electric start, the starter
switch mounting bracket is bolted to the fuel tank
and will come off with the tank. If replacing the
tank, make sure to remove the bracket from the old
tank and mount it on the new one. See Figure
4.10.
45
Page 52

61/65/70/75 Series Horizontal Shaft Engines
Figure 4.11
Remove this bolt
6. Remove the bolt securing the fuel tank mounting tab
to the cylinder block. See Figure 4.11.
7. Install the fuel tank by following the above steps in
reverse order.
46
Page 53

Choke
Figure 4.12
Choke knob
Choke lever
Figure 4.13
choke lever
FUEL SYSTEM AND GOVERNOR
MTD engines are equipped with a choke, a primer or
both. If equipped with a manual choke, it must be closed to
start the engine. The choke should be opened when the
engine starts. This can be a source of starting issues with
customers who are not familiar with manual chokes.
The choke is operated by either a knob or a lever at the
carburetor, depending on the application. If the choke plate
fails to close fully, the engine will be difficult or impossible
to start when cold. See Figure 4.12.
NOTE: Engines with a choke lever do not have any choke
linkages. The choke lever is mounted on the carburetor and directly connected the choke plate.
See Figure 4.13.
47
Page 54

61/65/70/75 Series Horizontal Shaft Engines
Figure 4.14
Choke knob shaft
Choke
plate
Choke linkage
Choke linkage
The rod connecting the choke knob to the choke plate
on the carburetor can be bent slightly to facilitate adjustment. To access it:
1. Remove the choke knob and the engine shroud by
following the steps described in Chapter 3: Air
Intake Systems.
2. Rotate the choke knob shaft to verify full choke
movement. See Figure 4.14.
3. If the choke plate does not open fully or close fully,
adjust the choke linkage.
NOTE: When adjusting the choke linkage, make
small bends and recheck the movement of
the choke plate. Repeat this step until full
movement is achieved.
4. Reassemble by following step 1 in reverse order.
5. Test run the engine before returning to service.
48
Page 55

Primers
Figure 4.15
Primer hose
Carburetor throat
Figure 4.16
Clamp
Tabs
MTD engines use a dry bulb primer. This means that
there is no fuel in the primer bulb. The primer works by
pushing air into the float chamber of the carburetor when
the primer bulb is depressed. This will force fuel to be
sprayed out of the main nozzle into the throat of the carburetor.
To test the primer:
1. Remove the engine shroud by following the steps
described in Chapter 3: Air Intake Systems.
2. Reconnect the primer hose to the carburetor. See
Figure 4.15.
3. Press the primer bulb while looking down the carburetor throat. If there is fuel squirting into the carburetor throat the primer is working properly. If not,
replace the primer and hose.
NOTE: The primer and primer hose come as an
assembly so there is no need to determine which part is bad.
FUEL SYSTEM AND GOVERNOR
To replace the primer:
4. If the primer is bad, disconnect hose from the carburetor.
5. Remove the hose camp at the rear of the primer
bulb. See Figure 4.16.
6. The primer is held to the shroud by a pair of split,
barbed posts. Squeeze the posts to release the
barbs. See Figure 4.16.
NOTE: The primer bulb and hose will slide out as an
assembly.
7. Install the new primer by following the above steps
in reverse order.
49
Page 56

61/65/70/75 Series Horizontal Shaft Engines
Figure 4.17
Charcoal canister
Vacuum lines
Roll over valve
Figure 4.18
Purge Line
Vent Line
Evaporative (EVAP) emissions system
NOTE: Gasoline is made from the graduated distillation of crude oil. It consists of a multitude of individual
o
hydrocarbons and has a boiling range of 86 - 410
and the low boiling range makes gasoline an ideal fuel for spark ignited, internal combustion engines.
However, the hydrocarbons are not good for the environment. To reduce or eliminate the release of fuel
vapors into the atmosphere, an evaporative (EVAP) emissions system is used. Starting with the 2008
season, an EVAP system has been offered in areas that require it. All fuel caps must be tethered to the
fuel tank as part of the EPA tier III emissions. A broken tether on the fuel cap must be repaired before
the unit can be put back into service.
This charcoal canister system consists of:
• A charcoal canister
• The fuel tank with a roll over valve
• An unvented fuel cap
• Vacuum lines
F (30-210oC)1. The large quantity of hydrocarbons
This system operates as follows:
1. The gasoline evaporates, letting off vapors.
2. The vapors exit the fuel tank through a roll over
valve.
3. The vapors are carried to the charcoal canister by a
vacuum line (colored orange in Figure 4.18.
4. The activated charcoal inside the canister absorbs
the hydrocarbons allowing the air to pass through
and out to the atmosphere.
5. When the engine is running, the vacuum between
the air filter and the carburetor is used to draw the
vapors out of the charcoal canister through the
purge line, colored green in Figure 4.18. This temporarily enriches the fuel/air mixture, and is used in
the combustion process.
1. Dr. Ullmann, J, Fuels, Automotive Ha ndbook, seventh edition. Bosch, Robert distributed by SAE Society of
Automotive Engineers, 2007. 320.
50
Page 57

FUEL SYSTEM AND GOVERNOR
Troubleshooting the EVAP system
NOTE: Troubleshooting a charcoal canister fuel cap is the same as troubleshooting a non-EVAP system.
Symptom Cause
Fuel leaking from the
carburetor throat or
vents
Engine starts, then
stalls
Engine runs rich • A blockage in the line
Engine runs lean • Wrong fuel cap
Gasoline vapor
escaping from the
engine
A blockage in the charcoal
canister or between the
canister and the tank.
• Roll over valve stuck
closed.
• Plugged vent line or
charcoal canister.
• Raw fuel in the charcoal canister.
between the charcoal canister and the
carburetor insulator
plate.
installed.
• Leak in the vacuum
lines.
• The charcoal canister is saturated.
• A blockage in the
line between the
charcoal canister
and the carburetor
insulator plate.
• Wrong fuel cap
installed.
• Leak in the vacuum
lines.
51
Page 58

61/65/70/75 Series Horizontal Shaft Engines
Figure 4.19
Gently pry out the roll over valve and grommet
Figure 4.20
15 in.Hg.
Figure 4.21
Zero reading
Roll over valve vent
To remove/replace the roll over valve:
1. Gently pry the roll over valve out of the fuel tank.
See Figure 4.19.
2. Inspect the rubber grommet, replace if damaged.
3. Disconnect the vacuum line.
NOTE: if the roll over valve is being removed to
remove/replace the fuel tank, the vacuum
line can remain attached.
4. With the grommet on the roll over valve, install the
roll over valve by pressing it into the opening in the
tank.
5. Install the vacuum line.
6. Test run the engine in a safe area before returning
to service.
Testing the roll over valve
The roll over valve vent has two functions. The first
function is to vent the tank and the second function is to
close off the vent if the tank is inverted.
Test the roll over valve by:
1. Remove the roll over valve by following the steps
described above.
2. Connect a vacuum pump to the roll over valve.
3. Hold the roll over valve in an inverted position.
4. Apply a vacuum to the roll over valve. See Figure
4.20.
NOTE: The roll over valve should hold 15 in.Hg. for
15 seconds.
5. With the vacuum still applied, turn the roll over valve
over. See Figure 4.21.
NOTE: The vacuum should be relieved.
6. If the results do not match what is listed above,
replace the roll over valve.
52
Page 59

Charcoal canister
Figure 4.22
Charcoal canister
Screws
Figure 4.23
Vacuum lines
Figure 4.24
Hooks
FUEL SYSTEM AND GOVERNOR
To remove/replace the charcoal canister:
1. Remove the air filter.
2. Remove the two screws that hold the air filter base to
the elbow using a #2 Phillips screw driver. See Figure
4.22.
3. Lift the base off of the elbow enough to gain access
to the vacuum lines underneath it.
4. Disconnect the vacuum lines.
.
5. Gently spread the two hooks while pulling the canister out of the base. See Figure 4.24.
6. Install the Charcoal canister by following the previous
steps in reverse order.
7. Test run the engine in a safe area before returning it
to service.
53
Page 60

61/65/70/75 Series Horizontal Shaft Engines
Figure 4.25
Figure 4.26
Testing a charcoal canister
To test for a plugged charcoal canister:
1. Remove the charcoal canister by following the procedures described in the previous section of this
chapter.
2. Attach a vacuum pump to the smallest nipple of the
canister.
3. Apply vacuum.
NOTE: The canister should not be able to build a
vacuum. If it does, the canister is bad and
needs to be replaced.
4. Attach the vacuum pump to the middle nipple.
5. Apply vacuum.
NOTE: The canister should not be able to build a
vacuum. If it does, the canister is bad and
needs to be replaced.
NOTE: The large nipple is the canisters vent.
54
Page 61

FUEL SYSTEM AND GOVERNOR
Figure 4.27
Bowl vent port
Bowl vent
channel
Primer port
(if equipped)
insulator block
gasket
Carburetors
If diagnosis indicates a fuel problem, inspect the carburetor. This is important even if problems are identified elsewhere in the fuel system..
IMPORTANT: the fuel must be tested for alcohol content before diagnosing anything else on the engine.
NOTE: It is important to perform a compression or leak down test before condemning a carburetor. An engine
can have a borderline compression reading and not create enough of a vacuum to draw in a sufficient fuel/air
charge.
NOTE: If the engine has border-line compression, a quick test to see if that is the problem is to remove the
spark plug. Squirt a little bit of oil into the combustion chamber to seal the rings. Reinstall the spark plug. If the
engine starts and runs ok, then that was the problem. If it does not start, move on to the carburetor.
Inspecting the carburetor:
1. Remove the float bowl and check for dirt and/or varnish.
2. Inspect the needle valve and needle valve seat for dirt and/or damage.
3. Inspect the gaskets and O-rings for damage.
4. Inspect the vents and orifices, verify that they are free of debris.
NOTE: If a little cleaning and new gaskets will fix the carburetor, do it. If the carburetor requires extensive
cleaning, it is better to replace the carburetor.
IMPORTANT: Never try to mechanically clean orifices. That will damage them and ruin the carburetor.
NOTE: The jet markings (if present) may be used for identification purposes, but the technician should not
attempt to infer orifice sizes from the identification numbers.
NOTE: Installing the wrong main jet, or a carburetor with the wrong main jet will produce performance and
emissions issues.
Disassembly and rebuilding the carburetor
1. Clamp-off the fuel line to prevent fuel spillage, then
disconnect the fuel line from the carburetor.
NOTE: If the carburetor is equipped with a primer,
disconnect the primer hose.
2. Remove the carburetor by following the steps
described in Chapter 3: Air Intake and Filter.
NOTE: An insulator separates the carburetor from
the cylinder head.
• A bowl vent port is in a recessed passage on
the end of the carburetor that faces the insulator.
• A second passage in the insulator supple-
ments the passage on the carburetor.
• Gaskets separate the insulator from the cylin-
der head and the carburetor from the insulator.
• A port in the carburetor to insulator gasket ties the bowl vent passages together.
55
Page 62

61/65/70/75 Series Horizontal Shaft Engines
Figure 4.28
Float bowl
Drain bolt
Flat fiber
gasket
Bowl bolt
with recess in
head for O-ring
Gasket seal
Figure 4.29
Float
Float pin
Float valve
Fuel inlet
Figure 4.30
Float
Compression
spring
Float valve
3. Remove the bowl bolt using a 10mm wrench. See
Figure 4.28.
NOTE: From this point an assessment can be made
about the viability of rebuilding the carburetor.
• If extensive corrosion is evident, replace the
carburetor.
• If varnish build-up is too extensive to clean,
replace the carburetor.
4. When inverted, the float should rest in a level position. See Figure 4.29.
5. Remove the pin that the float hinges on to remove
56
the float.
NOTE: The float is not adjustable. Spring tension
against the float valve begins to build from
the horizontal position, putting progressively
more pressure between the tip of the valve
and the seat. See Figure 4.30.
NOTE: Because the float valve is crucial to the func-
tioning of the carburetor, and the viton tip of
the valve is subject to wear, technicians
should replace the valve and spring any time
the carburetor is disassembled for cleaning.
• A square cross-section gasket seals the bowl to
the body of the carburetor.
Page 63

FUEL SYSTEM AND GOVERNOR
Figure 4.31
Main jet
Bowl gasket
Bowl vent port
Figure 4.32
Bowl vent ports
Emulsion air port: main jet
Emulsion air port: pilot jet
Emulsion tube
Main jet
Figure 4.33
Fuel feed leg
on central
column for pilot
and transition
shot plug in feed bore
Fuel port to
central column
Throttle stop screw
6. Remove the main jet using a narrow-shank straight
blade screwdriver. See Figure 4.31.
NOTE: Fuel enters the central column through a port
about 1/2” (1cm) from the bottom, to help prevent
the ingress of any residue in the bottom of the
bowl.
NOTE: The orifice in the main jet meters fuel into the cen-
tral column.
NOTE: Air from the main jet emulsion port enters the cen-
tral column near the top, then gets bubbled
through the emulsion tube into the metered fuel
flow to promote atomization.
NOTE: The main jet secures the emulsion tube in the cen-
tral column of the carburetor. See Figure 4.32.
7. The throttle stop screw has a large pliable lip around
the head of the screw. That lip secures a metering
plug for the pilot and transition ports. Remove the
screw to reach the plug. See Figure 4.33.
57
Page 64

61/65/70/75 Series Horizontal Shaft Engines
Figure 4.34
Figure 4.35
Air passage
O-rings
Fuel metering orifice
End view
Figure 4.36
Adjustment screw
8. Carefully pry out the metering plug using a small
screwdriver. See Figure 4.34.
9. Examine the metering plug: See Figure 4.35.
NOTE: The transition ports are fixed. They are
drilled into the throat of the carburetor,
down-stream of the venturi. They lie behind
the brass welch plug near the pilot screw.
10. Clean the carburetor body in an ultrasonic cleaner.
11. Rinse it thoroughly.
12. Dry the carburetor body using compressed air.
13. Reassembly the carburetor and install it by following
steps 1-8 in reverse order.
14. Start engine and check the idle RPM using a
tachometer.
NOTE: Idle speed: If applicable, is 1,800 RPM +
16 0 RP M, s et us ing thr ott le s to p s cre w.
15. Check the top no load speed of the engine.
NOTE: The top no load speed will vary depending
on the application. The specification for it will
be listed in the manual for each application.
16. The top no-load speed is easily adjusted by tightening/loosing the speed adjustment screw. Tighten the
screw to decrease speed and loosen it to increase
speed. See Figure 4.36.
58
Page 65

Governor
Figure 4.37
Spring tension
Governor action
Figure 4.38
Loosen nut
Spread here
Governor arm
FUEL SYSTEM AND GOVERNOR
The engine speed is controlled by a balance between
the force applied by a spring (pulling the throttle open) and
a flyweight mechanism within the engine applying force to
the governor arm (pushing the throttle closed).
See Figure 4.37.
NOTE: While the mechanism is simple and robust, it is
important to pay attention when working on parts
near the governor. Binding caused by interference
with mis-routed lines or cables may make the governor unresponsive.
NOTE: When a governed engine “hunts”, it is generally an
indication of a lean fuel/air mixture, rather than a
problem with the governor.
To remove the governor arm from the governor shaft:
1. Remove the fuel tank by following the steps
described in the Fuel Tank section of this chapter.
2. Unhook the governor spring.
NOTE: Mark which hole the spring was in to ensure
it goes back in the same hole.
3. Unhook the governor linage and throttle return
spring.
4. Loosen the nut and through bolt. See Figure 4.38.
5. Carefully spread open the seam on the arm.
6. Carefully slide the Governor arm off of the governor
shaft.
7. Install the governor arm by rotating the governor
shaft clockwise until it stops.
8. Slide the arm onto the shaft. The flat on the top of the shaft should be roughly perpendicular to the arm.
NOTE: There is a hairpin clip that keeps the governor shaft from sliding into the engine. It may be necessary to
hold the shaft while sliding the arm on to prevent it from going into the engine.
9. Tighten the nut on the clamp bolt to secure the arm.
10. Attach the governor linkage and spring.
11. Adjust the governor to maintain top no-load speed as described in a previous section of this chapter.
59
Page 66

61/65/70/75 Series Horizontal Shaft Engines
Figure 4.39
Remove
hairpin clip
Figure 4.40
Remove the
governor
shaft
Governor gear
Governor shaft
To remove or replace the governor shaft:
1. Remove the engine from the equipment that it powers.
2. Remove the governor arm by following the previously described steps.
3. Remove the flywheel by following the steps
described in Chapter 7: Ignition Systems.
4. Remove the sump and crankshaft from the engine
by following the steps described in Chapter 10:
Cam, Crankshaft and Piston.
5. Remove the hairpin clip from the governor shaft.
See Figure 4.39.
6. Slide the governor arm out of the engine block from
the inside of the engine. See Figure 4.40.
7. Check the movement of the fly-weights and cap on
8. Install the shaft by following the above steps in
9. Install the engine on the equipment it powers.
10. Test run the engine and adjust the top no load
the governor gear.
reverse order.
engine rpms by following the steps described in the
carburetor section of this chapter.
60
Page 67

Governor cup and the governor gear
Figure 4.41
Governor gear shaft
Figure 4.42
Remove the
stator
Gear shaft
Figure 4.43
Governor gear
Governor cup
Gear shaft
Washer
FUEL SYSTEM AND GOVERNOR
To remove or replace the governor gear and cup:
1. Remove the engine from the unit.
2. Remove the governor arm by following the previously
described steps.
3. Remove the flywheel by following the steps
described in Chapter 7: Ignition Systems.
4. Remove the sump and crankshaft by following the
steps described in Chapter 10: Cam, Crankshaft and
Piston.
5. Drive out the governor gear shaft using a 5/32” pin
punch. See Figure 4.41.
NOTE: If the engine is equipped with an alternator,
remove the stator for easier access to the shaft.
See Figure 4.42.
6. Slide the shaft out of the gear and cup. See Figure
4.43.
61
Page 68

61/65/70/75 Series Horizontal Shaft Engines
Figure 4.44
Thrust washer
NOTE: A second thrust washer goes between the
governor gear and the cylinder block. Make
sure it is in place when installing the governor gear. See Figure 4.44.
7. Install the governor gear and cup by following the
above steps in reverse order.
NOTE: Check the governor arm for freedom of
movement before test running the engine.
8. Test run the engine and adjust the top no load
engine RPMs by following the steps described in
the disassembly and rebuilding the carburetor section of this chapter.
62
Page 69

Lubrication
SAE 40
SAE 30
SAE 10W30/SAE 10W40
SAE 5W20
-4°F
14°F
32°F 50°F 68°F 86°F 104°F
-20°C
-10°C
0°C
10°C 20°C
30°C
40°C
Oil Chart
CHAPTER 5: LUBRICATION
Oil type and quantity
The recommended oil for MTD engines is an SAE 10W-30 oil with an SM API rating or better. The oil capacity is
17.0- 20.3 fl.oz (0.5-0.6 liters).
• If the oil is noticeably thin, or smells of gasoline, carburetor repair may be needed before the engine can
be run safely.
• Check the oil level frequently and change the oil more frequently in severe operating conditions such as
exceptionally deep snow falls.
• Synthetic oil is a suitable alternative, but it does not extend service intervals.
NOTE: MTD recommends the use of petroleum oil during the break in period to ensure the piston rings cor-
rectly break in.
Synthetic vs. Petroleum based oil: To simply look at synthetic oil and to compare it with Petroleum based oil there
is very little difference. However, when you look at the two through a microscope it is easy to see the difference. Synthetic is made up of smaller molecules. This allows the oil to get into areas that petroleum based oil cannot.
63
Page 70

61/65/70/75 Series Horizontal Shaft Engines
Figure 5.1
Dip stick
Figure 5.2
upper limit
lower limit
Oil dip stick
To check the oil level:
NOTE: Be sure to check the engine on a level sur-
face with the engine stopped.
1. Remove the oil filler cap and wipe the dipstick clean.
2. Insert the dipstick into the engine block, but do not
screw it in. See Figure 5.1.
3. Pull the dip stick out again and read the oil level.
See Figure 5.2.
4. If the level is low, slowly add oil to the upper limit on
the dipstick.
64
Page 71

Dip stick tube removal
Figure 5.3
Remove these
screws
Figure 5.4
Remove this screw
Fuel tank
Figure 5.5
Lubrication
To remove/replace the dip stick tube:
1. Remove the dip stick.
2. Remove the two screws securing the dip stick cover
in place using a #2 Phillips screw driver. See Figure
5.3.
3. Remove the screw at the bottom of the dip stick tube.
See Figure 5.4.
4. Pull the dip stick tube out of the engine block and fuel
tank. See Figure 5.5.
5. Inspect the O-rings on the dip stick and the dip stick
tube. Replace if damaged.
6. Install by following the previous steps in reverse
order.
65
Page 72

61/65/70/75 Series Horizontal Shaft Engines
Dipper
Figure 5.6
Figure 5.7
Oil supply passage
Oil return
Tappets
Lubrication system
MTD uses a splash lube system for it’s horizontal shaft
engines. The connecting rod has a dipper on it that
“splashes” oil around the inside of the engine. See Figure
5.6.
NOTE: The cam and tappets were removed for bet-
ter visualization of the lubrication system.
The splashing action will also atomize or change the
oil into a mist. There are two oil passages that run along
the engine cylinder. The one on the top side of the engine
is the oil supply passage. The oil mist will flow through this
passage to the cylinder head. See Figure 5.7.
The second oil passage runs along the bottom side of
the cylinder. This is the oil return passage. As the name
implies, it allows the oil collecting in the cylinder head to
return to the sump. The return passage is the tiny hole that
is in between the two tappet passages.
NOTE: Because these engines use splash lubrica-
tion, the type of oil and the oil level is critical
for proper operation of the engine. If the oil
level is too low, the dipper on the connecting rod cannot splash the oil into the engine. If the oil level is
too high, the oil will not change into a mist to reach the upper side of the engine.
66
Page 73

Positive crankcase ventilation valve
Figure 5.8
Breather hose
Pliers
Figure 5.9
10mm wrench
Lubrication
The PCV valve is located inside the valve cover. The
function and test procedures for the PCV valve is covered
in Chapter 2: Basic Troubleshooting.
To remove the valve cover and PCV valve:
1. Disconnect and ground the spark plug wire.
2. Squeeze the spring clamp that secures the breather
hose to the valve cover nipple and slide it back. Then
remove the breather hose from the valve cover nipple. See Figure 5.8.
3. Remove the four screws that hold the valve cover to
the cylinder head using a 10mm wrench. See Figure
5.9.
NOTE: The PCV valve is not serviceable. If it is faulty, the
valve cover must be replaced.
4. Reassemble the PCV and valve cover by following
the above steps in reverse order..
NOTE: Tighten the cover bolts to a torqued of 62 - 80 in-
lbs (7-9 Nm).
5. Inspect the PCV tubing for cracks, brittleness or
signs of leaking. Replace the PCV tube if any are
found.
6. Test run the engine before returning to service.
67
Page 74

61/65/70/75 Series Horizontal Shaft Engines
68
Page 75

Recoil Starter Removal
Figure 6.1
Remove these screws
Starter cup
Inspect slots
Figure 6.2
Starters
CHAPTER 6: STARTER AND CHARGING SYSTEMS
To remove recoil assembly from the engine:
1. Remove the three nuts that secure the recoil assembly to the engine using a 8mm wrench. See Figure
6.1.
2. Install the starter by following the above step in
reverse order. Tighten the screws to a torque of 53 71 in-lbs (6-8 Nm).
Starter Cup
The starter cup is a steel cup that is bolted to the flywheel.
1. Inspect the inside of the starter cup. See Figure 6.2.
NOTE: If the starter was failing to engage the flywheel,
and the edges of the teeth inside the cup are
burred or damaged, replace the starter cup.
NOTE: If the starter cup is replaced, the complete starter
should be replaced as well, to prevent a repeat failure.
2. Remove the starter cup by removing the flywheel nut.
69
Page 76

61/65/70/75 Series Horizontal Shaft Engines
Figure 6.3
Flywheel dimple
Starter cup dimple
3. Install a starter cup by placing it on the flywheel,
with the dimple on the bottom of the starter cup in
the dimple in the flywheel. See Figure 6.3.
4. Install the flywheel nut and tighten it to a torque of
47 - 52 ft-lbs (64 - 70 Nm).
70
Page 77

Starter Rope
Figure 6.4
Rope inserted
from the inside
out
pulley blocked
Figure 6.5
Inset: knot
Figure 6.6
Rope-return tension may be increased by winding
the rope and pulley counter clockwise.
notch in pulley
Starters
The most common failure mode for most recoil assemblies is a broken rope.
NOTE: If the spring was not damaged when the recoil
sprung back, It is possible to simply remove the
remnants of the old rope and install a new rope.
1. Remove the starter by following the steps described
earlier in this chapter.
2. Remove the old starter rope by prying out the starter
cord knot and pulling the rope out with it.
3. Cut a piece of #4 recoil rope 7’ (2.1 meters) long.
4. Heat fuse the ends of the starter rope, and tie a double half-hitch in one end.
5. The rope may be easily installed from the outside-in.
Pull the rope tight to seat the knot firmly in the recess
in the back of the pulley. See Figure 6.4.
NOTE: It may be necessary to wind the pulley clockwise to
line up the hole in the pulley to the hole in the
starter housing. If so, use a punch or screwdriver
to block the pulley, preventing it from rewinding.
See Figure 6.4.
6. Wind the spring tightly. Then relieve it minimum 1 full
turn, counting when the pulley knot aligns with the
rope bushing in the housing. (This usually results in
about 1.5-1.75 complete turns of relief), and block it
with a punch or screwdriver to keep it from rewinding.
7. Install the handle and handle insert on the loose end
of the rope, again using a double half-hitch. See Figure 6.5.
8. Remove the blocking tool and at a controlled rate, let
the rope rewind into the starter.
9. Give the starter a couple of test pulls to verify the
right amount of tension on the starter rope.
NOTE: If starter rope tension needs to be adjusted, hook
the rope into the notch in the pulley and wind the
pulley a couple of turns to add tension-. See Figure
6.6.
10. Install the starter and tighten the starter nuts to a
torque of 53 - 71 in-lbs (6-8 Nm).
71
Page 78

61/65/70/75 Series Horizontal Shaft Engines
Eye protection should be worn if the starter pulley is to be removed.
The recoil spring is under tension and can release as the pulley is removed.
! CA UTION! CAUTION
Figure 6.7
Pressure plate
Figure 6.8
Torsion springs
Pawls
Starter pulley and recoil spring
The recoil spring is nested within the starter pulley and both parts are sold as a single part number.
If damage is suspected, the recoil may be disassem-
bled by:
1. Remove the starter by following the steps described
earlier in this chapter.
2. Relieve the spring tension by:
2a. Pull some slack in the rope, inside of the starter.
2b. Hook the rope into the notch in the starter pul-
ley.
2c. Wind the pulley clockwise until all tension is
removed.
3. Remove the shoulder screw and pressure plate
using a 10 mm wrench. See Figure 6.7.
4. Inspect the pawls and torsion springs for wear and
NOTE: Beneath the pressure plate is a compres-
sion spring, and two starter pawls that are
held in the disengaged position by two torsion springs.
damage. See Figure 6.8.
72
Page 79

Starters
Figure 6.9
Pulley
Spring
Housing
Lithium grease
5. Carefully lift the spring and pulley out of the recoil
housing. See Figure 6.9.
NOTE: If the spring is undamaged, but has been
removed from the pulley, the spring may be
re-wound. Hook the end of the spring into
the slot in the outer lip of the recess of the
pulley and wind the spring into the recess in
a counter-clockwise direction.
NOTE: Evaluate the damage, including parts prices
and local labor rates. In some parts of the
country, it makes economic sense to replace
the complete assembly, in other areas labor
rates favor repair.
6. To re-assemble, apply a small amount of lithiumbased chassis grease to the surface of the recoil
housing that contacts the spring.
NOTE: Use low temperature grease on the snow engines.
7. Carefully position the pulley and spring in the recoil housing. Rotate the pulley gently counter-clockwise until
the spring seats, allowing the pulley to fall into position.
8. Install the torsion springs and pawls so that the long arm of the spring reaches outside of the pawl, and draws
it toward the center of the assembly.
NOTE: The rolled end of the pawl fits in the recess in the starter pulley. The hooked end engages the starter
cup. The roll faces inward and the hook faces outward.
NOTE: The extrusions on the pressure plate should fall inside of the pawls as the starter is assembled.
NOTE: Drag on the pressure plate, from the friction between the compression spring and the head of the
shoulder screw causes these extrusions to force the pawls outward, engaging the starter cup.
9. Apply a small amount of thread locking compound such as Loctite 242 (blue) to the threads of the shoulder
screw, and install the screw. Tighten it to a torque of 71 - 89 in-lb. (8 - 10 Nm).
10. Install the starter rope by following the steps described in the previous section of this chapter.
11. Install the starter and tighten the starter nuts to a torque of 53 - 71 in-lbs (6-8 Nm).
73
Page 80

61/65/70/75 Series Horizontal Shaft Engines
Figure 6.10
Remove these screws
Figure 6.11
Remove these screws
Figure 6.12
Alignment dowels
Electric starter
The electric starter is only available on the snow
engine. It is powered by an extension cord that is plugged
into household 120 volt AC current. The starter and switch
assembly are one piece and are not serviceable.
To replace the starter assembly:
1. Disconnect the extension cord.
2. Remove the two screws that secures the switch box
to the engine. See Figure 6.10.
3. Remove the starter by removing the two screws that
hold it to the engine block using an 8mm wrench.
See Figure 6.11.
NOTE: Before condemning a starter make sure to
bench test it. To bench test a starter:
A. Remove the starter from the engine.
B. Plug the extension cord into the switch housing.
C. Hold the starter down and press the starter but-
ton.
• If the starter works on the bench, confirm that
the engine crankshaft rotates with normal force.
• If the engine does not rotate with normal force,
identify and repair the engine problem.
NOTE: This includes adjusting the valve lash.
• If the crankshaft rotates with normal force but
the starter is unable to turn it, replace the
starter.
• If the starter does not work, replace the starter.
4. Install the starter by following the above steps in
reverse order.
NOTE: Make sure the alignment dowels are in the
NOTE: Tighten the starter screws to a torque of 53 -
74
engine block before installing the starter.
See Figure 6.12.
71 in-lbs (6-8 Nm).
Page 81

Electric starter switch
Figure 6.13
Cable tie
Figure 6.14
Screws
Figure 6.15
Starters
To remove/replace the electric starter switch assembly:
1. Cut the cable tie that secures the alternator harness
to the starters power cord. See Figure 6.13.
2. Remove the two screws that hood the switch box
assembly to the engine using a #2 Phillips screwdriver.
3. Remove the two screws that attach the starter’s end
cap to the starter using a #2 Phillips screwdriver. See
Figure 6.14.
4. Slide the end cap and body off of the starter.
NOTE: There is a thrust washer on the rotor that usually
comes out with the body. Set the thrust washer off
to the side.
5. Separate the starter’s end cap from the body enough
to gain access to the wire connections inside. See
Figure 6.15.
6. Remove the two screws that attach the white and
black wires to the brush housing using a #2 Phillips
screwdriver.
75
Page 82

61/65/70/75 Series Horizontal Shaft Engines
Figure 6.16
Ground wire
Figure 6.17
O-ring
Figure 6.18
7. Disconnect the ground wire from the end cap. See
Figure 6.16.
8. Remove the O-ring.
9. Lift the harness and grommet out of the end cap.
10. Install a new O-ring on the front cover that is still
attached to the engine. See Figure 6.17.
NOTE: Applying grease to the front cover will help
hold the O-ring in place during assembly.
11. Slide the starter body over the rotor until it reaches
the brushes.
12. Gently depress one of the brushes enough to slip it
passed the edge of the rotor.
13. Repeat step 12 on the remaining brush.
76
Page 83

Starters
Figure 6.19
Thrust washer
Figure 6.20
Figure 6.21
O-ring
Green wire
14. Install the thrust washer. See Figure 6.19.
15. Press the harness’s grommet into the end cap. See
Figure 6.20.
16. Attach the green wire to the end cap.
17. Install a new O-ring on the end cap. See Figure 6.21.
NOTE: Applying grease to the O-ring groove will help hold
the O-ring in place during assembly.
77
Page 84

61/65/70/75 Series Horizontal Shaft Engines
Figure 6.22
Figure 6.23
12 O’clock
6 O’clock
Figure 6.24
Longer screw
18. Attach the white and black wires of the harness to
the brush housing. See Figure 6.22.
19. Set the end cap in place.
NOTE: The holes should be at the 6 & 12 O’clock
positions.
20. Install the two starter screws with new insulator
washers.
21. Attach the switch box to the engine.
NOTE: The longer screw goes in the bottom hole.
NOTE: The bottom screw must pass through the
hole in the front shroud, then enter the hole
in the mounting bracket.
22. Attach the alternator harness to the starter harness
with a cable tie. See Figure 6.24.
23. Test run the engine in a safe area before returning it
to service.
78
Page 85

Charging system
Figure 6.25
Magnets
Figure 6.26
Charger harness
Yellow wire
Figure 6.27
Red wire
Starters
Description
Some engines are equipped with a charging system.
The charging system consists of:
• Alternator stator: copper field windings around an
iron core. The stator is attached to the engine
block beneath the flywheel.
• Four magnets on the inside of the flywheel, refer to
figure 6.13, that rotate around a stator that is
mounted to the cylinder block. As the crankshaft
and flywheel rotate, the moving magnets induce a
charge in the stator.
• A rectifier: A set of diodes that turn the AC current
into DC current.
Testing
The charging system will produce AC and DC voltages.
The rectifier for the DC voltage is inside of the stator and is
not serviceable. To test the charging system:
1. Disconnect the charger harness.
2. Connect the black (-) lead of a digital multimeter to a
good ground on the engine.
3. Connect the red (+) lead of the multimeter to the yellow wire in the charger harness. See Figure 6.26.
4. Set the multimeter to read AC voltage.
5. Start the engine and run it at full throttle.
6. The multimeter should read a voltage of 13 - 18Vac.
7. Set the multimeter read DC voltage.
8. Move the red (+) to the red wire of the charger harness. See Figure 6.27.
9. The multimeter should read 17 - 26Vdc.
10. If the results do not match what is listed above,
replace the stator.
79
Page 86

61/65/70/75 Series Horizontal Shaft Engines
Figure 6.28
Remove these
Baffle
screws
Stator
To remove/replace the stator:
1. Remove and ground the spark plug wire.
2. Remove the flywheel by following the steps
described in Chapter 7: Ignition System.
3. Remove the baffle that covers the charger harness
using a 10mm wrench.
4. Remove the two screws that secures the stator with
a 10mm wrench and lift the stator off of the engine.
See Figure 6.28.
5. Install the stator by following the above steps in
reverse order.
6. Test run the engine in a safe area and retest the
voltage output before returning to service.
Rotor
Rotor failures are extremely rare. To check the rotor:
• Confirm that the magnets are firmly attached to the flywheel.
• Hold a screwdriver or a similar tool made of ferrous metal within a 1/4” of each magnet.
• If the tool is drawn to the magnet, the rotor is good.
80
Page 87

Figure 7.1
Spark tes ter
! CA UTION! CA UTION
Never remove the spark plug and
hold it against the cylinder head to
test for spark. The fuel/air mix com-
ing out of the spark plug hole will catch on fire.
CHAPTER 7: IGNITION SYSTEM
Troubleshooting the ignition system
The purpose of the ignition system is to provide a
spark in the combustion chamber at the proper time to
ignite the fuel/air mixture. The steps in troubleshooting the
ignition system are:
1. Examine the spark plug(s) by following the steps
described in the spark plug section of this chapter.
NOTE: It is convenient to check the compression
when the spark plug is removed for examination.
2. Connect a spark tester between the spark plug wire
and a good ground point on the engine. See Figure
7.1.
Ignition System
NOTE: It only takes 1,000 volts to jump a .025” air gap in open atmosphere, it takes 10,000 volts to jump the
same gap at 120 psi, therefore an open air spark test in not valid.
NOTE: The spark should be a minimum of 10 Kv (10,000 volts) at pull over speed.
3. Place the stop switch in the run position (Insert key for snow engines and move throttle to the full throttle posi-
tion).
4. Pull the starter rope. If sparks can be seen in the spark tester, the ignition system is working.
NOTE: If there are sparks present in the spark tester, install a known-good spark plug and prime test the
engine. If the engine does not start, the problem is not in the ignition system. Check the engine’s compression.
5. If no sparks are seen in the spark tester further testing is required.
6. Test the stop switch by following the steps described in the stop switch section of this chapter.
7. If the stop switch is working properly, replace the module.
8. Inspect the flywheel.
81
Page 88

61/65/70/75 Series Horizontal Shaft Engines
Figure 7.2
Disconnect switch
Figure 7.3
Ground
Switch lead
Continuity
Figure 7.4
No continuity
Stop switch
NOTE: On snow engines, test the remote (ignition)
stop switch first.All MTD horizontal engines
that are in use in North America have a stop
switch built into the throttle lever assembly.
MTD engines used on snow blowers have
an additional stop (ignition) switch in the
engine shroud.
Test the stop switch (throttle) by:
1. Remove the fuel tank by following the steps
described in Chapter 4: The Fuel System And Governor.
2. Remove the engine shroud (snow engines) by following the steps described in Chapter 3: Air Intake
Systems.
3. Remove the blower housing.
4. Disconnect the lead that runs from the module to
the stop switch. See Figure 7.2.
5. Connect one lead of a digital multimeter to the lead
going to the stop switch. Connect the other lead of
the digital multimeter to a good ground.
6. Set the multimeter to the ohms (Ω) scale.
7. Operate the throttle lever while watching the multimeter.
• When the throttle is all the way to the right
(stop), the multimeter should read at or near
0.0Ω, indicating continuity. See Figure 7.3.
• When the throttle is all the way to the left (full
throttle), the multimeter should not show continuity. See Figure 7.4.
82
Page 89

Remote (ignition) stop switch
Figure 7.5
Disconnect wires
Remote switch
Figure 7.6
No Continuity
Key Inserted
Figure 7.7
Continuity
Key removed
Ignition System
To test the remote stop switch:
1. Remove the muffler cover.
2. Disconnect the two wires from the remote switch.
See Figure 7.5.
3. Connect a digital multimeter to the two tabs on the
back of the remote switch.
4. Set the multimeter to the ohms (Ω) scale.
• With the key fully inserted, the multimeter should
not show continuity. See Figure 7.6.
• With the key removed, the meter should show con-
tinuity.
5. If the test results do not match the results described
in step 4, replace the remote switch.
NOTE: If the engine does not stop when the key is
removed and the remote switch is working properly; proceed to step 6.
83
Page 90

61/65/70/75 Series Horizontal Shaft Engines
Figure 7.8
Blue wire
Continuity
Figure 7.9
Blue wire
Ground connection
6. Connect one lead of the multimeter to the blue wire
that goes to the remote switch.
7. Connect the other lead of the multimeter to a good
ground. Blue wire Continuity
8. Set the multimeter to the ohms (Ω) scale.
• If the multimeter shows continuity, Check the
black wire from the module for an open or
replace the module. See Figure 7.8.
• If the multimeter does not show continuity,
check the wire for a break and check the
ground connection. See Figure 7.9.
84
Page 91

Ignition System
Figure 7.10
The module
The coil in this ignition system is an inductive discharge magneto, contained in a single module.
• The inductive discharge magneto has a two leg design.
• The magneto is energized by the passing of a pair of magnets mounted in the flywheel.
• Ignition timing is set by the location of the flywheel in relation to the crankshaft. Proper timing is maintained by a steel key.
Normal performance of the coil is to produce at least 10,000 volts at starter-rope pull-through speed.
The presence or absence of strong spark, with the stop switch known to be good, is generally enough to identify
the ignition coil as good or bad. Resistance readings may help confirm the source of the failure, but are generally
meaningless because they only measure a small part of the module.
NOTE: Presence of a weak spark maybe the result of an improper air gap. The air gap space should be 0.008”
- 0.016” (0.2 - 0.4 mm).
Simple spark-testers are readily available and inexpensive. Thexton Part # 404 is available from a variety of
retailers, and similar units are available from other manufacturers.
NOTE: If the complaint is that the engine quits run-
ning when it gets warm, the ignition module
should be tested with the engine at normal
operating temperature.
NOTE: At operating speed, the ignition should pro-
duce voltage approaching 12,000.
NOTE: At pull-over speed (~ 600 RPM), voltage
should be at least 10,000V.
NOTE: Flash-over voltage will vary with spark plug
condition and gap.
NOTE: Pull-over speed may vary from operator to
operator.
NOTE: Failure of the magnets in the flywheel is
exceedingly rare. To test the magnets, simply hold an item made of ferrous metal roughly 1/4” (0.635cm) away from the magnets in the flywheel.
It should be drawn to the flywheel. A wrench or screwdriver is suitable for this test.
85
Page 92

61/65/70/75 Series Horizontal Shaft Engines
Figure 7.11
Unhook spark
plug wire
Figure 7.12
Magnet
0.010” feeler gauge
Module removal
1. Unplug the spark plug.
2. Remove the Heat box (snow engines) and intake
elbow by following the steps described in Chapter 3:
Air Intake Systems.
3. Unhook the spark plug wire from the clip in the carburetor insulator. See Figure 7.11.
4. Remove the recoil assembly by following the steps
described in Chapter 6: Starter.
5. Remove the blower housing.
6. Disconnect the lead that runs from the module to
the stop switch.
7. Remove the module using a 10mm wrench. m is
half-way between 2nd and 3rd reticle (10,000 V.)
Installing the module and setting the air gap
NOTE: If just setting the air gap, loosen the module
mounting screws first then follow the same
steps as described below.
1. Rotate the flywheel so that the magnets are away
from where the module is mounted.
2. Install the module. Do not tighten the module down.
3. Place a non-ferrous feeler gauge between the module and the flywheel.
NOTE: The air gap should be 0.008” - 0.016” (0.2 -
0.4 mm).
4. Rotate the flywheel so that the magnets align with
the legs of the module while holding the feeler
gauge in place. See Figure 7.12.
5. Tighten the module mounting screws to a torque of
80 - 106 in-lbs (9 - 12 Nm).
6. Rotate the flywheel to remove the feeler gauge.
7. Install the blower housing and starter.
8. Hook the spark plug wire from the clip in the carburetor insulator.
9. Install the Heat box (snow engines) and intake elbow by following the steps described in Chapter 3: Air Intake
Systems.
10. Connect the spark plug wire to the spark plug.
11. Test run the engine before returning to service.
86
Page 93

Ignition System
Figure 7.13
Brass punch
! CA UTION! CA UTION
If the flywheel shows any signs of physical damage such as cracks, broken vanes (if
equipped), or a damaged keyway, replace it. A damaged flywheel poses a threat of a burst
failure. Burst failures are extremely hazardous to surrounding people and property.
Figure 7.14
Key flat parallel to the threads
Taper
Flywheel
The flywheel holds the magnets that induce a field in the module which in turn produces a spark. But it also con-
trols the timing of the ignition system by controlling when the magnets are introduced to the module.
A sheared flywheel key will throw off the ignition timing. They are uncommon on the MTD engine. If one is found,
check for a bent crankshaft.
To Remove and/or inspect the flywheel and key:
1. 1.Remove the recoil assembly by following the steps
describe in Chapter 6: Starter and Charging System.
2. Remove the blower housing.
3. Loosen the flywheel nut until it is a couple of threads
past the end of the crankshaft using a 19mm wrench.
4. Remove the flywheel by applying a sharp blow to the
crankshaft using a brass drift punch and a hammer
while gently prying with a prybar. The flywheel will
loosen then lift it off.
NOTE: Never strike the crankshaft directly with a hammer.
To prevent damage to the crankshaft use a brass
drift punch or a piece of wood between the hammer and the crankshaft. See Figure 7.15.
5. Inspect the key, keyway, and tapered mating surfaces of the flywheel and crankshaft.
NOTE: If the key is damaged it must be replaced. If
there is damage to the crankshaft, the
engine must be short blocked because the
crankshaft is not available as a service part.
NOTE: On installation, confirm that the key is prop-
erly seated (the flat of the key parallel with
the threaded section of the crankshaft) in the
keyway, and that the tapers are fully seated.
Key or keyway failure may result from
improper seating.
IMPORTANT: The tapers in flywheel and on the
crankshaft must be clean and dry.
The flywheel is held in place by the
friction between the flywheel and the
crankshaft, not the key. The key is
only to guide the flywheel to the proper position until it is torqued down.
6. Install the flywheel nut to a torque of 47 - 52 ft lbs (64-70 Nm).
7. Adjust the air gap by following the steps described in the previous section of this chapter.
8. Reassemble the engine.
9. Test run the engine before returning to service.
87
Page 94

61/65/70/75 Series Horizontal Shaft Engines
Figure 7.15
13/16” spark plug
socket
The spark plug
• The spark plug is a F6RTC, part #951-10292, gapped to 0.024” - 0.031” (0.6 - 0.8 mm).
• Wear rate will vary somewhat with severity of use. If the edges of the center electrode are rounded-off, or
any other apparent wear / damage occurs, replace the spark plug before operating failure (no start)
occurs.
Cleaning the spark plug
• Cleaning the spark plug is not recommended. If the plug needs to be cleaned, replace it.
• Use of a wire brush may leave metal deposits on the insulator that cause the spark plug to short-out and
fail to spark.
• Use of abrasive blast for cleaning may damage the ceramic insulator or leave blast media in the recesses
of the spark plug. When the media comes loose during engine operation, severe and non-warrantable
engine damage may result.
Inspection of the spark plug
Inspection of the spark plug can provide indications of the operating condition of the engine.
• Light tan colored deposits on insulator and electrodes is normal.
• Dry, black deposits on the insulator and electrodes indicate an over-rich fuel / air mixture (too much fuel or
not enough air)
• Wet, black deposits on the insulator and electrodes indicate the presence of oil in the combustion chamber.
• Heat damaged (melted electrodes / cracked insulator / metal transfer deposits) may indicate detonation.
• A spark plug that is wet with fuel indicates that fuel is present in the combustion chamber, but it is not
being ignited.
Spark plug removal
1. Disconnect and ground the spark plug wire.
2. Remove the spark plug using a 13/16” or 21mm
wrench. A flexible coupling or “wobbly” extension
may help. See Figure 7.15.
3. Gap a new spark plug to 0.024” - 0.032” (0.60 - 0.80
mm).
4. Install the new spark plug and tighten to a torque of
15 - 18 ft lbs (20 - 25 Nm).
88
Page 95

Exhaust
Figure 8.1
Spark arrestor
Retaining screw
Figure 8.2
Muffler shield
Remove these
screws
CHAPTER 8: EXHAUST
The exhaust system is a frequently overlooked component of an engine. It is important to make sure the muffler
is in good condition and free of debris and/or insects.
NOTE: A blocked muffler will result in poor performance. If a muffler is completely blocked, the engine may not
start.
Summer engines
One of the main differences between the summer and the snow engines is the exhaust system. Because of this
they will be addressed separately.
Spark arrestor
The spark arrestor should be checked and/or cleaned
every month.
NOTE: The spark arrestor also serves to keep blockages
out of the exhaust system. Typical blockages
include insect nests built during the dormant season.
The spark arrestor can be inspected by shining a flash
light into the muffler. See Figure 8.1.
If The spark arrestor needs to be cleaned or replaced:
1. Remove the four screws that retain the muffler shield
using a 8mm wrench and lift it off of the engine. See
Figure 8.2.
89
Page 96

61/65/70/75 Series Horizontal Shaft Engines
Figure 8.3
Figure 8.4
Remove
these nuts
Figure 8.5
Remove all gasket material
2. Remove the spark arrestor retaining screw using a
#2 Phillips screwdriver. See Figure 8.1.
3. Pry the spark arrestor out of the muffler. See Figure
8.3.
4. The spark arrestor can be:
• Replaced
• Cleaned by mechanical means
• Solvent cleaned
• Burned clean using a butane or propane torch.
5. Install the spark arrestor by following steps 1-3 in
reverse order.
To remove/replace the muffler
1. Remove the two muffler nuts using a 13mm wrench.
See Figure 8.4.
2. Lift the muffler off of the engine.
3. Clean all of the gasket material off of the cylinder
head and the muffler (if reusing the muffler). See
Figure 8.5.
NOTE: The MTD engine uses a graphite exhaust
gasket. It is not reusable and must be
replaced every time the muffler nuts are
loosened.
NOTE: The graphite exhaust gasket transfers heat
from the cylinder head to the muffler. The
heat transfer helps to keep the engine operating temperature under control. Do not substitute an exhaust gasket made from another
material.
4. Install a new gasket.
5. Install the muffler and tighten the muffler nuts. Refer
to the table at the end of Chapter 10 for the proper
torque.
6. Test run the engine before returning to service.
90
Page 97

Snow engines
Figure 3.6
Remove these
screws
Muffler shroud
Figure 8.7
muffler shield
Figure 8.8
Muffler nuts
Exhaust
Unlike the summer engines, the snow engines are not
equipped with spark arrestors.
To remove/replace the muffler:
1. Remove the muffler shroud by taking off the six
screws that hold the muffler cover in place using a 10
mm wrench. See Figure 3.6.
2. Remove the four screws securing the muffler shield
using a 10 mm wrench and lift it off of the engine. See
Figure 8.7.
3. Remove the two muffler nuts using a 13mm wrench
and lift the muffler off of the engine. See Figure 8.8.
4. Clean all of the gasket material off of the cylinder
head and the muffler (if reusing the muffler)
NOTE: The MTD engine uses a graphite exhaust gasket.
It is not reusable and must be replaced every time
the muffler nuts are loosened.
5. Install a new gasket.
6. Install the muffler and tighten the muffler nuts. Refer
to the table at the end of Chapter 10 for the proper
torque.
7. Test run the engine before returning to service.
91
Page 98

61/65/70/75 Series Horizontal Shaft Engines
92
Page 99

Cylinder head
Figure 9.1
Disconnect switch
Figure 9.2
CHAPTER 9: CYLINDER HEAD
The Cylinder head of the MTD engine can be removed without removing the engine from the piece of equipment.
To remove the cylinder head:
1. Disconnect and ground the spark plug high tension
lead.
2. Remove the spark plug using a 13/16” or 21mm
wrench.
3. Rotate the crankshaft until it is at TDC of the compression stroke by following the steps described in
the valve lash section of Chapter 1: Introduction..
4. Remove the carburetor and insulator plate by following the steps described in Chapter 3: Air Intake Systems.
5. Disconnect the throttle stop switch. See Figure 9.1.
6. Remove the throttle lever by removing the two
screws using a 8mm wrench. See Figure 9.2.
93
Page 100

61/65/70/75 Series Horizontal Shaft Engines
Figure 9.3
Heat baffle
Remove these screws
Figure 9.4
Remove valve cover
Figure 9.5
Jam nut
Fulcrum nut
7. Remove the muffler by following the steps
described in Chapter 8: Exhaust.
8. Remove the heat baffle. See Figure 9.3.
9. Remove the four screws securing the valve cover
using a 10mm wrench. See Figure 9.4.
10. Remove the rocker arms and push rods:
61/65/70 Series heads:
94
A. Loosen the jam nuts and fulcrum nuts that
secure the rocker arms using a 10mm wrench
and a 14mm wrench. See Figure 9.5.
B. Pivot the rocker arms aside, or remove them
completely, and remove the push rods.
NOTE: Once broken-in, the rocker arm should be
kept with its corresponding valve.
NOTE: The intake and exhaust push rods are iden-
tical and interchangeable. It is preferable,
but not absolutely necessary to return the
same push rods to their original locations on
engine with substantial (>
ing time.
100 hours) operat-
 Loading...