

Page 1

SERVICE MANUAL
SERIES 7000
COMPACT TRACTOR
Model Number
7360SS
CUB CADET • P.O. BOX 368023 • CLEVELAND, OHIO 44136-9723
Page 2

INDEX
1. GENERAL 3
1. SAFETY 4
2. LOCATION OF ENGINE MODEL, ENGINE SERIAL NO.
AND TRACTOR SERIAL NO. IDENTIFICATIONS 6
3. SPECIFICATION AND DATA 7
4. TRANSMISSION DIAGRAM 8
5. TIGHTENING TORQUES 9
6. PRECAUTIONS FOR DISASSEMBLY 10
7. GENERAL INFORMATION 11
2. ASSEMBLY REMOVAL AND REINSTALLATION 12
1. FRONT AXLE ASSY REMOVAL AND REINSTALLATION 13
1-1 FRONT AXLE ASSY REMO VAL 13
1-2 FRONT AXLE ASSY REINSTALLA TION 14
2. ENGINE ASSY REMOVAL AND REINSTALLATION 15
2-1 ENGINE ASSY REMOVAL 15
2-2 ENGINE ASSY REINSTALLA TION 19
3. CLUTCH HOUSING, TRANSMISSION CASE, REAR AXLE CASE
AND HYDRAULIC LIFT CASE REMOVAL AND REINSTALLATION 21
3-1 HOUSING REMOVAL 21
3-2 HOUSING REINSTALLATION 23
4. ENGINE 25
4-1 DETERMINING WHEN TO OVERHAUL THE ENGINE 25
4-2 TROUBLE SHOOTING 28
4-3 DISASSEMBLING 34
4-4 REASSEMBLING 44
4-5 INSPECTION 79
4-6 ADJUSTMENT 100
4-7 SPECIAL TOOLS 107
1
Page 3

5. CLUTCH 108
5-1 DISASSEMBLING 108
5-2 REASSEMBLING 108
5-3 ADJUSTMENT 109
6. TRANSMISSION 111
6-1 CLUTCH HOUSING DISASSEMBLING 1 11
6-2 CENTER CASE DISASSEMBLING 11 3
6-3 TRANSMISSION CASE DISASSEMBLING 11 5
6-4 CLUTCH HOUSING REASSEMBLING 11 7
6-5 CENTER CASE REASSEMBLING 11 8
6-6 TRANSMISSION CASE REASSEMBLING 121
6-7 CHECK AND MAINTENANCE 123
7. REAR AXLE 126
7-1 DIFFERENTIAL CASE ASSY DISASSEMBLING 126
7-2 REAR AXLE DISASSEMBLING 126
7-3 BRAKE CONTROL DISASSEMBLING 127
7-4 DIFFERENTIAL CASE ASSY REASSEMBLING 128
7-5 REAR AXLE REASSEMBLING 129
7-6 BRAKE CONTROL REASSEMBLING 130
7-7 CHECK AND MAINTENANCE 131
8. FRONT AXLE 132
8-1 FRONT AXLE DISASSEMBLING 132
8-2 FRONT AXLE REASSEMBLING 135
8-3 FRONT AXLE CHECK AND MAINTENANCE 139
9. STEERING 141
9-1 OPERATOR CONTROL AREA DISASSEMBLING 141
9-2 STEERING UNIT DISASSEMBLING 142
9-3 HYDRAULIC CYLINDER DISASSEMBLING 144
9-4 OPERATOR CONTROL AREA REASSEMBLING 146
9-5 STEERING UNIT REASSEMBLING 147
9-6 HYDRAULIC CYLINDER REASSEMBLING 150
9-7 CHECK AND MAINTENANCE 152
10. HYDRAULICS 153
10-1 MAIN HYDRAULICS DISASSEMBLING 153
10-2 HYDRAULIC LIFT DISASSEMBLING 155
10-3 MAIN HYDRAULICS REASSEMBLING 158
10-4 HYDRAULIC LIFT REASSEMBLING 159
10-5 HYDRAULIC LINE CHECKING 164
10-6 HYDRAULIC CHECK AND MAINTENANCE 166
11. ELECTRICAL 167
11-1 ELECTRICAL DIAGRAM 168
11-2 SPECIFICA TION 170
2
Page 4

I. GENERAL
3
Page 5

1. SAFETY
4
Page 6

5
Page 7
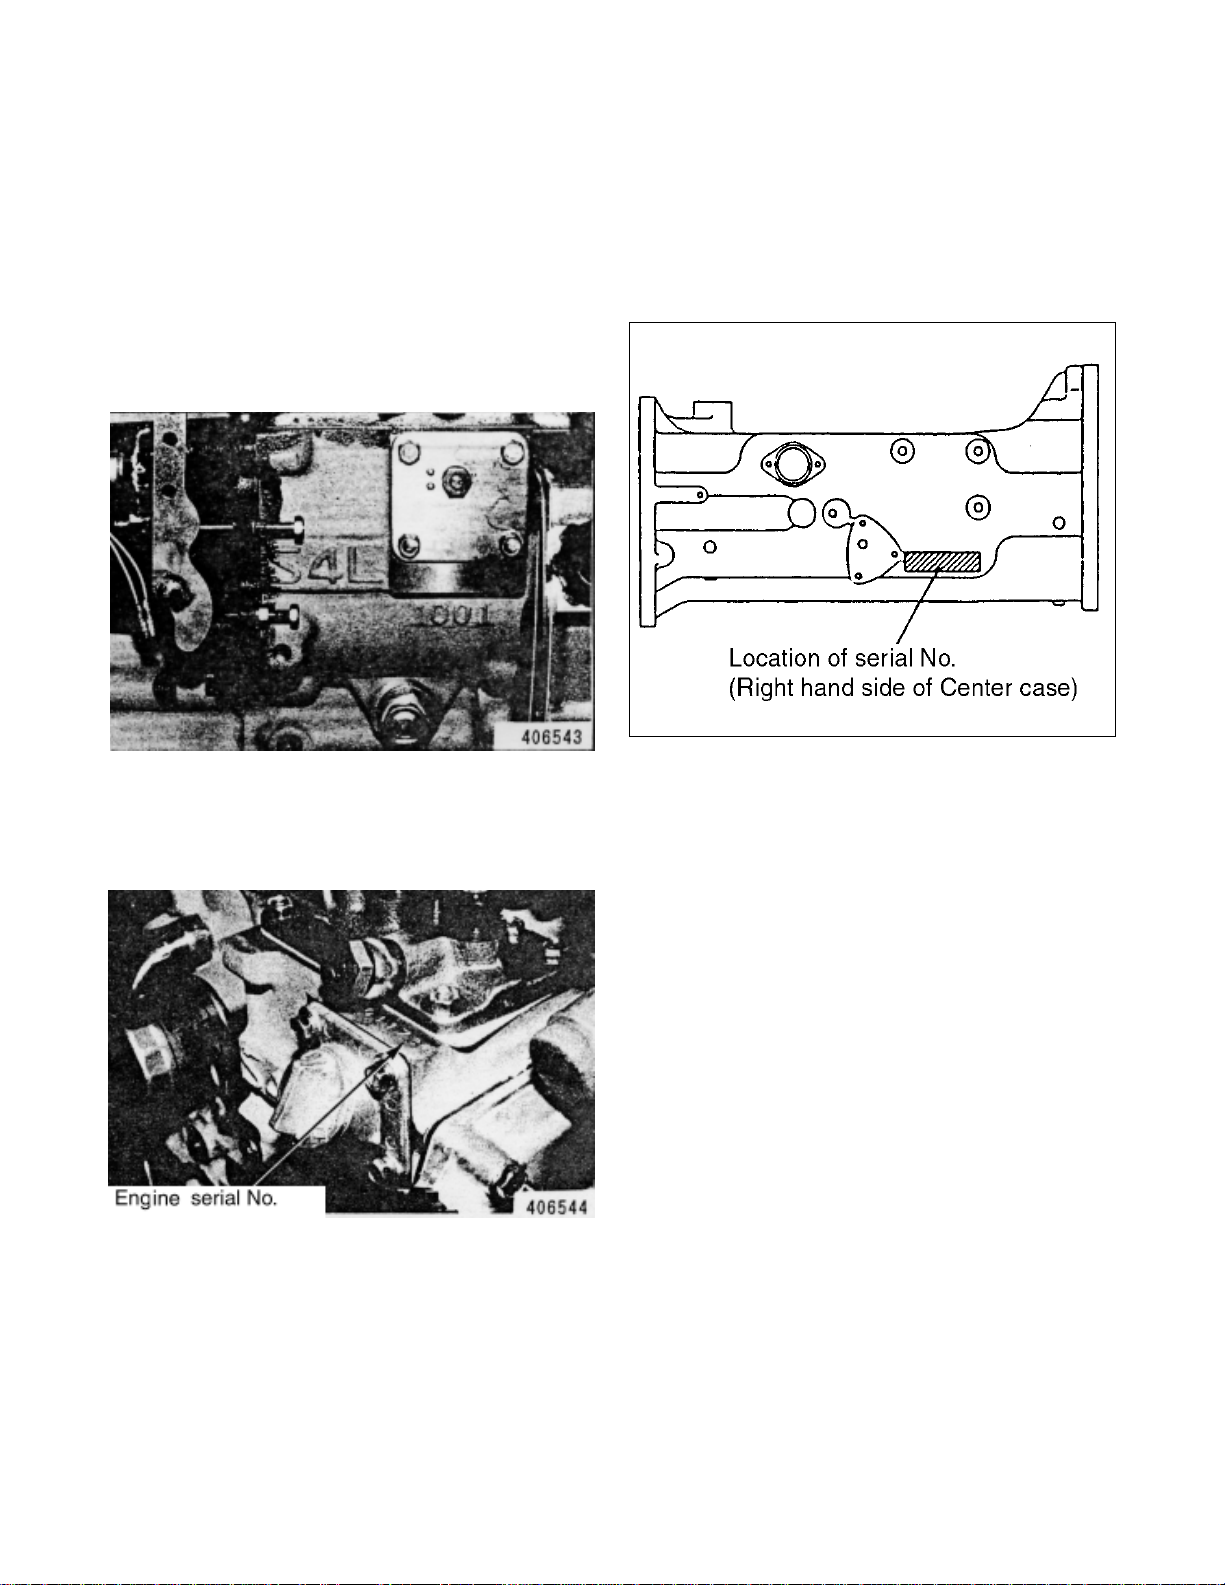
2. LOCATION OF ENGINE MODEL, ENGINE SERIAL NO.
AND TRACTOR SERIAL NO. IDENTIFICATIONS
(1) ENGINE MODEL
Engine model is relieved on right side of
cylinder block . Enter this model and engine
serial number
(See next paragraph) for ordering parts.
(2) ENGINE SERIAL NO.
Engine serial No. is punched on right side of
engine block by the injection pump.
(3) TRACTOR SERIAL NO.
Tractor Serial No. is punched on right side of
transmission center case.
6
Page 8

3. SPECIFICATION AND DATA
Capacities
Engine oil capacity with filter change ———————————————— 4.5 liters 4.8 QTS
NOTE : Oil filter capacity is 0.5 liters (0.13 US Galls)
Cooling capacity ————————————————————————— 7.1 liters 7.9 QTS
Transmission & Hydraulic oil———————————————————— 43 liters 45.9 QTS
MFD Axle ———————————————————————————— 6.5 liters 6.9 QTS
Fuel Tank ———————————————————————————— 35 liters 9.2 Gallons
NOTE : Use the capacities listed above only as a guide. Always use the dipstick or level plug to make
sure the units are filled to the correct level.
Fuel Specifications
A.P.I Gravity (Min) ————————————————————————— 34
Flash Point (Min) ————————————————————————— 60 C 140 F
Cloud Point (Wax Appearance Point) (Max)—————————————— 21 C 5.8 F
Pour Point (Max)————————————————————————— 26 C 14.8 F
Distillation Temperature, 90% Point ————————————————282 to 338flC 539 to 640flF
Viscosity at 38flC
Centistokes ——————————————————————————— 2.0 to 4.3
Saybolt second Universal ————————————————————— 32 to 40
Cetane Number (Min) —————————————————— 43 (45 to 55 for winter or high altitude)
Water and Sediment by Volume (Max) ———————————————— 0.05 of 1 %
Sulfer, by weight (Max) —————————————————————— 0.50 of 1 %
Copper Strip Corrosion (Max) ———————————————————— No. 2
Ash, by weight (Max) ——————————————————————— 0.01 of 1 %
Fuel Filter Cup Service Interval ——————————————————— Every 10 Hours
Fuel Filter Element Change ———————————————————— Replace yearly or as needed
Fuel injectors
Valve Leakage Rate ——— No Leakage Permissible, Slight Moistening of the Nozzle Tips is allowed
7
Page 9
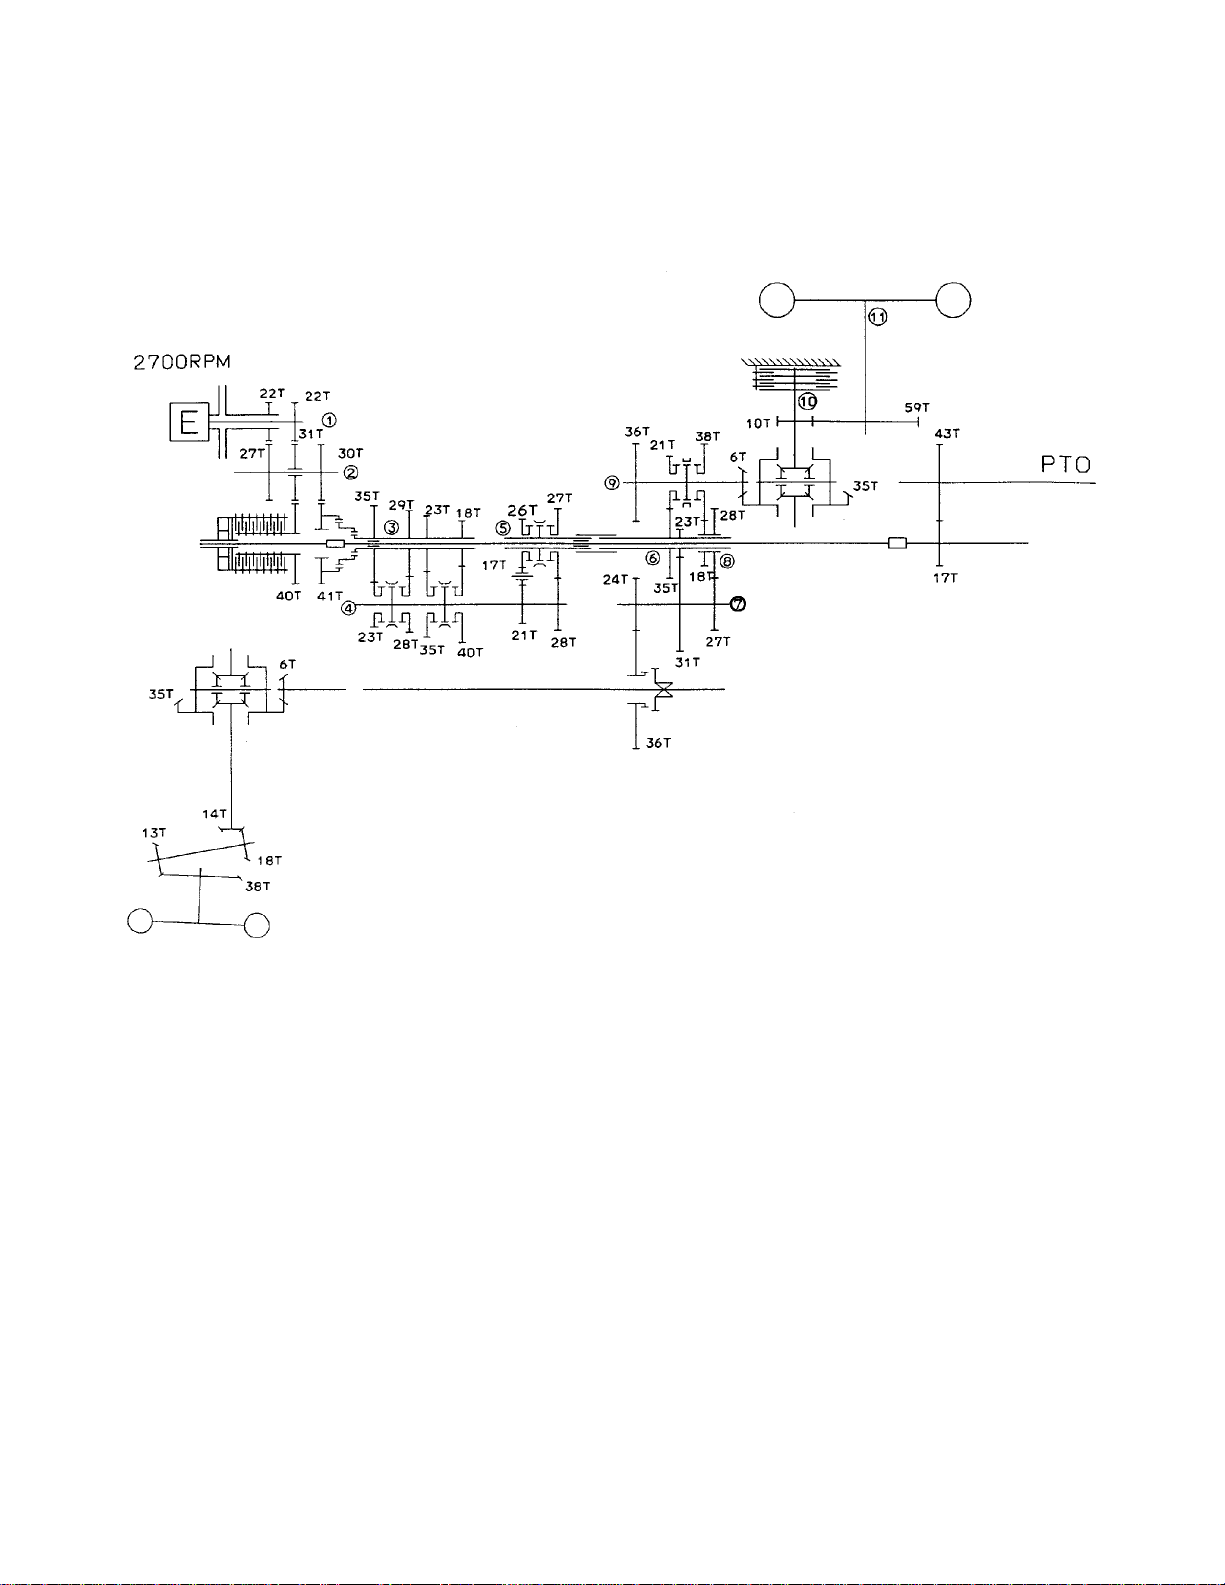
4. POWER TRANSMISSION DIAGRAM
8
Page 10
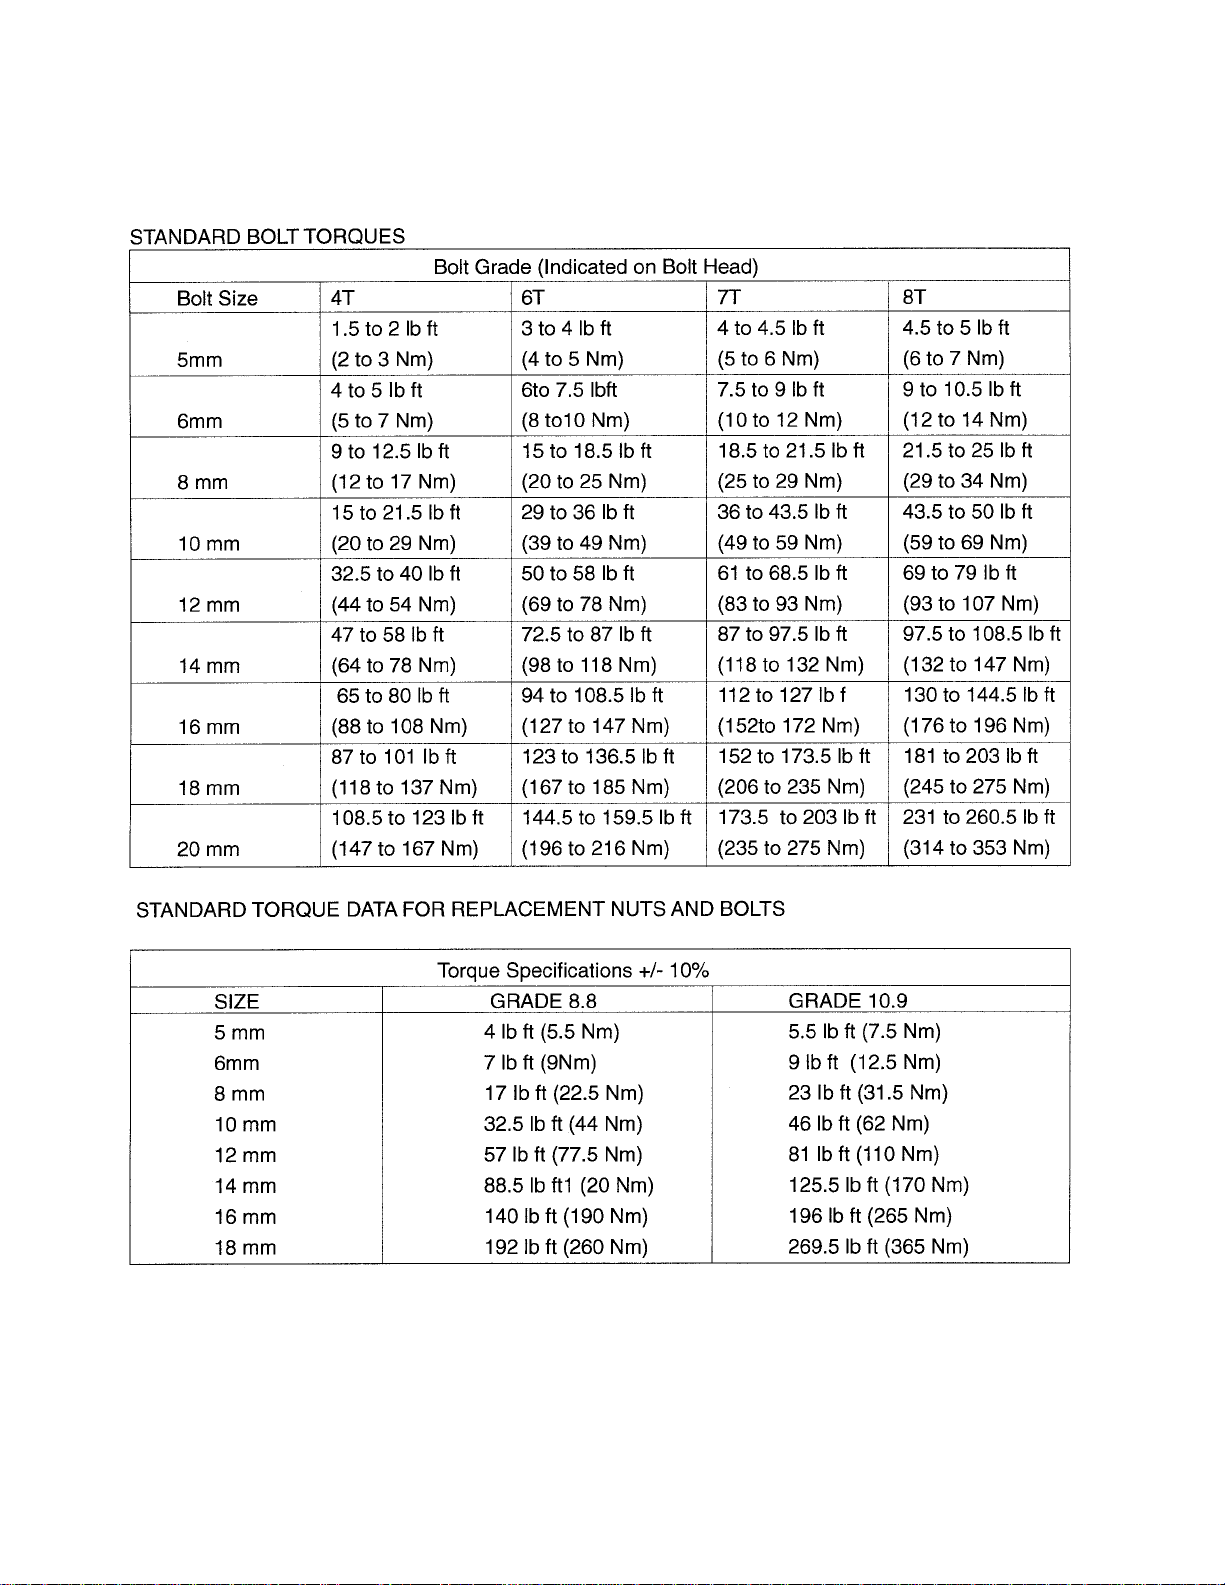
5. TIGHTENING TORQUES
9
Page 11
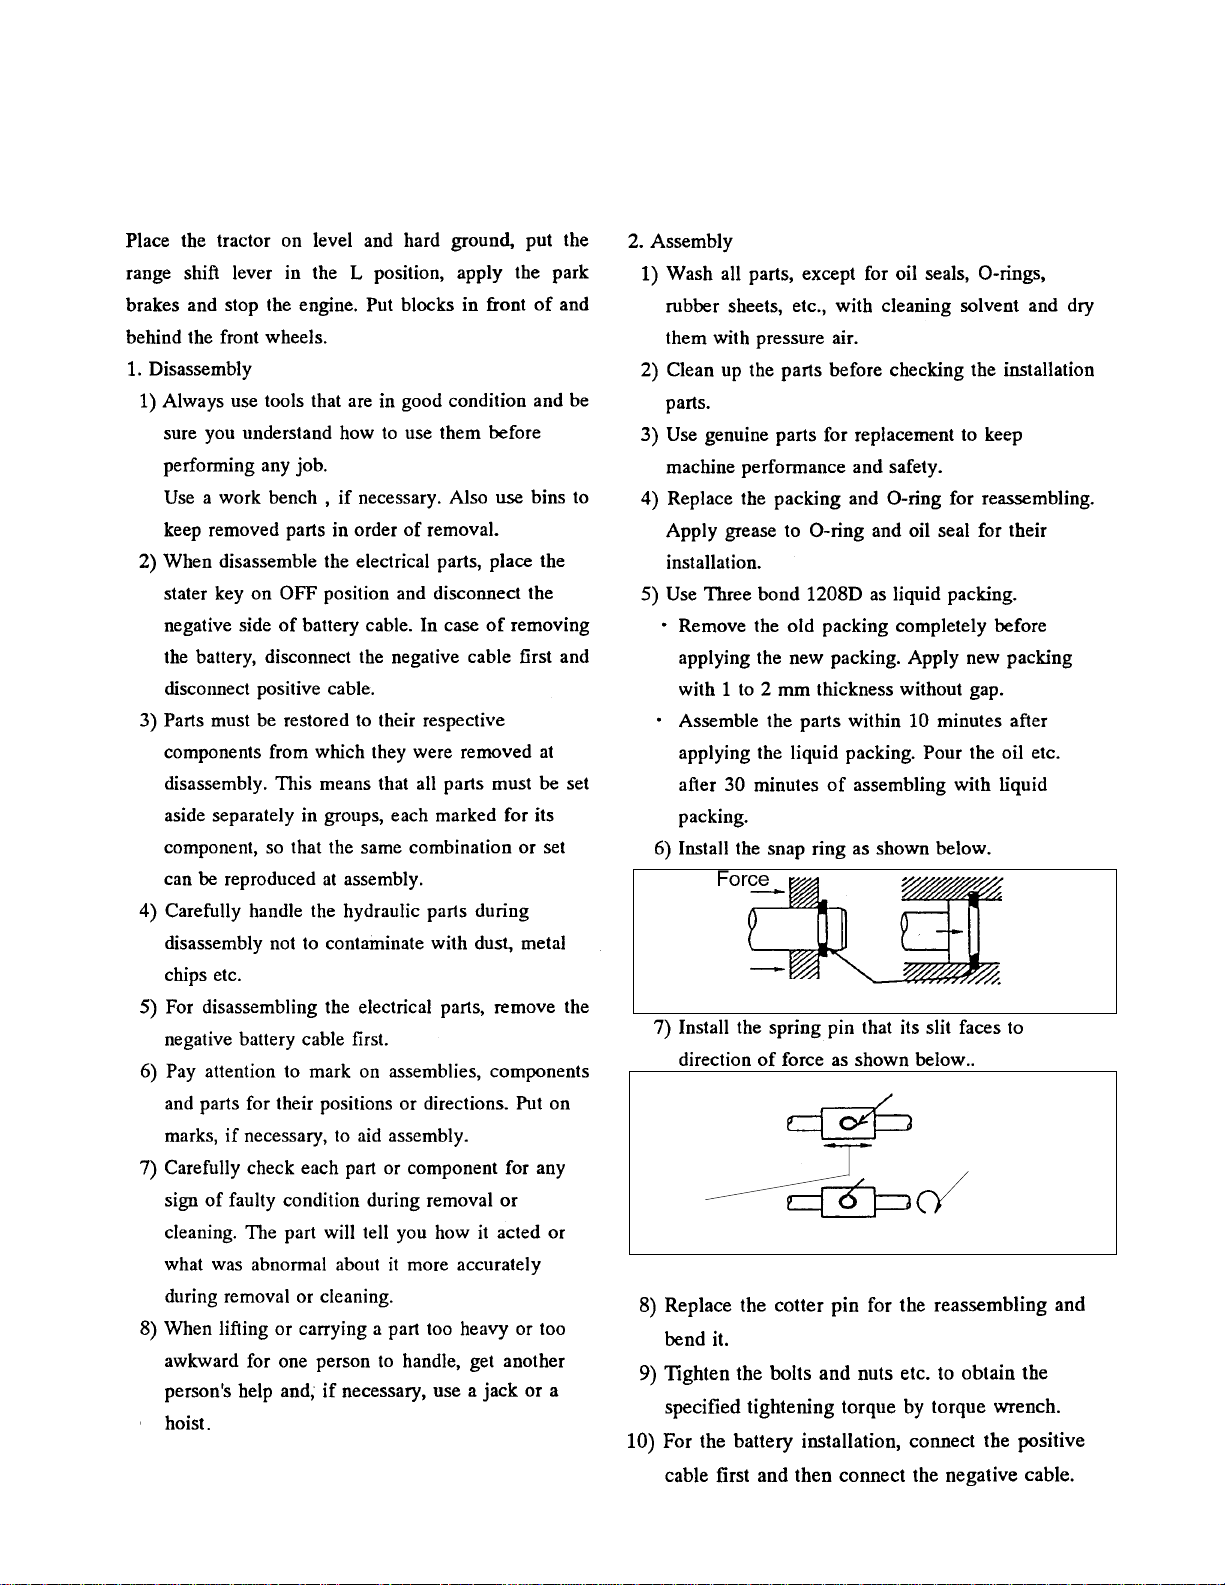
6. PRECAUTIONS FOR DISASSEMBLY
Shaft
movement
10
Place snap ring that square side face to force
Slit
Shaft
Slit
movement
Page 12
7. GENERAL INFORMATION
11
Page 13

II. ASSY REMO VAL AND REINSTALLATION
12
Page 14

1. FRONT AXLE ASSY REMOVAL AND REINSTALLATION
1-1 FRONT AXLE ASSY REMOVAL
(1) 4WD SHAFT REMOVAL
1. Remove cov er A
2. Remove the snap ring at joint (rear side) from
the shaft groove.
3. Move the joint to front side and remove the
4WD shaft.
(2)STEERING HOSE REMOVAL
1.Remove the two hoses from steering cylinder
(3) BATTERY CODE DISCONNECTION
1. Disconnect Battery Code (Negative) and
loosen fixing bolts of bracket.
13
Page 15
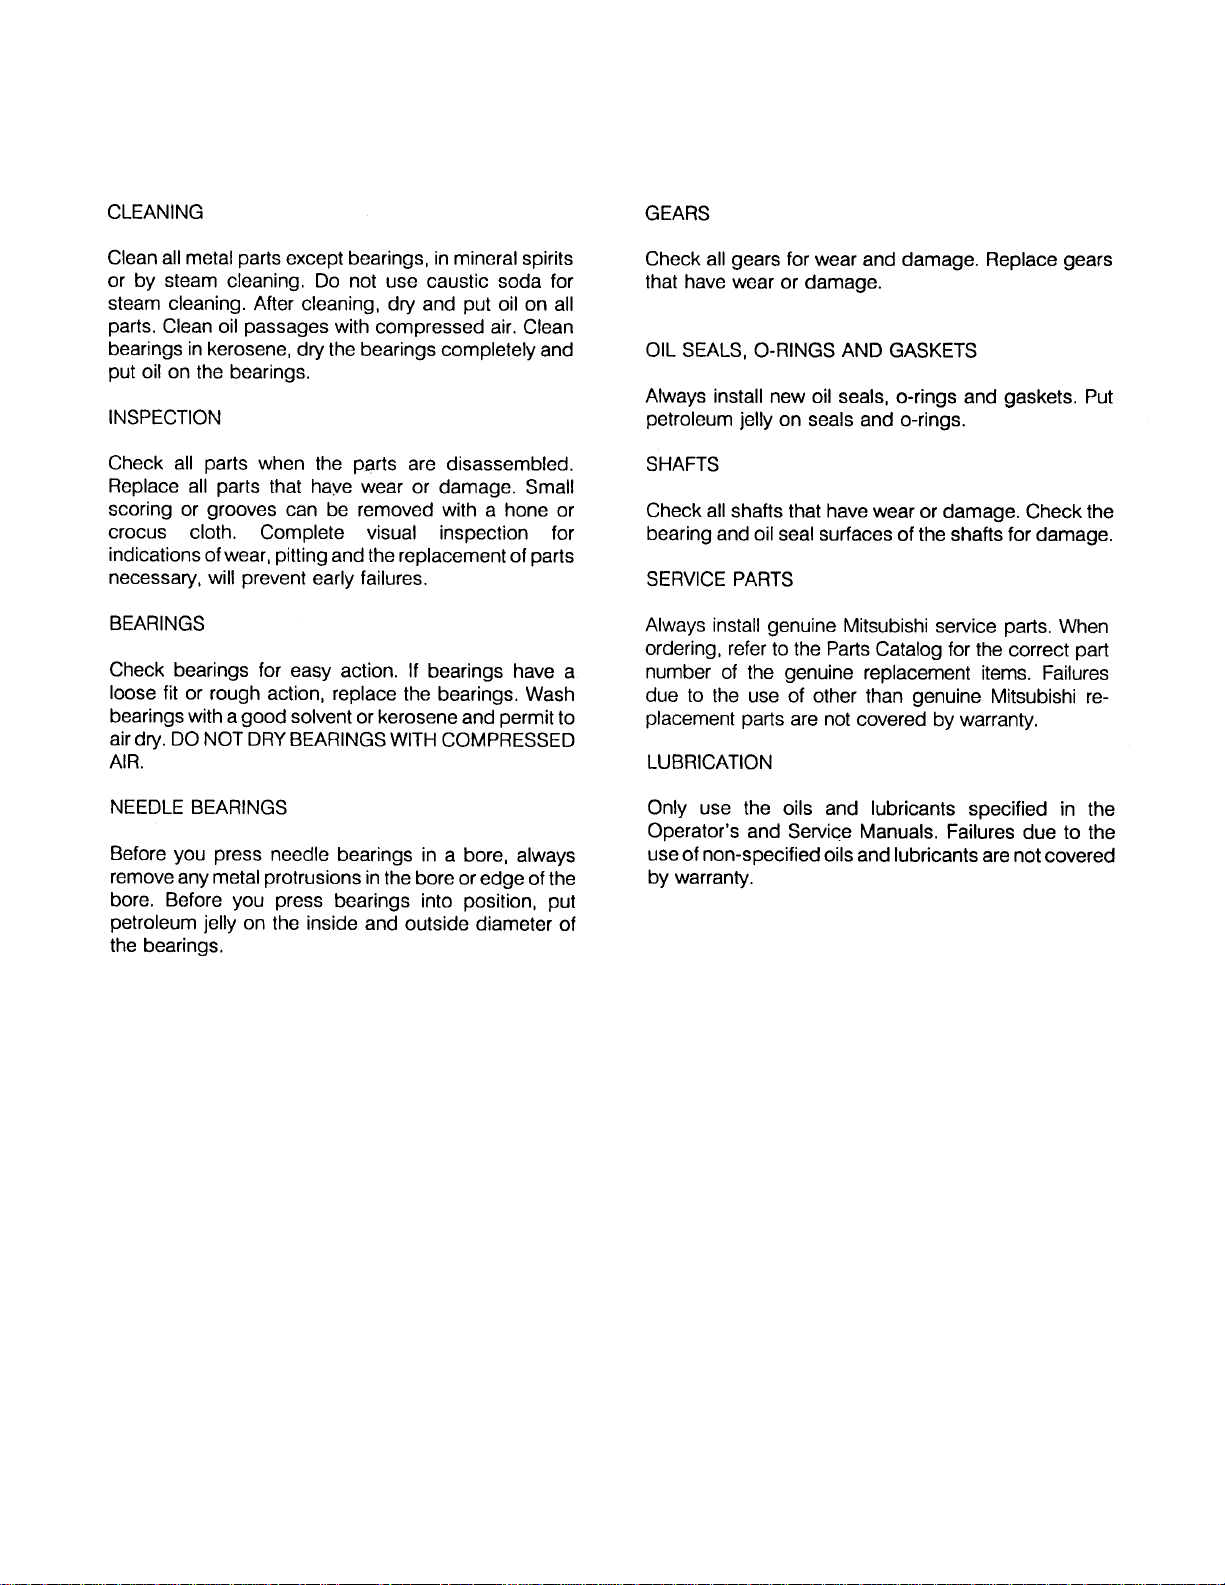
(4) FRONT & REAR HOLDER REMOVAL
1. Remove mounting bolts of front holder.
1-2 FRONT AXLE ASSY
REINSTALLATION
*Install the front axle assy with reversed
procedure of removal.
Use following adjustment and service standards
for the reinstallation.
1. When reinstall the front axle assy to chassis,
tighten the mounting bolts of the rear holder
first.
Tightening Torque : 86.8~97.6lbf.ft
(12 ~13.5 kgf-m)
2. Remove mounting bolts of rear holder.
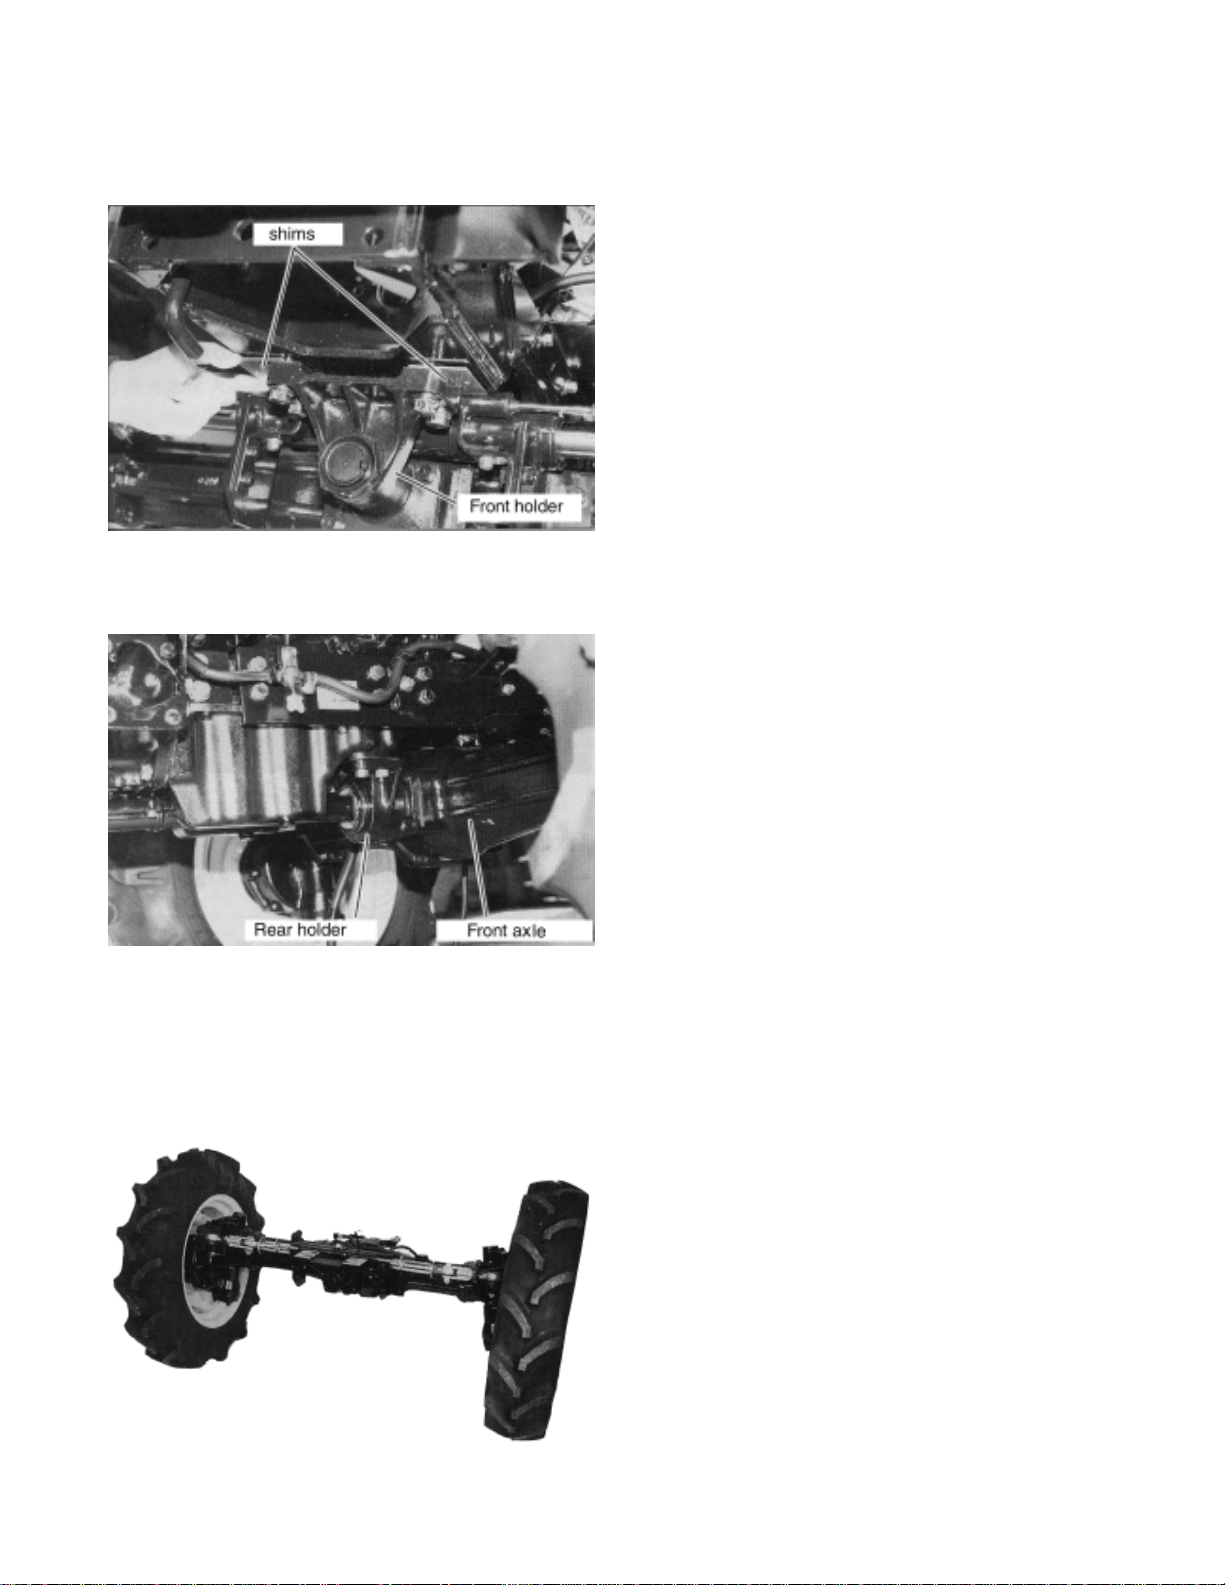
(5) FRONT AXLE ASSY REMO VAL
1. Lift up the chassis by jack and remove the
front axle assy from chassis.
2. Measure the clearance between front holder
and chassis. Put the shims of which thickness
is half of the measured clearance.
Tighten the mounting bolts of Front Holder.
Tightening Torque : 61.5~68.7lbf.ft
(8.5~9.5 kgf-m)
3. When reinstall the hoses to the cylinder, install
the hose with red tape to lower side of the
port.
4. After install the hoses, turn the steering wheel
to left and make sure the front axle is steered
to left.
5. When reinstall the 4WD shaft, apply the
grease to the spline.
6. Make sure the snap ring is in the groove.
7. After reinstall the front axle assy, check the
toe-in and readjust it if necessary.
14
Page 16

2. ENGINE ASSY REMOVAL AND REINSTALLATION
2-1 ENGINE ASSY REMOVAL
(1) HARNESSES REMOVAL
1. Remove front grille, bonnet, side covers and
panel cover.
2. Disconnect battery cable (Disconnect
negative cable first and then disconnect
positive cable.)
5. Disconnect the harnesses at oil pressure
sensor, fuel cut solenoid, electric fuel feed
pump and fuel gauge.
3. Disconnect the harnesses at alternator and
starter motor. Disconnect the tachometer
cable.
4. Disconnect the harnesses at water
temperature gauge, water temperature
sensor and glow plug.
6. Disconnect the engine control wires (2 wires)
at governor side. Disconnect the engine
control wire for foot accel pedal from step.
Remove the power steering hoses (2 hoses)
from steering cylinder.
15
Page 17
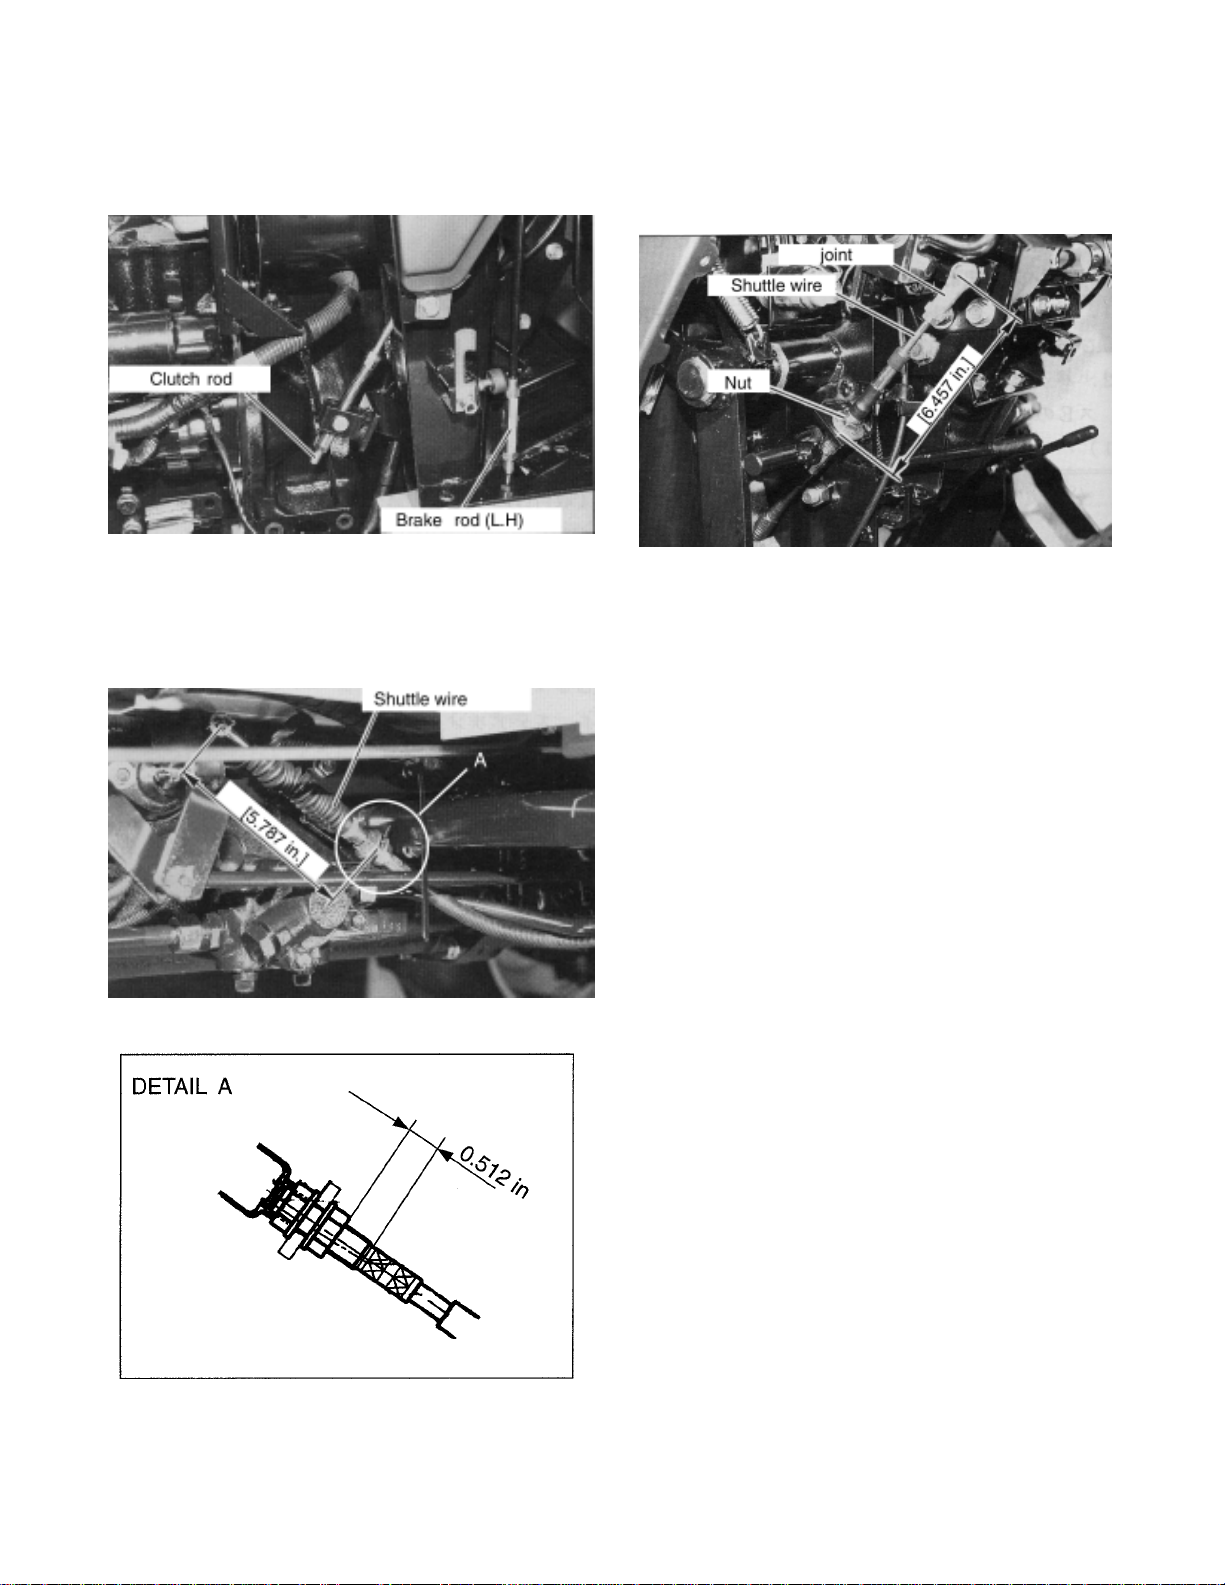
(2) PANEL REMOVAL
1. Disconnect the clutch rod and brake rods
(Left and right brake rods).
(Lever side)
2. Disconnect the shuttle wire.
(Transmission side)
3. Disassemble the operator seat area.
16
Page 18
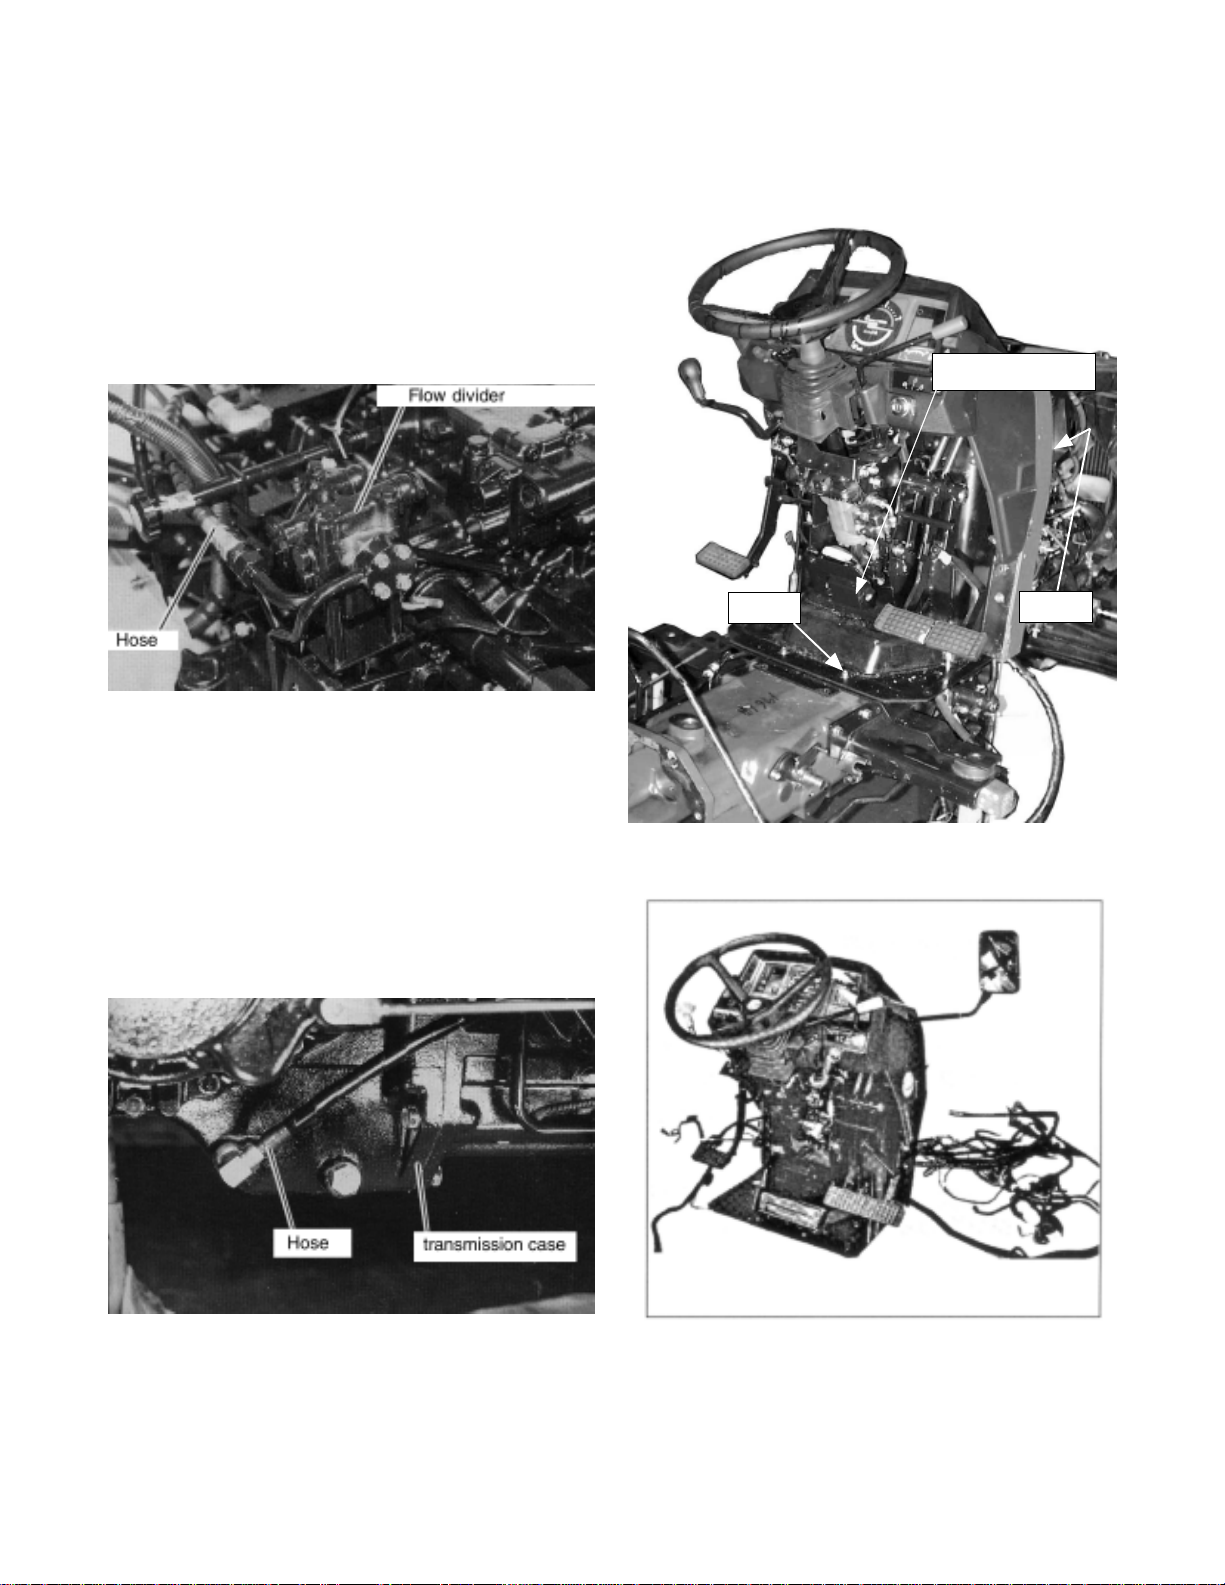
4. Disconnect the connectors of harness B.
5. Remove the steering hoses from the flow
divider and transmission case.
(Flow divider)
6. Remove the fixing bolts at column cover .
Lift up the panel assy .
Column cover
(Transmission case)
Bolt
Bolts
17
Page 19
(3) ENGINE REMOVAL
1. Drain the coolant from radiator and drain the
transmission oil.
2. Remove the 4WD Shaft. (See Page 13)
3. Remove the panel Assy. (See Page 17)
4. Remove the fuel hose at fuel filter and drain
the fuel.
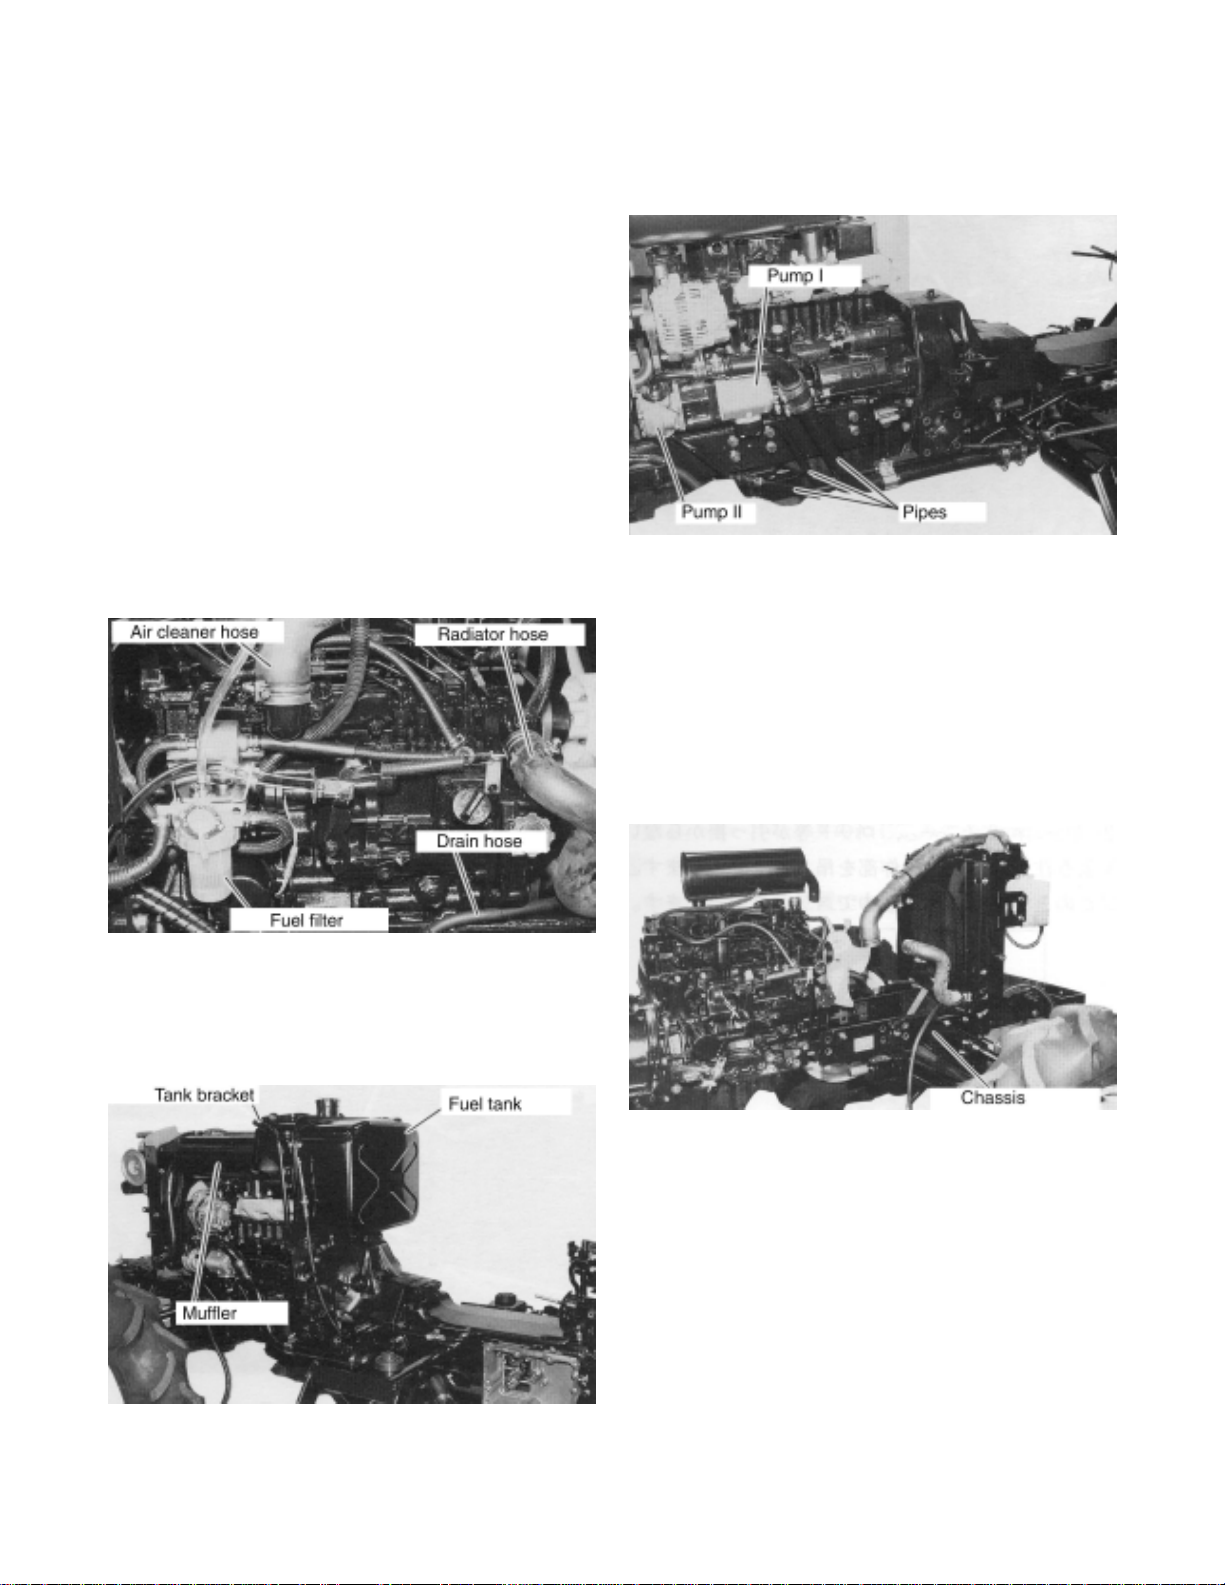
5. Remove the air cleaner hose, radiator hoses
(2 hoses) and coolant drain hose from engine.
8. Remove the suction and pressure pipe from
pump I and II.
9. Put the jack under the transmission case to
support and remove the chassis mounting
bolts.
6. Remove the fuel tank bracket and fuel tank.
7. Remove the muffler from engine
10. Pull the chassis together with front axle assy
to front and remove it from engine.
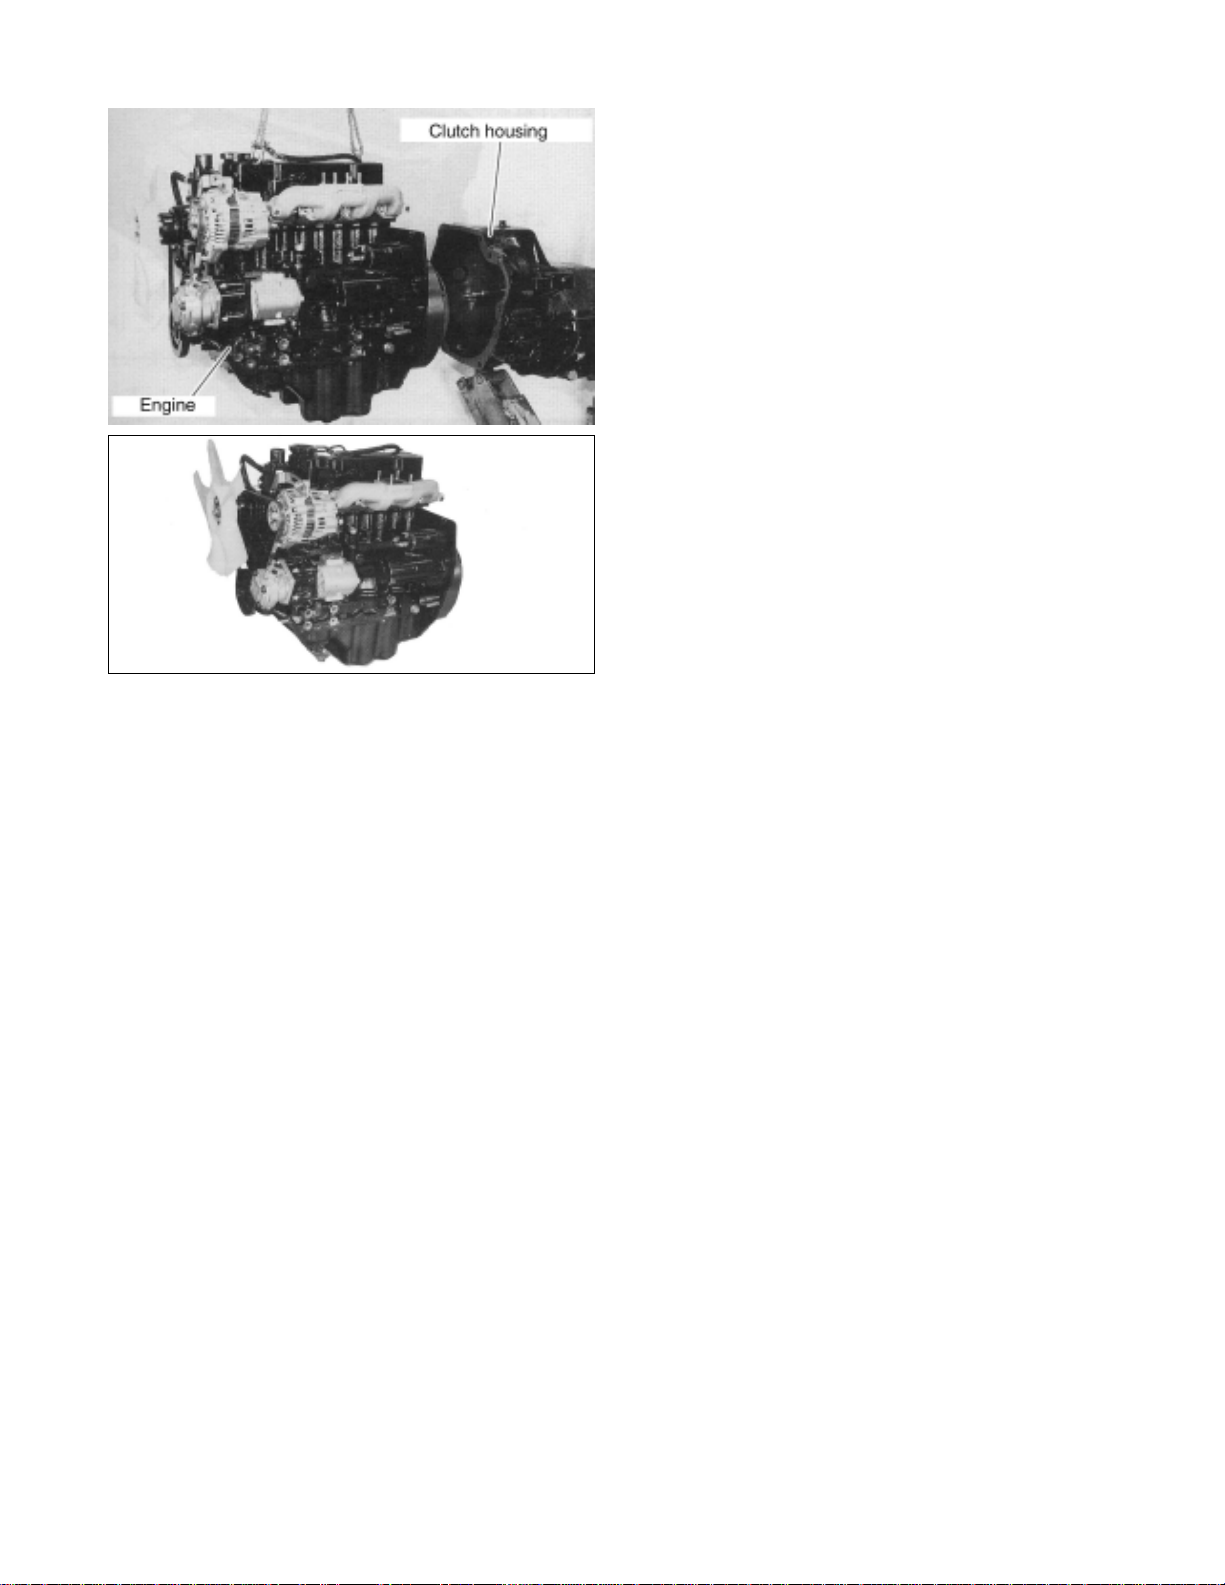
11. Lift the engine by hoist and remove the
engine mounting bolts between engine rear
plate and clutch housing.
12. Remove the engine from clutch housing.
18
Page 20
2-2 ENGINE REINSTALLATION
*Install the engine with reversed procedure of
removal
Use following adjustment and service standards
for the reinstallation.
1. When reinstall the engine to clutch housing,
apply the liquid packing (Threebond #1208D)
to the mating surface of engine rear plate and
clutch housing.
2. When installing the engine, make sure that
main shaft and clutch center is aligned
3. Tightening torque of engine mounting bolts
61.5~68.7 lbf.ft (8.5~9.5 kgf-m)
4. Tightening torque of chassis mounting bolts
68.7~83.2 lbf.ft (9.5~11.5 kgf-m)
5. Tightening torque of power steering hose at
transmission side.
36.2~43.4 lbf.ft (5~6 kgf-m)
19
Page 21
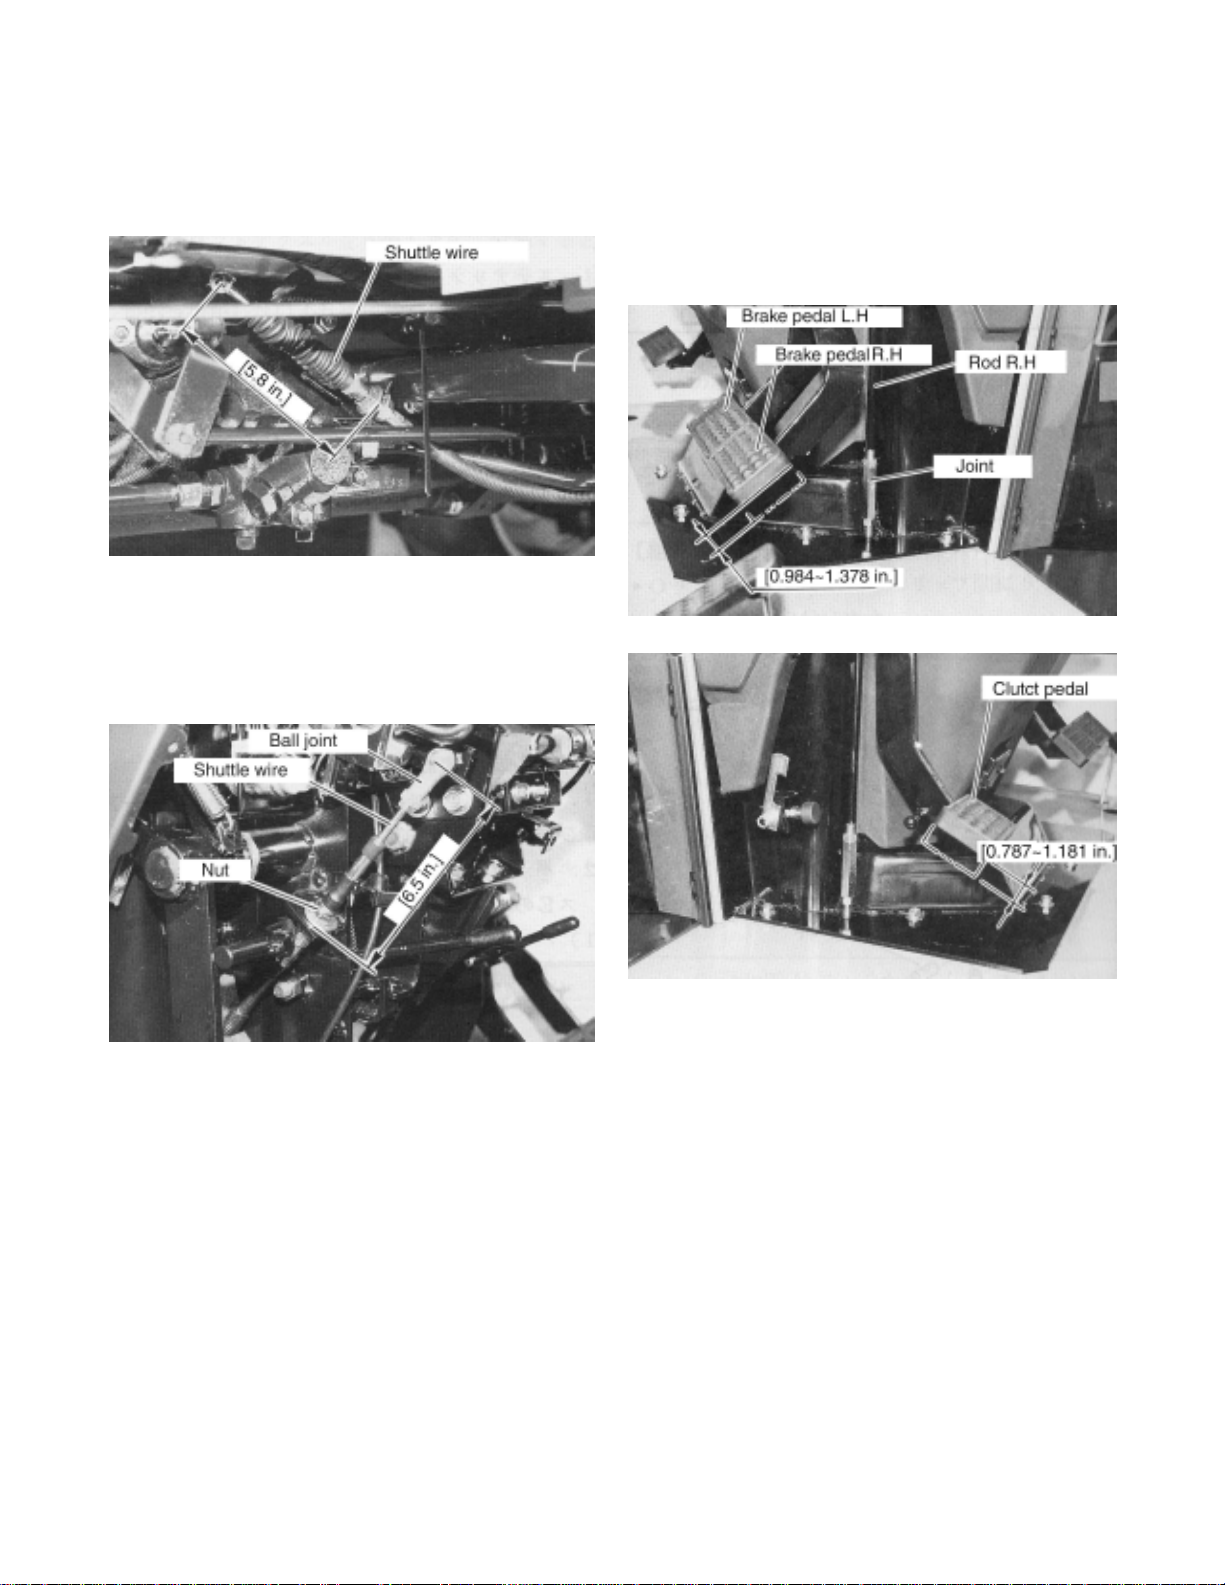
6. Shuttle wire installation.
1) Set the length of wire at transmission side to
5.8 in (147 mm).
2) Set the length of wire at shuttle lever side
to 6.5in (164 mm).
*Amount of screw into the ball joint must be
0.32 in (8 mm)
8. Clutch pedal free play
[0.787~1.181 in.]
9. After reinstall the harnesses and tachometer
cable, clamp them not to touch the muffler,
manifold and fan belt.
3) After set of the wire lengths, adjust the wire
length by nut to obtain the shuttle shift lever
neutral position at lever guide. In the neutral
position, shuttle shift lever can be move side
to side.
7. Brake pedal adjustment (See page 127)
Free play : 0.99~1.39in (25 ~35 mm)
Adjust the left and right brake pedal height
difference to be less than 0.12in (3 mm).
20
Page 22
3. CLUTCH HOUSING, TRANSMISSION CASE, REAR AXLE
CASE AND HYDRAULIC LIFT CASE REMOVAL AND
REINSTALLATION
3-1. HOUSINGS REMOVAL
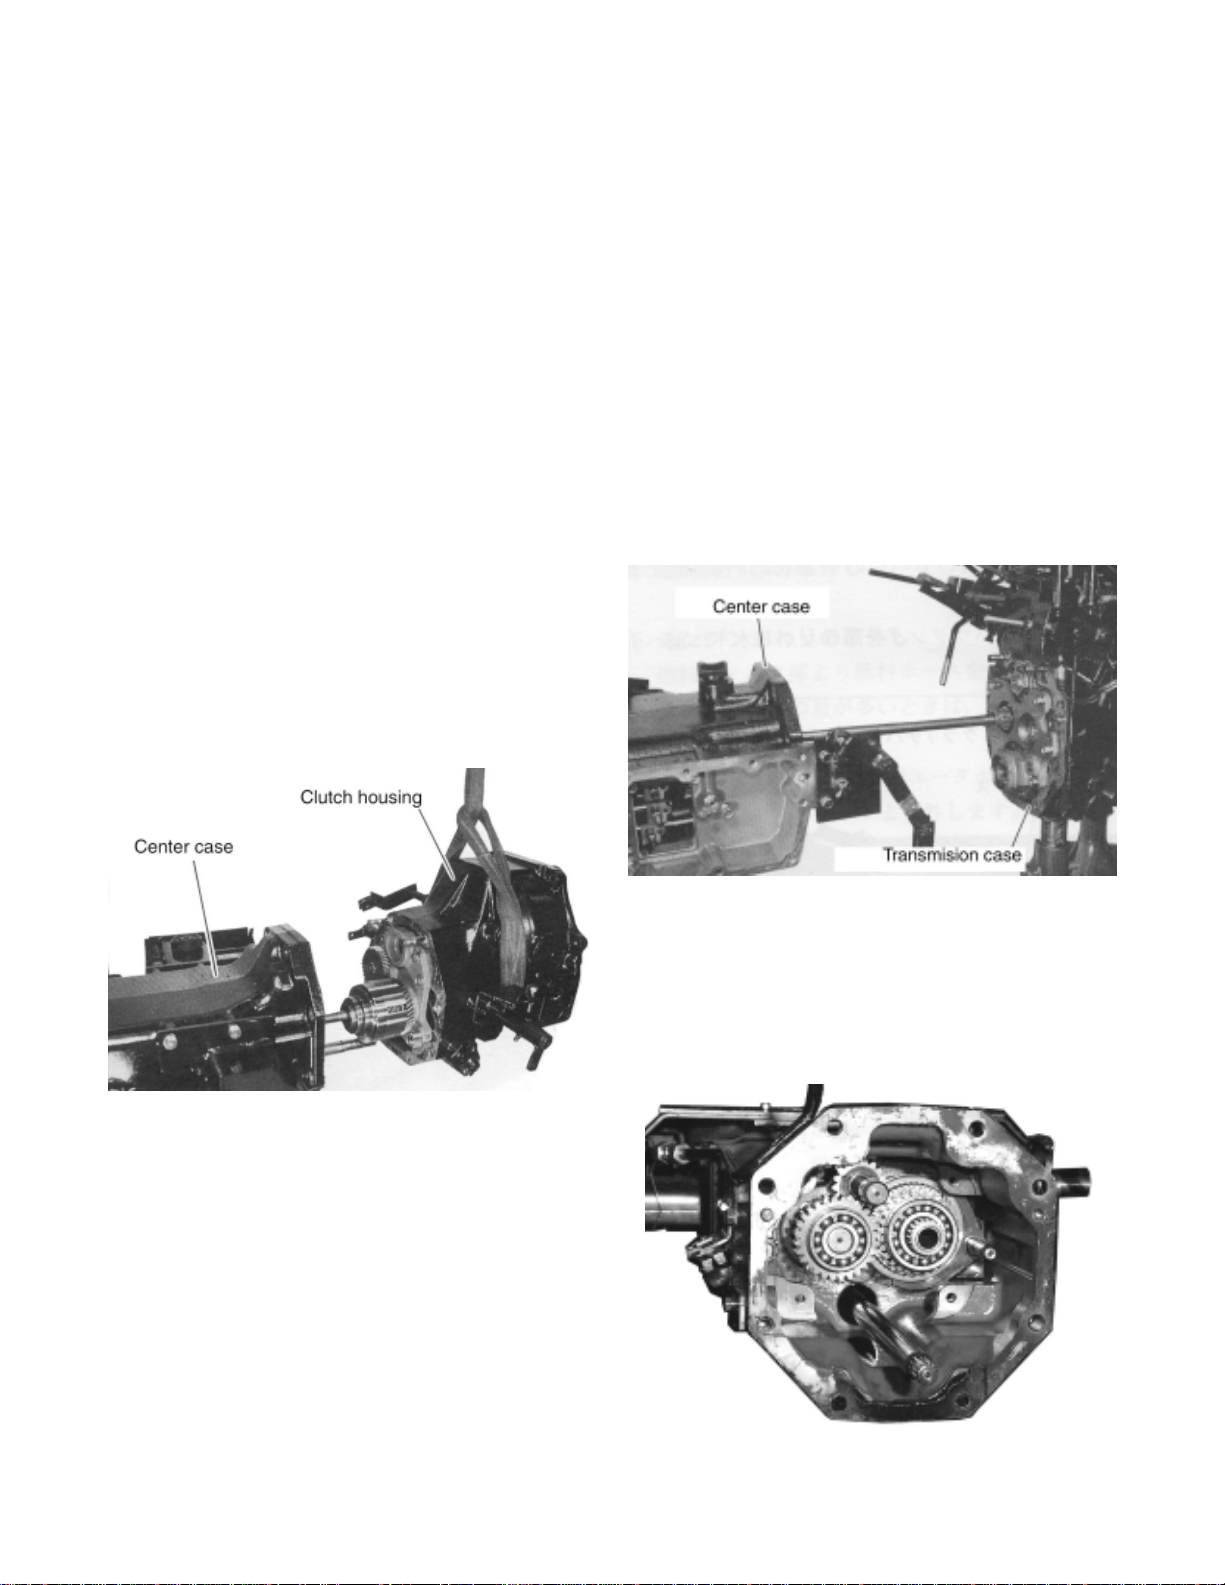
(1) CLUTCH HOUSING REMOVAL
1. Remove the fixing bolts between clutch
housing and center case.
2. Lift the clutch housing and remove it from
center case.
2. Remove the main shift lever linkages.
3. Lift the center case and remove it from
transmission case.
(2) CENTER CASE REMOVAL
1. Remove the fixing bolts between center
case and transmission case.
21
Page 23
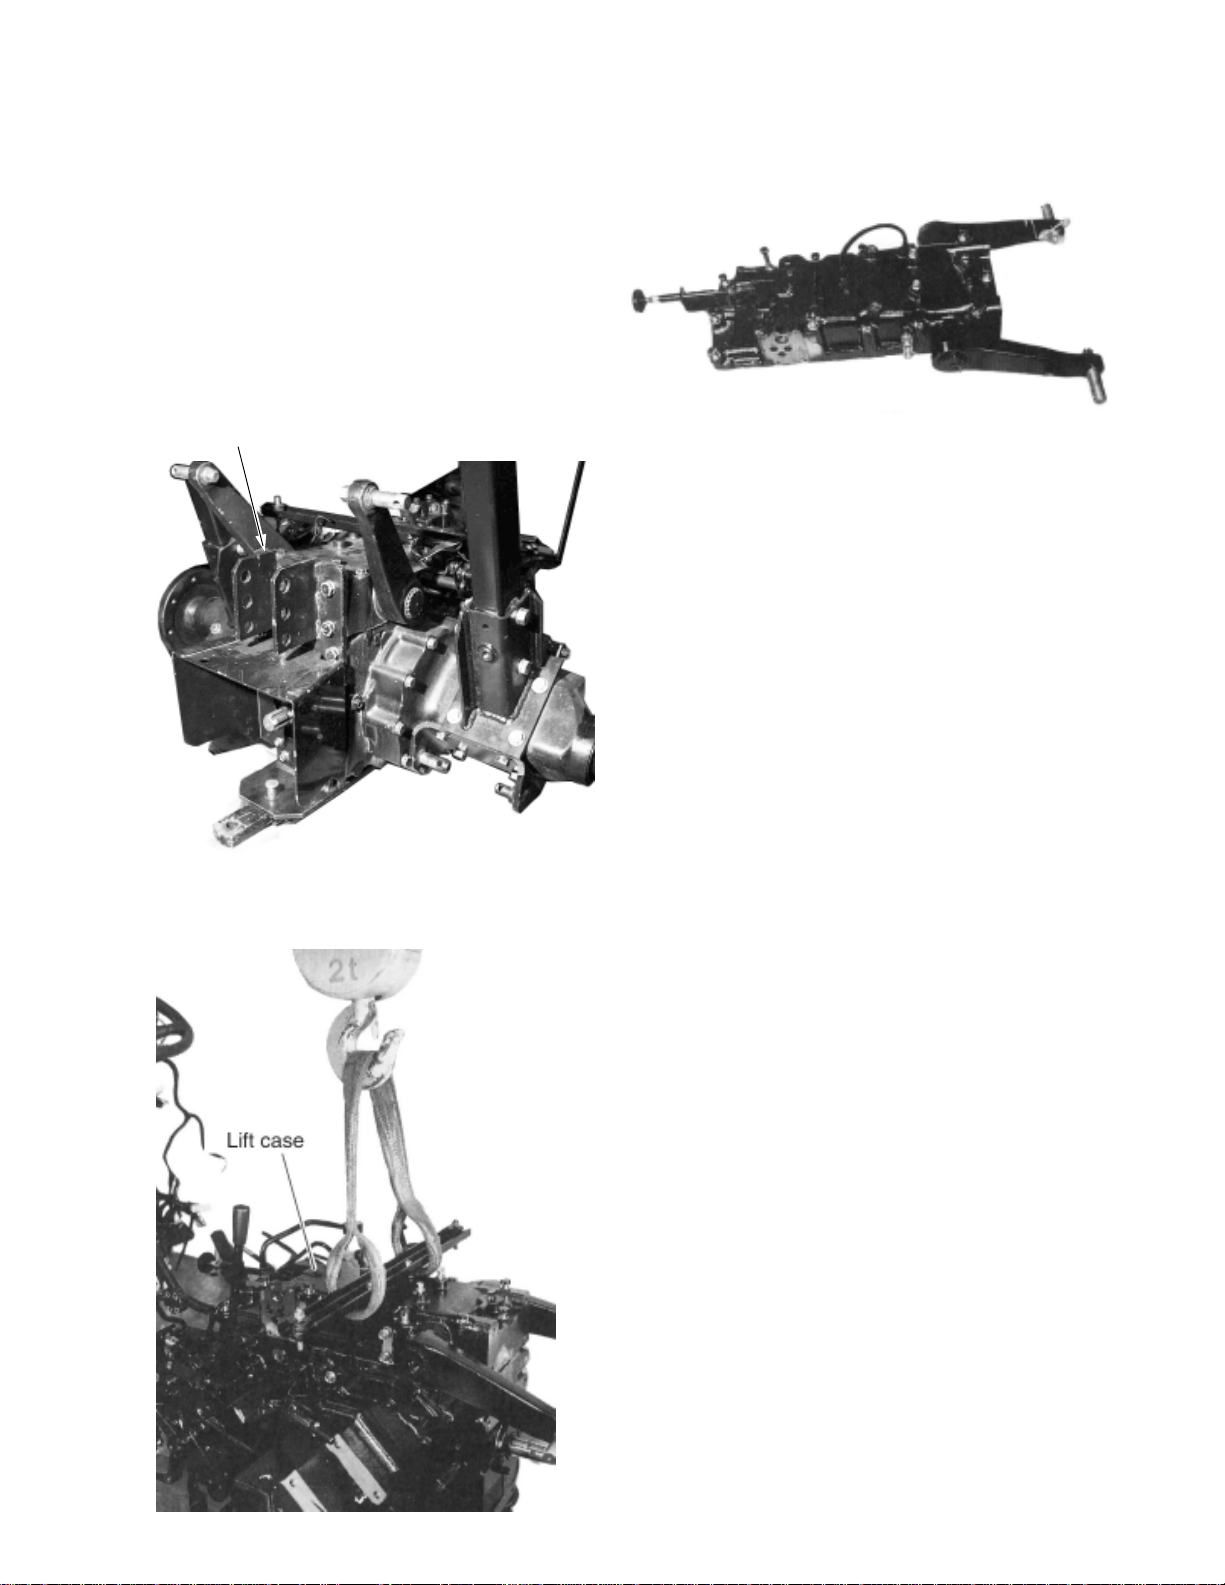
(3) HYDRAULIC LIFT CASE REMOVAL
1. Remove the seat and seat bracket.
2. Remove the lever grip from position control
lever and remove the lever guide by removing
the fixing bolts.
3. Remove the top link bracket .
Top link bracket
(8) REAR AXLE CASE REMOVAL
1. Remove the ROPS.
1) Remove hinge pin and position pin. Remove
ROPS upper flame.
2) Remove fixing bolts of ROPS lower flame
and remove ROPS lower flame.
4. Remove the fixing bolts of hydraulic lift case
and lift up the hydraulic lift case to remove.
22
Page 24
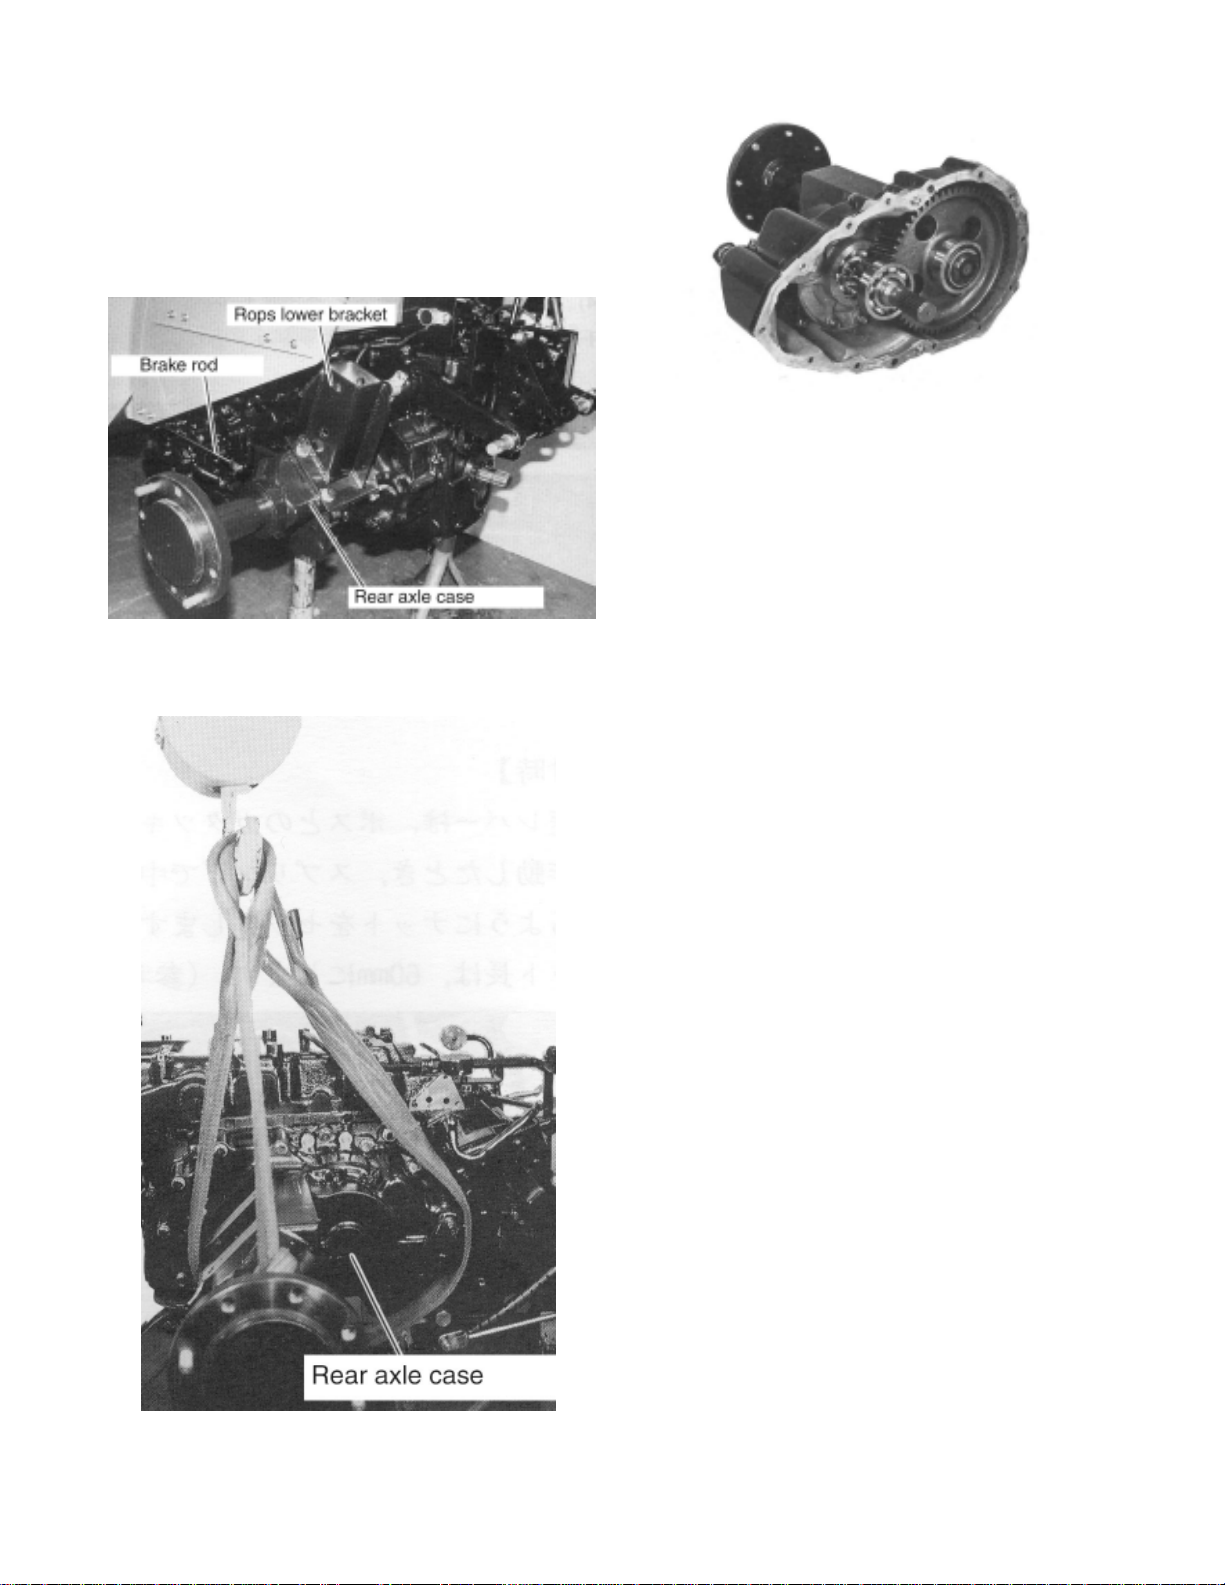
3) Remove mounting bolts of ROPS lower
bracket and remove the bracket.
2. Disconnect the brake rod at brake lever on
the rear axle case.
3-2. HOUSING REINSTALLATION
*Reinstall the housings with reverse procedure
of the removal. Use following values as
adjustment and service standard for the
installation.
3. Lift the rear axle case and remove the
mounting bolts.
(1) Rear axle case reinstallation
1. Apply the liquid packing (Threebond
#1280D) to the mating surface of the rear
axle case and transmission case.
2. Tightening torque of rear axle case
mounting bolts.
61.5~68.7lbf.ft (8.5 ~ 9.5 kgf-m)
(2) Hydraulic lift case reinstallation
1. Apply the liquid packing (Threebond
#1280D) to the mating surface of the
hydraulic lift case and transmission case.
2. Tighten the top link bracket mounting bolts
before tightening the hydraulic lift case fixing
bolts.
4. Remove the rear axle assy.
3. Tightening torque of hydraulic case fixing
bolts.
61.5~68.7 lbf.ft (8.5 ~ 9.5 kgf-m)
4. Tightening torque of the top link bracket
mounting bolts.
86.8~97.6 lbf.ft (12 ~ 13.5 kgf-m)
23
Page 25
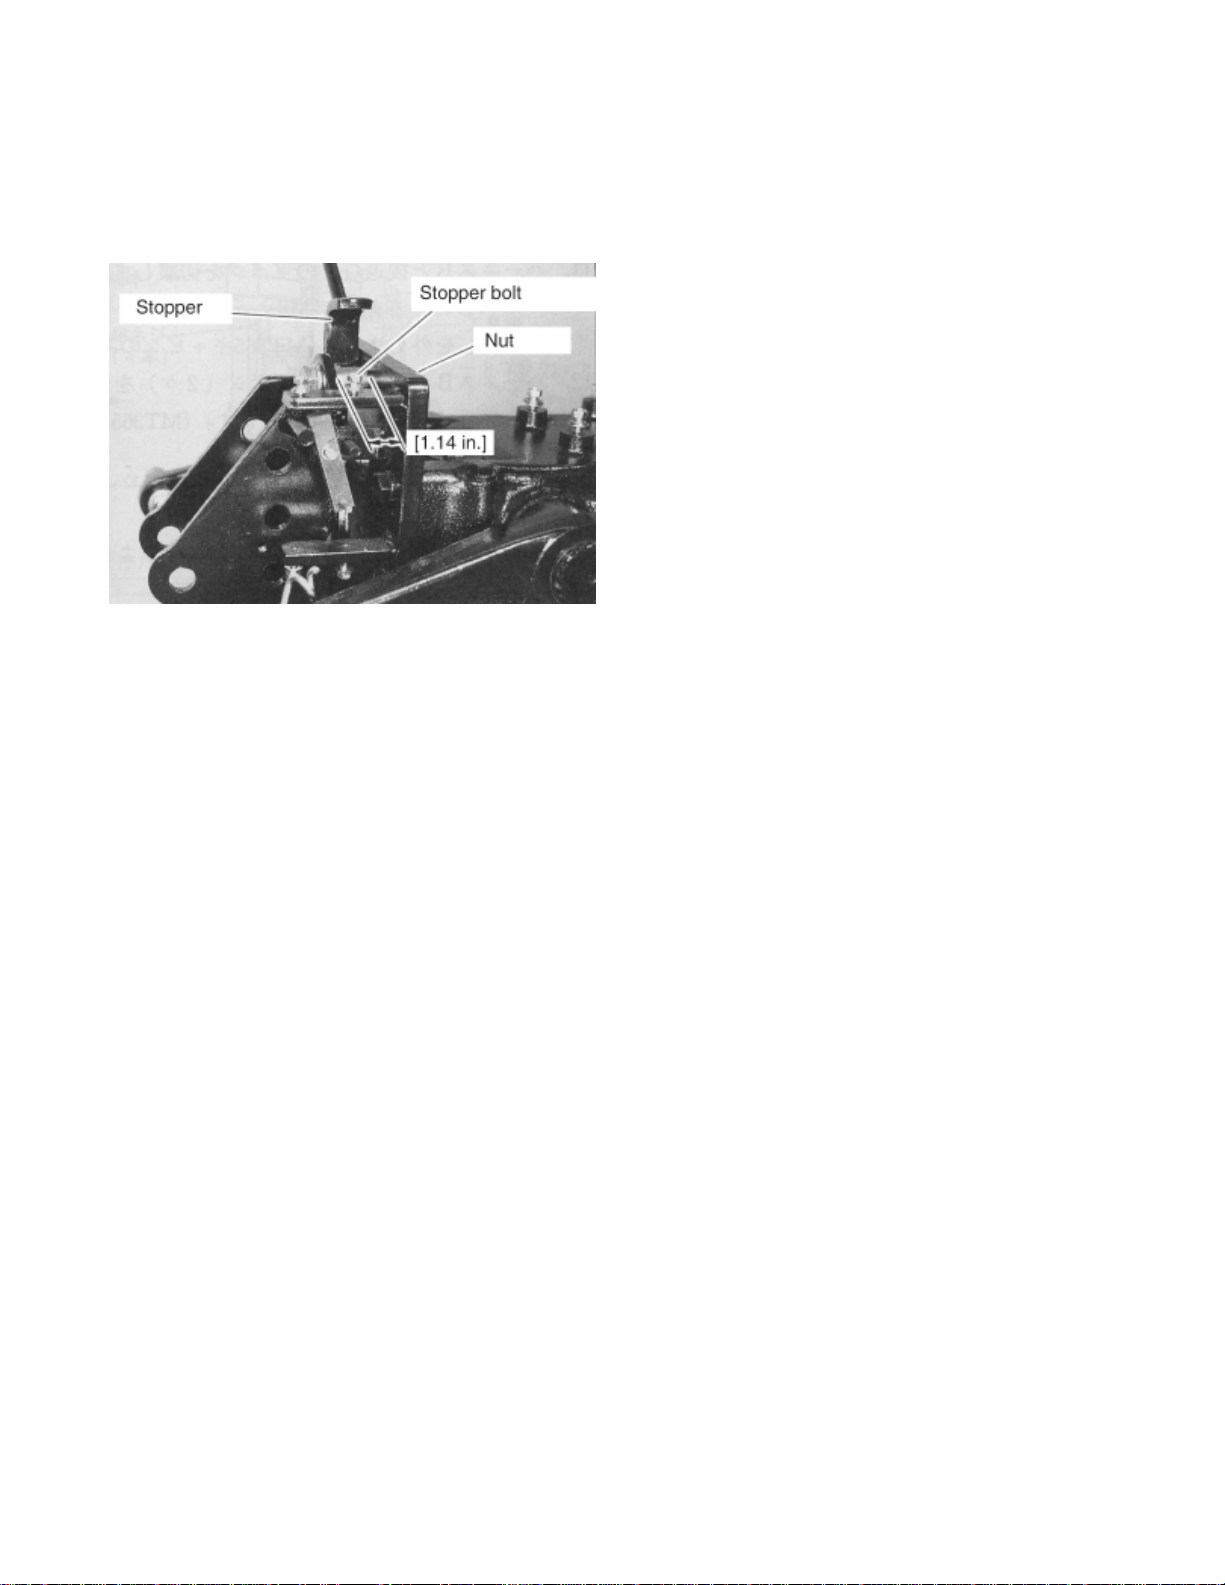
5. In case of equipping the draft control and
disassembling the top link bracket, adjust the
dimension of stopper bolt to 29 mm(1.14in)
and lock it by jam nut.
(3) Center case reinstallation
1. Apply the liquid packing (Threebond #1208D)
to the mating surface of the center case and
transmission case.
2. Tightening torque of center case fixing bolts.
86.8~97.6 lbf.ft (12 ~13.5 kgf-m)
(4) Clutch housing reinstallation
1. Apply the liquid packing (Threebond #1208D)
to the mating surface of the clutch housing
and center case.
2. Tightening torque of the clutch housing fixing
bolts.
86.8~97.6 lbf.ft (12 ~13.5 kgf-m)
24
Page 26
4. ENGINE
4-1. DETERMINING WHEN TO
OVERHAUL THE ENGINE
The trouble to be taken into account as the most
valid reason for overhauling the engine is(4): in
actually determining when to overhaul the
engine, it is reasonable to take this trouble into
account in conjunction with the other ones
(1)DETERMINING WHEN TO
OVERHAUL THE ENGINE
Generally, when to overhaul the engine is to be
determined by taking into account a drop in
compression pressure as well as an increase in
lube oil consumption and excessive blowby gases.
Lower power or loss of pow er, an increase in fuel
consumption, a drop in lube oil pressure, hard
starting and excessive abnormal noise are also
troubles. These troubles,however,are not always
the result of low compression pressure and give
no valid reason for overhauling the engine.
the engine develops troubles of widely different
varieties when the compression pressure drops
in it. Following are the typical troubles caused
by the compression pressure failure:
(1)Low power or loss of power
(2)Increase in fuel consumption
(3)Increase in lube oil consumption
(4)Excessive blowby through breather due
to worn cylinders, pistons, etc.
(5)Excessive blowby due to poor seating of
worn inlet and exhaust valves
(6)Hard starting or failure to start
(7)Excessive engine noise
In most cases, these troubles occur concurrently.
Some of them are directly caused by low
compression pressure, but others are not.
Among the troubles listed above, (2)and(6)
are caused by a fuel injection pump
improperly adjusted with respect to injection
quantity or injection timing, worn injection pump
plungers, faulty injection nozzles, or poor care
of the battery , starter and alternator.
(2) COMPRESSION PRESSURE
MEASUREMENT
1. Inspection
-Check to make sure(1)The crankcase oil level is correct, and the
air cleaner, starter and battery are all in
normal condition.
(2)The engine is at the normal operating
temperature.
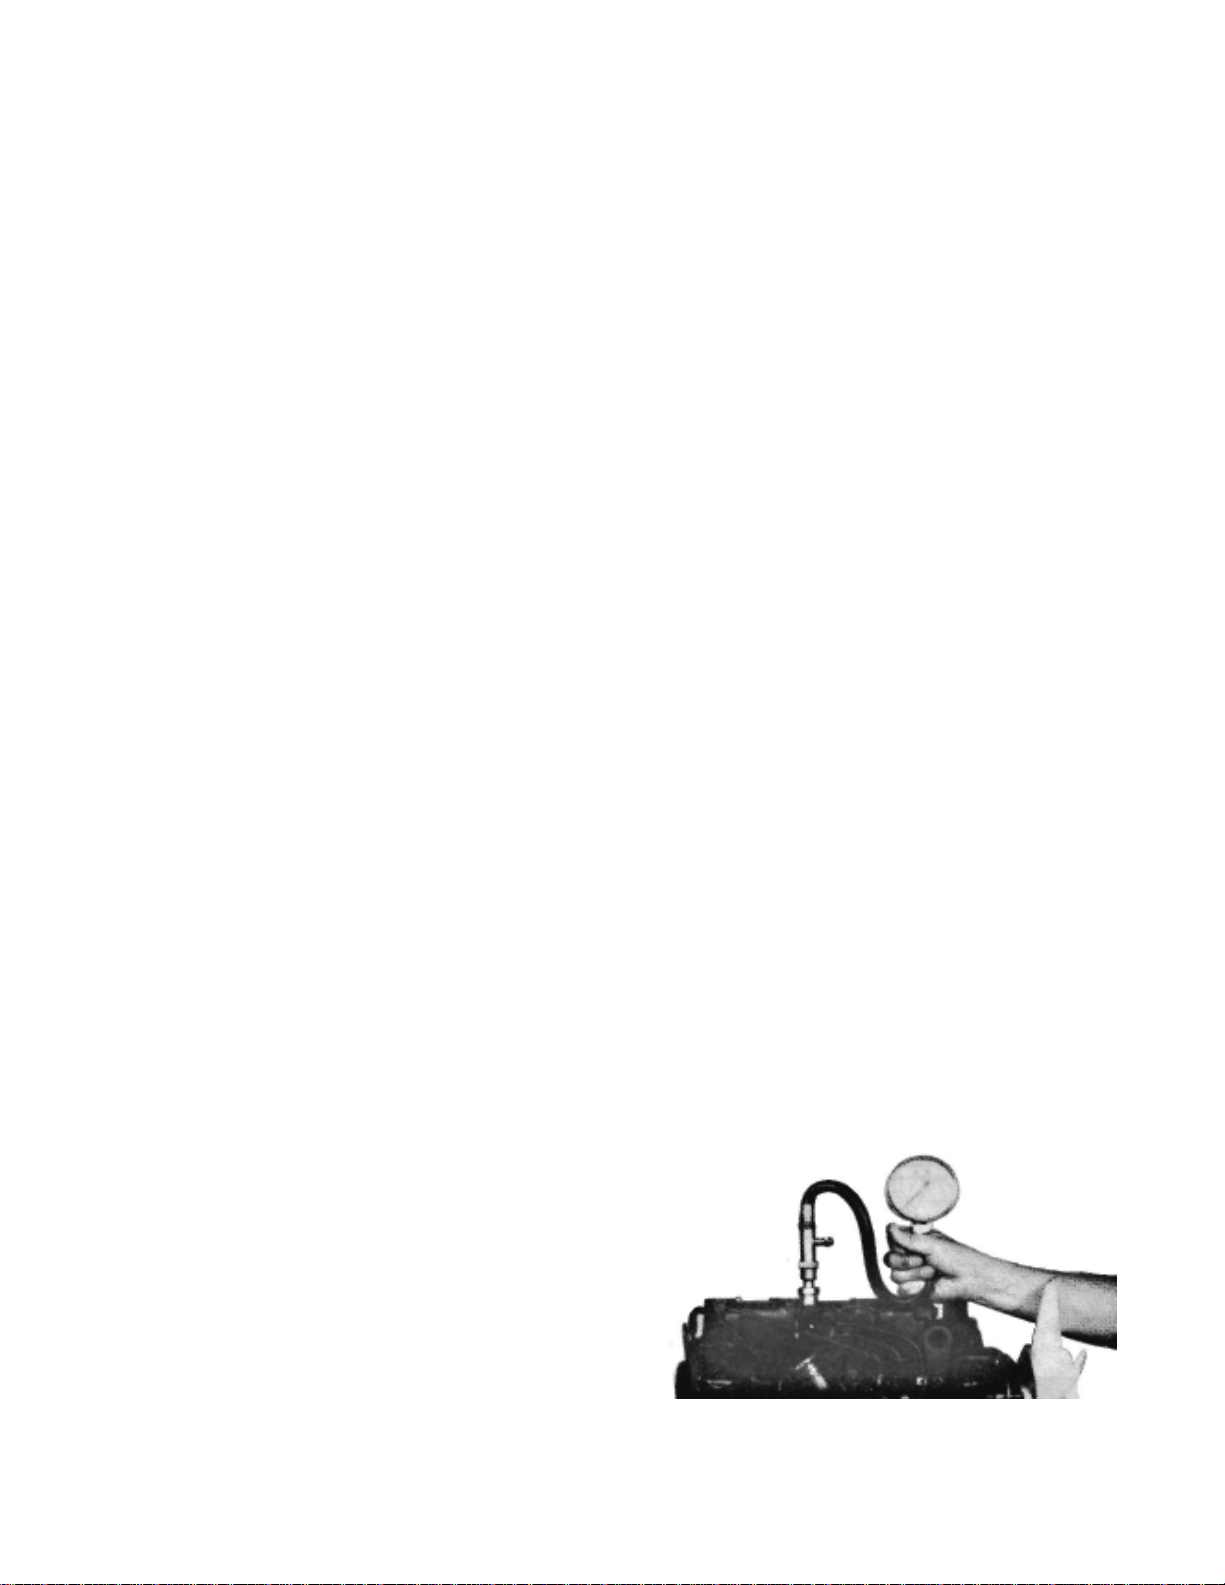
2. Measurement
(1)Move the control lever to a position for
shutting off fuel supply.
(2)Remove all glow plugs from the engine.
Install the compression gauge and adaptor
(ST332270)combination to a cylinder on
which the compression pressure is to be
measured.
(3)Turn the engine with the starter and read
the gauge pressure at the instant the gauge
pointer comes to stop.
(4)If the gauge reading is below the limit,
overhaul the engine.
25
Page 27

1. Be sure to measure the compression
pressure on all cylinder.
2. The compression pressure varies with
change of engine r.p.m.. This makes it
necessary to check engine r.p.m.. at the
time of measuring the compression
pressure.
3. It is important to measure the compression
pressure at regular intervals to obtain the
data on the gradual change of the
compression pressure.
4. The compression pressure would be slightly
higher than the standard in a new or
overhauled engine owing to breaking-in of
the piston rings, valve seats, etc. It drops as
the engine components wear down.
(3) BASIC PRECAUTION FOR DISASSEMBLY
AND ASSEMBLY
This section outlines basic precautions
recommended by Mitsubishi that should
always be observed.
1. Disassembly
(1)Always use tools that are in good condition
and be sure you understand how to use them
before performing any job.
(2)Use an overhaul stand or a work bench, if
necessary . Also, use bins to keep engine parts
in order of removal.
(3)Parts must be restored to their respective
components from which they were removed at
disassembly. This means that all parts must
be set aside separately in groups,each
marked for its component, so that the same
combination or set can be
reproduced at assembly.
(4)Pay attention to marks on assemblies,
components and parts for their positions
or directions. Put on marks, if necessary,
(5)Carefully check each part or component
for any sign of faulty condition during
removal or cleaning. The part will tell you
how it acted or what was abnormal about
it more accurately during removal or
cleaning.
(6)When lifting or carrying a part too heavy
or too awkward for one parson to handle,
get another person’s help and, if neces sary, use a jack or a hoist.
2. Assembly
(1)Wash all parts, except for oil seals,
O-rings, rubber sheets, etc., with cleaning
solvent and dry them with pressure air.
(2)Always use tools that are in good condi tion and be sure you understand how to
use them before performing any job.
(3)Use only good-quality lubricants. Be sure
to apply a coat of oil, grease or sealant to
parts as specified.
(4)Be sure to use a torque wrench to tighten
parts for which torques are specified.
(5)Any time the engine is assembled, new
gaskets and O-rings must be installed.
26
Page 28
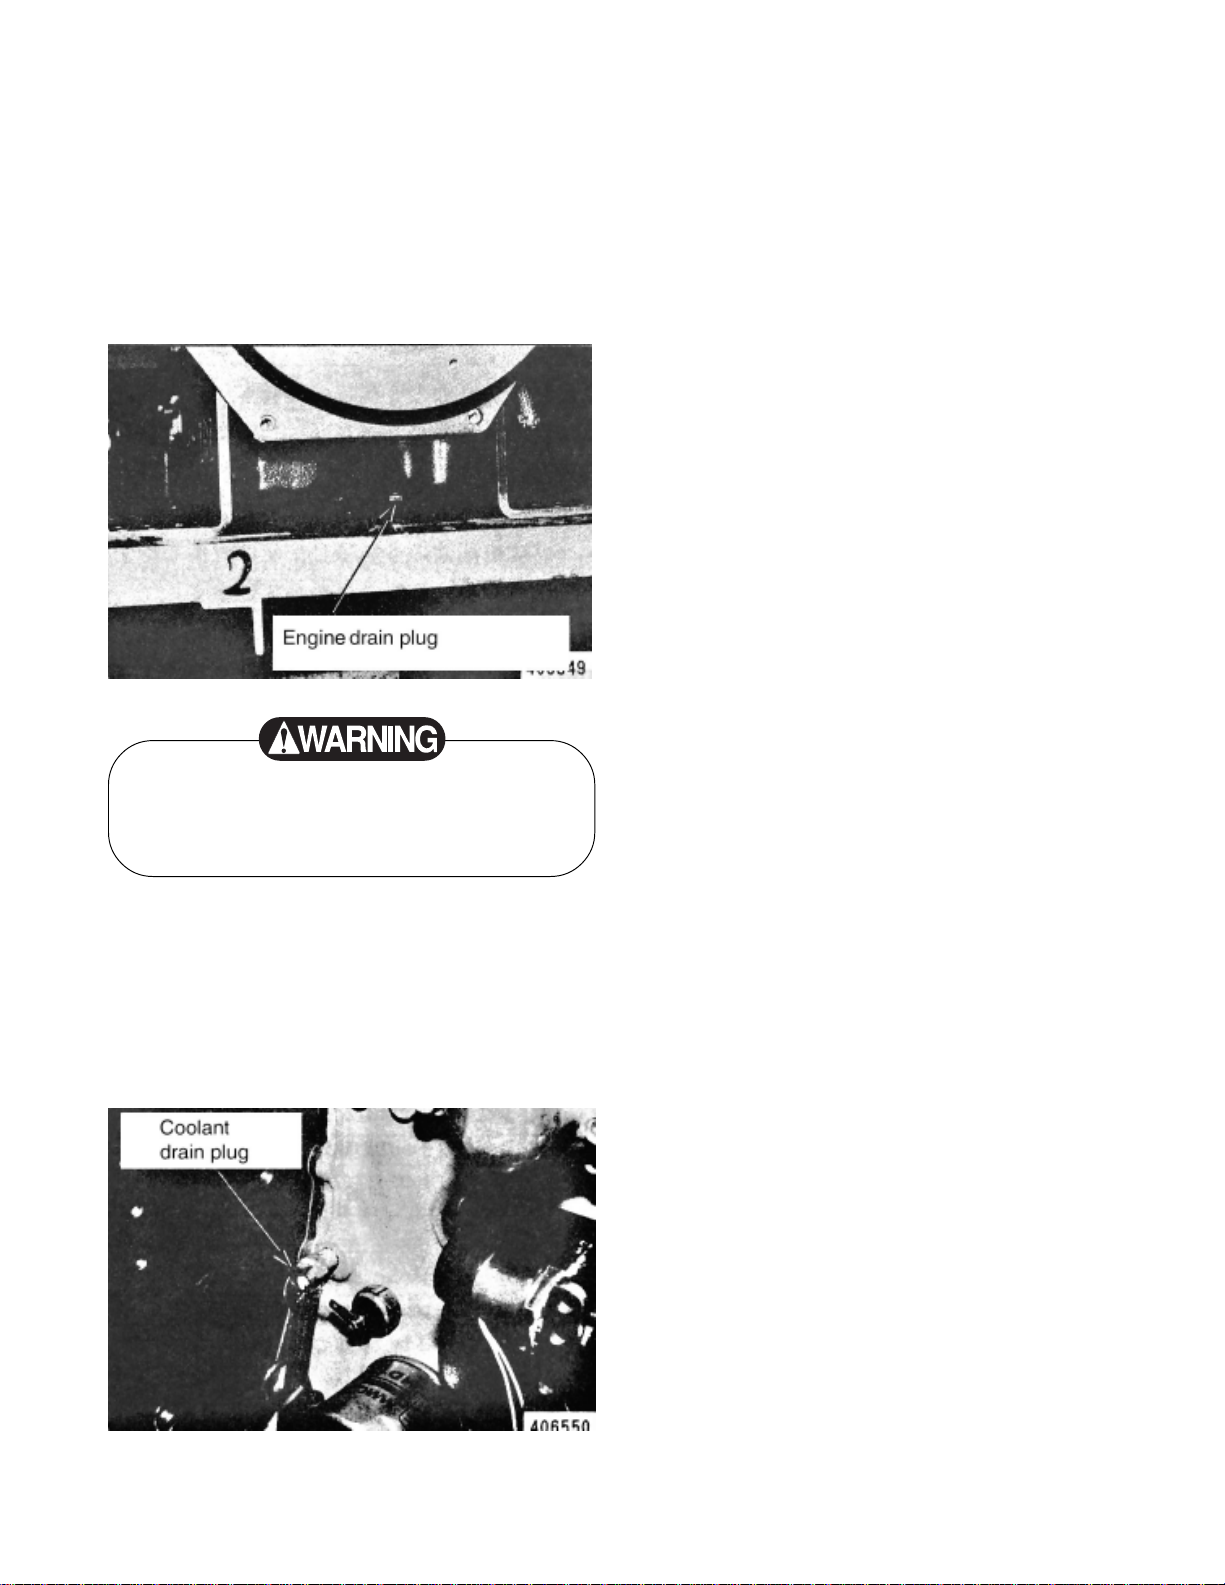
(6)PREPARATION FOR DISASSEMBLY
1. Engine oil draining
Remove the drain plug from the bottom of
the oil pan and allow the oil to drain.
Refil capacity ——— 1.19 gal (4.5 L)
Hot oil and components can cause personal
injury. Do not allow hot oil or
components to contact skin.
2. Coolant draining
Loosen the drain plug on the right side of the
cylinder block and allow the coolant to drain.
Refill capacitiy ——— 6.6 gal (2.5 L)
27
Page 29
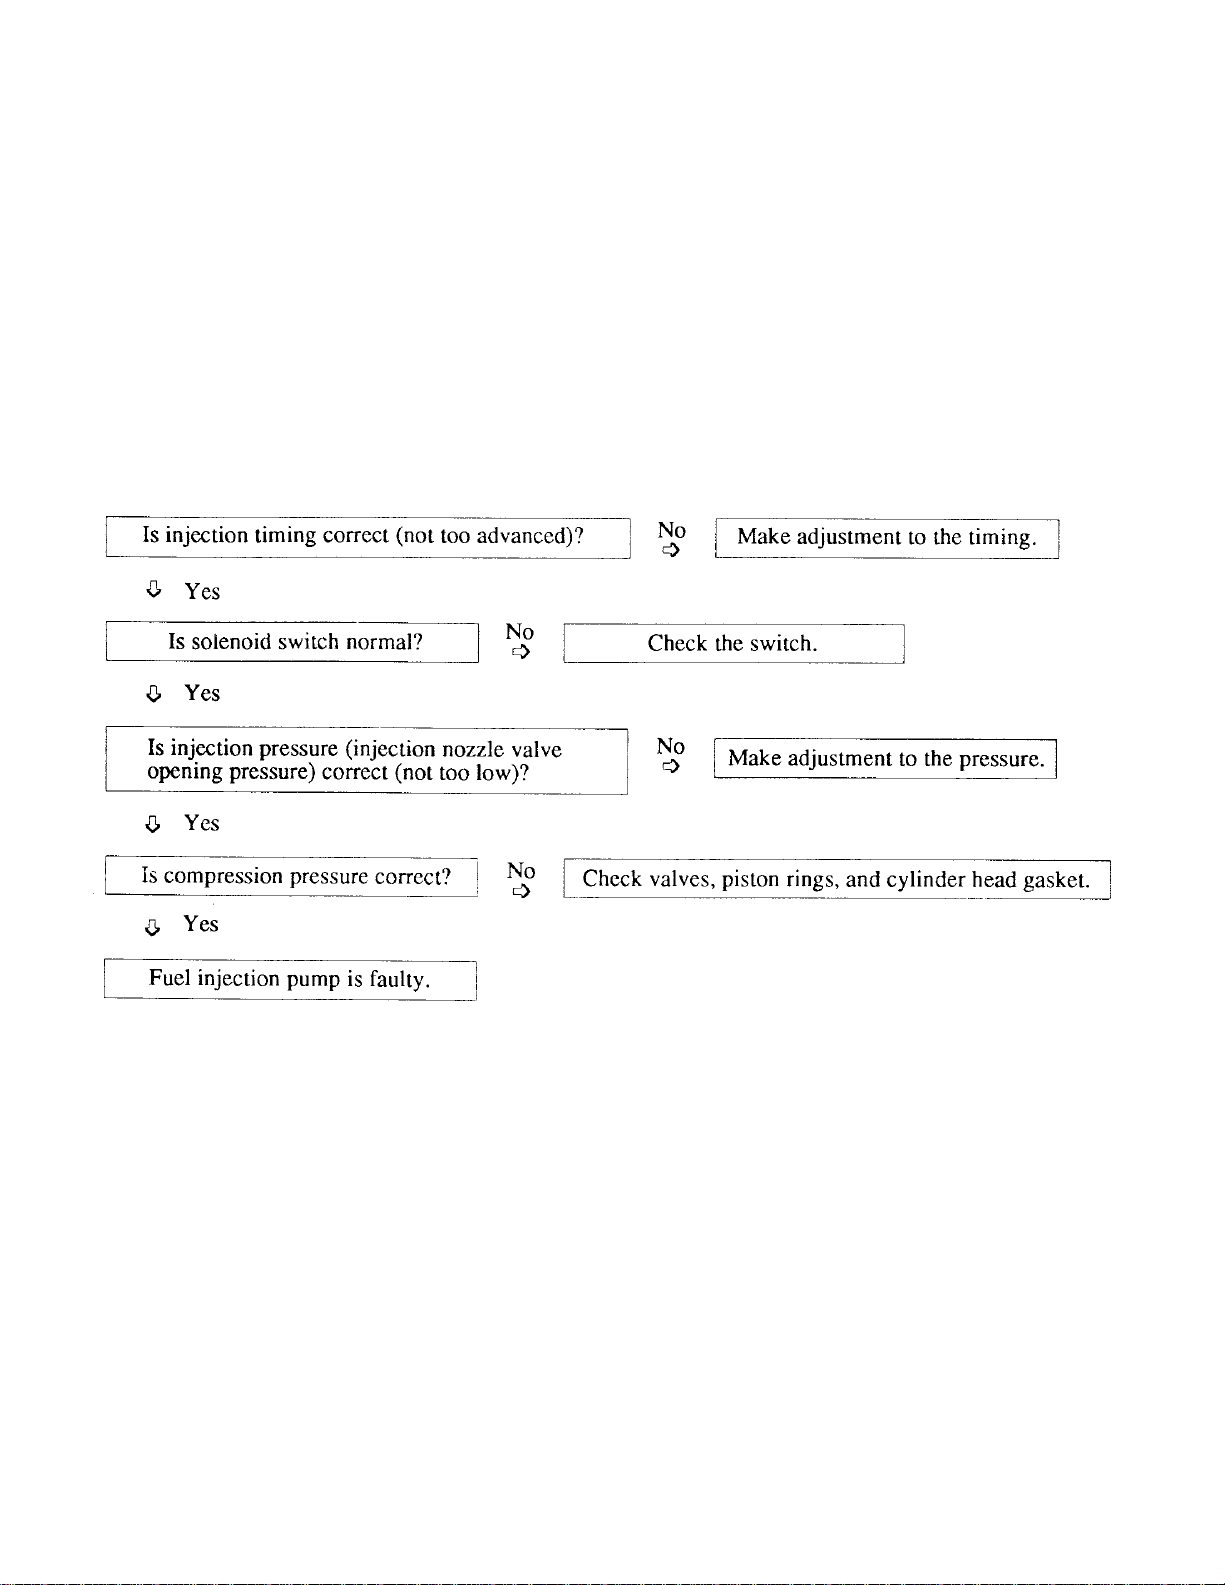
4-2. TROUBLE SHOOTING
Problem 1 : Fuel knock
More or less knock occurs in diesel engines. This may be caused either by an excessively
large delay period or by a too fast rate of fuel injection.
(1)Items to be checked for ahead
• Clogged air cleaner
• Poor quality fuel
(2)Inspection procedure
28
Page 30
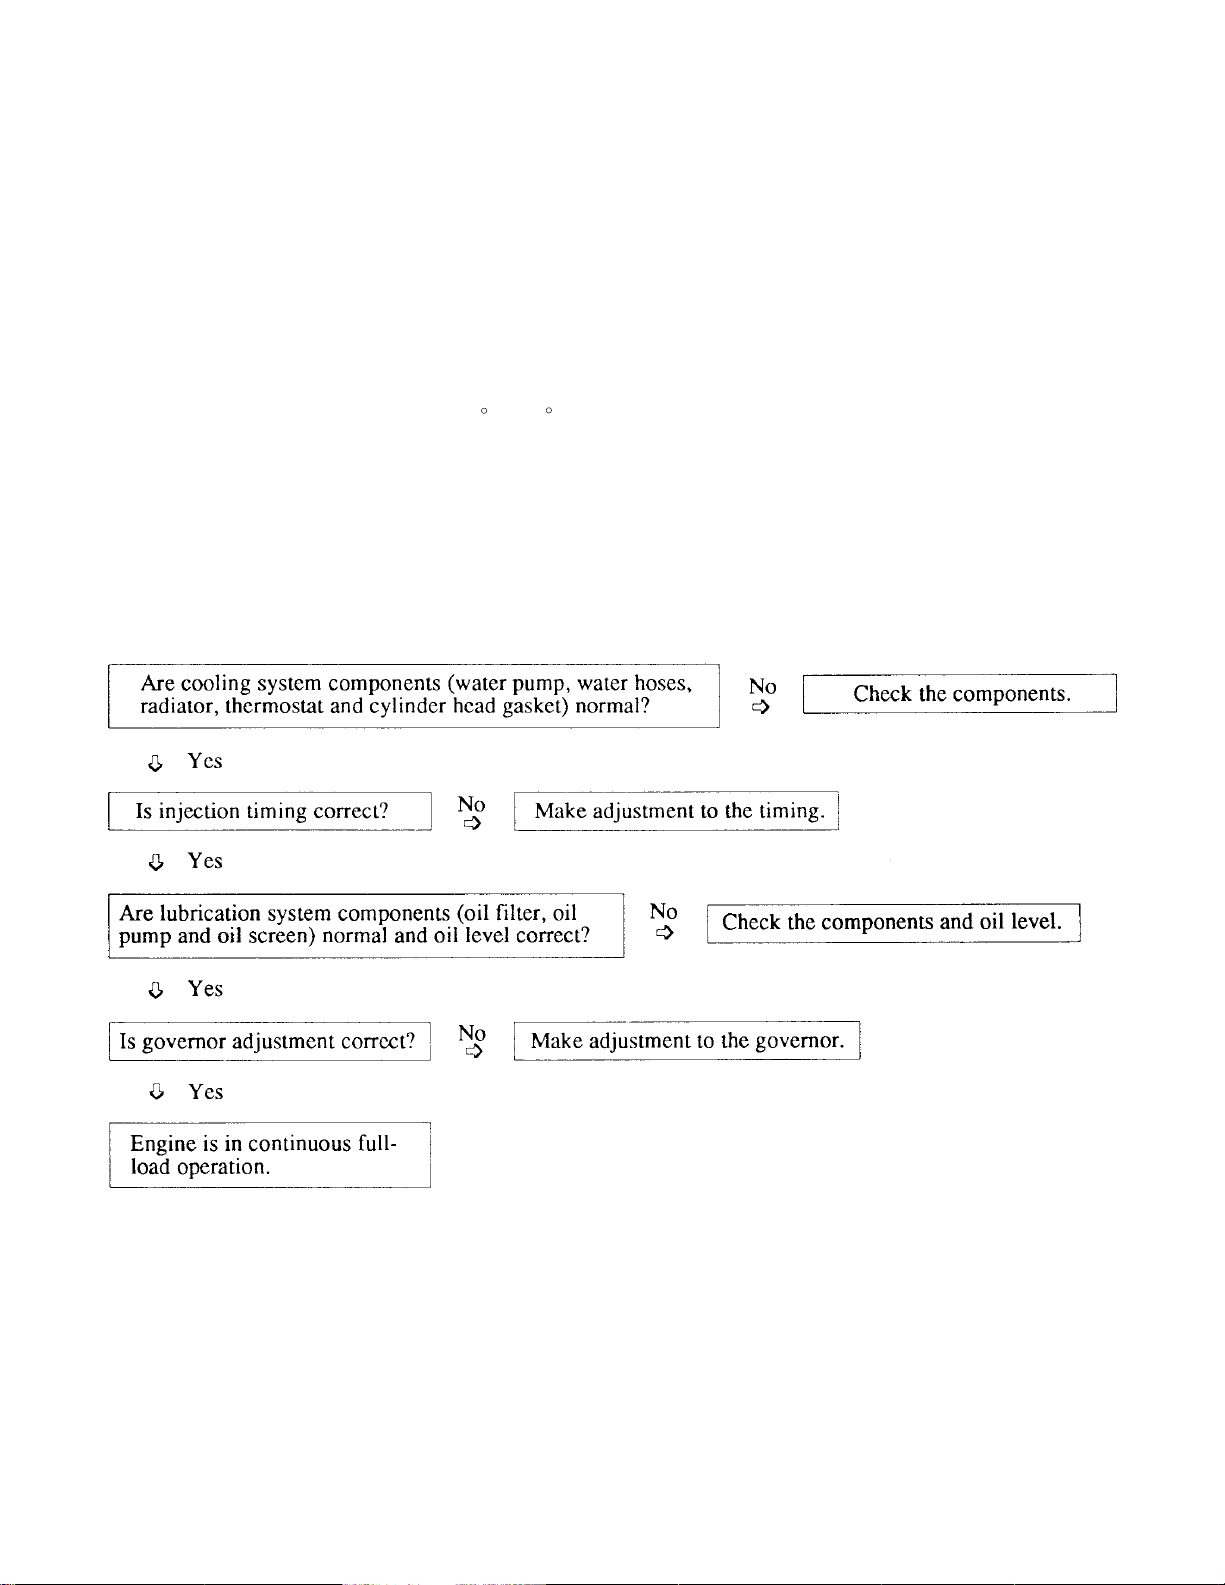
Problem 2 : Overheating
(1) Items to be checked for ahead
Overheating might also be caused by abnormal operating conditions. If the engine is overheating but its cooling system is not contributing to this trouble, it is necessary to check the difference between the ambient temperature when the engine is in normal operation
(with the thermostat fully open). If the ambient temperature is higher than the normal
coolant temperature by more than 140 F(108 C), investigate other items than those related to the
engine cooling system.
• Insufficient coolant and exterior coolant leaks
• Loose fan belt
• Radiator core openings plugged with dirt
(2)Inspection procedure
29
Page 31

Problem 3 : Black exhaust smoke
(1)Items to be checked for ahead
• Clogged air cleaner
• Poor quality fuel
(2)Inspection procedure
Problem 4 : Erratic idle speeds
(1)Items to be checked for ahead
• Maladjusted engine control
• Wrong oil grade for weather conditions
• Poor quality fuel
(2)Inspection procedure
30
Page 32

Problem 5 : Low power or loss of power
(1)Items to be checked for ahead
• Stuck running parts
• Wrong oil grade for weather conditions
• Poor quality fuel
• Clogged air cleaner
• Restricted exhaust line
• Faulty power take-off
(2)Inspection procedure
31
Page 33

Problem 6 : Starting system troubleshooting
32
Page 34

33
Page 35

4-3. DISASSEMBLING
(1)CYLINDER HEAD DISASSEMBLY
1.Rocker cover
2.Rocker shaft assembly
3.Push rod
4.Cylinder head bolt
5.Cylinder head
6.Cylinder head gasket
7.Valve lock
8.Valve retainer
9.Valve spring
10.Valve
11.Stem seal
12.Valve cap
1.Rocker shaft assembly removal
(1)Remove the bolts that hold the rocker
stays in position and remove the rocker
shaft assembly.
(2)Remove the valve caps.
2.Rocker shaft disassembly
Put identification on each rocker arm as to its
location on the rocker shaft.
3.Cylinder head bolt removal
Loosen the cylinder head bolts in two or three
steps in the sequence shown.
If any parts on the cylinder head are faulty,
check the cylinder head bolts for tightness
with a torque wrench before loosening them.
Cylinder head bolt loosening sequence.
34
Page 36

4.Cylinder head assembly removal
Lift the cylinder head straight up with a hoist.
6.Valve stem seal removal
Remove the valve stem seals with pliers.
If the gasket is seized and the cylinder head
cannot be separated from the cylinder block,
tap around the thick side portion of the
cylinder head with a plastic hammer.
5.Valve and valve spring removal
(1)Compress the valve spring with a valve
lifter and remove the valve lock.
(2)Remove the retainer, spring and valve.
Do not reuse the valve stem seals.
The valves, retainers, springs and valve
locks must be set aside separately in groups,
each tagged for cylinder number, for correct
installation.
35
Page 37

(2) TIMING GEAR•FLYWHEEL
(1) Flywheel (8) Timing gear case (13) Pump camshaft gear
(2) Rear plate (9) Idler gear (14) Bearing
(3) Oil seal case (10) Valve camshaft gear (15) Pump camshaft
(4) Tappet (11) Thrust plate (16) Oil pump
(5) Speedometer driven gear (12) Valve camshaft (17) Front plate
(6) PTO gear
(7) Crankshaft pulley
1.Flywheel removal
(1)Have someone hold the crankshaft pulley
with a wrench to prevent the flywheel
from rotating.
(2)Remove one of the bolts that hold the
flywheel in position.
(3)Install a safety bar(M12x1.25)into the
threaded hole in the flywheel from which
the bolt was removed in Step(2). Remove
the remaining bolts.
(4)Hold the flywheel by hands and withdraw
it from the crankshaft. Joggling the
flywheel back and forth will facilitate
removal.
When removing the flywheel, wear heavy
gloves to avoid hand injury.
36
Page 38

2.Rear plate removal
The rear plate is doweled in position. Pull the
plate as straight as possible when removing it.
3.Oil seal case removal
Remove the bolts that hold the oil seal case in
position. Remove the case from the cylinder
block with a screwdriver or the like.
5.Speedometer driven gear removal
Remove the lock plate and speedometer
driven gear in that order.
Unless the speedometer driven gear is
removed, the camshaft cannot be removed.
Do not cause damage to the oil seal.
4.Tappet removal
Remove the tappets from the cylinder block
with a valve push rod.
6.Crankshaft pulley removal
(1)Install two safety bars(M12x1.25)into
the threaded holes in the rear end of the
crankshaft. Put a bar between the safety
bars to hold the crankshaft to prevent it
from rotating.
(2)Remove the crankshaft pulley.
The tappets will fall into the oil pan if the
camshaft is removed before the tappets are
removed.
When removing the crankshaft pulIey, be
prepared to stop the job in case the bar slips
off the crankshaft to prevent injury.
37
Page 39

Item
Crankshaft gear
and idler gear
Idler gear and
camshaft gear
Idler gear and
fuel injection
pump
camshaft gear
Standard
0.04 to 0.12
(0.0016 to 0.0047)
Limit
0.30
(0.0118)
7.Timing gear case removal
Remove the bolts that hold the timing gear
case in position and remove the case.
The front plate is bolted inside the timing
gear case. Do not attempt to remove this
plate along with the timing gear case by
tapping.
Camshaft gear
Timing gear backlash
and P.T.O. gear
Fuel injection
pump camshaft
gear and
oil pump gear
9.Idler gear removal
To remove the idler gear, rotate the gear in a
direction of the helix of the teeth to pull it out
of mesh.
0.08 to 0.19
(0.003 to 0.0075)
0.007 to 0.20
(0.0028 to 0.0079)
8.Timing gear backlash measurement
Measure the backlash of each gear and
keep a record of it for correct installation.
Replace the gears if the backlash exceeds
the limit.
10.Camshaft removal
(1)Remove the bolts that hold the thrust plate.
(2)Pull the camshaft out of the cylinder block.
38
Page 40

Do not cause the damage to the lobes or
bearing journals when removing the camshaft.
11.Fuel injection pump camshaft removal
(1)Remove the stopper bolt.
(2)Tap the rear end of the camshaft with a
copper bar to push it out of the front side
of the cylinder block.
14.Front plate removal
Remove four bolts that hold the front plate in
position. Tap the plate lightly with a plastic
hammer to separate the gasket.
12.Gear removal(when required)
To remove the gears from the camshaft and
fuel injection pump camshaft, use an arbor
press.
13.Oil pump removal
Remove the bolts that hold the oil pump to the
cylinder block and remove the pump.
39
Page 41

(3) CYLINDER BLOCK,
CRANKSHAFT,PISTONS AND
OIL PAN DISASSEMBLY
(1)Oil pan
(2)Oil screen
(3)Connecting rod cap
(4)Connecting rod bearing
(lower)
Remove 5 thru 10 as an assembly
(5)Connecting rod
(6)Piston pin
(7)No.1 ring
(8)No.2 ring
(9)Oil ring
(10)Piston
(11)Connecting rod bearing
(upper)
(12)Main bearing cap
(13)Main bearing(lower)
(14)Crankshaft
(15)Main bearing(upper)
(16)Cylinder block
1.Oil pan removal
(1)Turn the engine upside down.
(2)Tap the bottom corners of the oil pan with
a plastic hammer to remove the oil pan.
Do not attempt to pry off the oil pan by
inserting a screwdriver or a chisel between
the oil pan and cylinder block. Damage to
the oil pan can be the result.
40
Page 42

2.Oil screen removal
Loosen the nut that holds the screen in
position and remove the screen.
3.Thrust clearance measurement for
connecting rod big end.
Install the connecting rod to its crankpin and
tighten the cap nuts to the specified torque.
Measure the thrust clearance with a feeler
gauge. If the clearance exceeds the limit,
replace the connecting rod.
Unit:mm(in.)
Item
thrust clearance
for connecting
rod big end
Standard
0.10 to o.35
(0.0039 to 0.0138)
Limit
0.50
(0.0197)
4.Connecting rod cap removal
(1)Lay the cylinder block on its side.
(2)Put identification on each connecting rod
and cap combination as to its location in
the engine.
(3)Remove the caps.
5.Piston removal
(1)Turn the crankshaft until the piston is at
top center.
(2)Push the piston and connecting rod away
from the crankshaft with the handle of a
hammer or the like until the piston rings
are above the cylinder. Remove the piston
and connecting rod. Do Steps (1)and(2)
for the removal of the other pistons.
41
Page 43

6.End play measurement for crankshaft
Set a dial indicator so that it will touch the end
of the crankshaft and measure the end play.
If the end play exceeds the limit, replace the
flanged bearing in No.3 journal.
Unit:mm(in.)
Item
End play for
crankshaft
end play
Standard
0.050 to 0.175
(0.00197 to 0.00689)
Limit
0.500
(0.01969)
8.Crankshaft removal
Remove the crankshaft.
Do not cause damage to the bearings.
Put identification on each main bearing as
to its location in the engine.
9.Piston separation from connecting rod
(1)Use Piston Pin Setting Tool (31A9100100)
(special tool)to separate the piston from the
connecting rod.
7.Main bearing cap removal
(1)Lay the cylinder block with its bottom(oil
pan)side up.
(2)Remove the bolts that hold the main
bearing caps in position. Remove the caps.
(3)Remove the front and rear bearing caps
with a sliding hammer
Do not attempt to remove the piston pin by
tapping. Replace a piston pin which needs
a greater force for removal.
42
Page 44

(2)Insert the push rod of the tool into the
bore in the piston for the piston pin and,
using an arbor press, remove the piston pin.
(3)Use this Piston Pin Setting Tool to install
the connecting rod to the piston.
43
Page 45

4-4. REASSEMBLING
(1) CYLINDER HEAD REASSEMBLING
* Reassemble the cylinder head with reverse
procedure of disassembling. Use the following
values as adjustment and service standard.
1.Cylinder head bottom face cleaning
Scrape the gasket from the bottom face of the
cylinder head.
After scraping the gasket, rub off gasket
remnants from the face with an oilstone
smeared with engine oil and thoroughly
clean the face.
(1) Rocker cover (7) V alv e Lock
(2) Rocker shaft assembly (8) Valve retainer
(3) Valve push rod (9) Valve spr ing
(4) Cylinder head bolt (10) Valve
(5) Cylinder head (11) Valve stem seal
(6) Cylinder head gasket (12) Valve cap
2.Valve stem seal installation
Using Box 12, install the valve stem seal in
position in the valve guide . After installation,
make sure the seal is in its correct position.
Improper stem seal installation can cause a
failure to seal against downward flow of oil
along the stem.
44
Page 46

3.Valve spring installation
Install the valve spring with the white
enameled end up.
4.Valve block installation
Put compression on the valve spring with a
valve lifter and install the block in position on
the valve top.
(3)Put new cylinder head gasket in position
on the cylinder block, making sure the
guide bolts are all in alignment with their
respective holes in the gasket.
Do not use any gasket adhesive or other
substances on the top face of the cylinder
block.
Do not put excessive compression on the
valve spring. This can cause the retainer to
hit and damage the stem seal.
5.Cylinder head gasket installation
(1)Thoroughly clean the top faces of the
cylinder block and pistons.
(2)Install two guide bolts (M10x1.25)in
the bolt holes in the cylinder block.
6.Cylinder head installation
Put the cylinder head in position on the
cylinder block, making sure the guide bolts are
all in alignment with their respective bolt holes
in the head.
45
Page 47

7.Cylinder head bolt tightening
(1)Remove the guide bolts and install the
bolts that hold the cylinder head to the
cylinder block.
(2)Tighten the bolts in number sequence in
two or three steps to the specified torque.
9 0.5 kgf•m
Tightening torque
(65 4 lbf•ft)
[88 5 N•m]
8.Valve push rod installation
(1)Put the valve push rod into position
through the bore in the cylinder
head.
(2)Make sure the ball end of the push rod has
been put into position over the top of the
tappet.
9.Rocker shaft assembling
(1)Install the rocker arms, brackets and
springs on the rocker shaft. Secure the
brackets to the shaft by tightening the
bolts.
(2)Make sure the rocker arms move freely.
46
Page 48

(2) TIMING GEAR•FLYWHEEL REASSEMBLING
(1) Flywheel
(2) Rear plate
(3) Oil seal case (8) Timing gear case (13) Pump camshaft gear
(4) Tappet (9) Idler gear (14) Bearing
(5) Speedometer driven gear (10) Valve camshaft gear (15) Pump camshaft
(6) PTO gear (11) Thrust plate (16) Oil pump
(7) Crankshaft pulley (12) Valve camshaft (17) Front plate
* Reassemble the timing gears and flywheel
with reverse procedure of disassembling.
Use following values for reassembling as
adjustment and service standard.
1.Front plate installation
(1)Scrape the gasket from the cylinder block
and front plate.
(2)Coat the gasket contact surface of
cylinder block with adhesive and put a
new gasket in position, making sure the
holes in the gasket are all in alignment
with the holes in the cylinder block.
(3)Put the front plate in position. Install four
bolts and tighten them.
2.Oil pump installation
(1)Make sure the packing has been put in
position on the oil pump.
(2)Put the oil pump in position on the
cylinder block. Install three bolts and
tighten them evenly.
(3)Make sure the oil pump gear rotates
freely.
47
Page 49

3.Engine turning
(1)Install two bolts (M12x1.25)in the flywheel
bolt holes in the crankshaft.
(2)Put a bar between the bolts and turn the
crankshaft to bring No.1 piston to the top
center as shown in the illustration.
(2)Put the camshaft(with gear)in position in
the cylinder block.
Do not cause damage to the lobes and
journals when the camshaft is installed.
4.Fuel injection pump camshaft installation
(1)Put the camshaft(with bearing and gear)
in position in the cylinder block.
(2)Hit the gear with a plastic hammer to fit
the bearing in position.
(3)Make sure the camshaft rotates freely.
(4)Tighten the stopper bolt.
(3)Tighten the bolts that hold the thrust plate
to the specified torque.
1.1 0.1 kgf•m
Tightening torque
(4)Make sure the camshaft rotates freely.
Check the end play for the camshaft.
(8 0.7 lbf•ft)
[10.8 1 N•m]
5.Camshaft installation
(1)Lubricate the lobes and journals with
engine oil.
48
Page 50

6.Idler gear installation
(1)Lubricate the idler gear with engine oil.
(2)Install the idler gear in position with its
“3”,“2”and “11”marks in alignment
with the “33”mark on the fuel injection pump
camshaft gear, the “22”mark on the
camshaft gear and the “1”mark on the
crankshaft gear respectively.
(3)Check the backlash of the gears. Make
reference to “Timing gear backlash
measurement”(page 38).
(2)Tighten the crankshaft pulley nut to the
specified torque.
17.5 2.5 kgf•m
Tightening torque
Check the strength of the bolts and bar
used for holding the crankshaft.
(127 18 lbf•ft)
[172 25N•m]
7.Timing gear case installation
(1)Coat the gasket with adhesive and put it
in position the front plate.
(2)Lubricate the oil seal lip with engine oil.
(3)tighten the bolts that hold the timing gear
case.
8.Crankshaft pulley nut tightening
(1)Install two bolts(M12x1.25)in the
flywheel bolt holes in the crankshaft and
hold the crankshaft.
9.P.T.O. gear installation
Install the P.T.O. gear in position in the
timing gear case with the side that has no oil
hole toward the rear of the engine.
10.Speedometer driven gear installation
(1)Install the O-ring in the groove in the driven
gear sleeve.
(2)Install the speedometer driven gear in position
in the cylinder block while rotating it or the
camshaft.
49
Page 51

11.T appet installation
Lubricate the tappets with engine oil and put
them in position in the cylinder block.
(2)Put the rear plate in position on the
cylinder block with its dowel holes in
alignment with the dowels. Tighten the
bolts that hold the rear plate to the
specified torque.
6.5 1 kgf•m
Tightening torque
Install the starter to the rear plate before
installing the plate to the cylinder block for
convenience of rear plate installation.
(47 7 lbf•ft)
[64 10 N•m]
12.Oil seal case installation
(1)Put new gasket in position on the oil seal
case.
(2)Lubricate the oil seal lip with engine oil
and install the oil seal in position in the
cylinder block.
13.Rear plate installation
(1)Put a new gasket in position on the rear
plate.
14.Flywheel installation
(1)Install a safety bar(M12x1.25)in the
rear end of the crankshaft.
(2)Put the flywheel in position in alignment
with the safety bar.
(3)Install three of four bolts in the flywheel
and tighten them finger tight only.
(4)Remove the safety bar. Install the last bolt
in the flywheel and tighten it finger tight only.
50
Page 52

(5)Have someone hold the crankshaft pulley
with a wrench to prevent the flywheel
from rotating.
(6)Tighten the four bolts that hold the
flywheel to the specified torque.
13.5 0.5 kgf•m
Tightening torque
Always signal each other to prevent
possible personal injury.
(98 4 lbf•ft)
[132 5 N•m]
11.Valve c learance adjustment
Make reference to“VALVE CLEARANCE”
(page 100)
12.Rocker cover installation
(1)Make sure the gasket is put on the rocker
cover.
(2)Tighten the bolts that hold the rocker
cover to the specified torque.
10.Rocker shaft assembly installation
(1)Install the valve caps in position on the top
of the valves.
(2)Put the rocker shaft assembly in position
on the cylinder head. Tighten the bolts
that hold the rocker shaft assembly to the
specified torque
1.5 0.5 kgf•m
Tightening torque
(11 4 lbf•ft)
[14.7 5 N•m]
Tightening torque
1.15 0.15 kgf•m
(8.3 1.1 lbf•ft)
[11.3 1.5 N•m]
51
Page 53

(3) CYLINDER BLOCK, CRANKSHAFT,PISTONS AND OIL PAN REASSEMBLING
(1)Oil pan
(2)Oil screen
(3)Connecting rod cap
(4)Connecting rod bearing
(lower)
Reassemble 5 thru 10
(5)Connecting rod
(6)Piston pin
(7)No.1 ring
(8)No.2 ring
(9)Oil ring
(10)Piston
*Reassemble the cylinder block, crankshaft,
pistons and oil pan with reverse procedure
of disassemble. Use following values for
reassembling as adjustment and service
standard.
1.Main bearing installation
(1)Install the upper halves of the main
bearings in the cylinder block and the
lower halves in the main bearing caps so
their tabs fit into the notches in the
cylinder block and the main bearing caps.
(11)Connecting rod bearing
(upper)
(12)Main bearing cap
(13)Main bearing(lower)
(14)Crankshaft
(15)Main bearing(upper)
(16)Cylinder block
(2)Install the flanged bearing in the No.3
journal.
(3)Lightly lubricate the inside surfaces of the
bearings with engine oil.
52
Page 54

2.Crankshaft installation
(1)Clean the crankshaft with cleaning solvent
and blow dry with compressed air.
(2)Fasten a hoist to the crankshaft and hold
it in horizontal position. Carefully put the
crankshaft in position in the cylinder
block.
(3)Lightly lubricate the crankshaft journals
with engine oil.
3.Main bearing cap installation
(1)Coat the mating surfaces of the rear
bearing cap and cylinder block with Three
Bond 1212.
(2)Install the main bearing caps in position.
Make sure the number(arrow head)on the
main bearing cap is toward the front of the
engine.
(3)Tighten the main bearing cap bolts finger
tight only.
Install the front and bearing caps in
position so their end faces are even with the
end faces of the cylinder block.
(4)Tighten the bolts holding the main
bearing caps in steps to the specified
torque.
5.25 0.25 kgf•m
Tightening torque
(38 2 lbf•ft)
[51.5 2.5 N•m]
(5)Make sure the crankshaft rotates freely
without binding or catching.
(6)Measure the end play for the crankshaft.
Make reference to“End play measurement
for crankshaft”(page 42). If the end play
is incorrect, loosen the bolts holding the
main bearing caps once and tighten them
again.
53
Page 55

4.Side seal installation
(1)Coat the side seals with Three Bond 1212.
(2)Insert the side seals between the cylinder
block and the front and rear caps and push
in them by hand as far as possible, with
their rounded side toward the outside of
the cylinder block.
(3)Put the piston in position on the connecting
rod, making sure the model identification on
the rod is on the same side as the arrow head
on the top of the piston.
(3)Using a flat plate, push the seals into
position, taking care not to bend them.
5.Piston assembling to connecting rod
(1)Set Piston Setting Tool(31A91-00100)
(special tool)in a hydraulic press.
(2)Put the connecting rod on the tool and
lubricate the bore in the rod for the piston
pin with engine oil.
(4)Insert the push rod of the Tool into the bore in
the piston for the piston pin and press the pin
with the press.
Observe the indicator of the press when
pressing the piston pin. If the force of the press
is ready to exceed 110 lbf (50 kgf) [490 N], stop
pressing the pin and check the bores in the
piston and connecting rod for alignment.
54
Page 56

(5)After assembling the piston and connecting
rod, make sure the connecting rod moves
freely.
6.Piston ring installation
Using a piston ring pliers, install the piston
rings on the piston.
a)The piston rings must be installed with the
side that has the mark “T” toward the top of
the piston.
b)The oil ring must be installed with the ring
end gap 180 apart from the coil spring joint.
7.Piston and connecting rod installation
(1)Lubricate the piston and piston rings with
engine oil.
(2)Move the piston rings on the piston so that
the end gaps are apart from a direction
parallel to, or transverse to, the piston pin.
(3)Install the connecting rod bearing(upper
half) to the rod, making sure the tab in
the back of the bearing is in the notch of
the connecting rod.
(4)Turn the crankshaft until the crankpin for
the piston and connecting rod to be
installed is at the top center.
(5)Hold the piston and connecting rod with
“FRONT”mark(arrow head) on the top
of the piston toward the front(timing gear
case side) of the engine.
(6)Using a piston guide (commercially available),
put the piston and connecting rod into the
cylinder from the top of the cylinder block.
55
Page 57

Do not hit the piston with a hammer to install
the piston and connecting rod. This will put
force on the piston and connecting rod and
cause damage to the piston rings and crankpin.
(4)Tighten the connecting rod cap nuts in
steps to the specified torque.
3.55 0.25 kgf•m
Tightening torque
(25.7 2 lbf•ft)
[34.8 2.5 N•m]
8.Connecting rod cap installation
(1)Push the piston into position until the big
end of the connecting rod is put into
position over the crankpin. Then turn the
crankshaft 180 while pushing on the top
of the piston.
(2)Install the lower halt of the connecting rod
bearing in the connecting rod cap, making
sure the tab in the back of the bearing is
in the notch of the cap.
(3)Install the bearing cap to the connecting rod.
a)Make sure the number on the cap is the
same as the number on the connecting rod.
b)In case of a new connecting rod having no
cylinder number, install the cap to the rod
with the notches on the same side.
(5)Check the thrust clearance for the
connecting rod big end.
9.Oil screen installation
(1)Lay the cylinder block with the bottom
(oil pan side) up.
(2)Install the oil screen in position.
The oil screen must be installed in position
so that it is below the oil level line and away
from the oil pan.
56
Page 58

10.Oil pan installation
(1)Clean the mating surfaces of the oil pan and
cylinder block and coat them with Three Bond
1207C.
Squeeze out a 4mm(0.2 in.) thick bar of
sealing compound(three Bond) from the
tube and put it on the flange of the oil pan
as shown.
(2)Tighten the bolts that hold the oil pan to
the cylinder block in a crisscross pattern
to the specified torque.
Cast oil pan:
2.8 0.3 kgf•m
(20.3 2.2 lbf•ft)
Tightening torque
[27.5 3 N•m]
Plate oil pan:
1.15 0.15 kgf•m
(8.3 1.1 lbf•ft)
[11.3 1.5 N•m]
57
Page 59

(4)COOLING SYSTEM
DISASSEMBLY REMOVAL
1.Cooling fan removal
Hold the fan by one hand remove the four
bolts that hold the fan in position. Remove the
fan and spacers.
Keep the spacers with the for installation.
3.Water pump assembly removal
Remove the water pump assembly.
2.Thermostat case removal
Remove the thermostat case assembly
containing thermostat.
58
Page 60

(5)FUEL SYSTEM DISASSEMBLY
REMOVAL
1.Fuel injection pipe removal
Disconnect the fuel injection pipes and fuel
leak-off pipe from the fuel injection pump and
nozzles.
Put plugs or caps on the openings of the
injection pump and nozzle connectors.
3.Governor assembly removal
(1)Remove the tie rod cover.
(2)Remove the spring from the tie rod with a
pliers to disconnect the tie rod from the
fuel injection pump.
(3)Remove the governor assembly.
2.Fuel injection nozzle removal
Loosen the fuel injection nozzles with a
wrench. Remove the nozzles and gaskets from
the cylinder head.
Remove the gaskets from the cylinder head
with a screwdriver or the like. Discard
defective gaskets.
4.Governor weight removal
(1)Remove the sliding sleeve.
(2)Remove the sliding sleeve shaft and
governor weights.
5.Fuel injection pump removal
(1)Remove the tie rod cover.
(2)Remove the spring from the tie rod with a
pliers to disconnect the tie rod from the
fuel injection pump.
59
Page 61

(3)Remove the fuel injection pump.
Keep a record of the thickness of shims for
installation.
(6)AIR INLET AND EXHAUST SYSTEM
DISASSEMBLY REMOVAL
1.Exhaust manifold removal
Remove the exhaust manifold from the cylinder
head.
2.Air inlet cover removal
Remove the air inlet cover from the cylinder
head.
60
Page 62

(7)LUBLICATION SYSTEM REMOVAL
1.Oil filter removal
(1)Put a container under the oil filter to catch
the oil.
(2)Remove the oil filter from the cylinder
block with a filter wrench.
3.Oil pressure switch removal
Remove the oil pressure switch with Oil
Pressure Switch Socket Wrench(MD998054)
(special tool).
2.pressure relief valve removal
Remove the pressure relief valve from the
cylinder block.
61
Page 63

(8)ELECTRICAL SYSTEM DISASSEMBLY
1. Starter disassembly
(1)magnetic switch
(2)rear bracket
(3)brush holder assembly
(4)yoke
(5)armature
(6)cover
(7)center bracket
(8)gear
(9)spring set
(10)stopper ring
(11)stopper
(12)pinion
(13)spring
(14)pinion shaft
(15)lever
(16)front bracket
(1)Magnetic switch
(a)Loosen the nut that holds the connector
to the M terminal of the magnetic switch
and disconnect the connector from the
magnetic switch.
(b)Remove the bolts(two) that hold the
magnetic switch in position and remove
the magnetic switch.
(2)Rear bracket removal
Remove the through bolts(two) and the bolts
(two) that hold the brush holder in position.
Remove the rear bracket.
Keep the rear bracket with washer for
installation.
(3)Brush holder removal
With the brushes (two) kept apart from the
commutator, remove the yoke and brush
holder assembly. Remove the armature.
62
Page 64

(4)Cover removal
Remove the cover and remove the snap ring
and washer.
Any time the pinion is removed, a ne w
stopper ring must be installed.
(7)Pinion shaft removal
Remove the spring, lever, reduction gear and
pinion shaft from the front bracket.
(5)Center bracket removal
Remove the bolt and remove the center
bracket. Remove the washer for adjusting the
end play for the pinion shaft.
(6)Pinion removal
(a)Put a pipe-shaped tooling on the pinion
stopper and hit the stopper with a
hammer to expose the stopper ring.
(b)Remove the stopper ring with a pliers
and remove the pinion.
Do not mix the sequence of spring, lever and
reduction gear when the pinion shaft is
removed.
(8)Bearing removal
To remove the ball bearings from the ends of
the armature, use a bearing puller. The
bearing fitted in the front bracket is not re placeable. Replace the front bracket assembly
if this bearing is defective.
63
Page 65

2. Alternator
(1)through bolts
(2)pulley
(3)rotor
(4)rear bearing
(5)bearing retainer
(6)front bearing
(7)front bracket
(8)stator core
(9)brush holder
(10)rectifier
(11)rear bracket
Disassembly procedure
(1)Stator core separation from front bracket
(a)Pry the stator core off the front bracket
with a screwdriver as shown in the
illustration.
Be careful not to insert the screwdriver too
deep. Damage to the stator core can be the
result.
(2)Pulley removal
(a)Hold the rotor assembly in a vise by
using thick cloth as shown in the illus tration. Remove the nut that holds the
pulley in position, and remove the
pulley and spacer.
(b)Remove the rotor assembly from the
front bracket.
(3)Stator core and rectifier removal
(a)Unsolder the leads from the rectifier and
remove the stator core from the rectifier.
Unsolder the leads as quickly as possible to
prevent damage to the diodes in the rectifier.
(b)Remove the screws that hold the
rectifier in position and remove the
rectifier.
64
Page 66

3.Injection pump
Check the injection pump for items listed in the chart below and replace it if defective. Do not attempt
to make repairs by disassembling.
Test item Test method Criteria
Low idle speed Use a tachometer. Standard farm engine:
980 rpm
+30
0
Exhaust smoke 1)Check by quickly increasing Not too much black or gray
engine speed under no-load smoke
condition.
2)Check by staring load.
Orifice discharge pattern Remove injection nozzle and Good discharge pattern
reinstall it with orifice toward
outside of engine. Look at
discharge pattern by cranking
the engine with starter.
65
Page 67

(9)ELECTRICAL SYSTEM
REASSEMBLING
1.starter
Follow the reverse of disassembly and use the
procedure that follows.
(1)Lubrication
Lubrication the following starter components
with grease after the starter has been
assembled:
(a)Armature shaft gear and reduction gear
(b)Bearing
(c)Washer and stopper ring of pinion shaft
(d)Pinion
(e)Sliding surfaces of lever
Do not put grease on the starter mounting
face,brushes, commutator and other electrical
parts.
(3)Pinion shaft end play adjustment
The maximum permissible limit of the end
play(thrust gap) for the pinion shaft is 0.5mm
(0.020 in)
(a)Put the pinion shaft, reduction gear washer
and snap ring in position in the center
bracket.
(b)Move the pinion shaft in the axial
direction to measure the end play. If the
end play exceeds 0.5mm(0.020 in.),
make adjustment to it by adding adjusting
washer.
(2)Stopper ring installation
Put the stopper ring on the pinion shaft.
Using a puller, pull the pinion stopper to fit
the ring in the groove.
(4)Lever installation
Install the lever in correct position.
66
Page 68

(5)Pinion clearance adjustment
The pinion clearance must be 0.020 to 0.079
in. (0.5 to 2.0mm). With the pinion held in
cranking position, lightly push it toward
commutator end to measure free movement
(clearance). If the clearance is not correct,
make adjustment to it. Increase the amount of
packings if the clearance is too large; decrease
it if the clearance is too small.
67
Page 69

2.Alternator
Follow the reverse of disassembly and use the
procedure that follows.
(a)The rear bearing has a groove for the
snap ring. Install the snap ring in this
groove, making sure its tab is in the deep
portion of the groove.
(b)When installing the new rear bearing,
put it in position with the side that has a
groove toward the slip rings of the rotor.
(c)To install the rear bearing in the rear
bracket, heat the rear bracket.
(d)Before installing the rotor in the rear
bracket, insert a wire-shaped tooling into
the hole in the rear bracket to lift the
brushes off the slip rings. Remove the
tooling after the rotor has been installed
in position.
68
Page 70

3. Shutoff solenoid installation
(a)Remove the tie rod cover.
(b)Coat the threads of the stop solenoid
with thread sealant(three Bond 1212).
Coat the length of the threads to be turned
in the governor case.
(c)Temporarily install the shutoff solenoid
and nut in the governor case.
(d)Move the injection pump control rack all
the way to the non-injection(shutoff)
position.
(f)Back off the shutoff solenoid 30•to 45•
turn(the clearance between the control
rack and plunger will be 0.0059 to 0.0070ı in.
(0.15 to 0.20 mm) and tighten
the nut to the specified torque.
(g)Start the engine and make sure the
engine stops when the plunger is pushed
all the way.
(h)Install the rubber cap in position with the
arrow head toward up(with the side that
has a water drain hole down)as shown
in the illustration.
Do not allow cleaning solvent to contact any
solenoid parts.
(e)Turn the shutoff solenoid in the
governor case while pushing the plunger
toward the control rack until the shaft is
in touch with the tie rod. At this time,
clearance C must be 0 mm. (Under this
condition, the plunger will be rotated by
the shutoff solenoid being turned in.)
Inspection after assembly
(a)For the schematic of the key shutoff system,
see page 168.
(b)Start the engine and make sure the engine
stops when the starter switch key
is turned to OFF position.
(c)Start the engine and make sure the engine
stops when the oil pressure switch terminal is
shorted to the switch body.
It will take about 5 minutes to restart an
engine which was shut down by the key
shutoff device.
69
Page 71

(10)COOLING SYSTEM
REINSTALLATION
1.Water pump installation
Put a new gasket in position on the water
pump flange. Install the water pump in
position on the cylinder block.
4.Thermoswitch and thermounit
combination installation
Coat the threads of the combination with Three
Bond 1104. Put the combination in position and
tighten it to the specified torque.
2.Thermostat installation
(1)Put the thermostat in the thermostat case.
(2)Put a new gasket in position on the
thermostat case. Install the thermostat
assembly in position on the cylinder head.
3.Cooling fan installation
(1)Install the spacers in position in the fan as
shown.
(2)Install the pulley in position on the water
pump. Install the fan and spacer combi nation in position on the pulley.
70
Page 72

(11)ELECTRICAL SYSTEM
REINSTALLATION
1.Glow plug installation
Install the glow plug in position in the
precombustion chamber and tighten in to the
specified torque.
1.75 0.25 kgf•m
Tightening torque
(12.7 1.8 lbf•ft)
[17.2 2.5 N•m]
2.Alternator installation
(1)Put the alternator in position. Install the
adjusting plate bolt in position to hold the
alternator in position.
(2)Put the belt in position on the pulley.
Move the alternator away from the engine
to make an adjustment to the belt.
(3)Tighten the bolts.
(4)Make sure the deflection(tension)of the
belt is correct.
Unit:in.(mm)
Deflection under 22 lbs 0.4 to 0.5
(10 kgf)[98 N] force (10 to 12)
71
Page 73

(12)LUBLICATION SYSTEM
REINSTALLATION
1.Pressure relief valve installation
Put the relief valve in position on the cylinder
block and tighten in to the specified torque.
5 0.5 kgf•m
Tightening torque
(36 4 lbf•ft)
[49 5 N•m]
3.Oil pressure switch installation
Coat the threads of the switch with thread
sealant (Three Bond 1102). Use Oil Pressure
Switch Socket Wrench(MD998054)(special
tool) to install the oil pressure switch.
a)Put the sealant on the threads only.
b)Do not over-tighten the oil pressure
switch when it is installed.
2.Oil filter installation
(1)Lightly lubricate the gasket with engine oil.
(2)Install the new filter element by hand.
When the gasket contacts the base, tighten
one turn more.
72
Page 74

(13)FUEL SYSTEM REINSTALLATION
1.fuel injection nozzle installation
(1)Put the gasket on the nozzle.
(2)Put the nozzle assembly in position in the
cylinder head and tighten it to the speci fied torque.
5.5 0.5 kgf•m
Tightening torque
(40 4 lbf•ft)
[54 5 N•m]
4.Sliding sleeve installation
Install the sliding sleeve on the sliding sleeve
shaft and make sure the sleeve moves freely.
2.Fuel injection pump installation
Put the pump in position on the cylinder block
and tighten the bolts that hold the pump to the
specified torque.
3.Flyweight assembly installation
Put the flyweight assembly in position on the
rear end of the fuel injection pump camshaft
and tighten the sliding sleeve shaft to the
specified torque.
5.Governor assembly installation
(1)Install the governor assembly in position
while putting the tie rod and spring into
position in the injection pump.
(2)Install the tie rod to the pin of the control
rack and secure it with the tie rod spring.
(3)Install the tie rod cover in position.
Tightening torque
5.5 0.5 kgf•m
(40 4 lbf•ft)
[54 5 N•m]
73
Page 75

6.Fuel injection line installation
(1)Put the fuel leak-off line in position and
connect it to the fuel injection nozzles.
(2)Put the fuel injection lines in position and
connect them to the fuel injection pump.
Install the clamps
74
Page 76

(13)ELECTRICAL SYSTEM
DISASSEMBLY REMOVAL
1.Starter
1.1Testing before disassembly removal
(1)Clearance between pinion and housing
(pinion clearance)
(a)Connect the starter to a 12 volt battery
as shown in the illustration to cause the
pinion to shift into cranking position and
remain there.
Due to the amount of current being passed
through the solenoid series winding, this test
must be made within 10 seconds.
(b)Push the pinion toward the commutator
end by hand to measure its free movement
(pinion clearance).
(c)The pinion clearance must be 0.020 to
0.079 in. (0.5 to 2.0mm). If the clearance
is out of this range, make an adjustment
to it by adding or removing the packings
on the magnetic switch. Adding the
packings will decrease the clearance.
(b)Close the switch to make sure the pinion
shifts into cranking position properly
and the starter runs at speeds higher than
is specified. If the current draw and / or
operating speed is out of the standard,
disassemble the starter for inspection
and repairs.
a)The size of wires used for this test must
be as large as possible. Tighten the
terminals securely.
b)This starter has a reduction gear.
Do not confuse gear noise with some
abnormal noise else.
c)When measuring the starter speed at the
end of the pinion, be ready for accidental
shifting of the pinion.
(2)No-load characteristics
(a)Connect the starter to a 12 volt battery
with an ammeter capable of indicating
several hundred amperes as shown in the
illustration.
Item Standard
Model M2T5622 M2T50381
Nominal output, V-kW
Terminal voltage, V
Current draw, A
Speed, rpm
No-load
characteristics
12-2.0 12-1.6
11 11.5
130, maximum 100, maximum
3850,minimum 3000, minimum
75
Page 77

(3)Magnetic switch
(a)disconnect the connector from the M
terminal of the magnetic switch.
(b)Connect the magnetic switch to a 12 volt
battery with a switch as shown in the
illustration to test the pull-in coil. Close
the switch to see if the pinion shifts. If
the piston fails to shift, the magnetic
switch is faulty.
Due to the amount of current being passed
through the solenoid series winding, this test
must be made within 10 seconds.
Due to the amount of current being passed
through the solenoid series winding, this test
must be made within 10 seconds.
(d)Connect the magnetic switch to a 12 volt
battery with a switch as shown in the
illustration to make a pinion return test.
Close the switch and pull the pinion
away from the commutator end by hand.
Release the pinion to see if it returns
immediately when released. If the
pinion fails to so return, the magnetic
switch is faulty.
Due to the amount of current being passed
through the solenoid series winding, this test
must be made within 10 seconds.
(c)Connect the magnetic switch to a 12 volt
battery with a switch as shown in the
illustration to test the hold-in coil. Close
the switch and pull the pinion away from
the commutator end by hand. Release
the pinion to see if it remains there. If
the pinion returns, the magnetic switch
is faulty.
1.2.Removal
(1)Disconnect the battery wires. Disconnect
the negative (-) wire first.
(2)Disconnect wire (1) from the starter.
(3)Loosen bolts (2)(two) holding starter(3)
in position and remove the starter.
76
Page 78

2.Alternator
2.1.Inspection before removal
The correct diagnosis of the charging system
requires a careful inspection with the alternator
on the engine to determine whether or not it is
necessary to remove the alternator from the
engine for further inspection. The following
chart, in which two troubles are listed with four
possible causes of each, will help locate
the cause of the trouble:
Voltage regulator setting too high
Ground return circuit defective
Wiring incorrect
Alternator
charge too high
Series resistor or winding open-circuited
Alternator drive belt loose
Voltage regulator setting too low
Alternator output low
2.2.Precautions for removal
Following is a list of basic precautions that
should always be observed for removal:
(1)When installing the battery, care must be
used to make sure the negative (-) termi nal is grounded.
(2)Do not use a megger (an instrument for
high resistance of electrical materials).
(3)Disconnect the battery cables before
charging the battery.
(4)Do not attempt to disconnect the lead from
the B terminal of the alternator when the
engine is running.
(5)Battery voltage is being applied to the B
terminal of the alternator. Do not ground it.
(6)Do not short or ground the terminal of
the alternator with a built-in IC regulator.
(7)Do not blow a spray from the steam
cleaner nozzle at the alternator.
Alternator
gives no charge
Brushes worn
2.3.Testing voltage setting
(1)Connect the alternator to a 12 volt battery
with an ammeter, a voltmeter and a
switch as shown in the illustration.
77
Page 79

(2)The voltmeter reading must be zero(0)
when the starter switch is in OFF position.
It must be lower than the battery voltage
when the switch is in ON position(the
engine will not start).
(3)With one ammeter lead short-circuited,
start the engine.
(4)Read the voltmeter when the ammeter
reading is below five amperes and the
engine is running at 1800 rpm and also at
2500 rpm with all electrical loads turned
off. The voltage setting varies with
alternator temperature. Generally, the
higher the alternator temperature, the
lower the voltage setting.
(6)Increase the engine speed. Measure the
maximum output current at the specified
alternator speed when the voltmeter
reading is 13.5 volts.
-
Standard
Item Model
Terminal
voltage / Speed
currents
13.5 V / 33 A
A7T02071
13.5 V / 47 A
Output characteristics
(at normal temperature)
2500 rpm,
maximum
5000 rpm,
maximum
Connections for testing voltage setting
Item Standard
Voltage setting
[at 20 C (68 F)] 14.7 0.3V
2.4.Testing output characteristics
(1)Disconnect the battery ground(negative)
cable
(2)Connect one ammeter lead to the B
terminal of the alternator and the other
lead to the positive terminal of the battery.
Connect one voltmeter lead to the B
terminal and the other lead to the ground.
(3)Connect the battery ground cable.
(4)Start the engine.
(5)Turn on all electrical loads.
2.5.Removal
(1)Disconnect the battery cables.
(2)Disconnect the lead from the B terminal
of the alternator.
(3)Disconnect the connector from the
alternator.
(4)Loosen the brace and support bolts. Move
the alternator toward the engine and
remove the drive belt.
(5)Remove the alternator.
78
Page 80

4-5. INSPECTION
(1) CYLINDER HEAD AND VALVE
MECHANISM
1.cylinder head
Using a heavy accurate straight edge and a
feeler gauge, check the bottom face for
warpage in three positions lengthwise, two
crosswise and two widthwise as shown in the
illustration. If warpage exceeds the limit,
reface the bottom face with a surface grinder.
Unit:mm(in.)
Item Standard Limit
Warpage of 0.05(0.0020) 0.10
cylinder head maximum (0.0039)
bottom face
3.V alve springs
Check the squareness and free length. If the
squareness and /or free length exceeds the
limit, replace the spring.
Item Standard Limit
Free length 47(1.85) 46(1.81)
Squareness 1.5 maximum
Length under 13.9 0.7
test force: (30.6 1.5)
39.1(1.54) [136 7]
Length under 29 2 -15%
test force: (64 4.4)
30.5(1.20) [284 20]
Test force ,kgf(lbf)[N]
2.Rocker arms and rocker shaft
Measure the bore in the rocker arm for the
rocker shaft and the diameter of the rocker
shaft to find the clearance between the arm
and shaft. If the clearance has reached the
limit, replace the rocker arm. If it exceeds the
limit, replace both arm and shaft.
Unit:mm(in.)
Item Nominal Standard Limit
size
Bore in rocker 0.744 0.74449 to 0.74527
arm for shaft (18.9) (18.910 to 18.930)
Diameter of 0.744 0.74331 to 0.74401
shaft for arm (18.9) (18.880 to 18.898)
Clearance between 0.00047 to 0.00197 0.00787
rocker arm and shaft (0.012 to 0.050) (0.200)
79
Page 81

4.Valve push rods
Using V-blocks and a dial indicator, check for
bend. If the bend exceeds the limit, replace the
push rod.
Unit:mm(in.)
Item Limit
Bend(dial indicator reading) 0.3(0.012)
of valve push rod maximum
5.Valves, valve guides and valve seats
(1)Diameter of valve stem
Measure the diameter of the valve stem as
shown in the illustration. If the stem is worn
beyond the limit, or if it is abnormally worn,
replace the valve.
Unit:mm(in.)
Item Nominal Standard Limit
size
Inlet 6.6 6.565to
valve (0.260) 6.580
Diameter (0.25846to 6.500
of valve 0.25905) (0.25591)
stem Exhaust 6.6 6.530to
valve (0.260) 6.550
(0.25709to
0.25787
(2)Clearance between valve stem and valve
guide.
The valve guide wears more rapidly at its both
ends than at any other parts. Measure the bore
in the guide for the stem at its ends with an
inside micrometer caliper to find the clearance
between the stem and guide. If the clearance
exceeds the limit, replace the guide or valve
whichever is badly worn.
Unit:mm(in.)
Item Nominal Standard Limit
size
0.02 to
Clearance Inlet 0.05 0.10
between valve (0.008to (0.0039)
valve stem 0.0020)
and valve 0.05to
guide Exhaust 0.085 0.15
valve (0.0020to (0.0059)
0.00335)
Height to 9.5to10.5
top of valve 10(0.39) (0.374to
guide 0.413)
Before measuring the valve guides, clear the
guides of lacquer and carbon.
(3)Valve guide replacement
(a)Remove the guide from the cylinder
head by pushing it with a tool and an
arbor press from the bottom side of the
head.
80
Page 82

(b)Install a new guide into the cylinder
head by pushing it with an arbor press
from the upper side of the head until the
specified height to the top of the guide
is obtained.
(c)Insert a new valve into the guide and
make sure the valve slides in the guide
freely.
(d)After the valve guide has been replaced,
check the valve contact with its seat.
(4)Valves
(a)Put a small amount of Prussian blue or
read lead on the valve face. Hold the
valve with a valve lapping tool(com mercially available)and press it against
the seat to check its contact.
(c)If the valve margin(valve lip thickness)
exceeds the limit, replace the valve.
Unit:mm(in.)
Item Standard Limit
Valve margin 1.0(0.039) 0.5(0.020)
(lip thickness)
(d)If the valve sinkage(the dimension from
the top of a closed valve to the face of
cylinder head)exceeds the limit, recon dition the valve seat or replace the
cylinder head assembly.
Unit:mm(in.)
Item Standard Limit
V alv e sinkage
(dimension from 0.05 0.25 1.5
top of closed (0.020 0.0098) (0.059)
valve to face
of head)
(b)The width of contact must be uniform all
the way around both seat and valve. If
the contact is bad, reface the valve and
seat.
(5)Valve refacing
(a)Set the valve refacer at an angle of 45
and grind the valve.
81
Page 83

(b)The valve margin must be not less than
the limit. If the margin seems to be less
than the limit when the valve is refaced,
replace the valve.
(6)Valve seat refacing
(a)Before refacing the valve seat, check the
clearance between the valve and guide,
and replace the guide if necessary.
(b)Cut the valve seat with a valve seat
cutter(commercially available), or grind
it with a valve seat grinder, and finish
the width of valve seat and the angle of
seat face to the correct values.
(7)Valve lapping
Be sure to lap the valves in the seas after
refacing or replacing the valves or valve
seats.
(a)Put a small amount of lapping compound
on the valve face.
a)Do not put lapping compound on the
valve stem.
b)Use a lapping compound of 120 to 150
mesh for initial lapping and a compound
of finer than 200 mesh for finish lapping.
c)Mixing the compound with a small
amount of engine oil will help put the
compound on the valve face uniformly.
Unit:mm(in.)
Item Standard Limit
Angle of 45
seat face
Width of 1.3 to 1.8 2.5
valve seat (0.051 to 0.071) (0.098)
(c)After refacing the valve seat, put lapping
compound on the valve face and lap the
valve in the valve seat.
(b)Using a lapping tool, hold the valve
against the seat and rotate it only a part
of a turn, then raise the valve off its seal,
rotating it to a new position. Press the
valve against the seal for another part of
a turn. Repeat this operation until the
compound wears and loses its cutting
property.
82
Page 84

(c)Wash the valve and valve seat with dry
cleaning solvent.
(d)Apply engine oil to the valve and lap it
in the seat.
(e)Check the valve face for contact.
6.Combustion jet replacement
Replace the combustion jets only when they
are cracked or defective.
(1)To remove the jet, insert a 6mm(0.24in.)
diameter round bar through the bore in the
cylinder head for the glow plug and tap
around the jet.
(2)To install a new jet, put the jet in position
in the head with its tangential orifice in
alignment with the center of the main
chamber and tap it with a plastic hammer.
83
Page 85

(2)TIMING GEARS AND FLYWHEEL
1.Camshaft
(1)Clearance between journal and bushing
Measure the diameter of the journal and the
bore in the bushing for the shaft to find the
clearance as shown in the illustration. If the
clearance exceeds the limit, replace the
bushing.
Unit:mm(in.)
Item Standard
Clearance between
camshaft journal 0.15(0.0059)
and bushing
(b)Installation
Install a new bushing in position with its
oil holes in alignment with those of the
oil gallery.
(2)Bushing replacement
Use Camshaft Bushing Installer(ST332340)
(special tool) for camshaft bushing
replacement.
(a)Removal
Remove the oil pan. Using a “remover”
end of the Installer, push out the bushing
into the cylinder block. Crush and
take out the bushing from the block.
(3)Lobe lift
Measure the lobe height and base circle as
shown in the illustration. Subtract the base
circle from the lobe height to find the lobe life.
If the lobe lift exceeds the limit, replace the
camshaft.
84
Page 86

Unit:mm(in.)
Item Standard Limit
Lobe height 35.72 34.72
of camshaft (1.4063) (1.3669)
2.Fuel injection pump camshaft
Measure the lobe height and base circle as
shown in the illustration. Subtract the base
circle from the height to find the lobe life.
If the lobe lift exceeds the limit, replace the
camshaft.
Unit:mm(in.)
Item Standard Limit
Lobe height of
fuel injection 44(1.73) 43(1.69)
pump camshaft.
(2)Clearance between tappet and cylinder
block
Measure the diameter of the tappet and the
bore in the cylinder block for the tappet to
find the clearance. If the clearance exceeds the
limit, replace the tappet.
Unit:mm(in.)
Item Standard
Clearance between 0.15(0.0059)
tappet and cylinder block
3.Tappets
(1)Cam contact face
Check the cam contact face of each tappet for
abnormal wear. Replace the tappet if the face
is defective.
4.Idler gear
(1)Clearance between idler gear and shaft
measure the bore in the idler gear for the
shaft and the diameter of the shaft to find the
clearance. If the clearance exceeds the limit,
replace the gear or shaft whichever is badly
worn.
Unit:mm(in.)
Item Standard Limit
Clearance between 0.03 to 0.0 0.20
idler gear and shaft (0.0012 to 0.0028) (0.0079)
85
Page 87

(2)Idler shaft replacement
Install a new idler shaft to the cylinder block
so that its dimension from the face of the block
is 26.5 0.5 mm(1.043 0.020 in.).
5.Flywheel and ring gear
(1)Flatness(difference between lower and
higher measurements)of flywheel
Put the flywheel on the surface plate. Set a
dial indicator at one side of the friction(clutch
contact) face and move it over to the opposite
side of the face as shown in the illustration to
find the flatness. If the flatness exceeds the
limit, grind the face.
Unit:mm(in.)
Item Standard Limit
Flatness of 0.15(0.0059) 0.50
flywheel maximum (0.0197)
(a)Removal
Heat the ring gear evenly with an
acetylene torch. Tap the ring gear all the
way around with a bar and a hammer as
shown in the illustration to remove it
from the flywheel.
(b)Installation
Heat a new ring gear up to a temperature
of 150 C(302 F) with a piston heater
and install it to the flywheel with its
unchamfered side foremost.
(2)Ring gear replacement
Check the ring gear and replace it if its teeth
are abnormally worn or chipped.
86
Page 88

(3)CYLINDER BLOCK, CRANKSHAFT,
PISTONS AND OIL PAN
1.Pistons, Piston Rings and Piston Pins
(1)Diameter of piston
Measure the diameter of the piston at its skirt
in a direction transverse to the piston pin with
a micrometer as shown in the illustration. If
the diameter exceeds the limit, replace the
piston. Select a new piston so that the differ ence between average weight of all pistons in
one engine does not exceed the standard.
Unit:mm(in.)
Item Nominal size Standard Limit
77.93 to
Standard 78.00 77.95 77.80
(3.0709) (3.0681 to (3.0630)
3.0689)
0.25 78.18to
Diameter (0.0098) 78.25 78.20 78.05
of piston oversize (3.0807) (3.0779to (3.0728)
3.0787)
0.50 78.43to
(0.0197) 78.50 78.45 78.30
Maximum permissible
difference between average 5(0.18)
weight of all pistons in one
engine, g(oz)
oversize (3.0905) (3.0878to (3.0827)
Unit:mm(in.)
Item Standard Limit
No.1 comp- 0.06 to 0.10 0.30(0.0118)
ression ring (0.0024 to 0.0039)
No.2 comp- 0.05 to 0.09 0.20(0.0079)
ression ring (0.0020 to 0.0035)
Oil ring 0.03 to 0.07 0.20(0.0079)
(0.0012 to 0.0028)
(b)If the clearance still exceeds the limit
after new piston rings have been
installed, replace the piston.
(3)Clearance between ends of piston ring
Put the piston ring in a gauge or in the bore in
a new cylinder block and measure the clear ance between the ends of the ring with a
feeler gauge as shown in the illustration. If the
clearance exceeds the limit, replace all the
rings.
(2)Clearance between piston ring and groove
(a)Measure the clearance between the
groove and piston with a straight edge
and a feeler gauge as shown in the
illustration. If the clearance exceeds the
limit, replace the ring.
87
Page 89

Inside diameter of gauge
Standard: 78 mm(3.07 in.)
+0.03
0
+0.0012
0
0.25 mm(0.0098 in.)oversize:
78.25 mm(3.08 in.)
+0.03
0
+0.0012
0
0.50 mm(0.0197 in.)oversize:
78.50 mm(3.09 in.)
+0.03
0
+0.0012
0
Put the piston ring in the gauge or cylinder
squarely with piston.
Unit:mm(in.)
Item Standard Limit
Clearance No.1 comp- 0.15 to 0.30
between ression ring (0.0059 to 0.0118)
ends of No.2 comp- 0.15 to 0.35 1.50
piston ring ression ring (0.0059 to 0.0138) (0.0591)
Oil ring 0.20 to 0.40
(0.0079 to 0.0157)
2.Connecting rods
Check the connecting rod for bend or twist as
follows:
(a)Measure”C”and”L”If”C”exceeds0.05 mm
(0.0020 in.)per 100 mm(3.94in.)of”L”straighten
the connecting rodwith a press.
Unit:mm(in.)
Item Standard Limit
Bend or twist of 0.05 / 100(0.0020 / 0.15 / 100
connecting rod 3.94)maximum (0.0059 / 3.94)
(4)Clearance between piston pin and piston
Measure the diameter of the piston pin and the
bore in the piston for the pin as shown in the
illustration to find the clearance. If the
clearance exceeds the limit, replace the
piston or pin whichever is badly worn.
Unit:mm(in.)
Item Nominal size Standard Limit
22.994 to
Diameter of 23 23.000
piston pin (0.91) (0.90527 to
0.90551)
Clearance 0.0006to
between 0.018 0.050
piston pin (0.00024to (0.00197)
and piston 0.00071)
(b)Generally, a connecting rod aligner is
used to check the connecting rod for
bend or twist.
To check the rod for bend, install the cap to
the connecting rod and tighten the cap nuts
to the specified torque.
88
Page 90

(c)To check the connecting rod fitted to the
piston for bend, put the connecting rod
and piston on the surface plate as shown
in the illustration, insert a round bar
having a diameter equal to that of the
crankpin into the bore in the big end of
the rod and measure”A”and”B”with
a dial indicator. Subtract”A”from”B”
to find the bend(“C”).
(b)Measure the diameter of the crankpin as
shown in the illustration to find the
clearance between the crankpin and
connecting rod bearing.
Unit:mm(in.)
Item Nominal size Standard Limit
Diameter 48 47.950to
of crankpin (1.89) 47965
(standard) (1.88779to
1.88838
Clearance 0.025to
between 0.072
crankpin and (0.00098to 0.150
connecting 0.00283 (0.00591)
rod bearing
3.Crankshaft
(1)Clearance between crankpin and connect ing rod bearing
(a)Install the bearing(upper and lower
halves)and cap to the big end of the
connecting rod and tighten the cap nuts
to the specified torque. Measure the
bore in the bearing for crankpin as
shown in the illustration.
3.55 0.5 kgf•m
Tightening torque
(25.7 1.8 lbf•ft)
[34.8 2.5 N•m]
(c)If the clearance exceeds the limit, install
a new bearing and check the clearance
again.
(d)If the clearance still exceeds the limit,
grind the crankpin to 0.25 mm(0.098
in.), 0.50 mm(0.0197 in.)or 0.75 mm
(0.0295 in.)undersize and use undersize
connecting rod bearing.
Crankpin undersizes Unit:mm(in.)
Item Undersize Finish
0.25 47.75
(0.0098) (1.8799 )
0.50 47.50
(0.0197) (1.8701 )
Crankpin
0.75 47.25
(0.0295) (1.8602 )
-0.035
-0.050
-0.00138
-0.00197
-0.035
-0.050
-0.00138
-0.00197
-0.035
-0.050
-0.00138
-0.00197
89
Page 91

a)Grind all the crankpins of one crankshaft to
the same undersize.
b)Finish the crankpin fillets to a radius of
2.5 mm(0.098 in.).
(2)Clearance between journal and main
bearing
(a)Install the main bearing(upper and
lower halves)and cap to the cylinder
block and tighten the cap bolts to the
specified torque. Measure the bore in
the bearing for the journal as shown in
the illustration.
5.25 0.25 kgf•m
Tightening torque
(38 1.8 lbf•ft)
[51.5 2.5 N•m]
Unit:mm(in.)
Item Nominal size Standard Limit
Diameter 52 51.985to
of journal (2.05) 52.000
(standard) (2.04665to
2.04724
clearance 0.030 to
between 0.077
journal and (0.00118to 0.100
main bearing 0.00303 (0.00394)
(c)If the clearance exceeds the limit, install a
new bearing and check the clearance again.
(d)If the clearance still exceeds the limit,grind
the journal to 0.25 mm(0.0098in.), 0.50
mm(0.0197 in.)or 0.75 mm(0.0295 in.)
undersize and use undersizemain bearing.
(b)Measure the diameter of the journal as
shown in the illustration to find the
clearance between the journal and main
bearing.
Journal undersize Unit:mm(in.)
Item Undersize Finish
0.25 51.75
(0.0098) 2.0374
0.50 51.50
(0.0197) 2.0276
Journal
0.75 51.25
(0.0295) 2.0177
a)Grind all the journals of one crankshaft
to the same undersize.
b)Finish the journal fillets to a radius of 2
mm(0.08 in.).
0
-0.015
0
-0.00059
0
-0.015
0
-0.00059
0
-0.015
0
-0.00059
90
Page 92

(3)Runout
Support the crankshaft on its front and rear
journals in V-blocks or in a lathe and check
runout at the center journal with a dial indica tor as shown in the illustration. Depending on
the amount of runout, repair the crankshaft by
grinding or by straightening with a press. If
runout exceeds the limit, replace the crank shaft.
(5)Crankshaft gear installation
(a)Install the key in position on the crank shaft.
(b)Install the gear in position with its
keyway in alignment with the key as
shown in the illustration.
4.Cylinder block
(1)Bore
Measure the bore at the top, middle and bot tom points on axes A and B with a cylinder
bore gauge as shown in the illustration. If any
one of the cylinders exceeds the limit, hone out
all the bores for oversize pistons.
Unit:mm(in.)
Item Standard Limit
Crankshaft runout 0.025(0.00098) 0.05(0.0020)
(4)Crankshaft gear removal
Use a gear puller to remove the gear from the
crankshaft.
Do not remove the gear unless the gear or
crankshaft is defective.
91
Page 93

Unit:mm(in.)
Piston and piston ring Bore
Size Size code Standard Limit
Standard STD 78
(3.07 )
0.25(0.0098) 25 78.25
oversize (3.0807 ) +0.2
0.50(0.0197) 50 78.50 (+0.08)
oversize (3.0905 )
+0.03
0
+0.0012
0
+0.03
0
+0.0012
0
+0.03
0
+0.0012
0
Standard
Taper and 0.01(0.0004)
out-of-round maximum
(2)Warpage of top face
Using a heavy accurate straight edge and a
feeler gauge, check the top face for warpage
in two positions lengthwise, two crosswise and
two widthwise as shown in the illustration. If
warpage exceeds the limit, reface the top face
with a surface grinder.
The maximum permissible amount of stock
to be removed from the cylinder head and
block by grinding is 0.2 mm(0.008 in.)intotal.
Checking cylinder block top face for warpage
Unit:mm(in.)
Item Standard Limit
Warpage of cylinder 0.05(0.0020) 0.10
block top face maximum (0.0039)
92
Page 94

(4)COOLING SYSTEM
1.Water pump
Check the impeller and shaft for rotation. If
they do not rotate freely or have noise, replace
the water pump assembly.
2.Thermostat(standard)
Hang the thermostat in the pan of water as
shown in the illustration. The thermostat must
be below the surface of the water and its must
be away from the sides of the pan. Heat the
water uniformly in the pan and measure a
temperature at which the valve starts opening
and a temperature at which the valve lift
(distance)is 8 mm (0.3 in.). Replace the
thermostat if defective.
3.Thermoswitch(standard)
Hang the thermoswitch in the pan of oil with its
temperature sensing end below the surface of
oil and measure the resistance while heating
the oil as shown in the illustration. If the resis tance is incorrect, replace the thermoswitch.
Resistance at 120 C 30m
(248 F)
+
Temperature at which 111 3.5 C
switch is turned ON (232 6.3 F)
_
+
_
Oil in the pan is hot. Any contact can
cause severe burns.
Temperature at which 85 1.5 C
valve starts opening (180 2.7 F)
Temperature at which 95 C
valve lift is 8 mm(0.3 in.) (203 F)
Water in the pan is hot. Any contact can
cause severe burns.
4.Thermounit(standard)
Hang the thermounit in the pan of antifreeze
with its temperature sensing end below the
surface of antifreeze and measure the resist ance while heating the antifreeze as shown in
the illustration. If the resistance is incorrect,
replace the thermounit.
50 C(122 F):80 10
Standard 80 C(176 F):29.5 2.5
120 C(248 F):10 0.3
Antifreeze in the pan is hot. Any contact
can cause severe burns.
93
Page 95

(5)LUBRICATION SYSTEM
1.Oil pump
Visually check the pump for rough rotation or
other defects. Replace the pump assembly if
defective.
2.Oil pressure switch
(1)Test for continuity between the terminal
and body with an ohmmeter as shown in the
illustration. No continuity is the cause for
replacing theswitch.
(2)Insert a small diameter bar into the oil hole
in the switch and lightly push it in to test
for no continuity as shown in the illustra tion. Any continuity is the cause for
replacing the switch.
(3)Apply a pressure air of 0.5kgf/cm
(49kpa)to the switch through the oil
hole to test for no continuity.
Any continuity is the cause f or replacing
the switch. Also, check for air leaks.
Any air leak is an indication of a ruptured
diaphragm. In such a case, replace the switch.
2
(7psi)
3.Pressure relief valve
(1)Check the valve seat for contact.
Check the spring for damage.
(2)Measure the oil pressure at which the
relief valve opens (the oil pressure with
the engine running at the rated rpm).
If the pressure is not correct, remove the
cap nut increase or decrease the amount of
shims. The engine oil pressure tap is
located on the right side of the engine.
Relief valve 3.5 0.5kgf/cm
2
opening pressure (50 7psi)
[343 49kPa]
94
Page 96

(6)ELECTRICAL SYSTEM
1.Starter
(1)Brushes
(a)Wear
Replace the brushes if they are worn
down to the wear limit line which is the
bottom of the border for Mitsubishi
mark. Replace the brush holder assembly
if the brushes are worn beyond the
wear limit line.
(c)Brush holders
Test for no continuity between the positive
brush holder and brush holder base
as shown in the illustration. If there is
any continuity between them, replace
the brush holder. Also, check the brush
holder for loose staking.
(b)Brush spring tension
Test the spring tension using a new
brush as shown in the illustration. Read
the load when the spring just moves off
the brush. If the tension is below the
limit, replace the spring.
Unit:kgf(lbf)[N]
Item Standard Limit
Brush spring 3.0(6.6)[29.4] 1.8(4.0)[17.7]
tension
(2) Armature
(a)Commutator runout
Support the armature in V-blocks and
measure the commutator runout with a
dial indicator. If runout e xceeds the
limit, turn the commutator in a lathe.
The cut should be made within the limit
of the commutator diameter .
Unit: mm (in.)
ltem Standard Limit
Runout of 0.03 0.10
commutator (0.0012) (0.0039)
95
Page 97

(b)Diameter of commutator
Measure the diameter of commutator.
If it exceeds the limit, replace the armature.
Unit: mm (in.)
Item Standard Limit
Diameter of 32(1.26) 31(1.22)
commutator
(c)Mica undercut
Measure the undercut of mica insulation
between the adjacent segments. If
undercut exceeds the limit, recondition
the mica, or replace the armature.
Unit: mm (in.)
Item Standard Limit
Undercut 0.5 (0.020) 0.2 (0.008)
of mica
(e)Testing for grounded circuit
Test the armature for grounded circuit as
shown in the illustration. If there is any
continuity between commutator segment
and coil, the armature is grounded and
should be replaced.
(d)Testing for short circuit
Place the armature on growler and
slowly rotate it with a hacksaw blade
held above the armature core. The
hacksaw blade vibrates against the core
when it is above a slot containing a
shorted winding. A shorted armature
should be replaced.
(f)Testing for open circuit
Test the armature for open circuit as
shown in the illustration. If there no
continuity between the segments, the
armature is open circuited and should be
replace.
96
Page 98

(3)Field coils
Replace the yoke assembly if (a)There is any continuity between the
brush and yoke.
(b)There is no continuity between the
brushes.
(c)The pole piece or coil is loosen.
(4)Bearings
Replace the bearings if they are noisy or fail
to run freely.
(5)Overrunning clutch
Replace the overrunning clutch assembly if (a)The pinion is not locked when spun
freely when spun in the reverse direction
(clockwise).
(b)The pinion is worn or chipped
Do not wash the overrunning clutch with
cleaning solvent.
(6)Front bracket
Replace the front bracket assembly if the ball
bearing is noisy or fails or rotate freely.
(7)Reduction gears
Replace the reduction gears if they are worn
or damaged.
97
Page 99

2.Alternator
(1)Diodes
(a)Test the resistance between the diode
and heat sink. First touch the positive
(+) prod of an ohmmeter to the diode,
then the negative (-) prod. If the
resistance is infinite in both cases, the
diode is open. If it is nearly zero in both
cases, the diode is shorted. Do the same
step for the remainder of the diodes. If
any diode is open or shorted, replace the
rectifier.
(3)Stator core
(a)Test for continuity between the leads as
shown in the illustration. No continuity
shows there is an open circuit in the
stator core. Replace the stator core.
(2)Field coil
(a)Test for continuity between the slip rings
as shown in the illustration. No continuity
shows there is an open circuit in the field
coil. Replace the field coil.
(b)Test for continuity between the slip
ring and shaft(or core)as shown in the
illustration. Any continuity shows there
is a grounded circuit in the field coil.
Replace the field coil.
(b)Test for no continuity between each lead
and stator core as shown in the illustration.
Any continuity shows there is a grounded
circuit in the stator core. Replace the stator
core.
98
Page 100

(4)Brushes
(a)Make replacement of brushes that have
been worn down to,or beyond, the wear
limit line.
(c)To install the new brushes, put them in
position in the brush holder and solder
the leads to the brushes.
(b)To remove the brushes from the brush
holder for replacement, unsolder the
leads from the brushes. This will
permit removal of the brushes and
springs.
3.Glow plug
Test for continuity between the terminal and
body as shown in the illustration.
Item Standard
Resistance 0.55
99
 Loading...