

Page 1

OPERATOR’S MANUAL
Zero Turn Tractor
Models
364, 365 & 365L
IMPORTANT: READ SAFETY RULES AND INSTR UCTIONS CAREFULLY
Warning: This unit is equipped with an internal combustion engine and should not be used on or near any unimproved forest-
covered, brush-covered or grass-covered land unless the engine’s exhaust system is equipped with a spark arrester meeting
applicable local or state laws (if any). If a spark arrester is used, it should be maintained in effective working order by the operator.
In the State of California the above is required by law (Section 4442 of the California Public Resources Code). Other states may have
similar laws. Federal laws apply on federal lands. A spark arrester for the muffler is available through your nearest engine authorized
service dealer or contact the service department, P.O. Box 368023 Cleveland, Ohio 44136-9722.
CUB CADET CORP. P.O. BO X 368023 CLEVELAND, OHIO 44136-9722
PRINTED IN U.S.A.
FORM NO.
770-10099E.fm
(10/00)
Page 2

TABLE OF CONTENTS
Content Page
Important Safe Operation Practices...................................................................3
Slope Gauge......................................................................................................6
Know Your Z-Series...........................................................................................7
Operating Your Z-Series....................................................................................10
Making Adjustments ..........................................................................................12
Maintaining Your Z-Series .................................................................................14
Mower Deck.......................................................................................................18
Troubleshooting.................................................................................................21
Parts List............................................................................................................22
FINDING MODEL NUMBER
This Operator’s Manual is an important part of your new Z-Series. It will help you assemble, prepare and
maintain the unit for best performance. Please read and understand what it says.
Before you start assembling your new equipment, please locate the model plate on the
equipment and copy the information from it in the space provided below. The information on
the model plate is very important if you need help from our Customer Support Department or
an authorized dealer.
• You can locate the model number by looking at the rear right side below the battery. A sample model
plate is explained below. For future reference, please copy the model number and the serial number
of the equipment in the space below.
(Model Number)
(Serial Number)
CUB CADET CORP.
P.O. BOX 368023
CLEVELAND, OHIO 44136
Copy the model number here:
Copy the serial number here:
CALLING CUSTOMER SUPPORT
If you have difficulty assembling this product or have any questions regarding the controls, operation or
maintenance of this unit, please call the Customer Dealer Referral Line.
Call 1- (800)-528-1009 to reach the Customer Dealer Referral Line. Please have your unit’s
model number and serial number ready when you call. See previous section to locate this
information. You may be asked to enter the serial number in order to process your call.
For more details about your unit, visit our website at www.cubcadet.com
2
Page 3

SECTION 1: IMPORTANT SAFE OPERATION PRACTICES
WARNING: This symbol points out important safety instructions which, if not followed, could
endanger the personal safety and/or property of yourself and others. Read and follow all instructions in
this manual before attempting to operate this machine. Failure to comply with these instructions may
result in personal injury. When you see this symbol - heed its warning.
WARNING: Engine Exhaust, some of its constituents, and certain vehicle
components contain or emit chemicals known to State of California to cause cancer
and birth defects or other reproductiv e harm.
DANGER
manual. As with any type of power equipment, carelessness or error on the part of the operator can
result in serious injury. This machine is capable of amputating hands and feet and throwing objects.
Failure to observe the following safety instructions could result in serious injury or death.
: This machine was built to be operated according to the rules for safe operation in this
General Operation
1. Read, understand, and follow all instructions on the
machine and in the manual(s) before attempting to
assemble and operate. Keep this manual in a safe
place for future and regular reference and for
ordering replacement parts.
2. Be familiar with all controls and their proper
operation. Know how to stop the machine and
disengage them quickly.
3. Never allow children under 14 years old to operate
this machine. Children 14 years old and over
should read and understand the operation
instructions and safety rules in this manual and
should be trained and supervised by a parent.
4. Never allow adults to operate this machine without
proper instruction.
5. To help avoid blade contact or a thrown object
injury, keep bystanders, helpers, children and pets
at least 75 feet from the machine while it is in
operation. Stop machine if anyone enters the area.
6. Thoroughly inspect the area where the equipment
is to be used. Remove all stones, sticks, wire,
bones, toys, and other foreign objects which could
be picked up and thrown by the blades. Thrown
objects can caus e serious pe rsonal in jury.
7. Plan your mowing pattern to avoid discharge of
material toward roads, sidewalks, bystanders and
the like. Also, avoid discharging material against a
wall or obstruction which may cause discharged
material to ricochet back toward the operator.
8. Always wear safety glasses or safety goggles
during operation and while performing an
adjustment or repair to protect your eyes. Thrown
objects which rico chet can cause se rious injury to
the eyes.
9. Wear sturdy, rough-soled work shoes and closefitting slacks and shirts. Loose fitting clothes and
jewelry can be caught in movable parts. Never
operate this machine in bare feet or sandals.
10. Be aware of the mower and attachment discharge
direction and do not point it at anyone. Do not
operate the mower without the discharge cover or
entire grass catcher in its proper place.
11. Do not put hands or feet near rotating parts or
under the cutting deck. Contact with the blade(s)
can amputate hands and feet.
12. A missing or damaged discharge cover can cause
blade contact or thrown object injuries.
13. Stop the blades when crossing gravel drives,
walks, or roads and while not cutting grass.
14. Watch for traffic when operating near or crossing
roadways. This machine is not intended for use on
any public roadway.
15. Do not operate the machine while under the
influence of alcohol or drugs.
16. Mow only in daylight or good artificial light.
17. Never carry passengers.
18. Disengage blades before moving both control
handles into reverse. Back up slowly. Always look
down and behind before and while backing to avoid
a back-over accident.
19. Slow down before turning. Operate the machine
smoothly. Avoid erratic operation and excessive
speed.
20. Disengage blades, set parking brake, stop engine
and wait until the blades come to a complete stop
before removing grass catcher, emptying grass,
unclogging chute, removing any grass or debris, or
making any adjustments.
21. Never leave a running machine unattended.
Always turn off blades/PTO, move both control
handles into neutral position, set parking brake,
stop engine and remove key before dismounting.
22. Use extra care when loading or unloading the
machine int o a trailer or truck. T his unit shou ld not
be driven up or down ramp(s), because the unit
could tip over, causing serious personal injury. The
unit must be pushed manually on ramp(s) to load or
unload properly.
3
Page 4

23. Muffler and engine become hot and can cause a
burn. Do not touch.
24. Check overhead clearances carefully before driving
under low hanging tree branches, wires, door
openings etc., where the operator may be struck or
pulled from the unit, which could result in serious
injury.
25. Your machine is designed to cut normal residential
grass of a height no more than 10“. Do not attempt
to mow through unusually tall, dry grass(e.g.,
pasture) or piles of dry leaves. Dry grass or leaves
may contact the engine exhaust and/or build up on
the mower deck presenting a potential fire hazard.
26. Use only accessories and attachments approved
for this machine by the machine manufacturer.
Read, understand and follow all instructions
provided with the approved accessory or
attachment.
27. Data indicates that operators, age 60 years and
above, are involved in a large percentage of riding
mower-related injuries. These operators should
evaluate their ability to operate the riding mower
safely enough to protect themselves and others
from serious injury .
28. If situations occur which are not covered in this
manual, use care and good judgment. Contact your
dealer or telephone 1-800-528-1009 for assistance
and the name of your nearest servicing dealer.
Slope Operation
Slopes are a major factor related to loss of control and
tip-over a cciden ts whic h can result in sever e inju ry or
death. All slopes require extra caution. If you cannot
back up the slope or if you feel uneasy on it, do not mow
it.
For your safety, use the slope gauge included as part of
this manual to measure slopes before operating this
machine on a sloped or hilly area. If the slope is greater
than 15 degrees as shown on the slope gauge, do not
operate this machine on that area or serious injury
could result.
Do:
1. Mow up and down slopes, not across. Exercise
extreme caution when changing direction on
slopes.
2. Watch for holes, ruts, bumps, rocks, or other hidden
objects. Uneven terrain could overturn the
machine. Tall grass can hide obstacles.
3. Use slow speed. Tires may lose traction on slopes
even though the brakes are functioning properly.
4. Follow the manufacturer’s recommendations for a
counterweight for additional stability.
5. Use extra care with grass catchers or other
attachments. These can change the stability of the
machine.
6. Keep all movement on the slopes slow and gradual.
Do not make sudden changes in speed or direction.
Rapid engagement or braking could cause the front
of the machine to lift and rapidly flip over backwards
which could cause serious injury.
7. Avoid starting or stopping on a slope. If tires lose
traction, disengage the blades and proceed slowly
straight down the slope.
Do Not:
1. Do not turn on slopes unless necessary; then, turn
slowly and gradually downhill, if possible.
2. Do not mow near drop-offs, ditches or
embankments. The mower could suddenly turn
over if a wheel is over the edge of a cliff, ditch, or if
an edge caves in.
3. Do not try to stabilize the machine by putting your
foot on the ground.
4. Do not use a grass catcher on steep slopes.
5. Do not mow on wet grass. Reduced traction could
cause sliding.
Children
1. Tragic accidents can occur if the operator is not
alert to the presence of children. Children are often
attracted to the machine and the mowing activity.
They do not understand the dangers. Never
assume that children will remain where you last
saw them.
a. Keep children out of the mowing area and in
watchful care of a responsible adult other
than the operator.
b. Be alert and turn machine off if a child enters
the area.
c. Before and while backing, look behind and
down for smal l children .
d. Never carry children, even with the blades
shut off. They may fall off and be seriously
injured or inte rfere with sa fe m achine
operation.
e. Use extreme care when approaching blind
corners, doorways, shrubs, trees or other
objects that may block your vision of a child
who may run into the machine.
f. Disengage the cutting blades before moving
both control handles into reverse. The “NoCut-In Reverse” feature is a reminder not to
cut in reverse and to help avoid back over
accidents. Do not defeat it.
g. Keep ch ildr en away fro m hot o r ru nning
engines. They can suffer burns from a hot
muffler.
h. Remove key when machine is unattended to
prevent unauthorized operation.
9. Never allow children under 14 years old to operate
the machine. Children 14 years old and over should
read and understand the operation instructions and
safety rules in this manual and should be trained
and supervised by a parent.
4
Page 5

Service
Safe Handling Of Gasoline:
1. To avoid personal injury or property damage use
extreme care in handling gasoline. Gasoline is
extremely flammable and the vapors are explosive.
Serious personal injury can occur when gasoline is
spilled on yourself or your clothes which can ignite.
Wash your skin and change clothes immediately.
a. Use only an approved gasoline container.
b. Never fill containers inside a vehicle or on a
truck or trailer bed with a plastic liner. Always
place containers on the ground away from
your vehicle be fore fil ling.
c. When practical, remove gas-powered
equipment from the truck or trailer and refuel
it on the ground. If this is not possible, then
refuel such equipment on a trailer with a
portable container, rather than from a
gasoline dispenser nozzle.
d. Keep the no zzle in c ontact wi th the ri m of the
fuel tank or container opening at all times
until fuelin g is complete . Do not use a no zzle
lock-open device.
e. Extingu ish all ciga rettes , cigars, pi pes and
other sources of ignition.
f. Never fuel machine indoors.
g. Never remove gas cap or add fuel while the
engine is hot or running. Allow engine to cool
at least two minutes before refueling.
h. Never over fill fuel tank. Fill tank to no more
than ½ inch below bottom of filler neck to
allow space for fuel expansion.
i. Replace gasoline cap and tighten securely.
j. If gasoline is spilled, wipe it off the engine
and equipment. Move unit to another area.
Wait 5 minutes before starting the engine.
k. To reduce fire hazards, keep machine free of
grass, leaves, or other debris build-up. Clean
up oil or fuel spillage and remove any fuel
soaked debris.
l. Never store the machine or fuel container
inside where there is an open flame, spark or
pilot light as on a water heater, space heater,
furnace, clothes dryer or other gas
appliances.
m. Allow a machine to cool at least 5 minutes
before storing.
General Service:
1. Never run an engine indoors or in a poorly
ventilated area. Engine exhaust contains carbon
monoxide, an odorless, and deadly gas.
2. Before cleaning, repairing, or inspecting, make
certain the blades and all moving parts have
stopped. Disconnect the spark plug wire and
ground against the engine to prevent unintended
starting.
3. Periodically check to make sure the blades come to
complete stop within approximately (5) five
seconds after operating the blade disengagement
control. If the blades do not stop within the this time
frame, your unit should be serviced professionally
by an authorized MTD service dealer.
4. Check parking brake frequently as it is subjected to
wear during normal operation. Adjust and service
as required.
5. Check the blades and engine mounting bolts at
frequent intervals for proper tightness. Also,
visually inspect blades for damage (e.g., excessive
wear, bent, cracked) Replace the blades with the
original equipment manufacturer’s (O.E.M.) blades
only, listed in this manual. “Use of parts which do
not meet the original equipment specifications may
lead to improper performance and compromise
safety!”
6. Mower blades are sharp. Wrap the blade or wear
gloves, and use extra caution when servicing them.
7. Keep all nuts, bolts, and screws tight to be sure the
equipment is in safe working condition.
8. Never tamper with the safety interlock system or
other safety devices. Check their proper operation
regularly.
9. After striking a foreign object, stop the engine,
disconnect the spark plug wire(s) and ground
against the engine. Thoroughly inspect the
machine for any damage . Repair the damag e
before starting and operating.
10. Never attempt to make adjustments or repairs to
the machine while the engine is running.
11. Grass catcher components and the discharge
cover are subject to wear and damage which could
expose moving parts or allow objects to be thrown.
For safety protection, frequently check components
and replace immediately with original equipment
manufacturer’s (O.E.M.) parts only, listed in this
manual. “Use of parts which do not meet the
original equipment specifications may lead to
improper performance and compromise safety!”
12. Do not change the engine governor settings or
over-speed the engine. The governor controls the
maximum safe operating speed of the engine.
13. Maintain or replace safety and instruction labels, as
necessary.
14. Observe proper disposal laws and regulations for
gas, oil, etc. to protect the environment.
WARNING: Your Responsibility: Restrict
the use of this power machine to persons
who read, understand and follow the
warnings and instructions in this manual
and on the machine.
5
Page 6
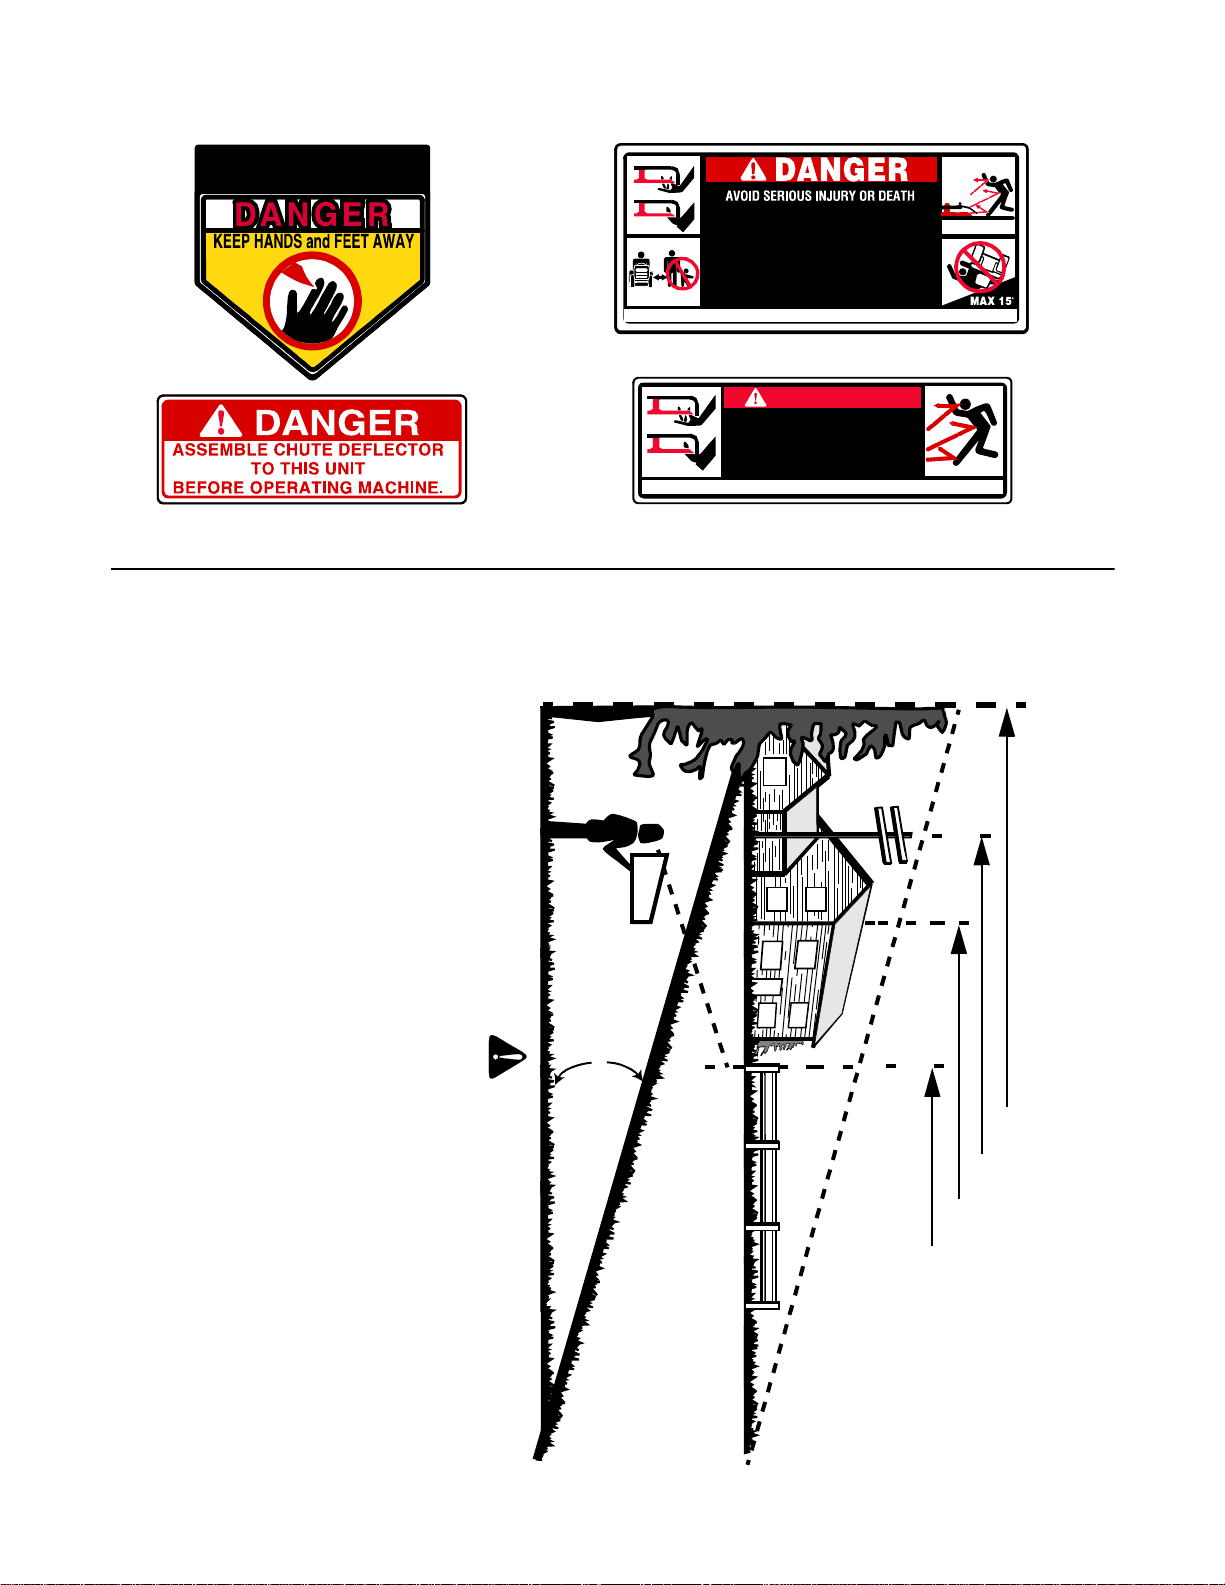
TO REDUCE THE RISK OF INJURY,
DO NOT OPERATE MOWER UNLESS
DISCHARGE CHUTE COVER OR GRASS
CATCHER IS IN ITS PROPER PLACE.
KEEP HANDS AND FEET AWAY FROM ROTATING PARTS.
REMOVE OBJECTS THAT CAN BE THROWN BY THE
BLADE IN ANY DIRECTION. WEAR SAFETY GLASSES.
DO NOT MOW WHEN CHILDREN OR OTHERS ARE AROUND.
NEVER CARRY CHILDREN.
USE EXTRA CAUTION ON SLOPES. DO NOT MOW SLOPES
GREATER THAN 15.MOW UP AND DOWN, NOT ACROSS.
AVOID SUDDEN TURNS, USE LOW GEAR.
DANGER
KEEP HANDS AND FEET AWAY.
DO NOT OPERATE MOWER
UNLESS THIS GUARD OR
ENTIRE GRASS CATCHER IS
ASSEMBLE CHUTE DEFLECTOR TO THIS UNIT BEFORE OPERATING.
IN ITS PROPER PLACE.
S30010
S30012
S30015
READ OPERATOR'S MANUAL. KEEP SAFETY DEVICES WORKING.
SECTION 2: SLOPE GAUGE
Use this page as a guide to determine slopes where you may not operate safely. Do not operate your lawn mower
on such slopes.
Do not mow on inclines with a slope in excess of 15 degrees (a rise of approximately 2-1/2
feet every 10 feet). A riding mower could overturn and cause serious injury. If operating a
walk-behind mower on such a slope, it is extremely difficult to maintain your footing and
you could slip, resulting in serious injury.
Operate RIDING mowers up and down slopes, never across the face of slopes.
Operate WALK-BEHIND mowers across the face of slopes, never up and down slopes.
F
O
L
D
O
N
D
O
T
T
E
D
15°
WARNING
L
I
N
E
,
R
E
P
R
E
S
E
N
T
I
N
G
A
1
5
°
S
L
O
P
E
OR A FENCE POST
SIGHT AND HOLD THIS LEVEL WITH A VERTICAL TREE
A POWER POLE
A CORNER OF A BUILDING
6
Page 7
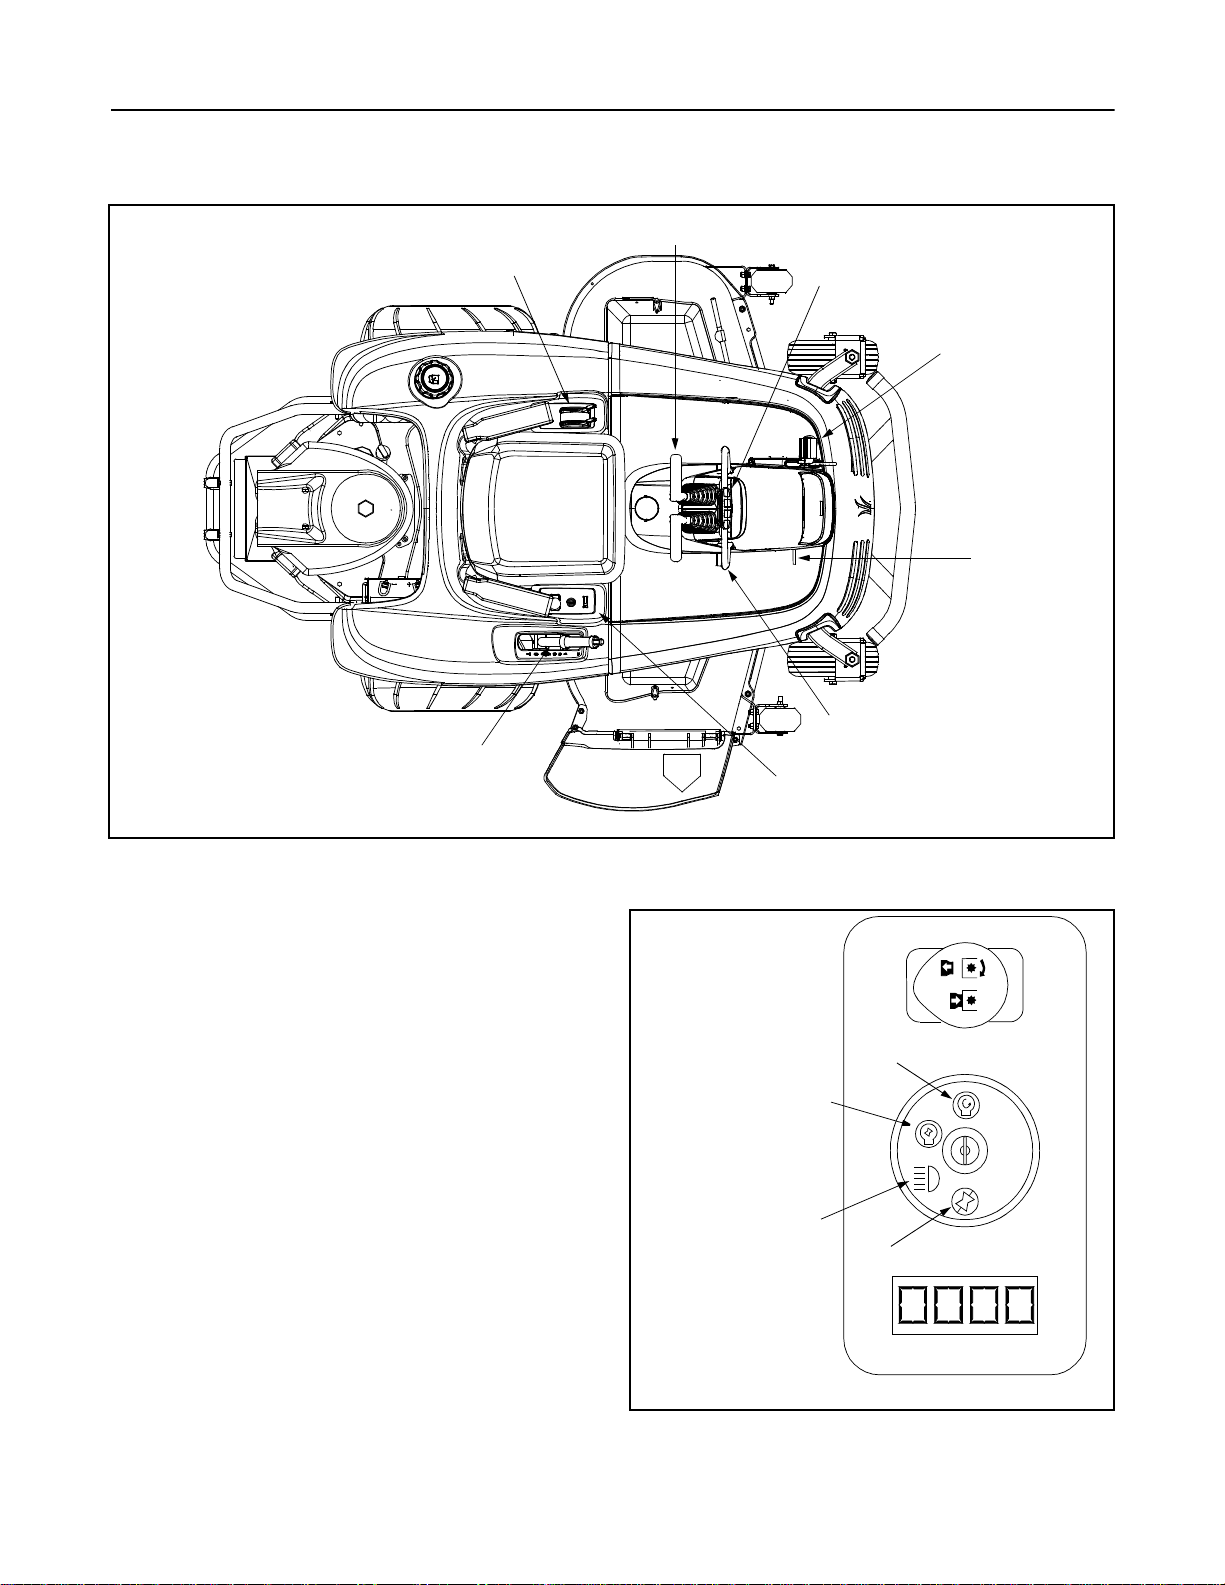
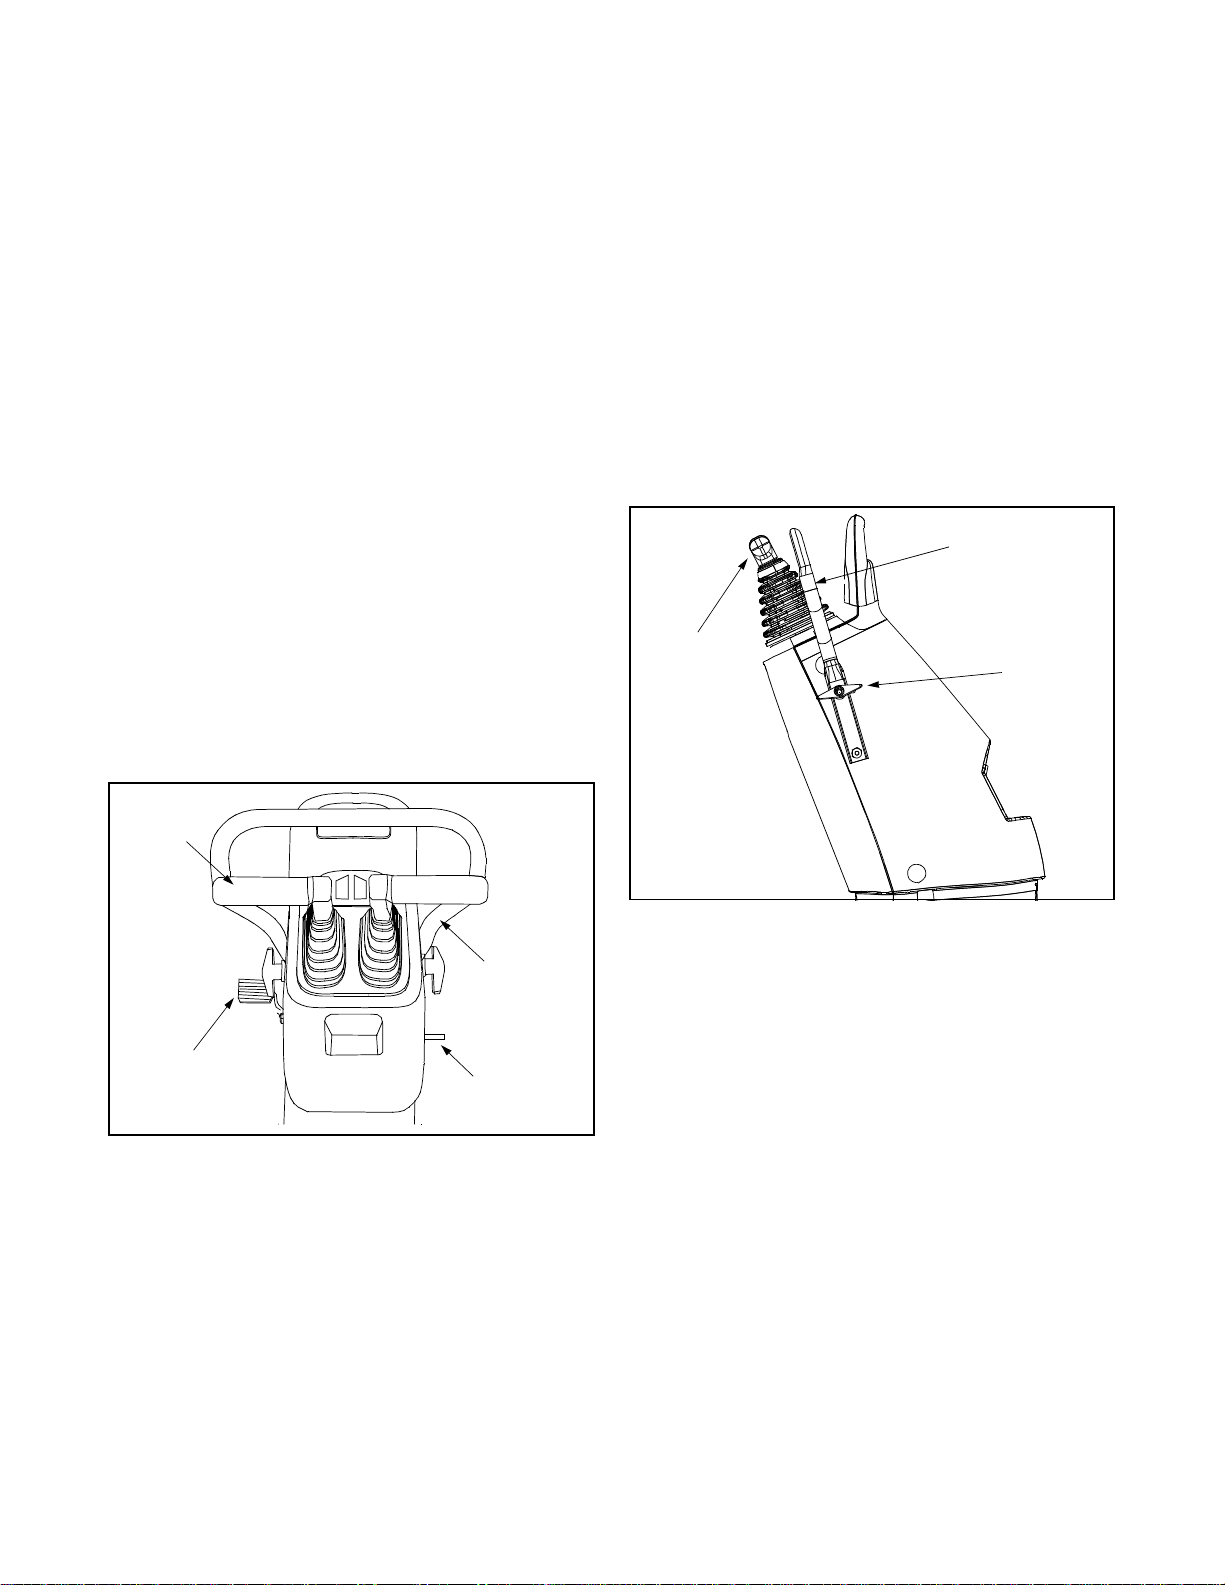
SECTION 3: KNOW YOUR Z-SERIES
NOTE: Reference to right or left hand side of the mower is observed from the operating position.
Throttle Lever And
Choke Lever
Lift Handle
Drive Handles
Indicator Panel
Brake
Pedal
Parking
Brake Pedal
Speed Control Bar
Right Control
Panel
Figure 1
Read this operator’s manual and safety rules before
operating your Z-Series. Compare the illustrations in
this manual with your unit to familiarize yourself with the
location of various controls and adjustments.
Reference to right or left hand side of the unit is
observed from the operating position. Save this manual
for future reference. See Figure 1.
Right Control Pa nel
Ignition/Light Switch
The ignition/light switch is located on the right control
panel and it is used to start the engine. Insert key into
the ignition switch and turn clockwise to the START
position. Release key to the ON position once engine
has fired.The ignition switch is also used to operate the
headlights when the switch is in the ON/LIGHT position.
See Figure 1 and Figure 2.
Hour Meter
The hour meter is located on the right control panel and
the meter’s display stays on continuously. The hour
value is the number of hours of engine’s operation. Use
the hour value to determine when maintenance is
required. See Figure 1 and Figure 2.
PTO Switch
Start
On
Ignition/Light Switch
On/
Light
Off
Hour Meter
Front
Figure 2
7
Page 8
Electric PTO (Power Take-Off) Switch
The PTO switch is located on the right control panel
and it is used to control the engagement of the cutting
blades. When the switch is up, the cutting blades are
engaged. When the switch is down, the cutting blades
are disengaged. See Figure 1 and Figure 2.
NOTE: The PTO switch must be in the disengaged
(OFF) position when st arting the eng ine, when sh ifting
into reverse, and when the operator leaves the seat.
Throttle Lever and Choke Lever
The choke lever is located on the left control panel.
Activating the choke control closes the choke plate on
the carburetor and aids in starting the engine during
initial or cold engine start-up. During normal operation
the choke lever should be in the OFF position. Push the
lever forward to turn choke on and pull choke lever back
to turn choke off. See Figure 1 and Figure 3.
The throttle lever is also located on the left control panel
and it is used to regulate the engine speed. To get
maximum efficiency from cutting, the throttle should be
in the FAST position when operating the mower. Push
the throttle lever forward for faster engine speed and
pull lever back for slower engine speed. See Figure 3.
Front
Throttle Lever
ON
Choke
Lever
Seat Adjustment
Lever
Figure 4
Lift Handle
The lift handle is located on the right fender and it raises
and lowers the cutting height of the mower deck. The
height positions are one through seven and the L is the
lock position. The lock position is used when removing
the mower deck. See Figure 1 and Figure 5.
Height
Positions
7
6
5
4
3
2
Figure 5
Button
1
L
Fast
OFF
Figure 3
Seat Adjustment Lever
The seat adjustment lever is located beneath the seat
and it is used to move the seat forward and backward.
See Figure 4.
• Pull up on the seat adjustment lever and push the
seat forward or back to the desired position.
• Release the seat adjustment lever so that it locks
the seat in place.
WARNING: Do not try to adjust the seat
position while operating the Z-Series.
Indicator Pa nel
The indicator panel is located at the top of the control
tower. See Figure 1 and Figure 6. When the corresponding light is illuminated it indicates:
Low
Engine Oil
• Low Engine Oil: Stop the tractor immediately and
check the engine oil level. Continuing to operate
with low engine oil can severely damage the
engine.
8
Temperature
Figure 6
Battery
Page 9
• Battery: The BATTERY indicator light will
illuminate any time the ignition key is in the ON
position and the engine is not running. If it
illuminat es wh ile t he en gine is runn ing, then t he
battery is i n need of a char ge. Refer to the
MAINTENANCE section of this manual for the
proper battery charging procedure.
• Temperature: (Liquid Cooled Models On ly) Stop
the engine immediately. Check clean air intake and
cooling ar eas.
Brake Pedal and P arking Brake Pedal
The brake pedal is located on the lower left side of the
control tower and it is used to engage the brake in order
to slow down or stop the unit. It also is used to engage
the parking brake. See Figure 1 and Figure 7.
drive handles are released, they immediately return
towards the neutral position as the unit slows to a stop
position (while the engine continues to run).
The rear wheels move and steer the unit. The left drive
handle controls the left rear wheel and the right drive
handle controls the right rear wheel. When a drive
handle is moved forward, the respective wheel turns
forward. When a drive handle is moved backward, the
respective wheel turns in reverse.
Each drive handle has a range in the forward position
(push) and the reverse position (pull). The drive
handles can be moved together in the same direction or
independent of each other in any combination (i.e. left
push, right pull). refer also to the Quick Reference
OPERATION section. See Figure 8.
Parking Brake Pedal
The parking brake pedal is located on the lower right
side of the control tower. Engage the parking brake
when the unit is not in use. See Figure 7.
• Push down on the brake pedal and hold.
• Push down on the parking brake pedal and hold.
• Release br ake pedal to l ock pa rking brake
engagement.
• To release parking brake pedal, press down on
brake pedal and release.
Drive
Handle
Speed
Control Bar
Brake
Pedal
Figure 7
Parking
Brake Pedal
Drive Handles
The drive handles (left and right) are located at the top
of the control tower. The drive handles are used to
move, steer, and stop the Z-Series. The drive handles
will return toward the neutral position when released;
however, the driver should place the drive handles in
the neutral position so the unit will not move. If the drive
handles are not placed in the neutral position, the ZSeries may creep. See Figure 1 and Figure 7.
When the engine is running, the unit will move in
accordance with the drive handles (push, pull, or both)
as they are moved from the neutral position. When the
Speed Control
Bar
Drive
Handles
Figure 8
Wing Nut
Speed Control Bar
The speed control bar is connected to the console with
two wing nuts and it is used as a grab bar for entry or
exit from the tractor and allows for pre-set maximum
travel speed. See Figure 1 and Figure 8.
• Loosen the wing nuts located on either side of the
plastic console.
• Rotate speed control bar to desire location.
• Tighten wing nut to secure speed control bar.
NOTE: Limit loosening the wing nuts to 1 1/2 turns. This
will insure proper a ssembly o f the screw not visible on
the other side of the plastic console.
The speed control bar also aids the drive handles in
making “perfect U-turns”. To move forward grasp both
drive handles and the speed control bar at the same
time, then release the left drive handle to turn left and
then grasp it again to continue straight ahead or release
the right drive handle to turn right. Refer also to the
Quick Reference Chart located in the OPERATION
Section.
9
Page 10

SECTION 4: OPERATING YOUR Z-SERIES
Gas and Oil Fill-Up
Service the engine with gasoline and oil as instructed in
the separate engine manual packed with your mower.
Read instructions carefully.
IMPORT ANT :
MUST check the oil level before operating. Be careful
not to overfill. Overfilling with oil may cause the engine
to smoke. This will result in poor engine performance
and could cause permanent engine damage.
Your unit is shipped with oil; however, you
WARNING: Never fill fuel tank indoors
with engine running or until the engine
has been allowed to co ol for at least two
minutes after running. Do not fill closer
than 1/2 inch from the top o f the f uel ta nk
to prevent spills and to allow for fuel
expansion. If gasoline is accidently
spilled, move unit away from area of spill.
Avoid creating any source of ignition until
gasoline vapors have disappeared.
Operating Guidelines
• Study this manual carefully for it has been provided
to help you safely operate and maintain this unit
and familiarize yourself with all instruments and
controls.
• NO RIDERS! Keep c hildr en an d pet s awa y from
unit during operation.
• Always look down and behind before and while
backing up.
• Keep safety devices (guards, shields, and
switches) in place and working.
• Use the SL OPE GA UGE to det ermine safe
operating areas. Go up and down slopes, not
across.
• Before leaving operator’s position, disengage the
PTO (down), engage the parking brake and turn
ignition switch to OFF.
IMPORT ANT :
pressure washer or garden hose to clean your unit.
They may cause damage to electric components,
spindles, pulleys, bearings, or the engine.
We do not recommend the use of a
WARNING: Always remove the key from
the ignition switch to avoid accidental
starting.
Safety interlock Switches
• The engine will not crank or start without the brake
pedal fully engaged and the PTO disengaged
(down).
• If the operator leaves the unit with the PTO in the
RUN position or the parking brake disengaged, it
automatically shuts the engine off.
Starting Engine
• Insert the key into the ignition switch.
• Move the choke lever to the full choke position (all
the way toward the front of the unit).
• Move the throttle lever to the FAST (Rabbit)
position (all the wa y tow ard t he fr ont o f the unit) .
NOTE: Less choking may be required due to engine
temperature variance. If the engine is warm, choking
may not be necessary.
• Push the PTO (power take-off) switch to OFF.
• Fully depress the brake pedal.
• Turn the ignition switch to the START position and
release it as soon as the engine starts. It will return
to the ON position.
• Move the choke lever to the OFF position
(rearward).
NOTE: If starting problems are encountered, refer to
the TROUBLESHOOTING section.
Driving the Z-Series
• Set the throttle to the fastest position (rabbit).
• Release the parking brake by depressing the
parking brake pedal.
• Gradually move the drive handles in the desired
direction, referring to the Quick Reference Chart.
NOTE: The Z-Series spe ed is bas ed on th e posi tion o f
the drive handles. Push the handles forward to increase
speed and back toward neutral for slower speeds.
Stopping The Z-Series
• Bring the Z-Series to a stop by pulling the drive
handles to the neutral position.
• Disengage the PTO (down).
• Push down on the brake pedal and hold.
• Push down on the parking brake to lock
engagement.
• Turn the ignition to the OFF position.
• Remove the ke y.
Driving On Slopes
Before operating the Z-Series on any slope:
• Use the SLOPE GAUGE to determine if the slope is
safe for operation.
WARNING: Do not mow on inclines with a
slope in excess of 15 degrees (a rise of
approximately 2-1/2 feet every 10 feet). The
tractor could over turn and cause serious
injury.
10
Page 11
• If safe for operation, walk the slope and look for
hazards such as rocks, mounds, ruts, stumps, or
other irregularities.
• After removing debris and identifying irregularities
of the slope, back the Z-Series up the steepest
slope you intend to work. If it cannot negotiate the
slope in reverse, the slope is too steep.
Use the following guidelines when operating on a slope:
• Drive UP and DOWN slopes. Never drive across
slopes.
• Avoid turns when driving on a slope. If you must
turn, turn down the slope. Turning up a slope
greatly increases the chance of roll over.
• Avoid stopping when driving on a slope. If you must
stop, start slowly and smoothly to reduce the
chance of flipping the Z-Series over backwards.
• Position the Z-Series on a flat and level surface and
engage the parking brake.
• Remove each hydraulic relief levers from the lock
position. There is a lever for the right and left
hydraulic pump.
• Slide the levers into the slots to relieve the
hydraulic pumps. See Figure 9.
• Disengage parking brake and push unit.
Mowing
• For best results it is recommended that the first two
laps be cut with the discharge thrown towards the
center. After the first two laps, reverse the direction
to throw the discharge to the outside for the
balance of cutting. This will give a better
appearance to the lawn.
• Do not cut grass too short. Short grass invites weed
growth and yellows quickly in dry weather.
• Mowing should always be done with the engine at
full throttle.
• Do not mow at hi gh grou nd speed , espec ially if
mulching or bagging.
• Under heavier conditions, it may be necessary to
go back over the cut area a second time to get a
clean cut.
• Do not attempt to mow heavy brush, weeds, or
extremely tall grass. Your Z-Series is designed to
mow lawns, not clear brush.
• Keep the blades sharp and replace the blades
when worn. Refer to the MAINTENANCE section of
the manual for proper blade sharpening
instructions.
Pushing Your Unit
To push your unit you will have to first relieve the
hydrostatic pumps.
Lock Position
(Unit will not roll)
Relief
Lever
Neutral Position
(Unit will roll)
Figure 9
Quick Reference Chart
The Z-Series can turn with a zero radius. The Z-Series
uses the rear tires to turn. When turning with a zero
radius, the rear tires are used as the pivot point. A
conventional tractor can make a circle but it needs a
turning radius, usually based on the distance between
the front and rear wheels. With a shorter overall length
and a zero turn radius, the Z-Series has an excellent
maneuverability.
The Z-Series does not have a steering wheel, instead
drive handles are used to steer and to move the unit.
When the drive handles are in the full positions (pull or
push), the wheels turn at full speed based on the
throttle setting. Positions between neutral and full are
proportional across the range based on the throttle
setting. The quick reference chart indicates the
direction the Z-Series will move based on the position
of the drive handles. See Figure 10.
WARNING: The hydraulic relief levers are
near engine parts that can be hot. To avoid
injury wait until engine parts have cooled
before disengaging.
11
Page 12
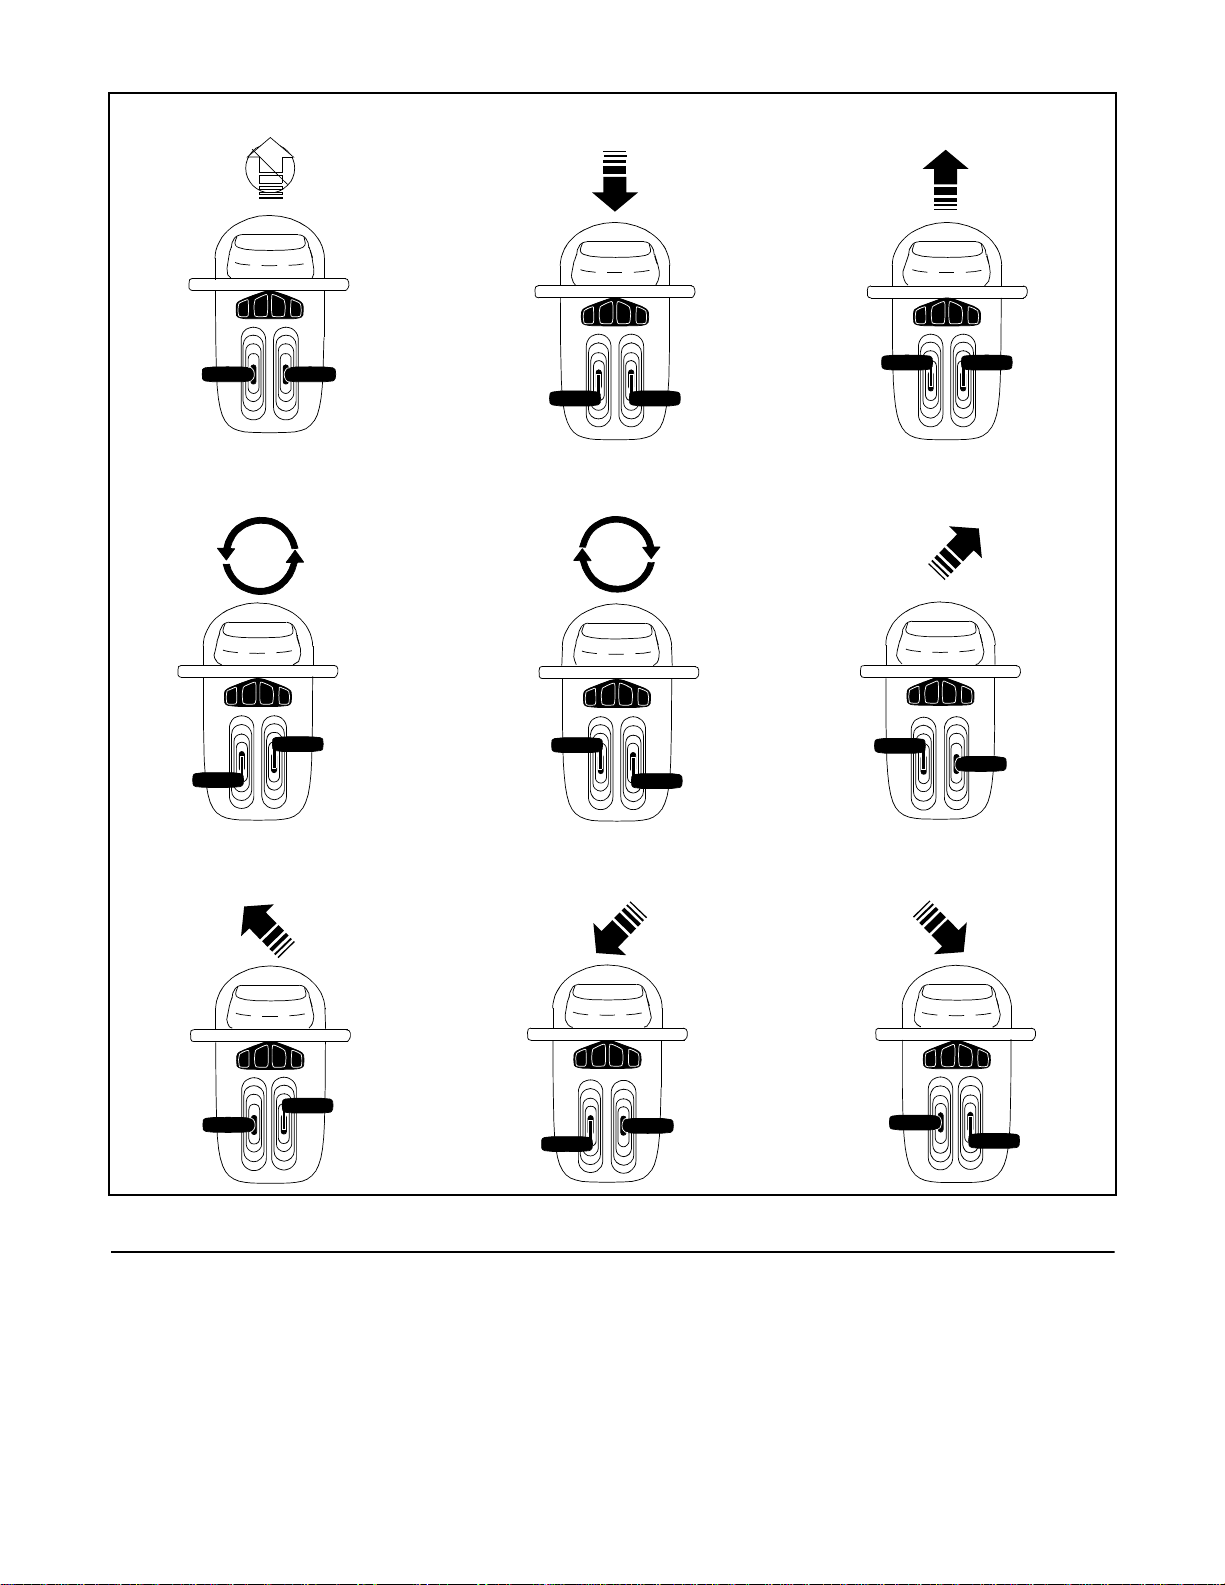
Release Handles = Neutral / Stop
Pull Handles Equal Back =
Straight Reverse
Push Handles Equal Forward =
Straight Forward
Full Right Forward And Full
Left Back = Zero Turn Left
Right Forward And Left Neutral =
Left T u rn
Full Right Back and Full Left
Forward = Zero Turn Right
Right Neutral And Left Back =
Reverse Left
Right Neutral And Left Forward =
Right Turn
Right Back And Left Neutral =
Reverse Right
Figure 10
SECTION 5: MAKING ADJUSTMENTS
Adjusting the Mower Deck Height
• To push or pull the lift lever, depress and hold the
button. Refer to Figure 5.
• Move the handle up/down to the desired location.
• Release bu tton at th e desi red posit ion.
Adjusting the Seat Position
• Lift the seat adjustment lever. Refer to Figure 4.
• Slide the seat either forward or back to the desired
location.
• Lock the seat in position by releasing the seat
adjustment lever.
12
Page 13
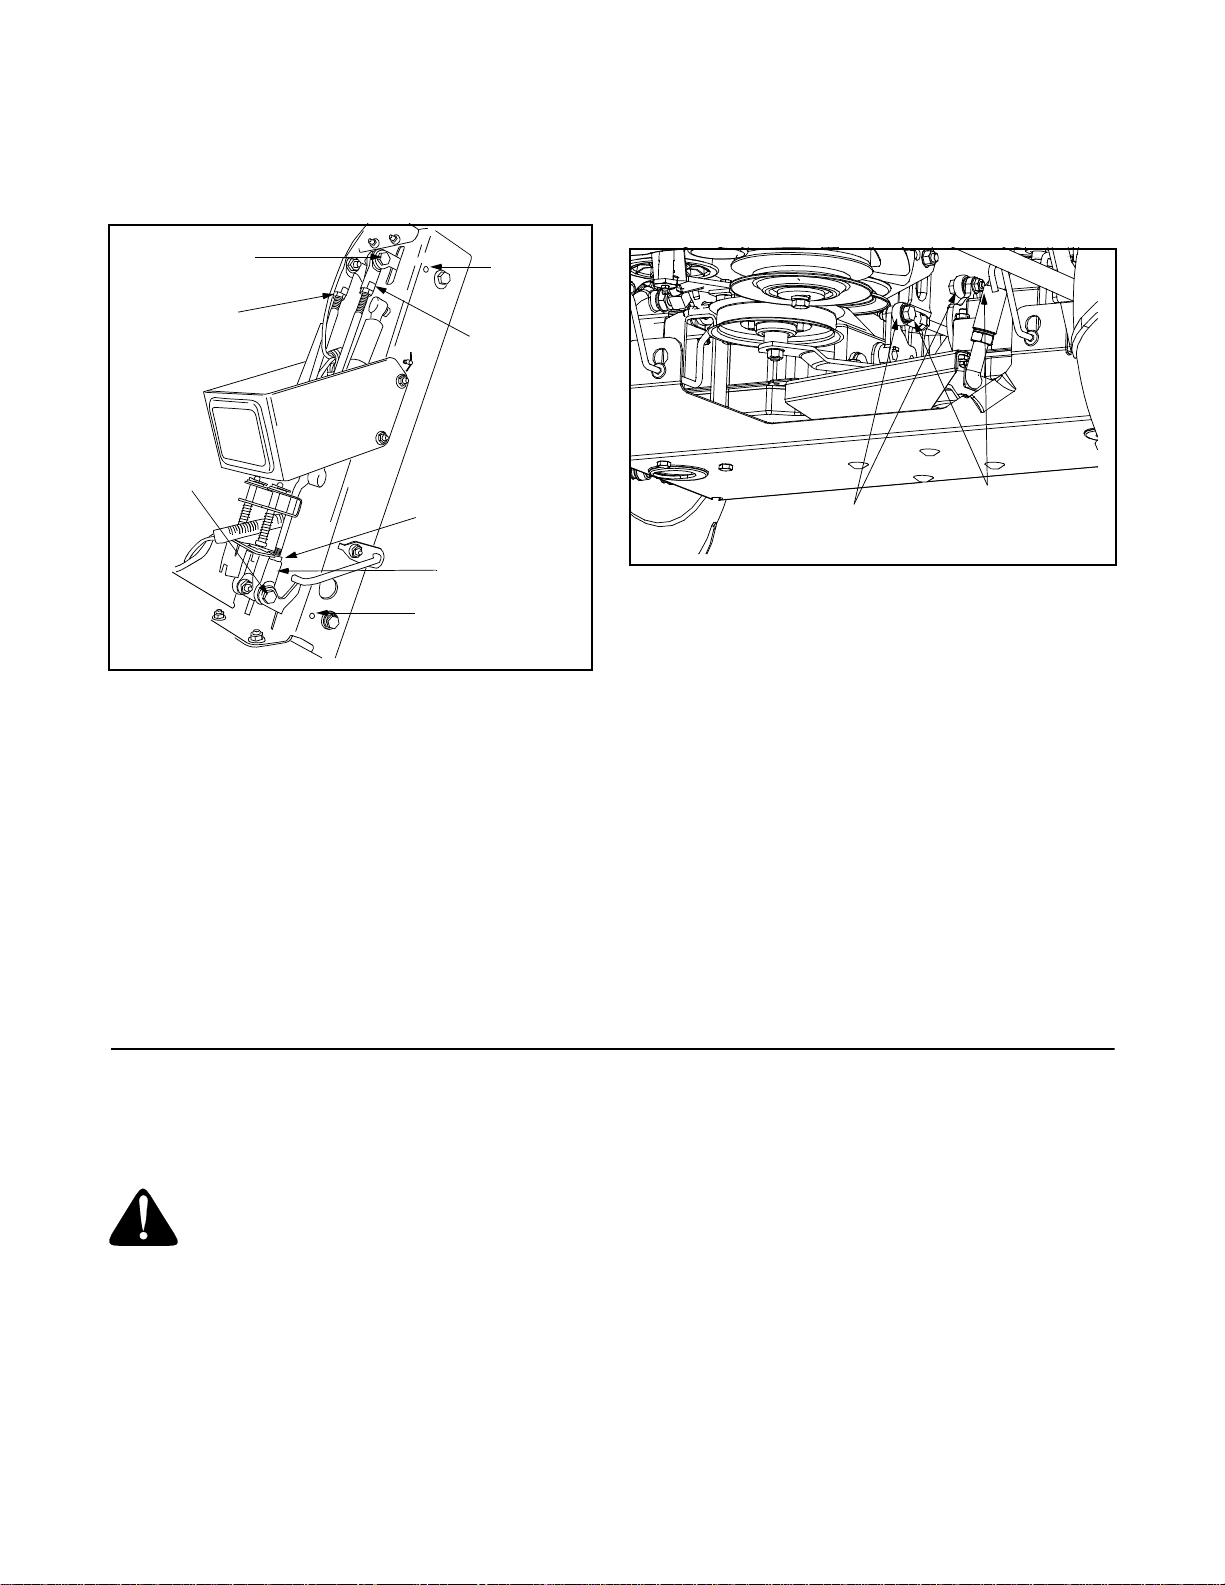
Checking the Brake Adjustment
• Position the Z-Series on a level surface and move
the throttle lever to the slowest position (turtle).
• Stop the engine, remove the key from the ignition,
and engage the parking brake.
• Release both hydraulic relief levers.
• From the rear push on the frame and try to move
the Z-Series.
If you can move it, then the brake force must be
increased. Go to AD JUSTING BRAKE FORC E.
If you can not move it, the go on to next step.
• Release the parking brake and try again to move
the Z-Series by pushing.
If you can not move it, then the brake force must be
decreased. Go to ADJUSTING BRAKE FORCE.
If you can move it, then you are done (no adjustment
necessary).
Adjusting Brake Force
• Place the Z-Series on level surface without the
brake engaged and place blocks behind the
wheels.
• Turn the engine OFF and remove the key from the
ignition.
• From underneath the Z-Series directly behind the
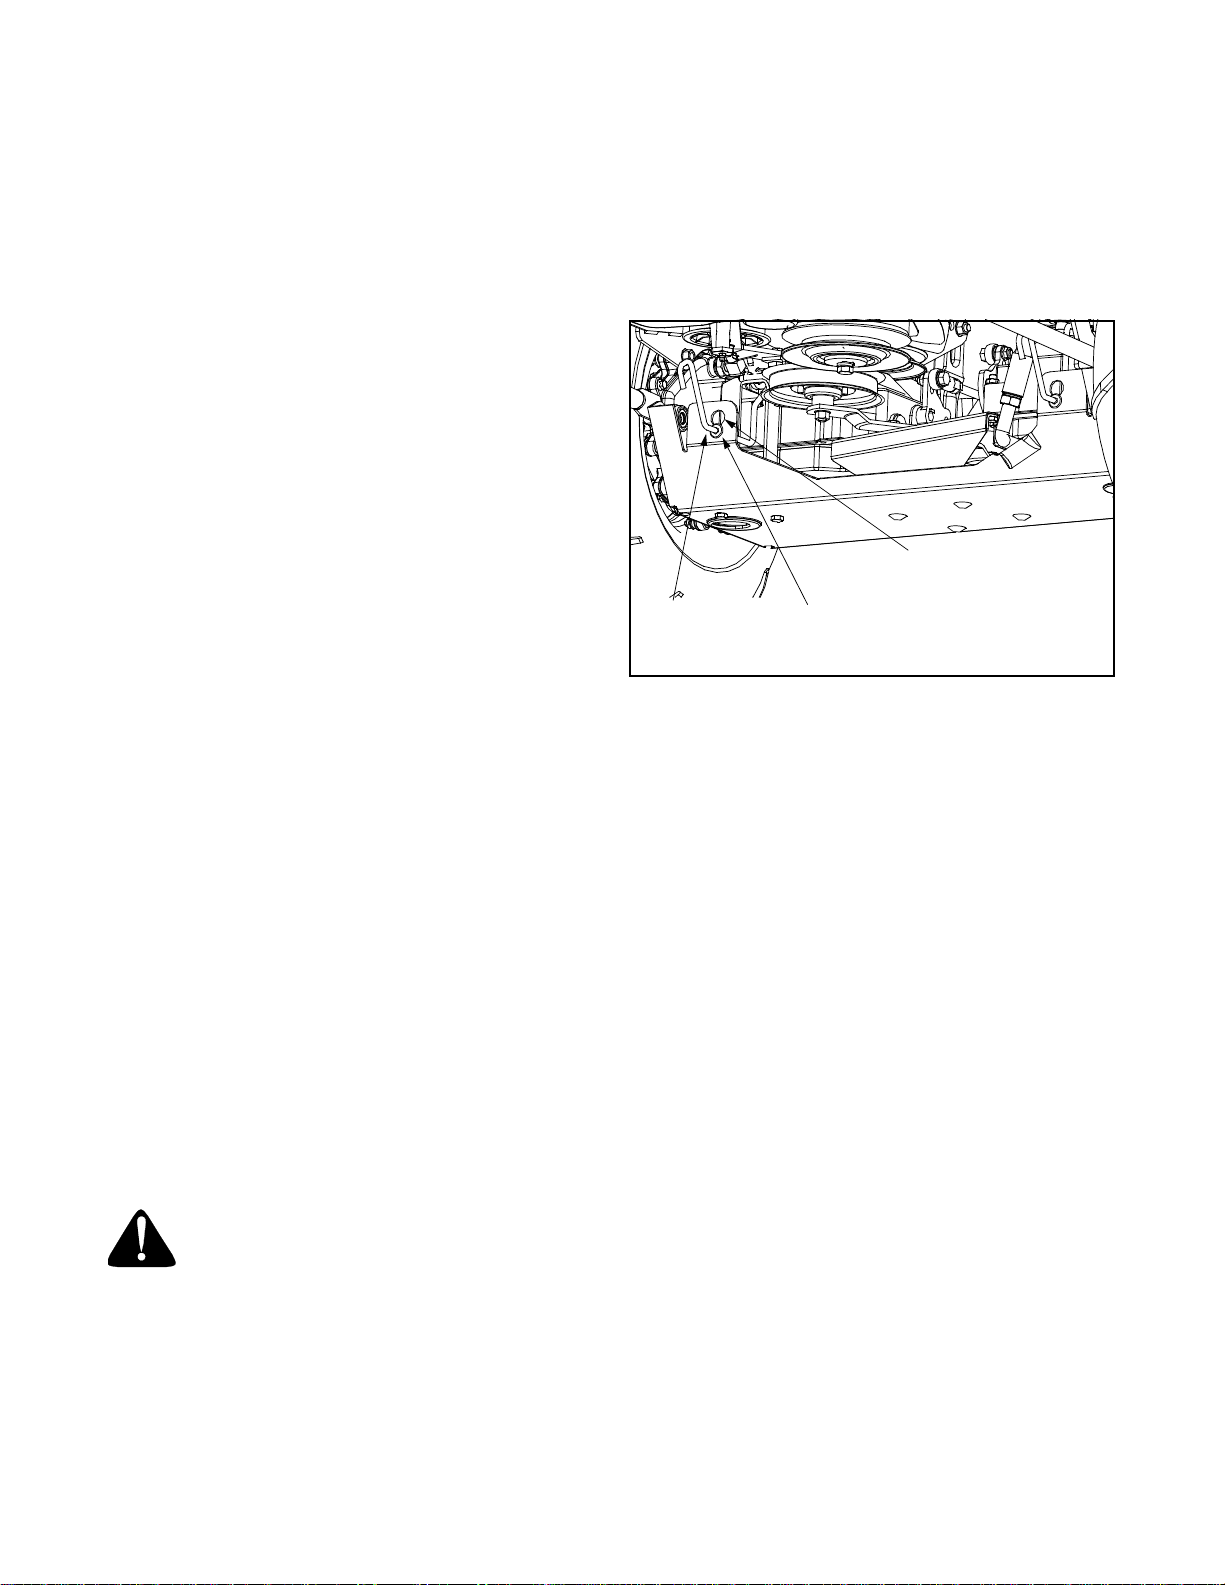
caster wheel pivot bar, locate the brake rods. There
is one on the right and one on the left.
See Figure 11.
• The factory sets a 1/16” gap minimum between the
brake arm and frame of the Z-Series. More
adjustment may be necessary
If incre ased forc e is n eeded , then rot ate br ake rods
clockwise.
If decreased force is needed, then rotate brake rods
counterclockwise.
• Repeat process on the other brake rod.
• Check the operation of the brakes before operating.
If the adjustment does not help, see your dealer.
Frame
Measure Gap
Brake Arm
Figure 11
Steering Adjustment
• Remove the ignition key from ignition switch and
detach the bottom of the rubber boot cover on the
drive handles.
• Slide the boot cover all the way up (toward the drive
handles) to access the drive handle bolts.
• Remove both bolts securing the drive handles and
remove the drive handles and the rubber boot.
Brake Rod
• Remove the four bolts securing the retaining plate
to the control tower cover.
• Pull up on the cover and slide up and over the
control tower.
• Remove both safety switches from their respective
holders by squeezing together on the retaining clips
while gently pushing upward until the switches clear
the bracket s.
13
Page 14
• Remove bolts that secure linkage to upper control
handles and lower control arms. The shock
absorbers should remain connected to linkage.
See Figure 12.
• With quarter inch by seven inch pins still installed in
the top and bottom linkage arms, loosen the jam
nuts at both the front and rear ends of linkage that
runs from bottom linkage arms to hydrostatic
pumps. See Figure 13.
Hex Bolt
Jam Nuts
Hex Bolt
Jam Nuts
Alignment
Holes
Figure 12
• Insert quarter inch by seven inch pin or equivalent
through the top and bottom alignment holes of the
control arms to secure arms at positive neutral.
• With the shock absorber still bolted to linkage,
loosen the jam nuts at both ends of the linkage so
the alignaball adjustment can be made.
• Adjust the alignaball until retaining bolts slips
through alignaball and hole in arm with little effort.
• Re-install bolts, washers, and nuts in all four ends
of linkage. Tighten jam nuts against alignaball ends
to keep ends from turning.
• Lift rear wheels off ground using floor jack or other
suitable lifting device.
Alignment
Holes
Alignaball
Alignaball
Spherical Rods
Jam Nuts
Figure 13
• Set parking brake and start the engine (set throttle
at full speed). Make sure that the PTO is OFF.
• Rotate rods (lengthen or shorten) to bring each
hydrostat to neutral.
NOTE: The control linkage going to the hydrostatic
pump has left-handed thr eads at the pump and righthanded threads at the tower.
• Tighten the jam nuts earlier loosened and
reassembled the safety switches.
• Remove quarter inch by seven inch pins from top
and bottom holes.
• Reassemble body panels and drive handle
assembly.
• Make sure that all hardware is tightened.
SECTION 6: MAINTAINING YOUR Z-SERIES
Lubrication
WARNING: Always stop engine and
disconnect spark plug wire(s) and ground
against the engine before performing any
maintenance.
Engine
Lubricate the engine with motor oil as instructed in the
separate engine manual packed with your unit.
Control Tower
There are two grease fittings that are located on the
right side of tower. Lubricate both with a grease gun at
least once a season. The control tower cover must be
removed to lubricate. See Figure 14.
Caster Assembly / Wheels
There are three grease fittings, one on each wheel
spindle and one in middle of caster assembly. The
caster wheels have one grease fitting on each wheel.
Lubricate these with a grease gun at least once a
season. See Figure 14.
Deck Lift Pivot / Lift Handle
The deck lift pivot assembly has grease fittings on each
end and the lift handle has a grease fitting on its lower
side. Lubricate with a grease gun at least once a
season. See Figure 14.
Mower Deck
The mower deck m ay hav e grea se fi ttin gs loc ated on
the idler assembly or the spindle assemblies.
14
Page 15
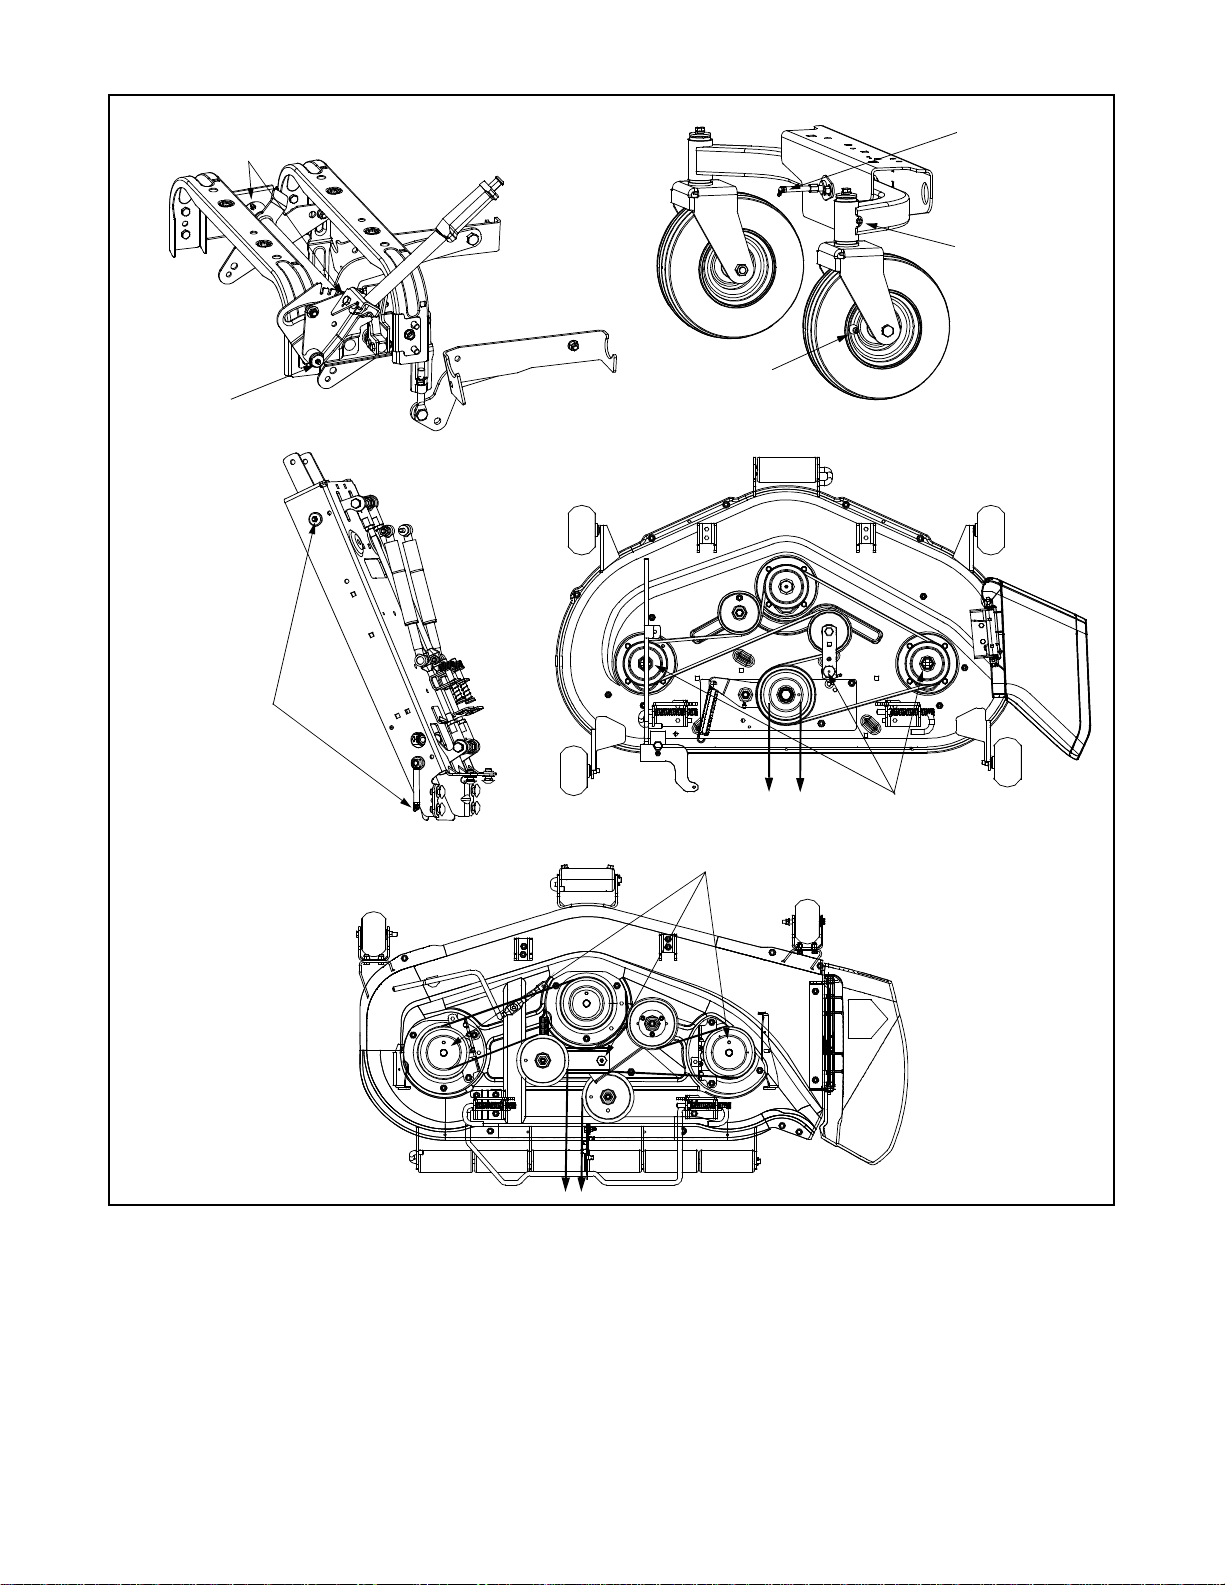
Deck Lift Pivot
Grease Fittings
Lift Handle
Grease Fitting
Control Tower
Grease Fittings
Pivot Bar
Grease Fitting
Caster Wheel
Spindle Grease
Fitting
Caster Wheel
Grease Fitting
Figure 14
Engine
Refer to the separate engine manual for engine
maintenance instructions.
Service air cleaner every 25 hours under normal
conditions. Clean every few hours under extremely
dusty conditions. To service the air cleaner, refer to the
separate engine manual.
The spark plug(s) should be cleaned and the gap reset
once a season. Spark plug replacement is recom-
44” Mower Deck Grease Fittings
54” Mower Deck Grease Fittings
mended at the start of each mowing season. Check
engine manual for correct plug type and gap
specifications.
Fuel Tank
The fuel tank cap is located on the left rear fender
panel. Remove the fuel cap by unscrewing and fill the
gas tank from this point.
15
Page 16
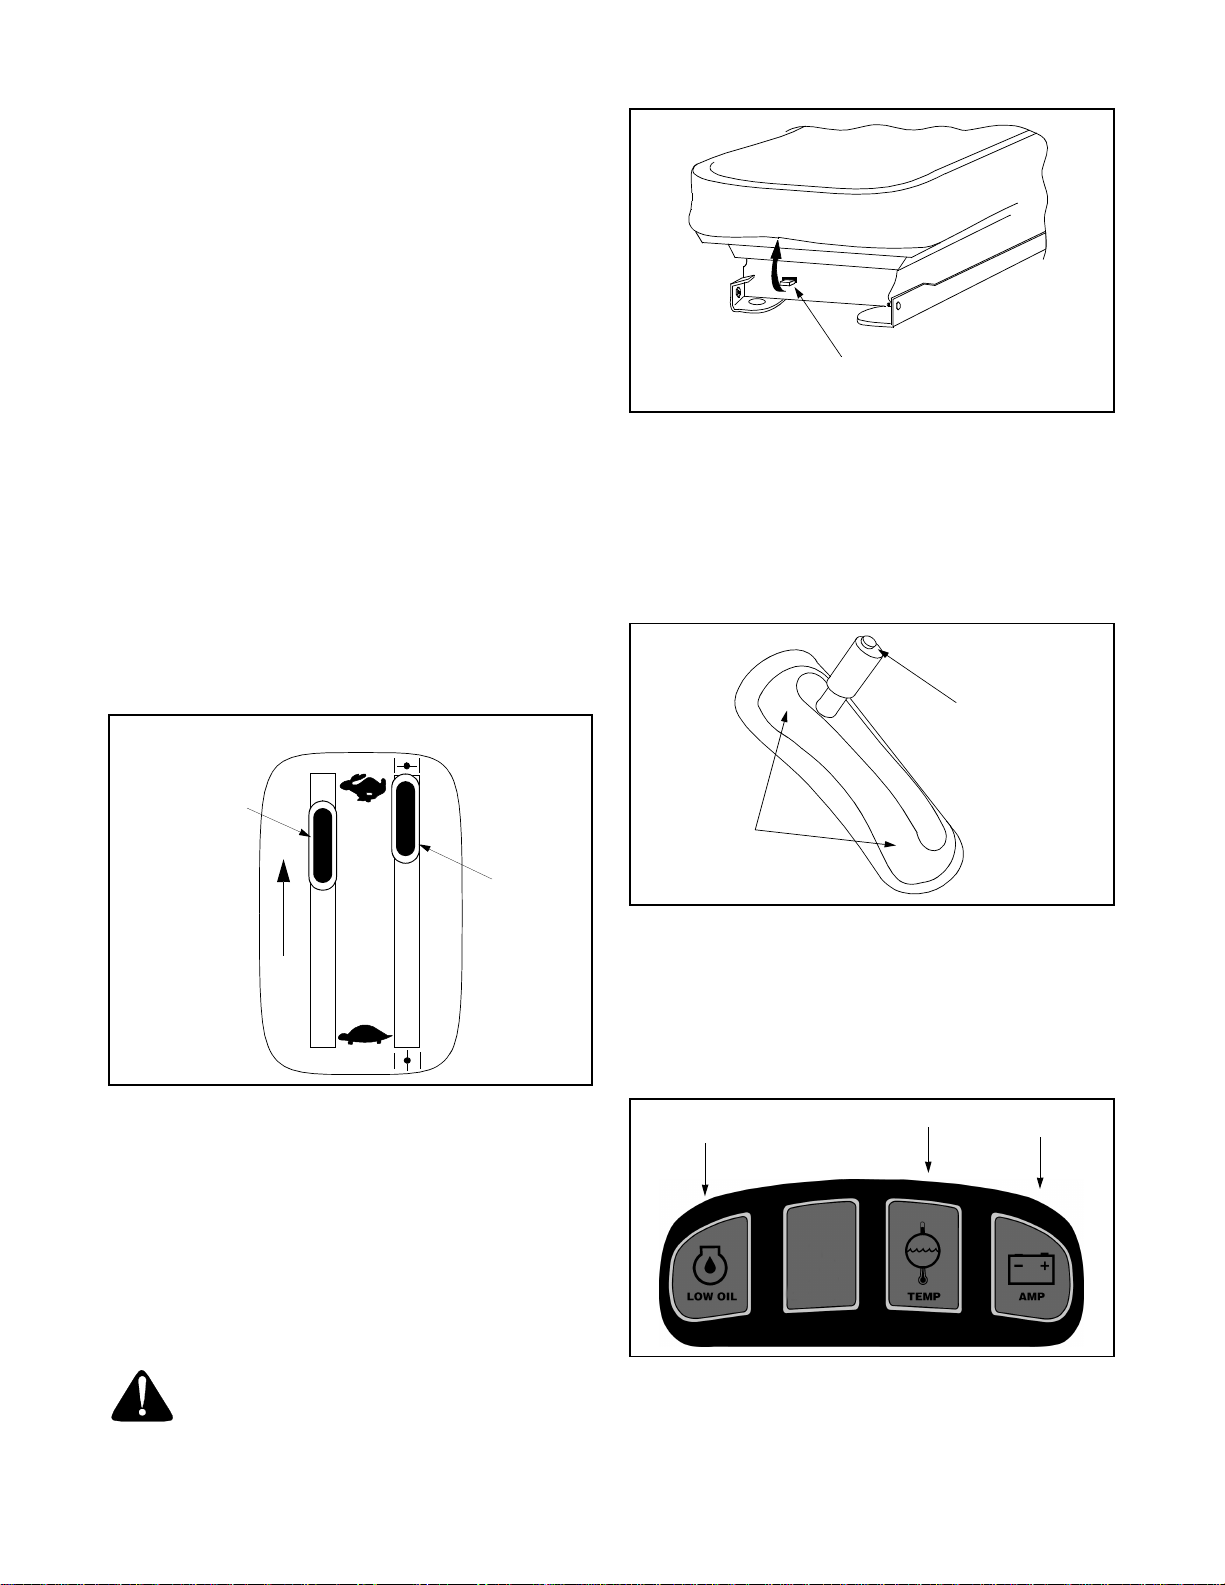
Checking Hydraulic Oil
Check the oil level of hydraulic units only when the
engine is OFF.
During initial break-in (first five hours of operation),
check oil before each use and after every hour of
operation.
During normal operation, check oil after 50 hours of
operation.
• Flip seat up and clean the area around the
hydraulic oil dipstick to prevent debris from entering
the crankca se. Se e Figur e 15.
• Remove the hydraulic fill plug/dipstick and read the
level:
If hydraulic oil level is inside operating range, then do
nothing.
If hydraulic oil level is below operating range, the add
hydraulic oil before operating. Also check for leaks.
If hydraulic oil level is above operating range, then drain
excess oil before operating.
• Reinstall the dipstick completely into the fill tube.
Hydraulic Fill
Plug/Dipstick
• Pour proper amount of hydraulic oil level, insert the
dipstick, and check the hydraulic oil level.
Draining Hydr aulic Oil
• Place the Z-Series on a level surface and engage
the parking brake.
• Stop the engine and remove the key from the
ignition switch.
• Remove the mower deck. See Removing the
Mower Deck section.
• Flip seat up and clean the area around the
hydraulic oil dipstick to prevent debris from entering
the crankcase.
• Remove hydraulic fill plug/dipstick.
• Place a suitable container (at least 2 gallon) under
the hydr aulic oil filt er.
• Remove the hydr aulic fil ter to al low hydraul ic oil to
drain. See Figure 16.
Hydraulic Fill
Point
Figure 15
Adding Hydraulic Oil
WARNING: Never overfill the hydraulic
units. Damage can result if the oil level is
not within the operating range. When
adding hydraulic oil, do so in small
quantities and recheck the oil level before
adding more.
• Place the Z-Series on a level surface and engage
the parking brake.
• Stop the engine and remove the key from the
ignition switch.
• Clean the area around the hydraulic oil dipstick to
prevent debris from entering the crankcase.
• Remove the hydrau lic fi ll pl ug an d inser t a cle an
funnel into the hydraulic fill point. See Figure 15.
Hydraulic
Oil Filter
Left Transmission
Drain Plug
Figure 16
• Place a small pan under the skid plate and drain oil
from both left and right axles.
• Replace bo th a xle dra in pl ugs and i nstal l new
hydraulic oil filter.
• Add proper amount of hydraulic oil to reservoir.
• Run and check oil level.
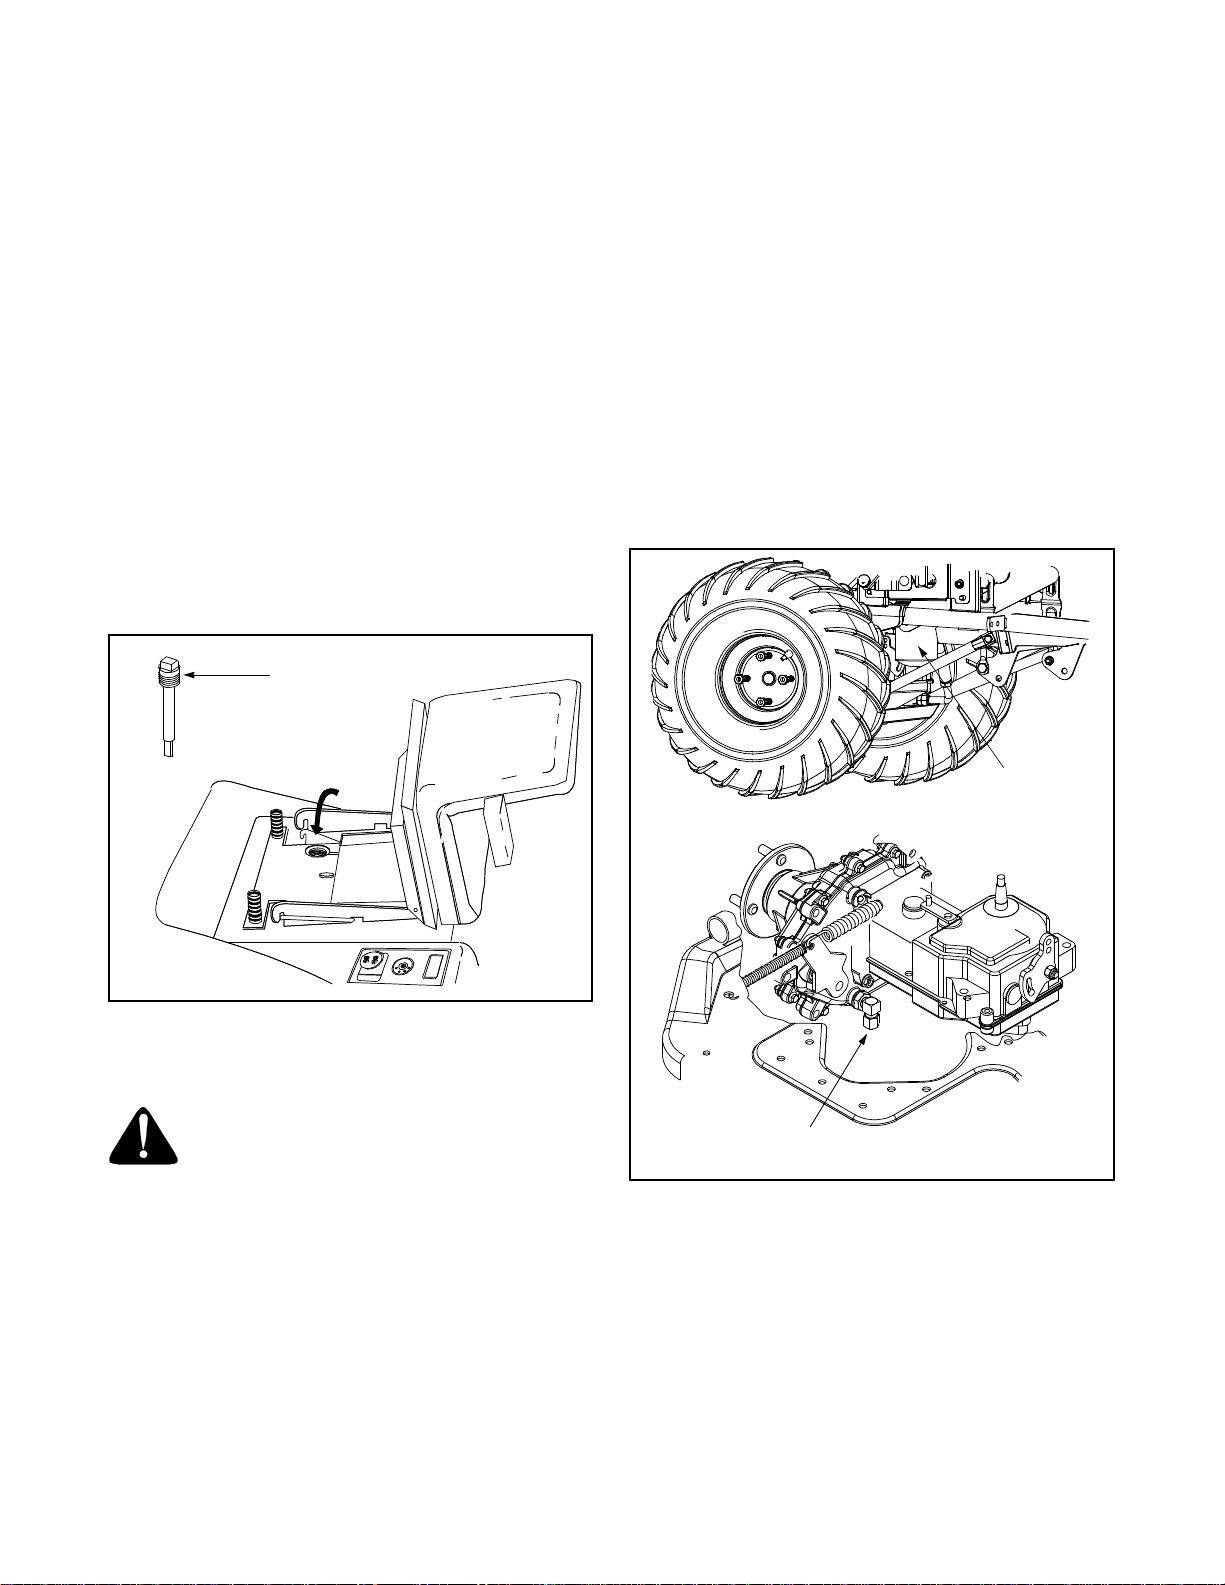
Replaci ng The He ad Lamp B ulb
• Detach the bottom of the rubber boot cover on the
drive handles.
16
Page 17
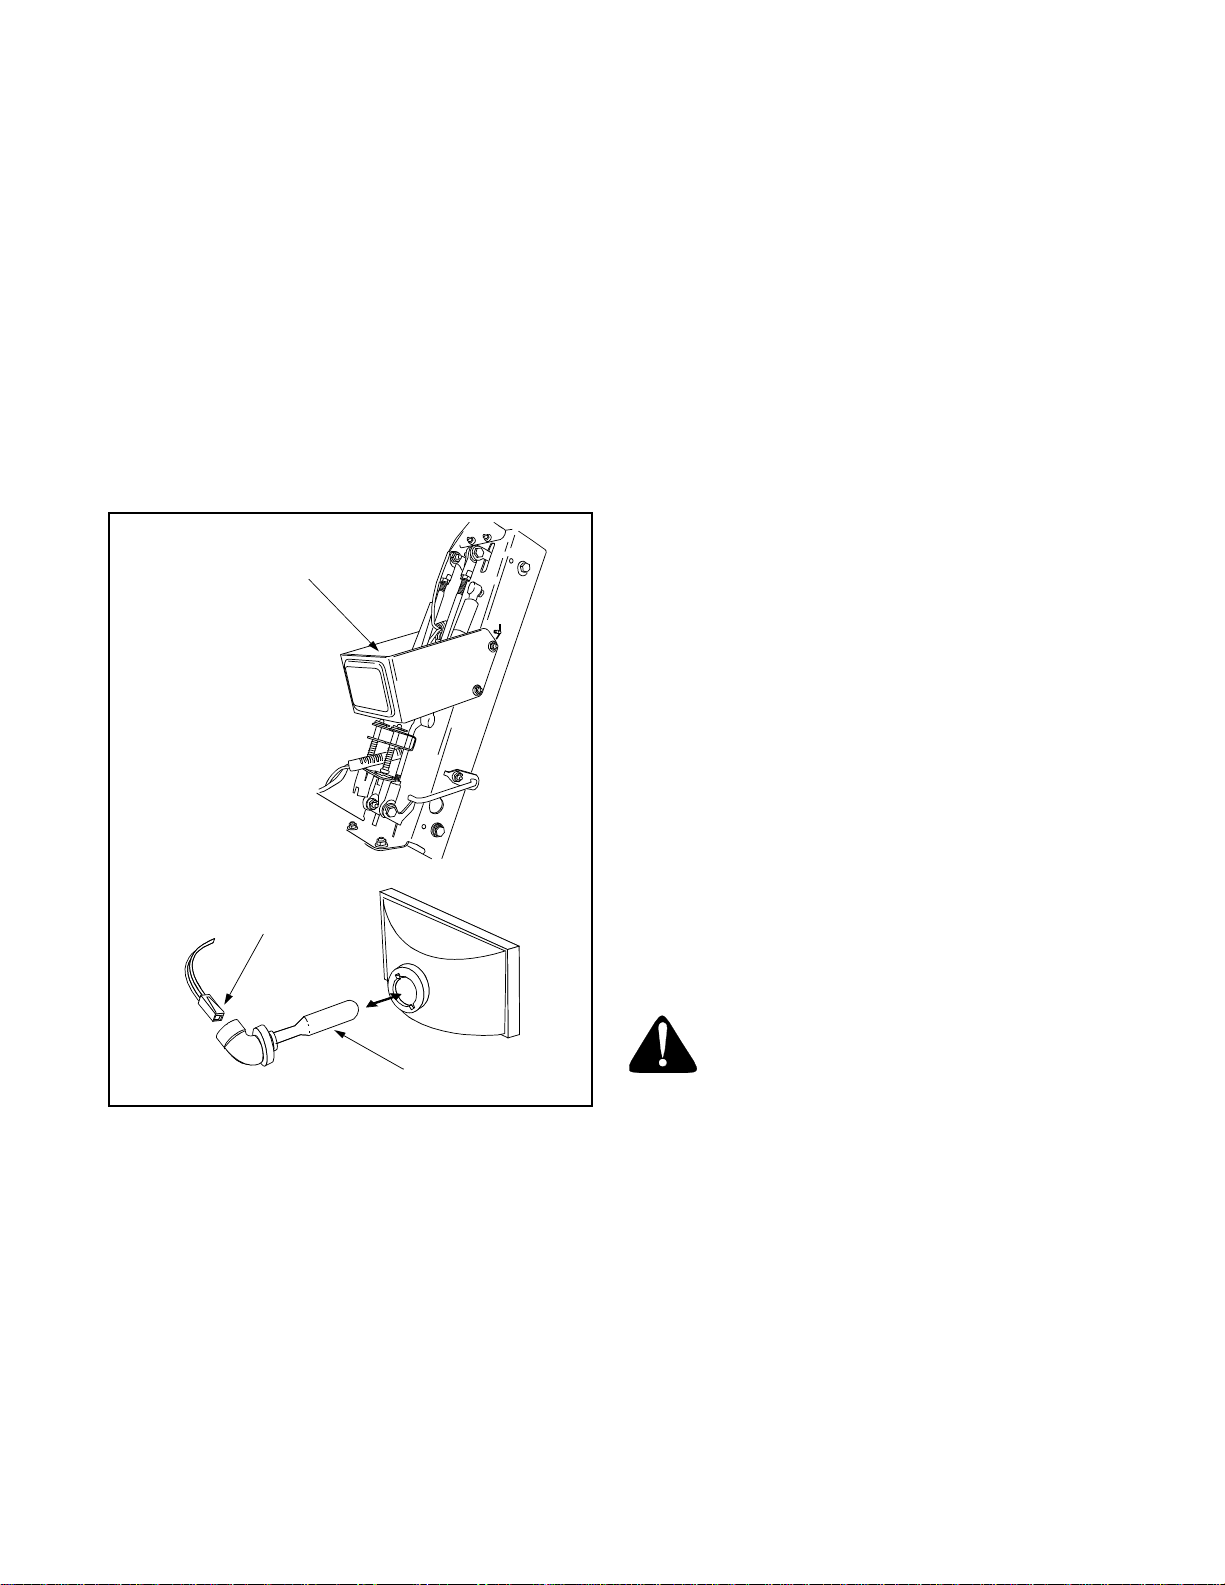
• Slide the boot cover all the way up (toward the drive
handles) to access the drive handle bolts.
• Remove drive handle bolts, drive handles, and
rubber boot.
• Remove the four bolts securing the retaining plate
to the control tower cover.
• Pull up on the control tower cover and slide up and
over the control tower.
• Locate the rear of the light fixture where the wire
attaches. See Figure 17.
• Remove the wire from the light bulb assembly and
squeeze the tab on the connector that attaches the
wire to the light bulb assembly.
• Pull the wire from the light bulb assembly and turn
the light bulb assembly counterclockwise to release
it from the light fixture.
Headlight
Mounting
Bracket
• Remove the old fuse and replace with same rated
fuse.
Battery
The battery is sealed and is maintenance free. Acid
levels can not be checked.
• Always keep the battery, cables, and terminals
clean and free of corrosive build-up.
• After cleaning the battery and terminals, apply a
light coat of petroleum jelly or grease to the
terminals and over the positive terminal boot.
• Always keep the boot positioned over the positive
terminal to prevent shorting.
IMPORT ANT :
disconnect the NEGATIVE (Black) wire from it’s
terminal first, follow by the POSITIVE (Red) wire. When
reinstalling the battery, always connect the POSITIVE
(Red) wire to it’s terminal first and the NEGATIVE
(Black) wire second. Be certain that the wires are
connected to the correct terminals.
If removing the battery for any reason,
Charging
If the unit has not been in use for an extended period of
time, charge the battery with an automotive-type 12-volt
charger for a minimum of one hour at six amps. Never
store battery without a full charge.
Connector
Light
Bulb
Figure 17
• Carefully pull the light bulb out of the light fixture
and insert the replacement light bulb into the light
fixture.
• Turn the light bulb assembly clockwise until it locks
in place and carefully insert the connector into the
light bulb assembly.
• Replace the control tower cover and drive handle
assemblies.
Changing The Fuse
• The fuse can be located on a wiring harness in a
protective cover between the engine and the
battery.
Tires
The two fr ont wh eels are ca ster w heels that swivel to
accommodate the direction of the Z-Series. The two
rear wheels are used to propel the Z-Series in the
direction of input from the drive handles. Inflation
pressure of the tires is important for stability while the ZSeries is in operation. See tire side wall for proper
inflatio n pressu re.
WARNING: Periodical ly inspect the blade
adapter for cracks , espec ially if yo u st rike
a foreign object. Replace when necessary.
Removing The Drive Be lt
Visually inspect the drive belt for wear and cracking. If
the drive belt shows signs of glazing, fraying, cracking
or excess wear it needs to be replaced. Follow these
steps to replace the drive belt.
• Set parking brake and remove the mower deck belt
from the engine pulley. See Removing the Mower in
MOWER DECK section.
• Locate the drive belt and roll drive belt down off the
left drive pulley.
• Then roll the drive belt down off the right drive
pulley and remove the drive belt from the engine
pulley.
17
Page 18

• Carefully pull th e bel t up and o ver th e righ t
hydrostatic cooling fan and then lift up and over the
left hydrostatic cooling fan.
• Pull the driv e belt out of the unit.
Installing Drive Belt
• Set the parking brake and insert drive belt up and
over the left and right hydostatic cooling fans. Do
not place the belt into the drive pulley groves at this
time.
SECTION 7: MOWER DECK
• Place the drive belt into the top groove of the
engine pulley and route the belt to the inside of the
idler pulley.
• Roll the belt up into the groove of the left drive
pulley and roll the belt up into the groove of the right
drive pulley.
• Make sure that th e belt is sea ted in all pu lley
grooves and release the parking brake.
• The drive belt should be tightened by the idler
pulley if the belt was installed correctly.
Checking The Level Of T he Mower Deck
Side to Side
• Position the Z-Series on a hard and level surface
and place the PTO switch in the OFF position.
• Engage the par king brak e and tur n the ignit ion
switch to the OFF position and remove key.
• Remove spark plug wire(s) from the spark plug(s).
• Raise the lift handle to the highest setting (7).
• Position the mower blades so they run
perpendicular to the Z-Series. See Figure 18.
Measurement
Figure 18
• Measure the distance from the outside of the left
blade tip to the ground and the distance from the
outside of the right blade tip to the ground. Both
measurements taken should be within 1/16”. If they
are not, proceed to the next step.
Adjustable
Link
Lift Link
Shoulder
Screw
Support
Pin
Hanger
Bracket
Figure 19
Blade
• Remove the shoulder screw that holds the lift link to
the hanger bracket on the side to be adjusted.
See Figure 19.
• Turn the adjustable link the appropriate distance up
or down. Every 1/2 turn equals 1/32”.
Front To Rear
• Position the Z-Se ries o n a ha rd le vel su rface and
place the PTO switch in the OFF position.
• Engage the par king brak e and tur n the igni tion
switch to the OFF position and remove the key.
• Remove spark plug wire(s) from the spark plug(s).
• Raise the lift handle to the highest setting (7).
• Position the mower blades so the ends of each
blade point to the front and to the rear of the ZSeries. Se e Figur e 20.
Rear
Edge
Figure 20
• Measure the distance from the front of the blade tip
to the ground and the rear of the blade tip to the
ground. The front edge of each blade should be
lower than its back edge by 1/8” to 1/4”. Determine
the appropriate distance necessary for proper
adjustment and proceed, if necessary, to the next
step.
• Lower the deck to the lowest position.
• Loosen the rear jam nuts on the front lift rods and
turn the front lock nuts clockwise to raise the front of
the mower deck or counterclockwise to lower the
front of the mower deck See Figure 21.
• Raise the deck to the highest position. Recheck the
blade measurements and repeat steps, if
necessary.
• Tighten the rear jam nuts after adjustments of the
front lift rods are completed.
Front
Edge
18
Page 19

Lock Nut
• Release the tension bar by pushing bar out of the
bracket.
• Lift the tension bar over the bracket and allow the
bar to rest on the mower deck.
• Pull support pin out to release hanger bracket from
lift link and turn support pin until it is against outside
of hanger bracket. See Figure 23.
Front Lift
Rods
Jam Nut
Figure 21
Removing The Mower Deck
WARNING: Do not remove deck immediately after operating the tractor. Allow the
engine and other moving parts ample time
to cool down.
• Position t he Z-Se ries on a hard fl at su rfac e and
engage the parking brake.
• Move the lift handle to the L position.
• Remove belt covers by removing the hex nuts or
wing nuts that hold on the covers. See Figure 22.
44” Deck
Hex Bolt
Adjustable
Link
Lift Link
Shoulder
Screw
Support
Pin
Hanger
Bracket
Figure 23
• Move the lift handle to position 7 (all the way up).
• Remove the belt from the outside pulley of the
mower deck by pulling and holding the belt so part
of it is outside the pulley.
• Turn the pulley counterclockwise until the belt is
completely off the pulley.
• Locate the clutch pulley in the rear of the tractor
below the muffler to remove the belt from the pulley.
See Figure 24.
Tension
Bar
Tension Bar
Figure 22
Belt Cover
54” Deck
Belt Cover
Wing Nut
Clutch
Pulley
Figure 24
• From the front of the Z-Series, pull the mower deck
towards you to release the retaining arms from the
mower deck.
• Lift and hold up the retaining arms.
• Move the mower deck toward the rear of the tractor
until the front lift rods clear the mower deck.
• From the right side, pull the mower deck out from
under the tractor. See Figure 25.
• To service the blades or the underside of the 54”
mower deck, there is a mower deck stand that folds
out from the top of the mower deck.
19
Page 20

Belt
54” Deck
44” Deck
54” Deck
Retaining
Bracket and
Front Lift Rod
Retaining
Bracket and
Front Lift Rod
Figure 25
Installing Mower Deck Belt
• Remove the mower deck and the old mower deck
drive belt from the mower deck.
• Install and route the new belt according to the
routing diagram. See Figure 26 or Figure 27.
• Install the mower deck. Refer to Installing The
Mower Deck.
Belt
44” Deck
To Clutc h Pulley
Figure 27
Installing The Mower Deck
• Slide the mower deck under the Z-Series, making
sure belt cove rs are remove d.
• From the rear, reach under the muffler cover and
grasp the belt from the mower deck and bring it
between the hydraulic units.
• Bring the belt between the pulley and the clutch. Do
not put the belt into the pulley grove yet.
• From the front of the Z-Series, hold both front lift
rods up and slid e the mower deck forw ard unti l the
lift rods go into the bracket.
• Slide the mower deck backwards to insert the front
lift rods into the brackets. See Figure 25.
• Align the mower deck so the lift link aligns with the
hanger bracket on the mower deck. See Figure 28.
Adjustable
Link
Lift Link
Shoulder
Screw
Support
Pin
Hanger
Bracket
To Clutch Pulley
Figure 26
Figure 28
• Pull the support pin out and align with holes in
hanger bracket and lift link.
• Release the support pin so that it goes through both
holes to secure deck. Repeat these steps for other
side of the deck.
• From the rear, attach the belt around the clutch
pulley.
• Engage tension bar by moving it into the bracket to
maintain belt tension and replace belt covers.
20
Page 21

Mower Blades
WARNING: The mower blades are sharp
and can cause severe injury. Always
protect hands by wearing heavy leather
work gloves to grasp blades.
Block
Of Wood
Blade
• Secure the mower bl ade by p uttin g a piec e of wo od
between the blade and the housing. See Figure 29.
• Remove the hex flange nut that secures the blade
to the spindle assembly.
It is extremely important that each cutting blade edge
be ground equally to maintain proper blade balance. An
unbalanced blade will cause excessive vibration when
rotating at high speeds, may cause damage to the unit,
or result in personal injury. The blade can be tested by
balancing it on a round shaft screwdriver. Grind metal
from the heavy side until it balances evenly.
When replacing the blade, be sure to install the blade
with the side of the blade marked “Bottom” (or with a
part number stamped in it) facing the ground when the
mower is in the operating position.
IMPORT ANT :
Tighten the hex nut that secures mower
blade to spindle to 100 ft-lbs.
WARNING: Periodical ly inspect the blade
adapter for cracks , espec ially if yo u st rike
Figure 29
a foreign object. Replace when necessary.
SECTION 8: TROUBLESHOOTING
Trouble Possible Cause(s) Corrective Action
Engine fails to start PTO switch engaged.
Brake pedal not engaged.
Spark plug wire disconnected.
Throttle control lever not in correct
starting position.
Fuel tank empty, or stale fuel.
Blocked fuel line.
Faulty spark plug.
Engine flooded.
Engine runs erratic Unit running in START position.
Choke lever toward ON position.
Spark pl ug wire loose.
Blocked fuel line or stale fuel.
Vent in gas cap plugged.
Water or dirt in fuel system.
Dirty air cleaner.
Engine overheats Engine oil level low.
Air flow restricted.
Occasional ski p (h esi tates) at
high speed
Idles poorly Spark plug fouled, faulty or gap too
Excessive vibration Cutting blade loose or unbalanced.
Uneven cut Wheels not positioned correctly.
Spark plug gap too close. Adjust gap to .030”.
wide.
Dirty air cleaner.
Bent cutting blade.
Dull blade.
Uneven tire pressure.
Disengage PTO switch.
Engage brake pedal.
Connect wire to spark plug.
Move throttle lever to FAST or START position.
Fill tank with clean, fresh (not over 30 days)
gasoline.
Clean fuel line.
Clean, adjust gap or replace.
Crank engine with throttle in FAST position.
Move throttle lever to FAST position.
Push choke lever to OFF position.
Connect and tighten spark plug wire.
Clean fuel line; fill tank with clean, fresh (n ot
over 30 days) gasoline.
Clear vent.
Drain fuel tank. Refill with fresh fuel.
Clean air cleaner.
Fill crankcase with proper oil.
Remove blower housing and clean.
Reset gap to .030” or replace spark plug.
Clean air cleaner.
Tighten blade a nd a da pter. Balance blade.
Replace blade.
Place all four wheels in same height position.
Sharpen or replace blade.
Equal tire pressure in all four wheels.
21
Page 22

Models 364, 365, & 365L
1
29
23
2
3
20
21
6
24
25
26
22
28
6
6
7
12
13
14
4
8
5
9
10
11
16
15
17
18
19
30
31
32
24
27
36
37
38
39
6
25
22
35
33
34
6
Page 23

Models 364, 365, & 365L
REF.
NO.
1. 731-3263 Control Handle
2. 712-3004A Flange Lock Nut 5/16-18
3. 710-0451 Carriage Bolt 5/16-18
4. 731-3185 Bellow
5. 735-0251 Foot Pad
6. 710-0642 Hex Washer Screw 1/4-20 x .75
7. 703-2648 Bellow Retainer Bracket
8. 712-0431 Flange Lock Nut 3/8-16
9. 703-2807B Foot Pad Mounting Bracket
10. 710-3168 Carriage Bolt 3/8-16
11. 749-3081 Cruise Control Tube
12. 703-3288 Control Tube Mounting Bracket
13. 710-0276 Carriage Screw 5/16-18 x 1.0
14. 731-3310 Console
15. 726-0289 Plug
16. 731-3128A Lens
17. 736-0242 Bell Washer .340 I D x .872 OD
18. 720-0241 Wing Nut Knob
19. 738-0754 Shoulder Screw
20. 720-0302 Knob
PART
NO. DESCRIPTION
REF.
NO.
21. 731-3195B LH Control Panel Cover
22. 703-2703 LH Control Panel
23. 723-3042 Snap Bushing
24. 712-0453 Retainer Nut 1/4-20
25. 726-3047 Push Nut
26. 728-011 7 Pop Rivet
27. 726-0197 Cable Tie
28. 732-0830 Spring Clip
29. 731-3293 Rear Body
30. 738-3163A Shoulder Screw 3/8-16
31. 736-3039 Flat Washer .406 ID x 1.5 OD
32. 731-3312 Floor Body
33. 603-0578 Body Plate Assembly
34. 703-3474 Body Clip
35. 710-0376 Hex Cap Screw 5/16-18 x 1.0
36. 703-1345A Key
37. 725-3233 Electric PTO Switch
38. 731-3196A RH Control Panel Cover
39. 703-3583 RH Control Panel
PART
NO. DESCRIPTION
23
Page 24

Models 364, 365, & 365L
11
10
1
3
2
4
5
6
9
8
12
7
13
14
15
25
7
4
19
20
7
21
22
24
23
9
16
17
18
24
Page 25

Models 364, 365, & 365L
REF.
NO.
1. 603-0649 Parking Brake Shift Ass’y
2. 714-3004 Cotter Pin
3. 710-3178 Carriage Bolt 3/8-16 x .75
4. 741-0324 Hex Flange Bearing .506 ID x .590
5. 703-3400 Brake Mounti ng Bracket
6. 747-3404 Connecting Brake Rod
7. 714-0104 Cotter Pin
8. 710-0134 Carriage Screw 1/4-20 x .62
9. 712-3027 Hex Flange Lock Nut 1/4-20
10. 703-3405 Support Plate
11. 714-0101 Cotter Pin
12. 703-285 7 Retaini ng Rod Br a cket
13. 732-0827 Torsion Spring 5/16
14. 747-3397 Parking Brake Retaining Rod
15. 735-0664 Parking Brake Pad
16. 603-068 3 Brake Rod Ass’y
17. 711-3357 Ferrule
18. 712-0314 Jam Nut 1/4-28
19. 736-0258 Flat Washer .385 ID x 1.0 OD
20. 712-0431 Flange Lock Nut 3/8-16
21. 747-3266A Bracket Rod
22. 732-0463 Extension Spring
23. 732-0800 Extension Spring
24. 747-3284 Release Pump Rod RH
25. 747-3363 Release Pump Rod LH
PART
NO. DESCRIPTION
25
Page 26

Models 364, 365, & 365L
19
9
21
23
8
25
27
5
9
25
27
14
33
33
1
37
26
33
33
14
16
15
10
17
15
17
21
15
21
7
20
36
24
12
14
9
11
10
17
15
9
28
17
6
20
36
23
24
12
21
9
31
2
19
15
19
22
30
15
10
33
9
9
3
33
26
33
4
33
15
18
34
13
32
22
11
29
35
21
13
15
21
18
26
19
Page 27

Models 364, 365, & 365L
REF.
NO.
1. 603-0340 Bellcrank Ass’y Upper LH
2. 603-0341 Bellcrank Ass’y Upper RH
3. 603-0342 Bellcrank Ass’y Lower LH
4. 603-0343 Bellcrank Ass’y Lower RH
5. 603-0647 Support Ass’y Tower
6. 603-0410 Rod Ass’y Control RH
7. 603-0411 Rod Ass’y Control LH
8. 710-0216 Hex Cap Screw 3/8-16 x .75
9. 710-3005 Hex Cap Screw 3/8-16 x 1.25
10. 710-3178 Carriage Bolt 3/8-16 x .75
11. 711-1111 Control Shaft
12. 711-1124 Pin
13. 712-0312 Hex Jam Nut LH 3/8-24
14. 712-0365 Hex Center Lock Nut
15. 712-0431 Hex Flange Lock Nut 3/8-16
16. 712-0453 Retainer 1/4-20
17. 712-0711 Hex Jam Nut 3/8-24
18. 712-3001 Hex Jam Nut 3/8-24
19. 712-3004A Hex Flange Lock Nut 5/16-18
PART
NO. DESCRIPTION
REF.
NO.
20. 714-0104 Cotter Pin
21. 723-0420 Spherical Rod End RH 3/8-24
22. 723-0421 Spherical Rod End LH 3/8-24
23. 727-3113 Damper Cylinder
24. 732-3084 Spring Compression
25. 736-0169 Lock Washer 3/8
26. 736-0539 Thrust Washer .625 ID x 1.12 OD
27. 736-3004 Flat Washer .406 ID x .875 OD
28. 737-0280 Grease Fitting
29. 737-3072 Grease Fitting w/Tube
30. 737-3073 Adapter 1/4-20
31. 738-0296 Shoulder Bolt .437 Dia. x .268
32. 738-3153 Shoulder Bolt
33. 741-3063 Sleeve Bearing
34. 747-3281 Control Ro d LH 31-5/8
35. 747-3282 Control Rod RH 35-3/8
36. 736-0300 Flat Washer .406 ID x .87 OD
37. 703-3405 Support Plate
PART
NO. DESCRIPTION
27
Page 28

Models 364, 365, & 365L
26
25
63
66
61
63
62
65
62
64
22
21
20
44
19
18
14
12
13
3
5
6
1
4
7
11
12
13
2
8
9
10
33
32
36
30
31
35
67
28
27
29
34
40
37
38
41
24
23
68
39
42
43
44
42
45
15
47
16
46
9
49
48
52
51
50
37
17
53
54
55
56
57
58
59
60
28
Page 29

Models 364, 365, & 365L
REF.
NO.
1. 737-3069 Pipe Plug
2. 737-3070A Pipe Dipstick
3. 603-0639 Hydraulic Tank Assembly
4. 727-3116 Connection Fitting
5. 721-0223 Seal
6. 738-0940 Drain Plug
7. 727-3120 Inlet Tube LH
8. 727-3155 Tee Fitting
9. 727-3154 Outlet Hose RH
10. 727-3121 Inlet Tube RH
11. 727-3153 Outlet Hose LH
12. 710-0216 Hex Cap Screw 3/8-16 x .75
13. 712-0455 Retainer Nut 3/8-16
14. 747-3360A Belt Retainer Rod RH
15. 710-0378 Hex Cap Screw 5/16-18 x 2.5
16. 736-3089 Flat Washer 5/16
17. 723-3071 Filter Element
18. 731-1449A Fan Blade
19. 712-0333 Hex Nut 1/2-20
20. 703-3168 Mounting Pulley Bracket
21. 756-0625 Roller C able
22. 738-0924 Hex Shoulder Screw 1/4-28 x .375
23. 703-3169 Retainer Cable Bracket
24. 712-0117 Lock Nut 1/4-28
25. 618-3165 Complete Transmission Assembly LH
26. 712-3050 Lug Nut
27. 710-0347 Hex Cap Screw 3/8-16 x 1.75
28. 736-0258 Flat Washer .385 ID x 1.0 OD
29. 756-0627B Flat Idler Pulley 3.5 OD
30. 703-3174 Mounting Bracket Cable
31. 712-3019 Hex Nut 7/16-14
32. 736-0171 Lock Washer 7/16
33. 736-3015 Flat Washer .469 ID x .875 OD
34. 603-0377A Idler Arm Assembly
PART
NO. DESCRIPTION
REF.
NO.
35. 603-0102 Shoulder Screw
36. 732-0478 Extension Spring 6.12 Lg
37. 712-0431 Flange Lock Nut 3/8-16
38. 712-3027 Lock Nut 1/4-20
39. 703-338 0 Declutchi ng C able Bracket
40. 736-0119 Lock Washer 5/16
41. 738-0704 Shoulder Screw
42. 710-3008 Hex Cap Screw 5/16-18 x .75
43. 710-3011 Hex Cap Screw 3/8-16 x 2.25 †
44. 603-0362 Idler Pulley Assembly 5.0” †
45. 703-2888 Idler Bracket
46. 712-3004A Flange Lock Nut 5/16-18
47. 710-3103 Hex Cap Screw 5/16-18 x 2.0
48. 727-3100 Connection Fitting 1/2 x 3/8
49. 603-0358B Skid Plate Assembly
50. 747-3361 Belt Rod LH
51. 603-045 0 Support Pump Assembl y
52. 710-317 8 Carriage Bolt 3/8-16 x .75
53. 749-3040 Frame Strut
54. 736-0921 Lock Washer 1/2
55. 710-1189 Hex Washer Screw #12-24 x .625
56. 756-0974 Transmission Pulley
57. 732-0729 Wire Ring
58. 736-0185 Flat Washer
59. 710-3144 Hex Cap Screw 3/8-16 x 2.0
60. 618-3164 Complete Transmission Assembly RH
61. 710-0751 Hex Cap Screw 1/4-20 x .62
62. 703-2907 Bearing Cup
63. 741-0600 Ball Bearing
64. 756-3085 Idler Pulley 5.0”
65. 712-0324 Hex Lock Nut 1/4-20
66. 750-3176 Idler Spacer
67. 746-308 9 Declut chi ng Cable
68. 712-3007 Jam Nut 5/16-18
PART
NO. DESCRIPTION
† Models 365 & 365L Only
29
Page 30

Models 364, 365, & 365L
1
4
7
6
3
2
8
2
5
REF.
NO.
1. 618-3110A Drive Ass’y Complete
2. 712-3004A Hex Flange Lock Nut 5/16-18
3. 715-0136 Spiral Pin 3/16 x 1.25
4. 717-3396 Spur Gear 14T
5. 717-3455 Hydro Transmission
6. 718-3053 Parking Brak e Lever
7. 721-0343 O-Ring 2.0 Dia.
8. 727-3125 Cap Nut 3/8
PART
NO. DESCRIPTION
30
Page 31

Models 364, 365, & 365L
3
4
7
1
16
18
5
8
5
17
21
5
5
18
6
REF.
NO.
1. 611-3012 Axle Assembly
2. 618-3106 Carrier Assembly, Output
3. 618-3107 Gear Assembly, 51T Internal & 20T
4. 618-3109 Housing Ass’y
5. 710-1342 Hex Washer Screw 1/4-20 x 1-1/8
6. 711-1048 Brake Shaft
7. 712-3027 Hex Flange Lock Nut 1/4-20
8. 715-0156 Roll Pin
9. 715-0219 Dowel Pin
10. 715-3045 Bushing
11. 716-3015 Inverted Retaining Ring
12. 716-3018 Snap Ring
PART
NO. DESCRIPTION
618-3110A Drive Ass’y Complete
710-0852 Ribbed Neck Stud
20
11
12
2
13
10
24
9
23
REF.
NO.
13. 717-3 395 Spur Gear 13T
14. 717-3397 Ring Gear 46T
15. 719-3114 Axle Outer Housing
16. 721-0381 Oil Seal
17. 721-0393 Oil Seal
18. 727-3124 Elbow Fitting
19. 732-0752 Brake Shoe Spring
20. 736-0351 Shim Washer .76 x 1.5 x .030
736-0492 Shim Washer .76 x 1.5 x .010
736-0493 Shim Washer .76 x 1.5 x .020
21. 741-0665 Needle Bearing
22. 741-3033A Ball Bearing
23. 741-3080 Needle Bearing
24. 761-3049 Shoe Brake
19
14
PART
NO. DESCRIPTION
7
15
22
31
Page 32

Model 364
23
4
1
2
3
18
21
20
19
30
22
7
17
16
31
32
35
15
14
5
6
8
9
10
13
11
33
12
34
24
25
26
27
24
28
41
29
44
46
39
38
42
47
36
37
40
43
45
32
Page 33

Model 364
REF.
NO.
1. 751-3141 Oil Drain Extension Hose
2. 751-3142 Oil Drain Cap
3. 751-3140 Oil Drain
4. 710-3009 Tap Screw #10-24 x .75
5. 746-3070 Throttle Cable
6. 746-3069 Choke Cable
7. 712-0161 Hex Lock Nut #10 - 24
8. 710-0751 Hex Cap Screw 1/4-20 x .620
9. 736-3006 Lock Washer 1/4 x 3/4
10. 736-0270 Bell Washer .265 x .75
11. 726-0205 Hose Clamp
12. 751-0535 Fuel Line Hose
13. 725-3001 Solenoid Switch
14. 712-0291 Hex Lock Nut 1/4-20
15. 736-0119 Lock Washer 5/16
16. 712-3010 Hex Nut 5/16-18
17. 712-3071 Hex Nut #10-32
18. 712-0431 Flange Lock Nut 3/8-16
19. 703-2859 Muffler Bracket
20. 710-3178 Carriage Bolt 3/8-16 x .75
21. 710-0642 Hex Washer Screw 1/4-20 x .75
22. 721-0460 Gasket
23. 751-0650 Exhaust Pipe - RH
24. 710-1314 Cap Screw 5/16-18 x .625
PART
NO. DESCRIPTION
REF.
NO.
25. 703-3004 Muffler Guard
26. 751-0616 Muffler
27. 710-0148 Hex Washer Screw #8-32 x .375
28. 751-0564 Muffler Deflector
29. 751-0651 Exhaust Pipe - LH
30. 747-3362 Rear Belt Retainer Rod
31. 736-0258 Flat Washer .385 x 1.0
32. 603-0317 Clutch Retainer A ss’y
33. 710-1237 Hex Washer Screw #10-32 x .625
34. 751B221535 Casing Clamp
35. 726-3008 Heat Shield Cable Clip
36. 712-0291 Hex Lock Nut 1/4-20
37. 710-1007 Hex Washer Screw 3/8-16 x 1.5
38. 710-1008 Hex Washer Screw 3/8-16 x 1.875
39. 736-3010 Flat Washer .407 x .812 x .135
40. 754-3100 V-Belt
41. 756-3060A Transmission Drive Pulley
42. 714-0128 Key 1/4 x 1.0
43. 725-0157 Cable Tie
44. 717-3467 Electric Clutch
45. 750-3106 Spacer Clutch
46. 736-0171 Lock Washer
47. 710-3157 Hex Cap Screw 7/16-20 x 3.25
PART
NO. DESCRIPTION
629-3038A Engine Harness Assembly (Not Shown)
33
Page 34

Model 365
4
5
22
1
11
2
3
16
19
17
18
23
21
20
10
8
9
7
14
15
25
8
6
12
13
40
33
24
31
36
35
29
32
39
26
27
28
30
34
37
38
34
Page 35

Model 365
REF.
NO.
1. 751-3141 Oil Drain Hose
2. 751-3142 Oil Drain Cap
3. 751-3140 Oil Drain
4. 710-3009 Screw #10-24 x .750
5. 746-3070 Throttle Control Cable 40.5”
6. 746-3066 Choke Control Cable 38.0”
7. 710-3008 Hex Cap Screw 5/16-18 x .75
8. 726-3008 Cable Clip Heat Shield
9. 712-3004A Hex Lock Nut 5/16-18
10. 749-3048 Fuel Line
11. 726-0205 Hose Clamp
12. 725-1711 Retainer Clip
13. 712-0161 Lock Nut #10-24
14. 736-0607 Lock Washer 5/16
15. 751-0535 Fuel Line Hose
16. 712-0431 Flange Lock Nut 3/8-16
17. 736-0258 Flat Washer .385 ID x 1.0 OD
18. 747-3362 Rear Belt Retainer Rod
19. 751-0644A Exhaust Pipe LH
20. 710-3178 Carriage Bolt 3/8-16 x .75
21. 751-0645 Exhaust Pipe RH
PART
NO. DESCRIPTION
REF.
NO.
22. 710-0642 Hex Washer Screw 1/4-20 x .75
23. 736-3010 Flat Washer .407 ID x .812 OD
24. 703-2859 Muffler Bracket
25. 603-0317 Clutch Retainer Ass’y
26. 710-1007 Hex Washer Screw 3/8-16 x 1.5
27. 710-1008 Hex Washer Screw 3/8-16 x 1.875
28. 754-3100 V-Belt
29. 736-0250 Flat Washer 1.0 ID x 1.75 OD
30. 756-3060A Drive Pulley
31. 703-3004 Muffler Bracket
32. 714-0128 Key
33. 751-0805 Duel Muffler
34. 725-0157 Cable Tie
35. 717-3389 Electric PTO Clutch
36. 751-0564 Muffler Deflector
37. 750-3106 Spacer Clutch
38. 736-0171 Lock Washer 7/16
39. 710-3157 H ex Cap Screw 7/16-20 x 3.25
40. 710-0148 Hex Washer Screw #8-32 x .375
PART
NO. DESCRIPTION
629-3035 Engine Harness Assembly (Not Shown)
35
Page 36

Model 365L
24
1
2
3
4
23
22
17
18
16
5
15
7
6
8
9
10
11
12
13
14
15
25
30
27
19
13
20
21
26
28
29
31
32
33
36
Page 37

Model 365L
REF.
NO.
1. 751-3141 Oil Drain Hose
2. 712-3004A Flange Lock Nut 5/16-18
3. 703-3023 Mounting Muffler Bracket
4. 710-3008 Hex Cap Screw 5/16-18 x .75
5. 726-0205 Hose Clamp
6. 751-0535 Fuel Line Hose
7. 710-0216 Hex Cap Screw 3/8-16 x .75
8. 710-3009 Screw #10-24 x .750
9. 746- 3071 Throttle Control Cable 53.0”
10. 746-3068 Choke Control Cable 43.0”
11. 712-0161 Nylon Lock Nut #10-24
12. 736-0607 Lock Washer 5/16
13. 726-3008 Heat Shield Cable Clip
14. 712-0431 Flange Lock Nut 3/8-16
15. 736-3010 Flat Washer .407 ID x .812 OD
16. 736-0258 Flat Washer .385 ID x 1.0 OD
17. 747-3362 Rear Belt Retainer Rod
PART
NO. DESCRIPTION
REF.
NO.
18. 736-0159 Washer 5/16
19. 603-0317 Clutch Retainer Ass’y
20. 736-0242 Bell Washer .340 ID x .872 OD
21. 710-3207 Hex Cap Screw
22. 703-3014 Muffler Shield
23. 751-3151 Muffler Tube Clamp
24. 749-3074A Muffler Tube
25. 726-0290 Adjustable Clamp
26. 754-3077 V-Belt
27. 756-3083 Pulley
28. 714-0128 Key 1/4 x 1.0
29. 725-0157 Cable Tie
30. 717-3390 Electric PTO Clutch
31. 750-3106 Spacer Clutch
32. 736-0171 Lock Washer 7/16
33. 710-1616 Hex Cap Screw
PART
NO. DESCRIPTION
37
Page 38

Models 364 & 365
2
3
4
29
5
24
22
21
23
17
18
20
19
17
15
16
6
8
11
12
13
14
31 32
34
7
9
10
30
33
25
9
26
27
28
38
Page 39

Model 364 & 365
REF.
NO.
1. 629-3070 Wire Harness, Main - Not Shown
2. 723-0455 Foam Protector, Indicator Light
3. 710-3013 Hex Cap Screw 1/4-20 x .50
4. 703-2809 Bracket, Indicator Bulb Mtg.
5. 712-3027 Nut, Hex Flange Lock, 1/4-20
6. 725-1718 Relay
7. 703-2836 Bracket, Headlight Mtg.
8. 710-0134 Carriage Screw 1/4-20 x .62
9. 725-3164A Switch, Plunger Safety
10. 725-0157 Cable Tie
11. 725-1347 Cap, Ignition Switch
12. 725-1346 Nut, Ignition Switch, 5/8-32
13. 725-3163 Switch, Ignition
14. 783-0462 Bracket, PTO Switch Retainer
15. 725-1722 Battery
16. 725-3253 Switch, Seat
17. 712-0397 Nut, Nylon Wing, 1/4-20
18. 712-0271 Nut, Hex Sems, 1/4-20
PART
NO. DESCRIPTION
REF.
NO.
19. 710-3015 Screw, Hex Cap, 1/4-20 x .75 GR5
20. 703-3149A Strip, Battery Retainer
21. 747-3347 Rod, Battery Retainer
22. 731-3233 Tray, Battery
23. 725-3250 He adlight Assembly
24. 731-3184 B ezel, Headlight
25. 732-0816 Spring, Switch Mounting
26. 710-0425 Screw , Machin e , #10 -24 x 5/8
27. 712-0161 Nut, Hex Insert Lock, #10-24
28. 725-3251 Voltage Sensor
29. 726-0349 Ratchet Retainer
30. 710-3143 Machine Screw #10-24
31. 7 50-0539 Spacer .315 ID x .50 OD
32. 725-3159 H our Meter
33. 725-0157 C able Tie
34. 712-0161 Lock Nut #10-24
PART
NO. DESCRIPTION
759-3864 Bulb, Headlight - Only
39
Page 40

Model 365L
2
3
4
29
5
24
22
21
23
17
18
20
19
17
15
16
6
8
11
12
13
14
32 33
35
7
9
10
31
34
30
25
28
26
27
40
Page 41

Model 365L
REF.
NO.
1. 629-3071 Wire Harness, Main - Not Shown
2. 723-0455 Foam Protector, Indicator Light
3. 710-3013 Hex Cap Screw 1/4-20 x .50
4. 703-2809 Bracket, Indicator Bulb Mtg.
5. 712-3027 Nut, Hex Flange Lock, 1/4-20
6. 725-1718 Relay
7. 703-2836 Bracket, Headlight Mtg.
8. 710-0134 Carriage Screw 1/4-20 x .62
9. 725-3164A Switch, Plunger Safety
10. 725-0157 Cable Tie
11. 725-1347 Cap, Ignition Switch
12. 725-1346 Nut, Ignition Switch, 5/8-32
13. 725-1717 Switch, Ignition
14. 783-0462 Bracket, PTO Switch Retainer
15. 725-1722 Battery
16. 725-3254 Switch, Seat
17. 712-0397 Nut, Nylon Wing, 1/4-20
18. 712-0271 Nut, Hex Sems, 1/4-20
PART
NO. DESCRIPTION
REF.
NO.
19. 710-3015 Screw, Hex Cap, 1/4-20 x .75 GR5
20. 703-3149A Strip, Battery Retainer
21. 747-3347 Rod, Battery Retainer
22. 731-3233 Tray, Battery
23. 725-3250 Headlight Assembly
24. 731-3184 Bezel, Headlight
25. 732-0816 Spring, Switch Mounting
26. 7 10-0425 Screw, Machine, #10-24 x 5/8
27. 7 12-0161 Nut, Hex Insert Lock, #10-24
28. 725-3251 Voltage Sensor
29. 726-0349 Ratchet Retainer
30. 725-3191A Switch, Plunger Safety
31. 710-3143 Machine Screw #10-24
32. 750-0539 Spacer .315 ID x .50 OD
33. 725-3159 Hour Meter
34. 725-0157 Cable Tie
35. 712-0161 Lock Nut #10-24
PART
NO. DESCRIPTION
759-3864 Bulb, Headlight - Only
41
Page 42

Models 364, 365, & 365L
1
2
3
4
9
5
8
10
11
12
6
7
16
14
15
13
17
18
42
Page 43

Models 364, 365, & 365L
REF.
NO.
1. 757-0375B Seat Ass’y
2. 757-3009 Seat Arm Ass’y (If Equipped)
3. 731-3154 Seat Slide
4. 710-1260A Hex Washer Screw 5/16-18 x .750
5. 738-0372 Shoulder Spacer
6. 720-0190 Height Adjuster Knob
7. 732-3098 Spring Index
8. 712-3004A Flange Lock Nut 5/16-18
9. 603-0294 Seat Base Bracket Ass’y
10. 710-0788 Hex Washer Screw 1/4-20 x 1.0
11. 736-0463 Flat Washer .25 x .630
12. 750-3276 Spacer
13. 738-0296 Shoulder Screw
14. 712-3005 Flange Lock Nut 3/8-16
15. 7 32-3080 Compression Spring
16. 750-0664 Spacer
17. 603-0730 Seat Plate Ass’y
18. 710-0560 H ex Carriage Screw 3/8-16 x 1.75
PART
NO. DESCRIPTION
43
Page 44

Models 364, 365, & 365L
2
3
4
12
13
5
15
21
21
28
14
16
18
17
20
19
6
7
8
9
10
11
1
40
27
26
25
24
4
22
23
33
36
35
32
31
30
29
34
37
38
20
39
44
Page 45

Models 364, 365, & 365L
REF.
NO.
1. 711-0642A Handle Button
2. 731-3158 Handle Deck Lif t Grip
3. 732-3097 Compression Spring
4. 747-3 405 Front Lift Rod
5. 738-0507B Shoulder Screw .500 Dia x .434
6. 710-0216 Hex Cap Scr ew 3/8-16 x .75
7. 603-0422 Shaft Mounting Bracket - LH
8. 603-0 370 Pivot Link Bearing Ass’y
9. 603-0 313 Lift Shaft Ass’y
10. 703-2621 Adjustable Deck Lift Link
11. 703-2780 Lift Parallel Link
12. 603-0327 Handle Bearing Ass’y
13. 703-2772 Deck Height Adjustable Plate
14. 738-3150 Lift Handle Shoulder Screw
15. 712-3020 Top Lock Jam Nut 3/8-16
16. 603-0423 Shaft Mounting Bracket - RH
17. 710-3083 H ex Cap Screw 5/16-1 8 x 1.375
18. 711-0773 Eye Bolt Adjustable Link
19. 738-0380 Shoulder Screw 3/8-16
20. 712-0206 Hex Nut 1/2-13
PART
NO. DESCRIPTION
REF.
NO.
21. 712-0431 Flange Lock Nut 3/8-16
22. 738-3151 Shoulder Screw 3/8-16 .56 x .27
23. 712-3015 Jam Nut 5/8-11
24. 736-0158 Lock Washer 5/8
25. 7 12-3016 Lock Hex Nut 5/8-11
26. 711-3266 Clevis Pin
27. 703-3407 Front Lift Bracket
28. 603-0401 Lift Arm Ass’y
29. 738-0183 Shoulder Screw 3/8-16 .50 x .21
30. 603-0257 For k Lift Ass’y
31. 7 10-3011 Hex Cap Screw 3/8-16 x 2.25
32. 747-3276 Lift Link Rod
33. 736-0300 Flat Washer .406 x .875
34. 747-3267 H andle Ar m
35. 750-3200 Spacer .448 ID x .688 OD
36. 712-0290 Lock Nut 7/16-14
37. 712-3009 Hex Center L-Nut 5/16-18
38. 710-0431 Hex Screw 3/8-16 x 1.50
39. 737-0280 Grease Fitting
40. 747-3406 Front Mounting Rod Bracket
PART
NO. DESCRIPTION
45
Page 46
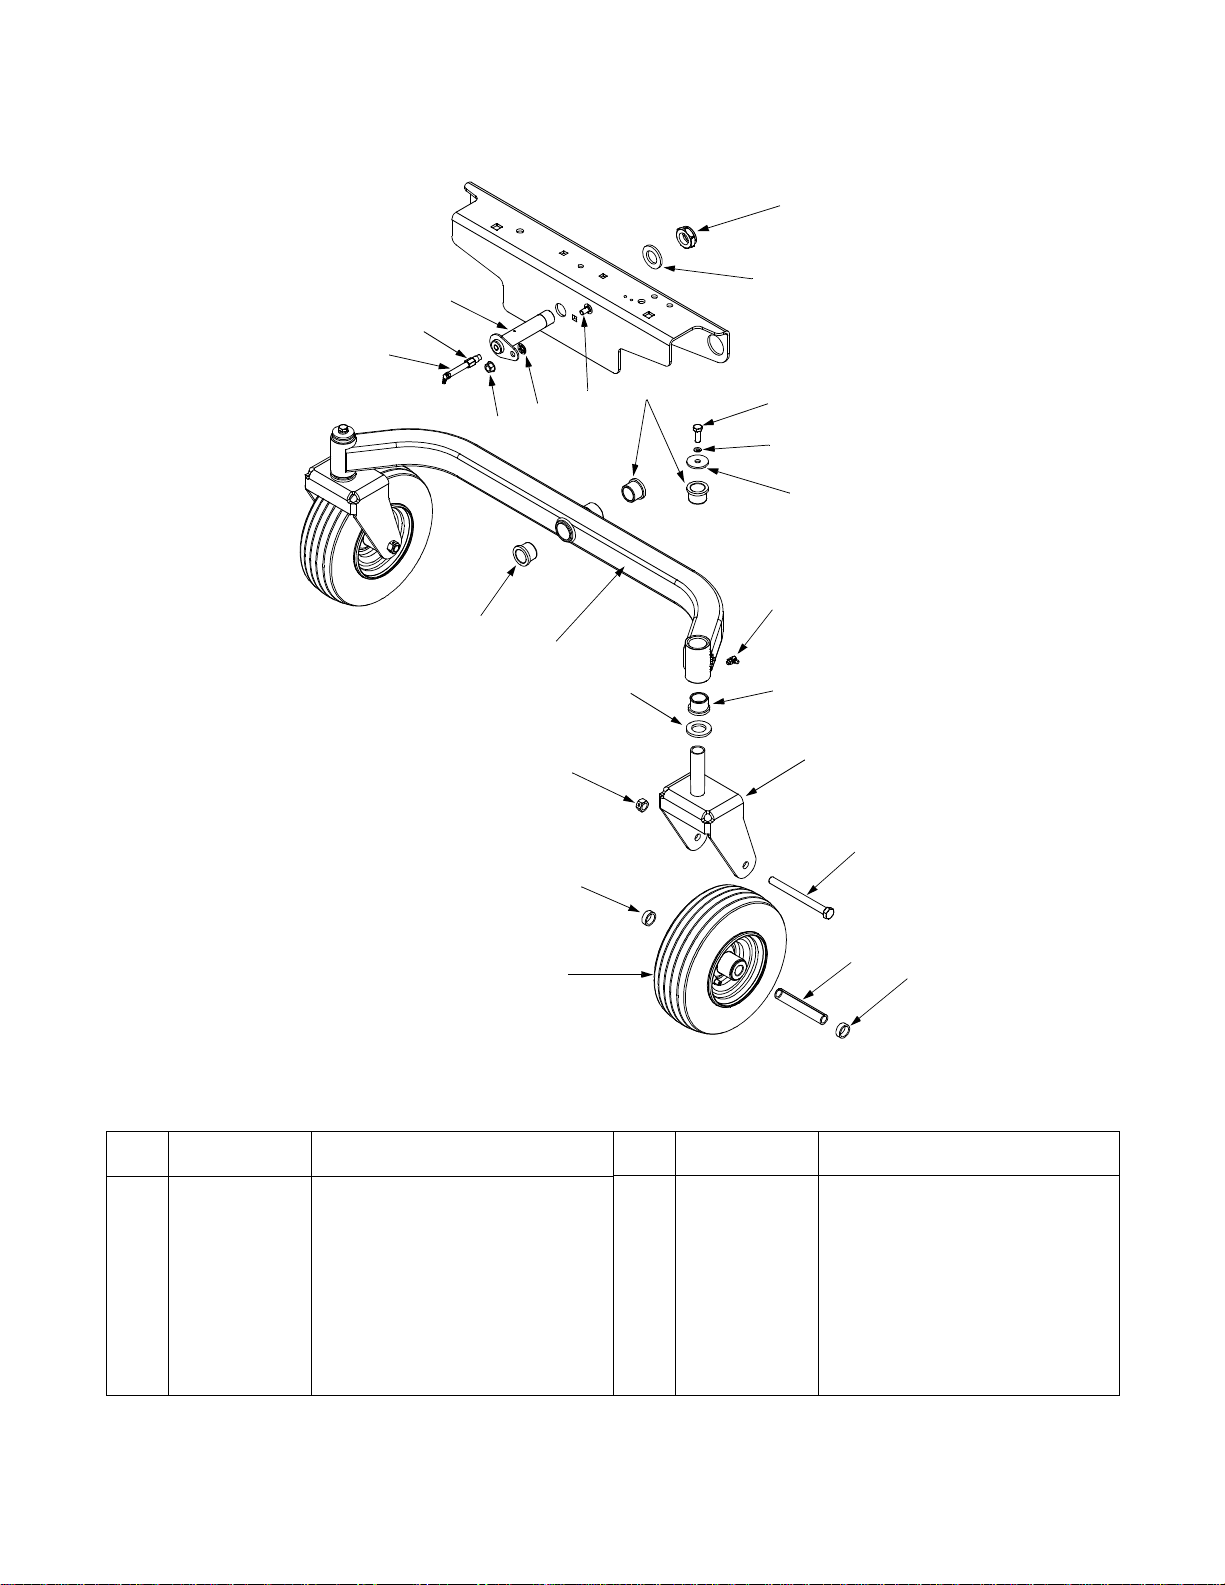
Models 364, 365, & 365L
5
1
2
3
4
12
8
7
6
9
10
11
12
REF.
NO.
1. 712-3075 Hex Lock Nut, 1.0-14
2. 736-0274 Flat Washer
3. 603-0389A Pin Ass’y, Pivot
4. 737-3090 Adapter, 1/8 NPTF x 1/8 NPTF
5. 737-3072 Grease Fitting, 65° w/Extension
6. 712-0431 Hex Flange Lock Nut, 3/8-16
7. 712-0229 Push Nut, 3/8 ID
8. 710-3178 Carriage Bolt, 3/8-16 x .75
9. 710-0514 Hex Cap Screw, 3/8-16 x 1.0
10. 736-0169 Lock Washer 3/8
PART
NO. DESCRIPTION
20
18
15
17
13
2
REF.
NO.
11. 7 36-0227 Flat Washer 3/8 x 1.5
12. 731-0374 Flange Bearing 1.0 ID
13. 737-0280 Grease Fitting
14. 603-0363 Castor Wheel Bracket
15. 712-0239 Hex Center Lock Nut 1/2-20
16. 710-0506 Hex Cap Screw, 1/2-20 x 5.5
17. 750-0456 Spacer, .79 ID x .347 Lg ‘
18. 6 34-3163 Wheel Comp 11.0 x 4.0 x 5.0
19. 750-3197A Wheel Spacer
20. 603-0382 Front Axle Ass’y
12
14
16
19
17
PART
NO. DESCRIPTION
46
Page 47

Model 364
3
7
9
8
7
4
2
4
1
5
14
15
16
11
12
13
REF.
NO.
1. 712-0251 Retainer Nut 3/8-16
2. 603-0720B Frame Assembly
3. 712-0455 Retainer Nut 3/8-16
4. 712-0431 Flange Lock Nut 3/8-16
5. 710-0216 H ex Cap Screw 3/8-16 x .75
6. 710-3144 H ex Cap Screw 3/8-16 x 2.0
7. 712-3004A Flange Lock Nut 5/16-18
8. 736-0258 Flat Washer .385 x 1.0 x .135
9. 749-3087 Upper Bumper Tube
10. 7 49-3089 Lower Bumper Tube
PART
NO. DESCRIPTION
10
6
17
18
19
20
REF.
NO.
11. 736-0451 Washer .320 ID x .93 OD
12. 7 03-3504 Bumper Bracket
13. 710-1250 Carriage Bolt 5/16 x 1.5
14. 7 10-0521 Hex Cap Screw 3/8-16 x 3.0
15. 710-0859 Hex Cap Screw 3/8 - 16 x 2.5
16. 719-3130 Counter Weight
17. 726-0298 End Cap
18. 603-0620A Bumper Ass’y
19. 736-3004 Flat Washer .406 ID x .875 OD
20. 712-0431 Flange Lock Nut 3/8-16
PART
NO. DESCRIPTION
47
Page 48

Models 365 & 365L
3
7
9
8
7
4
2
4
1
5
11
12
13
REF.
NO.
1. 712-0251 Retainer Nut 3/8-16
2. 603-0720B Frame Assembly
3. 712-0455 Retainer Nut 3/8-16
4. 712-0431 Flange Lock Nut 3/8-16
5. 710-0216 Hex Cap Screw 3/8-16 x .75
6. 710-3144 Hex Cap Screw 3/8-16 x 2.0
7. 712-3004A Flange Lock Nut 5/16-18
8. 736-0258 Flat Washer .385 x 1.0 x .135
9. 749-3062 Upper Bumper
PART
NO. DESCRIPTION
10
6
REF.
NO.
10. 749-3061 Lower Bumper Tube
11. 736-0451 Washer .320 ID x .93 OD
12. 703-3504 Bumper Bracket
13. 710-1250 Carriage Bolt 5/16 x 1.5
14. 710-0520 Hex Cap Screw 3/8-16 x 1.5
15. 736-3004 Flat Washer .406 ID x .875 OD
16. 603-0620A Front Bumper
17. 726-0298 End Cap
18. 712-0431 Flange Lock Nut 3/8-16
PART
NO. DESCRIPTION
48
Page 49

Models 364, 365, & 365L
1
2
3
4
1
5
6
2
11
3
8
7
8
10
9
11
9
10
REF.
NO.
1. 722-0265 Foam 2.04 x 3.50 x .62
2. 710-1260A Hex Washer Screw 5/16-18 x .75
3. 736-0231 Flat Washer .344 ID x 1.125 OD
4. 651-3004 Tank Assembly 4.0 Gallon
5. 703-3490 Fuel Tank Mounting Bracket
6. 712-0431 Flange Lock Nut 3/8-16
7. 710-0216 Hex Cap Screw 3/8-16 x .75
8. 734-1596 Tire 20 x 8 - 8 (364)
9. 634-3005 Rim Ass’y 8 x 6.19 (364)
10. 734-0255 Tube les s Air Valve
11. 634-3050 Wheel Comp 20 x 8 - 8 (364)
PART
NO. DESCRIPTION
734-3163 Tire 22 x 11 - 8 (365 & 365L)
634-3030 Rim Ass’y 8 x 6.19 (365 & 365L)
634-3051 Wheel Co mp 22 x 11 - 8 RH (365 & 365L)
634-3052 Wheel Comp 22 x 11 - 8 LH (365 & 365L)
49
Page 50

Model 364
34
35
43
44
33
32
36
1
4
10
11
12
2
31
3
30
42
28
46
19
37
41
13
14
16
29
13
27
39
38
9
18
68
23
5
6
15
22
8
6
17
24
26
67
78
19
20
21
23
24
25
45
48
24
54
52
42
53
49
55
50
47
19
51
56
57
24
58
59
66
2
61
69
62
63
65
70
60
64
50
Page 51

Model 364
REF.
NO.
1. 732-0556 Extension Spring .94 OD x 7.57
2. 712-3006 Hex Nut 1/4-20
3. 710-0597 Hex Cap Screw 1/4-20 x 1.0
4. 710-3151 Hex Cap Screw 5/8-18 x 4.25
5. 736-0290 Flat Washer 5/8 ID x 1.0 OD
6. 741-0524 Bearing .625 ID x 1.574 OD
7. 754-3091 Belt
8. 716-3020 Snap Ring
9. 750-3164 Spacer .635 ID x 2.0
10. 712-0239 Hex Lock Nut 1/2-20
11. 736-0179 Flat Washer 1/2 x 1.25
12. 736-0188 Flat Washer .76 ID x 1.49 OD
13. 741-0338 Flange Bearing 3/4 ID x .52
14. 750-0656 Spacer .50 OD x .75 ID
15. 756-3108 Pulley
16. 732-0850 Extension Spring 1.0 OD x 6.140
17. 603-0743 Idler Assembly
18. 736-0100 Flat Washer .531 ID x 1.25 OD
19. 737-3000 Grease Fitting
20. 738-3172 Shoulder Screw
21. 603-0741 Idler Arm Assembly
22. 732-3067 Torsion Spring
23. 756-3005 Flat Pulley
24. 712-0431 Flange Lock Nut 3/8-16
25. 748-3100 Retainer Spring
26. 603-0763 Deck Mounting Plate Assembly
27. 712-3004A Flange Lock Nut 5/16-18
28. 703-2559 Stop Bracket
29. 710-3008 Hex Cap Screw 5/16-18 x .75
30. 726-3045 Button Plug
31. 703-3742 Belt Cover LH
32. 712-3010 Hex Nut 5/16-18
33. 736-0119 Lock Washer 5/16
34. 738-0213 Shoulder Screw .498 x 1.445
35. 736-0192 Flat Washer .531 x .93
PART
NO. DESCRIPTION
REF.
NO.
36. 603-0766 Handle Assembly
37. 710-1693 Spindle Bolt 3/4-16 x 5.215
38. 756-3089 Pulley
39. 710-3144 Hex Cap Screw 3/8-16 x 2.0
41. 710-1611A Screw 5/16-18 x .750
42. 748-3065 Spindl e Spacer
43. 715-3003 Pin
44. 747-3013 Support Pin
45. 732-0802 Compression Spring .63 OD x 6.3
46. 710-1260A Hex Washer Screw 5/16-18 x .750
47. 750-3119 Spacer .406 ID x 1.0 OD
48. 750-0150 Spacer .550 ID x .750 OD
49. 603-0734 Deck Assembly
50. 710-3178 Carriage Bolt 3/8-16 x .75
51. 754-3039 Belt
52. 618-3129 Spindl e Assembly
53. 748-3020 Blade Spacer
54. 742-3036 Blade
55. 712-3078 Hex Flange Nut 3/4-16
56. 736-0171 Lock Washer 7/16
57. 712-3019 Hex Nut 7/16-14
58. 736-0105 Bell Washer .401 ID x .870 OD
59. 703-1890 Deck Wheel
60. 631-0094 Chute Assembly
61. 738-3056 Should er Screw 1/2 x 2.5
62. 703-3359 Skirt Baffl e
63. 710-0260A Carriage Bolt 5/16-18 x .62
64. 731-3316 Mulching Plug
65. 711-3314 Roller Pin
66. 703-3743 Belt Cover RH
67. 731-3005 Front Roller
68. 714-0115 Pin
69. 736-0270 Bell Washer .265 ID x .75 OD
70. 710-0751 Hex Cap Screw 1/4-20 x .620
PART
NO. DESCRIPTION
IMPORTANT: For a proper working machine, use Factory Approved Parts.
V-Belts are specially designed to engage and disengage safely. A substitute (non OEM) V-belt can be dangerous
by not disengaging complete ly .
NOTE: For painted parts, please refer to
the list of color codes below. Please add the
applicable color code, wherever needed, to
the part number to order a replacement part.
For instance , if a part, numbered 700- xxxx,
is painted Cub Yellow, the part number to
order would be 700-xxxx-0716.
Cub Yellow: 0716
Cub Beige: 0499
Cub Blue: 0685
Powder Black: 0637
51
Page 52

Model 365 & 365L
33
35
32
11
28
1
6
7
20
7
31
34
36
37
39
38
40
10
13
12
10
42
44
2
4
5
6
8
9
15
14
17
16
22
30
29
9
28
9
27
41
43
46
3
1
18
20
53
19
6
67
68
7
11
21
7
26
25
55
54
69
7
22
23
24
7
56
7
66
71
57
65
58
7
70
68
22
59
44
60
62
63
45
47
64
48
31
45
49
72
52
61
51
49
50
52
Page 53

Model 365 & 365L
REF.
NO.
1. 720-0241 Wing Nut Knob
2. 703-2817 Belt Cover LH
3. 703-2816 Belt Cover RH
4. 747-3306 Idler Spring Mounting Rod
5. 738-0380 Shoulder Screw 3/8-16
6. 756-3106 Pulley
7. 712-0431 Flange Lock Nut 3/8-16
8. 710-0521 Hex Cap Screw 3/8-16 x 3.0
9. 736-0258 Flat Washer .385 ID x 1.0 OD
10. 756-3105 Idler Pulley 5.0
11. 603-0690 Deck Spindle Ass’y
12. 603-0469A Idler Bearing Arm Ass’y
13. 711-0242 Spacer
14. 738-3108 Shoulder Bolt
15. 737-0280 Grease Fitting
16. 736-3015 Flat Washer .469 ID x .875 OD
17. 603-0407 Idler Pulley Ass’y 5.0
18. 736-0316 Flat Washer .78 ID x 1.59 OD
19. 703-2849 Channel
20. 703-0326 Front End Deck Bracket LH
21. 703-2091A Front Roller Bracket
22. 714-0115 Cotter Pin
23. 711-3314 Roller Pin
24. 731-3005 Roller
25. 703-2430 Front End Deck Bracket RH
26. 703-2090 Reinforcement Disk RH
27. 703-2767 Front End Deck Bracket LH
28. 703-2089A Reinforcement Disk
29. 732-0971 Extension Spring
30. 712-0375 Lock Nut 3/8-16
31. 710-3168 Carriage Bolt 3/8-16
32. 603-0325 Mower Deck Ass’y
33. 747-3297A Deck Support Rod
34. 732-0395 Extension Spring .50 OD x 2.51 Lg
35. 711-1103 Pin Roller
36. 703-2929 Deck Support Link
37. 736-0231 Flat Washer .344 ID x 1.125 OD
PART
NO. DESCRIPTION
REF.
NO.
38. 712-3004A Flange Lock Nut 5/16-18
39. 710-3168 Carriage Bolt 3/8-16
40. 731-3005 Roller
41. 738-0296 Shoulder Screw
42. 750-3243 Spacer
43. 703-3381 Idler Support Plate
44. 710-0944 Hex Cap Screw 3/8-16 x 4.25
45. 736-0227 Flat Washer
46. 736-0171 Lock Washer 7/16
47. 712-3019 Hex Nut 7/16-14
48. 703-2988 Support Plate
49. 710-3034 Carr i age Screw 3/8-16 x 1.25
50. 603-0144 Front Bar
51. 750-3119 Spacer
52. 703-2099 Finger Guard
53. 703-2392 Bracket
54. 732-3070 Torsion Spring
55. 725-0157 Cable Tie
56. 710-3001 Hex Cap Screw 3/8-16 x .880
57. 703-2410 Castor Bracket
58. 634-3159 Wheel Complete
59. 750-3193 Spacer
60. 711-3318 Hinge Pin
61. 731-3131 Deflector Chute
62. 703-2093 Inner Baffle
63. 710-3178 Carriage Bolt 3/8 - 16
64. 742-3013 Blade
65. 754-3078 Belt
66. 747-3013 Support Pin
67. 732-0802 Compression Spring
68. 736-0160 Flat Washer .536 ID x .93 OD
69. 715-3003 Spr ing Pin
70. 603-0351 Rear Hanger Bracket LH
71. 703-2683 Rear Hanger Bracket Spacer
72. 710-0693 Hex Cap Screw 3/8-16 x 4.5
PART
NO. DESCRIPTION
754-3083 Belt
603-0350 Rear Hanger Bracket RH
IMPORTANT: For a proper working machine, use Factory Approved Parts.
V-Belts are specially designed to engage and disengage safely. A substitute (non OEM) V-belt can be dangerous
by not disengaging completely.
NOTE: For painted parts, please refer to
the list of color codes below. Please add the
applicable color code, wherever needed, to
the part number to order a replacement part.
For instance, if a part, numbered 700-xxxx,
is painted Cub Yellow, the part number to
order would be 700-xxxx-0716.
Cub Yellow: 0716
Cub Beige: 0499
Cub Blue: 0685
Powder Black: 0637
53
Page 54

Model 365 & 365L
1
4
7
6
2
3
3
5
6
2
5
7
4
1
REF.
NO.
1. 732-0772 Extension Spring 1.25 OD x 11.5 Lg
2. 711-0509 Spring
3. 712-3007 Hex Jam Nut 5/16-18
4. 712-0116 Jam Lock Nut 3/8-24
5. 711-1059 Ferrule
6. 736-0159 Washer 5/16
7. 710-1207 Hex Cap Screw 5/16-18 x 3.50
PART
NO. DESCRIPTION
54
Page 55

Models 364, 365, & 365L
629-3070
629-3071
55
Page 56

MANUFACTURER’S LIMITED WARRANTY FOR:
TWO-YEAR RESIDENTIAL
ONE-YEAR COMMERCIAL
Proper maintenance of your Cub Cad et equi pm ent is the own er’s responsibility. Follow the instructions in your
operator’s manual for correct lubricants and maintenance schedule. Your Cub Cadet dealer carries a
complete line of quality lubricants and filters for your equipment’s engine, transmission, chassis and
attachments.
Riding mowers, lawn tractors, garden tractors, Cub Cadet
attachments and home maintenance products
This limited warra nty for residential users, covers a ny defect in mater ials or workmansh ip in your Cub Cadet
equipment for two years from the dat e of purchase for the firs t user purchase r. We will replace or repa ir any
part or parts without charge through your authorized Cub Cadet dealer.
Batteries have a one-year prorated limited warranty with 100% replacement during the first three months.
V-belts for either the traction drive or any attachments are covered for one year only.
Cub Cadet equipment used commercially is warranted for one year only.
(Commercial use is defined as either having hired operators or used for income producing purposes.)
Items not covered
The warranty doe s not c over rout ine ma intena nce i tems suc h as lubri cants, f ilt ers (o il, fue l, air a nd h ydraul ic),
cleaning, tune-ups, br ake and/or clutch inspection, a djustments made as part of normal maintenance, blade
sharpening, set-up, a bus e, a ccid ent s and normal wear. It does not cover incidental cos ts suc h as tr anspo rti ng
your equipment to and from the dealer, telephone charges or renting a product temporarily to replace a
warranted product.
There is no other express warranty.
How to obtain service
Contact your autho riz ed Cub Ca det s ervi cing de ale r who s old you your Cub Cadet eq uipment. If this deal er i s
not available, see the Consumer Yellow Pages under “lawn mowers” for the name of a dealer near you.
If you need further assistance in finding an authorized Cub Cadet servicing dealer, contact:
Cub Cadet Corporation
Post Office Box 368023
Cleveland, Ohio 44136
How does state law apply?
This limited warranty gi ves y ou spec ific lega l rig hts, and you m ay als o have ot her right s which va ry from s tate
to state.
 Loading...