

Page 1

1
Cont ent s
HackLinM manual
1.1
Summary
1.2
System frame diagram
1.2.1
Functional interface definition
1.2.2
Technical specifications
1.2.3
Default connection password
1.2.4
Initial installation
1.3
In connection with the PixHack flight control
1.3.1
Test whether the communication is normal
1.3.2
Extended HDMI display
1.3.3
Re transmission by ground remote control
1.3.4
Software application
1.4
CUAV Hfight
1.4.1
3DR SOLO
1.4.2
Mission Planner
1.4.3
QGroundControl
1.4.4
Appendix
1.5
pairing and restoring system
1.5.1
Detailed annotation on OLED display
1.5.2
Frequently asked questions FAQ
1.5.3
Page 2

2
CUAV HackLink Quic k star t and Dev elo pme nt Gui de
Revision record:
A version release finished in 2017-2-6.
Page 3
3
Summa ry
HackLink --a UAV digital link system with integration of HD graphics and data transfer
Support 720P HD video transmission and MAVLINK protocol, as well as PPM & SBUS remote signal forwarding
The realization of a link system can be on real-time HD video backhaul, UAV data interaction and the real time control of UAV
Dual Mino technology, standard omnidirectional antenna distance 3KM, and 2.4G or 5.8G channel can be selected according to
requirements.
Use NXP high performance IMX6 processor for running LINUX system, suitable for second development (Compatible with 3DR
SOLO development environment).
The ground station terminal built-in OLED screen can display flight related state.
HDMI output, it can be connected to the HDMI display and HDMI video glasses
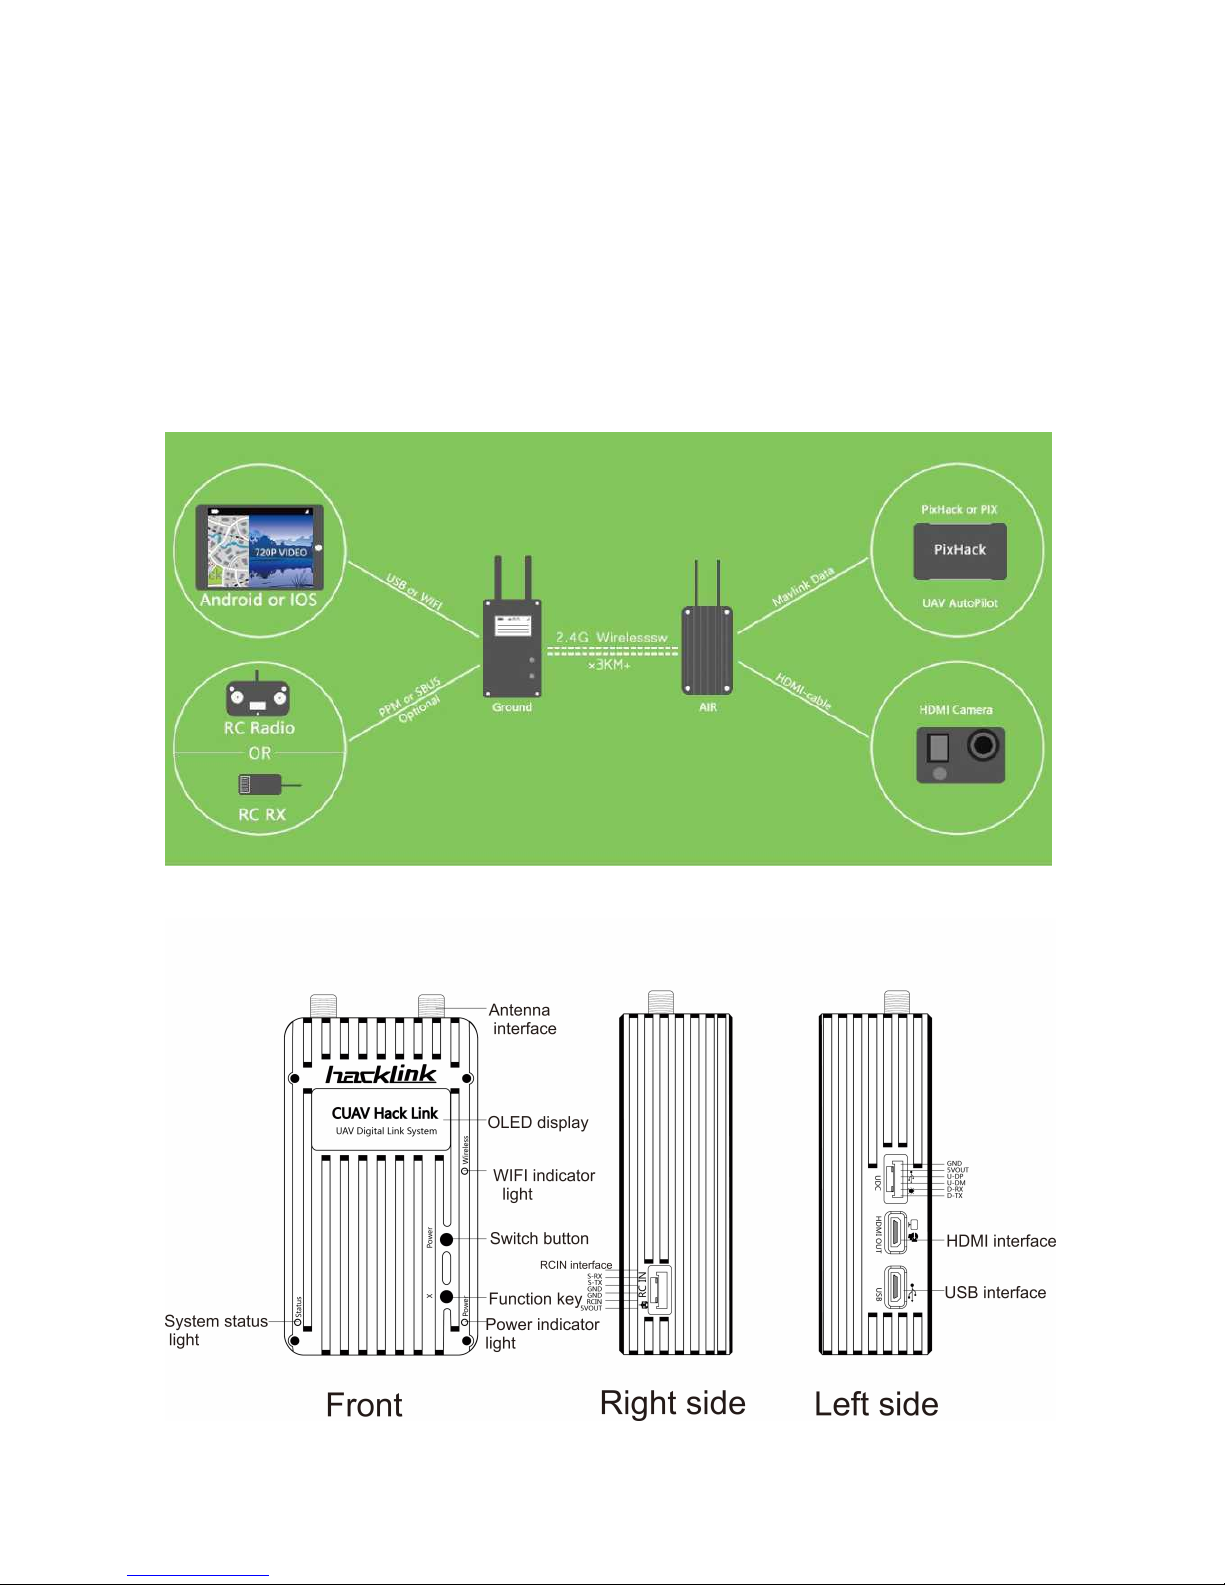
Sys tem fra me diag ram
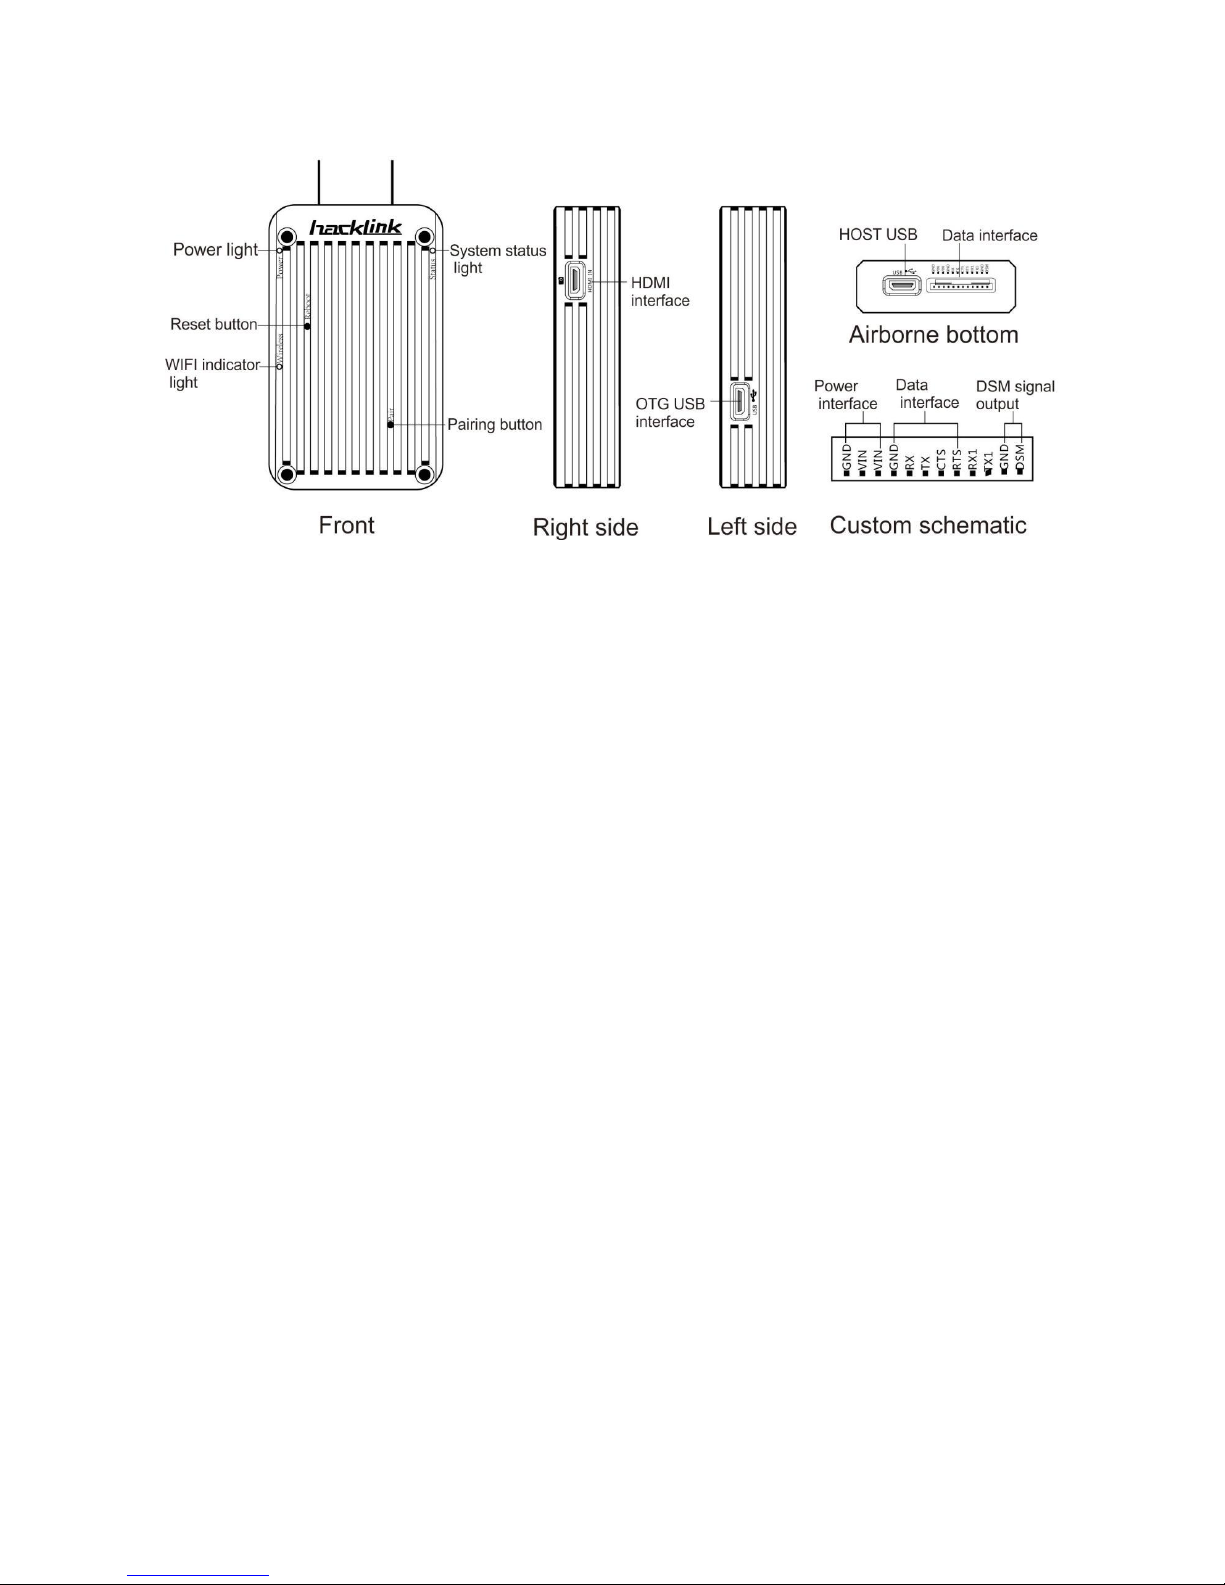
Fun ctiona l inter face defini tion Ground end int erface d efini tion:
Page 4
4
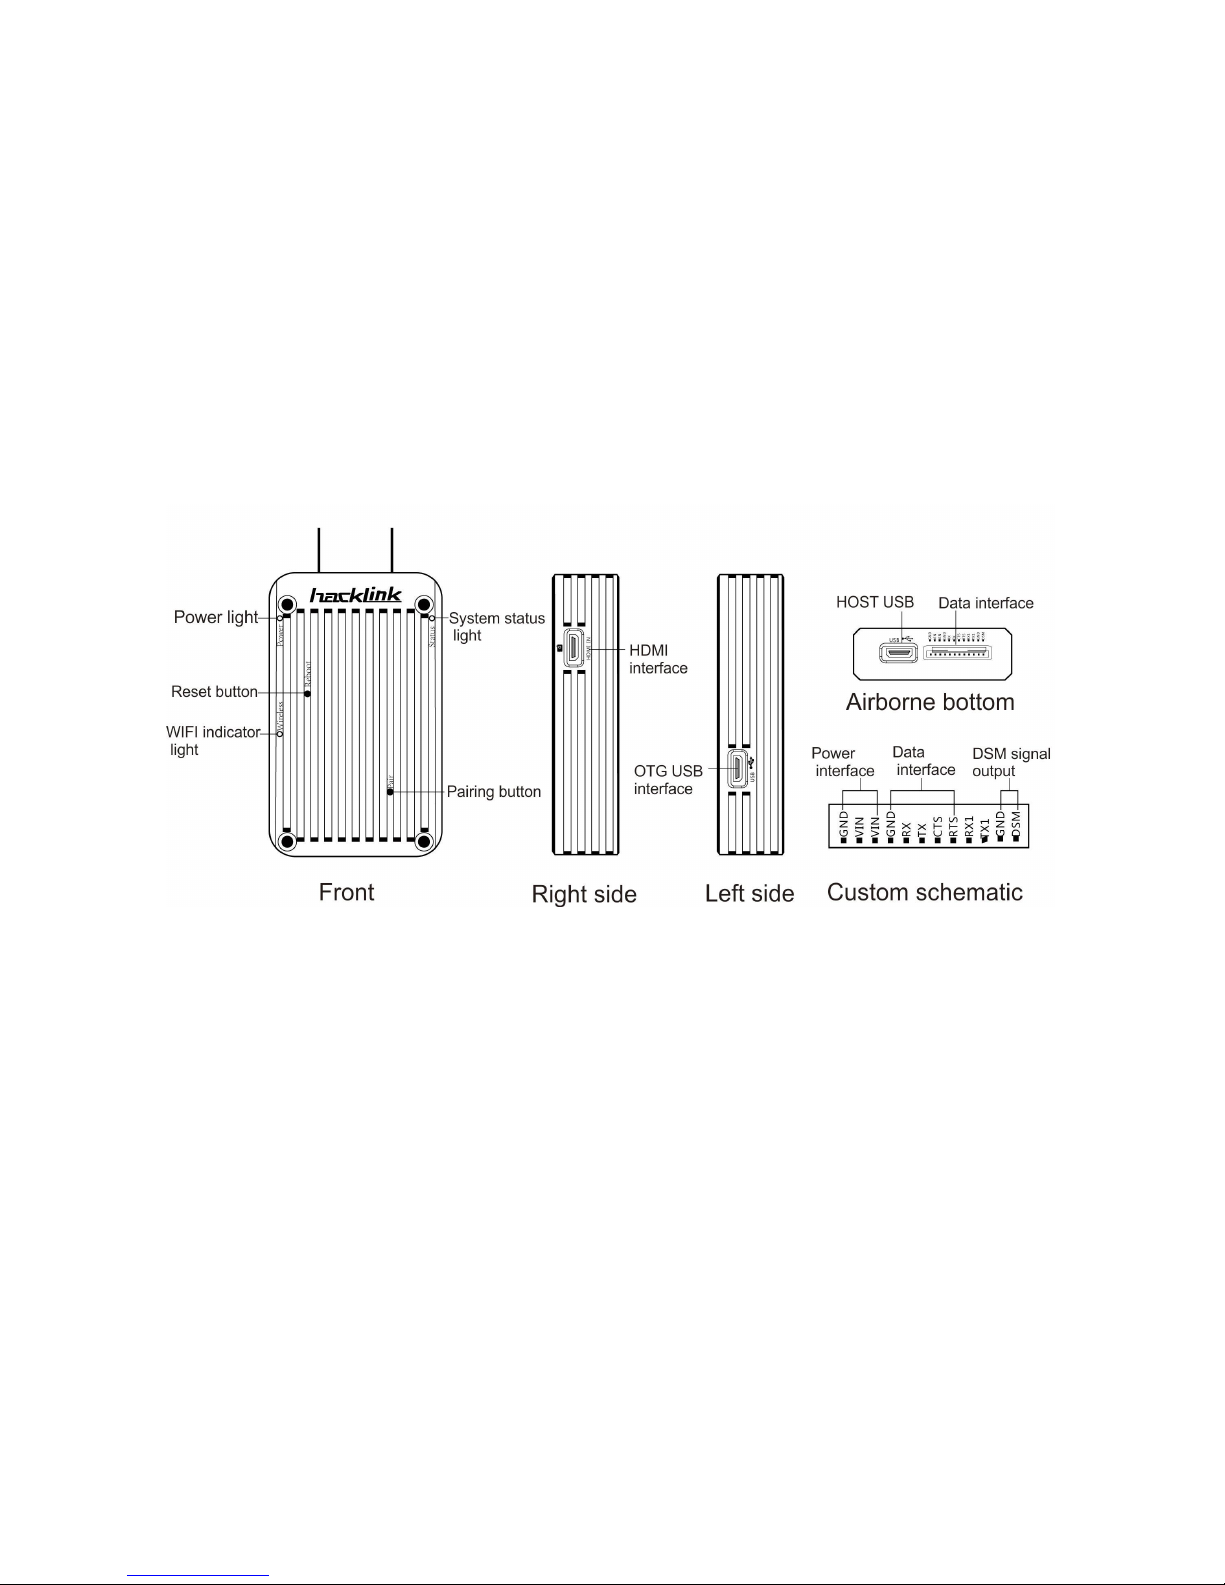
Air craft end i nterf a ce def initio n:
Technical specifications
-
-
Communication distance
2-3KM ideal environment omnidirectional antenna
Effective isotropic radiated power(EIRP)
500MW
Receiving sensitivity(1°%PER)
-95dbm
Working frequency
2.4Ghz or 5.8Ghz (optional for purchase)
Antenna gain (airborne) UFL interface
2.0dBi
Antenna gain (ground side) SMA interface
5.0dBi
Working environment and physical parameters
AIR airborne working voltage and current
5.0+-0.2V 2A max
GR ground station charging voltage
5.0+-0.2V
GR ground station operating current
2.1A max
GR ground station built in battery capacity
3.6V 3105mah
GR ground station OLED display resolution
white light 128 X64
Operating temperature range
-10〜50°c
Dimension
Airborne terminal:75mm(length) x45mm(width)x45mm(height)
GR:80mm(length) x45mm(width) x25mm(height)
Weight
AIR:60g
GR:150g
Video input / output application equipment
Video input format
HDMI:720P
Page 5

5
Def ault W IFI S SID and p asswo rd
Def ault WIFI SSID: HackLink_XXXXXX ( Last 6 digit of MAC address, Automatic generation )
Default password:cuavhlink
Supporting camera
GOPRO3 GOPRO4 ant motion camera and other HDM cameras
Video output
MICRO HDMI720P30P
Support equipment
HDM input display or video glasses
Remote signal input and output
Ground station support remote control signal standard
SBUS & PPM automatic recognition
Aircraft remote control signal output
DSM
Page 6
6
HackLink Init ial in sta lla tio n
At present, only the PixHack or PixHawk wiring is optional , other mavlink flight may need to change the line
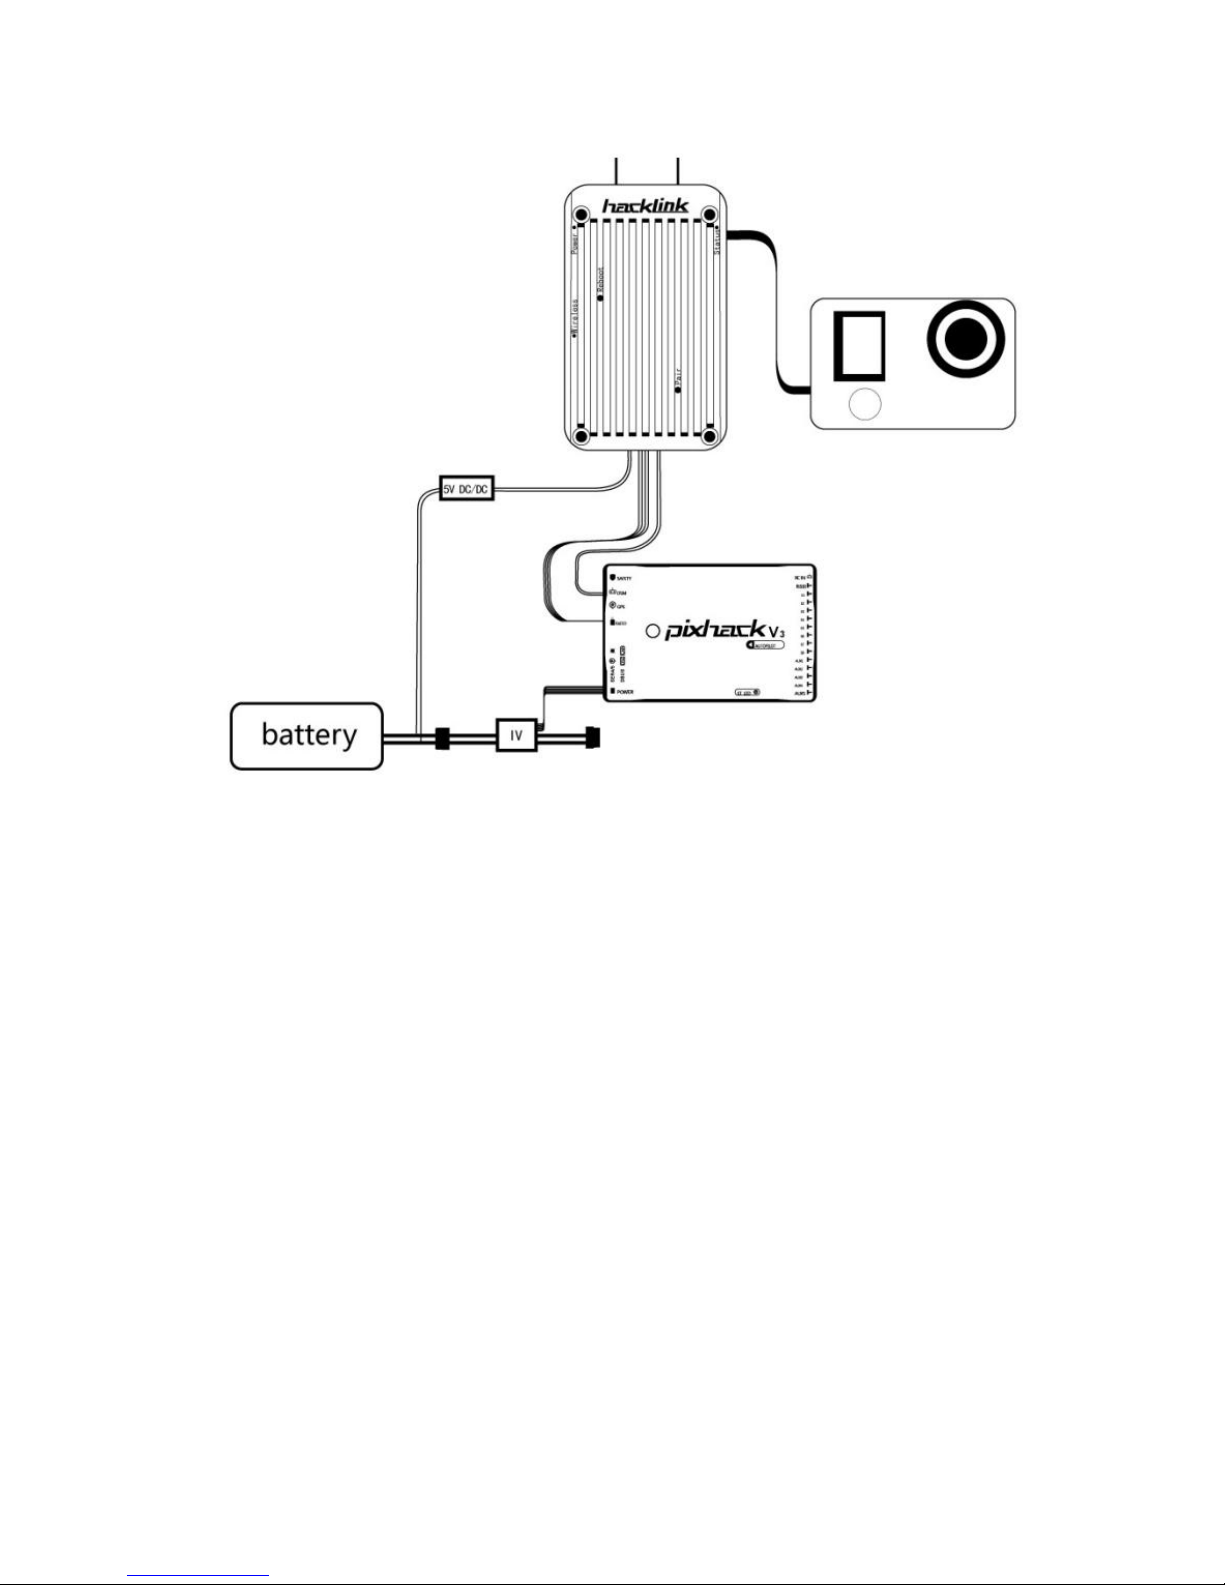
In conne ction with t he Pix H ack fli ght
1. Insert the data interface of HackLink aircraft terminal in the RADIO transmission interface.
2. Supporting DC-DC module for power supply (support 2-7S battery)
3. Then insert the DSM remote control signal into the DSM interface of the flight control
Notes:
1. If the ground is not connected to the remote control or receiver, do not plug the DSM interface
2. If the flight control is connected to the receiver, do not insert the DSM interface simultaneously.
Page 7
7
In conne ction with t he Pix H a wk fl i ght
•Insert the HackLink data interface end into the teleml or telem2 transmission interface of the flight control
• Then insert the DSM remote control signal into the DSM interface of the flight control
Notes:
1. If the ground is not connected to the remote control or receiver, do not plug the DSM interface
2. If the flight control is connected to the receiver, do not insert the DSM interface simultaneously.
Con n ect cam era
• HackLink compatible with HDMI output, and the 720P signal camera is required.
• Please turn off the camera's WIFI function before installation to avoid interference.
• Insert the attached MICRO HDMI soft line into AIR side micro HDMI interface
• The other end is inserted into the camera's Micro HDMI interface
Note:The current standard HDMI line for double micro HDMI interface. Other interfaces require additional purchases.
Test whether the communication is normal
1. Connect HackLinkAIR with flight control, then power on. Wait for the start light (blue) flashing and the wireless status light
always bright (green).
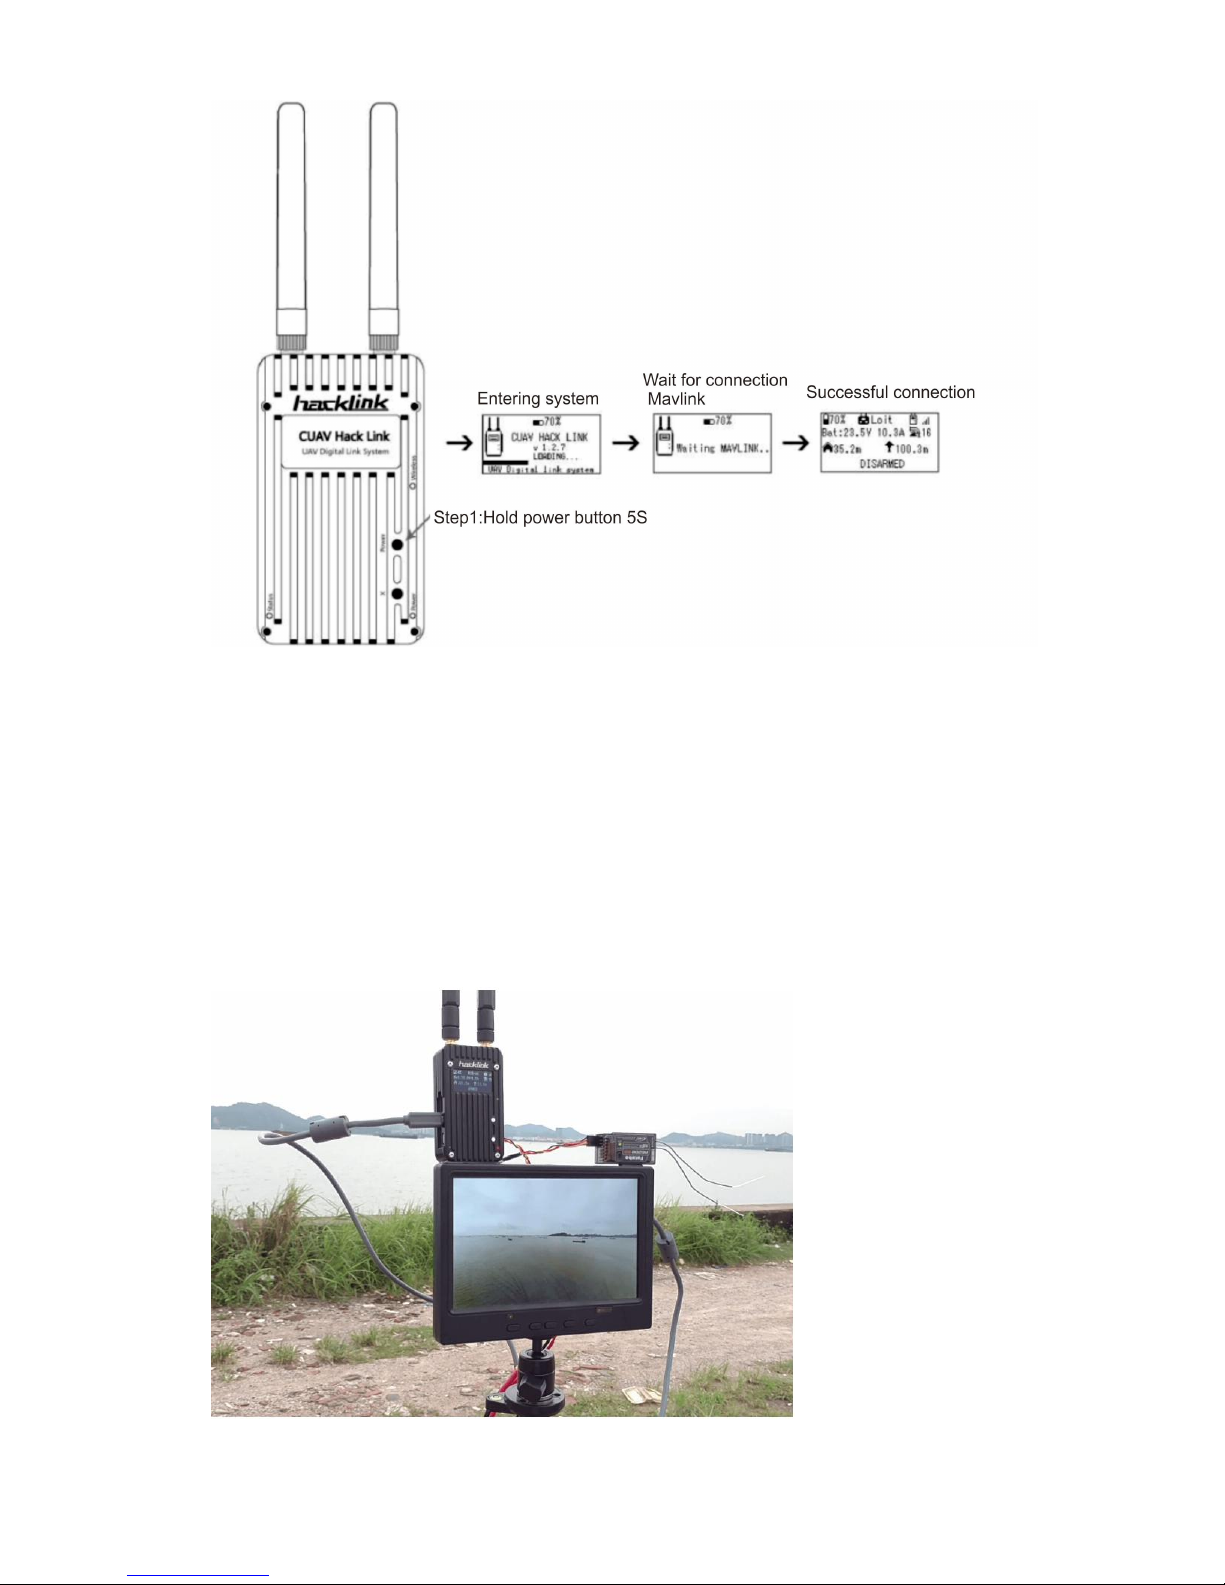
2. Open the HackLink ground power supply (long press the power button 5 seconds), the system will boot, probably system
startup success in 30s, the screen will display waiting.
3. Wait, and the AIR end blue light will become bright
4. The ground screen display control data (voltage mode and signal state) mavlink
5. The normal boot on the ground and the successful connection OLED display flow chart
Page 8
8
i. After both ends powered on, aircraft end blue start status lights will flash, it indicates that the connection has not been
successfully connected to the ground, at this time , pairing is needed.
ii.
After both ends powered on, the AIR end blue light has become bright, but ground side OLED does not show flight
data, but waiting mavlink, there is maybe problem in aircraft flight control terminal and communication,
check the connection line and control settings (try to open the Telem control for setting).
How to connect a mobile phone or a computer, please refer to the software applicaion part.
Extended HDMI display
Hac kLink groun d termin al con nects HDMI d ispla y or vid e o glass es
HackLink ground end has a HDMI extended output interface, in theory, it can support any HDMI display or video glasses
Its output format :30P Resolution 30P
Use the HDMI line to connect the HackLink ground to the monitor, which can be used to display HD videos.
Trouble shooting:
Page 9

9
1. APP display normal, HDMI display can not be displayed properly
Solution: activate the camera again; if nothing is displayed, check the HDMI display connection line
2. Both APP and HDMI can not be displayed
Solution: check the camera settings, set the 720P output, it is also possible that the camera is not compatible
Re transmission by ground remote control
Hac kLink groun d access remote c ontro l signa l
HackLink remote control re transmission
Access remote signal in HackLink GR RCIN, the DSM signal will be output to flight control by AIR
Support two standard remote control signals (SBUS and PPM), the two standards can be automatically identified, no need to set.
Note: the novice shall cautiously use this function, if the aircraft is not adjusted to the desired state, do not use the remote control
re transmission function, so as to avoid the blast situation.
Advantages:
1. No receiver is needed on the plane
2. uniformity in distance and digital link
3. No co frequency interference problem
4. Disadvantages:
1. After the signal is lost, there is a certain reconnection time between the aircraft and the ground station
2. Add a certain delay
Page 10

10
Soft war e appli cat ion
Com p atibl e softw are
Cur rently HackLi nk supp ort sof tware are as follo ws
Computer terminal:
• Mission P 丨 anner Unable to view video stream, used for digital transmission only)
• QGroundControl Video streams and data can be viewed interactively, but because of the QGC video decoder, the
video is not fluent)
Android:
• CUAV Hfight CUAV official ground station, you can upgrade and set up operations)Recommended
• 3DR SOLO(Unable used directly, then wifi SSID needs to be changed as s〇i〇Link_xxxxxx )
• QGroundControl Video streams and data can be viewed interactively, but because of the QGC video decoder, the
video is not fluent)
Apple :
• 3DR SOLO Unable to be used directly, the wifi SSID needs to be changed as...)
Download: Apple store search 3DR SOLO
Page 11
11
CUAV Hfight
CUAV Official ground station
Download at:http://fw.cuav.net/apk/
System requirements: Android 4.4 or more
Connect ground station via WIFI
1. Download and install Android earth station
2. Digital link connecting flight control, aircraft powered on and ground end boot
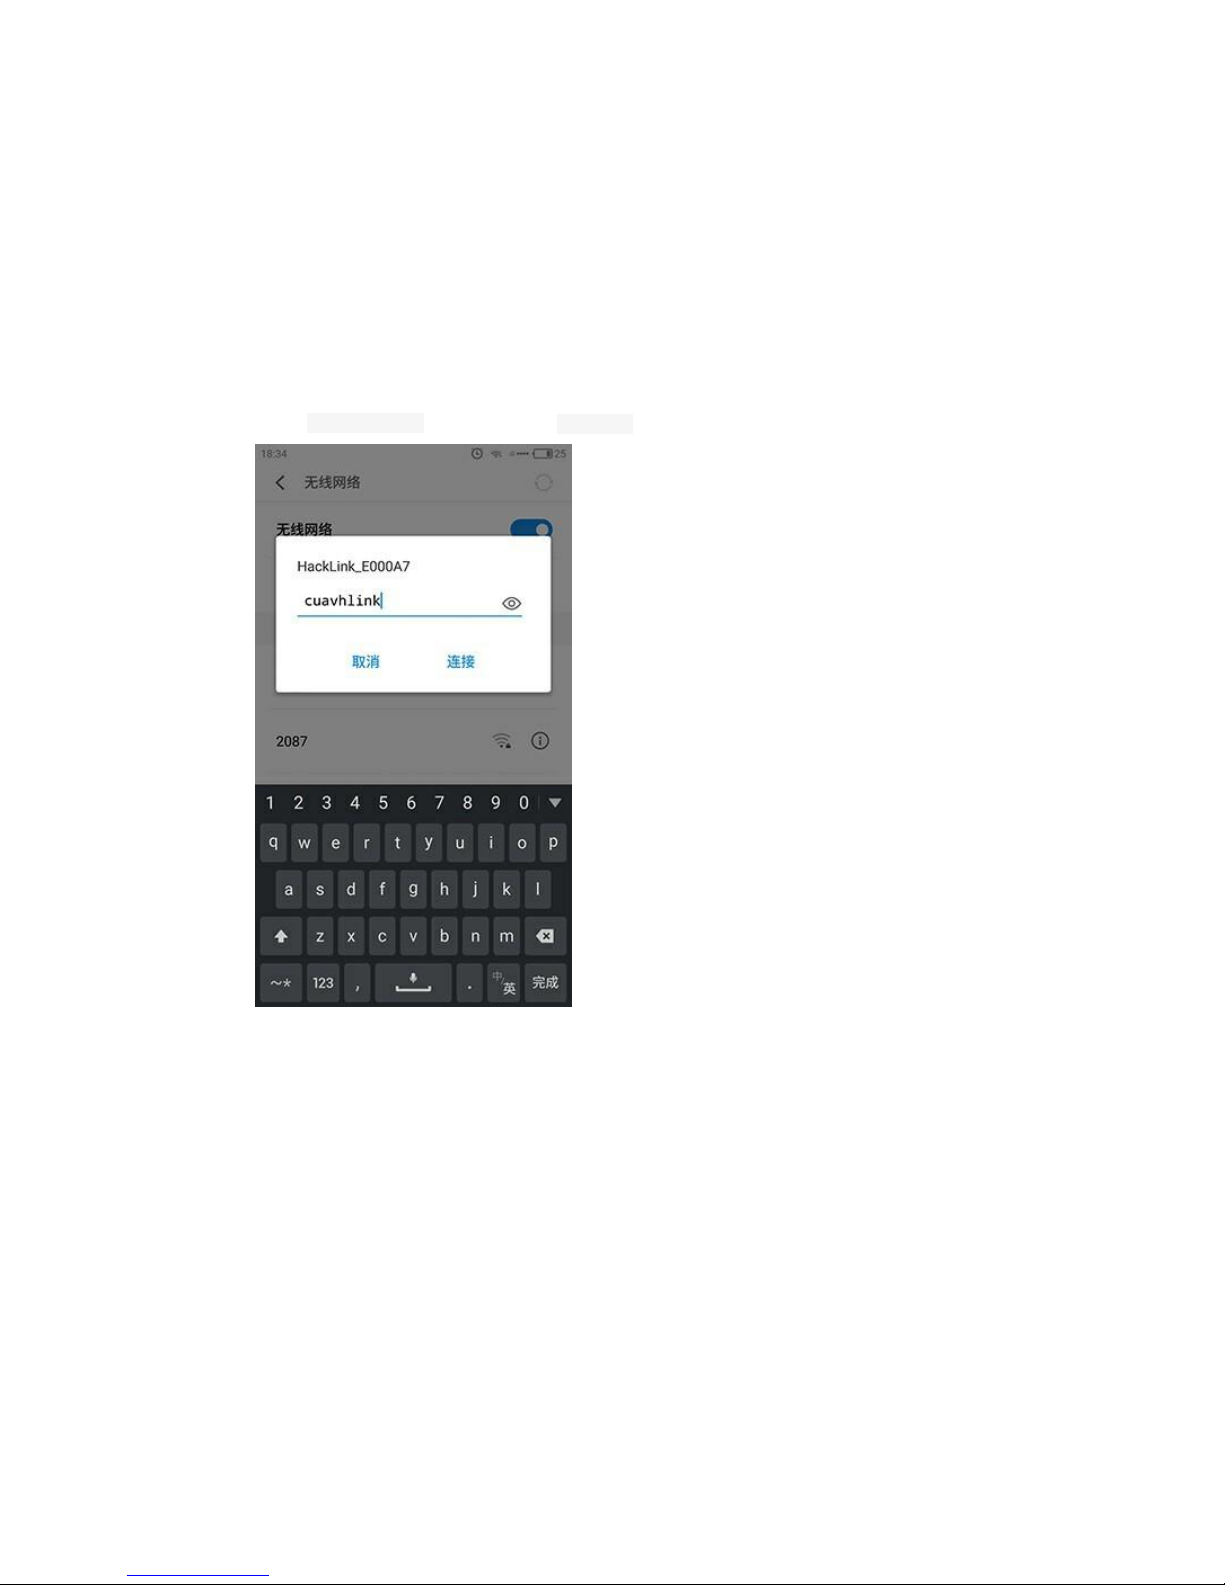
3. Search HackLink_xxxxxx, pass password and connected
4. open CUAV Hfight software
Page 12
12
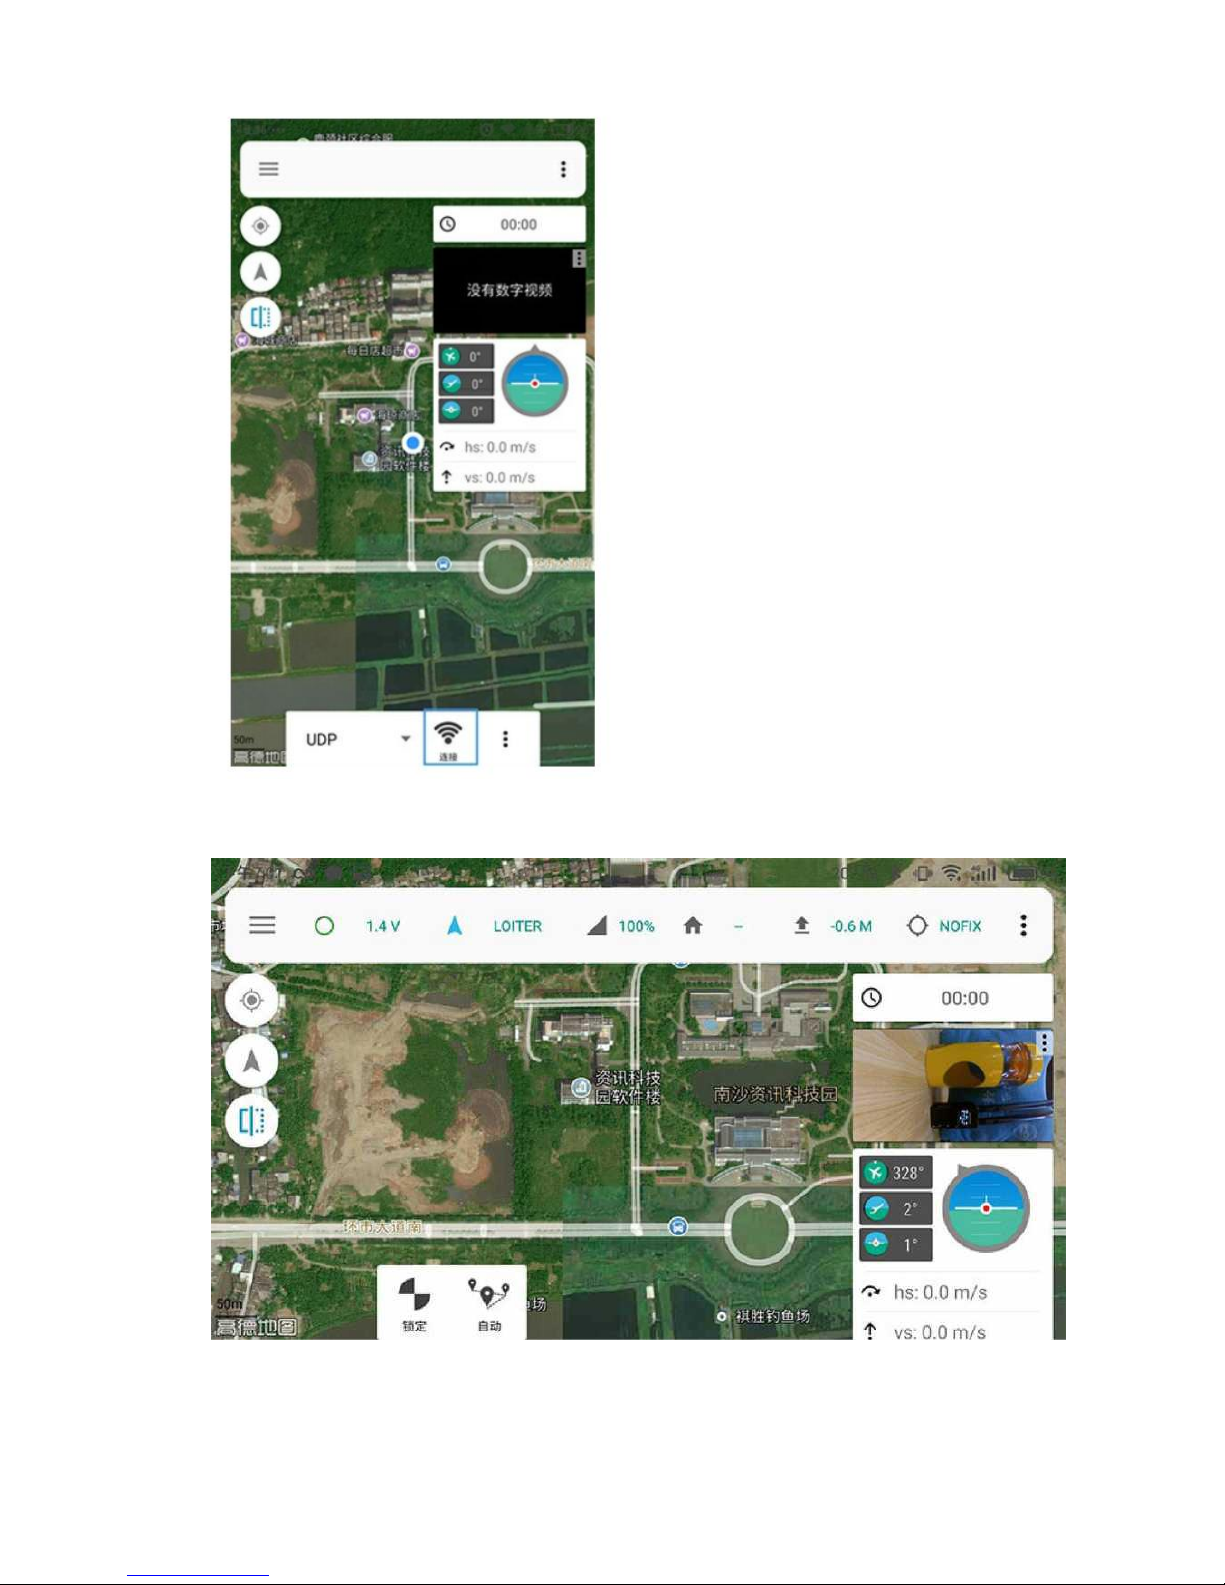
5. Select UDP, click connection
6. After the connection is successful, you can see the video and flight
data
7. Click on the video window to switch to the large screen display
Page 13
13
Cha n ge WIF I SSID and pas sword
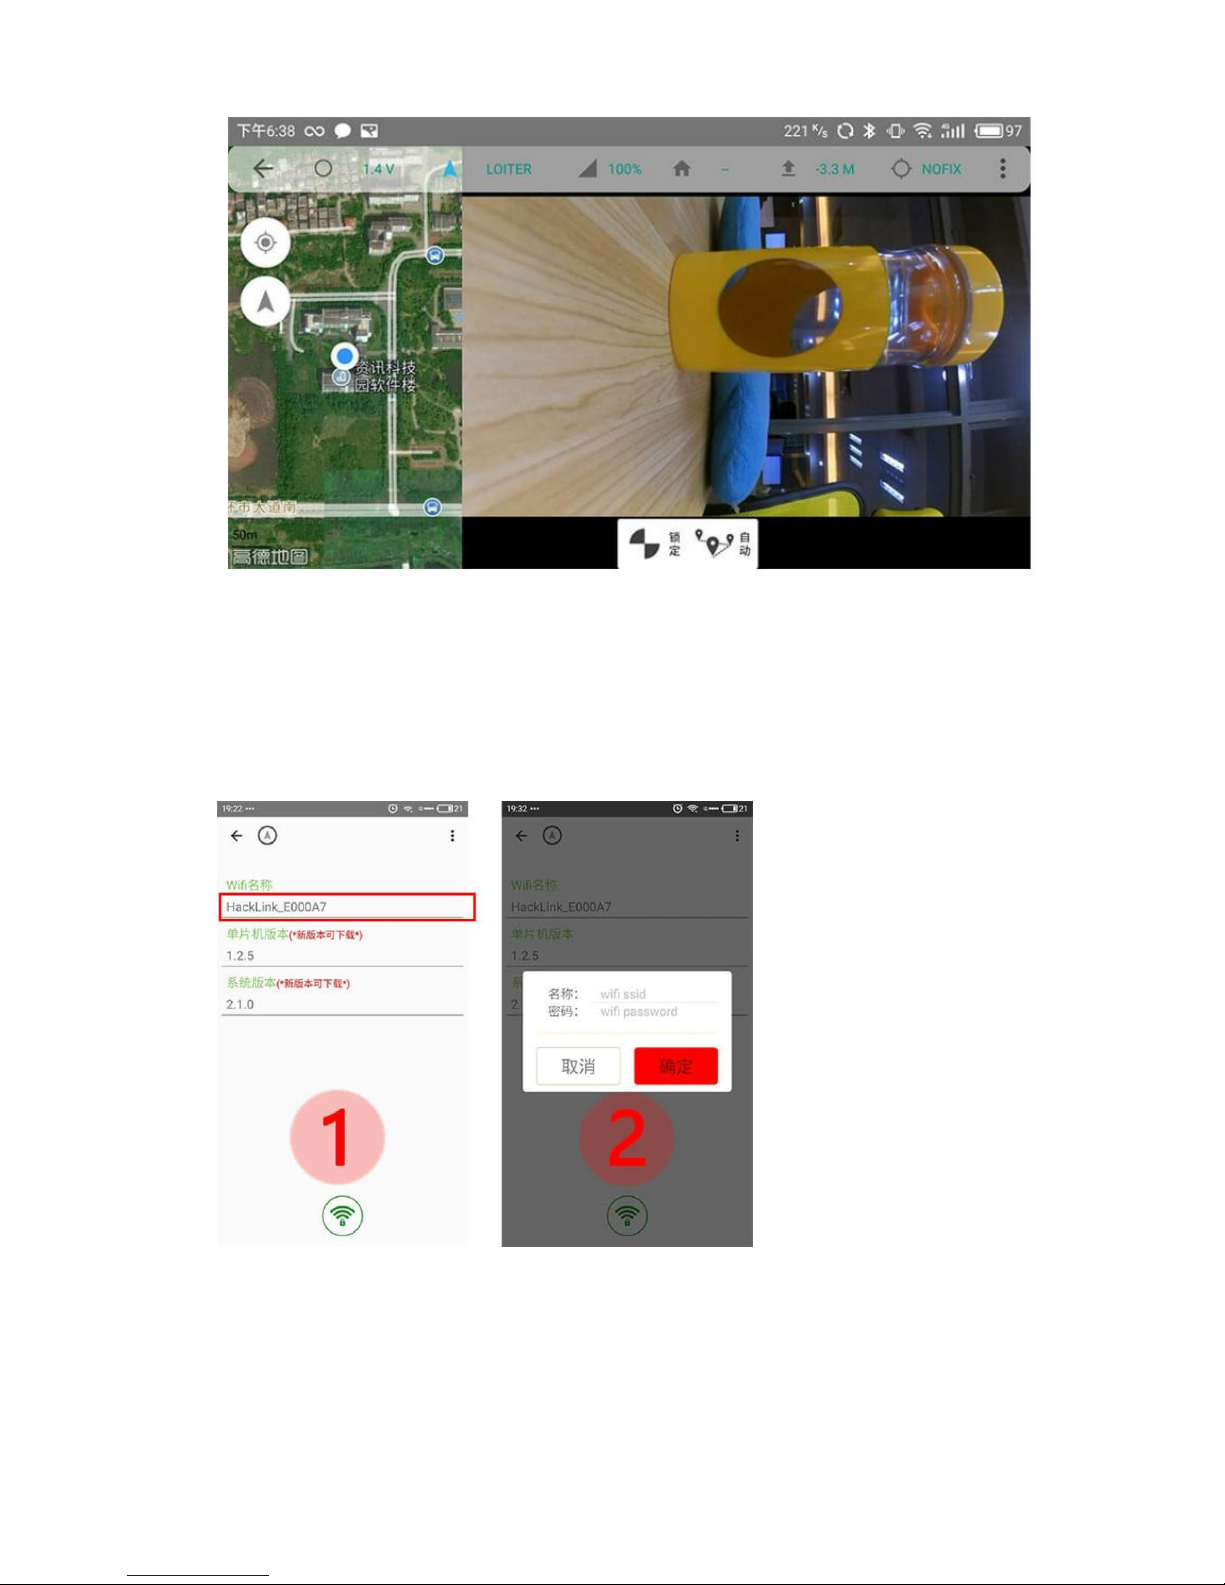
1. open the sidebar → system interface
2. _XXXXXX
3. Popup dialog
If only changing password, you can type a password in the password box (more than 8 digits)
If you modify the SSID, you can change the name, no need to add the HackLink_ prefix, the software will automatically
identify and add
M o d i f y S S I D , u s i n g 3 D R S O L O s o f t w a r e
If you need to change the SoloLink_ prefix, type SoloLink_123456 in the dialog and confirm.
Page 14
14
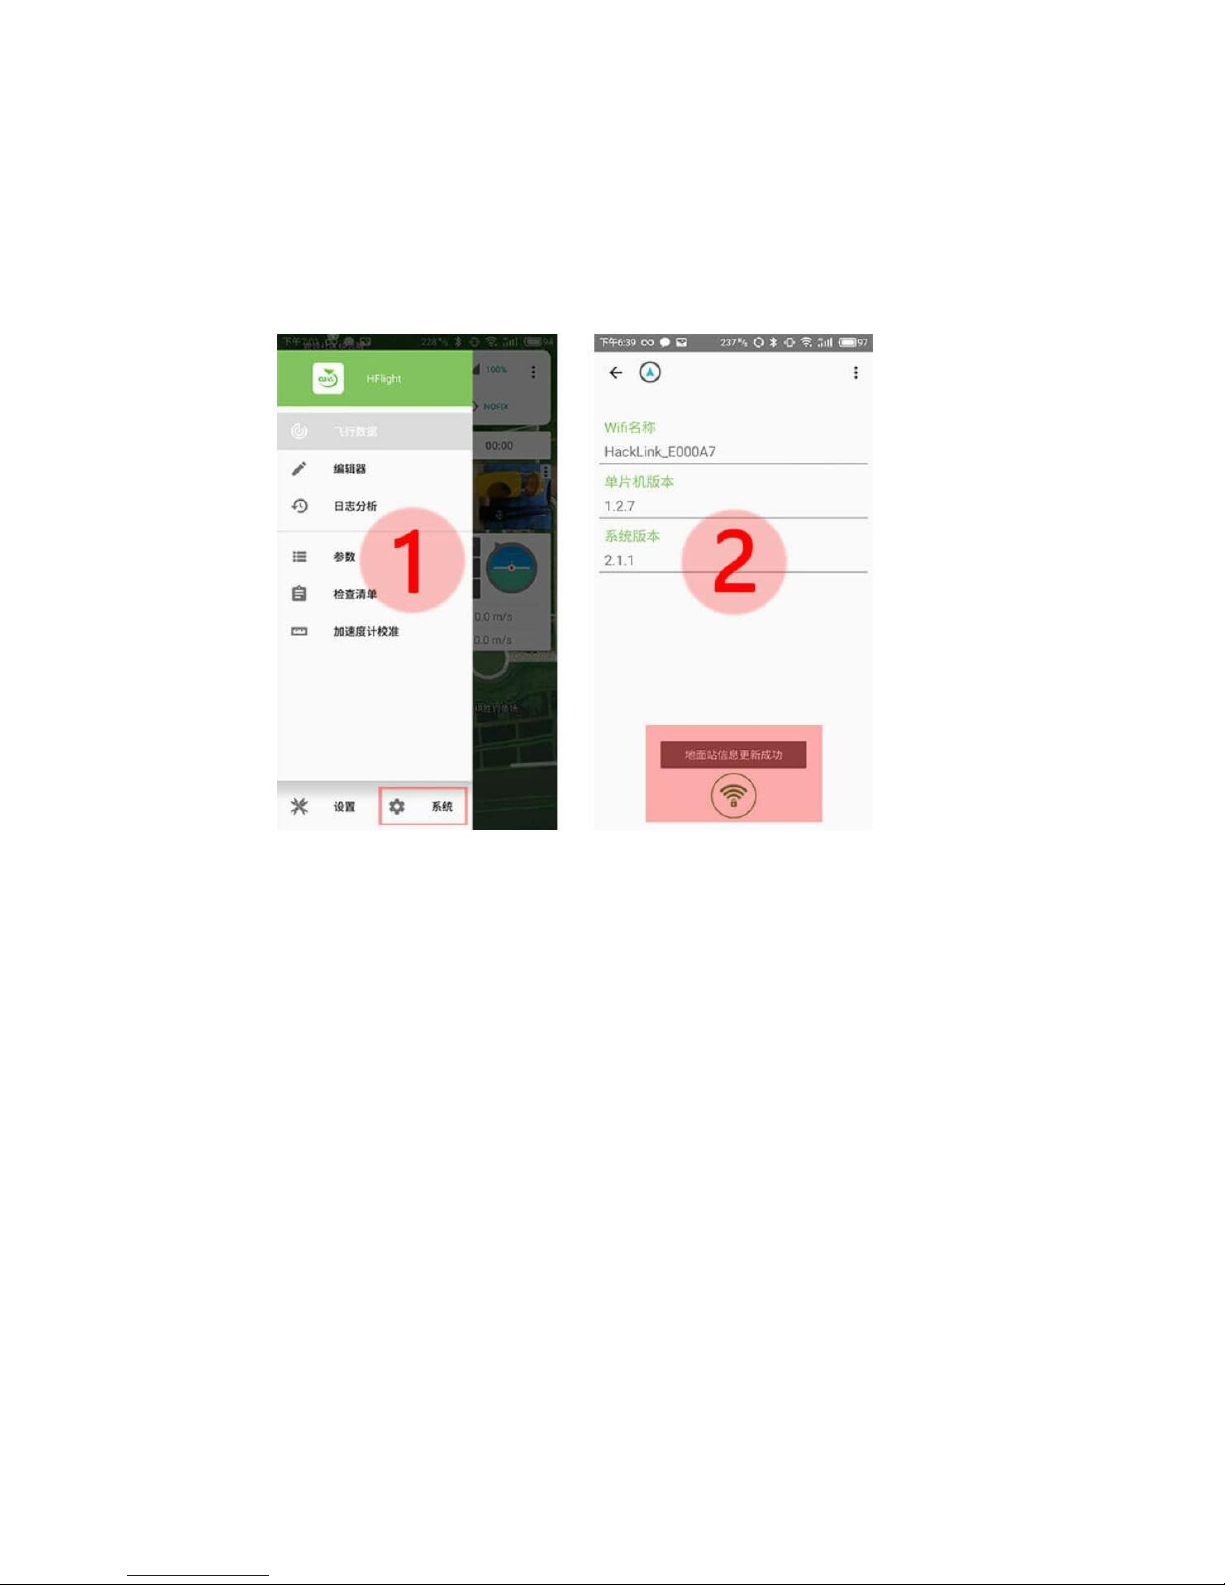
Upg rade th e groun d side MCU pro gram
1. Get version information
〇 Use the ground station to connect the digital link
〇Click on the sidebar→system options
〇 The ground station will show that the information is updated successfully
〇Then disconnect WIFI and switch to the network connection
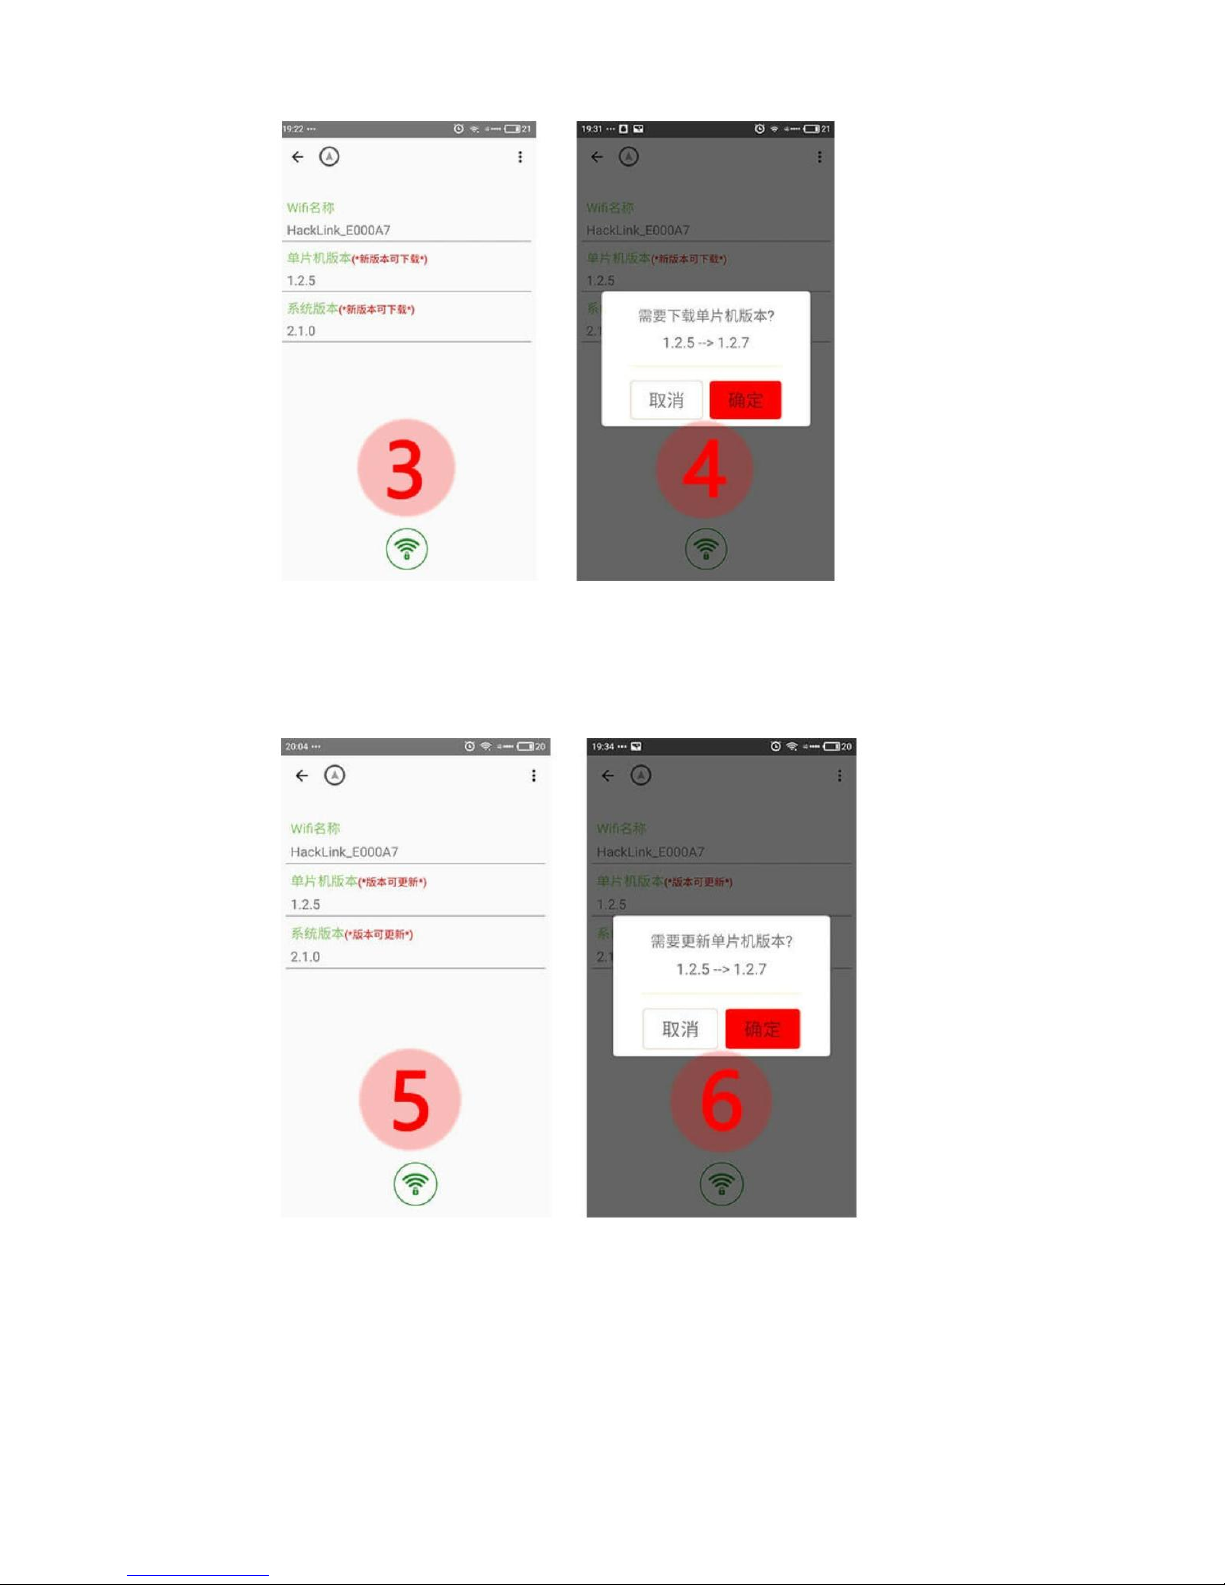
2. Get a new version of the file from the Internet
〇 When a new version is available, a new version is available for download
〇Click on the corresponding option to download the latest version to the local cache of the phone
Page 15
15
3.Update MCU program to digital link
〇Switch to Hacklink digital link WIFI network
〇Open the sidebar→system options
〇After the program is downloaded to the phone cache, you can see the prompt version can be updated
〇 Click on SCM options
〇Update now?
〇 Click confirm, APP will update the firmware file to the digital link folder
〇Then prompted to restart, the system will reboot after confirming, when system restarts, the MCU
will be updated.
Upg rade sy s tem
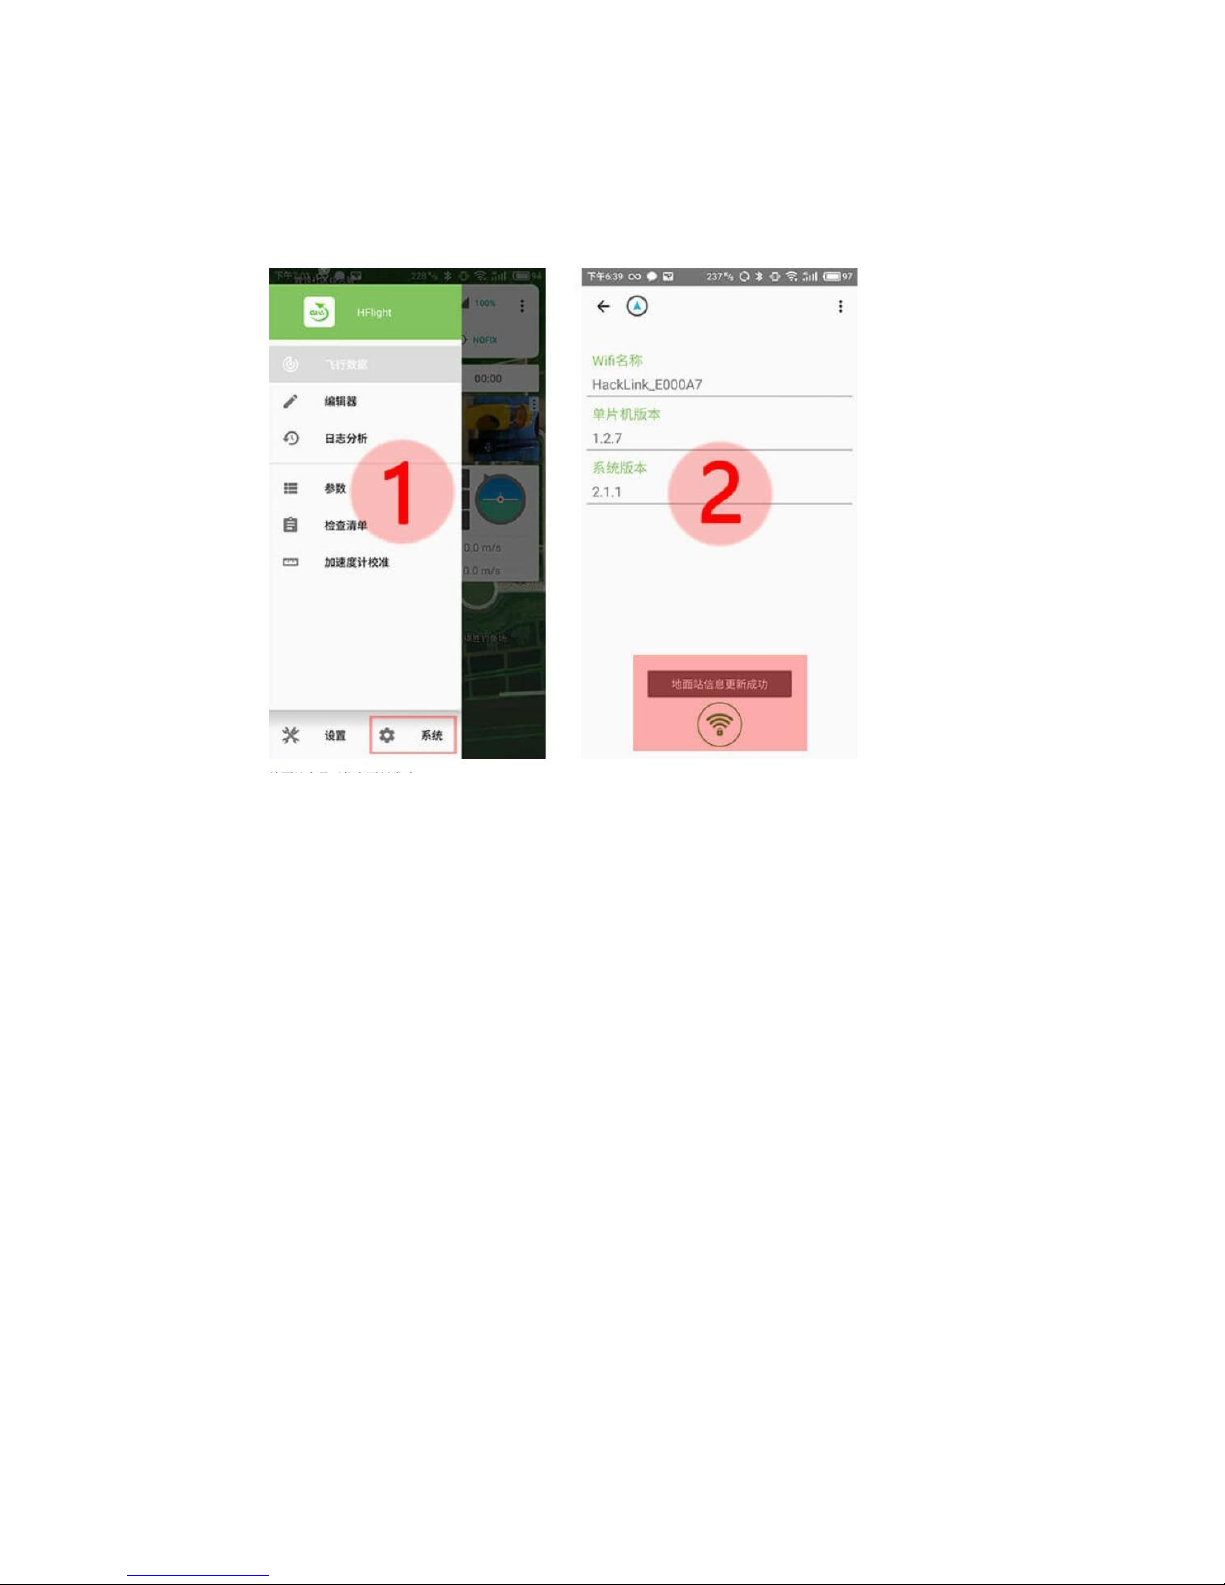
1.Get version information
Page 16
16
Upgrade system needs to meet two conditions
i. ground terminal power above 30% (more than 50%)
ii.
aircraft and the end of the ground has been normally matched
〇Use the ground station to connect the digital link
〇Click on the sidebar→ system options
〇The ground station will show that the information is updated successfully
〇 Then disconnect WIFI and switch to external network connection
2.Get a new version of the file from the Internet
〇 When a new version is available, it is available for download
〇Click on the system version (version available) option
〇Pop-up dialog box to download the system version, then download it (System is relatively large, it may take some time to
download).
Page 17
17
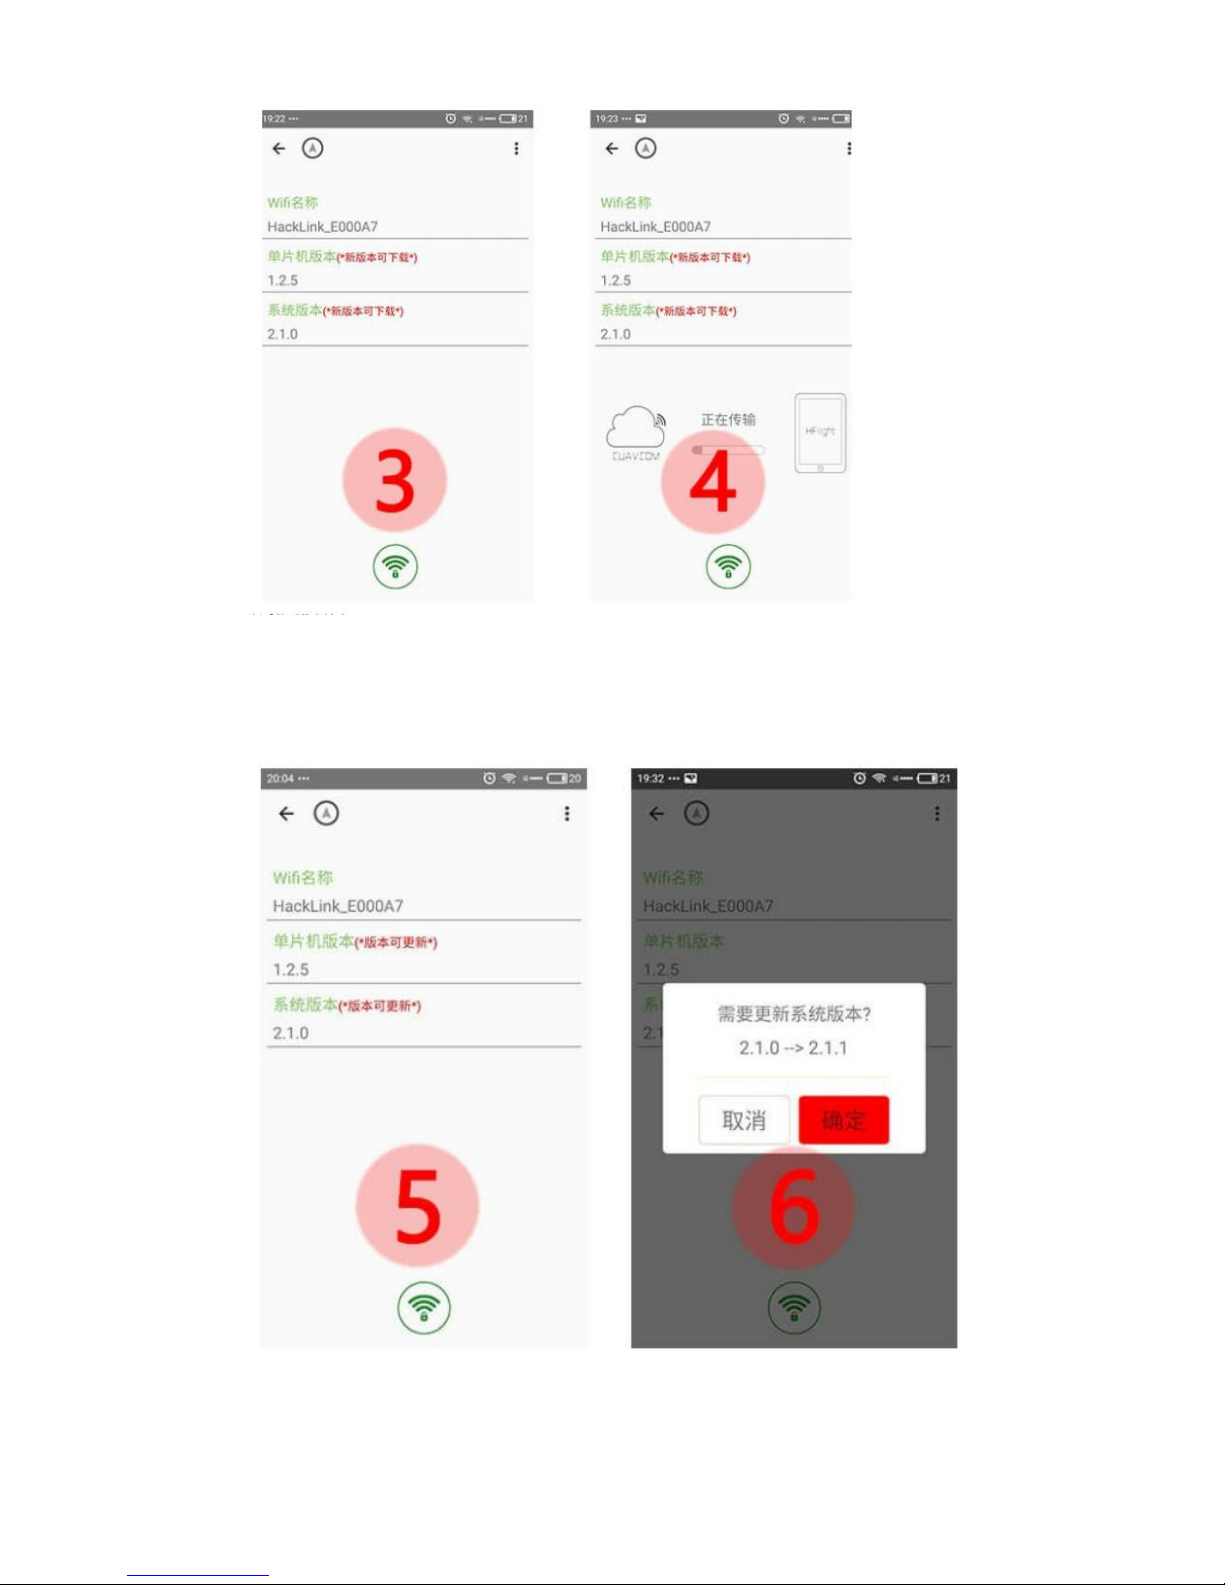
3. update system to digital link
〇 Switch to Hacklink digital link WIFI network
〇Open the sidebar→system options
〇After the program is downloaded to the phone cache, you can see the prompt version can be updated
〇 Click on the system version (version update) option
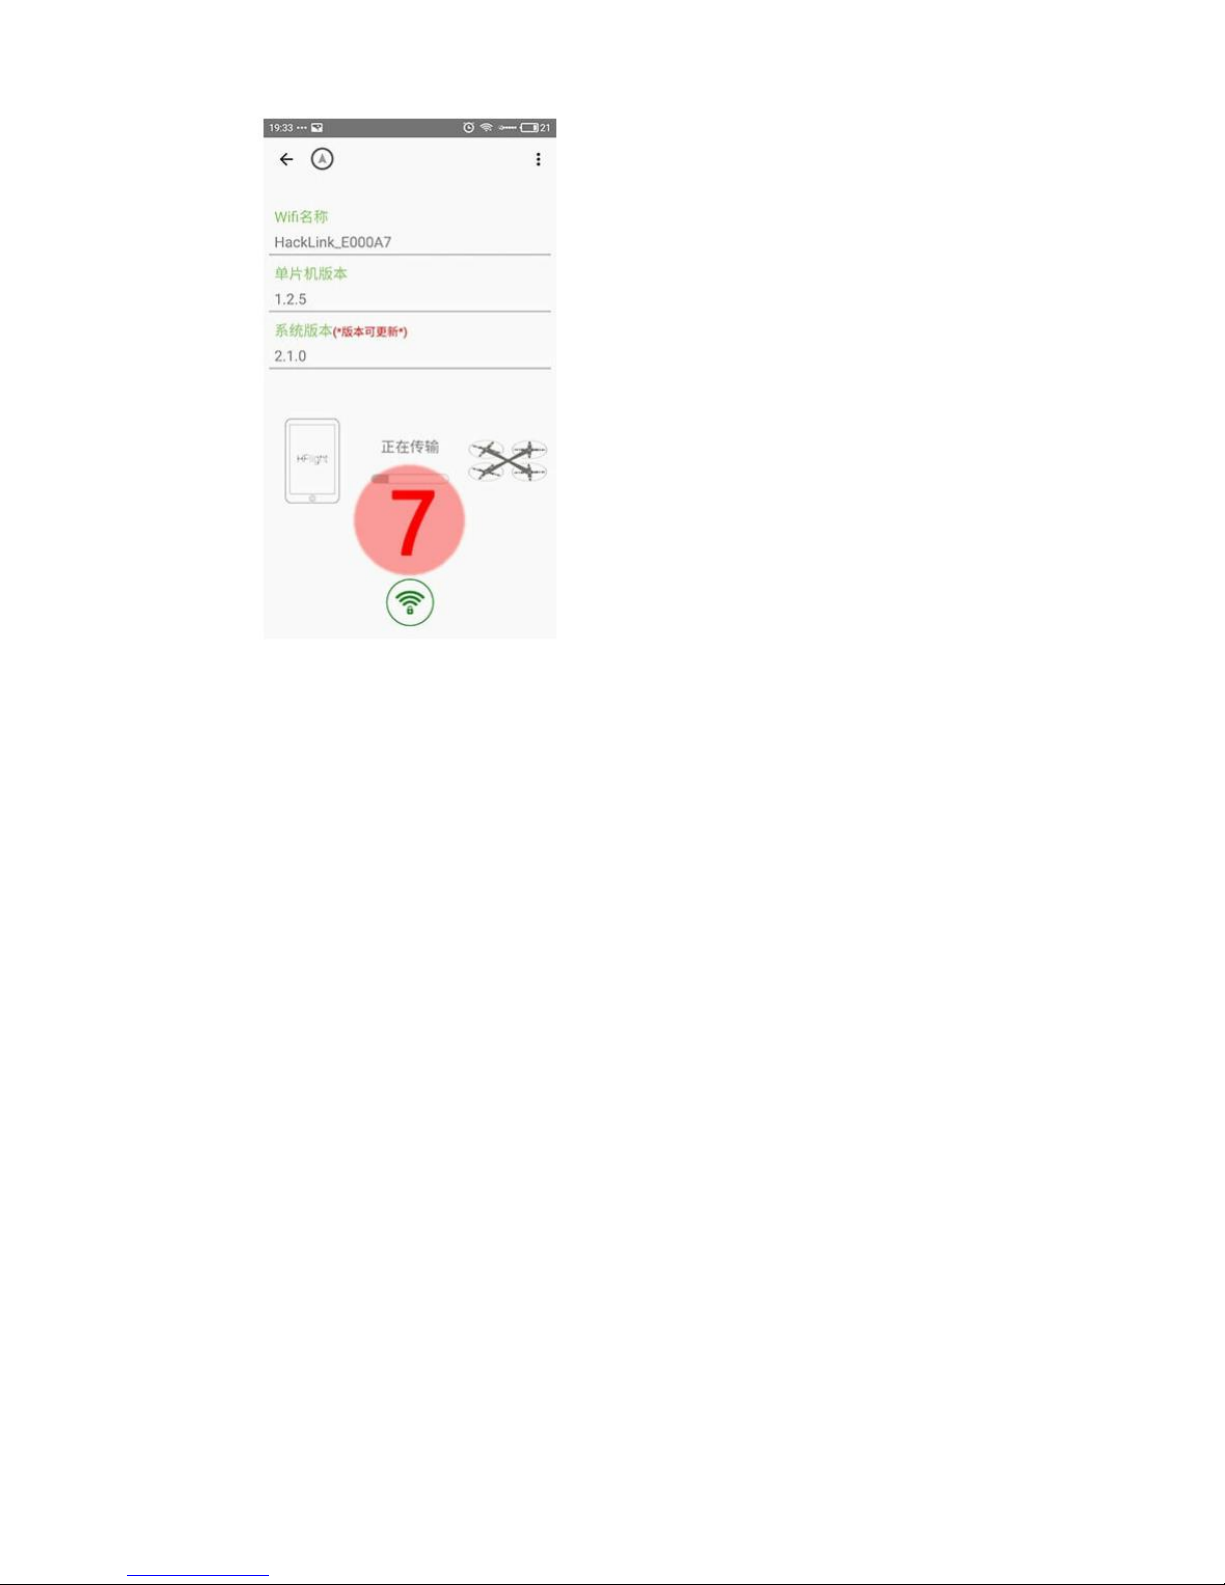
〇Update now?
〇 confirm, and APP will update the firmware file to the digital link folder
Page 18
18
〇 Then prompted to restart, the system will reboot after confirming, when system restarts, the MCU will be updated.
Page 19
19
Use QGC to connect HackLink
QGroundContro is a cross platform ground station software, including Windows version, Android version, apple version,
etc.
Because it is compiled from the same set of code, so the operation is almost the same, the difference is relatively small, thus, this article
only explain the use methods of Windows version and Android version
Windows :
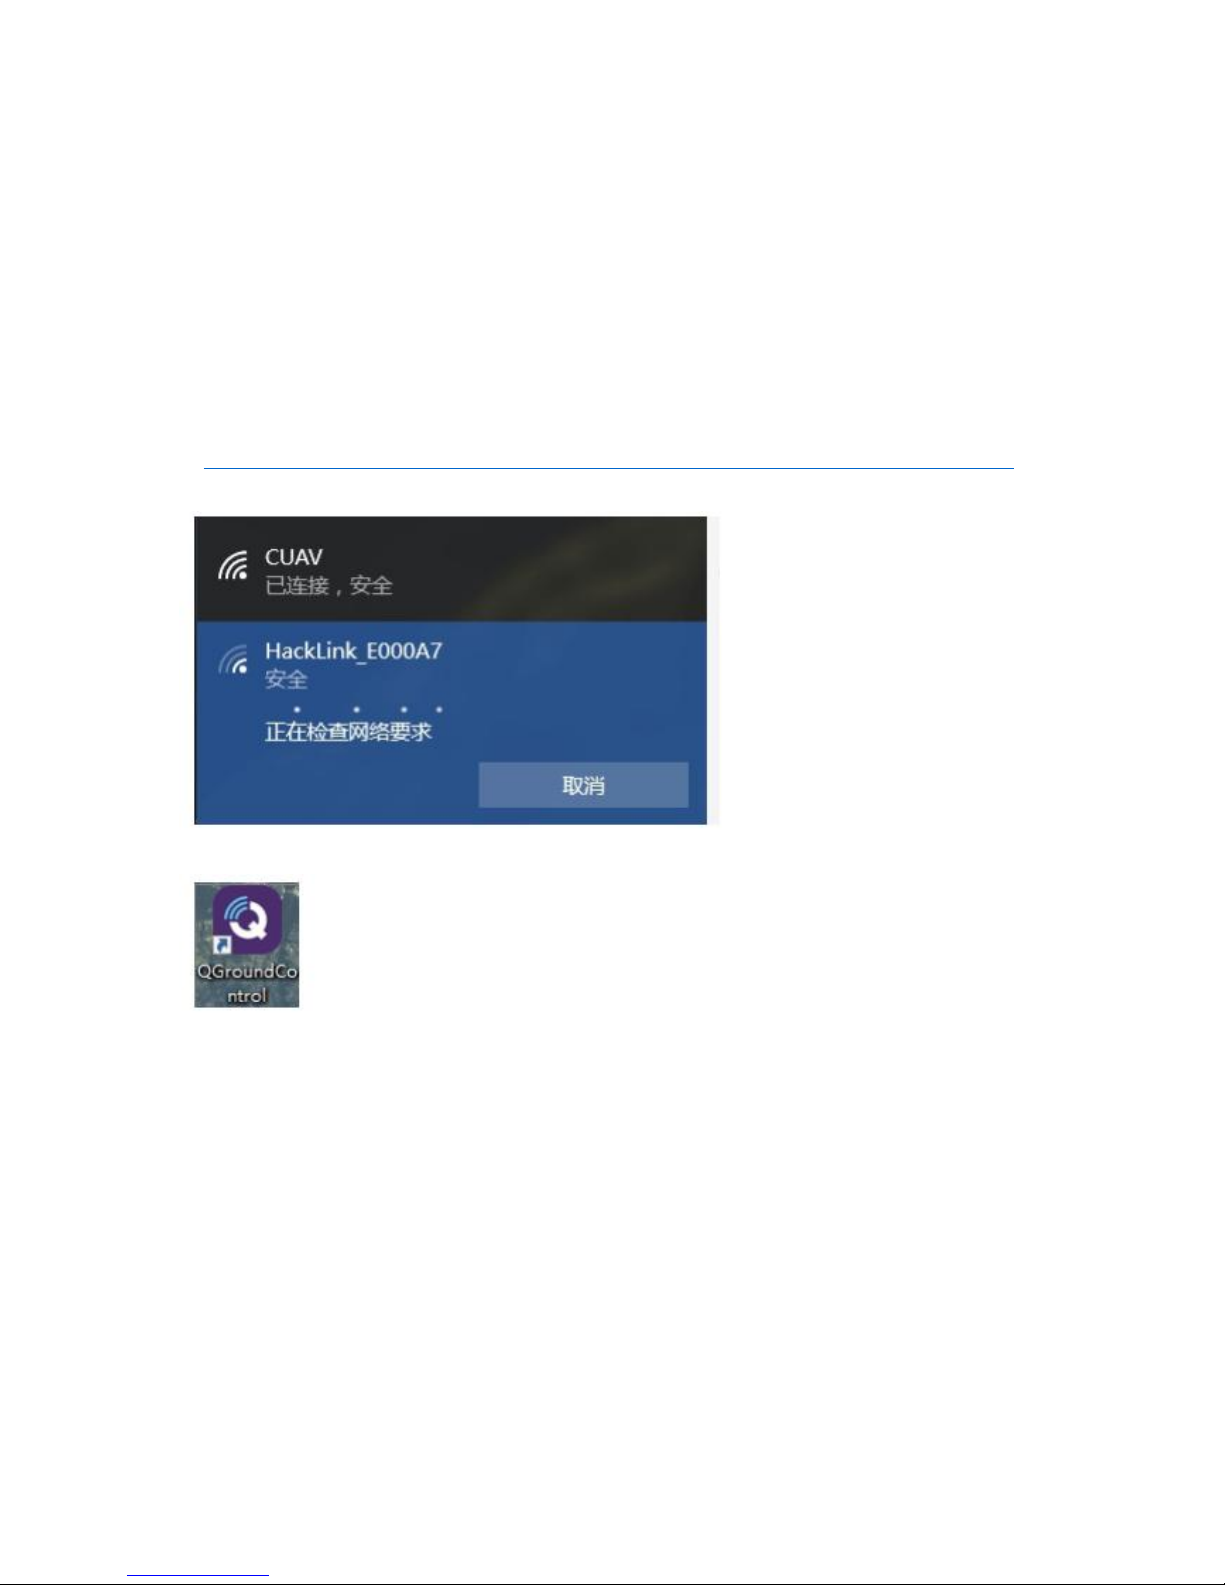
1.Install and connect network
Before the connection, please ensure that the HackLink is normal and flight control has powered on
If not, check the hardware connection - the initial installation
Download at:
https://s3-us-west-2.amazonaws.com/qgroundcontrol/latest/QGroundControl-installer.exe
2.use the network connected to HackLink
3.Install and open QGC software
HackLink is used in UDPMavlink data broadcasting, as long as in the same network, open the QGC software will automatically
connect to the flight control.
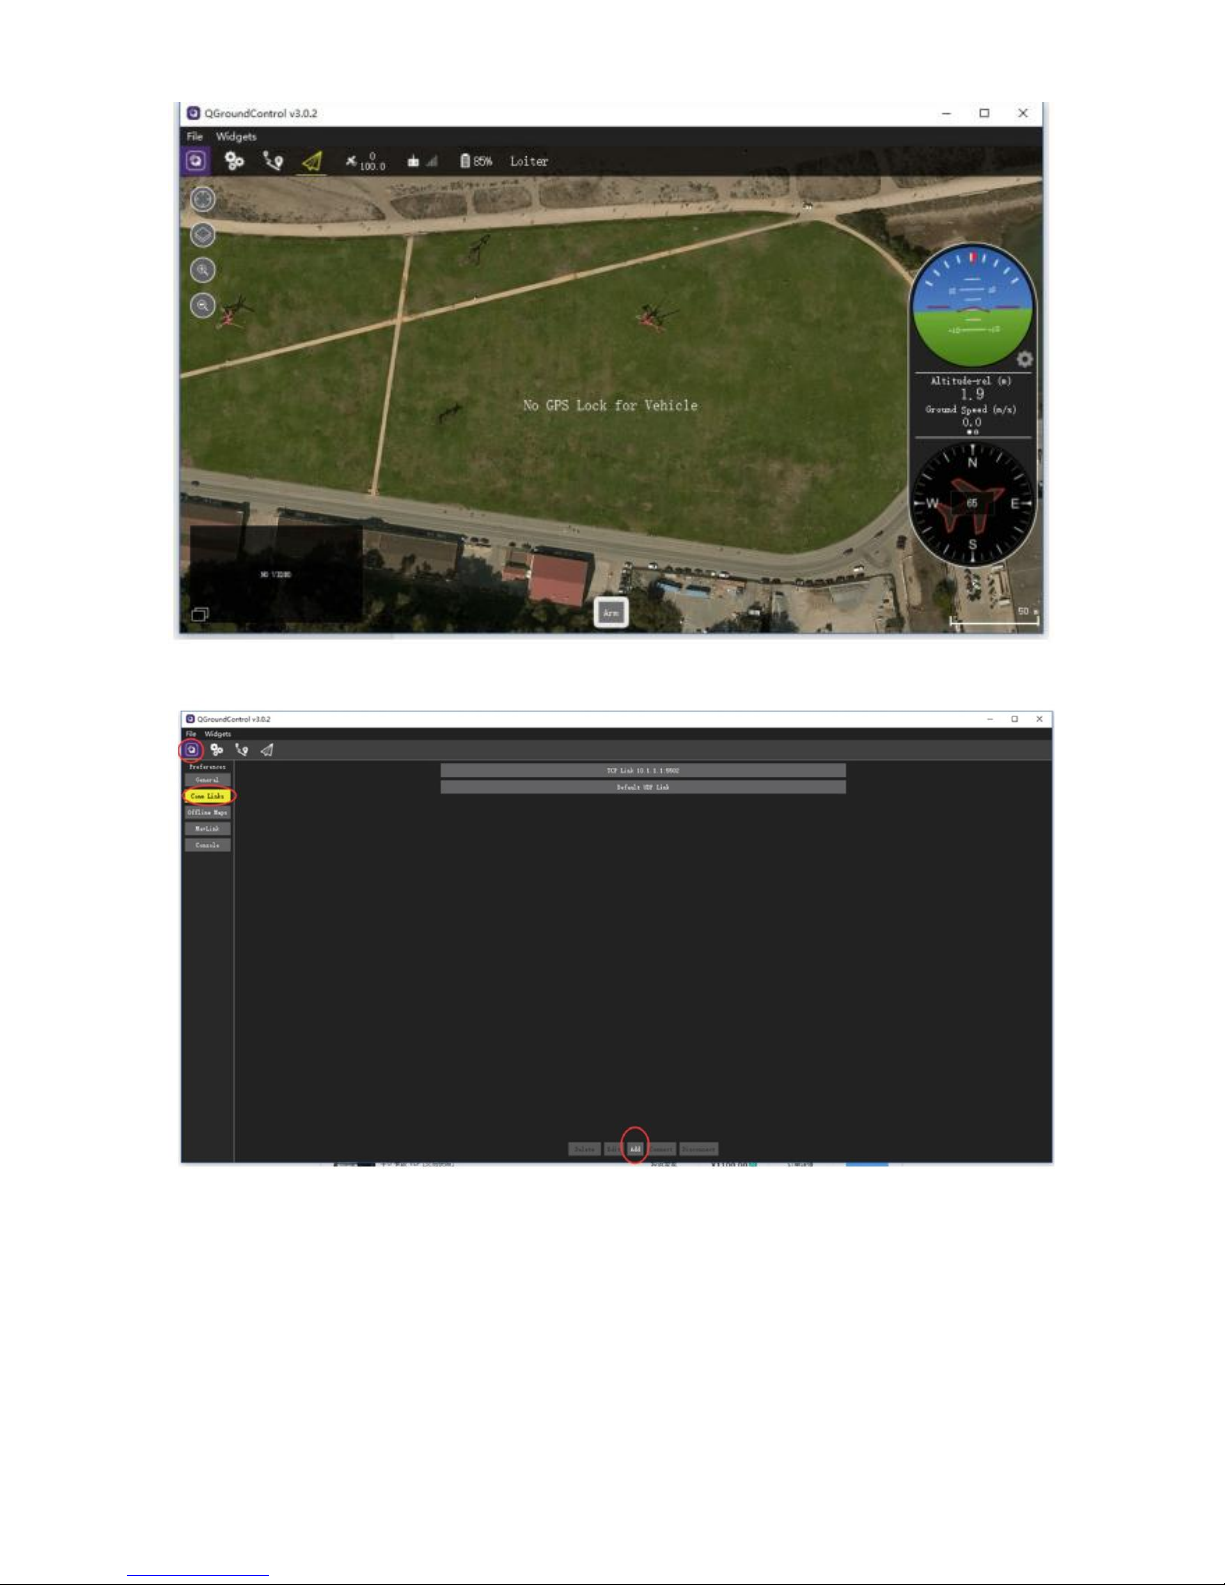
The following describes a new connection to allow the QGC to get the video stream
Page 20
20
1 . Enter the comm links option, ADD will add a new link
2. Host address: 10.1.1.1
port: 5502, click OK.
Page 21
21
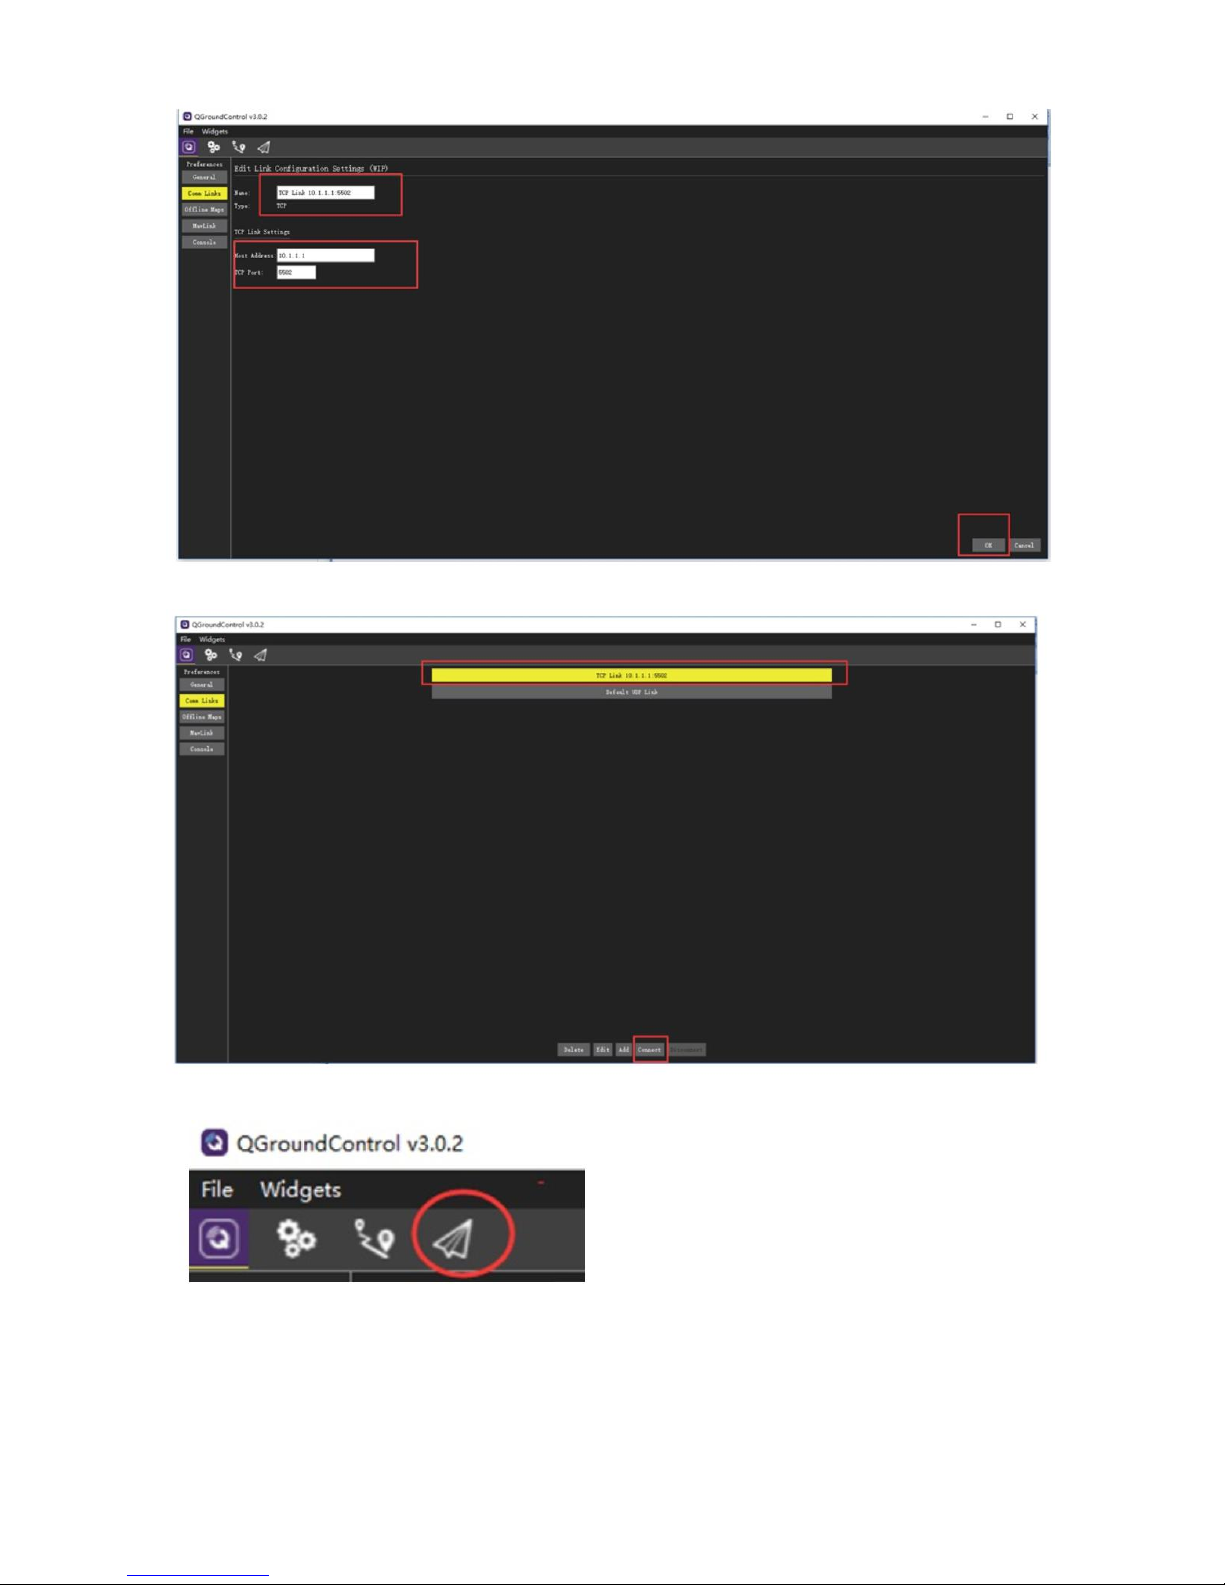
3. Select new connection
4. Click connect, and then return to the main interface
Video and data available
Same settings for other platforms QGC, including Android QGC, apple QGC, linuxQGC, etc.. For QGC uses a soft decoding, video
is not smooth
Page 22
22
pair i ng an d resto rin g syst em
HackLink
At present, the factory has done a good pairing operation, no need to do the pairing operation after receiving..
Only to upgrade the system or do a restore system operation, you need to re pairing/
How to determine wheth e r HackL ink has b een suc cessf u lly m atched
Status light (Power lamp red system status lamp blue wireless status lamp green).
Power on the AIR, turn on GR, and wait 1 minutes, after the system is started. The normal state should be as follows
G R :
Start light flashes (blue) (that has been started; Wireless state light (green) bright, wireless RF card is activated
AIR:
Start status light (blue)bright (Connected to GR), Wireless state light (green) bright, wireless RF card is activated
pai ring proces s
It is simple and requires only a few steps
1. Start and power on, waiting for indicators bright
2. Use a toothpick or pointed tool (such as paper clips and tweezers) to press Pair button for 5 seconds
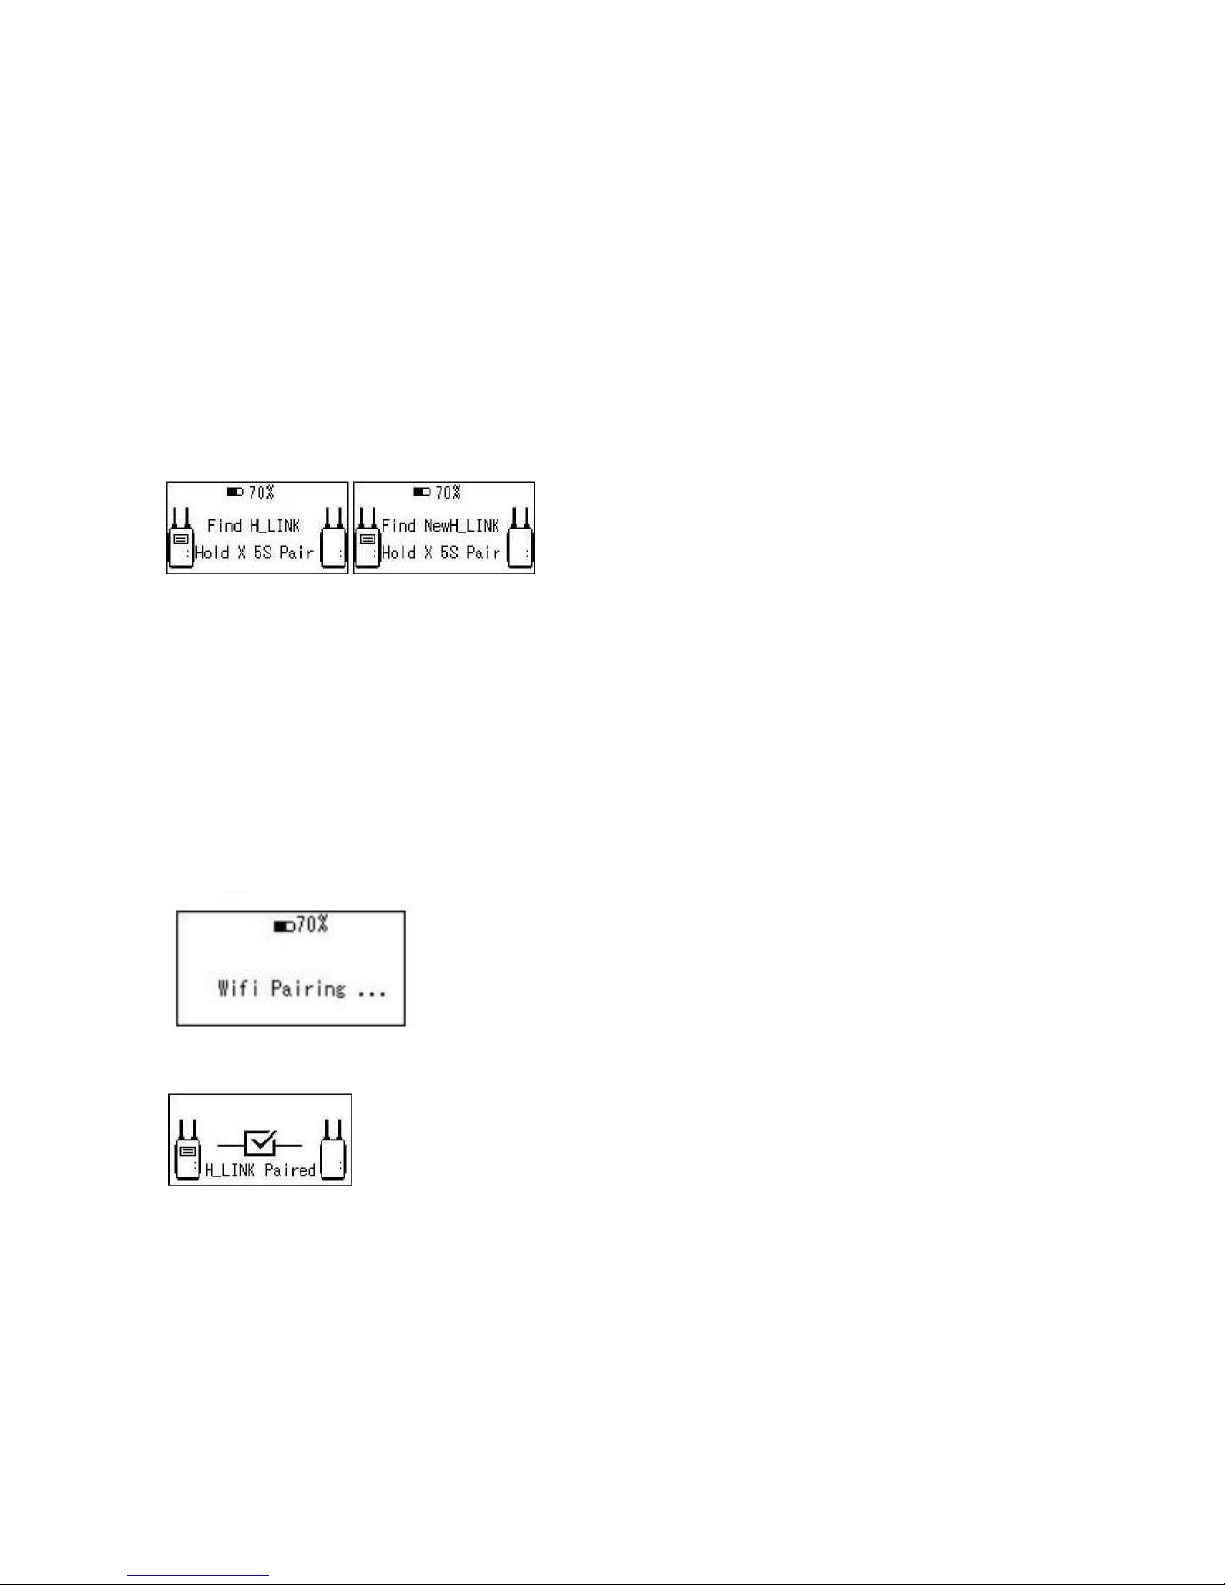
3. After a period of time, OLED end will prompt to find a new AIR end
4. Press X key don't let go, after prompting paired, release the button
5. About 15 seconds later, the pairing is successful
Restore system operating instructions
Note: make sure the battery is 20 % above before the restore of the system
Ground end restore process:
1. In shutdown state
2. Press the X key, then press the power button.
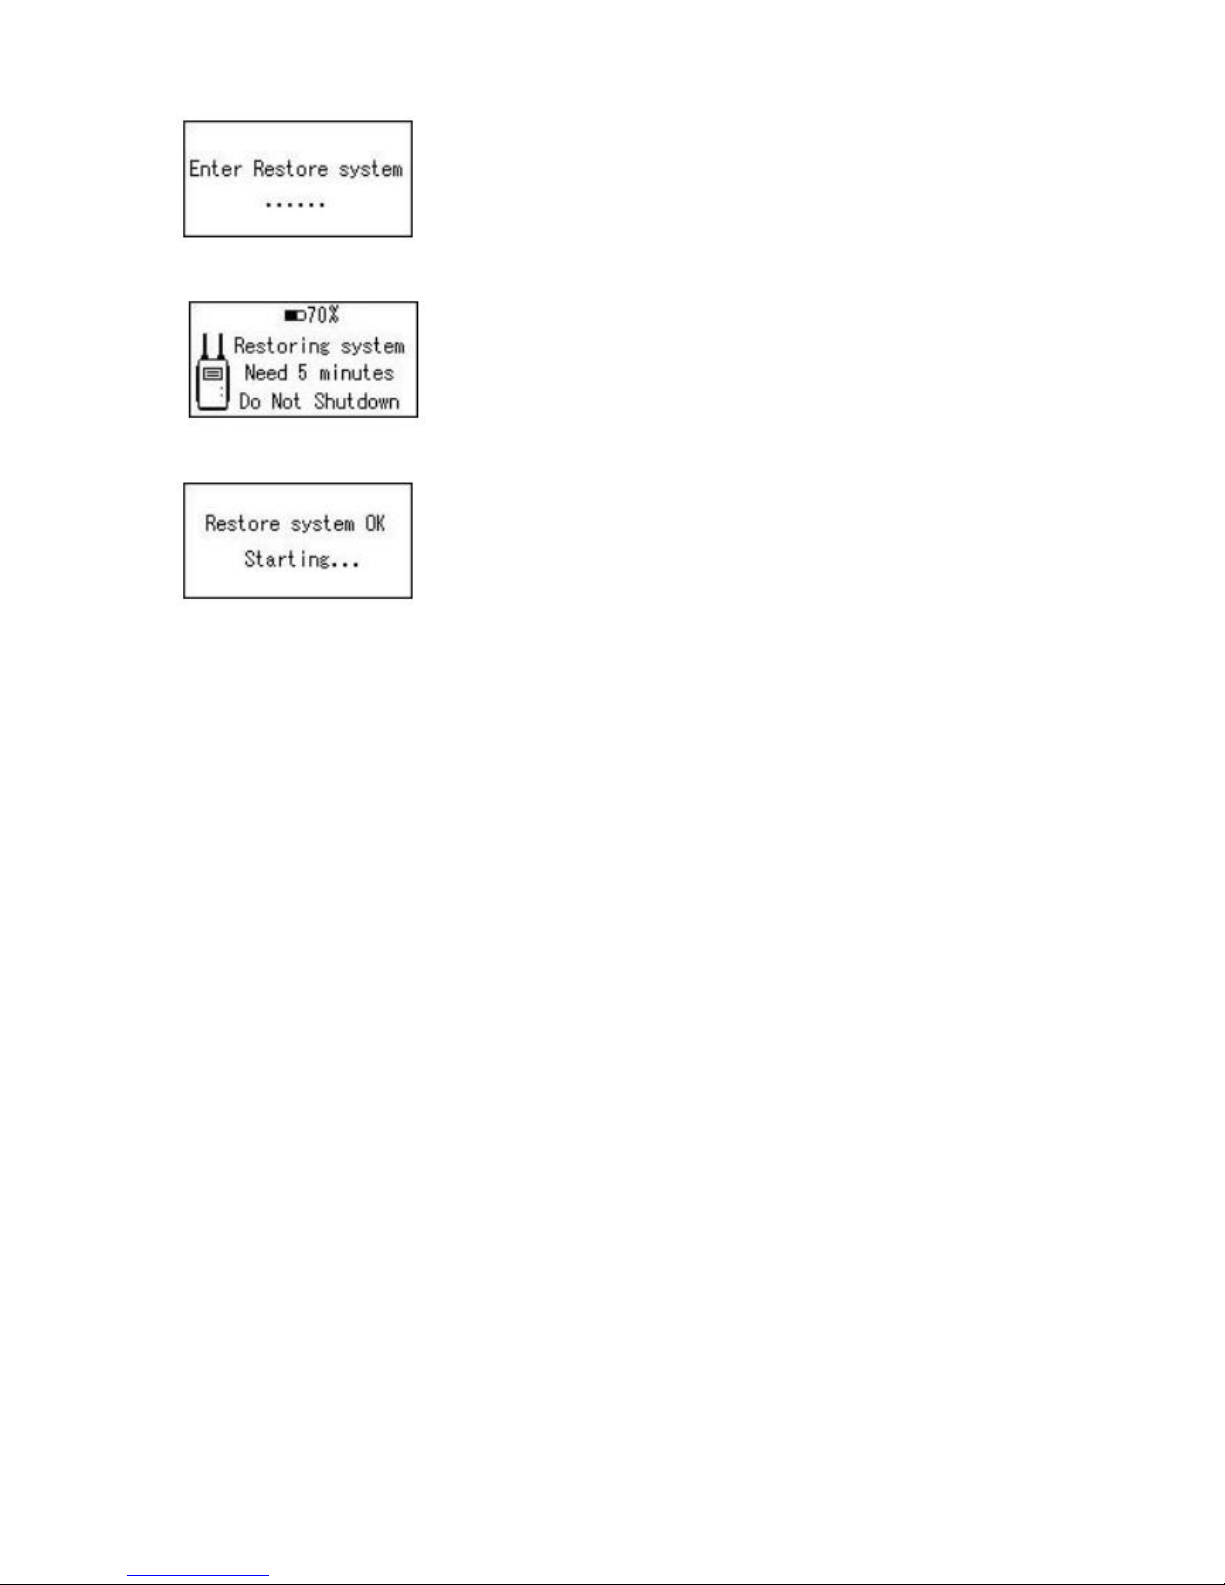
3. After the start , press X button, till OLED screen prompts to restore system.
Page 23
23
4. after a period of time, the indicator will flash and OLED screen shows in restoring system.
5. About 5 minutes later, the success of the restore system
Aircraft end restore process:
•Like that of GR end, press the Pair button, then wait for blue light flashes
•Or press the Pair, and then press the reset button.
•The system will restart after restore, the state light will return to normal flashing state
Page 24
24
Detailed annotation on OLED display
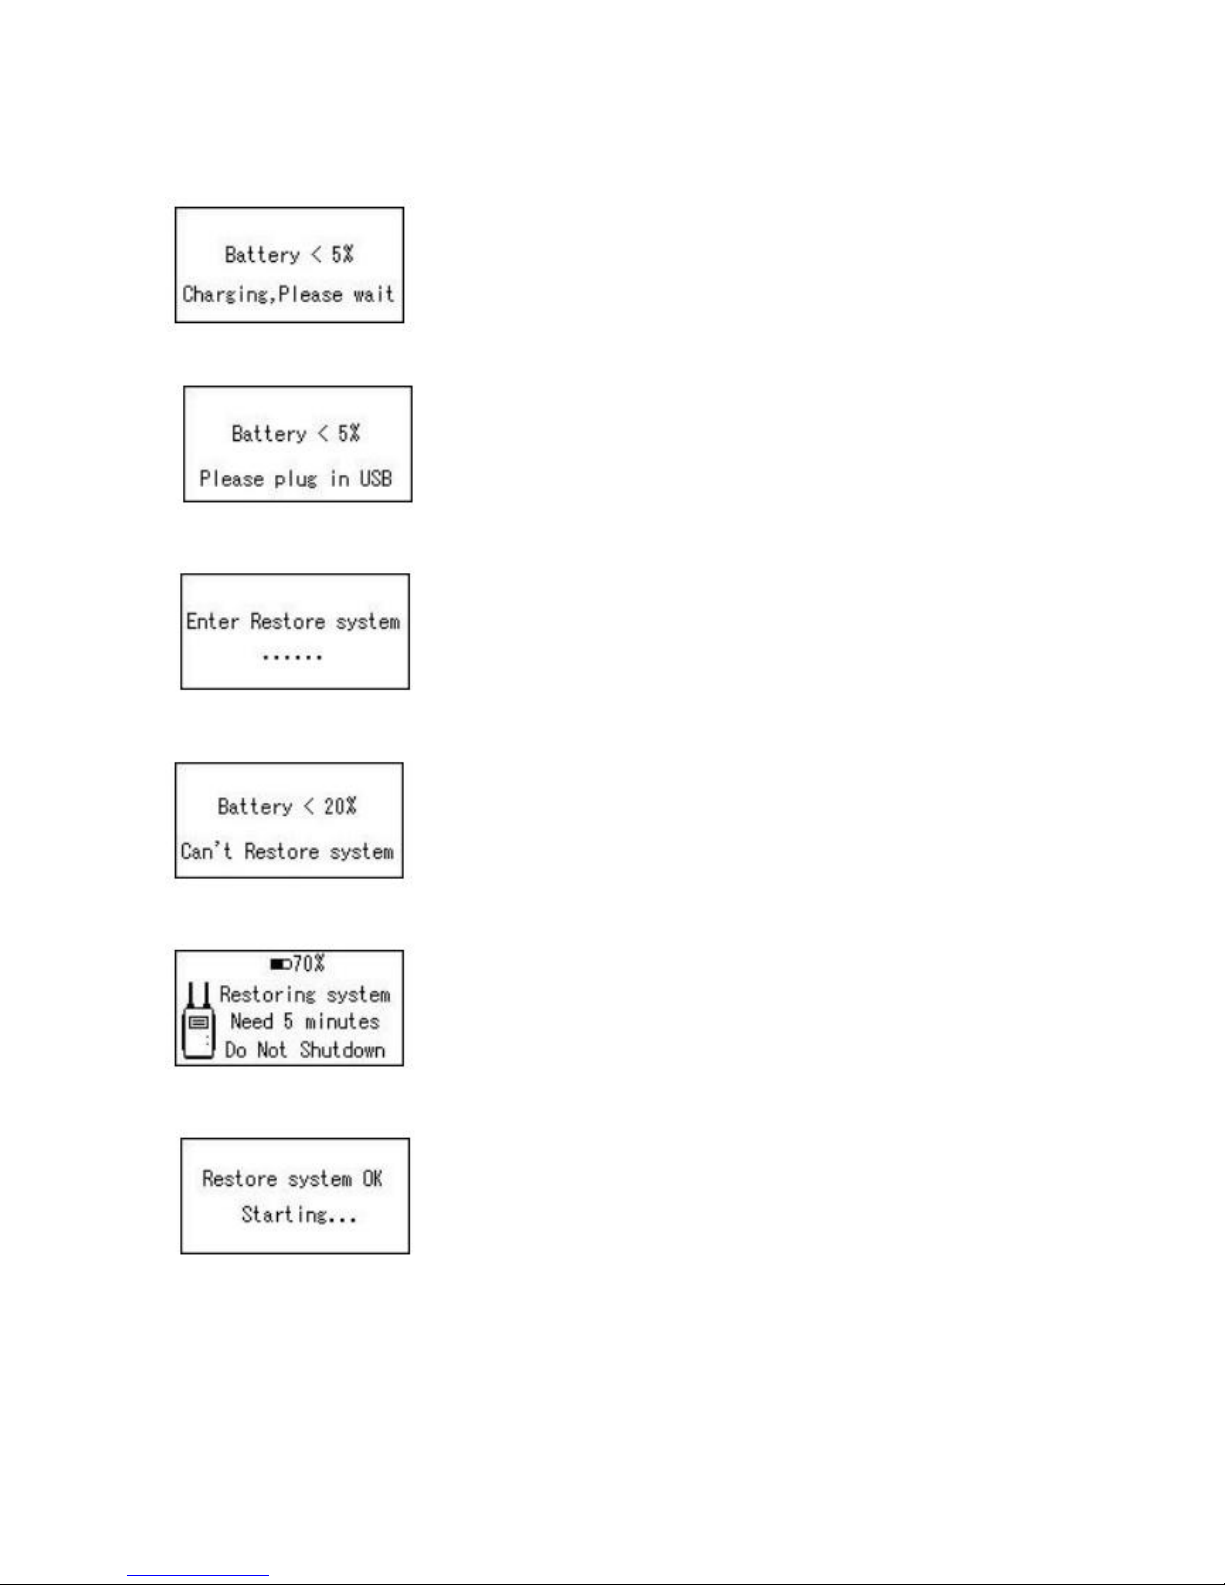
Battery less than 5% , unable to boot, charging, please wait.
Battery less than 5% , unable to boot, please access the USB for charging
Enter the recovery system, wait.........
Battery power is less than 20%, unable to restore the system, please turn off, and charge till over 20% power for recovery system.
Ongoing recovery system, need 5 minutes, please do not shutdown
Recovery system is completed, the system is being restarted, please wait
Page 25
25
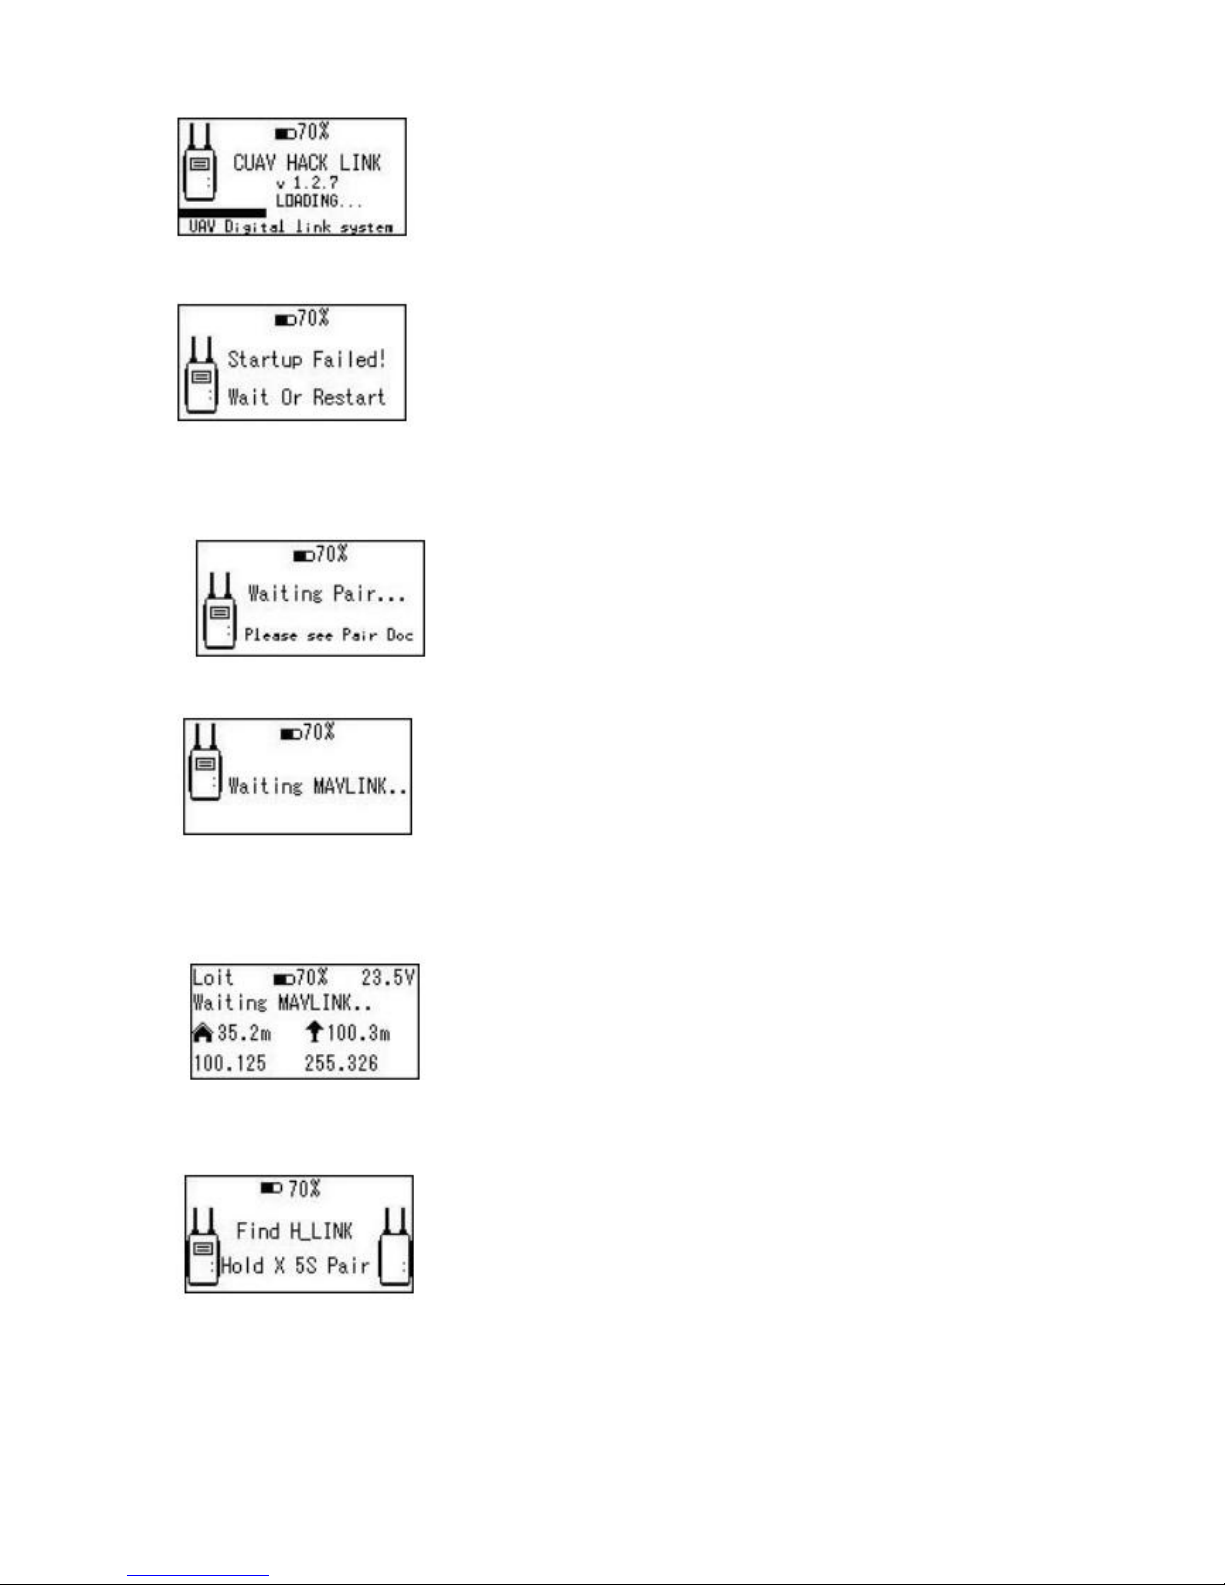
Boot load, please wait.
Boot load failed, please wait for the load to complete or shutdown for restart. There are reasons:
1. Hardware start up delay, waiting to start to complete
2. Hardware boot failure, shutdown restart required. If you start the system, please see the status lights.
Waiting for the aircraft to launch the pairing, please click on the aircraft pairing, please refer to the pairing documentation..
Waiting for the aircraft terminal MAVLINK data :
1. The plane did not connect the flight control
2. No MAVLINK data, check the pairing state
Wait MAVLINK data, and store information before shut down, including Flight mode, flight height away from home, battery
voltage, GPS latitude and longitude information.
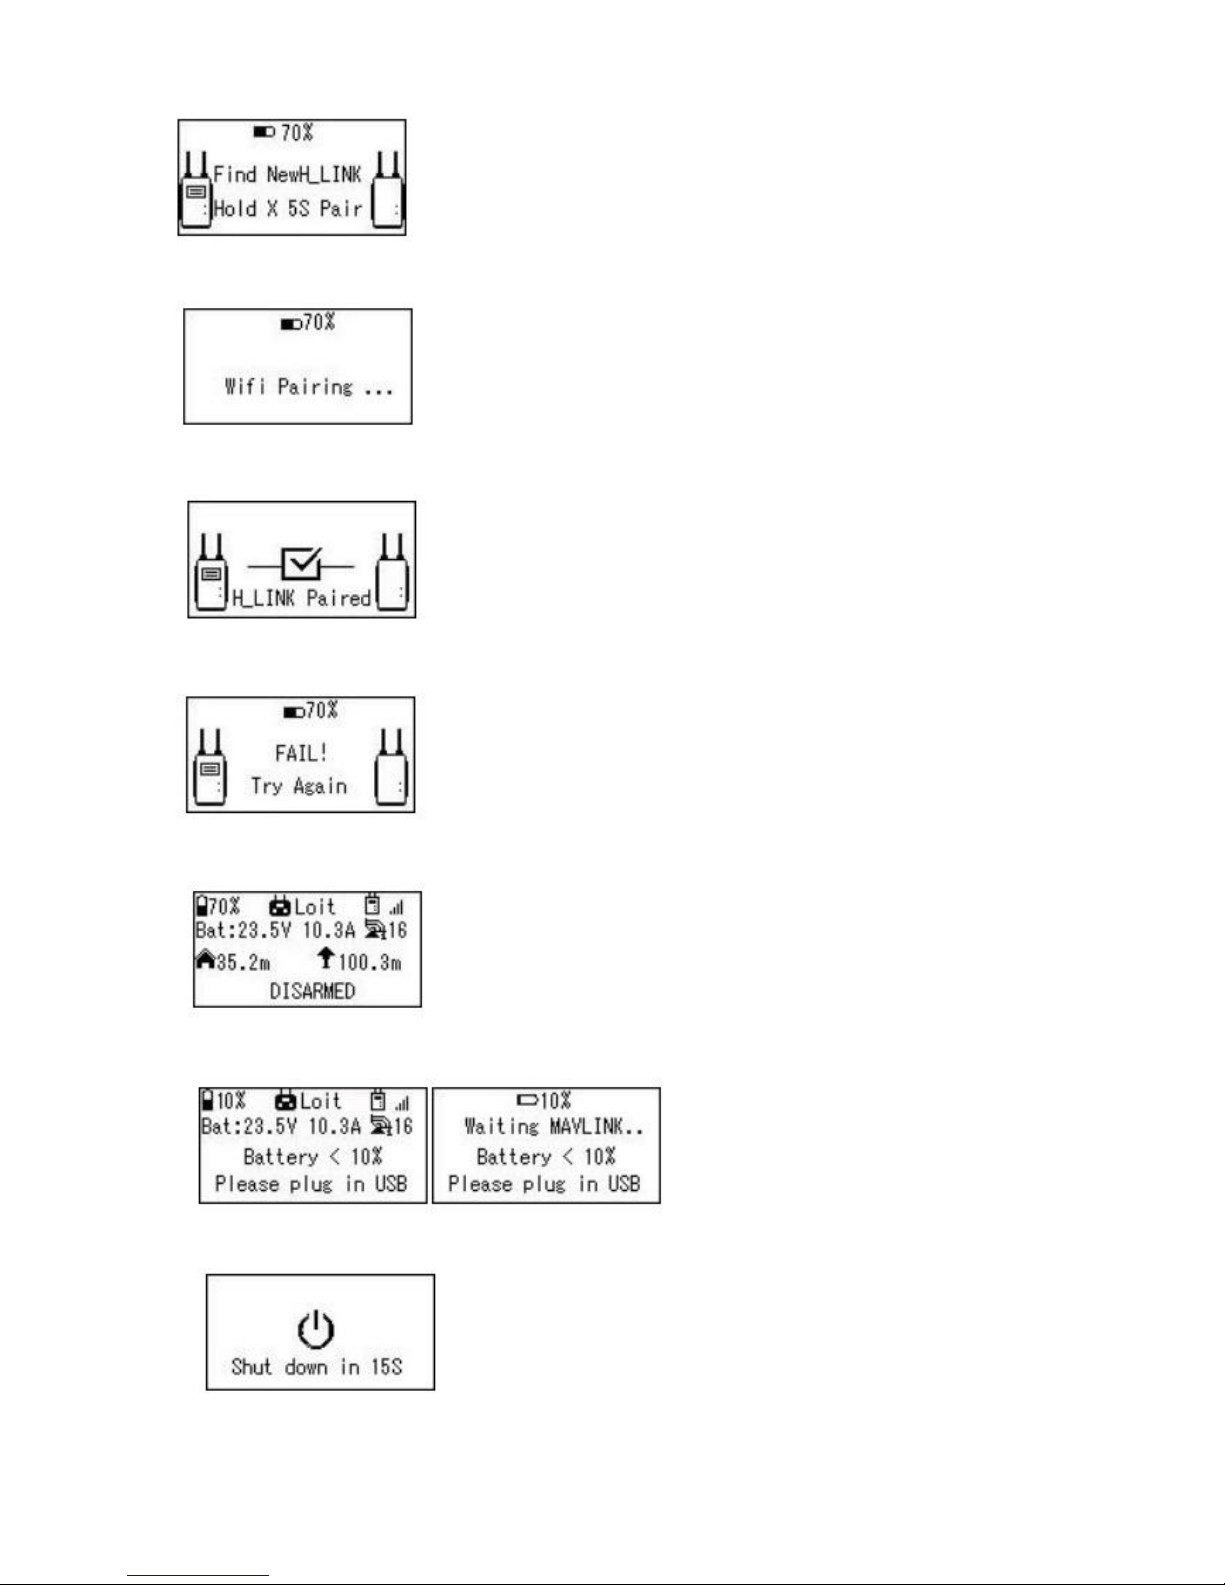
Searched an aircraft, hold down the X key for 5 seconds for pairing
Page 26
26
Searched an aircraft, hold down the X key for 5 seconds for pairing
Pairing, wait
Paired
Fail, try again
Successful pairing , the normal display interface.
Battery less than 10%. Please connect to USB charging.
Shut down
Page 27
27
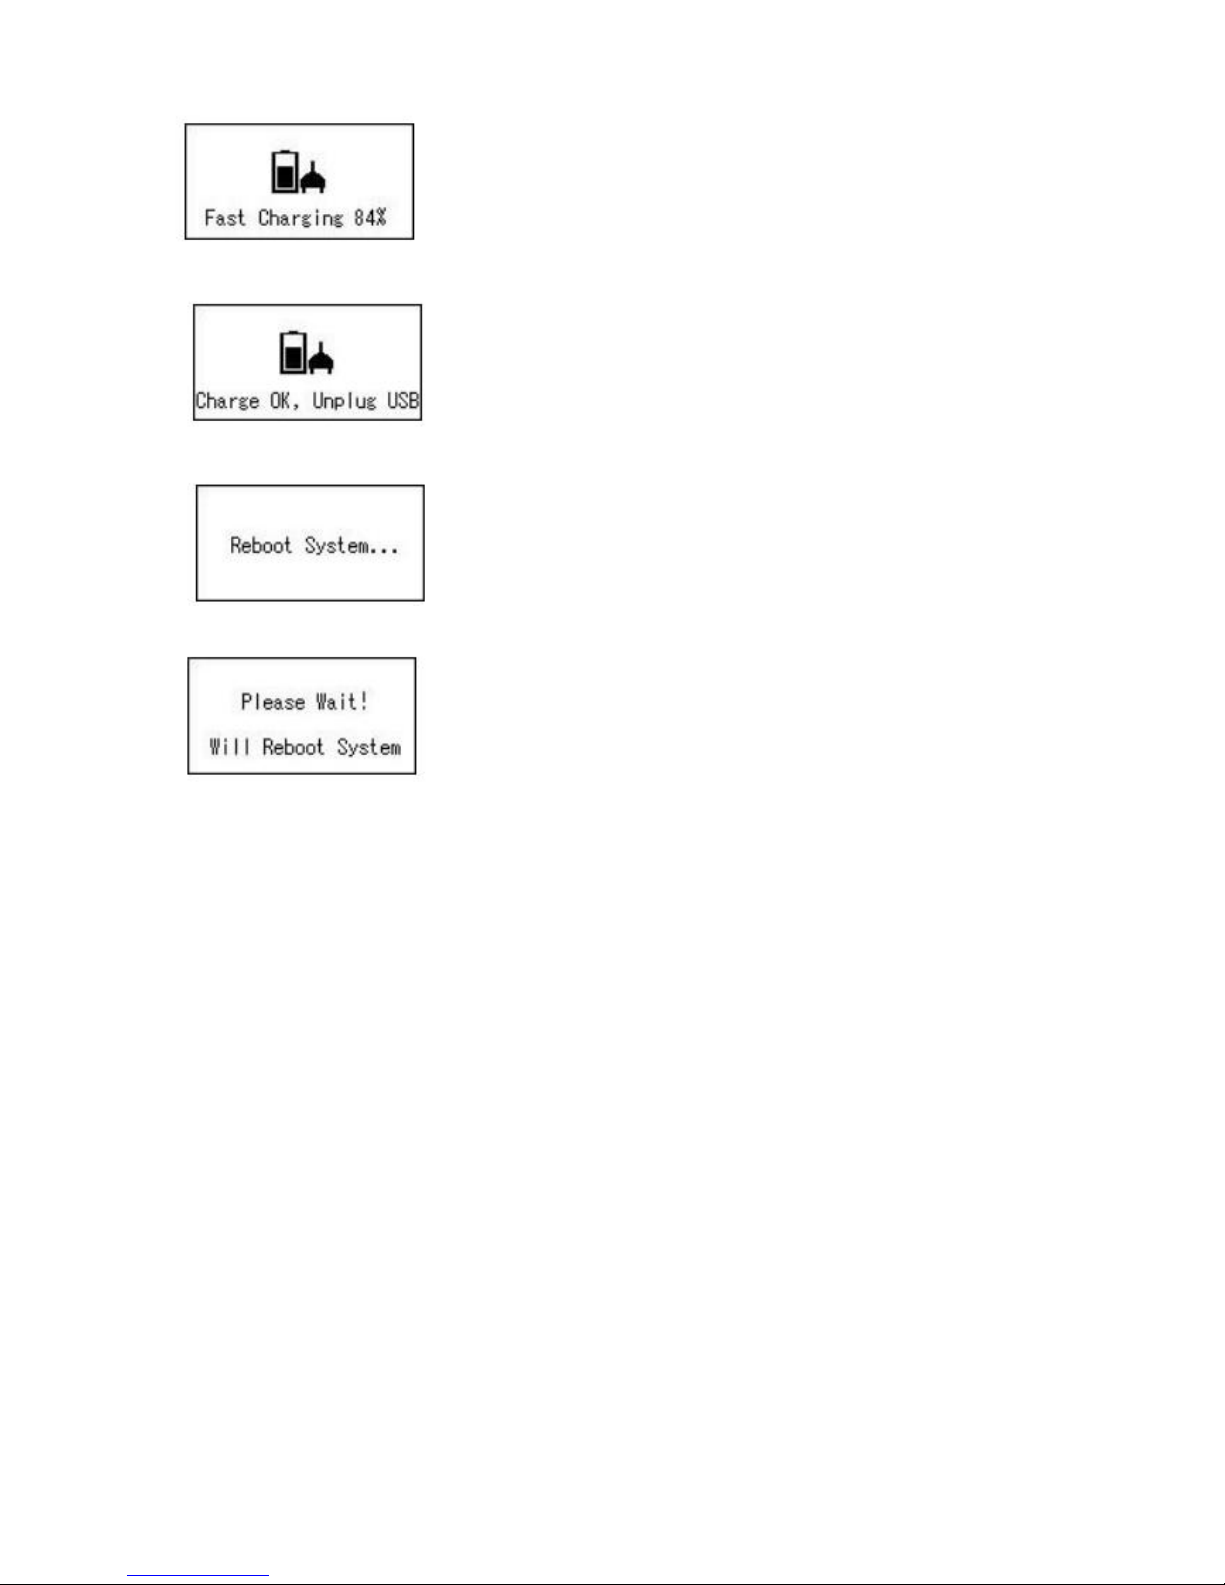
Shutdown fast charging interface.
Charging is complete, please unplug USB.
Modifying the WIFI name, automatically restart the system, please wait.
Please wait, the system will be rebooted
Page 28

28
FAQ
APP downlo ad addr e ss
• CUAVAPP
HDM output c annot d ispla y image
1. APP display normal, HDMI display can not display ; solution: the camera re boot
2. APP and HDM can not display.
Solution: check the camera settings, set the 720P output, it is also possible that the camera is not compatible
How far can HackLink fly
Under the condition of no shelter and no interference, the farthest 3KM, even farther, but depending on the environment, if the
interference is serious or occlusion, may be only a few hundred meters or even more short!
How much pow er is t ransm itted
Dual 500MW , it can be adjusted by software : 10 - 500mW
Wha t chann el is w orkin g on:
There are currently 2.4G version and 5.8G version
Wha t's the d iffer ence be t ween 2.4G a nd 5.8 G?
1. different frequency, wireless wave penetration is not the same, the lower the channel, the better penetration, 2.4G penetration is
much better than 5.8G
2. 2.4G may be far away. However, because WIF is 2.4G, so it is prone to have interference or cause interference to2.4G remote
control
3. 5.8G penetration will be a little worse, but because the 5.8G device resources are not so much, the band is relatively clean, and it
will not interfere with the 2.4G remote control
4. 5.8G actual video fluency, a little better than 2.4G, but 2.4G may have far distance
Wha t remot e contr ol signal can b e supp o rted on the groun d
PPM and SBUS protocol remote control receiver signal, it is recommended to use the remote controller's output port signal directly into
the HackLink
How many cha nnels suppo rt
?
at most 8
Pow er ampl ifier suppo rted?
Support, but power amplifier for GR and AIR at the same time.
Planar antenna supported?
Yes, Flat antenna gain will be much stronger than the omni-directional antenna, but the angle is relatively narrow, you need to be able to
target the aircraft at all times
How long can the built-in battery be used on the ground?
If continuous uninterrupted work, at least 3 hours
How long does it take to recharge the ground end?
Built -in PMU support of fast charging , using a fast 2A charger, about 30 minutes or so, it can be charged, but charger current shall reach
more than 2A
Gro und end resol u tion a nd mate rial
self luminous screen, 128x32 resolution
Wha t can b e displ ayed on the g round e nd?
1. Built in battery current
Page 29

29
2. Signal strength of digital link
3. Aircraft altitude, distance from home, GPS coordinates, flight mode
4. After disconnection, the final height, GPS coordinates, flight mode
How does Hac kLink pair (plea se refe r to the manu al for det ails)
1. Paired during ex factory
2. If reset , manually pair
3. After the aircraft end powered, waiting for the blue lights flashing, the green lights are often bright, press the pair of keys for 5
seconds
4. There will be a hint in 10 seconds, press the X key to complete the pairing
How does HackLink restore default configuration (pleas e refer t o the manual
for detail s)
1. AIR end: before power on, press the Pair key, wait for blue light, and let go if the blue light flashes, restore the system, do not power
off in the process
2. GR end: press X button, then press POWER button, and after display, release, restore the system, after the success of the
restore, the screen will have prompts
3. After restored, pairing and APP upgrading are required for normal work.
Can HackLink connect OSD?
1. Negative, for traditional OSD is generated by analog video overlay, does not apply to HackLink digital system
2. Using mobile phone APP can simultaneously achieve video and data display
Can HackLink connect to computer?
Yes, but MP can not have a video display, only the transmission of data, QGC can display both video and data
How many S b atter ies sha ll be su e d for provid ing pow er to HackLink AIR
end?
1. The distributed module must be used to supply power to the aircraft end, and it can support the 3-7S battery
2. Or use 5V3A voltage regulator module to supply power to the aircraft end.
 Loading...