

Page 1

REPORT NO : HCT-F04-1216 FCC ID : SR3WCS-211-R DATE :DECEMBER 30, 2004
HYUNDAI CALIBRATION & CERTIFICATION TECHNOLOGIES CO., LTD.
SAN 136-1, AMI-RI , BUBAL-EUP, ICHEON-SI,KYOUNKI-DO, 467-701,KOREA
TEL : +82 31 639 8517 FAX : +82 31 639 8525
www.hct.co.kr
ATTACHMENT E.
- USER’S MANUAL
Page 2
Page 3
3
Contents
• Thank you purchasing Wellbeing call system product.
• Wellbeing call system has 57 kinds of voice supporting system for users so that users
can use the product more conveniently and more correctly. We do our best for our
customer’s convenience.
• After reading the manual, you may be able to use the product more easily and safely
for a long time.
STABILITY
• You check all the entrance state of the office and processes from outside.
• When there is a fire or an emergency case, it is rapidly reported to the administrator
ECONOMIC
•
There is not maintenance fee.
CONVENIENCE
•
There is remote On/Off function functioned with cellular phones.
•
For emergent cases, children or patients can notify to their family with one button on the cellular phone.
FUNCTIONALITY
•
Ultra strong human sensor and temperature sensor is stored internally in the phone device.
•
Newest alarm system notifies housebreaking and fire emergency immediately.
•
Calling ID and Memory system function.
Product components
Product information
Telephone set-up
How to use Wellbeing call system
Wellbeing call system’s telephone usage
Trouble-shooting checking
Caution for safety use
Guarantee for the product
Phone number for Customer service
Product components ...................................................................................................................4
The front side of Wellbeing call system device ...........................................................................5
The reverse side of Wellbeing call system device.......................................................................6
Wellbeing call system set-up ......................................................................................................7
Option sensor set-up and usage .................................................................................................8
Wellbeing call system input set-up ............................................................................................10
To stop / to return Wellbeing call system ...........................................................................10
System input set-up: mode and finish methods..................................................................10
Telephone number registration...........................................................................................11
Password number registration ............................................................................................12
Emergency remote control registration...............................................................................13
Dial voice guidance registration..........................................................................................14
Language usage choice registration...................................................................................14
Wellbeing call system function set-up .......................................................................................15
Alarm set-up and cancellation ............................................................................................15
Alarm set-up procedure ......................................................................................................16
Emergency remote control procedure ................................................................................19
Remote control procedure ..................................................................................................20
Telephone line and power line cutoff alarm procedure.......................................................21
Rechargeable battery procedure, when connected to the power for the first time .............22
Telephone function set-up.........................................................................................................23
Checklist for trouble-shooting....................................................................................................31
Caution for safety use ...............................................................................................................32
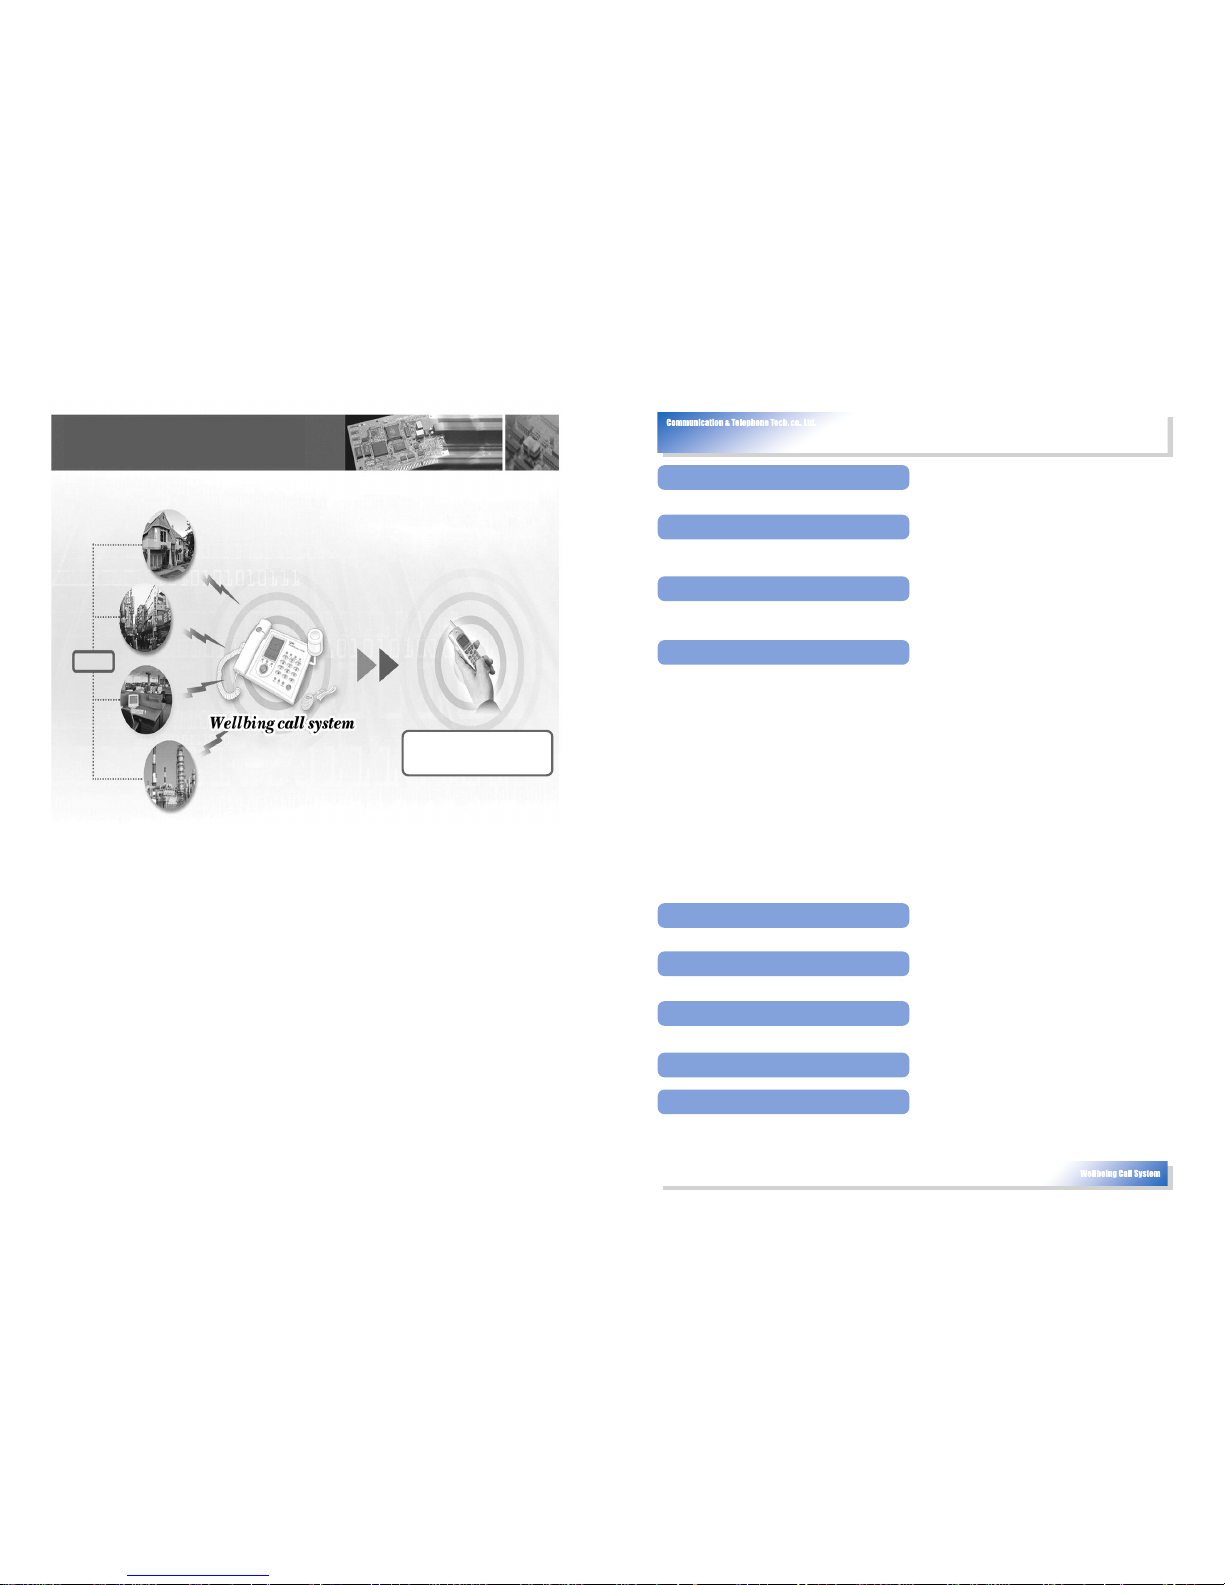
Wellbeing call system is not a choice
but a necessity for security
Housebreaking
Connects to all kinds of phone
including cellular phones (take proper
actions & handling the problem)
Page 4
5
Product information
4
Product component
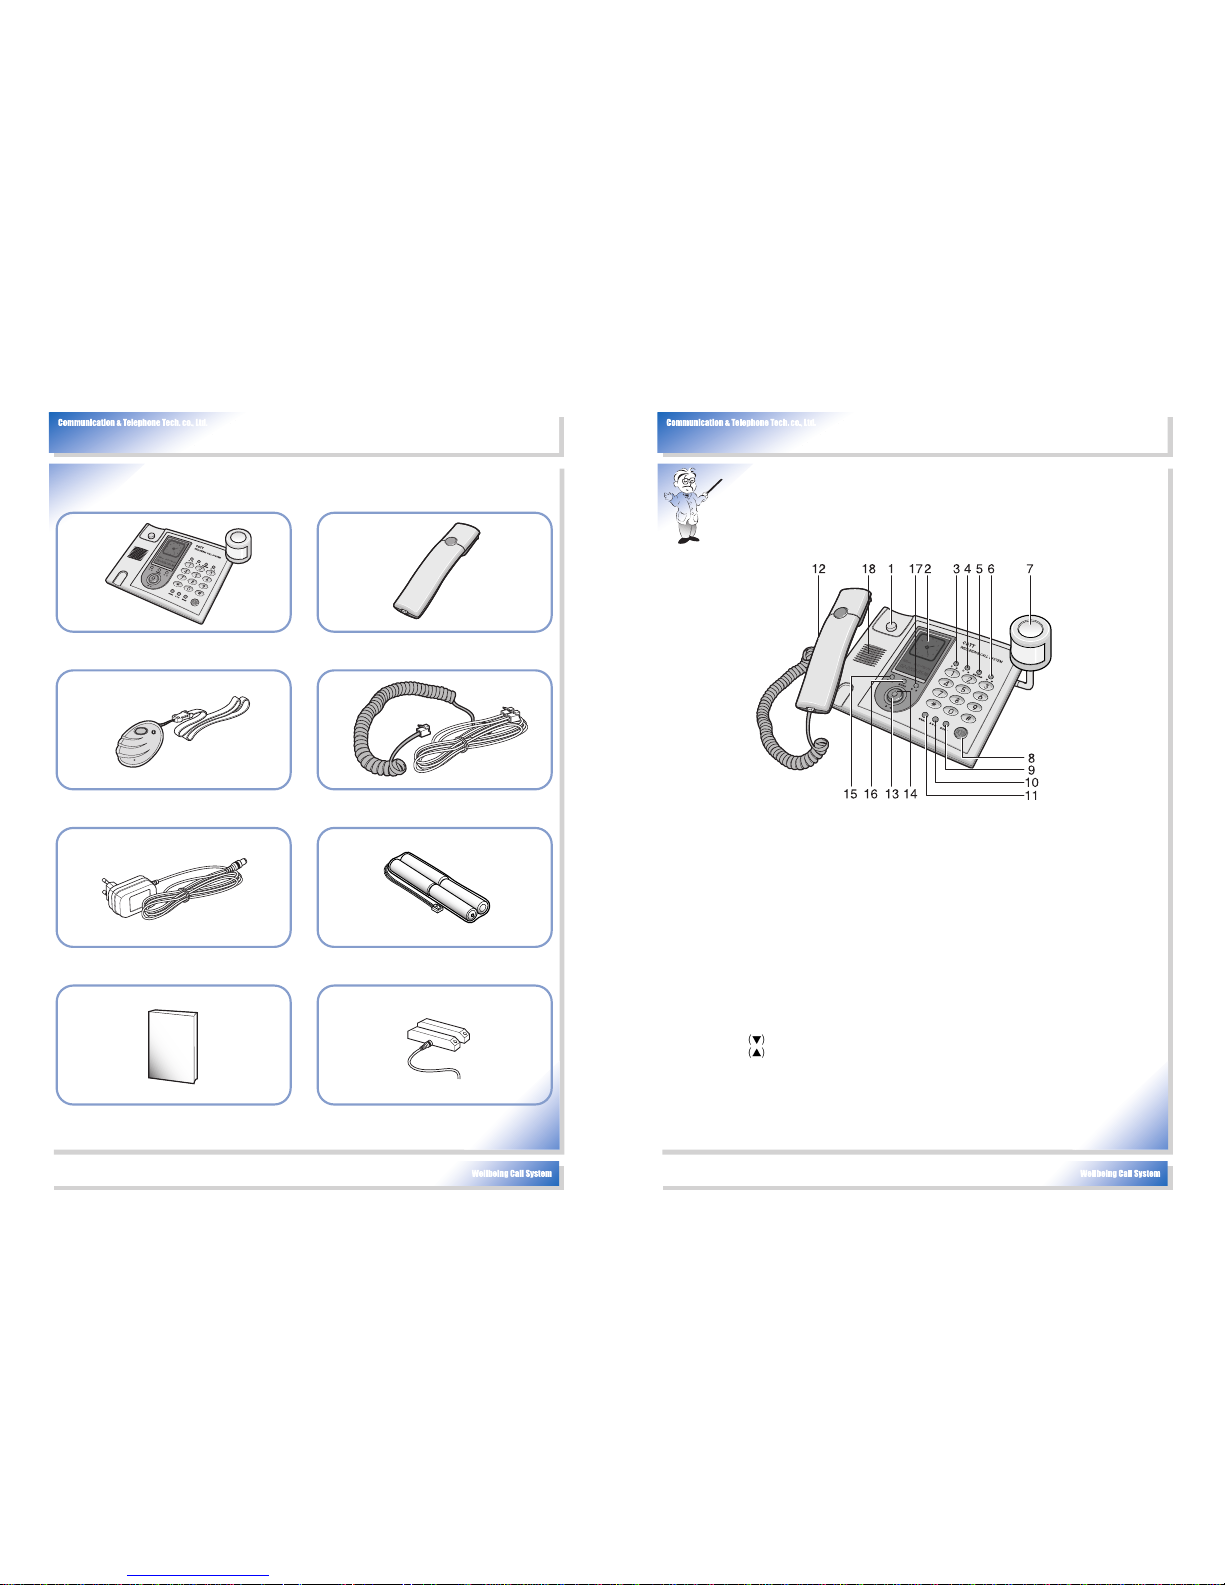
Please check your product components and if there is any problem, please contact where you purchased
the product.
Bitmap Wellbeing Call System device Handset
Wireless Emergency Remote Control Telephone line
Adapter (12V/500mA) Rechargeable Battery
Manual Option sensor (Option)
(Example: magnetic sensor)
WELLBEING CALL SYSTEM WCS-211
• There is brief explanation for names and function for each part in the below.
Please use different functions.
• For more detailed explanation of functions, please refer to the appropriate contents.
The front side of Wellbeing Call System Device
1. Hook button: hang-up, dial, and receive telephone.
2. LCD: For clock (time), caller’s ID, etc.
3. Recording button: short-time function input storage
4. Short-time button: short-time function for calling
5. Voice button: Melody volume and speaker phone volume
6. Alarm selection button: Alarm set-up and cancellation as well as input storage of the Wellbeing call system
7. Human sensor & Fire sensor module: Senses human housebreaking and fire emergency by sensing the fire
temperature.
8. Speakerphone button: Call without lifting the handset
9. Redial/pose button: Dial and call the phone number lastly used. Pose function is used for private exchange,
office exchange, key phone, etc.
10. Redial button: After the last call, continue to call a different number.
11. Direct call button: After searching or entering phone numbers, call the number without lifting the handset.
12. Handset
13. Search button : Search all received numbers and function set-up
14. Search button : Search all received numbers and function set-up
15. Delete button: Delete searched numbers and function set-up
16. Dialed numbers verification button: Search dialed numbers
17. Set-up: Function set-up of the telephone
18. Speaker: Call without lifting the handset, bell sound, and voice output of the each function of Wellbeing call
system.
Page 5
7
Telephone set-up
6
Product information
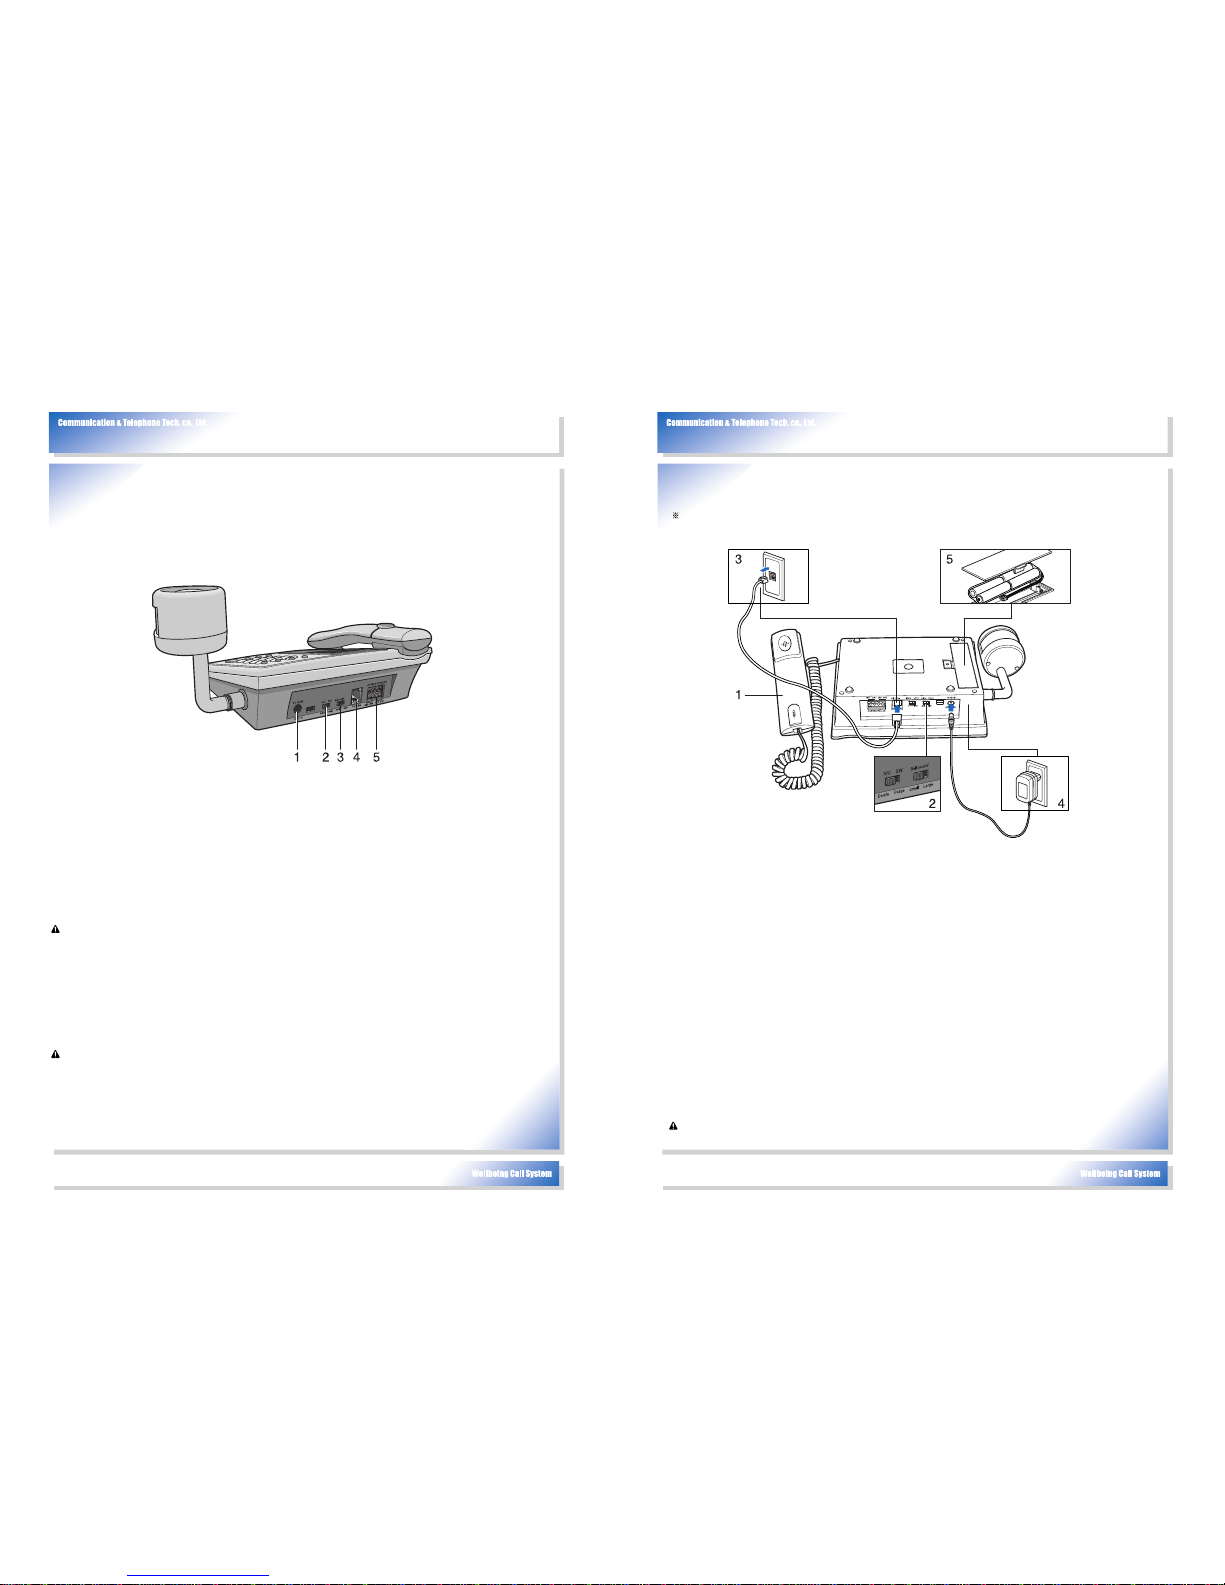
The reverse side of Wellbeing call system device
1. DC Adapter connector: Power adapter supply jack
2. N.C SW switch: Usage switch of N/C Type SW of the option sensor connection
• When you don't use the sensor of N/C Type SW with Option Sensor, you must place the switch at
"Delete".
3. Bell sound switch: Switch for controlling the volume sound
4. line connector jack: Jack to connect to the phone line
5. OPTION Sensor: optional beside basic sensor to install additional sensor
: Caller’s ID information may not be transferred when used another communication device
beside telephone at home. Also, it may not be possible to check messages and remote control
of Wellbeing call system
Example) Communication device connection: ADSL, Card Reader, DDD controller, cash
machine, sound proof system device..etc.
• When setting up the internet in a parallel circuit to the phone platform or phone
line, if you do not use a noise filter, there can be noise and even if you use the
noise filter, there could be a problem in caller’s ID signal and Wellbeing call system
action. (For noise and a trouble, contact the internet service company)
: If you use the service in an area where there is no Caller ID service provided, Caller ID sign is
not shown. If calls from a payphone or from abroad and if the calling condition is not stable, the
number may not be shown.
Wellbeing call system set-up
1. Link a plug of Curl Cord to the handset; link the opposite plug to the jack in the side of the fixed device.
2. Fix the bell volume-controlling switch to the proper position of either "Big" or "Small".
In case when there is no additional installation of an optional sensor and N/C Type SW is not used for
optional sensor, you must place the switch to the "Delete". If there is an additional installation of an
optional sensor to set up N/C Type SW optional sensor, you must place the switch to the "Use".
3. Connect one plug of a Line Cord to the phone jack of the fixed device (phone device). Link the opposite
plug to the outlet of the Line Cord.
• The outlet of the Line Cord installed in general households is modular as standard. If the outlet is 4
terminal type, you should purchase 4 terminal type cord additionally.
4. Connect the power adapter to the AC220V outlet, and then connect the DC jack to the DC12V IN jack on
the fixed device.
• If AC220V outlet is on the wall, let the line of the adapter faces the ground when connected to the
power adapter.
5. If you hear the dial tone after connection set-up, the basic set-up has been completed correctly.
6. Rechargeable battery set-up
Open the battery cover on the bottom of the fixed device and connect the rechargeable battery pack to
the connector, place it in the case and close the battery cover.
• If you use another rechargeable batteries beside the designated products, it may cause a critical shock
to the product and there is a possibility for a dangerous accident, please do not use other products.
: 1. Place the rechargeable battery after completing the installation.
2. Separate the battery from the product if not used for a long time.
As we begin to set up the following procedure, please read the contents below and use and set up the
product according to the set-up procedure.
CAUTION
CAUTION
CAUTION
Page 6
9
Telephone set-up
Connect in series
Connect in parallel
Terminal block
Terminal block
8
Telephone set-up
Option sensor set-up and usage
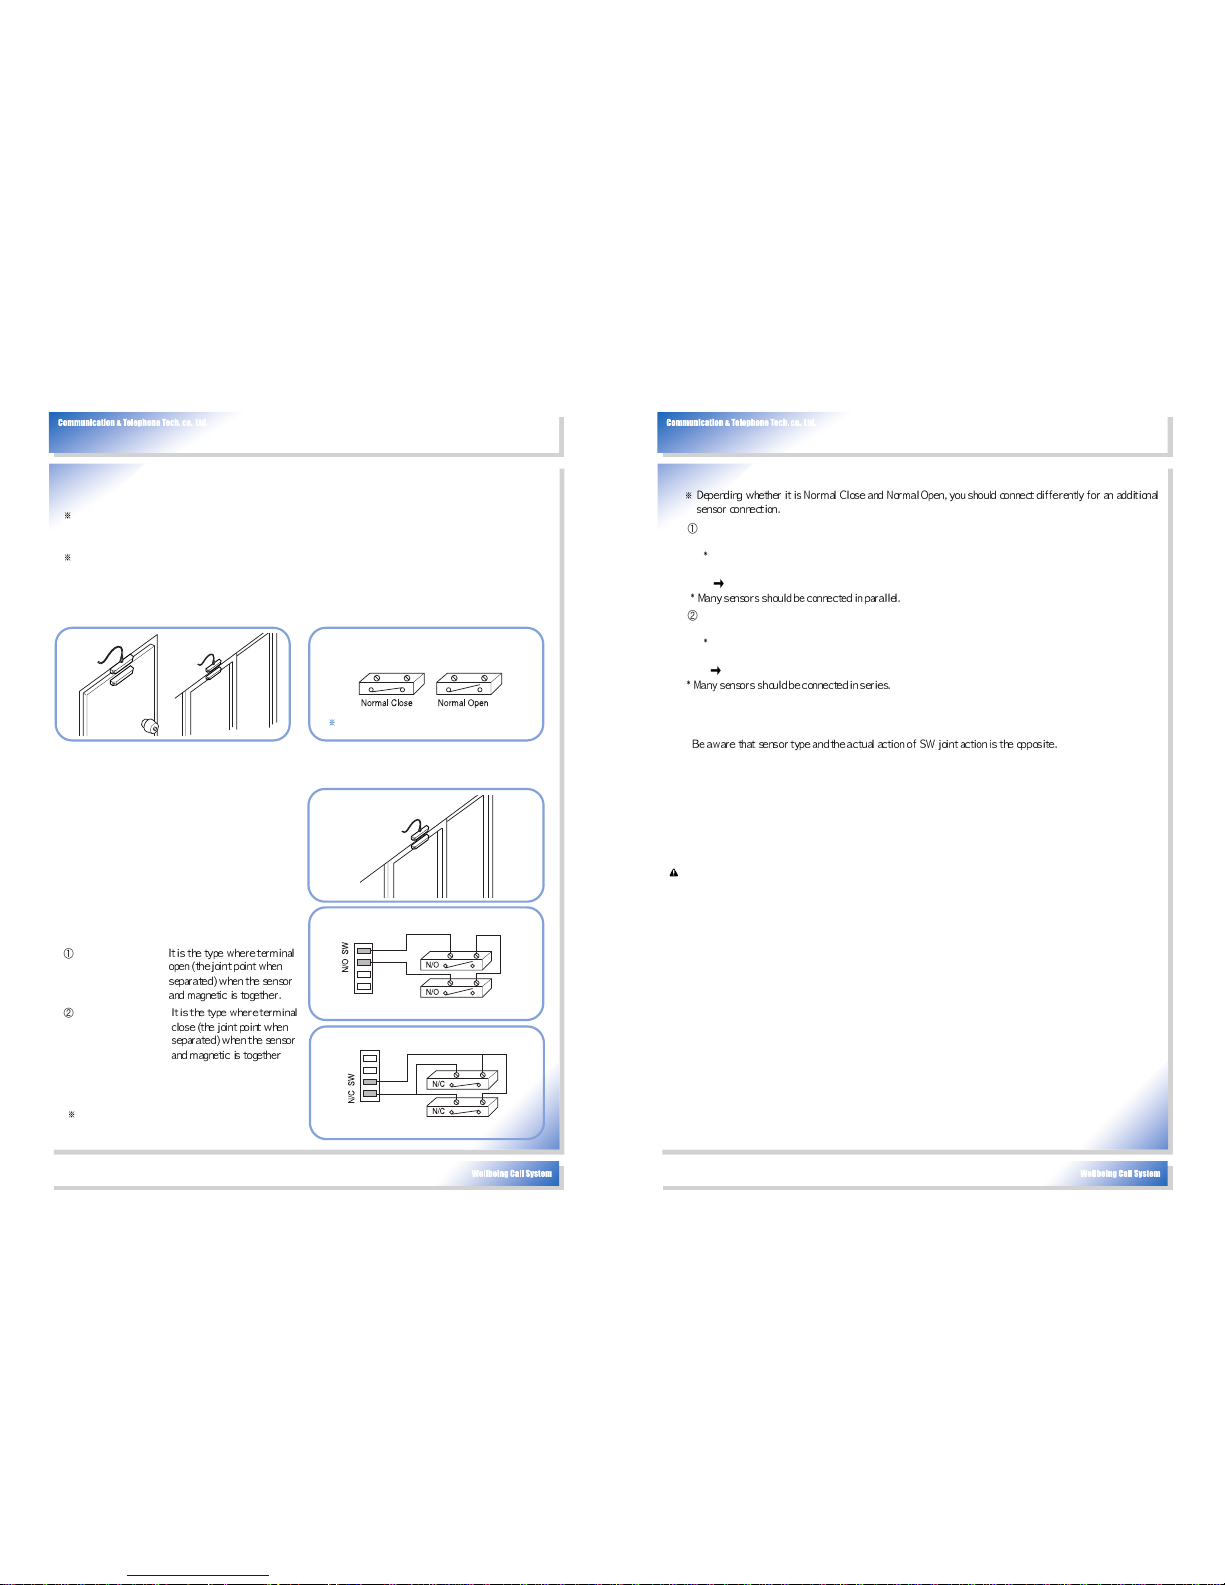
The usage of the option sensor is designed to expand easily to install many sensors beside the basic
sensor after purchasing Wellbeing call system. The optional sensor allows the usage of all sensors if it is
“Normal Open Tyle SW joint” or “Normal Close Type SW joint”.
The most used “Magnetic Sensor” for the option sensor and we define the usage of this sensor in the
below.
■ Example of set-up and Magnetic sensor structure
use and connect to the picture sensor set up in many Magnetic windows.
For Normal Close Type sensor’s additional connection, the additional N/C sensor should be also
Normal Close Type.
Normal Close Type sensor is “Close” when both terminal joint points are separated and is “Open”
when the sensor and magnetic are together.
”Open” when the door is closed after setting up and “Short” when the door is open.
For Normal Open Type sensor’s additional connection, the additional N/C sensor should be also
Normal Open Type.
Normal Open Type sensor is “Open” when both terminal joint points are separated and is “Close”
when the sensor and magnetic are together.
Close” when the door is closed after setting up and “Open” when the door is open.
4. Decide the connection line according to the sensor joint action type (N/C or N/C) and connect to the SW
terminal(N/O SW or N/C SW) of the “OPTION SENSOR (terminal block)” on the bottom of the fixed
device.
•
• When using “N/C SW” of “OPTION SENSOR (terminal block”) you must place the switch to the “Use”
on the “N/C SW” on the reverse side of the fixed device. If not using “N/C SW” of “OPTION SENSOR
(terminal block”), you must place the switch to the “Delete” on the “N/C SW” on the reverse side of the
fixed device
• When setting up Alarm, the voice guiding message is “Door open is detected” by the option sensor.
: If there is a connection error or wrong switch choice of the “N/C SW” switch, it detects
it as the sensor error so the error action message and sensor detection is not working.
■ Magnetic sensor set-up and actions
1. Magnetic sensor installation is mostly designed to
protect from external invader by setting up at the
door and windows.
2. Wellbeing call system enables two types of
sensors that are “N/O” and “N/C” , used separately
or together. Two types of sensors may be installed
in series or in parallel.
• Attention when setting up : The terminal block
joint type (N/O SW, N/C SW) of “OPTION
SENSOR” has the definition in the following.
(Based on the actual action)
N/0(Normal Open) :
N/C(Normal Close) :
3. Fix the Magnetic Sensor where the user wants it
to be placed.
Depending on the user’s environment, you may
One piece standard for a Sensor Condition
N/O, N/C are changed when MAGNETIC is placed
Set-up Magnetic Sensor Structur
CAUTION
Page 7
Wellbeing Call System
Communication & Telephone Tech. co., Ltd.
1
Press the button
1st phone number
has been registered.
• It signals whether you can register
the 1st phone number.
• If you press the wrong button, you
will hear the voice, "Please try
again"
2
Press the button
1st phone number
has been registered.
•
To connect to the office exchange or
private exchange, etc, press
and button before pressing
phone number, and set up the
phone number.
•
Please do it again from registration if
you enter the wrong number.
1
Press the button for more
than 3 second
System input set-up
has been completed.
• No input set-up is allowed. If you
want to set up inputs, you have to
enter the mode again.
Or
Press the button System input set-up
has been completed.
• Calling the number
Or
When there is no button pressed
for 10 seconds
System input set-up
has been completed.
• Automatically input set-up is
completed.
Speaker phone
Select a phone number
and enter the number
Alarm
Order
Method Voice Explanation
Order
Method Voice Explanation
11
How to use Wellbeing call system
Wellbeing Call System
Communication & Telephone Tech. co., Ltd.
Alarm
Alarm
Alarm
Order
Method Voice Explanation
Order
Method Voice Explanation
Order
Method Voice Explanation
10
How to use Wellbeing call system
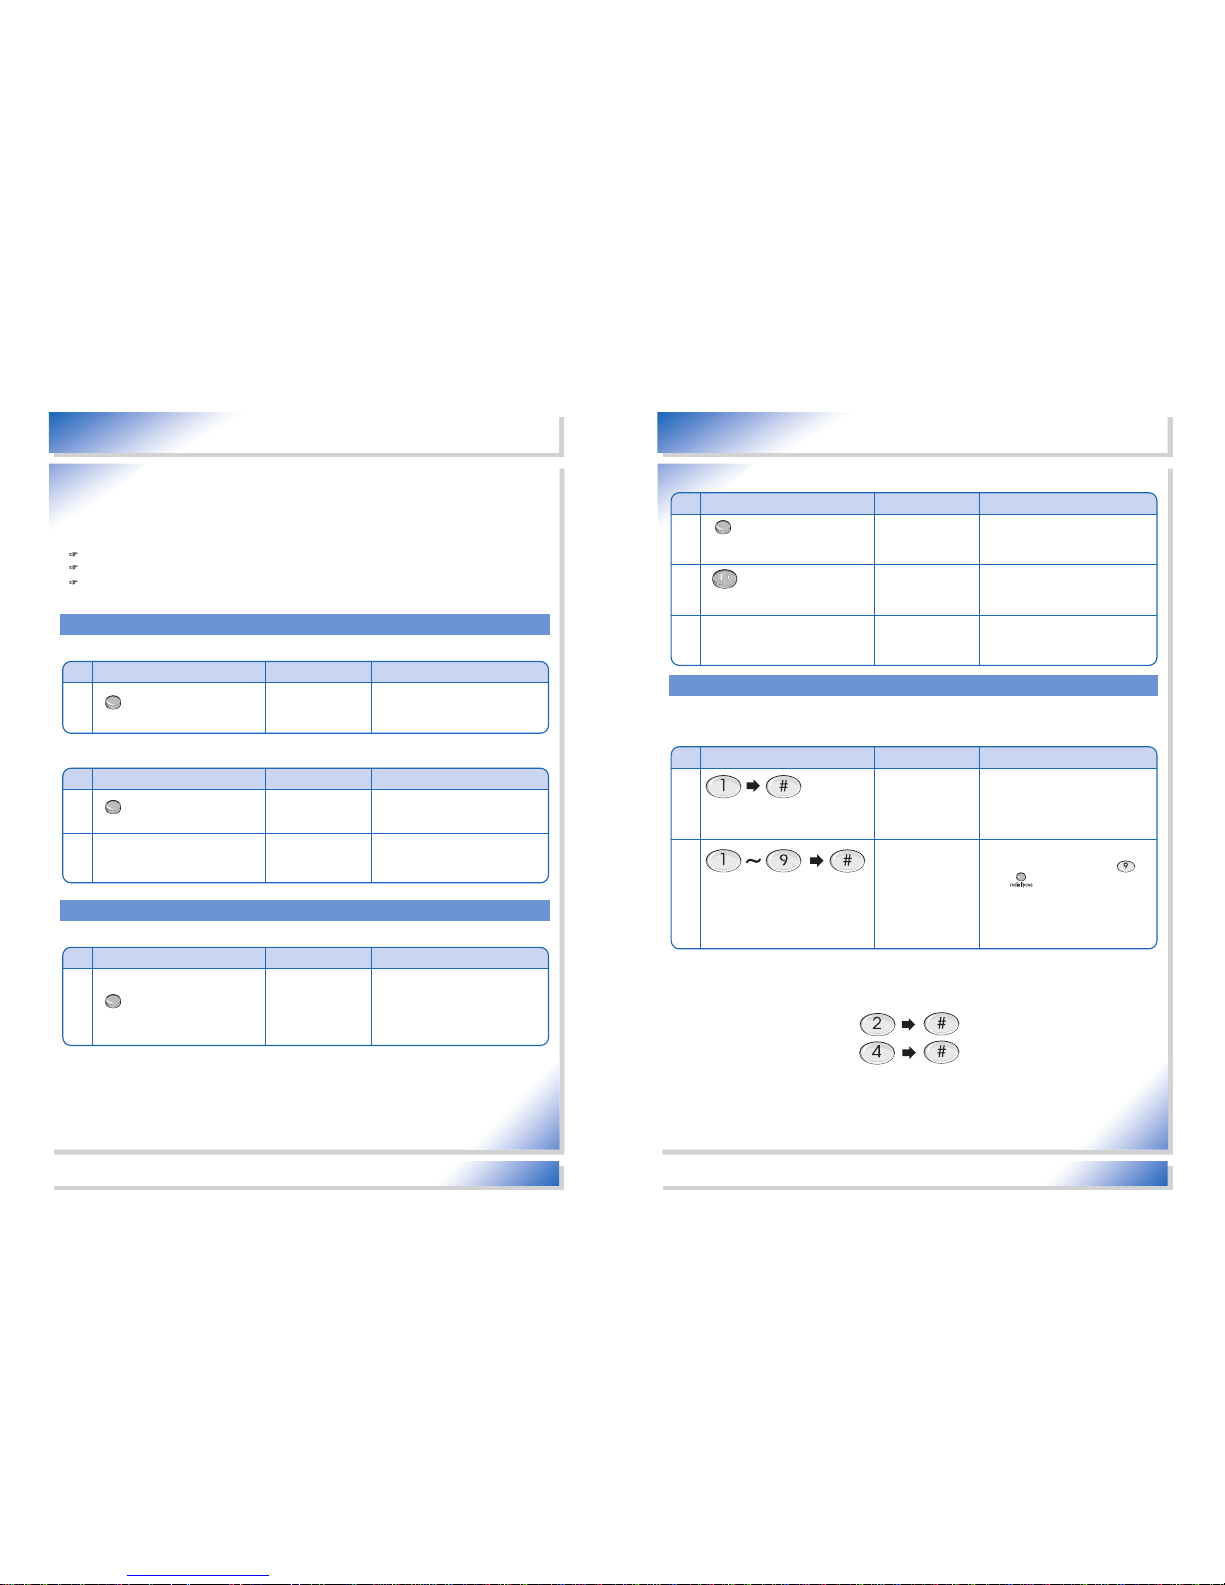
Wellbeing call system input set-up
To stop / to return Wellbeing call system
• All the input set-up of Wellbeing call system for phone number (change/delete), password number
registration (change), emergency remote control registration (change/delete), dial voice guidance set-up).
• All input set-up should be done in the “system input set-up mode”.
You can enter, change, and delete 9 contact phone numbers.
You can enter, change, and delete 4 emergency remote controls
You can register and change 1 password number.
1
Press the button for more
than 10 seconds
• All Wellbeing call system’s actions
are stopped and only the function
of normal telephones is working.
Wellbeing call system
has been stopped
1
Press the button for more
than 3 second
• You cannot access when you lift
the handset and when the speaker
phone is ON.
• You can set-up all inputs.
Please set-up the
system input
1
Alarm: Press the button for
more than 10 seconds
• All actions are working normally.
Wellbeing call system
has returned to use.
Or
Separate rechargeable batteries
and separate the power adapter and
the reconnect.
• All actions are working normally.
C&TT Wellbeing call
security system.
■ To stop using Wellbeing call system
Telephone number registration
• You can register maximum 9 phone numbers and this is only done in the system input set-up mode.
■ 1st phone number registration
System input set-up: mode and finish methods
■ Input set-up mode of the system
■ To return to Wellbeing call system
■ Finish input set-up mode of the system
■ 2nd ~ 9th phone number registration
• Same as the 1st phone number registration, and just press the sequential number for the appropriate
numbers.
Ex) 1. For the 2nd phone number:
Ex) 2. For the 4th phone number:
■ 1st~9th phone number change
• Same as the phone number registration. The initial phone number will be deleted automatically when the
new phone number is registered.
Page 8
Wellbeing Call System
Communication & Telephone Tech. co., Ltd.
1
Press the button
Register the 1st
emergency remote
controller
• It signals whether you can register
emergency remote controller.
• If you press the wrong button, you will
hear the voice, "Please try again"
2
Press the emergency
remote controller button.
Press the emergency remote controller's
button for more than 1 second
emergency remote
controller has been
registered
•
You can change and delete new
remote controller.
•
Each remote controller has its own
ID Code so there is no lines
crossed.
1
Press the button
Register emergency
remote controller
• It signals whether you can register
emergency remote controller.
• If you press the wrong button, you will
hear the voice, "Please try again"
2
Emergency remote
Press the button
Order
Method Voice Explanation
Order
Method Voice Explanation
13
How to use Wellbeing call system
Wellbeing Call System
Communication & Telephone Tech. co., Ltd.
1
Press the button
Please enter the 1st
phone number
• It signals whether you can register the
1st phone number.
• If you press the wrong button, you will
hear the voice, "Please try again"
2
Press the button
1st phone number
has been deleted
• Please delete unused phone
numbers. It may unnecessarily
connect to the phone in the alarm
message.
1
Press the button
Register the
password number
• It signals whether you can register
the 4 digit password number.
• If you press the wrong button, you
will hear the voice, "Please try again"
2
Press the button
Enter the 4 digit password
number
Password number
has been registered
• Password number for remote
control/alarm set-up and
cancellation to control the motions
of Wellbeing call system. It may be
changed.
Order
Method Voice Explanation
Order
Method Voice Explanation
12
How to use Wellbeing call system
■ Delete the 1st phone number
■ Delete the 2nd~9th phone number
• Same as the 1st phone number registration, and just press the sequential number for the appropriate
numbers.
* To connect to the office exchange or private exchange, etc, press button before pressing
phone number, and set up the phone number.
Ex)
: When connecting to the PBX(Private Branch Exchange), PABX (Private Automatic Branch eXchange),
Key phone, etc, you must use buttons to enter phone numbers when setting up phone number registration.
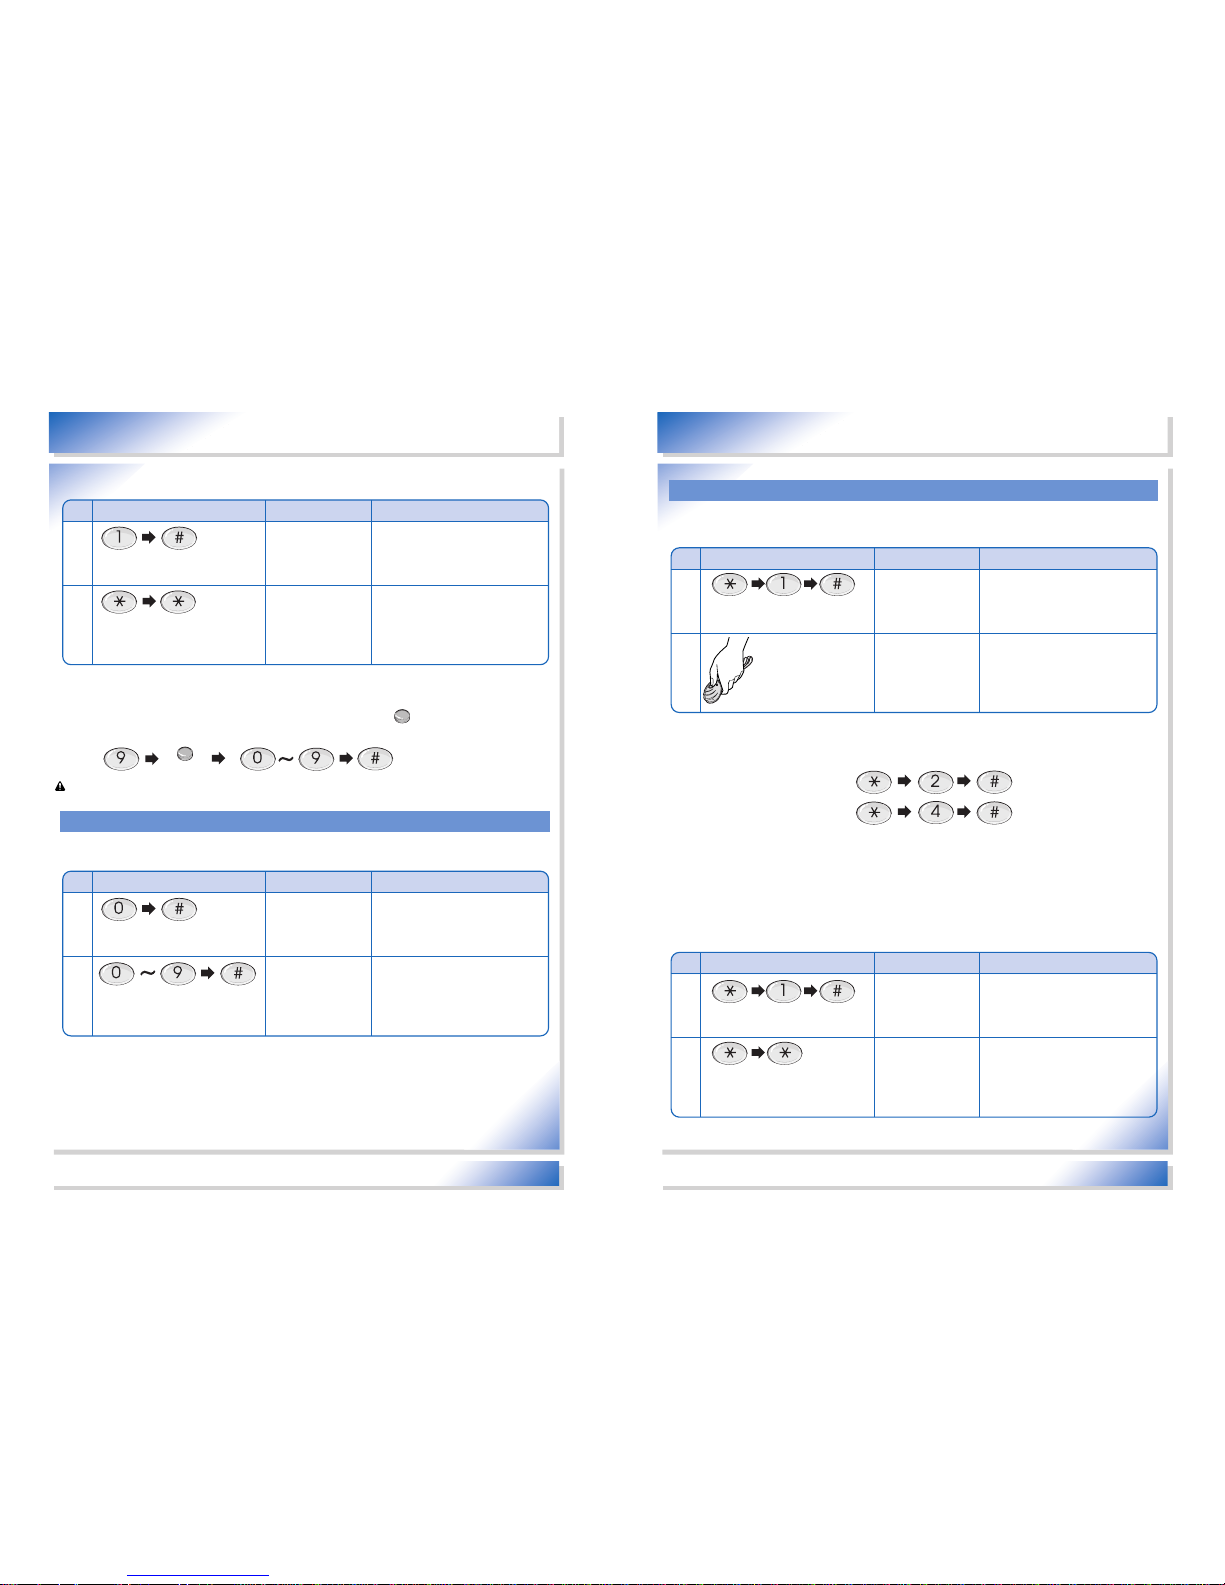
Password number registration
■ Password number registration
• The password number is set up as "1111" when first came out of the factory.
■ Password number change
• Same as the password number registration. The initial password number will be deleted automatically
when the new number is registered.
* Password number is not deleted permanently.
• After connecting to the remote control, you may change the password number and do it as the password
number registration.
■ 2nd~4th emergency remote control registration
• Same as the 1st phone number registration, and just press the sequential number for the appropriate
numbers.
Ex) 1. For the 2nd phone number:
Ex) 2. For the 4th phone number:
■ Change 1st~4th emergency remote control registration
• Same as the emergency remote controller registration. The initial emergency remote controller will be
deleted automatically when the new emergency remote controller is registered.
■ Delete the 1st emergency remote control
Emergency remote controller registratio
■ 1st emergency remote controller registration
• You can register maximum 4 emergency remote controllers.
Redial/pose
Redial/pose
CAUTION
Page 9
Wellbeing Call System
Communication & Telephone Tech. co., Ltd.
1
Press the button briefly. Alarm has been set
up.
• You cannot set up when you lift the
handset and when the
speakerphone is ON.
• The functions of telephone do not
work when the alarm is set up.
1
Press the button briefly. Alarm has been
cancelled.
1
Password
Press the button
Alarm has been
cancelled.
• If you press the
button, alarm is immediately
cancelled after 70 seconds after
the alarm set-up and when any
action of alarm.
Alarm
Alarm
password
Order
Method Voice Explanation
Order
Method Voice Explanation
Order
Method Voice Explanation
15
Wellbeing call system function set-up
Wellbeing Call System
Communication & Telephone Tech. co., Ltd.
1
Press the button
Dial voice guidance
set-up. #1 for set-up
and #2 for
cancellation.
2
Dial voice guidance
has been set up.
• After putting down the handset, if
you dial the button, the voice
signals the dialed number.
1
Press the button
Dial voice guidance
set-up. #1 for set-up
and #2 for
cancellation.
2
Press the button
Dial voice guidance
has been cancelled.
• No voice when dial button is
pressed.
Press the button
Action
Press the button
Select the language.
#1 for English, #2 for
Chinese, #3 for
Spanish.
English
Press the
English is selected • All the messages for voice are in
English
• You can choose among
English/Chinese/Spanish
depending on your language
preference.
Chinese
Press the
Chinese is selected • All the messages for voice are in
Chinese
Spanish
Press the
Spanish is selected • All the messages for voice are in
Spanish
Order
Method Voice Explanation
Order
Method Voice Explanation
Order
Method Voice Explanation
14
How to use Wellbeing call system
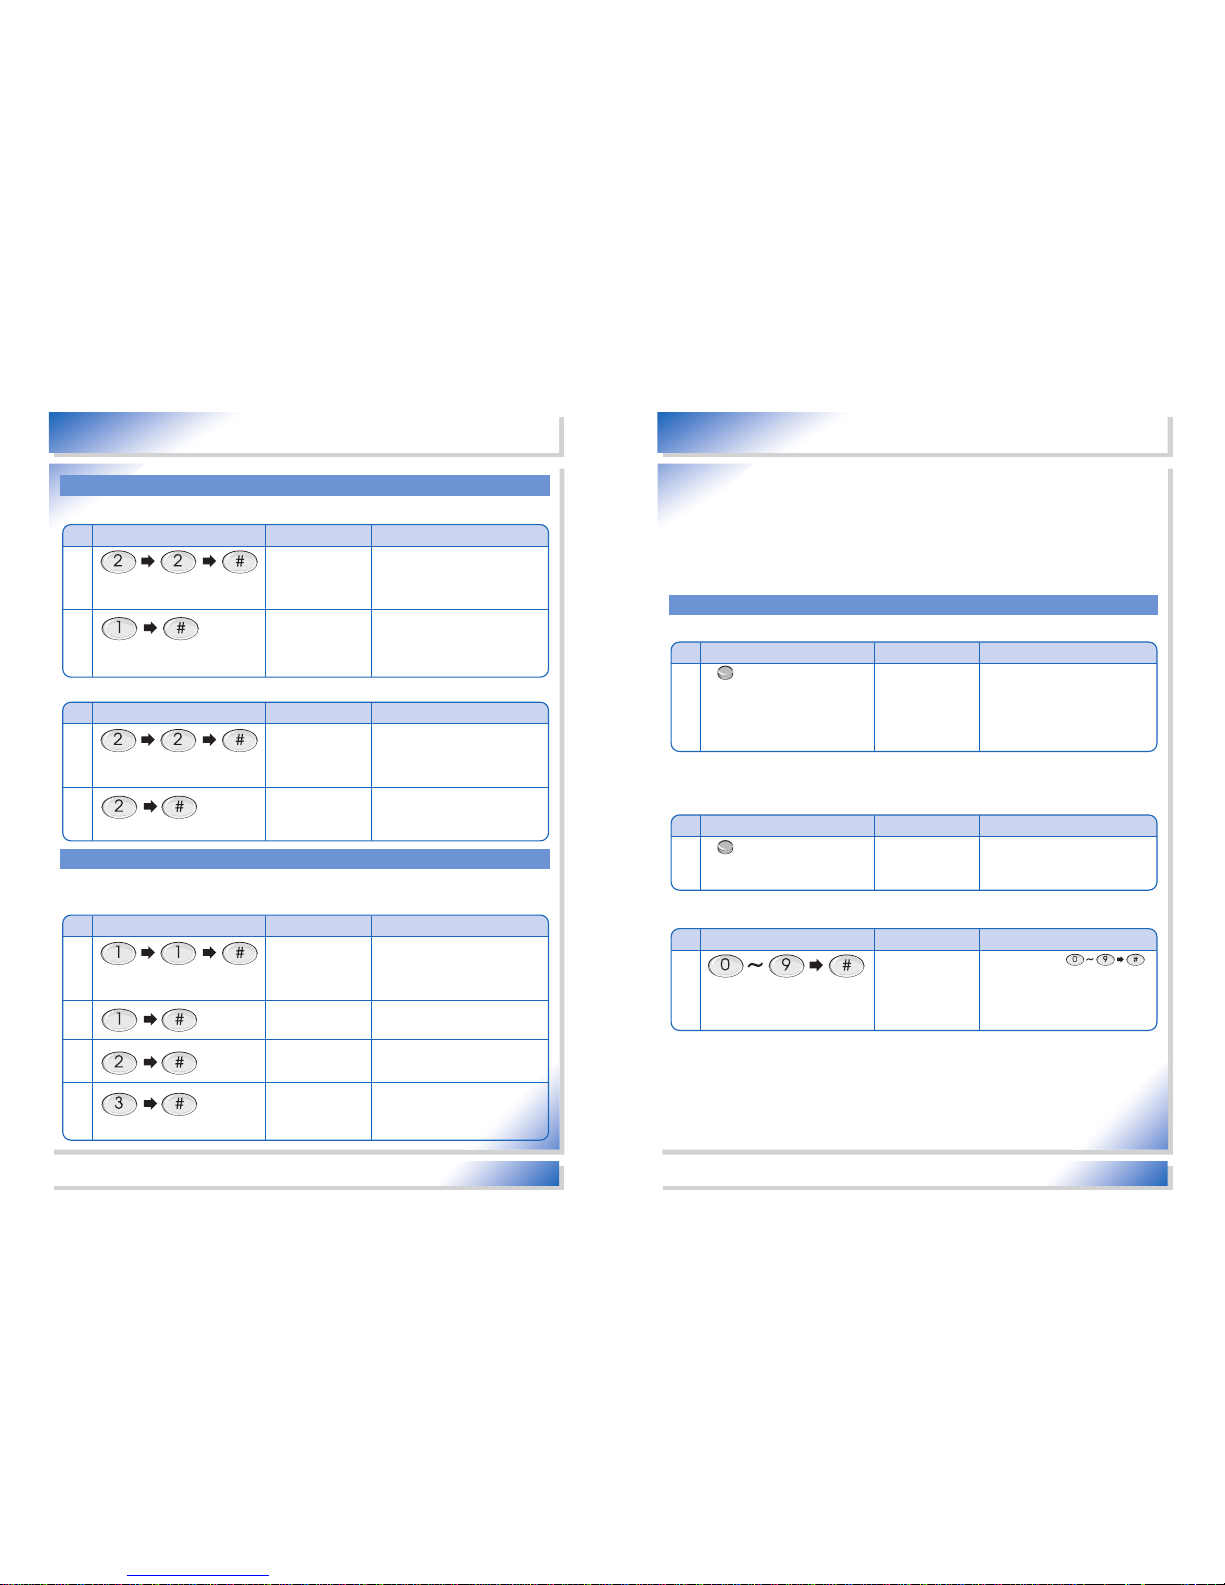
Dial voice guidance set-up
Language usage choice registration
■ Dial voice guidance set-up
Alarm set-up and cancellation
■ Alarm set-up (Alarm condition)
■ Cancel the Alarm set-up
(Within 70 seconds after alarm set-up)
■ Cancel the Alarm set-up
(After 70 seconds after alarm set-up: Normal state or all actions are in process after alarm set-up)
■ Cancel dial voice guidance set-up
• Wellbeing call system is a safety system for crime/fire/security/life prevention and senses housebreaking
and fire emergency as well as fire outbreak, immediately notifying entered telephone number. It also
reports emergency calls of patients and emergency calls of old people.
It can also report emergency calls when burglar or a thief breaks in by immediately reporting all the
conditions from monitoring.
• Wellbeing call system may be controlled from outside, and it enables internal monitoring as well.
■ Language selection
•
The user’s language is set to be “English” when first came out of the factory, and the basic content is written in English.
Page 10
17
Wellbeing call system function set-up
16
Alarm set-up procedure
■ Activities before and after alarm set-up
Waiting time: It is the minimum required for the user to escape movement activities after setting up the
alarm. During this time, the self-system checking function is working and it notifies and
checks each sensor’s condition and the condition of rechargeable batteries, etc.
Contents
Alarm set-up
Waiting time (70 seconds) After 70 seconds
Explanation
Press once
• Dial Back Light LED turns ON.
• LCD Back Light Lamp turns ON.
• Self-diagnosis for each sensor. If there
is a problem in a sensor, the following
voice message appears 5 times
signaling the problem.
- door open sensor (OPTION
SENSOR): There is a problem in the
door open sensor.
- Housebreaking sensor: There is a
problem in the housebreaking sensor.
Fire sensor: There is a problem in the
fire sensor.
• If the sensor is not restored and
continues to have a problem, it ignore
the sensor activities and if it is restored,
it automatically returns to normal.
• If there is a problem in rechargeable
batteries, voice messages sound 3
times saying “Replace a new battery”.
Please replace a new battery
accordingly.
- Purchase rechargeable batteries from
the product seller
• Dial Back Light LED turns OFF.
• LCD Back Light Lamp turns OFF.
• After sensing each sensor’s activity,
calls the registered phone number and
reports the following voice messages.
- door open sensor (OPTION SENSOR):
Door has been open.
- Housebreaking sensor:
Housebreaking has been detected.
- Fire sensor: Danger of fire is detected.
Fire breakout is detected. This is an
emergency.
• If the sensor continues its activity
instead of returning to the system,
- Normal activities until the 2nd time
- After then, it ignores sensing
movement before returning to normal
(ignores from the 3rd)
- Sensor returns to normal activities
automatically for normal state.
■ Report when automatically connecting to the phone from the sensor
• The sensor is detected at the alarm set-up mode and then it automatically connects to the registered
telephone number.
Contents
Sensor movement
Connect to the phone
Activities after connecting to the phoneMotions while connecting to the phone
Explanation
• Sensor
detection
- Human
detecting
sensor
- Fire
detecting
sensor
- OPTION
SENSOR
(door open
sensor)
• Emergency
remote
control
movement
• Connect to the
registered telephone
number. (max. 9)
- If no one answers
the phone, it
connects to the next
telephone number
after 40 seconds,
and it automatically
finishes after
repeating this for 3
times.
- If the line is busy, it
hangs up the phone
and automatically
connects to the next
phone.
- If any one receives
the phone and the
voice comes out
from the handset, it
stops to connect to
the phone.
• After calling the registered
number, “Sending
Wellbeing call voice
message” Press *.
The voice message
appears every 4 seconds.
➲ Press * after the voice
message.
- If you hear the same voice
message, press *.
- Press * after the voice
message in case it does
not recognize * if you press
the button while the voice
message is on.
• It senses that the phone is
connected when * is
pressed after the voice
message. If there is no *
pressed, it automatically
connects to the next phone
after 40 seconds.
• When “*” is pressed, the
voice message about
sensor activities
immediately.
- Open door sensor
(OPTION SENSOR) has
been detected.
- Housebreaking sensor:
Housebreaking has been
detected.
- Fire sensor: Danger of fire
is detected. Fire breakout
is detected.
-This is an emergency.
- Emergency remote control:
Please help me. This is an
emergency.
• Hang up the phone
automatically after 60
seconds of both
speakerphones being one
line.
• To stay on line, press “*”
before 60 seconds.
Additionally stays on line
for 60 seconds
• If you want to hang up
before 60 secs, press “#”
button or hang up the
phone.
Alarm
Page 11
1918
■ Sensor
Emergency remote control
■ Emergency remote control
• You can use maximum 4 emergency remote controls and each remote control has its own ID CODE
preventing crossed lines or error in system. Also, wireless RF Type is not limited in directions.
Contents
Human detection sensor Fire sensor OPTION SENSOR
Explanation
• Senses the temperature
change of the infrared
rays and an object
movement with infrared
rays
• movement range is (right
and left) max. 220 degree
and max. 11 meter
• After setting-up, turn and
fix the sensor lenses
towards the exit
• do not place it close to the
thermo objects, hot
objects. It may cause a
trouble
• apply NTC Thermo- objects
and detects fire breakout by
applying analysis with algorism
• Detects rapid temperature
change in case of fire breakout,
reports a warning message by
detecting the fire breakout
temperature
• “human detection sensor” may
work together with the fire
sensor in case of fire breakout
and it may report
housebreaking message as
well.
• Wellbeing call system allows
additional set-up of optional
sensor beside basic detection
sensor.
• Applicable message for
activities “Door has been
detected to be open”
• For additional option
installation, you can install N/O
Type SW, N/C Type SW, etc.
• Most often used optional
device for door open sensor is
Magnetic sensor. It can
temporarily connect in series or
in parallel.
Contents
Emergency remote
control 8activities
Phone connection
Actions after connecting
to the phone
Actions while connecting
to the phone
Explanation
• emergency
remote control
works while
“alarm is on or
alarm is off”
• “stop
Wellbeing call
system” –does
not work
• its activities
come first than
other activities
• press the
button of
emergency
remote control
• Connect to the
registered telephone
number. (max. 9)
- If no one answers the
phone, it connects to the
next telephone number
after 40 seconds, and it
automatically finishes
after repeating this for 3
times.
- If the line is busy, it
hangs up the phone and
automatically connects
to the next phone.
- If any one receives the
phone and the voice
comes out from the
handset, it stops to
connect to the phone.
• After calling the
registered number,
“Sending Wellbeing call
voice message” Press *.
The voice message
appears every 4
seconds.
➲ Press * after the
voice message.
- If you hear the same
voice message, press *.
- Press * after the voice
message in case it does
not recognize * if you
press the button while
the voice message is
on.
• It senses that the phone
is connected when * is
pressed after the voice
message. If there is no *
pressed, it automatically
connects to the next
phone after 40 seconds.
• When “*” is pressed, the
voice message about
emergency remote
control activities
immediately.
- Please help me. This is
an emergency.
• Hang up the phone
automatically after 60
seconds of both
speakerphones being
one line.
• To stay on line, press “*”
before 60 seconds.
Additionally stays on
line for 60 seconds
• If you want to hang up
before 60 secs, press
“#” button or hang up
the phone.
Page 12
21
Wellbeing Call System
Communication & Telephone Tech. co., Ltd.
1
With Wellbeing call system, call from
outside. After a bell rings for 12 times
(36 secs), it automatically connects to
the remote control mode.
Connecting to the
System remote control
Press the password
number and #
• Connect to the Well-being call
system by calling in order to
control remotely from outside.
2-2
No button pressed Connecting to the
System remote
control
Press the password
• Automatically it turns off when
there is no button pressed until the
voice sounds three times every 10
seconds.
2-1
Press the button
Password
Connected to the
System remote
control
Set up the remote
• Two ways call is enabled through
speakerphone by completing
connection to the Well-being call
system.
• Choose between alarm on and off and
you can change the password number.
2-3
Wrong password
Password error.
Press the password
number and # again.
• No remote control connected if wrong
password button is pressed
• It automatically turns off if the wrong
password number is entered for three
times.
3
Press the button Alarm is now on
• Repeat the same process as the
normal alarm set-up.
4
Press the button Alarm is now off
• Repeat the same process as the
normal alarm set-up.
5
Press the button
Register the
password
• Repeat the same process as the
normal password number set-up
• For password number change
6
Press the button
Press 4 digit password number
Password is
registered
7
Calling time after remote control
connection
• No button pressed after connecting to
the remote control, it automatically
disconnects the phone after 60
seconds of calling.
• To extend the calling time, press
button.
7
Explanation
Order
Method
Voice message
20
Remote Control
➲
Remote Control: Connects to the phone with the Wellbeing call system from outside and remotely
controls “alarm on/off”, “Change the password number”, and “Monitoring environment inside”
■ Remote control from outside
• Call from outside and connect to the remote control and then same procedure as alarm on/off and
password change, etc.
Phone line & power line cut off alarm
■ Phone line cut-off alarm
Contents
Phone line cut-off Alarm siren ON Alarm siren OFF
Explanation
• Phone line cut-off is
working only in the “Alarm
set-up mode”
• When the phone is cut off at the
“Alarm set-up mode”, siren rings
for 120 seconds from the fixed
device speaker of the Wellbeing
call system.
• When the phone is disconnected,
all other activities of alarm mode
beside the alarming siren, go
back to the initial stage.
• When this state continues, the
siren sounds for another 120
seconds and then it does not
sound any longer.
• It repeats the process again
when the cut0off stage restores
and then phone line is cut off
again.
• When the phone is
disconnected, and is restored
again siren rings for 120
seconds and the turns off
automatically.
• If you want to turn off the siren
manually, press
password
button.
■ Phone line cut-off alarm explanation
Contents
Phone line cut-off Alarm siren ON Alarm siren OFF
Explanation
• Phone line cut-off is
working only in the “Alarm
set-up mode”
• When the phone is cut off at the
“Alarm set-up mode”, siren rings for
120 seconds from the fixed device
speaker of the Wellbeing call
system.
• If the power supply is cut off while
connecting to the phone by the
sensor action at the alarm set-up
mode, the alarm siren sounds after
completing calling the phone.
• When this state continues, the siren
sounds for another 120 seconds
and then it does not sound any
longer.
• It repeats the process again when
the cut-off stage restores and then
phone line is cut off again.
•
When the phone is
disconnected, and is restored
again siren rings for 120
seconds and the turns off
automatically.
•
If you want to turn off the siren
manually, press
password
button.
password button
password button
Page 13
Wellbeing Call System
Communication & Telephone Tech. co., Ltd.
1
Press the button • Main screen of SET-UP
2
Press the button • 2003 flashes
3
Press the Dial button for
year/month/date/time
• manage the year, month, day, time
with the dial button
(two digit for year)
•
After year is entered, it automatically
goes to month, date, and time
4
Press the button • year, month, date, and time are set
up
1
Press the button • Main screen of SET-UP
2
Press the button
3
Press the button
• Each button pressed for , the
left LCD display shows each flash
time being circulated
• Flash time-"FLASH 600" as a
standard
4
Press the button • Time on FLASH has been set up
Order
Method ExplanationLCD display
Order
Method Explanation
23
Wellbeing call system’s telephone usage
Wellbeing Call System
Communication & Telephone Tech. co., Ltd.
1
Connect the
power adapter
to the unit.
C&TT Wellbeing call
system.
• All activities stay at the initial stage
• Separate the power, reconnect,
and try again when there is a
problem.
1
To set up rechargeable battery,
open the cover below the main
phone, connect to the designated
rechargeable battery pack.
Rechargeable
battery is used as a
back-up for black out
or when power
supply is cut off from
being fully charged
all the time.
• When recharging does not work
from a trouble, an alarm voice of
"Change the rechargeable battery"
sounds for three times.
N
/C
D
C
12V
IN
S
W
사
용
지움
Order
Method Voice Explanation
Order
Method Voice Explanation
22
Rechargeable battery procedure, when connected to the power for the first time
■ Initial power connection
Telephone function set-up
• Choose: time and date, redial time, area code, digital/analog dial, alarm, time to stop using the alarm,
melody bell sound, ring/melody/voice information, analog clock for hours on/off
• Shortened memory, receiving calls, callers ID, sending call numbers search, direct calls, flash,
redial/pose, and volume control
Beside the Wellbeing call system’s alarm function, it can be used as a phone
Caller ID does not work when used in a area where the service is not provided, and when connection is
bad, or it may not work for payphone calls and international calls.
Time and Date Set-up
■ "Year", "Month", "Date", "Time" Set-up
■ FLASH time set-up
■ Rechargeable battery
Page 14
Wellbeing Call System
Communication & Telephone Tech. co., Ltd.
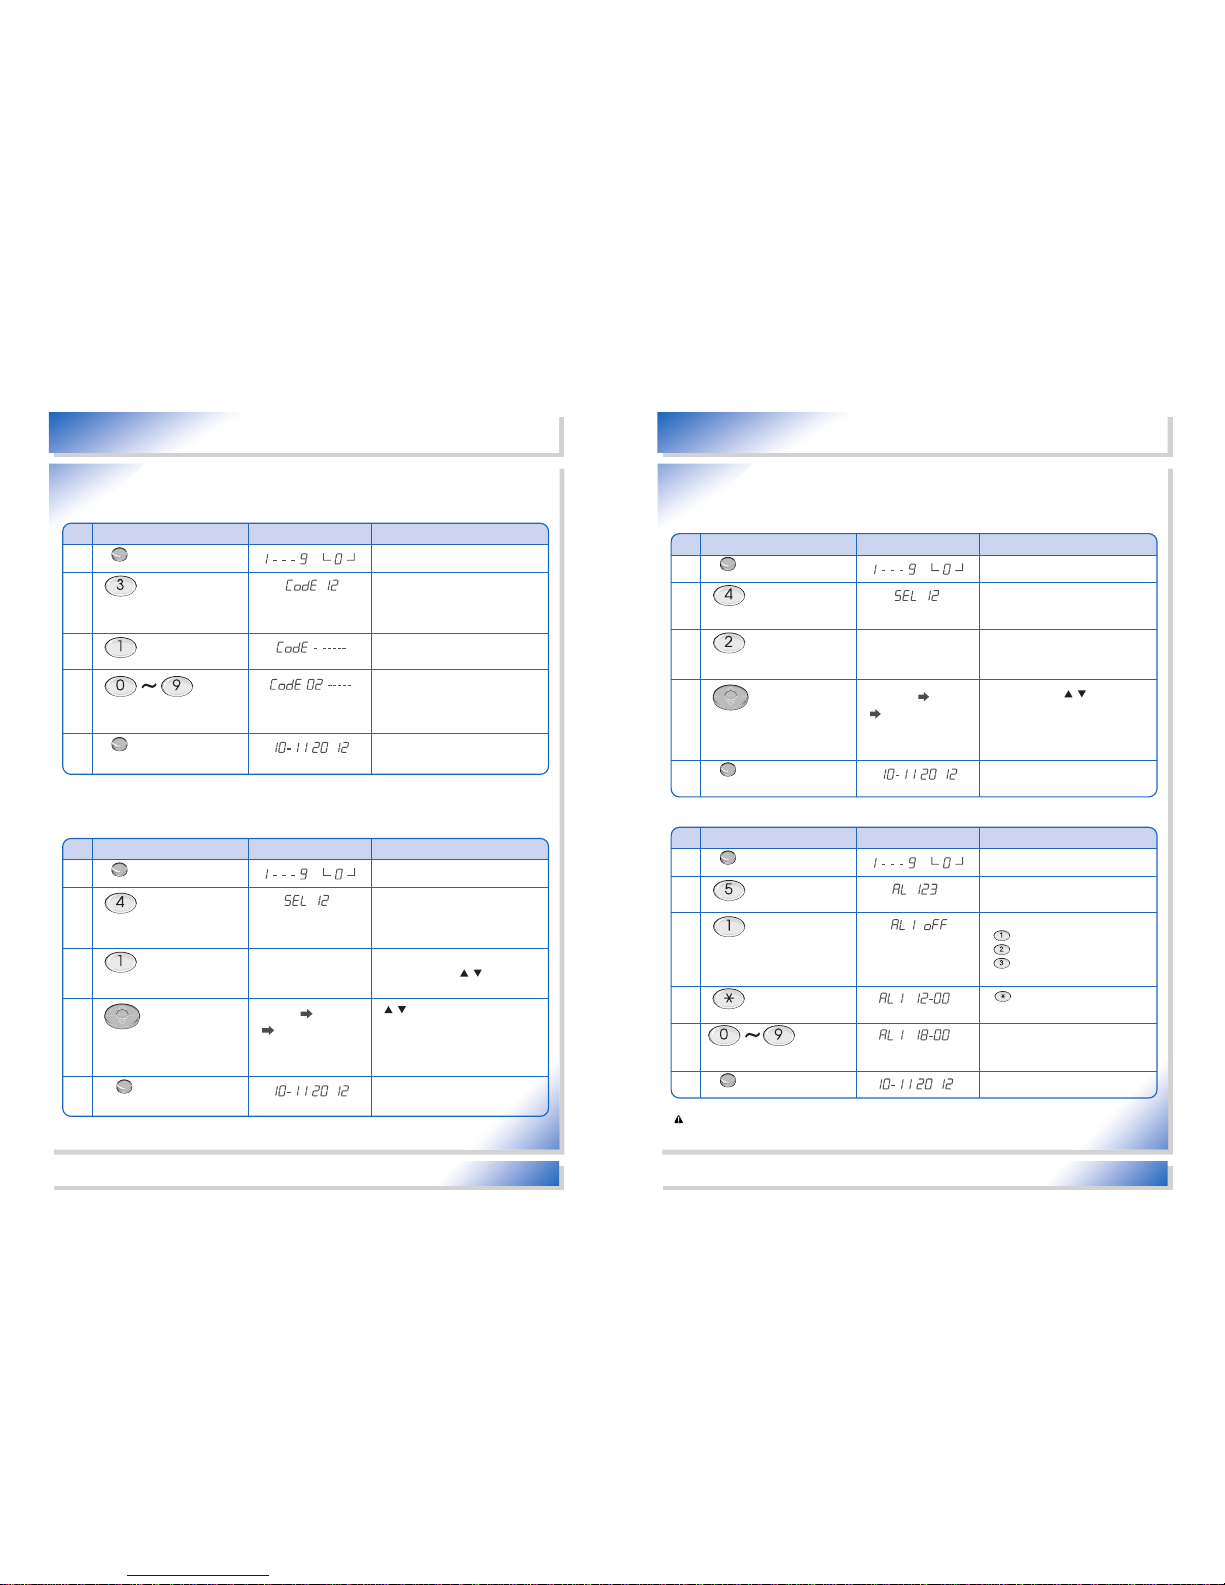
1
Press the button • Main screen of SET-UP
2
Press the button • ‘CODE 1’ is for dial set-up
• ‘CODE 2’ is for wiretap prevention
set-up
3
Press the button • The basic set-up should be on OFF.
If not necessary, do not use it
OFF SPI
4
Press the area code • When pressing button, the
left LCD displays ON and OFF.
• The basic set-up should be on OFF.
OFF SPI ON SPI
OFF SPI
5
Press the button • Wiretap prevention set-up is
complete
1
Press the button • Main screen of SET-UP
4
Press the button • button can switch between
set-up and OFF
5
Press the dial button for the
Appropriate Alarm Time
• Example of First alarm time on
18:00
5
Press the button • Alarm set-up is complete
2
Press the button • 3 alarm times can be set up
3
Press the button • The basic set up is on OFF
• alarm set up,
alarm,
alarm
DELETE
DELETE
SET-UP
SET-UP
SEARCH
Order
Method ExplanationLCD display
Order
Method ExplanationLCD display
25
Wellbeing call system’s telephone usage
Wellbeing Call System
Communication & Telephone Tech. co., Ltd.
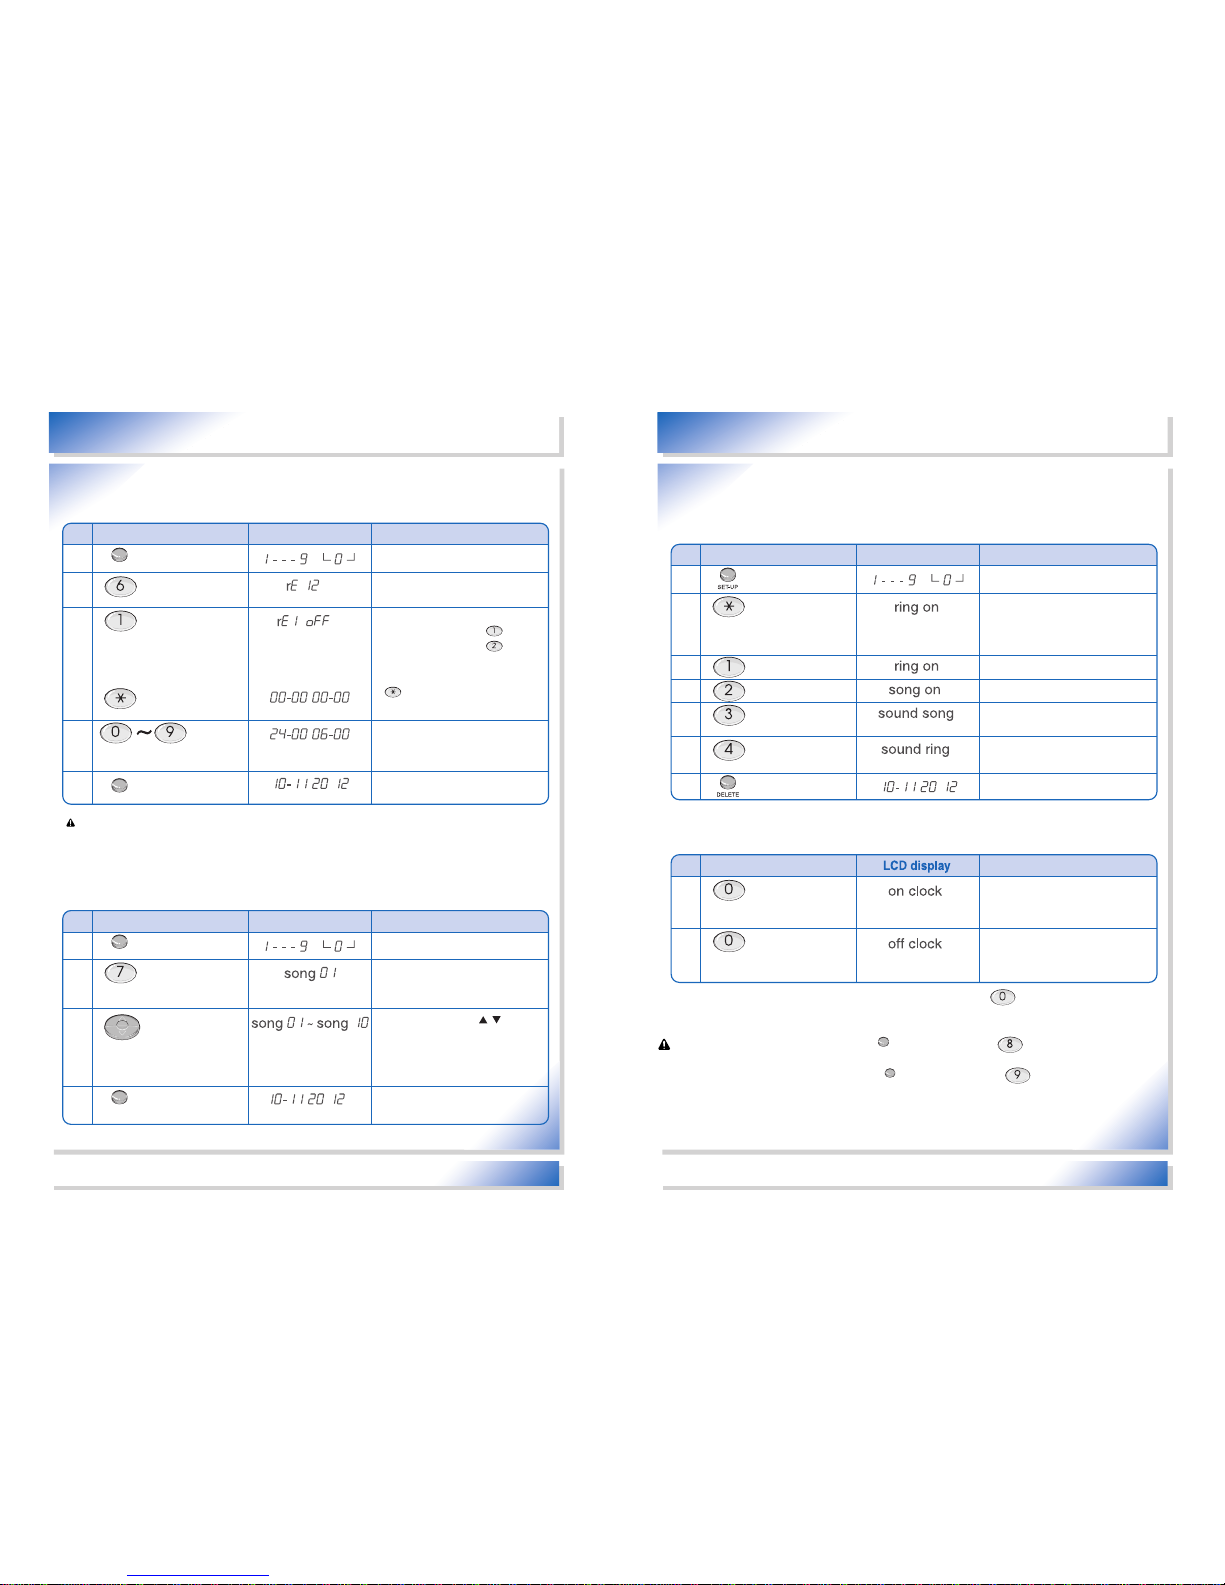
1
Press the button • Main screen of SET-UP
2
Press the button • 'CODE 1' for area code set-up
• 'CODE 2' is set up but not used
3
Press the button • Area code for the area where
phone is used
4
Press the area code
• press the area code with the dial
button
• start with the first number of the
digits
5
Press the button • area code is complete
1
Press the button • Main screen of SET-UP
2
Press the button • 'CODE 1' is for dial set-up
• 'CODE 2' is for wiretap prevention
set-up
3
Press the button • the basic set-up is TONE and
choose with the
tONE
4
Press the button • button is to show TONE and
PURSE on the LCD display
• basic set-up should be on TONE
tONE PULSE
tONE
5
Press the button • Dial set up is complete
DELETE
DELETE
SET-UP
SET-UP
SEARCH
Order
Method ExplanationLCD display
Order
Method ExplanationLCD display
24
Wellbeing call system’s telephone usage
■ Area code
• “CODE 2” is not used for the main telephone.
■ Wiretap prevention set-up 9
• If there is a wiretap on the same line, it automatically sends a signal of beeping (Doo~Doo~Doo~) that
there is a wiretap phone connected.
■ Alarm set-up
: 1. set the alarm on OFF normally.
2. for the set-up, alarm is set up and is on.
■ Electronic/Mechanical Dial selection
• Choose between digital (TONE) and analog (PULSE) for dialing when you make a phone call.
CAUTION
Page 15
Wellbeing Call System
Communication & Telephone Tech. co., Ltd.
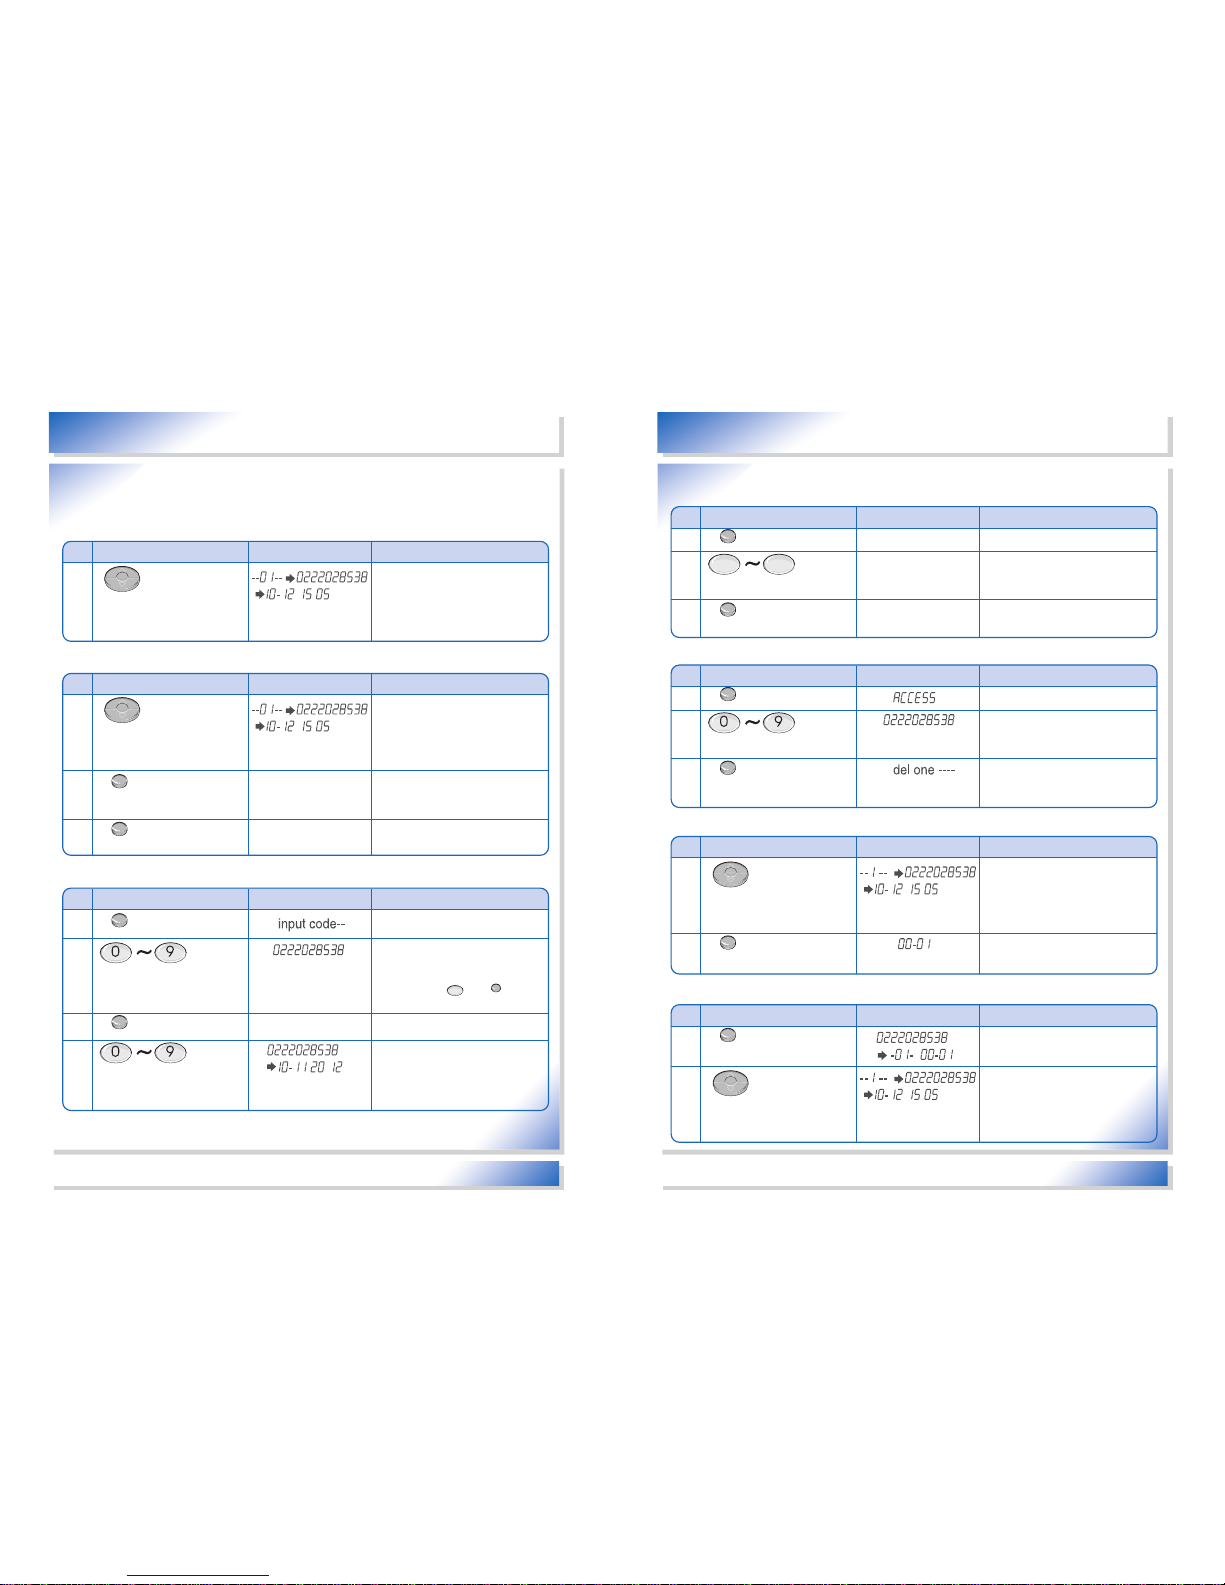
1
Press the button • Main screen of the Set-up
2
Press the button • When it first came out, it was set
up as Ring
• Choose among 4 different bell
types
3-1
Press the button • Ring
3-2
Press the button • Melody bell
3-3
Press the button
• Melody bell after the voice message
(English) about Caller's ID phone number
3-3
Press the button • Ring after the voice message (English)
about Caller’s ID phone number
4
Press the button • Bell choice is complete.
1
Press the button for
3 seconds
• On time clock alarm is on
• Tone sound is on for every on time
hour’s number count
2
Press the button for
3 seconds
• On time clock alarm is off
• no on time clock alarm
Order
Method ExplanationLCD display
Order
Method Explanation
27
Wellbeing call system’s telephone usage
Wellbeing Call System
Communication & Telephone Tech. co., Ltd.
1
Press the button • Main screen of the Set-up
2
Press the button • 2 kinds of time setting
3
Press the button • The basic set-up is OFF
• The 1st time setting is ,
the 2nd time setting is .
4
Press the button • button switches between set-
up and OFF
5
Dial button for the desired stoppage
time
• The example of the 1st stoppage
time from 24:00 to 06:00
6
Press the button • Alarm sound stoppage set-up is
complete
1
Press the button • Main screen of the Set-up
5
Press the button • Melody Bell sound set-up is
complete
2
3
Press the button
Chosen melody sounds
• There are 10 kinds of melody.
It works when set up as melody bell
Press the button
Chosen melody sounds
• When pressing the button,
the left LCD displays Song 1~Song
10 and the chosen melody sounds.
• Choose the melody you want
DELETE
DELETE
SET-UP
SET-UP
SEARCH
Order
Method ExplanationLCD display
Order
Method ExplanationLCD display
26
Wellbeing call system’s telephone usage
■ Alarm sound stoppage set-up
• This function decides the specific time in which alarm is off.
: 1. Normally, set the stoppage time on OFF
2. During the set-up, alarm does not work from 24:00 till 06:00
■ Melody Bell sound set-up
• You can choose your preferable melody bells when setting up the bell sound
■ Choose regular bell and melody bell after voice guide
• When the phone rings, choose one of 4 in the following: Ring, Melody bell, Ring after the voice message
about Caller’s ID phone number, and Melody bell after the voice message about Caller’s ID phone
number.
■ Analog clock alarm on and off set-up
• Analog clock on time
■ When first came out, it was set [ON CLOCK] and every 3seconds button is pressed, ON CLOCK
and OFF CLOCK switches
: 1. N_NIH 5 set-up (choose " " button and press button) is not used.
Do not use this set-up.
2. NO CODE set-up (choose " " button and press ) is not used.
Do not use this set-up.
SET-UP
ng
SET-UP
g
CAUTION
CAUTION
Page 16
Wellbeing Call System
Communication & Telephone Tech. co., Ltd.
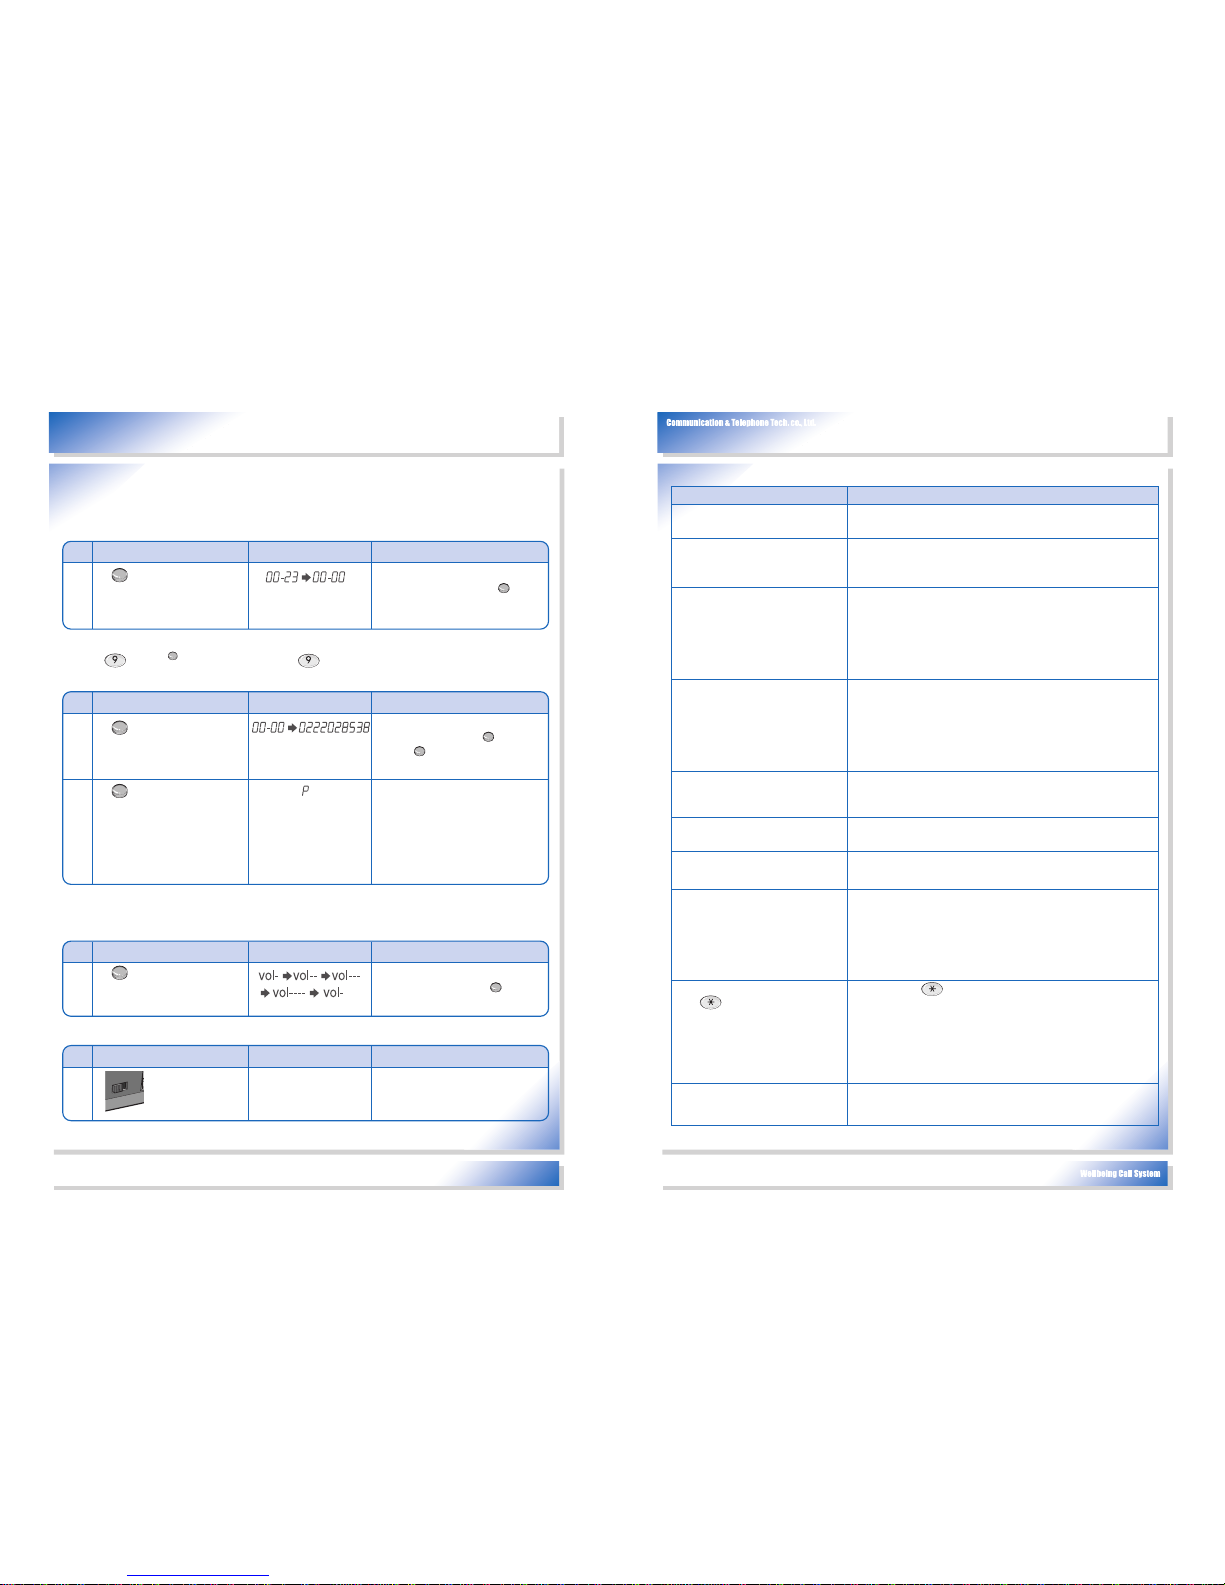
1
Press the button • Main screen of Direct dial
2
Press the DIAL button for the shortened number.
• Entered phone no. appears
according to its direct number
0222028538
3
Press the button • Calls directly and “sending call
screen” is shown.
00-00
2
Press the button • Calls directly and "sending call
screen" is shown.
1
Press the button
Received number appears
on the screen
• Search the number to call and
choose
1
Press the button
Received number appears
on the screen
• The last call from receiving calls is
shown.
2
Press the button
• You can check 30 sending calls starting
from the recently called number
• After the phone number is displayed on
the LCD screen, you may use Redial
function.
1
Press the button • Main screen of Direct dial
ACCESS
2
• Entered phone no. appears
according to its direct number
3
Press the button • To delete the chosen one phone
number and this only deletes one
phone number.
0 9
DELETE
SEARCH
SEARCH
Press the DIAL button for the shortened number.
Direct
DIAL BUTTON
DIAL BUTTON
Direct
Redial
REDIAL
Check sending
calls
Order
Method ExplanationLCD display
Order
Method ExplanationLCD display
Order
Method ExplanationLCD display
Order
Method ExplanationLCD display
29
Wellbeing call system’s telephone usage
Wellbeing Call System
Communication & Telephone Tech. co., Ltd.
1
Press the button
One by one, the information
is displayed each time
button is pressed.
• The firstly sending phone number's
complete number is shown, then
the phone number, date, and the
time are shown.
1
Press the button
One by one, the information
is displayed each time
button is pressed.
• Search the number to delete and
choose the number.
2
Press the button • To delete the chosen one phone
number and this only deletes one
phone number.
del one -----
3
Press the button for
more than 3 seconds
• All phone numbers called are
deleted.
del ALL -----
1
Press the button • Shortened function memory screen
2
Press the dial button for the
phone number
-
3
Press the button
• Phone numbers for this shortened
function
• When using the internal phone,
press button and button.
4
Choose one no. among 10
numbers for direct function with
the dial button
• Registration completes as entered
numbers are passing by.
9
DELETE
DELETE
SEARCH
SEARCH
SAVE
DIAL BUTTON
DIAL BUTTON
SAVE
redial/pose
Order
Method ExplanationLCD display
Order
Method ExplanationLCD display
Order
Method ExplanationLCD display
28
Wellbeing call system’s telephone usage
■ Receiving calls search (Caller’s ID display for telephone no. search)
• Must register Caller’s ID (CID) service and if the currently installed PABX (private exchange) and key
phone system do not provide service for CID, it cannot display it.
■ Direct dial function usage
■ Shortened dial function usage: memory deletion
■ Receiving calls search (Caller’s ID): direct phone call function
■ Sending calls search
■ Receiving calls search (Caller’s ID display for telephone no. search) number deletion
■ Shortened function for phone number memory (direct number-10 memories)
Page 17
31
Trouble-shooting checking
Wellbeing Call System
Communication & Telephone Tech. co., Ltd.
1
Press the button • When wrong dial button is pressed
or the line is busy, press
button to call again.
1
Press the button once • The volume goes from level 1 to
level 4 when pressing button
for once.
1
Choose the switch
*Choose between “Loud” and “Small”
for the bell switch.
1
Press the button
(Redial)
• When line is busy, put down and lift
the handset or press button
and button for automatic
dialing.
1
Press the button
(Pose)
• Pose function is entered without
lifting the handset and used to
registered a phone number for
Wellbeing call system and phone
number memo.
• used for line connection
VOLUME
VOLUME
FLASH
FLSH
FLSH
REDIAL/POSE
REDIAL/POSE
REDIAL/POSE
벨
소
리
소
대
Order
Method ExplanationLCD display
Order
Method ExplanationLCD display
Order
Method ExplanationLCD display
Order
Method ExplanationLCD display
30
HOW TO USE WELLBEING CALL SYSTEM TELEPHONE
■ FLASH function
• Use to make a phone call again. It is convenience to use when connecting to the key phone or PABX
(private exchange) thus to replace different internal users.
■ REDIAL/POSE function
• Press " " and button when using line from the key phone or PABX (private exchange)
and set up the input and record the telephone number.
■ SPEAKER VOLUME CONTROL
• The users can volume when calling the phone
■ REGULAR BELL VOLUME CONTROL
Symptom Checklist for trouble-shooting
• No signal on the LCD
• No movement such as alarm set
up and no voice message
• Cannot set up the Wellbeing call
system
• Cannot set up and cancel the
alarm
• Voice message “There is a
problem in a sensor when setting
up alarm”.
• Cannot use telephone functions
(even when you press the dial
button)
• Siren rings when alarm is set up
•
Voice message "Replace your battery"
when setting up the alarmalarm
• No report when sensor works fine
for alarm set up
• Cannot connect even when I press
the button after receiving the
alarm set-up report
• Remote control connection not
working
• No Caller’s ID shown
•
Hear the sound "Bee" from the speaker
when calling from the speakerphone
• Is the power adapter connected correctly?
• Is the power adapter connected correctly?
• Refer to the Wellbeing call system input set up and Function set-up methods
and try it again.
• Is your handset put down correctly?
• Is your speakerphone on?
• Is the Wellbeing call system put on Stop?
• Did you use the correct password number when canceling the alarm set-up?
• Check whether there is a problem in the external part of the
sensor.
• Check whether the option sensor is connected normally if there
is an error voice message about the door open sensor. Also,
check whether N/C SW is placed correctly at the back side of the
phone.
• Is it set up as alarm?
• Are the power adapter and phone line connected?
• Are the power adapter and phone line connected?
• Did you use the assigned rechargeable battery package?
• Please change the battery.
• Did you registered the phone number?
• Try again after referring to the telephone number registration and
function set-up methods.
• Did you enter the button 9 and button POSE for the telephone
registration while using private exchange and key phone?
• Did you press button during the information message?
• Is this the correct password number?
• Do you use another communication device at the same line with
the Wellbeing call system? If yes, add noise filter, etc. It may still
cause a trouble for the caller’s ID and Wellbeing call system.
• Turn the speaker volume down with "Volume" button in case
there is a structural problem with a microphone.
Redial/pose
Page 18
CAUTION
33
CAUTIONS FOR SAFETY USE OF THE PRODUCT
WARNING
WARNING
CAUTION
32
CAUTIONS FOR SAFETY USE OF THE PRODUCT
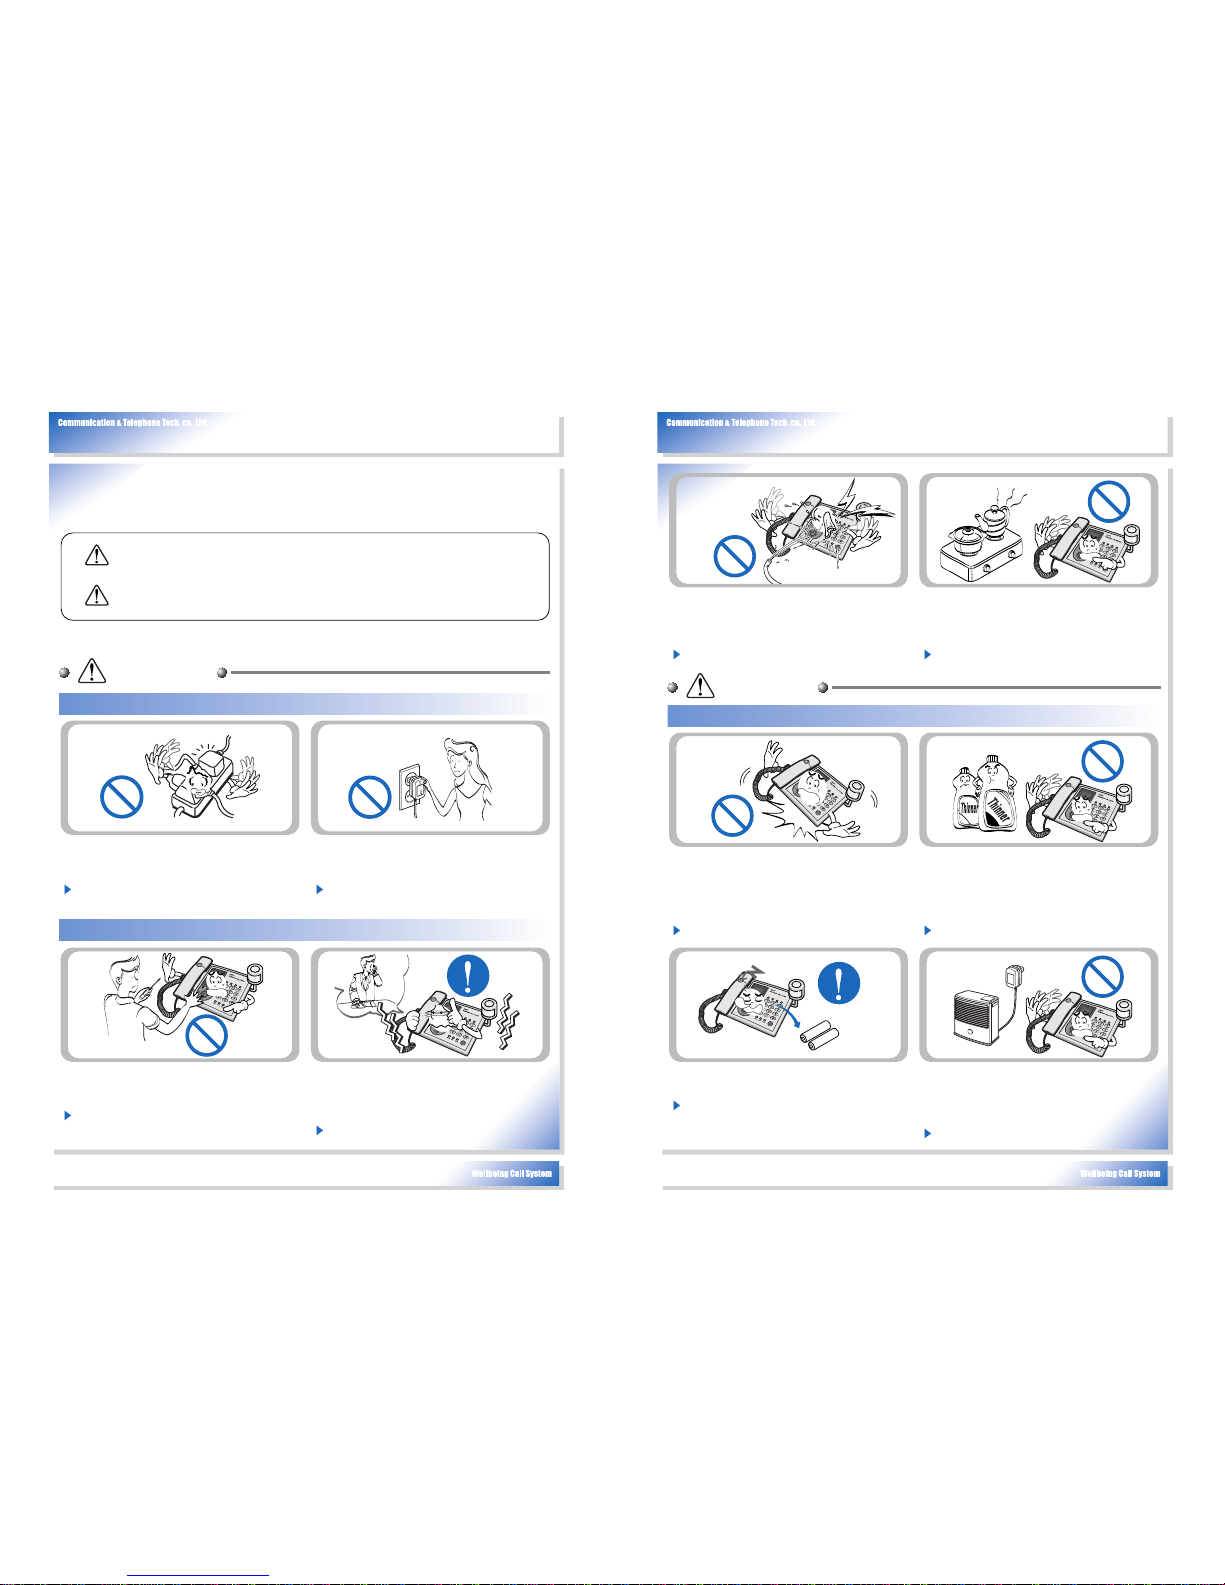
This is to prevent any unexpected danger or loss before using the product by reading safety-related
cautions.
The user may die or be injured severely if he/she does not keep the
warning points mentioned.
Do not use and connect multiple consent to the
power outlet. Also, do not use loose consent and
always tightly insert it.
It may cause fire or electric shock.
Please use The C&TT applicable adapter that is
included in the product package. This product is
for current 220V. Check the voltage.
It may cause fire or electric shock.
Do not dismantle the product. Consult the sales
sector or customer service for checkup and repair.
It may cause fire or electric shock.
If there is a smoke or smell, discontinue using the
product. Separate a power plug, phone line, and
rechargeable battery package and contact sales
sector or customer service.
It may cause fire or electric shock when
continue to use the broken product.
The user may be injured severely or his/her product may be damaged
if he/she does not keep the warning points mentioned.
About the power
Do not drop or throw the phone. If there is a
problem from dropping the phone, take out a
power plug, phone line, and rechargeable battery
package, and contact sales sector or customer
service.
It may cause accident, injury, or damage.
Do not spin more than once when changing the direction
of the human detection sensor. If it is revolved more than
once, you must spin it in the opposite direction. Do not
clean the lenses of the human detection sensor with
alcohol or chemicals and do not press too hard.
It may break the product.
Do not let the product wet in water. If water enters
the product internally, take out a power plug,
phone line, and rechargeable battery package,
and contact sales sector or customer service.
It may cause fire or electric shock.
Do not give a shock to the product and keep away
from vibration. Do not set up the product close to
fire, corrosive gas, dust, wetness, etc.
It may cause fire or electric shock.
In use
Separate the battery package when not using for a
long time or to preserve.
It may cause accident or damage.
Use the assigned adapter and assigned power voltage, do
not use or set up beside the assigned use. Also, do not use
another rechargeable batteries or regular batteries beside
the assigned rechargeable battery package.
It may cause fire, electric shock or severe
damage.
In use
Page 19
35
Memo
List of Phone Numbers
List of Phone Numbers
Name Phone number Etc.
List of Phone Numbers
Name Phone number Etc.
34
 Loading...