

Page 1

CTIPC SERIES IP CAMERA
USER MANUAL
-www.ctronics- te ch .c om -
-www. ctr on ics -te ch .co m-
Page 2
Table o f Cont ents
1. General Intro du cti on --- -- ----- -- --- -- ----- -- --- -- ----- -- --- -- ----- -- --0 2
2. Se t up the Ca mer a ---- -- --- -- ----- -- --- -- ----- -- --- -- ----- -- --- -- ----- -0 3
2 .1 Se t u p the c ame ra wi th Mo bi le App licat io n - -- --- -- ----- -- --- -- 03
2.2 Se t up t he ca me ra w ith P C/ MAC Sof tw are - -- ----- -- --- -- ----- -0 4
2.3 Se t up the ca mera wi th P C b ro wser -- -- --- -- ----- -- --- -- ----- -- -05
3. Int ro duc ti on of M ob ile Ap pl icati on ---- ----- -- --- -- ----- -- --- -- ----- -0 7
3 .1 Ca mera --- -- --- -- ----- -- --- -- ----- -- --- -- ----- -- --- -- -- --- -- --- -- -- --0 7
3 .2 Pi cture -- -- --- -- ----- -- --- -- ----- -- --- -- ----- -- --- -- -- --- -- --- -- -- --- -0 9
3.3 Vi deo - ----- -- --- -- ----- -- --- -- ----- -- --- -- ----- -- --- -- -- --- -- --- -- -- --0 9
3 .4 Abo ut -- ----- -- --- -- ----- -- --- -- ----- -- --- -- ----- -- --- -- -- --- -- --- -- -- -10
4. I ntr od uctio n o f P C/ Ma c S oft wa re -- --- -- ----- -- --- -- ----- -- --- -- ----- 10
5. In tr odu ct ion of We b I nte rf ace (I nt ern et Exp lo re r) - -- --- -- ----- -- -13
5 .1 Pr eview Inte rf ace ( Mon it or) - -- --- -- --- -- -- --- -- ----- -- --- -- ----- -1 3
5 .2 Se tt in gs In ter fa ce -- -- --- -- ----- -- --- -- ----- -- --- -- ----- -- --- -- -- --- 14
6. FAQ -- -- --- -- -- --- -- ----- -- --- -- ----- -- --- -- ----- -- --- -- ----- -- --- -- ----- -- 15
1
Gener al Int rodu ctio n
Ctron ic s CT IP C Se ri es C am er as c on si st o f a wi de r an ge o f in do or a nd o ut do or
cameras with di ff er en t sh ap es a nd f un ct io ns . Us er m ay m on it or m ul ti pl e ca me ra s
on the same device. Ctr on ic s CT IP C Se ri es C am er as s up po rt s And ro id a nd i OS
mobile phones and tablets, Wi ndows PC and Mac. All cameras are equipped with
LAN port an d Wi -F i mo du le , su pp or ti ng w ir ed a nd w ireless co nnecti on.
Ove rv ie w of C am er a
Bullet ty pe Dome type
*Above images are only fo r re fe re nc e. Your camera may have a diff er en t ou tl oo k.
*Certain camera may have fo ur b ra nc he s on t he c ab le . Th e fo ur th b ra nc h is u se d
to co nn ec t ex te rn al s pe ak er i f th is m od el s up po rt s sp ea ke r fu nc ti on .
Each ca mera i s de livered with below accessories in the package:
;
1 Antenna
1 Power adapter;
1 LAN cab le;
1 User ma nu al;
1 set of Sc re ws f or m ou nt in g.
-01-
-www.ctronics-te ch .c om -
-02-
-www.ctronics-te ch .c om -
Page 3
2
Set up th e came ra
The c am er a st ar ts t o ru n im me di at el y af te r co nn ec ti on w it h po we r su pp ly. I t ca n
be used as a stan dalone video recorder.
It’ s re co mm en de d to c on ne ct t he c am er a wi th y ou r mo bi le d ev ic e or P C. Af te r th e
setup , yo u’ ll be able to access the c am er a mo re c on ve ni en tl y. Th er e’ re 3 w ay s to
set up th e ca me ra : wi th m ob il e ap pl icatio n, w it h PC s of tw ar e, w it h PC b ro ws er.
2.1 Set up the camera with mobile application
No LAN cable is required if you set up the camera with mobile application.
Ste p 1: P re pa ra ti on
1.Do wn lo ad m ob il e ap pl ic at io n “C tr on ic s” f ro m Go og le P la y or Ap p St or e
to yo ur m ob il e de vi ce ;
2.C on ne ct t he c am er a to p ow er s up pl y an d ke ep i t cl os e to y ou r
mob ile device.
Ste p 2: C on ne ct t he c am er a to m ob il e de vi ce
1.E nt er W LA N se tt in gs o f yo ur m ob il e de vi ce , fi nd t he n et wo rk n am ed
“IP CA M- XX XX XX ” in t he n et wo rk l is t. T hi s is t he n et wo rk o f th e ca me ra .
2.C onnect thi s ne tw or k wi th p as sw or d “0 12 34 56 7”, yo ur m ob il e de vi ce w il l
be co nnecte d to t he n et wo rk o f th e ca me ra ;
Ste p 3: C on ne ct t he c am er a to W i- Fi n et wo rk
1.O pe n mo bi le a pp li ca ti on “ Ct ro ni cs ” on m ob il e de vi ce , yo u ma y ad d th e
cam er a ei th er b y “S ca n QR C od e ad d UI D” o r “S ea rc h ca me ra f ro m LA N;
The c am er a wi ll b e di sp la ye d wi th s ta tu s “O nl in e” . (P ic tu re 1 )
2.C lick on Se tt in g ic on o n th e in te rf ac e (P ic tu re 1 ) to e nt er c am er a se tt in g
men u. Go to W i- Fi s et ti ng , cl ic k on W i- Fi m an ag er, s el ec t yo ur W i- Fi
network i n th e li st , in pu t yo ur W i- Fi p as sw or d an d sa ve t he s et ti ng . Th e
cam er a is n ow c on ne ct ed t o yo ur W i- Fi n et wo rk .
2.2 Set up the camera with PC/MAC Software
LAN cable is required if you set up t he c am er a wi th P C/ MA C so ft wa re .
Ste p 1
: Pre pa ra ti on
1.Do wn lo ad a nd i ns ta ll P C/ MA C so ft wa re “ Hi P2 P” f ro m Su pp or t Dow nl oa d of C tr on ic s we bs it e ;
2.C on ne ct t he c am er a to p ow er s up pl y;
3.Co nn ec t th e ca me ra t o th e ro ut er b y LA N ca bl e. M ak e su re t ha t yo ur
PC/MA C an d yo ur c am er a ar e in t he s am e lo ca l ne tw or k.
Ste p 2: C on ne ct t he c am er a in H iP 2P s of tw ar e
1.R un “ Hi P2 P” s of tw ar e on y ou r co mp ut er ;
*By d efau lt, th er e’ s no p as sw or d fo r th e so ft wa re . You ma y le av e th e
passw ord blank.
2.C li ck o n Auto-Ad d ic on o n th e me nu bar (Pi ct ur e 2) .
3.T he s of tw ar e wi ll f in d an d ad d th e ca me ra a ut om at ic al ly. W it hi n a fe w
sec onds, th e ca me ra w il l be d is pl ay ed o n th e in te rf ac e wi th s ta tu s
“On li ne” (P ic tu re 2 ).
Ste p 3: C on ne ct t he c am er a to W i- Fi n et wo rk
1.C li ck o n Se tt in gs i co n on t he m en u ba r (p ic tu re 3 );
2.C li ck o n Pa ra me te r se tt in gs , se le ct t he c am er a XX XX -X XX XX X- XX XX X
(ca me ra U ID ) un de r Re gi on , cl ic k on W i- Fi , Wi -F i se tt in g wi nd ow w il l
appear;
3.C li ck o n Se ar ch t o sh ow a ll a va il ab le W i- Fi n et wo rk , se le ct y ou r Wi -F i
netwo rk , in pu t yo ur W i- Fi p as sw or d (K ey ) an d App ly t he s et ti ng . Th e
cam er a is n ow c on nected t o yo ur W i- Fi n et wo rk .
www.ctronics-tech.co m
Pictu re 2
-03-
Pictu re 1
-www.ctronics-te ch .c om -
-04-
-www.ctronics-te ch .c om -
Page 4
Pictu re 3
2.3 Set up the camera with PC browser
LAN cab le is re quired if yo u se t up t he c am er a wi th P C br ow se r.
Ste p 1:
Pre paration
1.Do wn lo ad P C so ft wa re “ Se ar ch Tool ” fr om S up po rt - D ow nl oa d of
Ctr on ic s we bs it e and i ns ta ll t he s of tw ar e on
you r PC ;
2.Co nn ec t th e ca me ra t o po we r su pp ly ;
3.Co nn ec t th e ca me ra t o th e ro ut er b y LA N ca bl e. M ak e su re t ha t yo ur P C
and y ou r ca me ra a re i n th e sa me l oc al n et wo rk .
Ste p 2: C on ne ct t he c am er a in P C br ow se r
1.Ru n “S ea rc hToo l” o n yo ur c om pu te r, th e so ft wa re w il l di sp la y th e ca me ra
and i ts d et ai le d in fo rm at io n in t he l is t (P ic tu re 4 );
2.Do ub le -c li ck o n th e ca me ra t o op en c am er a in te rf ac e wi th P C br ow se r;
3.In pu t de fa ul t us er n am e “a dm in ” an d de fa ul t pa ss wo rd “ ad mi n” t o en te r
wel co me p ag e of t he c am er a;
4.Se le ct l an gu ag e an d cl ic k on P C Vi ew t o ac ce ss t he c am er a (P ic tu re 5 )
-05-
www.ctronics-tech.co m
-www.ctronics-te ch .c om -
Pictu re 4
Pictu re 5
Ste p 3: C on ne ct t he c am er a to W i- Fi n et wo rk
1.Go t o to se t Wi -F i fo r th e ca me ra
(Pi ct ur e 6) ;
2.Cl ic k on S ea rc h to d is pl ay a ll a va il ab le W i- Fi n et wo rk s, s el ec t yo ur
Wi- Fi n et wo rk , in pu t yo ur W i- Fi p as sw or d (K ey ), a pp ly t he s et ti ng . Th e
cam er a is n ow c on ne ct ed t o yo ur W i- Fi n et wo rk .
-06-
Setti ng s – Ne tw or k – Wi re le ss
-www.ctronics-te ch .c om -
Page 5
Pictu re 6
3
Introduction of Mobile Application
Wit h Ct ro ni cs a pp , yo u’ re a bl e to c on ne ct m ul ti pl e Ct ro ni cs C TI PC s er ie s Wi fi
cameras on th e sa me m ob il e device. Th er e’ re 4 t ab s on t he i nt er fa ce : Ca me ra ,
Pictu re , Vi de o, Ab ou t.
3.1 Ca me ra
Thi s ma in i nterfa ce a llows you to a dd camera, delete camera, vi ew camer a and
access to c am er a se tt in gs .
Add c am er a: y ou m ay a dd a ny o nl in e ca me ra s im pl y by i np ut t he U ID , us er n am e
and password of the c am er a to a dd i t in to t he a pp ( Pi ct ur e 7) .
-07-
Pictu re 7
-www.ctronics-te ch .c om -
Delete camera: Click on Edit icon on to p of the i nt er fa ce o r sl id e th e ca me ra b ar
to th e le ft t o sh ow d el et e op ti on .
Vie w ca me ra : Cl ic k on c am er a im ag e to e nt er r ea l- ti me s ur ve il la nc e in te rf ac e
(Pi ct ur e 8) .
***Attention: Functions on this interface are not available on all CTIPC cameras.
Please refer to product description or contact us for the available functions of
your camera model.
Camera Settings
Click on Settings icon to access camera settings (Picture 9).
- Change Password
Default passw or d is a dm in . It ’s r ec om me nd ed t o mo di fy
the password to p ro te ct y ou r ca me ra .
- Alarm Se tt in g
Enable/disable motion detection of the ca me ra, se t
detecti on area and sensitivity, se t au di o al ar m (n ot
available for all models).
- Acti on with Alarm
Define th e acti on s to b e ta ke n wh en t he c am er a de te ct s
movement: s en d al arm no ti fi ca ti on , re co rd v id eo t o SD
card, sen d em ai l wi th p ic tu re s, s en d pi ct ur es a nd v id eo s
to yo ur FTP s er ve r.
-08-
Pictu re 8
Pictu re 9
-www.ctronics-te ch .c om -
Page 6

-Reco rdin g Schedule
You may enabl e/di sab le cont inuous rec ordi ng of the ca mera , set the le ngth of
reco rded vi deo, selec t quality of rec orded vide o. Note : More de tail ed rec ordi ng
sche dule ma y be set wit h PC brow ser or PC softwa re.
-Audi o Setti ng
Set inp ut/o utput volu me (only for cam era with audi o function ).
-Video Se tting
Set vid eo para met ers and se lec t frequ ency. Note: vid eo para meters are au toma tic ally
adju sted by th e came ra. It’ s not nece ssa ry to modi fy the va lues .
-Wi-F i Setti ng
Set Wi- Fi netw ork fo r the camera.
-SD Card Se ttin g
Chec k SD card storag e and format SD car d in case of ne ed.
-Time Set ting
Set tim e and time zone for th e came ra.
***A tten tion : Defa ult tim e zone of th e camera is set to GMT+8. Pl ease mo dif y the
time zo ne afte r conn ecti on with the came ra.
-Emai l Setti ng
Inpu t email in for mati on after you ena ble email ala rm. You may find our docu ment
abou t email se tti ng in Supp ort – Dow nloa d of our web site.
-FTP Sett ing
Inpu t FTP serv er info rmation af ter you enabl e FTP tran smis sio n. Plea se check with
your FT P serve r provi der fo r serve r info rmat ion.
-Syst em Sett ing
Rebo ot came ra and Re set Cam era .
-Devi ce Info rmation
Info rmat ion about the ca mera inclu ding softw are ver sion, IP address, et c.
3.2 Pi ct ure
Touch Picture tab a nd select a ca me ra t o wa tc h th e pi ct ur es t ak en m an ua ll y
during monitoring.
The se m an ually-taken pictures are s av ed i n th e me mo ry o f yo ur m ob il e de vi ce .
3.3 Vide o
Touch Vid eo t ab a nd s el ec t a ca me ra t o wa tc h re co rd ed v id eo s.
-09-
-www.ctronics-te ch .c om -
Loca l
Video s take n manually du ring real- time surve ill ance ca n be foun d in Loca l. Thes e
vide os are sa ved in the memor y of your mo bile devic e. Cli ck on the do wnlo ad ico n
to downl oad th e video to the Album /Pho tos of yo ur mobile dev ice .
Onli ne
Auto mati cal ly reco rde d video s can be fou nd in Onl ine. There ar e two typ es of
auto mati c reco rdin g: Alarm Re cor ding an d Plan ned Re cord ing (o r Sched ule d
reco rdin g). The se vid eos are saved in the SD card of the camera.
By defa ult, the inte rfa ce will displ ay all re cord ing s in past 6 hou rs. User may cli ck on
Sear ch on top to th e righ t of the int erfa ce to fin d the rec ordi ngs of a spe cified per iod .
Clic k on the rec ordi ng to sho w two opt ions : Play back and Down loa d. Touch
Play back to play the video di rectly; Touch Dow nload to down loa d the vid eo to Local
file .
3.4 Abo ut
Version information of the m ob ile application.
4
Intro duct ion of P C/Ma c Soft ware
With PC /Mac softw are “H iP2P ”, you ’re abl e to conn ect mu ltip le Ctr onic s CTIP C
seri es Wifi camer as on the sa me PC. All sof twa re can be do wnlo ade d in Support –
Down load of Ctron ics we b site.
***A tten tio n: Mac softwa re has a mor e simplifi ed interfa ce compare d to
Windows sof tware. Man y func tion s may onl y exist in Windo ws sof twar e.
By defa ult, there ’s no pass wor d for the us er “adm in” in th e soft ware . You may leave
pass word blank an d conf irm to access th e func tion s on the int erf ace.
Menu Ba r
Ther e’re 8 fu ncti on ico ns in the me nu bar. They ar e (fro m left to ri ght):
Prev iew, Auto- Add, Local Pl ayback, Re mote Playb ack , Setti ngs , Syste m Logs ,
Swit ch User, Exit.
Prev iew:
Refe r to belo w image for func tions on the interf ace (Pictu re 10) .
***A tten tio n: not all funct ions are avai lab le on your camer a. Ple ase ref er to
prod uct descri ptio n or cont act us fo r availabl e function s of your ca mera .
-10-
-www.ctronics-te ch .c om -
Page 7
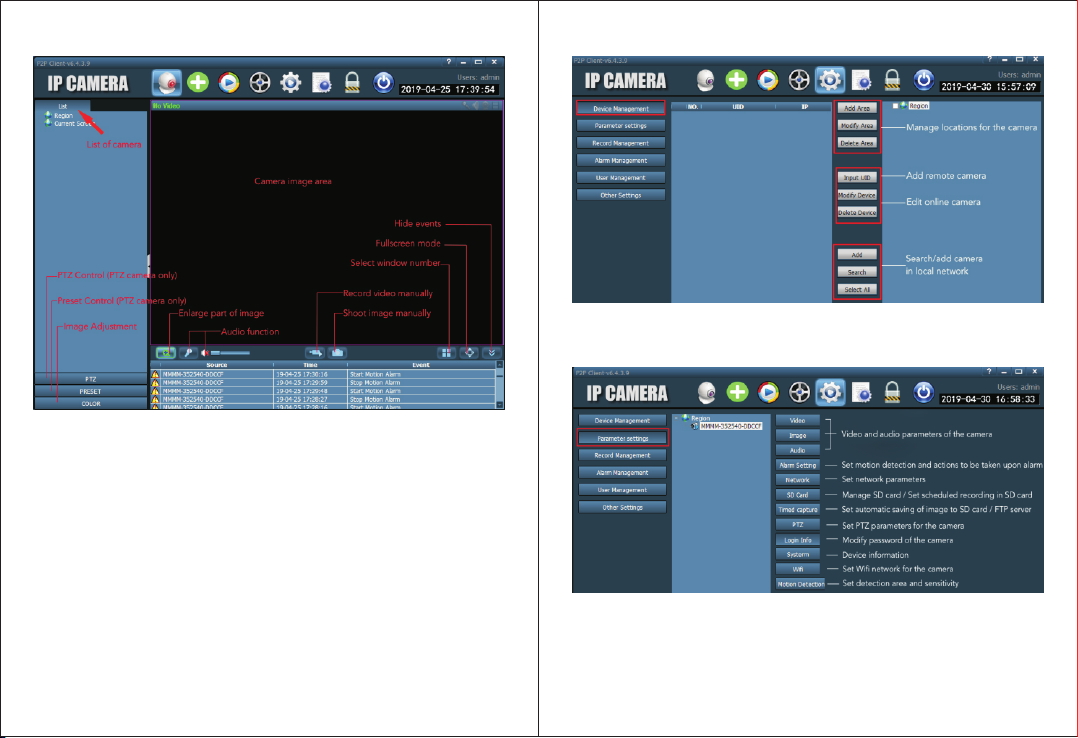
Pictu re 1 0
-11-
(Pict ure 11)
-www.ctronics-te ch .c om -
Auto -Add :
One cli ck to add ca mera s of the sam e LAN automat ical ly.
Loca l Playb ack:
Play back vi deos which ar e save d local ly in the ha rd disc of the comp uter.
Sele ct came ra, ty pe of reco rdi ng, dat e and tim e to find the recor ded videos in PC ha rd
disc .
Remo te Play back:
Play back vi deos which ar e save d in the SD card of the came ra.
Sele ct came ra, ty pe of reco rdi ng, dat e and tim e to find the recor ded videos in ca mera
SD card .
Sett ings :
-Devi ce Mana gement
Mana ge came ras in th e softw are
Pictu re 11
-Par amet er Setting s (Pict ure 12 )
Set par amet ers of th e camer a.
Pictu re 12
-Record Management
Set rec or di ng in PC hard disc: en ab le/disable recording, se t re co rd in g sc he du le,
path of sto ra ge , et c. At te nt io n: I t’ s ne ce ss ar y to k ee p th e so ft wa re r un ni ng o n PC
to be able to record vi deo in the hard disc of PC .
-12-
-www.ctronics-te ch .c om -
Page 8
-Ala rm Mana gement
Set ala rm func tio n on PC: enable/ disa ble al arm on PC, set alar m sched ule , set alar m
reco rdin g in PC hard di sc, set sound al arm on PC .
-User Ma nage ment
Mana ge user s of the sof twar e on this PC .
-Othe r Setti ngs
5
Introduction of Web Interface (Internet Explorer)
Att en ti on:
-It’ s rec om me nd ed to u se I nte rn et E xplor er t o acces s th e cam er a on w eb in te rf ace.
Wit h ot her bro ws er s, so me i mport an t fe atu re s (S D Car d, M ot ion D et ec tion) m ay
not b e di spl ay ed .
-Cer ta in func ti on s dis pl ay ed on t he i nt erf ac e ma y not b e ap plica bl e on your
cam er a. Plea se r ef er to p ro duct de sc ri pti on o r co nta ct u s for the f un ction s
sup po rt ed by y ou r camer a.
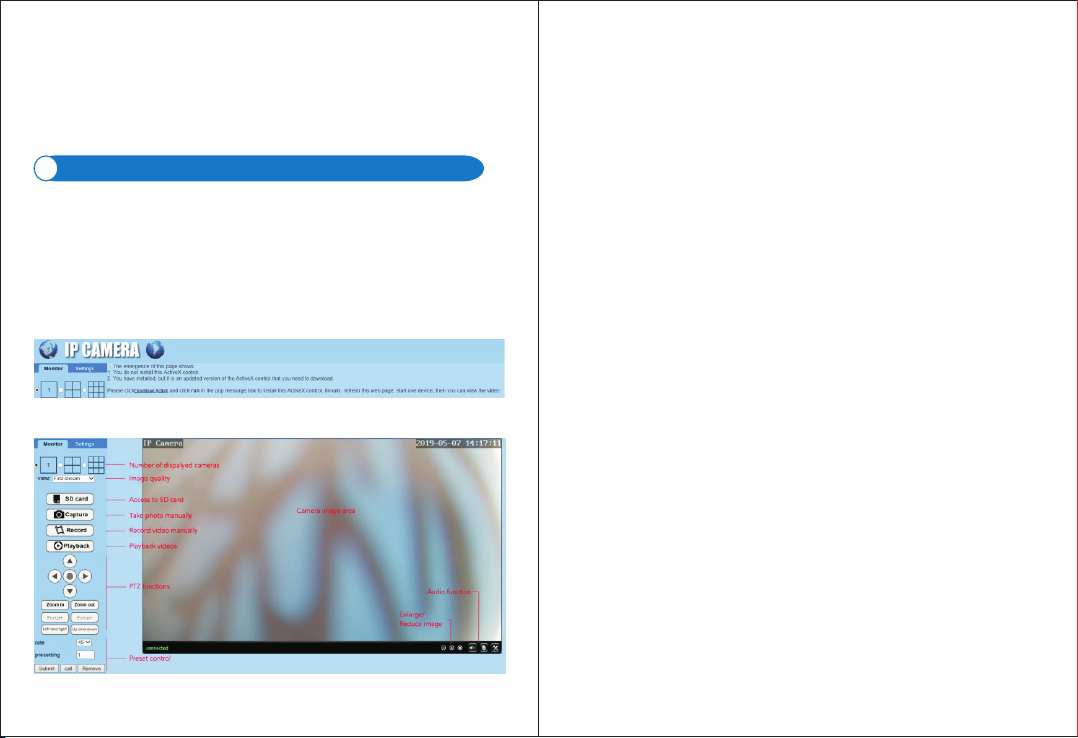
-Ima ge d ispla y in I ntern et E xplor er r eq uir es t he i nst al la tion of Ac ti vX. You m ay
fol lo w instr uc ti on on t he i nterf ac e (P ict ur e 13 ) to do wn lo ad an d in st all t he p lu g-i n.
Pictu re 1 3
5.1 Preview Interface (Monitor)
5.2 Settings Interface
-Media
Video: vid eo param eters are set automa tical ly. It’s not necessary to modify the values .
OSD set: select infor matio n to be display ed on screen .
Image: image adju stmen t, flip and mirror image , adjust ima ge mode (only for
professional users)
Audio: set audio func tion
-Network
Network: set IP address and DNS, HTTP /RTSP/RTMP port for the camera (on ly for
professional users) .
Wirele ss: set Wi-F i networ k for the camera.
Ddns: set DDNS for the camer a (only for pro fessi onal use rs).
ONVIF: set ONVIF when th e camera is connected to ONVIF NVR.
P2P: came ra use P2P techn ology to rea lize rem ote access, pleas e make sure tha t
P2P is set to ON.
-Alarm
Audio ala rm: set whet her to trigg er alarm upon sound.
Motion detecti on: defi ne up to 4 detectio n areas and set detection sensit ivity of eac h
area.
Alarm: define act ions to be taken upon motion detecti on, incl uding sending ala rm
email, saving ima ge/vi deo on FTP serve r, saving image/video in SD card, movi ng to
preset positio n (PTZ camer a only), activating sound al arm.
Schedule: set detailed tim e table for mot ion dete ction . Green mean s selected.
-Advanced
User: mod ify user nam e and password.
Auto snap : take pictu res auto matic ally and sav e to SD card or FTP server, set deta iled
time tabl e for automa tic pict ures.
Timer reco rd: enab le/di sable co ntinu ous recording, set record ing length, set video
quality, set detailed time table for co ntinu ous recording. Green mean s selected.
Email: input emai l informa tion (ne cessa ry when emai l alarm is enab led).
FTP: inpu t FTP server inf ormat ion (nec essar y when FTP trans missi on is enable d).
Terminal: pa ramet ers for PTZ cameras (onl y for professional users)
485Set: parame ters for PTZ ca meras (only for prof essio nal users)
Multiple setti ngs: add cam eras of the sam e LAN to web interf ace for viewing at the
same time .
Video shad e: selec t not to view speci fic area s (up to 4 areas). Note: it’s neces sary to
input sta ndard RB G code for Color.
Restart timer: se t automat ic resta rt of the camer a.
-13-
Pictu re 14
-www.ctronics-te ch .c om -
-14-
-www.ctronics-te ch .c om -
Page 9

-System
Time: set tim e and time zone for the camera.
Initialize: select lan guage for the web page, reb oot camer a, reset camera, upg rade
camera firmwar e.
Device informa tion: de vice information such as IP addre ss, firmware vers ion, etc .
System Log: system log.
6
FAQ
1.How can I turn on the camer a?
The camera will power on automatically as soon as it’s connected to power supply.
There’s no power indicator on the camera. You may cover the light detector on the
camera to simulate the night and check if the infrared Led can light up. If yes, the camera
is well powered on.
2.I cannot find camera network “IPCAM-xxxxxx” and cannot connect my mobile
device to the camera.
Please reset the camera to factory default settings and search for the network again on
your mobile device.
3.How can I recover the password of the camera if I forget it?
The password cannot be recover ed. If you forget the password, you’ll have to reset the
camera to factory default sett ings and set up the camera again.
4.How can I reset the camera to factory default settings?
If the camera is connected online, you may find reset option in the mobile application or
PC software to reset the camera. If the camera is offline, you may hold the reset button
on camera cable for 15-20 seconds to reset the camera.
5.How can I delete the recordings in the SD card?
The camera will erase the oldest recordings in the SD card automatically when the SD
card is full. If you hope to delete the recordings manually, you may go to SD card setting
and format the SD card.
6.I set Wi-Fi network for the camera. However, the camera is disconnected as soon
as I unplug network cable.
The camera does not support special letters (è à ö ...) or symbols (@ # & ...) in Wi-Fi
SSID and Wi-Fi password. Pleas e use standard English letters and numbers. At the
same time, please check in your router setting and make sure that the encrypt ion of your
Wi-Fi is not set to combined algorithm of AES+TKIP, which is not supported by the
camera.
7.The time displayed on the recorded video is not correct. There’s a difference of
several hours with the real time of the recorded event.
-15-
-www.ctronics-te ch .c om -
By default, the time zone of the camera is set to GMT+8. Please enter Time setting of the
camera and select the correct time zone for your camera. If you’ve got summer time,
please enable DST (Dayligh t Saving Time). After selection of new time zone, please
remember to validate the modification. The camera will restar t to get the correct time.
8.The alarm recording lasts only 15 seconds. How can I modify the length of the
alarm video?
The length of alarm video is fixed at 15 seconds and cannot be modified. At the end of 15
seconds, if the camera continu es to detect movement, it will start a new recording. In the
end, if the movement lasts more than 15 seconds, there will be multiple recor dings.
9.I keep receiving frequen t alarm notificatio n and emails, but when I check the
image, there’s nobody.
The camera calculates the change of pixels on the image to judge if there’s movement.
Due to this fact, the camera is not able to differentiate moving objects: it may be dogs,
trees, insects, sudden change of light, etc. It’s highly recommend ed to define specific
detection areas in order to reduce false alarms. By the way, during raini ng and snowing
days, as the pixels on whole image are changing, the motion detection of the camera is
not reliable.
10.I don’t know how to input email information in email setting .
We have a document about email setting with various email provi ders. You may find it in
Support – Download of our website .You may also contact us by
email to receive the document.
11.I’ve enabled alarm notifica tion. However, I still cannot receive notification on
my smartphone when there’s motion detection.
This may happen on Android phone, because Android system will shut down apps in the
backgroun d to save battery. When the app is shut down, it won’t be able to send
notificat ion. You may enter Batter y Management/B attery Optimization in the setting of
your Android phone and allow the running of the app Ctronics in the background.
12.May I have Alarm recording and Continuous recor ding at the same time?
Since latest software upgrade, the camera only support s one recording mode at a time.
When alarm recording is enabled, continuous recor ding will be disabled automat ically.
Vice versa.
13.The camera is working correc tly during the day. But I can see nothing at night.
The image is totally black.
This may be caused by wrong LED mode. Please open mobile application and enter
real-time surveillance inter face. Click on Bulb symbol on top and set the mode to Normal.
-16-
www.ctronics-tech.com
-www.ctronics-te ch .c om -
Page 10

14.I do not have a router. How can I access the camera directly with my computer?
The camera has a fixed IP address: 192.168.1.88 . You may connect the camera to your
computer directly by network cable, modify the IP address of your computer to 192.168.
1.20. Then you may input 192.168.1.88 in the browser of your computer to access the
camera.
15.I’ve enabled transmission of image and video to FTP server. However, I only
receive image in my FTP server. The alarm video is not saved on the server.
The camera has not enough memory to execute the task of video transmissi on to FTP
server. Please install SD card in the camera and the video transmission will be done.
16.I access the SD card and get the recorded video. But I cannot play it on my
computer.
Recorded videos are under H264 format which is our proprietary format. You may
download the software “HiPlayer” from Support – Download of our website
ctronics- tech.com
You may also downlo ad the software “FileCon verter” to convert the video from H264 to
AVI.
17. My camera has been running normally in past months. Howeve r, it has been
disconnec ted since yesterday. How can I reconnect the camera?
Firstly, please make sure that there’s no problem with your network. Secondly, please
check if the infrared Led can still light up at night. If no, there may be probl em with power
supply and we recommend to replace the power adapte r. If yes, please reset the camera
to factory default settin gs and connect the camera again. If the reset does not solve the
problem, please contact us by email and we’ll give you a solution.
For any questions about your camera, please contact our service team by email
@ctronics -tech.com
to play the video.
. We’ll reply to you within 24 hours.
www.
support
-17-
-www.ctronics-te ch .c om -
-18-
-www.ctronics-te ch .c om -
 Loading...