

Page 1
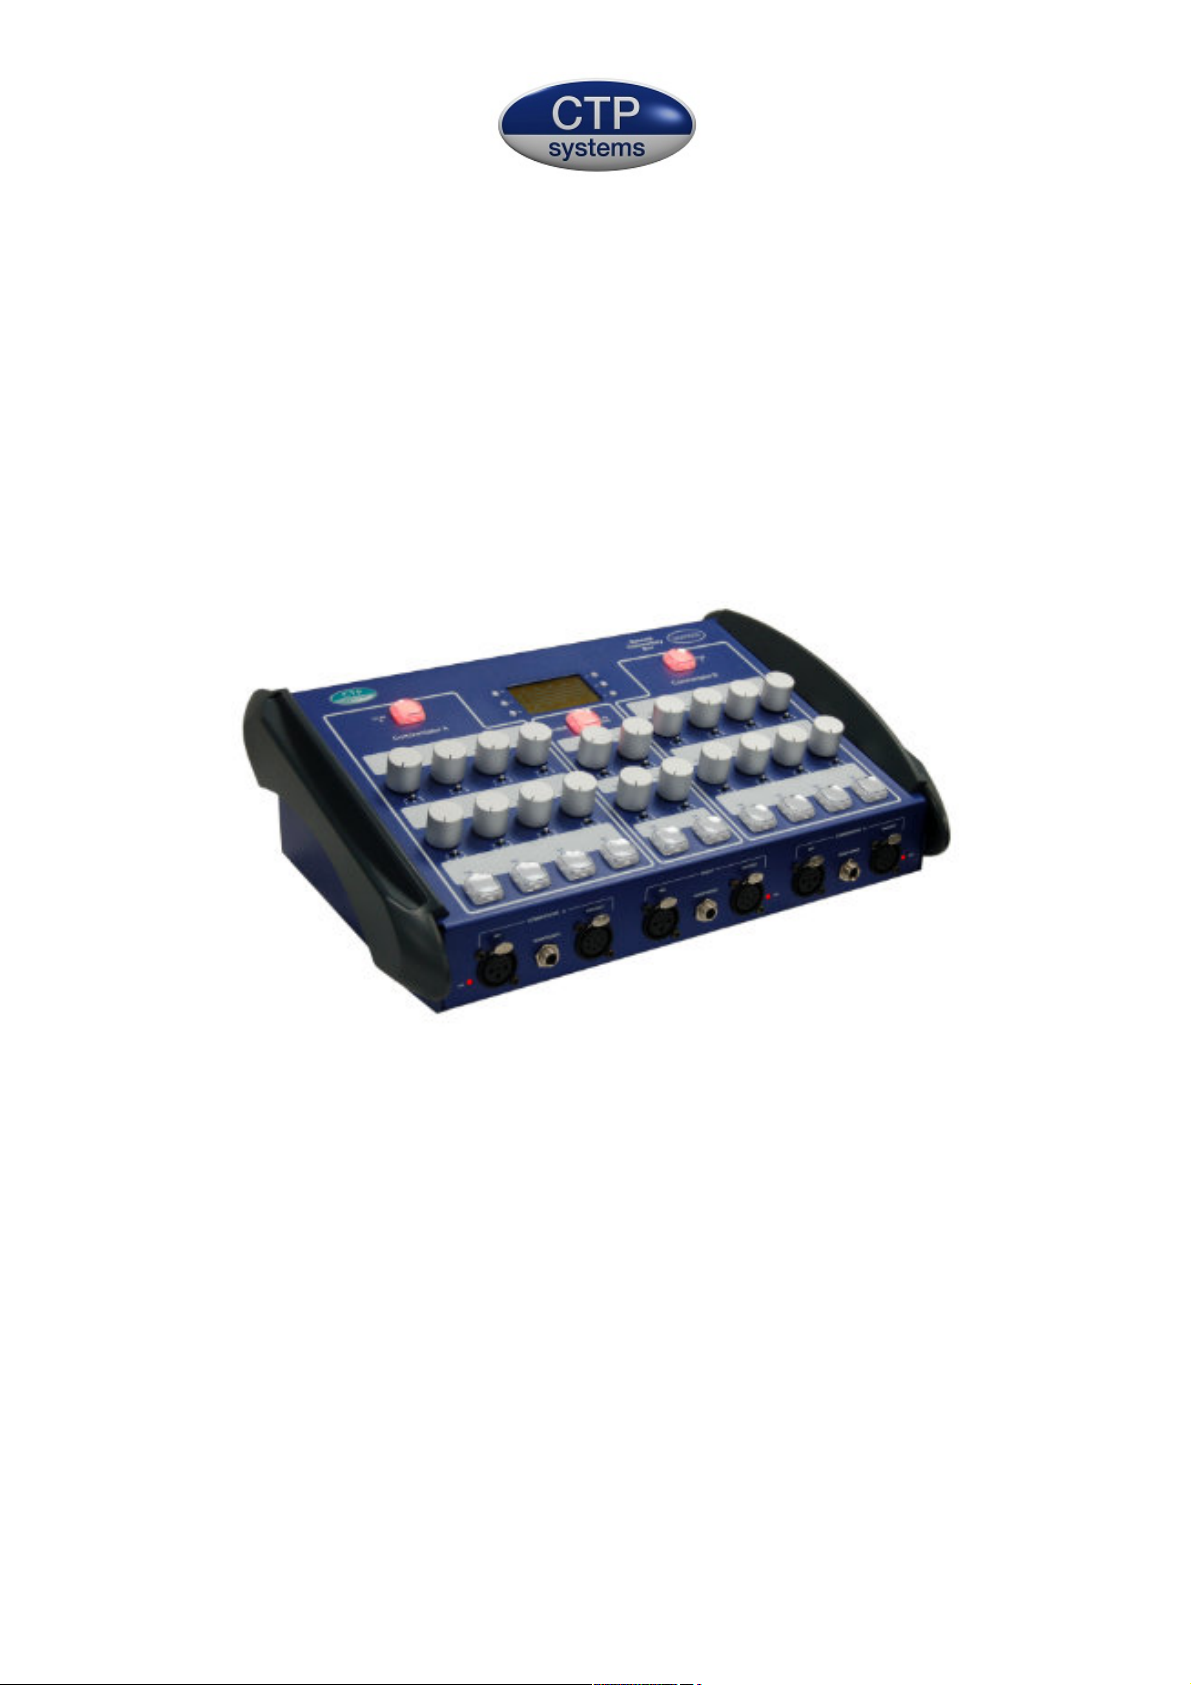
Dante™ enabled Commentary Box
DCD2020
Firmware version 1.1
by
CTP Systems
Page 2

Product warranty
This unit is guaranteed for a period of one year from dispatch of the goods. This
guarantee is a return to base warranty. In the unlikely event of a fault the goods
should be returned to CTP Systems in the UK or your local dealer.
This equipment is CE marked and conforms to the following directives:
Low Voltage Directive: EN60065 and EN62368-1: 2014
Emissions: EN55032: 2015
Immunity: EN55035: 2017
WEEE
CTP Systems are registered for Business to Business sales of WEEE in the UK. Our
registration number is WEE/DF0509VR. This is why our product has a ridiculous
picture of a dustbin on the back.
RoHS
The product conforms to the RoHS Directive 2002/95/EC for restriction of the use of
hazardous substances in electrical and electronic equipment.
This unit was designed and manufactured in the UK by CTP Systems Limited, Unit 4,
Clinton Business Centre, Lodge Road, Staplehurst, Kent TN12 0QF.
ctpsystems.co.uk. Telephone +44 (0)1580 891114
Dante is a trademark of Audinate Pty Ltd.
This manual assumes a degree of familiarity with Dante controller. If you are not
familiar please see this document:
https://dev.audinate.com/GA/dante-controller/userguide/pdf/latest/AUD-MANDanteController-4.1.x-v1.0.pdf
Firmware
The update from v1.0 to v1.1 adds local sidetone facilities to the DCD2020.
The currently installed firmware version is displayed on the LCD display on power up.
Please contact us if you would like your firmware updated to the latest version.
Page 3

Overview
The DCD2020 is a Dante enabled Commentary box supporting 2+1
commentators. Network connection may be fibre or copper and it has full
network redundancy. Microphone amplifier gains and many other adjustments
such as phantom power and limit levels may be made on the local lockable
LCD screen or remotely via the DCD2020's web page.
In addition to the commentary box functions there is a built in Dante breakout
box with six analogue inputs and eight analogue outputs. With 240V mains, 12
volt and PoE powering and a built in ethernet switch the DCD2020 can truly be
the hub of your commentary system.
Power
The DCD2020 may be powered by:
Mains, 110-240 VAC 50/60Hz.
Power over Ethernet (PoE) on either or both of the copper primary and secondary
ethernet jacks. The unit has a class 3 signature.
An external 12 volt supply.
If the unit is powered using a mains supply, a 12 volt supply (minimum rating 1 Amp)
may also be connected effectively providing a redundant supply for the unit. In fact
power may be provided on all power inputs if required and the unit will seamlessly
switch between supplies as required.
Clearly PoE power will not be available if the unit is used with fibre connections so
the mains and/or the external 12 volt input should then be utilised.
Network Connections
The DCD2020 has a built in network switch. This switch may be configured either as a
standard switch where network connections may be passed on to other network
devices or with redundant inputs for connection to a secondary (backup) network.
The switch function should be configured from within Dante Controller.
For copper network connections the closest green LED will flicker on successful
network connection. For SFP connections (usually fibre) the relevant green LED on
the left of the sockets will flicker.
Page 4

Microphone Amplifiers
The DCD2020 includes three digitally controlled microphone amplifiers with very low
distortion and really natural sounding audio amplification. Microphone amplifier gain
is adjustable in 1dB steps from 0dB to +70dB.
Each microphone amplifier has an individual network output with a built in
adjustable threshold limiter. There is also a selectable mixed output available with its
own limiter. Ensure only terminated microphone inputs are switched to this output
else the inevitable open mic line hiss will be heard.
All microphone inputs have switchable 48 volt phantom power, operation is
indicated by red LEDs on the front of the unit.
Microphone inputs may be either 3 pin XLR or via the 5 pin headset XLRs.
Talk Keys
When a talk key is pressed the programme output of the commentary microphone
will be silently muted and the audio will be diverted to the relevant talk key(s)
output. Commentators A and B have four talk keys, the guest has two talk keys.
These talk keys may be individually routed via Dante Controller to any network
destination. For simplicity and to avoid the need for mixing signals the talk keys are
also available in groups. For example if all commentators are to talk to the Director
on key 1 then just Talk A+B+G1 need be routed.
When a talk key is pressed the on air light will extinguish or change colour depending
on settings. Gain make-up is available on the talkback outputs so they may be a
higher level than the programme microphones.
On-Air Keys
The On-Air keys may be programmed to off, where they will only operate as
indicators, to momentary where when pressed they will take the commentators off
air and when released back on air. (Useful, for example, as a cough key.) They may
also be programmed to toggle so when pressed they will switch the commentator
microphone off (and indicate as such) and when pressed again take the
commentator back on air. If they are toggled off, the talk keys will still operate as
normal but the commentator will not be switched back on air until the on-air key is
toggled back on. Try it, it’s easier to see than to explain.
Page 5

GPI connections
The DCD2020 includes three GPI inputs and three GPI outputs on the rear D15
connector. The three GPI outputs provide relay contacts which are shorted when the
commentator is on-air and open when off-air. These only switch when the on-air
keys are set to toggle mode and are intended primarily for external red on-air light
switching.
The three GPI inputs activate the Talk1 key of each of the three commentators and
are intended primarily for use with a foot switch or a remote key.
Headphone Monitoring
Each commentator has eight audio monitoring inputs with individual volume
controls, the guest position has four volume controls. Sidetone may be achieved by
routing the desired commentator to the desired volume control using Dante
Controller. Every input may be switched via individual user adjustable mini toggle
switches to left, right or both ears of the headphones.
Headphone monitoring connection may be 5 pin XLR with both microphone and
headset connection or TRS jack stereo headset connection. This jack socket is
suitable for use with both ¼ inch stereo and 316 (PO) jacks. Commentator and cocommentator sidetone may be assigned via the display or web page..
Analogue Breakouts
There are six analogue inputs and eight analogue outputs available via XLR on the
rear of the unit, all accessible via the network. These breakouts have no fixed
function and may be used for external facilities as required. They may also be used
to provide analogue inputs and outputs to/from the commentary box. For example,
if commentator A microphone is required locally in analogue format just select the
Prog Out Com A cross point to Ana Line Out 1 on Dante controller. Using the
analogue breakouts it is possible to use the DCD2020 as an essentially analogue unit,
however it will still require some form of network connection.
Other Facilities
The DCD2020 has a built in tone generator which can be set to identify the audio
outputs, perfect for setup and identification of the audio channels with a different
tone identification on each output. Lots of lights flash when it’s on so it’s not easy to
forget. Commentator A output breaks once every three seconds. Commentator B
outputs twice, Guest three times and the mixed output is continuous.
Page 6

Tone frequency may be set at 400Hz, 1kHz or 2kHz to avoid confusion with other
tone sources.
dBFS metering is available for all three commentators and the mixed output and is
the default function of the LCD screen
The system includes two 2:1 Dante mixers for convenient adding of Dante audio
signals.
The LDC display and its functions may be locked using the toggle switch on the rear
to prevent accidental ‘adjustments’. When locked the display will just show
microphone levels on the dBFS meter.
Page 7
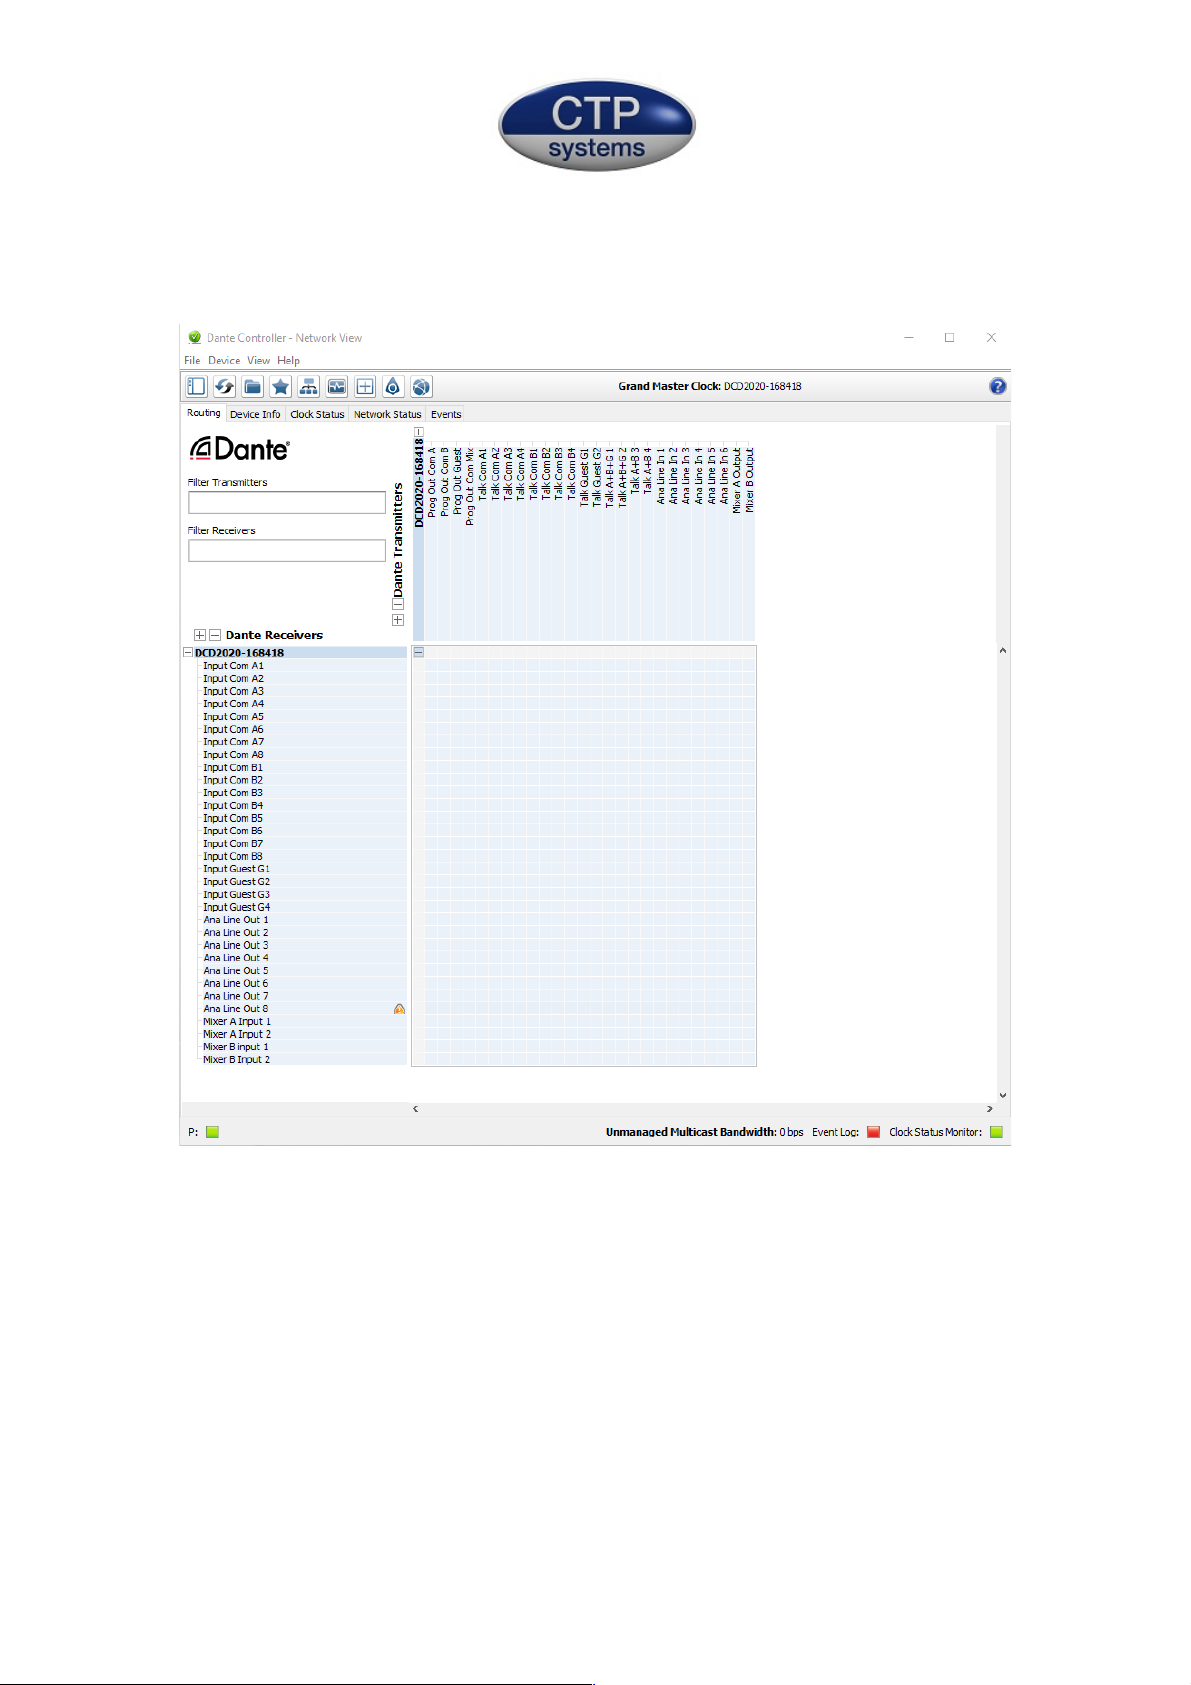
Using with Dante Controller
Below is a picture of how the DCD2020 will appear in Dante Controller and a brief
description of the functions.
Dante Transmitters
Prog Out Com A, B and G : These are the Programme microphone outputs which
remain active unless a talk key is pressed or on-air is
disabled using the on air keys.
Prog Out Com Mix : A mix of all the selected programme outputs.
Talk Com A1 to Guest G2 : Talk or ‘Lazy’ outputs, individual to each key.
Talk A+B+G1 to A+B4 : Mix of keys sent to selected destination.
Page 8

Ana Line In 1 to 6 : Rear analogue inputs to Dante network
Mixer A Output : Dante audio mixer A output
Mixer B Output : Dante Audio mixer B output.
Dante Receivers
Input Com A1 to A8 : Inputs to commentator A volume controls.
Input Com B1 to B8 : Inputs to commentator B volume controls.
Input Guest G1 to G4 : Inputs to Guest volume controls.
Ana Line Out 1 to 4 : Rear analogue outputs from Dante Network.
Mixer A inputs 1 to 2 : Dante Audio mixer A Inputs.
Mixer B inputs 1 to 2 : Dante Audio mixer B Inputs.
Accessing the DCD2020 web page
The Dante web page may be accessed using the Dante assigned IP address of the
DCD2020. If you are using a fixed IP address then you already know what the IP
address is. If you are using DHCP the address may be found using Dante Controller
and selecting Device Info. Dial this address (ie. 169.254.34.217) into your web
browser and the webpage will appear.
If your network is suitably set up it is also possible to access the web page using the
following:
http://dantename.local/
where dantename is the name that appears for the DCD2020 in Dante Controller. If
this does not work it is outside the scope of this document and down to your
network setup, please ask your IT guy/gal or use the IP address.
Any number of DCD2020s may be viewed at once in multiple browsers or tabs.
Page 9
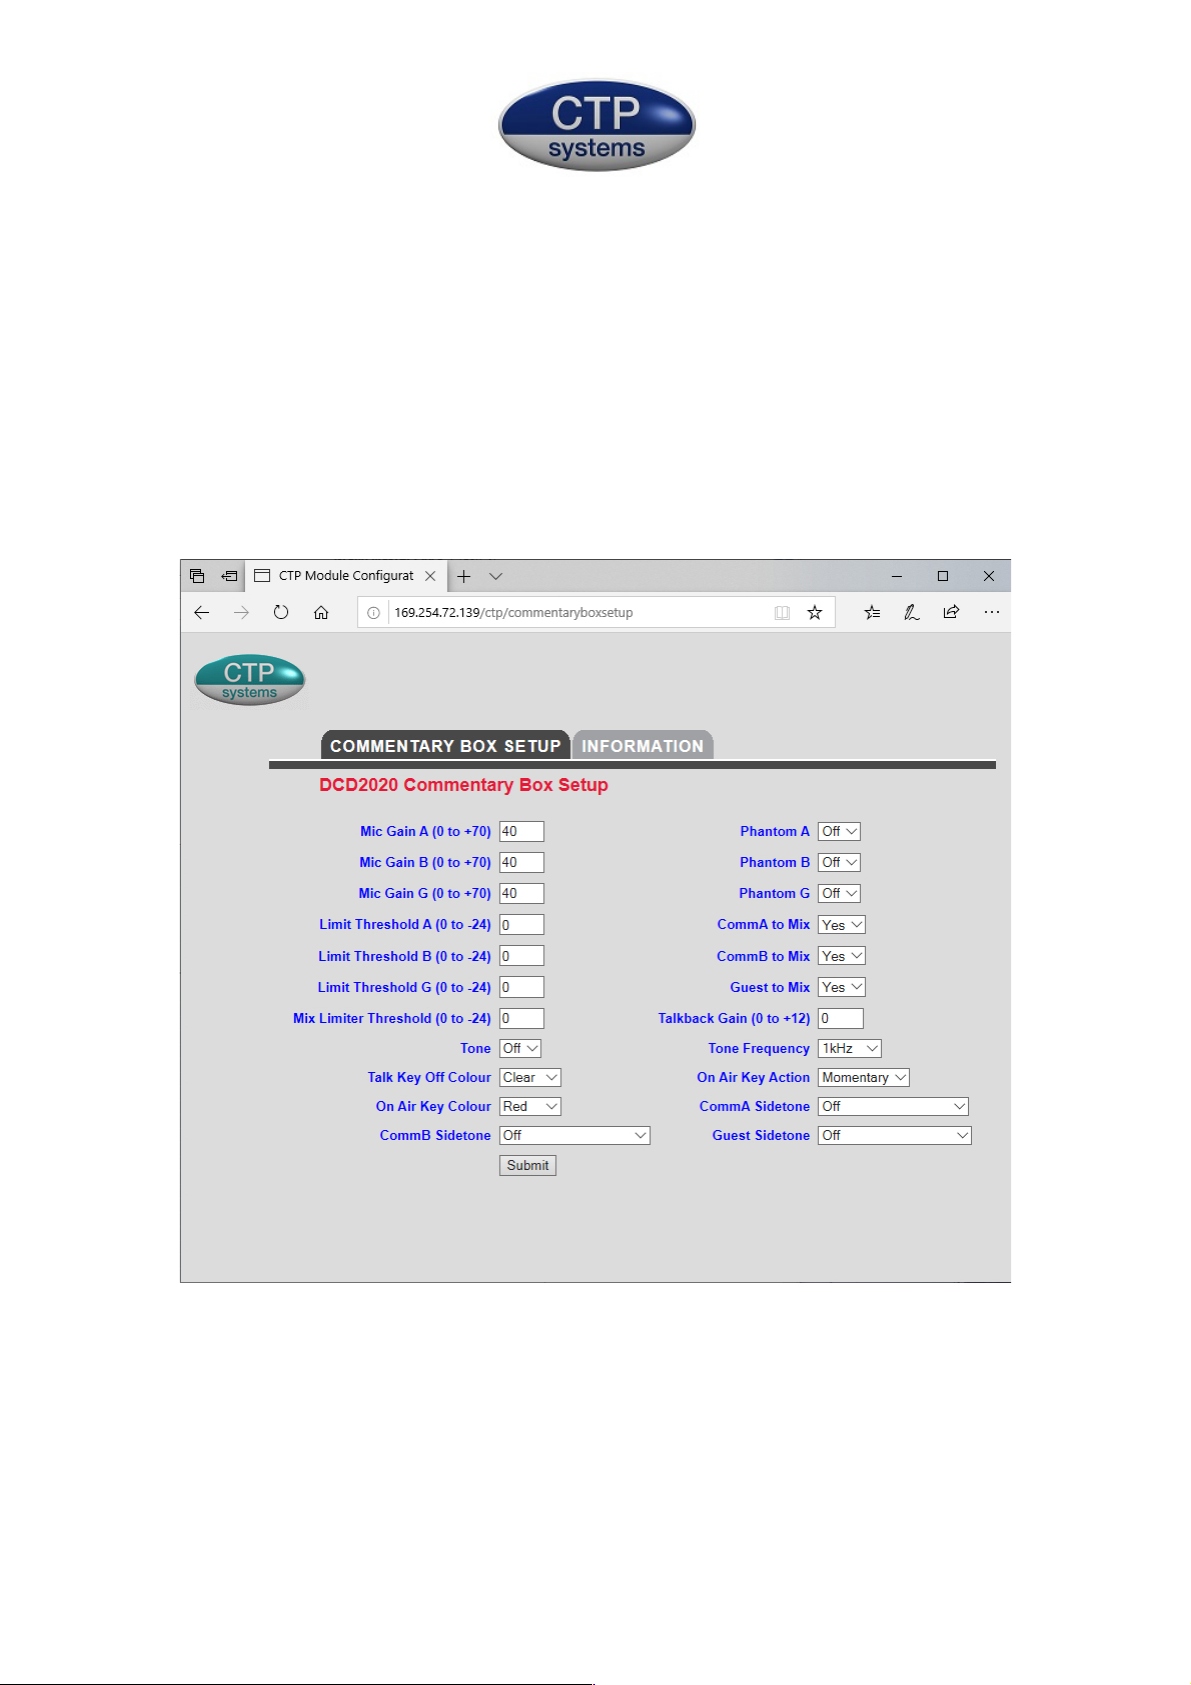
It is important to note that the web page information will not be valid until after
some 30 seconds after the DCD2020 is powered up, it takes this time for the first full
network update. If changes are made using the LCD screen the web page will not be
automatically updated, it must be refreshed in the normal way as with any web
page. Once downloaded the information is static until reloaded. For this reason if the
unit is to be adjusted both at the commentary box end and via the web page it is
recommended to refresh the web page before making adjustments via the web
interface.
For items on the web page with a down arrow such as Phantom A, just click on the
down arrow and select as required. For items with a direct input such as mic gain
just click on the box and type in a value. Any values outside the allowed value range
will result in no change in the display, the allowed range is shown to the left of the
Page 10

input boxes. Note that one or any number of changes may be made but they will not
be sent to the commentary box until the ‘Submit’ button is pressed.
If at any time you require confirmation of the comms box status just put the cursor
in the URL box and hit return and the page will reload.
When inputting positive values (say +12dB) the + sign is not required so just type in
12. For negative values the minus (-) is required as in standard mathematical
notation. Note that gain is relative, as in +60dB but limit thresholds are fixed as in
-18dBFS.
Comms box setup
All of the following setup functions are available using the LCD display or the
DCD2020 web page. The guide shows how to access the functions using the LCD
while they are all available directly on the web page. Please note again the need to
refresh the web page if changes are made using the LCD display. All changes on the
LCD screen are shown live, if the LCD screen is showing mic gains and the web page
changes these values the changes will immediately appear on the LCD screen.
Don’t forget to press ‘submit’ on the web page!
LCD adjustment of settings may be protected by switching the rear panel toggle
switch to ‘lock’. When switched to’ lock’ the display will automatically switch to the
top menu showing ‘Setup locked’ and the four dBFS meters. No adjustment will now
be possible from the LCD buttons but all functions are still adjustable via the web
page.
Setup
From the ‘switch on’ menu select ‘Setup’
Mic Gains
This allows adjustment of individual microphone amplifier gains from 0dB to +70dB.
Press the button next to the mic amp you wish to adjust. The cursor arrows will
move to show your selection. Press the up/down buttons to adjust to the required
gain. Either press the button quickly to adjust in 1dB steps or hold the button down
to adjust at speed. Press ‘back’ to return to the top menu.
Phantom
Each mic amp is shown with phantom on or off. Press the associated button to
toggle phantom on that channel on or off. Front panel LEDs will illuminate to indicate
status with phantom on.
Page 11

Limiters
Each microphone amplifier has it’s own limiter. To adjust the limit threshold select
the required microphone to adjust, the cursor will move to show the selection. Press
up or down to adjust the threshold to suit. If no limiter is required in circuit then
adjust the limiter to it’s maximum threshold of 0dBFS
Mixed O/P
This allows selection of each microphone to the mixed output. It is important that if
a mic amp is not in use that it is deselected from the mixed output as otherwise the
inevitable ‘open mic amp’ hiss will be added to the mix.
Back
This returns to the previous menu.
More
This selects the More menu as below.
More menu
Mix limiter
This is used to set the limiter threshold for the mixed programme output. This limiter
is inserted after the individual commentator limiters and is available to limit the
overall mix. If not required just set the threshold to 0dBFS.
Tone Gen
This generates tone with interrupt identification on each line at -18dBFS.
Idents as follows:
Commentator A : 1 break every 3 seconds
Commentator B : 2 breaks every 3 seconds
Guest : 3 breaks every 3 seconds
Mix: Continuous tone.
When Tone Gen is selected the comms box is effectively disabled apart from tone
generation.
To signal this all the lazy keys will flash alternate red and green. Just press ‘Off and
back’ to return to normal operation.
Each output may be selected to tone on or tone off. Frequency may be changed
between 1kHz, 2kHz and 400Hz to enable differentiation from other tone sources.
TB Setup
Gain
Gain may be adjusted up or down on the talkback output circuits. Useful for sports
such as snooker where the commentary may be quiet but a higher level may be
useful for the talkback outputs. Gain range is 0 to+12dB.
Page 12

Key Off Colour
The ten lazy keys may be green for off and red for active or clear for off and red for
active.
Mic Live keys
The mic live A, B and Guest keys may be used as just ‘on air’ indicators, or as
momentary or latching ‘cough’ keys where pressing the relevant button will take the
commentator off air (muted mic amp). When selected to off the keys will do nothing
apart from indicating off air when a lazy key is pressed. Momentary will take the
commentator off air only while the key is pressed. Latching will switch off air and
remain off air until the key is pressed again. Latching mode also enables the GPI
relays.
TX Light Colour
The TX switch lights (Mic Live A, B and Guest) may be selected to be green when the
mic is live and red when not live OR red when the mic is live and off when not live.
Press the TX Light colour button to toggle between the two selections.
Sidetone
Sidetone (or commentators hearing themselves) may be assigned in several
combinations. This is an example for commentator A.
Off: No sidetone, all ‘pot’ inputs are Dante assigned.
Self A3, Co-comm A4 Pot A3 = comm A voice, Pot A4 comms B and G.
All A4 Pot A4 = All commentators voices.
Self A7, Co-comm A8 Pot A7 = comm A voice, Pot A8 comms B and G.
All A8 Pot A8 = All commentators voices.
When a potentiometer is assigned to sidetone its associated Dante input is no longer
available.
Back
This returns to the previous menu.
Utility D15 Pinouts
Pins 1 and 9 short when Comm A on air
Pins 2 and 10 short when Comm B on air
Pins 3 and 11 short when Guest on air
Short Pins 4 and 12 to activate Talk A1
Short Pins 5 and 13 to activate Talk B1
Short Pins 6 and 14 to activate Talk G1
Page 13

Headset XLR
1 Headset mic live
1 Headset mic neutral
1 Headset Earth
4 Right earpiece live
5 Left earpiece live
Sample rate
The DCD2020 is set to operate at a sample rate of 48kHz, 24 bit.
 Loading...