

Phone: 61 03 97863982
Fax: 61 03 97852347
E-mail: ebike@optusnet.com.au
www.chitumaelectricbicycles.com.au
3/6 KLAUER ST SEAFORD VIC
AUSTRALIA 3198
C H I T U M A A U S T R A L I A P T Y L T D
•
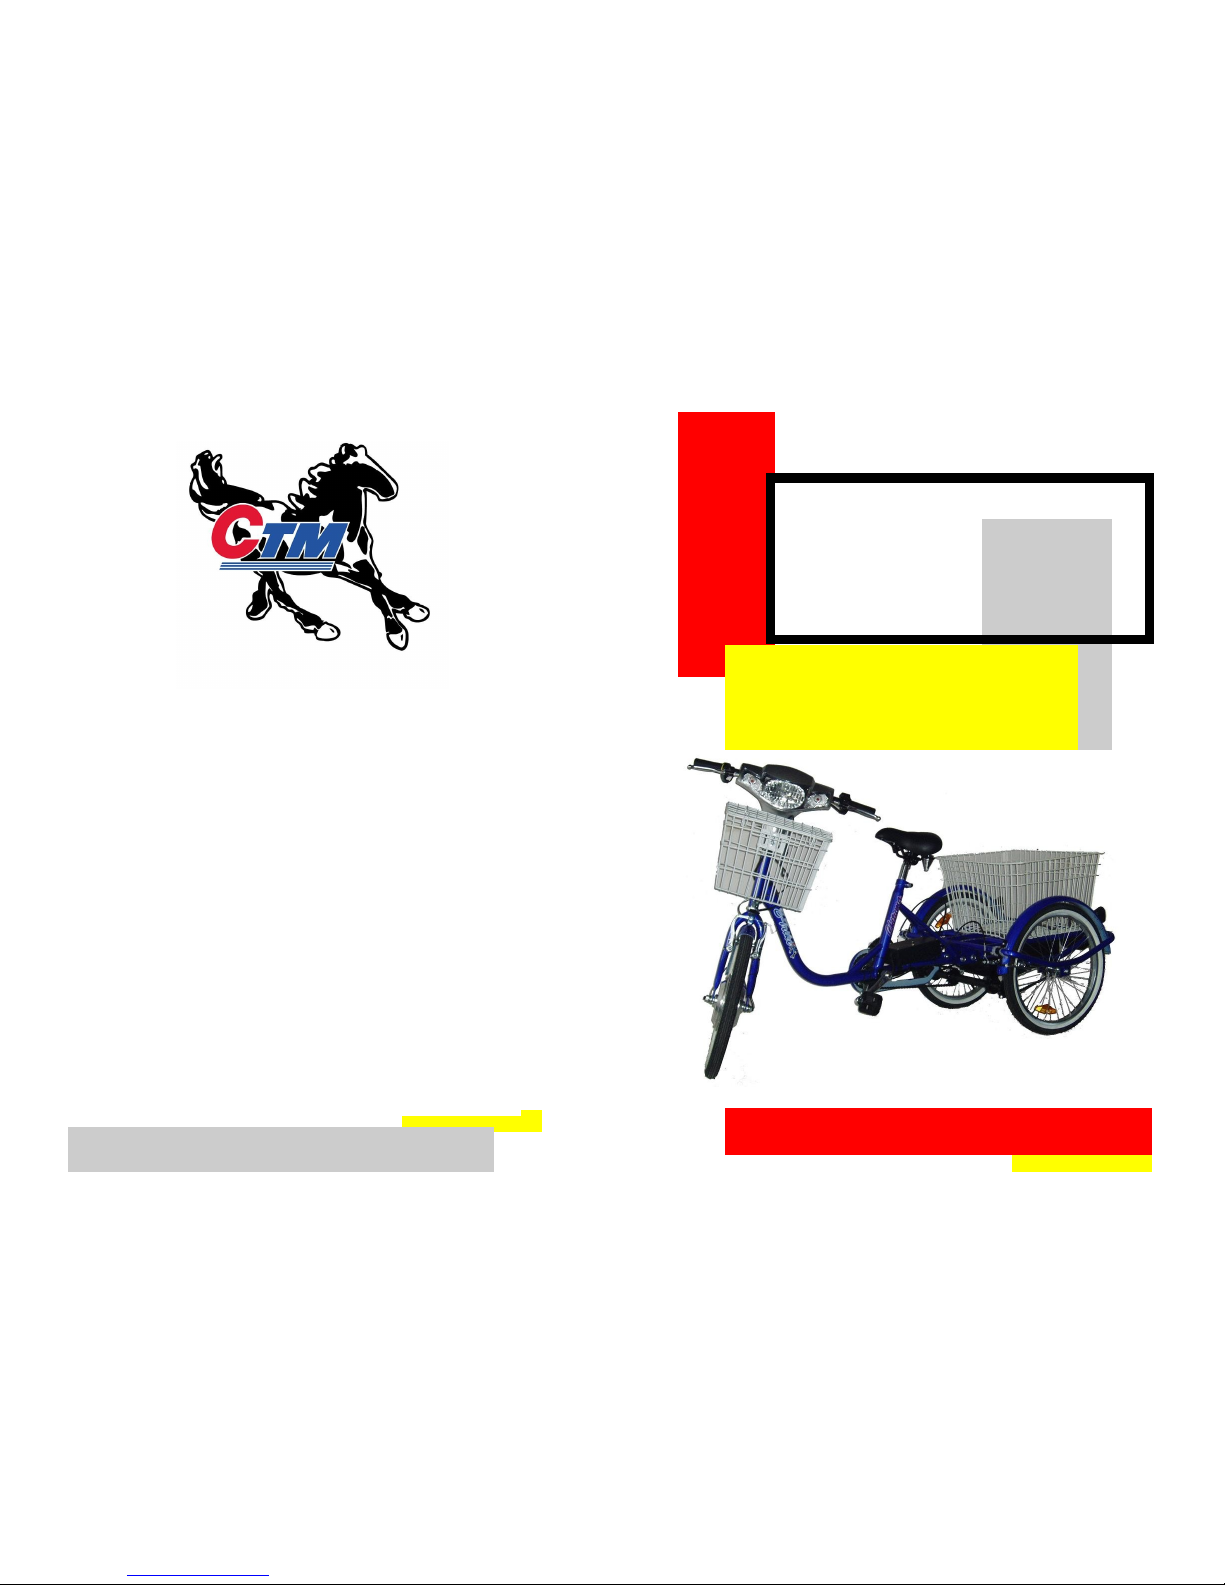
E-TRIKE20 LS
C H I T U M A A U S T R A L I A P T Y L T D
OWNER MANUAL
Da te : 06\12\2009
Page 2
THANK YOU FOR CHOOSING OUR ELECTRIC ASSISTED
TRICYCLE
OUR E-TRIKE CAN BE OPERATED VERY EASILY.IT CAN
BE OPERATED BY THE MOTOR ALONE OR BY PEDALING
ALONE OR A COMBINATION OF BOTH AT THE SAME
TIME.IN ORDER TO GIVE YOU A LONG AND SAFE USAGE PLEASE READ THE INSTRUCTIONS BEFORE USING.
SAFTEY CHECK BEFORE RIDING
YOUR
BICYCLE
1.CHECK AND TIGHTEN ALL NUTS ,BOLTS,
STRAPS
AND FASTENERS
2.CHECK THAT BRAKES OPERATE CORRECTLY
3.CHECK TYRES FOR WEAR, DAMAGE AND
CORRECT PRESSURES.PRESSURES ARE USUALY
WRITTEN ON TYRE WALLS.
4.CHECK WHEELS FOR TRUENESS
5.CHECK LIGHTS FOR OPERATION AND ADJUSTMENT
6.CHECK AUDIABLE WARNING DEVICE [BELL
OR HORN
ALWAYS WEAR AN APPROVED
BICYCLE HELMET AND OBEY THE
ROAD RULES AT ALL TIMES
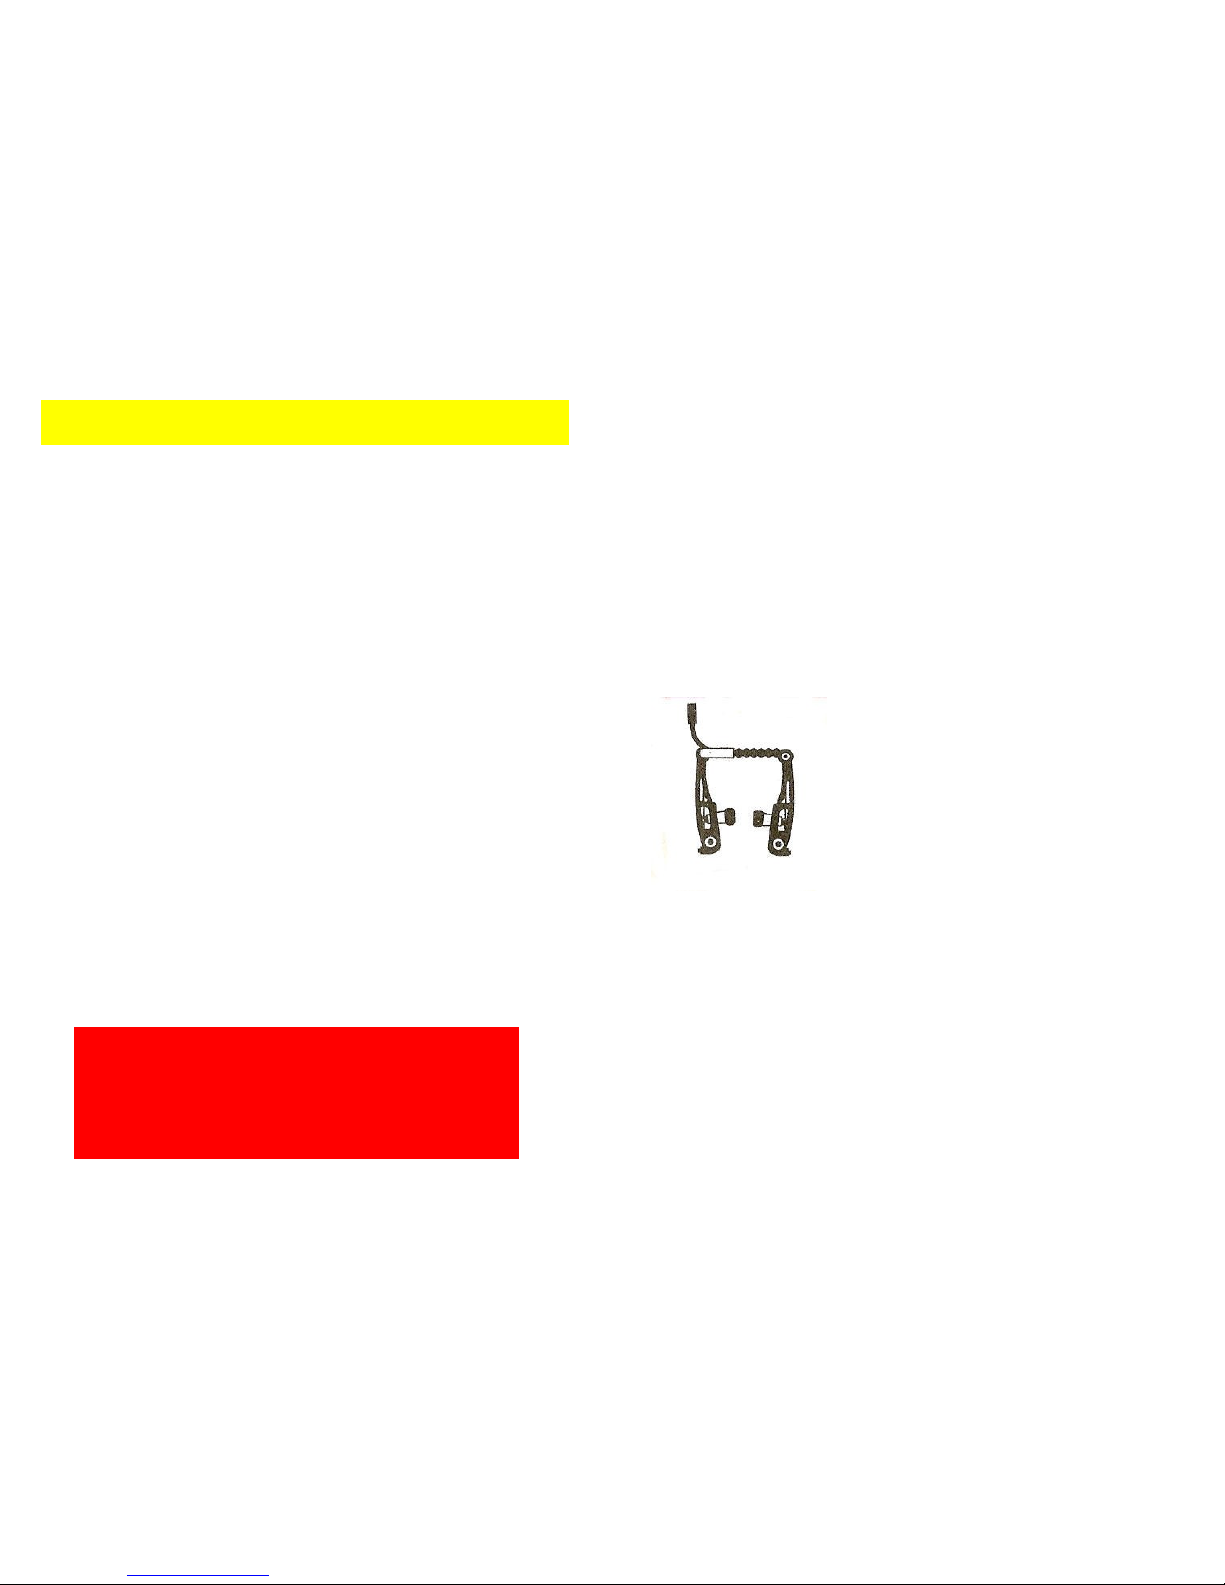
Align Brake Arms
With the pads installed, check the brake arm position. Both arms should be
facing straight up and down when the pads are contacting the rim. If they are
too wide apart, or two close together, you may have to re -arrange the pad
washers.
One set of washers is usually thicker than the other. To correct brakes arms
that are too far apart, make sure the smallest set of washers are closest to the
pads. To correct brakes arms that are too close together, make sure the largest set of washers are closest to the pads.
Adjust Cable Tension
Now re-connect the cable and adjust the cable tension on the brake arm by
pulling the cable through the pinch bolt and tightening. You’ll have to play
with this adjustment until your brakes feel good. I like to have mine set so that
the pads hit the rim when my lever is pulled about 1/4 of the way.
Brake Arm Centering
Make sure both pads now have equal clearance,
and are not rubbing against the rim. Both pads
should contact the rim at the same time. If not, you
can adjust the centering by tightening or loosening
the side adjustment screw with your screwdriver.

Align Brake Levers
The first step is to set up your brake levers. Start by loosening the clamp, and
then align them so that they match the angle of your arms when you’re riding.
Once the angle is set, tighten the clamp. If you have smaller hands and your
levers are hard to reach, you can set them closer by tightening the reach adjustment screw on most levers.
Remove & Inspect Brake Pads
Start by giving the cable some slack. Tighten the lever’s barrel adjuster in all
the way. Then pull the protective rubber back and disconnect the brake cable’s quick release mechanism.
Then remove the pads. V-brake pads have two sets of positioning washers on
each side of the brake arm. Be careful to watch how the washers are positioned so that you can re-install them correctly.
Inspect your pads. If they are worn past the indicator line, or have metal pok-
ing through the surface, you’ll need to replace them. If they look ok, use your
sandpaper to re-surface both pads.
Adjust Brake Arm Tension
Now check your brake arm tension. The brake arms should have good spring
tension, which makes them release when you let go of the brake lever. If
there isn’t much tension, you may have to increase it on both sides. Undo
both bolts one at a time, but don’t remove them completely.
You’ll notice a small piece of metal poking out the backside of the brake. This
is the spring, and it slides into one of three holes on your frame or fork. Most
brakes work fine in the middle hole. To increase your brake tension, move
the spring into the top hole. To decrease the brake tension, move the spring
into the bottom hole. Then tighten the mounting bolt.
Install & Align Brake Pads
Now re-install the brake pads, with the washers in the same order as they
were before. Align the brake pads so the pad face is flat against the rim. V-
brake pads are different from traditional pads in that they don’t require any
toe-in. Both the front and rear of the pad should contact the rim at the same
time. Because of this, v-brakes will sometimes squeak when applied. If
you’ve re-surfaced the pads and they are still noisy, you may have to try a
higher quality set of pads.
Take a look from the side to make sure the pad is in line with the rim’s brake
surface, and not touching the tire or hanging off the bottom of the rim.
BRAKE ADJUSTMENT
ASSEMBLEY
IT IS ALWAYS RECOMMENDED THAT BICYCLE IS
ASSEMBLED AND CHECKED BY A COMPETENT
BICYCLE MECHANIC
CAREFULLY UNPACK AND UNTIE HEADSTEM ASSY FROM
FRAME BEING CAFULL TO NOT STRAIN WIRING LOOM
INSERT HEADSTEM INTO FRONT FORK ASSEMBLY MAKING
SURE THE CUT MARK IN STEM IS NOT
VISABLE
AFTER ALIGNING HANDLE BAR
TIGHTEN 12MM NUT THROUGH SLOT
IN HEADSTEM COVER
DO NOT OVERTIGHTEN
ARRANGE WIRING LOOM AND FAS-
TEN TO TRIKE WITH CABLE TIES SUP-
PLIED ASM PER PICTURE MAKING
SURE THE CABLE DOSNT CATCH ON
MUDGAURD AND THAT WHEEL CAN
BE TURNED BOTH WAYS WITHOUT
STRAINING WIRING LOOM.
CUT EXCESS OFF TIE.
FOR TRANSPORT THE TAILLAMP ASSEMLY IS TIED TO THE
FRAME NEAR LEFT WHEEL.UNDO THE TIES AND BOLT THE
BRACKET TO REAR OF TRIKE
USING THE REFLECTOR
MOUNTING BOLTS. THE
CROSSBAR GOES TO THE IN-
SIDE OF THE BRACKETS

ASSEMBLEY
MOUNT SEAT ONTO SEAT POLE AND TIGHTEN SECURELY. INSERT SEAT POLE AND
ADJUST FOR HEIGHT
HANDLE BARS AND SEAT POLES ARE MARKED WITH A MINIMUMN INSERTION
AT MAXIMUMN EXTENSION.NEITHER OF THESE MARKS SHOULD BE VISIBLE
PLUG IN BATTERY CABLE AT REAR OF TRIKE USE CABLE TIES TO SECURE BATTERY
CABLE AND TAILLAMP WIRE
CHARGING
YOU MUST ONLY USE THE CHARGER THAT
WE SUPPLY
ONLY USE IN A DRY WELL VENTILATED
ENVIROMENT .
WITH THE LEAD UNPLUGGED FROM 240V POWER SUPPLY PLUG THE
SMALL ROUND PLUG INTO POINT LOCATED ON BLACKBOX INSIDE
FRONT BASKET.PLUG 3 PIN PLUG INTO POWER SUPPLY AND SWITCH
ON.YOU WILL NOTICE A RED LIGHT ON CHARGER ,THIS INDICATES
THE UNIT IS ON AND CHARGING THE BATTERY.WHEN CHARGED
THIS LIGHT WILL CHANGE TO GREEN AND CHARGER WILL SWITCH
AND GO INTO MAINTENANCE MODE.IT IS ALRIGHT TO LEAVE IT IN
THIS MODE FOR A SHORT PERIOD OF TIME BUT WE RECOMMEND
THAT YOU TURN IT OFF AND UNPLUG FROM POWER POINT AND
BIKE AFTER 12HOURS
REMEMBER ALWAYS SWITCH OF AT POWER POINT BEFORE PLUGING OR ON PLUGING FROM TRICYCLE
MAXIMUN BATTERY LIFE WILL BE ACHIEVED BY CHARGING EVERY
DAY AFTER BEING USED . BATTERIES LEFT IN A SEMI DISCHARGED
STATE WILL PREMATURALLY FAIL.

SWITCH AND WARNING LAMPS
OPERATING INSTRUCTIONS CONTINUED
INDICATOR. LIGHTING AND HORN SWITHES ARE LOCATED ON THE LEFT
HAND
HANDLEBAR GRIP THE HORN BUTTON IS ALSO USED TO SET THE ALARM
BY PRESSING IT WHEN THE POWER KEY IS TURNED OFF.THE ALARM
WILL BEEP MOMENTARALY TO INDICATE IT IS ARMED.THEN IF THE BIKE
IS TOUCHED A HI PITCHED ALARM WILL SONE FOR 5-10SECS AND THEN
IT WILL RESET.THE ALARM CAN ALSO BE DEACTIVATED BY TURNING THE
POWER KEY ON THEN OFF.
ALWAYS TURN ON THE POWER VIA THE KEY EVEN IF YOU ONLY INTEND TO
PEDAL MANUALLY.
ALWAYS TURN ON THE LIGHTS IF RIDING AT NIGHT.
ALWAYS WEAR AN APROVED HELMET AND OBEY ALL ROAD RULES
YOU CAN EITHER MOVE OFF BY PEDALING OR BY GRADUALLY AND
SMOOTHLY ROTATING THE THROTTLE GRIP ON THE RIGHT HANDLEBAR.THE
MORE YOU ROTATE THE FASTER YOU CAN GO.IF YOU HOLD BRAKE LEVER
NO POWER WILL BE TRANSMITTED TO THE MOTOR.
THE ROW OF LIGHTS ON THE DASH INDICATE THE AMOUNT OF POWER IN
THE BATTERY AS THE LIGHTS GO OUT THE LESS POWER IS AVAILABLE.THIS
IS IN EFFECT YOUR FUEL GAUGE
IF ATTACHING MIRRORS REMOVE HANDBRAKE FASTENING BOLT .RETAIN 10MM
NUT AND DISCARD BOLT. REMOVE MIRROR FROM PACKACKING AND YOU WILL
SEE A 10 MM NUT ON THE MIRROR STEM,WIND THIS NUT UP THE STEM LEEAVING
ABOUT 2-3 THREADS AT TOP.INSERT MIRROR STEM INTO HANDBRAKE AND TURN
INTO 10MM NUT (SAVED PREVIOUSLY )UNTILL ALMOST TIGHT.ADJUST MIRROR AND
THE TIGHTEN THE TOP NUT DOWN UNTILL FIRM
CHECK ALL NUTS BOLTS AND OTHER FASTENERS, CHECK BRAKES DO NOT OVER
ADJUST,INFLATE TYRES TO CORRECT PRESSURES ,YOU WILL FIND PRESSURE
WRITTEN ON TYRES
FULLY CHARGE BATTERY

PLEASE READ
FOLLOWING
PAGES
CAREFULLY
REMEMBER CHECK BRAKE OPERATION EVERY
TIME BEFORE RIDING AND INSPECT CABLES
Page 7
YOUR TRICYCLE IS DESIGNED FOR USE
ONLY ON PAVED ROADS OR PATHS
(WHERE THE LAWS PERMIT)
DO NOT USE OFF THESE SURFACES
OPERATION
PERFORM SAFTEY CHECKS AND ADJUST SEAT
FOR COMFORTABLE RIDING
POSITION YOUR SELF ON TRIKE WITH FEET ON
THE PEDALS NOT ON THE GROUND. USE HAND-
BRAKE TO MAINTAIN A STATIONARY POSITION
AND RELEASED PARK BRAKE (LOCATED ON LEFT
HAD BRAKE) SQUEEZING THE HANDLE AS YOU
WOULD A NORMAL HANDBRAKE,THIS WILL RELEASE THE LOCK TAB
TURN ON KEY
SWITCH
FOUND ON
INSTRUMENT
PANEL
YOUR TRIKE IS NOW READY TO GO.YOU MAY EITHER
PEDAL OR BY TWISTING THE R/HAND GRIP BACK
TOWARDS YOU USE THE ELECTRIC MOTOR.THE
FURTHER YOU TWIST THE FASTER YOU WILL TRAVEL
APPLYING EITHER HANDBRAKE WILL CUT MOTOR
POWER AUTOMATICALLY
 Loading...