

Page 1

Monitoring and Control Network
Comparator Display System
System Manual
S2-60425-120
68-10833-120
Page 2

CTI Products, Inc.
1211 W. Sharon Rd.
Cincinnati, OH 45240
If you have questions about the MCN comparator display system, call us at:
(513) 595-5900. (8:30 to 5:00 Eastern)
Information contained in this document is subject to change without notice and does not represent a commitment on the part of CTI
Products, Inc.
No part of this manual may be reproduced or transmitted in any form or by any means, electronic or mechanical, including
photocopying and recording, for any purpose without the written permission of CTI Products, Inc.
Copyright 1995, 1996, CTI Products, Inc. All rights reserved.
MCN is a trademark of CTI Products, Inc. ASTRO-TAC is a trademark of Motorola, Inc. Other trademarks referenced are properties
of their respective owners.
68-10833-120
Page 3

MCN System Manual
CTI Products, Inc.
1. INTRODUCTION AND OVERVIEW........................................................................ 1
1.1 MCN S
1.2 R
1.3 MCN S
YSTEM ARCHITECTURE
EFERENCE DOCUMENTS
YSTEM COMPONENTS
....................................................................................... 1
............................................................................................... 2
......................................................................................... 4
2. COMPARATOR I/O MODULES ............................................................................... 6
2.1 ASTRO-TAC™ C
2.2 C
OMPARATOR INTERFACE MODULE
OMPARATOR INTERFACE MODULE
(CIB) ..................................................................... 7
(AIB).......................................... 6
3. USER INTERFACE MODULES ................................................................................ 8
3.1 H
OST COMPUTER INTERFACE MODULE
3.2 I
NPUT/OUTPUT INTERFACE MODULE
(HIB)................................................................ 8
(IIB)...................................................................... 9
4. AUXILIARY MODULES........................................................................................... 10
4.1 TSAM I
4.2 E
XTENDER MODULE
NTERFACE MODULE
(EXB) ......................................................................................... 10
(TIB)............................................................................... 10
5. SYSTEM OPERATION ............................................................................................. 14
5.1 M
ONITORING AND CONTROL OPERATION
5.2 R
ECEIVER BANKS
......................................................................................................... 16
..................................................................... 14
6. HARDWARE INSTALLATION............................................................................... 18
6.1 S
ETTING THE UNIT ADDRESS
........................................................................................ 19
6.1.1 Address Planning.................................................................................................. 20
6.2 G
ROUNDING
6.3 M
OUNTING OPTIONS
................................................................................................................. 22
.................................................................................................... 23
6.3.1 Wall Mounting ...................................................................................................... 23
6.3.2 Rack Mounting ...................................................................................................... 24
6.3.3 CIB DIGITAC Mounting....................................................................................... 26
6.4 N
ETWORK CABLING
6.5 P
OWER REQUIREMENTS
..................................................................................................... 28
................................................................................................ 29
7. MODULE OPERATION............................................................................................ 31
7.1 M
ODULE
7.2 M
ODULE BUTTONS
LEDS............................................................................................................ 31
....................................................................................................... 31
8. SYSTEM EXAMPLES ............................................................................................... 32
8.1 E
8.2 E
8.3 E
8.4 E
8.5 E
8.6 E
XAMPLE
XAMPLE
XAMPLE
XAMPLE
XAMPLE
XAMPLE
1 - 8 R
2 - PC B
3 - 16 R
4 - 24 R
5 - S
6 - C
ECEIVERS WITH A CONSOLE DISPLAY
ASED MONITORING AND CONTROL
ECEIVERS WITH A CONSOLE DISPLAY
ECEIVERS WITH MULTIPLE OPERATOR STATIONS
TEERED TRANSMITTER SYSTEM
ONNECTING NETWORKS IN MULTIPLE BUILDINGS
............................................................ 37
................................................ 32
................................................. 33
.............................................. 34
............................ 35
................................ 38
68-10833-120
i
Page 4

MCN System Manual
CTI Products, Inc.
9. CUSTOMER SUPPORT ............................................................................................ 39
10. TROUBLESHOOTING ........................................................................................... 40
11. APPENDIX A - UNIT ADDRESS WORKSHEET................................................ 42
68-10833-120
ii
Page 5

MCN System Manual Introduction and Overview
CTI Products, Inc.
1. Introduction and Overview
CTI Products’ Monitoring and Control Network (MCN™) system provides a
modular, scaleable system for managing your comparator display requirements.
MCN modules connect to your comparator device to provide comparator status
monitoring and control. Monitor and control functions can be provided either
locally, in the same physical building as the comparator, or remotely over phone
lines.
This manual includes sections on MCN system architecture, operation,
installation, and troubleshooting. A summary of each MCN module is provided
in this manual, while specific features are covered their respective hardware
reference manuals. These hardware reference manuals are listed in section 1.2,
Reference Documents
Note: All MCN modules are shipped with default switch settings. When
installing a module into a system, you must configure the module’s switches
appropriately for your application. The module’s hardware reference manual
describes the switches and gives the default switch settings.
.
1.1 MCN System Architecture
Figure 1 shows a basic MCN comparator display system. The MCN system is
made up of two modules, a Comparator I/O Module and a User Interface Module.
The Comparator I/O Module provides the hardware interface to the comparator.
The User Interface Module provides the mechanism for the user to monitor and
control the comparator.
USER
INTERFACE
USER
INTERFACE
MODULE MODULE
MCN SYSTEM
MCN NETWORK
COMPARATOR
I/0
COMPARATOR
CA-80018-100
Figure 1 - Basic MCN System
1
68-10833-120
Page 6

MCN System Manual Introduction and Overview
CTI Products, Inc.
The Comparator I/O Module and the User Interface Modules connect with a single
cable between the network ports of the modules, simplifying system installation.
Large comparator display systems can be built by chaining up to 20 Comparator
I/O Modules together in a single network segment. Contact CTI Products for help
in designing systems that will require more than 20 Comparator I/O Modules.
The MCN family also includes Auxiliary Modules that provide special control or
interface functions, allowing you to expand the capabilities of your comparator
display system. For example, your system may have transmitter sites that you
want to be able to remotely monitor and control. Section 4 provides a list of all
the MCN Auxiliary Modules available. These Auxiliary Modules connect into
your comparator display system the same way as the Comparator I/O or User
Interface Modules.
Some of the features of the MCN products include:
• Easy RF communications system troubleshooting
• Remote disabling of noise-producing equipment
• Automatic logging of RF system malfunctions with a PC based user
interface
Together, the Comparator I/O Module and the User Interface Module provide a
simple, cost effective way to control your comparator system. Because of the
MCN system’s modular design, your comparator display system can easily expand
as your communications system grows.
Note: Some modules in the MCN family look alike. The model number label on
the rear panel of the module gives the module type information you need to tell
each module apart.
1.2 Reference Documents
1. Comparator Interface Module (CIB) Hardware Reference Manual
Part Number S2-60426
2. ASTRO-TAC™ Comparator Interface Module (AIB) Hardware Reference
Manual
Part Number S2-60399
3. Input/Output Interface Module (IIB) Hardware Reference Manual
Part Number S2-60400
4. Host Computer Interface Module (HIB) Hardware Reference Manual
Part Number S2-60427
2
68-10833-120
Page 7

MCN System Manual Introduction and Overview
CTI Products, Inc.
5. MCN RCD Software User Manual
Part Number S2-60428
6. TSAM Interface Module (TIB) Hardware Reference Manual
Part Number S2-60469
7. Extender (EXB) Module User Documentation
Part Number S2-60596
8. Input/Output Control Module (IOB) Hardware Reference Manual
Part Number S2-60630
9. CIB Test Board Hardware Reference Manual
Part Number S2-60651
10. MCN RYB-8 Relay Board
Part Number S2-60657
68-10833-120
3
Page 8

MCN System Manual Introduction and Overview
CTI Products, Inc.
1.3 MCN System Components
Below is a list of all MCN modules and accessories available to build your
comparator display system.
PART
COMPONENT
Comparator Interface Module (CIB) S2-60442
Digitac Mounting Kit and Cable S2-60437
Dual 25 Pair Punch block 31-10354
Cable to Punch block (10 ft.) 89-10711
Cable to Punch block (25 ft.) 89-10837
Cable to Spectra TAC, TAC, GE (25 ft.) Blunt End 89-10843
NUMBER
ASTRO-TAC™ Comparator Interface Module (AIB)
-
available exclusively through Motorola, Inc
.
S2-60331
AIB to ASTRO-TAC™ Comparator cable (10 ft.) S2-60440
Input/Output Interface Module (IIB) S2-60433
Dual 25 Pair Punch block 31-10354
Cable to Punch block (10 ft.) 89-10711
Cable to Punch block (25 ft.) 89-10837
Cable to Blunt End (25 ft.) 89-10843
Host Interface Module (HIB) with MCNRCD DOS Software S1-60424
Cable Kit (includes cable and adapter for 9 pin or 25 pin
S2-60441
comm. ports)
TSAM Interface Module (TIB) S2-60451
Input/Output Control Module (IOB) S2-60511
Extender Module (EXB) S1-60602
Telephone handset with 7 ft coiled cord S2-60505
CIB Test Board S1-60601
MCN-RYB-8 Relay Board S2-60694
68-10833-120
4
Page 9
MCN System Manual Introduction and Overview
CTI Products, Inc.
PART
COMPONENT
NUMBER
Network Cables
9 inch cable S2-60438
3 ft. cable 89-10732
10 ft. cable 89-10712
25 ft. cable 89-10835
100 ft. cable 89-10836
100 ft. Plenum cable S2-60439
Terminator (1 each) S2-60318
Cable Coupler 27-10841
Power Supplies
120 VAC U.S. / Canada 81-10398
230 VAC Europe (terminates with an IEC connector) 81-10728
Mounting Kits
Rack Mount - 4 A size modules S2-60435
Rack Mount - 2 A size modules plus 1 B size module S2-60443
Rack Mount - 3 B size modules S2-60472
Wall Mount - 1 A size module S2-60444
Wall Mount - 1 B size module S2-60436
MODULE SIZE
AIB A
CIB A
HIB A
IIB A
TIB A
IOB A
EXB B
Table 1 - MCN Module Sizes
5
68-10833-120
Page 10

MCN System Manual Comparator I/O Modules
CTI Products, Inc.
2. Comparator I/O Modules
Comparator I/O Modules provide the physical connection between the comparator
and the MCN network. Depending on the features provided by the comparator,
the connection to the comparator may be discrete I/O points that are hard wired to
the comparator, or an RS-232 cable connected to a communications port on the
comparator.
The following are CTI Products’ MCN Comparator I/O Modules:
• ASTRO-TAC™ Comparator Interface Module (AIB)
• Comparator Interface Module (CIB)
Each module is briefly described below. General information about the operation
of each of these modules is provided in this manual. For more information about
features specific to an individual module, refer to its hardware reference manual.
2.1 ASTRO-TAC™ Comparator Interface Module (AIB)
The AIB connects Motorola’s ASTRO-TAC™ (VSELP signaling) or ASTROTAC™ 3000 (APCO Project 25 IMBE signaling) Comparator to the MCN
network. This module is available exclusively through Motorola, Inc. Features of
the AIB module include:
• Serial communication cable connects the AIB to the ASTRO-TAC™
Comparator.
• Support for up to 13 receivers per AIB when operating with an
ASTRO-TAC™ Comparator
• Support for up to 64 receivers per AIB when operating with an
ASTRO-TAC™ 3000 Comparator
• Provides VOTE, RECEIVE, DISABLE, and FAIL status for each
receiver to an MCN User Interface Module.
• Allows a User Interface Module to FORCE VOTE or DISABLE any
receiver.
Refer to the AIB hardware reference manual for a description of the option
switches and cable pinout.
NOTE: The HIB User Interface Module only supports 8 receivers of an ASTROTAC™ or ASTRO-TAC™ 3000 Comparator.
68-10833-120
6
Page 11

MCN System Manual Comparator I/O Modules
CTI Products, Inc.
2.2 Comparator Interface Module (CIB)
The CIB module connects various types of comparators with parallel I/O facilities
to the MCN network. Features of the CIB module include:
• Parallel bi-directional I/O line connections between the CIB and a
parallel I/O comparator, including Motorola Digitac, Spectra-TAC,
TAC, and Ericsson/GE Analog comparators.
• Support for up to 8 receivers per module.
• Provides VOTE, RECEIVE, DISABLE, and FAIL status for each
receiver to an MCN User Interface Module.
• Allows a User Interface Module to FORCE VOTE or DISABLE any
receiver.
• The CIB can be connected to more than one comparator (with total
support for 8 receivers) as long as the comparators are of the same
type.
• Interfaces with a TIB module to provide transmitter site monitoring
and control (this feature is selected from a front panel option switch).
Option switches on the front panel of the CIB configure the type of comparator
being used. Refer to the CIB hardware reference manual for a description of the
CIB’s option switches.
68-10833-120
7
Page 12

MCN System Manual User Interface Modules
CTI Products, Inc.
3. User Interface Modules
An MCN User Interface Module connects the MCN network to various User
Interface devices. The user interface may be simple lights and push buttons, such
as a console, or the user interface may be a program running on a PC to monitor
and control the comparator.
The following are CTI Products’ MCN User Interface Modules:
• Host Computer Interface Module (HIB) for PC interface (serial)
• Input/Output Interface Module (IIB) for console interface (parallel)
Each module is briefly described below. General information about the operation
of each of these modules is provided in this manual. For more information about
features specific to an individual module, refer to its hardware reference manual.
3.1 Host Computer Interface Module (HIB)
The HIB provides a serial interface to a PC and works with CTI Products’ Remote
Comparator Display (MCNRCD) software to provide comparator monitoring and
control. Features of the HIB/MCNRCD combination are:
• Support for up to 512 receivers per system with up to 88 receivers
viewable on a single screen.
• Configurable receiver names and screen positions.
• Displays VOTE, RECEIVE, DISABLE and FAIL information for each
receiver on the screen.
• FORCE VOTE and DISABLE switch functions are controlled with
either a mouse or keyboard.
• Allows logging (to the screen and/or to a disk file) of receivers that fail
or become disabled.
• Optional modems allow remote monitoring and control.
• Provides transmitter status monitoring and control for systems that use
the TIB module for controlling individual transmitter sites.
Because the module can be used with modems for remote operation, a technician
no longer has to travel to the comparator site to diagnose system problems since
he can monitor and control the comparator from a PC anywhere there is a dial-up
phone line.
68-10833-120
8
Page 13

MCN System Manual User Interface Modules
CTI Products, Inc.
3.2 Input/Output Interface Module (IIB)
The IIB provides discrete, parallel I/O points for monitoring and control of your
comparator. IIB outputs can be connected to LEDs for viewing comparator status
and inputs can be connected to switches for control of comparator functions.
Features of the IIB include:
• Support for up to 8 receivers.
• Outputs for each receiver include RECEIVE and FAIL.
• Bi-directional Inputs/Outputs for each receiver include VOTE and
DISABLE.
68-10833-120
9
Page 14

MCN System Manual Auxiliary Modules
CTI Products, Inc.
4. Auxiliary Modules
An MCN Auxiliary Module connects to the MCN network to provide specific
control or interface functions.
The following are CTI Products’ MCN Auxiliary Modules:
• TSAM Interface Module (TIB)
• Extender Module (EXB)
• Input/Output Control Module (IOB)
Each module is briefly described below. General information about the operation
of each of these modules is provided in this manual. For more information about
features specific to an individual module, refer to its hardware reference manual.
4.1 TSAM Interface Module (TIB)
The TIB module is a control module that interfaces between an MCN CIB module
and CTI Product’s Transmitter Steering Audio Matrix (TSAM). This interface
provides monitor and control of transmitter sites from an PC connected to an
MCN HIB module. The TIB supports up to 8 transmitters.
The TIB is used in systems that have multiple transmitters, with each transmitter
associated with one or more receivers that use the TSAM to provide steering for
the transmitter sites. The TIB will translate a FORCE VOTE command for a
particular receiver into a FORCE TX command that will cause the TSAM to steer
to the transmitter associated with the receiver being FORCE VOTED. The TIB
also monitors the TSAM for the active transmitter site for display on a PC.
Section 9.5 gives an example monitor and control system that incorporates the
TIB and TSAM.
4.2 Extender Module (EXB)
The EXB Module is used in pairs to connect multiple MCN networks that are
physically separated. The communication channel used by the EXB can be any
analog or digitized analog channel that is capable of carrying V.32 terbo standard
modem signaling, including 2-wire or 4-wire leased lines or microwave channels.
The EXB Module does not provide any dialing capability, therefore it cannot
be used over dial-up lines.
10
68-10833-120
Page 15

MCN System Manual Auxiliary Modules
CTI Products, Inc.
EXB modules are used when two multi-node MCN networks are separated by a
distance beyond the reach of conventional wired media (typically 4000 feet) and
need to be interconnected. This distance could be across a large building,
business campus, city, etc. This interconnection is accomplished using one EXB
module at each network site and a single voice-grade telephone circuit connecting
the two EXB modules. Additional networks can be added to this unified network
by simply adding an EXB module pair per network.
Optional handsets can be plugged into the EXB modules to allow simultaneous
voice and data between the two locations.
Typical uses include:
• Comparators located remotely plus multiple PC display positions at the
local site.
• Comparators at a local and remote site with PC displays at the local
and/or remote site.
• In general, any system that requires multiple MCN networks to be
connected over phone lines.
See section 9.6 for an example system.
4.3 Input/Output Control Module (IOB)
The IOB Module allows I/O devices (such as relays) to be connected to the MCN
network and controlled with a User Interface Module (such as a HIB), creating an
I/O control system.
The IOB module has four different operating modes:
1. 16 input and 16 output general purpose I/O lines
2. Two sets of 1 of 4 select outputs plus 24 input lines
3. One set of 1 of 4 select outputs plus 8 input/output lines plus 20 input
only lines
4. One set of 1 of 8 select output lines plus 24 input only lines
11
68-10833-120
Page 16

MCN System Manual Application Accessories
CTI Products, Inc.
5. Application Accessories
Application accessories are An MCN Auxiliary Module connects to the MCN
network to provide specific control or interface functions.
The following are CTI Products’ MCN Application Accessories:
• CIB Test Board (CIBT)
• Relay Control Board (RYB)
Each application accessory is briefly described below. General information about
the operation of each of these items is provided in this manual. For more
information about features specific to an individual item, refer to its hardware
reference manual.
5.1 CIB Test Board
The CIB Test Board (CIBT) is used to test the input and output status signals of
the MCN parallel I/O modules. MCN modules compatible with the CIBT include
the following:
CIB
IIB
IOB
TIB
The CIBT plugs directly into the rear connector of these modules (J1) for
simulation of all monitor and control lines. The switches SW1 through SW32
control the status inputs of the module and LEDs LD1 through LD32 show the
output status of the module.
This test board requires an external 18 to 32 Vdc power supply.
12
68-10833-120
Page 17

MCN System Manual Application Accessories
CTI Products, Inc.
5.2 MCN-RYB-8 Relay Board
The MCN-RYB-8 Relay Board provides relay contacts that can be controlled
with by the MCN Input/Output Control Module (IOB).
The MCN-RYB-8 board has the following features:
• (8) DPDT Relays (Configured to switch circuit pairs).
• Hi-reliability long-life sealed relays.
• Relays rated for low-level (dry circuit) audio switching, up to 2A.
• Selectable 600 Ohm terminations for the Normally Open, Normally Closed, or
Common circuits (may be de-selected).
• LEDs to indicate which relays are active.
• Control Connector (relay coil inputs) which is pin-compatible with the MCN
IOB module.
• 25-pair telco connectors used for control inputs and relay outputs.
• Jumpers to control adjacent relays.
• Jumpers for Sub-Category strapping for MCNRCD variable status text
messages.
• Optional EIA 19” rack-mount panel available for mounting (4) MCN-RYB-8
boards.
13
68-10833-120
Page 18

MCN System Manual System Operation
CTI Products, Inc.
6. System Operation
This section describes the basic operation of both Comparator I/O Modules and
User Interface Modules in a comparator display system.
6.1 Monitoring and Control Operation
In an MCN system, the Comparator I/O Module accepts VOTE, RECEIVE,
DISABLE, and FAIL receiver status messages from the comparator and sends
them to a User Interface Module over the MCN network. User Interface Modules
then display the comparator status information on a console or PC.
Likewise, when a User Interface Module sends FORCE VOTE or DISABLE
commands, the Comparator I/O Module translates the commands and sends them
to the comparator.
MCN modules do not latch the FORCE VOTE or DISABLE controls to the
comparator. Any latching required for these signals must be provided by the user
interface device. For example, if using a console to control the DISABLE of a
receiver, the console switch has to be a latching switch, not a momentary, to keep
the DISABLE active after the button is released. The Remote Comparator
Display Software running on a PC does provide a latched DISABLE control so
that if the right mouse button is used to disable a receiver, the receiver will
remain disabled when the right mouse button is released. Pressing the right
mouse button a second time will re-enable the receiver.
Figure 2 shows a small system made up of three Comparator I/O Modules (the
CIBs) and one User Interface Module (the HIB). The PC can monitor and control
all three comparators from a single screen. For this example, assume that all three
comparators are Motorola Digitac comparators. When a receiver is force voted
from the PC, a FORCE VOTE message is generated by the RCD software and
sent to the CIB that is controlling that particular receiver. When the CIB receives
the FORCE VOTE message, it will drive the receiver’s VOTE output line to
signal the comparator that the receiver is being force voted. A similar process
occurs when a receiver is disabled from the PC.
Going the other direction, when the comparator detects that a receiver is active, it
will drive the RX input of the CIB. The CIB will then generate a RECEIVE
message and send it to the HIB so that the active receiver can be shown on the PC
screen. A similar process occurs when the comparator generates a Vote (driving
the CIB’s VOTE input) or a Fail (driving the CIB’s FAIL input) signal.
14
68-10833-120
Page 19

MCN System Manual System Operation
CTI Products, Inc.
P/S
COMPARATORS
IN
LOCAL PC
T
P/S
IN
OUT
T
COM 2
COM 1
HIB
OUT
OUT
OUT
CIB
IN
CIB
IN
CIB
CA-80041-100
1
2
3
Figure 2 - System Operation Example
Bi-directional Lines on IIBs
Because the console VOTE and DISABLE lines are bi-directional, the console’s
LEDs will be lit if the console’s outputs are active. Because of this, the console
could still indicate a DISABLE or VOTE on a receiver even if there is a problem
in the network cabling or the Comparator I/O Module. Take for example the
system shown in Figure 3.
CEB
16 I/O
A
16 I/O
B
RX1-4
RX5-8
IIB
T
OUT
IN
T
IN
COMPARATOR
OUT
MCN
I/O
MODULE
P/S
COMPARATOR
CA-80029-100
Figure 3 - Parallel I/O Monitoring and Control Station
In this system, the VOTE and DISABLE control lines that connect to the 16 I/O
cards of the CEB are actually bi-directional signals. Figure 4 shows the interface
between the console electronics and the IIB’s J1 connector.
68-10833-120
15
1
Page 20

MCN System Manual System Operation
CTI Products, Inc.
CONSOLE ELECTRONICS
+V
MOMENTARY
+V
+V
LATCHING
+V
IIB J1
VOTE
RX
DISABLE
FAIL
Figure 4 - Console Electronics Interface
When the DISABLE button on the console is pressed, the DISABLE LED on the
console will immediately turn on and stay on after the DISABLE button is
released since it is a latching button. The IIB will send the DISABLE information
to the Comparator I/O Module so that the comparator will disable the receiver. If
the DISABLE does not occur (the MCN network is not connected or the receiver
is Force Voted so the comparator ignores the DISABLE), the operator at the
console may not know it because the console’s DISABLE LED is on.
The hardware reference manual of the CIB and IIB indicate which I/O lines are bidirectional and when this type of a problem will occur.
6.2 Receiver Banks
The CIB parallel Comparator Interface Module controls and monitors 8 receivers.
The AIB supports up to 13 receivers when configured for an ASTRO-TAC™
Comparator or up to 64 receivers when configured for an ASTRO-TAC™ 3000
Comparator.
CA-80049-100
68-10833-120
16
Page 21

MCN System Manual System Operation
CTI Products, Inc.
For Comparator I/O Modules, such as the AIB module, that support more than 8
receivers, the receivers are grouped into banks of 8 receivers. Some User
Interface Modules, such as HIBs operating with the MCN Remote Comparator
Display software support only bank 0. Other User Interface Modules, such as the
IIB, can be configured to control any one of the 8 banks.
Below is a list of the MCN banks and the receivers contained in those banks.
Bank Receiver Numbers
0 1 through 8
1 9 through 16
2 17 through 24
3 25 through 32
4 33 through 40
5 41 through 48
6 49 through 56
7 57 through 64
Table 2 - MCN Receiver Banks
In the example shown in Figure 5, the ASTRO-TAC™ Comparator supports 13
receivers. The AIB divides the receivers into two banks (receiver banks 0 and 1)
for its communications with the User Interface Modules (the IIB modules). Two
IIBs are installed in the example system to support these 13 receivers. When the
IIBs were installed, each had to be configured (through front panel option
switches) for the bank of receivers that each will be monitoring. The first IIB is
configured to monitor receivers 1 through 8 (bank 0). The second IIB is
configured to monitor receivers 9 through 13 (bank 1). With this configuration,
the console can monitor and control receivers 1 through 13.
CONSOLE
IN
OUT
T
AIB
ASTRO-TAC
COMPARATOR
13 RECEIVERS
CA-80044-100
CONSOLE
ELECTRONICS
IIB
BANK 0
IIB
BANK 1
P/S
OUT
IN
OUT
IN
T
Figure 5 - MCN Bank Configuration Example
17
68-10833-120
Page 22

MCN System Manual Hardware Installation
CTI Products, Inc.
7. Hardware Installation
This section describes how MCN modules are installed into a system. All MCN
modules follow the same basic installation procedure. Some modules may have
additional installation requirements. Refer to the module’s hardware reference
manual for any additional installation information.
Below is a list of steps required for installing an MCN system.
Step Operation
1 Determine the addresses of all MCN modules. Refer to section
7.1.1,
2 Set Group and Module number for each module. Refer to section
7.1,
3 Set option switches for each module and Receiver Bank number for
IIB modules. Refer to the hardware reference manual of the
particular module being installed. Note that the addresses for HIB
modules are entered into the PC when the Remote Comparator
Display software is installed.
4 Mount all modules at their proper location. Refer to section 7.3,
Mounting Options
5 Route the network cables to connect the modules and install
terminators at each end of the network. Refer to section 7.4,
Network Cabling
6 Connect power supplies to the modules. Refer to section 7.5,
Requirements
7 Connect the Comparator I/O Modules to their respective
comparators. Refer to the module’s hardware reference manual.
8 Connect the User Interface Modules to their operator stations. Refer
to the module’s hardware reference manual.
9 Check the hardware reference manual of each module to see if any
additional installation setups are required.
10 Power up the system and verify that, for all modules, the PWR LED
is ON, the ACT LED is ON or blinking and the ERR LED is OFF
(the ACT LED of an HIB module will blink only if the MCN
Remote Comparator Display runtime software is running on the PC
and a screen configuration screen is loaded). Refer to section 8.1 for
a description of these LEDs.
11 Test the system for proper operation. Refer to section 11 for
troubleshooting hints if the system is not working properly.
Address Planning.
Setting the Unit Address.
.
.
Power
.
18
68-10833-120
Page 23

MCN System Manual Hardware Installation
CTI Products, Inc.
7.1 Setting the Unit Address
Each MCN module is identified by a unique address that must be set at
installation time. This address is specified by the combination of a Group number
and a Module number. On all modules (except the HIB) the Group and Module
numbers are assigned with the rotary switches on either the front or back of the
module. Whenever the Group or Module number is changed, the module must be
reset or power cycled for the change to occur.
MODULEGROUP
9
8
7
A
6
5
4
3
B
C
D
E
F
2
1
0
9
8
7
A
6
5
4
3
B
C
D
E
F
2
1
0
9
8
7
6
5
4
3
2
1
0
CA-80046-100
A
B
C
D
E
F
Figure 6 - Group and Module Switches
Figure 6 shows a view of the Group and Module switches. Valid ranges of these
switches are:
• Group number = 00 through FE
• Module number = 0 through F
Group number FF is reserved and should not be used for any module in the
system. If Group number FF is assigned to a module, the module, when reset, will
lock on its ERR LED and halt. Other than that restriction, any Group/Module
combination can be used for any module. You do not have to have all modules in
a system set to the same Group number and you do not have to have like modules
set to the same Group number.
Certain MCN modules must have two addresses specified. One is for the MCN
module that it will operate with and the other is for the module itself. The IIB and
TIB modules require this dual address information. Refer to the IIB’s and TIB’s
hardware reference manuals for details about setting the two addresses.
Note that the addresses for HIB modules are entered into the PC when the Remote
Comparator Display software is installed.
CAUTION
All modules in a system must have unique addresses. This address is
made up of the Group and Module switches combined. If two or more
modules are set to the same address, your system will not work properly
and you could have unintended operation.
68-10833-120
19
Page 24

MCN System Manual Hardware Installation
CTI Products, Inc.
7.1.1 Address Planning
To help organize the MCN system, we have provided the following guidelines for
assigning unit addresses:
• Assign all Comparator I/O Modules to the same Group or set of
Groups (if you have more than 16 modules), typically beginning with
Group 00, Module 0 and progressing sequentially. Although modules
can be added at higher addresses later, if you have plans to expand a
channel, you may want to leave a module addresses open for the
expansion.
• Assign all User Interface Modules to the same Group or set of Groups
(if you have more than 16 modules), beginning with Group 80, Module
0.
• If you have multiple MCN systems in remote locations and you plan to
tie them together with a EXB Module, use unique addresses
throughout all your systems. Start the Comparator I/O modules and
User Interface Modules at each location with new group numbers.
This will allow you to connect the systems without re-addressing the
modules.
• When using the HIB User Interface Module with the MCN Remote
Comparator Display software, only four Groups can be monitored and
controlled at a time on one PC. If you are going to be using this User
Interface Module, plan the addresses of your Comparator I/O modules
so that you use as few different Groups as possible.
• In a large system, you can monitor and control more than 4 Groups on
a PC using the HIB; you are just limited to 4 groups simultaneously.
For these types of large systems, group your modules so that all the
receivers you may want to watch simultaneously are within the same 4
groups.
20
68-10833-120
Page 25

MCN System Manual Hardware Installation
CTI Products, Inc.
Figure 7 shows a system that has three Comparator I/O Modules located in
comparator room A, two Comparator I/O Modules located in comparator room B,
two User Interface Modules located at a maintenance site and two User Interface
Modules located in a dispatch room. For this system, all of the modules in a
single room are set to the same Group number. All modules in comparator room
A are assigned to Group 01. All modules in comparator room B are assigned to
Group 02. The User Interface Modules in the dispatch room are set to Group 80.
The User Interface Modules at the maintenance site are set to Group 81.
With this setup, all of the Comparator I/O Modules are addressed into two
different Groups. This allows plenty of expansion in both comparator rooms, but
since only 2 groups are used, it allows the PCs running the MCN Remote
Comparator Display Software to monitor and control all receivers in the system
from a single screen.
COMPARATOR ROOM A
T
GROUP 01 GROUP 01 GROUP 01 GROUP 02 GROUP 02
P/S
COMPARATOR 1 COMPARATOR 2
GROUP 80 GROUP 80 GROUP 81GROUP 81
CONSOLE
MODULE 2
COMPARATOR 3
P/S
DISPATCH ROOM MAINTENANCE SITE
MODULE 1MODULE 0
MODULE 1MODULE 0
USER
INTERFACE
COMPARATOR ROOM B
P/S
P/S
USER
INTERFACE
Figure 7 - Unit Address Planning Example
MODULE 1MODULE 0
COMPARATOR 5COMPARATOR 4
T
MODULE 1MODULE 0
USER
INTERFACE
CA-80045-100
21
68-10833-120
Page 26

MCN System Manual Hardware Installation
CTI Products, Inc.
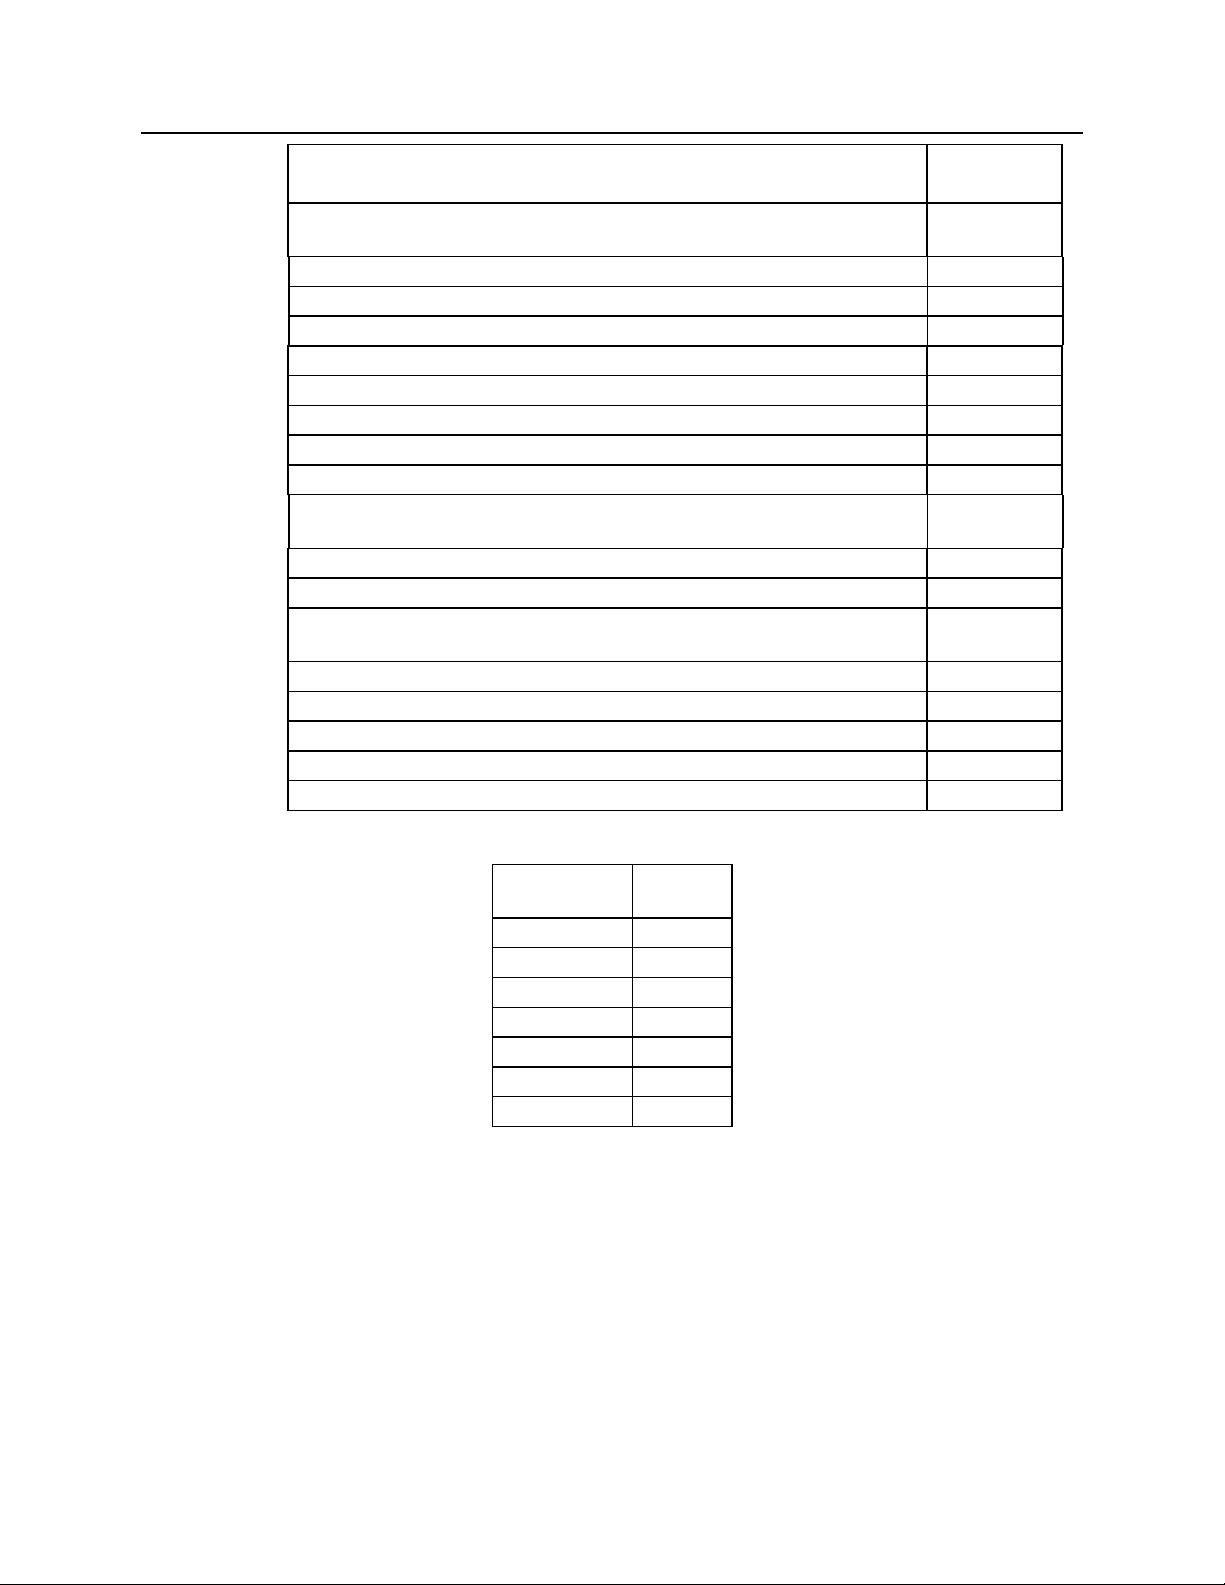
A unit address planning worksheet is provided in
Worksheet
that allows you to record the unit addressing information for your
Appendix A - Unit Address
comparator display system. Using the system shown in Figure 7 as an example,
the worksheet would look like the following:
Group & Module # of
Unit Type Group # Module # Bank
CIB 01 0 0 Comparator #1 Room A
CIB 01 1 0 Comparator #2 Room A
CIB 01 2 0 Comparator #3 Room A
AIB 02 0 0,1 Comparator #4 Room B
AIB 02 1 0,1 Comparator #5 Room B
IIB 80 0 0 * 02 0 Console Dispatch Room
HIB/RCD 80 1 0 PC #1 Dispatch Room
HIB/RCD 81 0 0 PC #2 Maintenance Site
associated
Comparator I/O
Module
(For IIB only)
Group: Module:
Notes
HIB/RCD 81 1 0 PC #3 Maintenance Site
* You must set the Bank # on the IIBs. CIBs and HIBs are factory-configured for
Bank 0 only. AIBs are factory-set for Banks 0 and 1.
With this worksheet, you now have a record of your MCN system configuration,
which can help reduce system troubleshooting time.
7.2 Grounding
A chassis ground connection is available on all MCN modules. This connection
point is provided by a screw hole that is marked on the bottom of the case.
Make sure that the screw used for grounding and mounting does not protrude into
the enclosure more than 1/8 inches from the bottom surface of the module.
Using a larger screw that touches the PC board inside the module may damage the
module when it is powered. Doing so will void the unit’s warranty.
CAUTION
22
68-10833-120
Page 27

MCN System Manual Hardware Installation
CTI Products, Inc.
7.3 Mounting Options
Wall mount and EIA 19” rack mount kits are available for MCN modules. These
kits are described below. Some modules may have other mounting options (the
CIB module has a special mounting kit that allows the module to be mounted to
the back of a Digitac comparator). Any alternate mounting options are described
in the specific module’s hardware reference manual.
7.3.1 Wall Mounting
The wall mount option allows a module to be mounted to a flat surface. Screw
holes are provided on the bottom of all MCN modules for attaching the wall
mount bracket(s). Two screw holes are provided on A size MCN modules and
four screw holes are provided on B size MCN modules (refer to Table 1, in
section 1.3, to determine the size of your module). Simply attach the mounting
plate to the bottom of the module using these screw holes and then screw this
assembly to the wall. The module can be mounted in any orientation. Figure 8
shows an exploded view of the wall mount installation.
PRODUCTS, INC.
IN
NETWORK
OUT
DC IN
RESET SVC
ERR
PWR
OPTION A
12345678
ON
ACT
CA-80026-100
Figure 8 - Wall Mounting
CAUTION
Be sure to use the flat head screws provided with the wall mount kit. If you are
not using the wall mount kit from CTI Products, make sure that the screws do not
protrude into the enclosure more than 1/8 inches from the bottom surface of the
module.
Using a larger screw that touches the PC board inside the module may damage the
module. Doing so will void the unit’s warranty.
23
68-10833-120
Page 28

MCN System Manual Hardware Installation
CTI Products, Inc.
7.3.2 Rack Mounting
The rack mount option provides a 19” rack mounting bracket that supports four
MCN modules. Two types of rack mount brackets are available. One supports
four A size MCN modules and the other supports two A size and one B size MCN
modules (refer to Table 1, in section 1.3, to determine the size of your MCN
module). Figure 9 shows an exploded view of the rack mount installation. The
top diagram shows the front view of the bracket with one module installed. The
bottom two diagrams show a side view of the module installation and bracket
installation respectively.
FACEPLATE
SPACER
PRODUCTS, INC.
IN
ERR
PWR
OPTION A
12345678
ON
ACT
SVC
CA-80021-100
OUTNETWORK
DC IN
RESET
Figure 9 - Rack Mounting - Front and Side View
To attach a module to the bracket, and then mount the bracket, follow the steps
below.
WARNING
Do not allow the PC board to slide out of the case when the front panel is
removed. If it does, DO NOT slide the PC board back into the case from the
front of the module. Doing so may damage the unit, causing the unit to
malfunction when powered on. Doing so will void the unit’s warranty.
68-10833-120
24
Page 29

MCN System Manual Hardware Installation
CTI Products, Inc.
Rack Mounting Instructions
Step Operation
1 Remove all cables from the module.
2 Make sure all screws are installed in the back of the module so that the
PC board will not be able to slide out of the case when the front panel is
removed.
3 Remove the front panel from the module, including the bezel, by
removing the two Philips head screws in the faceplate. The bezel is not
used when rack mounting the module.
4 Position the module behind the bracket, lining up the holes in the
bracket with the front panel screw holes on the module.
5 Position the front panel in front of the bracket, lining the front panel up
with the module.
6 Fasten the front panel and module to the bracket with the screws that
were previously removed.
7 Position the bracket into your rack, lining up the four mounting holes of
the bracket with mounting holes in the rack frame.
8 Position the two spacers in the front of the bracket, aligning the cutouts
in the spacers with the holes of the bracket.
9 Install mounting screws (customer provided) into the rack.
When the module’s front panel is removed, do not allow the PC board to slide out
of the case (this will not happen as long as all screws are installed on the rear
panel of the module). If the PC board does slide out of the case, you must follow
the steps below to replace the PC board in the case.
Re-Installing a PC Board in its Housing
Step Operation
1 From the front of the module, slide the PC board out of the case.
2 Remove the back panel of the module.
3 From the rear of the module, slide the PC board back into the case (there
are markings on the PC board to indicate which edge to insert into the
rear of the case first).
4 Install the back panel of the module.
There is nothing user serviceable inside the modules. Do not attempt to remove
the PC board from its enclosure.
25
68-10833-120
Page 30

MCN System Manual Hardware Installation
CTI Products, Inc.
7.3.3 CIB DIGITAC Mounting
Figure 10 shows the bracket used to mount the CIB module to the rear of the
DIGITAC comparator. This mounting option is only available for the CIB
module.
QTY (2) 6-32 X 1\4" SCREWS PROVIDED
QTY (2) 8-32 X 3\8" SCREWS PROVIDED
P805 P806
FEMALE CONNECTOR
TO PUNCH BLOCK CABLE
25
50
CIB
26
1
CIB DIGITAC MTG. BRKT.
CIB
DIGITAC
DIGITAC
NOTE ADDITIONAL CLEARANCE REQUIRED BEHIND DIGITAC
WHEN INSTALLING CIB AND BRACKET.
2.181
ACT
ERR
PWR
345678
OPTION ARESET SVC
2
1
ON
DC IN
PRODUCTS, INC.
IN OUTNETWORK
REMOVE THESE (4) SCREWS FROM THE BACK OF THE DIGITAC
AND RE-INSTALL THEM THROUGH THE CIB MOUNTING BRACKET
AS SHOWN ABOVE.
CA-80165-100
DIGITAC
Figure 10 - CIB DIGITAC Mounting Bracket
To attach a CIB module to the bracket, and then mount the bracket, follow the
steps below.
WARNING
Be sure to use the screws provided with the DIGITAC bracket kit. If you are not
using the screws provided, make sure that the screws used do not protrude into the
enclosure more than 1/8 inches from the bottom surface of the module.
Using a larger screw that touches the PC board inside the module may damage the
module. Doing so will void the unit’s warranty.
68-10833-120
26
Page 31

MCN System Manual Hardware Installation
CTI Products, Inc.
DIGITAC Mounting Instructions
Step Operation
1 Remove all cables from the CIB.
2 Attach the small mounting plate, using the 6-32 X 1/4 screws provided,
to the bottom of the CIB module.
3 Attach CIB/plate assembly to the mounting bracket using the 8-32 X 1/4
screws provided.
4 Remove the 4 screws from the back of the DIGITAC, as indicated in
Figure 10.
5 Connect the provided cable to the back of the CIB and route the cable
underneath the DIGITAC mounting bracket.
6 Position the DIGITAC mounting bracket on the back of the DIGITAC
so that the bracket’s mounting holes line up with the DIGITAC’s screw
holes.
7 Re-install the 4 screws (from step 4) in the back of the DIGITAC.
8 Attach other end of the cable to P805 of the DIGITAC.
9 Connect the CIB power and network cables.
With the CIB mounting bracket installed on the back of the DIGITAC, an
additional 2.181 inches of clearance is required behind the DIGITAC.
27
68-10833-120
Page 32

MCN System Manual Hardware Installation
CTI Products, Inc.
7.4 Network Cabling
MCN modules communicate over a network cable. Specifications for network
cabling are the following:
• 4 pair level IV or V unshielded, 24 AWG, twisted pair cable (EIA/TIA
568B).
• Maximum of 20 modules can be connected together in a segment.
• Maximum cable length is 1200 feet.
• Straight through connections.
Figure 11 shows one side of the network cable. This diagram details the pinout
and twisted pair configuration of the cable.
TOP VIEW
OF CONNECTOR
1
2
3
4
5
6
7
8
DATA +
DATA +POWER
NC
NC
-POWER
-POWER
+POWER
CA-80042-100
Figure 11 - MCN Cable Pinout
When cabling your system, daisy-chain the modules together and insert a network
terminator into the unused port of the first module and the unused port of the last
module in the chain. An example of what the terminator looks like is shown in
Figure 12.
100 ohm 1/8 WATT
RESISTOR
CA-80025-100
Figure 12 - MCN Network Terminator
Use of standard length cables from CTI Products is highly recommended to
provide best system performance. Standard lengths up to 100 feet can be
combined with cable couplers to create desired length cables. See section 1.3 for
28
68-10833-120
Page 33

MCN System Manual Hardware Installation
CTI Products, Inc.
CTI part numbers.
If you do provide your own cable, be sure it meets the specifications above. The
system will not work with ordinary telephone cable.
If you are providing your own cable for a run longer than 100 feet, a new power
supply will be required at the far end. You may use 2-pair Level IV or Level V
cable instead of 4-pair. In this instance, connect just the data pair (Pins 1 & 2).
7.5 Power Requirements
Power input for all MCN modules is 10 to 32 VDC, with most modules requiring
no more than 2 W (refer to the module’s hardware reference manual for exact
input power requirements). CTI Products has plug in power supplies available
that provide 18 VDC at 800 mA. MCN systems have been fully tested for
appropriate immunity to harmful electrical noise and electrical impulses when
assembled with these power supplies only. Operation with other, non-qualified
power supplies could yield lower system performance and may void US and
Canadian emissions and European emissions and susceptibility approvals.
The DC IN receptacle of all MCN modules can accept either polarity
configuration from the input power plug.
The MCN system provides a unique way to distribute power to multiple modules
from a single power supply. The network cable used for module communication
also contains power lines so that the power from a power supply can be
distributed along with the communication lines. The limits of this power
distribution are the following:
• A maximum of four modules can be powered from a single power
supply.
• The maximum cable length between the modules that share a power
supply is 100 feet.
Note: The EXB module, because of its higher power requirements, counts as two
module loads when distributing power through the network cable. Therefore, one
power supply could be used to power one EXB module plus two other modules.
To create this power distribution (refer to Figure 13), simply connect the power
supply into your first module. Then, connect the NETWORK OUT port of that
module to the NETWORK IN port of the next module. Continue connecting
NETWORK OUT ports to NETWORK IN ports until all modules are connected.
If you need to add more power supplies to the system due to power distribution
limits, simply connect another power supply into the DC IN port of a module.
This new power supply then provides power for the module it is connected to as
well as all modules from that module’s NETWORK OUT port or until another
29
68-10833-120
Page 34

MCN System Manual Hardware Installation
CTI Products, Inc.
power supply is encountered.
PRODUCTS, INC. PRODUCTS, INC.
IN
OUTNETWORK
DC IN
RESET
ERR
PWR
ACT
OPTION A
ON
12345678
TO DC POWER SUPPLY
SVC
ERR
PWR
OPTION A
ON
12345678
ACT
SVC
TO NETWORK IN
OF NEXT MCN MODULE
IN
OUTNETWORK
DC IN
RESET
CA-80027-100
Figure 13 - DC Power Chaining
In the example shown in Figure 14, two power supplies are required, even though
there are only four modules in the system. The second supply is required because
the network cable between the third and fourth modules is greater than the 100
foot cable length maximum for power distribution.
IN
OUT
DC IN
DC POWER
T T
SUPPLY
IN
OUT
DC IN
IN
OUT
DC IN
>100'
IN
CA-80028-100
Figure 14 - Power Distribution Example
30
OUT
DC IN
DC POWER
SUPPLY
68-10833-120
Page 35

MCN System Manual Module Operation
CTI Products, Inc.
8. Module Operation
The following sections describe features and functions common to all MCN
modules.
8.1 Module LEDs
All MCN modules have three indicator LEDs on the front panel. These LEDs
give the following indications:
PWR ON when the module has DC input voltage within specification.
This LED will blink if the input voltage falls below the minimum
specified input voltage level. The module may still function in this
condition (depending upon how low the DC input voltage is),
however this is not recommended.
ERR ON to indicate module errors. Refer to the module’s hardware
reference manual for a description of these error conditions.
ACT ON or blinking to indicate that the module is successfully
communicating with other modules over the network.
During normal system operation, the PWR LED should be on, the ACT LED
should be ON or blinking, and the ERR LED should be OFF. If the LEDs do not
match this after the system is installed, refer to section 11 for troubleshooting
hints.
8.2 Module Buttons
All modules are equipped with a RESET button. Pressing this button will force
the module to initialize itself by reading its configuration switches and to begin
communicating with other modules.
Some modules are equipped with a SVC button. This button is reserved and
should not be pressed during normal operation.
31
68-10833-120
Page 36

MCN System Manual System Examples
CTI Products, Inc.
9. System Examples
The following examples show how MCN modules are combined to form various
systems, as well as the capabilities of those systems.
9.1 Example 1 - 8 Receivers with a Console Display
Figure 15 shows an MCN system that provides monitoring and control of up to 8
receivers connected to a Motorola ASTRO-TAC™ Comparator. Only 8
receivers are supported because only one IIB module is in the system. To control
all 13 receivers of the comparator, you would simply add another IIB module to
the system and connect this IIB to the console. This additional IIB has to be
configured to operate with receivers 9 through 13.
T
OUT
AIB
IN
ASTROTAC
COMPARATOR
CONSOLE
CONSOLE
ELECTRONICS
IIB
P/S
OUT
IN
T
Figure 15 - 8 ASTRO-TAC™ Receivers with Console Display
CA-80016-100
32
68-10833-120
Page 37

MCN System Manual System Examples
CTI Products, Inc.
9.2 Example 2 - PC Based Monitoring and Control
Figure 16 shows a system that provides local monitoring and control of up to 8
receivers utilizing a PC as the operator interface. CTI Product’s Remote
Comparator Display software running on the PC allows each receiver of the
comparator to be individually controlled.
LOCAL PC
COM 2
COM 1
HIB
P/S
IN
OUT
T
T
OUT
IN
CIB
COMPARATOR
CA-80019-100
Figure 16 - 8 Receivers with PC Display
The Remote Comparator Display Software will also work with AIBs and ASTROTAC™ Comparators with up to 8 receivers per comparator.
1
33
68-10833-120
Page 38

MCN System Manual System Examples
CTI Products, Inc.
9.3 Example 3 - 16 Receivers with a Console Display
A multiple comparator system is shown in Figure 17. This system implements
monitoring and control of 3 different comparators from one console.
Notice that in this system, one CIB module is being used to control receivers from
two comparators (comparators 1 and 2). The only requirement for this setup is
that both comparators 1 and 2 are the same type (i.e. both must be Digitac or both
must be Spectra TAC, etc.). Comparator 3 does not have to be the same type as
comparators 1 and 2 since it connects to a different CIB.
This example will provide control for up to 16 receivers total.
A benefit of this system is that all of the parallel I/O lines between the
comparators and the console electronics do not have to be run the 400 ft. distance
between the console electronics and the comparators. Only a single network cable
for the MCN system has to be run the 400 ft.
CONSOLE
400'
T
CONSOLE
ELECTRONICS
P/S
IIB
IIB
OUT
IN
OUT
IN
Figure 17 - 16 Receivers with Console Display
P/S
IN
OUT
CIB
IN
OUT
CIB
T
COMPARATORS
1
2
3
CA-80020-100
34
68-10833-120
Page 39

MCN System Manual System Examples
CTI Products, Inc.
9.4 Example 4 - 24 Receivers with Multiple Operator Stations
The example in Figure 18 shows a much larger system than the previous
examples. Three CIB modules are used to control a total of 24 receivers. The
three IIB modules can be used to provide control of all receivers from the main
console. Each PC in the system can control all receivers as well. The HIB
modules provide both local and remote control of all receivers. With the HIB
connected directly to the modem, the comparators can be accessed from anywhere
that has a dial-up phone line.
REMOTE PC
CONSOLE
COM 2
COM 1
MODEMMODEM
LOCAL PC
CONSOLE
ELECTRONICS
HIB
P/S
COM 2
HIB
COM 1
P/S
IIB
IIB
IIB
T
IN
OUT
IN
OUT
CIB
IN
OUT
CIB
IN
OUT
CIB
IN
OUT
IN
OUT
IN
OUT
IN
OUT
T
COMPARATORS
CA-80017-100
Figure 18 - 24 Receivers with Multiple Operator Stations
Power can be provided to this MCN system from two power supplies, as long as
the network cables are connected properly for power distribution. One supply
could power one HIB module and all three CIB modules. Another supply could
power the other HIB module and the three IIB modules.
1
2
3
This system allows parallel status and control of three comparators from three
operator locations. If an operator at one station force votes a receiver, the other
two operator stations will show that receiver as voted. Or, if an operator at one
station disables a receiver, all other operator stations will also show that receiver
as disabled. If one of the comparators signals that a receiver is voted, all three
stations will show the receiver being voted.
68-10833-120
35
Page 40

MCN System Manual System Examples
CTI Products, Inc.
There is one limitation of a system which uses both HIBs and IIBs together to
control the same comparator. If a receiver is disabled from the console (this is a
latched disable), the two PC displays will report the receiver as disabled when the
comparator disables that receiver. If one of the PCs then re-enables that receiver,
the comparator will enable the receiver and both PC displays will show the
receiver as enabled, but the console will still indicate that the receiver is disabled
because the console has a latched disable (the console LED is controlled by the
disable switch).
36
68-10833-120
Page 41

MCN System Manual System Examples
CTI Products, Inc.
9.5 Example 5 - Steered Transmitter System
Figure 19 shows an example system using the TIB module with a TSAM to
provide transmitter steering as well as comparator monitoring and control.
LOCAL PC
COMPARATOR
1
VOTE LINES
RX AUDIO
COM 2
COM 1
HIB
P/S
OUT
IN
T
IN
CIB
OUT
RX1
TX1
TX SELECTIN
FORCE SELECT
TSAM
CA-80118-100
CONSOLE
TX AUDIO
PTT
TIB
OUT
T
Figure 19 - TIB System Example
For the system shown in the figure, note the following:
• The system receivers are connected to the comparator
• The system transmitters are connected to the TSAM
• The comparator’s vote lines are connected to the CIB and to the
TSAM (this allows the TSAM to steer based on receiver activity and
comparator voting)
Assume initially that all receivers are inactive and that the TSAM is programmed
for Instant Update mode (the TSAM will steer as soon as a vote occurs). When
receiver 8 becomes active, the comparator will vote receiver 8, activating the
receiver 8 vote output. The TSAM sees this vote change, since it is monitoring
the comparator’s vote outputs, and steers to transmitter 8 (since it is programmed
for Instant Update mode). The TSAM updates the Tx Select lines to indicate that
transmitter 8 is active. The TIB detects the change on these lines and sends a
message to the MCN modules indicating that transmitter 8 is the currently active
transmitter. The HIB receives this steered transmitter information and updates the
PC’s receiver 8 display information to show that it is the active transmitter. The
CIB will also detect the receiver 8 vote status and generate a VOTE message to
the HIB. Thus, the HIB will receive status messages indicating that receiver 8 is
voted and that transmitter 8 is active. Both of these states will be shown on the
RX8
TX8
37
68-10833-120
Page 42

MCN System Manual System Examples
CTI Products, Inc.
operator’s PC.
To force the TSAM to steer to transmitter 1, the operator will generate a FORCE
VOTE for receiver 1. The TIB will receive this FORCE VOTE for receiver 1 and
setup the Tx Select lines for transmitter 1 and the Force Select line. When the
TIB activates the Force Select line to the TSAM, the TSAM will immediately
steer to transmitter 1. The FORCE VOTE for receiver 1 will also cause the CIB
to generate a FORCE VOTE command to the comparator.
9.6 Example 6 - Connecting Networks in Multiple Buildings
Figure 20 shows an example system using two EXB modules to connect a
monitoring and control system that has the comparators and the console located in
different buildings.
BUILDING 1 BUILDING 2
CONSOLE
T T
OUT
EXB
IN
EXB
OUT
IN
COMPARATORS
1
2
CA-80166-100
CONSOLE
ELECTRONICS
OUT
IIB
IN
OUT
IIB
IN
T
P/S
OUT
CIB
IN
OUT
IN
CIB
T
P/S
Figure 20 - MCN module in two buildings connected with EXB Modules
This system extends the comparator status and control lines to a console located
more than 4000 feet away. It performs a “logical extender” function.
The EXB modules are used to connect the IIB modules with the CIB modules.
The EXB connection can be either a 2 wire or 4 wire leased line. No
programming is required for the EXB. Simply set the option switches as specified
in reference 7, connect the EXBs to the leased line, and power on the modules.
The EXBs will automatically begin training and once the link is established, begin
passing data.
An optional handset could be plugged into each EXB to allow the personnel in
building 1 to talk to personnel in building 2 while the comparator display system
is functioning.
68-10833-120
38
Page 43

MCN System Manual Customer Support
CTI Products, Inc.
10. Customer Support
If you need help in setting up your system, call one of our engineers at:
(513) 595-5900.
Ask to speak to a CTI Products engineer. Our hours are from 8:30 to 5:00 Eastern
time.
If you are calling about a problem with a specific module, please have the
module’s model name, model number and serial number available when you call.
39
68-10833-120
Page 44

MCN System Manual Troubleshooting
CTI Products, Inc.
11. Troubleshooting
Below is a table listing some common problems encountered with MCN modules.
If , after using this diagnostic table, you still have a problem, check the module’s
hardware reference manual to see if there are any other troubleshooting guides
that are specific to the module.
PROBLEMS CAUSES
PWR LED is off If using a power supply, make sure it is plugged into the DC IN port
of the module. Also, make sure the power supply is plugged into the
wall outlet.
If power is being supplied over the network cable, make sure that the
network cable is properly connected between NETWORK OUT
ports and NETWORK IN ports as specified in section 7.4.
PWR LED is blinking This indicates low voltage. Plug a power supply directly into the DC
IN port and see if the PWR LED stops blinking. If so, make sure
that the system’s power distribution requirements are met as stated
in section 7.5.
ERR LED is blinking Reset the module. If LED still blinks, call CTI Products’ customer
support.
ERR LED is on Verify that the module’s Group and Module numbers are valid
(refer to section 7.1). Correct them if necessary, then press the reset
button.
Verify that the option switches are set properly. Refer to the
module’s hardware reference manual for a description of the option
switches. Correct them if necessary, then press the reset button.
ACT LED is off Verify that the module’s Group and Module numbers were properly
assigned and set.
Check the network cables and make sure they are fully inserted into
the receptacle.
Make sure that the terminators are installed (refer to section 7.4).
Note: The ACT LED of the HIB module will only blink if a PC that
is running the MCN Remote Comparator Display runtime software
is running and a screen configuration file is loaded.
68-10833-120
40
Page 45

MCN System Manual Troubleshooting
CTI Products, Inc.
PROBLEMS CAUSES
System does not
correctly display the
VOTE, RECEIVE,
DISABLE, or FAIL
status of a receiver
OR
System does not
correctly FORCE VOTE
or DISABLE a receiver
Verify that all wiring between the Comparator I/O Module and the
comparator is correct.
Verify that all wiring between the User Interface Module and the
operator station is correct.
Verify that all unit addresses were set correctly.
Verify option switch settings on all modules.
Verify that the total system cable length is less than the maximum
specified in section 7.4.
Verify that the total number of MCN modules in the system is less
than the maximum specified in section 7.4.
41
68-10833-120
Page 46

MCN System Manual Unit Address Worksheet
CTI Products, Inc.
12. Appendix A - Unit Address Worksheet
Group & Module # of
Unit Type
(CIB, IIB
AIB, HIB,
TIB, IOB)
Group
Number
(00-FE)
Module
Number
(0-F) Bank
associated Comparator
I/O Module
(Use for IIB or TIB)
Group Module Notes
42
68-10833-120
 Loading...