

Page 1

DVS-8504E User Guide
DVS-8504E
4 Channel H.264 Video Encoder
1
Page 2

DVS-8504E User Guide
LEGAL
The information in this publication has been carefully checked and is believed to be
entirely accurate at the time of publication. CTC Union Technologies assumes no
responsibility, however, for possible errors or omissions, or for any consequences
resulting from the use of the information contained herein. CTC Union Technologies
reserves the right to make changes in its products or product specifications with the
intent to improve function or design at any time and without notice and is not
required to update this documentation to reflect such changes.
CTC Union Technologies makes no warranty, representation, or guarantee
regarding the suitability of its products for any particular purpose, nor does CTC
Union assume any liability arising out of the application or use of any product and
specifically disclaims any and all liability, including without limitation any
consequential or incidental damages.
CTC Union products are not designed, intended, or authorized for use in systems or
applications intended to support or sustain life, or for any other application in which
the failure of the product could create a situation where personal injury or death
may occur. Should the Buyer purchase or use a CTC Union product for any such
unintended or unauthorized application, the Buyer shall indemnify and hold CTC
Union Technologies and its officers, employees, subsidiaries, affiliates, and
distributors harmless against all claims, costs, damages, expenses, and reasonable
attorney fees arising out of, either directly or indirectly, any claim of personal injury
or death that may be associated with such unintended or unauthorized use, even if
such claim alleges that CTC Union Technologies was negligent regarding the
design or manufacture of said product.
TRADEMARKS
Microsoft is a registered trademark of Microsoft Corp.
Please check CTC Union's website for any updated manual or contact us by E-mail
at [email protected]. Please address any comments for improving this manual or to
point out omissions or errors to [email protected]. Thank you.
CTC Union maintains a support web site (support.ctcu.com) where you may obtain
the latest manual, quick installation guide, and operational firmware. Membership to
this web site is free, however, you must be a registered member in order to access
any software updates.
CTC Union Technologies Co., Ltd.
2008~2009 Copyright, All rights reserved.
2
Page 3

DVS-8504E User Guide
Table of Contents
1.
INTRODUCTION.......................................................................6
1.1. Welcome ..........................................................................................6
1.2. What is IP Surveillance?...................................................................6
1.3. IP Surveillance Benefits....................................................................7
1.4. Network Video Recording.................................................................7
1.5. Quick Install Steps............................................................................7
2. TECHNICAL SPECIFICATION.................................................8
2.1. Hardware Specification.....................................................................8
2.2. System Requirement........................................................................8
3. HARDW ARE AND SETTING....................................................9
3.1. Package Contents............................................................................9
3.2. Overview : Front panel...................................................................9
3.3. Overview : Back Panel...................................................................10
4. HOW TO ACCESS UNIT........................................................ 11
4.1. Default Setting................................................................................ 11
4.2. Windows UPnP ..............................................................................12
4.3. CTCU UPnP Finder........................................................................13
5. HOME PAGE SETTING..........................................................14
5.1. Live View........................................................................................14
5.1.1. ActiveX Installation.................................................................................... 14
5.1.2. Main / Sub Streaming................................................................................ 15
5.1.3. TCP / UDP Connection............................................................................. 15
5.1.4. ActiveX Viewer.......................................................................................... 15
5.1.5. RTSP Viewer Support............................................................................... 16
5.2. Image Setup...................................................................................17
5.3. PTZ Control....................................................................................17
5.4. Playback.........................................................................................18
6. BASIC SETTING ....................................................................19
6.1. System...........................................................................................19
6.1.1. System Information ................................................................................... 19
6.1.2. Date/ Time................................................................................................. 20
3
Page 4

DVS-8504E User Guide
6.1.3. Initialize ..................................................................................................... 21
6.2. Work mode.....................................................................................22
6.2.1. Video format.............................................................................................. 22
6.2.2. Steam Port................................................................................................. 22
6.2.3. Resolution ................................................................................................. 22
6.3. Channel parameter.........................................................................23
6.3.1. Main stream setting................................................................................... 23
6.3.2. Sub stream setting .................................................................................... 23
6.3.3. Privacy mask............................................................................................. 23
6.3.4. Audio......................................................................................................... 24
6.3.5. OSD Setting .............................................................................................. 24
6.4. Network..........................................................................................25
6.4.1. Network Information.................................................................................. 25
6.4.2. PPPOE...................................................................................................... 26
6.4.3. DDNS........................................................................................................ 27
6.4.4. UPnP......................................................................................................... 28
6.4.5. SNMP........................................................................................................ 29
6.4.6. HTTPS....................................................................................................... 31
6.4.7. IP Notification............................................................................................ 32
7. ADVANCED SETTING ...........................................................33
7.1. PTZ Setting....................................................................................33
7.1.1. PTZ Connector.......................................................................................... 33
7.1.2. PTZ Control............................................................................................... 33
7.1.3. Preset Position.......................................................................................... 34
7.1.4. Patrol......................................................................................................... 35
7.2. Alarm Configuration........................................................................36
7.2.1. Alarm Receiver Setting ............................................................................. 36
7.2.1.1. FTP client................................................................................... 36
7.2.1.2. FTP General Setting .................................................................. 36
7.2.1.3. Periodical Sending..................................................................... 37
7.2.1.4. SMTP......................................................................................... 38
7.2.1.5. General ...................................................................................... 38
7.2.1.6. SMTP Periodical Sending.......................................................... 39
7.2.1.7. SMS........................................................................................... 40
7.2.2. Alarm I/O Setting....................................................................................... 41
7.2.2.1. I/O Connector............................................................................. 41
7.2.2.2. Alarm Input................................................................................. 41
7.2.2.3. Alarm Output.............................................................................. 42
7.2.3. Alarm Video Setting................................................................................... 43
7.2.3.1. Motion Detection........................................................................ 43
7.2.3.2. Video Loss ................................................................................. 44
7.2.4. Alarm Storage setting................................................................................ 45
7.2.4.1. Alarm local recording................................................................. 45
4
Page 5

DVS-8504E User Guide
7.2.4.2. Event Remote Store................................................................... 46
7.3. Storage management.....................................................................47
7.3.1. HDD management .................................................................................... 47
7.3.2. Local Storage............................................................................................ 48
7.4. Event Management........................................................................49
7.4.1. Event Setting............................................................................................. 49
7.4.2. Event Report ............................................................................................. 50
7.4.3. Event Import/ Export ................................................................................. 51
8. ACCOUNT MANAGEMENT...................................................52
8.1. Admin.............................................................................................52
8.2. User................................................................................................53
9. DVS STATUS..........................................................................54
10. SYSTEM LOG.........................................................................55
11. TROUBLE SHOOTING...........................................................56
5
Page 6

DVS-8504E User Guide
1. INTRODUCTION
1.1. Welcome
Thank you for purchasing DVS-8504E, 4 channel, D1 H.264 Digital Video Server
developed by CTC Union Technologies Company, Limited. For a better understanding,
please read this manual before operating the DVS-8504E unit.
This installation guide provides instructions for installing the DVS-8504E Video Server
on your network. To check for any product updates or latest release of the product
User’s Manual, please visit www.ctcu.com
.
1.2. What is IP Surveillance?
IP-Surveillance is a term for a security system that gives users the ability to monitor
and record video and/or audio over an IP (Internet Protocol-based) computer network
such as a local area network (LAN) or the Internet. In a simple IP-Surveillance system,
this involves the use of a network camera (or an analog camera with a video
encoder/video server), a network switch, a PC for viewing, managing and storing video,
and video management software.
Unlike analog video systems that use dedicated point-to-point analog cabling from the
camera location to the viewing/recording station, IP-Surveillance (or network video)
uses the IP network technology as the backbone for transporting information. In an
IP-Surveillance application, digitized video and/or audio streams can be sent to any
location, even around the world, if desired, via a wired and/or wireless IP network,
enabling video monitoring and recording from anywhere with network access.
While an analog video system is for the most part a one-directional signal carrier that
ends at the recording device, a network video system is bi-directional (allowing
information to be sent and received) and can be an integrated part of a larger, scalable
system. A network camera, for instance, can send video and audio to a user, as well as
receive from the user audio and data instructions that could, for example, activate
doors or external alarms. In addition, a network video system can communicate with
several applications in parallel and perform various tasks such as detecting motion or
sending different streams of video. Such a system provides for greater performance
possibilities and flexibility.
6
Page 7

DVS-8504E User Guide
1.3. IP Surveillance Benefits
The benefits of digital surveillance are many. At the camera level, the scalability of an
IP-based system grows from a single camera to thousands in single unit increments,
compared with 16-camera or channel steps for DVR or PC-based systems. In addition,
any camera can be provided with any frame rate at any time, and frame rate and
storage capacity can be increased simply by adding hard drives and PC servers.
Moreover, IP allows "intelligent" functionality of camera, such as motion detection,
sensor input, relay output and alarm triggering or even advanced intelligence like
'object left' or 'object missing'. Faster system integration allows one network that
controls audio, video and data with remote accessibility of live or stored video streams
from any location with increased reliability through real-time management software.
1.4. Network Video Recording
IP-based systems employ an NVR (network video recorder) rather than a DVR. The
NVR is a server, using sof tware that receives video streams of all digital video sources
or analog cameras from the network and stores the content on a hard disk. Because
they are IP based, Network Video Recorders can be managed remotely via a LAN or
over the Internet giving greater flexibility. Capable of recording at super high
resolutions and at speeds of up to 480 pictures per second, the NVR offers unmatched
versatility.
1.5. Quick Install Steps
Follow these steps to install the 8504E Video Server on your local network (LAN) :
1. Check the package contents against the list below.
2. Connect the Video Server. See page 10.
3. Set an IP address. See page 12 for information on the available methods.
4. Set the password. See page 10.
5. Connect with Internet Explorer.
6. Configure Video settings
7
Page 8

DVS-8504E User Guide
2. TECHNICAL SPECIFICATION
2.1. Hardware Specification
Model name : DVS-8504E
Video compression : Dual-stream H.264 / Motion JPEG
Video Resolution : 1CH / D1 720x480(NTSC) / 720x576(PAL)
2CH /2CIF 704x240(NTSC) / 704x288(PAL)
4CH / CIF 352x240(NTSC) / 352x288(PAL)
QCIF 176x120(NTSC) / 176x144(PAL)
Operating system : Linux (embedded)
Video bit rate : 64K/96K/128K/192K/256K/384K/512K/640K/768K/1M/1.5M/2M
Video frame rate : 1~30 FPS
Video quality : 5 level (medium, standard, good, detailed, excellent)
Video input : 4, BNC, 75ohm, 1Vp-p
Video output : 1, BNC, 75ohm, 1Vp-p
Digital zoom : 4x
Audio compression : ADPCM, G.711
Audio input : 4 channel microphone in
Audio output : 1 channel line out
Ethernet : RJ45, 10BaseT/100BaseTX
Power input : 12VDC, 2A
Digital Input/Output : 4DI, 2DO
PTZ control : RS485
Local storage : 3.5” HDD *1 (SATA-II)
2.2. System Requirement
If you use the unit, please check your PC hardware level.
PC Minimum System Requirement
Operating System Microsoft Windows XP
System Memory 512MB (1GB recommended)
Video RAM 64MB (128MB recommended)
Others Requires DirectX 9 preinstalled
8
Page 9

DVS-8504E User Guide
3. HARDWARE AND SETTING
3.1. Package Contents
1. DVS 8504E video encoder
2. 12V Power Adaptor
3. CD (User Manual)
4. PTZ control cable
3.2. Overview : Front panel
1. Hard disk box.
Use 3.5” HDD to record at local site
2. Reset button
Reset to factory default setting
z Press and hold the DVS 8504E front panel "Reset" button about 5 ~ 6
seconds and release. This will automatically restore factory settings.
z DVS 8504E default IP : 192.168.0.100
z If DVS 8504E is in DHCP environment, it will get IP address
automatically.
634
1
2
5
3. Network : RJ-45 connector
4. Video-in LED : Flash while video is working.
5. Hard disk LED : Flash while hard disk is reading or writing.
6. Power LED : Keep lighting while power on.
9
Page 10
DVS-8504E User Guide
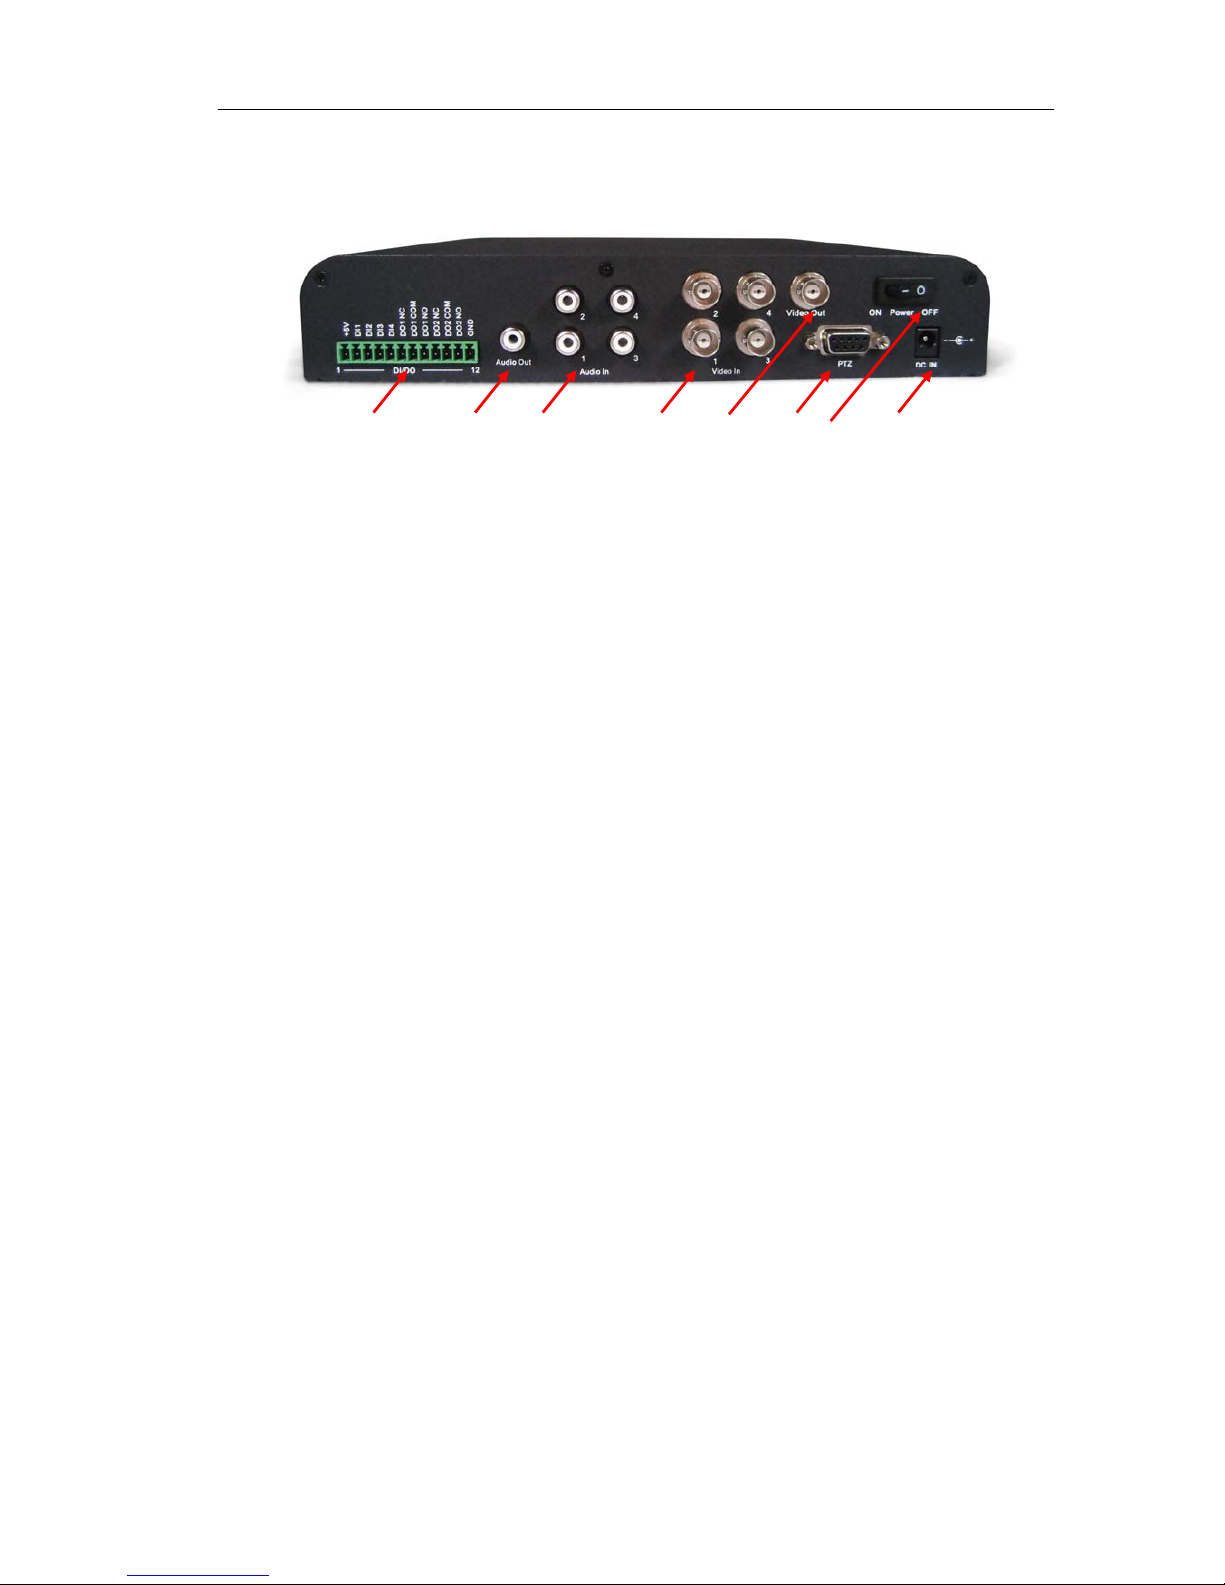
3.3. Overview : Back Panel
45
6
123
1. DI/DO. Please refer 7.2.2.1.
2. Audio out.
3. Audio in (x4)
4. Video in (x4)
5. Video out
6. PTZ control port. Please refer 7.1.1.
7. Power switch.
8. Power DC in.
10
Page 11
DVS-8504E User Guide
4. HOW TO ACCESS UNIT
4.1. Default Setting
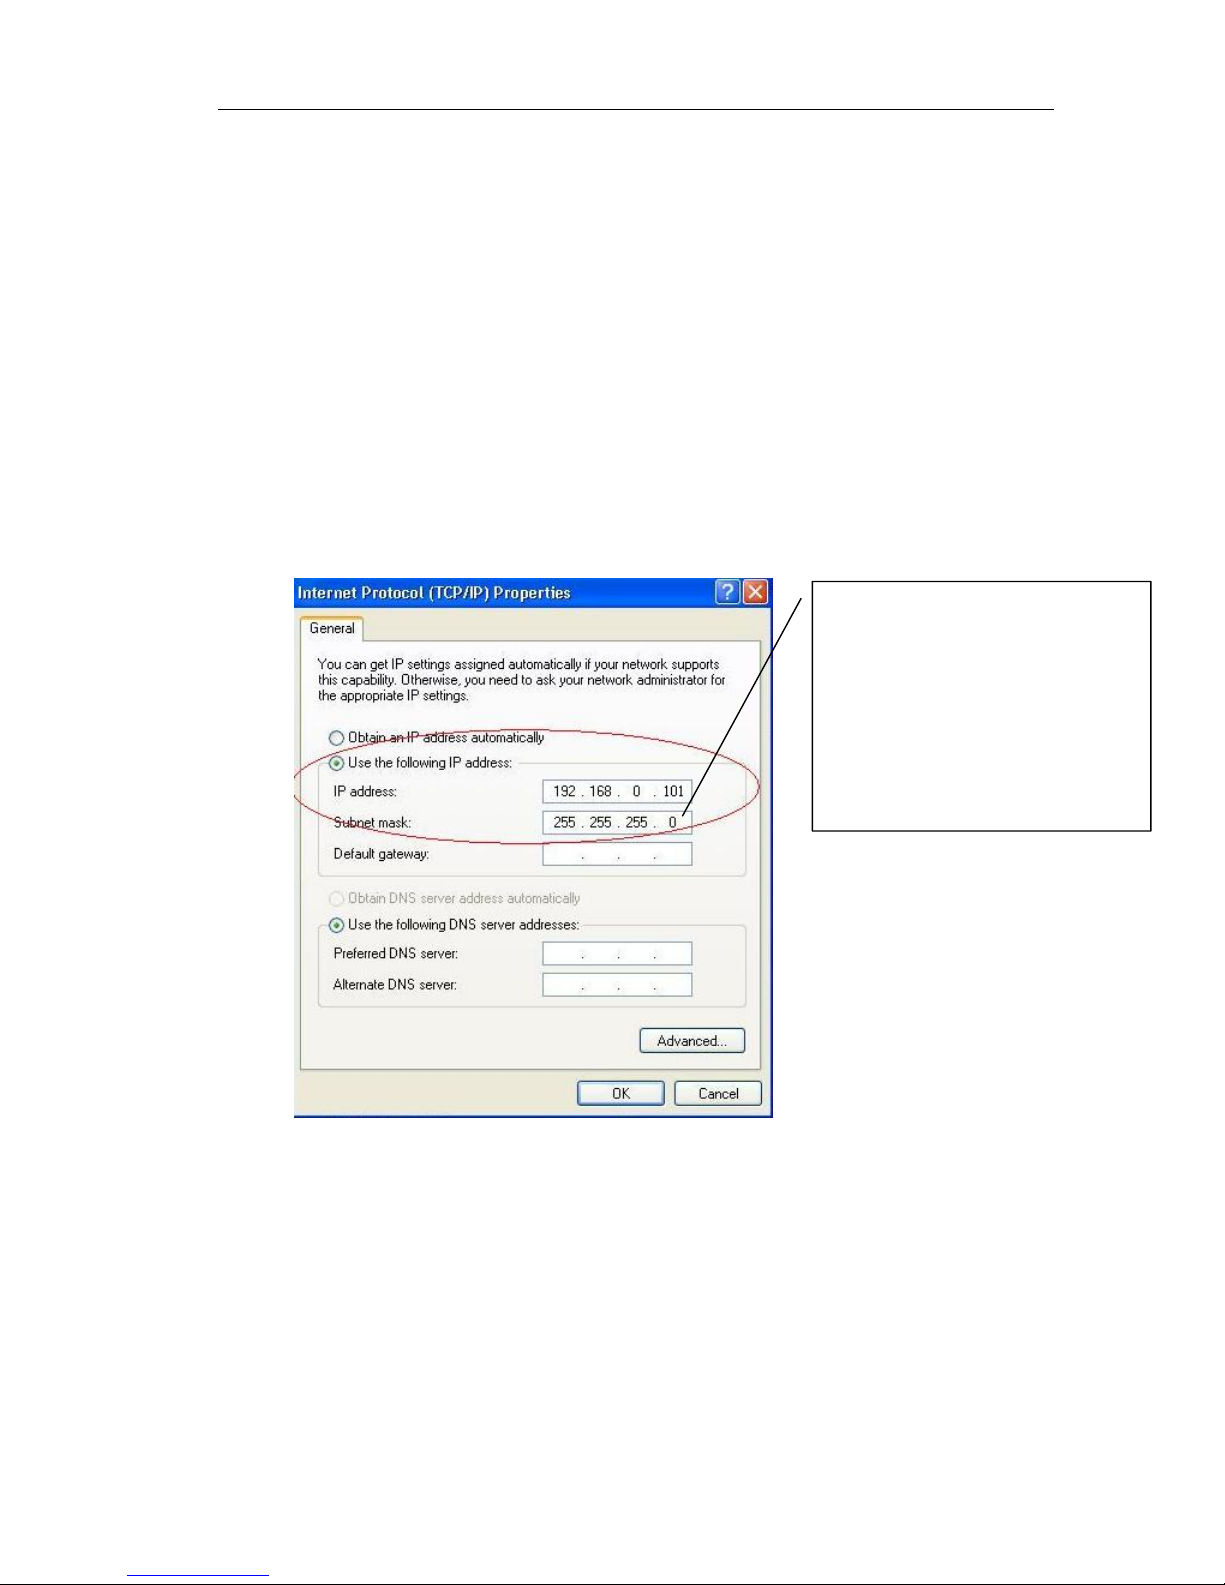
Connect the DVS-8504E with the computer through a UTP cable directly.
Execute Internet Explorer browser (I.E. is the only supported WEB browser
now). If there is a DHCP server in local LAN, please key-in the IP address
from DHCP server on address bar. If not, please use the default IP
“192.168.0.100” to access the device initially.
Please make sure the video server and your PC are on the same network
segment before running the installation. Check it out in the TCP/IP setting in
the “Local Area Connection Properties” of the DVS-8504E under the
“Network Connection”.
Set up your LAN IP here as below:
IP address: 192.168.0.XXX
Subnet mask: 255.255.255.0
Note:
XXX from 1 to 254, except
the number that already assigned
to the device. (Here it is 100)
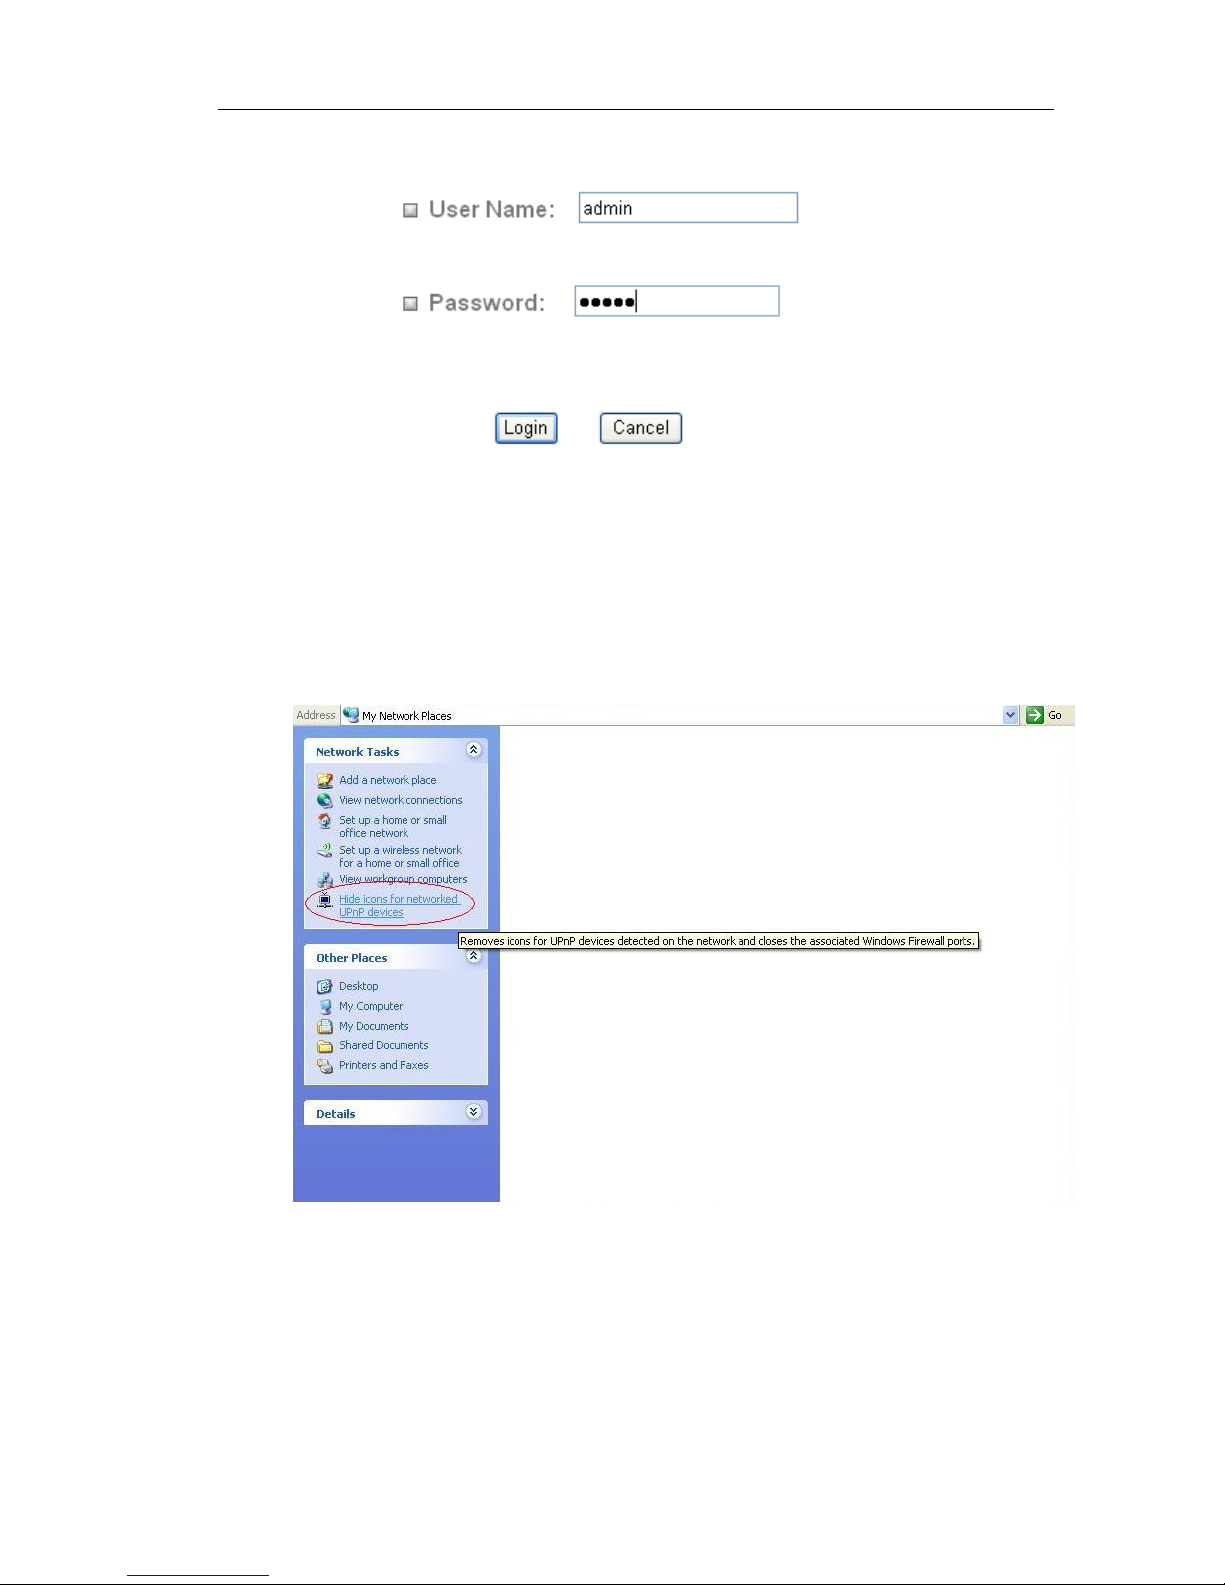
When the connection is successful, the login page will show up in the I.E
browser. The default username and password are both “admin”
11
Page 12
DVS-8504E User Guide
Note : Default username and password can be changed by clicking “Account” then
clicking “Admin”
4.2. Windows UPnP
Open the Windows UPnP in “My Network Places” to show the detected
UPnP devices normally. (Refer to the red circle in the below picture)
When the DVS is connected to the LAN properly, the Windows UPnP will
show the corresponding icon in the list.
12
Page 13
DVS-8504E User Guide
4.3. CTCU UPnP Finder
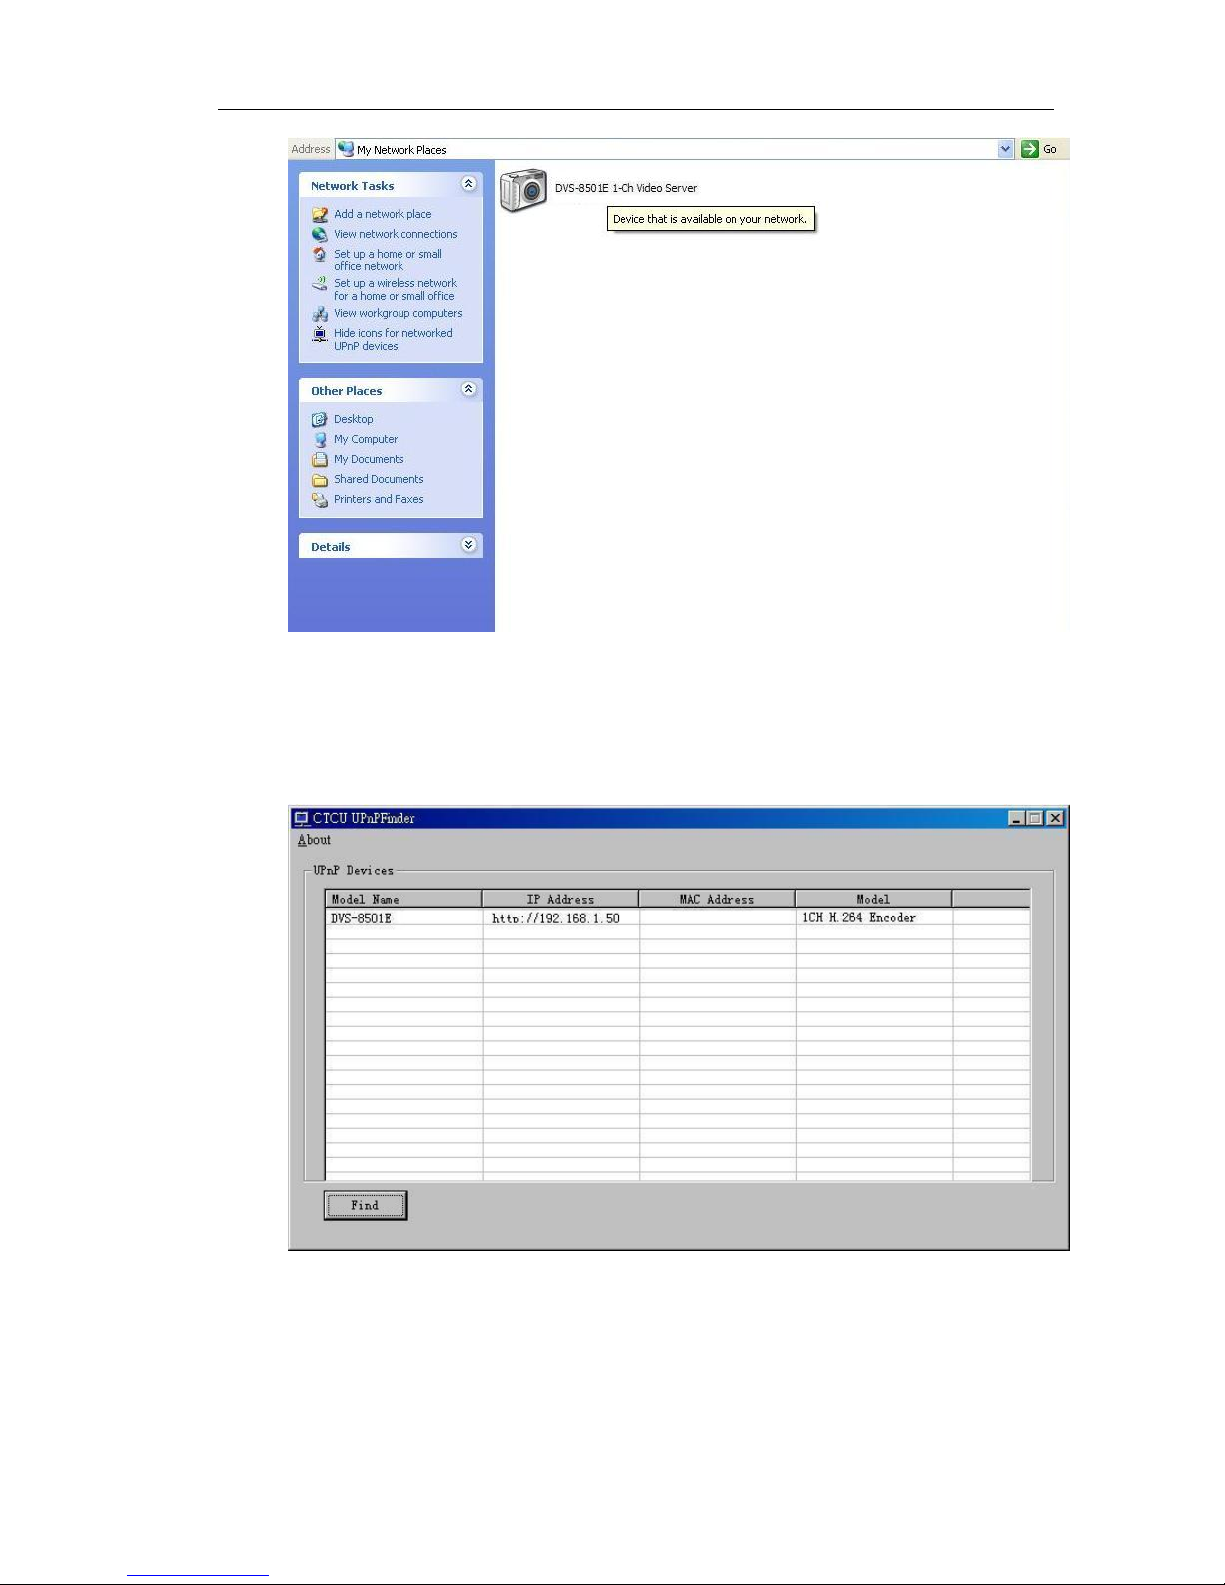
Besides Windows UPnP, CTCU UPnP Finder can also help detect the UPnP
devices that are connected to the network.
13
Page 14
DVS-8504E User Guide
5. HOME PAGE SETTING
5.1. Live View
5.1.1. ActiveX Installation
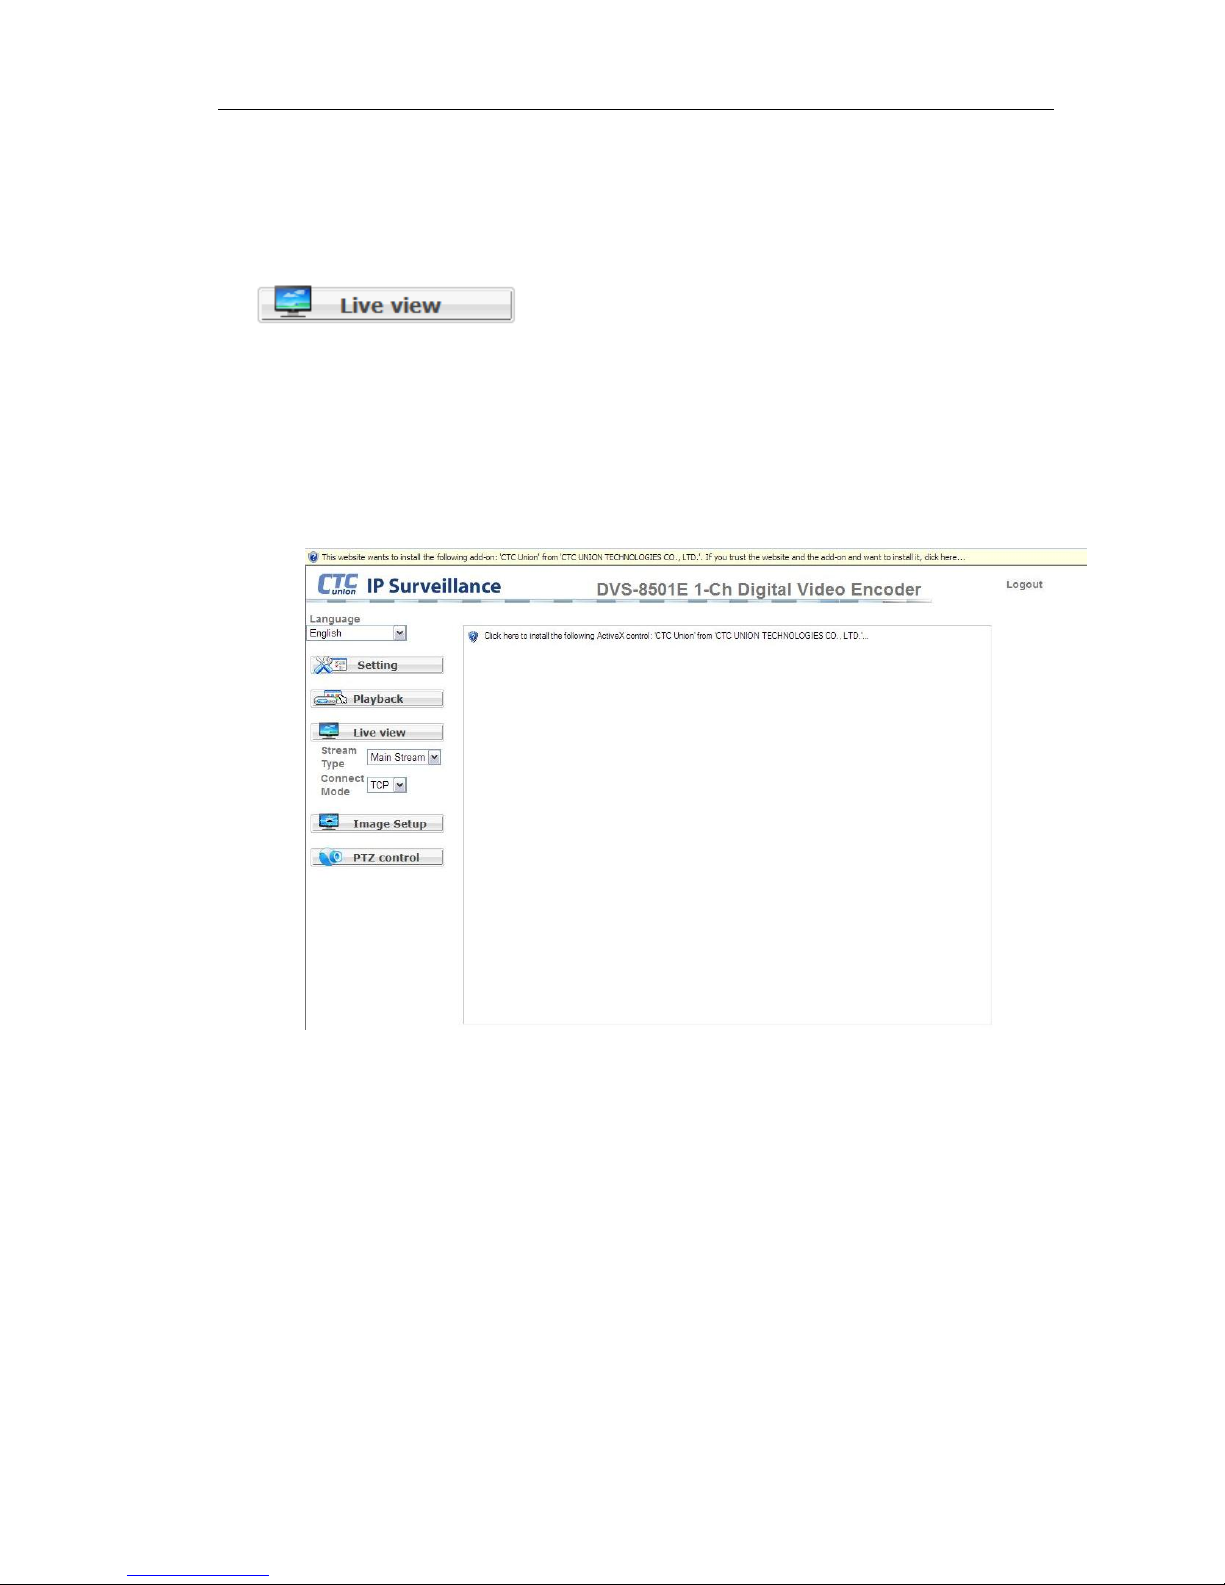
The first time the DVS is accessed though I.E. browser, users have to
install the add-on ActiveX for the normal activation of the ActiveX viewer.
Execute the I.E. and log in the DVS, users will find a slight yellow bar
indicated the reminder of ActiveX installation. Click on the bar and allow
the install.
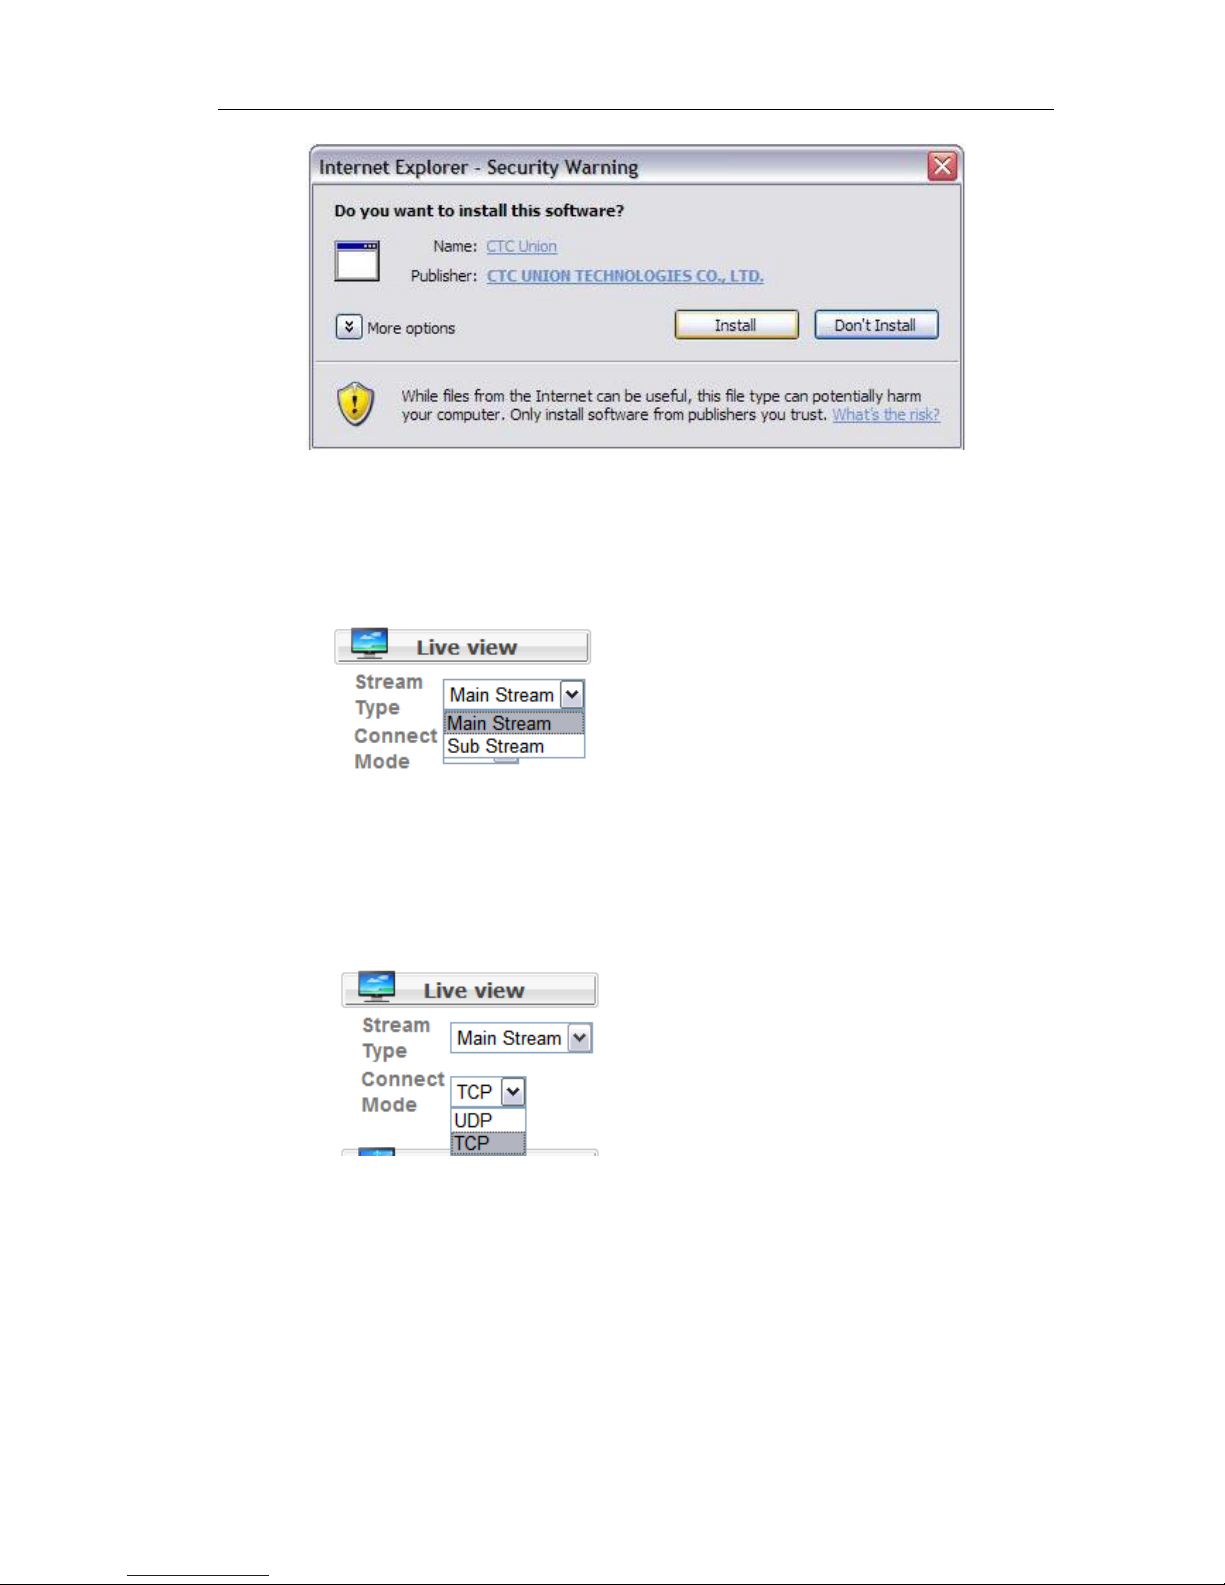
After allowing the ActiveX download, a dialog will show up several seconds
later. Click on “Install” to start the installation of the ActiveX.
Note : ActiveX is only supported in Microsoft Internet Explorer. If you use
any other browser (Firefox, Chrome, etc.) to open the DVS configuration
page, it will not be capable of displaying any video stream.
14
Page 15
DVS-8504E User Guide
After the installation is completed, users are able to see the ActiveX V iewer
interface. (Please refer to 5.1.4. ActiveX Viewer)
5.1.2.
Main / Sub Streaming
Choose to watch “Main Stream” or “Sub Stream” here from the
dropdown list. For Main Stream and Sub Stream set up, please refer to
Chapter 6.3.
5.1.3.
TCP / UDP Connection
Choose “UDP” or “TCP” connect mode here from the dropdown list
5.1.4. ActiveX Viewer
15
Page 16
DVS-8504E User Guide
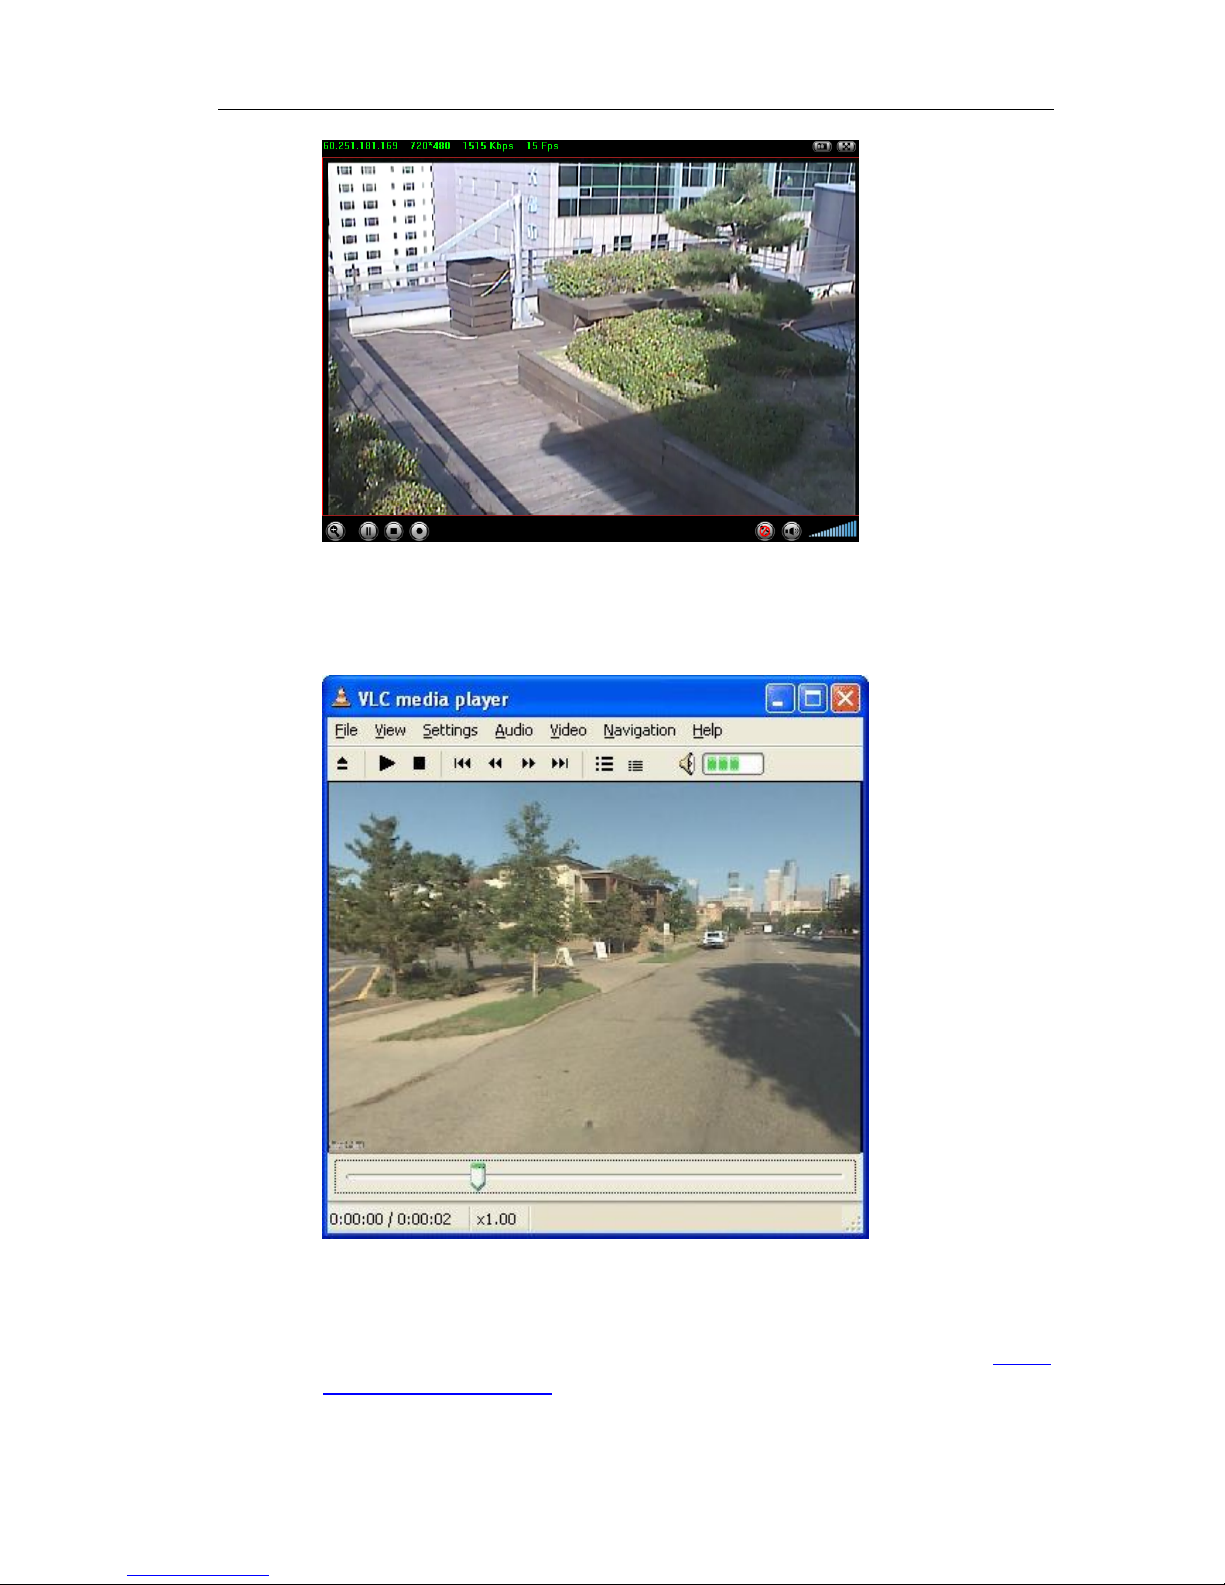
Above is the ActiveX viewer which will show up when users use I.E.
Browser to access the video of DVS-8504E
5.1.5. RTSP Viewer Support
Users can also use other media player to play the RTSP stream. We
recommend using VLC media player to watch the RTSP stream because
VLC can support the H.264 video compression format. Users can freely
download VLC player by logging on to VLC official website http :
//www.videolan.org/vlc/
16
Page 17
DVS-8504E User Guide
5.2. Image Setup
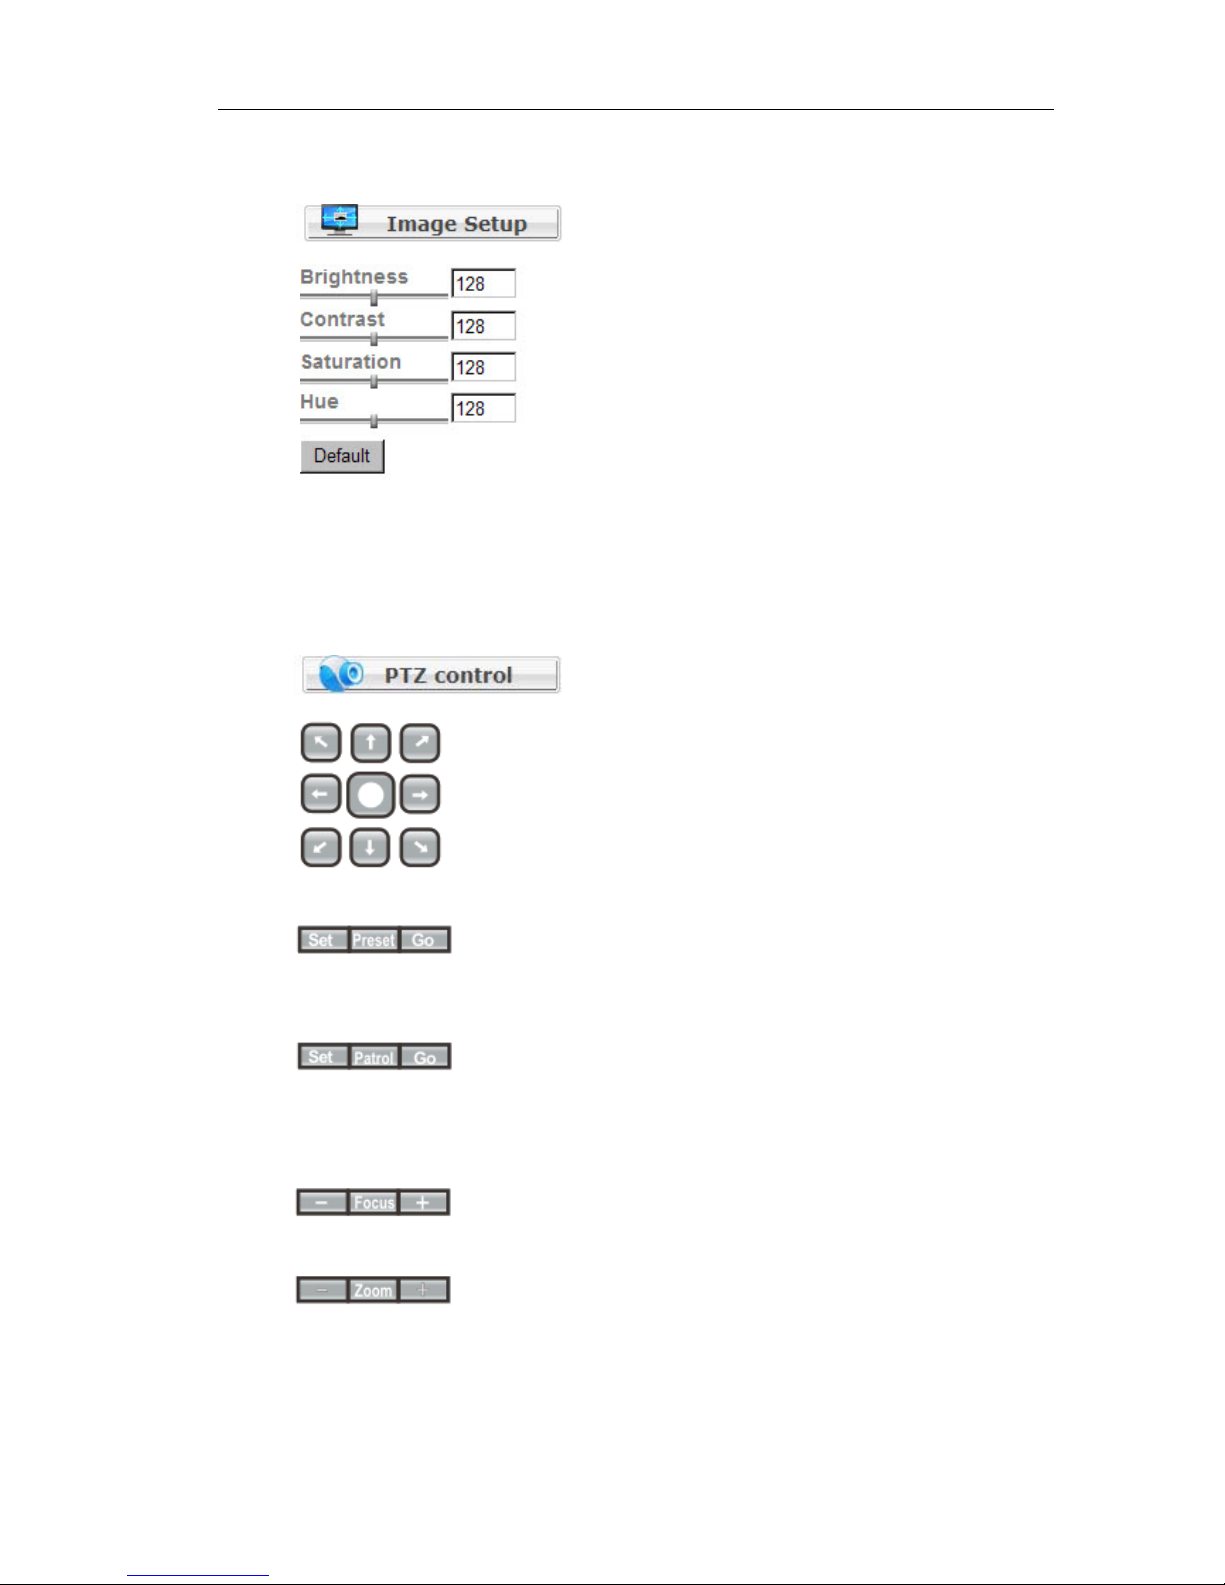
Move the slider to setup brightness, contrast, saturation, and hue. Click on
the “Default” button to go back default setting.
5.3. PTZ Control
Click these directional buttons to control PTZ camera.
Click “Set” to add a camera preset point. Click “Go” to direct camera to
preset points.
Click “Set” to select patrol mode. Click “Go” to patrol. Before using this
feature, please go to “Setting” Æ “Advance” Æ “Patrol” to set the patrol
mode.
Adjust camera focus.
Adjust camera zoom in or out.
Please refer to Chapter 7.1 for detailed PTZ control set up.
17
Page 18
DVS-8504E User Guide
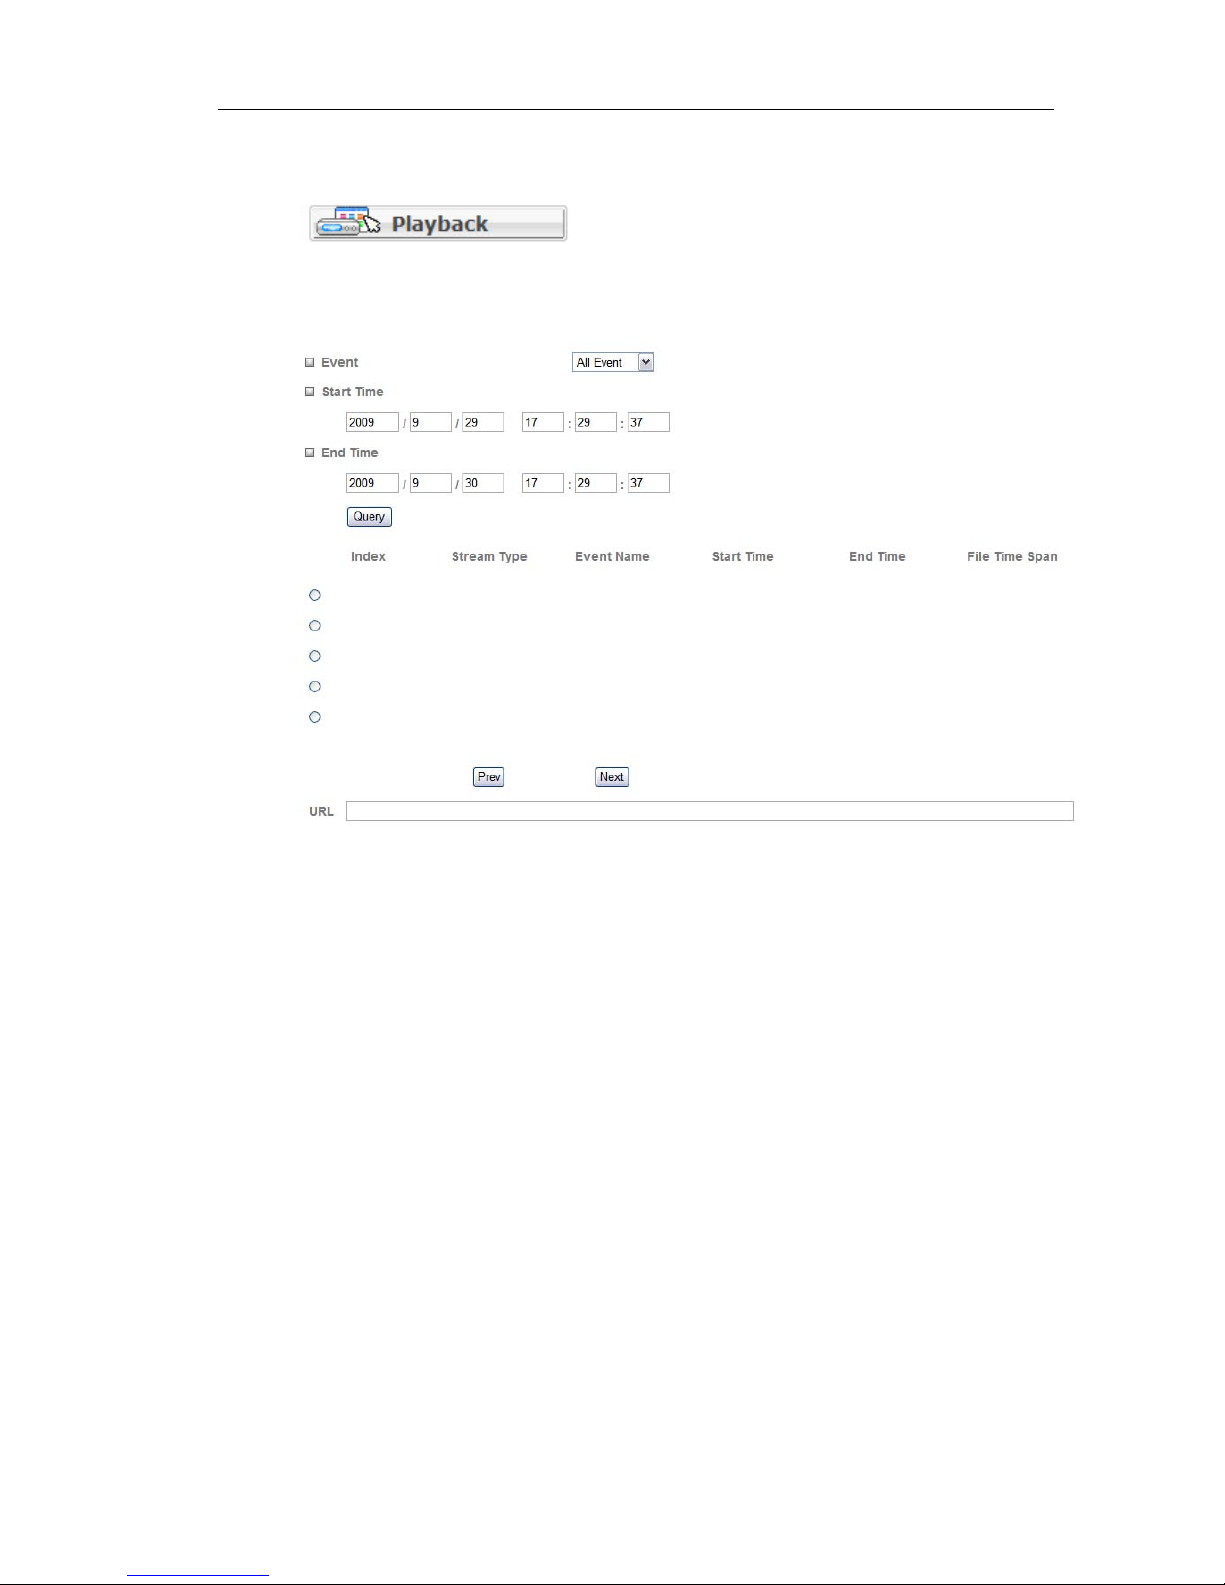
5.4. Playback
Look up recorded video by channel, event, and period time.
Selecting the event, setup the demand period, and then click on “Query”.
Users can get the video record that fits the search condition for playback.
18
Page 19
DVS-8504E User Guide
6. BASIC SETTING
There are four settings in this sub-menu, including “System”, “Work mode“,
“Channel parameter” and “Network”
6.1. System
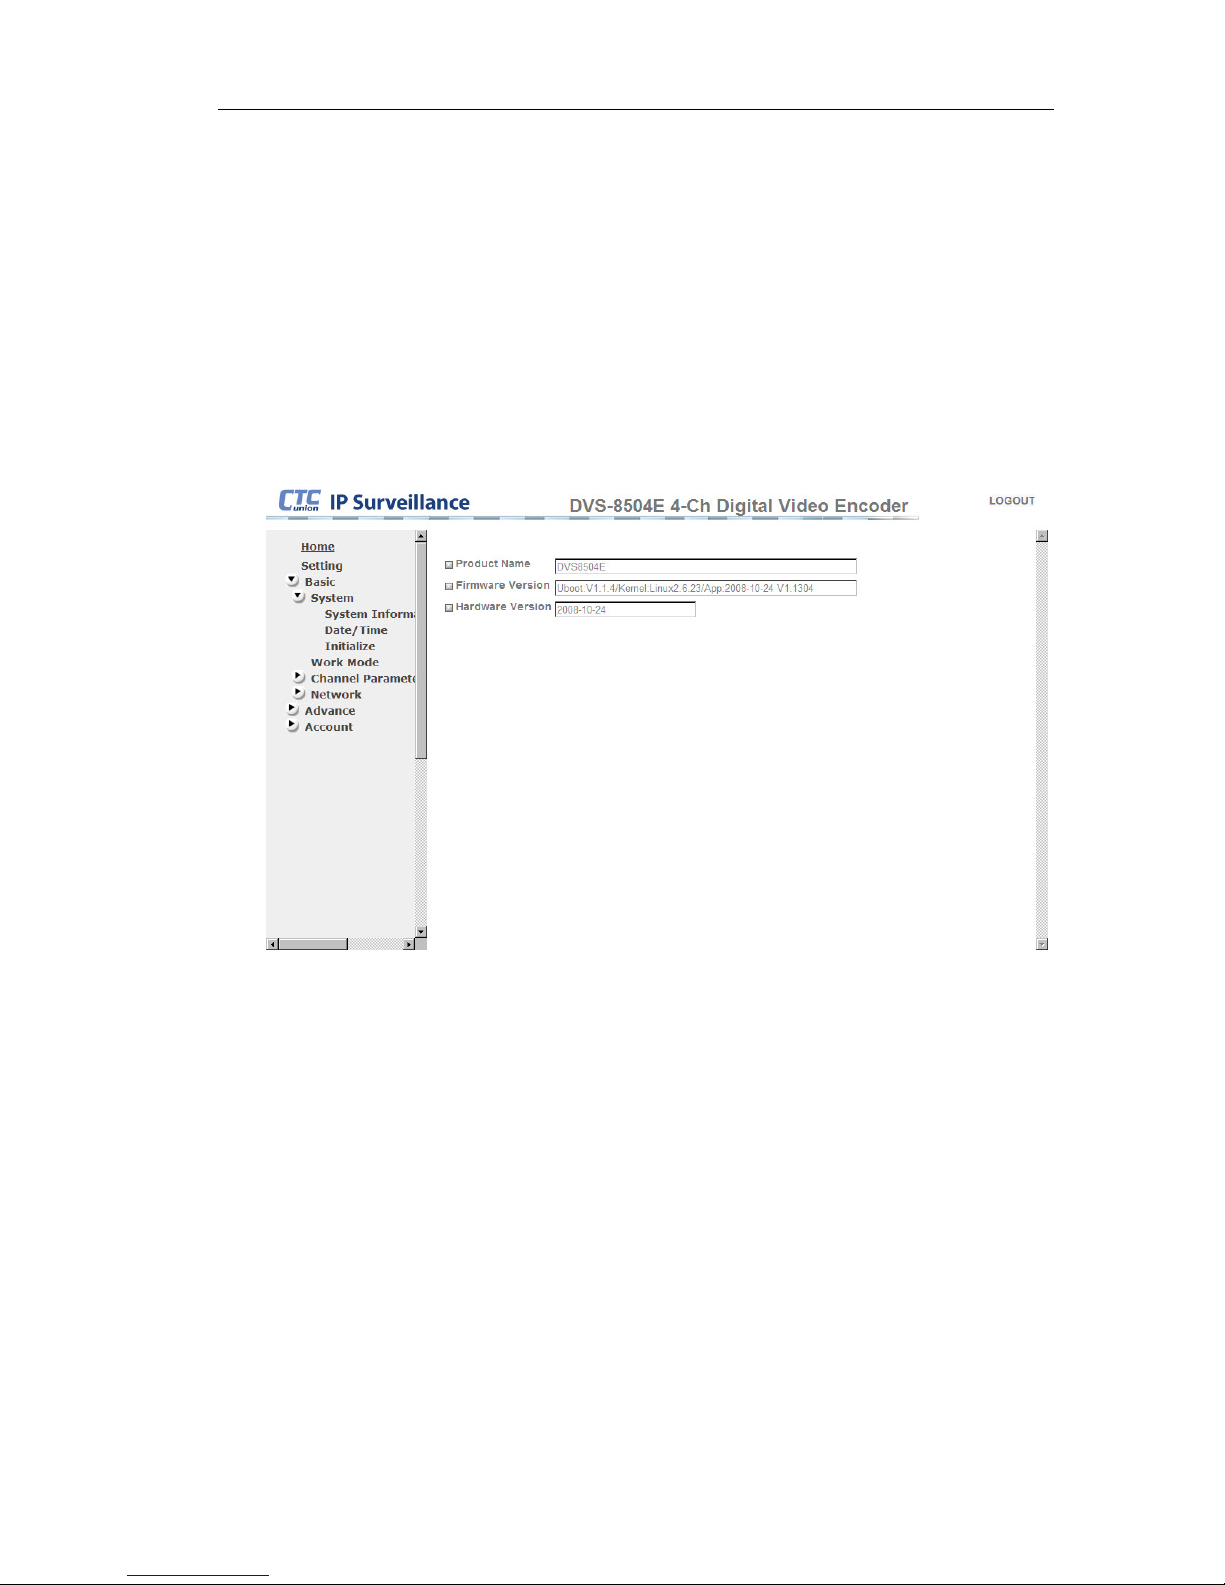
6.1.1. System Information
This page includes information on “Product name”, “Firmware Version”,
and “Hardware version”.
19
Page 20
DVS-8504E User Guide
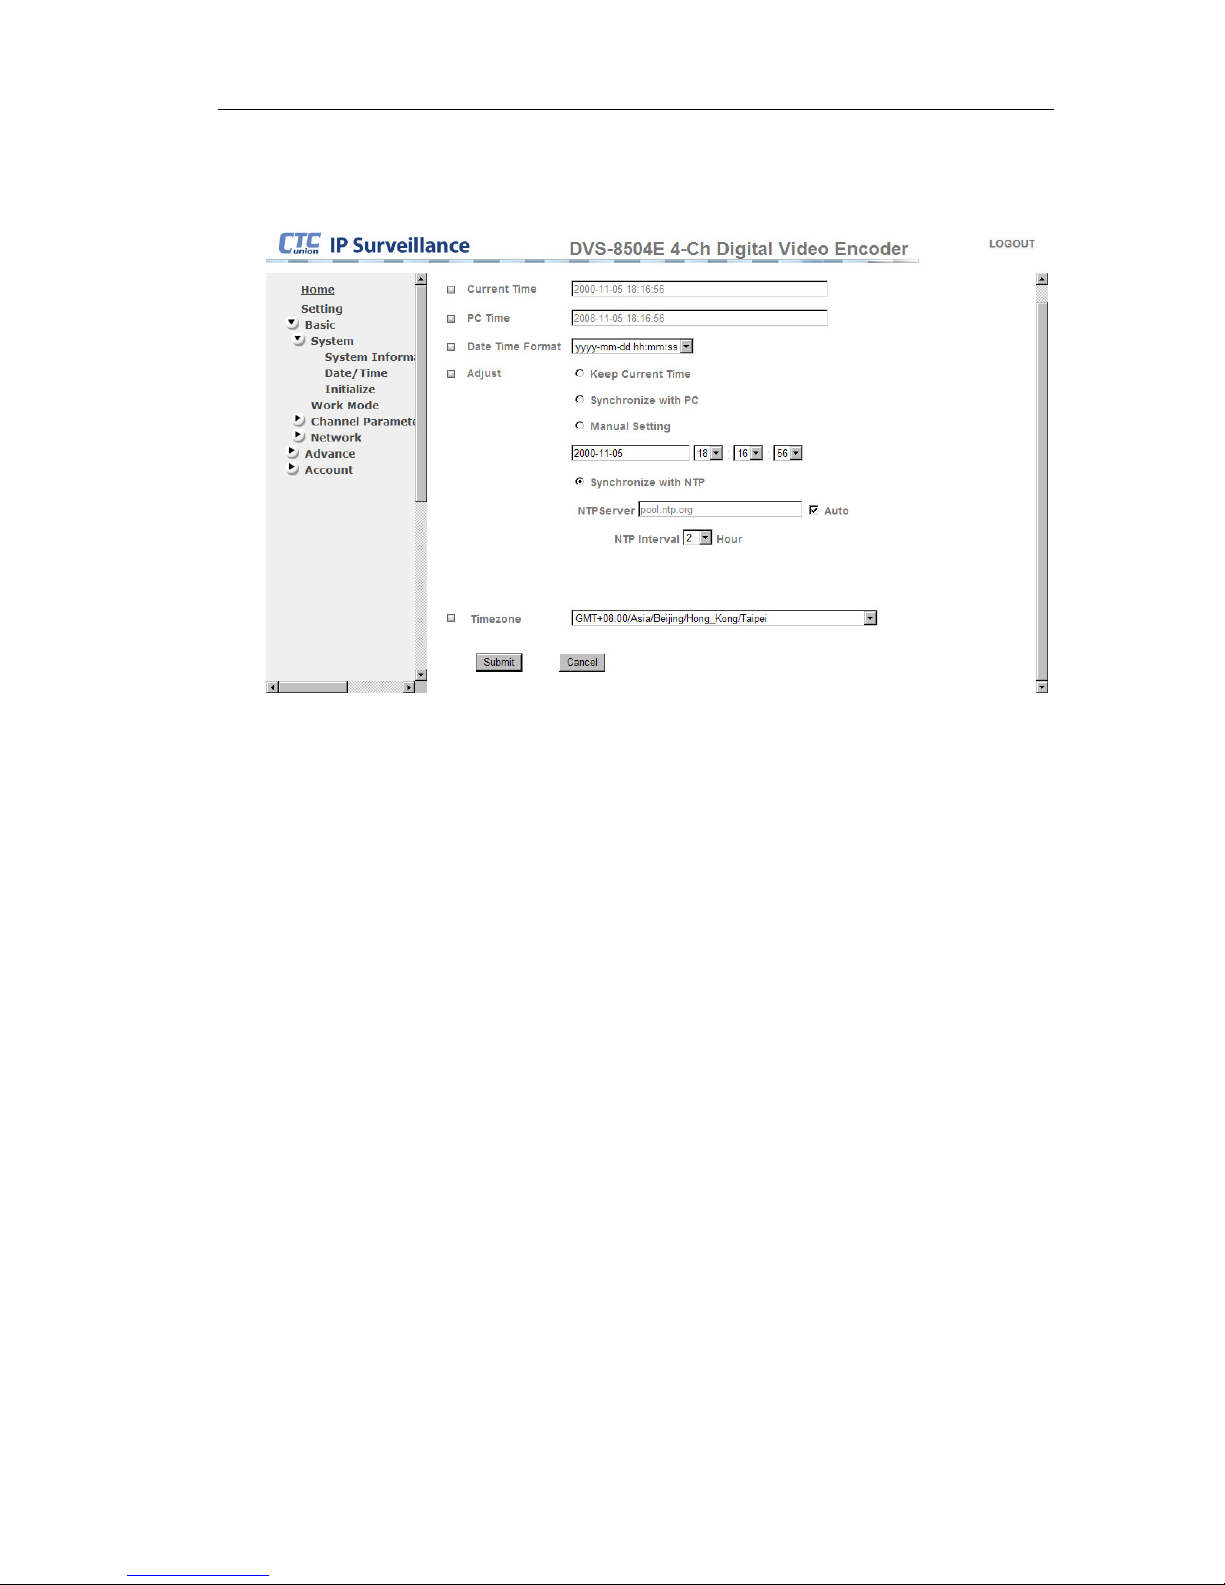
6.1.2. Date/ Time
z Current time : Shows the current time of this device.
z PC Time : Shows the current time of controlling PC.
z Date Time Format : Select the display format for time. For example :
yyyy-mm-dd hh : mm : ss (Year - Month - Day Hour : Minute : Second)
z Adjust : Four ways to update server time.
◎Keep Current Time : Remain device current time.
◎Synchronize with PC : Synchronize with controlling PC
◎Manual Setting : Select this mode to manually adjust the date and time
of this device.
◎Synchronize with NTP : Refresh interval to synchronize the date and
time of this device with those of the time server,
known as NTP (Network Time Protocol) server.
z NTP Server : Input NTP server name or IP address. No more than 64
characters.
z Time zone : Choose time zone and time difference from Greenwich Mean
Time in the area where the device is installed from the pull-down box.
20
Page 21
DVS-8504E User Guide
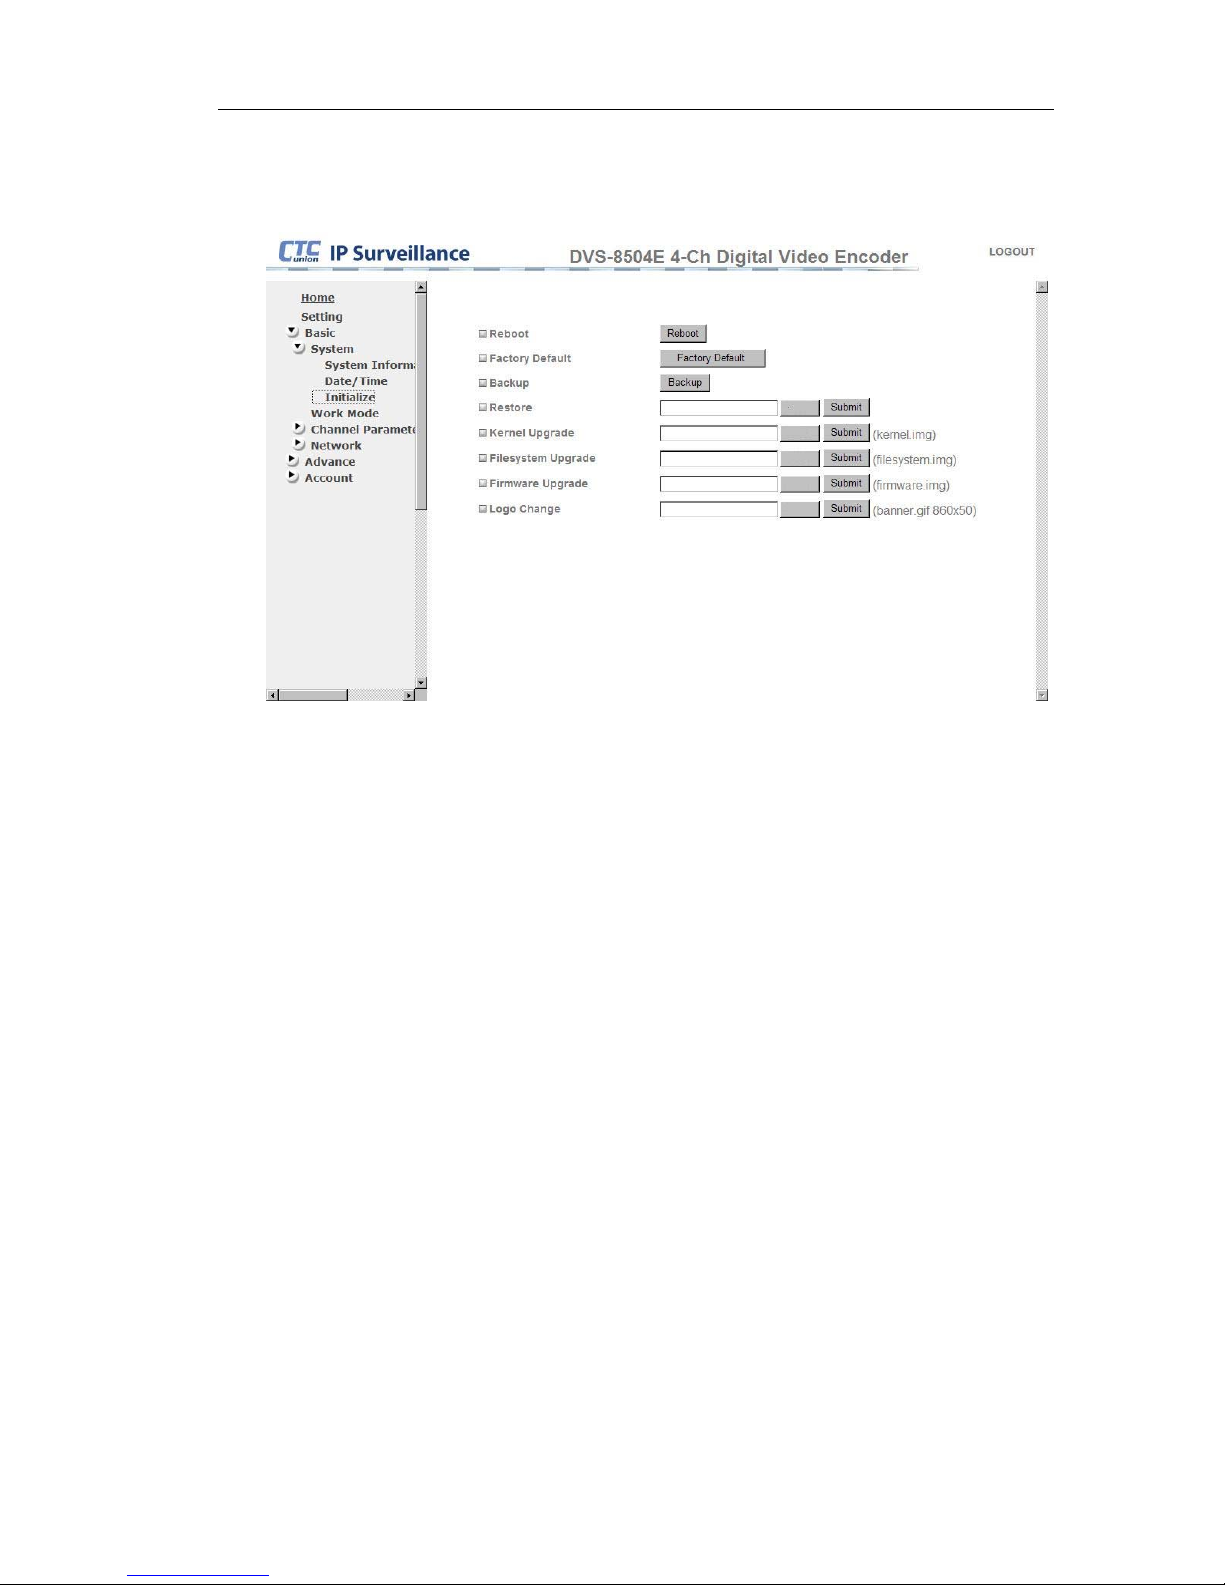
6.1.3. Initialize
z Reboot : Click this button to reboot the device.
z Factory default : Click this to get back factory defaults. After reset, server
will reboot automatically.
z Backup : Click to save a config file on PC.
z Restore : Click to restore a config file from PC to server. All settings can
be restored to a previous state.
z Kernel upgrade : Click to upgrade device k ernel.
z File system upgrade : Click to upgrade dev ice file system.
z Firmware update : Click to upgrade firmware.
z Logo update : Click to change homepage logo. Please use 850x50 gif
formats to replace old one.
21
Page 22
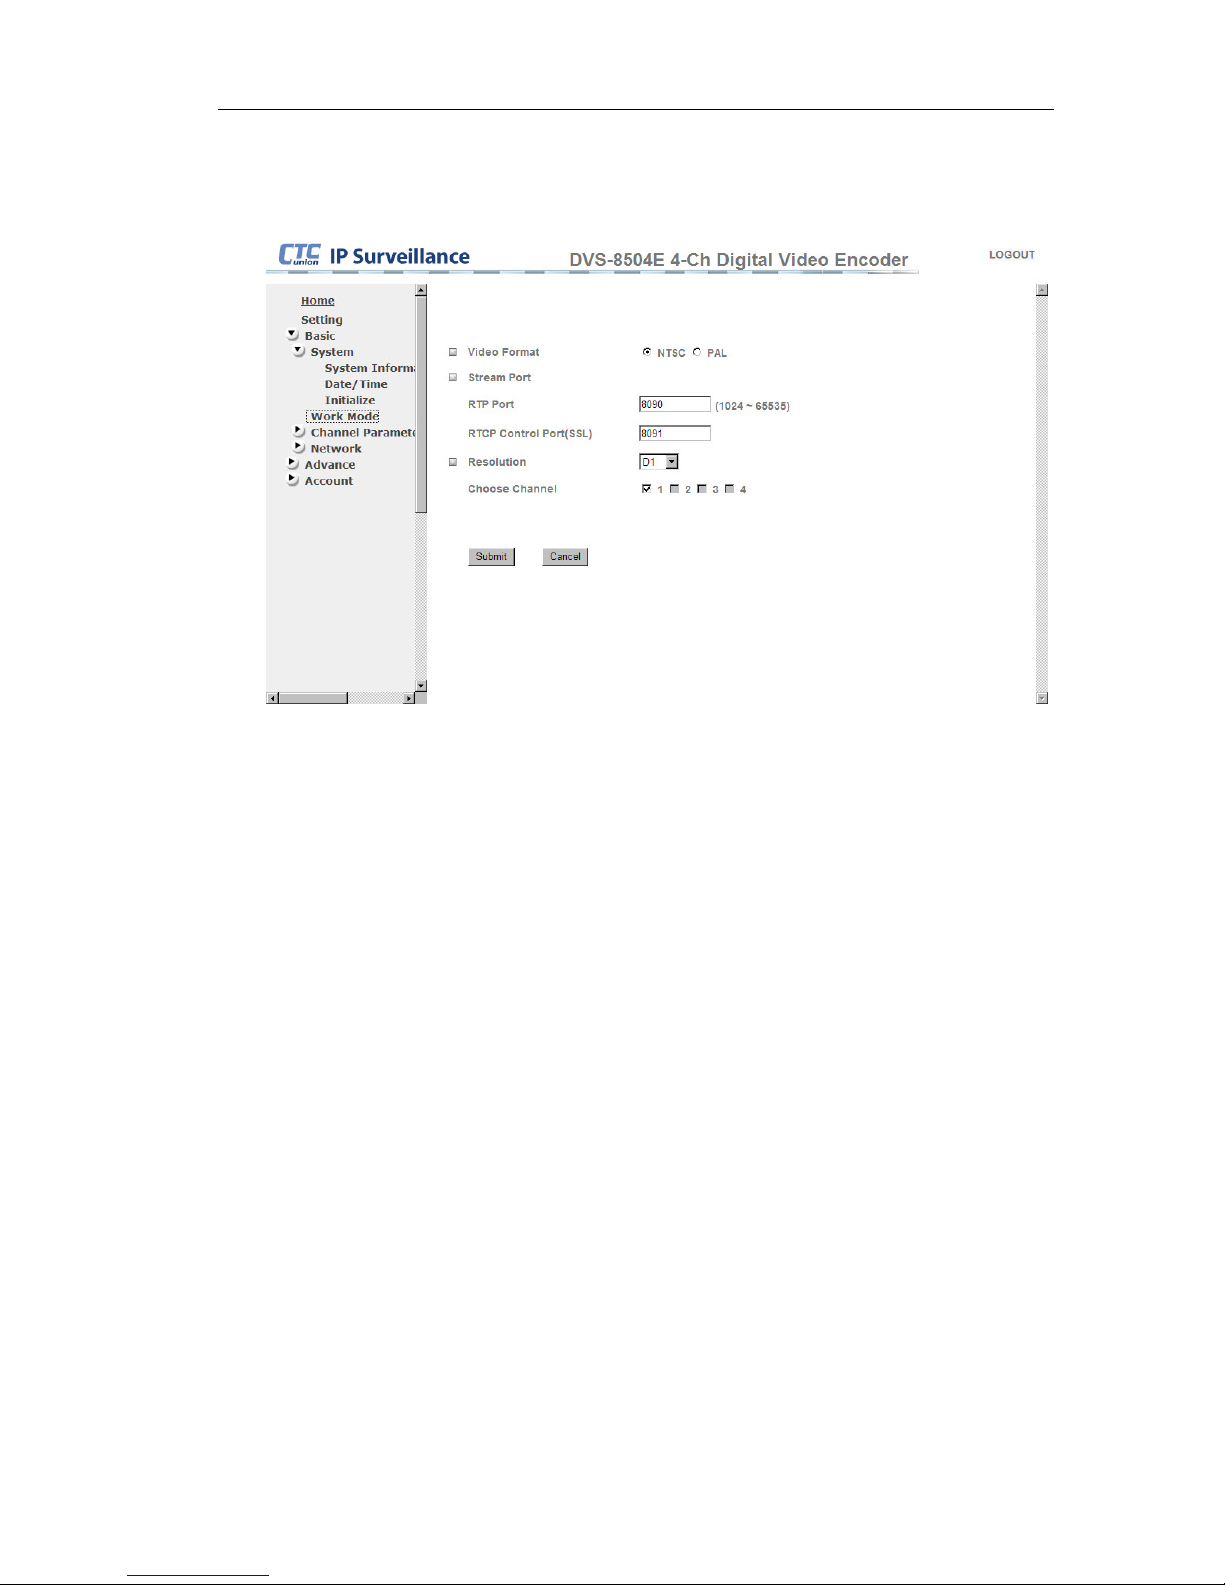
DVS-8504E User Guide
6.2. Work mode
6.2.1. Video format
Video format : One of two formats can be selected. NTSC or PAL
6.2.2. Steam Port
RTP Port : Input RTP protocol port. User can use software which
supports RTP steaming to watch video. (Range 1024 ~ 65535)
RTCP control port (SSL) : Input RTCP protocol port. User can use
software which supports RTCP steaming to watch video.
6.2.3. Resolution
Resolution : Click pull-down menu to choose resolution.(CIF,D1 or 2CIF)
Choose channel : Click checkbox to choose channel. Supports four
channels in CIF. Supports two channels in 2CIF. Supports only one
channel in D1.
22
Page 23
DVS-8504E User Guide
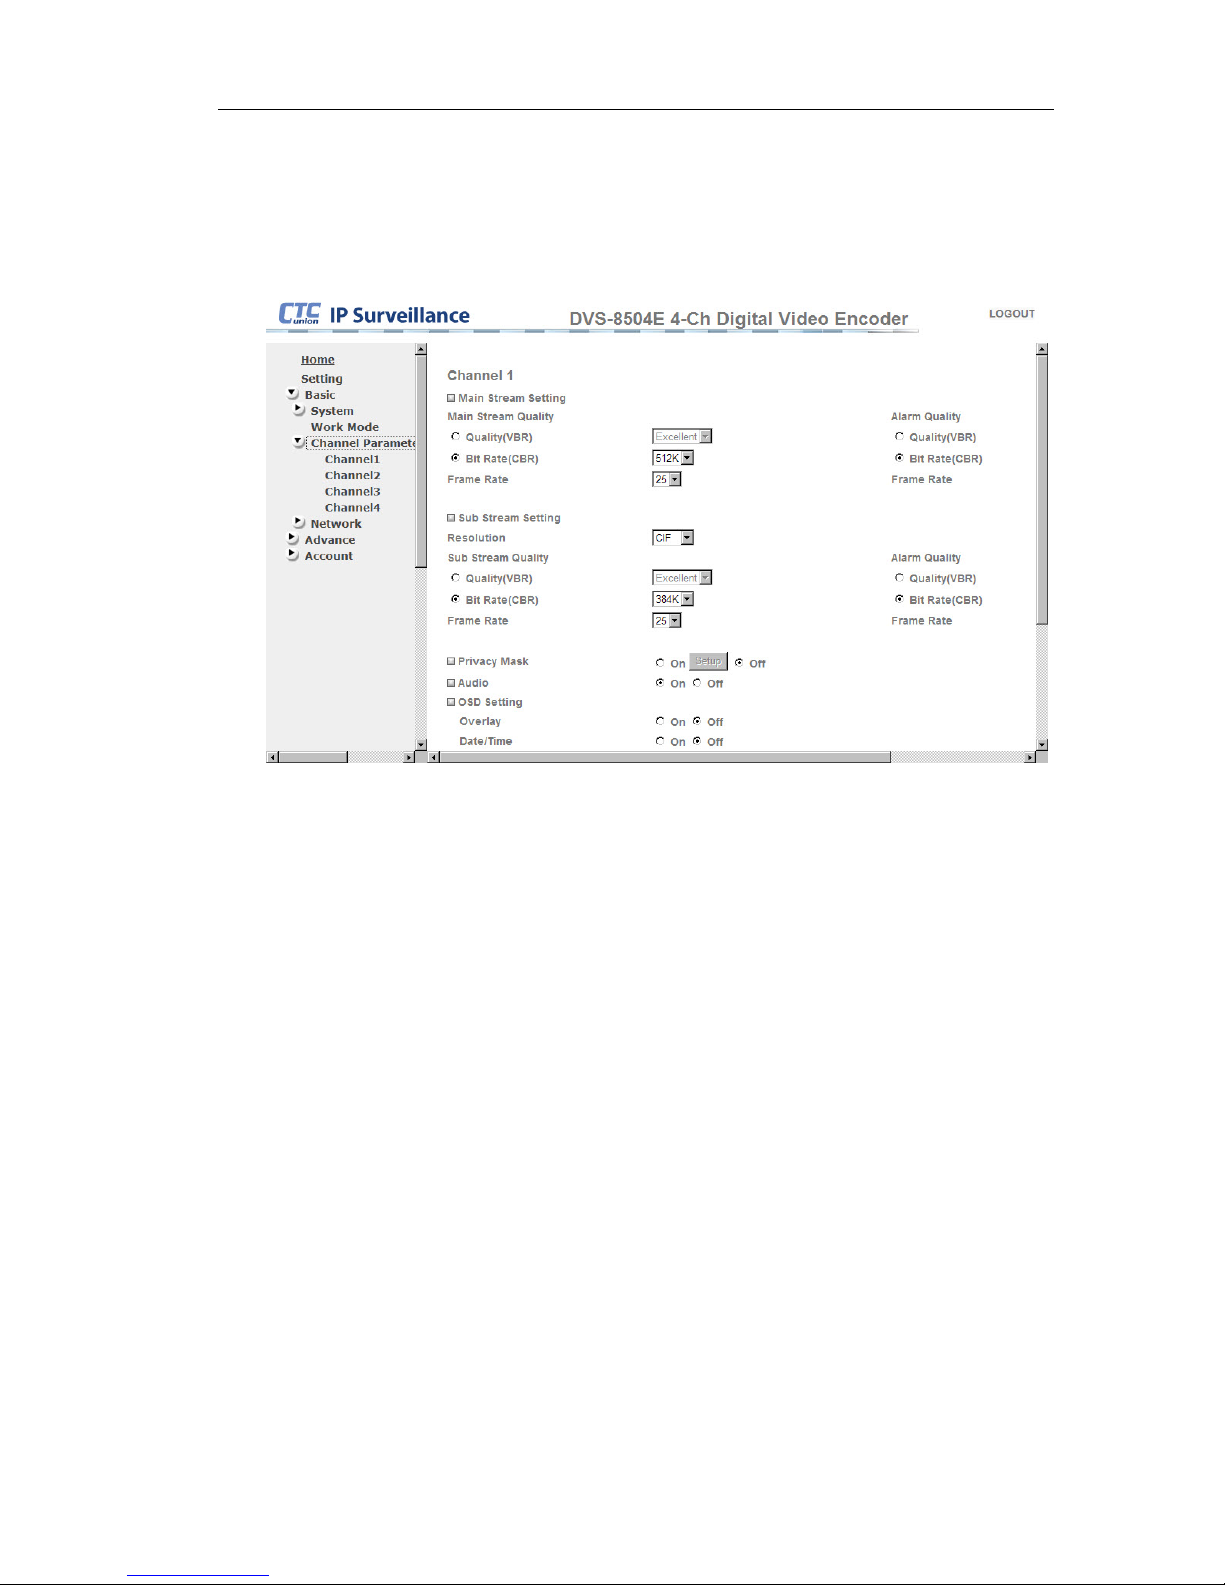
6.3. Channel parameter
There are four channels support in this setting. Each channel has an
independent setting page.
6.3.1. Main stream setting
Main stream quality : VBR (Variable bit rate) – Bit rate is variable
depending on video quality.
CBR (Constant bit rate) –Fix video bit rate.
Frame rate : Set picture transferred per second. Maximum is 25 frames in
PAL mode or 30 frames in NTSC mode.
Alarm Quality : All parameter are the same above.
6.3.2. Sub stream setting
Sub stream setting : All parameter have same meaning as with main
stream.
6.3.3. Privacy mask
Privacy mask : To activate select “on”, and then click “setup”. This will
hide the selected region from normal view.
23
Page 24

DVS-8504E User Guide
6.3.4. Audio
Audio : Turn on or off audio.
6.3.5. OSD Setting
OSD (On screen display) setting :
Overlay : Turn on or off overlay text.
Date time : Turn on or off date stamp shown on screen.
Text color : Choose OSD text color.
Background color : Choose background color of OSD.
Alias : Channel alias
Display position : Text display position on screen.
24
Page 25
DVS-8504E User Guide
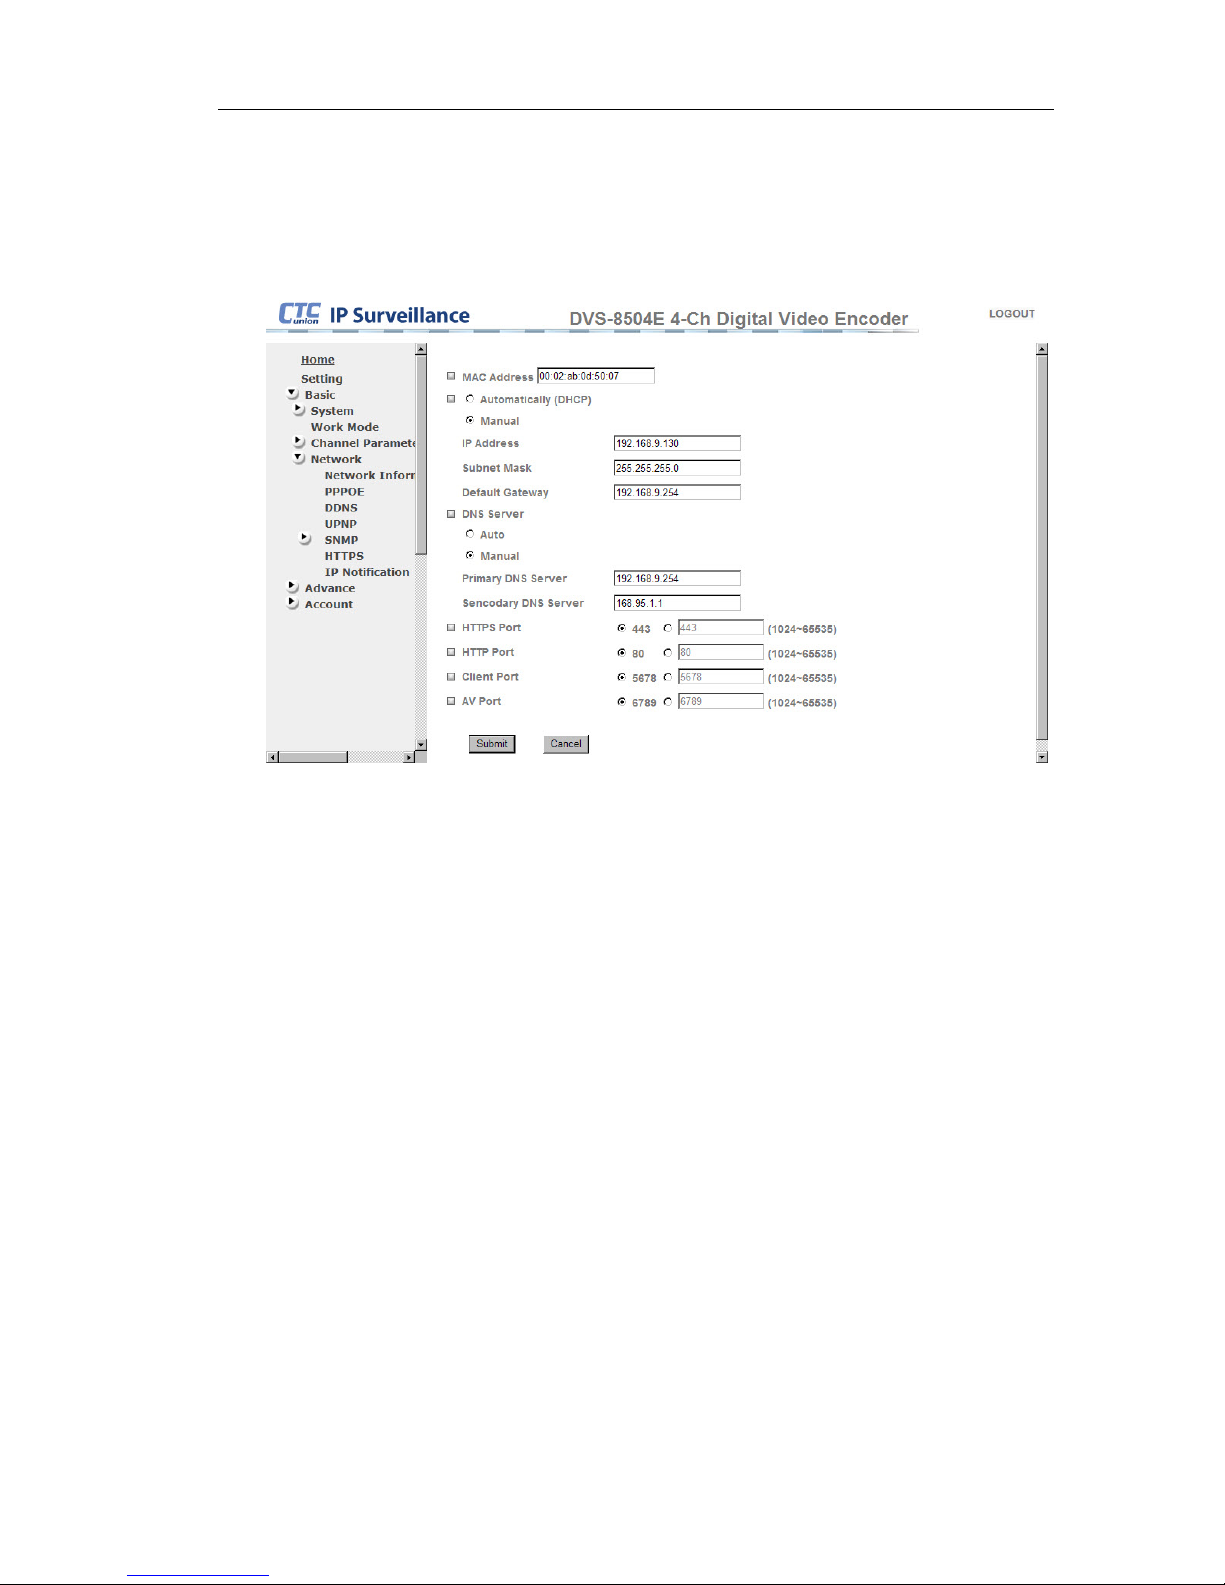
6.4. Network
6.4.1. Network Information
• MAC address : Shows the device MAC address.
• Automatically(DHCP) : Set device to DHCP client mode
• Manual : Manually set IP, subnet and default gateway.
• DNS Server
o Auto : Get DNS server IP automatically via DHCP.
o Manual : Set DNS IP manually.
o Primary DNS : Input primary DNS server IP address here.
o Secondary DNS : Input secondary DNS server IP address here.
• HTTPS Port : Set to connect by default https port 443 or range 1024~65535
• HTTP Port : Set to connect by default http port 80 or range 1024~65535
• Client Port : Define client device connect to encoder by which port.
• AV Port : Port of video service stream. 6789, or set manually (range
1024~65535)。
25
Page 26
DVS-8504E User Guide
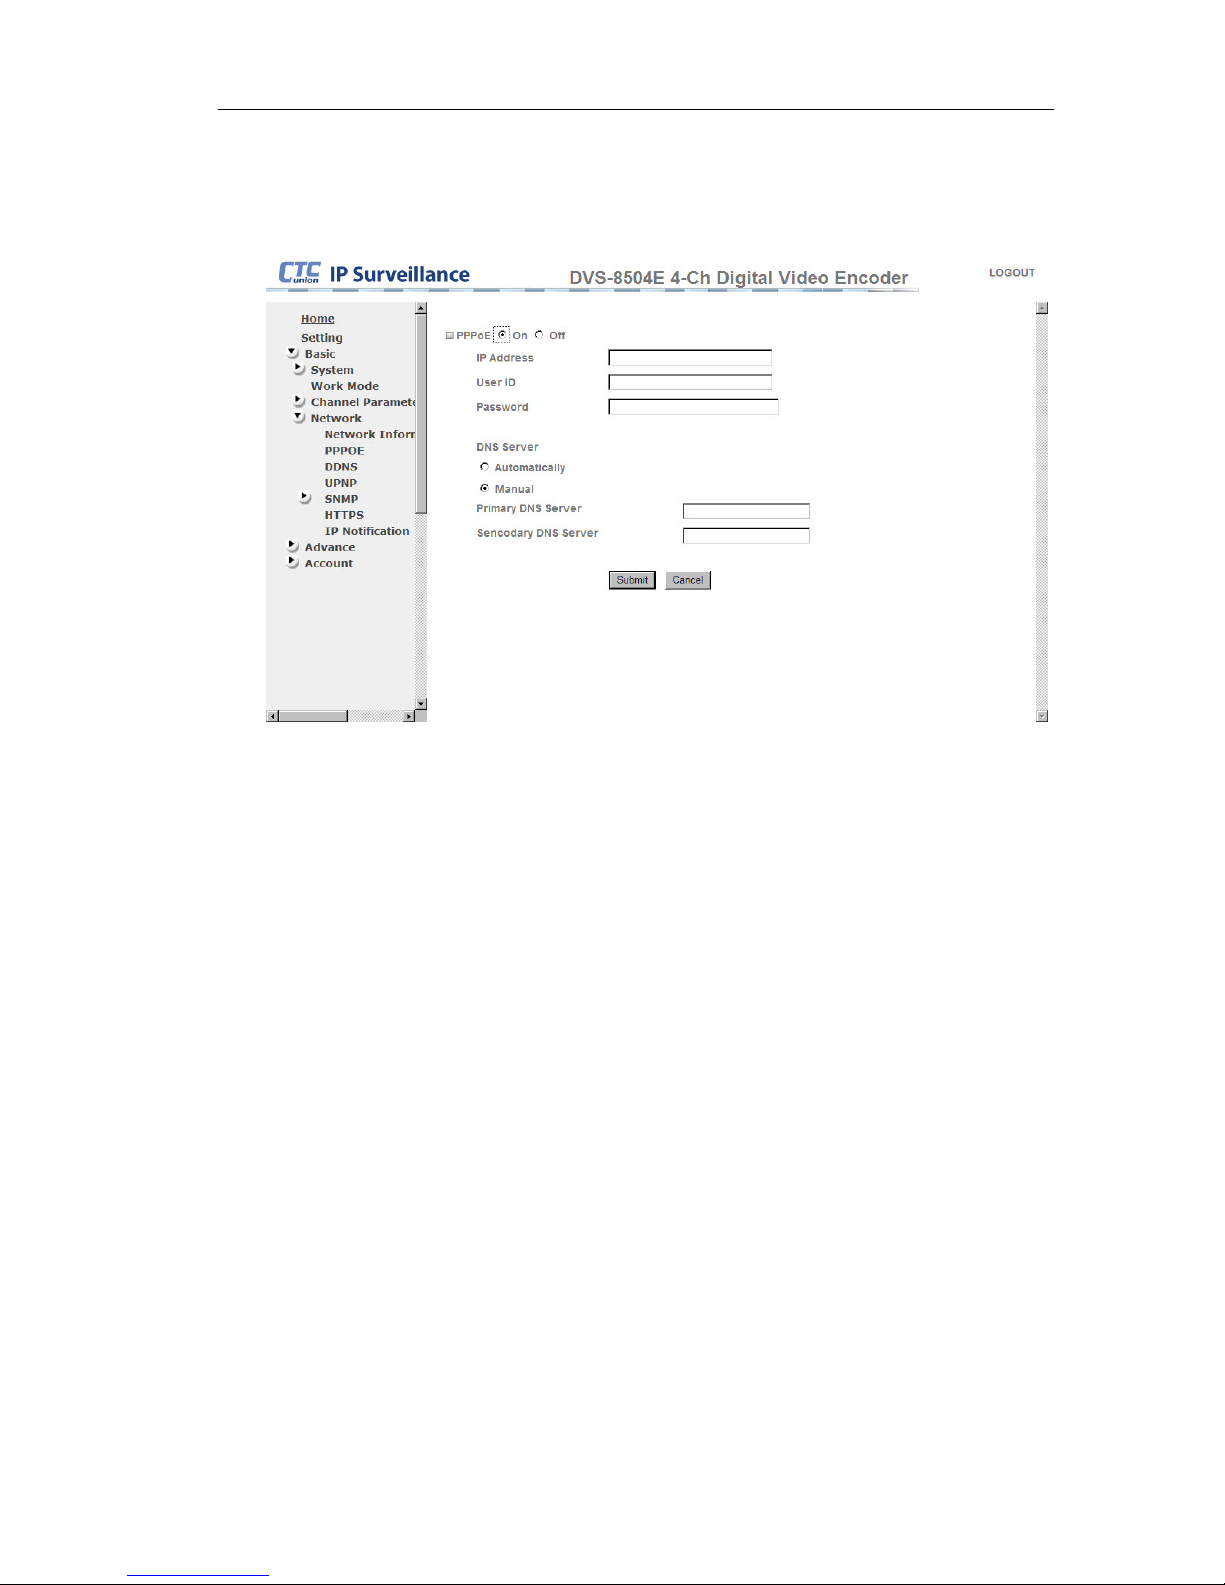
6.4.2. PPPOE
Set to connect to Internet by PPPoE.
z IP address : Read-only. IP address from PPPoE service.
z Username ID : PPPoE username ID. Usually get from ISP.
z Password : PPPoE authentication password. Usually get from ISP.
z DNS Server
Automatically : Get DNS IP automatically.
Manually : Set DNS IP manually.
Primary DNS : Input primary DNS server IP address here.
Secondary DNS : Input secondary DNS server IP address here.
26
Page 27
DVS-8504E User Guide
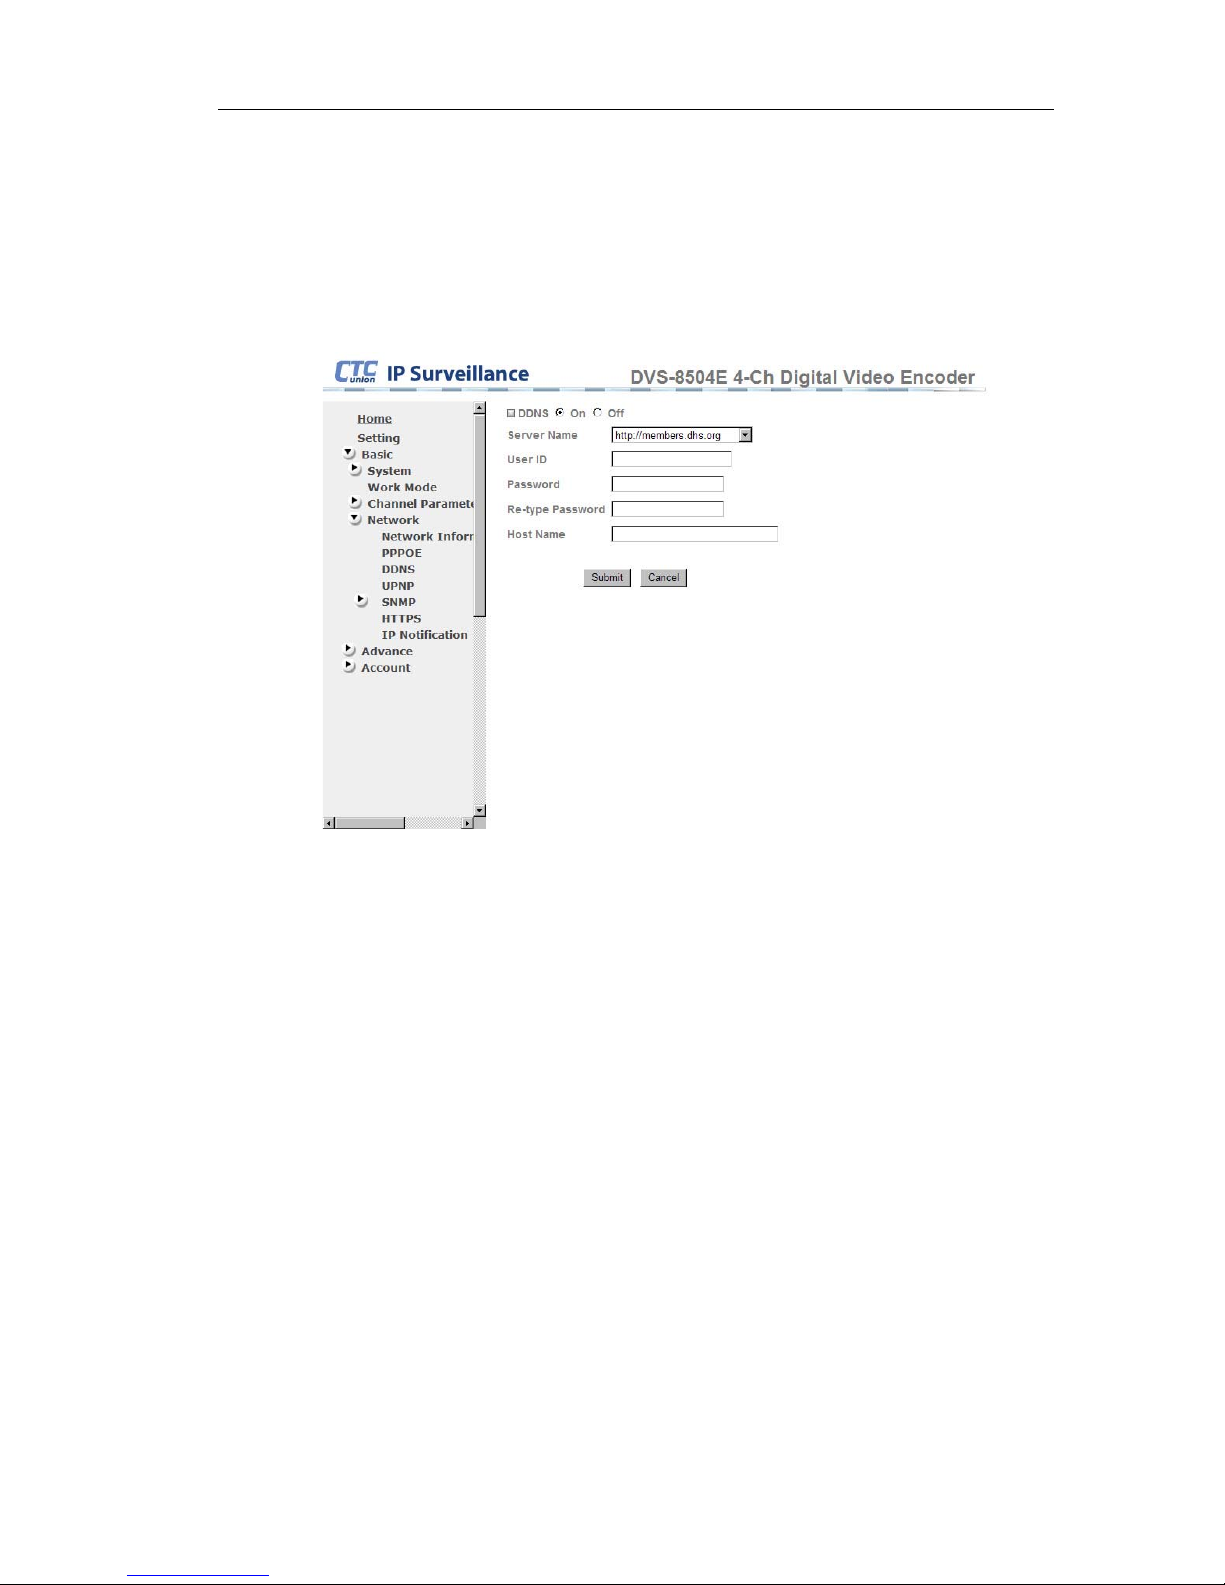
6.4.3. DDNS
This allow device to have DDNS domain name. Encoder will notify a
dynamic domain name server to change mapping IP in real time (ad-hoc),
the active DNS configuration of its configured hostnames, addresses or
other information.
z Server name : Select a DDNS server from Pull-down menu.
z User ID : Input DDNS ID for DDNS server.
z Password : DDNS authentication password.
z Host name : Hostname which is registered on DDNS server.
z Note : Before using this function, please register an account from
DDNS service provider.
27
Page 28
DVS-8504E User Guide
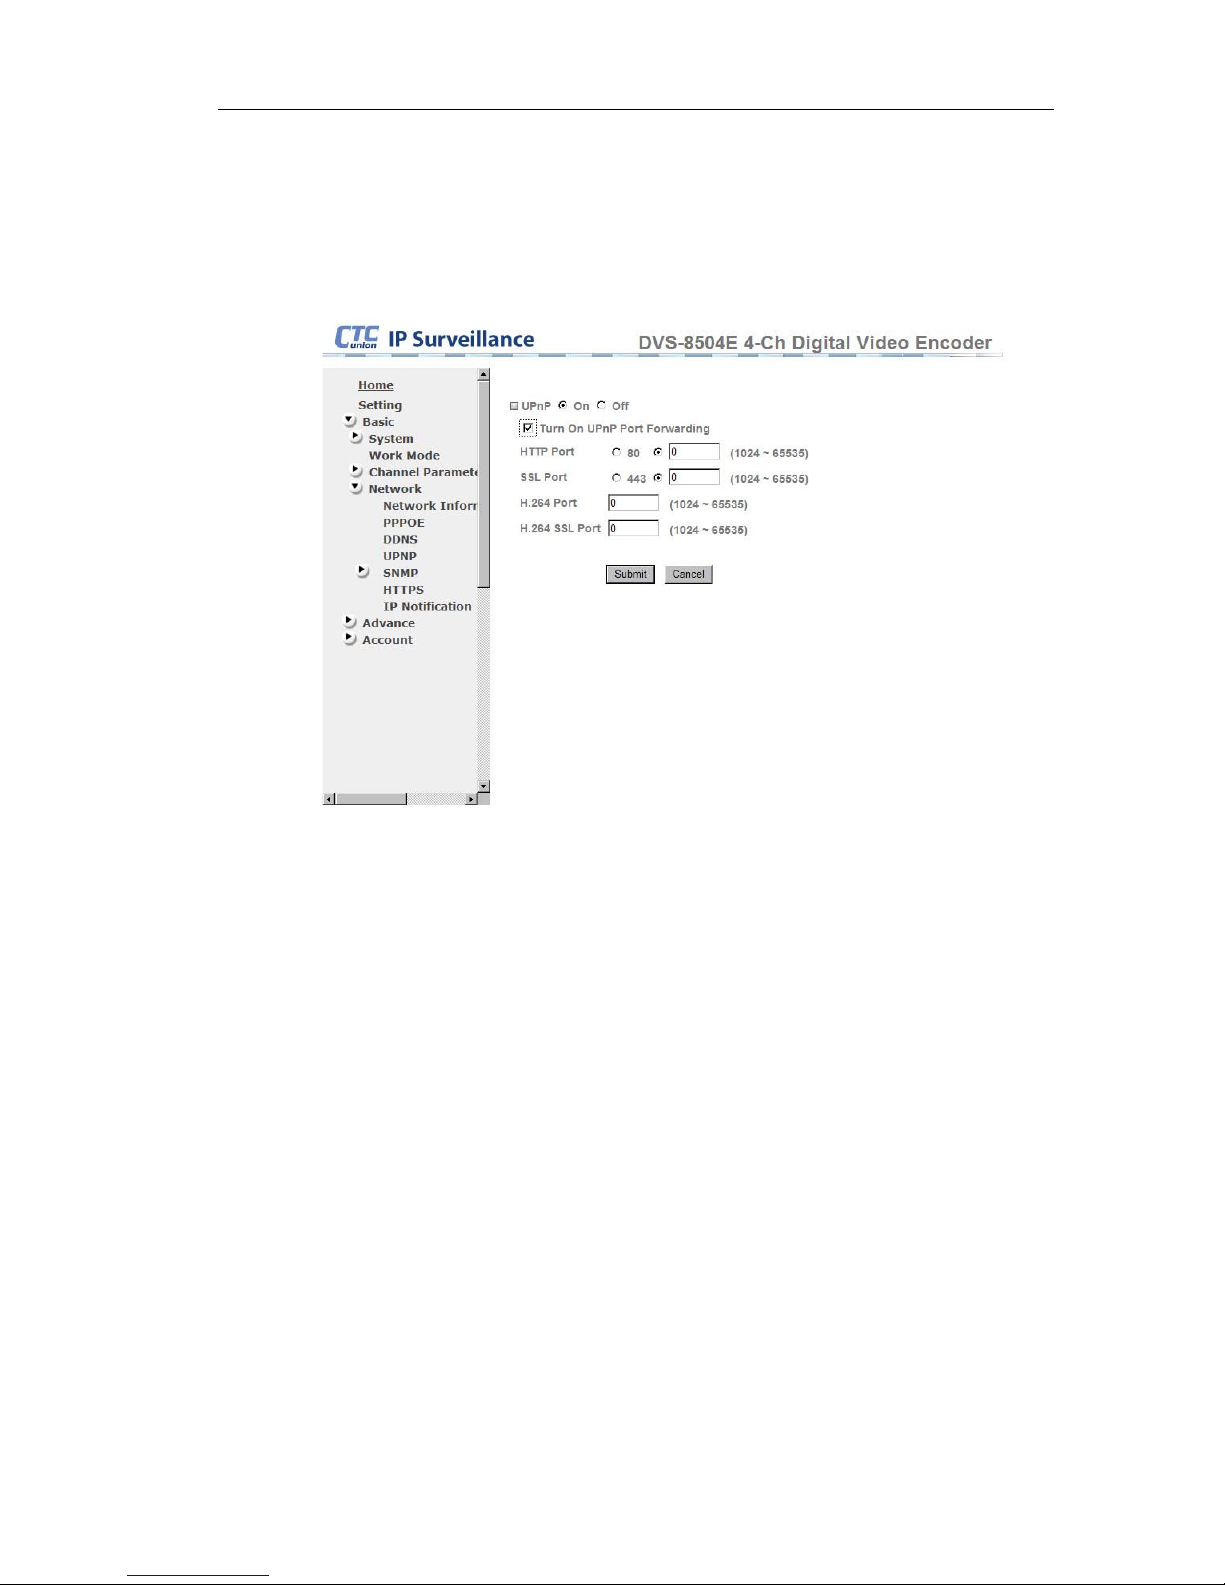
6.4.4. UPnP
UPnP helps user to find this machine easily. It will open service ports on
local LAN UPnP router. It allows easier access to this device from the
Internet.
z HTTP port : HTTP connected port. Use the default 80 or set manually
(range 1024~65535)
z SSL port : Https security connection port setting. Use the default 443 or
set manually. (range 1024~65535)
z H.264 port : Set video stream port (range 1024~65535)
z H.264 SSL port : Input security connection port (range 1024~65535)
28
Page 29
DVS-8504E User Guide
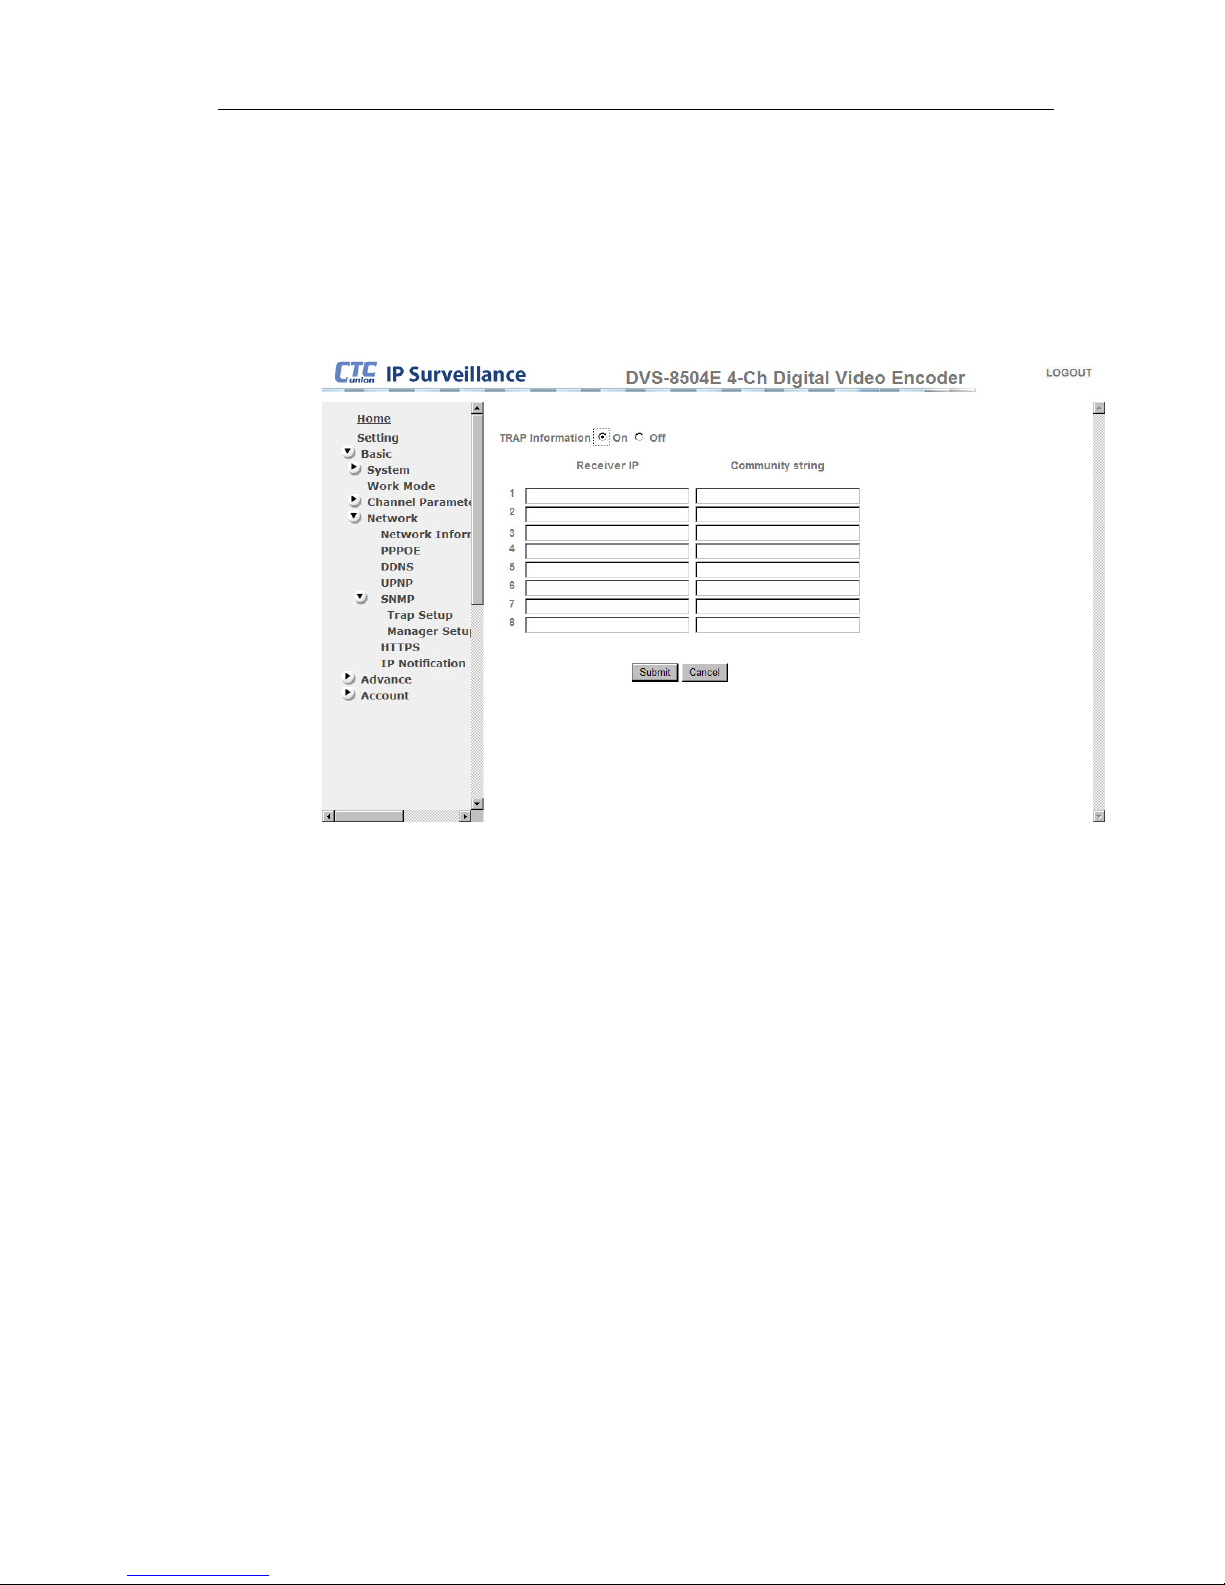
6.4.5. SNMP
Simple Network Management Protocol (SNMP) is a widely used protocol
for monitoring the health and welfare of network equipment.
SNMP_TRAP
z Trap Information : Turn on or off SNMP service.
z Receiver IP : SNMP information receiver IP.
z Community string : Input SNMP server string to communicate with
SNMP manager.
29
Page 30
DVS-8504E User Guide
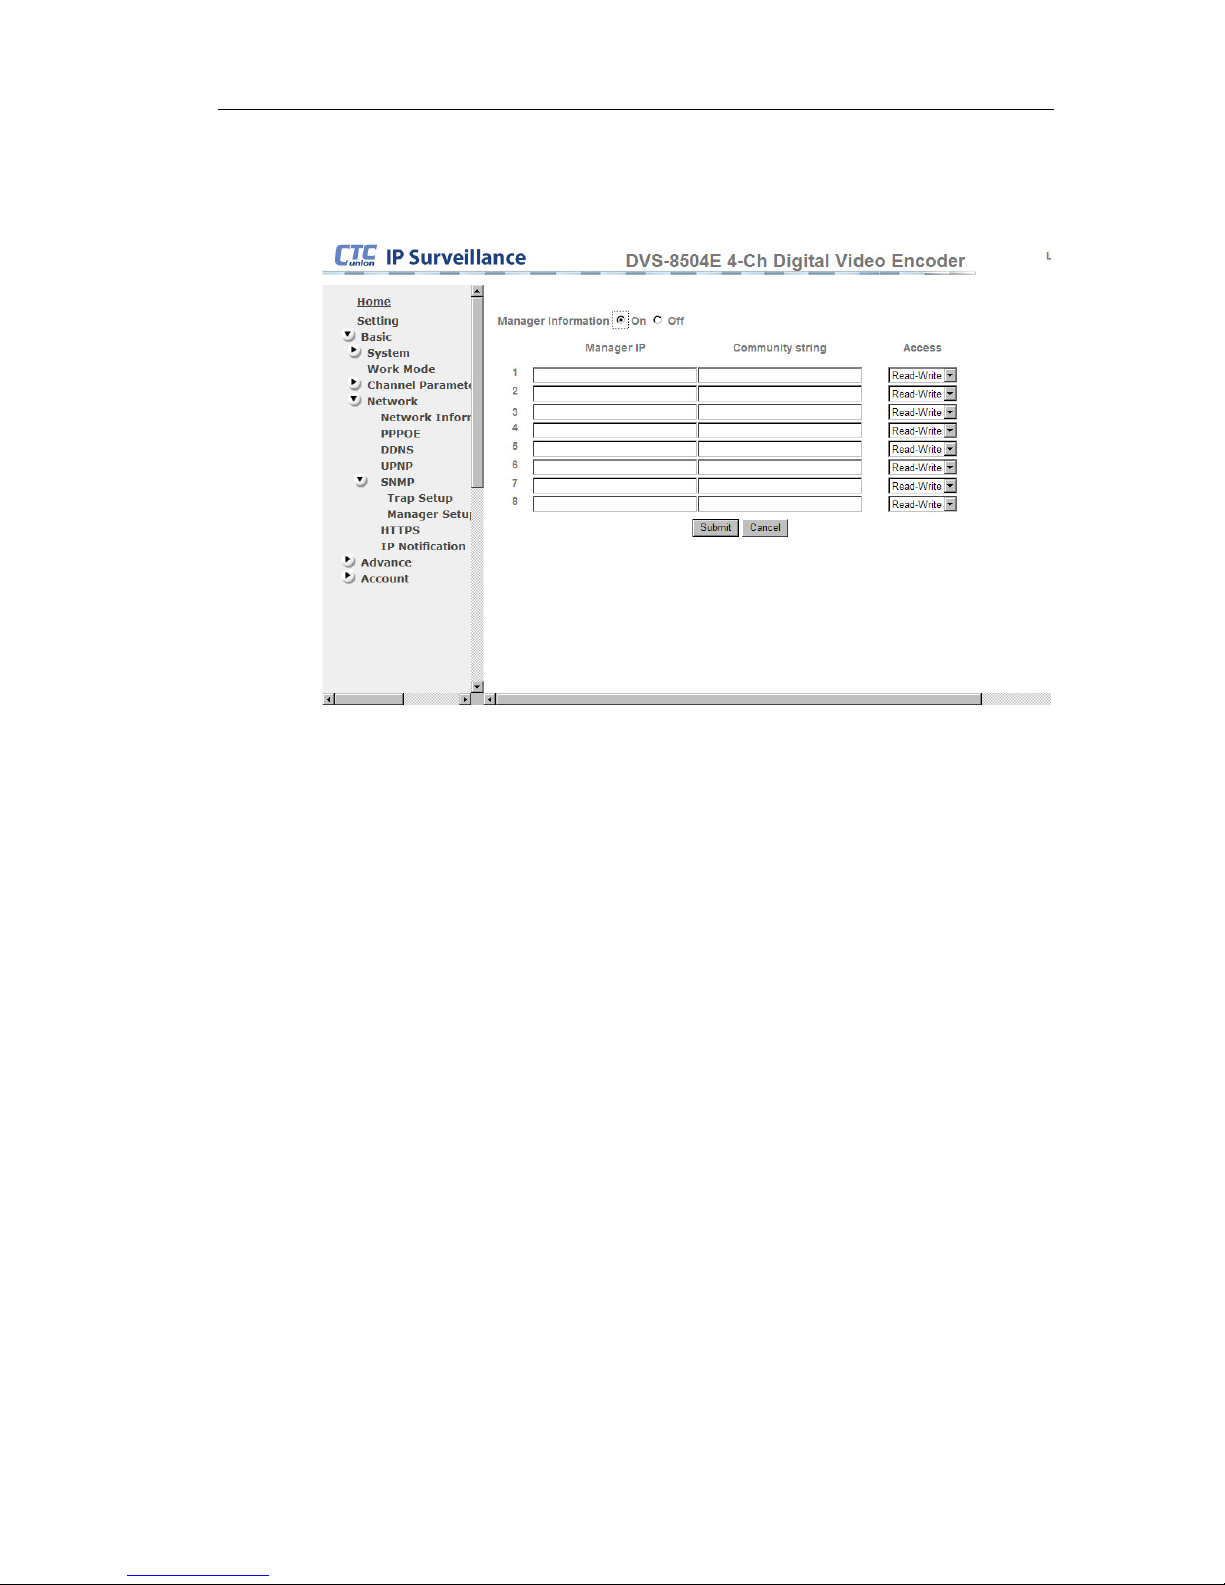
SNMP_MANAGER
z Manager IP : Input SNMP manager's IP address.
z Community string : Input SNMP community string to communicate with
SNMP manager.
z Access : Let user “read” or “read and write” on device.
30
Page 31
DVS-8504E User Guide
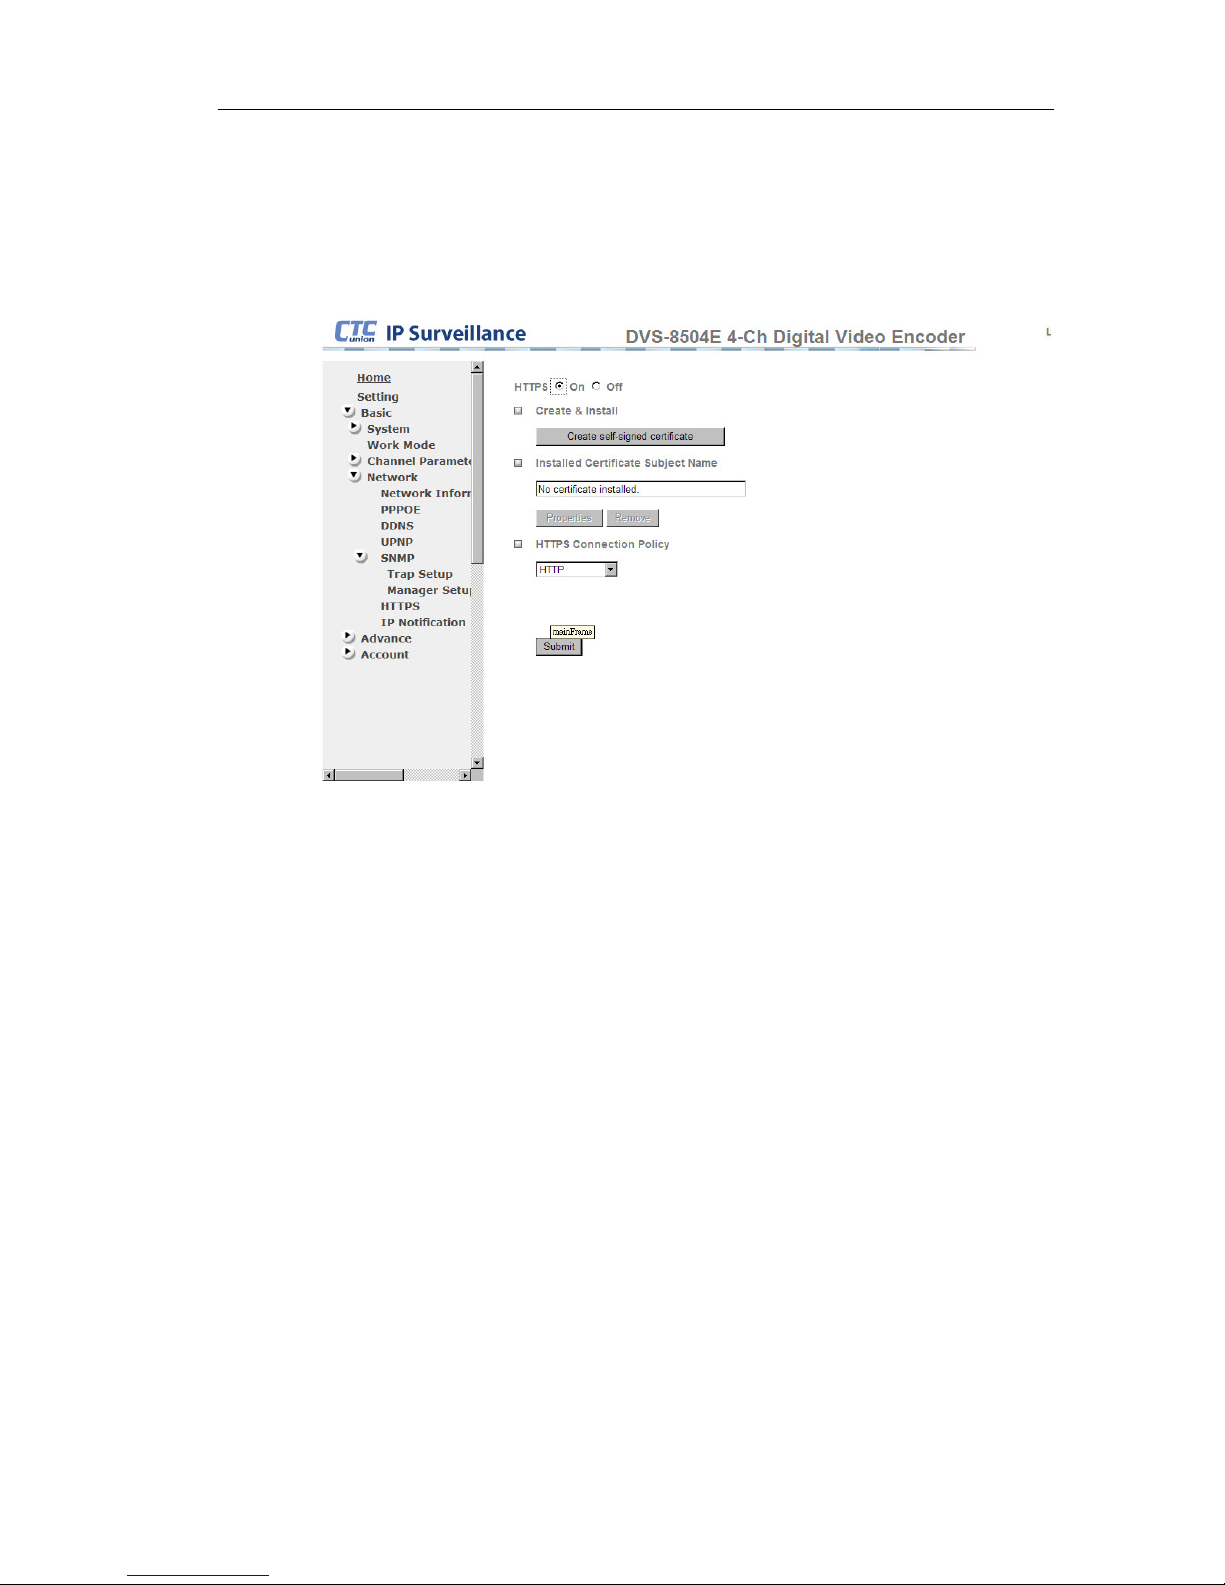
6.4.6. HTTPS
Https is a URL scheme used to create a secure HTTP connection. It is
syntactically identical to the http : // scheme normally used for accessing
resources using HTTP. Select “on” to start to setup.
z Create & install : Click “create self-signed certificate” to create a
certificate
z Installed Certificate Subject Name : show or remove certificate.
z HTTPS connection policy : Three policies can be choosing. (HTTP,
HTTPS, HTTP&HTTPS)
31
Page 32
DVS-8504E User Guide
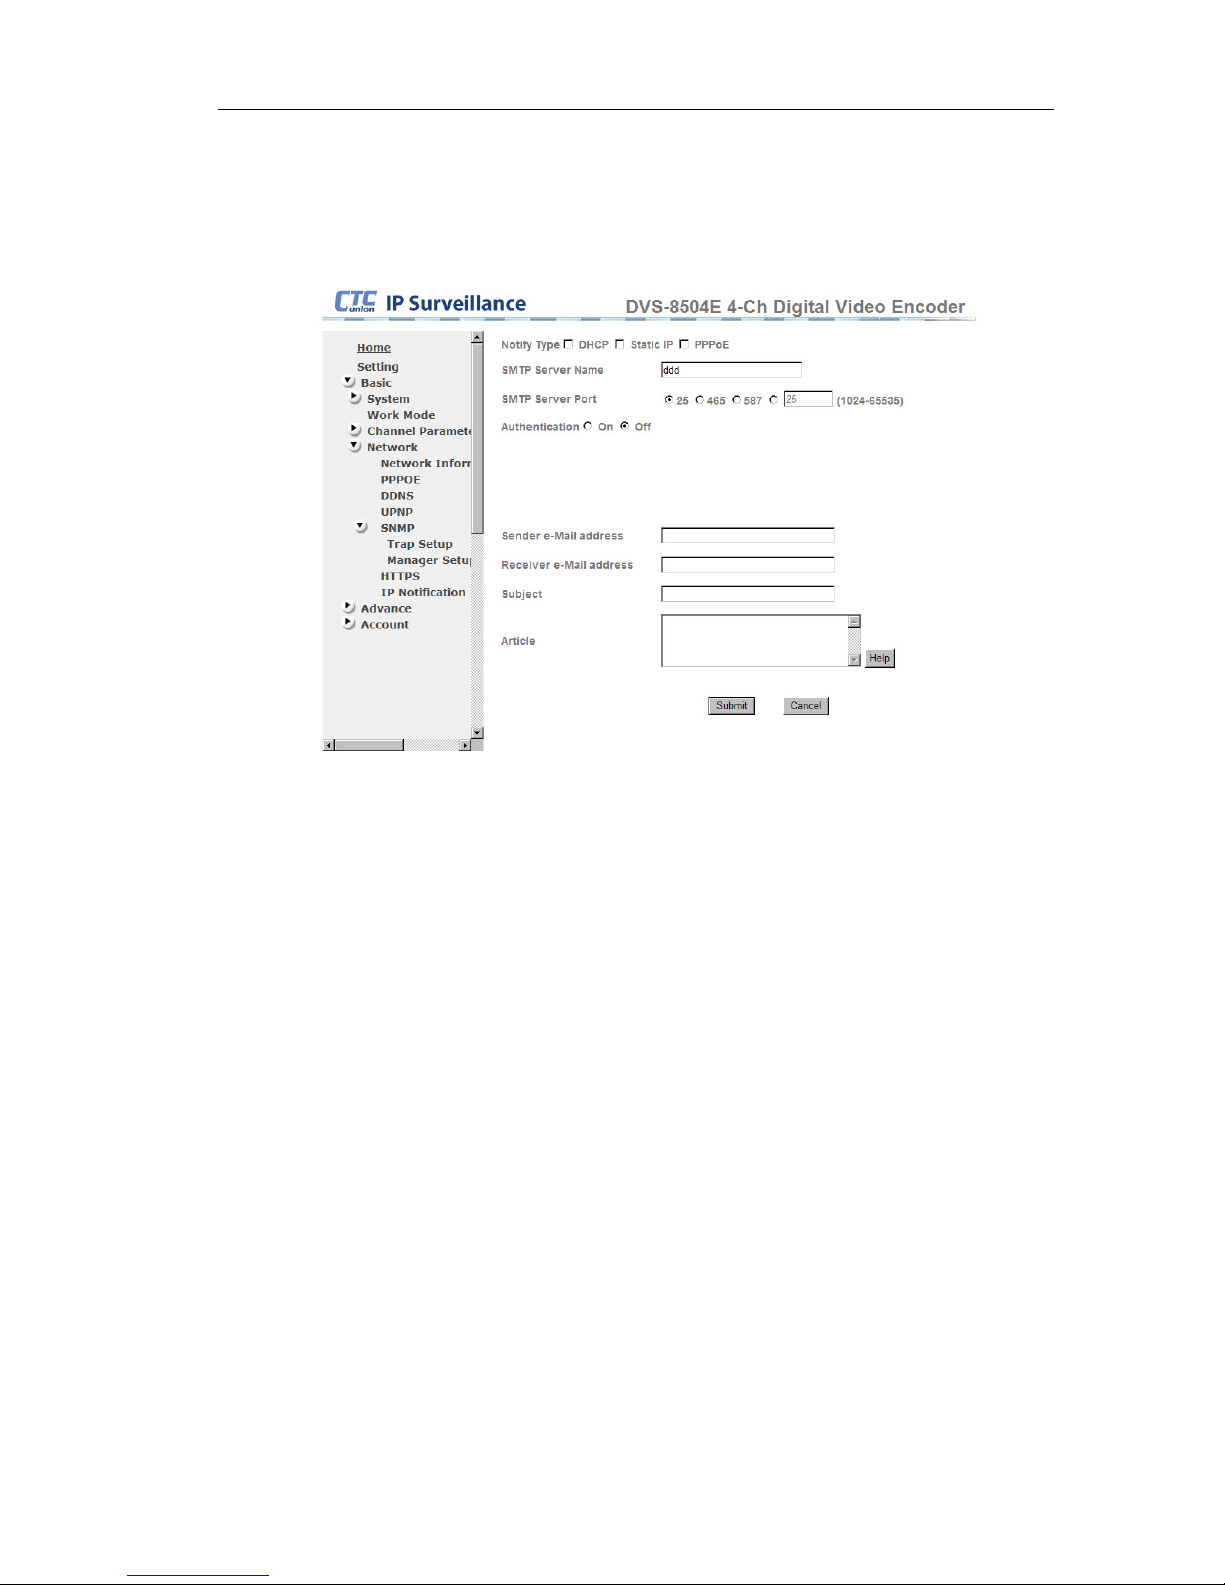
6.4.7. IP Notification
Notify user by E-mail, when device is using a new IP. Select “on” to turn
on.
z Notify Type : Select which condition to send notification.
z SMTP Server name : Input SMTP server name or IP address here.
z SMTP server port : Use default SMTP port or user-defined (range
1024~65535)
z Authentication : Select authentication type according to your SMTP
server (mail server).
z Receiver mail address : There are five receivers acceptable.
z Sender mail address : Input sender's E-mail address here.
z Subject : Mail subject
z Message : Mail text
32
Page 33
DVS-8504E User Guide
7. ADVANCED SETTING
7.1. PTZ Setting
7.1.1. PTZ Connector
8504E PTZ Pin assignment allocation (DB9)
No. Definition Color
1 X X
2 RS-232 TX Yellow
3 RS-232 RX Green
4 RS-422 TX + Blue
5 GND Purple
6 RS-485(B)/ RS-422 RX - Brown
7 RS-485(A)/ RS-422 RS + White
8 RS-422 TX - Black
9 X X
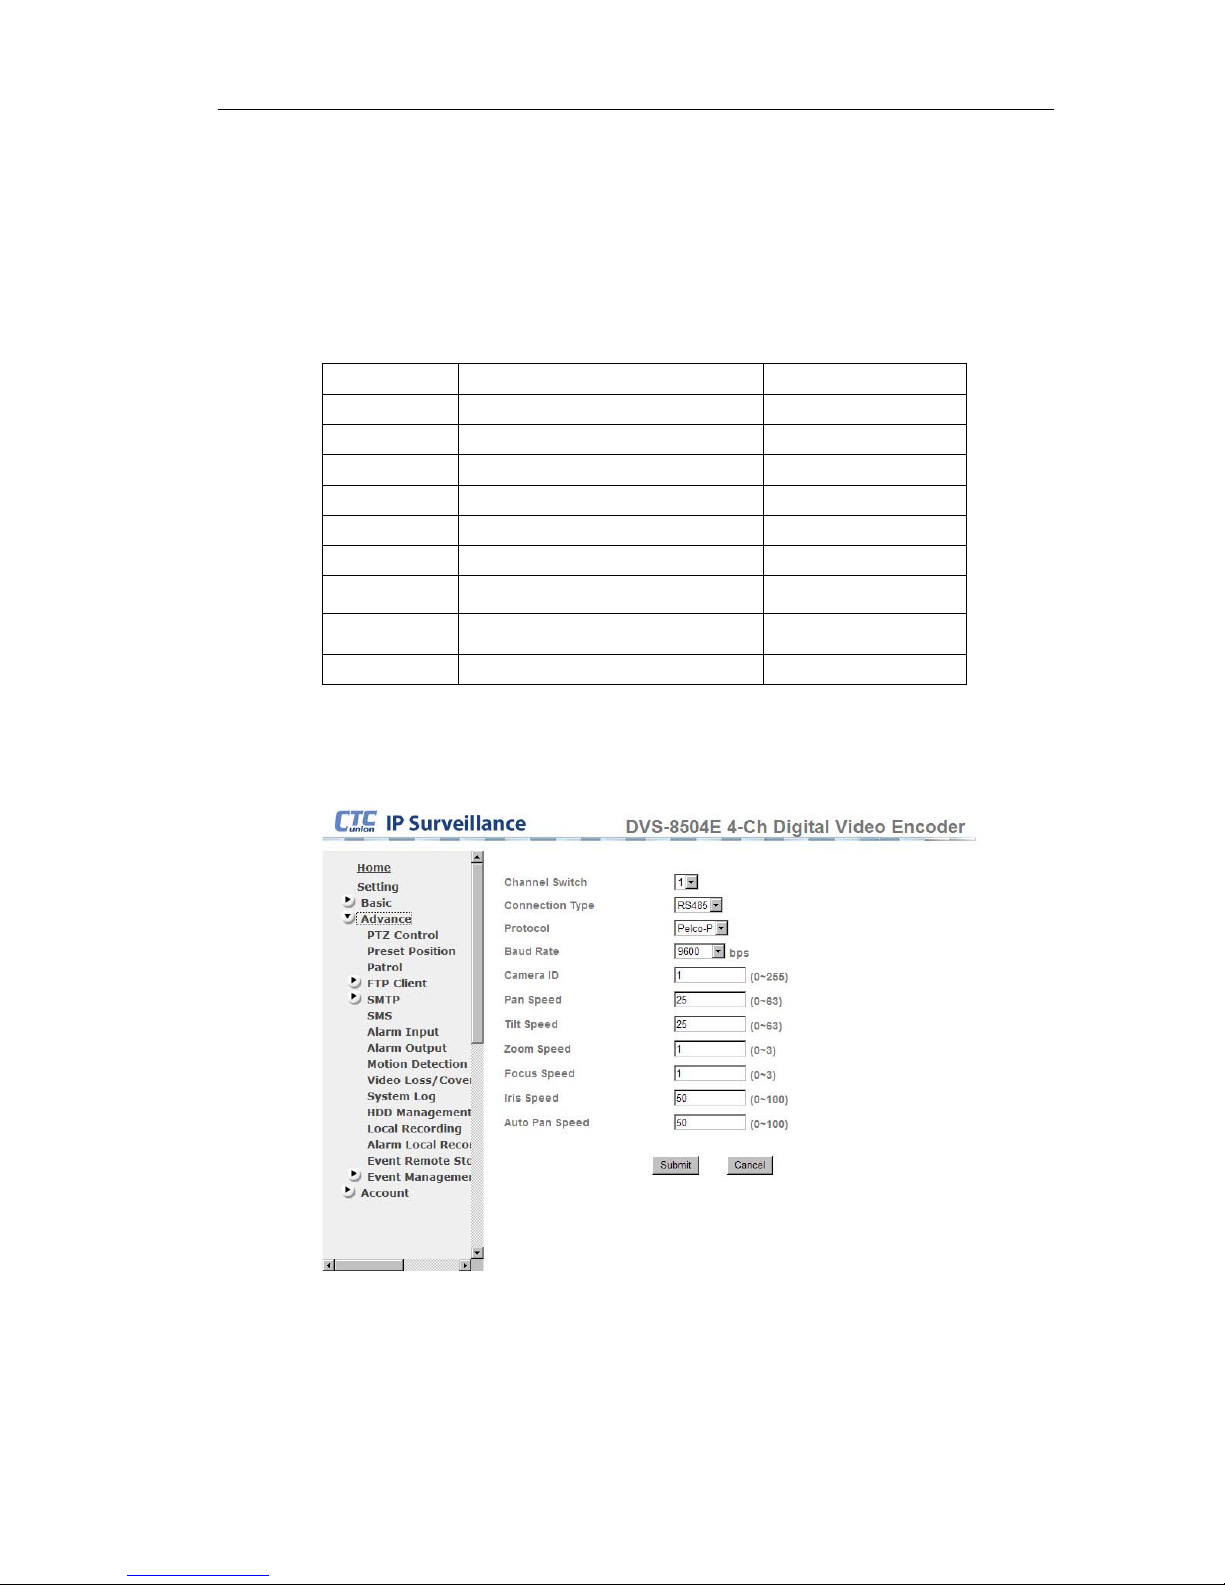
7.1.2. PTZ Control
This page lets user setup PTZ parameters.
z Channel Switch : Select one channel to start to setup.
z Connection type : Select connection type according to interface.
z Protocol : Select camera protocol. Please refer to user manual of
camera.
z Pan Speed : PTZ camera pan speed (range 0~63).
z Tilt Speed : PTZ camera tilt speed (range 0~63)
33
Page 34
DVS-8504E User Guide
z Zoom speed : PTZ camera zoom speed (range 0~3)
z Focus speed : Focus speed of camera (range 0~3).
z Iris speed : Adjust Iris speed of camera (range 0~100)
z Auto Patrol speed : Adjust auto patrol speed (range 0~100)
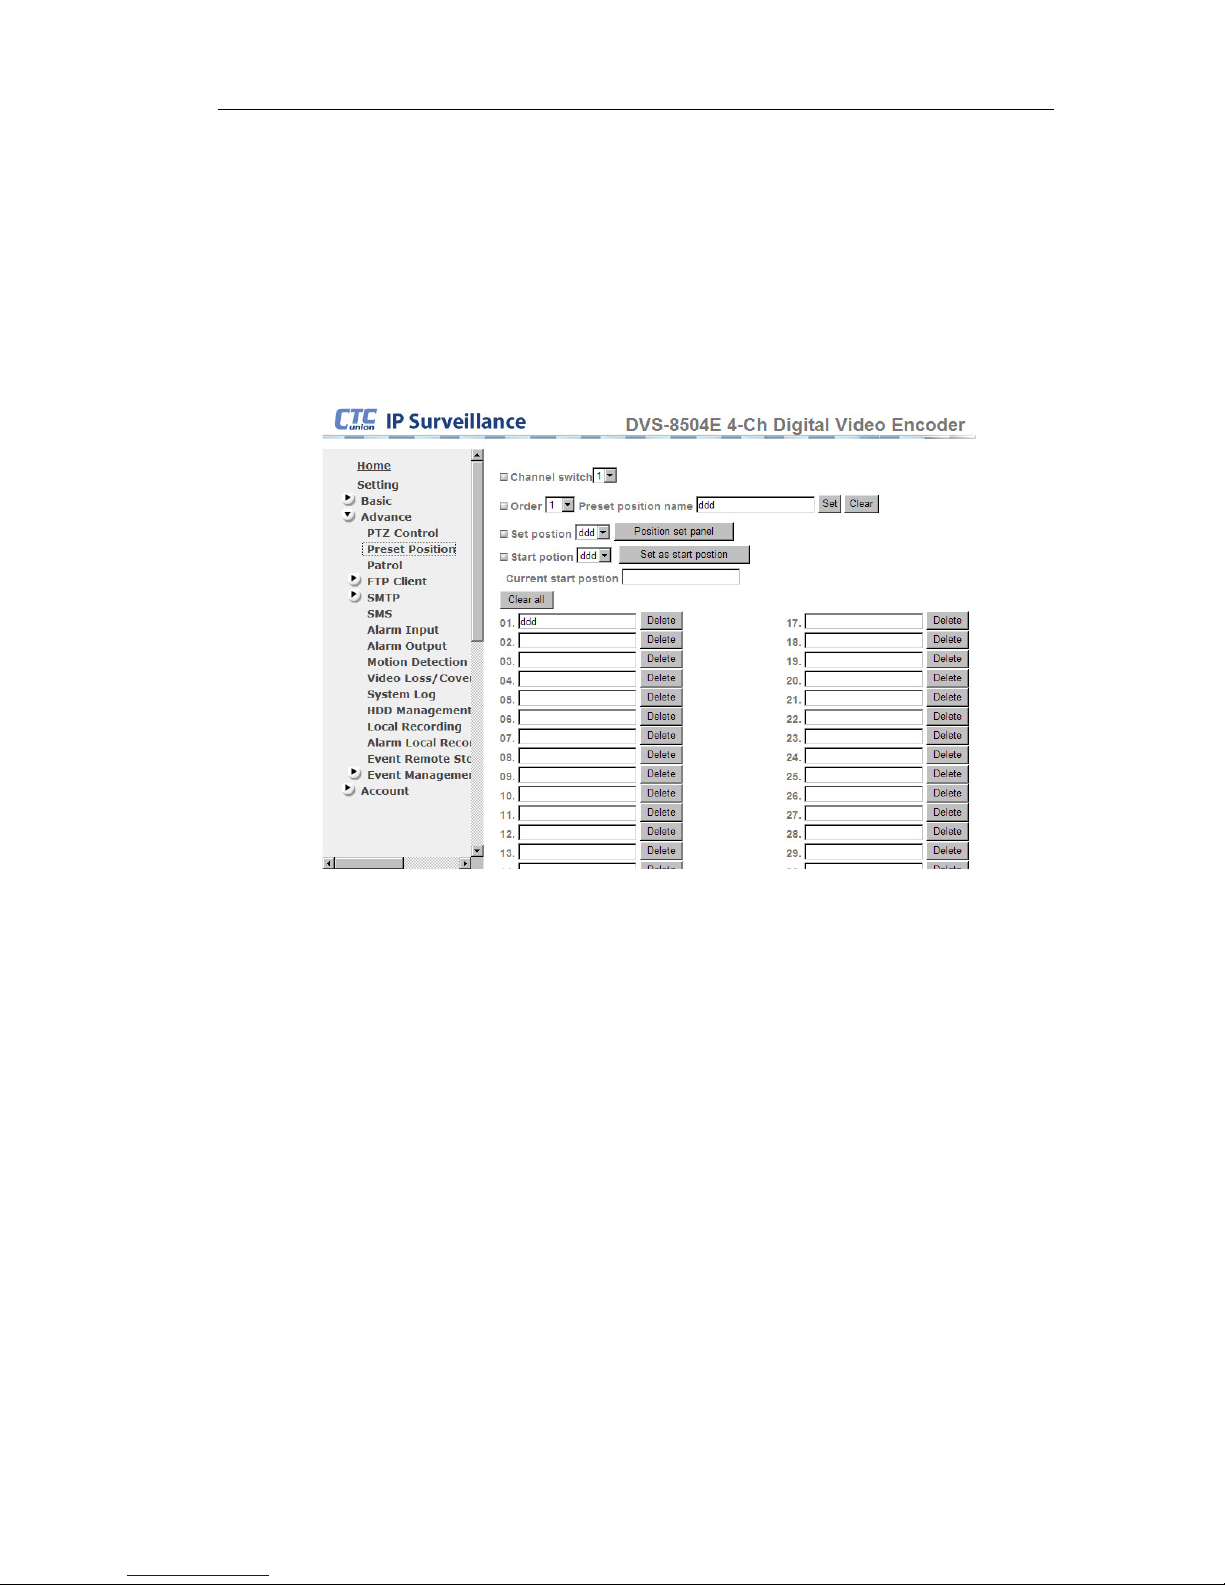
7.1.3. Preset Position
Setup preset position of PTZ camera on each channel.
Steps :
z Select channel you want to setup.
z Select preset number which you want to setup. There are 32 available
parameter locations.
Write down position name and click “Set”
Click “Position set panel”, a new PTZ control window will appear.
“Start position”(home position). Choose a position name for home
position from pull-down menu. “Clear all” will clear all positions you have
set.
z Remember to click “Submit” after making any changes.
34
Page 35
DVS-8504E User Guide
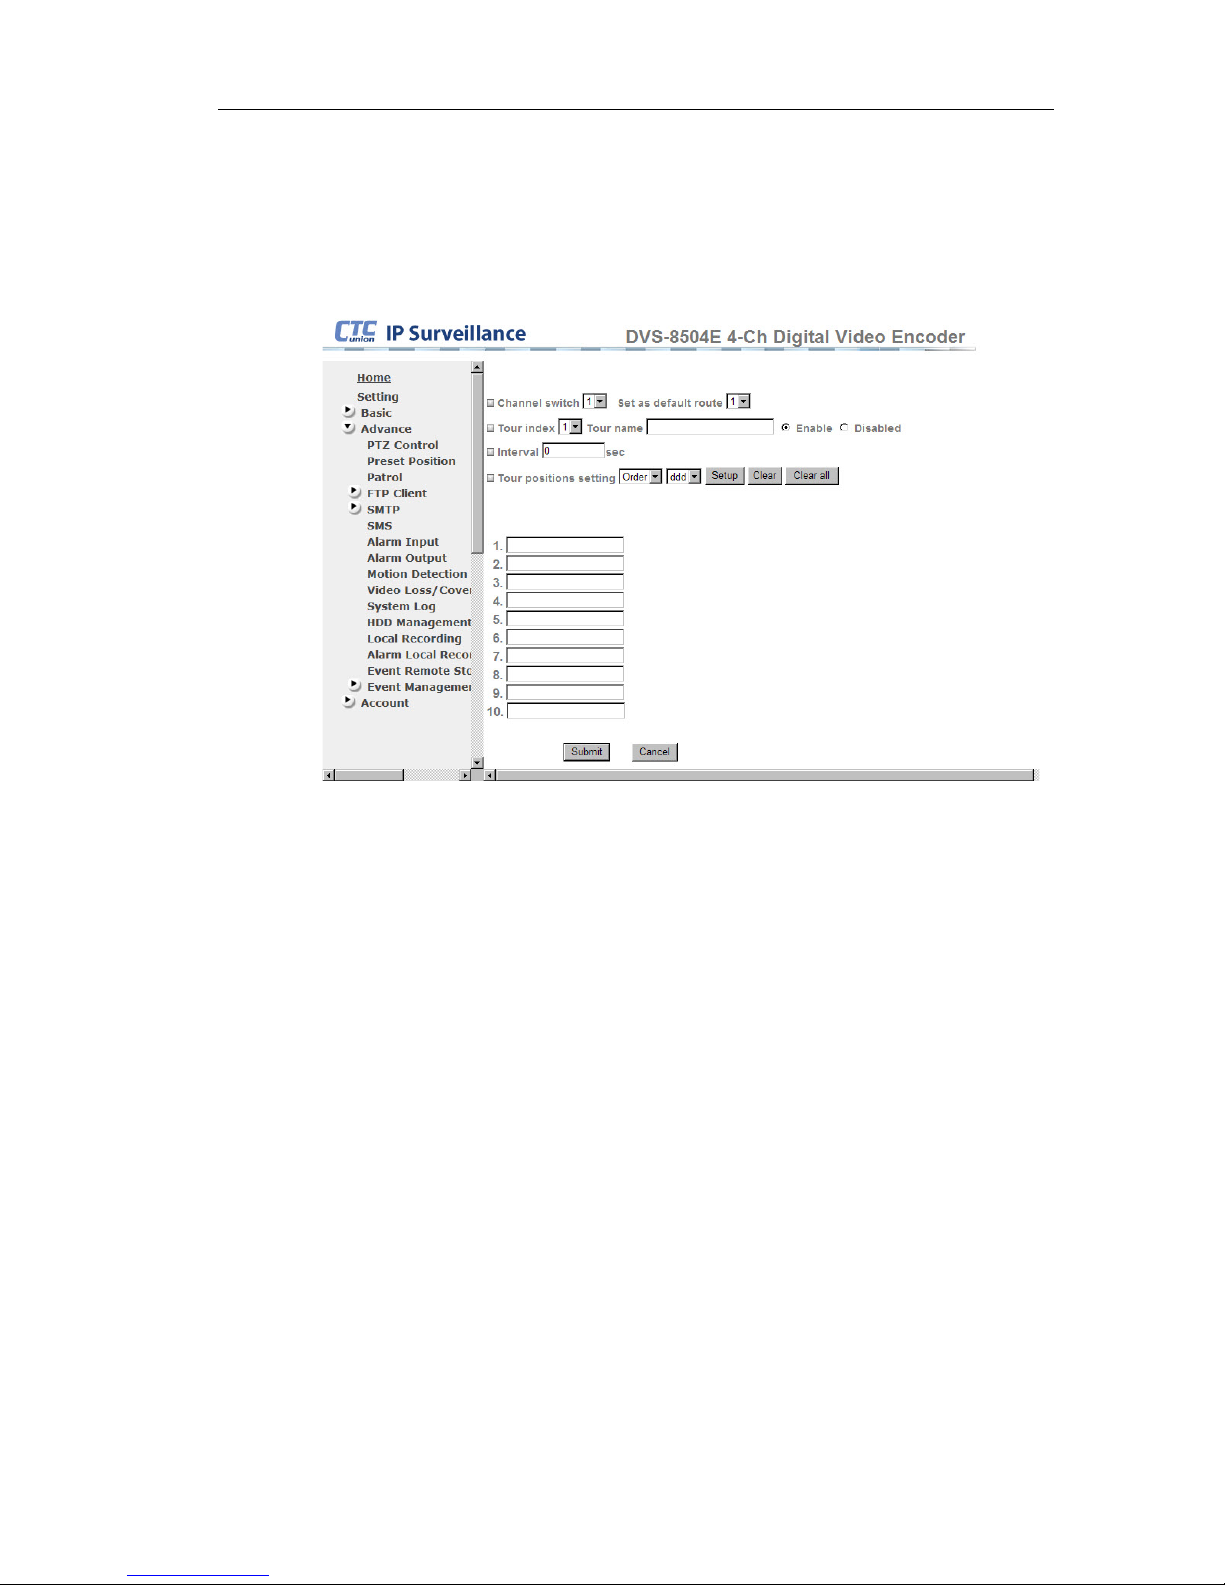
7.1.4. Patrol
This page let user setup a patrol mode for the camera. Every channel has
four patrol routes. Every route can consist of 8 preset points. Camera
lens will move in order to the end.
z Channel switch : Choose channel to setup
z Set as default route : Choose a route number
z Tour index : Show the route number you are setting now.
z Tour name : Give a name for this tour.
z Interval : Stop time on each preset position.
z Select preset point, click “setup” to put it on the preset route.
z Remember to click “Submit” after any changes.
35
Page 36
DVS-8504E User Guide
7.2. Alarm Configuration
7.2.1. Alarm Receiver Setting
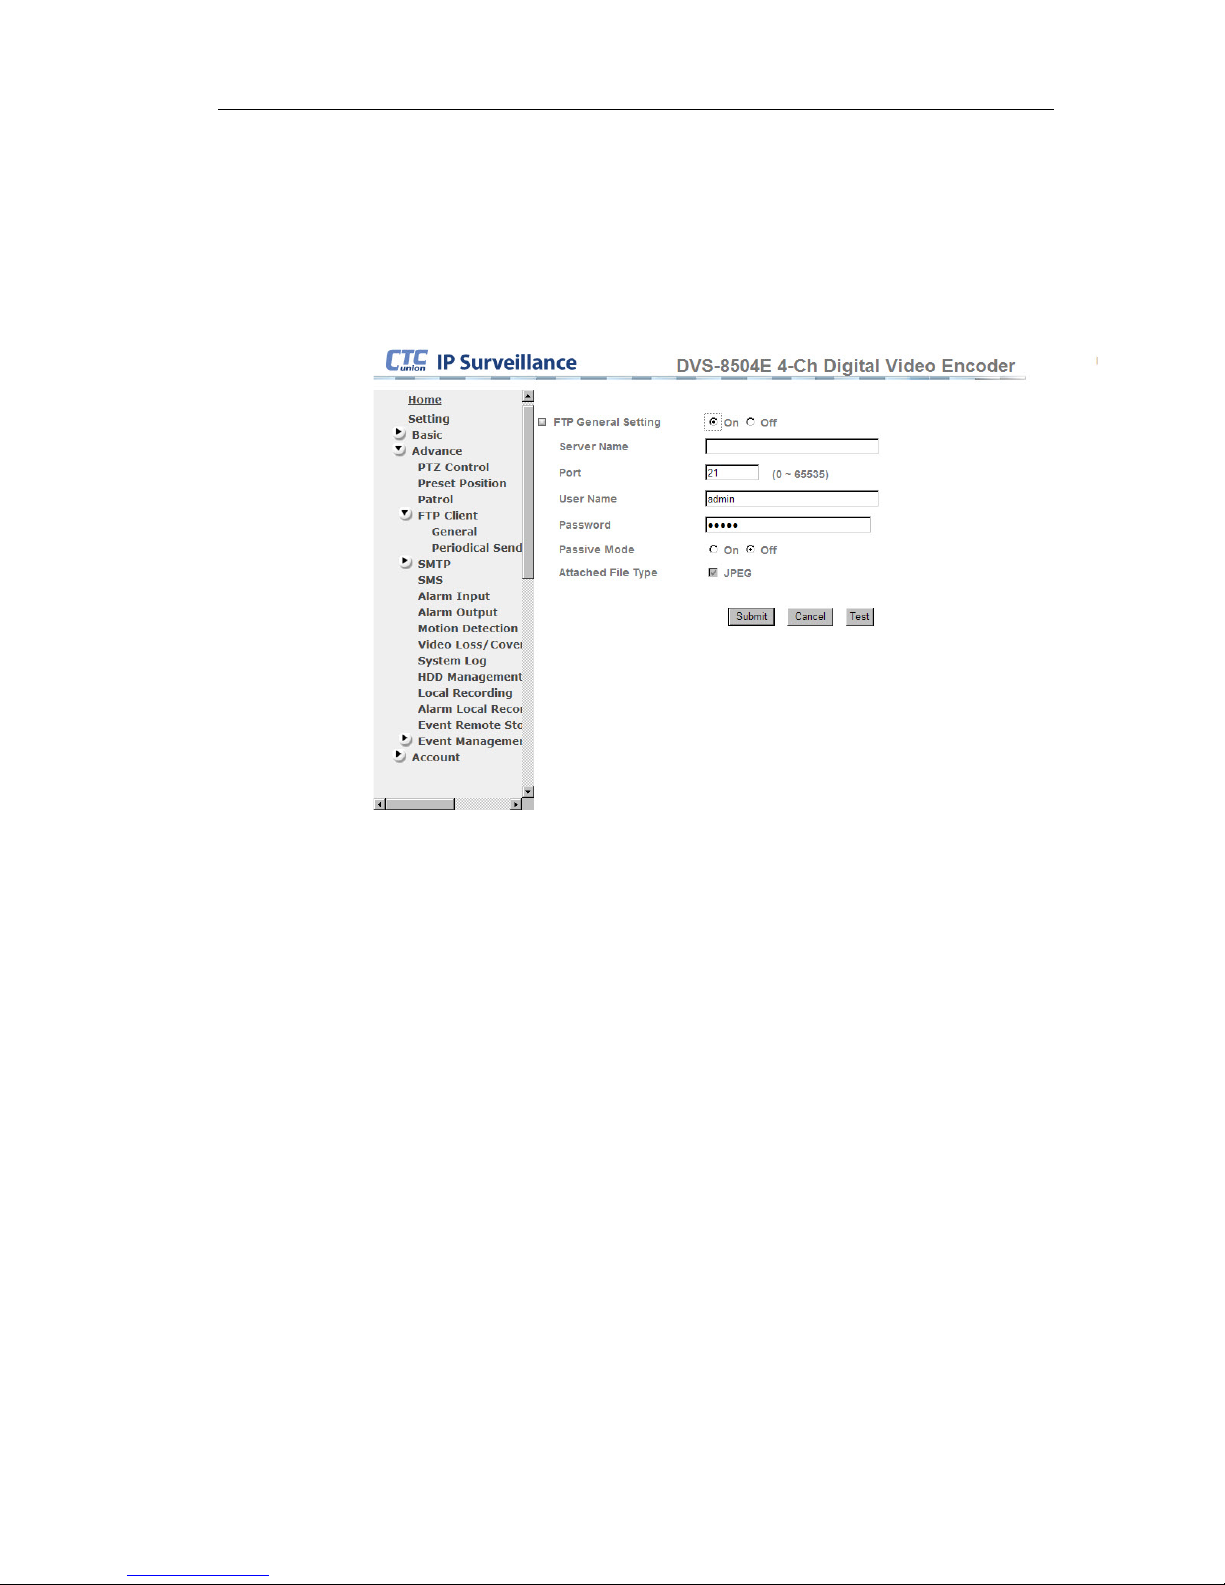
7.2.1.1. FTP client
FTP client will send image files while alarms occur.
7.2.1.2. FTP General Setting
z FTP General Setting : Turn on or off this feature.
z Server name : Input FTP server name or IP address.。
z FTP port : Input FTP server port, default is 21 (range 0~65535)
z User name : Input user name of FTP server.
z Password : Input password of FTP server.
z Passive Mode : If you are connecting to an FTP server with
passive mode, please turn this on. Leaving off will connect with
Active mode.
z Attached File Type : Click here to send “JPEG” file to FTP
server.
36
Page 37
DVS-8504E User Guide
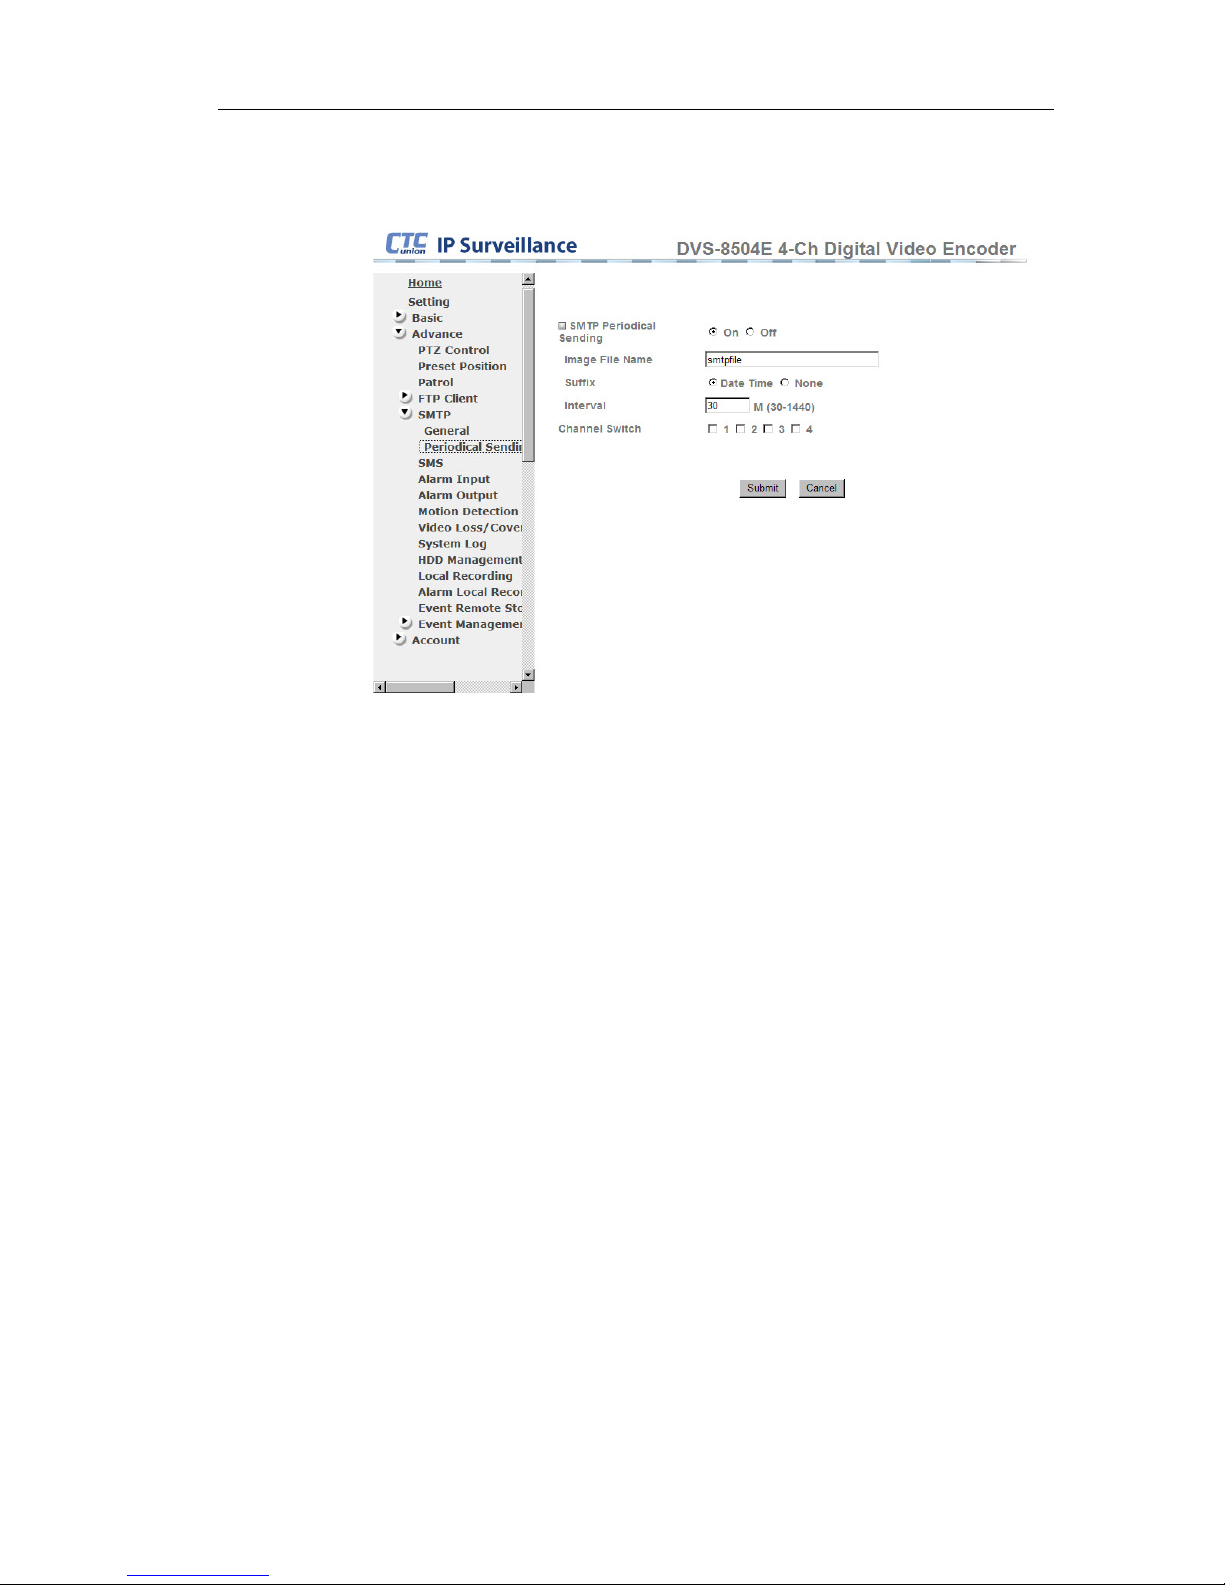
7.2.1.3. Periodical Sending
Send images file to FTP server periodically.
z FTP Periodical Sending : Turn this feature on or off.
z Image File Name : File name for sending to FTP server.
z Suffix : Suffix of sent file.
z Interval : Choose time interval for sending-files
z Channel Switch : Choose active channel here.
37
Page 38
DVS-8504E User Guide
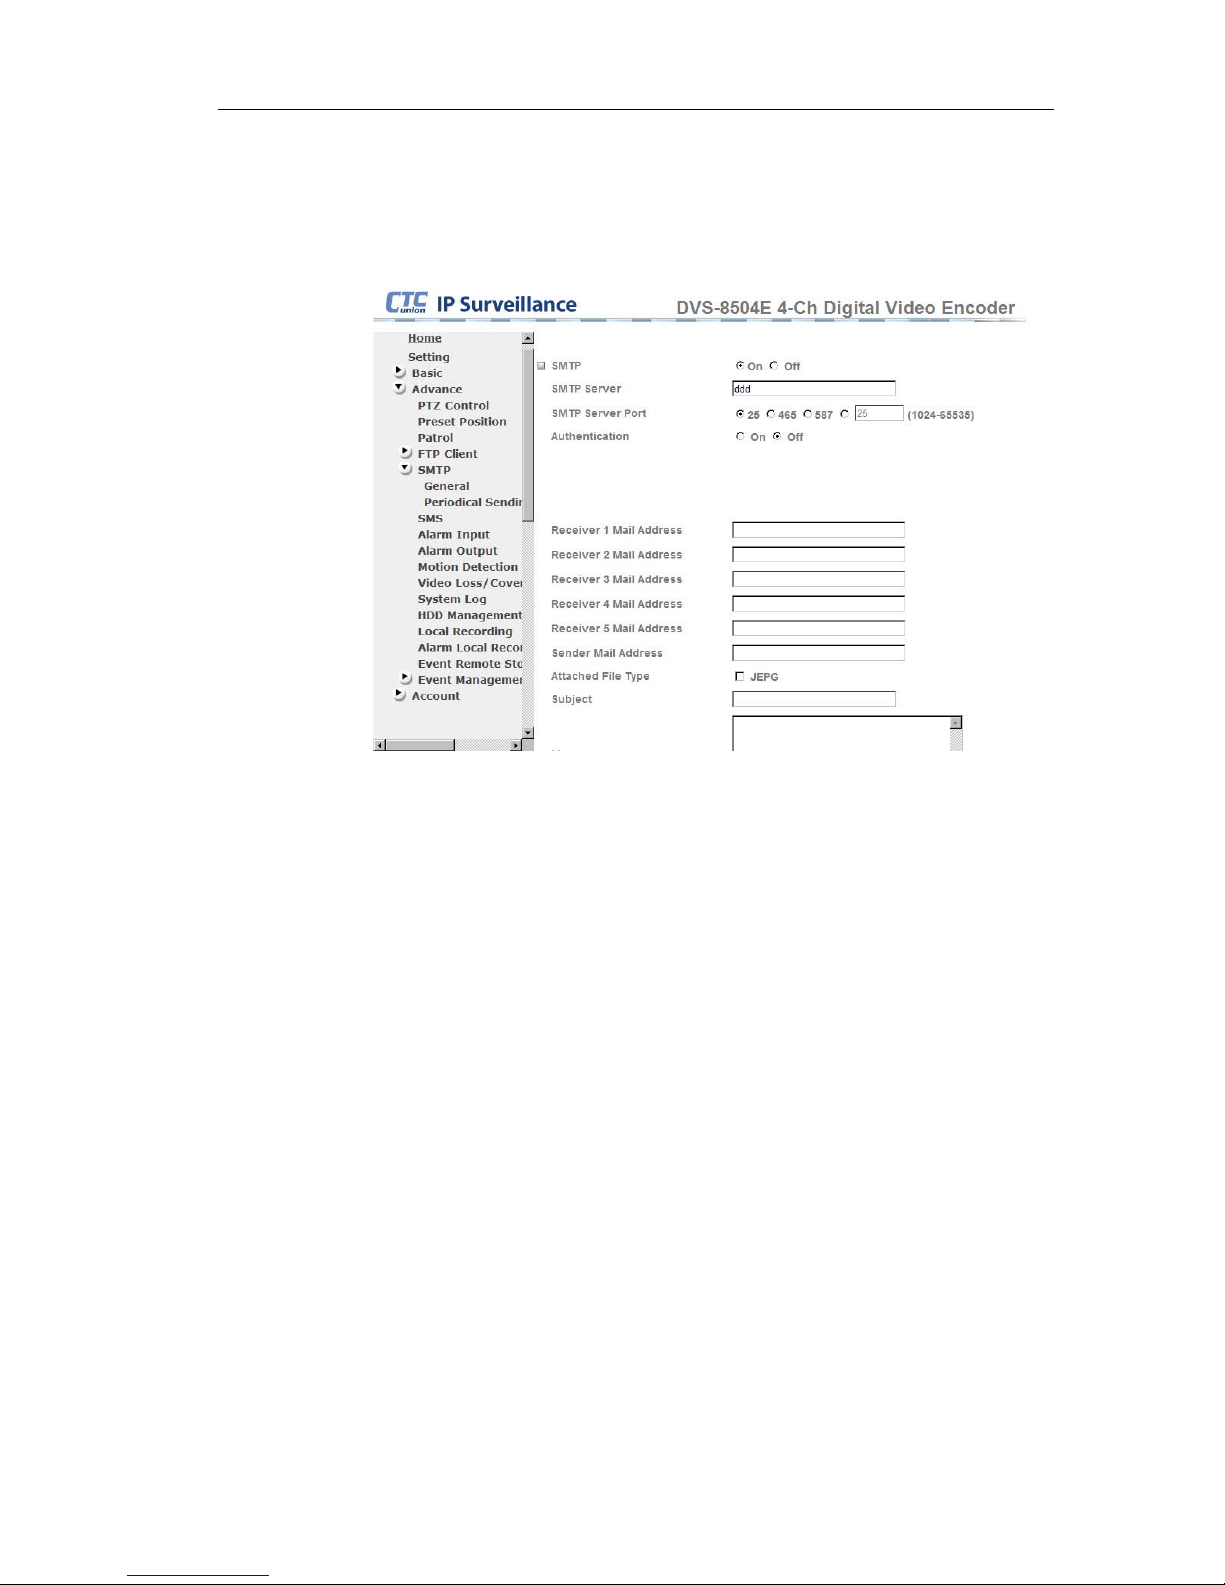
7.2.1.4. SMTP
SMTP or Simple Mail Transport Protocol lets this device send image
files to specific E-mail addresses.
7.2.1.5. General
SMTP : Turn this feature on or off.
r IP address
fined (range
tion : Select authentication type according to your
ail address : There are five receivers acceptable.
z
z SMTP Server : Input the SMTP serve
z SMTP port : Use default SMTP port or user-de
1024~65535)
z Authentica
SMTP server.
z Receiver m
z Sender mail address : Used as mail "from" address.
z Subject : Mail subject
z Message : Mail text
38
Page 39
DVS-8504E User Guide
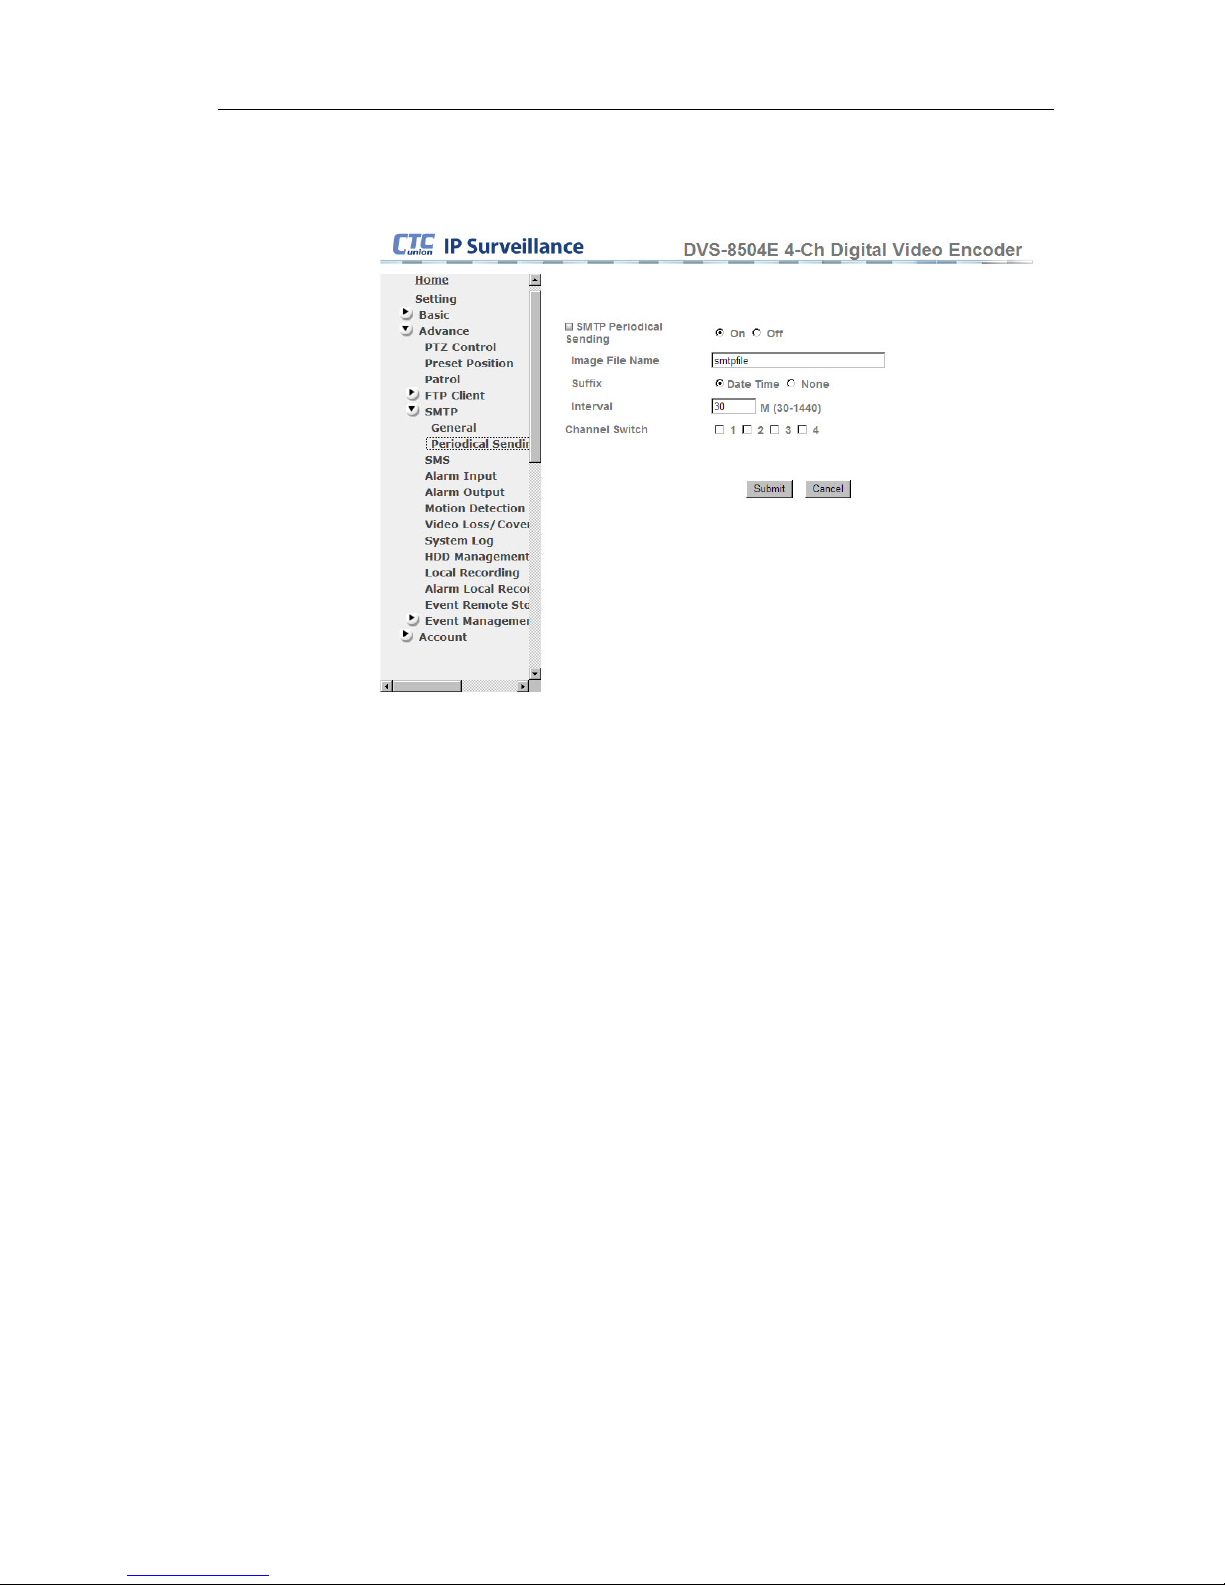
7.2.1.6. SMTP Periodical Sending
Send image files to specific E-mail address periodically.
z SMTP Periodical Sending : Turn this feature on or off.
z Image File Name : Attached file name.
z Suffix : Select “Date Time” for image suffix or not.
z Interval : Periodical mail interval time (Minute). Range from 30
minutes to 1440 minutes.
z Channel Switch : Choose active channel here.
39
Page 40
DVS-8504E User Guide
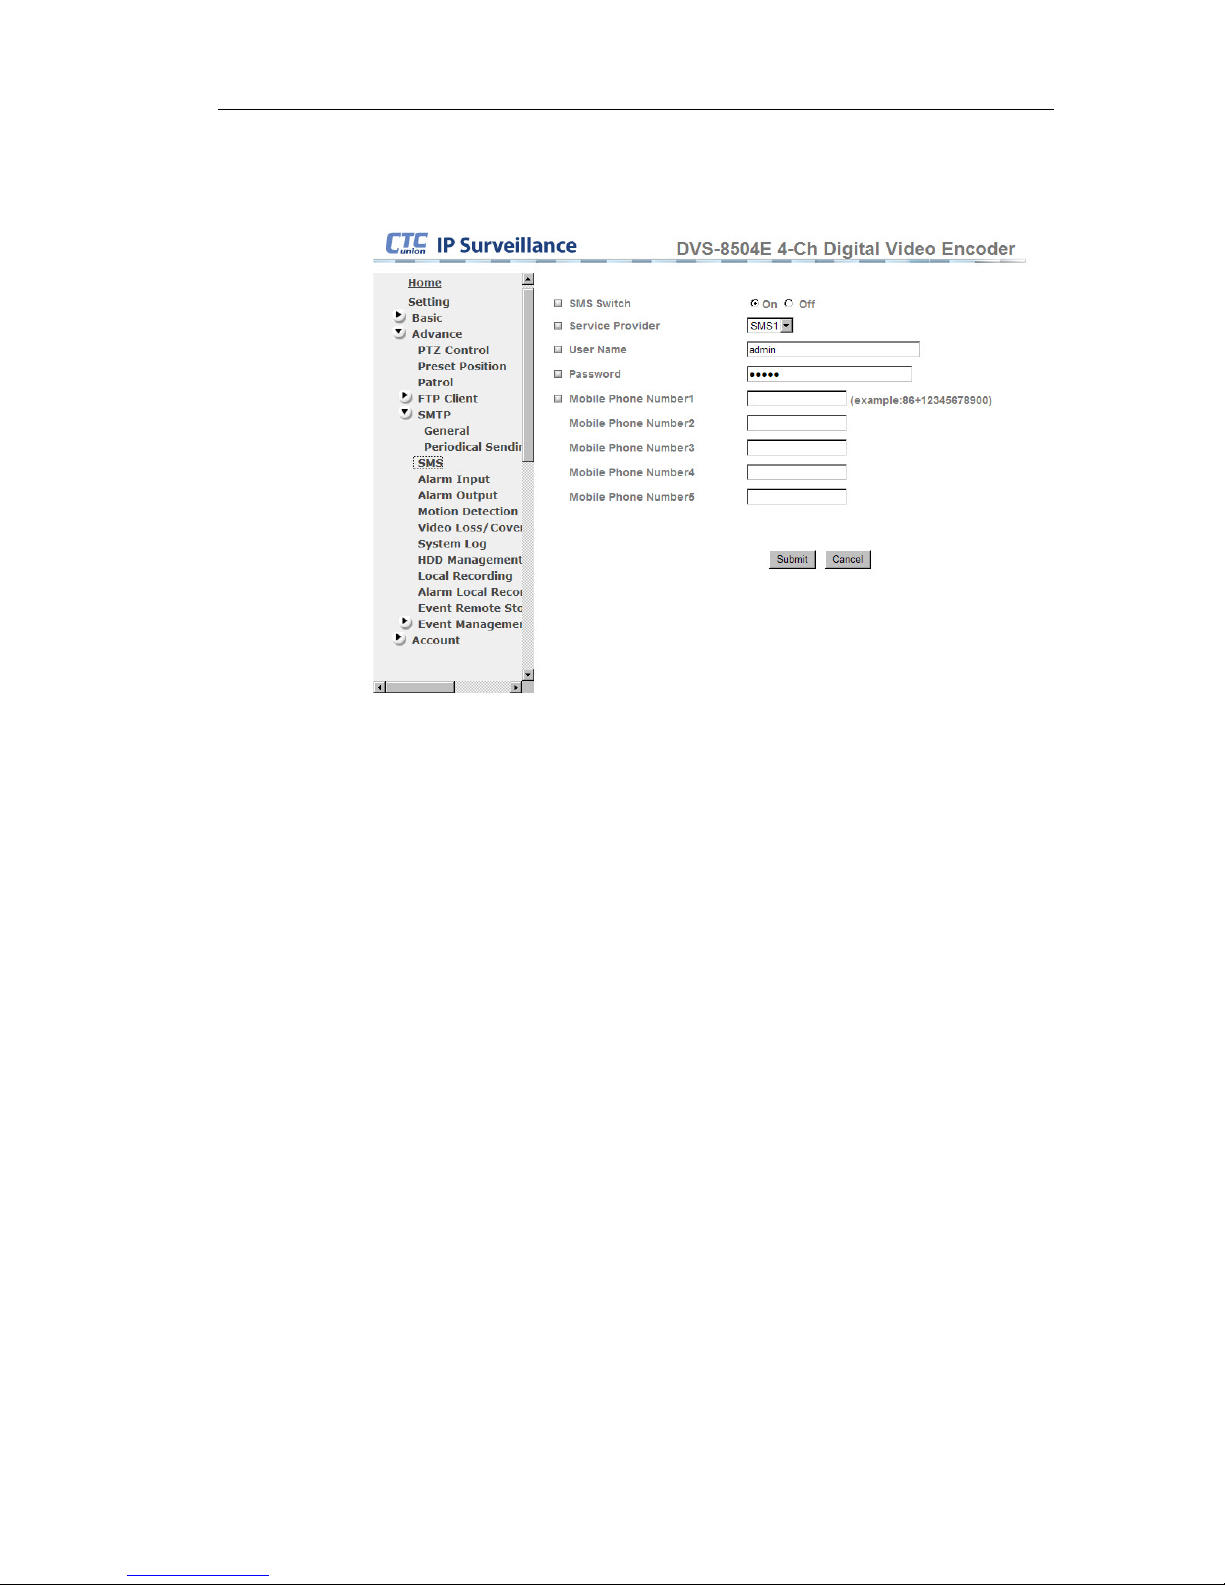
7.2.1.7. SMS
Send messages to mobile devices.
z SMS switch : Turn this feature on or off.
z Service provider : Select message service provider.
z Username : Input username on SMS server.
z Password : Input SMS server password.
z Mobile Phone Number : Input receiver phone number from 1 to
5.
40
Page 41
DVS-8504E User Guide
7.2.2. Alarm I/O Setting
7.2.2.1. I/O Connector
No. Definition
1 +5V
2 DI 1
3 DI 2
4 DI 3
5 DI 4
6 DO 1 NC
7 DO 1 COM
8 DO 1 NO
9 DO 2 NC
10 DO 2 COM
11 DO 2 NO
12 GND
7.2.2.2.
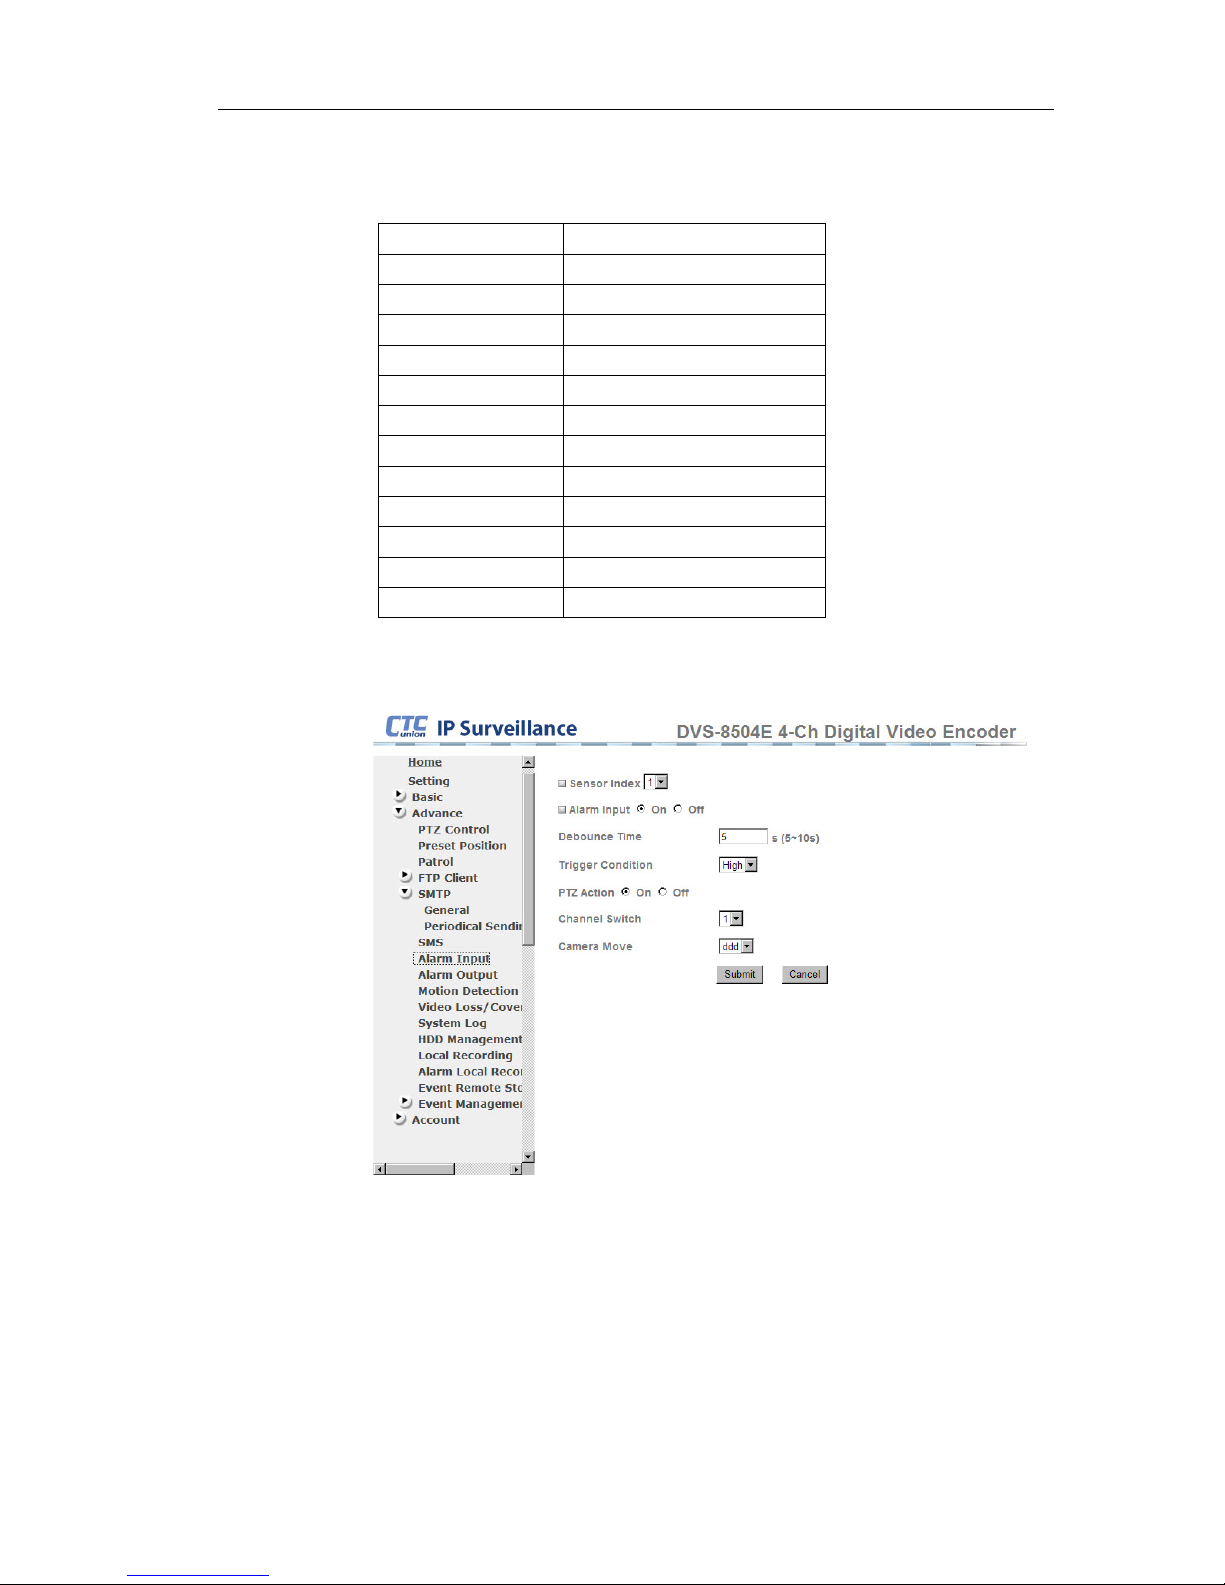
Alarm Input
z Sensor Index : Select which sensor you want to configure.
z Alarm Input : Turn this feature on or off.
z Debounce Time : Interval time, range from 5 to 10 seconds.
z PTZ Action : If turned on, PTZ camera will move to
pre-assigned position when alarm condition exists.
z Camera Move : Assign position.
41
Page 42
DVS-8504E User Guide
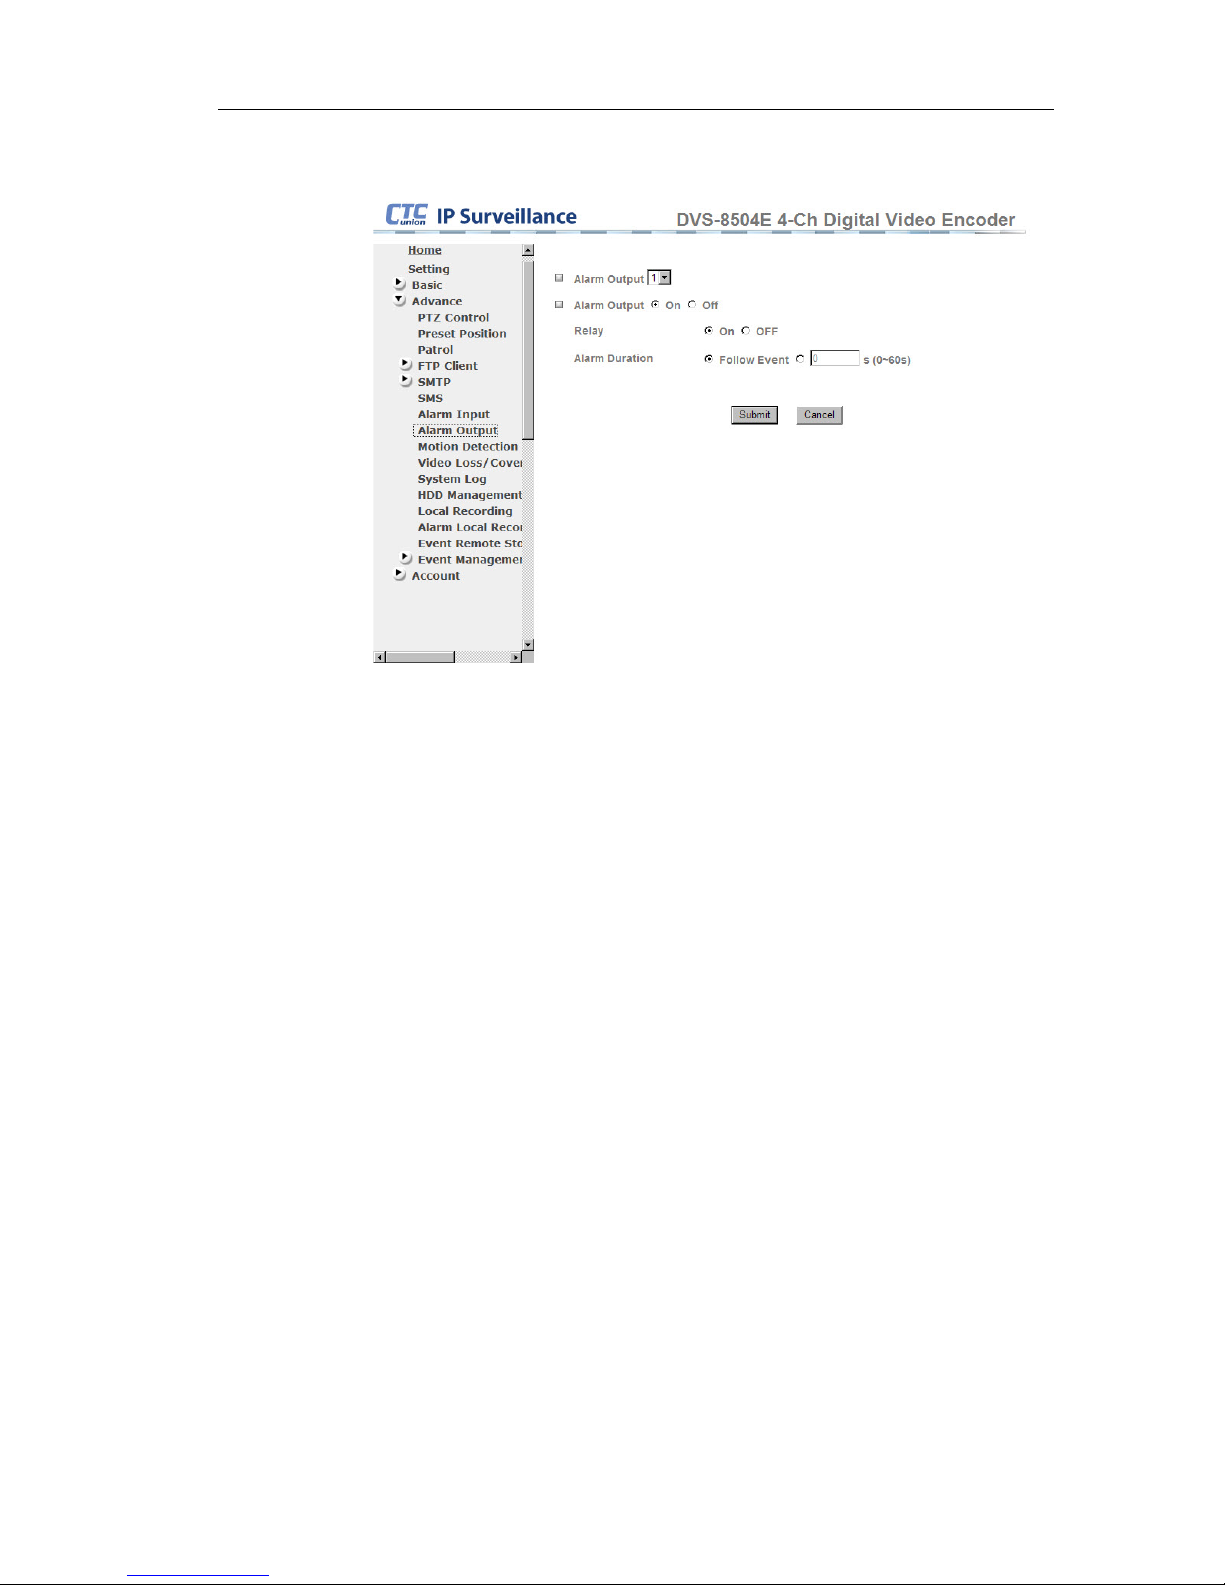
7.2.2.3. Alarm Output
z Alarm Output : Select DO1 or DO2 for alarm output.
z Alarm Output switch : Turn on or off “alarm output”
z Relay : Turn on or off the relay.
z Alarm Duration : For “Follow Event”, the alarm will continue
until the event has ended. Or the durative may be set for
0~60seconds.
42
Page 43
DVS-8504E User Guide
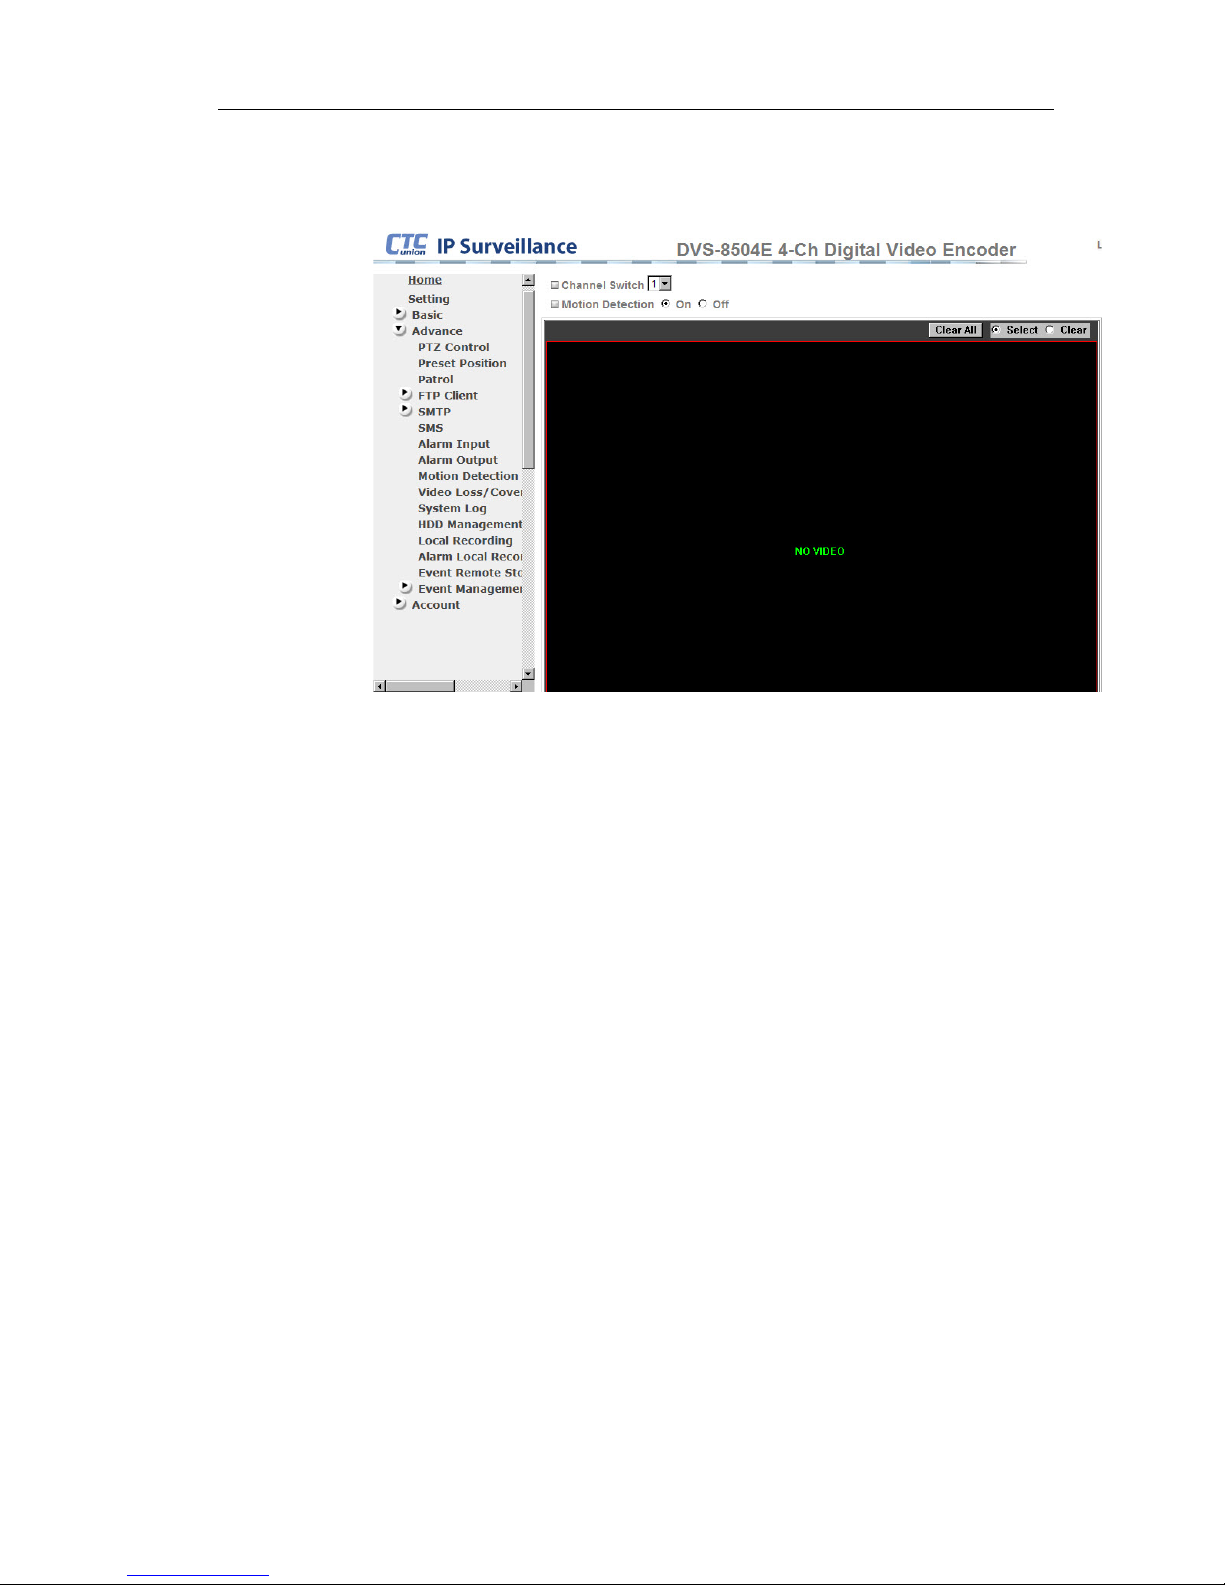
7.2.3. Alarm Video Setting
7.2.3.1. Motion Detection
z Channel : Select which channel to setup.
z Motion detection : Turn this function on or off.
z Spatial Threshold : Sensitivity of motion detection.
z Debounce time : Motion-triggered duration time.
43
Page 44
DVS-8504E User Guide
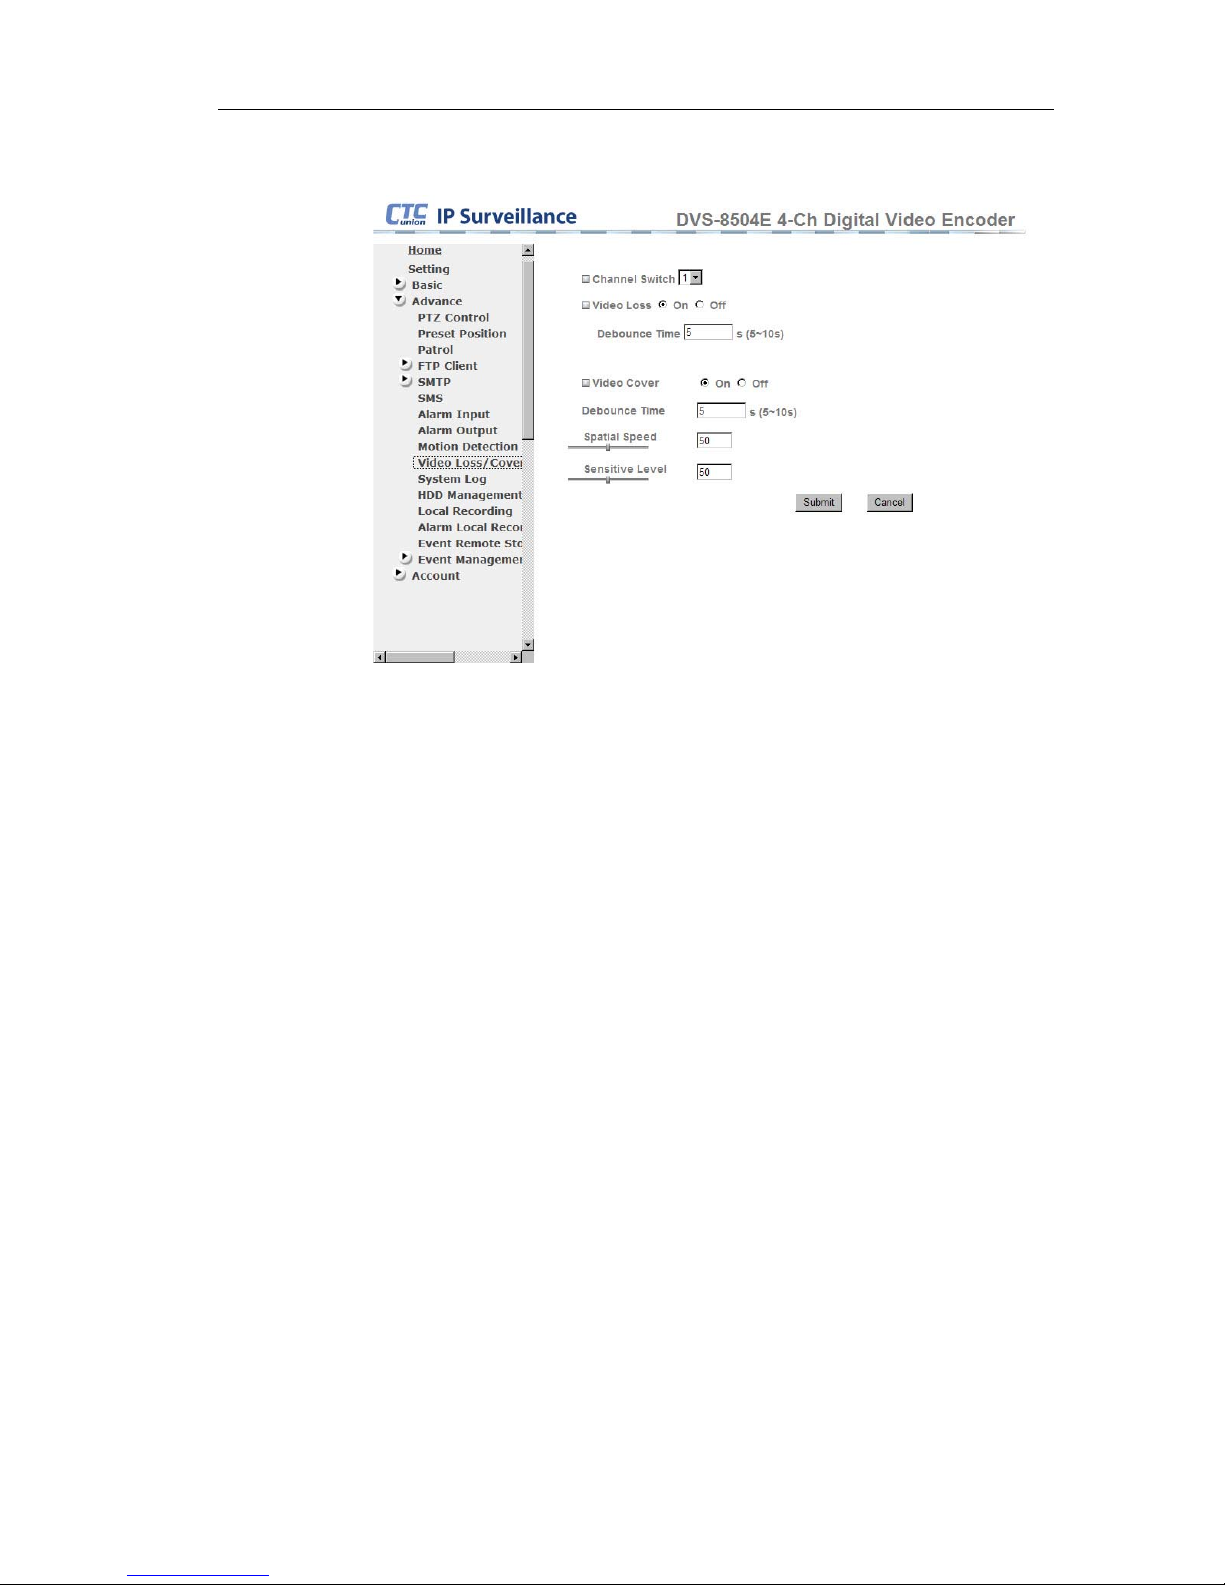
7.2.3.2. Video Loss
z Channel Switch : Select which channel to setup.
z Video Loss : Turn on to activate specific action when “video
loss” occurs. Go to “Event Management” --> “Event Setting” to set
action.
z Debounce Time : Interval time, range from 5 to 10 seconds.
z Video Cover : Detect if camera lens is covered.
z Debounce Time : Interval time, range from 5 to 10 seconds.
z Sensitive Level : Setup “video cover” sensitivity. Range 0~100
44
Page 45
DVS-8504E User Guide
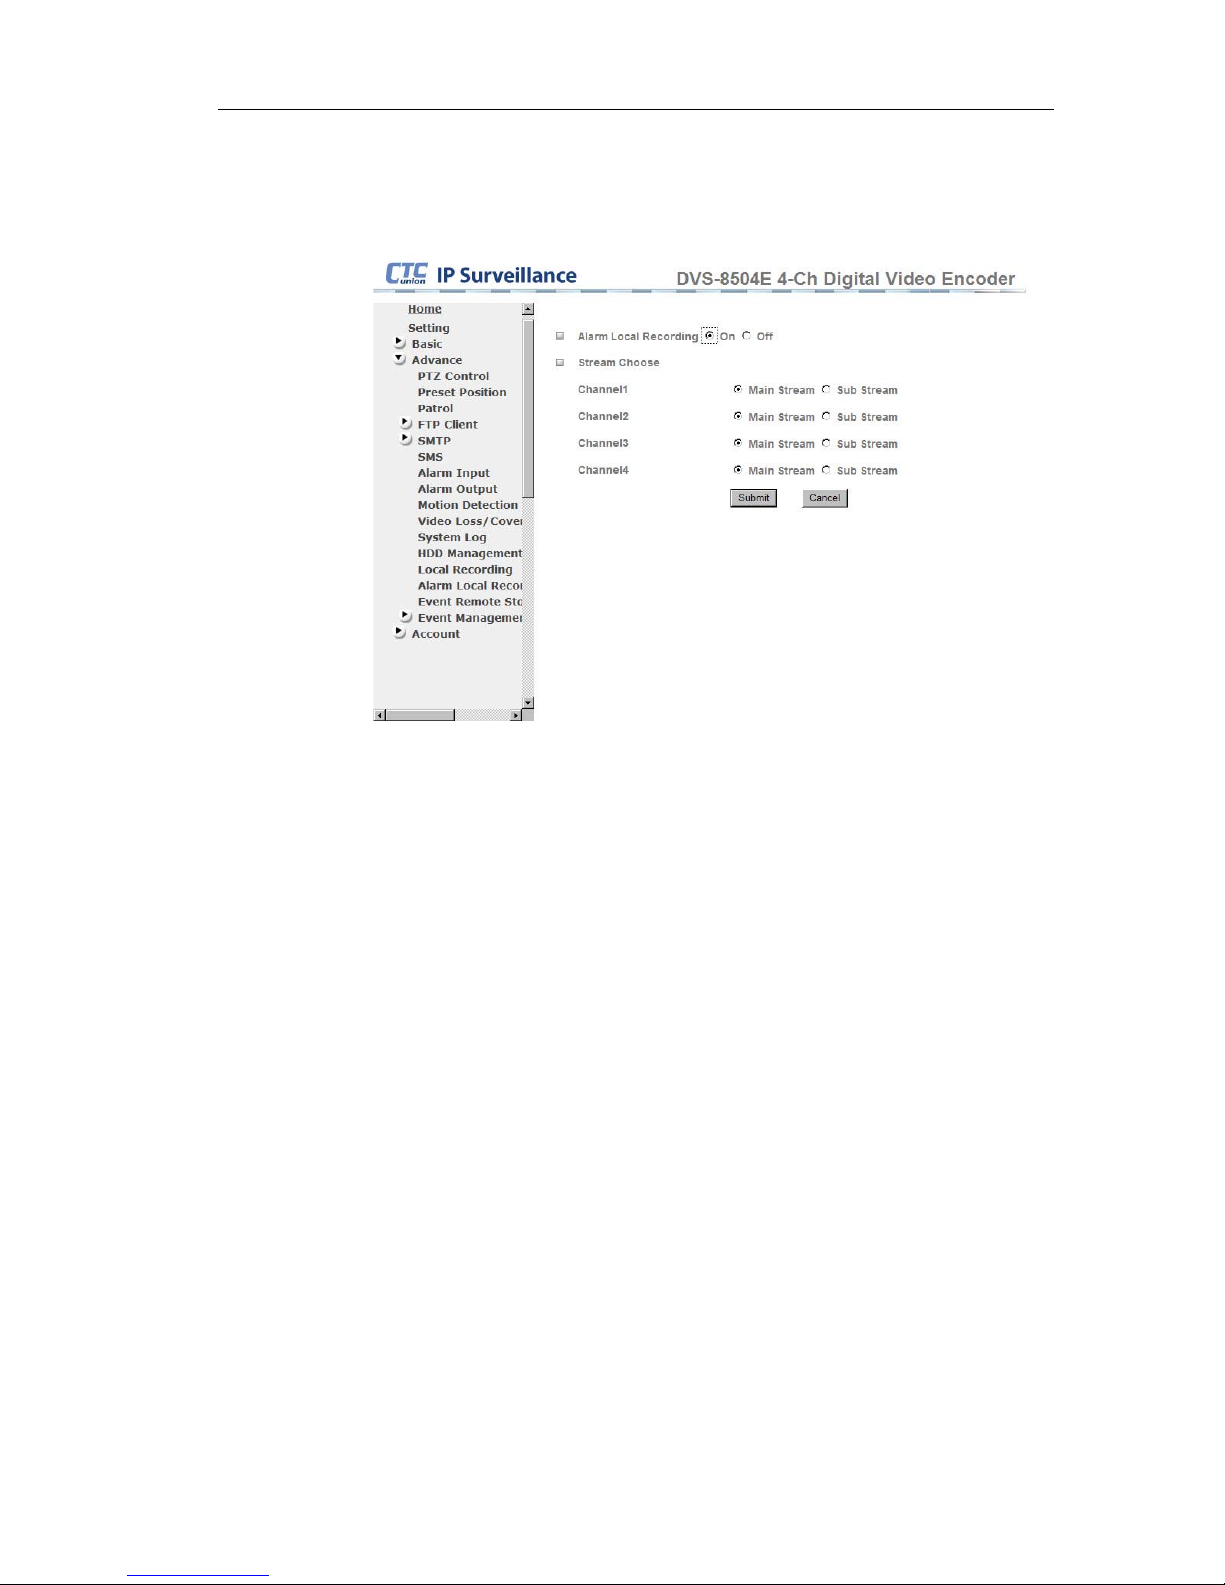
7.2.4. Alarm Storage setting
7.2.4.1. Alarm local recording
z Alarm local recording : Record video when alarm occurs.
Choose channel(s) and main or sub stream for recording.
45
Page 46
DVS-8504E User Guide
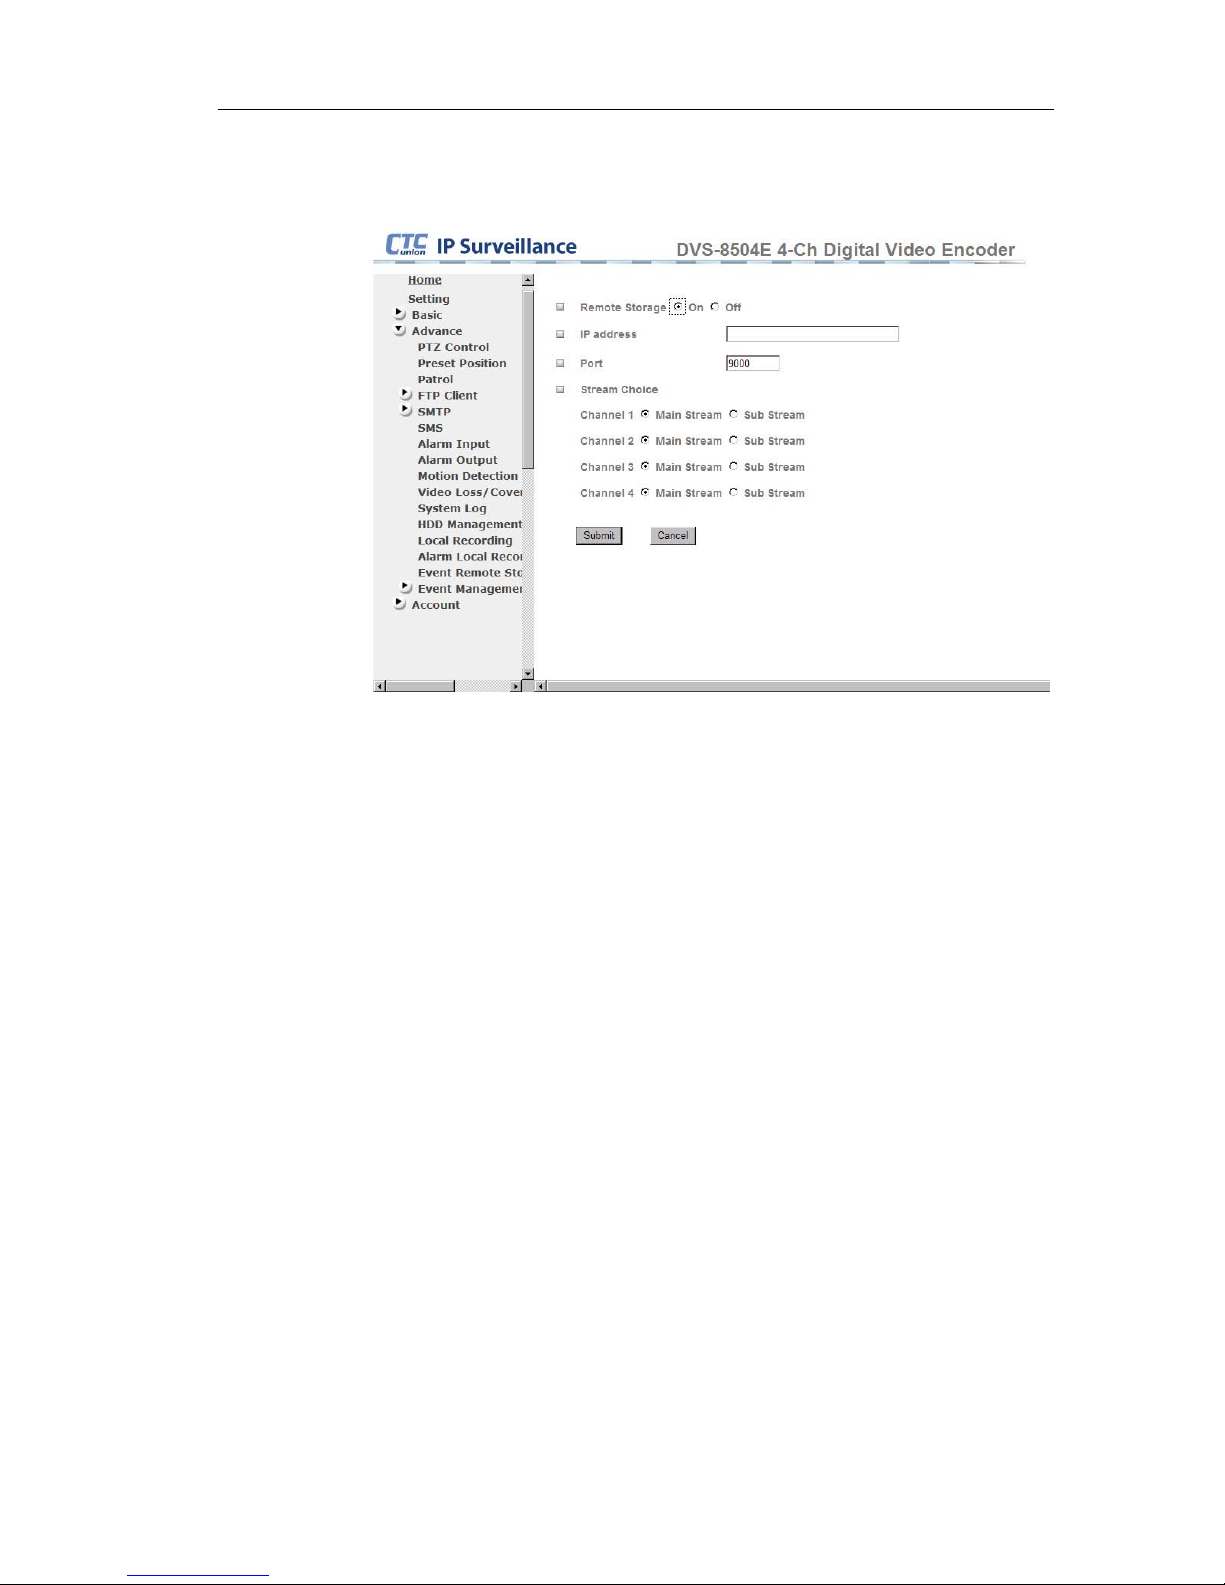
7.2.4.2. Event Remote Store
Save video to remote video server when event occurs.
Remote Storage : Turn this feature on or off.
ddress.
eam for remote
z
z IP address : Input remote video server's IP a
z Port : Input remote video server's port here.
z Stream choice : Choose main or sub str
recording.
46
Page 47
DVS-8504E User Guide
7.3. Storage management
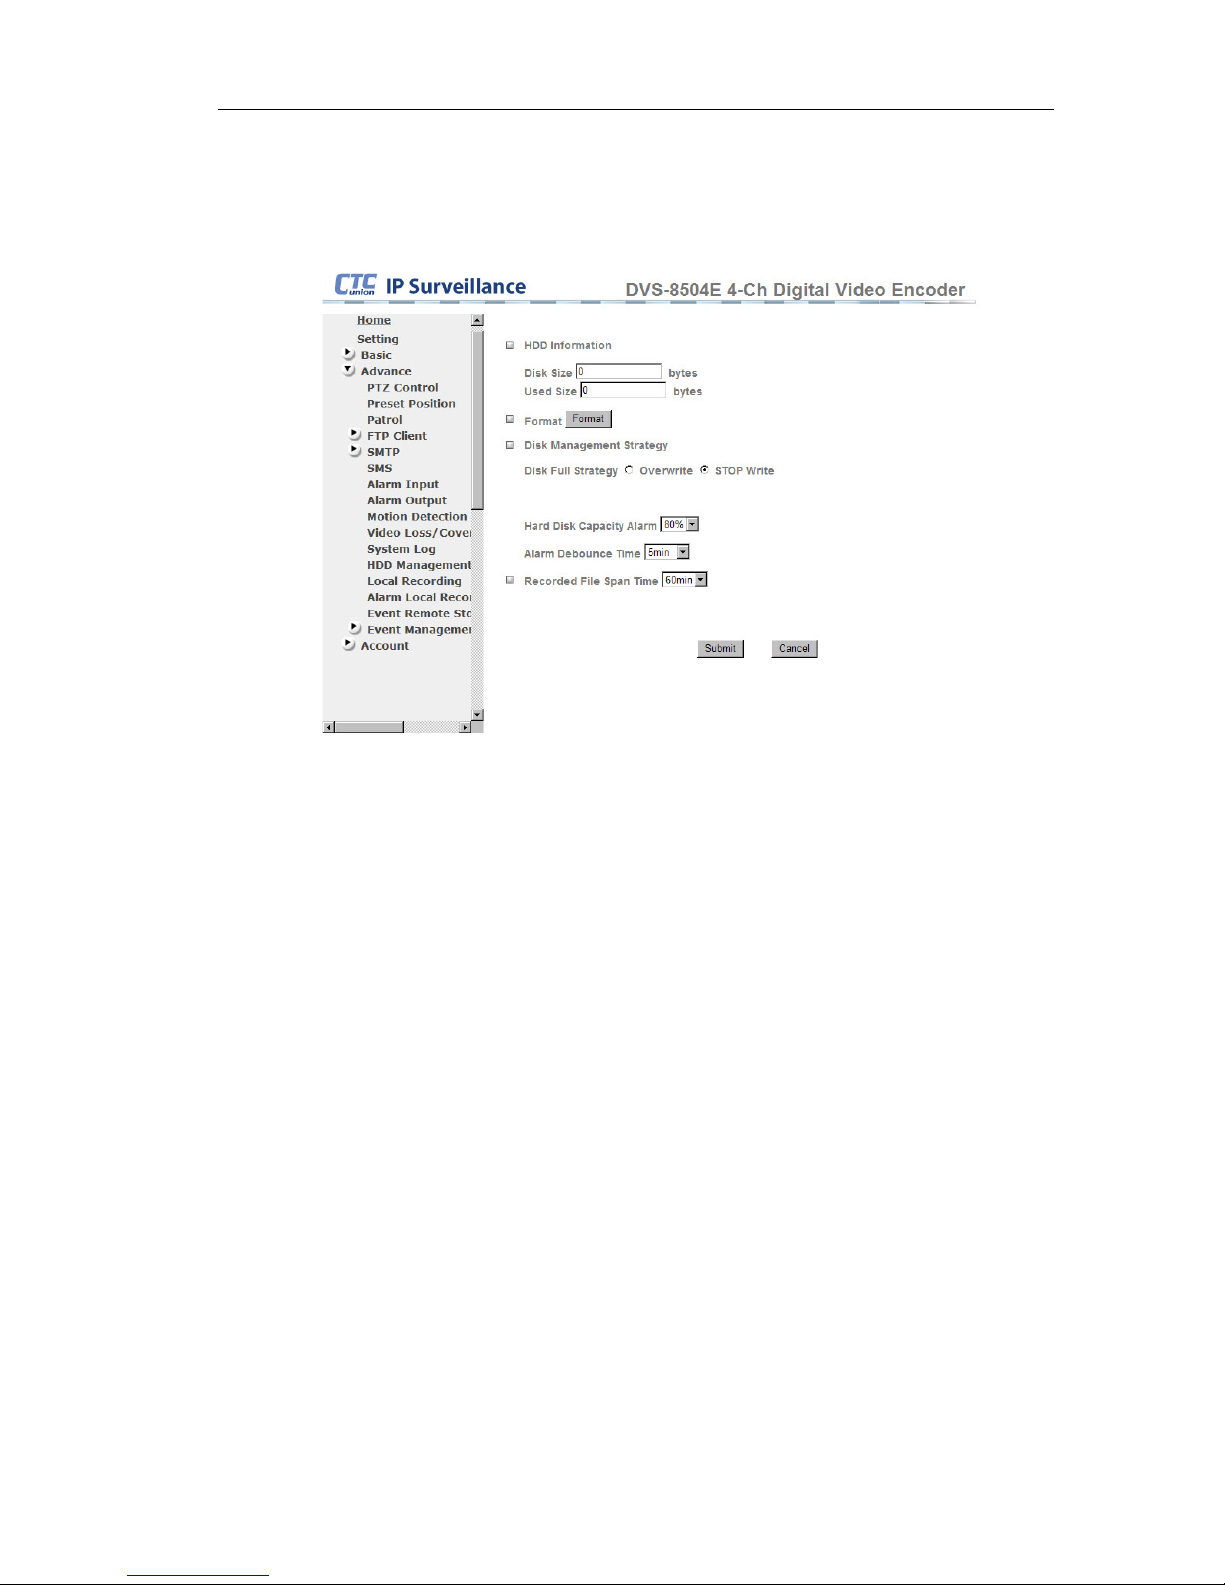
7.3.1. HDD management
z HDD information : If there is a hard disk installed, the disk size and used
size will show. If no disk is installed, both will show 0.
z Format : Click “Format” button to format the hard disk. All data will be
erased.
z Disk Management Strategy :
Disk Full Strategy : “Overwrite” old data while hard disk is full. “STOP
Write” hard disk while hard disk is full.
z Hard Disk capacity alarm : Send alarm while hard disk space reaches
the set percentage.
z Alarm Debounce Time : Alarm duration.
z Recorded File Span Time : Makes video split into files of 15, 30, 45 or
60 minute segments.
47
Page 48
DVS-8504E User Guide
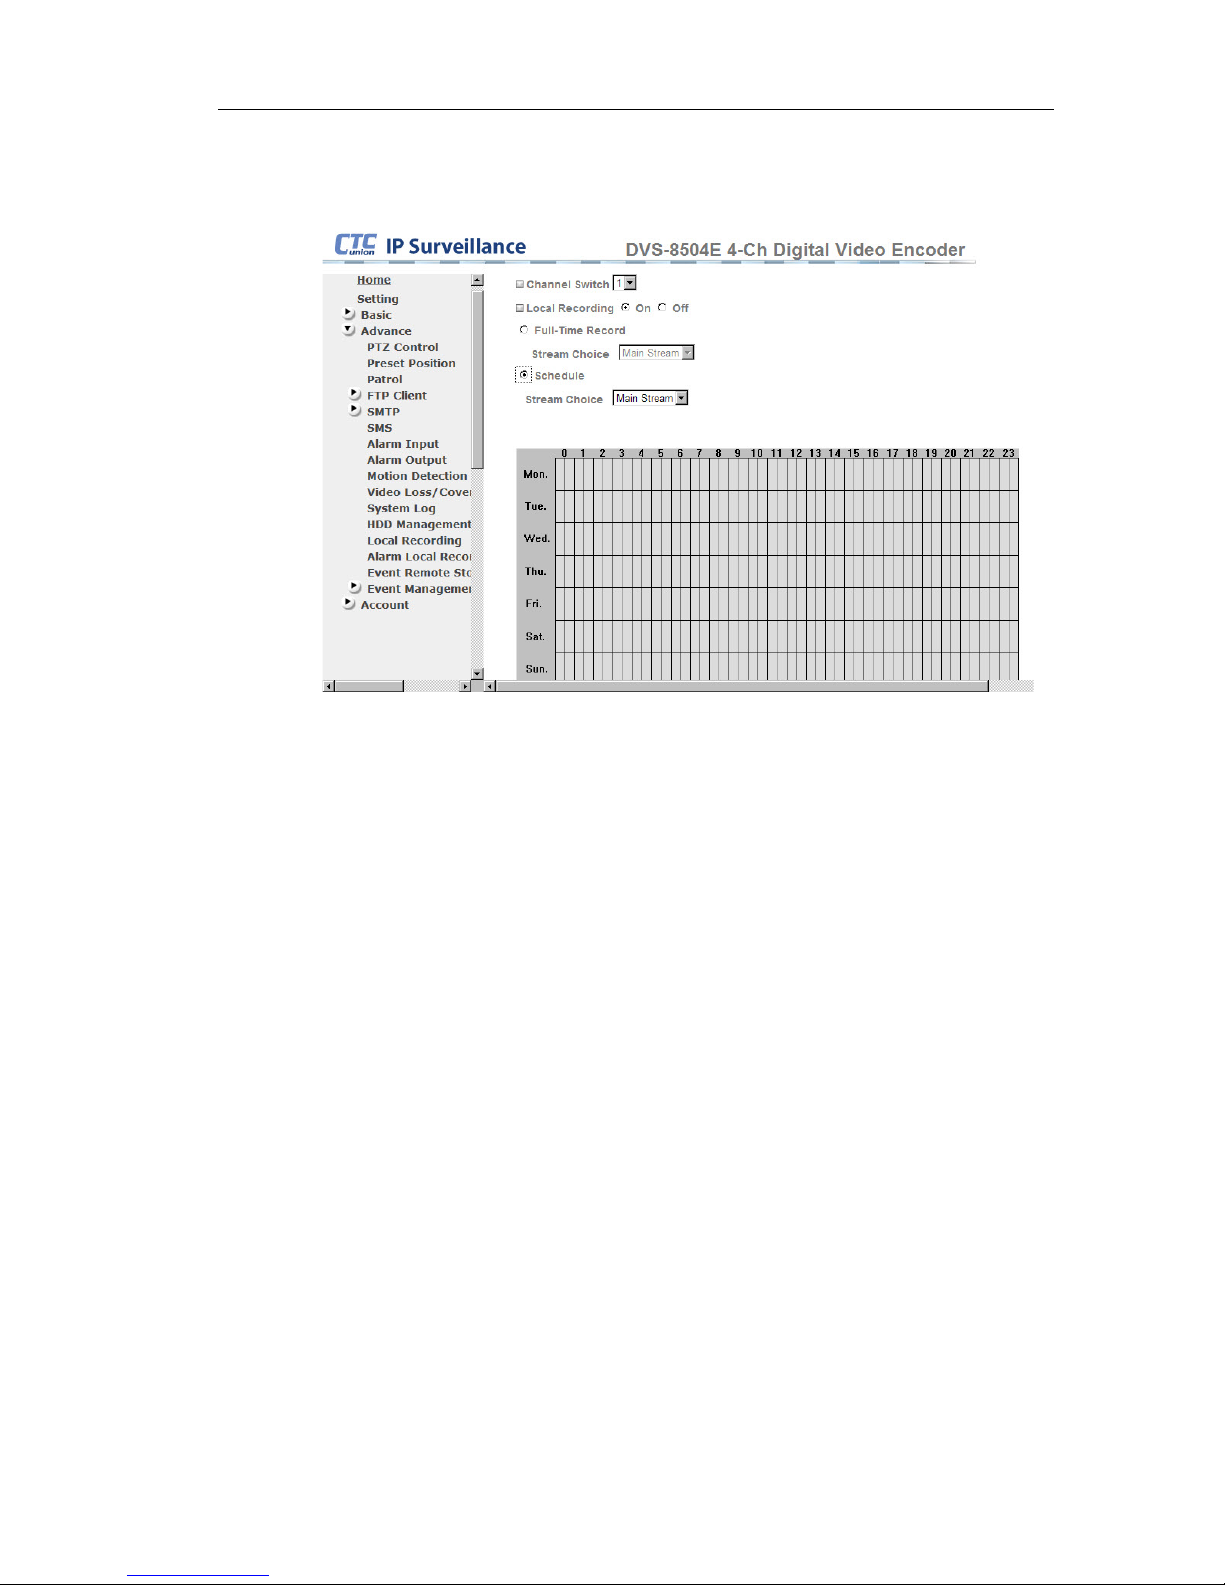
7.3.2. Local Storage
z Channel Switch : Select which channel you want to setup.
z Local Recording : Set the recording feature on or off.
z Full-Time Recording : Record all video for this channel. Then, pleas e
choose “main” or “Sub” stream.
z Schedule : Use schedule table to select when to record video. Each
block represents half an hour.
48
Page 49
DVS-8504E User Guide
7.4. Event Management
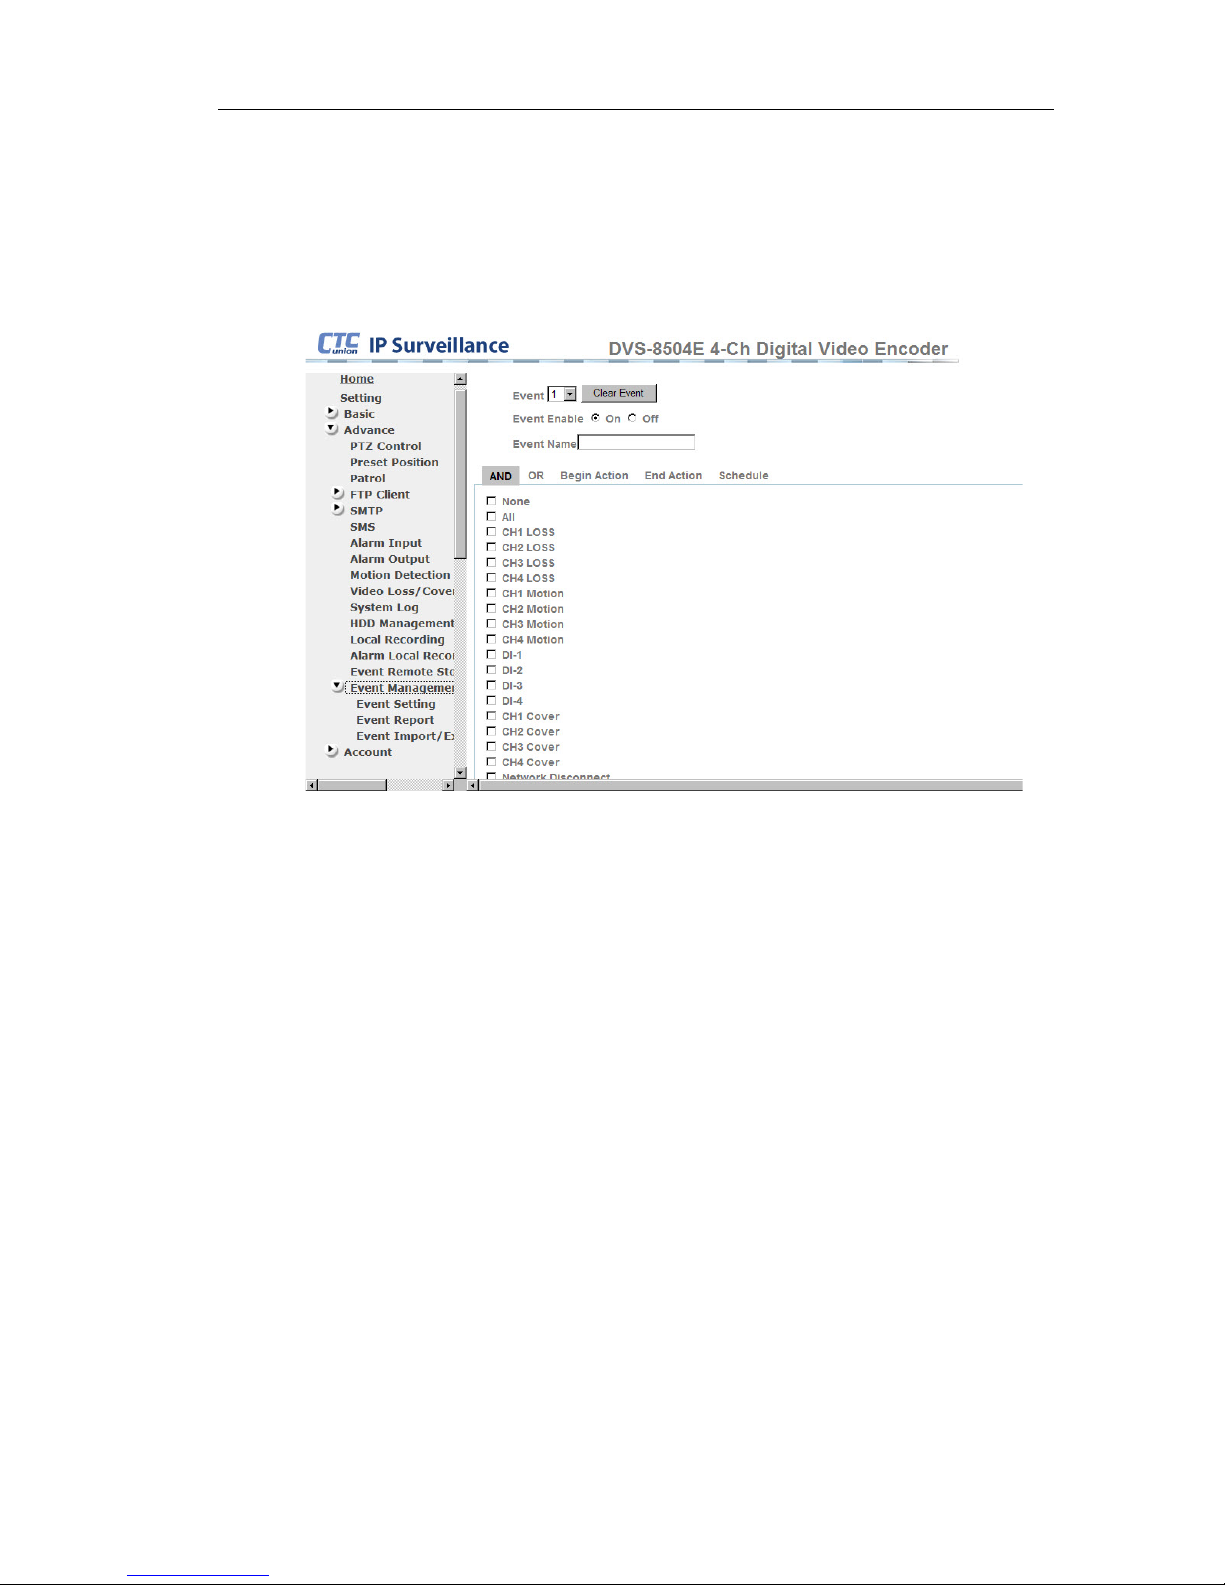
This function includes event setting, import and export.
7.4.1. Event Setting
z Event : Give every event setting a serial number
z Event Enable : Turn event setting function on or off.
z Event Name : Give every event a specific name for Identification.
z AND : Select trigger-event. In “AND” condition, all events should
happen, and then device trigger alarm.
z OR : Select trigger-event. In “OR” condition, any one of the selected
events will trigger an alarm.
z Begin Action : Select action when alarm is triggered.
z End Action : Select action when alarm has ended
z Schedule : Schedule recording. The same table as “Local recording”
49
Page 50
DVS-8504E User Guide
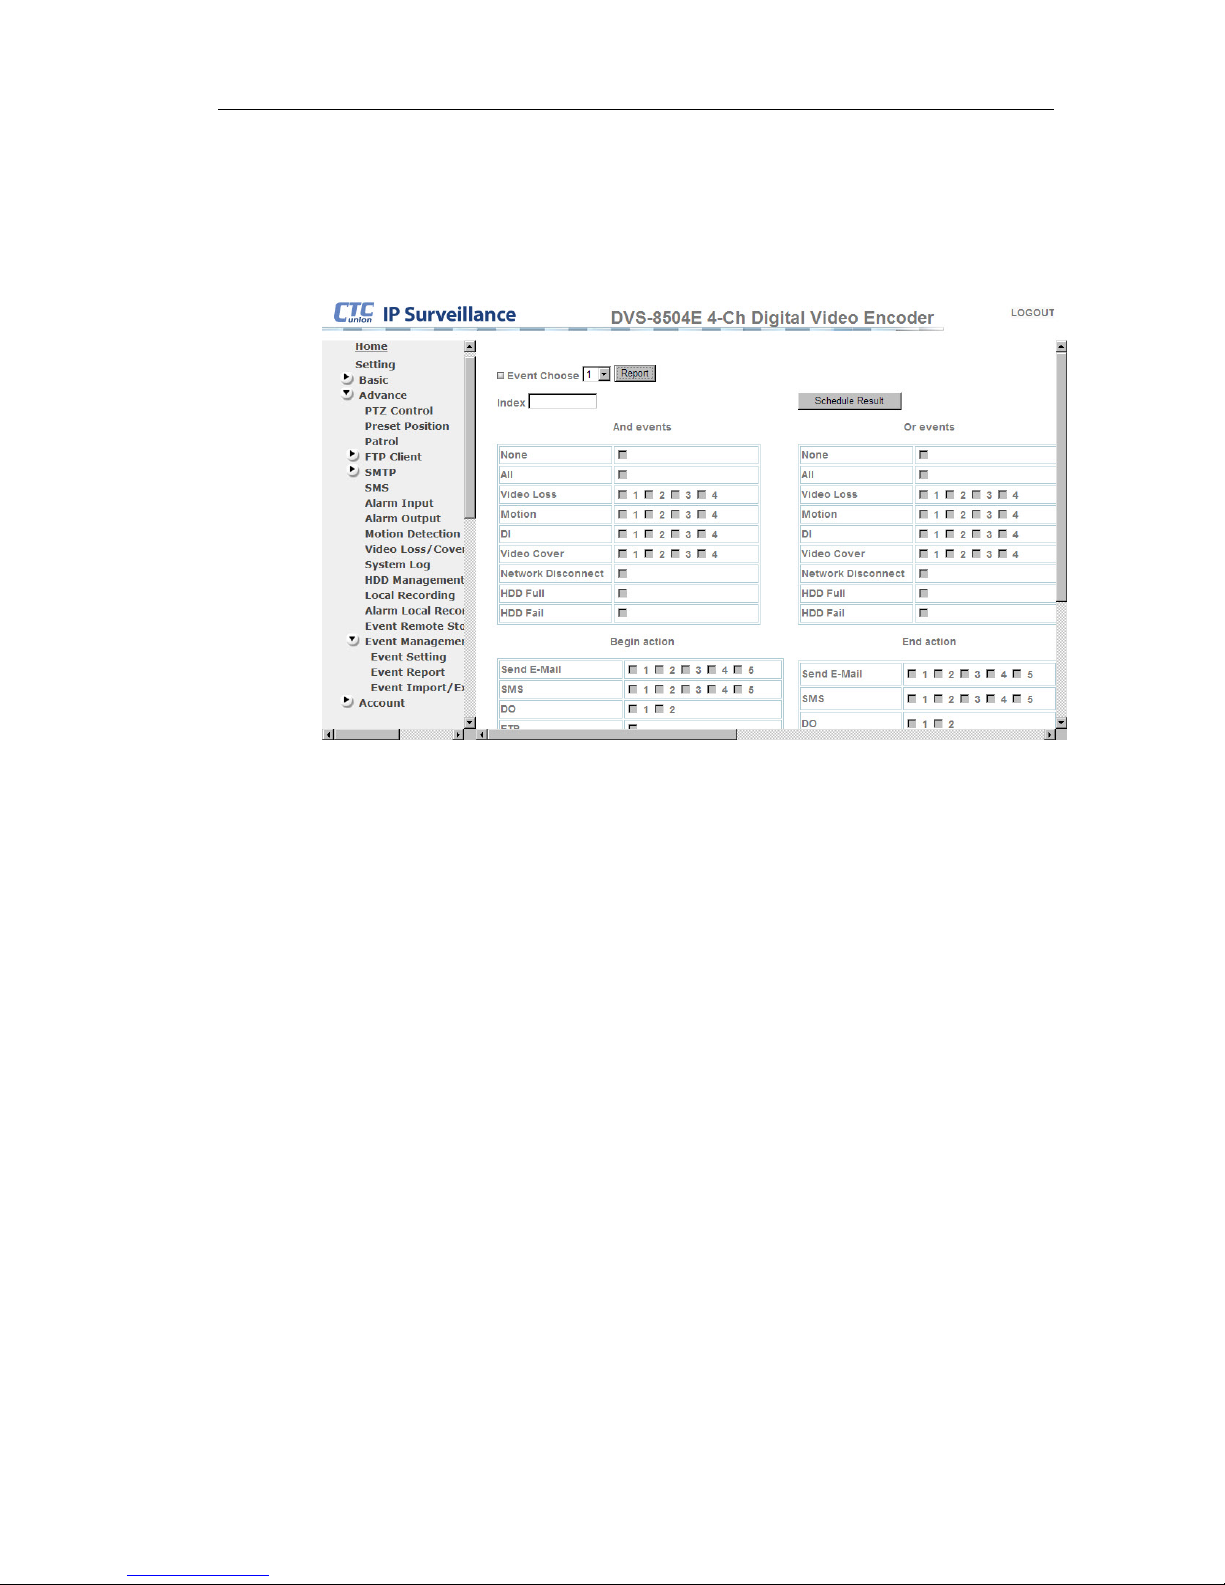
7.4.2. Event Report
Use the Event Report page to filter and manage all events recorded by
the system. Filtering uses 'and' and 'or' logic to filter particular events.
Click ”Report” to show a report for the chosen event index.
50
Page 51
DVS-8504E User Guide
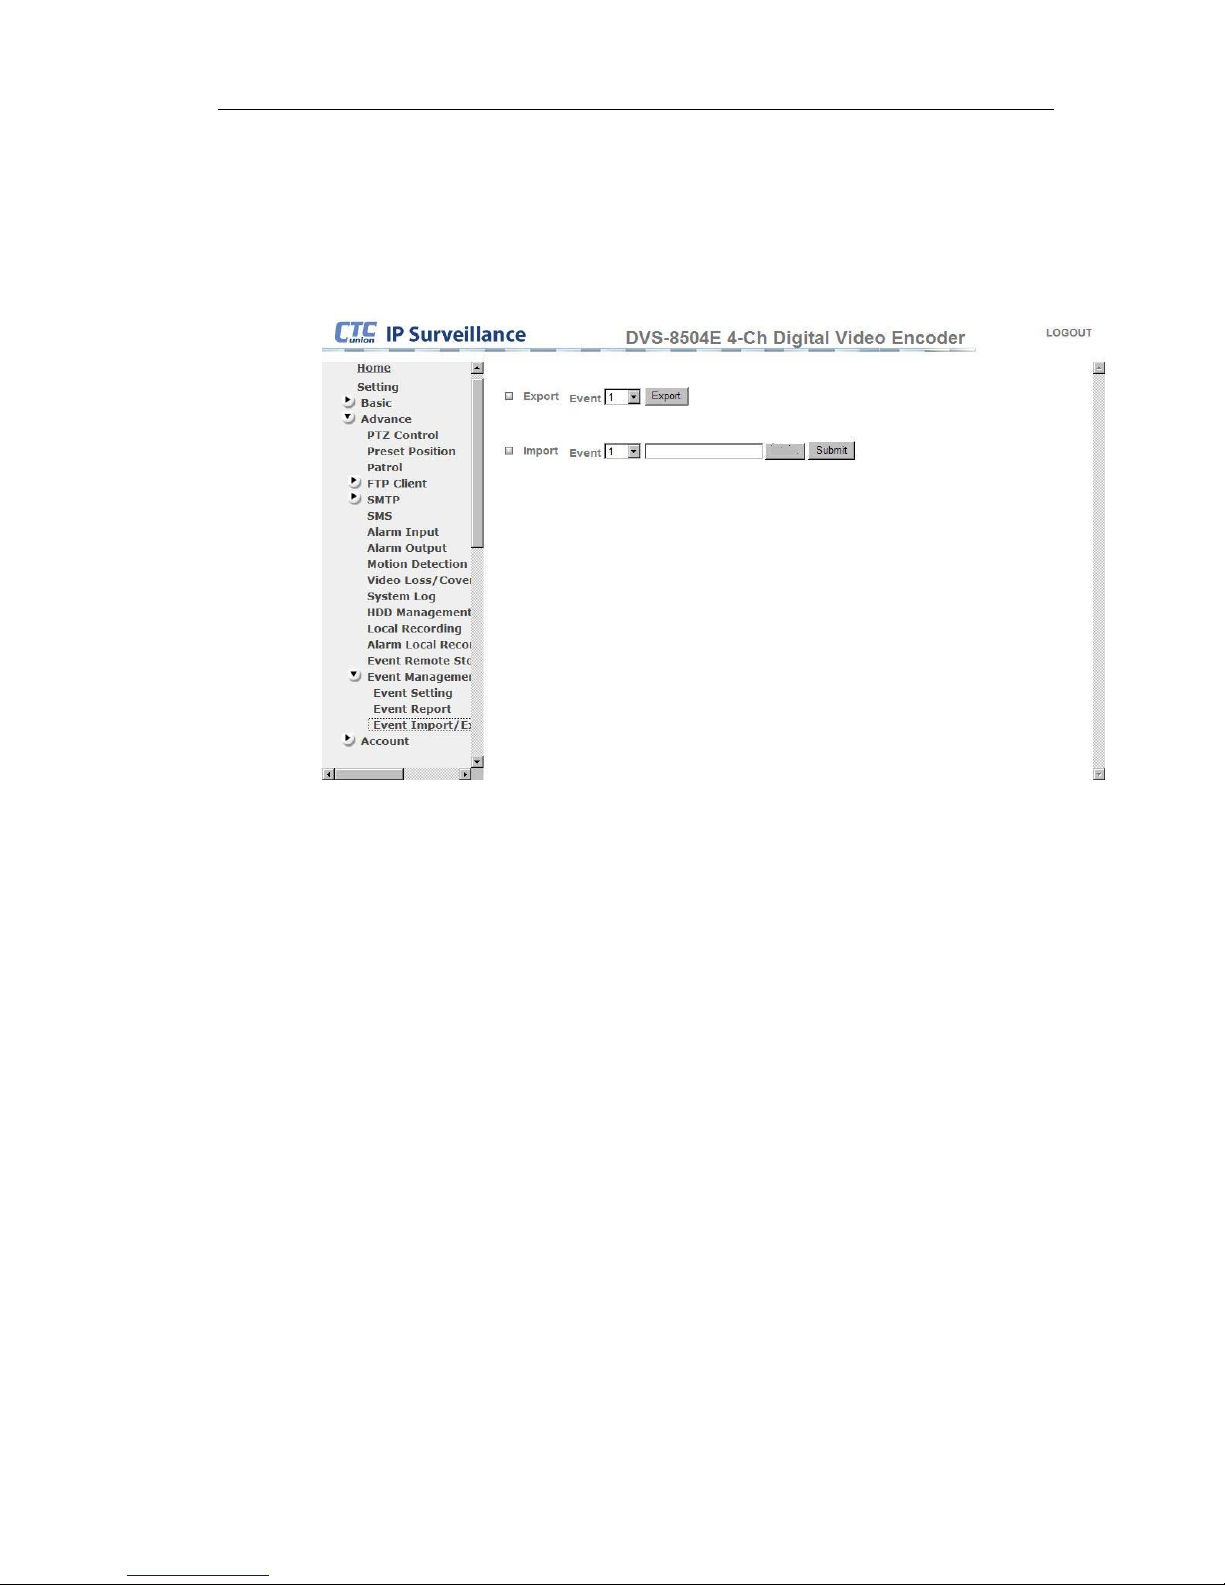
7.4.3. Event Import/ Export
All Event settings can be exported to a file. Also user can also import a
previously saved event setting export or file from a different DVS for
cloning.
Action:
z Export : Click ”Export” to export an event file. Then, select “save as” to
save on PC.
z Import : Click ”Browse” to select a specific file to import.
51
Page 52
DVS-8504E User Guide
8. ACCOUNT MANAGEMENT
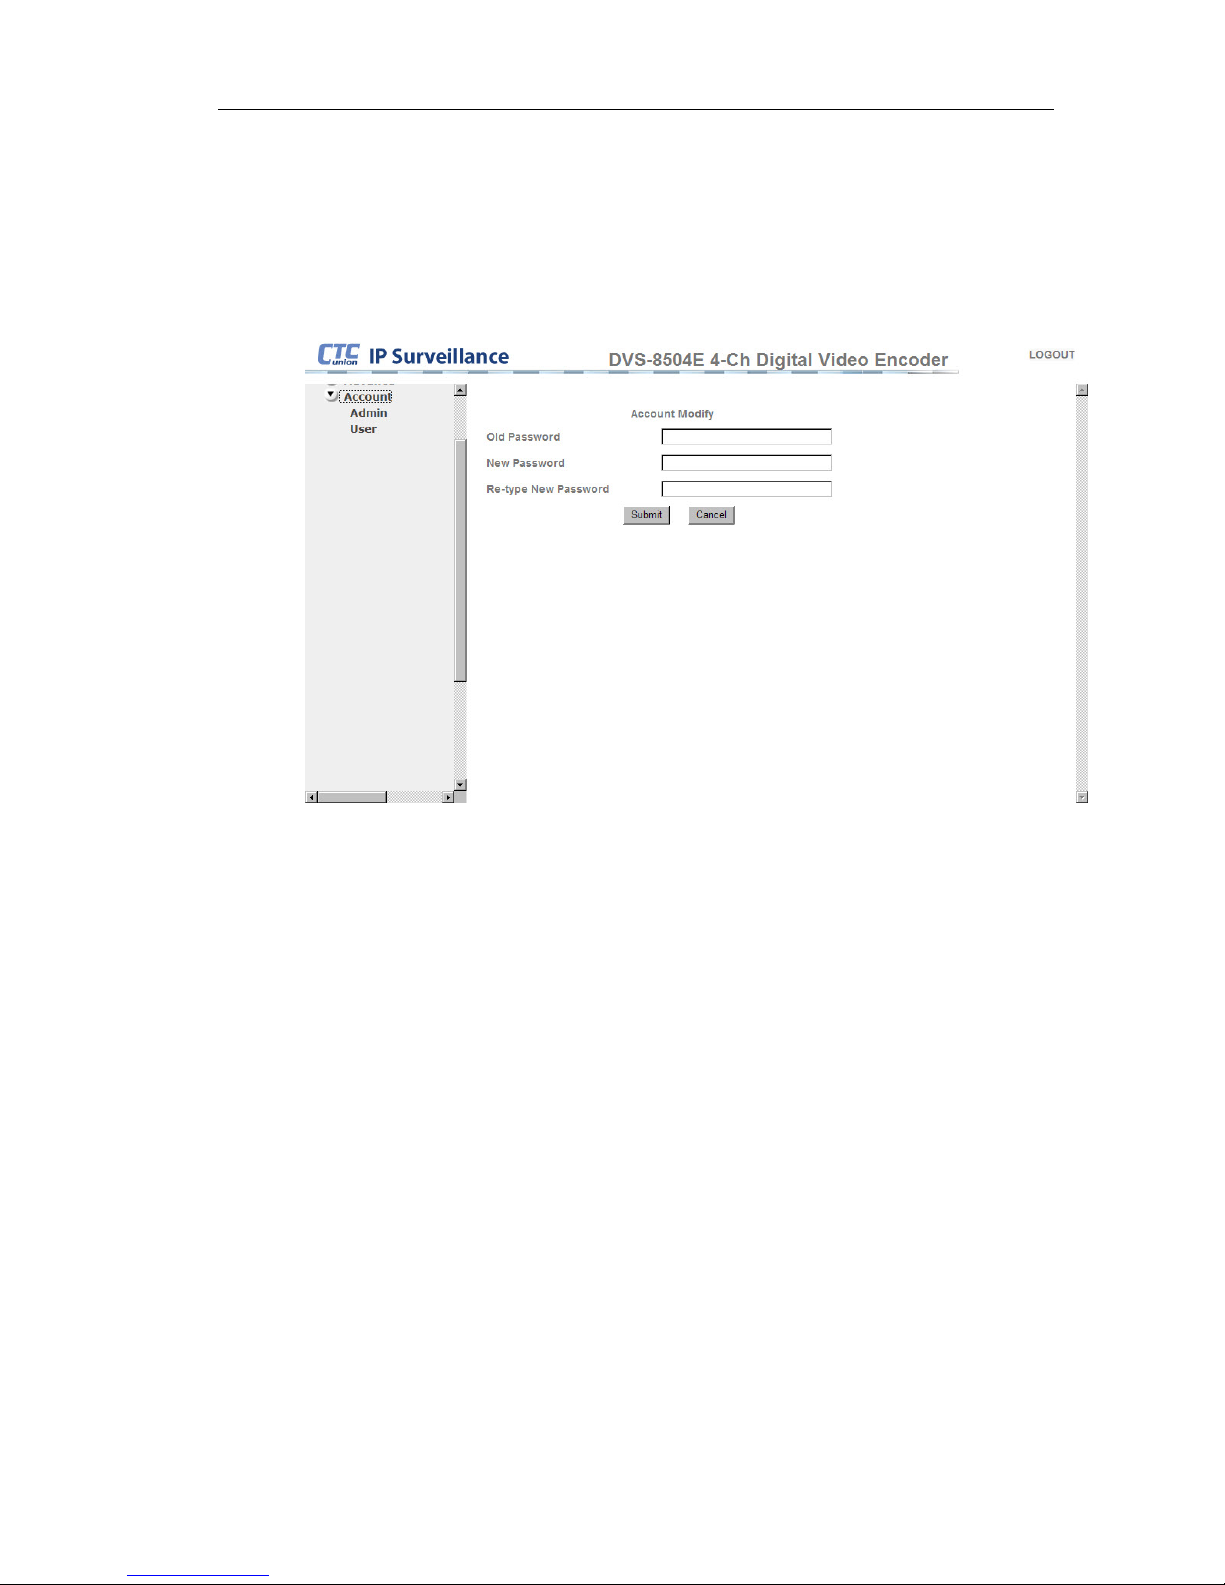
8.1. Admin
Administrator’s default username and password are both “admin”. This
page allows the administrator to change the password for administrator.
Action:
z Input old password to verify changing and new password twice. Click
the 'Submit' button.
52
Page 53
DVS-8504E User Guide
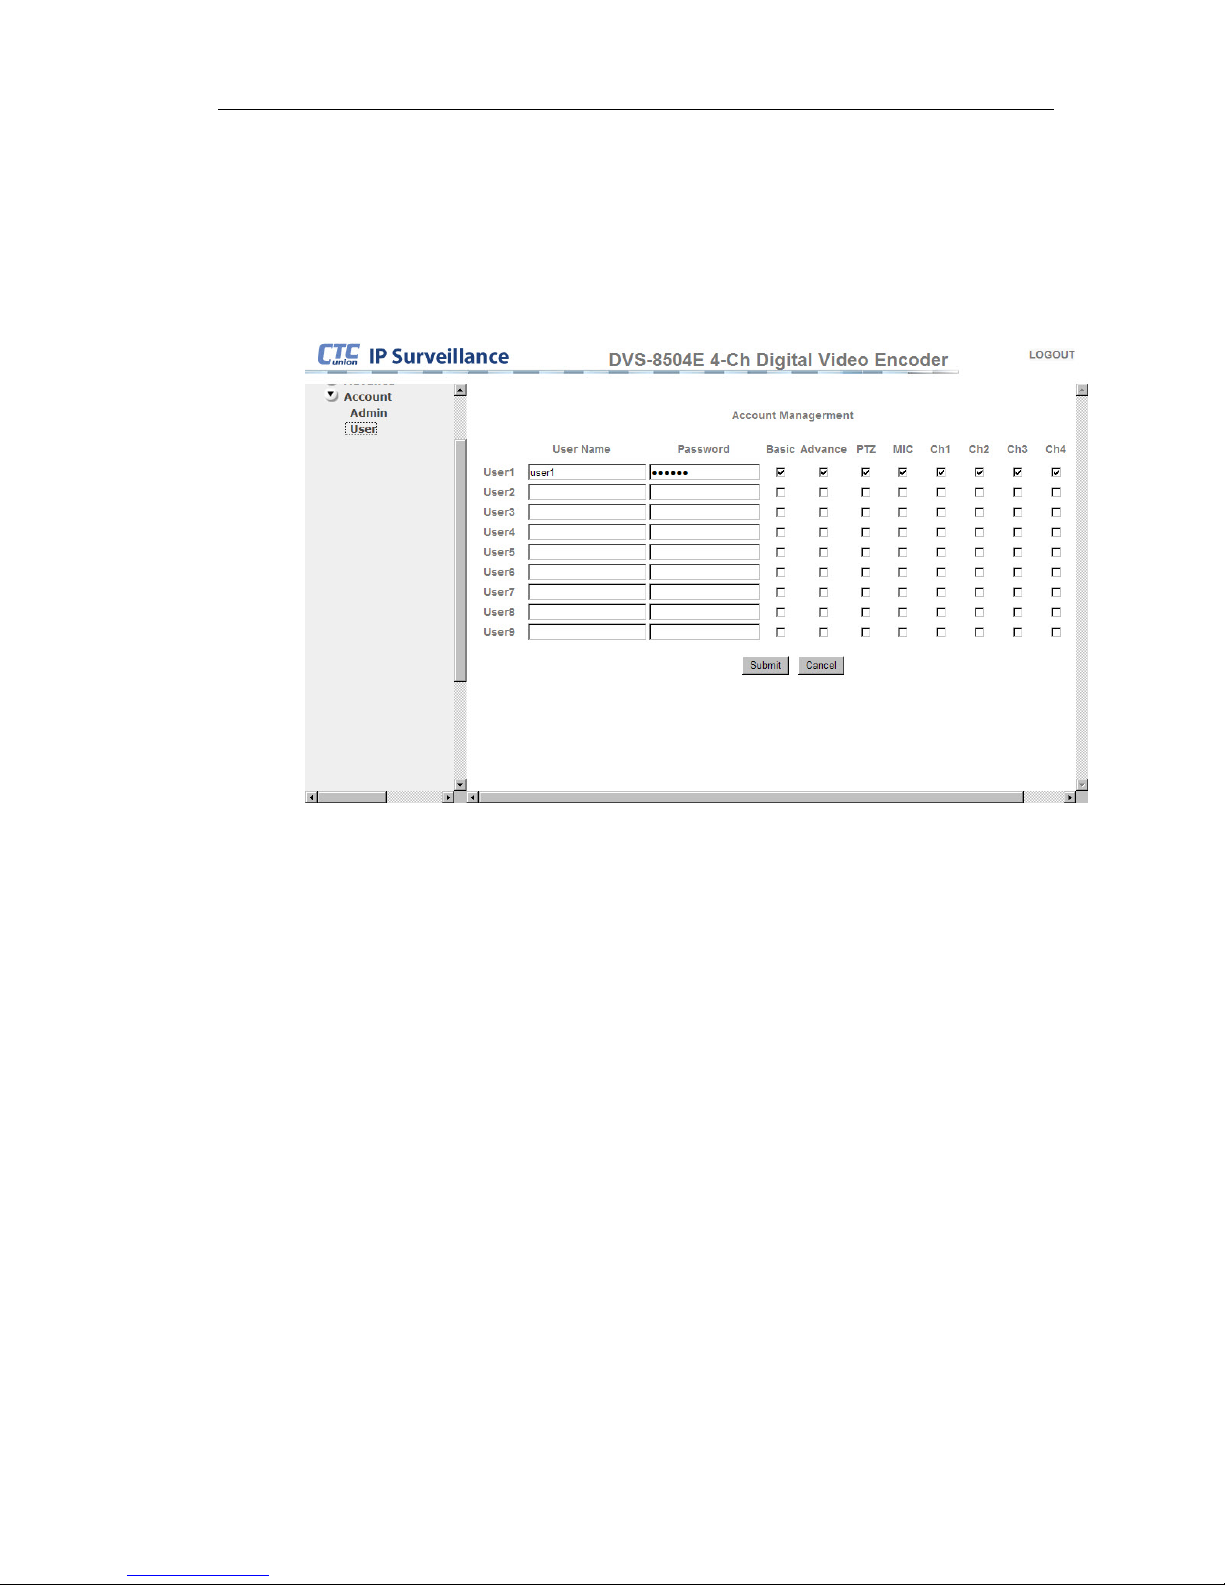
8.2. User
The administrator can create up to nine more users and assign
permissions under Account Management. Add or change normal user
“User name”, “Password” and limits of authority.
Items:
z User name : Input the desired user name.
(Do not exceed 32 characters)
z Password : Input the desired user password.
(Do not exceed 32 characters)
z Basic : User’s authority allows ”Basic” viewing function
z Advance : User’s authority allows setting ”Advance” function
z PTZ : User’s authority allows controlling PTZ camera.
z MIC : User’s authority allows use of ”MIC” function
z Ch1~Ch4 : User has authority to provision each channel.
z Playback : User’s authority allows watching ”Playback” of recorded
video.
53
Page 54
DVS-8504E User Guide
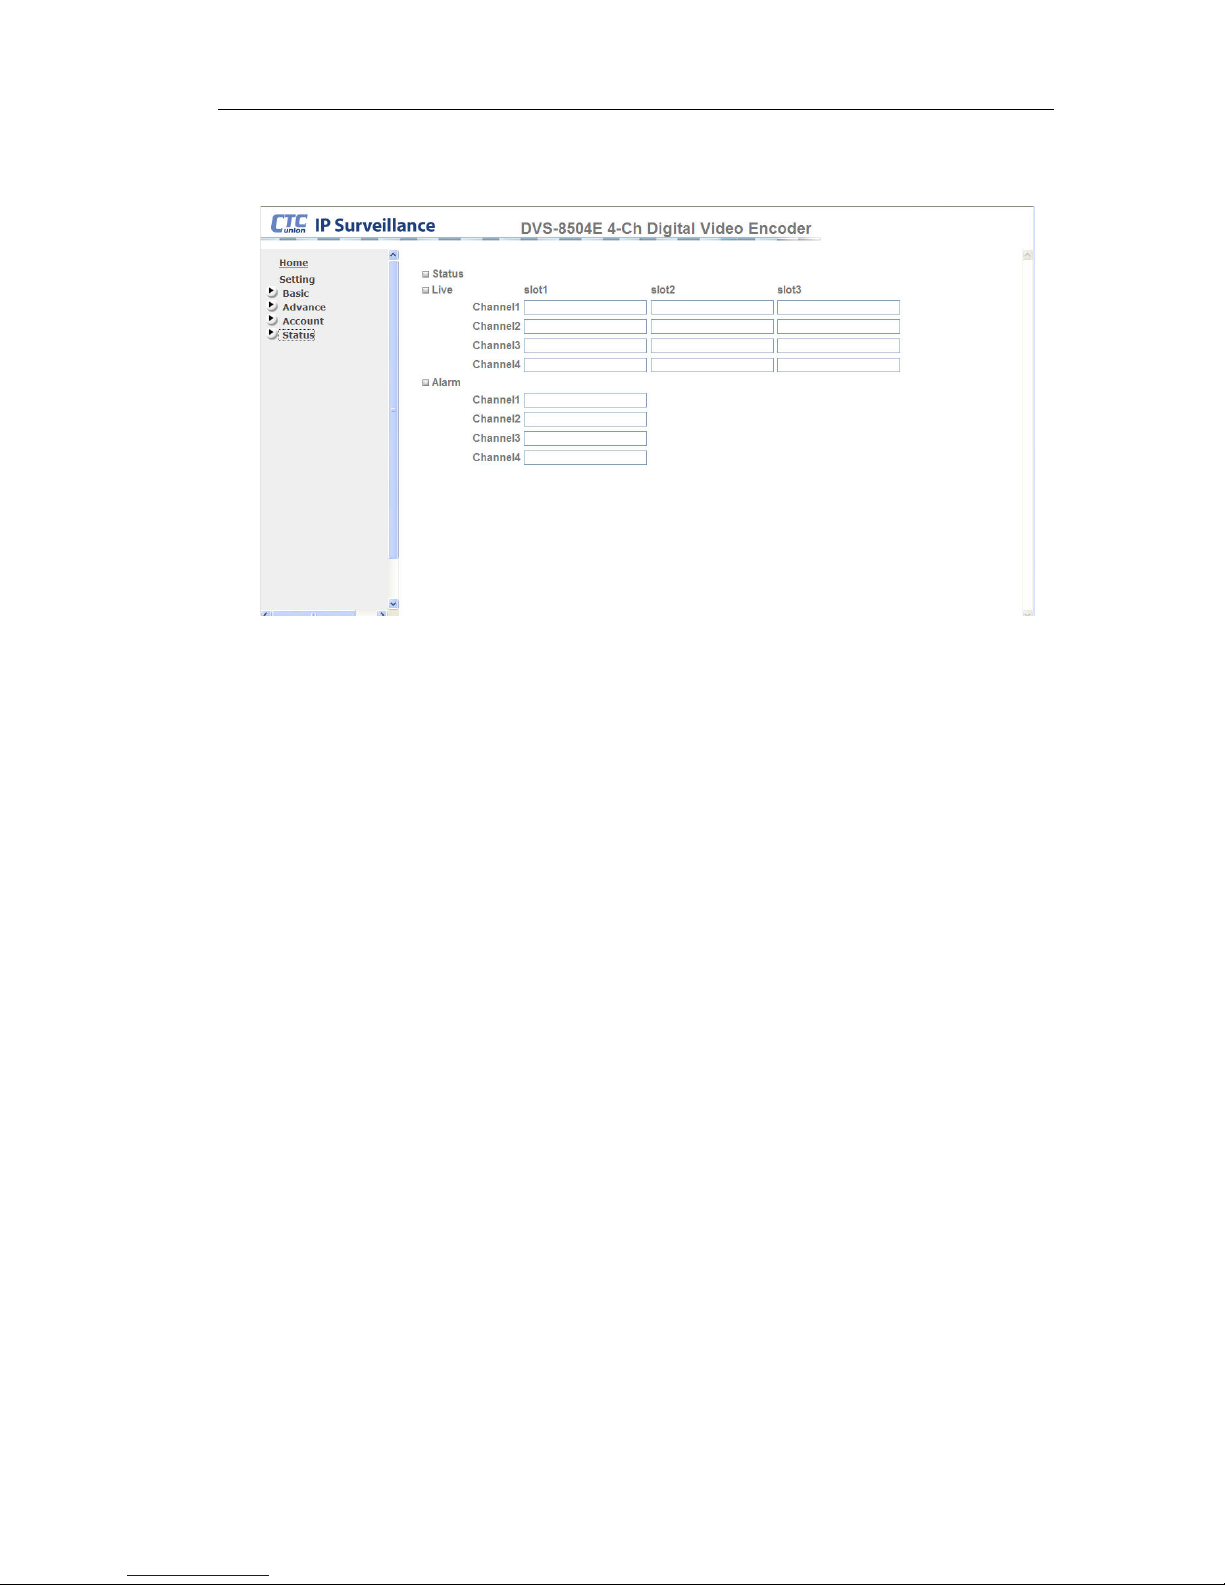
9. DVS STATUS
The Status displays active connections to the DVS and any alarm indications
per channel.
z Live : Show IP and port number of live streaming connection.
z Alarm : Show IP and port number of alarm streaming connection.
54
Page 55
DVS-8504E User Guide
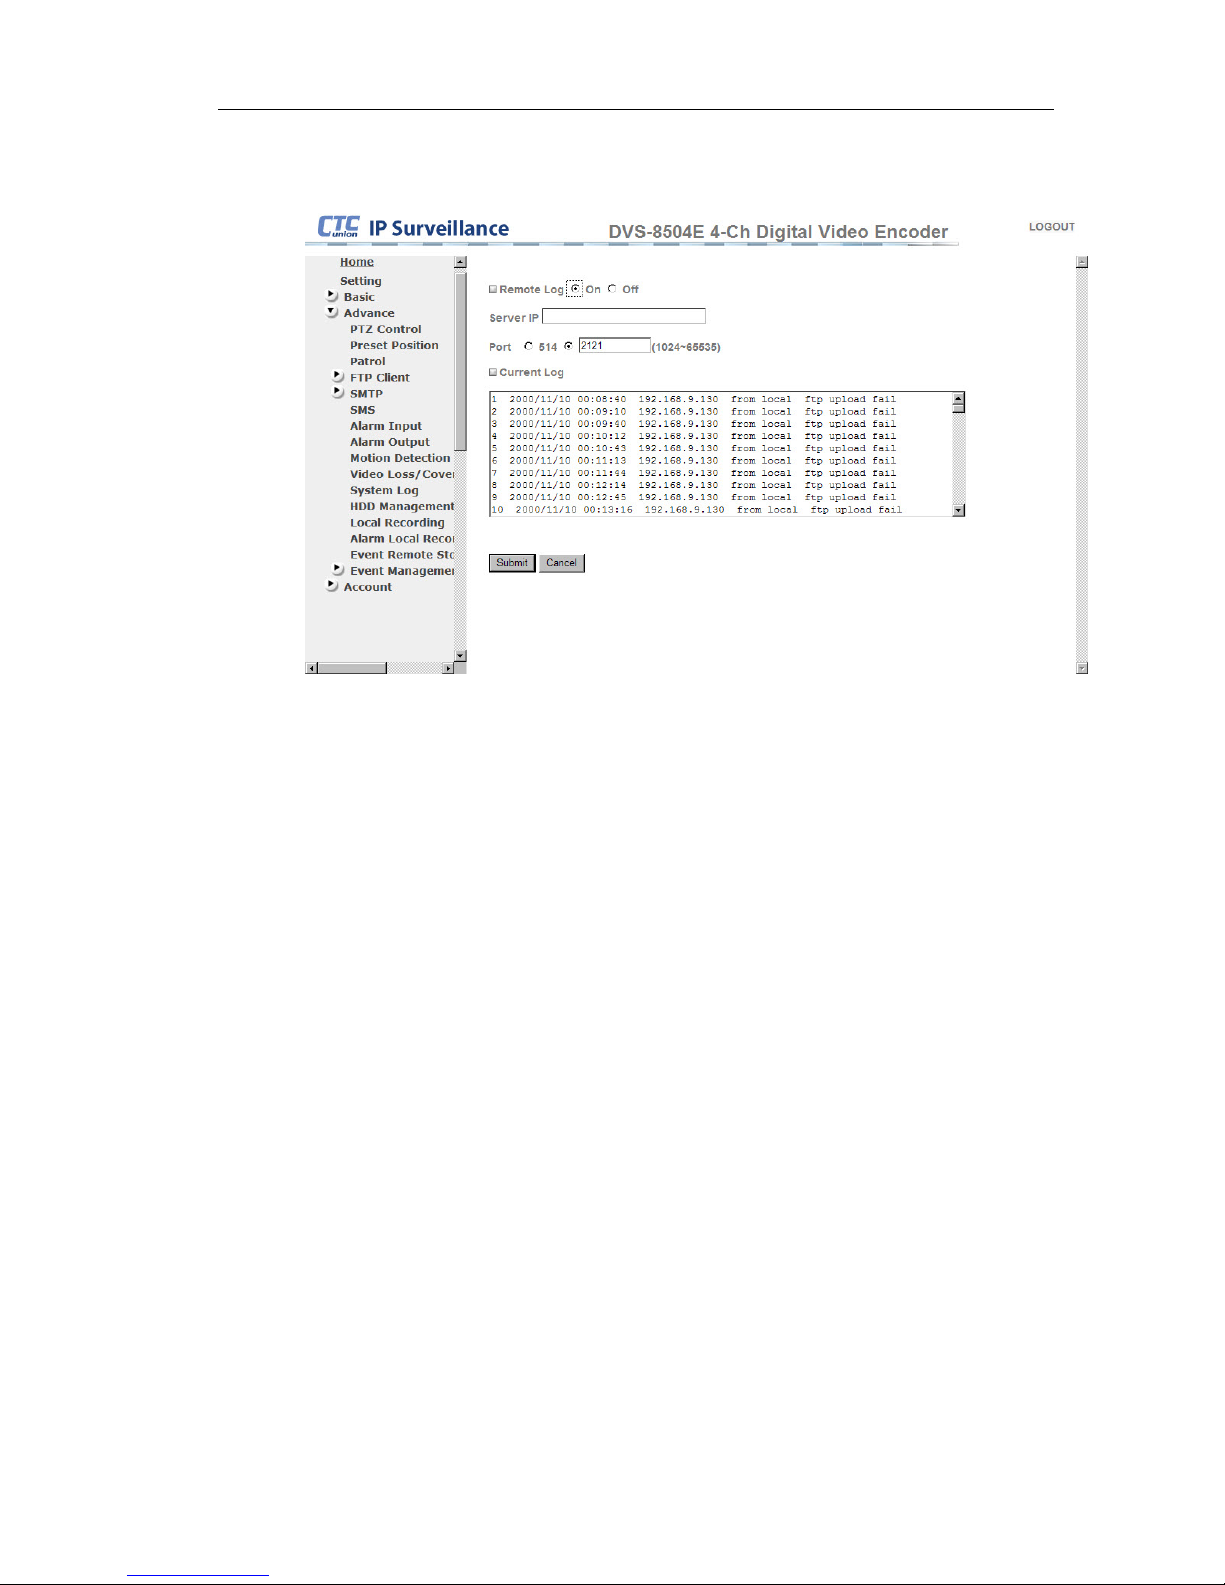
10. SYSTEM LOG
The System Log holds a record of activity recorded by the operating
system of the DVS. This log may be viewed on the DVS or it may be
configured to send the log to a log server for centralized management.
z Remote Log : Send log to remote log server.
z Server IP : Input IP of remote log server
z Port : Remote Log Server port. (Range from 1024 ~ 65535)
z Current Log : Shows the DVS current log. When full, new data will
overwrite the oldest data in the queue.
55
Page 56

DVS-8504E User Guide
11. TROUBLE SHOOTING
1) I can’t seem to add the DVS video into the NVR live view. Attached is a
screenshot of my NVR setting. Please check what am I missing?
If you are using RTSP streaming, please make sure that you have chosen the
Stream Mode in RTSP properly. (See attached picture). By the way, the 6789
port is for UDP stream. You also have to make sure that there is no firewall or
network block concern if there is network device like NAT between the NVR and
the DVS. Make sure you forward the port properly.
2) In web browser playback, I can’t fast forward the video. I dragged the slider,
but nothing happens.
Yes, we have found this problem in firmware V1.1532 which you have on hand.
This problem didn't exist in the previous edition. We will fix it very quickly and
provide you the updated firmware as soon as it is available.
3) I can’t find a way to backup video directly from the DVS local HDD onto my
PC. I pressed the REC button in playback, it seems to start recording whatever
is playback, but I tried to play the recorded file on VLC, nothing happens. Can I
just copy the video from the DVS HDD to my PC, without waiting for the REC?
The only way to back up the video now from the HDD is to push the REC button
while doing the playback. The backup video needs to be transcoded to AVI
format to be successfully played on the VLC player. Attached zip file is the tool
software that you can use to transfer the back up video. We will provide a more
efficient process to manage the video files in the HDD very soon.
4) The email notifies me of motion detect, but there’s no attachment. Is this
normal?
Please open the DVS page through I.E. Go to
"Setting"-->"Advance"-->"SMTP"-->"General" to set up the email address.
Make sure to check the "JPEG" box to send the attached file.
56
Page 57

DVS-8504E User Guide
5) Is there a way to store the video recording directly to a PC over SAMBA or
NFS protocol?
For SAMBA, although our DVS has embedded Linux, we put most of the CPU
resource on the video encode and decode processes. You can understand it
while you operate the DVS which brings the exceptional hardware encode
capability. Therefore, the DVS-8504E so far cannot support either SAMBA or
NFS protocol.
6) How do I use the Live stream URL (rtsp : //ipaddress/live.mp)
You have to use VLC media player to watch the video as VLC can support the
H.264 format. Real player and Windows Media Player cannot support H.264
compression yet.
7) What is Cell Threshold
This parameter means the number of scan times in a period in the motion
detection area. The higher the setting number is, the more scan is proceeding
in a single period (It means more "Sensitive"). On the other hand, the lower the
setting number is, the less scan is proceeding.
8) What is Spatial Threshold
This parameter means the image alteration rate inside the motion detection
area. The higher the setting number is, the higher the threshold of the motion
detection activation which means the harder the condition of motion detection
will be sufficient.
9) What is Debounce time
It means during the setting time, all the motion detection detected will be treated
as one detected event. For example, if you set it at the min. 20 seconds, there
is one moving object trigger the motion detection event. In the following 20
seconds, even if there are other triggers in the same motion detection area, the
user will receive the alarm only one time. This debounce time can prevent the
user from receiving too many redundant alarms. After all, once the first motion
trigger the alarm, the user can playback the video to check out the related
image data around the trigger time.
57
Page 58

DVS-8504E User Guide
58
10) SMTP already set but received no email notification?
You have to set up the SMTP server and Sender Mail Address under same
source. That means, for example, if you set "smtp.gmail.com" in SMTP server,
the Sender Mail Address has to be [email protected]. (XXXXX depends on
the actual gmail account). Please kindly note that we suggest you choosing
456(SSL) port and check SSL under Authentication while using gmail as SMTP
server.
Page 59

 Loading...