

Page 1

W arr anty
English • Italiano • Español • Français •日本語
Page 2

This timepiece is warranted by CT Scuderia to the owner for two years from the date of original purchase against defects
in material or from workmanship. During the two year warranty period, CT Scuderia watches will repair at no charge the
timepiece if it is defective.
To obtain service under this limited warranty, the timepiece must be sent or delivered to one of the authorized service
locations listed on our web site www.ctscuderia.com. The timepiece should be accompanied by the original receipt or other
proof of purchase from an authorized CT Scuderia Watches Dealer. To prevent damage, CT Scuderia recommends shipping your
timepiece by insured mail in a carefully wrapped package.
This limited warranty does not cover the batteries, the crystals the straps and case covers. Also, it does not cover damage
to the case or movement caused by humidity or moisture entering the watch due to mishandling. In addition, this limited
warranty does not apply to damage caused by misuse, abuse, neglect, or damage caused as a result of servicing by an agency
not authorized by CT Scuderia.
The duration of any warranties implied by law, are limited to the two year duration of this warranty. The exclusive remedy for
breach of this warranty or any implied warranty is repair or replacement. CT Scuderia shall have no liability whatsoever to the
purchaser for consequental, special, incidental or other damages.
Some states do not allow the exclusion or limitation of incidental or consequental damages, or limitations on how long implied
warranty lasts, so the above limitations and exclusions may not apply to you. This warranty gives you specific legal rights, and
you may have other rights which may vary from State to State.
Limited Warranty (valid in USA)
Page 3

Your CT Scuderia watch has been manufactured according to rigorous criteria faithful to the best traditions of watchmaking.
All CT Scuderia watches are guaranteed for two years anywhere in the world against any manufacturing defect. The warranty
takes effect on the purchase date of the watch, when this certificate is duly completed, dated and signed by the authorized
retailer.
The straps, crystals and batteries are not included in the warranty. Neither is damage to the case or movement resulting from
mishandling. Also not included are defects due to inappropriate treatment or problems caused from repairs done by someone
other than a watchmaker authorized by CT Scuderia. If, in spite of all our care, your watch needs repairing, please send it by
insured mail to the agent of CT Scuderia watches in your country, enclosing your international warranty. You will find the
updated addresses of the agents of CT Scuderia watches on our web site www.ctscuderia.com.
Alternatively, you can take the watch in person to a CT Scuderia watch retailer. The agent in your country will be able to give
you the name and address of the CT Scuderia watch retailer nearest to your home.
International Warranty
Page 4

Il Suo orologio CT Scuderia è stato studiato con i più rigorosi criteri di produzione nella migliore tradizione dell’orologeria. I
nostri orologi sono garantiti per due anni in tutto il mondo contro ogni eventuale difetto di fabbricazione. La garanzia è valida
dal giorno in cui questo libretto Le viene consegnato, debitamente compilato, datato e firmato dal negoziante. Se, nonostante
tutte le nostre attenzioni, il Suo orologio avesse bisogno di una riparazione, lo consegni all’agente CT Scuderia del Suo Paese
allegando la garanzia internazionale. Non sono coperti dalla garanzia: i cinturini, i vetri e le pile, i danni alla cassa e al
movimento provocati da uso improprio o dall’intervento di un riparatore che non sia un orologiaio autorizzato da CT Scuderia.
Le raccomandiamo di spedire il Suo orologio CT Scuderia imballato con la massima cura, in plico raccomandato, all’agente CT
Scuderia del Suo Paese oppure di portarlo al Suo gioielliere-orologiaio CT Scuderia. Troverà l’elenco aggiornato degli agenti CT
Scuderia per zone geografiche sul nostro sito web www.ctscuderia.com. A richiesta, essi potranno indicarLe il nominativo del
gioielliere-orologiaio CT Scuderia più vicino al Suo domicilio.
Garanzia Internazionale
Page 5

Su reloj CT Scuderia ha sido diseñado con los más rigurosos criterios de fabricación respetando fielmente la tradición relojera.
No obstante, todos nuestros relojes tienen una garantia de dos años en todo el mundo contra cualquier defecto de fabricación.
La garantia corre a partir del momento en que el vendedor le entraga este folleto correctamente completado, fechado y
firmado. Si a pesar de todo nuestro esmero, su reloj necesitará una reparación, por favor envíelo al representante de CT
Scuderia de su país, adjuntando su garantía internacional. La garantía no cubre: las correas, cristales y pilas, deterioros
de la caja y del movimento provocados por una mala manipulación, los defectos debidos a tratamientos inadecuados o a
la intervención de otra persona que no sea un relojero de CT Scuderia. Le recomendamos enviar por certificado su reloj CT
Scuderia envuelto cuidadosamente al agente de CT Scuderia de su país, o presentarlo directamentes su joyero-relojero CT
Scuderia. Encontrará la lista de los agents de CT Scuderia por zona geográfica sul nuestro sito www.ctscuderia.com. Si lo
solicita, le enviarán los datos del joyero-relojero CT Scuderia más próximo a su domicilio.
Garantia Internacional
Page 6

Votre montre Glam Rock a été conçue selon de rigoureux critères de fabrication dans la plus fidèle tradition horlogère. Toutes
nos montres sont cependant garanties pendant deux ans et dans le monde entier contre tout eventuel défaut de fabrication. La
garantie est valide dès que la carte de garantie vous a été remise, dûment remplie, datée et signee par le détaillant. Si malgré
tous nos soins, votre montre devait nécessiter une réparation, veuillez l’adresser à l’agent des montres Glam Rock de votre pays
en y joignant votre garantie internationale. Sont exclus de la garantie: les bracelets, les verres et les piles. Les détériorations
du boîtier et du mouvement provoquées par une erreur de manipulation, les défauts dûs aux traitements inappropriés ou à
l’intervention d’une personne autre qu’un horloger agrée par Glam Rock. Nous vous recommandons d’expédier votre montre
Glam Rock par envoi recommandé, emballée avec soin, à l’agent des montres Glam Rock de votre pays ou de l’appoter à votre
horloger-bijoutier Glam Rock. Vous trouverez la liste mise á jour des agents des montres Glam Rock par zone géographique
sur notre sire internet www.glamrockwatches.com. A votre demande, ceux-ci vous communiqueront les coordonnées de
l’horloger-bijoutier Glam Rock le plus proche de votre domicile.
Garantie Internationale
Page 7

本腕時計は時計製造業の最高の伝統の厳しい基準に従って製造されました。全ての Racetrack 腕時
計は、いかなる製造の欠陥に対して世界各地で2年間保証されます。保証は腕時計の購入日(本証明
書を順当に完成し、日付づき、お買い上げの販売店に署名された際)に有効となります。ただし、
電池、クリスタル及びストラップについては本保証に含まれておりません。取扱の誤りによりケ
ースや装置の損害についても保証されません。それに、取扱の誤りによる欠損、或いは Racetrack
の認可されていない人または時計屋によって起こった問題についても含まれないのでご了承くだ
さい。当社の全てのケアにもかかわらず、お買い上げの腕時計は修理が必要であれば、本腕時計
と本国際保証書と共に、郵便保険でお客様の国の Racetrack 腕時計の代理店までご送付ください。
当社のウェブサイトにて Racetrack の代理店の更新された住所を検索できます。また、お客様は本
腕時計をご自身で Racetrack 腕時計の販売店へ持参することも可能です。お国の代理店は、お宅に
最も近くにある Racetrack 腕時計の販売店の氏名及び住所をご案内できます。
国際保証
Page 8

FASHION ICONS LLC (THE “COMPANY”) THANKS YOU FOR PURCHASING OR OBTAINING A TIMEPIECE, STRAP, COVER CASE,
TOOL OR OTHER ITEM (EACH A “PRODUCT”), FROM THE COMPANY, ITS AFFILIATES, SUBSIDIARIES, OR DISTRIBUTORS. BY
PURCHASING OR OBTAINING A PRODUCT, OPENING THE PACKAGING AND RETAINING SUCH PRODUCT, YOU AGREE THAT YOU
HAVE READ, UNDERSTAND AND AGREE TO ALL OF THE TERMS OF THIS NOTICE AND AGREEMENT (THIS “AGREEMENT”). IF
YOU DO NOT AGREE TO ALL OF THE TERMS OF THIS AGREEMENT, THEN WITHIN ONE WEEK OF YOUR RECEIPT OF A PRODUCT,
RETURN THE PRODUCT TO YOUR POINT OF PURCHASE.
Except as expressly stated in any written limited warranty enclosed by the Company with a Product, the Company does not
warrant or guarantee any Product. The Company expressly disclaims any and all warranties, express or implied, including any
implied warranties of suitability, condition, merchantability, fitness for a particular purpose, non-infringement or availability
of its Products. The Company shall not be liable to you or any one else for any incidental, consequential or other non-direct
damages.
Any and all damages for any failure of any Product or for any other claim that may be raised between the parties or under
this Agreement shall be limited to direct damages that shall not exceed the amounts of money received by the Company from
you for the applicable Product or Products.
All Products are intended for use by adults (e.g., competent people, ages eighteen (18) and older. Use by individuals under
the age of eighteen (18) should only occur under close adult supervision. Some Products and parts of Products pose a serious
choking hazard and/or risk of personal injury when not used as intended or directed. Some Products may contain small parts,
chemicals and/or glass, and should not be altered or disassembled other than as specifically directed in instructions provided
with the Product.
Notice and Agreement
Page 9

All Products and Product parts are intended for external use only and are not to be consumed, ingested, or otherwise placed in
the mouth or any other bodily orifice. Putting any Product or part of a Product in the mouth or other bodily orifice is strongly
discouraged. In case of accidental ingestion or chocking, immediately contact a hospital, doctor or other provider of emergency
medical care for assistance.
Company, its employees, owners, agents, affiliates; subsidiaries and distributors do not condone, nor recommend any use of
our Products for which they are not intended. Company, its employees, owners, agents, affiliates, subsidiaries and distributors
shall not be held responsible for any misuse or consequence of misuse (including, but not limited to, misuse resulting from your
folly, malice or negligent misuse) of the Products supplied to you. By purchasing and retaining any Product from Company,
you agree to indemnify, hold harmless and defend Company and/or its employees, owners, agents, affiliates, subsidiaries
and distributors from any claims and expenses including attorney fees and damages, actions or negligence claims, arising in
connection with a violation of this agreement by you, or any injury or liability or damages whatsoever arising from the proper
or improper use of any Product supplied to you, including without limitation, from any damages, injury or death resulting from
the use or misuse of a Product in any way whatsoever. If you do not agree to these terms, do not use, and immediately return,
the Product to the location of its purchase.
The law of the State of Florida shall govern the purchase or any other use of a Product, this Agreement, and any dispute related
thereto without regard to choice of law rules. Any controversy or claim between the parties or arising out of this Agreement
shall be determined by one disinterested arbitrator in binding arbitration administered by the American Arbitration Association
pursuant to its Commercial Arbitration Rules, the Optional Rules for Emergency Measures of Protection and the Supplementary
Procedures for Online Arbitration. The arbitral award will be final and binding, and may be entered and enforced in any court
of competent jurisdiction.
Page 10

Page 11

English • Italiano • Español • Français •日本語
Instruction Manual
Page 12

12
Automatic Single Time Models
Description of the display and control buttons
Setting the time
1. Pull out the crown to position III (the watch stops).
2. Turn the crown until you reach the correct time.
3. Push the crown back into position I.
Automatic Chronograph Models
Description of the display and control buttons
Setting the time
1. Pull out the crown to position III (the watch stops).
2. Turn the crown until you reach the correct time.
3. Push the crown back into position I.
Chronograph: Basic function (Start / Stop / Reset)
1. Press pusher 2 to start the center stop-second hand.
2. To stop the timing, press pusher 2 again.
3. To reset the three chronograph hands to zero positioning, press pusher 1.
PLEASE NOTE : Before using the chronograph functions, please ensure that :
- the crown is in position I (=normal position)
- the three chronograph hands are precisely at zero position following activation of pusher 1.
Chronograph
- The chronograph’s hour counter measures times up to 12 hours
- The minute counter measures 30 minutes per rotation.
- The center stop-second measures 60 seconds per rotation.
Page 13

13
Chronograph Models (3520.D)
Description of the display and control buttons
Setting the time
1. Pull out the crown to position III (the watch stops).
2. Turn the crown until you reach the correct time.
3. Push the crown back into position I.
Chronograph
- The chronograph’s hour counter measures times up to 12 hours
- The minute counter measures 30 minutes per rotation.
- The center stop-second measures 60 seconds per rotation.
PLEASE NOTE :
Before using the chronograph functions, please ensure that :
- the crown is in position I (=normal position).
- the three chronograph hands are precisely at zero position following activation of pusher 1. Should
this not be the case, the position of the hands must be adjusted (see the chapter entitled “Adjusting
the chronograph hands to zero position”).
A
B
C
D
E
F
G
H
I
Hour hand
Minute hand
Second hand
Crown
Hour counter
Center
stop-second
Minute counter
Pusher 1
(reset)
Pusher 2
(start/stop)
Page 14

14
Chronograph: Basic function (Start / Stop / Reset)
1. Press pusher 2 to start the center stop-second hand.
2. To stop the timing, press pusher 2 again.
3. To reset the three chronograph hands to zero positioning, press pusher 1.
Chronograph: Intermediate or interval timing
1. Press pusher 2 to start the center stop-second hand.
2. Press pusher 1 to stop the chronograph.
NOTE: Although the chronograph hands have stopped, the movement continues to record the current timing.
3. Make up the measured time: Press pusher 1 again and the 3 chronograph hands are quickly advanced
to the ongoing measured time. To continue to record intervals, continue to push pusher 1.
4. Press pusher 2 to stop and the final time is displayed.
5. To reset the three chronograph hands to zero positioning, press pusher 1.
Page 15

15
A
B
C
D
E
F
G
H
I
Hour hand
Minute hand
Second hand
Crown
Hour counter
Center
stop-second
Minute counter
Pusher 1
(reset)
Pusher 2
(start/stop)
Adjusting the chronograph hands to zero position
1. Pull out the crown to position III (all three chronograph hands are in their correct or incorrect
zero position).
2. Keep pusher 2 and 1 depressed simultaneously for at least 2 seconds (the center stop-second
rotates by 360º - corrective mode is activated).
3. Press pusher 2 to single step the center stop-second hand. Press and hold pusher 2 to advance
the center stop-second hand quickly. Press pusher 1 to advance the next hand.
4. Press pusher 2 to single step the hour counter hand. Press and hold pusher 2 to advance the
hour counter hand quickly. Press pusher 1 to advance to the next hand.
5. Press pusher 2 to single step the minute counter hand. Press and hold pusher 2 to advance the
minute counter hand quickly.
6. Return the crown to position I.
Page 16
16
Water Resistance
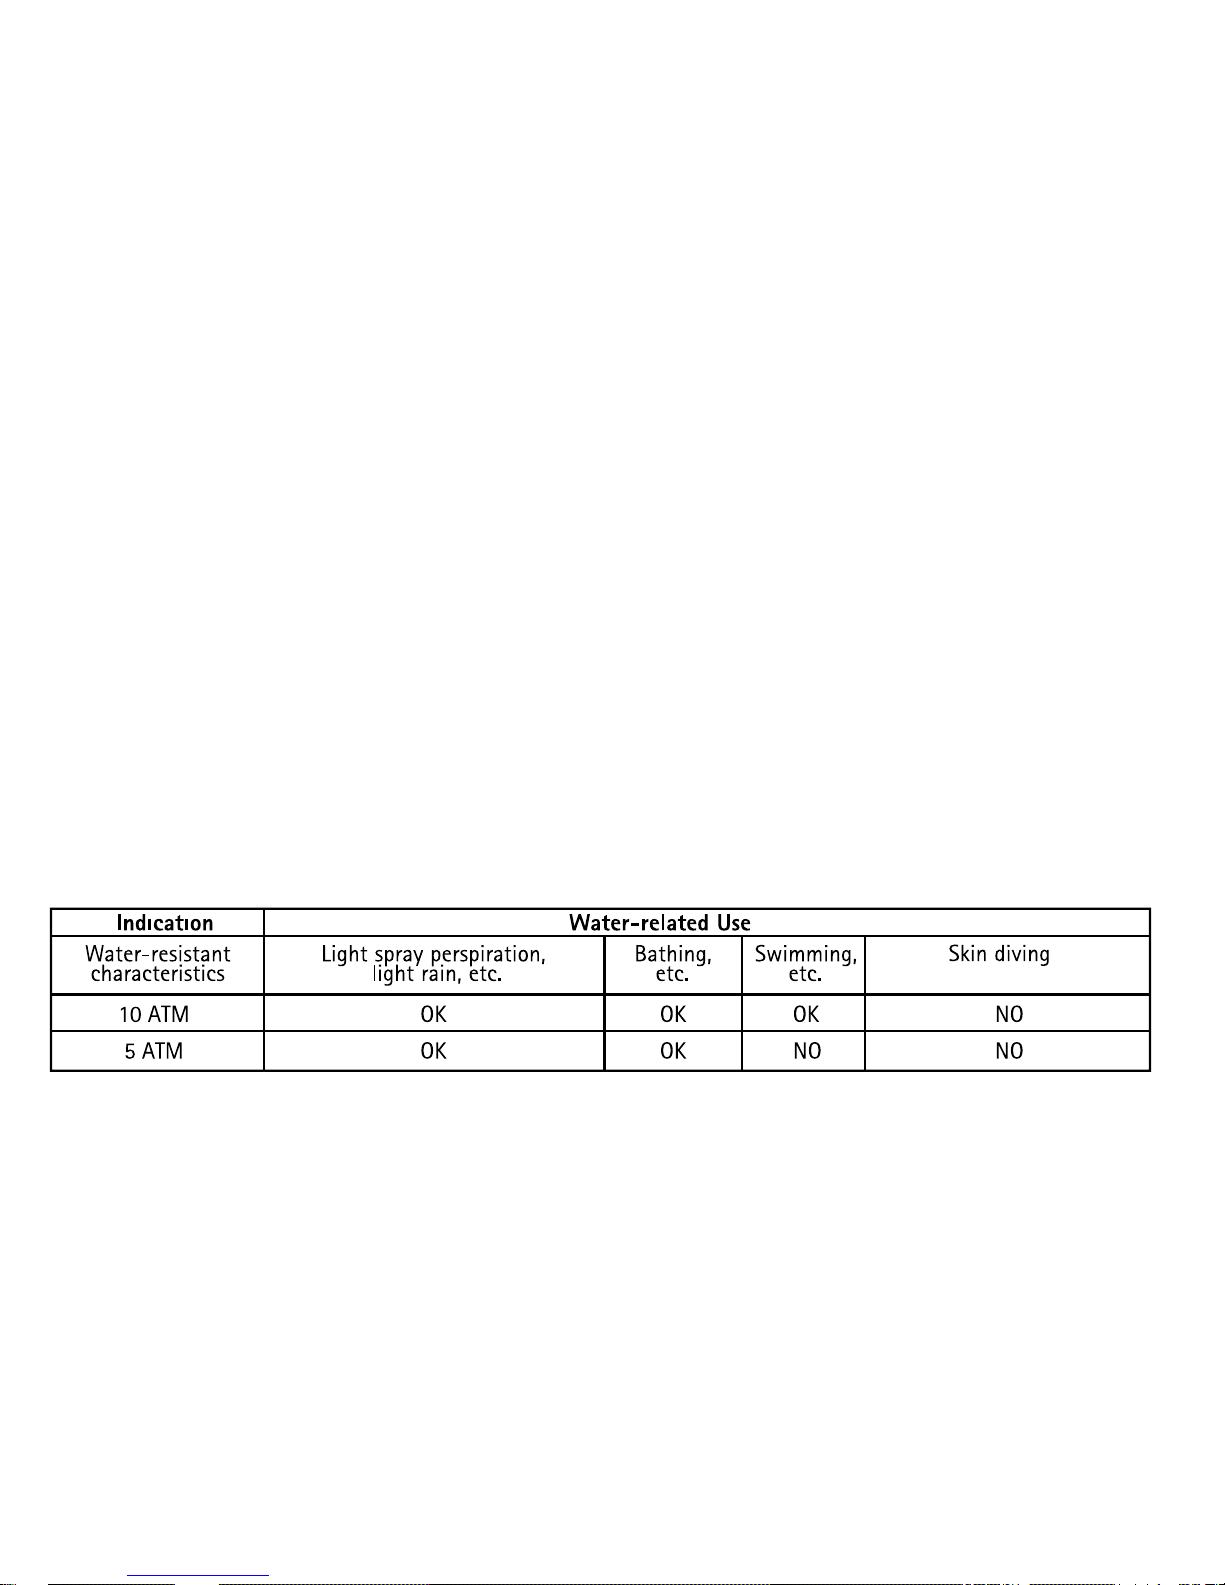
All the CT Scuderia timepieces are designed with a minimum water-resistance rating of 5 ATM (50 m). The water-resistance of
a timepiece protects the movement from dust, moisture, and risk of damage to the movement should it be immersed in water.
Please see chart for guidelines for recommended exposure of various water ratings. It is important not to attempt to adjust the
position of the crown while the timepiece is in contact with water. Water can enter the case causing damage to the movement.
For timepieces with screw-down crowns, it is important to ensure the crown is in the proper position and completely locked
before contact with water.
For timepieces with chronograph functions, do not engage the chronograph under water, as water may leak in the case and
cause damage to the movement.
Use Precautions (Resistance to water)
All the CT Scuderia timepieces are designed to withstand use as indicated in the following chart.
Page 17

17
Care and Precaution
Each CT Scuderia timepiece is designed and manufactured to exceed the highest of standards. Unlike
most other mechanical objects, a watch operates non-stop. In order to ensure optimal performance and
longevity from your timepiece, please review the simple guidelines for care and precautions of your CT
Scuderia timepiece.
Care
Your timepiece should be cleaned with soft cloth and water only. Do not submerge your time piece. Your
timepiece should be rinsed clean and dried with a soft cloth after any saltwater use. In order to maintain
the “new look” of metal bracelets, we recommend periodic cleaning of the bracelet. Dip a soft brush in
warm soapy water and gently rub bracelet clean. We advise having your timepiece serviced every 18-24
months to ensure long use and trouble free operation.
Precautions
Your timepiece is a complex integration of parts and components brought together by skilled craftsmen. There
are certain actions or environmental situations that may damage or impede your timepiece’s ability to perform
optimally. It is important to avoid the following conditions: extreme heat or cold, as well as prolonged periods of
exposure to direct sunlight, exposure to extreme heat or cold, as well as prolonged periods of exposure to direct
sunlight, exposure to wet conditions that exceed your timepiece’s water rating (see case back and chart). Never
operate any of the function buttons or crown when timepiece is in contact with water. Your timepiece should
not be affected by magnetic fields generated by household items such as televisions and stereos, but avoidance
of other strong electric fields static electricity, which may interrupt mechanism, is suggested. It is also important
to avoid extreme shock or impact.
A
B
C
D
E
F
G
H
I
Hour hand
Minute hand
Second hand
Crown
Hour counter
Center
stop-second
Minute counter
Pusher 1
(reset)
Pusher 2
(start/stop)
Page 18

18
Modelli Automatico Solo Tempo
Descrizione del display e dei tasti di controllo
Regolazione dell’orario
1. Estrarre la corona in posizione III (l’orologio si ferma).
2. Ruotare la corona finché le lancette indicano l’orario corretto.
3. Spingere la corona nuovamente in posizione I.
Modelli Automatico con Cronografo
Descrizione del display e dei tasti di controllo
Regolazione dell’orario
1. Estrarre la corona verso l’esterno nella posizione III (l’orologio si ferma).
2. Ruotare la corona finché le lancette indicano l’orario corretto.
3. Spingere la corona nuovamente nella posizione I.
Cronografo: Funzionamento di base (Avvio / Stop / Azzeramento)
1. Premere il pulsante A per avviare/arrestare la lancetta centrale ferma-secondi.
2. Per arrestare la funzione, spingere di nuovo il pulsante 2.
3. Per azzerare le tre lancette del cronografo, spingere il pulsante 1.
NOTA BENE: Prima di usare le funzioni del cronografo, si prega di assicurarsi che:
- la corona sia in posizione I (=posizione normale);
- le tre lancette del cronografo siano esattamente in posizione zero, dopo l’attivazione del pulsante a pressione 1.
Cronografo
- Il contatore delle ore del cronografo misura tempi fino
a 12 ore.
- Il contatore dei minuti misura 30 minuti per rotazione.
- Il centro ferma-secondi misura 60 secondi per rotazione.
Page 19

19
Modelli Quarzo con Cronografo (3520.D)
Descrizione del display e dei tasti di controllo
Regolazione dell’orario
1. Estrarre la corona verso l’esterno nella posizione III (l’orologio si ferma).
2. Ruotare la corona finché le lancette indicano l’orario corretto.
3. Spingere la corona nuovamente nella posizione I.
Cronografo
- Il contatore delle ore del cronografo misura tempi fino a 12 ore.
- Il contatore dei minuti misura 30 minuti per rotazione.
- Il centro ferma-secondi misura 60 secondi per rotazione.
NOTA BENE:
Prima di usare le funzioni del cronografo, si prega di assicurarsi che:
- la corona sia in posizione I (=posizione normale);
- le tre lancette del cronografo siano esattamente in posizione zero, dopo l’attivazione del pulsante a
pressione 1. Nel caso non fosse cosi, le posizioni delle lancette devranno essere regolate (vedi il
capitolo intitolato “Regolazione delle lancette del cronografo in posizione zero”).
A
B
C
D
E
F
G
H
I
Lancetta
delle ore
Lancetta
dei minuti
Lancetta
dei secondi
Corona
Contare delle ore
Lancetta centrale
ferma-secondi
Contatore
dei minuti
Pulsante 1
(azzerare)
Pulsante 2
(avvio/stop)
Page 20

20
Cronografo: Funzionamento di base (Avvio / Stop / Azzeramento)
1. Premere il pulsante A per avviare/arrestare la lancetta centrale ferma-secondi.
2. Per arrestare la funzione, spingere di nuovo il pulsante 2.
3. Per azzerare le tre lancette del cronografo, spingere il pulsante 1.
Cronografo: Misurazione di tempo imtermedio o di intervallo
1. Premere il pulsante 2 per avviare/arrestare la lancetta centrale ferma-secondi.
2. Premere il pulsante 1 per arrestare il cronografo.
NOTA: nonostante le lancette del cronografo si siano fermate, il movimento continua a registrare il tempo corrente.
3. Comporre il tempo misurato: spingere di nuovo il pulsante 1 e le tre lancette del cronografo
avanzano rapidamente al tempo correntemente misurato. Per continuare, spingere il pulsante 1.
4. Spingere il pulsante 2 per fermare: viene visualizzato l’orario finale.
5. Per azzerare le tre lancette del cronografo, spingere il pulsante 1.
Page 21

21
Regolazione delle lancette del cronografo in posizione zero
1. Tirare la corona in posizione III (tutte e tre le lancette del cronografo sono in posizione corretta
oppure in posizione zero scorretta).
2. Tenere premuti i pulsanti 2 e 1 simultaneamente per almeno 2 secondi (il centrale ferma-secondi
ruota di 360º - viene attivata la modalità correttiva).
3. Spingere il pulsante 2 per far avanzare di una posizione la lancetta centrale ferma-secondi. Tenere
premuto il pulsante 2 per far avanzare rapidamente la lancetta centrale ferma-secondi. Premere il
pulsante 1 per passare alla modalità cronografo.
4. Spingere il pulsante 2 per far avanzare di una posizione la lancetta delle ore. Tenere premuto il
pulsante 2 per far avanzare rapidamente la lancetta delle ore. Spingere il pulsante 1 per avanzare
alla modalità cronografo.
5. Spingere il pulsante 2 per far avanzare di una posizione la lancetta dei minuti. Tenere premuto il
pulsante 2 per far avanzare rapidamente la lancetta dei minuti.
6. Riportare la corona alla posizione I.
A
B
C
D
E
F
G
H
I
Lancetta
delle ore
Lancetta
dei minuti
Lancetta
dei secondi
Corona
Contare delle ore
Lancetta centrale
ferma-secondi
Contatore
dei minuti
Pulsante 1
(azzerare)
Pulsante 2
(avvio/stop)
Page 22
22
Impermeabilità
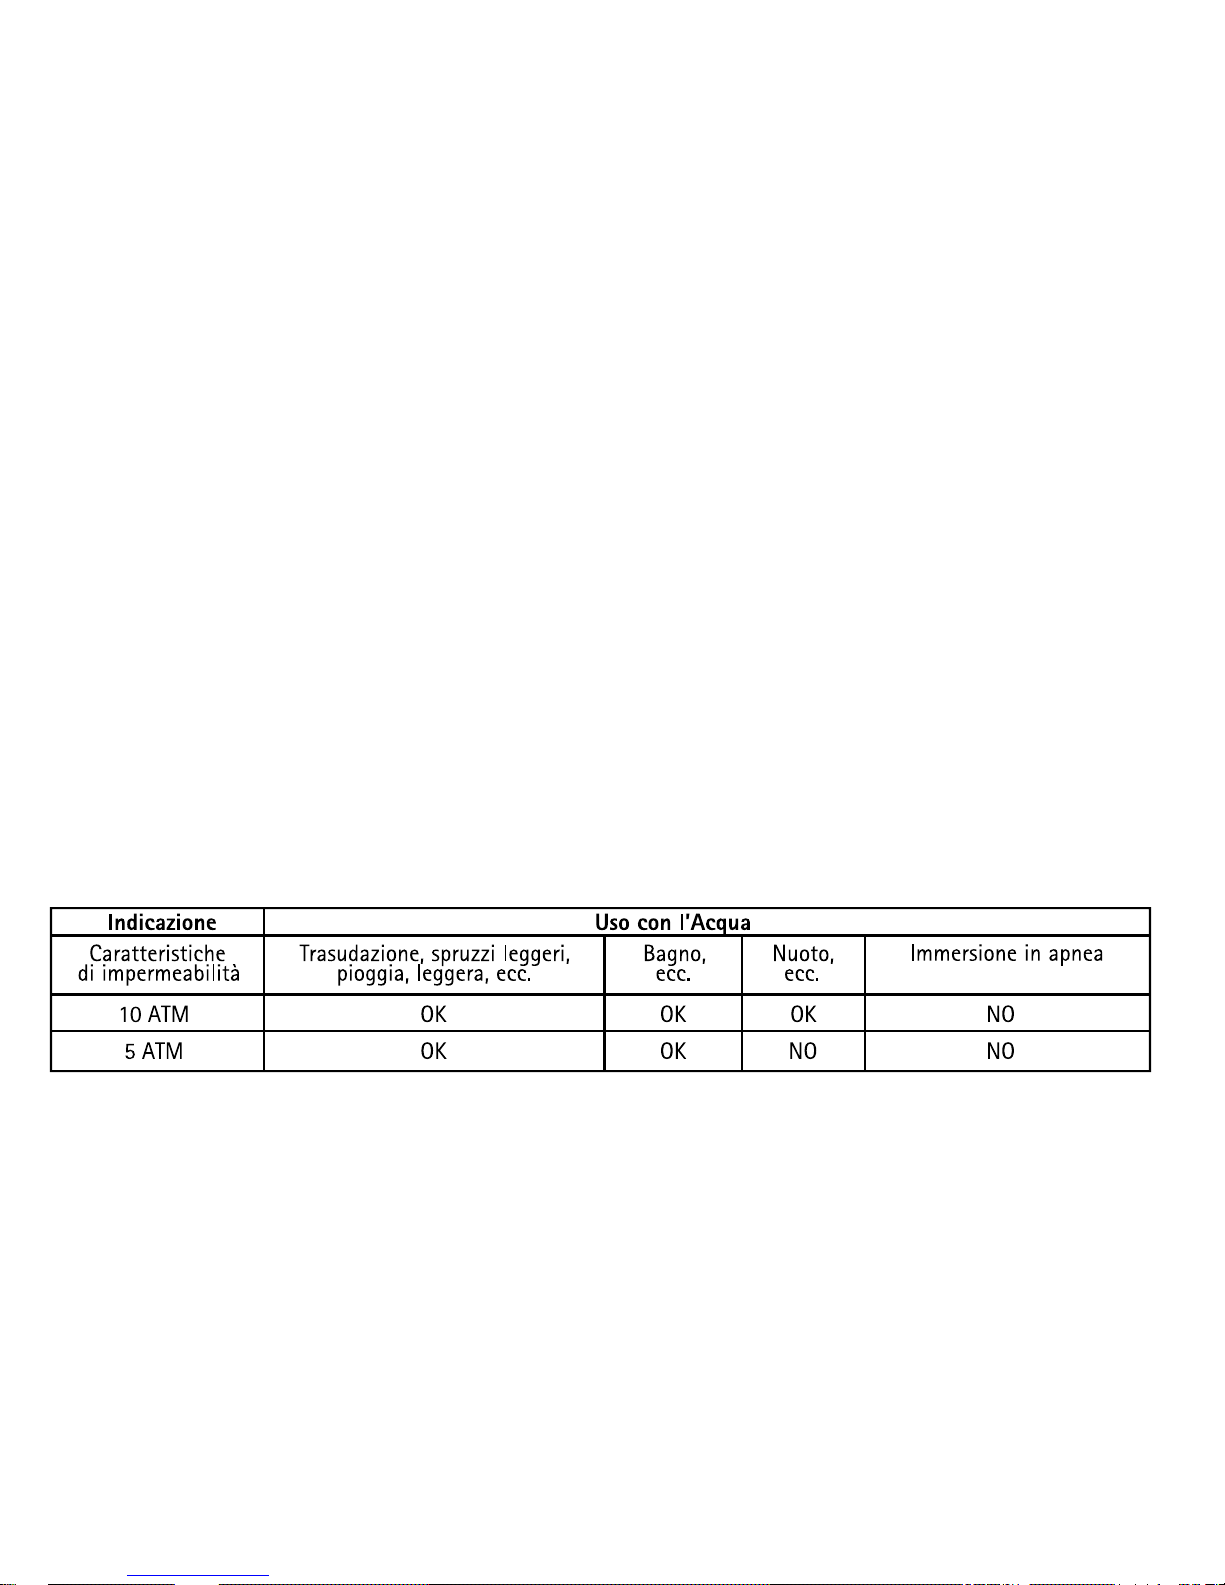
Tutti gli orologi sono progettati con una impermeabilità minima di 5 ATM (50 m).
L’impermeabilità di un orologio protegge il movimento dalla polvere e dall’umidità, nonché dal rischio di danno al movimento
nel caso venisse immerso nell’acqua. È importante non tentare di regolare la posizione della corona mentre l’orologio è in
contatto con l’acqua: l’acqua, infatti, può entrare nella cassa e provocare un danno al movimento.
Per orologi con corona avvitata, è importante assicurarsi che essa si trovi nella posizione corretta e sia completamente avvitata
prima che l’orologio venga a contatto con l’acqua.
Per orologi con funzioni cronografo, non attivare il cronografo sott’acqua, poiché questa potrebbe penetrare nella cassa e
provocare danni al movimento.
Precauzioni d’Uso (Resistenza all’Acqua)
Tutti gli orologi CT Scuderia sono progettati per resistere all’uso come indicato nella tabella che segue.
Page 23

23
Cura e Precauzioni
Tutti gli orologi CT Scuderia sono progettati e fabbricati perché superino gli standard più elevati.
Diversamente da molti altri oggeti meccanici, un orologio è continuamente in funzione. Per assicurare
le prestazioni ottimali e la longevità del Vostro orologio, consultare la semplice guida per la cura e le
precauzioni d’uso del Vostro nuovo orologio CT Scuderia.
Cura
Il Vostro orologio deve essere pulito soltanto con un panno morbido e con acqua. L’orologio deve essere risciacquato e
asciugato con un panno morbido dopo l’uso in acqua salata. Per mantenere l’aspetto “nuovo” del bracciale di metallo, se ne
raccomanda la periodica pulizia. Intingere uno spazzolino morbido in acqua tiepida saponata e spazzolare delicatamente il
bracciale per pulirlo. Per assicurarne l’uso prolungato e il funzionamento senza problemi, si raccomanda la manutenzione
dell’orologio ogni 18-24 mesi. I modelli con cinturino e copri cassa in pelle naturale, o alligatore, non devono essere immersi
in acqua pertanto ne è sconsigliato l’utilizzo in mare.
Precauzioni
Il Vostro orologio è costituito da un complesso di parti e componenti assemblati da tecnici specializzati. Certe azioni o
certe situazioni ambientali possono danneggiare o impedire la capacità dell’orologio di funzionare in maniera ottimale
è importante evitare le condizioni che seguono: caldo o freddo eccessivi, come anche periodi prolungati di esposizione
alla luce diretta del sole, a condizioni di umidità che eccedono il livello di resistenza all’acqua (controllare il retro della
cassa e la tabella). Non attivare mai alcun pulsante funzionale o la corona quando l’orologio è in contatto con l’acqua. Il
vostro orologio non deve essere influenzato dai campi magnetici generati da oggetti domestici quali televisori e impianti
stereo; si suggerisce tuttavia di evitare altri campi elettrici potenti o l’elettricità statica, che potrebbero interrompere il
meccanismo. E’ anche importante evitare scosse o impatti eccessivi.
A
B
C
D
E
F
G
H
I
Lancetta
delle ore
Lancetta
dei minuti
Lancetta
dei secondi
Corona
Contare delle ore
Lancetta centrale
ferma-secondi
Contatore
dei minuti
Pulsante 1
(azzerare)
Pulsante 2
(avvio/stop)
Page 24

24
Modelos Automáticos
Descripciòn del visor y de los botones de control
Cambio de hora
1. Tire de la corona hasta la posiciòn II (el reloj se detendrà).
2. Gire la corona hasta que llegue a la hora correcta.
3. Presione la corona hasta la posiòn I.
Modelos Automáticos con Cronómetro
Descripciòn del visor y de los botones de control
Cambio de hora
1. Tire de la corona hasta la posiciòn III (el reloj se detendrà).
2. Gire la corona hasta que llegue a la hora correcta.
3. Presione la corona hasta la posiòn I.
Cronòmetro: funciones bàsicas (Iniciar/detener/poner a cero)
1. Presione el botòn 2 para iniciar la manecilla contadora de segundos.
2. Para detener el tiempo, vuelva a presionar el botòn 2.
3. Para devolver las tres manecillas del cronòmetro a la posiciòn cero, presione el botòn 1.
NOTA: Antes de utilizar las funciones de cronòmetro, asegùrese de que:
- la corona està en la posiciòn I (posiciòn normal)
- las tres manecillas del cronòmetro estàn situadas exactamente en la posiciòn cero tras presionar el botòn 1
Cronòmetro
- El contador de horas del cronòmetro cuenta las horas hasta
un total de 12.
- El contador de minutos cuenta 30 minutoa en cada rotaciòn.
- El contador de segundos cuenta 60 segundos en cada
rotaciòn.
Page 25

25
Modelos de Cronómetros (5030.D)
Descripciòn del visor y de los botones de control
Cambio de hora
1. Tire de la corona hasta la posiciòn II (el reloj se detendrà).
2. Gire la corona hasta que llegue a la hora correcta.
3. Presione la corona hasta la posiòn I.
Cronòmetro
- El contador de horas del cronòmetro cuenta las horas hasta un total de 12.
- El contador de minutos cuenta 30 minutoa en cada rotaciòn.
- El contador de segundos cuenta 60 segundos en cada rotaciòn.
NOTA:
Antes de utilizar las funciones de cronòmetro, asegùrese de que:
- la corona està en la posiciòn I (posiciòn normal)
- las tres manecillas del cronòmetro estàn situadas exactamente en la posiciòn cero tras presionar
el botòn 1. Si no fuera así, deberá ajustarse las posición de las manecillas (consulte el capìtulo
titulado “Ajuste de las manecillas del cronòmetro a la posiciòn cero”).
A
B
C
D
E
F
G
H
I
Manecilla
de horas
Manecilla
de minutos
Manecilla
de segundos
Corona
Contador
de horas
Contador
de segudos
Contador
de minutos
Botòn 1
(Poner a cero)
Botòn 2
(Iniciar/detener)
Page 26

26
Cronòmetro: funciones bàsicas
(Iniciar/detener/poner a cero)
1. Presione el botòn 2 para iniciar la manecilla contadora de segundos.
2. Para detener el tiempo, vuelva a presionar el botòn 2.
3. Para devolver las tres manecillas del cronòmetro a la posiciòn cero, presione el botòn 1.
Cronòmetro: Tiempo intermedio o de intervalo
1. Presione el botòn 2 para iniciar el cronòmetro.
2. Presione el botòn 1 para detener el cronòmetro
NOTA: Aunque las manecillas del cronòmetro se hayan detenido,
se continùa contando el tiempo
3. Mostrar el tiempo cronometrado: Vuelva a presionar el botòn 1 y las tres manecillas del cronòmetro se moveràn
ràpidamente el tiempo cronòmetro hasta ahora. Para proseguir con el registro de intervalos, presione el botòn 1.
4. Presione el botòn 2 para detener el cronòmetro y mostrar el tiempo final.
5. Para devolver las tres manecillas del cronòmetro a la posiciòn cero, presione el botòn 1.
Page 27

27
Ajuste de las manecillas del cronòmetro a la posiciòn cero
1. Tire de la corona hasta a la posiciòn III(las tres manecillas del cronòmetro estàn en la posiciòn
cero correcta o incorrecta).
2. Mantenga presionados los botones 2 y 1 contemporáneamente durante al menos 2 segundos (la
manecilla contadora de segundos darà un giro de 360º y se activarà el modo de correcciòn).
3. Presione el botòn 2 para hacer avanzar lentamente la manecilla contadora de segundos.
Mantenga presionado el botòn 2 para hacer avanzar ràpidamente la manecilla contadore de
segundos. Presione el botòn 1 para pasar a la siguente manecilla.
4. Presione el botòn 2 para hacer avanzar lentamente la manecilla contadora de horas. Presione el
botòn 1 para pasar a la siguiente manecilla.
5. Presione el botòn 2 para hacer avanzar ràpidamente la manecilla contadora de minutos.
6. Coloque nuevamente la corona en la posiciòn III.
A
B
C
D
E
F
G
H
I
Manecilla
de horas
Manecilla
de minutos
Manecilla
de segundos
Corona
Contador
de horas
Contador
de segudos
Contador
de minutos
Botòn 1
(Poner a cero)
Botòn 2
(Iniciar/detener)
Page 28
28
Resistencia al Agua
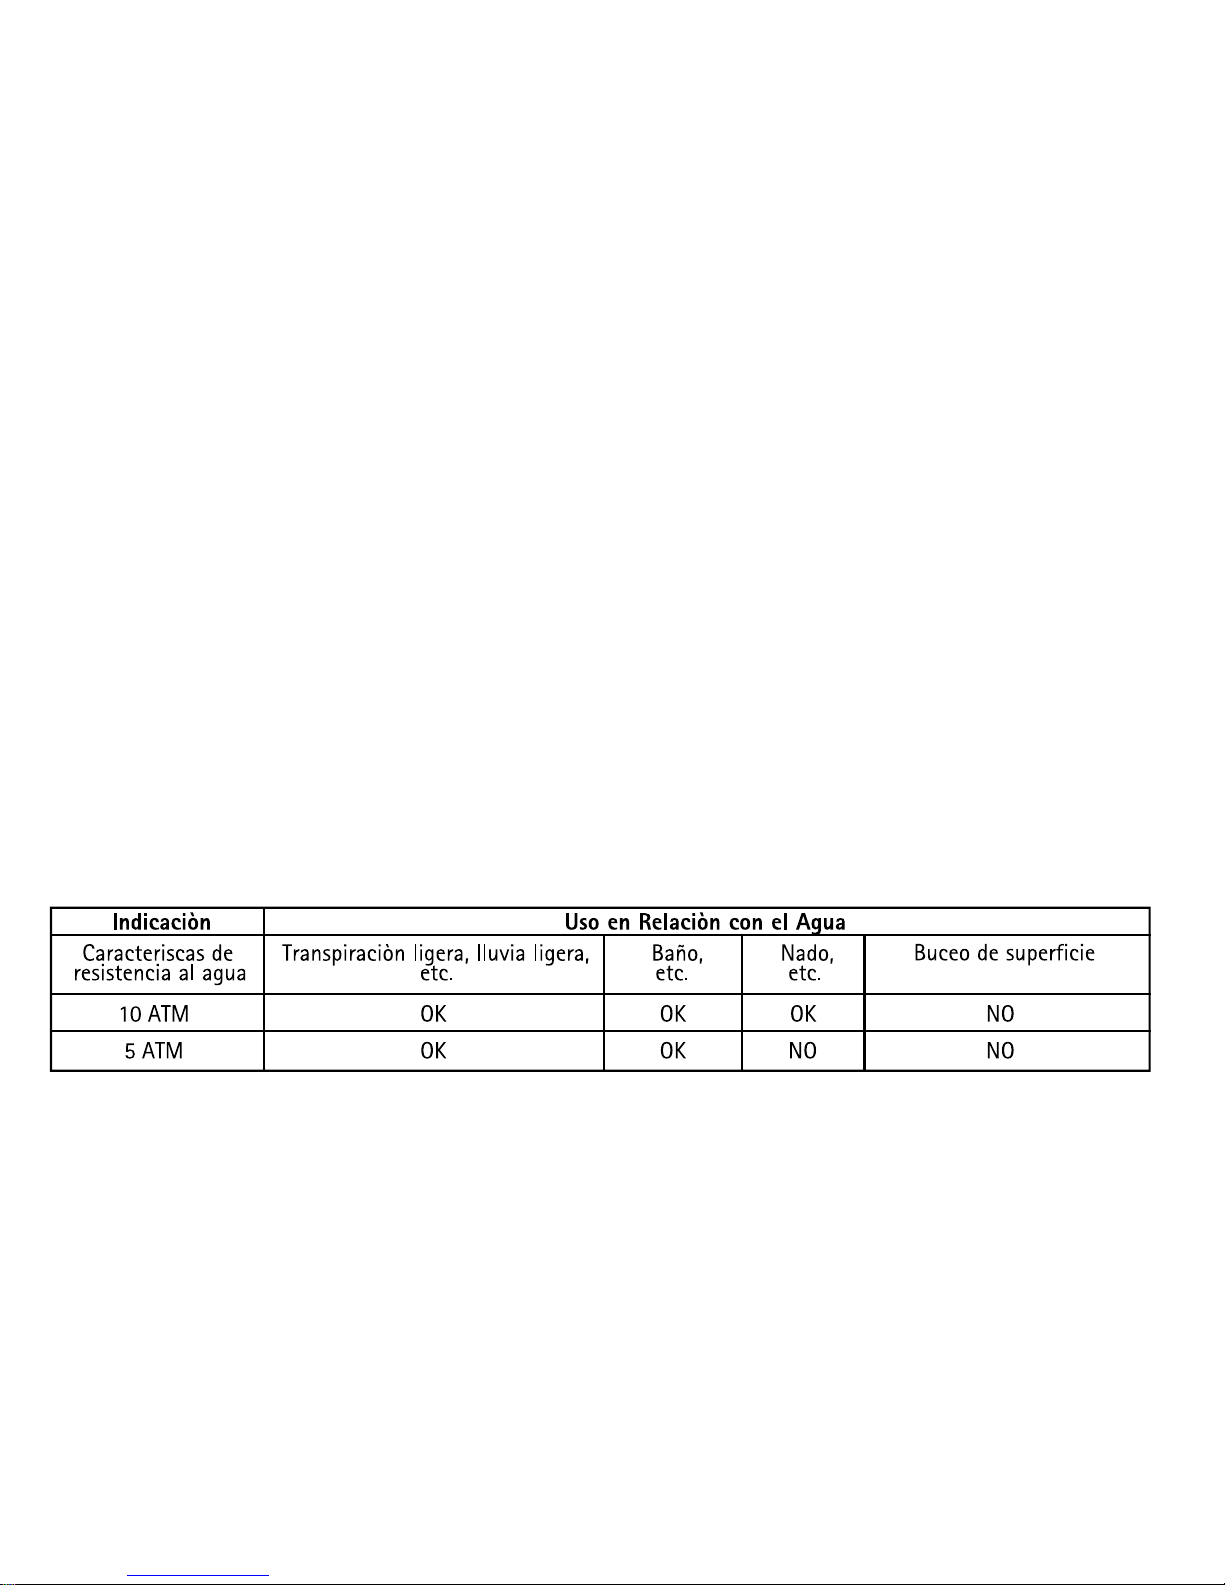
Todos los relojes Glam Rock están diseñados con una clasificación mínima de resistencia al agua de 5 ATM (50 m).
La resistencia al agua de un reloj protege el mecanismo del polvo, de la humedad y del riesgo de daños en caso de sumergirlo
en el agua.
Consulte el cuadro con las pautas de exposición recomendadas de las distintas clasificaciones de resistencia al algua.
Es importante no intentar ajustar la posición de la corona mientras el reloj esté en contacto con el agua.
El agua podría entrar en la caja y provocar daños al mecanismo.
Para los relojes con corona de rosca, es importante aseguarse de que la corona está en posición correcta y totalmente apretada
antes de entrar en contacto con el agua.
Para los relojes con función de cronòmetro no activar cronòmetro mientras está debajo del agua pues esta podría entrar dentro
de la caja y provocar daños al mecanismo.
Precauciones de Uso (resistencia al agua)
Todos los relojes Glam Rock están diseñados para soportar el uso indicado en la siguiente tabla.
Page 29

29
Cuidado y Precauciones
Cada reloj de Glam Rock està diseñado y fabricado a fin de superar los estándares más elevados. A
diferencia de la mayoría de los demás objetos mecánicos, un reloj funciona sin detenerse. Para garantizar
un rendimiento y una longevidad óptimos de su reloj, por favor, lea las siguentes pautas sobre el cuidado
y precauciones a tener en cuenta su nuevo reloj Glam Rock.
Cuidado
Limpie el reloj únicamente con un paño suave y agua. No sumerja el reloj. Enjuague y seque el reloj con un
paño suave tras haberlo utilizado dentro del agua salada. Para conservar siempre nuevas las pulseras metálicas,
recomendamos realizar limpiezas periódicas de las mismas. Sumerja un cepillo suave en agua tibia con jabón y
cepille suavemente la pulsera. Aconsejamos realizar el mantenimiento del reloj cada 18-24 meses para garantizar
una operación duradera y sin problemas.
Precauciones
Este reloj es el resultado de una compleja integración de partes y componentes por parte de expertos artesanos.
Existen ciertas acciones y situaciones ambientales que puenden dañar o afectar el buen funcionamiento del reloj.
Es importante evitar las siguentes condiciones: calor o frio extremos, asi como periodos prolongados de exposición
a la luz solar directa, exposición a condiciones de humedad que exedan la clasificación de resitencia al agua del
reloj (consulte revés de la caja y tabla). Nunca opere ninguno de los botones de función o la corona mientras el
reloj se encuentre en contacto con el agua. El reloj no deberia verse afectado por los campos magnéticos generados
por articulos del hogar tales como televisores y aquipos de estéreo, pero se sugiere evitar cualquier otro campo
alectro fuerte o electricidad estática, pues podrian afectar el mecanismo. También es importante evitar los golpes
o impactos extremos.
A
B
C
D
E
F
G
H
I
Manecilla
de horas
Manecilla
de minutos
Manecilla
de segundos
Corona
Contador
de horas
Contador
de segudos
Contador
de minutos
Botòn 1
(Poner a cero)
Botòn 2
(Iniciar/detener)
Page 30

30
Modèles automatique à trois aiguilles
Description des boutons d’affichage et de commande
Réglage de l’heure
1. Tirer le remontoir pour le mettre en position II (la montre s’arrête).
2. Tourner le remontoir jusqu’à atteindre l’heure exacte.
3. Repousser le remontoir en position I.
Modèles Automatiques avec Chronograph
Description des boutons d’affichage et de commande
Réglage de l’heure
1. Tirer le remontoir pour le mettre en position III
(la montre s’arrête).
2. Tourner le remontoir jusqu’à atteindre l’heure exacte.
3. Repousser le remontoir en position I.
Chronographe: Fonction de base (Démarrer/arrêter/remettre à zéro)
1. Appuyer sur le bouton 2 pour faire démarrer l’aiguille d’arrêt à la seconde.
2. Pour arrêter le chronométrage, appuyer de nouveau sur le bouton 2.
3. Pour remettre les trois aiguilles du chronographe à zéro, appuyer sur le bouton 1.
ATTENTION: Avant d’utiliser les fonctions chronomètre, veuillez veiller à ce que:
- le remontoir soit en position I (= position normale).
- les trois aiguilles du chronographe soient exactement en position zéro après l’activation du bouton 1.
Chronographe
- Le compteur des heures du chronographe mesure jusqu’à 12 heures.
- Le compteur des minutes mesure 30 minutes par tour.
- Le bouton d’arrêt à la seconde du centre mesure 60 secondes par
tour.
Page 31

31
Modèles avec Chronograph (5030.D)
Description des boutons d’affichage et de commande
Réglage de l’heure
1. Tirer le remontoir pour le mettre en position II (la montre s’arrête).
2. Tourner le remontoir jusqu’à atteindre l’heure exacte.
3. Repousser le remontoir en position I.
Chronographe
- Le compteur des heures du chronographe mesure jusqu’à 12 heures.
- Le compteur des minutes mesure 30 minutes par tour.
- Le bouton d’arrêt à la seconde du centre mesure 60 secondes par tour.
ATTENTION:
Avant d’utiliser les fonctions chronomètre, veuillez veiller à ce que:
- le remontoir soit en position I (= position normale).
- les trois aiguilles du chronographe soient exactement en position zéro après l’activation du bouton 1.
Si ce n’était pas le cas, les positions des aiguilles doivent être réglées (voir le chapitre intitulé “Remettre
les aiguilles du chronographe en position zéro”).
A
B
C
D
E
F
G
H
I
Aiguille
des heures
Aiguille
des minutes
Aiguille
des secondes
Remontoir
Compteur
des heures
Arrêt à
la seconde
Compteur
des minutes
Bouton 1
(remettre a zéro)
Bouton 2
(démarrer/arrêter)
Page 32

32
Chronographe: Fonction de base
(Démarrer/arrêter/remettre à zéro)
1. Appuyer sur le bouton 2 pour faire démarrer l’aiguille d’arrêt à la seconde.
2. Pour arrêter le chronométrage, appuyer de nouveau sur le bouton 2.
3. Pour remettre les trois aiguilles du chronographe à zéro, appuyer sur le bouton 1.
Chronographe: Chronométrage intermédiaire ou d’intervalle
1. Appuyer sur le bouton 2 pour faire démarrer l’aiguille d’arrêt à la seconde.
2. Appuyer sur le bouton 1 pour arrêter le chronomètre.
NB: Malgrès l’arrêt des aiguilles du chronomètre, le mouvement continue d’enregistrer
le temps actuel.
3. Rattraper le temps mesuré: Appuyer de nouveau sur le bouton 1 et les 3 aiguilles du chronomètre avancent rapidement
jusqu’au temps actuel. Pour continuer à mesurer des intervalles, continuer d’appuyer sur le bouton 1.
4. Appuyer sur le bouton 2 pour arrêter et le temps final s’affiche.
5. Pour remettre les trois aiguilles du chronomètre en position zéro, appuyer sur le bouton 1.
Page 33

33
Remettre les aiguilles du chronomètre en position zéro
1. Tirer le remontoir et le mettre en position III (les aiguilles du chronomètre sont toutes les trois dans
la bonne ou la mauvaise position zéro).
2. Garder les boutons 2 et 1 enfoncés en même temps pendant au moins 2 secondes (l’arrêt à la
seconde tourne de 360º - le mode correctif est activé).
3. Appuyer sur le bouton 2 pour faire avancer d’un en un l’aiguille d’arrêt à la seconde. Maintenir le
bouton 2 enfoncé pour faire avancer l’aiguille d’arrêt à la seconde rapidement. Appuyer sur le
bouton 1 pour passer à l’aiguille suivante.
4. Appuyer sur le bouton 2 pour faire avancer d’un en un l’aiguille du compteur des heures. Maintenir
le bouton 2 enfoncé pour faire avancer l’aiguille du compteur des heures rapidement. Appuyer sur le
bouton 1 pour passer à l’aiguille suivante.
5. Appuyer sur le bouton 2 pour faire avancer d’un en un l’aiguille du compteur des minutes. Maintenir le
bouton 2 enfoncé pour faire avancer l’aiguille du compteur des minutes rapidement.
6. Remettre le remontoir en position I.
A
B
C
D
E
F
G
H
I
Aiguille
des heures
Aiguille
des minutes
Aiguille
des secondes
Remontoir
Compteur
des heures
Arrêt à
la seconde
Compteur
des minutes
Bouton 1
(remettre a zéro)
Bouton 2
(démarrer/arrêter)
Page 34
34
Etanchéité
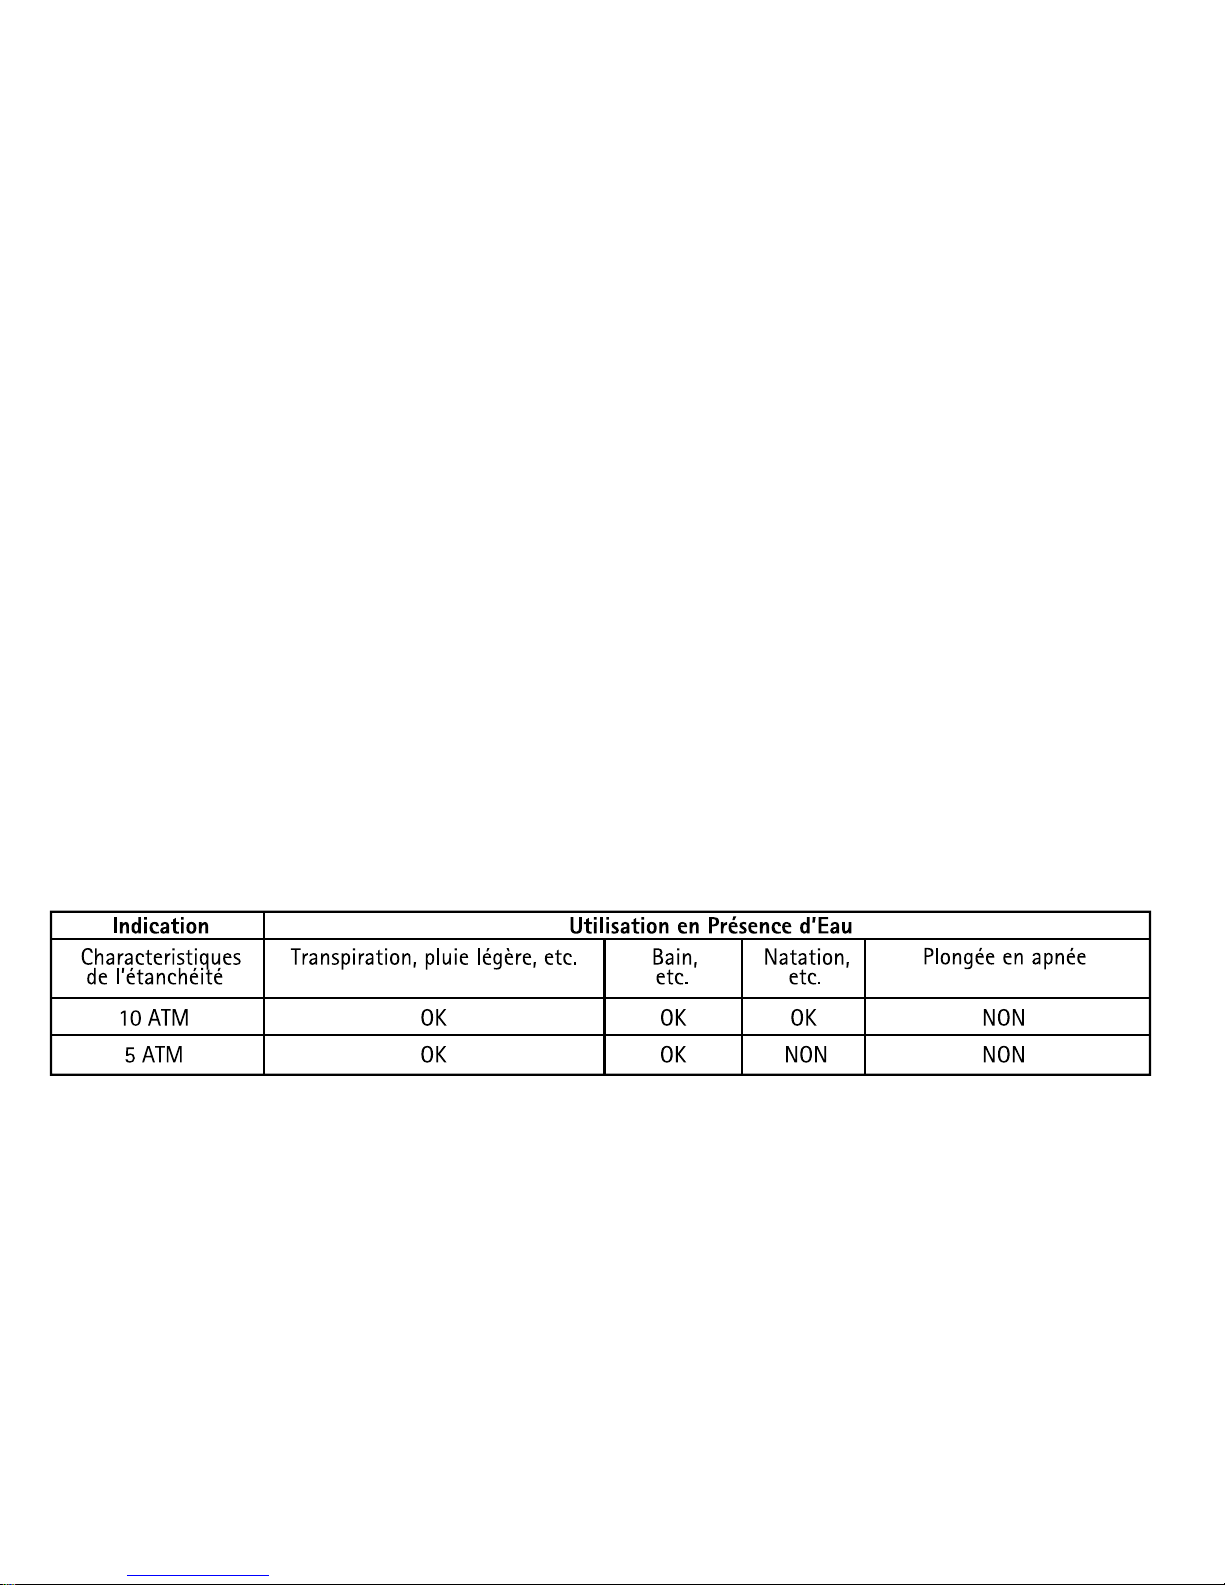
Toutes les montres Glam Rock sont conçues pour un indice d’étanchéité de 5 ATM (50 m).
L’étanchéité d’une montre protège son mouvement contre la poussiére, l’humidité et le risque d’endommagement en cas
d’immersion dans l’eau.
Se reporter au tableau pour les consignes quant au type d’exposition selon les différents indices.
Il est important de ne pas tirer la couronne lorsque la montre est en contact avec l’eau. L’eau peut s’infiltrer dans le boîtier
et endommager le mouvement.
Pour les montres avec couronne vissée, s’assurer que la couronne est en position correcte et complétement vérouillée avant
tout contact avec l’eau.
P our les montres avec fonction chronographe, ne jamais utiliser cette fonction sous l’eau, car l’eau pourrait s’infiltrer dans le
boîtier et endommager le mouvement.
Précaution d’Utilisation (étanchéité)
Toutes les montres Glam Rock sont conçues pour résister à l’utilisation telle qu’indiquée sur le tableau a ci-dessous.
Page 35

35
Entretien et Précautions
Chaque montre Glam Rock est conçue et fabriquée afin de dépasser les normes les plus strictes.
Contrairement à d’autres objets mécaniques, une montre fontionne sans interruption. Pour assurer
une performance et une longétivité optimales, il est conseillé de lire les instructions d’entretien et les
précautions à prendre avec votre nouvelle montre Glam Rock.
Entretien
Votre montre doit être nettoyée avec un chiffon doux et de l’eau uniquement. Ne pas immerger la montre.
Celle-ci doit être rincée à l’eau douce et séchée avec un chiffon doux après toute utilisation dans de l’eau salée.
Pour maintenir l’apparence neuve des bracelets métalliques nous recommandons des nettoyages périodiques.
Tremper une brosse douce dans de l’eau savonneuse tiède et frotter légèrement afin de les nettoyer. Nous
conseillons de procéder à l’entre tien de votre montre par un professionnel tous les 18-24 mois afin d’assurer
une utilisation prolongée et un fonctionnement sans incident.
Précautions
Votre montre est un ensemble complexe de pièces et de conposants réunis de façon experte par des artisans. Certaines
actions ou situations peuvent endommager la montre ou altérer son fonctionnement optimal. Il est important d’éviter
d’exposer votre montre aux conditions suiv antes: chaleur ou froid extrêmes; exposition directe et prolongée aux rayon du
soleil, ou à l’eau dans des conditions dépassant l’indice d’étanchéité de votre montre (c.f. arrière du boîtier et tableau). Ne
jamais utiliser les poussoirs ou la couronne lorsque la montre est en contact avec l’eau. Votre montre ne devrait pas être
affectée par les champs magnétique générés par des articles ménagers tels que les téléviseurs et les chaînes hi-fi, mais il
est conseillé d’éviter les champs électriques puissants ou une forte électricité statique, sans quoi le mécanisme pourrait être
interrompu. Eviter également tout choc ou impact statique important.
A
B
C
D
E
F
G
H
I
Aiguille
des heures
Aiguille
des minutes
Aiguille
des secondes
Remontoir
Compteur
des heures
Arrêt à
la seconde
Compteur
des minutes
Bouton 1
(remettre a zéro)
Bouton 2
(démarrer/arrêter)
Page 36

36
単一の時間自動モデル
ディスプレイ及びボタンの説明― 時刻の設定
1. 竜頭を位置IIIに引き抜いてください(腕時計が止まります)。
2. 正確な時刻になるまで竜頭を調節してください。
3. 竜頭を位置Iに押し戻してください。
自動モデル クロノグラフ
ディスプレイ及びボタンの説明
時刻の設定
1. 竜頭を位置IIIに引き抜いてください
(腕時計が止まります)。
2. 正確な時刻になるまで竜頭を調節してください。
3. 竜頭を位置Iに押し戻してください。
クロノグラフ:基本機能 (開始/停止/リセット)
1.プッシャ2を押して秒計を起動します。
2.計時を止める場合にはプッシャ2をもう一回押してください。
3.3本のクロノグラフ針をゼロ位置にリセットする時にはプッシャ3を押して下さい。
注意!: クロノグラフ機能をご使用の前に、以下のことに確かめてください。
―竜頭は位置Iにある。(=正常な位置)
―プッシャ1を起動後、3本のクロノグラフ針は正確にゼロ位置に位置してあります。
クロノグラフ
―クロノグラフの時間カウンターは12時間まで時間を
計ります。
―分カウンターは回転につき30分を計ります。
―秒カウンター(秒計)は回転につき60秒を計ります。
Page 37

37
クロノグラフモデル(5030.D)
ディスプレイ及びボタンの説明
時刻の設定
1. 竜頭を位置IIIに引き抜いてください
(腕時計が止まります)。
2. 正確な時刻になるまで竜頭を調節してください。
3. 竜頭を位置Iに押し戻してください。
クロノグラフ
―クロノグラフの時間カウンターは12時間まで時間を計ります。
―分カウンターは回転につき30分を計ります。
―秒カウンター(秒計)は回転につき60秒を計ります。
注意!
クロノグラフ機能をご使用の前に、以下のことに確かめてください。
―竜頭は位置Iにある。(=正常な位置)
―プッシャ1を起動後、3本のクロノグラフ針は正確にゼロ位置に位置してあります。
―もしそうでなければ、針の位置は必ず調節されてあります。(詳細は【クロノグラフ指針をゼロ位
置に調節する】を参照)
A
B
C
D
E
F
G
H
I
時針
分針
秒針
竜頭
時間カウンター
センター
ストップセコンド
分カウンター
プッシャ 1
(リセット)
プッシャ 2
(起動 /停止)
Page 38

38
クロノグラフ:基本機能 (開始/停止/リセット)
1.プッシャ2を押して秒計を起動します。
2.計時を止める場合にはプッシャ2をもう一回押してください。
3.3本のクロノグラフ針をゼロ位置にリセットする時にはプッシャ3を押して下さい。
クロノグラフ:中級或いは間隔計時
1.プッシャ2を押して秒計を起動します。
2.プッシャ1を押してクロノグラフを止めます。
注:クロノグラフ針が止まっても、作動装置は現在のタイミングを記録し続けます。
3.計った時間を仕上げます:プッシャ1をもう一回押してください。
そして、3本のクロノグラフ針は進行中の計
った時間に快速に進みます。間隔を記録し続ける場合、プッシャ1を押し続けてください。
4.プッシャ2を押してください。最終の時間が表示されます。
5.3本のクロノグラフ針をゼロ位置にリセットする場合、プッシャ1を押してください。
Page 39

39
クロノグラフ指針をゼロ位置に調節する
1.竜頭を位置IIIに引き抜いてください。(3本のクロノグラフはそれぞれの正確または不正
確なゼロ位置にあります)
2.プッシャ2と1を同時に最短2秒間押し続けて下さい。(秒計は3 60º 回転します - 補正
モードは起動されました)
3.プッシャ2を押して秒計をステップ実行してください。秒計を速く進むため、プッシャ
2を 押し続けてください。プッシャ1を押して次の針を進めてください。
4 .プッシャ2を押して時間カウンターをステップ実行してください。時間カウンターを速く
進むためプッシャ2を押し続けてください。プッシャ1を押して次の針を進めてください
5.プッシャ2を押して分カウンターをステップ実行してください。分カウンターを速く進むた `
めプッシャ2を押し続けてください。
6.竜頭を位置Iに戻してください。
A
B
C
D
E
F
G
H
I
時針
分針
秒針
竜頭
時間カウンター
センター
ストップセコンド
分カウンター
プッシャ 1
(リセット)
プッシャ 2
(起動 /停止)
Page 40
40
防水
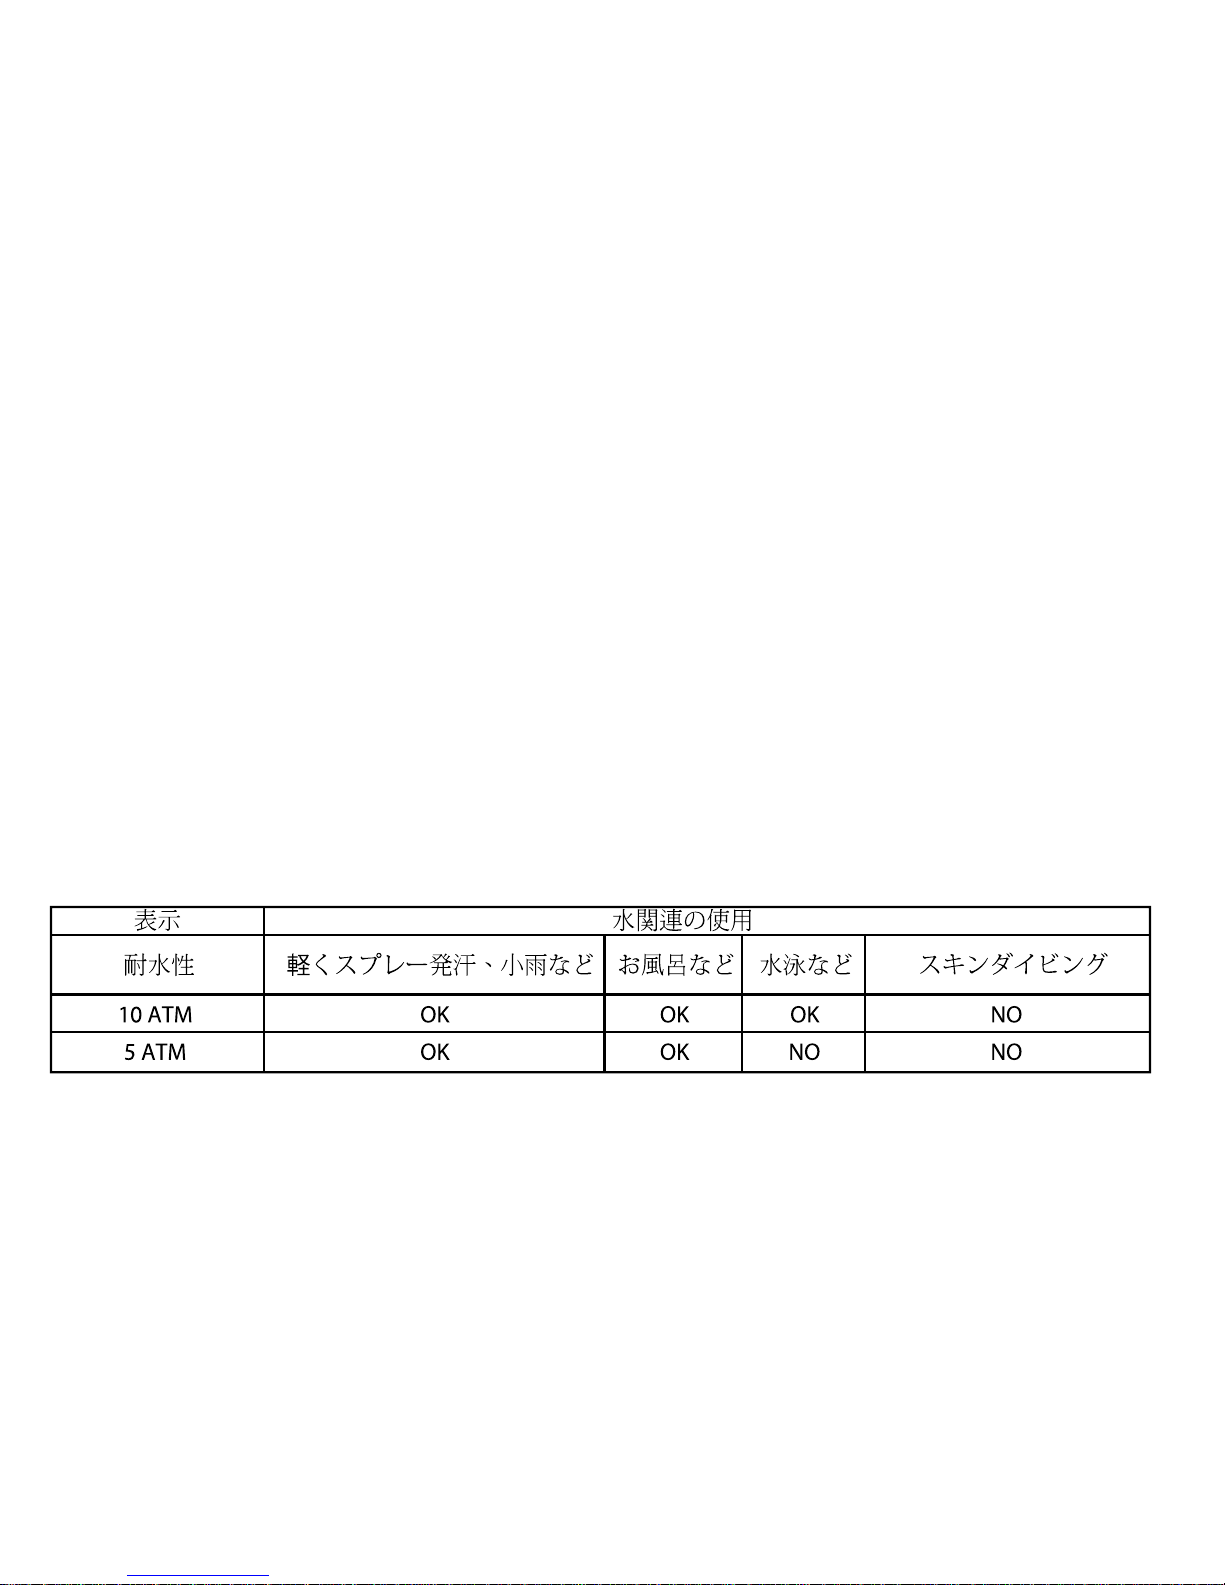
全ての CT Scuderia 腕時計は 5 ATM(50 m)の最小限の防水定格で設計されています。
時計の防水性はちり、湿気及び水に浸した時などの損害リスクから装置を保護します。
各時計のおすすめの防水定格はガイドラインのチャートをご参照ください。腕時計が水と接触する際には、竜頭
の位置を調節しないことをご注意ください。水がケースに入り装置への損害になることです。ねじ込み式の竜頭
(Screw-down crown)のある時計に関し、竜頭が適当な位置にあり、水と接触する前に完全にロックされたこ
とを確かめるのは重要です。クロノグラフ機能がある時計に関しては、腕時計の内部に入った水によって装置を
損害する可能性があるためクロノグラフを水の中に使用しないでください。
使用予防措置(防水)
以下のチャートで示された通り、全ての CT Scuderia は使用に耐えるように設計されています。
Page 41

41
保護及び予防措置
各々の CT Scuderia は最高の標準を上回るために設計及び製造されています。
分の他の機械と異なり腕時計はノンストップで動きます。お客様の腕時計を最適な性能
と長命に確保するために、お持ちの時計の保護及び予防措置簡易ガイドラインをご参照
ください。
保護
お客様の腕時計は柔らかい布と水だけで清掃してください。水に入れないでください。塩水
に接触したご使用後、必ずきれいにすすぎ、柔らかい布で拭いてください。金属ブレスレット
のニュールックを維持するため、定期的なクリーニングをおすすめします。柔らかいブラシを
暖かい石鹸水に軽く浸し、やさしくブレスレットをこすってください。長く使用でき、問題なく
操作できるように、お客様の腕時計を18-24ヶ月ごとに点検することをおすすめです。
予防措置
お客様の腕時計は熟練した職人によって、複雑なパーツと構成部品から統合したものです。
若干の行動或いは環境状況によって、お持ちの腕時計を最適な機能を妨げる、または損害
を与える可能性があります。以下の状況を避けることが重要です:極熱、極寒、または直射日
光への長時間暴露、時計の防水性(ケースの後ろ及びチャートを参照)を超えた湿った環境
への長時間暴露。腕時計が水と接触する際には必ず機能ボタン及び竜頭を作動しないでく
ださい。お客様の腕時計はテレビやステレオなどのような家電製品より起こした磁場に影響
されませんが、機械装置を中途妨害する可能性のある他の強い電場静電気を避けるのがお
すすめします。それに、極端な電撃或いは衝撃を避けることも重要です。
A
B
C
D
E
F
G
H
I
時針
分針
秒針
竜頭
時間カウンター
センター
ストップセコンド
分カウンター
プッシャ 1
(リセット)
プッシャ 2
(起動 /停止)
Page 42

INFORMAZIONE AGLI UTENTI
ai sensi dell’Art.13 del Decreto Legislativo 25 Luglio 2005, n.151
“Attuazione delle Direttive 2002/95/CE, 2002/96/CE e 2003/108/CE,
relative alla riduzione dell’uso di sostanze pericolose
nelle apparecchiature elettriche ed elettroniche, nonchè dello smaltimento dei rifiuti”
Il simbolo del cassonetto barrato riportato sull’apparecchiatura indica che il prodotto alla fine della sua vita utile
deve essere raccolto separatamente dagli altri rifiuti. L’utente dovrà pertanto portare l’apparecchiatura giunta a
fine vita presso gli idonei centri di raccolta differenziata dei rifiuti elettrici ed elettronici, oppure riconsegnarla al
rivenditore al momento dell’acquisto di una nuova apparecchiatura di tipo equivalente, in ragione di uno a uno.
L’adeguata raccolta differenziata dell’apparecchiatura dismessa, per l’avvio al riciclaggio, al trattamento e allo
smaltimento ambientale compatibile contribuisce ad evitare possibili effetti negativi sull’ambiente e sulla salute
e favorisce il riciclo dei materiali di cui è composta l’apparecchiatura. Lo smaltimento abusivo del prodotto da
parte dell’utente comporta l’applicazione delle sanzioni amministrative di cui al
D.Lgs. n.22/1997 ( articolo 50 e seguenti del D.Lgs. n.22/1997 )
Page 43

USER INFORMATION
according to art.13 of Decree Law 151 dated 25 July 2005 “Implementation of
Directives 2002/95/EC, 2002/96/EC and 2003/108/EC, referring to reduction
in the use of hazardous substances in electrical and electronic equipment
and to waste disposal”
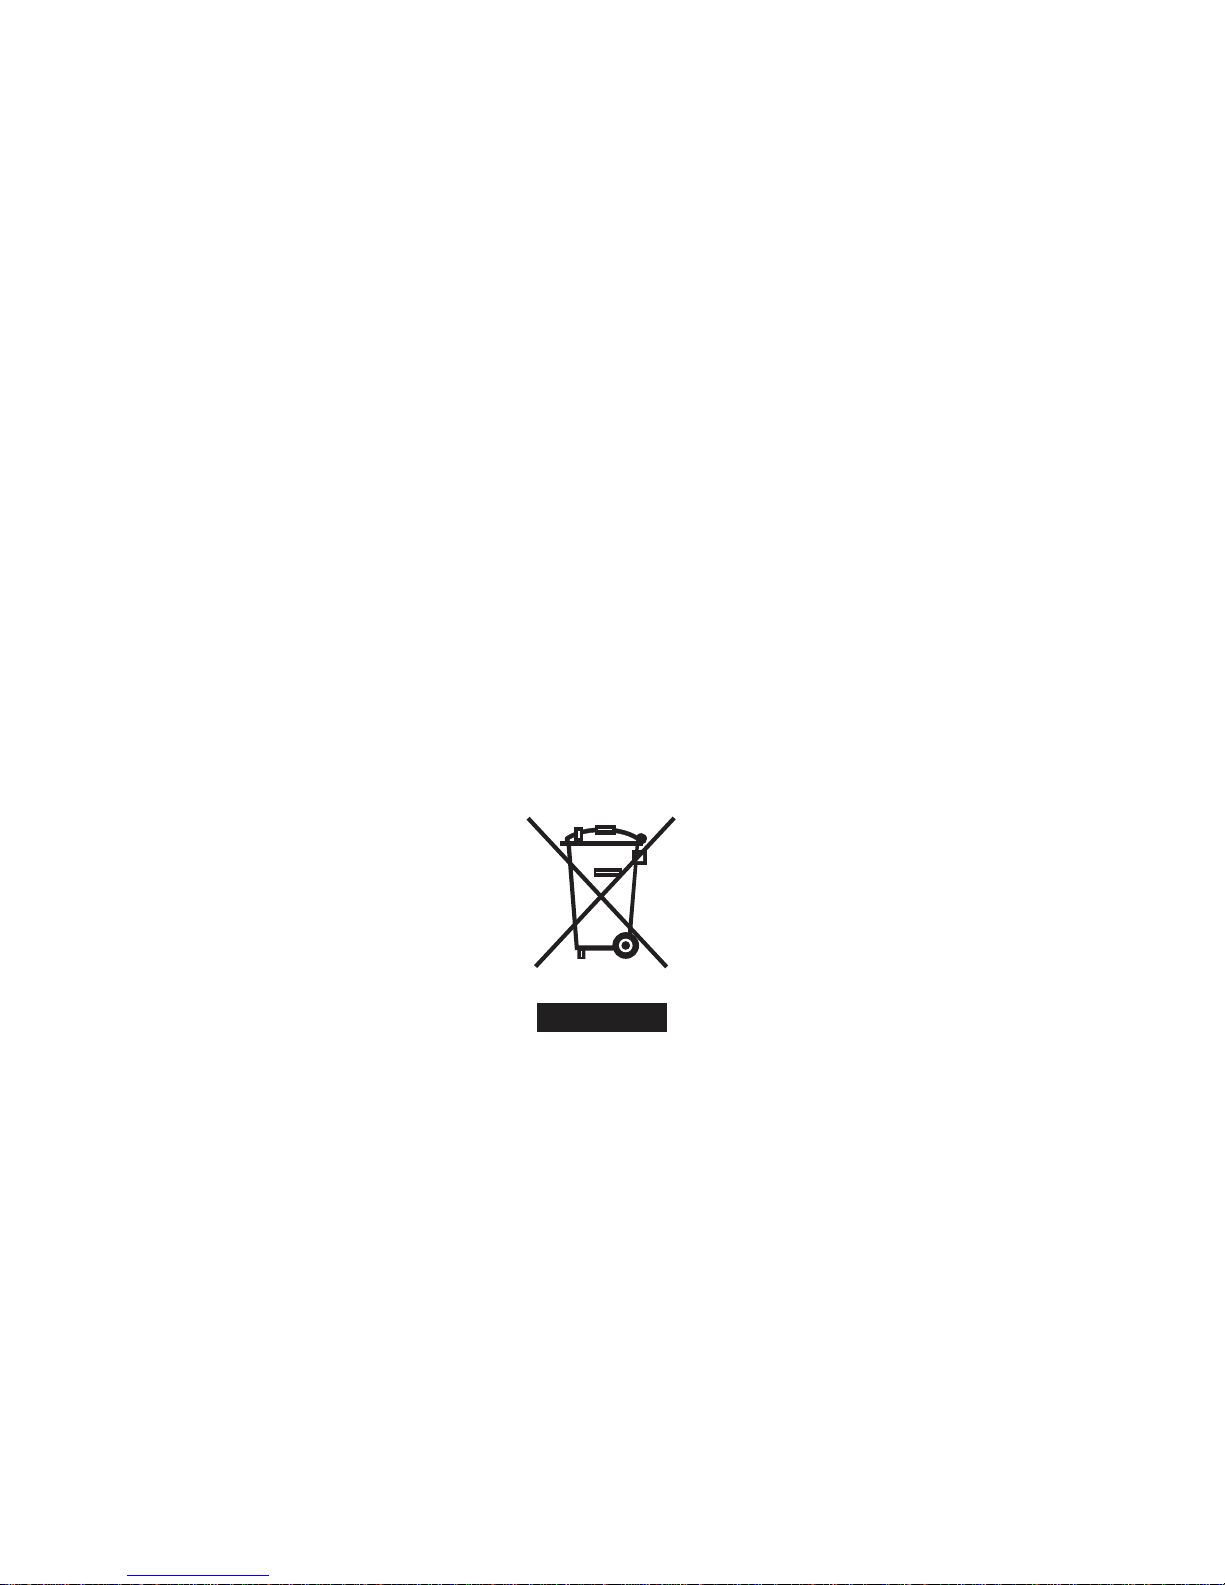
The crossed out wheeled bin symbol on the equipment or on its packaging indicates that when the product
reaches the end of its working life it must be collected separately from other waste. The user shall therefore
take the waste equipment to appropriate separate collection sites for electronic and electrical waste, otherwise
consign it to the seller when purchasing a new, equivalent appliance, at a one to one ratio. Adequate separate
collection of the waste equipment with subsequent recycling, treatment and environment friendly disposal
contributes towards avoiding negative effects on the environment and health and favours reuse and/or recycling
of materials making up the material. Illegal disposal of the product by the owner will be sanctioned under
Decree Law 22/1997
( art.50 and later amendments of Decree Law 22/1997 )
Page 44
ctscuderia.com
 Loading...