

Page 1

CSSN
Scanshell.Net
USER GUIDE
Page 2

This publication contains proprietary information of the Card Scanning Solutions
Company, provided for customer use only. No other uses are authorized without the
express written permission of Card Scanning Solutions.
WARRANTY
Card Scanning Solutions provides this publication “as is” without warranty of any kind,
either express or implied, including, but not limited to, the implied warranties of
merchantability or suitability fo r any particular purpose.
Card Scanning Solutions reserves the right to revise this publication, and to make changes
in the content hereof from time to time without notification. Some countries or states in the
USA do not allow a disclaimer of express or implied warranties in certain transactions; if
you are a resident of such country or state, this statement may not apply to you.
This publication may include technical inaccuracies or typographical errors. Changes are
made periodically to the information herein; these changes will be incorporated in new
editions of the publication. Card Scanning Solutions may make improvements and/or
changes in the products and/or the software described in this publication at any time.
NOTICE TO USER
This user guide should not be construed as a representation or warranty with respect to the
software named herein. Occasionally, changes or variations exist in the software that are
not reflected in the manual. Generally, if such changes or variations are known to exist and
to affect the product significantly, a release note or “read me” file accompanies the user
guide and/or the distributed software. In that event, be sure to read the release note or “read
me” file before using the product.
PUBLICATION
The descriptions, specifications, design and procedures contained in this user guide were
effective at the time of publication of this document. Card Scanning Solutions reserves the
right to modify any of the above at any time without notice and without incurring
obligations.
TRADEMARKS
All trademarks are the property of their respective holders and are hereby acknowledged.
Scanshell.net User Guide © 2005 Card Scanning Solutions 2
Page 3

Table of Contents
TABLE OF CONTENTS
Warranty .................................................................................................................................................................... 2
Notice to User ........................................................................................................................................................... 2
Publication................................................................................................................................................................. 2
Trademarks ................................................................................................................................................................ 2
TABLE OF CONTENTS ..................................................................................................................................................... 3
Table of Figures........................................................................................................................................................ 6
1. INTRODUCTION.................................................................................................................................................. 8
ABOUT THIS DOCUMENT ................................................................................................................................................ 8
Modules covered in this document ........................................................................................................................ 8
Navigating this User Guide .................................................................................................................................... 8
OVERVIEW ....................................................................................................................................................................... 8
MODULES......................................................................................................................................................................... 8
SCANSHELL.NET FEATURES .......................................................................................................................................... 9
2. GETTING STARTED ........................................................................................................................................ 10
BEFORE USING THE SCANNER ..................................................................................................................................... 10
MINIMUM SYSTEM REQUIREMENTS............................................................................................................................ 10
CONNECTING THE SCANNER ........................................................................................................................................ 10
INSTALLATION .............................................................................................................................................................. 11
UNINSTALL .................................................................................................................................................................... 11
3. STARTING THE PROGRAM ......................................................................................................................... 12
LOGIN ............................................................................................................................................................................. 12
First time use: ......................................................................................................................................................... 12
Creating a new database ....................................................................................................................................... 13
4. MAIN SCREEN .................................................................................................................................................... 14
MENU DESCRIPTION..................................................................................................................................................... 15
TOOLBAR DESCRIPTION ............................................................................................................................................... 16
SEARCH FACILITY ......................................................................................................................................................... 17
RECORD LIST TABLE.................................................................................................................................................... 18
Modifying and organizing the record list appearance ..................................................................................... 18
Organize according to a specific field ...................................................................................................................18
Table headers - Right-clicking options .................................................................................................................18
Record list - Right-clicking options ......................................................................................................................18
Editing a record ...................................................................................................................................................... 19
Adding a new record .............................................................................................................................................. 19
Auto detect ............................................................................................................................................................19
Deleting records ..................................................................................................................................................... 19
Printing records ...................................................................................................................................................... 20
Exporting records ................................................................................................................................................... 20
ACTIVE RECORD DETAILS........................................................................................................................................... 21
Module tabs ............................................................................................................................................................. 21
The Image section................................................................................................................................................... 21
Zoom .....................................................................................................................................................................21
Browsing ...............................................................................................................................................................22
Notes and Categories............................................................................................................................................. 22
Editing the active-record section layout ............................................................................................................. 22
Editing the active record fields ............................................................................................................................ 22
Renaming field labels ............................................................................................................................................22
Moving fields up and down the list .......................................................................................................................22
Removing fields ....................................................................................................................................................22
Additional commands ............................................................................................................................................ 22
Editing the active record values ........................................................................................................................... 22
Scanshell.net User Guide © 2005 Card Scanning Solutions 3
Page 4

Table of Content
THE STATUS BAR........................................................................................................................................................... 23
5. RECORD MANAGEMENT ............................................................................................................................. 24
SCAN/EDIT WINDOW ................................................................................................................................................... 24
NEW RECORD SCREEN: BUTTON DESCRIPTION ....................................................................................................... 25
ADDING A NEW RECORD .............................................................................................................................................. 26
Adding more images ............................................................................................................................................... 27
SCANNING FROM FILE .................................................................................................................................................. 28
SCANNING MAGNETIC STRIPS...................................................................................................................................... 28
CAPTURING SIGNATURES ................................................................................................................................... 28
AFTER THE CARD IS SCANNED .................................................................................................................................... 29
Notes ......................................................................................................................................................................... 29
Categories................................................................................................................................................................ 29
Attaching categories ..............................................................................................................................................30
Creating, editing and deleting Categories .............................................................................................................30
sIGNATURES .......................................................................................................................................................... 30
Adding, Validating and deleting signatures ..........................................................................................................31
RAW OCR...................................................................................................................................................................... 32
V ERIFYING CARDS ........................................................................................................................................................ 34
6. DATABASE MANAGEMENT ........................................................................................................................ 36
OVERVIEW ..................................................................................................................................................................... 36
CREATING A NEW DATABASE...................................................................................................................................... 36
Fields display order ............................................................................................................................................... 39
Fields manipulation options ................................................................................................................................. 39
Adding fields .........................................................................................................................................................39
Editing fields .........................................................................................................................................................40
Deleting fields .......................................................................................................................................................40
Set legal fields .......................................................................................................................................................40
OPENING AN EXISTING DATABASE ............................................................................................................................. 41
DATABASE BACKUP ...................................................................................................................................................... 42
Creating a backup .................................................................................................................................................. 42
7. USER MANAGEMENT ..................................................................................................................................... 43
ADDING A NEW USER.................................................................................................................................................... 43
Advanced.................................................................................................................................................................. 45
EDITING AN EXISTING USER ........................................................................................................................................ 45
DELETING A USER ........................................................................................................................................................ 45
8. EXPORTING DATA........................................................................................................................................... 47
EXPORT LIST ................................................................................................................................................................. 47
Creating an export list ........................................................................................................................................... 47
EXPORTING TO THE WEB ............................................................................................................................................. 47
EXPORTING TO FTP...................................................................................................................................................... 50
FTP Advanced Details........................................................................................................................................... 50
Data file naming ....................................................................................................................................................51
Data Field Format ................................................................................................................................................. 51
EXPORTING TO EMAIL .................................................................................................................................................. 54
EXPORTING TO APPLICATIONS .................................................................................................................................... 55
EXPORTING TO FILE ...................................................................................................................................................... 56
Data File Naming ................................................................................................................................................... 57
Data Field Format ................................................................................................................................................. 58
TRANSFERRING DATA TO AN APPLICATION............................................................................................................... 61
9. APPLICATION SETTINGS ............................................................................................................................. 62
G ENERAL TAB ............................................................................................................................................................... 62
Scanshell.net User Guide © 2005 Card Scanning Solutions 4
Page 5

Table of Content
IMAGE TAB .................................................................................................................................................................... 64
Overview .................................................................................................................................................................. 64
Image color scheme................................................................................................................................................ 64
Image File Settings................................................................................................................................................. 65
Scanner..................................................................................................................................................................... 65
Scanner Calibration ............................................................................................................................................... 66
Cleaning the scanner ............................................................................................................................................. 66
LIVE UPDATE ................................................................................................................................................................ 67
Registration ............................................................................................................................................................. 67
IDSCAN ........................................................................................................................................................................... 69
Scanner automation Tab ....................................................................................................................................... 69
Card Size ...............................................................................................................................................................70
Field setting tab ...................................................................................................................................................... 70
Removing fields from the display list ...................................................................................................................71
Renaming fields.....................................................................................................................................................71
Fields order............................................................................................................................................................71
Verification Tab ...................................................................................................................................................... 73
SCANSHELL AND MEDICSCAN TABS ........................................................................................................................ 74
Scanner automation Tab ....................................................................................................................................... 74
Card Size ...............................................................................................................................................................74
Field setting tab ...................................................................................................................................................... 75
Removing fields from the display list ...................................................................................................................76
Renaming fields.....................................................................................................................................................76
Fields order............................................................................................................................................................76
BUSINESS CARD AND CHECK TABS ..................................................................................................................... 77
PASSPORT TAB .............................................................................................................................................................. 78
Scanner automation Tab ....................................................................................................................................... 78
Card Size ...............................................................................................................................................................78
Field setting tab ...................................................................................................................................................... 79
SIGNISHELL TAB ........................................................................................................................................................... 79
Settings tab .............................................................................................................................................................. 79
Field setting tab ...................................................................................................................................................... 80
10. PRINTING ............................................................................................................................................................. 81
PRINTING RECORDS ...................................................................................................................................................... 81
LAYOUT OPTIONS.......................................................................................................................................................... 83
Adding a layout ....................................................................................................................................................... 83
Adding a layout from an existing one ................................................................................................................. 83
Modifying an existing page layout....................................................................................................................... 83
Deleting a layout .................................................................................................................................................... 83
SELECTING FIELDS ........................................................................................................................................................ 84
Changing the order of the fields appearance .................................................................................................... 86
Removing a field from the Selected Fields column........................................................................................... 86
PRINT PREVIEW............................................................................................................................................................. 86
Changing the printing font .................................................................................................................................... 88
11. DYMO PRINTER ................................................................................................................................................ 89
Changing the order of the fields appearance .........................................................................................................90
Removing a field from the Selected Fields column ..............................................................................................90
12. LIVE UPDATE ..................................................................................................................................................... 91
13. IMPORT ................................................................................................................................................................. 93
14. RULES ..................................................................................................................................................................... 95
CREATING RULES .......................................................................................................................................................... 96
EDITING RULES ............................................................................................................................................................. 99
DELETING RULES........................................................................................................................................................ 100
Scanshell.net User Guide © 2005 Card Scanning Solutions 5
Page 6

Table of Content
MANAGING RULES ...................................................................................................................................................... 100
15. APPENDIX A: TROUBLES HOOTING ..................................................................................................... 101
TABLE OF FIGURES
Figure 3-1: Login window ....................................................................................................12
Figure 4-1: The main screen .................................................................................................14
Figure 4-2: The search facility .............................................................................................17
Figure 4-3: Records list ........................................................................................................18
Figure 4-4: Right-click contextual menu..............................................................................18
Figure 4-6: Delete command in the contextual menu ..........................................................19
Figure 4-7: Delete dialog ......................................................................................................20
Figure 4-8: Active record details ..........................................................................................21
Figure 4-10: Status bar .........................................................................................................23
Figure 5-1: The New and Edit Record screen ......................................................................25
Figure 5-2: Region/State selection .......................................................................................27
Figure 5-4: Categories window ............................................................................................30
Figure 5-5: Manual OCR window ........................................................................................32
Figure 5-6: Card verification window ..................................................................................34
Figure 5-7: Verification window with scan and verification results ....................................35
Figure 6-1: Module selection window..................................................................................37
Figure 6-2: Database fields a nd layout fields' selection window .........................................38
Figure 6-3: Fields creation window......................................................................................39
Figure 6-4: Dropdown list value definition window ............................................................40
Figure 6-5: Set legal fields window......................................................................................41
Figure 6-6: Database backup screen .....................................................................................42
Figure 7-1: User list window ................................................................................................43
Figure 7-2: New user setup window.....................................................................................44
Figure 7-3: The user permissions Advance screen ...............................................................45
Figure 8-1: Export list window.............................................................................................47
Figure 8-2: Module and fields selection for Web export .....................................................48
Figure 8-3: Extra export data (Web export) .........................................................................49
Figure 8-4: FTP Export configuration ..................................................................................50
Figure 8-5: FTP Advanced Export configuration.................................................................50
Figure 8-6: Module and fields for export .............................................................................52
Figure 8-7: Extra export data................................................................................................53
Figure 8-8: Email export header screen................................................................................54
Figure 8-9: Email export advanced details ...........................................................................54
Figure 8-10: Module and fields selection for export ............................................................55
Figure 8-11: Extra export data..............................................................................................56
Figure 8-12: Export file name configuration ........................................................................57
Figure 8-13: Module and fields selection for export ............................................................59
Figure 8-14: Extra export data (Web export) .......................................................................60
Figure 8-1: The transfer dialog .............................................................................................61
Figure 9-1: Setup - General tab ............................................................................................62
Scanshell.net User Guide © 2005 Card Scanning Solutions 6
Page 7

Table of Content
Figure 9-2: Setup - Image tab ...............................................................................................64
Figure 9-3: Setup - LiveUpdate tab ......................................................................................67
Figure 9-4: Registration window ..........................................................................................68
Figure 9-5: Setup – ID Scan .................................................................................................69
Figure 9-6: Field selection screen.........................................................................................71
Figure 9-7: Verification tab ..................................................................................................73
Figure 9-8: Setup – MedicScan and ScanShell ....................................................................74
Figure 9-9: Field selection screen.........................................................................................75
Figure 9-10: Setup – Barcode and DL Barcode ................... Error! Bookmark not defined.
Figure 9-11: Setup - Business card module ..........................................................................77
Figure 9-12: Setup – passportl..............................................................................................78
Figure 9-13: Magnetic reader tab ......................................... Error! Bookmark not defined.
Figure 10-1: Print wizard - Format selection screen ............................................................82
Figure 10-2: Print Wizard - Fields selection screen .............................................................84
Figure 10-3: Print Preview screen ........................................................................................87
Figure 11-1: Dymo printer setup ..........................................................................................89
Figure 13-1: Import Wizard - Selection of previous CSSN programs' database..................93
Figure 13-2: Import Wizard - Selection of fields to import ...............................................93
Figure 14-1: Rule Wizard window .......................................................................................96
Figure 14-2: Rule Wizard with selections according to the example in this chapter ...........97
Figure 14-3: Rule details section in the Rule Wizard ...........................................................97
Figure 14-4: Field content dialog box ..................................................................................98
Figure 14-5: Sound file selection dialog box .......................................................................98
Figure 14-6: Rule list window ..............................................................................................99
Scanshell.net User Guide © 2005 Card Scanning Solutions 7
Page 8

Introduction About this document
1. INTRODUCTION
ABOUT THIS DOCUMENT
MODULES COVERED IN THIS DOCUMENT
Scanshell.net is a modular application. It has several modules, eac h dedicated to a specific
field. The modules available to you depend on your license, and the CSSN scanner that is
connected to your computer. The basic operation principles of the different modules are
similar; however, there are some differences in both operation and layout, according to the
specific module tasks. This user guide covers all available modules. Please refer to the
parts of this user guide covering your module/s, and ignore those concerned with modules
not included in your package.
NAVIGATING THIS USER GUIDE
If you are using this user guide on screen, please note that all pointers (such as “See
Section x, page 00) are live hyperlinks, which you can click to jump to the pointed section.
Similarly, all the entries in the Table of Contents at the beginning of this document are live
hyperlinks. In addition, you can open the Bookmarks of the Acrobat Reader and use them
to navigate the document.
OVERVIEW
Scanshell.net is a powerful scanning application for ID cards as well as other types of
cards and scanning purposes. The cards are scanned into a relational database, and saved in
records; each record stores the ID card image, the ID card data, and additional user-defined
information such as the scanning time, categories and more. The data stored in
Scanshell.net can be easily sorted, arranged, stored, retrieved and printed according to
various built-in and user-defined criteria and categories.
Scanshell.net has extensive export capabilities, allowing you to export scanned data
automatically to any other application such as Microsoft Outlook, Excel and Word, as well
as Email, FTP, and the Web, directly from within the program.
MODULES
Scanshell.net is a modular application. It has several modules, each dedicated to a specific
field. The modules availab le at the moment are:
§ IdScan for Driver Licenses – Scanning driver licenses
§ Passports Reader – Scanning Passports
§ MedicScan – Scanning medical insurance cards
§ Business Cards Reader – Scanning business cards
§ Scanshell – General scanning purposes
Scanshell.net User Guide © 2005 Card Scanning Solutions 8
Page 9

Introduction Scanshell.net Features
§ Checks Re ader – Scanning checks
Note: The modules available to you depend on your license, and the CSSN scanner that is
connected to your computer. If you wish to add more modules, please contact CSSN sales
department on (310) 691 8920, or through our Web site, http://www.card -reader.com.
SCANSHELL.NET FEATURES
§ Fully automated scanning process - Allowing you to focus on chain-feeding media
to the scanner, while image processing and data extraction take place in the
background.
§ Automatic page-feed detection - launches the scan job immediately upon the
insertion of a document into the scanner.
§ Fully customizable – User defined layout, fields, and field names.
§ Multi language support - users can select their individual application interface
language.
§ The ID card / Passport / Barcode image and data are automatically stored in a local
or remote relational database, in a pre-defined color scheme and resolution.
§ Image auto alignment - Automatically corrects incorrect card insertion.
§ Capable of scanning any photo media including paper photos, ID cards, Passports
and even rigid plastic credit cards.
§ Data is automatically extracted into appropriate database fields.
§ Database capabilities including extensive search capabilities.
§ Exclusive database export capabilities; to other Ap plications, Internet, FTP, Email,
files.
Scanshell.net User Guide © 2005 Card Scanning Solutions 9
Page 10

Getting Started
2. GETTING STARTED
BEFORE USING THE SCA NNER
The scanner has been carefully packaged to avoid damage during transportation. Before
operating the scanner, please remove the packaging materials. The box contains the
following:
§ ScanShell scanner
§ Application CD
§ USB interface cable
§ User license card
§ Calibration card (only with ScanShell 800)
§ Cleaning card (only with ScanShell 800)
MINIMUM SYSTEM REQUIREMENTS
The minimum system requirements are:
§ Pentium III with 128MB
§ Win 2000 with service pack 2 or higher
§ Internet Explorer 5.01 or higher
§ USB port
§ 25 MB free storage space
CONNECTING THE SCANNER
The scanner is connected to the computer via the USB port. To connect the scanner, do the
following:
§ Place the scanner on a flat, fir m, solid surface with easy access.
§ Plug the USB interface cable into the USB port of the computer
§ After the Add new hardware wizard dialog box appears, click Next until you are
asked to install the driver for the reader.
§ Insert the installation CD into the drive.
§ You will find the driver on the installation CD at:
1. < CD-ROM drive >:/Driver/800 (for the ScanShell 800 or 800N scanner
model)
2. < CD-ROM drive >:/Driver/MagShell (for the MagShell scanner model)
3. < CD-ROM drive >:/Driver/1000 (for the ScanShell scanner 1000 model)
§ After you specify the driver location, click Next until the installation is complete.
Scanshell.net User Guide © 2005 Card Scanning Solutions 10
Page 11

Getting Started Installation
INSTALLATION
To install the software on the computer, do the following:
1. Close all programs.
2. Insert the CD into the CD ROM drive.
3. Wait until the install program begins and follow the instructions on the screen.
4. If the install program does not start automatically, click the My Computer icon on
the desktop and select the CD ROM drive.
5. Double click on the Setup program.
6. Wait until the install program begins a nd follow the instructions on the screen.
7. Setup will check if Microsoft .NET framework 1.1 or higher is installed on your
computer. If it is not installed, setup will promt you to install it. Click "Yes" to
install Microsoft .NET framework or "No" to skip Microsoft .NET framework
installation.
Please note that if Microsoft .NET framework 1.1 or higher is not installed on your
computer, you will not be able to install and use Scanshell.net.
To run the software, click the Windows Start button, select Programs > Card Scanning
Solution, and then click Scanshell.net.
When starting the program for the first time, you will be prompted to fill in your license
code.
Note: Scanshell.net requires a minimal resolution of 1024*768 and is best viewed at 96 DPI.
UNINSTALL
To uninstall the software, open the Add-Remove Programs control panel. Select the
application icon and click on Add/Remove. Follow the uninstall instructions until the
operation is completed.
Scanshell.net User Guide © 2005 Card Scanning Solutions 11
Page 12
Starting the Program Login
3. STARTING THE PROGRAM
LOGIN
Note: The very first time you sta rt the program you will be prompted to enter your registration
number.
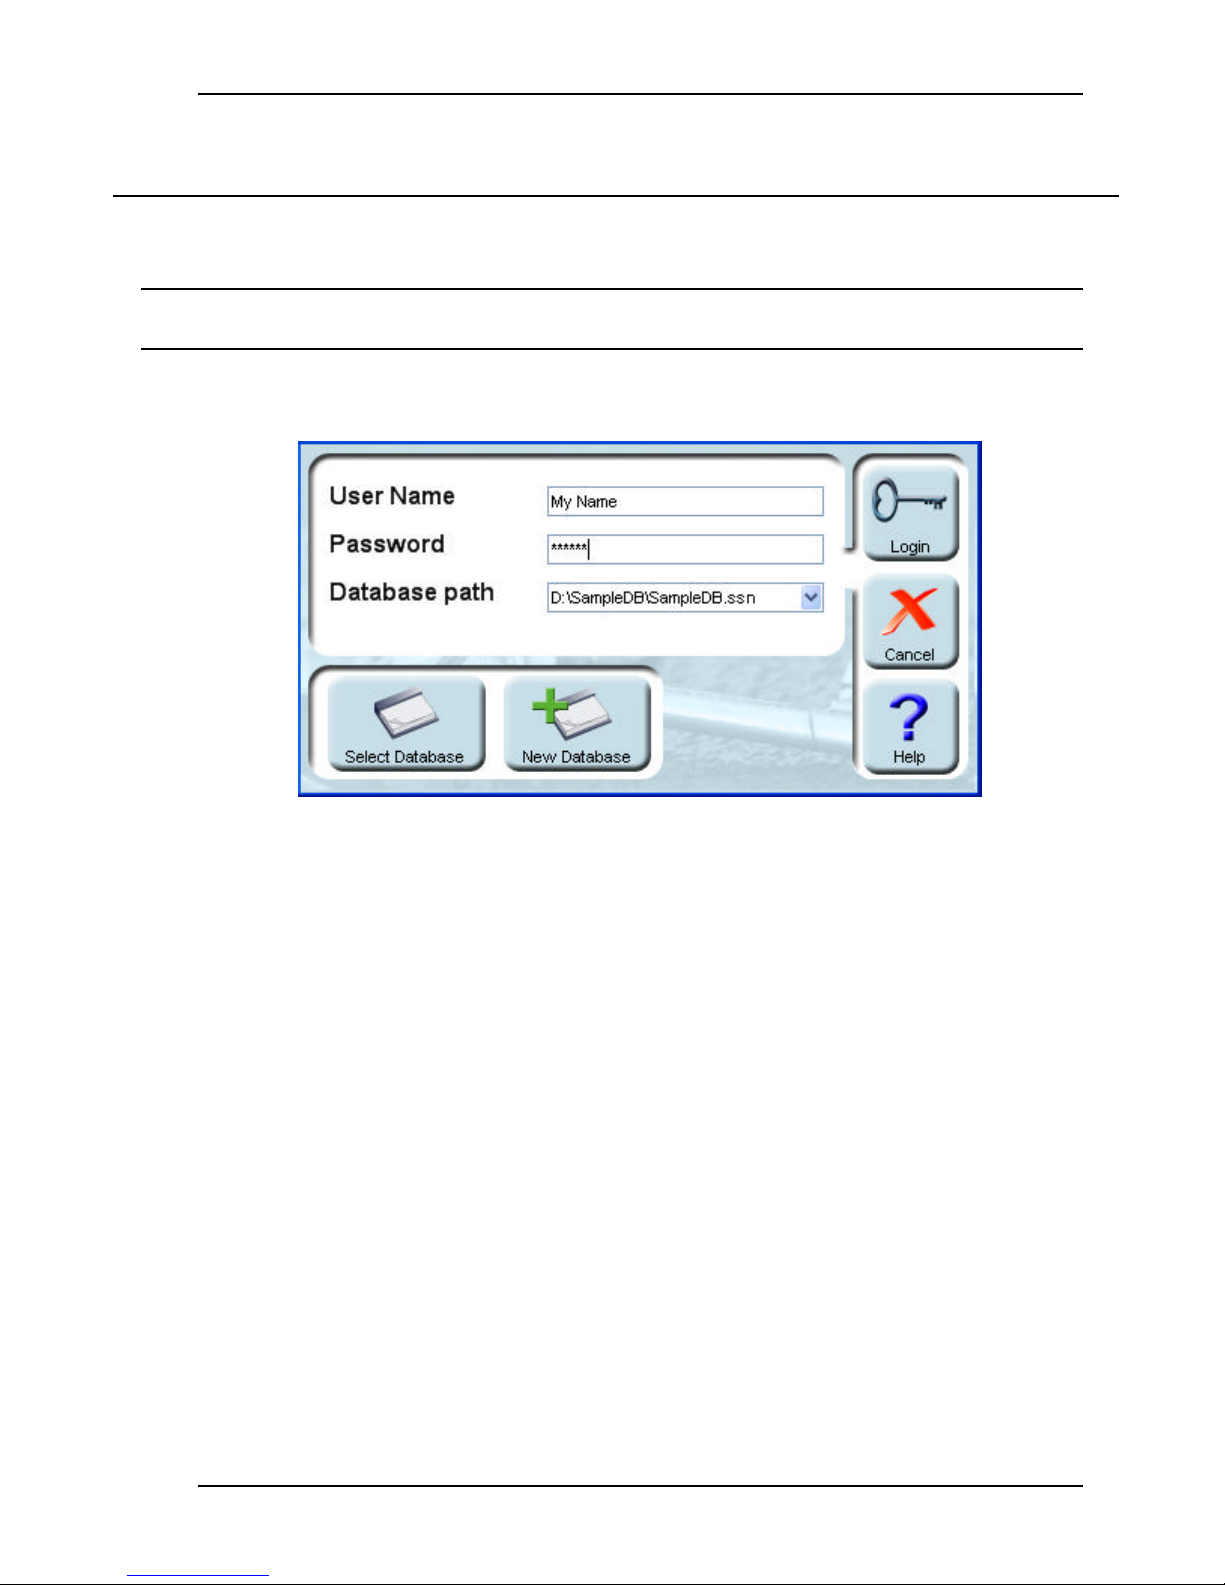
When you start the application, you will be presented with a Login dialog box, where you
have to fill in a user name and a password, and select or create a database:
Figure 3-1: Login window
1. Type in your user name and password.
2. Select a database to open. By default, the application starts with the database that
was most recently used, already selected. You can select another database (if it
exists) by clicking the Select Database button, or create a new database if no
database is available (you must create and specify a database before proceeding).
A standard browsing window will be opened, by default displaying the
s
application root directory.
Navigate to the desired database file (which can also be located in a different
s
directory), select a database and press OK.
3. If there is no database yet, you must create at least one database before you can
proceed. Click the New Database button to create a database. For complete
instruction on creating a new database, please see Creating a new database, page
36.
4. Click Login. The main screen will appear.
FIRST TIME USE:
1. You must create at least one database in which scanned data will be stored before
you can log in. Click the New Database button to open the Database Wizard and
Scanshell.net User Guide © 2005 Card Scanning Solutions 12
Page 13

Starting the Program Login
create a database. For detailed instructions on creating a new database, please see
Creating a new database, page 36.
2. After you create a database, type in a user name and a password you would like to
use for this database, and make sure you will remember them.
3. Click the Login button or hit the Enter key.
Administrator Login
Login as an administrator enables the administrator privileges level (highest user level).
The administrator can define and control access privileges to the application and databases.
Using the User List he/she can define additional users and give them different access
privileges as explained in the User Management, page 43. To log in as an administrator,
use the following initial administrator user name and password:
User name: CSSN
Password: 123456
CREATING A NEW DATABASE
Click the New Database button to open the Database Wizard. For detailed instructions on
creating a new database, see Creating a new database, page 36.
When you are done, click Login.
Scanshell.net User Guide © 2005 Card Scanning Solutions 13
Page 14
Main screen
4. MAIN SCREEN
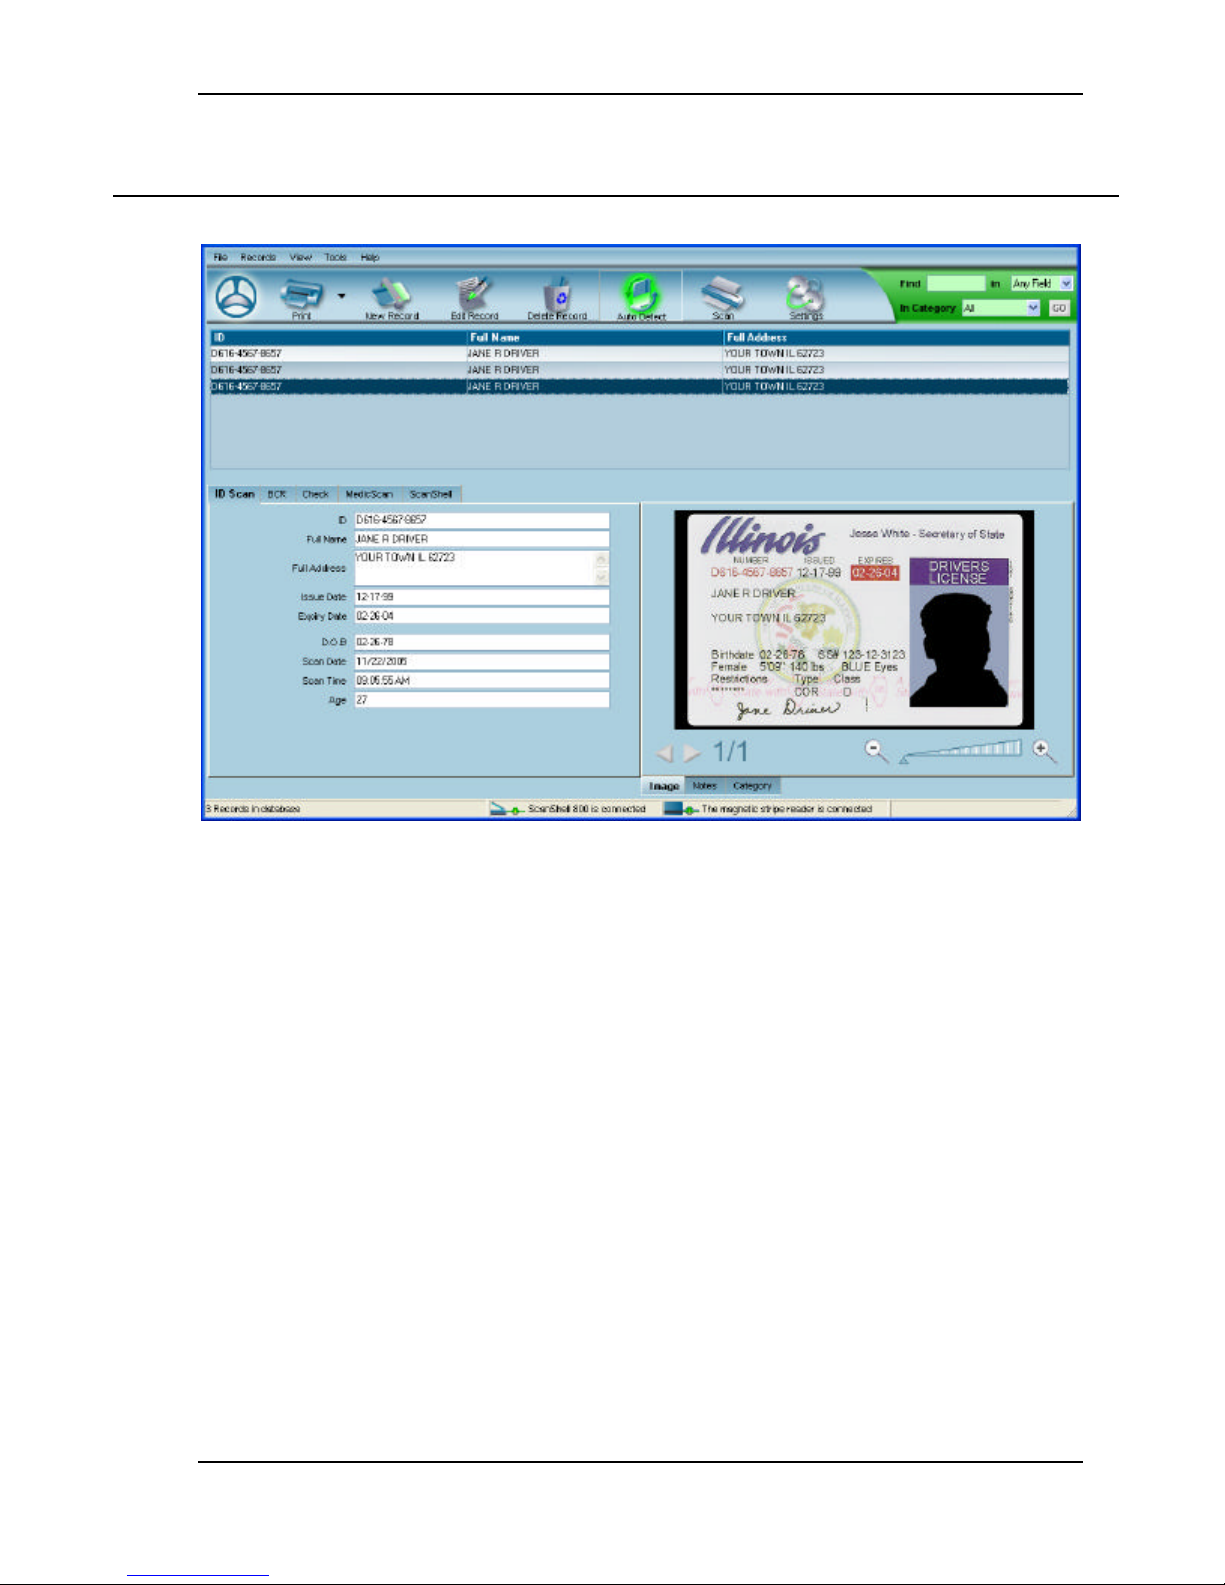
Figure 4-1: The main screen
The main screen consists of the following sections (for instructions on how to use each
section, please refer to the detailed description of each section after the following list):
1. Menu bar (see Menu Description, page 15).
2. Toolbar - Containing buttons for most of the common application functions (see
Toolbar Description, page 16).
3. Search facility – Allowing you to search for any string in any field of the database,
and use categories as additional criteria (see Search facility, page 17).
4. Record List - Displays all the records currently in the database (see, page 2).
5. Record Details - Displays the Active Record details. After a record is scanned, it is
added automatically at the bottom of the record list and becomes the active record.
The Record Details section has an additional tab for each module that is available
in the application (see Active Record Details, page 21).
6. Image frame - Showing the scanned card image, and image browsing and zoom
controls.
7. Notes and categories - Additional tabs under the image frame for displaying the
record notes and categories (if they exist), see Notes and Categories page 22, and
Notes and Categories, page 29.
Scanshell.net User Guide © 2005 Card Scanning Solutions 14
Page 15

Main screen Menu Description
Menu
Sub
-
menu
Action / Description
New Database
Create a new da
tabase,
see
Creating a new database
Open Database
Open an existing database, see
O
pening an existing
Edit Database
Open the database wizard that allows you to edit the
Backup database
Backup the currently open dat
abase,
see
Database
Import
Import records from previous versions of CSSN
Export list
Open the Export list, see
Exporting data
->Export
Print
Print either selected records or all records usi
ng the
Label Printers
Select and open the dialog of label printers, if
Transfer
Transfer data to a designated application (currently
Log off CSSN
Log of
f the current user, enabling registration as a
Recent Databases
Allows you to select a database from a list of recently
Exit Exit the program
New record
Create a new record
– Open the scanning window,
Edit record
Edit selected record
– See Scan/Edit
Window
, page
Delete record
Delete selecte
d record(s)
– See Deleting records
,
Record Details
Toggle the display of the
Active Record
section on
Always on top
Selecting this option causes
Scanshell.net
to
be
Settings
Open the scanner configuration window, see
Change Password
Open a window in which you can change your
8. Status bar - At the bottom of the screen, showing the number of records in the
database, and the scanning sources that are connected/not connected.
MENU DESCRIPTION
page 36
database page 41
current database, see Creating a new database page
36.
backup page 42
applications, see Import, page 93.
File
Record
View
List, page 47.
print wizard, see Printing, page 81
connected. See DYMO Printer, page 89.
only MS Outlook is supported), see Transferring
data to an application, page 61.
different user
used databases.
see Scan/Edit Window, page 24
24
page 19
and off
Tools
Scanshell.net User Guide © 2005 Card Scanning Solutions 15
always visible
Application Settings, page 62.
password
Page 16
Main screen Toolbar Description
Menu
Sub
-
menu
Action / Description
User
Manager
Open the user setup window in which you can
Check for Updates
Activate the live update function, see
Live Update
,
Rules list
Open the
Rules
window, where you can define rules.
About
Scans
hell.net
Open
Scanshell.net
About screen, with a complete
CSSN
on the web
A link to the CSSN web site
View help
Open the Help file
Button
Name
Description
Print records according to recent
ly used print properties.
Automatically detect insertion of a new card into the
Open the app
lication's configuration screen, where you can
add/delete users and access privileges, see User
Management, page 43
page 91
See Rules, page 95
Help
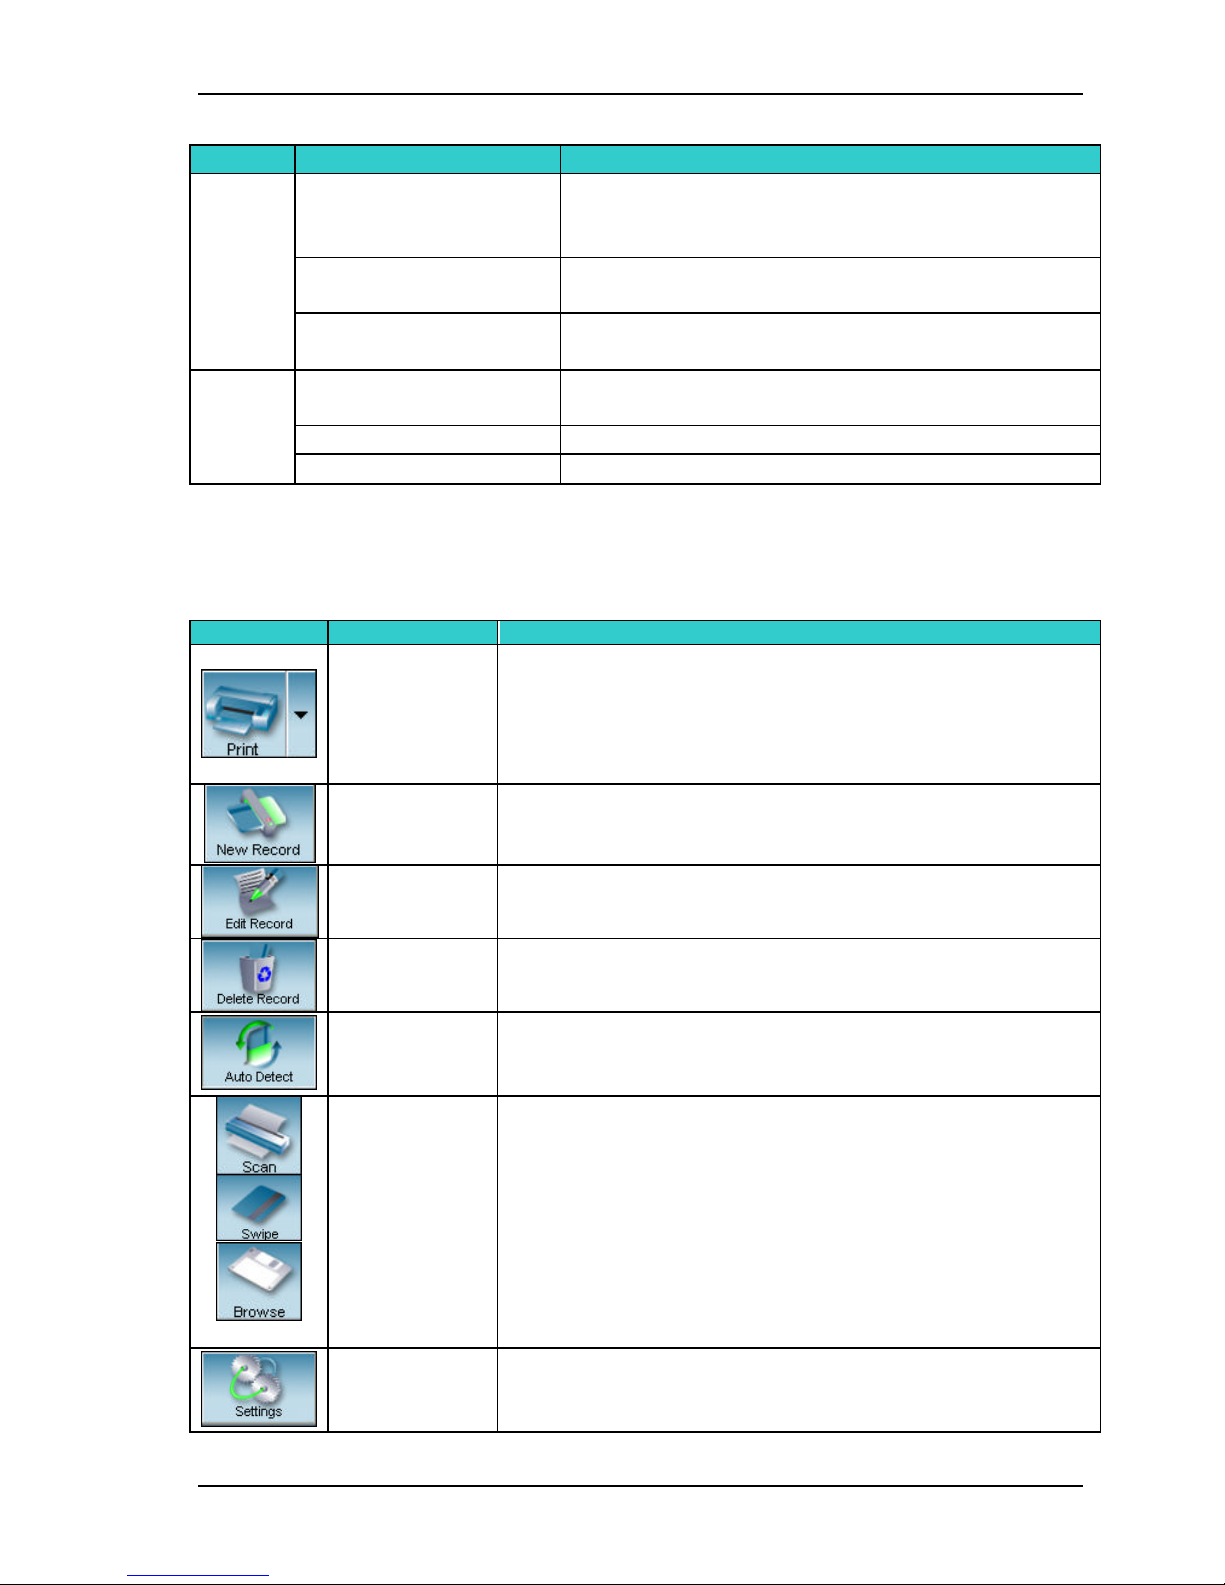
TOOLBAR DESCRIPTION
Print
New record
Edit record Open the Edit Record dialog to edit the active record
Delete record Delete the selected record(s)
list of Scanshell.net modules
Click on the arrow to select Selected Records or All
Records. Before you can use the print button you have to
use the print wizard at least once, to set up the print
properties
Open a new record dialog box, in which you can configure
and start a scan
Card autodetection
Scan button
Application
settings
Scanshell.net User Guide © 2005 Card Scanning Solutions 16
scanner tray, open the New Record dialog box and perform
a scan according to the preset configuration
The scan button allows direct scanning. The button's icon
changes automatically according to the scanning source
selection in the New Record screen:
Swipe – Read magnetic strips using the Magshell scanner.
Scan – Perform a scan using one of CSSN scanners.
Browse – Browse for an image file to be used as a data
source.
Capture – Capture a signature using the SigniShell
pad\LCD.
configure the parameters of the application's various
functions
Page 17
Main screen Search facility
SEARCH FACILITY
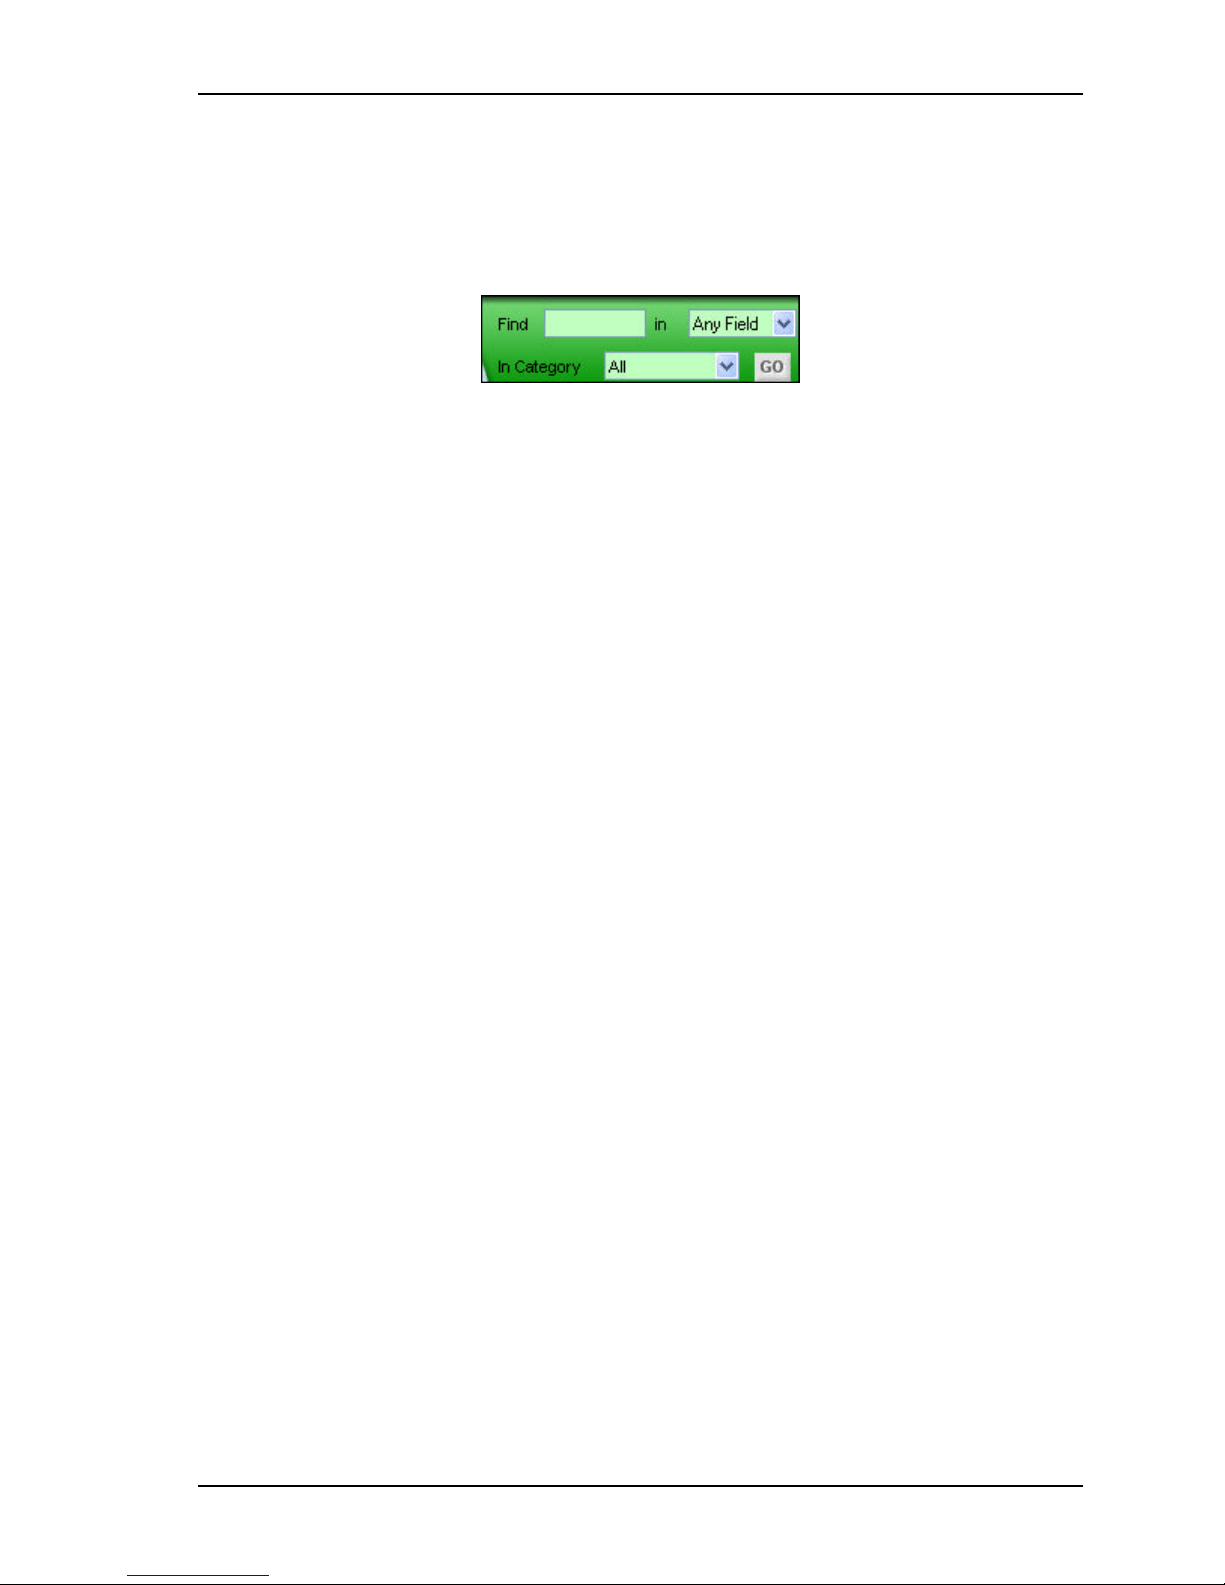
Filter the records of the active module using the following criteria: The search word or
string you enter, a field you specify (or all the active module records if you leave “Any
field”), and category.
For example: Typing “Smith” in the Find box and selecting Name in the field combo box
finds all the records in the active module that have the string “Smith” in their Name field.
You can perform the search on the entire module records list by selecting Any field.
The search tries to match the requested string to sub -strings in the database. For example, if
you typed in “Jo” in the Find field, the search will show results with all records that include
the string “Jo”, such as “Johnson”, “Jonah” and even “Banjo”.( case insensitive)
Category: When you scan in a card, you have the option of attaching categories it to, see
Categories, page 29. Categories allow you to search for cards in certain categories, e.g.,
VIP customers, business associates, etc. Categories can also be added later while editing
records.
Figure 4-2: The search facility
Scanshell.net User Guide © 2005 Card Scanning Solutions 17
Page 18
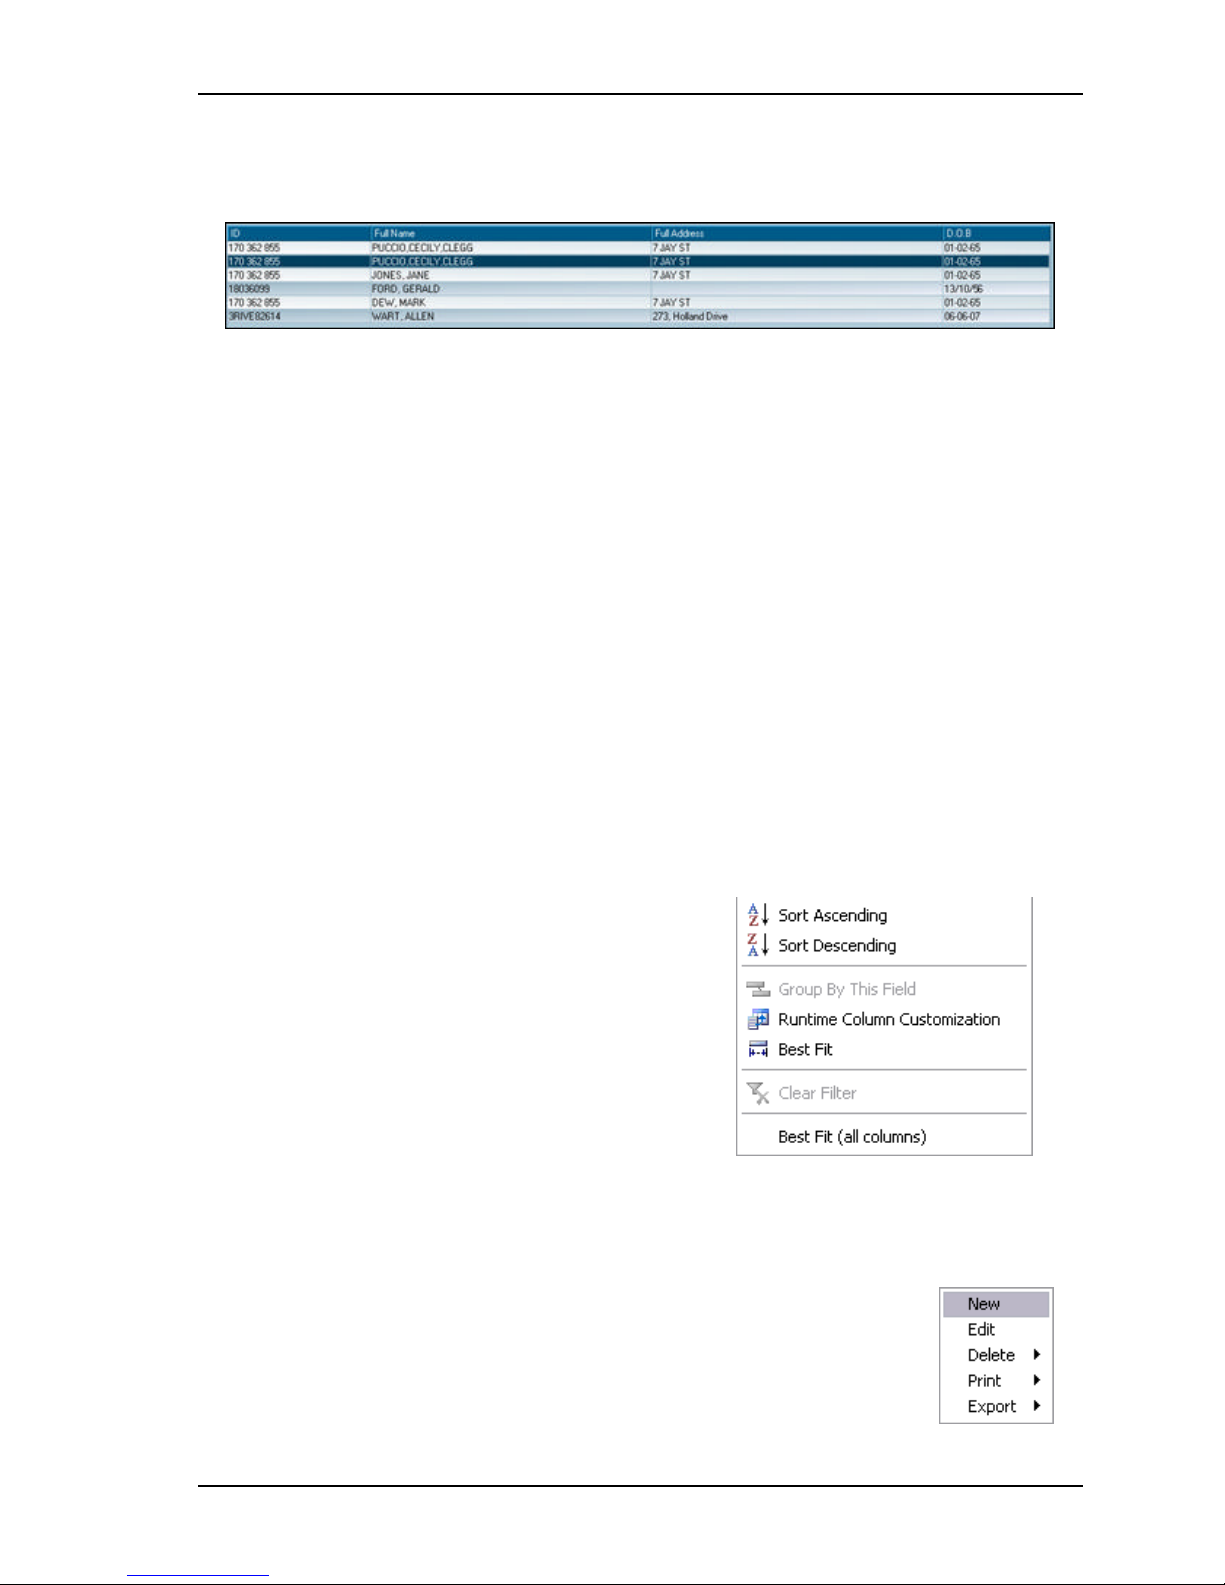
Main screen Record List Table
Right
-
clicking on the Record List headers will
RECORD LIST TABLE
The record-list table shows a summary of the database records. The fields that are
displayed in the grid are determined while using the database wizard to create the database.
The fields and the order in which they appear in the grid can be changed by opening the
Application Settings (click the Settings button or by select Settings from Tools menu) and
selecting the desired module tab. The module tab will have a secondary tab named ‘Field
settings’, where you can select the fields that are d isplayed, and the fields display order, as
well as create new fields. See Application Settings, page 62.
MODIFYING AND ORGANIZING THE RECORD LIST APPEARANCE
Figure 4-3: Records list
The appearance of the list can be modified in several ways, as follows:
Organize according to a specific field
Click on the desired field column header. The whole list will be organized according to this
field, sorted in ascending order.
An additional click on the column header will toggle between displaying the table records
according to this field in an ascending or descending order.
Table headers - Right-clicking options
display the following contextual menu:
Sort Ascending/Sort Descending: Select Ascending
or Descending to organize the table according to this
field in ascending or descending order.
Group by This Field - N/A.
Runtime column customization - N/A.
Best Fit – Fits the column width to its content.
Clear Filter – N/A
Figure 4-4: Right-click contextual
menu
Best Fit (all columns) - Fits all columns width to the
table content.
Record list - Right-clicking options
Right clicking on the list opens a contextual menu with the options to
create a new record, edit, delete, print and export the active record.
Scanshell.net User Guide © 2005 Card Scanning Solutions 18
Figure 4-5: Record
list contextual menu
Page 19
Main screen Record List Table
EDITING A RECORD
You can open a record for editing in one of the following ways:
§ Double-click on a record, or
§ Double – click on one of the record fields in the fields display section, or
§ Right-click on a record and select Edit from the contextual menu, or
§ Select a record and then click the Edit Record button in the button bar, or
§ Select a record and then select Edit Record from the main menu.
§ The record will open in edit mode, in which you can edit the record fields, images,
notes and categories. This is the same window as the window in which you scan a
new card. For information on modifying records data, please see Adding a new
record, page 26.
ADDING A NEW RECORD
To add a new record, you can use one of the following options:
§ Click the New button, or
§ Right-click on a record and select New from the contextual menu, or
§ Select New Record from the main menu.
§ Click on the Scan/Browse/Swipe button (N/A in auto detection mode). The
scanning window will open. Adjust settings as required, and click the Scan button.
For detailed instructions on how to perform a scan, see Adding a new record, page
26.
Auto detect
Alternatively, if the auto detect option is enabled, insert a card into the scanner. The
scanning process will proceed automatically. To enable auto detect, click the Auto Detect
button in the button bar (note that the icon is highlighted green), or check the auto
detection box in the Settings->General tab. In Magnetic Reader mode, just swipe the card
through the magnetic reader.
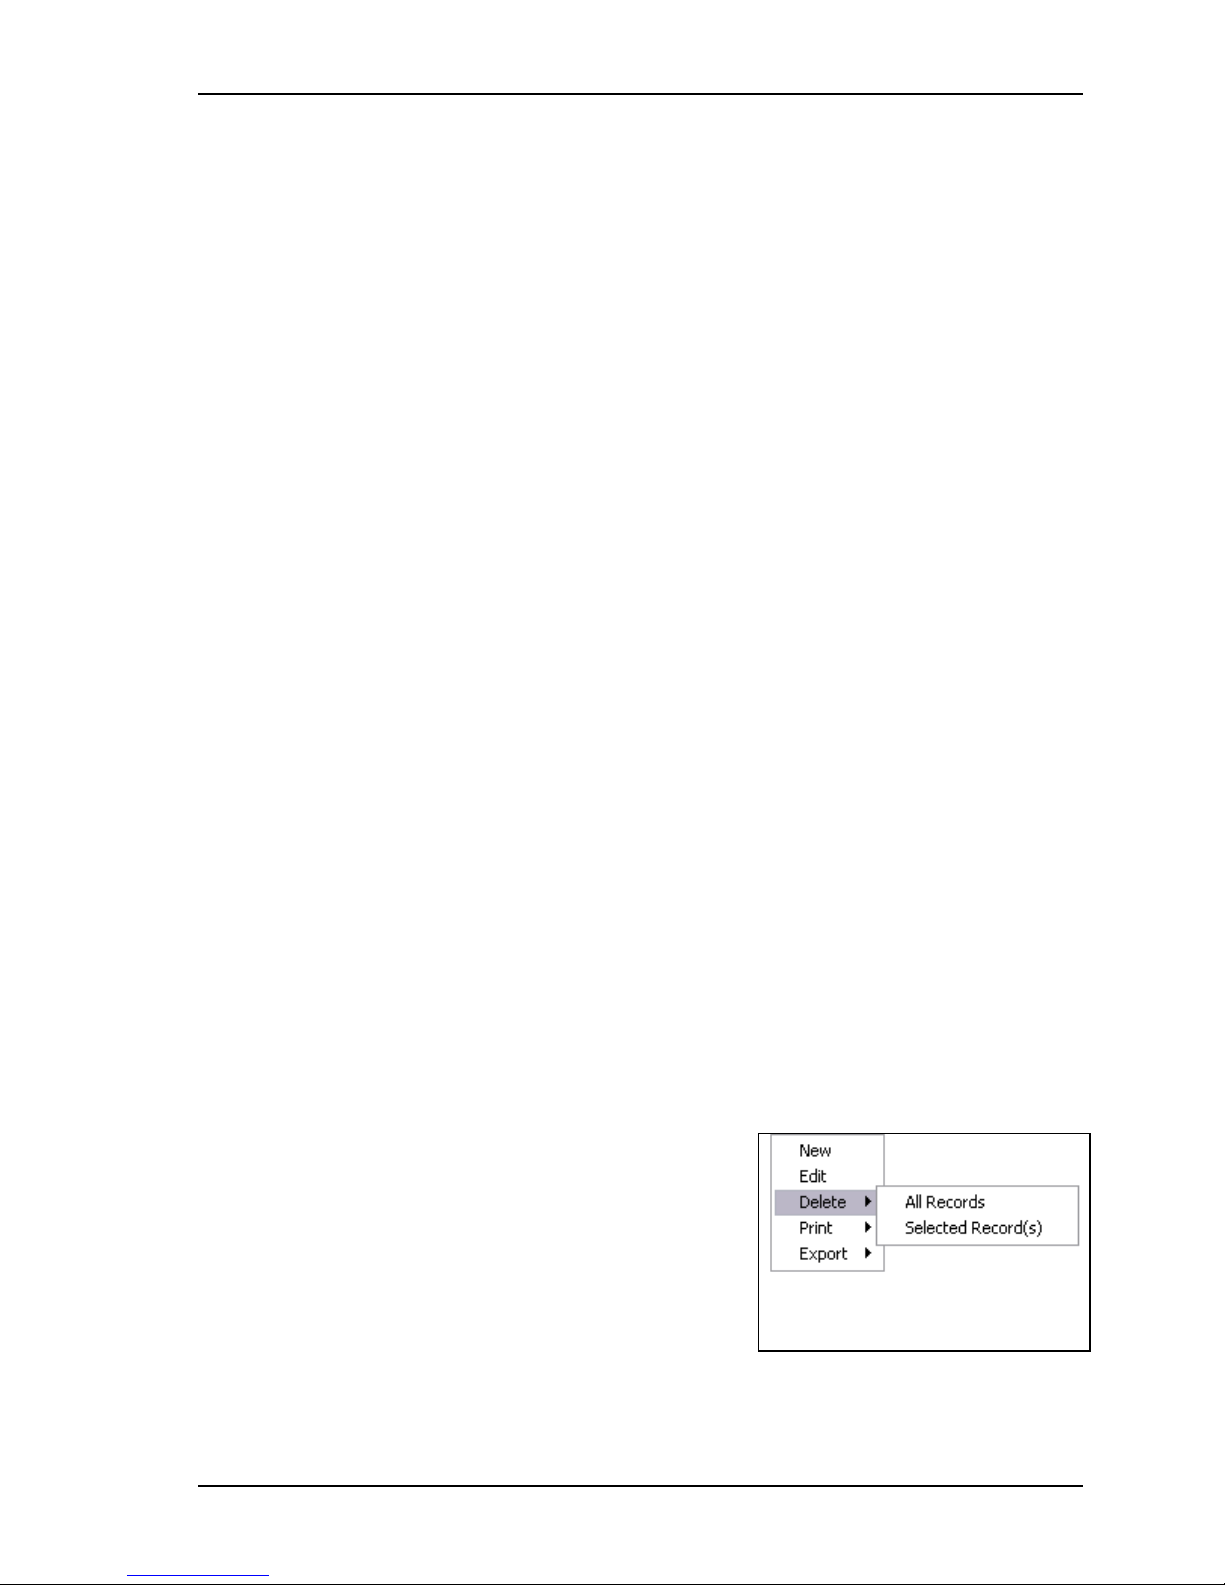
DELETING RECORDS
Right-click on a record and select Delete->All records
to delete all records currently in the module database, or
Selected Record(s) to delete only the record(s) you
selected and right-clicked on.
To delete more than one record at the same time: Hold
down the Ctrl key, select the records you want to delete,
right-click and select Delete-> Selected Record(s).
Figure 4-6: Delete command in the
contextual menu
Delete button and Delete Record menu command: You can also delete records by
selecting one or more records and clicking on the Delete button in the button bar, or
selecting Delete Record from the Records menu.
Scanshell.net User Guide © 2005 Card Scanning Solutions 19
Page 20
Main screen Record List Table
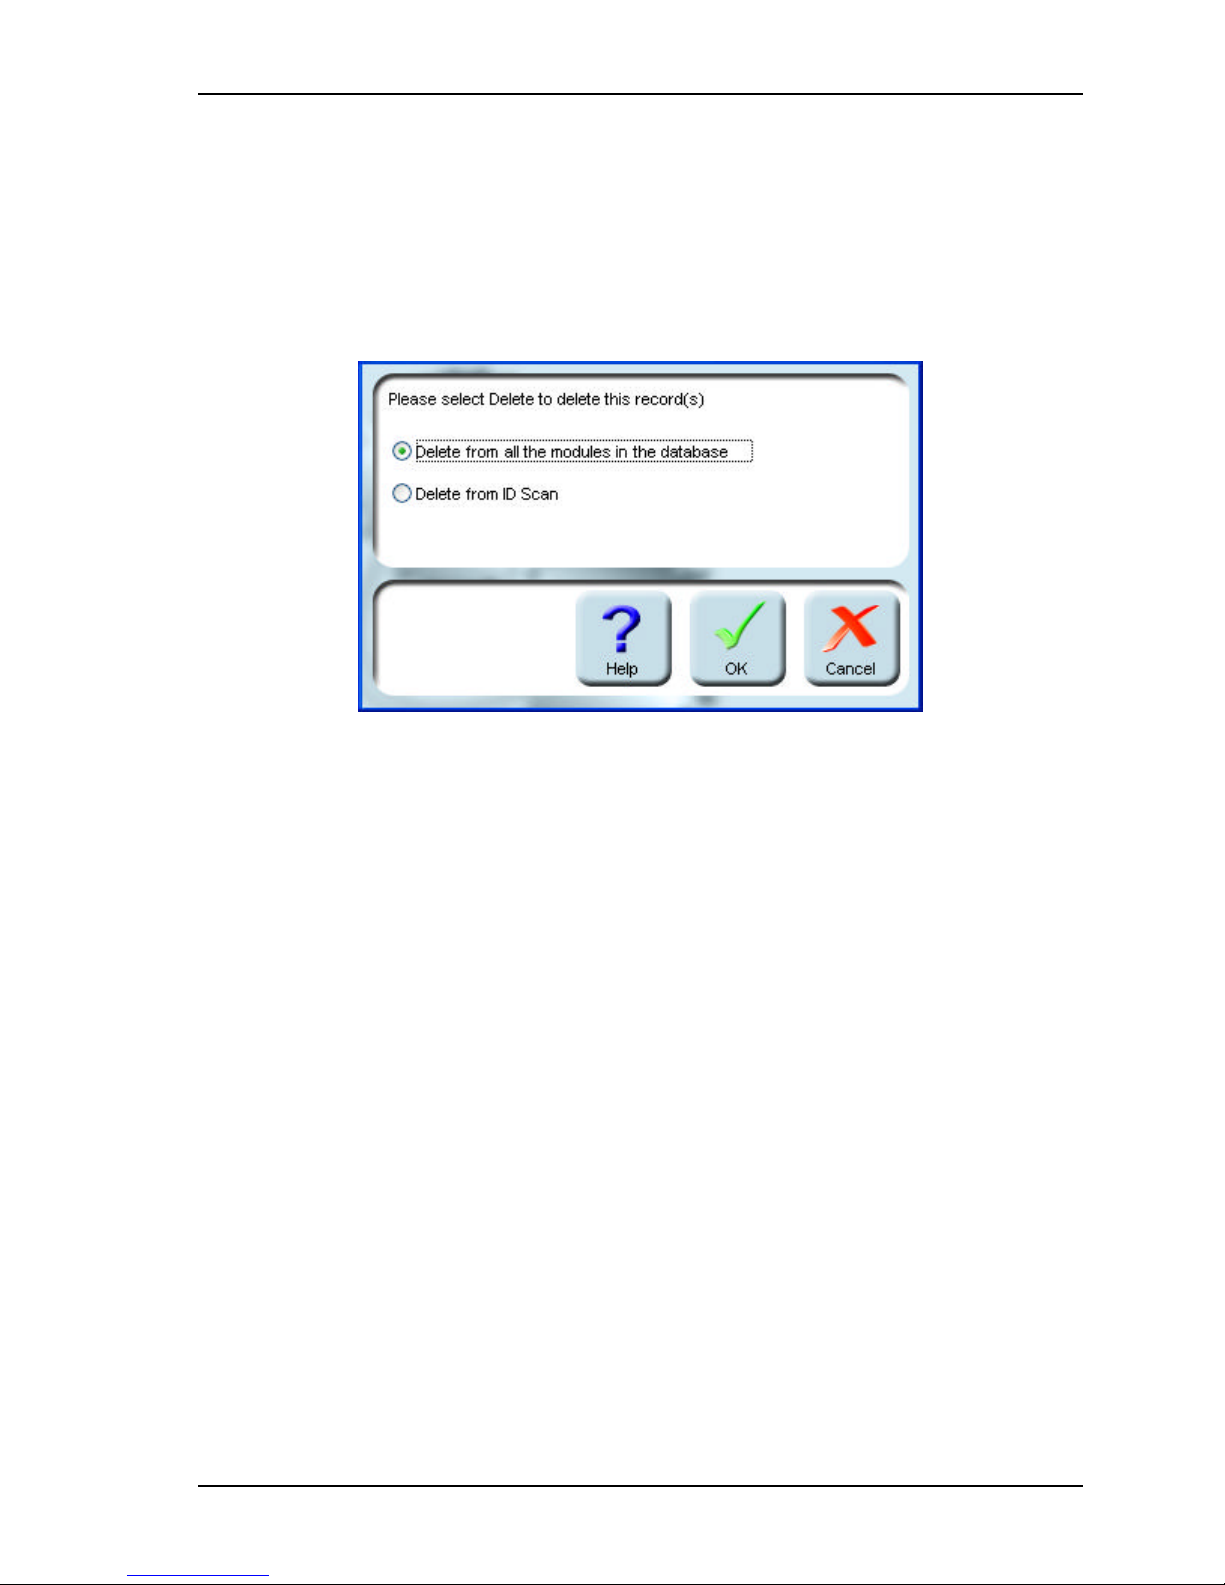
Whatever deleting method you choose, the dialog box in Figure 4-7 will open, asking you
if you want to delete the record from all the modules in your Scanshell.net application, or
just from the module in which you are currently working. For example, you might have a
record of the same person in several modules: A record of his driver’s license in the
driver’s license module, a record of his business card in the business card module, etc. You
can choose to delete the person’s record from the driver’s license module, but keep the one
in the business card module.
Figure 4-7: Delete dialog
PRINTING RECORDS
Right-click on a record and select Print->All records to print all records currently in the
database, or Selected Record(s) to print only the record(s) you selected and right -clicked
on.
To print more than one record at the same time: Hold down the Ctrl key, select the records
you want to print, right-click and select Print-> Selected Record(s). See also Printing,
page 81.
Print button - Select one or more records and click on the Print button in the button bar.
This option will print the records using the printing setup that was most recently used,
without opening the Print Wizard.
Print menu command: You can also print e ither selected records or all records by
selecting Print from the File menu, which will open the Print Wizard.
Print Wizard – After you make your printing selection, you will be presented with the
Printing Wizard, which will guide you through the various printing options in
Scanshell.net. Please see Printing, page 81.
EXPORTING RECORDS
Right-click on a record and select either an existing export list, or Export list if you want to
create a new export list for this export.
Scanshell.net User Guide © 2005 Card Scanning Solutions 20
Page 21
Main screen Active Record Details
If you selected an existing export list, the export will take place silently in the background.
If you export to email or the web, make sure your computer is connected to the Internet.
If you selected Export List , the Export List window will open, in which you can create a
new export list that specifies the parameters for this export. See Export List, page 47.
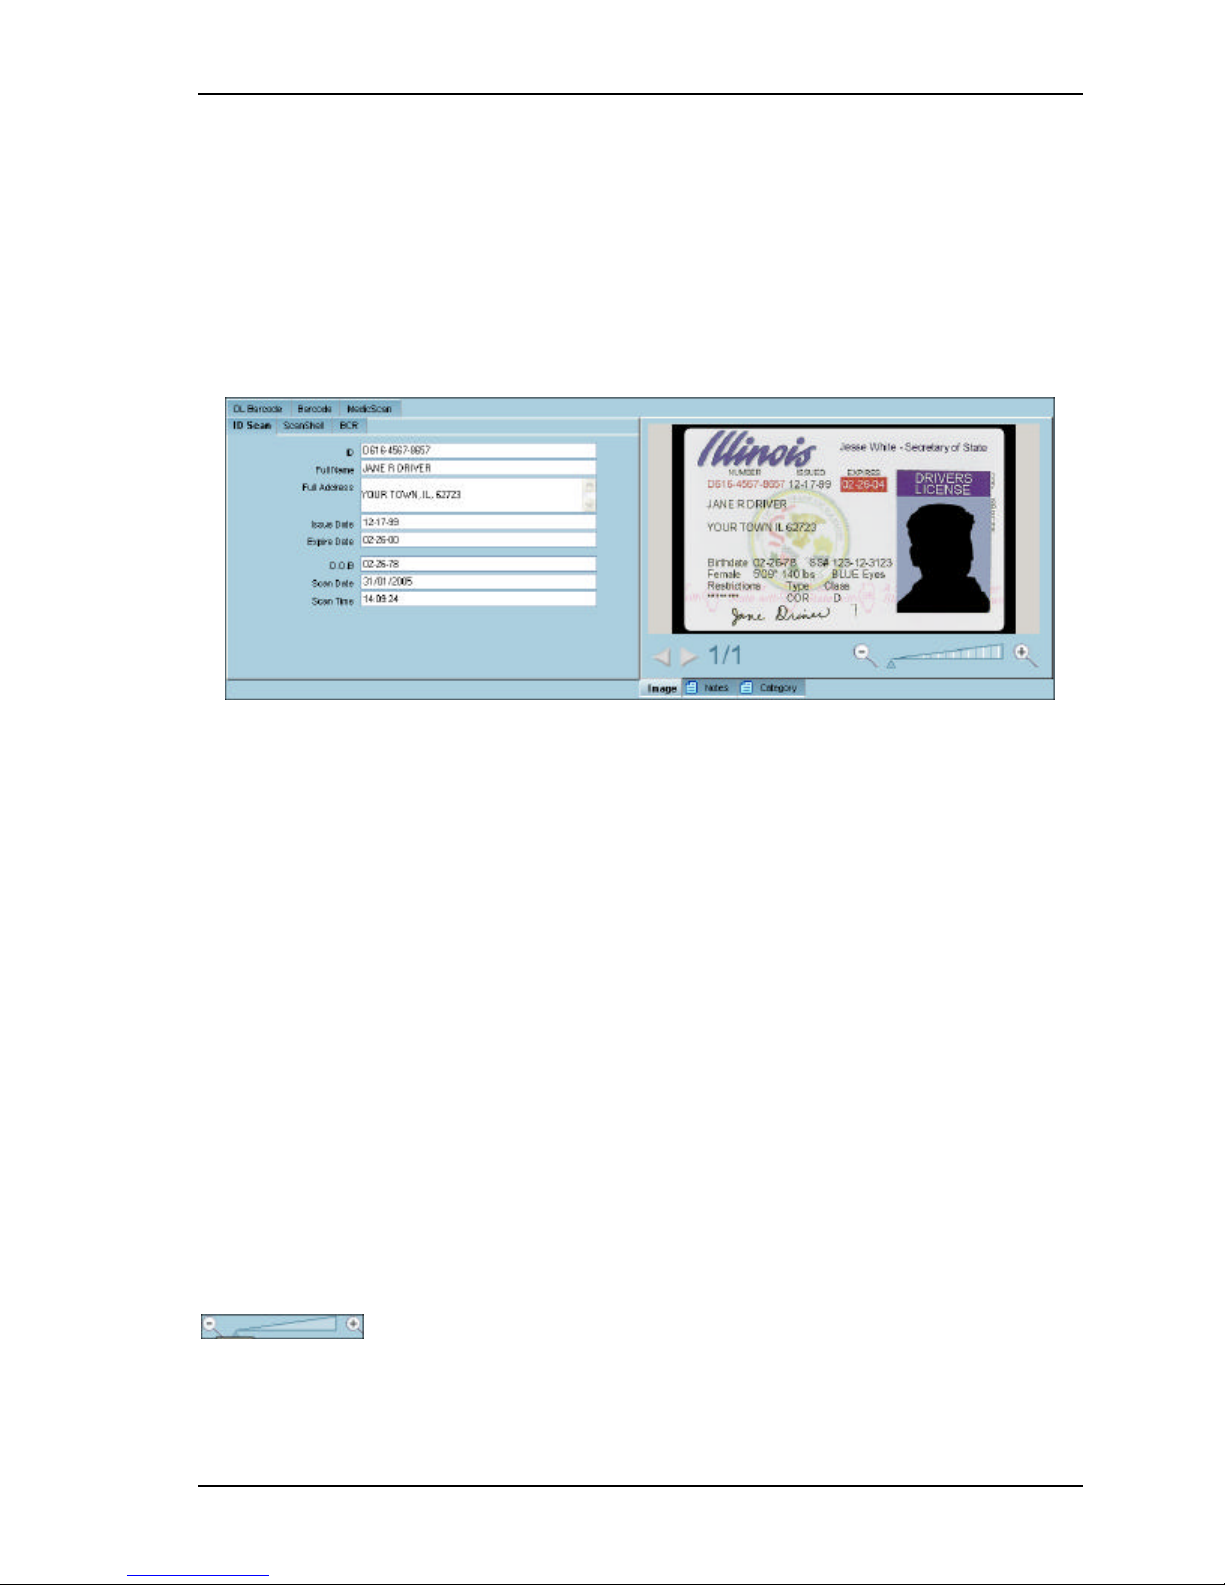
ACTIVE RECORD DETAILS
Figure 4-8: Active record details
The active-record details section displays the active record, which is either the last scanned
record, if you performed a scan, or a record selected in the record list. In addition, it
contains the card image (or face/signature image in the case of idScan for Driver License
module, if this option is selected in t he module setup tab, see idScan, page 69).
MODULE TABS
The cards are scanned and kept in a specific application module. You can scan different
cards of the same person into more than one module. For example, you can scan a person’s
driver license into the driver license module, his medical card into the medical card
module, and his business card into the business card module. The system will keep an
internal link between records of the same person in different modules. You can switch
modules by clicking the module tabs.
THE IMAGE SECTION
The image section displays the card image. In the case of the driver’s license and passport
modules, it can also display just the cardholder face or signature image, according to the
selected configuration in idScan->Scanner automation Tab, page 69.
Zoom
- You can zoom in and out on the image as follows: Slide the zoom slide
bar, or click somewhere on the slide bar, or use the "+" and "-" buttons. Note that when
you enlarge the image, the cursor changes into a hand, with which you can drag the image
within the image frame.
Scanshell.net User Guide © 2005 Card Scanning Solutions 21
Page 22
Main screen Active Record Details
Browsing
- Use the arrows to browse thought the images of the same record (if more images
exist).
NOTES AND CATEGORIES
If the record contains notes and categories, it will be indicated by a note sign in the
respective button . Click on Notes to view notes attached to the
record, click on Categories to view the categories assigned to the record. To edit notes and
categories, open the record for editing; see Notes and Categories, page 29.
EDITING THE ACTIVE-RECORD SECTION LAYOUT
You can determine which active-record fields are displayed, and change field names and
their order of appearance in the module tab under Settings, see Application Settings, page
62.
EDITING THE ACTIVE RECORD FIELDS
Renaming field labels
- Right-click on the field label and select Rename.
- Type in a new name and click OK.
Moving fields up and down the list
Right-click on the field label and select Move->Up or Move->Down.
Removing fields
Right-click on the field label, select Remove and click Yes in the remove dialog box.
Removing a field will also remove it from the record list.
ADDITIONAL COMMANDS
Right-click on the field value to open a contextual menu,
which allows you to copy and paste values, and contains the
following commands for non-Latin languages:
Right-to-left reading order
Show Unicode control character – For displaying the
active non-Latin characters control commands
Insert Unicode control character – For controlling the
Figure 4-9: Active
record contextual
display of Unicode characters.
EDITING THE ACTIVE RECORD VALUES
Double click on the active record line and open the record in Edit mode. Alternatively, you
can also select a record and click the Edit Record button, or select Edit Record from the
Record menu. In Edit mode (the same screen as the Scan screen), you can edit record
Scanshell.net User Guide © 2005 Card Scanning Solutions 22
Page 23

Main screen The status bar
values as well as categories, and add or edit notes. For more information on editing record
values, categories and notes, see Adding a new record, page 26.
THE STATUS BAR
The status bar at the bottom of the screen displays the number of records in the database,
and scan sources that are connected/not connected.
Figure 4-10: Status bar
Scanshell.net User Guide © 2005 Card Scanning Solutions 23
Page 24

Record Management Scan/Edit Window
5. RECORD MANAGEMENT
Note: Scanshell.net is designed to work with CSSN scanners only. If a CSSN scanner is not
attached to the computer, the 'New Record’ as well as ‘Edit Record’ commands will not be
available! If the magnetic reader is attached, the New/Edit option will be available only in
the modules that support the magnetic reader.
SCAN/EDIT WINDOW
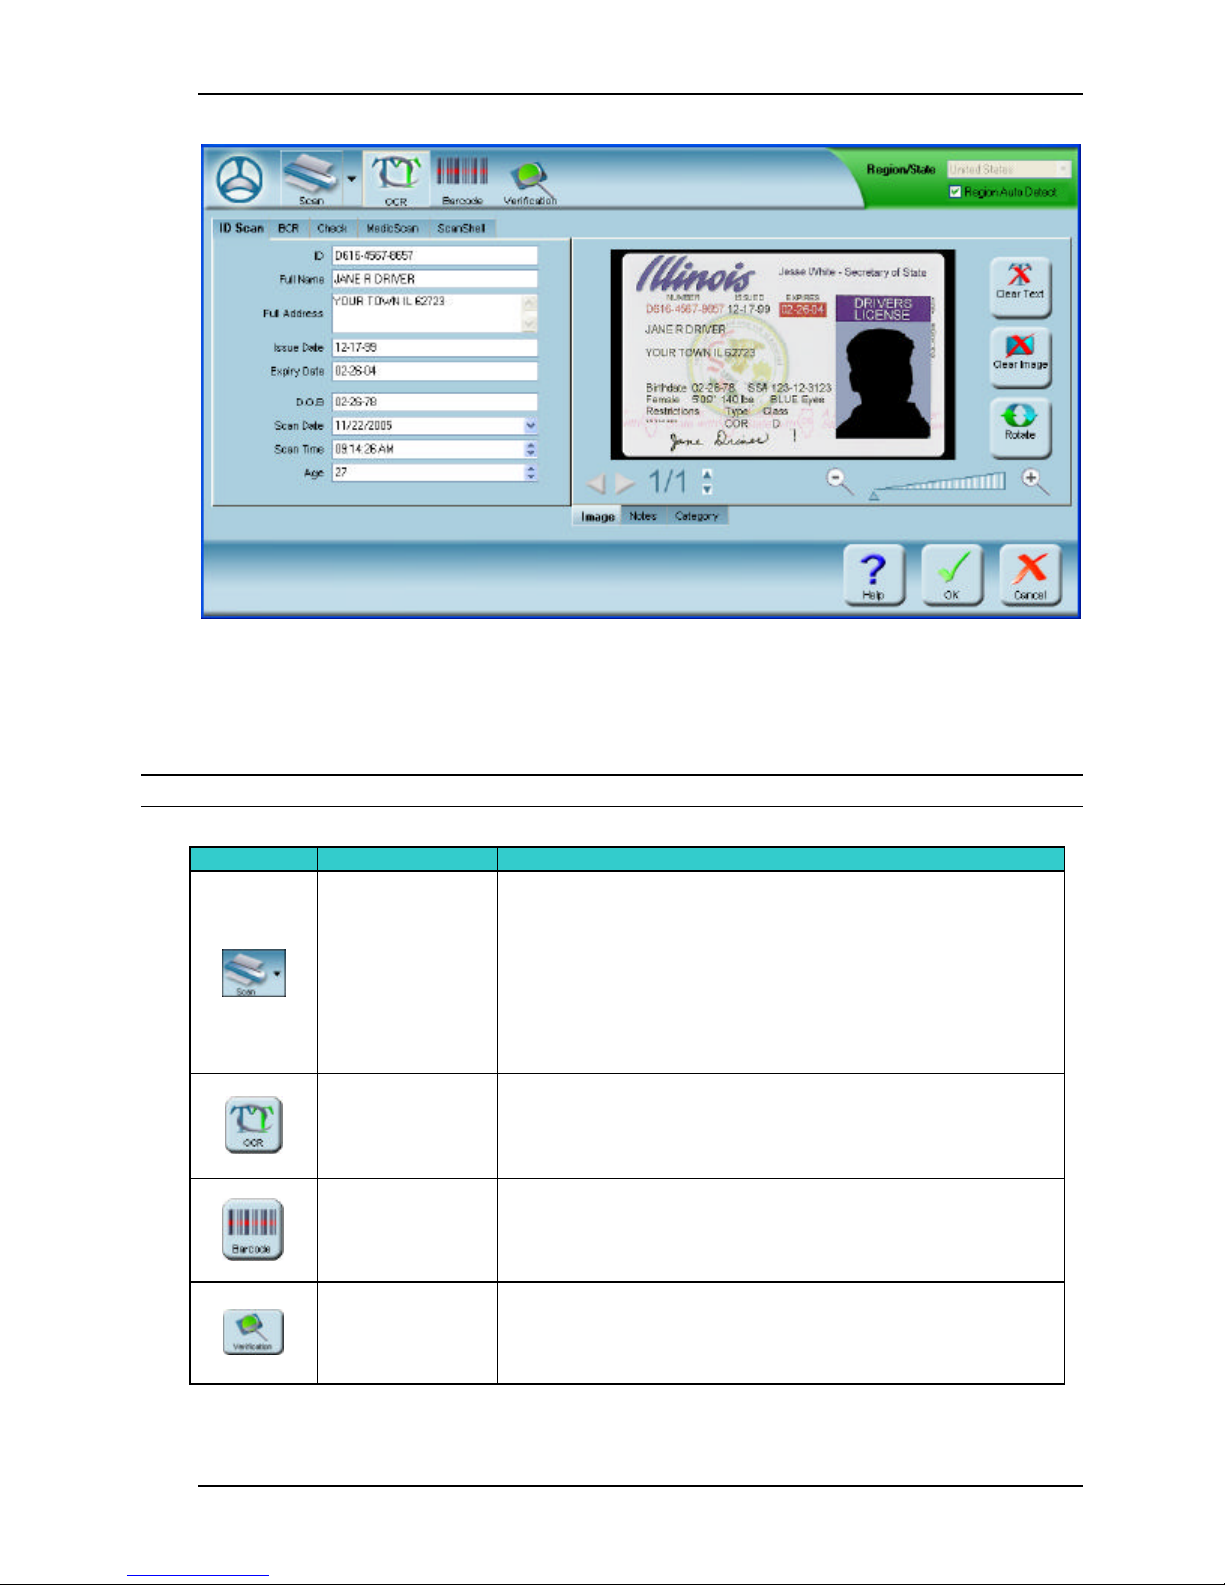
The New/Edit Record window is used for scanning new records and editing existing
records. The Record screen is used to acquire new card data and images from CSSN
scanners connected to the computer, and store them in database records. Once the scan is
performed and processed, the fields on the left side are populated automatically with the
user information, extracted from the scanned card. This information can be edited (if
needed) before it is saved to the database. To canc el the auto data–extraction, go to the
Settings, and uncheck this option in the desired module
Another image source can be local image files on the hard disk. These files must be
scanned in a format of 24 bits (true color) with a resolution of 300 dpi.
To open the New/Edit Record window and perform a new scan, you can use one of the
following options:
Click the New Record button, or
Select New Record from the main menu, or
Right-click on a record in the main screen and select New from the contextual menu.
Click the Scan\Browse\Swipe button
The scanning window will open:
Scanshell.net User Guide © 2005 Card Scanning Solutions 24
Page 25
Record Management New Record Screen: Button Description
Button
Name
Descripti
on
Scanning source selection
Figure 5-1: The New and Edit Record screen
NEW RECORD SCREEN: BUTTON DESCRIPTION
From top left to right in clockwise direction:
Note: Some of the buttons described here are only available in certain modules.
1. Click on the arrow to select the scanning source:
Select Scanner
Extract data
from OCR
Extract data
from Barcode
scanner, file, or magnetic reader (if connected).
The icon on the button will change accordingly
2. In manual mode: Click on the button to start
scanning
Extract the data from the scanned card by OCR (Optical
Character Recognition)
Extract the data from the scanned card's Barcode.
Verification Verify the the scanned card
Scanshell.net User Guide © 2005 Card Scanning Solutions 25
Page 26
Record Management Adding a new record
Button
Name
Descripti
on
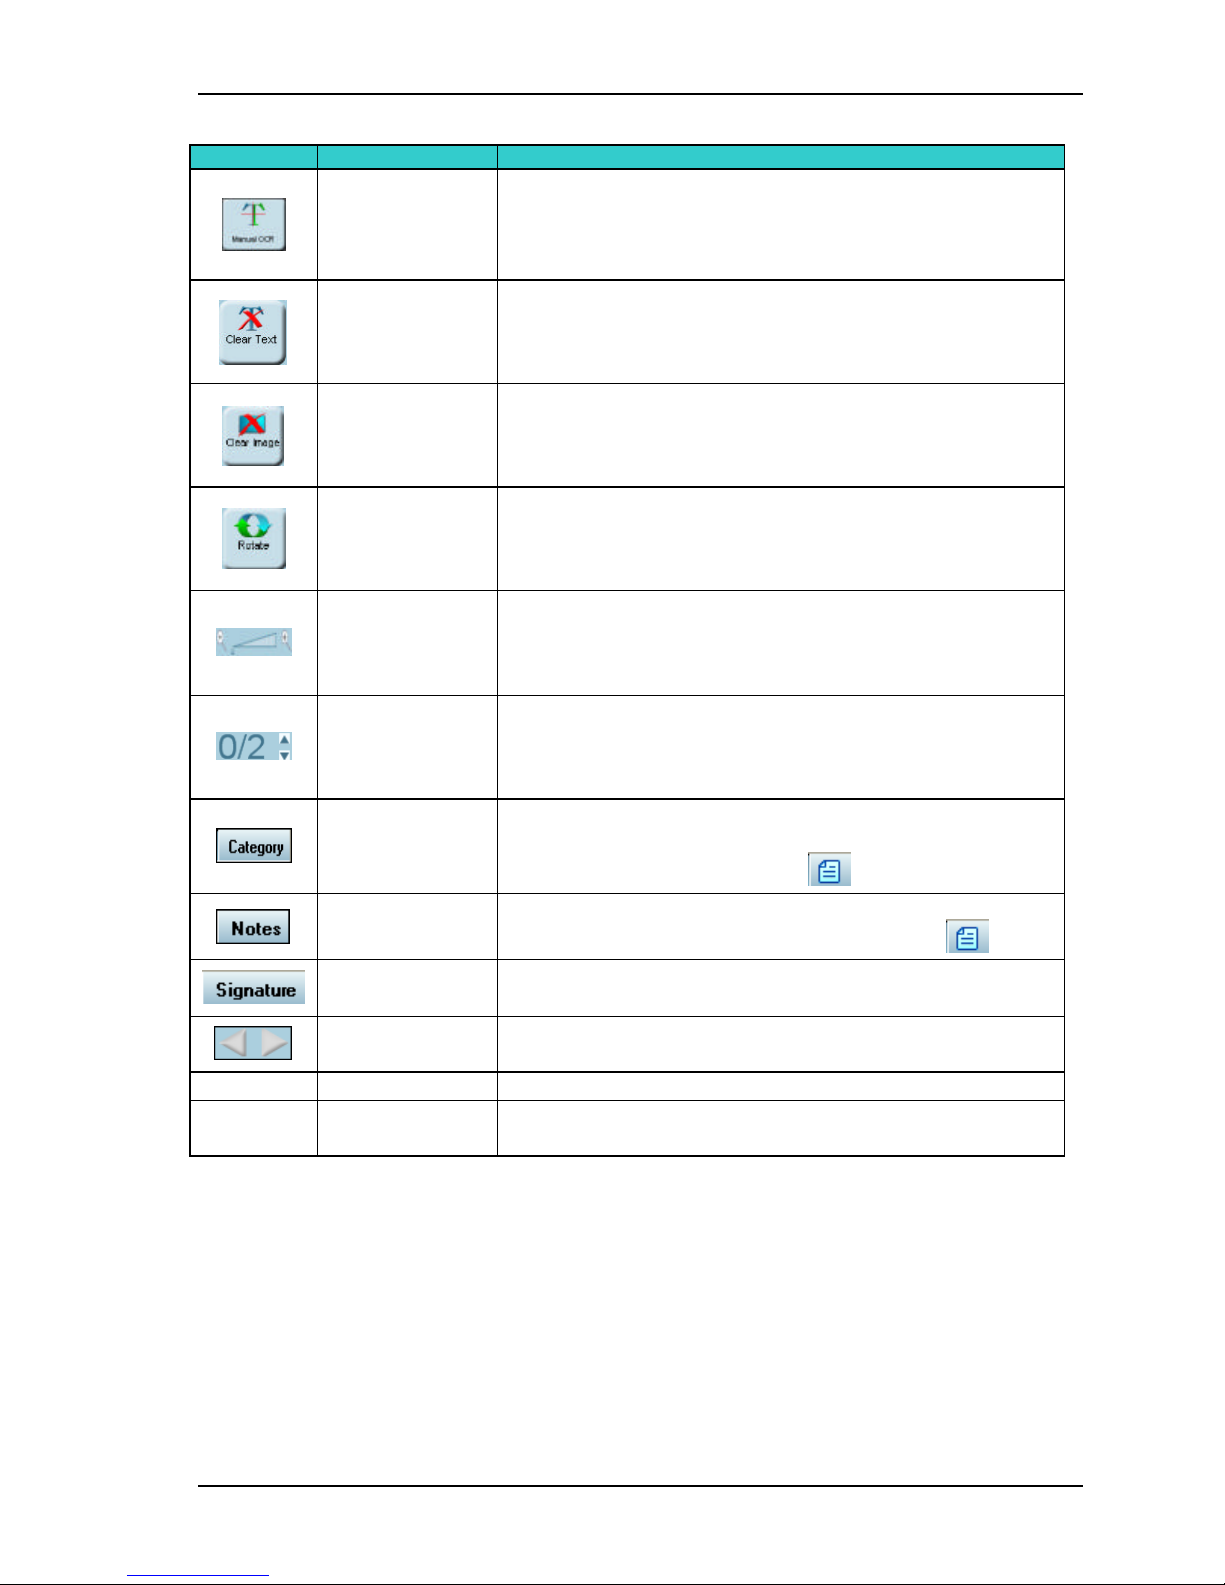
Manually extract text data
by OCR from a scanned
Click to assign categories to record, see
Categories
,
Click to
add notes to the record. If the record contains
Click to signatures management’s options. This tab will
Browse through t
he images attached to the record
(if
Data fields
The scanned data arranged in fields
Tabs for the different modules included in your product
Raw OCR
image. The image has to be in the correct format. If this
button is not available, it means the image format is
wrong)
Clear text Clear scanned data
Clear image Clear the scanned image
Rotate
Zoom slider Zoom in and out the image
Number of
Images
Rotate the scanned image 90 degrees clockwise. Use it
to control the image orientation prior to saving.
Set the number of images that will be scanned for this
record (Record cycle - allows chain-feeding and
automatic records saving.)
Category
Notes
Signature
Browse images
Module tabs
ADDING A NEW RECORD
1. Select the scan source from the dropdown list of the Scan button, by clicking on the
arrow; Scanner, File or Magnetic reader.
Scanner – Scan the card using the attached scanner.(N/A when auto detection
s
is active)
File - Extract data from an existing image file. The file must be in 24 bits
s
(true color) format and a resolution of 300 dpi.
page 29. If categories are assigned to a record, it will be
marked on the Category tab as
notes this will be marked on the Notes tab as
only be available if the SigniShell option was installed.
there is more than one)
package (click to select the desired tab)
Scanshell.net User Guide © 2005 Card Scanning Solutions 26
Page 27
Record Management Adding a new record
Magnetic reader – Extract the data from the card’s magnetic strip (requires a
s
magnetic reader).
Signature – Capture a signature using the SigniShell pad \LCD.
s
2. Select the data extraction method: OCR or Barcode.
OCR uses Optical Character Recognition technology to extract data from the
scanned card text.
Barcode extracts the data from the barcode.(N/A in magnetic mode)
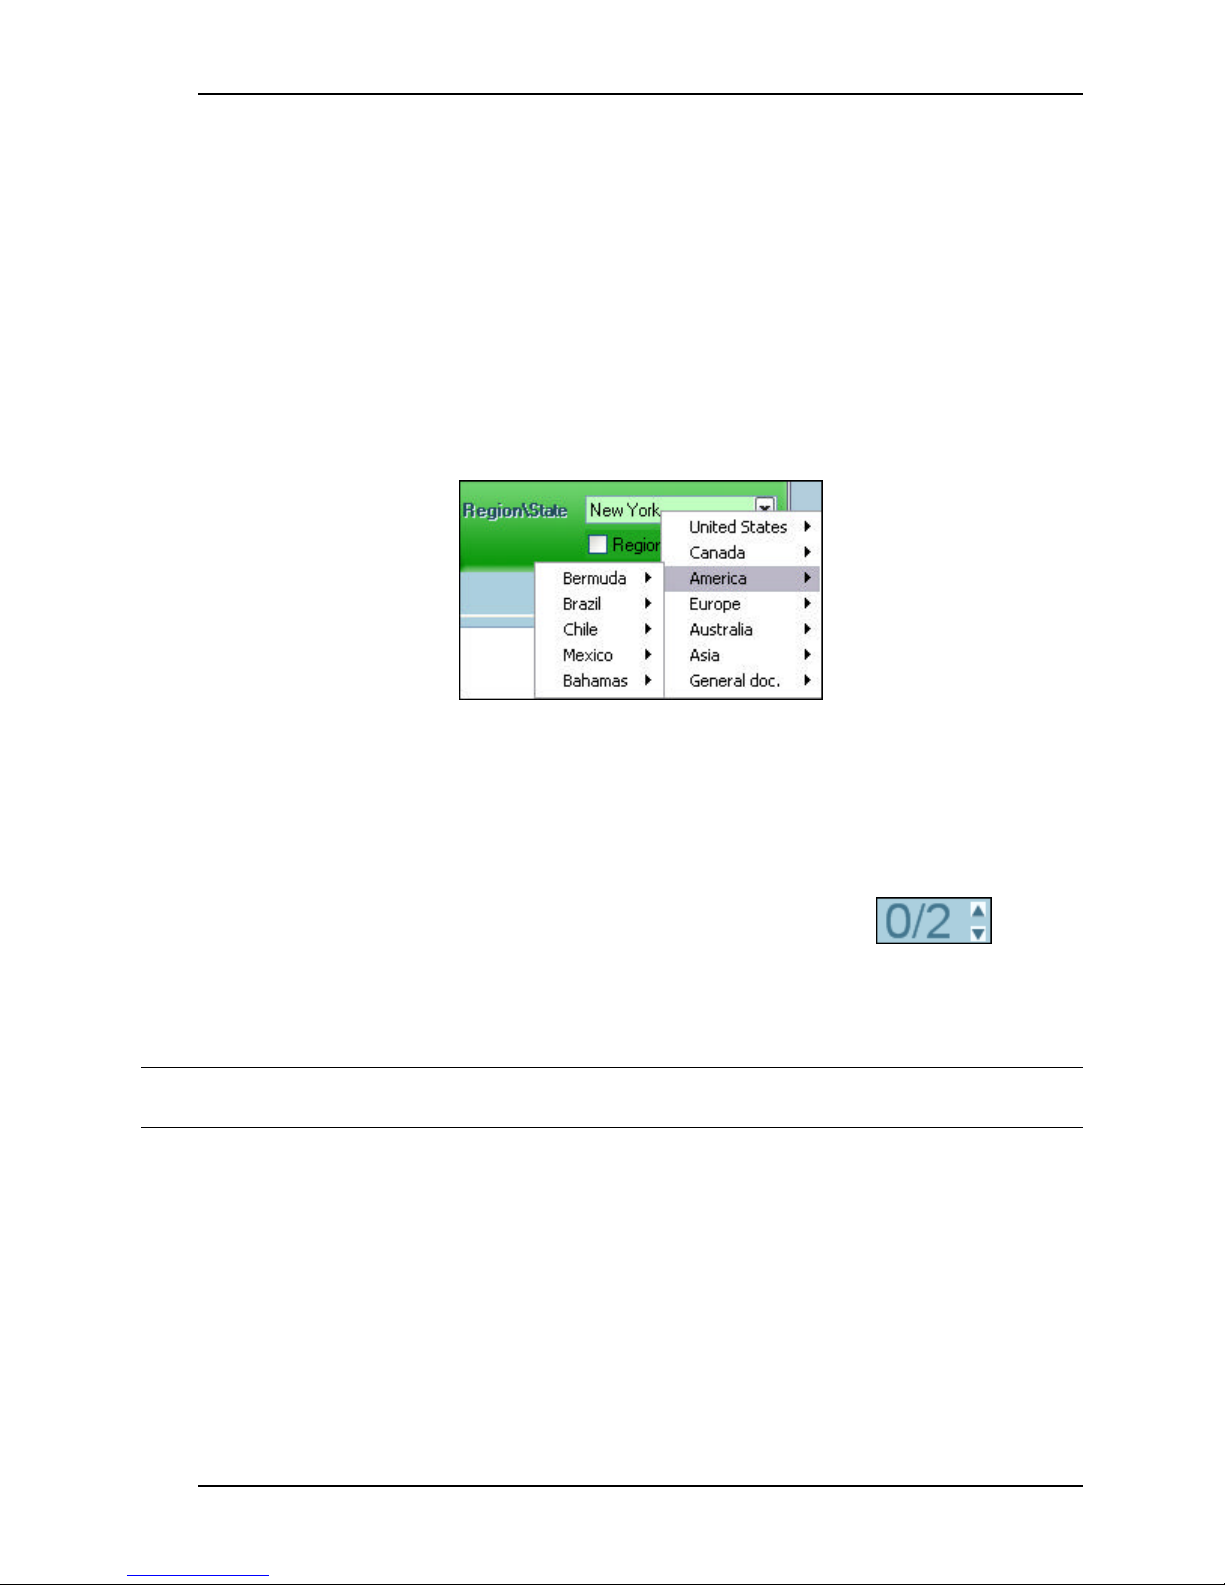
3. If you scan driver licenses, you can click on the Region Auto Detect button to
toggle between Region Auto Detect mode and manual country/state selection.
Region Auto Detect is only applicable to regions that support this feature.
Figure 5-2: Region/State selection
4. If you c hoose manual region selection, select a state from the Region/State
dropdown list (For OCR). Note that the list has several levels, which you can
navigate using the list arrows.
5. Select the module that you want to use for storing this record.
6. Select the number of images that you want to scan for this
record, by using the arrows next to the images number,
located under the image.
Figure 5-3: Scan cycle
7. Place the ID card in the scanner. If auto detect is enable, the
no. of images set to 2
scan will start automatically. Else, click on the Scan button.
Note: All of these parameters can be configured in the Setting panel, see Application Settings,
page 62. Scanshell.net will use this configuration as its default setup.
ADDING MORE IMAGES
If you selected a value greater that 1 in the number of images selection, insert a second
card or image into the scanner, and scan it in. The second card image will be added to the
record. This is also useful for scanning a card from both sides. (In the idScan module the
data will be extracted automatically from all the images, and not only from the first image
scanned. However, if the fields already contain data, this data will not be replaced with
data extracted from consequent images)
Scanshell.net User Guide © 2005 Card Scanning Solutions 27
Page 28

Record Management Scanning from file
SCANNING FROM FILE
You can also extract data from an image file. If you choose File as the scan source, the file
to be scanned must be a valid image file in .bmp format, with at least 300 dpi, and in true
color (24 bit) scale.
1. Follow the instructions in the previous paragraph, Adding a new record, page 26.
2. Click on File (instead of Scanner).
3. Navigate and select the desired file in the Windows Explorer window that opens.
4. Proceed as detailed in After the card is scanned on the next page.
SCANNING MAGNETIC STRIPS
Scanning magnetic strips requires a magnetic reader connected to the computer. The
process is the same, except you do not have to set up the data source (OCR or barcode) or
region, country and state. This data is included in the magnetic strip. When scanning from
a magnetic reader there is no image.
1. Follow the instructions in Adding a new record, page 26.
2. Select Magnetic and swipe a card through the magnetic reader
3. Proceed as detailed in After the card is scanned
CAPTURING SIGNATURES
Capturing signatures requires a SigniShell pad or LCD connected to the computer and
installed the SigniShell drivers during the setup process. You can save a simple signature
image to a record using a unique key.
4. Follow the instructions in Adding a new record, page 26.
Scanshell.net User Guide © 2005 Card Scanning Solutions 28
Page 29
Record Management After the card is scanned
Click on
to add notes that will be attached to the record. If you wish, you
AFTER THE CARD IS SCANNED
1. Control the data. You can edit data in the fields simply by placing the cursor in the
field and editing the information.
2. Right-click on the field value for a contextual menu, which allows you to cut, copy,
paste and delete values, and contains the following commands for non-Latin
languages:
Right-to-left reading order
s
Show Unicode control character – For displaying the active non-Latin
s
characters control commands
Insert Unicode control character – For controlling the disp lay of Unicode
s
characters.
NOTES
Notes
can add the current date and time to the note by using the corresponding
buttons on the right. When you are done, click OK to save the record.
Note: If a record contains notes and categories, it will be indicated by a .
CATEGORIES
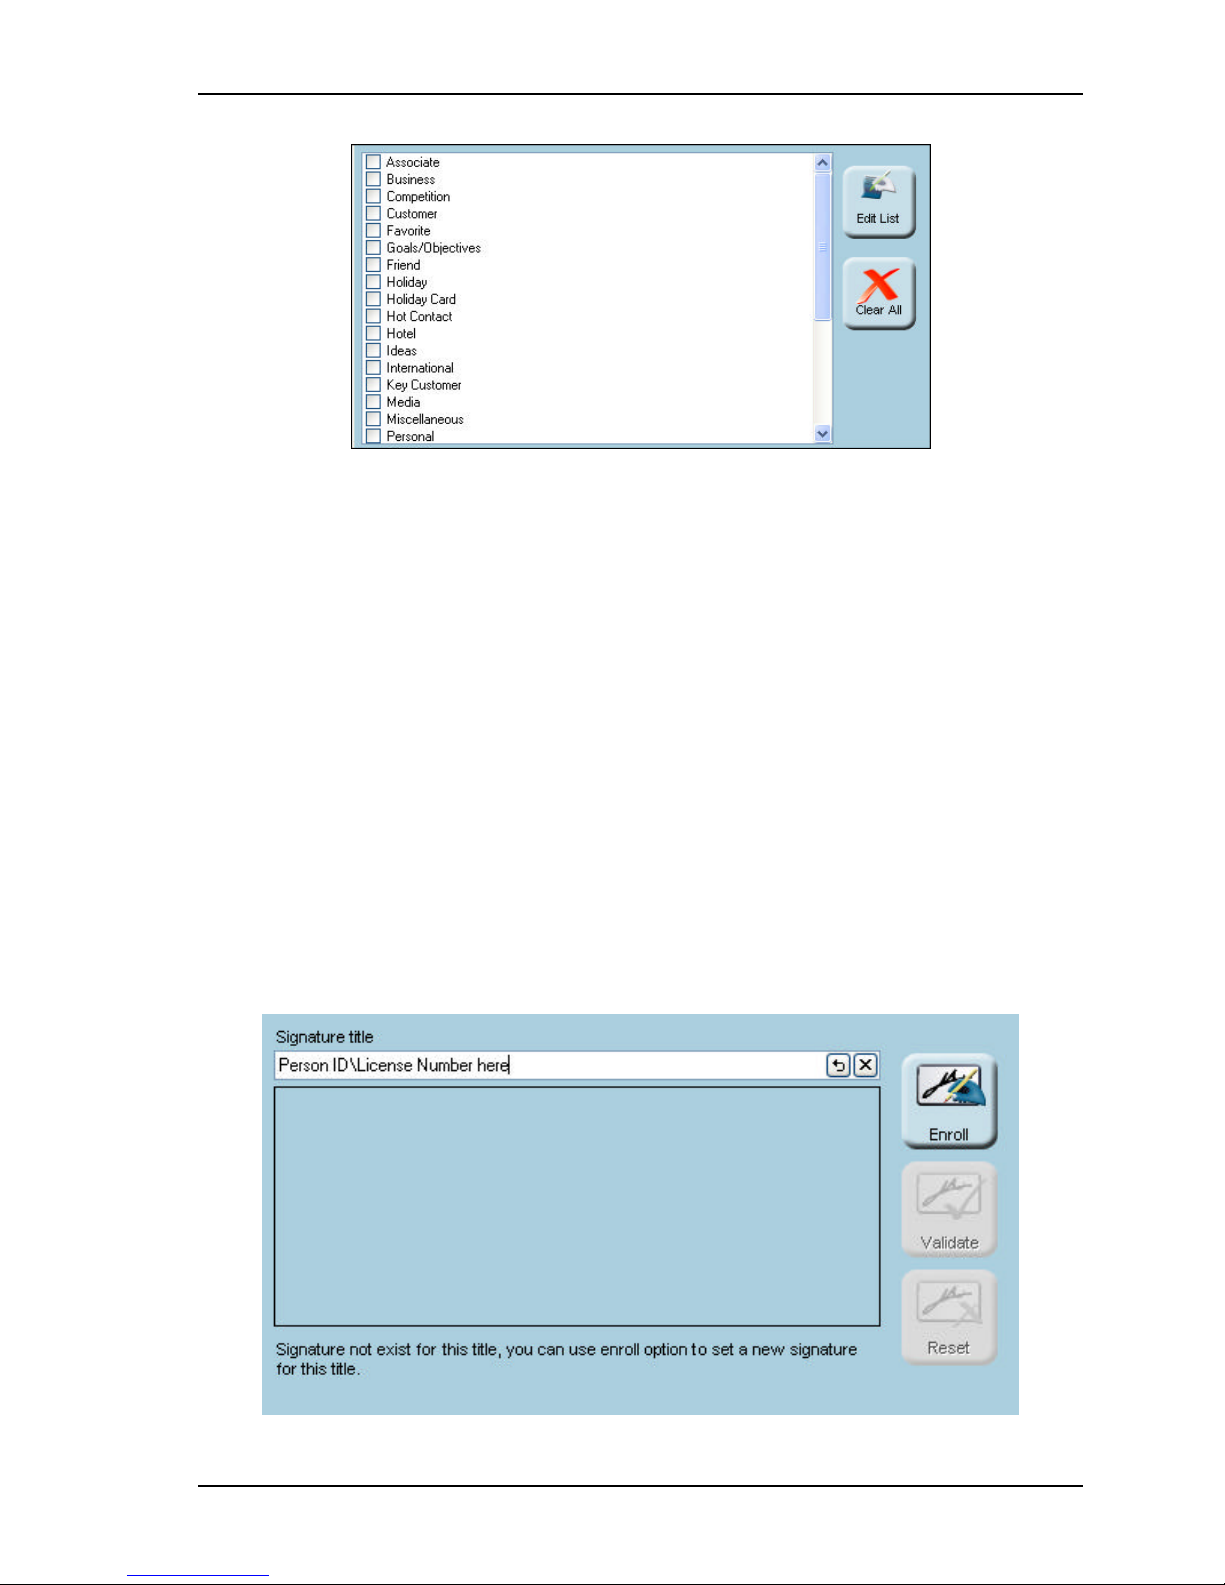
Click on Categories to assign categories to the record. Categories help you to sort the
records in your database, and allow you to produce useful reports by performing a search
based on categories. For example, you can sort the records in your database according to
business associates, VIP customers, badly-paying customers, etc., or even customers you
would like to call later. Once categories are attached to records, you can easily perform a
search and print or export a report, with a record list sorted according to the desired
criteria.
Scanshell.net allows you great flexibility in assigning categories; you can edit existing
categories, delete categories, or create as many new categories as you like.
Scanshell.net User Guide © 2005 Card Scanning Solutions 29
Page 30
Record Management After the card is scanned
Figure 5-4: Categories window
Attaching categories
Click on the Categories tab under the image.
Check the desired categories boxes.
Creating, editing and deleting Categories
With the Categories window open, click on Edit List .
In the window that opens you can perform the following:
§ Add a category - click Add and type in a name for a new category
§ Edit a category Select a category and click Edit
§ Delete categories - Select a category and click Delete.
When you are done, press OK to sa ve the record to the database.
SIGNATURES
Click on Signature to add a digital signature of the card holder in this way you will have
the person digital signature for later validation.
Scanshell.net User Guide © 2005 Card Scanning Solutions 30
Page 31

Record Management
Figure 5-5: Signature window
Adding, Validating and deleting signatures
With the Signature window you can manage your one digital signatures database using the
SigniShell options.
• Enroll- adding new signature to the SigniShell database with a unique key (For
best results you can use the person ID \License\Passport number). After clicking this
option a new dialog will display and the person will have to sign 6 times to create
his own digital signature.
• Validate – If a person already did add his signature to the S igniShell database then
you can enter the unique key that you had used to add his signature and type it in
the Signature title box after that the Validate button should be enabled to use.
Clicking this button will display a new dialog and the person will have to sign in it
after that you will get the validation results.
• Reset – This option gives you the ability to remove an existing signature from the
SigniShell database.
The SigniShell database is a global database for each computer and not just for this
software. You can use the SigniShell database to sign and validate documents and PDF
files and more.
Scanshell.net User Guide © 2005 Card Scanning Solutions 31
Page 32
Record Management Raw OCR
RAW OCR
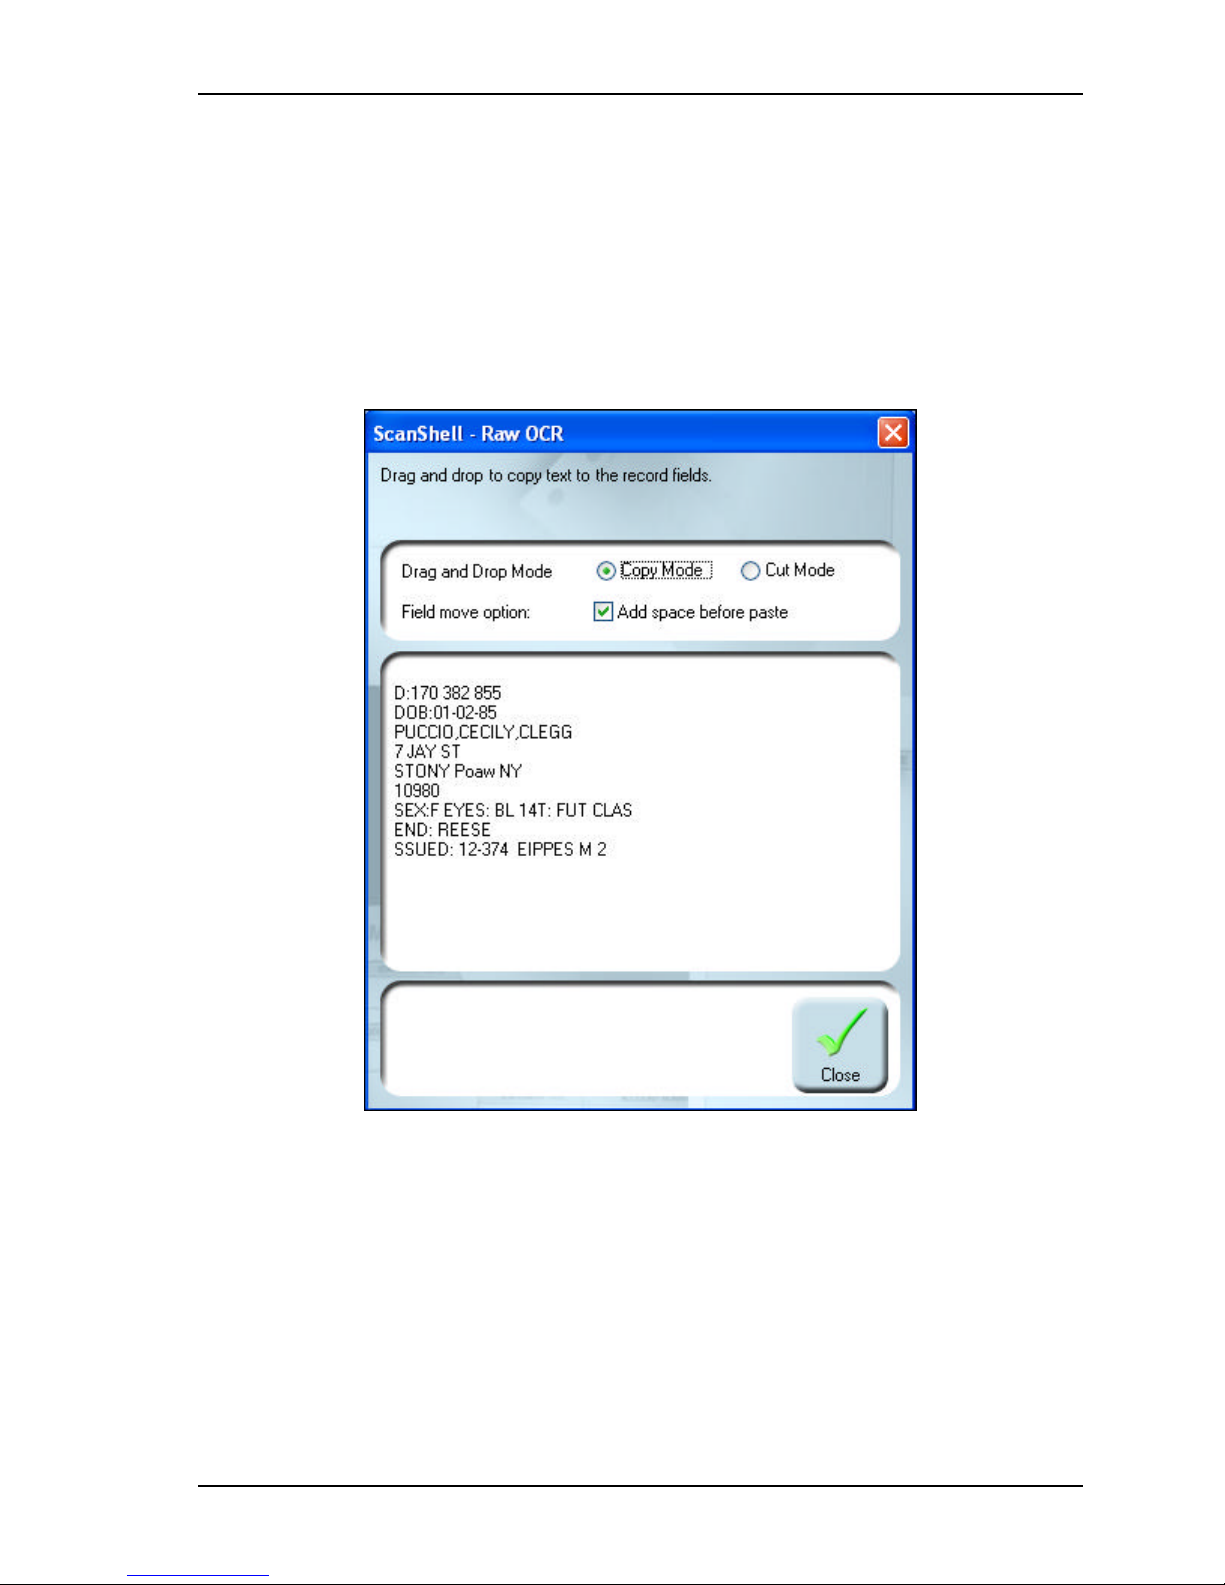
If you did not select OCR as data source before scanning, or if you have an image that
contains data you would like to extract, you can use the M anual OCR option.
Manual OCR provides you with the raw text data and the ability to control it manually.
1. Open the record containing the required image.
2. Click on the Manual OCR button.
3. Select Copy Mode if you want the data you move to fields to be copied, or Cut
Mode is you want the data to be cut from the raw data list when moved to a field.
4. If you wish to add space before the pasted values and lines, select Add space
before paste.
5. You can arrange the data as follows:
To select a value: Double click on a value.
s
To select a whole line: Click three times on a line to select the whole line.
s
Scanshell.net User Guide © 2005 Card Scanning Solutions 32
Figure 5-6: Manual OCR window
Page 33

Record Management Raw OCR
Right click on the selected value or line, and select the field to which you
s
want to paste the data.
You can also drag a selected value or line and drop it into a field on the left.
s
The data can also be selected and copied to another application.
s
Note: Raw OCR is not available in some modules.
Scanshell.net User Guide © 2005 Card Scanning Solutions 33
Page 34
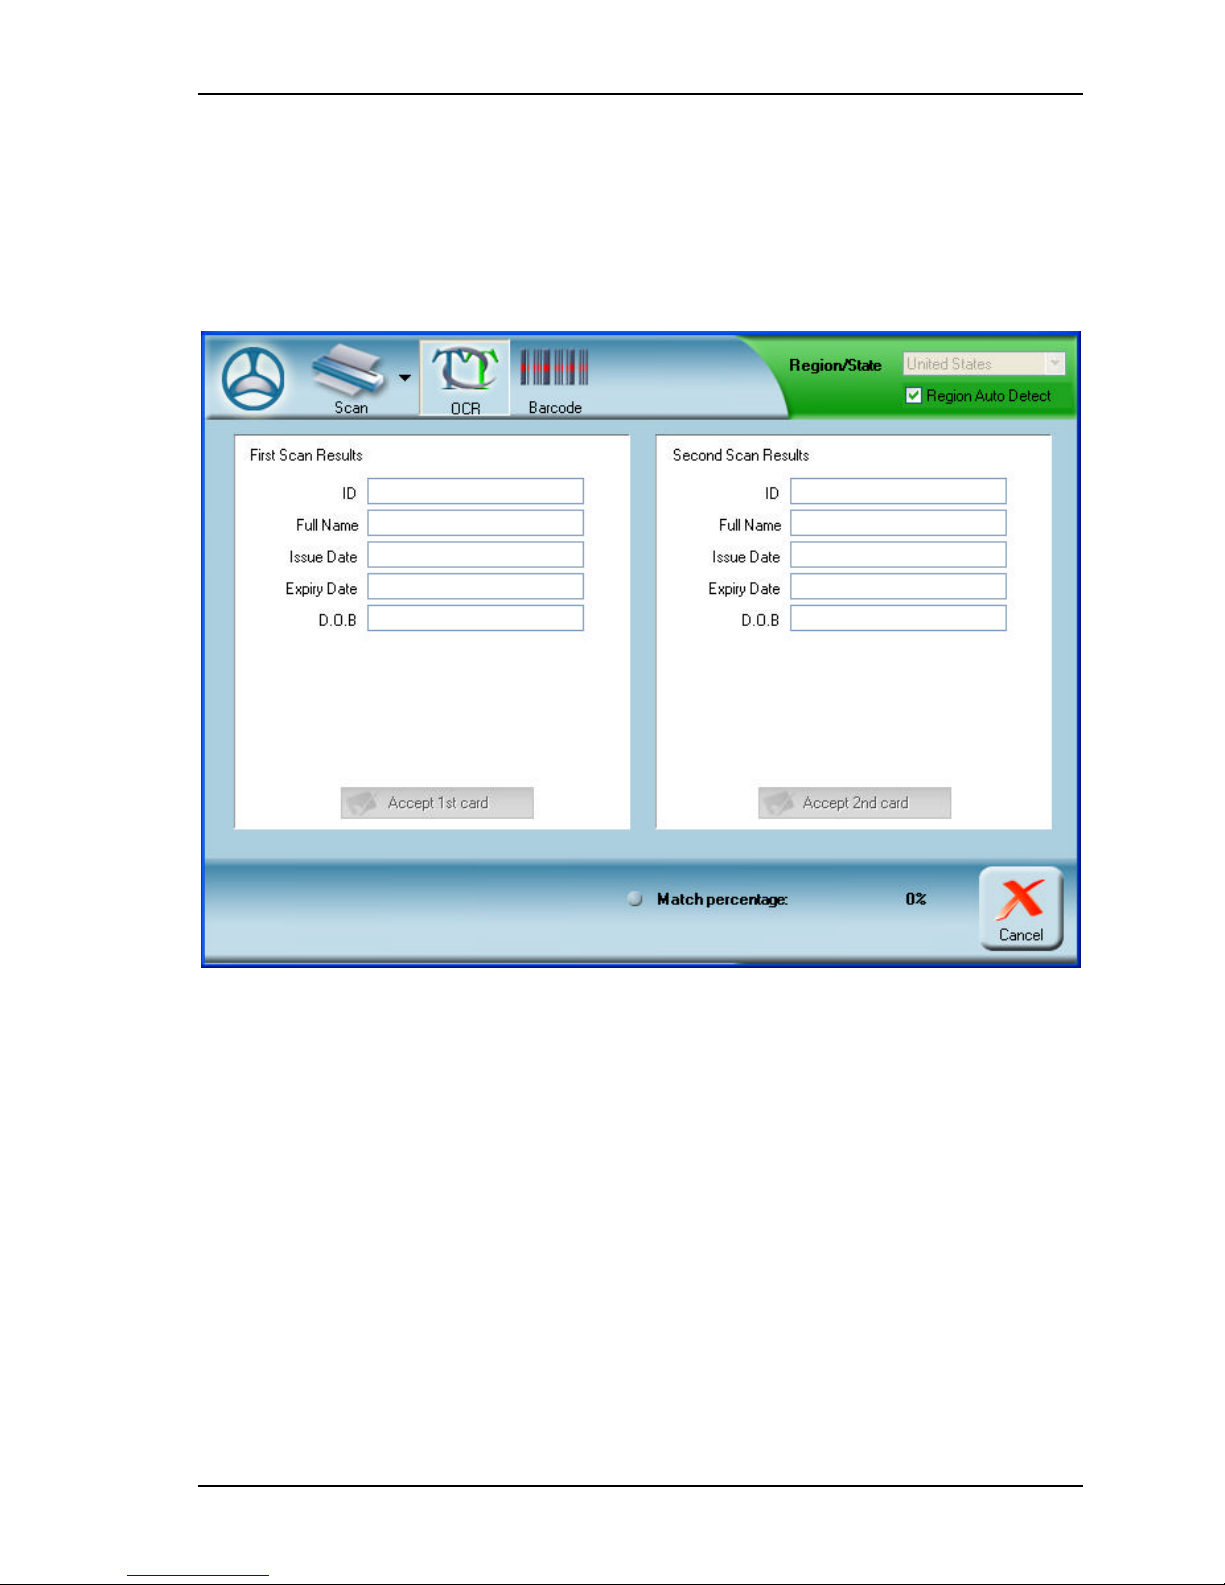
Record Management Verifying cards
VERIFYING CARDS
Scanshell.net is capable of verifying ID cards, by comparing data from two different
sources on the card, e.g., OCR and barcode, or OCR and magnetic strip.
1. Click on the Verification button
Figure 5-7: Card verification window
2. Select data source for the first scan; OCR or barcode.
3. Specify region, country and state, or check Region Auto Detect.
4. To start the scan, click Scanner, or File, if you use an image file as data source.
5. The card will be scanned once, and the data will appear under the First Scan
Results on the left side.
6. Repeat the process, but this time select a different data source, e.g., if the first scan
was performed using OCR, select now barcode or magnetic strip as data source.
If you select OCR or barcode as the second data source, click Scan to scan, or
s
File if your source is an image file.
If you wish to use the magnetic strip as data source for verification, select
s
Magnetic from the scan source list, and swipe the card's magnetic strip
through the magnetic reader.
Scanshell.net User Guide © 2005 Card Scanning Solutions 34
Page 35
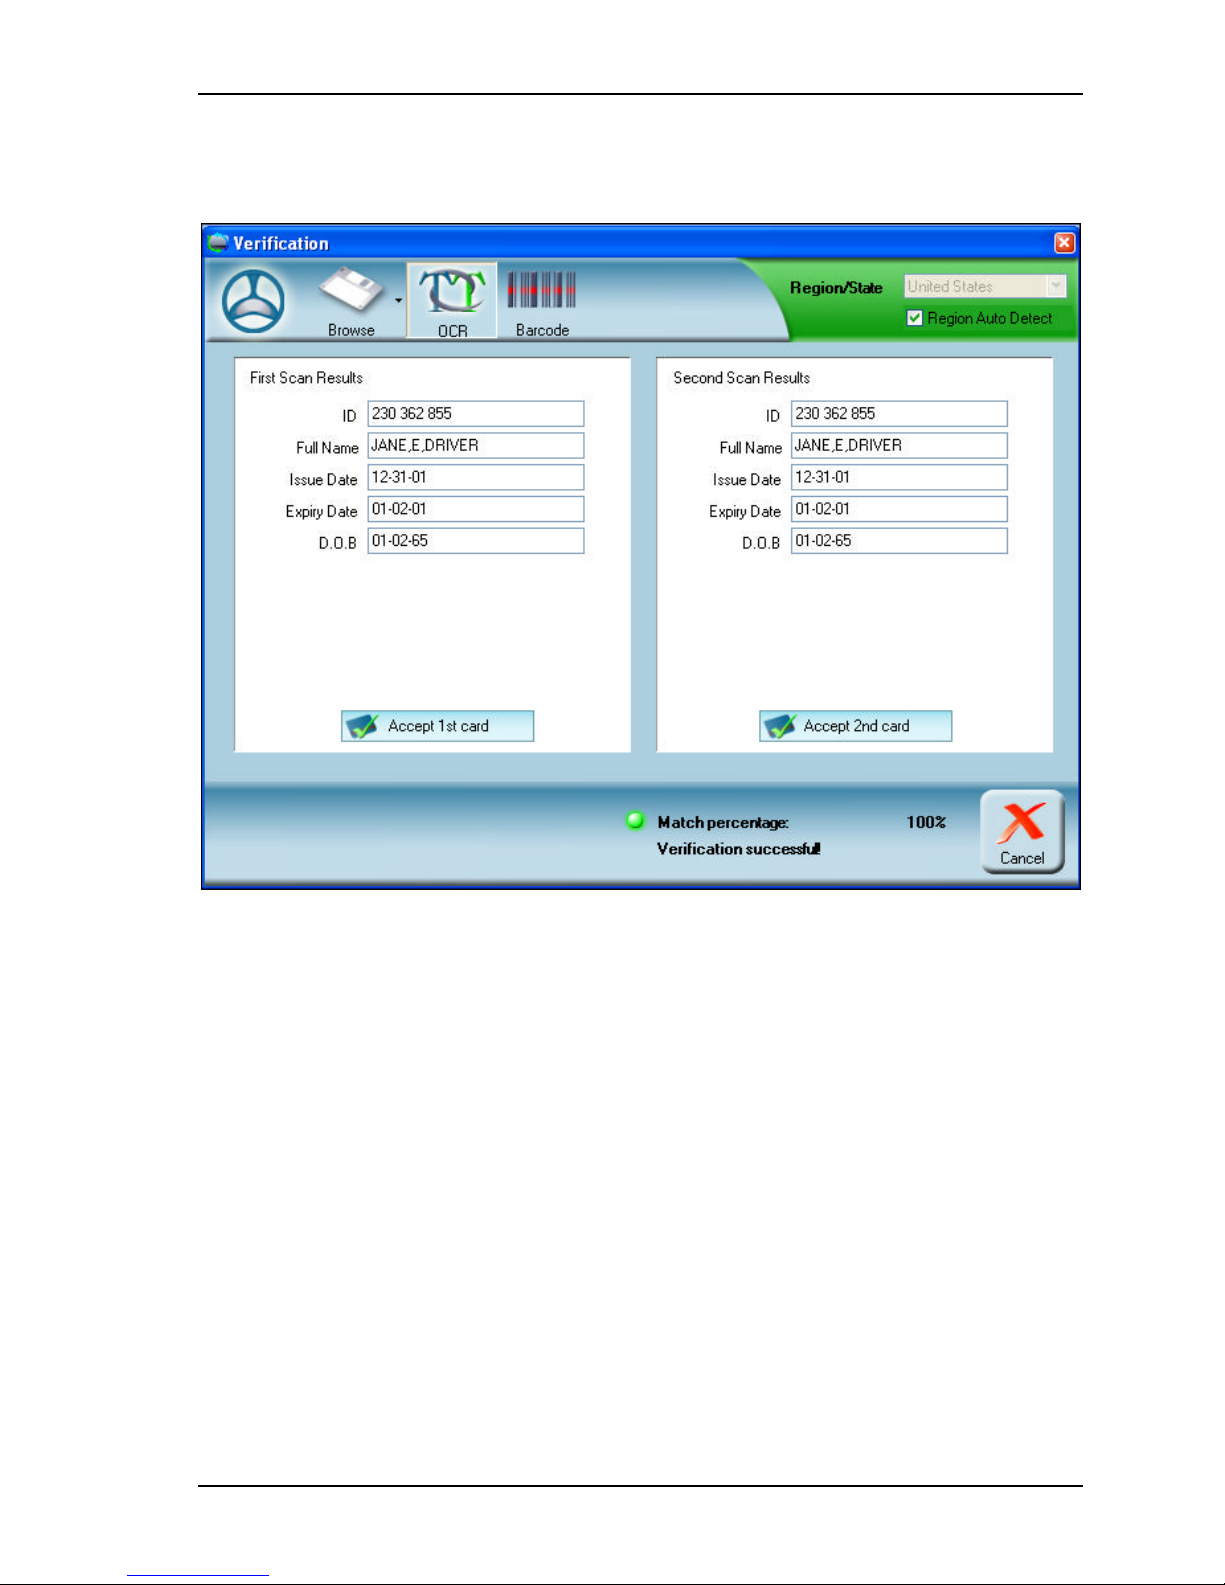
Record Management Verifying cards
7. The data extracted the second time will appear under the Second Scan Results on
the right side.
Figure 5-8: Verification window with scan and verification results
8. The indication light under the card details will be lit, indicating success and failure:
Green for successful verification.
s
Red for failed verification. The fields will also be painted red.
s
9. The matching percentage will be indicated to the right of the indication light. The
threshold of the matching percentage that determines verification success can be set
in the settings panel, see Application Settings, page 62.
10. You can choose to keep the results of either the first or the second scan by clicking
the Accept 1st card or Accept 2nd card button. As a result, the data of the respective
scan will be saved to the scanned record fields, and the verification window will be
closed.
11. You can define the fields that you want to use in the verification process in the
application Settings.
Scanshell.net User Guide © 2005 Card Scanning Solutions 35
Page 36

Database Management Overview
6. DATABASE MANAGEMENT
OVERVIEW
The database consists of a single main DB file, and a related sub -directory with the same
name as the DB file. The DB file may be located on the local machine or on a remote
server, as long as the user has read and write access permissions to the file location. The
database images are stored externally to the main database file; each image is linked to its
corresponding record.
CREATING A NEW DATABASE
1. Select File -> New Database from the menu bar.
First time use: Select New Database in the Login window.
2. The Database Wizard screen will appear.
Scanshell.net User Guide © 2005 Card Scanning Solutions 36
Page 37
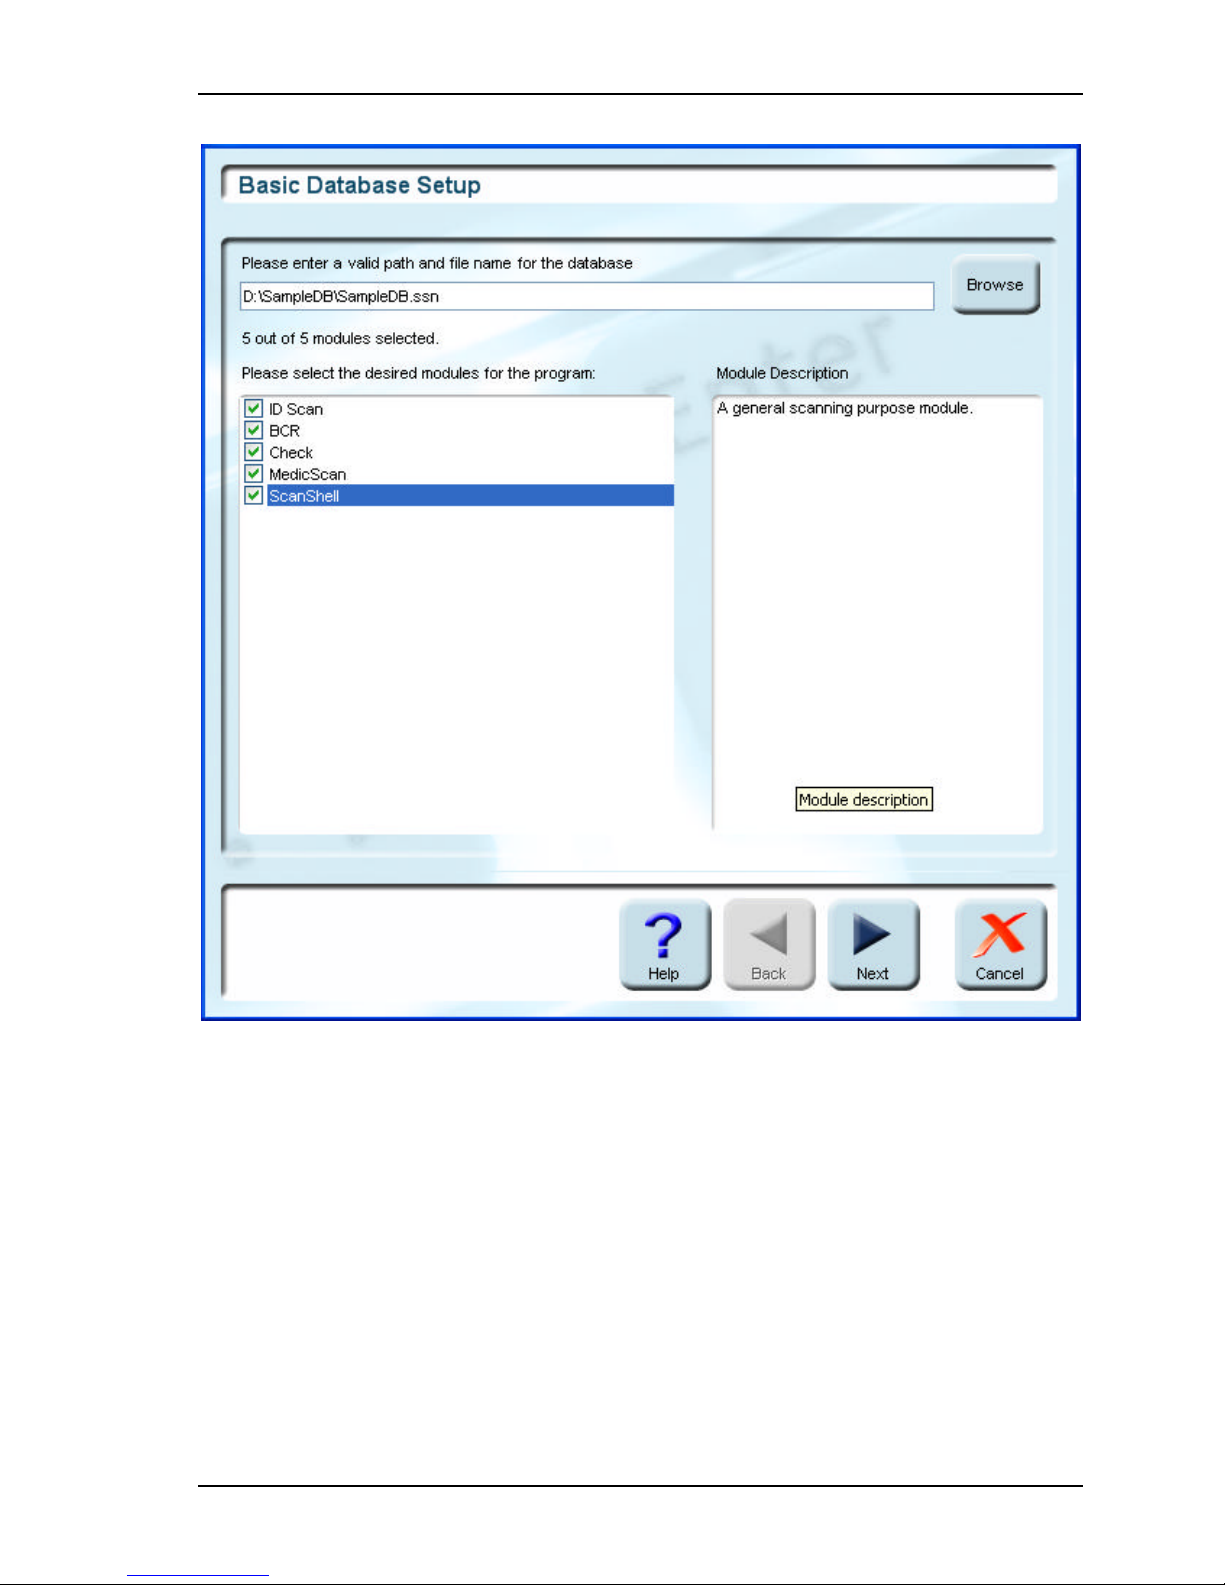
Database Management Creating a new database
3. Click on the Browse button on the right. Choose a location in the Windows
Explorer window that opens, create a file for the database, and click Save.
4. Select the modules you want to use in conjunction with this database. You can view
a description of the module in the right column by selecting it. Click next.
Scanshell.net User Guide © 2005 Card Scanning Solutions 37
Figure 6-1: Module selection window
Page 38
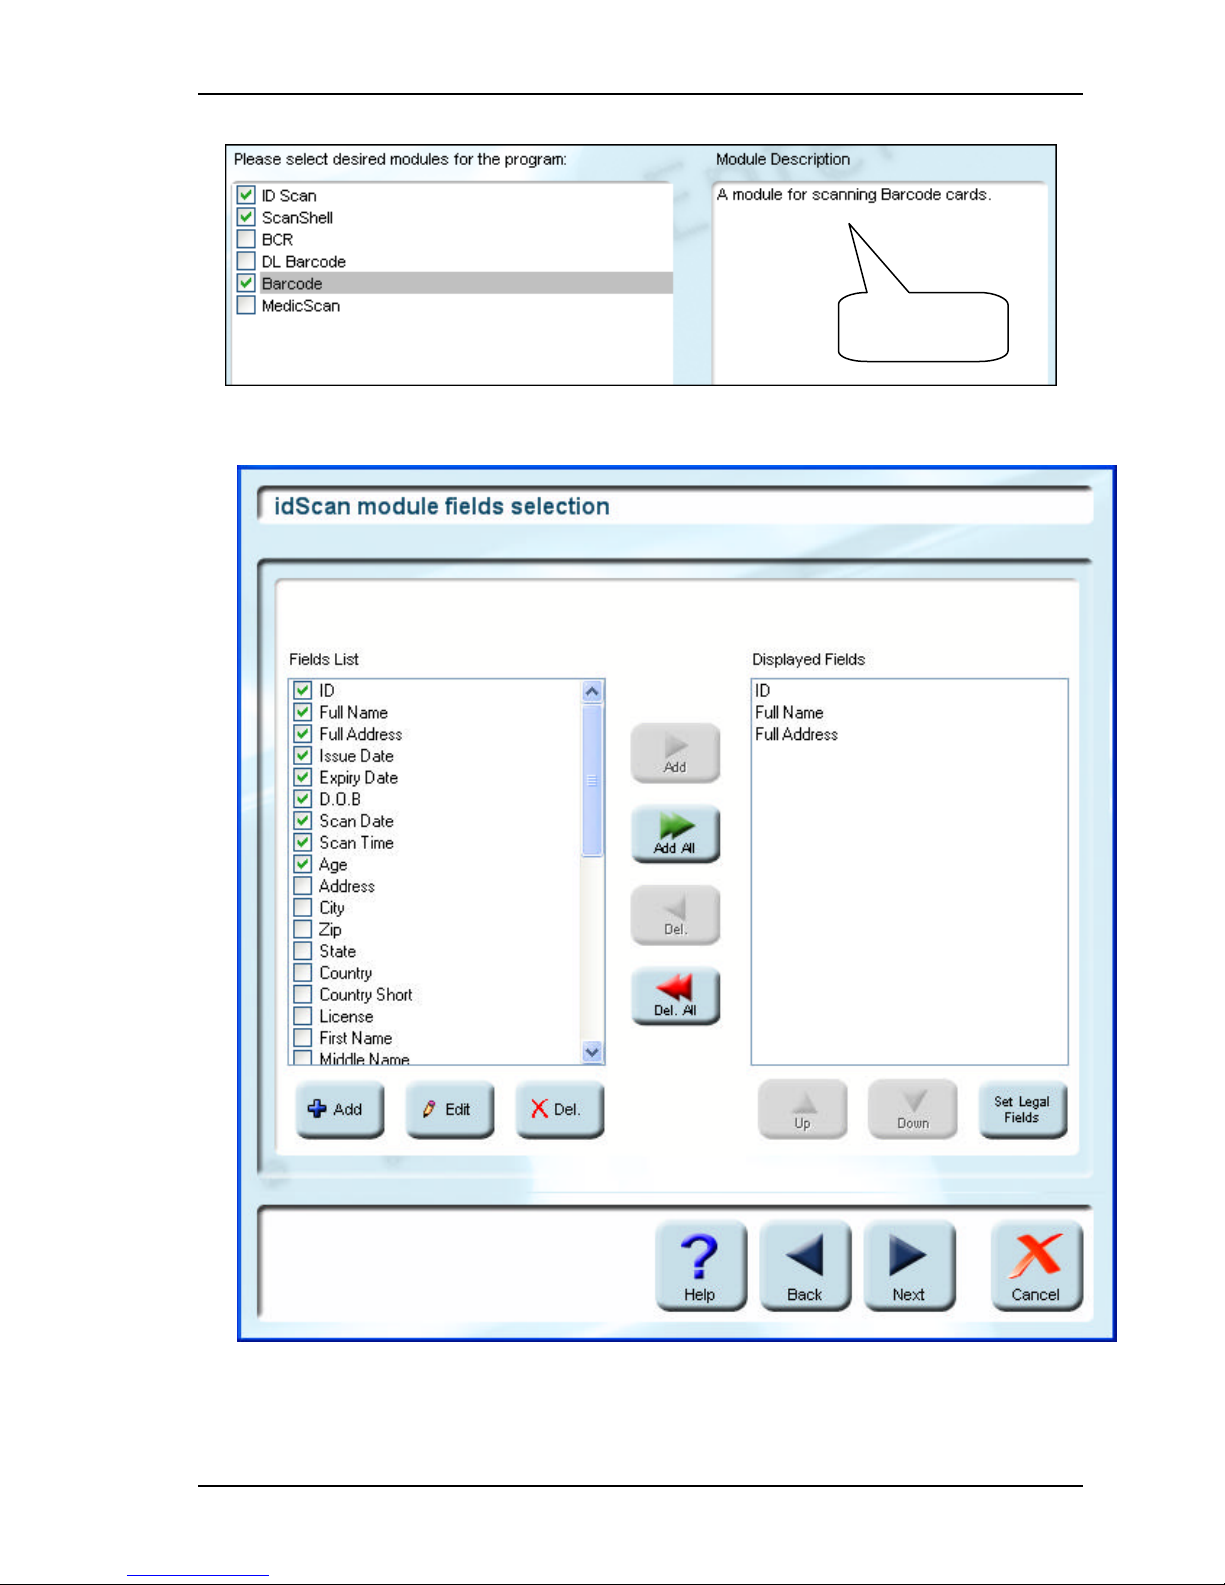
Database Management Creating a new database
Selected module
description
5. A window will open containing a list of fields from the first module you selected,
on the left side.
Figure 6-2: Database fields and layout fields' selection window
Scanshell.net User Guide © 2005 Card Scanning Solutions 38
Page 39
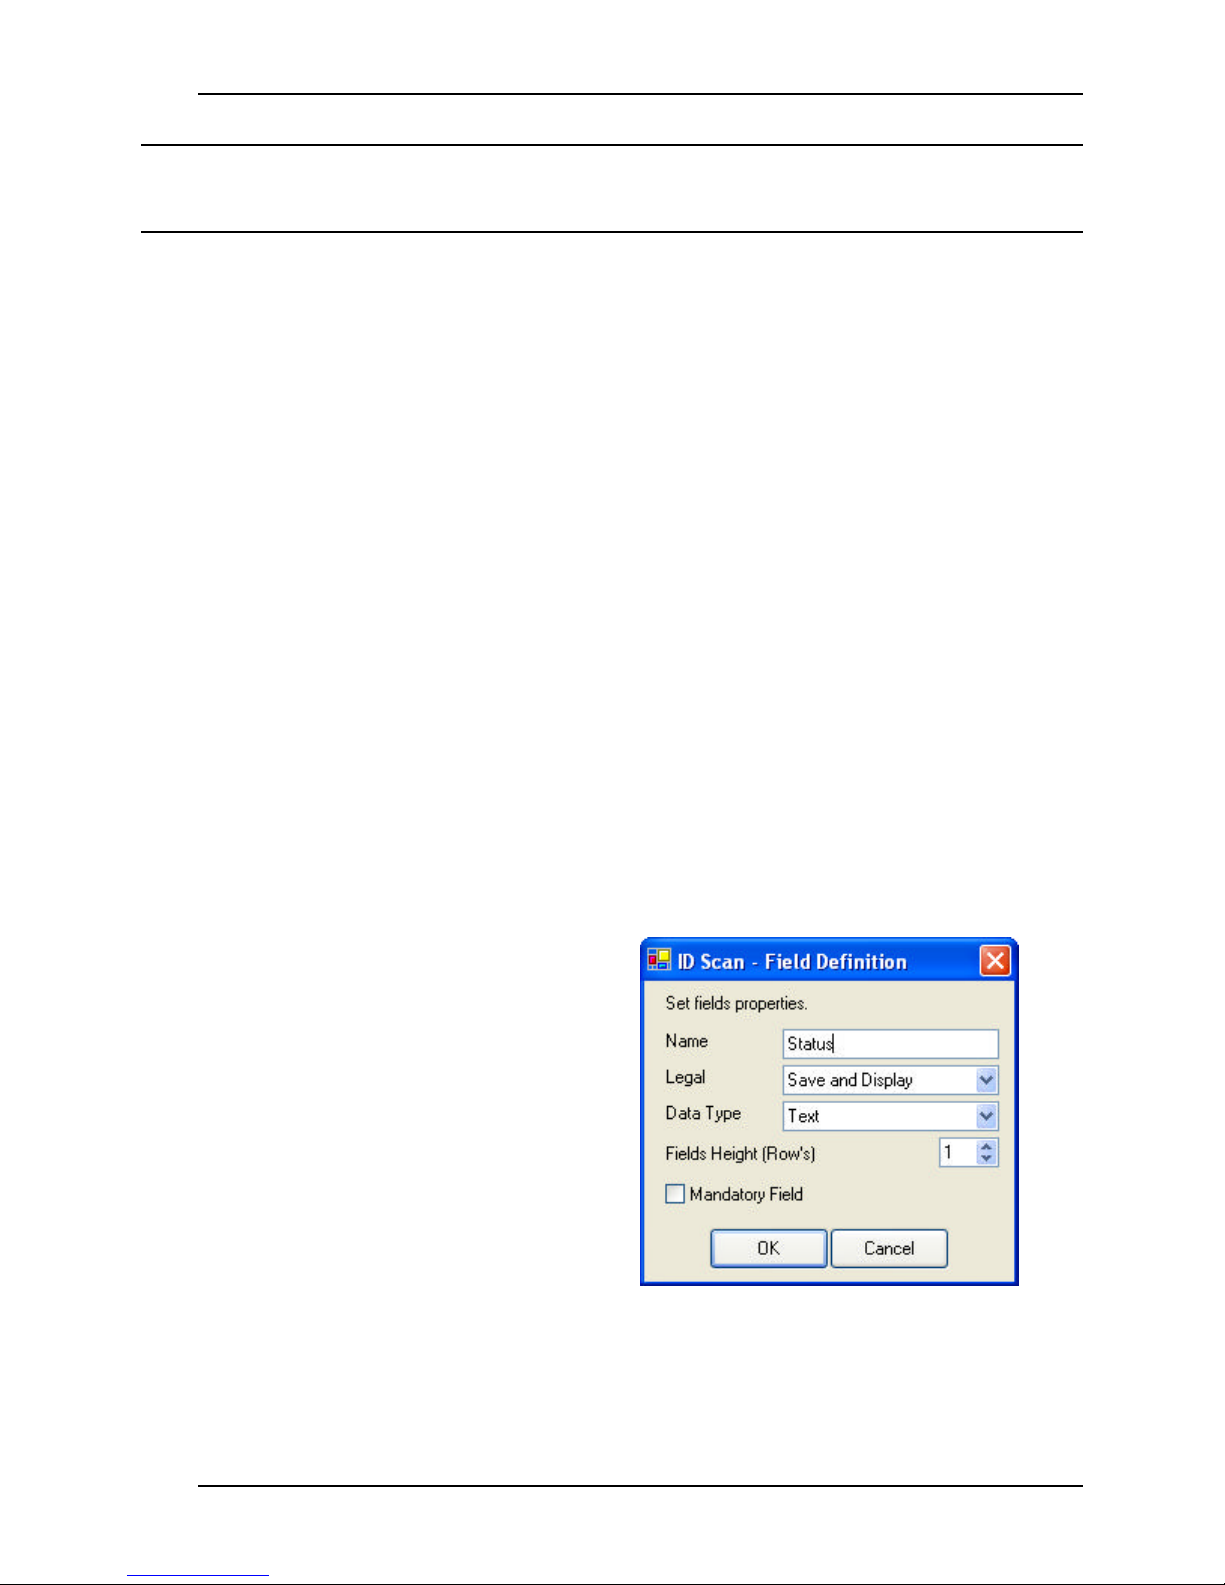
Database Management Creating a new database
Note: This screen allows two types of field selection, which have different effect; a. The fields
that will be included in the database, and b. The fields that will be displayed in
Scanshell.net main screen's records list
6. Select the checkboxes of fields you want to include in the database.
7. Select the fields you want to have displayed in the records list of the application
main window as follows:
a. Select a field that is included in the database (checked) by clicking on it
once, and then click on the right pointing Add arrow. The field will be
added to the list in the right column.
b. You can add all the checked fields to the display column by clicking on
the Add All arrow.
8. Removing fields from the display list: Click on a field to select it and then click the
left pointing Remove arrow. To remove all fields from the display list, click the left
pointing Remove All arrow.
FIELDS DISPLAY ORDER
The order of the display list determines t he display order of the fields in the records list of
the application main window. Fields higher on the list display first. You can change the
position of a field in the display list by selecting it, and clicking the Up and Down buttons
to move up and down the list.
FIELDS MANIPULATION OPTIONS
Scanshell.net allows you great flexibility in defining the application layout, including the
creation of new fields, renaming fields, etc.
Adding fields
Scanshell.net lets you create as many
fields as you like, and define various field
parameters.
Click on the Add button under the field
§
list.
Type in the field name
§
Legal: This field determines the field
§
properties associated with legal
requirements in some US states. You
can set the field to be saved and
displayed (no rmal mode), saved only
(not displayed) or ignored.
Select the field data type and height in
§
Figure 6-3: Fields creation window
rows (height selection is only enabled
for text fields).
Scanshell.net User Guide © 2005 Card Scanning Solutions 39
Page 40
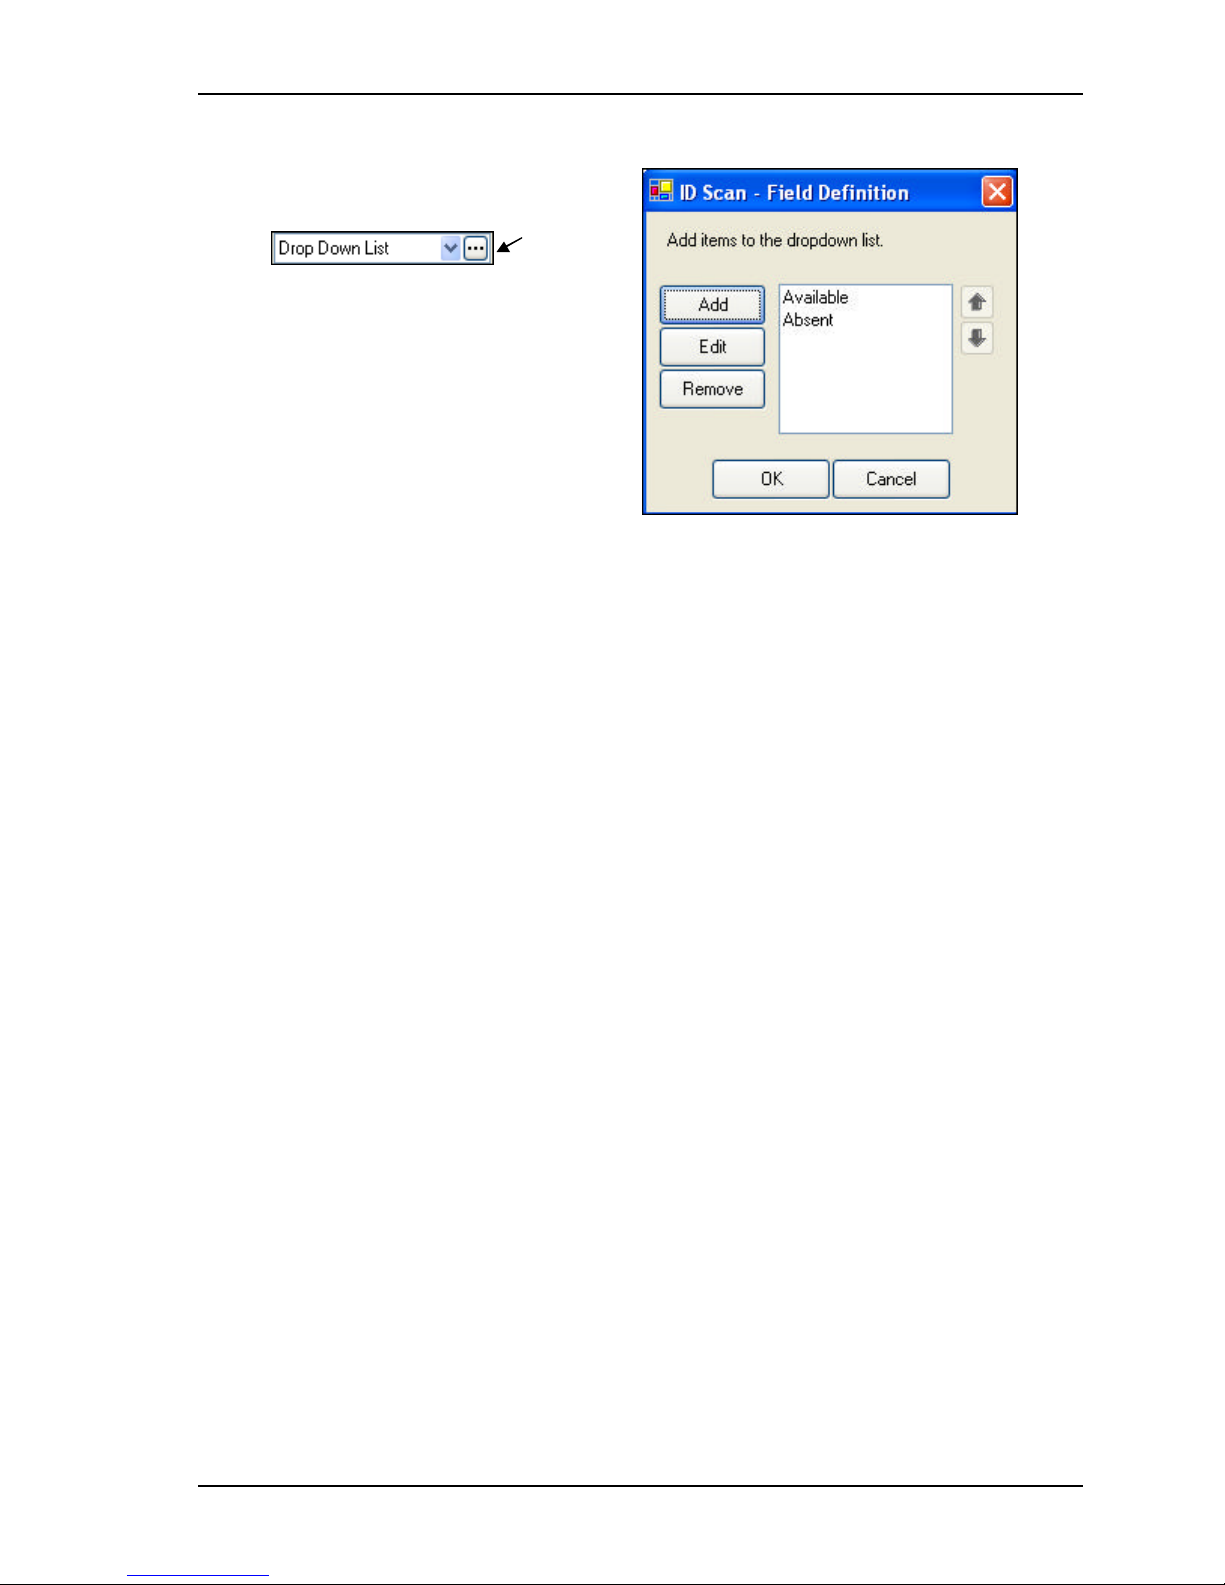
Database Management Creating a new database
If
list is selected as data
Dropdown
s
type, the Data Type field will
change to include an extra button.
Click this button to open a dialog
box where you can define
dropdown list values. Click Add,
type in a value and click OK. You
can add more values, edit values by
selecting a value and clicking Edit,
or remove values by selecting a
value and clicking Remove. To
move values up and down the
dropdown list, select a value and
use the arrows on the right.
Figure 6-4: Dropdown list value definition
window
§ Check the Mandatory field if you want this field to be mandatory.
§ Click OK.
Your new field is added at the bottom of the field list, and you can select it to add it to the
database structure.
Editing fields
Select a field and click the Edit button. Follow the steps as in Adding Fields detailed above.
(The field data type cannot be changed in existing fields)
Deleting fields
Select a field and click Del.
Set legal fields
The legal fields function is design to meet legal requirement of some US states concerning
the handling of personal data. Scanshell.net lets you define certain fields as Save Only
fields (cannot be displayed), Ignore fields (the data is being ignored) or regular operation
mode, in which data can be saved and displayed unrestrictedly.
Scanshell.net User Guide © 2005 Card Scanning Solutions 40
Page 41
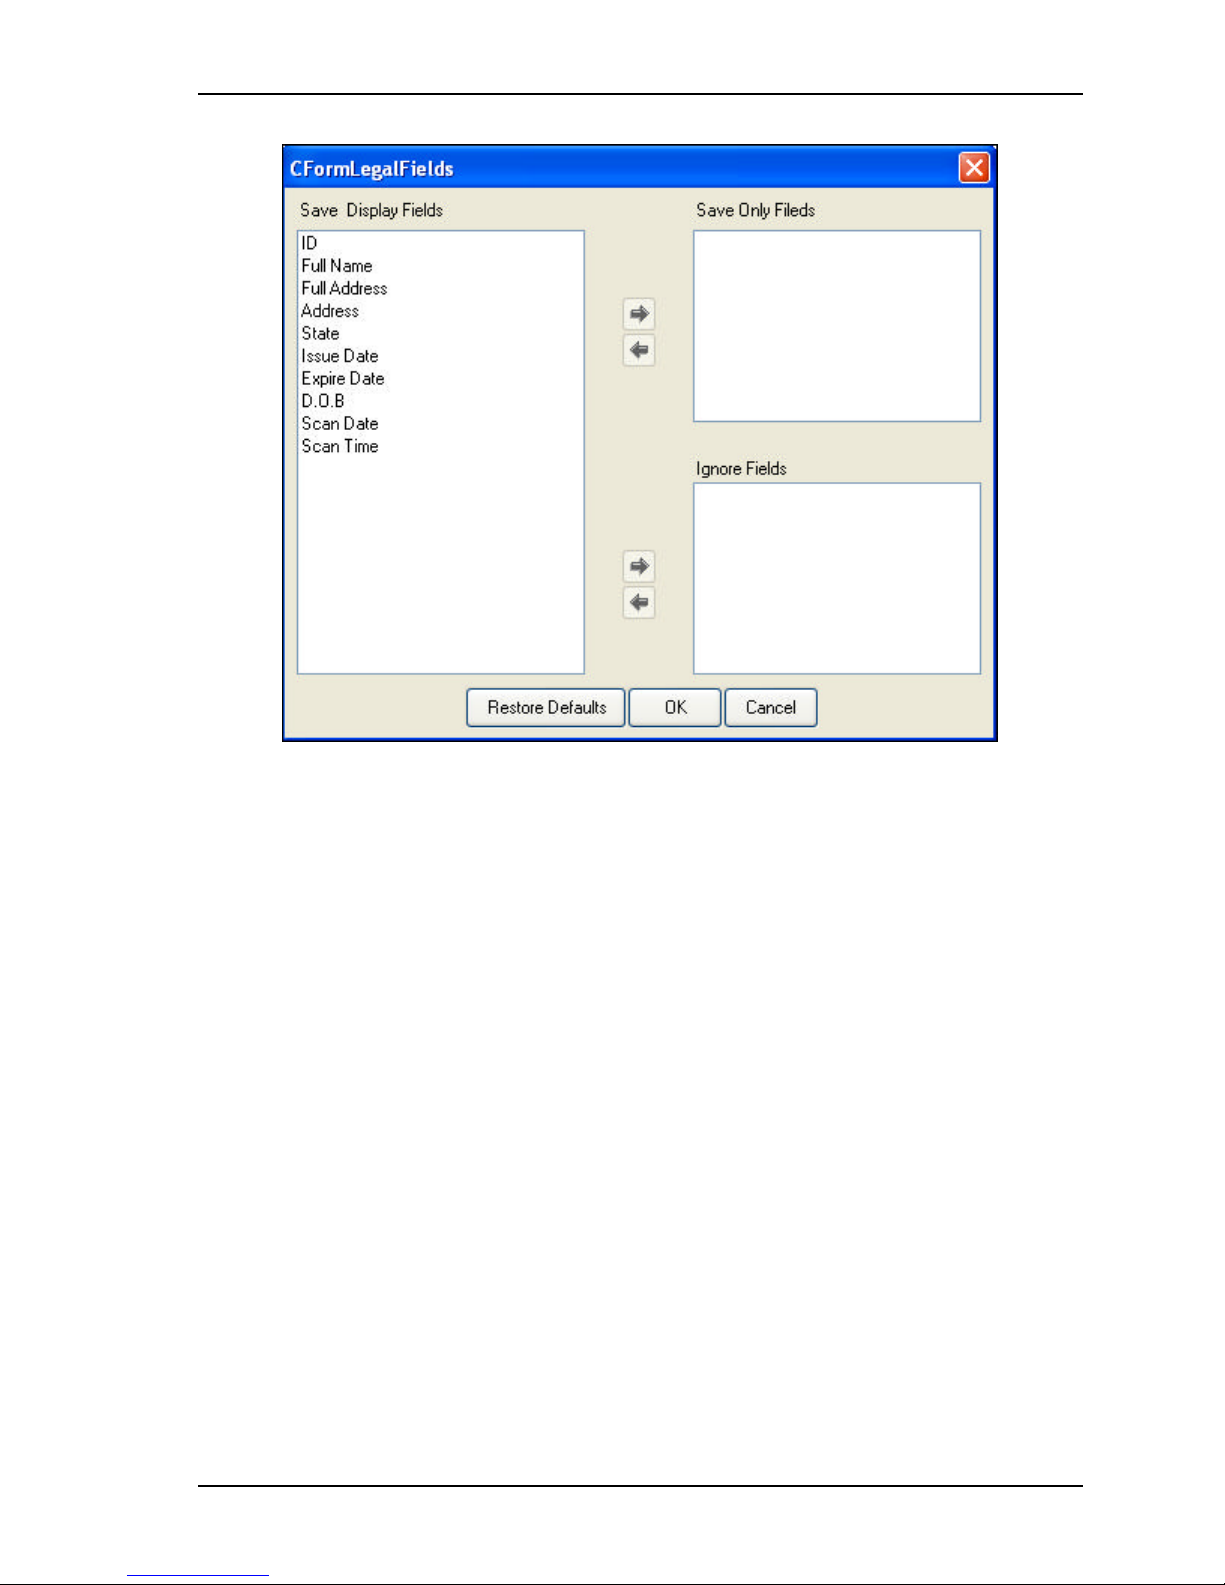
Database Management Opening an existing database
Figure 6-5: Set legal fields window
Select a field and use the arrows to move it to one of the other categories.
Restore Default will clear the Save Only and Ignore lists, and move all fields back to the
right column (Save & display ).
When you are done, click OK.
9. Clicking Next will take you to a similar window, containing a field list of the next
module you selected.
10. After you finish setting up all the modules you selected for inclusion in the current
database, you will be presented with the User List. Please see the following chapter:
7. User Management, page 43.
OPENING AN EXISTING DATABASE
1. Select File -> Open Database from the menu bar.
2. A standard Windows explorer screen will appear.
3. Select the database (or navigate to the desired directory, and then select a database).
4. Click OK.
5. The main screen will be closed and the login screen will be displayed.
Scanshell.net User Guide © 2005 Card Scanning Solutions 41
Page 42
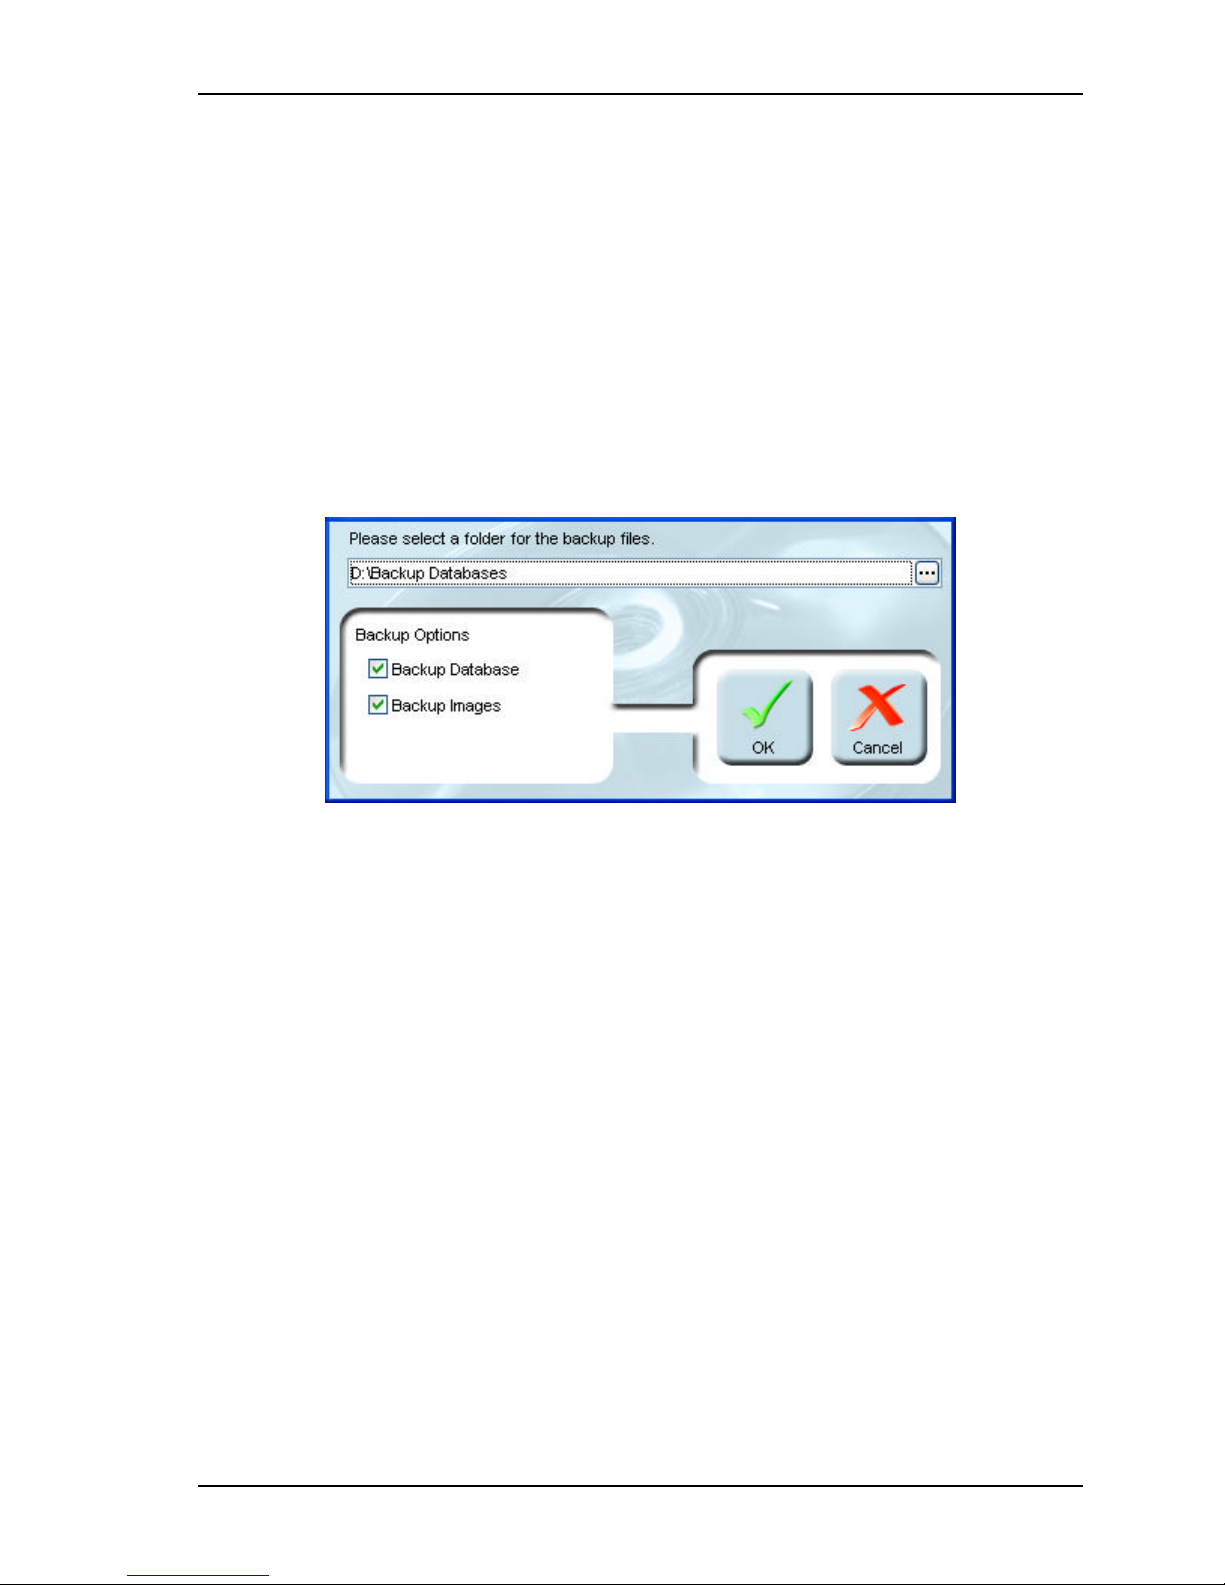
Database Management Database backup
DATABASE BACKUP
Backing up databases is good practice. If anything ever goes wrong (computer crash, hard
disk failure, database corruption) you will have a backup for most of your work.
The data used by Scanshell.net is stored in database files, which are located by default in
the application root folder. To backup this data, you need to copy these files to another
location; either on the hard disk or on external media (recommended).
CREATING A BACKUP
1. Choose Database Backup from the File menu on the main screen. The Backup
Database screen will appear:
Figure 6-6: Database backup screen
2. Click on the Browse button on the right.
3. In the standard Windows Explorer window that will open, navigate to the directory
in which you want to keep the backup files.
4. Check/uncheck the desired backup options.
5. Click OK.
Scanshell.net User Guide © 2005 Card Scanning Solutions 42
Page 43
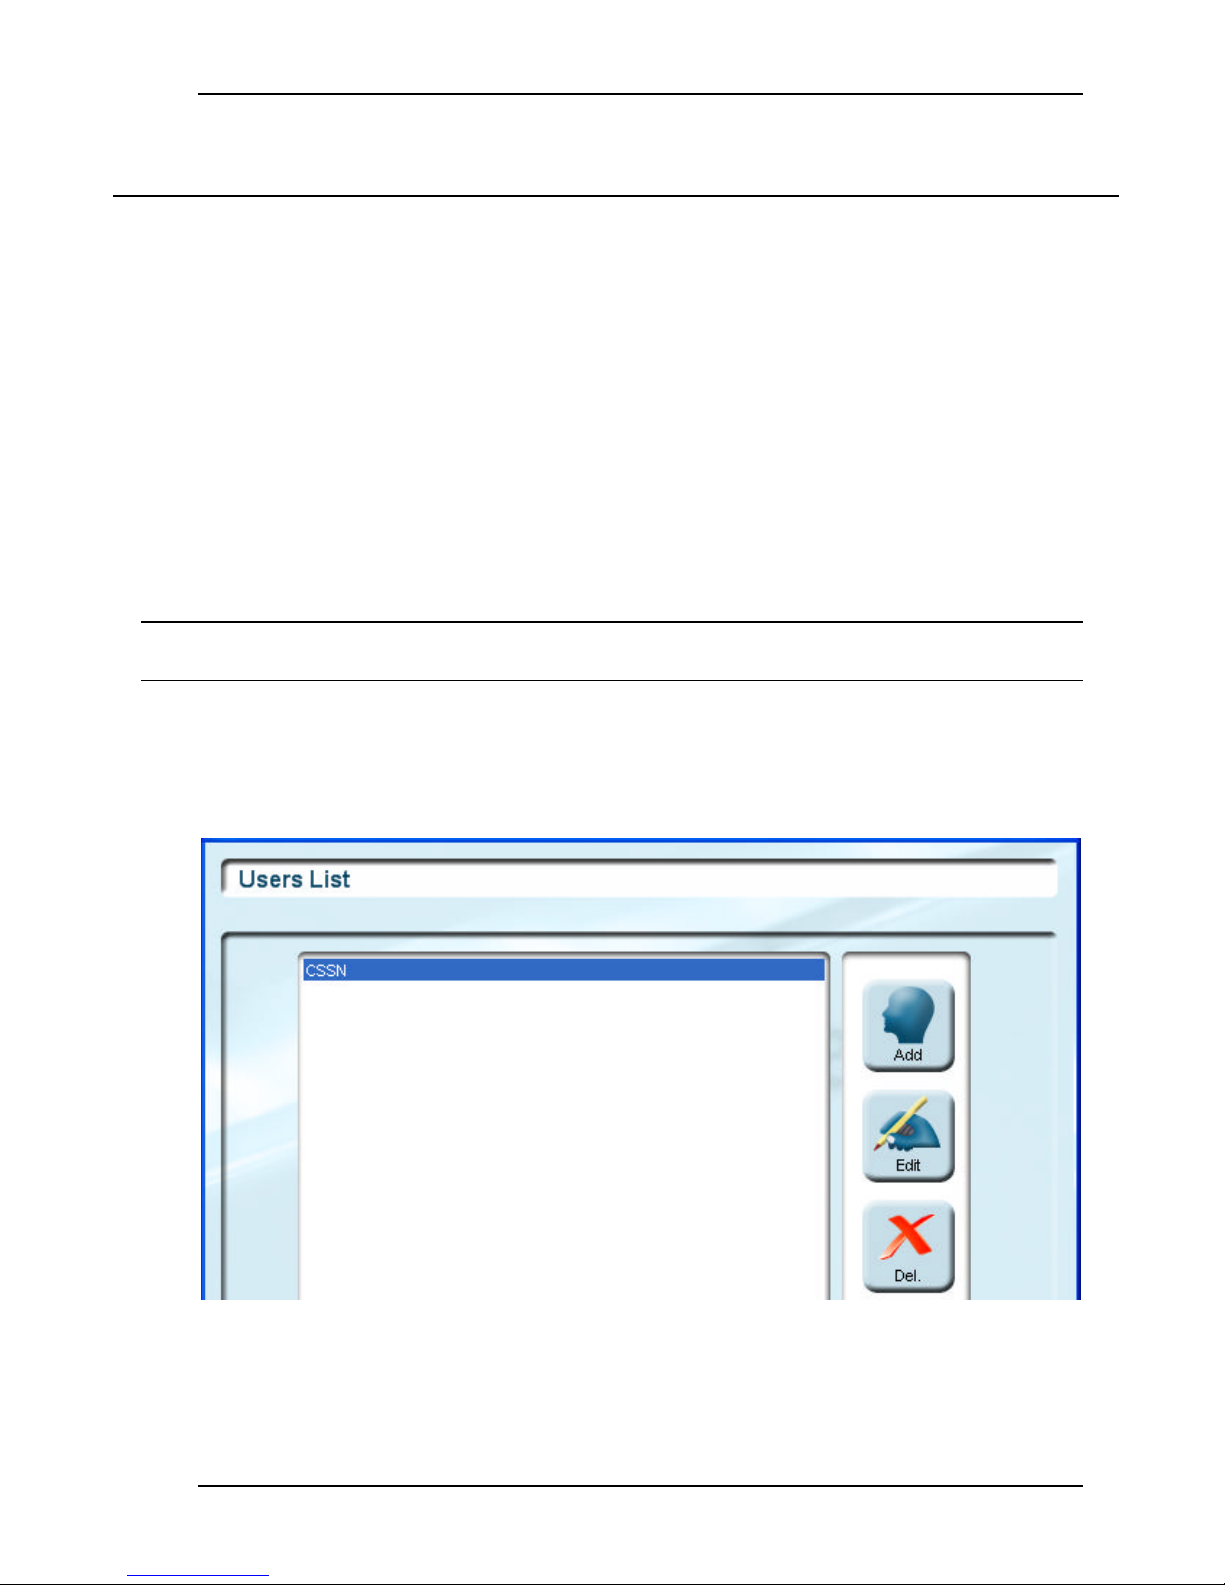
User Management Adding a new user
7. USER MANAGEMENT
The administrator (as well as users with administrator access privileges) can add users who
are authorized to use the application. These users can have different levels of access
privileges as follows:
Administrator: All access privileges, and in addition t he authorization to create other
users and edit existing users privileges.
Read and Write: Allows the user full access, including scanning of new records.
Read only: Allows the user to read customer information from the database without the
ability to add, edit or delete records.
To use the user management option, you must be logged in as an administrator.
ADDING A NEW USER
Note: Defining users is also part of the process of creating a new database. The procedures are
the same as described in this chapter.
1. In the main screen, select User Manager from the Tools menu. (If you are in the
middle of creating a new database, you will reach this screen as part of the New
Database Wizard).
2. The User List screen will appear.
3. Click on the Add button. The New User screen will appear.
Scanshell.net User Guide © 2005 Card Scanning Solutions 43
Figure 7-1: User list window
Page 44
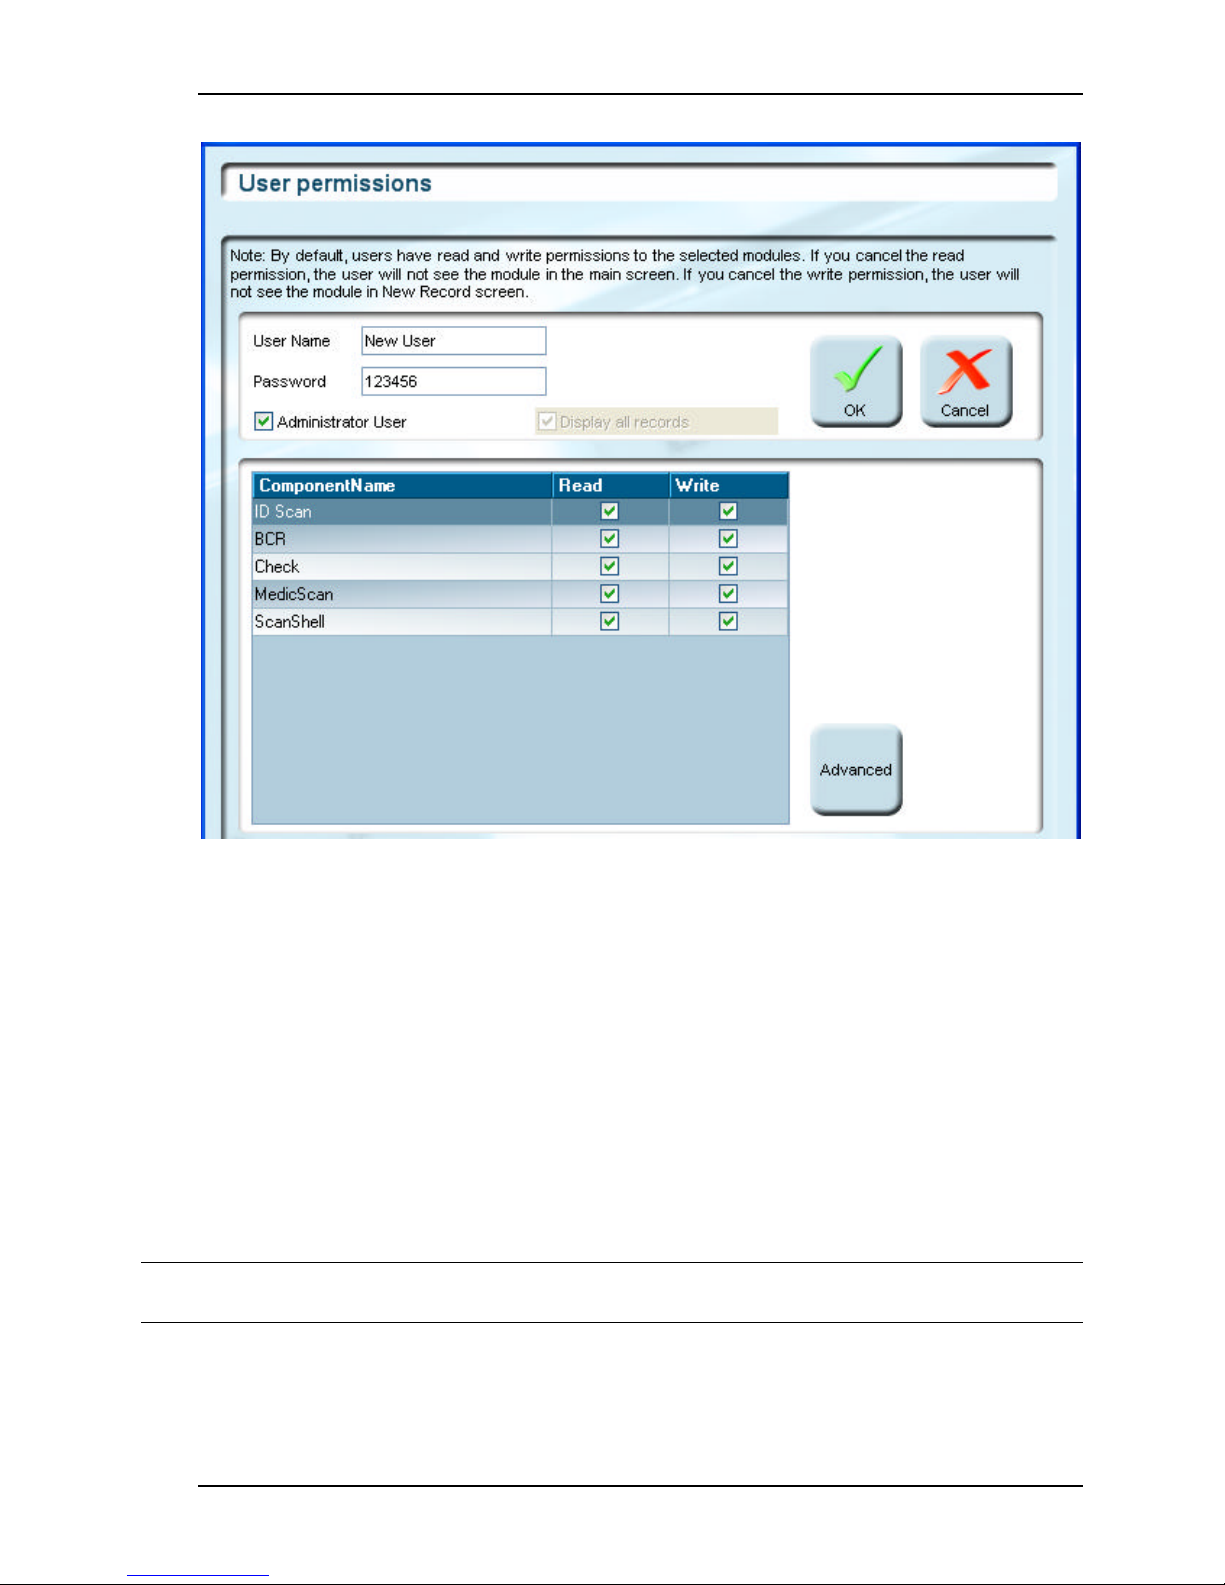
User Management Adding a new user
Figure 7-2: New user setup window
a. Enter a user name in the User field.
b. Enter a password in the Password field.
c. Check/uncheck the Administrator box. If checked, the user will have
administrator privileges, which means all access privileges, and in
addition the right to create and edit other users.
d. Check/uncheck the Display All records : If checked, the user can see
records that other users created. If unchecked, this user will see only the
records he created.
e. By default, all privileges are enabled for all modules. To disable a
privilege, uncheck the appropriate boxes for each of the available
modules in the Read and Write columns.
Note: If you disable the Read privilege, the whole module will not be available to this user! (The
user will not be able to see that module).
f . Check Read to authorize viewing of existing database records without
permission for scanning in new records, or editing existing records.
g. Check Write to authorize scanning of new records.
Scanshell.net User Guide © 2005 Card Scanning Solutions 44
Page 45
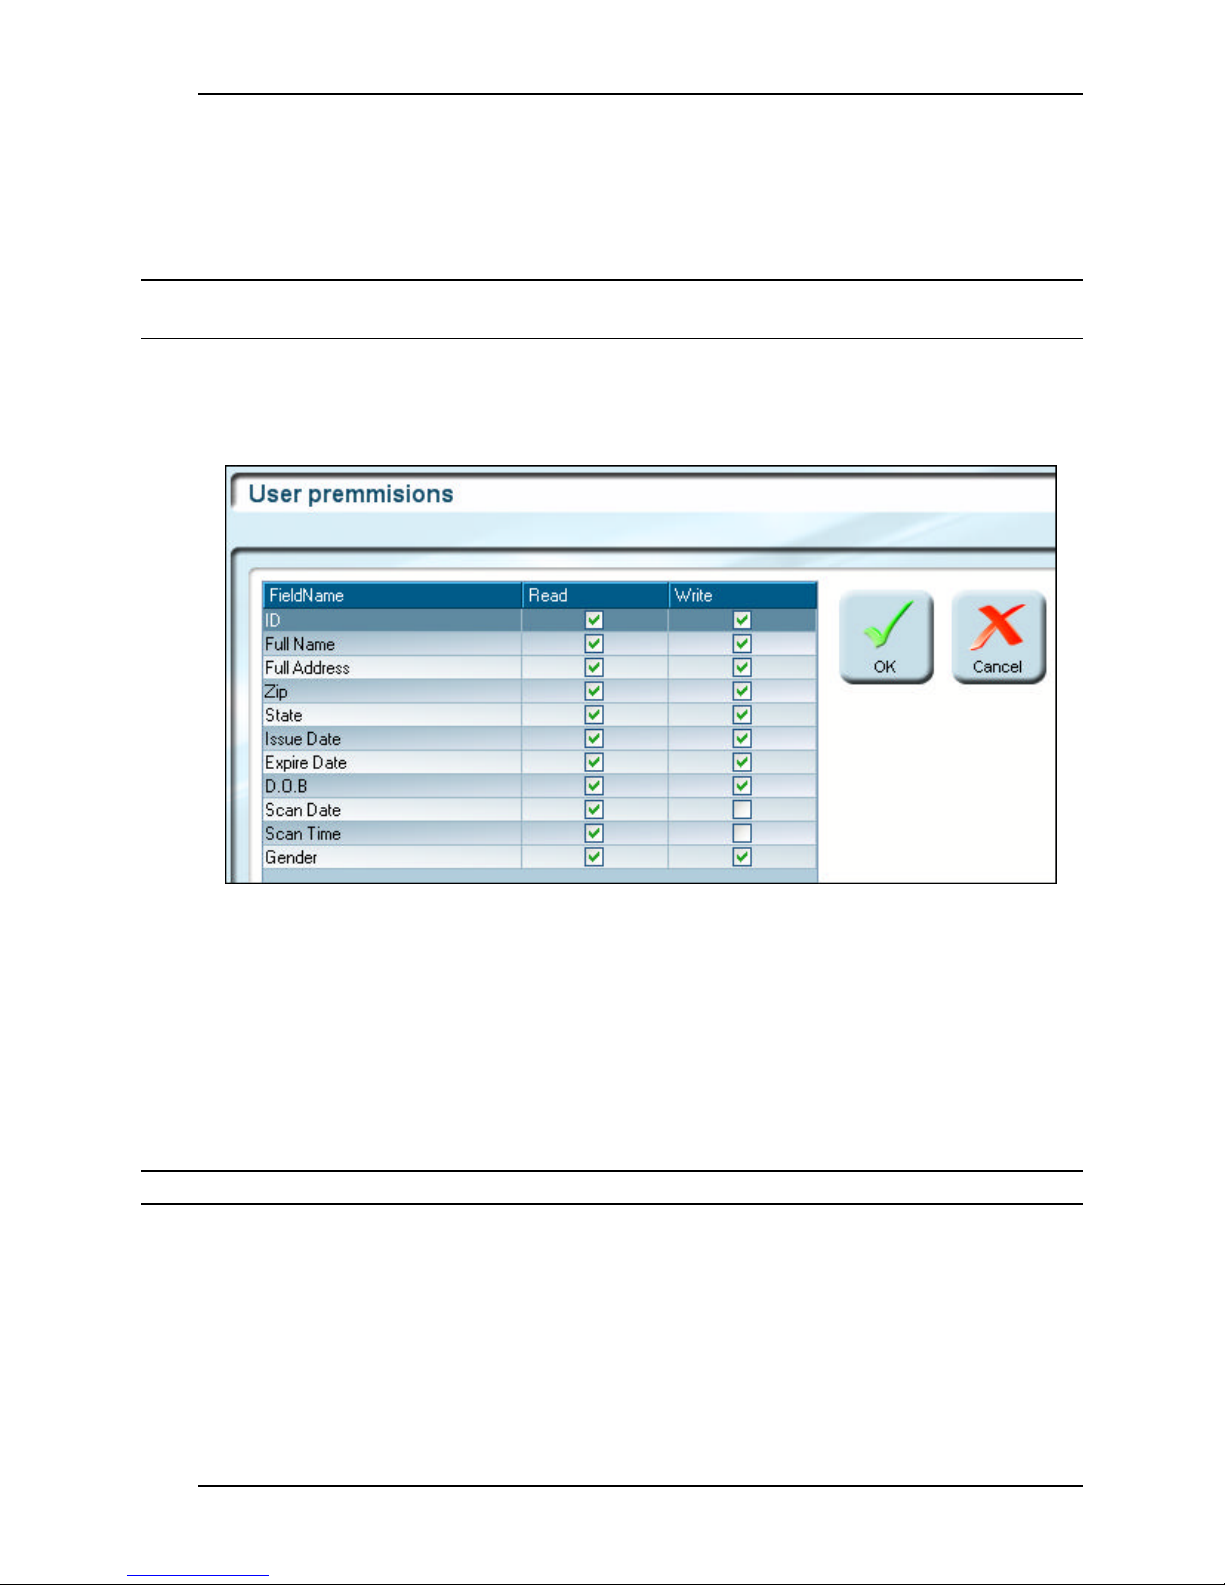
User Management Editing an existing user
h. Advanced: Clicking on Advance will open a window that will allow you
to control user privilege at field level (specify read/write privileges per
field).
i . When you are done, click OK.
Note: A user must have a read permission least for one module, and write permission for at least
one module.
ADVANCED
The Advanced screen lets you define user privileges per field.
Figure 7-3: The user permissions Advance screen
Check/uncheck the appropriate boxes to define the user permissions per field.
EDITING AN EXISTING USER
1. In the main screen, select User Manager from the Tools menu.
2. The Users List screen will appear.
3. Select a user and follow the instructions in Adding a new user, page 43.
Note: You cannot edit\delete the currently logged user.
DELETING A USER
1. From main screen, select Options-> Users List from menu bar.
2. The Users List Screen will appear.
3. Select a user from the Users List by clicking on it.
4. Click on the Delete button.
Scanshell.net User Guide © 2005 Card Scanning Solutions 45
Page 46

User Management Deleting a User
5. A confirmation dialog box will appear. Click OK.
Note: The CSSN user cannot be deleted.
Scanshell.net User Guide © 2005 Card Scanning Solutions 46
Page 47
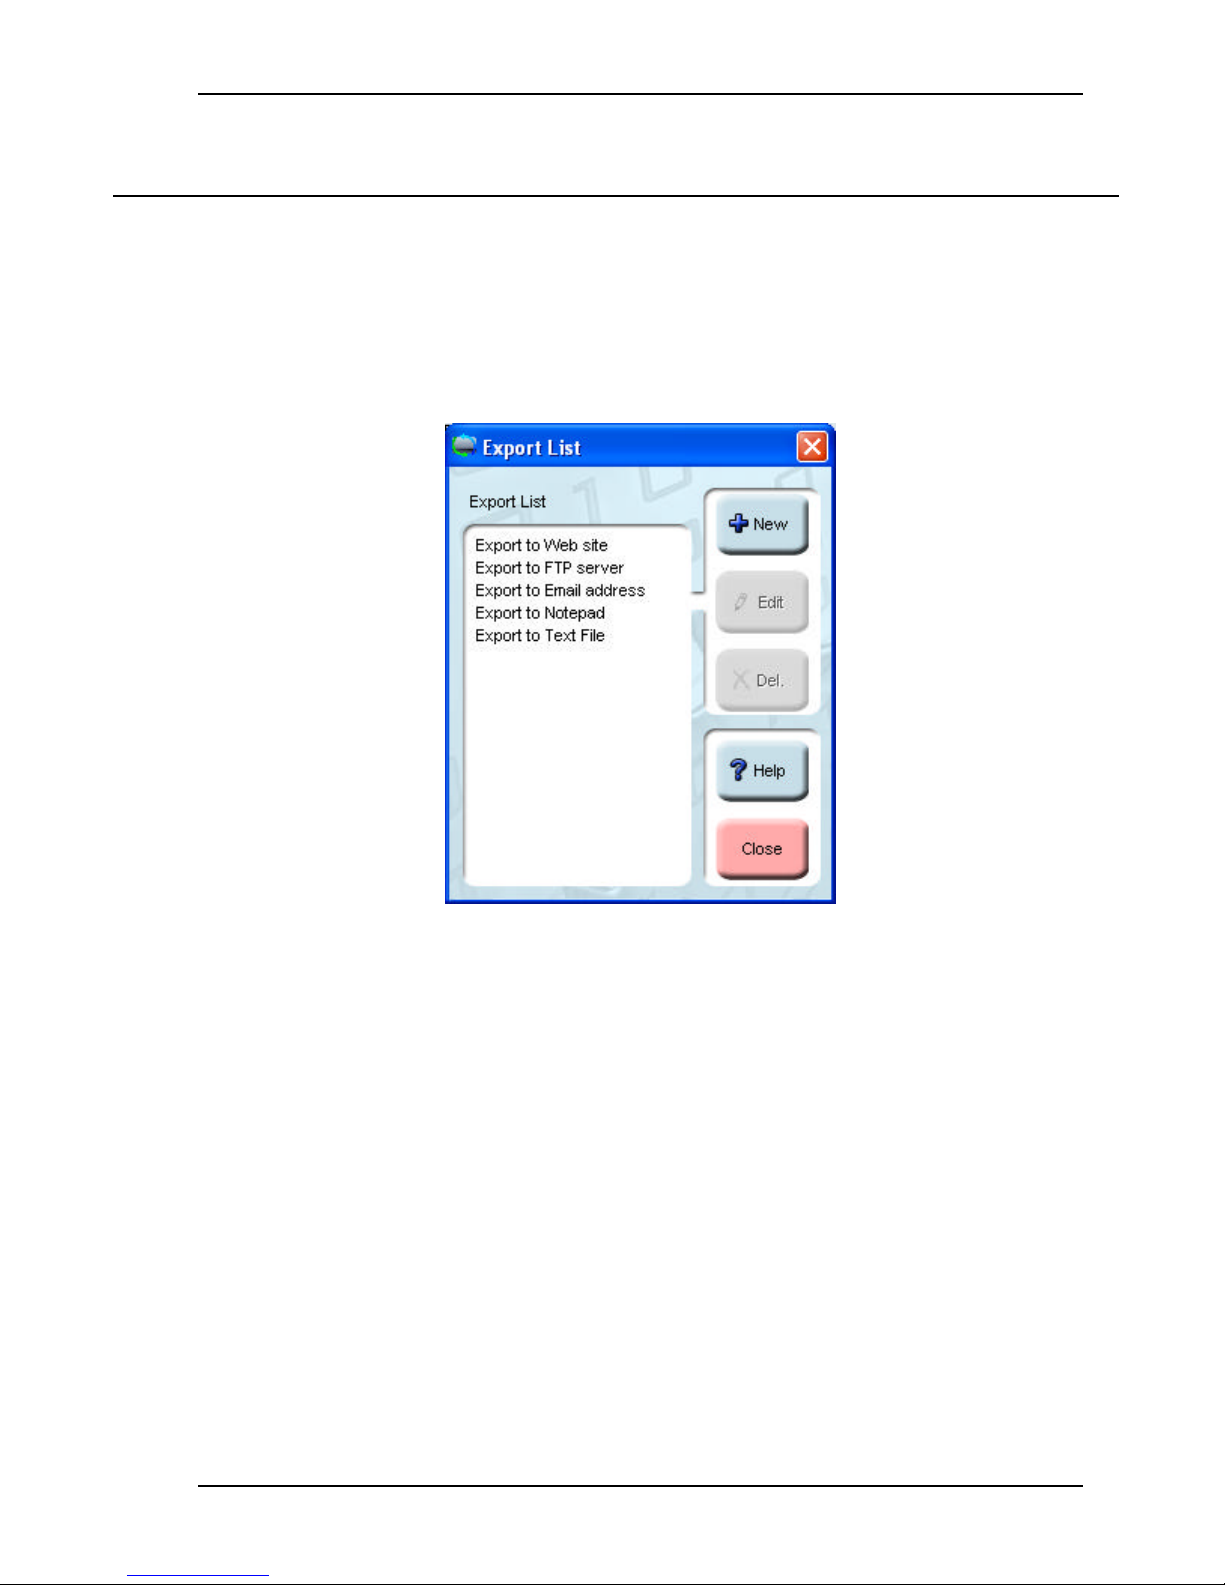
Exporting data Export List
8. EXPORTING DATA
EXPORT LIST
The export list allows you to configure predefined data export options. You can define data
export to the web, email, FTP, other applications, or a file. Once you define data export
options, you can select records and export them directly to one or more of the predefined
destinations.
CREATING AN EXPORT LIST
Select Export List from the File menu.
§
Click New.
§
Type in a name for the list. Try to use meaningful names, e.g., “Mail to main office”.
§
Select the export type.
§
Click next.
§
EXPORTING TO THE WEB
The web export function is designed to export the records to a predefined web page on the
organization Intranet/Internet server, where it can be accessed by other users.
1. Follow the steps in Creating an export list, above. (Select Web from the export
type list).
Figure 8-1: Export list window
Scanshell.net User Guide © 2005 Card Scanning Solutions 47
Page 48
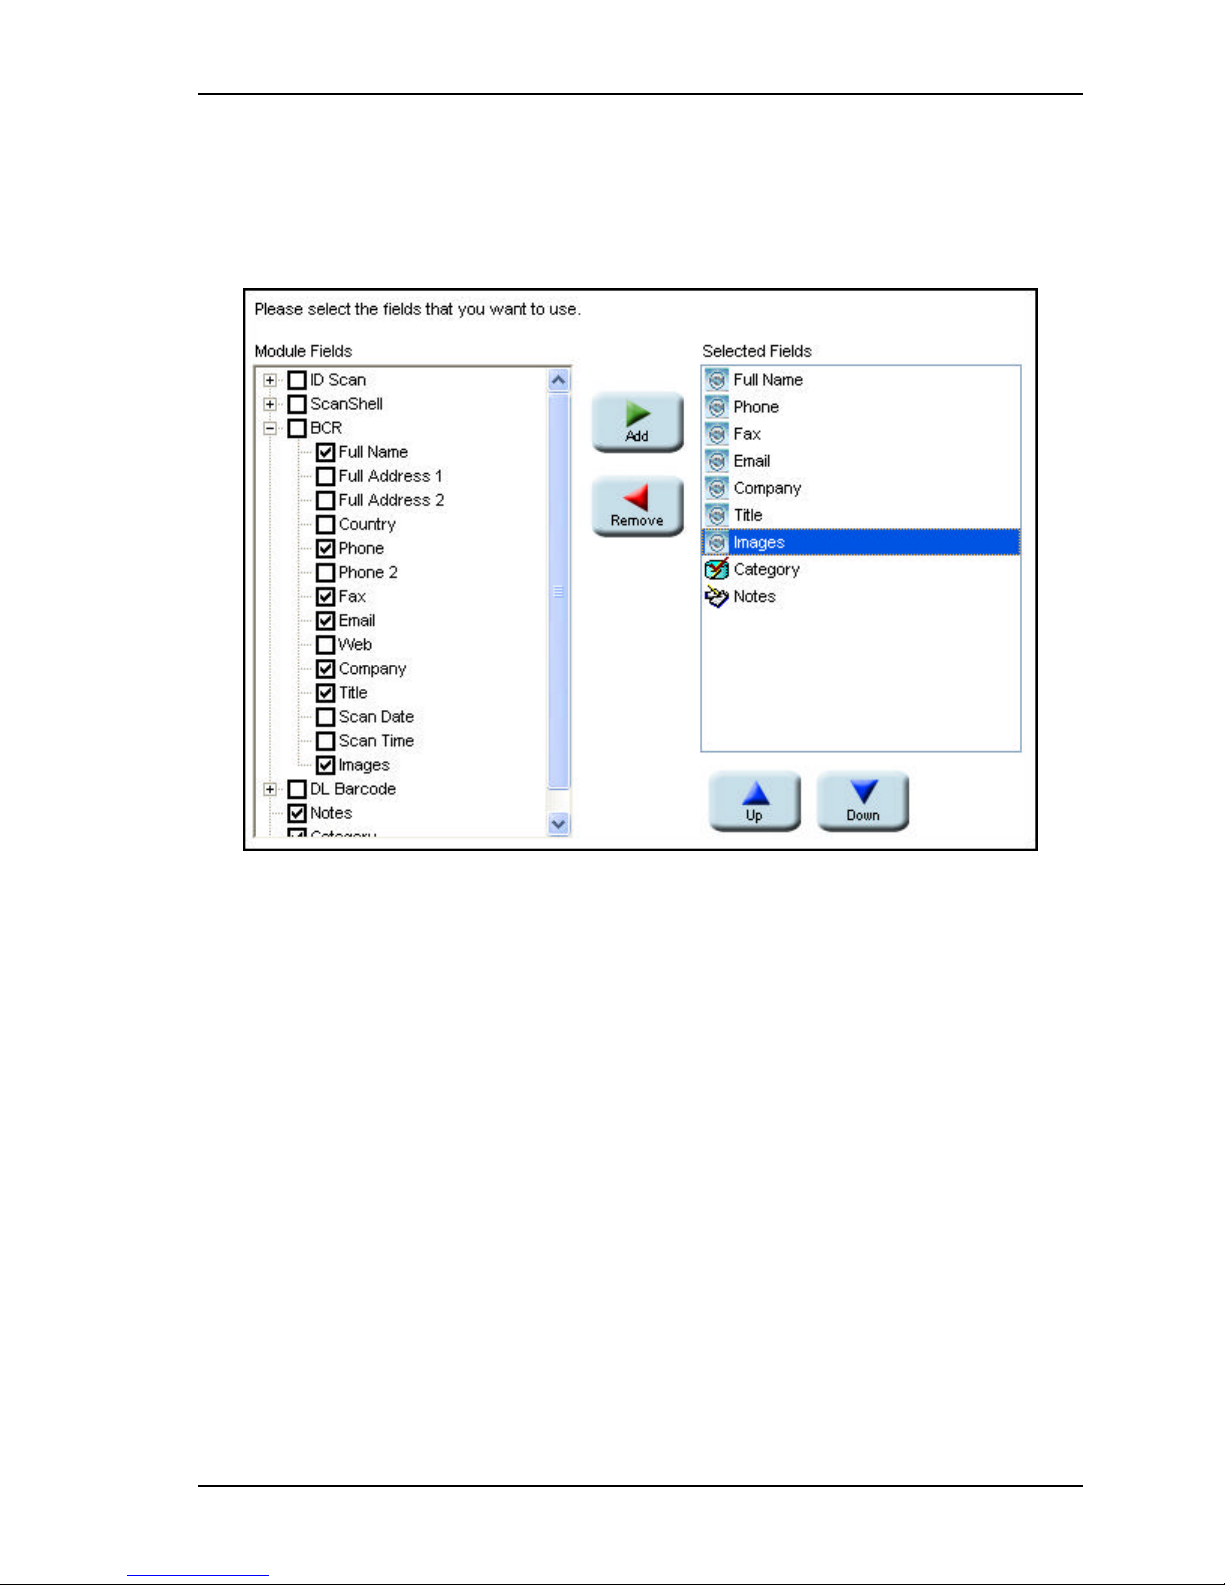
Exporting data Exporting to the Web
2. Fill in the appropriate web address (URL) to which the data will be exported
(consult your system administrator). Click Next.
3. In the screen that opens, select the fields of each module you want to be included in
the data export
Figure 8-2: Module and fields selection for Web export
4. Select the record fields you want to have exported as follows:
To select all the module fields – Check the box next to the module. All the
s
module fields will be listed in the Selected Fields column.
To select specific fields in each module, expand the module by clicking on the
s
“+” next to it, and then check the fields you would like to have exported
5. You can remove selected fields from the selected fields list on the right, by
selecting fields and clicking the remove arrow, or by deselecting their checkbox in
the left Module Fields column.
6. Check Notes and Category if you wish to have the notes and categories exported
together with the records.
7. You can determine the place, in which the selected field will appear on the exported
web page, by selecting a field in the right column, and using the up and down
arrows to move it up and down the list. Click Next.
Scanshell.net User Guide © 2005 Card Scanning Solutions 48
Page 49
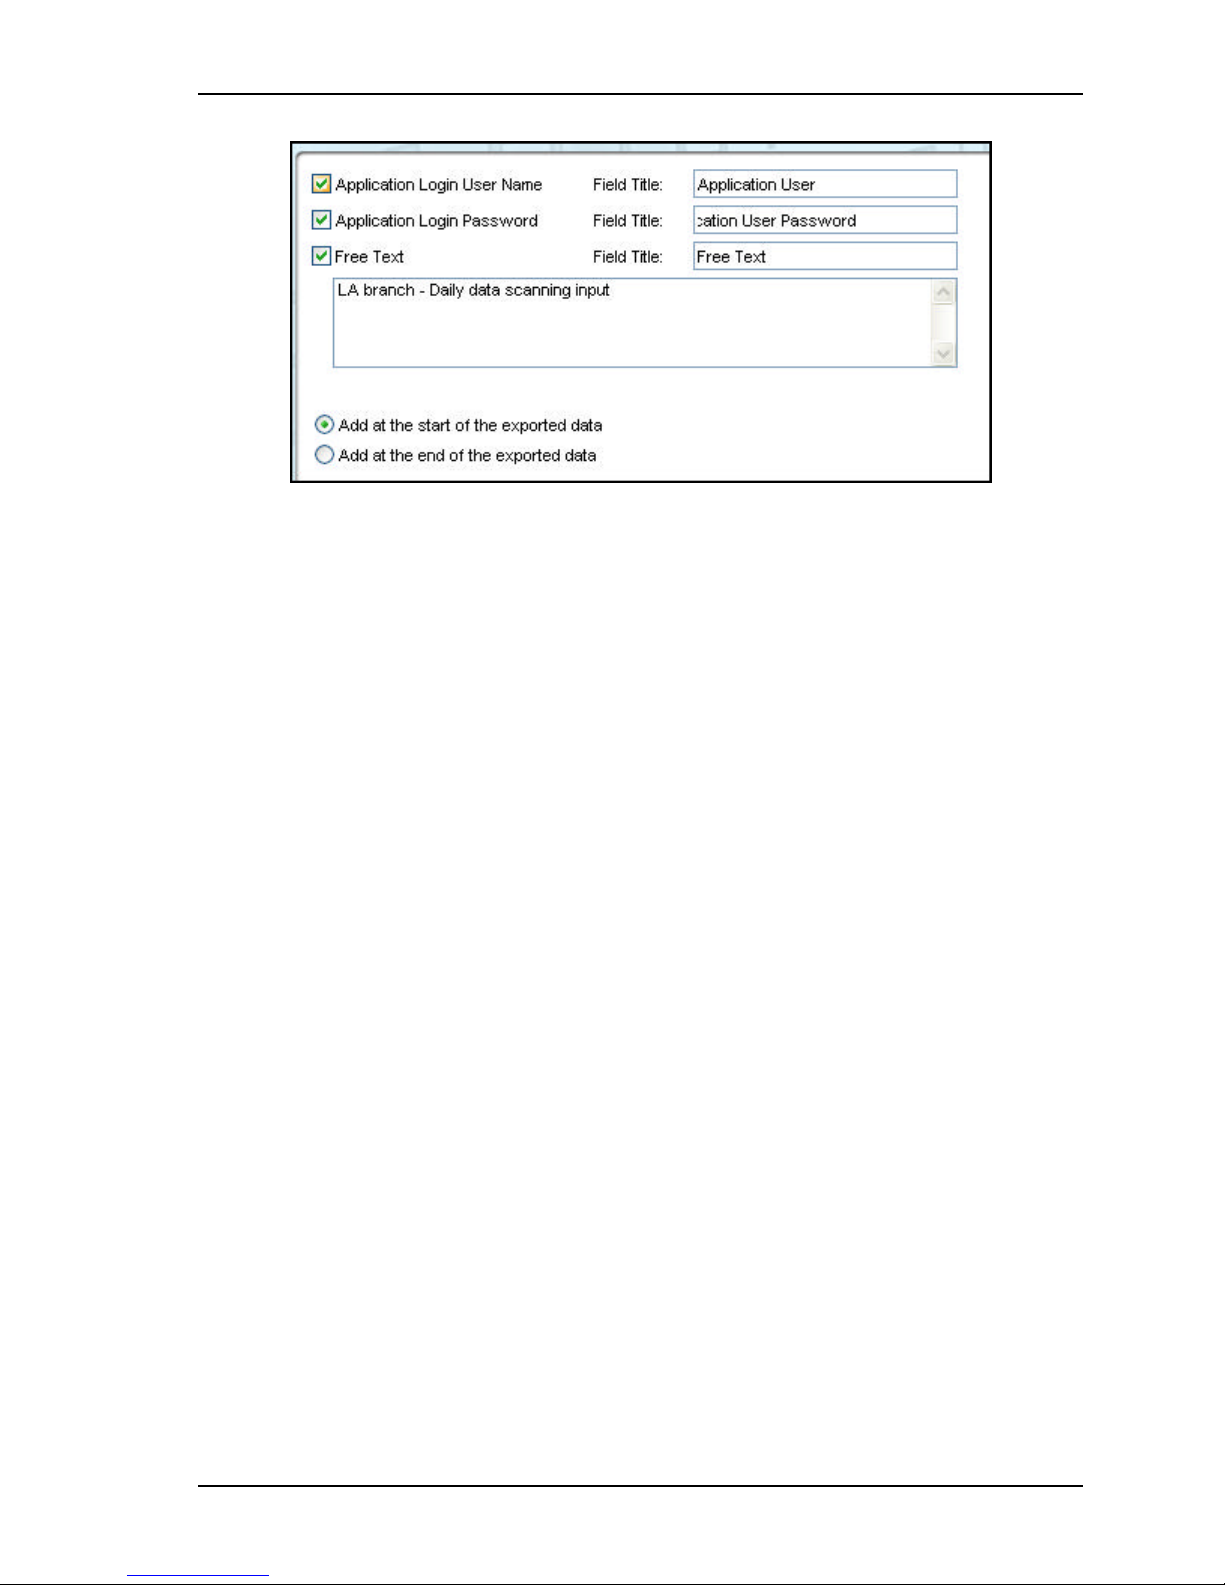
Exporting data Exporting to the Web
Figure 8-3: Extra export data (Web export)
8. In the Extra Export data screen that opens, select the desired options. You can edit
the field labels of each option you select in the Field Title field.
9. Determine whether the extra data will be attached at the beginning or the end of the
exported data.
10. Click Finish to complete the Web export list.
Scanshell.net User Guide © 2005 Card Scanning Solutions 49
Page 50
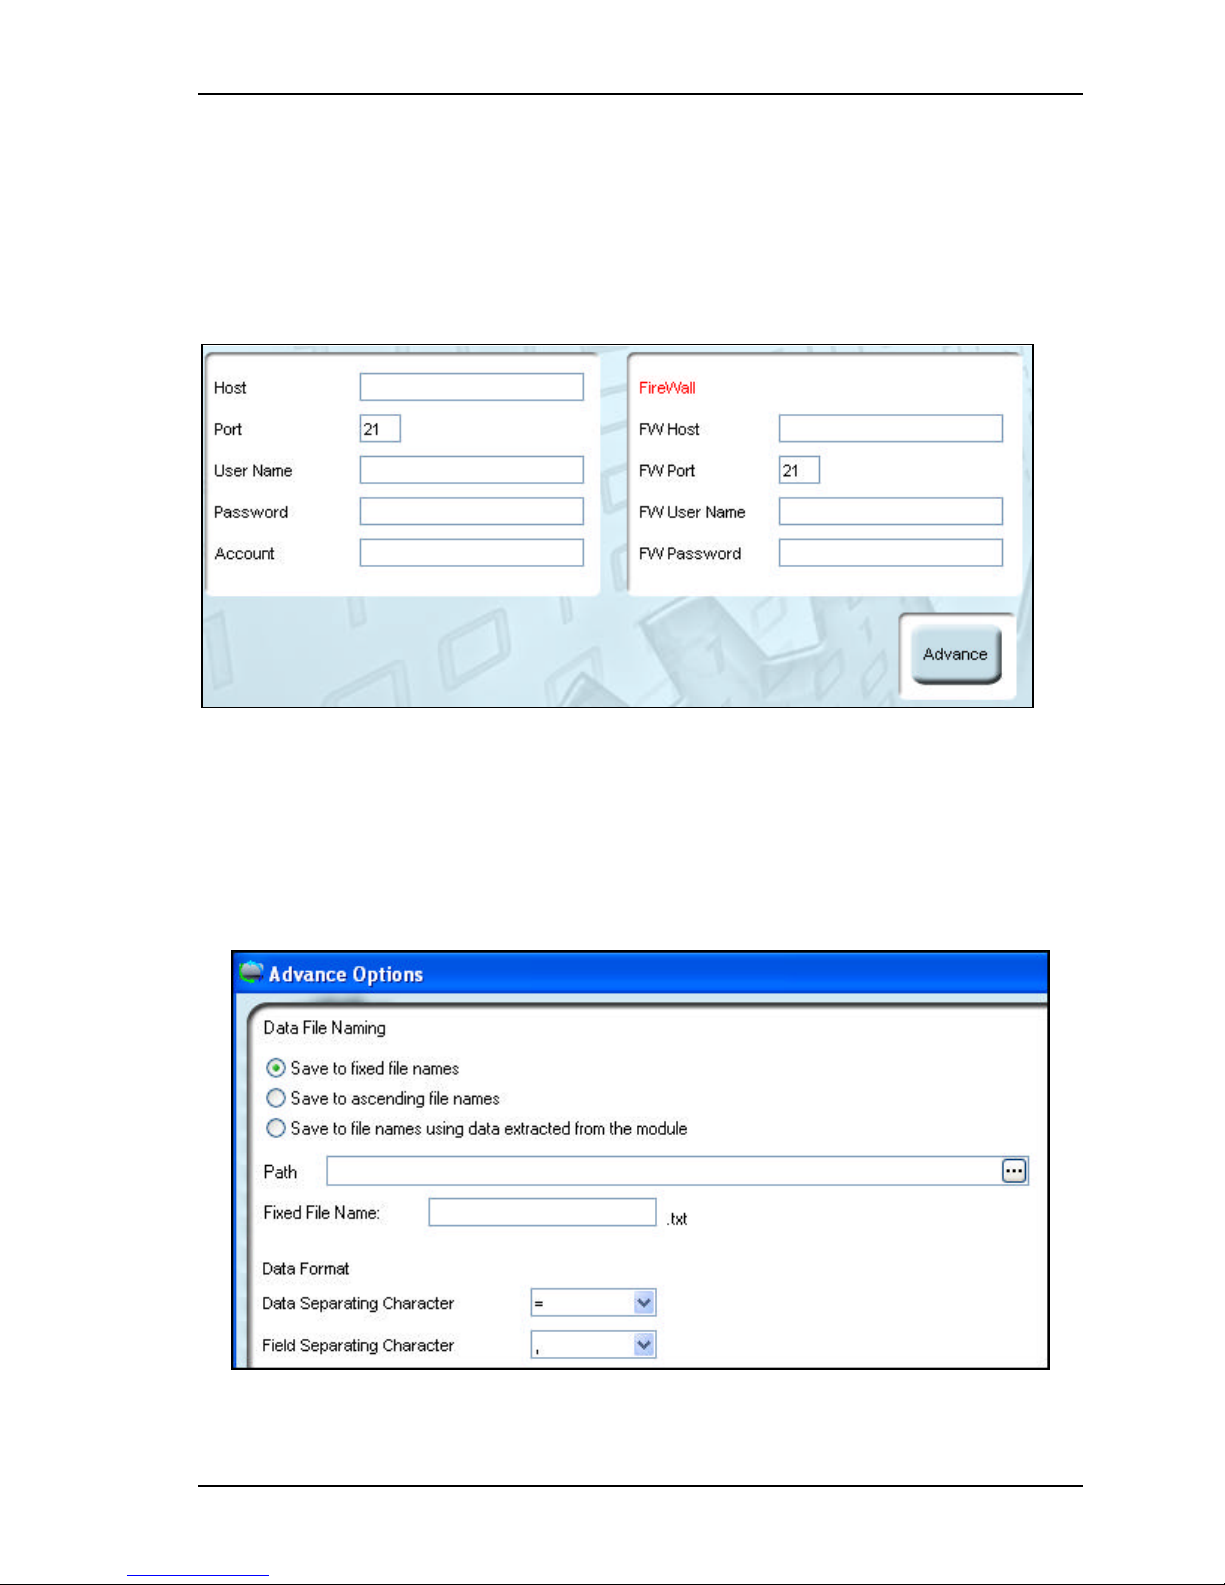
Exporting data Exporting to FTP
EXPORTING TO FTP
The FTP export function is designed to export records to a predefined FTP address, where
it can be accessed by other users.
1. Follow the steps in Creating an export list, page 47. (Select FTP from the export
type list).
Figure 8-4: FTP Export configuration
2. Fill in the appropriate details.
3. If required, fill in the Firewall details (consult your system administrator).
4. Click Advanced.
FTP ADVANCED DETAILS
Scanshell.net User Guide © 2005 Card Scanning Solutions 50
Figure 8-5: FTP Advanced Export configuration
Page 51

Exporting data Exporting to FTP
Data file naming
5. Select the desired FTP automatic file naming option:
Save to fixed file name - The file will have a fixed name. Example: If you fill
s
in the data file name: CSSN_ID, the resulting file name will be CSSN_ID.txt.
The following uploaded file will have the same name.
Save to ascending file name - In the File Name field, fill in the name prefix
s
and starting count number. Example: If you fill in the data file name:
CSSN_ID0, the resulting file name will be CSSN_ID0.txt. The following
uploaded file will be named CSSN_ID1.txt etc.
Save to file name using extracted data from ID – The file name is
s
determined by the field you select. Example: If you select the Family name
field, and the scanned card's cardholder name is Smith, the file will be named
Smith.txt.
DATA FIELD FORMAT
Data separating character – The character that separates the database field name and its
value. Example: If the data separating character is set to ‘=’, the result in the field ‘City’
will be: City=Miami. If set to ‘#’, the result in the field ‘City’ will be: City#Miami
Field separating character – The way fields and their values are separated.
Example: Tab
Line: First name: John
City: Miami
Tab: First name: John City: Mia mi
Custom field separating character – If you select ‘Custom’ in the ‘Field separating
character’, you can specify a custom character to separate between fields.
Example: &
Result: First name: John&City: Miami
6. Click Next.
7. In the screen that opens, select t he fields of each module you want to be included in
the data export
Note: If the character you selected as field separator appears in the record text, it will be
removed from the text and replaced with spaces. Example: If you select "," as your field
separating character, and your City field text contains the string "Rosewood,Paris,Texas"
the string will be displayed as follows: "City,Rosewood Paris Texas. The selected
character will be inserted between the value City and the text string.
Scanshell.net User Guide © 2005 Card Scanning Solutions 51
Page 52
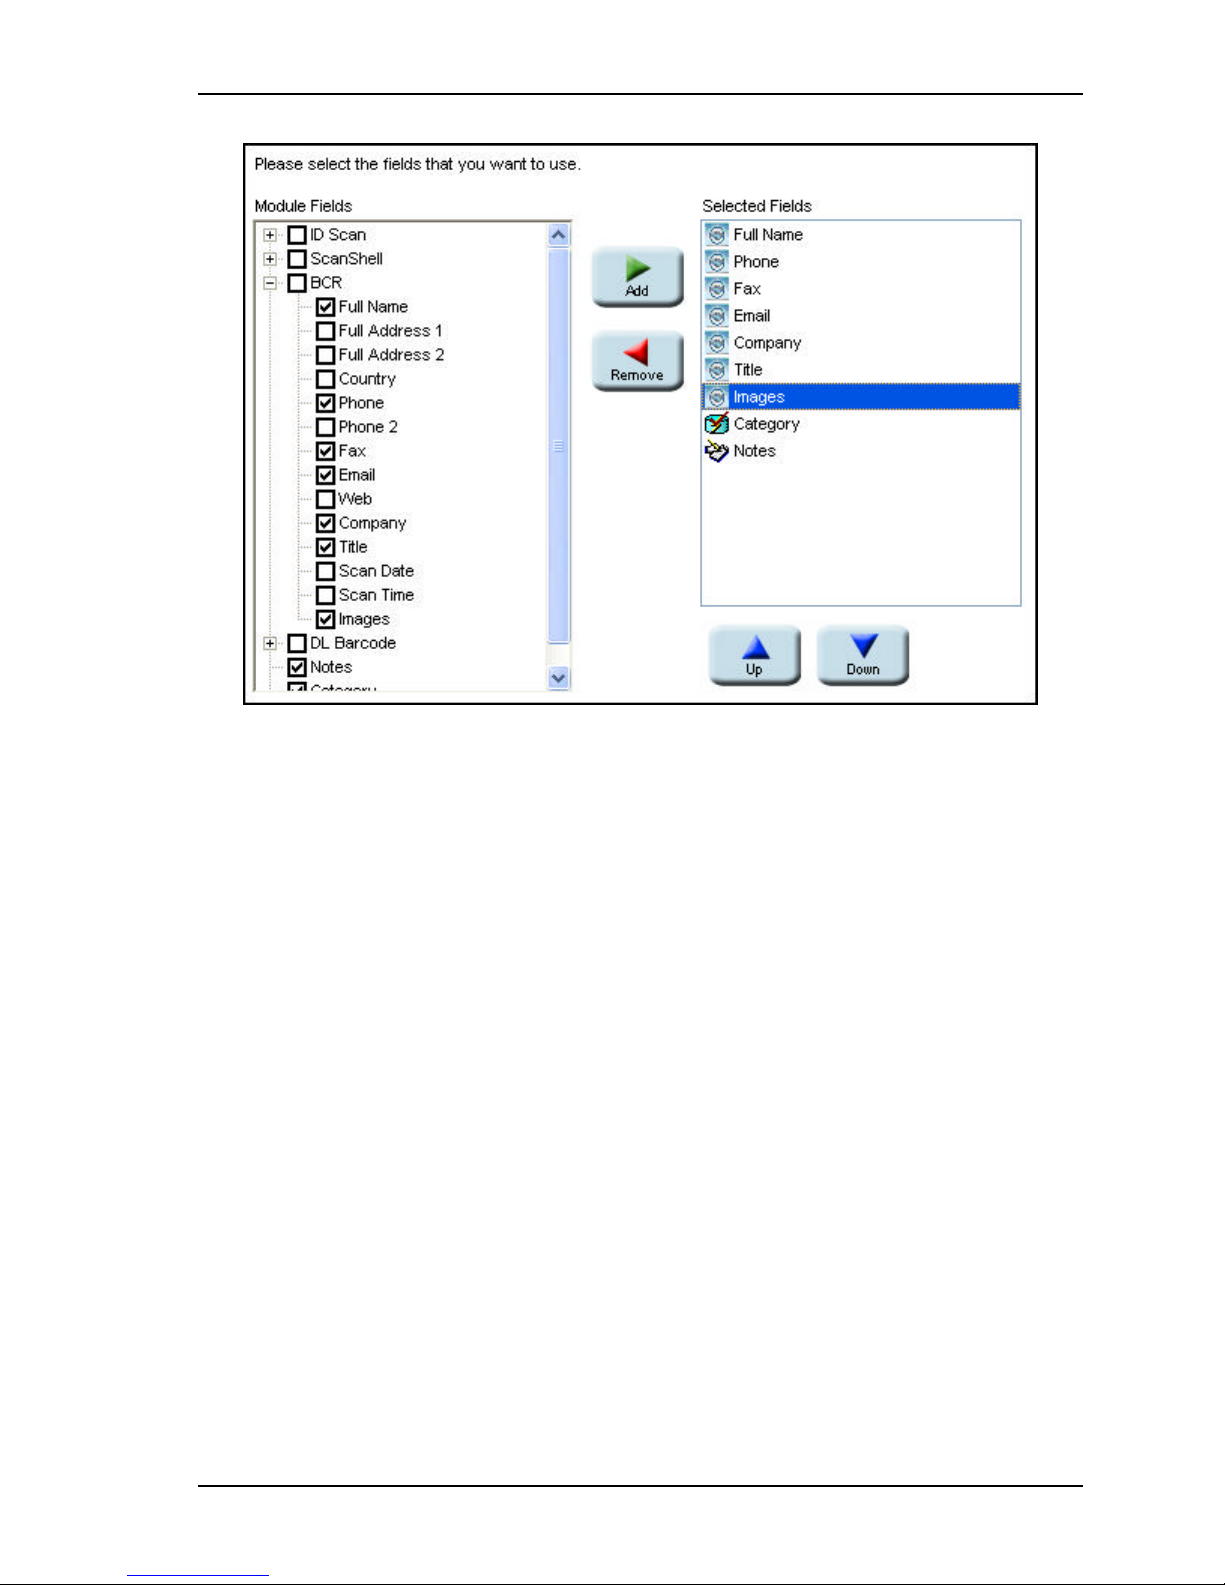
Exporting data Exporting to FTP
Figure 8-6: Module and fields for export
8. Select the record fields you want to have exported as follows:
To select all the module fields – Check the box next to the module. All the
s
module fields will be listed in the Selected Fields column.
To select specific fields in each module, expand the module by clicking on the
s
“+” next to it, and then check the fields you would like to have exported
9. You can remove selected fields from the selected fields list on the right, by
selecting fields and clicking the remove arrow, or by deselecting their checkbox in
the left module fields' column.
10. Check Notes and Category if you wish to have the notes and categories exported
together with the records.
11. Click Next.
Scanshell.net User Guide © 2005 Card Scanning Solutions 52
Page 53
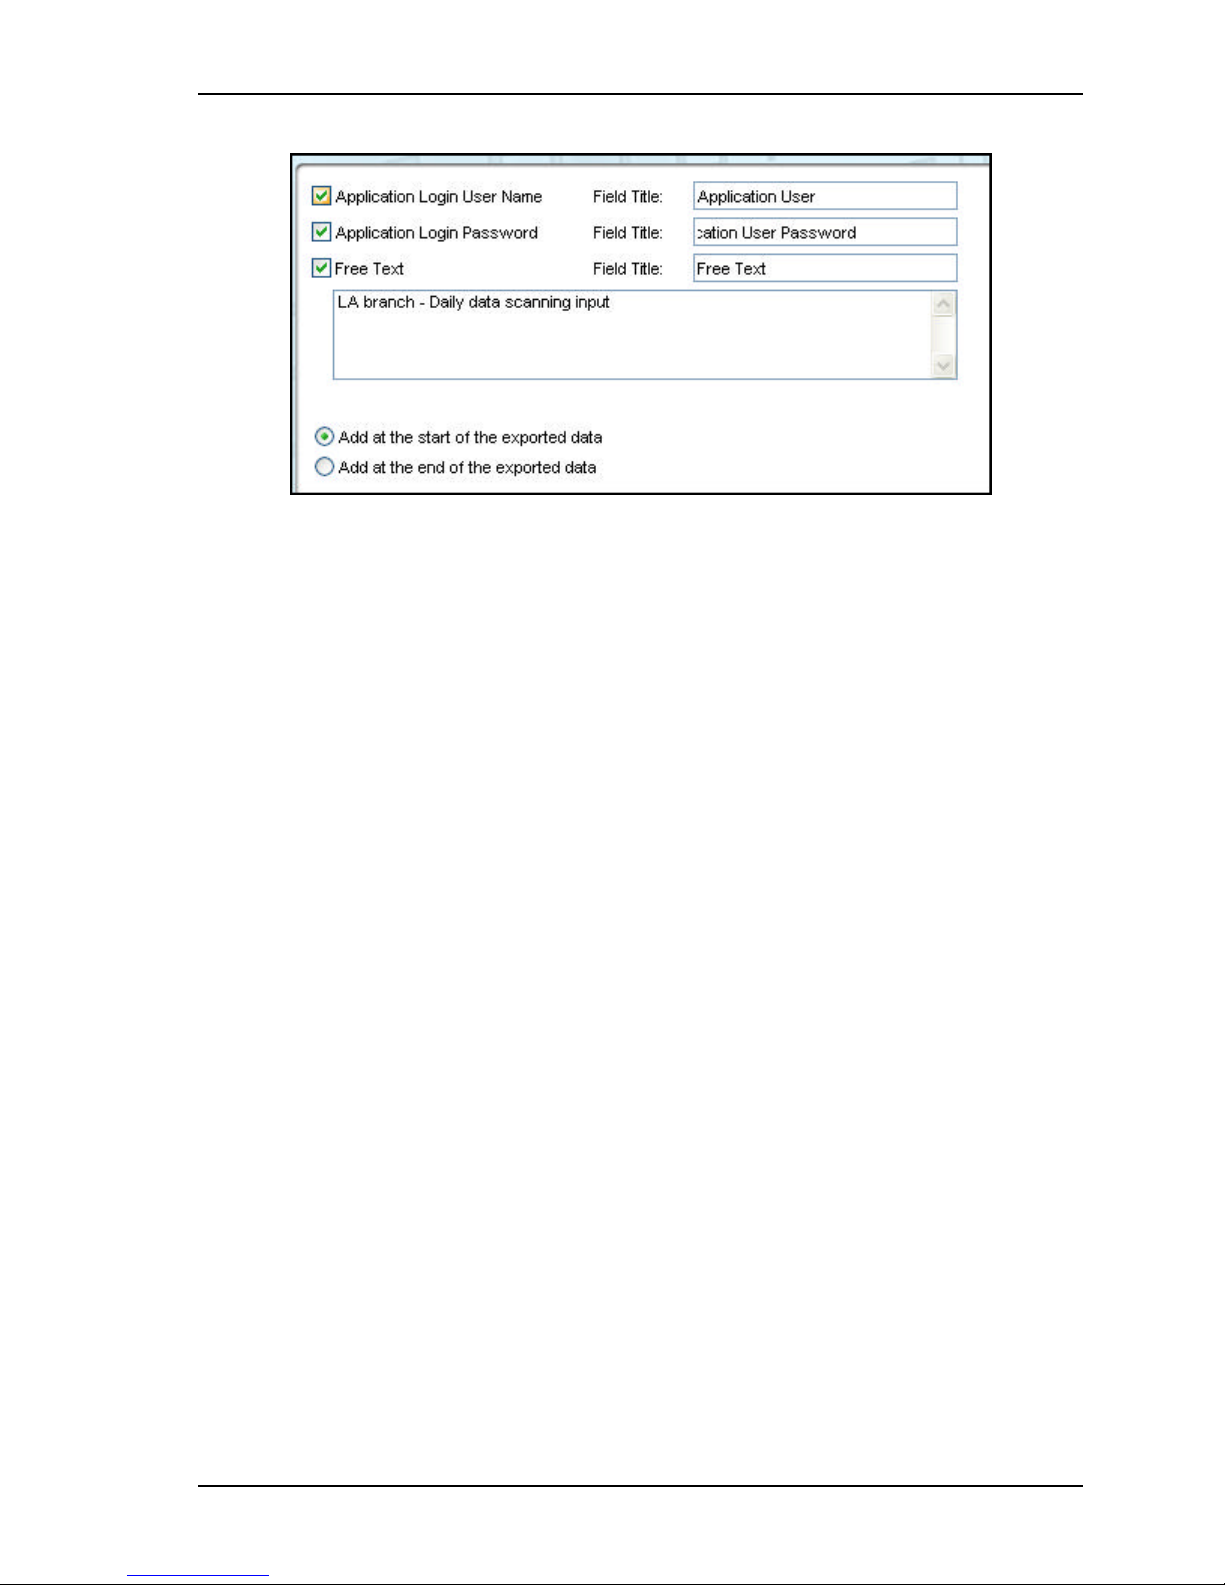
Exporting data Exporting to FTP
Figure 8-7: Extra export data
12. In the Extra export data screen that opens, select the desired options. You can edit
the field labels of each option you select in the Field Title field.
13. Determine whether the extra data will be attached at the beginning or the end of the
exported data.
14. Click Finish to complete the Web export list.
.
Scanshell.net User Guide © 2005 Card Scanning Solutions 53
Page 54
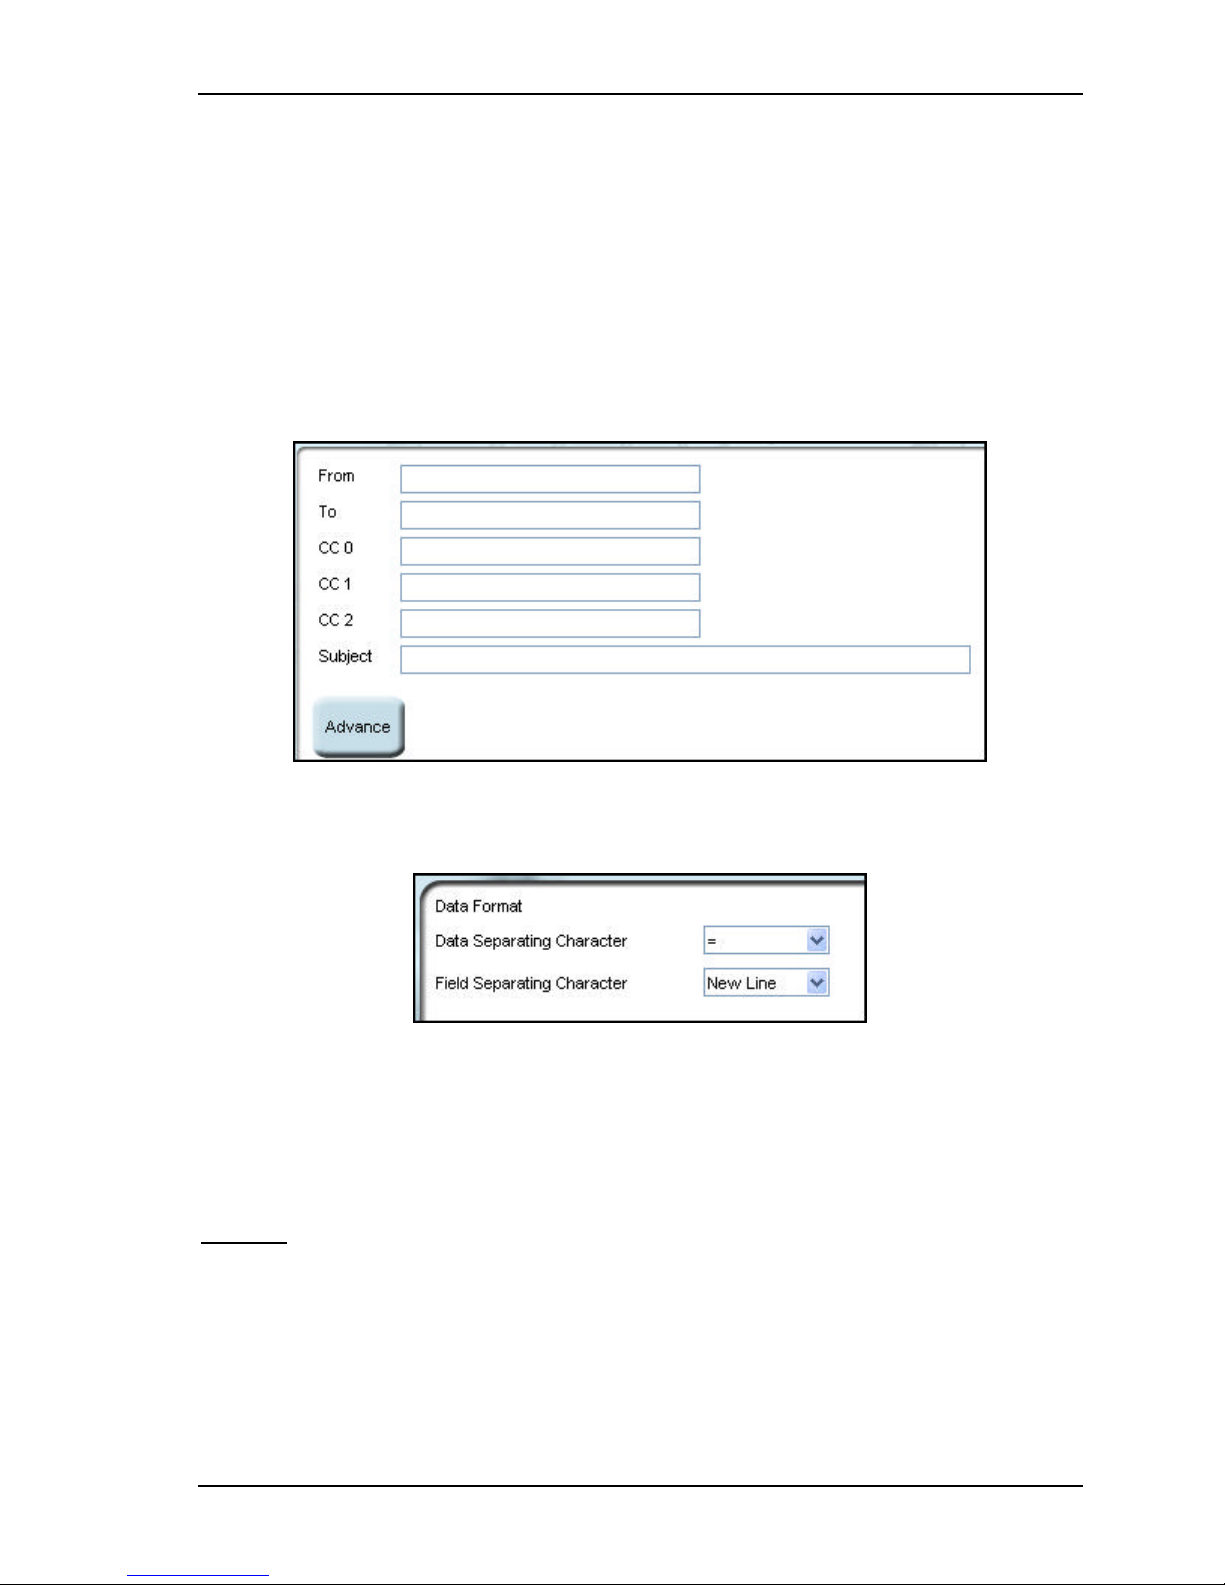
Exporting data Exporting to email
EXPORTING TO EMAIL
The email export function is designed to export records to a predefined email address. If
enabled, the data of the last card you scan (including image) will be automatically sent as
an email message to the mail recipient you specify, as soon as you press OK.
1. Follow the steps in Creating an export list, page 47. (Select Email from the export
type list).
2. In the mail header that opens, fill in the appropriate details (as you would in a
regular email message).
Figure 8-8: Email export header screen
3. Click on Advanced.
Figure 8-9: Email export advanced details
Data separating character – The character that separates the database field name and its
value. Example: If the data separating character is set to ‘=’, the result in t he field ‘City’
will be: City=Miami. If set to ‘#’, the result in the field ‘City’ will be: City#Miami
Field separating character – The way fields and their values are separated.
Example: Tab
Line: First name: John
City: Miami
Tab: First name: John City: Miami
Note: If the character you selected as field separator appears in the record text, it will be
removed from the text and replaced with spaces. Example: If you select "," as your field
Scanshell.net User Guide © 2005 Card Scanning Solutions 54
Page 55
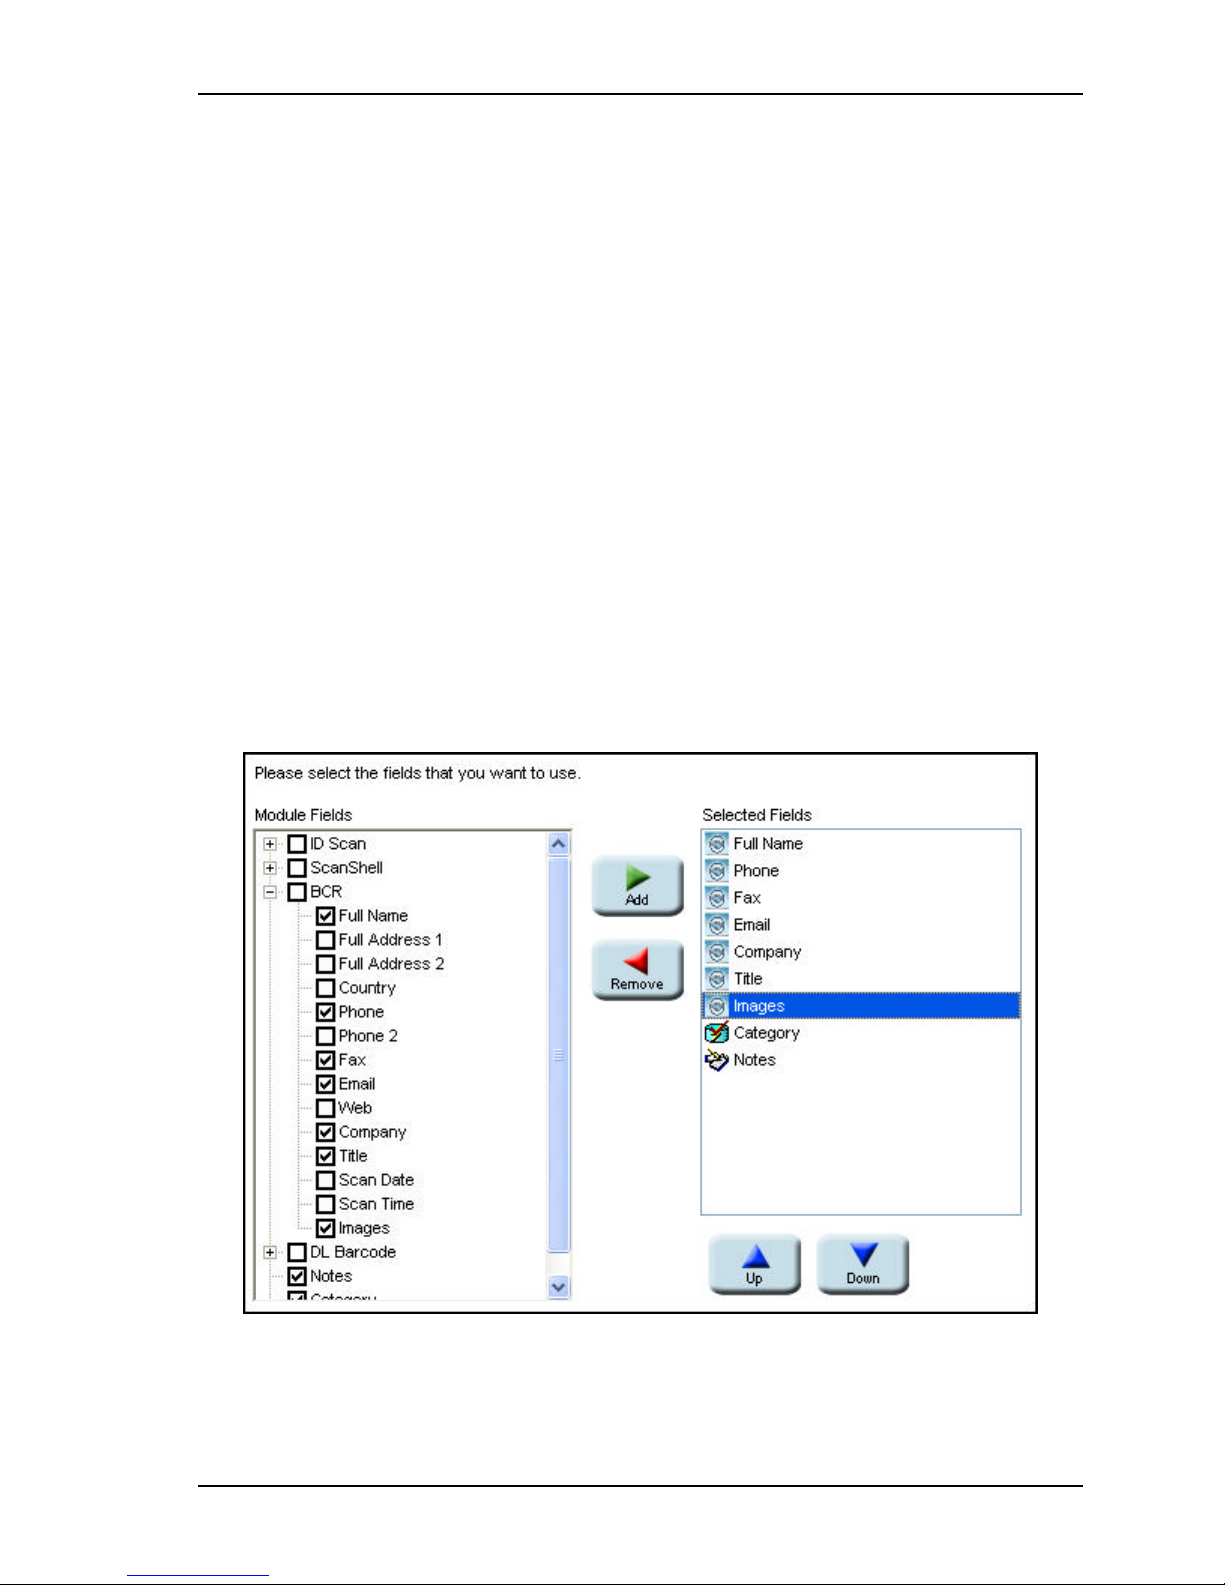
Exporting data Exporting to applications
separating character, and your City field text contains the string "Rosewood,Paris,Texas"
the string will be displayed as follows: "City,Rosewood Paris Texas. The selected character
will be inserted between the value City and the text string.
EXPORTING TO APPLICATIONS
The application export function is designed to e xport the last saved record to the clipboard,
from which it will be copied automatically to an open document of any application you
specify. If enabled, as soon as you press OK after scanning a new card, the data of the last
card you scan will be automatic ally copied as text to an open document of any application
you specify. To enable the export, the target application has to be running with an open
document, and be capable of pasting text from the clipboard.
1. Follow the steps in Creating an export list, page 47. (Select Application from the
export type list).
2. Type in the name of the application and click Advanced. Please see the previous
page for information on how to handle the Advanced screen. The application name
must be the same as the open application's window title (case sensitive)
3. Click Next.
4. In the screen that opens, select the fields of each module you want to include in the
data export
5. Select the record fields you want to have exported as follows:
Scanshell.net User Guide © 2005 Card Scanning Solutions 55
Figure 8-10: Module and fields selection for export
Page 56
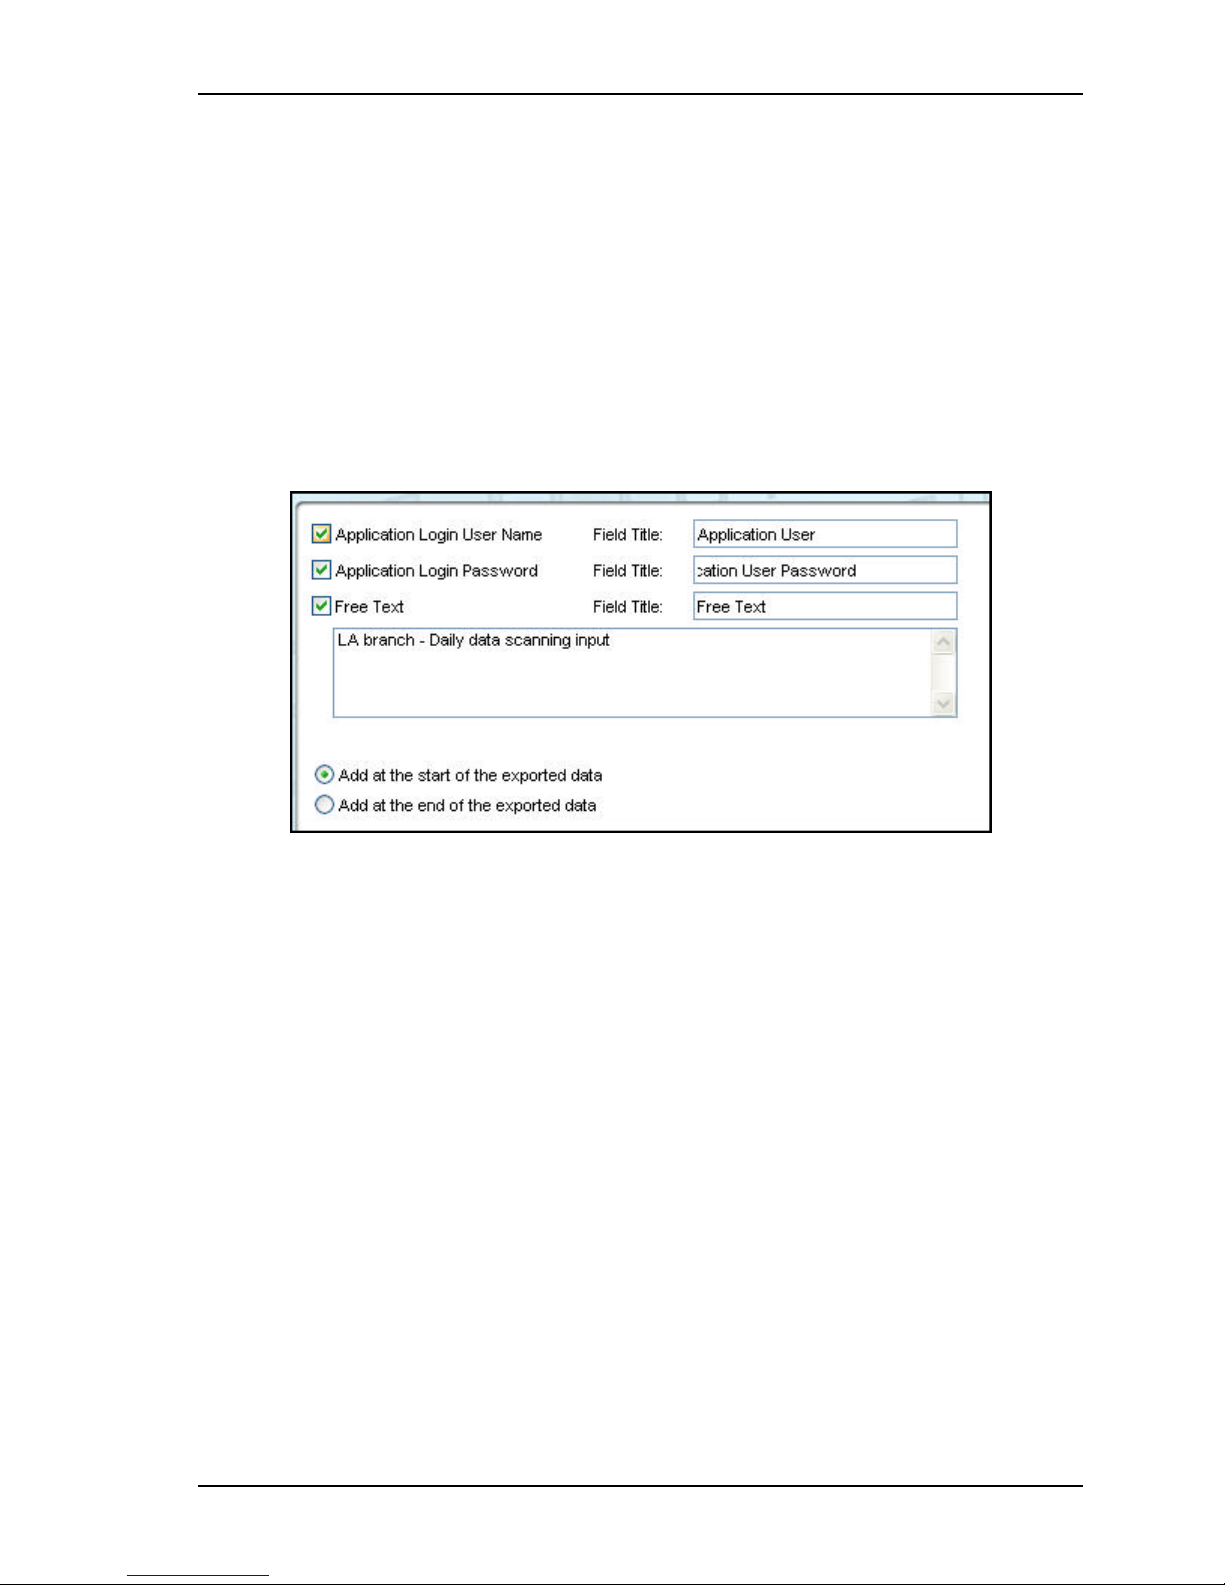
Exporting data Exporting to file
To select all the module fields – Check the box next to the module. All the
s
module fields will be listed in the Selected Fields column.
To select specific fields in each module, expand the module by clicking on the
s
“+” next to it, and then check the fields you would like to have exported
6. You can remove selected fields from the selected fields list on the right, by
selecting fields and c licking the remove arrow, or by deselecting their checkbox in
the left module fields' column.
7. Check Notes and Category if you wish to have the notes and categories exported
together with the records.
8. Click Next.
9. In the Extra export data screen that opens, select the desired options. You can edit
the field labels of each option you select in the Field Title field.
10. Determine whether the extra data will be attached at the beginning or the end of the
exported data.
11. Click Finish to complete the Application export list.
EXPORTING TO FILE
The file export function is designed to export the records to a text file automatically.
1. Follow the steps in Creating an export list, page 47. (Select File from the export
type list). Click next.
Figure 8-11: Extra export data
Scanshell.net User Guide © 2005 Card Scanning Solutions 56
Page 57
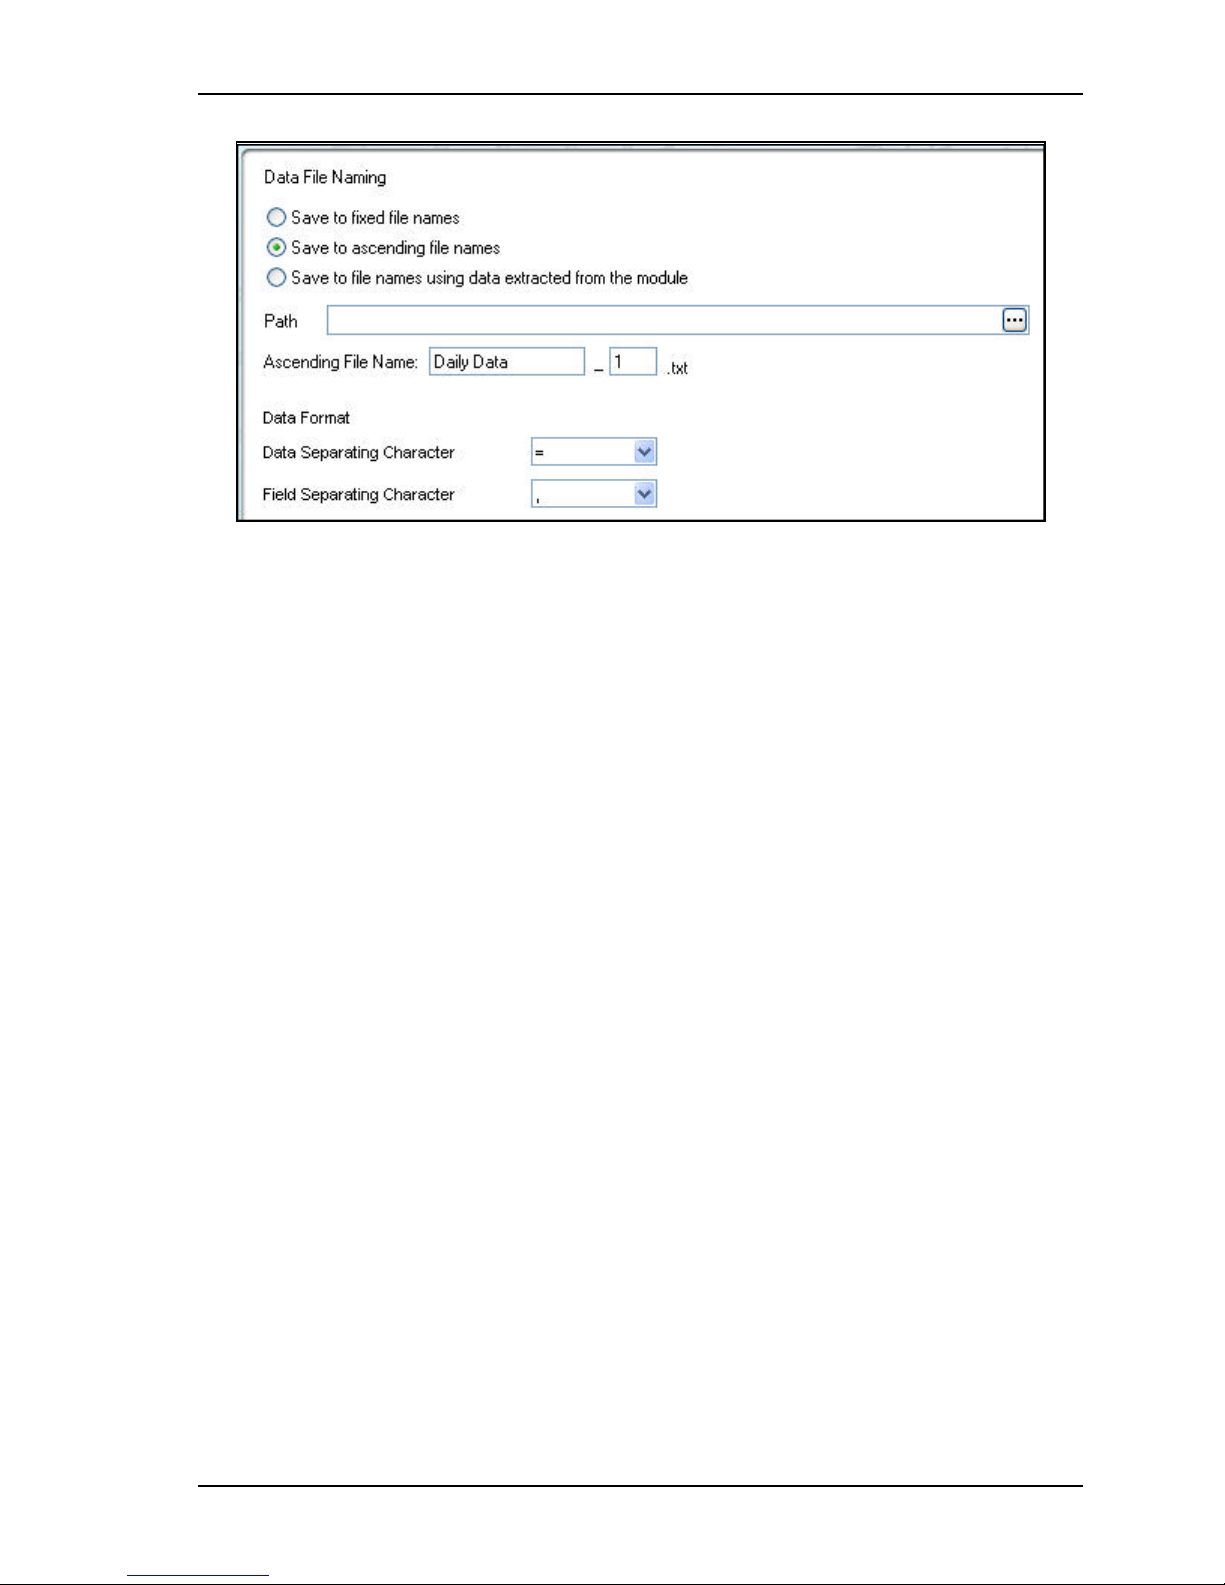
Exporting data Exporting to file
Figure 8-12: Export file name configuration
2. Type in a path in which to save the file, or click on the button to the right, and
select a location in which the file will be saved.
DATA FILE NAMING
§ Select the desired automatic file naming option:
Save to fixed file name - The file will have a fixed name. Example. If you fill
s
in the data file name: CSSN_ID, the resulting file name will be CSSN_ID.txt.
The following file that is created will have the same name.
Save to ascending file name - In the file name field, fill in the name prefix
s
and starting count number. Example. If you fill in the data file name:
CSSN_ID | 0, the resulting file name will be CSSN_ID0.txt. The following
file will be named CSSN_ID1.txt etc.
Save to file name using extracted data from ID – The file name is
s
determined by the field you select. Example: If you select the ‘Family name’
field, and the scanned card cardholder name is Smith, the file will be named
smith.txt.
Scanshell.net User Guide © 2005 Card Scanning Solutions 57
Page 58

Exporting data Exporting to file
DATA FIELD FORMAT
Data separating character – The character that separates the database field name and its
value. Example: If the data separating character is set to ‘=’, the result in the field ‘City’
will be: City=Miami. If set to ‘#’, the result in the field ‘City’ will be: City#Miami
Field separating character – The way fields and their values are separated.
Example: Choosing "Tab" as separating character:
Line: First name: John
City: Miami
Result: First name: John City: Miami
Custom field separating character – If you select ‘Custom’ in the ‘Field separating
character’, you can specify a custom character to separate between fields.
Example: Choosing "&" as separating character
Result: First name: John&City: Miami
Note: If the character you selected as field separator appears in the record text, it will be
removed from the text and replaced with spaces. Example: If you select "," as your field
separating character, and your City field text contains the string "Rosewood,Paris,Texas"
the string will be displayed as follows: "City,Rosewood Paris Texas. The selected
character will be inserted between the value City and the text string.
1. Click Next.
2. In the screen that opens, select the fields of each module you want to be included in
the data export
3. In the screen that opens, select the fields of each module you want to be included in
the data export
Scanshell.net User Guide © 2005 Card Scanning Solutions 58
Page 59
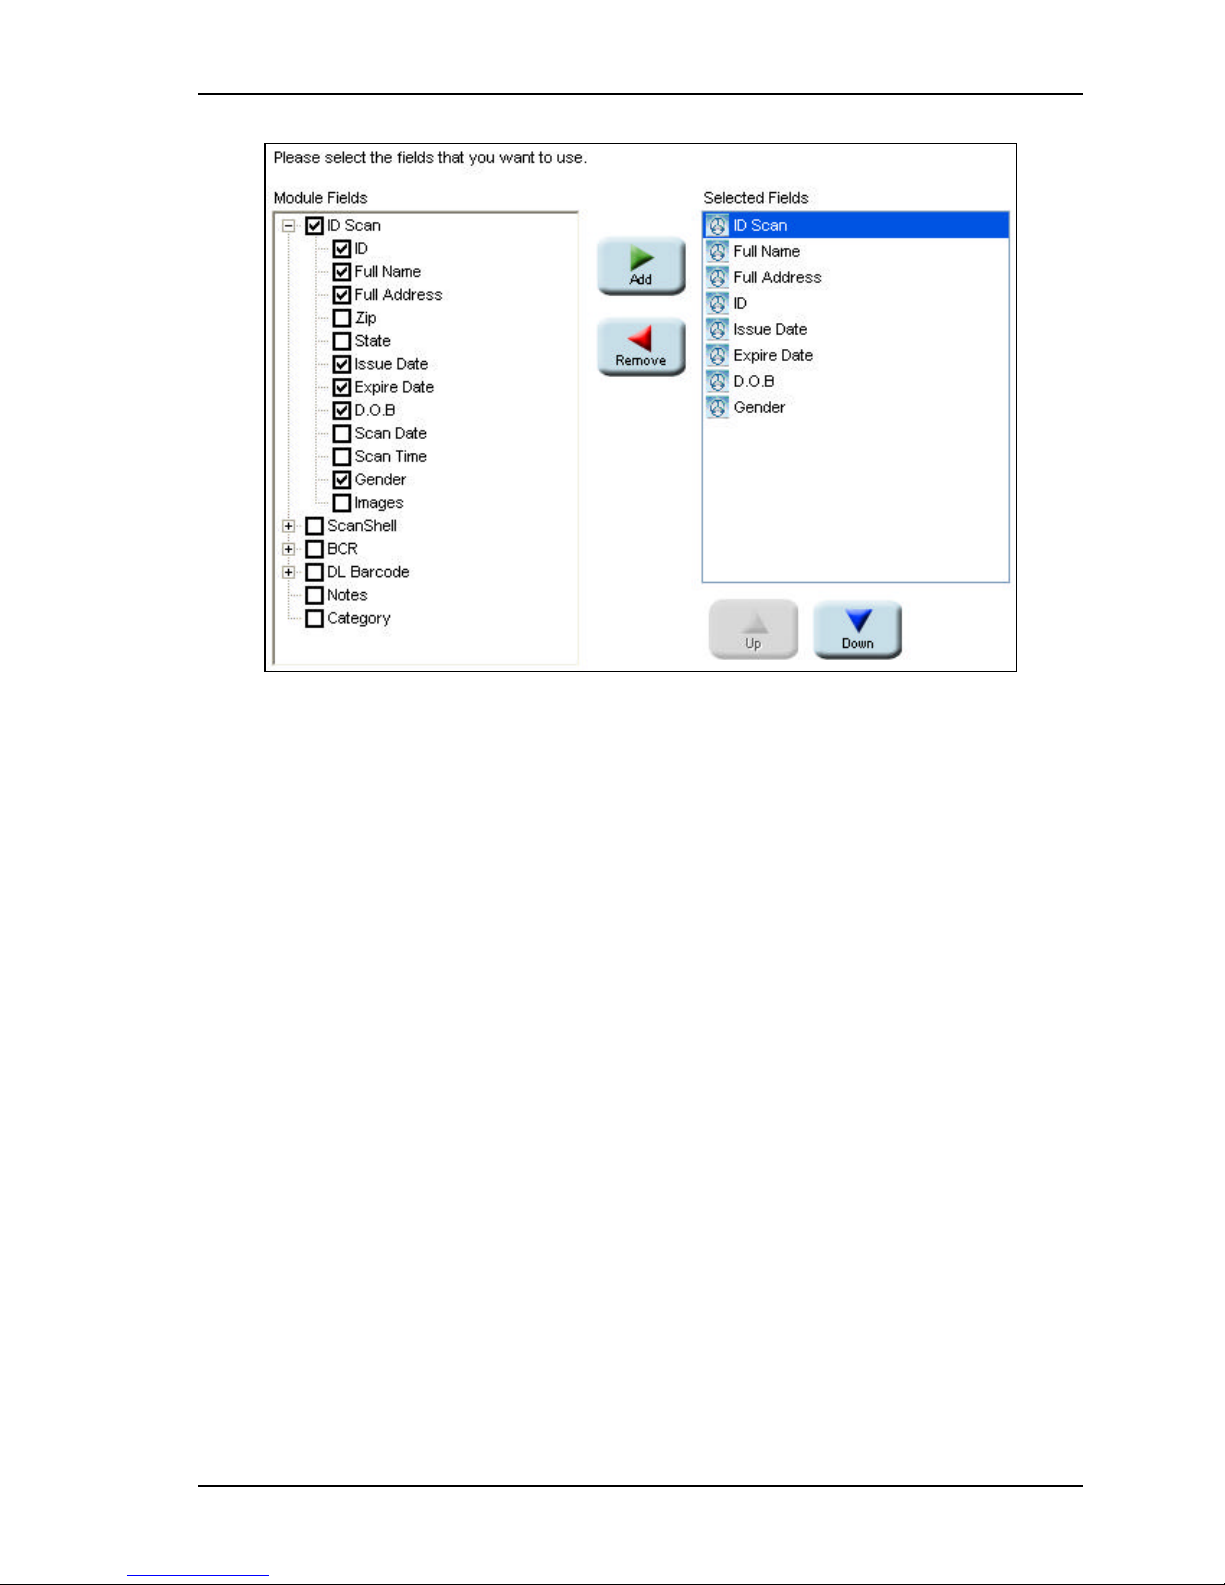
Exporting data Exporting to file
Figure 8-13: Module and fields selection for export
4. Select the record fields you want to have exported as follows:
To select all the module fields – Check the box next to the module. All the
s
module fields will be listed in the Selected Fields column.
To select specific fields in each module, expand the module by clicking on the
s
“+” next to it, and then check the fields you would like to have exported
5. You can remove selected fields from the selected fields list on the right, by
selecting fields and clicking the re move arrow, or by deselecting their checkbox in
the left module fields' column.
6. Check Notes and Category if you wish to have the notes and categories exported
together with the records.
7. You can determine the place, in which the selected field will appear on the exported
web page, by selecting a field in the right column, and using the up and down
arrows to move it up and down the list. Click Next.
Scanshell.net User Guide © 2005 Card Scanning Solutions 59
Page 60
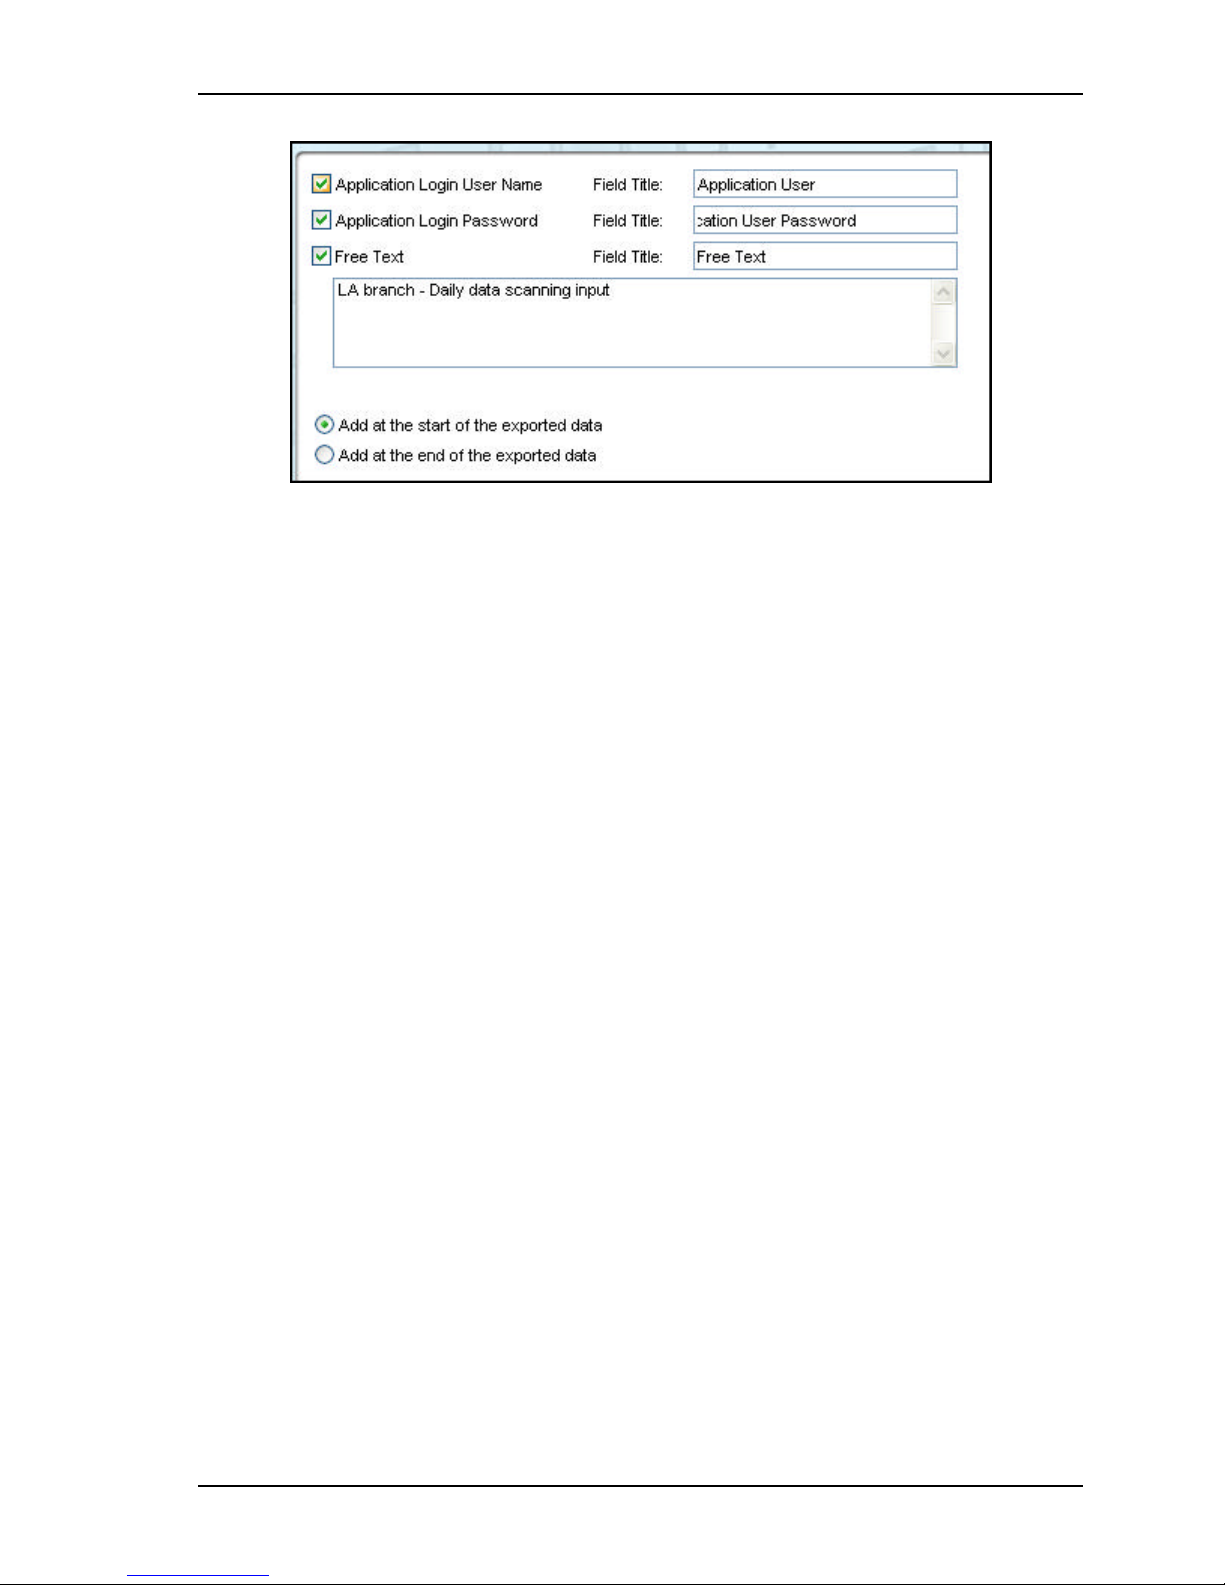
Exporting data Exporting to file
Figure 8-14: Extra export data (Web export)
8. In the Extra export data screen that opens, select the desired options. You can edit
the field labels of each option you select in the Field Title field.
9. Determine whether the extra data will be attached at the beginning or the end of the
exported data.
10. Click Finished to complete the File Export list.
Scanshell.net User Guide © 2005 Card Scanning Solutions 60
Page 61
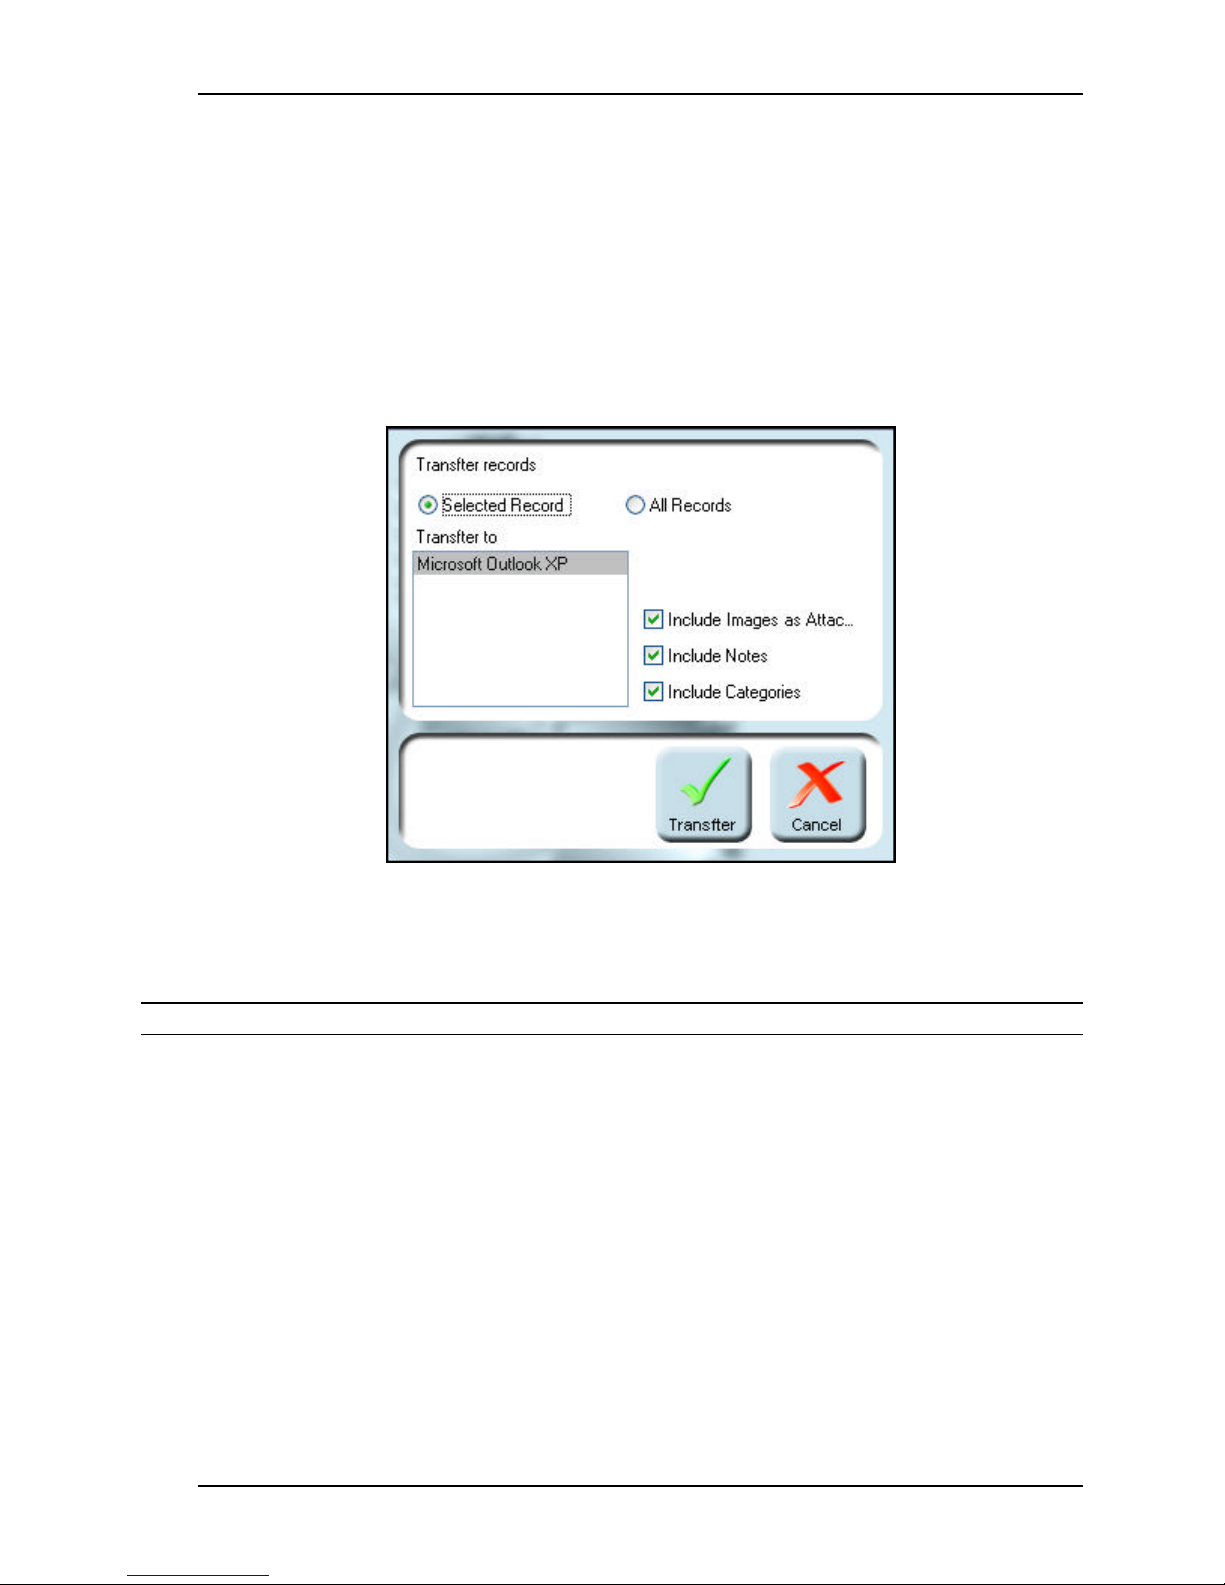
Transferring data to an application
TRANSFERRING DATA TO AN APPLICATION
In addition to exporting data to applications using the clipboard, you can also transfer data
to supported applications in the destination application format. For example, you can have
a record transferred directly into a Microsoft Outlook contact management file. In this
case, a new contact record will be added automatically to Outlook, containing the
transferred data.
Select the record(s) you want to transfer in the main screen's record list.
§
Select Transfer from the File menu.
§
Figure 8-1: The transfer dialog
Select the desired options
§
Click Transfer.
§
Note: Currently the transfer function only supports Microsoft Outlook.
Scanshell.net User Guide © 2005 Card Scanning Solutions 61
Page 62
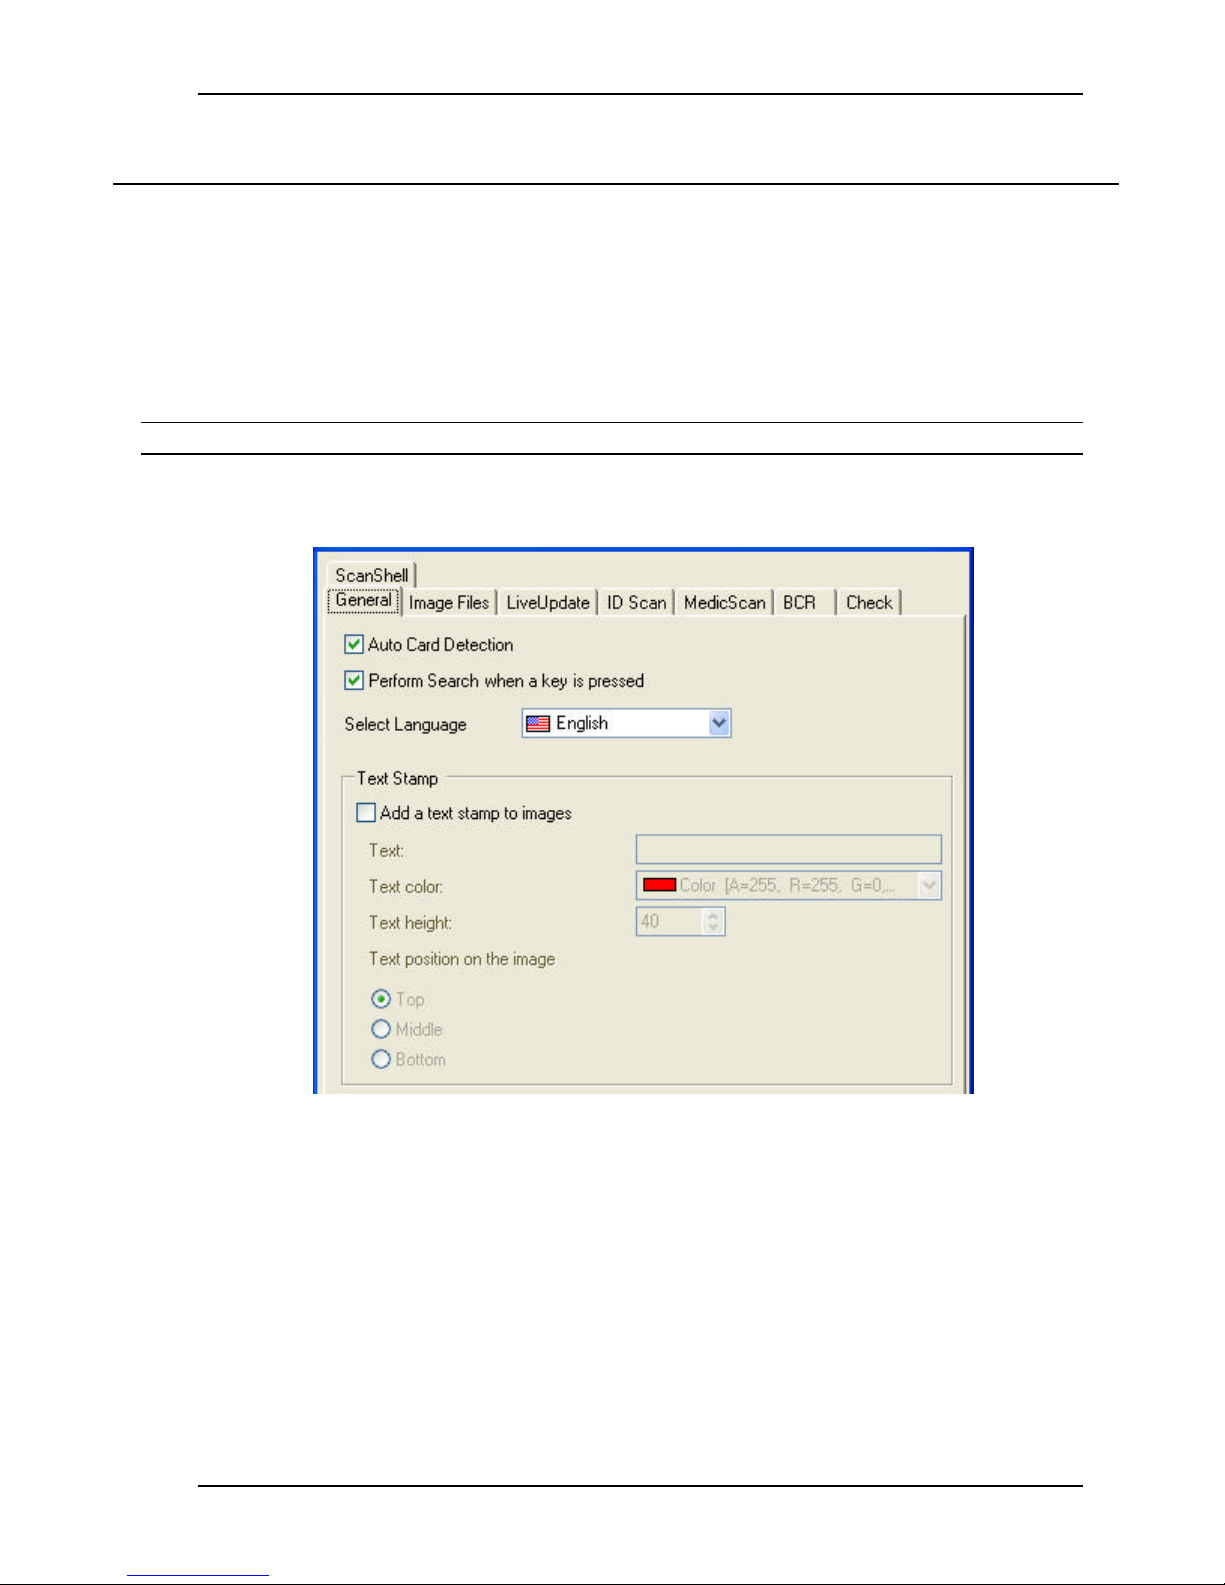
Application Settings General Tab
9. APPLICATION SETTINGS
Scanshell.net offers a variety of operating modes, all controlled from the Settings panel.
Using this panel, you can control the application automation options that ease the scanning
process, control the scanning parameters, and set the saving mode with which images and
data are saved in the database.
To open the setup panel from the main screen, click on the Settings button in the tool bar,
or select Tools-> Settings from the main menu.
Note: All the settings will be saved per user.
GENERAL TAB
Auto Card Detection – If checked, Scanning starts automatically when a card is inserted
into the scanner. If unchecked - The user has to click the Scan button to begin scanning.
This option can also be toggled using the Auto Detect button in the button bar of the main
screen.
This option is not available when the Scan source is set to From File.
Perform search when a key is pressed – If checked, the Go button of the search facility
will be disabled, and once the cursor is placed in the Find field, the application will
perform a search each time a key is entered e.g., when the "s" key is pressed t he application
Scanshell.net User Guide © 2005 Card Scanning Solutions 62
Figure 9-1: Setup - General tab
Page 63

Application Settings General Tab
will present all records beginning with an "s", and when "m" is pressed all records
beginning with "sm" will be presented.
If unchecked, the search will only start when you press Go or hit Enter after you define
your search criteria.
Select Language – Select the interface language (The language setup is saved per user)
Text Stamp – Allows you to add a text stamp to saved images. Use the various options to
determine the text parameters.
Scanshell.net User Guide © 2005 Card Scanning Solutions 63
Page 64
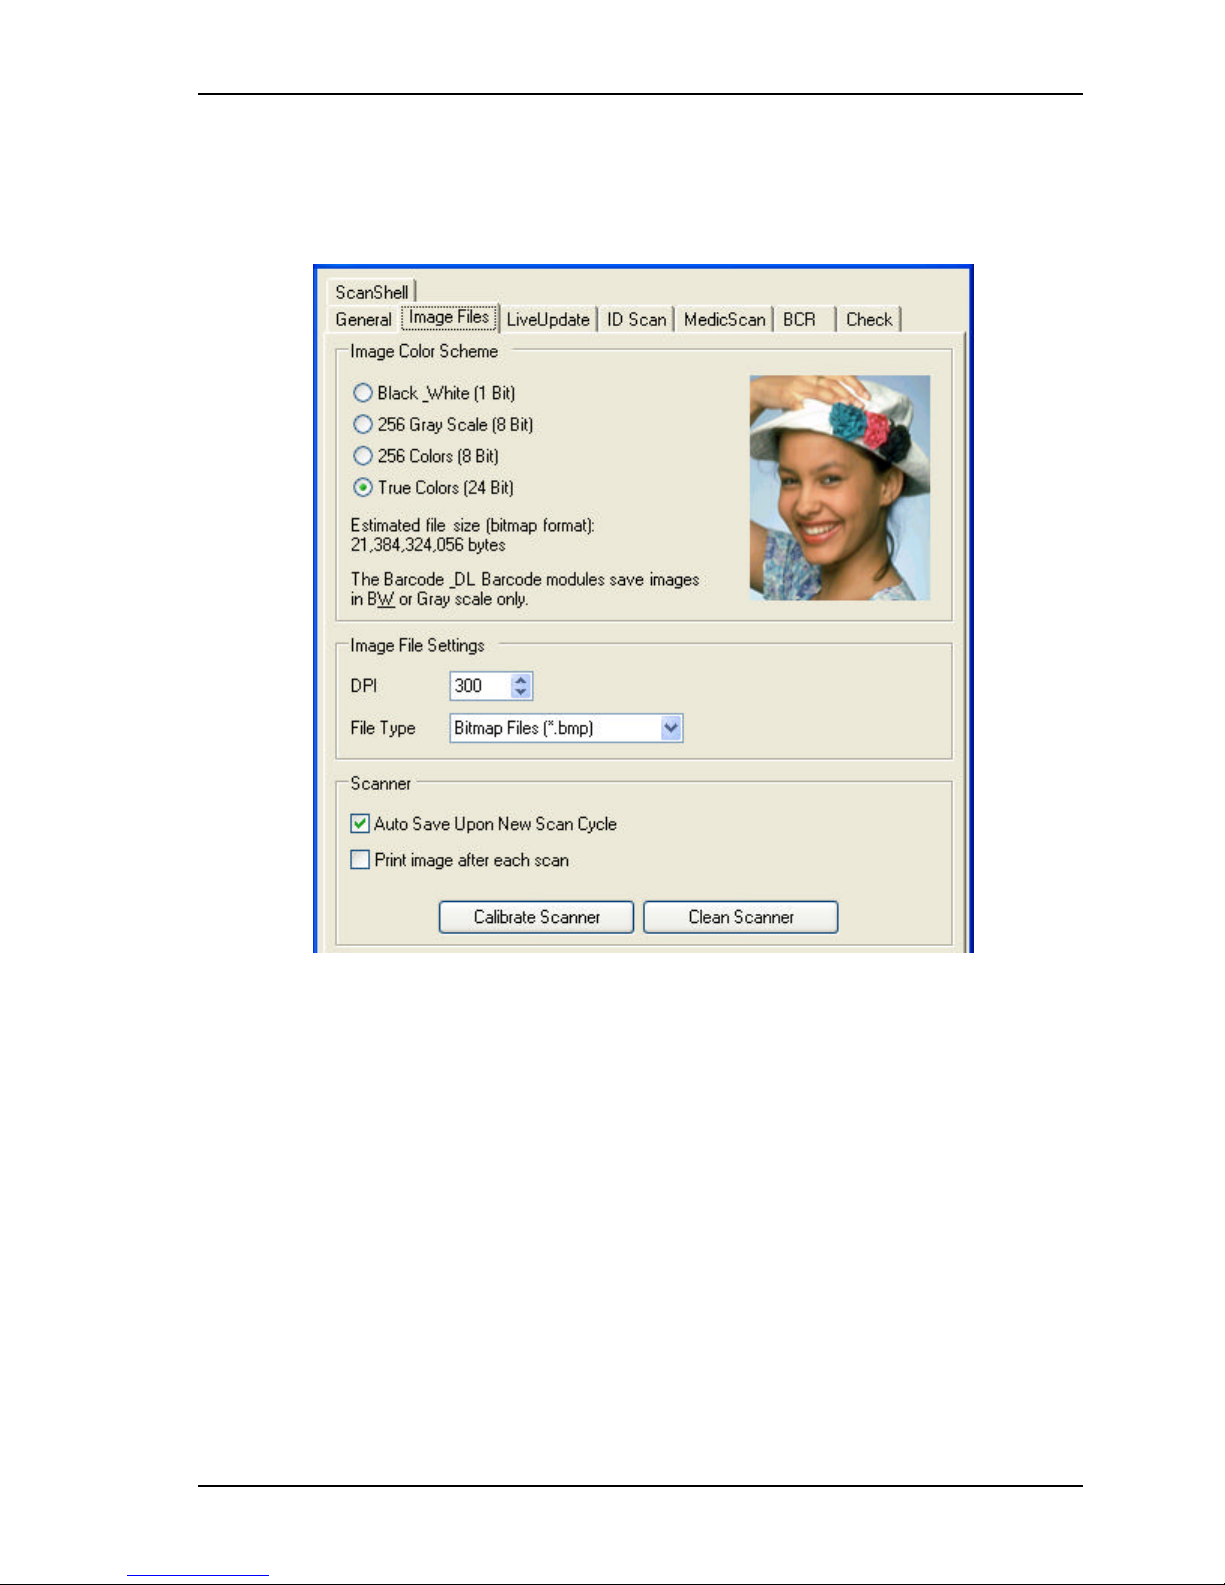
Application Settings Image Tab
IMAGE TAB
Figure 9-2: Setup - Image tab
OVERVIEW
This screen allows you to set parameters for the saved image such as color scheme,
resolution and file type.
In addition, it provides you with scanner setup options, which include Auto CardDetection, Auto Save, scanner calibration and cleaning, etc.
IMAGE COLOR SCHEME
The image color scheme has a great impact on the overall image file size. In general, using
lower resolution and colorless images keeps the database size to a minimum. On the other
hand, the more colors are used and the higher the resolution, the better the image quality.
Scanshell.net User Guide © 2005 Card Scanning Solutions 64
Page 65
Application Settings Image Tab
File format
True color (24
256 colors
256 gray scale
Black and
P P P
P
P P
P P
P P
Note: Although higher-quality images occupy more disk space, their size does not affect the
application speed, due to the database internal architecture.
The color scheme setup and dpi do not affect the application data detection accuracy.
The color scheme controls allow you to select a color scheme that ranges from black &
white to true color (24 bit). The resulting estimated file size is indicated below the
selection radio buttons.
Note: The Barcode modules cannot save the images in true color because these modules scan the
images in gray scale & 600 DPI for faster performance.
IMAGE FILE SETTINGS
DPI: The dpi (dot per inch) value sets the resolution of the scanned image. In Scanshell.net
you can select any of 55 values (50-600 in increments of 10). This gives you the flexibility
of finding the best balance between image quality and reasonable image file size. 50 dpi
provides very low quality; 600 dpi provides very high quality. 300 dpi is the default option.
Note that using higher dpi values will take up more hard drive space.
File Type: The file type field sets the image format that will be used by the application to
save the images internally.
When using the JPG format you can set the JPG quality.
BMP
TIF
JPG
PCX
TGA
PNG
PSD
bits)
P
P
P
P
P
P
P
(8 bits)
(8 bits)
P
P
white (1 bit)
SCANNER
Auto save upon new scan cycle:
Checked - The last scan process will be saved automatically to the database.
§
Unchecked - You have to click the OK button to save the record in the database. Else
§
the data will be overwritten with the data of the new scan.
Print image after each scan:
Checked - The last scanned record will be printed out automatically.
§
Unchecked - Printing is performed manually .
§
Scanshell.net User Guide © 2005 Card Scanning Solutions 65
Page 66

Application Settings Image Tab
SCANNER CALIBRATION
Scanner calibration resets the scanner color sensor and generates higher accuracy in the
OCR detection process. When you use the scanner for the first time, you will be prompted
to calibrate the scanner. Calibrating the scanner is also a good idea if you notice
deterioration in scanning and OCR quality.
Click the ‘Calibrate Scanner’ button.
§
Insert the calibration p aper that came with the scanner. (In ScanShell 1000 there is no
§
calibration paper; just click OK)
Click OK.
§
CLEANING THE SCANNER
It is a good idea to clean the scanner from time to time, especially if you notice
irregularities and deterioration in scanning and OCR quality.
Click the ‘Clean Scanner’ button.
§
Insert the cleaning paper that came with the scanner. You can add a few drops of
§
alcohol or cleaning solution to the cleaning paper. (In ScanShell 1000, wipe the
scanning surface with a clean cloth).
Click OK.
§
Scanshell.net User Guide © 2005 Card Scanning Solutions 66
Page 67
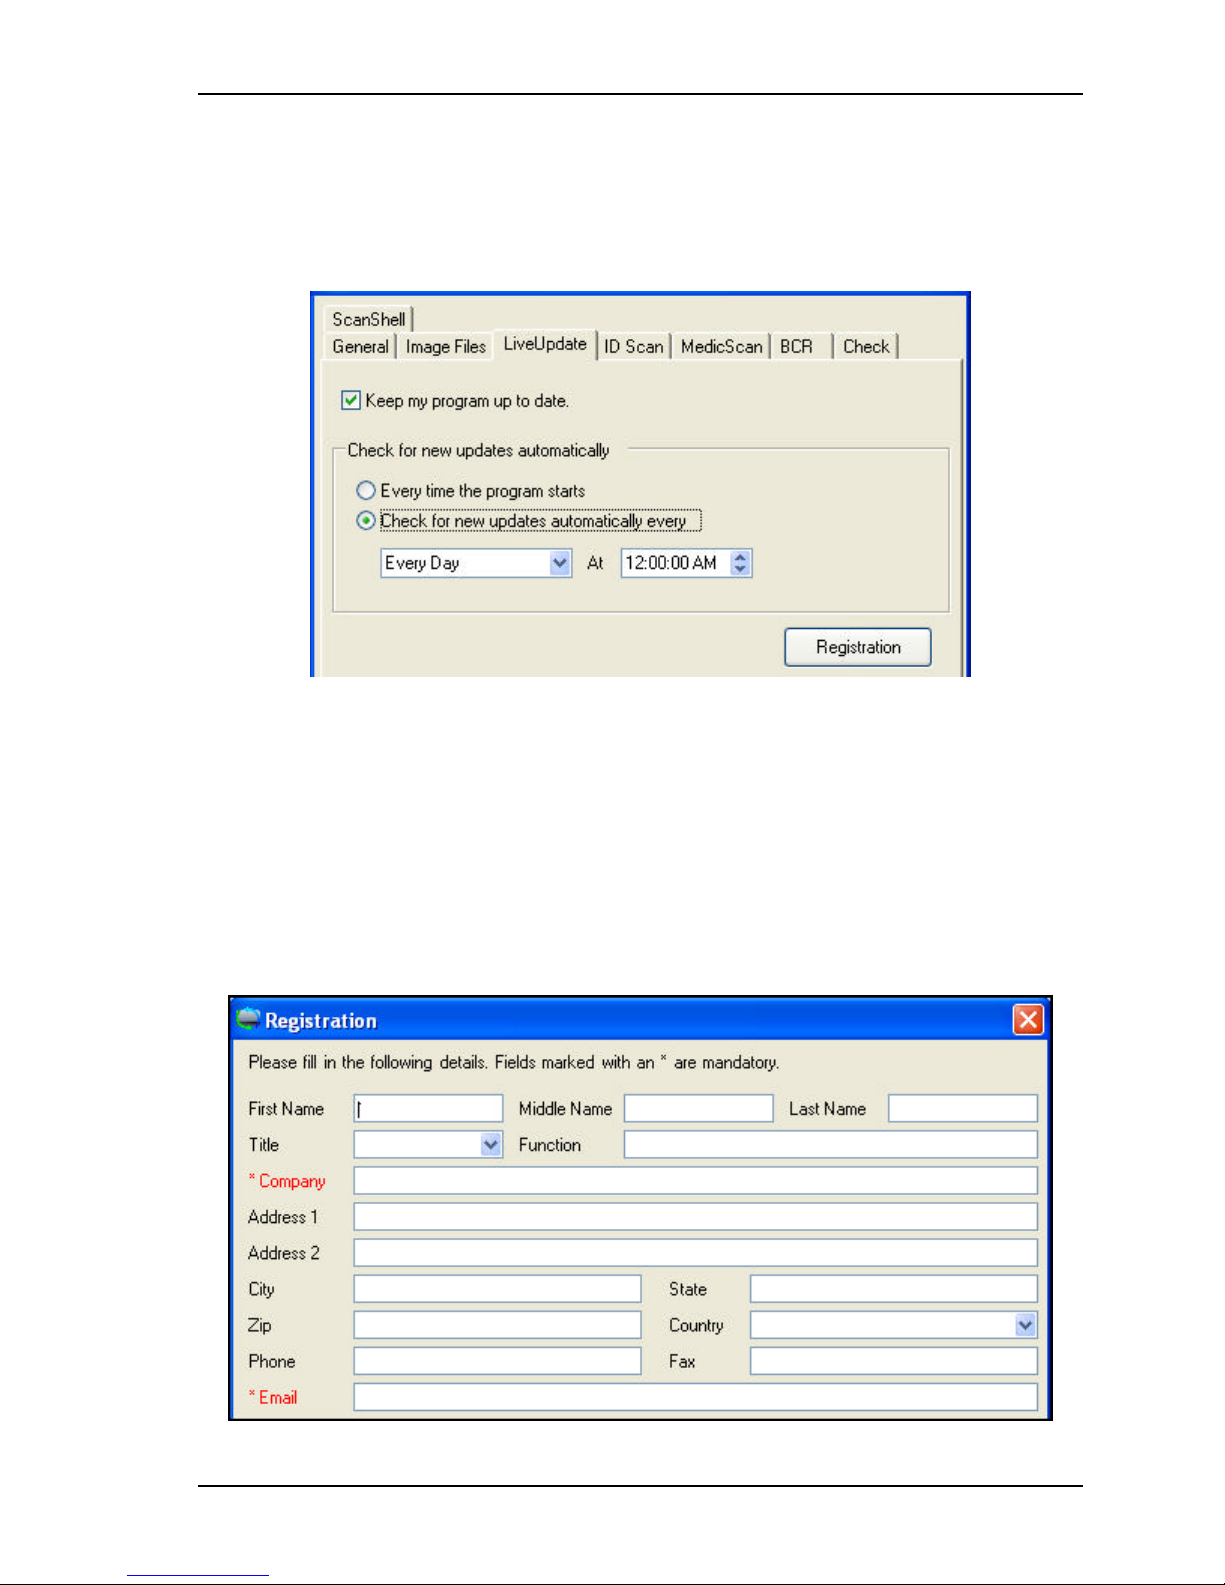
Application Settings Live Update
LIVE UPDATE
Live Update keeps your software up to date, by checking for updates using your Internet
connection, and if available, downloading and installing them automatically.
Figure 9-3: Setup - LiveUpdate tab
Check the Keep my program up to date box to enable ‘Live Update’.
§
Specify how often Live Update shall be performed.
§
Click the Registration button.
§
REGISTRATION
To use Live Update you need to be a registered user. Please fill in your details and click
OK. Fields marked with "*" must be filled in.
Scanshell.net User Guide © 2005 Card Scanning Solutions 67
Page 68

Application Settings Live Update
Figure 9-4: Registration window
Scanshell.net User Guide © 2005 Card Scanning Solutions 68
Page 69
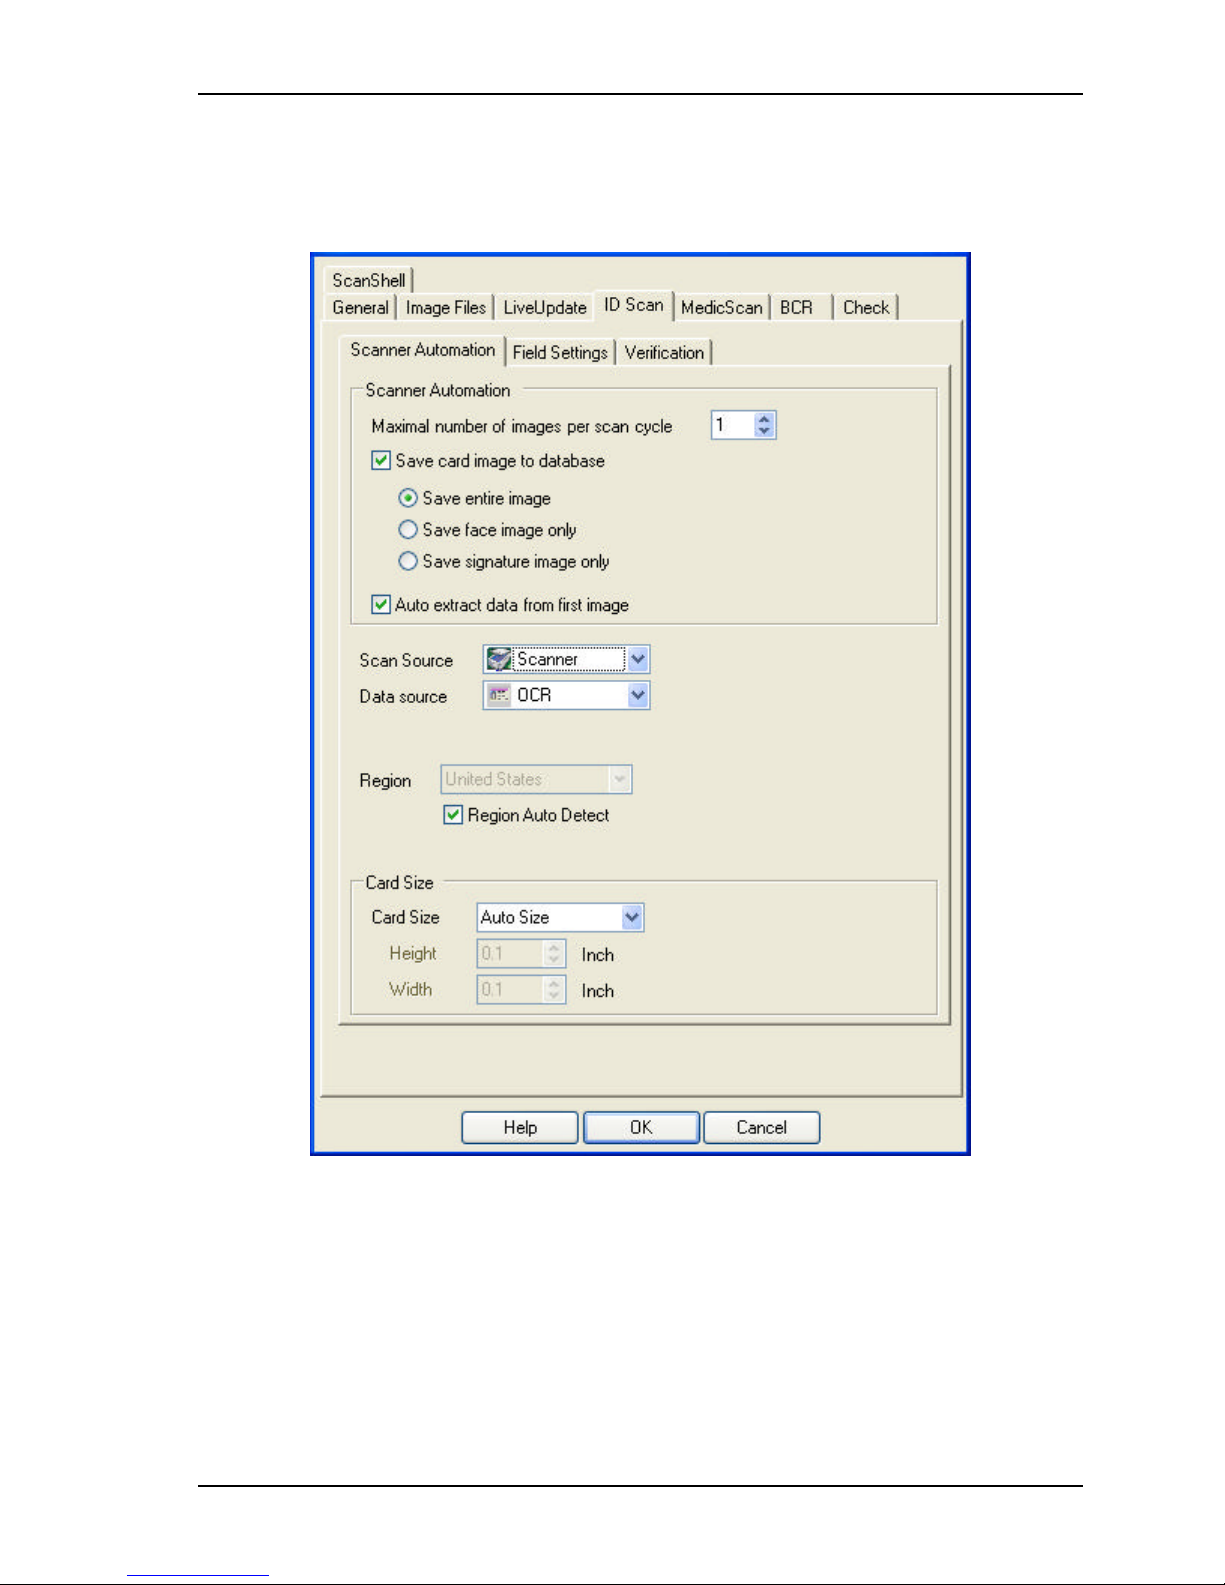
Application Settings idScan
IDSCAN
This is the setup panel of the idScan module, which scans driver licenses.
SCANNER AUTOMATION TAB
Maximal numb er of images in every scan cycle – Specify the number of images that can be
scanned and added in each scanning cycle. It allows you to insert additional images after
an initial scan, which are added and saved in the same record.
Save card image to database – Save an image of the card in the scanned record. You can
choose to save the entire image, just the face, or just the signature.
Scanshell.net User Guide © 2005 Card Scanning Solutions 69
Figure 9-5: Setup – ID Scan
Page 70

Application Settings idScan
Auto extract data from image – Extract the data from the image. If unchecked, the data is
not extracted.
Scan source – Select scanner, magnetic reader or file. This setup determines the default
scanning source when opening the scanning window ( New Record). This setup can also be
changed from within the scanning window.
Data Source – Select the data source. OCR uses Optical Character Recognition technology
to extract data from the scanned card text. Barcode extracts the data from the barcode.
Region –Specify the card issuing state or country. Click to open a dropdown list, navigate
to the desired country and state, and select it.
Region auto detect– If this option is checked, when scanning a driver license,
Scanshell.net will attempt to detect the card issuing region automatically.
Note: Region auto detect setup can also be changed from within the scanning window.
Card Size
Allows you to specify the card size and orientation (Portrait/landscape, Auto Size (not with
Scanshell 1000), MRZ (Europe) and Custom). If you select Custom, you can specify the
scanned area size manually.
FIELD SETTING TAB
This screen allows two types of field selection, which have different effect:
1. The fields that are displayed in the record details tab
2. The fields that will be displayed in records list of Scanshell.net main screen.
Scanshell.net User Guide © 2005 Card Scanning Solutions 70
Page 71
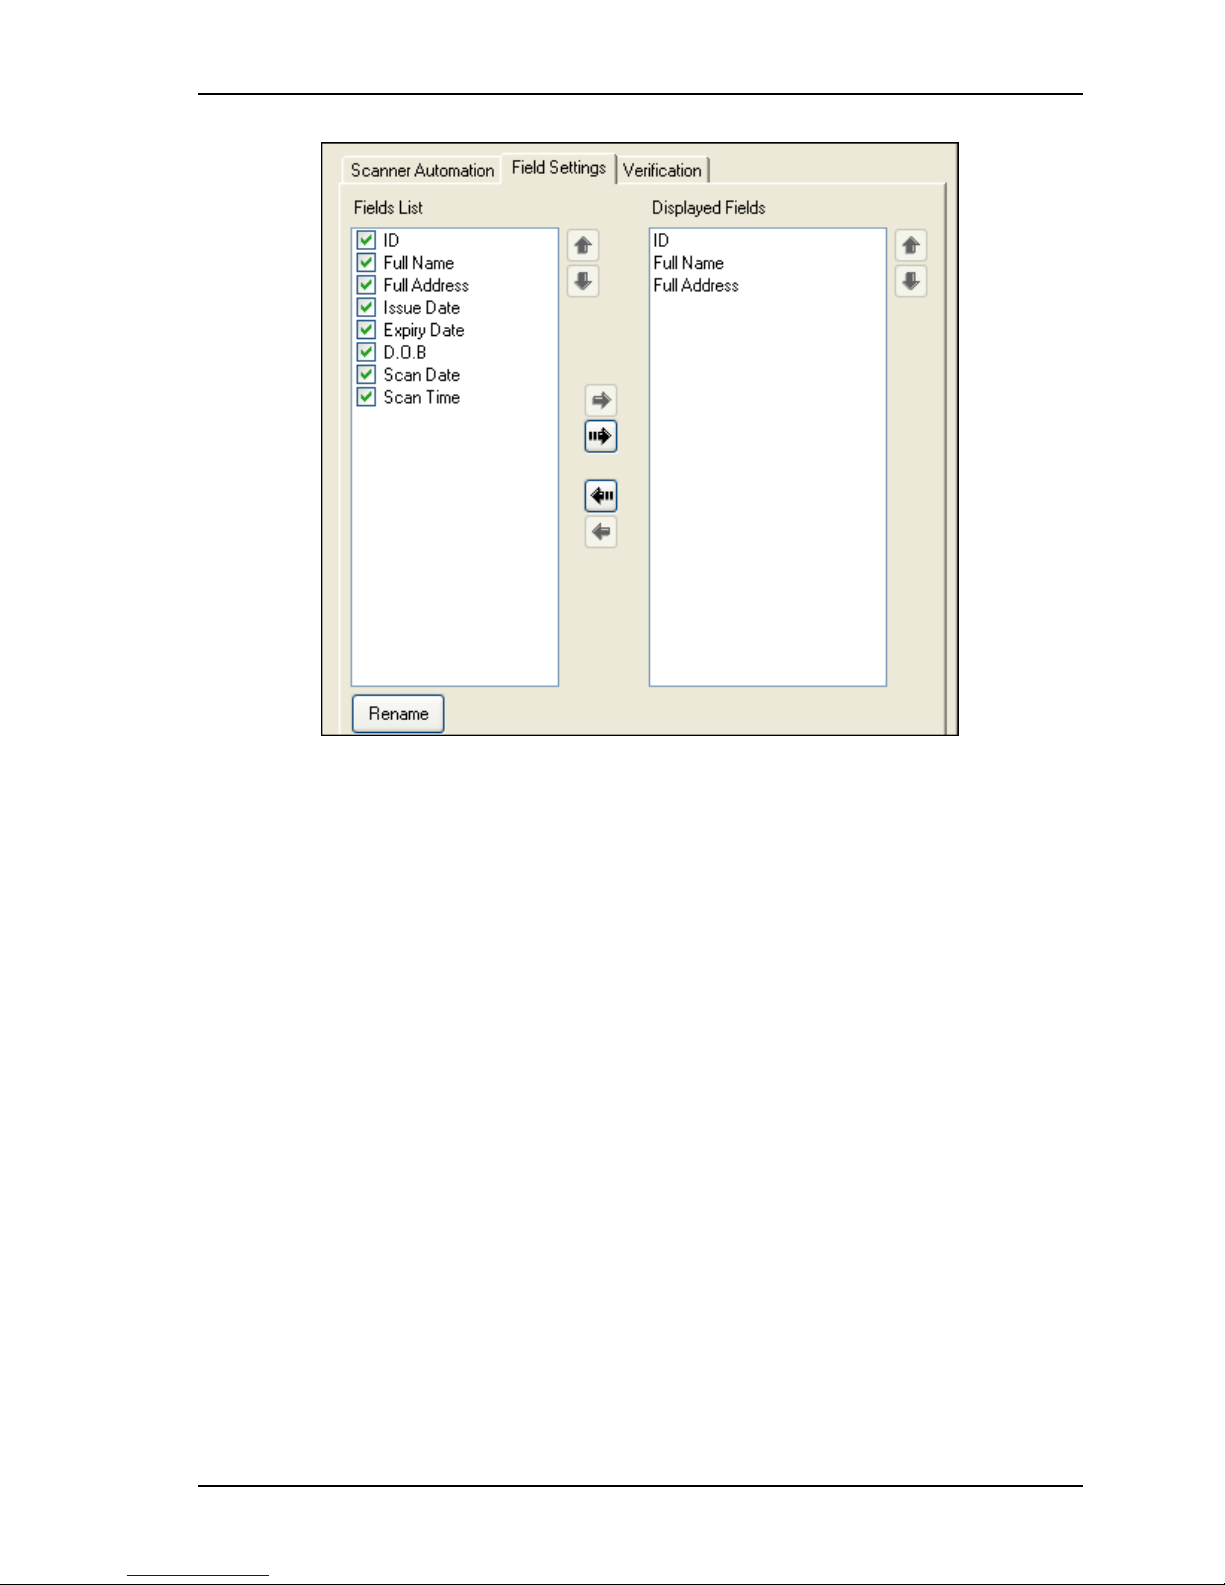
Application Settings idScan
Figure 9-6: Field selection screen
3. Double-click on a checkbox of a field to select/deselect it, and include it in the
record fields tab.
4. Select the fields you want to have displayed in the application main window as
follows:
a. Select a field that is included in the database (checked) by clicking on it
once, and then click on the right pointing arrow. The field will be added
to the list in the right column.
b. You can add all checked fields to the display column by clicking on the
right-pointing striped arrow.
Removing fields from the display list
Click on a field in the display list to select it, and then click the left pointing arrow. To
remove all fields from the display list, click the left pointing striped arrow.
Renaming fields
Click on a field to select it, and then click the Rename button.
Fields order
The order in which the fields are displayed in the field list, determines their order of
appearance in the record fields display of the main screen
The order in which the fields are displayed in the displayed field list, determines the order
in which the fields are displayed in the records list of the application main window.
Scanshell.net User Guide © 2005 Card Scanning Solutions 71
Page 72

Application Settings idScan
Fields higher on the list display first. You can change the position of a field in the list by
selecting it, and clicking the Up and Down arrows, to move the field up and down the list.
When you are done, click OK.
Scanshell.net User Guide © 2005 Card Scanning Solutions 72
Page 73
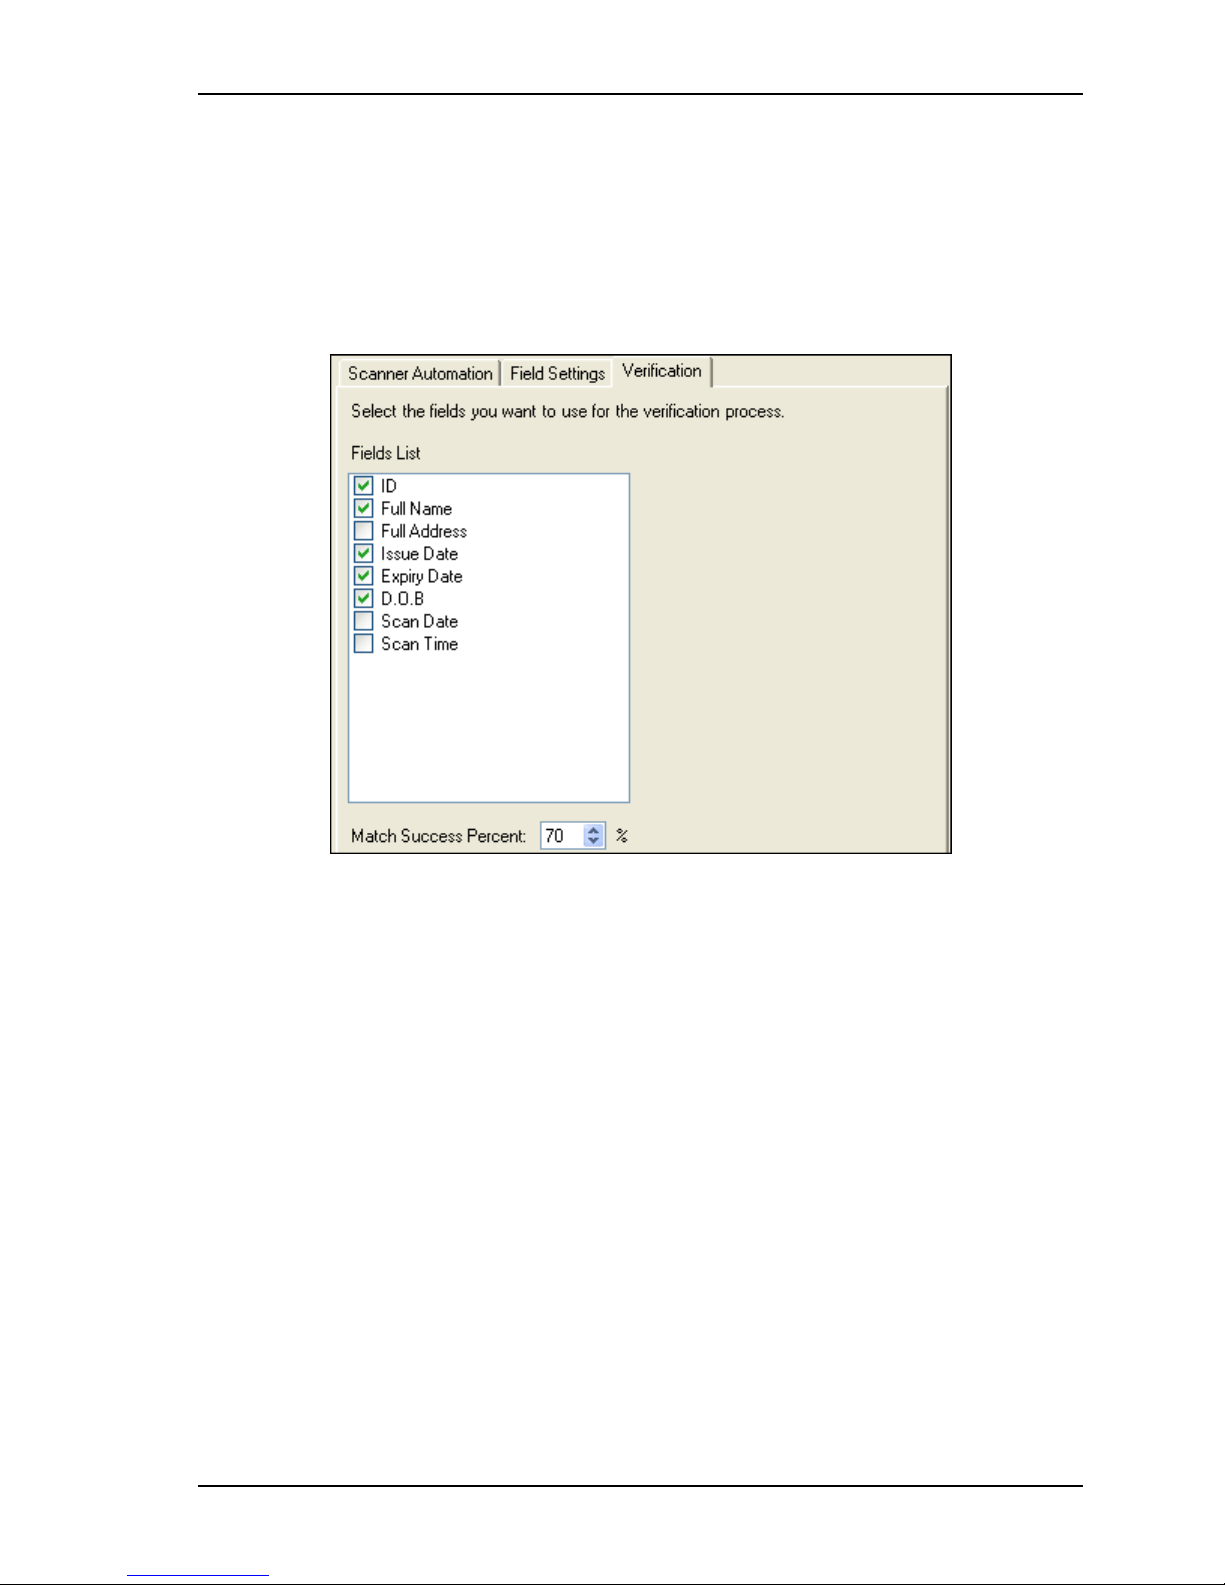
Application Settings idScan
VERIFICATION TAB
Scanshell.net is capable of verifying ID cards, by comparing data from two different
sources on the card.
The verification tab lets you determine the fields that are used for the verification process,
and the match percentage that serves as success threshold.
Figure 9-7: Verification tab
Check fields you want to include in the verification process.
Select the match percentage that would determine the verification process success
threshold.
Scanshell.net User Guide © 2005 Card Scanning Solutions 73
Page 74
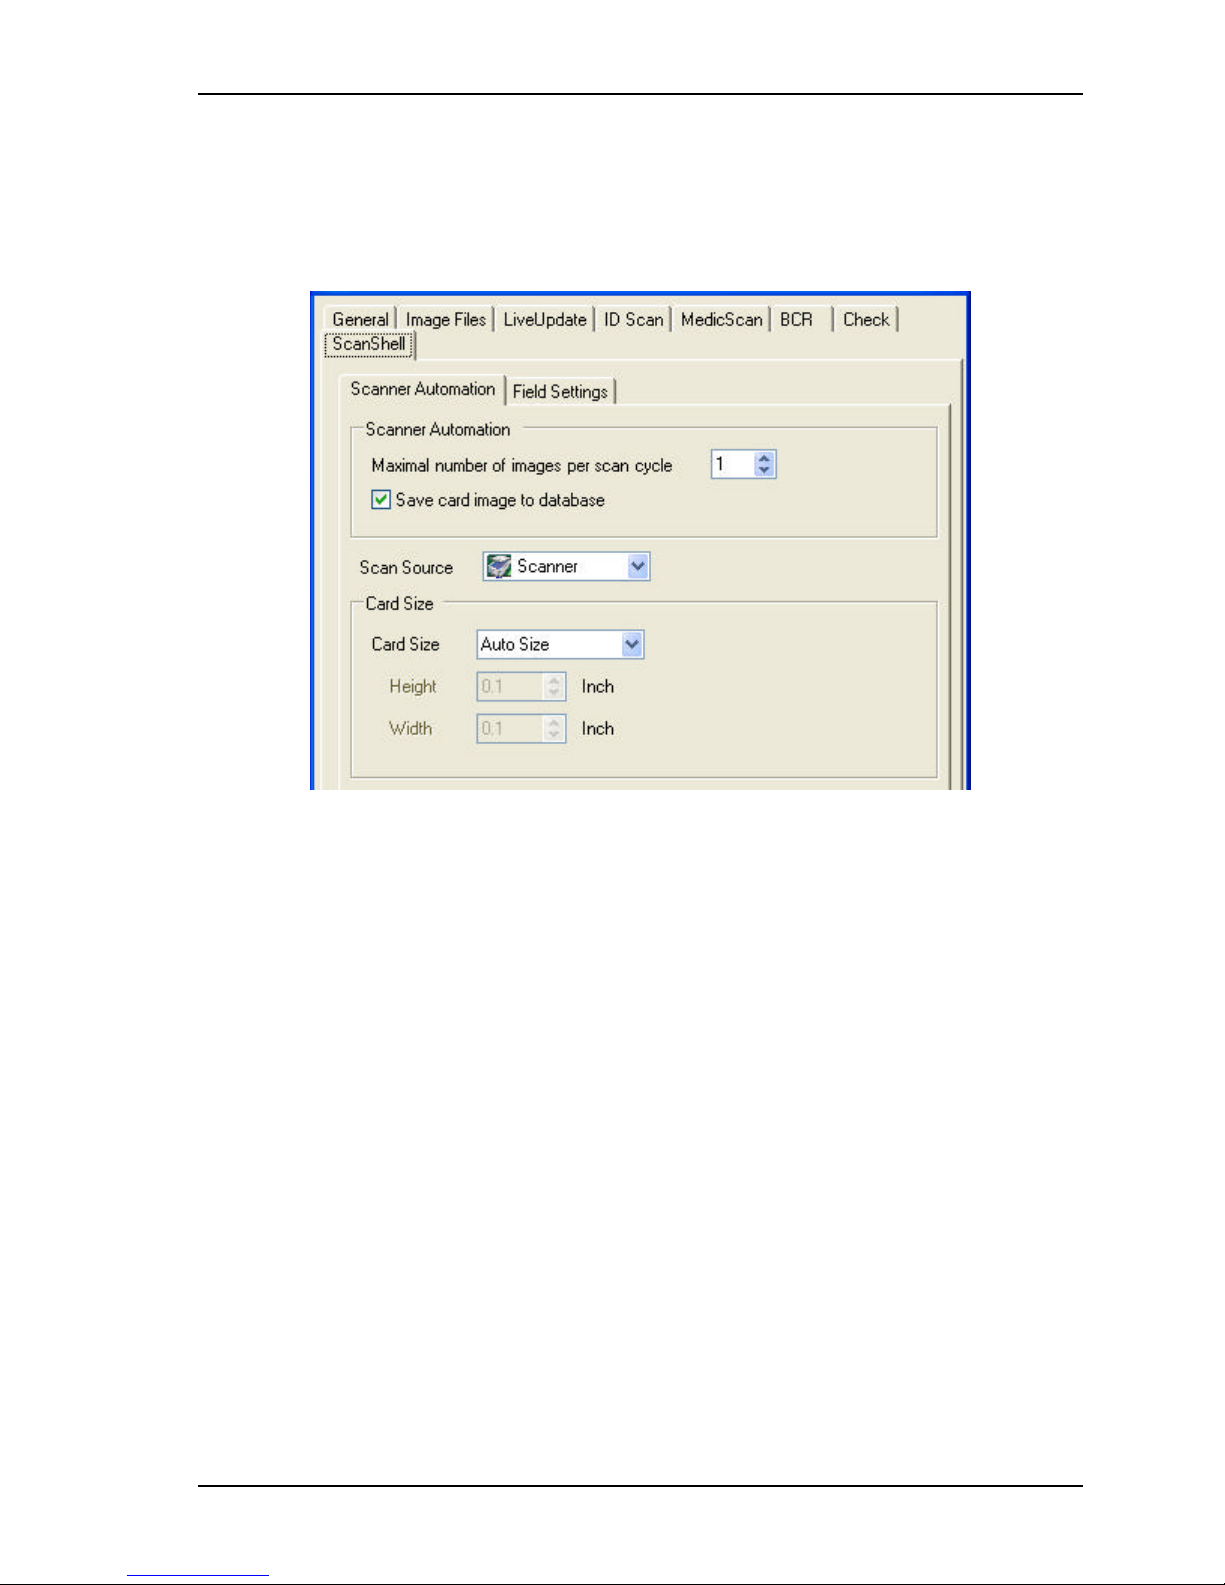
Application Settings Scanshell AND MedicScan tabs
SCANSHELL AND MEDICSCAN TABS
The Scanshell and MedicScan tabs have an identical layout, but they refer to different
modules. Scanshell is a general scanning module and MedicScan scans medical cards.
Figure 9-8: Setup – MedicScan and ScanShell
SCANNER AUTOMATION TAB
Maximal number of images in every scan cycle – Specify the number of images that can be
scanned and added in each scanning cycle. It allows you to insert additional images after
an initial scan, which are added and saved in the same record.
Save card image to database – Save an image of the card in the scanned record
Scan source – Select scanner, or file. This setup determines the default scanning source
when opening the scanning window (New Record). This setup can also be changed from
within the scanning window.
Card Size
Allows you to specify the card size and orientation (portrait/landscape, Auto Size). If you
select Custom, you can specify the scanned area size ma nually.
Scanshell.net User Guide © 2005 Card Scanning Solutions 74
Page 75
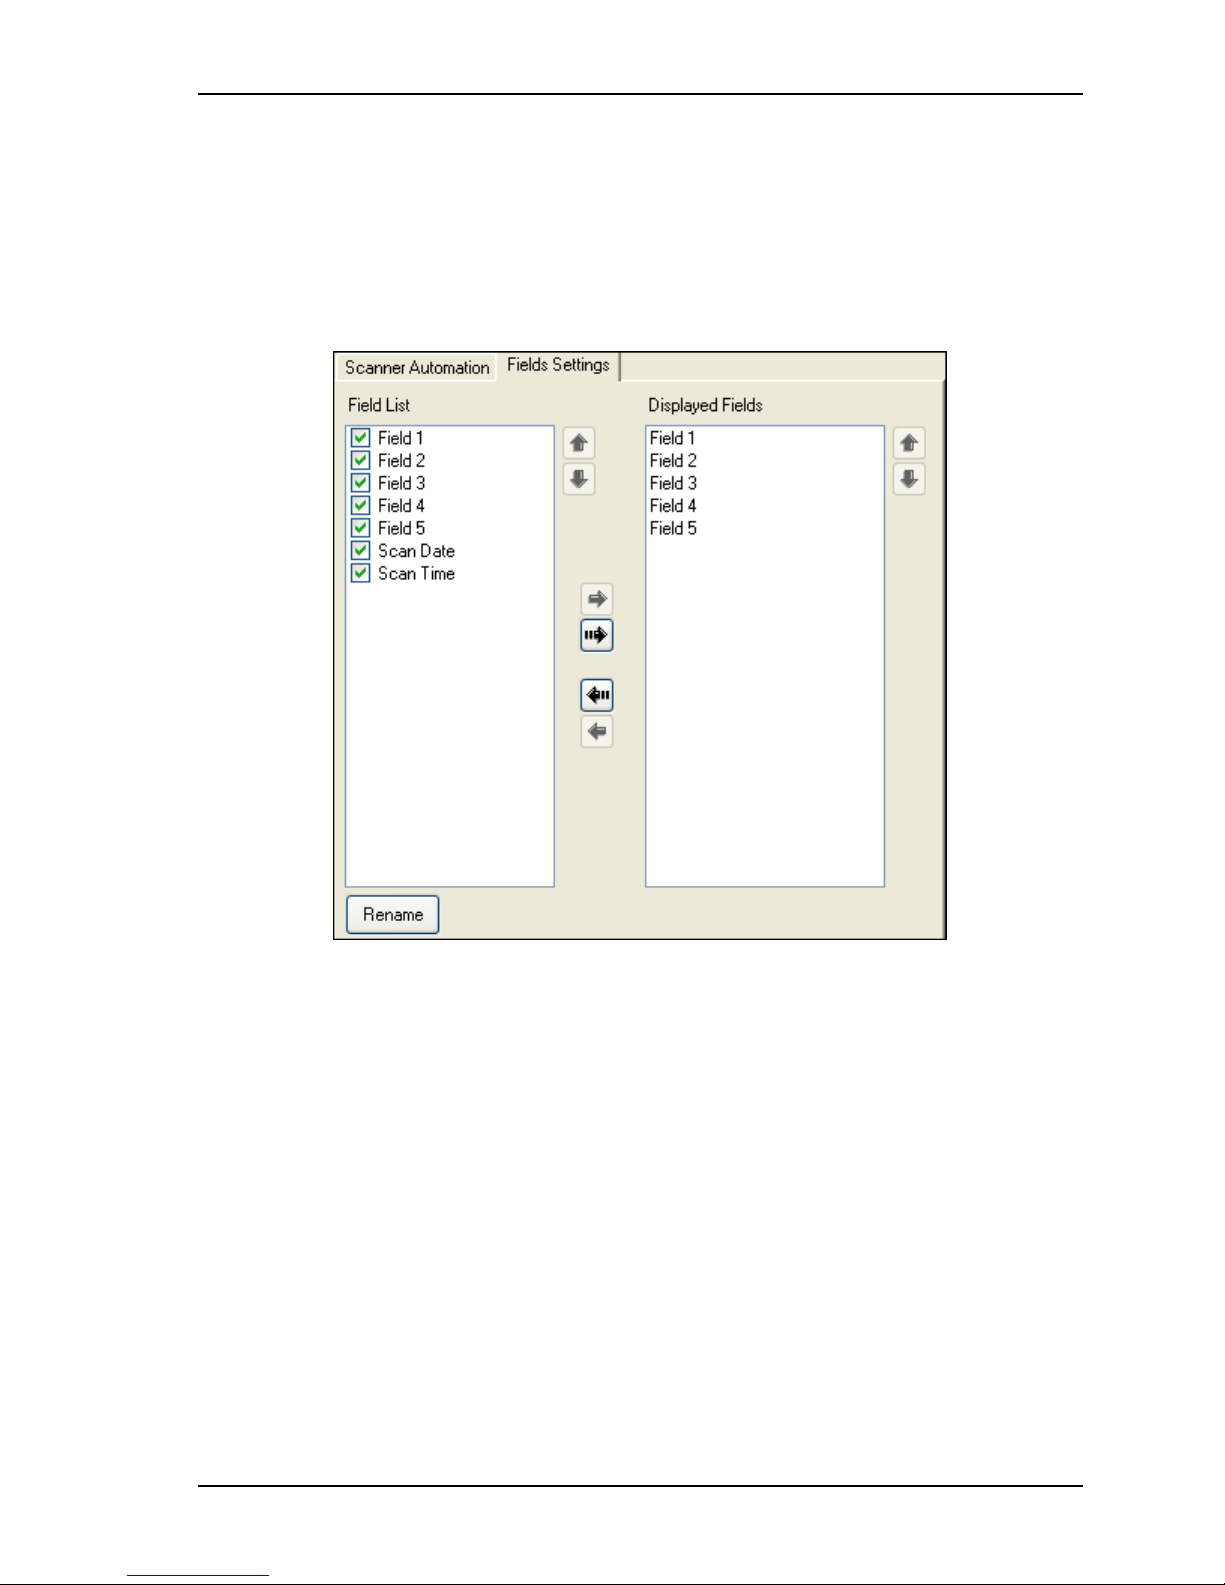
Application Settings Scanshell AND MedicScan tabs
FIELD SETTING TAB
This screen allows two types of field selection, which have different effect;
1. The fields that are displayed in the record details tab
2. The fields that will be displayed in records list of Scanshell.net main screen.
Figure 9-9: Field selection screen
3. Double-click on a checkbox of a field to select/deselect it, and include it in the
record fields display of the main screen.
4. Select the fields you want to have displayed in record list of the application main
window as follows:
a. Select a field that is included in the database (checked) by clicking on it
once, and then click on the right pointing arrow. The field will be added
to the list in the right column.
b. You can add all checked fields to the display column by clicking on the
right-pointing striped arrow.
c. Note the Scan Time and Scan Date fields at the bottom of the list. If
selected, these values are added automatically to the new record.
Scanshell.net User Guide © 2005 Card Scanning Solutions 75
Page 76

Application Settings Scanshell AND MedicScan tabs
Removing fields from the display list
Click on a field in the display list to select it, and then click the left pointing arrow. To
remove all fields from the display list, click the left pointing striped arrow.
Renaming fields
Click on a field to select it, and then click the Rename button.
Fields order
The order in which the fields are displayed in the field list determines their order of
appearance in the database (See same note as before).
The order in which the fields are displayed in the displayed field list determines the order
in which the fields are displayed in the application main window. (See same note as
before)
Fields higher on the list display first. You can change the position of a field in the list by
selecting it, and clicking the Up and Down arrows to move the field up and down the list.
When you are done, click OK.
Scanshell.net User Guide © 2005 Card Scanning Solutions 76
Page 77
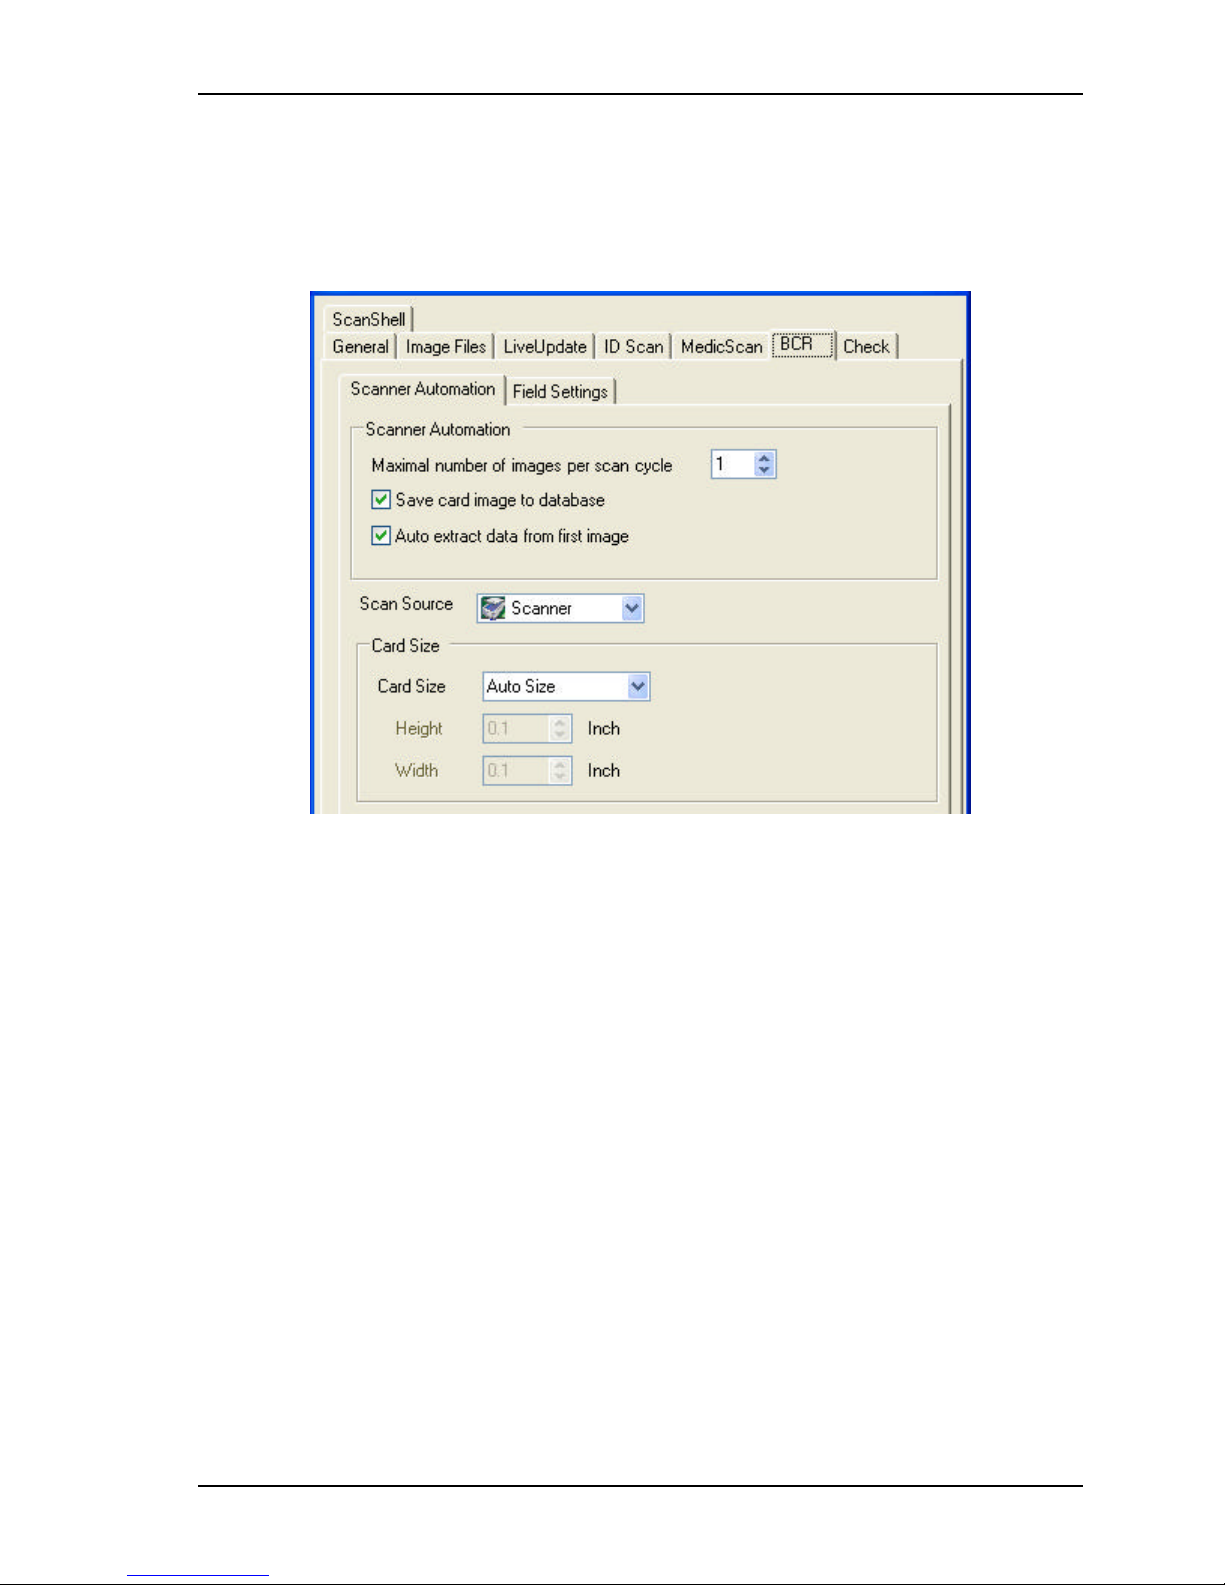
Application Settings Business Card AND CHECK TABS
BUSINESS CARD AND CHECK TABS
This is the setup panel of the bushiness card module. It is identical to Scanshell AND
MedicScan tabs, page 74, and therefore will not be explained again.
Figure 9-10: Setup - Business card module
Auto extract data from first image – Extract the data from the first image. If unchecked, the
data is not extracted.
Scanshell.net User Guide © 2005 Card Scanning Solutions 77
Page 78
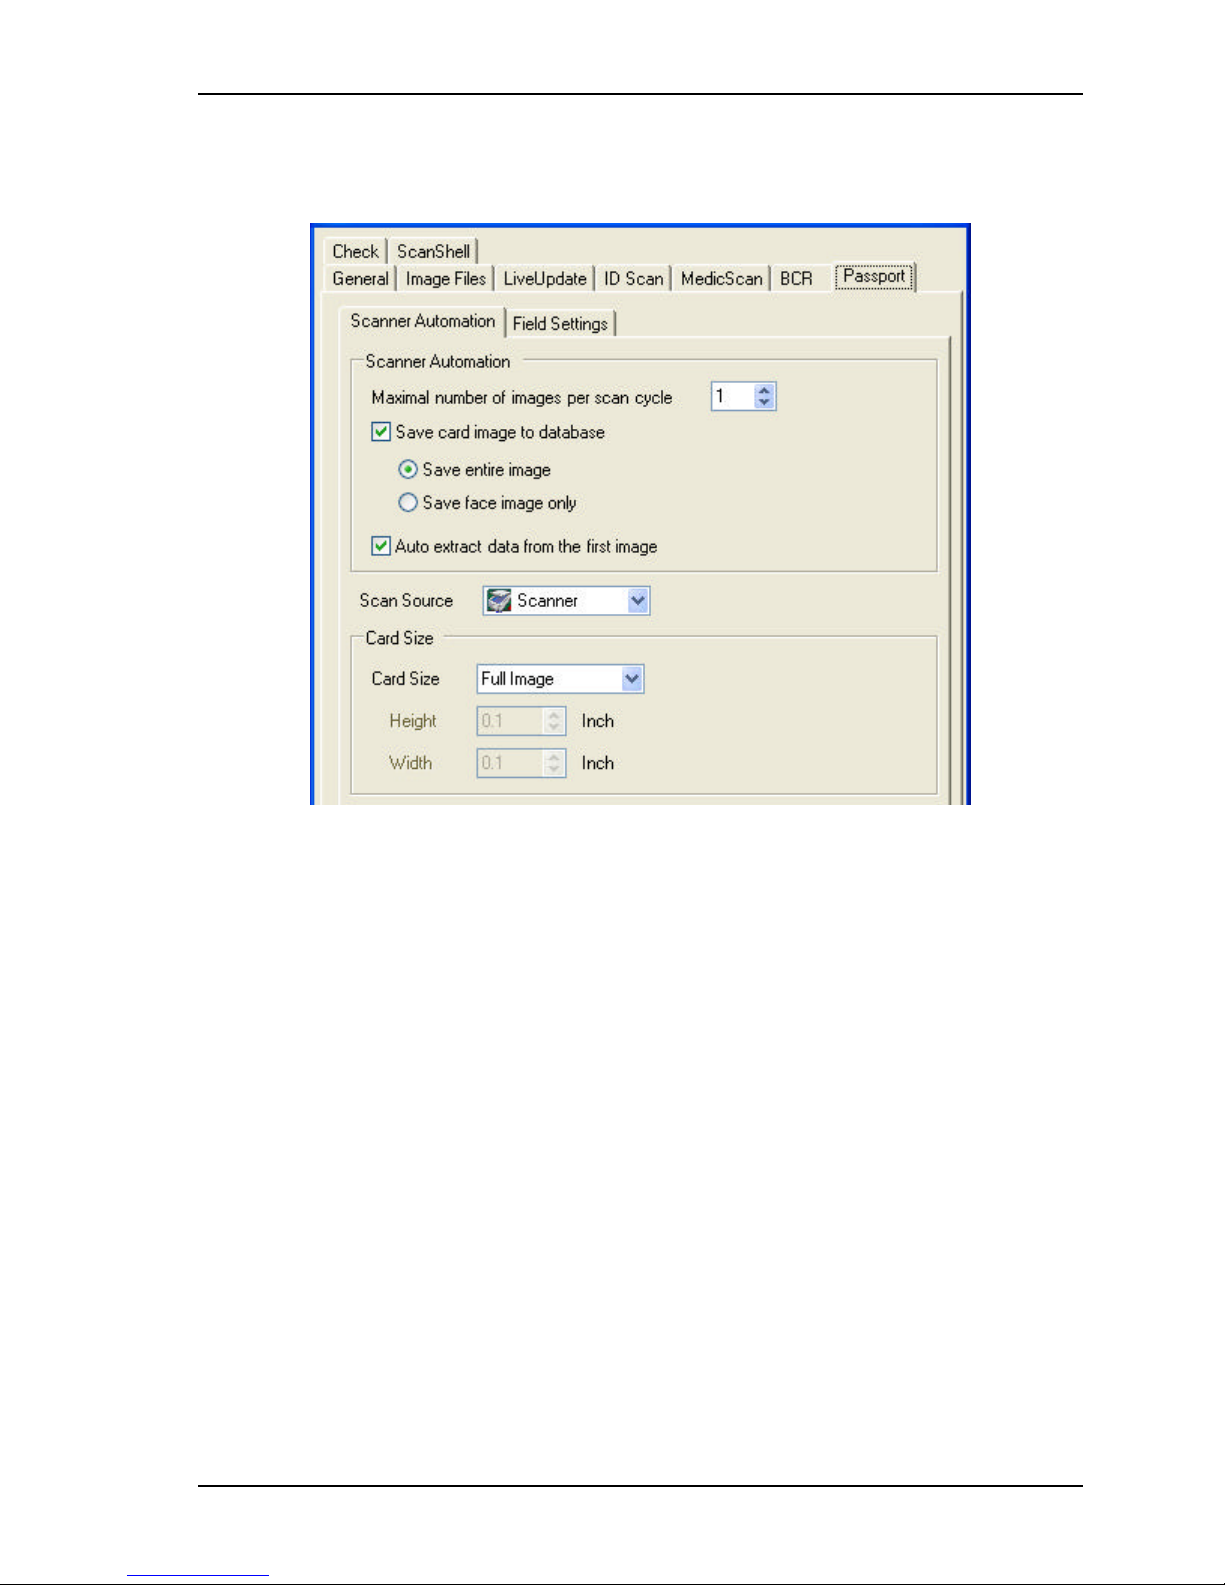
Application Settings Passport Tab
PASSPORT TAB
Figure 9-11: Setup – passportl
SCANNER AUTOMATION TAB
Maximal number of images in every scan cycle – Specify the number of images that can
be scanned and added in each scanning cycle. It allows you to insert additional images
after an initial scan, which are added and saved in the same record.
Save card image to database – Save an image of the card in the scanned record. You can
choose to save the entire image, or just the face.
Auto extract data from image – Extract the data from the image. If unchecked, the data is
not extracted.
Scan source – Select scanner, or file. This setup determines the default scanning source
when opening the scanning window (New Record). This setup can also be changed from
within the scanning window.
Card Size
Allows you to specify the card size and orientation (Full Image, Data Only, and Custom).
If you select Custom, you can specify the scanned area size manually.
Scanshell.net User Guide © 2005 Card Scanning Solutions 78
Page 79
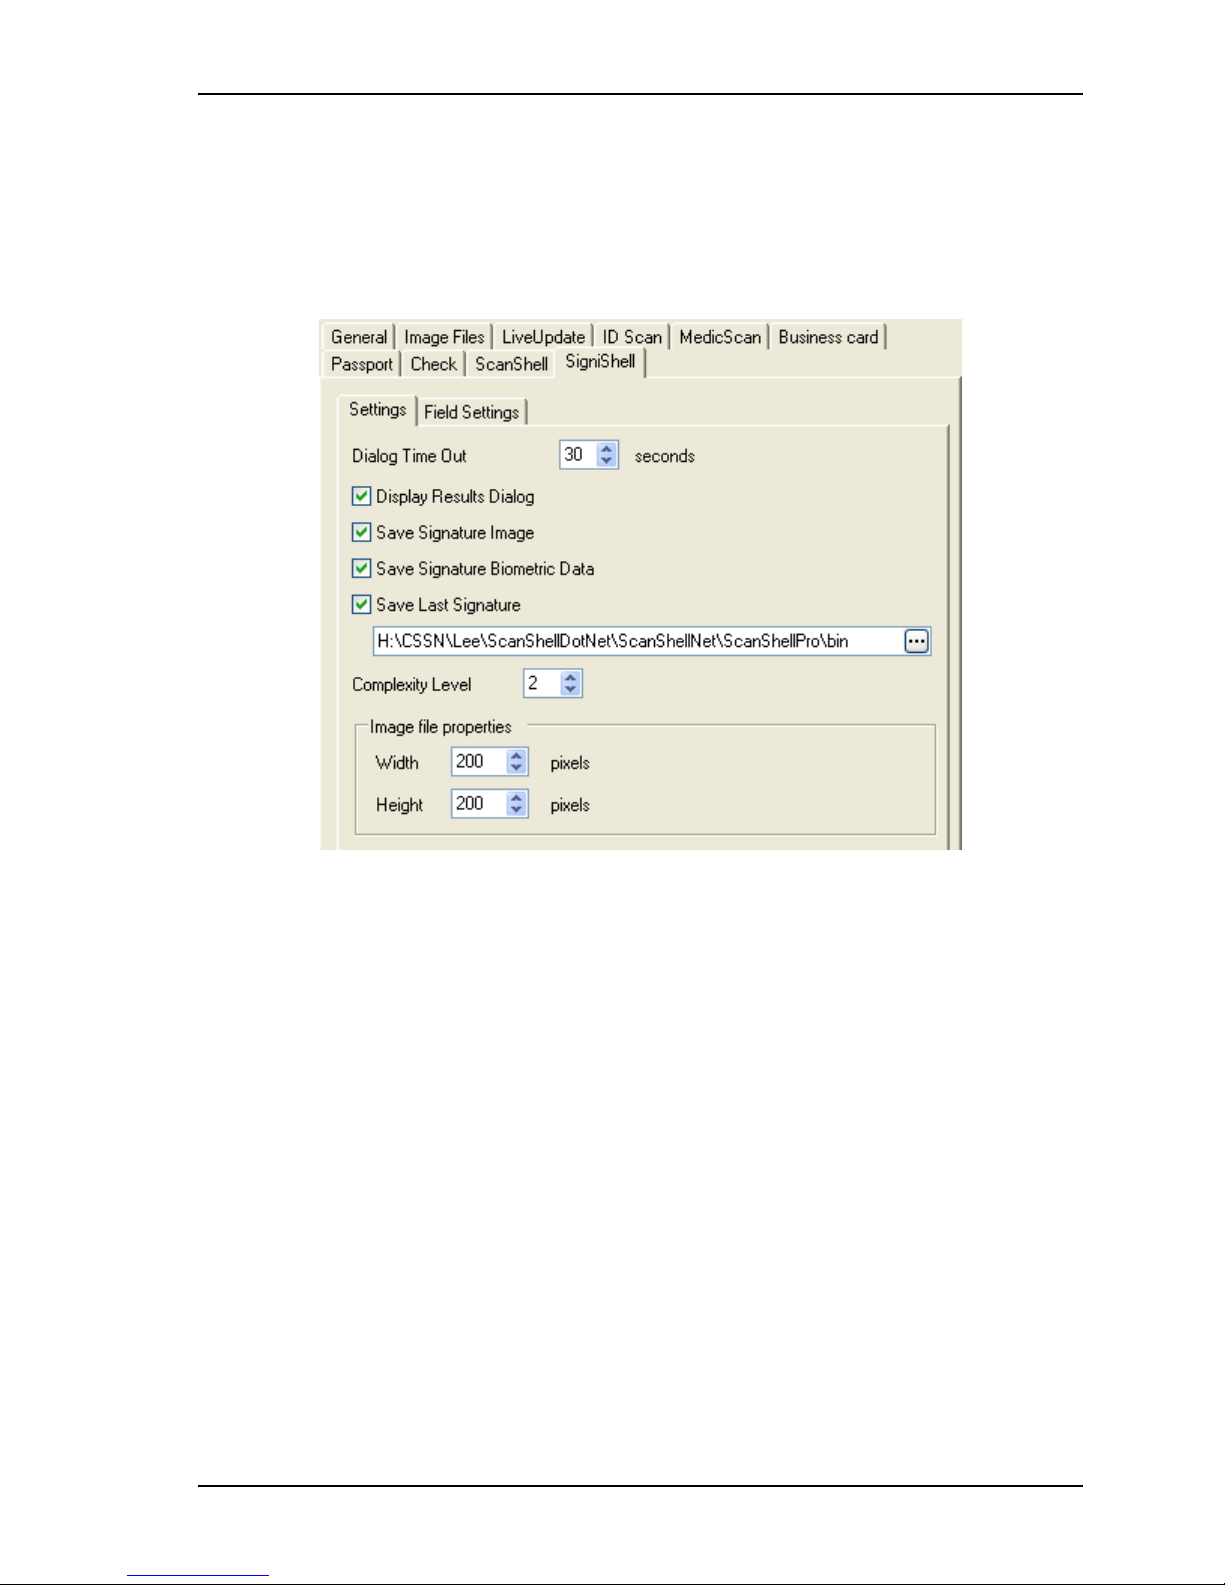
Application Settings SigniShell tab
FIELD SETTING TAB
The Passport's Field setting tab is the same as t he Field setting tabs in all the other
modules.
SIGNISHELL TAB
9-12: Setup – SigniShell
SETTINGS TAB
Dialog Time Out: The display time out to use for the SigniShell dialogs such as enroll and
validate.
Display Results Dialog: Show\Hide the confirmation and results messages after
completing a process using the SigniShell module.
Save Signature Image: Allow the software to save the signature image when creating new
records.
Save Signature Biometric Data: Allow the software to save the signature biometric data
when creating new records.
Save Last Signature: This will enable\disable the option to save the last signature image
and biometric data to the given path. If a signature data is exists in this path it will be
overwritten.
Complexity Level: Set this value to use more complexity signature or lower value to
simple signatures.
Image Properties: The signature image size.
Scanshell.net User Guide © 2005 Card Scanning Solutions 79
Page 80

Application Settings SigniShell tab
FIELD SETTING TAB
The SigniShell Field setting tab is the same as the Field setting tabs in all the other
modules.
Scanshell.net User Guide © 2005 Card Scanning Solutions 80
Page 81

Printing Printing records
10. PRINTING
PRINTING RECORDS
You can print records in one o f the following ways:
1. Quick printing without opening the Print Wizard – Select records you wish to
print and click on the Print button in the tool bar. Using this option will print
records according to recently used print properties. Click on the button's arrow to
select Selected Records or All Records. Before you can use the print button you
have to use the print wizard at least once, to set up the print properties
2. Printing using the Print Wizard
Select a record or several records and then select Print->All Records or Print-
s
>Selected Record(s) from the main File menu.
Right-click on a record (or select several records and click on one of them).
s
From the contextual menu, select Print->All records to print all records
currently in the database, or Selected Re cord(s) to print only the records you
selected and right-clicked on.
To print more than one record at the same time: Hold down the Ctrl key,
s
select the records you want to print, right-click and select Print-> Selected
Record(s).
The Print Wizard will appear:
Scanshell.net User Guide © 2005 Card Scanning Solutions 81
Page 82
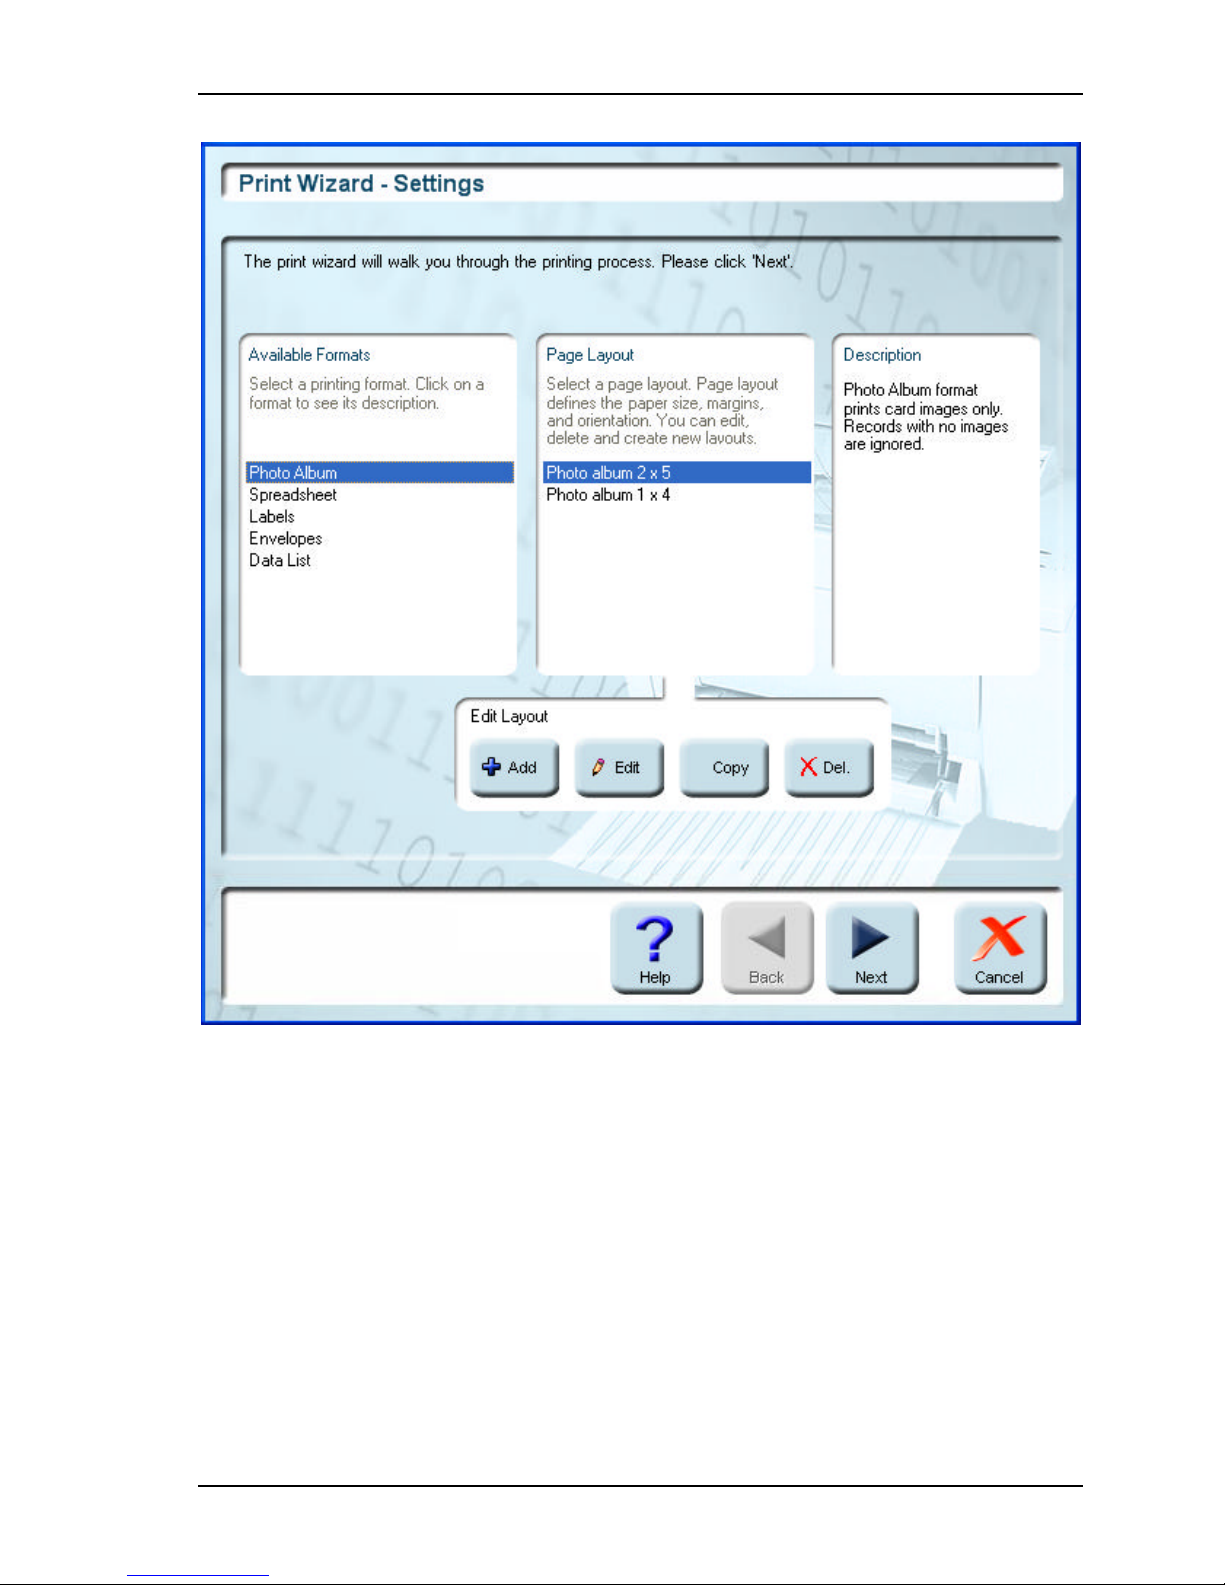
Printing Printing records
1. Select the required printing format. Note the description of the selected print format
in the description column on the right.
2. Select a page layout.
3. Click Next.
Scanshell.net User Guide © 2005 Card Scanning Solutions 82
Figure 10-1: Print wizard - Format selection screen
Page 83

Printing Layout options
LAYOUT OPTIONS
ADDING A LAYOUT
Click on the Add button in the Edit Layout section.
§
Enter a name for the layout (required).
§
Select parameters and enter values as required to determine the appearance of the
§
printed page.
Click Test to print a sample using your settings.
§
Click OK to add the layout to the Edit Page Layout List.
§
ADDING A LAYOUT FROM AN EXISTING ONE
In the Page Layout column, select a layout.
§
Click on the Copy button in the Edit Layout section
§
A copy of the selected layout will open.
§
Change the layout name, edit parameters, and click OK.
§
The new layout will be added to the layout list.
§
MODIFYING AN EXISTING PAGE LAYOUT
In the Page Layout column, select a layout.
§
Click on the Edit button in the Edit Layout section.
§
In the Page Layout dialog edit parameters and click OK.
§
DELETING A LAYOUT
In the Page Layout column, select a layout.
§
Click on the Delete button.
§
Scanshell.net User Guide © 2005 Card Scanning Solutions 83
Page 84
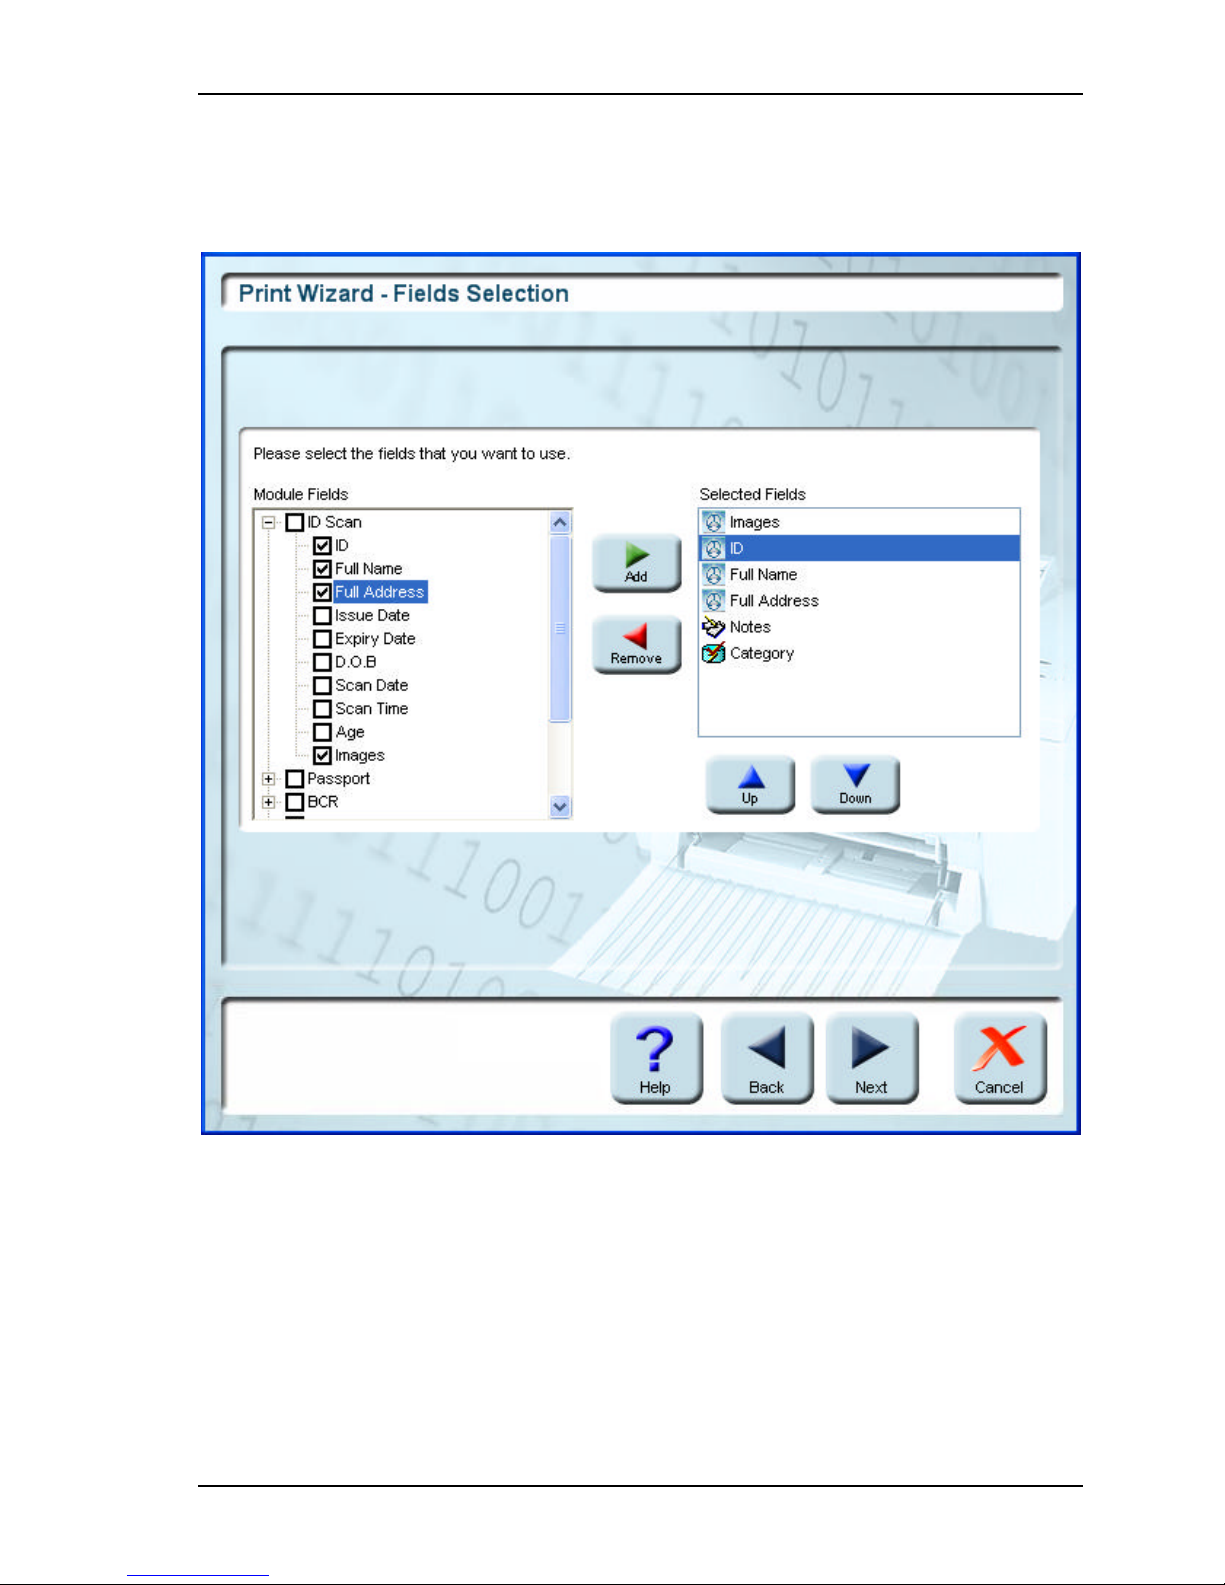
Printing Selecting fields
SELECTING FIELDS
You can select the fields that you want to print from each module:
Select the checkboxes of the modules you want to print. Selecting a module will
§
automatically select all its fields and display them in the Selected Fields column on the
right. You can print selected fields only, as follows:
Click on the "+" of a module to open it.
§
The module's field list will open.
§
Scanshell.net User Guide © 2005 Card Scanning Solutions 84
Figure 10-2: Print Wizard - Fields selection screen
Page 85

Printing Selecting fields
Select the desired fields, either by selecting their checkboxes or by clicking on a field to
§
select it and then clicking on the right-pointing arrow. The selected fields will be
displayed in the Selected Fields column on the right.
Scanshell.net User Guide © 2005 Card Scanning Solutions 85
Page 86

Printing Print Preview
CHANGING THE ORDER OF THE FIELDS APPEARA NCE
The fields are printed in the order in which they appear on the list.
To change the appearance order of the fields, select a field and use the up/down arrows to
move it up and down the list.
REMOVING A FIELD FRO M THE SELECTED FIELDS COLUMN
Select a field in the Selected Fields column and click on the left-pointing arrow.
When you are done, click Next.
PRINT PREVIEW
The Print Preview screen lets you view the printed data before it is printed. You can zoom
in on the image, and view the additional images that are stored in the records. You can also
control the printing font parameters.
Scanshell.net User Guide © 2005 Card Scanning Solutions 86
Page 87
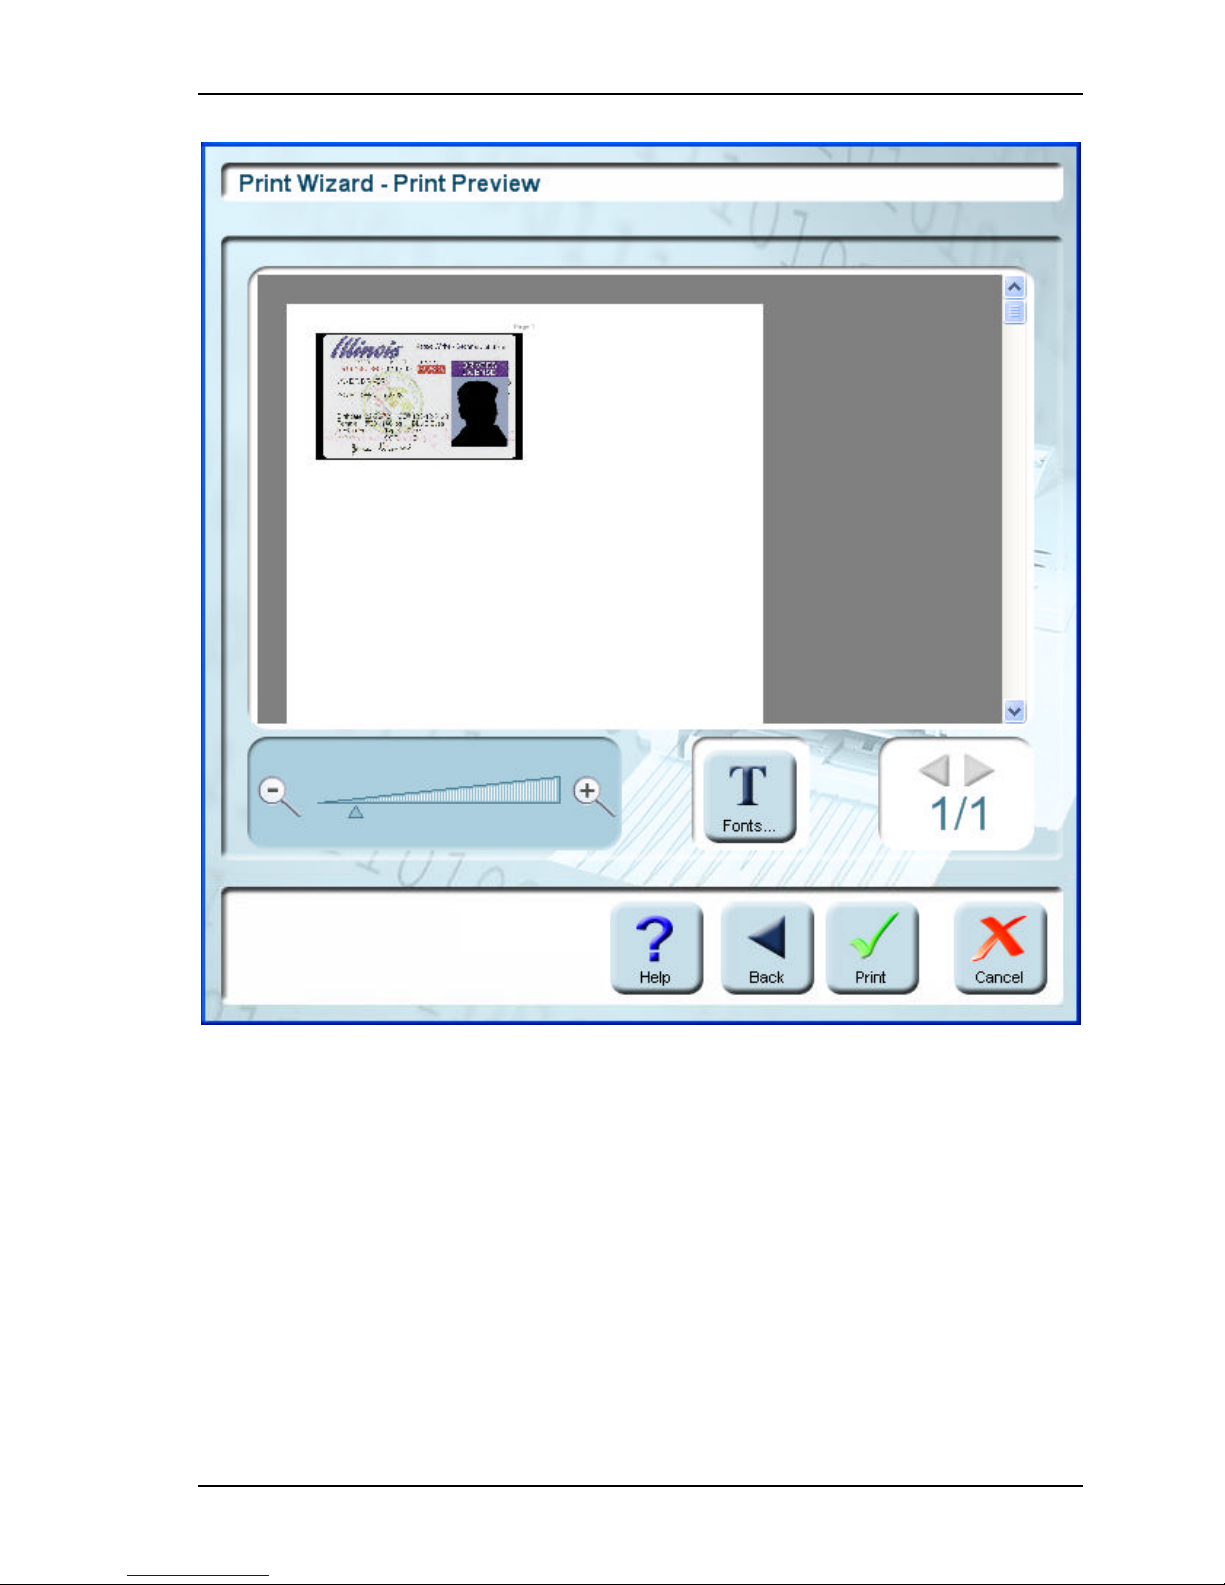
Printing Print Preview
Scanshell.net User Guide © 2005 Card Scanning Solutions 87
Figure 10-3: Print Preview screen
Page 88

Printing Print Preview
CHANGING THE PRINTING FONT
1. Click on the Fonts button.
2. Choose the font, style, size and effect, and click OK.
3. When you are done, click Print. The last print settings including fields selection will
be saved per user.
Scanshell.net User Guide © 2005 Card Scanning Solutions 88
Page 89
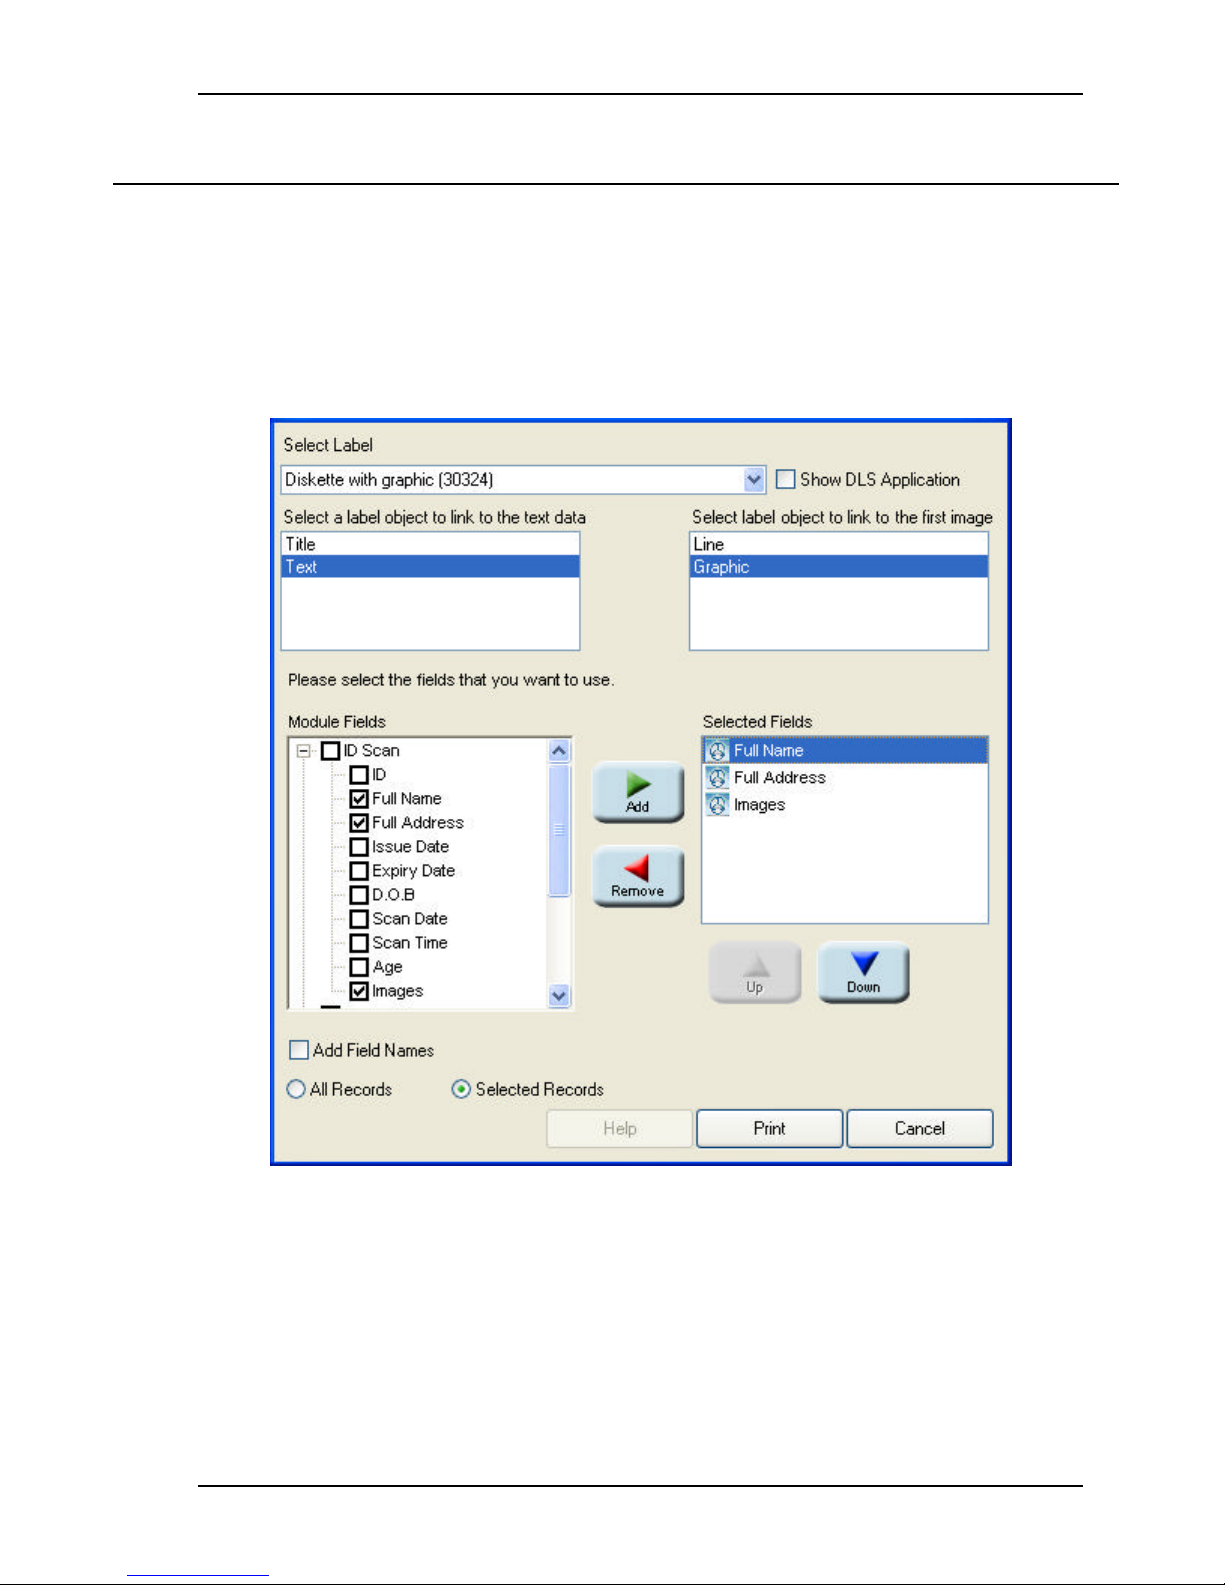
DYMO Printer Print Preview
11. DYMO PRINTER
The Dymo label printer is a special third-party label printer supported by Scanshell.net.
For detailed instructions on how to use the Dymo printer, please refer to the Dymo manual.
The following chapter describes and expla ins the setup of the Dymo printing from within
Scanshell.net.
1. Select Label Printers->Dymo from the File menu.
2. Select a label from the label dropdown list (top left).
3. DLS checkbox – Select if you want to display the Dymo application window.
4. The ”Label object" boxes display the objects contained in the selected label, which
can be linked to the records content. For example, in the label type displayed above,
if "Text" is selected in the text object box (left), the record data will be printed on
the label area that is designated for text. Selecting "Graphic" in the right box will
Scanshell.net User Guide © 2005 Card Scanning Solutions 89
Figure 11-1: Dymo printer setup
Page 90

DYMO Printer Print Preview
link the records image to the graphic object on the label. Only one object can be
selected in each box
5. Select the checkboxes of the modules you want to print. Selecting a module will
automatically select all its fields and display them in the Selected Fields column on
the right.
6. You can print selected fields only, as follows:
Click on the "+" of a module to open it.
s
The module's field list will open.
s
Select the desired fields, either by selecting their checkboxes or by clicking on
s
a field to select it and then clicking on the right-pointing arrow. The selected
fields will be displayed in the Selected Fields column on the right.
Add field name – Select this option if you want the field label to be printed next to the
field information, e. g., "Name" Address" etc.
All Records/Selected Records – select to print all the records in the active module
database, or only the selected records.
Changing the order of the fields appearance
The fields are printed in the order in which they appear on the list.
To change the appearance order of the fields, select a field and use the up/down arrows to
move it up and down the list.
Removing a field from the Selected Fields column
Select a field in the Selected Fields column and click on the left-pointing arrow.
When you are done, click Print.
Scanshell.net User Guide © 2005 Card Scanning Solutions 90
Page 91
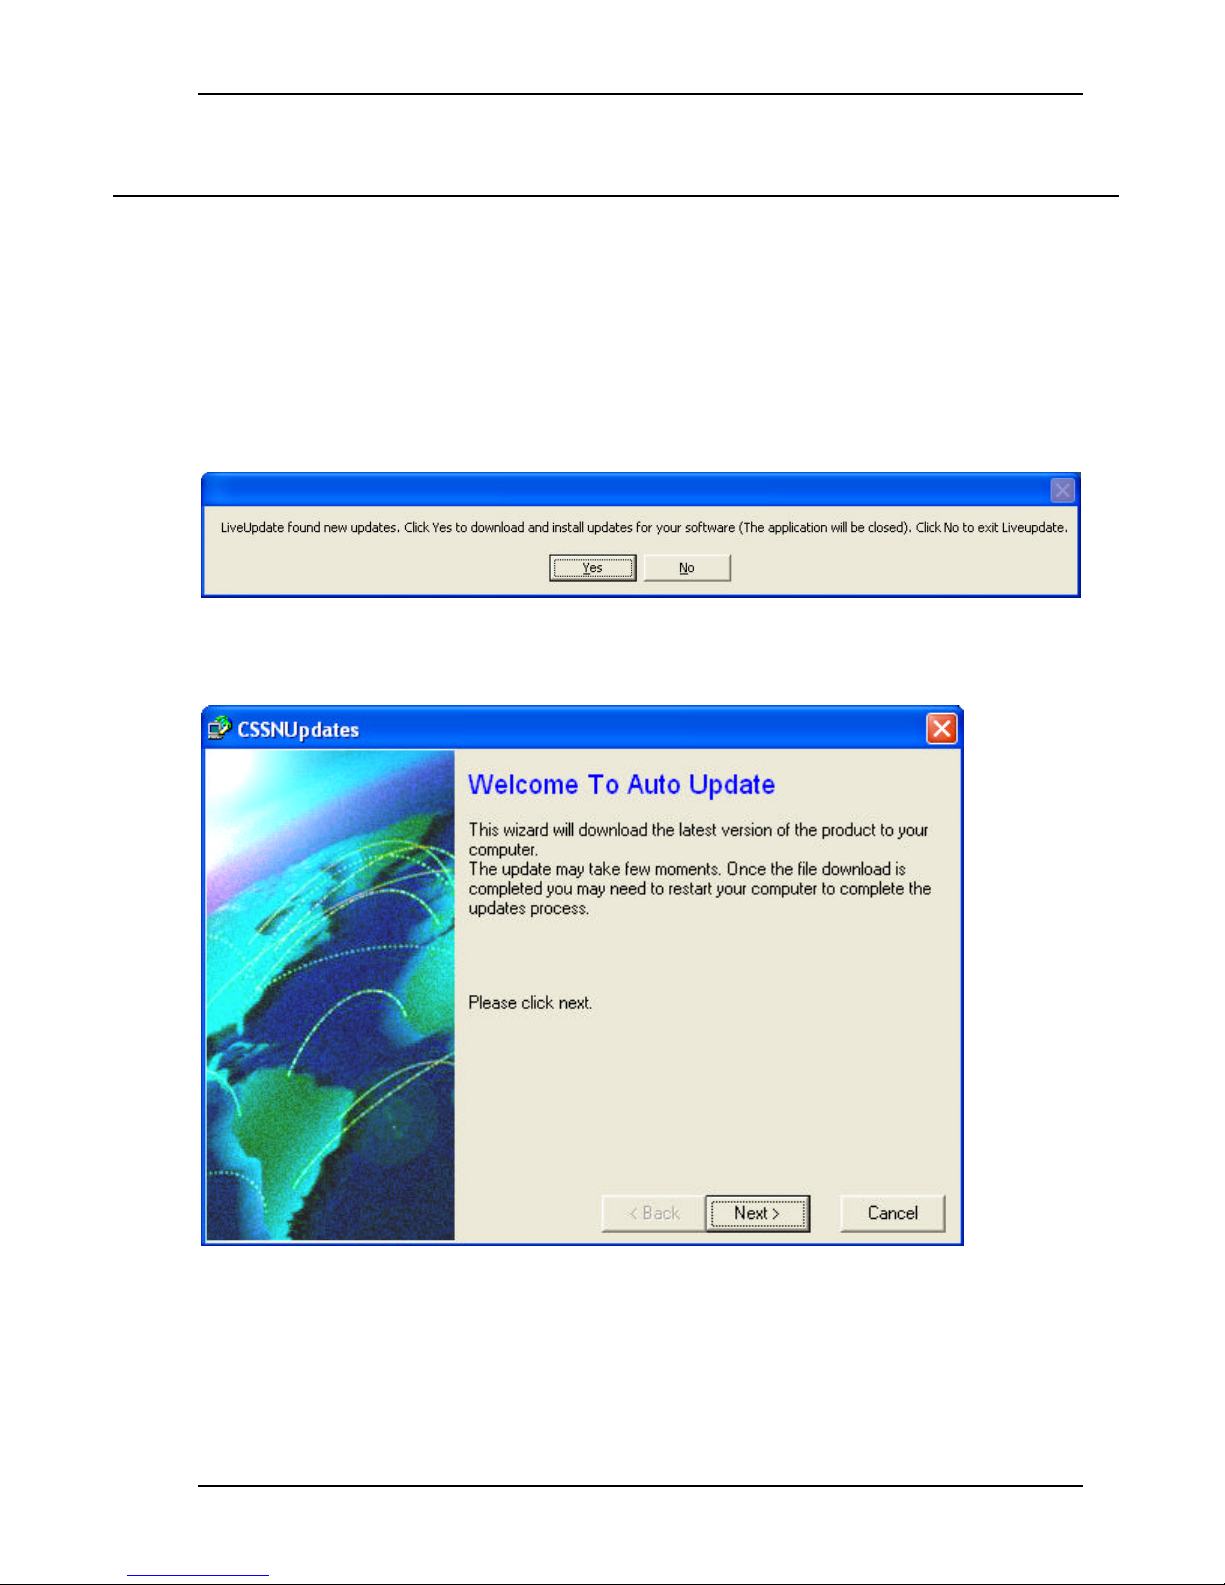
Live Update Print Preview
12. LIVE UPDATE
Live Update keeps your software up to date, by checking for updates using your Internet
connection. If updates are available, Scanshell.net will download and install them
automatically.
1. Click the Live Update button in the main screen or select Live Update from the
Tools menu.
2. If there are updates for your program you will see the following dialog:
3. Click Yes if you want to download and install the updates.
4. The following screen will appear:
5. Click Next.
Scanshell.net User Guide © 2005 Card Scanning Solutions 91
Page 92
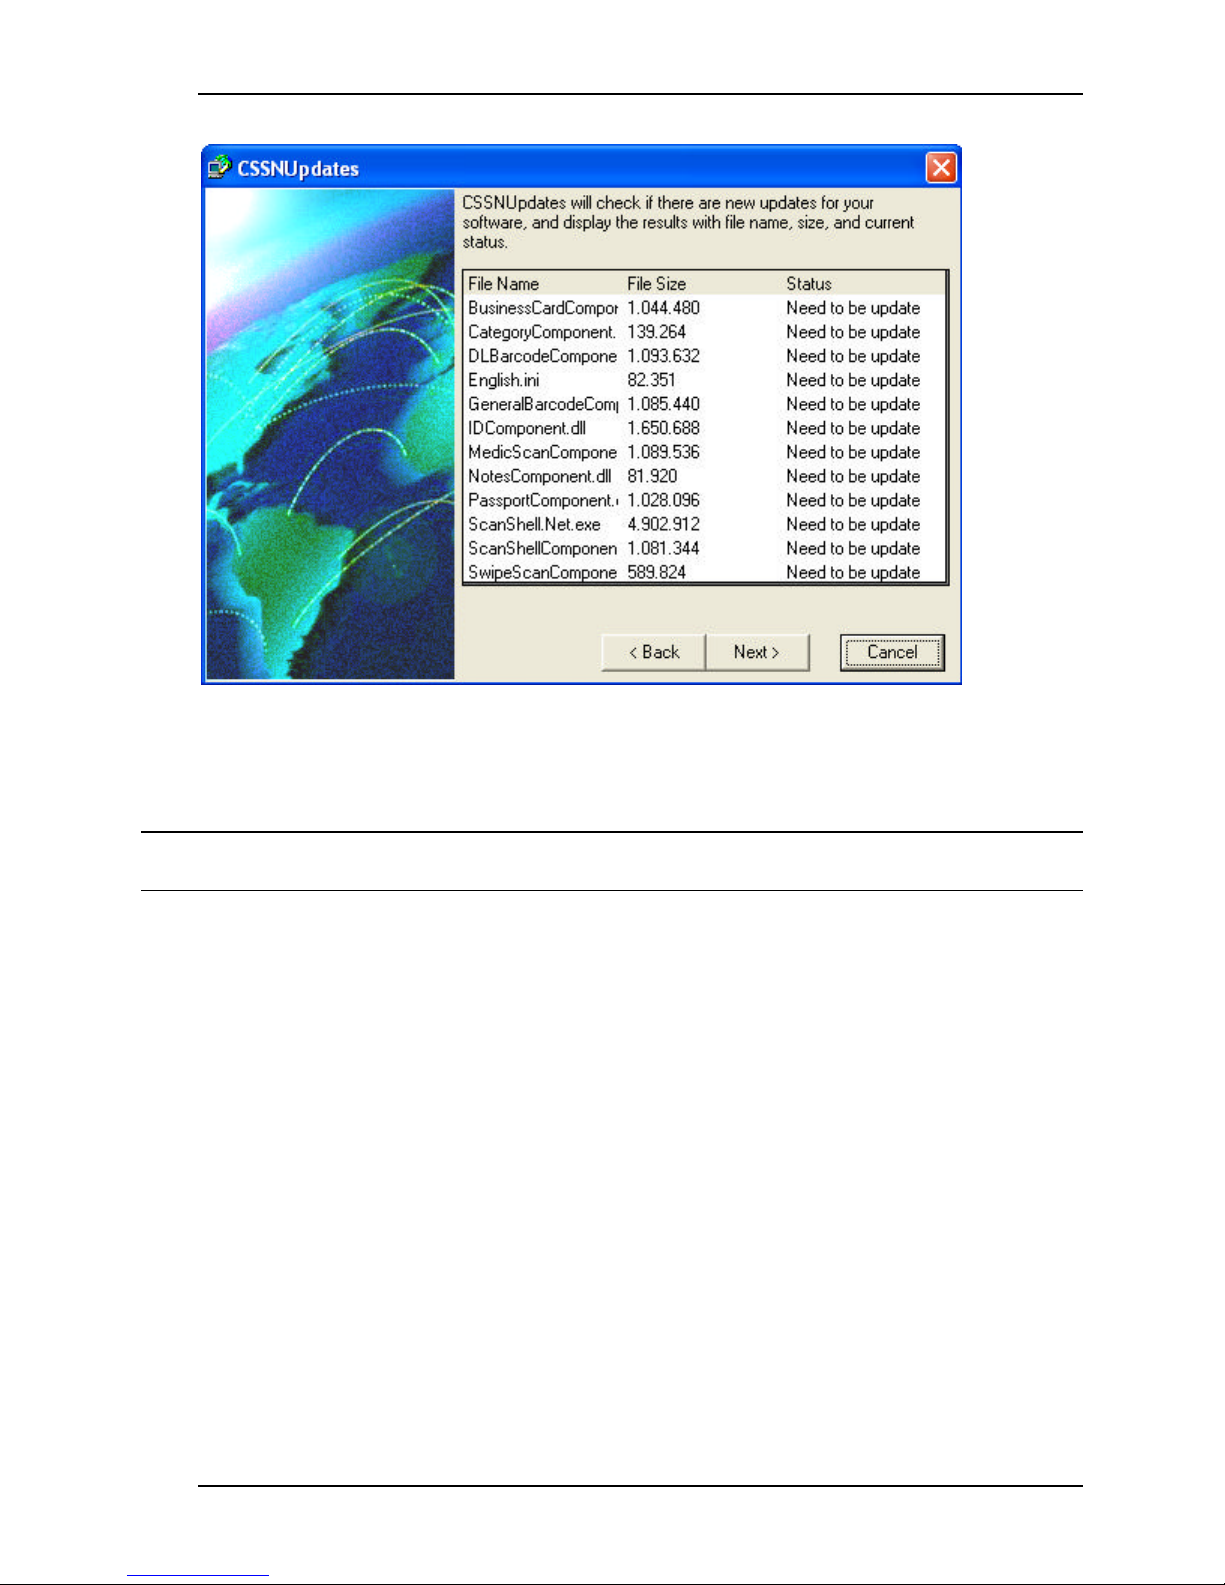
Live Update Print Preview
6. Scanshell.net will display the available updates.
7. Click Next to download and install the updates automatically.
Note: When performing Live Update, the application will be shut down. You will have to start it
again after Live Update is complete.
Scanshell.net User Guide © 2005 Card Scanning Solutions 92
Page 93
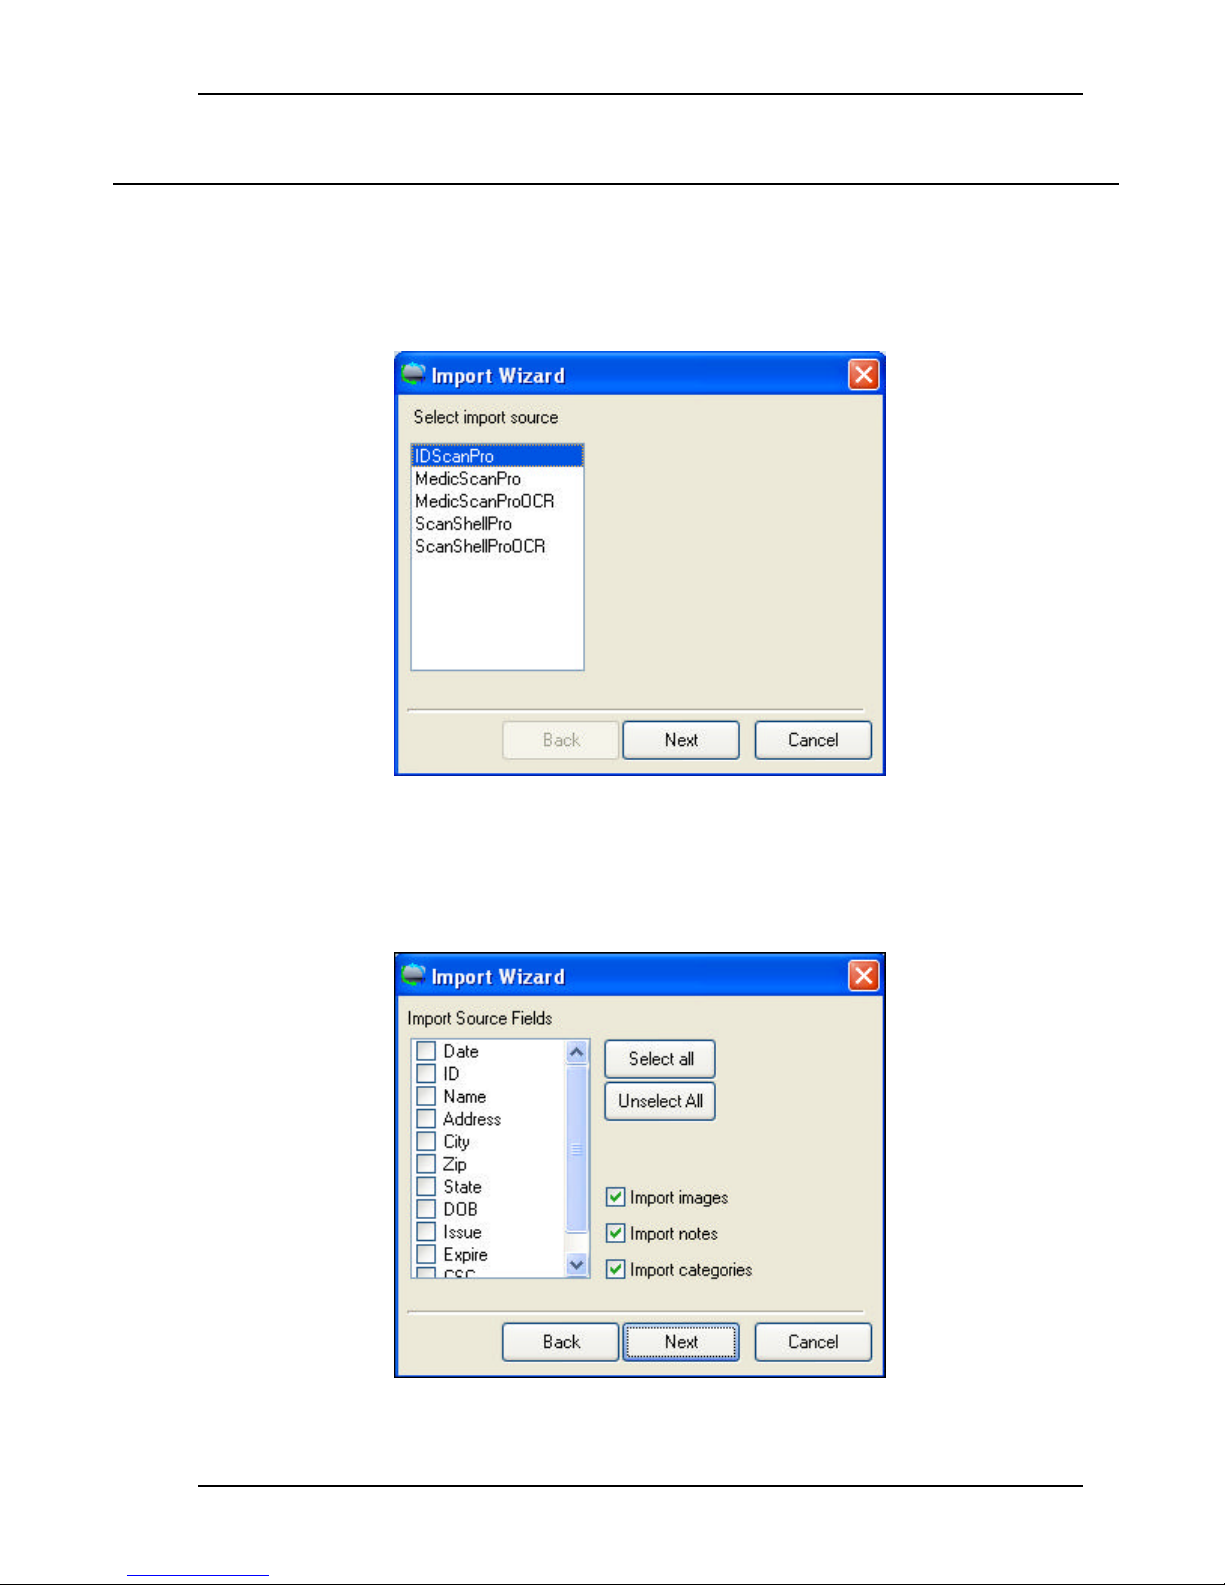
Import Print Preview
13. IMPORT
The Import function is designed to import databases of previous versions of CSSN software
such as idScan, idScan pro, Medicscan, etc.
1. Select Import from the File menu.
Figure 13-1: Import Wizard - Selection of previous CSSN programs' database
2. Select the program from which you want to import the database and click Next.
3. Click on the button to the right and navigate to the location of the database file you
want to import. Select it and click Next.
Figure 13-2: Import Wizard - Selection of fields to import
Scanshell.net User Guide © 2005 Card Scanning Solutions 93
Page 94

Import
4. Select the fields you want to import from the other database.
5. Check/uncheck the import of categories, notes and & images.
6. Click Next.
7. Select the module in the current database, into which you want to import the
records.
8. Click Next.
9. Define the ScanShell.Net destination field for each field in the imported database.
The data in the imported database field will be imported into the matching module
field.
10. Click Next.
11. Relate a ScanShell.Net destination category for each category in the imported
database.
12. Click Finish.
Scanshell.net User Guide © 2005 Card Scanning Solutions 94
Page 95

Rules
14. RULES
Rules are automatic actions that the program performs when certain, predefined conditions
are met.
Rules can be used for various purposes. The following are just few examples of the vast
number of rules that can be created in Scanshell.net:
Alerts concerning expired ID cards, persons under legal age, badly paying customers, or
§
any other kind of alert.
Automatic Export of data when certain criteria in records are met.
§
Automating application tasks such as saving data.
§
Scanshell.net User Guide © 2005 Card Scanning Solutions 95
Page 96
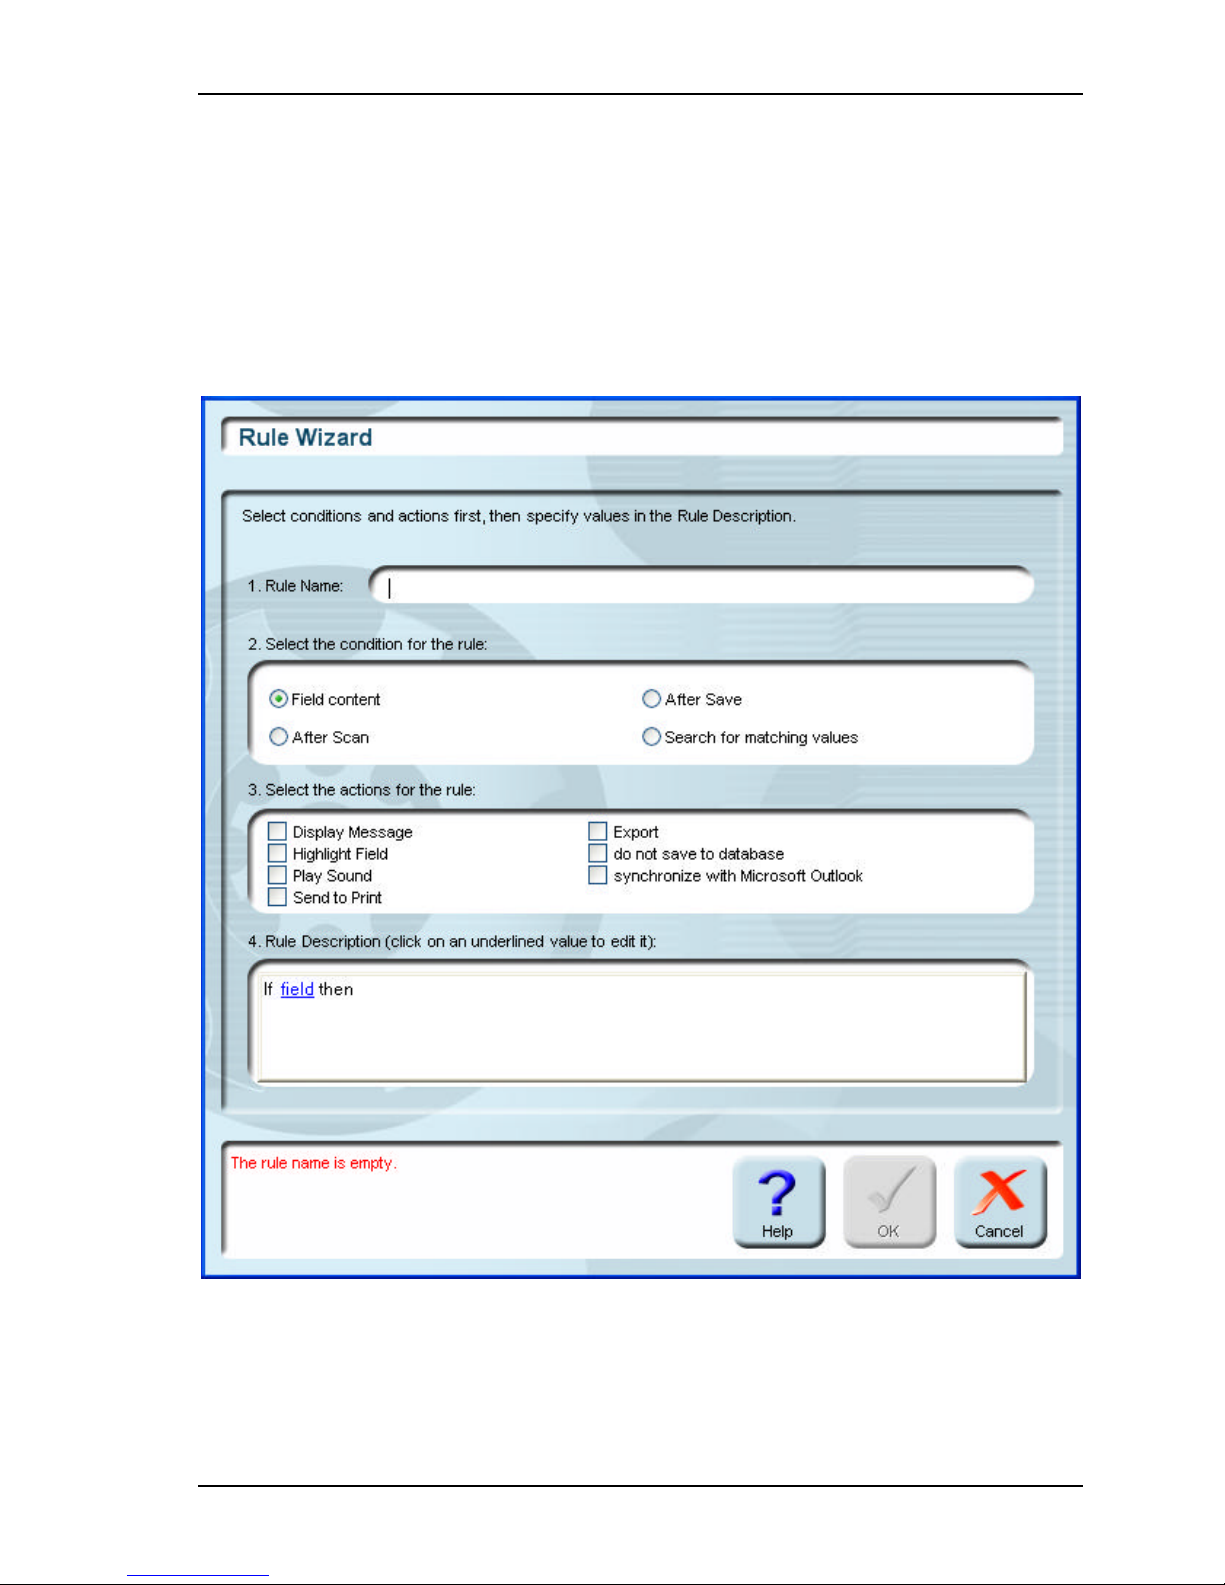
Rules Creating rules
CREATING RULES
We will explain the use of rules by following an example of creating a rule that identifies
expired ID cards, and produces an alert sound and message, informing the user that a
scanned card has expired.
1. Select Rule List from the Tools menu.
2. Click New.
3. Type in a name for your rule. Try to choose a meaningful name.
4. Select Field content in section 2.
Scanshell.net User Guide © 2005 Card Scanning Solutions 96
Figure 14-1: Rule Wizard window
Page 97
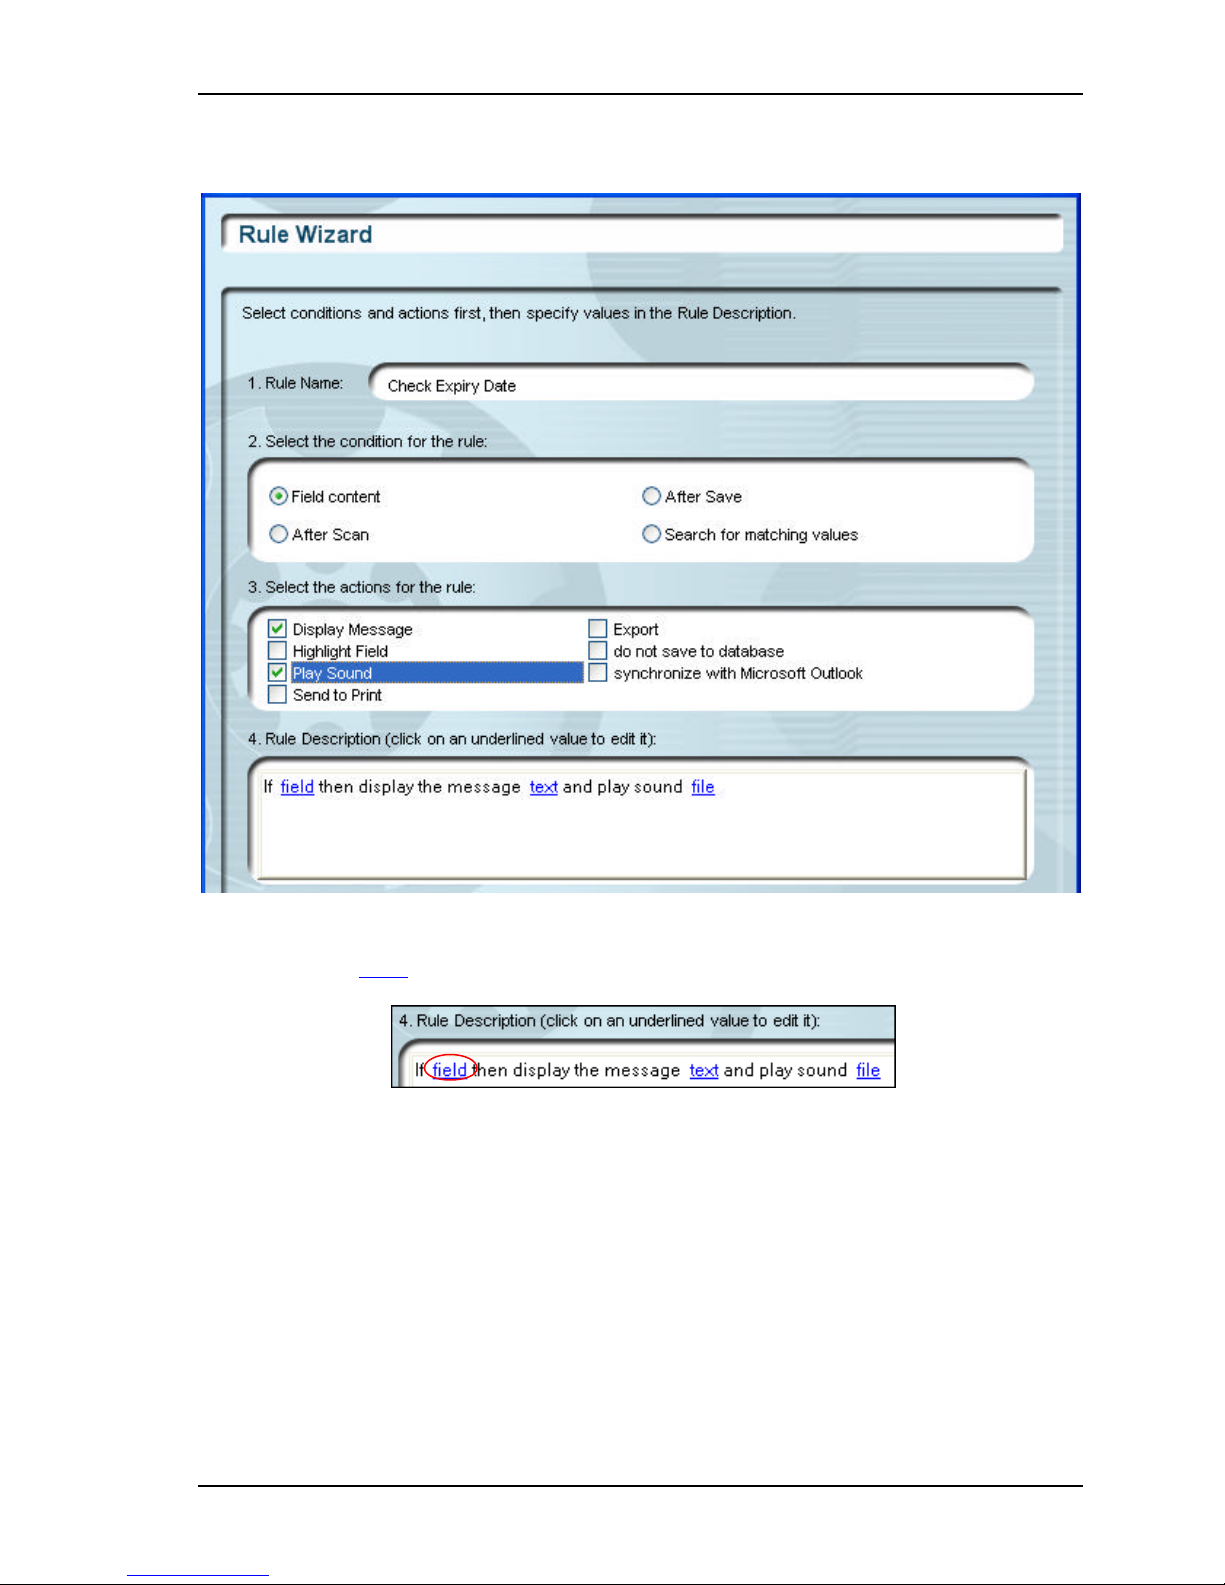
Rules Creating rules
5. Check Display Message, and Play sound in section 3.
Figure 14-2: Rule Wizard with selections according to the example in this chapter
6. Click on the Field hyperlink in section 4.
Figure 14-3: Rule details section in the Rule Wizard
Scanshell.net User Guide © 2005 Card Scanning Solutions 97
Page 98
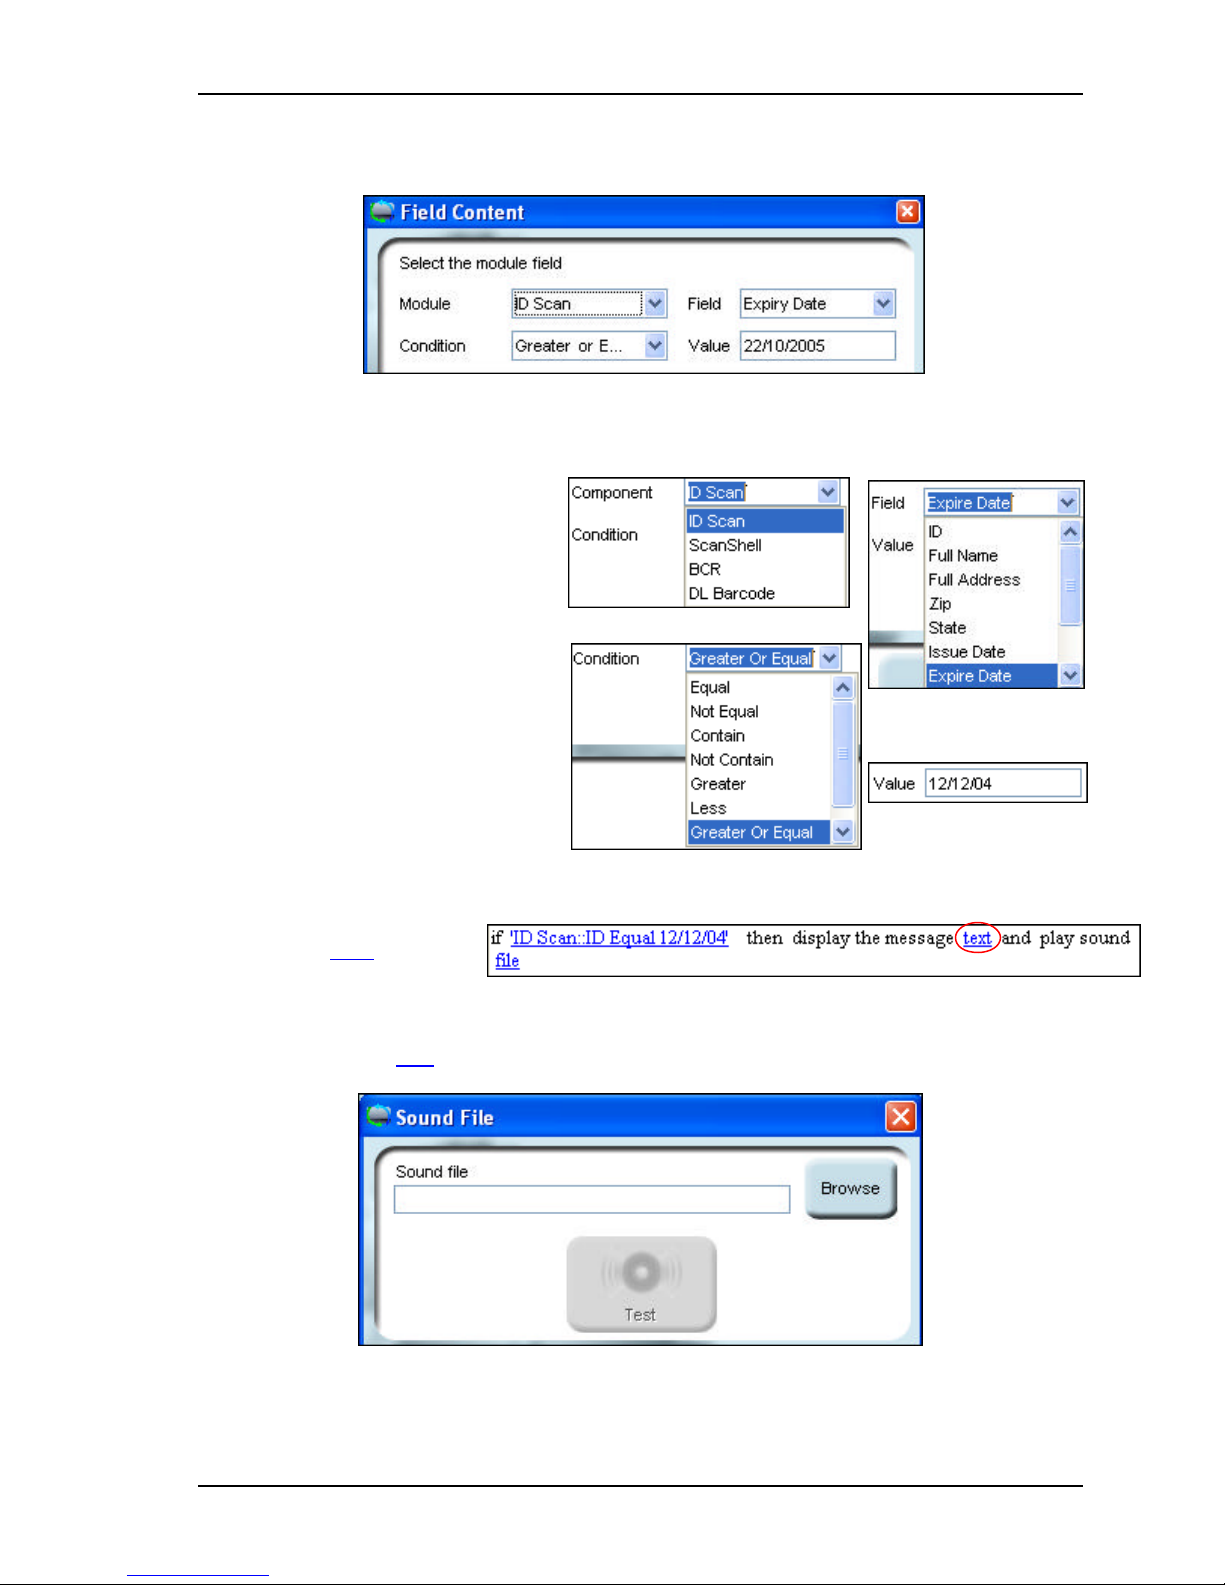
Rules Creating rules
Step 7
Step 8
Step 9
Step 10
The field content dialog will open:
Figure 14-4: Field content dialog box
7. Select the module to which you
want the rule to apply.
8. Select the condition that defines
your criteria. In this example,
we will choose Greater or
Equal.
9. Select the field to which you
want to apply the criteria. In this
case, we choose Expiry Date.
10. Fill in the required value – in
this case the required expiry
date. Please note that the value
type of this field changes
according to the selected field type.
11. Click OK.
12. Click the Text hyperlink.
13. Type in the text you want to appear in the alert message into the message box, and
click OK.
14. Click the Sound File hyperlink
Scanshell.net User Guide © 2005 Card Scanning Solutions 98
Figure 14-5: Sound file selection dialog box
Page 99
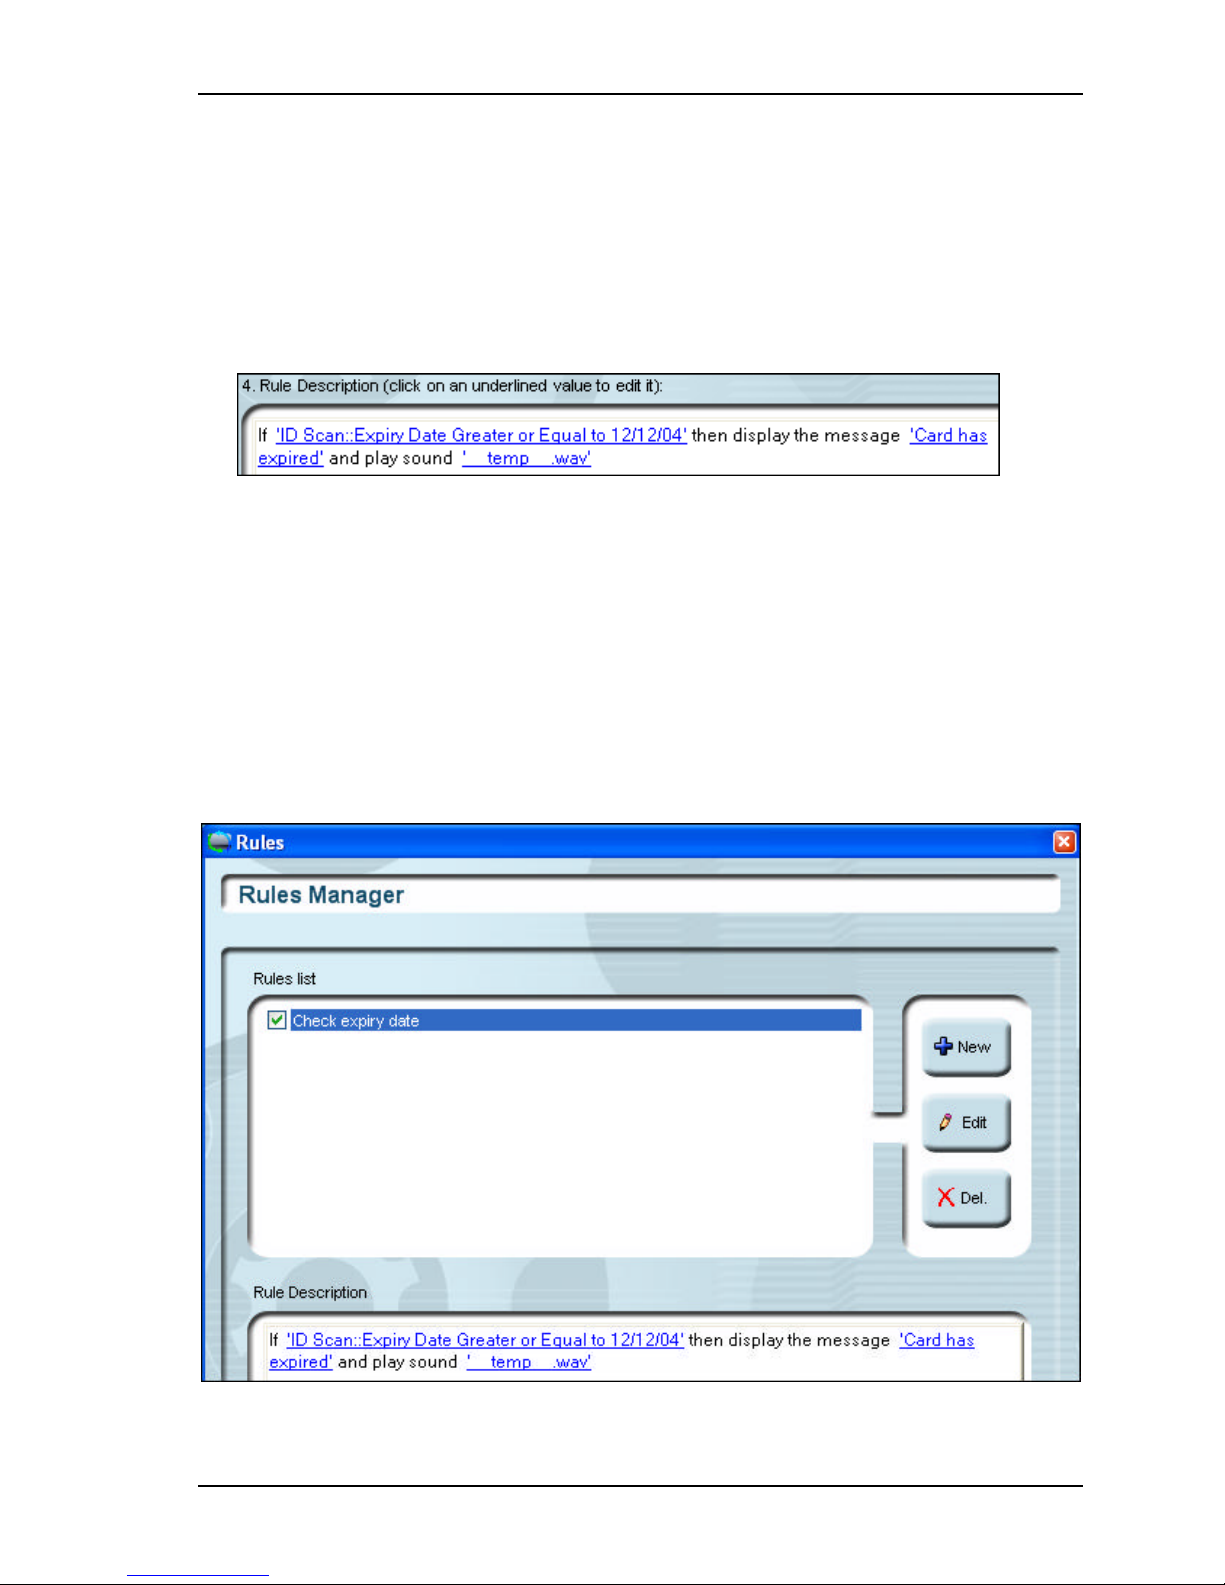
Rules Editing Rules
15. Click Browse, select a sound file in .wav format, which you would like the
application to play when the rule criteria is met, and click OK.
16. Click the Test button to play this sound.
17. Click OK to save your selection and close the sound-file dialog box.
18. Verify the rule description in section 4. It should contain the following rule
description:
This rule specify that if the Expiry Date field in the IDscan module is equal or
greater than 12/12/04, the application will display the message "This card has
expired" and play the temp_.wav sound.
19. When you are done, click OK to close the Rule Wizard.
20. You will find the new rule you created in the Rule Manager window, where you
can edit and delete it.
EDITING RULES
1. Select Rule List from the Tools menu.
Scanshell.net User Guide © 2005 Card Scanning Solutions 99
Figure 14-6: Rule list window
Page 100

Rules Deleting Rules
2. Click on the rule you want to edit to select it, and then click Edit.
3. Make changes as described in the previous section "Creating Rules" and click OK.
DELETING RULES
1. Select Rule List from the Tools menu.
2. Click on the rule you want to delete to select it, a nd then click Delete.
MANAGING RULES
You can activate rules or temporarily disable them, by checking and unchecking the boxes
of the relevant rules in the Rules Manager window.
Scanshell.net User Guide © 2005 Card Scanning Solutions 100
 Loading...