

Page 1

CSSN
Scan2CRM
for Act!
The ideal business and
ID card scanning solution
User Guide
Version 3.5
Page 2

This publication contains proprietary information of
the Card Scanning Solutions Company, provided for
customer use only. No other uses are authorized
without the express written permission of Card
Scanning Solutions.
Warranty
Card Scanning Solutions provides this
publication “as is” without warranty of any kind,
either express or implied, including, but not
limited to, the implied warranties of
merchantability or suitability for any particular
purpose.
Card Scanning Solutions reserves the right to
revise this publication, and to make changes in
the content hereof from time to time without
notification. Some countries or states in the
USA do not allow a disclaimer of express or
implied warranties in certain transactions; if you
are a resident of such country or state, this
statement may not apply to you.
This publication may include technical
inaccuracies or typographical errors. Changes
are made periodically to the information herein;
these changes will be incorporated in new
editions of the publication. Card Scanning
Solutions may make improvements and/or
changes in the products and/or the software
described in this publication at any time.
Notice to user
This user guide should not be construed as a
representation or warranty with respect to the
software named herein. Occasionally, changes
or variations exist in the software that are not
Page 3

reflected in the manual. Generally, if such
changes or variations are known to exist and to
affect the product significantly, a release note or
“read me” file accompanies the user guide
and/or the distributed software. In that event, be
sure to read the release note or “read me” file
before using the product.
Publication
The descriptions, specifications, design and
procedures contained in this user guide were
effective at the time of publication of this
document. Card Scanning Solutions reserves
the right to modify any of the above at any time
without notice and without incurring obligations.
Trademarks
All trademarks are the property of their
respective holders and are hereby
acknowledged.
© 2005-2007 Card Scanning Solutions
Page 4

Table of Contents
Scan2Contacts User Guide, version 3.5
TABLE OF CONTENTS
Warranty...................................................2
Notice to user...........................................2
Publication................................................3
Trademarks ..............................................3
TABLE OF CONTENTS ........................................... 2
1. INTRODUCTION........................................ 1
OVERVIEW........................................................... 1
Scanner/card type specification ............... 1
Features ...................................................2
Scanner specifications .............................2
2. GETTING STARTED ................................. 3
BEFORE USING THE SCANNER .............................. 3
MINIMUM SYSTEM REQUIREMENTS ...................... 3
CONNECTING THE SCANNER................................. 3
INSTALLATION ..................................................... 5
UNINSTALL .......................................................... 5
SCAN2CRM FOR ACT! WINDOW ......................... 5
3. USING SCAN2CRM FOR ACT!................ 6
APPLICATION STATE............................................ 7
Setting the application state.....................7
Configuring the Scan2CRM for Act!.........7
SCANNING CARDS ................................................ 7
4. CONFIGURATION..................................... 9
SCAN2CRM FOR ACT! WINDOW ......................... 9
1. About tab ....................................... 10
2. General tab.................................... 10
3. Maintenance tab............................11
Scanner calibration ................................11
Calibrating the scanner...................... 12
Cleaning the scanner.........................12
4. ID Settings tab...............................13
5. Image tab ......................................14
Page 5

Table of Contents
Scan2CRM for Act! User Guide, version 3.5
5. APPENDIX A: TROUBLESHOOTING .. 15
6. APPENDIX B: ADDING AN IMAGE
FIELD TO THE ACT! CONTACT LAYOUT.. 18
Page 6

Introduction Overview
Scan2CRM for Act! User Guide, version 3.5 1
1. INTRODUCTION
OVERVIEW
Scan2CRM for Act! is an add-on application
for the Act! CRM software suite.
Depending on the scanner that is used, it scans
business cards, ID cards and American driving
licenses, and automatically inputs both their
textual data and image to a new contact record
in Act.
Within seconds of placing a card into the
scanner, Scan2CRM for Act! pulls the
information off the card using OCR – Optical
Character Recognition technology, and
automatically populates the text fields of a new
Act! contact record (name, title, phone number,
etc.), while also capturing an image file of the
card.
Scan2CRM for Act! works directly from within
Act!, making it the only business card scanning
package that does not require cards to be
scanned into a 3rd party application before the
information can be imported into Act!.
Scanner/card type specification
Scanshell 800N scanner – scans business
cards only
Scanshell 800 scanner – scans business
cards, ID cards and American driving
licenses
Page 7

Introduction Overview
2 Scan2CRM for Act! User Guide, version 3.5
Features
Fully integrated into Act
Scan cards directly and automatically into
Act!
Capture both data and image
Just a few seconds per scan
Auto detect function - just place the card in
the scanner (text face down)
Scanner specifications
Powered by the computer USB – No
external power source is needed
Small footprint
Fully mobile
Page 8

Getting Started Before using the scanner
Scan2CRM for Act! User Guide, version 3.5 3
2. GETTING STARTED
BEFORE USING THE SCANNER
The scanner has been carefully packaged to
avoid damage during transportation. Before
operating the scanner, please remove the
packaging materials. After removing the
packaging materials, you will find the following:
ScanShell scanner
Application CD
USB interface cable
Calibration paper
Cleaning paper
MINIMUM SYSTEM REQUIREMENTS
The minimum system requirements are:
Pentium III with 128MB
Win 98 Second Edition or higher
USB port
Act! installed
CONNECTING THE SCANNER
The scanner is connected to the computer
via the USB port. To connect the scanner,
do the following:
Place the scanner on a flat, firm, solid
surface with easy access.
Plug the USB interface cable into the USB
port of the computer
Page 9
Getting Started Connecting the scanner
4 Scan2CRM for Act! User Guide, version 3.5
After the Add new hardware wizard dialog
box appears, click Next until you are asked
to set the driver for the reader. You’ll find the
driver on the Installation CD at:
< CD-ROM drive >:/Driver/800 (for
the ScanShell 800 or 800N scanner
model for ScanShell 800N)
After you specify the driver, click Next.
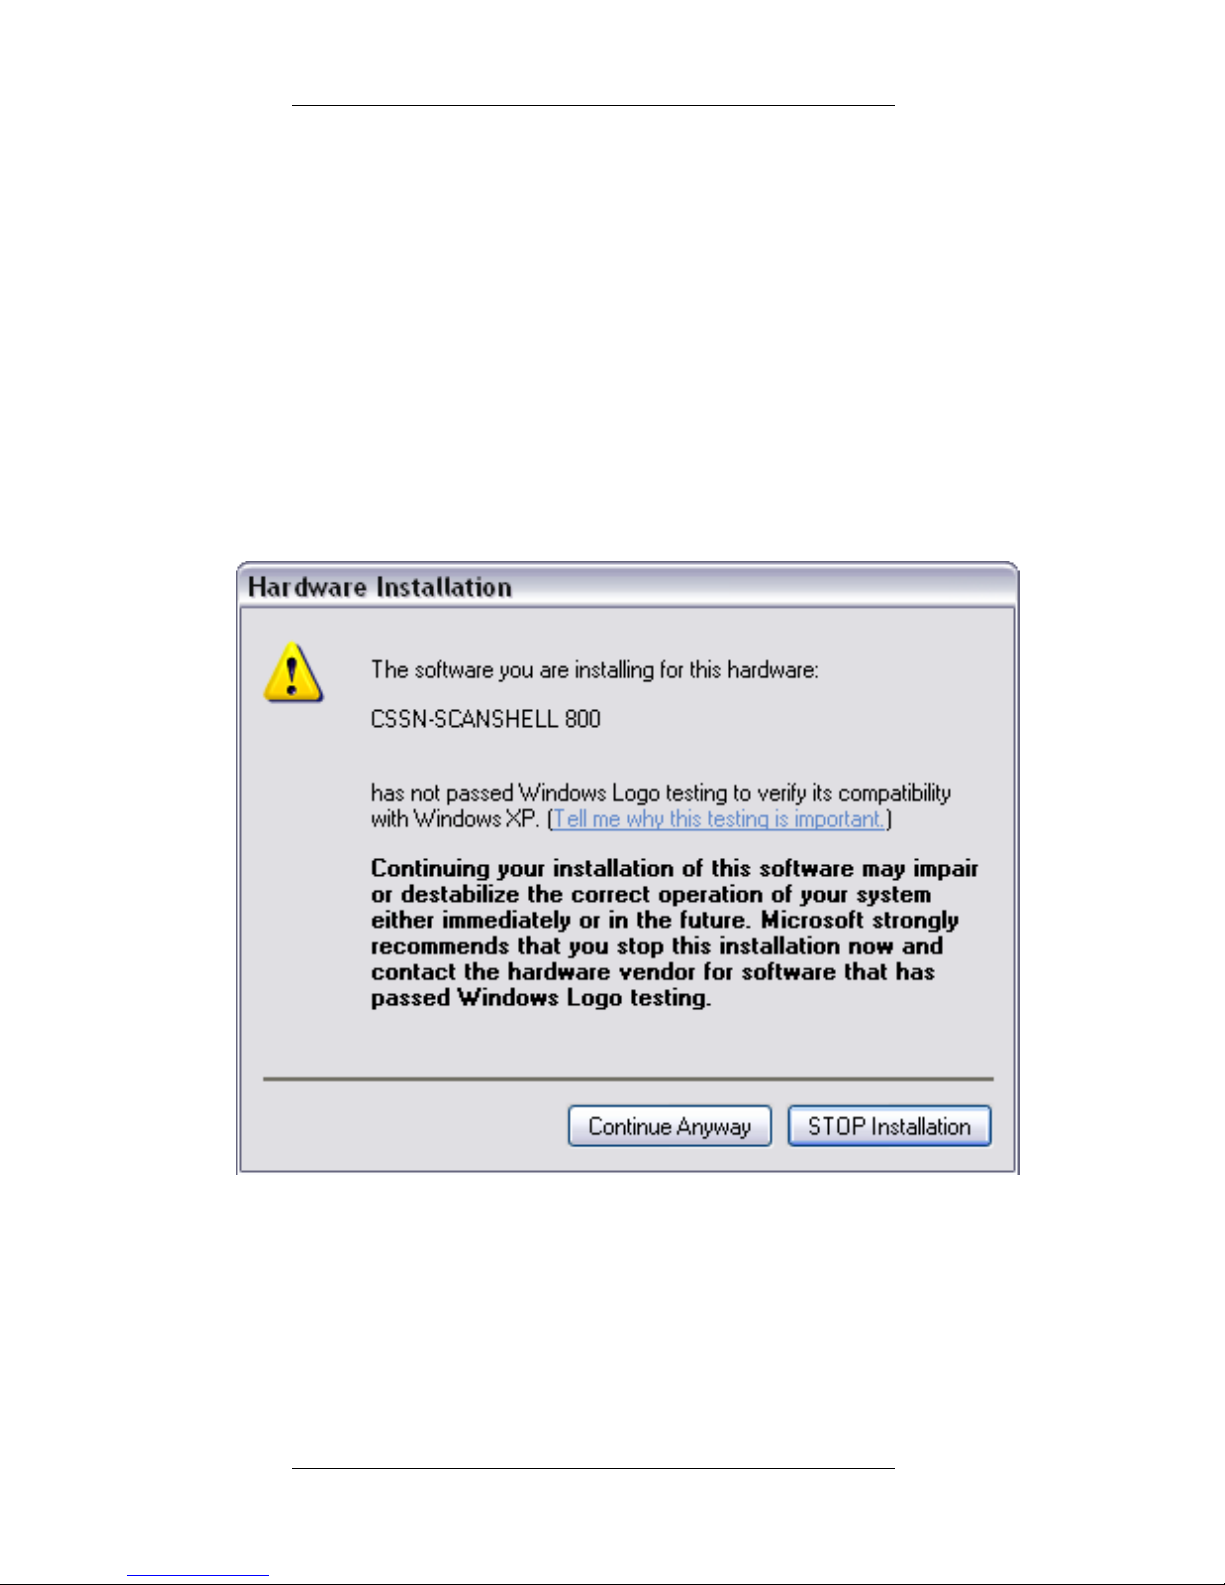
You will be presented with a standard
Windows message:
Click Continue Anyway. The installation of
ScanShell scanner drivers is safe for you
computer and will not affect your system.
Click Next until the installation is complete.
Page 10

Getting Started Installation
Scan2CRM for Act! User Guide, version 3.5 5
INSTALLATION
To install the software on the computer, do the
following:
1. Close all programs.
2. Insert the CD into the CD ROM drive.
3. Wait until the install program begins
and follow the instructions on the
screen.
4. If the install program does not
automatically start, click the My
Computer icon on the desktop and then
select the CD ROM drive.
5. Double click on the Setup program.
6. Wait until the install program begins
and follow the instructions on the
screen.
The software starts automatically when starting
Act.
UNINSTALL
To uninstall the software, open the AddRemove Programs control panel. Select
Scan2CRM for Act! and click on Add/Remove.
Follow the uninstall instructions until the
operation is completed (Act! must be closed).
SCAN2CRM FOR ACT! WINDOW
The Scan2CRM for Act! window is opened by
pressing the Scan2CRM for Act! button on Act!
toolbar.
Page 11
6 Scan2CRM for Act! User Guide, version 3.5
3. USING SCAN2CRM FOR ACT!
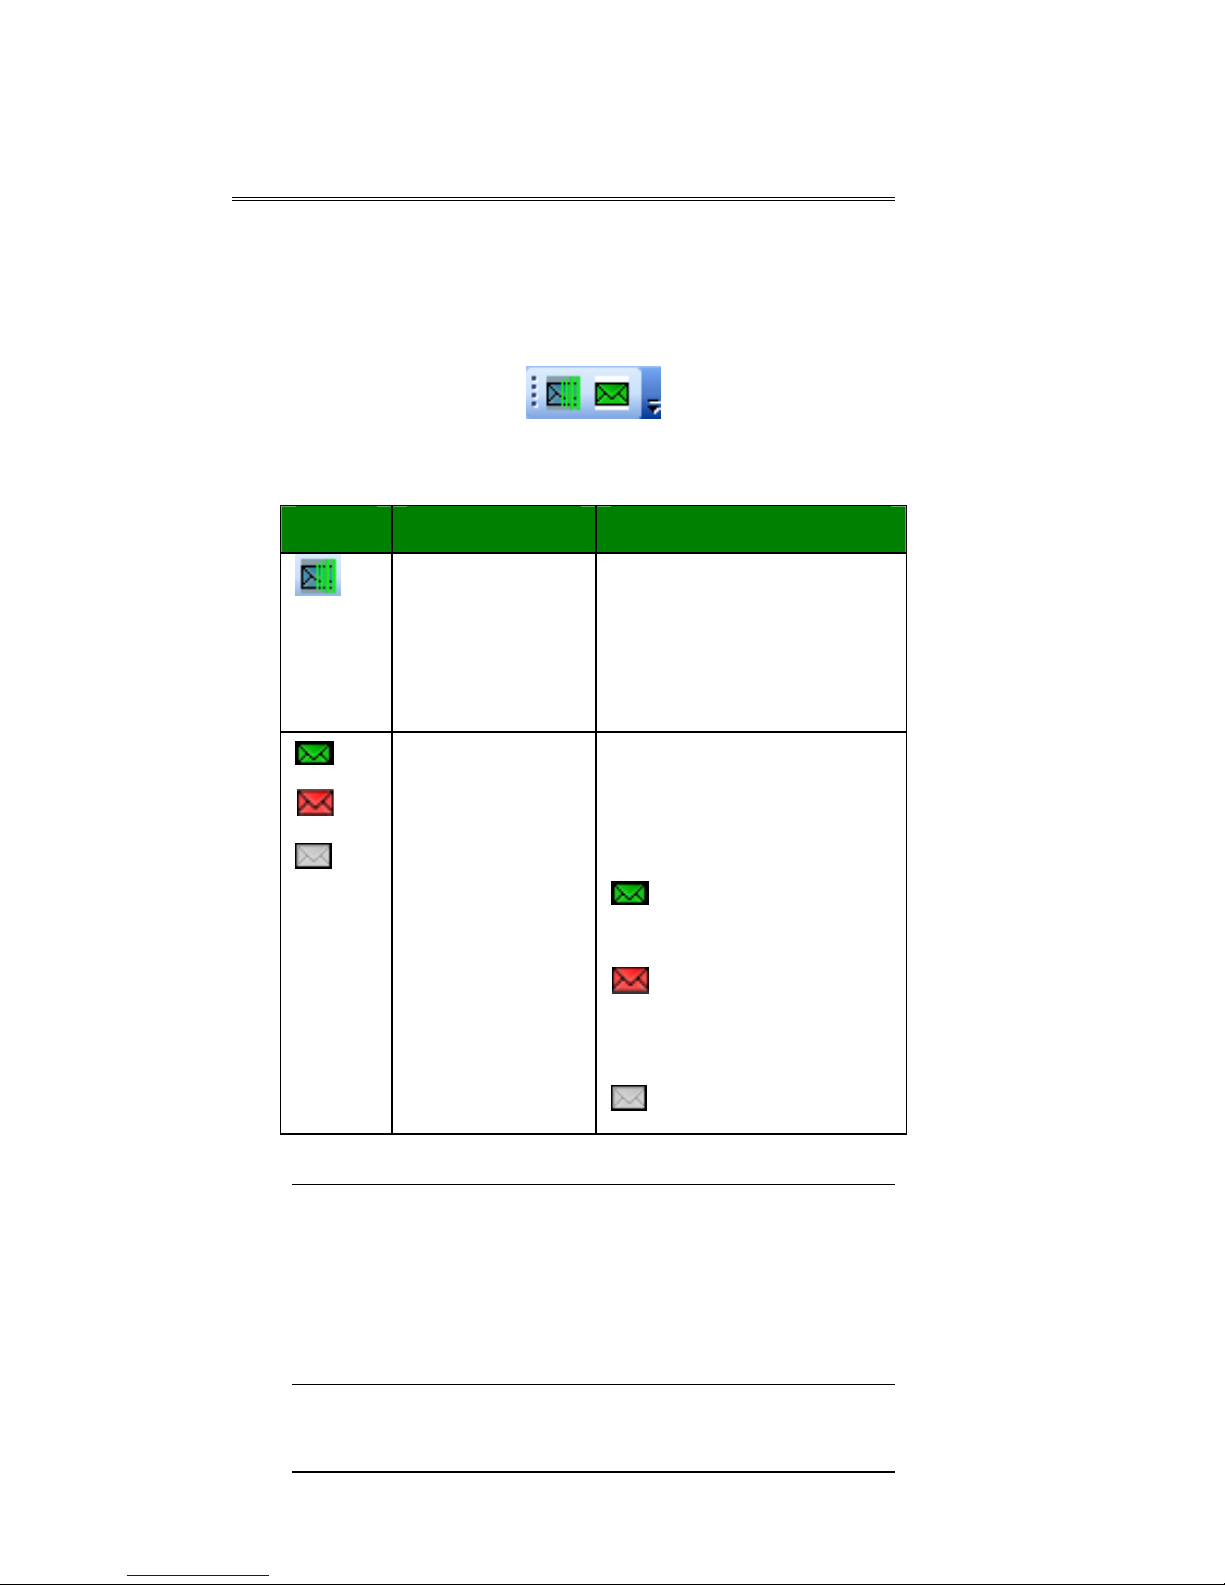
Scan2CRM for Act! adds a small toolbar to
Act, which is loaded at Act's startup.
Scan2CRM for Act! Toolbar in Act
Note: If Scan2CRM for Act! is enabled, the
application will detect the scanner status
(connected/disconnected) automatically, and
switch the icon color accordingly. If the
application is disabled, no detection of scanner
status is performed.
Button Name Description
Scan2CRM
for Act!
Opens a Scan2CRM
for Act! window with
version information,
setup, and scanner
maintenance options
State The State buttons
indicate the current
state of the
application:
= Enabled,
scanner is connected
= Enabled,
scanner is
disconnected
= Disabled
Page 12

Using Scan2CRM for Act! Application State
Scan2CRM for Act! User Guide, version 3.5 7
The scanner must be calibrated prior to
scanning business cards, please refer to
Calibrating the scanner, page 12 for
instructions. Once the scanner is calibrated
make sure the configuration window is closed to
begin scanning business cards.
APPLICATION STATE
When the application loads, its state is set to
Enabled by default.
Setting the application state
Press on the state button to toggle between
Enabled and Disabled states.
If the application is enabled (green button),
pressing on the state button will disable the
application and the button will be grayed out.
If an error occurred while the application
was loaded, the state will be set to Disabled.
You can try to enable the application by
pressing on the state button. If this does not
help, check if the scanner is properly
connected and try again.
Configuring the Scan2CRM for Act!
See Configuration, page 9.
SCANNING CARDS
Place the business card in the scanner with
the text face down.
If the card is a horizontal card, place the
card into the scanner horizontally and if the
card is vertical, place the card into the
scanner vertically. (If you do not do this, the
software will automatically rotate the card.)
Page 13

Using Scan2CRM for Act! Scanning cards
8 Scan2CRM for Act! User Guide, version 3.5
Your card will be automatically detected,
scanned in, and inserted automatically into a
new Act! Contact record.
Note: By default, the Act! Contact's layout does
not contain a special image field, and images
are kept in the "Notes" section of the Contact
record. You can however add an image field to
the contact layout, by selecting Design Layouts>Contact under the Act!'s Tools menu. For
detailed explanation on how to perform this
procedure, please see
Appendix B: Adding an
Image field to the Act! contact layout, page
18,
or consult Act!s user guide.
Page 14
Configuration Scan2CRM for Act! Window
Scan2CRM for Act! User Guide, version 3.5 9
4. CONFIGURATION
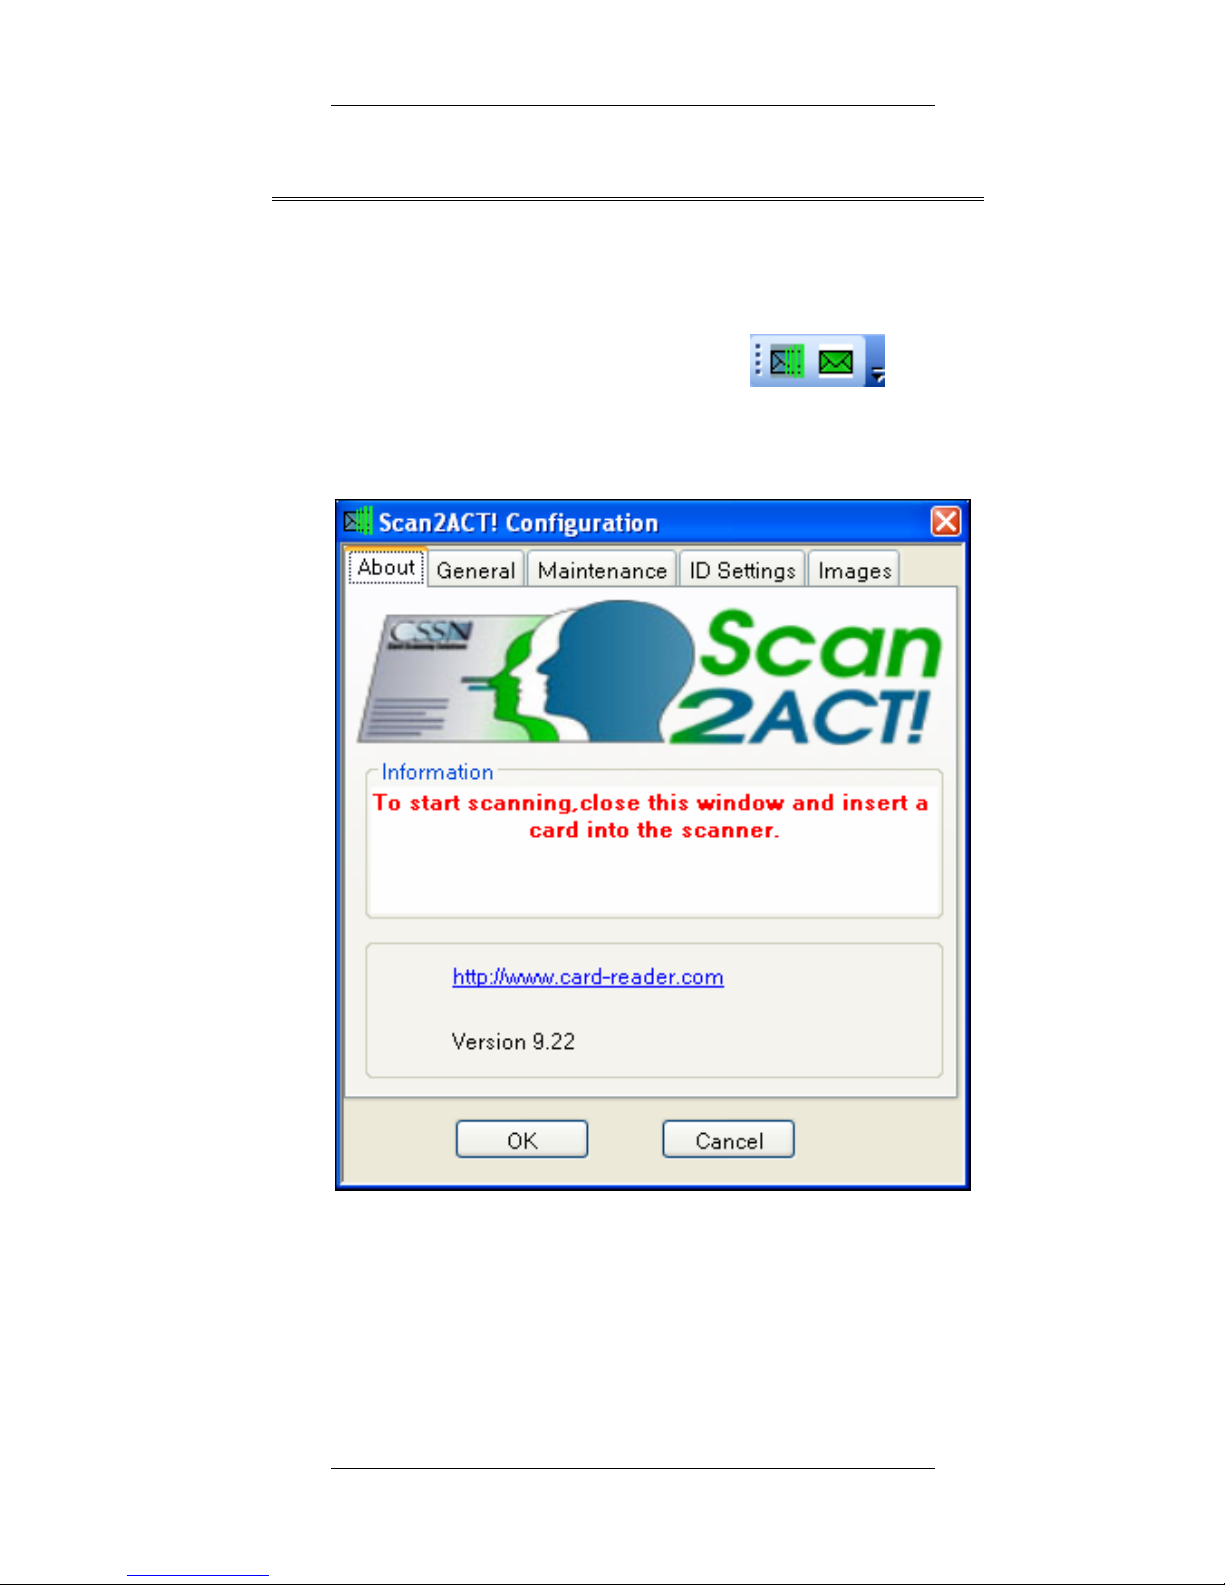
SCAN2CRM FOR ACT! WINDOW
Open the Scan2CRM for Act!
window by pressing the Scan2CRM for Act!
button on the Scan2CRM for Act! toolbar.
Page 15
Configuration Scan2CRM for Act! Window
10 Scan2CRM for Act! User Guide, version 3.5
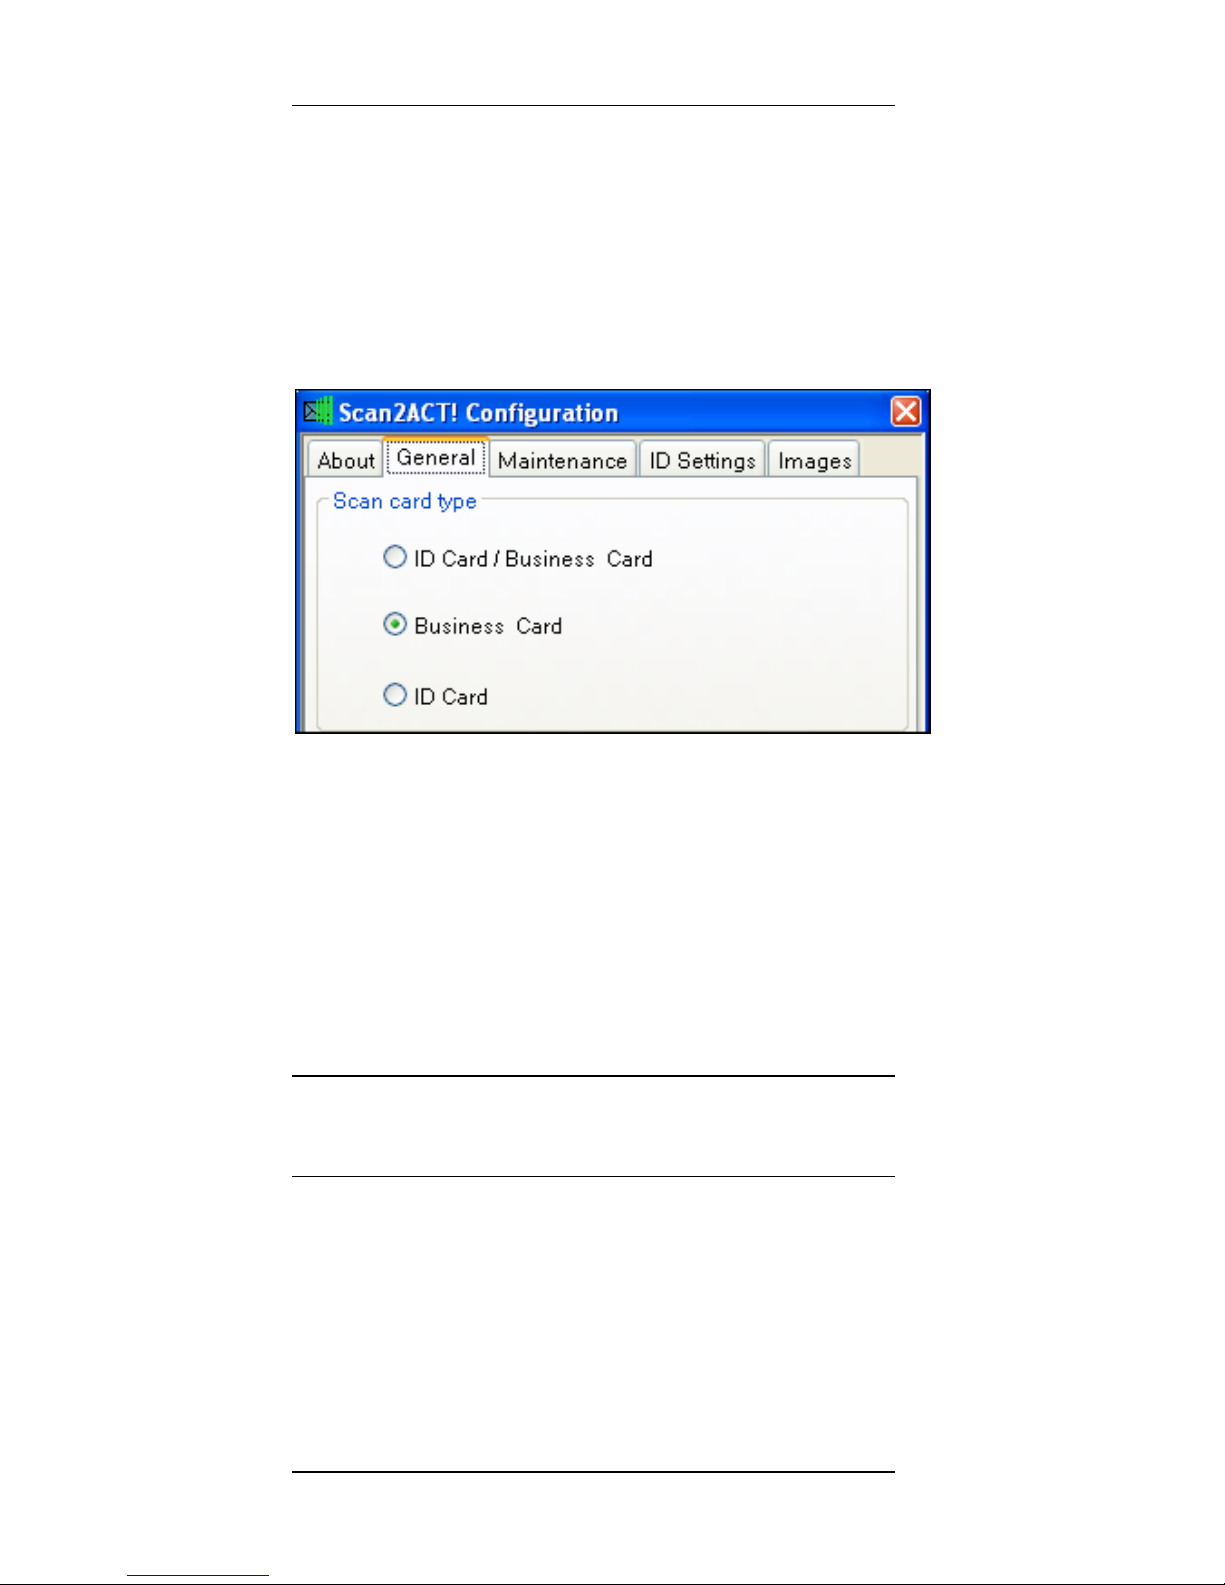
The Scan2CRM for Act! window has five tabs:
1.
About tab – Displays version
information.
2.
General tab- allows you to select the
type of scanned card:
ID Card/Business Card – the program will
attempt to detect the card type
automatically.
Business card – for scanning business
cards.
ID card – for scanning ID cards and
American driving licenses.
Note: the grayed-out options (ID card/Business
card and ID card) are not available with
ScanShell 800N scanner.
Page 16
Configuration Scan2CRM for Act! Window
Scan2CRM for Act! User Guide, version 3.5 11
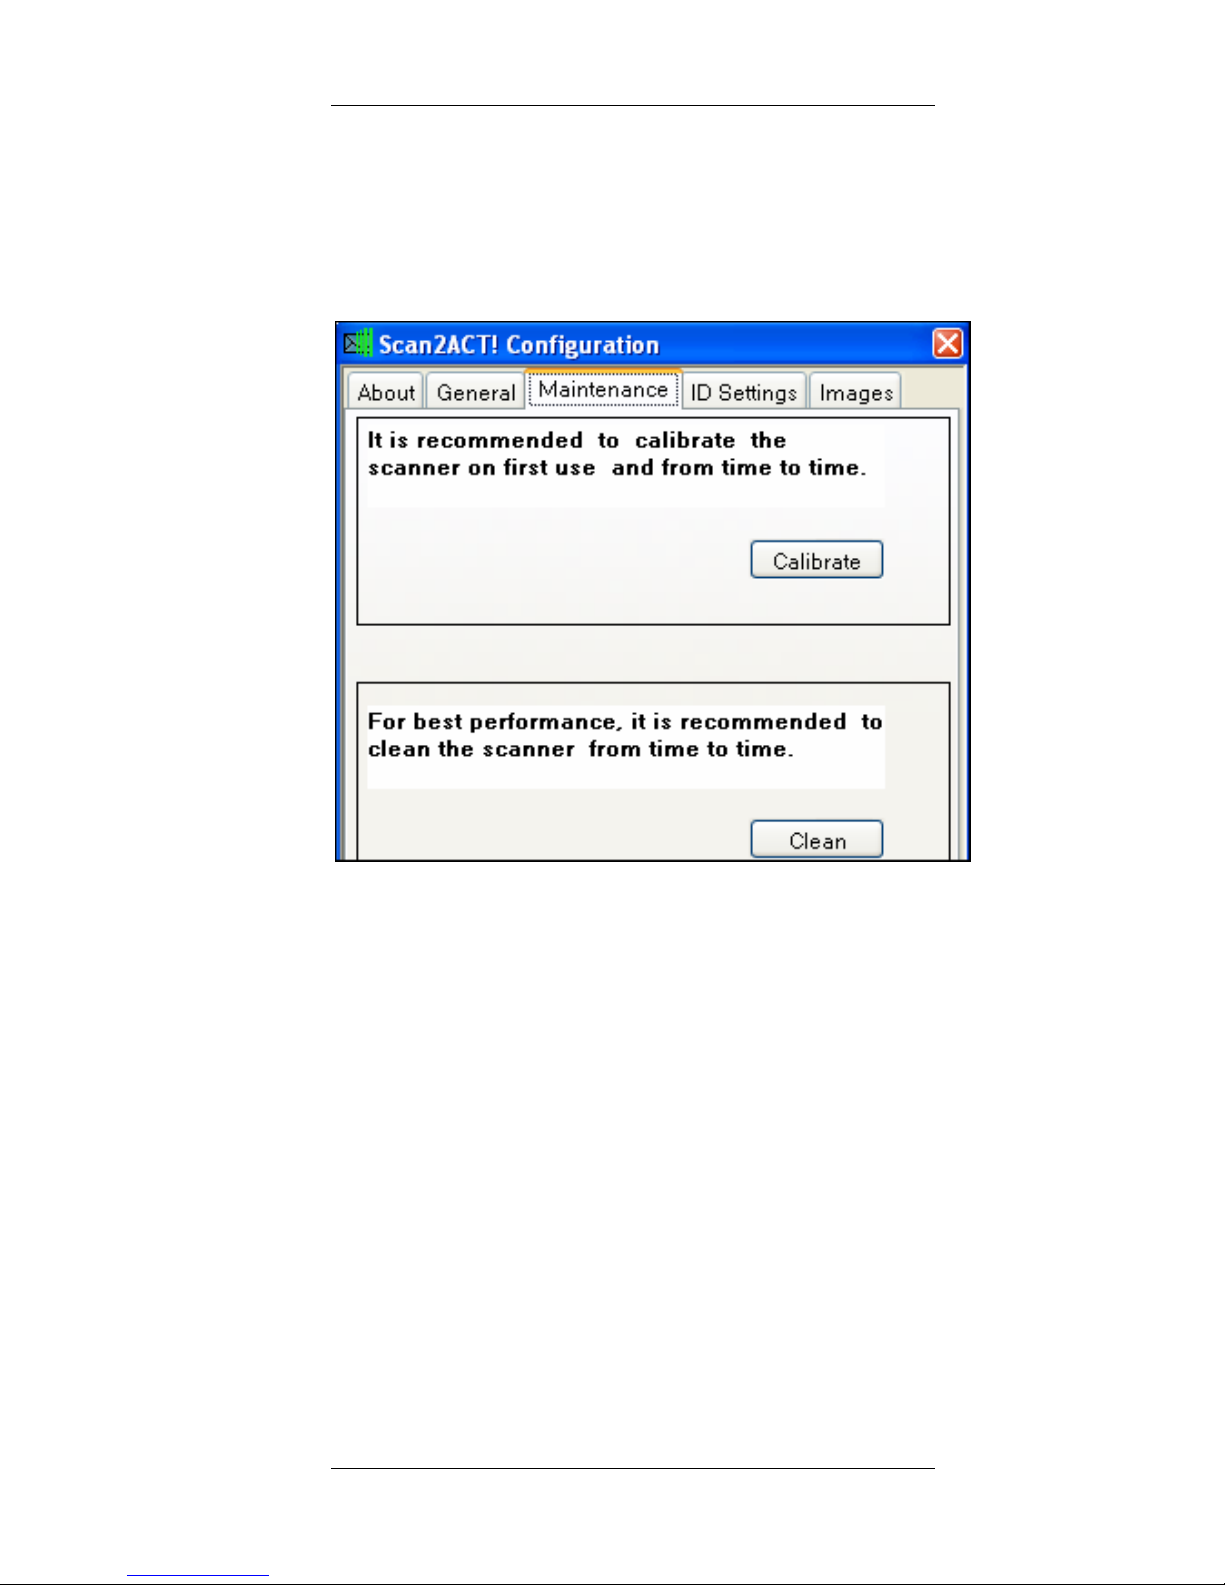
3. Maintenance tab – This tab is used
for calibrating and cleaning the scanner
- necessary for ensuring proper
functioning.
Scanner calibration
Scanner calibration resets the scanner color
sensor and generates higher accuracy in the
OCR detection process. When you use the
scanner for the first time, you will be prompted
to calibrate the scanner.
Calibrating the scanner is also a good idea if
you notice deterioration in scanning and OCR
quality.
Page 17

Configuration Scan2CRM for Act! Window
12 Scan2CRM for Act! User Guide, version 3.5
Calibrating the scanner
Open Act!
Open the Scan2CRM for Act! window
Click the ‘Calibrate Scanner’ button.
Insert the calibration paper that came with
the scanner (the paper sheet with black
stripes). Please make sure that the side of
the calibration paper with the black stripes is
facing down.
Click OK.
Note: The scanner must be calibrated before
the first use.
Cleaning the scanner
It is recommended to clean the scanner from
time to time, especially if you notice
irregularities and deterioration in scanning and
OCR quality.
Open Act!
Open the Scan2CRM for Act! window. Click
the ‘Clean Scanner’ button.
Insert the cleaning paper that came with the
scanner. You can add a few drops of alcohol
or cleaning solution to the cleaning paper.
Click OK.
Page 18
Configuration Scan2CRM for Act! Window
Scan2CRM for Act! User Guide, version 3.5 13
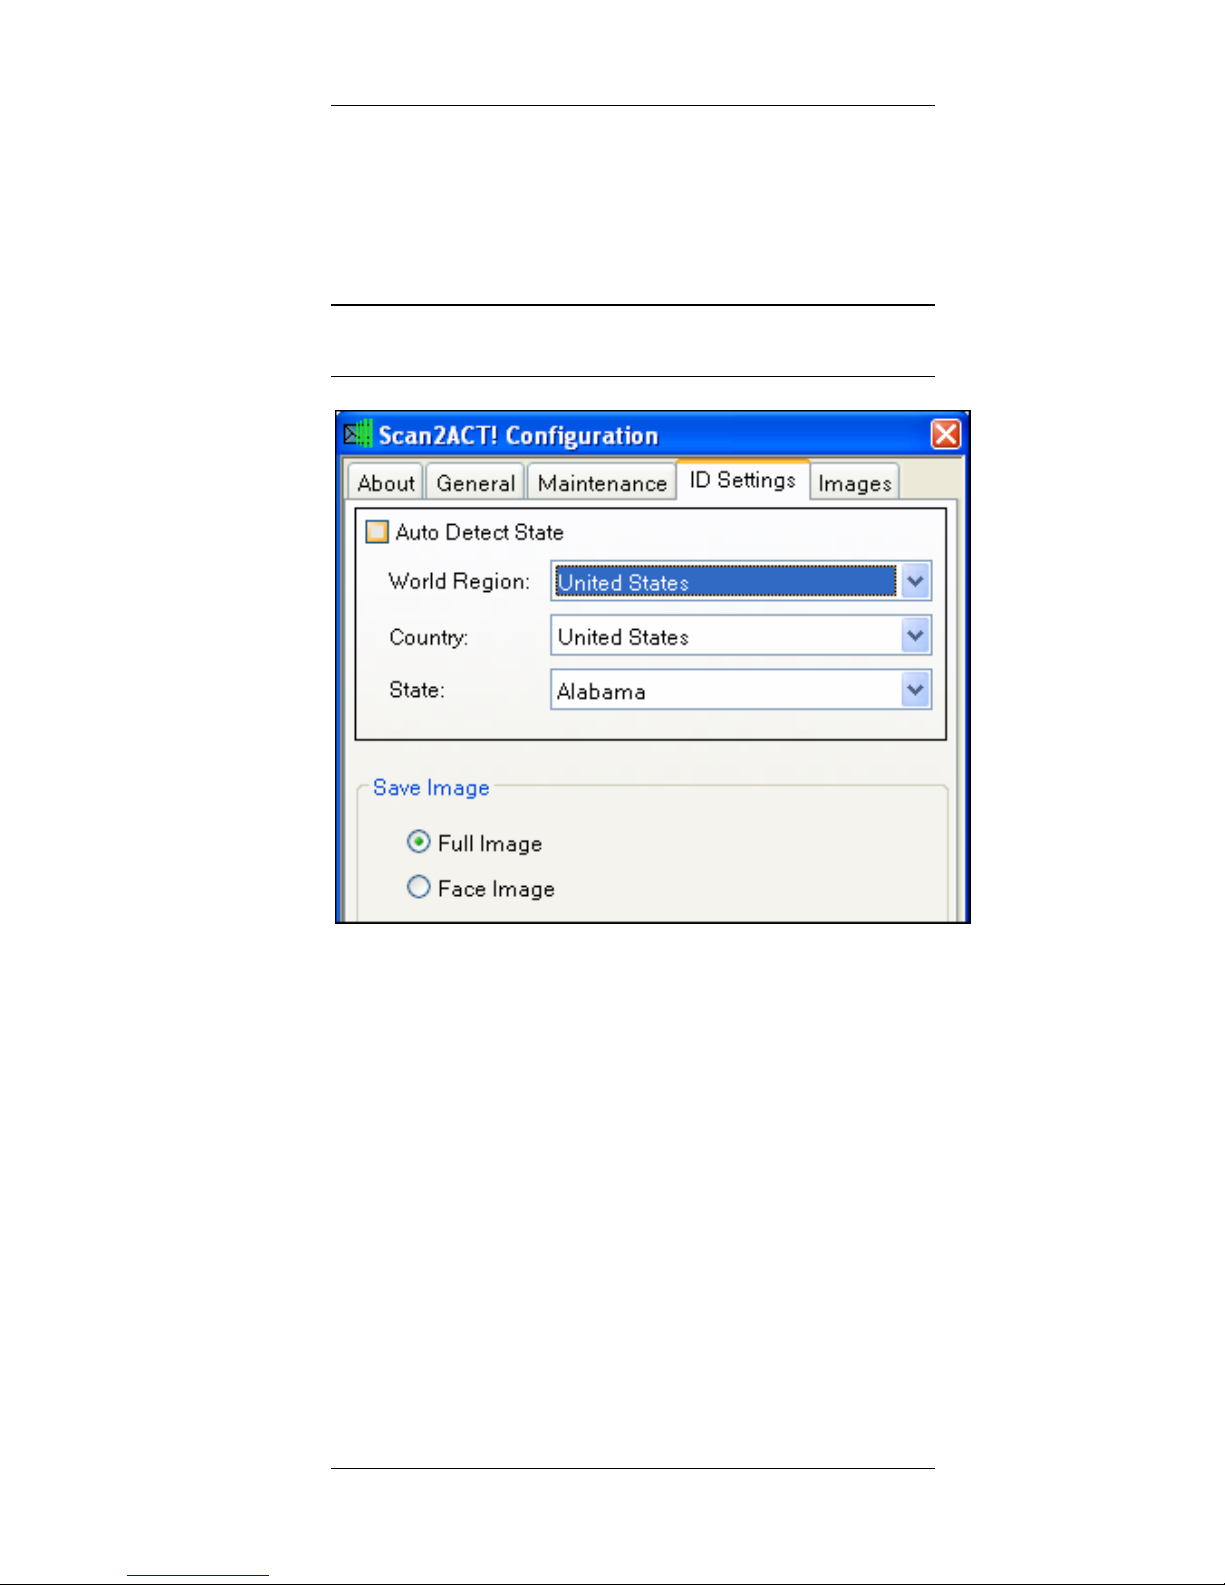
4. ID Settings tab – Allows you to
specify detection parameters of ID
cards, and how the Image of ID cards is
saved.
Note: This tab is unavailable with the ScanShell
800N scanner.
Auto Detect State – Select this option for
automatic detection of the issuing American
state when scanning American ID cards and
driving licenses. If this option is selected, the
manual detection options are disabled.
Manual detection options of ID cards and
driving licenses:
Select the world region, and the ID card's
issuing country and state (if applicable) from
the dropdown lists.
Save Image – Determine how the ID
card/driver license image is saved; the
Page 19
Configuration Scan2CRM for Act! Window
14 Scan2CRM for Act! User Guide, version 3.5
complete card or just the face image on the
card.
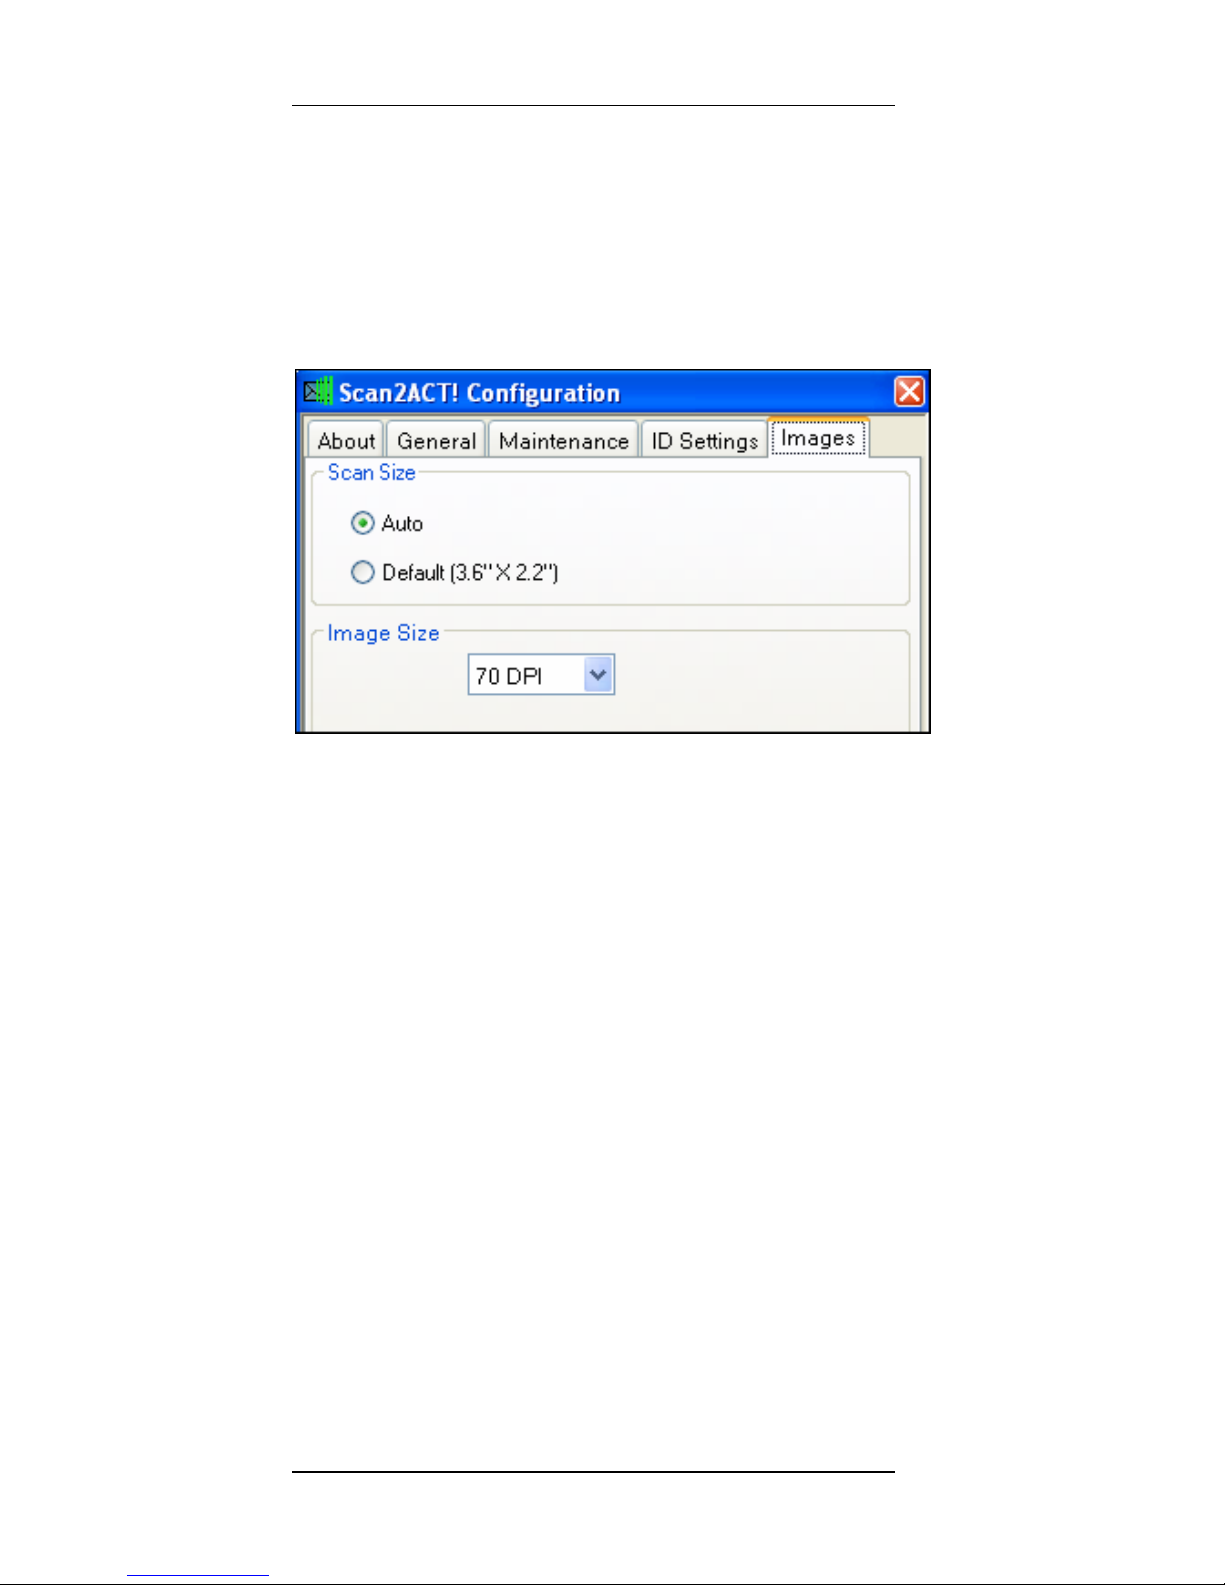
5.
Image tab – This tab allows you to
select and specify the scanned area
and image size.
Scan Size - Specify the scanned area size:
Auto – The scanner detects the card
size automatically.
Default – Save the image in a default
visit card size of 3.60X2.20 inch. This is
the best option for scanning dark color
cards.
Image Size - Specify the resolution of the
scanned image: Higher resolution results in
better image quality, and higher scanned
image file size.
Page 20

Appendix A: Troubleshooting
Scan2CRM for Act! User Guide, version 3.5 15
5. APPENDIX A: TROUBLESHOOTING
Description Solution
When I try to
enable
Scan2CRM
for Act! I get
an error
message,
which says
that another
CSSN
application is
open
Scan2CRM for Act! can not work while
another CSSN application is running. To
activate Scan2CRM for Act!, close the other
application and press on the state button in
the toolbar.
I opened Act!
and got an
error
message
from
Scan2Act
Scan2CRM for Act! failed to load. Check if the
scanner is connected properly, and press on
the state button in the toolbar. If Scan2CRM
for Act! is not enabled, contact the support
team.
The
application
state is set to
Disabled on
startup
Try to enable the application by pressing on
the state button. If this does not help, check if
the scanner is properly connected and try
again
There are
irregularities
or
deterioration
in scanning
and OCR
quality
Clean and calibrate the scanner, see page 12.
After
scanning, the
image is
black
Re-calibrate your scanner, see
Calibrating
the scanner
, page 12.
Page 21

Appendix A: Troubleshooting
16 Scan2CRM for Act! User Guide, version 3.5
Black line
down the
middle of the
scan
Re-calibrate your scanner, see
Calibrating
the scanner
, page 12.
Act! freezes
when I scan a
business card
Make sure that the card is placed into the
scanner with the text face down
When a card
is scanned
face down,
the
processing
window just
hangs and
locks up my
Act
Please recalibrate the scanner and try again.
(See
Calibrating the scanner, page 12)
Scan2CRM
for Act! is not
showing up in
my Act
Please disconnect any palm or smart phone
devices, disable Active Sync and restart Act
Scanner stop
working after
being idle for
a while
This usually occurs when the computer turns
off the USB port to save power. Try
unplugging the scanner and then plugging it in
again.
For a permanent solution:
1. Right click on "My Computer" and
select "Manage"
2. On the left side in "Computer
Management" click "Device
Manager"
3. On the right, look for "Universal
Serial Bus controllers" or "USB
controllers"
4. Right-click on "USB Root Hub"
and select "Properties"
Page 22

Appendix A: Troubleshooting
Scan2CRM for Act! User Guide, version 3.5 17
5. Choose the "Power
Management" tab and uncheck
the option "Allow the computer to
turn off this device to save
power", then click OK
6. Repeat this for each "USB Root
Hub"
7. Restart the computer
You may also need to install an update from
Microsoft. For more information,
http://support.microsoft.com/?kbid=822603
Any other
problem or
question
Contact our technical support at
www.Scan2Act.com.
For customer support in Europe, please
contact our technical support at
www.Scan2Act.co.uk
Page 23
Appendix B: Adding an Image field to the Act!
contact layout
18 Scan2CRM for Act! User Guide, version 3.5
6. APPENDIX B: ADDING AN IMAGE FIELD
TO THE ACT! CONTACT LAYOUT
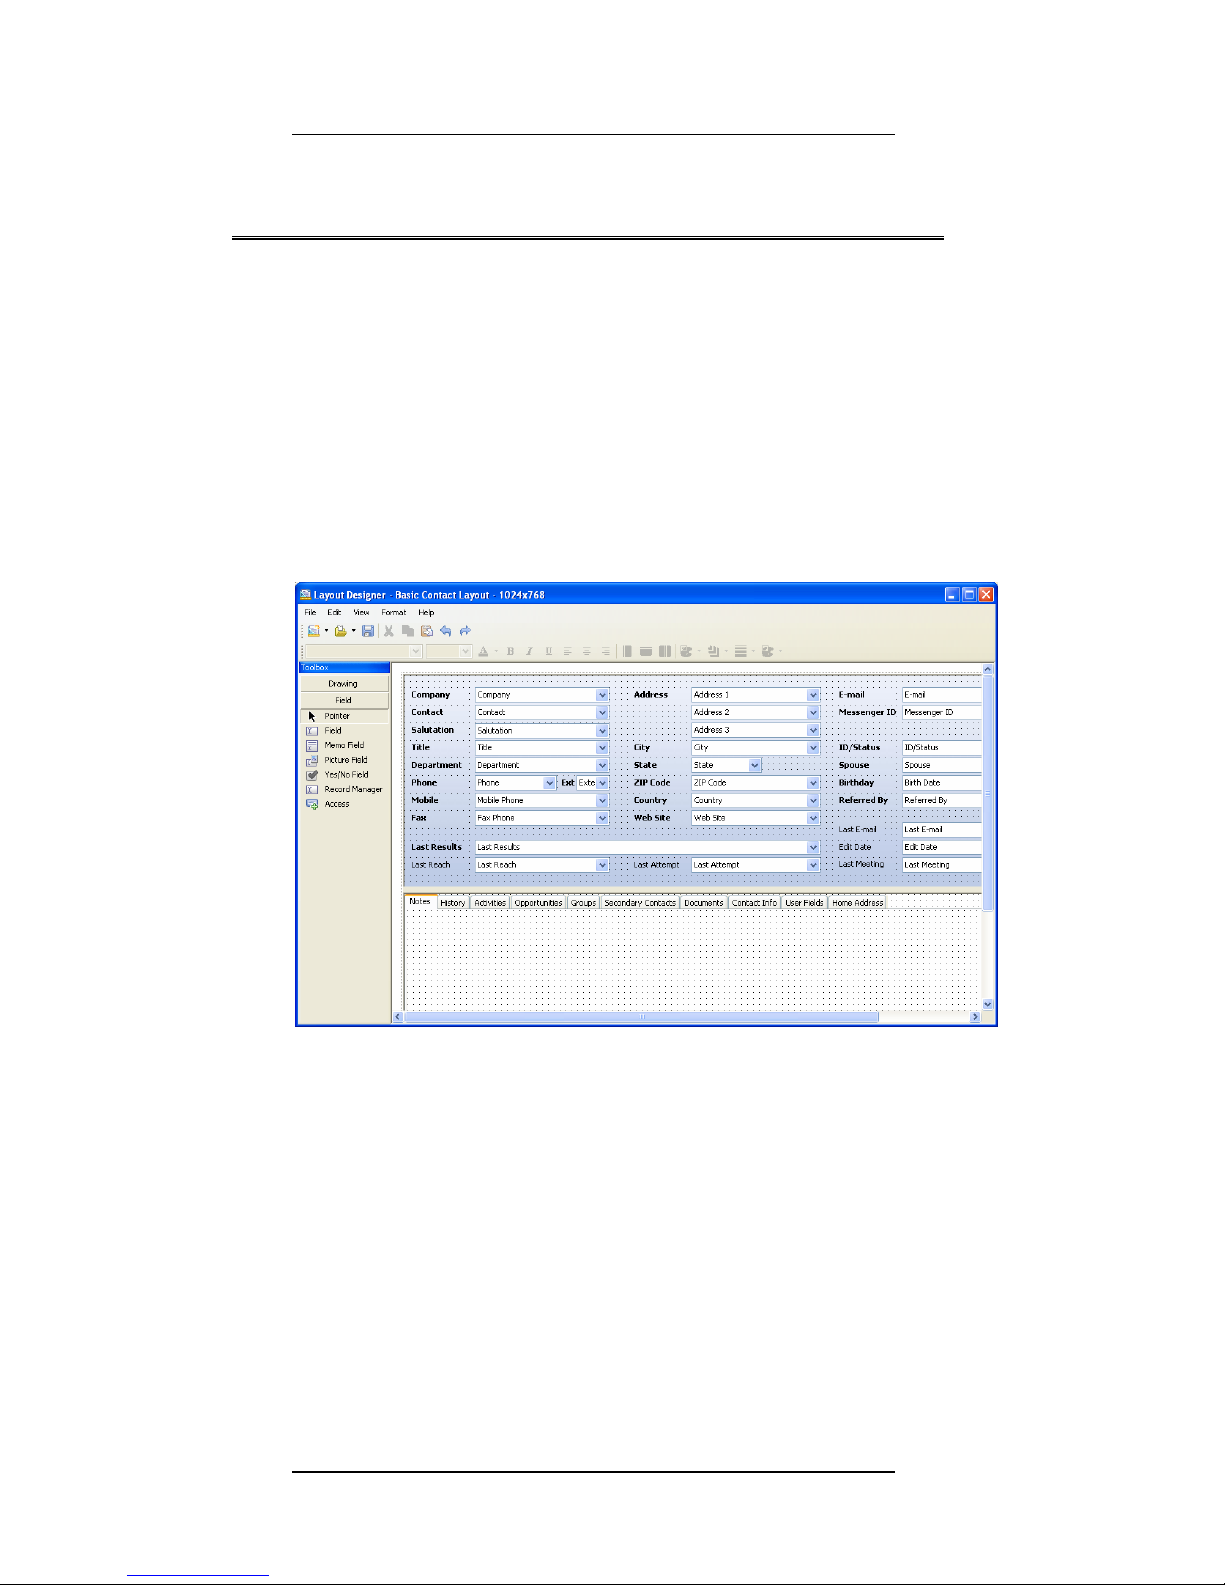
By default, Act! Databases do not include an
image field as part of the Contact layout. You
can add an image field to the contact layout as
follows:
1. From Act!'s Tools menu, select Design
Layouts->Contact. The following screen
opens:
2. Select the address tab in which you want
the image to appear. In this example we
selected the Home address tab (you can
choose any other section).
Page 24
Appendix B: Adding an Image field to the Act!
contact layout
Scan2CRM for Act! User Guide, version 3.5 19
Select Field
Dialog
Drawn
Square
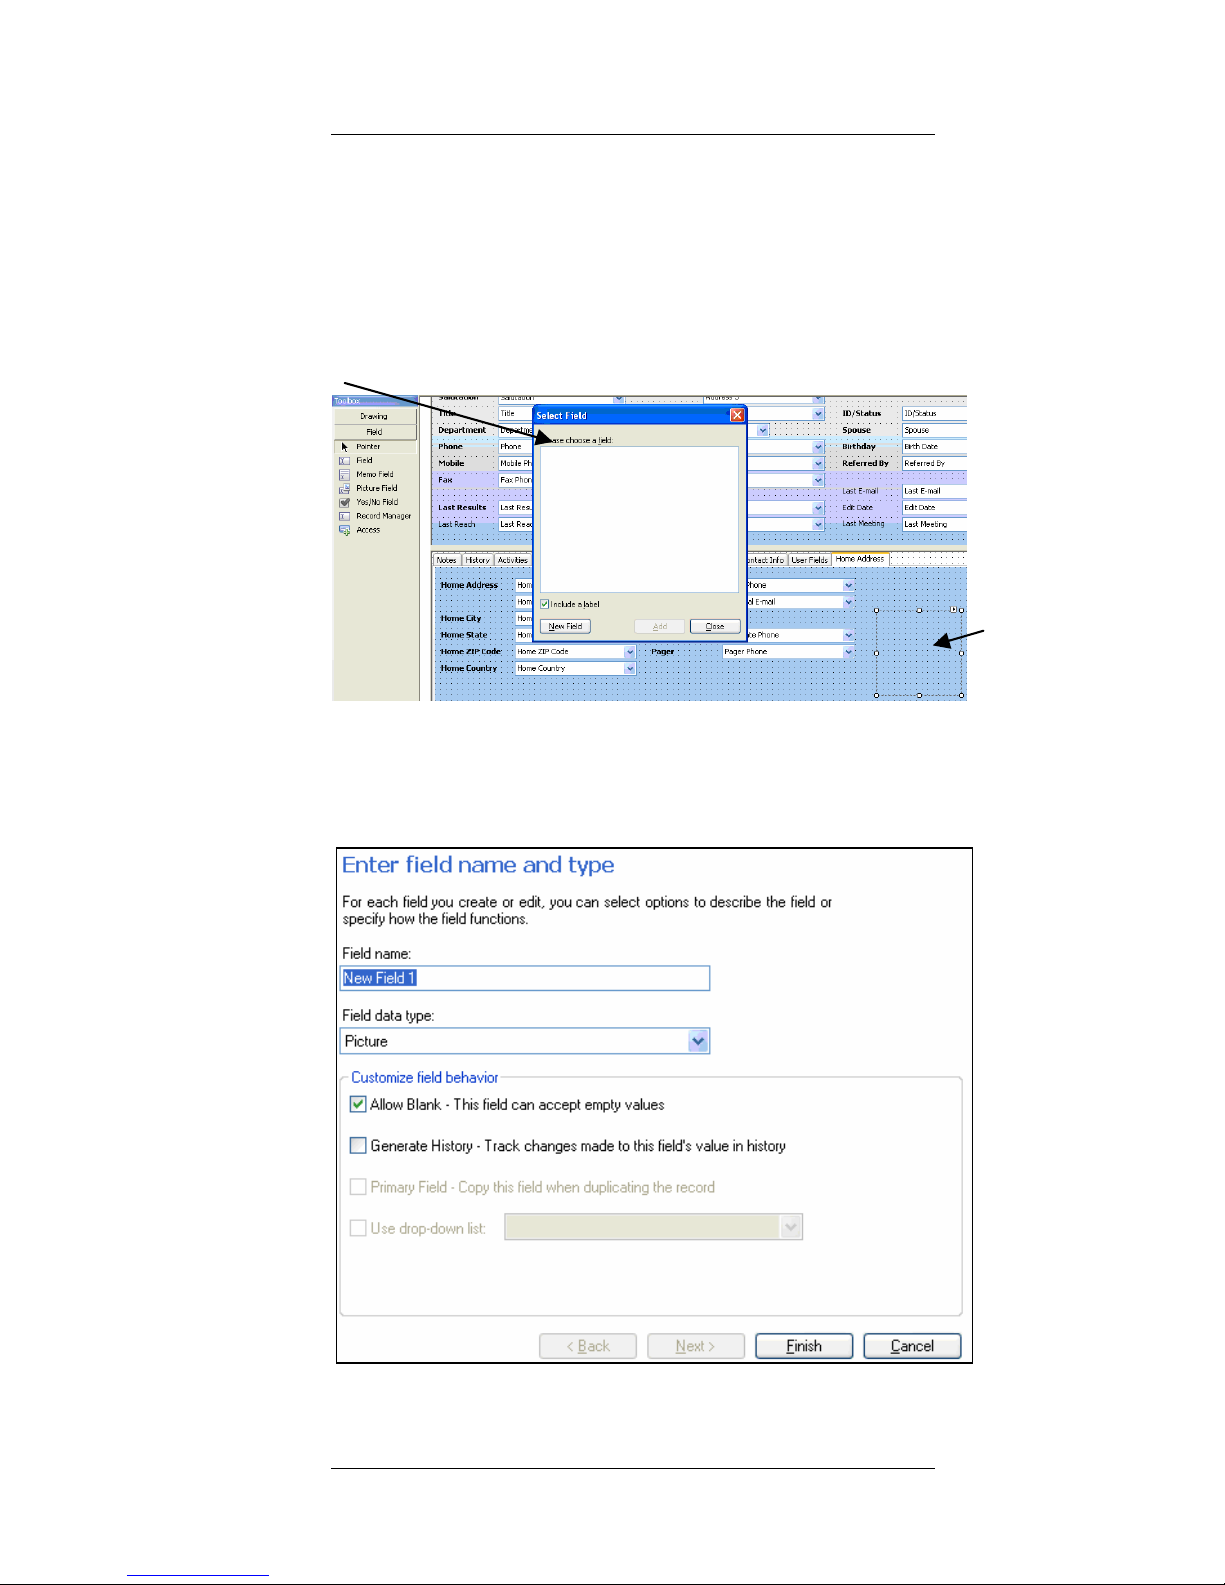
3. In the left tool bar, select "Picture Field" and
then draw a square in the selected layout,
in which the image will be displayed. (If the
"Picture Field" is not available in the left tool
bar, select "Field")
4. The Select Field dialog appears. Press New
Field. The Define Fields screen opens:
Page 25
Appendix B: Adding an Image field to the Act!
contact layout
20 Scan2CRM for Act! User Guide, version 3.5
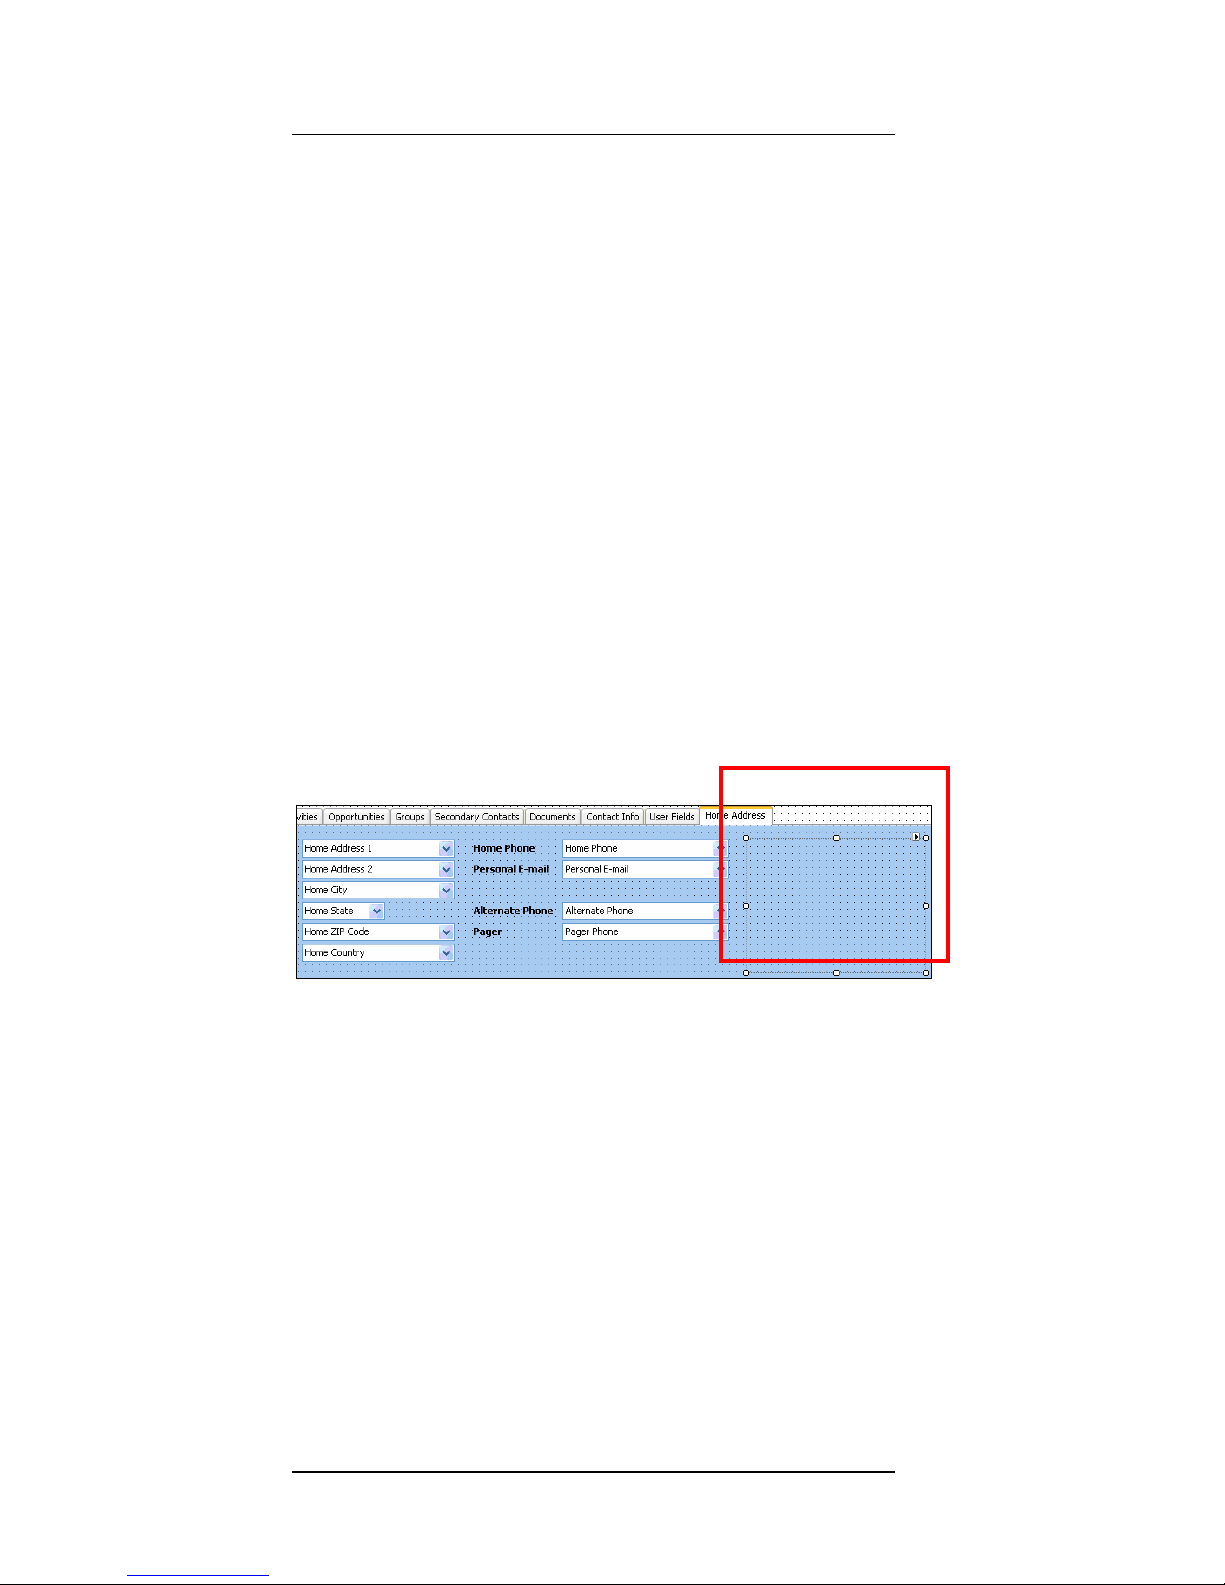
Fill in a name for the field e.g., "Member
Photo".
Select Picture from the Field Data Type
dropdown list.
Leave other default selections as they
are.
Click Finish.
5. The field you created will now appear in the
field list of the Select Field dialog. Select it.
6. If you want a label with the field name to
appear next to the field, select the Include a
Label checkbox,
7. Click Add.
8. Now you can change and edit the Picture
field properties – resize it, change its
borders etc.
9. Press Save in the main tool bar, and close
the Layout Designer dialog
10. After you close the Layout Designer dialog,
you should see the field in your contact
details screen, where you placed it.
11. From now on, when you scan a card the
card image will appear on this spot (in
addition to being added to the notes).
Page 26

Appendix B: Adding an Image field to the Act!
contact layout
Scan2CRM for Act! User Guide, version 3.5 21
 Loading...