

Page 1

Scan2Web User Guide
Powered By
www.card-reader.com
Page 2

2
Scan2Web - Complete data collection solution
Scan2Web is an easy to use yet very powerful modular package of Hardware and Software,
that scans a variety of personal documents such as Driver licenses, ID cards, Passports,
Business cards and so on directly into any of your web applications like CRM, ERP, and own
web pages.
Scan2Web system integrated seamlessly into MS Internet Explorer and fills in the fields of
any web page used to collect and store personal information to a database. Using the easy
to use drag-and-drop interface does not require programming knowledge and allows any
user to configure their desired web pages within minutes.
After simple configuration all you have to do is to place your customer's ID card on the
scanner - the system will automatically identify the scanned document and will fill the fields
of your web form with the relevant information acquired from the scanned document. The
system could also store a copy of the scanned document on your local HDD for further use.
Scan2Web is an ideal solution for every organization using web application for collecting
information from occasional customers such as Recruitment agencies, Car hire companies,
Hotels, Banks, Solicitors, libraries, schools and many others.
Scan2Web Main features:
• Extract and store all the information from the card directly to the relevant field in the
form.
• Automatically detects the form's fields for easy configuration
• Drag and Drop fields configuration
• Store image of the card to local HDD
• Keeps multiple web forms for quick change
• Auto-detect cards type and issuing country
• Scanner's sensor for size auto-detection (in pass-through scanners only)
Minimum PC Requirements:
• CPU: Intel Pentium IV 2Ghz or equivalent (3GHz is recommended)
• Memory: 256MB RAM (512MB/1GB is recommended)
• USB port
• 50MB free on HDD
• MS Windows 2000/XP/Vista
• MS Internet Explorer 5.0 or newer
Scan2Web package includes:
• Scanning device of your choice
• Scanner's Drivers
• USB cable
• Scan2Web Software
• Cleaning and Calibration sheet (for pass-through scanner)
Page 3
3
Installing Scan2Web software:
• A copy of Scan2Web could also be obtained for 15 days trial period on our website.
• Before installing Scan2Web please make sure you have Administrator permissions to
your MS Windows then run the Setup file and follow the installation wizard.
• During the installation Scan2Web icons will be added to your desktop and to your
start menu.
• Double click Scan2Web icon to run the Software.
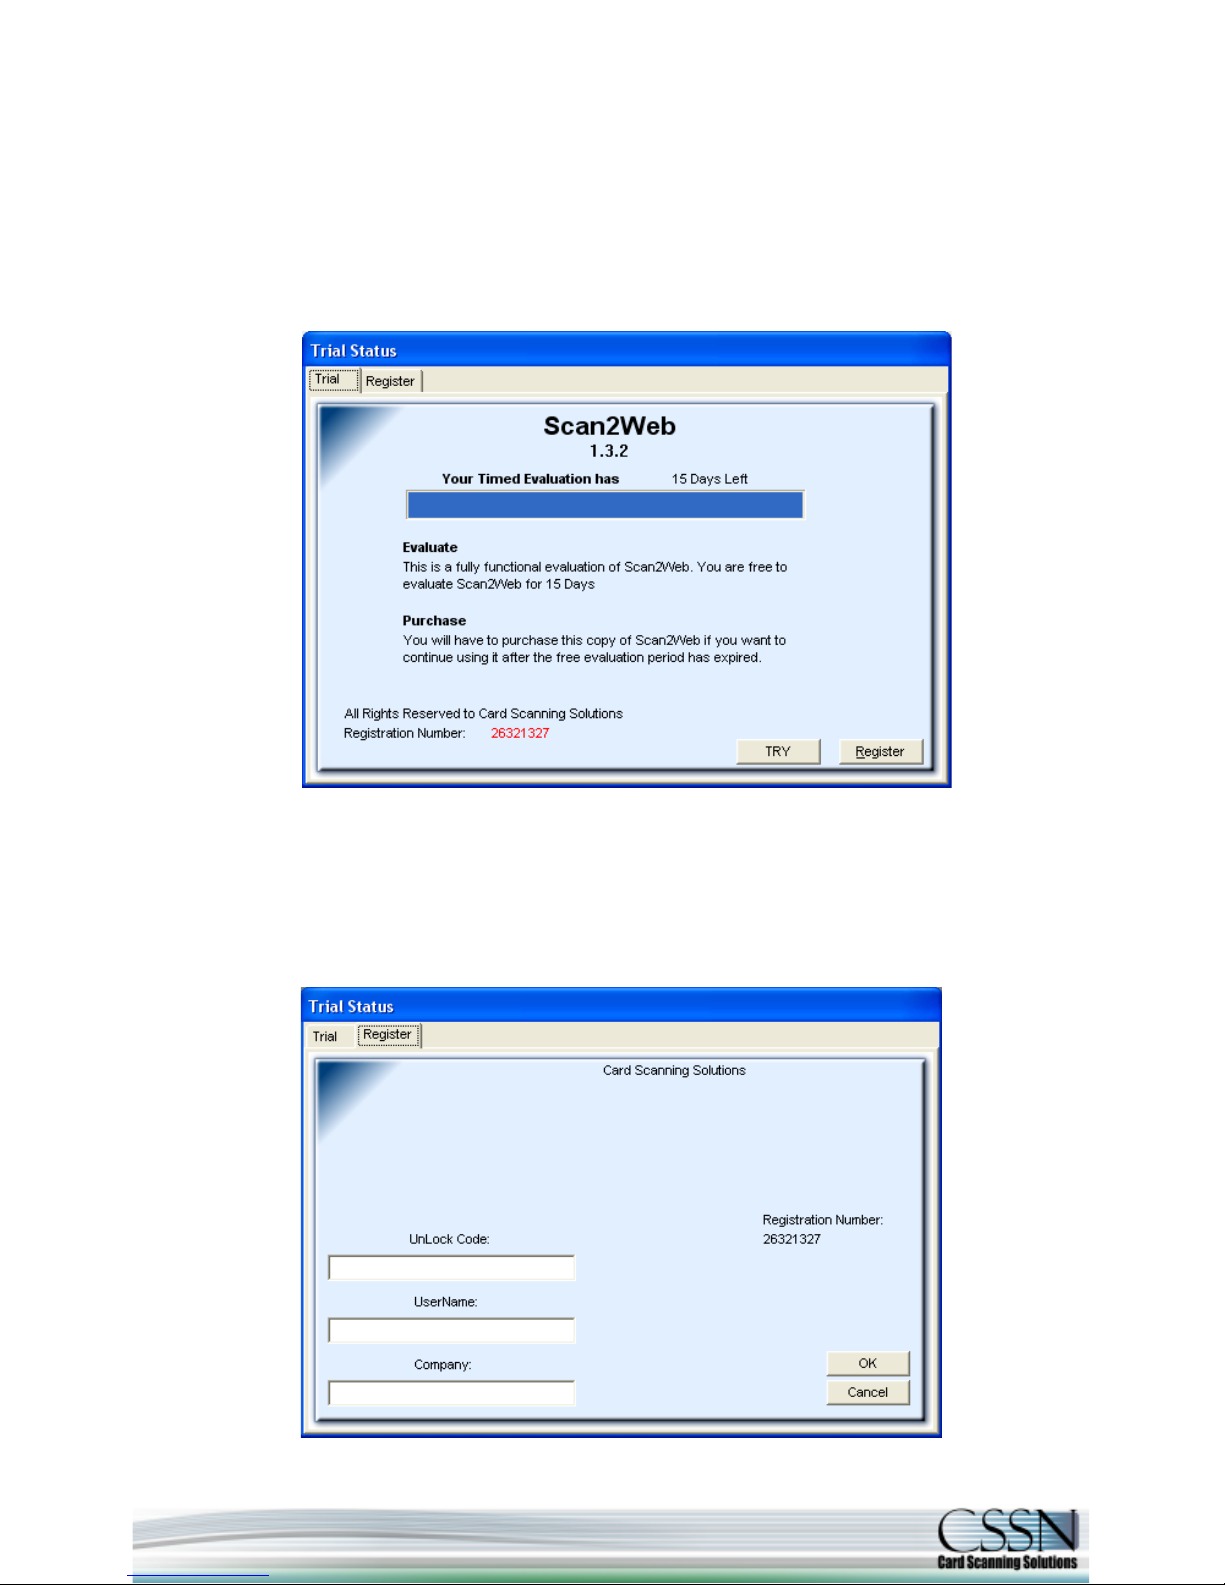
• If you have not yet purchased a license or registered your copy of Scan2Web you
should see the screen bellow when running the Software:
• Click on [TRY] to have fully featured experience of Scan2Web for up to 15 days.
• If you have already purchase a permanent license code, but not received it
yet, you will have to send an email to the seller. In the email you have to
provide your REGISTRATION NUMBER (on the middle right side of the
screen), order details, you’re User Name and Company Name.
You will get
your permanent license code in a returned email.
• If you already obtained a permanent license and you have the key number click on
[REGISTER] to activate your copy of the Software (see below):
Page 4
4
Scan2Web Scanning Modes:
Scan2Web offers three basic scanning modes for collecting information from various
personal documents:
1. ID Cards / Driver's license
2. Passports (Full page or MRZ only).
3. Business cards / Visitors cards.
Switching Scanning Modes:
Switching between scanning modes could be done in various ways:
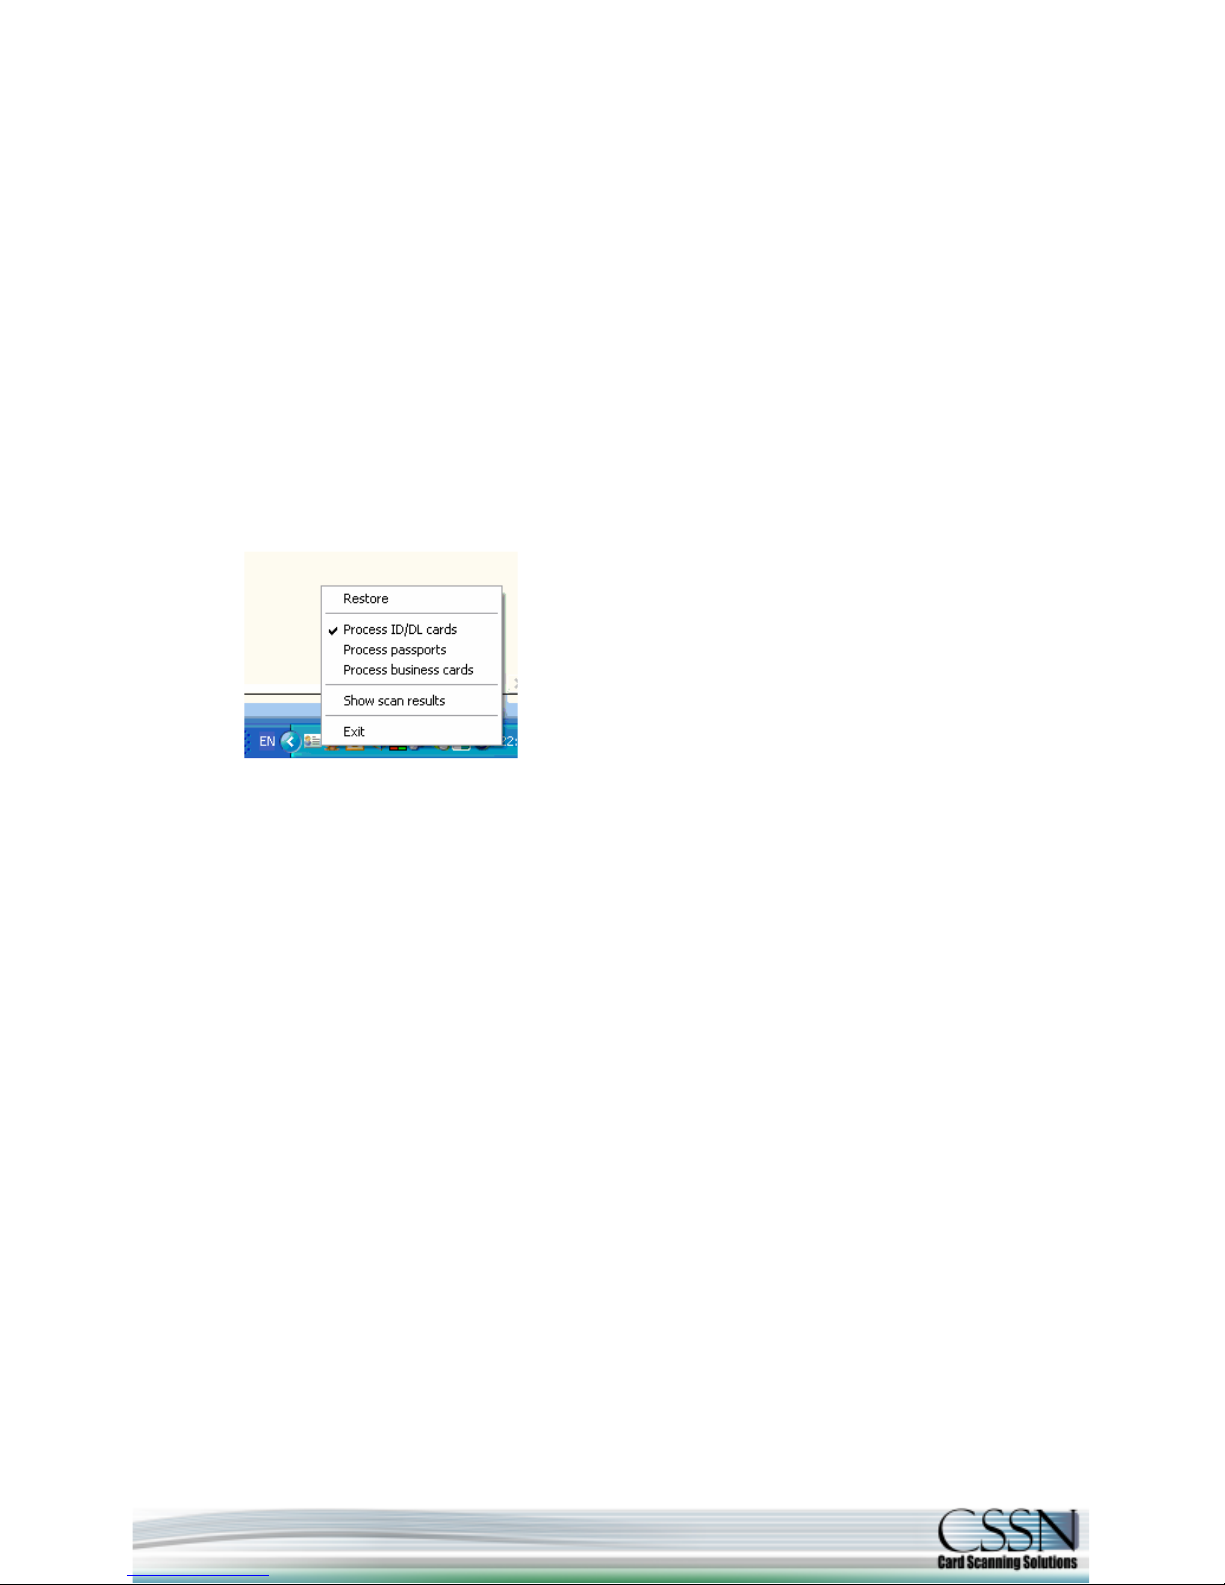
1. Simply by right click with your mouse on the Software icon (in the system tray) and
choosing from the list:
2. On ScanShell 1000 scanners each of the three buttons could be configured to
automatically process a different mode.
3. In ScanShell 800/2000/3000 scanners - continuous click on the scanner's button
switches processing mode.
Show scanning results:
Presents the OCR results in a flying window to allow you to realize to which property each
bit of information from the scanned document goes to. In addition, you could drag and drop
the extracted data into any other open application.
Important note: the Software icon in your system tray will change to indicate the current
scanning mode.
Page 5
5
Forms Configuration:
Setting up the system to store the scanned information in your desired web form includes
three simple steps:
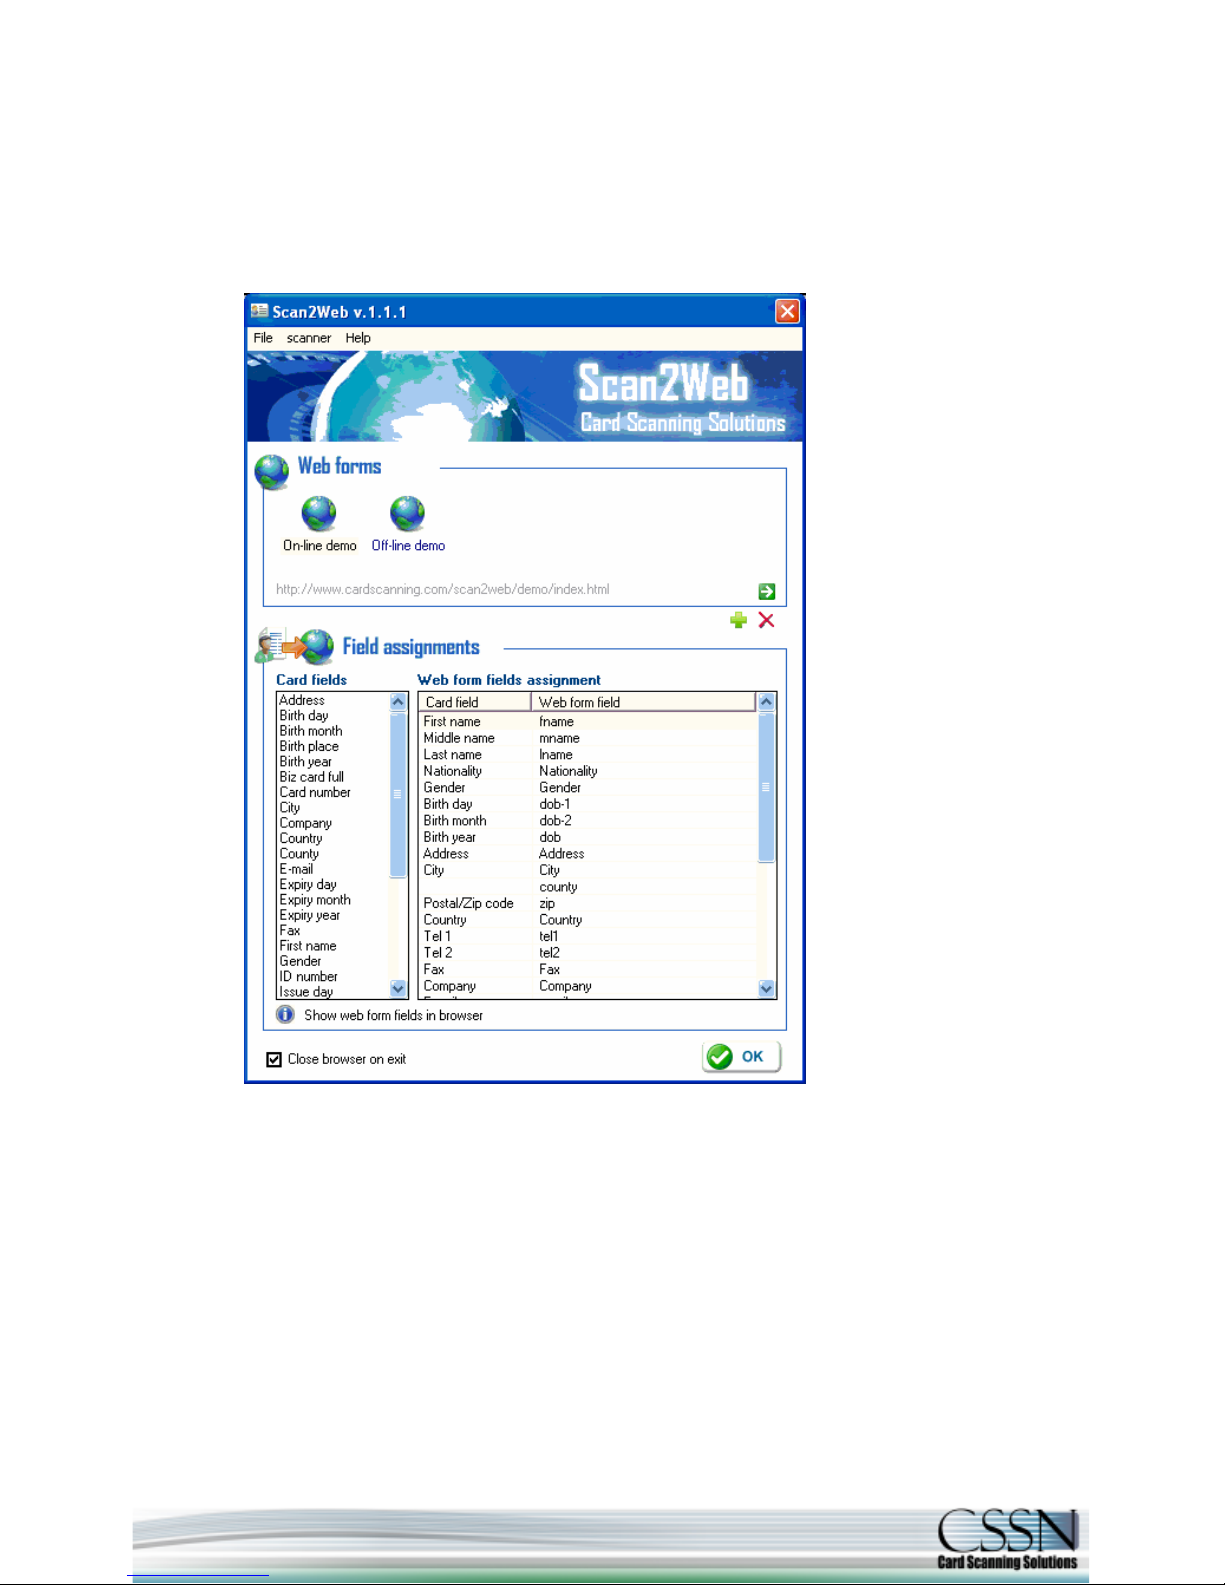
1. Open Scan2Web's setup screen by pressing the left mouse button on the icon or the right
button and choose Restore from the menu list. Click the green [+] button to add new web form.
Page 6
6
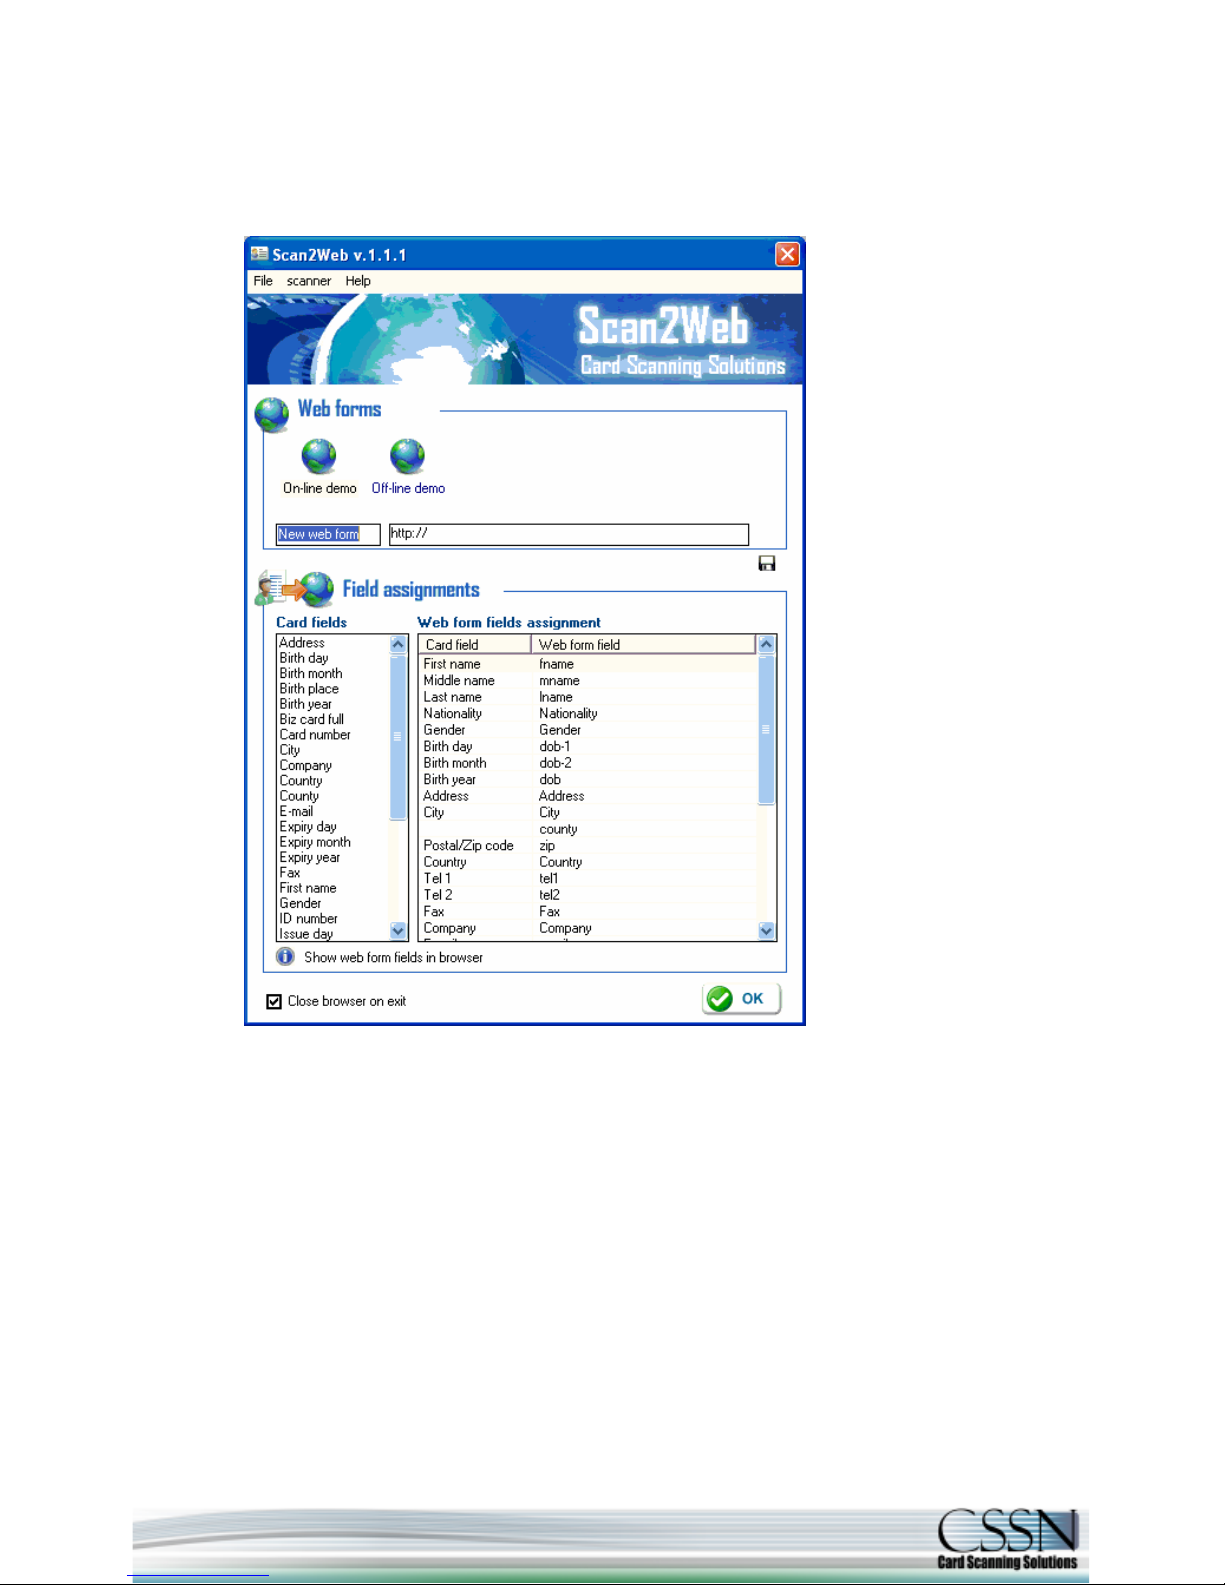
2. Type your form's name in the left field and your form's web address (URL) in the right field. Click Save to
store your new form.
Page 7
7
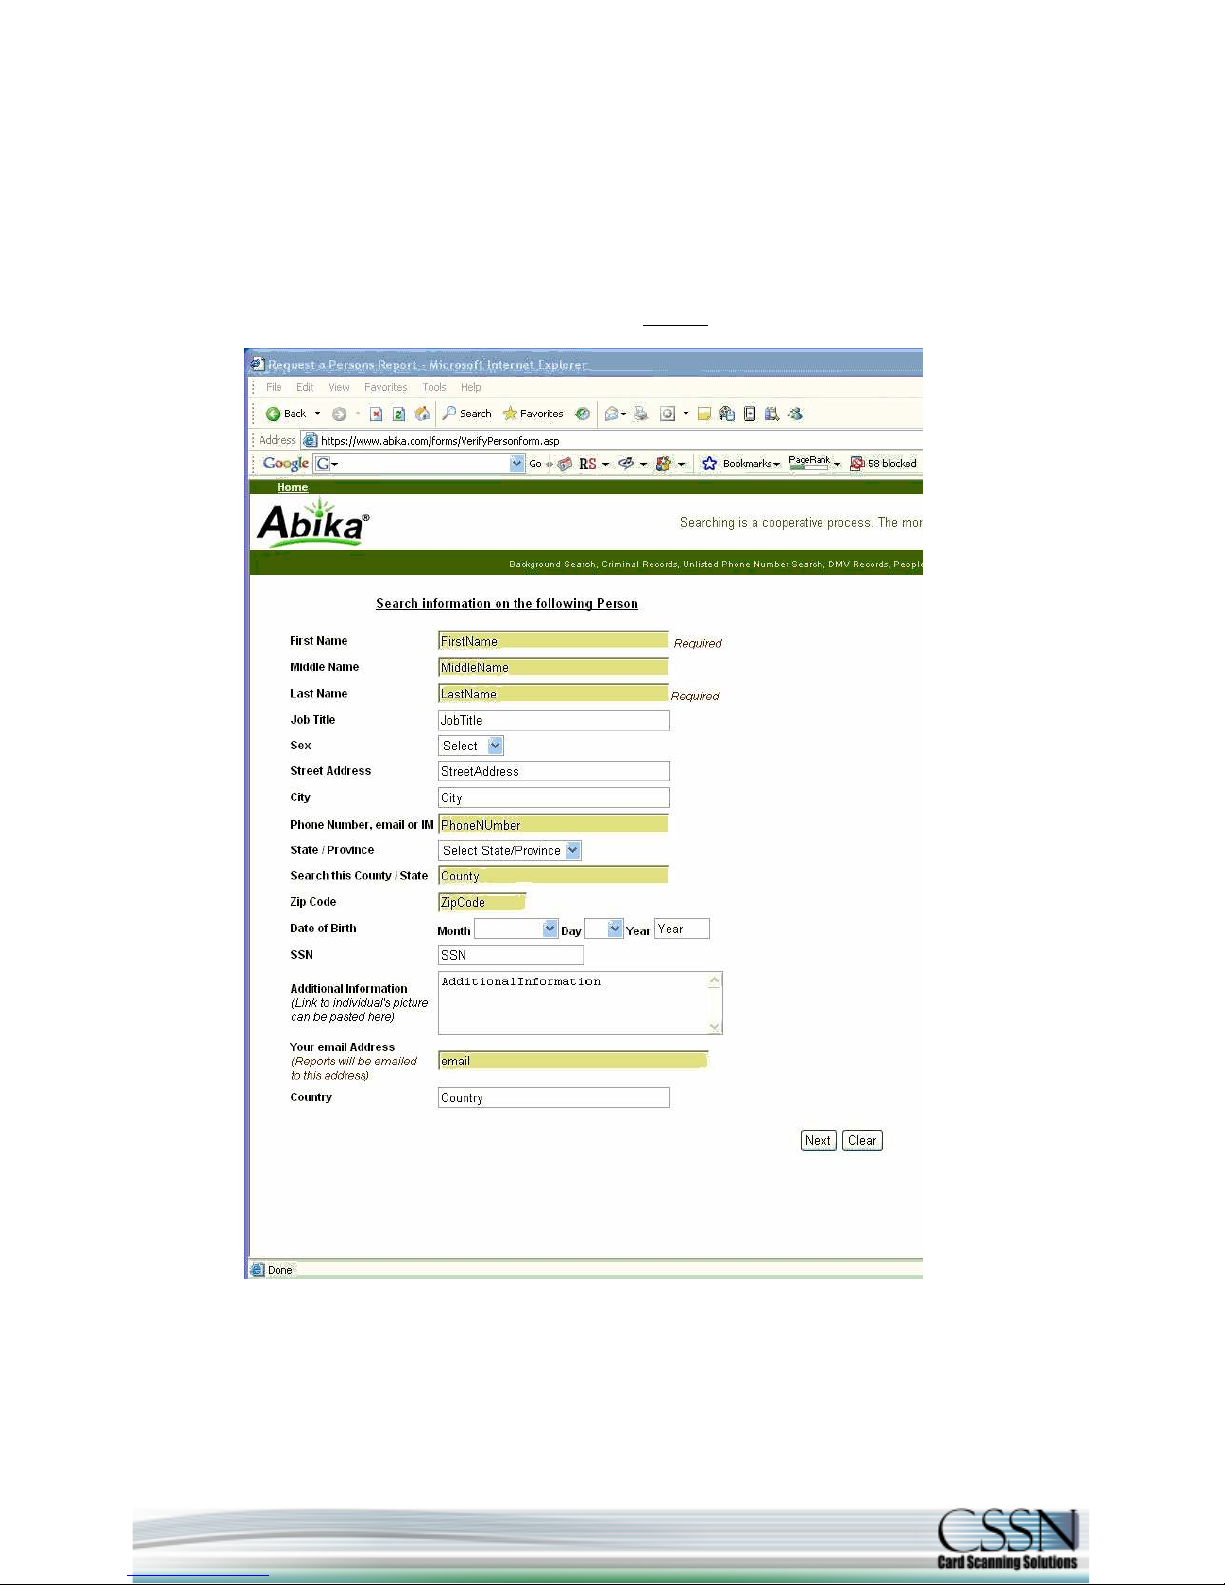
3. Scan2Web will login to your new page, analyze it and will make a list of the required information fields
within your form on the right side of the screen. Now you have to match the information from the scanned
document (the left table) with the fields of your form (the right table) by dragging and dropping the data
name onto the desired fields.
Note: If you are not familiar with the element names of your form's fields (the names that the programmer
put to identify each field) Scan2Web could present these names inside your web form to assist you
identifying the fields (see below). To do that, click on the magnifier
at the bottom of the setting screen.
Page 8
8
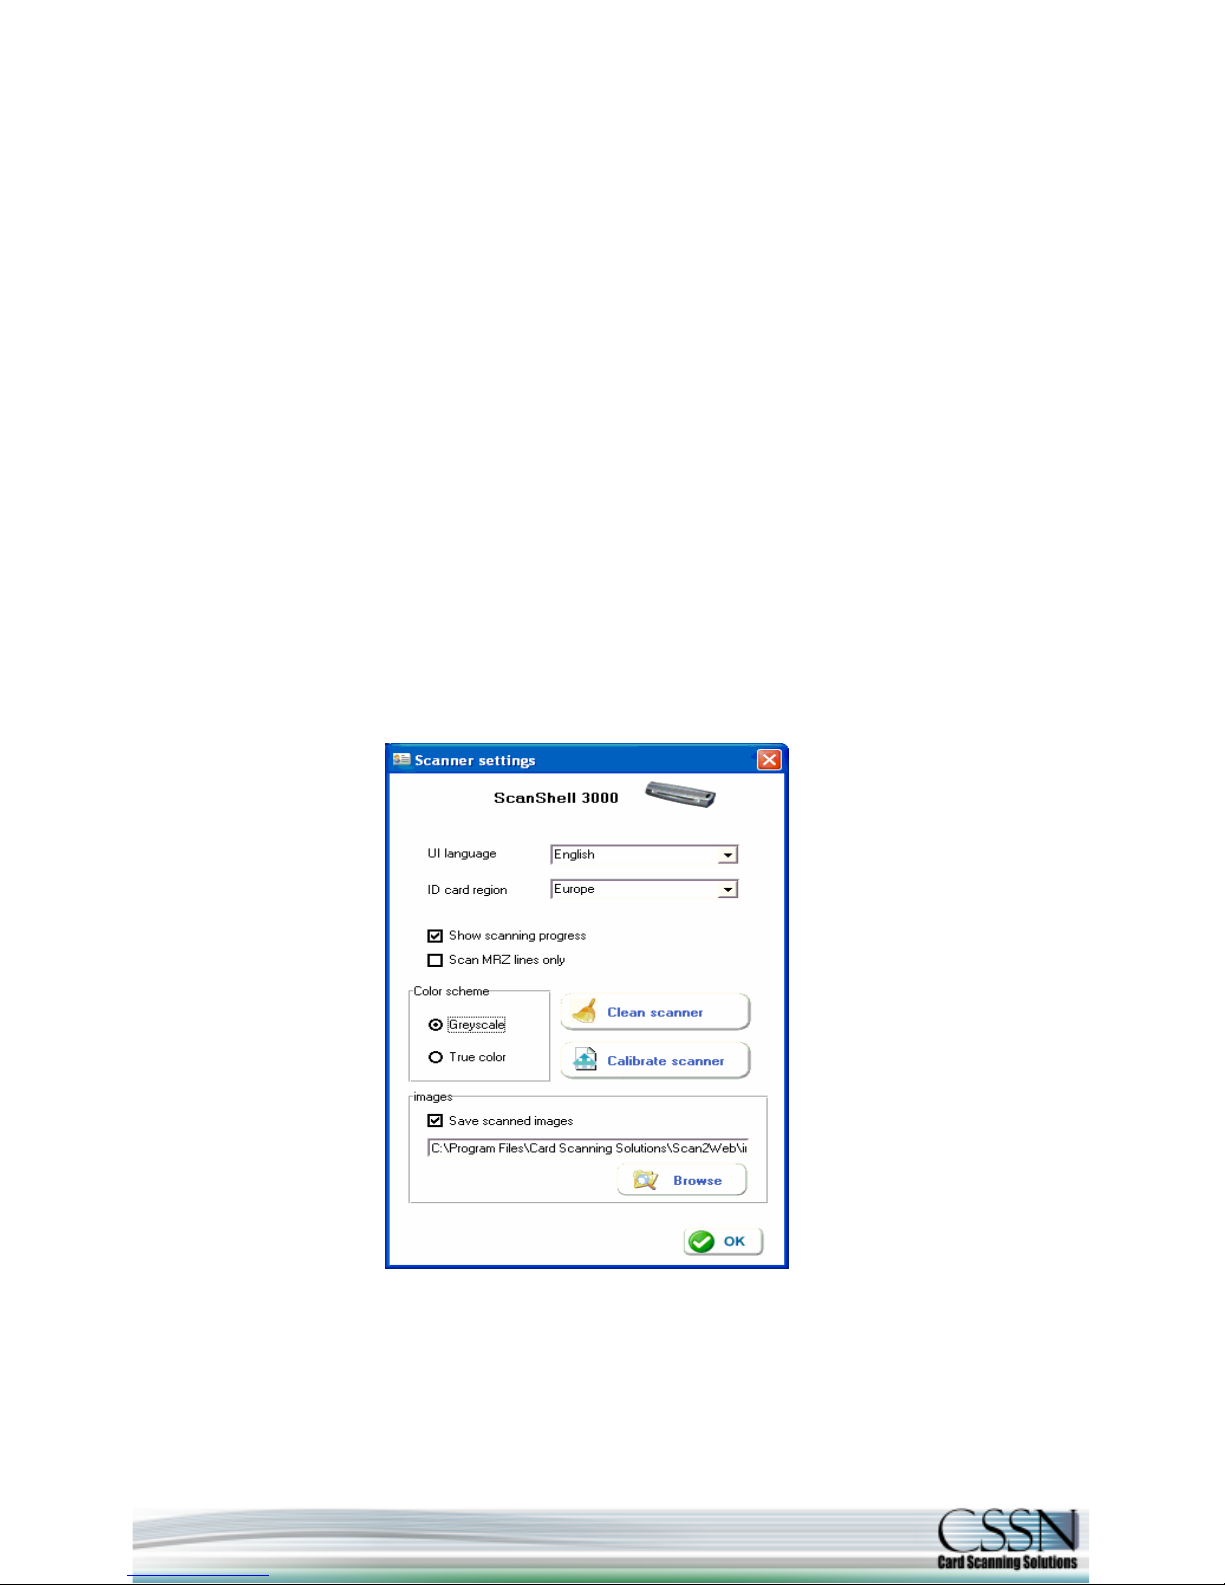
Settings:
Scan2Web allows several scan settings and scanner's maintenance:
1. User Interface Language - choose a convenient language for Scan2Web interface.
2.
Region - setup your document's region in order for the system to recognize the scanned documents.
This region is not applicable for Passports or Business cards and should refer only to ID
cards/Driver's licenses.
3.
Show Scanning Progress - presents a progress bar during scanning
4.
Scan MRZ lines only - allow to scan any document with ICAO compatible Machine Readable Zone.
The data will be stored as appears on the document.
5.
Color Scheme - store the scanned images in true colors or grayscale.
Note: scanning in true colors significantly slower and the scanned image files is bigger; however in
some cases the data accuracy might be better.
6. Store images - allows you to setup your desired folder to store the scanned images.
Scanner's Maintenance:
1. Calibration - allows to calibrate the scanner's black/white balance. Note: every optical device requires
light balance calibration to ensure good performance. OCR scanners are particularly sensitive to
calibration and require recalibration from time to time.
2. Clean Scanner - allow cleaning pass-through scanners (i.e. ScanShell 800/2000/3000) using
dedicated cleaning sheet.
 Loading...