

Page 1

C-Squared Inc. 1440 S State College Blvd, Unit 4L, Anaheim, CA 92806
Tel: (714) 999-2791, Fax: (714) 999-2928, sales@c-squaredinc.com, www.c-squaredinc.com
Introduction
The C-Squared Oxygen Analyzer is designed to measure oxygen levels in the 0.1 to 100.0%
range. It can be used to measure the oxygen content for mixes used in Diving, Medical
Instrumentation and Industrial applications. The Analyzer is designed to be able to verify
oxygen concentration in cylinders as well as analyze delivery systems.
The C-Squared Analyzer has a digital display, an internally or externally mounted temperature
compensated sensor with a 2 year life expectancy. The power is supplied by three AAA 1.5
volt batteries.
The case has an environmentally sealed, potentiometer, on/off/on with back light switch, long
life sensor and digital panel meter. The Analyzer is water resistant and sealed to prevent
moisture from affecting the internal components.
The Analyzer is shipped in a high impact case that can be used for storage or other purposes.
The Analyzer is ready to use out of the box with no additional work other than checking on the
calibration either in air (20.9%), or 100% O2.
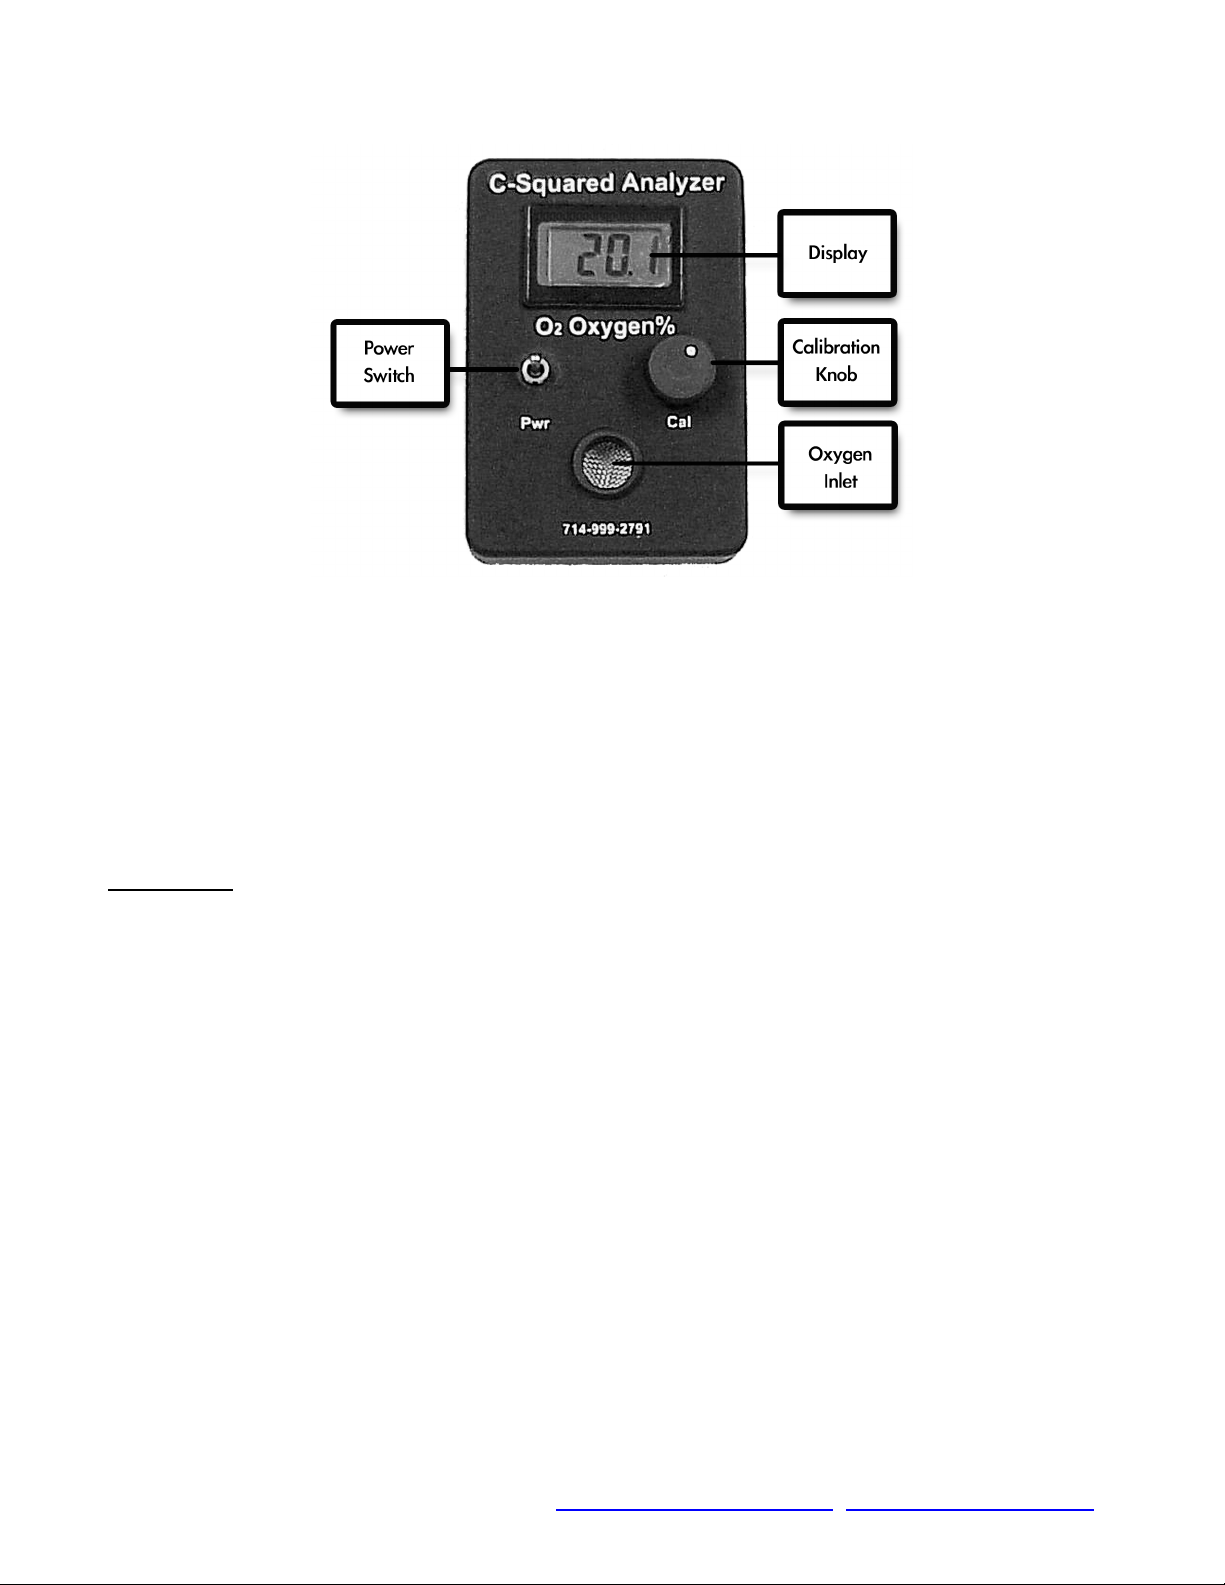
Controls
The C-Squared Oxygen Analyzer has a splash proof on/off/on (with back light). When the
switch is centered it is in the off position. When not in use, the switch should be in the off
position to conserve battery life. When the switch is in the up position it is on. When the
switch is flipped down, the switch is in the on position with the panel meter back light activated.
The back light option should only be used in limited light conditions to extend the life of the
batteries.
When switched on, the analyzer’s display will indicate an oxygen reading. Please note that the
analyzer must be calibrated prior to use (see calibration section).
The low battery warning is a battery symbol in the left corner of the display. When present
change the batteries prior to using the analyzer.
The display has a 0.1% resolution and is sealed. It also can be backlit (controlled via the
on/off switch).
Incorporated
Oxygen Analyzer
Instruction Manual
Page 2
Oxygen Analyzer Instruction Manual Page 2
C-Squared Inc. 1440 S State College Blvd, Unit 4L, Anaheim, CA 92806
Tel: (714) 999-2791, Fax: (714) 999-2928, sales@c-squaredinc.com, www.c-squaredinc.com
Air Calibration:
Calibration is essential prior to every use. For oxygen mixtures above 50% oxygen always
calibrate in 100% oxygen before use. This assures minimum deviation and greatest accuracy.
For regular use expose the analyzer to clean room air and adjust the calibration knob until the
display reads 20.9%.
The analyzer is now ready for oxygen measurement.
WARNING:
The analyzer is sensitive to oxygen partial pressure. Calibration must always be carried
out at the same pressure as the oxygen measurement.
Oxygen Calibration:
Obtain the 100% oxygen from a certified Distributor and measure the gas using a 100 ml to
500 ml per minute flow rate. Be sure to allow the reading to stabilize.
Operation:
The Oxygen Analyzer comes complete with a sensor flow cap/restrictor that allows you to read
directly from a cylinder valve. For the external sensor Oxygen Analyzer the sensor cable plugs
into the right side of the Analyzer and has a secured mini-phone jack that connects to the
sensor securely.
You should check the calibration with 100% oxygen periodically and adjust as necessary. If for
any reason the Analyzer does not calibrate within specifications the oxygen sensor should be
Page 3

Oxygen Analyzer Instruction Manual Page 3
C-Squared Inc. 1440 S State College Blvd, Unit 4L, Anaheim, CA 92806
Tel: (714) 999-2791, Fax: (714) 999-2928, sales@c-squaredinc.com, www.c-squaredinc.com
replaced. If the batteries are low an icon will appear on the face of the display and the
batteries should be replaced with three AAA alkaline batteries for best performance.
Once you have verified the operation of the Analyzer it is ready to use and should operate
correctly.
Troubleshooting:
PROBLEM
POSSIBLE SOLUTIONS
Cannot calibrate analyzer
Replace Sensor
No display once analyzer is turned
on.
Replace Batteries
Low battery indicator is displayed
Replace batteries
Maintenance:
Battery Replacement:
a) Remove the 4 screws located on the back of the analyzer and carefully remove
the back cover.
b) Slide the batteries out of their holder and replace them with new AAA
batteries.
c) Make sure no wire leads are outside of the enclosure, and the o-ring is in
place. Carefully secure the lid and replace the screws.
Sensor Replacement:
Internal : Remove the back cover to replace sensor.
a) Disconnect the Molex connector from the circuit board to release the sensor.
b) Unscrew the sensor from the Analyzer box.
c) Dispose of the sensor in accordance with local regulations.
d) Remove the new sensor from its package; check it for leaks or any damage.
e) Screw the sensor into the Analyzer box.
f) Connect the Molex connector to the circuit board.
External:
a) Remove the sensor from the sensor cable.
b) Dispose of the sensor in accordance with local regulations.
c) Remove the new sensor from its package; check it for leaks or any damage.
d) Attach the sensor cable to the sensor.
Page 4

C-Squared Inc. 1440 S State College Blvd, Unit 4L, Anaheim, CA 92806
Tel: (714) 999-2791, Fax: (714) 999-2928, sales@c-squaredinc.com, www.c-squaredinc.com
Care of the Analyzer:
The Analyzer is an electronic instrument and should be treated as such. It is a completely
sealed unit and the enclosure was designed to withstand use in harsh environments. However
it should not be intentionally dropped in water or physically abused. With proper care it will
provide you with a long life. The Analyzer and sensor may be wiped clean with standard
disinfectants or water. The Analyzer is designed to be splash proof so there is little chance of
liquids coming in contact with delicate electronics.
Safety:
When the batteries or sensor require replacement, dispose of them in accordance with local
regulations.
The sensor contains a KOH (Potassium Hydroxide) solution that is hazardous and can result in
the following:
Eye: Can cause eye damage. Flush the eye with water for 15 minutes and seek aid.
Ingestion: Can be fatal if swallowed. Drink a lot of fresh water and seek aid.
Skin: Chemical burn is possible. Wash the area of skin exposed and remove any
clothing that was in contact with the KOH. Seek aid if necessary.
V:03/08/18
 Loading...