

Page 1
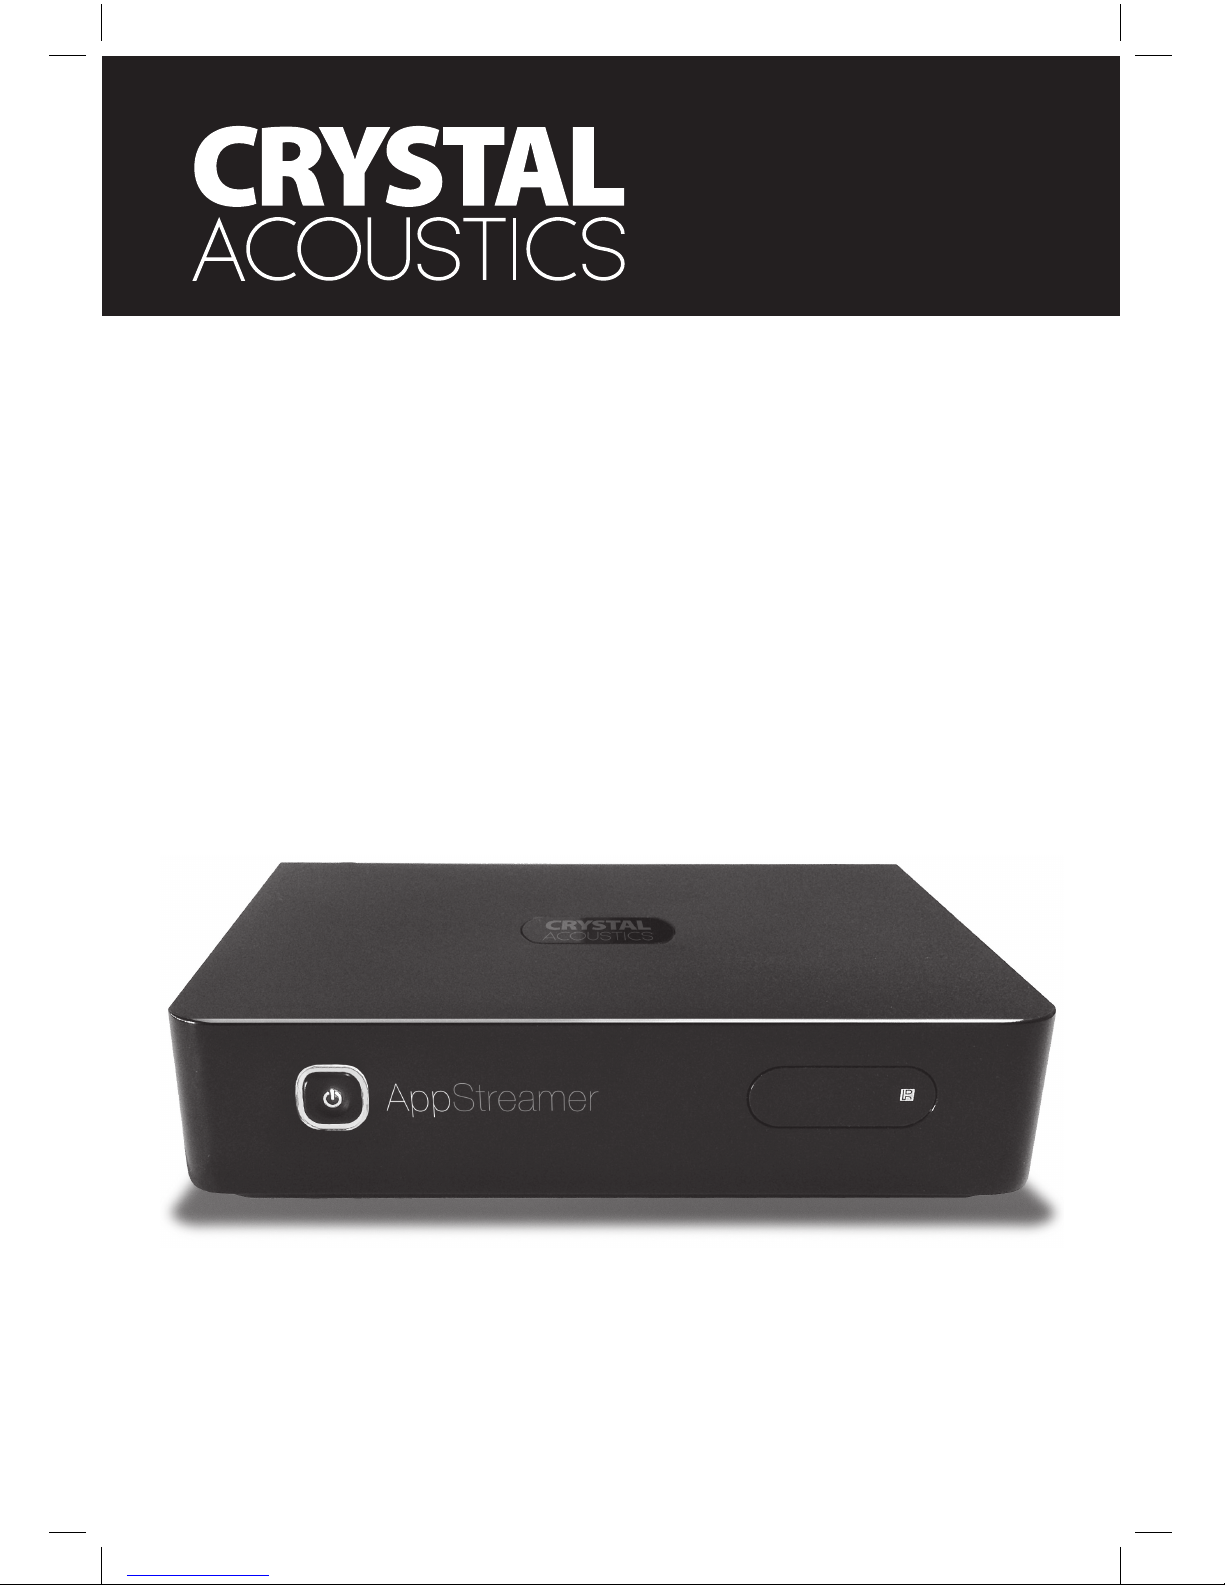
Gigabit Media Player with web applications
ΑppStreamer
User Manual
Page 2

2 CRYSTALACOUSTICS
INDEX
1. Introduction 3
1.1 Preface 3
1.2 Package contents 4
1.3 Precautions 4
1.4 Connecting the device with your A/V equipment 4
2. Remote Controller 6
3. Main Menu 7
3.1 Playback History 7
3.2 File Manager 7
3.2.1 File Browsing 7
3.2.2 File Management 7
3.2.3 Creation of “Favorites” list (movies/music/photos) 8
3.3 Movies 8
3.3.1 File Browsing 8
3.3.2 Options during movie playback 9
3.4 Music 10
3.4.1 File Browsing 10
3.4.2 Advanced controls during music playback 11
3.5 Photo 11
3.6 App 11
3.6.1 Internet Explorer 11
3.6.2 Muzze (Internet Radio & TV) 12
3.6.3 RSS 12
3.6.4 YouTubeXL 12
3.6.5 YouTube 12
3.6.6 Dailymotion 12
3.6.7 Mediay 12
3.6.8 Video Podcast 12
3.6.9 Audio Podcast 12
3.6.10 Flickr 12
3.6.11 Picasa 12
3.6.12 Yahoo Weather 13
3.6.13 Yahoo Finance 13
3.6.14 Buddy Link 13
3.7 BT 13
3.8 Setup 13
3.8.1 System 13
3.8.2 Sound 14
3.8.3 Video 14
3.8.4 Network 15
3.8.5 Subtitles 15
3.8.6 Various 15
4. Play les from your local network 16
5. Play les through UPNP 16
6. Technical Specications 17
Warranty 18
Page 3
3APPSTREAMER
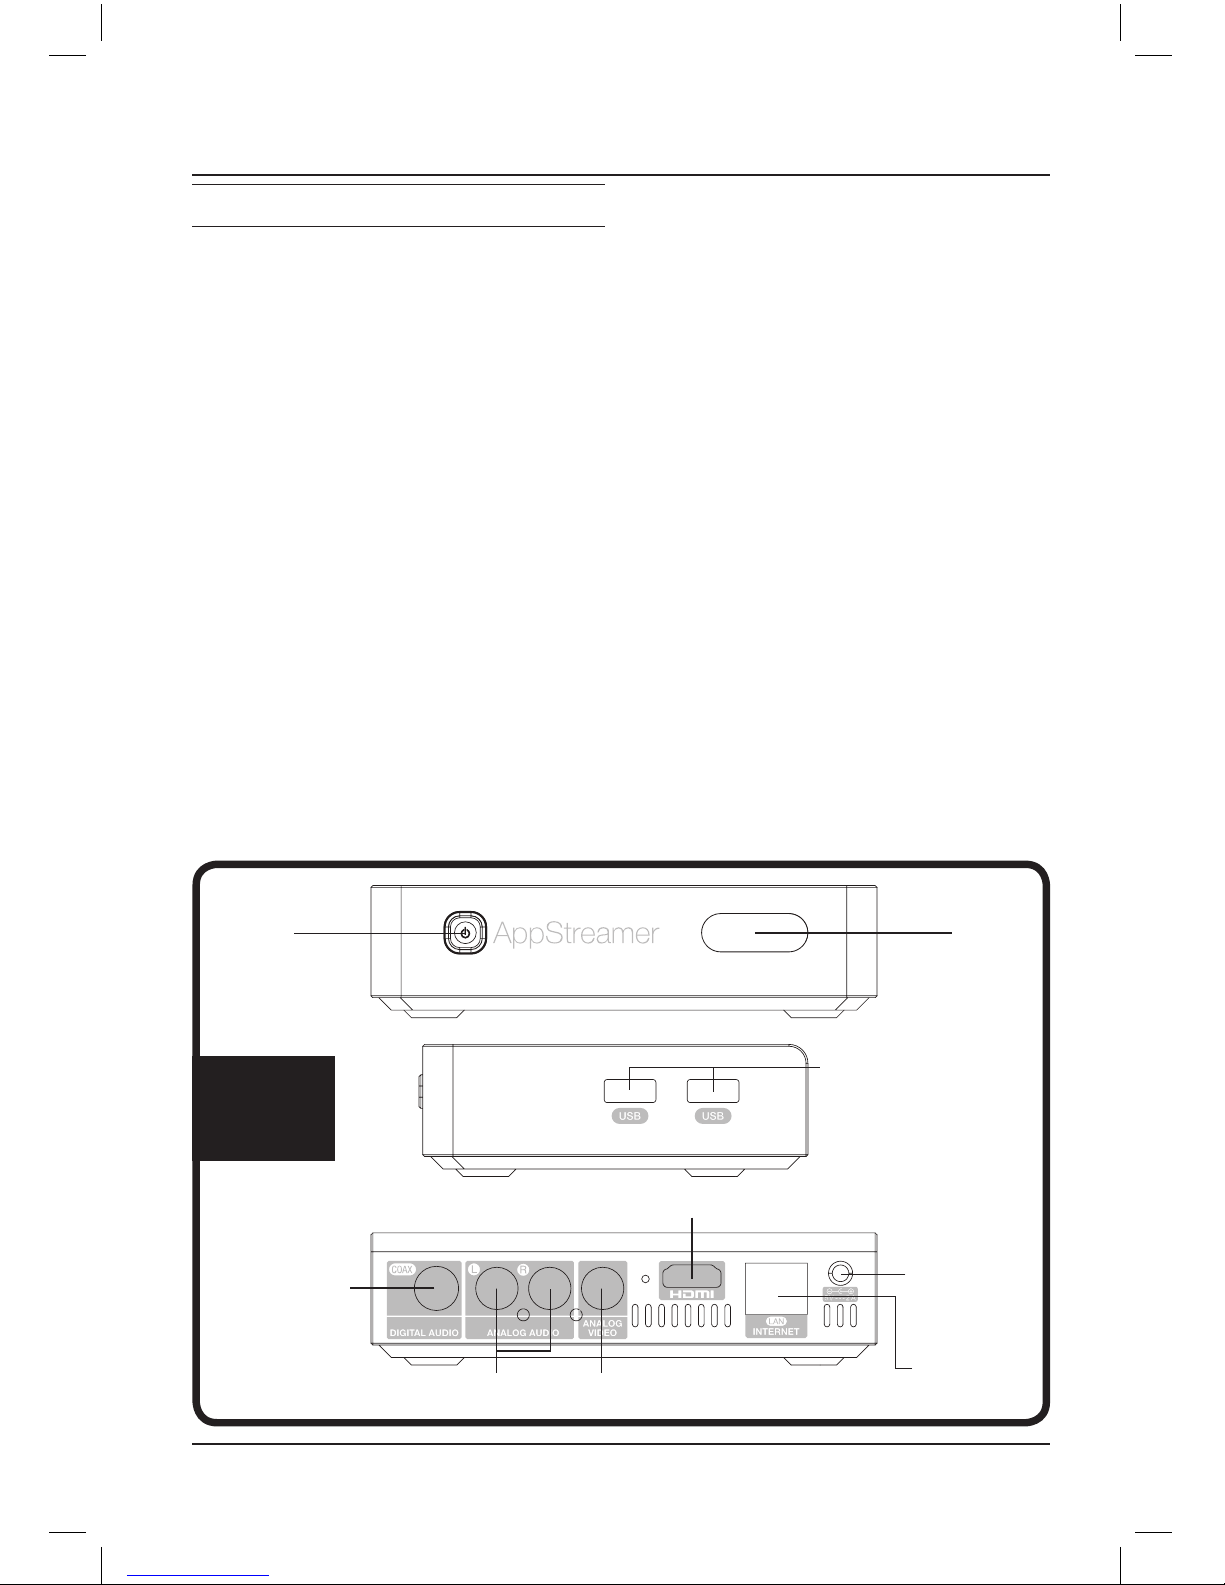
2 USB ports for
peripherals and storage
media connection
ΟΝ/ΟFF
Switch
Infrared
Receiver
HDMI 1.3 output for High Definition video and audio
Composite out for analog videoLine-out (L&R) for analog audio out
Coaxial out for
digital audio
Ethernet port
for Local Area
Connection
5V/2A
power supply
Inputs
Outputs
1. INTRODUCTION
1.1 Preface
Congratulations for choosing CRYSTAL
ACOUSTICS AppStreamer for your all-inone digital entertainment!
This powerful Media Player with enhanced
Networking features and Web Applications will
offer you unlimited entertainment options from
your movies, music and photos digital collection! And all of this, with the acclaimed crystal
clear quality of CRYSTAL ACOUSTICS.
Features and benefits
Realtek 1185 processor
Enjoy top performance, flawless HD video
and audio reproduction, even from the most
demanding files in your digital library
Gbit Ethernet
Stream movies and music from your local network, with artifact-free, crystal clear quality
DLNA Client
Enjoy streaming audio, movies and music
on your TV, from your DLNA enabled mobile,
laptop, gadget or other appliances
DTS Master Audio / Dolby TrueHD
Immerse yourself into the outmost sonic quality of modern, uncompressed soundtracks
Multimedia files support
AppStreamer supports all popular video and
audio file formats (1080p HD decoding):
Video Files:
AVI, MKV, TS, TP, MPG, MP4, M4V, MOV,
VOB, ISO, AVC, DAT, WMV, ASF, RM, RMVB,
FLV
Music Files:
MP3, OGG , WAV, AAC, FLAC
Photo Files:
JPEG, BMP, GIF, TIFF, PNG
Photo slide-show with music background
DVD menu functionality
Page 4
4 CRYSTALACOUSTICS
ΚΙΤΡΙΝΟAΣΠΡΟ
KITPINO
KOKKINO
KOKKINO
AΣΠΡΟ
KITPINO
KOKKINO
AΣΠΡΟ
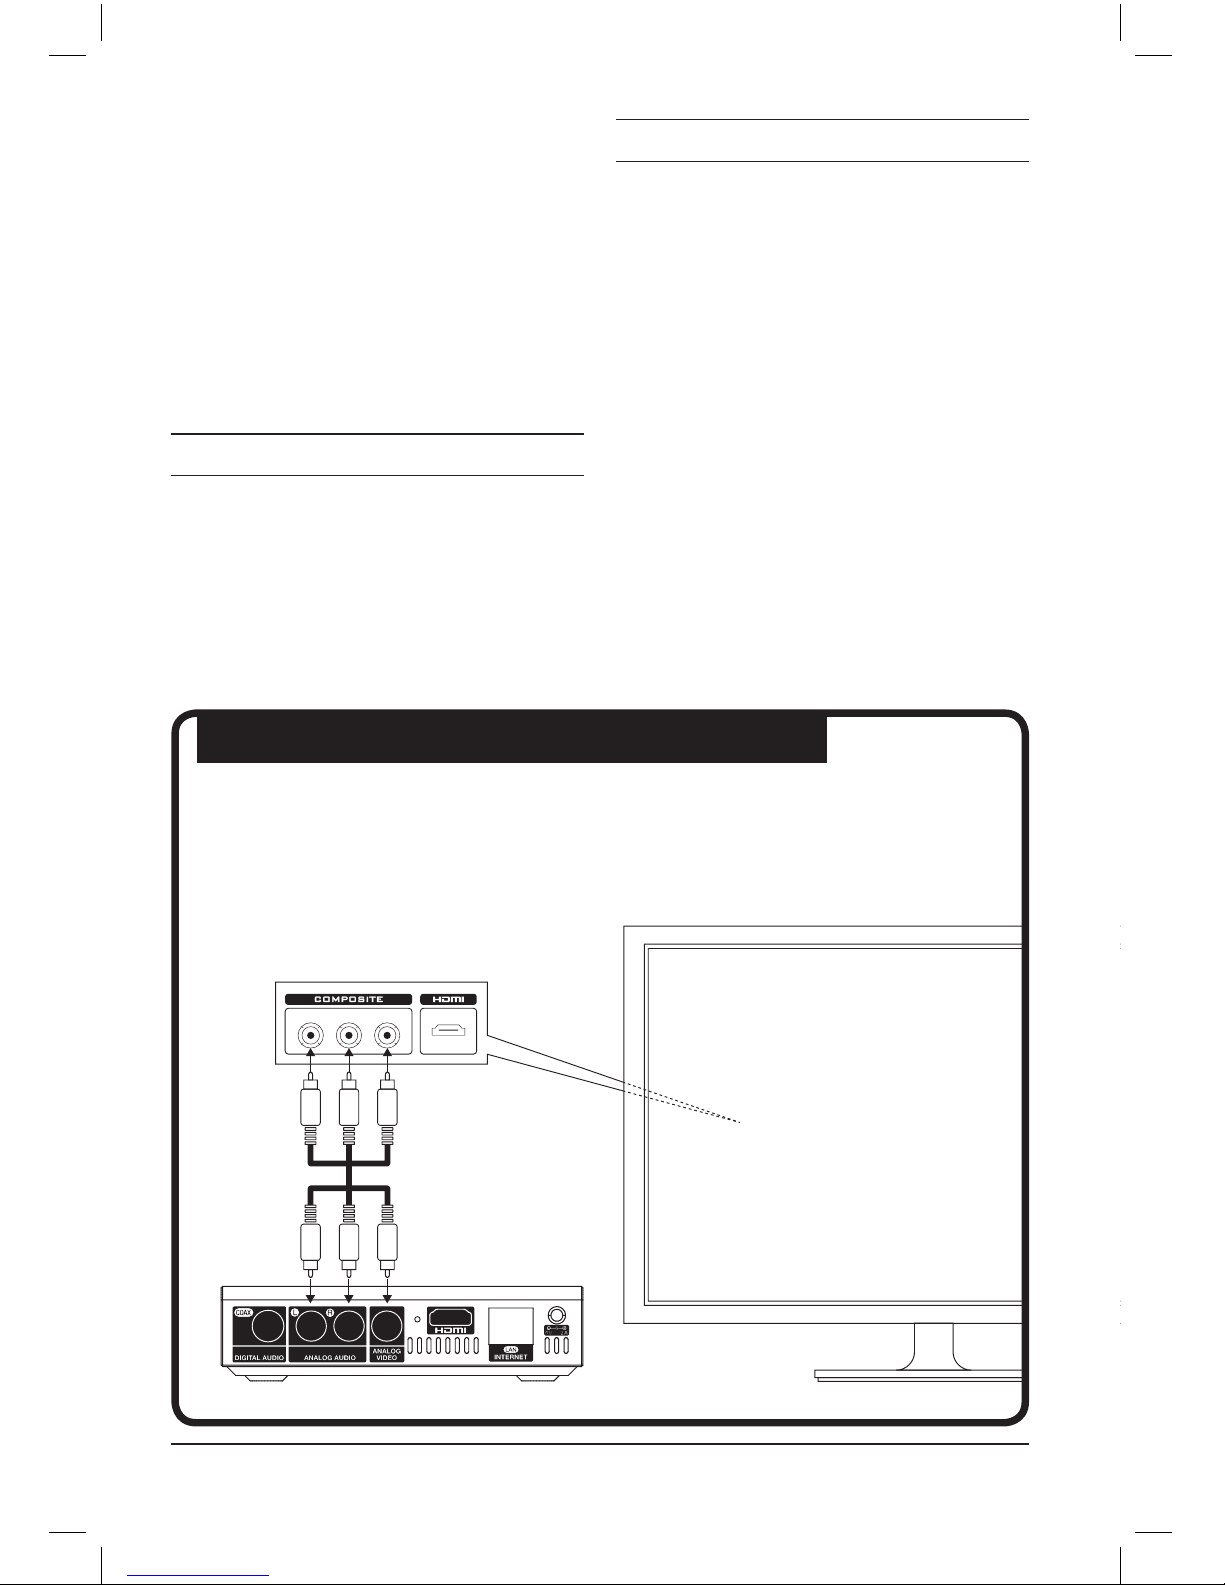
1.4 Connecting device with your A/V equipment
Analog A/V connection
Connect the Appstreamer to your TV, using the analog video and audio cable.
This allows you to enjoy your movies in Standard Definition and stereo audio.
Network functionality
AppStreamer comes with the following applications:
Web Browser
Internet TV & Radio
BitTorrent Client
YouTube
Files Management
AppStreamer allows you to perform Copy,
Paste and Delete operations for files.
1.2 Package contents
Item Quantity
AppStreamer 1
Remote controller 1
Power Supply (5V) 1
User Manual 1
Καλώδιο σύνδεσης AV 1
1.3 Precautions
The correct setup, use and maintenance of the
Appstreamer is essential in order to minimise
the chance of severe damage, injury or even
death from electrocution or fire.
Please, carefully read these instructions,
which provide important information, in
order to ensure a safe use of the device.
• Select the correct power input for the device
• Avoid damaging the power cable or power
supply
• Do not damage the device with heavy or
sharp objects
• Avoid exposing the device in humid environments or in direct contact with water
• Protect the device’s cables from accidental
foot stomps
• Avoid exposing the device in extremely hot
environments
WHITEWHITE
WHITE
REDRED
RED
YELLOWYELLOW
YELLOW
Page 5
5APPSTREAMER
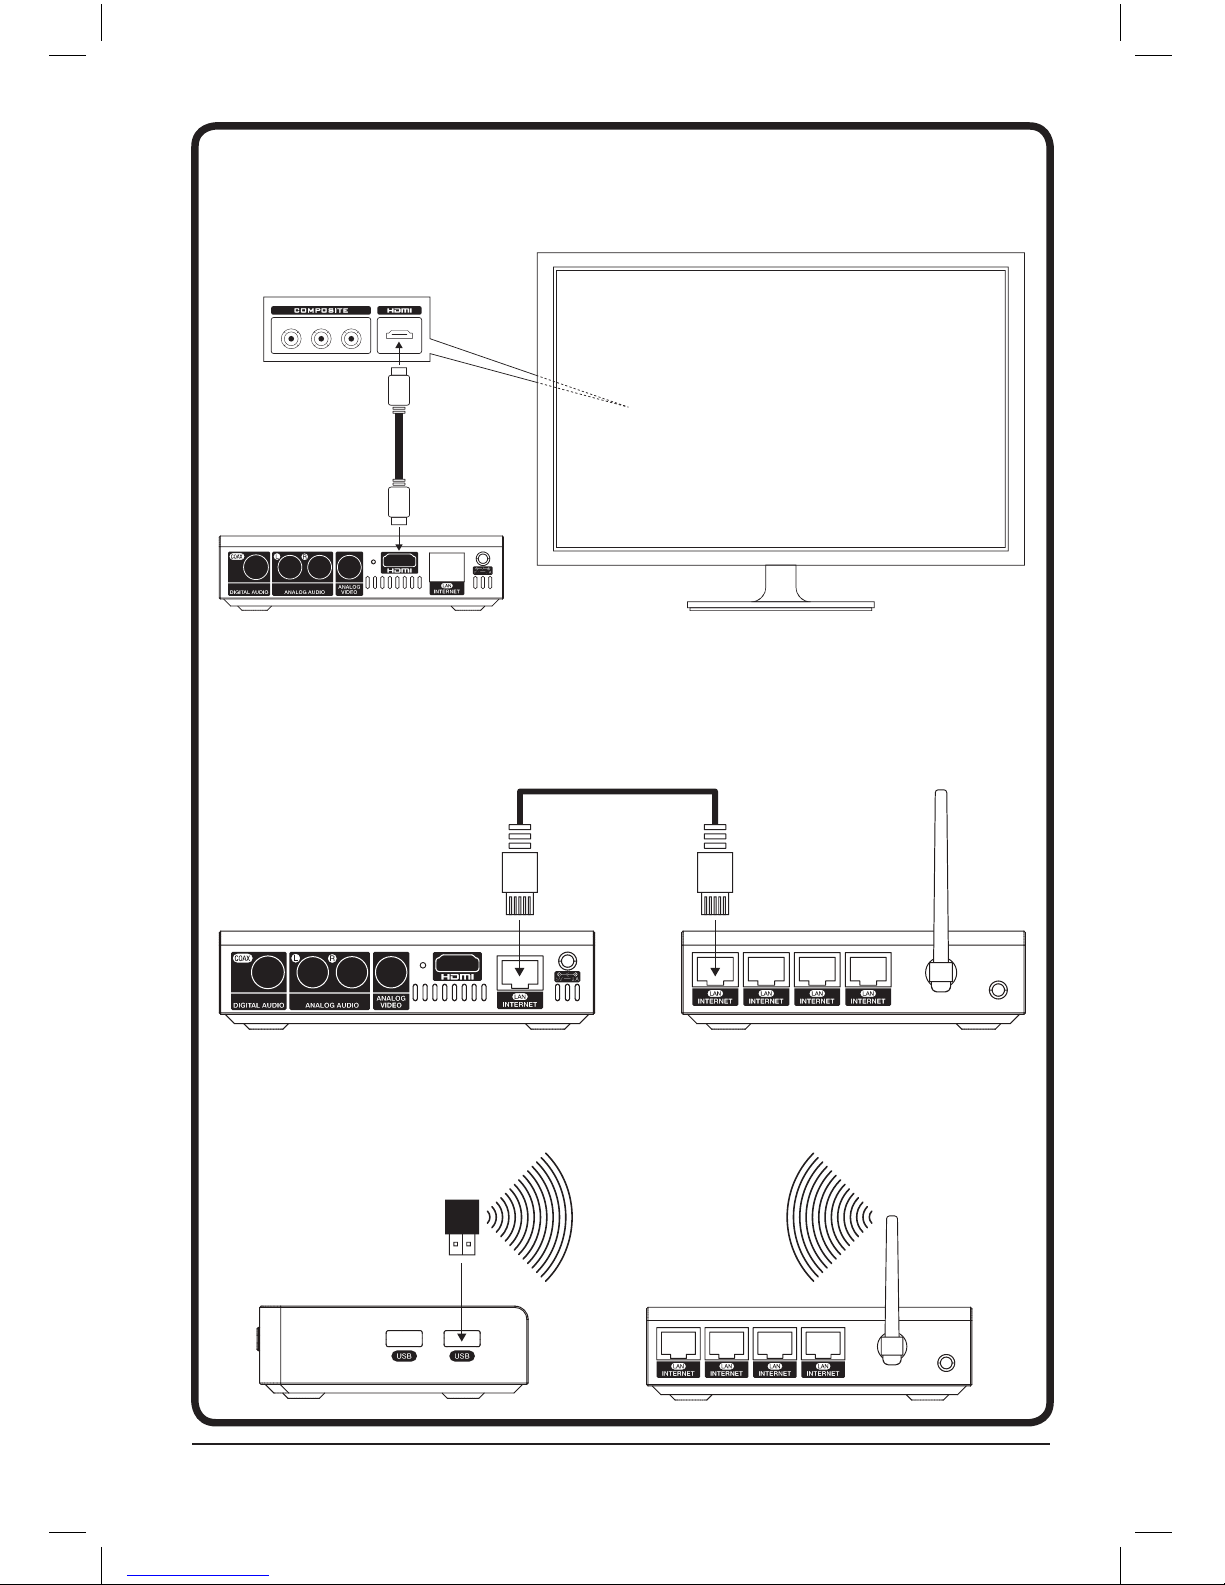
HDMI
Connect the AppStreamer with a HDMI cable to enjoy High Definition video up to 1080p,
and HD stereo or multichannel audio.
Wired network connection
Use a Cat-5 cable (or better, like Cat-6 or Cat-7), to enjoy the AppStreamer’s network functions.
Notice: in order to achieve maximum network speeds, all of your networking equipment
must be compatible with 1000BASE-T (Gigabit Ethernet)
Wireless network connection
Use the optional USB dongle CA-Wi-Fi, connect it to one of the available USB inputs and enjoy
the benefits of wireless network functionality.
ΚΙΤΡΙΝΟAΣΠΡΟ KOKKINO
HDMI HDMI
Router
AppStreamer
AppStreamer
Router
Page 6
6 CRYSTALACOUSTICS
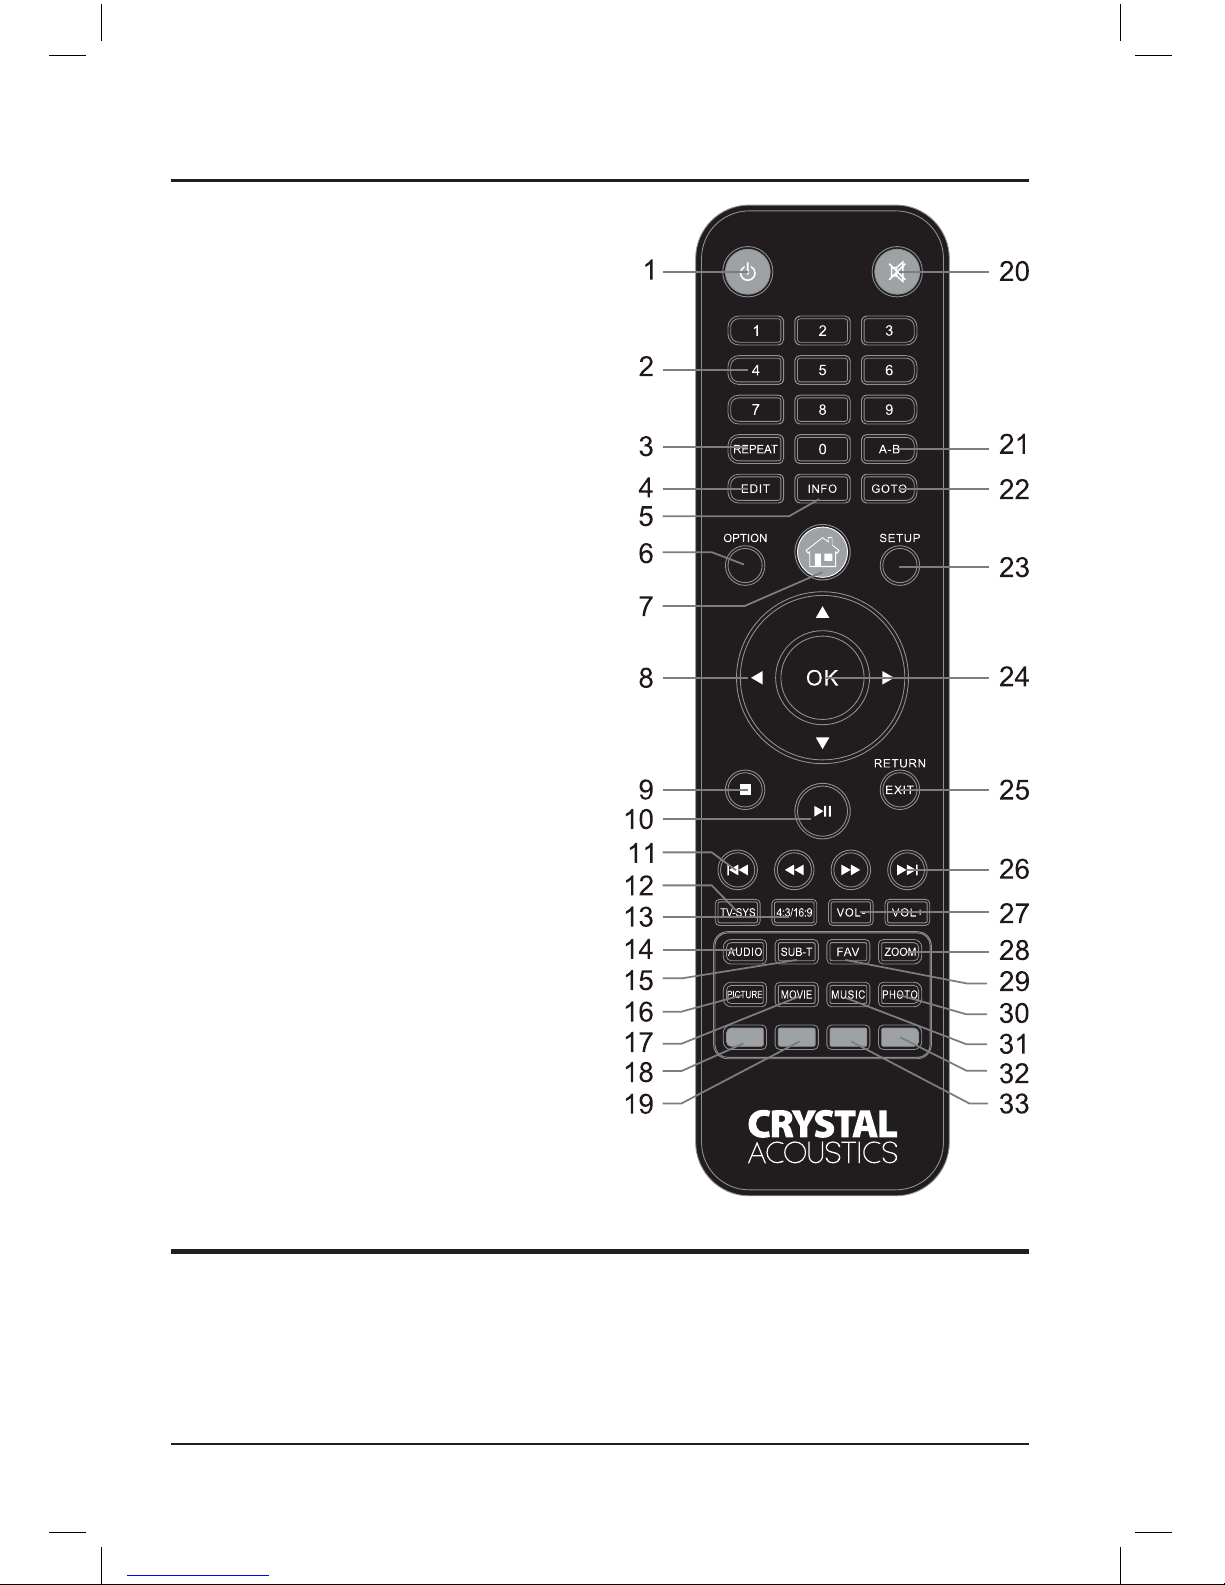
2. Remote controller
Control all of the AppStreamer’s functions
from a distance, using the remote controller
Button
1 Turn the AppStreamer ON / OFF
2 Numeric Buttons
3 Select the desired repeat mode
4 Rename / Copy / Move / Delete
5 Display file information
6 Display the available menu choices
7 Enter the main menu
8 Select menu items and files
9 Stop the playback
10 Play and Pause the current file
11 1. Play the previous file
2. Scroll-up through the files list
12 Select TV System
13 Select video type and resolution
14 Select audio format (DTS, AC3 κ.α.)
15 Select the desired subtitles
16 Access the picture settings
17 Access the movie list
18 Change the web navigation preset
(next link / page scrolling)
19 Scan for storage / Navigation Bookmarks
20 Mute the audio
21 Set a file to repeat from point A to point B
22 Jump to a specific time moment during a movie
23 Access the settings menu
24 Confirmation
25 Return to the previous screen
26 1. Play the next file
2. Scroll-down through the files list
27 Increase/Decrease the audio volume
28 Zoom-in / Zoom-out
(for pictures, photos and video)
29 Add files to the favourites list
30 Access the photos list
31 Access the music list
32 Eject USB storage
33 Not used
Notice
• To ensure the best possible operation of the
remote control, use it within a 5 meter radius from
the front of device and an angle of 30 degrees (horizontal and vertical axis).
• Ensure that the optical contact between the
remote and the device is unobstructed.
• After every firmware update, the AppStreamer’s video output returns to its factory presets
(HDMI Auto).
• After updating your AppStreamer’s firmware, read
the accompanying change-log carefully.
Page 7

7APPSTREAMER
When you connect your AppStreamer to its power
supply for the first time, it will turn ON automatically. The main menu will come up on your display.
Press the navigation buttons on the remote
control, to select “Playback History”, “Files”,
“Movies”, “Music”, “Photo”, “Applications”, “BT”
or “Settings”.
Notice: After permanently connecting the AppStreamer to its power supply, you can turn the
device ON and OFF by using the “Power” button
on the remote, or on the front of the device.
3.1 Playback history
Browse the movies you have seen recently.
This option is especially useful in case you
have stopped watching a movie some hours or
days ago and want to continue watching, from
the point you stopped.
3.2 File Manager
Browse and enjoy movie, music and photo
files from storage media and local servers or
UPNP devices.
To enter the file browser, select “Files”.
3.2.1 File browsing
Press the “Option” button to see the quick
selections menu.
The following choices are available:
• Thumbnails
• Preview
• List
• All media
• Movies
• Photo
• Music
Use the “up” / “down” buttons to select “OK”
for confirmation.
Thumbnails
Display you files and storage media as thumbnails.
From here you can use the following buttons:
• “Up”, “Down”, “Right”, “Left” and “ΟΚ” to
browse the files of the selected storage
media.
• “Page Down/Next” or “Page Up/Previous” to
go to the next page.
• “Exit” to return to the previous file / list.
List
Browse your files in list view.
All media
Display on-screen all of the available files in
your storage device.
Preview
View folders and files in preview mode, with
additional info on the left side of the screen.
Movies
Display movie files only.
Photo
Display photo files only.
Music
Display music and audio files only.
3.2.2 File management
Press the “Edit” button to access the following
commands.
Execute file management operations, like:
• Copy
• Delete
• Move
• Rename
• Edit playlist
• Edit photo album
• Multiple select
3. Main menu
Page 8

8 CRYSTALACOUSTICS
3.2.3 Creation of “Favorites” list
(movies/music/photos)
Create a playback list with your favorite
movies, music tracks and photos.
Press “Fav” while browsing a movies music or
photos folder.
After adding the tracks in the list (files will be
visible on the right side of the interface), press
the “Edit” button and select “Save List” (for
movies or music) and “Save photo album” (for
photos).
To access the list of favorite movies,
press the “Option” button while in the “Music”
menu and select “Search”. Next, input the list’s
name and from the results, select the v3u file.
Press “OK” for playback.
To start listening to your favorite tracks,
press the “Option” button while in “Movies”
and choose “List”. Select the desired m3u file
and press “ΟΚ” for playback.
To watch a slideshow of your favorite
photos, press “Option” while in the “Photo”
menu. Choose “Album” and then select the alb
file. Press “ΟΚ” for playback.
3.3 Movies
Watch any movie file in your storage devices.
Press “ΟΚ” or “Play” to start playing the
selected file.
While watching a movie file, you can execute
various commands like FF, FR, Zoom, Play /
Pause, Info e.t.c. using the corresponding buttons on the remote.
3.3.1 File browsing
Press the “Option” button to display the quick
selection menu. The following options are
available:
• Search
• Thumbnails
• List
• Preview
• All movies
• Video files
• BD/DVD
• Flash Animation
• Jump to folder
• Name
• Size
• Most viewed
• Recently added
Use the “UP” and “DOWN” buttons to select
“ΟΚ” for confirmation.
Search
Search for a specific movie, based on its title.
To search for a movie, you do not need to input
it’s full name . For example, if you write the
word “UP”, you will get a list of all the movies
that contain “UP” in their title.
Thumbnails
Browse all of your files and storage devices in
thumbnail view.
The available button commands include:
• “UP”, “DOWN”, “RIGHT”, “LEFT” and “ΟΚ”
to browse through the files of the selected
storage device.
• “Page Down/Next” or “Page Up/Previous” to
jump to the next page.
• “Exit” to return to the previous folder/ list.
List
Browse your files in list view.
Preview
Browse your files and folders in preview mode,
with additional info on the left side of the
screen.
All movies
View all of the available movies.
Video files
View the available video files only.
Page 9

9APPSTREAMER
BD / DVD
View the available Blu-ray and DVD ISO files.
Flash Animation
View the available Flash files.
Go to folder
Jump to the selected movie’s folder.
Name
Sort your movies by title.
Size
Sort your movies according to file size (from
larger to smaller).
Most viewed
Sort your movies by number of views (from
most to less viewed).
Recently added
Sort your movies by date of file creation (newest files display first).
3.3.2 Options during movie playback
Gain access to the following options by pressing the “Options” button during playback.
Subtitles
Select the desired subtitles from the selection menu.
To quickly access the selection menu, you
can press “SUB-T” during movie playback.
Select the subtitles type, size, sync and coding, as well as their color.
Select the desired setting by using the “left / right”
buttons and change the values with the “up /
down” buttons. Press “exit” to close the menu.
Audio
Select the desired audio band from the selection menu.
To quickly access the selection menu, you can
press “AUDIO” during movie playback.
Go To
Select the desired time moment of a movie, in
which you want to instantly “jump” to.
Quickly access this menu by pressing “GOTO”
during a movie playback.
You can use three transition modes: by time,
by chapter and by section.
Use the “left / right” keys on your remote control, to choose the transition and then use the
“up / down” keys to set the time point.
Press “ΟΚ” to “jump” to the desired time point.
If the “GOTO” menu is still displayed on your
screen, press “Exit” to close it.
Repeat Title
Repeat the current track, after the end of its
playback.
Quickly access this function by pressing “REPEAT” during a movie’s playback until “Repeat
Title” is displayed.
Repeat All
Repeat all files in the same folder.
Quickly access this function by pressing “REPEAT” during a movie’s playback until “Repeat
All” is displayed.
Repeat Off
Choose this option to de-activate the current
repeat mode.
Quickly access this function by pressing “REPEAT” during a movie’s playback until “Repeat
Off” is displayed.
Picture Settings
Modify the picture settings, according to your
liking.
You can access the following settings: Bright-
ness, Contrast, Saturation and Hue.
Confirm your choice by pressing “OK”.
Quickly access these options by pressing
“PICTURE” during a movie’s playback.
Page 10

10 CRYSTALACOUSTICS
3.4 Music
Browse and listen to all of your music files,
located on your external storage media.
Listen to a track by selecting it and pressing “ΟΚ” or “Play”. During playback you can
perform various functions like FF, FR, Play /
Pause, Info e.t.c. using the expropriate the
keys on the remote.
Press “Vol+” or “Vol-” to increase or decrease
the audio volume.
Press “Exit” to close the music files selection
screen. Music will continue playing in the
background.
3.4.1 File Browsing
Press “Option” to display a quick-selection
menu with these options:
• Search
• Now playing
• Thumbnails
• List
• Preview
• Go to folder
• All songs
• Album
• Artists
• Genre
• Year
•Playlists
• Recently played
• Recently added
• Name
Use “up” and “down” to select “ΟΚ” for confirmation.
Search
Use the virtual keyboard to search for any
music track.
You do not need to input the full name of a
track. For example, if you input “UP”, all of the
music tracks containing “UP” will be displayed
in the results.
Now playing
Jump to to the currently playing track.
Thumbnails
Display your files and storage devices as
thumbnails.
You can use the following buttons:
• “Up”, “Down”, “Right”, “Left” and “ΟΚ” to
browse the files in a storage media.
• “Page Down/Next” or “Page Up/Previous” to
jump to the next page.
• “Exit” to return to the previous folder / list.
List
Browse all your files in list view. You can use
the same keys as in 3.4.1.3
Preview
Browse files and folder in preview mode, with
additional info on the left side of the screen.
Go to folder
Jump to the folder of the currently playing
track.
All songs
Browse all of your music tracks.
Album
Browse all tracks in a music album.
Artists
Browse all the music tracks of a specific artist.
Genres
Browse all the music tracks of a specific genre.
Years
Browse music tracks by year.
Playlists
Browse all of your “favorites” lists.
Recently played
Sort the tracks according by playback frequency (how many times you have listened to
each track).
Page 11

11APPSTREAMER
Recently added
Sort the tracks in the order they where added
to the storage media.
Name
Sort the tracks by name.
3.4.2 Advanced controls during music
playback
Press “Option” to access the following functions:
Repeat Title
Repeat the current track, after the end of its
playback.
Quickly access this function by pressing “REPEAT” during a movie’s playback until “Repeat
Title” is displayed.
Repeat All
Repeat all files in the same folder.
Quickly access this function by pressing “REPEAT” during a movie’s playback until “Repeat
All” is displayed.
Repeat Off
Choose this option to de-activate the current
repeat mode.
Quickly access this function by pressing “REPEAT” during a movie’s playback until “Repeat
Off” is displayed
Shuffle
Listen to music tracks in random order.
Press “REPEAT” during playback, until “Shuffle” is displayed on screen.
3.5 Photo
Enjoy photos and picture files stored on your
external storage media.
Press “Option” while viewing a photo or picture, to access the following options:
Slideshow duration - Set the desired slideshow duration
Transition effect - Choose the desired transition effect from picture to picture
Repeat off - Disable the “repeat” function,
after the last photo is displayed
Repeat all - Activate the continuous loop of
the selected photos
Random view - Activate the random viewing
of the selected photos
Background music - Select the desired
music track from your digital library, to be used
as a background for your slideshow
Picture Settings - Change the picture settings (Brightness, Contrast, Saturation, Hue)
according to your liking or projection device.
3.6 Applications
Access a wide range of web applications.
You must have an active internet connection, in order to use these applications.
3.6.1 Internet Explorer
Upon loading this app you will be immediately
directed to Google, for easy web searching.
The available options and command available
through Ιnternet Εxplorer are:
OPTIONS: press the OPTIONS key to:
• Write the web address
• Visit the previous page
• Visit the next page
• Refresh the current page
• Cancel loading the current page
• Modify the up/down/right/left function keys
• Visit the bookmarked pages
• Bookmark a new page
• Change the character encoding
• Change the text size on any page
Red key: press the red key to select one of
the following:
Page 12

12 CRYSTALACOUSTICS
Scroll
Scroll the page up/down/right/left, by using the
appropriate keys
Select link
Jump to the next / previous link, by using the
up/down/right/left keys
Green key: press OPTIONS and the press
the green key, to automatically jump to the
bookmarked pages.
Using a USB mouse and keyboard
Connect a USB mouse and keyboard, for
maximum easy of use.
To use the hardware keyboard, you must first
enter the input field and press “ΟΚ” to display
the virtual keyboard.
3.6.2 Muzze (Internet Radio & TV)
Access a wide selection of internet radio and
TV stations.
In the main app screen, press “ΟΚ” to display
the internet radio or TV menu.
You can access the following options:
TOP100
Browse the 100 most popular stations
All Genres
Browse the stations according to genre
All Regions
Browse the stations according to region
Favorites
Browse your favorite stations
Search
Search for stations by name
History
Browse the station you have listened to,
recently
You can store any station in your favorites list.
Simply select the station and press “Add to
favorites”.
The next time you will use the Muzze app, you
can access your favorite stations from the
“Favorites” option, in the main menu.
3.6.3 RSS
Access a wide range of news feeds from all
around the globe.
Simply insert the RSS address of the desired
news source.
The next time you will use the RSS app, the
last source you have chosen will already be in
the list.
3.6.4 YouTubeXL
Access the vast videos database of YouΤube,
the most popular video sharing service.
3.6.5 YouTube
Similar to the YouTubeXL app (different user
interface), YouTube allows you to access the
vast videos database of YouΤube.
3.6.6 Dailymotion
Access Dailymotion’s vast video database.
3.6.7 Mediafly
Access the vast picture and audio database of
Mediafly.
3.6.8 Video Podcast
Enjoy newscast videos from all around the
globe.
3.6.9 Audio Podcast
Listen to a vast and expanding collection of
news and mixed media podcasts from all
around the globe.
3.6.10 Flickr
Browse the expanding photography collection of Flickr, the most popular photo-sharing
service on the web.
3.6.11 Picasa
Access the full photographic database of
Google’s Picassa service.
Page 13

13APPSTREAMER
3.6.12 Yahoo Weather
Watch weather forecasts for the desired location.
• Browse for the desired location and select it.
• The next time you will open the app, you will
have immediate access to the locations you
have chosen in the previous session.
3.6.13 Yahoo Finance
Monitor the worldwide stock market from the
comfort of your couch.
• Simply select the stocks you wish to monitor.
• The next time you will open the app, you will
have immediate access to the stocks you have
chosen in the previous session.
3.6.14 Buddy Link
Exchange messages with your Google friends.
3.7 BT
Monitor your torrents’ download progress.
To download a torrent, you must perform the
following steps:
• Open the BT app, from the menu.
• Select the storage media.
• Select the torrent file (.torrent) you wish to
download, using the “File” option from the
main menu. After choosing the file, the “Tor
rent successfully added” message will
appear. *
• Monitor the download progress anytime, by
accessing the BT app.
* You must have already downloaded the
file (.torrent) from the web and copied it on
your external storage media.
After the download is complete, you can locate
it in the folder named “Transmission 2.22”.
3.8 Setup
Select “Settings” from the main menu and
select “ΟΚ” to access these options.
The six different settings categories, have been
accordingly divided (System, Audio, Video,
Network, Subtitles, Various).
Press “left ” or “right” to change settings
category.
Press “up” or “down” to select the setting you
wish to modify.
3.8.1 System
Menu language
Press “up” or “down” to select the desired
language.
Press “ΟΚ” to to confirm your selection.
Text
Choose the desired subtitles encoding.
R/RW Auto-play
Set whether the externally connected USB
DVD/BD players should automatically start
playback.
Screen Saver
Activate or de-activate the screensaver function (especially for Plasma displays).
After entering the submenu, you can define
the desired time after which the screen saver is
activated, as well as its theme.
DLNA DMR
Engage or disengage the DLNA function for
the streaming of video, music and photo files,
via Android mobile phones * or other DLNA
enabled devices.
*You will need to install DLNA software on
your phone (e.g Imediashare or Eyecon).
Device name
Change the name with which the AppStreamer
will be visible on your local network.
The default name is “AppStreamer”.
Mini KBD language
Select the desired input language for the virtual
keyboard.
Page 14

14 CRYSTALACOUSTICS
Scan Storage
Select the mode in which the attached USB
media is scanned.
Resume Play
Activate or de-activate the AppStreamer’s
ability to resume playback from the point you
stopped watching a movie.
Format: Erase all data on the attached storage media.
Blu-ray Navigation: Select whether the Bluray (ISO) menu will appear.
Auto Standby: Set the minutes after which
the AppStreamer will automatically pass into
standby mode, if idle. This is especially useful
in case you forget to shut it down yourself.
Auto Play by booting: Set the AppStreamer
to automatically play a pre-selected set of
video, picture or music files, on startup.
To activate this feature, first create a folder
named “Autoplay”.
In this folder, create three sub-folders
named “movie”, “music” and “photo”.
Next, copy the desired files in the appropriate
folders (depending on kind)
From the menu, select “Movies”, “Music” or “Photo”.
Factory Default: Reset the AppStreamer to
its factory settings.
3.8.2 Sound
Night mode
Define the level of dynamic range compression
Activate this setting (“ON”) to enjoy movies
even at late night hours, without disturbing
your neighbors.
Key tone
Activate an audible effect for every key press.
If you set this option to ON, you will hear an
audible “click” with every command input from
the remote control.
HDMI-OUT
Set whether you wish the HDMI’s audio-out to
be Linear PCM or RAW
• PCM: Select this for stereo PCM output
only, regardless of audio signal (5.1 audio will
be converted to stereo)
• RAW: Select this for direct digital audio-out
of all stereo and multichannel audio. If you are
using the AppStreamer with an A/V Receiver,
Home Cinema system or other gear with AC3
and DTS decoders, this is the optimal setting.
SPDIF OUT
Set whether you wish the SPDIF’s audio-out to
be Linear PCM or RAW
• PCM: Select this for stereo PCM output
only, regardless of audio signal (5.1 audio will
be converted to stereo)
• RAW: Select this for direct digital audio-out
of all stereo and multichannel audio. If you are
using the AppStreamer with an A/V Receiver,
Home Cinema system or other gear with AC3
and DTS decoders, this is the optimal setting.
DBSS
Select between 5.1 or High Definition audio.
Lip Sync
Change the synchronization between video
and audio.
3.8.3 Video
Aspect Ratio
Select the desired picture aspect
You can set between Pan Scan 4:3, Letter
Box 4:3, 16:9 and 16:10, depending on your
display or projector.
Page 15

15APPSTREAMER
TV system
Select the desired refresh rate
Depending on the video media and projector
or TV type, you can adjust the refresh rate /
resolution setting accordingly.
Video Zoom
Select whether the zoom function will be active.
1080p/24Hz
Activate this option if your projector or TV supports 1080p/24Hz video input.
Play The Directory
Choose to “auto-play” or “access-first” the files
in a Blu-ray or DVD folder.
Color Deep
Select the HDMI output color depth.
3.8.4 Network
Wired Lan Setup
Set the AppStreamer’s network settings,
depending on your local network type
We advise using DHCP IP (AUTO) and DNS
(AUTO), provided the DHCP is active on your
router.
Wireless Setup
Set the AppStreamer’s network settings, according to the access point’s setup
Note: To use the AppStreamer in a Wi-Fi
network, you will need the optional CA-Wi-Fi
dongle, which needs to be connected to one
of the media player’s free USB inputs.
To setup a connection, follow these steps:
• After activating the Wi-Fi setting, the AppStreamer will perform an automatic search for
all nearby wireless networks.
• Select the desired Wi-Fi connection, pressing “OK”.
• Input the network’s security code.
• Press ΟΚ to perform a connection test. You
will see the results on a new screen.
PPPoE Setup
Input the user name and password for the PPPoE network connection.
BT Process
Enable / Disable the torrents download function.
Samba Process
Enable / Disable the samba server feature
When this feature is active, it allows you to
access any attacked USB storage on the
AppStreamer, from your local network.
Provided that your computer and the
AppStreamer are on the same network,
input the AppStreamer’s IP address (e.g.
\\192.168.1.120\) or simply the word “AppStreamer” (e.g. \\appstreamer\).
ΒΤ & Samba security
Enable / Disable the secure access feature,
when managing files through Samba or BT
The preset user name is “admin”
and the password is “123”.
3.8.5 Subtitles
Intelligent Recognition
Enable / Disable the automatic detection of
subtitles encoding.
Vertical position
Set the default vertical position of the subtitles.
Character size
Set the default subtitles size.
Language
Set the default subtitle language.
Color
Set the default subtitle color.
3.8.6 Various
Version Info
Display info regarding the installed firmware version.
Page 16

16 CRYSTALACOUSTICS
Network info
Display info regarding the network settings.
This option is especially useful, if you need to
know the IP address assigned to the AppStreamer via Ethernet or Wi-Fi connection.
Upgrade
Upgrade the AppStreamer’s firmware.
Use a USB storage media to install the newest
available firmware for the AppStreamer. To
upgrade the firmware, follow the instructions
that come with the upgrade file.
4. Play files from your
local network
To play files from you local network, the File
Sharing* feature must be active on the server
computer.
Select “Files”, then “Network”.
You will see a list of the available computers
on your local network. Select the desired
computer.
You will be asked to input the required User
name and Password.
You can also use the “My_Shortcuts” feature,
to quickly access the desired computer, without the need to input a user name.
Press “OK” to browse the attached storage on
the selected computer.
* To enable this feature, consult your computers Operating System’s help section.
5. Play files through
UPNP
To play files using the UPNP feature, activate
the UPNP server on the computer you wish to
access from the AppStreamer.
Select “Files”, then “UPNP”.
You will see a list of the available UPNP enabled computers on your local network. Select
the desired computer.
Note:
UPNP servers present different characteristics regarding file filtering. As a result, some
file types like MKV, RMVB e.t.c. may not be
supported. Also notice that subtitles are not
supported when streaming through UPNP.
Page 17

17APPSTREAMER
6. Technical Specifications
Video (Files)
Audio (Files)
Audio (Decoding)
Photo (Files)
Subtitles (Files)
Connectivity
Network features and applications
File Systems
Additional Features
Power supply input
Power supply Output
Standby consumption
Power consumption
Dimensions (WxDxH)
Weight
MKV, AVI, DIVX, XVID, TS, M2TS, MTS, MPG, MP4, MOV, M4V, VOB, ISO,
IFO, DAT, WMV, ASF, RM, RMVB, FLV, DVD-ISO, BD-ISO
WAV, MP3, AAC, WMA, OGG, LPCM, FLAC, M3U
Passthrough: DTS, DTS-HD Master Audio, DTS-HD High Resolution,
Dolby Digital, Dolby TrueHD
Downmix: DTS, DTS-HD Master Audio, DTS-HD High Resolution,
Dolby Digital, Dolby TrueHD
JPEG, GIF, BMP, PNG, TIFF
SRT, SMI, SSA, SUB-IDX, DVD (Yποστήριξη Ελληνικής γλώσσας)
HDMI 1.3, Composite Video, Line Out (L/R), Coaxial, Ethernet, 2 x USB
Web Browser, Youtube, Bit Torrent client, DLNA, Samba, Muzze (Internet Radio/TV), Flickr, Picasa, Yahoo
Finance, Yahoo Weather, Dailymotion, RSS Feeds, Audio podcasts, Video podcasts, Google Buddylink
FAT32, NTFS, HFS+ (MacOS)
Subtitles settings (sync, size, position, color), Screensaver, GOTO, Copy/Paste, Favorites List
(music), File sorting, Thumbnail viewing, Video zoom, Quick access to settings, Music slideshow
100 - 240 VAC, 50-60Hz
5VDC, 2A
< 1W
< 5W
135 x 105 x 43 mm
160gr
This product has been designed by Crystal Audio and manufactured with the highest quality standards in China
Page 18

18 CRYSTALACOUSTICS
WARRANTY
TERMS & CONDITIONS
To avoid any unnecessary inconvenience on
your part, we recommend that you read the
Instruction’s Manual carefully before seeking warranty service. Also, you can always
visit the company’s website www.crystalaudio.com for the latest updates with regard
to FAQ, Manual Instructions, firmware
upgrades.
1. Crystal Audio S.A. always maintains the
highest quaity and workmanship in all products, in order to offer you the best value for
your money.
2. The warranty applies from the purchase
date, as this is shown in the invoice receipt.
3. This warranty does not constitute, in any
case, financial reimbursement or any other
type of reimbursement beyond the repair or
replacement of the covered Product with the
same or equivalent equipment.
4. This warranty is valid only after the
display of the warranty card and evidence
of the legal Product purchase by submitting
the invoice receipt.
5. This warranty applies to the original enduser purchaser. Warranty does not apply
for damage caused by undue physical or
electrical stress or by acts of nature such as
floods, storms, fires, earthquakes, etc.
6. Crystal Audio warrants this product
against defects in material and workmanship for a period of two (2) years.
7. The battery included with this product is
covered by a six (6) month warranty, from
the day of purchase.
8. If the Product is covered under the Product’s Warranty period, Crystal Audio S.A.
will, at its sole discretion, at no cost to the
consumer, repair or replace defective Prod-
uct parts, or replace the entire Product.
9. In the event Crystal Audio S.A. is unable
to repair the Product, the Company will
replace the covered Product with the same
or equivalent equipment.
10. The required time for repairing the defective Product is solely determined by Crystal
Audio S.A.
11. Crystal Audio will, at its sole discretion,
and at no cost to the consumer, repair or
replace defective Product parts, or replace
the entire Product, subject to the Product
fall within the warranty period. Replaced
parts will be retained within Crystal Audio’s
ownership. The repair will take place at
Crystal Audio S.A facilities or authorized.
12. Consumable parts (e.g. cables, etc) of
this Product are not covered by this warranty.
13. Issues that may arise because of connection with electronic devices (TVs, DVD,
HDD, flash drives, etc) or other connected
equipment (cables, adaptors, etc) are not
covered by this warranty.
14. Potential repairs during the warranty
period do not automatically extend the warranty period. This will have to be discussed
and agreed between the consumer and
Crystal Audio S.A. facilities or another facility authorized by Crystal Audio. The Product
needs to be delivered at the dedicated facility, at the consumer’s own expense, during
normal working days and hours.
15. No reseller has the authority to amend
this warranty’s terms and conditions.
16. In order to exercise the warranty service,
please contact an authorized Crystal Audio reseller or Crystal Audio itself, to be given further
instructions, having ready the problem description and conditions, the product serial number
and computer operating system (if applicable).
Page 19

19APPSTREAMER
Copyright 2012 | CRYSTAL ACOUSTICS
Note: This warranty gives you specific legal
rights, which may vary from country to country depending on local law.
WARRANTY BECOMES VOID UNDER
THE FOLLOWING CONDITIONS:
1. When the Product has been subject to
any repair or modification by a facility or
person not authorized by Crystal Audio.
2. When damage caused by operator error
or non-compliance with instructions, other
power source not provided with the product
and damage caused by undue physical or
electrical stress or by acts of nature such as
floods, storms, fires, earthquakes, etc;
3. When the Product has been subject to
electrical or physical overstress beyond the
manufacturer’s specifications.
4. When the Product’s serial number or
labels have been damaged or removed.
5. When the Product fault is due to improper
installation
6. When the recommended precautions and
maintenance conditions are not followed.
Crystal Audio S.A. bears no responsibility
for damages which could not be anticipated
by both parties at the time of purchase of
the Product. The Company’s liability in no
event will cover job loss, loss of software,
loss of information, damage to computer
hardware excluding hardware. The personal
data storage and security falls within the
consumer’s responsibility.
PRODUCT RETURNS
1. Returns may be accepted within ten (10)
days from the day of Product purchase with
evidence of the invoice receipt.
2. The Product needs to be unused and
packaged to its original content.
Page 20

www.crystalaudio.com
 Loading...