

Page 1

INSTRUCTIONS OF INSTALLATION, OPERATION
& MAINTENANCE
MODEL
VENUS VETRINE 36,46,56
Page 2

1. INTRODUCTION
Proper installation and maintenance are essential for maximum satisfaction from your appliance. It is
therefore necessary to carefully read and observe the indications of these instructions for use.
2. TRANSPORT (Figure 1)
Always transport the appliance in horizontal position; do
not overturn it and do not load it in leaning position.
3. INSTALLATION
Figure 1
─ Unpack the appliance.
─ Make sure the appliance is stable and in horizontal position.
─ The appliance is equipped with wheels. Make sure the floor surface is not inclined and it facilitates the
appliance’s transport and installation.
─ Never install the freezer in a room exposed to direct sun radiation nor in the vicinity of a heat source such as
cooker, a stove, a heater, a fireplace, etc.
─ Avoid installing the appliance in confined rooms, damp, and without airing or in wall recesses.
─ Make sure that the distance between the wall or other large objects and the back and left side of the appliance is
at least 10 cm. This distance is the minimum required to ensure normal ventilation of the refrigeration
mechanism.
4. ELECTRICAL CONNECTION
Make sure that the feed cable and the socket is appropriate for the appliance power. In case of doubt, contact
a qualified technician.
Before inserting the plug in the mains outlet, make sure the voltage mentioned on the nameplate on the back
side of the appliance, complies with the one of your network. A discrepancy of ± 10% is acceptable.
Too high or too low voltage network may seriously damage the compressor. Such damages are not covered
by the guarantee. The appliance must be earthed as prescribed by the relevant legislation whereas it is indispensable
for your personal safety. The manufacturer has provided for earthing in the electrical installation and external
surface of the appliance.
NOTE: Upon start-up, running may be noisy. Noise will only last for the engine “running in” time and
will dim progressively.
5. OPERATION
Once the appliance installed, wait for at least fifteen minutes before start-up. Afterwards, insert the plug in
the mains outlet.
Make sure that the thermostat – located on the left side of the appliance – is set on the proper position (not 0)
and the indication lamp (located at the front side) is on (except for model VETRINE 16).
Start-up the freezer with no loads and make sure that the glasses (sliding lids) are properly closed. Wait at
least 1,5 hour before reaching the appropriate temperature inside the appliance.
If you wish to accelerate the freezer’s preparation set the thermostat on position 7. Store the products and
reset the thermostat in the middle of the scale.
WARNING: do not store products exceeding the load line limit (indicative red horizontal line in the
interior of the freezer).
Products are good to be packaged.
WARNING: do not store warm products in the freezer (temperature higher than ambient temperature
20º to 25º C). This could lead to malfunctioning of your appliance and spoiling of the products.
2
Page 3
In case of shutting the appliance off – either by the thermostat or due to power failure – and immediately
restarted, the compressor does not restart immediately. This is normal. The compressor will automatically start
soon after.
To protect your appliance, always wait for fifteen minutes before each restart.
Do not use electrical devices inside the food storage area of the appliance.
WARNING: we remind you that your appliance is a preserver for frozen products. It has not been
designed for the storage of products of ambient or higher temperature.
This appliance is not designed for use from the people (including children) with decreased physical, aesthetic
or intellectual abilities or with deficiency of experience and knowledge, unless they are under supervision or have
been given instructions concerning the appliance use from the person responsible for their safety.
The children have to be supervised in order to avoid playing with the device.
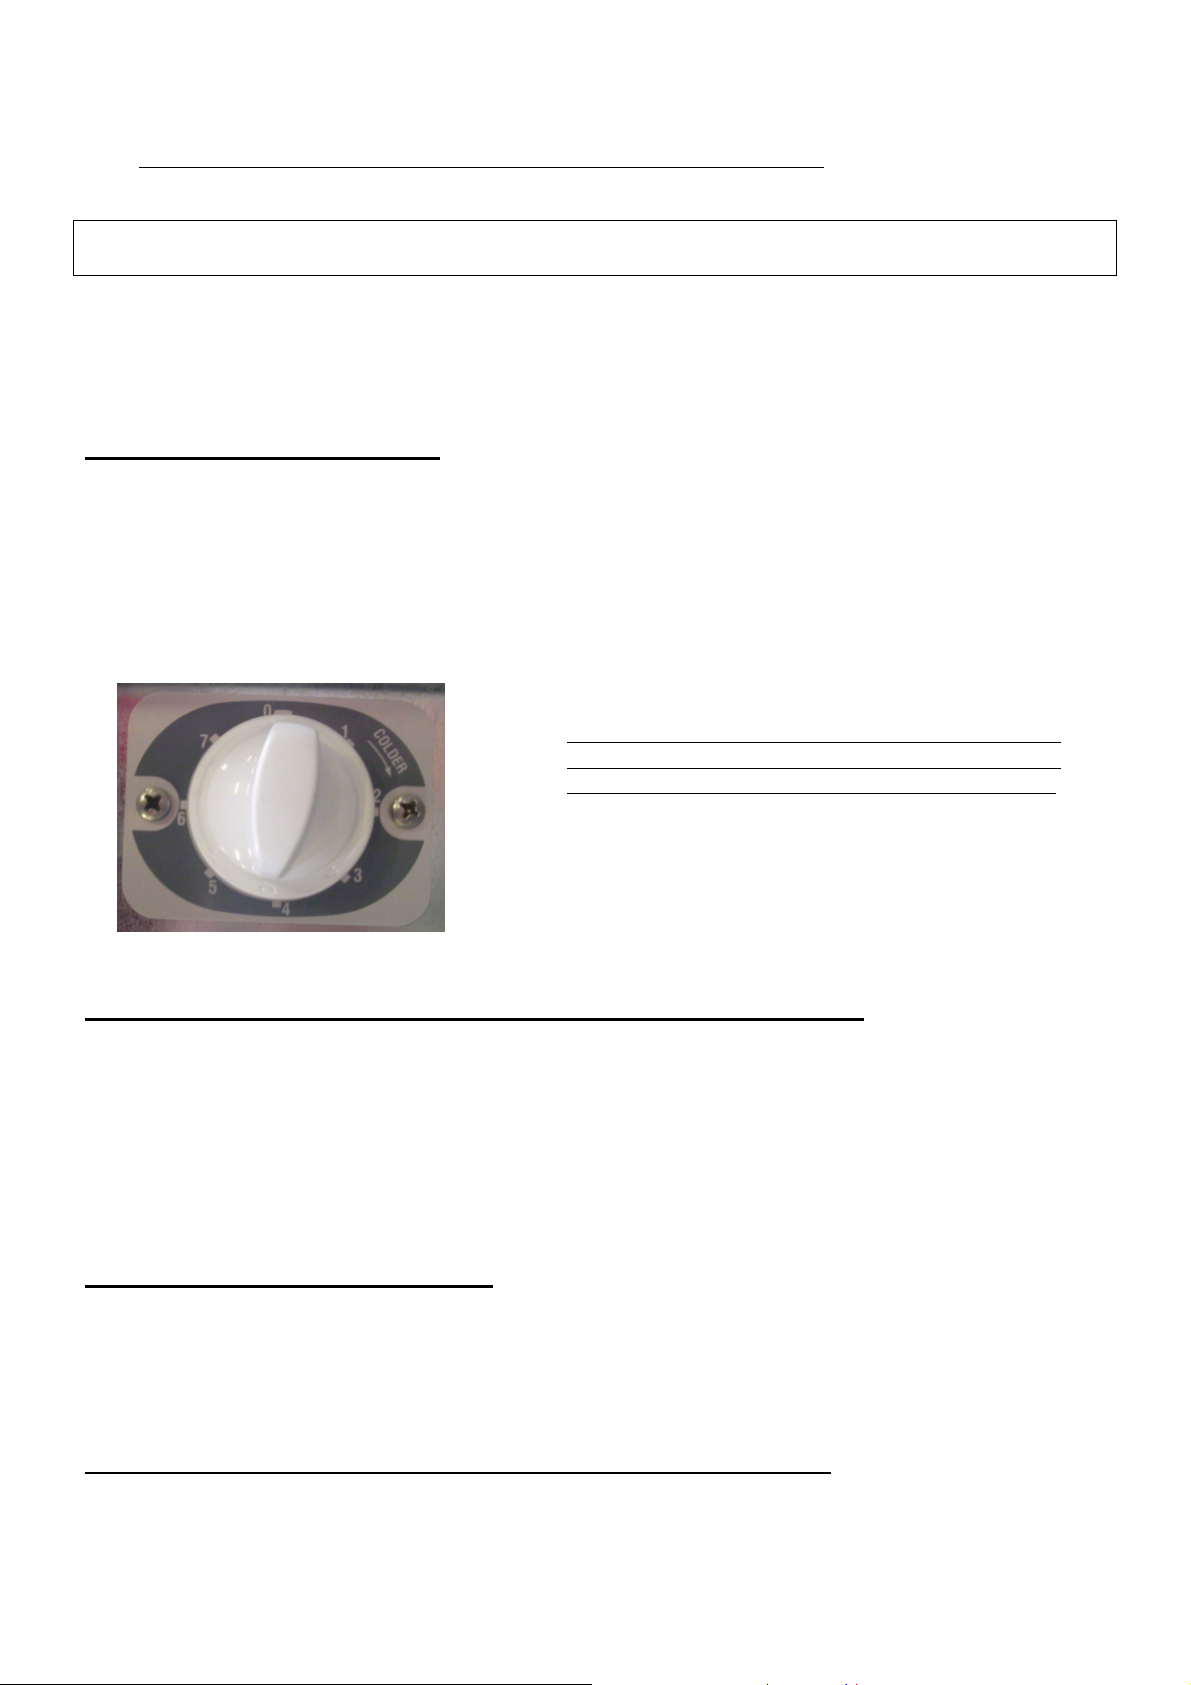
6. THERMOSTAT (Figure 2)
The thermostat located on the left side of your appliance, automatically sets the temperature inside the freezer
so that it varies from the warmer to the colder. The thermostat position is set and controlled by our company.
Based on the ambient temperature and on the refrigerator class for which the freezer has been designed, the
thermostat can be adjusted properly to ensure a temperature lower or equal to –15
recommended to set the thermostat approximately in the middle of 3-4 range.
Turning the thermostat adjustment knob from position 1 to position 7, results in colder temperatures inside
the appliance.
When the thermostat is set to 0 (off) the appliance is
switched off. Such an action is not recommended. If
you wish to deactivate your appliance simply unplug it.
0
C at the load line. It is
Figure 2
7. INDICATION LAMP (EXCEPT FOR MODEL VETRINE 16)
The indication lamp is located at the front side of your appliance and it is on only when the freezer’s power
cable is connected.
If the indication lamp is off and the appliance is working, that means that the lamp is damaged and should be
replaced.
If the lamp is off and your appliance is not working, check whether:
¾ The plug is not properly inserted in the socket.
¾ There is power supply network failure.
8. LIGHTING SWITCH ON/OFF
The lighting switch is located at the side of the fluorescent lamp, at the show case.
This switch in on-off, meaning it controls whether the lamp will work (on position) or not
(off position).
9. THERMOMETER (EXCEPT FOR MODEL VETRINE 16)
The cylindrical thermometer located at the front side of your appliance, indicates the temperature inside the
freezer.
3
Page 4

10. DEFROSTING
If ice appears in the freezers walls, the freezer’s efficiency will be possibly minimized, so it is recommended
to “defrost” the appliance.
Defrosting procedure:
⎯ Unplug the appliance.
⎯ Remove the products from the freezer, rap them in paper, and refrigerate them. If it is difficult to refrigerate
them, put them in a carton box and keep them cold.
⎯ Leave the freezer’s glass or glasses open.
⎯ Scrap the walls covered with frost using a special plastic scraper.
⎯ If you wish, place a plastic recipient at the rear of the freezer, under the existent draining pipe, for the
concentration of the defrosting water.
⎯ Remove the plastic drainage tap located inside, at the bottom of the appliance and let the frost melt.
⎯ Make sure the frost in the interior of the appliance has melted and the bucket is clean and dry.
⎯ Replace the drainage tap at the bucket’s bottom.
⎯ Close the glass or the glasses and make sure they are in their proper position.
⎯ Insert the plug in the mains outlet.
⎯ Make sure the thermostat is on. If you wish to accelerate the freezer’s preparation, set the thermostat on
position 7.
⎯ Start-up the freezer with no load and keep the glass or the glasses closed for at least one hour.
⎯ Replace the products and reset the thermostat in the middle of the scale.
WARNING: do not try to accelerate the defrosting by using sharp metal tools or by placing heat
sources, e.g. heaters, inside the appliance.
11. MAINTENANCE (figure 3)
For the purpose of gleaning the freezer interior, DO NOT use sharp objects or chemicals in order to accelerate
the process of defrosting. Follow the instruction that is recommended by the manufacturer, i.e. the use of lather in
lukewarm water.
For proper operation of the appliance, the condenser must be free of dust. Clean the condenser at least
once in a month if your appliance is working outside or once in three months if is working inside your store,
as follows:
Unplug the appliance.
Remove the plastic grill from the appliance which is located at the left side.
Clean the condenser by using a soft brush or a vacuum cleaner.
Clean also the blades of the condenser ventilator by using piece of cloth.
Replace the plastic grill back on the holding screws.
Insert the plug and switch on the appliance.
Figure 3
4
Page 5

12. SERVICE
If the appliance does not work satisfactorily or not at all, please check:
• If the temperature inside the appliance is not low enough, make sure:
Æ the appliance is not in the vicinity of a heat source and should be moved.
Æ the adjustment of the cover or covers is not impeded by products that have to be stored otherwise.
Æ the products do not exceed the load limit line and some of them should be removed.
Æ the appliance’s internal walls are not covered with frost and should be defrosted.
Æ the thermostat is correctly set (half-way, position 3-4) and not minimum.
Æ the glass or the glasses of the freezer are not left open.
• Although connected, the appliance does not work, make sure:
Æ there is power in the plug and plug is properly inserted in the socket.
Æ there is no power supply network failure in your house or store.
Æ the power distribution fuse to your appliance has not blown.
Æ your appliance’s power cable is not damaged.
• If your appliance emits a metallic noise, make sure:
Æ there is no contact between your appliance and other metallic objects.
Æ the appliance is well levelled with the floor.
Æ the ventilator is not covered with dust and dirt.
¾ If the feed cable is damaged, it must be replaced by the manufacturer or a qualified person from the service
department, or by similarly specialized personnel, in order to avoid danger.
¾ Do not cause any damage to the cooling circuit by the intervention of unauthorized personnel. Advise the
manufacturer and assign such works only to specialized technicians.
Keep this booklet as well as all documents provided with your appliance and read
the guarantee terms carefully.
5
Page 6

6
Page 7

7
 Loading...